

Page 1

Foreword
Jaguar S
Navigation Handbook
JAGUAR CARS LIMITED,
dedicated to the design and production of vehicles which meet
the expectations of the world's most discerning purchasers.
To complement the features, systems and technology of your
new vehicle we have produced this Navigation Handbook. In it
we have undertaken to make the control of complex systems
easy to understand and operate.
The information contained herein applies to a range of
vehicles and not to a specific vehicle. For the specification of a
particular vehicle, owners should consult their Jaguar Dealer.
Published November 1999 by Parts and Service Communications
as manufacturers, are
-TYPE
The Manufacturer reserves the right to vary its specifications
with or without notice, and at such times and in such manner
as it thinks fit. Major as well as minor changes may be involved
in accordance with the Manufacturer’s policy of constant
product improvement.
All rights reserved. No part of this publication may be
reproduced, stored in a retrieval system or transmitted, in any
form, electronic, mechanical, photocopying, recording or
other means without prior written permission from the
Service Division of Jaguar Cars Limited.
Jaguar Cars Limited
Publication Part No. JJM 18 05 16/00
Page 2

Contents
1. Introduction and controls
Introduction................................................................1 - 1
Using the system .........................................................1 -2
Safety information.......................................................1 -2
Loading the map CD ...................................................1 - 5
Control panel..............................................................1-5
Screen displays ...........................................................1- 6
Using the controls .......................................................1-9
2. Quick reference
Main features of the system ........................................2-1
Route setting example.................................................2-2
Navigation menu structure..........................................2 - 5
3. Basic functions
Getting started ............................................................3-1
General navigation menus...........................................3-5
Route options .............................................................3-10
4. Destination entry
Enter destination menu...............................................4-1
Previous destination menu..........................................4-2
Address input..............................................................4-4
Point of interest (POI) input ........................................4-5
Freeway junction input ...............................................4-6
Intersection input .......................................................4-7
5. Advanced functions
Set point menus ......................................................... 5- 1
Memory point functions ............................................. 5- 2
Way point functions ................................................... 5- 5
Avoid area functions................................................... 5- 8
Home position functions ............................................ 5-10
6. Route calculation and guidance
Route calculation........................................................ 6-1
Route guidance........................................................... 6-2
Screen types ............................................................... 6- 4
Additional guidance features ...................................... 6- 5
Setting destinations across map coverage areas .......... 6 - 6
7. Emergency and assistance
Introduction ............................................................... 7- 1
Getting started ........................................................... 7-2
Before using the system.............................................. 7-3
Operation of the system ............................................. 7- 4
Further information.................................................... 7 - 5
Message list ................................................................ 7- 7
A comprehensive index is located at the back of this
handbook.
JJM 10 05 16/00 Last amend: September 1999 – UK
Page 3

Index
About this handbook . . . . . . . . . . . . . . . . . . . . . . . . . . . 1-1
Address input. . . . . . . . . . . . . . . . . . . . . . . . . . . . . . . . .4-4
– house number input . . . . . . . . . . . . . . . . . . . . . . . . . . 4-4
– street input. . . . . . . . . . . . . . . . . . . . . . . . . . . . . . . . . 4 - 4
– town input . . . . . . . . . . . . . . . . . . . . . . . . . . . . . . . . . 4- 4
Audible prompt . . . . . . . . . . . . . . . . . . . . . . . . . . . . . . . 1-8
Average speed settings . . . . . . . . . . . . . . . . . . . . . . . . . . 3 - 8
B
Brightness and contrast settings . . . . . . . . . . . . . . . . . . . 3-5
C
Calibration settings . . . . . . . . . . . . . . . . . . . . . . . . . . . . 3 -7
Character entry . . . . . . . . . . . . . . . . . . . . . . . . . . . . . . .1-11
Control panel . . . . . . . . . . . . . . . . . . . . . . . . . . . . . . . . . 1-5
D
Destination entry
– address. . . . . . . . . . . . . . . . . . . . . . . . . . . . . . . . . . . . 4 - 4
– freeway junction. . . . . . . . . . . . . . . . . . . . . . . . . . . . . 4-6
– intersection . . . . . . . . . . . . . . . . . . . . . . . . . . . . . . . . 4-7
– point of interest . . . . . . . . . . . . . . . . . . . . . . . . . . . . . 4 -5
Destination selection from map . . . . . . . . . . . . . . . . . . . 4-1
Display options selection . . . . . . . . . . . . . . . . . . . . . . . . 3-6
E
Emergency/roadside information . . . . . . . . . . . . . . . . . . 3-9
F
Freeway junction input . . . . . . . . . . . . . . . . . . . . . . . . .4-6
– freeway name . . . . . . . . . . . . . . . . . . . . . . . . . . . . . . . 4- 6
– freeway selection . . . . . . . . . . . . . . . . . . . . . . . . . . . .4-6
– junction selection . . . . . . . . . . . . . . . . . . . . . . . . . . . .4-6
G
Guidance options selection . . . . . . . . . . . . . . . . . . . . . .3-8
H
How the system works. . . . . . . . . . . . . . . . . . . . . . . . . . 1 - 1
Initialisation. . . . . . . . . . . . . . . . . . . . . . . . . . . . . . . . . . 3 - 1
Intersection input . . . . . . . . . . . . . . . . . . . . . . . . . . . . . 4-7
– intersection name . . . . . . . . . . . . . . . . . . . . . . . . . . . 4-7
– street selection. . . . . . . . . . . . . . . . . . . . . . . . . . . . . . 4-7
J
Jaguar Assist system . . . . . . . . . . . . . . . . . . . . . . . . . . . . 7- 1
– accessing the system . . . . . . . . . . . . . . . . . . . . . . . . . 7-4
– automatic redial . . . . . . . . . . . . . . . . . . . . . . . . . . . . . 7-5
– battery disconnection. . . . . . . . . . . . . . . . . . . . . . . . . 7- 6
– call activation and termination. . . . . . . . . . . . . . . . . . 7-5
– calling the response center. . . . . . . . . . . . . . . . . . . . . 7-2
– cellular phone interface . . . . . . . . . . . . . . . . . . . . . . . 7 - 6
– cellular phone PIN code. . . . . . . . . . . . . . . . . . . . . . . 7-3
– cellular phone restrictions . . . . . . . . . . . . . . . . . . . . . 7-3
– data message . . . . . . . . . . . . . . . . . . . . . . . . . . . . . . . 7-4
– data message retransmission . . . . . . . . . . . . . . . . . . . 7-5
– emergency assistance . . . . . . . . . . . . . . . . . . . . . . . . . 7-1
– emergency calls . . . . . . . . . . . . . . . . . . . . . . . . . . . . . 7-4
– introduction. . . . . . . . . . . . . . . . . . . . . . . . . . . . . . . . 7-1
– limitations of the system . . . . . . . . . . . . . . . . . . . . . . 7-2
– making an emergency call . . . . . . . . . . . . . . . . . . . . . 7-2
– message list . . . . . . . . . . . . . . . . . . . . . . . . . . . . . . . . 7-7
– on-screen messages . . . . . . . . . . . . . . . . . . . . . . . . . . 7-5
– operator contact . . . . . . . . . . . . . . . . . . . . . . . . . . . . 7-4
– registration and acquaintance . . . . . . . . . . . . . . . . . . 7-3
– service charges. . . . . . . . . . . . . . . . . . . . . . . . . . . . . . 7-3
– terminating assistance calls . . . . . . . . . . . . . . . . . . . . 7- 4
L
JJM 18 05 16/00 Last amend: November 1999 – NAS
Page 4

Index
Language selection . . . . . . . . . . . . . . . . . . . . . . . . . . . . 3-6
Loading the map CD . . . . . . . . . . . . . . . . . . . . . . . . . . . 1 - 5
M
Map CD version. . . . . . . . . . . . . . . . . . . . . . . . . . . . . . . 3-6
Map display (not under guidance) . . . . . . . . . . . . . . . . . 3 - 2
– additional button functions . . . . . . . . . . . . . . . . . . . . 3-2
– panel controls . . . . . . . . . . . . . . . . . . . . . . . . . . . . . . 3 - 2
– quick points of interest . . . . . . . . . . . . . . . . . . . . . . . 3-4
– setting of points . . . . . . . . . . . . . . . . . . . . . . . . . . . . . 3 - 3
Memory point selection . . . . . . . . . . . . . . . . . . . . . . . . . 4-2
Menus
– enter destination . . . . . . . . . . . . . . . . . . . . . . . . . . . . 4 - 1
– guidance . . . . . . . . . . . . . . . . . . . . . . . . . . . . . . . . . . 3-8
– information . . . . . . . . . . . . . . . . . . . . . . . . . . . . . . . . 3-9
– main . . . . . . . . . . . . . . . . . . . . . . . . . . . . . . . . . . . . . 3 - 5
– previous destination. . . . . . . . . . . . . . . . . . . . . . . . . . 4-2
– route options . . . . . . . . . . . . . . . . . . . . . . . . . . . . . . . 3 - 10
– set points . . . . . . . . . . . . . . . . . . . . . . . . . . . . . . . . . . 5-1
– set up. . . . . . . . . . . . . . . . . . . . . . . . . . . . . . . . . . . . . 3-6
N
Navigation menu structure . . . . . . . . . . . . . . . . . . . . . . 2 - 5
Number entry . . . . . . . . . . . . . . . . . . . . . . . . . . . . . . . . 1-11
P
Point of interest input . . . . . . . . . . . . . . . . . . . . . . . . . . 4- 5
– POI details . . . . . . . . . . . . . . . . . . . . . . . . . . . . . . . . . 4-5
– POI name. . . . . . . . . . . . . . . . . . . . . . . . . . . . . . . . . . 4-5
– POI selection . . . . . . . . . . . . . . . . . . . . . . . . . . . . . . . 4 - 5
Points of interest . . . . . . . . . . . . . . . . . . . . . . . . . . . . . . 2-1
– quick points of interest . . . . . . . . . . . . . . . . . . . . . . . 2-1
R
Recent destination selection . . . . . . . . . . . . . . . . . . . . . 4-3
Road safety caution . . . . . . . . . . . . . . . . . . . . . . . . . . . . 3- 1
Route calculation . . . . . . . . . . . . . . . . . . . . . . . . . . . . . 6-1
– calculating the route . . . . . . . . . . . . . . . . . . . . . . . . . 6- 1
– destination confirmation . . . . . . . . . . . . . . . . . . . . . . 6-1
Route guidance . . . . . . . . . . . . . . . . . . . . . . . . . . . . . . . 6-2
– additional button functions . . . . . . . . . . . . . . . . . . . . 6- 3
– arrival guidance. . . . . . . . . . . . . . . . . . . . . . . . . . . . . 6- 5
– auto reroute . . . . . . . . . . . . . . . . . . . . . . . . . . . . . . . 6-5
– breaks in journey. . . . . . . . . . . . . . . . . . . . . . . . . . . . 6-5
– guidance tones . . . . . . . . . . . . . . . . . . . . . . . . . . . . . 6-2
– high level road areas . . . . . . . . . . . . . . . . . . . . . . . . . 6- 2
– panel controls . . . . . . . . . . . . . . . . . . . . . . . . . . . . . . 6- 2
– screen types . . . . . . . . . . . . . . . . . . . . . . . . . . . . . . . 6- 4
– way points. . . . . . . . . . . . . . . . . . . . . . . . . . . . . . . . . 6- 5
Route options . . . . . . . . . . . . . . . . . . . . . . . . . . . . . . . . 3-10
– cancelling guidance . . . . . . . . . . . . . . . . . . . . . . . . . . 3- 11
– detour settings. . . . . . . . . . . . . . . . . . . . . . . . . . . . . . 3-10
– preferences selection. . . . . . . . . . . . . . . . . . . . . . . . . 3- 10
– route display . . . . . . . . . . . . . . . . . . . . . . . . . . . . . . . 3- 11
Route setting example . . . . . . . . . . . . . . . . . . . . . . . . . . 2- 2
S
Safety information. . . . . . . . . . . . . . . . . . . . . . . . . . . . . 1-2
Screen displays . . . . . . . . . . . . . . . . . . . . . . . . . . . . . . . 1- 6
– map screens . . . . . . . . . . . . . . . . . . . . . . . . . . . . . . . 1-6
– menu screens . . . . . . . . . . . . . . . . . . . . . . . . . . . . . . 1-8
– personal marker symbols. . . . . . . . . . . . . . . . . . . . . . 1-8
– screen symbols . . . . . . . . . . . . . . . . . . . . . . . . . . . . . 1-7
– scroll indicators. . . . . . . . . . . . . . . . . . . . . . . . . . . . . 1- 8
JJM 18 05 16/00 Last amend: November 1999 – NAS
Page 5

Screen guidance . . . . . . . . . . . . . . . . . . . . . . . . . . . . . . . 2- 1
Screen types. . . . . . . . . . . . . . . . . . . . . . . . . . . . . . . . . . 6 - 4
– full screen. . . . . . . . . . . . . . . . . . . . . . . . . . . . . . . . . . 6- 4
– split screen . . . . . . . . . . . . . . . . . . . . . . . . . . . . . . . . . 6-4
– symbol view . . . . . . . . . . . . . . . . . . . . . . . . . . . . . . . .6-4
Set point input . . . . . . . . . . . . . . . . . . . . . . . . . . . . . . . . 5-1
– avoid area. . . . . . . . . . . . . . . . . . . . . . . . . . . . . . . . . . 5 - 8
– home position . . . . . . . . . . . . . . . . . . . . . . . . . . . . . . 5- 10
– memory point. . . . . . . . . . . . . . . . . . . . . . . . . . . . . . . 5- 2
– way point . . . . . . . . . . . . . . . . . . . . . . . . . . . . . . . . . . 5-5
Set points . . . . . . . . . . . . . . . . . . . . . . . . . . . . . . . . . . . . 2-1
– avoid areas . . . . . . . . . . . . . . . . . . . . . . . . . . . . . . . . .2-1
– home position . . . . . . . . . . . . . . . . . . . . . . . . . . . . . . 2- 1
– memory points . . . . . . . . . . . . . . . . . . . . . . . . . . . . . . 2 -1
– way points . . . . . . . . . . . . . . . . . . . . . . . . . . . . . . . . . 2- 1
Setting destinations across map coverage areas . . . . . . . 6- 6
U
Units selection . . . . . . . . . . . . . . . . . . . . . . . . . . . . . . . . 3- 7
Using the controls . . . . . . . . . . . . . . . . . . . . . . . . . . . . . 1-9
Using the system . . . . . . . . . . . . . . . . . . . . . . . . . . . . . .1-2
– errors in vehicle position . . . . . . . . . . . . . . . . . . . . . . 1-3
– Jaguar dealership locations . . . . . . . . . . . . . . . . . . . . . 1 - 4
– reception of GPS signals . . . . . . . . . . . . . . . . . . . . . . . 1- 3
– road junction layouts . . . . . . . . . . . . . . . . . . . . . . . . . 1-4
– route guidance precision . . . . . . . . . . . . . . . . . . . . . . 1-3
– screen cleaning. . . . . . . . . . . . . . . . . . . . . . . . . . . . . . 1-4
V
Voice guidance. . . . . . . . . . . . . . . . . . . . . . . . . . . . . . . . 2-1
– volume adjustment . . . . . . . . . . . . . . . . . . . . . . . . . . . 1 - 10
Index
JJM 18 05 16/00 Last amend: November 1999 – NAS
Page 6

Index
JJM 18 05 16/00 Last amend: November 1999 – NAS
Page 7

!
WARNING:
1 Introduction and controls
Introduction
This Jaguar navigation system assists the
driver by providing a route to a selected
destination. Guidance is given by means
of audible instructions (voice guidance),
complemented by map and turn
information which is displayed on an
LCD screen on the front panel of the
unit. Digital map information is held on a
compact disc (CD), which is loaded into
the navigation control unit housed in the
luggage compartment.
The system has an extremely
comprehensive range of features, yet is
easy to use. Some time spent reading this
handbook will ensure that the best
results are obtained.
The LCD display provides full
information for operating the system by
means of menus, text prompts and map
displays. Screen selections are made by
the controls on the front panel.
Introduction and controls 1-1
About this handbook
This handbook shows the on-screen
menus, explains how to operate the
controls, and gives an example showing
how to set a destination. After becoming
familiar with the controls, follow the
on-screen menus and prompts, to
operate the system as required.
The Navigation Menu Structure card
supplied with this handbook can be used
to find a particular menu. This
information is repeated on page 2-5.
Some menu items can be selected
entirely by using the function buttons (F1
to F3). These sequences are shown at the
top of the relevant pages, for example:
Address input (F1 → F1 → F2).
How the system works
The system uses signals from the Global
Positioning System (GPS) satellites, which
allow the approximate vehicle position
to be calculated. This is combined with
information from vehicle sensors and the
database on the map CD, to establish the
true vehicle position.
1. The Database reflects reality as
existing before you received the
Database and it comprises data
and information from
government and other sources,
which may contain errors and
omissions. Accordingly, the
Database may contain inaccurate
or incomplete information due to
the passage of time, changing
circumstances, and due to the
nature of the sources used. The
Database does not include or
reflect information on – inter alia
– neighborhood safety; law
enforcement; emergency
assistance; construction work;
road or lane closures; vehicle or
speed restrictions; road slope or
grade; bridge height, weight or
other limits; road or traffic
conditions; special events; traffic
congestion; or travel time.
2. Only operate, adjust or view the
system when it is safe to do so.
JJM 18 05 16/00 Last amend: November 1999 – NAS
Page 8
1-2 Introduction and controls
Using the system
Note: If the system is used for an
extended period of time with the
vehicle stationary, ensure that the
engine is running, to avoid draining
the battery.
For best results, always use the latest
version of the map CD (Navigable Map
Database). Map information is regularly
updated, but all areas are not necessarily
covered to the same level of detail.
While driving under route guidance, only
JOL.297
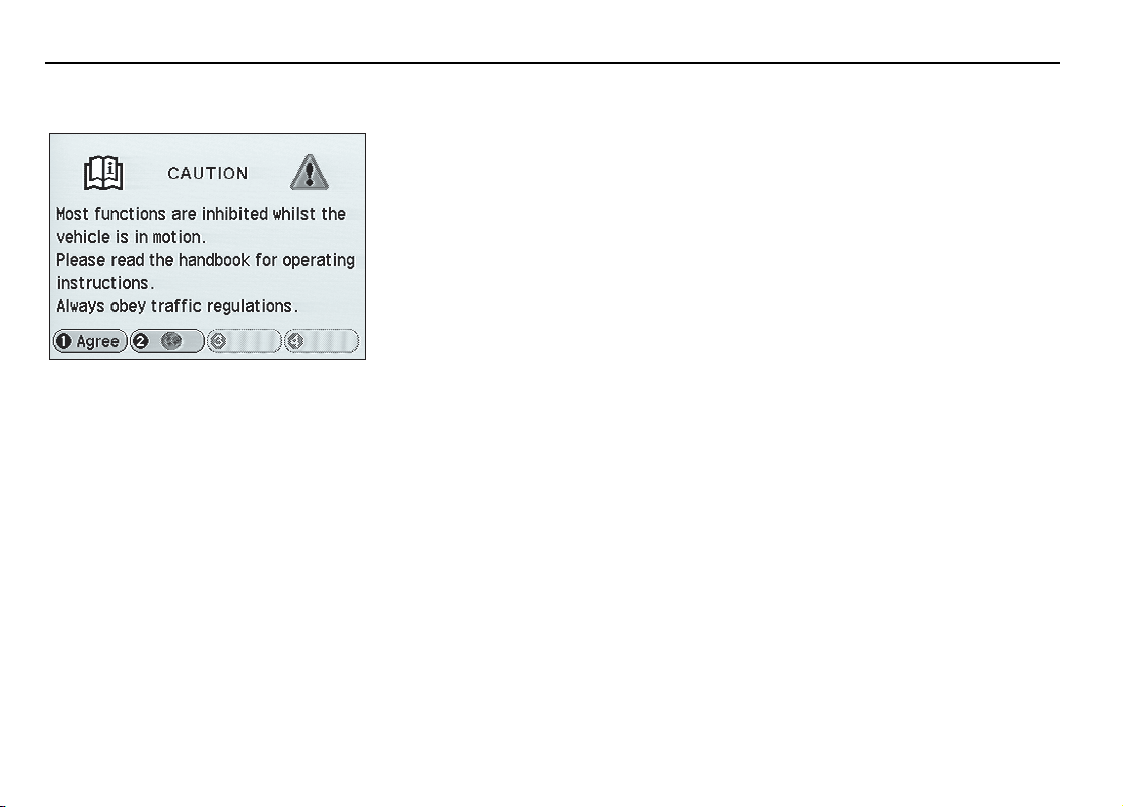
Safety information
When the system is switched on, the
Road Safety Caution screen is displayed,
giving the following information.
Most functions are inhibited whilst
the vehicle is in motion.
Please read the handbook for
operating instructions.
Always obey traffic regulations.
Remember, traffic regulations include all
the road signs, whether permanent or
temporary, you encounter on the route.
To use the system, press function
button F1 (Agree).
While driving, many of the menu items
and function buttons cannot be selected.
follow an instruction when it is safe to do
so, as the system cannot be aware of
changing conditions, for example turn
restrictions, roadworks or diversions.
Use voice guidance as much as possible,
and only view the display when driving
conditions permit.
JJM 18 05 16/00 Last amend: November 1999 – NAS
Page 9

Using the system (continued)
Introduction and controls 1-3
Reception of GPS signals
GPS signals are highly directional and
reception may occasionally be
interrupted. Some examples of situations
likely to cause problems are shown
below.
• Inside tunnels.
• Inside buildings.
• Roads under raised highways.
• Densely tree-lined roads.
• Forest roads between mountains.
• Between tall buildings.
• Roads under cliffs.
• Metal objects placed on the rear
parcel shelf.
• Fitting material to the rear screen
containing metal foil.
Errors in vehicle position
Under certain driving conditions, it is
possible that the vehicle position shown
may be incorrect. Some examples are
shown below.
• When the vehicle is transported by
ferry or train.
• Driving on steep roads.
• After vehicle battery removal or
supply fuse failure.
• When using snow chains.
• After the tyres have been replaced.
• After the vehicle has been rotated on
a turntable.
• Where there are two roads parallel to
each other.
• Elevated roads in proximity to other
roads.
• Driving up or down circular ramps in
car parks.
The position will usually be corrected
automatically. If not it can be corrected
manually, see
page 3-7.
Calibration settings
on
Route guidance precision
Under certain driving conditions, it is
possible that the route guidance may be
inaccurate. Some examples are shown
below.
• Deviation from a route may cause
incorrect guidance until the route has
been recalculated.
• Route guidance may be given where
no turn is required.
• If there is no road, or only a narrow
track, to the final destination,
guidance will be given to the nearest
point possible.
• No guidance is given while reversing.
• If driving at high speed or on very
dense road networks, it may not be
possible to recalculate the route in
time for the next instruction.
• On familiar roads, personal route
preferences may not always be
followed.
JJM 18 05 16/00 Last amend: November 1999 – NAS
Page 10

1-4 Introduction and controls
Using the system (continued)
Jaguar dealership locations
Details of Jaguar dealerships are held on
the map CD as a Points of Interest (POI)
class. Certain dealers may be located in
areas that are not fully mapped on the
CD. If a route is set to one of these
dealers, the following points should be
noted.
• When entered as a destination, the
screen will show ‘Location not on a
mapped road. Destination set to
closest road’. The route will be
calculated to the nearest point
possible.
• When entered as a way point, the
screen will show ‘Location not on a
mapped road. Way point set to
closest road’. The route will be
calculated to the nearest point
possible.
Road junction layouts
The layout of complex road junctions
may sometimes be shown in a simplified
form.
Traffic circles less than 25 metres across
are treated as junctions.
Screen cleaning
For approved screen cleaners, see your
Jaguar dealer.
JJM 18 05 16/00 Last amend: November 1999 – NAS
Page 11
Introduction and controls 1-5
JOL.136
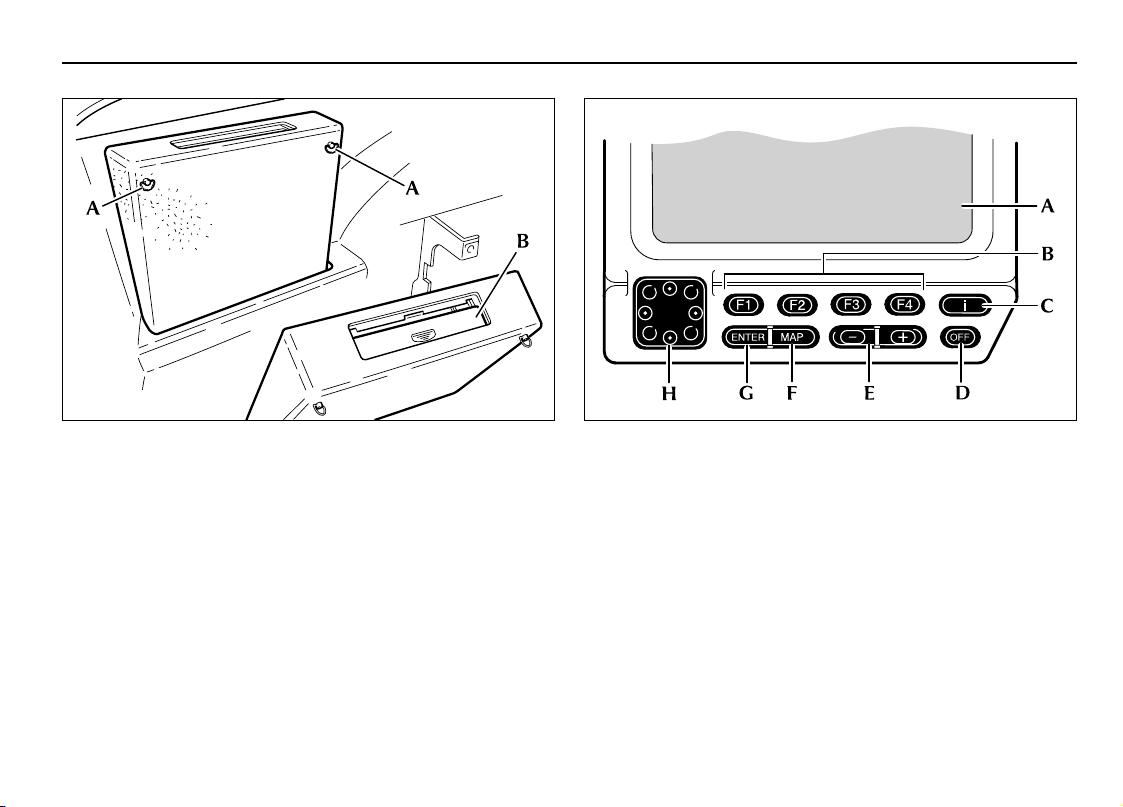
Loading the map CD
Note: The ignition must be switched on (position ‘l’).
1. Locate the navigation unit, on the left-hand side of the
luggage compartment. Turn the two quarter-turn
fasteners (A) anti-clockwise and tilt the navigation unit
forward.
2. Slide the cover (B) to the open position and load the CD
with the printed side upwards. Do not allow moisture or
foreign objects to enter the slot. (If a CD is already loaded it
will be ejected automatically.)
3. Close the cover (B), reposition the unit and turn the
fasteners (A) clockwise to the locked position.
JJM 18 05 16/00 Last amend: November 1999 – NAS
JOL.135
Control panel
A. LCD display
B. Function buttons (F1 to F4)
C. Information button
D. Off button
E. Zoom level control
F. Map button
G. Enter button
H. Cursor control
Page 12
1-6 Introduction and controls
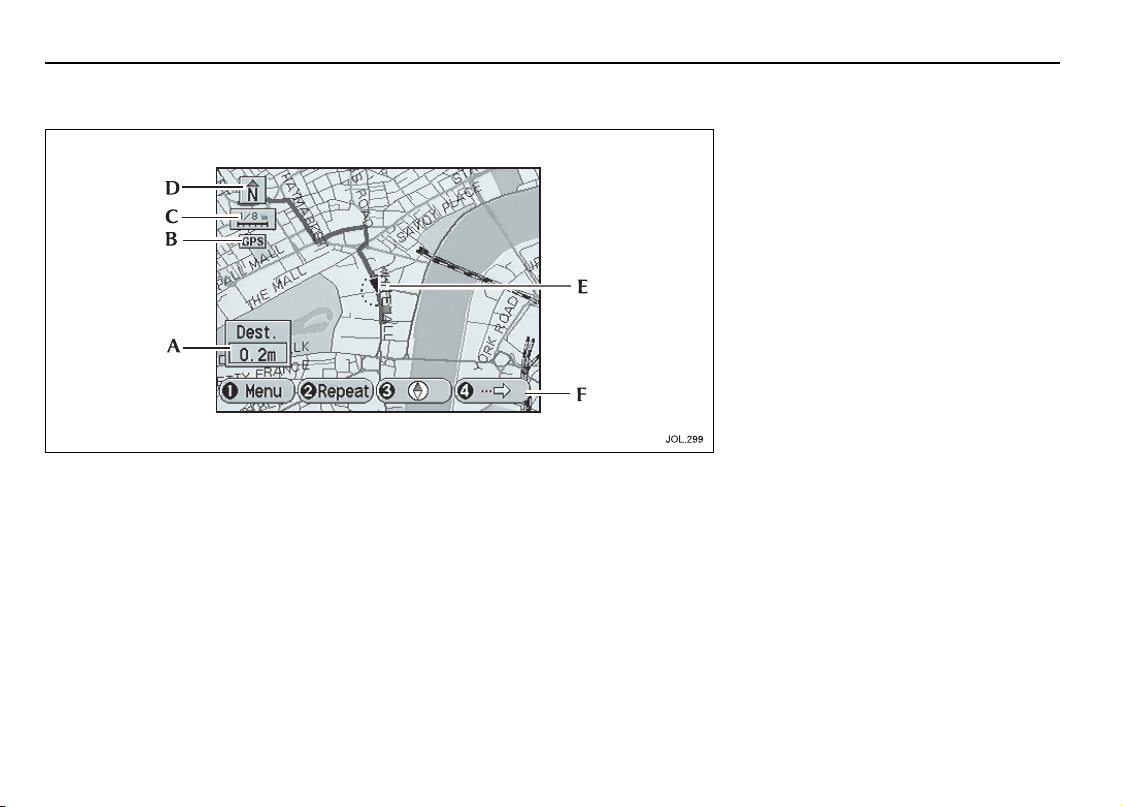
Screen displays
Map screens
A typical map display is shown, with a
key to the main items of information.
A. Destination information
– While
under guidance, the estimated time
or distance to the end of the route is
displayed, see
Set up menu
on page
3-6.
B. GPS symbol
– When the symbol is
selected, indicates that the system is
receiving information from GPS
satellites.
C. Map scale
zoom level. The scale length
represents a distance of from
128 miles to
100 metres).
D. Map heading symbol
that the map is displayed with either
north or vehicle heading to the top of
the screen.
– Indicates the current
1
mile (256 km to
/
16
– Indicates
E. Map position markers
– The map
indicates the current vehicle position
(navigation symbol). If the map is
scrolled, the cross-wire marker is
displayed. While the system is in use
various markers are displayed, see
Screen symbols
see
Personal marker symbols
on page 1-7. Also
on
page 1-8.
F. Function buttons
– The display
shows the current functions of the
buttons (F1 to F4).
Note: If the vehicle is in an area that
is not covered on the loaded map
CD, the screen shows ‘ROUTE ONLY’
in place of Destination information.
Only major routes are shown, at high
zoom levels, and route guidance is
not possible.
JJM 18 05 16/00 Last amend: November 1999 – NAS
Page 13

Screen displays (continued)
Screen symbols
The screen symbols used by the system
are explained below. Also see
marker symbols
Navigation symbol
current vehicle position and heading.
Cross-wire marker
displayed when the map is scrolled to
select a destination or point.
Destination symbol
current route destination.
on page 1-8.
– Indicates the
– This symbol is
– Indicates the
Personal
Introduction and controls 1-7
Way poin t sym bol
location of a way point on the map. The
number in the symbol shows the current
order in which the way points will be
visited on the route.
Home position symbol
location on the map currently set up as a
home position.
Avoid area symbol
that has been set up to be avoided in
route calculations.
– Indicates the
– Indicates the
– Indicates an area
North up symbol
map is displayed with north to the top of
the screen.
Heading up symbol
the map is displayed with the vehicle
heading to the top of the screen.
Language selection symbol
button symbol for selecting and changing
the screen and voice language.
– Indicates that the
– Indicates that
– Function
Next turn symbol
Memory point symbol
location of a memory point on the map.
JJM 18 05 16/00 Last amend: November 1999 – NAS
– Indicates the
position of the next turn instruction on
the route ahead.
– Indicates the
More symbol
for selecting the additional button
functions.
– Function button symbol
Page 14
1-8 Introduction and controls
JOL.302
Screen displays (continued)
JOL.300 JOL.301
Personal marker symbols
These symbols can be used as required
to tag points held in memory. Points can
then be displayed sorted by class
(category) according to the symbols used.
Audible prompt
– When this symbol is
selected, a tone will be heard whenever
the vehicle passes the location of the
tagged point.
Scroll indicators
The vertical indicators at the right-hand
side of the screen, show that more
information can be viewed by using the
Cursor control (Up/Down).
If a line of text is too long to display in
full, it can be scrolled to left and right
when function button F2 is highlighted.
Menu screens
Menu items are selected by using the
Cursor control (Up/Down) and pressing
Enter. The first three items can also be
selected by function buttons F1 to F3.
Function button F4 cancels the menu
and returns to the previous screen.
Where possible, the previous/next menu
or screen can also be selected by the
Cursor control (Left/Right).
If a menu item cannot currently be
selected, it is shown shaded.
The complete menu structure is shown
on the card supplied with this handbook
and on page 2-5.
JJM 18 05 16/00 Last amend: November 1999 – NAS
Page 15
Using the controls
Note: A single tone denotes the
confirmation of a control action. An
incorrect action is indicated by a
double tone.
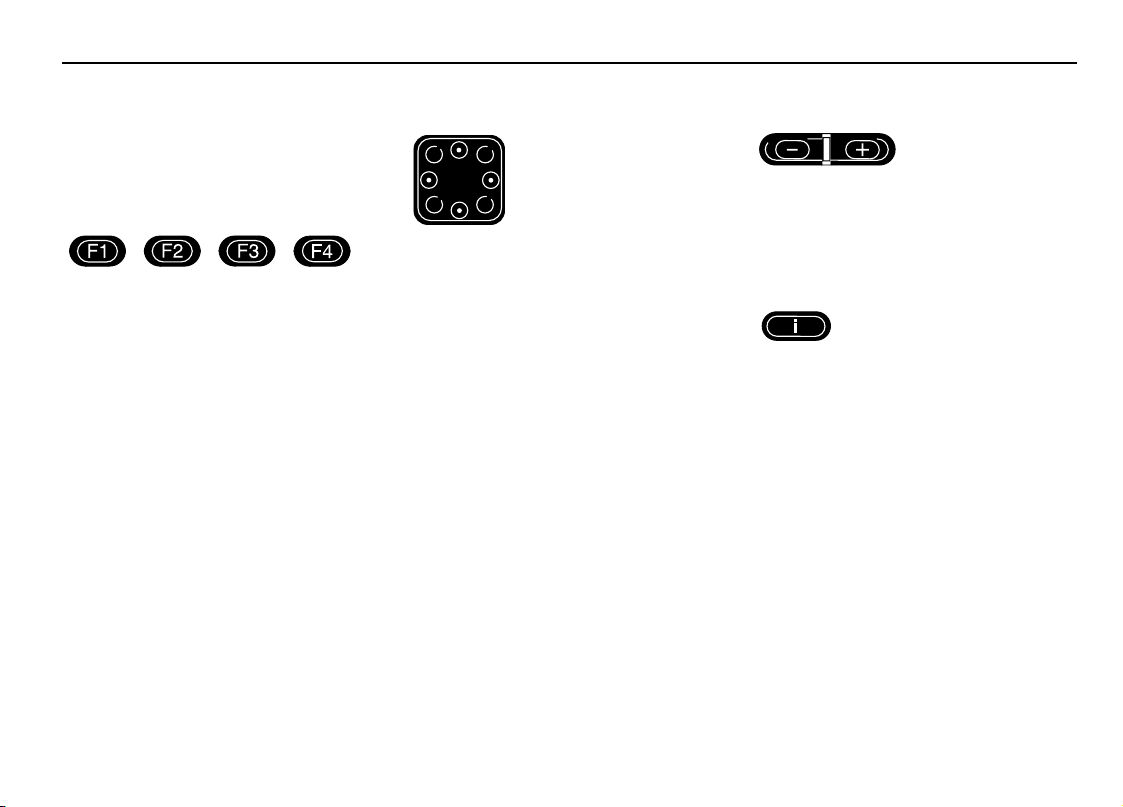
Function buttons
The operation of the function
buttons (F1 to F4) is determined by the
screen currently being displayed.
At the bottom of each screen (except
menu screens), the current function of
each button is displayed, numbered one
to four. Where function buttons are not
available, only the button number is
shown and appears shaded. For most of
the screens, function button F4 is used
to cancel the action and return to the
previous screen.
For information on the use of the
function buttons with menus, see
screens
on page 1-8.
Menu
Introduction and controls 1-9
Cursor control
The Cursor control has eight movements
(Up/Down, Left/Right, and diagonal) and
has the following uses according to the
screen currently selected.
• Selecting menu items (Up/Down).
• Selecting the next/previous menu or
screen (Left/Right). On some screens
this function is not available.
• Changing screen brightness and
contrast (Left/Right).
• Character and number entry
(Up/Down, Left/Right).
• Changing average speed settings
(Left/Right).
• Scrolling map position (Up/Down,
Left/Right). While under guidance,
the map is scrolled in preset
increments.
• Changing the method of list sorting
(Left/Right).
Zoom level control
When a map screen is displayed, the
map scale can be changed by pressing
and holding the Plus/Minus buttons to
reduce/enlarge the scale.
Information button
The Information button can be pressed
at any time to display the Information
menu, see
3-9.
Information menu
on page
JJM 18 05 16/00 Last amend: November 1999 – NAS
Page 16

1-10 Introduction and controls
Using the controls (continued)
Map button
The Map button has the following
functions.
• Returns to the initial map display
from any other screen.
• After scrolling, returns to the map
display of current vehicle position.
Enter button
The Enter button is used to confirm a
screen selection. The next screen in the
current procedure is displayed.
Off button
Press the Off button at any time to turn
the screen off. The system continues to
monitor vehicle position.
Note:
1. Press any button (except the
Information button) to turn the
screen on again.
2. While under guidance, the
audible instructions are also
turned on and off.
Volume adjustment
To adjust the volume of the audible
instructions, turn the Volume control as
required while a voice announcement is
in progress. The volume can be adjusted
between volume levels 05 and 20. If
further adjustment is required after the
end of an announcement, press the
Repeat button.
Note: The Volume control is located
on the front panel of the radio, see
the Audio Systems Handbook.
JJM 18 05 16/00 Last amend: November 1999 – NAS
Page 17
Using the controls (continued)
JOL.305
Introduction and controls 1-11
JOL.696
Character entry
Use the Cursor control (Up/Down,
Left/Right) to highlight the first character
in the name and press Enter. Repeat for
each character in turn. As characters are
entered, only the characters available to
complete the name (or similar names)
are shown in black.
To delete a character, select ‘DEL’ and
press Enter. The last character entered
will be deleted. To enter a space, select
the symbol and press Enter.
When sufficient characters have been
Selection screen example
A list of the possible names (for example
streets, towns, or motorways) from the
characters entered is displayed, up to a
maximum of 100.
Select the item required using the Cursor
control and press Enter. The next screen
is displayed, see
section 4.
Note: When the characters entered
reduces the number of possible
names to five or less, the list will be
displayed automatically.
entered (possible names become less
than 100) press F1 (List), or select ‘END’
and press Enter, see
Selection screen
example.
JJM 18 05 16/00 Last amend: November 1999 – NAS
Destination entry
JOL.304
,
Number entry
Use the Cursor control (Up/Down,
Left/Right) to highlight the first digit in
the number and press Enter. Repeat for
each digit in turn.
If no house number is entered, the route
will be calculated to the midpoint of the
number range displayed.
To delete a digit, select ‘DEL’ and press
Enter. The last digit entered will be
deleted.
When all the digits have been entered,
select ‘END’ and press Enter. The next
screen is displayed, see
, section 4.
entry
Destination
Page 18

2Quick reference
Main features of the system
Set points
When using the system, there are four
types of point that can be used in setting
up a route. These are selected from the
Set Points menu and are described
below, see
section 5.
Memory points
can be stored in memory and can be
selected as a route destination or as way
points.
Way points
intermediate points on a route and are
set in a similar manner to destinations
(Way Points→→→→Store). A maximum of five
way points can be set up on a route.
Way points are visited in the current
order that they appear in the way points
list, and the order can be changed if
required (Way Points→→→→Edit). If a way
point is entered after a destination has
been set, the route will be recalculated.
After way points have been visited they
are deleted from the way points list and
added to the list of recent destinations.
Advanced functions
– These are points that
– Way points are
,
Avoid areas
be selected as an avoid area, for example
a known area of heavy traffic. Routes will
then be calculated so that the area is
avoided where possible. A maximum of
10areas can be set up.
Home position
set a route to any frequently used
destination that has been entered as a
home position.
Points of interest(POI)
This is a database of useful names and
addresses held on the map CD. The
information can be displayed on the
screen and sorted by class (category). A
POI can be selected from the list and
used as a route destination or set point.
Quick points of interest(Q-POI)
Some commonly used classes of POI can
be selected directly from the map
display, without having to go through the
full procedure for selecting points of
interest.
– An area on the map can
– This is a quick way to
–
Quick reference2-1
Voice guidance
A chime and an audible instruction will
be heard as the vehicle is approaching
the next junction along the route where
a turn has to be made. The instruction is
repeated when the junction is reached.
Screen guidance
The screen shows the map display with
the current vehicle position and route
highlighted. As the vehicle approaches
the next turn, the screen automatically
shows the next junction diagram. After
the junction, the screen returns to the
map display automatically.
For further information, see
on page 6-4.
types
Screen
JJM 18 05 16/00Last amend: November 1999 – NAS
Page 19
2- 2 Quick reference
JOL.307
Route setting example
This is a simple example showing how to use the basic features of the system to set a route. It describes each screen in turn and
explains how to use the controls. For information relating to the other features of the system, see the relevant section in the
handbook.
Note: Before using the system, check that the correct map CD is loaded, see Loading the map CD on page 1-5.
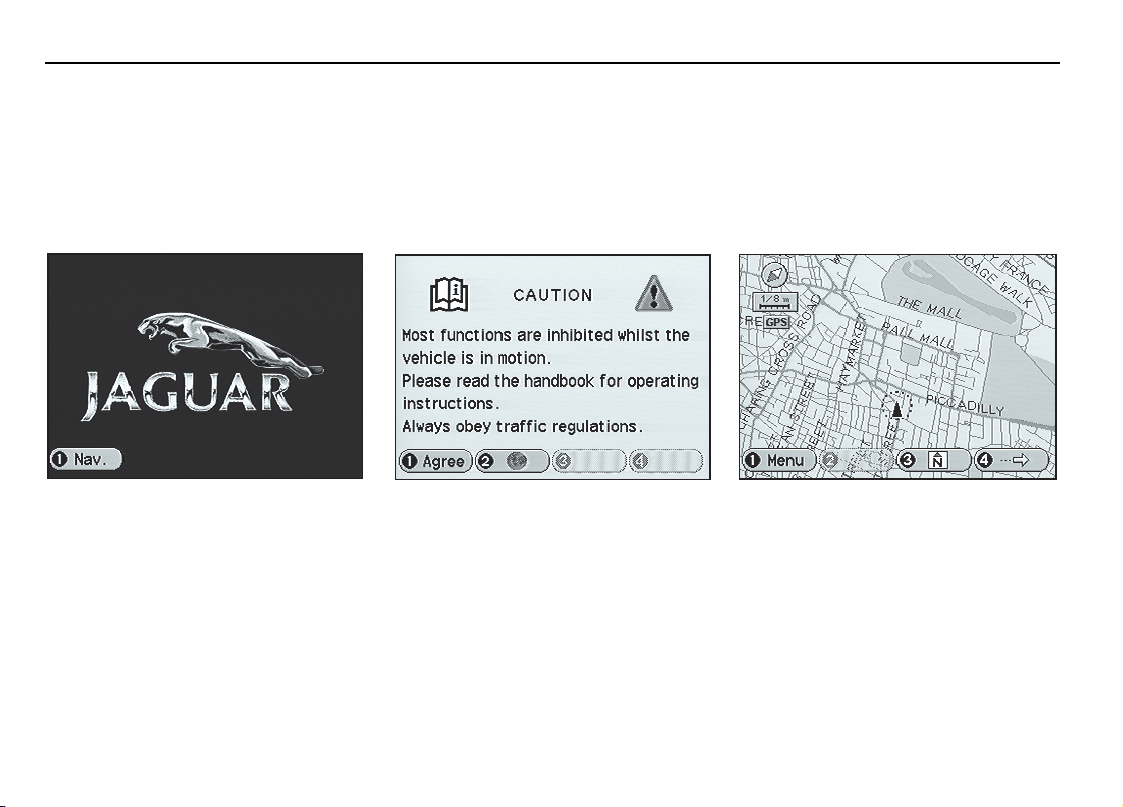
JOL.306
1. Initialisation
If the Jaguar screen is displayed, press
F1 (Nav.). The Road Safety Caution
screen is displayed.
2. Road safety caution
The screen shows safety information
which should be followed when using
the navigation system. see
information
Press F1 (Agree) to confirm. The screen
shows the map display.
Note: If required, press function
button F2 to change the language,
see Set up menu on page 3-6.
JJM 18 05 16/00 Last amend: November 1999 – NAS
on page 1-2.
Safety
JOL.297
3. Map display
The initial map screen showing the
current vehicle position is displayed.
Press F1 (Menu) to display the Main
menu.
Page 20
Route setting example (continued)
JOL.696
Quick reference 2-3
JOL.302
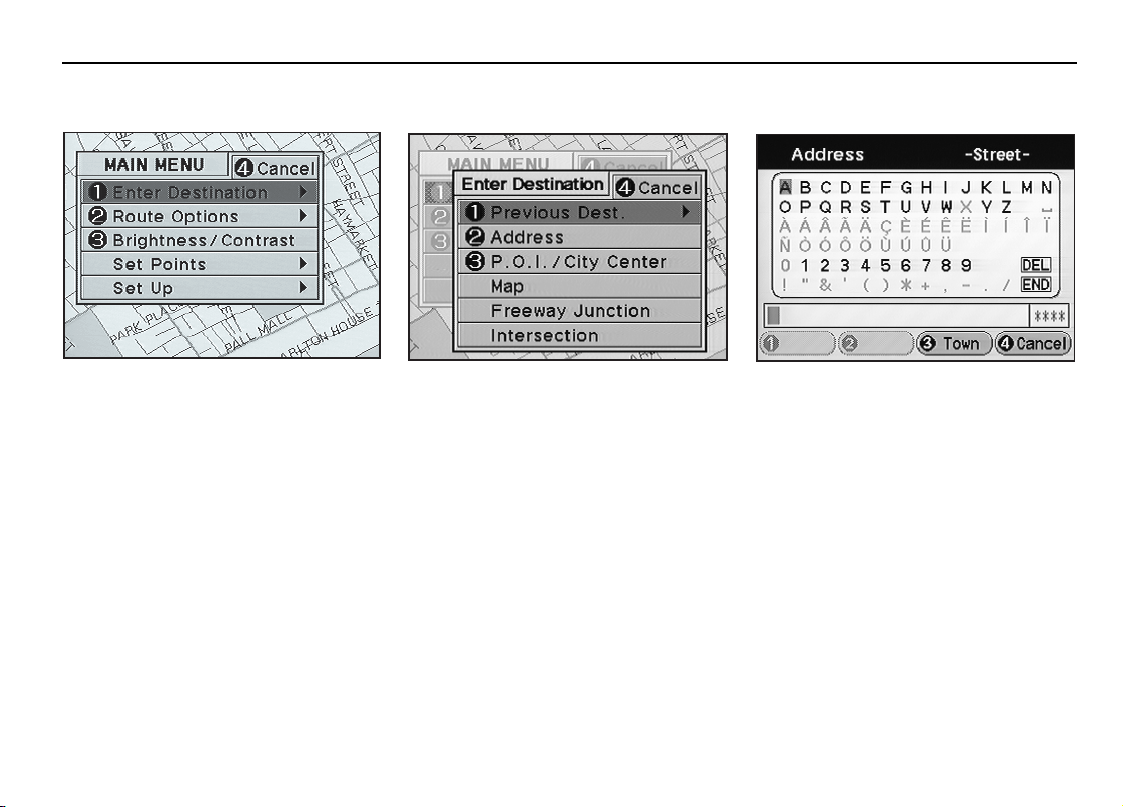
4. Main menu
The main navigation menu is displayed.
Press function button F1 to select the
Enter Destination menu.
5. Enter destination menu
The Enter Destination menu is displayed.
Press function button F2 to select the
second item on the menu (Address).
JJM 18 05 16/00 Last amend: November 1999 – NAS
JOL.676U
6. Address input
The Street Input screen is displayed.
Enter the street name using the Cursor
control and Enter button. If necessary,
press F3 (Town) to enter the name of the
destination town. For more information
see
Character entry
on page 1-11.
After selecting the street name, the
House Number Input screen is displayed.
Enter a house number if known. For
more information, see
Number entry
on page 1-11.
When the house number has been
entered, select ‘END’ and press Enter.
Page 21

2- 4 Quick reference
JOL.311
Route setting example (continued)
JOL.309 JOL.310
7. Confirm destination
The map display shows ‘Press ENTER to
confirm destination or F3 to select as a
Way Point’. Press Enter to confirm.
The route is calculated and the screen
shows ‘Searching’. When the calculation
is complete, the screen shows the map
display while under guidance.
While the route is being calculated the
screen shows ‘Searching’, and the
current screen preferences are displayed
(if selected).
8. Route guidance
The map display shows the current time
or distance to the destination.
Drive away, following the voice guidance
given by the system. The route is shown
highlighted on the map display. Continue
to follow the voice guidance until the
end of the route is reached.
9. End of route
When the vehicle arrives at the
destination, the screen shows ‘You have
arrived at your destination’. This is
confirmed by voice guidance. The system
is now ready for further use.
JJM 18 05 16/00 Last amend: November 1999 – NAS
Page 22

Navigation menu structure
Quick reference 2-5
JJM 18 05 16/00 Last amend: November 1999 – NAS
Page 23

3 Basic functions
Getting started
Basic functions 3-1
JOL.188
Initialisation
Caution: Do not leave the ignition
on for long periods with the engine
not running.
The navigation system is powered on
when the ignition switch is turned to
position ‘l’ and retains the settings when
switched off, including any route in
progress. The Jaguar screen is displayed
during initialisation, followed by the
Road Safety Caution screen.
If the system is not used, the Jaguar
screen is displayed again. The system can
then be activated by pressing function
button F1 (Nav.).
Road safety caution
The Road Safety Caution screen is
displayed, Function buttons F1 and F2
have the following functions:
F1 (Agree)
safety information. The screen shows the
map display, see
under guidance)
F2 (Languages)
screen of languages available for screen
display and voice guidance. To change
language, select a language and press
Enter. The Road Safety Caution screen is
displayed again. For further information,
see
Set up menu on page 3-6.
JJM 18 05 16/00 Last amend: November 1999 – NAS
JOL.297
– Acknowledges the road
Map display (not
on page 3-2.
– Displays the first
Page 24

3-2 Basic functions
Getting started (continued)
Map display (not under guidance)
The initial map screen showing the
current vehicle position is displayed.
Panel controls
F1 (Menu)
navigation menu, see
page 3-5.
F3 (Heading)
heading between north to the top of the
screen and vehicle heading to the top of
the screen.
F4 (More)
button functions, see
JOL.307
functions (not under guidance).
Enter
as a memory point. The screen shows
‘Press ENTER to store in memory’. When
Enter is pressed, the screen shows ‘Point
stored’.
Zoom level
enlarged or reduced.
Cursor
the map as required. The screen shows
new button functions (F1 to F4), see
Setting of points
– Displays the main
Main menu
– Changes the map
– Selects the additional
Additional
– Stores the map cursor location
– The scale of the map is
– Use the Cursor control to scroll
on page 3-3.
on
Additional functions (not under
guidance)
The additional button functions, selected
by pressing F4 (More), are as follows:
F1 (Home)
been entered, a route to that location
will be calculated, see
calculation
Note: To store your chosen home
position, select the Set Points menu
followed by the Home position and
Store. See Home position
functions (Store) on page 5-10.
F2 (Return)
the current position of the vehicle, to the
starting point of the last route to be
calculated, see
page 6-1.
F4 (Q-POI)
Interest screen, see
interest (Q-POI)
– If a home position has
Route
on page 6-1.
– Calculates a route from
Route calculation
– Selects the Quick Points of
Quick points of
on page 3-4.
on
JJM 18 05 16/00 Last amend: November 1999 – NAS
Page 25

Getting started (continued)
JOL.313
JOL.312
Setting of points
After scrolling the map, the following
functions are available:
F1 (Dest.)
under the cross-wire marker as a
destination, see
page 6-1.
F2 (Mem.)
under the cross-wire marker as a
memory point. The screen briefly shows
‘Point stored’.
– Selects the map location
Route calculation
on
– Selects the map location
F3 (Heading)
– Changes the map
heading between north to the top of the
screen and vehicle heading to the top of
the screen.
F4 (Q-POI)
classes, see
interest (Q-POI)
Enter
– Displays the list of Q-POI
Quick points of
on page 3-4.
– Selects the map location under
the cross-wire marker as a destination or
memory point, see
Destination/point
selection.
Basic functions 3-3
Destination/point selection
The screen shows ‘Set as?
F1: Destination F2: Memory Point’.
Select the item required:
F1 (Dest.)
location is calculated, see
calculation
F2 (Mem.)
‘Point stored’.
– A route to the selected map
Route
on page 6-1.
– The screen briefly shows
JJM 18 05 16/00 Last amend: November 1999 – NAS
Page 26

3-4 Basic functions
Getting started (continued)
F2 (Mem.)
– The screen briefly shows
‘Point stored’.
F3 (WayPt.)
– The screen briefly shows
‘Point stored’. The point is stored as the
last point in the list of way points. If the
vehicle is under guidance, the way point
is added to the calculated route.
JOL.665
Quick points of interest (Q-POI)
The screen shows a list of three
commonly used POI classes. Select the
class required and press Enter. The
screen shows a list of the three nearest
points in the selected class, see
Q-POI
selection.
Q-POI selection
Select the point required and press
Enter. The screen shows ‘Set as?
F1: Dest. F2: Mem. F3: WayPt.’. Select
the item required:
F1 (Dest.)
point of interest is calculated, see
calculation
JJM 18 05 16/00 Last amend: November 1999 – NAS
JOL.315
– A route to the selected
Route
on page 6-1.
Page 27

General navigation menus
Basic functions 3-5
Note: In Auto mode, the Day settings
are automatically selected with the
exterior lighting switch in the Off
position. The Night settings are
selected with the switch in any other
position.
JOL.302
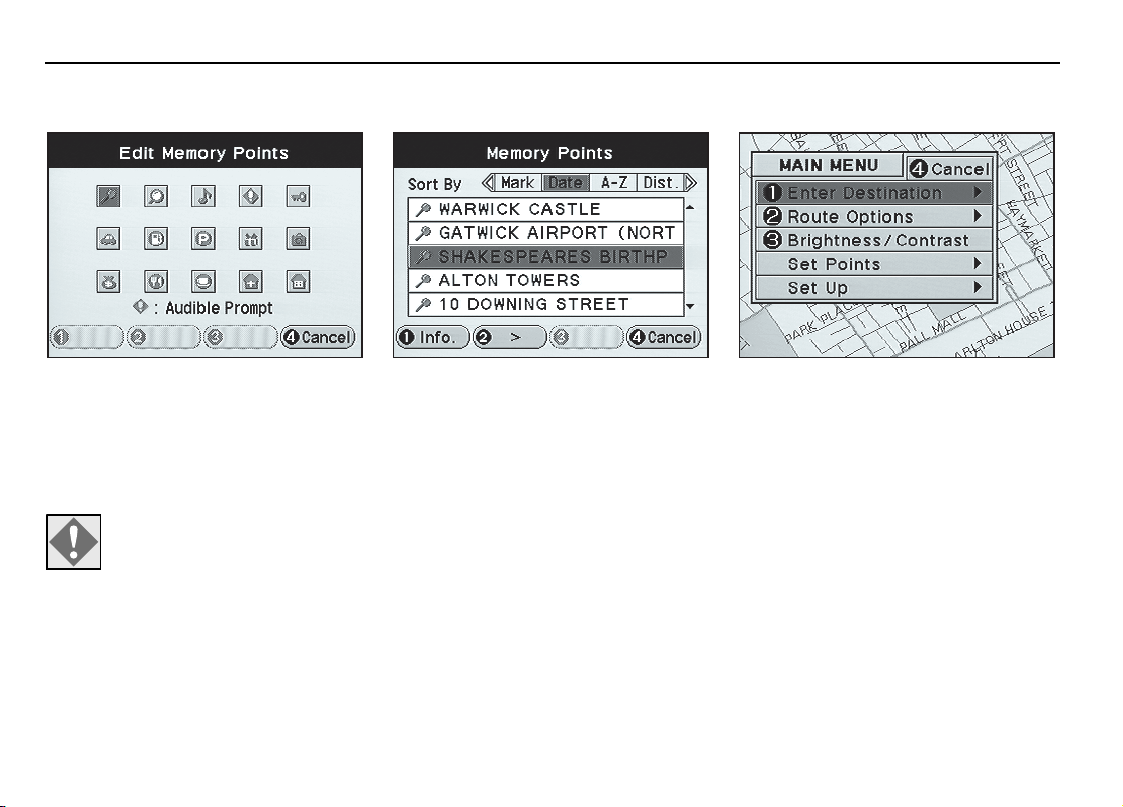
Main menu
Select the menu item required:
Enter Destination
destination menu
Route Options
on page 3-10.
menu
Brightness/Contrast
to the screen settings, see
– See
Enter
on page 4-1.
– See
Route options
– Allows changes
Brightness
and contrast settings.
Set Points
– See
Set point menus
on
page 5-1.
Set Up
– See
Set up menu
on page 3-6.
Note: To select the Main menu,
press the Map button, followed by
Brightness and contrast settings
The screen shows the brightness and
contrast selection scales, and the
currently selected mode (Auto, Day, or
Night). The function buttons (F1 to F3)
can be used to change the required
mode.
Brightness and contrast settings can be
changed independently for Day and
Night modes. Use the Cursor control
(Up/Down) to select Contrast or
Brightness. Then change the setting by
using the Cursor control (Left/Right).
Press Enter to confirm. The Main menu is
displayed again.
F1 (Menu).
JJM 18 05 16/00 Last amend: November 1999 – NAS
JOL.200
Page 28

3-6 Basic functions
JOL.697
General navigation menus (continued)
JOL.316 JOL.317
Set up menu
Select the menu item required:
Language
to be changed, see
Guidance
– Allows the current language
Language selection.
– See
Guidance menu
on
page 3-8.
Display
be changed, see
Calibration
to be changed, see
– Allows the current settings to
Display selection.
– Allows the current settings
Calibration settings
on page 3-7.
Map CD version
– The current version
number of the map CD is displayed.
– Allows the current distance units
Units
to be changed, see
Units selection
on
page 3-7.
JJM 18 05 16/00 Last amend: November 1999 – NAS
Language selection
The first list of languages available is
displayed. To change language, select a
language using function button F1 (Next
or Prev.) and the Cursor control
(Up/Down), and press Enter. The system
will change to the selected language, and
the Set Up menu will be displayed again.
The languages available are:
– German
– English
– English (US)
– Spanish
– French
–Italian
–Dutch
Display selection
The screen shows the currently selected
option for each item. The options
available are as follows:
GPS Icon
Scale Icon
Route Preference
– On/Off.
– On/Off.
– On/Off. Controls
the display of the current route
preferences during route calculation.
Use the Cursor control to select the
required item (Up/Down) and option
(Left/Right). Press Enter to confirm.
Page 29

General navigation menus (continued)
JOL.205
Select the calibration item required:
Relocate
vehicle position is displayed.
The screen shows ‘Adjust Position’. Use
the Cursor control to move the
Navigation symbol as required and press
Enter.
The screen shows ‘Adjust Direction’. Use
the Cursor control (Left/Right) to adjust
the vehicle heading as required and press
Enter. The screen briefly shows
JOL.319
Calibration settings
Sometimes the vehicle position shown
on the map display may not be correct.
This can occur, for example, if the
vehicle has been moved on a trailer or by
ferry. If the new position is not found
correctly by the system, follow the
calibration procedure described as
follows.
‘Relocation complete’.
Distance calibration
be necessary if wheel/tyre sizes have
been changed. The screen shows ‘Press
ENTER to start calibration or F4 to
cancel’. Drive the vehicle as normal.
There are no special requirements for
distance calibration.
– The map showing the current
– This should only
Basic functions 3-7
Units selection
The screen shows the currently selected
option. The options available are as
follows:
– Miles/Kilometres.
Units
Use the Cursor control to select the
required option (Left/Right). Press Enter
to confirm.
JJM 18 05 16/00 Last amend: November 1999 – NAS
Page 30

3-8 Basic functions
JOL.208
General navigation menus (continued)
JOL.320 JOL.321
Guidance menu
Select the menu item required:
Guidance Options
options to be changed, see
– Allows the current
Guidance
options selection.
Set Average Speed
settings to be changed, see
– Allows the current
Avera ge
speed settings.
Guidance options selection
The screen shows the currently selected
option for each item. The options
available are as follows:
Guidance Voice
Destination Info.
Screen View
Map/Symbol
Use the Cursor control to select the
required item (Up/Down) and option
(Left/Right). Press Enter to confirm.
Note: When Symbol is selected, the
screen view options have no effect.
– On/Off.
– Time/Distance.
– Full/Split.
– Map/Sym.
Average speed settings
The screen shows the current average
speed settings for major and minor
roads. These values are used by the
system to calculate the time to
destination on the map display.
To change a speed setting, select the type
of road required using function
button F1 (Major), or F2 (Minor). Change
the speed by using the Cursor control
(Left/Right) and press Enter. The Set Up
menu is displayed again.
JJM 18 05 16/00 Last amend: November 1999 – NAS
Page 31

General navigation menus (continued)
JOL.190
Basic functions 3-9
JOL.322
Information menu
The Information menu can be displayed
at any time by pressing the
Information (i) button.
Select the menu item required using the
function buttons (F1 or F2):
Emergency/Roadside
Emergency/Roadside selection
Information
selection
– See
.
– See
.
Information
Emergency/Roadside selection
The screen shows three classes of POI
which may be useful in an emergency
situation. Select the class required and
press Enter. The screen shows a list of
the three nearest points in the selected
class. Select the point required, see
Q-POI selection
Emergency and assistance
For vehicles fitted with Jaguar Assist,
press the Information button to access
the system. This is described in section 7.
JJM 18 05 16/00 Last amend: November 1999 – NAS
on page 3-4.
JOL.323
Information selection
The screen shows three classes of POI
which may provide useful information.
Select the class required and press Enter.
The screen shows a list of the three
nearest points in the selected class.
Select the point required, see
selection
on page 3-4.
Q-POI
Page 32

3-10 Basic functions
JOL.217
Route options (F1 →→→→ F2)
JOL.326
Route options menu
Select the menu item required:
Route Preferences
preferences selection
Detour Route
settings
.
Cancel Guidance
guidance, see
– See
Route
.
– See
Detour route
– Cancels the route
Cancelling guidance
page 3-11.
Display Whole Route
– The map
showing the whole route is displayed,
see
Route display
on page 3-11.
Route preferences selection
The screen shows the currently selected
option for each item. The options
available are as follows:
Major Roads
– Fastest/Shortest.
Route
Toll Road
Use the Cursor control to select the item
on
(Up/Down) and option (Left/Right)
required. Press Enter to confirm. The
Route Options menu is displayed again.
If the vehicle is under guidance the route
will be recalculated, see
calculation
JJM 18 05 16/00 Last amend: November 1999 – NAS
– Prefer/Avoid.
– Prefer/Avoid.
on page 6-1.
Route
JOL.662
Detour route settings
The screen shows the current settings for
major and minor roads. These values are
used in recalculating a route when the
Detour option is selected, see
Additional functions (under
guidance)
on page 6-3.
Select the type of road required using
function button F1 (Major) or F2 (Minor).
Change the detour distance as required
using the Cursor control (Left/Right).
Press Enter to confirm. The Route
Options menu is displayed again.
Page 33

Route options (continued)
Basic functions 3-11
JOL.327
Cancelling guidance
The screen shows ‘Press ENTER to cancel
Route display
The map of the whole route is displayed.
guidance’. When Enter is pressed, the
route is erased and the screen briefly
shows ‘Guidance cancelled’. The system
is then ready for further use.
JJM 18 05 16/00 Last amend: November 1999 – NAS
JOL.663
Page 34

JOL.309
4 Destination entry
Enter destination menu (F1 →→→→ F1)
Freeway Junction
junction as a destination, see
junction input
Intersection
intersection as a destination, see
Intersection input
JOL.676U
Enter destination menu
Select the menu item required:
Previous Dest.
using information already held by the
system, see
on page 4-2.
menu
Address
address, see
4-4.
P.O.I./Town Centre
town centre as a destination, see
of interest (POI) input
– Entry of a destination from a
Map
location on the map, see
from map.
– Entry of a destination
Previous destination
– Entry of a destination
Address input
on page
– Entry of a POI or
on page 4-5.
Destination
Poi nt
– Entry of a freeway
on page 4-6.
– Entry of a road
on page 4-7.
Freeway
Destination entry 4-1
Destination from map
The map showing the current vehicle
position is displayed. Scroll the map
using the Cursor control, until the
required location is under the cross-wire
marker, see
6-1.
Route calculation
on page
JJM 18 05 16/00 Last amend: November 1999 – NAS
Page 35

4-2 Destination entry
JOL.301
Previous destination menu (F1 →→→→ F1 →→→→ F1)
Memory Points
point as a destination, see
point selection.
Recent Destinations
destination from the list of recent
destinations, see
selection
JOL.689U
Previous destination menu
Select the menu item required:
– If a home position has been
Home
entered, a route to that location will be
calculated, see
Route calculation
on
page 6-1.
To enter a home position, select the
Store menu (home position functions),
see
Home position functions
on page
5-10.
Return Route
– A route is calculated
from the current position of the vehicle,
to the starting point of the last route to
be calculated, see
Route calculation
on
page 6-1.
JJM 18 05 16/00 Last amend: November 1999 – NAS
on page 4-3.
– Entry of a memory
Memory
– Entry of a
Recent destination
Memory point selection
The screen shows the list of current
memory points.
Select the point required and press
Enter. A route will be calculated to the
selected location, either as a destination
or as a way point, see
calculation
on page 6-1.
Memory point information
point and press F1 (Info.), see
display
List sorting
on page 4-3.
– The list can be displayed
Route
– Select a
List item
by date, alphabetically, by mark or by
distance. This is shown at the top of the
screen. Use the Cursor control
(Left/Right) to select the required sort
method.
Page 36

Previous destination menu (continued)
Destination entry 4-3
List sorting
by date, alphabetically or by distance.
This is shown at the top of the screen.
Use the Cursor control (Left/Right) to
select the required sort method.
– The list can be displayed
JOL.325
List item display
The details of the selected item are
displayed.
If F1 (Map) or Enter is pressed, a route
can be calculated to the selected point,
either as a destination or as a way point,
see
Route calculation
on page 6-1.
Recent destination selection
The screen shows the list of recent
destinations, up to a maximum of
10 destinations.
Select the point required as the new
destination and press Enter. A route will
be calculated to the selected location,
either as a destination or as a way point,
see
Route calculation
Destination information
destination and press F1 (Info.), see
item display.
JJM 18 05 16/00 Last amend: November 1999 – NAS
on page 6-1.
– Select a
JOL.214
List
Way points –
When way points have
been visited, they are deleted from the
way points list and added to the list of
recent destinations. They are indicated
by the symbol shown above.
Page 37

4-4 Destination entry
JOL.328
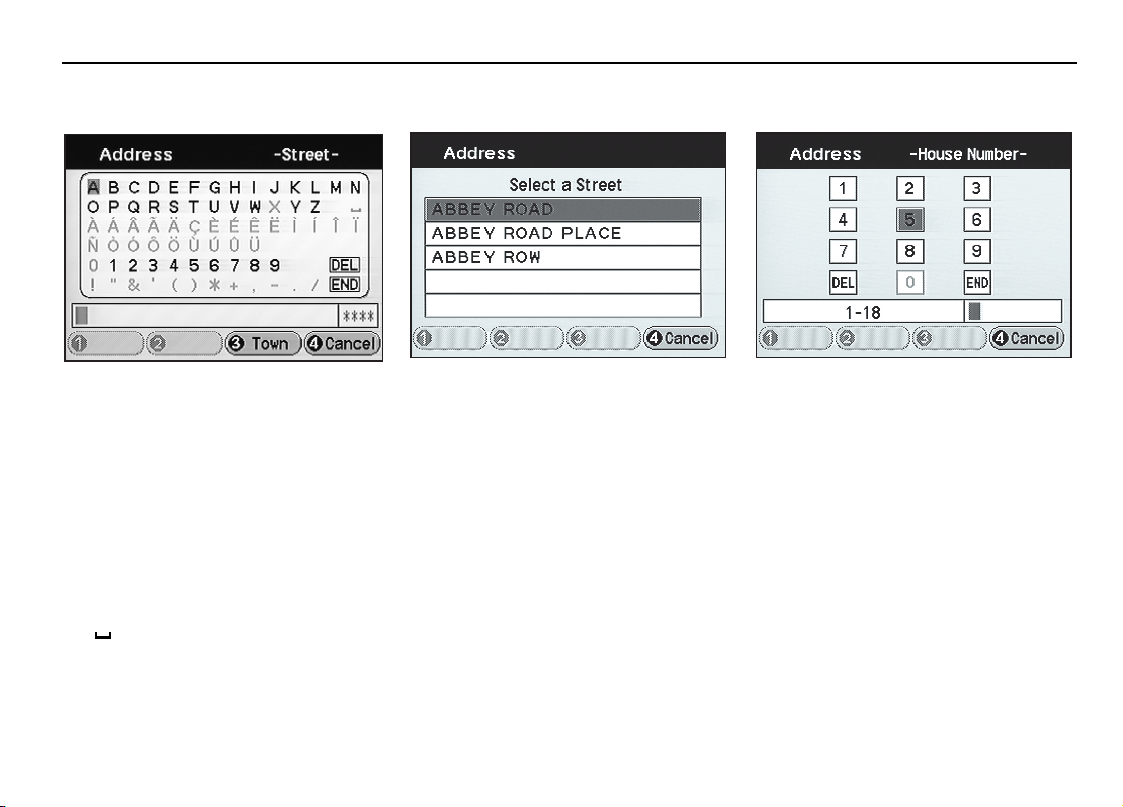
Address input (F1 →→→→ F1 →→→→ F2)
JOL.696
1. Street input
The Street Input screen is displayed.
Enter the street name, see
on page 1-11. When F1 (List)
entry
Character
appears, press the function button to
show the available streets, and select the
required street.
Note:
1. For more popular street names,
select F3 (Town) first to reduce
2. House number input
The Select a Range screen is displayed.
Select the required range and press
Enter. The Number Input screen is
displayed. Enter the house number, see
Number entry
Note: When a valid number (within
the number range) has been entered,
the cursor moves to ‘End’
automatically.
search time.
2. If the number of possible streets
is more than 100, the Town Input
screen will be displayed
automatically.
1.
JJM 18 05 16/00 Last amend: November 1999 – NAS
on page 1-11.
JOL.305
3. Town input
If not already selected, the Town Input
screen is now displayed. Enter the town
name,see
Character entry
1-11.
Note:
1. Some towns may require an area
code, or may be listed by district.
2. The more characters entered, the
shorter the list of choices will be.
3. If a road name is unique, the
Town Input screen is skipped and
the map is displayed for
confirmation of the location.
on page
Page 38

Point of interest (POI) input (F1 →→→→ F1 →→→→ F3)
JOL.331
Destination entry 4-5
JOL.667
1. POI name input
The POI Input screen is displayed. Enter
the name of a POI (alternatively press F2
(Class), or F3 (Town) first to restrict the
search:
F2 (Class)
– The screen shows the list of
POI classes. Select a class and press
Enter. The input screen is displayed
again.
F3 (Town)
– Enter and select the town
required. The POI Input screen is
displayed again.
Enter name
– The screen shows the list
of possible points of interest from the
characters entered, see
POI selection.
2. POI selection
Note: The list can be displayed by
pressing F1 (List), when it is shown
highlighted on the input screen.
Select the POI required and press Enter.
A route will be calculated to the selected
location, either as a destination or as a
way point, see
page 6-1.
Displaying POI information
POI and press F1 (Info.), see
details.
List sorting
alphabetically or by distance, as shown
at the top of the screen. Use the Cursor
control (Left/Right) to select the required
method.
JJM 18 05 16/00 Last amend: November 1999 – NAS
JOL.330
Route calculation
on
– Select a
POI
– The list can be displayed
3. POI details
The details of the selected POI are
displayed. Press F1 (Map) or Enter. A
route will be calculated to the selected
location, see
Route calculation
on page
6-1.
Routing to a town centre
With the POI Input screen displayed,
select F2 (Class), scroll to ‘Town Centre’
and press Enter. Enter and select the
town required. The map showing the
centre of the selected town is displayed.
Press Enter to confirm the destination,
see
Route calculation
on page 6-1.
Page 39

4-6 Destination entry
JOL.465
Freeway junction input
JOL.463 JOL.464
1. Freeway name input
The Freeway Input screen is displayed.
Enter the name of a freeway, see
Character entry
The screen shows the list of possible
freeways from the characters entered,
see
Freeway selection.
on page 1-11.
2. Freeway selection
Select the freeway required as the
destination and press Enter.
The Entrance/Exit screen is displayed.
Select ENTRANCE or EXIT and press
Enter, the screen shows the list of
possible freeway junctions, see
Junction
selection.
3. Junction selection
Select the junction required as a
destination or way point and press Enter.
A route will be calculated to the selected
location, see
Route calculation
on page
6-1.
JJM 18 05 16/00 Last amend: November 1999 – NAS
Page 40

Intersection input
JOL.335 JOL.336
1. Intersection name input
Note: This function is available in
certain areas only.
The Street Input screen is displayed.
An intersection is the junction between
two streets. Enter and select each street
in turn as described below.
Enter a street name, see
on page 1-11.
entry
The screen shows the list of possible
streets from the characters entered, see
Street selection.
Character
2. Street selection
Select the street required and press
Enter. After selecting the second street, a
route will be calculated to the selected
location either as a destination or way
point, see
6-1.
Note: If the intersection street
names are not unique, the list of
possible town options will be
displayed. Select the town required
and press Enter.
Route calculation
on page
Destination entry 4-7
JJM 18 05 16/00 Last amend: November 1999 – NAS
Page 41

5 Advanced functions
Set point menus
JOL.337 JOL.338
Set points menu
The Set Points menu is selected from the
Main menu, see
on page 3-5.
menus
The menu shows the four types of set
point, as listed below.
–Memory Points
–Way Points
– Avoid Area
– Home Position
Select the type of set point required. The
next menu is displayed showing the
functions available, see
function menus.
General navigation
Set point
Set point function menus
The functions available are the same for
each type of set point, the Memory
Points menu is shown above as an
example. These functions are described
for each type of set point in the following
pages.
Select the menu item required:
– Store
– Display
–Edit
–Delete
Stored Points
number of points is shown at the bottom
of the screen (except for Home Position).
– The current/maximum
Advanced functions 5-1
Note: On the Home Position menu,
if a home position exists, Store will
be shown shaded.
JJM 18 05 16/00 Last amend: November 1999 – NAS
Page 42

5-2 Advanced functions
Memory point functions
Adjust/store point –
The map location
can be entered as a destination or way
point. If the map is scrolled it can also be
entered as a new memory point. Press
the function button required, the screen
briefly shows ‘Point Stored’.
JOL.677U
1. Store
The screen shows the list of items that
can be stored as memory points. Select
the item required.
Enter the details of the point required,
see
Destination entry
, section 4.
After entry, the screen shows the map
location of the selected point and ‘Press
ENTER to store in memory’. The map can
2. Display
The screen shows the list of currently
stored memory points. Select a point and
press F1 (Info.) or Enter:
F1 (Info.) –
point are displayed. Press F1 (Map) or
Enter, see
Enter –
the selected point is displayed.
be scrolled to adjust the location if
required. When Enter is pressed the
screen briefly shows ‘Point stored’.
JJM 18 05 16/00 Last amend: November 1999 – NAS
JOL.233
The details of the selected
below.
Enter
The map showing the location of
Page 43

Memory point functions (continued)
Advanced functions 5-3
Adjust position
point can be changed by scrolling the
map. The screen shows ‘Press ENTER to
adjust position’. When Enter is pressed
the screen briefly shows ‘Point adjusted’.
– The position of the
JOL.234
3. Edit
The screen shows the list of currently
stored memory points. Select a point and
press Enter.
The details of the selected point are
displayed, see
Memory point details.
Memory point details
The screen shows the details of the
currently selected point. Select an item
to edit:
– The list of marker symbols is
Mark
displayed, see
symbols on page 1-8.
and press Enter.
– Enter the name required, see
Name
Character entry
– Enter the number required, see
Phone
Number entry
JJM 18 05 16/00 Last amend: November 1999 – NAS
JOL.699
Personal marker
Select a symbol
on page 1-11.
on page 1-11.
Page 44

5-4 Advanced functions
Memory point functions (continued)
Point information
points on the screen, select a point and
press F1 (Info.). The details of the
selected point are displayed.
To display the map location of the
selected point, press F1 (Map).
JOL.235
4. Delete
The screen shows the list of currently
stored memory points. Single points or
all points can be deleted.
To delete one point, select the point
required and press Enter. The screen
shows the map location of the selected
point and ‘Press ENTER to delete this
point’.
To delete all points, press F3 (Del. All).
The screen shows ‘Press ENTER to delete
all points’.
Press Enter to delete the point(s). This is
confirmed on the screen.
– With the list of
JJM 18 05 16/00 Last amend: November 1999 – NAS
Page 45

Way point functions
JOL.678U
1. Store
The screen shows the list of items that
can be stored as way points. Select the
item required.
Enter the details of the point required,
see
Destination entry
After entry, the screen shows the map
location of the selected point and ‘Press
ENTER to store in memory’. The map can
be scrolled to adjust the location if
required. When Enter is pressed the
screen briefly shows ‘Point stored’. If
under guidance, the route is
recalculated.
, section 4.
2. Display
The screen shows the list of currently
stored way points. Select a point and
press F1 (Info.) or Enter:
F1 (Info.) –
The details of the selected
point are displayed. Press F1 (Map) or
Enter, see
Enter –
The map showing the location of
Enter
below.
the selected point is displayed.
Advanced functions 5-5
Adjust/store point –
of the point can be entered as a
destination or memory point. If the map
is scrolled it can also be entered as a new
way point. Press the function button
required, the screen briefly shows ‘Point
Stored’.
Note: If the point is selected as a way
point while under guidance, the
route will be recalculated.
JOL.237
The map location
JJM 18 05 16/00 Last amend: November 1999 – NAS
Page 46

5-6 Advanced functions
Way point functions (continued)
JOL.683
3. Edit
The screen shows the list of currently
stored way points. Select a point and
press F1 (Info.), F3 (Sort), or Enter:
F1 (Info.)
point are displayed. Press F1 (Map) or
Enter, see
F3 (Sort)
place up the list, to change the order that
the way points are visited. (When the top
item is highlighted, the function button
will be shown shaded.)
– The details of the selected
below.
Enter
– Moves the selected item one
– The position of the point can be
Enter
changed by scrolling the map. The screen
shows ‘Press ENTER to adjust position’.
When Enter is pressed the screen briefly
shows ‘Point adjusted’.
JJM 18 05 16/00 Last amend: November 1999 – NAS
Page 47

Way point functions (continued)
JOL.239
4. Delete
The screen shows the list of currently
stored way points. Single points or all
points can be deleted.
To delete one point, select the point
required and press Enter. The screen
shows the map location of the selected
point and ‘Press ENTER to delete this
point’.
To delete all points, press F3 (Del. All).
The screen shows ‘Press ENTER to delete
all points’.
Press Enter to delete the point(s). This is
confirmed on the screen.
If under guidance, the route will be
recalculated.
Point information
points on the screen, select a point and
press F1 (Info.). The details of the
selected point are displayed.
To display the map location of the
selected point, press F1 (Map).
Note: After way points have been
visited (or the route cancelled), they
will be deleted from the way points
list and added to the list of recent
destinations.
– With the list of
Advanced functions 5-7
JJM 18 05 16/00 Last amend: November 1999 – NAS
Page 48

5-8 Advanced functions
JOL.240
Avoid area functions
JOL.679U
1. Store
The screen shows the list of items that
can be stored as avoid areas. Select the
item required.
Enter the details of the point required as
the centre of the area to be avoided, see
Destination entry
, section 4.
Area adjustment
– After entry, the
screen shows the map location of the
centre of the area. Use the function
buttons, F1 (Enlarge) and F2 (Reduce), to
select the area required, which is shown
within a rectangle on the screen. The
screen shows ‘Press ENTER to store in
memory’. When Enter is pressed the
screen briefly shows ‘Area stored’. If
under guidance, the route is
recalculated.
Note: An avoid area must include at
least one road junction.
2. Display
The screen shows the list of currently
stored areas. Select an area and press
F1 (Info.) or Enter:
F1 (Info.)
– The details of the selected
area are displayed. Press F1 (Map) or
Enter, see below.
– The screen shows the map
Enter
location of the selected area.
JJM 18 05 16/00 Last amend: November 1999 – NAS
Page 49

Avoid area functions (continued)
JOL.241 JOL.242
3. Edit
The screen shows the list of currently
stored areas. Select an area and press
Enter.
The name of the selected area to be
edited is displayed. The procedure is
similar to editing memory points, see
Memory point details
The position of the area can be changed
by selecting ‘Adjust position on map’
from the Avoid Area details screen. The
screen shows the map with the centre
point of the area under the cross-wire
marker. For details of the adjustment
procedure, see
page 5-8.
Area adjustment
on page 5-3.
on
4. Delete
The screen shows the list of currently
stored areas. Single areas or all areas can
be deleted.
To delete one area, select the area
required and press Enter. The screen
shows the map location of the selected
area and ‘Press ENTER to delete this
area’.
To delete all areas, press F3 (Del. All).
The screen shows ‘Press ENTER to delete
all areas’.
Press Enter to delete the area(s). This is
confirmed on the screen. If one or all
areas are deleted while under guidance,
the route is recalculated.
Advanced functions 5-9
Area information
areas on the screen, select an area and
press F1 (Info.). The details of the
selected area are displayed. To display
the map location of the selected area,
press F1 (Map).
– With the list of
JJM 18 05 16/00 Last amend: November 1999 – NAS
Page 50

5-10 Advanced functions
JOL.244
Home position functions
JOL.680U
1. Store
The screen shows the list of items that
can be stored as a home position. Select
the item required.
Enter the details of the home position
required, see
Destination entry
, section
4.
After entry, the screen shows the map
location of the home position and ‘Press
ENTER to store in memory’. The map can
be scrolled to adjust the location if
required. When Enter is pressed the
screen briefly shows ‘Point stored’.
2. Display
The map showing the current home
position is displayed. Press F1 (Dest.) to
set a route to the home position. The
screen shows ‘Destination confirmed’
and the route is calculated, see
calculation
Adjust/store position –
home position (or a new position by
scrolling the map) can be entered as a
memory point or way point. Press the
function button required, the screen
briefly shows ‘Point Stored’.
Note: If a home position has
previously been stored, it must be
deleted before entering a new one.
JJM 18 05 16/00 Last amend: November 1999 – NAS
on page 6-1.
Route
The current
JOL.243
3. Edit
The screen shows the map location of
the home position and ‘Press ENTER to
adjust position’. Scroll the map as
required and press Enter. When Enter is
pressed, the screen briefly shows ‘Point
adjusted’. The Home Position menu is
displayed again.
Page 51

Home position functions (continued)
JOL.245
4. Delete
The screen shows the map location of
the home position and ‘Press ENTER to
delete this point’. When Enter is pressed,
the screen briefly shows ‘Point deleted’.
The Home Position menu is displayed
again.
Advanced functions 5-11
JJM 18 05 16/00 Last amend: November 1999 – NAS
Page 52

JOL.695
6 Route calculation and guidance
Route calculation
JOL.309
Calculating the route
The map showing the selected
destination is displayed. The screen
shows one of the following messages:
• ‘Destination confirmed’,
• ‘Press ENTER to confirm destination’,
• ‘Press ENTER to confirm destination
or F3 to select as a Way Point’.
Route calculation and guidance 6-1
Destination confirmation
To confirm the screen prompt (If
required), press one of the following
buttons:
– The screen briefly shows
ENTER
‘Destination confirmed’ and the route to
the destination is calculated.
F3 (WayPt.)
‘Point stored’ and the way point will be
added to the way points list.
Note:
1. The map location can be adjusted
if required. Before confirmation,
use the Cursor control to scroll
the map until the desired
location is under the cross-wire
marker.
2. If a way point is stored after a
destination has been set, the
route will be recalculated.
– The screen briefly shows
Calculation
While the route is being calculated the
screen shows ‘Searching’. When the
calculation is complete, the screen
shows the map display while under
guidance, see
6-2.
Route preferences
current route preferences are displayed.
To change a preference, press
F3 (Replan) while the route is being
calculated. See
page 3-6. After entry, the route will be
recalculated.
Route guidance
– If selected, the
Display selection
on page
on
JJM 18 05 16/00 Last amend: November 1999 – NAS
Page 53

6-2 Route calculation and guidance
Route guidance
Guidance tones
A single tone is given before each audible
instruction.
High level road areas
On some map CDs, major roads in
neighbouring states may be displayed.
Where this occurs, these roads will only
be shown where the map has been
scaled to 4, 8 or 32 miles (8, 16 or
64 km).
JOL.310
Following guidance
!
WARNING:
Only operate, adjust or view the
system when it is safe to do so.
Drive away, following the voice guidance
given by the system. Continue to follow
the voice guidance until the end of the
route is reached.
A route can be calculated to a chosen
destination, but no route guidance will
be given under these conditions.
Panel controls
While under guidance, the panel
controls have the following functions:
F1 (Menu)
displayed, see
F2 (Repeat)
instruction and shows the relevant
junction diagram (according to the type
of screen guidance selected).
F3 (Heading)
changes between north to the top of the
screen and vehicle heading to the top of
the screen.
F4 (More)
button functions, see
functions (under guidance)
6-3.
Map
display (after scrolling, returns to the
display of the current vehicle position).
Cursor –
the map as required.
Enter
location as a new destination or as a
memory point. Press F1 (Dest.) or F2
(Mem.) as required. This is confirmed
briefly on the screen.
– The Main menu is
Main menu
– Repeats the last audible
– The map heading
– Selects the additional
– Selects the full screen map
Use the Cursor control to scroll
– Stores the current map cursor
on page 3-5.
Additional
on page
JJM 18 05 16/00 Last amend: November 1999 – NAS
Page 54

Route guidance (continued)
Additional functions (under
guidance)
The additional functions, while under
guidance, for the function buttons (F1 to
F4) are as follows:
F1 (Audible mode)
guidance and chime On or Off.
F2 (Detour)
screen is displayed and the route is
recalculated, where possible, avoiding
the set route for up to the current detour
distances, see
page 3-10.
F4 (Q-POI)
of Q-POI classes, see
interest (Q-POI)
– The Route Calculation
– The screen shows the list
– Turns voice
Detour route settings
Quick points of
on page 3-4.
on
Route calculation and guidance 6-3
JJM 18 05 16/00 Last amend: November 1999 – NAS
Page 55

6-4 Route calculation and guidance
JOL.354
Screen types
JOL.344
Map, split screen
The screen shows the map display with
the current vehicle position and route
highlighted. As the vehicle approaches
the next turn, the screen automatically
shows the next junction diagram overlaid
on the map display. After the junction,
the screen returns to the full map display
automatically.
Guidance options –
For Map, split
screen select as follows:
Screen View: Split
ap/Symbol: Map
M
Map, full screen
The screen shows the map display with
the current vehicle position and route
highlighted. As the vehicle approaches
the next turn, the screen automatically
shows the next junction diagram at full
screen size. After the junction, the screen
returns to the full map display
automatically.
Guidance options –
screen select as follows:
Screen View: Full
Map/Symbol: Map
JJM 18 05 16/00 Last amend: November 1999 – NAS
For Map, full
JOL.686
Symbol view
The screen shows a symbolic view of the
route. As the vehicle approaches the
next turn, the screen automatically
shows the next junction at full screen
size. After the junction, the screen
returns to the symbol view automatically.
Guidance options –
For Symbol view
select as follows:
Map/Symbol: Sym.
Note:
1. For Symbol view, the Screen View
options have no effect.
2. To set guidance options, see
Guidance options selection on
page 3-8.
Page 56

Additional guidance features
JOL.311
Arrival guidance
When the vehicle arrives at the
destination, the screen shows ‘You have
arrived at your destination’. This is
confirmed by voice guidance. The system
is now ready for further use.
Route calculation and guidance 6-5
JOL.212
Auto reroute
While under guidance, if the vehicle
deviates from the route, a new route will
be calculated automatically. While the
route is being recalculated, the time or
distance to the destination is not
displayed and the display shows
‘Rerouting’.
1
Note: If the vehicle is within
(400 metres) of the destination or
next way point, the route
recalculation will not occur.
/
4
mile
Breaks in journey
While driving under guidance, the
journey can be broken without affecting
the stored route. When the journey is
continued, the route guidance will
resume automatically.
Way points
When the vehicle arrives at a way point,
the screen shows ‘You have arrived at
your Way Point’. When the journey is
resumed, route guidance continues
automatically, either to the next way
point or to the final destination. After
visiting a way point, the next section of
the route will be shown on the screen
highlighted in orange.
After way points have been visited (or
the route cancelled), they will be deleted
from the way points list.
JJM 18 05 16/00 Last amend: November 1999 – NAS
Page 57

6-6 Route calculation and guidance
Setting destinations across map coverage areas
Setting a destination
!
WARNING:
When changing map CDs, find a safe
place to pull over. Each map CD has
an area of overlap with the adjoining
areas, to provide a smooth transition
between coverage areas during a
journey.
Road coverage
Outside the main coverage area of each
map CD, the adjoining major road
network only will be shown (at high
zoom levels). Destination setting will be
possible, but not to an exact location. If a
destination has been set, the route will
be highlighted but there will be no voice
guidance.
If a route is required starting in one map
CD area and finishing in another, this
can be achieved by changing the map CD
as required. A route may also be set
which crosses intermediate map CD
areas between the starting and finishing
areas. For more information, see
level road areas
on page 6-2.
High
To set a destination where the route
crosses one or more map CD
boundaries, follow the procedure below.
• Insert the map CD covering the
destination.
• Enter the destination by the method
required.
• Insert the map CD covering the start
of the route.
• Start the journey.
• Insert any intermediate map CDs (as
each area boundary is reached) and
continue the journey.
• Insert the final map CD before
reaching the destination.
Note:
1. This procedure will provide
detailed route guidance
throughout the journey. If route
guidance is not required for
certain parts of the journey, for
example while travelling for long
distances on freeways, some map
CD changes may be omitted.
2. Outside the coverage area of a
map CD, the screen will show
‘Out of Coverage Area’ in a yellow
text box, and the destination
information box will show ‘Route
Only’.
3. Each time the map CD is changed,
the route is recalculated and the
screen shows ‘Searching’.
JJM 18 05 16/00 Last amend: November 1999 – NAS
Page 58

7 Emergency and assistance
Introduction
Emergency roadside assistance is
provided by the Jaguar Assist system. The
system uses the vehicle’s Jaguar in-car
telephone installation to communicate
with the Jaguar security response center.
The Global Positioning System (GPS) is
used to identify the position, direction of
travel and speed of the vehicle.
The system can be used throughout the
contiguous United States, Hawaii and
Alaska, wherever cellular phone service
is available. A roaming airtime
agreement is required so that the system
can be used in all areas. The Jaguar
phone must be installed and working
correctly.
The emergency assistance feature allows
rapid access to emergency services
(police, fire, or ambulance) and roadside
assistance. Once assistance has been
requested, and the vehicle location
confirmed, the appropriate services are
contacted for assistance to be
despatched.
The benefits of the system are: ease of
activation, no requirement of knowing
who to call, emergency assistance call
sent automatically in the event of airbag
deployment, and location identification.
Emergency and assistance 7-1
Emergency assistance
Emergency assistance can be used in the
following situations:
• If you have been involved in an
accident.
• Airbag deployment (emergency
assistance call sent automatically).
• To report a crime or fire.
• When urgent medical attention is
required.
• To receive mechanical breakdown
assistance.
When the call is initiated, the response
center passes details of the emergency
and vehicle location to the appropriate
services.
Emergency help will be despatched to
your location and the operator will,
when appropriate, stay in direct contact
with you until the emergency help
arrives.
Note: If you are certain of your
location, a phone call to 911 or other
emergency service may provide a
faster response.
JJM 18 05 16/00 Last amend: November 1999 – NAS
Page 59

7 Emergency and assistance
Introduction
Emergency roadside assistance is
provided by the Jaguar Assist system. The
system uses the vehicle’s Jaguar in-car
telephone installation to communicate
with the Jaguar security response center.
The Global Positioning System (GPS) is
used to identify the position, direction of
travel and speed of the vehicle.
The system can be used throughout the
contiguous United States, Hawaii and
Alaska, wherever cellular phone service
is available. A roaming airtime
agreement is required so that the system
can be used in all areas. The Jaguar
phone must be installed and working
correctly.
The emergency assistance feature allows
rapid access to emergency services
(police, fire, or ambulance) and roadside
assistance. Once assistance has been
requested, and the vehicle location
confirmed, the appropriate services are
contacted for assistance to be
despatched.
The benefits of the system are: ease of
activation, no requirement of knowing
who to call, emergency assistance call
sent automatically in the event of airbag
deployment, and location identification.
Emergency and assistance 7-1
Emergency assistance
Emergency assistance can be used in the
following situations:
• If you have been involved in an
accident.
• Airbag deployment (emergency
assistance call sent automatically).
• To report a crime or fire.
• When urgent medical attention is
required.
• To receive mechanical breakdown
assistance.
When the call is initiated, the response
center passes details of the emergency
and vehicle location to the appropriate
services.
Emergency help will be despatched to
your location and the operator will,
when appropriate, stay in direct contact
with you until the emergency help
arrives.
Note: If you are certain of your
location, a phone call to 911 or other
emergency service may provide a
faster response.
JJM 18 05 16/00 Last amend: November 1999 – NAS
Page 60

7-2 Emergency and assistance
Getting started
Certain important features of the system
are described below. For full operating
information, see
system
Limitations of the system
It is important that the operation of
the system is properly understood
before attempting to use it. Read this
section of the handbook fully and
note the following summary of
limitations.
• The in-car telephone handset must
• The system is powered by the vehicle
• The system will only operate in areas
on page 7-4.
!
WARNING:
be installed and working correctly.
battery and will not operate if the
battery is discharged or
disconnected.
with cellular phone coverage and
when connection to the network is
established. This can be affected by
adverse weather conditions,
geographical features or tall
buildings.
Operation of the
• The system is not compatible with
certain cellular phone features. See
Cellular phone PIN code
Cellular phone restrictions.
• A roaming airtime agreement is
required so that the system can be
used in all areas.
• Loss of contact with the GPS satellite
system could result in an inaccurate
vehicle position being sent to the
response center.
• If the vehicle is involved in an
accident, components could be
damaged rendering the system
inoperative.
Making an emergency call
The procedure for obtaining emergency
assistance is as follows.
• Press the Information button on the
navigation front panel to display the
Assist menu.
• Press the Information button a
second time (or press the F1 function
button). The navigation screen shows
‘SOS REQUEST’.
and
A call to the response center is
automatically sent using the Jaguar in-car
telephone installation. After a brief
delay, voice contact with an operator is
established. The operator will have the
details of the vehicle available, including
its present location.
The operator verbally obtains details of
the emergency and, if necessary,
establishes a three-way phone call with
Jaguar Roadside Assistance, local 911, or
other emergency service. The
appropriate assistance will then be
dispatched to the vehicle location.
When the operator is satisfied that the
situation has been dealt with, the call
will be terminated.
Note: For full information, see
Operation of the system on page 7-4.
Calling the response center
To register a new system, or to obtain
information about Jaguar Assist, contact
the response center directly by phone
(not via Assist). The number is
1-800-756-9234.
JJM 18 05 16/00 Last amend: November 1999 – NAS
Page 61

Before using the system
Emergency and assistance 7-3
Registration and acquaintance
Before use, the registration procedure
must be completed. This can be done
either by calling the Jaguar security
response center directly by phone (not
via Assist), or during an acquaintance
activation which is described below.
It is necessary to initiate an acquaintance
activation before using the system. This
should be done as soon as possible after
the in-car telephone registration has
been carried out.
To carry out the acquaintance activation,
initiate an emergency call in the usual
way, see
When the operator answers, indicate
that you are a new user and the operator
will familiarize you with the system.
Cellular phone PIN code
The Jaguar Assist system cannot be used
where a PIN code has to be entered
before making a phone call. When the
phone is registered, ensure that the PIN
code feature is not required. In case of
difficulty, contact your Jaguar dealer.
Emergency calls
on page 7-4.
Cellular phone restrictions
Some cellular carriers offer customers
various optional features with their
cellular services. Several of these features
are not compatible, or could potentially
limit the performance of the system. No
Outgoing Calls, Hotline, and Numbering
Plan Area (NPA) restrictions are
incompatible cellular features and must
be avoided. Operation is possible with
No Incoming Calls, Call Forwarding,
Busy/No Answer Transfer and Call
Waiting, but these features could impair
overall system performance. Because
carriers are regularly making new
features available to customers, this list
may not be complete. Contact your
Jaguar dealer for assistance if you are
unsure if a particular cellular feature is
compatible with the system you choose.
Service charges
There are no charges for using the
system for the first four years, except for
the cost of the cellular airtime for calls
made to the response center. Details of
subsequent charges can be obtained
from your Jaguar dealer or the response
center.
JJM 18 05 16/00 Last amend: November 1999 – NAS
Page 62

7-4 Emergency and assistance
Operation of the system
Note: The ignition must be turned
on (position ‘l’ or ‘ll’).
The system is operated from the controls
on the navigation front panel, see section
1. While in use, a sequence of messages
is displayed on the LCD screen,
On-screen messages
Accessing the system
To access the service, press the
Information button. The Assist menu is
displayed.
Note: If an Assist call is initiated and
the operator cannot establish voice
communication, police assistance
will be despatched to the vehicle.
Emergency calls
The procedure for obtaining emergency
assistance is as follows.
With the Assist menu displayed, press
the Information button or the F1
Function button. (You can also press the
Enter button with the Emergency option
selected on the menu.) The screen shows
‘SOS REQUEST’ and the red lamp in the
Information button starts to flash. A call
to the response center is automatically
sent using the Jaguar in-car telephone.
on page 7-5.
see
Data message
When contact with the response center
is established, an electronic data
message is transmitted to the response
center's central computer. This data
message will include:
• Type of alarm (emergency or airbag).
• Vehicle identification number (VIN).
• Latitude and longitude coordinates.
• Last recorded speed and direction of
the vehicle.
• Time tag identifying when last
position was taken.
Operator contact
After the data transmission has been
completed, voice contact with an
operator is established. The operator has
the details of the vehicle available,
including its present location.
The operator verbally obtains details of
the emergency and, if necessary,
establishes a three-way phone call with
Jaguar Roadside Assistance, local 911, or
other emergency service. The
appropriate assistance will then be
dispatched to the vehicle location.
Terminating assistance calls
When the operator is satisfied that the
situation has been dealt with, the call
will be terminated and the red lamp in
the Information button will extinguish.
Normally, only the response center can
terminate an assistance call. (For
exceptions, see
page 7-5.)
Automatic redial
on
JJM 18 05 16/00 Last amend: November 1999 – NAS
Page 63

Further information
Emergency and assistance 7-5
On-screen messages
During an assistance call, various status
messages are displayed on the navigation
screen, which enable the progress of the
call to be followed. For a list of the
messages and their meaning, see
Message list
While in contact with the response
center, the vehicle location messages
(CID, LAT and LON) are displayed in
sequence, except when the display of
another message is required.
Data message retransmission
During an assistance call, the response
center operator can initiate a
retransmission of the electronic data
message. This may be necessary to
ensure a more precise determination of
vehicle location, or to track a vehicle that
is moving.
In this situation you will temporarily lose
contact with the operator while the data
is transmitted, and the messages
‘SENDING LOCATION DATA’, followed
by ‘DATA RECEIVED’ will be displayed.
After the data transmission is complete,
voice communication will be restored.
JJM 18 05 16/00 Last amend: November 1999 – NAS
on page 7-7.
Automatic redial
As described previously, when an
assistance call is made, the vehicle’s
cellular phone calls the response center's
central computer and attempts to send
an electronic data message.
Occasionally, it can be difficult for the
computer to recognize the message if the
cellular connection is weak or noisy. If
the transmission of the message is
unsuccessful, the data call will be
terminated and the message ‘REDIAL IN
PROGRESS’ will be displayed. A second
call will automatically be placed which
bypasses the response center's computer
and is forwarded directly to an operator.
Similarly, if the phone call is
disconnected by the cellular network
prior to termination, another call to the
response center will also automatically
be dialed. The message ‘REDIAL IN
PROGRESS’ will be displayed and voice
communication with the operator will be
restored.
During redial calls, full control of the
cellular phone is returned to you.
Pressing either PWR or END on the
portable will terminate the assistance
request and reset the system.
Call activation and termination
The system can be activated whenever
the ignition is turned on (position ‘l’ or
‘ll’), and for six minutes after the ignition
is turned off. Operation will continue
even if the ignition is turned off during
an activation (although visual feedback
via the navigation screen will not be
available).
In most situations, the assistance request
can only be terminated, and the system
reset, by the response center. (For
exceptions, see
Note: Once a call has been initiated,
do not attempt to crank the engine
as this may cancel the activation.
System self-test
The system will perform a self-test each
time the ignition is turned on (position
‘ll’). This is indicated by the illumination
of a red lamp in the Information button.
The lamp will remain illuminated for the
duration of the test. If the lamp does not
extinguish within 10 seconds, and stays
on continuously, contact your Jaguar
dealer.
Automatic redial.
)
Page 64

7-6 Emergency and assistance
Further information (continued)
Cellular phone interface
The cellular phone must be connected to
the vehicle, and registered with a cellular
network for the system to work. If the
phone is in use when the system is
activated (for example an airbag
deployment) that call will be terminated
and the response center will be called in
the usual way.
When an activation is terminated, your
phone is left unlocked, in the On state
and may not return to its previous call
restriction or system selection setting. It
can be reprogrammed to your previous
settings as desired. Refer to your phone
user's manual for further information.
Battery disconnection
If the battery has been disconnected, the
vehicle location will be lost. On
reconnection, it may take up to
approximately 15 minutes to re-establish
vehicle position.
JJM 18 05 16/00 Last amend: November 1999 – NAS
Page 65

Emergency and assistance 7-7
Message list
During operation, a sequence of messages will appear on the navigation screen. These are described below.
Message Meaning
SOS REQUEST Emergency call initiated
CALL IN PROGRESS Call being processed
RINGING RESPONSE CENTER Call being sent to response center
REDIAL IN PROGRESS Making a second attempt to call response center
SENDING LOCATION DATA Vehicle location data being sent to response center
CID Customer identification number
LAT Vehicle latitude
LON Vehicle longitude
DATA RECEIVED Location data received by response center
WAITING FOR OPERATOR Waiting for response center operator
ASSIST FAILURE Jaguar Assist system failed. See your Jaguar dealer
JJM 18 05 16/00 Last amend: November 1999 – NAS
Page 66

7-8 Emergency and assistance
Message list (continued)
Message Meaning
CELLULAR SYSTEM BUSY Trying to connect call to the cellular phone system (messages displayed alternately)
PLEASE WAIT
NO CELLULAR SIGNAL Difficulty in communicating with the cellular phone system (messages displayed
WAITING TO ACQUIRE
UNABLE TO PLACE CALL Failed to connect call to the cellular phone system
CELLULAR PHONE REMOVED Messages displayed if an Assist call is made while the cellular phone is not installed
ASSIST FEATURE DISABLED
ASSIST FEATURE ENABLED Message displayed after the cellular phone is installed
INSTALL PHONE TO ENABLE Message displayed if the cellular phone is removed during an Assist call
NON-ASSIST PHONE The phone installed is not a Jaguar S-TYPE phone
JJM 18 05 16/00 Last amend: November 1999 – NAS
alternately)
(messages displayed in sequence)
 Loading...