

Page 1
315-00032
07/05 Rev B
O W N E R ’ S
M A N U A L
Official product of the Ironman Triathlon
Page 2
QUESTIONS?
Call our toll free Ironman Fitness Helpline at
1.800.750.IRON
1.800.750.4766
Prior to your call, please be sure you have located and
noted the Model Number and Serial Number.
ironmanfitness.com
Congratulations on choosing an Ironman Fitness product.
The Ironman 112M Bike was designed with the agressive
rider in mind and is a tremendously effective tool for achieving your personal fitness goals.
Named after the 112 mile bike portion of the Ironman
Triathlon, you will be able to rely on the quality craftsmanship and durability of the Ironman 112M Bike for years to
come.
This owner’s manual contains all the information you need
to operate and enjoy your Ironman 112M Bike. Please read
the manual in its entirety before attempting to exercise on
the 112M Bike.
FITNESS SAFEGUARDS
Failure to follow any of these safeguards may result in
injury or serious health problems.
• Before starting any exercise program, consult with your
physician or health professional. He or she can help
establish the exercise frequency, intensity and time
appropriate for your particular age and condition.
• If you have any pain or tightness in your chest, an
irregular heartbeat, shortness of breath, feel faint or have
any discomfort while you exercise, STOP! Consult your
physician before continuing.
• Do not place fingers or any other objects into moving
parts of the exercise equipment.
• Keep children and pets away from the 112M Bike. A
child’s curiosity may result in injury.
• Do not allow children to use the 112M Bike. The machine
is designed and intended for adults, not children.
• Never turn pedal crank arms by hand. To avoid
entanglement and possible injury, do not expose hands or
arms to the drive mechanism.
• Do not dismount the 112M Bike until the pedals are at a
complete STOP.
• Warn bystandars to keep a safe distance. Do not allow
anyone to touch the bike while it is in operation.
1
Page 3
PARTS LIST
ASSEMBLY PARTS LIST
ASSEMBLY INSTRUCTIONS
32
PART # DESCRIPTION QTY
1 Handlebar 1
8 T-Pop Pin 1
10 Screw 2
11 Guard/Bottle Cage 1
26 Front Stabilizer 1
30 Allen Bolt 4
31 Washer 4
41 Rear Stabilizer 1
50R Right Pedal 1
50L Left Pedal 1
See Below Wrench 1
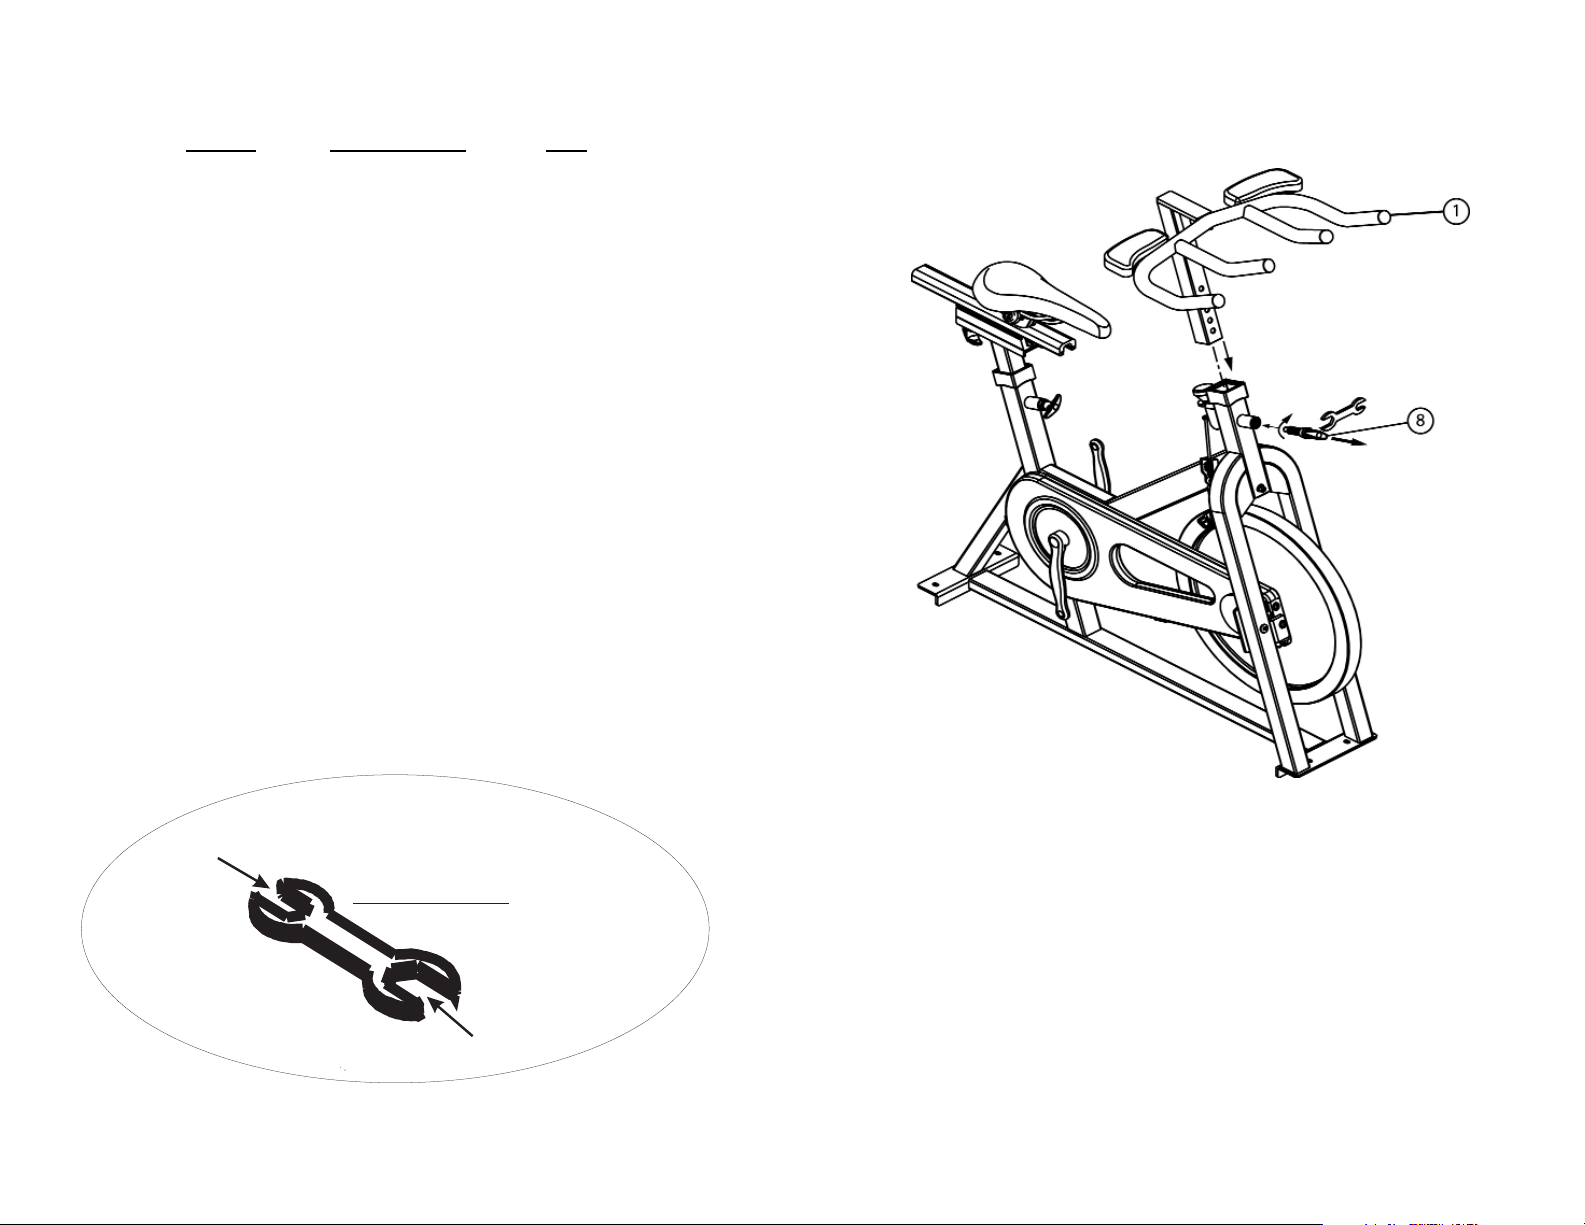
STEP 1
Install the Pop Pin (8) into the head tube using wrench.
Insert the Handlebar (1) into the head tube and secure with Pop Pin (8).
Make sure the Pop Pin (8) settles into the desired hole and then secure
it firmly.
15mm for pedals
ADJUSTABLE WRENCH
21mm for T pop pin
Page 4

4 5
ASSEMBLY INSTRUCTIONS ASSEMBLY INSTRUCTIONS
STEP 2
Secure the Water Bottle Cage (11) to the main frame using the two
Screws (10).
Thread the Right Pedal (50R) to the right side arm of the bike using the
wrench provided. The Right Pedal has “R” marked on the spindle.
Please note that the Right Pedal is right-hand threaded which must be
turned clockwise to tighten.
Thread the Left Pedal (50L) to the left side arm of the bike using the
wrench provided. The Left Pedal has “L” marked on the spindle.
Please note that the Left Pedal is left-hand threaded which must be
turned counter clockwise to tighten.
STEP 3
Attach the Front Stabilizer (26) to the main frame using two Allen Bolts
(30) and two Washers (31). Please make sure that the adjustable feet
are on the bottom and the trasport wheels are facing up and towards
the front of the bike as pictured.
Attach the Rear Stabilizer (41) to the main frame using two Allen Bolts
(30) and two Washers (31). Please also be aware that the adjustable
feet are on the bottom.
Page 5

6 7
Moving Your 112M Bike
To move the bike, carefully lift the rear end of the bike by pushing down
on the front of the handlebars. Steer the bike to another location. Be
gentle while moving the unit as any sharp impact can affect the operation.
Leveling
Your 1
12M Bike
The 112M Bike can be leveled to compensate for uneven surfaces. To
level the bike, raise or lower the four leveling bolts located on the underside of the front and rear stabilizers by screwing them in or out as needed.
Maintenance
Use a damp cloth to wipe your 112M Bike free from sweat after each
use.
Monitoring
Your Heart Rate
To obtain the greatest cardiovascular benefits from your exercise workout, it is important to work within your target heart rate zone. The
American Heart Association (AHA) defines this target as 60%-75% percent of your maximum heart rate.
Your maximum heart rate may be roughly calculated by subtracting your
age from 220. Your maximum heart rate and aerobic capacity naturally
decreases as you age. This may vary from one person to another, but
use this number to find your approximate effective target zone. For
example, the maximum heart rate for an average 40 year-old is 180
bpm. The target heart rate zone is 60%-75% of 180 or 108-135 bpm.
See Fitness Safety on page 8.
Before beginning your workout, check your normal resting heart rate.
Place your fingers lightly against your neck, or against your wrist over
the main artery. After finding your pulse, count the number of beats in
10 seconds. Multiply the number of beats by six to determine your pulse
rate per minute. We recommend taking your heart rate at these times;
at rest, after warming up, during your workout and two minutes into your
cool down, to accurately track your progress as it relates to better fitness.
STEP 4
You have completed the assembly of your new Ironman 112M Bike.
Please read on for more important information related to operating and
maintaining your 112M.
ASSEMBLY INSTRUCTIONS
Page 6

8 9
During your first several months of exercising, the AHA recommends
aiming for the lower part of the target heart rate zone-60%, then gradually progressing up to 75%. According to the AHA, exercising above
75% of your maximum heart rate may be too strenuous unless you are
in top physical condition. Exercising below 60% of your maximum will
result in minimal cardiovascular conditioning.
Check your pulse recovery rate – If your pulse is over 100 bpm five
minutes after you stop exercising, or if it’s higher than normal the morning after exercising, your exertion may have been too strenuous for
your current fitness level. Rest and reduce the intensity next time.
FITNESS SAFETY: A variety of different factors (including medication, emotional state, temperature and other conditions) can affect
the target heart rate zone that is best for you. Your physician or
health care professional can help you determine the exercise
intensity that is appropriate for your age and condition.
(MHR) = Maximum Heart Rate (THR) = Target Heart Rate
220 - age = maximum heart rate (MHR).
MHR x .60 = 60% of your maximum heart rate.
MHR x .75 = 75% of your maximum heart rate.
For example, if you are 30 years old, your calculations will be as follows:
220 - 30 = 190
190 x .60 = 114 (low end or 60% of MHR)
190 x .75 = 142 (high end or 75% of MHR)
30 year-old (THR) Target Heart Rate would be 114-142.
100%
85%
75%
60%
Serious
Athletic
Training
Range
Cardiovascular
Conditioning
Range
Fat Burning
Range
20 25 30 35 40 45 50 55 60 65
AGE
200
195
190
185
180
175
170
165
160
155
170
166
162
157
153
149
145
140
136
132
150
146
143
139
135
131
128
124
120
116
120
117
114
111
108
105
102
99
96
93
TARGET HEART RATE ZONE
Page 7

EXPLODED VIEWPARTS LIST
10
11
REF # PART # DESCRIPTION QTY
1 323-00035 HANDLEBAR 112M 1
2 302-00320 WASHER 16*6.5*1MM 12
3 302-00323 PAN HEAD ALLEN BOLT M5*12MM M-CT & 112M 11
4 328-00025 RACING PAD R 1
4-1 328-00026 RACING PAD L 1
5 310-00131 TENSION CONTROL KNOW M-CT & 112M 1
6 310-00138 ACOUSTIC GROMMET (NYLON) 1
7 306-00360 SLEEVE, 112M 2
8 310-00132 T-POP PIN (HANDLEBAR STEM ) M-CT & 112M 1
9 310-00133 T-POP PIN (SEAT POST) M-CT & 11M 1
10 302-00418 ROUND HEAD ALLEN BOLT #10 112M 2
11 310-00139 BOTTLE CAGE 112(OLD STYLE) 1
12 323-00186 FRAME M-CT & 112M 1
13 302-00084 BRAKE ASSEMBLY W/O BRAKE SHOE 112M 1
14 306-00371 ACOUSTIC GROMMET (PVC) 112M 1
15 302-00419 WASHER #15 112M 1
16 302-00420 NYLON NUT #16 112M 1
17 310-00017 BRAKE PADS (L&R) 112M 1
18 302-00421 POSITIONED NUT #18 112M 1
19 302-00422 NYLON NUT #19 112M 1
20 310-00017 BRAKE PADS (L&R) 112M 1
21 306-00243 FOOT CAP M-CT & 112M 4
22 302-00332 ROUND HEAD ALLEN BOLT M6*1.0*40 2
23 306-00244 TRANSPORT WHEEL M-CT & 112M 2
24 302-00433 LEVER NUT #24 112M 4
25 306-00603 LEVELER FOOT M-CT & 112M 4
26 323-00187 FRONT STABILIZER M-CT & 112M 1
27 302-00333 FLANGE NUT M12*1.25 M-CT & 112M 2
28 319-00015 FLYWHEEL DROPOUT PLATE (L ) M-CT & 112M 1
29 306-00248 END CAP M-CT & 112M 2
30 302-00334 Pan Head Allen Bolt M8*1.25*16 M-CT & 11 4
31 302-00329 FLAT WASHER 13*5 M-CT & 112M 4
33 319-00016 EZ RELEASE SET M-CT & 112M 1
34 302-00336 SNAP RING M-CT & 112M 1
35 302-00337 SPACER M-CT & 112M 1
36 311-00013 FLYWHEEL (MAIN) 112M 1
37 330-00054 HUB AXLE SET 1
40 319-00017 FLYWHEEL DROPOUT PLATE (R ) M-CT & 112M 1
41 323-00189 REAR STABILIZER M-CT & 112M 1
42 323-00082 SEAT POST 112M 1
43 302-00341 PAN HEAD ALLEN BOLT M6*1.0*12 4
43-1 302-00342 SPRING WASHER M6 4
44 328-00027 SEAT M-CT & 112M 1
45 319-00018 UPPER SEAT SLIDER ASSEMBLY M-CT & 112M 1
46 319-00019 LOWER SEAT SLIDER ASSEMBLY M-CT & 112M 1
47 319-00020 STEP PLATE M-CT & 112M 1
48 319-00021 CHAIN GUARD ( INNER ) M-CT 1
49 302-00343 PAN HEAD ALLEN BOLT M6*1.0*8 1
50 306-00111 PEDAL 112M 1
51 319-00022 CRANK (L) M-CT 1
51-1 302-00344 B/B BOLT M8*1.25 2
51-2 306-00248 END CAP M-CT & 112M 2
52 319-00023 BOTTOM BRACKET W/ ADAPTOR M-CT 1
53 302-00345 CHAIN 114 LINKS 1
54 330-00035 CHAIN WHEEL SET 1
55 319-00025 CHAIN GUARD ( OUTER ) M-CT 1
56 310-00135 T-POP PIN (SLIDER) 1
56-1 302-00346 DESPRESSED SPRING 1
56-2 319-00026 SLIDING GROOVE M-CT 1
56-3 302-00328 ROUND HEAD SCREW M5*0.8*30 M-CT & 112M 1
# 315-00032 OWNER'S MANUAL, 112M 1
112M Parts List Rev C
Page 8

IRONMAN FITNESS LIMITED WARRANTY
Residential Warranty Commercial Warranty
30 Years Frame 15 Years Frame
3 Years Parts 2 Years Parts
1 Year Labor 1 Year Labor
1 Year Wear Items 6 Months Wear Items
This Limited Warranty applies in the United States and Canada to products manufactured or distributed by Ironman
Fitness (“Ironman”) under the Ironman brand name. The warranty period to the original purchaser is listed above in the
table.
Ironman warrants that the Product you have purchased for use from Ironman or from an authorized Ironman reseller is
free from defects in materials or workmanship under normal use during the warranty period. Your sales receipt, showing
the date of purchase of the Product, is your proof of purchase. This warranty only extends to you, the original purchaser.
It is not transferable to anyone who subsequently purchases the Product from you. It excludes expendable parts (wear
items). Wear items pertain to components that might need to be replaced due to normal wear and tear. These items vary
per product but will include pedal straps, seats, grips, chains, bottom bracket assemblies, pads, etc. Please contact an
Ironman customer service representative for specifics on wear items. This Limited Warranty becomes VALID ONLY if the
product is purchased through an Ironman Fitness authorized dealer unless otherwise authorized by Ironman Fitness in
writing.
During the warranty period Ironman will repair or replace (at Ironman’s option) the product if it becomes defective, malfunctions, or otherwise fails to conform with this Limited Warranty under normal use. In repairing the Product, Ironman
may replace defective parts, or at the option of Ironman, serviceable used parts that are equivalent to new parts in performance. All exchanged parts and Products replaced under this warranty will become the property of Ironman. Ironman
reserves the right to change manufacturers of any part to cover any existing warranty.
This warranty DOES NOT COVER shipping charges, export taxes, custom duties and taxes, or any other charges associated with transportation of the parts or Product.
To obtain warranty service, you must contact an Ironman authorized retailer, service technician or Ironman Fitness at
our phone number located in this manual. Any parts determined to be defective must be returned to Ironman to obtain
warranty service. You must prepay any shipping charges, export taxes, custom duties and taxes, or any other charges
associated with transportation of the parts or Product. In addition, you are responsible for insuring any parts or Product
shipped or returned. You assume the risk of loss during shipment. You must present Ironman with proof-of-purchase
documents (including the date of purchase). Any evidence of alteration, erasing or forgery of proof-of-purchase documents will be cause to void this Limited Warranty.
This warranty does not extend to any product not purchased from Ironman or from an authorized Ironman reseller. This
Limited Warranty does not extend to any Product that has been damaged or rendered defective; (a) as a result of accident, misuse, or abuse; (b) by the use of parts not manufactured or sold by Ironman; (c) by modification of the Product
or normal wear and tear; (d) operation on incorrect power supplies; or (e) as a result of service by anyone other than
Ironman, or an authorized Ironman warranty service provider. Product on which the serial number has been defaced or
removed is not eligible for warranty service. Should any Product submitted for warranty service be found ineligible, an
estimate of repair cost will be furnished and the repair will be made if requested by you upon Ironman’s receipt of payment or acceptable arrangements for payment.
EXCEPT AS EXPRESSLY SET FORTH IN THIS WARRANTY, IRONMAN MAKES NO OTHER WARRANTIES,
EXPRESSED OR IMPLIED, INCLUDING ANY IMPLIED WARRANTIES OF MERCHANTABILITY AND FITNESS FOR A
PARTICULAR PURPOSE. IRONMAN EXPRESSLY DISCLAIMS ALL WARRANTIES NOT STATED IN THIS LIMITED
WARRANTY. ANY IMPLIED WARRANTIES THAT MAY BE IMPOSED BY LAW ARE LIMITED TO THE TERMS OF
THIS LIMITED WARRANTY. NEITHER IRONMAN NOR ANY OF ITS AFFILIATES SHALL BE RESPONSIBLE FOR
INCIDENTAL OR CONSEQUENTIAL DAMAGES. SOME STATES DO NOT ALLOW LIMITATIONS ON HOW LONG AN
IMPLIED WARRANTY LASTS OR THE EXCLUSION OR LIMITATION OF INCIDENTAL OR CONSEQUENTIAL DAMAGES, SO THE ABOVE LIMITATIONS OR EXCLUSION MAY NOT APPLY TO YOU. This Limited Warranty gives you
specific legal rights and you may also have other rights that may vary from state to state. This is the only expressed
warranty applicable to Ironman-branded products. Ironman neither assumes nor authorizes anyone to assume for it any
other express warranty.
PLEASE SEND IN THE ATTACHED WARRANTY CARD WITHIN TEN (10) DAYS OF PURCHASE TO REGISTER
YOUR UNIT WITH IRONMAN FITNESS.
12
Page 9

IRONMAN FITNESS
4009 DISTRIBUTION DRIVE
SUITE 250
GARLAND, TEXAS 75041
ironmanfitness.com
 Loading...