

Page 1

DISCOVER GUITAR USB
QUICKSTART GUIDE
ENGLISH ( 2 – 4 )
GUÍA DE INICIO RÁPIDO
ESPAÑOL ( 5 – 7 )
GUIDE D'UTILISATION SIMPLIFIÉ
FRANÇAIS ( 8 – 10 )
GUIDA RAPIDA
ITALIANO ( 11 –13 )
KURZANLEITUNG
DEUTSCH ( 14 – 16 )
SNELSTARTGIDS
NEDERLANDS ( 17 – 19 )
Page 2
BOX CONTENTS
• ION Electric Guitar
• Guitar strap
• Guitar pick
• Whammy bar
• ION GUITARLINK 1/4"-to-USB cable
• Software DVD
• Learn-to-Play Guide
• Quickstart Guide
• Safety Instructions & Warranty Information Booklet
GUITAR SETUP
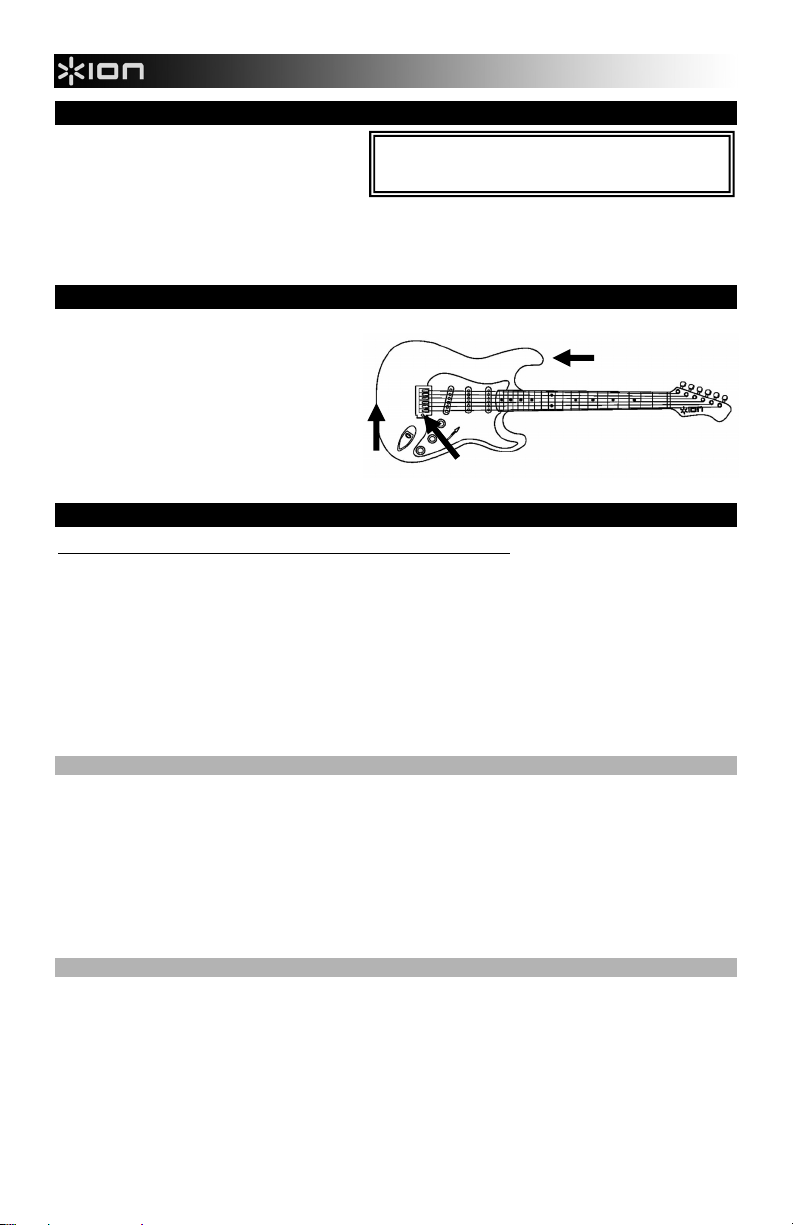
1. Attach both ends of the included guitar strap to
the strap buttons as shown in the picture.
2. Attach the included whammy bar by screwing it
clockwise into the whammy bar receiver as
shown in the picture.
3. After installing the software and drivers,
connect the guitar to your computer with the
included GUITARLINK 1/4"-to-USB cable.
(Alternatively, if you have an amplifier and a
standard 1/4" guitar cable, you may connect
the guitar directly into an amp, just as you
would do with any other guitar.)
SOFTWARE & DRIVER INSTALLATION
Before beginning, make sure your computer meets these system requirements:
• Windows: Microsoft Windows XP (SP2) / Vista (32- or 64-bit) / 7 (32- or 64-bit) with Pentium-IV or Athlon XP 1.6GHz or
higher (recommended)
• Mac: Apple Mac OSX 10.5 above
• 1 GB RAM or above (recommended)
• Sound card (AC97-compatible sound card)
• 1GB free hard drive space
• DVD-ROM drive (for software installation)
• One available USB 2.0 port (preferably on the rear panel of your computer)
The included DVD contains the necessary drivers and software so you can use DISCOVER GUITAR USB. We also included
an optional installation video to help you with the process as well as tutorial videos from Guitarmasterclass.net to help you with
your guitar playing. You will also find links to PDFs of the DISCOVER GUITAR USB manuals plus links to ION Audio's
technical support team, if you encounter any problems.
WINDOWS
1. Insert the included software DVD into your computer's DVD-ROM drive.
2. On the window that appears after you insert the disc, click "Install Asio4ALL Driver." Follow the on-screen instructions
that appear.
If this window does not automatically appear, double-click "My Computer" then double-click the "DISCOVER GUITAR
USB" disc. The window should appear. If the window still does not appear, right-click the "DISCOVER GUITAR USB"
disc and select "Explore." Once the CD's contents are shown, double-click "ASIO4ALL_2_10_English.exe."
3. On the main window, click "Install Guitar Rig LE." Follow the on-screen instructions that appear. If the main window is
not shown, "explore" the disc contents as described in Step 2 and double-click "Guitar_Rig_4_Setup_PC.exe."
4. You can now eject the disc and begin using Guitar Rig LE. You can find the software by going to Start Menu f All
Programs f Native Instruments f Guitar Rig LE. (You may also double-click the shortcut icon on your computer's
Desktop, if you created one during installation.)
MAC
1. Insert the included software DVD into your computer's DVD drive.
2. In the window that appears after you insert the disc, double-click the Guitar Rig LE ".pkg" file. Follow the on-screen
instructions that appear. You will need to restart your computer afterward to complete this process. (If this window does
not automatically appear, double-click the "DISCOVER GUITAR USB" disc on the Desktop and the window should
appear.)
3. You can now eject the disc and begin using Guitar Rig LE. You can find the software by going to Applications f
Native Instruments f Guitar Rig LE.
1. Make sure all items listed here are included in the box.
2. READ THE SAFETY INSTRUCTIONS BEFORE USING
THE PRODUCT.
1
1
2
2
Page 3
SETTING UP THE SOFTWARE
WINDOWS
After installing Guitar Rig LE (and the ASIO4ALL drivers, if you are using Windows), you will need to configure it so you can
hear your guitar play through your computer. To do this, follow these steps:
1. Connect your guitar to your computer with the included 1/4"-to-USB cable. (If you are using Windows, you may see
several dialog boxes in the corner of your screen indicating it is "recognizing" the hardware – the guitar – for the first
time. Wait a minute until this is complete.)
2. Open Guitar Rig LE. In the window that appears, click the "Activate" button to register the software. The Native
Instruments Service Center will launch. (You will need to be connected to the internet to access the Service Center to
register your software.)
3. In the Service Center login window, click "Create new User Account" (if you do not already have one) and follow the
on-screen instructions to complete your registration. (You will need the serial number on the included DVD sleeve to do
this.)
4. After registering your software and opening it, the Audio and MIDI Settings window should appear. (If not, go to File then
Audio and MIDI Settings.)
5. Under the Audio tab, for Driver, select "ASIO." For Device, select "ASIO4ALL v2."
6. In your system tray (the icons near the clock and date display of your PC), click the green arrow icon once. An
"ASIO4ALL" window should appear.
7. Click the wrench icon in the lower right corner.
8. Under WDM Device List, check the boxes next to your computer's
sound card* and "C-Media USB Audio Device" so they are lit greenblue.
9. Click the "+" sign to the left of those names so they "expand," each
showing sub-options titled "Out" and "In."
10. Click the boxes next to the "Out" and "In" options to match the
following:
• Your computer's sound card's "Out" is lit and "In" is not lit.
• "C-Media USB Audio Device"'s "In" is lit" and "Out" is not lit.
11. You should now be able to play your guitar and hear sound coming
from your computer.
12. If you are experiencing too much latency (lag from the time you
strum the strings to the time you hear the sound in your computer),
you can decrease the "ASIO Buffer Size" to 256 or 128 samples. If
you are experiencing "clipping," pops, or glitches in the guitar playback, you may want to raise the buffer size to 512 or
above.
MAC
Leopard (OS X 10.5)
1. Connect DISCOVER GUITAR USB to your computer with the included USB cable.
2. In the "Finder," click the "Go" menu at the top of the screen. Select "Utilities," then double-click "Audio MIDI Setup" in
the window that appears.
3. In the Audio MIDI Setup utility, click the "Audio" menu at the top of the screen and select "Open Aggregate Device
Editor."
4. In the window that appears, select the "Use" checkboxes next to "Built-in Output" and "C-Media USB Audio Device"
(with 1 input).
Note: If you have USB speakers connected to your computer, select those instead of "Built-in Output."
5. Click "Done" to close that window. Click the "Audio MIDI Setup" menu at the top of the screen and select "Quit Audio
MIDI Setup."
6. Open Guitar Rig LE. Click on the "Guitar Rig" menu in the upper-left corner of the screen and select "Preferences."
7. In the "Audio and MIDI Settings..." window that appears, click the drop-down menu next to "Device" and select
"Aggregate Device (1 In, 2 Out)."
8. Click "OK." Your guitar should now be able to make sound in Guitar Rig LE.
Snow Leopard (OS X 10.6)
1. Connect DISCOVER GUITAR USB to your computer with the included USB cable.
2. In the "Finder," click the "Go" menu at the top of the screen. Select "Utilities," then double-click "Audio MIDI Setup" in
the window that appears.
3. In the Audio Devices window that appears, select "Aggregate Device" in the panel on the left side.
4. In the panel on the right side, select the "Use" checkboxes next to "Built-in Output" and "C-Media USB Audio Device."
Note: If you have USB speakers connected to your computer, select those instead of "Built-in Output."
5. Close the window. Click the "Audio MIDI Setup" menu at the top of the screen and select "Quit Audio MIDI Setup."
6. Open Guitar Rig LE. Click on the "Guitar Rig" menu in the upper-left corner of the screen and select "Preferences."
7. In the "Audio and MIDI Settings..." window that appears, click the drop-down menu next to "Device" and select
"Aggregate Device (1 in, 4 out)."
8. Click "OK." Your guitar should now be able to make sound in Guitar Rig LE.
* Note: If you are using speakers connected
to a USB port on your computer, then you
should select these instead of your
computer's original sound card. If you are
not using USB speakers, then select your
computer's original sound card (some
common names include "SoundMAX,"
"Realtek," and "Conexant").
* Note: For additional assistance and
information, you can find Guitar Rig LE's
manual by going to the software's "Help"
menu, "Open Manual," then selecting the
manual you want.
3
Page 4
FEATURES
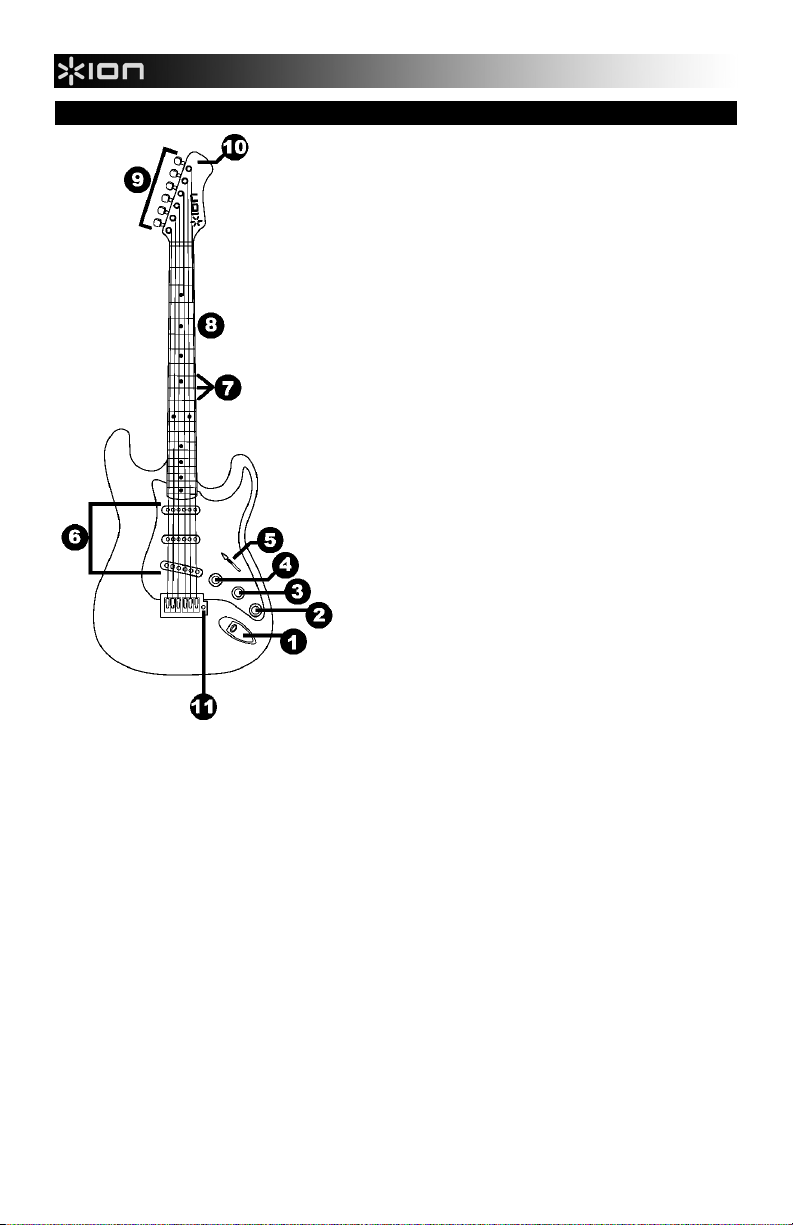
1. Guitar Audio output: Sends audio from guitar to the
amplifier.
2. Tone Control Knob: This control knob adjusts the tone of
the last pick-up (furthest from the neck).
3. Tone Control Knob: This control knob adjusts the tone of
the first pick-up (closest to the neck).
4. Volume Control Knob: This knob controls the volume
output before the sound reaches the amplifier.
5. Pick-up Selector Switch: This toggle switch allows you to
select which pickups are used to capture the sound from
the guitar strings. With the switch positioned closest to the
strings, selects the first pick-up. Positioned away from the
strings selects the last pick-up. In between positions select
combinations of pick-ups.
6. Pick-Ups: These capture the sound made by the strings to
be sent to the amplifier.
7. Frets: Raised bars on the neck of the guitar that designate
where the strings should be pressed to change the sound
of the string.
8. Neck: The part of the guitar that allows the user to change
the note of the strings, as well as stretch the strings to give
them a tonal quality.
9. Keys: Rotate these knobs to tune/adjust the pitch of its
corresponding string.
10. Headstock: Houses the keys for tuning and winding the
strings.
11. Whammy Bar Receiver: Attach the whammy bar by
screwing it in clockwise.
4
Page 5
CONTENIDO DE LA CAJA
• Guitarra eléctrica ION
• Correa para guitarra
• Rasgador
• Barra Whammy
• Cable 1/4" a USB ION GUITARLINK
• DVD de software
• Guía para aprender a tocar
• Guía de inicio rápido
• Folleto de instrucciones de seguridad e información sobre la garantía
PREPARACIÓN DE LA GUITARRA
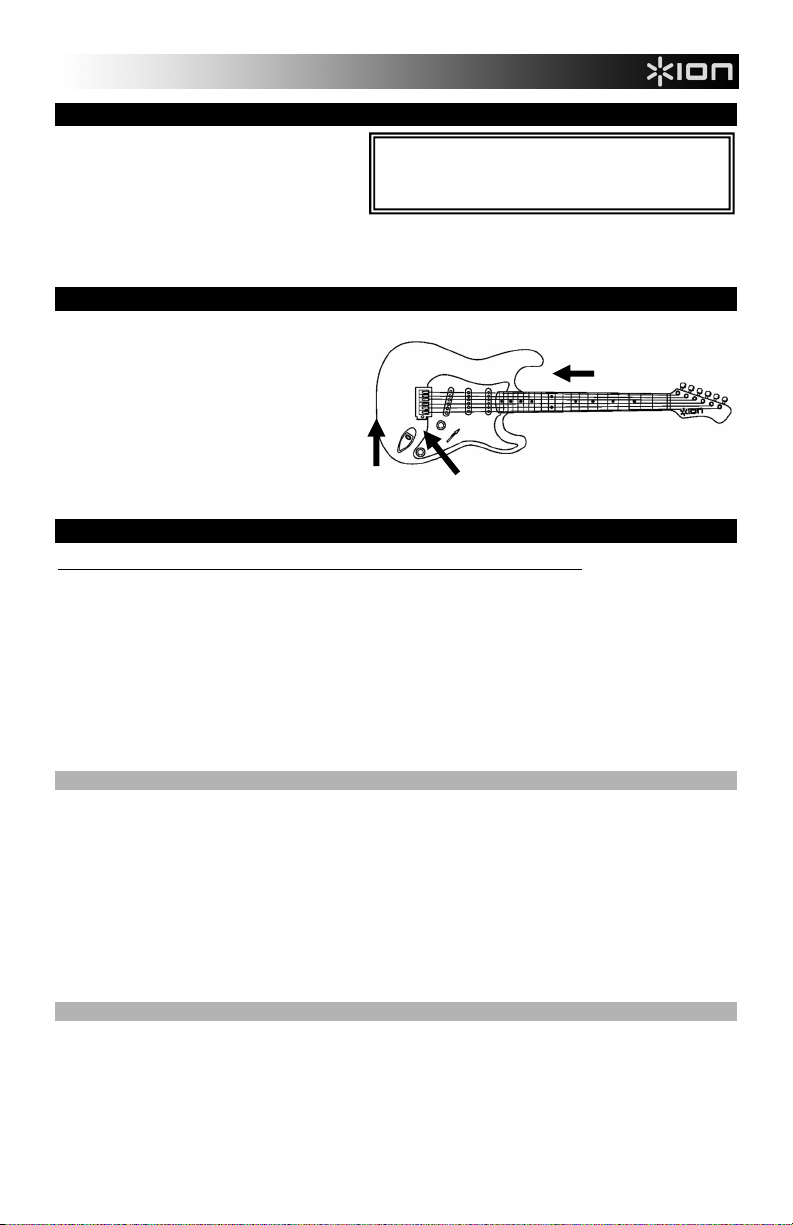
1. Fije ambos extremos de la correa incluida en
los botones para la misma como se muestra
en la ilustración.
2. Fije la barra whammy incluida enroscándola en
sentido horario en el receptor para la misma
como se muestra en la ilustración
3. Después de instalar el software y los drivers,
conecte la guitarra a la computadora con el
cable de 1/4" a USB GUITARLINK. (Como
alternativa, si tiene un amplificador y un cable
estándar de ¼” para guitarra, puede conectarla
directamente al amplificador, como haría con
cualquier otra guitarra.)
INSTALACIÓN DEL SOFTWARE Y LOS DRIVERS
Antes de comenzar, asegúrese de que su computadora cumpla estos requisitos de sistema:
• Windows: Microsoft Windows XP (SP2) / Vista (de 32 ó 64 bits) / 7 (de 32 ó 64 bits) con Pentium-IV o Athlon XP de 1.6
GHz o superior (recomendado)
• Mac: Apple Mac OSX 10.5 o superior
• 1 GB de RAM o más (recomendado)
• Tarjeta de sonido (compatible con AC97)
• 1 GB de espacio libre en disco duro
• Lector de DVD-ROM (para la instalación del software)
• Un puerto USB 2.0 disponible (preferiblemente en el panel trasero de la computadora)
El DVD incluido contiene los drivers y el software necesarios para que pueda usar la DISCOVER GUITAR USB. Hemos
incluido también un video de instalación opcional para asistirle en el proceso, como también videos tutoriales de
Guitarmasterclass.net para ayudarle a tocar. Si tiene algún problema, puede encontrar también enlaces a archivos PDF de los
manuales de DISCOVER GUITAR USB además de enlaces al equipo de soporte técnico de ION Audio.
WINDOWS
1. Inserte el DVD de software incluido en el lector de DVD-ROM de la computadora.
2. En la ventana que aparece después de insertar el disco, haga clic en "Install Asio4ALL Driver." Siga las instrucciones
de la pantalla.
Si esta ventana no aparece automáticamente, haga doble clic en "My Computer" (Mi PC) y luego en el disco de
"DISCOVER GUITAR USB". (Si la ventana sigue sin aparecer, haga doble clic en el disco de "DISCOVER GUITAR
USB" y seleccione "Explore" (Explorar)). Una vez que se muestra el contenido del DVD, haga doble clic en
"ASIO4ALL_2_10_English.exe."
3. En la ventana principal, haga clic en "Install Guitar Rig LE". Siga las instrucciones de la pantalla. Si no aparece la
ventana principal, "explore" el contenido de disco como se explica en el paso 2 y haga doble clic en
"Guitar_Rig_4_Setup_PC.exe."
4. Ahora puede expulsar el disco y comenzar a usar Guitar Rig LE. Puede encontrar el software yendo al menú Start
(Inicio) f All Programs (Todos los programas) f Native Instruments f Guitar Rig LE. (También puede hacer doble
clic en el icono del acceso directo del escritorio de la computadora, si creó uno durante la instalación.)
MAC
1. Inserte el DVD de software incluido en el lector de DVD-ROM de la computadora.
2. En la ventana que aparece después de insertar el disco, haga doble clic en el archivo Guitar Rig LE ".pkg". Siga las
instrucciones de la pantalla. Es necesario que reinicie la computadora después de terminar el proceso. (Si esta
ventana no aparece automáticamente, haga doble clic en el disco "DISCOVER GUITAR USB" del escritorio para que
aparezca.)
3. Ahora puede expulsar el disco y comenzar a usar Guitar Rig LE. Puede encontrar el software yendo a Applications
(Aplicaciones) f Native Instruments f Guitar Rig LE.
1. Asegúrese de que todos los artículos aquí indicados
estén incluidos en la caja.
2. LEA LAS INSTRUCCIONES DE SEGURIDAD ANTES
DE UTILIZAR EL PRODUCTO.
1
1
2
5
Page 6

)
que desea
CÓMO CONFIGURAR EL SOFTWARE
WINDOWS
Después de instalar Guitar Rig LE (y los drivers ASIO4ALL si usa Windows), debe configurarlo a fin de que pueda oír la
guitarra a través de su computadora cuando toca. Para hacerlo, siga estos pasos:
1. Conecte la guitarra a la computadora con el cable 1/4" a USB incluido. (Si usa Windows, puede ver varios cuadros de
diálogo en la esquina de la pantalla, que le indican que está "reconociendo" el hardware –la guitarra– por primera vez.
Espere un minuto hasta que termine.)
2. Abra Guitar Rig LE. En la ventana que aparece, haga clic en el botón "Activate" (Activar) para registrar el software. Se
abre Service Center (Centro de Servicios) de Native Instruments. (Debe estar conectad a Internet para acceder al
Centro de Servicios a fin de registrar su software.)
3. En la ventana de inicio de sesión de Service Center, haga clic en "Create new User Account" (Crear cuenta de usuario
nuevo) (si no tiene ya una) y siga las instrucciones de la pantalla para terminar el registro. (Para hacerlo, necesita el
número de serie que figura en la funda del DVD incluido.)
4. Después de registrar y abrir el software, debe aparecer la ventana Audio and MIDI Settings (Parámetros de audio y
MIDI). (Si no aparece, vaya a File y luego a Audio and MIDI Settings.)
5. Bajo la pestaña Audio, en Driver, seleccione "ASIO". En Device (Dispositivo), seleccione "ASIO4ALL v2".
6. En la bandeja de su sistema (los iconos que están cerca del reloj y la hora de su PC), haga clic una vez en el icono de
la flecha verde. Debe aparecer la ventana "ASIO4ALL".
7. Haga clic en el icono de la llave inglesa de la esquina inferior derecha.
8. En WDM Device List (Lista de dispositivos WDM), marque las casillas
contiguas a la tarjeta de sonido* de su computadora y "C-Media USB
Audio Device" de modo que queden de color verde azulado.
9. Haga clic en el signo "+" de la izquierda de los nombres, de modo que
se "expandan" para mostrar cada uno las opciones denominadas
"Out" e "In".
10. Marque las casillas continuas a las opciones "Out" e "In" de acuerdo a
lo siguiente:
• El "Out" de la tarjeta de sonido de su computadora queda
encendido y el "In" no.
• "C-Media USB Audio Device" tiene el "In" encendido y el
11. Ahora puede tocar la guitarra y oír el sonido que proviene de la
computadora.
12. Si experimenta demasiada latencia (retardo entre el momento que
rasguea las cuerdas hasta el momento en que oye el sonido en la
computadora), puede reducir el "ASIO Buffer Size" (Tamaño del buffer ASIO) a 256 ó 128 muestras. Si experimenta
"recortes" chasquidos o interrupciones momentáneas en la reproducción de la guitarra, es conveniente que aumente el
tamaño del buffer a 512 o más.
MAC
Leopard (OS X 10.5)
1. Conecte DISCOVER GUITAR USB a su computadora con el cable USB incluido.
2. En “Finder” (Buscador), haga clic en el menú “Go” (Ir) de la parte superior de la pantalla. Seleccione "Utilities"
(Utilidades) y haga doble clic en "Audio MIDI Setup" (Configuración MIDI de audio) en la ventana que aparece.
3. En la utilidad Audio MIDI Setup, haga clic en el menú "Audio" de la parte superior de la pantalla y seleccione "Open
Aggregate Device Editor" (Agregar editor de dispositivos).
4. En la ventana que aparece, seleccione las casillas "Use" (Usar) contiguas a "Built-in Output" (Salida incorporada) y "C-
Media USB Audio Device" (Dispositivo de audio USB C-Media) (con 1 entrada).
Nota: Si tiene altavoces USB conectados a su computadora, selecciónelos en lugar de "Built-in Output".
5. Haga clic en Done (Listo) para cerrar las ventana. Haga clic en el menú "Audio MIDI Setup" de la parte superior de la
pantalla y seleccione "Quit Audio MIDI Setup" (Salir de la configuración MIDI de audio).
6. Abra Guitar Rig LE. Haga clic en el menú "Guitar Rig" (Equipo de guitarra) de la esquina superior izquierda de la
pantalla y seleccione "Preferences" (Preferencias).
7. En la ventana "Audio and MIDI Settings..." que aparece, haga clic en el menú desplegable que está junto a "Device"
(Dispositivos) y seleccione "Aggregate Device (1 In, 2 Out)" (Agregar dispositivo).
8. Haga clic en “OK” (Aceptar). De esta forma, ya puede tocar su guitarra en Guitar Rig LE.
Snow Leopard (OS X 10.6)
1. Conecte DISCOVER GUITAR USB a su computadora con el cable USB incluido.
2. En “Finder” (Buscador), haga clic en el menú “Go” (Ir) de la parte superior de la pantalla. Seleccione "Utilities"
(Utilidades) y haga doble clic en "Audio MIDI Setup" (Configuración MIDI de audio) en la ventana que aparece.
3. En la ventana Audio Devices (Dispositivos de audio) que aparece, seleccione "Aggregate Device" (Agregar dispositivo)
en el panel del lado izquierdo.
4. En el panel del lado izquierdo, seleccione las casillas "Use" (Usar) contiguas a "Built-in Output" (Salida incorporada) y
"C-Media USB Audio Device" (Dispositivo de audio USB C-Media).
Nota: Si tiene altavoces USB conectados a su computadora, selecciónelos en lugar de "Built-in Output".
5. Cierre la ventana. Haga clic en el menú "Audio MIDI Setup" de la parte superior de la pantalla y seleccione "Quit
Audio MIDI Setup" (Salir de la configuración MIDI de audio).
6. Abra Guitar Rig LE. Haga clic en el menú "Guitar Rig" (Equipo de guitarra) de la esquina superior izquierda de la
pantalla y seleccione "Preferences" (Preferencias).
7. En la ventana "Audio and MIDI Settings..." que aparece, haga clic en el menú desplegable que está junto a "Device"
(Dispositivos) y seleccione "Aggregate Device (1 In, 4 Out)" (Agregar dispositivo).
8. Haga clic en “OK” (Aceptar). De esta forma, ya puede tocar su guitarra en Guitar Rig LE.
"Out" no
.
* Nota: Si va a usar altavoces conectados
a un puerto USB de su computadora, debe
seleccionarlos en lugar de la tarjeta de
sonido original de la misma. Si no va a
usar altavoces USB, seleccione la tarjeta
de sonido original de su computadora
(algunos nombres comunes son
"SoundMAX", "Realtek"y "Conexant"
* Nota: Para asistencia adicional e
información, puede encontrar el manual
de Guitar Rig LE en el menú "Help"
(Ayuda) del software, "Open Manual"
(Abrir manual) y seleccionando el manual
.
6
.
Page 7

CARACTERÍSTICAS
1. Salida de audio de la guitarra: Envía el audio desde la
guitarra al amplificador.
2. Perilla de control de tono: Esta perilla de control ajusta el
tono del último pickup (el más lejano del mástil).
3. Perilla de control de tono: Esta perilla de control ajusta el
tono del primer pickup (el más cercano al mástil).
4. Perilla de control de volumen: Esta perilla controla la salida
del volumen antes que el sonido llegue al amplificador.
5. Interruptor selector del Pick-up: Este conmutador le permite
seleccionar cuáles pick-ups se usan para capturar el sonido de
las cuerdas de la guitarra. Con el interruptor ubicado más
cerca de las cuerdas, se selecciona el primer pickup.
Posicionado lejos de las cuerdas, se selecciona el último pickup. En posiciones intermedias, se seleccionan combinaciones
de pick-ups.
6. Pick-Ups (captores): Capturan el sonido que hacen las
cuerdas, que es enviado al amplificador.
7. Trastes: Barras en relieve en el mástil de la guitarra que
designan dónde deben ser presionadas las cuerdas para
cambiar el sonido de la cuerda.
8. Mástil: La parte de la guitarra que le permite al usuario
cambiar la nota de las cuerdas, como también estirarlas para
darles calidad tonal.
9. Clavijas: Gire estas perillas para afinar / ajustar el pitch de la
cuerda correspondiente.
10. Cabeza: Aloja las clavijas para afinar y apretar las cuerdas.
11. Recibidor de la barra Whammy: Fije la barra Whammy
atornillándola en el sentido de las agujas del reloj.
7
Page 8

CONTENU DE LA BOÎTE
• Guitare électrique ION
• Courroie de guitare
• Médiator
• Barre de trémolo
• Câble ¼ po à USB ION GUITARLINK
• DVD logiciel
• Guide d’apprentissage de la guitare
• Guide d’utilisation simplifié
• Consignes de sécurité et informations concernant la garantie
INSTALLATION GUITARE
1. Fixez les deux extrémités de la courroie pour guitare sur les boutons de courroie sur la guitare comme indiqué sur
l’image.
2. Fixez la barre de trémolo en la plaçant sur le
chevalet et la vissant dans le sens horaire
comme indiqué sur l’image.
3. Une fois que le logiciel et les pilotes sont
installés, branchez la guitare à votre ordinateur
à l’aide du câble ¼ po à USB ION
GUITARLINK. Si vous avez un amplificateur et
un câble ¼ po standard pour guitare, vous
pouvez également brancher la guitare
directement à l’amplificateur comme vous le
ferriez pour toute autre guitare.
INSTALLATION DU LOGICIEL ET DES PILOTES
Avant de commencer, assurez-vous que votre ordinateur dispose de la configuration système requise suivante :
• Windows : Microsoft Windows XP (SP2) / Vista (32 ou 64 bits) / 7 (32 ou 64 bits) sur Pentium IV ou Athlon XP 1.6 GHz
ou supérieur (recommandé)
• Mac : Mac OS X 10.5 ou ultérieure
• 1 Mo de mémoire vive (RAM) ou plus (recommandé)
• Carte son (compatibilité AC97)
• 1 Go Mo d’espace disque libre
• Lecteur DVD-ROM (pour l’installation du logiciel)
• 1 port USB 2.0 disponible (de préférence sur le panneau arrière de l’ordinateur)
Le DVD inclus contient le logiciel et tous les pilotes dont vous avec besoin pour utiliser la DISCOVER GUITAR USB. Nous
avons également inclus une vidéo afin de vous aider avec l'installation et également des vidéos tutoriels de
Guitarmasterclass.net pour vous apprendre à jouer de la guitare. Vous retrouverez également des liens vers les fichiers PDF
des guides d’utilisations pour la DISCOVER GUITAR USB et vers le service de soutien technique d’ION Audio.
WINDOWS
1. Insérez le DVD-ROM inclus dans le lecteur DVD-ROM de votre ordinateur.
2. Sur la fenêtre qui s’affiche une fois le DVD-ROM inséré, cliquez sur « Install Asio4ALL Driver ». Suivez ensuite les
instructions à l’écran.
Si aucune fenêtre ne s'ouvre, double-cliquez sur « Poste de travail », puis double-cliquez sur disque « DISCOVER
GUITAR USB ». La fenêtre devrait s’afficher. Si la fenêtre ne s'ouvre toujours pas, double-cliquez sur le disque
« DISCOVER GUITAR USB » puis sélectionnez « Explorer ».) Une fois le contenu du DVD-ROM affiché, double-
cliquez sur « ASIO4ALL_2_10_English.exe ».
3. Cliquez sur « Install Guitar Rig LE » à partir de la fenêtre principale. Suivez ensuite les instructions à l’écran. Si la
fenêtre ne s'affiche pas, parcourez le contenu du disque comme indiqué à l’étape 2 puis double-cliquez sur «
Guitar_Rig_4_Setup_PC.exe ».
4. Vous pouvez maintenant éjecter le DVD-ROM et utiliser Guitar Rig LE. Vous trouverez le logiciel en cliquant sur
Démarrer f Tous les programmes f Native Instruments f Guitar Rig LE. Vous pouvez également l'ouvrir en
double-cliquant l'icône sur le bureau de votre ordinateur si vous avez créé un raccourci durant l’installation.
MAC
1. Insérez le DVD-ROM inclus dans le lecteur DVD-ROM de votre ordinateur.
2. Sur la fenêtre qui s’affiche une fois le DVD-ROM inséré, double-cliquez sur le fichier Guitar Rig LE « .pkg ». Suivez
ensuite les instructions à l’écran. Une fois l’installation complétée, vous devez redémarrer l’ordinateur pour compléter le
processus d’installation. Si aucune fenêtre ne s'ouvre, double-cliquez sur le disque « DISCOVER GUITAR USB » sur le
bureau et la fenêtre devrait s’afficher.
3. Vous pouvez maintenant éjecter le DVD-ROM et utiliser Guitar Rig LE. Vous trouverez l’application dans le dossier
Applications f Native Instruments f Guitar Rig LE.
1. Assurez-vous que tous les articles énumérés dans le
contenu de la boîte de ce guide sont inclus dans la boîte.
2. VEUILLEZ LIRE LES CONSIGNES DE SÉCURITÉ
'
1
1
2
8
Page 9

CONFIGURATION DU LOGICIEL
WINDOWS
Une fois le logiciel Guitar Rig LE et les pilotes ASIO4ALL installés, vous devez configurer le logiciel afin que vous puissiez
entendre le son de votre guitare via votre ordinateur. Commencez par suivre les étapes suivantes :
1. Branchez la guitare à votre ordinateur à l’aide du câble ¼ po à USB inclus. Il se peut que quelques boîtes de dialogue
s'affichent indiquant que l’ordinateur recherche le nouveau matériel – la guitare. Veuillez attendre environ une minute
qu’il ait terminé.
2. Lancez Guitar Rig LE. Dans la fenêtre qui s’affiche, cliquez sur « Activate » afin de procéder à l'inscription du logiciel.
L’assistant Native Instruments Service Center devrait s’ouvrir. Vous devez être connecté à l’Internet pour accéder au
Centre de service afin de procéder à l'inscription du logiciel.
3. Dans la fenêtre de connexion du centre de service, cliquez sur « Create new User Account » (si vous n’en avez pas
déjà un), et suivez les instructions à l’écran afin de compléter l’inscription. Vous devez avoir en main le numéro de série
du logiciel qui se trouve sur la pochette du DVD.
4. Une fois l’inscription complétée, lancez l’application. La fenêtre de configuration des paramètres audio et MIDI devrait
s’afficher. Si elle ne s’ouvre pas, cliquez sur File puis sur Audio and MIDI Settings.
5. Sous l’onglet Audio, pour le champ Driver, sélectionnez « ASIO ». Pour le champ Device, sélectionnez « ASIO4ALL
v2 ».
6. Dans la barre d’état système (les icônes dans le coin inférieur droit
de l’écran à côté de l’heure et la date), cliquez une fois sur l’icône
représentant une flèche verte. Une fenêtre « ASIO4ALL » devrait
s’afficher.
7. Cliquez sur l’icône représentant une clé à molette dans le coin
inférieur droit. Sous WDM Device List, cochez les cases de la carte
son* de votre ordinateur et de « C-Media USB Audio Device » afin
qu’elles deviennent bleu-vert.
8. Cliquez sur le « + » à gauche de ces noms afin d’afficher les options
« Out » et « In ».
9. Cliquez sur les cases à côté des options « Out » et « In » pour
qu’elles correspondent aux suivantes :
• L’option « Out » de la carte son de votre ordinateur doit être
allumée et l'option « In » doit être éteinte.
• L’option « In » de « C-Media USB Audio Device » doit être
10. Vous devriez maintenant être capable d’entendre le son de votre
11. S'il se produit trop de latence (le temps que met l’ordinateur à traiter les données entrantes et à produire un son), vous
MAC
Leopard (OS X 10.5)
1. Branchez la DISCOVER GUITAR USB à votre ordinateur à l’aide du câble USB inclus.
2. À partir de la fenêtre « Finder », cliquez sur le menu « Aller » dans le haut de l’écran. Sélectionnez « Utilitaires », puis
3. À partir de l’utilitaire de configuration audio et MIDI, cliquez sur le menu « Audio » dans le haut de l’écran et
4. Dans la fenêtre qui s’ouvre, cochez les cases « Utiliser » à côté de « Sortie intégrée » et de « Périphérique audio C-
5. Cliquez sur « Terminé » pour fermer la fenêtre. Cliquez sur le menu « Configuration audio et MIDI » dans le haut de
6. Lancez Guitar Rig LE. Cliquez sur le menu « Guitar Rig » dans le coin supérieur gauche de l’écran et sélectionnez
7. Dans la fenêtre « Audio and MIDI Settings... » qui s’ouvre, cliquez sur le menu déroulant du champ « Device » et
8. Cliquez sur « OK ». Vous devriez maintenant être capable d’entendre le son de votre guitare dans Guitar Rig LE.
Snow Leopard (OS X 10.6)
1. Branchez la DISCOVER GUITAR USB à votre ordinateur à l’aide du câble USB inclus.
2. À partir de la fenêtre « Finder », cliquez sur le menu « Aller » dans le haut de l’écran. Sélectionnez « Utilitaires », puis
3. Dans la fenêtre Périphériques audio qui s’affiche, sélectionnez « Périphérique agrégé » dans la fenêtre de gauche.
4. Dans la fenêtre de droite, cochez les cases sous « Util. » à côté de « Sortie intégrée » et de « Périphérique audio C-
5. Fermez la fenêtre. Cliquez sur le menu « Configuration audio et MIDI » dans le haut de l’écran et sélectionnez «
6. Lancez Guitar Rig LE. Cliquez sur le menu « Guitar Rig » dans le coin supérieur gauche de l’écran et sélectionnez
7. Dans la fenêtre « Audio and MIDI Settings... » qui s’ouvre, cliquez sur le menu déroulant du champ « Device » et
8. Cliquez sur « OK ». Vous devriez maintenant être capable d’entendre le son de votre guitare dans Guitar Rig LE.
allumée et l'option « Out » doit être éteinte.
guitare via votre ordinateur.
pouvez diminuer la taille de la mémoire tampon en réduisant l’option du champ « ASIO Buffer Size » à 256 ou à 128
échantillons. S’il y a de l’écrêtage ou des bruits indésirables sur les enregistrements, essayez d'augmenter la taille de la
mémoire tampon à 512 ou plus.
double-cliquez sur « Configuration audio et MIDI » dans la fenêtre qui apparaît.
sélectionnez « Ouvrir l’éditeur de périphérique agrégé ».
Media USB » (avec 1 entrée).
Remarque : Si vous avez des haut-parleurs USB, sélectionnez ceux-ci au lieu de « Sortie intégrée ».
l’écran et sélectionnez « Quitter configuration audio et MIDI ».
« Preferences ».
sélectionnez « Aggregate Device (1 In, 2 Out) ».
double-cliquez sur « Configuration audio et MIDI » dans la fenêtre qui apparaît.
Media USB ».
Remarque : Si vous avez des haut-parleurs USB, sélectionnez ceux-ci au lieu de « Sortie intégrée ».
Quitter configuration audio et MIDI ».
« Préférences ».
sélectionnez « Aggregate Device (1 In, 4 Out) ».
* Remarque : Si vous utilisez des
haut-parleurs qui sont branchés au port USB
de votre ordinateur, vous devez sélectionner
ceux-ci au lieu de la carte son originale de
votre ordinateur. Si vous n’utilisez pas de
haut-parleurs USB, sélectionnez la carte son
originale de votre ordinateur (elle peut porter
des noms tels que SoundMAX, Realtek et
Conexant).
* Remarque : Pour plus d’assistance et
d'information, consultez le guide d'utilisation
du Guitar Rig LE en cliquant sur le menu
« Help », l’option « Open Manual », puis en
9
Page 10

CARACTERISTIQUES
1. Sortie audio guitare : Permet d’acheminer l’audio de la
guitare à l’amplificateur.
2. Bouton de réglage de la tonalité : Ce bouton de réglage
permet d’ajuster la tonalité du dernier micro (le plus
éloigné du manche).
3. Bouton de réglage de la tonalité : Ce bouton de réglage
permet d’ajuster la tonalité du premier micro (le plus près
du manche).
4. Bouton de réglage de la tonalité : Ce bouton permet de
régler le volume de sortie avant que le son n’arrive à
l’amplificateur.
5. Sélecteur de micro : Le sélecteur permet de choisir les
micros utilisés pour capturer les sons produits par les
cordes de la guitare. Pour sélectionner le premier micro, il
faut positionner le sélecteur près des cordes. Lorsque le
sélecteur est positionné loin des cordes, le dernier micro
est sélectionné. Les positions se trouvant entre ces
dernières permettent l'utilisation de combinaisons de
micros.
6. Micros : Permet de capter le son fait par les cordes et
l’achemine vers l’amplificateur.
7. Frettes : Les petites barres sur le manche de la guitare qui
indique l’emplacement où les cordes doivent être pressées
pour modifier le son de la corde.
8. Manche : La partie de la guitare qui permet à l’utilisateur
de modifier la note des cordes, aussi bien que d’étirer les
cordes pour leur donner une qualité tonale.
9. Chevilles : Permet d'accorder et d’ajuster la tonalité de la
corde correspondante.
10. Tête : La partie où logent le mécanisme d’accordage, les
chevilles et l’enroulage des cordes.
11. Vibrato : Fixez le vibrato en le visant dans le sens des
aiguilles d'une montre.
10
Page 11

CONTENUTI DELLA CONFEZIONE
• Chitarra elettrica ION
• Fascia per chitarra
• Plettro
• Barra whammy
• Cavo da 1/4" a USB ION GUITARLINK
• DVD recante il software
• Guida "IMPARA A SUONARE"
• Guida rapida
• Istruzioni di sicurezza e garanzia
SETUP CHITARRA
1. Fissare entrambi i capi della fascia per chitarra
in dotazione agli appositi pulsanti come
illustrato nell'immagine.
2. Fissare la barra whammy in dotazione
avvitandola in senso orario al ricevitore della
barra whammy come illustrato nell'immagine.
3. Dopo aver installato il software e i driver,
collegare la chitarra al computer servendosi del
cavo da 1/4" a USB ION GUITARLINK in
dotazione. (Alternativamente, se si dispone di
un amplificatore e di un cavo per chitarra
standard da 1/4", collegare la chitarra
direttamente all'ampli, proprio come si farebbe con qualsiasi altra chitarra.)
INSTALLAZIONE DEL SOFTWARE E DEI DRIVER
Prima di iniziare, assicurarsi che il computer rispetti i seguenti requisiti di sistema:
• Windows: Microsoft Windows XP (SP2) / Vista (32 o 64 bit) / 7 (32 o 64 bit) con Pentium-IV o Athlon XP 1.6GHz o
superiore (consigliato)
• Mac: Apple Mac OSX 10.5 o superiore
• 1 GB RAM o superiore (consigliato)
• Scheda audio (compatibile con AC97)
• 1GB di spazio libero su disco fisso
• Lettore di DVD-ROM (per l'installazione del software)
• Una porta USB 2.0 disponibile (preferibilmente presente sul pannello posteriore del computer)
Il DVD in dotazione contiene i driver e il software necessari per l'uso del DISCOVER GUITAR USB. Abbiamo inoltre incluso un
video di installazione opzionale per aiutarvi nei vari procedimenti, oltre a video guida tratti da Guitarmasterclass.net per aiutarvi
a suonare. Si troveranno inoltre link ai PDF relativi ai manuali della DISCOVER GUITAR USB oltre a quelli per il team di
assistenza tecnica ION Audio per qualsiasi problema.
WINDOWS
1. Inserire il CD recante il software nel lettore DVD del computer.
2. Nella finestra che appare dopo aver inserito il CD, cliccare su "Install Asio4ALL Driver." (installa driver per Asio4ALL).
Seguire le istruzioni che compaiono sullo schermo.
Se questa finestra non compare automaticamente, fare doppio clic su "Risorse del computer" e quindi sul disco
"DISCOVER GUITAR USB". La finestra dovrebbe apparire. Se la finestra ancora non appare, fare clic col tasto destro
del mouse sul disco "DISCOVER GUITAR USB" e selezionare "Esplora". Una volta che compaiono i contenuti del CD,
fare doppio clic su "ASIO4ALL_2_10_English.exe."
3. Nella finestra principale, cliccare su "Install Guitar Rig LE". Seguire le istruzioni che compaiono sullo schermo. Se la
finestra principale non compare, "esplorare" il contenuto del disco come descritto nella fase 2 e fare doppio clic su
"Guitar_Rig_4_Setup_PC.exe."
Si può ora espellere il disco e iniziare a utilizzare il Guitar Rig LE. Il software può essere reperito recandosi su Start
fTutti i programmi f Native Instruments f Guitar Rig LE. . (Si può anche fare doppio clic sull'icona di scelta rapida
presente sul Desktop del computer se ne è stata creata una durante l'installazione.)
MAC
1. Inserire il DVD recante il software nel lettore DVD del computer.
2. Nella finestra che appare dopo aver inserito il disco, fare doppio clic sul file ".pkg" del Guitar Rig LE. Seguire le
istruzioni che compaiono sullo schermo. Per completare il processo, occorrerà riavviare il computer. (Se questa finestra
non compare automaticamente, fare doppio clic sul disco "DISCOVER GUITAR USB" sul Desktop e la finestra dovrebbe
apparire.)
3. Si può ora espellere il disco e iniziare a utilizzare il Guitar Rig LE. Il software può essere reperito recandosi su
Applicazioni f Native Instruments f Guitar Rig LE.
1. Assicurarsi che gli elementi elencati di seguito siano
contenuti nella confezione.
2. PRIMA DI UTILIZZARE IL PRODOTTO, LEGGERE
ATTENTAMENTE LE ISTRUZIONI DI SICUREZZA.
1
1
2
11
Page 12

CONFIGURAZIONE DEL SOFTWARE
WINDOWS
Dopo aver installato il Guitar Rig LE (e i driver ASIO4ALL se si utilizza Windows), occorrerà configurarlo in modo da sentire la
chitarra suonare attraverso il computer. Per farlo, procedere come segue:
1. Collegare ia chitarra al computer, servendosi del cavo da 1/4" a USB in dotazione. (Se si utilizza WIndows si possono
visualizzare numerose caselle di dialogo nell'angolo dello schermo, che indicano che sta riconoscendo l'hardware, ossia
la chitarra, per la prima volta. Attendere un minuto fino a che tale operazione non sia completa.)
2. Aprire il Guitar Rig LE. Nella finestra che compare, cliccare sul tasto "Activate" (attiva) per registrare il software. Verrà
lanciato il centro servizi di Native instruments. (Per accedere al centro servizi e registrare il software occorre essere
collegati a Internet.)
3. Se ancora non se ne possiede uno, nella finestra di login del centro servizi, cliccare su "Create new User Account"
(crea nuovo account utente) e seguire le istruzioni su schermo per completare la registrazione. (Per farlo, occorrerà il
numero di serie presente sulla custodia del DVD in dotazione.)
4. Dopo aver registrato il software e averlo aperto, si dovrebbe aprire la finestra di configurazione Audio e MIDI. (Se non si
dovesse aprire, recarsi su File, quindi Configurazioni Audio e MIDI)
5. Nella scheda "Audio", sotto Driver, selezionare "ASIO." Sotto Device, selezionare "ASIO4ALL v2".
6. Nella barra di sistema (le icone accanto alla data e all'ora del PC), cliccare una volta sull'icona a forma di freccia verde.
Dovrebbe apparire la finestra "ASIO4ALL".
7. Cliccare sull'icona a forma di chiave inglese nell’angolo inferiore
destro.
8. Sotto WDM Device List, spuntare le caselle accanto alla scheda
audio del computer e "C-Media USB Audio Device" in modo che si
accendano di verde-blu.
9. Cliccare sul segno "+" a sinistra di tali nomi in modo da "espanderli"
mostrando le opzioni denominate "Out" e "In."
10. Spuntare le caselle a fianco delle opzioni "Out" e "In" in modo che si
presentino come segue:
• L'"Out" della scheda audio del computer è accesa e l'"In" non
lo è.
• In "C-Media USB Audio Device" "In" è acceso e "Out" non
11. Dovrebbe ora essere possibile suonare la chitarra e udire il suono
12. In caso di eccessiva latenza (ritardo dal momento in cui si pizzicano
MAC
Leopard (OS X 10.5)
1. Collegare il DISCOVER GUITAR USB al computer, servendosi del cavo USB in dotazione.
2. In "Finder," cliccare sul menu "Go" nell'angolo superiore sinistro dello schermo. Selezionare "Utilities" e fare doppio clic
3. In Audio MIDI Setup, cliccare sul menu "Audio" in cima allo schermo e selezionare "Open Aggregate Device Editor."
4. Nella finestra che compare, selezionare le caselle di spunta "Use" di fianco a "Built-in Output" e "C-Media USB Audio
5. Cliccare su "Done" (fatto) per chiudere la finestra. Cliccare sul menu "Audio MIDI Setup" in cima allo schermo e
6. Aprire il Guitar Rig LE. Cliccare sul menu "Guitar Rig" nell'angolo superiore sinistro dello schermo e selezionare
7. Nella finestra "Audio and MIDI Settings..." (configurazioni audio e MIDI) che compare, cliccare sul menu a cascata di
8. Cliccare su “OK”. La chitarra dovrebbe ora essere in grado di produrre suoni in Guitar Rig LE.
Snow Leopard (OS X 10.6)
1. Collegare il DISCOVER GUITAR USB al computer, servendosi del cavo USB in dotazione.
2. In "Finder," cliccare sul menu "Go" nell'angolo superiore sinistro dello schermo. Selezionare "Utilities" e fare doppio clic
3. Nella finestra Dispositivi Audio che compare, selezionare "Aggregate Device" nel pannello a sinistra.
4. Nel pannello a destra, selezionare le caselle di spunta "Use" di fianco a "Built-in Output" e "C-Media USB Audio
5. Chiudere la finestra. Cliccare sul menu "Audio MIDI Setup" in cima allo schermo e selezionare "Quit Audio MIDI
6. Aprire il Guitar Rig LE. Cliccare sul menu "Guitar Rig" nell'angolo superiore sinistro dello schermo e selezionare
7. Nella finestra "Audio and MIDI Settings..." (configurazioni audio e MIDI) che compare, cliccare sul menu a cascata di
8. Cliccare su “OK”. La chitarra dovrebbe ora essere in grado di produrre suoni in Guitar Rig LE.
lo è.
provenire dal computer.
le corde a quello in cui si sente il suono nel computer), si può ridurre
l'"ASIO Buffer Size" a 256 o 128 campioni. In caso di "salti",
schiocchi o errori nella riproduzione della chitarra, aumentare la dimensione del buffer a 512 o più.
su "Audio MIDI Setup" nella finestra che compare.
Device" (con 1 input).
Nota bene: se si hanno altoparlanti USB collegati al computer, selezionare questi ultimi anziché"Built-in Output".
selezionare "Quit Audio MIDI Setup" (lascia configurazione audio MIDI).
"Preferences".
fianco a "Device" e selezionare "Aggregate Device (1 In, 2 Out)."
su "Audio MIDI Setup" nella finestra che compare.
Device."
Nota bene: se si hanno altoparlanti USB collegati al computer, selezionare questi ultimi anziché"Built-in Output".
Setup" (lascia configurazione audio MIDI).
"Preferences".
fianco a "Device" e selezionare "Aggregate Device (1 in, 4 out)."
* Nota bene: se si utilizzano altoparlanti
collegati ad una porta USB del computer,
occorre selezionare questi ultimi anziché la
scheda audio originale del computer. Se non
si utilizzano altoparlanti USB, selezionare la
scheda audio originale del computer (alcuni
nomi comuni comprendono "SoundMAX,"
"Realtek," e "Conexant").
* Nota bene: per maggiore aiuto e
informazioni, si può consultare il manuale
del Guitar Rig LE recandosi al menu di
"Aiuto" del software, cliccando su "Open
Manual" (apri manuale) e selezionando il
manuale che si desidera.
12
Page 13

CARACTERISTIQUES
1. Uscita audio chitarra: invia audio dalla chitarra
all’amplificatore.
2. Manopola di controllo del tono: questa manopola di
controllo regola il tono dell’ultimo pick-up (il più lontano dal
manico).
3. Manopola di controllo del tono: questa manopola di
controllo regola il tono del primo pick-up (il più vicino al
manico)
4. Manopola di controllo del volume: questa manopola
regola l’uscita del volume prima che il suono raggiunga
l’amplificatore.
5. Interruttore di selezione del pick-up: questo
commutatore permette di scegliere quale pickup usare per
captare il suono dalle corde della chitarra. Se l’interruttore è
posizionato più vicino alle corde, seleziona il primo pick-up.
Posizionato lontano dalle corde seleziona l’ultimo. In una
posizione intermedia seleziona una combinazione dei pickup.
6. Pick-Up: catturano il suono prodotto dalle corde per
inviarlo all’amplificatore.
7. Tastiera: barrette in rilievo sul manico della chitarra che
designano il punto in cui le corde vanno premute per
modificare il suono della corda stessa.
8. Manico: parte della chitarra che permette all’utente di
cambiare la nota delle corde e a tirare le corde stesse per
una maggiore qualità tonica.
9. Chiavette: da ruotare per accordare/regolare il pitch della
corda corrispondente.
10. Paletta: alloggia le chiavette per accordare e avvolgere le
corde.
11. Ricevitore Whammy Bar: fissare qui la whammy bar
avvitandola in senso orario.
13
Page 14

SCHACHTELINHALT
• ION E-Gitarre
• Gitarrengurt
• Gitarren-Pick
• Vibratohebel
• ION GUITARLINK 1/4" / USB-Kabel
• Software-DVD
• Anleitung zum Erlernen des Gitarrenspiels
• Schnellstart-Anleitung
• Sicherheitshinweise und Garantieinformationen
VORBEREITUNGEN
1. Befestigen Sie die beiden Enden des
mitgelieferten Gitarrengurts an den
Gurthaltern, so wie im Bild gezeigt.
2. Bringen Sie den mitgelieferten Vibratohebel an,
indem Sie ihn im Uhrzeigersinn – wie im Bild
gezeigt - in die Vibratohebel-Halterung
einschrauben.
3. Nach der Installation der Software und der
Treiber schließen Sie die Gitarre mit dem
mitgelieferten GuitarLink 1/4" / USB-Kabel an
Ihren Computer an. (Wenn Sie einen
Verstärker und ein standardisiertes 1/4" Gitarrenkabel haben, können Sie die Gitarre wahlweise direkt an einen
Verstärker anschließen, ganz so wie Sie dies mit jeder anderen Gitarre auch tun.)
SOFTWARE & TREIBER-INSTALLATION
Bevor Sie beginnen, vergewissern Sie sich, dass Ihr Computer folgende Systemvoraussetzungen erfüllt:
• Windows: Microsoft Windows XP (SP2) / Vista (32- oder 64-Bit) / 7 (32- oder 64-bit) mit Pentium-IV oder Athlon XP 1,6
GHz oder höher (empfohlen)
• Mac: Apple Mac OSX 10.5 und höher
• 1 GB RAM oder mehr (empfohlen)
• Soundkarte (AC97-kompatible Soundkarte)
• 1 GB freier Festplattenspeicher
• DVD-ROM-Laufwerk (für die Software-Installation)
• Ein freier USB 2.0-Anschluss (vorzugsweise auf der Rückseite des Computers)
Die mitgelieferte DVD enthält die erforderlichen Treiber und die Software zur Verwendung von DISCOVER GUITAR USB. Wir
haben zudem ein optionales Installations-Video inkludiert, das Ihnen diesen Ablauf erleichtert, sowie Tutorial-Videos von
Guitarmasterclass.net, um Ihnen das Gitarrenspiel näher zu bringen. Dort finden Sie auch Links zu den Handbüchern des
DISCOVER GUITAR USB als PDF-Dateien sowie Links zum technischem Support des ION Audio-Teams für den Falls, dass
Sie Hilfe benötigen.
WINDOWS
1. Legen Sie die inkludierte Software-DVD in das DVD-Laufwerk Ihres Computers ein.
2. Klicken Sie im Fenster, das nach dem Einlegen der CD erscheint, auf "Asio4ALL Treiber installieren." Befolgen Sie
die Anweisungen auf dem Bildschirm.
Wenn dieses Fenster nicht automatisch aufscheint, doppelklicken Sie erst auf „Mein Computer“ und anschließend auf
die „DISCOVER GUITAR USB“-Disk. Das Fenster sollte nun angezeigt werden. Wenn das Fenster immer noch nicht
angezeigt wird, rechtsklicken Sie auf die „DISCOVER GUITAR USB“-Disk und wählen "Explorer". Sobald der Inhalt der
CD angezeigt wird, doppelklicken Sie auf "ASIO4ALL_2_10_English.exe."
3. Im Hauptfenster klicken Sie auf "Guitar Rig LE installieren." Befolgen Sie die Anweisungen auf dem Bildschirm. Wenn
das Hauptfenster nicht angezeigt wird, durchsuchen Sie den Inhalt der Disk, indem Sie auf "Explorer" klicken, so wie
dies in Schritt 2 beschrieben wurde, und anschließend auf "Guitar_Rig_4_Setup_PC.exe" doppelklicken.
4. Jetzt können Sie die Disk auswerfen und Guitar Rig LE verwenden. Sie finden die Software, indem Sie Start-Menü f
Alle Programme f Native Instruments f Guitar Rig LE wählen. (Sie können auch auf das entsprechende Symbol
auf Ihrem Desktop doppelklicken, falls Sie während der Installation eine Desktop-Verknüpfung erstellt haben.)
MAC
1. Legen Sie die inkludierte Software-DVD in das DVD-Laufwerk Ihres Computers ein.
2. Doppelklicken Sie im Fenster, das nach dem Einlegen der CD erscheint, auf die Datei Guitar Rig LE „.pkg“. Befolgen
Sie die Anweisungen auf dem Bildschirm. Sie müssen anschließend Ihren Computer neu starten, um diesen Prozess
abzuschließen. (Wenn dieses Fenster nicht automatisch aufscheint, doppelklicken Sie auf die Disk „DISCOVER
GUITAR USB" am Desktop. Das Fenster sollte nun aufscheinen.)
3. Jetzt können Sie die Disk auswerfen und Guitar Rig LE verwenden. Sie finden die Software, indem Sie Applikationen
f Native Instruments f Guitar Rig LE wählen.
1. Stelle Sie sicher, dass alle hier aufgelisteten Artikel in
der Schachtel enthalten sind.
2. LESEN SIE DIE SICHERHEITSHINWEISE BEVOR SIE
DAS PRODUKT VERWENDEN.
1
1 2
14
Page 15

EINRICHTEN DER SOFTWARE
WINDOWS
Nach der Installation von Guitar Rig LE (und den ASIO4ALL Treibern, wenn Sie mit Windows arbeiten), müssen Sie die
Software so konfigurieren, dass Sie Ihre Gitarre über Ihren Computer hören können. Gehen Sie hierzu folgendermaßen vor:
1. Schließen Sie Ihre Gitarre mit dem mitgelieferten 1/4 "/ USB-Kabel an Ihren Computer an. (Wenn Sie Windows
verwenden, kann es sein, dass Sie mehrere Dialogfelder in der Bildschirmecke sehen, die angeben, dass die Hardware
– also die Gitarre – zu ersten Mal "erkannt" wurde. Warten Sie eine Minute, bis dieser Vorgang abgeschlossen ist.)
2. Öffnen Sie Guitar Rig LE. Im nun angezeigten Fenster klicken Sie auf die Schaltfläche "Aktivieren", um die Software zu
registrieren. Das Native Instruments Service Center wird gestartet. (Sie müssen mit dem Internet verbunden sein, um
Ihre Software im Service Center registrieren zu können.)
3. Im Login-Fenster des Service Centers, klicken Sie auf "Neues Benutzerkonto anlegen" (falls Sie nicht schon über
eines verfügen) und folgen Sie den Anweisungen auf dem Bildschirm, um Ihre Registrierung abzuschließen. (Dazu
benötigen Sie die Seriennummer auf der mitgelieferten DVD-Hülle.)
4. Nachdem Sie Ihre Software registriert und geöffnet haben, sollte das Fenster Audio- und MIDI-Einstellungen angezeigt
werden. (Wenn nicht, gehen Sie auf Datei und anschließend auf Audio- und MIDI-Einstellungen.)
5. Wählen Sie "ASIO" als Treiber in der Registerkarte "Audio" aus. Als Gerät wählen Sie "ASIO4ALL v2."
6. Klicken Sie in der Taskleiste (Symbole neben der Uhr-und Datumsanzeige Ihres PCs) einmal auf den grünen Pfeil. Das
Fenster "ASIO4ALL" sollte nun angezeigt werden.
7. Klicken Sie in der rechten unteren Ecke auf das SchraubenschlüsselSymbol.
8. Haken Sie die Kontrollkästen in der WDM-Geräteliste neben der
Soundkarte* Ihres Computers und "C-Media USB Audiogerät" an,
damit sie grün-blau leuchten.
9. Klicken Sie auf das "+" Symbol auf der linken Seite dieser Punkte, so
dass sie „ausklappen" und jeweils ihre Unteroptionen mit den Namen
„Out“ und „In“ anzeigen.
10. Klicken Sie auf das Kästchen neben den Optionen "Out" und "In",
sodass sie folgende Einstellungen repräsentieren:
• Die Option „Out“ der Soundkarte Ihres Computers leuchtet,
während die Option "In" nicht leuchtet.
• Die Option „In“ des "C-Media USB Audiogeräts" leuchtet,
11. Sie sollten jetzt in der Lage sein, Ihre Gitarre zu spielen und den
12. Falls eine zu hohe Latenz auftritt (Verzögerung zwischen dem
MAC
Leopard (OS X 10.5)
1. Schließen Sie DISCOVER GUITAR USB mit dem mitgelieferten USB-Kabel an Ihren Computer an.
2. Klicken Sie im „Finder“ auf das „Go“-Menü am oberen Rand des Bildschirms. Wählen Sie "Dienstprogramme" und
3. Im Dienstprogramm Audio-MIDI-Setup klicken Sie nun auf das "Audio"-Menü am oberen Bildschirmrand und wählen
4. Im nun aufscheinenden Fenster haken Sie das "Verwenden"-Kontrollkästchen an, das sich neben „Built-in Output”
5. Klicken Sie auf "Fertig", um das Fenster zu schließen. Klicken Sie auf das Menü "Audio-MIDI-Setup" am oberen
6. Öffnen Sie Guitar Rig LE. Klicken Sie auf das Menü "Guitar Rig" in der linken oberen Ecke des Bildschirms und wählen
7. Im nun aufscheinenden Fenster "Audio- und MIDI-Einstellungen ..." klicken Sie auf das Dropdown-Menü neben
8. Klicken Sie auf "OK". Ihre Gitarre sollte nun in Guitar Rig LE zu hören sein.
Snow Leopard (OS X 10.6)
1. Schließen Sie DISCOVER GUITAR USB mit dem mitgelieferten USB-Kabel an Ihren Computer an.
2. Klicken Sie im „Finder“ auf das „Go“-Menü am oberen Rand des Bildschirms. Wählen Sie "Dienstprogramme" und
3. Im nun aufscheinenden Fenster Audiogeräte wählen Sie im linken Bereich "Aggregate Device".
4. Auf der rechten Seite wählen Sie das "Verwenden"-Kontrollkästchen neben "Built-in Output" und "C-Media USB
5. Schließen Sie das Fenster. Klicken Sie auf das Menü "Audio-MIDI-Setup" am oberen Bildschirmrand und wählen Sie
6. Öffnen Sie Guitar Rig LE. Klicken Sie auf das Menü "Guitar Rig" in der linken oberen Ecke des Bildschirms und wählen
7. Im nun aufscheinenden Fenster "Audio-und MIDI-Einstellungen ..." klicken Sie auf das Dropdown-Menü neben "Gerät"
8. Klicken Sie auf "OK". Ihre Gitarre sollte nun in Guitar Rig LE zu hören sein.
während „Out" nicht leuchtet.
Klang über den Computer zu hören.
Zeitpunkt, an dem Sie die Saiten anschlagen, und dem Zeitpunkt, bis Sie den Klang aus Ihrem Computer hören),
können Sie die "ASIO Buffergröße" auf 256 oder 128 Samples verringern. Wenn es zu "Clipping", Störgeräuschen oder
Probleme bei der Wiedergabe der Gitarre kommt, können Sie die Puffergröße auf 512 oder mehr erhöhen.
doppelklicken Sie im danach aufscheinenden Fenster auf "Audio-MIDI-Setup".
"Open Aggregate Device Editor” ("Geräte-Editor öffnen").
("Integrierte Ausgabe") und "C-Media USB Audiogerät" (mit 1 Eingang) befindet.
Hinweis: Wenn Sie USB-Lautsprecher mit Ihrem Computer verbunden haben, wählen Sie diese statt "Built-in Output"
aus.
Bildschirmrand und wählen Sie "Audio-MIDI-Setup verlassen."
Sie "Einstellungen".
"Gerät" und wählen Sie „Aggregate Device (Kombiniertes Gerät) (1 In, 2 Out)".
doppelklicken Sie im danach aufscheinenden Fenster auf "Audio-MIDI-Setup".
Audiogerät".
Hinweis: Wenn Sie USB-Lautsprecher mit Ihrem Computer verbunden haben, wählen Sie diese statt "Built-in Output"
aus.
"Audio-MIDI-Setup verlassen."
Sie "Einstellungen".
und wählen Sie "Aggregate Device (1 in, 4 out)."
* Hinweis: Wenn Sie Lautsprecher
verwenden, die mit einem USB-Anschluss
Ihres Computers verbunden sind, dann
sollten Sie diese anstelle der ursprünglichen
Computer-Soundkarte wählen. Wenn Sie
keine USB-Lautsprecher verwenden, wählen
Sie die ursprünglichen Soundkarte Ihres
Computers (gängige Marken sind z.B.
"
* Hinweis: Weitere Hilfe und Informationen
finden Sie im Guitar Rig LE-Handbuch.
Gehen Sie dazu in Ihrer Software in das
Menü „Hilfe“, „Handbuch lesen“ und wählen
dann das gewünschte Handbuch.
"
"
"
"
"
15
Page 16

BEDIENUNGSELEMENTE
1. Tonausgabe der Gitarre: Sendet Tonsignale von der
Gitarre zum Verstärker.
2. Tonsteuerungsregler: Dieser Drehregler dient zur
Abstimmung des Tons des untersten Tonabnehmers (am
weitesten vom Gitarrenhals entfernt).
3. Tonsteuerungsregler: Dieser Drehregler dient zur
Abstimmung des Tons des obersten Tonabnehmers (am
nächsten zum Gitarrenhals).
4. Lautstärkeregler: Dieser Regler dient zur Regulierung
der Lautstärke bevor der Ton den Verstärker erreicht.
5. Tonabnehmer-Wahlschalter: Dieser Umschalter
überlässt Ihnen die Wahl, welche Tonabnehmer zur
Aufnahme der Töne der Gitarrensaiten verwendet
werden sollen. Befindet sich der Schalter in der Position,
welche den Saiten am nächsten ist, ist der oberste
Tonabnehmer gewählt. Steht er auf der von den Saiten
entfernten Position, ist der unterste Tonabnehmer aktiv.
Dazwischen befindliche Positionen dienen zur Auswahl
von verschiedenen Tonabnehmer-Kombinationen.
6. Tonabnehmer: Diese nehmen die von den Saiten
gespielten Töne auf, welche an den Verstärker geschickt
werden.
7. Bünde: Gewölbte Balken auf dem Gitarrenhals, welche
bestimmen, an welcher Stelle die Saiten gedrückt
werden sollen, um den Ton der Saite zu verändern.
8. Hals: Der Teil der Gitarre, welcher es dem Spieler
gestattet, die Note der Saite zu verändern und auch die
Saiten zu ziehen, um diesen eine tonliche Qualität zu
verleihen.
9. Stimmwirbel: Drehen Sie diese Knöpfe, um die Tonlage
der zugehörigen Saite einzustellen/zu verändern.
10. Kragen: Hier befinden sich die Stimmwirbel zum
Einstellen und Anziehen der Saiten.
11. Einschraubvorrichtung für Vibratohebel: Bringen Sie
den Vibratohebel hier an, indem Sie diesen im
Uhrzeigersinn anschrauben.
16
Page 17

INHOUD PAKKET
• ION Electrische Gitaar
• Gitaarriem
• Plectrum
• Tremolohandle
• ION GuitarLink 1/4" USB kabel
• DVD Software
• Leer-te-spelen Handleiding
• Snelstart Handleiding
• Veiligheidsinstructies & Garantie Infobrochure
INSTELLEN GITAAR
1. Verbind beide uiteinden van de bijgeleverde
gitaarriem aan de daarvoor bestemde
bevestigingen zoals in de afbeelding
weergegeven.
2. Bevestig de bijgeleverde tremolohandle door
deze met de klok mee vast te schroeven in de
tremolo ontvanger zoals in de afbeelding
weergegeven.
3. Na het installeren van de software en drivers,
sluit u de gitaar aan op uw computer met de
meegeleverde GuitarLink 1/4" USB kabel.
(Indien u een versterker en standaard 1/4"
gitaarkabel heeft, kunt u de gitaar direct aan de versterker koppelen, net zoals u met elke andere gitaar zou doen.)
SOFTWARE & DRIVER INSTALLATIE
Alvorens te beginnen verzeker uzelf ervan, dat uw computer aan deze systeemeisen voldoet:
• Windows: Microsoft Windows XP (SP2) / Vista (32- of 64-bit) / 7 (32- of 64-bit) met Pentium-IV of Athlon XP 1.6GHz of
hoger (aanbevolen)
• Mac: Apple Mac OSX 10.5 en hoger
• 1 GB RAM of hoger (aanbevolen)
• Geluidskaart (AC97-compatibele geluidskaart)
• 1 GB vrije ruimte op de harde schijf
• DVD-ROM schijf (voor software installatie)
• Een beschikbare USB 2.0 poort (bij voorkeur aan de achterkant van uw computer)
De bijgeleverde DVD bevat de benodigde drivers en software, zodat u de DISCOVER GUITAR USB kunt gebruiken. We
hebben ook een optionele installatievideo bijgevoegd, om u te helpen bij dit proces, netzoals instructievideos van
Guitarmasterclass.net om u te helpen bij het gitaarspel. U zult ook links vinden naar PDF’s van de DISCOVER GUITAR USB
handleidingen, en links naar ION Audiotechnisch ondersteuningsteam, indien u problemen ondervindt.
WINDOWS
1. Plaats de bijgeleverde software DVD in de DVD-ROM drive van uw computer.
2. Op het venster dat verschijnt na het plaatsen van de cd, klikt u op “Install Asio4ALL Driver.” Volg de instructies die op
het scherm verschijnen.
Als dit venster niet automatisch verschijnt, dubbelklik op “My Computer” en dubbelklik dan op de “DISCOVER GUITAR
USB” cd. Het venster zou nu moeten verschijnen. (Indien het venster nog steeds niet verschijnt, rechterklik op de
“DISCOVER GUITAR USB” CD en selecteer “Explore”. Zodra de inhoud van de cd wordt getoond, dubbelklikt u op
"ASIO4ALL_2_10_English.exe."
3. In het hoofdvenster, klikt u op "Install Guitar Rig LE.” Volg de instructies die op het scherm verschijnen. Als het
hoofdvenster niet wordt getoond, “explore” (doorzoek) de inhoud van de cd zoals omschreven in Stap 2 en dubbelklik op
"Guitar_Rig_4_Setup_PC.exe."
4. U kunt nu de cd ejecteren en Guitar Rig LE gaan gebruiken. U kunt de software vinden via Start Menu f Alle
Programma’s f Native Instruments f Guitar Rig LE. (U kunt ook dubbelklikken op de snelkoppeling van het
bureaublad op uw computer, indien u deze tijdens de installatie heeft gecreëerd.)
MAC
1. Plaats de bijgeleverde software DVD in de DVD-ROM drive van uw computer.
2. In het venster dat verschijnt na het plaatsen van de cd, dubbelklikt u op het Guitar Rig LE “.pkg" bestand. Volg de
instructies die op het scherm verschijnen. U zult de computer moeten herstarten na het voltooien van dit proces.
(Indien dit venster niet automatisch verschijnt, dubbelklikt u op de “DISCOVER GUITAR USB” cd op het bureaublad en
het venster zou moeten verschijnen.)
3. U kunt nu de cd ejecteren en Guitar Rig LE gaan gebruiken. U kunt deze software vinden via Applicaties f Native
Instruments f Guitar Rig LE.
1. Zorg dat alle opgenoemde onderdelen aanwezig zijn in
het pakket.
2. LEES DE VEILIGHEIDSINSTRUCTIES VOORDAT U
HET ARTIKEL GAAT GEBRUIKEN.
1
1
2
17
Page 18

INSTELLEN SOFTWARE
WINDOWS
Na het installeren van Guitar Rig LE (en de ASIO4ALL drivers, indien u Windows gebruikt), zult u deze moeten configureren,
zodat u de gitaar kunt horen via de computer. Hiervoor volgt u de onderstaande stappen:
1. Sluit uw gitaar aan op uw computer met de bijgeleverde 1/4"-naar-USB kabel. (Bij Windows, ziet u meerdere
dialoogvensters in de hoek van het scherm, die aangeven dat de hardware -de gitaar- wordt “herkend”. Wacht een
minuut voordat dit proces is voltooid.)
2. Open Guitar Rig LE. In het venster dat verschijnt, klikt u op “Activate” om de software te registreren. Het Native
Instruments Service Center zal starten. (U moet verbinding hebben met internet om uw software via het Service Center
te kunnen registreren.)
3. In het Service Center inlogvenster, klikt u op “Create new User Account” (als u deze nog niet heeft) en volgt u de
scherminstructies om de registratie te voltooien. (U hebt hiervoor het serienummer nodig, dat op de bijgeleverde DVD
hoes is terug te vinden.)
4. Na het registreren en openen van de software, zal het venster voor Audio en MIDI Settings verschijnen. (Zo niet, ga naar
Bestand, daarna Audio and Midi Settings.)
5. Onder de Audio tab, bij Driver, selecteert u "ASIO.” Bij Device, selecteert u "ASIO4ALL v2."
6. In het systeemvak (de pictogrammen weergegeven bij de klok en datum van uw PC), klikt u eenmaal op de groene pijl.
Het “ASIO4ALL” venster zou nu moeten verschijnen.
7. Klik op het moersleutel-pictogram in de rechter benedenhoek.
8. Onder WDM Device List, vinkt u de vakjes aan naast de
geluidskaart* van uw computer en “C-Media USB Audio Device”
zodat deze groen-blauw oplichten.
9. Klik op het “+” teken links van de namen, zodat deze “uitbreid”, en
subopties toont genaamd “Out” en “In”.
10. Vink de vakjes aan naast de “Out” en “In” opties, die met het
volgende overeenkomen:
• De geluidskaart van uw computer brandt op "Out” en “In" is
niet verlicht.
• “C-Media USB Audio Device” brandt op “In” en “Out” is niet
11. U zou nu de gitaar moeten kunnen bespelen en het geluid kunnen
12. Als u teveel latency ondervindt (vertraging vanaf het moment dat u
MAC
Leopard (OS X 10.5)
1. Sluit de DISCOVER GUITAR USB aan op uw computer met de bijgeleverde USB kabel.
2. In de “Finder”, klikt u op het “Go” menu bovenaan het scherm. Selecteer “Utilities”, daarna dubbelklikt u op “Audio
3. In de Audio Midi Setup Utility, klikt u op het “Audio" menu bovenaan het scherm en selecteert u “Open Aggregate
4. In het venster dat verschijnt, selecteert u de “Use” aanvinkvakjes naast de “Built-In Output” en “C-Media USB Audio
5. Klik op “Done” om het venster te sluiten. Klik op het “Audio MIDI Setup” menu bovenaan het scherm en selecteer “Quit
6. Open Guitar Rig LE. Klik op het “Guitar Rig” menu in de linker bovenhoek van het scherm en selecteer “Preferences".
7. In het "Audio and MIDI Settings..." Venster dat verschijnt, klikt u op het uitrolmenu naast “Device” en selecteert u
8. Klik op “OK”. Uw gitaar zult u nu kunnen horen via Guitar Rig LE.
Snow Leopard (OS X 10.6)
1. Sluit de DISCOVER GUITAR USB aan op uw computer met de bijgeleverde USB kabel.
2. In de “Finder”, klikt u op het “Go” menu bovenaan het scherm. Selecteer “Utilities”, daarna dubbelklikt u op “Audio
3. In het Audio Devices-venster dat nu verschijnt, selecteert u “Aggregate Device” in het paneel aan de linkerkant.
4. In het paneel aan de rechterkant, selecteert u de “Use” aanvinkvankjes naast “Built-in Output” en “C-Media USB
5. Sluit het venster. Klik op het “Audio MIDI Setup” menu bovenaan het scherm en selecteer “Quit Audio MIDI Setup”.
6. Open Guitar Rig LE. Klik op het “Guitar Rig” menu in de linker bovenhoek van het scherm en selecteer “Preferences".
7. In het "Audio and MIDI Settings..." venster dat verschijnt, klikt u op het uitrolmenu naast “Device” en selecteert u
8. Klik op “OK”. Uw gitaarzult u nu kunnen horen via Guitar Rig LE.
verlicht.
horen via computer.
de snaren aanslaat tot het moment dat u geluid uit de computer hoort), vermindert u de “ASIO Buffer Size” met 256 of
128 samples. Als u "clipping”, knallen of onderbrekingen in de playback van de gitaar ondervindt, zult u de buffergrootte
naar 512 of hoger willen verstellen.
MIDI Setup” in het venster dat nu verschijnt.
Device Editor”.
Device" (met 1 input).
Opmerking: Als u USB speakers op uw computer hebt aangesloten, selecteer dan deze i.p.v. “Built-in Output”.
Audio MIDI Setup”.
“Aggregate Device (1 In, 2 Out)”.
MIDI Setup” in het venster dat nu verschijnt.
Audio Device”.
Opmerking: Als u USB speakers op uw computer hebt aangesloten, selecteer dan deze i.p.v. “Built-in Output”.
“Aggregate Device (1 in, 4 out)”.
* Opmerking: Als u speakers gebruikt die
via een USB poort met de computer zijn
verbonden, selecteer dan deze i.p.v. de
orginele geluidskaart van uw computer. Als u
geen USB speakers gebruikt, selecteer dan
wel de originele geluidskaart (enkele
gebruikelijke namen zijn: "SoundMAX”,
"Realtek" en"Conexant").
* Opmerking: Voor meer ondersteuning of
informatie, kunt u de Guitar Rig LE
handleiding vinden via het "Help" menu van
de software, "Open Manual", en selecteer
vervolgens de gewenste handleiding.
18
Page 19

KENMERKEN
1. Audio output gitaar: Verzendt audio vanuit de gitaar
naar de versterker.
2. Toonregelaar: Deze regelknop verstelt de toon van de
laatste pickup (het verste van de hals vandaan),
3. Toonregelaar: Deze controleknop verstelt de toon van
de eerste pickup (het dichtste bij de hals),
4. Volumeregelaar: Deze knop regelt de volume-output
voordat het geluid de versterker bereikt.
5. Pickupschakelaar: Deze kipschakelaar laat u kiezen
tussen de pickups die het geluid van de gitaarsnaren
opnemen. Met de schakelaar het dichtste bij de snaren,
selecteert u de eerste pickup. De schakelaar die het
verste van de snaren afstaat, selecteert de laatste
pickup. De posities ertussenin liggend, selecteren de
pickupcombinaties.
6. Pick-Ups: Deze leggen het geluid vast dat door de
snaren wordt gemaakt en vervolgens naar de
versterker wordt verzonden.
7. Fret: Verhogingsbalk op de hals van de gitaar, die
aangeeft waar de snaren moeten worden ingedrukt en
verandert het geluid van de snaar.
8. Hals: Het gedeelte van de gitaar dat de snaartoon
verandert, en daarbij de snaren strekt om ze een tonale
kwaliteit te geven.
9. Stemknoppen: Draai deze knoppen om de hoogte te
tunen/ verstellen per bijbehorende snaar.
10. Kop: Bevat de stemknoppen om te tunen en de snaren
te verstellen.
11. Ontvanger Tremolohandle: Bevestig de
Tremolohandle, door deze met de klok mee vast te
schroeven op de gitaar.
19
Page 20

www.ionaudio.com
MANUAL VERSION 1.0
 Loading...