

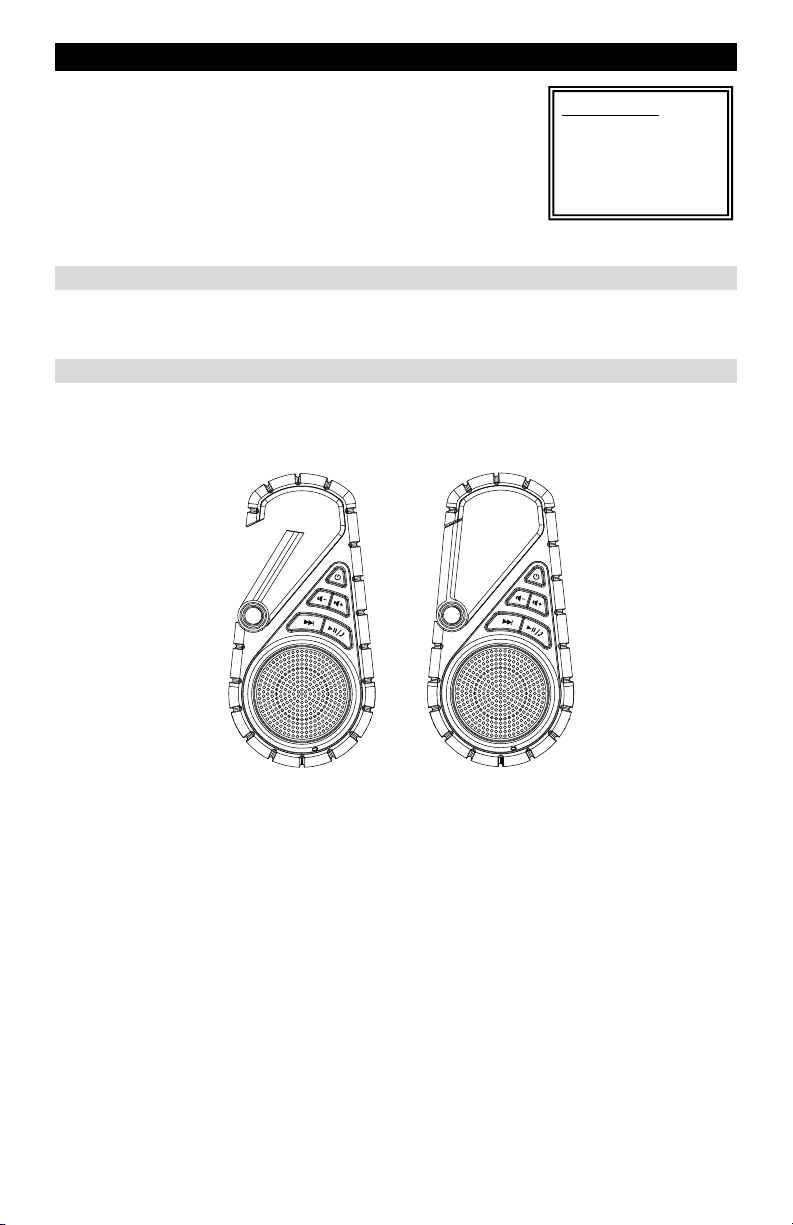
Page 1

Clipster Active
User Guide
English ( 3 – 5 )
Guía del usuario
Español ( 6 – 8 )
Guide d'utilisation
Français ( 9 – 11 )
Guida per l'uso
Italiano ( 12 – 14 )
Benutzerhandbuch
Deutsch ( 15 – 17 )
Gebruikershandleiding
Nederlands ( 18 – 20 )
Appendix
English ( 21 )
Page 2

Page 3
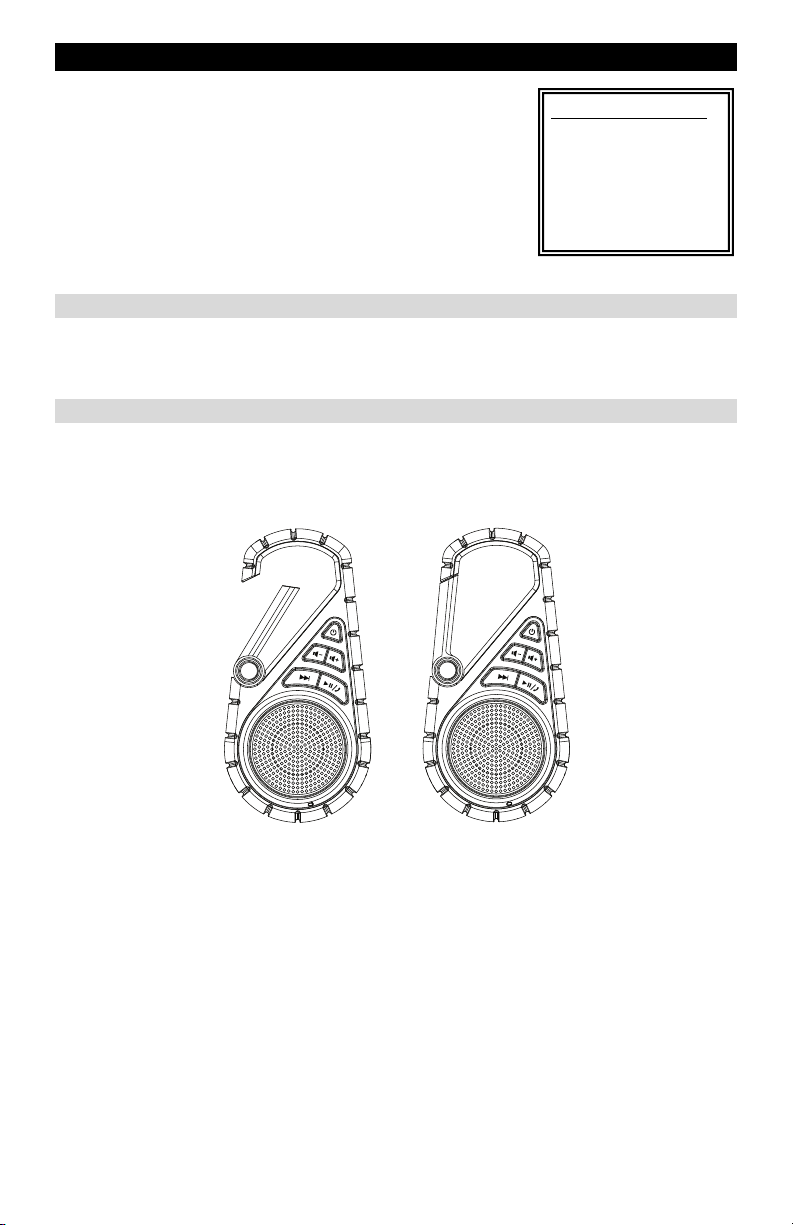
User Guide (English)
1. Make sure all items listed in the BOX CONTENTS are included
in the box.
2. READ SAFETY INSTRUCTION BOOKLET BEFORE USING
THE PRODUCT.
3. MAKE SURE THAT YOU HAVE COMPLETELY CHARGED
THE BATTERY PRIOR TO FIRST USE FOR MAXIMUM
BATTERY LIFE.
Go to ionaudio.com for product registration.
Charging Clipster Active
Use the included micro-USB cable to connect Clipster Active to (A) a USB power adapter
connected to a power outlet or (B) your computer (powered on) for 2.5 hours.
Setup
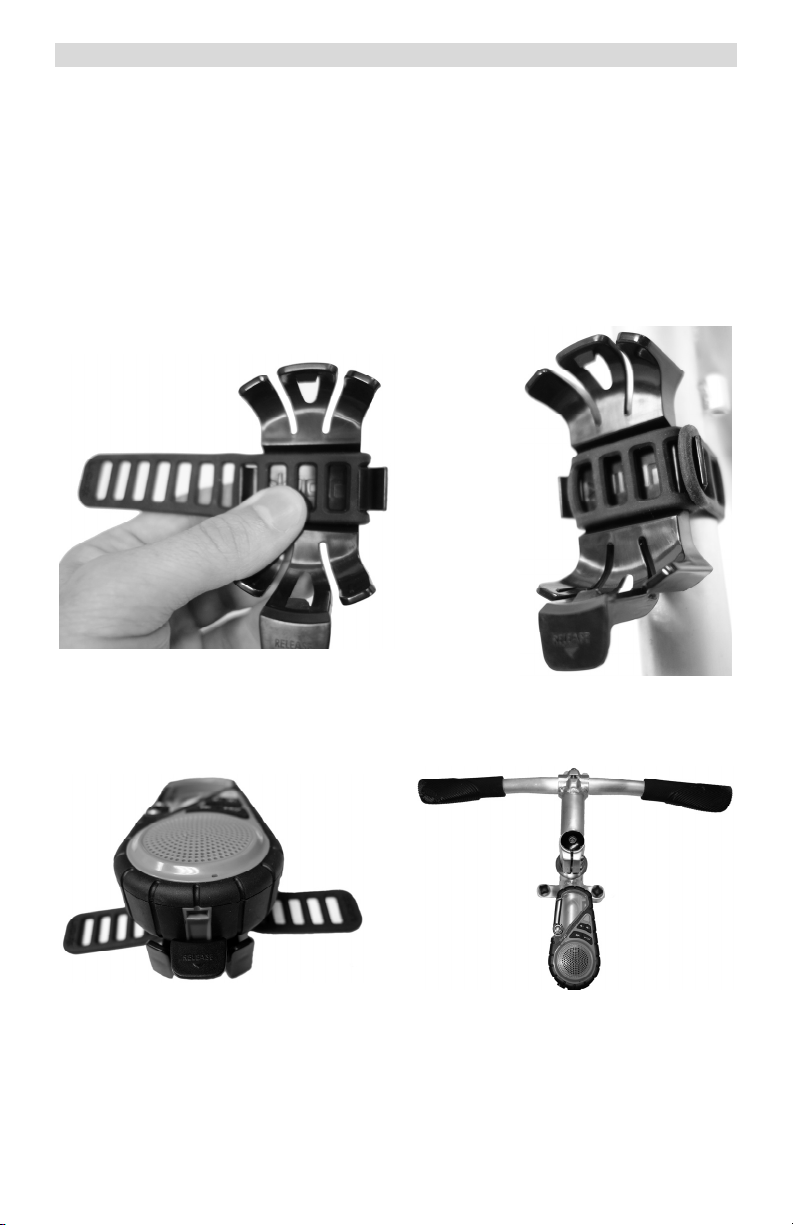
1. Connect Clipster Active’s hook to secure material such as a backpack loop, belt loop or
purse handle.
2. Make sure the hook is locked into place (see pictures below).
UNLOCKED LOCKED
Box Contents
• Clipster Active
• Active Mount
• Mounting Strap
• USB Charging Cable
• Quickstart Guide
3
Page 4
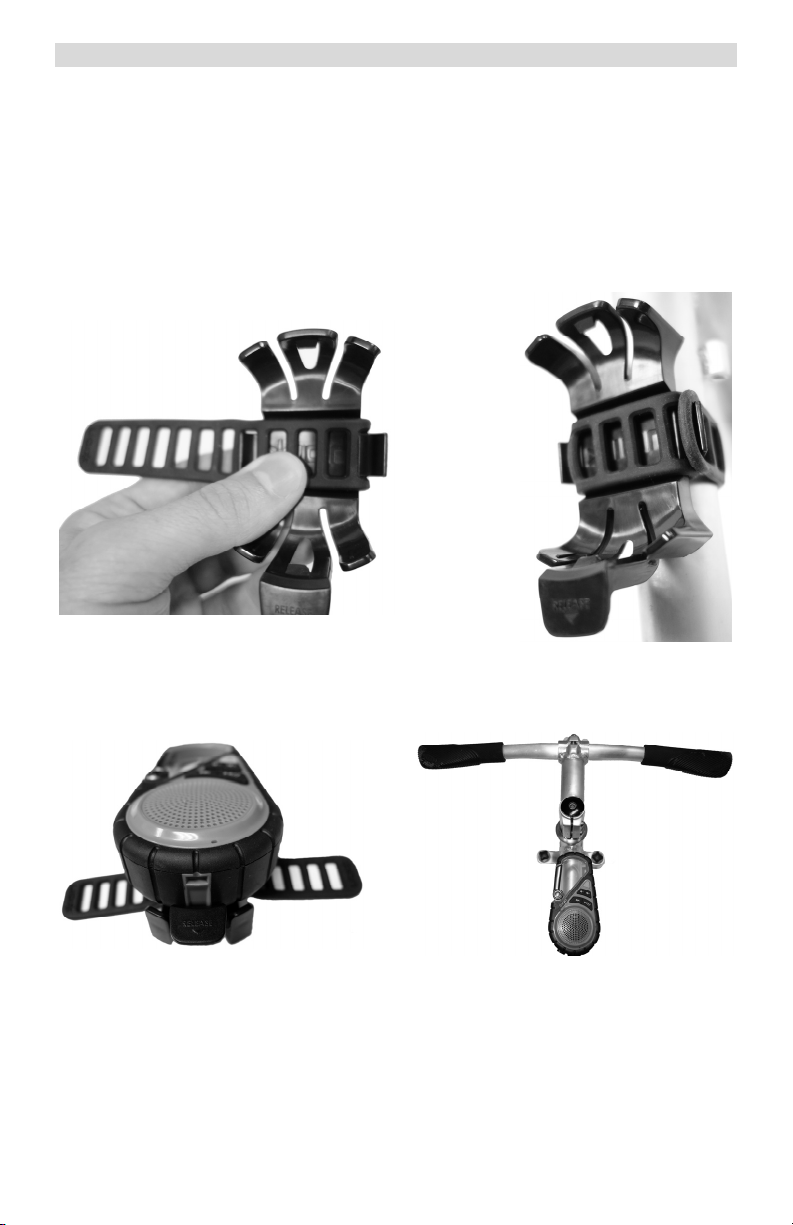
Connecting the Active Mount to Clipster Active
To connect the Active Mount to Clipster Active:
1. Connect the mounting strap slots to the hook on one side of the Active Mount.
2. Wrap the mounting strap around a bike frame tube (or any sturdy place you would like to
mount Clipster Active) and connect the strap to the hook on the other side of the Active
Mount to secure the connection.
3. Insert the front hook first, then rock the unit back toward the release latch for easy
installation.
4. To remove the Active Mount from Clipster Active, press down on the release latch on the
Active Mount.
4
Page 5
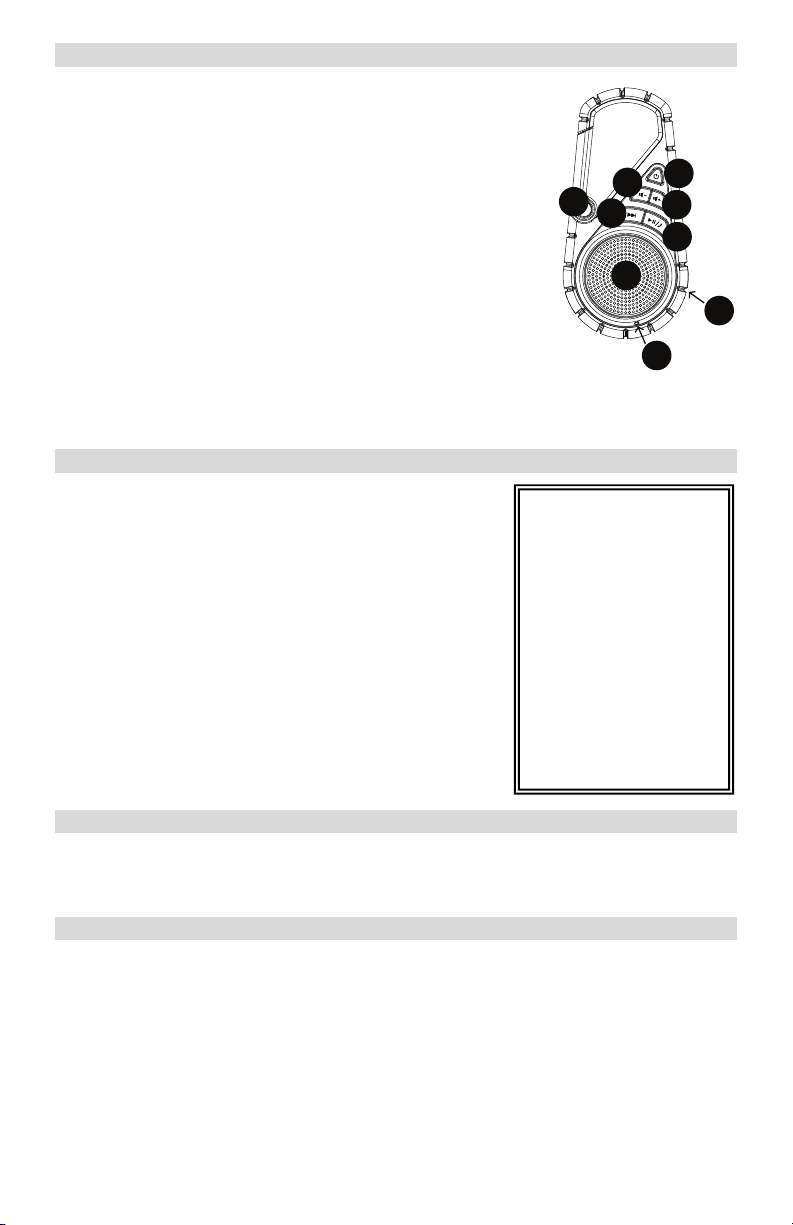
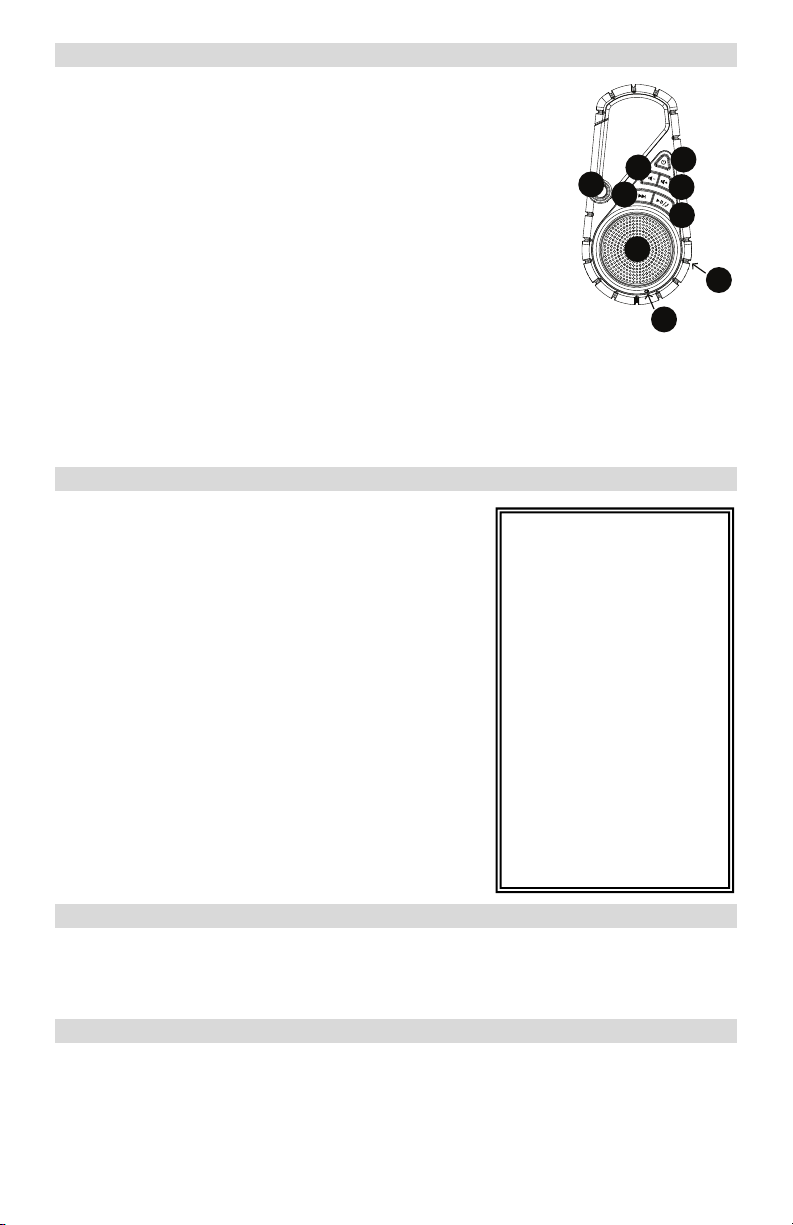
Parts Description
1. Track Skip: Press this button to advance to the next track on a
connected Bluetooth device.
2. Power On/Off: Hold this button down for 3 seconds to power
Clipster Active on/off.
3. Volume Down: Decreases the speaker volume on Clipster
Active.
4. Volume Up: Increases the speaker volume on Clipster Active.
5. Play/Pause/Call-Answer: Press this button to start/pause
music playback on a paired music device. Press this button to
7
1
2
3
4
5
answer a call. To disconnect a phone call, press and release the
button.
6
6. Speaker: This full-range speaker plays audio from a paired
Bluetooth device.
8
7. Clip: Use this carabiner style “hook” to clip to a belt loop,
backpack, or purse.
8. Micro-USB Port: Use the included micro-USB cable to connect
9
this port to a computer USB port to charge Clipster Active.
9. Microphone: The signal sent from the built-in microphone is sent to a paired Bluetooth
device.
Pairing a Bluetooth Device
1. Press and hold the Power button for 3 seconds to power
on Clipster Active.
2. Open Bluetooth settings on your music device
(smartphone, tablet, etc.).
3. Connect to Clipster Active.
4. If your device requires a passcode or PIN, enter the
number zero (“0”) four times.
5. Play music and adjust Clipster Active volume buttons.
6. Attach the active mount to the location of your choice,
adjusting the mounting strap length and tightness.
7. To disconnect the Bluetooth connection, hold the
Play/Pause/Call-Answer button for 2 seconds.
Answering Phone Calls
LED Activity:
Blinking Blue LED =
Bluetooth pairing mode
Solid Blue LED =
Connected to a
Bluetooth device
Blinking Red LED =
Battery is low and needs
to be recharged
Solid Red LED = The
Battery Charging LED
will be lit while the unit is
charging and the red
LED will turn off when
charging has completed.
1. Press and release the Play/Pause/Call-Answer button.
2. Adjust volume with the Volume Down/Up controls.
3. To disconnect a phone call, press and release the Play/Pause/Call-Answer button.
Standby Mode
Clipster Active will power off after 15 minutes if no audio is playing, and there is no Bluetooth
connection.
5
Page 6
Guía del usuario (Español)
1. Asegúrese que todos los artículos incluidos en la
CONTENIDO DE LA CAJA estén incluidos en la caja.
2. LEA EL FOLLETO DE INSTRUCCIONES DE SEGURIDAD
ANTES DE UTILIZAR EL PRODUCTO.
3. PARA ASEGURAR UNA MÁXIMA VIDA ÚTIL DE LA
BATERÍA, CÁRGUELA COMPLETAMENTE ANTES DE
USARLA POR PRIMERA VEZ.
Visite ionaudio.com para registrar el producto.
Cómo cargar el Clipster Active
Cuando la luz de carga de la batería comience a atenuarse, cargue el Clipster Active. Use el
cable micro USB incluido para conectar el Clipster Active a (A) un adaptador de alimentación
USB conectado a un tomacorriente o (B) su ordenador (encendido) durante 2.5 horas.
Instalación
1. Conecte el gancho del Clipster Active a un material firme como la correa de una mochila, el
cinturón o la manija de la cartera.
2. Asegúrese de que el gancho quede trabajo en su sitio (vea las ilustraciones de abajo).
DESTRABADO
TRABADO
Contenido de la caja
• Clipster Active
• Montaje active
• Correa de montaje
cable
• USB de carga
• Guía de inicio rápido
6
Page 7
Conexión de Active Mount con Clipster Active
Para conectar Active Mount con Clipster Active:
1. Inserte un orificio de la correa de montaje en el gancho de un lado del Active Mount.
2. Pase la correa de montaje alrededor de un caño del cuadro de la bicicleta (o cualquier otro
lugar robusto en donde desee montar el Clipster Active) y enganche la correa en el gancho
del otro lado del Active Mount para asegurarlo en su lugar.
3. Inserte el gancho frontal primero, luego balancee la unidad hacia atrás hacia la traba de
liberación para una fácil instalación.
4. Para extraer el Clipster Active del Active Mount, pulse la traba de liberación del Active
Mount hacia abajo.
7
Page 8
Descripción de las partes
1. Salto de pista: Presione este botón para avanzar a la pista
siguiente en un dispositivo Bluetooth conectado.
2. Encendido/apagado: Mantenga pulsado este botón durante 3
segundos para encender y apagar el Clipster Active.
3. Bajar volumen: Disminuye el volumen del altavoz del Clipster
Active.
4. Subir volumen: Aumenta el volumen del altavoz del Clipster
Active.
5. Reproducir/Pausa/Atender llamadas: Pulse este botón para
iniciar o poner en pausa la reproducción de música en un
dispositivo musical apareado. Pulse el botón para atender una
llamada. Para finalizar una llamada, pulse y suelte el botón.
6. Altavoz: Este altavoz de gama completa reproduce el audio
proveniente de un dispositivo Bluetooth.
7
2
3
4
1
5
6
8
9
7. Clip: Use este gancho estilo carabinero para enganchar el equipo a un cinturón, mochila o
cartera.
8. Puerto Micro USB: Use el puerto micro-USB cable incluido para conectarlo al puerto USB
de una computadora a fin de cargar el Clipster Active.
9. Micrófono: La señal enviada desde el micrófono incorporado se envía a un dispositivo
Bluetooth apareado.
Cómo aparear un dispositivo Bluetooth
1. Mantenga pulsado el botón de encendido durante 3
segundos para encender el Clipster Active.
2. Abra la configuración Bluetooth en su dispositivo
musical (teléfono inteligente, tableta, etc.).
3. Conéctelo al Clipster Active.
4. Si su dispositivo solicita un código de contraseña o
PIN, ingrese el número ("0") cuatro veces.
5. Reproduzca la música y ajuste el botónes de volumen
del Clipster Active.
6. Fije el montaje activo en el lugar que elija, ajustando la
longitud y tensión de la correa de montaje.
7. Para desconectar la conexión Bluetooth, mantenga
pulsado el botón de reproducir/pausa/atender-llamada
durante 2 segundos.
Actividad de los LED del
Clipster Active:
LED azul parpadeante =
Modo de apareamiento de
Bluetooth
LED con luz azul
permanente = Conectado
a un dispositivo Bluetooth
LED rojo parpadeante =
La batería tiene poca carga
y debe recargarse
LED con luz rojo
permanente = El rojo LED
de batería en carga se
enciende cuando la unidad
se está cargando y se
apaga cuando la carga está
completa.
Cómo contester llamadas
1. Pulse y suelte el botón reproducir/pausa/atender-llamada.
2. Ajuste el volumen con los controles de subir/bajar volumen.
3. Para finalizar una llamada, pulse y suelte el botón reproducir/pausa/atender-llamada.
Modo de espera
El Clipster Active se apagará después de 15 minutos sin reproducir audio, y haya no un
conexión Bluetooth.
8
Page 9

Guide d’utilisation (Français)
1. Veuillez vous assurer que tous les articles énumérés dans la
CONTENU DE LA BOÎTE sont inclus dans la boîte.
2. VEUILLEZ LIRE LE LIVRET DES CONSIGNES DE
SÉCURITÉ AVANT D'UTILISER LE PRODUIT.
3. ASSUREZ-VOUS D'AVOIR COMPLÈTEMENT RECHARGÉ
LA PILE AVANT LA PREMIÈRE UTILISATION AFIN
D’AUGMENTER SA DURÉE DE VIE.
Pour enregistrer le produit, veuillez visiter ionaudio.com.
Rechargement de la batterie du Clipster Active
Lorsque l’intensité du voyant d’indication de charge de la batterie diminue, la batterie doit être
rechargée. Utilisez le câble micro-USB inclus afin de brancher le Clipster Active à (A) un
adaptateur d’alimentation USB branché à une prise secteur, ou (B) à un ordinateur (sous
tension) pendant 2.5 heures.
Installation
1. Attachez le mousqueton du Clipster Active à une boucle de sac à dos, de ceinture ou à la
poignée d’un sac à main.
2. Veillez à ce que le mousqueton soit bien verrouillé en place (voir photos ci-dessous).
DÉVERROUILLÉ
VERROUILLÉ
9
Contenu de la boîte
• Clipster Active
• Support
• Courroie
• Câble de
rechargement USB
• Guide de
démarrage rapide
Page 10

Fixation du Clipster Active sur le support
Pour fixer le Clipster Active sur le support :
1. Reliez les fentes de la courroie à l’une des languettes du support.
2. Enroulez la courroie du support autour d'un des montants du vélo (ou sur tout autre
emplacement solide) et reliez les fentes de la courroie à l’autre languette.
3. Afin de faciliter l’installation, insérez le Clipster Active vers le haut du support d'abord, puis
basculez-le vers la languette de dégagement.
4. Pour retirer le Clipster Active du support, appuyez sur la languette de dégagement.
10
Page 11

Description
1. Track Skip : Appuyez sur cette touche pour passer à la piste
suivante sur l'appareil Bluetooth jumelé.
2. Interrupteur d’alimentation : Maintenez ce bouton enfoncé
pendant 3 secondes afin de mettre le Clipster Active sous et hors
tension.
3. Volume - : Cette touche permet de diminuer le volume du haut-
parleur du Clipster Active.
4. Volume + : Cette touche permet d’augmenter le volume du haut-
parleur du Clipster Active.
5. Lecture/pause/d'appel-réponse : Cette touche permet de
lancer la lecture ou de pauser la musique sur l’appareil jumelé.
Appuyez sur la touche pour répondre à un appel. Enfoncez puis
7
1
2
3
4
5
6
8
relâchez la d'appel-réponse touche afin de mettre fin à un appel.
6. Haut-parleur : Ce haut-parleur pleine gamme joue l’audio d'un
appareil Bluetooth jumelé.
9
7. Mousqueton : Utilisez ce mousqueton afin de l'attacher à une ceinture, un sac à dos ou à
un sac à main.
8. Port micro-USB : Utilisez le câble micro-USB inclus afin de relier ce port au port USB d’un
ordinateur afin de recharger la pile du Clipster Active.
9. Microphone : Le signal reçu
Bluetooth jumelé.
Jumelage d'un appareil Bluetooth
par le microphone intégré est acheminé au périphérique
1. Maintenez l’interrupteur d’alimentation enfoncé
pendant 3 secondes afin de mettre le Clipster Active
sous tension.
2. Accédez aux paramètres Bluetooth de votre lecteur de
musique (smartphone, tablette, etc.).
3. Connectez-le au Clipster Active.
4. Si votre appareil vous demande un mot de passe ou
un NIP, saisissez le numéro zéro (« 0 ») quatre fois.
5. Faites jouer de la musique et réglez la boutons volume
du Clipster Active.
6. Fixer le support sur l'emplacement de votre choix, en
ajustant la longueur et la tension de la courroie.
7. Maintenez enfoncée la touche de
lecture/pause/d'appel-réponse pendant 2 secondes
afin de supprimer la connexion à l’appareil Bluetooth.
Répondre à un appel
Légende des indicateurs:
DEL bleue clignotante =
Jumelage Bluetooth
DEL bleue fixe = Appareil
Bluetooth jumelé
DEL rouge clignotante =
Pile faible, doit être
recharge
DEL rouge fixe = La DEL
rouge de rechargement
s'allume lors du
rechargement et s'éteint
lorsque la batterie est
entièrement rechargée.
1. Enfoncez puis relâchez la touche de lecture/pause/d'appel-réponse.
2. Réglez le volume avec les commandes de volume.
3. Enfoncez puis relâchez la touche de lecture/pause/d'appel-réponse afin de mettre fin à un
appel.
Mode veille
Le Clipster Active s’éteint automatiquement après 15 minutes d’inutilisation, et non Bluetooth
soit jumelé.
11
Page 12

Guida per l’uso (Italiano)
1. Assicurarsi che tutti gli elementi elencati nella CONTENUTI
DELLA CONFEZIONE si trovino nella confezione.
2. LEGGERE ATTENTAMENTE IL LIBRETTO DELLE
ISTRUZIONI DI SICUREZZA PRIMA DI UTILIZZARE IL
PRODOTTO.
3. PER GARANTIRE LA MASSIMA DURATA DELLA
BATTERIA, ASSICURARSI DI AVERLA CARICATA
COMPLETAMENTE PRIMA DEL PRIMO UTILIZZO.
Recarsi alla pagina ionaudio.com per la registrazione del
prodotto.
Ricarica del Clipster Active
Quando la spia della batteria diventa fioca, caricare il Clipster Active. Servirsi del cavo microUSB in dotazione per collegare il Clipster Active a (A) un adattatore USB collegato ad una
presa di alimentazione o (B) al computer (acceso) per 2.5 ore.
Setup
1. Collegare il gancio del Clipster Active a un punto sicuro quale uno zaino, una cintura o al
manico di una borsa.
2. Assicurarsi che il gancio sia ben fissato (si veda l'immagine qui di seguito).
APERTO
CHIUSO
Contenuti della
confezione
• Clipster Active
• Supporto attivo
• Fascetta di
montaggio
• Cavo di ricarica
USB
• Guida rapida
12
Page 13

Collegamento dell'Active Mount al Clipster Active
Per collegare Active Mount al Clipster Active:
1. Collegare le slot per le fascette di montaggio al gancio posto su un lato dell'Active Mount.
2. Avvolgere la fascetta di montaggio attorno al tubo del telaio della bicicletta (o a qualsiasi
punto robusto si desideri utilizzare per montare il Clipster Active) e collegare la fascetta al
gancio posto sull'altro lato dell'Active Mount per fissare il collegamento.
3. Inserire per primo il gancio frontale, quindi ruotare l'apparecchio all'indietro verso il
dispositivo di sgancio per una facile installazione.
4. Per rimuovere l'Active Mount dal Clipster Active, premere il dispositivo di sgancio dell'Active
Mount stesso.
13
Page 14

Descrizione delle parti
1. Track Skip (salta traccia): premere questo tasto per passare
alla traccia successiva su un dispositivo Bluetooth collegato.
2. Accensione/spegnimento (on/off): tenere premuto questo
pulsante per 3 secondi per accendere/spegnere il Clipster Active.
3. Volume giù: abbassa il volume dell'altoparlante del Clipster
Active.
4. Volume su: alza il volume dell'altoparlante del Clipster Active.
5. Play/Pause/tasto di risposta: premere questo pulsante per
7
1
2
3
4
5
avviare/interrompere momentaneamente la riproduzione della
musica da un dispositivo accoppiato. Premere il per rispondere a
6
una chiamata telefonica. Per scollegare una chiamata, premere e
rilasciare il tasto.
8
6. Altoparlante: questo altoparlante a gamma completa riproduce
audio da un dispositivo Bluetooth accoppiato.
7. Clip: servirsi del suo stile a moschettone per agganciare il
9
dispositivo a una cintura, a uno zaino o a una borsa.
8. Porta micro-USB: servirsi del cavo micro-USB in dotazione per collegare questa porta alla
porta USB di un computer per caricare il Clipster Active.
9. Microfono: Il segnale inviato
Bluetooth accoppiato.
Allineamento di un dispositivo Bluetooth
dal microfono incorporato viene inviato ad un dispositivo
1. Premere e tenere premuto il tasto Pitch per 3 secondi
per accendere il Clipster Active.
2. Aprire le impostazioni Bluetooth sul dispositivo
musicale (smartphone, tablet, ecc.).
3. Collegarlo allo Clipster Active.
4. Se il dispositivo chiede un codice o PIN, inserire il
numero zero ("0") quattro volte.
5. Suonare la musica e regolare ilvolume servendosi
dell’apposita pulsanti del Clipster Active.
6. Fissare il supporto attivo nella sede prescelta,
regolando la lunghezza della fascetta di montaggio e
stringendola a piacere.
7. Per annullare il collegamento Bluetooth, tenere
premuto il tasto Play/Pause/Call-Answer per 2
secondi.
Come rispondere alle telefonate
Attività del LED:
LED blu lampeggiante =
Modalità di accoppiamento
Bluetooth
LED blu fisso = Collegato a
un dispositivo Bluetooth
LED rosso lampeggiante =
La batteria è scarica, deve
essere ricaricata
LED rosso fisso = il rosso
LED di ricarica della batteria
sarà acceso mentre
l'apparecchio si sta
caricando e si spegnerà
quando la ricarica è
completa.
1. Premere e rilasciare il tasto Play/Pause/Call-Answer.
2. Regolare il volume servendosi dei comandi Volume giù/su.
3. Per scollegare una chiamata, premere e rilasciare il tasto Play/Pause/Call-Answer.
Modalità Standby
il Clipster Active si spegnerà dopo 15 minuti se non viene riprodotto alcun audio, e che ci sia no
collegamento Bluetooth.
14
Page 15

Benutzerhandbuch (Deutsch)
1. Achten Sie darauf, dass alle in der LIEFERUMFANG
aufgeführten Teile in der Schachtel enthalten sind.
2. LESEN SIE DIE SICHERHEITSHINWEISE, BEVOR SIE DAS
PRODUKT VERWENDEN.
3. STELLEN SIE SICHER, DASS DIE BATTERIE VOR DER
ERSTEN VERWENDUNG VOLLSTÄNDIG AUFGELADEN
IST, UM EINE MAXIMALE BATTERIELEBENSDAUER ZU
ERZIELEN.
Besuchen Sie ionaudio.com, um Ihr Produkt zu registrieren.
Aufladen des Clipster Active
Wenn die Batterieleuchte schwächer wird, muss der Clipster Active aufgeladen werden.
Verwenden Sie das mitgelieferte Micro-USB-Kabel, um den Clipster Active (A) mit einem USBNetzteil zu verbinden, das in einer Steckdose eingesteckt ist oder (B) mit Ihrem
(eingeschalteten) Computer für einen Zeitraum von 2.5 Stunden zu verbinden.
Setup
1. Bringen Sie den Haken des Clipster Active an einem zugfesten Material an, wie etwa einem
Rucksackgurt, einer Gürtelschlaufe oder dem Griff einer Handtasche.
2. Vergewissern Sie sich, dass der Karabiner geschlossen ist und einrastet (siehe folgende
Bilder).
OFFEN
GESCHLOSSEN
Lieferumfang
• Clipster Active
• Aktivhalterung
• Montagebügel
• USB-Ladekabel
• Schnellstart-
Anleitung
15
Page 16

Montage der Aktivhalterung an Clipster Active
So montieren Sie die Aktivhalterung am Clipster Active:
1. Bringen Sie den Haken auf der einen Seite der Aktivhalterung in die Schlitze des
Montagebügels.
2. Legen Sie den Montagebügel um eine Fahrradstange (oder eine andere stabile Stelle, an
der Sie den Clipster Active anbringen möchten) und verbinden Sie die Schlaufe mit dem
Haken auf der anderen Seite der Aktivhalterung, um die Verbindung zu sichern.
3. Die Montage ist einfach: Bringen Sie zuerst den vorderen Haken ein und bewegen Sie
dann das Gerät in Richtung Entriegelungshebel.
4. Um die Aktivhalterung vom Clipster Active zu lösen, drücken Sie auf den
Entriegelungshebel auf der Aktivhalterung.
16
Page 17

Beschreibung der teile
1. Track Überspringen: Drücken Sie diese Taste, um auf einem
angeschlossenen Bluetooth-Gerät zum nächsten Track zu
gelangen.
2. Ein-/Ausschalter: Halten Sie diese Taste 3 Sekunden lang
gedrückt, um Clipster Active ein-/auszuschalten.
3. Lautstärke reduzieren: Reduziert die Lautstärke des Clipster
Active.
4. Lautstärke erhöhen: Erhöht die Lautstärke des Clipster Active.
5. Wiedergabe/Pause/Ruftaste: Drücken Sie diese Taste, um die
Musikwiedergabe auf einem gekoppelten Musik-Player zu
starten bzw. zu pausieren. Drücken Sie zum einen Anruf
entgegen. Um einen Anruf zu trennen, drücken Sie die Taste.
6. Lautsprecher: Der Full-Range-Lautsprecher spielt Audio von
einem gekoppelten Bluetooth-Gerät.
7. Clip: Mit diesem karabinerähnlichem "Haken" können Sie das
Gerät an Gürtelschlaufen, Rucksäcken oder Handtaschen befestigen.
8. Mikro-USB-Port: Verwenden Sie das mitgelieferte Mikro-USB-Kabel, um diesen Port mit
dem USB-Port eines Computers zu verbinden, um Clipster Active aufzuladen.
9. Mikrofon: Das Signal des eingebauten Mikrofons wird an ein gekoppeltes Bluetooth-Gerät
gesendet.
Koppeln eines Bluetooth-geräts
1. Halten Sie den Ein-/Ausschalter 3 Sekunden lang
gedrückt, um Clipster Active einzuschalten.
2. Öffnen Sie die Bluetooth-Einstellungen auf Ihrem
Musikgerät (Smartphone, Tablet etc.).
3. Stellen Sie eine Verbindung zum Clipster Active her.
4. Wenn Ihr Gerät nach einem Passwort oder einer PIN
fragt, geben Sie viermal die Zahl Null ("0") ein.
5. Spielen Sie Ihre Musik und stellen den
Lautstärkeregler am Clipster Active Rocker nach
Wunsch ein.
6. Bringen Sie die Aktivhalterung an der gewünschten
Stelle an und passen Sie Länge und Straffheit des
Montagebügels an.
7. Um die Bluetooth-Verbindung zu trennen, halten Sie
die Taste Wiedergabe/Pause/Anruf entgegennehmen
2 Sekunden lang gedrückt.
Anrufe entgegennehmen
1. Drücken Sie die Taste Wiedergabe/Pause/Anruf entgegennehmen.
2. Stellen Sie die Lautstärke mit den Lautstärkereglern ein.
3. Um einen Anruf zu trennen, drücken Sie die Taste Wiedergabe/Pause/Anruf
entgegennehmen.
Standby-Modus
Clipster Active schaltet sich nach 15 Minuten aus, wenn kein Audiosignal wiedergegeben wird,
und nicht Bluetooth-Verbindung besteht.
Clipster Active LEDAktivität:
Blau blinkende LED =
Bluetooth-Koppelmodus
Durchgehend blau
leuchtende LED = Mit
Einem Bluetooth-Gerät
verbunden
Rot blinkende LED = Der
Akku hat einen niedrigen
Ladestand und muss
aufgeladen werden
Durchgehend rot
leuchtende LED = Die rot
Akkulade-LED leuchtet,
während das Gerät
aufgeladen wird und erlischt,
wenn der Ladevorgang
abgeschlossen ist.
7
1
2
3
4
5
6
8
9
17
Page 18

Gebruikershandleiding (Nederlands)
1. Zorg ervoor dat alle artikelen opgesomd in de INHOUD VAN
DE DOOS zijn inbegrepen zich in de doos bevinden.
2. LEES DE VEILIGHEIDSVOORSCHRIFTEN VOORALEER
HET PRODUCT TE GEBRUIKEN.
3. ZORG ERVOOR DAT DE ACCU VOOR HET EERSTE
GEBRUIK VOLLEDIG IS OPGELADEN, VOOR EEN
MAXIMALE LEVENSDUUR VAN DE ACCU.
Ga naar ionaudio.com voor productregistratie.
Clipster Active opladen
Wanneer het batterijlampje donker wordt, moet u Clipster Active opladen. Gebruik de
meegeleverde micro-USB-kabel om Clipster Active gedurende 2.5 uur te verbinden met (A)
een USB-stroomadapter, aangesloten op een stopcontact, of (B) uw pc (ingeschakeld).
Installatie
1. Verbindt de haak van de Clipster Active met een veilig materiaal zoals het lusje aan een
rugzak, een riemlus of de handgreep van uw handtas.
2. Zorg ervoor dat de haak zich in de juiste positie bevindt.
ONTGRENDELD
VERGRENDELD
Inhoud van de doos
• Clipster Active
• Actieve Clip
• Monteerband
• USB-oplaadkabel
• Snelstartgids
18
Page 19

De Active Mount verbinden met de Clipster Active
De Active Mount met de Clipster Active verbinden:
1. Plaats de openingen in de bevestigingsriem in de haak aan één kant van de Active Mount.
2. Wikkel de bevestigingsriem rond een buis van uw fietsframe (of een voldoende stevige plek
waarop u de Clipster Active wilt monteren) en plaats de riem in de haak aan de andere kant
van de Active Mount om de verbinding te bevestigen.
3. Plaats eerst de voorste haak, kantel vervolgens het toestel terug naar het
ontgrendelingslipje voor eenvoudige installatie.
4. Om de Active Mount van de Clipster Active los te koppelen, drukt u op het
ontgrendelingslipje op de Active Mount.
19
Page 20

Beschrijving van de onderdelen
1. Nummer overslaan: Druk op deze knop om op een aangesloten Bluetooth-apparaat naar
het volgende nummer te gaan.
2. Voeding Aan/Uit: Hou deze knop 3 seconden lang ingedrukt om de Clipster Active aan of
uit te zetten.
3. Volume omlaag: Vermindert het speakervolume op de Clipster Active.
4. Volume omhoog: Verhoogt het speakervolume op de Clipster Active.
5. Afspelen/pauzeren/puhelun vastau: Druk op deze knop om op een gekoppeld
muziekapparaat het afspelen van muziek te starten/pauzeren. Paina Vastaa puheluun.
Druk de knop in om een oproep af te breken.
6. Speaker: De speaker met vol bereik speelt audio af van een gekoppeld Bluetooth-
apparaat.
7. Clip: Gebruik deze karabijnhaak om de Clipster Active vast te haken aan een riemlus, een
rugzak of handtas.
8. Micro-USB-poort: Gebruik de meegeleverde micro-USB-kabel om deze poort aan te
sluiten op de USB-poort van een computer en de Clipster Active op te laden.
9. Microfoon: Het signaal afkomstig
Bluetooth-apparaat gestuurd.
Een Bluetooth-apparaat koppelen
1. Druk en houd de aan/uit-knop 3 seconden lang ingedrukt
om de Clipster Active aan te zetten.
2. Open de Bluetooth-instellingen op uw muziekapparaat
(smartphone, tablet, enz.)
3. Maak verbinding met de Clipster Active.
4. Als uw apparaat een wachtwoordcode of pincode vereist,
voer dan vier keer het nummer nul ('0') in.
5. Speel muziek af en Pas de volumeknop Clipster Active
aan.
6. Verbind de actieve clip op de plaats naar keuze en regel
de lengte en spanning van de monteerband.
7. Houd de knop Afspelen/Pauzeren/Bellen-beantwoorden 2
seconden lang ingedrukt om de Bluetooth-verbinding te
verbreken.
Een oproep beantwoorden
van de ingebouwde microfoon wordt naar een gekoppeld
LED-activiteit Clipster
Active:
Knipperende Blauwe
LED = koppelmodus
Bluetooth
Effen Blauwe LED =
verbonden met een
Bluetooth-apparaat
Knipperende rode LED
= de batterij is bijna leeg
en moet herladen
worden.
Effen rode LED = De
batterij rode-LEDgaat
branden wanneer het
toestel aan het laden is
en de LED gaat uit
wanneer het laden is
voltooid.
1. De knop Afspelen/Pauzeren/Bellen-beantwoorden indrukken en loslaten.
2. Regel het volume met de bedieningsknop Volume omlaag/omhoog.
3. Druk de knop Afspelen/Pauzeren/Bellen-beantwoorden in om een oproep af te breken.
Standby-modus:
Clipster Active gaat uit na 15 minuten als er geen audio wordt afgespeeld, en geen Bluetoothverbinding is.
20
Page 21

Appendix (English)
Technical Specifications
Battery: Built-in rechargeable lithium-Ion battery
Battery Life: 3-4 hours (at max volume); 15-20 hours (at 50% volume)
Power input for charging: 5V DC, 0.2A
Speaker Output: 1.5W
Supported Bluetooth Profile: A2DP, HFP, and AVRCP
Trademarks and Licenses
ION Audio is a trademark of ION Audio, LLC, registered in the U.S. and other countries.
The Bluetooth word mark and logos are owned by the Bluetooth SIG, Inc. and any use of such
marks by ION Audio is under license.
All other product or company names are trademarks or registered trademarks of their
respective owners.
Allgemeinhinweis zur Konformitätserklärung: Hiermit erklären wir, daß sich das
Gerät Clipster Active in Übereinstimmung mit den grundlegenden Anforderungen der
europäischen Richtlinie 1999/5/EG befindet. Die vollständige EG
Konformitätserklärung kann unter folgender Adresse angefordert werden:
inMusic GmbH
Halskestrasse 16-18
D – 47877 Willich
GERMANY
21
Page 22

Page 23

Page 24

ionaudio.com
Manual Version 1.0
 Loading...