

Page 1

Clipster
QUICKSTART GUIDE
ENGLISH ( 3 – 6 )
GUÍA DE INICIO RÁPIDO
ESPAÑOL ( 7 – 10 )
GUIDE D'UTILISATION RAPIDE
FRANÇAIS ( 11 – 17 )
GUIDA RAPIDA
ITALIANO ( 15 – 18 )
KURZANLEITUNG
DEUTSCH ( 19 – 22 )
SNELSTARTGIDS
NEDERLANDS ( 23 – 26 )
Page 2

Page 3

t
QUICKSTART GUIDE (ENGLISH)
1. Make sure all items listed in the BOX
CONTENTS are included in the box.
2. READ SAFETY INSTRUCTION BOOKLET
BEFORE USING THE PRODUCT.
3. MAKE SURE THAT YOU HAVE
COMPLETELY CHARGED THE BATTERY
PRIOR TO FIRST USE FOR MAXIMUM
BATTERY LIFE.
Go to www.ionaudio.com for product registration.
INTRODUCTION
Clipster features a classic style carabiner “hook” that attaches easily to a belt loop,
backpack strap, or purse handle. Clipster is equipped with a rechargeable battery and
Bluetooth® technology, enabling you to listen to your favorite music wirelessly
anywhere. Its full-range speaker provides clear, undistorted audio indoors and
outdoors. So go climb that towering, cloud-capped mountain. Go ride that uncharted
bike trail. A new journey begins now with Clipster – your soundtrack to adventure!
Bluetooth is a registered trademark owned by Bluet ooth SIG, Inc. and any use by ION Audio is
under license. Other trademarks and trade names are those of their respective o wners.
BOX CONTENTS
Clipster
Micro USB Cable
Quickstart Guide
Safety Instructions &
Warranty Information
Bookle
3
Page 4
SETUP
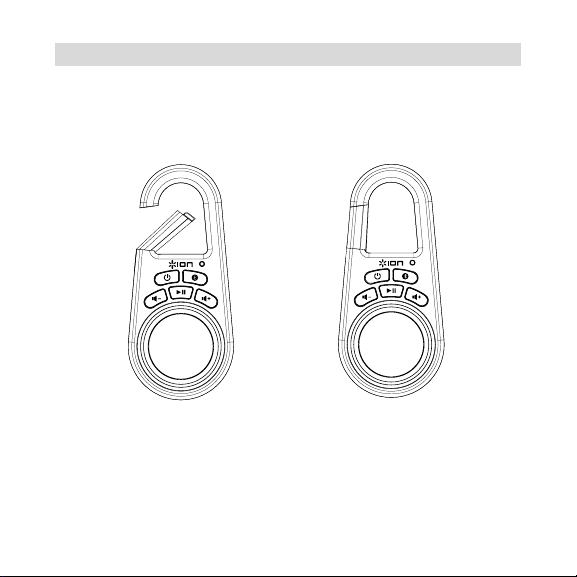
1. Connect Clipster’s hook to secure material such as a backpack loop, belt loop or
purse handle.
2. Make sure the hook is locked into place (see pictures below).
UNLOCKED
4
LOCKED
Page 5
PARTS DESCRIPTION
9
10
1
2
3
4
5
6
7
8
9
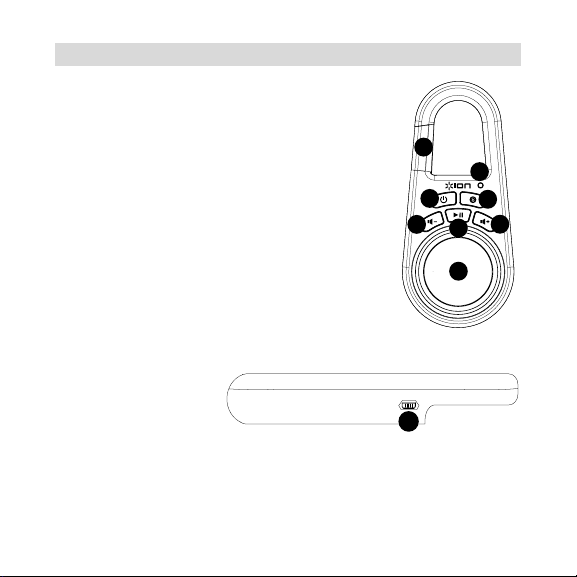
1. Power On/Off: Hold this button down for 2 seconds to
power Clipster on/off.
2. Pairing button: Hold this button down for 2 seconds to
activate pairing mode on Clipster. If you do not unpair
your device, Clipster will "remember" your device even if
it is powered off then on again.
3. LED: Indicates various states of activity on Clipster. See
the Clipster LED activity callout box for more details.
4. Volume Down: Decreases the speaker volume on
Clipster.
5. Volume Up: Increases the speaker volume on Clipster.
6. Play/Pause: Press this button to start/pause music
playback on a paired music device.
7. Speaker: This full-range speaker plays audio from a
paired Bluetooth device.
8. Clip: Use this carabiner style “hook” to clip to a belt loop,
backpack, or purse.
9. Micro-USB Port: Use the included micro-USB cable to
connect this port to a computer USB port to charge
Clipster.
5
Page 6

PAIRING A BLUETOOTH DEVICE
1. Turn on Clipster by pressing the
power button for 2 seconds.
2. Hold the Pairing button for two
seconds and wait until the blue
Pairing LED blinks rapidly.
3. Navigate to your Bluetooth device’s
setup screen, find “ION Clipster” and
connect.
4. If your device requires a passcode or
PIN, enter the number zero (“0”) four
times.
Note: The next time you approach Clipster with your Bluetooth device, it will
automatically re-pair.
5. If your Bluetooth device is not able to pair to Clipster, hold the Pairing button for 2
seconds on Clipster to break previous Bluetooth connections and reset the
Bluetooth module.
Note: Maximum range will be achieved when using devices with Bluetooth 4.0.
6. To pair a new device, hold the Pairing button for 2 seconds.
7. To connect to another Bluetooth device, hold the Pairing button for 2 seconds.
Repeat Step 3.
8. To disconnect a paired Bluetooth device, hold the Pairing button for 2 seconds.
Note: If you experience trouble pairing or playing music, update your device's OS.
Clipster LED activity:
Blinking Blue LED = Bluetooth
pairing mode
Solid Blue LED = Connected to
a Bluetooth device
Blinking Red LED = Battery is
low and needs to be recharged
6
Page 7

GUÍA DE INICIO RÁPIDO (ESPAÑOL)
1. Asegúrese que todos los artículos
incluidos en la CONTENIDO DE LA
CAJA estén incluidos en la caja.
2. LEA EL FOLLETO DE
INSTRUCCIONES DE SEGURIDAD
ANTES DE UTILIZAR EL PRODUCTO.
3. PARA ASEGURAR UNA MÁXIMA VIDA
ÚTIL DE LA BATERÍA, CÁRGUELA
COMPLETAMENTE ANTES DE
USARLA POR PRIMERA VEZ.
Visite www.ionaudio.com para registrar el producto.
INTRODUCCIÓN
Clipster incluye un "gancho" estilo carabinero clásico que puede fijarse fácilmente a
un cinturón, correa de mochila o manija de cartera. Clipster está equipado con una
batería recargable y tecnología Bluetooth®, que le permite escuchar su música
favorita en forma inalámbrica desde cualquier lugar. Su altavoz de rango completo
brinda un audio claro y sin distorsiones en ambientes interiores y exteriores. De modo
que puede trepar a esa montaña cuya cima la tapan las nubes. Vaya en bicicleta por
ese sendero que no figura en los mapas. ¡Comienza un nuevo viaje con Clipster —su
pista de sonido que conduce a la aventura!
CONTENIDO DE LA CAJA
Clipster
Cable Micro USB
Guía de inicio rápido
Folleto de instrucciones de
seguridad e información
sobre la garantía
7
Page 8
INSTALACIÓN
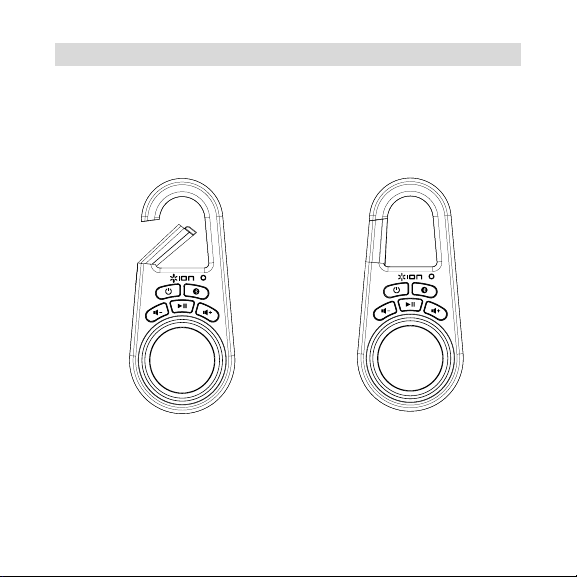
1. Conecte el gancho del Clipster a un material firme como la correa de una mochila,
el cinturón o la manija de la cartera.
2. Asegúrese de que el gancho quede trabajo en su sitio (vea las ilustraciones de
abajo).
DESTRABADO
TRABADO
8
Page 9
9
10
1
2
3
4
5
6
7
8
9
DESCRIPCIÓN DE LAS PARTES
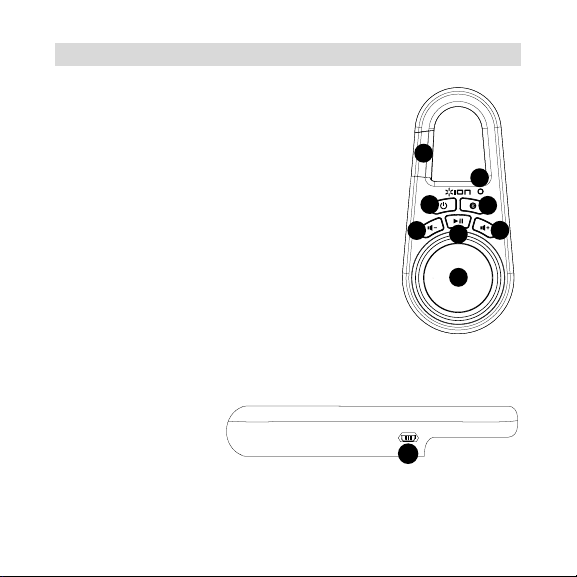
1. Encendido/apagado: Mantenga pulsado este botón
durante 2 segundos para encender y apagar el Clipster.
2. Botón de apareamiento: Mantenga pulsado este botón
durante 2 segundos para activar el modo de
apareamiento del Clipster. Si no desaparea su
dispositivo, el Clipster lo "recordará" aunque lo apague y
vuelva a encender.
3. LED: Indica los diversos estados de actividad del
Clipster. Para más detalles, vea el recuadro Actividad de
los LED del Clipster.
4. Bajar volumen: Disminuye el volumen del altavoz del
Clipster.
5. Subir volumen: Aumenta el volumen del altavoz del
Clipster.
6. Reproducir/Pausa: Pulse este botón para iniciar o poner
en pausa la reproducción de música en un dispositivo
musical apareado.
7. Altavoz: Este altavoz de gama completa reproduce el
audio proveniente de un dispositivo Bluetooth.
8. Clip: Use este gancho estilo carabinero para enganchar el equipo a un cinturón,
mochila o cartera.
9. Puerto Micro USB: Use el puerto micro-USB cable incluido para conectarlo al
puerto USB de una computadora a fin de cargar el Clipster.
9
Page 10

CÓMO APAREAR UN DISPOSITIVO
BLUETOOTH
1. Encienda el Clipster pulsando el
botón de encendido durante 2
segundos.
2. Mantenga pulsado el botón de
apareamiento durante dos
segundos y espere a que el LED
Pairing destelle rápidamente con
luz azul.
3. Navegue a la pantalla de
configuración de su dispositivo
Bluetooth, busque “ION Clipster” y
conecte.
4. Si su dispositivo solicita un código de contraseña o PIN, ingrese el número ("0")
cuatro veces.
Nota: La próxima vez que se acerque al Clipster con su dispositivo Bluetooth, se
volverá a aparear automáticamente.
5. Si su dispositivo Bluetooth no es capaz de aparearse con el Clipster, pulse el
botón de apareamiento del Clipster para romper las conexiones Bluetooth
anteriores y reinicie el módulo Bluetooth.
Nota: El alcance máximo se logra cuando se utilizan dispositivos con Bluetooth
4.0.
6. Para aparear un nuevo dispositivo, mantenga pulsado el botón de apareamiento
durante 2 segundos.
7. Para conectarse a otro dispositivo Bluetooth, mantenga pulsado el botón de
apareamiento durante 2 segundos. Repita el paso 3.
8. Para desconectar un dispositivo Bluetooth apareado, mantenga pulsado el botón
de apareamiento durante 2 segundos.
Nota: Si tiene problemas para aparear su dispositivo o reproducir música,
actualice el programa operativo de su dispositivo.
Actividad de los LED del Clipster:
LED azul parpadeante = Modo de
apareamiento de Bluetooth
LED con luz azul permanente =
Conectado a un dispositivo
Bluetooth
LED rojo parpadeante = La batería
tiene poca carga y debe recargarse
10
Page 11

GUIDE DE DÉMARRAGE RAPIDE (FRANÇAIS)
1. Veuillez vous assurer que tous les articles
énumérés dans la CONTENU DE LA
BOÎTE sont inclus dans la boîte.
2. VEUILLEZ LIRE LE LIVRET DES
CONSIGNES DE SÉCURITÉ AVANT
D'UTILISER LE PRODUIT.
3. ASSUREZ-VOUS D'AVOIR
COMPLÈTEMENT RECHARGÉ LA PILE
AVANT LA PREMIÈRE UTILISATION
AFIN D’AUGMENTER SA DURÉE DE VIE.
Pour enregistrer le produit, veuillez visiter www.ionaudio.com.
PRÉSENTATION
Le Clipster dispose d’un mousqueton qui permet de le fixer sur une ceinture, un sac à
dos ou à un sac à main. Il est doté d’une pile rechargeable et de la technologie
Bluetooth®, vous permettant d’écouter votre musique sans fil de n’importe où. Son
haut-parleur pleine gamme fournit un son clair et sans distorsion, à l’intérieur comme à
l’extérieur. Vous pouvez maintenant écouter votre musique du haut de la plus grande
montagne ou d’un sentier de vélo inexploré. Une nouvelle ère commence maintenant
avec Clipster – votre bande sonore pour l'aventure!
CONTENU DE LA BOÎTE
Clipster
Câble micro-USB
Guide de démarrage
rapide
Consignes de sécurité et
information concernant
la garantie
11
Page 12

INSTALLATION
1. Attachez le mousqueton du Clipster à une boucle de sac à dos, de ceinture ou à la
poignée d’un sac à main.
2. Veillez à ce que le mousqueton soit bien verrouillé en place (voir photos ci-
dessous).
DÉVERROUILLÉ
VERROUILLÉ
12
Page 13

9
10
1
2
3
4
5
6
7
8
9
DESCRIPTION
1. Interrupteur d’alimentation : Maintenez ce bouton
enfoncé pendant 2 secondes afin de mettre le Clipster
sous et hors tension.
2. Jumelage : Maintenez ce bouton enfoncé pendant 2
secondes afin d’activer le mode de jumelage du Clipster.
Si vous ne faites pas le déjumelage, le Clipster se
souviendra de l’appareil même s’il est mis hors tension et
à nouveau sous tension.
3. DEL : Indique les différents états d'activité du Clipster.
Veuillez consulter l’encadré Légende du témoin DEL
pour plus de détails.
4. Volume - : Cette touche permet de diminuer le volume du
haut-parleur du Clipster.
5. Volume + : Cette touche permet d’augmenter le volume
du haut-parleur du Clipster.
6. Lecture/pause : Cette touche permet de lancer la lecture
ou de pauser la musique sur l’appareil jumelé.
7. Haut-parleur : Ce haut-parleur pleine gamme joue
l’audio d'un appareil Bluetooth jumelé.
8. Mousqueton : Utilisez ce mousqueton afin de l'attacher à une ceinture, un sac à
dos ou à un sac à main.
9. Port micro-USB : Utilisez le câble micro-USB inclus afin de relier ce port au port
USB d’un ordinateur afin de recharger la pile du Clipster.
13
Page 14

JUMELAGE D'UN APPAREIL BLUETOOTH
1. Allumez le Clipster en appuyant
sur l’interrupteur d’alimentation
pendant 2 secondes.
2. Maintenez la touche de jumelage
enfoncée pendant deux secondes
et attendez que la DEL de
jumelage bleue clignote
rapidement.
3. Accédez à l'écran de configuration
de votre appareil Bluetooth et
recherchez « ION Clipster » et
lancez le jumelage.
4. Si votre appareil vous demande un mot de passe ou un NIP, saisissez le numéro
zéro (« 0 ») quatre fois.
Remarque : La prochaine fois que vous approcherez votre appareil Bluetooth du
Clipster, il devrait se jumeler automatiquement.
5. Si votre appareil Bluetooth ne parvient pas à se jumeler au Clipster, appuyez sur la
touche de jumelage afin de supprimer la connexion à d'autres appareils Bluetooth
et remettre à zéro le module Bluetooth.
Remarque : La plage maximale peut être atteinte avec l’utilisation d’appareils
dotés de Bluetooth 4.0.
6. Pour jumeler un nouvel appareil, maintenez la touche de jumelage enfoncée
pendant 2 secondes.
7. Pour jumeler un autre appareil, maintenez la touche de jumelage enfoncée
pendant 2 secondes. Répétez l'étape 3.
8. Pour déjumeler un appareil Bluetooth, maintenez la touche de jumelage enfoncée
pendant 2 secondes.
Remarque : Si vous éprouvez de la difficulté à jumeler votre appareil ou à faire
jouer de la musique, faites une mise à jour du système d'exploitation de votre
appareil.
Légende du témoin DEL
DEL bleue clignotante = Jumelage
Bluetooth
DEL bleue fixe = Appareil Bluetooth
jumelé
DEL rouge clignotante = Pile faible,
doit être rechargée
14
Page 15

GUIDA RAPIDA (ITALIANO)
1. Assicurarsi che tutti gli elementi elencati
nella CONTENUTI DELLA CONFEZIONE
si trovino nella confezione.
2. LEGGERE ATTENTAMENTE IL
LIBRETTO DELLE ISTRUZIONI DI
SICUREZZA PRIMA DI UTILIZZARE IL
PRODOTTO.
3. PER GARANTIRE LA MASSIMA DURATA
DELLA BATTERIA, ASSICURARSI DI
AVERLA CARICATA COMPLETAMENTE
PRIMA DEL PRIMO UTILIZZO.
Recarsi alla pagina www.ionaudio.com per la registrazione del prodotto.
INTRODUZIONE
Il Clipster ha una classica forma a “moschettone” e si fissa facilmente ad una cintura,
ad uno zaino o al manico di una borsa. Il Clipster è dotato di una batteria ricaricabile e
di tecnologia Bluetooth® che consentono di ascoltare la propria musica preferita senza
fili, ovunque ci si trovi. Il suo altoparlante a gamma completa offre un audio nitido e
non distorto al chiuso e all'aperto. Andate pure a scalare quella montagna torreggiante
avvolta da nubi. Pedalate su quella pista non segnata sulle mappe. Un nuovo viaggio
inizia ora con Clipster – la colonna sonora delle vostre avventure!
CONTENUTI DELLA
CONFEZIONE
Clipster
Cavo Micro USB
Guida rapida
Istruzioni di sicurezza e
garanzia
15
Page 16

SETUP
1. Collegare il gancio del Clipster a un punto sicuro quale uno zaino, una cintura o al
manico di una borsa.
2. Assicurarsi che il gancio sia ben fissato (si veda l'immagine qui di seguito).
APERTO
CHIUSO
16
Page 17

9
10
1
2
3
4
5
6
7
8
9
DESCRIZIONE DELLE PARTI
1. Accensione/spegnimento (on/off): tenere premuto
questo pulsante per 2 secondi per accendere/spegnere il
Clipster.
2. Tasto di accoppiamento: tenere premuto questo tasto
per 2 secondi per attivare la modalità di accoppiamento
del Clipster. Se non si annulla l'accoppiamento del
dispositivo, il SOUND SPLASH lo "ricorderà" anche se
viene spento e riacceso.
3. LED: indica vari stati di attività del Clipster. Si veda la
casella attività Clipster LED per maggiori dettagli.
4. Volume giù: abbassa il volume dell'altoparlante del
Clipster.
5. Volume su: alza il volume dell'altoparlante del Clipster.
6. Play/Pause: premere questo pulsante per
avviare/interrompere momentaneamente la riproduzione
della musica da un dispositivo accoppiato.
7. Altoparlante: questo altoparlante a gamma completa
riproduce audio da un dispositivo Bluetooth accoppiato.
8. Clip: servirsi del suo stile a moschettone per agganciare
il dispositivo a una cintura, a uno zaino o a una borsa.
9. Porta micro-USB: servirsi del cavo micro-USB in dotazione per collegare questa
porta alla porta USB di un computer per caricare il Clipster.
17
Page 18

ALLINEAMENTO DI UN DISPOSITIVO
BLUETOOTH
1. Accendere il Clipster premendo
il tasto di accensione per 2
secondi.
2. Tenere premuto il tasto di
accoppiamento per due secondi
e attendere fino a quando il LED
blu di accoppiamento lampeggia
rapidamente.
3. Navigare nella schermata di
configurazione del dispositivo
Bluetooth, trovare “ION Clipster”
e collegarlo.
4. Se il dispositivo chiede un codice o PIN, inserire il numero zero ("0") quattro volte.
Nota bene: la prossima volta che ci si avvicina al Clipster con il dispositivo
Bluetooth, questo si accoppierà automaticamente.
5. Se il dispositivo Bluetooth non è in grado di effettuare l'accoppiamento al Clipster,
premere il tasto di accoppiamento (Pairing) del Clipster per interrompere
collegamenti Bluetooth precedenti e azzerare il modulo Bluetooth.
Nota bene: la portata massima sarà raggiunta utilizzando dispositivi dotati di
Bluetooth 4.0.
6. Per accoppiare un nuovo dispositivo, tenere premuto il tasto di accoppiamento per
due 2 secondi.
7. Per collegare un altro dispositivo Bluetooth, tenere premuto il tasto di
accoppiamento per due 2 secondi. Ripetere la fase 3.
8. Per scollegare un dispositivo Bluetooth accoppiato, tenere premuto il tasto di
accoppiamento per due 2 secondi.
Nota bene: in caso di problemi nell'accoppiare gli apparecchi o nel riprodurre la
musica, aggiornare il sistema operativo del dispositivo.
Attività LED Clipster:
LED blu lampeggiante = Modalità di
accoppiamento Bluetooth
LED blu fisso = Collegato a un
dispositivo Bluetooth
LED rosso lampeggiante = La
batteria è scarica, deve essere
ricaricata
18
Page 19

SCHNELLSTART-ANLEITUNG (DEUTSCH)
1. Achten Sie darauf, dass alle in der
LIEFERUMFANG aufgeführten Teile in der
Schachtel enthalten sind.
2. LESEN SIE DIE SICHERHEITSHINWEISE,
BEVOR SIE DAS PRODUKT
VERWENDEN.
3. STELLEN SIE SICHER, DASS DIE
BATTERIE VOR DER ERSTEN
VERWENDUNG VOLLSTÄNDIG
AUFGELADEN IST, UM EINE MAXIMALE
BATTERIELEBENSDAUER ZU ERZIELEN.
Besuchen Sie www.ionaudio.com, um Ihr Produkt zu registrieren.
EINFÜHRUNG
Clipster besitzt einen klassischen Karabinerhaken, der sich leicht an einer
Gürtelschlaufe, einem Rucksackgurt oder einem Handtaschenhenkel befestigen lässt.
Clipster verfügt über einen wieder aufladbaren Akku und die Bluetooth®-Technologie,
so dass Sie Ihre Lieblingsmusik überall drahtlos hören können. Seine Full-RangeLautsprecher sorgen für eine klare, unverzerrte Audiowiedergabe sowohl im Haus als
auch im Freien. Jetzt können Sie Bergspitzen erklimmen, die hoch in die Wolken
ragen. Oder einen unerforschten Radweg nehmen. Mit Clipster beginnt eine neue
Reise für Sie - Ihr Soundtrack für Ihre Abenteuer!
LIEFERUMFANG
Clipster
Mikro-USB-Kabel
Schnellstart-Anleitung
Sicherheitshinweise &
Garantieinformationen
19
Page 20

SETUP
1. Bringen Sie den Haken des Clipster an einem zugfesten Material an, wie etwa
einem Rucksackgurt, einer Gürtelschlaufe oder dem Griff einer Handtasche.
2. Vergewissern Sie sich, dass der Karabiner geschlossen ist und einrastet (siehe
folgende Bilder).
OFFEN
GESCHLOSSEN
20
Page 21

9
10
1
2
3
4
5
6
7
8
9
BESCHREIBUNG DER TEILE
1. Ein-/Ausschalter: Halten Sie diese Taste 2 Sekunden
lang gedrückt, um Clipster ein-/auszuschalten.
2. Koppel-Taste: Halten Sie diese Taste 2 Sekunden lang
gedrückt, um den Koppel-Modus des Clipster zu
aktivieren. Wenn Sie Ihr Gerät nicht entkoppeln, "erinnert"
sich Clipster an Ihr Gerät, auch wenn es ausgeschaltet
und wieder eingeschaltet wird.
3. LED: Zeigt verschiedene Aktivitäten des Clipster an.
Beachten Sie den hervorgehobenen Text Clipster LED-
Aktivität für nähere Details.
4. Lautstärke reduzieren: Reduziert die Lautstärke des
Clipster.
5. Lautstärke erhöhen: Erhöht die Lautstärke des Clipster.
6. Wiedergabe/Pause: Drücken Sie diese Taste, um die
Musikwiedergabe auf einem gekoppelten Musik-Player zu
starten bzw. zu pausieren.
7. Lautsprecher: Der Full-Range-Lautsprecher spielt Audio
von einem gekoppelten Bluetooth-Gerät.
8. Clip: Mit diesem karabinerähnlichem "Haken" können Sie
das Gerät an Gürtelschlaufen, Rucksäcken oder Handtaschen befestigen.
9. Mikro-USB-Port: Verwenden Sie das mitgelieferte Mikro-USB-Kabel, um diesen
Port mit dem USB-Port eines Computers zu verbinden, um Clipster aufzuladen.
21
Page 22

KOPPELN EINES BLUETOOTH-GERÄTS
1. Schalten Sie Clipster ein, indem Sie
den Ein-/Ausschalter 2 Sekunden lang
gedrückt halten.
2. Halten Sie die Koppel-Taste zwei
Sekunden lang gedrückt und warten
Sie, bis die blaue Koppel-LED schnell
blinkt.
3. Navigieren Sie zum Setup-Bildschirm
Ihres Bluetooth-Geräts, suchen Sie
"ION Clipster" und verbinden Sie die
Geräte.
4. Wenn Ihr Gerät nach einem Passwort
oder einer PIN fragt, geben Sie
viermal die Zahl Null ("0") ein.
Hinweis: Wenn Sie das nächste Mal ein Bluetooth-Gerät in die Nähe Ihres Clipster
bringen, wird es automatisch gekoppelt.
5. Wenn Ihr Bluetooth-Gerät nicht mit Clipster gekoppelt werden kann, dann halten
Sie die Koppel-Taste 2 Sekunden lang gedrückt, um die vorherigen BluetoothVerbindungen zu unterbrechen und setzen das Bluetooth-Modul zurück.
Hinweis: Die maximale Reichweite wird erreicht, wenn Sie Geräte mit Bluetooth
4.0 verwenden.
6. Um ein neues Gerät zu verbinden, halten Sie die Koppel-Taste 2 Sekunden lang
gedrückt.
7. Um es mit einem anderen Bluetooth-Gerät zu verbinden, halten Sie die Koppel-
Taste 2 Sekunden lang gedrückt. Wiederholen Sie Schritt 3.
8. Um ein gekoppeltes Bluetooth-Gerät zu trennen, halten Sie die Koppel-Taste 2
Sekunden lang gedrückt.
Hinweis: Wenn Sie Probleme bei der Musikwiedergabe oder beim Koppeln Ihres
Gerätes haben, aktualisieren Sie das OS Ihres Gerätes.
Clipster LED-Aktivität:
Blau blinkende LED =
Bluetooth-Koppelmodus
Durchgehend blau leuchtende
LED = Mit einem Bluetooth-Gerät
verbunden
Rot blinkende LED = Der Akku
hat einen niedrigen Ladestand
und muss aufgeladen werden
22
Page 23

SNELSTARTGIDS (NEDERLANDS)
1. Zorg ervoor dat alle artikelen opgesomd in
de INHOUD VAN DE DOOS zijn
inbegrepen zich in de doos bevinden.
2. LEES DE
VEILIGHEIDSVOORSCHRIFTEN
VOORALEER HET PRODUCT TE
GEBRUIKEN.
3. ZORG ERVOOR DAT DE ACCU VOOR
HET EERSTE GEBRUIK VOLLEDIG IS
OPGELADEN, VOOR EEN MAXIMALE
LEVENSDUUR VAN DE ACCU.
Ga naar www.ionaudio.com voor productregistratie.
INLEIDING
De Clipster beschikt over een klassieke karabijnhaak die u gemakkelijk aan een
riemlus, bandje van uw rugzak of de handgreep van uw handtas kunt bevestigen. De
Clipster is voorzien van een herlaadbare batterij en Bluetooth®-technologie, waardoor
u overal draadloos naar uw favoriete muziek kunt luisteren. De speaker met volledig
bereik zorgt voor een duidelijk, onvervormd geluid, zowel binnen als buiten. Die
torenhoge berg, die schuilgaat achter de wolken, kunt u dus nu gaan beklimmen. Of u
kunt eindelijk die fietsroute berijden die op geen enkele kaart te vinden is. Met de
Clipster begint u aan een nieuwe reis: een soundtrack voor avontuur!
INHOUD VAN DE DOOS
Clipster
Micro-USB-kabel
Snelstartgids
Veiligheidsvoorschriften
& boekje met garantieinformatie
23
Page 24

INSTALLATIE
1. Verbindt de haak van de Clipster met een veilig materiaal zoals het lusje aan een
rugzak, een riemlus of de handgreep van uw handtas.
2. Zorg ervoor dat de haak zich in de juiste positie bevindt.
ONTGRENDELD
24
VERGRENDELD
Page 25

9
10
1
2
3
4
5
6
7
8
9
BESCHRIJVING VAN DE ONDERDELEN
1. Voeding Aan/Uit: Hou deze knop 2 seconden lang
ingedrukt om de Clipster aan of uit te zetten.
2. Koppelingsknop: Hou deze knop 2 seconden lang
ingedrukt om de Clipster in koppelmodus te zetten. Als u
uw apparaat niet ontkoppelt, dan onthoudt de Clipster uw
apparaat, ook al wordt het eerst uit- en daarna
aangeschakeld.
3. LED: Geeft de verschillende activiteitsstatus van de
Clipster weer. Zie voor meer details het bijschrift
Activiteits-LED Clipster.
4. Volume omlaag: Vermindert het speakervolume op de
Clipster.
5. Volume omhoog: Verhoogt het speakervolume op de
Clipster.
6. Afspelen/pauzeren: Druk op deze knop om op een
gekoppeld muziekapparaat het afspelen van muziek te
starten/pauzeren.
7. Speaker: De speaker met vol bereik speelt audio af van
een gekoppeld Bluetooth-apparaat.
8. Clip: Gebruik deze karabijnhaak om de Clipster vast te haken aan een riemlus,
een rugzak of handtas.
9. Micro-USB-poort: Gebruik de meegeleverde micro-USB-kabel om deze poort aan
te sluiten op de USB-poort van een computer en de Clipster op te laden.
25
Page 26

EEN BLUETOOTH-APPARAAT KOPPELEN
1. Zet de Clipster aan door 2 seconden
lang op de aan/uit-knop te drukken.
2. Hou de koppelknop twee seconden
lang ingedrukt en wacht tot de blauwe
koppel-LED snel begint te knipperen.
3. Navigeer naar het instelscherm van
uw Bluetooth-apparaat, zoek naar
“ION Clipster” en maak verbinding.
4. Als uw apparaat een wachtwoord of
PIN-code nodig heeft, voer dan vier
keer nul (“0”) in.
Opmerking: De volgende keer dat u de Clipster met uw Bluetooth-apparaat
benadert, zal het automatisch opnieuw verbinding maken.
5. Als uw Bluetooth-apparaat zich niet kan koppelen aan de Clipster, druk dan twee
seconden lang de koppelknop in om de vorige Bluetooth-verbindingen te verbreken
en de Bluetooth-module opnieuw in te stellen.
Opmerking: Voor het maximumbereik moeten apparaten met Bluetooth 4.0
worden gebruikt.
6. Om een nieuw apparaat te koppelen, moet u de koppelknop 2 seconden lang
ingedrukt houden.
7. Om verbinding te maken met een ander Bluetooth-apparaat, moet u de koppelknop
2 seonden lang ingedrukt houden. Herhal stap 3.
8. Om een gekoppeld Bluetooth-apparaat te ontkoppelen, moet u de koppelknop 2
seconden lang ingedrukt houden.
Opmerking: Als u problemen ondervindt bij het koppelen van uw apparaat of het
afspelen van muziek, update dan het besturingssysteem van uw apparaat.
LED-activiteit Clipster:
Knipperende Blauwe LED =
koppelmodus Bluetooth
Effen Blauwe LED = verbonden
met een Bluetooth-apparaat
Knipperende rode LED = de
batterij is bijna leeg en moet
herladen worden.
26
Page 27

SPECIFICATIONS
Battery: Built-in rechargeable lithium-Ion battery
Battery Life: 3.3 hours (with volume at 70%)
Power: Power adapter sold separately. You may use your tablet's/smartphone's
10W or 5W USB power adapter. 10W, 5V DC, 2.1A recommended for fastest
charge time.
Speaker Output: 1.5W
Supported Bluetooth Profile: A2DP
27
Page 28

www.ionaudio.com
MANUAL VERSION 1.1
 Loading...