

Page 1

CENTER STAGE
QUICKSTART GUIDE
ENGLISH ( 2 – 4 )
MANUAL DE INICIO RÁPIDO
ESPAÑOL ( 5 – 7 )
GUIDE D'UTILISATION SIMPLIFIÉ
FRANÇAIS ( 8 – 10 )
GUIDA RAPIDA
ITALIANO ( 11 – 13 )
KURZANLEITUNG
DEUTSCH ( 14 – 16 )
SNELSTARTGIDS
NEDERLANDS ( 17 – 19 )
Page 2
QUICK START GUIDE (ENGLISH)
1. Make sure all items listed on the front of this guide are
included in the box.
2. READ SAFETY INSTRUCTION BOOKLET BEFORE USING
THE PRODUCT.
3. Study this setup diagram.
4. Place product in an appropriate position for operation.
5. Make sure all input devices such as microphones, CD players,
MP3 players, and linked amplifiers/PAs are turned off and
volume settings are set at "zero."
6. Connect all devices as shown here.
7. Switch everything on in the following order.
i. audio input sources (i.e. microphones, instruments,
CD/MP3 Players)
ii. CENTER STAGE
8. When shutting down, always reverse this operation by turning off:
i. CENTER STAGE
ii. audio input sources (i.e. microphones, instruments, CD/MP3 Players)
Go to http://www.ionaudio.com
for product registration.
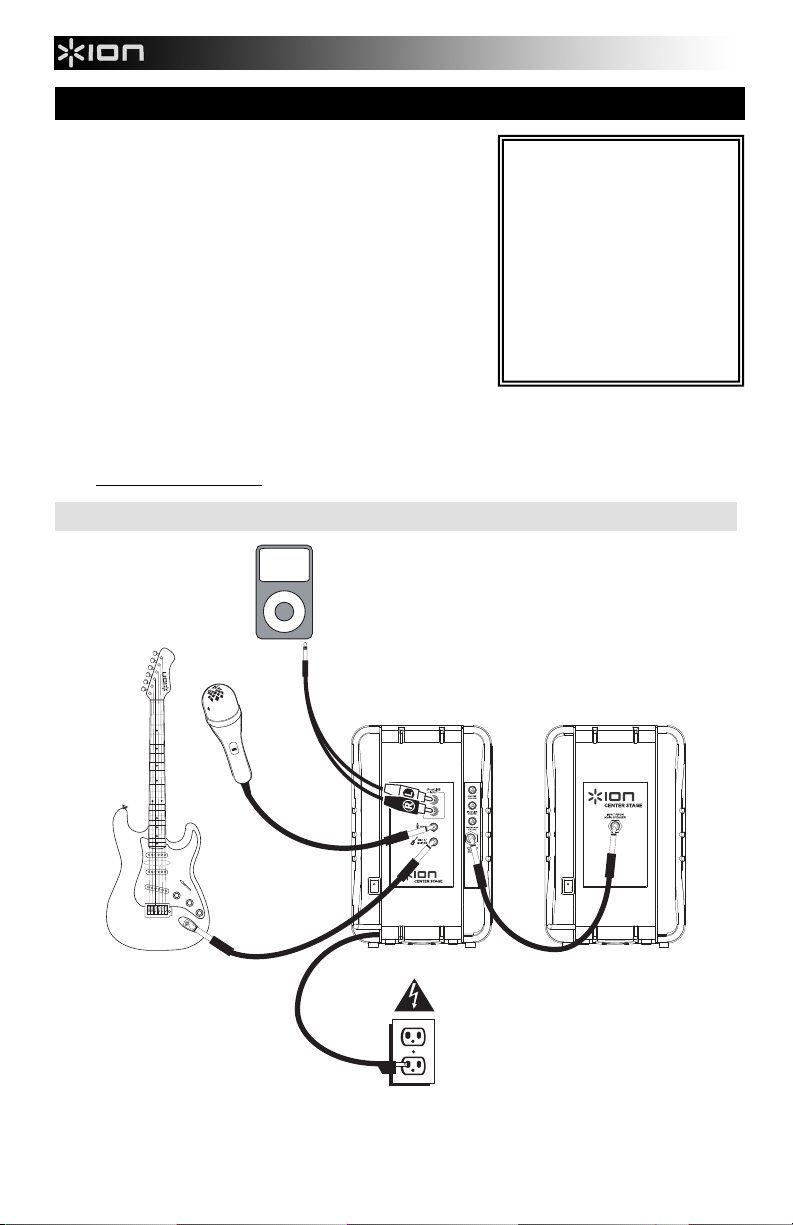
CONNECTION DIAGRAM
iPod *
BOX CONTENTS
CENTER STAGE
Speaker stands
Speaker mounts
Speaker interconnection cable
Microphone with cable
Stereo RCA-to-1/8" (3.5mm)
cable
iPod holder
Quickstart Guide
Safety Instructions & Warranty
Information Booklet
Guitar *
Microphone
Power
* Guitar, guitar cable, and iPod not included.
2
Page 3
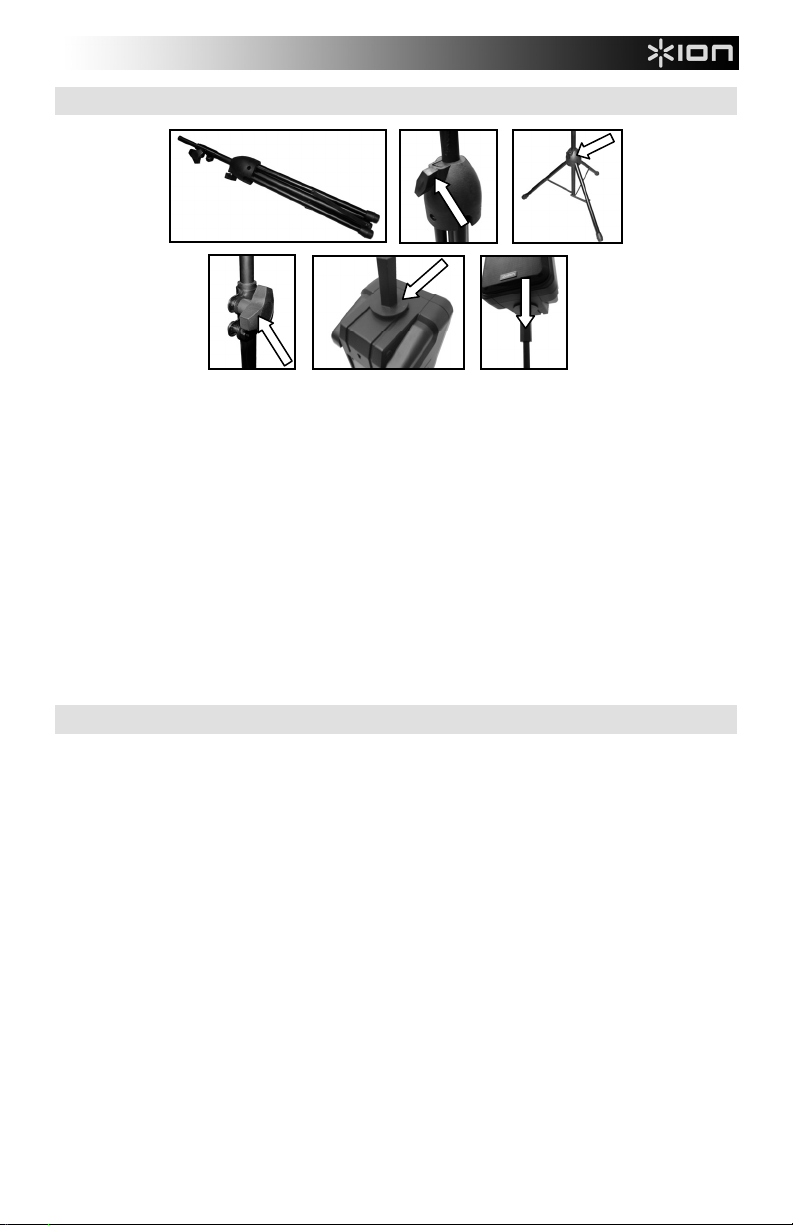
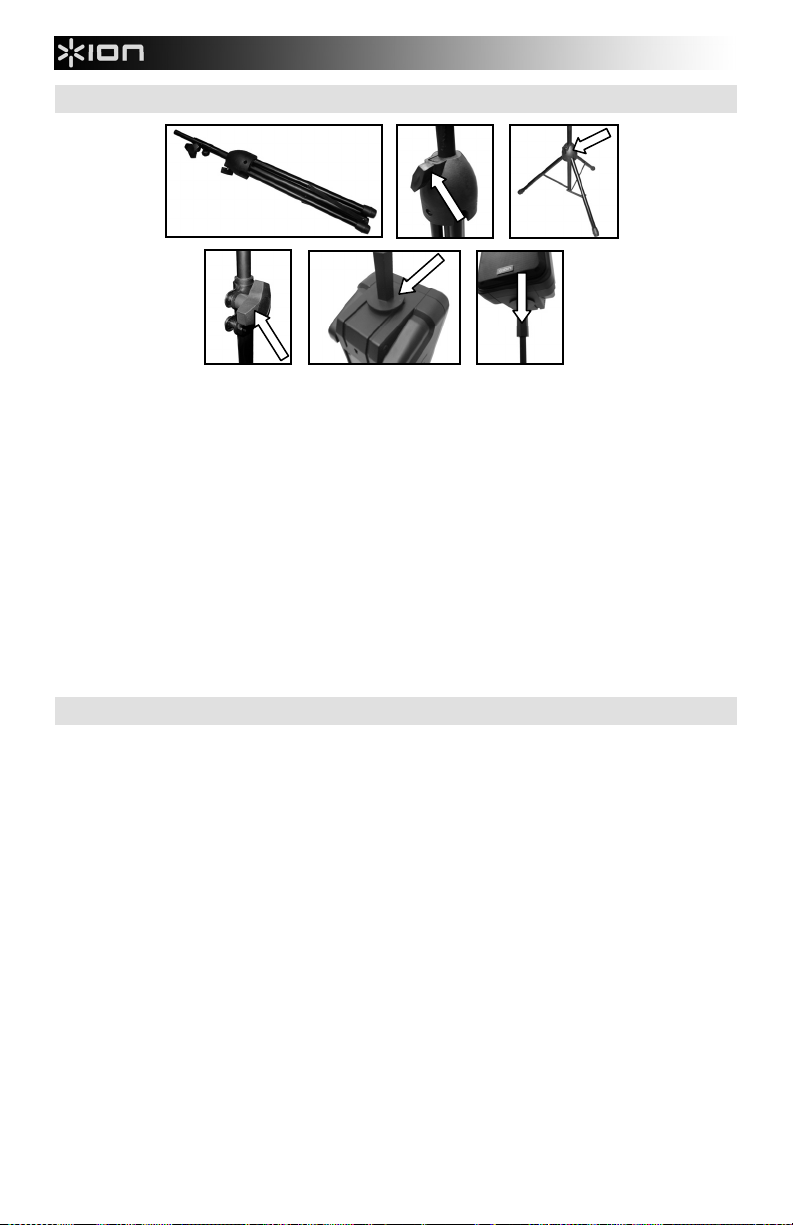
SETTING UP CENTER STAGE
#4 #5
1. Remove the speaker stands from their packaging.
2. On one stand, turn the knob on the base counterclockwise to loosen it.
3. Pull the three legs of the stand apart and/or push the base down the center pole. The legs should be
far enough apart to support the stand and speaker. Turn the knob clockwise to tighten it, securing the
legs in place. (Note: Be careful not to over-tighten the knob.) Place the stand on a flat, stable surface.
4. Turn the knob on the pole counterclockwise to loosen it. Pull the upper portion of the center pole
upward to extend it, then turn the knob clockwise to tighten it again. (Note: Be careful not to over-
tighten the knob.)
5. Screw one of the speaker mounts into the hole underneath one of the speakers.
6. Place the speaker on top of the stand, guiding the end of the pole into the hole of the mount.
7. Repeat Steps 2-6 for the other stand and speaker.
8. Connect the two speakers with the included 1/4" (6.3mm) speaker interconnection cable.
9. Connect your audio device(s) (e.g., iPod, microphone, guitar, etc.) to the appropriate input(s) on the
speaker's rear panel. (See the CONNECTION DIAGRAM and USING CENTER STAGE for more
information).
10. If you are using an iPod, attach the included velcro to the included iPod holder and to the side of the
CENTER STAGE speaker with the inputs and volume controls.
11. Connect the speaker's power cord (attached) to a power outlet.
#1 #2 #3
#6
USING CENTER STAGE
1. Follow the instructions in the SETUP section to set up your CENTER STAGE speakers and stands
properly.
2. Be sure volume levels of CENTER STAGE and your device(s) are turned to "zero."
3. Connect the device(s) you want to play to the appropriate input(s) on the speaker's rear panel:
a. iPod* or other device with an 1/8" output: With the included stereo RCA-to-1/8" (3.5mm) cable,
connect the 1/8" end to the output of your iPod or other device, then connect the RCA plugs to
the iPod/LINE INPUT of the CENTER STAGE. Be sure to color-match the RCA plugs with their
inputs (red to red, white to white). If the device you want to use has a different kind of output
(e.g., 1/4" (6.3mm) or RCA), adapters can be easily purchased at your local electronics store.
b. Microphone: Connect the included microphone's cable to the MIC 1 or MIC 2/GUITAR INPUT.
c. Guitar: Connect your guitar's 1/4" (6.3mm) cable (not included) to the MIC 2/GUITAR INPUT.
4. Turn on your device, then turn on CENTER STAGE's POWER SWITCH.
5. Play your device and turn up its volume. Also, if you connected a device to the iPod/LINE INPUT,
adjust the iPod/LINE VOLUME; if you connected a device to the MIC 1 or MIC 2/GUITAR INPUT,
adjust the MIC 1/MIC 2 VOLUME.
6. Turn up CENTER STAGE's MASTER VOLUME.
Note: Do not remove the speaker grille.
* iPod is a trademark of Apple, Inc., registered in the U.S.A. and other countries.
3
Page 4
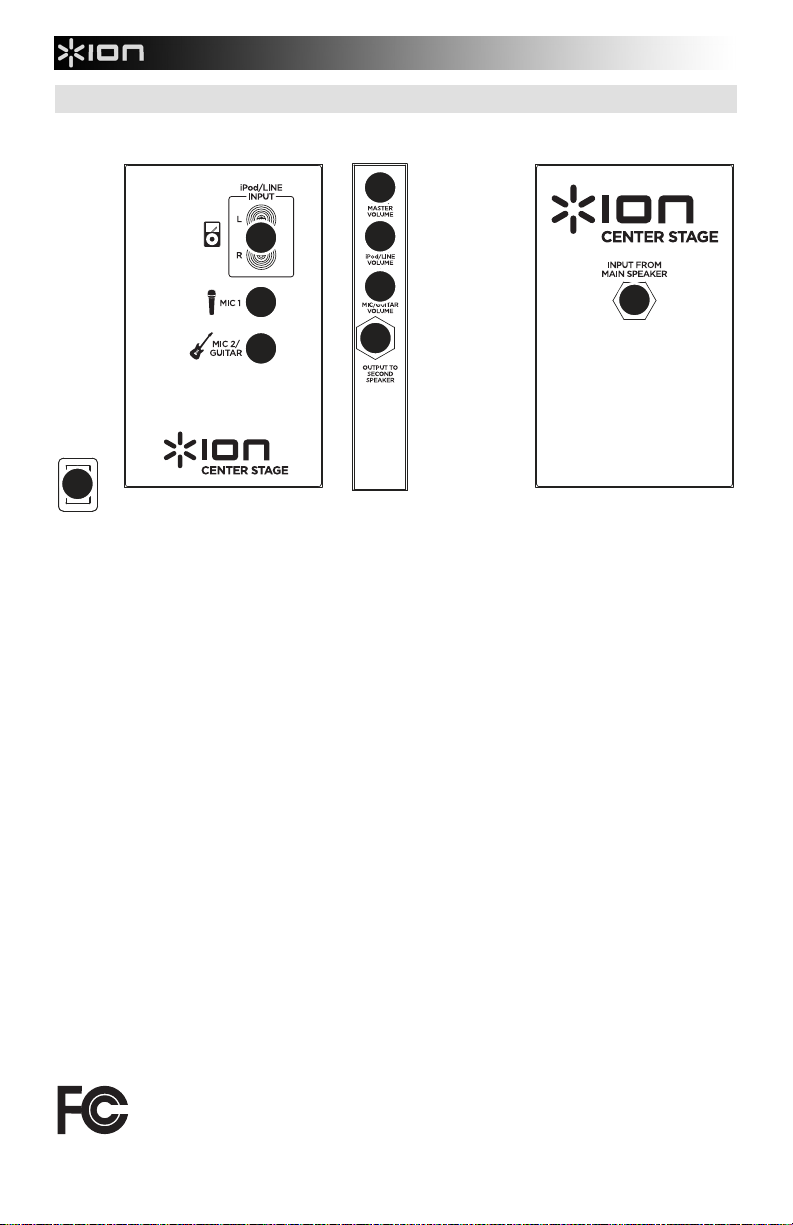
FEATURES
MAIN SPEAKER SECOND SPEAKER
8
3
4
5
2
6
7
2
1
1. POWER ON/OFF SWITCH: Turns CENTER STAGE on or off.
2. OUTPUT TO SECOND SPEAKER & INPUT FROM MAIN SPEAKER: Connect each end of the
included 1/4" (6.3mm) cable to these two jacks, allowing sound to play from both speakers.
3. iPod/LINE INPUT (Stereo RCA): This stereo RCA input can be used to connect a CD, MP3, or other
audio source. The knob controls the level of the iPod and the RCA input. To connect to a portable
device with a 1/8" (3.5mm) headphone jack, you need a standard 1/8"-to-RCA adapter which is not
included.
4. MIC 1 INPUT (1/4"): This mono input accepts a 1/4" (6.3mm) input such as a microphone.
5. MIC 2/GUITAR INPUT (1/4"): This mono input accepts a 1/4" (6.3mm) input such as a microphone,
guitar, or other musical instrument.
6. iPod/LINE VOLUME: This knob controls the iPod/LINE INPUT volume.
7. MIC/GUITAR VOLUME: This knob controls the MIC 1 INPUT and MIC 2/GUITAR INPUT volume.
8. MASTER VOLUME: This knob controls the master volume.
Important: As with all speakers, CENTER STAGE speakers will perform best after an initial "break-in"
period of a few hours of play at a medium volume.
THIS DEVICE COMPLIES WITH PART 15 OF THE FCC RULES. OPERATION IS SUBJECT TO
THE FOLLOWING TWO CONDITIONS: (1) THIS DEVICE MAY NOT CAUSE HARMFUL
INTERFERENCE, AND (2) THIS DEVICE MUST ACCEPT ANY INTERFERENCE RECEIVED,
INCLUDING INTERFERENCE THAT MAY CAUSE UNDESIRED OPERATION.
4
Page 5
MANUAL DE INICIO RÁPIDO (ESPAÑOL)
1. Asegúrese que todos los artículos incluidos al inicio de este
manual estén incluidos en la caja.
2. LEA LAS INSTRUCCIONES DEL FOLLETO DE SEGURIDAD
ANTES DE UTILIZAR EL PRODUCTO.
3. Estudie este diagrama de instalación.
4. Coloque el producto en una posición adecuada para su
funcionamiento.
5. Asegúrese de que todos los dispositivos de entrada tales como
micrófonos, reproductores de CD, reproductores MP3 y
amplificadores/sistemas de amplificadores para altavoces estén
apagados y con el control de volumen en "cero".
6. Conecte todos los dispositivos como se muestra aquí.
7. Encienda todo en el siguiente orden:
i. fuentes de entrada de audio (por ejemplo, micrófonos,
instrumentos, reproductores de CD/MP3)
ii. CENTER STAGE
8. Al apagar, realice siempre esta operación en sentido inverso. Apague:
i. CENTER STAGE
ii. fuentes de entrada de audio (por ejemplo, micrófonos, instrumentos, reproductores de CD/MP3)
Visite http://www.ionaudio.com
para registrar el producto.
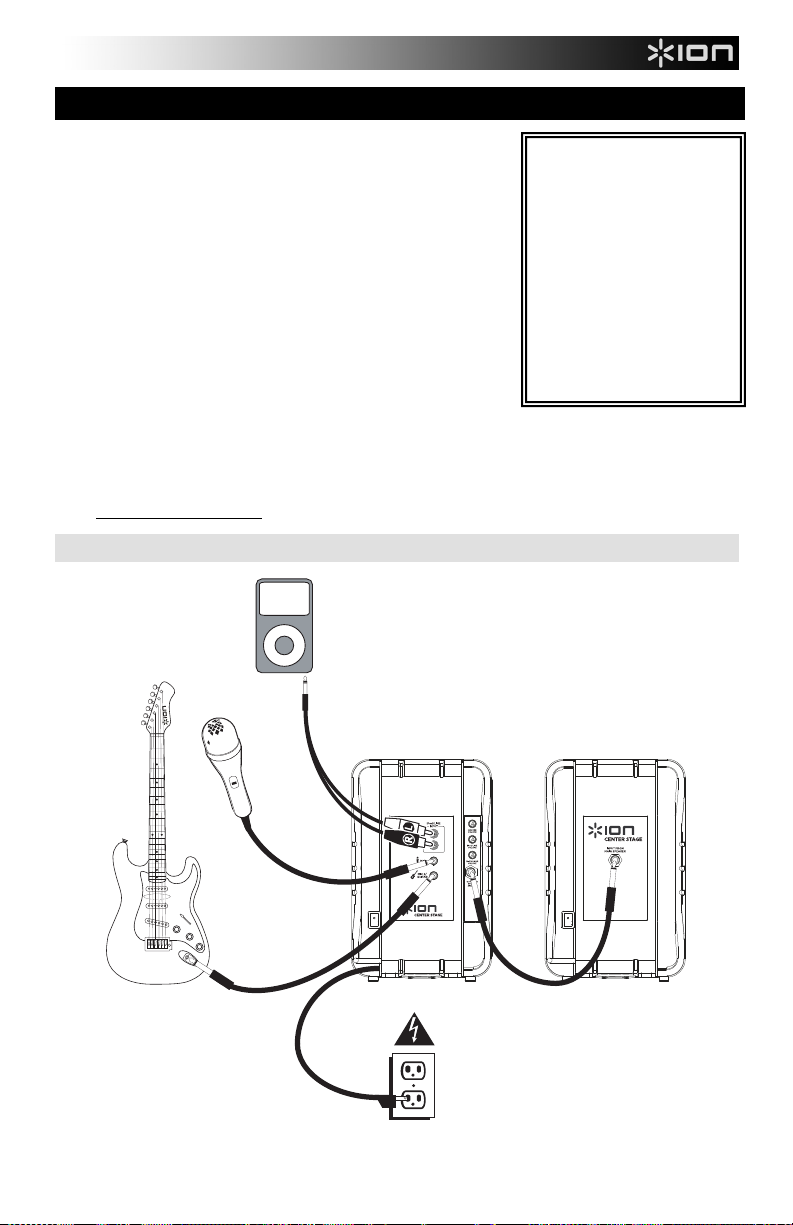
DIAGRAMA DE CONEXIÓN
iPod *
CONTENIDO DE LA CAJA
CENTER STAGE
Soportes para altavoces
Montajes para altavoces
Cable de interconexión para
altavoces
Micrófono con cable
Cable RCA a 1/8" (3,5mm)
estéreo
Soporte para iPod
Manual de inicio rápido
Folleto de información sobre
la seguridad y la garantía
Micrófono
Guitarra *
Alimentación
5
* Guitarra, cable para guitarra e iPod no incluidos.
Page 6
PREPARACIÓN DE ALTAVOCES CENTER STAGE
#4 #5
1. Retire los soportes para altavoces de su embalaje.
2. En un soporte, gire la perilla de base en sentido antihorario para aflojarla.
3. Tire de las tres patas del soporte para separarlas y/o empuje la base a lo largo de la columna central.
#1 #2 #3
#6
Las patas deben quedar lo suficientemente separadas para sostener el soporte y el altavoz. Gire la
perilla en sentido horario para apretarla y sujetar las patas en su sitio. (Nota: Tenga cuidado de no
apretar excesivamente la perilla.) Coloque el soporte sobre una superficie plana y estable.
4. Gire la perilla de la columna central en sentido antihorario para aflojarla. Tire de la porción superior de
la columna central hacia arriba para extenderla y luego gire la perilla en sentido horario para apretarla
nuevamente. (Nota: Tenga cuidado de no apretar excesivamente la perilla.)
5. Enrosque uno de los montajes para altavoz en el orificio que está debajo de uno de los altavoces.
6. Coloque el altavoz sobre el soporte, guiando el extremo de la columna hacia el orificio del montaje.
7. Repita los pasos 2 a 6 para el otro soporte y altavoz.
8. Conecte los dos altavoces con el cable de interconexión de 1/4" (6.3mm) incluido.
9. Conecte sus dispositivos de audio (por ejemplo iPod, micrófono, guitarra, etc.) a las entradas
apropiadas del panel trasero del altavoz. (Para más información, vea el DIAGRAMA DE CONEXIÓN y
CÓMO USAR LOS ALTAVOCES CENTER STAGE).
10. Si utiliza un iPod, fije el velcro incluido en el soporte para iPod también incluido y en el costado del
altavoz CENTER STAGE con las entradas y los controles de volumen.
11. Conecte el cable de alimentación del altavoz (incorporado) a un tomacorriente.
CÓMO USAR LOS ALTAVOCES CENTER STAGE
1. Siga las instrucciones de la sección PREPARACIÓN para preparar correctamente los altavoces
CENTER STAGE y los soportes.
2. Asegúrese de que los niveles de volumen de CENTER STAGE y de sus dispositivos estén ajustados a
"cero".
3. Conecte los dispositivos de los que desea reproducir a las entradas apropiadas del panel trasero del
altavoz.
a. iPod* u otros dispositivos con salida de 1/8": Con el cable RCA a 1/8" (3.5mm) estéreo
incluido, conecte el extremo de 1/8" a la salida del iPod u otro dispositivo y luego los enchufes
RCA a la ENTRADA iPod/LINE del CENTER STAGE. Asegúrese de que coincidan los colores
de los enchufes RCA con sus entradas (rojo con rojo y blanco con blanco). Si el dispositivo que
desea usar tiene una clase de salida diferente (como de 1/4" (6.3mm) o RCA), es posible adquirir
adaptadores fácilmente en la tienda de materiales electrónicos local.
b. Micrófono: Conecte el cable para micrófono incluido a la ENTRADA MIC 1 o MIC 2/GUITAR.
c. Guitarra: Conecte el cable de 1/4" (6.3mm) de la guitarra (no incluido) a la ENTRADA MIC
4. Encienda su dispositivo y luego encienda el CENTER STAGE con el INTERRUPTOR DE
5. Reproduzca la música de su dispositivo y aumente el volumen. Asimismo, si conectó un dispositivo a
6. Aumente el volumen con el control de VOLUMEN MAESTRO de CENTER STAGE.
Nota: No quite la verja del altavoz.
* iPod es una marca registrada de Apple Inc., registrada en EE.UU. y otros países.
2/GUITAR.
ENCENDIDO del mismo.
la ENTRADA iPod/LINE, ajuste el VOLUMEN de iPod/LINE y, si conectó un dispositivo a la ENTRADA
MIC 1 o MIC 2/GUITAR, ajuste el VOLUMEN de MIC 1/MIC 2.
6
Page 7

CARACTERÍSTICAS
ALTAVOZ PRINCIPAL SEGUNDO ALTAVOZ
8
3
4
5
2
6
7
2
1
1. INTERRUPTOR DE ENCENDIDO: Enciende y apaga el CENTER STAGE.
2. SALIDA AL SEGUNDO ALTAVOZ Y ENTRADA DESDE EL ALTAVOZ PRINCIPAL: Conecte cada
extremo del cable de 1/4" (6.3mm) incluido a estos dos jacks, permitiendo que el sonido se reproduzca
desde ambos altavoces.
3. ENTRADA iPod/LINE (RCA estéreo): Esta entrada se puede usar para conectar un reproductor de
CD, MP3 u otra fuente de audio. La perilla controla el nivel del iPod y de la entrada de RCA. Para
conectar a un dispositivo portátil con conector para auriculares de 1/8" (3.5mm), se necesita un
adaptador estándar 1/8"-a-RCA que no está incluido.
4. ENTRADA MIC 1 (1/4"): Esta entrada mono admite una entrada de 1/4" (6.3mm) tal como un
micrófono.
5. ENTRADA MIC 2/GUITAR (1/4"): Esta entrada mono admite una entrada de 1/4" (6.3mm) tal como un
micrófono, una guitarra u otro instrumento musical.
6. VOLUMEN de iPod/LINE: Esta perilla controla el volumen de la ENTRADA iPod/LINE.
7. VOLUMEN DE MIC/GUITAR: Esta perilla controla el volumen de las ENTRADAS MIC 1 y MIC
2/GUITAR.
8. VOLUMEN MAESTRO: Esta perilla controla el volumen master (maestro).
Importante: Como todos los altavoces, los CENTER STAGE funcionan mejor después de un período de
“rodaje” de unas cuantas horas de reproducción a volumen mediano.
7
Page 8

GUIDE D'UTILISATION SIMPLIFIÉ (FRANÇAIS)
1. Assurez-vous que tous les articles énumérés sur la page
couverture de ce guide sont inclus dans la boîte.
2. VEUILLEZ LIRE LE LIVRET DES CONSIGNES DE SÉCURITÉ
AVANT D'UTILISER LE PRODUIT.
3. Examinez bien le schéma d'installation.
4. Placez l'appareil en position de fonctionnement.
5. Assurez-vous que tous les appareils d'entrée tels que
microphones, lecteur de disques compacts, lecteur MP3 et les
autres appareils branchés tels que les amplificateurs et les
systèmes PA sont hors tension et que leur volume soit réglé à
« zéro ».
6. Connectez tous les appareils tel qu'indiqué sur le schéma.
7. Mettre tous les appareils sous tension dans l'ordre suivant:
i. source d'entrée audio (p. ex. microphones, instruments,
lecteurs CD/MP3)
ii. CENTER STAGE
8. Pour mettre hors tension, toujours inverser l'opération. Éteindre:
i. CENTER STAGE
ii. source d'entrée audio (p. ex. microphones, instruments, lecteurs CD/MP3)
Allez à la http://www.ionaudio.com
pour l'enregistrement du produit.
SCHÉMA DE CONNEXION
iPod *
CONTENU DE LA BOÎTE
CENTER STAGE
Supports pour haut-parleurs
Fixations pour haut-parleurs
Câble d’interconnexion pour
haut-parleurs
Microphone avec câble
Câble stéréo RCA à 1/8 po
(3,5mm)
Support pour iPod
Guide d'utilisation simplifié
Le livret des consignes de
sécurité et des informations
concernant la garantie
Microphone
Guitare *
Électricité
8
* Guitare, câble pour guitare et iPod non inclus.
Page 9

INSTALLATION DES HAUT-PARLEURS
#4 #5
1. Retirez les supports pour haut-parleurs de leur emballage.
#1 #2 #3
#6
2. Veuillez tourner le bouton de verrouillage sur la base d’un des supports dans le sens antihoraire afin de
le dévisser.
3. Écartez les trois pieds du support et/ou poussez la base dans le bas de la tige centrale. Les pieds
doivent être assez éloignés les uns des autres afin de maintenir en équilibre le support et le hautparleur. Veuillez tourner le bouton de verrouillage sur la base dans le sens horaire afin de le revisser et
maintenir les pieds en place. (Remarque : Veillez à ne pas trop serrer.) Placez le support sur une
surface plate et stable.
4. Tournez le bouton de verrouillage sur la tige centrale dans le sens antihoraire afin de la dévisser. Tirez
sur la section supérieure de la tige centrale afin de la rallonger, puis revissez le bouton. (Remarque :
Veillez à ne pas trop serrer.)
5. Vissez une des fixations pour haut-parleur dans l’orifice situé sous le haut-parleur.
6. Placez le haut-parleur sur le support en alignant l’extrémité de la tige dans l’orifice de la fixation.
7. Répétez les étapes 2 à 6 afin d’installer le deuxième haut-parleur sur son support.
8. Branchez les deux haut-parleurs à l’aide du câble d’interconnexion pour haut-parleurs 1/4 po (6,3mm)
fourni.
9. Branchez vos appareils audio (c.-à-d.,iPod, microphone, guitare, etc.) aux entrées appropriées sur le
panneau arrière du haut-parleur. (Pour de plus amples informations, veuillez consulter le SCHÉMA DE
CONNEXION et la section UTILISATION DES HAUT-PARLEURS CENTER STAGE.)
10. Si vous utilisez un iPod, fixez la bande velcro incluse sur le support iPod et sur le côté du haut-parleur
près des entrées et les commandes de volume.
11. Brancher le câble d'alimentation du haut-parleur à une prise secteur.
UTILISATION DES HAUT-PARLEURS CENTER STAGE
1. Suivez les instructions dans la section INSTALLATION afin d’installer correctement les haut-parleurs et
les supports.
2. Assurez-vous que les niveaux de volume des haut-parleurs CENTER STAGE et de vos appareils audio
soient à « zéro ».
3. Branchez vos appareils audio aux entrées appropriées sur le panneau arrière du haut-parleur :
a. iPod ou autre appareil avec sortie 1/8 po (3,5mm) : Branchez l’extrémité 1/8 po (3,5mm) du câble
stéréo RCA à 1/8 po inclus à la sortie du iPod ou d’un autre appareil, puis les extrémités RCA
dans les entrées iPod/LINE INPUT du haut-parleur CENTER STAGE. Assurez-vous que les
couleurs correspondent aux entrées (rouge/rouge et blanc/blanc). Si l’appareil que vous désirez
utiliser est doté d’une sortie différente (p. ex., ¼ po (6,3mm) ou RCA), procurez-vous des
adaptateurs chez un détaillant de produits électroniques.
b. Microphone : Branchez le câble pour microphone inclus à l’entrée MIC 1 ou MIC 2/GUITAR
INPUT.
c. Guitare : Branchez le câble ¼ po (6,3mm) de votre guitare (non inclus) à l'entrée MIC 2/GUITAR
INPUT.
4. Mettez d’abord l’appareil sous tension, puis mettez les haut-parleurs CENTER STAGE sous tension.
5. Faites jouer l’appareil et augmenter son volume. Si vous avez branché un appareil à l’entrée iPod/LINE
INPUT, réglez également le volume iPod/LINE VOLUME; si vous avez branché un appareil à l’entrée
MIC 1 ou MIC 2/GUITAR INPUT, réglez également le volume MIC1/MIC 2 VOLUME.
6. Augmentez le volume principal (MASTER) des haut-parleurs CENTER STAGE.
Remarque : Ne retirez pas la calandre d'enceinte.
*iPod est une maque de commerce déposée de Apple, inc., enregistrée aux États-Unis et dans d'autres pays.
9
Page 10

CARACTÉRISTIQUES
HAUT-PARLEUR PRINCIPAL DEUXIÈME HAUT-PARLEUR
8
3
4
5
2
6
7
2
1
1. INTERRUPTEUR MARCHE/ARRÊT (ON/OFF) : Permet de mettre le CENTER STAGE sous et hors
tension.
2. OUTPUT TO SECOND SPEAKER et INPUT FROM MAIN SPEAKER : Branchez chacune des
extrémités du câble 1/4 po (6,3mm) à ces deux prises afin de faire jouer les deux haut-parleurs.
3. ENTRÉE iPod/LINE (stéréo RCA) : Cette entrée permet de brancher un lecteur de disques compacts,
un lecteur MP3 ou autres sources audio. Le contrôle permet de régler le niveau de l'iPod et de l'entrée
de RCA. Pour brancher à un appareil portable à l’aide d’une prise de casque d’écoute de 1/8 po
(3,5mm), il vous faut un adaptateur standard 1/8 po-à-RCA non fourni.
4. ENTRÉE MIC 1 (1/4 po) : Cette entrée mono peut accueillir un câble de 1/4 po (6,3mm) pour
microphone.
5. ENTRÉE MIC 2/GUITAR (1/4 po) : Cette entrée mono peut accueillir un câble de 1/4 po (6,3mm) pour
microphone, guitare ou un autre instrument de musique.
6. VOLUME iPod/LINE: Ce contrôle permet de régler le niveau du volume de l'ENTRÉE iPod/LINE.
7. VOLUME MIC/GUITAR : Ce contrôle permet de régler le niveau du volume des ENTRÉES MIC 1 et
MIC 2/GUITAR.
8. VOLUME MASTER : Ce contrôle permet de régler le niveau du volume général.
Important : Comme c’est le cas pour tous les haut-parleurs, les haut-parleurs CENTER STAGE fonctionnent
mieux après une période de rodage de quelques heures à volume moyen.
10
Page 11

GUIDA RAPIDA (ITALIANO)
1. Verificare che tutti gli elementi elencati sul
frontespizio di questa guida siano inclusi nella
confezione.
2. PRIMA DI UTILIZZARE IL PRODOTTO LEGGERE
IL LIBRETTO DELLE ISTRUZIONI DI SICUREZZA.
3. Esaminare attentamente lo schema di montaggio.
4. Posizionare il prodotto in maniera adeguata all’uso.
5. Assicurarsi che tutti i dispositivi d’ingresso quali
microfoni, lettori CD, lettori MP3 e amplificatori/PA
collegati siano spenti e che il volume sia impostato su
"zero"
6. Collegare tutti i dispositivi come illustrato qui.
7. Accendere tutto nel seguente ordine:
i. sorgenti di ingresso audio (microfoni, strumenti,
lettori CD/MP3)
ii. CENTER STAGE
8. Al momento dello spegnimento, invertire l’operazione. Spegnendo:
i. CENTER STAGE
ii. sorgenti di ingresso audio (microfoni, strumenti, lettori CD/MP3)
Recarsi sul sito http://www.ionaudio.com
per la registrazione del prodotto.
SCHEMA DEI COLLEGAMENTI
iPod *
CONTENUTI DELLA CONFEZIONE
CENTER STAGE
Supporti per altoparlante
Dispositivi di montaggio dell’altoparlante
Cavo di interconnessione
dell’altoparlante
Microfono con cavo
Cavo stereo RCA a 1/8” (3,5mm)
Supporto per iPod
Guida rapida
Libretto di istruzioni di sicurezza e
garanzia
Microfono
Chitarra *
Elettricità
* Chitarra, cavo per chitarra e iPod non in dotazione.
11
Page 12

CONFIGURAZIONE DEL CENTER STAGE
#4 #5
1. Rimuovere i supporti dell’altoparlante dalla loro confezione.
#1 #2 #3
#6
2. A livello di un supporto, girare la manopola sulla base in senso antiorario per allentarla.
3. Allargare le tre gambe del supporto e/o spingere la base verso il basso l'asta centrale. Le gambe
devono essere sufficientemente larghe da sostenere il supporto e l’altoparlante. Girare la manopola in
senso orario per stringerla, fissando le gambe in posizione. (Nota bene: prestare attenzione a non
stringere eccessivamente la manopola.) Collocare il supporto su una superficie uniforme e stabile.
4. A livello dell’asta centrale, girare la manopola in senso antiorario per allentarla. Tirare la parte
superiore dell’asta centrale verso l’alto per estenderla, quindi girare la manopola in senso orario per
stringerla di nuovo. (Nota bene: prestare attenzione a non stringere eccessivamente la manopola.)
5. Avvitare uno dei dispositivi di montaggio nel foro al di sotto di uno degli altoparlanti.
6. Collocare l’altoparlante sul supporto, guidando il capo dell'asta all’interno del foro del dispositivo di
montaggio.
7. Ripetere le fasi 2-6 per l’altro supporto e l’altro altoparlante.
8. Collegare i due altoparlanti servendosi dell’apposito cavo da 1/4" (6,3mm) in dotazione.
9. Collegare i dispositive audio (ad es. iPod, microfono, chitarra, ecc.) agli ingressi adeguati a livello del
pannello posteriore dell’altoparlante. (Per maggiori informazioni, si veda lo SCHEMA DEI
COLLEGAMENTI e il paragrafo "USO DEL CENTER STAGE".)
10. Se si utilizza un iPod, fissure il Velcro in dotazione al supporto per iPod in dotazione e al lato
dell’altoparlante del CENTER STAGE con gli ingressi e i comandi del volume.
11. Collegare il cavo di alimentazione (fissato) ad una presa di alimentazione.
USO DEL CENTER STAGE
1. Seguire le istruzioni specificate nel paragrafo “CONFIGURAZIONE” per impostare adeguatamente gli
altoparlanti e i supporti del CENTER STAGE.
2. Assicurarsi che il volume del CENTER STAGE e dei dispositivi sia su "zero".
3. Collegare i dispositive che si desidera riprodurre agli ingressi adeguati del pannello posteriore
dell’altoparlante.
a. iPod* o altri dispositivi dotati di un'uscita da 1/8": Servendosi del cavo stereo da RCA a 1/8"
(3,5mm) in dotazione, collegare il capo da 1/8" all’uscita dell’iPod o di altri dispositivi, quindi
collegare le spine RCA all’ingresso iPod/LINEA del CENTER STAGE. Assicurarsi di abbinare
correttamente i colori delle spine RCA ai relativi ingressi (rosso con rosso, bianco con bianco). Se
il dispositivo che si intende utilizzare è dotato di un diverso tipo di uscita (ad es. ¼” (6,3mm) o
RCA), è possibile acquistare un adattatore presso un qualsiasi negozio di elettronica.
b. Microfono: collegare il cavo del microfono in dotazione all’INGRESSO MIC 1 o MIC
2/CHITARRA.
c. Chitarra: collegare il cavo da ¼” (6,3mm) (non in dotazione) all’INGRESSO MIC 2 / CHITARRA.
4. Accendere il dispositivo, quindi accendere il CENTER STAGE servendosi dell’INTERRUTTORE DI
ALIMENTAZIONE.
5. Avviare il dispositivo e alzarne il volume. Inoltre, se si collega un dispositivo all'INGRESSO
iPod/LINEA, regolare il VOLUME iPod/LINEA; se si collega un dispositivo all’INGRESSO MIC 1 o MIC
2/CHITARRA, regolare il VOLUME MIC 1/MIC 2.
6. Alzare il VOLUME MASTER del CENTER STAGE.
Nota bene: Non rimuovere la griglia dell'altoparlante.
*
iPod è un marchio di fabbrica di Apple, Inc., registrato negli Stati Uniti e in altri Paesi.
12
Page 13

CARATTERISTICHE
ALTOPARLANTE PRINCIPALE SECONDO ALTOPARLANTE
8
3
4
5
2
6
7
2
1
1. INTERRUTTORE ALIMENTAZIONE: accende o spegne il CENTER STAGE.
2. USCITA AD UN SECONDO ALTOPARLANTE E INGRESSO DALL’ALTOPARLANTE PRINCIPALE:
collegare ciascun capo del cavo da 1/4" (6,3mm) in dotazione a questi due jack, facendo in modo che il
suono venga riprodotto tramite entrambi gli altoparlanti.
3. INGRESSO iPod/LINEA (RCA Stereo): Questo ingresso può essere utilizzato per il collegamento di
un CD, MP3, o altra sorgente audio. La manopola controlla il livello del iPod e dell'input di RCA. Per
collegare un dispositivo portatile dotato di jack cuffie da 1/8" (3,5mm), è necessario un adattatore
standard da 1/8"-a-RCA non incluso.
4. INGRESSO MIC 1 (1/4"): questo ingresso mono accetta un ingresso da 1/4" (6,3mm) quali un
microfono.
5. INGRESSO MIC 2/CHITARRA (1/4"): questo ingresso mono accetta un ingresso da 1/4" (6,3mm) quali
un microfono, chitarra o altro strumento musicale.
6. VOLUME iPod/LINE: questa manopola controlla il volume di INGRESSO iPod/LINE.
7. VOLUME MIC/GUITAR: questa manopola controlla il volume degli INGRESSI MIC 1 e MIC 2/GUITAR.
8. VOLUME MASTER: questa manopola controlla il volume master.
Importante: come per tutti gli altoparlanti, gli altoparlanti CENTER STAGE avranno migliori prestazioni dopo
un periodo iniziale di "riscaldamento" di alcune ore di riproduzione a volume medio.
13
Page 14

KURZANLEITUNG (DEUTSCH)
1. Überprüfen Sie, dass sich alle auf dem Deckblatt genannten
Teile in der Verpackung befinden.
2. LESEN SIE DIE SICHERHEITSHINWEISE, BEVOR SIE
DIESES PRODUKT VERWENDEN.
3. Sehen Sie sich die Aufbauabbildung der an.
4. Stellen Sie den Produkt in einer für den Betrieb geeigneten
Position auf.
5. Schalten Sie alle Eingangsquellen (Mikrofone, CD Player,
MP3 Player und Verstärker/Pas) aus und drehen Sie deren
Lautstärke auf "Null."
6. Schließen Sie alle Geräte, wie hier gezeigt.
7. Schalten Sie das System in der folgenden Reihenfolge ein:
i. Eingangsquellen (z.B. Mikrofon, Instrumente und/oder
CD-Player)
ii. CENTER STAGE
8. Gehen Sie beim Ausschalten in der genau umgekehrten
Reihenfolge vor. Schalten Sie:
i. CENTER STAGE
ii. Eingangsquellen (z.B. Mikrofon, Instrumente und/oder CD-Player)
Registrieren Sie Ihr Produkt online unter http://www.ionaudio.com
ANSCHLUSSÜBERSICHT
iPod *
INHALT DER VERPACKUNG
CENTER STAGE
Lautsprecherstative
Lautsprecher-Halterungen
Verbindungskabel für
Lautsprecher
Mikrofon mit Kabel
Verbindungskabel von Stereo-
Cinch auf 1/8“ (3,5mm)
iPod-Halterung
Kurzanleitung
Broschüre mit den Sicherheits-
und Garantierichtlinien
.
Gitarre *
Mikrofon
Steckdose
* Gitarre, Gitarrenkabel und iPod nicht im Lieferumfang enthalten.
14
Page 15

EINRICHTEN DER CENTER STAGE
#1 #2 #3
#4 #5
1. Entfernen Sie die Lautsprecherstative aus der Verpackung.
2. Drehen Sie den Drehknopf am unteren Teil eines Stativs gegen den Uhrzeigersinn, um ihn zu lösen.
3. Ziehen Sie die drei Beine des Stativs auseinander und / oder drücken Sie den unteren Teil an der Mittelstange
herunter. Die Beine sollten weit genug auseinander stehen, um den Lautsprecher und das Stativ stützen zu
können. Drehen Sie den Drehknopf solange im Uhrzeigersinn bis er fest sitzt und die Beine sichert.
(Anmerkung: Ziehen Sie den Drehknopf nicht zu stark an.) Stellen Sie das Stativ auf eine ebene, stabile
Oberfläche.
4. Drehen Sie den Drehknopf an der Mittelstange gegen den Uhrzeigersinn um ihn zu lockern. Ziehen Sie den
oberen Teil der Mittelstange nach oben, um sie zu verlängern und drehen Sie anschließend den Drehknopf im
Uhrzeigersinn, um ihn wieder zu fixieren. (Anmerkung: Ziehen Sie den Drehknopf nicht zu stark an.)
5. Schrauben Sie eine der Lautsprecher-Halterungen in das Loch unterhalb eines Lautsprechers.
6. Stellen Sie den Lautsprecher auf das Stativ, und bringen Sie das Ende der Stange in das Montage-Loch.
7. Wiederholen Sie die Schritte 2-6 für das andere Stativ samt Lautsprecher.
8. Verbinden Sie die beiden Lautsprecher mit dem mitgelieferten 1/4" (6,3mm) Lautsprecher-Verbindungskabel.
9. Verbinden Sie Ihr(e) Audiogerät(e) (z. B. iPod, Mikrofon, Gitarre etc.) mit den entsprechenden Eingängen / dem
Eingang an der Rückseite des Lautsprechers. (Siehe ANSCHLUSSÜBERSICHT und SO VERWENDEN SIE
CENTER STAGE für nähere Informationen).
10. Wenn Sie einen iPod verwenden, befestigen Sie das mitgelieferte Klettband an der mitgelieferten iPodHalterung und an der Seite des CENTER STAGE Lautsprechers mit den Eingängen und Lautstärkereglern.
11. Verbinden Sie das am Lautsprecher befestigte Netzkabel mit einer Steckdose.
#6
SO VERWENDEN SIE CENTER STAGE
1. Folgen Sie den Anweisungen des Abschnitts EINRICHTEN, um Ihre CENTER STAGE Lautsprecher und die
Stative ordnungsgemäß aufzubauen.
2. Stellen Sie sicher, dass die Lautstärke der CENTER STAGE und Ihres/Ihrer Geräts/Geräte auf "Null" stehen.
3. Verbinden Sie das/die Gerät(e), das/die Sie verwenden möchten, mit dem/den entsprechenden
Eingang/Eingängen an der Rückseite des Lautsprechers:
a. * iPod oder ein anderes Gerät mit einem 1/8"- Ausgang: Mit dem mitgelieferten Verbindungskabel
von Stereo-Cinch auf 1/8“ (3,5mm) verbinden Sie das 1/8“-Ende mit dem Ausgang Ihres IPod oder
anderen Geräts und die Cinch-Stecker mit dem iPod/LINE-EINGANG der CENTER STAGE. Achten Sie
darauf, dass die Farben der Cinch-Stecker mit den Farben der Eingänge übereinstimmen (rot zu rot,
weiß zu weiß). Wenn das Gerät, das Sie verwenden möchten, einen anderen Ausgang besitzt, (z.B. 1/4"
(6,3mm) oder Cinch), können Sie entsprechende Adapter einfach in Ihrem örtlichen
Elektronikfachgeschäft kaufen.
b. Mikrofon: Verbinden Sie das mitgelieferte Mikrofon-Kabel mit MIC 1 oder dem MIC 2/GITARREN-
EINGANG.
c. Gitarre: Verbinden Sie das 1/4"-Kabel (6,3mm) Ihrer Gitarre (nicht im Lieferumfang enthalten) mit dem
4. Schalten Sie zunächst Ihr Gerät und anschließend den CENTER STAGE NETZSCHALTER ein.
5. Lassen Sie das Gerät spielen und erhöhen Sie die Lautstärke. Falls Sie ein Gerät an den iPod / LINE-
6. Drehen Sie die MASTER-LAUTSTÄRKE der CENTER STAGE auf.
Hinweis: Entfernen Sie nicht die Lautsprechergitter.
* iPod ist eine Marke der Apple, Inc. und ist in den USA und anderen Ländern eingetragen.
MIC 2/GITARREN-EINGANG.
EINGANG angeschlossen haben, adjustieren Sie die iPod / LINE-LAUTSTÄRKE. Falls Sie ein Gerät an den
MIC 1 oder MIC 2/GITARREN-EINGANG angeschlossen haben, adjustieren Sie die MIC 1/MIC 2
LAUTSTÄRKE.
15
Page 16

BEDIENUNGSELEMENTE
HAUPTLAUTSPRECHER ZWEITER SPRECHER
8
3
4
5
2
6
7
2
1
1. NETZSCHALTER: Schaltet den CENTER STAGE an oder aus.
2. AUSGANG AN DEN ZWEITEN LAUTSPRECHER & EINGANG VOM HAUPTLAUTSPRECHER:
Verbinden Sie die Enden des mitgelieferten 1/4" (6,3mm)-Kabels mit diesen beiden Buchsen, so dass
der Ton aus zwei Lautsprechern wiedergegeben werden kann.
3. iPod/LINE-EINGANG (Stereo RCA): Dieser Eingang nimmt das Signal eines CD/MP3 Players oder
einer anderen Audioquelle auf. Der Regler steuert das Niveau des iPod und des RCA Einganges. Um
ein tragbares Gerät mit einem 3,5mm Miniklinkenstecker zu verwenden, benötigen Sie einen
optionalen Miniklinke/RCA Adapter.
4. MIC 1-EINGANG (6,3mm Klinke): Dieser Mono Eingang verarbeitet normale Klinkenkabelanschlüsse
von einem Mikrofon.
5. MIC 2/GITARREN-EINGANG (6,3mm Klinke): Dieser Mono Eingang verarbeitet normale
Klinkenkabelanschlüsse von einem Mikrofon, einer Gitarre oder einem anderen Musikinstrument.
6. iPod/LINE-LAUTSTÄRKE: Mit diesem Regler stellen Sie die iPod/LINE EINGANG-Lautstärke.
7. MIC/GITARREN-LAUTSTÄRKE: Mit diesem Regler stellen Sie die MIC 1- und MIC 2/GUITAR
EINGANG-Lautstärke.
8. MASTER-LAUTSTÄRKE: Mit diesem Regler stellen Sie die Summenlautstärke.
Wichtig: Wie alle Lautsprecher wird auch CENTER STAGE das beste Ergebnis nach einer „Einspielphase“
von einigen Stunden bei mäßiger Lautstärke erzielen.
16
Page 17

SNELSTARTGIDS (NEDERLANDS)
1. Controleer dat alle onderdelen die op de voorzijde van
deze gids staan ook in de doos zitten.
2. LEES DE VEILIGHEIDSINSTRUCTIES VOOR HET
PRODUCT GEBRUIKT WORDT
3. Bestudeer dit installatiediagram.
4. Plaats het product in een juiste positie voor bediening.
5. Zorg ervoor dat alle invoerapparatuur zoals microfoons,
CD-spelers, MP3-spelers en gekoppelde versterkers/PA's
uitgeschakeld zijn met volume-instellingen op "nul".
6. Sluit alle apparaten aan zoals hier te zien.
7. Schakel alles in de hier gegeven volgorde in.
i. bronnen voor geluidsinput (bijv. microfoons,
instrumenten, CD/MP3-spelers)
ii. CENTER STAGE
8. Bij uitschakelen draait u de volgorde om door:
i. CENTER STAGE
ii. bronnen voor geluidsinput (bijv. microfoons, instrumenten, CD/MP3-spelers)
Ga naar http://www.ionaudio.com
voor productregistratie.
AANSLUITDIAGRAM
iPod *
INHOUD VERPAKKING
CENTER STAGE
Luidsprekerstatieven
Luidsprekerbeugels
Verbindingskabel luidsprekers
Microfoon met snoer
Stereo verloopsnoer tulpplug naar
iPod-houder
Snelstartgids
Veiligheids- en garantie-informatie
3,5 mm
Microfoon
Gitaar *
Elektriciteit
17
* Gitaar, gitaarkabel en iPod niet inbegrepen.
Page 18

CENTER STAGE OPSTELLEN
Haal de luidsprekerstatieven uit hun verpakking.
1.
2. Schroef bij één van de statieven de knop op de basis linksom los.
3. Haal de drie poten van het statief uit elkaar en/of duw de basis over de middenzuil omlaag. De poten
#4 #5
#1 #2 #3
#6
moeten ver genoeg uit elkaar staan om het statief en de luidspreker te kunnen dragen. Draai de knop
rechtsom vast om de poten op hun plaats te houden. (Opmerking: Span de knop niet te strak aan.)
Plaats het statief op een vlakke en stabiele ondergrond.
4. Schroef bij de knop op de middenzuil linksom los. Trek het bovenste gedeelte van de middenzuil
omhoog om het te verlengen en draai vervolgens de knop rechtsom opnieuw vast. (Opmerking:
Schroef de knop niet te strak vast.)
5. Schroef één van de luidsprekerbeugels vast in het gat onderaan één van de luidsprekers.
6. Plaats de luidspreker op het statief en begeleid ondertussen het uiteinde van de staaf in het gat van de
beugel.
7. Herhaal stappen 2-6 voor het andere statief en de andere luidspreker.
8. Verbind de twee luidsprekers met de inbegrepen 6,3mm-verbindingskabel voor luidsprekers.
9. Sluit uw audioappara(a)t(en) (bijv. iPod, microfoon, gitaar enz.) aan op de juiste ingang(en) op het
achterpaneel van de luidspreker. (Zie AANSLUITDIAGRAM en CENTER STAGE GEBRUIKEN voor
meer informatie).
10. Maak als u een iPod gebruikt de meegeleverde klittenband vast aan de meegeleverde iPod-houder en
de zijkant van de CENTER STAGE-luidspreker die over ingangen en volumeregeling beschikt.
11. Sluit het netsnoer (aangehecht) van de luidspreker aan op een stopcontact.
CENTER STAGE GEBRUIKEN
1. Volg de instructies in het onderdeel OPSTELLING om uw CENTER STAGE-luidsprekers en statieven
naar behoren op te stellen.
2. Zorg ervoor dat het volumeniveau van CENTER STAGE en uw apparatuur op "nul" staat.
3. Sluit de apparatuur die u wilt gebruiken aan op de gepaste ingang(en) op het achterpaneel van de
luidspreker:
a. Een iPod* of ander toestel met een 3,5mm-uitgang: Sluit met het meegeleverde stereo
verloopsnoer tulpplug-3,5mm het 3,5mm-uiteinde aan op de uitgang van uw iPod of ander
apparaat en sluit dan de tulppluggen aan op de ingang iPod/LINE INPUT van CENTER STAGE.
Zorg ervoor dat de kleuren van de tulppluggen overeenkomen met die van de ingangen (rood op
rood, wit op wit). Als het apparaat dat u wilt gebruiken een andere uitgang heeft (bijvoorbeeld jack
of tulp): verloopsnoeren zijn te koop in uw lokale elektronicawinkel.
b. Microfoon: Sluit de meegeleverde microfoonkabel aan op de ingang MIC 1 of MIC 2/GUITAR
INPUT.
c. Gitaar: Sluit de jack-kabel van uw gitaar (niet meegeleverd) aan op de ingang MIC 2/GUITAR
4. Zet eerst uw toestel aan en druk dan op de AAN/UITKNOP van CENTER STAGE.
5. Laat uw toestel spelen en verhoog het volume ervan. Als u een toestel op de ingang iPod/ LINE
6. Verhoog het MASTER VOLUME van CENTER STAGE.
Opmerking: Verwijder niet de luidsprekerrooster.
* iPod is een handelsmerk van Apple Inc, geregistreerd in de VS en andere landen.
INPUT.
INPUT hebt aangesloten, kunt u het iPod/LINE VOLUME aanpassen; als u een apparaat hebt
aangesloten op de ingang MIC 1 of MIC 2/GUITAR INPUT, kunt u het MIC 1/MIC 2 VOLUME
aanpassen.
18
Page 19

FUNCTIES
HOOFDSPEAKER TWEEDE SPEAKER
8
3
4
5
2
6
7
2
1
1. AAN/UITKNOP: Schakelt de CENTER STAGE in of uit.
2. OUTPUT NAAR DE TWEEDE LUIDSPREKER & INPUT VAN DE HOOFDLUIDSPREKER: Sluit elk
uiteinde van de meegeleverde jack-kabels aan op de twee hiervoor bestemde aansluitingen, waardoor
beide luidsprekers geluid kunnen afspelen.
3. iPod/LINE INPUT (Stereo RCA): Deze stereo RCA-ingang kan gebruikt worden voor het aansluiten
van een CD-, MP3- of andere geluidsbron. De knop bestuurt het niveau van de iPod en de RCA-input.
Om een draagbaar apparaat met een 1/8" (3,5mm) koptelefoonstekker aan te sluiten heeft u een
standaard 1/8"-naar-RCA-adapter nodig die niet meegeleverd wordt.
4. MIC 1 INPUT (1/4"): Deze mono-ingang accepteert 1/4" (6,3mm)-input zoals microfoon.
5. MIC 2/GUITAR INPUT (1/4"): Deze mono-ingang accepteert 1/4" (6,3mm)-input zoals microfoon, gitaar
of andere muziekinstrumenten.
6. iPod/LINE VOLUME: Deze knop bestuurt het iPod/LINE INGANG-volume.
7. MIC/GUITAR VOLUME: Deze knop bestuurt het MIC 1 en MIC 2/GUITAR INGANG-volume.
8. MASTER VOLUME: Deze knop bestuurt het hoofdvolume.
Belangrijk: Zoals met alle luidsprekers het geval is, zullen de CENTRAL STAGE-luidsprekers het best
presteren na een aanvankelijke opwarmingsperiode van enkele uren spelen op een normaal volume.
19
Page 20

TECHNICAL SPECIFICATIONS
FREQUENCY RESPONSE: 38 Hz – 20 kHz
SIGNAL-TO-NOISE RATIO: 73 dB
THD: 0.13%
www.ionaudio.com
MANUAL VERSION 1.2
 Loading...