

Page 1

CD DIRECT
QUICKSTART GUIDE
ENGLISH ( 3 - 9 )
GUÍA DE INICIO RÁPIDO
ESPAÑOL ( 10 – 17 )
GUIDE D'UTILISATION RAPIDE
FRANÇAIS ( 18 - 24 )
GUIDA RAPIDA
ITALIANO ( 25 - 31 )
KURZANLEITUNG
DEUTSCH ( 32 – 38 )
SNELSTARTGIDS
NEDERLANDS (39 - 45 )
Page 2

Page 3
QUICKSTART GUIDE (ENGLISH)
BOX CONTENTS
Make sure that the items
listed below are included in
the box:
• CD DIRECT
• EZ Vinyl Software Disc
• Software Quickstart
Guide
• USB Cable
• Quickstart Guide
• Safety Instructions & Warranty Information Booklet
READ SAFETY INSTRUCTION BOOKLET BEFORE USING THE PRODUCT
INTRODUCTION
CD DIRECT easily converts your treasured vinyl records and external audio sources to CD. CD DIRECT can also
connect to a computer through its USB port. We have included two software packages to aid you in converting your
vinyl recordings. You should install one of the following applications to take advantage of computer recording:
• EZ Vinyl/Tape Converter (PC only) is the quickest and easiest way to turn your recordings into digital media.
EZ Vinyl/Tape Converter conveniently saves your recordings in your iTunes* library. Novice users may find this
application preferable. We have included a handy Software Quickstart Guide with step-by-step instructions on
software installation and operation.
• EZ Audio Converter (Mac only) is a basic converter application for Mac OS X and is ideal for novice users.
Please refer to the included Software Quickstart Guide for step-by-step instructions on software installation and
operation.
To install the software: simply insert the included CD into your computer and follow the on-screen instructions. After
you finish converting your vinyl, you can then burn to CD or load onto portable media devices.
Visit http://www.ionaudio.com/computer-optimization
* iTunes is a trademark of Apple, Inc., registered in the U.S.A. and other countries.
for more information on optimizing your computer for audio.
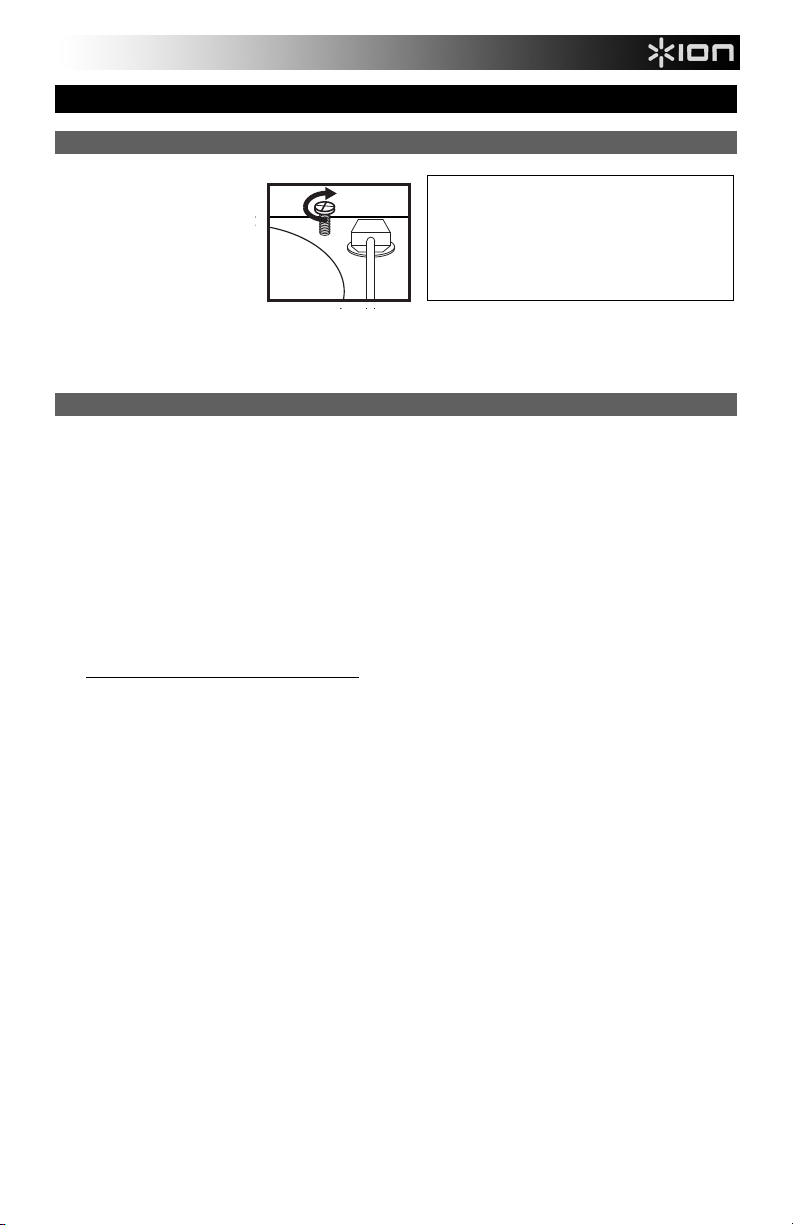
Before using the turntable, loosen
the "transport screw" (at the far end
of the platter, near the tonearm) by
turning it CLOCKWISE.
Windows Vista and Windows 7 Audio Setup:
Once the EZ Converter software is installed on your computer, connect the CD DIRECT to an available USB
port on your computer using the included USB cable.
1. Click the Windows Start button in the lower-left of your screen, and select Control Panel.
2. Double-click Hardware and Sound.
3. Double-click Sound.
4. Select the Playback tab. Choose your computer’s soundcard (such as Speakers – High Definition
Audio Device or Headphones – High Definition Audio Device. Some common PC soundcard
names are Realtek, Soundmax, and Sigmatel.
5. Click Set Default.
6. Select the Recording tab at the top of the Sound Control Panel window. Under Recording, choose
Microphone – USB Audio Codec as the default device.
7. Click Set Default.
8. Select the Advanced tab.
9. Set the Default Format setting to 2-channel, 16 bit 44100 Hz (CD Quality).
10. Un-check the two boxes listed under Exclusive Mode. Then Click Apply.
11. Select the Levels tab from the top of the window.
12. Under Levels, set the level slider to 5.
13. Click Apply, and then click Ok to close the window.
ATTENTION:
3
Page 4
Windows XP Audio Setup Procedure:
Once the EZ Converter is installed on your computer, connect the CD DIRECT using the included USB cable
to an available USB port on your computer.
1. Select the Windows Start menu.
2. Select Settings then Control Panel.
3. Double-click the Sounds and Audio Devices control panel. If you do not see a choice called Sounds
and Audio Devices, choose the Switch to Classic View option.
4. Select the Audio tab.
5. Under Sound Playback, choose your computer’s internal soundcard. Some common PC soundcard
names are Realtek, Soundmax, and Sigmatel.
6. Under Sound Recording, select USB Audio Codec for your default device.
7. Check the box titled Use only default devices.
8. Click Apply (if possible), and then click OK.
Mac Audio Setup Procedure:
Once the EZ Converter is installed on your computer, connect the CD DIRECT using the included USB cable
to an available USB port on your computer.
1. Click the Apple icon in the upper-left corner of your computer screen and choose System
Preferences.
2. In the window that opens, under Hardware, click the item labeled Sound.
3. Click on the Input tab. Underneath Choose a device for sound input, select USB AUDIO CODEC (or
USB AUDIO DEVICE).
4. Click on the Outputs tab. Underneath Choose a device for sound input, select Headphones (Builtin Output).
5. Close the system preferences Window.
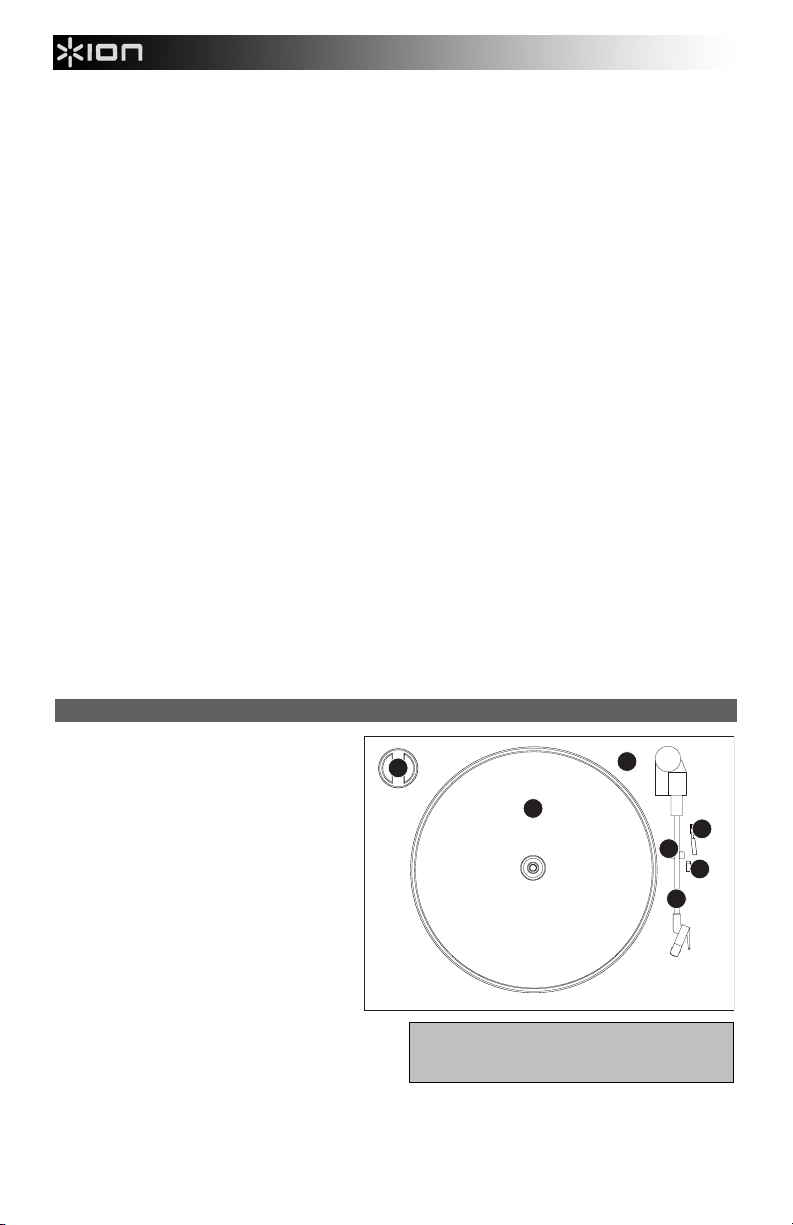
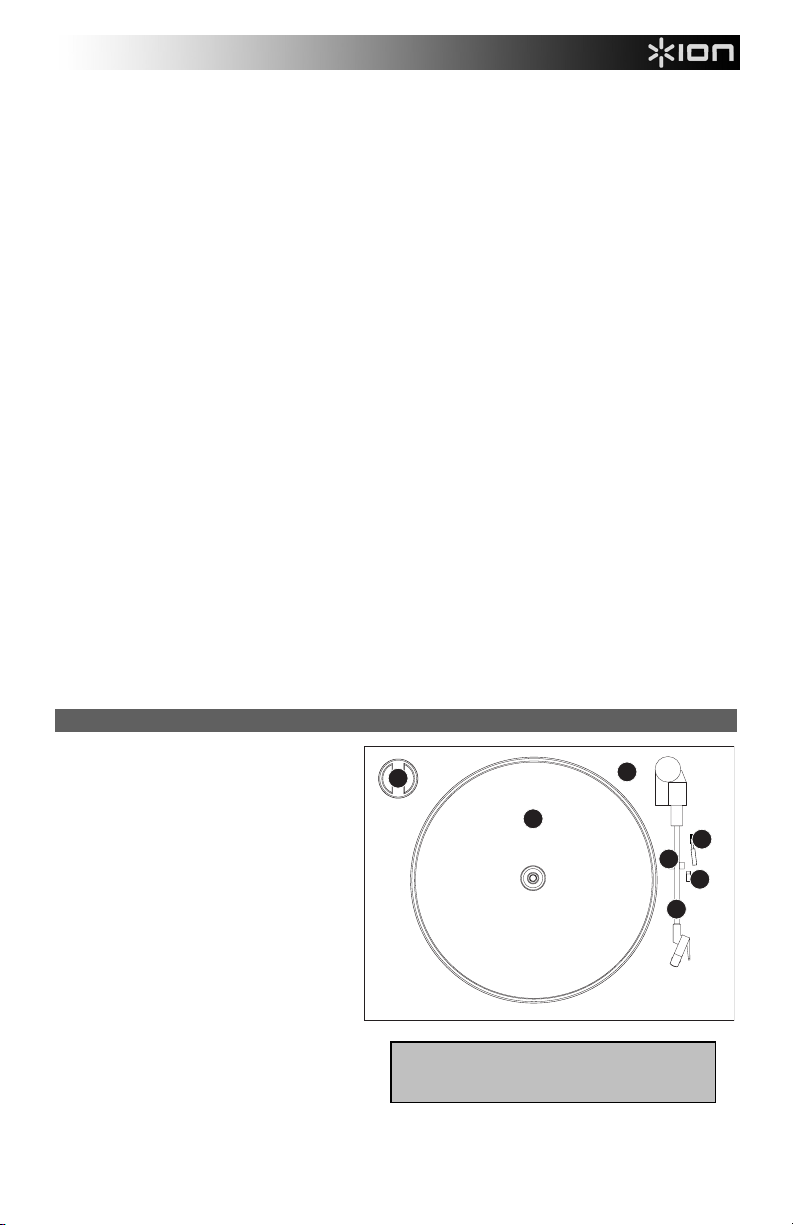
TOP PANEL
1. PLATTER – Place your record here.
2. TRANSPORT SCREW – Secures the platter
and tonearm assembly to prevent damage
during transport. If you transport the turntable,
tighten the screw to re-secure the platter and
tonearm assembly. Before first using the
turntable, please turn the TRANSPORT
SCREW clockwise to loosen it.
3. 45 RPM ADAPTER HOLDER – Holds the
included 45 RPM adapter. When not using the
adapter, please place it in this holder.
4. TONEARM – CD DIRECT comes with a ready
to use pre-balanced TONEARM and cartridge.
The TONEARM can be raised and lowered by
hand, or by pressing the RAISE / LOWER
LEVER. Please note that the TONEARM
needs to be moved away from its resting
position (on the ARM CLIP) for the turntable
motor to activate. When the TONEARM is
placed back in its resting position, the turntable motor
will deactivate.
5. ARM CLIP – This specially designed arm clip secures
the tone arm while at rest or when not in use. The arm
clip has been designed to remain in the up position
while unlocked.
6. RAISE / LOWER LEVER – Raises and lowers the tonearm.
7. 33 / 45 / 78 RPM SWITCH – This switch controls the RPM of the turntable platter.
3
Remove the plastic cartridge cover (needle cover)
before operating the turntable.
1
2
6
5
7
4
4
Page 5
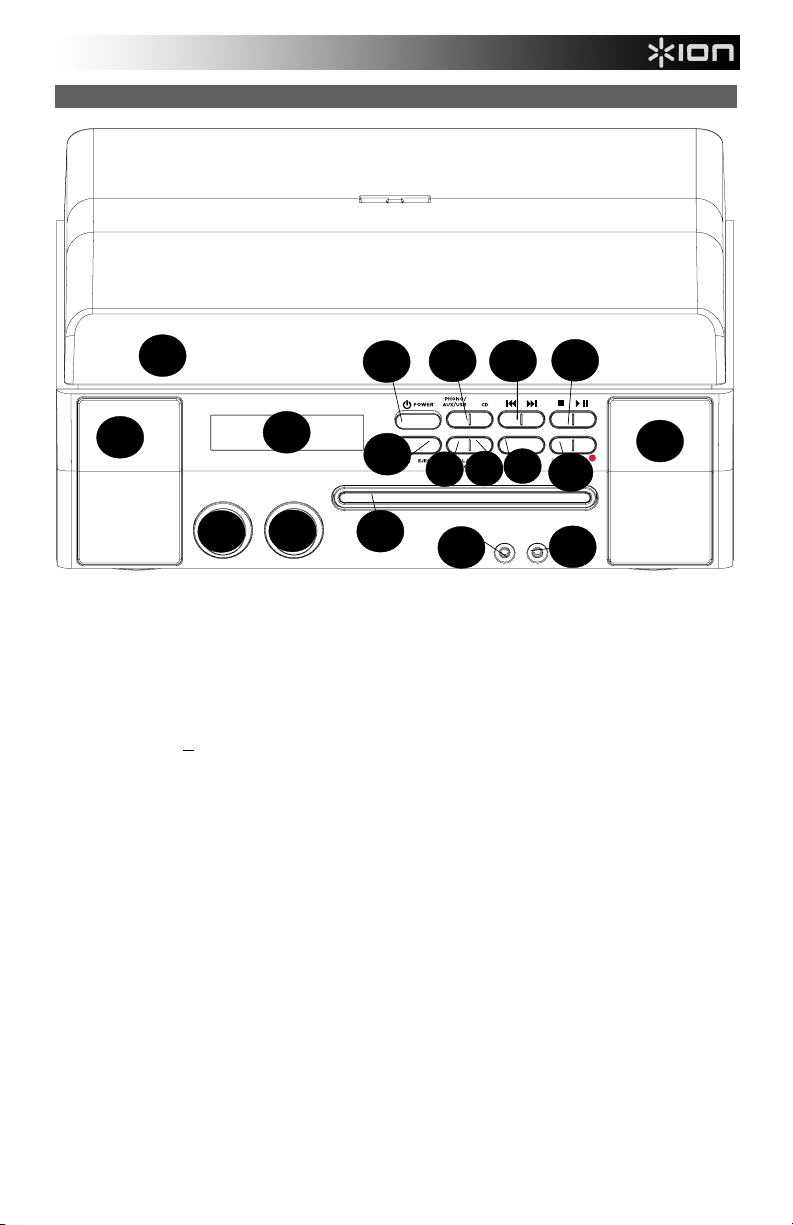
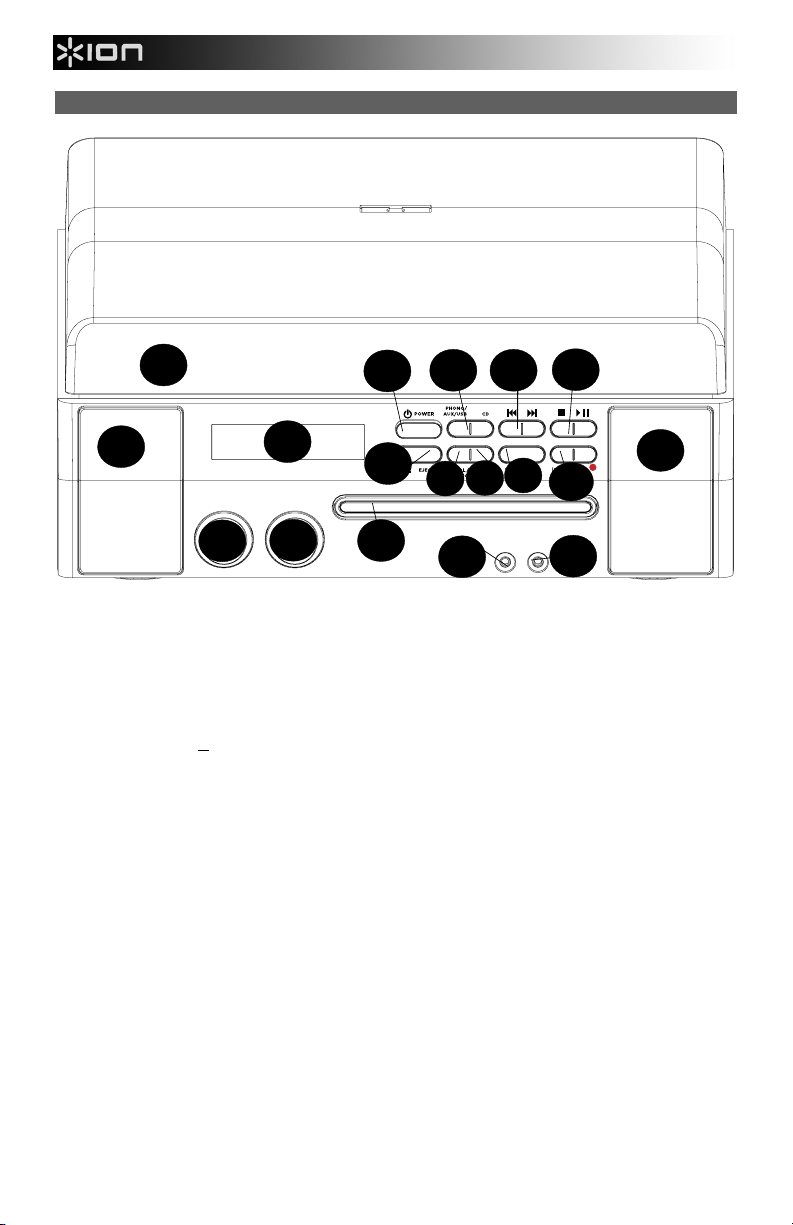
FRONT PANEL
16
17
1
2
6
11
1. LCD – Displays information about CD DIRECT's functions.
2. POWER ON/OFF – Turns CD DIRECT on or off.
3. PLAY MODE SELECTORS – Selects what media format you want to use. Press this button to cycle through
and set CD DIRECT to be in turntable (PHONO), LINE IN jack (AUX), computer (USB), or CD player (CD)
mode.
4. MUSIC SKIP – Press one of these buttons once to skip to the previous/next track when playing
music from a CD. Press and hold one of these buttons to scan back/forward through the current track.
5. STOP/PLAY/PAUSE f – Controls the operation of the CD transport.
6. OPEN/CLOSE s
7. MANUAL/AUTO – Selects the volume level (in dB) at which tracks will be separated automatically or the track
can be manually separated using this button.
8. FINALIZE/ ERASE – Press this button once to either finalize a CD (you will not be able to add any more tracks
to a finalized CD) or double press the button to erase one track or all tracks from a CD-RW.
9. TRACK SPLIT – Creates a new track while recording.
10. ENTER/RECORD – Press the left side of this button to confirm recording, erasing or finalizing of a CD. Press
the right side of this button to prepare the CD player for recording.
11. LEVEL – Adjusts the signal level being recorded to CD as well as the incoming signal sent through the USB
port, the Line input and the Aux input.
12. VOLUME – Adjusts the internal speaker volume and headphone output volume.
13. CD TRAY – Use the OPEN/CLOSE button to open/close the tray and place your disc here.
14. LINE IN – Use a 1/8" stereo cable to connect another audio device (e.g., iPod, computer, etc.) to this jack,
allowing you to record and/or play it through CD DIRECT's speakers.
15. PHONES – Connect 1/8" headphones here.
16. SPEAKER – Listen to your music source through here.
17. DUST COVER – This cover protects the turntable from dust and abuse while not in use or while in transport.
– Opens/closes the CD tray.
12
13
3 4
8
7
14
9
5
16
10
15
5
Page 6
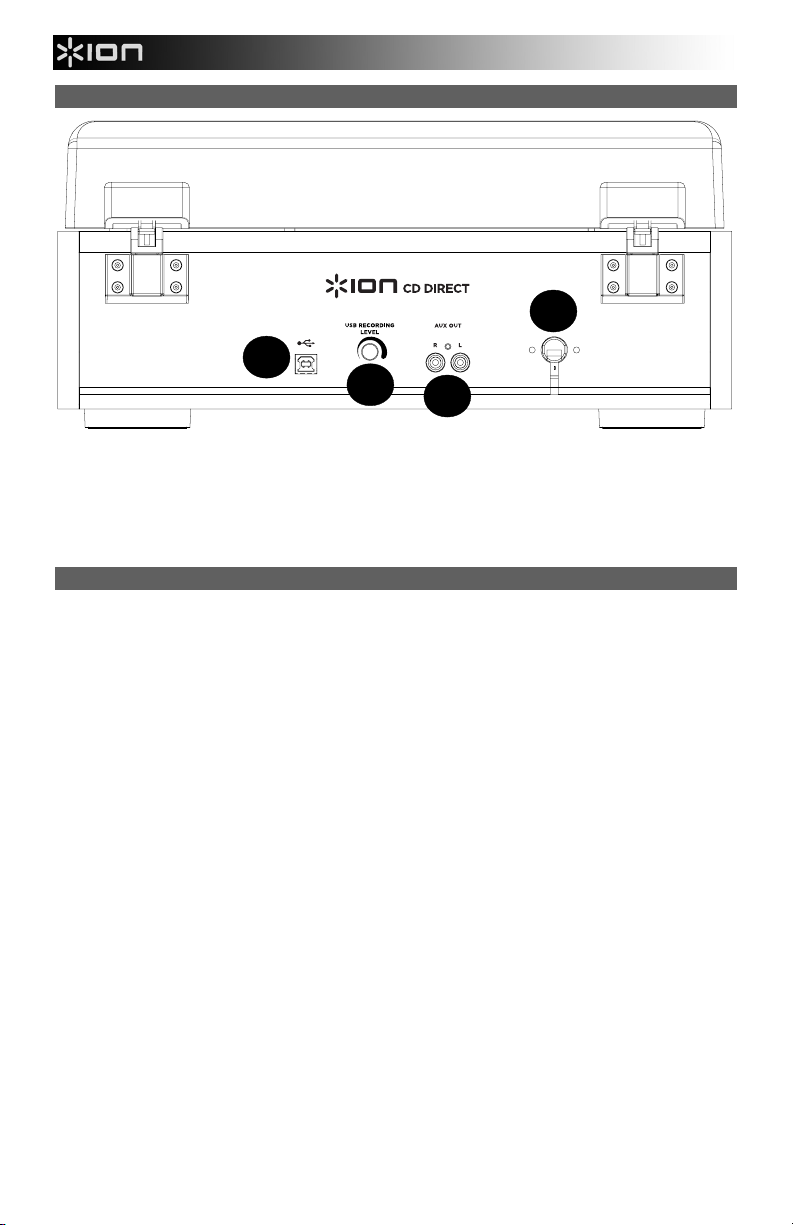
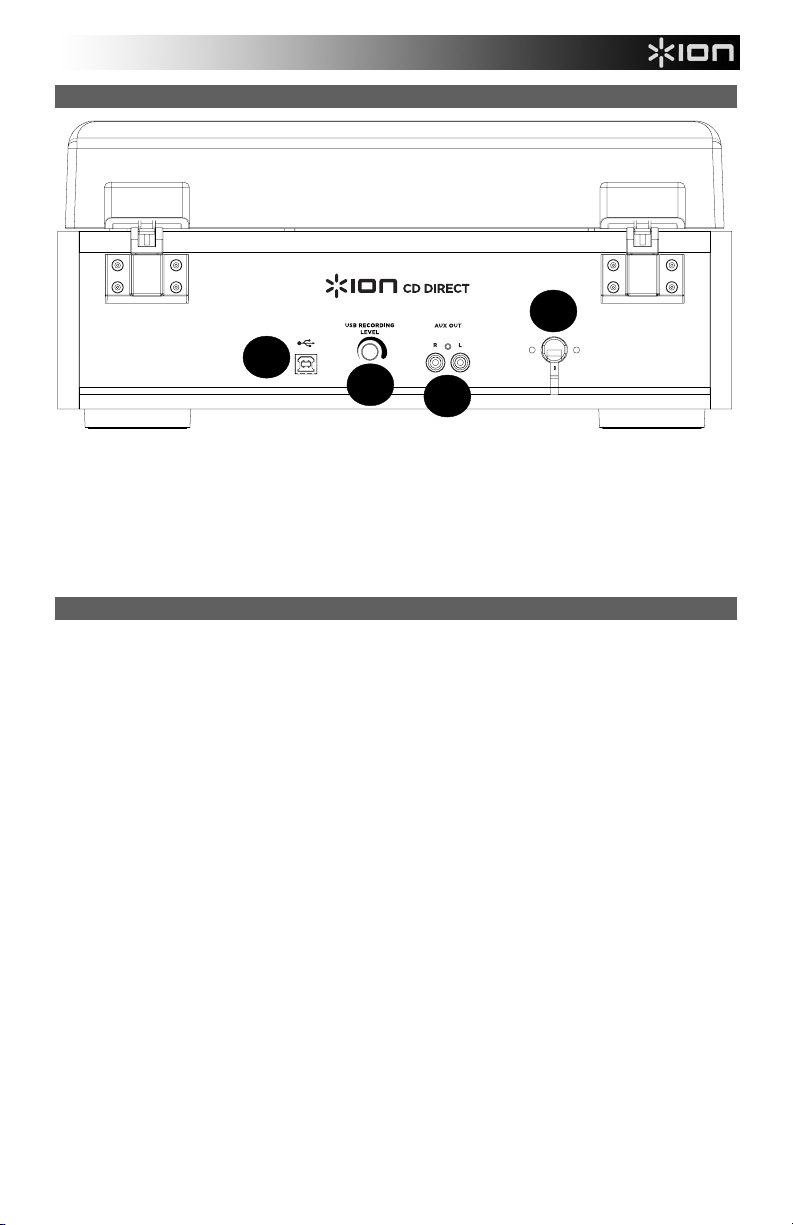
BACK PANEL
1
2
4
3
1. USB PORT – Connect a USB cable from the CD DIRECT to a computer to record or listen to audio.
2. GAIN ADJUSTMENT – Before recording through a USB connection, use this knob to adjust the recording gain.
The level should be high enough so that the loudest part of the song does not distort or "clip".
3. AUX OUT – RCA Audio outputs to connect to external speakers or an amp.
4. POWER CONNECTION – The built-in power cable is located here.
BEFORE RECORDING TO CD
Before you start recording, make sure that you understand the following points:
• CD specifications limit the number of tracks to 99.
• You can not create recording tracks shorter than 10 seconds.
• Once you have recorded on a CD-R disc, the data cannot be erased.
• A recorded CD-R can be played back in a regular CD player only after finalizing.
• To add more recordings to a finalized CD-RW, unfinalize it.
• When all available space on a CD-RW has been recorded, you can record additional tracks by erasing previously
recorded tracks. Note that you can only erase all tracks or the last track.
• If the STOP button or PLAY/PAUSE f button is pressed within 10 seconds from the beginning of recording,
the unit will not stop recording.
• When the recording is finished, “REC” and “- ENd –“ blink for a few seconds, and the unit then goes into stop
mode. Do not apply any shock or vibration to the unit during blinking.
• If the disc reaches the end during recording, the unit will automatically finalize the disc.
• If the disc reaches the end of the 99th track during recording, the unit will finalize the disc automatically.
• The recording time of a track may differ slightly from the original source.
• When a partially recorded disc is inserted, recording will begin after the last recorded track.
• The AUTO REC function automatically separates tracks when it detects the volume level (in dB) set by the
MANUAL/AUTO button. When using this function, your CD may have more or fewer tracks than its source due to
unexpected quiet or noisy parts, which may trigger -- or not trigger -- the automatic track separation in unexpected
ways. If this occurs, use the MANUAL/AUTO button to adjust the volume level appropriately.
• When the disc which was recorded by this unit is played back by some other players, a small noise may be heard
at the point that the track is divided.
6
Page 7
RECORDING
Recording audio from the turntable or AUX sources on the CD recorder:
1. Press the PHONO/AUX/USB button repeatedly to select which source is to be recorded, either PHONO or
AUX.
2. Press the OPEN/CLOSE s button and place a recordable CD-R or CD-RW disc into the disc tray with the
printed label side up, and then press the OPEN/CLOSE s
Note: Make sure “NO TOC” and “CD-R” (or “CD-RW“) indicators lights on the display, or the RECORD
button will not work.
3. Select the mode of track number assignment using the MANUAL/AUTO REC button. When the
MANUAL/AUTO REC button is pressed once, the current mode is displayed. Press the MANUAL/AUTO REC
button repeatedly to select any other mode.
• (MANUAL)
In this mode track numbers are not given automatically. Use the TRACK SPLIT button to divide tracks.
MANUAL is recommended for recording an analog source such as a record. The settings will be reset to
“Manual” when the unit is powered off.
• –20db, –30db or –40db (AUTO REC)
In this mode the unit will automatically insert a track division in the recorded material when the sound
level has dropped below the threshold for more than 2 seconds, and sound has re-started. “–20db”
requires a louder signal to trigger the track increment. “–30db” means that a relatively quiet signal will
trigger the track increment. “–40db” is suitable for recording a noiseless source such as a CD. When
recording from a source with unwanted noise or an analog source in auto track setting, more track
numbers may be assigned than actual tracks recorded. In this case, use the “Manual” setting and press
the TRACK SPLIT button to assign the track numbers at the points that you want.
• AUTO REC may not work properly with analog sources that contain low-level noises.
AUTO REC may not work properly with some genres (classical musical, spoken word, etc.) that have
extended periods of silence within a single track.
• The AUTO TRACK indicator lights when –20dB, –30dB or –40dB is selected.
• The default setting is MANUAL (off). When the unit is turned on or the OPEN/CLOSE button is pressed,
the setting is automatically reset to MANUAL (off).
• The MANUAL/AUTO REC button does not work during recording.
• Use of the MANUAL/AUTO REC mode is disabled when a disc is being inserted in the drive. Use of this
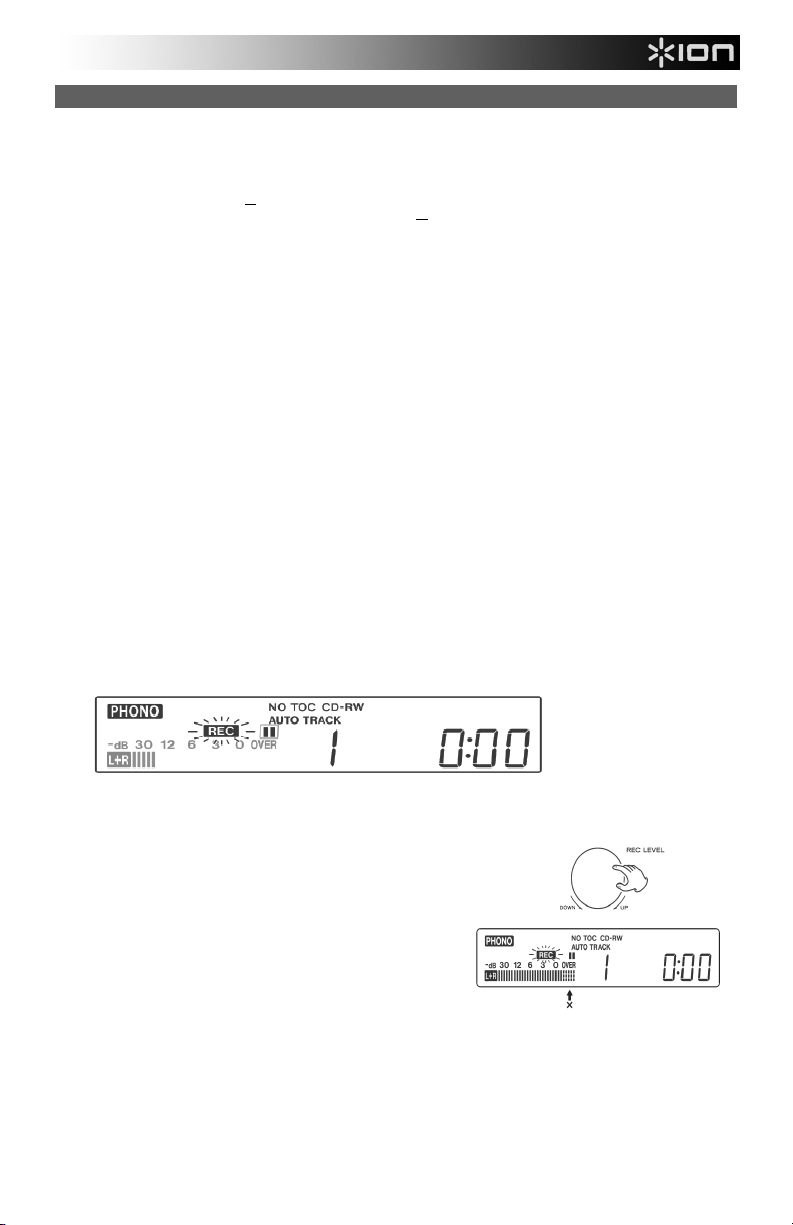
4. Press the RECORD button. The unit will enter record pause mode. During recording, the indicator lights red.
mode is possible when “NO TOC” is displayed.
In record pause mode, the “REC” indicator blinks and the Pause indicator lights on the display.
• Button presses will not work while “bUSY” is displayed. Wait about 10 seconds until “bUSY” disappears
from the display.
button to close the disc tray.
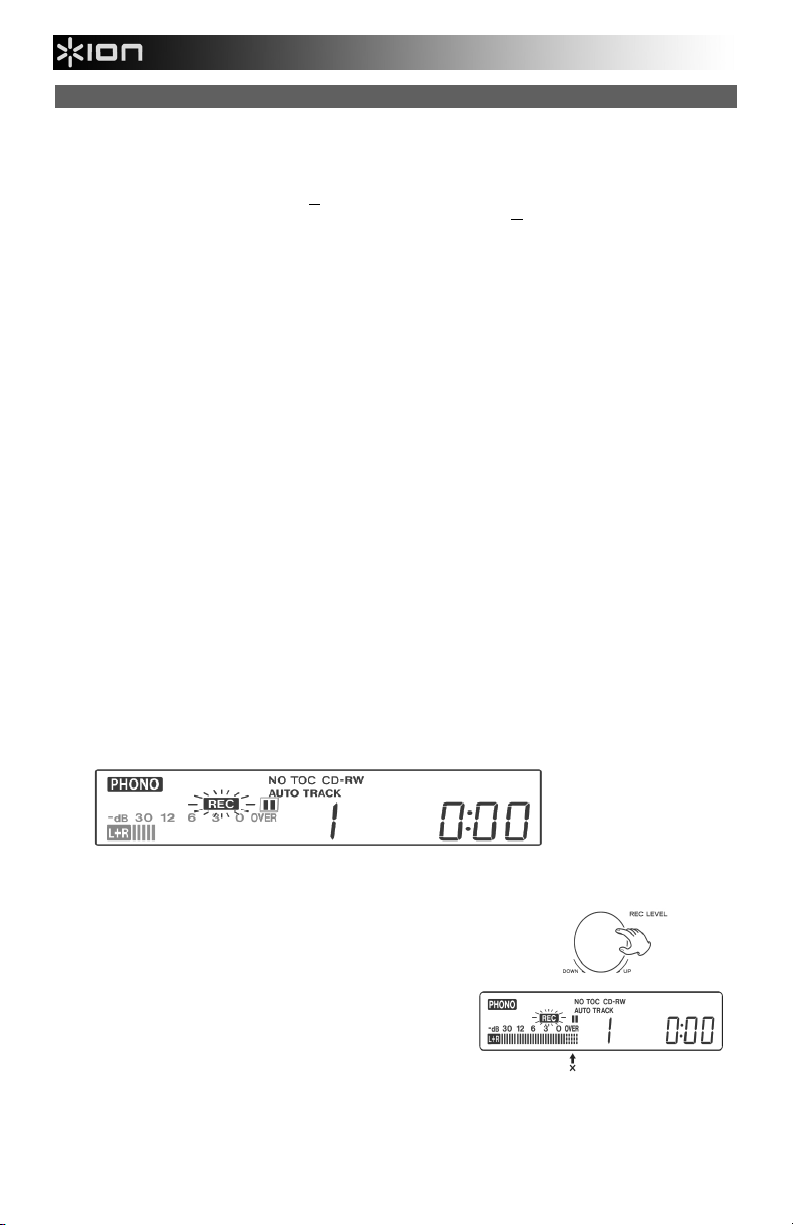
5. Adjusting the recording level. Once the Record button has
been pressed, play the source to be recorded as a test to
adjust the recording level so that the loudest sound does not
exceed the “OVER” indicator on the level meter. The level can
be adjusted from –8 (–12dB) to +8(+12dB).
• The default setting is 0. Every time the recording is
finished, the setting is automatically reset to 0.
• Different sources (Phono, Line In, CD) have different
volumes.
different sources, it is necessary to adjust the recording
level for each source. Adjust the recording level so that
the loudest sound does not exceed the “OVER”
indicator on the level meter.
LCD while recording
In order to record at the optimal volume for
7
Page 8

6. Prepare the recording source.
To record from a record:
Please ensure that the white protective cover has first been removed from the turntable stylus.
Then move the tonearm to the edge of the record or a position on the record and slowly put it down.
While the turntable is stopped, the PLAY/PAUSE f button will not work and you cannot start recording.
To record a sound played by an audio device connected to the LINE IN terminal:
Play the unit connected to the Line In terminal.
• To prevent the beginning part from being cut out, cue the unit and pause playback temporarily, then after
starting recording, release the pause of the unit to start playback.
• If the unit does not have the pause function, after starting recording, start playback of the unit.
7. Press the PLAY/PAUSE button to start recording.
When the playback of the source finishes, press the STOP button to stop recording. When playback of a
record finishes and the turntable stops rotating, recording automatically ends.
To prevent unwanted noise from the tone arm, stop the recording manually by using the STOP button as
soon as the playback of numbers you want to record finishes. When recording is stopped, “REC” and “-End-”
blink for several seconds. Do not turn OFF the power or shake the unit during recording or when “REC” and “---
--” are blinking. Such actions prevent proper recording.
To stop recording
Press the STOP button to stop recording.
To pause recording
Press the PLAY/PAUSE fbutton. “bUSY” briefly appears on the display, and the recording is paused. To
restart recording, press the PLAY/PAUSE button f.
• You cannot restart recording while “bUSY” is displayed.
• Remember that every time recording is paused or stopped, a new track number will always be assigned.
It is not possible to record in two “stages” within one track.
• The unit will not stop or pause even if the PLAY/PAUSE f button is pressed within 10 seconds after
recording has started.
Manual track division
It is possible to divide the recording into tracks while recording. While recording is taking place, press the
TRACK SPLIT button. The current track number will be increased by one.
• The TRACK SPLIT button works regardless of the MANUAL/AUTO REC setting.
• You cannot divide the track manually to make a track of less than 10 seconds. Up to 99 tracks can be
made on a disc depending on the CD specifications.
• When the TRACK SPLIT button is pressed while recording the recorded sound will be cut for a moment.
8
Page 9
FINALIZING A CD
In order for a disc to become a standard CD, it must have a Table of Contents (TOC) written to it. This process is
known as finalizing. Once finalized, no more tracks can be recorded on CD-R discs. However CD-RW discs can be
“unfinalized“ and if there is space, further material can be recorded on them.
• You cannot finalize a blank disc.
• When the disc has reached its maximum recordable time, it will automatically finalize even if recording is
still in progress.
1. Press the CD button to select “CD” and open the CD tray by pressing the s button.
2. Load an unfinalized (recordable) disc into the tray.
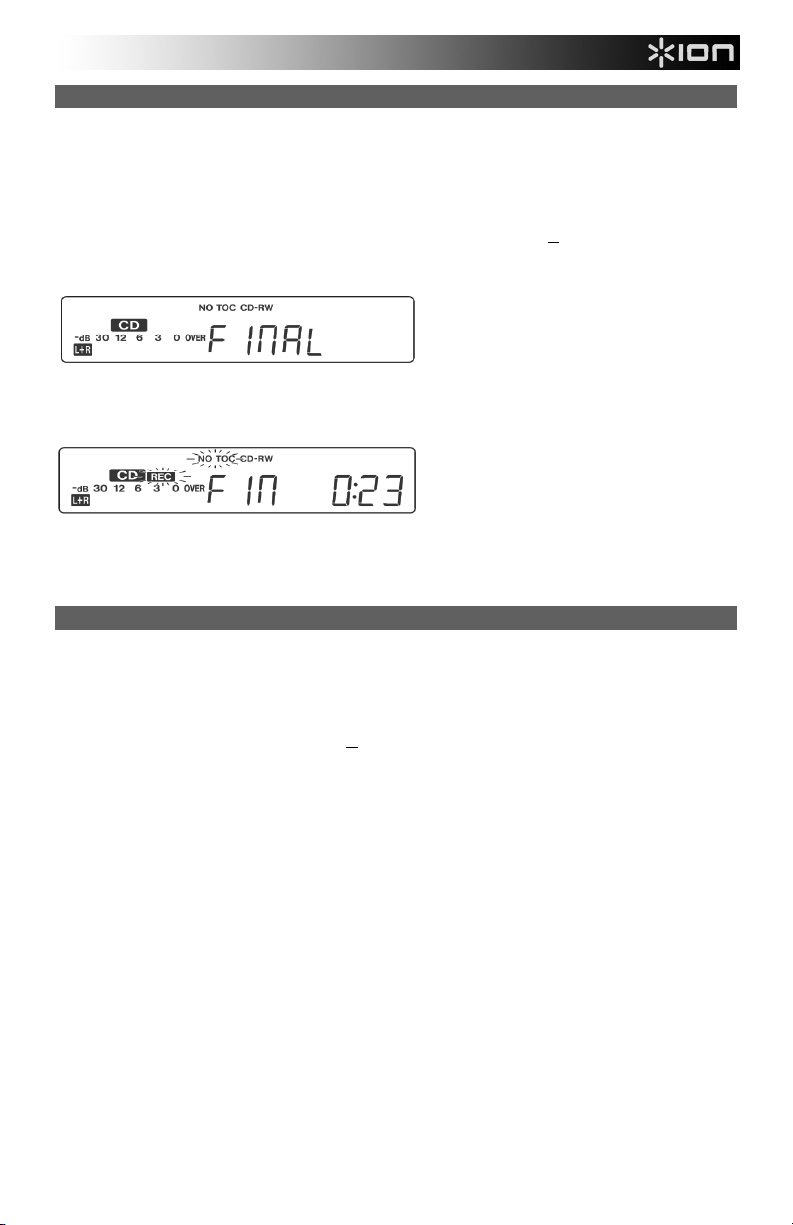
3. Press the FINALIZE button in the stop mode. “FINAL” will appear on the display. To cancel the finalizing
process, press the STOP button.
4. Press the ENTER button to start finalizing. “NO TOC” and “REC” indicators will blink and the remaining time
for the finalizing operation will appear in the display. When the operation has been finished, the NO TOC
indicator turns off and the display returns to the track/time display. During finalizing, no buttons will work.
NOTE: Never turn the power off or unplug the power cord when in operation.
• Although finalized CD-R discs may play on ordinary CD players, remember that finalized CD-RW discs
may not play on ordinary CD players.
• The time for the finalizing varies with the type of the disc.
ERASE OR UNFINALIZE A CD-RW
It is not possible to perform any erase or unfinalize procedures on a CD-R disc. Erase procedures are possible only
on an unfinalized CD-RW disc. If a CD-RW disc has been finalized, unfinalize it prior to erasure. On a CD-RW, it is
possible to erase the last recorded track or to erase the whole disc. Erasing cannot be undone. If you are going to
erase a track or tracks, make sure that they are recordings that you really want to erase.
1. Press the CD button to select “CD”.
2. Load a recorded CD-RW by pressing the s button.
3. Press the FINALIZE/ERASE button in the stop mode. Each time the FINALIZE/ERASE button is pressed,
the display changes as follows:
“UnFINAL” (unfinalize) appears when a finalized disc is loaded. Select this to unfinalize the disc.
“FINAL” appears when the disc has not been finalized. If you press the FINALIZE/ERASE button again,
“ErASE XX” (the number of the last track recorded on the disc) will appear. Select this to erase the last track on
the disc. This will not appear when only one track is recorded on the disc. If you press the FINALIZE/ERASE
button again, ErASE ALL will appear. Select this to erase all the tracks. To cancel the erasing or unfinalizing
process, press the STOP button.
4. Press the ENTER button to start finalizing. The remaining time for the operation appears in the display.
When the operation has been finished, the display returns to the track/time display. During erasing/unfinalizing,
no buttons will work. Never turn the power off or unplug the power cord when the unit is finalizing or this will
make the disc unplayable.
9
Page 10

GUÍA DE INICIO RÁPIDO (ESPAÑOL)
CONTENIDO DE LA CAJA
Asegúrese de que todos los
elementos abajo indicados
estén incluidos en la caja:
• CD DIRECT
• Disco de software EZ
Vinyl
• Guía de inicio rápido del
software
• Cable USB
• Guía de inicio rápido
• Folleto de instrucciones de seguridad e información sobre la garantía
LEA EL FOLLETO DE INSTRUCCIONES DE SEGURIDAD ANTES DE UTILIZAR EL PRODUCTO.
INTRODUCCIÓN
CD DIRECT convierte fácilmente sus apreciadas grabaciones en vinilo y fuentes de audio externas en CD. CD
DIRECT también puede conectarse a una computadora por su puerto USB. Hemos incluido dos paquetes de
software para ayudarle a convertir sus grabaciones de vinilo. Debe instalar una de las siguientes aplicaciones para
aprovechar la función de grabación de su computadora:
• EZ Vinyl/Tape Converter (sólo para PC) es la forma más rápida y fácil de convertir las grabaciones en medios
digitales. Este software guarda convenientemente sus grabaciones en la biblioteca de iTunes*. Es posible que
los usuarios novicios prefieran esta aplicación. Incluimos una práctica Guía de inicio rápido del software con
instrucciones paso a paso sobre la instalación y la operación del mismo.
• EZ Audio Converter (sólo para Mac) es una aplicación de convertidor básica para Mac OS X, ideal para
usuarios novicios. Consulte en la Guía de inicio rápido del software incluida las instrucciones detalladas sobre
la instalación y la operación del software.
Para instalar el software: inserte simplemente el CD incluido en la computadora y siga las instrucciones de la
pantalla. Después de terminar de convertir su vinilo, puede quemarlo en CD o cargarlo en dispositivos de medios
portátiles.
Visite http://www.ionaudio.com/computer-optimization
computadora para audio.
*iTunes es una marca comercial de Apple Inc., registrada en EE.UU. y otros países.
Configuración de audio para Windows Vista y Windows 7:
Una vez instalado el software EZ Converter en su computadora, conecte el CD DIRECT a un puerto USB
para más información sobre la optimización de su
disponible de la misma mediante el cable USB incluido.
1.
Haga clic en el botón Start (Inicio) de Windows de la esquina inferior izquierda de la pantalla y seleccione
Control Panel (Panel de control).
2. Haga doble clic en Hardware and Sound (Hardware y sonido).
3. Haga doble clic en Sound (Sonido).
4. Haga clic en la pestaña Playback (Reproducir). Elija la tarjeta de sonido de su computadora (como Speakers
– High Definition Audio Device o Headphones – High Definition Audio Device (Altavoces - Dispositivo de
audio de alta definición o Auriculares - Dispositivo de audio de alta definición). Los nombres de algunas
tarjetas de sonido para PC comunes son Realtek, Soundmax y Sigmatel.
5. Haga clic en Set Default (Configurar parámetros predeterminados).
6. Seleccione la pestaña Recording (Grabación) de la parte superior de la ventana Sound del panel de control.
Bajo Recording, seleccione Microphone – USB Audio Codec (Micrófono - Códec de audio USB) como
dispositivo predeterminado.
7. Haga clic en Set Default (Configurar parámetros predeterminados).
8. Seleccione la pestaña Advanced (Avanzados).
9. Configure el parámetro Default Format (Formato predeterminado) como 2-channel, 16 bit 44100 Hz (CD
Quality) (2 canales, 16 bits, 44100 Hz (calidad de CD).
10. Deseleccione las dos casillas indicadas bajo Exclusive Mode (Modo exclusivo). Luego, haga clic en Apply
(Aplicar).
11. Seleccione la pestaña Levels (Niveles) de la parte superior de la ventana.
12. En Levels, ajuste el cursor de nivel a 5.
13. Haga clic en Apply y luego en Ok (Aceptar) para cerrar la ventana.
Antes de usar el giradiscos, afloje
el "tornillo de transporte" (en el
extremo más alejado del plato,
cerca del brazo) girándolo EN
SENTIDO HORARIO.
10
Page 11
Procedimiento de configuración de audio para Windows XP:
Una vez instalado EZ Converter en su computadora, conecte el CD DIRECT mediante el cable USB incluido a un
puerto USB disponible de la misma.
1. Seleccione el menú Start (Inicio) de Windows.
2. Seleccione Settings (Configuración) y luego Control Panel (Panel de control).
3. Haga doble clic en el panel de control Sounds and Audio Devices (Sonidos y dispositivos de audio). Si no ve
una opción llamada Sounds and Audio Devices, elija la opción Switch to Classic View (Cambiar a vista
clásica).
4. Seleccione la pestaña Audio.
5. En Sound Playback (Reproducción de sonido), seleccione la tarjeta de sonido interna de su computadora.
Los nombres de algunas tarjetas de sonido para PC comunes son Realtek, Soundmax y Sigmatel.
6. En Sound Recording (Grabación de sonido), seleccione USB Audio Codec (Códec de audio USB) como su
dispositivo predeterminado.
7. Marque la casilla llamada Use only default devices (Usar sólo los dispositivos predeterminados).
8. Haga clic en Apply (Aplicar) (si es posible) y luego en OK (Aceptar).
Procedimiento de configuración de audio para Mac:
Una vez instalado EZ Converter en su computadora, conecte el CD DIRECT mediante el cable USB incluido a un
puerto USB disponible de la misma.
1. Haga clic en el icono de Apple de la esquina superior izquierda de la pantalla de su computadora y seleccione
System Preferences (Preferencias del sistema).
2. En la ventana que se abre, bajo Hardware, haga clic en el elemento llamado Sound (Sonido).
3. Haga clic en la pestaña Input (Entrada). Debajo de Choose a device for sound input (Elegir un dispositivo
para entrada de sonido), seleccione USB AUDIO CODEC (Códec de audio USB) (o USB AUDIO DEVICE
[Dispositivo de audio USB]).
4. Haga clic en la pestaña Outputs (Salidas). Debajo de Choose a device for sound input, seleccione
Headphones (Built- in Output) (Auriculares [Salida integrada]).
5. Cierre la ventana de preferencias del sistema.
PANEL SUPERIOR
1. PLATO – Coloque aquí su disco.
2. TORNILLO DE TRANSPORTE – Sujeta el
conjunto de plato y brazo para evitar daños
durante el transporte. Si va a transportar el
giradiscos, apriete el tornillo para volver a
sujetar el conjunto de plato y brazo. Antes de
usar el giradiscos por primera vez, gire el
TORNILLO DE TRANSPORTE en sentido
horario para aflojarlo.
3. SOPORTE DEL ADAPTADOR DE 45 RPM –
Sostiene el adaptador de 45 RPM incluido.
Cuando no use el adaptador, póngalo en este
soporte.
4. BRAZO – CD DIRECT viene con un BRAZO y
una cápsula previamente balanceados listos
para usar. El BRAZO se puede subir y bajar a
mano o presionando la PALANCA DE SUBIR /
BAJAR. Tenga en cuenta que es necesario
sacar el BRAZO de la posición de reposo
(sobre el CLIP DEL BRAZO) para que se
active el motor del giradiscos. Cuando el BRAZO se
coloca de nuevo en su posición de reposo, el motor
del giradiscos se desactiva.
5. CLIP DEL BRAZO – Este clip diseñado
especialmente fija el brazo mientras está en reposo
o no se usa. El clip ha sido diseñado para que
permanezca hacia arriba mientras está desbloqueado.
6. PALANCA DE SUBIR / BAJAR – Sube y baja el brazo.
7. CONMUTADOR DE 33 / 45 / 78 RPM – Este conmutador controla las RPM del plato del giradiscos.
3
1
Retire la cubierta plástica de la cápsula (cubierta
de la púa) antes de hacer funcionar el giradiscos.
11
2
6
5
7
4
Page 12
PANEL FRONTAL
16
17
1
2
6
11
1. PANTALLA LCD – Muestra información acerca de las funciones de CD DIRECT.
2. ENCENDIDO/APAGADO – Enciende y apaga CD DIRECT.
3. SELECTORES DE MODO DE REPRODUCCIÓN – Seleccionan el formato del medio que desea usar. Pulse
este botón para recorrer las opciones y configurar CD DIRECT para que esté en modo de giradiscos
(PHONO), conector LINE IN (AUX), computadora (USB) o reproductor de CD (CD).
4. SALTAR MÚSICA – Pulse uno de estos botones una vez para saltar a la pista anterior o siguiente
cuando se reproduce música desde un CD. Mantenga pulsado uno de estos botones para explorar hacia
delante o atrás la pista que se está reproduciendo.
5. PARAR/REPRODUCIR/PAUSA f – Controla la operación del transporte del CD.
6. ABRIR/CERRAR s
7. MANUAL/AUTO – Selecciona el nivel de volumen (en dB) al cual las pistas se separan automáticamente o se
pueden separar manualmente con este botón.
8. FINALIZAR/ BORRAR – Pulse este botón para finalizar un CD (no puede agregar más pistas a un CD
finalizado) o pulse dos veces el botón para borrar una o todas las pistas de un CD-RW.
9. DIVISIÓN DE PISTA – Se utiliza para crear una pista nueva durante la grabación.
10. ENTER/GRABAR – Pulse el lado izquierdo de este botón para confirmar la grabación, borrado o finalización
de un CD. Pulse el lado derecho del botón para preparar el reproductor de CD para la grabación.
11. NIVEL – Ajuste el nivel de señal que se graba en CD, así como la señal entrante enviada por el puerto USB, la
entrada de línea y la entrada Aux.
12. VOLUMEN – Se utilizar para ajustar el volumen del altavoz interno y el volumen de salida de los auriculares.
13. BANDEJA DE CD – Utilice el botón de ABRIR/CERRAR para abrir y cerrar la bandeja y colocar aquí su disco.
14. ENTRADA DE LÍNEA – Use un cable estéreo de 1/8" para conectar a este conector otro dispositivo de audio
(iPod, computadora, etc.), lo que le permite grabarlo o reproducirlo a través de los altavoces de CD DIRECT.
15. AURICULARES – Conecte aquí los auriculares de 1/8".
16. ALTAVOZ – Escuche por aquí su fuente de música.
17. CUBIERTA ANTIPOLVO – Esta cubierta protege el giradiscos del polvo y la falta de uso mientras no se esté
usando o mientras se esté transportando.
– Se utiliza para abrir y cerrar la bandeja de CD.
12
13
3 4
8
7
14
9
5
16
10
15
12
Page 13
PANEL TRASERO
1
2
4
3
1. PUERTO USB – Conecte aquí un cable USB desde CD DIRECT a una computadora para grabar o escuchar
el audio.
2. AJUSTE DE GANANCIA – Antes de grabar por una conexión USB, utilice esta perilla para ajustar la ganancia
de grabación. El nivel debe ser lo suficientemente alto para que la parte de mayor volumen del tema no se
distorsione ni “recorte”.
3. SALIDA PARA AUXILIARES – Salidas de audio RCA para conectar a altavoces o un amplificador externos.
4. CONEXIÓN DE ALIMENTACIÓN – Aquí se ubica el cable de alimentación integrado.
ANTES DE GRABAR EN CD
Antes de comenzar a grabar, asegúrese de que entiende los puntos siguientes:
• Las especificaciones del CD limitan el número de pistas a 99.
• No se pueden crear pistas de grabación de menos de 10 segundos.
• Una vez que ha grabado en un disco CD-R, los datos no se pueden borrar.
• Un CD-R grabado se puede reproducir en un reproductor de CD normal sólo después de que esté finalizado.
• Para agregar más grabaciones a un CD-RW finalizado, desfinalícelo.
• Cuando se haya grabado en todo el espacio disponible de un CD-RW, puede agregar pistas adicionales borrando
las grabadas previamente. Tenga en cuenta que sólo puede borrar todas las pistas o la última.
• Si el botón de PARAR o el de REPRODUCIR/PAUSA f se pulsan dentro de los 10 segundos de comenzar a
grabar, la unidad no detiene la grabación.
• Cuando termina la grabación, “REC” y “- ENd –” parpadean durante algunos segundos y luego la unidad pasa al
modo de parada. No aplique golpes ni sacudidas a la unidad durante el parpadeo.
• Si el disco llega al final durante la grabación, la unidad finaliza el disco automáticamente.
• Si el disco llega al final de la pista n° 99 durante la grabación, la unidad finaliza el disco automáticamente.
• El tiempo de grabación de una pista puede diferir ligeramente con respecto al de la fuente original.
• Cuando se introduce un disco parcialmente grabado, la grabación comienza después de la última pista grabada.
• La función AUTO REC (Grabación automática) separa automáticamente las pistas cuando detecta el nivel de
volumen (en dB) ajustado con el botón MANUAL/AUTO. Cuando se utiliza esta función, el CD puede tener más o
menos pistas que la fuente, debido a que las partes silenciosas o ruidosas inesperadas pueden disparar o no la
separación automática de pistas de maneras imprevistas. Si esto ocurre, utilice el botón MANUAL/AUTO para
ajustar el nivel de volumen apropiadamente.
• Cuando un disco grabado con esta unidad se reproduce en algunos otros reproductores, puede oírse un leve
ruido en el punto en que se divide la pista.
13
Page 14
CÓMO GRABAR
Cómo grabar audio desde el giradiscos o fuentes AUX en el grabador de CD:
1. Pulse el botón PHONO/AUX/USB (Fonógrafo/Auxiliar/USB) varias veces para seleccionar la fuente a grabar,
ya sea FONÓGRAFO o AUXILIAR.
2. Pulse el botón de ABRIR/CERRAR s coloque un disco CD-R o CD-RW grabable en la bandeja con el lado
de la etiqueta impresa hacia arriba y pulse el botón de ABRIR/CERRAR s
Nota: Asegúrese de que las luces indicadoras “NO TOC” y “CD-R” (o “CD-RW“) de la pantalla o el
botón de GRABAR no funcionen.
3. Seleccione el modo de asignación de números de pista usando el botón MANUAL/AUTO REC (Grabación
manual/automática). Cuando el botón de GRABACIÓN MANUAL/AUTOMÁTICA se pulsa una vez, se muestra
el modo actual. Pulse el botón de GRABACIÓN MANUAL/AUTOMÁTICA varias veces para seleccionar
cualquier otro modo.
• (MANUAL)
En este modo, los números de pista no se asignan automáticamente. Use el botón TRACK SPLIT
(División de pistas) para dividir las pistas.
MANUAL se recomienda para grabar una fuente analógica tal como un disco. La configuración se
restablece como “Manual” cuando se apaga la unidad.
• –20db, –30db o –40db (AUTO REC)
En este modo, la unidad inserta automáticamente una división de pistas en el material grabado cuando
el nivel de sonido cae por debajo del umbral durante más de 2 segundos y luego se reinicia. “–20db”
requiere una señal más fuerte para disparar el incremento de pista. “–30db” significa que una señal
relativamente silenciosa dispara el incremento de pista. “–40db” es adecuado para grabar fuentes sin
ruido, como un CD. Cuando se graba desde una fuente con ruido indeseable o una fuente analógica en
configuración automática de pistas, se asignan más números de pista que las pistas realmente
grabadas. En este caso, use la configuración “Manual” y pulse el botón TRACK SPLIT para asignar los
números de pista en los puntos que desee.
• AUTO REC puede no funcionar correctamente con fuentes analógicas que contienen ruidos de bajo
nivel.
AUTO REC puede no funcionar correctamente con algunos géneros (música clásica, discursos
hablados, etc.) que tengan períodos de silencio prolongados dentro de la misma pista.
• El indicador AUTO TRACK se enciende cuando se selecciona –20dB, –30dB o –40dB.
• La configuración predeterminada es MANUAL (desactivada). Cuando se enciende la unidad o se pulsa
el botón de ABRIR/CERRAR, la unidad se restablece automáticamente al modo MANUAL (desactivada).
• El botón de GRABACIÓN MANUAL/AUTOMÁTICA no funciona durante la grabación.
• El uso del modo de GRABACIÓN MANUAL/AUTOMÁTICA se deshabilita cuando se está introduciendo
4. Pulse el botón de GRABAR. La unidad entra al modo de pausa en la grabación. Durante la grabación, el
un disco en la unidad. El uso de este modo es posible cuando aparece “NO TOC”.
indicador se enciende con luz roja. En modo de pausa en la grabación, el indicador “REC” parpadea y el
indicador de pausa se enciende en la pantalla.
• Las pulsaciones de botones no funcionan mientras aparece “bUSY”. Espere unos 10 segundos después
de que desaparezca “bUSY” de la pantalla.
para cerrar la bandeja portadisco.
5. Cómo ajustar el nivel de grabación. Una vez pulsado el
botón de grabar, reproduzca la fuente a grabar como prueba
para ajustar el nivel de grabación de modo que el sonido más
fuerte no exceda el indicador “OVER” del medidor de nivel. El
nivel se puede ajustar entre –8 (–12 dB) y +8(+12 dB).
Pantalla LCD durante la grabación
• El ajuste predeterminado es 0. Cada vez que termina la
grabación, el ajuste se restablece automáticamente
como 0.
• Las distintas fuentes (fonógrafo, entrada de línea y CD)
tienen volúmenes diferentes.
óptimo para las distintas fuentes, es necesario ajustar el
nivel de grabación para cada una. Ajuste el nivel de
grabación de modo que el sonido más fuerte no exceda
el indicador “OVER” del medidor de nivel.
A fin de grabar al volumen
14
Page 15

6. Preparación de la fuente de grabación.
Para grabar desde un disco:
Asegúrese de que se haya retirado la cubierta protectora blanca de la púa del giradiscos.
Luego lleve el brazo al borde del disco o a una posición en el mismo, y bájelo lentamente.
Cuando se detiene el giradiscos, el botón de REPRODUCIR/PAUSA f no funciona y no se puede
comenzar a grabar.
Para grabar un sonido reproducido por un dispositivo de audio conectado al terminal LINE IN (Entrada
de línea):
Reproduzca con la unidad conectada al terminal de entrada de línea.
• Para evitar que se corte el comienzo, busque el comienzo de la grabación en la unidad, ponga la
reproducción en pausa momentáneamente y luego, después de comenzar a grabar, libere la pausa de la
unidad para comenzar la reproducción.
• Si la unidad no cuenta con la función de pausa, inicie la reproducción después de comenzar a grabar.
7. Pulse el botón REPRODUCIR/PAUSA para comenzar a grabar.
Cuando termine la reproducción de la fuente, pulse el botón de PARAR para detener la grabación. Cuando
termina la reproducción del disco y el giradiscos deja de girar, la grabación termina automáticamente.
Para evitar ruidos indeseables del brazo, detenga la grabación manualmente usando el botón de PARAR tan
pronto termine la reproducción de los números que desea grabar. Cuando se detiene la grabación, “REC” y “End-” parpadean durante algunos segundos. No apague ni sacuda la unidad durante la grabación o cuando
están parpadeando “REC” y “-----”. Tales acciones impiden la grabación correcta.
Para detener la grabación
Pulse el botón de PARAR para detener la grabación.
Para poner la grabación en pausa
Pulse el botón de REPRODUCIR/PAUSAf. Aparece brevemente “bUSY” en la pantalla y la grabación se
pone en pausa. Para reiniciar la reproducción, pulse el botón REPRODUCIR/PAUSA f.
• No se puede reiniciar la grabación mientras aparece “bUSY”.
• Recuerde que cada vez que se pone en pausa o se detiene la grabación, se asigna siempre un número
de pista nuevo. No es posible grabar en dos “etapas” dentro de una pista.
• La unidad no se detiene ni se pone en pausa aunque se pulse el botón de REPRODUCIR/PAUSA f
dentro de los 10 segundos posteriores al comienzo de la grabación.
División manual de pistas
Es posible dividir la grabación en pistas durante la misma. Mientras se realiza la grabación, pulse el botón
TRACK SPLIT (División de pistas). El número de la pista actual se incrementa en uno.
• El botón TRACK SPLIT funciona independientemente del ajuste de la configuración de MANUAL/AUTO
REC (Grabación manual/automática).
• No es posible dividir la pista manualmente para hacer una pista de menos de 10 segundos. Pueden
hacerse hasta 99 pistas en un disco, dependiendo de las especificaciones del CD.
• Cuando se pulsa el botón TRACK SPLIT durante la grabación, el sonido grabado se corta por un
momento.
CÓMO FINALIZAR UN CD
A fin de que un disco se convierta en un CD estándar, debe tener escrito un índice (TOC) en el mismo. Este proceso
se conoce como finalización. Una vez finalizado, no se pueden grabar más pistas en los discos CD-R. En cambio, los
discos CD-RW se puede “desfinalizar” y, si hay espacio, se puede grabar material adicional en ellos.
• No se puede finalizar un disco vacío.
• Cuando el disco alcanza su tiempo máximo de grabación, finaliza automáticamente aunque la grabación
no haya terminado aún.
15
Page 16

1. Pulse el botón del CD para seleccionar “CD” y abra la bandeja pulsando el botón de abrir/cerrar s .
2. Cargue un disco no finalizado (grabable) en la bandeja.
3. Presione el botón de FINALIZAR en modo de parada. Aparece “FINAL” en la pantalla. Para cancelar el
proceso de finalización, pulse el botón de PARAR.
4. Pulse el botón ENTER para comenzar la finalización. Los indicadores “NO TOC” y “REC” parpadean y
aparece en la pantalla el tiempo remanente para la operación de finalización. Cuando termina la operación, el
indicador NO TOC se apaga y la pantalla vuelve a la visualización de pista/tiempo. Durante la finalización, no
funciona ningún botón.
NOTA: Nunca apague la unidad ni desenchufe el cable de alimentación mientras está funcionando.
• Si bien los discos CD-R finalizados se pueden reproducir en reproductores de CD ordinarios, recuerde
que los CD-RW finalizados pueden no reproducirse en esta clase de reproductores de CD.
• El tiempo para la finalización varía según el tipo de disco.
BORRADO O DESFINALIZACIÓN DE UN CD-RW
No es posible realizar procedimientos de borrado o finalización en un disco CD-R. Los procedimientos de borrado
son posibles sólo en un disco CD-RW no finalizado. Si el disco CD-RW ha sido finalizado, desfinalícelo antes de
borrarlo. En un CD-RW, es posible borrar la última pista grabada o el disco completo. El borrado no se puede
deshacer. Si va a borrar una o todas las pistas, asegúrese de que sean grabaciones que desea borrar realmente.
1. Pulse el botón del CD para seleccionar “CD”.
2. Cargue un CD-RW grabable pulsando el botón s.
3. Presione el botón de FINALIZAR/BORRAR en modo de parada. Cada vez que pulse el botón de
FINALIZAR/BORRAR, la pantalla cambia de la siguiente manera:
Aparece “UnFINAL” (desfinalizar) cuando se carga un disco finalizado. Seleccione esto para desfinalizar el
disco.
Aparece “FINAL” cuando el disco no ha sido finalizado. Si pulsa otra vez el botón de FINALIZAR/BORRAR,
Aparece “ErASE XX” (Borrar XX) (el número de la última pista grabada del disco. Seleccione esta opción para
borrar la última pista del disco. Esta indicación no aparece cuando hay sólo una pista grabada en el disco. Si
pulsa nuevamente el botón de FINALIZAR/BORRAR, aparece ErASE ALL (Borrar todo). Seleccione esta
opción para borrar todas las pistas. Para cancelar el proceso de finalización, pulse el botón de PARAR
4. Pulse el botón ENTER para comenzar la finalización. Aparece en la pantalla el tiempo remanente para la
operación. Cuando termina la operación, la pantalla vuelve a la visualización de pista/tiempo. Durante el
borrado/finalización, no funciona ningún botón. Nunca apague la unidad ni desenchufe el cable de
alimentación cuando la unidad está en proceso de finalización, puesto que causará que no se pueda
reproducir el disco.
16
.
Page 17

GUIDE D’UTILISATION SIMPLIFIÉ (FRANÇAIS)
CONTENU DE LA BOÎTE
Assurez-vous que tous les
articles énumérés dans le
contenu de la boîte de ce
guide sont inclus dans la
boîte :
• CD DIRECT
• Logiciel EZ vinyle
• Guide de démarrage
rapide de logiciel
• Câble USB
• Guide d’utilisation simplifié
• Consignes de sécurité et informations concernant la garantie
VEUILLEZ LIRE LES CONSIGNES DE SÉCURITÉ AVANT D'UTILISER LE PRODUIT.
PRÉSENTATION
Le CD DIRECT vous permet de facilement convertir vos disques vinyles et musique provenant d’autres sources
audio en CD. Le CD DIRECT peut également se relier à un ordinateur par le biais de son port USB. Afin que vous
puissiez transférer facilement vos disques vinyles au format numérique, nous avons inclus deux logiciels pour vous
aider. Vous devez installer un des logiciels suivant afin de pouvoir enregistrer sur ordinateur :
• Le EZ Vinyl/Tape Converter (PC) est la façon la plus rapide et la plus simple de convertir vos enregistrements
au média numérique. Le EZ Vinyl/Tape Converter permet de sauvegarder vos enregistrements dans votre
bibliothèque iTunes*.L'utilisateur débutant préférera peut-être cette application pour sa simplicité d'utilisation.
Nous avons inclus un guide d’utilisation pratique afin de vous guider à travers toutes les étapes d’installation et
de fonctionnement du logiciel.
• Le EZ Audio Converter (Mac) est un logiciel de conversion pour Mac OS X idéal pour l’utilisateur débutant.
Veuillez consulter le guide d’utilisation du logiciel pour des instructions détaillées pour l’installation et le
fonctionnement du logiciel.
Pour installer le logiciel : Insérez le CD d’installation du logiciel dans votre ordinateur, puis suivez les instructions à
l’écran pour installer le logiciel. Une fois la conversion du vinyle terminée, vous pouvez graver les fichiers sur CD ou
les transférer sur des lecteurs multimédia.
Visitez le site http://www.ionaudio.com/computer-optimization
votre ordinateur pour une meilleure qualité audio.
*iTunes est une maque de commerce enregistrée de Apple, Inc., enregistrée aux États-Unis et dans d'autres pays.
Configuration audio Windows Vista et Windows 7 :
Une fois le logiciel EZ Converter installé sur votre ordinateur, branchez le CD DIRECT au port USB de votre
ordinateur à l’aide du câble USB inclus.
1. Cliquez sur le bouton Démarrer dans le coin inférieur gauche de la fenêtre, puis sélectionnez Panneau
de configuration.
2. Double-cliquez sur Matériel et audio.
3. Double-cliquez sur Son.
4. Sélectionnez l'onglet Lecture. Sélectionnez la carte son (comme Haut-parleurs – Périphérique audio
haute définition ou Casque – Périphérique audio haute définition.) Realtek, Soundmax et
Sigmatel sont des noms de cartes son populaires.
5. Cliquez sur Définir par défaut.
6. Sélectionnez l'onglet Enregistrement dans le haut de la fenêtre du panneau de configuration Son.
Sous Enregistrement, sélectionnez Microphone – USB Audio Codec comme périphérique par
défaut.
7. Cliquez sur Définir par défaut.
8. Sélectionnez l'onglet Avancé.
9. Réglez le Format par défaut à 2 canaux, 16 bits 44 100 Hz (qualité CD).
10. Décochez les deux cases figurant sous Mode exclusif. Puis cliquez sur Appliquer.
11. Sélectionnez l'onglet Niveaux dans le haut de la fenêtre.
12. Sous Niveaux, réglez le curseur sur le niveau 5.
13. Cliquez sur Appliquer, puis cliquez sur OK pour fermer la fenêtre.
afin obtenir plus d’information sur comment optimiser
17
MISE EN GARDE :
Avant d'utiliser la platine, desserrer
la "vis de transport" (à l'extrémité
du plateau, à proximité du bras de
lecture) en la tournant vers la
droite.
Page 18

Configuration audio Windows XP :
Une fois le logiciel EZ Converter installé sur votre ordinateur, branchez le CD DIRECT au port USB de votre
ordinateur à l’aide du câble USB inclus.
1. Cliquez sur le bouton Démarrer dans le coin inférieur gauche de la fenêtre.
2. Sélectionnez Panneau de configuration.
3. Sélectionnez Sons et périphériques audio. Si vous ne voyez pas Sons et périphériques audio,
choisissez l'option Basculer vers l'affichage classique.
4. Sélectionnez l'onglet Audio.
5. Sous Lecture audio, sélectionnez la carte son interne de votre ordinateur. Realtek, Soundmax et
Sigmatel sont des noms de cartes son populaires.
6. Sous Enregistrement audio, sélectionnez USB Audio Codec comme périphérique par défaut.
7. Cochez la case intitulée Utiliser les périphériques par défaut uniquement.
8. Cliquez sur Appliquer (si possible), puis cliquez sur OK.
Configuration audio Mac :
Une fois le logiciel EZ Converter installé sur votre ordinateur, branchez le CD DIRECT au port USB de votre
ordinateur à l’aide du câble USB inclus.
1. Cliquez sur le menu Pomme (logo Apple) située dans le coin supérieur gauche de l’écran et
sélectionnez Préférences Système.
2. Dans la fenêtre qui s'ouvre, sous Matériel, cliquez sur Son.
3. Cliquez sur l’onglet Audio. Sous Choisir un périphérique d'entrée audio, sélectionnez USB AUDIO
CODEC (ou PÉRIPHÉRIQUE AUDIO USB).
4. Cliquez sur l’onglet Sorties. Sous Choisissez un appareil d'entrée audio, sélectionnez Casque
(Sortie intégrée).
5. Fermez ensuite la fenêtre Preferences système.
PANNEAU SUPÉRIEUR
1. PLATEAU – Veuillez placer le disque sur ce
plateau.
2. VIS DE TRANSPORT – Elle permet de
verrouiller le plateau et le bras de lecture afin
d’éviter de les endommager durant le
transport. Si vous transportez la platine
tourne-disque, veuillez resserrer la vis afin de
verrouiller en place le plateau et le bras de
lecture. Avant d’utiliser la platine tourne-
disque, veuillez desserrer (sens horaire) la
VIS DE TRANSPORT.
3. RANGEMENT POUR ADAPTATEUR 45
TR/MIN – Il permet de ranger l'adaptateur 45
tr/min lorsqu’il n’est pas utilisé. Lorsqu’il n’est
pas utilisé, veuillez mettre l'adaptateur dans cet
emplacement.
4. BRAS DE LECTURE – Le CD DIRECT est
doté d’un bras de lecture équilibré et d’une
cartouche. Le bras de lecture peut être levé ou
abaisser manuellement ou en utilisant le bouton du
levier de commande. Veuillez noter que le bras de
lecture doit être déplacé du support (serre-bras) afin
que le moteur de la platine soit activé. Lorsque le bras
de lecture est à nouveau sur le support, le moteur se
désactive.
5. SERRE-BRAS – Ce serre-bras a été conçu spécialement afin de maintenir en place le bras de lecture lorsque la platine
n’est pas utilisée et de demeurer dans la position élevée lorsqu’il n’est pas verrouillé.
6. LEVIER DE COMMANDE – Permet de lever ou d’abaisser le bras de lecture.
7. SÉLECTEUR DE VITESSE (33/45/78) – Ce sélecteur régit la vitesse de rotation du plateau.
3
1
Retirez le couvercle de plastique de la cartouche
(protège aiguille) avant d’utiliser la platine.
2
6
5
7
4
18
Page 19

PANNEAU AVANT
16
17
1
2
6
11
1. ÉCRAN ACL – Écran permettant l’affichage les informations concernant le fonctionnement du CD DIRECT.
2. INTERRUPTEUR D’ALIMENTATION – Cet interrupteur permet de mettre l’appareil sous et hors tension.
3. SÉLECTEURS DU MODE DE LECTURE – Sélectionne le format de support que vous souhaitez utiliser.
Appuyez sur ce bouton pour faire défiler et régler le CD DIRECT en mode platine (PHONO), niveau ligne
(AUX), ordinateur (USB), ou lecteur CD (CD).
4. PISTE PRÉCÉDENTE/SUIVANTE – Appuyez une de ces touches afin de sauter à la piste
précédente/suivante lors de la lecture d’un CD. Maintenez l'une de ces touches enfoncée pour parcourir la
piste en cours.
5. ARRÊT/LECTURE/PAUSE f – Ces touches sont les commandes pour la lecture d’un CD.
6. OUVRIR/FERMER s
7. MANUEL/AUTO – Sélectionne le niveau de seuil du volume (en dB) qui déterminera où la séparation
automatique ou manuelle sera faite à l’aide de cette touche.
8. FINALISER/EFFACER – Appuyez une fois sur cette touche pour finaliser un CD (vous ne serez pas en
mesure d'ajouter d’autres pistes une fois le CD finalisé) ou appuyez deux fois pour effacer une piste ou toutes
les pistes d’un CD-RW.
9. TRACK SPLIT – Cette touche permet de créer une nouvelle piste durant l’enregistrement.
10. ENTER/ENREGISTREMENT – Appuyez sur le côté gauche de cette touche pour confirmer l'enregistrement,
l'effacement ou la finalisation d'un CD. Appuyez sur le côté droit de cette touche pour préparer le lecteur à
l'enregistrement.
11. RECORD LEVEL – Cette touche permet de régler le niveau du signal enregistré sur le CD ainsi que le signal
entrant envoyé via le port USB, l'entrée ligne et l'entrée AUX.
12. VOLUME – Cette touche permet de régler le volume du haut-parleur interne et de la sortie casque.
13. PLATEAU CD – Utilisez la touche OUVRIR/FERMER pour ouvrir/fermer le plateau et placez votre CD ici.
14. ENTRÉE LIGNE – Utilisez un câble stéréo ⅛ po pour brancher un autre périphérique audio (p. ex., iPod,
ordinateur, etc.) à cette entrée, vous permettant d'enregistrer et/ou de faire jouer via les haut-parleurs du CD
DIRECT.
15. SORTIE CASQUE D’ÉCOUTE – Ce connecteur ⅛ po permet de brancher un casque d’écoute.
16. HAUT-PARLEUR – Permet de faire l’écoute de votre musique.
17. COUVERCLE ANTI-POUSSIÈRE – Ce couvercle protège le tourne-disque de la poussière et les mauvais
traitements durant le remisage ou le transport.
12
– Cette touche permet d’ouvrir/fermer le plateau pour CD.
13
3 4
8
7
14
9
5
16
10
15
19
Page 20

PANNEAU ARRIÈRE
1
2
4
3
1. PORT USB – Cette sortie permet d’enregistrer ou d’écouter de l'audio via un ordinateur à l’aide d’un câble
USB.
2. RÉGLAGE DU GAIN – Avant de lancer l'enregistrement via une connexion USB, utilisez ce bouton pour
ajuster le gain d'enregistrement. Le niveau doit être suffisamment élevé sans que les parties plus fortes de la
chanson se déforment ou s'écrêtent.
3. AUX OUT – Sorties audio RCA pour brancher des haut-parleurs externes ou un amplificateur.
4. ENTRÉE D’ALIMENTATION – Câble d'alimentation électrique.
AVANT D'ENREGISTRER UN CD
Avant de commencer l'enregistrement, veuillez lire attentivement les points suivants :
• Le nombre de pistes que peut contenir un CD est limité à 99.
• Vous ne pouvez enregistrer des pistes de moins de 10 secondes.
• Une fois que vous avez enregistré sur un disque CD-R, les données ne peuvent pas être effacées.
• Un CD-R peut être lu par un lecteur CD ordinaire seulement après la finalisation.
• Pour ajouter des enregistrements sur un CD-RW finalisé, vous devez le définaliser.
• Lorsque tout l'espace disponible sur un CD-RW a été enregistré, vous pouvez enregistrer des pistes
supplémentaires en effaçant des pistes précédemment enregistrées. Veuillez noter que vous ne pouvez qu’effacer
soit toutes les pistes ou uniquement la dernière enregistrée.
• Si la touche d’arrêt ou de lecture/pause f est enfoncée dans les 10 premières secondes de l’enregistrement,
l’enregistrement ne s'arrêtera pas.
• Lorsque l'enregistrement est terminé, « REC » et « - END - » clignotent pendant quelques secondes, puis
l'appareil s'arrête. Évitez tout choc ou toutes vibrations à l'appareil lors du clignotement.
• Si durant l’enregistrement le disque atteint sa pleine capacité, l'appareil finalisera automatiquement le disque.
• Si durant l’enregistrement le disque atteint sa pleine capacité, c.-à-d. 99 pistes, l'appareil finalisera
automatiquement le disque.
• La durée d'enregistrement d'une piste peut différer légèrement de l’originale.
• Lorsqu'un disque inséré est partiellement enregistré, l'enregistrement sera gravé à la suite de la dernière piste
existante.
• La fonction AUTO REC sépare automatiquement les pistes lorsqu’elle détecte le niveau du volume (en dB) fixé
par la touche MANUEL/AUTO. Avec cette fonction, il se pourrait que votre CD contienne un nombre différent de
pistes que celui de la source originale en raison de sections plus ou moins fortes, ce qui peut déclencher (ou ne
pas déclencher) la séparation automatique de manière différente. Si cela se produit, utilisez la touche
MANUEL/AUTO pour régler le volume de façon appropriée.
• Lorsque le disque enregistré par cet appareil est lu par certains autres lecteurs, il se peut qu’un petit bruit se fasse
entendre à l’endroit où la piste a été séparée.
20
Page 21

ENREGISTREMENT
Enregistrement d’audio provenant de la platine ou des sources auxiliaires sur le graveur de CD :
1. Appuyez sur la touche PHONO/AUX/USB à plusieurs reprises pour sélectionner la source à enregistrer, soit
PHONO ou AUX.
2. Appuyez sur la touche OUVRIR/FERMER s et placer un CD-R ou CD-RW sur le plateau du disque avec
l'étiquette imprimée vers le haut, puis appuyez sur la touche OUVRIR/FERMER pour refermer le plateau du
CD.
Remarque : Assurez-vous que les témoins « NO TO » et « CD-R » (ou «
sinon le bouton d’enregistrement ne fonctionnera pas.
3. Sélectionnez le mode d'attribution de numéros de piste en utilisant la touche MANUEL/AUTO REC.
Lorsque la touche MANUEL/AUTO REC est enfoncée une fois, le mode en cours est affiché. Appuyez sur la
touche MANUEL/AUTO REC de façon répétée pour sélectionner un autre mode.
• (MANUAL)
Lorsque vous utilisez ce mode, les numéros de piste ne sont pas attribués automatiquement. Utilisez la
touche TRACK SPLIT afin de séparer les pistes.
Le mode MANUAL est recommandé pour l'enregistrement d'une source analogique comme un disque
vinyle. Les réglages reviennent en mode manuel lorsque l'appareil est mis hors tension.
• –20 db, –30 db ou –40 db (AUTO REC)
Lorsque vous utilisez ce mode, l’appareil insère automatiquement une séparation de piste dans le
matériel enregistré lorsque le niveau sonore chute sous le seuil pendant plus de 2 secondes avant de
recommencer. « -20 dB » signifie qu’un signal fort fait déclencher la séparation de pistes. « -30 dB »
signifie qu’un signal faible fait déclencher la séparation de pistes. « -40 dB » est idéal pour
l'enregistrement d'une source relativement sans bruit comme un CD. Lors de l'enregistrement d'une
source contenant des bruits parasitaires ou d'une source analogique en mode automatique, il se peut
qu’il y ait plus de numéros de piste attribués qu’il y a de pistes réellement enregistrées. Dans ce cas,
utilisez le mode manuel et appuyez sur la touche TRACK SPLIT pour attribuer des numéros de piste où
vous en désirés.
• La fonction AUTO REC peut ne pas fonctionner correctement avec des sources analogiques qui
contiennent des bruits parasitaires.
AUTO REC peut ne pas fonctionner correctement avec certains genres musicaux (classique, les
créations parlées, etc.) qui ont de longues périodes de silence durant la piste.
• Les témoins indicateurs AUTO TRACK s'allument lorsque -20 dB, -30 dB ou -40 dB est sélectionné.
• Le réglage par défaut est MANUAL (OFF). Lorsque l'appareil est allumé ou que la touche
OUVRIR/FERMER est enfoncée, le réglage revient automatiquement au mode manuel (OFF).
• La touche MANUEL/AUTO REC ne fonctionne pas pendant l'enregistrement.
• L’utilisation du mode MANUAL/AUTO REC est désactivée lorsqu’un disque est inséré dans le lecteur.
4. Appuyez sur la touche d’enregistrement. L'appareil interrompt l'enregistrement. Durant l'enregistrement, le
L'utilisation de ce mode est possible lorsque « NO TOC » est affiché.
voyant est rouge. Lorsque l’enregistrement est interrompu, le témoin indicateur « REC » et le témoin indicateur
du mode pause clignotent sur l'écran.
• Aucune touche ne fonctionne lorsque « bUSY » est affiché. Attendez environ 10 secondes jusqu'à ce que
« bUSY » disparaisse de l'écran.
CD-RW ») s'allument à l'écran,
5. Réglage des niveaux d'enregistrement. Une fois la touche
d'enregistrement a été enfoncée, lancez la lecture de la source
à enregistrer pour faire un essaie des niveaux d'enregistrement
afin que le son le plus fort ne dépasse pas celui de l'indicateur
de niveau du vumètre. Le niveau peut être ajusté de -8 (-12 dB)
à +8 (+12 dB).
Écran ACL durant l’enregistrement
• Le réglage par défaut est 0. Chaque fois que
l'enregistrement est terminé, le réglage revient
automatiquement à 0.
• Différentes sources (Phono, ligne, CD) ont des volumes
ne dépasse pas celui de l'indicateur de niveaux sur le vumètre.
Afin d'enregistrer au volume optimum selon
différents.
différentes sources, il est nécessaire d'ajuster les niveaux
d'enregistrement pour chaque source. Ajustez les niveaux
d'enregistrement de sorte que le son le plus fort
21
Page 22

6. Préparez la source d'enregistrement.
Enregistrement d’un disque vinyle :
Veuillez vous assurer que le couvercle protecteur blanc a été retiré du stylet de la platine tourne-disque.
Déplacez ensuite le bras de lecture sur le rebord du disque ou à l’endroit désiré, puis relâchez-le doucement.
Lorsque le plateau est arrêté, la touche de LECTURE/PAUSE f ne fonctionne pas et il n’est pas possible
de lancer l’enregistrement.
Enregistrement d’un périphérique audio branché à l’entrée ligne :
Lancez la lecture du périphérique branché à l'entrée ligne.
• Afin d’empêcher que la première partie soit coupée, interrompez la lecture, et ne redémarrez la lecture
du périphérique qu’une fois que l'enregistrement est lancé.
• Si le périphérique ne dispose pas de fonction pause, lancez la lecture seulement après que
7. Appuyez sur la touche de LECTURE/PAUSE pour lancer l’enregistrement.
l'enregistrement soit lancé.
Une fois la lecture de la source terminée, appuyez sur la touche d’ARRÊT pour arrêter l'enregistrement.
Lorsque la lecture d'un disque vinyle est terminée et que le plateau ne tourne plus, l'enregistrement s’arrête
automatiquement.
Afin d’empêcher des bruits indésirables provenant du bras de lecture, arrêtez l'enregistrement manuellement à
l'aide de la touche d’ARRÊT dès que la lecture des pistes que vous désirez enregistrer se termine. Lorsque
l'enregistrement est arrêté, « REC » et « -fin » clignotent pendant quelques secondes. Ne pas fermer ou
secouer l'appareil pendant l'enregistrement ou lorsque « REC » et « ----- » clignotent. Ces actions peuvent
entrainer des problèmes d’enregistrement.
Pour arrêter l'enregistrement
Pour arrêter l’enregistrement, appuyez sur la touche d’ARRÊT .
Pour interrompre l'enregistrement
Appuyez sur la touche de LECTURE/PAUSE f. « bUSY » s’affiche brièvement, puis l'enregistrement est
interrompu. Appuyez sur la touche de LECTURE/PAUSE f pour relancer l’enregistrement.
• Vous ne pouvez pas reprendre l'enregistrement alors que « bUSY » est affiché.
• Veuillez noter que chaque fois que l’enregistrement est interrompu ou arrêté, un nouveau numéro de
piste est assigné. Il n'est pas possible d'enregistrer en deux « étapes » au sein d'une même piste.
• L'enregistrement ne peut être arrêté ou interrompu même en appuyant sur la touche de
LECTURE/PAUSE f dans les 10 premières secondes de l’enregistrement.
Séparation manuelle des pistes
Il est possible de séparer l'enregistrement en pistes pendant l'enregistrement. Une fois l'enregistrement lancé,
appuyez sur la touche TRACK SPLIT. Le numéro de la piste en cours augmentera d’un numéro.
• La touche TRACK SPLIT fonctionne indépendamment du réglage MANUAL/AUTO REC.
• Vous ne pouvez pas séparer la piste manuellement en moins d’une piste de 10 secondes. Jusqu'à 99
pistes peuvent être séparées sur un disque en fonction des spécifications du CD.
• Lorsque la touche TRACK SPLIT est enfoncée durant l'enregistrement, le son de l’enregistrement est
coupé pendant un moment.
22
Page 23

FINALISATION D'UN CD
Pour qu’un CD soit considéré standard, il doit contenir une table des matières (TOC). Ce processus est connu sous
le nom de finalisation. Une fois finalisé, aucune piste ne peut être enregistrée sur un disque CD-R. Cependant, même
lorsque les CD-RW sont finalisés, s'il y reste de l'espace, d'autres données peuvent être ajoutées.
• Vous ne pouvez pas finaliser un disque vierge.
• Lorsque le disque a atteint sa durée d'enregistrement maximale, il sera automatiquement finalisé, et ce,
même si l'enregistrement est toujours en cours.
1. Appuyez sur la touche CD pour sélectionner « CD » et ouvrir le plateau pour CD en appuyant sur la
touche s
2. Chargez un CD non finalisé (enregistrable) dans le plateau.
3. Appuyez sur le bouton FINALISER en mode arrêté. « FINAL » s’affichera à l'écran. Pour annuler le
.
processus de finalisation, appuyez sur la touche d’ARRÊT.
4. Appuyez sur la touche ENTER pour commencer à finaliser le CD. Les indicateurs « NO TOC » et « REC »
clignotent et le temps restant pour finaliser l'opération apparaîtra à l'écran. Lorsque l'opération est terminée,
l'indicateur NO TOC s'éteint et l'écran revient à l'affichage de la piste/heure. Pendant le processus de
finalisation, aucune touche ne fonctionne.
Remarque : Ne jamais fermer l'appareil ou débrancher le cordon d'alimentation lorsque l'appareil
effectue une opération.
• Bien que les CD-R finalisés peuvent être lus sur des lecteurs CD ordinaire, n'oubliez pas que les CD-RW
finalisés peuvent ne pas être lus par les lecteurs de CD ordinaire.
• La durée du processus de finalisation varie selon le type de CD.
EFFACER OU DÉFINALISER UN CD-RW
Il n'est pas possible d’effacer ou définaliser un CD-R. La suppression n’est possible que sur un CD-RW non finalisé.
Lorsqu’un disque CD-RW a été finalisé, il faut le définaliser avant de pouvoir supprimer son contenu. Sur un CD-RW,
il est possible d'effacer la dernière piste enregistrée ou d'effacer le contenu du disque en entier. La suppression ne
peut être annulée. Si vous désirez effacer une ou plusieurs pistes, assurez-vous qu'elles sont bien celles que vous
désirez réellement supprimer.
1. Appuyez sur la touche CD pour sélectionner « CD ».
2. Chargez un CD-RW contenant des données en appuyant sur la touche s.
3. Appuyez sur la touche FINALISER/SUPPRIMER en mode arrêté. Chaque fois que la touche
FINALISER/SUPPRIMER est enfoncée, l'affichage change comme suit :
« UnFINAL » (définaliser) apparaît lorsqu’un disque finalisé est chargé. Sélectionnez cette option pour
définaliser le disque.
« FINAL » apparaît lorsque le disque n'a pas été finalisé. Si vous appuyez à nouveau sur la touche
FINALISER/SUPPRIMER,
« ErASE XX » (le numéro de la dernière piste enregistrée sur le disque) apparaît. Sélectionnez cette option
pour supprimer la dernière piste du disque. Ceci ne s'affiche pas lorsque seulement une piste est enregistrée
sur le disque. Si vous appuyez à nouveau sur la touche FINALISER/SUPPRIMER, ErASE ALL s’affiche.
Sélectionnez cette option pour supprimer toutes les pistes. Pour annuler la suppression ou le processus de
finalisation, appuyez sur la touche d’ARRÊT .
4. Appuyez sur la touche ENTER pour commencer à finaliser le CD. Le temps restant au processus s’affiche
à l’écran. Lorsque l'opération est terminée, l'écran revient à l'affichage de la piste/heure. Durant le processus
de suppression/définalisation, aucune touche ne fonctionne. Ne jamais fermer l'appareil ou débrancher le
cordon d'alimentation lorsque l'appareil effectue la finalisation, car ceci pourrait rendre le disque illisible.
23
Page 24

GUIDA RAPIDA (ITALIANO)
CONTENUTI DELLA CONFEZIONE
Assicurarsi che gli elementi
elencati di seguito siano
contenuti nella confezione:
• CD DIRECT
• Disco recante il software
EZ Vinyl
• Guida rapida per l'uso del
Software
• Cavo USB
• Guida rapida
• Istruzioni di sicurezza e garanzia
LEGGERE ATTENTAMENTE IL LIBRETTO DI ISTRUZIONI PRIMA DI UTILIZZARE IL PRODOTTO
INTRODUZIONE
CD DIRECT converte facilmente i vostri preziosi dischi in vinile e le fonti audio esterne in CD. CD DIRECT può anche
essere collegato ad un computer tramite la sua porta USB. Abbiamo incluso due pacchetti software packages per
aiutare nella conversione delle registrazioni dei vinili. Sarà necessario installare una delle seguenti applicazioni per
sfruttare la registrazione su computer:
• EZ Vinyl/Tape Converter (unicamente per PC) è il modo più facile e veloce di trasformare le tue registrazioni
in media digitali. L'EZ Vinyl/Tape Converter salva comodamente le tue registrazioni nella libreria
iTunes*. Questa è probabilmente l’applicazione preferibile per gli utenti alle prime armi. Abbiamo incluso una
comoda guida rapida per l'uso del software con istruzioni passo passo circa l'installazione el'uso del software.
• EZ Audio Converter (solo Mac) è un applicativo base di conversione per Mac OS X ed è l’ideale per utenti
principianti. Fate riferimento alla comoda Guida Rapida Software allegata, recante le istruzioni passo passo
circa l’installazione e l’uso del software.
Per instalalre il software: inserire il CD in dotazione nel computer e seguire le istruzioni da schermo. Una volta
terminato di convertire il vinile, lo si può masterizzare su un CD o caricare su dispositivi media portatili.
Per maggiori informazioni su come ottimizzare il computer per l'audio, recarsi alla pagina
http://www.ionaudio.com/computer-optimization
* iTunes è un marchio di fabbrica di Apple, Inc., registrato negli Stati Uniti e in altri Paesi.
.
Configurazione dell'audio in Windows Vista e Windows 7:
Una volta installato il software EZ Converter sul computer, collegare il CD DIRECT ad una porta USB
disponibile del computer servendosi del cavo USB in dotazione.
1. Cliccare su Start in basso a sinistra dello schermo e selezionare Pannello di controllo.
2. Fare doppio clic su Hardware e suoni.
3. Fare doppio clic su Audio.
4. Selezionare la scheda Riproduzione. Scegliere la scheda audio del proprio computer (Casse –
Periferica audio ad alta definizione o Cuffie – Periferica audio ad alta definizione. Alcuni nomi di
note schede audio per PC sono Realtek, Soundmax e Sigmatel.
5. Cliccare su "Set Default" (imposta come predefinito).
6. Selezionare la scheda Registrazione in cima alla finestra Audio del Pannello di controllo. Sotto
Registrazione, scegliere Microfono – Codec USB Audio come periferica predefinita.
7. Cliccare su "Set Default" (imposta come predefinito).
8. Selezionare la scheda Avanzate .
9. Impostare il Formato predefinito su 2 canali, 16 bit 44100 Hz (Qualità da CD).
10. Deselezionare le due caselle elencate in Modalità esclusiva. Quindi cliccare su Apply (applica).
11. Select the Levels tab from the top of the window.
12. Sotto Livelli, impostare il cursore su 5. Cliccare su Apply (applica), e quindi su Ok per chiudere la
finestra.
prima di utilizzare il giradischi,
allentare la "vite di trasporto" (in
fondo al piatto, vicino al braccio)
girandola in senso ORARIO.
24
Page 25

Procedura di configurazione audio per Windows XP:
Una volta installato EZ Converter sul computer, collegare il CD DIRECT servendosi del cavo USB in
dotazione ad una porta USB disponibile del computer.
1. Selezionare il menu Start.
2. Selezionare Impostazioni e quindi Pannello di controllo.
3. Fare doppio clic sul pannello di controllo Suoni e periferiche audio. Se non compare una scelta
denominata Suoni e periferiche audio, scegliere l'opzione Passa alla visualizzazione classica .
4. Selezionare la scheda Audio.
5. Sotto Riproduzione audio, scegliere la scheda audio interna del computer. Alcuni nomi di note schede
audio per PC sono Realtek, Soundmax e Sigmatel.
6. Sotto Registrazione audio, selezionare il Codec Audio USB per la periferica predefinita.
7. Spuntare la casella denominata Utilizzare unicamente periferiche predefinite.
8. Cliccare su Apply (applica) (se possibile), quindi cliccare su OK.
Procedura di configurazione dell'audio in Mac:
Una volta installato EZ Converter sul computer, collegare il CD DIRECT servendosi del cavo USB in
dotazione ad una porta USB disponibile del computer.
1. Cliccare sull'icona Apple nell'angolo superiore sinistro dello schero e scegliere Preferenze di sistema.
2. Nella finestra che si apre, sotto Hardware, cliccare la voce Suono.
3. Fare clic sulla scheda Input (ingresso). Sotto a Scegliere una periferica per l'ingresso audio,
selezionare USB AUDIO CODEC (o USB AUDIO DEVICE).
4. Cliccare sulla scheda Uscite. Sotto a Scegliere una periferica per l'ingresso audio, selezionare
cuffie (uscita incorporata).
5. Chiudere la finestra preferenze di sistema.
PANNELLO SUPERIORE
1. PIATTO – Il disco va collocato qui.
2. VITE DI TRASPORTO – Fissa il piatto e il
gruppo del braccio per evitare che si
danneggino durante il trasporto. Se si trasporta
il giradischi, stringere la vite per fissare
nuovamente il piatto e il gruppo del braccio.
Prima del primo utilizzo del giradischi,
girare la VITE DI TRASPORTO in senso
orario per allentarla.
3. SUPPORTO PER ADATTATORE A 45 GIRI –
Regge l’incluso adattatore per 45 giri. Quando
l'adattatore non è in uso, può essere collocato
a questo livello.
4. BRACCIO – Il CD DIRECT è dotato di un
BRACCIO e di una cartuccia pre-bilanciati
pronti per l’uso. Il BRACCIO può essere alzato
e abbassato a mano, oppure premendo la
LEVETTA di SOLLEVAMENTO /
ABBASSAMENTO. Va notato che il BRACCIO
deve essere allontanato dalla posizione di riposo (sul
FERMABRACCIO) affinché il motore del giradischi si
attivi. Quando il BRACCIO viene nuovamente collocato
in posizione di riposo, il motore si disattiva.
5. FERMABRACCIO – Questo fermabraccio dal design
speciale fissa il braccio quando è a riposo o quando non è in uso.
Il fermabraccio è stato progettato in modo da restare sollevato quando sbloccato.
6. LEVETTA DI SOLLEVAMENTO / ABBASSAMENTO – Alza e abbassa il braccio.
7. INTERRUTTORE 33 / 45 / 78 GIRI – Questo interruttore regola i GIRI del piatto del giradischi.
3
1
Rimuovere il cappuccio della cartuccia
(copripuntina) prima di utilizzare il giradischi.
2
6
5
7
4
25
Page 26

PANNELLO ANTERIORE
16
17
1
2
6
11
1. LCD – Mostra a display informazioni circa le funzioni del CD DIRECT.
2. POWER ON/OFF (accensione / spegnimento) – Accende e spegne il CD DIRECT
3. SELETTORI MODALITÀ DI RIPRODUZIONE – Seleziona il formato che si desidera utilizzare. Premere questo
pulsante per girare tra una funzione e l'altra e impostare il CD DIRECT in modalità giradischi (PHONO), jack
LINE IN (AUX), computer (USB), o lettore CD (CD).
4. MUSIC SKIP
quando si riproduce musica da CD. Tenere premuto uno di questi tasti per scorrere avanti/indietro lungo la
traccia corrente.
5. STOP/PLAY/PAUSE
6. OPEN/CLOSE s
7. MANUAL/AUTO – Seleziona il livello di volume (in dB) al quale le tracce verranno spearate automaticamente
oppure le tracce possono essere separate manualmente servendosi di questo tasto.
8. FINALIZE/ ERASE (finalizza/cancella) – Premere una volta questo tasto per finalizzare un CD (non sarà
possibile aggiungere ulteriori tracce ad un CD finalizzato) o premerlo due volte per cancellare una traccia o
tutte le tracce da un CD-RW.
9. TRACK SPLIT (suddividi traccia) – Crea una nuova traccia durante la registrazione.
10. ENTER/RECORD (invio/registra) – Premere il lato sinistro di questo pulsante per confermare la registrazione,
la cancellazione o la finalizzazione di un CD. Premere il lato destro del pulsante per preparare il lettore CD per
la registrazione.
11. LEVEL (livello) – Regola il livello del segnale che viene registrato su CD, oltre al segnale in ingresso inviato
tramite la porta USB, l'ingresso di linea e l'ingresso Aux.
12. VOLUME – Regola il volume dell'altoparlante interno e il volume dell'uscita cuffie.
13. VASSOIO PORTA CD – Servirsi del tasto OPEN/CLOSE per aprire/chiudere il vassoio e collocare qui il disco.
14. LINE IN (ingresso di linea) – Servirsi di un cavo stereo da 1/8" per collegare un altro dispositivo audio (ad es.
iPod, computer, ecc.) a questo jack, consentendo di registrare e/o riprodurre musica tramite le casse del CD
DIRECT.
15. CUFFIE – Collegare cuffie da 1/8" a questo livello.
16. SPEAKER – Ascoltare la fonte musicale attraverso questo altoparlante.
17. COPERCHIO ANTIPOLVERE – Questo coperchio protegge il giradischi dalla polvere e dall'abuso quando
l'apparecchio non è in uso o viene trasportato.
– Premere una volta uno di questi tasti per passare alla traccia precedente/successiva
– Apre/chiude il vassoio porta-CD.
12
f – Controlla il funzionamento del trasporto CD.
13
3 4
8
7
14
9
5
16
10
15
26
Page 27

PANNELLO POSTERIORE
1
2
4
3
1. PORTA USB – Collegare un cavo USB dal CD DIRECT al computer per registrare o ascoltare audio.
2. GAIN ADJUSTMENT (regolazione del guadagno) – Prima di registrare tramite un collegamento USB, servirsi
di questa manopola per regolare il guadagno della registrazione. Il livello deve essere sufficientemente alto da
impedire che la parte più rumorosa della canzone non provochi distorsione o "taglio".
3. AUX OUT (uscita AUX) – Uscite audio RCA per il collegamento ad altoparlanti esterni o ad un ampli.
4. ALIMENTAZIONE – Il cavo di alimentazione incorporato è situato a questo livello.
PRIMA DI REGISTRARE SU CD
Prima di iniziare la registrazione, assicurarsi di aver ben compreso i seguenti punti:
• Le specifiche del CD limitano il numero di tracce a 99.
• Non è possibile creare tracce di registrazione più corte di 10 secondi.
• Una volta registrato su un disco CD-R, i dati non possono essere cancellati.
• Un CD-R registrato può essere riprodotto in un normale lettore CD solo dopo essere stato finalizzato.
• Per aggiungere ulteriori registrazioni ad un CD-RW finalizzato, annullarne la finalizzazione.
• Quando tutto lo spazio disponibile in un CD-RW è stato registrato, è possibile registrare ulteriori tracce
cancellando tracce registrate in precedenza. Va notato che è possibile unicamente cancellare tutte le tracce o
l'ultima traccia.
• Se il tasto STOP
l'apparecchio non interromperà la registrazione.
• Una volta terminata la registrazione, “REC” ed “- ENd –“ lampeggiano per alcuni secondi e l'apparecchio si ferma
(modalità "stop"). Non applicare urti o vibrazioni all'apparecchio durante il lampeggio.
• Se il disco giunge alla fine durante la registrazione, l'apparecchio finalizzerà automaticamente il disco.
• Se il disco giunge alla fine della 99esima traccia durante la registrazione, l'apparecchio finalizzerà
automaticamente il disco.
• Il tempo di registrazione di una traccia può differire leggermente dalla fonte originale.
• Quando viene inserito un disco parzialmente registrato, la registrazione inizierà a partire dall'ultima traccia
registrata.
• La funzione AUTO REC separa automaticamente le tracce quando individua il livello del volume (in dB) stabilito
dal tasto MANUAL/AUTO. Quando si utilizza questa funzione, il CD può avere più o meno tracce della fonte per
via di parti silenziose o rumorose inattese che possono attivare o meno la separazione automatica delle tracce in
modi inattesi. Se ciò dovesse accadere, servirsi del tasto MANUAL/AUTO per regolare il livello del volume in
maniera adeguata.
• Quando un disco registrato da questo apparecchio viene riprodotto da altri lettori, è possibile udire un piccolo
rumore nel punto in cui la traccia è stata divisa.
o il tasto PLAY/PAUSE f vengono premuti entro 10 secondi dall'inizio della registrazione,
27
Page 28

REGISTRAZIONE
Registrazione di audio dal giradischi o da fonti AUX sul registratore CD:
1. Premere il tasto PHONO/AUX/USB ripetutamente per selezionare quale fonte registrare, PHONO o AUX.
2. Premere il tasto OPEN/CLOSE e collocare un disco CD-R registrabile o CD-RW nel vassoio porta-disco con il
lato recante l'etichetta rivolto verso l'alto, quindi premere il tasto OPEN/CLOSE
Nota bene: assicurarsi che gli indicatori “NO TOC” e “CD-R” (o “CD-RW“) si accendano a display, o il
tasto RECORD non funzionerà.
3. Selezionare la modalità di assegnazione del numero di traccia servendosi del tasto MANUAL/AUTO REC.
Quando il tasto MANUAL/AUTO REC viene premuto una volta, la modalità corrente compare a display.
Premere il tasto MANUAL/AUTO REC ripetutamente per selezionare qualsiasi altra modalità.
• (MANUALE)
In questa modalità i numeri di traccia non vengono assegnati automaticamente. Servirsi del tasto TRACK
SPLIT per dividere le tracce.
La modalità MANUALE è consigliata per la registrazione di una fonte analogica quale un disco. Quando
l'apparecchio viene spento, questa unnzione torna a “Manuale”.
• –20db, –30db o –40db (AUTO REC)
In questa modalità l'apparecchio inserirà automaticamente una divisione di traccia nel materiale
registrato quando il livello audio è sceso sotto la soglia per oltre 2 secondi e il suono è stato riavviato. “–
20db” richiede un segnale più forte per attivare l'incremento di traccia. “–30db” significa che un segnale
relativamente silenzioso attiverà l'incremento di traccia. “–40db” è adatto alla registrazione di una fonte
priva di rumori quale un CD. Quando si registra da una fonte che presenta rumore indesiderato o da una
fonte analogica in funzione auto track, più numeri di traccia possono essere assegnati rispetto alle tracce
effettivamente registrate. In questo caso, servirsi dell'impostazione “Manuale” e premere il tasto TRACK
SPLIT per assegnare i numeri di traccia nei punti desiderati.
• AUTO REC potrebbe non funzionare con fonti analogiche che contengono rumori a basso livello.
AUTO REC potrebbe non funzionare bene con alcuni generi (musica classica, parlato, ecc.) che hanno
prolungati periodi di silenzio all'interno di una singola traccia.
• La spia AUTO TRACK si accende quando viene selezionato –20dB, –30dB o –40dB.
• L'impostazione predefinita è MANUAL (off). Quando si accende l'apparecchio o si preme il tasto
OPEN/CLOSE, l'impostazione passa automaticamente a MANUAL (off).
• Il tasto MANUAL/AUTO REC non funziona durante la registrazione.
• L'uso della modalità MANUAL/AUTO REC è disattivato quando si inserisce un disco nel drive. L'uso di
4. Premere il tasto RECORD. L'apparecchio entrerà in modalità di pausa della registrazione. Durante la
questa modalità è possibile quando a display compare la scritta “NO TOC”.
registrazione la spia si accende in rosso. In modalità di pausa della registrazione, la spia “REC” lampeggia e la
spia Pause
è accesa a display.
• La pressione del tasto non funziona finché a display compare la scritta “BUSY”. Attendere circa 10
secondi finché la scritta “bUSY” non scompare dal display.
per chiudere il vassoio stesso.
5. Regolazione del volume di registrazione. Una volta premuto il
tasto Record (registra), riprodurre la fonte che si desidera
registrare come test per regolare il volume della registrazione in
modo tale che il suono più alto non superi l'indicatore “OVER”
sul misuratore di livello. Il livello può essere regolato da –8 (–
12dB) a +8(+12dB).
• L'impostazione predefinita è 0. Ogni volta che si conclude
una registrazione, l'impostazione torna automaticamente
a 0.
• Fonti diverse (Phono, Line In, CD) hanno volumi diversi.
Per registrare al volume ottimale per fonti diverse occorre
regolare il livello di registrazione di ciascuna fonte.
Regolare il livello di registrazione in modo tale che il
suono più elevato non superi l'indicatore “OVER” sul misuratore di livello.
LCD durante la registrazi
28
Page 29

6. Preparare la fonte di registrazione.
Per registrare da un disco:
Assicurarsi che il coperchio bianco di protezione sia stato rimosso dalla puntina del giradischi.
Quindi portare il braccio sul bordo del disco o in una posizione specifica sul disco e abbassarlo lentamente.
Quando il giradischi è fermo, il tasto PLAY/PAUSE
registrazione.
f non funzionerà e non è possibile iniziare la
Per registrare un suono riprodotto da un dispositivo audio collegato al terminale LINE IN:
Riprodurre l'apparecchio collegato al terminale Line In.
• Per impedire che la parte iniziale venga tagliata via, effettuare il cueing dell'apparecchio e interrompere
temporaneamente la riproduzione, quindi, dopo aver iniziato la registrazione, lasciare la pausa
dell'apparecchio per iniziare la riproduzione.
• Se l'apparecchio non dispone della funzione pausa, dopo aver iniziato la registrazione avviare la
7. Premere il tasto PLAY/PAUSE per avviare la registrazione.
riproduzione dell'apparecchio.
Quando termina la riproduzione della fonte, premere il tasto STOP
Quando termina la riproduzione di un disco e il giradischi smette di ruotare, la registrazione termina
automaticamente.
Per impedire rumori indesiderati provenienti dal braccio, interrompere la registrazione manualmente servendosi
del tasto STOP
registrazione viene interrotta, “REC” ed “-End-” lampeggiano per diversi secondi. Non spegnere (OFF)
l'alimentazione né scuotere l'apparecchio durante la registrazione o quando “REC” e “-----” lampeggiano. Tali
azioni impediscono un'adeguata registrazione.
Per interrompere la registrazione
Premere il tasto STOP
Per interrompere momentaneamente la registrazione
Premere il tasto PLAY/PAUSE
Per riavviare la registrazione, premere il tasto PLAY / PAUSE
• Non è possibile riavviare la registrazione quando “bUSY” compare a display.
• Va ricordato che ogni volta in cui la registrazione viene interrotta o fermata, un nuovo numero di traccia
• L'apparecchio non si ferma né si interrompe nemmeno se il tasto PLAY/PAUSE f viene premuto
Divisione manuale delle tracce
Mentre si registra è possibile dividere la registrazione in tracce. Durante la registrazione, premere il tasto
TRACK SPLIT. L'attuale numero di traccia verrà aumentato di uno.
• Il tasto TRACK SPLIT funziona indipendentemente dall'impostazione di MANUAL/AUTO REC.
• Non è possibile dividere una traccia manualmente per creare tracce di durata inferiore a 10 secondi. Su
• Quando il tasto TRACK SPLIT viene premuto durante la registrazione, il suono registrato verrà tagliato
non appena termina la riproduzione dei numeri che si desidera registrare. Quando la
verrà assegnato. Non è possibile registrare una traccia in due “fasi”.
entro 10 secondi dall'inizio della registrazione.
un disco possono essere registrate fino a 99 tracce, a seconda delle specifiche del CD stesso.
per un momento.
per interrompere la registrazione.
pe fermare la registrazione.
f. “bUSY” compare brevemente a display e la registrazione viene interrotta.
f.
29
Page 30

FINALIZZAZIONE DI UN CD
Affinché un disco diventi un CD standard, deve contenere un indice (TOC). Questo procedimento è noto come
finalizzazione. Una volta finalizzato, sul disco CD-R non è possibile aggiungere altre tracce. Nel caso di dischi CDRW, invece, è possibile annullare la finalizzazione e registrare altro materiale.
• Non è possibile finalizzare un disco vuoto.
• Quando il disco ha raggiunto il massimo tempo registrabile, effettuerà automaticamente la finalizzazione,
anche se la registrazione è ancora in corso.
1. Premere il tasto CD per selezionare “CD” e aprire il vassoio porta CD premendo il tasto.
2. Inserire nel vassoio un disco non finalizzato (registrabile).
3. Premere il tasto FINALIZE in modalità stop. Sullo schermo appare la scritta "FINAL". Per annullare il
processo di finalizzazione, premere il tasto STOP.
4. Premere il tasto ENTER per avviare la finalizzazione. Le spie “NO TOC” e “REC” lampeggiano e il tempo
rimanente per l'operazione di finalizzazione comparirà a display. Una volta conclusa l'operazione, la spia NO
TOC si spegne e il display torna alla visualizzazione traccia/tempo. Durante la finalizzazione non funzionano i
tasti.
NOTA BENE: mai spegnere l'alimentazione né scollegare il cavo di alimentazione quando l'apparecchio
è in uso.
• Sebbene dischi CD-R finalizzati possano essere riprodotti su normali lettori CD, va ricordato che dischi
CD-RW finalizzati potrebbero non suonare su lettori CD ordinari.
• Il tempo necessario alla finalizzazione varia in base al tipo di disco.
CANCELLARE O ANNULLARE LA FINALIZZAZIONE DI UN CD-RW
Non è possibile effettuare operazioni di cancellazione o di annullamento della finalizzazione di dischi CD-R. La
procedura di cancellazione è possibile unicamente per dischi CD-RW non finalizzati. Se un disco CD-RW è stato
finalizzato, annullare la finalizzazione prima della cancellazione. Su un CD-RW è possibile cancellare l'ultima traccia
registrata o l'intero disco. La cancellazione non può essere annullata. Se si cancella una o più tracce, assicurarsi che
siano registrazioni che si desidera realmente cancellare.
5. Premere il tasto CD per selezionare “CD”.
6. Inserire un CD-RW registrato premendo il tasto s .
7. Premere il tasto FINALIZE/ERASE in modalità stop. A ciascuna pressione del tasto FINALIZE/ERASE il
display cambia come segue:
“UnFINAL” (annulla finalizzazione) compare quando viene caricato un disco finalizzato. Selezionare questa
opzione per annullare la finalizzazione del disco.
“FINAL” compare quando il disco non è stato finalizzato. Premendo nuovamente il tasto FINALIZE/ERASE,
comparirà
“ErASE XX” (il numero dell'ultima traccia registrata sul disco). Selezionare questa opzione per
cancellare l'ultima traccia presente sul disco. Questo non compare quando una sola traccia è registrata sul
disco. Se si preme nuovamente il tasto FINALIZE/ERASE, compare ErASE ALL. Selezionare questa opzione
per cancellare tutte le tracce. Per annullare il processo di finalizzazione, premere il tasto STOP .
8. Premere il tasto ENTER per avviare la finalizzazione. Il tempo rimanente per l'operazione compare a
display. Quando l'operazione è stata completata, il display torna alla visualizzazione traccia/tempo. Durante la
cancellazione/annullamento della finalizzazione non funzionano i tasti. Mai spegnere l'alimentazione o
scollegare il cavo di alimentazione quando l'apparecchio sta finalizzando il disco o questo non sarà
riproducibile.
30
Page 31

SCHNELLSTART-ANLEITUNG (DEUTSCH)
LIEFERUMFANG
Vergewissern Sie sich, dass
alle hier angeführten
Komponenten in der Schachtel
enthalten sind:
• CD DIRECT
• EZ Vinyl Software-Disk
• Software-Schnellstart-
Anleitung
• USB-Kabel
• Schnellstart-Anleitung
• Sicherheitshinweise und
Garantieinformationen
LESEN SIE DIE SICHERHEITSHINWEISE, BEVOR SIE DAS PRODUKT VERWENDEN.
ACHTUNG:
Bevor Sie den Plattenspieler, lösen Sie die
"transport Schraube" (am Ende der Platte,
in der Nähe der Tonarm) durch Drehen im
Uhrzeigersinn.
EINLEITUNG
CD DIRECT konvertiert Ihre wertvollen Schallplatten und Musik externer Audioquellen einfach und bequem auf CD.
CD DIRECT kann über den USB-Port auch an einen Computer angeschlossen werden. Wir haben zwei Software-
Pakete mitgeliefert, die Sie beim Konvertieren Ihrer Schallplatten unterstützen. Sie sollten eine der folgenden
Anwendungen installieren, um die Vorteile der Computer-Aufnahme ausnützen zu können:
• EZ Vinyl/Tape Converter (nur PC) ist der schnellste und einfachste Weg, um Ihre Schallplatten in digitale
Mediendateien zu verwandeln. EZ Vinyl/Tape Converter speichert Ihre Aufnahmen direkt in Ihrer iTunes*
Bibliothek.Unerfahrene Benutzer werden diese Anwendung wahrscheinlich bevorzugen. Wir haben Ihnen die
praktische Software-Schnellstart-Anleitung mit Schritt-für-Schritt-Anleitungen für Installation und Betrieb der
Software zur Verfügung gestellt.
• EZ Audio Converter (nur Mac) ist ein einfaches Konvertierungsprogramm für Mac OS X und eignet sich ideal
für unerfahrene Anwender. Bitte beachten Sie die Schritte in der beiliegenden Software-Schnellstart-Anleitung
für die Software-Installation und den Betrieb.
Zur Installation der Software legen Sie einfach die mitgelieferte CD in Ihren Computer ein und folgen den
Anweisungen auf dem Bildschirm. Nachdem Sie Ihre Schallplatten konvertiert haben, können Sie sie auf CD brennen
oder auf tragbare Mediengeräte laden.
Besuchen Sie http://www.ionaudio.com/computer-optimization
Computers für Audio.
* iTunes ist eine Marke der Apple Inc. und ist in den USA und anderen Ländern eingetragen.
Audio-Setup für Windows Vista und Windows 7:
Sobald die EZ Converter Software auf Ihrem Computer installiert ist, verbinden Sie CD DIRECT mit dem mitgelieferten USBKabel an einen freien USB-Anschluss Ihres Computers.
1. Klicken Sie auf die Schaltfläche Start in der unteren linken Ecke des Bildschirms und wählen Systemsteuerung.
2. Doppelklicken Sie auf Hardware und Sound.
3. Doppelklicken Sie auf Sound.
4. Wählen Sie die Registerkarte Wiedergabe. Wählen Sie Ihre Computer-Soundkarte (z.B. Lautsprecher – High
Definition Audio oder Kopfhörer– High Definition Audio. Einige gängige Markennamen von PC-Soundkarten sind
Realtek, Soundmax und Sigmatel.
5. Klicken Sie auf Als Standard einstellen.
6. Wählen Sie die Registerkarte Aufnahm e am oberen Rand des Fensters Sound. Unter Aufnahme wählen Sie Mikrofon
- USB-Audio-Codec als Standardgerät.
7. Klicken Sie auf Als Standard einstellen.
8. Wählen Sie die Registerkarte Erweitert .
9. Setzen Sie die Einstellung Standardformat auf 2-Kanal, 16 Bit 44100 Hz (CD-Qualität).
10. Entfernen Sie die Häkchen in den beiden Kästchen unter Exklusivmodus. Klicken Sie danach auf Übernehmen.
11. Wählen Sie die Registerkarte Pegel im oberen Bereich des Fensters.
12. Unter Pegel bringen Sie den Schieberegler auf 5.
13. Klicken Sie auf Übernehmen und anschließend auf OK, um das Fenster zu schließen.
für weitere Informationen zur Optimierung Ihres
31
Page 32

Windows XP Audio-Setup:
p
Sobald die EZ Converter Software auf Ihrem Computer installiert ist, verbinden Sie CD DIRECT mit dem mitgelieferten USBKabel an einen freien USB-Anschluss Ihres Computers.
1. Klicken Sie auf das Windows-Startmenü.
2. Wählen Sie Einstellungen und Systemsteuerung.
3. Doppelklicken Sie auf das Bedienfeld Sounds und Audiogeräte . Wenn Sie das Feld Sounds und Audiogeräte nicht
sehen, wählen Sie Zur klassischen Ansicht wechseln.
4. Wählen Sie die Registerkarte Audio.
5. Unter Soundwiedergabe wählen Sie die interne Soundkarte Ihres Computers. Einige gängige Markennamen von PC-
Soundkarten sind Realtek, Soundmax und Sigmatel.
6. Unter Aufnahme wählen Sie USB Audiocodec als Ihr Standardgerät aus.
7. Aktivieren Sie das Kontrollkästchen mit dem Titel Nur Standardgeräte verwenden.
8. Klicken Sie (wenn möglich) auf Übernehmen und anschließend auf OK.
Mac Audio-Setup:
Sobald die EZ Converter Software auf Ihrem Computer installiert ist, verbinden Sie CD DIRECT mit dem mitgelieferten USBKabel an einen freien USB-Anschluss Ihres Computers.
1. Klicken Sie auf das Apfel-Symbol in der oberen linken Ecke des Bildschirms und wählen Sie Systemeinstellungen.
2. Klicken Sie im nun angezeigten Fenster unter Hardware auf das Element mit der Bezeichnung Sound.
3. Klicken Sie auf die Registerkarte Eingang. Wählen Sie USB AUDIO CODEC (oder USB-AUDIOGERÄT) unter Gerät
für Sound-Eingabe auswählen.
4. Klicken Sie auf die Registerkarte Ausgabe. Unter Gerät für Sound-Eingabe auswählen wählen Sie Kopfhörer
(integrierte Ausgabe).
5. Schließen Sie das Fenster Systemeinstellungen.
OBERSEITE
1. PLATTENTELLER – Hier platzieren Sie Ihre
Schallplatte.
2. TRANSPORTSCHRAUBE - Bewahrt
Plattenteller und Tonarm vor
Transportschäden. Wenn Sie den
Plattenspieler transportieren, ziehen Sie die
Schraube wieder an, um Plattenteller und
Tonarm zu sichern. Bevor Sie den
Plattenspieler zum ersten Mal verwenden,
drehen Sie bitte die
TRANSPORTSCHRAUBE im Uhrzeigersinn,
um sie zu lösen.
3. 45 RPM-ADAPTERHALTERUNG – Sichert
den mitgelieferten 45 RPM-Adapter. Wenn Sie
den Adapter nicht verwenden, legen Sie ihn
bitte in diese Haltevorrichtung.
4. TONARM – CD DIRECT wird mit einem bereits
ausgerichteten TONARM und Tonabnehmer
geliefert. Der TONARM kann mit der Hand
oder durch Betätigen des Hebels zum
ANHEBEN/ABSENKEN angehoben oder abgesenkt
werden. Bitte beachten Sie, dass der TONARM aus der
Ruhestellung (am ARM-CLIP) entfernt werden muss,
damit der Drehtellermotor aktiviert wird. Wenn der
TONARM wieder in seine Ruheposition gebracht wird, schaltet sich der Motor des Drehtellers aus.
5. ARM-CLIP – Dieser speziell entworfene Arm-Clip sichert den Tonarm, wenn er nicht verwendet wird. Der Arm-Clip
wurde so entwickelt, dass er in der oberen Position bleibt, wenn er entsperrt ist.
6. HEBEL ZUM ANHEBEN/ABSENKEN– Hebt und senkt den Tonarm.
7. 33 / 45 / 78 RPM-SCHALTER - Regelt die Geschwindigkeit (RPM) des Plattentellers.
3
1
Entfernen Sie die Kunststoffabdeckung des
Tonabnehmers (Nadelabdeckung) bevor Sie den
ieler verwenden.
Plattens
2
6
5
7
4
32
Page 33

VORDERSEITE
16
17
1
2
6
11
1. LCD – Zeigt Informationen über die Funktionen des CD DIRECT.
2. EIN-/AUS-SCHALTER – Schaltet CD DIRECT ein oder aus.
3. MODUSWAHLTASTE - Wählt aus, welches Medienformat Sie verwenden. Drücken Sie diese Taste, um durch
die Optionen zu blättern und stellen Sie ein, ob Sie CD DIRECT im Modus Plattenspieler (PHONO), LINE INBuchse (AUX), Computer (USB) oder CD-Player (CD) betreiben möchten.
4. TITEL ÜBERSPRINGEN - Drücken Sie eine dieser Tasten, um beim Abspielen einer Musik-CD zum
vorherigen/nächsten Titel zu springen. Halten Sie eine dieser Tasten gedrückt, um im aktuellen Track vor- oder
zurückzuspulen.
5. STOPP/WIEDERGABE/PAUSE f - Steuert die CD-Transportfunktionen.
6. ÖFFNEN/SCHLIESSEN s
7. MANUELL/AUTO - Wählt die Lautstärke (in dB) aus, bei der die Tracks automatisch getrennt werden. Der
Track kann auch manuell getrennt werden, indem Sie diese Taste drücken.
8. FINALISIEREN/ LÖSCHEN - Drücken Sie einmal auf diese Taste, um eine CD zu finalisieren. (Sie können
einer finalisierten CD keine weiteren Titel hinzufügen). Drücken Sie die Taste zweimal, um einen einzigen
Track oder alle Tracks von einer CD-RW zu löschen.
9. TRACK SPALTEN - Erstellt während der Aufnahme einen neuen Track.
10. ENTER/AUFNAHME- Drücken Sie die linke Seite dieser Taste, um die Aufnahme zu bestätigen, sie zu löschen
oder eine CD zu finalisieren. Drücken Sie die rechte Seite dieser Taste, um den CD-Player für die Aufnahme
vorzubereiten.
11. PEGEL - Stellt den Signalpegel ein, mit der die CD aufgenommen wird und regelt das Eingangssignal, das
über den USB-Port, den Line-Eingang und den Aux-Eingang gesendet wird.
12. LAUTSTÄRKE - Stellt die interne Lautstärke von Lautsprecher und Kopfhörerausgang ein.
13. CD-FACH – Verwenden Sie die Taste ÖFFNEN/SCHLIESSEN zum Öffnen/Schließen des Fachs und zum
Einlegen Ihrer CD.
14. LINE IN - Verwenden Sie ein 1/8"-Stereo-Kabel, um ein anderes Audiogerät (z.B. iPod, Computer etc.) an
diese Buchse anzuschließen, so dass Sie die Musik des Audiogeräts aufnehmen können oder direkt über CD
DIRECT-Lautsprecher anhören können.
15. KOPFHÖRER - Schließen Sie Ihre 1/8"-Kopfhörer hier an.
16. LAUTSPRECHER - Hören Sie Ihre Musikquelle über diese Lautsprecher an.
17. ABDECKHAUBE - Diese Abdeckung schützt den Plattenspieler vor Verschmutzung und Missbrauch während
dieser nicht verwendet oder transportiert wird.
12
- Öffnet/schließt das CD-Fach.
13
3 4
8
7
14
9
5
16
10
15
33
Page 34

RÜCKSEITE
1
2
4
3
1. USB-PORT – Um Audiodateien aufzunehmen oder wiederzugeben, verbinden Sie CD DIRECT über ein USB-
Kabel mit dem Computer.
2. GAIN-REGLER - Verwenden Sie diesen Regler bevor Sie über eine USB-Verbindung aufnehmen, um den
Gain-Wert für die Aufnahme anzupassen. Der Pegel sollte so eingestellt werden, dass der lauteste Teil des
Songs nicht verzerrt oder "clippt".
3. AUX OUT - RCA-Audioausgänge für den Anschluss von externen Lautsprechern oder einem Verstärker.
4. STROMVERSORGUNG – Hier befindet sich das integrierte Netzkabel.
BEVOR SIE AUF CD AUFNEHMEN
Bevor Sie die Aufnahme starten, sollten Sie sich folgender Punkte bewusst sein:
• CD-Spezifikationen begrenzen die Anzahl der Tracks auf 99.
• Sie können keine Tracks aufnehmen, die kürzer als 10 Sekunden sind.
• Sobald Sie auf eine CD-R-Disk aufgenommen haben, können Sie die Daten nicht wieder löschen.
• Eine aufgenommene CD-R kann erst dann in einem normalen CD-Player abgespielt werden, wenn sie finalisiert
wurde.
• Um einer finalisierten CD-RW weitere Aufnahmen hinzuzufügen, müssen Sie die Finalisierung der CD aufheben.
• Wenn kein Speicherplatz mehr auf einer CD-RW vorhanden ist, können Sie zusätzliche Tracks aufnehmen, indem
Sie zuvor aufgezeichnete Tracks löschen. Beachten Sie, dass Sie jeweils nur den letzten Track oder alle Tracks
löschen können.
• Wenn die Taste STOPP oder die Taste WIEDERGABE/PAUSEf innerhalb von 10 Sekunden ab Beginn einer
Aufnahme gedrückt wird, kann das Gerät die Aufnahme nicht stoppen.
• Wenn die Aufnahme fertig ist, blinken "REC" und "- END -" einige Sekunden lang auf. Das Gerät springt
anschließend in den Stopp-Modus. Achten Sie darauf, dass das Gerät keinen Erschütterungen oder Vibrationen
ausgesetzt wird, solange es blinkt.
• Wenn die CD während der Aufnahme das Ende der CD erreicht, finalisiert das Gerät die CD automatisch.
• Wenn die CD das Ende des 99. Tracks während der Aufnahme erreicht, finalisiert das Gerät die CD automatisch.
• Die Aufnahmedauer eines Titels kann von der ursprünglichen Quelle geringfügig abweichen.
• Wenn eine teilweise bespielte Disk eingelegt ist, beginnt die Aufnahme nach dem letzten aufgezeichneten Track.
• Die Funktion AUTO REC trennt Tracks automatisch, wenn der mit der Taste MANUELL/AUTO gesetzte
Lautstärkepegel (in dB) erkannt wird. Wenn Sie diese Funktion verwenden, kann Ihre CD mehr oder weniger
Tracks als die Originalquelle haben, da unerwartete leise oder laute Passagen die automatische TrackUnterteilung auf unerwartete Weise auslöst oder unterdrückt. Wenn dies der Fall ist, verwenden Sie die Taste
MANUELL/AUTO, um die Lautstärke entsprechend anzupassen.
• Wenn die Disk, die mit diesem Gerät aufgenommen wurde, über einen anderen Player wiedergegeben wird, kann
es sein, dass ein leises Geräusch an der Stelle zu hören ist, an der der Track unterteilt wurde.
34
Page 35

AUFNAHME
Audiodaten vom Plattenspieler oder von AUX-Quellen mit dem CD-Recorder aufnehmen:
1. Drücken Sie wiederholt die Taste PHONO/AUX/USB, um auszuwählen, von welcher Quelle aufgezeichnet
werden soll: PHONO oder AUX.
2. Drücken Sie die Taste ÖFFNEN/SCHLIESSEN s , legen eine beschreibbare CD-R oder CD-RW-Disk mit der
bedruckten Seite nach oben in das CD-Fach und drücken die Taste ÖFFNEN/SCHLIESSEN s
zu schließen.
Hinweis: Stellen Sie sicher, dass die Anzeigen "NO TOC" und "CD-R" (oder "CD-RW") am Display
aufleuchten, andernsfalls funktioniert die Taste AUFNAHME nicht.
3. Wählen Sie mit der Taste MANUELL/AUTO REC den Modus für die Tracknummernvergabe. Wenn die
Taste MANUELL/AUTO-REC gedrückt wird, wird der aktuelle Modus angezeigt. Drücken Sie die Taste
MANUELL/AUTO REC wiederholt, um einen anderen Modus zu wählen.
• (MANUELL)
In diesem Modus werden Tracknummern nicht automatisch vergeben. Verwenden Sie die Taste TRACK
SPALTEN, um Tracks zu unterteilen.
MANUELL ist für die Aufnahme einer analogen Quelle (z.B. Schallplatte) zu empfehlen. Die
Einstellungen werden auf "Manuell" zurückgesetzt, wenn das Gerät ausgeschaltet wird.
• –20db, –30db oder –40db (AUTO REC)
In diesem Modus wird das Gerät automatisch Track-Unterteilungen im aufgenommenen Material
einfügen, wenn der Schallpegel länger als 2 Sekunden unter dem Schwellenwert liegt, und das Signal
neu begonnen hat. "-20dB" erfordert ein noch lauteres Signal, um eine Track-Unterteilung auszulösen. "30dB" bedeutet, dass ein relativ geringes Signal die Track-Unterteilung auslöst. "-40dB" eignet sich für
die Aufnahme einer rauschfreien Quelle, wie einer CD. Bei der Aufnahme einer Quelle mit
unerwünschtem Rauschen oder einer analogen Quelle mit der Einstellung Auto Track können mehr
Tracknummern zugewiesen werden als im Original. In diesem Fall verwenden Sie die Einstellung
"Manuell" und drücken die Taste TRACK SPALTEN, um die Tracknummern an die gewünschten Punkte
zu bringen.
• Es kann sein, dass AUTO REC mit analogen Quellen, die niederfrequente Geräusche enthalten, nicht
ordnungsgemäß funktioniert.
Es kann sein, dass AUTO REC in manchen Genres (Klassik, Musical, Spoken Word etc..), in denen
längere stille Passagen innerhalb eines Tracks vorkommen, nicht ordnungsgemäß funktioniert.
• Die AUTO TRACK Anzeige leuchtet auf, wenn -20dB, -30dB oder- 40dB ausgewählt ist.
• Die Standardeinstellung ist MANUELL (deaktiviert). Wenn das Gerät eingeschaltet ist, oder die Taste
ÖFFNEN/SCHLIESSEN gedrückt wird, wird die Einstellung automatisch auf MANUELL (deaktiviert)
zurückgesetzt.
• Die Taste MANUELL/AUTO REC funktioniert während der Aufnahme nicht.
• Der Modus MANUELL/AUTO REC wird deaktiviert, wenn eine Disk in das Laufwerk eingelegt wird. Die
4. Drücken Sie die Taste AUFNAHME. Das Gerät schaltet in den Aufnahmepausemodus. Während der
Nutzung dieses Modus ist nur dann möglich, wenn "NO TOC" angezeigt wird.
Aufnahme leuchtet die Anzeige rot. Im Aufnahmepausemodus blinkt die "REC"-Anzeige und die Pause-
Anzeige leuchtet am Display auf.
• Tasten können nicht gedrückt werden, solange "beschäftigt" angezeigt wird. Warten Sie etwa 10
Sekunden, bis "beschäftigt" vom Display verschwindet.
, um das Fach
5. Den Aufnahmepegel anpassen. Sobald die Aufnahme-Taste
gedrückt wurde, spielen Sie die Quelle als Test ab, um den
Aufnahmepegel so einzustellen, dass das lauteste Geräusch
die "OVER"-Anzeige auf der Pegelanzeige nicht überschreitet.
Der Pegel kann von -8 (-12dB) bis +8 (+12 dB) eingestellt
werden.
• Die Standardeinstellung ist 0. Jedes Mal, wenn die
Aufnahme beendet wird, wird die Einstellung
automatisch auf 0 zurückgesetzt.
• Verschiedene Quellen (Phono, Line In, CD) haben
verschiedene Lautstärken.
Lautstärke für verschiedene Quellen aufzunehmen, ist
es wichtig, dass die Aufnahmepegel für jede Quelle
einzeln eingestellt werden. Stellen Sie den Aufnahmepegel so ein,
dass das lauteste Geräusch die "OVER"-Anzeige auf der Pegelanzeige nicht überschreitet.
LCD während der Aufnahme
Um mit der optimalen
35
Page 36

6. Bereiten Sie die Aufnahmequelle vor.
Aufnehmen einer Schallplatte:
Stellen Sie sicher, dass zuerst die weisse Schutzkappe von der Plattennadel entfernt wurde.
Dann bewegen Sie den Tonarm an den Rand der Platte oder an eine bestimmte Position auf der Platte und
setzen die Nadel vorsichtig auf.
Solange der Plattenspieler stillsteht, funktioniert die Taste WIEDERGABE/PAUSEf nicht und Sie können
folglich nicht mit der Aufnahme beginnen.
So nehmen Sie das Signal eines Audiogeräts auf, das mit dem LINE IN-Anschluss verbunden ist:
Spielen Sie Musik vom Gerät ab, das mit dem Line In-Anschluss verbunden ist.
• Spulen Sie am Gerät zurück, pausieren Sie die Wiedergabe vorübergehend und lassen Sie nach Beginn
der Aufnahme die Pause-Taste des Geräts los, um die Wiedergabe zu starten, damit der Anfang nicht
abgeschnitten wird.
• Wenn das Gerät keine Pause-Funktion hat, starten Sie nach Beginn der Aufnahme einfach die
7. Drücken Sie die WIEDERGABE/PAUSE-Taste, um die Aufnahme zu starten.
Wiedergabe des Geräts.
Wenn die Wiedergabe der Quelle abgeschlossen ist, drücken Sie die STOPP-Taste, um die Aufnahme zu
stoppen. Wenn die Wiedergabe der Schallplatte beendet ist und sich der Plattenspieler nicht mehr dreht, wird
die Aufnahme automatisch beendet.
Um unerwünschte Geräusche vom Tonarm zu vermeiden, stoppen Sie die Aufnahme manuell, indem Sie die
STOPP--Taste drücken, sobald die Wiedergabe der Tracks, den Sie aufnehmen wollen, beendet ist. Beim
Stoppen der Aufnahme blinken "REC" und "-End-" einige Sekunden lang auf. Vermeiden Sie Erschütterungen
des Geräts und schalten Sie den Strom nicht AUS, solange das Gerät aufnimmt oder solange "REC" und "-----"
blinken. Diese Aktionen verhindern eine ordnungsgemäße Aufnahme.
So beenden Sie die Aufnahme
Drücken Sie die STOPP-Taste, um die Aufnahme zu stoppen.
Aufnahme pausieren
Drücken Sie die Taste WIEDERGABE/PAUSEf. Am Display erscheint kurz "beschäftigt" und die Aufnahme
wird pausiert. Drücken Sie die Taste WIEDERGABE/PAUSE, um die Aufnahme erneut zu startenf.
• Sie können die Aufnahme nicht erneut starten, solange "beschäftigt" angezeigt wird.
• Beachten Sie, dass jedes Mal, wenn die Aufnahme pausiert oder gestoppt wird, eine neue Tracknummer
zugeordnet wird. Es ist nicht möglich, innerhalb eines Tracks in zwei "Phasen" aufzunehmen.
• Das Gerät wird nicht stoppen oder pausieren, auch wenn die Taste WIEDERGABE/PAUSE
finnerhalb von 10 Sekunden nach Beginn der Aufnahme gedrückt wird.
Manuelle Track-Unterteilung
Während der Aufnahme kann die Aufnahme in Tracks unterteilt werden. Drücken Sie während der Aufnahme
die Taste TRACK SPALTEN. Die aktuelle Tracknummer wird um eins erhöht.
• Die Taste TRACK SPALTEN funktioniert unabhängig von der MANUELL/AUTO REC-Einstellung.
• Sie können die Tracks nicht auf Tracks mit einer Länge von weniger als 10 Sekunden spalten. Je nach
CD-Spezifikationen können bis zu 99 Tracks auf einer CD erstellt werden.
• Wenn während die Aufnahme die Taste TRACK SPALTEN gedrückt wird, wird das aufgenommene
Signal kurz unterbrochen.
FINALISIEREN EINER CD
Um eine Disk zu einer Standard-CD zu machen, muss ein Inhaltsverzeichnis (TOC) auf die CD geschrieben werden.
Dieser Vorgang wird als Finalisieren bezeichnet. Nach der Fertigstellung können keine weiteren Tracks auf CD-RDiscs aufgenommen werden. Man kann die Finalisierung von CD-RW-Discs jedoch aufheben und weiteres Material
aufnehmen, wenn noch Platz auf der CD ist.
• Ein Rohling kann nicht finalisiert werden.
• Wenn die Disk ihre maximale Aufnahmekapazität erreicht hat, wird die Disk automatisch finalisiert, auch
wenn die Aufnahme noch läuft.
36
Page 37

1. Drücken Sie die CD-Taste, um "CD" auszuwählen und öffnen Sie das CD-Fach, indem Sie die s -Taste
drücken.
2. Legen Sie eine noch nicht finalisierte (bespielbare) Disk in das Fach ein.
3. Drücken Sie die Taste FINALISIEREN im Stopp-Modus. Auf dem Display erscheint "FINAL". Um den
Finalisierungsprozess abzubrechen, drücken Sie die Taste STOPP.
4. Drücken Sie die ENTER-Taste, um die Finalisierung zu starten. Die Indikatoren "NO TOC" und "REC"
blinken und die verbleibende Zeit zur Finalisierung wird im Display angezeigt. Wenn der Vorgang
abgeschlossen ist, schaltet sich die NO TOC-Anzeige aus. Die Anzeige springt nun zurück zur Track-/ZeitAnzeige. Während der Finalisierung funktionieren keine Tasten.
HINWEIS: Schalten Sie das Gerät niemals aus oder ziehen den Netzstecker ab, wenn das Gerät in
Betrieb ist.
• Obwohl finalisierte CD-R-Disks auf normalen CD-Playern abgespielt werden können, denken Sie daran,
dass finalisierte CD-RW-Disks auf normalen CD-Playern möglicherweise nicht abgespielt werden
können.
• Die Finalisierungszeit variiert je nach Datenträgertyp.
AUFHEBEN EINER FINALISIERUNG ODER LÖSCHEN EINER CD-RW
Auf einer CD-R-Disk können keine Löschvorgänge vorgenommen oder Finalisierungen aufgehoben werden.
Löschvorgänge können nur auf einer nicht finalisierten CD-RW-Disk vorgenommen werden. Wenn eine CD-RW-Disk
finalisiert wurde, heben Sie die Finalisierung auf bevor Sie Tracks löschen. Auf einer CD-RW ist es möglich, den
zuletzt aufgenommenen Track zu löschen oder die gesamte Disk zu löschen. Der Löschvorgang kann nicht
rückgängig gemacht werden. Wenn Sie vorhaben, einen oder mehrere Tracks zu löschen, stellen Sie sicher, dass es
sich um Aufnahmen handelt, die Sie wirklich löschen möchten.
1. Drücken Sie die CD-Taste, um "CD" zu wählen.
2. Legen Sie eine bespielte CD-RW ein, indem Sie die s -Taste drücken.
3. Drücken Sie im Stopp-Modus die Taste FINALISIEREN/LÖSCHEN. Jedes Mal, wenn Sie die Taste
FINALISIEREN/LÖSCHEN drücken, zeigt das Display folgende Änderungen:
"UnFINAL" (Finalisierung aufheben) erscheint, wenn eine finalisierte Disk eingelegt wird. Wählen Sie dies aus,
um die Finalisierung der Disk aufzuheben.
"FINAL" erscheint, wenn die Disk nicht finalisiert wurde. Wenn Sie erneut die Taste FINALISIEREN/LÖSCHEN
drücken,
wird "XX LÖSCHEN" angezeigt (Nummer der zuletzt auf die CD aufgenommenen Tracks) angezeigt. Wählen
Sie dies aus, um den letzten Track auf der Disk zu löschen. Dies wird nicht angezeigt, wenn nur ein Track auf
der Disk aufgezeichnet ist. Wenn Sie die Taste FINALISIEREN/LÖSCHEN erneut drücken, erscheint ALLES
LÖSCHEN. Wählen Sie dies aus, um alle Tracks zu löschen. Um den Finalisierungs- oder Löschvorgang
abzubrechen, drücken Sie die Taste STOPP.
4. Drücken Sie die ENTER-Taste, um die Finalisierung zu starten. Am Display erscheint die für den Vorgang
verbleibende Zeit. Wenn der Vorgang abgeschlossen ist, springt die Anzeige zurück zur Track-/Zeit-Anzeige.
Während dem Löschen/Aufheben der Finalisierung funktionieren keine Tasten. Schalten Sie das Gerät niemals
aus oder ziehen den Netzstecker, wenn das Gerät gerade finalisiert. Andernfalls wird die Disk unlesbar.
37
Page 38

SNELSTARTGIDS (NEDERLANDS)
INHOUD VAN DE DOOS
Controleer of de doos de
onderstaande onderdelen
bevat:
• CD DIRECT
• Cd-rom met EZ Vinyl
Software
• Snelstartgids software
• USB-kabel
• Snelstartgids
• Veiligheidsvoorschriften & boekje met informatie over de garantie
LEES DE VEILIGHEIDSVOORSCHRIFTEN VOORALEER HET PRODUCT TE GEBRUIKEN
INLEIDING
CD DIRECT biedt een eenvoudige manier om uw gekoesterde vinylplaten en externe geluidsbronnen op cd over te
zetten. CD DIRECT kan via zijn USB-poort ook op een computer worden aangesloten. Om u te helpen in het
converteren van uw vinylplaten, zijn er twee softwarepakketten meegeleverd. Voor geluidsopnames op computer
moet u één van de volgende applicaties installeren:
• EZ Vinyl/Tape Converter (alleen voor PC) is de snelste en gemakkelijkste manier om uw opnamen te
converteren naar digitale media. EZ Vinyl/Tape Converter slaat uw opnamen op een handige manier op in uw
iTunes*-bibliotheek. Beginnende gebruikers geven waarschijnlijk de voorkeur aan deze applicatie. Er is een
handige snelstartgids voor de software meegeleverd, met stapsgewijze instructies voor installatie en bediening
van de software.
• EZ Audio Converter (alleen voor Mac) is een basisapplicatie voor conversie, bestemd voor Mac OS X. Dit
programma is ideaal voor beginnende gebruikers. Raadpleeg de meegeleverde snelstartgids voor stapsgewijze
instructies over de installatie en de werking van de software.
Om de software te installeren: plaats de meegeleverde cd in uw computer en volg de instructies op het scherm. Na
het omzetten van uw vinylplaten, kunt u ze op cd branden of opladen op draagbare muziekspelers.
Surf naar http://www.ionaudio.com/computer-optimization
computer voor audio.
* iTunes is een handelsmerk van Apple Inc., geregistreerd in de VS en andere landen.
Draai voor het gebruik van de
draaitafel de “transportschroef”
(aan het uiteinde van de draaitafel,
vlakbij de toonarm) RECHTSOM los.
voor meer informatie over het optimaliseren van uw
Audioconfiguratie in Windows Vista en Windows 7:
Van zodra de EZ Converter-software op uw computer is geïnstalleerd kunt u met de meegeleverde USBkabel de CD DIRECT aansluiten op een beschikbare USB-poort op uw computer.
1. Klik op de Windows Start-knop links onderaan uw scherm en selecteer Configuratiescherm.
2. Dubbelklik op Hardware en geluid.
3. Dubbelklik op Geluid.
4. Selecteer het tabblad Afspelen. Selecteer de geluidskaart van uw computer (bv. Luidsprekers – High
Definition Audioapparaat of Koptelefoon – High Definition Audioapparaat). Enkele vaak
voorkomende namen voor geluidskaarten zijn Realtek, SoundMAX, en Sigmatel.
5. Klik op Standaard instellen.
6. Selecteer het tabblad Opnemen bovenaan het venster Geluid in het Configuratiescherm. Selecteer in
‘Opnemen’ Microfoon – USB audio codec als standaardapparaat.
7. Klik op Standaard instellen.
8. Selecteer het tabblad Geavanceerd.
9. Stel het Standaardformaat in op 2-kanaals, 16 bit 44100 Hz (cd-kwaliteit).
10. Vink de twee vakjes uit onder Exclusieve modus. Klik daarna op Toepassen.
11. Selecteer het tabblad Niveaus bovenaan het venster.
12. Zet in Niveaus de niveauschuifknop op 5.
13. Klik op Toepassen en klik daarna op Ok om het venster te sluiten.
LET OP:
38
Page 39

Instelprocedure audio in Windows XP:
Van zodra de EZ Converter-software op uw computer is geïnstalleerd kunt u met de meegeleverde USBkabel CD DIRECT aansluiten op een beschikbare USB-poort op uw computer.
1. Selecteer het Windows Start-menu.
2. Selecteer Instellingen en daarna Configuratiescherm.
3. Dubbelklik op het configuratiescherm Geluiden en Audioapparaten. Als u de keuze Geluiden en
Audioapparaten niet kunt zien, selecteer dan de optie Omschakelen naar klassieke weergave.
4. Selecteer het tabblad Audio.
5. Kies onder Audio afspelen de interne geluidkaart van uw pc. Enkele veel voorkomende namen voor
geluidskaarten zijn Realtek, SoundMAX en Sigmatel.
6. Selecteer onder Audio opnemen als standaardapparaat USB audio codec.
7. Vink het vakje Gebruik alleen standaardapparaten aan.
8. Klik op Toepassen (indien mogelijk) en klik daarna op OK.
Instelprocedure audio op een Mac:
Van zodra de EZ Converter-software op uw computer is geïnstalleerd, kunt u met de meegeleverde USBkabel CD DIRECT aansluiten op een beschikbare USB-poort op uw computer.
1. Klik op het Apple-pictogram in de rechterbovenhoek van uw computerscherm en selecteer
Systeemvoorkeuren.
2. Klik in het venster dat opent, onder Hardware, op het item Geluid.
3. Klik op het tabblad Invoer. Selecteer USB AUDIO CODEC (of USB-AUDIOAPPARAAT) onderaan in
Kies een apparaat voor geluidsinvoer.
4. Klik op het tabblad Uitgangen. Selecteer Koptelefoons (Ingebouwde uitgang) onderaan in Kies een
apparaat voor geluidsuitvoer.
5. Sluit het venster systeemvoorkeuren.
BOVENPANEEL
1. DRAAITAFEL: leg hierop uw plaat.
2. TRANSPORTSCHROEF: beveiligt de
draaitafel en toonarmconstructie tegen
beschadigingen tijdens het vervoer. Als u de
draaitafel vervoert, draai dan de schroef vast
om de draaitafel en toonarmconstructie te
beschermen. Draai voor het eerste gebruik
van de draaitafel de TRANSPORTSCHROEF
rechtsom los.
3. HOUDER 45-TOERENADAPTER: houder voor
de meegeleverde 45-toerenadapter. Plaats de
adapter in de houder wanneer u hem niet
gebruikt.
4. TOONARM: CD DIRECT wordt geleverd met
vooraf gebalanceerde TOONARM en naald.
De toonarm kan met de hand worden verhoogd
en verlaagd, of door de hendel
OMHOOG/OMLAAG in te drukken. Let op: de
TOONARM moet uit rustpositie worden
verplaatst (op de ARMSTEUN) om de motor van de
draaitafel te activeren. Wanneer de TOONARM terug in
rustpositie wordt geplaatst, valt de motor van de
draaitafel uit.
5. ARMSTEUN: deze speciaal ontworpen armsteun
beveiligt de toonarm in rustpositie of wanneer hij niet wordt gebruikt. De armsteun werd ontworpen om in de hoogste
positie te blijven wanneer hij ontgrendeld is.
6. HENDEL OMHOOG/OMLAAG: heft de toonarm op en laat hem zakken.
7. SCHAKELAAR 33 / 45 / 78 TOEREN: deze schakelaar controleert het toerental van de draaitafel.
3
1
Verwijder het plastic kapje van de naald
(naaldbescherming) voor de draaitafel aan te
zetten.
2
6
5
7
4
39
Page 40

VOORPANEEL
16
17
1
2
6
11
1. LCD: Geeft informatie weer over de functies van CD DIRECT.
2. AAN/UIT-SCHAKELAAR: zet CD DIRECT aan of uit.
3. KEUZESCHAKELAARS AFSPEELMODUS: selecteert het mediaformaat dat u wenst te gebruiken. Druk op
deze knop om te bladeren en CD DIRECT in te stellen in afspeelmodus draaitafel (PHONO), lijningang (AUX),
computer (USB) of cd-speler (CD).
4. MUZIEK OVERSLAAN : druk één keer op één van deze knoppen om naar het volgende/vorige nummer
te gaan bij het afspelen van muziek van een cd. Houd één van deze knoppen ingedrukt om het huidige
nummer voor- of achterwaarts te spoelen.
5. STOPPEN/AFSPELEN/PAUSE f: bestuurt de werking van de cd-speler.
6. OPENEN/SLUITEN s
7. MANUEEL/AUTO: selecteert het volumeniveau (in dB) waarbij de nummers automatisch worden opgesplitst.
Met deze knop kunnen de nummers ook manueel worden opgesplitst.
8. FINALISEREN/WISSEN: druk één keer op deze knop om de cd-opname te finaliseren (u kunt geen nummers
meer toevoegen aan een gefinaliseerde cd) of druk twee keer op de knop om één nummer of alle nummers te
wissen van een cd-rw.
9. NUMMER SPLITSEN: creëert een nieuw nummer tijdens de opname.
10. ENTER/OPNEMEN: druk op de linkerkant van deze knop om het opnemen, wissen of finaliseren van een cd te
bevestigen. Druk op de rechterkant van deze knop om de cd-speler klaar te maken voor opname.
11. NIVEAU: past het niveau aan van het signaal dat op de cd wordt opgenomen, net zoals het signaal dat
binnenkomt via de USB-poort, de Lijningang en de Aux-ingang.
12. VOLUME: past het volume van de interne luidspreker aan en van de koptelefoonuitgang.
13. CD-INVOERLADE: gebruik de knop OPENEN/SLUITEN om de invoerlade te openen/sluiten en plaats hier uw
cd.
14. LINE IN: gebruik een 1/8" stereokabel om een ander audioapparaat (bijv. iPod, computer, enz.) aan te sluiten
op deze ingang, zodat u het kunt opnemen en/of afspelen door de luidsprekers van CD DIRECT.
15. KOPTELEFOON: sluit hier koptelefoons met een 1/8”-jack op aan.
16. LUIDSPREKER: luister hierdoor naar uw muziekbron.
17. DUST COVER: Deze dekking beschermt de draaitafel tegen stof en misbruik, terwijl deze niet in gebruik of
tijdens het transport.
12
: opent of sluit de cd-invoerlade.
13
3 4
8
7
14
9
5
16
10
15
40
Page 41

ACHTERPANEEL
1
2
4
3
1. USB-POORT: sluit een USB-kabel aan van CD DIRECT naar een computer om audio op te nemen of er naar
te luisteren.
2. AANPASSEN GAIN: pas vóór opname via een USB-verbinding met deze knop de opnameversterking aan. Het
niveau moet voldoende hoog zijn, zonder dat het luidste deel van het nummer vervormd raakt of 'weggeknipt'
wordt.
3. AUX UIT: RCA-audiouitgangen om aan te sluiten op externe luidsprekers of een versterker.
4. STROOMAANSLUITING: hier bevindt zich de ingebouwde stroomkabel.
VOORALEER OP CD OP TE NEMEN
Voordat u de opname start dient u het volgende te weten:
• De cd-specificaties begrenzen het aantal nummers op een cd tot 99.
• U kunt geen nummers opnemen die korter zijn dan 10 seconden.
• Van zodra u op een cd-r hebt opgenomen, kunnen de gegevens niet meer worden gewist.
• Een opgenomen cd-r kan enkel na het finaliseren op een gewone cd-speler worden afgespeeld.
• Om meer opnames aan een gefinaliseerde cd-rw toe te voegen moet u de cd-rw ontfinaliseren.
• Wanneer alle beschikbare ruimte op een cd-rw is opgebruikt, kunt u bijkomende nummers opnemen door
voorheen opgenomen nummers te wissen. Let op: u kunt enkel alle nummers of het laatste nummer wissen.
• Als binnen de 10 seconden na het starten van de opname de STOP- of AFSPELEN/PAUSEf-knop wordt
ingedrukt, stopt het apparaat niet met opnemen.
• Wanneer de opname klaar is, knipperen “REC” en “- END -” enkele seconden en dan gaat het apparaat over in
stopstand. Zorg ervoor dat het apparaat geen schokken of trillingen ondergaat tijdens het knipperen.
• Als de cd tijdens de opname zijn einde bereikt, dan finaliseert het apparaat automatisch de cd.
• Als de cd tijdens de opname het einde van het 99ste nummer bereikt, dan finaliseert het apparaat automatisch de
cd.
• De opnametijd van een nummer kan lichtjes verschillen van de originele geluidsbron.
• Wanneer een gedeeltelijk opgenomen cd wordt ingevoerd, begint de opname na het laatst opgenomen nummer.
• De functie AUTO REC splitst automatisch de nummers op wanneer het volumeniveau wordt bereikt (in dB) dat
werd ingesteld met de knop MANUEEL/AUTO. Bij gebruik van deze functie kan uw cd meer of minder nummers
tellen dan de geluidsbron. Dit is te wijten aan onverwacht stille of luide gedeelten, die op onvoorspelbare manieren
het automatische opsplitsen al dan niet in gang zetten. Gebruik in dat geval de knop MANUEEL/AUTO om het
volumeniveau naar behoren aan te passen.
• Wanneer de cd, opgenomen op dit apparaat, wordt afgespeeld op bepaalde andere cd-spelers, kan een kleine
ruis te horen zijn op het punt wanneer het nummer werd opgesplitst.
41
Page 42

OPNEMEN
Audio opnemen van de draaitafel of AUX-bronnen op de cd-recorder:
1. Druk herhaaldelijk de knop PHONO/AUX/USB in om de op te nemen bron te selecteren, PHONO of AUX.
2. Druk de knop OPENEN/SLUITEN s in en plaats een opneembare cd-r of cd-rw in de invoerlade met het
bedrukte label naar boven. Druk daarna op de knop OPENEN/SLUITEN s
Opmerking: Zorg ervoor dat de indicatoren “NO TOC” en “CD-R” (of “CD-RW”) op het scherm
oplichten. Anders werkt de RECORD-knop niet.
3. Selecteer de modus voor tracknummertoewijzing met behulp van de knop MANUEEL/AUTO REC.
Wanneer de knop MANUEEL/AUTO REC één keer wordt ingedrukt, wordt de huidige modus weergegeven.
Druk meermaals op de knop MANUEEL/AUTO REC om een andere modus te kiezen.
• (MANUEEL)
In deze modus worden de tracknummers niet automatisch toegewezen. Gebruik de knop NUMMER
SPLITSEN om de nummers te verdelen.
MANUEEL is aanbevolen voor opnames van een analoge bron, zoals een vinylplaat. Wanneer het
apparaat wordt uitgezet, worden de instellingen opnieuw op “Manueel” gezet.
• –20db, –30db of –40db (AUTO REC)
In deze modus zal het apparaat automatisch een track opsplitsen in het opgenomen materiaal van zodra
het geluidsniveau voor meer dan 2 seconden onder de drempel zakt en dan weer aanvangt. “-20dB”
vereist een luider signaal om het nummer op te splitsen. “-30dB” betekent dat een relatief stil signaal het
nummer opsplitst. “-40dB” is geschikt voor de opname van een ruisvrije bron, zoals een cd. Bij opname
van een bron met ongewenste ruis of een analoge bron in de automatische opsplitsmodus, kunnen er
mogelijk meer tracknummers worden toegewezen dan er eigenlijk werden opgenomen. Gebruik in dat
geval de “Manual” modus en druk op de knop NUMMER SPLITSEN om de tracknummers toe te wijzen
op de punten van uw keuze.
• AUTO REC werkt mogelijk niet naar behoren met analoge bronnen die ruis van een laag niveau
bevatten.
AUTO REC werkt mogelijk niet naar behoren met bepaalde genres (klassieke muziek, voordracht, enz.)
waar één nummer lange stiltes kan bevatten.
• De indicator AUTO TRACK gaat branden wanneer –20dB, –30dB or –40dB zijn geselecteerd.
• De standaardinstelling is MANUEEL (uitgeschakeld). Wanneer het apparaat aan wordt gezet of de knop
OPENEN/SLUITEN wordt ingedrukt, wordt de instelling automatisch opnieuw op MANUEEL
(uitgeschakeld) gezet.
• De knop MANUEEL/AUTO REC werkt niet tijdens de opname.
• Gebruik van de modus MANUEEL/AUTO REC is onmogelijk tijdens het invoeren van een cd in de speler.
4. Druk op de knop OPNEMEN. Het apparaat zet zich in de opnamepauzestand. De indicator licht rood op
Het gebruik van deze modus is mogelijk wanneer “NO TOC” wordt weergegeven.
tijdens de opname. In opnamepauzestand knippert de “REC”-indicator en gaat op het scherm de Pause indicator branden.
• Zolang “BUSY” wordt weergegeven, werkt het drukken op knoppen niet. Wacht ongeveer 10 seconden,
tot “BUSY” van het scherm verdwijnt.
om de invoerlade te sluiten.
5. Instellen van het opnameniveau. Speel van zodra de opnameknop
is ingedrukt de op te nemen geluidsbron af om te testen en pas het
opnameniveau zodanig aan dat de luidste gedeelten de “OVER”indicator op de niveaumeter niet overschrijden. Het niveau kan
worden aangepast van -8 (-12dB) tot +8 (+12 dB).
• De standaardinstelling is 0. Telkens een opname wordt
beëindigd, wordt deze instelling teruggezet op 0.
• Verschillende geluidsbronnen (Phono, Lijningang, CD) hebben
verschillende volumes.
deze geluidsbronnen op te nemen, moet voor elke bron het
opnameniveau worden aangepast. Pas het opnameniveau zo
aan dat het luidste gedeelte de “OVER”-indicator op de niveaumeter niet overschrijdt.
LCD-scherm tijdens het opnemen
Om aan het optimale volume voor
42
Page 43

6. De opnamebron voorbereiden.
Om van een vinylplaat op te nemen:
Zorg ervoor dat eerst het witte beschermkapje van de naald is verwijderd.
Verplaats daarna de toonarm naar de rand van de plaat of op een bepaalde positie op de plaat en laat hem
traag zakken.
Zolang de draaitafel stilstaat, zal de knop AFSPELEN/PAUZEREN f niet werken en kunt u niet beginnen
opnemen.
Om een geluid op te nemen dat wordt afgespeeld op een audioapparaat, aangesloten op de
LIJNINGANG:
Speel de audiobron af op het apparaat dat aangesloten is op de Lijningang.
• Om te vermijden dat het begin niet wordt opgenomen zet u de geluidsbron op het apparaat op het begin
en pauzeert u tijdelijk het afspelen. Na het starten van de opname laat u vervolgens de pauzeknop van
het apparaat los, om het afspelen te starten.
• Als het apparaat niet beschikt over een pauzefunctie, zet het apparaat dan in gang na het starten van de
7. Druk op de knop AFSPELEN/PAUZEREN om de opname te starten.
opname.
Druk wanneer het afspelen van de geluidsbron eindigt op de STOP-knop om de opname te stoppen.
Wanneer een vinylplaat stopt met afspelen en de draaitafel niet langer draait, stopt het apparaat automatisch
met opnemen.
Om ongewenste geluiden van de toonarm te vermijden, stopt u manueel de opname met de STOP-knop van
zodra het afspelen van de nummers die u wilt opnemen is beëindigd. Wanneer de opname is stopgezet,
knipperen “REC” en “-End-” gedurende enkele seconden. Zet de stroom niet AF en schudt niet met het
apparaat tijdens de opname of wanneer “REC” en “-----” knipperen. Dergelijke handelingen verhinderen een
goede opname.
De opname stopzetten
Druk op de STOP-knop om de opname stop te zetten.
De opname pauzeren
Druk op de knop AFSPELEN/PAUZERENf. Op het scherm verschijnt even “BUSY” en de opname wordt
gepauzeerd. Druk op de knop AFSPELEN/PAUZEREN f om de opname te hervatten.
• U kunt de opname niet herstarten zolang “BUSY” wordt weergegeven.
• Denk eraan dat telkens u de opname pauzeert of stopzet, er een nieuw tracknummer wordt toegewezen.
Het is niet mogelijk om één nummer in twee “stappen” op te nemen.
• Zelfs als binnen de 10 seconden na het starten van de opname de AFSPELEN/PAUSEf-knop wordt
ingedrukt, stopt of pauzeert het apparaat niet.
Manueel nummers opsplitsen
Het is mogelijk om de opname tijdens het opnemen op te splitsen in nummers. Druk op de knop NUMMER
SPLITSEN terwijl de opname loopt. Het huidige tracknummer wordt verhoogd met één.
• De knop NUMMER SPLITSEN werkt in elke opnamemodus, MANUEEL zowel als AUTOMATISCH.
• U kunt een nummer niet manueel opsplitsen om een nummer van minder dan 10 seconden te verkrijgen.
Afhankelijk van de cd-specificaties kan een cd tot 99 nummers bevatten.
• Wanneer de knop NUMMER SPLITSEN tijdens de opname wordt ingedrukt , wordt het opgenomen
geluid voor een ogenblik weggeknipt.
43
Page 44

EEN CD FINALISEREN
Een cd is pas een standaard-cd als hij een inhoudstafel (TOC) bevat. Dit proces staat bekend als finaliseren. Eens de
cd is gefinaliseerd, kunnen er op cd-r's geen nummers meer worden opgenomen. Cd-rw's kunnen echter
'geontfinaliseerd' worden, en als er nog ruimte beschikbaar is, kunnen er bijkomende nummers op worden
opgenomen.
• Een lege cd kan niet worden gefinaliseerd.
• Van zodra de cd zijn maximale opnametijd heeft bereikt, begint hij automatisch te finaliseren, zelfs
wanneer de opname nog steeds loopt.
1. Druk op de CD-knop om “CD” te selecteren en open de invoerlade door op de s -knop te drukken.
2. Plaats een niet-gefinaliseerde (opneembare) cd in de lade.
3. Druk in de stopstand op de knop FINALISEREN. Op het scherm verschijnt “FINAL”. Druk op de STOP-knop om
het finaliseringsproces stop te zetten.
4. Druk op de ENTER-knop om het finaliseren te starten. De indicatoren “NO TOC” en “REC” gaan knipperen
en op het scherm verschijnt de resterende tijd voor het finaliseren. Wanneer deze operatie is beëindigd,
verdwijnt de indicator “NO TOC” en keert het scherm terug naar de weergave van nummer/tijd. Tijdens het
finaliseren werken de knoppen niet.
OPMERKING: Zet nooit de stroom af en trek nooit de stroomkabel uit wanneer het apparaat in werking
is.
• Hoewel gefinaliseerde cd-r's afgespeeld kunnen worden op gewone cd-spelers, is het mogelijk dat
gefinaliseerde cd-rw's niet afspeelbaar zijn op gewone cd-spelers.
• De tijd, vereist voor het finaliseren, hangt af van het type cd.
EEN CD-RW WISSEN OF 'ONTFINALISEREN'
Een cd-r kan niet worden gewist of 'geontfinaliseerd'. Wissen is enkel mogelijk op een niet-gefinaliseerde cd-rw. Eens
een cd-rw is gefinaliseerd, moet hij 'geontfinaliseerd' worden voor er gewist kan worden. Op een cd-rw is het mogelijk
het laatst opgenomen nummer of de gehele cd te wissen. Wissen kan niet ongedaan worden gemaakt. Als u op het
punt staat een nummer of nummers te wissen, zorg dan dat u er zeker van bent dat deze nummers gewist mogen
worden.
1. Druk op CD-knop om “CD” te selecteren.
2. Voer een opgenomen cd-rw in door de s -knop in te drukken.
3. Druk in de stopstand op de knop FINALISEREN/WISSEN. Telkens de knop FINALISEREN/WISSEN wordt
ingedrukt, verandert het scherm als volgt:
Er verschijnt “UnFINAL” wanneer een gefinaliseerde cd is ingevoerd. Selecteer deze optie om de cd te
'ontfinaliseren'.
Er verschijnt “FINAL” als de cd nog niet is gefinaliseerd. Drukt u nogmaals op de knop
FINALISEREN/WISSEN, dan verschijnt er “ErASE XX” (het tracknummer van het laatst opgenomen nummer
op de cd). Selecteer dit om het laatste nummer op de cd te wissen. Dit verschijnt niet als de cd slechts één
opgenomen nummer bevat. Drukt u nogmaals op de knop FINALISEREN/WISSEN, dan verschijnt er ErASE
ALL. Selecteer dit om alle nummers te wissen. Druk op de STOP-knop om het finaliserings- of wisproces
stop te zetten.
4. Druk op de ENTER-knop om het finaliseren te starten. Op het scherm verschijnt de tijd die nog nodig is voor
deze handeling. Wanneer deze handeling is beëindigd, keert het scherm terug naar de weergave van
nummer/tijd. Tijdens het wissen/finaliseren werken de bedieningsknoppen niet. Zet nooit de stroom af en trek
nooit de stroomkabel uit wanneer het apparaat aan het finaliseren is. Anders wordt uw cd onbruikbaar.
44
Page 45

POWER OUTPUT
• 2W x 2@ 4 ohm
• 2" Speaker
EXTERNAL CONNECTION
• 1/8” (3.5mm) Phones jack
• 1/8” (3.5mm) AUX In jack
• RCA stereo jack
• USB port
POWER SUPPLY
• AC Operated
DIMENSIONS (WxDxH)
• 15” x 14.5” x 6”; 381mm x 368mm x 152mm (with the cover closed)
WEIGHT
• 12.1lb (5.46kg)
TECHNICAL SPECIFICATIONS
www.ionaudio.com/supporthome
www.ionaudio.com/CDDIRECT
45
Page 46

Page 47

Page 48

www.ionaudio.com
MANUAL VERSION 1.3
 Loading...