

Page 1
Roll Bar Mount
Quick Start Guide
Page 2

Page 3
Roll Bar Mount
Quick Start Guide
1. Key Features
Mount the camera onto the handlebars of bicycles, jet skis, 4x4 ATVs, motorcycles, circular bumper
of SUVs, or ski poles. Fits around any tube or round bars from 30mm to 65mm in diameter.
Easily remove and remount the camera.
Capture multiple views (front, side, back, etc.), without remounting the camera.
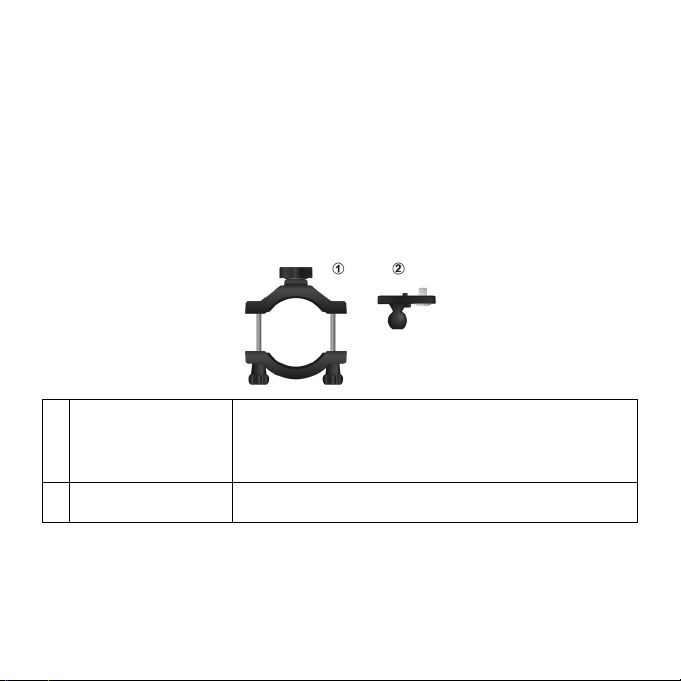
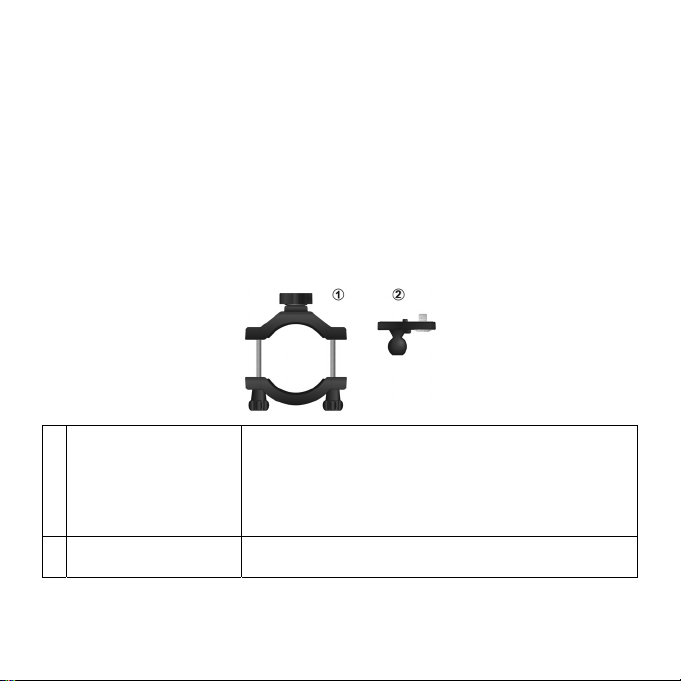
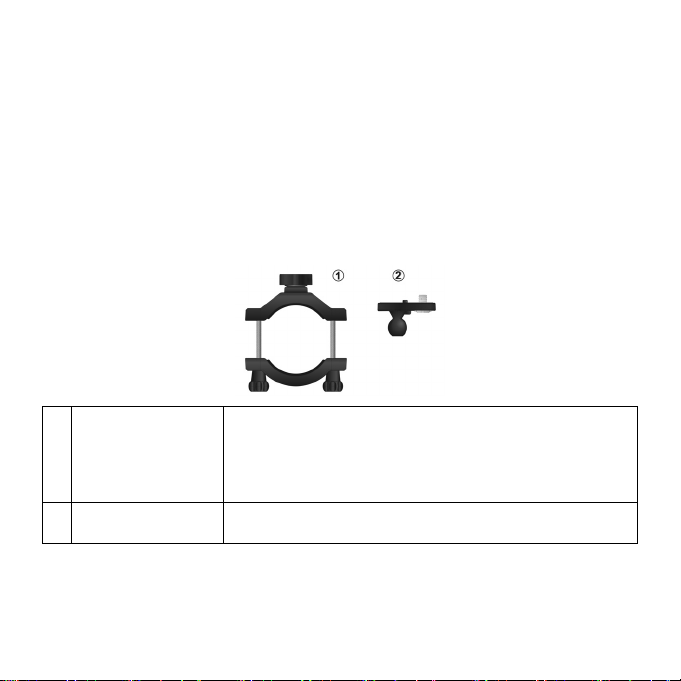
2. Package Contents
Carefully unpack the package and ensure that you have the following items:
Roll bar Mount screws – Loosen to install the roll bar mount to the
Roll bar Mount with
1
removable ball joint nut
Ball Joint with Fix Screw
2
on top
handlebar of bike or pole, re-tighten the nut after selecting
placement and angle.
Ball joint nut- mount the camera on the roll bar mount by tightening
and loosening the ball joint nut
Ball Joint - to be installed into the Roll bar Mount
Fix Screw - for attaching the camera
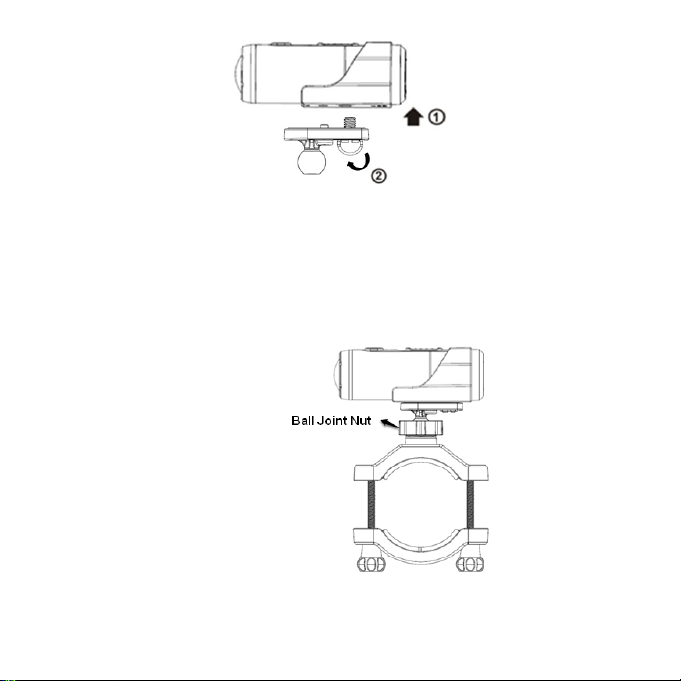
3. Attaching the Ball Joint to Your Camera
1. Fit the screw of the Ball Joint to the tripod socket of the camera.
2. Screw the Ball Joint until it is securely tightened to the camera.
EN-1
Page 4
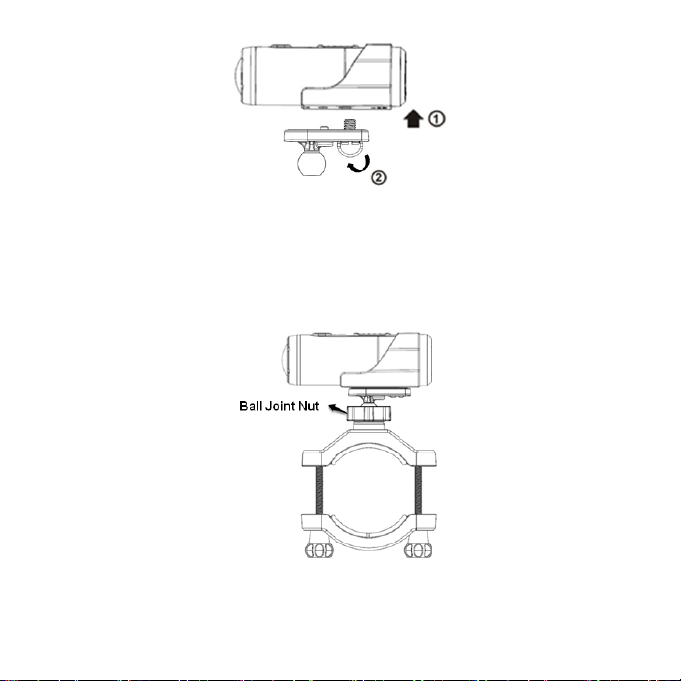
(The diagram is for illustration purposes only)
4. Mounting on the Handlebar or Pole
1. Loosen both roll bar mount screws.
2. Attach the roll bar mount to the handlebar or pole and tighten the screws until the mount is firmly
secured.
3. Loosen and detach the ball joint nut from the roll bar mount.
4. Insert the ball joint with camera into the roll bar mount through the ball joint nut and tighten the nut.
For details about how to attach the ball joint to your camera, please refer to section 3.
(The diagram is for illustration purposes only)
Note:
The Ball joint nut allows you to change the angle of the camera. Simply loosen the nut, adjust the camera
angle and retighten the nut.
EN-2
Page 5
Montierung für Überrollbügel
Kurzanleitung
1. Hauptfunktionen
Die Kamera kann auf Fahrradlenker, Jet-Skis, Quads, Motorräder, runde Stoßstangen von Sport-
und Nutzfahrzeugen (SUVs) oder Skistöcken montiert werden. Sie passt um Rohre oder runde
Stangen mit einem Durchmesser von 30 mm bis 65 mm.
Dabei kann die Kamera leicht abgenommen und wieder angebracht werden.
Verschiedene Winkel (Front, seitlich, rückwärtig etc.) können aufgenommen werden, ohne die
Kameraposition zu verändern.
2. Packungsinhalt
Entfernen Sie vorsichtig die Verpackung und kontrollieren Sie, ob folgendes Zubehör erhalten ist:
Schrauben für die Montierung für Überrollbügel – zur Montage der
Montierung für
Überrollbügel mit
1
2
abnehmbarer
Kugelgelenkmutter
Kugelgelenk mit festen
Schrauben an der Oberseite
Montierung für Überrollbügel vom Fahrradlenker oder einer Stange
lösen und die Mutter nach Einstellen von Position und Winkel
wieder festziehen.
Kugelgelenkmutter – die Kamera an der Montierung für
Überrollbügel befestigen, indem Sie die Kugelgelenkmutter lösen
und wieder festziehen.
Kugelgelenk - zur Montage in der Montierung für Überrollbügel
Fixe Schraube – zum Anbringen der Kamera
3. Das Kugelgelenk an Ihrer Kamera anbringen
1. Bringen Sie die Schraube des Kugelgelenks an der Stativöffnung der Kamera an.
2. Schrauben Sie das Kugelgelenk fest, bis es sicher an der Kamera sitzt.
DE-1
Page 6
(Die Zeichnung dient lediglich der Veranschaulichung)
4. Am Lenker oder einer Stange montieren
1. Beide Schrauben der Montierung für Überrollbügel lösen.
2. Die Montierung für Überrollbügel am Lenker oder an der Stange anbringen und die Schrauben
anziehen, bis sie fest und sicher sitzen.
3. Die Kugelgelenkmutter von der Montierung für Überrollbügel lösen und abnehmen.
4. Das Kugelgelenk mit Kamera mithilfe der Kugelgelenkmutter an der Montierung für Überrollbügel
anbringen und die Mutter anziehen. Wie das Kugelgelenk an Ihrer Kamera angebracht wird, wird
im Abschnitt 3 näher beschrieben.
(Die Zeichnung dient lediglich der Veranschaulichung)
Hinweis:
Die Kugelgelenkmutter ermöglicht es Ihnen, den Winkel der Kamera zu ändern. Es wird einfach die
Mutter gelöst, der Kamerawinkel angepasst und die Mutter wieder angezogen.
DE-2
Page 7
Monture de barre anti-tonneau
Guide de démarrage rapide
1. Caractéristiques principales
La caméra peut être fixée aux guidons des vélos, des jet skis, des 4x4 tout-terrains, des motos, au
par-choc circulaire des SUV et aux bâtons de ski. S'adapte à n'importe quel tube ou barre circulaire
d'un diamètre se situant entre 30 mm et 65 mm.
Permet l'installation et le retrait aisé de la caméra.
Permet de capturer différents angles (avant, côté, arrière, etc.) sans avoir à remonter la caméra.
2. Contenu de la boîte
Déballez le contenu de la boîte avec précautions et confirmez la présence des éléments suivants :
Vis monture de barre anti-tonneau – Déserrer pour installer la monture
Monture de barre
anti-tonneau avec écrou
1
de jointure à bille
amovible
Jointure à bille avec vis
2
de fixation sur le dessus
de barre anti-tonneau sur le guidon d'un vélo ou sur un bâton, puis
serrez l'écrou après avoir choisit l'emplacement et l'angle.
Écrou de monture à bille – pour monter la caméra sur la monture de
barre anti-tonneau en serrant ou en desserrant l'écrou de jointure à
bille.
Jointure à bille – pour installation sur la monture de barre anti-tonneau
Vis de fixation – pour fixer la caméra
3. Fixer la jointure à bille sur votre caméra
1. Placez la vis de la jointure à bille dans le trépied de support de la caméra.
2. Vissez la jointure à bille jusqu'à fixation complète à la caméra.
FR-1
Page 8

(Le diagramme est présenté à titre d'illustration uniquement)
4. Fixation à un guidon ou à un bâton
1. Desserrez les vis de barre anti-tonneau
2. Attachez la monture au guidon ou bâton puis serrez les vis jusqu'à fixation complète.
3. Desserrez et retirer l'écrou de l'articulation à bille de la monture de barre anti-tonneau.
4. Insérez la jointure à bille avec la caméra sur la monture de barre anti-tonneau via l'écrou de
jointure à bille et serrez l'écrou. Pour obtenir plus de détails sur comment fixer la jointure à bille à
votre caméra, reportez-vous à la section 3.
(Le diagramme est présenté à titre d'illustration uniquement)
Remarque :
Le système de jointure à bille permet une réorientation aisée de la caméra. Desserrez simplement l'écrou
de fixation, réglez l'angle de la caméra puis resserrez l'écrou.
FR-2
Page 9

Attacco per sbarre
Guida Rapida
1. Caratteristiche principali
Possibilità di montaggio della videocamera su manubri di biciclette, moto d'acqua, ATV 4x4,
motociclette, sul paraurti dei SUV o su bastoncini da sci. Adatto per tubi o sbarre circolari con
diametro compreso tra 30 mm e 65 mm.
Semplice rimozione e ri-montaggio della videocamera.
Possibilità di ottenere diverse visualizzazioni (frontale, laterale, posteriore, ecc.) senza dover
rimontare la videocamera.
2. Contenuto della confezione
Aprire la confezione e verificare che siano presenti i seguenti elementi:
Viti per attacco sbarre - Allentare per installare l'attacco al
Attacco per sbarre con dado
1
per snodo sferico rimovibile
Snodo sferico con vite di
2
fissaggio sulla parte superiore
manubrio di una bicicletta o a una sbarra, serrare nuovamente il
dado dopo avere scelto la posizione e l'angolazione.
Dado per snodo sferico - montare la videocamera sull'attacco
per sbarre serrando e allentando il dado per snodo sferico
Snodo sferico - da installare sull'attacco per sbarre
Vite di fissaggio - per fissare la videocamera
3. Fissaggio dello snodo sferico alla videocamera
1. Inserire la vite dello snodo sferico alla presa del treppiede della videocamera.
2. Avvitare lo snodo sferico fino a quando non è fissato in modo sicuro alla videocamera.
IT-1
Page 10

(Il disegno ha solo scopo illustrativo)
4. Montaggio su manubrio o su sbarra
1. Allentare entrambe le viti dell'attacco per sbarre.
2. Sistemare l'attacco per sbarre sul manubrio o sulla sbarra e serrare le viti fino a fissare
fermamente l'attacco.
3. Allentare e scollegare il dado dello snodo sferico dall'attacco per sbarre.
4. Inserire lo snodo sferico con la videocamera nell'attacco per sbarre attraverso l'apposito dado;
quindi serrare il dado. Per i dettagli su come fissare lo snodo sferico alla videocamera, fare
riferimento alla sezione 3.
(Il disegno ha solo scopo illustrativo)
Nota:
Il dado dello snodo sferico consente di modificare l’angolazione della videocamera. È sufficiente allentare
il dado, regolare l’angolazione della videocamera e serrare nuovamente il dado.
IT-2
Page 11

Soporte para Barra
Guía rápida de uso
1. Características principales
Para montar la cámara en los manillares de las bicis, jet skis, 4x4, motocicletas, parachoques de los
jeeps ó bastones de esquí. Se acopla a cualquier barra tubular ó redonda de 30 mm a 65 mm de
diámetro.
Fácil desmontaje y montaje de la cámara.
Captura múltiples ángulos (frontal, lateral, trasero, etc.), sin tener que volver a montar la cámara.
2. Contenido del embalaje
Abre el paquete cuidadosamente y asegúrate que contiene los siguientes artículos:
Tornillos del soporte para barra – Aflojar para instalar el
Soporte para barra con tuerca de
1
2
rótula desmontable
Articulación de rótula con tornillo
central en la parte superior
soporte en el manillar de la bici ó bastón, volver a ajustar la
tuerca después de haber elegido el lugar y el ángulo
deseado.
Tuerca de rótula- montar la cámara en el soporte para
barra ajustando y aflojando la tuerca de rótula
Rótula – para ser montada en el soporte para barra
Tornillo central – para acoplar la cámara
3. Acoplar la rótula a la cámara
1. Fijar el tornillo de la rótula al soporte del trípode de la cámara.
2. Ajustar la rótula hasta que esté acoplada con seguridad a la cámara.
ES-1
Page 12

(La imagen es sólo ilustrativa)
4. Montar en un manillar ó bastón
1. Aflojar ambos tornillos del soporte.
2. Acoplar el soporte al manillar ó bastón y ajustar los tornillos hasta que el soporte se encuentre
firmemente asegurado.
3. Aflojar y separar la tuerca de rótula del soporte.
4. Insertar la rótula con la cámara en el soporte con la tuerca de rótula y ajustar la tuerca. Para una
información más detallada de cómo acoplar la rótula a la cámara, acuda a la sección 3.
(La imagen es sólo ilustrativa)
Nota:
La tuerca de rótula permite cambiar el ángulo de la cámara. Aflojar la tuerca, ajustar el ángulo de la
cámara y volver a ajustar la tuerca.
ES-2
Page 13

Suporte para Barras
Guia de Início Rápido
1. Principais Características
Fixe a câmara no guiador de bicicletas, jet skis, Quad moto 4x4 , motocicletas, na barra de proteção
de Suv’s (jeeps), ou bastões de esqui. Pode ser montado em qualquer tubo ou barras redonda de
30mm a 65 milímetros de diâmetro.
Sistema fácil de desmontar e montar.
Captura vários pontos de vista (frontal, lateral, traseira, etc), sem desmontar a câmara.
2. Conteúdo da embalagem
Abra cuidadosamente a embalagem e verifique se tem os seguintes itens:
Suporte de Barra com parafusos.- Solte para instalar o suporte
Suporte para barras com
1
2
rótula amovível
Rótula de junção com fixação
de parafuso no topo
de barra no guiador da bicicleta ou bastão, apertar a porca de
plástico depois de selecionar o ângulo que deseja.
Rótula de fixação - montar a câmara no suporte de barra,
apertando e desapertando a porca para ajeitar a rótula
Rótula de junção – Para ser instalado no suporte de barra
Parafuso de fixação – Para fixar a câmara
3. Colocar a rótula de junção na sua câmara
1. Colocar o parafuso da rótula de junção no lugar da sapata de tripé na câmara.
2. Apertar o parafuso até estar bem apertado e seguro na câmara.
PT-1
Page 14

(O esquema é apenas para fins de ilustração)
4. Montagem no guiador ou Bastão
1. Solte os dois parafusos do suporte de barra.
2. Fixe o suporte barra no guiador ou bastão e apertar os parafusos até que a montagem esteja
firme.
3. Solte e retire a rótula do suporte.
4. Fixe a rótula com a câmara no suporte com a porca de fixação e apertar a mesma. Para obter
detalhes na fixação da rótula à sua câmara, consulte a secção 3.
(O esquema é apenas para fins de ilustração)
Observação:
A rótula permite-lhe mudar o ângulo da câmara. Basta soltar a porca, ajustar o ângulo da câmara e
volte a apertar a porca.
PT-2
Page 15

Крепление Roll Bar Mount
Руководство по быстрому запуску
1. Главные функции
Установите камеру на рулях велосипедов, водных мотоциклов, квадроциклов, мотоциклов,
бамперах внедорожников или лыжных палках. Крепится на любые трубы или брусья от 30мм
до 65 мм в диаметре.
Легко снимать и устанавливать камеру.
Захват нескольких ракурсов (передние, боковые, задние, и т.д.), без дополнительного монтажа
камеры.
2. Комплектация
Осторожно вскройте упаковку и убедитесь в наличии следующих предметов:
Ослабить винты крепление Roll bar Mount для установк и на
Крепление на трубы со
1
съемным шаровым
шарниром
Шаровой шарнир с
2
фиксирующим винтом
3. Крепление шарового шарнира к Вашей камере
1. Установите винт шарового шарнира в гнездо для штатива камеры.
2. Затяните шаровой шарнир, пока он не будет надежно закреплен к камере.
руль или другой круглый профиль, зятяните гайки после
выбора позиции крепления.
Шаровой шарнир – установите камеру на
затягивая и ослабляя гайку крепления шарового шарнира.
Установите шаровой шарнир в крепление Roll bar Mount
Фиксирующий винт – для фиксации положения камеры
крепление
RU-1
Page 16

(диаграмма только для иллюсстрации)
4. Крепление на руль или иной круглый профиль
1. Открутите оба винта на креплении roll bar mount.
2. Установите крепление на место крепления и затяните винты.
3. Ослабьте и снимите шаровой шарнир с крепления roll bar mount.
4. Вставьте шаровой шарнир с камерой в крепление roll bar mount через гайку крепления
шарового шарнира и затяните гайку. Для получения дополнительной информации о порядке
установки шарового шарнира к вашей к амере, пожалуйста, обратитесь
к разделу 3.
(диаграмма только для иллюсстрации)
Примечание:
Шаровой шарнир позволяет изменить угол камеры. Га до просто ослабить гайку, отрегулировать
угол наклона камеры и затянуть гайк и.
RU-2
Page 17

單車組件
快速入門指南
1. 主要特徵
將相機安裝至各種自行車、水上摩托艇或摩托車車把,4x4 ATVs 及 SUVs 的圓形保險杠或滑雪杆等。
適用於直徑為 30mm 至 65mm 的圓杆。
可輕便取下或重新安裝相機
可拍攝多個角度(前方、側面、後面等),無需重新安裝相機
2. 包裝內容
小心打開包裝,確保有以下配件:
單車組件(帶鎖緊螺母)
1
短球連接頂座組件
2
(帶連接頂座組件)
3. 將短球連接頂座組件安裝至相機
1. 將短球連接頂座組件的螺旋對準相機相相應的三腳架孔。
2. 旋動短球連接頂座組件下面的旋鈕,扣緊相機
單車組件螺旋-鬆開兩個螺旋將單車組件套進單車車把或杆上,安裝
好角度之後再將其旋緊。
鎖緊螺母-通過鬆開及旋緊此螺母,將相機安裝至單車組件。
球形接頭-插入單車組件。
連接頂座組件-將相機附於其上,安裝相機。
繁-1
Page 18

(此圖僅供參考)
4. 安裝至車把或杆
1. 鬆開兩個單車組件螺旋;
2. 將單車組件安裝至車把或杆,並旋緊螺旋直到組件牢固;
3. 旋動並鬆開單車組件上的鎖緊螺母;
4. 將裝有相機的短球連接頂座組件通過鎖緊螺母插進單車組件插槽內並旋緊螺母。請參考第 3 章節獲
知如何將短球連接頂座組件安裝至相機。
(此圖僅供參考)
注意:
你可以通過調節鎖緊螺母,來改變拍攝角度。僅需鬆開螺母,調節相機角度,重新旋緊螺母。
繁-2
Page 19

单车组件
快速入门指南
1. 主要特征
将相机安装至各种自行车、水上摩托艇或摩托车车把,4x4 ATVs 及 SUVs 的圆形保险杠或滑雪杆
等。适用于直径为 30mm 至 65mm 的圆杆。
可轻便取下或重新安装相机
可拍摄多个角度(前方、侧面、后面等),无需重新安装相机
2. 包装内容
小心打开包装,确保有以下配件:
单车组件(带锁紧螺母)
1
2
短球连接顶座组件
(带连接顶座组件)
3. 将短球连接顶座组件安装至相机
1. 将短球连接顶座组件的螺旋对准相机相相应的三脚架孔。
2. 旋动短球连接顶座组件下面的旋钮,扣紧相机
单车组件螺旋-松开两个螺旋将单车组件套进单车车把或杆上,
安装好角度之后再将其旋紧。
锁紧螺母-通过松开及旋紧此螺母,将相机安装至单车组件。
球形接头-插入单车组件。
连接顶座组件-将相机附于其上,安装相机。
简-1
Page 20

(此图仅供参考)
4. 安装至车把或杆
1. 松开两个单车组件螺旋;
2. 将单车组件安装至车把或杆,并旋紧螺旋直到组件牢固;
3. 旋动并松开单车组件上的锁紧螺母;
4. 将装有相机的短球连接顶座组件通过锁紧螺母插进单车组件插槽内并旋紧螺母。请参考第 3章节获
知如何将短球连接顶座组件安装至相机。
(此图仅供参考)
注意:
你可以通过调节锁紧螺母,来改变拍摄角度。仅需松开螺母,调节相机角度,重新旋紧螺母。
简-2
Page 21

Page 22

AM-QG-ROLL-9L-EU1
 Loading...