

Page 1
EN
Helmet & Bike Kit
Quick Start Guide
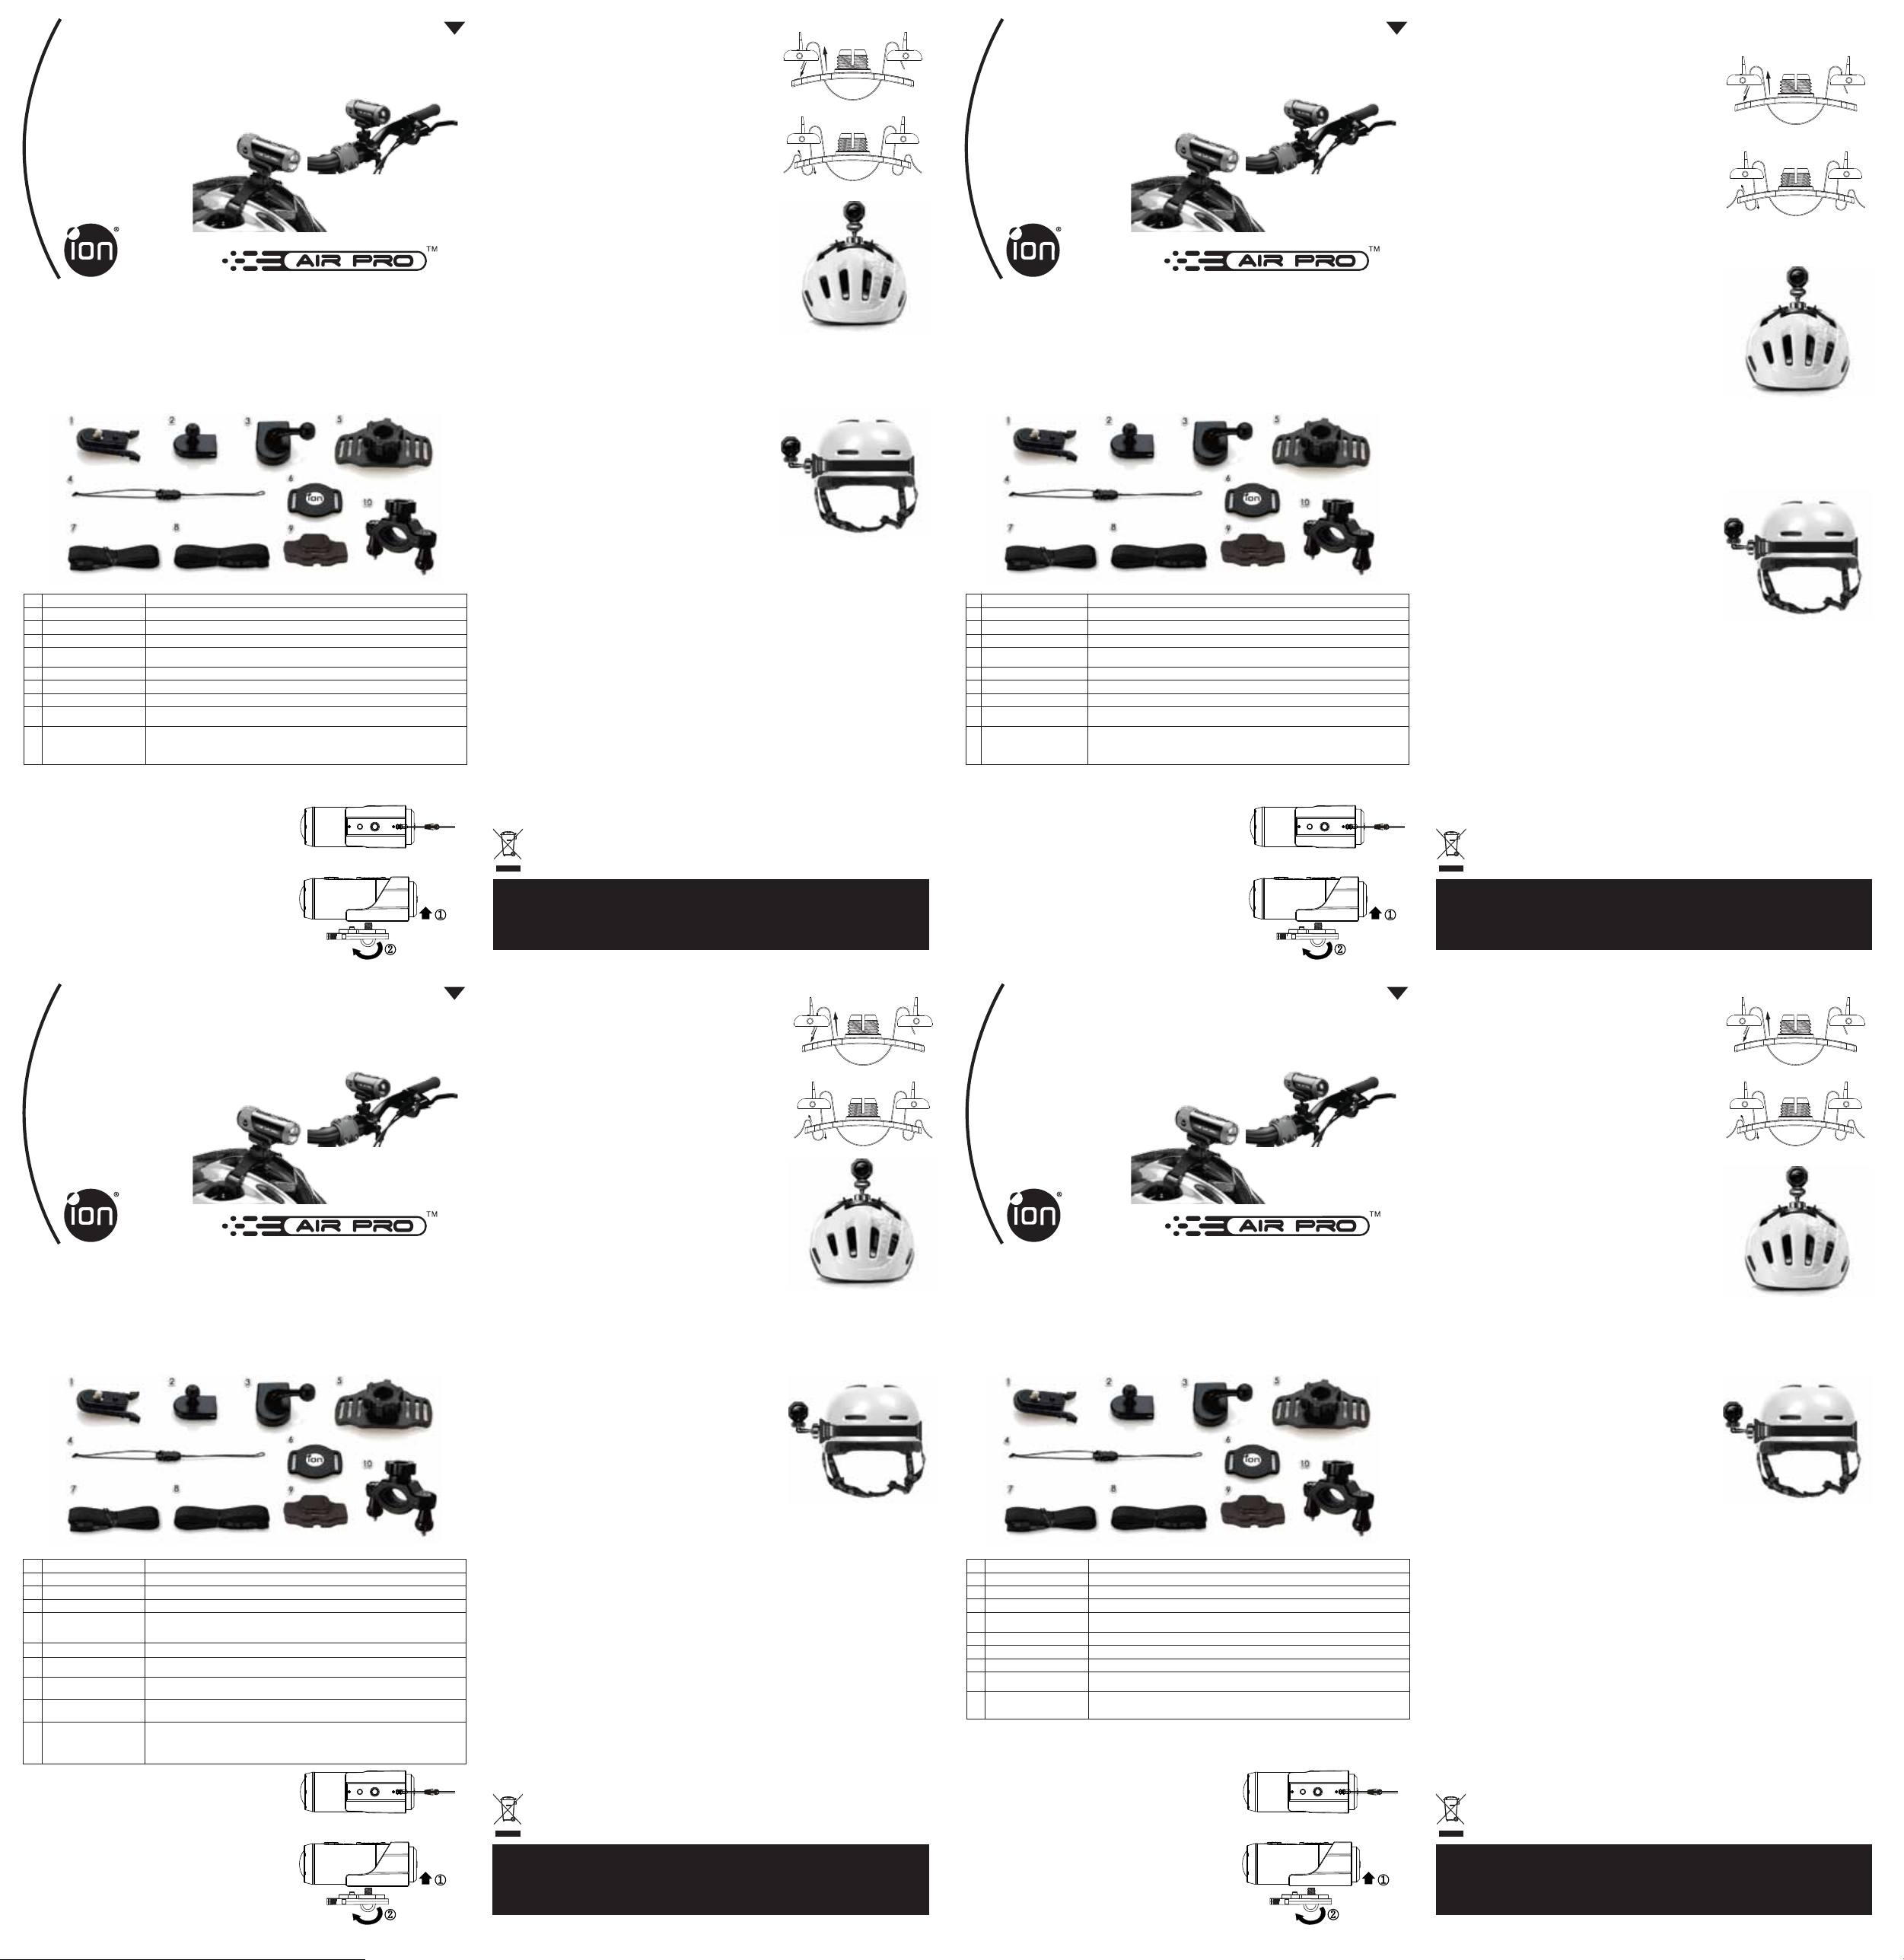
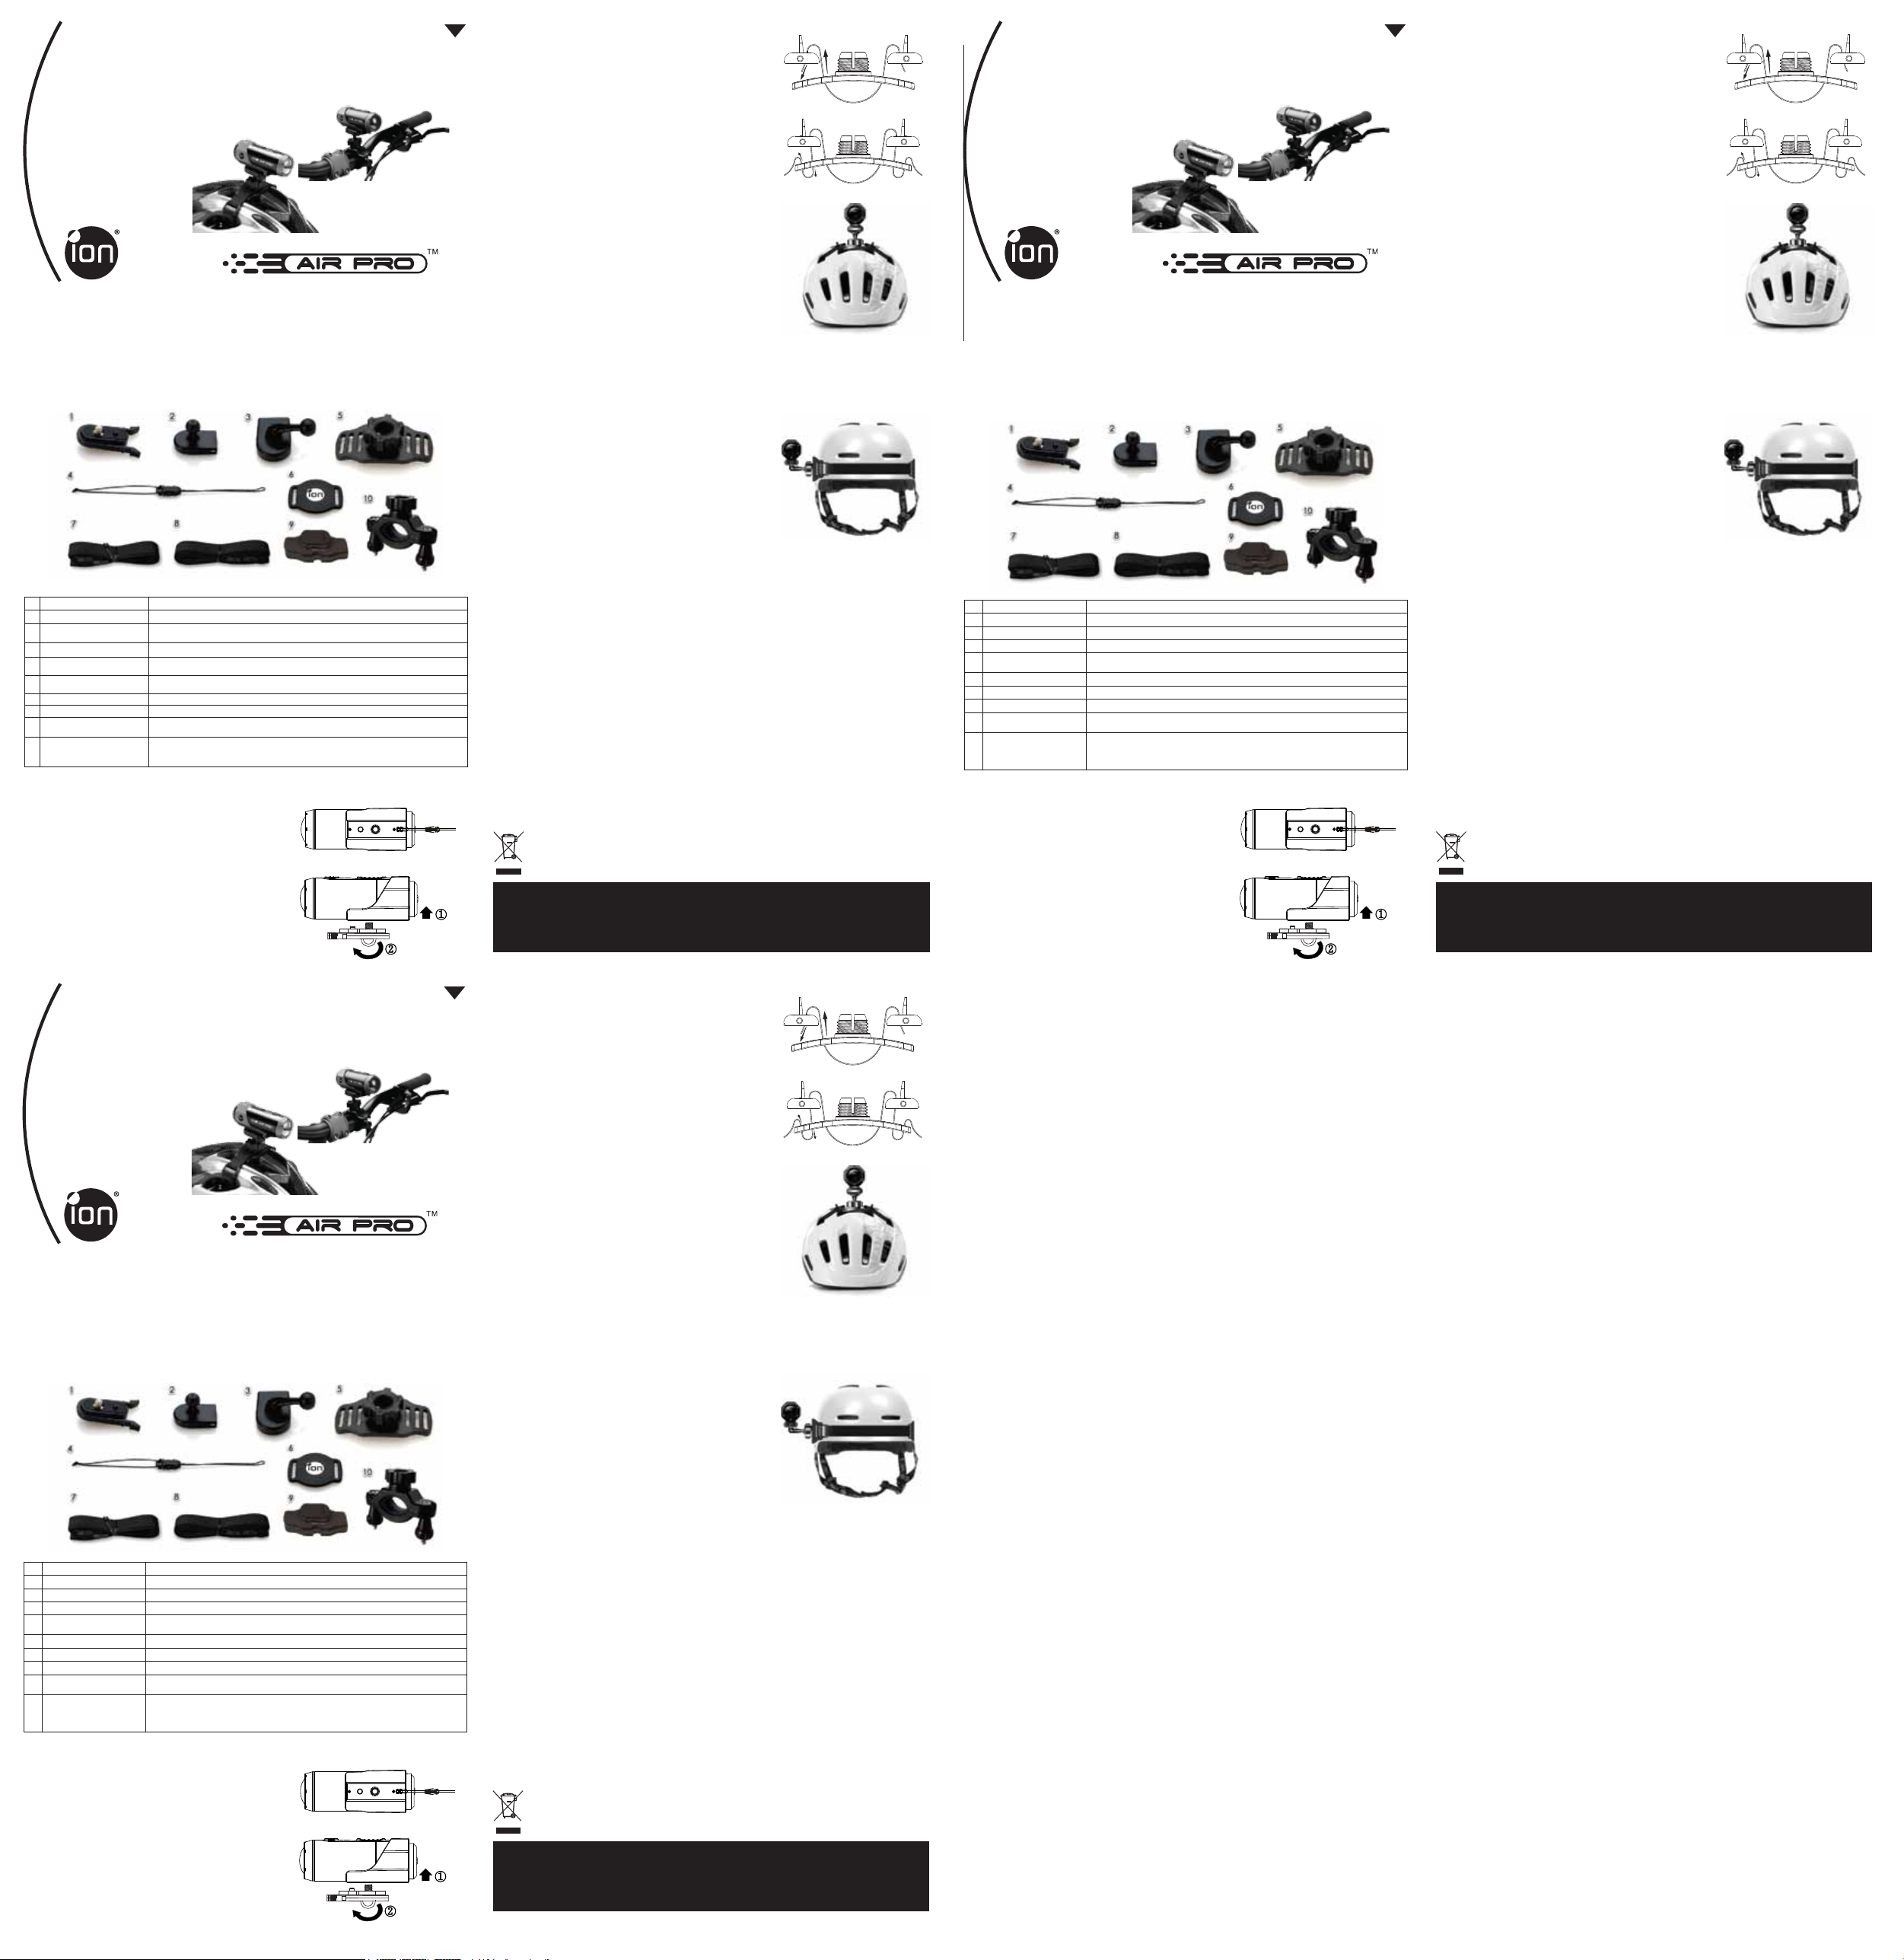
Getting to Know Your CamLOCK System and Helmet & Bike Accessories
ion’s versatile CamLOCK System allows you to attach the ion camera to any type of helmet (bike, motorcycle,
ski, skydive etc.)
Mount the camera onto the handlebar of bicycles, jet skis, 4x4 ATVs and motorcycles, as well as ski poles.
The CamLOCK system allows you to easily remove and remount the camera.
The ball joint is designed to allow the user to turn the camera to capture multiple views (front, side, back, etc.),
without remounting the camera.
1. Getting to Know Your Mount System
1
CamLOCK
2
Ball Joint - Short
Ball joint - L shape
3
4
Secure Strap
5
Helmet Mount
6
Fitting Piece
Mount strap - short Loop through the helmet mount, fitting piece and helmet.
7
8
Mount strap - medium
Single and Double Sided
9
3M Adhesive Mounts
Bike Mount
10
2. Before Mounting Your Camera
2.1 Secure Strap
1. Loop one end of the secure strap through the strap hole of
the camera. You may use a pin to help thread it thru the hole.
2. Attach other half to the mount
3. Clip both ends together when camera is mounted.
2.2 CamLOCK
1. Fit the screw of the CamLOCK to the tripod socket of the
camera.
2. Screw the CamLOCK until it is tightened on the camera.
Mount or remove the camera quickly from the CamLOCK socket.
Attach CamLOCK.
Attach CamLOCK.
Secure the camera to the mount to provide additional security.
Mount the camera on different type of helmets.
Removable Ball Joint Nut – To tighten and loosen the ball joint.
Work with Helmet Mount to provide additional security for the mount system.
Loop through the helmet mount, fitting piece and helmet.
Adhere to the helmet mount, fitting piece or helmet.
Attach the Air Pro camera to handlebars, ski poles and more.
Fit 0.75” to 1.4” (20 - 35mm) diameter tubes.
Removable Ball Joint Nut –Tighten and loosen the ball joint.
Bike Mount Screws – Tighten and loosen the bike mount.
3. Getting Started
3.1 Connecting Your Camera to a PC
1. Choose the suitable strap to mount on different types of helmets. .
For example, use the short mount strap for bike helmets and the
medium mount strap for motorcycle helmets.
2. Remove the 2 strap clips from the strap.
3. There are three vents at each side of the Helmet mount. Loop the
strap through the inner vent (closest to the center) from the bottom.
(Step 1)
4. Loop the strap through the strap clip from the top. (Step 2)
5. Loop the strap through middle vent from the top. (Step 3)
6. Loop the strap through the outer vent from the bottom (Step 4)
7. Tighten the strap and repeat Step 1 – 4 on the other side.
3.2 Mounting on your Bike Helmet
1. Choose the Helmet Mount with the suitable length of strap.
2. Adhere the single sided 3M adhesive mount to the base of the
helmet mount. Use the double sided 3M adhesive mount to
permanently secure the mount to the helmet.
3. Loosen and detach the ball joint nut from the helmet mount.
4. Install the ball joint to the helmet mount and tighten the nut.
5. Loop the strap of the helmet mount through the vents of the bike
helmet and back through the strap clip.
6. Fasten the strap.
7. Repeat on the opposite end of the strap until the helmet mount is
firmly attached to the helmet.
8. Attach the CamLOCK and camera into the CamLOCK socket.
Ensure that the CamLOCK nut is tightened securely.
Note:
The CamLOCK system allows the user to change the angle of the camera. Simply loosen the nut, adjust the
camera angle and re-tighten the nut.
3.3 Mounting on your Motorcycle Helmet
1. Adhere the helmet mount to the helmet by applying a double-sided
3M adhesive mount.. By utilizing a combination of the helmet
mount and fitting piece, it will provide additional security to the
mount system.
2. Select the Helmet Mount with suitable length of strap.
3. Loosen and detach the ball joint nut from the helmet mount.
4. Install the L ball joint to the helmet mount and tighten the nut.
5. Adhere the double sided 3M adhesive mount to the base of the
helmet mount and fitting piece.
6. Attach the helmet mount at one side of the helmet.
7. Loop the strap to another side of helmet, through the vent of fitting
piece and back to the original side of the helmet.
8. Fasten the strap with strap clip.
9. Repeat on the opposite end of the strap until the helmet mount is
firmly attached to the helmet.
10. Attach the CamLOCK and camera to the CamLOCK socket.
Assure that the CamLOCK nut is tightened securely.
Note:
The CamLOCK system allows the user to make simple changes to the angle the camera is positioned. Simply
loosen the nut, adjust the camera angle, and re-tighten the nut.
3.4 Mounting on the Handlebar or Pole
1. Loosen both bike mount screws.
2. Attach the bike mount to the handlebar or pole and tighten the screws until the mount is firmly secured.
3. Loosen and detach the ball joint nut from the bike mount.
4. Insert the ball joint into the CamLOCK socket and tighten the nut.
5. Attach the CamLOCK and camera into the CamLOCK socket. Assure that the CamLOCK nut is tightened
securely.
Note:
The CamLOCK system allows the user to make simple changes to the angle the camera is positioned. Simply
loosen the nut, adjust the camera angle, and re-tighten the nut.
1
2
4
3
4. Trademark Information
© 2012 World Wide Licenses Limited.
® The ion logo is a registered trademark of World Wide Licenses Limited.
CamLOCK, PODZ, Shoot/Share and AIR PRO and their respective logos are trademarks or registered trademarks
of World Wide Licenses Limited in the United States and other countries. Copyright © 2012. All Rights Reserved.
For EU only
Questions?
Need Some Help?
This manual should help you
understand your new product.
If you still have questions,
visit our website:
www.iontheaction.com
Like Us:
www.facebook.com/iontheaction
Tweet Us:
www.twitter.com/iontheaction
DE
Helm & Bike Kit
Lernen Sie Ihr CamLOCK System und das Zubehör für Helm & Bike kennen
ion’s universelles CamLOCK System ermöglicht es Ihnen die ion Kamera an alle Helmtypen (Rad, Motorrad,
Ski, Fallschirm, , u.s.w.) zu befestigen
Befestigen Sie die Kamera an die Lenkstange von Rädern, Jet-Skis, Quads, ATVs und Motorrädern als auch
an Skistangen
Das CamLOCK Ssystem ermöglicht es Ihnen die Kamera einfach abzubauen und einfacst wieder zu
installieren.
Das Kugellager System is so Konzipiert um den Benutzer die Kamera zu drehen und aus unterschiedlichsten
Ansichten (Frontal. Seitlich, Rückwärts u.s.w.) zu filmen, ohne die Kamera ab- oder umbauen zu müssen.
1. Getting to Know Your Mount System
1
CamLOCK
2
Kugelgelenk - Kurz
Kugelgelenk - L Form
3
4
Sicherheitsband
5
Helm Befestigung
6
Pass Teil
Befestigungsband - Kurz
7
8
Befestigungsband - Medium
Ein - und Zweiseitiges 3M Selbstklebe
9
Befestigungs-Pass Teile
Bike
10
Befestigung
2. Bevor Sie die Kamera Montieren
2.1 Sicherheits Band
1. Führen Sie ein Ende des Sicherheitsbandes durch die
Band-Öffnung an der Unterseite. Eine Stecknadel könnte bei der
Einfädelung hilfreich sein.
2. Befestigen Sie die andere Hälfte des Bandes an der
entsprechenden Befestigung
3. Klippen Sie beide Enden des Bandes zusammen, nachdem die
Kamera motiert wurde
2.2 CamLOCK
1. Verschrauben Sie die Schraube des CamLOCK mit dem Tripod.
2. Schrauben Sie den CamLOCK soweit fest bis die Kamera fest
befestigt ist.
Schnell-Befestigung für ion-Kamera mit CamLOCK Fassung
Verbindung zu CamLOCK.
Verbindung zu CamLOCK.
Sicherheitsband um die Kamera noch zusätzlich an der Befestigung zu befestigen.
Um die Kamera auf die verschiedensten Helm-Typen zu befestigen.
Wechselbare Führungsgelenk Mutter – Um das Kugellager festzuschrauben – oder zu lösen.
Dient bei der Helm-Befestigung um zusätzliche Sicherung für das Befestigungssystem zu geben.
Befestigungsband um dieses durch die Helmbefestigung und das Passteil durchzuführen.
Befestigungsband um dieses durch die Helmbefestigung und das Passteil durchzuführen.
Selbstklebende Elemeite für den Helm-Kit
Befestigung für die Air Pro camera an die RadGabel, Slalom oder Schistangen und
vieles mehr. Passform für Röhrendurchmesser von. Fit 0.75” to 1.4” (20 - 35mm)
Abnehmbare Kugellager-Halterung Fixieren und Lösen des Kugellagers.
Bike –Befestigungs-Schrauben – Fixieren und Lösen der Bike-Befestigung
3. Bereitmachen
3.1 Befestigung Ihrer Helmbefestigung mit dem
Sicherheitsband
1. Wählen Sie die Helm-Befestigung mit der geeigneten
Befestigungsbandlänge, die am Besten für Ihren Helm geeignet
ist.z.B.
das kurze Befestiungsband für Bike Helme und das Mittelgrosse
Band für Motorradhelme
2. Entfernen Sie die beiden Clips vom Band
3. mounts gibt 3 Öffnungen an jeder Seite der Helm-Befestigung.
Fädeln Sie das Band von unten durch die Innerste Öffnung (am
Nähesten zur Mitte) der Helmbefestungung (Schritt 1).
4. Fädeln Sie die das Band von Oben durch einen der Befestigungs
Clips (Schritt 2)
5. Fädeln Sie nun von Oben das Band durch die mittlere Öffnung
(Schritt 3)
6. Fädeln Sie das Befestigungsband von der Unterseite durch die
äußerste Öffnung der Helmbefestigung (Schritt 4)
7. Ziehen Sie das Band straff und .wiederholen Sie Schritt 1 bis
Schritt 4 auf der anderen Seite der Helmbefestigung
3.2 Befestigung Ihres Bike Helm zu
1. Wählen Sie die Helm-Befestigung mit der geeigneten
Befestigungsbandlänge, die am Besten für Ihren Helm geeignet
ist.
2. Kleben sie das einseitigen 3M Klebe-Passteil an der Basis der
Helmbefestigung. Verwenden Sie das Zwei-seitige 3M
Klebe-Passteil um die Befestigung permanent an den Helm zu
befestigen.
3. Lockern und Trennen Sie das Kugelgelenk von der
Helm-Befestigung.
4. Befestigen Sie das Kugelgelenk an der Helm-Befestigung und
ziehen Sie die Mutter fest an.
5. Führen Sie das Befestigungsband durch die Lüftungsschlitze des
Helms und durch die Band-Schlitze der Helmbefestigung.
6. Zurren Sie das Band fest
7. Führen Sie das andere .Ende des Bandes wie unter Punkt 5 und 6
beschrieben durch den Helm und die Helmbefestigung.
8. Pressen Sie die CamLOCK und die Kamera in die CamLOCK
Halterung. Stellen Sie sicher dass die CamLOCK Mutter fest und
sicher angezogen ist.
Anmerkung:
Das CamLOCK system erlaubt dem Anwender die Kamera unter verschiedensten Winkeln zu verwenden. Durch
einfaches Lösen der Verschraubung kann die Kamera adjustiert werden, und danach durch einfaches festziehen
Dieser wieder fixiert werden.
3.3 Befestigung am Motorrad Helm
1. Befestige die Helm-Befestigung unter Benutzung der
Zwei-Seitigen 3M Selbstklebe-Pass Teile.
Unter Verwendung der Kombination der Helm-Befestigung und
der Pass-Teile ergibt sich eine zusätzliche Sicherheit des
Befestigungssystems.
2. Wählen Sie das entsprechende Befestigungssysteme und die
geeignete Länge des Befestigungsbandes.
3. Lockern und Trennen Sie das Kugelgelenk von der
Helm-Befestigung.
4. Befestigen Sie das Lmit der Helm-Befestigung und ziehen Sie die
Mutter fest an.
5. Befestige das zwei seitige 3M Klebe Befestigungs Pass TEil an
der Basis des Helmes und dem Pass Teil:
6. Bestegen Sie diese an einer Seite des Helmes
7. Führen Sie das Band auf die andere Seite des Helmes, führen Sie
dieses durch die Öffnung des Pass-Teiles und zurück auf die
andere Seite des Helms
Anmerkung:
Das CamLOCK system erlaubt dem Anwender die Kamera unter verschiedensten Winkeln zu verwenden. Durch
einfaches Lösen der Verschraubung kann die Kamera adjustiert werden, und danach durch einfaches festziehen
Dieser wieder fixiert werden.
3.4 Befestigen an der Gabel oder an einer Stange
1. Lösen Sie beide Schrauben der Radbefestigung
2. Befestigen Sie die Radbefestigung an der Gabel oder einer Stange und ziehen Sie die Schrauben fest an.
3. Lösen und Trennen Sie den Passteil des Kugelgelenks der Radbefestigung
4. Pressen Sie die CamLOCK und die Kamera in die CamLOCK Halterung. Stellen Sie sicher dass die
CamLOCK Mutter fest und sicher angezogen ist
5. Attach the CamLOCK and camera into the CamLOCK socket. Assure that the CamLOCK nut is tightened
securely.
Note:
Das CamLOCK system erlaubt dem Anwender die Kamera unter verschiedensten Winkeln zu verwenden. Durch
einfaches Lösen der Verschraubung kann die Kamera adjustiert werden, und danach durch einfaches festziehen
Dieser wieder fixiert werden.
For EU only
Fragen?
Sie brauchen zusätzliche Hilfe?
Dieses Bedienhandbuch sollte Sie
bei Ihren Fragen unterstützen.
Sollten Sie weitere Fragen haben,
visit our website:
www.iontheaction.com
1
2
4
3
Like Us:
www.facebook.com/iontheaction
Tweet Us:
www.twitter.com/iontheaction
FR
Kit Casque & Vélo
Guide de démarrage
Connaître votre système CamLOCK et accessoires pour Casque & Vélo
Le système de verrouillage flexible CamLOCK permet d'attacher la caméra AIR PRO à tout type de casque
(vélo, moto, ski, casque pour saut en parachute, etc.)
La caméra peut être fixée au guidon de vélos, jet skis, quads, motos et bâtons de ski.
Le système CamLOCK permet la fixation et le retrait facile de la caméra.
Le support articulé (système à billes) permet l'orientation de caméra pour obtenir de multiples points de vue
(avant, arrière, côtés, etc.), sans avoir à démonter et remonter la caméra.
1. Connaître votre système de montage
1
CamLOCK
2
Articulation à bille - Courte
Articulation à bille - En L
3
4
Dragonne
5
Support de casque
6
Pièce d’encrage
Sangle d'attache du
7
support - Courte
Sangle d'attache du
8
support - Moyenne
Bandes adhésives 3M
9
simple et double face.
Support de guidon
10
2. Avant de monter votre caméra
2.1 Fixer la sangle d'attache
1. Faites passez une extrémité de la dragonne dans l'œillet de
la caméra. Vous pouvez vous aider d'une aiguille pour y
parvenir plus facilement.
2. Fixez l'autre extrémité au support.
3. Clipsez les deux extrémités ensemble lorsque la caméra
est fixée.
2.2 CamLOCK
1. Placez la vis du CamLOCK dans le trépied de support de la
caméra.
2. Vissez le CamLOCK jusqu'à fixation complète à la caméra.
Pour monter ou démonter la caméra rapidement de la fixation CamLOCK.
Pour attacher le CamLOCK
Pour attacher le CamLOCK
Pour sécuriser la caméra en l’attachant au support.
Fixe la caméra à différents types de casques.
Écrou amovible de l’articulation à bille - pour serrer ou desserrer l'articulation et
régler l’inclinaison du casque
Permet d’attacher le support à différents types de casques.
Fixation entre le support de casque, la pièce d'attache et le casque.
Fixation entre le support de casque , la pièce d'attache et le casque.
Assure l'adhésion entre le support de casque, la pièce d’encrage et le casque.
Pour fixer Air Pro à des guidons, bâtons de ski et plus encore. Adapté à des tubes
de diamètre 0.75” à 1.4” (20 - 35mm).
Écrou amovible d'articulation à bille - pour serrer ou desserrer l'articulation
Vis de support de guidon - pour serrer ou desserrer le support de guidon
3. Démarrer
3.1 Installer votre support de casque avec
la sangle d'attache
1. Choisissez la sangle d'attache adaptée au type du casque. Par
exemple, choisissez la sangle d'attache courte pour les casques
de vélo et la dragonne moyenne pour un casque de moto.
2. Retirez les deux clips de la sangle d’attache
3. Le support de casque possède 3 fentes sur ses côtés. Faites
passer la sangle d'attache dans la fente intérieure (la plus
proche du centre), en commençant par le bas. (Étape 1)
4. Faites passer la sangle d'attache dans le clip en commençant par
le haut. (Étape 2)
5. Faites passer la sangle d'attache dans la fente du milieu en
commençant par le haut. (Étape 3)
6. Faites passer la sangle d'attache dans la fente extérieure en
commençant par le bas (Étape 4).
7. Serrez la sangle d'attache et répétez les étapes 1 – 4 de l'autre côté.
3.2 Monter le support sur votre casque de vélo
1. Choisissez le support de casque équipé de la longueur de sangle
d'attache adaptée.
2. Collez la bande d'adhésif 3M simple face à la base de la monture
de casque.Utilisez la bande d'adhésif 3M double face pour fixer la
monture de manière permanente
3. Desserrez et retirer l'écrou de l'articulation à bille du support de casque.
4. Installez l'articulation à bille sur le support de casque et serrez l'écrou.
5. Faites passez la sangle d'attache par les fentes d'aération du casque
de vélo et dans le clip d'attache.
6. Serrez la sangle d'attache.
7. Répétez l'opération avec l'autre extrémité de la sangle d'attache jusqu'à fixation totale du support.
8. Attachez l'ensemble CamLOCK et caméra sur la fixation CamLOCK. Assurez-vous que l'écrou CamLOCK est
correctement serré.
Remarque:
Le système CamLOCK permet d’orienter aisément la caméra. Desserrez simplement l'écrou de fixation, ajustez
l'angle de la caméra puis resserrez l'écrou.
3.3 Monter le support sur votre casque de moto
1. Attachez le support au casque à l'aide de l'adhésif 3M double face.
En combinaison avec la pièce d’encrage, ceci assurera une fixation
maximum.
2. Choisissez le support de casque équipé de la longueur de sangle
d'attache adaptée.
3. Desserrez et retirer l'écrou de l'articulation à bille du support de casque.
4. Installez l'articulation en L sur le support de casque et serrez l'écrou.
5. Collez la bande d'adhésif 3M double face à la base du support de
casque et de la pièce d'attache.
6. Attachez le support de casque sur un côté du casque.
7. Faites passer la sangle d'attache de l'autre côté du casque, au travers
de la fente de la pièce d'encrage et de nouveau sur le point de départ.
8. Fixez la sangle d'attache à l'aide du clip.
9. Répétez l'opération avec l'autre extrémité de la sangle d'attache jusqu'à
fixation totale du support.
10. Attachez l'ensemble CamLOCK et caméra sur la fixation CamLOCK.
Assurez-vous que l'écrou CamLOCK est correctement serré.
Remarque:
Le système CamLOCK permet d’orienter aisément la caméra. Desserrez simplement l'écrou de fixation, ajustez
l'angle de la caméra puis resserrez l'écrou.
3.4 Fixation à un guidon ou à un bâton
1. Desserrez les deux vis de support de guidon.
2. Attachez le support au guidon ou bâton puis serrez les vis jusqu'à fixation complète.
3. Desserrez et retirer l'écrou de l'articulation à bille du support de guidon.
4. Installez l'articulation à bille sur la fixation CamLOCK et serrez l'écrou.
5. Attachez l'ensemble CamLOCK et caméra sur la fixation CamLOCK. Assurez-vous que l'écrou CamLOCK est
correctement serré.
Remarque:
Le système CamLOCK permet d’orienter aisément la caméra. Desserrez simplement l'écrou de fixation, ajustez
l'angle de la caméra puis resserrez l'écrou.
1
2
4
3
4. Informations légales
© 2012 World Wide Licenses Limited.
® Le logo ion est une marque déposée de World Wide Licenses Limited.
CamLOCK, PODZ, Shoot/Share et AIR PRO ainsi que leurs logos respectifs sont des marques ou marques
déposées de World Wide Licenses Limited aux États-Unis et autres pays. Copyright © 2012. Tous droits réservés.
For EU only
Des questions ?
Besoin d'aide ?
Ce guide vous aidera à
comprendre votre nouveau
produit
Si vous avez toujours des
questions,
visitez notre site web :
www.iontheaction.com
Aimez nous :
www.facebook.com/iontheaction
Twittez nous :
www.twitter.com/iontheaction
Kit per Casco e
Bicicletta
Guida Rapida
Conoscere il tuo sistema CamLOCK come accessorio per il casco e la bicicletta.
Il sistema CamLOCK studiato per la tua ION è molto versatile e ti consente di fissare la tua fotocamera
ad ogni tipo di casco,bicicletta,motocicletta,etc.
Montare la tua ION sul manubrio della bicicletta, della motocicletta,della moto d’acqua,del furistrada,
sulle racchette da sci è veramente molto semplice
Il sistema CamLOCK ti consente di montare e smontare la tua fotocamera in modo semplice e rapido.
Il sistema di aggancio sferico è progettato per consentire all'utente di catturare immagini e video da ogni
angolazione e posizione (frontale, laterale, posteriore, ecc), senza smontare la fotocamera.
1. Conoscere i sistemi di montaggio
1
CamLOCK
2
Sfera di aggancio -Corta
Sfera di aggancio –Lunga
3
4
Cinghia di sicurezza
5
Montaggio Casco
6
Adattatore
Cinghia di montaggio-Corta
7
8
Cinghia di montaggio-Corta
Adesivo singolo e doppio Utile ad assicurare un maggiore fissaggio al Casco
9
Sistema di fissaggio al
10
manubrio della bicicletta
2. Prima di montare la tua ion
2.1 Cinghia di Sicurezza
1. Agganciare un’estremità della cinghia alla ion.
2. Agganciare l’altra estremita della cinghia al gancio posto
alla base della CamLOCK (vedi imagine 2).
3. Unire le due estremità.
2.2 CamLOCK
1. Avvitare la vite della CamLOCK nell’apposita filettatura posta
alla base della ion.
2. Assicurarsi che la vite della CamLOCK sia stata serrata in
modo corretto.
Utile a fissure la ion su ogni supporto
Utile ad agganciare la CamLOCK
Utile ad agganciare la CamLOCK
Cinghia per ion utile per una sicurezza maggiore
Utile a fissare la ion su ogni tipo di Casco.
Utile ad offrire una maggiore sicurezza nel fissaggio del Casco.
Utile a fissare il Casco con l’ausilio dell’adattatore.
Utile a fissare il Casco con l’ausilio dell’adattatore.
Utile a fissare la ion al manubrio della bicicletta e non solo.
Diamentro manubrio da 20 a 35 mm.
IT
3. Guida Introduttiva
3.1 Installare l’attacco per elmetto con il cinturino
1. Scegliere la cinghia più adatta a montare i differenti tipi di casco. Un
esempio: usare la cinghia corta per I caschi da bicicletta e quella
media per I caschi da motocicletta.
2. Rimuovere la clips 2 dalla cinghia.
3. Ci sono 3 prese d’aria su ogni casco. Avvolgere la cinghia in queste
fessure (Step 1)
4. Avvolgere la cinghia alla clip ed al lato alto del casco (Step 2).
5. Avvolgere il cinturino attraverso la presa di mezzo partendo dalla
parte superiore. (Fase 3)
6. Avvolgere il cinturino attraverso la presa più esterna partendo dalla
parte inferiore (Fase 4)
7. Stringere il cinturino e ripetere le Fasi da 1 a 4 sull’altro lato.
3.2 Montare la ion al casco della bicicletta
1. Scegliere la cinghia la cui lunghezza sia adatta al casco.
2. Utilizzare l’adesivo 3M per fissare in modo definitivo il supporto al
casco.
3. Allentare o rimuovere la sfera di aggancio dal casco.
4. Installare la sfera di aggancio e serrare il dado.
5. Passare la cinghia attraverso la fessura del casco ed agganciarla
alla clip.
6. Fissare la cinghia .
7. Ripetere la stessa operazione anche sul lato opposto e fissure
saldamente il support al casco.
8. Agganciare la CamLOCK e la ion al supporto .Assicurarsi che la
CamLOCK e’ fissata con sicurezza.
Note:
La CamLOCK consente di poter riprendere immagini con ogni angolazione. Basta allentare il dado, regolare la
ION e serrare di nuovo il dado.
3.3 Montaggio sull’elmetto per moto
1. Incollare il doppio adesivo 3M su un lato del casco.
2. Selezionare la cinghia piu’adatta al casco.
3. Allentare o rimuovere la sfera di aggancio dal casco.
4. Montare la sfera di aggancio lunga al casco e serrare il dado.
5. incollare l’ adesivo 3M sul lato opposto alla ion ed incollare
l’adattatore.
6. Attaccare il support ion ad un lato del casco.
7. Avvolgere la cinghia al casco passandola attraverso il supporto ion
e l’adattatore.
8. Fissare bene la cinghia.
9. Ripetere l’operazione anche sul lato posterior del casco, fissure la
cinghia su entrambi i lati.
10. Introdurre la CamLOCK e la ion al supporto ed assicurarsi che
l’operazione sia riuscita.
Nota:
Il sistema CamLOCK consente all’utente di apportare semplici modifiche all’angolazione in cui la fotocamera è
posizionata. È sufficiente allentare il dado, regolare l’angolo della fotocamera e serrare nuovamente il dado
3.4 Montaggio sul manubrio o sulla racchetta
1. Allentare entrambe le viti del supporto.
2. Montare il supporto per la bicicletta al manubrio e serrare Ie viti fino ad ottere un fissaggio sicuro.
3. Allentare o rimuovere la sfera di aggancio.
4. Inserire il supporto nella CamLOCK.
5. Agganciare la ION alla CamLOCK ed assicurarsi che l’operazione sia avvenuta in modo corretto.
Nota:
Il sistema CamLOCK consente all’utente di apportare semplici modifiche all’angolazione in cui la fotocamera è
posizionata. È sufficiente allentare il dado, regolare l’angolo della fotocamera e serrare nuovamente il dado.
1
2
4
3
4. Trademark Information
© 2012 World Wide Licenses Limited.
® Il logo ION e’ stato registrato dalla World Wide Licenses Limited.
CamLOCK, PODZ, Shoot/Share and AIR PRO sono loghi registrati dalla World Wide Licenses Limited in tutto il
Mondo Copyright © 2012. Tutti I diritti sono riservati.
For EU only
Domande?
Hai bisogno di aiuto?
Questo manual potrebbe aiutare
te a comprendere
Se hai alter domande chiama
oppure visita il sito
www.iontheaction.com
www.facebook.com/iontheaction
www.twitter.com/iontheaction
Page 2
Guía rápida de montaje
Kit de Bicicleta y Casco
Conocer tu sistema CamLOCK y los accesorios de Bicicleta y Casco
El versátil sistema CamLOCK de iON te permite sujetar la cámara iON a cualquier tipo de casco (bicicleta,
motocicleta, ski, paracaidismo, etc.)
Fija la cámara sobre cualquier manillar de bicicleta, jet ski, 4x4 ATV y motocicleta, e incluso en tus
bastones de esquí.
El sistema CamLOCK te permite desmontar y volver a montar la cámara con facilidad.
La articulación de rótula esta diseñada para que el usuario pueda girar la cámara y capturar múltiples
perspectivas (frontal, lateral, trasera, etc...) sin necesidad de tener que volver a montar la cámara.
1. Conocer tu sistema de montaje
1
CamLOCK
2
Articulación de rótula corta
Articulación de rótula en forma
3
de “L”
Cinta de seguridad
4
5
Soporte para casco
6
Pieza de conexión
Correa corta de montaje
7
8
Correa media de montaje
Adhesivos de montaje 3M
9
de una cara y doble cara
Soporte para bicicleta
10
2. Antes de montar tu cámara
2.1 Cinta de seguridad
1. Pasa un extremo de la cinta de seguridad por el agujero de la
cinta que hay en la cámara. Quizá debas usar un alfiler para
ayudar a pasar la cinta a través del agujero.
2. Sujeta la otra mitad a la montura.
3. Acopla los dos extremos cuando la cámara esté montada
2.2 CamLOCK
1. Fija el tornillo del CamLOCK al soporte del trípode de la
cámara.
2. Atornilla el CamLOCK hasta que esté bien ajustado a la
cámara.
Montar y desmontar la cámara rápidamente del soporte CamLOCK.
Acopla el CamLOCK.
Acopla el CamLOCK.
Asegura la cámara en el soporte para proporcionar mayor seguridad.
Monta la cámara en diferentes tipos de casco.
Tuerca de rótula desmontable – Para ajustar y aflojar la rótula.
Funciona con el soporte del casco para proporcionar mayor seguridad al sistema
de montaje.
Ata la montura del casco, la pieza de conexión y el casco.
Ata la montura del casco, la pieza de conexión y el casco.
Se pegan al soporte del casco, la pieza de conexión ó el mismo casco.
Fija la cámara Air Pro a manillares, bastones de esquí y más. Tubos de 20 – 35 mm
de diámetro.Tuerca de rótula desmontable –Para ajustar y aflojar la rótula.
Tornillos para el soporte de bicicleta – Para ajustar y aflojar el soporte de bicicleta
SP
3. Empezar
3.1 Instalar tu soporte para casco con la correa
1. Elige la correa de montaje más apropiada para el tipo de casco. Por
ejemplo, utiliza la correa corta de montaje para cascos de bicicleta
y la media para cascos de motocicleta.
2. Quita las dos pinzas de la correa.
3. Hay tres orificios a cada lado de la montura del casco. Introduce la
correa por el orificio interior (el más cercano al centro) desde abajo.
(Paso 1)
4. Introduce la correa por la pinza desde arriba. (Paso 2)
5. Introduce la correa por el orificio de en medio desde arriba. (Paso
3)
6. Introduce la correa por el orificio exterior desde abajo (Paso 4)
7. Ajusta la correa y repite los pasos 1-4 en el otro extremo.
3.2 Montar en tu casco de bicicleta
1. Elige el soporte de casco con el largo adecuado de correa.
2. Pega el adhesivo de montaje de una cara 3M a la base del soporte.
Utiliza el adhesivo de doble cara para asegurar permanentemente
el soporte al casco.
3. Afloja y separa del soporte del casco la tuerca de la rótula.
4. Coloca la rótula en el soporte y ajusta la tuerca.
5. Pasa la correa del soporte por los orificios del casco de bicicleta y
vuelve hacia atrás a través de la pinza de la correa.
6. Ajusta la correa.
7. Repite en el extremo opuesto de la correa hasta que el soporte esté
bien fijado al casco.
8. Sujeta el CamLOCK y la cámara al conector CamLOCK.
Asegúrate que la tuerca del CamLOCK está bien ajustada.
Nota:
El sistema CamLOCK permite al usuario cambiar el ángulo de la cámara. Simplemente aflojando la tuerca,
ajustando el ángulo de cámara y volviendo a apretar la tuerca.
3.3 . Montar en tu casco de motocicleta
1. Pega el soporte del casco al casco utilizando el adhesivo de
montaje 3M de doble cara. Si se utiliza una combinación del
soporte y la pieza de conexión, proporcionará seguridad adicional
al sistema de montaje.
2. Elige el soporte de casco con el largo adecuado de correa.
3. Afloja y separa del soporte del casco la tuerca de la rótula.
4. Coloca la rótula en forma de “L” en el soporte y ajusta la tuerca.
5. Pega el adhesivo de montaje 3M de doble cara a la base del
casco y la pieza de conexión.
6. Fija el soporte a un lado del casco.
7. Pasa la correa al otro lado del casco a través del orificio de la
pieza de conexión y de vuelta al lado de origen del casco.
8. Ajusta la correa con la pinza.
9. Repite en el extremo opuesto de la correa hasta que el soporte
esté bien fijado al casco.
10. Sujeta el CamLOCK y la cámara al conector CamLOCK.
Asegúrate que la tuerca del CamLOCK está bien ajustada.
Nota:
El sistema CamLOCK permite al usuario cambiar el ángulo de la cámara. Simplemente aflojando la tuerca,
ajustando el ángulo de cámara y volviendo a apretar la tuerca.
3.4 Montar en un manillar ó bastón
1. Afloja los dos tornillos del soporte de bicicleta.
2. Fija el soporte al manillar ó bastón y aprieta los tornillos hasta que el soporte esté bien fijado.
3. Afloja y separa del soporte de la bicicleta la tuerca de la rótula.
4. Inserta la rótula en el conector CamLOCK y ajusta la tuerca.
5. Sujeta el CamLOCK y la cámara al conector CamLOCK. Asegúrate que la tuerca del CamLOCK está bien
ajustada.
Nota:
El sistema CamLOCK permite al usuario cambiar el ángulo de la cámara. Simplemente aflojando la tuerca,
ajustando el ángulo de cámara y volviendo a apretar la tuerca.
1
2
4
3
4. Información sobre la marca
© 2012 World Wide Licenses Limited.
® El logotipo iON es una marca registrada de World Wide Licenses Limited.
CamLOCK, PODZ, Shoot/Share y AIR PRO y sus respectivos logotipos son marcas registradas de World Wide
Licenses Limited en los Estados Unidos y otros países.
Copyright © 2012. All Rights Reserved
For EU only
¿Preguntas?
¿Necesitas ayuda?
Este manual debería ayudarte a
entender tu nuevo producto.
Si todavía tienes dudas
visita nuestra web:
www.iontheaction.com
Like Us:
www.facebook.com/iontheaction
Tweet Us:
www.twitter.com/iontheaction
頭盔和腳踏車系列
瞭解你的主機連接卡扣元件系統及頭盔和腳踏車配件
ion 的通用主機連接卡扣元件系統允許你固定ion相機至任何類型的頭盔上。(腳踏車,摩托車,滑雪橇,跳傘
運動等)
安裝相機在自行車手把,噴氣式滑雪橇,4X4全地形越野車和摩托車,也可以在滑雪橇杖上。
主機連接卡扣元件系統允許你可以容易地拆卸和安裝相機。
球體連接配件旨在允許用戶旋轉相機進行多視角拍照(前面,側面,後面,等..),而無需重新安裝相機
1. 瞭解你的安裝系統
1
主機連接卡扣元件
2
短球體連接配件
彎球體連接配件
3
4
安全繩+掛扣
5
頭盔組件
6
配合件
短帶(帶2個卡扣) 環繞頭盔安裝組件,配合件及頭盔
7
8
中帶(帶2個卡扣)
頭盔連接件海綿墊
9
和膠墊
腳踏車安裝組件
10
快速從主機連接卡扣座上安裝或拆卸主機
固定主機連接卡扣元件
固定主機連接卡扣元件
提供更多一重安全保障確保主機在固定裝置的安全。
安裝主機在不同類型的頭盔。
可拆卸式球體連接配件螺母-緊固或放鬆球體連接配件
配合頭盔元件給安裝系統提供更多一重安全保障
環繞頭盔安裝組件,配合件及頭盔
粘貼至頭盔安裝組件,配合件及頭盔
固定Air Pro 主機至手把,滑雪杖等,適合0.75至1.4英寸(20-35mm)直徑。
可拆卸球體連接配件螺母-緊固或放鬆球體連接配件。
腳踏車安裝螺絲-緊固或放鬆腳踏車安裝組件
2. 安裝主機之前
2.1 安全繩+掛扣
1. 安全繩+掛扣的尾端穿過主機吊繩孔
2. 固定另一半至安裝設置上。
3. 當主機安裝時將兩端夾在一起。
2.2 主機連接卡扣元件
1. 安裝主機連接卡扣元件的螺絲至主機三腳架固定座。
2. 旋動主機連接卡扣元件直至緊緊固定在主機上。
快速入門指南
繁
3. 開始安裝
3.1 用皮帶安裝你的頭盔組件
1. 選擇合適的皮帶安裝不同類型的頭盔.例如:使用短帶在腳踏車頭盔
和中帶在摩托車頭盔。
2. 從皮帶上拆卸兩個皮帶夾。
3. 在頭盔組件的每邊有三個孔。皮帶從底部穿過最裏面的孔。(最靠
近中心)(圖示第1步)
4. 皮帶從頂部穿過皮帶夾。(圖示第2步)
5. 皮帶從頂部穿過頭盔組件中間的孔(圖示第3步)
6. 皮帶從底部穿過頭盔組件最外側的孔。
7. 拉緊皮帶並且重複第1-4步穿好另外一邊。
3.2 安裝至你的自行車頭盔
1. 選擇頭盔組件和適合長度的皮帶。
2. 粘貼單面背膠的頭盔連接件海綿墊在頭盔元件的底座。使用雙面背
膠的頭盔連接件膠墊將頭盔元件緊緊粘貼在頭盔上。
3. 從頭盔元件上鬆開並分離球體連接配件螺母
4. 安裝球體連接配件至頭盔元件並且旋緊螺母。
5. 頭盔組件的皮帶繞穿過腳踏車頭盔的孔再從背面穿過皮帶夾。
6. 扣緊皮帶
7. 重複繞穿皮帶另一端直至頭盔組件被牢固地安裝在頭盔上。
8. 固定主機連接卡扣元件和主機在主機連接卡扣元件的座子上。
確保主機連接卡扣元件的螺母被完全擰緊。
注意:
主機連接卡扣元件系統允許用戶改變主機的角度。只旋松螺母,調整主機角度後再重新旋緊螺母。
3.3 安裝至你的摩托車頭盔
1. 通過使用雙面背膠的頭盔連接件膠墊粘貼頭盔元件至頭盔。利用頭
盔元件和配合件組合在一起,它給你的頭盔系統提供多重安全保障。
2. 選擇合適長度的皮帶安裝頭盔組件。
3. 從頭盔元件放鬆和分離球體連接配件螺母
4. 安裝長球體連接配件至頭盔元件並擰緊螺母。
5. 粘貼雙面背膠的頭盔連接件膠墊至頭盔底座和配合件。
6. 粘貼頭盔組件在頭盔的一側。
7. 皮帶環繞至頭盔的另一側穿過頭盔配合件的通氣孔。
8. 用皮帶夾扣緊皮帶
9. 重複繞穿皮帶另一端直至牢固地固定在頭盔上。
10. 固定主機連接卡扣元件和主機至主機連接卡扣元件座子上。確保主
機連接卡扣元件螺母完全擰緊。
注意:
主機連接卡扣元件系統允許用戶改變主機的角度。只旋松螺母,調整主機角度後再重新旋緊螺母。
3.4 安裝至手把或手杖
1. 放鬆腳踏車組件的兩個螺絲。
2. 固定腳踏車組件至手把或手杖並且擰緊螺絲直至完全牢固地安裝好。
3. 從腳踏車元件放鬆並分離球體連接元件螺母
4. 球體連接配件裝入至主機連接卡扣座子上並擰緊螺母。
5. 固定主機連接卡扣元件和主機裝入主機連接卡扣座子。確保主機連接卡扣元件螺母完全被擰緊。
注意:
主機連接卡扣元件系統允許用戶改變主機的角度。只旋松螺母,調整主機角度後再重新旋緊螺母。
1
2
4
3
4. 注冊商標信息
© 2012 World Wide Licenses Limited.
® The ion logo is a registered trademark of World Wide Licenses Limited.
CamLOCK, PODZ, Shoot/Share and AIR PRO and their respective logos are trademarks or registered trademarks
of World Wide Licenses Limited in the United States and other countries. Copyright © 2012. All Rights Reserved.
For EU only
Questions?
Need Some Help?
This manual should help you
understand your new product.
If you still have questions
visit our website:
www.iontheaction.com
Like Us:
www.facebook.com/iontheaction
Tweet Us:
www.twitter.com/iontheaction
头盔和脚踏车系列
了解你的主机连接卡扣组件系统及头盔和脚踏车配件
ion 的通用主机连接卡扣组件系统允许你固定ion相机至任何类型的头盔上。(脚踏车,摩托车,滑雪橇,跳伞
运动等)
安装相机在脚踏车手把,喷气式滑雪橇,4X4全地形越野车和摩托车,也可以在滑雪橇杖上。
主机连接卡扣组件系统允许你可以容易地拆卸和安装相机。
球体连接配件旨在允许用户旋转相机进行多视角拍照(前面,侧面,后面,等..),而无需重新安装相机
1. 了解你的安装系统
快速入门指南
繁
3. 开始安装
3.1 用皮带安装你的头盔组件
1. 选择合适的皮带安装不同类型的头盔.例如:使用短带在脚踏车头
盔和中带在摩托车头盔。
2. 从皮带上拆卸两个皮带夹。
3. 在头盔组件的每边有三个孔。皮带从底部穿过最里面的孔。
(最靠近中心)(图示第1步)
4. 皮带从顶部穿过皮带夹。(图示第2步)
5. 皮带从顶部穿过头盔组件中间的孔(图示第3步)
6. 皮带从底部穿过头盔组件最外侧的孔。
7. 拉紧皮带并且重复第1-4步穿好另外一边。
3.2 安装至你的脚踏车头盔
1. 选择头盔组件和适合长度的皮带。
2. 粘贴单面背胶的头盔连接件海绵垫在头盔组件的底座。使用双面背
胶的头盔连接件胶垫将头盔组件紧紧粘贴在头盔上。
3. 从头盔组件上松开并分离球体连接配件螺母
4. 安装球体连接配件至头盔组件并且旋紧螺母。
5. 头盔组件的皮带绕穿过脚踏车头盔的孔再从背面穿过皮带夹。
6. 扣紧皮带
7. 重复绕穿皮带另一端直至头盔组件被牢固地安装在头盔上。
8. 固定主机连接卡扣组件和主机在主机连接卡扣组件的座子上。
确保主机连接卡扣组件的螺母被完全拧紧。
注意:
主机连接卡扣组件系统允许用户改变主机的角度。只旋松螺母,调整主机角度后再重新旋紧螺母。
3.3 安装至你的摩托车头盔
1. 通过使用双面背胶的头盔连接件胶垫粘贴头盔组件至头盔。利用头
盔组件和配合件组合在一起,它给你的头盔系统提供多重安全保障。
2. 选择合适长度的皮带安装头盔组件。
3. 从头盔组件放松和分离球体连接配件螺母
4. 安装长球体连接配件至头盔组件并拧紧螺母。
5. 粘贴双面背胶的头盔连接件胶垫至头盔底座和配合件。
6. 粘贴头盔组件在头盔的一侧。
7. 皮带环绕至头盔的另一侧穿过头盔配合件的通气孔。
8. 用皮带夹扣紧皮带
9. 重复绕穿皮带另一端直至牢固地固定在头盔上。
10. 固定主机连接卡扣组件和主机至主机连接卡扣组件座子上。确保主
机连接卡扣组件螺母完全拧紧。
注意:
主機連接卡扣元件系統允許用戶改變主機的角度。只旋松螺母,調整主機角度後再重新旋緊螺母。
1
2
4
3
1
主机连接卡扣组件
2
短球体连接配件
弯球体连接配件
3
4
安全绳+挂扣
5
头盔组件
6
配合件
短带(带2个卡扣) 环绕头盔安装组件,配合件及头盔
7
8
中带(带2个卡扣)
头盔连接件海绵垫
9
和胶垫
脚踏车安装组件
10
快速从主机连接卡扣座上安装或拆卸主机
固定主机连接卡扣组件
固定主机连接卡扣组件
提供更多一重安全保障确保主机在固定装置的安全。
安装主机在不同类型的头盔。
可拆卸式球体连接配件螺母-紧固或放松球体连接配件
配合头盔组件给安装系统提供更多一重安全保障
环绕头盔安装组件,配合件及头盔
粘贴至头盔安装组件,配合件及头盔
固定Air Pro 主机至手把,滑雪杖等,适合0.75至1.4英寸(20-35mm)直径。
可拆卸球体连接配件螺母-紧固或放松球体连接配件。
脚踏车安装螺丝-紧固或放松脚踏车安装组件
2. 安装主机之前
2.1 安全绳+挂扣
1. 安全绳+挂扣的尾端穿过主机吊绳孔
2. 固定另一半至安装设置上。
3. 当主机安装时将两端夹在一起。
2.2 主機連接卡扣元件
1. 安装主机连接卡扣组件的螺丝至主机三脚架固定座。
2. 旋动主机连接卡扣组件直至紧紧固定在主机上。
3.4 安裝至手把或手杖
1. 放鬆腳踏車組件的兩個螺絲。
2. 固定腳踏車組件至手把或手杖並且擰緊螺絲直至完全牢固地安裝好。
3. 從腳踏車元件放鬆並分離球體連接元件螺母
4. 球體連接配件裝入至主機連接卡扣座子上並擰緊螺母。
5. 固定主機連接卡扣元件和主機裝入主機連接卡扣座子。確保主機連接卡扣元件螺母完全被擰緊。
注意:
主机连接卡扣组件系统允许用户改变主机的角度。只旋松螺母,调整主机角度后再重新旋紧螺母。
4. 注冊商標信息
© 2012 World Wide Licenses Limited.
® The ion logo is a registered trademark of World Wide Licenses Limited.
CamLOCK, PODZ, Shoot/Share and AIR PRO and their respective logos are trademarks or registered trademarks
of World Wide Licenses Limited in the United States and other countries. Copyright © 2012. All Rights Reserved.
For EU only
Questions?
Need Some Help?
This manual should help you
understand your new product.
If you still have questions
visit our website:
www.iontheaction.com
Like Us:
www.facebook.com/iontheaction
Tweet Us:
www.twitter.com/iontheaction
AM-QG-HELMET-7L-EU1
 Loading...