

Page 1
Quick Start Guide
DashCam
IN-CAR CAMERA
Page 2
Quick Start Guide
DashCam
EN-2
IN-CAR CAMERA
Page 3

1. Key Features
y Car DashCam with 135o Wide Angle Lens.
y 2.7" Color LCD for real-time monitoring and video playback.
y Automatic Event Video Recording for sudden external impact.
y Continuous loop recording of scenery capture for unexpected incidents.
y Geo-information capture in photo or video files with the built-in GPS sensor.
y High quality video recording up to 1296p high quality videos in extreme low light environment.
y Photo capture during recording.
EN-3
Page 4

2. Package Contents
1 USB Cable 2 5M Power Cable
3 USB Car Adapter 4 Windshield Mount
5 Sensormatic Tag 6 DashCam Software CD
7 Warranty Card 8 QSG
9 iON label
EN-4
Page 5
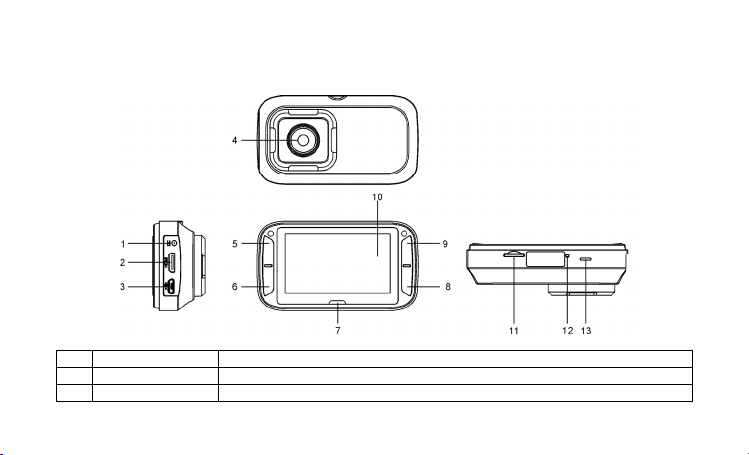
3. Functional Parts
1 DC in Port Connect to the provided DC in to USB cable for charging.
2 Mini HDMI Port Connect to the TV through mini HDMI cable (not supplied).
3 Micro USB Port Connect to PC for file browsing and file transfer.
EN-5
Page 6
4 Wide Angle Lens Capture a wide angle view.
5
6
7 LED Indicator Operation status indication.
8
9
10 Display Sharp panel for live view, playback and function indications.
11 MicroSD Slot MicroSD card storage location.
12 Reset Button Reset the DashCam.
13 Speaker Vent Output the sound.
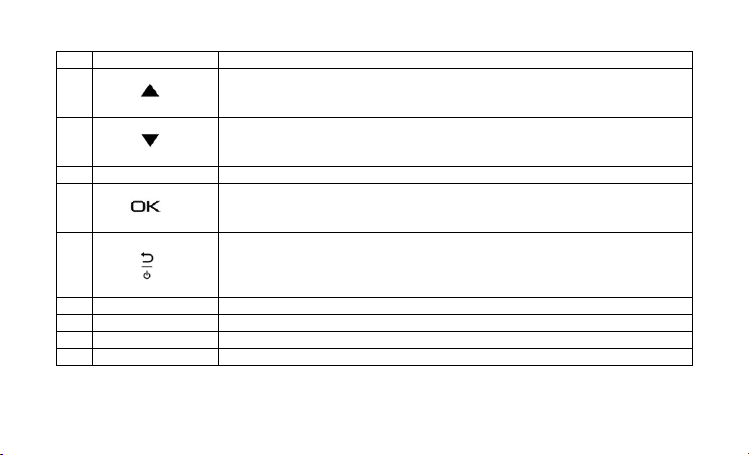
1. Select the top-left on-screen command.
2. Enter the playback mode.
3. Move up the selection bar or move to former file.
1. Select the bottom-left on-screen command.
2. Move down the selection bar or move to next file.
3. Take a photo.
1. Confirm your selection.
2. Manually trigger an Event Protection Video Recording.
3. Select the bottom-right on-screen command.
1. Turn on or off the DashCam by pressing and holding the button.
2. Select the top-right on-screen command.
3. Enter the setup menu.
4. Go back to previous interface.
EN-6
Page 7

4. Installing the Windshield Mount & DashCam in a
Vehicle
1. Clean the area on the windshield.
2. Peel off the protective membrane of the 3M adhesive and stick the Windshield Mount to the front windshield inside
the car.
3. Slip the socket on the top of the DashCam into Windshield Mount until it is latched.
4. The lens of DashCam should be at the center of the front windshield and be aware not to block the driver’s visibility.
EN-7
Page 8
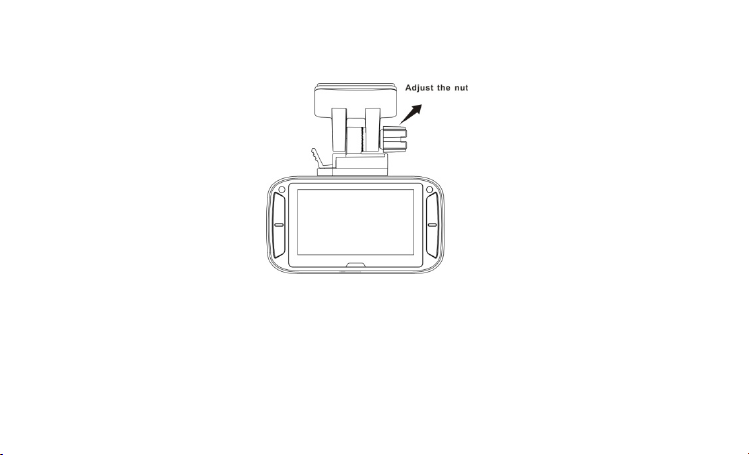
5.Adjust the nut on the Windshield Mount for suitable direction and orientation.
EN-8
Page 9
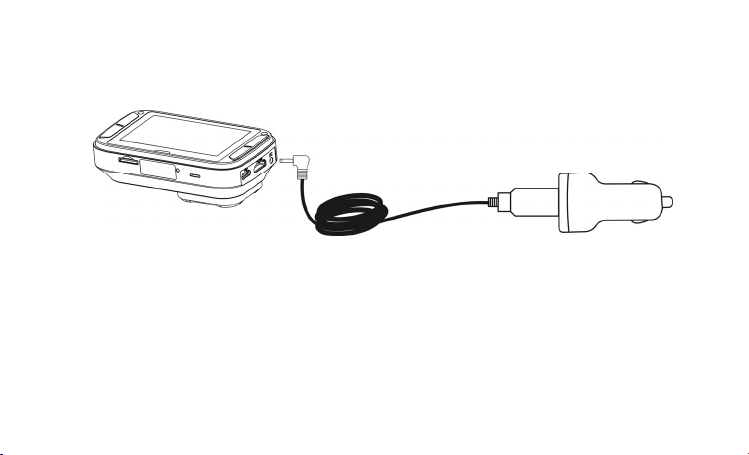
6. Connect the DashCam to the DC Power jack with included DC in to USB cable and the Dual USB CLA.
Secure the cable with the cable holder to avoid interference of driver's motion.
EN-9
Page 10

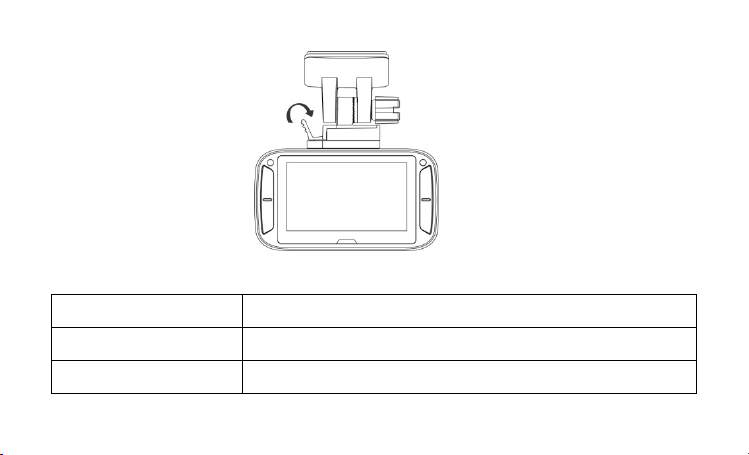
Press the Windshield Mount side to release and slide the DashCam off the mount.
EN-10
Page 11
5. LED and Sound Indication
Red LED
Red LED flashes continuously
Purple LED
DashCam is under Normal Loop Recording
2 chimes sound indicates the recording starts
Counting down to DashCam shut down due to the power source being removed.
Periodic sound indicates the counting down status
DashCam is under Event Protection Recording
1 chime sound indicates the recording starts
EN-11
Page 12
Blue LED DashCam is not recording but other status (e.g. setting or playback)
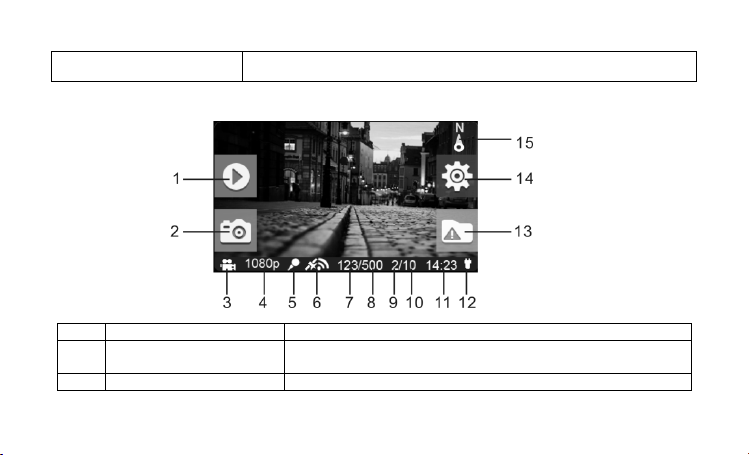
6. Explanation of Status Icons
Item Function Description
1 Playback Indicator
2 Screenshot Indicator Capture and save a screenshot of the video.
Enter playback mode.
(Normal Loop Recording only.)
EN-12
Page 13
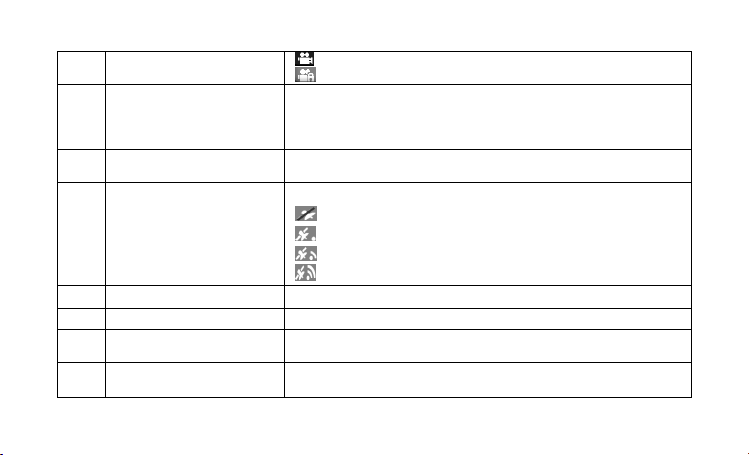
3 Mode Selected
4 Video Resolution
5 Microphone Status
6 GPS Strength
Normal Loop Recording mode.
Event Protection Recording mode.
Show the selected video resolution setting.
1296p (2304x1296 P30)
1080p ( 1920x1080 P30)
720p (1280x720 P30)
Show the Microphone if it is on.
(Icon hidden if the Microphone is “off”.)
Show the intensity of GPS signal.
No GPS reception
Weak GPS reception
Fair GPS reception
Strong GPS reception
7 Photo Counter Shows the number of photos that have been taken.
8 Total Photo Counter Shows the maximum number of photos that can be taken.
Event Protection Video
9
Counter
Total Event Protection Video
10
Counter
Show the number of Event Protection Videos that have been recorded.
Show the maximum number of Event Protection Videos that can be
taken.
EN-13
Page 14

11 System Time Show current system time in Hour and Minute.
12 Power Status
13 Event Protection Indicator
14 Setup Indicator
15 Compass Indicator
An external power supply is connected.
External power supply not connected.
Start Event Protection Recording.
Stop Event Protection Recording.
Enter the Setup menu.
(Normal Loop Recording only.)
Show the direction going ahead.
(Icon hidden if no GPS signal is received.)
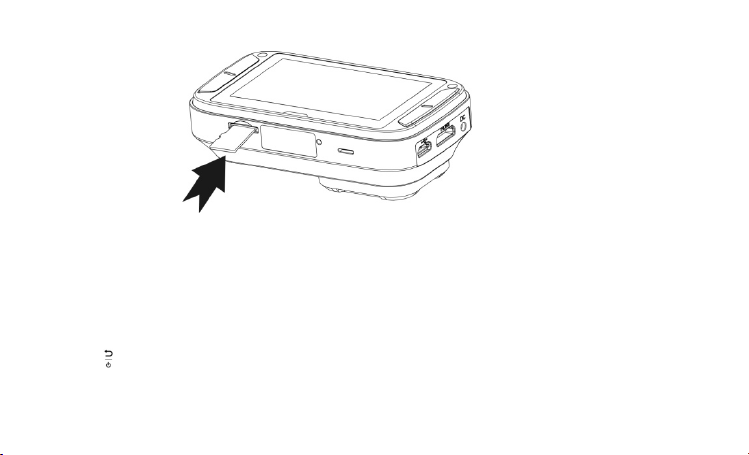
7. Using Your Car DashCam
7.1 Inserting a MicroSD Memory Card (required but not included)
Insert a MicroSD card (not included) to the slot before using the DashCam. Assure that the DashCam power is turned
OFF before inserting the card. Make sure a MicroSD card with minimum 8GB free space has been installed into the card
slot. A 32GB or above Class 6 card is recommended for recording features.
EN-14
Page 15
Notes:
1. The correct direction should be followed to insert the MicroSD card into the slot.
2. A new MicroSD card should be formatted before using. For more information, refer to section 7.6.
7.2 Turning on/off the DashCam
The DashCam will detect car ignition vibration and automatically turn on and start Normal Loop Recording.. Or, pressing
and hold to turn on the DashCam if a power source is absent.
If the DashCam is turned on for the first time, you will need to set up Date & Time/Language first.
EN-15
Page 16
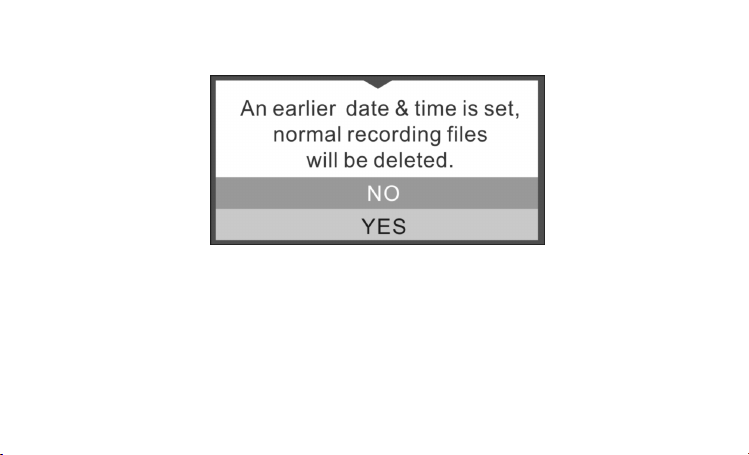
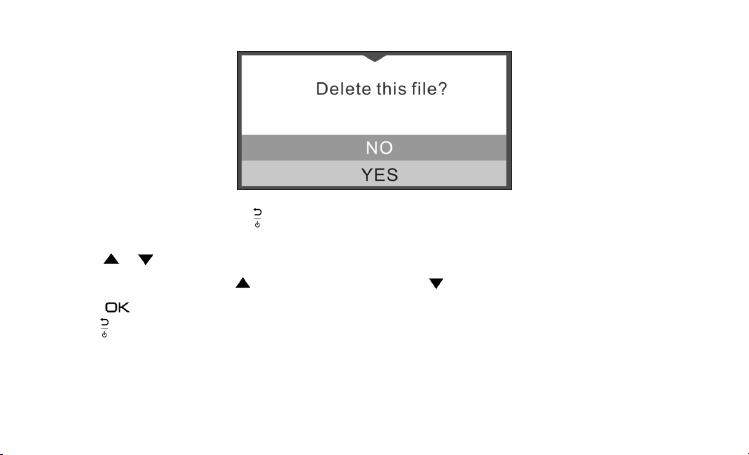
In Date & Time setup, if you have set an earlier Date & Time, the below message pops up:
Select “Yes”, all normal recording files will be deleted. Select “No” to keep these files.
7.3 Video Recording and Photo Taking
Normal Loop Recording
The DashCam will start Normal Loop Recording once turned on. Video recording is continuously creating successive files
of 3 / 5 / 10 min. The most outdated file will be replaced if the memory is full for continuous recording.
Event Protection Recording
EN-16
Page 17

Files will be protected from the auto deletion if an impact is detected. The sensitivity of impact detection can be adjusted
through the setup menu (refer to section 7.6).
By pressing
You can store up to 10 Event protection videos to the DashCam.
during normal recording can also enter the Event Protection Recording mode to protect your video files.
Photo Taking
Press once during recording for taking a photo. You can store up to 500 photos to the DashCam.
7.4 Playing Back Files
During Normal Loop Recording, press to enter the playback mode. You can choose to view the files in specific folders
on separate pages.
EN-17
Page 18
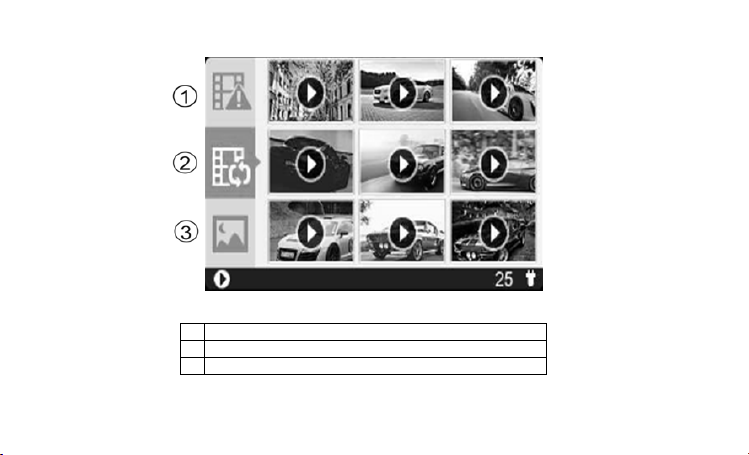
1 Event Protection Videos
2 Normal Loop Videos
3 Photos
General operation of playback:
EN-18
Page 19
Press and once to select the folder/file you want to view.
Press
Press to open a single Video or Photo file
During the thumbnail mode, long press the
Press to start playing back a video, during video playback:
Press to pause and press it again to continue.
Press to fast forward the video and press it again to change the speed.
Press
Note:
The file currently being recorded will be saved before entering the Playback mode.
7.5 Deleting a Video/Photo File
You can delete a single file (photo or video) from the memory card in single photo or video playback mode.
In single photo or video playback mode, press and hold to enter the single photo or video delete interface.
Press or to select “Yes”;
Press to confirm.
to confirm and enter the thumbnail mode of the selected folder.
or to switch to previous or next thumbnail page.
to fast rewind the video and press it again to change the speed.
EN-19
Page 20
7.6 Setup Menu
During Normal Loop Recording, press to enter the setup mode.
Follow the below three steps to enter setup screen for each Menu item:
1. Press or to select the Menu/Submenu item you want to set.
(In “Date/Time set” item, press to increase the number or press to decrease the number.)
2. Press to confirm your selection.
3. Press to return to previous interface.
EN-20
Page 21

Camera
Video Resolution
Recording Duration
Screen Saver Duration
Driving
Screen Saver Type Set the Screen saver type
Microphone
Volume
Set the video resolution of
Normal Loop Video and Event
Protection Video
Set the duration of each Normal
Loop Video
Set the amount of time you
would like the screen saver to
activate or turn off the screen
saver function
Turn on/ off the microphone
during recording
Adjust the Speaker volume of
Voice/Sound/Playback
EN-21
y 1296p: 2304x1296 P30
y 1080p: 1920x1080 P30
y 720P: 1280x720 P30
y 3 min
y 5 min
y 10 min (Disabled in 1296p)
y 30 sec
y 1 min
y 3 min
y Off
y Display off
y Time
y Direction
y On
y Off
y 0-5
Page 22

Set the sensitivity of the G-
Sensitivity
Language
General
Date/Time Set
Format Format the MicroSD card
Default Setting
Device Information Display the model number, firmware version and GPS information
sensor to activate the Event
Protection Recording or turn off
this function
Set the device language
Set the date and time of the
device
Restore all settings to default
factory positions
EN-22
y High
y Mid
y Low
y Off
y English
y German
y Spanish
y French
y Italian
y Russian
y Japanese
y Korean
y S. Chinese
y T. Chinese
YYYY/MM/DD/HH/MM
y No
y Yes
y No
y Yes
Page 23
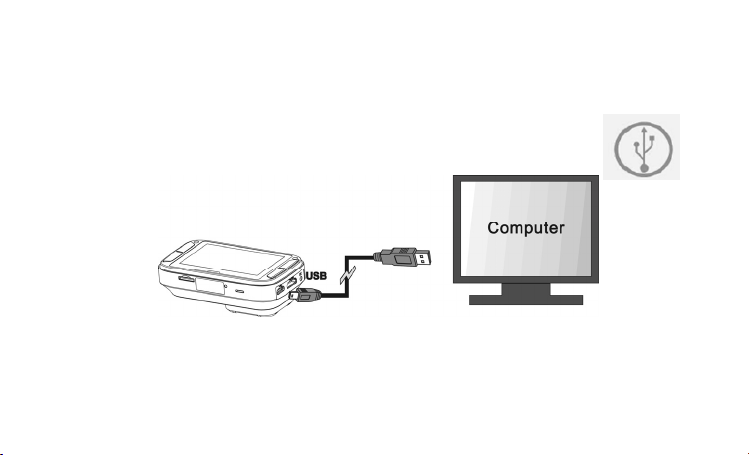
8. Connecting Your DashCam to a Computer
You may also connect your DashCam to your computer and view videos and pictures on the computer monitor.
1. Connect your DashCam to your computer with a USB cable(included).
2. Your computer will recognize the DashCam as a “Removable Disk”. The USB icon will be
displayed on the LCD screen of your camera. Open the disk and go to relevant file folder to view,
import, copy, transfer or delete the videos or photos.
Note:
If the Removable Device Window did not launch automatically, go to your “My Computer/Computer” and find the device
under Removable Disk.
EN-23
Page 24
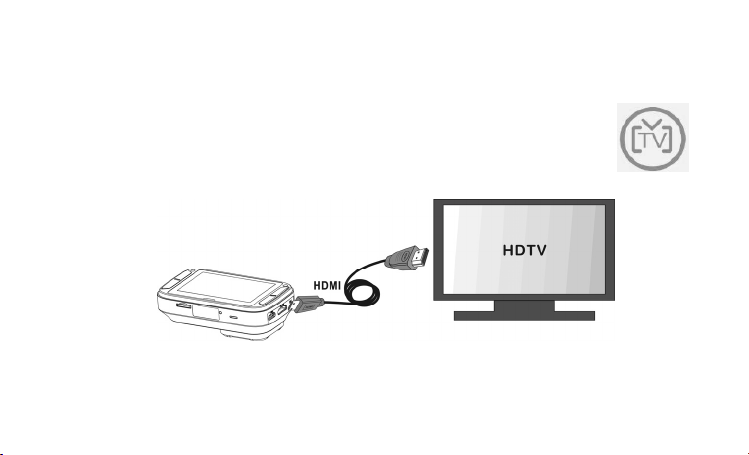
9. Connecting Your DashCam to an HDTV
You can connect your DashCam to an HDTV via the HDMI cable (not included). Once it is connected
you can:
1. View the live view of the camera.
2. View/Playback any photo/video files saved in the camera.
EN-24
Page 25

10. Specifications
Sensor
Lens 135 oWide Angle Lens
Still Image Resolution
on Recording
Video Resolution
Video Format
Photo Format
Display Panel
Indicator LED
GPS Sensor
G Sensor
TV Out
3MP CMOS
3MP on 1296p 2MP on 1080p 1MP on 720p
1296P: 2304x1296 P30 1080P: 1920x1080 P30 720P: 1280x720 P30
MPEG4 (H.264) .MOV File
JPG
2.7" Color Display 16:9
1 pc, 3 colors
Yes
Yes
Mini HDMI
EN-25
Page 26

USB Port
Power
Microphone
Speaker
Operation
Temperature
Storage Temperature
Dimension (L x W x H) 92 x 51 x 29.3mm
Weight
Micro USB
DC in
Yes
Yes
-20 to 70 degree
-40 to 80 degree
104g
11. Computer System Minimum Requirements
Operating System Windows 7&8 / Vista / XP and Mac OS 10.5 or above
CPU Pentium Ⅲ or above4 / 3.0G or faster recommended
RAM At least 256MB
Interface USB port
CD 4x speed CD ROM or above
EN-26
Page 27

12. Troubleshooting
Problem Cause Solution
Cannot turn on the
DashCam
Cannot find
removable disk after
connecting the
DashCam to the
computer
Blurry images
Low battery power
Connection failure
1. The DashCam has
not been installed
steadily
2. The lens of
DashCam is dirty
Connect the DashCam with power source by DC or
USB cable
1. Make sure all cable connections
are secured
2. Restart the computer if necessary
1. Reinstall the DashCam
2. Clean the lens with soft dry cloth
EN-27
Page 28

FCC Statement
Caution Statement
“Modifications not approved by the party responsible for compliance could void the user’s authority to
operate the equipment.”
This device complies with Part 15 of the FCC Rules. Operation is subject to the following two conditions:
(1) this device may not cause harmful interference, and
(2) this device must accept any interference received, including interference that may cause
Instruction Statement
NOTE: This equipment has been tested and found to comply with the limits for a Class B digital device,
pursuant to Part 15 of the FCC Rules. These limits are designed to provide reasonable protection against
harmful interference in a residential installation. This equipment generates, uses and can radiate radio
frequency energy and, if not installed and used in accordance with the instructions, may cause harmful
interference to radio or television reception, which can be determined by turning the equipment off and on,
the user is encouraged to try to correct the interference by one or more of the following measures:
• Reorient or relocate the receiving antenna.
• Increase the separation between the equipment and receiver.
• Connect the equipment into an outlet on a circuit different from that to which the receiver is connected.
• Consult the dealer or an experienced radio/ TV technician for help.
WARNING: THE MANUFACTURER IS NOT RESPONSIBLE FOR ANY RADIO OR TV INTERFERENCE
CAUSED BY UNAUTHORIZED MODIFICATIONS TO THE DEVICE. ANY SUCH MODIFICATIONS
COULD VOID THE USER’S AUTHORITY TO OPERATE THE EQUIPMENT.
undesired operation.
EN-28
Page 29

TRADEMARK INFORMATION
© 2015 World Wide Licenses Limited.
® The iON logo is a registered trademark of World Wide Licenses Limited.
Questions?
Need Some Help?
This manual should help
you understand your new
product.
If you still have
questions,
visit our website:
www.ioncamera.com
Like Us:
www.facebook.com/ioncamera
Tweet Us:
www.twitter.com/ioncamera
EN-29
Page 30

Kurzanleitung
DashCam
DE-1
AUTO- KAMERA
Page 31

1. Hauptmerkmale
y Car DashCam mit 135o Weitwinkel-Objektiv.
y 2.7" Farb-LCD zur Echtzeit-Überwachung und Video-Wiedergabe.
y Ereignisschutz-Videoaufzeichnung, vor und nach der plötzlichen Außenwirkung.
y Endlosschleife (Loop Funktion) für unvorhergesehene Ereignisse.
y Geo-Informationserfassung im Foto oder Video-Dateien mit dem integrierten GPS-Sensor.
y Hochwertige Video-Aufzeichnung bis zu qualitativ hochwertige Videos 1296p auch in extremen schlechten
Lichtverhältnissen.
y Fotoaufnahme während der Aufnahme.
DE-2
Page 32

2. Verpackungsinhalt
1 USB Kabel 2 5m Stromkabel
3 USB Auto Adapter 4 Windschutzscheibenhalterung
5 Sensormatic-warensicherung 6 Dashcam Wi-Fi-Software-CD
7 Garantiekarte 8 Kurzanleitung
9 iON Aufkleber
DE-3
Page 33

3. im Überblick
Strom Anschluss Anschluss an den vorgesehenen DC in den USB-Kabel zum
1
Mini HDMI Anschluss Eine Verbindung zum TV über Mini-HDMI-Kabel aufbauen
2
Micro USB Anschluss Anschluss für PC für die Datenverwaltung und
3
Aufladen
(Kabel nicht mitgeliefert).
Datenübertragung
DE-4
Page 34

4 Weitwinkelobjektiv Fange eine Weitwinkelaufnahme ein
5
6
7 LED Anzeige
8
9
10 LCD Anzeige
11 MicroSD-Steckplatz
12 Reset-Taste Neu Start DashCam Wi-Fi
1. Wählen Sie den oberen linken Befehl auf dem Bildschirm aus.
2. gehen Sie in den Wiedergabemodus.
3. Bewegen Sie die Auswahlleiste nach oben oder gehen Sie auf
eine ältere Datei.
1. Wählen Sie den unteren linken Befehl auf dem Bildschirm
aus.
2. Bewegen Sie die Auswahlleiste nach unten odergehen Sie zur
nächsten Datei.
3. Machen Sie ein Foto.
Betriebszustandsanzeige.
1. Bestätigen Sie die Auswahl..
2. Lösen Sie eine Ereignisschutz Video Recording manuell aus.
3. Wählen Sie die untere rechte Befehl auf dem Bildschirm aus.
1. Ein- und Ausschalten der Dashcam durch Drücken und Halten
der Taste.
2. Wählen Sie den rechten oberen Befehl auf dem Bildschirm
aus.
3. Gehen Sie in das Einstellungs-Menü.
4. Gehen Sie zurück zur vorherigen Schnittstelle.
Display für Live-Ansicht, Wiedergabe und Funktionsanzeigen.
Micro SD-Karten Speicherort
DE-5
Page 35

13 Lautsprecher Ventil Audio Ausgang.
4. Installation der Windschutzscheibenhalterung &
Dashcam W-Fi in einem Fahrzeug
1. Reinigen Sie den Bereich auf der Windschutzscheibe.
2. Ziehen Sie die Schutzmembran von der 3M Klebstoff und kleben Sie die Windschutzscheibenhalterung an der
Windschutzscheibe im Auto.
3. Schieben Sie die Buchse auf der Oberseite des Dashcam Wi-Fi in Windschutzscheibenhalterung, bis sie
eingerastet ist..
DE-6
Page 36

4. Die Linse Dashcam Wi-Fi sollte in der Mitte der Frontscheibe befestigt werden und beachten Sie die Sicht des Fahrers
r
nicht zu versperren.
5.Stellen Sie die Mutter auf der Windschutzscheibenhalterung für geeignete Richtung und Orientierung ein.
Einstellen der Mutte
DE-7
Page 37

6. Schließen Sie das Dashcam Wi-Fi an die DC-Buchse mit einbezogen DC zum USB-Kabel, und der Dual USB
Auto-Adapter. Sichern Sie das Kabel mit dem Kabelhalter, um Störungen an den Fahrer zu vermeiden.
DE-8
Page 38

Die beste Einbaulage
DE-9
Page 39

Drücken Sie die Windschutzscheibenhalterung Seite zu entriegeln, und ziehen Dashcam Wi.Fi aus der Halterung.
DE-10
Page 40

5. LED-Anzeige und Sound
Rot LED
ROT LED blinkt
kontinuierlich
Lila LED
Blau LED
Dashcam ist in normaler Schleifen-Aufnahme
2 aufeinander folgende akustische Signale zeigen an, dass die Aufnahme
beginnt.
Countdown zur Abschaltung der Dashcam aufgrund der Entfernung der
Stromquelle. Periodische Geräusche gibt den Countdown Status an.
Dashcam unter Ereignisschutz Recording
1 akustisches Signal zeigt an, dass die Aufnahme beginnt.
Dashcam nimmt nicht auf, sondern ein anderer Status (z.B. Einstellung oder
Wiedergabe
DE-11
Page 41

6. Erläuterung der Statussymbole
Artikel Funktion Beschreibung
1 Wiedergabeanzeige
2 Bildschirmanzeige Aufnehmen und einen Screenshot des Videos speichern.
3 Ausgewählter Modus Normale Schleifen Aufnahmemodus.
In den Wiedergabemodus. (nur normale SchleifenAufnahme)
DE-12
Page 42

Ereignisschutz Aufnahmemodus.
Anzeige der ausgewählten Videoauflösung-Einstellung
4 Video-Auflösung
5 Mikrofon-Status
6 GPS-Stärke
1296p (2304x1296 P30)
1080p (1920x1080 P30)
720p (1280x720 P30)
Zeigt das Mikrofon an, wenn es eingeschaltet ist. (Symbol
ausgeblendet, wenn das Mikrofon ausgeschaltet ist).
Anzeige der Intensität des GPS-Signals.
Kein GPS-Empfang
Schwaches GPS-Empfang
Angemessen GPS-Empfang
Stark GPS-Empfang
7 Foto Zähler Zeigt die Anzahl der Fotos an, die aufgenommen wurden.
8 Gesamter Foto Zähler
9 Ereignisschutz Video Zähler
Gesamt Ereignisschutz
10
Video Zähler
Zeigt die maximale Anzahl der Bilder an, die
aufgenommen werden können.
Anzeige der Anzahl der Ereignisaufnahmeschutz
Videos, die aufgenommen wurden.
Anzeige der maximalen Anzahl von
Ereignisaufnahmeschutz Videos, die aufgenommen
DE-13
Page 43

werden können.
11 System Zeit
12 Betriebsstatus
13 Ereignisschutz Anzeige
14 Einstellungs-Anzeige
15 Kompass-Anzeige
Zeigen Sie die aktuelle Systemzeit in Stunde und Minute
an.
Eine externe Stromversorgung angeschlossen ist.
Externes Netzteil nicht angeschlossen.
Starten der Ereignisschutz Aufnahme.
Stoppen der Ereignisschutz Aufnahme.
Gehen Sie in das Einstellungs-Menü.
(Normal Schleifen-Aufnahme verfügbar.)
Anzeige der Bewegungsrichtung.
(Symbol ausgeblendet, wenn kein GPS-Signal empfangen
wird.)
7. Verwendung der DashCam
7.1 Einlegen einer microSD-Speicherkarte (nicht im Lieferumfang enthalten)
Legen Sie eine MicroSD-Karte (nicht im Lieferumfang enthalten) in den Steckplatz, bevor die Dashcam und das Dashcam
Wi-Fi eingeschaltet sind. Mindestens 8GB Speicherplatz werden benötigt. 32GB oder über Klasse 6 Karten sind für
Aufnahmen empfohlen.
DE-14
Page 44

Hinweise:
1. Stellen Sie sicher, dass die MicroSD-Karte in den Steckplatz richtig eingesetzt wird.
2. Eine neue MicroSD-Karte sollten vor der Verwendung formatiert werden. Für mehr Informationen, siehe 7
7.2 Ein- / Ausschalten DashCam Wi-Fi
Die Dashcam Wi-Fi wird bei der Zündung die Vibration erkennen und automatisch einschalten und normale Schleifen
Aufnahme beginnen.
Oder: Drücken und halten auf dem Dashcam wenn eine Stromquelle fehlt..
Wenn die Dashcam zum ersten Mal eingeschaltet wird, müssen Sie zuerst das Datum und die Uhrzeit / Sprache
einstellen.
DE-15
Page 45

In der Datum & Zeit-Einstellung, wenn Sie eine frühere Datum und Uhrzeit eingestellt haben, erscheint die folgende
Meldung auf:
Wählen Sie "Ja", alle normalen Aufnahmedateien werden gelöscht. Wählen Sie "Nein", um diese Dateien zu halten..
7.3 Videoaufzeichnung und Foto unter normalen Looping Recording
Die Dashcam Wi-Fi beginnt normalen Schleifen Aufnahme, wenn sie eingeschaltet wird. Die Videoaufnahme wird
kontinuierlich aufeinanderfolgende Dateien von 3 / 5 / 10 min aufnehmen. Die veralteten Datei werden ersetzt, wenn der
Speicher für die kontinuierliche Aufzeichnung voll ist.
Ereignisschutz Aufnahme
DE-16
Page 46

Die Dateien werden von der automatischen Löschen geschützt, wenn ein Aufprall erkannt wird. Die Empfindlichkeit der
Aufprallerkennung können über die Dashcam setup menu (refer to section 7.6).
Durch Drücken
Aufnahme zu schützen.
Sie können bis zu 10 Ereignisschutz Videos im Dashcam speichern.
Aufnehmen eines Fotos
Drücken Sie auf das Symbol während der Aufnahme, um ein einzelnes Foto aufzunehmen. Sie können bis zu 500
Bilder auf die Dashcam speichern.
normalen Aufnahme können Sie auch den Ereignisschutz Aufnahmemodus, um eine Video-
7.4 Abspielen von Dateien
Während normale Looping Aufnahme drücken um den Wiedergabemodus. SieSie können wählen, um die Dateien in
bestimmten Ordnern auf separaten Seiten angezeigt werden.
DE-17
Page 47

1 Ereignisschutz Videos
2 Normale Schleifen Videos
3 Fotos
Allgemeine Bedienung der Wiedergabemodi:
DE-18
Page 48

Drücken Sie und einmal um den Ordner / Datei anzuzeigen.
Drücken Sie
Drucken Sie um ein einzelnes Video oder eine Foto-Datei zu öffnen
In der Miniaturansicht, drücken Sie lange
Drücken Sie um ein Video wiederzugeben während einer Video-Wiedergabe zu
starten:
Drücken Sie um zu pausieren und drücken Sie erneut, um fortzufahren.
Drücken Sie
Drücken Sie
Hinweis:
Die zurzeit aufgezeichnete Datei wird gespeichert, bevor sie in den Wiedergabemodus gehen.
7.5 Löschen eines Video / Foto
Sie können eine einzelne Datei (Foto oder Video) von der Speicherkarte in einzelnen Foto oder Video-Wiedergabemodus
löschen.
In einzelnen Foto oder Video-Wiedergabemodus, drücken und halten um in den einzelnen Foto oder
Löschbildschirm zu gelangen.
Drücken Sie oder auf "Ja“auszuwählen.
Drücken Sie um zu bestätigen.
Bestätigen um in die Miniaturansicht des ausgewählten Ordners zu wechseln.
oder um zur vorherigen oder nächsten Miniaturansicht zu wechseln.
um das Video vorzuspulen und drücken Sie sie erneut, um die Geschwindigkeit zu ändern.
um das Video schnell zurückzuspulen und drücken Sie sie erneut, um die Geschwindigkeit zu ändern..
DE-19
Page 49

7.6 Einstellungsmenü
Während normalen Schleifen Aufnahmen drücken um in den Einstellungsmodus zu gelangen.
Folgen Sie den folgenden drei Schritte, um in den Einstellungsbildschirm für jedes
Menü Element zu gelangen.
1. Drücken Sie oder um das Menü / Untermenü Element aus, das Sie einstellen möchten.
(In der Datum/Zeit Einstellung drücken, um die Zahl zu erhöhen oder Drücken um die Anzahl zu
verringern.)
2. Drücken Sie um die Auswahl zu bestätigen.
3. Drücken Sie um zur vorherigen Seite zurückzukehren.
DE-20
Page 50

Video-Auflösung
Kamera
Stellen Sie die
Videoauflösung normaler
Schleifen Videos und
Ereignisschutz Videos ein.
y 1296p: 2304x1296 P30
y 1080p: 1920x1080 P30
y 720P: 1280x720 P30
Aufnahmedauer
Dauer des
Fahren
Bildschirmschoner
Bildschirmschoner Typ
Stellen Sie die Dauer jedes
normalen Schleifen Videos
ein.
Stellen Sie die Zeit ein
wann der
Bildschirmschoner aktiviert
wird oder deaktivieren Sie
die BildschirmschonerFunktion
Stellen Sie die
Bildschirmschoner-Typ
DE-21
y 3 min
y 5 min
y 10 min (nicht in 1296p modi)
y 30 sec
y 1 min
y 3 min
y Aus
y Display aus
y Zeit
y Richtung
Page 51

Mikrofon
A
Lautstärke
Empfindlichkeit
Ein- / Ausschalten des
Mikrofons während der
ufnahme
Stellen Sie die
Lautsprecher-Lautstärke
von
Stimmen/Geräuschen/Wied
ergabe ein.Wiedergabe
Stellen Sie die
Empfindlichkeit des GSensor ein, um die
Ereignisschutz Aufnahme
zu aktivieren oder
deaktivieren Sie diese
Funktion
DE-22
y An
y Aus
y 0-5
y Hoch
y Mittel
y Niedrig
y Aus
Page 52

y Englisch
A
y Deutsch
y Spanisch
Sprache
General
Datum / Zeit Einstellung
Format
Standardeinstellung
Geräteinformationen Zeigen Sie die Modellnummer, Firmware-Version und GPS-Informationen
Stellen Sie die DisplaySprache
Stellen Sie das Datum und
die Uhrzeit des Gerätes
ein.
Formatieren Sie die
MicroSD-Karte
lle Einstellungen auf die
Werkspositionen
zurücksetzen.
DE-23
y Französisch
y Italienisch
y Russisch
y japanisch
y Koreanisch
y S. Chinese
y T. Chinese
JJJJ/MM/TT/SS/MM
y Nein
y Ja
y Nein
y Ja
Page 53

8. Anschließen der Dashcam Wi-Fi an einen Computer
Sie können auch Ihren Dashcam an den Computer anschließen, und schauen Sie sich die Videos und
Bilder auf dem Computermonitor an.
1. Schließen Sie das Dashcam an den Computer mit dem USB-Kabel.(im Lieferumfang
enthalten)
2. Ihr Computer kann das Dashcam als "Wechseldatenträger" erkannen. The USB icon will be
displayed on the LCD screen of your camera. Öffnen Sie die Festplatte und gehen Sie zum entsprechenden
Dateiordner um Videos oder Fotos anzuzeigen, importieren, kopieren, übertragen oder zu löschen..
Hinweis:
DE-24
Page 54

Wenn der Wechseldatenträger-Fenster nicht automatisch gestartet wird, gehen Sie zu Ihrem "Arbeitsplatz" und suchen
Sie das Gerät unter Wechseldatenträger.
9. Anschließen Dashcam an ein HDTV-
Sie können Ihre Dashcam an ein HDTV über das HDMI-Kabel (nicht enthalten). Sobald es angeschlossen ist, können Sie:
1. Sehen Sie sich die Live-Ansicht der Kamera.
2. Wiedergabe jedes Foto / Video-Dateien in der Kamera gespeichert.
DE-25
Page 55

10. Technische Daten
Sensor
Objektiv
Auflösung bei Standbildern
auf Aufnahme
Video-Auflösung
Videoformat MPEG4 (H.264) .MOV File
Foto Format JPG
LCD Display 2.7" LCD Farb Display 16:9
LED-Anzeige 1 pc, 3 farben
GPS-Sensor Ja
G-Sensor Ja
TV Ausgang Mini HDMI
USB Anschluss Micro USB
Strom DC
Microfon Ja
Lautsprecher Ja
3MP CMOS
o
135
Weitwinkel-Objektiv.
3MP on 1296p
2MP on 1080p
1MP on 720p
1296P: 2304x1296 P30
1080P: 1920x1080 P30
720P: 1280x720 P30
DE-26
Page 56

Betriebs-Temperatur -20 to 70 Grad
Lagertemperatur
Abmessungen (L x H x B) 92 x 51 x 29.3mm
Gewicht 104g
-40 to 80 Grad
11. Computer System Mindestanforderungen
Betriebssystem Windows 7&8 / Vista / XP und Mac OS 10.5 oder höher
CPU Pentium Ⅲ oder höher 4 / 3.0G oder schneller empfohlen
RAM Mindestens 256MB
Interface USB Anschluss
CD 4x speed CD ROM oder höher
12. Fehlerbehebung
Problem Ursache Lösung
DE-27
Page 57

Dashcam Wi-Fi lässt sich
nicht einschalten
Nach dem Anschluss des
Dashcam Wi-Fi an einen
Computer kann die Festplatte
nicht finde
Unscharfe Bilder
Niedrige Batteriespannung
Verbindungsfehler
1. Die Dashcam Wi-Fi ist
nicht in fester Position
montiert
2. Die Linse Dashcam Wi-Fi
ist verschmutzt
Schließen Sie das Dashcam Wi-Fi an
eine Stromquelle mit DC oder USBKabel
1. Stellen Sie sicher, dass alle
Kabelverbindungen fest sind
2. Starten Sie den Computer
gegebenenfalls neu
1. neuinstallieren oder neu montieren
Sie die DashCam
2. Reinigen Sie das Objektiv mit einem
weichen und trockenen Tuch
FCC Statement
Caution Statement
“Modifications not approved by the party responsible for compliance could void the user’s
authority to operate the equipment.”
This device complies with Part 15 of the FCC Rules. Operation is subject to the following two
DE-28
Page 58

conditions:
(1) this device may not cause harmful interference, and
(2) this device must accept any interference received, including interference that
Instruction Statement
NOTE: This equipment has been tested and found to comply with the limits for a Class B
digital device, pursuant to Part 15 of the FCC Rules. These limits are designed to provide
reasonable protection against harmful interference in a residential installation. This equipment
generates, uses and can radiate radio frequency energy and, if not installed and used in
accordance with the instructions, may cause harmful interference to radio or television
reception, which can be determined by turning the equipment off and on, the user is
encouraged to try to correct the interference by one or more of the following measures:
• Reorient or relocate the receiving antenna.
• Increase the separation between the equipment and receiver.
• Connect the equipment into an outlet on a circuit different from that to which the receiver is
connected.
• Consult the dealer or an experienced radio/ TV technician for help.
WARNING: THE MANUFACTURER IS NOT RESPONSIBLE FOR ANY RADIO OR TV
INTERFERENCE CAUSED BY UNAUTHORIZED MODIFICATIONS TO THE DEVICE. ANY
SUCH MODIFICATIONS COULD VOID THE USER’S AUTHORITY TO OPERATE THE
EQUIPMENT.
may cause undesired operation.
DE-29
Page 59

INFORMATIONEN ZU DEN WARENZEICHEN
© 2015 World Wide Licenses Limited.
® Das Cool iCam logo ist ein eingetragenes Warenzeichen von World Wide Licenses Limited.
Questions?
Need Some Help?
This manual should help you understand
your new product.
If you still have
questions,
visit our website:
www.ioncamera.com
Like Us:
www.facebook.com/ioncamera
Tweet Us:
www.twitter.com/ioncamera
DE-30
Page 60

Guide de démarrage rapide
DashCam Caméra pour voiture
FR-1
Page 61

1. Caractéristiques principales
y Caméra video pour voiture DashCam avec lentille à angle large de 135o.
y Écran couleur LCD 2.7" pour un contrôle en direct et la lecture des videos.
y Enregistrement automatique des évènements lors d'impacts externes soudains.
y Enregistrement continu et en boucle en cas d’éventuels incidents.
y Enregistrement des informations de géo-localisation à l’intérieur des fichiers photos et videos grâce au capteur GPS
integré.
y Enregistrement vidéo de haute qualité, jusqu'à 1296p dans des conditions extrêmes de faible intensité lumineuse.
y Prise de photos lors de l'enregistrement vidéo.
FR-2
Page 62

2. Contenu de la boîte
1 Câble USB 2 Câble d'alimentation 5M
3 Adaptateur USB pour voiture 4 Fixation pour pare-brise
5 Étiquette Antivol 6 Logiciel CD pour DashCam
7 Carte de garantie 8 Guide de démarrage rapide
9 Autocollant iON
FR-3
Page 63

3. Composants fonctionnels
FR-4
Page 64

1 Port DC in Connectez le câble USB (fourni) au port DC pour charger la caméra.
2 Port Mini HDMI Connectez à la télévision avec un câble Mini HDMI (non fourni).
3 Port Micro USB Connectez à un PC pour voir et transférer vos fichiers.
Lentille à angle
4
large
5
6
7 Indicateur LED Indique les tâches en cours.
8
9
10 Écran Pour la vue en direct, la lecture et les indications de fonctionnalité.
Pour un grand angle de vue.
1. Sélectionne le bouton en haut à gauche de l'écran.
2. Entre dans le mode Lecture.
3. Monte dans la sélection ou va au fichier précédent.
1. Sélectionne le bouton en bas à gauche de l'écran.
2. Descends dans la sélection ou va au fichier suivant.
3. Prends une photo.
1. Confirme votre selection.
2. Déclenche manuellement l'enregistrement d'une vidéo sécurisée.
3. Sélectionne le bouton en bas à droite de l'écran.
1. Allume ou éteins la caméra DashCam en appuyant et maintenant le
bouton.
2. Sélectionne le bouton en haut à droite de l'écran.
3. Entre dans le menu Réglages.
4. Reviens à l'interface précédente.
FR-5
Page 65

Compartiment pour
11
carte MicroSD
12 Bouton Reset Pour réinitialiser la caméra.
13 Haut parleur Sortie sonore.
Accueille une carte mémoire de stockage MicroSD.
4. Installation de la fixation de pare-brise et de la caméra
DashCam dans votre véhicule
1. Nettoyer la zone en question sur le pare-brise.
2. Ôtez la membrane de protection de l'autocollant 3M et collez la fixation pour pare-brise sur le pare-brise, à l'intérieur
du véhicule.
3. Insérez le clip en haut de la caméra DashCam dans la fixation pour pare-brise afin de la vérouiller.
FR-6
Page 66

4. La lentille de la caméra DashCam doit être au centre du pare-brise avant et ne doit pas gêner la visibilité du
conducteur.
FR-7
Page 67

5. Ajustez la molette sur la fixation pour pare-brise pour orientez la caméra dans la bonne direction et à l'angle souhaité.
FR-8
Page 68

6. Connectez la caméra DashCam à l'allume cigare à l'aide du câble USB / DC in fourni et du double chargeur
USB. Sécurisez le câble à l'aide de l'attache pour empêcher toute interférence avec la visibilité du conducteur.
FR-9
Page 69

FR-10
Page 70

Déverouillez et retirez la caméra en pressant le bouton sur le côté de la fixation.
FR-11
Page 71

5. Lumière LED et indicateur de son
LED Rouge
LED flash
continu
LED Violet
LED Bleue
La caméra DashCam enregistre normalement en mode boucle.
2 sonneries indiquent que l'enregistrement commence.
Compte à rebours jusqu'à l'arrêt de la caméra après l'avoir déconnectée de sa
source d'alimentation.
Une sonnerie regulière indique le statut du compte à rebours.
La caméra DashCam enregistre en mode sécurisé.
1 sonnerie indique que l'enregistrement commence.
La caméra DashCam n'est pas en cours d'enregistrement mais occupée à une
autre tâche (par ex. Réglages ou Lecture).
FR-12
Page 72

6. Explication des icones de statut
Objet Fonction Description
1 Indicateur de Lecture
Entre dans le mode Lecture.
(Mode normal d'enregistrement en boucle seulement).
FR-13
Page 73

2 Indicateur de capture d'écran Opère une capture d'écran d'une vidéo.
3 Mode sélectionné
4 Résolution vidéo
5 Statut du microphone
6 Intensité du GPS
Mode normal d'enregistrement en boucle.
Mode d'enregistrement sécurisé.
Affiche le paramètre de résolution vidéo sélectionné.
1296p (2304x1296 P30)
1080p ( 1920x1080 P30)
720p (1280x720 P30)
Montre si le microphone est en marche.
(L'icone est cachée si le microphone est éteint).
Affiche l'intensité du signal GPS.
Aucune réception GPS
Faible réception GPS
Réception GPS convenable
Forte réception GPS
7 Compteur de photos Affiche le nombre de photos que vous avez prises.
8 Compteur total de photos
Compteur de vidéos
9
sécurisées
Affiche le nombre maximum de photos que vous pouvez
prendre.
Affiche le nombre de vidéos sécurisées ayant été
enregistrées.
FR-14
Page 74

Compteur total de vidéos
10
sécurisées
11 Heure système Affiche l'heure actuelle du système en Heures et Minutes.
12 Statut d'alimentation
Indicateur d'enregistrement
13
sécurisé
14 Indicateur de Réglages
15 Indicateur de direction
Affiche le nombre maximum de vidéos sécurisées pouvant
être enregistrées.
Une source d'alimentation externe est connectée.
Aucune source d'alimentation externe connectée.
Commencer l'enregistrement sécurisé.
Arrêter l'enregistrement sécurisé.
Entre dans le menu Réglages.
(Mode normal d'enregistrement en boucle seulement).
Affiche la direction actuelle.
(L'icone est cachée si aucun signal GPS).
7. Utiliser votre caméra pour voiture DashCam
7.1 Insérez une carte mémoire MicroSD (nécessaire mais non fournie)
Insérez une carte MicroSD (non fournie) dans le compartiment prévu à cet effet avant d'utiliser la caméra. Assurez-vous
que la caméra soit éteinte avant d'insérer la carte mémoire et que la carte MicroSD comprenant au minimum 8GB
d'espace de stockage soit insérée dans l'emplacement prévu à cet effet. Nous recommendons une carte mémoire
MicroSD de Classe 6 ou supérieure et de capacité 32GB pour un résultat optimal.
FR-15
Page 75

Remarques:
1. Respectez le sens lorsque vous insérez la carte MicroSD dans le compartiment prévu à cet effet.
2. Une carte MicroSD neuve doit être formatée avant utilisation. Pour davantage d'informations, reportez-vous à la
section 7.6
7.2 Allumer/Éteindre la caméra DashCam
La caméra DashCam détecte le démarrage du véhicule et commence automatiquement à enregistrer en mode Boucle..
Ou, appuyez et maintenez pour allumer la caméra si aucune source d'alimentation n'est connectée.
FR-16
Page 76

Lors de la première utilisation, il vous faudra configurer la Date& Heure et la langue.
Lors du réglage de la Date & Heure, si vous programmez une Date & Heure antérieure, le message suivant apparaitra:
Choisissez "OUI", tous les fichiers normaux seront supprimés. Choisissez "NON" pour garder les fichiers.
FR-17
Page 77

7.3 Enregistrement vidéo et prise de photos
Enregistrement normal en boucle
La caméra DashCam commence à enregistrer en mode boucle normal lorsque vous l'allumez. L'enregistrement vidéo créé
en continu des fichiers successifs de 3 / 5 / 10 min. Le fichier le plus ancien sera remplacé si la mémoire est pleine, lors de
l'enregistrement en continu.
Enregistrement sécurisé
Si un impact est détecté, les fichiers seront protégées de la suppresion automatique. La sensibilité de la détection d'impact
peut être réglée dans le menu Réglages (reportez-vous à la section 7.6)
En pressant lors de l'enregistrement normal, vous pouvez entrer en mode Enregistrement sécurisé pour protéger
vos fichiers vidéos.
Vous pouvez stocker jusqu'à 10 vidéos sécurisées sur la caméra DashCam.
Prise de photos
Appuyez une fois sur durant l'enregistrement pour prendre une photo. Vous pouvez stocker jusqu'à 500 photos sur la
caméra DashCam.
7.4 Lecture des fichiers
Durant l'enregistrement normal en mode boucle, appuyez sur pour entrer dans le mode Lecture. Vous pouvez choisir
de visualiser dans des dossiers spécifiques et sur des pages différentes.
FR-18
Page 78

1 Vidéos sécurisées
2 Vidéos normales en boucle
3 Photos
FR-19
Page 79

Comment se déplacer en mode Lecture:
Appuyez une fois sur et sur pour sélectionner le dossier/fichier que vous souhaitez visualiser.
Appuyez sur pour confirmer et entrer dans le mode Aperçu du dossier sélectionné.
Appuyez sur
Dans le mode Aperçu, maintenez ou pour aller à la page d'aperçus suivante ou précédente.
Appuyez sur pour lire une vidéo. Durant la lecture de la vidéo:
Appuyez sur pour mettre en pause et appuyez de nouveau pour continuer.
Appuyez sur
Appuyez sur
Remarque:
Le fichier en cours d'enregistrement sera sauvegardé avant d'entrer dans le mode Lecture.
7.5 Supprimer un fichier Photo / Vidéo
Vous pouvez supprimer un fichier unique (photo/vidéo) de la carte mémoire dans le mode Lecture.
En mode Lecture photo / vidéo, appuyez et maintenez pour entrer dans l'interface de suppression de photos et
vidéos.
Appuyez sur ou pour sélectionner "OUI";
Appuyez sur pour confirmer.
pour ouvrir un simple fichier Photo ou Video.
pour accélerer la vidéo et appuyez de nouveau pour changer la vitesse de lecture.
pour rembobiner la vidéo et appuyez de nouveau pour changer la vitesse de lecture.
FR-20
Page 80

7.6 Menu Réglages
Durant l'enregistrement normal en boucle, appuyez sur pour entrer dans le mode Réglages.
Procédez aux trois étapes suivantes pour entrer dans l'écran de Réglages pour
chaque menu:
1. Appuyez sur ou pour sélectionner le Menu/Sous-menu que vous souhaitez modifier.
FR-21
Page 81

(Dans le "Réglage Date/Heure” , appuyez sur pour accroître le nombre et sur pour diminuer le nombre.)
2. Appuyez sur pour confirmer votre sélection.
3. Appuyez sur pour retourner à l'interface précédente.
Résolution Vidéo
Caméra
Règlage de la résolution
vidéo du mode boucle
normal et des vidéos
sécurisées
y 1296p: 2304x1296 P30
y 1080p: 1920x1080 P30
y 720P: 1280x720 P30
Durée d'enregistrement
Conduite
Durée de l'économiseur
d'écran
Règlage de la durée de
chaque vidéo sécurisée
Règlage du temps d'activité
de l'économiseur d'écran
que vous souhaitez ou met
fin à la fonction
économiseur d'écran
FR-22
y 3 min
y 5 min
y 10 min (Désactivée à 1296p)
y 30 sec
y 1 min
y 3 min
y Inactif
Page 82

Type d'économiseur d'écran
A
A
Microphone
Volume
Sensibilité
Règlage du type
d'économiseur d'écran
llumer / Éteindre le
microphone durant
l'enregistrement
juste le volume du haut
parleur pour la voix et le
Lecture des vidéos
Règlage de la sensibilité du
capteur G pour activer
l'enregistrement de vidéos
sécurisées ou éteindre
cette fonction
y Écran éteint
y Heure
y Direction
y En marche
y Inactive
y 0-5
y Haute
y Moyenne
y Faible
y Inactive
FR-23
Page 83

y Anglais
A
y Allemand
y Espagnol
y Français
Language
General
Réglage Date/Heure
Formatage
Réglages par défaut
Information sur l'appareil Affiche le numéro de modèle, la version du logiciel et les informations GPS
Règlage la langue de
l'appareil
Réglage de la Date &
Heure de l'appareil
Formatage de la carte
MicroSD
Restaure tous les
paramètres par défaut
y Italien
y Russe
y Japonais
y Coréen
y S. Chinois
y T. Chinois
AAA/MM/JJ/HH/MM
y Non
y Oui
y Non
y Oui
FR-24
Page 84

8. Connecter votre caméra DashCam à un ordinateur
Vous pouvez également connecter votre caméra DashCam à votre ordinateur et ainsi visualiser vos
photos et vidéos.
1. Connectez votre caméra DashCam à votre ordinateur avec le câble USB fourni (inclut).
2. Votre ordinateur va reconnaître la caméra DashCam en tant que "Disque Ejectable". L'icone USB va
apparaitre sur l'écran de votre caméra. Ouvrez l'image disque sur votre ordinateur et accédez au
dossier de fichiers pour voir, importer, copier, transférer et supprimer les photos et vidéos.
FR-25
Page 85

Remarque:
Si la fenêtre de Disque Éjectable ne s'est pas lancée automatiquement, aller dans "Mon Ordinateur / Ordinateur" et trouver
l'appareil "Disque Éjectable".
9. Connecter votre caméra DashCam à une TV HD
Vous pouvez connecter votre caméra DashCam à une TV HD grâce à un câble HDMI (non fourni). Une fois que vous êtes
connecté, vous pouvez:
1. Voir la vue en direct de la caméra.
2. Voir/ Lire les fichiers Photos/Vidéos sauvegardés sur la caméra.
FR-26
Page 86

10. Spécifications
Capteur
Lentille Grand Angle Large 135
3MP CMOS
o
FR-27
Page 87

Résolution des photos
prises lors de
l'enregistrement vidéo
Résolution vidéo
Format vidéo
Format photo
Écran
Indicateur LED
Capteur GPS
Capteur G
Sortie TV
Port USB
Alimentation
3MP on 1296p
2MP on 1080p
1MP on 720p
1296P: 2304x1296 P30
1080P: 1920x1080 P30
720P: 1280x720 P30
MPEG4 (H.264) Fichier .MOV
JPG
Écran couleur 2.7" 16:9
1 pièce, 3 couleurs
Oui
Oui
Mini HDMI
Micro USB
DC in
FR-28
Page 88

Microphone
Haut-parleur
Températures d'opération
Températures de stockage
Dimensions (L x l x H) 92 x 51 x 29.3mm
Poids
Oui
Oui
-20 à 70 degrés
-40 à 80 degrés
104g
11. Conditions requises minimales du système
d'exploitation de votre ordinateur
Système d'exploitation Windows 7&8 / Vista / XP et Mac OS 10.5 ou supérieur
CPU Pentium Ⅲ ou supérieur 4 / 3.0G ou plus rapide recommendé
RAM Au minimum 256MB
FR-29
Page 89

Interface Port USB
CD CD ROM 4x vitesse ou supérieur
12. Dépannage
Problème Cause Solution
Ne peut pas allumer la
caméra DashCam
Ne peut pas trouver le Disque
Éjectable après avoir
connecté la caméra
DashCam à l'ordinateur
Images floues
Niveau de batterie faible
Erreur de connexion
1. La caméra DashCam n'a
pas été installée dans une
position stable
2. La lentille de la caméra
DashCam est sale
FR-30
Connectez la caméra DashCam à une
source d'alimentation avec le câble DC
ou USB
1. Assurez-vous que tous les câbles de
connexion soient en état de
fonctionnement
2. Redémarrez votre ordinateur si
besoin
1. Réinstallez la caméra DashCam
2. Nettoyez la lentille à l'aide d'un chiffon
propre et sec
Page 90

Déclaration de la FCC
Avertissement : Les changements ou modifications à cet appareil non expressément approuvés par la
partie responsable de la conformité pourraient annuler l'autorité de l'utilisateur à utiliser cet appareil.
Ce périphérique est conforme à l'article 15 des règles de la FCC. Son utilisation est sujette aux deux
conditions suivantes :
(1) cet équipement ne doit pas créer d'interférences dangereuses.
(2) Cet équipement doit accepter toute interférence reçue, incluant celles pouvant
REMARQUE : Cet équipement à été testé et est conforme aux limites d'un appareil de Classe B, selon
l'article 15 des Règles FCC. Ces limites ont étés mises en place pour offrir une protection raisonnable
contre les interférences dans un complexe résidentiel. Cet équipement génère, utilise et contient de
l'énergie de fréquence radio, si inutilisé incorrectement pourrait créer des interférences dangereuses
pour les communications radio.
Mais il n'existe aucune garantie que des interférences ne seront pas produites dans une installation
particulière. Si cet équipement crée des interférences pour la réception radio ou télévisuelle, ce qui
peut être constaté en l'allumant et en l'éteignant, alors il vous est conseillé d'y remédier d'une des
manières suivantes :
entraîner un mauvais fonctionnement.Instruction Statement
y Réorientez ou déplacez l'antenne réceptrice.
y Augmentez la distance entre l'équipement et le récepteur.
y Connectez l'équipement à une prise ou circuit différent de celui du récepteur.
Consultez le distributeur ou un technicien radio ou TV d'expérience pour de l'assistance.
FR-31
Page 91

ATTENTION: LE CONSTRUCTEUR N'EST PAS RESPONSABLE POUR QUELCONQUE
INTERFERENCE RADIO OU TELEVISUELLE CAUSEES PAR DES MODIFICATIONS NON
AUTORISEES SUR L'APPAREIL. TOUTE MODIFICATIONS DE CE TYPE PEUT ENTRAINER
L'ANNULATION DE L'AUTORISATION D'UTILISATION DE L'EQUIPEMENT PAR
L'UTILISATEUR.
INFORMATIONS LEGALES
© 2015 World Wide Licenses Limited.
® Le logo iON est une marque déposée de World Wide Licenses Limited.
Des questions ?
Besoin d'aide ?
Ce manuel vous aidera à
comprendre votre nouveau
produit
Si vous avez des questions
supplémentaires,
visitez notre site web :
www.ioncamera.com
Aimez nous :
www.facebook.com/ioncamera
Twittez nous :
www.twitter.com/ioncamera
FR-32
Page 92

Guida rapida 1040
DashCam VIDEOCAMERA PER AUTO
IT-1
Page 93

1. Funzionalità principali
y Dash cam per auto con lente grandangolare 135o.
y LCD a colori da 2,7" per monitoraggio in tempo reale e riproduzione video.
y Registrazione video eventi automatica per improvvisi impatti esterni.
y Registrazione a ciclo continuo di scenari per incidenti improvvisi.
y Registrazione di informazioni terrestri in file fotografici o video grazie al sensore GPS integrato.
y Registrazione video di alta qualità fino a 1296p in ambienti estremi con ridotta luminosità.
y Possibilità di catturare immagini durante la registrazione.
IT-2
Page 94

2. Contenuto della confezione
1 Cavo USB 2 Cavo di alimentazione da 5 m
3 Adattatore USB per auto 4 Supporto per parabrezza
5 Etichetta Sensormatic 6 CD software per dash cam
7 Scheda di garanzia 8 Guida rapida
9 Etichetta iON
IT-3
Page 95

3. Parti funzionali
1 Porta ingresso CC
Porta mini HDMI
2
3 Porta micro USB
Lente
4
grandangolare
5
Per il collegamento della porta CC nel cavo USB per la ricarica.
Per il collegamento al televisore mediante cavo mini HDMI (non
fornito).
Per il collegamento al PC per visione e trasferimento di file.
Per la cattura di un'immagine grandangolare.
1. Per selezionare il comando su schermo in alto a sinistra.
IT-4
Page 96

6
7 Spia LED
8
9
10 Schermo
11
12 Tasto di ripristino
13 Presa altoparlante
Vano per scheda
MicroSD
2. Per accedere alla modalità di riproduzione.
3. Per spostarsi verso l'alto nella barra di selezione o spostarsi al
file precedente.
1. Per selezionare il comando su schermo in basso a sinistra.
2. Per spostarsi verso il basso nella barra di selezione o spostarsi
al file successivo.
3. Per scattare una foto.
Indicazione dello stato di funzionamento.
1. Per confermare la selezione.
2. Per avviare manualmente una registrazione video protezione
evento.
3. Per selezionare il comando su schermo in basso a destra.
1. Per accendere o spegnere la dash cam tenendo premuto il
pulsante.
2. Per selezionare il comando su schermo in alto a destra.
3. Per accedere al menu Configurazione.
4. Per tornare all’interfaccia precedente.
Pannello Sharp per visione dal vivo, riproduzione e indicazioni
delle funzioni.
Alloggio per scheda MicroSD.
Per ripristinare la dash cam.
Per l'uscita dell’audio.
IT-5
Page 97

4. Installazione del supporto per parabrezza e della dash
cam nel veicolo
1. Pulire l'area sul parabrezza.
2. Rimuovere la pellicola protettiva dall'adesivo 3M e fissare il supporto per parabrezza sullo stesso all'interno
dell'automobile.
3. Far scorrere la presa sulla parte superiore della dash cam nel supporto per parabrezza fino al fissaggio.
IT-6
Page 98

4. La lente della dash cam deve trovarsi al centro del parabrezza senza però ostruire la visuale del conducente.
5.Regolare il dado sul supporto per parabrezza per ottenere una direzione e un orientamento corretti.
Regolare il dado
IT-7
Page 99

6. Collegare la dash cam Wi-Fi al jack di alimentazione CC nel cavo USB e nell'adattatore doppio USB.
Fissare il cavo con l'apposito supporto per evitare interferenze a seguito dei movimenti del conducente.
IT-8
Page 100

Posizione di installazione
IT-9
 Loading...