

Page 1
User's Manual
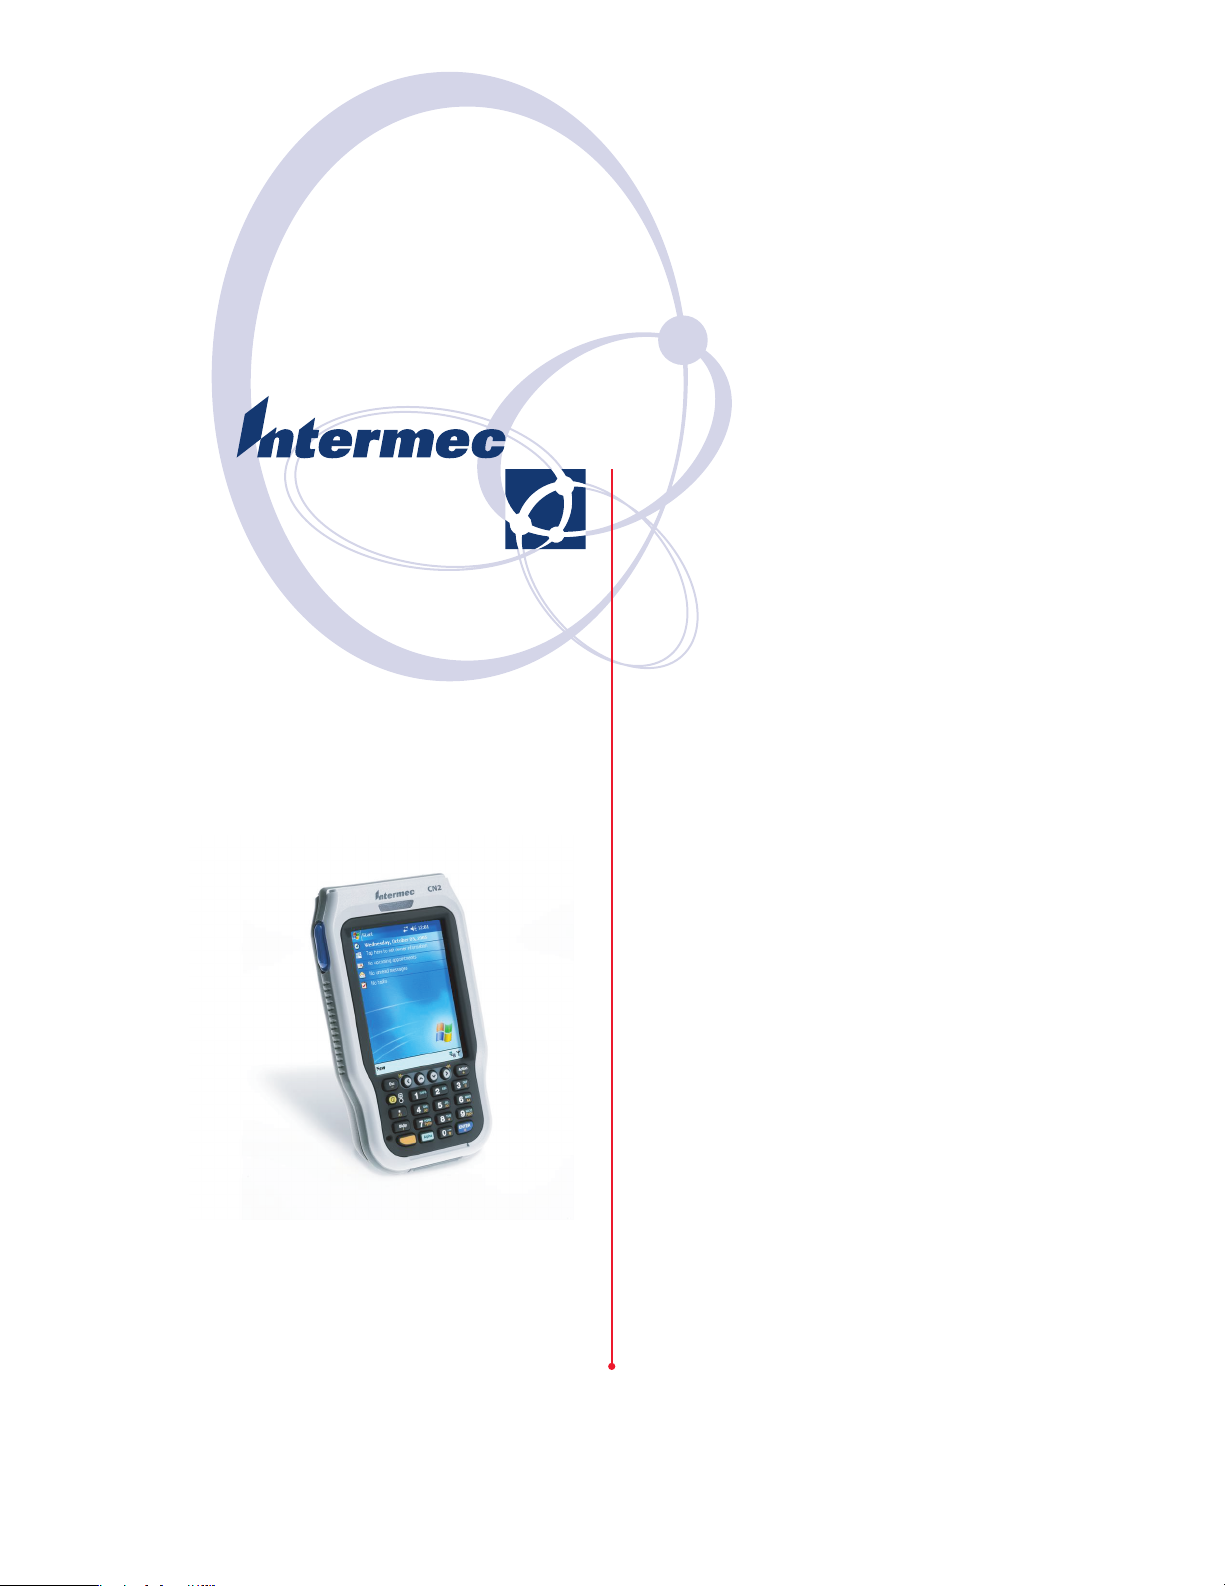
CN2B Mobile
Computer
Page 2

Intermec Technologies Corporation
Worldwide Headquarters Cedar Rapids Technical Communications
6001 36th Ave.W. 550 Second Street SE
Everett, WA 98203 Cedar Rapids, IA 52401
U.S.A. U.S.A.
www.intermec.com
The information contained herein is provided solely for the purpose of allowing customers to operate and service Intermec-manufactured equipment and is not to be released, reproduced, or used for any other purpose
without written permission of Intermec Technologies Corporation.
Information and specifications contained in this document are subject to change without prior notice and do
not represent a commitment on the part of Intermec Technologies Corporation.
© 2006 by Intermec Technologies Corporation. All rights reserved.
The word Intermec, the Intermec logo, Norand, ArciTech, Beverage Routebook, CrossBar, dcBrowser,
Duratherm, EasyADC, EasyCoder, EasySet, Fingerprint, i-gistics, INCA (under license), Intellitag, Intellitag
Gen2, JANUS, LabelShop, MobileLAN, Picolink, Ready-to-Work, RoutePower, Sabre, ScanPlus, ShopScan,
Smart Mobile Computing, TE 2000, Trakker Antares, and Vista Powered are either trademarks or registered
trademarks of Intermec Technologies Corporation.
There are U.S. and foreign patents as well as U.S. and foreign patent applications pending.
Wi-Fi is a registered certification mark of the Wi-Fi Alliance.
Microsoft, Windows, and the Windows logo are registered trademarks of Microsoft Corporation in the United
States and/or other countries.
Bluetooth is a trademark of Bluetooth SIG, Inc., U.S.A.
This product includes software developed by the OpenSSL Project for use in the OpenSSL Toolkit.
(www.openssl.org).
This product includes cryptographic software written by Eric Young (EAY@cryptsoft.com).
This product uses Regex++, Index software during its operational phases. The owner of Regex++ has granted
use of the software to anyone provided such use is accompanied by the following copyright and permission
notice:
Regex++, Index. (Version 3.31, 16th Dec 2001)
Copyright © 1998-2001 Dr John Maddock
Permission to use, copy, modify, distribute and sell this software and its documentation for any purpose is
hereby granted without fee, provided that the above copyright notice appear in all copies and that both that
copyright notice and this permission notice appear in supporting documentation. Dr John Maddock makes no
representations about the suitability of this software for any purpose. It is provided "as is" without express or
implied warranty.
ii CN2B Mobile Computer User’s Manual
Page 3

Document Change Record
This page records changes to this document. The document was originally
released as version 001.
Version
Number
002 06/2006 Added Intermec Settings > Printers information,
Date Description of Change
improved configuration information, adapted for RoHS
compliance.
CN2B Mobile Computer User’s Manual iii
Page 4

iv CN2B Mobile Computer User’s Manual
Page 5

Contents
Before You Begin. . . . . . . . . . . . . . . . . . . . . . . . . . . . . . . . . . . . . . . . . . . . . . . . . . . . . . . . .xv
Safety Information . . . . . . . . . . . . . . . . . . . . . . . . . . . . . . . . . . . . . . . . . . . . . . . . .xv
Global Services and Support. . . . . . . . . . . . . . . . . . . . . . . . . . . . . . . . . . . . . . . . . .xv
Who Should Read This Document? . . . . . . . . . . . . . . . . . . . . . . . . . . . . . . . . . . . xvi
Related Documents . . . . . . . . . . . . . . . . . . . . . . . . . . . . . . . . . . . . . . . . . . . . . . . xvi
Patent Information . . . . . . . . . . . . . . . . . . . . . . . . . . . . . . . . . . . . . . . . . . . . . . . .xvii
Using the CN2B Computer . . . . . . . . . . . . . . . . . . . . . . . . . . . . . . . . . . . . . . . . . . . . . . . . . . 1
1
Audio System. . . . . . . . . . . . . . . . . . . . . . . . . . . . . . . . . . . . . . . . . . . . . . . . . . . . . . . . . . . . 2
Speaker. . . . . . . . . . . . . . . . . . . . . . . . . . . . . . . . . . . . . . . . . . . . . . . . . . . . . . . . . . 2
Microphone . . . . . . . . . . . . . . . . . . . . . . . . . . . . . . . . . . . . . . . . . . . . . . . . . . . . . . 2
External Headset Jack. . . . . . . . . . . . . . . . . . . . . . . . . . . . . . . . . . . . . . . . . . . . . . . 2
Battery. . . . . . . . . . . . . . . . . . . . . . . . . . . . . . . . . . . . . . . . . . . . . . . . . . . . . . . . . . . . . . . . . 3
Installing and Charging the Battery . . . . . . . . . . . . . . . . . . . . . . . . . . . . . . . . . . . . 4
Removing the Battery . . . . . . . . . . . . . . . . . . . . . . . . . . . . . . . . . . . . . . . . . . . . . . . 5
Maximizing Battery Life . . . . . . . . . . . . . . . . . . . . . . . . . . . . . . . . . . . . . . . . . . . . . 6
Contents
Beeper . . . . . . . . . . . . . . . . . . . . . . . . . . . . . . . . . . . . . . . . . . . . . . . . . . . . . . . . . . . . . . . . . 6
Enabling the Beeper . . . . . . . . . . . . . . . . . . . . . . . . . . . . . . . . . . . . . . . . . . . . . . . . 6
Adjusting the Beeper Volume . . . . . . . . . . . . . . . . . . . . . . . . . . . . . . . . . . . . . . . . . 7
Disabling the Beeper. . . . . . . . . . . . . . . . . . . . . . . . . . . . . . . . . . . . . . . . . . . . . . . . 7
Intermec Settings Applet . . . . . . . . . . . . . . . . . . . . . . . . . . . . . . . . . . . . . . . . . . . . . . . . . . . 7
Key Sequences . . . . . . . . . . . . . . . . . . . . . . . . . . . . . . . . . . . . . . . . . . . . . . . . . . . . . . . . . . . 8
[Orange] Plane Keys. . . . . . . . . . . . . . . . . . . . . . . . . . . . . . . . . . . . . . . . . . . . . . . . 8
Alpha (Green) Plane Keys. . . . . . . . . . . . . . . . . . . . . . . . . . . . . . . . . . . . . . . . . . . . 8
LEDs . . . . . . . . . . . . . . . . . . . . . . . . . . . . . . . . . . . . . . . . . . . . . . . . . . . . . . . . . . . . . . . . . 10
PSM Build Version . . . . . . . . . . . . . . . . . . . . . . . . . . . . . . . . . . . . . . . . . . . . . . . . . . . . . . 10
Resetting Your CN2B Computer. . . . . . . . . . . . . . . . . . . . . . . . . . . . . . . . . . . . . . . . . . . . 11
Performing a Warm-Boot. . . . . . . . . . . . . . . . . . . . . . . . . . . . . . . . . . . . . . . . . . . 11
Performing a Cold-Boot . . . . . . . . . . . . . . . . . . . . . . . . . . . . . . . . . . . . . . . . . . . . 11
Software Build Version . . . . . . . . . . . . . . . . . . . . . . . . . . . . . . . . . . . . . . . . . . . . . . . . . . . 12
Software Tools. . . . . . . . . . . . . . . . . . . . . . . . . . . . . . . . . . . . . . . . . . . . . . . . . . . . . . . . . . 12
SmartSystems Foundation Console (www.intermec.com/SmartSystems) . . . . . . . 12
Intermec Resource Kits (www.intermec.com/IDL) . . . . . . . . . . . . . . . . . . . . . . . . 12
Storage Media . . . . . . . . . . . . . . . . . . . . . . . . . . . . . . . . . . . . . . . . . . . . . . . . . . . . . . . . . . 13
Wireless Network Support. . . . . . . . . . . . . . . . . . . . . . . . . . . . . . . . . . . . . . . . . . . . . . . . . 15
Accessories . . . . . . . . . . . . . . . . . . . . . . . . . . . . . . . . . . . . . . . . . . . . . . . . . . . . . . . . . . . . . 16
CN2B Mobile Computer User’s Manual v
Page 6

Contents
Physical and Environmental Specifications . . . . . . . . . . . . . . . . . . . . . . . . . . . . . . . . . . . . 16
Windows Mobile 2003 . . . . . . . . . . . . . . . . . . . . . . . . . . . . . . . . . . . . . . . . . . . . . . . . . . . . . 19
2
Software Builds . . . . . . . . . . . . . . . . . . . . . . . . . . . . . . . . . . . . . . . . . . . . . . . . . . . . . . . . . 20
Where to Find Information . . . . . . . . . . . . . . . . . . . . . . . . . . . . . . . . . . . . . . . . . . . . . . . . 20
Basic Skills. . . . . . . . . . . . . . . . . . . . . . . . . . . . . . . . . . . . . . . . . . . . . . . . . . . . . . . . . . . . . 21
Today Screen . . . . . . . . . . . . . . . . . . . . . . . . . . . . . . . . . . . . . . . . . . . . . . . . . . . . 21
Programs . . . . . . . . . . . . . . . . . . . . . . . . . . . . . . . . . . . . . . . . . . . . . . . . . . . . . . . 21
Navigation Bar and Command Bar. . . . . . . . . . . . . . . . . . . . . . . . . . . . . . . . . . . . 22
Pop-up Menus . . . . . . . . . . . . . . . . . . . . . . . . . . . . . . . . . . . . . . . . . . . . . . . . . . . 23
Notifications. . . . . . . . . . . . . . . . . . . . . . . . . . . . . . . . . . . . . . . . . . . . . . . . . . . . . 23
Entering Information . . . . . . . . . . . . . . . . . . . . . . . . . . . . . . . . . . . . . . . . . . . . . . 23
Typing With the Onscreen Keyboard . . . . . . . . . . . . . . . . . . . . . . . . . . . 24
Using Block Recognizer. . . . . . . . . . . . . . . . . . . . . . . . . . . . . . . . . . . . . . 25
Using Letter Recognizer . . . . . . . . . . . . . . . . . . . . . . . . . . . . . . . . . . . . . 25
Using Transcriber . . . . . . . . . . . . . . . . . . . . . . . . . . . . . . . . . . . . . . . . . . 26
Selecting Typed Text. . . . . . . . . . . . . . . . . . . . . . . . . . . . . . . . . . . . . . . . 26
Writing on the Screen. . . . . . . . . . . . . . . . . . . . . . . . . . . . . . . . . . . . . . . . . . . . . . 26
Selecting the Writing. . . . . . . . . . . . . . . . . . . . . . . . . . . . . . . . . . . . . . . . 26
Converting Writing to Text. . . . . . . . . . . . . . . . . . . . . . . . . . . . . . . . . . . 27
Drawing on the Screen . . . . . . . . . . . . . . . . . . . . . . . . . . . . . . . . . . . . . . . . . . . . . 28
Creating a Drawing . . . . . . . . . . . . . . . . . . . . . . . . . . . . . . . . . . . . . . . . . 28
Selecting a Drawing. . . . . . . . . . . . . . . . . . . . . . . . . . . . . . . . . . . . . . . . . 29
Recording a Message. . . . . . . . . . . . . . . . . . . . . . . . . . . . . . . . . . . . . . . . . . . . . . . 29
Creating a Recording. . . . . . . . . . . . . . . . . . . . . . . . . . . . . . . . . . . . . . . . 29
Playing a Recording. . . . . . . . . . . . . . . . . . . . . . . . . . . . . . . . . . . . . . . . . 29
Using My Text . . . . . . . . . . . . . . . . . . . . . . . . . . . . . . . . . . . . . . . . . . . . . . . . . . . 30
Finding and Organizing Information . . . . . . . . . . . . . . . . . . . . . . . . . . . . . . . . . . 30
Customizing Your CN2B Computer . . . . . . . . . . . . . . . . . . . . . . . . . . . . . . . . . . 31
Adjusting Settings . . . . . . . . . . . . . . . . . . . . . . . . . . . . . . . . . . . . . . . . . . 31
Adding or Removing Programs . . . . . . . . . . . . . . . . . . . . . . . . . . . . . . . . 31
Microsoft ActiveSync. . . . . . . . . . . . . . . . . . . . . . . . . . . . . . . . . . . . . . . . . . . . . . . . . . . . . 34
Microsoft Pocket Outlook . . . . . . . . . . . . . . . . . . . . . . . . . . . . . . . . . . . . . . . . . . . . . . . . . 35
Calendar: Scheduling Appointments and Meetings. . . . . . . . . . . . . . . . . . . . . . . . 35
Synchronizing Calendar. . . . . . . . . . . . . . . . . . . . . . . . . . . . . . . . . . . . . . 36
Why Use Categories in the Calendar? . . . . . . . . . . . . . . . . . . . . . . . . . . . 36
What’s an All Day Event? . . . . . . . . . . . . . . . . . . . . . . . . . . . . . . . . . . . . 37
What’s a Recurrence Pattern? . . . . . . . . . . . . . . . . . . . . . . . . . . . . . . . . . 37
Viewing Appointments . . . . . . . . . . . . . . . . . . . . . . . . . . . . . . . . . . . . . . 38
Creating or Changing an Appointment . . . . . . . . . . . . . . . . . . . . . . . . . . 38
Creating an All Day Event. . . . . . . . . . . . . . . . . . . . . . . . . . . . . . . . . . . . 39
Setting a Reminder for an Appointment . . . . . . . . . . . . . . . . . . . . . . . . . 40
Adding a Note to an Appointment . . . . . . . . . . . . . . . . . . . . . . . . . . . . . 40
Making an Appointment Recurring. . . . . . . . . . . . . . . . . . . . . . . . . . . . . 41
Assigning an Appointment to a Category. . . . . . . . . . . . . . . . . . . . . . . . . 41
Sending a Meeting Request . . . . . . . . . . . . . . . . . . . . . . . . . . . . . . . . . . . 42
Finding an Appointment. . . . . . . . . . . . . . . . . . . . . . . . . . . . . . . . . . . . . 43
Deleting an Appointment . . . . . . . . . . . . . . . . . . . . . . . . . . . . . . . . . . . . 43
vi CN2B Mobile Computer User’s Manual
Page 7

Contents
Changing Calendar Options . . . . . . . . . . . . . . . . . . . . . . . . . . . . . . . . . . 43
Contacts: Tracking Friends and Colleagues . . . . . . . . . . . . . . . . . . . . . . . . . . . . . 44
Creating a Contact . . . . . . . . . . . . . . . . . . . . . . . . . . . . . . . . . . . . . . . . . 44
Synchronizing Contacts. . . . . . . . . . . . . . . . . . . . . . . . . . . . . . . . . . . . . . 45
Viewing Contacts . . . . . . . . . . . . . . . . . . . . . . . . . . . . . . . . . . . . . . . . . . 45
Creating or Changing a Contact . . . . . . . . . . . . . . . . . . . . . . . . . . . . . . . 46
Adding a Note to a Contact. . . . . . . . . . . . . . . . . . . . . . . . . . . . . . . . . . . 46
Assigning a Contact to a Category . . . . . . . . . . . . . . . . . . . . . . . . . . . . . . 47
Copying a Contact . . . . . . . . . . . . . . . . . . . . . . . . . . . . . . . . . . . . . . . . . 47
Sending a Message to a Contact. . . . . . . . . . . . . . . . . . . . . . . . . . . . . . . . 48
Finding a Contact . . . . . . . . . . . . . . . . . . . . . . . . . . . . . . . . . . . . . . . . . . 48
Deleting a Contact . . . . . . . . . . . . . . . . . . . . . . . . . . . . . . . . . . . . . . . . . 49
Adding a Contact to Speed Dial . . . . . . . . . . . . . . . . . . . . . . . . . . . . . . . 49
Changing Contacts Options . . . . . . . . . . . . . . . . . . . . . . . . . . . . . . . . . . 49
Tasks: Keeping a To Do List . . . . . . . . . . . . . . . . . . . . . . . . . . . . . . . . . . . . . . . . 50
Creating a Task . . . . . . . . . . . . . . . . . . . . . . . . . . . . . . . . . . . . . . . . . . . . 50
Synchronizing Tasks . . . . . . . . . . . . . . . . . . . . . . . . . . . . . . . . . . . . . . . . 51
Notes: Capturing Thoughts and Ideas . . . . . . . . . . . . . . . . . . . . . . . . . . . . . . . . . 52
Creating a Note. . . . . . . . . . . . . . . . . . . . . . . . . . . . . . . . . . . . . . . . . . . . 52
Synchronizing Notes . . . . . . . . . . . . . . . . . . . . . . . . . . . . . . . . . . . . . . . . 52
Inbox: Sending and Receiving E-mail Messages . . . . . . . . . . . . . . . . . . . . . . . . . . 53
Synchronizing E-mail Messages . . . . . . . . . . . . . . . . . . . . . . . . . . . . . . . . 54
Managing E-mail Messages and Folders. . . . . . . . . . . . . . . . . . . . . . . . . . 54
Connecting to a Mail Server . . . . . . . . . . . . . . . . . . . . . . . . . . . . . . . . . . 55
Composing and Sending Messages . . . . . . . . . . . . . . . . . . . . . . . . . . . . . 56
Companion Programs . . . . . . . . . . . . . . . . . . . . . . . . . . . . . . . . . . . . . . . . . . . . . . . . . . . . 57
Pocket Word . . . . . . . . . . . . . . . . . . . . . . . . . . . . . . . . . . . . . . . . . . . . . . . . . . . . 57
Creating a Document . . . . . . . . . . . . . . . . . . . . . . . . . . . . . . . . . . . . . . . 57
Typing Mode . . . . . . . . . . . . . . . . . . . . . . . . . . . . . . . . . . . . . . . . . . . . . 58
Writing Mode . . . . . . . . . . . . . . . . . . . . . . . . . . . . . . . . . . . . . . . . . . . . . 59
Recording Mode . . . . . . . . . . . . . . . . . . . . . . . . . . . . . . . . . . . . . . . . . . . 59
Drawing Mode . . . . . . . . . . . . . . . . . . . . . . . . . . . . . . . . . . . . . . . . . . . . 60
Synchronizing Pocket Word Documents. . . . . . . . . . . . . . . . . . . . . . . . . 60
Pocket Excel . . . . . . . . . . . . . . . . . . . . . . . . . . . . . . . . . . . . . . . . . . . . . . . . . . . . . 60
Creating a Workbook . . . . . . . . . . . . . . . . . . . . . . . . . . . . . . . . . . . . . . . 61
Tips for Working in Pocket Excel . . . . . . . . . . . . . . . . . . . . . . . . . . . . . . 61
MSN Messenger . . . . . . . . . . . . . . . . . . . . . . . . . . . . . . . . . . . . . . . . . . . . . . . . . . 62
Setting Up an Account . . . . . . . . . . . . . . . . . . . . . . . . . . . . . . . . . . . . . . 62
Signing In and Out . . . . . . . . . . . . . . . . . . . . . . . . . . . . . . . . . . . . . . . . . 63
Working with Contacts . . . . . . . . . . . . . . . . . . . . . . . . . . . . . . . . . . . . . . 64
Managing Contacts . . . . . . . . . . . . . . . . . . . . . . . . . . . . . . . . . . . . . . . . . 64
Sending a Message. . . . . . . . . . . . . . . . . . . . . . . . . . . . . . . . . . . . . . . . . . 65
Windows Media Player for Windows Mobile . . . . . . . . . . . . . . . . . . . . . . . . . . . . 65
Microsoft Reader . . . . . . . . . . . . . . . . . . . . . . . . . . . . . . . . . . . . . . . . . . . . . . . . . 66
Getting Books on Your CN2B Computer . . . . . . . . . . . . . . . . . . . . . . . . 66
Using the Library. . . . . . . . . . . . . . . . . . . . . . . . . . . . . . . . . . . . . . . . . . . 66
Reading a Book . . . . . . . . . . . . . . . . . . . . . . . . . . . . . . . . . . . . . . . . . . . . 67
Using Reader Features . . . . . . . . . . . . . . . . . . . . . . . . . . . . . . . . . . . . . . . 67
Removing a Book . . . . . . . . . . . . . . . . . . . . . . . . . . . . . . . . . . . . . . . . . . 68
CN2B Mobile Computer User’s Manual vii
Page 8

Contents
Pocket Internet Explorer . . . . . . . . . . . . . . . . . . . . . . . . . . . . . . . . . . . . . . . . . . . . . . . . . . 68
The Mobile Favorites Folder. . . . . . . . . . . . . . . . . . . . . . . . . . . . . . . . . . . . . . . . . 68
Favorite Links. . . . . . . . . . . . . . . . . . . . . . . . . . . . . . . . . . . . . . . . . . . . . . . . . . . . 68
Mobile Favorites. . . . . . . . . . . . . . . . . . . . . . . . . . . . . . . . . . . . . . . . . . . . . . . . . . 69
Using AvantGo Channels . . . . . . . . . . . . . . . . . . . . . . . . . . . . . . . . . . . . . . . . . . . 70
Using Pocket Internet Explorer. . . . . . . . . . . . . . . . . . . . . . . . . . . . . . . . . . . . . . . 70
Viewing Mobile Favorites and Channels . . . . . . . . . . . . . . . . . . . . . . . . . 70
Browsing the Internet . . . . . . . . . . . . . . . . . . . . . . . . . . . . . . . . . . . . . . . 71
Installing Applications . . . . . . . . . . . . . . . . . . . . . . . . . . . . . . . . . . . . . . . . . . . . . . . . . . . . . 73
3
Packaging an Application. . . . . . . . . . . . . . . . . . . . . . . . . . . . . . . . . . . . . . . . . . . . . . . . . . 74
Installing Applications . . . . . . . . . . . . . . . . . . . . . . . . . . . . . . . . . . . . . . . . . . . . . . . . . . . . 74
Using Microsoft ActiveSync . . . . . . . . . . . . . . . . . . . . . . . . . . . . . . . . . . . . . . . . . 75
Using the FTP Server . . . . . . . . . . . . . . . . . . . . . . . . . . . . . . . . . . . . . . . . . . . . . . 76
Copying a Secure Digital Storage Card. . . . . . . . . . . . . . . . . . . . . . . . . . . . . . . . . 76
Using Wavelink Avalanche . . . . . . . . . . . . . . . . . . . . . . . . . . . . . . . . . . . . . . . . . . 76
Using the SmartSystems Console . . . . . . . . . . . . . . . . . . . . . . . . . . . . . . . . . . . . . 77
Replicating Settings Using the Registry. . . . . . . . . . . . . . . . . . . . . . . . . . . . . . . . . 77
Deleting the Old Registry File . . . . . . . . . . . . . . . . . . . . . . . . . . . . . . . . . 78
Confirming the New Registry File. . . . . . . . . . . . . . . . . . . . . . . . . . . . . . 79
Updating Other Computers in Your Network. . . . . . . . . . . . . . . . . . . . . 79
Updating the System Software. . . . . . . . . . . . . . . . . . . . . . . . . . . . . . . . . . . . . . . . . . . . . . 80
Using a Secure Digital Card to Upgrade the CN2B Computer. . . . . . . . . . . . . . . 81
Using the SmartSystems Console to Upgrade the CN2B Computer . . . . . . . . . . . 82
Migrating from Another Computer . . . . . . . . . . . . . . . . . . . . . . . . . . . . . . . . . . . . . . . . . . 83
Installing Cabinet Files . . . . . . . . . . . . . . . . . . . . . . . . . . . . . . . . . . . . . . . . . . . . . . . . . . . 83
Network Support . . . . . . . . . . . . . . . . . . . . . . . . . . . . . . . . . . . . . . . . . . . . . . . . . . . . . . . . . . . 85
4
Personal Area Networks. . . . . . . . . . . . . . . . . . . . . . . . . . . . . . . . . . . . . . . . . . . . . . . . . . . 86
About the Application . . . . . . . . . . . . . . . . . . . . . . . . . . . . . . . . . . . . . . . . . . . . . 86
Mode. . . . . . . . . . . . . . . . . . . . . . . . . . . . . . . . . . . . . . . . . . . . . . . . . . . . 86
Wireless Printing . . . . . . . . . . . . . . . . . . . . . . . . . . . . . . . . . . . . . . . . . . . 87
Properties . . . . . . . . . . . . . . . . . . . . . . . . . . . . . . . . . . . . . . . . . . . . . . . . 87
File Transfer . . . . . . . . . . . . . . . . . . . . . . . . . . . . . . . . . . . . . . . . . . . . . . 88
Connecting with Bluetooth . . . . . . . . . . . . . . . . . . . . . . . . . . . . . . . . . . . . . . . . . 88
Local Area Networks . . . . . . . . . . . . . . . . . . . . . . . . . . . . . . . . . . . . . . . . . . . . . . . . . . . . . 92
Configuring USB Communications . . . . . . . . . . . . . . . . . . . . . . . . . . . . . . . . . . . 93
Configuring 802.11b/g Radio Communications. . . . . . . . . . . . . . . . . . . . . . . . . . 93
Configuring the Network Parameters for a TCP/IP Network . . . . . . . . . 93
Configuring the Network Parameters for a UDP Plus Network. . . . . . . . 93
Network Adapters. . . . . . . . . . . . . . . . . . . . . . . . . . . . . . . . . . . . . . . . . . . . . . . . . 94
Wireless 802.11 Communications. . . . . . . . . . . . . . . . . . . . . . . . . . . . . . 94
No Networking . . . . . . . . . . . . . . . . . . . . . . . . . . . . . . . . . . . . . . . . . . . . 95
Network Selection APIs . . . . . . . . . . . . . . . . . . . . . . . . . . . . . . . . . . . . . . . . . . . . 95
Network Connections . . . . . . . . . . . . . . . . . . . . . . . . . . . . . . . . . . . . . . . . . . . . . 95
viii CN2B Mobile Computer User’s Manual
Page 9

Creating a Wireless Network Connection. . . . . . . . . . . . . . . . . . . . . . . . . . . . . . . 96
AutoIP/DHCP . . . . . . . . . . . . . . . . . . . . . . . . . . . . . . . . . . . . . . . . . . . . . . . . . . . 99
Wide Area Networks . . . . . . . . . . . . . . . . . . . . . . . . . . . . . . . . . . . . . . . . . . . . . . . . . . . . 100
Remote Access (Modems) . . . . . . . . . . . . . . . . . . . . . . . . . . . . . . . . . . . . . . . . . . . . . . . . 100
Connecting to an Internet Service Provider (ISP) . . . . . . . . . . . . . . . . . . . . . . . . 101
Connecting to Work. . . . . . . . . . . . . . . . . . . . . . . . . . . . . . . . . . . . . . . . . . . . . . 103
Creating a VPN Server Connection to Work . . . . . . . . . . . . . . . . . . . . . . . . . . . 105
Ending a Connection . . . . . . . . . . . . . . . . . . . . . . . . . . . . . . . . . . . . . . . . . . . . . 107
Management . . . . . . . . . . . . . . . . . . . . . . . . . . . . . . . . . . . . . . . . . . . . . . . . . . . . . . . . . . 108
SmartSystems™ Foundation Console (www.intermec.com/SmartSystems) . . . . . 108
SNMP Configuration on the Mobile Computer. . . . . . . . . . . . . . . . . . . . . . . . . 108
Management Information Base . . . . . . . . . . . . . . . . . . . . . . . . . . . . . . . 109
Object Identifiers. . . . . . . . . . . . . . . . . . . . . . . . . . . . . . . . . . . . . . . . . . 109
Configuring with SNMP. . . . . . . . . . . . . . . . . . . . . . . . . . . . . . . . . . . . 110
Printer Support. . . . . . . . . . . . . . . . . . . . . . . . . . . . . . . . . . . . . . . . . . . . . . . . . . . . . . . . . . . . 111
5
Printing ASCII . . . . . . . . . . . . . . . . . . . . . . . . . . . . . . . . . . . . . . . . . . . . . . . . . . . . . . . . 112
Directly to a Port . . . . . . . . . . . . . . . . . . . . . . . . . . . . . . . . . . . . . . . . . . . . . . . . 112
Directly to a Generic Serial Port . . . . . . . . . . . . . . . . . . . . . . . . . . . . . . . . . . . . . 112
Contents
NPCP Printer Driver. . . . . . . . . . . . . . . . . . . . . . . . . . . . . . . . . . . . . . . . . . . . . . . . . . . . 112
About NPCP . . . . . . . . . . . . . . . . . . . . . . . . . . . . . . . . . . . . . . . . . . . . . . . . . . . 113
NPCP Driver Installation and Removal . . . . . . . . . . . . . . . . . . . . . . . . . . . . . . . 113
Opening the NPCP Driver. . . . . . . . . . . . . . . . . . . . . . . . . . . . . . . . . . . . . . . . . 113
Closing the NPCP Driver. . . . . . . . . . . . . . . . . . . . . . . . . . . . . . . . . . . . . . . . . . 114
Reading from the NPCP Driver . . . . . . . . . . . . . . . . . . . . . . . . . . . . . . . . . . . . . 114
Writing to the NPCP Driver . . . . . . . . . . . . . . . . . . . . . . . . . . . . . . . . . . . . . . . 114
NPCP Driver I/O Controls . . . . . . . . . . . . . . . . . . . . . . . . . . . . . . . . . . . . . . . . 114
NPCP Printer Communications. . . . . . . . . . . . . . . . . . . . . . . . . . . . . . . . . . . . . 115
Sample Code . . . . . . . . . . . . . . . . . . . . . . . . . . . . . . . . . . . . . . . . . . . . . . . . . . . 116
NPCP Error Codes. . . . . . . . . . . . . . . . . . . . . . . . . . . . . . . . . . . . . . . . . . . . . . . 116
O’Neil Printer Driver . . . . . . . . . . . . . . . . . . . . . . . . . . . . . . . . . . . . . . . . . . . . . . . . . . . 117
DTR Driver Installation and Removal . . . . . . . . . . . . . . . . . . . . . . . . . . . . . . . . 117
Opening the DTR Driver. . . . . . . . . . . . . . . . . . . . . . . . . . . . . . . . . . . . . . . . . . 117
Closing the DTR Driver. . . . . . . . . . . . . . . . . . . . . . . . . . . . . . . . . . . . . . . . . . . 118
Writing to the DTR Driver . . . . . . . . . . . . . . . . . . . . . . . . . . . . . . . . . . . . . . . . 118
DTR Printer Communications. . . . . . . . . . . . . . . . . . . . . . . . . . . . . . . . . . . . . . 118
Configuring PB42 Printers Via Intermec Settings. . . . . . . . . . . . . . . . . . . . . . . . 119
Scanner Support . . . . . . . . . . . . . . . . . . . . . . . . . . . . . . . . . . . . . . . . . . . . . . . . . . . . . . . . . . 121
6
Scanner Control and Data Transfer . . . . . . . . . . . . . . . . . . . . . . . . . . . . . . . . . . . . . . . . . 122
Data Collection Configuration . . . . . . . . . . . . . . . . . . . . . . . . . . . . . . . . . . . . . . . . . . . . 122
CN2B Mobile Computer User’s Manual ix
Page 10

Contents
Internal Scanners . . . . . . . . . . . . . . . . . . . . . . . . . . . . . . . . . . . . . . . . . . . . . . . . . . . . . . . 123
Linear Imager Settings . . . . . . . . . . . . . . . . . . . . . . . . . . . . . . . . . . . . . . . . . . . . 123
Internal Scanner Supported Symbologies . . . . . . . . . . . . . . . . . . . . . . . . . . . . . . 124
Reading Distances . . . . . . . . . . . . . . . . . . . . . . . . . . . . . . . . . . . . . . . . . . . . . . . 124
Programming. . . . . . . . . . . . . . . . . . . . . . . . . . . . . . . . . . . . . . . . . . . . . . . . . . . . . . . . . . . . . . 125
7
Creating CAB Files . . . . . . . . . . . . . . . . . . . . . . . . . . . . . . . . . . . . . . . . . . . . . . . . . . . . . 126
Creating Device-Specific CAB Files . . . . . . . . . . . . . . . . . . . . . . . . . . . . . . . . . . 126
Creating an .INF File . . . . . . . . . . . . . . . . . . . . . . . . . . . . . . . . . . . . . . 126
Sample .INF File . . . . . . . . . . . . . . . . . . . . . . . . . . . . . . . . . . . . . . . . . . 133
Using Installation Functions in SETUP.DLL. . . . . . . . . . . . . . . . . . . . . . . . . . . 136
After the CAB File Extraction. . . . . . . . . . . . . . . . . . . . . . . . . . . . . . . . . . . . . . . 136
Creating CAB Files with CAB Wizard . . . . . . . . . . . . . . . . . . . . . . . . . . . . . . . . 139
Troubleshooting the CAB Wizard . . . . . . . . . . . . . . . . . . . . . . . . . . . . . . . . . . . 140
Customization and Lockdown . . . . . . . . . . . . . . . . . . . . . . . . . . . . . . . . . . . . . . . . . . . . . 140
FTP Server. . . . . . . . . . . . . . . . . . . . . . . . . . . . . . . . . . . . . . . . . . . . . . . . . . . . . . . . . . . . 141
Configurable Parameters Via the Registry Editor . . . . . . . . . . . . . . . . . . . . . . . . 143
BlockSize. . . . . . . . . . . . . . . . . . . . . . . . . . . . . . . . . . . . . . . . . . . . . . . . 143
DeviceName . . . . . . . . . . . . . . . . . . . . . . . . . . . . . . . . . . . . . . . . . . . . . 143
DeviceURL . . . . . . . . . . . . . . . . . . . . . . . . . . . . . . . . . . . . . . . . . . . . . . 143
IDNATarget . . . . . . . . . . . . . . . . . . . . . . . . . . . . . . . . . . . . . . . . . . . . . 144
ManifestName. . . . . . . . . . . . . . . . . . . . . . . . . . . . . . . . . . . . . . . . . . . . 144
PauseAtStartup . . . . . . . . . . . . . . . . . . . . . . . . . . . . . . . . . . . . . . . . . . . 144
Root . . . . . . . . . . . . . . . . . . . . . . . . . . . . . . . . . . . . . . . . . . . . . . . . . . . 144
Transferring Files Over TCP/IP Networks . . . . . . . . . . . . . . . . . . . . . . . . . . . . . 145
Stopping the FTP Server from Your Application . . . . . . . . . . . . . . . . . . . . . . . . 148
Autostart FTP. . . . . . . . . . . . . . . . . . . . . . . . . . . . . . . . . . . . . . . . . . . . . . . . . . . 149
Kernel I/O Controls . . . . . . . . . . . . . . . . . . . . . . . . . . . . . . . . . . . . . . . . . . . . . . . . . . . . 150
IOCTL_HAL_GET_DEVICE_INFO . . . . . . . . . . . . . . . . . . . . . . . . . . . . . . . 150
IOCTL_HAL_ITC_READ_PARM. . . . . . . . . . . . . . . . . . . . . . . . . . . . . . . . . . 151
IOCTL_HAL_ITC_WRITE_SYSPARM . . . . . . . . . . . . . . . . . . . . . . . . . . . . . 153
IOCTL_HAL_GET_DEVICEID . . . . . . . . . . . . . . . . . . . . . . . . . . . . . . . . . . . 154
IOCTL_HAL_GET_OAL_VERINFO . . . . . . . . . . . . . . . . . . . . . . . . . . . . . . . 155
IOCTL_HAL_GET_BOOTLOADER_VERINFO . . . . . . . . . . . . . . . . . . . . . 155
IOCTL_HAL_WARMBOOT. . . . . . . . . . . . . . . . . . . . . . . . . . . . . . . . . . . . . . 156
IOCTL_HAL_COLDBOOT . . . . . . . . . . . . . . . . . . . . . . . . . . . . . . . . . . . . . . 157
IOCTL_HAL_GET_RESET_INFO . . . . . . . . . . . . . . . . . . . . . . . . . . . . . . . . . 157
IOCTL_HAL_GET_BOOT_DEVICE. . . . . . . . . . . . . . . . . . . . . . . . . . . . . . . 158
IOCTL_HAL_REBOOT. . . . . . . . . . . . . . . . . . . . . . . . . . . . . . . . . . . . . . . . . . 159
IOCTL_PROCESSOR_INFORMATION . . . . . . . . . . . . . . . . . . . . . . . . . . . . 159
IOCTL_GET_CPU_ID . . . . . . . . . . . . . . . . . . . . . . . . . . . . . . . . . . . . . . . . . . 160
Network Selection APIs. . . . . . . . . . . . . . . . . . . . . . . . . . . . . . . . . . . . . . . . . . . . . . . . . . 161
Basic Connect/Disconnect Functions . . . . . . . . . . . . . . . . . . . . . . . . . . . . . . . . . 162
RadioConnect(). . . . . . . . . . . . . . . . . . . . . . . . . . . . . . . . . . . . . . . . . . . 162
RadioDisconnect() . . . . . . . . . . . . . . . . . . . . . . . . . . . . . . . . . . . . . . . . 163
RadioDisassociate() . . . . . . . . . . . . . . . . . . . . . . . . . . . . . . . . . . . . . . . . 163
x CN2B Mobile Computer User’s Manual
Page 11

Contents
Query Information Functions. . . . . . . . . . . . . . . . . . . . . . . . . . . . . . . . . . . . . . . 163
GetAssociationStatus(). . . . . . . . . . . . . . . . . . . . . . . . . . . . . . . . . . . . . . 163
GetAuthenticationMode(). . . . . . . . . . . . . . . . . . . . . . . . . . . . . . . . . . . 164
GetBSSID(). . . . . . . . . . . . . . . . . . . . . . . . . . . . . . . . . . . . . . . . . . . . . . 164
GetDiversity() . . . . . . . . . . . . . . . . . . . . . . . . . . . . . . . . . . . . . . . . . . . . 165
GetLinkSpeed() . . . . . . . . . . . . . . . . . . . . . . . . . . . . . . . . . . . . . . . . . . . 165
GetMac(). . . . . . . . . . . . . . . . . . . . . . . . . . . . . . . . . . . . . . . . . . . . . . . . 166
GetNetworkMode(). . . . . . . . . . . . . . . . . . . . . . . . . . . . . . . . . . . . . . . . 166
GetNetworkType() . . . . . . . . . . . . . . . . . . . . . . . . . . . . . . . . . . . . . . . . 167
GetSSID() . . . . . . . . . . . . . . . . . . . . . . . . . . . . . . . . . . . . . . . . . . . . . . . 167
GetPowerMode(). . . . . . . . . . . . . . . . . . . . . . . . . . . . . . . . . . . . . . . . . . 168
GetRSSI() . . . . . . . . . . . . . . . . . . . . . . . . . . . . . . . . . . . . . . . . . . . . . . . 168
GetTXPower(). . . . . . . . . . . . . . . . . . . . . . . . . . . . . . . . . . . . . . . . . . . . 169
GetWepStatus(). . . . . . . . . . . . . . . . . . . . . . . . . . . . . . . . . . . . . . . . . . . 169
GetRadioIpAddress(). . . . . . . . . . . . . . . . . . . . . . . . . . . . . . . . . . . . . . . 170
GetCCXStatus() . . . . . . . . . . . . . . . . . . . . . . . . . . . . . . . . . . . . . . . . . . 170
Set Information Functions . . . . . . . . . . . . . . . . . . . . . . . . . . . . . . . . . . . . . . . . . 171
AddWep() . . . . . . . . . . . . . . . . . . . . . . . . . . . . . . . . . . . . . . . . . . . . . . . 171
EnableWep() . . . . . . . . . . . . . . . . . . . . . . . . . . . . . . . . . . . . . . . . . . . . . 171
EncryptionStatus() . . . . . . . . . . . . . . . . . . . . . . . . . . . . . . . . . . . . . . . . 172
SetAuthenticationMode() . . . . . . . . . . . . . . . . . . . . . . . . . . . . . . . . . . . 173
SetChannel() . . . . . . . . . . . . . . . . . . . . . . . . . . . . . . . . . . . . . . . . . . . . . 173
SetNetworkMode() . . . . . . . . . . . . . . . . . . . . . . . . . . . . . . . . . . . . . . . . 174
SetPowerMode() . . . . . . . . . . . . . . . . . . . . . . . . . . . . . . . . . . . . . . . . . . 174
SetSSID() . . . . . . . . . . . . . . . . . . . . . . . . . . . . . . . . . . . . . . . . . . . . . . . 175
SetCCXStatus() . . . . . . . . . . . . . . . . . . . . . . . . . . . . . . . . . . . . . . . . . . . 175
SetMixedCellMode(). . . . . . . . . . . . . . . . . . . . . . . . . . . . . . . . . . . . . . . 175
RemoveWep() . . . . . . . . . . . . . . . . . . . . . . . . . . . . . . . . . . . . . . . . . . . . 176
Helper Functions . . . . . . . . . . . . . . . . . . . . . . . . . . . . . . . . . . . . . . . . . . . . . . . . 176
ConfigureProfile() . . . . . . . . . . . . . . . . . . . . . . . . . . . . . . . . . . . . . . . . . 176
EnableZeroConfig() . . . . . . . . . . . . . . . . . . . . . . . . . . . . . . . . . . . . . . . 177
isZeroConfigEnabled() . . . . . . . . . . . . . . . . . . . . . . . . . . . . . . . . . . . . . 177
isSupplicantRunning(). . . . . . . . . . . . . . . . . . . . . . . . . . . . . . . . . . . . . . 177
StartScanList(). . . . . . . . . . . . . . . . . . . . . . . . . . . . . . . . . . . . . . . . . . . . 178
StartSupplicant() . . . . . . . . . . . . . . . . . . . . . . . . . . . . . . . . . . . . . . . . . . 178
StopSupplicant() . . . . . . . . . . . . . . . . . . . . . . . . . . . . . . . . . . . . . . . . . . 178
isDHCPEnabled(). . . . . . . . . . . . . . . . . . . . . . . . . . . . . . . . . . . . . . . . . 179
RenewDHCP() . . . . . . . . . . . . . . . . . . . . . . . . . . . . . . . . . . . . . . . . . . . 179
GetCurrentDriverName() . . . . . . . . . . . . . . . . . . . . . . . . . . . . . . . . . . . 179
ResetRadioToSystemSave() . . . . . . . . . . . . . . . . . . . . . . . . . . . . . . . . . . 180
EnableSuppLogging() . . . . . . . . . . . . . . . . . . . . . . . . . . . . . . . . . . . . . . 180
SwitchPacketDriver(). . . . . . . . . . . . . . . . . . . . . . . . . . . . . . . . . . . . . . . 180
Notifications . . . . . . . . . . . . . . . . . . . . . . . . . . . . . . . . . . . . . . . . . . . . . . . . . . . . . . . . . . 181
NLEDGetDeviceInfo . . . . . . . . . . . . . . . . . . . . . . . . . . . . . . . . . . . . . . . . . . . . . 181
NLEDSetDevice. . . . . . . . . . . . . . . . . . . . . . . . . . . . . . . . . . . . . . . . . . . . . . . . . 182
Reboot Functions . . . . . . . . . . . . . . . . . . . . . . . . . . . . . . . . . . . . . . . . . . . . . . . . . . . . . . 182
IOCTL_HAL_REBOOT. . . . . . . . . . . . . . . . . . . . . . . . . . . . . . . . . . . . . . . . . . 182
IOCTL_HAL_COLDBOOT . . . . . . . . . . . . . . . . . . . . . . . . . . . . . . . . . . . . . . 182
IOCTL_HAL_WARMBOOT. . . . . . . . . . . . . . . . . . . . . . . . . . . . . . . . . . . . . . 182
CN2B Mobile Computer User’s Manual xi
Page 12

Contents
Remapping the Keypad . . . . . . . . . . . . . . . . . . . . . . . . . . . . . . . . . . . . . . . . . . . . . . . . . . 182
Choosing How to Change Keypad Registry Settings. . . . . . . . . . . . . . . . . . . . . . 183
Planes . . . . . . . . . . . . . . . . . . . . . . . . . . . . . . . . . . . . . . . . . . . . . . . . . . . . . . . . . 183
Unshifted Plane. . . . . . . . . . . . . . . . . . . . . . . . . . . . . . . . . . . . . . . . . . . 183
Orange Plane. . . . . . . . . . . . . . . . . . . . . . . . . . . . . . . . . . . . . . . . . . . . . 183
Alpha (Green) Plane . . . . . . . . . . . . . . . . . . . . . . . . . . . . . . . . . . . . . . . 184
Locating the Registry Settings for Your Key Values . . . . . . . . . . . . . . . . . . . . . . 184
How Key Values Are Stored in the Registry . . . . . . . . . . . . . . . . . . . . . . . . . . . . 184
Change Notification. . . . . . . . . . . . . . . . . . . . . . . . . . . . . . . . . . . . . . . . . . . . . . 185
Advanced Keypad Remapping . . . . . . . . . . . . . . . . . . . . . . . . . . . . . . . . . . . . . . 185
Scan Codes . . . . . . . . . . . . . . . . . . . . . . . . . . . . . . . . . . . . . . . . . . . . . . . . . . . . . 185
Understanding Keypad Attributes. . . . . . . . . . . . . . . . . . . . . . . . . . . . . . . . . . . . 187
Creating Multiple Key Definitions . . . . . . . . . . . . . . . . . . . . . . . . . . . . . . . . . . . 187
Sample Registry Settings. . . . . . . . . . . . . . . . . . . . . . . . . . . . . . . . . . . . . . . . . . . 188
Numeric Keypad Registry Settings . . . . . . . . . . . . . . . . . . . . . . . . . . . . 188
Scroll Keypad Registry Settings . . . . . . . . . . . . . . . . . . . . . . . . . . . . . . . 188
Configurable Settings . . . . . . . . . . . . . . . . . . . . . . . . . . . . . . . . . . . . . . . . . . . . . . . . . . . . 191
A
Configuration Parameters . . . . . . . . . . . . . . . . . . . . . . . . . . . . . . . . . . . . . . . . . . . . . . . . 192
Intermec Settings Applet . . . . . . . . . . . . . . . . . . . . . . . . . . . . . . . . . . . . . . . . . . . . . . . . . 192
Utilities Applet . . . . . . . . . . . . . . . . . . . . . . . . . . . . . . . . . . . . . . . . . . . . . . . . . . . . . . . . 193
Registry Save. . . . . . . . . . . . . . . . . . . . . . . . . . . . . . . . . . . . . . . . . . . . . . . . . . . . 193
Wakeup Mask . . . . . . . . . . . . . . . . . . . . . . . . . . . . . . . . . . . . . . . . . . . . . . . . . . 194
App Launch . . . . . . . . . . . . . . . . . . . . . . . . . . . . . . . . . . . . . . . . . . . . . . . . . . . . 194
Wireless Network Applet. . . . . . . . . . . . . . . . . . . . . . . . . . . . . . . . . . . . . . . . . . . . . . . . . 195
About the Wireless Network. . . . . . . . . . . . . . . . . . . . . . . . . . . . . . . . . . . . . . . . 196
Terminology. . . . . . . . . . . . . . . . . . . . . . . . . . . . . . . . . . . . . . . . . . . . . . . . . . . . 196
Configuring Your Wireless Network. . . . . . . . . . . . . . . . . . . . . . . . . . . . . . . . . . 197
Basic . . . . . . . . . . . . . . . . . . . . . . . . . . . . . . . . . . . . . . . . . . . . . . . . . . . 198
Security . . . . . . . . . . . . . . . . . . . . . . . . . . . . . . . . . . . . . . . . . . . . . . . . . 198
Advanced. . . . . . . . . . . . . . . . . . . . . . . . . . . . . . . . . . . . . . . . . . . . . . . . 212
Other Configurable Parameters . . . . . . . . . . . . . . . . . . . . . . . . . . . . . . . . . . . . . . . . . . . . 214
Using Reader Commands . . . . . . . . . . . . . . . . . . . . . . . . . . . . . . . . . . . . . . . . . . . . . . . . 215
Change Configuration . . . . . . . . . . . . . . . . . . . . . . . . . . . . . . . . . . . . . . . . . . . . 215
Set Time and Date . . . . . . . . . . . . . . . . . . . . . . . . . . . . . . . . . . . . . . . . . . . . . . . 216
Configuration Bar Codes. . . . . . . . . . . . . . . . . . . . . . . . . . . . . . . . . . . . . . . . . . . . . . . . . 216
Audio Volume . . . . . . . . . . . . . . . . . . . . . . . . . . . . . . . . . . . . . . . . . . . . . . . . . . 216
Automatic Shutoff . . . . . . . . . . . . . . . . . . . . . . . . . . . . . . . . . . . . . . . . . . . . . . . 217
Backlight Timeout . . . . . . . . . . . . . . . . . . . . . . . . . . . . . . . . . . . . . . . . . . . . . . . 218
Key Clicks . . . . . . . . . . . . . . . . . . . . . . . . . . . . . . . . . . . . . . . . . . . . . . . . . . . . . 218
Virtual Wedge Grid, Preamble, Postamble . . . . . . . . . . . . . . . . . . . . . . . . . . . . . 219
Grid . . . . . . . . . . . . . . . . . . . . . . . . . . . . . . . . . . . . . . . . . . . . . . . . . . . 219
Preamble . . . . . . . . . . . . . . . . . . . . . . . . . . . . . . . . . . . . . . . . . . . . . . . . 219
Postamble . . . . . . . . . . . . . . . . . . . . . . . . . . . . . . . . . . . . . . . . . . . . . . . 219
xii CN2B Mobile Computer User’s Manual
Page 13

Contents
Troubleshooting the CN2B Computer . . . . . . . . . . . . . . . . . . . . . . . . . . . . . . . . . . . 221
B
Sending the CN2B Computer to Intermec for Service. . . . . . . . . . . . . . . . . . . . . . . . . . . 225
Cleaning the Scanner Window and the Touch Screen . . . . . . . . . . . . . . . . . . . . . . . . . . . 226
Index . . . . . . . . . . . . . . . . . . . . . . . . . . . . . . . . . . . . . . . . . . . . . . . . . . . . . . . . . . . . . . . . . . . . . . . . 227
I
CN2B Mobile Computer User’s Manual xiii
Page 14

Contents
xiv CN2B Mobile Computer User’s Manual
Page 15
Before You Begin
Safety Information
Before You Begin
This section provides you with safety information, technical support information, and sources for additional product information.
Your safety is extremely important. Read and follow all warnings and cautions in this document before handling and operating Intermec equipment.
You can be seriously injured, and equipment and data can be damaged if
you do not follow the safety warnings and cautions.
This section explains how to identify and understand dangers, warnings,
cautions, and notes that are in this document.
A warning alerts you of an operating procedure, practice, condition, or
statement that must be strictly observed to avoid death or serious injury
to the persons working on the equipment.
A caution alerts you to an operating procedure, practice, condition, or
statement that must be strictly observed to prevent equipment damage
or destruction, or corruption or loss of data.
Note: Notes either provide extra information about a topic or contain special instructions for handling a particular condition or set of circumstances.
Global Services and Support
Warranty Information
To understand the warranty for your Intermec product, visit the Intermec
web site at www.intermec.com and click Service & Support. The Intermec
Global Sales & Service page appears. From the Service & Support menu,
move your pointer over Support, and then click Warranty.
Disclaimer of warranties: The sample code included in this document is
presented for reference only. The code does not necessarily represent com
plete, tested programs. The code is provided “as is with all faults.” All warranties are expressly disclaimed, including the implied warranties of
merchantability and fitness for a particular purpose.
Web Support
Visit the Intermec web site at www.intermec.com to download our current
manuals in PDF format. To order printed versions of the Intermec manuals, contact your local Intermec representative or distributor.
Visit the Intermec technical knowledge base (Knowledge Central) at
intermec.custhelp.com to review technical information or to request
technical support for your Intermec product.
-
CN2B Mobile Computer User’s Manual xv
Page 16

Before You Begin
Telephone Support
These services are available from Intermec Technologies Corporation.
In the U.S.A. and Canada
call 1-800-755-5505 and
Service Description
Order Intermec
products
Order Intermec media Order printer labels and ribbons. 1 and then choose 1
Order spare parts Order spare parts. 1 or 2 and then choose 4
Technical Support Talk to technical support about
Service • Get a return authorization
Service contracts • Ask about an existing con-
• Place an order.
• Ask about an existing order.
your Intermec product.
number for authorized service
center repair.
• Request an on-site repair technician.
tract.
• Renew a contract.
• Inquire about repair billing or
other service invoicing ques
tions.
choose this option
1 and then choose 2
2 and then choose 2
2 and then choose 1
1 or 2 and then choose 3
-
Outside the U.S.A. and Canada, contact your local Intermec representative.
To search for your local representative, from the Intermec web site, click
Contact.
Who Should Read This Document?
The CN2B Mobile Computer User’s Manual is written for the person who is
responsible for installing, configuring, maintaining, and troubleshooting
the product.
Before you install and configure your product, you should be familiar with
your network and general networking terms, such as IP address.
Related Documents
This table contains a list of related Intermec documents and part numbers.
Document Title Part Number
CN2B Mobile Computer Quick Start Guide 962-054-053
The Intermec web site contains Intermec documents (in PDF) that you can
download for free.
To download documents
1 Browse to www.intermec.com.
xvi CN2B Mobile Computer User’s Manual
Page 17

Patent Information
Before You Begin
2 Click Service & Support > Manuals.
3 In the Select a Product field, choose the product whose documentation
you want to download.
To order printed versions of the Intermec manuals, contact your local
Intermec representative or distributor.
This product is protected by one or more of the following patents:
4,455,523; 4,553,081; 4,709,202; 4,845,419; 4,961,043; 5,195,183; 5.216,233;
5,218,187; 5,218,188; 5,227,614; 5,241,488; 5,278,487; 5,322,991; 5,331,136;
5,331,580; 5,349,678; 5,397,885; 5,371,858; 5,373,478; 5,410,141; 5,488,575;
5,500,516; 5,504,367; 5,508,599; 5,530,619; 5,567,925; 5,568,645; 5,592,512;
5,598,007; 5,617,343; 5,627,360; 5,657,317; 5,671,436; 5,684,290; 5,777,309;
5,793,604; 5,805,807; 5,818,027; 5,821,523; 5,828,052; 5,831,819; 5,834,753;
5,841,121; 5,844,222; 5,883,492; 5,883,493; 5,886,338; 5,889,386; 5,898,162;
5,969,328; 5,986,435; 6,075,340; 6,109,528; 6,158,661; 6,234,395; 6,244,512;
6,330,975; 6,431,451; 6,497,368; 6,538,413; Des. 417,445.
There may be other U.S. and foreign patents pending.
CN2B Mobile Computer User’s Manual xvii
Page 18

Before You Begin
xviii CN2B Mobile Computer User’s Manual
Page 19

Using the CN2B Computer
1
This chapter introduces the CN2B Mobile Computer, developed by Intermec to enhance wireless connectivity needs. This chapter contains hardware and software configuration information to assist you in making the
most out of your CN2B Computer.
Note: Desktop icons and applet icons are shown to the left.
CN2B Mobile Computer User’s Manual 1
Page 20
Chapter 1 — Using the CN2B Computer
Audio System
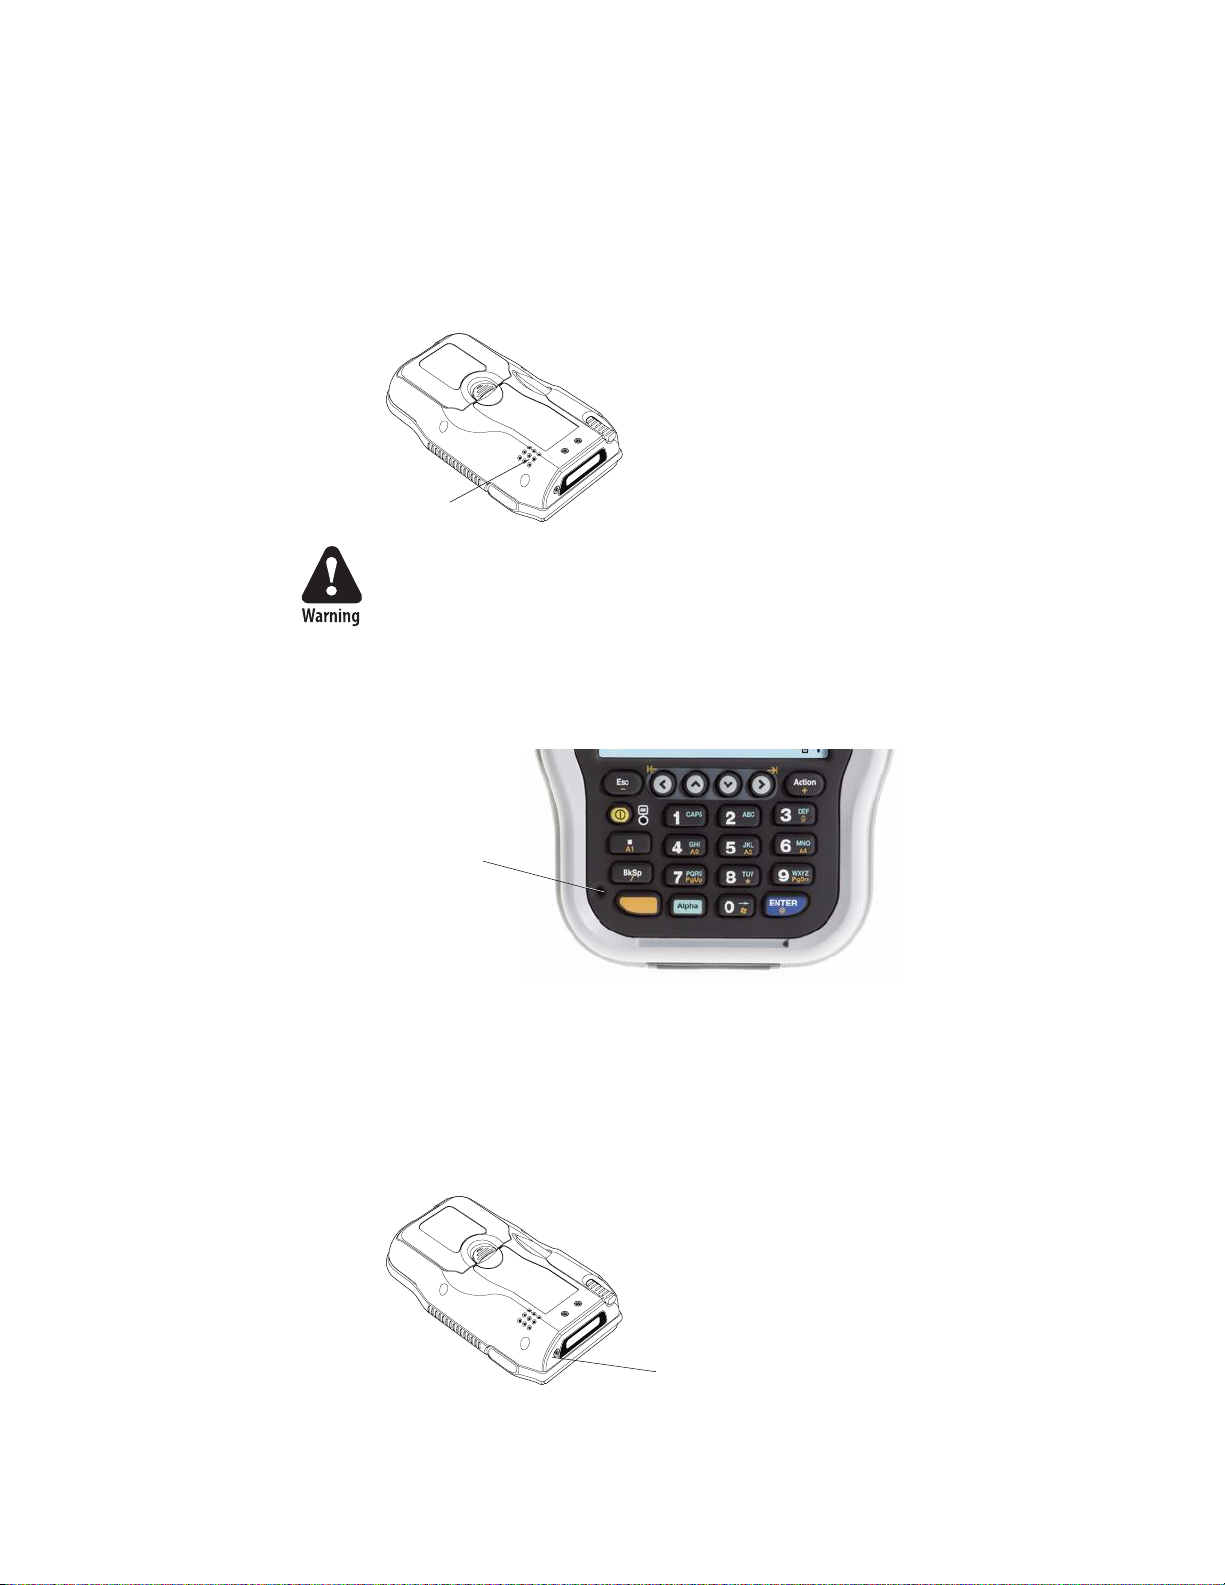
Speaker
A speaker capable of variable volume levels is located on the back of the
computer. This speaker has a transducer maximum volume of 85 dB at 10
cm, a frequency range of 1 to 8KHz, and a separate volume control.
Speaker
Warning: Do not place the speaker next to your ear when the speaker
volume is set to “Loud” (maximum), or you may damage your hearing.
Microphone
External Headset Jack
The built-in microphone is located on the front, left corner of the keypad,
to the left of the BkSp and B key.
Microphone
The external headset jack connects a mobile phone style headset to your
mobile computer for use in noisy environments. The jack is a 2.5 mm,
three-conductor jack, with autosensing of the headset jack insertion which
disables the internal speaker and microphone. The external headset jack is
located on the top of the mobile computer next to the scanner.
Headset Jack
2 CN2B Mobile Computer User’s Manual
Page 21
Battery
Chapter 1 — Using the CN2B Computer
The CN2B Computer comes with an 7.95 Watt-hour, 3.7V, 2150mAh,
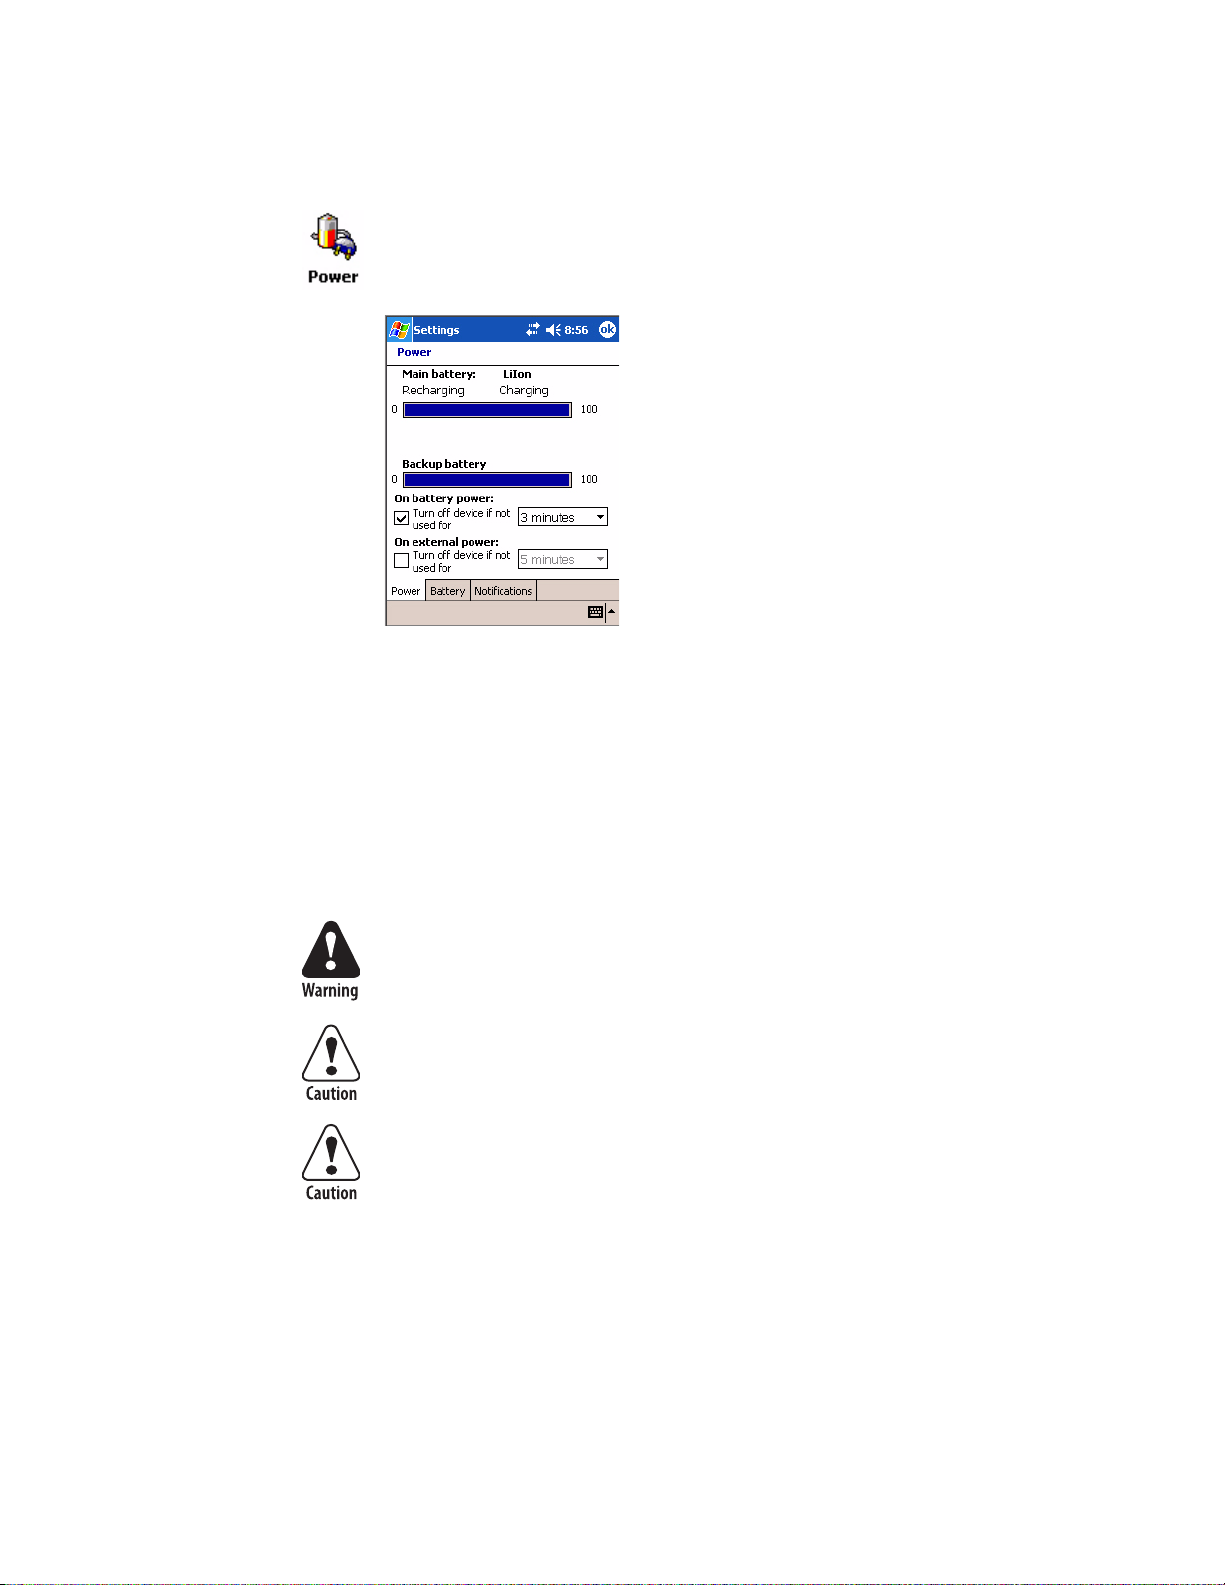
replaceable LiIon battery. To view the status of this battery, tap Start > Settings > the System tab > the Power icon > the Power tab to view the current status of both the main battery and the backup battery. Tap ok to exit.
If your computer shuts down because of low battery conditions, your computer does not operate. This is done to ensure that data is protected.
Although the battery does protect the data against loss for several hours,
you should connect your computer to a power source when you first detect
a low battery condition.
Your computer contains an internal supercapacitor, a temporary power
storage device, that protects data for up to ten minutes. This is to give you
time to replace the main battery pack before that data is lost. Be sure to put
the computer in a suspend mode before doing so.
The lithium-ion battery pack that is used in this device may present a
fire or chemical burn hazard if it is mistreated. Do not disassemble it,
heat it above 100°C (212°F), or incinerate it.
Removing the main battery when the backup battery low or critically
low icon appears on the status bar may cause your CN2B Computer to
cold boot and you may lose data.
If you fail to replace the battery immediately, you may lose important
data or applications.
If you have at least one device in your CN2B Computer (radio, scanner, or
imager), the battery power fail level is set so that after the system shuts
down in a low battery condition, there is still sufficient charge to allow the
unit to remain configured, keep proper time, and maintain DRAM
(Dynamic Random Access Memory) for at least 23 to 32 hours at room
temperature if the main battery remains in the mobile computer.
CN2B Mobile Computer User’s Manual 3
Page 22

Chapter 1 — Using the CN2B Computer
The configuration and time are lost if:
• The battery discharges beyond this level.
• The battery is removed when the computer is not in suspend mode.
• A cold reset is performed on the computer.
You can modify RAM maintenance in a limited way. On the CN2B Computer, tap Start > Settings > the System tab > the Power icon > the Battery
tab. Drag the top slider bar to the left to change the suspend voltage to
favor suspend time over rundown time, then click ok to exit.
Installing and Charging the Battery
Make sure you fully charge the battery before you use your CN2B Computer. To charge the battery, you need to install it in the CN2B Computer.
1 Push down on the battery door latch, pull up on and remove the battery
door, then set it aside.
Battery door latch
2 Align the battery contacts, then slide the battery into the compartment.
Press on the battery until it clicks in place, then replace the battery door.
Battery
4 CN2B Mobile Computer User’s Manual
Page 23
Chapter 1 — Using the CN2B Computer
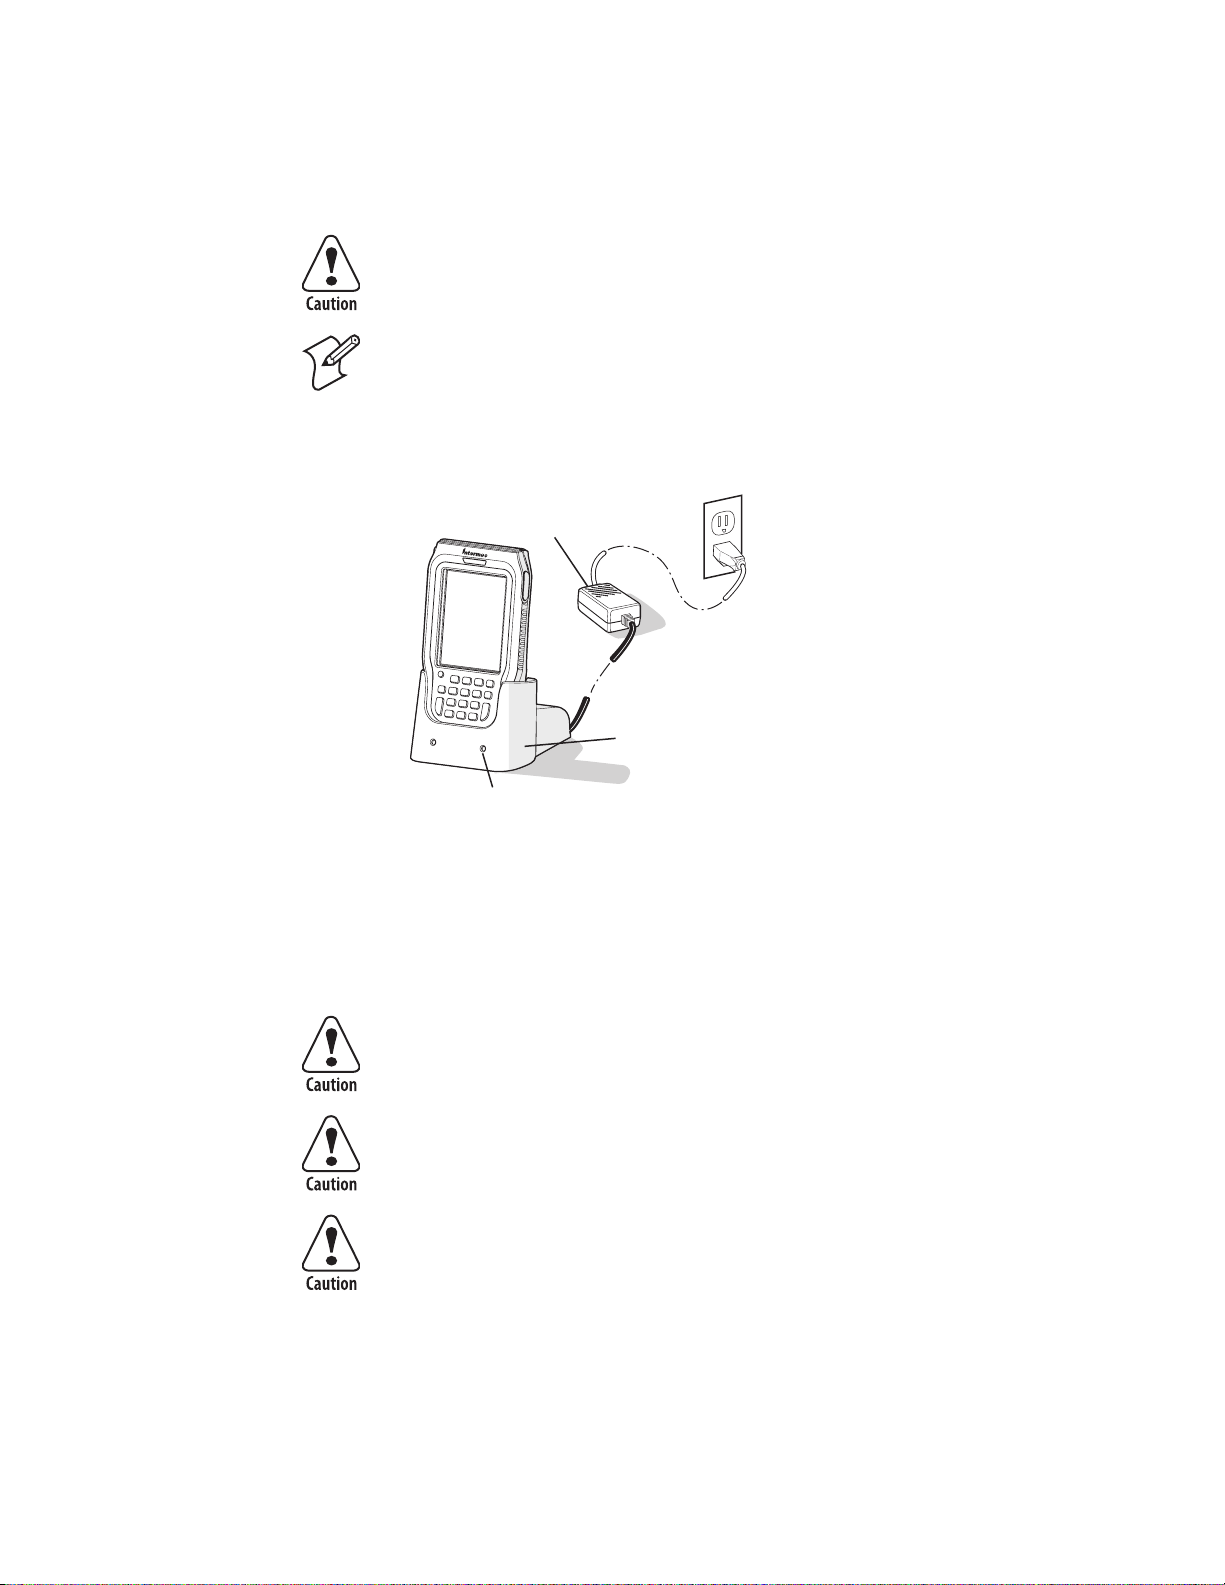
3 Connect the AC power supply to the power connector on the back of the
CN2B Communications Dock, and then connect the power cord to the
AC power supply.
You must use only the Intermec power supply approved for use with
the CN2B Computer. Using any other power supply will damage the
CN2B Computer.
Note: For help installing and using the communications dock, see the CN2
Communications Dock Quick Start Guide (P/N: 930-061-001), which
shipped with the dock.
4 Connect the power cord to an AC power outlet. The green Power light
on the CN2B Communications Dock turns on.
AC power
supply
CN2
5 Place the CN2B Computer in the communications dock. The battery is
Removing the Battery
Follow these instructions to remove the battery from the CN2B Computer.
Only use either the stylus or the bottom tabs on the battery door to dislodge and remove the battery. Using any other tool or method to
remove the battery may damage the battery or the CN2B Computer.
Removing the main battery when the backup battery low or critically
low icon appears on the status bar may cause your CN2B Computer to
cold boot and you may lose data.
If you fail to replace the battery immediately, you may lose important
data or applications.
Communications
dock
Power
light
fully charged in approximately four hours.
CN2B Mobile Computer User’s Manual 5
Page 24
Chapter 1 — Using the CN2B Computer
To remove the battery
1 Push down on the battery door latch, and pull up on the battery door.
2 Remove the battery door and set it aside.
3 Insert the stylus between the battery and the CN2B case, and press
straight down until the battery is released.
Battery door latch
4 Lift the battery out of the battery compartment.
Maximizing Battery Life
•Set the Backlight Timeout to 10 seconds.
• Verify that Radio Power Management is enabled (Fast PSP). Enabling
radio power management allows your radio to switch between awake and
sleep modes based on network traffic.
• Verify that each setting under Power Management has a value of 1
minute for a combined automatic shutoff time of 3 minutes.
Beeper
Note: Each time a cold-boot is performed on the CN2B Computer, all
default settings are restored unless registry storage is enabled. See page 193
for information about enabling the registry storage.
To learn how to set volume levels for screen taps, ActiveSync alert noises,
etc., tap Start > Help > Pocket PC Basics, then select Notifications.
Enabling the Beeper
Tap Start > Settings > the Personal tab > Sounds & Notifications > the
Volume tab, then drag the System volume slider bar away from the
“Silent” position.
6 CN2B Mobile Computer User’s Manual
Page 25
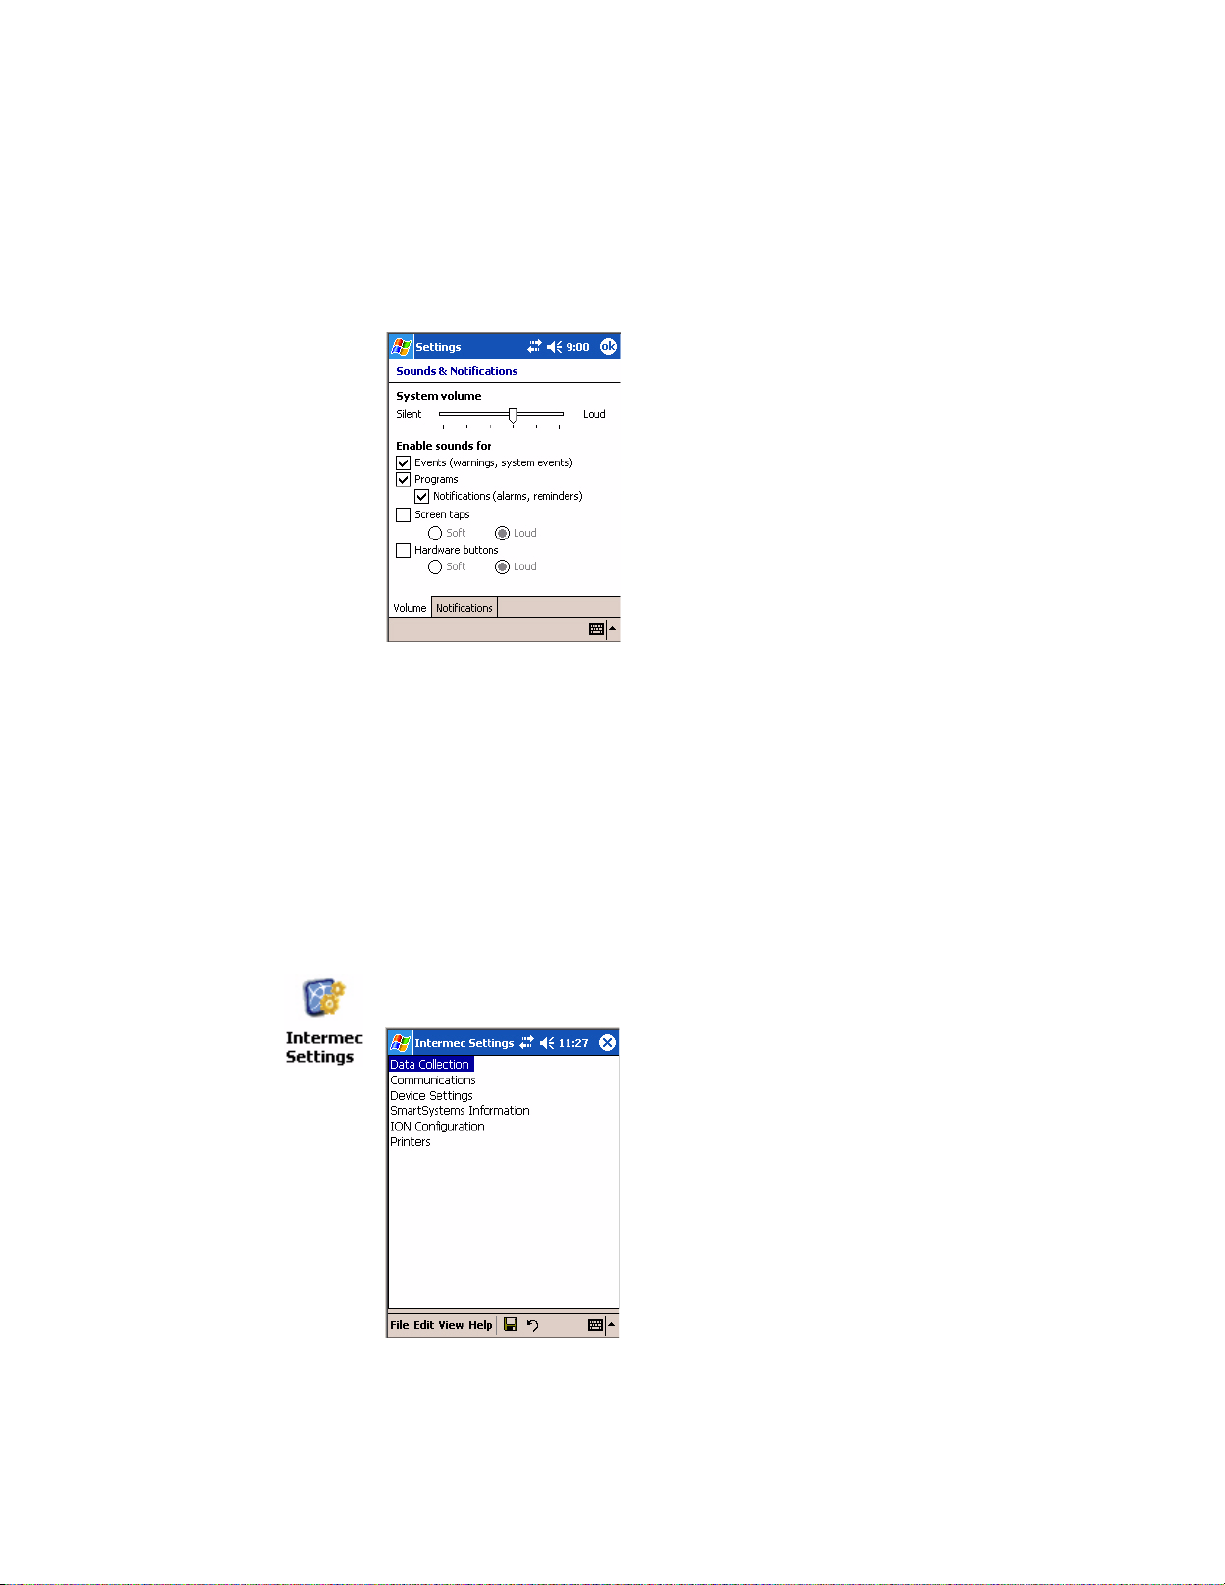
Adjusting the Beeper Volume
Tap or drag the System volume slider bar to your most comfortable level.
Disabling the Beeper
Drag the System volume slider bar completely to the left to the “Silent”
position, then tap ok to exit this applet.
Chapter 1 — Using the CN2B Computer
Intermec Settings Applet
Use the Intermec Settings applet to gather, view, and update device configuration settings. Information about the settings you can configure with the
Intermec Settings applet is in the Intermec Computer Command Reference
Manual (P/N: 073529) available online at www.intermec.com.
See the Data Collection Resource Kit in the Intermec Developer Library
(IDL) for information about data collection functions. The IDL is available
as a download from the Intermec web site at www.intermec.com/idl. Contact your Intermec representative for more information.
Tap Start > Settings > the System tab > the Intermec Settings icon to
access the applet.
CN2B Mobile Computer User’s Manual 7
Page 26
Chapter 1 — Using the CN2B Computer
Key Sequences
[Orange] Plane Keys
The orange plane key provides you access to display controls, special characters, and Pocket PC options.
Press the orange key for each orange plane key stroke you wish to make.
For example to turn on the front light, press and hold the orange key plus
the [3] key. To turn the front light off, press the appropriate keys again.
Below and on the next page are the key sequences.
This table lists sequences that use the orange plane key. See Chapter 2,
“Windows Mobile 2003” to learn about the Pocket PC applications.
Press the Keys To Do This
orange [3] Toggles the backlight (also goes through backlight power levels if
orange [.] Access the Pocket PC Record application (see Note).
this key is held down)
orange [4] Access the Pocket PC Calendar application (see Note).
orange [5] Access the Pocket PC Contacts application (see Note).
orange [6] Access the Pocket PC Tasks application (see Note).
orange [7] Move up one page.
orange [8] Enter an asterisk (*).
orange [9] Move down one page.
orange [0] Access the Pocket PC Start menu.
orange [ENTER] Enter an at symbol (@).
orange [BkSp] Enter a backslash (/).
orange [Esc] Enter a minus sign (–).
orange [Action] Enter a plus sign (+).
orange [ ]
orange [ ]
Pocket PC applications are accessible only if configured to do so via Utilitiese > App Launch.
Tab to the right.
Tab to the left.
Alpha (Green) Plane Keys
You can enter the alphabet using the Alpha (green) plane keys. Below and
on the next page are the key sequences.
When you press [Alpha], the Scanning/Alpha LED shows red for the
Alpha mode. The keypad stays in Alpha mode until you press [Alpha]
again.
8 CN2B Mobile Computer User’s Manual
Page 27

Chapter 1 — Using the CN2B Computer
To type a lowercase “c,” press [Alpha] [2] [2] [2]. To type a letter on the
same key as the last letter entered, wait two seconds, then enter the correct
series of keystrokes to create the next letter.
While in the Alpha mode and you press [1] to initiate the CAPS mode, you
will render a CAPS LOCK until you press [1] again. Once you are in CAPS
mode, you stay in CAPS until it is pressed again. Press [0] to enter a space.
To Enter Press the Keys To Enter Press the Keys
a [Alpha] [2] A [Alpha] [1] [2]
b [Alpha] [2] [2] B [Alpha] [1] [2] [2]
c [Alpha] [2] [2] [2] C [Alpha] [1] [2] [2] [2]
d [Alpha] [3] D [Alpha] [1] [3]
e [Alpha] [3] [3] E [Alpha] [1] [3] [3]
f [Alpha] [3] [3] [3] F [Alpha] [1] [3] [3] [3]
g [Alpha] [4] G [Alpha] [1] [4]
h [Alpha] [4] [4] H [Alpha] [1] [4] [4]
i [Alpha] [4] [4] [4] I [Alpha] [1] [4] [4] [4]
j [Alpha] [5] J [Alpha] [1] [5]
k [Alpha] [5] [5] K [Alpha] [1] [5] [5]
l [Alpha] [5] [5] [5] L [Alpha] [1] [5] [5] [5]
m [Alpha] [6] M [Alpha] [1] [6]
n [Alpha] [6] [6] N [Alpha] [1] [6] [6]
o [Alpha] [6] [6] [6] O [Alpha] [1] [6] [6] [6]
p [Alpha] [7] P [Alpha] [1] [7]
q [Alpha] [7] [7] Q [Alpha] [1] [7] [7]
r [Alpha] [7] [7] [7] R [Alpha] [1] [7] [7] [7]
s [Alpha] [7] [7] [7] [7] S [Alpha] [1] [7] [7] [7] [7]
t [Alpha] [8] T [Alpha] [1] [8]
u [Alpha] [8] [8] U [Alpha] [1] [8] [8]
v [Alpha] [8] [8] [8] V [Alpha] [1] [8] [8] [8]
w [Alpha] [9] W [Alpha] [1] [9]
x [Alpha] [9] [9] X [Alpha] [1] [9] [9]
y [Alpha] [9] [9] [9] Y [Alpha] [1] [9] [9] [9]
z [Alpha] [9] [9] [9] [9] Z [Alpha] [1] [9] [9] [9] [9]
CN2B Mobile Computer User’s Manual 9
Page 28
Chapter 1 — Using the CN2B Computer
LEDs
The battery status LED and the scanning/keypad shift and notification
LED turn red, green, or yellow.
Battery Status LED
LED Color and Action Description
Steady Green Battery is more than 95% charged and the CN2B Computer is on charger.
Blinking Red Battery is less than 10% charged and the CN2B Computer is not on charger.
Red The CN2B Computer is on charge.
Yellow The CN2B Computer is on a charging source and there is no battery pack installed. The
mobile computer may also be out of the charging range of 32° to 104° F (0° to 40° C).
When back in range, charging resumes and the LED changes to red or green.
Scanning/Keypad Shift and Notification LED
LED Color and Action Description
Momentary Green
Steady Red Indicates the keypad is shifted to the Alpha plane and the CN2B Computer is turned on.
Indicates the scanner has initialized and had a good scan.
PSM Build Version
The Persistent Storage Manager (PSM) is an area of storage which is
embedded in a section of the system’s FLASH memory. This storage area is
not erased when a cold-boot is performed. It may, however, erase during the
reflashing process. In addition to storing applications and data files, you do
have the option to store a persistent registry to the PSM region.
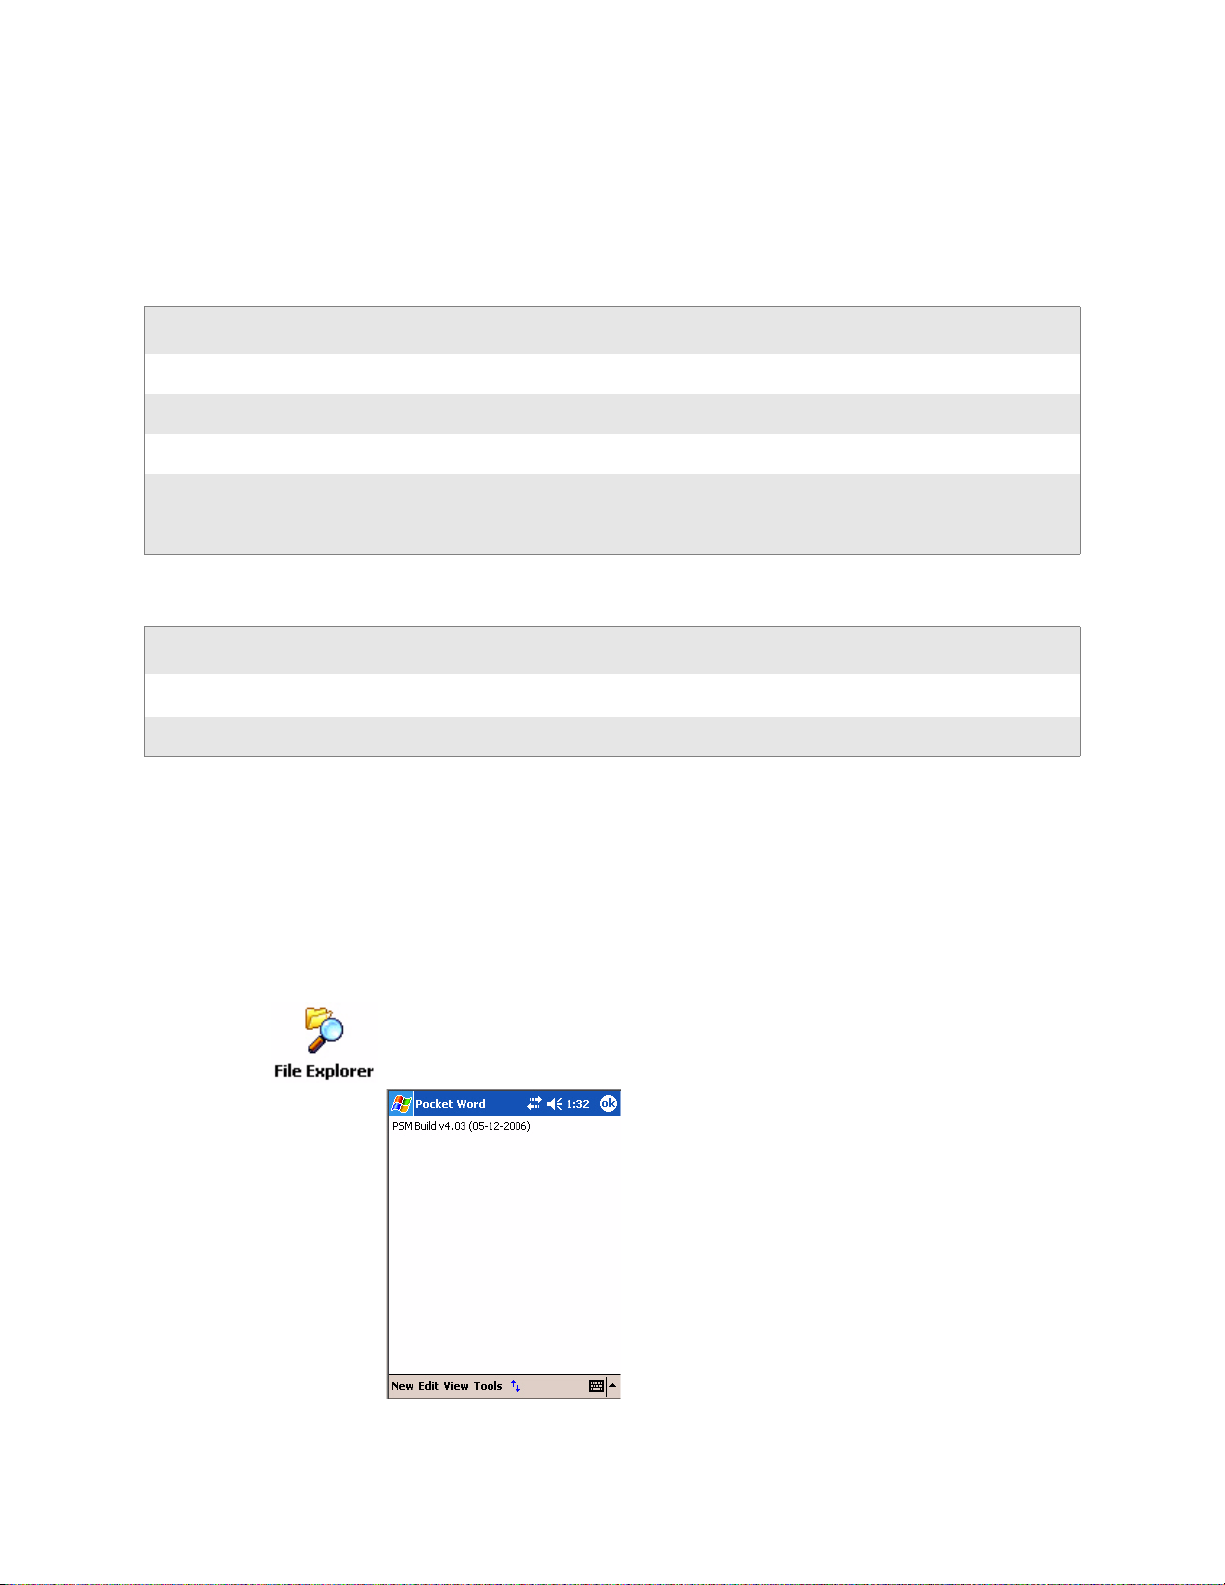
To determine what PSM Build is on your CN2B Computer, tap Start >
Programs > File Explorer. Access the Flash File Store folder from the My
Device root directory, then tap the PSMinfo text file. Tap ok to exit.
10 CN2B Mobile Computer User’s Manual
Page 29
Resetting Your CN2B Computer
Performing a Warm-Boot
Performing a warm-boot may be necessary to correct conditions where an
application stops responding to the system. It does, however, unload all
running programs.
Press and hold the I/O key for ten seconds, then the CN2B Computer continues from the screen you were at before you performed the warm-boot.
Performing a Cold-Boot
In some cases where the CN2B Computer completely stops responding, it
may be necessary to perform a cold-boot. Because this may result in data
loss, this procedure is not recommended unless all other recovery methods
have failed.
Note: This deletes all programs and data stored in RAM including the
Object Store. Make sure data is backed up to your host computer or a storage card before performing a cold-boot.
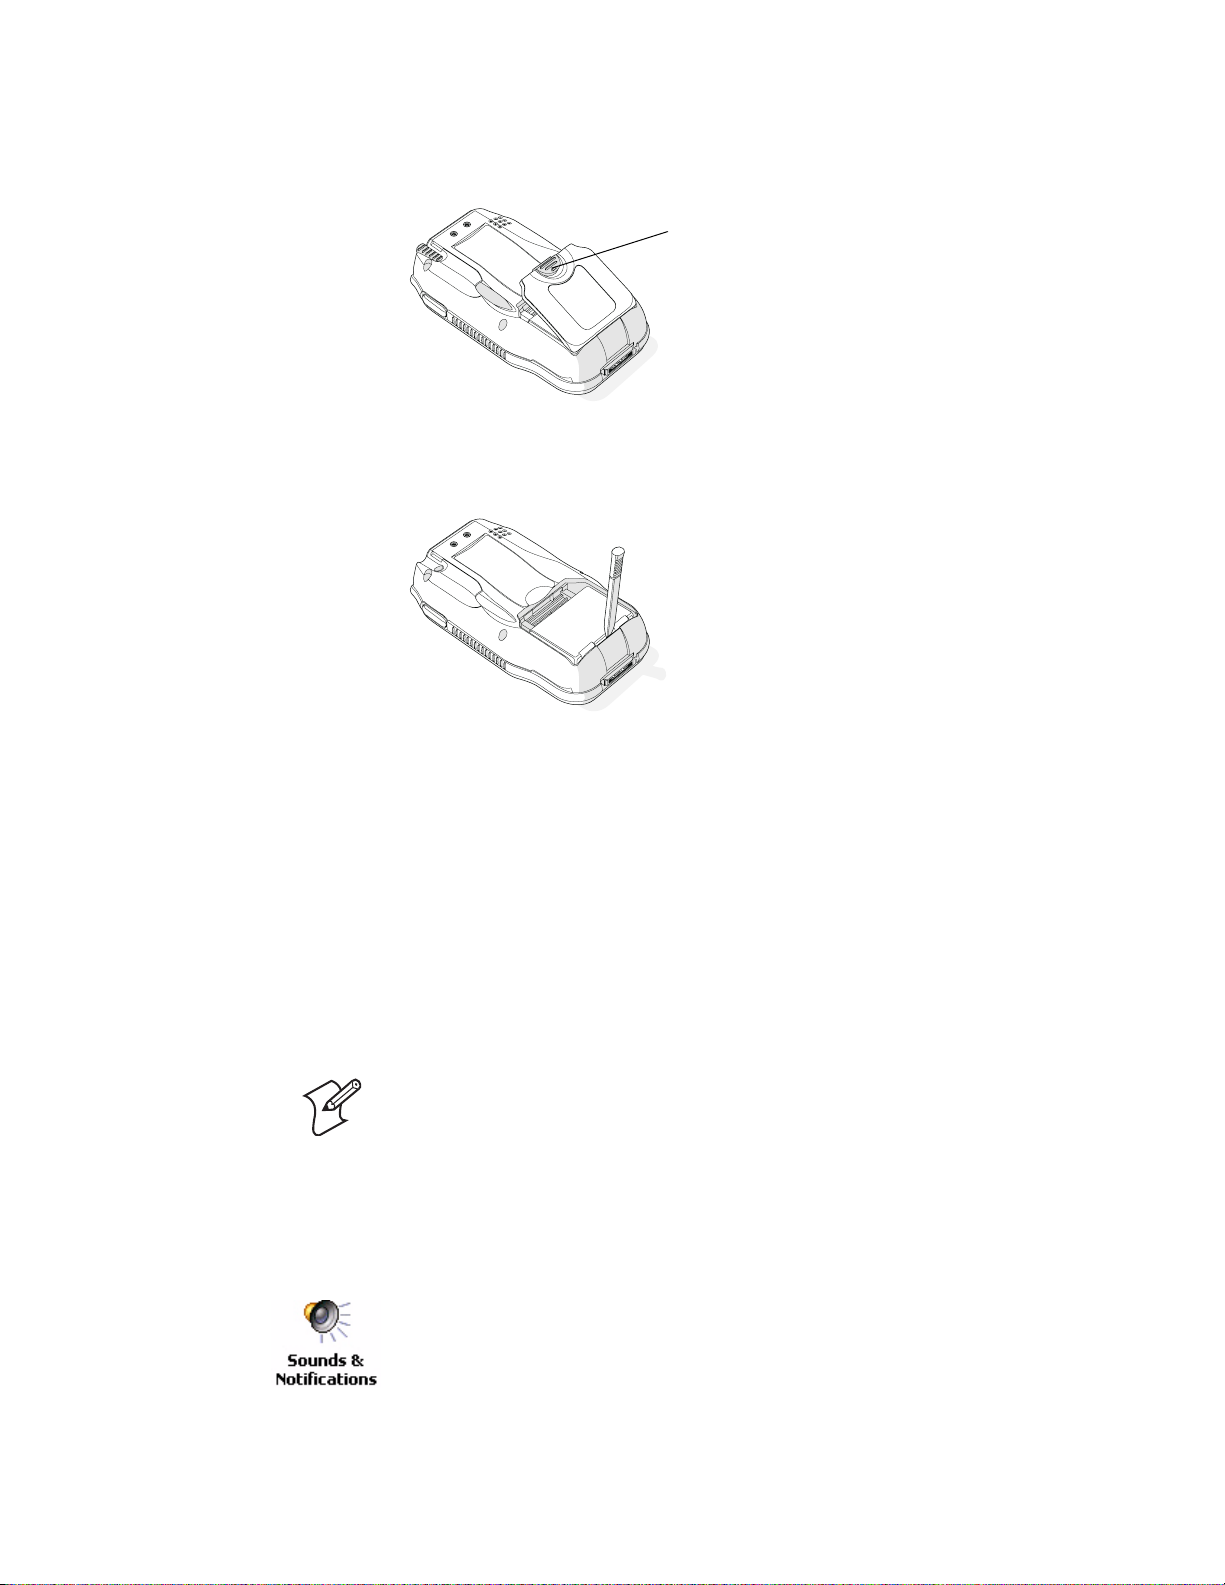
Chapter 1 — Using the CN2B Computer
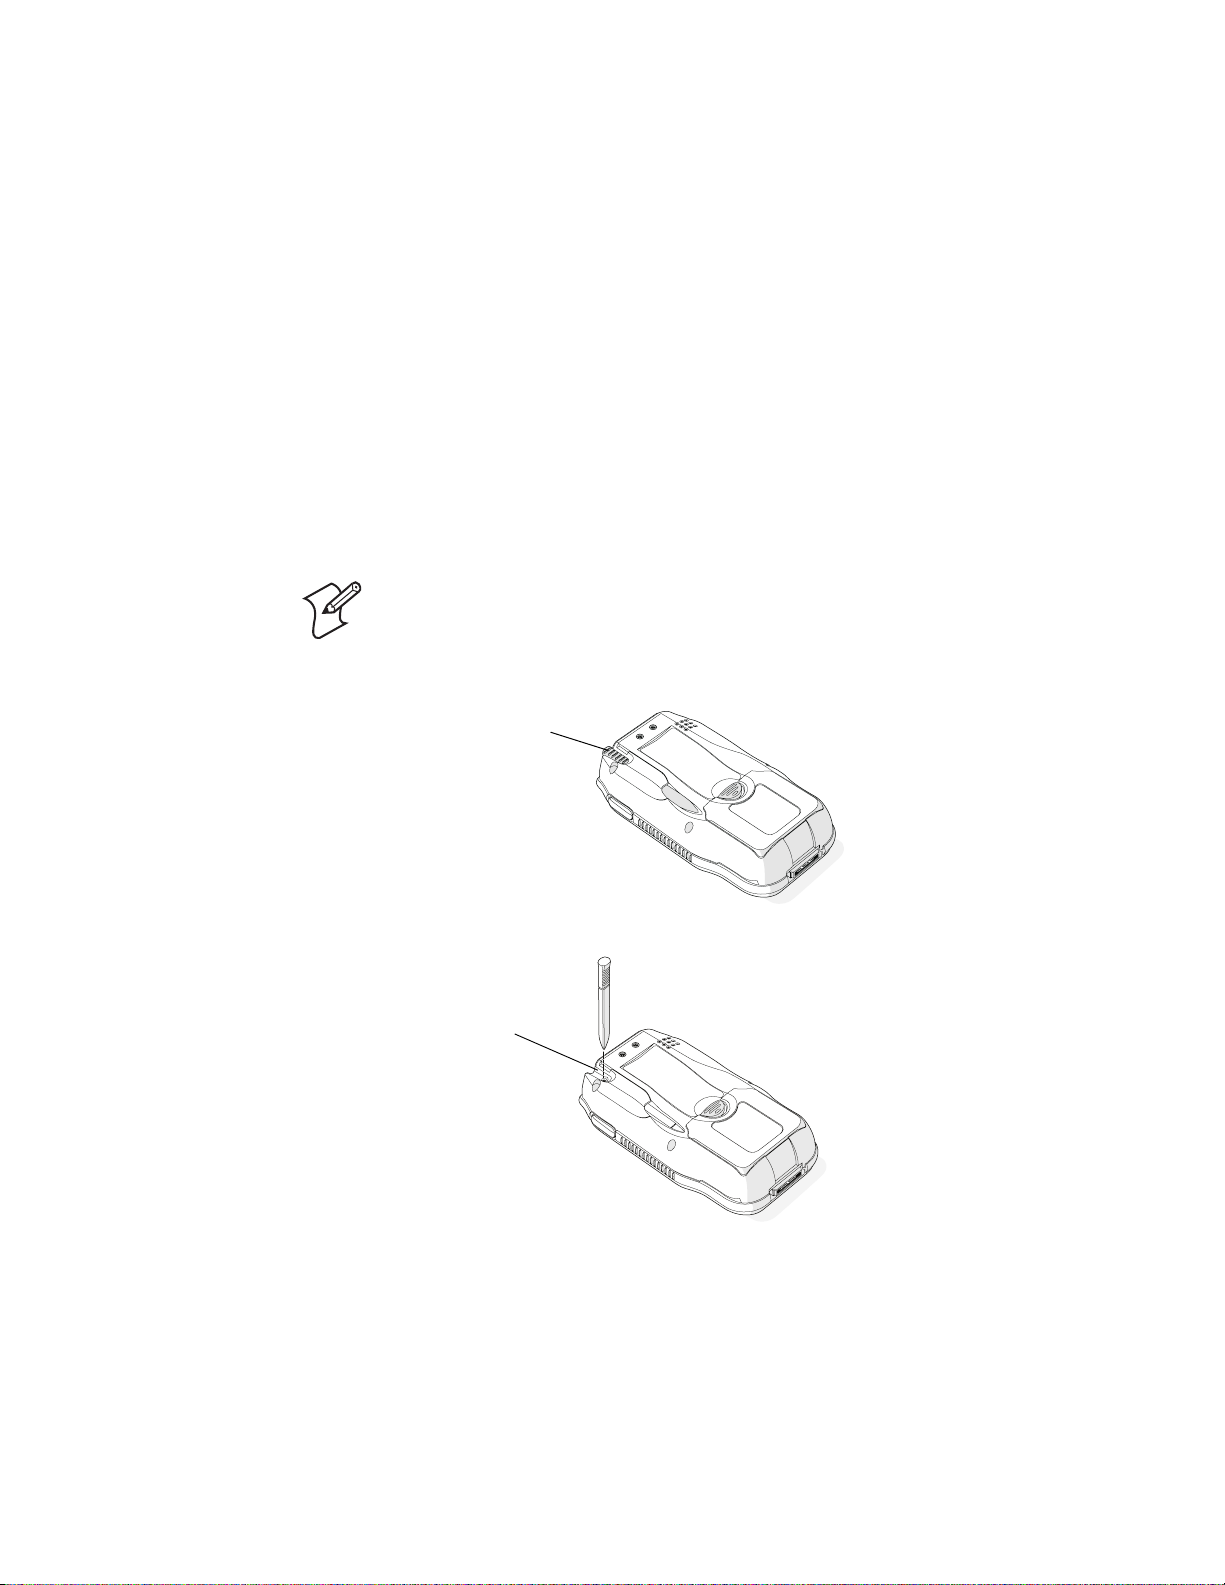
1 Pull the stylus from its place in the back of the CN2B Computer.
Pull the stylus out
2 Using the stylus, press the reset button in the stylus holder.
Press to reset
CN2B Mobile Computer User’s Manual 11
Page 30
Chapter 1 — Using the CN2B Computer
Software Build Version
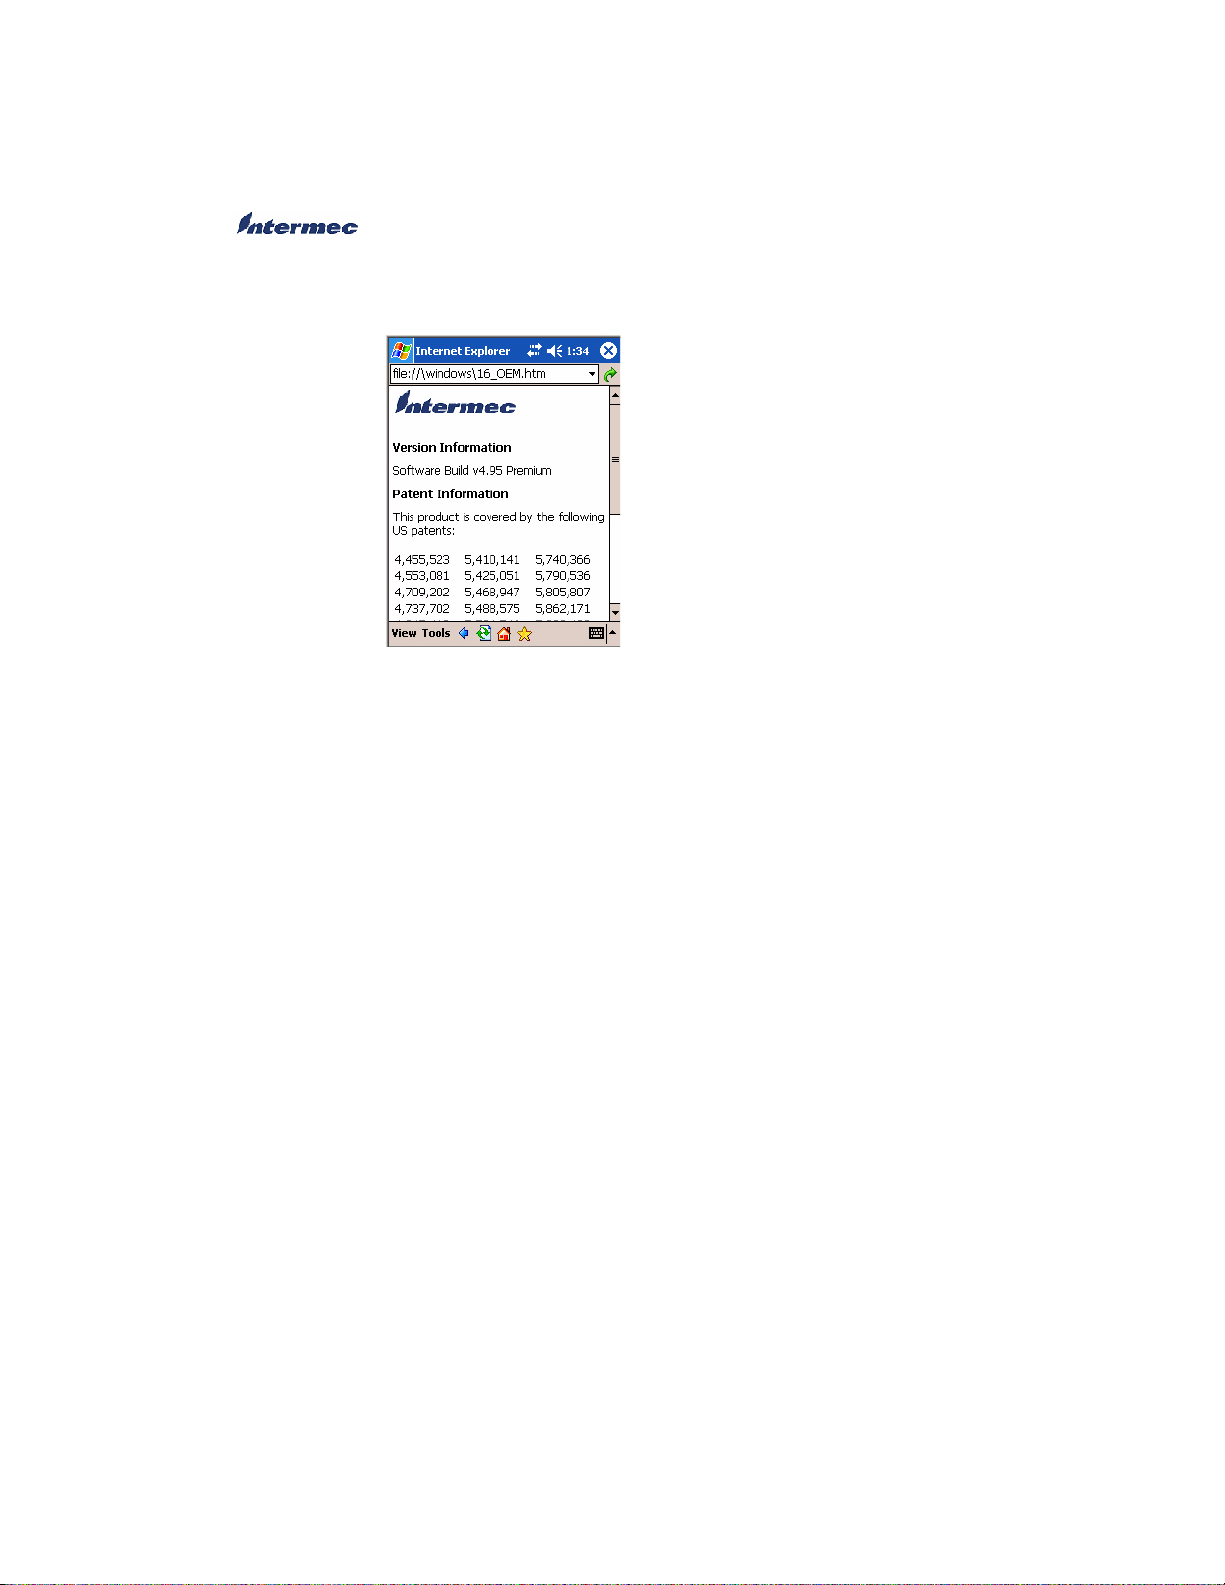
To check to see if your CN2B Computer has the latest software build,
select Start > Internet Explorer > the Intermec logo.
The latest software build version is displayed beneath the Version Informa-
tion title. This information is useful should you need assistance.
Software Tools
The following Intermec software tools are available as free downloads:
SmartSystems Foundation Console (www.intermec.com/SmartSystems)
This tool includes a management console that provides a default method to
configure and manage Intermec devices “out-of-the-box,” without the purchase of additional software licenses. This is for anyone who must configure
and deploy multiple devices or manage multiple licenses.
Intermec Resource Kits (www.intermec.com/IDL)
Resource Kits provide tools that build applications using the features of
Intermec devices. Resource kits include: Bluetooth, Communications,
Data Collection, Device Settings, Mobile Gadgets, Printing, and RFID.
This is for anyone who develops software for the CN2B Computer.
12 CN2B Mobile Computer User’s Manual
Page 31

Storage Media
Chapter 1 — Using the CN2B Computer
Note: MultiMediaCards (MMCs) and CompactFlash (CF) storage cards
are not supported in CN2B Computers.
Note: The CN2B Computer currently supports Delkin Devices Secure
Digital cards only. Intermec cannot guarantee that other SD cards will
work with the CN2B Computer.
The CN2B Computer supports the Secure Digital storage card. The CompactFlash card slot is embedded in the CN2B Computer and cannot be
removed.
The following procedures explain how to:
• insert an SD card.
• access the files on an SD card.
• remove an SD card.
For help using a Secure Digital card to install applications and files, see
“Using a Secure Digital Card to Upgrade the CN2B Computer” on
page 81.
To insert the SD card
1 Before inserting the Secure Digital card, you must attach one of the
pull-tabs that ships with the CN2B Computer. A Secure Digial card
without a pull-tab can be very difficult to remove.
SD card
Pull-tab
2 Align the Secure Digital card as shown in the next illustration, and insert
the Secure Digital card into the slot.
SD card
Pull-tab
CN2B Mobile Computer User’s Manual 13
Page 32

Chapter 1 — Using the CN2B Computer
3 Push the card into the slot until it is fully inserted.
4 Align the battery contacts as shown in the next illustration, and insert the
battery in the battery compartment. Press down on the battery until it
clicks into place.
Fully inserted
SD card
Battery
5 Install the battery door.
To access files stored on the Secure Digital card
If you have a Secure Digital card inserted in your CN2B Computer, it
appears as the “\Storage Card” folder. To access this folder, select My
Device, then tap the “\Storage Card” folder. You can copy files to and from
this folder just as you would any other folder on the CN2B Computer.
To remove the Secure Digital card
1 Press and hold the Power key for two to three seconds, and then release
the Power key to turn off the CN2B Computer.
2 Place the CN2B Computer face-down on a clean, flat, stable surface.
3 Push down on the battery door latch, and pull up on the battery door.
4 Remove the battery door and set it aside.
14 CN2B Mobile Computer User’s Manual
Page 33

Chapter 1 — Using the CN2B Computer
d
5 Insert the stylus between the battery and the CN2B case, and press
straight down until the battery is released.
6 Remove the battery and set it aside.
7 Pull the tab toward the bottom on the CN2B Computer to remove the
Secure Digital card.
r
Tab
Wireless Network Support
Radios are installed at the factory and cannot be installed by a user. The
CN2B Computer must be serviced to install or replace radios. Contact your
Intermec representative for more information. See Chapter 4, “Network
Support” for information about supported radios.
Note: Changes or modifications not expressly approved by Intermec could
void the user’s authority to operate the equipment.
CN2B Mobile Computer User’s Manual 15
Page 34

Chapter 1 — Using the CN2B Computer
Accessories
The following accessories are available for the CN2B Computer. Note that
this is not a complete list. Contact your Intermec representative for informa-
tion about these and other accessories that are not in this list.
AC Wall Adaptor
Battery
Car Charger
Handstrap
Holster
Modem Dock
Replacement Stylus Kit - tethered stylus
Screen Cleaner Kit
Screen Protector Kit - 3 pack
Single USB Client Dock
Two-Wire Phone Cord
Universal Power Supply
USB Type B Interface Cable
Physical and Environmental Specifications
Use these specifications to locate technical information about the CN2B
Computer and its available features and options.
Display
Transflective: TFT all-light readable color display with LED backlight
Pixels: 240x320
Diagonal: 89 mm (3.52 in)
Colors: 65 K
Environmental
Operating Temperature: -10° to 50°C (14° to 122°F)
Storage Temperature: -20° to 60°C (-4° to 140°F)
Relative Humidity: 5% to 95% noncondensing
Rain and Dust Resistance: IP54 compliant
Drop Specifications: 0.9 m (3 ft) drop, 26 times on concrete
Secure Digital Expansion Slots
The CN2B Computer supports the Delkin Devices Secure Digital storage
card.
16 CN2B Mobile Computer User’s Manual
Page 35

Chapter 1 — Using the CN2B Computer
Integrated Scanner Options
EV10 Linear Imager
Integrated Wireless
802.11b/g (Wi-Fi® certified): WLAN (802.11b/g)
Bluetooth™ compatible module
Keypad Options
Numeric
Memory and Storage
RAM Memory: 64 MB
Flash ROM: 64 MB, includes ROM folder for application storage
Microprocessor
Intel® XScale™ PXA255 Application Processor, 400 MHz
Operating System
Microsoft® Windows® Mobile software for Pocket PC
Physical Dimensions
Length: 147 mm (5.8 in)
Width: 86 mm (3.4 in)
Height: 35 mm (1.4 in)
Weight: 370 g (11.9 oz)
Power
Battery Type: Lithium-Ion (LiIon), 3.7V, (1x2150 mAh cells),
customer-replaceable
Battery Capacity: 7.95 Watt-hours
Battery Life: 6-10 hours, application dependent
Recharging Time: 4 hours
Charging Range: 0° to 40°C (32° to 104°F)
Regulator Approvals
FCC Part 15 Class B; UL Listing; CE Mark; CB Report
Standard Communications
RS232; USB
CN2B Mobile Computer User’s Manual 17
Page 36

Chapter 1 — Using the CN2B Computer
18 CN2B Mobile Computer User’s Manual
Page 37

Windows Mobile 2003
2
This chapter introduces Microsoft Windows Mobile 2003 for Pocket PC.
While using your CN2B Computer, keep these key points in mind:
• Tap Start on the navigation bar, located at the top of the screen, to
quickly move to programs, files, and settings. Use the command bar at
the bottom of the screen to perform tasks in programs. The command
bar includes menus, icons, and the onscreen keyboard.
• Tap and hold an item to see a pop-up menu containing a list of actions
you can perform. Pop-up menus give you quick and easy access to the
most common actions.
Below is a list of Windows Mobile 2003 components described in this
chapter. Tap Start > Help on your CN2B Computer to find additional
information on Windows Mobile components.
Microsoft ActiveSync (page 34)
Microsoft Pocket Outlook (page 35)
Pocket Word (page 57)
Pocket Excel (page 60)
MSN Messenger (page 62)
Windows Media Player for Windows Mobile (page 65)
Microsoft Reader (page 66)
Pocket Internet Explorer (page 68)
CN2B Mobile Computer User’s Manual 19
Page 38

Chapter 2 — Windows Mobile 2003
Software Builds
Go to “Software Build Version” on page 12 to determine which Intermec
build of Windows Mobile 2003 is on your unit.
Where to Find Information
This chapter describes your CN2B Computer hardware, provides an overview of the programs on your CN2B Computer, and explains how to connect your CN2B Computer to a desktop, a network, or the Internet. For
instructions on setting up your CN2B Computer and installing ActiveSync, see the Quick Start Guide. The following is a guide to more information to assist you use your CN2B Computer.
For Information: See this Source:
Programs on the mobile computer. This chapter and mobile computer Help. To view Help, tap Start > Help.
Additional programs that can be
installed on the mobile computer.
Connecting to and synchronizing
with a desktop.
Last-minute updates and detailed
technical information.
Up-to-date information on your
Windows Mobile.
Windows Mobile and many of the technologies supported by the CN2B
Computer are not from Intermec. Many of the utilities and features on a
Windows Mobile device come directly from Microsoft without any modification from Intermec. There may be certain Microsoft-specific issues that
Intermec would not be able to support, so contact our front-line support
personnel to determine the best source of assistance.
Use these URLs for additional information about Microsoft Windows
Mobile (Pocket PC):
• msdn.microsoft.com/support/
• support.microsoft.com/
The Windows Mobile Companion CD.
The Quick Start Guide or ActiveSync Help on your desktop. To view Help,
click Help > Microsoft ActiveSync Help.
The Read Me files, located in the Microsoft ActiveSync folder on the desktop
and on the Windows Mobile Companion CD.
www.microsoft.com/windowsmobile/resources/communities/default.mspx
• news://news.microsoft.com (a free support option)
20 CN2B Mobile Computer User’s Manual
Page 39

Basic Skills
Today Screen
Chapter 2 — Windows Mobile 2003
Learning to use your CN2B Computer is easy. This section describes the
basic concepts of using and customizing your CN2B Computer.
When you turn on your CN2B Computer for the first time each day (or
after four hours of inactivity), you see the Today screen. You can also display
it by tapping the Start flag (shown left) and then Today. On the Today
screen, you can see important information for the day.
Tap to start a program
Tap and hold to change the time format
Tap to change owner information
Tap to change date and time
Your day at a glance. Tap to open the associated program
Programs
To customize what is displayed on the Today screen, including the background image, tap Start > Settings > the Personal tab > Today.
Status icons display information such as low batteries or when the CN2B
Computer is connected to a desktop or to the Internet. You can tap an icon
to open the associated setting or program.
You can switch from one program to another by selecting it from the Start
menu. (You can customize which programs you see on this menu. For
information, see
“Adjusting Settings” on page 31.) To access some pro-
grams, tap Start > Programs, and then the program name.
You can also switch to some programs by pressing a program icon. Your
CN2B Computer has one or more program icons located on the front or
side of the computer. The icons on the icons identify the programs to
which they switch.
Note: Some programs have abbreviated labels for check boxes and dropdown menus. To see the full spelling of an abbreviated label, tap and hold
the stylus on the label. Drag the stylus off the label so that the command is
not carried out.
CN2B Mobile Computer User’s Manual 21
Page 40

Chapter 2 — Windows Mobile 2003
The following is a partial list of programs that are on your CN2B Computer. Look on the Windows Mobile Companion CD for additional programs that you can install onto your CN2B Computer.
Synchronize information between your CN2B Computer and desktop.
Keep track of your appointments and create meeting requests.
Keep track of your friends and colleagues.
Send and receive e-mail messages.
Browse Web and WAP (Wireless Application Protocol) sites, and download new programs and files from the Internet.
Create handwritten or typed notes, drawings, and recordings.
Keep track of your tasks.
Play digital audio and video files that are stored on your CN2B Computer
or on a network.
Navigation Bar and Command Bar
The navigation bar is located at the top of the screen. It displays the active
program and current time, switches to programs, and closes screens.
Use the command bar at the bottom of the screen to perform tasks in programs. The command bar includes menu names, icons, and the Input
Panel icon. To create a new item in the current program, tap New. To see
the name of an icon, tap and hold the stylus on the icon. Drag the stylus off
the icon so that the command is not carried out.
Tap to switch to a program that you recently used.
Tap to switch to a program.
Tap to see more programs.
Tap to change device settings.
Tap to see a Help topic for the current screen.
Tap to display the input panel.
Tap to select icon commands.
Tap to select menu commands.
22 CN2B Mobile Computer User’s Manual
Page 41

Pop-up Menus
Chapter 2 — Windows Mobile 2003
Use pop-up menus to quickly perform an action on an item. For example,
you can use a pop-up menu to delete or make a copy of an item. To access
a pop-up menu, tap and hold the item on which you want to perform the
action. When the menu appears, tap the action to perform, or tap anywhere
outside the menu to close the menu without performing the action.
Lift the stylus and tap the action you want
Tap and hold to display the pop-up menu
Tap outside the menu to close it without performing
an action
Notifications
Entering Information
When you have something to do, your device notifies you in a variety of
ways. For example, if you have set up an appointment in Calendar, an email message arrives, or a friend sends you an instant message, you are notified in any of the following ways:
• A message box appears on the screen.
• A sound, which you can specify, is played.
• A light flashes on your CN2B Computer.
You can choose the notification types.
You can enter information on your CN2B Computer in several ways,
depending on the type of device you have and the program you are using:
• Synchronizing
Using Microsoft ActiveSync, synchronize or copy information between
your desktop and CN2B Computer. For more information on Active
-
Sync, see ActiveSync Help on your desktop.
• Typing
Using the input panel, enter typed text into the CN2B Computer either
by tapping keys on the onscreen keyboard or using handwriting recognition software.
• Writing
Using the stylus, write directly on the screen.
CN2B Mobile Computer User’s Manual 23
Page 42

Chapter 2 — Windows Mobile 2003
• Drawing
Using the stylus, draw directly on the screen.
• Recording
Create a stand-alone recording or embed a recording into a document or
note.
Use the input panel to enter information in any program on your CN2B
Computer. You can either type using the onscreen keyboard or write using
Block Recognizer, Letter Recognizer, or Transcriber. In either case, the
characters appear as typed text on the screen.
To show or hide the input panel, tap the Input Panel icon. Tap the arrow
next to the Input Panel icon to see your choices.
When you use the input panel, your CN2B Computer anticipates the word
you are typing or writing and displays it above the input panel. When you
tap the displayed word, it is inserted into your text at the insertion point.
The more you use your CN2B Computer, the more words it anticipates.
Select an input method
Tap to see your choices
Tap a text box to display the currently selected input
Tap to insert the anticipated word
Tap keys on the onscreen keyboard to enter characters
Typing With the Onscreen Keyboard
Tap the input panel arrow, then tap Keyboard. On the soft keyboard that is
displayed, tap the keys with your stylus.
• To type lowercase letters, tap the keys with the stylus.
• To type a single uppercase letter or symbol, tap the Shift key. To tap
multiple uppercase letters or symbols, tap the CAP key.
• To convert a letter to uppercase, tap and hold the stylus on the letter and
drag up.
• To add a space, drag the stylus to the right across at least two keys.
• To backspace a character, drag the stylus to the left over at least two keys.
24 CN2B Mobile Computer User’s Manual
Page 43

Chapter 2 — Windows Mobile 2003
• To insert a carriage return, tap and hold the stylus anywhere on the key-
board and drag down.
To use larger keys, tap the input panel arrow, tap Options, select “Keyboard” from the Input method drop-down list, then select Large keys.
Using Block Recognizer
Character recognition software gives you a fast and easy method for entering information in any program on your CN2B Computer. Letters, numbers, and punctuation you write are translated into typed text.
Tap the input panel arrow, then tap Block Recognizer. Write a letter in the
box, which then is converted to typed text that appears on the screen.
For specific instructions on using Block Recognizer, with Block Recognizer
open, tap the question mark next to the writing area.
Tap for assistance
Using Letter Recognizer
With Letter Recognizer, you can write letters using the stylus just as you
would on paper.
Tap the input panel arrow, then tap Letter Recognizer. Write a letter in the
box. When you write a letter, it is converted to typed text that appears on
the screen. For specific instructions on using Letter Recognizer, with Letter
Recognizer open, tap the question mark next to the writing area.
Tap for assistance
CN2B Mobile Computer User’s Manual 25
Page 44

Chapter 2 — Windows Mobile 2003
Using Transcriber
With Transcriber, you can write anywhere on the screen using the stylus
just as you would on paper. Unlike Letter Recognizer and Block Recognizer, you can write a sentence, then pause and let Transcriber change the
written characters to typed characters.
Tap the input panel arrow, then tap Transcriber. Tap ok, then write anywhere on the screen.
For specific instructions on using Transcriber, with Transcriber open, tap
the question mark in the lower, right-hand corner of the screen.
Selecting Typed Text
To edit or format typed text, you must select it first. Drag the stylus across
the text you want to select. You can cut, copy, and paste text by tapping
and holding the selected words and then tapping an editing command on
the pop-up menu, or by tapping the command on the Edit menu.
Tap for assistance
Writing on the Screen
In any program that accepts writing, such as the Notes program, and in the
Notes tab in Calendar, Contacts, and Tasks, you can use your stylus to
write directly on the screen. Write the way you do on paper. You can edit
and format what you have written and convert the information to text at a
later time.
•Tap the Pen icon to switch to writing mode. This action displays lines
on the screen to help you write.
Tap to use your stylus like a pen
Note: Some programs that accept writing may not have the Pen icon. See
related documentation to find out how to switch to writing mode.
Selecting the Writing
If you want to edit or format writing, you must select it first.
26 CN2B Mobile Computer User’s Manual
Page 45

Chapter 2 — Windows Mobile 2003
1 Tap and hold the stylus next to the text you want to select until the
insertion point appears.
2 Without lifting, drag the stylus across the text you want to select.
If you accidentally write on the screen, tap Tools > Undo and try again.
You can also select text by tapping the Pen icon to deselect it and then
dragging the stylus across the screen.
You can cut, copy, and paste written text in the same way you work with
typed text: tap and hold the selected words and then tap an editing command on the pop-up menu, or tap the command on the Edit menu.
Converting Writing to Text
You can convert words you write in print or cursive to text by tapping
Tools > Recognize. If a word is not recognized, it keeps its original form.
To convert only certain words, tap Pen to disable the writing function, tap
twice over the word or phrase to highlight, then tap Tools > Recognize.
The writing is turned to text
Select the text to convert, then tap Recognize
on the pop-up menu
If the conversion is incorrect, you can choose different words from a list of
alternates or return to the original writing. To do so, tap and hold the
incorrect word (tap one word at a time). On the pop-up menu, tap Alter
nates. Tap the word use from the menu with a list of alternate words, or tap
the writing at the top of the menu to return to the original writing.
-
Tap to return to your original writing
Or tap the word you want to use
CN2B Mobile Computer User’s Manual 27
Page 46

Chapter 2 — Windows Mobile 2003
Tips for getting good recognition:
• Write neatly.
• Write on the lines and draw descenders below the line. Write the cross of
the “t” and apostrophes below the top line so they are not confused with
the word above. Write periods and commas above the baseline.
• For better recognition, increase the zoom level to 300% by using the
Tools menu. Recognition does not work well below a 150% zoom level.
• Write the letters of a word closely and leave big gaps between words so
the CN2B Computer can easily tell where words begin and end.
• Hyphenated words, foreign words that use special characters such as
accents, and some punctuation cannot be converted.
• If you add writing to a word to change it (such as changing a “3” to an
“8”) after you attempt to recognize the word, the writing you add is not
included if you attempt to recognize the writing again.
Drawing on the Screen
You can draw on the screen in the same way that you write on the screen.
The difference between writing and drawing on the screen is how you select
items and how they are edited. For example, you can resize selected drawings, while you cannot resize writing.
Creating a Drawing
• After your first stroke, wait for a drawing box to appear around the area
you marked. Subsequent strokes in or touching the drawing box become
part of the drawing. Drawings that do not cross the borders of the box
are considered writing.
The drawing box indicates the boundary
Note: You may want to change the zoom level so that you can more easily
work on or view your drawing. Tap Tools and then a zoom level.
28 CN2B Mobile Computer User’s Manual
Page 47

Recording a Message
Chapter 2 — Windows Mobile 2003
Selecting a Drawing
To edit or format a drawing, select it first. Tap and hold the stylus on the
drawing until the selection handle appears. To select multiple drawings,
deselect the Pen icon and then drag to select the drawings you want.
You can cut, copy, and paste selected drawings by tapping and holding the
selected drawing and then tapping an editing command on the pop-up
menu, or by tapping the command on the Edit menu. To resize a drawing,
make sure the Pen icon is not selected, and drag a selection handle.
In any program where you can write or draw on the screen, you can also
capture thoughts, reminders, and phone numbers by recording a message.
In the Inbox program, you can add a recording to an e-mail message. In
Calendar, Tasks, and Contacts, you can include a recording in the Notes
tab. In the Notes program, you can create a stand-alone recording or add a
recording to an open note.
Creating a Recording
1 Hold the CN2B Computer microphone near your mouth or source of
sound. Tap the red recording button and make your recording.
2 Tap the black stop recording button when finished. If you are recording
in an open note, an icon appears in the note. If you are creating a standalone recording, it appears in the note list.
3 To play a recording, tap the recording icon in the open note or tap the
recording in the note list.
Note: To quickly create a recording, hold down the Record hardware icon.
When you hear the beep, begin your recording. Release the icon when you
are finished. The new recording is stored in the open note or as a standalone recording if no note is open.
Playing a Recording
To play a recording, tap it in the list or tap its icon in the note.
Indicates an embedded recording
Tap to show or hide the recording toolbar
CN2B Mobile Computer User’s Manual 29
Page 48

Chapter 2 — Windows Mobile 2003
Using My Text
When using Inbox or MSN Messenger, use My Text to quickly insert preset or frequently used messages into the text entry area. To insert a message,
tap My Text and tap a message.
• To quickly add common messages, tap My Text, then tap a message.
• To edit a My Text message, tap Tools > Edit My Text Messages. Tap
the message to edit and enter new text at the bottom of the screen.
Tap to select a prewritten message
Finding and Organizing Information
The Find feature on your CN2B Computer helps you quickly locate information. Tap Start > Find. Enter the text you want to find, select a data
type, and then tap Go to initiate the search.
Note: To quickly find information that is taking up storage space on your
CN2B Computer, select Larger than 64 KB in Type.
You can also use the File Explorer to find files on your CN2B Computer
and to organize these files into folders. Tap Start > Programs > File
Explorer.
Tap the folder name to open it
Tap New Folder to create a new folder
Note: You can move files in File Explorer by tapping and holding the item
to move, and then tapping Cut or Copy and Paste on the pop-up menu.
30 CN2B Mobile Computer User’s Manual
Page 49

Customizing Your CN2B Computer
You can customize your CN2B Computer by adjusting settings and installing additional software.
Adjusting Settings
You can adjust settings to suit the way you work. To see available options,
tap Start > Settings > either the Personal tab or the System tab located at
the bottom of the screen. You might want to adjust the following:
Chapter 2 — Windows Mobile 2003
Personal tab
Menus To customize what appears on the Start menu, and to enable a
pop-up menu from the New icon.
Owner Information To enter your contact information.
Password To limit access to your CN2B Computer.
Today To customize the look and information displayed on the Today
screen.
Clock To change the time or to set alarms.
Power To maximize battery life.
System tab
Adding or Removing Programs
Programs added to your CN2B Computer at the factory are stored in
ROM (Read Only Memory). You cannot remove this software, and you
cannot accidentally lose ROM contents. ROM programs can be updated
using special installation programs with a *.XIP extension. All other programs and data files added to your CN2B Computer after factory installation are stored in RAM (Random Access Memory).
Install any program created for your CN2B Computer, as long as there is
enough memory. The most popular place to find software for your CN2B
Computer is on the Windows Mobile Web site (
www.microsoft.com/win-
dowsmobile/resources/communities/default.mspx).
CN2B Mobile Computer User’s Manual 31
Page 50

Chapter 2 — Windows Mobile 2003
Adding Programs Using ActiveSync
Install the appropriate software for your CN2B Computer on your desktop
before installing it on your CN2B Computer.
1 Determine your CN2B Computer and processor type so that you know
which version of the software to install. Tap Start > Settings > the Sys-
tem tab > About > the Version tab, then make a note of the information
in Processor.
2 Download the program to your desktop (or insert the CD or disk that
contains the program). You may see a single *.XIP, *.EXE, or *.ZIP file,
a SETUP.EXE file, or several versions of files for different CN2B Computer types and processors. Be sure to select the program designed for the
Windows Mobile and your CN2B Computer processor type.
3 Read any installation instructions, Read Me files, or documentation.
4 Connect your CN2B Computer and desktop.
5 Double-click the *.EXE file.
• If the file is an installer, the installation wizard begins. Follow the
directions on the screen. Once the software is installed, the installer
automatically transfers the software to your CN2B Computer.
• If the file is not an installer, an error message stating that the program
is valid but it is designed for a different type of computer is displayed.
Move this file to your CN2B Computer. If you cannot find any installation instructions for the program in the Read Me file or documentation, use ActiveSync Explore to copy the program file to the Program
Files folder on your CN2B Computer. For more information on
copying files using ActiveSync, see ActiveSync Help.
Once installation is complete, tap Start > Programs, and then the program
icon to switch to it.
32 CN2B Mobile Computer User’s Manual
Page 51

Chapter 2 — Windows Mobile 2003
Adding a Program Directly from the Internet
1 Determine your CN2B Computer and processor type so that you know
which version of the software to install. Tap Start > Settings > the System tab > About > the Version tab, then make a note of the information
in Processor.
2 Download the program to your CN2B Computer straight from the
Internet using Pocket Internet Explorer. You may see a single *.XIP,
*.EXE, or *.ZIP file, a SETUP.EXE file, or several versions of files for
different CN2B Computer types and processors. Be sure to select the
program designed for the Windows Mobile and your CN2B Computer
processor type.
3 Read program installation instructions, Read Me files, or other docu-
mentation. Many programs provide installation instructions.
4 Tap the file, such as a *.XIP or *.EXE file to start the installation wizard.
Follow the directions on the screen.
Adding a Program to the Start Menu
Tap Start > Settings > Menus > the Start Menu tab, and then the check
box for the program. If you do not see the program listed, you can either
use File Explorer on the CN2B Computer to move the program to the
Start Menu folder, or use ActiveSync on the desktop to create a shortcut to
the program and place the shortcut in the Start Menu folder.
Using File Explorer on the CN2B Computer
Tap Start > Programs > File Explorer, and locate the program (tap the
folder list, labeled My Documents by default, and then My Device to see a
list of all folders on the CN2B Computer). Tap and hold the program and
tap Cut on the pop-up menu. Open the Start Menu folder located in the
Windows folder, tap and hold a blank area of the window, and tap Paste on
the pop-up menu. The program now appears on the Start menu. For more
information on using File Explorer, see
tion” on page 30.
Using ActiveSync on the desktop
Use the Explorer in ActiveSync to explore your CN2B Computer files and
locate the program. Right-click the program, and then click Create Short-
cut. Move the shortcut to the Start Menu folder in the Windows folder.
The shortcut now appears on the Start menu. For more information, see
ActiveSync Help.
“Finding and Organizing Informa-
Removing Programs
Tap Start > Settings > the System tab > Remove Programs.
If the program does not appear in the list of installed programs, use File
Explorer on your CN2B Computer to locate the program, tap and hold the
program, and then tap Delete on the pop-up menu.
CN2B Mobile Computer User’s Manual 33
Page 52

Chapter 2 — Windows Mobile 2003
Microsoft ActiveSync
Visit the following Microsoft Web site for the latest in updates, technical
information, and samples:
www.microsoft.com/windowsmobile/resources/communities/
default.mspx
Using Microsoft ActiveSync, you can synchronize the information on your
desktop with the information on your CN2B Computer. Synchronization
compares the data on your CN2B Computer with your desktop and
updates both computers with the most recent information. For example:
• Keep Pocket Outlook data up-to-date by synchronizing your CN2B
Computer with Microsoft Outlook data on your desktop.
• Synchronize Microsoft Word and Microsoft Excel files between your
CN2B Computer and desktop. Your files are automatically converted to
the correct format.
Note: By default, ActiveSync does not automatically synchronize all types
of information. Use ActiveSync options to turn synchronization on and off
for specific information types.
With ActiveSync, you can also:
• Back up and restore your CN2B Computer data.
• Copy (rather than synchronize) files between your CN2B Computer and
desktop.
• Control when synchronization occurs by selecting a synchronization
mode. For example, you can synchronize continually while connected to
your desktop or only when you choose the synchronize command.
• Select which information types are synchronized and control how much
data is synchronized. For example, you can choose how many weeks of
past appointments you want synchronized.
Before you begin synchronization, install ActiveSync on your desktop from
the Windows Mobile Companion CD. For more information on installing
ActiveSync, see your Quick Start card. ActiveSync is already installed on
your CN2B Computer.
After installation is complete, the ActiveSync Setup Wizard helps you connect your CN2B Computer to your desktop, set up a partnership so you
can synchronize information between your CN2B Computer and your
desktop, and customize your synchronization settings. Your first synchroni
zation process automatically begins when finished using the wizard.
-
After your first synchronization, look at Calendar, Contacts, and Tasks on
your CN2B Computer. Notice that information you have stored in
Microsoft Outlook on your desktop was copied to your CN2B Computer,
and you did not have to type a word. Disconnect the CN2B Computer
from your computer and you are ready to go!
34 CN2B Mobile Computer User’s Manual
Page 53

Chapter 2 — Windows Mobile 2003
Once you have set up ActiveSync and completed the first synchronization
process, you can initiate synchronization from your CN2B Computer. To
switch to ActiveSync on your CN2B Computer, tap Start > ActiveSync.
Note that if you have a wireless LAN card, you can synchronize remotely
from your CN2B Computer.
For information about using ActiveSync on your desktop, start ActiveSync
on your desktop, and then see ActiveSync Help.
View connection status
Tap to stop synchronization
Tap to connect and synchronize
View synchronization status
For more information about ActiveSync on your CN2B Computer, switch
to ActiveSync, then tap Start > Help.
Microsoft Pocket Outlook
Microsoft Pocket Outlook includes Calendar, Contacts, Tasks, Inbox, and
Notes. You can use these programs individually or together. For example,
you can use e-mail addresses stored in Contacts to address e-mail messages
in Inbox.
Using ActiveSync, you can synchronize information in Microsoft Outlook
or Microsoft Exchange on your desktop with your CN2B Computer. You
can also synchronize this information directly with a Microsoft Exchange
server. Each time you synchronize, ActiveSync compares the changes you
made on your CN2B Computer and desktop or server and updates both
computers with the latest information. For information on using ActiveSync, see ActiveSync Help on the desktop.
You can switch to any program by tapping it on the Start menu.
Calendar: Scheduling Appointments and Meetings
To switch to Calendar on the CN2B Computer, tap Start > Calendar.
Use Calendar to schedule appointments, including meetings and other
events. You can check your appointments in one of several views (Day,
Week, Month, Year, and Agenda) and set Calendar to remind you of
appointments with a sound or other method. Appointments for the day can
display on the Today screen.
CN2B Mobile Computer User’s Manual 35
Page 54

Chapter 2 — Windows Mobile 2003
If you use Outlook on your desktop, you can synchronize appointments
between your device and desktop.
Synchronizing Calendar
Calendar items stored on your device can be synchronized with calendar
items on your desktop or Microsoft Exchange Server. (Note you can only
synchronize information directly with an Exchange Server if your company
is running Microsoft Mobile Information Server 2002 or later.) Calendar
synchronization is automatically selected in ActiveSync.
Tap to go to Today
Tap to display or edit the appointment details
Calendar items entered on one computer are copied to the other during
synchronization. Handwritten notes and drawings are saved as metafiles
(pictures). For information on synchronization, see ActiveSync Help on the
desktop.
Why Use Categories in the Calendar?
Use categories to group related tasks, contacts, and appointments. Then,
use these groupings to quickly display only the information you want. For
example, you can share your device with another by assigning appointments to a category with a special project’s name. You can then use this category to filter Calendar and only display appointments for that project.
Note: In Month View, the day of an appointment assigned to the Holiday
category appears in red.
This day was assigned the Holiday category
36 CN2B Mobile Computer User’s Manual
Page 55

Chapter 2 — Windows Mobile 2003
What’s an All Day Event?
An appointment can either be a normal appointment or an all day event,
which lasts the full day or spans many days. Examples include a trade show,
a vacation, or a seminar. You can also use all day events to schedule an
annual event, such as a birthday or anniversary. In this case, change the Sta
tus box to Free (you may need to scroll to see it) so that it does not show
time as busy in your calendar. All day events do not occupy blocks of time
in Calendar; they appear in banners at the top of the calendar.
Note: You cannot modify or create all-day events with attendees on the
device. If you create all-day events with attendees on your desktop, use
ActiveSync to copy such events to the device. Then, view them in Calendar.
For more information on copying files, see ActiveSync Help. To use the
device to schedule an appointment with attendees lasting all day, set type to
“Normal,” then adjust the date and time appropriately.
This describes the all-day event
-
What’s a Recurrence Pattern?
If you have an appointment or task that you do on a regular basis, such as a
weekly team meeting or a monthly status report, enter the item once and
set a recurrence pattern for it. If the default patterns in the list are not what
you need, you can create your own pattern using the wizard.
Select your recurrence pattern from this drop-down list
Select <Edit pattern...> to access the wizard to
customize a recurrence
CN2B Mobile Computer User’s Manual 37
Page 56

Chapter 2 — Windows Mobile 2003
Viewing Appointments
You can view appointments in one of several views (Agenda, Day, Week,
and Month). In Agenda view, upcoming appointments are displayed in
bold. To see detailed appointment information in any view, tap the
appointment. To see a list of available actions for an appointment, tap and
hold the appointment. Tap Start > Today to quickly see your appoint
ments for the day.
-
This displays the appointment in bold
Month view displays symbols to indicate the types of appointments you
have on a given day. An upward triangle indicates a morning appointment;
a downward triangle indicates an afternoon appointment. If you have
appointments in the morning and afternoon, a solid square is displayed. If
you have an all-day event not marked Free, a hollow square is displayed.
This displays a morning appointment
This displays appointments both morning and afternoon
This displays an afternoon appointment
This displays an all-day event not marked Free
Creating or Changing an Appointment
To create an appointment, tap New. To select a new date from a pop-up
calendar, tap the display date. To enter or select a new time, tap the display
time. Enter the appointment details, and when finished, tap OK to return
to the calendar.
If you are working in Day view, tap the time slot for the new appointment
and then tap New to have the time automatically entered for you.
38 CN2B Mobile Computer User’s Manual
Page 57

Chapter 2 — Windows Mobile 2003
To change an appointment, tap it in the calendar, then tap Edit. Change
any appointment detail by tapping it and entering the new information.
Note: Tap the arrows to the right of the description and location boxes to
choose from previous entries.
When entering a time, you can type military and abbreviated time forms,
such as 2300 (becomes 11:00 PM), 913pm (becomes 9:13 PM), 911
(becomes 9:11 AM), and 9p (becomes 9:00 PM).
Tap to return to the calendar (appointment is saved
automatically)
Tap to choose from predefined text
Tap to choose from previously entered locations
Tap to choose a date and time
Use Notes to record information
Creating an All Day Event
To create an all day event, do the following:
1 Tap New.
2 Tap All Day, then select Yes.
Tap to select whether this is an all-day event
Note: To change an all-day event, switch to Day or Agenda view, tap the
event listed at the top of the calendar, then tap Edit. Change any appointment detail by tapping it and entering the new information.
You cannot modify or create all day events with attendees on the CN2B
Computer. If you create all day events with attendees on your desktop, use
ActiveSync to copy such events to the CN2B Computer. Then, view them
in Calendar. For more information on copying files, see ActiveSync Help.
To use the device to schedule an appointment with attendees lasting all
day, set type to Normal, then adjust date and time accordingly.
CN2B Mobile Computer User’s Manual 39
Page 58

Chapter 2 — Windows Mobile 2003
Setting a Reminder for an Appointment
Do the following to set a reminder for an appointment in the calendar:
1 Tap the appointment, then tap Edit to change the appointment.
2 Tap Reminder and select Remind me.
3 To change how many minutes before the appointment you are
reminded, tap the minutes displayed, then select the new minutes from a
drop-down or enter the new minutes. Tap minutes to change hours,
days, or weeks.
Tap whether to enable the reminder feature
Note: To automatically set a reminder for all new appointments, in the calendar, tap Tools > Options, select Set reminders for new items, then tap
the number and timeframe options to change the information given.
Tap this to set reminders for new appointments
To choose how you are reminded, for example by a sound, tap Start > Set-
tings > the Personal tab > the Sounds & Notifications icon.
Adding a Note to an Appointment
You can add written or typed notes and even recordings (if your device supports recordings) to an appointment. This is a good place for maps, drawings, and other detailed information.
1 In the calendar, tap the appointment, then tap Edit.
40 CN2B Mobile Computer User’s Manual
Page 59

Chapter 2 — Windows Mobile 2003
2 Tap the Notes tab to enter notes. For specific instructions, tap Start >
Help > Notes to see Notes Help.
Controls for the recorder
Use the stylus to write or draw information here
Tap to activate onscreen keyboard
Tap to activate writing pad
Tap to activate recorder
Note: To edit an existing note, tap the appointment in the calendar, tap
Edit, then tap the Notes tab.
Making an Appointment Recurring
Do the following to make a recurring appointment:
1 In the calendar, tap the appointment, then tap Edit.
2 Tap Occurs and select a pattern from the list. Or, to create a new pat-
tern, tap <Edit pattern...>, and follow the steps in the wizard.
Select your recurrence pattern from this list
Select <Edit pattern...> to access the wizard with
which to customize your recurrence
Assigning an Appointment to a Category
1 In the calendar, tap the appointment, then tap Edit.
2 Tap Categories.
3 On the Select tab, select the categories to which you want to assign the
appointment.
4 To create a new category, tap the Add/Delete tab, enter the category
name, then tap Add. The new category is automatically selected in the
Select tab.
CN2B Mobile Computer User’s Manual 41
Page 60

Chapter 2 — Windows Mobile 2003
5 Tap ok to return to the appointment.
Note: To find an appointment assigned to a category, tap Tools > Categories and select the type of appointment that you want displayed. To show
all appointments again, tap Tools > Categories and clear all categories.
Sending a Meeting Request
Use Calendar to schedule meetings with people who use Outlook or Pocket
Outlook. When attendees receive a meeting request, they can accept or
decline the meeting. If accepted, the meeting is added to their schedule,
their response is sent back to you, and your calendar is updated.
A check mark indicates a selected category
Before sending a meeting request, enter e-mail addresses in Contacts Help
and set up Inbox to send and receive messages. For more information on
sending and receiving meeting requests, tap Start > Help > Calendar to see
Calendar Help, and tap Start > Help > Inbox to see Inbox Help.
1 Tap New, then enter the meeting information.
2 Hide the onscreen keyboard, if needed, then tap Attendees. Only those
contacts with e-mail addresses are displayed. Select the contacts you want
to invite, then tap ok to return to the appointment.
3 Select other desired options and then tap ok.
4 Inbox automatically creates a meeting request and sends it to the attend-
ees the next time you synchronize with your desktop. Textual notes
entered in the Notes tab (excluding writing or recordings) are sent also.
A check mark indicates a selected attendee
42 CN2B Mobile Computer User’s Manual
Page 61

Chapter 2 — Windows Mobile 2003
Note: If you are sending the meeting request through a connection to an
ISP or the network, rather than through synchronization with your desktop, tap Tools > Options. From the Send meeting requests via drop-down
list, tap the service to use to send the meeting request.
Finding an Appointment
There are two ways to find an appointment:
•Tap Start > Find, enter the appointment name, tap the Type arrow and
select Calendar from the drop-down list, and then tap Go.
• In the calendar, tap Tools > Categories and select the type of appointment you want displayed. To show all appointments again, tap Tools >
Categories and clear all categories.
Enter a phrase or tap the list for existing phrases
Tap for a list of areas where to search this phrase
Tap these to see details
Note: In Find, you can tap the Find arrow to select from a list of items of
previously searched items or phrases.
Deleting an Appointment
1 In the calendar, tap and hold the appointment.
2 On the pop-up menu, tap Delete Appointment. The next time you syn-
chronize, the appointment is also deleted from the desktop.
Changing Calendar Options
In the calendar, tap Tools > Options.
• To see appointment indicators, select icons to display in Show icons.
You can choose to display indicators for such things as recurring
appointments, appointments with notes, and appointments with
reminders. Tap and hold an icon to see its name.
CN2B Mobile Computer User’s Manual 43
Page 62

Chapter 2 — Windows Mobile 2003
• If you are having trouble reading the calendar, select Use large font. You
may see less appointment information.
Contacts: Tracking Friends and Colleagues
To switch to Contacts on the CN2B Computer, tap Start > Contacts.
Tap this to view larger text
The Show icons consist of:
Reminder, Recurs, Note, Location, Attendees, Private
Contacts maintains a list of your friends and colleagues so that you can easily find the information you are looking for, whether you are at home or on
the road. You can enter both personal and business information.
If you use Microsoft Outlook on your desktop, you can synchronize contacts between your CN2B Computer and your desktop.
Select the category of contacts you want displayed
Tap and enter part of a name to quickly find it
Tap to display or edit contact details
Tap to see additional phone #s and email addresses
Tap and hold to display a pop-up menu
Tap to toggle between Name and Company views
Creating a Contact
1 Tap New, then use the input panel to enter a name and other contact
information. Scroll down to see all available fields.
2 To assign the contact to a category, scroll to and tap Categories, then
select a category from the list, which can display contacts by category.
44 CN2B Mobile Computer User’s Manual
Page 63

Chapter 2 — Windows Mobile 2003
3 To add notes, tap the Notes tab. You can enter text, draw, or create a
recording. For more information on creating notes, see “Notes: Captur-
ing Thoughts and Ideas” on page 52.
4 When finished, tap OK to return to the contact list.
Use Notes to store additional information
Scroll to see more fields
Synchronizing Contacts
Contacts stored on your device can be synchronized with Outlook contacts
stored on your desktop or with Mobile Information Server 2002 or later.
New items entered in a location are copied to another during synchronization. Handwritten notes and drawings are saved as pictures when synchronizing with the desktop, but are removed when synchronizing with a server.
For information on synchronization, see ActiveSync Help on the desktop.
Viewing Contacts
The contact list displays the contact name and the first primary phone
number or e-mail address specified for that contact. Contacts are ordered
by name of contact or company.
• Tap the default letter (home, w ork, mobile, or e-mail) to the right of the
contact to see additional phone numbers and e-mail addresses.
• Use your up/down controls on your keypad to select a contact, then
press the left/right controls on your keypad to change the default num
ber, displayed as a letter to the right of the contact name.
• To see more contact information, tap the contact.
• To see a list of available actions for a contact via a pop-up menu, tap and
hold the contact.
• To see a list of contacts employed by a specific company, tap View > By
Company. Then, tap the desired company name.
-
CN2B Mobile Computer User’s Manual 45
Page 64

Chapter 2 — Windows Mobile 2003
Note: You can change the appearance of the contact list by tapping Tools >
Options.
Indicates the default
Creating or Changing a Contact
• To create a contact, tap New. To enter notes, tap the Notes tab. When
finished, tap ok to return to the contact list.
Tap for phone #s, email addresses
• To change a contact, tap it in the contact list, and then tap Edit. To cancel edits, tap Edit > Undo. When finished making changes, tap ok to
return to the contact list.
Note: If you enter a name with more than two words, the middle word is
recorded as a middle name. If your contact has a double first or last name,
tap the Name arrow and enter the names in the proper boxes.
Tap anywhere outside the box to return to details
Note: New contacts are added to the displayed category.
Adding a Note to a Contact
You can add written or typed notes and even recordings (if your device supports recordings) to a contact. Notes are handy for maps and drawings.
1 In the contact list, tap the contact.
46 CN2B Mobile Computer User’s Manual
Page 65

Chapter 2 — Windows Mobile 2003
2 Tap the Notes tab. For specific instructions, tap Start > Help > Notes to
see Notes Help.
Controls for the recorder
Use the stylus to write or draw your information here
Tap to activate the keyboard
Tap to activate the writing pad
Tap to activate the recorder
Note: To edit an existing note, tap the contact, tap Edit, then tap the
Notes tab.
Assigning a Contact to a Category
1 In the contact list, tap the contact, and then tap Edit.
2 Scroll to and tap Categories.
3 On the Select tab, check the categories to assign to the contact.
4 To create a new category, tap the Add/Delete tab, enter the category
name, then tap Add. The new category is automatically checked in the
Select tab.
5 Tap ok to return to the contacts.
A check mark indicates a selected category
Copying a Contact
1 In the contact list, select the contact. For multiple contacts, tap and drag.
2 Tap Tools, and then select Copy Contacts.
CN2B Mobile Computer User’s Manual 47
Page 66

Chapter 2 — Windows Mobile 2003
Sending a Message to a Contact
1 In the contact list, tap and hold the contact. To select multiple contacts,
tap and drag. Then, tap and hold the selected contacts.
2 On the pop-up menu, select Send Email or Send SMS, depending upon
the type of message to send.
Note: To send an e-mail message, use an e-mail address configured for the
contact. To send an SMS (Short Messaging Service) message, use an SMS
number for the contact, which is usually the mobile phone number.
Finding a Contact
•Tap Start > Find, enter the contact name (first, last, or middle), phone
number, or address, select Contacts for the type, then tap Go.
• From Contacts, start typing a contact name until you see it displayed on
the screen. To show all contacts again, tap the text box at the top of the
screen and clear the text, or tap the arrow to the right of the text box.
• In the contact list, tap the category list (labeled All Contacts by default)
and tap the category to which you have assigned a contact. To show all
contacts again, select All Contacts.
• To view the names of companies for which your contacts work, in the
contact list, tap View > By Company. The number of contacts that work
for that company is displayed to the right of the company name.
48 CN2B Mobile Computer User’s Manual
Page 67

Chapter 2 — Windows Mobile 2003
Note: To quickly move through the contacts, tap a set of letters at the top.
This takes you to the contact names beginning with those letters.
Enter the first few letters of the contact in question here
Tap to jump to that portion of the contacts list
Deleting a Contact
1 In the contact list, tap and hold the contact. To select multiple contacts,
tap and drag. Then, tap and hold the selected contacts.
2 On the pop-up menu, tap Delete Contact. The next time you synchro-
nize, the contact is deleted from the desktop also.
Adding a Contact to Speed Dial
You can create speed dials to call frequently-called numbers with a single
tap. Before you can create a speed dial entry for a phone number, that number must already exist in Contacts.
1 From the Phone keypad, tap Speed Dial > New.
2 Tap the desired contact name and number.
3 In the Location field, tap the Up/Down arrows to select an available
location to assign as the new speed dial entry. The first speed dial loca
-
tion is reserved for your voice mail.
To delete a speed dial entry, go to the Speed Dial list, tap and hold the contact name in the box to the right of the assigned speed dial number, then
tap Delete.
Changing Contacts Options
In the contact list, tap Tools > Options.
• The area code and country/region for new contacts are automatically
entered based on the information in Country/Region settings.
• If you are having trouble reading the contacts in the contact list, select
Use large font.
• To increase the available space for displaying contacts in the list, clear
Show ABC tabs.
CN2B Mobile Computer User’s Manual 49
Page 68

Chapter 2 — Windows Mobile 2003
Tasks: Keeping a To Do List
To switch to Tasks on your CN2B Computer, tap Start > Tasks.
Use Tasks to keep track of what you have to do. A variety of task information can display on the Today screen. If you use Microsoft Outlook on
your desktop, you can synchronize tasks between your device and desktop.
Clear this to view more contacts per screen
Enter the three-digit area code
Select from a drop-down list
Select the type of tasks to display
Indicates low priority
Indicates high priority
Tap, hold for a pop-up menu
Select the list sort order
Assign tasks quickly here
Tap to display or edit
Note: To change the way information is displayed in the list, tap Tools >
Options.
Creating a Task
• To create a task, enter text in the Tap here to add a new task box at the
top of the screen. If you do not see this box, tap Tools > Entry Bar.
• To create a task with detailed information, such as start and due dates,
tap New. To enter notes, tap the Notes tab.
You can enter a start date and due date or enter other information by
first tapping the field. If the input panel is open, you need to hide it to
see all available fields.
50 CN2B Mobile Computer User’s Manual
Page 69

Chapter 2 — Windows Mobile 2003
You can enter text, draw, or create a recording. For more information on
creating notes, see “Notes: Capturing Thoughts and Ideas” on page 52.
• To change a task, tap it in the task list, and then tap Edit.
• Using the onscreen keyboard, enter a description.
• To assign the task to a category, tap Categories and select a category
from the list. In the task list, you can display tasks by category.
• When finished, tap ok to return to the task list.
Tap to choose from predefined subjects
Use Notes to store additional information
Note: To create a task with only a subject, tap Entry Bar on the Tools
menu. Then, tap Tap here to add a new task and enter the information.
Synchronizing Tasks
Tasks stored on your CN2B Computer can synchronize with Microsoft
Outlook on your desktop. Task synchronization is automatically selected in
ActiveSync.
New items entered on one computer are copied to the other during synchronization. Handwritten notes and drawings are saved as metafiles (pictures). For more information on synchronization, see ActiveSync Help on
the desktop.
CN2B Mobile Computer User’s Manual 51
Page 70

Chapter 2 — Windows Mobile 2003
Notes: Capturing Thoughts and Ideas
To switch to Notes on your CN2B Computer, tap Start > Notes.
Notes helps you quickly capture your ideas, notes, and thoughts. You can
create a note using written and typed text, drawings, and recordings. You
can also share your notes with others through e-mail, infrared, and synchronization with your desktop.
Tap to change the sort order of the list
Tap to open a note or play a recording
Tap and hold to display a pop-up menu
Tap to record
Tap to access the Recording toolbar
Note: To create documents with advanced formatting or templates, such as
bulleted lists and tabs, use word processing software developed for your
device, such as Pocket Word.
Creating a Note
To create your note, tap New, then write, draw, type, or record your information. For information about using the input panel, writing and drawing,
and creating recordings, see “Basic Skills” on page 21.
• Writing
Using the stylus, write directly on the screen.
• Drawing
Using the stylus, draw directly on the screen.
• Typing
Using the input panel, enter typed text into the CN2B Computer. Do
this by tapping keys on the onscreen keyboard or by using handwriting
recognition software.
• Recording
Create a stand-alone recording or embed a recording into a note.
Synchronizing Notes
Notes can be synchronized between your desktop and device either through
notes synchronization or file synchronization. Notes synchronization synchronizes the notes on the CN2B Computer with Outlook Notes on the
desktop. File synchronization does all notes on the CN2B Computer with
the My Documents folder for the CN2B Computer on the desktop.
52 CN2B Mobile Computer User’s Manual
Page 71

Chapter 2 — Windows Mobile 2003
To synchronize notes through synchronization, first select the Notes information type for synchronization in ActiveSync. The next time you synchronize, all notes in My Documents and its subfolder on your device appear in
Outlook Notes on your desktop. Notes that contain only text appear as regular notes in Outlook on your desktop, while notes containing written text
or drawings appear in the device format. In addition, all notes in the Notes
group in Outlook on the desktop appear in Notes on the device.
To synchronize your notes as files, in ActiveSync, select the Files information type for synchronization and clear the Notes information type. When
you select Files, the My Documents folder for the CN2B Computer is created on your desktop. All .PWI files placed in the My Documents folder on
your device and all .DOC files placed in the My Documents folder for the
CN2B Computer on your desktop are synchronized. Password-protected
files cannot be synchronized.
ActiveSync converts documents during synchronization. For information
on synchronization or file conversion, see ActiveSync Help on the desktop.
Note: When you delete or change an item on either your desktop or CN2B
Computer, the item is changed or deleted in the other location the next
time you synchronize.
Note: If you synchronize your notes using file synchronization and then
later decide to use notes synchronization, all of your notes are synchronized
with Outlook on your desktop and no longer store in the My Documents
folder for the CN2B Computer.
Inbox: Sending and Receiving E-mail Messages
To switch to Inbox on your CN2B Computer, tap Start > Inbox.
You can receive Internet e-mail messages and SMS messages in Inbox.
Internet e-mail messages are sent by using an address you receive from your
Internet service provider (ISP) or your employer. SMS messages are sent
and received through your wireless phone service provider by using a phone
number as the message address.
You can send and receive e-mail by synchronizing with your desktop, or by
connecting to a Post Office Protocol 3 (POP3) or Internet Message Access
Protocol 4 (IMAP4) mail server. You need to set up an e-mail account for
each method that you use except for Microsoft ActiveSync, which is set up
by default. The ActiveSync folder on your CN2B Computer stores messages that you send and receive through synchronization with a desktop.
Account names appear as folders in the folder list (located on the left, under
the navigation bar) in the Inbox message list.
With synchronization, messages are synchronized between the device Inbox
and the PC Inbox by using ActiveSync and Microsoft Exchange or
Microsoft Outlook. For more information, see
“Synchronizing E-mail
Messages” on page 54.
CN2B Mobile Computer User’s Manual 53
Page 72

Chapter 2 — Windows Mobile 2003
Synchronizing E-mail Messages
After selecting Inbox for synchronization in ActiveSync, e-mail messages
are synchronized as part of the general synchronization process. During
synchronization:
• Messages are copied from the Inbox folder on your desktop or the
Microsoft Exchange server to the Inbox folder on your CN2B Computer. (Note that you can only synchronize information directly with an
Exchange Server if your company is running Microsoft Mobile Information Server 2002 or later.) By default, you receive messages from the last
three days only, the first 100 lines of each new message, and file attachments of less than 100 KB in size.
• Messages in the Outbox folder on your device are transferred to
Exchange or Outlook and then sent from those programs.
• The messages on the two computers are linked. When you delete a message on your CN2B Computer, it is deleted from your desktop the next
time you synchronize.
• Messages in subfolders in other e-mail folders in Outlook are synchronized only if they were selected for synchronization in ActiveSync.
For information on initiating Inbox synchronization or changing synchronization settings, see ActiveSync Help on your desktop or select Start > Help
> Connections to see Connections Help.
Managing E-mail Messages and Folders
Each e-mail account and SMS account has its own folder hierarchy with
five default folders: Inbox, Outbox, Deleted Items, Drafts, and Sent Items.
The messages you receive and send through the mail account are stored in
these folders. You can also create additional folders within each hierarchy.
The Deleted Items folder contains messages that were deleted on the
device. The behavior of the Deleted Items and Sent Items folders depends
on the Inbox options you have chosen.
The behavior of the folders you create depends on whether you are using
ActiveSync, SMS, POP3, or IMAP4.
• If you use ActiveSync,
e-mail messages in the Inbox folder in Outlook automatically synchronize with your device. You can select to synchronize additional folders by
designating them for ActiveSync. The folders you create and the mes
sages you move are then mirrored on the server. For example, if you
move two messages from the Inbox folder to a folder named Family, and
you have designated Family for synchronization, the server creates a copy
of the Family folder and copies the messages into that folder. You can
then read the messages while away from your desktop.
-
• If you use SMS,
messages are stored in the Inbox folder.
54 CN2B Mobile Computer User’s Manual
Page 73

Chapter 2 — Windows Mobile 2003
• If you use POP3
and you move e-mail messages to a folder you created, the link is broken
between the messages on the device and their copies on the mail server.
The next time you connect, the mail server sees that the messages are
missing from the device Inbox and deletes them from the server. This
prevents you from having duplicate copies of a message, but it also
means that you no longer have access to messages that you move to folders created from anywhere except the CN2B Computer.
• If you use IMAP4,
the folders created and the e-mail messages moved are mirrored on the
server. Thus, messages are available to you anytime you connect to your
mail server, whether it is from your CN2B Computer or desktop. This
synchronization of folders occurs whenever you connect to your mail
server, create new folders, or rename or delete folders when connected.
For all accounts except ActiveSync, you can access folder options by tapping Tools > Manage Folders.
Connecting to a Mail Server
In addition to synchronizing e-mail messages with your desktop, you can
send and receive e-mail messages by connecting to an e-mail server using a
network card connected to your CN2B Computer. You need to set up a
remote connection to a network or an ISP, and a connection to your e-mail
server. For more information, see “Remote Access (Modems)” on
page 100.
When you connect to the e-mail server, new messages are downloaded to
the CN2B Computer Inbox folder, messages in the CN2B Computer Outbox folder are sent, and messages that were deleted on the e-mail server are
removed from the CN2B Computer Inbox folder.
Messages that you receive directly from an e-mail server are linked to your
e-mail server rather than your desktop. When you delete a message on your
CN2B Computer, it is also deleted from the e-mail server the next time you
connect based on the settings selected in ActiveSync.
You can work online or offline. When working online, you read and
respond to messages while connected to the e-mail server. Messages are sent
as soon as you tap Send, which saves space on your CN2B Computer.
When working offline, once you have downloaded new message headers or
partial messages, you can disconnect from the e-mail server and then decide
which messages to download completely. The next time you connect,
Inbox downloads the complete messages you have marked for retrieval and
sends the messages you have composed.
Setting Up or Changing an Account
• To set up a POP3 or IMAP4 e-mail account, tap Accounts > New
Account. Follow the instructions in the New Account Wizard.
• To set up an SMS account, tap Accounts > Accounts, and then tap
SMS. Follow the instructions on the screen.
CN2B Mobile Computer User’s Manual 55
Page 74

Chapter 2 — Windows Mobile 2003
To change options for an account, tap Accounts > Accounts, then tap the
name of the account, and follow the instructions on the screen.
To delete an account, tap Accounts > Accounts, tap and hold the name of
the account, then tap Delete.
Note: You can set up several e-mail accounts including your ActiveSync
account, but you can set up, but not delete, only one SMS account.
You cannot add a new account while connected. Tap Accounts > Discon-
nect to disconnect.
Downloading Messages from the Server
In Inbox, tap Accounts > Connect to open a connection to the Internet or
your corporate network, depending on the account. For more information,
tap Start > Help > Connections to see Connections Help.
1 Tap Accounts and ensure that the account you want to use is selected
(marked by a bullet.)
2 Tap Connect. The messages on your CN2B Computer and e-mail server
are synchronized: new messages are downloaded to the CN2B Inbox
folder, messages in the CN2B Outbox folder are sent, and messages that
were deleted from the server are removed from the CN2B Inbox. Tap a
message in the message list to open it.
3 If you read a message and decide that you need the full copy, tap Edit >
Mark for Download while in the message window. If you are in the mes-
sage list, tap and hold the message, and then tap Mark for Download.
This also downloads message attachments if you selected those options
when you set up the e-mail account. You can also choose to download
full copies of messages by default.
4 When finished, tap Accounts > Disconnect.
Note: Receiving entire messages consumes storage memory.
Note: The size column in the message list displays the local size and server
size of a message. Even when a message has downloaded fully, these numbers may differ because the size of a message can vary between the server
and the device.
Composing and Sending Messages
1 In the message list, tap New.
2 To select an account, tap the From list and select “ActiveSync,” “SMS,”
or the desired e-mail account.
3 Enter the e-mail address or SMS address of one or more recipients, sepa-
rating them with semicolons. To access addresses and phone numbers
from Contacts, tap To.
4 Enter your message. To quickly add common messages, tap My Text
and tap a desired message.
56 CN2B Mobile Computer User’s Manual
Page 75

Chapter 2 — Windows Mobile 2003
5 To check spelling, tap Edit > Spell Check.
6 Tap Send. If you are working offline, the message is moved to the Out-
box folder and is sent the next time you connect.
Tap to toggle header
Tap My Text to include prewritten messages
Tap to display the address book
Tap to access Recording toolbar
Note: If you are sending an SMS message and want to know if it was
received, before sending the message, tap Edit > Options > Request SMS
text message delivery notification.
You can directly call the sender of an SMS message by tapping the SMS
icon, then selecting Call.
Note: Depending on the e-mail address options that you select, you can use
a directory service in addition to your contact list to verify names.
Companion Programs
The companion programs consist of Microsoft Pocket Word, Microsoft
Pocket Excel, Windows Media Player, and Microsoft Reader. To switch to
a companion program on your CN2B Computer, tap Start > Programs.
Pocket Word
Pocket Word works with Microsoft Word on your desktop to give you
access to copies of your documents. You can create new documents on your
CN2B Computer, or you can copy documents from your desktop to your
CN2B Computer. Synchronize documents between your desktop and your
CN2B Computer to have up-to-date content in both locations.
Creating a Document
Use Pocket Word to create documents, letters, meeting minutes, etc. To
create a new file, tap Start > Programs > Pocket Word > New for either a
blank document or a template, depending on what you have selected under
Tools > Options. Select an input mode from the View menu.
CN2B Mobile Computer User’s Manual 57
Page 76

Chapter 2 — Windows Mobile 2003
You can open only one document at a time; when you open a second document, you have to save the first. You can save a document you create or edit
in formats such as Word (.DOC), Pocket Word (.PSW), Rich Text Format
(.RTF), and Plain Text (.TXT).
Pocket Word contains a list of files stored on your CN2B Computer. Tap a
file in the list to open it. To delete, make copies of, and send files, tap and
hold a file in the list, then, select the action on the pop-up menu.
Tap to change the sort order
Tap to open a document
Tap and hold an item to see a pop-up menu
You can enter information in Pocket Word in one of four modes (typing,
writing, recording, and drawing), which are displayed on the View menu.
Each mode has its own toolbar, which you can show and hide by tapping
the Show/Hide Toolbar icon on the command bar.
You can change the zoom magnification by tapping View > Zoom, then
select the percentage you want. Select a higher percentage to enter text and
a lower one to see more of your document.
If you are opening a Word document created on a desktop, you may select
View > Wrap to Window so that you can see the entire document.
To check spelling, select text, then tap Tools > Spell Check. To use your
new document as a template, move the document to the Templates folder.
You can insert the data in a document. First, make sure that no drawings
are selected, tap and hold anywhere on the document, then tap Insert Date
from the pop-up menu.
Typing Mode
Using the input panel, enter typed text into the document. For more information on entering typed text, see “Basic Skills” on page 21.
To format existing text and to edit text, first select the text. You can select
text as you do in a Word document, using your stylus instead of the mouse
to drag through the text you want to select. You can search a document to
find text by tapping Edit > Find/Replace.
58 CN2B Mobile Computer User’s Manual
Page 77

Chapter 2 — Windows Mobile 2003
Tap and hold to see a pop-up menu
Tap to return to
the list
Tap to format text
Tap to change
format options
Tap to toggle the toolbar
Writing Mode
In writing mode, use your stylus to write directly on the screen. Ruled lines
are displayed as a guide, and the zoom magnification is greater than in typing mode to allow you to write more easily. For more information on writing and selecting writing, see “Basic Skills” on page 21.
With Space icon selected, drag to insert space.
An arrow appears showing the space direction and size
Tap to highlight the selected text
Tap to select formatting options, such as pen weight
Pen icon
Space icon
Note: If you cross three ruled lines in a single stylus stroke, the writing
becomes a drawing, and can be edited and manipulated as described in
“Drawing Mode” on page 60.
Note: Written words are converted to graphids (metafiles) when a Pocket
Word document is converted to a Word document on your desktop.
Recording Mode
In recording mode, embed a recording into your document. Recordings are
saved as .WAV files. For more information on recording, see
on page 21.
“Basic Skills”
For more information on using Pocket Word, tap Start > Help > Pocket
Word to see Pocket Word Help.
CN2B Mobile Computer User’s Manual 59
Page 78

Chapter 2 — Windows Mobile 2003
Drawing Mode
In drawing mode, use your stylus to draw on the screen. Grid lines appear
as a guide. When you lift your stylus off the screen after the first stroke, a
drawing box indicating the boundaries of the drawing appears. Every subsequent stroke within or touching the drawing box becomes part of the drawing. For more information on drawing and selecting drawings, see “Basic
Skills” on page 21.
Resize an object by dragging the selection handles
Tap to select formatting options, such as fill color
Pocket Excel
Tap to see choices
Pen icon
Synchronizing Pocket Word Documents
Pocket Word documents can be synchronized with Word documents on
your desktop. To synchronize files, first select the Files information type for
synchronization in ActiveSync. When you select Files, the My Documents
folder for the CN2B Computer is created on your desktop. Place all files
you want to synchronize with the device in this folder. Password-protected
files cannot be synchronized.
All Pocket Word files stored in My Documents and its subfolders are synchronized with the desktop. ActiveSync converts documents during synchronization.
For more information on synchronization or file conversion, see ActiveSync
Help on the desktop.
Note: When you delete a file on either your desktop or your CN2B Computer, the file is deleted in the other location the next time you synchronize.
You can create and edit workbooks and templates in Microsoft Pocket
Excel as you do in Microsoft Excel on your desktop. Pocket Excel work
books are usually saved as .PXL files, and also in .XLS format.
-
When you close a workbook, it is automatically named and placed in the
Pocket Excel workbook list. You can attach a password to a workbook to
help ensure privacy.
60 CN2B Mobile Computer User’s Manual
Page 79

Chapter 2 — Windows Mobile 2003
Creating a Workbook
Use Pocket Excel to create workbooks, such as expense reports and mileage
logs. To create a new file, tap Start > Programs > Pocket Excel > New. A
blank workbook appears. Or, if you have selected a template for new workbooks in the Tools > Options dialog, that template appears with appropriate text and formatting already provided. You can open only one workbook
at a time; when you open a second workbook, save the first. You can save a
workbook you create or edit in a variety of formats, including Pocket Excel
(.PXL) and Excel (.XLS). You can also save a workbook as a template by
moving the workbook to the Templates folder.
Pocket Excel contains a list of the files stored on your CN2B Computer.
Tap a file in the list to open it. To delete, make copies of, and send files, tap
and hold a file in the list. Then select the appropriate action from the popup menu.
Pocket Excel provides fundamental spreadsheet tools, such as formulas,
functions, sorting, and filtering. Tap View > Toolbar to see the toolbar.
Cell contents appear here as you tab through them
Tap to enter a formula
Tap to zoom
Note: If your workbook contains sensitive information, you can protect it
with a password. To do so, open the workbook, tap Edit > Password.
Every time you open the workbook, enter a password, preferably one that is
easy for you to remember but hard for others to guess.
Tips for Working in Pocket Excel
Note the following when working in large worksheets in Pocket Excel:
• View in full-screen mode to see as much of your worksheet as possible.
Tap View > Full Screen. To exit full-screen mode, tap Restore.
•Tap View > Zoom and select a percentage so that you can easily read the
worksheet.
• Show and hide window elements. Tap View and then tap the elements
you want to show or hide.
• Freeze panes on a worksheet to keep certain rows and columns visible as
you work. Select the cells, then tap View > Freeze Panes to freeze them.
Tap View > Unfreeze Panes to undo this process.
CN2B Mobile Computer User’s Manual 61
Page 80

Chapter 2 — Windows Mobile 2003
• Split panes to view different areas of a large worksheet. Tap View > Split.
Then drag the split bar to where you want it. To remove the split, tap
View > Remove Split.
• Show and hide rows. To hide a row, select a cell in the row you want to
hide. Then tap Format > Row > Hide. To show a hidden row, tap Tools
> Go To, and then type a reference that is in the hidden row. Then tap
Format > Row > Unhide.
• Do the same to show and hide columns. To hide a column, select a cell
in the column you want to hide. Then tap Format > Column > Hide.
To show a hidden column, tap Tools > Go To, and then type a reference
that is in the hidden column. Then tap Format > Column > Unhide.
For more information on using Pocket Excel, tap Start > Help > Pocket
Excel to see Pocket Excel Help.
MSN Messenger
MSN Messenger on your CN2B Computer provides the same chat environment as MSN Messenger on your desktop. These features include:
• Seeing who is online
• Sending and receiving instant messages
• Having an instant message conversation with a group of contacts
• Telling contacts that you are unavailable
• Blocking contacts from seeing your status or sending you messages
To use MSN Messenger, you need a Microsoft Passport account, or a
Microsoft Exchange e-mail account that your employer provides. Once you
have one of these accounts, do the following:
1 Set up a connection on your CN2B Computer, such as a wireless con-
nection, that enables you to connect to the Internet.
2 Set up an account in MSN Messenger.
3 Sign in to MSN Messenger.
Note: To set up a free Hotmail account, go to www.hotmail.com.
To set up a Microsoft Passport account, go to www.passport.com.
To set up an Exchange account, see your network administrator.
For more information on using MSN Messenger, tap Start > Help > MSN
Messenger to see MSN Messenger Help.
To switch to MSN Messenger, tap Start > Programs > MSN Messenger.
Setting Up an Account
Before you can use MSN Messenger, you must set up the instant messaging
accounts to use. For MSN Messenger Service, you must have a Microsoft
Passport or Hotmail account. For Exchange Instant Messaging, you must
have an Exchange account.
62 CN2B Mobile Computer User’s Manual
Page 81

Chapter 2 — Windows Mobile 2003
1 Create a connection for your device. To use MSN Messenger Service, set
up a connection to the Internet; to use Exchange Instant Messaging, set
up a connection to your corporate network. See “Remote Access
(Modems)” on page 100 for more information on getting connected.
2 In MSN Messenger, tap Tools > Options > the Accounts tab.
3 Select either Enable MSN Messenger Service, or Enable Exchange
Instant Messaging, or both.
4 Enter your sign-in name and password for the selected accounts. Your
sign-in name is usually in the username@domain.com form.
5 If you selected both accounts, under Sign in using this account first,
select which account to sign in to first.
Signing In and Out
• To sign in, tap anywhere on the screen and follow the directions.
• To sign out, tap Tools > Sign Out.
• To sign in upon connecting, tap Tools > Options > General and select
the Run this program upon connection box.
• Signing in to an Exchange account may take several minutes depending
upon your connection speed. Reducing the number of Exchange contacts decreases your sign-in time.
CN2B Mobile Computer User’s Manual 63
Page 82

Chapter 2 — Windows Mobile 2003
Working with Contacts
The MSN Messenger window shows all of your messenger contacts at a
glance, divided into Online and Not Online categories. From this view,
while connected, you can chat, send e-mail, block the contact from chatting with you, or delete contacts from your list using the pop-up menu.
To add a contact, tap Tools > Add a Contact and follow the directions on
the screen. To delete a contact, tap and hold the contact’s name, then tap
Delete Contact from the pop-up menu. To see others online without being
seen, tap Tools > My Status > Appear Offline.
Tap a contact to start a chat
Tap and hold to display a pop-up menu
Managing Contacts
To be alerted each time you are added to a contact list, tap Tools >
Options > the Privacy tab.
• To block a contact from seeing your status and sending you messages,
tap the contact and tap the right arrow. This moves the contact to the
My Block List.
• To unblock a contact, tap the contact and tap the left arrow. This moves
the contact to the My Allow List.
• To receive an alert when someone adds you to their contacts list, select
Alert me when I am added to a Passport contact list.
• To see who has you listed as a contact, tap View.
64 CN2B Mobile Computer User’s Manual
Page 83

Chapter 2 — Windows Mobile 2003
Sending a Message
• Tap a contact to whom you want to send a message. Enter your message
in the text entry area at the bottom of the screen and tap Send. To
quickly add common messages, tap My Text and tap a desired message.
• To invite another contact to an ongoing chat, tap Tools > Invite and tap
a contact.
• To see who is already chatting or to switch between chats, tap Chats.
Enter a message here
Tap to send a message
Windows Media Player for Windows Mobile
Use Microsoft Windows Media Player for Windows Mobile to play digital
audio and video files that are stored on your CN2B Computer or on a network. To switch to Windows Media Player on your CN2B Computer, tap
Start > Windows Media.
Use Microsoft Windows Media Player on your desktop to copy digital
audio and video files to your CN2B Computer. You can play Windows
Media and MP3 files on your Windows Mobile.
Tap to skip to the next song
Tap to play a previous song
Tap to start, pause, or stop a song
Monitors the progress of the current track
Tap to adjust volume
For more information about using Windows Media Player for Windows
Mobile, tap Start > Help > Windows Media Player.
CN2B Mobile Computer User’s Manual 65
Page 84

Chapter 2 — Windows Mobile 2003
Microsoft Reader
Use Microsoft Reader to read eBooks on your CN2B Computer. Download books to your desktop from your favorite eBook Web site. Then, use
ActiveSync to copy the book files to your activated CN2B Computer. The
books appear in the Reader Library, where you can tap them in the list to
open them. Each book consists of a cover page, an optional table of contents, and the pages of the book. You can:
• Page through the book by using the Up/Down control on your CN2B
Computer or by tapping the page number on each page.
• Annotate the book with highlighting, bookmarks, notes, and drawings.
• Search for text and look up definitions for words.
The Guidebook contains the information needed to use the software. To
open the Guidebook, tap Help on the Reader command bar. Or, on a book
page, tap and hold the book title, and then tap Help on the pop-up menu.
To switch to Microsoft Reader, tap Start > Programs > Microsoft Reader.
Getting Books on Your CN2B Computer
You can download book files from the Web. Just visit your favorite eBook
retailer and follow the instructions to download the book files.
Sample books and a dictionary are also included in the “\Extras\MSReader”
path on the Windows Mobile Companion CD.
Use ActiveSync to download the files from your desktop to your activated
mobile computer described in the Read Me file in the “\MSReader” folder.
Using the Library
The Library is your Reader home page; it displays a list of all books stored
on your CN2B Computer or storage card. To open the Library:
1 On the Reader command bar, tap Library.
2 On a book page, tap the book title, then tap Library on the menu.
3 To open a book, tap its title in the Library list.
Tap to scroll through the list
Tap to select a sort order
Tap these to navigate
to other parts of the
Reader
66 CN2B Mobile Computer User’s Manual
Tap to open a book
Page 85

Chapter 2 — Windows Mobile 2003
Reading a Book
Each book consists of a cover page (which includes navigation options), an
optional table of contents, and the pages of the book.
The first time you open a book, go to the first page or to the table of contents, if there is one. Subsequently, whenever you open the book, you are
automatically taken to the last page read.
With the text, each book page includes a page number and book title. You
can also page through a book by using the Up/Down/Left/Right controls
on your CN2B Computer.
Tap to select a
navigational option
Tap the text for a pop-up menu
Using Reader Features
Reading a book electronically gives you several options not available with
paper books. These options are available from any book page.
Select text by dragging across the text on the page. Then, tap an option on
the pop-up menu, as described here:
Searching for Text Find text in a book by tapping Find on the pop-up menu. Enter the word you want to
Copying Text You can copy text from books that support this feature into any program that accepts text.
search for, and tap the desired Find option. Reader highlights found text on the page. To
close Find, tap outside the box. To return to your original page, tap the title and then tap
Return on the pop-up menu.
On a book page, select the text you want to copy. Then, tap Copy Text on the pop-up
menu. The text can be pasted into the program of your choice.
Adding Bookmarks When you add a bookmark to a book, a color-coded bookmark icon appears in the right
margin. You can add multiple bookmarks to a book. Then, from anywhere in the book,
tap the bookmark icon to go to the bookmarked page.
Highlighting Text When you highlight text, it appears with a colored background.
Attaching Notes to Text When you attach a note to text, you enter the text in a notepad that appears on top of the
book page. A Note icon displays in the left margin. To show or hide the note, tap the icon.
Adding Drawings When you add a drawing, a Drawing icon appears in the bottom, left corner of the page,
and drawing tools appear across the bottom of the page. Draw by dragging your stylus.
Annotations Index To see a list of a book’s annotations, including bookmarks, highlights, text notes, and
drawings, tap Annotations Index on the book’s cover page. You can tap an entry in the list
to go to the annotated page.
CN2B Mobile Computer User’s Manual 67
Page 86

Chapter 2 — Windows Mobile 2003
Removing a Book
When you finish reading a book, you can delete it to conserve space on
your CN2B Computer. If a copy of the book is stored on your desktop, you
can download it again at any time.
To remove a book from your CN2B Computer, tap and hold the title in
the Library list, and then tap Delete on the pop-up menu.
Pocket Internet Explorer
Use Microsoft Pocket Internet Explorer to view Web or WAP pages in
either of these ways:
• During synchronization with your desktop, download your favorite links
and mobile favorites that are stored in the Mobile Favorites subfolder in
Internet Explorer on the desktop.
• Connect to an ISP or network and browse the Web. To do this, create
the connection first, as described in “Remote Access (Modems)” on
page 100.
When connected to an ISP or network, you can also download files and
programs from the Internet or intranet.
To switch to Pocket Internet Explorer on your CN2B Computer, tap Start
> Internet Explorer.
The Mobile Favorites Folder
Only items stored in the Mobile Favorites subfolder in the Favorites folder
in Internet Explorer on your desktop are synchronized with your CN2B
Computer. This folder was created automatically with ActiveSync installed.
Favorite Links
During synchronization, the list of favorite links in the Mobile Favorites
folder on your desktop is synchronized with Pocket Internet Explorer on
your CN2B Computer. Both computers are updated with changes made to
either list each time you synchronize. Unless you mark the favorite link as a
mobile favorite, only the link is downloaded to your CN2B Computer.
Connect to your ISP or network to view the content.
1 In ActiveSync on your desktop, click Tools > Options, and select
“Favorites” from the Mobile Device list. For more information on using
ActiveSync, see ActiveSync Help on the desktop.
2 In Internet Explorer on your desktop, save or move favorite links to the
Mobile Favorites subfolder in the Favorites list via Favorites > Organize
Favorites. For more information on using Internet Explorer, see Internet
Explorer Help on the desktop.
3 Connect your CN2B Computer to your desktop. If synchronization
does not start automatically, in ActiveSync on your desktop, click Sync.
68 CN2B Mobile Computer User’s Manual
Page 87

Mobile Favorites
Chapter 2 — Windows Mobile 2003
If you are using Microsoft Internet Explorer 5.0 or later on your desktop,
you can download mobile favorites to your CN2B Computer. Synchronizing mobile favorites downloads Web content to your CN2B Computer so
that you can view pages while disconnected from your ISP and desktop.
Use the Internet Explorer plug-in installed with ActiveSync to create
mobile favorites quickly. To create a mobile favorite:
1 In ActiveSync on your desktop, click Tools > Options, and select
“Favorites” from the Mobile Device list. For more information on using
ActiveSync, see ActiveSync Help on the desktop.
2 In Internet Explorer 5.0 or greater on your desktop, browse to the page
you want to view offline, then click Tools > Create Mobile Favorite.
3 To change the link name, enter a new name in the Name box.
4 In the Update box, select a desired update schedule to keep the page in
the Mobile Favorites folder up to date. You can also update content by
clicking Tools > Synchronize in Internet Explorer.
5 To save the link in a subfolder of Mobile Favorites, click Create In and
select the desired subfolder.
6 Click OK. Internet Explorer downloads the latest version of the page to
your desktop.
7 To download the pages that are linked to the mobile favorite you just
created, in Internet Explorer on the desktop, right-click the mobile
favorite, then click Properties. On the Download tab, specify the number of links deep you want to download. To conserve CN2B Computer
memory, go only one level deep.
8 Connect your CN2B Computer to your desktop. If synchronization
between your CN2B Computer and desktop does not start, in ActiveSync on your desktop, click Sync.
Mobile favorites take up storage memory on your CN2B Computer. To
minimize the amount of memory used:
• In the settings for the Favorites information, type in ActiveSync options,
turn off pictures and sounds, or stop some mobile favorites from being
downloaded to the CN2B Computer. For more information, see Active
Sync Help.
• Limit the number of downloaded linked pages. In Internet Explorer on
the desktop, right-click the mobile favorite you want to change and then
Properties. In the Download tab, specify “0” or “1” for the number of
linked pages you want to download.
-
CN2B Mobile Computer User’s Manual 69
Page 88

Chapter 2 — Windows Mobile 2003
Using AvantGo Channels
AvantGo is a free interactive service that gives you access to personalized
content and thousands of popular Web sites. You subscribe to AvantGo
channels directly from your CN2B Computer, then synchronize your
CN2B Computer and desktop, or connect to the Internet to download the
content. Visit the AvantGo website for information. Tap the Add or
Remove link to add or remove channels. Do the following to synchronize
an AvantGo channel:
1 In Pocket Internet Explorer on your CN2B Computer, tap to dis-
play your list of favorites.
2 Tap the AvantGo Channels link.
3 Tap Activate.
4 Follow instructions on the screen. Synchronize the CN2B Computer
with the desktop, then tap My Channels to complete the setup.
5 When synchronization is complete, tap the AvantGo Channels link in
your list of favorites to see a few of the most popular channels.
Using Pocket Internet Explorer
You can use Pocket Internet Explorer to browse mobile favorites and channels that were downloaded to your CN2B Computer without connecting
to the Internet. You can also connect to the Internet through an ISP or a
network connection and browse the Web.
Refresh icon Home icon
Viewing Mobile Favorites and Channels
1 Tap the Favorites icon to display your list of favorites.
2 Tap the page you want to view.
70 CN2B Mobile Computer User’s Manual
Page 89

Chapter 2 — Windows Mobile 2003
Tap to view a favorite
Tap to add or delete a folder or favorite link
The page that was downloaded the last time you synchronized with your
desktop opens. If the page is not on your CN2B Computer, the favorite is
dimmed. Synchronize with your desktop again to download the page to
your CN2B Computer, or connect to the Internet to view the page.
Browsing the Internet
1 Set up a connection to your ISP or corporate network using Connec-
tions, as described in “Remote Access (Modems)” on page 100.
2 To connect and start browsing, do one of the following:
•Tap the Favorites icon, and then tap the favorite you want to view.
•Tap View > Address Bar. In the address bar that appears at the top of
the screen, enter the Web address you want to visit and then tap Go.
Tap the arrow to choose from previously entered addresses.
Note: To add a favorite link while using the CN2B Computer, go to the
page you want to add, tap and hold on the page, and tap Add to Favorites.
CN2B Mobile Computer User’s Manual 71
Page 90

Chapter 2 — Windows Mobile 2003
72 CN2B Mobile Computer User’s Manual
Page 91

Installing Applications
3
There are multiple ways to get an application to your CN2B Mobile Computer; like there are multiple ways to package the application for delivery.
CN2B Mobile Computer User’s Manual 73
Page 92

Chapter 3 — Installing Applications
Packaging an Application
Use any of these methods to package an application for installation:
• For very simple applications, the application itself might be the only file
that needs to be delivered.
• It could be a directory structure that contains the application, supporting
files like ActiveX controls, DLLs, images, sound files, and data files.
• Or, you could package an application via a CAB file.
Consider any of the following when choosing a location into which to store
your application:
• In the basic CN2B Computer, there are two built-in storage options: the
Object Store and the Persistent Storage Manager (PSM). The Object
Store is RAM that looks like a disk. Anything copied here is deleted
when a cold-boot is performed on the CN2B Computer. The PSM is an
area of storage which is embedded in a section of the system’s FLASH
memory. This storage area is not erased during a cold-boot. It may, however, be erased during the reflashing process. In addition to storing applications and data files, you do have the option to store a persistent registry
to the PSM region.
• If the optional Secure Digital storage card is in the system, then consider
this card the primary location for placing an applications install files.
This storage card creates the “\Storage Card” folder.
• Use the small nonvolatile Flash File Store region to hold CAB files that
rebuild the system at cold-boot or install applications from a CAB file
into the Flash File Store so they are “ready-to-run” when a cold-boot is
performed. Since the FLASH in the system has a limited number of
write cycles, do not use the Flash File Store for excessive writing purposes; however, reading is okay.
Files copied to any of these locations are safe when a cold-boot is performed
on a CN2B Computer — providing the AutoRun system is installed in the
appropriate location You can find this system in the CN2B Management
Tools portion. Copying a CAB file to the “\CabFiles” folder on one of
these cards automatically extracts that CAB file on every cold-boot to
ensure that your system is properly set up (see
Installing Applications
Consider any of these options to get the package to the preferred location
on your CN2B Computer: Microsoft ActiveSync (page 75), FTP Server
(page 76), Secure Digital storage cards (page 76), Wavelink Avalanche
(page 76), SmartSystems™ Console (page 77), or Registry (page 77).
page 83).
74 CN2B Mobile Computer User’s Manual
Page 93

Using Microsoft ActiveSync
Note: These instructions assume the CN2B Management Tools were
installed on your desktop.
The Microsoft ActiveSync tool is located on the CN2B Companion CD. See
Chapter 2, “Windows Mobile 2003” for information about this tool as
provided by Microsoft Corporation.
This can be a serial, USB, or InfraRed ActiveSync connection. Files can be
copied using File Explorer on a desktop or a laptop computer. This is usually good when updating few CN2B Computers.
These instructions assume that Microsoft ActiveSync was installed onto
your desktop and is up and running. If not, go to
Mobile 2003” for an URL from which to download the latest application.
1 Connect your CN2B Computer to your desktop computer via an Active-
Sync cable.
2 Wait for a “Connected” message to appear in the Microsoft ActiveSync
application to signal a connection to the CN2B Computer. If necessary,
select File > Get Connected to initiate a connection.
Chapter 3 — Installing Applications
Chapter 2, “Windows
3 Click Explore to access the Mobile Device folder on your unit.
4 From your desktop, select Start > Windows Explorer, then browse the
“C:\Intermec\CN2B Mgmt Tools\CabFiles” path for any CAB files
needed for your CN2B Computer. Select the appropriate file, right-click
the file for a pop-up menu, then select Copy.
5 Within the Mobile Device directory, go to the directory where you want
the files located on the CN2B Computer, do a right-click for a pop-up
menu, then select Paste.
6 When all of the files are pasted, perform a warm-boot on the CN2B
Computer. When the computer reboots, wait for the LED on the top
left of your keypad to stop blinking. Tap Start > Programs > File
Explorer to locate the newly copied executable files, then tap these files
to activate their utilities.
CN2B Mobile Computer User’s Manual 75
Page 94

Chapter 3 — Installing Applications
Using the FTP Server
The CN2B Computer has a built-in FTP Server that connects to a network
via 802.11b/g or WAN (Wireless Access Network). This allows connections to the CN2B Computer to perform file transfers or computer management functions. Another benefit is you can create FTP scripts to
automate the process of copying files to the CN2B Computer. This option
is good for when a large number of CN2B Computers need updating. See
Chapter 7, “Programming” for information.
Copying a Secure Digital Storage Card
Use these steps to install an application using a Secure Digital storage card:
1 Suspend the CN2B Computer, remove the battery from the CN2B
Computer, then remove its Secure Digital storage card.
Secure Digital
storage card
2 Using a Secure Digital card reader connected to your desktop PC, insert
the Secure Digital card into your card reader.
3 Create a “\CabFiles” directory on the Secure Digital card, then copy
(build into cabfiles) your application, data files, and all required DLLs
and drivers into this directory.
4 Remove the Secure Digital card from your card reader and reinstall it
into the CN2B Computer.
5 Perform a warm-boot on the CN2B Computer to install these files.
Using Wavelink Avalanche
You can use the Wavelink Avalanche device management system to install
applications on all of your wireless CN2B Computers.
The wireless CN2B Computer ships with the Avalanche Enabler already
loaded on it. The Avalanche Enabler is configured to activate automatically
(typically on a warm boot).
Note: If you manually activate the Avalanche Enabler on the CN2B Computer, you may be prompted for a password when you exit the Avalanche
Enabler. The default password is leave.
When the Avalanche Enabler is activated, the CN2B Computer attempts to
connect to the Avalanche Agent. When the CN2B Computer connects to
the Agent, the Agent determines whether an update is available and immediately starts the software upgrade, file transfer, or configuration update.
76 CN2B Mobile Computer User’s Manual
Page 95

To use Avalanche to remotely manage the CN2B Computer
1 Install software packages and updates for the CN2B Computer using the
Avalanche Management Console. For help using the console, see the
online help.
2 Schedule the CN2B Computer updates or manually initiate an update
using the Avalanche Management Console.
For information on using Wavelink Avalanche, contact your local Intermec
representative or visit the Wavelink web site at www.wavelink.com.
Using the SmartSystems Console
You can use the SmartSystems Console to drag-and-drop Intermec applications onto your CN2B Computers. The CN2B Computer ships with the
SmartSystems client loaded on it. The console is part of SmartSystems
Foundation and is available from the Intermec web site. To download
SmartSystems Foundation, go to www.intermec.com/idl and open the
Device Management page.
To use SmartSystems Console to install an application
Chapter 3 — Installing Applications
1 Download your application file from the Intermec web site and unzip it
on your desktop.
2 From the SmartSystems Console, drag-and-drop the application onto
each CN2B Computer discovered in your network.
For information on using the SmartSystems Console, see its online help.
Replicating Settings Using the Registry
The following information updates the registry on your CN2B Computer,
confirms the registry update, then copies the information onto other CN2B
Computers in your network.
If you are using DHCP, no changes are necessary.
If using Static IP, the new CN2B Computer has the IP address of the original CN2B Computer because the copied registry includes this information.
When you change the IP address using the Intermec Settings applet, the
information is lost when a warm-boot is performed, and the original IP
address is used.
Load the REGFLUSH.CAB file to install the Registry Save application, run
this application, then perform a warm-boot to keep the new IP address.
To install the Registry Save application after a cold-boot is performed,
change the properties of the REGFLUSH.CAB file to that of read-only.
Using ActiveSync, copy the CAB file to the “Flash File Store\Persistent
Copy\CabFiles” folder on the CN2B Computer, then perform a cold-boot
to load this file.
CN2B Mobile Computer User’s Manual 77
Page 96

Chapter 3 — Installing Applications
Deleting the Old Registry File
1 On the original CN2B Computer, select Start > Programs > File
Explorer, then tap My Device > Flash File Store. Scroll down to the bot-
tom of the list of files and folders, press and hold your stylus in the white
area beneath for a pop-up menu, then select View All Files.
2 Look for a “registry” file. If one exists, select to highlight that file, press
and hold for a pop-up menu, select Delete, then Yes to remove this file.
3 Select Start > Settings > the System tab > the Utilities icon > the Regis-
try Save tab, then check Enable Registry Storage to enable the registry
save flag. Tap ok to close, then close the Settings.
4 Select Start > Registry Save, then tap ok when told the registry is saved.
78 CN2B Mobile Computer User’s Manual
Page 97

Chapter 3 — Installing Applications
Confirming the New Registry File
To confirm whether the new registry file exists, do the following:
1 On the CN2B Computer, select Start > Programs > File Explorer, then
tap My Device > Flash File Store. Press and hold your stylus in the white
area beneath for a pop-up menu, then select View All Files.
2 The new registry file should be on the root of the Flash File Store folder
with today’s date.
Updating Other Computers in Your Network
These instructions assume you have Windows XP on your desktop.
1 Connect your CN2B Computer to your desktop using Microsoft Active-
Sync and a cradle. Make sure the ActiveSync application on your desktop is up and running and connected to your CN2B Computer.
2 On your desktop, select Start > Settings > Control Panel, double-click
Folder Options, then click the View tab.
CN2B Mobile Computer User’s Manual 79
Page 98

Chapter 3 — Installing Applications
3 Beneath “Hidden files and folders,” check Show hidden files and fold-
ers, then click OK to close.
4 Remove the CN2B Computer from the cradle, and put another CN2B
Computer in its place. The ActiveSync application on your desktop
should connect to the new unit.
5 Follow the instructions for “Deleting the Old Registry File” on page 78,
put the new registry file in the root of the Flash File Store folder on the
new CN2B Computer, enable the registry save flag via the Utilities
applet, perform a warm-boot. and make sure these settings are saved.
Updating the System Software
When you upgrade your CN2B Computer, you are updating the operating
system (OS) and the Persistent Storage Manager (PSM) files.
The PSM files are stored in the Flash File Store region, and deliver Intermec value-added functionality such as data collection, unit configuration
and diagnostics, and Intermec’s wireless security suite.
You need to download the latest upgrade files from the Intermec web site to
your desktop PC.
1 Start your web browser and go to the Intermec web site at www.inter-
mec.com/wm2003.
2 Click the PPC 2003 OS link, fill out the appropriate information, then
click Submit Information. Click OK to continue.
3 Click the link and download the .zip file to your PC.
80 CN2B Mobile Computer User’s Manual
Page 99

Chapter 3 — Installing Applications
4 Follow the steps in one of the next sections:
• If you are using a Secure Digital card to upgrade the CN2B Com-
puter, see below.
• If you are using the SmartSystems Console to upgrade the CN2B
Computer, see “Using the SmartSystems Console to Upgrade the
CN2B Computer” on page 82.
Using a Secure Digital Card to Upgrade the CN2B Computer
To use a Secure Digital card to upgrade the CN2B Computer, you need a
Secure Digital card reader and a Secure Digital card formatted as FAT
Note: The CN2B Computer currently supports Delkin Devices Secure
Digital cards only. Intermec cannot guarantee that other Secure Digital
cards will work with the CN2B Computer.
1 Suspend the CN2B Computer, remove the battery from the CN2B
Computer, then remove its Secure Digital storage card.
Secure Digital
storage card
.
2 Place the Secure Digital storage card in your desktop PC card drive, then
copy all required upgrade files to the storage card.
3 Remove the Secure Digital card from your desktop, reinstall it into the
CN2B Computer, and insert the CN2B Computer into a dock connected to external power.
4 Press the Reset button inside the stylus holder to perform a cold-boot.
Do not use force or a sharp object when pressing the Reset button, or you may
damage the Reset button.
Press to reset
5 When the Bootloader Menu shows “complete,” remove the Secure Digi-
tal card, insert the battery, then install the battery door. Press the Reset
button again to load the new operating system.
CN2B Mobile Computer User’s Manual 81
Page 100

Chapter 3 — Installing Applications
Note: The upgrade will fail if the CN2B Computer is not connected to
external power. For help, see “Accessories” on page 16.
When the CN2B Computer finishes booting, you may use it. You have
reset the CN2B Computer to its default configuration. You need to set the
date and time and to set its network communications parameters to reestablish communications with the other devices in the wireless network.
Using the SmartSystems Console to Upgrade the CN2B Computer
You can use the SmartSystems Console to upgrade the operating system on
your CN2B Computer. The console is part of SmartSystems Foundation
and is available from the Intermec web site via the Intermec Developer
Library (IDL). Before you can upgrade your computer, you need:
• the SmartSystems Foundation. To download SmartSystems Foundation,
go to www.intermec.com/idl and open the Device Management page.
• the device upgrade .exe file. This file is available from the Intermec web
site at www.intermec.com. Go to Service & Support > Downloads.
Make sure the file you select is for your language.
1 Install SmartSystems Foundation on your desktop PC, then open the
console.
2 Make sure the console and CN2B Computers are on the same subnet.
3 Make sure your CN2B Computers are either in a CN2B Communica-
tions Dock or charging dock, or that power management is disabled.
4 Download the device upgrade .exe file to your desktop PC.
5 Double-click the .exe file on your desktop PC. An InstallShield applica-
tion starts and walks you through the process of extracting the upgrade
files in the default location.
Note: Do not change the default location where InstallShield extracts the
files. The SmartSystems Console requires the files be in this location.
6 From the SmartSystems Console, locate the device upgrade to install.
7 Drag-and-drop the device upgrade onto each CN2B Computer you
want to upgrade. The SmartSystems Console will tell you that it is
installing the upgrade on your CN2B Computer.
Once the upgrade is done downloading to your CN2B Computer, your
CN2B Computer replaces the operating system and then automatically
performs a cold boot. Progress messages do appear on the CN2B screen.
The SmartSystems Console will show your CN2B Computer as offline
(note the red stop sign) until the device reboots and reconnects to the system.
82 CN2B Mobile Computer User’s Manual
 Loading...