

User's Manual
CK30 Handheld
Computer

Intermec Technologies Corporation
Worldwide Headquarters
6001 36th Ave. W.
Everett, WA 98203
U.S.A.
www.intermec.com
The information contained herein is provided solely for the purpose of allowing customers to
operate and service Intermec-manufactured equipment and is not to be released, reproduced, or
used for any other purpose without written permission of Intermec Technologies Corporation.
Information and specifications contained in this document are subject to change without prior
notice and do not represent a commitment on the part of Intermec Technologies Corporation.
© 2003-2006 by Intermec Technologies Corporation. All rights reserved.
The word Intermec, the Intermec logo, Norand, ArciTech, Beverage Routebook, CrossBar,
dcBrowser, Duratherm, EasyADC, EasyCoder, EasySet, Fingerprint, INCA (under license), igistics, Intellitag, Intellitag Gen2, JANUS, LabelShop, MobileLAN, Picolink, Ready-to-Work,
RoutePower, Sabre, ScanPlus, ShopScan, Smart Mobile Computing, TE 2000, Trakker
Antares, and Vista Powered are either trademarks or registered trademarks of Intermec
Technologies Corporation.
There are U.S. and foreign patents as well as U.S. and foreign patent applications pending.
ii CK30 Handheld Computer User’s Manual

Document Change Record
This page records changes to this document. The document was originally released as
version 001.
Version Date Description of Change
002 04/2004 Added new information to support the release of Service Pack
1. New information includes remote upgrade using Intermec
Settings, configuration using Intermec Settings one-to-one or
with the Wavelink Avalanche package, support for IE
Browser, support for the EasyADC system and other minor
updates and revisions.
003 07/2004 Added an addendum to support the release of Service Pack 2.
New information includes the addition of CCX compliance,
the EAN.UCC Composite symbology, Funk security, the
ability to disable or modify some key functions, and other
minor updates.
004 01/2005 Revised to include information for the Service Pack 3 release.
Changes include the addition of the SP2 addendum to the
user’s manual, CK30C support for iBrowse, VPN support,
support for a programmable keypad, and minor updates and
corrections.
005 11/2005 Updated information on Funk security and configuration,
added new diagnostics, and added information on
SmartSystems.
006 06/2006 Revised the manual to support RoHS compliance. Other new
information includes an updated list of scanners and cables,
instructions for changing the contrast, instructions for
scanning PDF417 and Micro PDF417 bar codes, instructions
for loading multiple certificates, expanded information about
the backup battery and the Backup Battery Very Low dialog
box, troubleshooting information for the SD card, bar code
symbologies listed by scanner option, new information on the
EV10 1D linear imager reading distances, and an illustration
that identifies the pins in the serial adapter.
007 07/2006 Added the standard range laser scanning option. Corrected
the minimum reading distances setbacks for the area imager
and linear imager. Added a procedure for saving the
configuration to Flash memory for registry persistence after a
cold boot.
CK30 Handheld Computer User’s Manual iii

iv CK30 Handheld Computer User’s Manual

Contents
Before You Begin.......................................................................................................xi
Using the CK30 Handheld Computer.................................................. 1
Contents
Safety Icons .................................................................................................xi
Global Services and Support........................................................................xi
Who Should Read This Document?..........................................................xiii
Related Documents...................................................................................xiii
Patent Information....................................................................................xiii
Other Copyright Information....................................................................xiv
1
Introducing the CK30 Handheld Computer.............................................................. 2
What’s New? ............................................................................................................. 4
Using the Battery....................................................................................................... 5
Charging and Installing the Battery............................................................. 6
Maximizing Battery Life.............................................................................. 7
Checking the Battery Status......................................................................... 8
Using the Keypad ...................................................................................................... 8
The 42-Key Large Numeric and Function Keypad ...................................... 9
The 50-Key Full Alphanumeric Keypad .................................................... 10
The 52-Key Full Alphanumeric Keypad .................................................... 11
Using the Color-Coded Keys..................................................................... 12
Capitalizing All Characters........................................................................ 13
Using the Alpha Key on the 42-Key Keypad.............................................. 13
Using the Power (I) Key........................................................................... 14
Disabling or Modifying Keypad Functions ................................................ 14
Using the Screen...................................................................................................... 15
Understanding the Screen Icons ................................................................ 16
Changing the Contrast .............................................................................. 17
Using the Mouse Pointer........................................................................... 18
Repositioning a Window........................................................................... 19
Understanding the Status Lights.............................................................................. 20
Understanding the Beeps......................................................................................... 21
CK30 Handheld Computer User’s Manual
v

Contents
Scanning Bar Codes................................................................................................. 22
Scanning With the Linear Imager or Laser Scanner.................................... 23
Attaching a Tethered Scanner.................................................................... 26
Using Energy Saver Mode With Your 1551E or 1553 Scanner.................. 27
Attaching a Scanner to the Serial Port........................................................ 28
Installing an SD Card.............................................................................................. 30
Configuring the CK30.................................................................................... 33
2
How to Configure the CK30 Parameters ................................................................. 34
Configuring the CK30 With the Setup Assistant....................................... 35
Configuring the CK30 With the Configuration Utility ............................. 36
Configuring the CK30 With SmartSystems Console ................................. 40
Configuring the CK30 by Scanning Bar Codes.......................................... 41
Configuring the CK30 Through the Network........................................... 42
Synchronizing the CK30 System Time With a Time Server....................... 45
Configuring the CK30 for Your Network................................................................ 46
Configuring Serial Communications ......................................................... 46
Configuring 802.11b/g Radio Communications........................................ 48
Configuring Ethernet Communications on Older CK30s.......................... 51
Configuring Bluetooth Radio Communications ........................................ 53
Configuring Security ............................................................................................... 55
Choosing Between Funk and Microsoft Security ....................................... 56
Configuring WPA Security........................................................................ 57
Configuring 802.1x Security...................................................................... 63
Configuring LEAP Security....................................................................... 66
Configuring Static WEP Security .............................................................. 67
Loading a Certificate ................................................................................. 69
Disabling Security ..................................................................................... 73
Configuring a VPN................................................................................... 73
Saving Your Configuration Changes to Flash Memory............................................. 75
3
vi
Developing and Installing Applications ......................................... 77
Developing Applications for the CK30 .................................................................... 78
Developing a New Application for the CK30 ............................................ 78
Developing a Web-Based Application........................................................ 79
Converting a Trakker Antares Application to a CK30 Application............. 83
CK30 Handheld Computer User’s Manual

Contents
Installing Applications on the CK30........................................................................ 84
Installing Applications Using ActiveSync................................................... 85
Installing Applications Using Your SD Card.............................................. 89
Installing Applications Using the FTP Server............................................. 89
Installing Applications Using Wavelink Avalanche..................................... 90
Installing Applications Using the SmartSystems Console ........................... 90
Launching Your Application Automatically ............................................................. 91
Customizing How Applications Load on the CK30................................................. 91
Managing the CK30......................................................................................... 93
4
5
Accessing the System Main Menu............................................................................ 94
Managing Files on the CK30................................................................................... 95
Running an Application From File Manager.............................................. 95
Deleting a File With File Manager............................................................. 96
Copying a File With File Manager............................................................. 97
Viewing the Properties of a File With File Manager................................... 97
Managing Applications on the CK30....................................................................... 98
Viewing All Applications Currently Running on the CK30 ....................... 98
Closing an Application.............................................................................. 99
Switching Between Applications .............................................................. 100
Viewing the Properties of an Application................................................. 100
Setting or Changing the System Main Menu Password .......................................... 100
Backing Up Your Files........................................................................................... 102
Upgrading Your CK30 .......................................................................................... 103
Upgrading the Operating System Using an SD Card............................... 103
Upgrading Your CK30 Using SmartSystems Console .............................. 105
Running Diagnostics.................................................................................... 107
Using Diagnostics on the CK30............................................................................. 108
Understanding the Diagnostics Screens.................................................................. 109
Battery Information................................................................................. 109
Bluetooth Console................................................................................... 111
Bootcode Version.................................................................................... 112
CK30 Handheld Computer User’s Manual
vii

Contents
6
Contrast Test .......................................................................................... 112
CPU Monitor.......................................................................................... 113
Display Test ............................................................................................ 114
Hardware Configuration Table................................................................ 114
Installed Fonts......................................................................................... 115
Intermec Value Add Information............................................................. 115
Keypad Test ............................................................................................ 116
LED Test ................................................................................................ 116
Memory Information .............................................................................. 117
Network Connection Test....................................................................... 117
Network Interface Information................................................................ 118
Operating System Version....................................................................... 119
Ping Utility ............................................................................................. 119
Radio Driver Version .............................................................................. 120
Radio Information................................................................................... 120
RAM Monitor......................................................................................... 121
Read CPU Registers ................................................................................ 121
Security Information ............................................................................... 122
Sound Test.............................................................................................. 123
Troubleshooting and Maintaining the CK30............................. 125
Troubleshooting the CK30.................................................................................... 126
Calling Product Support.......................................................................... 126
Problems and Solutions........................................................................... 127
Problems While Operating the CK30...................................................... 127
Problems While Configuring Security ..................................................... 129
Problems With Wireless Connectivity ..................................................... 132
Problems Transmitting Data Through the Serial Port.............................. 134
Problems While Scanning Bar Codes....................................................... 134
A
viii
Booting the CK30 ................................................................................................. 139
Warm Booting the CK30........................................................................ 139
Cold Booting the CK30 .......................................................................... 139
Cleaning the Scanner Window and CK30 Screen .................................................. 140
Specifications..................................................................................................... 143
Physical and Environmental Specifications............................................................. 144
Accessories for the CK30 ....................................................................................... 150
CK30 Handheld Computer User’s Manual

Contents
Typing Characters Not Printed on the Keypad ...................................................... 152
Pin Assignments for the Serial Port........................................................................ 156
Default Settings ............................................................................................... 159
B
C
I
Default Configuration Settings.............................................................................. 160
Reprogrammable Keypad ........................................................................ 167
Reprogramming the Keypad.................................................................................. 168
Changing the Functionality of Keypad Keys or Key Combinations.......... 168
Creating Keypad Macros ......................................................................... 180
Index ......................................................................................................................... 187
CK30 Handheld Computer User’s Manual
ix

Contents
CK30 Handheld Computer User’s Manual
x

Before You Begin
This section provides you with safety information, technical
support information, and sources for additional product
information.
Safety Icons
This section explains how to identify and understand warnings,
cautions, and notes that are in this document.
A warning alerts you of an operating procedure, practice,
condition, or statement that must be strictly observed to
avoid death or serious injury to the persons working on
the equipment.
A caution alerts you to an operating procedure, practice,
condition, or statement that must be strictly observed to
prevent equipment damage or destruction, or corruption
or loss of data.
Note: Notes either provide extra information about a topic or
contain special instructions for handling a particular condition
or set of circumstances.
Before You Begin
Global Services and Support
Warranty Information
To understand the warranty for your Intermec product, visit the
Intermec web site at www.intermec.com and click Service &
Support > Service & Support. The Intermec Global Sales &
Service page appears. From the Service & Support menu, move
your pointer over Support, and then click Warranty.
Disclaimer of warranties: The sample code included in this
document is presented for reference only. The code does not
necessarily represent complete, tested programs. The code is
provided “as is with all faults.” All warranties are expressly
disclaimed, including the implied warranties of merchantability
and fitness for a particular purpose.
CK30 Handheld Computer User’s Manual
xi

Before You Begin
Web Support
Visit the Intermec web site at www.intermec.com to download
our current documents (in PDF). To order printed versions of
the Intermec manuals, contact your local Intermec representative
or distributor.
Visit the Intermec technical knowledge base (Knowledge
Central) at intermec.custhelp.com to review technical
information or to request technical support for your Intermec
product.
Telephone Support
These services are available from Intermec.
Service
Order Intermec
products
Order Intermec
media
Order spare
parts
Technical
Support
Service
Description
• Place an order.
In the U.S.A. and Canada
call 1-800-755-5505 and
choose this option
1 and then choose 2
• Ask about an existing order.
Order printer labels and ribbons. 1 and then choose 1
Order spare parts. 1 or 2 and then choose 4
Talk to technical support about your Intermec
product.
• Get a return authorization number for
authorized service center repair.
2 and then choose 2
2 and then choose 1
• Request an on-site repair technician.
Service
contracts
• Ask about an existing contract.
• Renew a contract.
1 or 2 and then choose 3
• Inquire about repair billing or other service
invoicing questions.
Outside the U.S.A. and Canada, contact your local Intermec
representative. To search for your local representative, from the
Intermec web site, click Contact.
xii
CK30 Handheld Computer User’s Manual

Who Should Read This Document?
The CK30 Handheld Computer User’s Manual provides you with
information about the features of the CK30 and how to install,
operate, maintain, and troubleshoot the CK30. Before you
install and configure the CK30, you should be familiar with
your network and general networking terms, such as IP address.
The Intermec Computer Command Reference Manual (P/N
073529) is included with this manual on a CD or is available as
a download from the Intermec web site. Please refer to this
manual for help configuring your CK30. The reference manual
contains information about all of the CK30 commands and
contains pages of bar codes that you can print and scan when
configuring supported commands.
Related Documents
The Intermec web site contains Intermec documents (in PDF)
that you can download for free.
To download documents
1 Visit the Intermec web site at www.intermec.com.
Before You Begin
2 Click Service & Support > Manuals.
3 In the Select a Product field, choose the product whose
documentation you want to download.
To order printed versions of the Intermec manuals, contact your
local Intermec representative or distributor.
Patent Information
Product is covered by one or more of the following patents:
4,455,523; 5,627,360; 4,553,081; 5,657,317; 4,709,202; 5,671,436;
4,845,419; 5,684,290; 4,961,043; 5,777,309; 5,195,183; 5,793,604;
5,216,233; 5,805,807; 5,218,187; 5,818,027; 5,218,188; 5,821,523;
5,227,614; 5,828,052; 5,241,488; 5,831,819; 5,278,487; 5,834,753;
5,322,991; 5,841,121; 5,331,136; 5,844,222; 5,331,580; 5,883,492;
5,349,678; 5,883,493; 5,397,885; 5,886,338; 5,371,858; 5,889,386;
5,373,478; 5,898,162; 5,410,141; 5,969,328; 5,488,575; 5,986,435;
5,500,516; 6,075,340; 5,504,367; 6,109,528; 5,508,599; 6,158,661;
CK30 Handheld Computer User’s Manual
xiii

Before You Begin
5,530,619; 6,234,395; 5,567,925; 6,244,512; 5,568,645; 6,330,975;
5,592,512; 6,431,451; 5,598,007, 6,497,368; 5,617,343; 6,538,413.
There may be other U.S. and foreign patents pending.
Other Copyright Information
Microsoft, Windows, and the Windows logo are registered
trademarks of Microsoft Corporation in the United States
and/or other countries.
Bluetooth is a trademark of Bluetooth SIG, Inc., U.S.A.
Wi-Fi is a registered certification mark of the Wi-Fi Alliance.
This product includes software developed by the OpenSSL
Project for use in the OpenSSL Toolkit.
(http://www.openssl.org/)
This product includes cryptographic software written by Eric
Young. (eay@cryptsoft.com)
This product uses Regex++, Index software during its
operational phases. The owner of Regex++ has granted use of the
software to anyone provided such use is accompanied by the
following copyright and permission notice:
Regex++, Index. (Version 3.31, 16th Dec 2001)
Copyright
© 1998-2001 Dr John Maddock.
Permission to use, copy, modify, distribute and sell this software
and its documentation for any purpose is hereby granted
without fee, provided that the above copyright notice appear in
all copies and that both that copyright notice and this
permission notice appear in supporting documentation. Dr John
Maddock makes no representations about the suitability of this
software for any purpose. It is provided “as is” without express or
implied warranty.
xiv
CK30 Handheld Computer User’s Manual

Using the CK30 Handheld
1
Use this chapter to familiarize yourself with the CK30 Handheld
Computer. In this chapter you will find these sections:
• Introducing the CK30 Handheld Computer
• What’s New?
• Using the Battery
• Using the Keypad
• Using the Screen
• Understanding the Status Lights
Computer
• Understanding the Beeps
• Scanning Bar Codes
• Installing an SD Card
CK30 Handheld Computer User’s Manual 1

Chapter 1 — Using the CK30 Handheld Computer
Introducing the CK30 Handheld Computer
The Intermec CK30 is an ergonomically designed handheld
®
computer built on the Microsoft
Windows® CE .NET
operating system. It is a lightweight, easy-to-use, reliable
computer that runs client/server applications, terminal
emulation applications, and browser-based applications.
Good read
light
User-defined
lights
Scan
button
Intermec
Ready-to-Work
Indicator
Battery
light
Battery
Serial
port
CK30 Handheld Computer
CK30 Handheld Computers with an IEEE 802.11b/g radio
®
installed are Wi-Fi
802.11b/g wireless LAN devices.
certified for interoperability with other
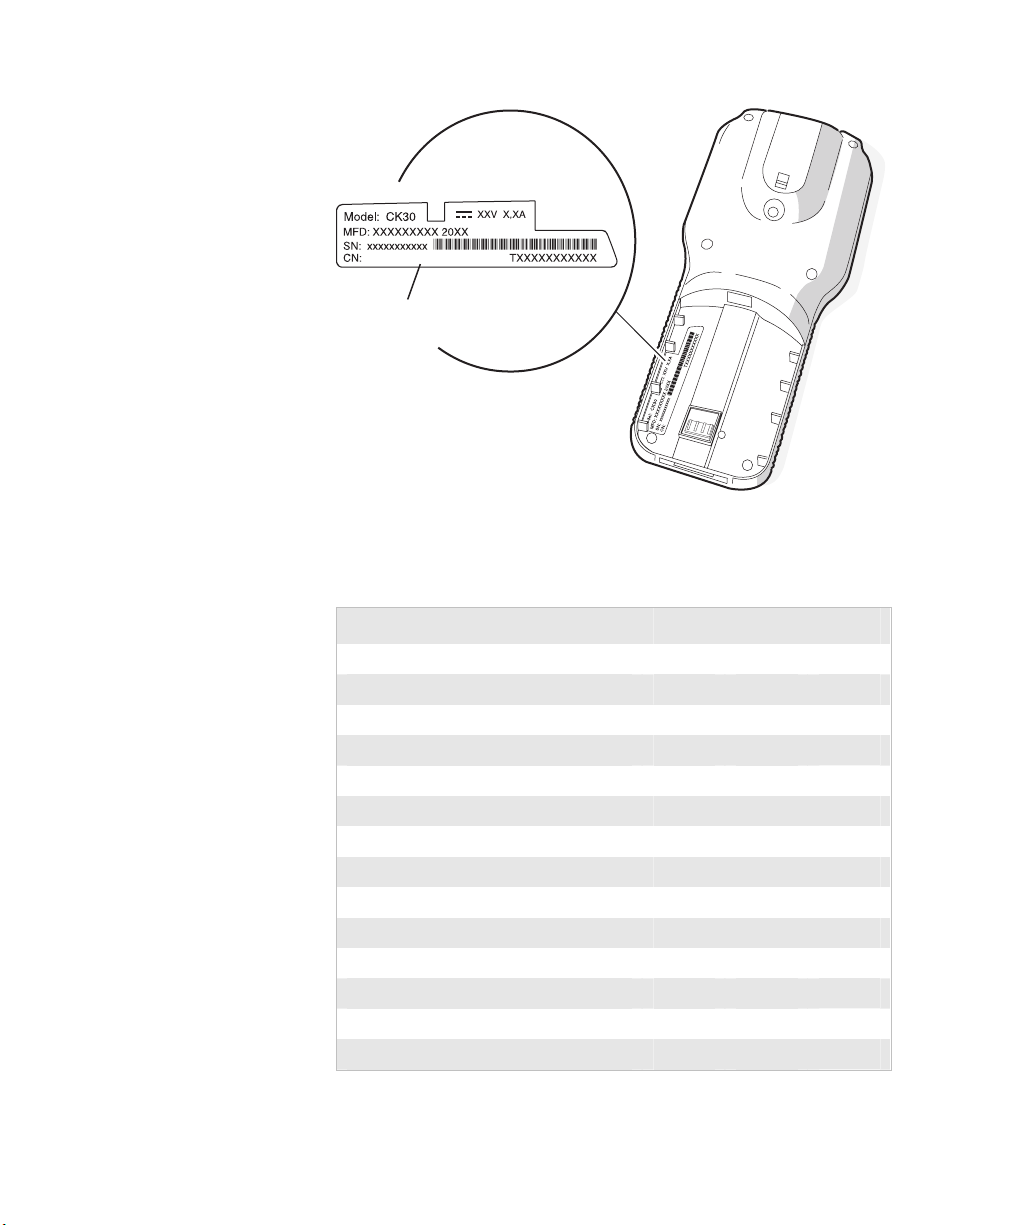
The CK30 computer is available in three different models that
offer several options. To find out which model of the CK30 you
have, locate the configuration label on the back of the computer.
The first five characters of the configuration number indicate the
model of CK30 you ordered.
2 CK30 Handheld Computer User’s Manual
CK30AA0301000
Configuration
number
Chapter 1 — Using the CK30 Handheld Computer
CK30AA0301000
Configuration Label: This label is for a CK30 Model A (CK30A).
Features Included With the Different Models of the CK30
Feature CK30A CK30B CK30C
802.11b/g radio
*Bluetooth (optional)
9 9 9
CCX v2.0 compliance
.NET Compact Framework
Pocket Internet Explorer
Internet Explorer 6, SQL Server CE
iBrowse
IE Browser
Monochrome Display
9 9
Color Display
32MB RAM/32MB Flash Memory
9 9
64MB RAM/64MB Flash Memory
200 MHz Processor
9 9
400 MHz Processor
9 9
9 9
9
9
9
9 9
9
9
9
9
*Bluetooth is a trademark owned by Bluetooth SIG, Inc., USA.
CK30 Handheld Computer User’s Manual 3

Chapter 1 — Using the CK30 Handheld Computer
These options are available for the CK30B and CK30C:
• TE 2000 terminal emulation application including 3270,
5250, and VT/ANSI as well as third-party TE applications
• Linear imager, standard range laser, or tethered scanner
interface
• Data Collection Browser (dcBrowser™) application
Use this manual to understand how to use the features and
options available on the CK30. For additional help using
terminal emulation, see the TE 2000 Terminal Emulation
Programmer’s Guide (P/N 977-055-008).
For additional help using dcBrowser, see the documentation that
ships with the dcBrowser gateway software or the Data Collection
Browser Client User’s Guide (P/N 070011).
iBrowse is a locked-down web browser for Intermec devices that
is compatible with Microsoft’s Internet Explorer but does not
allow the user to exit out of the browser or key in a URL to
access a non-work related web site. For help using iBrowse, see
the iBrowse User’s Guide (P/N 961-055-015). For help using IE
Browser, see “Developing a Web-Based Application” on page
79.
What’s New?
This revision of the user’s manual supports the latest software
and hardware release:
• The operating system build is 4.00.xx.xxxx or higher, and
Intermec Value Add (IVA) build is iva_4.03.xx.xxxx or
higher.
• The CK30 is now available with a linear imager, standard
range laser, or tethered scanner option.
4 CK30 Handheld Computer User’s Manual

Using the Battery
The CK30 uses a model AB1G (P/N 318-020-xxx) lithium-ion
battery as its main power source. You must fully charge the main
battery before you can use the CK30. When you change the
battery, a backup battery maintains your status, memory, and
real-time clock for at least 10 minutes.
If the Battery light blinks or turns on solid, you cannot restore
factory defaults or perform a warm or cold boot on your CK30
using the I key. You must replace the battery with a fully
charged battery before you can perform either function.
Removing the main battery when the backup battery low or
critically low icon displays on the taskbar may cause your
CK30 to cold boot and you may lose data.
The lithium-ion battery pack that is used in this device may
present a fire or chemical burn hazard if it is mistreated. Do
not disassemble it, heat it above 100°C (212°F) or incinerate
it.
Chapter 1 — Using the CK30 Handheld Computer
If you fail to replace the battery immediately, you may lose
important data or applications.
Dispose of used battery packs promptly. Keep away from
children. Contact your local Intermec sales representative for
replacement batteries.
Several factors determine the life of your battery such as extreme
temperatures, input devices, and your usage. For example, if you
use a tethered scanner every day, you will need to replace your
battery more often than someone who uses an internal scanner.
CK30 Handheld Computer User’s Manual 5

Chapter 1 — Using the CK30 Handheld Computer
Charging and Installing the Battery
Make sure you fully charge the AB1G battery before you install
it in your CK30.
To charge the battery
• Either insert the battery into the AC1 4-slot battery charger
or place the CK30 with battery installed in the AC2 4-Bay
Charging Dock, AC3 8-Bay Charging Dock, AD1 1-Bay
Communications Dock, or AD2 4-Bay Communications
Dock. For more information on these accessories, see page
150.
Use the following table to understand how long it will take to
charge your batteries in each of the CK30 charging or
communications dock accessories.
Charging Times for CK30 Batteries
CK30 Accessory Charging Time
AC1 4-Slot Battery Charger 5 hours
AC2 4-Bay Charging Dock 5 hours
AC3 8-Slot Charging Dock 5 hours
AD1 1-Bay Communications Dock 5 hours
AD2 4-Bay Communications Dock 5 hours
6 CK30 Handheld Computer User’s Manual
Chapter 1 — Using the CK30 Handheld Computer
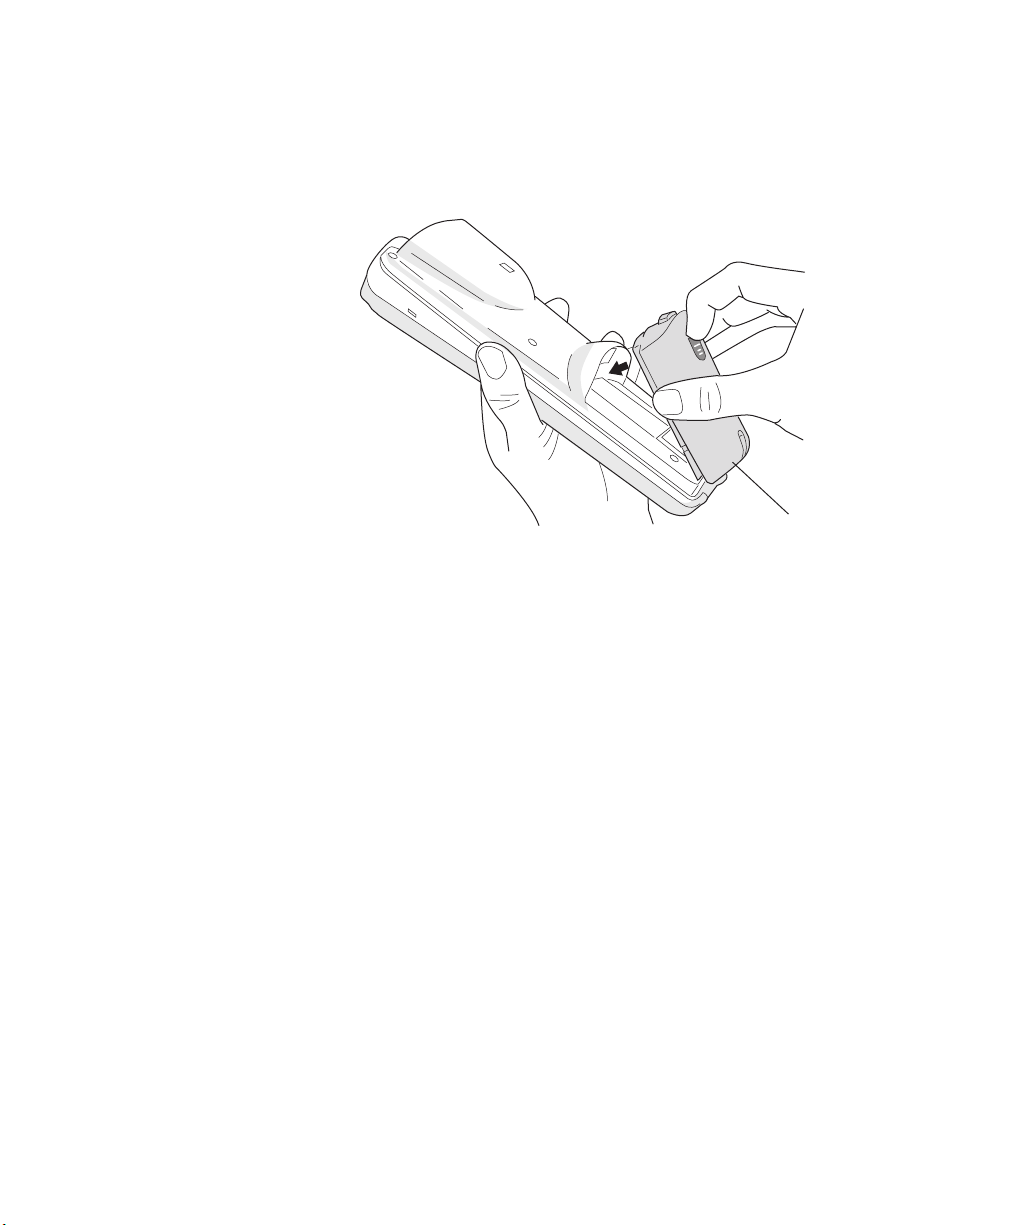
To install the battery
• Insert the tabs on the bottom of the charged battery into the
CK30 and snap the battery into place.
Maximizing Battery Life
There are several things that you can do to prolong the life of
your fully charged battery.
AB1G
battery
1 Verify that Radio Power Management is enabled (Fast PSP).
Enabling radio power management allows your radio to
switch between awake and sleep modes based on network
traffic. If you use the default setting of disabled (CAM), you
will have the best network performance (data throughput) but
it will draw the most power from your battery.
2 Verify that the backlight timeout is set to 15 seconds.
3 Verify that Power Management has an automatic shutoff time
of 3 minutes.
You can use the Configuration Utility to easily make all of these
configuration changes. For help, see “Configuring the CK30
With the Configuration Utility” on page 36.
CK30 Handheld Computer User’s Manual 7
Chapter 1 — Using the CK30 Handheld Computer
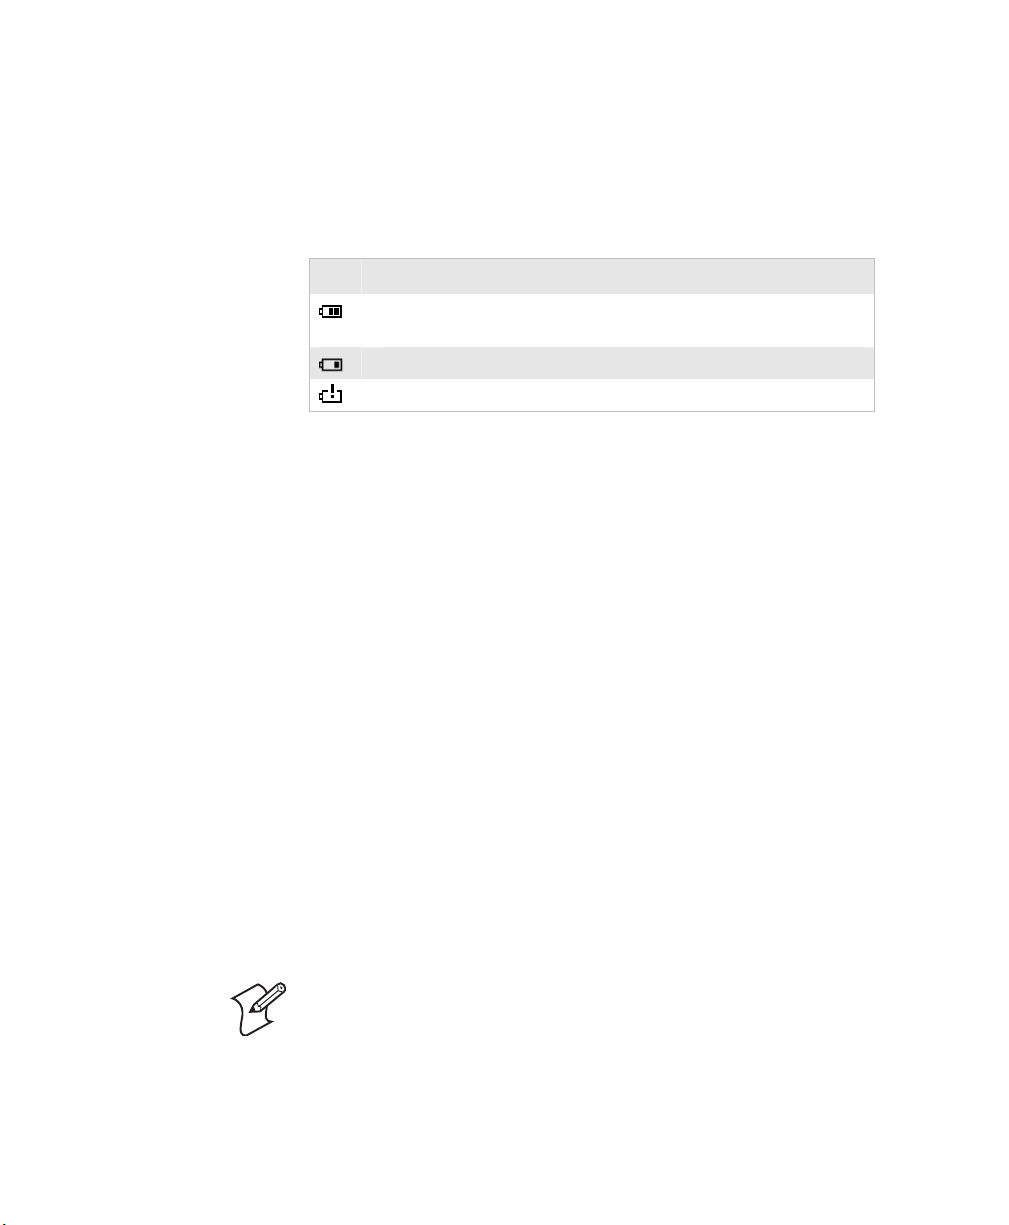
Checking the Battery Status
The easiest way to tell the status of your battery is to look at the
battery icon on the taskbar of your CK30.
Battery Icon Status
Icon Status
Battery has a medium charge. You should be able to work for
several more hours before changing batteries.
Battery is low. You need to replace the battery soon.
Battery is critically low. You must replace the battery now.
You can also check the battery status by looking at the Battery
light on the front of the CK30 or by using the battery
diagnostics screen. For help using the Battery light, see
“Understanding the Status Lights” on page 3 for more
information. For help using the Battery Information diagnostic
screen, see “Battery Information” on page 109.
Using the Keypad
Your CK30 has one of the following keypad overlay options:
• 42-key large numeric and function
• 50-key full alphanumeric
• 52-key full alphanumeric
You can order all versions of the CK30 keypad with an
international overlay. The international overlay supports English
and many Western European languages, such as French,
German, Italian, Portuguese, and Spanish. You enter all of the
characters and functions printed above the keys just like you
would on a standard keypad.
Note: There are hidden characters (such as { and }) on each
CK30 keypad that require using the color-coded keys to access
them. For help accessing these hidden characters, see “Typing
Characters Not Printed on the Keypad” on page 152.
8 CK30 Handheld Computer User’s Manual
Chapter 1 — Using the CK30 Handheld Computer
The CK30 supports TE 2000 VT100/220/320/340 and ANSI,
TE 2000 5250, and TE 2000 3270. When you order the CK30
with a TE 2000 application, you must order the corresponding
keypad overlay. Use the TE 2000 keypad overlays to enter the
same keys that you can enter on a VT/ANSI keyboard, an IBM
5250 keyboard, or an IBM 3270 keyboard. The terminal
emulation keypads also come with the same color-coded keys
that are on the standard overlay.
For help using TE 2000 terminal emulation, see the TE 2000
Terminal Emulation Programmer’s Guide (P/N 977-055-008).
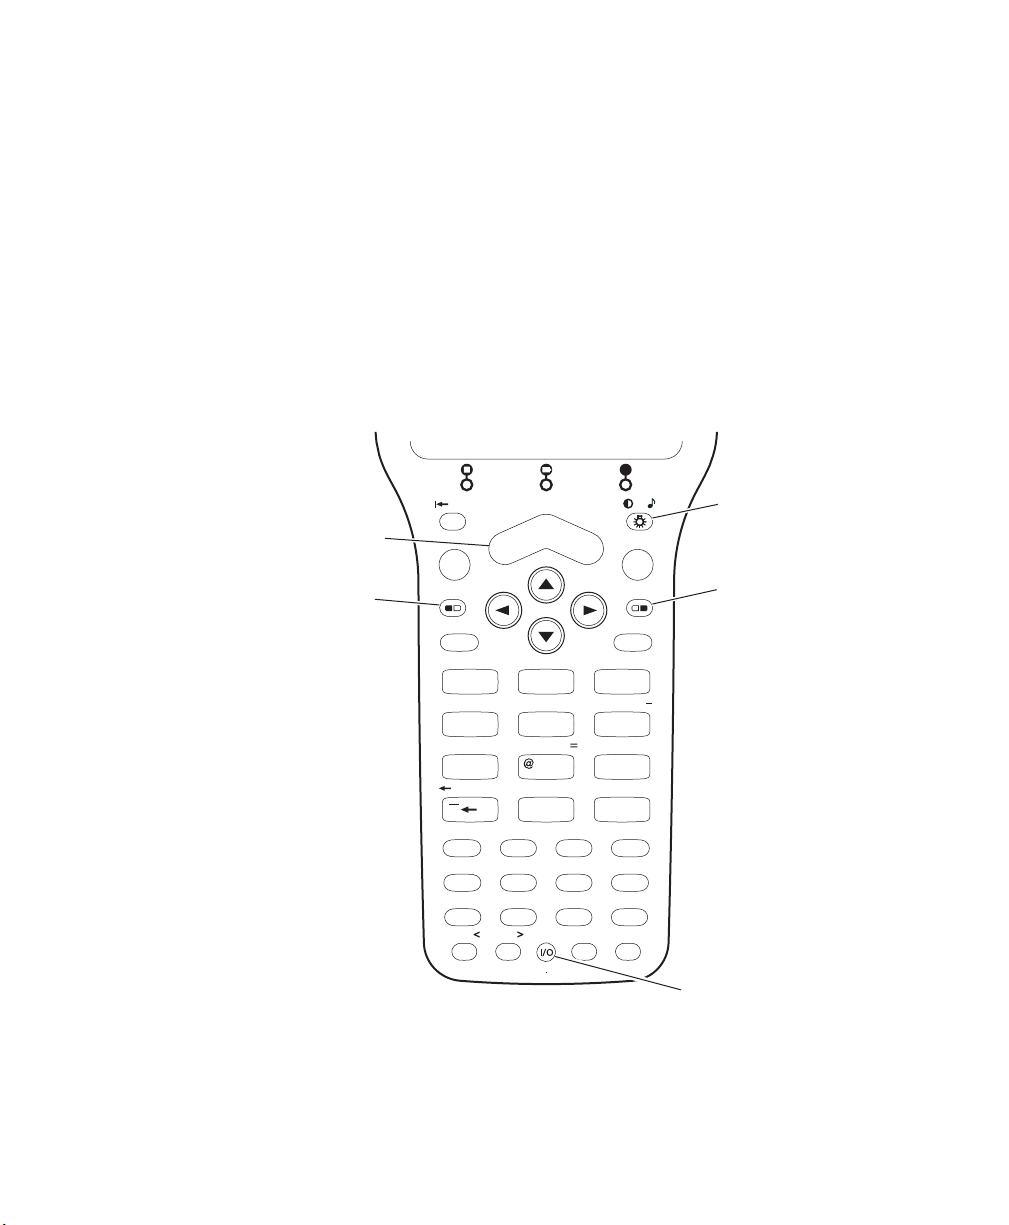
The 42-Key Large Numeric and Function Keypad
Scan
button
Orange
key
42-Key Large Numeric and Function Keypad: This keypad is designed for
applications that enter mainly numeric data (0-9) and that need dedicated
function keys (F1- F12). This keypad also lets you enter the entire alphabet
and special characters by pressing color-coded key sequences.
Tab
Enter
CAPS
Shift
A
&
D
$
G
!
KL
F1
O
F5
S
F9
B
*
7
456
1
Ctl
8
E
%
H
2
J
Del
)
0
[]
F2
P
F6 F7
T
F10
X
Alt
PROG
C
Home
F
?
I
.
M N
F3
Q
U
F11
YW
Alpha
/
(
^
#
,
R
V
Z
*
9
3
.
F4
F8
F12
Sp
Enter
Ins
Esc
Backlight
key
Green
key
\
Sp
Power
key
CK30 Handheld Computer User’s Manual 9
Chapter 1 — Using the CK30 Handheld Computer
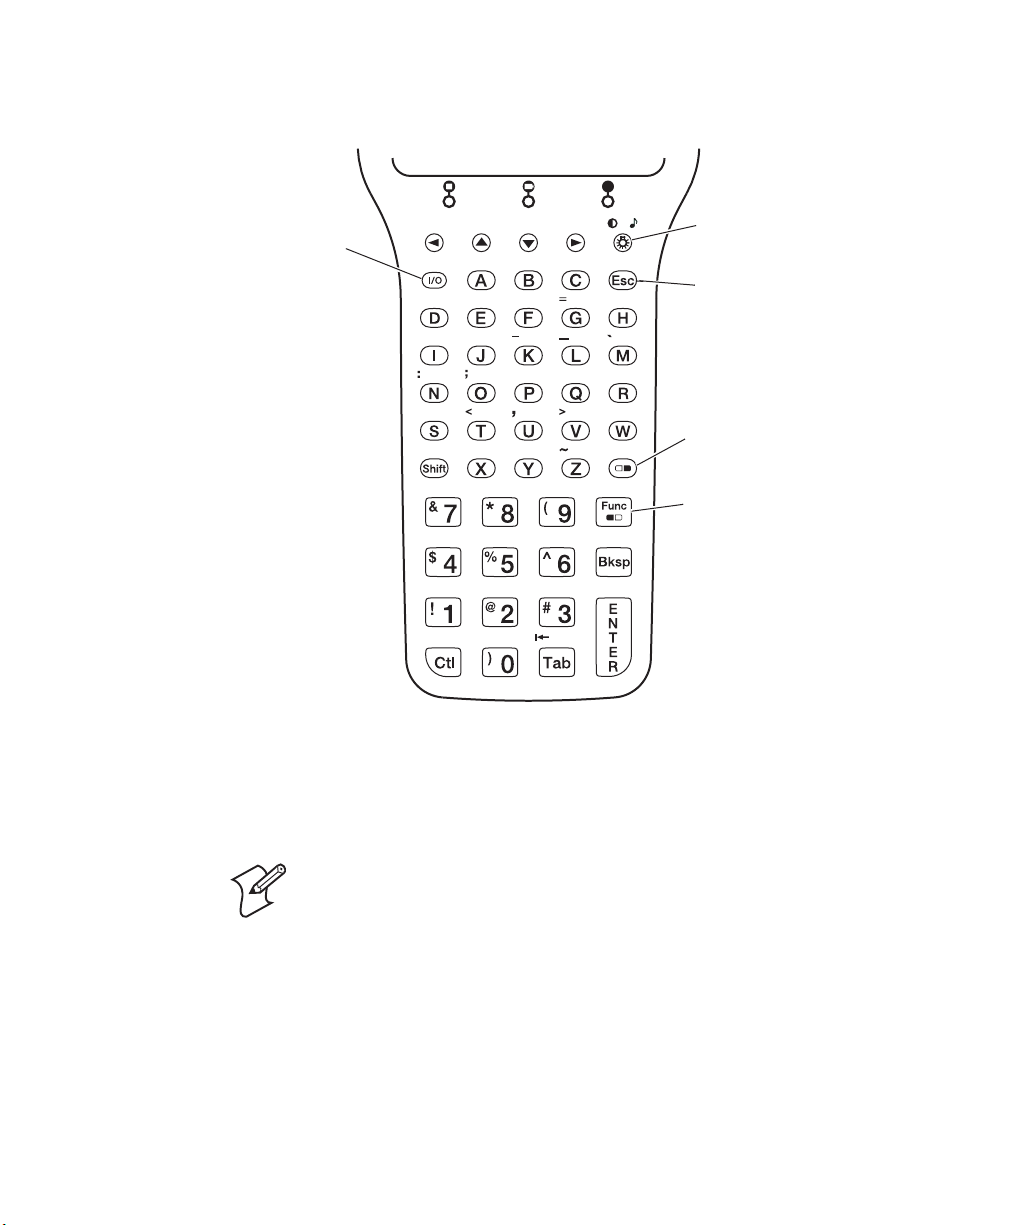
The 50-Key Full Alphanumeric Keypad
Power
key
¦
[ ]
{}
CAPS
?
*
Backlight
key
\
Home
+
‘
“
Esc key
.
/
Del
Green
key
F7 F8 F9
Orange
key
Space
F10
PROG
F6F5
F4
F1 F2 F3
Alt
Ins
50-Key Full Alphanumeric Keypad: This keypad is designed for
applications that enter mainly numeric data (0-9) and that may need to enter
the entire alphabet. The keypad also provides shifted function keys (F1-F9)
and special characters, symbols, and functions by pressing color-coded key
sequences.
Note: The 50-key keypad does not have a scan key, because it
was designed to work with the required AH1 handle that has a
built-in scanner trigger.
10 CK30 Handheld Computer User’s Manual
Chapter 1 — Using the CK30 Handheld Computer
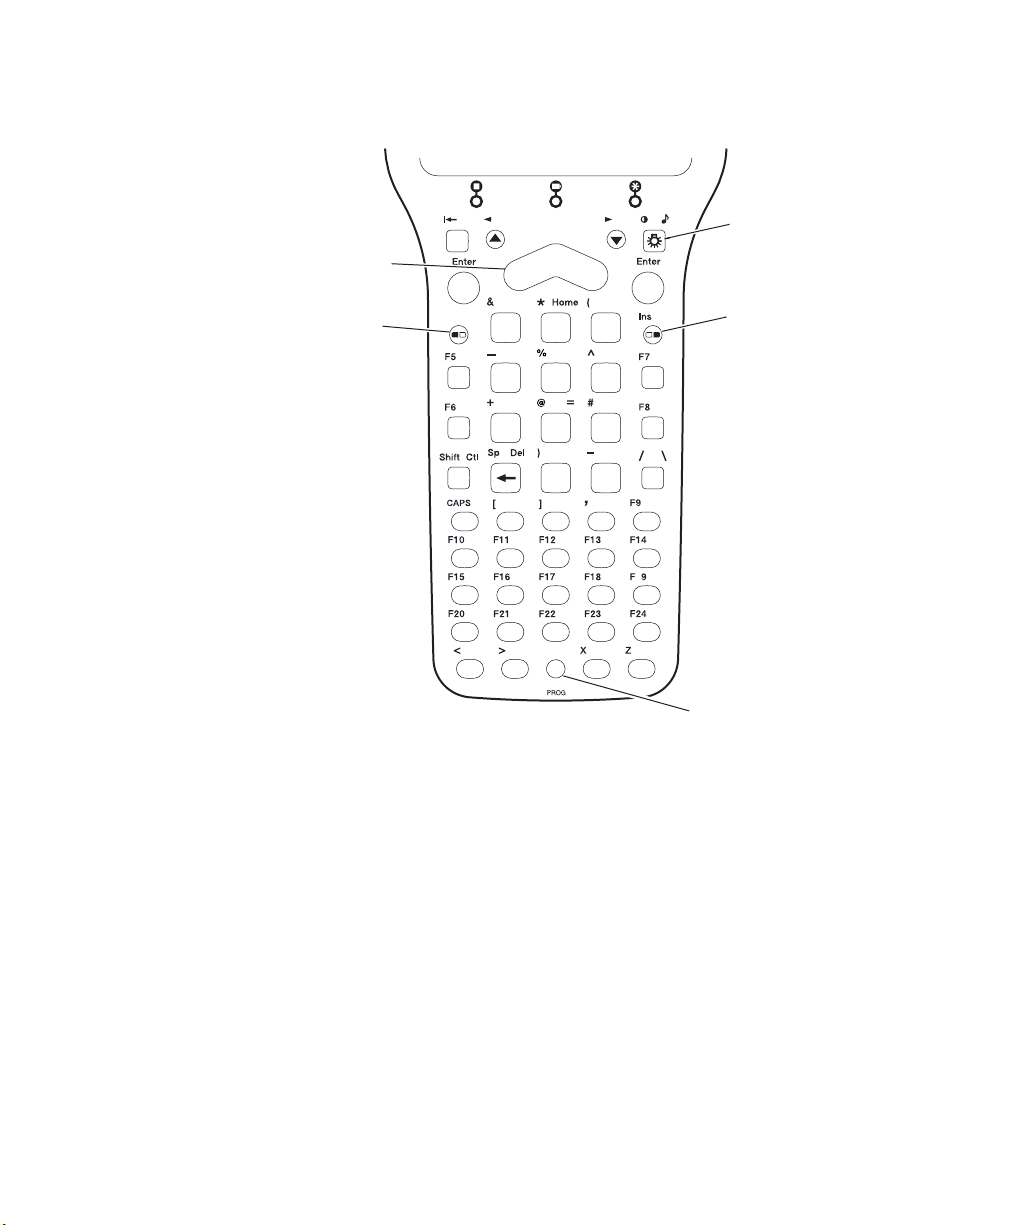
The 52-Key Full Alphanumeric Keypad
Scan
button
Ta b
Backlight
key
Power
key
Green
key
Orange
key
789
F1
F2
Alt
ABCDE
FGH I J
KLMNO
PQRS T
UV WY
5
4
12
0
I/O
F3
6
F4
3
Esc
.
52-Key Full Alphanumeric Keypad: This keypad is designed for
applications that enter mainly numeric data (0-9) and that may need to enter
the entire alphabet. The keypad also provides function keys (F1-F24) and
special characters, symbols, and functions by pressing color-coded key
sequences.
CK30 Handheld Computer User’s Manual 11

Chapter 1 — Using the CK30 Handheld Computer
Using the Color-Coded Keys
Each keypad available for the CK30 provides color-coded keys
to let you access additional characters, symbols, and functions
printed on the keypad overlay. Once you understand how to use
the color-coded keys and key sequences, you will know how to
access all of the additional features printed on the keypad
overlay. There are two color-coded modifier keys on the CK30:
the orange B key and the green C key.
You press and release the first key and then press and release the
second key to access the color-coded character or function
printed above a key.
Using the Color-Coded Keys
You Want To: Press: Example
Use an orange character or
function printed above a key
Use a green character or
function printed above a key
Use a blue character printed on
a key (42-key and 50-key
keypads only)
Lock the orange, green, Ctl,
Alt, or Shift key to stay on
Unlock a green, orange, Ctl,
Alt, or Shift key
B key and then the key
with character or function
printed above it
C key and then the key
with character or function
printed above it
Shift key and then the key Press Shift and then 4 to
B , C, Ctl, Alt, or Shift
key twice
B , C, Ctl, Alt, or Shift
key once
Press B and then 2 to type
the @ character on the 52key keypad.
Press C and then J to type
the } character on the 50key keypad.
type the $ character on the
42-key keypad.
Press C twice and the
appears in the taskbar.
Note: There are hidden characters (such as { and }) on each
CK30 keypad that require using the color-coded keys to access
them. For help accessing these hidden characters, see “Typing
Characters Not Printed on the Keypad” on page 152.
12 CK30 Handheld Computer User’s Manual

Capitalizing All Characters
To type all alphabetic characters as uppercase letters, you can
enable the Caps Lock feature on the CK30 keypad.
To enable Caps Lock
1 Press the orange B key. The B icon appears on the taskbar.
2 Press one of these keys:
• On the 52-key keypad, press A.
• On the 42-key and 50-key keypad, press Shift.
Chapter 1 — Using the CK30 Handheld Computer
The Caps Lock icon (
3 Type an alphanumeric character. The letter appears as an
uppercase character on the CK30 screen.
To disable Caps Lock
• Press the same key sequence you used to enable it.
Using the Alpha Key on the 42-Key Keypad
The 42-key keypad provides an Alpha key to allow you to enter
alpha characters when necessary.
To enable the Alpha key
1 On the 42-key keypad, press the Alpha key. The Alpha icon
) appears on the taskbar.
(
2 Press a function or numeric key. The corresponding orange
alpha letter appears on the screen.
To disable the Alpha key
• Press B or C.
) appears on the taskbar.
CK30 Handheld Computer User’s Manual 13

Chapter 1 — Using the CK30 Handheld Computer
Using the Power (I) Key
When you press the I key to turn off the CK30, you actually
put the CK30 in Suspend mode. In Suspend mode, the CK30
continues to supply power to all memory, but turns off power to
most hardware. This power-saving feature is designed to prolong
battery life.
When you press the I key to turn the CK30 back on, your
computer resumes where it was when you turned it off.
If you are using WPA2, WPA, or 802.1x security, the computer
may need to reauthenticate before it starts your application.
If the Battery light flashes and your CK30 does not resume after
pressing I, your battery may be too low to supply power.
Replace the battery. If replacing the battery does not solve the
problem, see “Booting the CK30” on page 139.
Disabling or Modifying Keypad Functions
You can disable the functionality of several keys on the keypad if
you want to restrict the ability to perform adjustments made
from the keypad, such as changing the beeper volume.
You can disable these keypad functions:
• Beeper volume
• Task Manager (opened by pressing Alt and then Tab)
Note: When you disable Alt Tab, you also disable the Alt Esc
key sequence.
You can modify this keypad function:
• The behavior of the I key. You can configure the boot
functionality to either warm or cold boot when you press and
hold the I key for five seconds.
To disable keypad functions
1 Press C and then B. The System Main Menu appears.
2 Select the Configuration Utility.
14 CK30 Handheld Computer User’s Manual
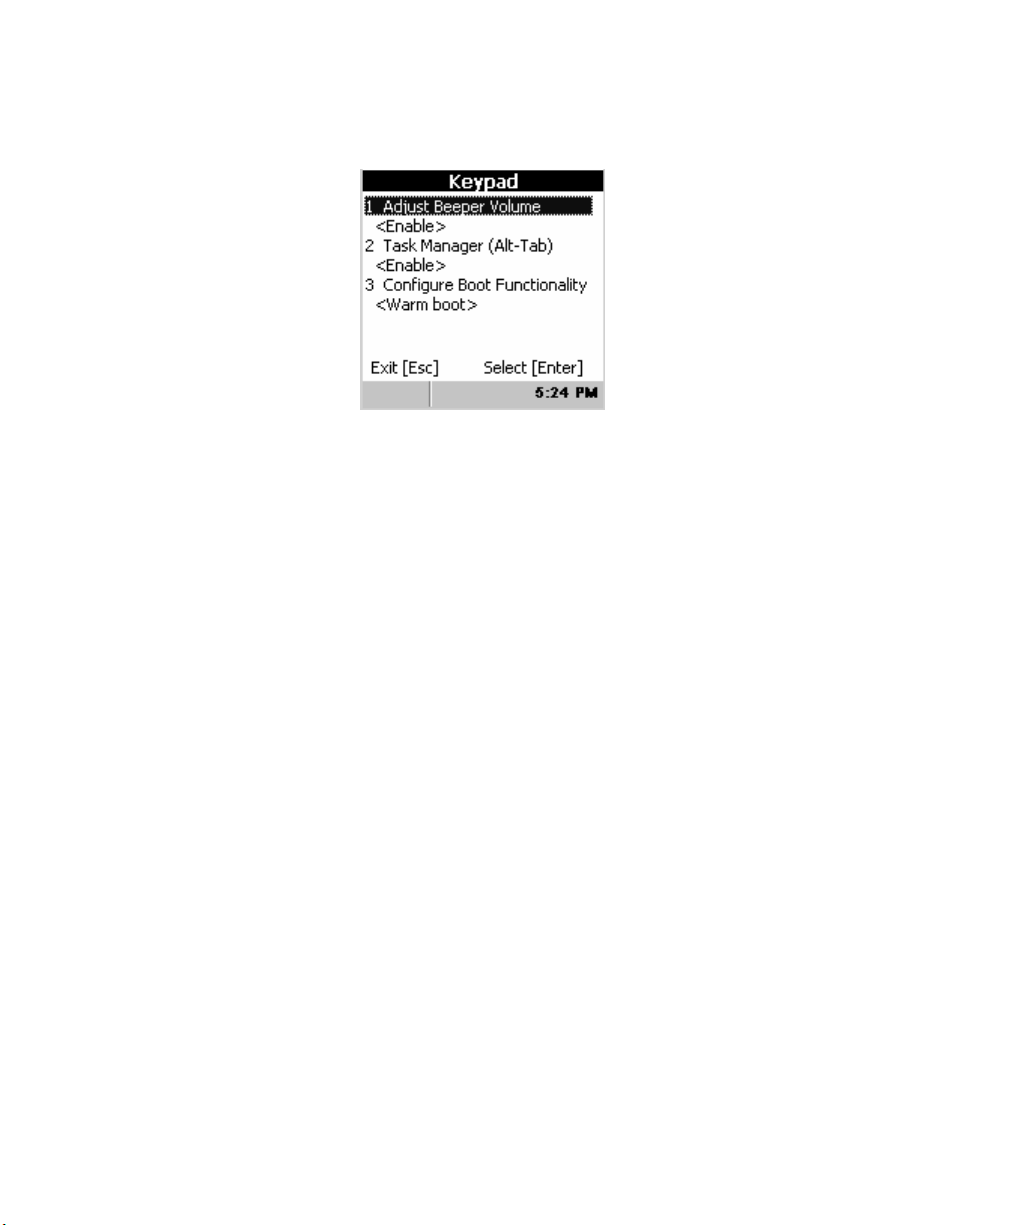
Chapter 1 — Using the CK30 Handheld Computer
3 Select Device Settings > Keypad. The Keypad settings screen
appears:
4 Choose the function you want to disable from the Keypad
menu, select Disable from the function dialog box, and then
press Enter.
5 Exit the Configuration Utility.
To change the I key functionality
1 Press C and then B. The System Main Menu appears.
2 Select the Configuration Utility.
3 Select Device Settings > Keypad.
4 From the Keypad menu, select Configure Boot
Functionality.
5 Choose Warm Boot or Cold Boot and then press Enter.
6 Exit the Configuration Utility.
Using the Screen
The CK30 can have either a color or monochrome display
depending on the model. Both screens are 160 x 160 pixels. The
desktop is 160 x 140 pixels and the taskbar is 160 x 20 pixels. In
addition, the screens support Unicode characters, userprogrammable fonts, and bitmap graphics.
CK30 Handheld Computer User’s Manual 15
Chapter 1 — Using the CK30 Handheld Computer
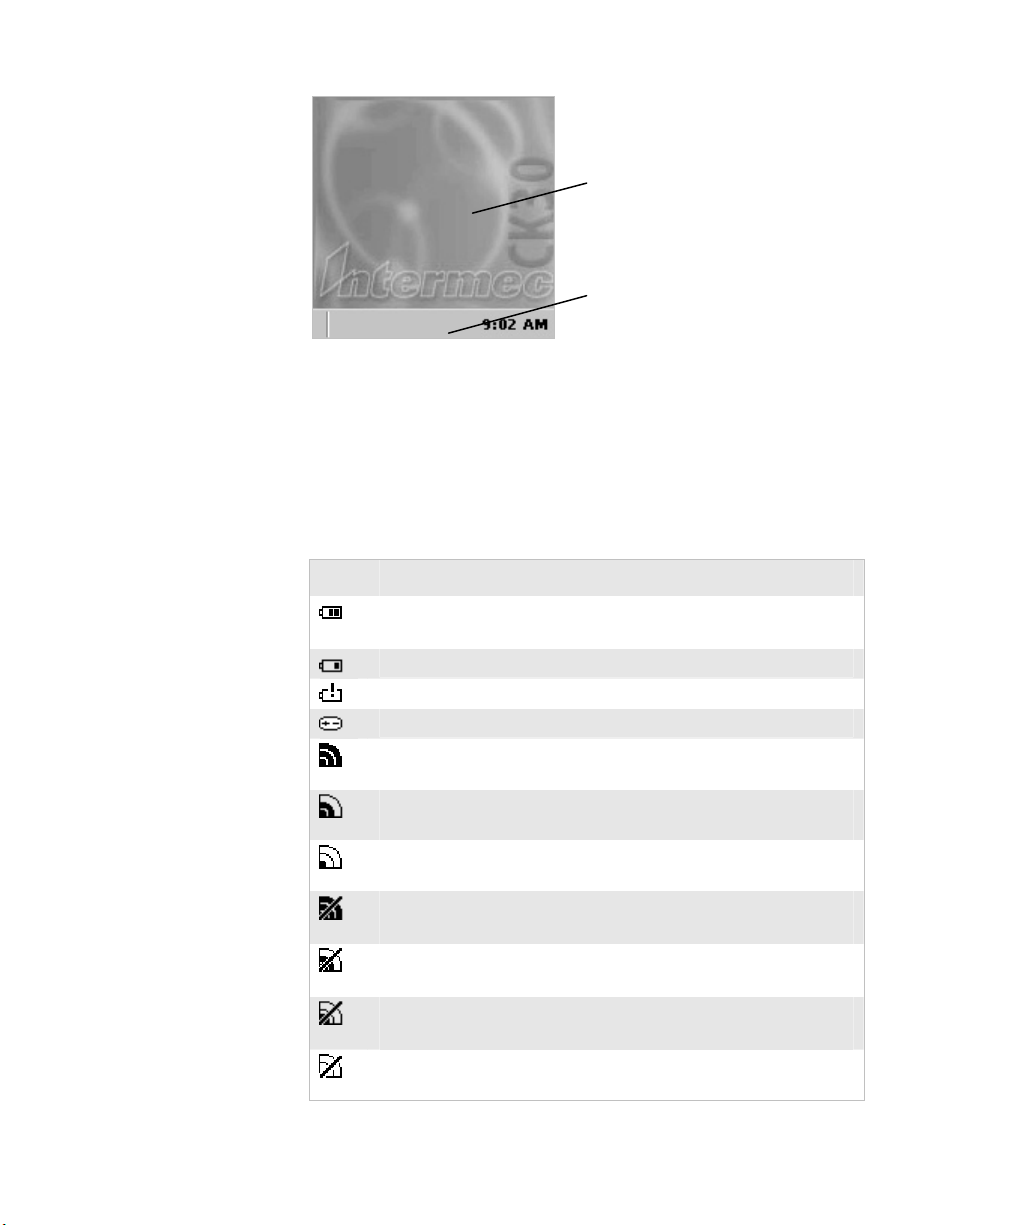
T
CK30 Start Screen
Understanding the Screen Icons
Use the screen icons on the taskbar to see battery status, network
connections, and special keys or functions you may be using.
CK30 Screen Icons
Icon Description
Battery is half full. You should be able to work for several
more hours before changing batteries.
Battery is low. You need to replace the battery soon.
Battery is critically low. You need to replace the battery now.
Backup battery is low.
Strong signal strength with the access point and security is
enabled.*
Medium signal strength with the access point and security is
enabled.*
Weak signal strength with the access point and security is
enabled.*
Strong signal strength with the access point, but security is
not configured correctly.
Medium signal strength with the access point, but security is
not configured correctly.
Weak signal strength with the access point and security is not
configured correctly.
No connection to the access point. For help, see “Problems
With Wireless Connectivity” on page 132.
Desktop
askbar
16 CK30 Handheld Computer User’s Manual

Chapter 1 — Using the CK30 Handheld Computer
CK30 Screen Icons (continued)
Icon Description
Mouse pointer is turned on.
Ethernet connection.
No Ethernet connection.
Orange key is enabled.
Green key is enabled.
Green key is locked.
Orange key is locked.
Ctrl key is enabled.
Alt key is enabled.
Shift key is enabled.
Caps Lock key is enabled.
Alpha key is enabled (locked).
The window positioning feature is turned on.
The CK30 is buffering (storing) data.
You are in the password-protected area of the CK30.
The CK30 is connected using ActiveSync.
UDP Plus is connected.
UDP Plus is transferring data.
No UDP Plus connection.
The CPU monitor is enabled.
The RAM monitor is enabled.
* If you are using static WEP and you cannot send information
wirelessly, make sure your WEP key setting is correct.
Changing the Contrast
You can change the contrast of the screen by pressing B and
then E. Each time you press this key sequence, the screen
gradually gets darker until it is almost black and then it goes to
the lightest setting, which is almost white.
CK30 Handheld Computer User’s Manual 17

Chapter 1 — Using the CK30 Handheld Computer
Using the Mouse Pointer
If you need to use a mouse to perform an action, you can use the
mouse pointer on your CK30. The mouse pointer can simulate
single-clicks, double-clicks, right mouse button, middle mouse
button, and left mouse button functions.
To turn on the mouse pointer
• Press Alt and then b. The mouse screen icon (
) appears in
your taskbar.
Understanding the Mouse Pointer Keys
To Simulate This Function:
Left mouse button
Middle mouse button
Right mouse button
Single-click
Double-click
Press down on mouse button
Release the mouse button
Press This Key on a Keypad:
42-key 50-key 52-key
F2 X B
F3 Y C
F4 Z D
5 5 5
s s s
0 (zero) 0 (zero) 0 (zero)
. (period) Tab . (period)
For example, to generate a left single-click with the 52-key keypad
• Press B and then 5.
Moving the Mouse Pointer: Use the numeric keypad to move the mouse
pointer by pressing the appropriate number key associated with the
direction you want the mouse pointer to move.
18 CK30 Handheld Computer User’s Manual

To click and drag an item on the screen
1 Position the mouse pointer on the part of the window you
want to move.
2 Press the key for the left mouse button and then press 0
(zero).
3 Use the directional keys to drag the mouse pointer.
4 Release the mouse pointer by pressing . (period) or Tab
depending on your keypad.
To turn off the mouse pointer
• Press Alt and then b.
Repositioning a Window
If you need to move a window to see more of a screen, you can
reposition the window without having to use the mouse pointer.
When you turn on the positioning feature, the focus is on the
top window. You can change the focus to another window by
using the Task Manager to select a different task. See “Managing
Applications on the CK30” on page 98.
Chapter 1 — Using the CK30 Handheld Computer
To reposition a window
1 Press Alt and then E. An icon (
) appears on the taskbar.
2 Use the numeric keypad to move the window. See page 3 for
an illustration of the numeric keypad and how to use the
number keys as directional keys.
To recenter the window in the CK30 screen
• Press 5.
To turn off the repositioning feature
• Press Alt and then E.
CK30 Handheld Computer User’s Manual 19

Chapter 1 — Using the CK30 Handheld Computer
Understanding the Status Lights
The status lights on the CK30 turn on to indicate the status of
the battery, a successful decode of a bar code, or a user-defined
function.
Good Read
light (green)
Ready-to-Work
indicator (blue)
CK30 Status Lights
Battery
light
User-defined
lights
The Battery light and the battery screen icons work with each
other to alert you to the status of your battery. If the Battery
light comes on, check the taskbar to see which battery icon
appears on it. Use the CK30 Screen Icons table on page 3 to
help determine when you need to replace your battery.
Understanding the CK30 Status Lights
Light Name Light Description
User-Defined
Battery
On Battery is critically low. You
Good Read This green light comes on when the CK30
Use the Intermec resource kits to program these
lights to turn on and off for any task or error within
your application. The resource kits are part of the
Intermec Developer Library (IDL), which is available
from the Intermec web site at
www.intermec.com/idl.
Light Status What It Means
Off The battery is charged.
need to replace the battery now.
successfully decodes a bar code.
20 CK30 Handheld Computer User’s Manual

Chapter 1 — Using the CK30 Handheld Computer
Understanding the CK30 Status Lights (continued)
Light Name Light Description
Ready-to-Work™
indicator
Blinking The CK30 is not connected to
On A connection to the server has
This blue light indicates when the CK30 is ready to
use TE 2000.
Light Status What It Means
Off TE 2000 has not loaded
successfully.
the host.
been established and all network
connections are active. You can
use TE 2000.
Understanding the Beeps
The CK30 uses beeps to provide you with audio feedback when
it performs some functions. For example, you hear a beep each
time you scan a valid bar code.
Understanding the CK30 Beeps
Beep Sequence What It Means
High beep You entered valid data or a valid command, the
CK30 decoded a label, or the CK30 decoded
the last row of a two-dimensional bar code.
Three low beeps You entered or scanned an invalid command.
Click You pressed a key.
You can change the beeper volume for your needs and
environment. You can set the beeper volume to off, low (quiet),
medium, high (loud), and very high (very loud - default). If
necessary, you can also change the beep duration and beep
frequency for good read, low, and high beeps.
CK30 Handheld Computer User’s Manual 21

Chapter 1 — Using the CK30 Handheld Computer
Changing the Beeper Volume
Method Procedure
Use the keypad.
Use the Intermec
Configuration
menu.
Use the Beeper
Volume command.
Scanning Bar Codes
Do not look directly into the window area or at a reflection
of the laser beam while the laser is scanning. Long-term
exposure to the laser beam can damage your vision.
Use the scanner to scan and enter bar code data. The type of
scanner you are using and the type of bar code you are decoding
determines the way you scan the bar code. The CK30 supports
the scanning of 1D linear bar codes. Plus, if you are using an
integrated handle or a tethered scanner, the way you scan bar
codes is different.
Press C and then press E to increase the
volume. There are five beep volumes on the
CK30 including off. When you reach the
loudest setting, the next setting is off. The
volume starts with the lowest setting and goes
up.
From the System Main Menu, choose
Configuration Utility > Device Settings >
Beeper > Volume.
For help, see “Beeper Volume” in the Intermec
Computer Command Reference Manual.
When you unpack the CK30, these bar code symbologies are
enabled:
• Code 39
• Code 128
• DataMatrix (if supported)
• PDF417
• UPC/EAN
If you are using bar code labels that are encoded in a different
symbology, you need to enable the symbology on the computer.
Use the Configuration Utility to enable and disable symbologies
22 CK30 Handheld Computer User’s Manual

Chapter 1 — Using the CK30 Handheld Computer
for your scanner. For help understanding how to use the
Configuration Utility, see “Configuring the CK30 With the
Configuration Utility” on page 36.
The next sections describe how to scan a bar code label with the
linear imager, standard range laser, tethered scanner, or scanner
attached to the serial port.
Scanning With the Linear Imager or Laser Scanner
If the CK30 has a linear imager or standard range laser, use the
following procedure to learn how to scan bar codes.
The linear imager can decode PDF417 bar codes as well as bar
codes with high-density, wide-density, and poor quality in any
lighting conditions. For help scanning PDF417 bar codes, see
the procedure on the next page.
To scan most bar code labels with a linear imager or laser scanner
1 Press I to turn on the CK30.
2 Point the scanner window at the bar code label and hold the
computer at a slight angle 15 to 25 cm (6 to 10 in) from the
label.
3 Press the Scan button on the keypad or pull the trigger on a
handle and direct the red beam so that it falls across all bars in
the bar code label.
CK30 Handheld Computer User’s Manual 23

Chapter 1 — Using the CK30 Handheld Computer
Good Read light (green)
Scan button
Scanning: Using the linear imager or laser scanner to scan a bar code label.
When the CK30 successfully reads a bar code label, you hear
a high beep and the green Good Read light turns on briefly.
4 Release the Scan button.
To scan PDF417 or Micro PDF417 bar code labels with a linear imager
1 Press I to turn on the CK30.
2 Point the scanner window PDF417 or Micro PDF417 bar
code label and hold the computer at a slight angle six to ten
inches from the label.
3 Press the Scan button on the keypad or pull the trigger on a
handle and direct the red beam so that it falls across at the top
row of the bar code label.
24 CK30 Handheld Computer User’s Manual

Chapter 1 — Using the CK30 Handheld Computer
Good Read light (green)
Scan button
Scanning a PDF417 or Micro PDF417 Bar Code Label
4 Move the beam down all rows of the bar code label. The
CK30 clicks as it reads each row.
5 The CK30 emits a high beep and the green Good Read light
turns on briefly when the CK30 successfully reads the entire
bar code label.
You may need to continue moving the beam from the bottom
of the bar code label to the top, and back to the bottom, until
you hear the high beep.
6 Release the Scan button.
CK30 Handheld Computer User’s Manual 25

Chapter 1 — Using the CK30 Handheld Computer
Attaching a Tethered Scanner
You can use a tethered scanner with the CK30 if you ordered it
with a 10-pin tethered scanner port in place of the integrated
scanner. The following devices have been supported by the
CK30:
Supported Device Required Cable
1550C0100*, 1550C0102*, 1550C0104*,
and 1550C0105*
1551E* 3-606034-02*
1553* 3-606034-02*
128X wands* 069444-002*
ASCII (generic decoded-output scanner) 3-606034-02*
* These products are not RoHS compliant and are discontinued. This
information is included here only for customers who have already
purchased these products.
To attach a tethered scanner
068419-001*
1 Locate and remove the scanner port cover.
Scanner
port cover
2 Insert the scanner 10-pin connector until it locks in place.
26 CK30 Handheld Computer User’s Manual

Chapter 1 — Using the CK30 Handheld Computer
Scanner port
To scanner
3 Configure the Scanner Model command and select the
tethered device connected to the CK30. There are several
ways to configure the scanner model:
• Use the Configuration Utility. From the System Main
Menu, choose Configuration Utility > Data Collection >
Tethered Scanner > Scanner Settings.
• Use one of the configuration methods discussed in “How
to Configure the CK30 Parameters” on page 34.
4 Modify any scanner commands necessary to meet your needs.
Use the Configuration Utility or one of the configuration
methods discussed on page 34.
Using Energy Saver Mode With Your 1551E or 1553 Scanner
Note: The 1551E, 1553, and the two required energy saver
cables listed on the next page are not RoHS compliant and are
discontinued. This information is included here only for
customers who have already purchased these products.
Use Energy Saver mode with your 1551E or 1553 scanner to
save battery power on your CK30. When you use Energy Saver
mode, the scanner is active while you are pressing the trigger and
goes into Standby mode after a good read. With Energy Saver
mode enabled, the current consumption drops to zero during
standby. Full energy is restored when you scan the next label.
CK30 Handheld Computer User’s Manual 27

Chapter 1 — Using the CK30 Handheld Computer
To use Energy Saver mode, you need:
• An energy saver cable:
• P/N 3-606034-02 is required for a 10-pin scanner port.
• P/N 3-606032-03 is required for a serial port.
• Firmware version 2.13 or later on the scanner.
For help using the Configuration Utility, see “Configuring the
CK30 With the Configuration Utility” on page 36.
To enable Energy Saver mode
1 From the Configuration Utility, choose Dock Tethered
Scanner > Scanner Settings > Energy saver mode.
2 Select Enable and press Enter.
3 Press Esc until you exit the Configuration Utility.
Note: If the scanner stops working after you enable energy saver
mode, you may not be using an energy saver cable. For help, see
“Problems While Scanning Bar Codes” on page 134.
Attaching a Scanner to the Serial Port
You can attach a scanner to the serial port of the CK30 if you
order a serial adapter or a required cable. There are two serial
adapters available to support decoded and undecoded scanners:
• Undecoded serial adapter (P/N 225-714-001)
• Decoded serial adapter (P/N 225-715-001) or AA2 serial
cable adapter
Use the next two tables to locate the serial adapter and the
required cable you need for your scanner.
28 CK30 Handheld Computer User’s Manual

Chapter 1 — Using the CK30 Handheld Computer
Undecoded Serial Adapter and Required Cables
Scanner
128X wands*
1550C0500*, 1550C0502*,
1550C0504*
155XE
1400
Undecoded
Serial Adapter Required Cable
225-714-001
225-714-001
069444-005*
068424*
or 068425*
225-714-001
225-714-001
3-606030-10
3-606030-10
* These products are not RoHS compliant and are discontinued. This
information is included here only for customers who have already
purchased these products.
Decoded Serial Adapter or AA2 and Required Cables
Scanner
1400
1551E*
1553E*
1800
SR60
* These products are not RoHS compliant and are discontinued. This
information is included here only for customers who have already
purchased these products.
Decoded
Serial Adapter Required Cable
225-715-001
or AA2
225-715-001
or AA2
225-715-001
or AA2
225-715-001
3-604032-15,
3-604032-06*, or 3-606032-03*
3-604032-15,
3-604032-06*, or 3-606032-03*
3-604032-15,
3-604032-06*, or 3-606032-03*
3-366032-01*
or AA2
225-715-001
321-639-002
or AA2
To attach a scanner to the serial port
1 Connect a scanner to the DB9 connector on the serial adapter
or cable.
2 Hook the serial adapter into the battery on the CK30 and
then snap it into place. If you are using the AA2 serial cable
adapter, attach the 26-pin connector to the serial port.
CK30 Handheld Computer User’s Manual 29

Chapter 1 — Using the CK30 Handheld Computer
Battery
Serial adapter
DB9 connector
3 Attach the scanner to the serial adapter.
4 Refresh Intermec Settings.
If you attach the undecoded serial adapter, the default scanner
is the 1550C05XX If you attach the decoded serial adapter,
the default scanner is the 1551E.
5 Use Intermec Settings to select your scanner model and
configure the serial port. For help using Intermec Settings, see
“Configuring the CK30 With SmartSystems Console” on
page 40.
Note: When you attach an undecoded serial adapter to the
CK30, the internal scanner does not work.
Installing an SD Card
You can use a Secure Digital (SD) card to increase file storage
and install software. The CK30 currently supports SD cards that
hold up to 1 gigabyte of information. The SD card slot is
located on the top of the CK30 just above the laser scanner
window.
To insert an SD card
1 Press I to turn off the CK30.
2 Remove the two screws on the SD card slot door and remove
the door.
30 CK30 Handheld Computer User’s Manual

Chapter 1 — Using the CK30 Handheld Computer
3 Gently insert the SD card into the CK30 with the printed
side facing the keypad and screen side of the CK30.
CK30
SD card
retainer
SD card
4 Push the card into the slot until it latches in place and the
steel card retainer covers the end of the SD card.
5 To verify that the SD card is seated correctly, press I to turn
on the CK30.
• If the SD card contains operating system upgrade files, the
upgrade process begins automatically. For more
information, see “Upgrading Your CK30” on page 103.
• You should be able to navigate to the SDMMC Disk
folder to see the contents of the SD card. If not, see page
129 for troubleshooting help.
6 Replace the door, making sure to insert the door catch into
the slot above the steel card retainer.
SD card
retainer
Door
catch
7 Replace the two screws.
Door
Screw
(2 places)
8 Press I to turn on the CK30.
9 (Optional) Navigate to the SDMMC Disk folder to see the
contents of the SD card.
CK30 Handheld Computer User’s Manual 31

Chapter 1 — Using the CK30 Handheld Computer
To remove the SD card
1 Press I to turn off the CK30.
2 Remove the two screws on the SD card slot door and remove
the door.
3 Push in on the SD card until you hear it unlatch. The card
should eject far enough that you can easily remove it from the
CK30.
If the card does not eject easily, you can use the door catch to
remove it by turning the door upside down and using the
catch to pull out the SD card.
SD card
Door
catch
4 Remove the SD card from the CK30.
32 CK30 Handheld Computer User’s Manual

Configuring the CK30
2
Use this chapter to understand how to configure the CK30 to
communicate in your network. In this chapter, you will find
these sections:
• How to Configure the CK30 Parameters
• Configuring the CK30 for Your Network
• Configuring Security
• Saving Your Configuration Changes to Flash Memory
CK30 Handheld Computer User’s Manual 33

Chapter 2 — Configuring the CK30
How to Configure the CK30 Parameters
You can configure many parameters on the CK30, such as the
bar code symbologies it decodes or the network settings. These
characteristics are controlled by configuration parameters. The
values you set for these configuration parameters determine how
the computer operates.
There are several ways to configure the CK30:
Use Setup Assistant on the CK30
Use Setup
Assistant to
quickly enter
network
parameters.
Use the SmartSystems Console
Use Intermec Settings
from within the
SmartSystems Console
to remotely congure
network parameters.
Use Conguration Utility on the CK30
Use the
Conguration
Utility to set all
parameters.
Use Conguration Commands
Send commands
through the
network to
your CK30s.
Ethernet
or Wireless
Network
Scan Bar Codes
Scan bar codes
to congure basic
CK30 and data
collection
parameters.
34 CK30 Handheld Computer User’s Manual

Configuring the CK30 With the Setup Assistant
When first setting up the CK30, use the Setup Assistant to set or
enable basic network parameters and connect your CK30 to the
network. The Setup Assistant guides you through setting the
following basic network parameters:
• Date and time
• 802.11 radio
• WEP security
• DHCP server or IP address, subnet mask, and default router
• Device name
Note: If you are using the CK30 in an EasyADC system, enable
the ION client. Your CK30 configures the security parameters,
reboots, and launches the TE 2000 application. When the CK30
connects to its host, the Intermec Ready-to-Work Indicator
turns on solid blue.
To set other parameters, use the Configuration Utility or
another configuration method. The Setup Assistant runs on the
CK30 the first time you turn on the computer.
Chapter 2 — Configuring the CK30
The Setup Assistant Start Screen
After you complete the Setup Assistant, the CK30 should be
communicating with your network.
CK30 Handheld Computer User’s Manual 35

Chapter 2 — Configuring the CK30
Configuring the CK30 With the Configuration Utility
Use the menu-driven Configuration Utility to configure the
CK30 and view system information. You can access the
Configuration Utility while running any application.
Tip: To easily navigate through the CK30 menus, press the
numbers to the left of the option you want to select.
To open the Configuration Utility
1 Press C and then B to open the System Main Menu.
2 Select the Configuration Utility. The Configuration Utility
main menu appears.
Refer to the next sections to understand your menu options,
learn how to navigate and enter information, and learn how the
menus are organized in the Configuration Utility. For help
understanding the commands and parameters, see the Intermec
Computer Command Reference Manual (P/N 073529).
36 CK30 Handheld Computer User’s Manual

Chapter 2 — Configuring the CK30
When using the Configuration Utility, you may not see a
parameter until you enable or disable a value for another key
field. For example, you will not see IP Settings unless you disable
DHCP. You may also not see a parameter if your computer does
not support a particular feature.
Use the following diagram to find the commands you need to
use to configure your CK30s. These screens do not represent the
exact information you will see on your CK30. They have been
modified to show you how the information is structured.
Configuration Utility Menus at a Glance
CK30 Handheld Computer User’s Manual 37

Chapter 2 — Configuring the CK30
Configuration Utility Menu Options
Menu Option Description
Data Collection Configure scanner settings and bar code
Communications Set up network settings including the
Device Settings Configure settings specific to the CK30 such as
SmartSystems
Information
ION
Configuration
Restore Defaults Restore factory default settings on your CK30.
Save to Flash Configure registry persistence so your settings
Printers Configure settings for Bluetooth printers
Use this table to understand how to navigate and enter
information in the Configuration Utility.
symbologies.
802.11b/g radio and the Bluetooth radio.
the date, time, beeper volume, and backlight
timeout.
Add information specific to the SmartSystems
application such as identity, administrator, and
location.
Configure settings specific to the Instant On
(ION) application.
are saved after a cold boot.
associated with the CK30.
Navigating in the Configuration Utility
To Do This: Press:
Select an option • The number associated with the option
• a or b to select an option and then press
Enter
• Tab to select an option and then press
Enter
Save a setting
Exit or return to a
previous screen
Delete a character
Delete all characters
in a highlighted field
38 CK30 Handheld Computer User’s Manual
F3 key
Esc until you exit the application or return
to a previous screen
C key, Backspace () key
Backspace () key

Chapter 2 — Configuring the CK30
Navigating in the Configuration Utility (continued)
To Do This: Press:
Return to the
Configuration
Utility main menu
(Home)
• On the 42-key and 52-key keypads, press
C and then 8
• On the 50-key keypad , press C and then
H
Restoring Default Settings
You can restore the CK30 to factory default settings from the
Configuration Utility. For a complete list of the default settings,
see “Default Configuration Settings” on page 160.
Note: Using the Restore Defaults option resets all network
parameters. As a result, you may lose network communications.
This option should only be used by network administrators or
by Intermec support personnel.
To restore factory default settings
1 From the Configuration Utility menu, select Restore
Defaults.
2 Press Enter to select Restore Defaults. The following Restore
Defaults dialog box appears.
3 Press Enter to restore factory defaults.
Your CK30 performs a cold boot and returns all of your
settings to the factory default settings.
4 If you have CAB files loaded on your CK30, you will see a
Confirm File Replace dialog box. Select Yes to All and then
press Enter. The CK30 installs your CAB files.
CK30 Handheld Computer User’s Manual 39

Chapter 2 — Configuring the CK30
When the CK30 is done booting, the Start Screen or the
Setup Assistant appears depending on your settings.
Note: You may need to reinstall some applications after
restoring the default settings because any settings that were
modified for your application will be reset.
Exiting the Configuration Utility
You can exit the Configuration Utility at any time by pressing
the Esc key. If you have made changes to your configuration,
they will automatically be saved to flash if you save your
changes.
To exit the Configuration Utility
1 Press Esc until you return to the System Main Menu. If you
have made any changes to your configuration, the Save
Changes dialog box appears.
2 If you want to save your configuration, select Save changes.
If you do not want to save your configuration changes, select
Discard changes.
Configuring the CK30 With SmartSystems Console
The SmartSystems™ Console lets you manage all your
SmartSystems-enabled devices at the same time from a central
host PC. The CK30 ships with a SmartSystems client, which
means it is SmartSystems-enabled. The console displays all of
the CK30s in your network. In the console, you can right-click a
CK30 and a menu appears. To configure the CK30, choose
Intermec Settings from the menu.
The console is part of SmartSystems Foundation, which is
available from the Intermec web site. Go to
www.intermec.com/SmartSystems to download SmartSystems
Foundation. For help using the console, see the online manual
available from the Help menu in the console.
40 CK30 Handheld Computer User’s Manual

Configuring the CK30 by Scanning Bar Codes
You can change some of the configuration parameters of the
CK30 by scanning Code 39 or Code 93 bar code labels
containing configuration commands. This method is a fast and
easy way to change just a few configuration parameters on a
single CK30.
You can only change some of the configuration parameters by
scanning bar codes. To configure all of the configuration
parameters, use the Configuration Utility or send commands
through the network to your CK30.
You can print and scan the bar code labels from the Intermec
Computer Command Reference Manual or you can create your
own bar code labels. For help, see the Intermec Computer
Command Reference Manual.
You can also use Intermec’s EasySet software to print
configuration labels you can scan to change your configuration
settings. For more information, see the EasySet online help.
EasySet is available from the Intermec Data Capture web site.
There are some limitations on using EasySet labels to change
symbology configuration settings. Please use an alternate method
of configuration for setting up symbologies.
Chapter 2 — Configuring the CK30
For example, you can use the Beeper Volume configuration
command to adjust the beep volume of the CK30. Scan this bar
code label to set the volume to the lowest (quietest) level:
Beeper Volume Low
*$+BV1*
*$+BV1*
When you scan bar code configuration commands, the CK30
emits a series of beeps unless the volume is turned off. There are
two beep sequences:
• One high beep means you scanned a valid configuration
command.
• Three low beeps means you scanned an invalid configuration
command.
CK30 Handheld Computer User’s Manual 41

Chapter 2 — Configuring the CK30
Configuring the CK30 Through the Network
You can change the configuration parameters of the CK30 by
sending commands through a host PC or through the network.
If you are using a network, you can configure one or more
CK30s at a time. If a CK30 has already been configured for your
wireless network, you can remotely configure the CK30 by
sending a command from an application on the host PC. You
cannot set all parameters through the network. You can only set
those commands that have a syntax in the Intermec Computer
Command Reference Manual.
Note: You can continue running an application on the CK30
while configuring it from the host.
Configuring the CK30 in a UDP Plus Network
You can use the host computer to configure a CK30 in your
wireless network. To send and receive configuration data or files,
you need to write a host application that can communicate with
the Intermec Application Server.
For help, see the appropriate Intermec Application Server user’s
manual. You use the Terminal Message Format (TMF) protocol
to send and receive transactions between the host application
and the CK30.
To set up the Intermec Application Server
• Configure a peer-to-peer destination name for the host
application. Create a transaction ID, $NGCFGRSP, that will
be routed to this destination name. The Intermec Application
Server uses the transaction ID to route responses from the
CK30 back to the host application. $NGCFGRSP is a special
transaction ID that the server uses to forward configuration
response data from a CK30.
All configuration responses are routed with the
$NGCFGRSP transaction ID. The Intermec Application
Server cannot keep track of multiple applications sending
reader or configuration commands. If you have two host
applications sending reader or configuration commands, they
must both be configured to receive the $NGCFGRSP
transactions, and therefore both will receive all responses from
all CK30s.
42 CK30 Handheld Computer User’s Manual

Chapter 2 — Configuring the CK30
To set up the host computer
• Verify that the host computer can communicate with the
Intermec Application Server.
To set up the application
• Prepare and write a host application that can communicate
with the Intermec Application Server and send transactions to
and receive transactions from the CK30 in this format:
transaction header TMF field commands
where:
transaction is a 96-byte field containing the message
header number, date and time, source application ID,
destinations application ID, transaction ID,
and other information. You must set the system
message (SYS$MSG) flag to E in the
transaction header. For help, see the Intermec
Application Server user’s manual.
TMF field is a 2-byte field containing one of these values:
CG Configuration Get request sent from the
host application.
Cg Configuration Get response sent from
the CK30 to the host.
CS Configuration Set request sent from the
host application.
Cs Configuration Set response sent from
the CK30 to the host.
commands are the reader and configuration commands
that you want to set on the CK30 or the
current value you want to retrieve from the
CK30. To save configuration changes in flash
memory, send the reader command .+1 as the
last command.
For a list of all supported commands, see the
Intermec Computer Command Reference Manual.
CK30 Handheld Computer User’s Manual 43

Chapter 2 — Configuring the CK30
To see an example of the host application transaction, see the
example on page 45.
Configuring the CK30 in a TCP/IP Direct Connect Network
You can use the host computer to configure a wireless CK30 in
your TCP/IP network. To send and receive configuration data,
you need to write a host application that can communicate with
the CK30 directly through an access point or through the
Ethernet network. Use the Terminal Message Format (TMF)
protocol to send and receive transactions between the host
application and the CK30.
To set up the host computer
• Verify that you can communicate with the CK30.
To set up the application
• Prepare and write a host application that can communicate
with the CK30. Send message transactions to and receive
transactions from the CK30 on the network port using this
format:
TMF field commands
where:
TMF field is a 2-byte field containing one of these values:
CG Configuration Get request sent from the
host application.
Cg Configuration Get response sent from the
CK30 to the host.
CS Configuration Set request sent from the
host application.
Cs Configuration Set response sent from the
CK30 to the host.
commands are the reader and configuration commands
that you want to set on the CK30 or the
current value you want to retrieve from the
CK30. To save configuration changes in flash
memory, send the reader command .+1 as the
last command.
44 CK30 Handheld Computer User’s Manual

Chapter 2 — Configuring the CK30
For a list of all commands, see the Intermec Computer Command
Reference Manual.
Example
In the host application, you want to get the current values of
two configuration commands from the CK30. Send this
transaction from the host application:
CG$+NABV
Note: The transaction header is not shown in this example. You
do not need a transaction header for a host application in a
TCP/IP network, but you do for a UDP Plus network.
where:
CG is a TMF Configuration Get request.
$+ is the Change Configuration reader command.
BV is the Beeper Volume configuration command.
The CK30 returns this transaction to the host application.
Cg$+BV4
where:
Cg is a TMF Configuration Get response.
$+ is the Change Configuration reader command.
BV4 means the Beep Volume configuration command is
currently set to a value of 4, which is a very high beeper
volume.
Synchronizing the CK30 System Time With a Time Server
It is important that the time on all of your CK30s be
synchronized with a network time server to ensure real-time
communications and updates. Network time servers acquire
Coordinated Universal Time (UTC) from an outside source
such as the U.S. Naval Observatory (USNO). The CK30 uses
Simple Network Time Protocol (SNTP) to synchronize with a
network time server.
CK30 Handheld Computer User’s Manual 45

Chapter 2 — Configuring the CK30
The default reference time server is the USNO
(tock.usno.navy.mil). To synchronize the time on your CK30
with this time server, you must have a valid connection to the
Internet. You can also synchronize the CK30 system time with a
corporate network server within your firewall that is SNTP
capable. To use an internal corporate network server, you need
to set the domain name in the registry.
Configuring the CK30 for Your Network
The CK30 is a versatile handheld computer that you can easily
add to your wired or wireless data collection network. You can
connect your CK30 to your network using:
• Serial communications
• 802.11b/g radio communications
• Ethernet communications
• Bluetooth™ radio communications
Configuring Serial Communications
The CK30 has a serial port to transfer data to and receive data
from another device via RS-232 communications. You can also
insert the CK30 into a communications dock to transmit data to
and receive data from a host computer or PC using RS-232
communications. The serial cable and the communications dock
are sold separately. For more information on accessories and
how to order them, see page 150.
46 CK30 Handheld Computer User’s Manual

Host
Chapter 2 — Configuring the CK30
Ethernet
Serial cable
CK30
CK30 in a Serial Network
PC
To use serial communications with your CK30
1 Turn off the CK30.
2 Connect the CK30 to the serial port of another device. You
can do this in one of the following ways:
• Connect the CK30 serial port to the serial port of the other
device using the AA1 (26-pin to DB9-pin) serial cable
adapter and a female-to-female null modem RS-232 cable.
• Connect the AD1 or AD2 communications dock to the
serial port of the other device using a DB9-pin to DB9-pin
serial adapter cable. Insert the CK30 into the dock.
3 Turn on the CK30.
CK30 Handheld Computer User’s Manual 47

Chapter 2 — Configuring the CK30
Configuring 802.11b/g Radio Communications
Make sure all components with antennas are at least 30 cm
(1 ft) apart when power is applied. Failure to comply could
result in equipment damage.
The wireless CK30 has an internal 802.11b/g radio to transfer
data using wireless communications. This section of the manual
assumes that you have already set up your wireless
communications network including your access points. If you
are using a UDP Plus network, you also need to have your
Intermec Application Server communicating with a host
computer.
Your CK30 supports these network protocols:
• TCP/IP
• UDP Plus
The next sections explain the parameters you need to configure
for the CK30 to work in your wireless network.
Configuring the Network Parameters for a TCP/IP Network
In a TCP/IP network, the CK30 communicates with a host
computer directly using TCP/IP. The access point acts as a
bridge to allow communications between the wired network and
the wireless network.
48 CK30 Handheld Computer User’s Manual

TCP/IP
Direct Connect
Access point
Chapter 2 — Configuring the CK30
Host
Ethernet
CK30s
CK30s in a TCP/IP Direct Connect Network
To use wireless communications in a TCP/IP network
1 Configure these network parameters on each CK30 in the
network:
• Network Name (SSID)
• IP Settings (if not using DHCP)
2 Make sure that your CK30 is talking to the network and that
the network can see your CK30.
3 Configure security. For help, see “Configuring Security” on
page 55.
CK30 Handheld Computer User’s Manual 49

Chapter 2 — Configuring the CK30
The easiest way to configure the network parameters on the
CK30 is to use the Configuration Utility. For help, see
“Configuring the CK30 With the Configuration Utility” on
page 36.
Configuring the Network Parameters for a UDP Plus Network
In a UDP Plus network, the CK30 communicates with a host
computer through the Intermec Application Server.
Host
Ethernet
UDP Plus
Intermec Application Server
Access point
CK30s
CK30s in a UDP Plus Network
50 CK30 Handheld Computer User’s Manual

Chapter 2 — Configuring the CK30
The Intermec Application Server translate UDP Plus packets on
the wireless network into TCP/IP packets on the wired network
and vice versa. The access point acts as a bridge to allow
communications between the wired network and the wireless
network.
To use wireless communications in a UDP Plus network
1 Configure these network parameters on each CK30 in the
network:
• Network Name (SSID)
• Controller IP Address
• IP Settings (if not using DHCP)
• Network Port
2 Configure the security. For help, see “Configuring Security”
on page 55.
You can configure the network parameters on the CK30 with
the Configuration Utility. For help, see “Configuring the CK30
With the Configuration Utility” on page 36.
Configuring Ethernet Communications on Older CK30s
Note: The Ethernet option is no longer available on the CK30.
The information in this section is useful only if you already have
an installed base of older CK30s with the Ethernet option.
You can use an older CK30 directly in an Ethernet network if
you ordered the Ethernet option on your CK30A. Insert the
CK30A into an AD1 or AD2 Communications Dock. The
communications dock has an Ethernet connector that makes it
possible for the CK30 to communicate with your Ethernet
network.
CK30 Handheld Computer User’s Manual 51

Chapter 2 — Configuring the CK30
Host
Ethernet
CK30A
Older CK30s in an Ethernet Network
CK30A CK30A
To use an older CK30 in an Ethernet network
1 Configure these network parameters on each CK30:
• If you have a DHCP server, enable DHCP.
• If you do not have a DHCP server, set these parameters:
a IP address
b Subnet mask
c Default router
2 If required for your network, you may also need to set these
parameters on each CK30:
• Primary and secondary DNS Servers
• Primary and Secondary WINS Servers
3 Make sure that your CK30 is talking to the network and that
the network can see your CK30.
52 CK30 Handheld Computer User’s Manual

Configuring Bluetooth Radio Communications
You can send and receive information to printers wirelessly using
the Bluetooth module by Socket Communications. The
Bluetooth technology uses short-range radio links and allows for
communications over a 10-meter (32.8 ft) range.
To configure the CK30 for wireless printing
1 Go to Configuration Utility > Communications >
Bluetooth. The Bluetooth menu appears.
2 Set these Bluetooth parameters:
Chapter 2 — Configuring the CK30
Parameter Setting
Power On
Discoverable Enable
Connectable Enable
3 Save your changes and exit the Configuration Utility.
4 From File Manager, go to Program Files > Intermec >
Network > Bluetooth.
5 Select wp_quickset_l.exe. The Run dialog box appears.
6 Select Run and press Enter to start the Bluetooth device
discovery. A list of discovered devices appears in the Devices
dialog box.
CK30 Handheld Computer User’s Manual 53

Chapter 2 — Configuring the CK30
7 Select the device you want to use from the list and press
Enter. You are now ready to send information to the selected
device.
If devices are discovered, but your device is not displayed in the
box, make sure your device and radio are turned on and try
device discovery again.
Use this table to understand the settings you see in the
Bluetooth menu.
Bluetooth Settings
Setting Description
Device Address Displays the Bluetooth address of your CK30.
Discoverable Allows other Bluetooth devices to be able to
discover your CK30 during a device discovery.
Connectable Allows other Bluetooth devices to connect to your
CK30.
Class of Device Determines how the device appears to other
devices during discovery.
Power Set and view whether the Bluetooth radio is on or
off.
IBT Displays the version of the Intermec Bluetooth
Library.
Radio Displays the version of the Bluetooth Radio
Hardware.
For more information on using Bluetooth communications, see
the Bluetooth Resource Kit. The resource kit is part of the
54 CK30 Handheld Computer User’s Manual

Intermec Developer Library (IDL), which is available as a
download from the Intermec web site at www.intermec.com/idl.
Configuring Security
The CK30 provides four types of security for your wireless
network:
• Wi-Fi Protected Access 2 (WPA2)
• Wi-Fi Protected Access (WPA)
• 802.1x
• WEP
This section explains how to configure security on your wireless
CK30. If you choose not to use security, see “Disabling
Security” on page 73. Intermec always recommends that you
implement security.
You must choose to use either Funk or Microsoft security to
implement your security solution. For details, see the next
section, “Choosing Between Funk and Microsoft Security.”
If you want to extend the connectivity of your WLAN to remote
servers, you can configure a virtual private network (VPN) to
communicate through a dedicated server to a corporate network
over the internet. For help setting up a VPN, see “Configuring a
VPN” on page 73.
Chapter 2 — Configuring the CK30
If you are using WPA-802.1x, WPA2-802.1x, or 802.1x
security, this section also assumes that your authentication server
and authenticators are properly configured. For more
information on 802.1x security, see the MobileLAN™ secure
802.1x Security Solution Installation Guide (P/N 073134)
available at www.intermec.com.
Note: Your security choice does not depend on your
authentication server. For example, you can choose Funk
security if you use Microsoft Internet Authentication Service
(IAS) to issue certificates.
CK30 Handheld Computer User’s Manual 55

Chapter 2 — Configuring the CK30
Choosing Between Funk and Microsoft Security
The CK30 provides both Funk and Microsoft security choices.
Funk security is the default setting. Use the following sections to
set security using either Funk or Microsoft as your security
choice.
Both Funk and Microsoft offer similar features, but Funk
security also offers these features:
• CCX v2.0 compliance
• Support for LEAP and TTLS
• Configuration of up to four profiles
If you want to use the default Funk security, you need to select a
profile. For help, see the next section, “Selecting a Profile for
Funk Security.”
If you want to use Microsoft security, you need to select it as
your security choice. For help, see “Selecting Microsoft as Your
Security Choice” on page 57.
Selecting a Profile for Funk Security
You can define up to four profiles for Funk security. Different
profiles let your CK30 communicate in different networks
without having to change all of your security settings. For
example, you may want to set up one profile for the
manufacturing floor and one for the warehouse.
By default, the active profile is Profile 1.
To select a profile for Funk security
1 Press C and then B to open the System Main Menu.
2 Select the Configuration Utility.
3 Select Communications > 802.11 Radio > Funk Security.
4 Select Active Profile, choose a profile from the list, and press
Enter.
5 Select the active profile to expand it.
6 (Optional) Give your profile a meaningful name:
a Select Profile Label and a dialog box appears.
56 CK30 Handheld Computer User’s Manual

Chapter 2 — Configuring the CK30
b Select the text in the box, type a meaningful name, and
press Enter.
7 Configure your security settings.
8 (Optional) Repeat this process for each profile you want to
define.
9 Select one profile as the active profile by selecting Active
Profile and choosing a profile from the list.
10 Save your settings.
Selecting Microsoft as Your Security Choice
The default security setting is Funk. If you want to use
Microsoft security, you need to select it as your security choice.
To select Microsoft security as your security choice
1 Press C and then B to open the System Main Menu.
2 Select the Configuration Utility.
3 Select Communications > 802.11 Radio > Security Choice.
4 From the Security Choice list, select Microsoft Security.
5 Press Enter. An alert box appears telling you that you must
save your settings and warm boot the CK30 for your new
security choice to take effect.
6 Select Yes and press Enter.
Your CK30 warm boots and your new security choice is
Microsoft security.
Configuring WPA Security
Wi-Fi Protected Access (WPA) is a strongly enhanced,
interoperable Wi-Fi security that addresses many of the
vulnerabilities of Wired Equivalent Privacy (WEP). Instead of
WEP, WPA uses Temporal Key Integrity Protocol (TKIP) for
its data encryption method.
Currently, WPA satisfies some of the requirements in the IEEE
802.11i draft standard. When the standard is finalized, WPA
will maintain forward compatibility.
CK30 Handheld Computer User’s Manual 57

Chapter 2 — Configuring the CK30
WPA runs in Enterprise (802.1x) mode or PSK (Pre-Shared
Key) mode:
• In Enterprise mode, WPA provides user authentication using
802.1x and the Extensible Authentication Protocol (EAP).
That is, an authentication server (such as a RADIUS server)
must authenticate each device before the device can
communicate with the wireless network.
• In PSK mode, WPA provides user authentication using a
shared key between the access point and the CK30. WPAPSK is a good solution for small offices or home offices that
do not want to use an authentication server.
To use WPA security, you need:
• an authentication server (Enterprise mode only).
• an access point with an 802.11b/g radio that supports WPA.
• a CK30 with the 802.11b/g radio and the 802.1x/WPA
security option.
The CK30 also supports Wi-Fi Protected Access 2 (WPA2) if
you are using Funk security. WPA2 is a product certification
available through the Wi-Fi Alliance that certifies wireless
equipment is compatible with the 802.11i standard. WPA2 uses
the Advanced Encryption Standard (AES) for data encryption.
WPA2 runs in 802.1x (Enterprise) mode or PSK (Pre-Shared
Key) mode:
• For WPA2-802.1x mode, WPA2 requires authentication in
two phases; the first is an open system authentication and the
second uses 802.1x and an Extensible Authentication
Protocol (EAP) authentication method.
• In PSK mode, WPA2 provides user authentication using a
shared key between the authenticator and the CK30. WPA2PSK is a good solution for small offices or home offices that
do not want to use an authentication server.
Configuring WPA Security With Funk Security
Use these procedures to set WPA-802.1x, WPA2-802.1x, WPAPSK, or WPA2-PSK security on your CK30 with Funk security.
58 CK30 Handheld Computer User’s Manual

Chapter 2 — Configuring the CK30
To configure WPA-802.1x or WPA2-802.1x with Funk security
1 Make sure you have configured the communications and
radio parameters on your CK30.
2 Make sure you have selected Funk as your security choice.
3 Press C and then B to open the System Main Menu.
4 Choose Configuration Utility > Communications > 802.11
Radio > Funk Security > Profile.
5 For Association, choose WPA or WPA2 and press Enter.
Encryption automatically defaults to TKIP if you are using
WPA. Encryption automatically defaults to AES if you are
using WPA2.
6 For 8021x, choose TTLS, PEAP, or TLS and press Enter.
If you choose TTLS or PEAP:
a Select Prompt for Credentials, choose Enter credentials
now and press Enter.
Note: You can use Prompt for credentials to troubleshoot
your connection to the network if you have problems.
b Select User Name, type a user name, and then press Enter.
c Select User Password, type a user password, and then
press Enter.
d Select Validate Server Certificate, choose Yes, and then
press Enter.
Note: You must have the date on the CK30 set correctly
when you enable Validate Server Certificate.
If you choose TLS:
a Load a user and root certificate on your CK30. For help,
see “Loading a Certificate” on page 69 for help.
b Select Validate Server Certificate, choose Yes, and then
press Enter.
c You must enter a User Name and Subject Name. You can
also enter a Server Common Name if you want to increase
your level of security.
CK30 Handheld Computer User’s Manual 59

Chapter 2 — Configuring the CK30
7 Exit the Configuration Utility.
To enable WPA-PSK or WPA2-PSK with Funk security
1 Make sure you have configured the communications and
radio parameters on your CK30.
2 Make sure you have selected Funk as your security choice.
3 Press C and then B to open the System Main Menu.
4 Choose Configuration Utility > Communications > 802.11
Radio > Funk Security > Profile.
5 For Association, choose WPA or WPA2 and press Enter.
6 For 802.1x, choose None and press Enter.
7 For Pre-Shared Key, enter the pre-shared key or the
passphrase.
The pre-shared key must be a value of 32 hex pairs preceded
by 0x for a total of 66 characters. The value must match the
key value on the access point. The passphrase must be from 8
to 63 characters. After you enter a passphrase, the CK30
internally converts it to a pre-shared key.
This value must match the passphrase on the authenticator.
8 Exit the Configuration Utility.
Configuring WPA Security With Microsoft Security
Use these procedures to set WPA-802.1x and WPA-PSK
security on your CK30 with Microsoft security.
To enable WPA-802.1x security on your CK30 with Microsoft security
1 Make sure you have configured the communications and
radio parameters on your CK30.
2 Press C and then B to open the System Main Menu.
3 Choose Configuration Utility > Communications > 802.11
Radio > Microsoft Security.
4 For Infrastructure Mode, choose Infrastructure and press
Enter.
5 For Network Authentication, choose WPA and press Enter.
Data Encryption automatically defaults to TKIP.
60 CK30 Handheld Computer User’s Manual

6 For 802.1x Authentication, choose either TLS or PEAP and
press Enter.
If you choose TLS:
a Select Properties. The Auth. Settings dialog box appears.
b Choose the Select button.
c Select your certificate from the list and press Enter. The
User Logon dialog box appears.
Chapter 2 — Configuring the CK30
d Enter a User Name and a Domain.
e Press Enter.
If you choose PEAP:
a Select Properties. The Auth. Settings dialog box appears.
b Make sure the Validate Server check box is selected.
c Press Enter. Once the radio starts to authenticate, the
Network Password dialog box appears.
CK30 Handheld Computer User’s Manual 61

Chapter 2 — Configuring the CK30
d Enter the User Name, Password, and select the Save
password check box.
e (Optional) In the Domain field, enter the Active Directory
domain associated with the user account.
f Press Enter. You return to the Communications menu.
7 Exit the Configuration Utility.
To enable WPA-PSK With Microsoft Security
1 Make sure you have configured the communications and
radio parameters on your CK30.
2 Press C and then B to open the System Main Menu.
3 Choose Configuration Utility > Communications > 802.11
Radio > Microsoft Security.
4 For Infrastructure Mode, choose Infrastructure.
5 For Network Authentication, choose WPA-PSK. Data
Encryption automatically defaults to TKIP.
6 For Pre-Shared Key, enter a pre-shared key or the
passphrase.
The pre-shared key must be a value of 32 hex pairs preceded
by 0x for a total of 66 characters. The value must match the
key value on the authenticator. The passphrase must be from
8 to 63 characters. After you enter a passphrase, the CK30
internally converts it to a pre-shared key.
This value must match the passphrase on the authenticator.
7 Exit the Configuration Utility.
62 CK30 Handheld Computer User’s Manual

Configuring 802.1x Security
802.1x security provides centralized user authentication using an
authentication server, authenticators (access points), and
supplicants. These components communicate using an EAP
authentication type, such as TLS (Transport Layer Security) or
PEAP (Protected Extensible Authentication Protocol). 802.1x
security provides data encryption using dynamic WEP key
management.
To use 802.1x security, you need:
• an authentication server.
Note: You can also use a MobileLAN access point with
software release 1.80 or later as an authentication server. For
help, see the system manual for your access point.
• an access point with an 802.11b/g radio.
• a CK30 with an 802.11b/g radio and the 802.1x/WPA
security option.
Configuring 802.1x Security With Funk Security
Chapter 2 — Configuring the CK30
1 Make sure you have configured the communications and
radio parameters on your CK30.
2 Make sure you have selected Funk as your security choice.
3 Press C and then B to open the System Main Menu.
4 Choose Configuration Utility > Communications > 802.11
Radio > Funk Security > Profile.
5 For Association, choose Open and then press Enter.
6 For Encryption, choose WEP and then press Enter.
7 For Authentication, choose TTLS, PEAP, or TLS and then
press Enter.
If you choose TTLS or PEAP:
a Select Prompt for Credentials, choose Enter credentials
now and press Enter.
CK30 Handheld Computer User’s Manual 63

Chapter 2 — Configuring the CK30
Note: You can use Prompt for credentials to troubleshoot
your connection to the network if you have problems.
b Select User Name, type a user name, and then press Enter.
c Select User Password, type a user password, and then
press Enter.
d Select Validate Server Certificate, choose Yes, and then
press Enter.
Note: You must have the date on the CK30 set correctly
when you enable Validate Server Certificate.
If you choose TLS:
a Load a user and root certificate on your CK30. For help,
see “Loading a Certificate” on page 69 for help.
b Select Validate Server Certificate, choose Yes, and then
press Enter.
c You must enter a User Name and Subject Name. You can
also enter a Server Common Name if you want to increase
your level of security.
8 Exit the Configuration Utility.
Configuring 802.1X Security With Microsoft Security
Use this procedure to configure 802.1x security on your CK30
with Microsoft security.
To enable 802.1x security on your CK30
1 Make sure you have configured the communications and
radio parameters on your CK30.
2 Press C and then B to open the System Main Menu.
3 Choose Configuration Utility > Communications > 802.11
Radio > Microsoft Security.
4 For Infrastructure Mode, choose Infrastructure.
5 For Network Authentication, choose Open.
6 For Data Encryption, choose WEP.
64 CK30 Handheld Computer User’s Manual

7 For 802.1X Authentication, choose TLS or PEAP.
If you choose TLS:
a Select Properties. The Auth. Settings dialog box appears.
b Choose the Select button.
c Select your certificate from the list and press Enter. The
User Logon dialog box appears.
Chapter 2 — Configuring the CK30
d Enter a User Name and a Domain.
e Press Enter.
If you choose PEAP:
a Select Properties. The Auth. Settings dialog box appears.
b Make sure the Validate Server check box is selected.
c Press Enter. Once the radio starts to authenticate, the
Network Password dialog box appears.
CK30 Handheld Computer User’s Manual 65

Chapter 2 — Configuring the CK30
d Enter the User Name, Password, and select the Save
password check box.
e (Optional) In the Domain field, enter the Active Directory
domain associated with the user account.
f Press Enter. You return to the Communications menu.
8 Exit the Configuration Utility.
Configuring LEAP Security
Lightweight Extensible Authentication Protocol (LEAP), also
known as Cisco-Wireless EAP, provides username/passwordbased authentication between a wireless client and a RADIUS
server. In the 802.1x framework, traffic cannot pass through an
Ethernet hub or wireless network access point until it
successfully authenticates itself.
The station must identify itself and prove that it is an authorized
user before it is actually allowed to use the LAN. LEAP also
delivers a session key to the authenticated station, so that future
frames can be encrypted with a key that is different than keys
used by others sessions
To use LEAP security, you need:
• a RADIUS server.
• Cisco access points.
LEAP security is not supported with Microsoft security.
To enable LEAP security on your CK30
1 Make sure you have selected Funk as your security choice.
66 CK30 Handheld Computer User’s Manual

2 Make sure you have configured the communications and
radio parameters on your CK30.
3 Choose Configuration Utility > Communications > 802.11
Radio > Funk Security > Profile.
4 For 8021x, choose LEAP and then press Enter.
5 For Association, choose Open, WPA, WPA2, or Network
EAP and then press Enter. Encryption automatically defaults
to TKIP if you choose WPA, to AES if you choose WPA2,
and to WEP if you choose Open or Network EAP.
6 Select Prompt for Credentials, choose Enter credentials
now, and then press Enter.
7 Select User name, type your user name, and then press
Enter.
8 Select User Password, type a user password, and then press
Enter.
9 Exit the Configuration Utility.
Configuring Static WEP Security
Chapter 2 — Configuring the CK30
The CK30 uses the Wired Equivalent Privacy (WEP) protocol
to add security to your wireless network based on the 802.11b
standard.
To use WEP security, you need:
• a CK30 handheld computer with an 802.11b/g radio.
• an access point with an 802.11b/g radio.
Configuring Static WEP Security With Funk Security
1 Make sure you have selected Funk as your security choice.
2 Make sure you have configured the communications and
radio parameters on your CK30.
3 Press C and then B to open the System Main Menu.
4 Choose Configuration Utility > Communications > 802.11
Radio > Funk Security > Profile.
5 For Association, choose Open and then press Enter.
6 For Encryption, choose WEP and then press Enter.
CK30 Handheld Computer User’s Manual 67

Chapter 2 — Configuring the CK30
7 For 8021x, choose None and then press Enter.
8 Define a value for the keys you want to use. You can define
up to four keys (Key 1 through Key 4).
Enter an ASCII key or a hex key that is either 5 bytes or 13
bytes long depending on the capability of the radio. Set a 5byte value for 64-bit WEP or a 13-byte value for 128-bit
WEP. Hex keys must be preceded by 0x and contain 5 or 13
hex pairs.
9 For Transmit key, choose the key you want to use for
transmitting data.
10 Exit the Configuration Utility.
Configuring Static WEP Security With Microsoft Security
1 Make sure you have configured the communications and
radio parameters on your CK30.
2 Press C and then B to open the System Main Menu.
3 Choose Configuration Utility > Communications > 802.11
Radio > Funk Security > Profile.
4 For Network Authentication, choose Open.
5 For Data Encryption, choose WEP.
6 For Network Key Setting, choose Enter Key and Index.
7 For Network Key Value, enter an ASCII key or a hex key
that is either 5 bytes or 13 bytes long depending on the
capability of the radio.
Set a 5-byte value for 64-bit WEP or a 13-byte value for 128bit WEP. Hex keys must be preceded by 0x and contain 5 or
13 hex pairs.
8 For Network Key Index, select the key you want to use for
data transmission.
9 Exit the Configuration Utility.
68 CK30 Handheld Computer User’s Manual

Loading a Certificate
If you choose to use transport layer security (TLS) with WPA or
802.1x security, you need to have a unique client certificate on
the CK30 and a trusted root certificate authority (CA)
certificate. You can use a third-party CA to issue unique client
certificates and a root certificate.
There are three ways to load certificates on the CK30:
• If you are using Active Directory® to issue certificates, you
• If you are using another third-party CA, you can use the
• If you have multiple certificates to install, you can use the
Note: For certificates to be valid, the CK30 must be set to the
correct date and time. After cold booting the CK30, you may
need to correct the date and time.
Chapter 2 — Configuring the CK30
can use the Enroll Certificates application to load the
certificates.
Import Certificates program to load the certificates.
Import Root Certificates and Import User Certificates
functions.
To load certificates if you are using Active Directory
1 Configure the network and radio settings for the CK30 to
communicate with your certificate authority.
2 From the Configuration Utility, select Communications >
802.11 Radio > Certificates.
3 Select Enroll Certificates. The Enroll Certificates dialog box
appears.
CK30 Handheld Computer User’s Manual 69

Chapter 2 — Configuring the CK30
4 In the Enroll Certificates dialog box, enter the User Name,
Password, and Server (IP address) to log into the CA server.
5 Press Enter. A dialog box appears asking if you want to load
the root certificate.
6 Press Enter for yes. The Enrollment Tool message box
appears telling you that the user certificate has been added.
7 Press Enter to close the Enrollment Tool message box.
8 Configure your CK30 for WPA, WPA2, or 802.1x security.
To load certificates if you are using a third-party CA
1 From the Configuration Utility, select Communications >
802.11 Radio > Certificates.
2 Select Import Certificates. The certificates application
appears.
3 Select Import Root Cert. The Import Root Cert dialog box
appears.
4 From the Import Root Cert dialog box, select Pick certificate
and navigate to your root .cer file.
5 Press Enter. The path to your .cer file now appears in the
Certificate Path text box.
70 CK30 Handheld Computer User’s Manual

6 From the Import Root Cert dialog box, select Import Root
Cert. A dialog box appears asking if you want to add the
certificate to the root store.
7 Press Enter to add the certificate. A message box appears
telling you that the root certificate has been imported.
8 Press Enter to close the Success message box.
Chapter 2 — Configuring the CK30
9 Select Import User Cert. The Import User Cert dialog box
appears.
10 From the Import User Cert dialog box, select Pick certificate
and navigate to your user .cer file.
11 Press Enter. The path to your .cer file now appears in the text
box.
12 From the Import User Cert dialog box, select Pick private
key and navigate to your .pvk file.
13 Press Enter. The path to your .pvk file now appears in the
text box.
14 From the Import User Cert dialog box, select Import User
Cert. A dialog box appears telling you that the user certificate
and the associated key were successfully imported.
CK30 Handheld Computer User’s Manual 71

Chapter 2 — Configuring the CK30
15 Press Enter to close the Success message box.
16 Configure your CK30 for WPA, WPA2, or 802.1x security.
To load multiple certificates
1 Create the \Temp\Root and the \Temp\User folders on the
CK30.
2 Copy at least one root certificate .cer file into the
\Temp\Root folder.
3 Copy at least one user certificate .cer file and key .pvk file into
the \Temp\User folder. Each pair of filenames must match
(for example, cert1.cer and cert1.pvk).
4 From the Configuration Utility, select Communications >
802.11 Radio > Certificates. The Certificates screen appears.
Note: The Import Root Certificate and Import User
Certificate functions are also available in Intermec Settings.
5 Select Import Root Certificates. The Import Root Certific
screen appears. Press U to select True and press Enter to save
the change. You return to the Certificates screen.
6 Select Import User Certificates. The Import User Certific
screen appears. Press U to select True and press Enter to save
the change. You return to the Certificates screen.
7 Press F3 to immediately import the certificates:
• All root certificates in \Temp\Root are imported into the
Trusted Authorities certificate store.
Note: You are prompted when a root certificate is
72 CK30 Handheld Computer User’s Manual
imported, unless that certificate is already in the store.

Disabling Security
Configuring a VPN
Chapter 2 — Configuring the CK30
• All certificate and key files in \Temp\User are imported
into the My Certificates certificate store.
• The Import Root Certificates and the Import User
Certificates settings are changed from True to False.
8 Configure your CK30 for WPA, WPA2, or 802.1x security.
If you choose not to use security with your wireless network, you
can disable it on the CK30. Intermec recommends that you
always set security in your network.
To disable security
1 Press C and then B to open the System Main Menu.
2 Choose Configuration Utility > Communications > 802.11
Radio > Funk Security > Profile.
3 For Association, choose Open.
4 For Encryption, choose None.
A virtual private network (VPN) is a private network that uses a
public network (Internet) to connect remote sites or users
together. These networks use encryption and other security
mechanisms to ensure that only authorized users can access the
network and that data cannot be intercepted. The CK30 uses
the Microsoft CE .NET Remote Access Service (RAS) to set up
the VPN. You can configure the CK30 to use either Point-toPoint Tunneling Protocol (PPTP) or Layer Two Tunneling
Protocol (L2TP).
PPTP is a network protocol that adds a security infrastructure
for the transfer of data from a remote CK30 to a private server,
thus creating a VPN by using TCP/IP-based data networks. Like
PPTP, L2TP also uses Point-to-Point Protocol (PPP) to encrypt
data. L2TP uses Internet Protocol Security Protocol (IPSec) to
enable a more secure VPN client connection from your CK30 to
a remote server.
CK30 Handheld Computer User’s Manual 73

Chapter 2 — Configuring the CK30
IPSec supports the following settings:
• Public key certificates
• Pre-shared keys
Note: If you want to use L2TP and IPSec, they must be
supported by the corporate server.
To configure a VPN
1 From the Configuration Utility, select Communications >
VPN.
2 Select Create New VPN.
3 Select VPN Name, type a VPN name, and then press Enter.
4 Select VPN Type, choose PPTP or P2TP, and then press
Enter.
5 Select Host Name, type a host name, and then press Enter.
6 Select Create the new VPN. A message box appears to tell
you that your new VPN has been created.
7 Press Enter.
8 Select View/Edit VPN.
9 Select TCP/IP Settings and make the settings match those of
your remote server.
10 Select Security and make the settings match those of your
remote server.
11 If you are using L2TP, select IPSEC Setting and make the
settings match those of your remote server.
12 Select Connect Current VPN.
13 Exit the Configuration Utility.
74 CK30 Handheld Computer User’s Manual

Chapter 2 — Configuring the CK30
Saving Your Configuration Changes to Flash Memory
If you want to save your configuration changes through a cold
boot, you need to save your changes to the flash memory. You
can save your changes to flash memory by:
• using the Configuration Utility main menu.
• scanning a bar code.
• sending a reader command through the network.
To save configuration changes using the Configuration Utility
1 From the System Main Menu, select Configuration Utility.
2 From the Configuration Utility, select Save to Flash and
then press Enter. The Save Settings dialog box appears.
3 Press Enter.
An hourglass appears while the CK30 is saving your settings
to flash. When the CK30 is done saving your changes, it
returns you to the Save to Flash menu.
4 Press Esc twice to return to the System Main Menu.
CK30 Handheld Computer User’s Manual 75

Chapter 2 — Configuring the CK30
To save configuration changes by scanning a bar code
• Scan this bar code:
Save Configuration in Flash Memory
*.+1*
*.+1*
Note: After you scan this bar code, wait several seconds before
cold booting the CK30.
To save configuration changes by sending a command from the host
• Send .+1 as the last command from the host application.
76 CK30 Handheld Computer User’s Manual

Developing and Installing
3
In this chapter you will find guidelines for developing
applications and converting existing Trakker Antares
applications. You will also find information on installing
applications and automatically launching them. In this chapter
you will find these sections:
• Developing Applications for the CK30
• Installing Applications on the CK30
• Launching Your Application Automatically
• Customizing How Applications Load on the CK30
Applications
CK30 Handheld Computer User’s Manual 77

Chapter 3 — Developing and Installing Applications
Developing Applications for the CK30
The CK30 Handheld Computers run applications programmed
in Microsoft Visual Studio 2005-. The CK30C can also run
applications developed for the .NET Compact Framework using
Microsoft C# and Visual Basic.
Use this section to understand what you need to:
• Develop a new application for the CK30.
• Develop a web-based application for the CK30.
• Convert a Trakker Antares application to a CK30 application.
Developing a New Application for the CK30
Use the Intermec Resource Kits to develop new applications to
run on the CK30. The Intermec Resource Kits are libraries of
C++ and .NET components grouped by functionality that you
can use to create applications for the CK30. The Resource Kits
are part of the Intermec Developer Library (IDL), which is
available as a download from the Intermec web site at
www.intermec.com/idl.
You need these hardware and software components to use the
Intermec Resource Kits:
• Pentium PC, 400 MHz or higher
• Windows 2000 (Service Pack 2 or later) or Windows XP
(Home, Professional, or Server)
• For native C++ development, Microsoft eMbedded Visual
C++ version 4.0
• For .NET Development and Compact Framework (C# and
VB.NET), Microsoft Visual Studio .NET 2003 or Visual
Studio 2005
• 128MB RAM (196MB recommended)
• 360MB Hard drive space for minimum installation (720MB
for complete)
• CD-ROM drive compatible with multimedia PC
specification
78 CK30 Handheld Computer User’s Manual

Chapter 3 — Developing and Installing Applications
• VGA or higher-resolution monitor (Super VGA
recommended)
• Microsoft Mouse or compatible pointing device
Developing a Web-Based Application
You can develop web-based data collection applications for use
on the CK30. For help, see any HTML source book. The CK30
ships with iBrowse or IE Browser (CK30C only).
To open iBrowse or IE Browser
1 Press C and then B to open the System Main Menu.
2 Select Programs. The Programs menu appears.
3 Select either iBrowse or IE Browser. If you selected IE
Browser, the default browser window appears.
For help using IE Browser, press F1. For help using iBrowse, see
the iBrowse User’s Guide (P/N 961-055-015).
Note: iBrowse does not support the use of tethered scanners
with the CK30.
CK30 Handheld Computer User’s Manual 79

Chapter 3 — Developing and Installing Applications
Using the IE Browser Application
IE Browser is an IE 6.0 compatible web interface that allows you
to run web-based applications on the CK30. IE Browser
provides the ability to customize the way function keys work.
You can use default Windows functions, allow your application
to control the functions, or program the function keys to go to a
URL. To increase the amount of usable screen real estate,
elements of a typical browser such as the address bar and scroll
bars have been removed.
Use this table to understand what keys to press to perform basic
functions in IE Browser.
To use the IE Browser shortcut keys
1 Set Use F1-F5 as URL keys to Default Windows.
2 Set Pass Function Keys to Browser to Function Keys to
URLs.
IE Browser Shortcuts
You Want to: Press These Keys:
Access Help, exit Help
Make the font smaller
Make the font larger
Refresh the browser
Exit IE Browser
Hide the taskbar
Go to the home page
Edit the URL
Scroll up or down a page
Move to the next hyperlink
Go back a page
Go forward a page
Stop loading
Use the following procedures to program the basic functionality
of IE Browser.
F1
F3
F4
F5
Ctl and then C
Ctl and then X
Ctl and then H
Ctl and then O, Alt and then M
U and D keys
Tab
Alt and then L
Alt and then R
Esc
80 CK30 Handheld Computer User’s Manual

Chapter 3 — Developing and Installing Applications
Setting the Start Page
Use the Start Page command to set the default application
address for IE Browser. The Start Page is the first page a user
sees when they turn on the CK30 and select IE Browser.
To set the start page
1 From the Configuration Utility main menu, select Device
Settings > IE Browser > General > Start Page.
2 In the Start Page dialog box, enter the address for the
application you want to use for your default application.
3 Press Enter to save your changes.
Using Windows Default Function Keys
IE Browser provides the capability of being able to use the
default Windows functions for F1-F5, such as F1 for Help.
To use Windows default function keys for F1 to F5
1 From the Configuration Utility main menu, select Device
Settings > IE Browser > Use F1-F5 as URL Keys.
2 In the Use F1-F5 as URL Keys dialog box, select Default
Windows and press Enter.
3 From the IE Browser menu, select Pass Function Keys to
Browser.
4 In the Pass Function Keys to Browser dialog box, select
Function Keys to URLs and press Enter.
Using Web-Based Application Settings for Function Keys
If your web-based application always uses F1-F5 to perform the
same functions, you can set up IE Browser so that it recognizes
and uses your web application function keys.
To program function keys to use the web-based application settings
1 From the Configuration Utility main menu, select Device
Settings > IE Browser > Use F1-F5 as URL Keys.
2 In the Use F1-F5 as URL Keys dialog box, select URL
Shortcuts and press Enter.
CK30 Handheld Computer User’s Manual 81

Chapter 3 — Developing and Installing Applications
3 From the IE Browser menu, select Pass Function Keys to
Browser.
4 In the Pass Function Keys to Browser dialog box, select
Function Keys to HTML and press Enter.
Setting the URLs for the Function Keys
You can program all of the available function keys on the CK30
to launch a URL. You can also control whether the URLs will
have open or restricted access.
To set the URLs for the function keys
1 From the Configuration Utility main menu, select Device
Settings > IE Browser > Set URL’s for F1-F5.
You can select to set the URLs for F1-F5, F6-F10, F11-F15,
F16-F20, or F21-F24. This procedure uses F1-F5 as an
example.
2 Select F1 URL.
3 In the F1 URL dialog box, enter the URL you want to
correspond to the F1 key and press Enter.
4 (Optional) If you want to restrict access to the URL, select F1
Access to bring up the F1 Access dialog box.
5 (Optional) In the F1 Access dialog box, select Restricted
Access and press Enter.
6 Complete Steps 1 through 5 as many times as necessary to
program all of the function keys you need.
Programming the Function Keys to Go to a URL
If you want your function keys to open URLs when you press
them, you need to program IE Browser to recognize that it
should open a URL when you select a function key.
To program function keys to go to a URL
1 From the Configuration Utility main menu, select Device
Settings > IE Browser > Use F1-F5 as URL Key.
2 In the Use F1-F5 as URL Keys dialog box, select URL
Shortcuts and press Enter.
82 CK30 Handheld Computer User’s Manual

Chapter 3 — Developing and Installing Applications
3 From the IE Browser menu, select Pass Function Keys to
Browser.
4 In the Pass Function Keys to Browser dialog box, select
Function Keys to URLs and press Enter.
5 Set the URLs for the function keys you want to use. For help,
see the previous procedure on how to set the URLs.
Programming IE Browser Applications for the CK30 Screen
Since the CK30 screen is small, you may want to use a few of the
programming tips in this table to more efficiently use your
screen space.
To Do This: Use These Attributes in Your Tags:
Remove scroll bars <body scroll=no> </body>
Remove top and left margins <body topmargin=0 leftmargin=0> </body>
Use a small font <basefont face=”Lucida Console” size=1>…</font>
Remove spacing between cells in a
table
Set the font size for entries in a table <tbody style=”font:7pt Lucida Console>…</tbody>
Create a shorter text edit box that
stretches across the screen
Control the order of controls the tab
key jumps to
<table class=MenuItem cellspacing=0
cellpadding=0>…</table>
Tip: You can also use this attribute with theader and
tfooter tags.
<input type=”text” name=”barcode1” tabindex=”1”
style=”font-size:6pt; width:160px”/>
<input type=”text” name=”barcode1” tabindex=”1”/>
Converting a Trakker Antares Application to a CK30 Application
If you have an existing Trakker Antares application that you
would like to run on the CK30, you can use the Antares
Migration Resource Kit to convert it. The Antares Migration
Resource Kit is a set of libraries and tools that you use to convert
your existing Trakker Antares C applications into C++
applications for use on the CK30.
The CK30 does not support all Trakker Antares PSK functions.
You may need to rewrite parts of your application when
converting it for use on the CK30. See the resource kit
documentation for a list of functions that are not supported.
CK30 Handheld Computer User’s Manual 83

Chapter 3 — Developing and Installing Applications
You need these hardware and software components to use the
Antares Migration Resource Kit:
• PC with at least 300MB of free disk space running Microsoft
Windows 2000/XP
• Microsoft eMbedded Visual C++ version 4.0 with Service
Pack 2
The Resource Kit is part of the Intermec Developer Library
(IDL), which is available from the Intermec web site at
www.intermec.com/idl.
Installing Applications on the CK30
There are several ways you can package applications to install on
the CK30:
• You can package your application as a cabinet (CAB) file.
• If you have a simple application, you may only need to deliver
the EXE file.
• You can copy a directory structure that contains the
application, supporting files, DLLs, images, sound files, and
data files.
Intermec recommends using CAB files to install your
applications. The CK30 uses standard Windows CE CAB files
and will install third-party CAB files. Before the CK30 executes
a CAB file, it marks the file as read-only so that it will not be
deleted after installation. After the CAB file is extracted, the
CK30 automatically saves any RAM-based changes you have
made to the registry or file system so that they will persist
through a cold boot. This process means that you will not have
to reinstall your applications when your battery goes dead or you
perform a cold boot.
You can have your CAB files place your application in any of
these memory locations on the CK30:
• The RAM-based file store (anywhere in the root \ directory)
• The Flash File System (the CK_FFS folder)
• On the SD card (SDMMC folder)
84 CK30 Handheld Computer User’s Manual

Chapter 3 — Developing and Installing Applications
Unless your application and additional data files are very large,
you can place them in the RAM of the unit. They will
automatically be backed up to the Flash File System
(\CK_FFS\Persistent Copy folder). These files will be preserved
through a cold boot, or a complete battery drain and
accompanying cold boot. However, Intermec recommends that
you place your applications files in the CK_FFS or SDMMC
Disk folder.
If you have an SD card inserted in your CK30, it appears as the
SDMMC Disk folder. This folder is the recommended location
for placing your application install files.
There are several ways you can install files and applications on
the CK30:
• ActiveSync
• SD Card
• FTP Server
• Wavelink Avalanche
• SmartSystems Console
The following sections explain how to use each one of these
processes to install your application on the CK30.
Installing Applications Using ActiveSync
You can use ActiveSync to establish a connection between your
PC and the CK30. ActiveSync allows you to transfer files,
synchronize files, perform remote debugging, and other device
management activities. ActiveSync is a free application available
from the Microsoft web site.
To establish a partnership between your PC and the CK30, you
need:
• a USB cable or a female-to-female null modem serial cable.
• an AD1 communications dock.
• ActiveSync version 3.7.1 or later.
CK30 Handheld Computer User’s Manual 85

Chapter 3 — Developing and Installing Applications
Installing ActiveSync and Establishing a Partnership
You can use either a USB cable or a serial cable to establish your
initial partnership between the CK30 and your PC.
To install ActiveSync and establish a partnership
1 Download ActiveSync from the Microsoft web site and follow
the onscreen instructions for installing it on your PC. When
the installation process is complete, the Get Connected dialog
box appears.
2 Connect the AD1 to your PC with the USB or serial cable.
3 If you are using a serial cable, from the CK30 System Main
Menu, select Programs > ActiveSync Serial.
The default setting for ActiveSync on the CK30 is USB.
4 Click Next in the Get Connected dialog box. ActiveSync
detects a device on the USB or serial port and prompts you to
set up a new partnership.
5 In the Set Up a Partnership dialog box, click Next.
6 In the Select Number of Partnerships dialog box, select Yes, I
want to synchronize with only this computer and then
click Next.
86 CK30 Handheld Computer User’s Manual
 Loading...