

Page 1
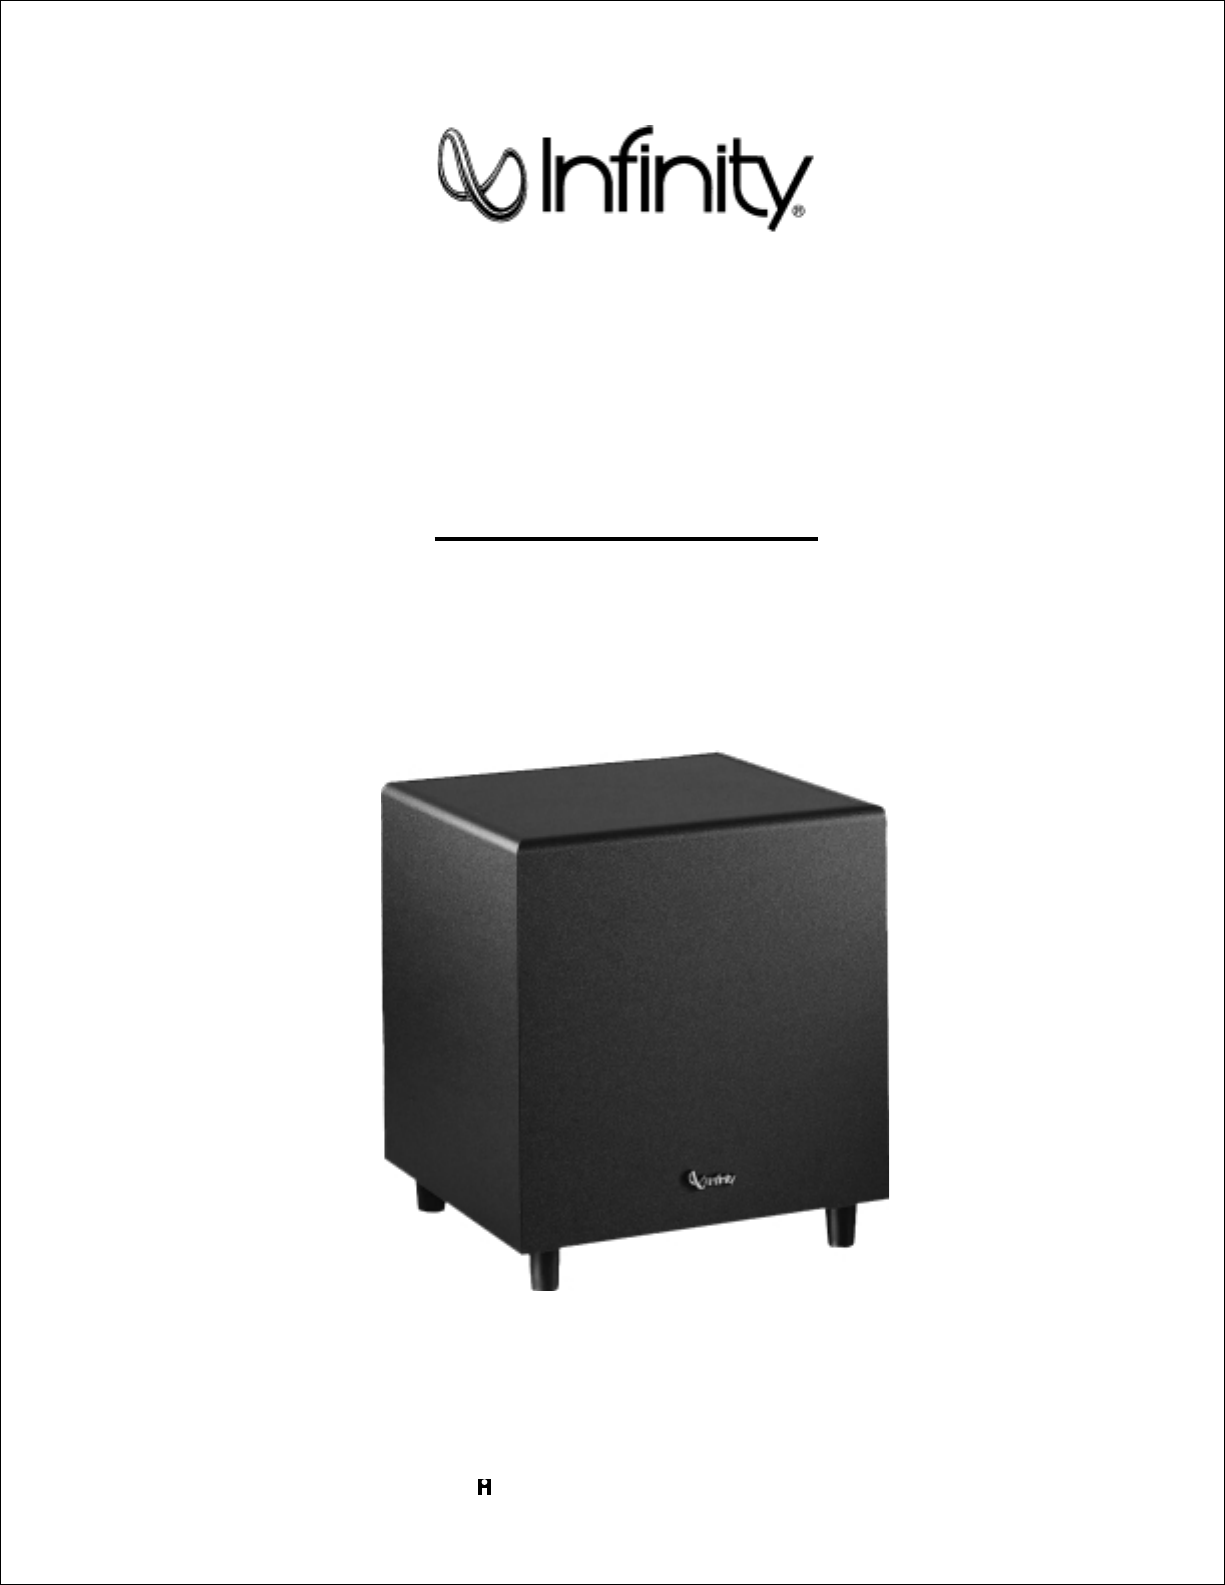
BU-150
Powered Subwoofer
SERVICE MANUAL
Infinity Systems Inc.
250 Crossways Park Drive
Woodbury, N.Y. 11797
1-800-553-3332
A Harman International Company
Rev A 3/2000
Page 2

Amplifier/Subwoofer BU-150
SAFETY INFORMATION
Warning
Any person performing service of this unit will be exposed to
hazardous voltages and the risk of electric shock. It is
assumed that any person who removes the amplifier from this
cabinet has been properly trained in protecting against
avoidable injury and shock. Therefore, any service
procedures are to be performed by qualified service personal
ONLY!
Caution
This unit does not have a power switch. Hazardous voltages
are present within the unit whenever it is plugged in.
Before the amplifier is plugged in, be sure its rated voltage
corresponds to the voltage of the AC power source to be
used. Incorrect voltage could cause damage to the amplifier
when the AC power cord is plugged in. Do not exceed rated
voltage by more than 10%: operation below 90% of rated
voltage will cause poor performance or may shut the unit off.
List of Safety Components Requiring
Exact Replacements
F1 Fuse SLO BLO 1.5A 250V 20mm.
UL approved
Leakage/Resistance Check
Before returning the unit to the customer, perform a leakage
or resistance test as follows:
Leakage Current. Note there is no power switch on this unit.
When the power plug is plugged in, the unit is live. Connect
the unit to its rated power source. Using an ammeter,
measure the current between the neutral side of the AC
supply and chassis ground of the unit under test. if leakage
current exceeds 0.5mA, the unit is defective. Reverse the
polarity of the AC supply and repeat.
Resistance. Measure the resistance from either side of the
line cord to chassis ground. If it is less than 500k ohms, the
unit is defective.
WARNING! DO NOT return the unit to the customer if it fails
one of these tests until the problem is located and corrected.
PWRCORD SPT-2 or better with polarized plug, UL
approved wired with the hot side to fused side.
Use with factory replacement panel strain relief
only.
T1 Transformer. Use only factory replacement.
DBR Bridge diode. Use only factory replacement.
C1, 2 2200uF, 100V electrolytic filter caps. Be sure
replacement part is at least the same working
voltage and capacitance rating. Also the lead
spacing is important. Incorrect spacing may
cause premature failure due to internal cabinet
pressure and vibration.
C6 4.7uF 100V electrolytic radial
S64AMI Power output module. Use only factory
replacement
Faceplate Faceplate. Use only factory replacement
Air leak cover Use only factory replacement
CMC1 Use only factory replacement
L1 Use only factory replacement
Fuse PCB Use only factory replacement
Main PCB Use only factory replacement
2
Page 3

Amplifier/Subwoofer BU-150
TABLE OF CONTENTS
SAFETY INFORMATION..................................................2
GENERAL SPECIFICATIONS..........................................3
DETAILED SPECIFICATIONS .........................................4
CONTROLS AND THEIR FUNCTION .............................6
BU-150 CONNECTIONS .................................................7
OPERATION ...................................................................11
BU-150 TEST SET UP AND PROCEDURE..................12
BU-150 POWER AMP MODULE TESTING
FLOW CHART ................................................................13
BU-150 PACKING & CABINET ASSEMBLY .................14
BU-150 AMPLIFIER ASSEMBLY EXPLODED VIEW....15
BU-150 PCB (Version 3.52) Component Side Trace ....16
BU-150 PCB (Version 3.52) Solder Side Trace ............17
BU-150 PCB (Version 3.53) Component Side Trace ....18
BU-150 PCB (Version 3.53) Solder Side Trace ............19
BU-150 ELECTRICAL PARTS LIST ..............................20
BU-150 INTEGRATED CIRCUIT DIAGRAMS ...............21
BU-150 SCHEMATIC 1 of 2...........................................22
BU-150 SCHEMATIC 2 of 2...........................................23
GENERAL SPECIFICATIONS
Frequency Response (63dB) .................28Hz – 150Hz
Output (RMS).............................200W
Driver ..................................15"Woofer
Crossover Frequency .......................50Hz ~ 150Hz (continuously variable)
Dimensions (HxWxD).....................17) "x17) "x17) " (451 x 451 x 451mm)
Add 1) " (4.5cm) for feet.
Weight..................................55lbs/20 kg
Refinements may be made on occasion to existing products without notice,
but will always meet or exceed original specifications unless otherwise stated.
3
Page 4

Amplifier/Subwoofer BU-150
DETAILED SPECIFICATIONS
LINE VOLTAGE Yes/NoHi/Lo Line Nom. Unit Notes
US 120vac/60Hz Yes 108-132 120 Vrms Normal Operation
Parameter Spe
cific
atio
n
Amp Section
Type (Class AB, D,
other)
Load Impedance
(speaker)
Rated Output Power 200 Watts 120 1 input driven Input voltage 120 VAC, 60 Hz
THD 1 % 2 22k filter 120W (Power Bandwidth
THD @ 1 Watt 0.5 % 0.5 22k filter
DC Offset <20 mV-DC 30 @ Speaker Outputs
Damping factor >80 DF >50 Measured across amplifier
Input Sensitivity
Input Frequency 35 Hz Nominal Freq. 1 input driven
Line Input 265 mVrms ±2dB To Rated Power/
Speaker/Hi Level Input 7 Vrms ±2dB To Rated Power/
Signal to Noise
SNR-A-Weighted 100 dBA 90 Relative to rated
SNR-unweighted 75 dBr 70 Relative to rated
SNR rel. 1W-unweighted
(22k)
Residual Noise Floor 2 mVrms 3 Volume @max, using RMS reading DMM/VOM (or
Residual Noise Floor 1.5
D n/a Class D Preferred...Sink
8 Ohms n/a Nominal Z-curve required
65 dBr 55 relative to 1W
Unit Test
Limits
mVrms(max)
2 Volume @max, w/ A/P Swept Bandpass
Conditions Notes
required for Class AB
30-100Hz) @ 120 VAC
outputs
1 input driven: AP source Z =
Vol @ Max
Vol @ Max
output
output
Output
A/P) , BW <20KHz
Measurement (Line freq.+ harmonics) , BW<20Khz
600 ohms
1 input driven: AP source Z =
25 ohms
A-Weighting filter
22k filter
22k filter
Input Impedance
Line Input 10K ohms n/a Nominal
Speaker/Hi Level Input 5K ohms n/a Nominal
Filters 0dBr = 1w @ 50Hz
Low Pass (fixed or
variable)
Low Pass filter (point or
range)
Slope 24 dB/Octave n/a
Q 1 Damping n/a
Subsonic filter (HPF) 25 Hz ±2dB -3dB Point
Slope 12 dB/Octave n/a
Q 1 Damping n/a
Varia
ble
60-180Hz ±2dB -3dB Point
4
Page 5

Amplifier/Subwoofer BU-150
Limiter (yes/no) yes
THD at Max. Output
Power
Features
Phase Switch (yes/no) YES — functional
Volume pot Taper
(lin/log)
Input Configuration —
Line In (L&R) LR — functional
Spkr/Hi Level In
(L&R) L,R — functional
Spkr Out: Hi Pass Filter 100 Hz functional
Signal-Present LED Yes
Signal-Present Input
Freq.
Signal-Present Level linein30 mV 35Hz into Line
Signal-Present Speaker
-in
Signal-Present Turn-on
time
Auto Mute/ Turn-OFF
Time
10 % functional
ck.
Maximum Output
Power
Maximum THD as a result of
limiting.
45 deg additional phase
ck.
shift/switch op.OK
LOG — functional
ck.
ck..
Enabled w/Line/Spkr
ck..
ck..
Input Select Switch
8 ohm Satellite: 6dB/oct passive xover 200 Uf cap. Non
polarized
35 Hz Nominal
Zo=600 Ohms
Input w/ 1 ch.
Driven
2.6 V 35Hz into Speaker
Input w/ 1 ch.
Driven
1 sec. Amp connected and AC on, then input signal
applied
> 3 min. T before muting,
after signal is
removed
Power on Delay time 1 sec. 3 AC Power Applied
Transients/Pops
Signal-Present Transient 5 mV-peak n/a @ Speaker Outputs
Turn-on Transient 1 mV-peak 2v-pp @ Speaker Outputs AC Line cycled from OFF to
ON
Turn-off Transient 2 mV-peak 4v-pp @ Speaker Outputs AC Line cycled from ON to
OFF
Efficiency
Stand-by Input Power 20 Watts 28 @ nom. line
Input Line voltage 120 VAC
voltage
Power Cons.@rated
power
210 Watts 220 @ nom. line
voltage
Efficiency 95.24%% 54.55% Relative to rated
output
Protection
Short Circuit Protection YES functional
ck..
Thermal Protection YES functional
ck..
Direct short at
output
@1/8 max
unclipped Power
Power transformer 85 deg C.
Line Fuse Rating 2 Amps 2 Slo-Blo type
5
Page 6
Amplifier/Subwoofer BU-150
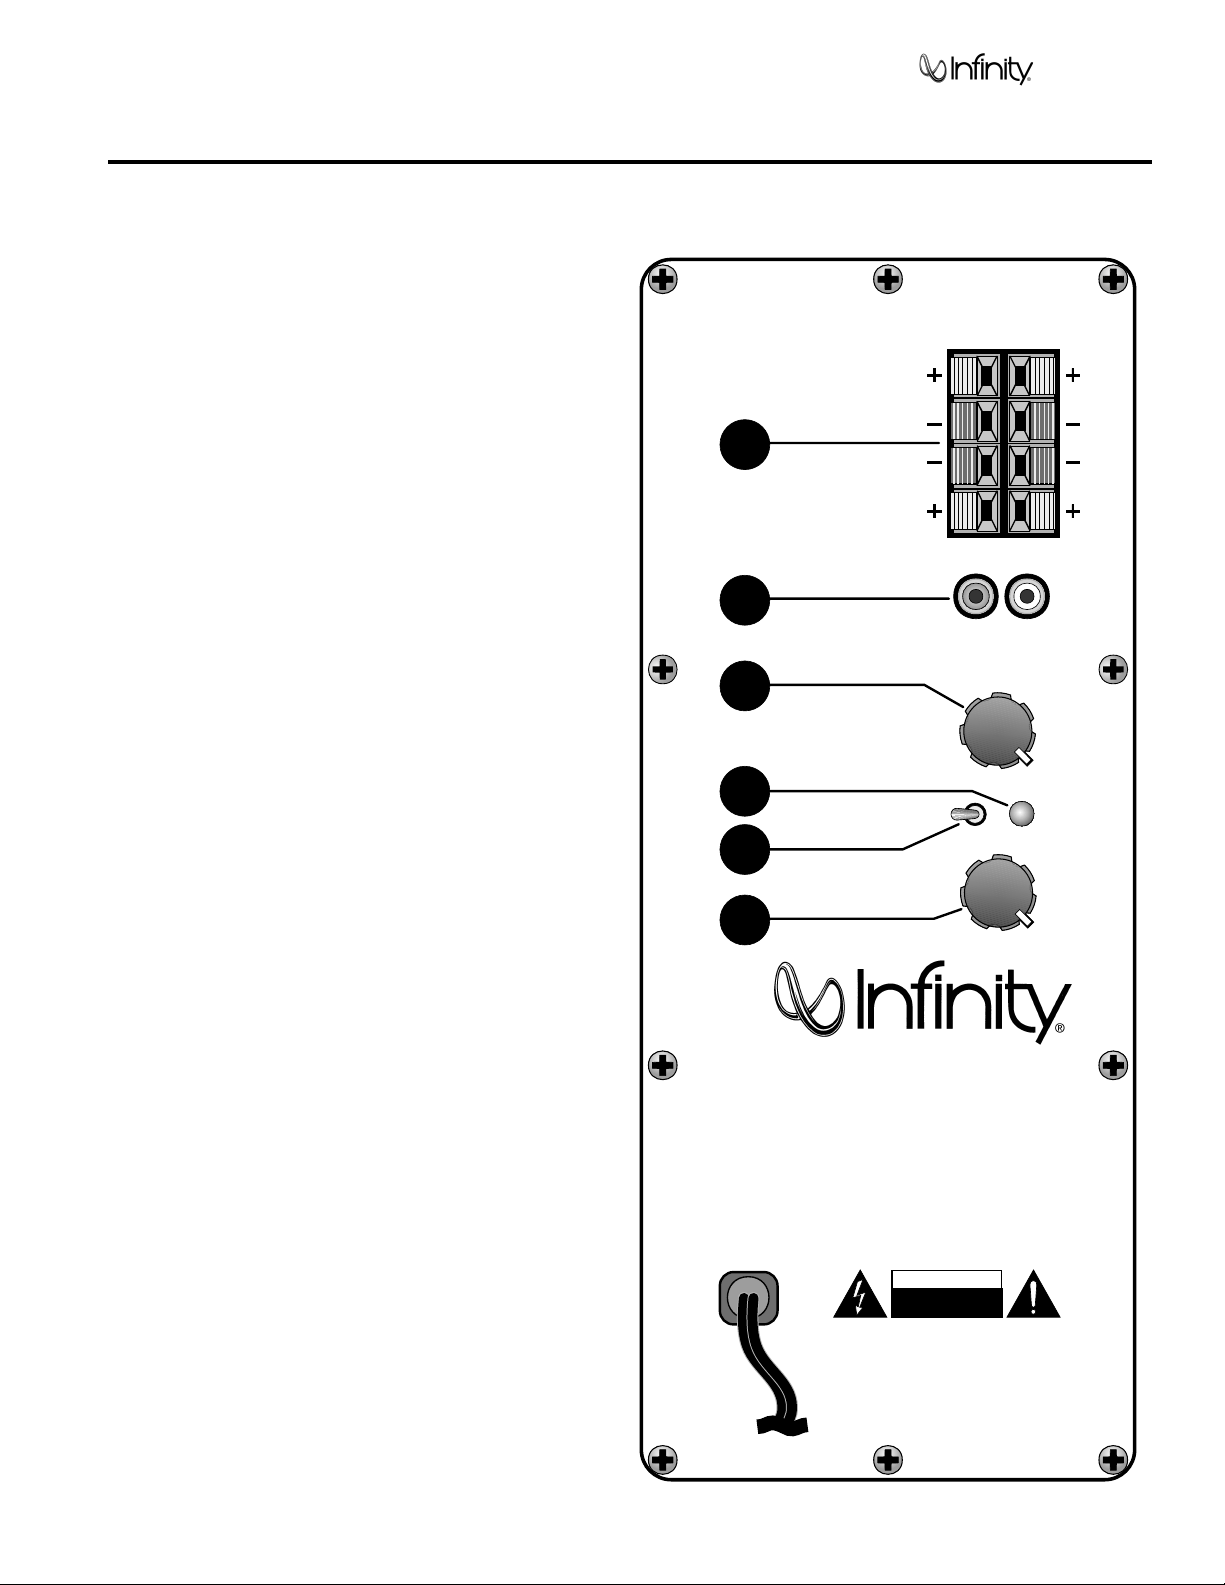
CONTROLS AND THEIR FUNCTION
1. High-Level input and Output terminals
2. Low-Level Input Jacks: connect to preamplifier outputs
3. Low Pass: This is the crossover frequency control
which determines the upper-corner roll-off points.
4. Power-On indicator
5. Phase: 0/180 switch to change audio-signal polarity.
6. Level: This controls the volume level of the subwoofer.
1
2
3
4
5
SPKR
OUT
SPKR
IN
RR
LL
R
L
Line Input
Low
Pass
Phase
50
0
o
180
150
Power
o
120V
60Hz
250W
6
BU-150
Level
Min
Digital
RISK OF ELECTRIC SHOCK
TO REDUCE THE RISK OF ELECTRIC SHOCK. DO NOT
EXPOSE THIS EQUIPMENT TO RAIN OR MOISTURE
Technology
Powered Subwoofer
CAUTION
DO NOT OPEN
Max
6
Page 7
Amplifier/Subwoofer BU-150
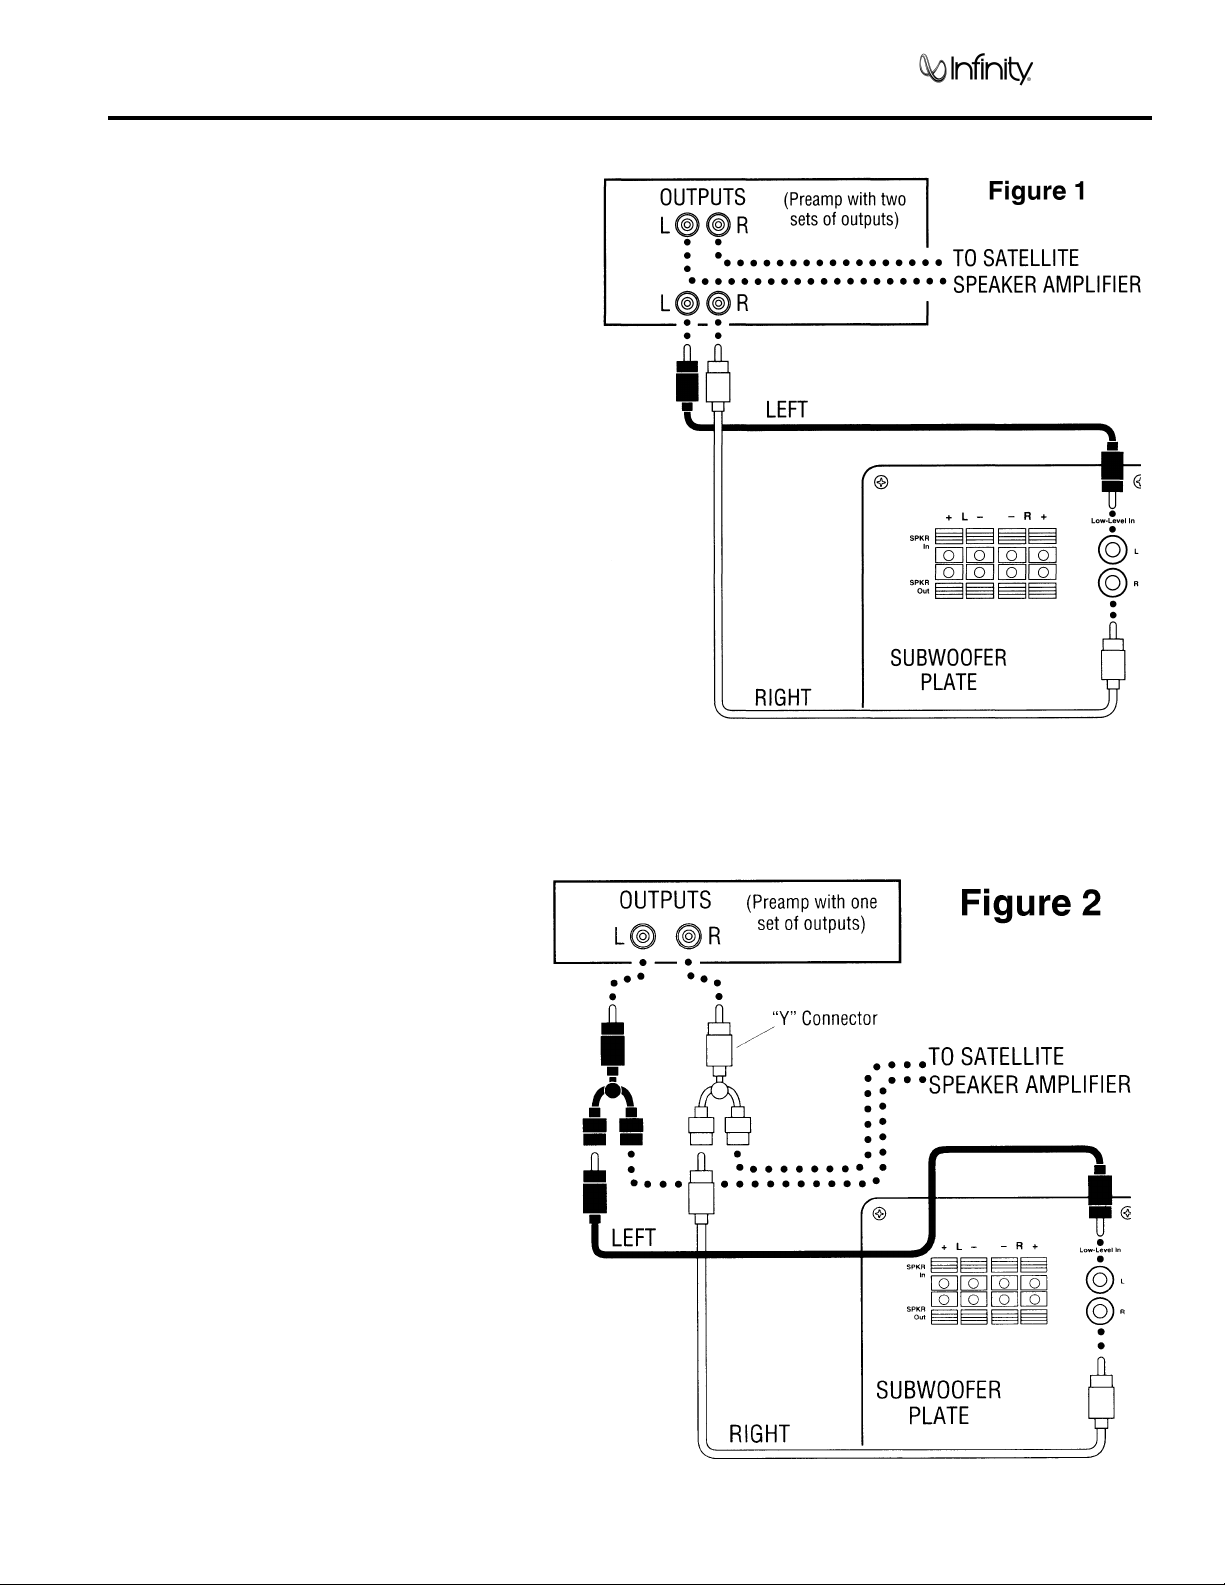
BU-150 CONNECTIONS
When connecting your subwoofer make sure you turn
all the power off.
There are several ways to connect your subwoofer.
Read this section carefully to determine which method
is best suited for your installation.
The subwoofer may be fed directly with a low-level
signal taken from a preamplifier's output by using the
second set of output jacks on the rear of the
preamplifier (See Figure 1). If a preamplifier has only
one set of outputs, you may use two (2) “Y” connectors
(See Figure 2) to connect the subwoofer. Use
standard shielded leads terminated at each end with
male RCA connectors. Connect one end of each
stereo pair of leads to the preamplifier's left and right
outputs and connect the other end to the
corresponding left and right LOW-LEVEL INPUTS (1)
on the subwoofer.
If you are using a tube preamplifier and the connecting
leads will be longer than 10 feet (3 meters), we
recommend not using the above connection method. A
tube preamplifier may not be able to handle the
capacitance introduced by leads more than 10 feet in
length. Instead, try using the high-level connection
methods listed on pages 5-7.
Figure 1.
preamp's output by connecting second set of
output jacks to the rear of your amplifier.
Figure 2.
connectors) if your preamp has only one set
of outputs.
- A low-level signal can be used from a
- You can use this method (2“Y”
7
Page 8

Amplifier/Subwoofer BU-150
When using a single subwoofer, you MUST use a pair of stereo low-level leads from your preamplifier's outputs. When using
two subwoofers, one for the left and another for the right channels, connect the left preamplifier output to BOTH the left and
right LOW-LEVEL INPUTS of the subwoofer used for the left channel by using a Female-to-Male “Y” connector at the
subwoofer's output. Connect the right-channel preamplifier output to both jacks of the right-channel subwoofer in the same
manner (See Figure 3). If the preamplifier has a mono subwoofer output, you'll also need a Male-to-Female “Y” connector to
split the mono signal to the subwoofer pair (See Figure 3).
Figure 3.
The subwoofer may be connected to your system using the
HIGH-LEVEL INPUTS (4) on the plate located on the rear
panel of the subwoofer. Use speaker wire, maintaining
proper polarity (+ to + and - to -). Attach the speaker wire to
the left and right HIGH-LEVEL INPUTS on the subwoofer
and the other ends to the proper left and right OUTPUTS on
your amplifier or receiver (See Figure 4).
If you plan to use two subwoofers (one for the left and the
other for the right channel), connect wires from the left and
right OUTPUT on your power amplifier or receiver and
attach the other ends to the corresponding HIGH-LEVEL
INPUTS on each subwoofer. Observe polarity (See Figure
6).
Figure 4.
subwoofer.
- Use this method when using single subwoofer or two subwoofers.
- Use this method when using a single
8
Page 9

Amplifier/Subwoofer BU-150
Figure 5.
subwoofers.
- Use this method when using two
Figure 6.
one subwoofer to satellites.
Depending on whether you are using one or two
subwoofers, connecting your satellites can be
accomplished in one of two ways. If you are using a
single subwoofer with a pair of satellites, connect
them as shown in Figure 7.
- Use this method when connecting
9
Page 10

Amplifier/Subwoofer BU-150
Figure 7.
connecting two subwoofers to
satellites.
If you are using two subwoofers as a
stereo pair with a pair of satellites, connect
them as shown in Figure 7.
The subwoofer has a variable frequency
control that can be used to block unwanted
frequencies (between 50 - 150Hz) from
being reproduced by the subwoofer.
When you set this control depends on the
low-frequency capabilities of your satellite
speakers. Adjust this knob to the lowest
frequency that you satellite speakers were
designed to reproduce (refer to Operation,
step 7).
- Use this method when
10
Page 11

Amplifier/Subwoofer BU-150
OPERATION
Setting the Controls
1. Initially set the subwoofer's Volume control to the minimum
position.
2. Initially set the subwoofer's Crossover Frequency control to
12 o'clock.
3. Set the subwoofer's Phase switch to the “NOM” position
Turn the Power On
4. Turn on the entire audio system and play any music
source.
5. Turn the Volume control to its mid position. If no sound
emanates from the subwoofer, check the AC line cord and
input cables. Are the connectors on the cables making proper
contact? Is the AC plug connected to a “live” receptacle?
Adjusting the Volume
6. Set the overall volume control of the preamplifier or stereo
to a comfortable level. Adjust the subwoofer's Volume control
until you obtain a pleasing blend of bass. Bass response
should not overpower the room but rather be adjusted so
there is a harmonious blend across the entire musical range.
Many users have a tendency to set the subwoofer volume too
loud following the belief that a subwoofer is there to produce
lots of bass. This is not entirely true. A subwoofer it there to
enhance bass, extending the response of the entire system
so the bass can be felt as well as heard. However, overall
balance must be maintained; otherwise, the music will not
sound natural. An experienced listener will set the volume of
the subwoofer so its impact on bass response is always there
but is never obtrusive.
The Crossover Frequency Controls
7. The Crossover Frequency control sets the high-frequency
roll-off, adjustable from 50 to 150Hz. Where you set this
control depends on the low-frequency capabilities of your
satellite speakers, system placement, and other factors
affecting the mid-bass region. Turn the control UP
(clockwise) until you feel there is too much mid-bass
information (around 100Hz), then back the control down a bit
until that area sounds more natural. To hear more low bass,
turn the Crossover Frequency control DOWN a bit and the
Volume control UP by about the same amount. This will
increase low bass while leaving the mid-bass sounding the
same as it did before the adjustment. To reduce low bass
without changing midbass, turn the Crossover Frequency
control UP and the Volume control DOWN. Switch the Phase
switch between “NOM” and “REV” positions while listening to
music. The selection that sounds the best is the correct
adjustment for your system.
Room Placement
8. The room placement of the subwoofer is the most critical
aspect of its installation. It will be necessary for you to try
various locations in your listening room before you choose
the final location. Some possible starting points include:
behind the right channel satellite speaker, along the back
wall between the satellites, along a side wall (but not too
close to a corner), or behind a couch or a chair.
In general, the closer the subwoofer is to wall and corners,
the greater the effect of low-frequency enhancement.
Experiment with the Crossover Frequency and Volume
controls in different locations until you are pleased with the
result you obtain from your particular application.
A Word of Advice
The Low-Frequency Roll-off and Volume controls may be
set anywhere within their rotation. However, it will be a most
unusual circumstance if you have to set the Volume control
completely clockwise. This may indicate an unbalanced
condition in your system (too much bass) or an especially
large room, or room placement may not be correct. Try
several other locations before concluding that the Volume
control must be set at maximum.
A Word About Tone Controls
The tone controls on your electronic components
(preamplifier, receiver, etc.) should be used with the utmost
discretion. Excessive boost can create severe power
demands on your power amplifier. Maximum bass boost
can create a demand for literally hundreds of watts in the
bass region, whereas in the “flat” position, or with the tone
controls switched out of the system, your average listening
level may be impressively and realistically loud at less than
10 watts. The remaining power capacity required is on
reserve for power peaks on sharp transients and powerful
crescendos.
11
Page 12

Amplifier/Subwoofer BU-150
OUTPUT
FROM
AMPLIFIER
FROM PRE AMP
BU-150 TEST SET UP AND PROCEDURE
AC VOLT METER ( 6V )
UNDER TEST
LINE LEVEL
CD PLAYER
PRE AMP
AMPLIFIER
SPEAKER LEVEL
General Function
UUT = Unit Under Test
1. Connect both right and left line level inputs (RCA) to signal
generator and UUT. Use Y-cable if necessary from
mono source. VOLUME control should be full counterclockwise.
2. Turn on generator, adjust to 50mV, 50 Hz.
3. Plug in UUT; red LED should be ON. Turn VOLUME control
full clockwise. Low Pass control should be set fully clockwise (150)
BU-150
OUTPUT
FROM
AMPLIFIER
FROM PRE AMP
BU-150
SPKR
OUT
RR
LL
L
Line Input
Low
Pass
50
Phase
o
180o0
Level
Min
Technology
Digital
Powered Subwoofer
SPKR
R
150
Power
Max
IN
4. LED should turn Green; immediate bass response should be
heard and felt from port tube opening.
5. Turn off generator, turn VOLUME control fully counterclockwise,
disconnect RCA cables.
6. Connect one pair of speaker cables to either high level input
terminal on UUT. Cables should be connected to
120V
60Hz
250W
CAUTION
RISK OF ELECTRIC SHOCK
DO NOT OPEN
TO REDUCE THE RISK OF ELECTRIC SHOCK. DO NOT
EXPOSE THIS EQUIPMENT TO RAIN OR MOISTURE
an integrated amplifier fed by the signal generator.
7. Turn on generator and adjust so that speaker level output is
2.0V, 50 Hz. Turn VOLUME control full clockwise.
8. Green LED should light, immediate bass response should be
heard and felt from the port tube opening.
Sweep Function
1. Follow steps 1-4 above, using a sweep generator as a signal source.
2. Sweep generator from 20Hz to 300Hz. Listen to the cabinet and drivers for any rattles, clicks, buzzes or any
other noises. If any unusual noises are heard, remove driver and test.
Driver Function
1. Remove driver from cabinet; detach + and - wire clips.
2. Check DC resistance of driver; it should be 6.4 ohms.
3. Connect a pair of speaker cables to driver terminals. Cables should be connected to an integrated amplifier fed by
a signal generator and adjust so that speaker level output is 5.0V.
4. Sweep generator from 20Hz to 1kHz. Listen to driver for any rubbing, buzzing, or other unusual noises.
12
Page 13

Amplifier/Subwoofer BU-150
BU-150 POWER AMP MODULE TESTING FLOW CHART
START
Check V+,
V-, +/-15V
Resistance
check
between V+
V- and O/P
No
O/P to GND
should > 5K
Yes
No
OK
Replace
Module
Yes
No
Power up with
no signal I/P
LED RED
Yes
voltage to
module
OK
Check 6V to
module
measure to V-
OK
Check
transformer,
CMC,
rectifier, C1,
C2, D9, D10,
R16, R17
Check D6,
R9, R46
No
OK
Yes
Check I/P of
No
module to
GND 0V D.C.
No Yes
OK
Check fuse
transformer,
CMC,
rectifier, C1,
C2
Check C29
and Pre-AMP
Check S/D
voltage to
module (5V)
measure to V-
Check O/P to
module for
Yes
Check
switching
80Vpp square
wave
measure to
GND
frequency
100KHz
H
+/-10%
No
~1Vpp
Yes
No
OK
Yes
Check L1,
L2, L3, L4,
C6, C24
OK
OK
Check D1,
R1, Q3, Q4,
Q5 and SCP
Power AMP
OK
END
13
Page 14

Amplifier/Subwoofer BU-150
BU-150 PACKING & CABINET ASSEMBLY
FEET PART
(Set of 4)
#200310
FOOT BASE
(Each)
#200870
SCREWS (8)
TRIM RING
#200401
15" WOOFER
#200400
CABINET
NOT FOR
SALE
SCREWS (10)
SCREWS (4)
BU-150 CABINET ASSEMBLY
TOP STYROFOAM
COVER PAD
#200465
S
P
K
R
O
U
T
R
S
P
K
R
IN
R
L
L
L
L
in
R
e
L
In
o
p
w
u
P
t
a
s
s
5
0
P
h
a
s
e
1
5
0
o
0
1
8
o
0
P
L
o
e
w
v
e
e
r
l
M
in
M
a
BU-150
x
D
i
g
i
t
a
l
Te
ch
P
n
olo
o
w
gy
e
r
e
d
S
u
b
w
o
120V
o
f
e
r
60Hz
250W
C
A
TO
R
I
S
U
R
K
E
O
E
T
D
F
X
U
P
I
C
E
O
D
O
L
E
S
E
O
T
E
C
H
T
N
N
T
E
R
O
H
I
T
R
C
I
S
I
S
O
S
E
K
P
H
Q
E
O
O
U
N
C
F
I
P
K
E
M
L
E
E
N
C
T
T
R
TO
I
C
R
S
A
H
I
O
N
C
O
K
R
.
D
M
O
O
I
N
S
O
T
U
T
R
E
AMPLIFIER
ASSEMBLY
TOP STYROFOAM
RAIL PADS
(2 per carton)
#200460
FEET PAD (4)
STICKERS
BU-150
SUBWOOFER
#200252
PLASTIC BAG
WARRANTY
CARD
#333715-001
OWNER'S
MANUAL
#200230
B
U
-1
O
5
W
0
N
E
M
R
A
'S
N
U
A
L
BOTTOM
STYROFOAM
RAIL PADS
(2 per carton)
#200470
BOTTOM
STYROFOAM
BU-150 PACKING
CENTER PAD
#200475
CARTON
#200420
14
Page 15

Amplifier/Subwoofer BU-150
BU-150 AMPLIFIER ASSEMBLY EXPLODED VIEW
A
B
5
1
SPKR
OUT
RR
LL
5
2
L
Line Input
Low
Pass
4
3
Phase
Level
50
o
Min
SPKR
IN
12
5
R
13
1
150
Power
180o0
1
Max
C
Part #
Ref.#
1 A70302 2
2 70317 Face Plate (Aluminum) SAFETY PART 1
3 70318 PCB Support SAFETY PART 1
4 70150 Phase Switch 1
5 70170 #4 x 0.5" Screws to secure input jacks 5
6 70171 #10 x 1" machine screw Bolts 4
7 70172 #10 Keps Nut 4
8 70173 #6 x 0.5" Screws for fuse PCB 2
9 80124 Transformer MCI4700 SAFETY PART 1
10 80123 250V, 1.5A, T type SLO BLO Fuse 1
11 80112 Motherboard SAFETY PART 1
12 108115 High level input and output terminals 1
13 108320 Dual RCA input jacks 1
14 70305
15 80105 Power cord, 2 conductor SAFETY PART 1
D
Description
Knobs
SAFETY PART
Pwr Cord Strain Relief SAFETY PART 1
E
Qty
1
2
3
BU-150
7
Amplifier Assembly
4
9
Exploded View
4
10
5
6
14
3
11
5
6
15
7
2
6
7
A
B
C
D
E
15
Page 16

Amplifier/Subwoofer BU-150
BU-150 PCB (Version 3.52) Component Side Trace
G
F
E
1
2
3
4
5
G
F
E
D
C
B
A
D
C
Version 3.52 - Component Side Trace Layer
B
A
1
2
3
4
5
16
Page 17

Amplifier/Subwoofer BU-150
BU-150 PCB (Version 3.52) Solder Side Trace
G
F
E
1
2
3
4
5
G
F
E
D
C
B
A
D
C
B
Version 3.52 - Solder Side Trace Layer as viewed through the board
A
1
2
3
4
5
17
Page 18

Amplifier/Subwoofer BU-150
BU-150 PCB (Version 3.53) Component Side Trace
G
F
E
1
2
3
4
5
G
F
E
D
C
B
A
D
C
Version 3.53 - Component Side Trace Layer
B
A
1
2
3
4
5
18
Page 19

Amplifier/Subwoofer BU-150
BU-150 PCB (Version 3.53) Solder Side Trace
G
F
E
1
2
3
4
5
G
F
E
D
C
B
A
D
C
B
Version 3.53 - Solder Side Trace Layer as viewed through the board
A
1
2
3
4
5
19
Page 20

Amplifier/Subwoofer BU-150
BU-150 ELECTRICAL PARTS LIST
REF # PART # DESCRIPTION QTY REF # PART # DESCRIPTION QTY
BU-150 PCB REV 3.5
Resistors
R1 40702 6.8MW 1/4W ±5% carbon film 1
R2 40466 8.66kW 1/4W ±1% metal film 1
R3 40458 43.2kW 1/4W ±1% metal film 1
R4 40417 47kW 1/4W ±5% carbon film 1
R4a/b/c 40105 0.1W 1.2W ±5% 3pcs. 1
R5 40420 1kW 1/4W ±5% carbon film 1
R6 40420 1kW 1/4W ±5% carbon film 1
R7 40449 3.3kW 1/2W ±5% carbon film 1
R8 40417 47kW 1/4W ±5% carbon film 1
R9 40464 9.1kW 10W ±5% power resistor Safety part 1
R14 40409 10kW 1/4W 5% carbon film 1
R15 40406 100kW 1/4W 5% carbon film 1
R16, 17 40465 2.4kW 7W ±5% wirewound Safety part 2
R18 40424 330kW 1/4W ±5% carbon film (LED sens) 1
R19 40466 3.9kW 2W ±5% carbon film 1
R20 40405 4.7kW 1/4W ±5% carbon film 1
R21 40443 39kW 1/4W ±5% carbon film 1
R22 40449 3.3kW 1/2W ±5% carbon film 1
R23 40461 20kW 1/2W ±5% carbon film 1
R24 40418 22kW 1/4W ±5% carbon film 1
R25 40417 47kW 1/4W ±5% carbon film 1
R26 40701 1.0MW 1/4W ±5% carbon film 1
R27 40440 6.81kW 1/4W ±1% metal film 1
R30, 31 40441 13.7kW 1/4W ±1% metal film 2
R32 40415 470kW 1/4W ±5% carbon film 1
R33 40100 332W 1/2W ±5% carbon film 1
R35 40422 301kW 1/4W ±1% metal film 1
R36 40446 8.66kW 1/4W ±1% metal film 1
R37 40446 8.66kW 1/4W ±1% metal film 1
R39 40467 30.1kW 1/4W 1% metal film 1
R40 40417 47kW 1/4W 1% carbon film 1
R42, 43 40406 100kW 1/4W ±1% carbon film 2
R44, 45 40409 10kW 1/4W ±5% carbon film 2
R46 40104 4.7W 1/4W ±5% carbon film 1
R48 40468 7.32kW 1/4W ±1% metal film 1
R49 40415 470kW 1/4W ±5% carbon film 1
R50 40100 332W 1/4W ±5% carbon film 1
R51 40417 47kW 1/4W ±5% carbon film 1
R52 40456 2.7kW 5W ±5% wirewound Safety part 1
R53, 54, 55, 56 40106 100W 2W 5% carbon film 4
R57 40456 2.7kW 5W ±5% wirewound Safety part 1
R58 40469 5.49kW 1/4W ±1% metal film 1
R59 40405 4.7kW 1/4W ±5% carbon film 1
R60 40443 39kW 1/4W ±5% carbon film 1
Crossover 40425 50kW 1/4W ±10% Double Log Pot 1
Level 40402 5kW 1/4W ±10% Single Linear Pot 1
Capacitors
C1 30710 2200uF 100V +80/-20% Electrolytic Radial 1
C2 30710 2200uF 100V +80/-20% Electrolytic Radial 1
Safety part
Safety part
C3 30514 47nF 50V +80/-20% Mono-ceramic axial 1
C4, 5 30504 100nF 50V +80/-20% Mono-cer rad 0.2" 1
C6 30709 4.7uF 100V +80/-20% Electrolytic Radial 1
C7 30510 33n 50V ±10% Mono-ceramic axial 1
C7a/b 30505 100n 100V ±20% Metal Polyester Rad 2
C8, 9 30504 100nF 50V +80/-20% Mono-ceramic radial 1
C11 30702 100uF 35V +80/-20% Electrolytic Radial 1
C13 30507 10nF 50V ±20% Mono-ceramic axial 1
C14 30511 330nF 50V ±10% Mono-ceramic axial 1
C15, 16 30707 220uF 50V ±20% Electrolytic Radial 2
C17 30502 100nF 50V +80/-20% Mono-ceramic radial 1
C18 30517 68nF 50V ±10% Mono-ceramic axial 1
C19 30524 82nF 50V ±10% Mono-ceramic axial 1
C20 30504 100nF 50V ±10% Mono-ceramic axial 1
C21 30522 100nF 250V ±10% Polyester film 1
C22, 23 30502 100nF 50V +80/-20% Mono-ceramic axial 2
C24 30523 330nF 100V +80/-20 Mono-ceramic axial 1
C26 30508 10nF 50V ±10% Mono-ceramic axial 1
C27 30513 3.3nF 50V ±10% Mono-ceramic axial 1
C29 30711 22uF 35V +80/-20% Electrolytic Radial 1
C31 30525 120nF 50V ±10% Mono-ceramic axial 1
C33 30503 2.2nF 50V ±20% Mono-ceramic axial 1
CW 30505 100nF 100V ±20% Polyester film 1
CZ 30505 100nF 100V ±20% Polyester film 1
/ax 0.3"
NP Safety part
Safety part
Diodes
D1 50111 ZENER 1N4763A 91V ±5% 1W 1
LED 1 or 2 50106 Dual Cir LED (2 legged)
D2, 4 50104 1N4148 100V 0.1A 2
D3 50102 ZENER 1N4749A 24V ±5% 1W 1
D6 50103 ZENER 1N5234B 6.2V ±5% 0.5W 1
D9, 10 50105 ZENER 1N4744A 15V ±5% 1W 2
DBR 50100 Bridge Rect 200V 4A Safety part 1
Transistors
Q1 60151 MPS A13 30V NPN (Darl) 1
Q2 60152 2N3906 40V PNP, 2N4402 alternate 1
Q3 60153 2N3904 40V NPN, 2N4401 alternate 1
Q4, 5 60155 2N5401 80V PNP 2
Integrated Circuits
U1 60100 LM324 Quad OpAmp +/-15V 1
U2 60101 TLO 82 Dual OpAmp +/-15V 1
60302 S64AMI Power Amp module SAFETY PART
Inductors
CMC1 80100 mc4438 Safety part 1
L1 80121 mc4642 Safety part 1
L2 80122 Ferrite bead 1
L3 80122 Ferrite bead 1
L4 80122 Ferrite bead 1
20
Page 21

Amplifier/Subwoofer BU-150
BU-150 INTEGRATED CIRCUIT DIAGRAMS
S53AMI/S64AMI - Power Amp module SAFETY PART
+6V
v+
O/P
V-
+15V
SD
FR
I/P
GND
-15V
15
16
17
18
19
20
21
22
23
24
25
26
27
28
1
2
3
4
5
6
7
8
9
10
11
12
13
14
+6V
v+
O/P
V-
+15V
SD
FR
I/P
GND
-15V
NOTE: THE FOLLOWING PROCEDURES MUST BE FOLLOWED
WHEN INSTALLING NEW S53AMI/S64AMI AMP MODULES:
FAILURE TO FOLLOW ONE OR MORE OF THESE STEPS MAY
RESULT IN THE INSTANT DESTRUCTION OF THE MODULE WHEN
POWERED UP.
1)
Align white indent marker on Amp Module with indent marker on main
PCB; alternately observe position of label on the top of the module;
incorrectly replacing the Module 180 in the PCB slot will result in its
°
destruction.
2)
All AC powered test instruments (meters, oscilloscopes, etc.) must
have a floating ground, i.e. be connected to an isolation transformer.
3)
Align and position the Amp Module before soldering.
4)
Attach the amp Module with the mounting screws or
before soldering
powering up.
5)
Use only rosin-core or non-acid core solder; thoroughly de-flux the
surfaces after soldering.
If the new S53AMI/S64AMI Amp Module has larger mounting hole(s) in
the case, and the stock screws no longer will fit, and screws of the
proper type cannot be obtained locally order:
(2) part# 60301S (screws)
(2) part# 60301N (nuts)
U1-(LM324) Quad Op Amp
+
OUT 4
14 10
-
IN 4
13 9
GND
IN 4
11
12 8
-
+
43
+
12
-
15
OUT 1
IN 1
Q4, 5 - (MPS A56)
80V PNP Transistor
3 Collector 3 Collector
2
Base
11
22
33
1 Emitter 1 Emitter
37
26
-
IN 1
4
+
V+
Q2 - (2N3906)
40V PNP Transistor
IN 3
IN 2
2
Base
+
-
IN 3
OUT 3
-
+
+
-
+
-
IN 2
OUT 2
U2 - (TLO 82) Dual Op Amp
V
A OUTPUT
A -INPUT
A +INPUT
Q3 - (2N3904)
40V NPN Transistor
2
Base
11
22
33
1
2
A
+
-
3
V
-
4
B
+
-
Q1 - (MPS A13)
30V NPN(Darl) Transistor
3 Collector 3 Collector
2
Base
1 Emitter
+
8
B OUTPUT
7
B -INPUT
6
B +INPUT
5
1 Emitter
21
Page 22

Amplifier/Subwoofer BU-150
BU-150 SCHEMATIC 1 of 2
G
F
E
D
G
F
BU-150 Schematic 1 of 2
E
D
C
B
A
C
B
A
1 1
2 2
3 3
4 4
5 5
22
Page 23

Amplifier/Subwoofer BU-150
BU-150 SCHEMATIC 2 of 2
G
F
E
D
G
F
E
D
C
B
A
C
B
A
BU-150 Schematic 2 of 2
1 1
2 2
3 3
4 4
5 5
23
 Loading...