


HÖGVÄRDIG |
GB |
|
|
|
|
|
|
DE |
|
|
FR |
|
|
IT |
|
|
|
|
|
|
ENGLISH 4 DEUTSCH 16 FRANÇAIS 29 ITALIANO 43
ENGLISH |
4 |
Contents
Safety information |
4 |
What to do if… |
10 |
Product description |
6 |
Technical information |
11 |
Daily use |
7 |
Installation |
12 |
Helpful hints and tips |
9 |
Environment concerns |
13 |
Care and cleaning |
9 |
IKEA GUARANTEE |
13 |
Subject to change without notice.
 Safety information
 For your safety and correct operation of the appliance, read this manual carefully before installation and use. Always
keep these instructions with the appliance even if you move or sell it. Users must fully know the operation and safety features of the appliance.
Correct use
•Do not leave the appliance unattended during operation.
•The appliance is designed exclusively for domestic use.
•The appliance must not be used as a work surface or as a storage surface.
•Do not place or store flammable liquids, highly inflammable materials or fusible objects (e.g. plastic film, plastic, aluminium) in or near the appliance.
•Watch out when connecting electric appliances to sockets nearby. Do not allow connecting leads to come into contact with or to catch underneath the appliance or hot cookware.
•Do not do repairs yourself to prevent injury and damage to the appliance. Always contact your local After Sales Service (refer to the Service chapter).
Child safety
•Only adults can use this appliance. Children must get supervision to make sure that they do not play with the appliance.
•Keep all packaging away from children. There is a risk of suffocation.
•Keep children away from the appliance when it is on.
Warning! Activate the child safety
 device to avoid small children and pets unintentionally switching the appliance on.
General safety
•This appliance is not intended for use by persons (including children) with reduced physical, sensory or mental capabilities, or lack of experience and knowledge, unless they have been given supervision or instruction concerning use of the appliance by a person responsible for their safety.
Installation
•Make sure that the appliance is not damaged because of transport. Do not connect a damaged appliance. If necessary, contact the After Sales Service (refer to the Service chapter).
•Only an authorized service engineer can install, connect or repair this appliance. Use only original spare parts.
•Built-in appliances can only be used after they are built into suitable built-in units and work surfaces that meet standards.
•Do not change the specifications or modify this product. Risk of injury and damage to the appliance.
Warning! Carefully obey the instructions for electrical and gas
connections.
•Do not install the appliance if it is damaged during the transportation.
Safety during use
•Remove all packaging, stickers and film from the appliance before the first use.

ENGLISH |
5 |
Warning! Fire hazard! Overheated fats and oils can ignite very quickly.
•Switch the cooking zones off after each use by its controls and do not rely on pan detector.
•Risk of burns! Do not place objects made of metal, such as knives, forks, spoons and saucepan lids on the cooking surface, as they can get hot.
Warning! The ventilation gap of 5 mm
 between the worktop and front of the unit underneath it must not be covered. For all safety distances between hob and cabinets refer to the Assembly Instruction.
Warning! Users with implanted
 pacemakers should keep their upper body at least 30 cm from induction cooking zones that are switched on.
Warning! Do not operate the
 appliance with wet hands and keep control panel surface dry. Lot of water on control panel keys will make them no longer operable.
 Warning! If the surface is cracked,
  switch off the appliance to avoid possibility of an electric shock and call the
After Sales Service (refer to the Service chapter).
How to avoid damage to the appliance
•The glass ceramic can be damaged by objects falling onto it, or knocked by the cookware.
•Cookware made of cast iron, cast aluminum or with damaged bottoms can scratch the glass ceramic if slid on the surface.
•To avoid damaging cookware and glass ceramics, do not allow saucepans or frying pans to boil dry.
•Do not use the cooking zones with empty cookware or without cookware.
•Never line any part of the appliance with aluminium foil. Never place plastic or any other material which may melt in or on the appliance.
Information on acrylamides
Important! According to the latest scientific knowledge, intensive browning of food, especially in products containing starch, can constitute a health risk due to acrylamides. Therefore, we recommend cooking at the lowest possible temperatures and not browning foods too much.

ENGLISH |
6 |
Product description
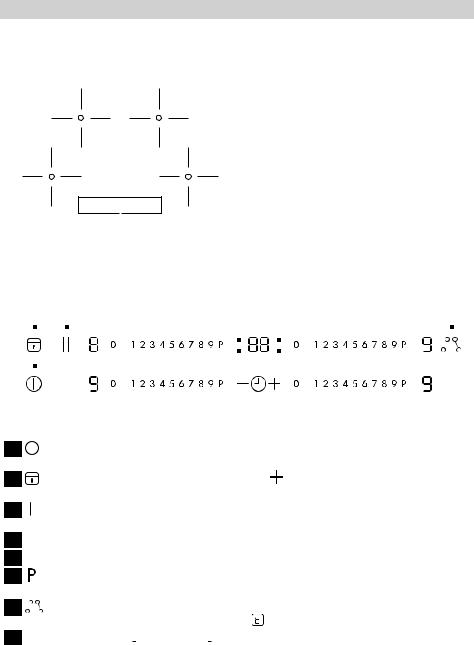
Cooking surface layout
12
1 Single cooking zone (210 mm) 2300 W, with Booster 3200 W
2 Single cooking zone (210 mm) 2300 W, with Booster 3200 W
3 Single cooking zone (210 mm) 2300 W, with Booster 3200 W
4 Control panel
5 Single cooking zone (210 mm) 2300 W, with Booster 3200 W
5 |
|
4 |
|
3 |
Control panel layout
|
1 |
|
|
2 |
|
|
3 |
|
4 |
|
|
5 |
|
|
|
6 |
|
|
|
7 |
|||||||||
|
|
|
|
|
|
|
|
|
|
|
|
|
|
|
|
|
|
|
|
|
|
|
|
|
|
|
|
|
|
|
|
|
|
|
|
|
|
|
|
|
|
|
|
|
|
|
|
|
|
|
|
|
|
|
|
|
|
|
|
|
|
|
|
|
|
|
|
|
|
|
|
|
|
|
|
|
|
|
|
|
|
|
|
|
|
|
|
|
|
|
|
|
|
|
|
|
|
|
|
|
|
|
|
|
|
|
|
|
|
|
|
|
|
|
|
|
|
|
|
|
|
|
|
|
|
|
|
|
|
|
|
|
|
|
|
|
|
|
|
|
|
|
|
|
|
|
|
|
|
|
|
|
|
|
|
|
|
|
|
|
|
|
|
|
|
|
|
|
|
|
|
|
|
|
|
|
|
|
|
|
|
|
|
|
|
|
|
|
|
|
|
|
|
|
|
|
|
|
|
|
|
|
|
|
|
|
|
|
|
|
|
|
|
|
|
|
|
|
|
|
|
|
|
|
|
|
|
|
|
|
|
|
|
|
|
|
|
|
|
|
|
|
|
|
|
|
|
|
|
|
|
|
|
|
|
|
|
|
|
|
|
|
|
|
|
|
|
|
|
|
|
|
|
|
|
|
|
|
|
|
|
|
|
|
|
|
|
|
|
|
|
|
|
|
|
|
|
|
|
|
|
|
|
|
|
|
|
|
|
|
|
|
|
|
|
|
|
|
|
|
|
|
|
|
|
|
|
|
|
|
|
|
|
|
|
|
|
|
|
|
|
|
|
|
|
|
|
|
|
|
|
|
|
|
|
|
|
|
|
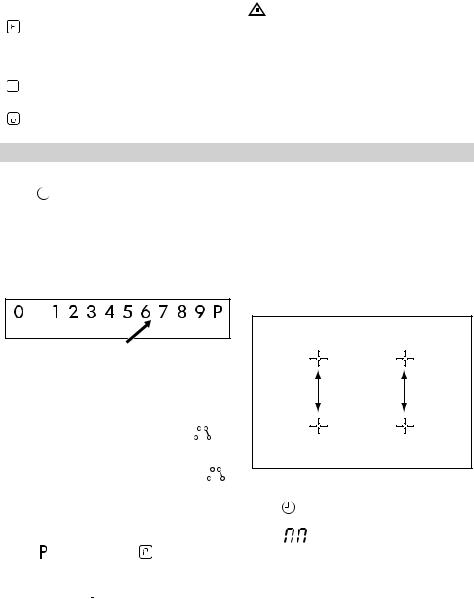
1 to switch the hob on or off
2to activate and deactivate the Lock or the Child safety device
3 To activate Stop+Go function
4Cooking zones' indicators of Timer 
5Timer display: 00 to  minutes
6to activate the Booster (Display shows a  )
)
7to activate and deactivate the Bridge function.
8A heat setting display:  , from
  to
to
9Control bar to select heat settings
|
10 |
|
|
9 |
|
|
|
8 |
|
|
|
to increase , or |
|
to decrease the |
|||||
10 |
|
||||||||
|
|
||||||||
|
|
|
Timer |
|
|
|
|
||
Touch Control sensor fields and displays
You operate the hob by touching sensor fields. Displays and acoustic signals (short beep) confirm the selection of a function.
Heat setting |
Description |
|
display |
||
|
||
|
|
|
|
A malfunction occurred |
|
|
|
|
|
A cooking zone is still |
|
|
hot |
|
|
The Child Safety Device |
|
|
is on |
ENGLISH |
7 |
Heat setting |
Description |
|
display |
||
|
||
|
|
|
|
Cookware is unsuitable, |
|
|
too small, or no cook- |
|
|
ware is on the cooking |
|
|
zone |
|
|
The Automatic Switch |
|
|
off is on |
|
|
The Stop+Go is on |
|
|
|
Residual heat indicator
Warning! Risk of burns from residual
 heat! After you switch the appliance off, the cooking zones need some time to cool down. Look at the residual heat
indicator  .
.
Use residual heat for melting and keeping food warm.
Daily use
 Switching on and off
Touch  for 2 seconds to switch the appliance on or off.
Adjusting the heat setting
Touch the control bar where there is a desired heat setting. Correct to the left or the right, if necessary. Do not release before you reach a desired heat setting.
Bridge function
The Bridge function connects two cooking zones and they operate as one.
First set the heat setting for one of the cooking zone.
To activate the Bridge function touch . To set or change the heat setting touch one of the control sensors.
To deactivate the Bridge function touch
. The cooking zones operate independently.
 Using the Booster function
The Booster function makes additional power available to the induction cooking zones.
Touch to switch it on, a lights up on a display. After maximum 10 minutes, the induction cooking zones automatically return
to cooking level  .
.
Power management
The power management shares the maximum available power between two cooking zones generating a pair (see picture). Booster function can cause, that the maximum available power for a pair is exceeded. Then the second cooking zone will be automatically reduced to a lower power level. The display for the reduced zone alternates between selected and maximum available.
 Using the Timer
Touch repeatedly until the pilot light of a desired cooking zone displays. For exam-
ple, 
 for the front left zone.
ENGLISH |
8 |
Touch |
or |
|
of the Timer to set the time |
|
between 00 and 99 minutes. When the pilot light flashes more slowly, the time counts down. Set the heat settings.
If the heat setting is set and the time set has
elapsed, acoustic signal appears, 00 flashes, and cooking zone switches off. If cooking zone is not in use and the time set has
elapsed acoustic signal appears and 00 flashes.
Select for a cooking zone to switch off the function, and the pilot light of the cook-
ing zone selected flashes faster. Touch and the remaining time counts backwards
to 00 . The pilot light goes out.
STOP+GO
The Stop+Go function sets all cooking zones
that operate to the lowest heat setting ( ).
When Stop+Go operates, you cannot change the heat setting.
The Stop+Go function does not stop the timer function.
• |
To activate this function touch |
. The |
|
• |
symbol |
comes on. |
. The |
To deactivate this function touch |
|||
|
heat setting that you set before comes on. |
||
Lock
When the cooking zones operate, you can
lock the control panel, but not  . It prevents an accidental change of the heat setting.
First set the heat setting.
To start this function touch |
. The symbol |
comes on for 4 seconds. |
|
The Timer stays on. |
. The heat set- |
To stop this function touch |
ting that you set before comes on.
When you stop the appliance, you also stop this function.
The child safety device
This function prevents an accidental operation of the appliance.
To activate the child safety device
•Activate the appliance with  . Do not set the heat settings.
• |
Touch |
for 4 seconds. The symbol |
||
• |
comes on. |
|
. |
|
Deactivate the appliance with |
||||
To deactivate the child safety device |
||||
• |
Activate the appliance with |
. Do not |
||
|
set the heat settings. Touch |
for 4 sec- |
||
• |
onds. The symbol |
comes on. |
. |
|
Deactivate the appliance with |
||||
To override the child safety device for |
||||
only one cooking time |
|
|
||
• |
Activate the appliance with |
. The sym- |
||
• |
bol |
comes on. |
|
|
Touch |
for 4 seconds. Set the heat set- |
|||
ting in 10 seconds. You can operate the appliance.
• When you deactivate the appliance with
 , the child safety device operates again.
Automatic Switch off
The function switches the hob off automatically if:
•all cooking zones are switched off.
•you do not set the heat setting after switching on the hob.
•you cover any sensor field with objects (a pan, a cloth, etc.) for longer than approx. 10 seconds. The cooking zone is switched off automatically and acoustic signal sounds until you uncover the sensor fields.
•you do not switch a cooking zone off after a certain time, or you do not modify the heat setting, or if the overheating occurs (e.g. when a pan boils dry). The sym-
bol  lights up. Before using again, you must set the cooking zone to
  .
.
ENGLISH
Heat setting |
Automatic switch off after |
- |
6 hours |
|
|
- |
5 hours |
|
|
|
4 hours |
|
|
Helpful hints and tips
Cookware is suitable for induction cooking zones if marked by the manu-
facturer.
 When a cooking zone is switched on, it may hum briefly. This is a characteristic of all ceramic glass cooking zones and does
not impair either the function or the life of the appliance.
Cookware sizes
Induction cooking zones adapt automatically to the size of the bottom of the cookware. But, it must have a minimum diameter depending on the size of the cooking zone.
Cooking zone |
Minimum diameter |
|
of cookware base |
|
[mm] |
Right rear cooking |
125 |
zone |
|
Care and cleaning
Warning! Switch the appliance off and
let it cool down before you clean it.
Warning! For safety reasons, do not
 clean the appliance with steam blasters or high-pressure cleaners.
Warning! Sharp objects and abrasive cleaning agents will damage the
appliance. Clean the appliance and remove the residues with water and washing up liquid after each use. Remove also the remnants of the cleaning agents!
9
Heat setting |
Automatic switch off after |
- |
1.5 hours |
|
|
If cookware that is not suitable is used,
lights up in the display and after 2 minutes the indicator for the cooking zone switches itself off.
Cooking zone |
Minimum diameter |
|
of cookware base |
|
[mm] |
Right front cooking |
125 |
zone |
|
Left rear cooking |
125 |
zone |
|
Left front cooking |
125 |
zone |
|
Energy saving
•If possible, always place lids on the pans.
•Place cookware on the cooking zone before you switch it on.
•The bottom of the cookware should be as thick and flat as possible.
 Scratches or dark stains on the glass ceramic that cannot be removed do not affect the functioning of the appliance.
ENGLISH |
10 |
Removing the residues and stubborn residues:
1.Food containing sugar, plastics, tin foil residues should be removed at once, best tool for cleaning glass surface is a scraper (not included with the appliance). Place a scraper on the glass ceramic surface at an angle and remove residues by sliding the blade over the
surface. Wipe the appliance with a damp cloth and a little washing up liquid. Finally, rub the appliance dry using a clean cloth.
2.Limescale rings, water rings, fat splashes, shiny metallic discolorations should be removed after the appliance has cooled down using cleaner for glass ceramic or stainless steel.
What to do if…
Problem |
Possible cause |
|
Remedy |
|
The appliance cannot be |
More than 10 seconds have |
Switch the appliance on |
||
switched on or is not operat- |
passed since the appliance |
again. |
|
|
ing. |
was switched on. |
|
|
|
|
The child safety device is |
Deactivate child safety de- |
||
|
switched on |
. |
vice (See the section “Child |
|
|
|
|
safety device” ). |
|
|
Several sensor fields were |
Only touch one sensor field. |
||
|
touched at the same time. |
|
|
|
Acoustic signal sounds, ap- |
One or more sensor fields |
Uncover sensor field. |
||
pliance switches off. |
have been covered for lon- |
|
|
|
|
ger than 10 seconds. |
|
|
|
Display is switching between |
Power management is re- |
See the section "Switching |
||
two heat settings. |
ducing the power of this |
the power function on and |
||
|
cooking zone. |
|
off". |
|
lights up on the heat set- |
Unsuitable cookware. |
Use suitable cookware. |
||
ting display. |
|
|
||
No cookware on the cook- |
Place cookware on the |
|||
|
ing zone. |
|
cooking zone. |
|
|
The diameter of the bottom |
Move onto a smaller cook- |
||
|
of the cookware is too small |
ing zone. |
|
|
|
for the cooking zone. |
|
|
|
symbol plus a number |
Electronics fault. |
Disconnect the appliance |
||
appears on the heat setting |
|
|
from the electrical supply for |
|
display. |
|
|
a few minutes (Take the fuse |
|
|
|
|
out of the house’s electric |
|
|
|
|
system) If after switching on |
|
|
|
|
again, |
is displayed |
|
|
|
again, call the after sales |
|
|
|
|
service. |
|
ENGLISH |
11 |
Problem |
Possible cause |
Remedy |
lights up on the heat |
Overheating protection for |
Switch off the appliance. Re- |
setting display. |
the cooking zone operates. |
move the hot cookware. Af- |
|
|
ter approximately 30 sec- |
|
|
onds switch on the cooking |
zone again. 

 should disappear, residual heat indicator can stay. Cool down the cookware and check it with the section Cookware for the induction cooking zone.
If there is a fault, first try to find a solution to |
If you operated the appliance wrongly, |
the problem yourself. If you cannot find a |
or the installation was not carried out |
solution to the problem yourself, contact |
by a registered engineer, the visit from the |
your dealer or the After Sales Service. |
customer service technician or dealer may |
|
not take place free of charge, even during |
|
the warranty period. |
Technical information
Rating Plate
Made in Germany |
Model HÖGVÄRDIG Typ 58 GBD C3 AU 7,4kW |
7,4kW Induction |
© Inter IKEA Systems B.V. 1999 |
PNC 949 594 317 00 S NO ............... 220V-240V AC 50-60 Hz |
|
|
||
002.228.31 |
230 V |
|
|
|
|
P Q M |
2 1 5 5 2 |
D G T |
The graphic above represents the rating plate of the appliance (without serial number which is generated dynamically during the production process), which is located at its underneath surface of the casing.
Dear Customer, please apply here aside the sticker you can find in the dedicate plastic bag inserted inside the hob packaging. This will allow us to assist you better, by identifying precisely your hob, in case you will need in future our assistance. Thank you for your help!

ENGLISH
Installation
Manufacturer is not responsible for any injury to persons and pets or damage to property caused by failure to comply following requirements.
Caution! To proceed with the
 installation refer to the assembly instructions.
Warning! Installation process must
 follow the laws, ordinances, directives and standards (electrical safety rules and regulations, proper recycling in accordance with the regulations, etc.) in force in the country of use!
Warning! The appliance must be
earthed!
Warning! Risk of injury from electrical current.
•The electrical mains terminal is live.
•Make electrical mains terminal free of voltage.
•Loose and inappropriate plug and socket connections can make the terminal overheat.
•Have the clamping connections correctly installed.
•Use strain relief clamp on cable.
•Follow the connection diagram (it is located on the underneath surface of the casting of the hob).
Important! You must observe the minimum distances to other appliances and furniture cabinets or other units according to Assembly Instruction.
If there is no oven beneath the hob insert a dividing panel at a minimum distance of 20 mm from the bottom of the hob.
Do not use silicon sealant between the appliance and the worktop. Avoid installing the appliance next to doors and under windows as hot cookware may be knocked off the rings when doors and windows are opened.
Only an authorized service engineer can install, connect or repair this appliance. Use only original spare parts.
12
Electrical connection
Before connecting, check that the nominal voltage of the appliance stated on the rating plate, corresponds to the available supply voltage. Also, check the power rating of the appliance and ensure that the wire is suitably sized to suit the appliance power rating (refer to the Technical data chapter). The rating plate is located on the lower casing of the hob.
The appliance is not provided with mains cable. Buy the right one from specialized dealer. Single-phase or two-phase connection requires the mains cable of type H05 BB-F/H05V2V2-F Tmax 90°C (equal or higher).
The appliance works perfectly on AC 230 V, AC220V~ or AC240V~ 50Hz electrical network.
You must have the means for disconnection incorporated in the fixed wiring. Have the appliance connected to the mains using a device that allows the appliance to be disconnected from the mains at all poles with a contact opening width of at least 3 mm, eg. automatic line protecting cut-out, earth leakage trips or fuse.
You must have the connection and the connecting links carried out as shown in the connection diagram (it is located on the underneath surface of the casting of the hob). The earth lead is connected to terminal
marked with the symbol  and must be longer than leads carrying electric current. Tighten the terminal screws securely! Finally, secure the connecting cable with the mains cable cleat and the covering closed by pressing firmly (lock into place).
Warning! Once connected to the mains supply check that all cooking
zones are ready for use by briefly setting each to maximum power.
ENGLISH
Environment concerns
The symbol  on the product or on its packaging indicates that this product may not be treated as household waste. Instead it should be taken to the appropriate collection point for the recycling of electrical and electronic equipment. By ensuring this product is disposed of correctly, you will help prevent potential negative consequences for the environment and human health, which could otherwise be caused by inappropriate waste handling of this product. For more detailed information about recycling of this product, please contact your local council, your household
13
waste disposal service or the shop where you purchased the product.
Packaging materials
The materials with the symbol 
 are recyclable. Dispose the packaging in a suitable collection containers to recycle it.
Before disposal of appliance
Warning! Do these steps to dispose the appliance:
•Pull the mains plug out of the mains socket.
•Cut off the mains cable and discard it.
IKEA GUARANTEE
How long is the IKEA guarantee valid?
This guarantee is valid for five (5) years from the original date of purchase of Your appliance at IKEA, unless the appliance is named LAGAN in which case two (2) years of guarantee apply. The original sales receipt is required as proof of purchase. If service work is carried out under guarantee, this will not extend the guarantee period for the appliance,
Which appliances are not covered by the IKEA five (5) years guarantee?
The range of appliances named LAGAN and all appliances purchased in IKEA before 1st of August 2007
Who will execute the service?
IKEA service provider will provide the service through its own service operations or authorized service partner network.
What does this guarantee cover?
The guarantee covers faults of the appliance, which have been caused by faulty construction or material faults from the date of purchase from IKEA. This guarantee applies to domestic use only. The exceptions are specified under the headline “What is not covered under this guarantee?” Within the guarantee period, the costs to remedy the fault e.g. repairs, parts, labour and travel will be covered, provided that the appliance is accessible for repair without special expenditure. On these conditions the EU guidelines (Nr. 99/44/EG) and the respective local regulations are applicable. Replaced parts become the property of IKEA.
What will IKEA do to correct the problem?
IKEA appointed service provider will examine the product and decide, at its sole discretion, if it is covered under this guarantee. If considered covered, IKEA service provider or its authorized service partner through its own service operations, will then, at its sole discretion, either repair the defective product or replace it with the same or a comparable product.
ENGLISH |
14 |
What is not covered under this guarantee?
•Normal wear and tear.
•Deliberate or negligent damage, damage caused by failure to observe operating instructions, incorrect installation or by connection to the wrong voltage, damage caused by chemical or electro-chem- ical reaction, rust, corrosion or water damage including but not limited to damage caused by excessive lime in the water supply, damage caused by abnormal environmental conditions.
•Consumable parts including batteries and lamps.
•Non-functional and decorative parts which do not affect normal use of the appliance, including any scratches and possible color differences.
•Accidental damage caused by foreign objects or substances and cleaning or unblocking of filters, drainage systems or soap drawers.
•Damage to the following parts: ceramic glass, accessories, crockery and cutlery baskets, feed and drainage pipes, seals, lamps and lamp covers, screens, knobs, casings and parts of casings. Unless such damages can be proved to have been caused by production faults.
•Cases where no fault could be found during a technician’s visit.
•Repairs not carried out by our appointed service providers and/or an authorized service contractual partner or where nonoriginal parts have been used.
•Repairs caused by installation which is faulty or not according to specification.
•The use of the appliance in a non-domes- tic environment i.e. professional use.
•Transportation damages. If a customer transports the product to their home or other address, IKEA is not liable for any damage that may occur during transport. However, if IKEA delivers the product to the customer's delivery address, then damage to the product that occurs during this delivery will be covered by this guarantee.
•Cost for carrying out the initial installation of the IKEA appliance. However, if an IKEA service provider or its authorized service partner repairs or replaces the appliance under the terms of this guarantee, the service provider or its authorized service partner will re-install the repaired appliance or install the replacement, if
necessary.
This restriction do not apply to fault-free work carried out by a qualified specialist using our original parts in order to adapt the appliance to the technical safety specifications of another EU country.
How country law applies
The IKEA guarantee gives You specific legal rights, which covers or exceed local demands. However these conditions do not limit in any way consumer rights described in the local legislation
Area of validity
For appliances which are purchased in one EU country and taken to another EU country, the services will be provided in the framework of the guarantee conditions normal in the new country. An obligation to carry out services in the framework of the guarantee exists only if the appliance complies and is installed in accordance with:
•the technical specifications of the country in which the guarantee claim is made;
•the Assembly Instructions and User Manual Safety Information;
The dedicated After Sales Service for IKEA appliances:
Please do not hesitate to contact IKEA After Sales Service to:
1.make a service request under this guarantee;
2.ask for clarification on installation of the IKEA appliance in the dedicated IKEA kitchen furniture. The service won’t provide clarifications related to:
–the overall IKEA kitchen installation;
–connections to electricity (if machine comes without plug and cable), to water and to gas since they have to be executed by an authorized service engineer.

ENGLISH |
15 |
3.ask for clarification on user manual contents and specifications of the IKEA appliance.
To ensure that we provide you with the best assistance, please read carefully the Assembly Instructions and/or the User Manual section of this booklet before contacting us.
How to reach us if You need our service
Please refer to the last page of this manual for the full list of IKEA appointed contacts and relative national phone numbers.
Important! In order to provide You with a quicker service, we recommend that You use the specific phone numbers listed at the
end of this manual. Always refer to the numbers listed in the booklet of the specific appliance You need an assistance for. Before calling us, assure that You have to hand the IKEA article number (8 digit code) for the appliance of which you need our assistance.
Important! SAVE THE SALES RECEIPT! It is Your proof of purchase and required for the guarantee to apply. Note that the receipt reports also the IKEA article name and number (8 digit code) for each of the appliances you have purchased.
Do You need extra help?
For any additional questions not related to After Sales of your appliances, please contact our nearest IKEA store call centre. We recommend you read the appliance documentation carefully before contacting us.

DEUTSCH |
16 |
Inhalt
Sicherheitshinweise |
16 |
Was tun, wenn … |
22 |
Gerätebeschreibung |
18 |
Technische Daten |
24 |
Täglicher Gebrauch |
19 |
Montage |
24 |
Praktische Tipps und Hinweise |
21 |
Umwelttipps |
25 |
Reinigung und Pflege |
22 |
IKEA GARANTIE |
26 |
Änderungen vorbehalten.
 Sicherheitshinweise
Zur Gewährleistung der Sicherheit und der richtigen Bedienung des Geräts le-
sen Sie diese Anleitung vor der Installation und Verwendung sorgfältig durch. Bewahren Sie diese Bedienungsanleitung in der Nähe des Geräts auf, auch wenn Sie dieses anderswo aufstellen oder verkaufen. Alle Benutzer müssen mit der Bedienung und den Sicherheitseigenschaften des Geräts vertraut sein.
Bestimmungsgemäße Verwendung
•Lassen Sie das Gerät bei Betrieb nicht unbeaufsichtigt.
•Das Gerät ist ausschließlich zur Verwendung im Haushalt bestimmt.
•Das Gerät darf nicht als Arbeitsoder Abstellfläche verwendet werden.
•Brennbare Flüssigkeiten, leicht entzündliche Materialien oder schmelzbare Materialien (z.B. Folien, Kunststoff, Aluminium) dürfen nicht auf dem Gerät oder in dessen Nähe abgestellt oder gelagert werden.
•Vorsicht bei Anschluss von Elektrogeräten an Steckdosen in Gerätenähe. Die Anschlussleitungen dürfen nicht unter dem Gerät oder heißem Kochgeschirr eingeklemmt werden oder damit in Berührung kommen.
•Versuchen Sie nicht, selbst Reparaturen auszuführen. Andernfalls besteht Unfallgefahr und das Gerät könnte beschädigt werden. Wenden Sie sich stets an Ihren lokalen Kundendienst (siehe hierzu den Abschnitt "Wartung").
Sicherheit von Kindern
•Nur Erwachsene dürfen dieses Gerät bedienen. Kinder müssen beaufsichtigt werden, so dass sie nicht mit dem Gerät spielen können.
•Halten Sie das Verpackungsmaterial von Kindern fern. Andernfalls besteht Erstickungsgefahr.
•Halten Sie Kinder von dem Gerät fern, wenn es in Betrieb ist.
Warnung! Aktivieren Sie die
 Kindersicherung, um ein versehentliches Einschalten durch Kleinkinder und Haustiere zu verhindern.
Allgemeine Sicherheit
•Personen (einschließlich Kinder), die aufgrund ihrer physischen, sensorischen oder geistigen Fähigkeiten oder ihrer Unerfahrenheit oder Unkenntnis nicht in der Lage sind, das Gerät sicher zu bedienen, sollten dieses Gerät nicht ohne Aufsicht oder Anweisung durch eine verantwortliche Person benutzen.
Aufstellung
•Vergewissern Sie sich, dass das Gerät beim Transport nicht beschädigt wurde. Schließen Sie ein beschädigtes Gerät nicht an. Wenden Sie sich bei Bedarf an den Kundendienst (siehe hierzu den Abschnitt "Wartung").
•Dieses Gerät darf nur von einem autorisierten Servicetechniker installiert, angeschlossen oder repariert werden. Verwenden Sie nur Originalersatzteile.
DEUTSCH |
17 |
•Einbaugeräte dürfen nur nach dem Einbau in normgerechte, passende Einbauschränke und Arbeitsplatten betrieben werden.
•Nehmen Sie weder technische noch anderweitige Modifikationen am Gerät vor. Andernfalls besteht Unfallgefahr und das Gerät könnte beschädigt werden.
Warnung! Beachten Sie genau die Anweisungen zu den elektrischen und
Gasanschlüssen.
•Das Gerät niemals installieren, wenn es während des Transports beschädigt wurde.
Sicherheit während der Benutzung
•Entfernen Sie vor der ersten Benutzung des Geräts sämtliches Verpackungsmaterial sowie alle Aufkleber und Folien.
Warnung! Brandgefahr! Überhitzte Fette und Öle entzünden sich sehr
schnell.
•Schalten Sie nach jedem Gebrauch die Kochzonen mit den Bedienelementen aus und verlassen Sie sich nicht auf die Topferkennung.
•Verbrennungsgefahr! Legen Sie keine Metallgegenstände wie Messer, Gabeln, Löffel oder Deckel auf die Oberfläche des Kochfelds, da diese heiß werden können.
Warnung! Vergewissern Sie sich, dass
 zwischen der Arbeitsfäche und der Gerätevorderseite der Lüftungsspalt von 5 mm nicht verdeckt ist. Siehe die Montageanleitung zu den Sicherheitsabständen zwischen Kochfeld und Schränken.
Warnung! Träger von implantierten Herzschrittmachern müssen sich jedoch
mindestens 30 cm von eingeschalteten Kochfeldern fernhalten.
Warnung! Benutzen Sie das Gerät
 nicht mit nassen Händen und achten Sie darauf, dass die Oberfläche des Bedienfelds stets trocken ist. Die Bedienelemente am Bedienfeld verlieren ihre Funktionstüchtigkeit, wenn sie mit viel Wasser in Berührung kommen.
Warnung! Schalten Sie das Gerät
 sofort ab, wenn Sie Risse auf der Glaskeramikfläche feststellen, um die Gefahr eines Stromschlags zu vermeiden, und wenden Sie sich an den Kundendienst (siehe hierzu den Abschnitt "Wartung").
Vermeidung von Schäden am Gerät
•Die Glaskeramik kann durch herabfallende Gegenstände oder durch das Kochgeschirr beschädigt werden.
•Kochgeschirr aus Gusseisen, Aluguss oder mit beschädigten Böden können beim Verschieben die Glaskeramik verkratzen.
•Das Leerkochen von Töpfen und Pfannen vermeiden. Es kann Beschädigungen am Kochgeschirr oder der Glaskeramik verursachen.
•Benutzen Sie die Kochzonen nicht mit leerem oder ohne Kochgeschirr.
•Legen Sie nie einen Teil des Gerätes mit Alu-Folie aus. Legen Sie keine Gegenstände aus Kunststoff oder aus anderem Material, das schmelzen kann, in oder auf auf das Gerät.
Hinweis zu Acrylamid
Wichtig! Nach neuesten wissenschaftlichen Erkenntnissen kann eine intensive Bräunung von Lebensmitteln, speziell bei stärkehaltigen Produkten, eine gesundheitliche Gefährdung durch Acrylamid verursachen. Daher empfehlen wir, möglichst bei niedrigen Temperaturen zu garen und die Speisen nicht zu stark zu bräunen.
DEUTSCH |
18 |
Gerätebeschreibung
Kochfeldanordnung
|
|
|
|
|
|
|
|
|
|
|
|
1 |
|
|
|
|
2 |
|
|
|
|
|
|
|
|
|
|
|
|
|
|
|
|
|
|
|
|
|
|
|
|||
|
|
|
|
|
|
|
|
|
|
|
|
|
|
|
|
|
|
|
|
|
|
|
|
|
|
|
|
|
|
|
|
|
Einkreis-Kochzone (210 mm) 2300 W, |
|
|
|
|||||||
|
|
|
|
|
|
|
|
|
|
|
|
|
|
|
|
|
|
|
|
|
|
|
|
|
|
|
|
|
|
|
|
|
|
|
|
||||||||
|
|
|
|
|
|
|
|
|
|
|
|
|
|
|
|
|
|
|
|
|
|
|
|
|
|
|
|
|
|
|
|
|
|
|
|
||||||||
|
|
|
|
|
|
|
|
|
|
|
|
|
|
|
|
|
|
|
|
|
|
|
|
|
|
|
1 |
|
|
|
|
|
|||||||||||
|
|
|
|
|
|
|
|
|
|
|
|
|
|
|
|
|
|
|
|
|
|
|
|
|
|
|
|
|
|
|
|
|
mit Power-Funktion 3200 W |
|
|
|
|||||||
|
|
|
|
|
|
|
|
|
|
|
|
|
|
|
|
|
|
|
|
|
|
|
|
|
|
|
|
|
|
|
|
|
Einkreis-Kochzone (210 mm) 2300 W, |
|
|
|
|||||||
|
|
|
|
|
|
|
|
|
|
|
|
|
|
|
|
|
|
|
|
|
|
|
|
|
|
|
2 |
|
|
|
|
|
|||||||||||
|
|
|
|
|
|
|
|
|
|
|
|
|
|
|
|
|
|
|
|
|
|
|
|
|
|
|
|
|
|
|
|
|
mit Power-Funktion 3200 W |
|
|
|
|||||||
|
|
|
|
|
|
|
|
|
|
|
|
|
|
|
|
|
|
|
|
|
|
|
|
|
|
|
|
|
|
|
|
|
Einkreis-Kochzone (210 mm) 2300 W, |
|
|
|
|||||||
|
|
|
|
|
|
|
|
|
|
|
|
|
|
|
|
|
|
|
|
|
|
|
|
|
|
|
3 |
|
|
|
|
|
|||||||||||
|
|
|
|
|
|
|
|
|
|
|
|
|
|
|
|
|
|
|
|
|
|
|
|
|
|
|
|
|
|
|
|
|
mit Power-Funktion 3200 W |
|
|
|
|||||||
|
|
|
|
|
|
|
|
|
|
|
|
|
|
|
|
|
|
|
|
|
|
|
|
|
|
|
|
|
|
|
|
|
Bedienfeld |
|
|
|
|||||||
|
|
|
|
|
|
|
|
|
|
|
|
|
|
|
|
|
|
|
|
|
|
|
|
|
|
|
4 |
|
|
|
|
|
|||||||||||
|
|
|
|
|
|
|
|
|
|
|
|
|
|
|
|
|
|
|
|
|
|
|
|
|
|
|
|
|
|
|
|
|
Einkreis-Kochzone (210 mm) 2300 W, |
|
|
|
|||||||
|
|
|
|
|
|
|
|
|
|
|
|
|
|
|
|
|
|
|
|
|
|
|
|
|
|
|
5 |
|
|
|
|
|
|||||||||||
|
|
|
|
|
|
|
|
|
|
|
|
|
|
|
|
|
|
|
|
|
|
|
|
|
|
|
|
|
|
|
|
|
mit Power-Funktion 3200 W |
|
|
|
|||||||
|
|
|
|
|
|
|
|
|
|
|
|
|
|
|
|
|
|
|
|
|
|
|
|
|
|
|
|
|
|
|
|
|
|
|
|
||||||||
|
|
|
|
|
|
|
|
|
|
|
|
|
|
|
|
|
|
|
|
|
|
|
|
|
|
|
|
|
|
|
|
|
|
|
|
|
|
|
|
|
|
|
|
|
|
|
|
|
|
|
|
|
|
|
|
|
|
|
|
|
|
|
|
|
|
|
|
|
|
|
|
|
|
|
|
|
|
|
|
|
|
|
|
||||
|
|
|
|
|
|
|
5 |
|
|
|
|
|
4 |
|
|
3 |
|
|
|
|
|
|
|
|
|
|
|
|
|
|
|
|
|
|
|
|
|||||||
Bedienfeldanordnung |
|
|
|
|
|
|
|
|
|
|
|
|
|
|
|
|
|
|
|
|
|
|
|
|
|
||||||||||||||||||
|
|
|
|
|
|
|
|
|
|
|
|
|
|
|
|
|
|
|
|
|
|
|
|
||||||||||||||||||||
1 |
|
2 |
|
3 |
|
|
|
|
|
4 |
5 |
6 |
|
|
7 |
||||||||||||||||||||||||||||
|
|
|
|
|
|
|
|
|
|
|
|
|
|
|
|
|
|
|
|
|
|
|
|
|
|
|
|
|
|
|
|
|
|
|
|
|
|
|
|
|
|
|
|
|
|
|
|
|
|
|
|
|
|
|
|
|
|
|
|
|
|
|
|
|
|
|
|
|
|
|
|
|
|
|
|
|
|
|
|
|
|
|
|
|
|
|
|
|
|
|
|
|
|
|
|
|
|
|
|
|
|
|
|
|
|
|
|
|
|
|
|
|
|
|
|
|
|
|
|
|
|
|
|
|
|
|
|
|
|
|
|
|
|
|
|
|
|
|
|
|
|
|
|
|
|
|
|
|
|
|
|
|
|
|
|
|
|
|
|
|
|
|
|
|
|
|
|
|
|
|
|
|
|
|
|
|
|
|
|
|
|
|
|
|
|
|
|
|
|
|
|
|
|
|
|
|
|
|
|
|
|
|
|
|
|
|
|
|
|
|
|
|
|
|
|
|
|
|
|
|
|
|
|
|
|
|
|
|
|
|
|
|
|
|
|
|
|
|
|
|
|
|
|
|
|
|
|
|
|
|
|
|
|
|
|
|
|
|
|
|
|
|
|
|
|
|
|
|
|
|
|
|
|
|
|
|
|
|
|
|
|
|
|
|
|
|
|
|
|
|
|
|
|
|
|
|
|
|
|
|
|
|
|
|
|
|
|
|
|
|
|
|
|
|
|
|
|
|
|
|
|
|
|
|
|
|
|
|
|
|
|
|
|
|
|
|
|
|
|
|
|
|
|
|
|
|
|
|
|
|
|
|
|
|
|
|
|
|
|
|
|
|
|
|
|
|
|
|
|
|
|
|
|
|
|
|
|
|
|
|
|
|
|
|
|
|
|
|
|
|
|
|
|
|
|
|
|
|
|
|
|
|
|
|
|
|
|
|
|
|
|
|
|
|
|
|
|
|
|
|
|
|
|
|
|
|
|
|
|
|
|
|
|
|
|
|
|
|
|
|
|
|
|
|
|
|
|
|
|
|
|
|
|
|
|
|
|
|
|
|
|
|
|
|
|
|
|
|
|
|
|
|
|
|
|
|
|
|
|
|
|
|
|
|
|
|
|
|
|
|
|
|
|
|
|
|
|
|
|
|
|
|
|
|
|
|
|
|
|
|
|
|
|
|
|
|
|
|
|
|
|
|
|
|
|
|
|
1 Zum Einund Ausschalten des Kochfelds
2Zum Einund Ausschalten der Tastenverriegelung oder Kindersicherung
3Zum Einschalten der Funktion Stop +Go
4Kochzonen-Anzeigen des Timers 
5Timer-Anzeige: 00 bis  Minuten
6Zum Einschalten der Power-Funktion (auf dem Display erscheint  )
)
7Zum Einund Ausschalten der Brückenfunktion.
8Kochstufenanzeige:  , von
, von  bis
bis 
|
10 |
|
|
9 |
|
|
|
8 |
|
|
|
Bedienleiste zur Auswahl der Kochstu- |
|||||||
9 |
|
||||||||
|
|
|
fen |
|
|
|
|
||
|
|
zum Höherstellen oder |
|
zum Nied- |
|||||
10 |
|
||||||||
|
|
||||||||
|
|
|
rigerstellen des Timers |
|
|
|
|
||
Touch Control-Sensorfelder und Anzeigen
Das Kochfeld wird durch Berühren der Sensorfelder bedient. Die Anzeigen und akustischen Signale (kurzer Signalton) bestätigen die Auswahl einer Funktion.
Kochstufenan- |
Beschreibung |
|
zeige |
||
|
||
|
|
|
|
Es ist eine Störung auf- |
|
|
getreten |
 Loading...