


IBS650PXS01
Ikea IBS650PXS01, IBS650PXB01, IBS550PXB00, IBS350PYB01, IBS350PXS01 Owner’s Manual
...
||E_ ®
BUILT-IN ELECTRICCONVECTION OVEN
For questions about features, operation/performance, parts, accessories or service, call: 1-866-664-2449.
In Canada, for assistance, installation and service, call: 1-866-664-2449
FOUR.A.CONVECTION I_LECTRIQUEENCASTRI_
Au Canada, pour assistance,installationou servicecomposez le1-866-664-2449
Table of Contents/Table des matieres ....................................... 2
Models/Mod61es
IBS650P, IBS350P, IBD650P
W10310197B
TABLEOF CONTENTS
OVEN SAFETY ................................................................................ 3
PARTS AND FEATURES ................................................................ 4
ELECTRONIC OVEN CONTROL ................................................... 6
Display .......................................................................................... 7
Oven Selector and Time and Temperature Control Knobs ......... 7
Enter and Cancel .......................................................................... 7
Fahrenheit and Celsius ................................................................. 7
Clock ............................................................................................ 7
OVEN USE ....................................................................................... 8
Aluminum Foil............................................................................... 8
Positioning Racks and Bakeware ................................................ 8
Bakeware ...................................................................................... 8
Oven Vent ..................................................................................... 9
Baking and Roasting .................................................................... 9
Broiling .......................................................................................... 9
Keep Warm ................................................................................. 10
Convection Cooking ................................................................... 10
Convection Baking and Roasting .............................................. 10
Timed Cooking ........................................................................... 11
OVEN CARE .................................................................................. 12
Self-Cleaning Cycle .................................................................... 12
General Cleaning ........................................................................ 12
Oven Lights ................................................................................ 13
Oven Door .................................................................................. 13
TROUBLESHOOTING .................................................................. 14
ASSISTANCE OR SERVICE ......................................................... 15
In the U.S.A................................................................................ 15
Accessories ................................................................................ 15
In Canada ................................................................................... 15
WAR RANTY .................................................................................. 16
TABLEDESMATIERES
SleCURITle DU FOUR ................................................................... 18
PIECES ET CARACTERISTIOUES .............................................. 19
MODULE DE COMMANDE I_LECTRONIQUE DU FOUR .......... 21
Affichage ..................................................................................... 22
Bouton de selection du four et boutons de
commande de duree et de temperature .................................... 22
Boutons Enter (entree) et Cancel (annulation) ........................... 22
Fahrenheit et Celsius .................................................................. 22
Horloge ....................................................................................... 22
UTILISATION DU FOUR ............................................................... 23
Papier d'aluminium ..................................................................... 23
Positionnement des grilles et des ustensiles
de cuisson au four ...................................................................... 23
Ustensiles de cuisson au four .................................................... 24
#vent du four .............................................................................. 24
Cuisson au four et r6tissage ...................................................... 24
Cuisson au gril ............................................................................ 25
Maintien au chaud ...................................................................... 25
Cuisson par convection ............................................................. 26
Cuisson et r6tissage par convection ......................................... 26
Cuisson minutee ......................................................................... 27
ENTRETIEN DU FOUR ................................................................. 27
Programme d'autonettoyage ..................................................... 27
Nettoyage gen6ral ...................................................................... 28
Lampes du four .......................................................................... 29
Porte du four ............................................................................... 29
DlePAN NAG E................................................................................. 30
ASSISTANCE OU SERVICE ......................................................... 31
Au Canada .................................................................................. 31
Liste d'accessoires ..................................................................... 31
GARANTIE ..................................................................................... 31
2
OVEN SAFETY
Your safety and the safety of others are very important.
We have provided many important safety messages in this manual and on your appliance. Always read and obey all safety
messages.
This is the safety alert symbol.
This symbol alerts you to potential hazards that can kill or hurtyou and others.
All safety messages will follow the safety alert symbol and either the word "DANGER" or "WARNING."
These words mean:
You can be killed or seriously injured if you don't immediately
follow instructions.
You can be killed or seriously injured if you don't follow
instructions.
All safety messages will tell you what the potential hazard is, tell you how to reduce the chance of injury, and tell you what can
happen if the instructions are not followed.
IMPORTANT SAFETY INSTRUCTIONS
WARNING: To reduce the risk of fire, electrical shock,
injury to persons, or damage when using the oven, follow
basic precautions, including the following:
[] Proper Installation - Be sure the oven is properly installed
and grounded by a qualified technician.
[] Never Use the Oven for Warming or Heating the Room.
[] Do Not Leave Children Alone - Children should not be left
alone or unattended in area where oven is in use. They
should never be allowed to sit or stand on any part of the
oven.
[] Wear Proper Apparel - Loose-fitting or hanging garments
should never be worn while using the oven.
[] User Servicing - Do not repair or replace any part of the
oven unless specifically recommended in the manual. All
other servicing should be referred to a qualified technician.
[] Storage in Oven - Flammable materials should not be
stored in an oven.
[] Do Not Use Water on Grease Fires - Smother fire or flame
or use dry chemical or foam-type extinguisher.
[] Use Only Dry Potholders - Moist or damp potholders on
hot surfaces may result in burns from steam. Do not let
potholder touch hot heating elements. Do not use a towel
or other bulky cloth.
[] Use Care When Opening Door - Let hot air or steam
escape before removing or replacing food.
[] Do Not Heat Unopened Food Containers - Build-up of
pressure may cause container to burst and result in injury.
SAVE THESE
[] Keep Oven Vent Ducts Unobstructed.
[] Placement of Oven Racks - Always place oven racks in
desired location while oven is cool. If rack must be moved
while oven is hot, do not let potholder contact hot heating
element in oven.
[] DO NOT TOUCH HEATING ELEMENTS OR INTERIOR
SURFACES OF OVEN - Heating elements may be hot
even though they are dark in color. Interior surfaces of an
oven become hot enough to cause burns. During and after
use, do not touch, or let clothing or other flammable
materials contact heating elements or interior surfaces of
oven until they have had sufficient time to cool. Other
surfaces of the oven may become hot enough to cause
burns - among these surfaces are oven vent openings and
surfaces near these openings, oven doors, and windows of
oven doors.
For self-cleaning ovens:
[] Do Not Clean Door Gasket - The door gasket is essential
for a good seal. Care should be taken not to rub, damage,
or move the gasket.
[] Do Not Use Oven Cleaners - No commercial oven cleaner
or oven liner protective coating of any kind should be used
in or around any part of the oven.
[] Clean Only Parts Listed in Manual.
[] Before Self-Cleaning the Oven - Remove broiler pan and
other utensils.
INSTRUCTIONS
State of California Proposition 65 Warnings:
WARNING: This product contains a chemical known to the State of California to cause cancer.
WARNING: This product contains a chemical known to the State of California to cause birth defects or other reproductive harm.
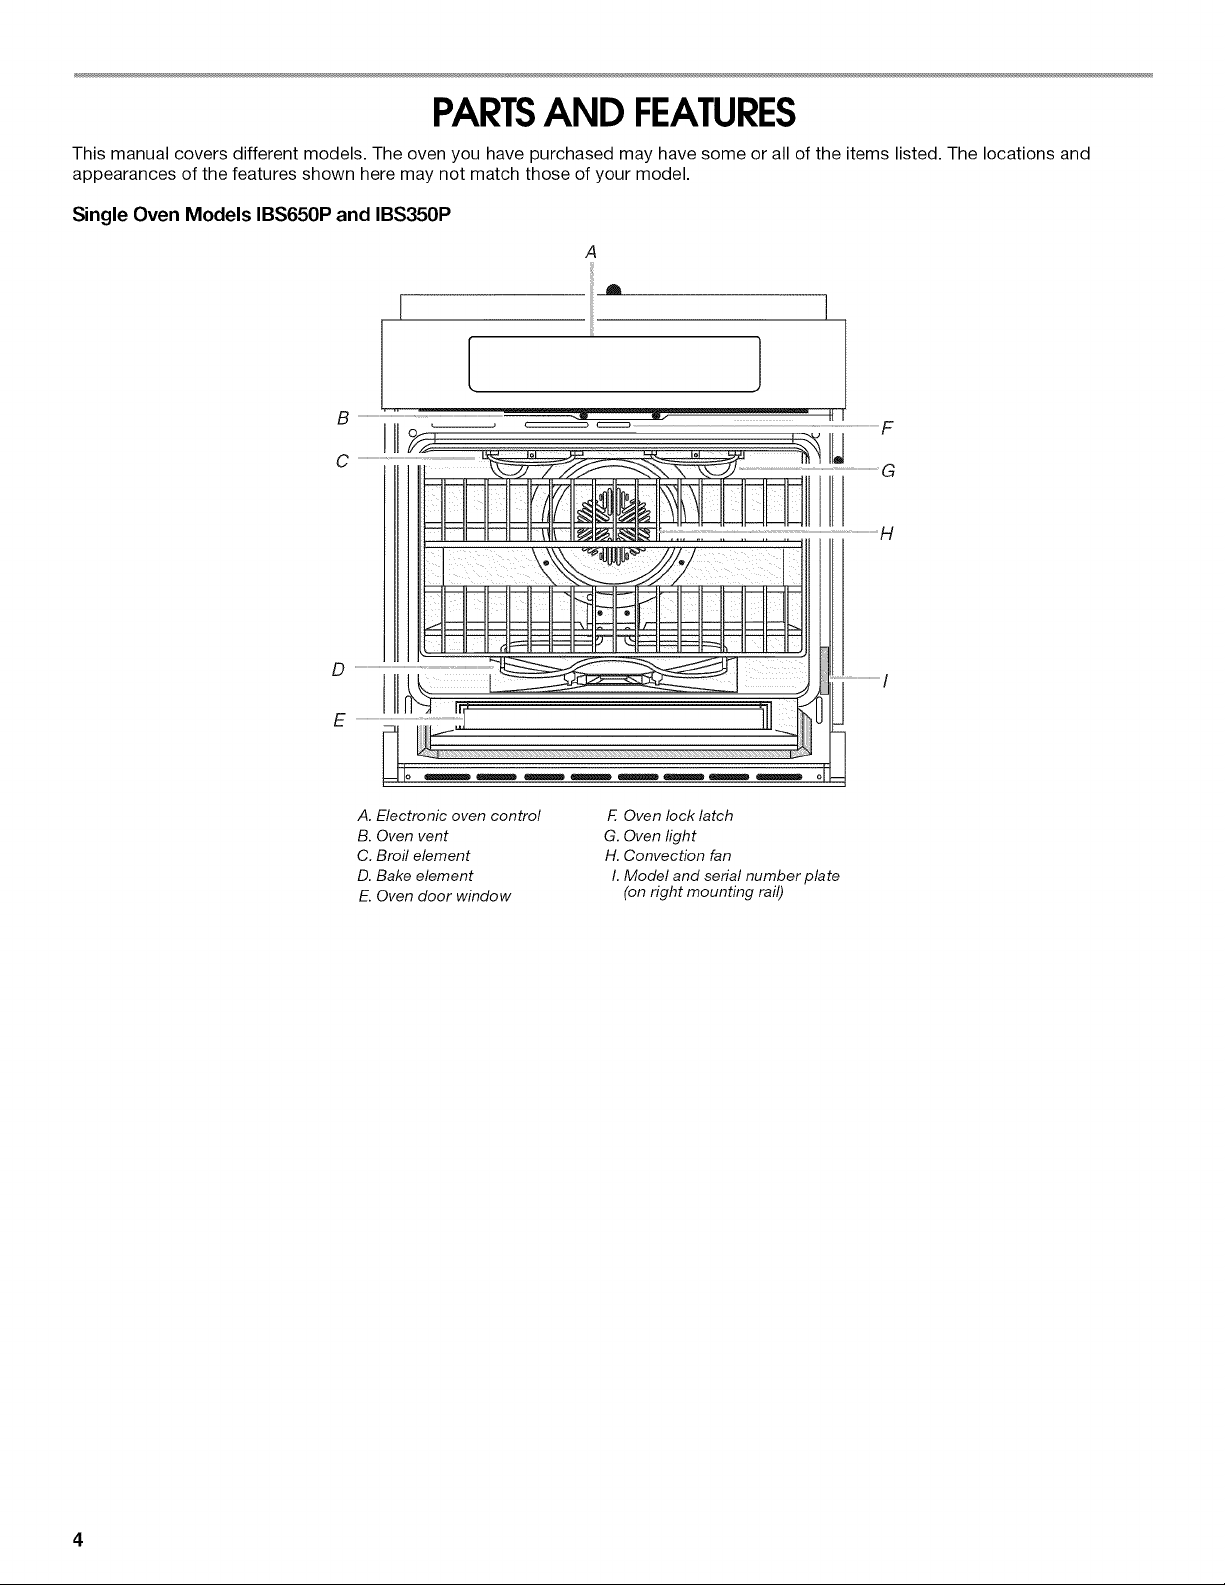
PARTSAND FEATURES
This manual covers different models. The oven you have purchased may have some or all of the items listed. The locations and
appearances of the features shown here may not match those of your model.
Single Oven Models IBS650P and IBS350P
H
A. Electronic oven control
B. Oven vent
C. Broil element
D. Bake element
E. Oven door window
E Oven lock latch
G. Oven light
H. Convection fan
I. Model and serial number plate
(on right mounting rail)
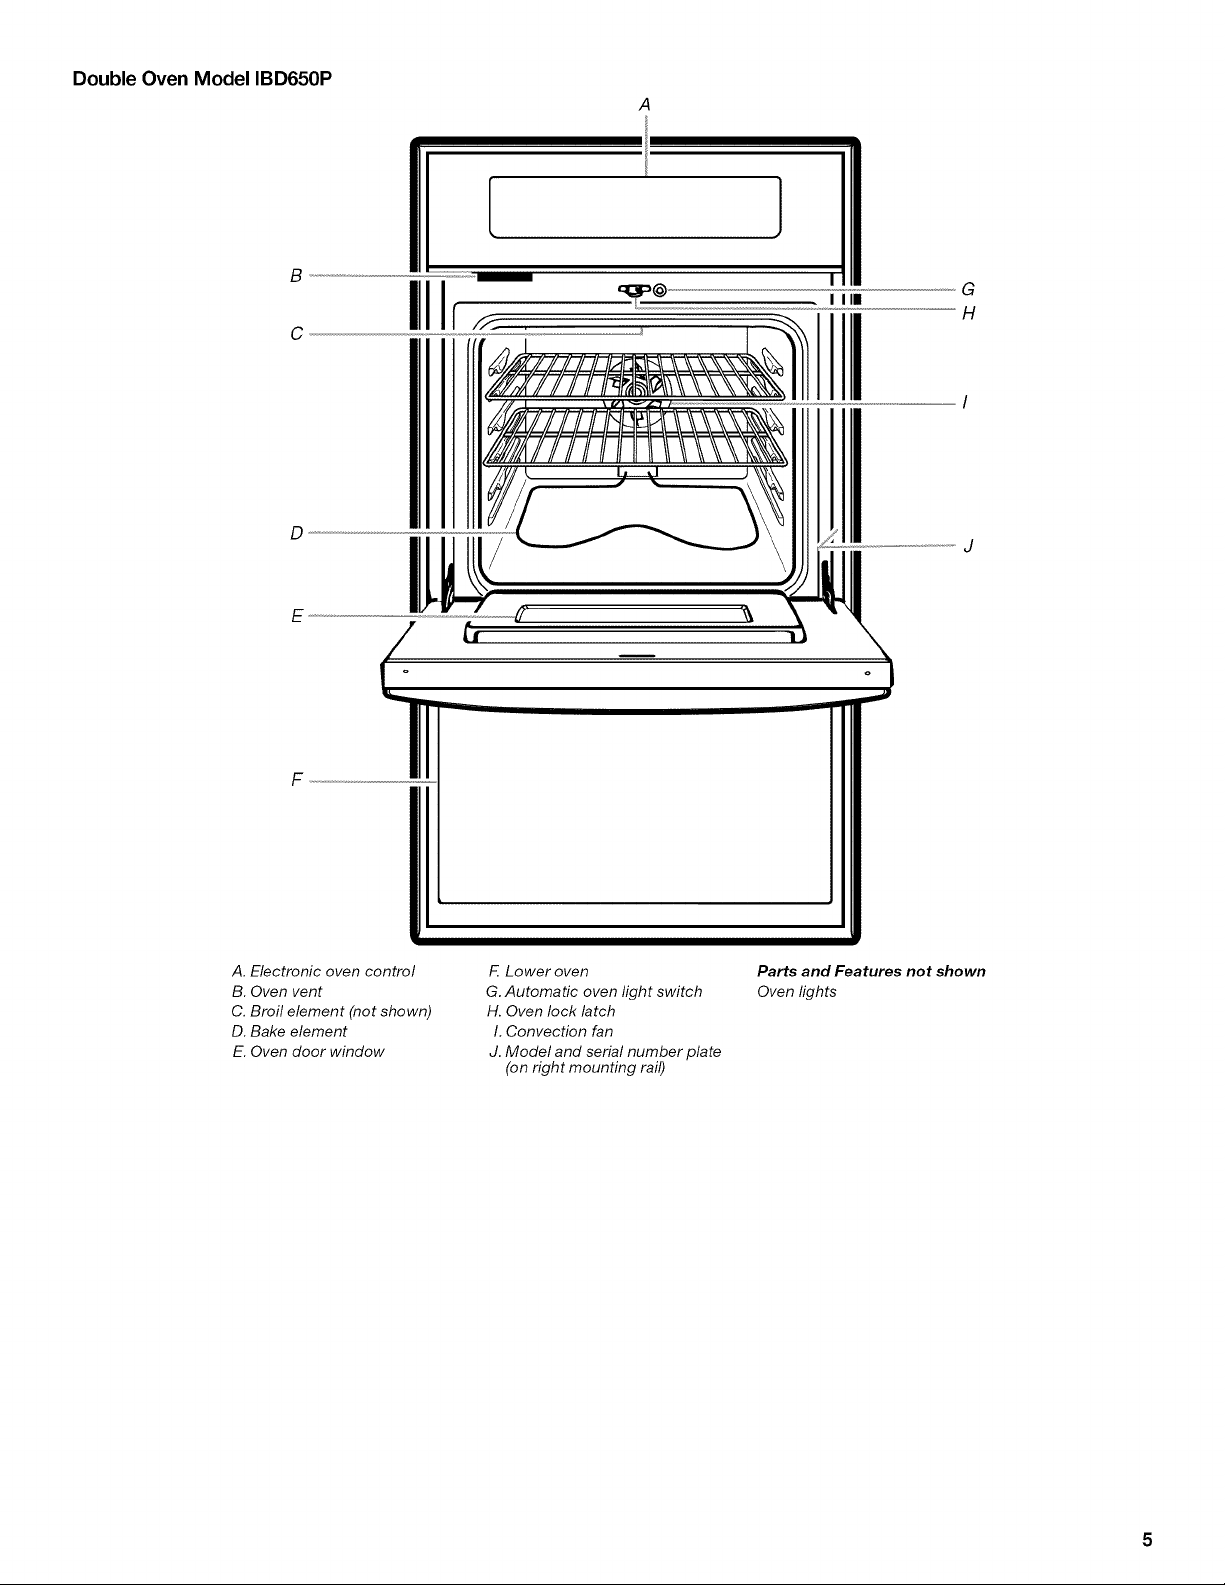
Double Oven Model IBD650P
B
C
]
,I
I Ill
IIII
G
H
D
J
E
o o
F
A. Electronic oven control
B. Oven vent
C. Broil element (not shown)
D. Bake element
E. Oven door window
F Lower oven
G. Automatic oven light switch
H. Oven lock latch
I. Convection fan
J. Model and serial number plate
(on right mounting rail)
Parts and Features not shown
Oven lights
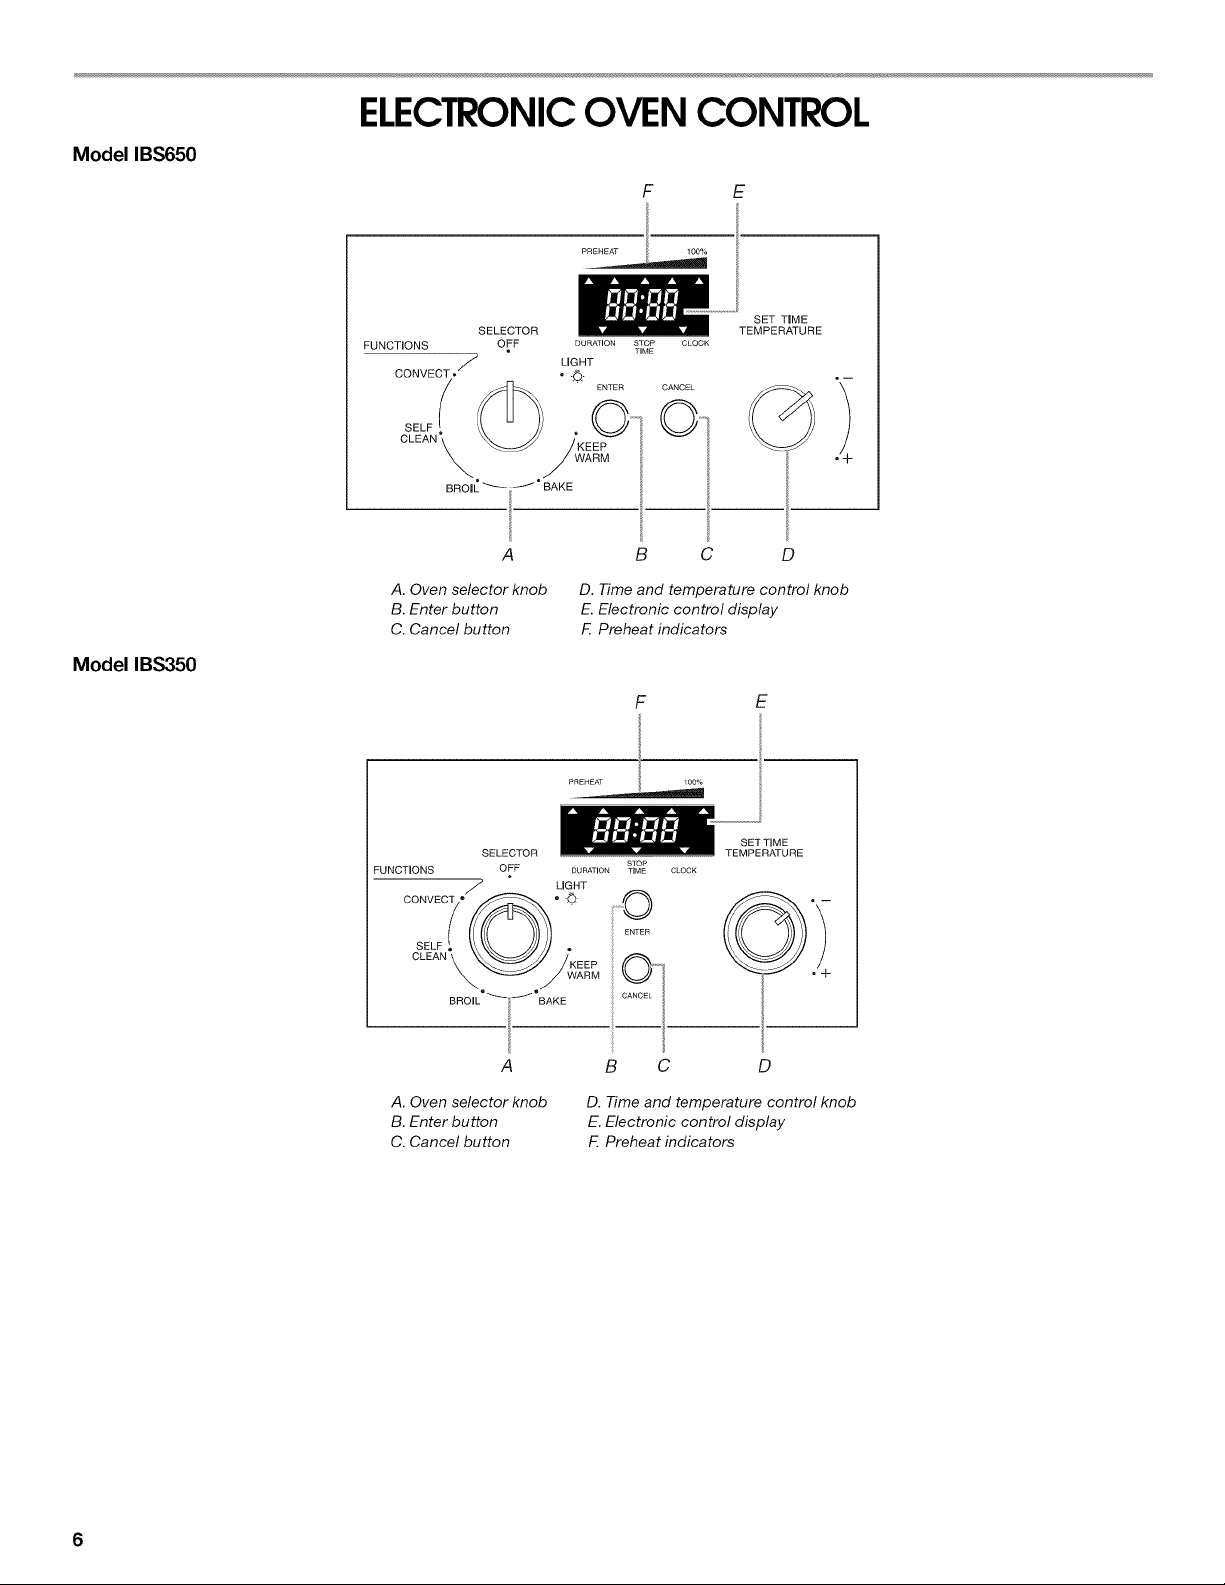
ELECTRONICOVEN CONTROL
Model IBS650
F E
lOO%
Model IBS350
SELECTOR
FUNCTIONS
CONVECT • f
cS_F"__
OFF DUR_ION STOP CLOCK
• TIME
LIGHT
ENTER CANCEL
•O10 ....
/KEEP I 1
WARM
° BAKE I
i
A B C
SET TIME
TEMPERATURE
.1
D
A. Oven selector knob D. Time and temperature control knob
B. Enter button E.Electronic control display
C. Cancel button F. Preheat indicators
F E
i! loo%
SELECTOR
FUNCTIONS OFF DURATION
/ LIGHT
SELF _ \\ \\\ j///1 ,
C_EA_\_ /
BAKE
sToP
TIME
.....O
ENTER
SETTIME
TEMPERATURE
A B C D
A. Oven selector knob
B. Enter button
C. Cancel button
D. Time and temperature control knob
E. Electronic control display
F. Preheat indicators
6
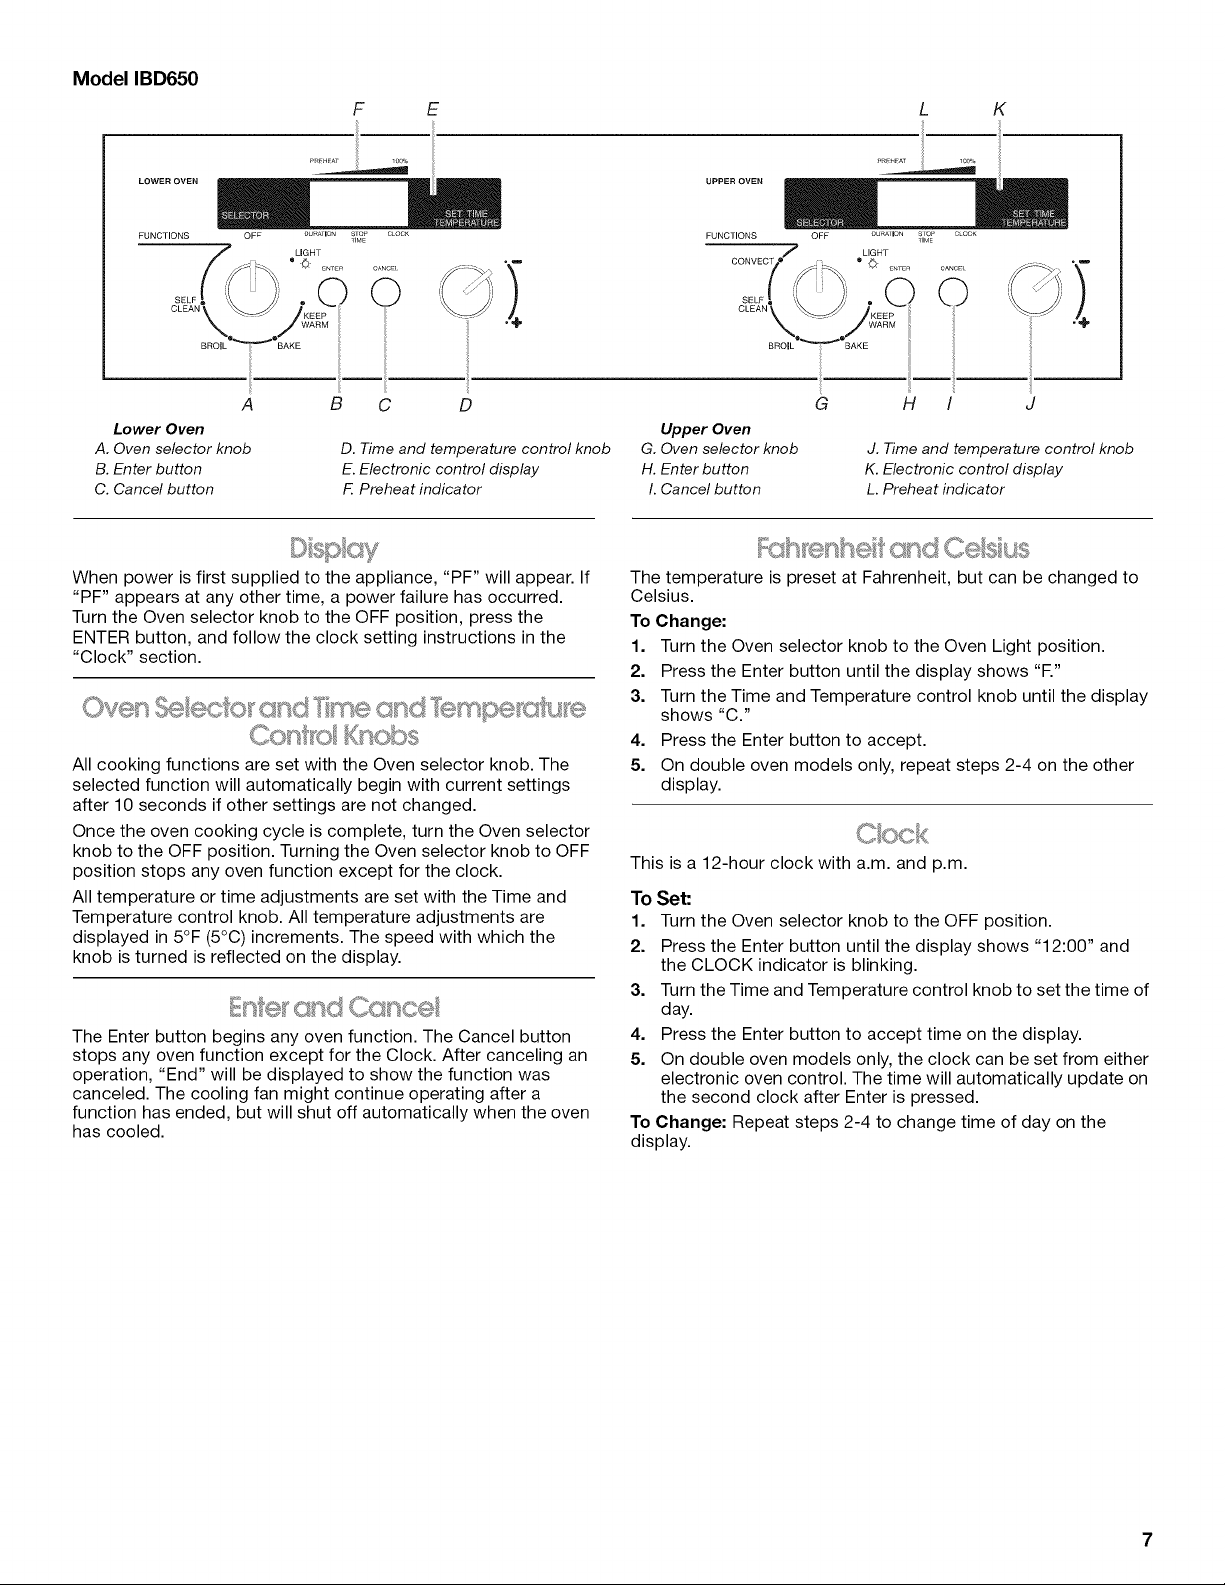
Model IBD650
F E K
FUNCTIONS OF F DURATION SITM(EP CLOCK
L,G.T
SELF ®
BROIL BAKE
i
A B C D
FUNCTIONS OFF .... ION SiOE_ .....
LIGHT
CONVECTBO •
ENTER CANCEl
/' 0
B_O,L'_'BAKE
ii
G H I J
Lower Oven
A. Oven selector knob
B. Enter button
C. Cancel button
D. Time and temperature control knob
E. Electronic control display
F. Preheat indicator
Upper Oven
G. Oven selector knob
H. Enter button
I. Cancel button
J. Time and temperature control knob
K. Electronic control display
L. Preheat indicator
When power is first supplied to the appliance, "PF" will appear. If
"PF" appears at any other time, a power failure has occurred.
Turn the Oven selector knob to the OFF position, press the
ENTER button, and follow the clock setting instructions in the
"Clock" section.
CoIs, ous
All cooking functions are set with the Oven selector knob. The
selected function will automatically begin with current settings
after 10 seconds if other settings are not changed.
Once the oven cooking cycle is complete, turn the Oven selector
knob to the OFF position. Turning the Oven selector knob to OFF
position stops any oven function except for the clock.
All temperature or time adjustments are set with the Time and
Temperature control knob. All temperature adjustments are
displayed in 5°F (5°C) increments. The speed with which the
knob is turned is reflected on the display.
The Enter button begins any oven function. The Cancel button
stops any oven function except for the Clock. After canceling an
operation, "End" will be displayed to show the function was
canceled. The cooling fan might continue operating after a
function has ended, but will shut off automatically when the oven
has cooled.
h e 'sh® c sdCesus
The temperature is preset at Fahrenheit, but can be changed to
Celsius.
To Change:
1. Turn the Oven selector knob to the Oven Light position.
2. Press the Enter button until the display shows "R"
3. Turn the Time and Temperature control knob until the display
shows "C."
4. Press the Enter button to accept.
5. On double oven models only, repeat steps 2-4 on the other
display.
This is a 12-hour clock with a.m. and p.m.
To Set:
1. Turn the Oven selector knob to the OFF position.
2. Press the Enter button until the display shows "12:00" and
the CLOCK indicator is blinking.
3. Turn the Time and Temperature control knob to set the time of
day.
4. Press the Enter button to accept time on the display.
5. On double oven models only, the clock can be set from either
electronic oven control. The time will automatically update on
the second clock after Enter is pressed.
To Change: Repeat steps 2-4 to change time of day on the
display.
OVEN USE
Odors and smoke are normal when the oven is used the first few
times, or when it is heavily soiled.
IMPORTANT: The health of some birds is extremely sensitive to
the fumes given off. Exposure to the fumes may result in death to
certain birds. Always move birds to another closed and well-
ventilated room.
A m Fo
IMPORTANT: To avoid permanent damage to the oven bottom
finish, do not line the oven bottom with any type of foil or liner.
• For best cooking results, do not cover entire rack with foil
because air must be able to move freely.
• To catch spills, place foil on rack below dish. Make sure foil is
at least 1/2"(1.3 cm) larger than the dish and that it is turned
up at the edges.
IMPORTANT: To avoid permanent damage to the porcelain
finish, do not place food or bakeware directly on the oven door or
bottom.
RACKS
• Position racks before turning on the oven.
• Do not position racks with bakeware on them.
• Make sure racks are level.
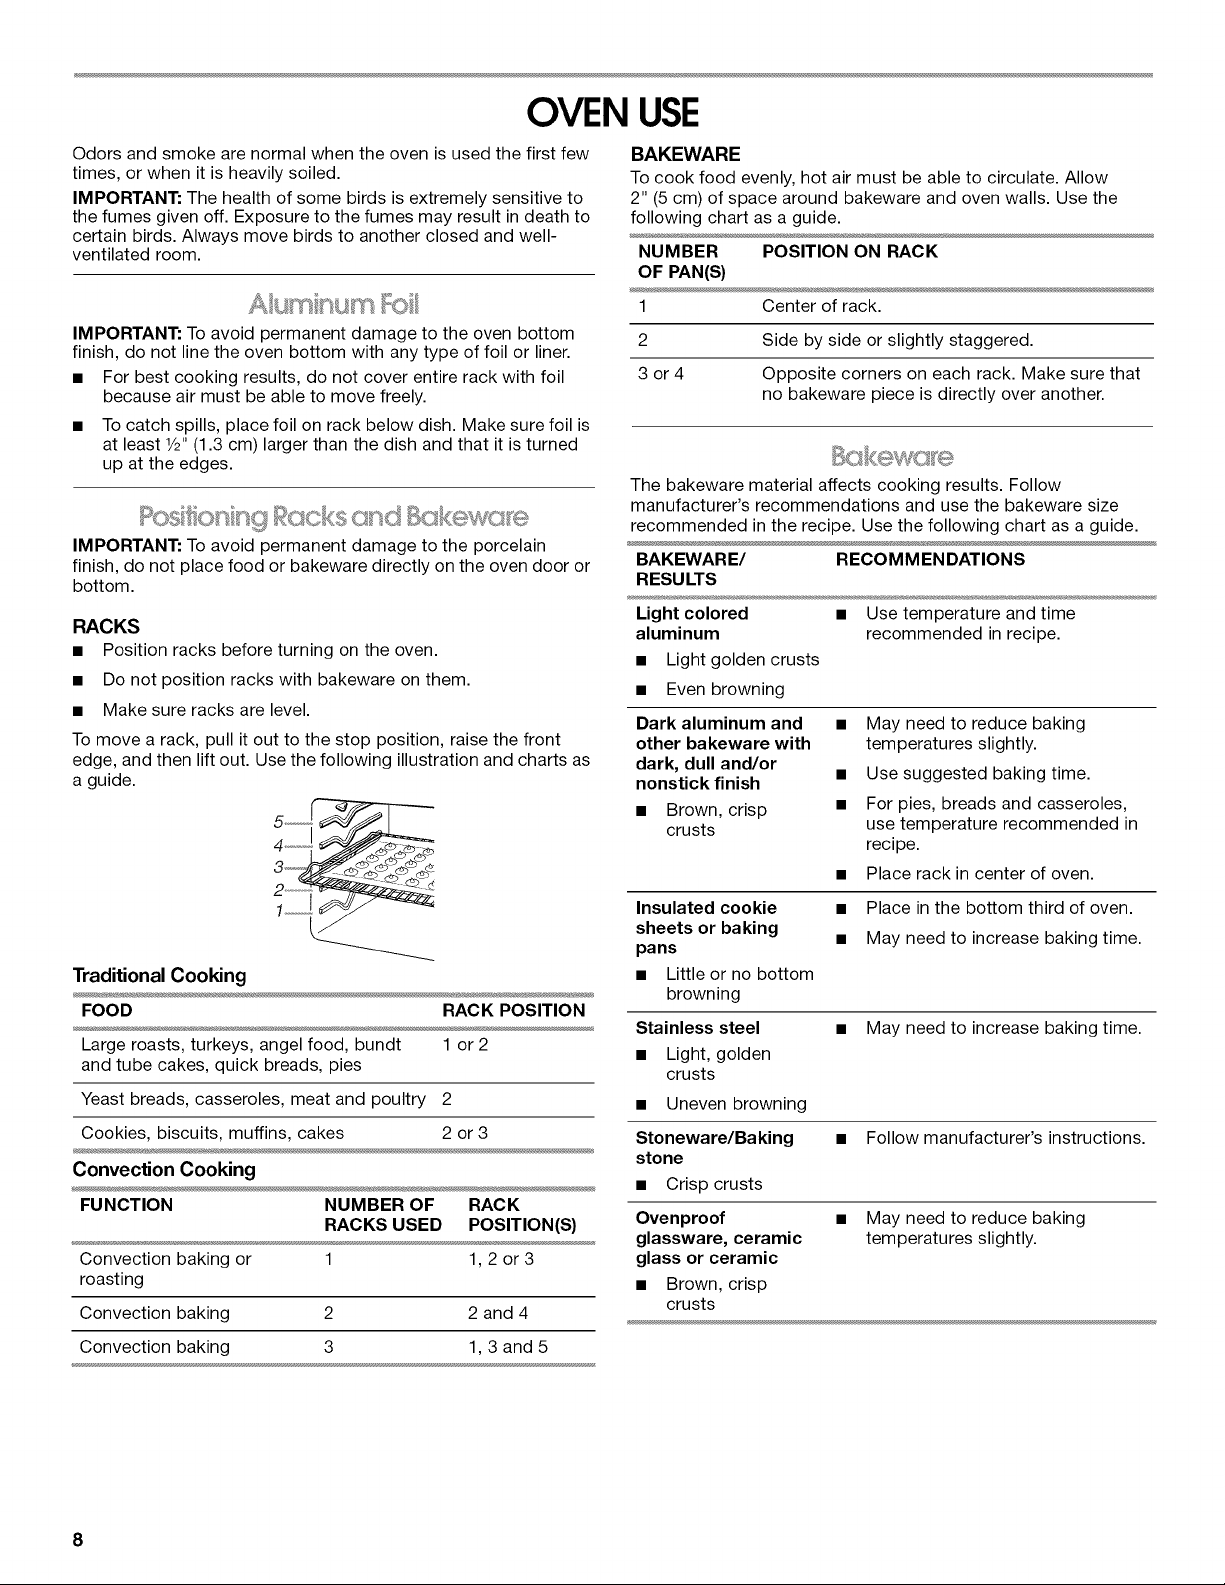
To move a rack, pull it out to the stop position, raise the front
edge, and then lift out. Use the following illustration and charts as
a guide.
2---_
Traditional Cooking
FOOD RACK POSITION
Large roasts, turkeys, angel food, bundt 1 or 2
and tube cakes, quick breads, pies
Yeast breads, casseroles, meat and poultry 2
Cookies, biscuits, muffins, cakes 2 or 3
Convection Cooking
FUNCTION NUMBER OF RACK
RACKS USED POSITION(S)
Convection baking or 1 1, 2 or 3
roasting
Convection baking 2 2 and 4
Convection baking 3 1, 3 and 5
BAKEWARE
To cook food evenly, hot air must be able to circulate. Allow
2" (5 cm) of space around bakeware and oven walls. Use the
following chart as a guide.
NUMBER POSITION ON RACK
OF PAN(S)
1 Center of rack.
2 Side by side or slightly staggered.
3 or 4 Opposite corners on each rack. Make sure that
no bakeware piece is directly over another.
The bakeware material affects cooking results. Follow
manufacturer's recommendations and use the bakeware size
recommended in the recipe. Use the following chart as a guide.
BAKEWARE/ RECOMMENDATIONS
RESULTS
Light colored • Use temperature and time
aluminum recommended in recipe.
• Light golden crusts
• Even browning
Dark aluminum and • May need to reduce baking
other bakeware with temperatures slightly.
dark, dull and/or
nonstick finish • Use suggested baking time.
• Brown, crisp • For pies, breads and casseroles,
crusts use temperature recommended in
recipe.
• Place rack in center of oven.
Insulated cookie
sheets or baking
pans
• Little or no bottom
browning
Stainless steel
• Light, golden
crusts
• Uneven browning
Stoneware/Baking
stone
• Crisp crusts
Ovenproof
glassware, ceramic
glass or ceramic
• Brown, crisp
crusts
• Place in the bottom third of oven.
• May need to increase baking time.
• May need to increase baking time.
• Follow manufacturer's instructions.
• May need to reduce baking
temperatures slightly.
8
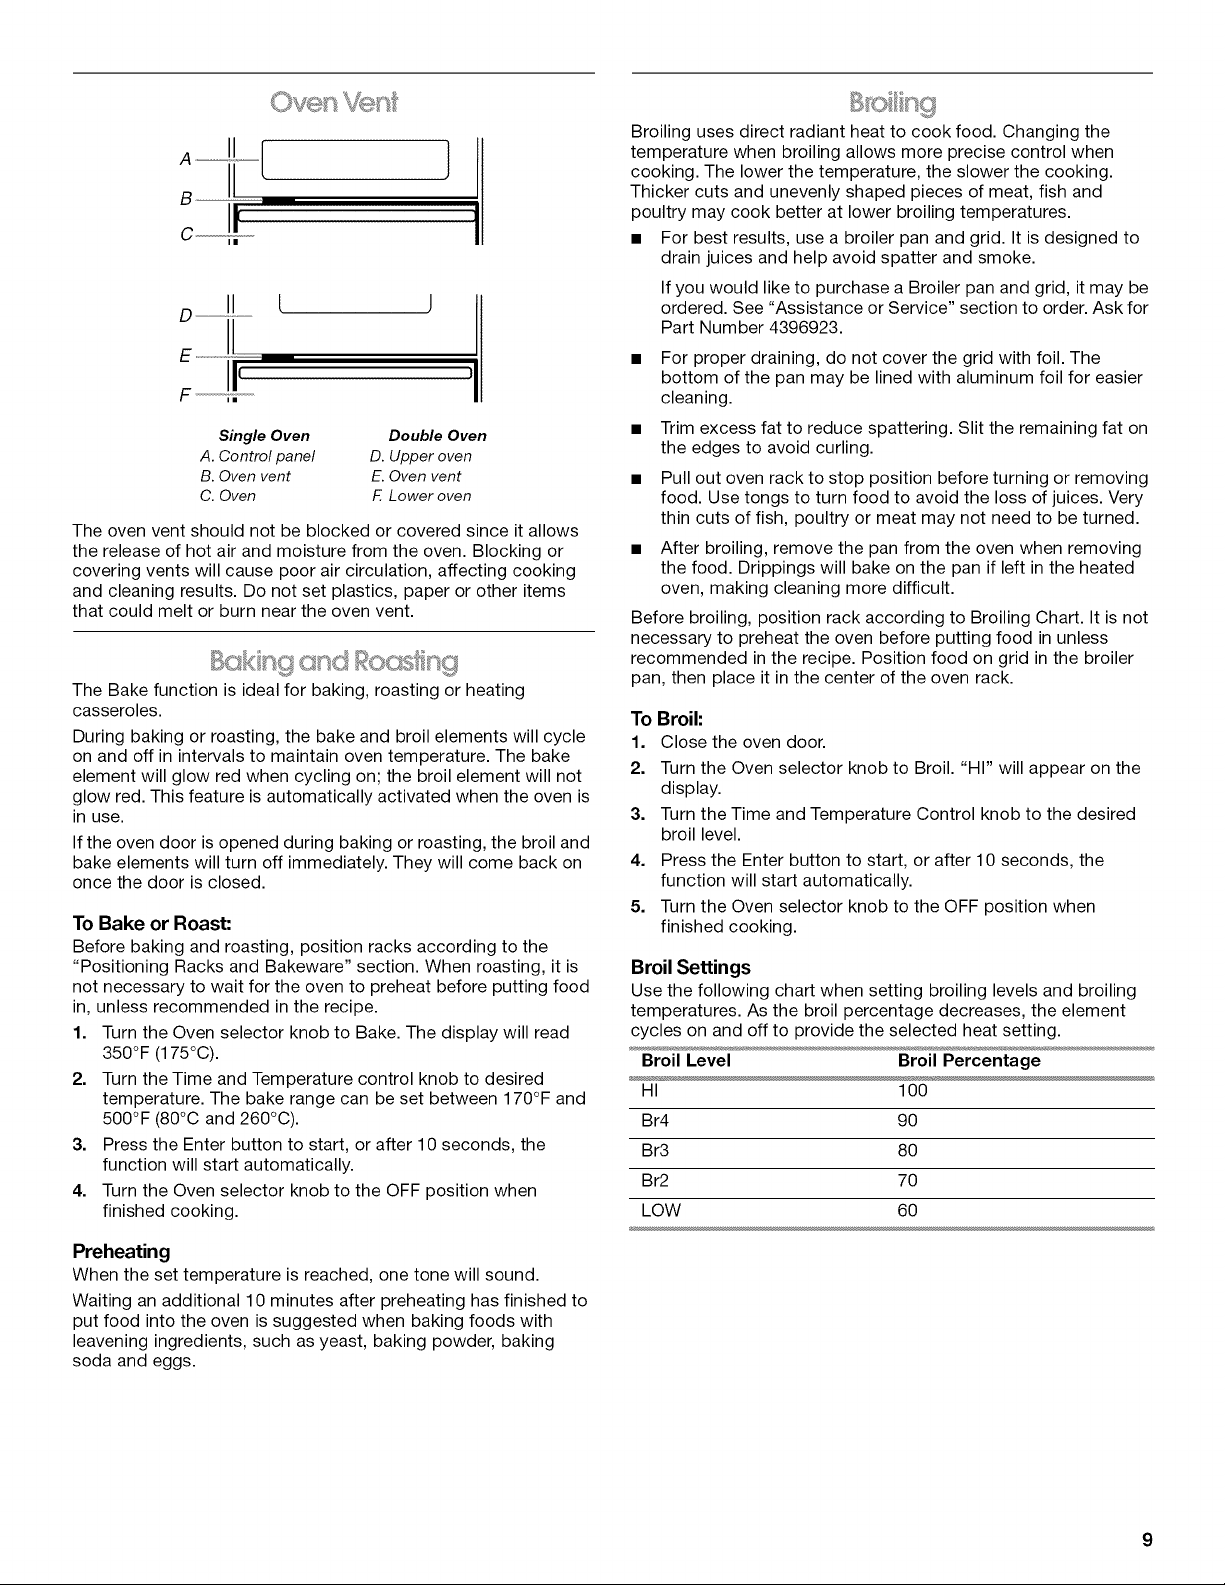
B (
D II L ] [
i
E ................
)
r
F ,=
Single Oven Double Oven
A. Control panel D. Upper oven
B. Oven vent E. Oven vent
C. Oven F. Lower oven
The oven vent should not be blocked or covered since it allows
the release of hot air and moisture from the oven. Blocking or
covering vents will cause poor air circulation, affecting cooking
and cleaning results. Do not set plastics, paper or other items
that could melt or burn near the oven vent.
The Bake function is ideal for baking, roasting or heating
casseroles.
During baking or roasting, the bake and broil elements will cycle
on and off in intervals to maintain oven temperature. The bake
element will glow red when cycling on; the broil element will not
glow red. This feature is automatically activated when the oven is
in use.
If the oven door is opened during baking or roasting, the broil and
bake elements will turn off immediately. They will come back on
once the door is closed.
To Bake or Roast:
Before baking and roasting, position racks according to the
"Positioning Racks and Bakeware" section. When roasting, it is
not necessary to wait for the oven to preheat before putting food
in, unless recommended in the recipe.
1. Turn the Oven selector knob to Bake. The display will read
350°F (175°C).
2. Turn the Time and Temperature control knob to desired
temperature. The bake range can be set between 170°F and
500°F (80°C and 260°C).
3. Press the Enter button to start, or after 10 seconds, the
function will start automatically.
4. Turn the Oven selector knob to the OFF position when
finished cooking.
Preheating
When the set temperature is reached, one tone will sound.
Waiting an additional 10 minutes after preheating has finished to
put food into the oven is suggested when baking foods with
leavening ingredients, such as yeast, baking powder, baking
soda and eggs.
Broiling uses direct radiant heat to cook food. Changing the
temperature when broiling allows more precise control when
cooking. The lower the temperature, the slower the cooking.
Thicker cuts and unevenly shaped pieces of meat, fish and
poultry may cook better at lower broiling temperatures.
• For best results, use a broiler pan and grid. It is designed to
drain juices and help avoid spatter and smoke.
If you would like to purchase a Broiler pan and grid, it may be
ordered. See "Assistance or Service" section to order. Ask for
Part Number 4396923.
• For proper draining, do not cover the grid with foil. The
bottom of the pan may be lined with aluminum foil for easier
cleaning.
• Trim excess fat to reduce spattering. Slit the remaining fat on
the edges to avoid curling.
• Pull out oven rack to stop position before turning or removing
food. Use tongs to turn food to avoid the loss of juices. Very
thin cuts of fish, poultry or meat may not need to be turned.
• After broiling, remove the pan from the oven when removing
the food. Drippings will bake on the pan if left in the heated
oven, making cleaning more difficult.
Before broiling, position rack according to Broiling Chart. It is not
necessary to preheat the oven before putting food in unless
recommended in the recipe. Position food on grid in the broiler
pan, then place it in the center of the oven rack.
To Broil:
1. Close the oven door.
2. Turn the Oven selector knob to Broil. "HI" will appear on the
display.
3. Turn the Time and Temperature Control knob to the desired
broil level.
4. Press the Enter button to start, or after 10 seconds, the
function will start automatically.
5. Turn the Oven selector knob to the OFF position when
finished cooking.
Broil Settings
Use the following chart when setting broiling levels and broiling
temperatures. As the broil percentage decreases, the element
cycles on and off to provide the selected heat setting.
Broil Level Broil Percentage
HI 100
Br4 90
Br3 80
Br2 70
LOW 60
BROILING CHART
For best results, place food 3" (7 cm) or more from the broil
burner. Times are guidelines only and may need to be adjusted
for individual tastes. Recommended rack positions are numbered
from the bottom (1) to the top (5). For diagram, see the
"Positioning Racks and Bakeware" section.
TOTAL
RACK BROIL TIME
FOOD POSITION LEVEL (min.)
Steak
1" (2.5 cm) thick
medium rare 4 HI 21-23
medium 4 HI 23-25
well-done 4 HI 27-29
Ground meat patties*
3/4"(2 cm) thick
well-done 4 HI 20-22
Pork chops
1" (2.5 cm) thick 4 HI 30-33
Lamb chops
1" (2.5 cm) thick 4 HI 22-26
Chicken
bone-in pieces 3 HI 34-40
boneless breasts 4 HI 22-32
Fish Fillets
1/4-1/2"(0.6-1.3 cm) thick 4 HI 12-15
Steaks
3/4-1" (2-2.5 cm) thick 4 HI 24-27
*Place up to 9 patties, equally spaced, on broiler grid.
Food Poisoning Hazard
Do not let food sit in oven more than one hour before
or after cooking.
Doing so can result in food poisoning or sickness.
IMPORTANT: The Keep Warm function allows hot cooked foods
to stay warm before serving.
To Use:
1. Turn the Oven selector knob to Keep Warm,
2. The display will show 170°F (75°C).
3. Press Enter button to start, or after 10 seconds, the function
will start automatically.
4. Turn the Oven selector knob to the OFF position when
finished.
In a convection oven, the fan-circulated hot air continually
distributes heat more evenly than the natural movement of air in a
standard thermal oven. This movement of hot air helps maintain a
consistent temperature throughout the oven, cooking foods more
evenly, crisping surfaces while sealing in moisture and yielding
crustier breads.
Most foods can be cooked by lowering cooking temperatures
25°F to 50°F (15°C to 30°C), and cooking time can be shortened
by as much as 30 percent, especially for large turkeys and roasts.
• It is important not to cover foods with lids or aluminum foil so
that surface areas remain exposed to the circulating air,
allowing browning and crisping.
• Keep heat loss to a minimum by opening the oven door only
when necessary.
• Choose cookie sheets without sides and roasting pans with
lower sides to allow air to move freely around the food.
• Test baked goods for doneness a few minutes before the
minimum cooking time with an alternative method such as
using a toothpick.
• Use a meat thermometer or the temperature probe to
determine the doneness of meats and poultry. Check the
temperature of pork and poultry in 2 or 3 places.
During convection baking or roasting, the bake and broil
elements cycle on and off in intervals to maintain the oven
temperature, while the fan constantly circulates the hot air.
If the oven door is opened during convection baking or roasting,
the bake and broil elements and fan will turn off immediately.
They will come back on once the door is closed.
Reduce recipe temperature 25°F (15°C). The cook time may need
to be reduced also.
To Convection Bake or Roast:
Before convection baking or roasting, position the racks
according to the "Positioning Racks and Bakeware" section.
When convection roasting, use the roasting rack on top of the
broiler pan and grid (not included). The roasting rack holds the
food above the broiler pan grid and allows air to circulate
completely around all surfaces of the food.
If you would like to purchase a roasting rack, it may be ordered.
See "Assistance or Service" section to order. Ask for Part
Number W10123240.
It is not necessary to wait for the oven to preheat before putting
in food, unless it is recommended in the recipe.
1. Turn the Oven selector knob to Convect. The display will read
325°F (165°C).
2. Turn the Time and Temperture Control knob to desired
temperature. The convection roast range can be set between
170°F and 500°F (75°C and 260°C).
3. Press the Enter button to start, or after 10 seconds, the
function will start automatically.
4. Turn the Oven selector knob to the OFF position when
finished cooking.
10
 Loading...