

Page 1
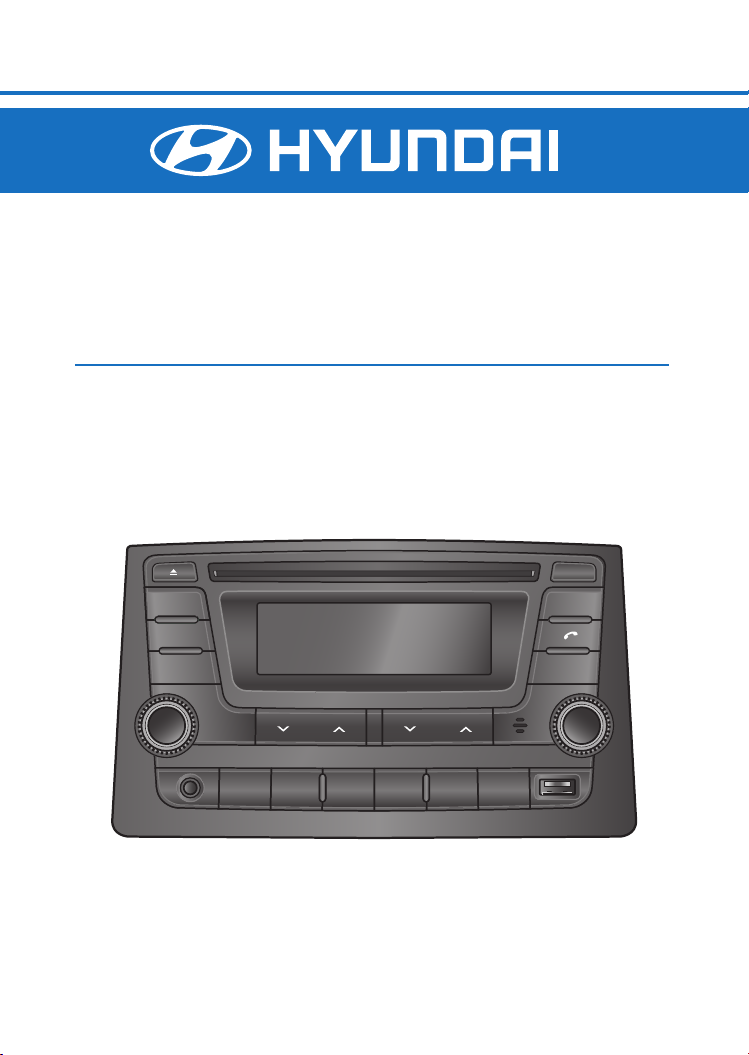
Front Panel Controls
MP3 [WMA]/USB/AUX/Bluetooth/iPod
FM/AM AST
CD
MEDIA SETUP
User Manual
HAMT1001 (BAPE-C300M)
CD Player with AM/FM Radio
DISP
PUSH
PWR
SEEK
VOLUME TUNE/FILE
1 RPT 5 INFO 6 RDM2 3 4
TRACK
FOLDER
PUSH
ENT
Page 2

Contents
Inportant Note:
Before operating the unit, Please read this manual thoroughly and retain it for future
reference.
Please refer to the main vehicle user manual section "Features of Your Vehicle" for
general information regarding radio reception and care and use of the vehicle mounted
antenna, and care and use of media (CDs, USB etc.).
The operation of Steering wheel controls in the main vehicle user manual are not
relevant to the radio model depicted in this user manual. interference to radio reception,
which can be determined by turning the equipment off or on, the user is encouraged to
consult the dealer or an experienced radio technician for help.
Contents
Location of Controls
.............................................................
1
Getting started
Radio
......................................................................................
.......................................................................
MP3 [WMA]/CD player
USB/AUX player
Bluetooth
Appendix
..............................................................................
..............................................................................
Specifications
....................................................................
......................................................................
...........................................................
3
5
6
9
11
15
17
Page 3
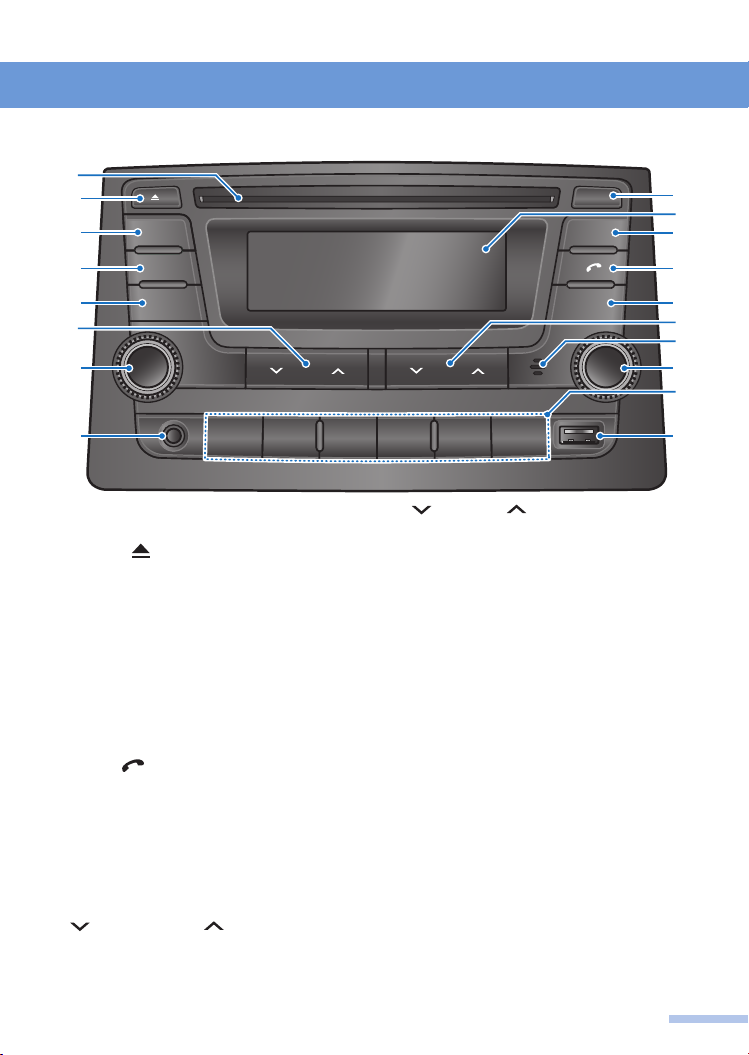
Location of controls
Front view of the unit
➊
➋
➍
➐
➒
FM/AM AST
CD
MEDIA SETUP
SEEK
TRACK
PUSH
PWR
VOLUME TUNE/FILE
1 RPT 5 INFO 6 RDM2 3 4
FOLDER
DISP
PUSH
ENT
➌
➎
➏
➑
➓
➊
Disc slot:
playback starts.
➋
EJECT
➌
DISPLAY [DISP] button:
dimming level for displaying.
➍
FM/AM button:
or band (press : FM1 → FM2 → FMT →
AM → FM1 → ....).
➎
Display window
➏
AST button:
automatically.
➐
CD button:
➑
CALL
or receive/end a call (press); reject/make a
call via last call (press and hold).
➒
MEDIA button:
external device (USB/iPod, AUX or
Bluetooth audio) playback.
➓
SETUP button:
(Audio/Bluetooth/Language/Scroll Direction).
station or skip a track (press); fast tune
down/up the frequency or fast-rewind/
forward a track (press and hold).
Insert a disc (label side up),
]
[
button:
Ejects the disc.
Switch the
Selects the radio function
Store the preset stations
Select the CD playback.
[
]
button: Enter the Phone menu
Select the connected
Enters the System setup
SEEK/TRACK buttons: Seek a
FOLDER buttons: Folder down/up
or setting/list menu move to lower/upper.
Microphone for handsfree function.
POWER [PWR] button with VOLUME
dial
Turn the power on/off (press); tune the
power off (press and hold); adjust the
volume (rotate).
ENTER [ENT] button with TUNE/FILE
dial
Enter the Music search mode or change
the selected the item for setting/searching
(press); find a station manually, skip a track
or move down/up the menu items for
setting (rotate).
Number [1
each station (press and hold), receive each
stored station, change the CD/USB
playback mode or show the playing track’s
information (press) as below;
RPT: Repeat playback
1
5 INFO: Show the playing track's information
6 RDM: Random playback
AUX jack:
USB port:
]
RPT
~ [6
Plug an external audio device.
Plug the USB storage device.
RDM
]
buttons:
Store
1
Page 4
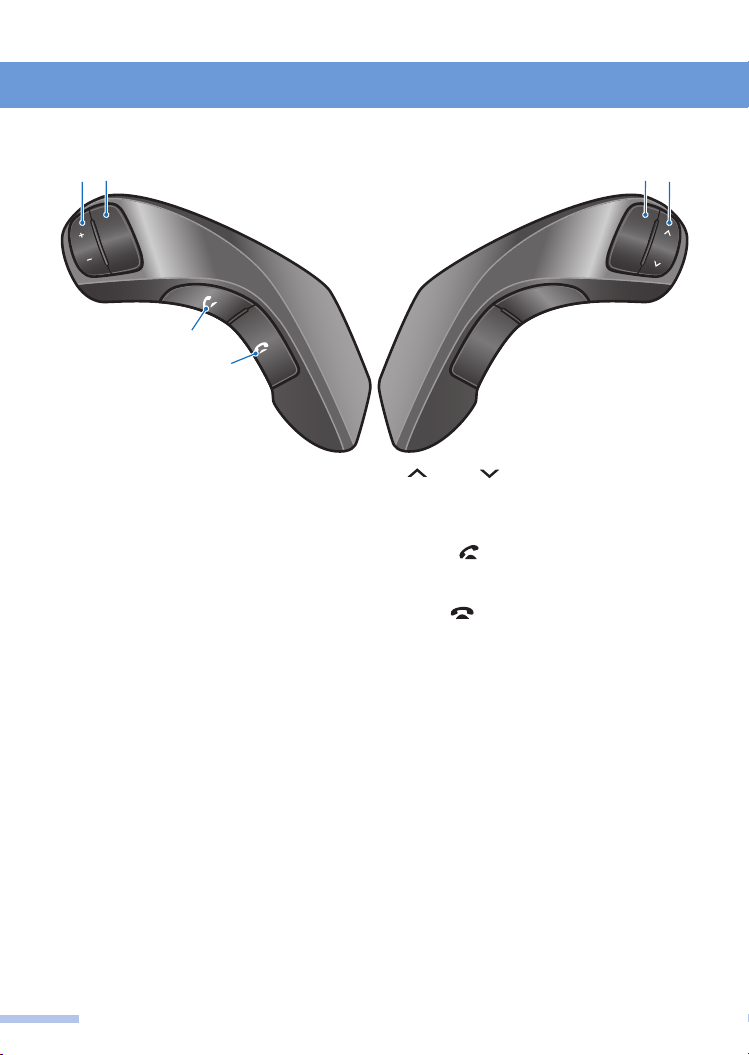
Location of controls
Steering wheel controls
➊
➌ ➍➋
MUTE
VOL
➎
➏
➊
+ VOLUME
[
VOL] - buttons:
Adjust the
volume.
➋
MUTE button:
Turn the Mute or Pause
function on/off.
➌
MODE button:
Turn the Car audio system
on, select the Radio, CD/MP3 [WMA]
player or connected external device (USB/
iPod, AUX or Bluetooth audio) playback
(press); turn the Car audio system off
(press and hold).
MODE
TRIP
RESET
➍
SEEK buttons: Skip the previous/
next preset station or track (press); fast
tune down/up the station frequence or fast-
rewind/forward a track (press and hold).
➎
CALL
[ ]
button: Enter the Phone menu
or receive an incoming call (press); make a
call via last call (press and hold).
➏
[
]
END
button: Ends/rejects a call.
2
Page 5

Getting started
Turn the unit on/off
1 Turn your car’s ignition key to ACC or
IGN (ON) position.
Or turn your car's ignition on by
pressing the smart ignition button.
2 Press the POWER
turn the unit on.
The previously selected station is
received or the song is played.
[
PWR] button to
3 Press or press and hold the POWER
[
PWR] button to turn the unit off.
To turn the power on directly
By inserting a disc, connecting the USB device
or pressing the FM/AM, CD, MEDIA or
MODE button (while the disc is inserted or the
USB/iPod/AUX/BT Audio device is
connected), you can also turn the power on and
the unit then plays.
Adjusting the volume level
1 Rotate the VOLUME dial to increase
or to decrease the volume level.
The display will show the volume level
(Audio mode: 00 to 31 / Call mode: 00 to
31).
Muting the sound quickly
1 Press the MUTE button on the
Steering wheel controls to set mute or
pause on.
"MUTE" or "PAUSE" will flash on the
display.
During the CD/USB, paused the
playback and mute the sound.
To restore the sound or resume CD/USB
playback, press the MUTE button on the
Steering wheel controls or rotate the
VOLUME dial.
Switching the screen
brightness
1 Press the DISPLAY [DISP] button to
switch the screen brightness high or
low.
Setting the Audio
You can adjust the level of the Bass/Treble/
Balance/Fade/AUX volume/SPD volume.
1 Press the SETUP button to enter the
System setup screen.
The System setup screen will be
displayed for 5 seconds.
2 Rotate the TUNE dial to select the
"Audio" then press the ENTER button.
3 Press the ENTER
desired Audio setup menu.
By pressing the ENTER button, you can
select one of the Audio setup menu as
following: Bass → Treble → Balance →
Fade → AUX VOL → SPD VOL
button to select the
4 Rotate the TUNE dial to select the
level, then press
●
Bass: adjust the bass sound level (-5 to
+5).
●
Treble: adjust the treble sound level (-5
to +5).
●
Balance: adjust the sound balance
between the right and left speakers (-5
to +5).
●
Fade: adjust the sound fade between
the front and rear speakers (-5 to +5).
●
AUX VOL (Auxiliary Volume): adjust
the AUX volume level (LOW/MID/HI).
●
SPD VOL (Speed Dependent Volume
Control: adjust the SPD volume level
(0 to 5).
the ENTER button.
3
Page 6

Getting started
Setting the Bluetooth
1 Press the SETUP or CALL [ ]
button to enter the System setup or
Phone menu screen.
The System setup or Phone menu
screen will be displayed for 5 seconds.
In case of the CALL [
pressed, skip next 2 steps.
] button is
2 Rotate the TUNE dial to select the
"Bluetooth", then press the ENTER
button.
3 Rotate the TUNE dial to select the
desired Bluetooth control menu, then
press the ENTER button.
By rotating the TUNE dial, you can
select one of the Bluetooth control
menus as follows; Pair Device ↔ Select
Device ↔ Delete Device ↔ On/OFF.
In case of the "Pair Device" is selected,
follow steps 4 to 6 on page 11 "Pairing
your phone and car audio system" to
complete the pairing.
• Pair Device: enter the pairing (Pin code:
0000/Device name Grand I10).
4 Rotate the TUNE dial to select device
list or On/Off, then press the ENTER
button.
• Select Device: selects one of five
Bluetooth devices for connection.
• Delete Device: deletes the Bluetooth
device.
• On/Off: Activate/deactivate the
Bluetooth function.
Setting the Language
You can select the language for displaying.
1 Press the SETUP button to enter the
System setup screen.
The System setup screen will be
displayed for 5 seconds.
2 Rotate the TUNE dial to select the
"Language", then press the ENTER
button.
3 Rotate the TUNE dial to select the
desired language, then press the
ENTER button.
Setting the Scroll Direction for
TUNE dial rotation
1 Press the SETUP button to enter the
System setup screen.
System setup screen will be displayed
for 5 seconds.
2 Rotate the TUNE dial to select the
"Scroll Direction", then press the
ENTER button.
3 Rotate the TUNE dial to select the UP
or DOWN, then press the ENTER
button.
4
Page 7

Radio
Tuning in a station
● Turn on the radio
1 Press the FM/AM button repeatedly to
select the band.
FM1 → FM2 → FMT → AM → FM1 ....
● Tuning a station manually
2 Rotate the TUNE dial to tune to a
desired frequency.
● Tuning a station automatically
3 Press the SEEK/TRACK buttons
to tune a station automatically.
The tuning automatically stops at the
stations whose signals can be received,
and the station is selected.
Note
• When tuning in stations while driving, use
Preset number button to prevent accidents.
Using the Preset station
You can preset six stations for each band (FM1,
FM2, FMT and AM).
● Storing stations manually
1 Follow steps 1 to 3 on this page
"Tuning in a station" to tune to the
frequency you wish to preset.
2 Press and hold the Preset number [1
RPT
] ~ [6 RDM] buttons for more than 2
seconds to select the preset number.
The frequency is stored in the selected
preset number and you will hear a beep.
To preset another station, repeat these
steps.
Note
If you try to store another station using the same
preset number, the previously stored station will be
replaced.
● Storing stations automatically
• The unit selects the stations with the strongest
signals within the selected band, and stores
them in the order of their frequency.
• Up to six stations can be stored in the current
band.
1 Press the FM/AM button repeatedly to
select the band.
FM1 → FM2 → FMT → AM → FM1 ....
2 Press and hold the AST button for
more than 2 seconds.
"AUTO STORE" appears on the display.
The unit stores stations in the order of
their frequencies on the number buttons.
Notes
• If only a few stations can be received due to
weak signals, some number buttons will retain
their former settings.
• When a number is indicated in the display, the
unit starts strong stations from the one
currently displayed.
● Listening to a Preset station
1 Press the FM/AM button repeatedly to
select the band.
FM1 → FM2 → FMT → AM → FM1 ....
2 Press the Preset number [1 RPT] ~ [6
RDM
] button on which the desired
station is stored.
5
Page 8

MP3 [WMA]/CD player
Before disc playback
• You can play CD-DA and MP3/WMA discs.
• This unit cannot play the following files:
- MP3 files encoded with MP3i and MP3 PRO
format.
- MP3 files encoded in an inappropriate
format.
- MP3 files encoded with Layer 1/2.
- WMA files encoded with lossless,
professional, and voice format.
- WMA files which are not based upon
Windows Media
- WMA files copy-protected with DRM.
- WMA 10 version.
- Files which have data such as WAVE,
ATRAC3, etc.
Note : Available discs
• CD-DA : CD-R/CD-RW
• MP3/WMA : CD-R/CD-RW/CD-ROM
Caution
• 3" (8 cm) CD is not playable with this unit, so
do not insert it.
• Do not use irregularly shaped discs.
• Do not use discs that have a seal or label
attached.
• To avoid damaging the front panel, do not
push it down or place objects on it while it is
open.
• Do not put your finger or hand in the front
panel.
• Do not insert foreign objects into the disc slot.
Note
• The power will be turned on automatically
when a disc is loaded.
A disc which has both CD-DA data and MP3/
WMA data on it may not play correctly.
®
Audio.
About CD-R/CD-RW
• Use only "finalised" CD-Rs or CD-RWs.
• This unit can play back only files of the same
type which are first detected if a disc includes
both audio CD (CD-DA) files and MP3/WMA
files.
• This unit can playback multi-session discs;
however, unclosed sessions will be skipped
while playing.
• Some CD-Rs or CD-RWs may not play back
on this unit because of their disc
characteristics, or for the following reasons:
- Discs are dirty or scratched.
- Moisture condensation occurs on the lens
inside the unit.
- The pickup lens inside the unit is dirty.
- CD-R/CD-RW on which the files are written
with “Packet Write” method.
- There are improper recording conditions
(missing data, etc.) or media conditions
(stained, scratched, warped, etc.).
• CD-RWs may require a longer readout time
since the reflectance of CDRWs is lower then
that of regular CDs.
• Do not use the following CD-Rs or CD-RWs:
- Discs with stickers, labels, or protective
seals stuck to the surface.
- Discs in which labels can be directly printed
by an ink jet printer.
• Using these discs under high temperatures or
high humidity may cause malfunctions or
damage to the unit.
About MP3/WMA
• This unit can playback MP3/WMA files with
the extension code<.mp3> or <.wma>
(regardless of the letter case-upper/lower).
• This unit can show the names of albums,
artists (performer), and Tag (Version 1.0, 1.1,
2.2, 2.3, or 2.4) for MP3 files and for WMA
files.
• This unit can display only one-byte characters,
no other characters can be correctly displayed.
• This unit can playback MP3/WMA files
meeting the conditions below:
- Bit rate:
8 kbps ~ 320 kbps for MP3 / 64 kbps ~ 161
kbps (VBR) for WMA
- Sampling frequency:
48 kHz, 44.1 kHz, 32 kHz (for MPEG-1
Layer 2/3)
24 kHz, 22.05 kHz, 16 kHz (for MPEG-2
Layer 2/3)
6
Page 9

MP3 [WMA]/CD player
12 kHz, 11.025 kHz, 8 kHz (for MPEG-2.5
Layer 3)
- Disc format: ISO/IEC 11172-3, ISO/IEC
13818-3
• The maximum number of characters for file/
folder names vary among the disc format used
(includes four extension characters - <.mp3>
or <.wma>).
- ISO 9660 Level 1: up to 12 characters
- ISO 9660 Level 2: up to 31characters
- Romeo: up to 128 characters
- Joliet: up to 64 characters
- Windows long file name: up to 128
characters
• The unit can playback files recorded in VBR
(variable bit rate). Files recorded in VBR have
a discrepancy in elapsed time display, and do
not show the actual elapsed time. After
performing the search function, this difference
becomes noticeable.
• The unit can recognise a total of 512 files, of
200 folders, and of 8 hierarchies.
Note
Microsoft and Windows Media are either
registered trademarks or trademarks of
Microsoft Corporation in the United States and/
or other countries.
Loading a disc and starting
playback
1 Insert a disc into the disc slot with the
label side facing up.
FM/AM AST
CD
MEDIA SETUP
SEEK
TRACK
VOLUME TUNE/FILE
PUSH
PWR
1 RPT 5 INFO 6 RDM2 3 4
FOLDER
• Playback will start automatically after
recognizing the data of the loading disc.
• It may take some time to start playing.
DISP
PUSH
ENT
• All tracks will be played repeatedly until
you change the source or eject the disc.
Note:
• Do not insert a disc when the disc indicator
light on the display window is illuminated
because a disc is already loaded.
• When disc is in the unit, press CD button
repeatedly to select the CD and playback
starts.
Controlling the playback
1 Press the SEEK/TRACK
buttons repeatedly to go to the
previous or next tracks.
• For MP3 or WMA disc, you can skip
tracks within the same folder.
2 Press and hold the SEEK/TRACK
to fast rewind or forward the track,
and release to resume the playback.
• The search function works but search
speed is not constant.
• While fast rewinding or forwarding, you
can only hear intermittent sounds.
3 Press the FOLDER button
repeatedly to go to the previous or
next folders (only for MP3 or WMA
disc).
Selecting the playback modes
1 Press the [1 RPT] button to activate/
deactivate the Repeat playback.
• RPT: The current track plays
repeatedly.
• Off: All tracks of disc play repeatedly.
2 Press the [6 RDM] button to activate/
deactivate the Random playback.
• RDM: All tracks of disc play in random
order.
• Off: Cancels random playback.
7
Page 10

MP3 [WMA]/CD player
Showing the song information
1 Press the [5 INFO] button repeatedly to
show the current song’s other
information.
Searching the track/file
1 Press the ENTER button to enter the
Music search mode.
Track/File list screen will be displayed
for 5 seconds.
2 Press the FOLDER button to
select the desired folder/categogy,
then press the ENTER button to enter
the track list of the selected folder/
category.
If necessary, repeat this step to select
the desired folder or category.
3 Rotate the FILE dial to select the
desired track/file name, then press the
ENTER button to start play back of
the selected track/file.
Stopping playback and
ejecting a disc
[
1 Press the EJECT
take the disc.
FM/AM AST
CD
MEDIA SETUP
SEEK
TRACK
VOLUME TUNE/FILE
PUSH
PWR
1 RPT 5 INFO 6 RDM2 3 4
Note: Ejecting a disc
If the ejected disc is not removed within 10
seconds, the disc is automatically inserted again
into the loading slot to protect it from dust. (Disc
will not play this time.)
Note: Changing the source
If you change the source, playback also stops
(without ejecting the disc).
Next time you select "CD" as the playback
source, disc play starts from where it was
stopped previously.
]
button, and
FOLDER
DISP
PUSH
ENT
8
Page 11

USB/AUX player
Precautions for handling USB
device/iPod
●
When using the external USB device, make sure
to keep the device disconnected and connect
only some time after turning on the vehicle
ignition. The USB device may be damaged if the
USB device is already connected when the
ignition is turned on. (USB device is not an
electronic automotive component)
●
Some USB devices may not operate properly
because of compatibility issues. Check that the
external device is supported by the device before
starting use.
●
The device will only recognise USB devices
formatted in FAT16 or FAT 32. (NTFS format is
not supported.) When formatting the external
USB device, the device may not properly
recognise a Byte/Sector selection other than 512
Byte or 2048 Byte.
●
Avoid contact of body parts and foreign
substances with the USB connector.
●
Repeatedly connecting/disconnecting the USB
in a short period of time may cause damage to
the device.
●
When disconnecting the USB, an abnormal
sound may occur occasionally.
●
Abruptly disconnecting the external USB device
while the USB is operating may cause the device
to be damaged or function abnormally.
Make sure to disconnect the USB device only
after the audio power is turned off or when the
audio is operating in a different mode.
●
The amount of time required to recognise the
external USB device may differ depending on
the type, size, or file formats stored on the USB.
Such differences in the required time are not
indications of malfunction. Please wait the
period of time required to recognise the device.
●
The device supports only USB devices used to
play music files.
●
Do not use the USB I/F to charge batteries or
USB accessories which generate heat. Such acts
may lead to deteriorated performance or damage
to the device.
●
The device may not recognise the USB device if
separately purchased USB hubs and extension
cables are used.
●
In the case of high capacity USB devices, there
are instances where the logical drives are
partitioned for user convenience. In this case, it
will only be possible to play the USB music in
the top level drive.
When using partitioned drives, save the songs
you wish to play on the device only in the top-
level logical drive. In addition, certain USB
devices are configured with a separate drive used
to install application programs and it may not be
possible to play songs from such drives for the
reasons described above.
●
The device may not support normal operation
when using formats such as HDD Type, CF, or
SD Memory.
●
The device will not support files locked by DRM
(Digital Rights Management).
●
iPod is a registered trademark of Apple
Corporation in the United States and/or other
countries.
●
This product connects iPod models which
support the following and other devices are not
supported.
- iPod Nano/iPod/iPod Touch/iPhone models
●
Some iPod/iPhone models may not be
supported/connected.
●
Only connect the iPod to this product with
connection cables supported by iPod products.
Other connection cables cannot be used.
●
In some cases, the iPod product may be
damaged if the ignition is turned off while it is
connected to the product. When the iPod product
is not being used, keep it separate from this
product with the car ignition turned off.
●
The playback functions and the information
display items of the iPod player used with this
product may differ from the iPod in terms of
play order, method, and the information
displayed.
9
Page 12

USB/AUX player
Playing a USB device/iPod
By connecting a USB device or iPod to the USB
cable at the USB input jack on the unit, you can
listen on your car speakers, while controlling the
USB device or iPod from the unit.
1 Connect the USB storage device or
iPod with MP3/WMA files to be played
to the USB input terminal.
FM/AM AST
CD
MEDIA SETUP
SEEK
TRACK
VOLUME TUNE/FILE
PUSH
PWR
1 RPT 5 INFO 6 RDM2 3 4
FOLDER
DISP
PUSH
ENT
The "USB" or "iPod" appears and
playback starts automatically after
recognizing the data of the USB storage
device or iPod.
2 When the USB storage device or iPod
is already connected, press the
MEDIA button to enter the Media
menu screen, then select the USB or
iPod by using the TUNE dial with
ENTER button.
The USB/iPod playback will start
automatically.
You can change the volume, playback mode
and folder/category or file/track selection by
using buttons and dials on control panel.
(Refer to "MP3[WMA]/CD player" section)
Listening to Auxiliary audio
equipment
By connecting an optional portable audio device to
the AUX input jack (stereo mini jack) on the unit
and then simply selecting the source, you can listen
on your car speakers. The volume level is
adjustable for any difference between the
unit and the portable audio device.
1 Turn down the volume on the unit.
2 Turn off the external audio equipment.
Connect the audio output of the
external audio equipment to the AUX
input terminal on the unit.
Be sure to adjust the volume for each
connected audio device before
playback.
FM/AM AST
CD
MEDIA SETUP
SEEK
TRACK
VOLUME TUNE/FILE
PUSH
PWR
1 RPT 5 INFO 6 RDM2 3 4
FOLDER
DISP
PUSH
ENT
When the external audio equipment is
already connected, press the MEDIA
button to enter the Media menu
screen, then select the AUX by using
the TUNE dial with ENTER button.
3 Start playback of the external audio
equipment at a moderate volume.
4 Set your usual listening volume level
on the unit.
10
Page 13

Bluetooth
Bluetooth operation
To use the Bluetooth function, the following
procedure is necessary.
1. Pairing
When connecting Bluetooth devices for the
first time, mutual registration is required.
This is called "pairing". This registration
(pairing) is required only for the first time,
as this unit and the other devices will
recognize each other automatically from
the next time. (Depending on the device,
you may need to input a pass code for
each connection.)
2. Connection
Sometimes pairing allows automatic
connection.
To use the device after pairing is made,
start the connection.
3. Hands-free talk/Music streaming
You can call a mobile phone and listen to
music when the connection is made.
• Some Bluetooth devices may not support
specific functions.
Pairing your phone and car
audio system
First, register ("pair") a Bluetooth device (mobile
phone, etc.) and this unit with each other. You
can pair up to six devices. Once pairing is
established, there is no need to pair them again.
Place the Bluetooth device within 3 m (9 ft) of
this unit.
[
1 Press the CALL
to enter the Phone or System setup
screen.
Phone or System setup screen will be
displayed for 5 seconds.
In case of CALL
skip next 2 steps.
]
or SETUP button
[
]
button is pressed,
2 Rotate the TUNE dial to select the
"Bluetooth", then press ENTER button.
3 Rotate the TUNE dial to select the
"Pair Device" menu, then press
ENTER button.
The unit enters pairing standby mode.
The "Ready to Pair Pin:0000" appears in
the display.
4 Set the Bluetooth device to search for
this unit.
A list of detected devices appears in the
display of the connecting device. This
unit is displayed as "Grand I10" on the
connecting device.
Confirm this by pressing "YES" or "OK"
on your phone.
- If your phone does not find "Grand I10"
repeat steps 1 ~ 2.
5 If *Pin code input is required on the
display of a connecting device, input
"0000" (4 digit).
This unit and Bluetooth device memorise
each other’s information, and when
pairing is made, the unit is ready for
connection to the device.
"Bluetooth device model name" and
"Connected" with "
after pairing is completed.
- Some Bluetooth devices ask you to accept the
"BT link" or "Connect". Enter "Yes" or "OK".
* Pin code may be called "passcode," "Pass key,"
"PIN number" or "password," etc., depending
on the device.
" indicator appear
6 Set the Bluetooth device to connect to
this unit.
Note: Pairing standby mode is not released until
the connection is made.
Notes: When Pairing Bluetooth Devices
This unit supports the Bluetooth profile
"Advanced Audio Distribution Profile" (A2DP).
If your mobile phone or music player supports
this profile then it is possible to listen to music
tracks located on your Bluetooth device through
this unit and car speakers.
Additionally, this unit supports the "Audio Video
Remote Control Profile" (AVRCP). If your
Bluetooth mobile phone or music player supports
this profile then it is possible to advance to the
11
Page 14

Bluetooth
next track or replay previous tracks on using the
buttons on the front of this unit or steering wheel
remote controls (if fitted) on your vehicle.
Notes When Playing Bluetooth Audio:
- Check your Bluetooth device user manual for
details of how to play music tracks via an
external Bluetooth audio system such as this
unit.
- Some Bluetooth mobile phones cannot play
music at all or may play music tracks in low
quality audio through this unit.
- Text Information attached to music tracks on
the music player (e.g. the elapsed playing time,
song or artist name etc.) will not be displayed
on this unit.
- Playback may automatically begin as soon as
the Bluetooth Audio mode is selected using this
unit or steering wheel buttons.
Notes When Pairing Bluetooth Devices:
- This unit allows a maximum of 6 Bluetooth
devices to be paired. Once paired, the device is
retained in memory and pairing is not required
again unless the device is deleted from the car
radio.
- Only one Bluetooth mobile phone may be
connected to this unit at one time for hands free
telephone operation.
- If a Bluetooth music player is to be connected
together with a mobile phone, refer to next
page "Listening to music from a Bluetooth
device".
- Bluetooth connection between this unit and
mobile phone is normally established using the
Hands Free Profile (HFP). However, some
mobile phones may only allow the connection
to establish in Head Set Profile (HSP) and
therefore some functions may not be available.
Connecting a mobile phone
- Devices are registered once paired and
connected with this unit. You can select the
registered device and connect it.
- If pairing has already been achieved, start
operation from here.
- Depending on the device, connection may start
automatically after pairing.
12
1 Connect to this unit using your mobile
[
phone and press the CALL
The "Connected" with " " icon is
appeared and Bluetooth signal is
switched to on.
]
button.
Receiving a call
When receiving a call, the ring tone is output
from your car speakers and caller’s number
appears on screen.
1 When a call comes in, "Incoming Call"
and "Telephone number" appears with
a ring tone, press the CALL
button or select the
the TUNE dial with ENTER button to
answer a call.
"Calling" appears and the phone call starts.
The built-in microphone of this audio
system will pick up your voice.
●
: Ends a call.
● / : Switch the private/hands-free call
mode.
●
#123: Enter the number entering mode.
To reject an incoming call, press and
hold the CALL
[ ]
icon by using the TUNE dial
the
with ENTER button.
"CALL REJECT" appears and return to
previous function.
[ ]
[ ]
button or select
Making a call
You can make a call from the connected mobile
phone by operating this unit.
● Redialing the Last Call
1 Press and hold the CALL
for more than 2 seconds to enter the
last call dial mode.
"Outgoing Call" appears and the phone
redialling starts.
● Using the Call History
[
1 Press the CALL
the Phone menu screen.
]
button to enter
[
]
[
]
button
icon by using
Page 15

Bluetooth
2 Rotate the TUNE dial to select the
"Call Lists" menu, then press the
ENTER button.
3 Select the desired History type and
Call number by using TUNE dial with
ENTER button.
"Outgoing Call" appears and the phone
dialing starts.
● Using the Dial function
1 During the Bluetooth menu screen,
Select the Call Number menu by
using the TUNE dial with ENTER
button.
2 Rotate the TUNE dial to select the
desired number then press the
ENTER button to enter the selected
number.
To complete telephone number, repeat
this step.
3 Rotate the TUNE dial to select the
[
Dialing
button.
"Outgoing Call" appears and the phone
dialling starts.
]
icon then press ENTER
● Using the Phone Book
This unit can store 500 names. Names with a
maximum length of up to 16 characters and phone
numbers with a maximum length of up to 20 digits
can be displayed. This unit downloads contacts
automatically from the Bluetooth mobile phone
once a Bluetooth phone is connected.
1 During the Bluetooth setup screen,
Select the Phone Book menu by using
the TUNE dial with ENTER button.
2 Selects the desired phone number by
using the TUNE dial with ENTER
button.
"Outgoing Call" appears and the phone
dialling starts.
Notes:
- The Phonebook feature is not operated during
the Phonebook downloading.
- Some mobile phones may not support Phone
Book Access Profile (PBAP) and therefore the
Phonebook feature may not be available.
Adjusting the talk volume
1 Rotate the VOLUME dial to increase
or to decrease the talk volume level.
The display will show the Bluetooth
volume level.
Transferring a call
In order to activate/deactivate the appropriate
device (this unit/mobile phone), check the
following.
1 During a call via Bluetooth hands-free,
rotate the TUNE dial to select the
Private
ENTER button.
The hands free function is deactivated,
and the mobile phone calling starts.
During a call via mobile phone, select
the Hands-free
TUNE dial with ENTER button.
The Bluetooth hands-free function is
activated and hands-free calling will
starts.
For details on mobile phone operation,
refer to your mobile phone manual.
Note:
Depending on the mobile phone, hands-free
connection may be cut off when call transfer is
attempted.
Ending a call
1 Press the END
the End
dial with ENTER button.
Note
Even if the call is ended, the Bluetooth
connection is not canceled.
[
]
icon, then press the
[ ]
icon byusing the
[
]
[
button or select
]
icon by using the TUNE
13
Page 16

Bluetooth
Listening to music from a
Bluetooth device
This unit supports the Bluetooth profile "A2DP
(Advanced Audio Distribution Profile)". If your
mobile phone or music player supports this profile
then it is possible to listen to music tracks located
on your Bluetooth device through this unit and car
speakers.
Additionally, this unit supports the "AVRCP
(Audio Video Remote Control Profile)". If your
Bluetooth mobile phone or music player supports
this profile then it is possible to advance to the
next track or replay previous tracks on using the
buttons on the front of this unit or steering wheel
remote controls (if fitted) on your vehicle.
1 Switch to Bluetooth signal on your
mobile phone/music device.
"Stereo Headset" appears when the
connection is made.
2 Press the MEDIA button to enter the
Media menu screen, then select the
BT Audio by using the TUNE dial with
ENTER button.
"BT AUDIO" screen appears.
3 Operate the your mobile phone or
music player to start playback.
You can change the volume and skip
track by using buttons on this unit.
(Refer to "MP3 [WMA]/CD player"
section)
14
Page 17

Appendix
WARNING
This equipment has been tested and found to
comply with the limits for a Class B digital
device, pursuant to Part 15 of the FCC Rules.
These limits are designed to provide
reasonable protection against harmful
interference in a residential installation. This
equipment generates, uses, and can radiate
radio frequency energy and, if not installed
and used in accordance with the instructions,
may cause harmful interference to radio
communications. However, there is no
guarantee that interference will not occur in a
particular installation. If this equipment does
cause harmful interference to radio or
television reception, which can be determined
by turning the equipment off and on, the user
is encouraged to try to correct the interference
by one or more of the following measures:
- Reorient or relocate the receiving antenna.
- Increase the separation between the
equipment and receiver.
- Connect the equipment into an outlet on a
circuit different from that to which the
receiver is connected.
- Consult the dealer or an experienced
radio/TV technician for help.
You are cautioned that any changes or
modifications not expressly approved in this
manual could void your authority to operate
this equipment.
This equipment should be installed and
operated with minimum 20 cm between the
radiator and your body.
PRECAUTIONS
When the inside of the car is very cold and
the CD player is used soon after switching
on the vehicle heater, moisture may form on
the disc or the optical parts of the player and
proper playback may not be possible. If this
occurs, do not use the player for about one
hour. The condensation will disappear
naturally allowing normal operation.
THIS DEVICE COMPLIES WITH PART 15 OF
THE FCC RULES. OPERATION IS SUBJECT TO
THE FOLLOWING TWO CONDITIONS:
(1) THIS DEVICE MAY NOT CAUSE HARMFUL
INTERFERENCE, AND (2) THIS DEVICE MUST
ACCEPT ANY INTERFERENCE RECEIVED,
INCLUDING INTERFERENCE THAT MAY
CAUSE UNDESIRED OPERATION.
15
Page 18

Appendix
Product and Warranty Service
This unit is guaranteed against defective parts
and workmanship for a period of three years
from the date of the first vehicle registration
after new vehicle sale.
In the event your MP3/WMA CD Player is
faulty, please take your HYUNDAI vehicle to
your nearest HYUNDAI dealer for their
diagnostic inspection of your MP3/WMA CD
Player.
If proven defective, your HYUNDAI dealer will
implement a change over product service to
replace your faulty MP3/WMA CD Player.
This product guarantee does not cover
damage to your MP3/WMA CD Player (with
CD, MP3/WMA and TUNER) if it has been
subjected to misuse or abuse. A fee to extend
warranty service to any unit that has been
misused or abused will be applied prior to any
service work carried out.
This guarantee does not cover any call for
warranty service or change over product
service if it is recognized that your complaint
is caused by your use of damaged, faulty CD
Discs or imperfect CD-R and CD-RW discs or
USB devices.
The guarantee does not cover operating and/
or performance expectations beyond the
specifications shown in this user manual.
* CE
Hereby, ' Humax Automotive Co., Ltd. '
declar
es that this HAMT1001 is in
compliance with the essential
requirements and other relevant
provisions of directive 1999/5/EC.
MP3/WMA Information
This unit is able to play MP3 and WMA music
files from a compact disc or USB memory
device.
MP3 is an abbreviation of Motion Picture
Experts Group (MPEG) Audio layer 3.
MP3 audio format files are typically only
1/10th the size of conventional CD DA audio
files. Most MP3 files are created on a
personal computer using special software.
Additional text information such as track
TITLE, ARTIST and ALBUM included in the
audio track can be displayed on this unit. The
sound quality of MP3 files varies depending
on the settings used when the file was
created. This unit plays most MP3 files.
WMA is an abbreviation of Windows Media
Audio, an audio format developed by
Microsoft Corporation. WMA is similar to MP3
with respect to size, sound quality and text
display.
WMA files are created using the Windows
Media Player on a personal computer. This
unit plays most WMA files.
Note:
- The elapsed playing time shown on the
display may not be correct when playing
MP3 files encoded with variable bit rate
(VBR).
- MP3 and WMA files encoded at bit rates
lower than 128 KB/s will provide lower
sound quality compared to conventional CD
DA audio tracks.
-- MP3 and WMA files with digital rights
management* (DRM) activated cannot be
played on this car audio set.
- Only 27 character file names are displayed.
- Only FAT16 and FAT32 file systems are
supported.
-- Only ID3 tags V1.1 and V2.2 are supported.
16
Page 19

Specifications
General section
Power supply: DC 14.4 V Negative Ground
Speaker impedance: 4 ohm
Max. Power: 45 Watts x 4 Ch
AM/FM Radio section
Frequency range: AM 522 kHz ~ 1,620 kHz
Usable sensitivity: AM ≤ 35 dBu / FM ≤ 18 dBu
Signal to noise ratio: AM ≥ 40 dB / FM ≥ 45 dBu
Stereo separation: FM ≥ 20 dB
USB MP3[WMA] section
Frequency response: 20 Hz ~ 20 kHz
Total harmonic distortion: 0.1 % (at 1 kHz)
Dynamic range: 85 dB (at 1 kHz)
Signal-to-Noise ratio: 60 dB (at 1 kHz)
Channel separation: 54 dB (at 1 kHz)
USB Charging Current: 2.1 A (max)
MP3[WMA]/CD section
Sampling frequency: 8 times oversampling
DA converter: 4 DAC system
Pick-up type: Astigma 3-beam
Light source: Semiconductor laser
Wave length: 780 nm
Frequency response: 20 Hz ~ 20 kHz (± 3 dB)
Signal to noise ratio: ≥ 50 dB
Total harmonic distortion: ≤ 1 % (1 kHz)
Wow and flutter: Below measurable limits
Channel separation: ≥ 35 dB
Bluetooth section
Frequency: 2,402 ~ 2,480 MHz
Specification: 2.0 + EDR
Profile: Head Set Profile (1.0), Hands-free Profile (1.5), Advanced Audio
FM 87.5 MHz ~ 108.0 MHz
Distribution Profile (1.2), Audio/Video Remote Control Profile (1.0),
Phone Book Access Profile
AUX section
Input Sensitivity: 2 V (Volume Step 20 ) / 400 and 800 mV @ 10 K Ohm
Specifications and design are subject to modification without notice due to improvements.
17
 Loading...