

Page 1
User Manual
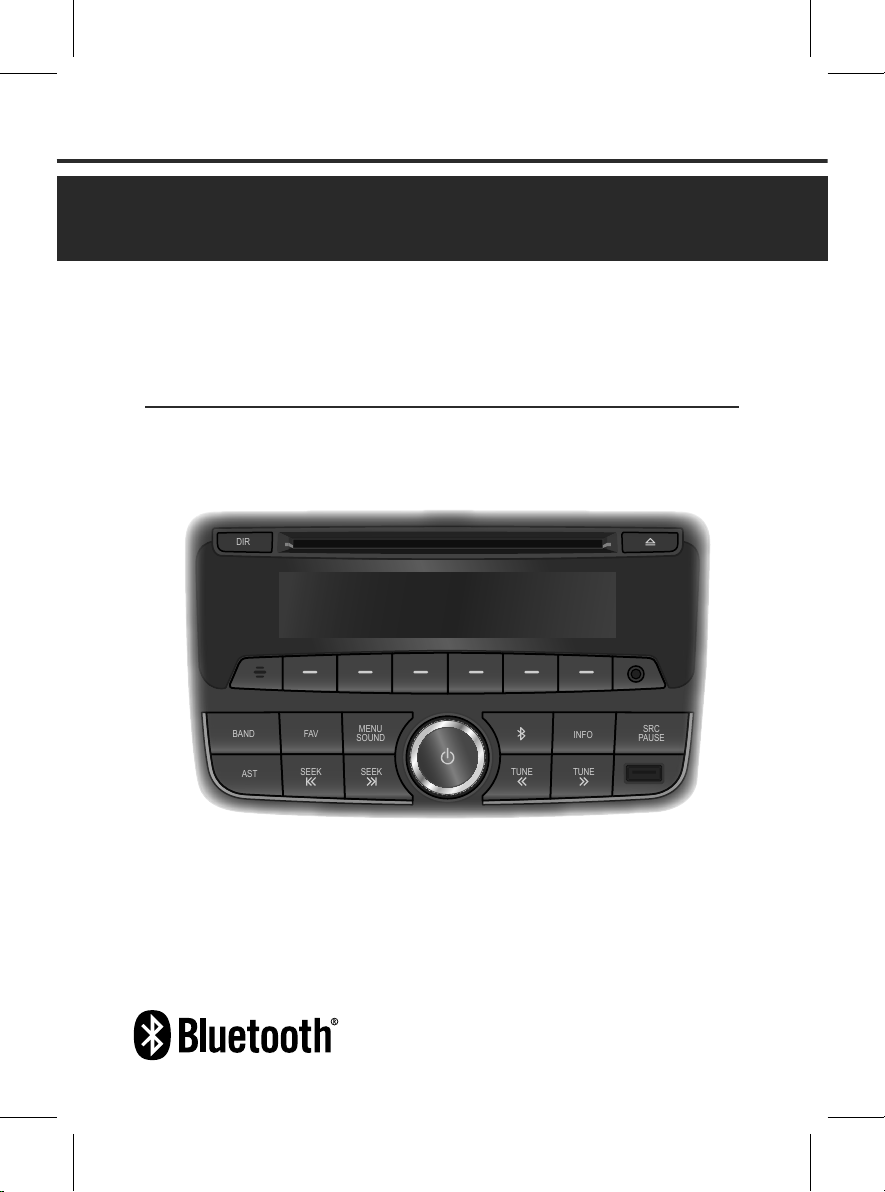
BAND
AST
SEEK
FAV
MENU
SOUND
SEEK
SRC
PAUSE
TUNE
TUNE
INFO
DIR
BAND
AST
SEEK
FAV
MENU
SOUND
SEEK
SRC
PAUSE
TUNE
TUNE
INFO
DIR
SEA-C3000S
CD/USB/iPod/Bluetooth Player
with AM/FM Radio
Page 2

Please read this manual carefully before operating your set and retain it for future reference.
Designs and specifications are subject to change without prior notice.
Page 3

English
Contents
Safety Information ..........................2
Getting started ................................5
Control buttons, functions and device
connections ........................................... 5
Control unit buttons and functions ........ 5
Basic operation...................................... 6
Turning the unit on/o ........................... 6
Adjusting the volume ............................. 6
Muting the sound quickly ...................... 6
Adjusting the bass/middle/treble for tone . 6
Adjusting the balance/fader for speakers 6
Setting the Sound style ......................... 6
Using the ChevyStar ............................. 7
Radio ...............................................7
Using the FM/AM radio .......................... 7
FM/AM radio screen .............................. 7
Listening to radio stations (FM/AM) ...... 7
Storing radio stations manually ............. 8
Storing radio stations automatically ...... 8
Selecting a preset radio station ............. 8
CD/MP3 [WMA] player ...................9
Before using the CD/MP3 player .......... 9
MP3/WMA disc format ..........................9
Using the CD/MP3 player .................... 10
Loading a disc and starting playback .. 10
Selecting the CD/MP3 disc player ...... 11
Using the Pause function ................... 11
Change the playback track ................. 11
Changing the playback position .......... 11
Changing the track informations ......... 11
Changing the playback mode ............. 11
Change the playback folder for MP3/
WMA disc ............................................ 11
Playing a folder for MP3/WMA disc ..... 11
Cautions for using USB devices ........ 12
Using the USB/iPod player ................. 13
Connecting a USB device or iPod to the
USB port ............................................. 13
USB or iPod playback screen ............. 13
Changing the playback le .................. 13
Fast-forwarding and re-winding the le 13
Change the folder for USB play .......... 13
Playing a folder for USB ...................... 13
Using the iPod menu ........................... 13
AUX player ...................................15
Connecting an external audio device to
the AUX port ........................................ 15
Using the AUX player .......................... 15
Bluetooth Connectivity ................16
About the Bluetooth feature ............... 16
Pairing devices .................................... 16
Connecting devices ............................. 16
Using the hands-free feature and listening
to music ............................................... 16
Bluetooth connection .......................... 16
Connecting a Bluetooth device ........... 17
Auto connection .................................. 17
Unpairing ............................................. 17
Bluetooth audio player ........................ 17
Pairing and connecting with a Bluetooth
device .................................................. 18
Bluetooth audio player screen ............ 18
Using the Pause function ................... 18
Change the playback track ................. 18
Ending the Bluetooth audio playback .. 18
Phone functions .................................. 17
Making a call via last call .................... 18
Incoming a call .................................... 19
Using options during a call .................. 19
Troubleshooting ...........................20
Specications ...............................21
1
Page 4

Safety Information
FCC Information to User
This equipment has been tested and found to comply with the limits for a Class B
digital device, pursuant to Part 15 of the FCC Rules. These limits are designed to
provide reasonable protection against harmful interference in a residential
installation. This equipment generates, uses and can radiate radio frequency
energy and, if not installed and used in accordance with the instructions, may
cause harmful interference to radio communications. However, there is no
guarantee that interference will not occur in a particular installation. If this
English
equipment does cause harmful interference to radio or television reception,
which can be determined by turning the equipment off and on, the user is
encouraged to try to correct the interference by one of the following measures:
- Reorient or relocate the receiving antenna.
- Increase the separation between the equipment and receiver.
- Connect the equipment into an outlet on a circuit different from that to which
the receiver is connected.
- Consult the dealer or an experienced radio/TV technician for help.
Caution
Modifications not expressly approved by the party responsible for compliance
could void the user’s authority to operate the equipment.
FCC Compliance Information
This device complies with Part 15 of the FCC Rules. Operation is subject to the
following two conditions:
(1) This device may not cause harmful interference, and
(2) this device must accept any interference received, including interference that
may cause undesired operation
IMPORTANT NOTE:
FCC RF Radiation Exposure Statement:
This equipment complies with FCC RF radiation exposeure limits set forth for an
uncontrolled environment. This equipment should be installed and operated with
a minimum distance of 20 centimeters between the radiator and your body. This
transmitter must not be co-located or operating in conjunction with any other
antenna or transmitter.
2
Page 5
Safety Information
Read and follow all safety instructions in this manual to operate the device safely and
appropriately. Malfunctions or defects caused by the user are not covered by the warranty.
Safety symbols
Warning
Indicates a potentially hazardous
situation that, if not avoided, could result
in injury or death.
Caution
Indicates a potentially hazardous
situation that, if not avoided, could result
in minor injury or property damage.
Note
Indicates items that help you understand
and maximize the performance of the
system.
Safety warnings
Warning
● Do not use the unit if there are audio
or screen problems. Operating the
unit in an abnormal state may cause
electric shock, injury, or fire.
● Do not disassemble or modify the
unit. Incorrect procedures can
cause electric shock, injury, fire, and
equipment malfunction.
● Do not use the unit at high volume
while driving. Listening at high volume
can reduce your ability to hear
external sounds and may cause an
accident.
● Do not block the vent. Restricting
airflow traps heat inside the unit and
may cause malfunction or fire.
● Do not adjust the unit while driving.
Entering information or adjusting the
controls on the unit can distract your
attention while driving and may cause
an accident. Stop your vehicle in a
safe location before adjusting the unit.
● Do not use your phone in private
mode while you are driving. You must
stop at a safe location before using the
phone in private mode.
English
3
Page 6

English
Safety Information
Safety cautions
Caution
● Some countries have laws restricting
the use of video screens while driving.
Use the unit only where it is legal to
do so.
● Do not operate the unit for a long
period while the engine is not
operating. This may cause the battery
to discharge.
● The recommended operating
temperature range for the unit is from
-20°C to 65°C. Operating the unit
outside the recommended range can
cause malfunction.
● Do not use unauthorized accessories.
Unauthorized accessories may cause
the unit to malfunction. Use authorized
accessories only.
● Do not allow the unit to come in
contact with moisture. Moisture
can damage the unit and cause
malfunction.
● When cleaning the screen, turn off
the unit and use a soft dry cloth. Do
not use abrasive cleaning products.
Abrasive products can damage the
screen or affect color and image
quality.
● Do not apply excessive force to the
unit's screen. Doing so may damage
the screen.
● Do not use sharp objects to operate
the screen. Using a sharp object may
cause damage or malfunction.
4
Page 7
English
Getting started
BAND
AST
SEEK
FAV
MENU
SOUND
SEEK
SRC
PAUSE
TUNE
TUNE
INFO
DIR
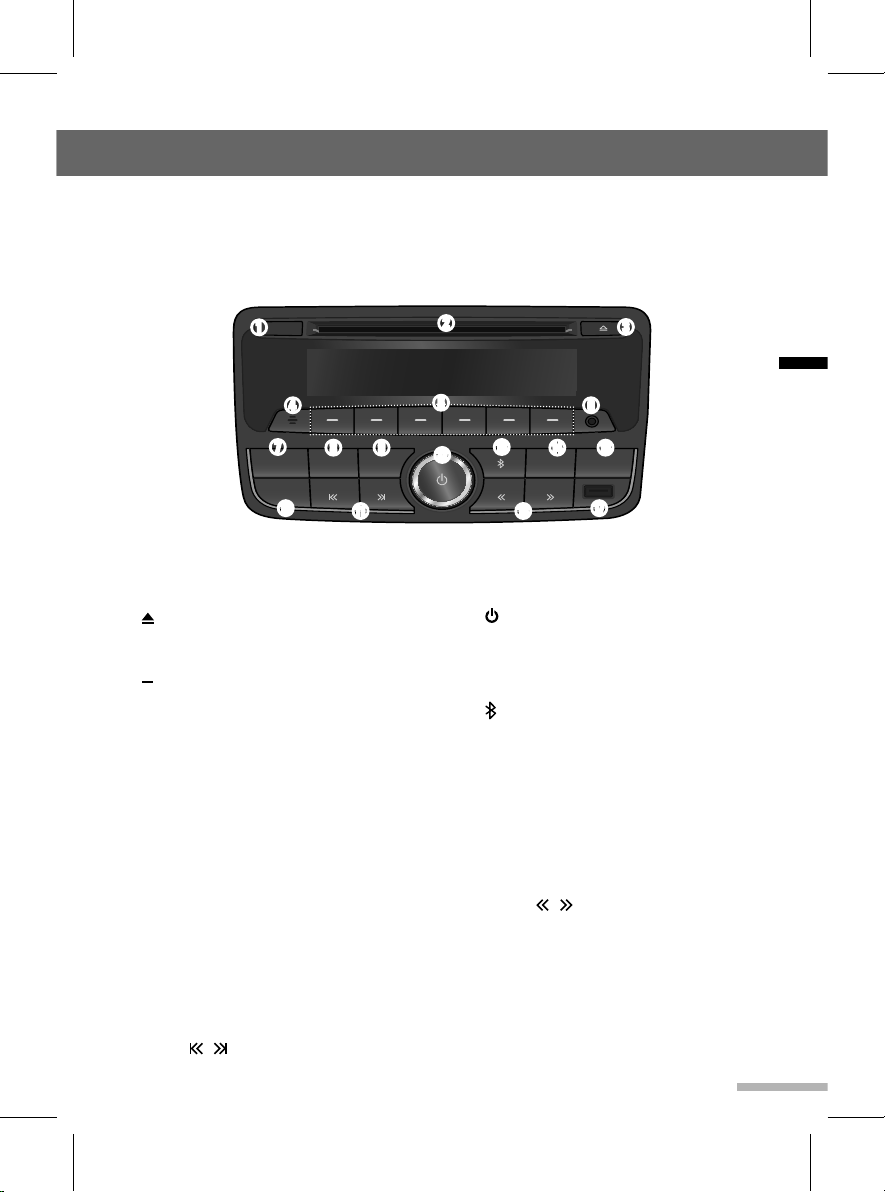
Control buttons, functions and device connections
This unit can be controlled by using the buttons on the unit. It also provides connections
for media devices. This section explains the buttons and functions that are available on the
unit and provides information about connecting media devices.
► Control unit buttons and functions
➊
➋
➌
➍ ➏
➎
➐
➑
➒
➓
➊ DIR button: Switches between the
current folder and all folders in CD/MP3/
USB playback mode.
➋ Disc slot: Insert or take out a disc.
➌ (Eject) button: Eject a disc.
➍
Microphone: Detect voice during phone
conversations.
➎ buttons for under menu shortcuts
● In Radio mode: Recall the stored radio
station (press); store the current radio
station to the Favorites page (press and
hold).
● In Menu mode: Select the function linked
to that button (press any of these buttons).
➏ AUX port: Plug an exterior sound device.
➐ BAND button: Turn on the radio or
change the FM/AM radio band.
➑ FAV button: Select the page of saved
favorite channels.
➒ MENU/SOUND button
● In iPod mode: Open the iPod menu
screen (press).
● In other mode: Open the Sound setting
menu screen (press and hold).
➓ AST button: Open the Auto Store Pages
menu screen (press).
SEEK / buttons
● In Radio mode: Automatically seeks
station with superior reception.
● In other mode: Search for the previous
or next media library.
(Power) button / Volume dial
● Switch between to standby mode and
the mode you used previously (press);
turn the screen on or off (press and
hold); adjust the volume level (rotate).
(Bluetooth) button: Open the
Bluetooth mode menu screen.
INFO button: Show the necessary
information for operations in each
mode and function.
SRC/PAUSE button: Select CD/
MP3, USB/iPod, Bluetooth audio or
AUX audio function (press); pause/
resume while a CD/MP3, USB/iPod or
Bluetooth audio is playing back.
TUNE / buttons
● In Radio mode: Tuning downward or
upward for radio frequency (press).
● In CD, USB, iPod, Bluetooth mode:
Move to the previous or next file
(press), rewind or fast forward the
track/ file (press and hold).
USB port: Plug an USB device or iPod.
5
Page 8
Getting started
FM
90.3
AM
530 600 780 1000 1400 1600
530
4
USB CD
STBT
Volume :
AM
530 600 780 1000 1400 1600
530
4
USB CD
STBT
On
Auto Store Pages
USB CD
STBT
Off
On
Auto Store Pages
USB CD
STBT
Off
Off
Research
Searching ...
>>>>
USB CD
STBT
On
89.1 91.9 93.1 95.1 95.9 97.3
Volume :
1
USB CD
STBT
AM
530 600 780 1000 1400 1600
530
4
USB CD
STBT
On
Auto Store Pages
USB CD
STBT
Off
On
Auto Store Pages
USB CD
STBT
Off
Off
Research
Searching ...
>>>>
USB CD
STBT
On
Audio Mute
FM
89.1 91.9 93.1 95.1 95.9 97.3
90.3
1
USB CD
STBT
AM
530 600 780 1000 1400 1600
530
4
USB CD
STBT
On
Auto Store Pages
USB CD
STBT
FM
89.1 91.9 93.1 95.9 97.3
95.1 KBSWORLD
1
ST
95.1
Bass
+
-
Off
Off
Searching ...
>>>>
USB CD
STBT
On
FM
89.1 91.9 93.1 95.1 95.9 97.3
90.3
1
USB CD
STBT
Volume :
1
USB CD
AM
530 600 780 1000 1400 1600
530
4
USB CD
STBT
On
Auto Store Pages
USB CD
STBT
FM
89.1 91.9 93.1 95.9 97.3
95.1 KBSWORLD
1
ST
95.1
Bass
+
-
BalMid Treb Fad P-EQ
Bass
Middle
+
-
BalBass Treb Fad P-EQ
Off
On
Auto Store Pages
USB CD
STBT
Off
Off
Research
Searching ...
>>>>
USB CD
STBT
On
FM
89.1 91.9 93.1 95.1 95.9 97.3
90.3
1
USB CD
STBT
89.1 91.9 93.1 95.1 95.9 97.3
Volume :
1
USB CD
STBT
AM
530 600 780 1000 1400 1600
530
4
USB CD
STBT
On
Auto Store Pages
USB CD
STBT
FM
89.1 91.9 93.1 95.9 97.3
95.1 KBSWORLD
1
ST
95.1
Bass
+
-
BalMid Treb Fad P-EQ
Bass
Middle
+
-
BalBass Treb Fad P-EQ
Mid
Balance
Bass Mid Treb Fad P-EQ
Off
On
Auto Store Pages
USB CD
STBT
Off
Off
Research
Searching ...
>>>>
USB CD
STBT
On
Audio Mute
1
USB CD
STBT
Basic operation
This section explains basic operations such
as switching to standby mode, adjusting
the volume, and quickly muting the sound.
► Turning the unit on/off
1 Place the ignition switch in the ACC
or IGN (ON) position.
English
2 Press the (Power) button to turn
the power on.
Turning on the power will play the
previously chosen broadcasting
station or song.
1
89.1 91.9 93.1 95.1 95.9 97.3
3 Press and hold the (Power) button
to turn the power off.
Note
● The unit also turns on automatically
when a device is connected to the USB,
disc inserted to disc slot, and incoming a
call via connected your phone.
► Adjusting the volume
Rotate the Volume dial to increase or
decrease the volume.
The volume level bar will appear as shown
below.
1
89.1 91.9 93.1 95.1 95.9 97.3
► Muting the sound quickly
Press the (Power) button to activate
the mute function.
The "Audio Mute" message will blink on the
screen.
1
89.1 91.9 93.1 95.1 95.9 97.3
To deactivate the mute function, press the
6
USB CD
STBT
USB CD
STBT
USB CD
STBT
(Power) button or rotate the Volume
dial.
► Adjusting the bass/middle/treble
for tone
1 Press and hold the SOUND button to
appear the "Tone setting menu" until
5 seconds.
Bass
BalMid Treb Fad P-EQ
2 Press one of the button under
Bass, Mid, or Treb shortcuts.
Mid
3 Turn the Volume dial to adjust the
level from -7 to +7 steps.
► Adjusting the balance/fader for
speakers
1 Press and hold the SOUND button to
appear the "Tone setting menu" until
5 seconds.
2 Press one of the button under Bal
or Fad shortcuts.
L R
Bal
3 Turn the Volume dial to adjust the
level.
● Balance: Left 15 to Right 15 steps
● Fader: Rear 15 to Front 15 steps
► Setting the Sound style
1 Press and hold the SOUND button to
appear the "Tone setting menu" until
5 seconds.
2 Press the button under P-EQ
shortcut.
Page 9

FM
89.1 91.9 93.1 95.1 95.9 97.3
90.3
1
USB CD
STBT
89.1 91.9 93.1 95.1 95.9 97.3
Volume :
1
USB CD
STBT
AM
530 600 780 1000 1400 1600
530
4
USB CD
STBT
On
Auto Store Pages
USB CD
STBT
FM
89.1 91.9 93.1 95.9 97.3
95.1 KBSWORLD
1
ST
95.1
Bass
+
-
BalMid Treb Fad P-EQ
Bass
Middle
+
-
BalBass Treb Fad P-EQ
Mid
Balance
L R
Bass Mid Treb Fad P-EQ
Bal
Fader
R F
Bass Mid Treb Bal P-EQ
Fad
EQ : Manual
Bass Mid Treb Bal Fad
Off
On
Auto Store Pages
USB CD
STBT
Off
Off
Research
Searching ...
>>>>
USB CD
STBT
On
89.1 91.9 93.1 95.1 95.9 97.3
Audio Mute
1
USB CD
STBT
FM
89.1 91.9 93.1 95.1 95.9 97.3
90.3
1
USB CD
STBT
89.1 91.9 93.1 95.1 95.9 97.3
Volume :
1
USB CD
STBT
AM
530 600 780 1000 1400 1600
530
4
USB CD
STBT
On
Auto Store Pages
USB CD
STBT
FM
89.1 91.9 93.1 95.9 97.3
95.1 KBSWORLD
1
ST
95.1
Bass
+
-
BalMid Treb Fad P-EQ
Bass
Middle
+
-
BalBass Treb Fad P-EQ
Mid
Balance
L R
Bass Mid Treb Fad P-EQ
Bal
Fader
R F
Bass Mid Treb Bal P-EQ
Fad
EQ : Manual
Bass Mid Treb Bal Fad
P-EQ
EQ : Jazz
Off
On
Auto Store Pages
USB CD
STBT
Off
Off
Research
Searching ...
>>>>
USB CD
STBT
On
89.1 91.9 93.1 95.1 95.9 97.3
Audio Mute
1
USB CD
STBT
File Check
RPT RDM INT
USB
BT
FM
89.1 91.9 93.1 95.1 95.9 97.3
90.3
1
USB CD
STBT
AM
530 600 780 1000 1400 1600
530
4
USB CD
STBT
On
Auto Store Pages
USB CD
STBT
FM
89.1 91.9 93.1 95.9 97.3
95.1 KBSWORLD
Off
Getting started
3 Press the button under the desired
EQ style on the audio display screen.
Pop Rock Ctry Voice Class
4 To cancel the selected EQ style,
press the button under “P-EQ”
once more with same procedure.
► Using the ChevyStar
Note: If ChevyStar function is activated
This unit should be displayed the
"ChevyStar is Activated" and not operated
exeption the volume control.
The ChevyStar function is ended, this unit
will return to previous mode.
P-EQ
Jazz
Radio
Using the FM/AM radio
This section explains how to use radio
and access various radio frequencies (FM
and AM). Also, it covers automatically or
manually locating and storing your favorite
radio stations.
► FM/AM radio screen
To turn on the radio, press the BAND
button.
➊ ➋ ➌ ➍
1
95.1
➏
➊ Favorite page: Displays the current
favorite page.
➋ Frequency band: Displays the current
radio frequency band.
➌ Radio frequency: Displays the current
station's radio frequency.
➍ Radio station name (optional): Displays
the name of the current radio station.
(The station name may not be displayed
depending on radio stations.).
➎ ST: Indicates when FM stereo reception
is available.
➏ Preset station shortcuts: Press one of
the button under shortcuts to recall
the indicated frequency. Press and hold
one of the button under shortcuts to
store the current station.
► Listening to radio stations (FM/
AM)
Changing the frequency band
Press the BAND button to change the
frequency band to FM or AM. The current
frequency band is displayed at the top left
corner of the screen.
➎
ST
English
7
Page 10

Radio
AM
530 600 780 1000 1400 1600
530
4
USB CD
STBT
On
Auto Store Pages
USB CD
STBT
Off
On
Auto Store Pages
Off
Research
Searching ...
>>>>
USB CD
STBT
On
Searching for a radio station
automatically
Press the SEEK / buttons to search
for a radio station automatically. When
a station is detected, the unit stops
searching.
Searching for a radio station manually
Press the TUNE / buttons to
English
manually tune in a desired frequency.
► Storing radio stations manually
Store up to six favorite pages and up to 36,
AM or FM stations. Follow the instructions
below to manually store radio stations.
1 Select a station.
2 Press the FAV button to select the
favorite page 1 to 6.
3 Press and hold one of the button
under preset station shortcuts for
more than 1 second to store the
current radio station.
Note
If a new station is stored using an existing
preset station shortcut, the previously
stored station will be deleted and the new
station will be stored.
► Storing radio stations
automatically
1 Press the BAND button to change to
the desired frequency band.
2 Press the AST button. The Auto Store
Pages menu screen is displayed.
Off
3 Press the button under ON or
Research menu.
The stations with the strongest
signals are automatically stored in the
8
Auto favorite page A1 to A2.
► Selecting a preset radio station
1 Press the BAND button to change to
the desired frequency band.
2 Press the FAV button to show the list
of preset stations shortcuts.
3 Press one of the button under
preset stations shortcuts.
USB CD
STBT
Page 11

CD/MP3 [WMA] player
This section explains how to use the CD or
MP3/WMA disc player.
Before using the CD/MP3
player
With the ignition on, insert a CD partway
into the CD slot, label side up. The player
will pull it in, Loading, then File check,
and then MP3 or WMA will appear on the
display. The CD should begin playing. You
cannot insert a CD with the ACC off.
As each CD is inserted, the infotainment
system will appear on the display and as
each CD is loading, File check will appear
on the display.
Once playback begins, the track and track
number will appear on the display.
If the ignition or infotainment system is
turned off with a CD in the player, it will
stay in the player. When a CD is in the
player and the ignition is turned on, the
infotainment system must be turned on
before the current CD will start playback.
When the ignition and infotainment system
are turned on, the CD will start playing
where it stopped, if it was the last selected
audio source.
The CD player can play the smaller 3 inch
(8 cm) single CDs with an adapter ring.
Full-size CDs and the smaller CDs are
loaded in the same manner.
If playing a CD-R, the sound quality may be
reduced due to CD-R quality, the method of
recording, the quality of the music that has
been recorded, and the way the CD-R has
been handled. There may be an increase
in skipping, difficulty in finding tracks,
and/or difficulty in loading and ejecting. If
these problems occur, check the bottom
surface of the CD. If the surface of the CD
is damaged, such as cracked, broken, or
scratched, the CD will not play properly. If
the surface of the CD is soiled, see Care of
Your CDs for more information.
If there is no apparent damage, try a known
good CD.
Do not add any label on the surface of the
CD. It could get caught in the CD player. If
a CD is recorded on a personal computer
and a description label is needed, try
labeling the top of the recorded CD with a
marking pen instead.
Notice:
If you add any label to a CD, insert more
than one CD into the slot at a time, or
attempt to play scratched or damaged CDs,
you could damage the CD player. When
using the CD player, use only CDs in good
condition without any label, load one CD
at a time, and keep the CD player and
the loading slot free of foreign materials,
liquids, and debris.
All of the CD functions work the same while
playing an MP3/WMA, except for those
listed here.
When a CD is in the player, it will:
● Remain in the player when the ignition or
the audio system is turned off.
● Not begin playback when the ignition is
turned on until the audio system is turned
on.
● Begin playback where it stopped, if it was
the last selected audio source.
► MP3/WMA disc format
If you burn your own MP3/WMA disc on a
personal computer:
Make sure the MP3/WMA files are recorded
on a CD-R disc.
● Do not mix standard audio and MP3/
WMA files on one disc.
● Make sure each MP3/WMA file has
a .mp3 or .wma extension, other file
extensions may not work.
● Files can be recorded with a variety of
fixed or variable bit rates. Song title, artist
name, and album will be available for
display by the infotainment system when
recorded using ID3 tags version 1 and 2.
● Create a folder structure that makes it
easy to find songs while driving. Organize
English
9
Page 12

CD/MP3 [WMA] player
songs by albums using one folder for
each album. Each folder or album should
contain 18 songs or less.
● Make sure to finalize the disc when
burning an MP3/WMA disc, using multiple
sessions. It is usually better to burn the
disc all at once.
The player will be able to read and play a
maximum of 50 folders, 5 sessions, and
English
999 files.
Long file names, folder names may use
more disc memory space than necessary.
To conserve space on the disc, minimize
the length of the file, folder names. You
can also play an MP3/WMA CD that was
recorded using no file folders. The system
can support up to 8 folders in depth,
though, keep the depth of the folders to
a minimum in order to keep down the
complexity and confusion in trying to locate
a particular folder during playback. If a CD
contains more than the maximum of 50
folders, 5 sessions, and 999 files the player
will let you access and navigate up to the
maximum, but all items over the maximum
will be ignored.
Root directory
The root directory will be treated as a
folder. If the root directory has compressed
audio files, the directory will be displayed
as ROOT. All files contained directly under
the root directory will be accessed prior to
any other directory.
Empty directory or folder
If a root directory or a folder exists
somewhere in the file structure that
contains only folders/subfolders and no
compressed files directly beneath them,
the player will advance to the next folder in
the file structure that contains compressed
audio files and the empty folder will not be
displayed or numbered.
No folder
When the CD contained only compressed
10
files, the files will be located under the root
folder.
The next and previous folder functions
will have no function on a CD that was
recorded without folders.
When displaying the name of the folder the
infotainment system will display ROOT.
When the CD contains only compressed
audio files, but no folders, all files will be
located under the root folder. When the
infotainment system displays the name
of the folder, the infotainment system will
display ROOT.
Order of play
Tracks will be played in the following order:
● Playback will begin from the first track
under the root directory.
● When all tracks from the root directory
have been played, playback will continue
from files, according to their numerical
listing.
● After playing the last track from the last
folder, the player will begin playing again
at the first track of the first folder or root
directory.
File system and naming
The song name in the ID3 tag will be
displayed. If the song name is not present
in the ID3 tag, then the infotainment system
will display the file name without the
extension (such as MP3/WMA) instead.
Using the CD/MP3 player
► Loading a disc and starting
playback
Insert a CD or MP3 disc into the CD slot
with the label facing up. The CD or MP3
disc is pulled into the slot automatically.
Playback will start automatically after
recognizing the data of the loading disc. It
may take some time to start playing.
Page 13
CD/MP3 [WMA] player
89.1 91.9 93.1 95.1 95.9 97.3
Volume :
1
USB CD
STBT
AM
530 600 780 1000 1400 1600
530
4
USB CD
STBT
On
Auto Store Pages
USB CD
STBT
Off
On
Auto Store Pages
USB CD
STBT
Off
Off
Research
Searching ...
>>>>
USB CD
STBT
On
89.1 91.9 93.1 95.1 95.9 97.3
Audio Mute
1
USB CD
STBT
File Check
RPT RDM INT
USB
BT
001/016 00:12
RPT RDM INT
USB
BT
CD Information
RPT RDM INT
USB
BT
Pause
RPT RDM INT
USB
BT
File name
RDM INT
Mode Selection
USB CD
BT
CALL AUDIO PLAY PAIRING
89.1 91.9 93.1 95.1 95.9 97.3
Volume :
1
USB CD
STBT
AM
530 600 780 1000 1400 1600
530
4
USB CD
STBT
On
Auto Store Pages
USB CD
STBT
Off
On
Auto Store Pages
USB CD
STBT
Off
Off
Research
Searching ...
>>>>
USB CD
STBT
On
89.1 91.9 93.1 95.1 95.9 97.3
Audio Mute
1
USB CD
STBT
File Check
RPT RDM INT
FM
89.1 91.9 93.1 95.1 95.9 97.3
90.3
1
USB CD
STBT
89.1 91.9 93.1 95.1 95.9 97.3
Volume :
1
USB CD
STBT
AM
530 600 780 1000 1400 1600
530
4
USB CD
STBT
On
Auto Store Pages
USB CD
STBT
FM
89.1 91.9 93.1 95.9 97.3
95.1 KBSWORLD
1
ST
95.1
Bass
+
-
BalMid Treb Fad P-EQ
Bass
Middle
+
-
BalBass Treb Fad P-EQ
Mid
Balance
L R
Bass Mid Treb Fad P-EQ
Bal
Fader
R F
Bass Mid Treb Bal P-EQ
Fad
EQ : Manual
Bass Mid Treb Bal Fad
P-EQ
EQ : Jazz
Pop Rock Ctry Voice Class
Jazz
Off
On
Auto Store Pages
USB CD
STBT
Off
Off
Research
Searching ...
>>>>
USB CD
STBT
On
89.1 91.9 93.1 95.1 95.9 97.3
Audio Mute
1
USB CD
STBT
TRACK 01 00:02
RPT RDM INT
File Check
RPT RDM INT
USB
BT
001/016 00:12
RPT RDM INT
USB
BT
FM
89.1 91.9 93.1 95.1 95.9 97.3
90.3
1
USB CD
STBT
89.1 91.9 93.1 95.1 95.9 97.3
Volume :
1
USB CD
STBT
AM
530 600 780 1000 1400 1600
530
4
USB CD
STBT
On
Auto Store Pages
USB CD
STBT
FM
89.1 91.9 93.1 95.9 97.3
95.1 KBSWORLD
1
ST
95.1
Bass
+
-
BalMid Treb Fad P-EQ
Bass
Middle
+
-
BalBass Treb Fad P-EQ
Mid
Balance
L R
Bass Mid Treb Fad P-EQ
Bal
Fader
R F
Bass Mid Treb Bal P-EQ
Fad
EQ : Manual
Bass Mid Treb Bal Fad
P-EQ
EQ : Jazz
Pop Rock Ctry Voice Class
Jazz
Off
On
Auto Store Pages
USB CD
STBT
Off
Off
Research
Searching ...
>>>>
USB CD
STBT
On
89.1 91.9 93.1 95.1 95.9 97.3
Audio Mute
1
USB CD
STBT
TRACK 01 00:02
RPT RDM INT
USB
BT
File name
RPT RDM INT
File Check
RPT RDM INT
USB
BT
001/016 00:12
RPT RDM INT
USB
BT
CD Information
RPT RDM INT
USB
BT
Pause
RPT RDM INT
USB
BT
TRACK 03 12:34
RDM INT
USB
BT
RPT
TRACK 03 12:34
RPT INT
USB
BT
RDM
TRACK 03 12:34
RDMRPT
USB
BT
INT
File name
RDM INT
USB
BT
DIR 0012
RPT
Mode Selection
USB CD
BT
CALL AUDIO PLAY PAIRING
89.1 91.9 93.1 95.1 95.9 97.3
Volume :
1
USB CD
STBT
AM
530 600 780 1000 1400 1600
530
4
USB CD
STBT
On
Auto Store Pages
USB CD
STBT
Off
On
Auto Store Pages
USB CD
STBT
Off
Off
Research
Searching ...
>>>>
USB CD
STBT
On
89.1 91.9 93.1 95.1 95.9 97.3
Audio Mute
1
USB CD
STBT
File Check
RPT RDM INT
USB
BT
001/016 00:12
RPT RDM INT
USB
BT
CD Information
RPT RDM INT
USB
BT
Pause
RPT RDM INT
<CD>
<MP3/WMA disc>
All tracks/files will be played until you
change the source or eject the disc.
The power will be turned on automatically
when a disc is loaded.
Once playback begins, the track number
and current playing time appear on the
display.
► Selecting the CD/MP3 disc player
During a CD or MP3 disc is already
inserted, press the SRC button repeatedly
until the "File Check ..." with CD symbol is
displayed.
► Using the Pause function
Press and hold the PAUSE button to pause
while a CD or MP3 disc is playing back.
“PAUSE” will appear on the display.
Press and hold the PAUSE button again to
start playing the CD or MP3 disc.
► Change the playback track
Press the TUNE / buttons to move to
the previous or next track.
► Changing the playback position
Press and hold the TUNE / buttons
to rewind or fast forward the track.
USB
BT
USB
BT
USB
BT
ALL 0012
USB
BT
► Changing the track informations
Press the INFO button repeatedly to
display information about the track or file
being played.
The information displayed includes the
track number/file name, playing time or CD
information.
If there is no information on the playing CD
or MP3 disc, "NO CD INFO" is displayed.
► Changing the playback mode
Press one of the button under RPT,
RDM or INT shortcuts to select/deselect
the playback mode as below;
● RPT (Repeat): The current track is
played repeatedly.
● RDM (Random): Tracks are played
randomly.
● INT (Intro-Scan): Ten seconds of each
track are played sequentially.
To cancel, press one the button under
RPT, RDM or INT shortcuts again.
► Change the playback folder for
MP3/WMA disc
Press the SEEK / buttons to move
disc
RPT
USB
BT
DIR 0012
to the previous or next folder.
If MP3/WMA disc does not have any folder,
“ROOT” will flash on display for a short time.
► Playing a folder for MP3/WMA
During the MP3/WMA playback mode,
press the DIR button to select the
current directory. DIR will appear on the
display.
Press the DIR button again to select all
of the directories. ALL will appear on the
display.
English
11
Page 14

USB/iPod music player
This section explains how to use the USB
or iPod music player.
You can play MP3 and WMA files that are
stored on a USB device, and any music
files that are stored on an iPod.
Cautions for using USB
devices
● Operation cannot be guaranteed if the
English
HDD built-in USB mass storage device or
CF or SD memory card is connected by
using a USB adaptor. Use a USB or flash
memory type storage device.
● Take caution to avoid static electricity
discharge when connecting or
disconnecting the USB. If connection and
disconnection are repeated many times
in a short time, this may cause a problem
in using the device.
● Operation is not guaranteed if the
connecting terminal of the USB device is
not metal.
● Connection with i-Stick Type USB
storage devices may be faulty due to
vehicle vibration, so their operation
cannot be guaranteed.
● Be careful not to touch the USB
connecting terminal with an object or any
part of your body.
● The USB storage device can only be
recognized when it is formatted in
FAT16/32 file format. Only devices
with an allocated unit size of 512 byte/
sector or 2,048 byte/sector can be used.
NTFS and other file systems cannot be
recognized.
● According to the type and capacity of the
USB storage device and the type of the
stored file, the time it takes to recognize
the files may differ. This is not a problem
with the product in this case, so please
wait for the files to be processed.
● Files in some USB storage devices may
not be recognized due to compatibility
problems, and connections with a
memory reader or a USB hub are not
12
supported. Please check the device’s
operation in the vehicle before use.
● When devices such as an MP3 player or
digital camera are connected through a
mobile disc, it may not operate normally.
● Do not disconnect the USB storage
device while it is being played. This may
cause damage to the product or the
performance of the USB device.
● Disconnect the connected USB storage
device when the vehicle ignition is turned
off. If the ignition is turned on while the
USB storage device is connected, the
USB storage device may be damaged or
may not operate normally in some cases.
Caution: USB storage devices can only be
connected to this product for the purpose of
playing music files.
The product's USB terminal should not be
used to charge USB accessory equipment
since the heat generation using the USB
terminal may cause performance issues or
damage to the product.
● When the logical drive is separated from
a mass USB storage device, only the
files from the top-level logical drive can
be played as USB music files. This is the
reason that the music files to be played
should be stored in the top-level drive of
the device. Music files on particular USB
storage devices may also not be normally
played if an application is loaded by
partitioning a separate drive inside the
USB device.
● Music files to which DRM (Digital Right
Management) is applied cannot be
played.
This product can support USB storage
devices that are up to 16 Gigabytes
in capacity with a limit of 999 files, 50
folders, and 8 stages of folder structure.
Normal usage cannot be guaranteed for
storage devices that exceed this limit.
If the device loading time takes longer
than usual, use after formatting the USB
into FAT16/32 format.
Page 15

USB/iPod music player
FM
89.1 91.9 93.1 95.1 95.9 97.3
90.3
1
USB CD
STBT
89.1 91.9 93.1 95.1 95.9 97.3
Volume :
1
USB CD
STBT
AM
530 600 780 1000 1400 1600
530
4
USB CD
STBT
On
Auto Store Pages
USB CD
STBT
FM
89.1 91.9 93.1 95.9 97.3
95.1 KBSWORLD
1
ST
95.1
Bass
+
-
BalMid Treb Fad P-EQ
Bass
Middle
+
-
BalBass Treb Fad P-EQ
Mid
Balance
L R
Bass Mid Treb Fad P-EQ
Bal
Fader
R F
Bass Mid Treb Bal P-EQ
Fad
EQ : Manual
Bass Mid Treb Bal Fad
P-EQ
EQ : Jazz
Pop Rock Ctry Voice Class
Jazz
Off
On
Auto Store Pages
USB CD
STBT
Off
Off
Research
Searching ...
>>>>
USB CD
STBT
On
89.1 91.9 93.1 95.1 95.9 97.3
Audio Mute
1
USB CD
STBT
TRACK 01 00:02
RPT RDM INT
USB
BT
File name
RPT RDM INT
USB
BT
ALL 0012
File name
RPT RDM INT
CD
BT
ALL 0012
0012/0123 01:23
RPT RDM INT
USB
BT
DIR 0012
File Check
RPT RDM INT
USB
BT
001/016 00:12
RPT RDM INT
USB
BT
CD Information
RPT RDM INT
USB
BT
Pause
RPT RDM INT
USB
BT
TRACK 03 12:34
RDM INT
USB
BT
RPT
TRACK 03 12:34
RPT INT
USB
BT
RDM
TRACK 03 12:34
RDMRPT
USB
BT
INT
File name
RDM INT
USB
BT
DIR 0012
RPT
File name
RPT RDM INT
Audio MP3
USB CD
BT
Mode Selection
USB CD
BT
CALL AUDIO PLAY UNPAIRING
Mode Selection
USB CD
BT
CALL AUDIO PLAY PAIRING
Incoming Call…
BT
ANSWER DECLINE
FM
89.1 91.9 93.1 95.1 95.9 97.3
90.3
1
USB CD
STBT
89.1 91.9 93.1 95.1 95.9 97.3
Volume :
1
USB CD
STBT
AM
530 600 780 1000 1400 1600
530
4
USB CD
STBT
On
Auto Store Pages
USB CD
STBT
FM
89.1 91.9 93.1 95.9 97.3
95.1 KBSWORLD
1
ST
95.1
Bass
+
-
BalMid Treb Fad P-EQ
Bass
Middle
+
-
BalBass Treb Fad P-EQ
Mid
Balance
L R
Bass Mid Treb Fad P-EQ
Bal
Fader
R F
Bass Mid Treb Bal P-EQ
Fad
EQ : Manual
Bass Mid Treb Bal Fad
P-EQ
EQ : Jazz
Pop Rock Ctry Voice Class
Jazz
Off
On
Auto Store Pages
USB CD
STBT
Off
Off
Research
Searching ...
>>>>
USB CD
STBT
On
89.1 91.9 93.1 95.1 95.9 97.3
Audio Mute
1
USB CD
STBT
TRACK 01 00:02
RPT RDM INT
USB
BT
File name
RPT RDM INT
USB
BT
ALL 0012
File name
RPT RDM INT
CD
BT
ALL 0012
0012/0123 01:23
RPT RDM INT
USB
BT
DIR 0012
File Check
RPT RDM INT
USB
BT
001/016 00:12
RPT RDM INT
USB
BT
CD Information
RPT RDM INT
USB
BT
Pause
RPT RDM INT
USB
BT
TRACK 03 12:34
RDM INT
USB
BT
RPT
TRACK 03 12:34
RPT INT
USB
BT
RDM
TRACK 03 12:34
RDMRPT
USB
BT
INT
File name
RDM INT
USB
BT
DIR 0012
RPT
File name
RPT RDM INT
CD
BT
ALL 0012
File name
RPT RDM INT
Audio MP3
USB CD
BT
Do you want to unpair?
USB CD
BT
YES NO
Mode Selection
USB CD
BT
CALL AUDIO PLAY UNPAIRING
Mode Selection
USB CD
BT
CALL AUDIO PLAY PAIRING
Incoming Call…
BT
ANSWER DECLINE
Caution for using USB music files
● Damaged music files may be cut-off
during playback or may not be played
at all.
About MP3 (WMA) music files
● The MP3 files that can be played are the
following:
- Bit rate : 8 kbps ~ 320 kbps
- Sampling frequency:
48 kHz, 44.1 kHz, 32 kHz (for MPEG-1)
24 kHz, 22.05 kHz, 16 kHz (for MPEG-2)
● This product displays MP3 (WMA) files
with the mp3, .wma (lower case letters)
or .MP3 or .WMA (capital letters) file
name extensions.
● This product can display ID3 tag (Version
1.0, 1.1, 2.2, 2.3, 2.4) information about
album, artist, etc. for MP3 files.
● This product can play MP3 files which
use VBR. When a VBR type MP3 file
is being played, the remaining time
displayed may be different from the
actual time remaining.
Using the USB/iPod player
► Connecting a USB device or iPod
to the USB port
Connect a USB device or iPod to the iPod/
USB port as shown below.
Music playback will start automatically
after the data on the USB device or iPod is
recognized.
► USB or iPod playback screen
To open the USB or iPod music player
screen:
1 Press the SRC button until to display
the USB/iPod playback screen.
CD
BT
ALL 0012
CD
BT
0012
The music player screen will be
displayed.
<USB>
<iPod>
► Changing the playback file
While playing, press the TUNE /
buttons to select the previous or next file.
► Fast-forwarding and re-winding
the file
While playing, press and hold TUNE /
to rewind or fast-forward through the song
until released. Once released, the file will
begin playing at normal speed.
► Change the folder for USB play
Press the SEEK / buttons to move
to the previous or next folder.
If USB does not have any folder, “ROOT”
will flash on display for a short time.
► Playing a folder for USB
During the USB playback mode, press
the DIR button to select the current
directory. DIR will appear on the display.
Press the DIR button again to select all
of the directories. ALL will appear on the
display.
► Using the iPod menu
While playing the iPod, press the MENU
button to enter the iPod menu.
Selecting the category
1 Press the SEEK / buttons to
English
13
Page 16
USB/iPod music player
move the desired category item, and
then press the button under ENT
shortcut.
2 Press the button under shortcut
to back to previous step
Afterwards, the functions to play
USB/iPod are operated similarly to
English
CD/MP3 [WMA] playback.
Caution
● When using a USB device or iPod,
make sure to disconnect the device
when it is not in use. Do not connect the
device until after you have started the
vehicle. The device may be damaged if
the device is already connected when
the ignition is turned on.
● Do not allow the USB connector to
come into contact with body parts or
foreign substances.
● Repeatedly connecting or disconnecting
a USB device over a short period may
cause damage to the device.
● Abruptly disconnecting a USB device
while it is in use may cause the
device to be damaged or to function
abnormally. Make sure to disconnect
the USB device only when the unit is
operating in a different mode.
● Do not use the USB I/F to charge
batteries or USB accessories that
generate heat. Doing so may reduce
performance or damage the device.
● In some cases, iPods may be damaged
if the ignition is turned off while it is
connected to the unit. When the iPod
is not being used, disconnect it before
turning the ignition off.
Note
● Some USB devices may not operate
properly due to compatibility issues.
Check that the device is supported
before using it.
● The unit will only recognize USB
devices formatted in FAT16 or FAT32
(NTFS format is not supported). When
you format a USB device, the unit may
not recognize a byte/sector selection
other than 512 bytes or 2,048 bytes.
● The amount of time required to
recognize a USB device may differ
depending on the type, size, or file
formats stored on the USB device. Such
time differences are not the result of any
malfunction. Please wait while the unit
attempts to recognize the device.
● The unit supports only USB devices
designed to play music and video files
and images.
● When disconnecting a USB device, an
abnormal sound may occur.
● The unit may not recognize the USB
device if separately purchased USB
hubs and extension cables are used.
● If high capacity USB devices are used,
there may be situations that require
the logical drive to be partitioned for
user convenience. In these situations,
it will only be possible to play music on
a USB device from the top level of the
drive. When using partitioned drives,
save songs to play on the device only
in the top level of the logical drive. Also,
certain USB devices are configured with
a separate drive for installing application
programs, playing music files from a
separate drive may not be possible for
the reasons described above.
● The unit may not operate properly when
accessing files from HDD, CF, or SD
memory.
● The unit will not support locked DRM
(Digital Rights Management) files.
14
Page 17

USB/iPod music player
AUX player
● iPod is a registered trademark of the
Apple Corporation in the United States
and other countries.
● The unit supports iPod Nano (exception
1 generation), iPod Touch, and
iPhone models. Other devices are not
supported.
● Some iPod and iPhone models may
not be supported or provide compatible
connection.
● Only connect the iPod and the unit
using approved iPod cables. Other
connection cables cannot be used.
● The playback functions and the
displayed items on iPods may differ
when they are connected to the unit.
This can affect play order, method, and
information displays on the iPod.
This section explains how to use the AUX
player.
External audio devices can be connected
to the AUX port (stereo mini jack).
When a device is connected to the AUX
port and the source is selected, you can
listen to the device’s audio through your
car speakers. The volume level can be
adjusted to allow for differences between
the unit and the device.
Connecting an external audio
device to the AUX port
Connect the audio output of the external
audio equipment to the AUX input
terminal.
This unit will automatically switch to the
exterior sound (AUX) input mode when the
exterior sound device is connected.
Using the AUX player
Make sure the volume is adjusted properly
both for the unit and for the connected
device before starting playback.
1 Press the SRC button to switch to
the exterior sound input mode if the
exterior sound system has already
been connected.
2 Turn the VOL dial to adjust the
volume
English
15
Page 18

English
Bluetooth Connectivity
About the Bluetooth feature
The Bluetooth feature enables you to
wirelessly connect two devices that are
near to each other. You can connect
your unit and a wide variety of Bluetoothenabled devices.
Note
● In some locations, there may be
restrictions when using Bluetooth
connections.
● Depending on the type and
specifications of the Bluetooth device,
your unit may respond differently when
connected.
● Some devices, especially those that
are not tested or approved by the
Bluetooth SIG, may be incompatible
with your unit.
► Pairing devices
Pairing is a process that enables mutual
registration between two devices. The
paired devices share and record the other's
Bluetooth information.
When two devices are paired for the first
time, you must enter a Bluetooth passkey.
Once the devices are paired and an initial
connection is established, the devices will
recognize and automatically connect to
each other each time they are in range.
Note
● Depending on the devices, you may
need to enter a passkey each time
they connect.
● Depending on the devices, the
passkey may be referred to
as "passcode", "PIN code", or
"password".
► Connecting devices
After the devices are paired, subsequent
Bluetooth connections for previously
paired devices start automatically. You
can connect to any of the devices on the
paired device list. Once you are connected,
you can access various Bluetooth
functions, such as hands-free calling or
playing music, depending on the device's
specifications.
► Using the hands-free feature and
listening to music
Once a Bluetooth connection is made, you
can make or answer calls using handsfree features and listen to music from a
Bluetooth-connected device.
For more information on how to use call
functions using Bluetooth, refer to "Phone
functions" on page 18.
For more information on how to play music
using Bluetooth, refer to "Bluetooth audio
player" on page 18.
Note
Some Bluetooth devices may not support
all available functions.
Bluetooth connection
Connect your unit with other Bluetoothenabled devices, such as smartphones and
music players.
Before establishing a connection, ensure
that the other device is ready to connect
using the Bluetooth feature. The Bluetooth
feature and the visibility option should be
activated on the device so that it can be
detected by other devices.
16
Page 19
Bluetooth Connectivity
English
89.1 91.9 93.1 95.1 95.9 97.3
Volume :
1
USB CD
STBT
AM
530 600 780 1000 1400 1600
530
4
USB CD
STBT
On
Auto Store Pages
USB CD
STBT
Off
On
Auto Store Pages
USB CD
STBT
Off
Off
Research
Searching ...
>>>>
USB CD
STBT
On
89.1 91.9 93.1 95.1 95.9 97.3
Audio Mute
1
USB CD
STBT
File Check
RPT RDM INT
USB
BT
001/016 00:12
RPT RDM INT
USB
BT
CD Information
RPT RDM INT
USB
BT
Pause
RPT RDM INT
USB
BT
Mode Selection
CALL AUDIO PLAY PAIRING
89.1 91.9 93.1 95.1 95.9 97.3
Volume :
1
USB CD
STBT
AM
530 600 780 1000 1400 1600
530
4
USB CD
STBT
On
Auto Store Pages
USB CD
STBT
Off
On
Auto Store Pages
USB CD
STBT
Off
Off
Research
Searching ...
>>>>
USB CD
STBT
On
89.1 91.9 93.1 95.1 95.9 97.3
Audio Mute
1
USB CD
STBT
File Check
RPT RDM INT
USB
BT
001/016 00:12
RPT RDM INT
USB
BT
CD Information
RPT RDM INT
USB
BT
Pause
RPT RDM INT
USB
BT
File name
RDM INT
USB
BT
DIR 0012
RPT
Audio MP3
USB CD
BT
CALL AUDIO PLAY UNPAIRING
Mode Selection
USB CD
BT
CALL AUDIO PLAY PAIRING
Incoming Call…
BT
ANSWER DECLINE
89.1 91.9 93.1 95.1 95.9 97.3
Volume :
1
USB CD
STBT
AM
530 600 780 1000 1400 1600
530
4
USB CD
STBT
On
Auto Store Pages
USB CD
STBT
Off
On
Auto Store Pages
USB CD
STBT
Off
Off
Research
Searching ...
>>>>
USB CD
STBT
On
89.1 91.9 93.1 95.1 95.9 97.3
Audio Mute
1
USB CD
STBT
File Check
RPT RDM INT
USB
BT
001/016 00:12
RPT RDM INT
USB
BT
CD Information
RPT RDM INT
USB
BT
Pause
RPT RDM INT
USB
BT
File name
RDM INT
USB
BT
DIR 0012
RPT
Audio MP3
USB CD
BT
Do you want to unpair?
Mode Selection
USB CD
BT
CALL AUDIO PLAY UNPAIRING
Mode Selection
USB CD
BT
CALL AUDIO PLAY PAIRING
Incoming Call…
BT
ANSWER DECLINE
► Connecting a Bluetooth device
Register the your phone to be connected to
the this unit.
Firstly, set up the your phone to be
connected from the Bluetooth settings
menu to enable other devices to search for
the Bluetooth device.
1 Press the button to display the
Bluetooth mode screen.
2 Press the button under PAIRING
shortcuts to enter the Pairing mode.
The information “Name: Device name /
PIN: 0000” appear in the display screen.
3 From your phone, search for this unit
and pair the device.
➊ Turn the Bluetooth on.
➋ Search and select device “CAR
AUDIO” in the Bluetooth menu.
➌ Enter this item on your phone.
To learn more about searching from
Bluetooth devices and pairing, refer to
the user's manual of your phone.
After a while, the your phone is
automatically registered.
● If the registration of the device to be
connected to this unit is successful,
“Connected: device ID” appears in the
display screen.
● This unit shall return "Mode Selection"
screen after connection procedure and
"BT" will be displayed.
Bluetooth connection may be intermittently
disconnected depending on the your
phone. Follow these steps to try again.
● Turn the Bluetooth function within your
phone OFF/ON and try again.
● Turn the your phone power OFF/ON and
try again.
● Completely remove the your phone
battery, reboot, and try again.
● Reboot this unit and try again.
● Delete all paired devices, pair and try
again.
► Auto connection
This unit will try to connect previous
Bluetooth device automatically when this
unit turn power on.
As a Bluetooth wireless connection can
USB CD
BT
have a range of up to 10 meters, your
Bluetooth device may automatically
connect to the infotainment system even
if the device is not inside the vehicle.
Please consider this, especially when
pairing or connecting Bluetooth devices
to the Infotainment system when other
Bluetooth devices may be within range.
► Unpairing
1 When this unit is connected with
a Bluetooth device, press the
(Bluetooth) button. Then it moves on
the Bluetooth menu screen.
2 Press the button under
UNPAIRING shortcut.
Mode Selection
USB CD
BT
3 Press the button under YES to
disconnect the Bluetooth device.
USB CD
YES NO
When selected the NO, this unit shall
keep the connection with the Bluetooth
device.
BT
17
Page 20

Bluetooth Connectivity
English
89.1 91.9 93.1 95.1 95.9 97.3
Volume :
1
USB CD
STBT
AM
530 600 780 1000 1400 1600
530
4
USB CD
STBT
On
Auto Store Pages
USB CD
STBT
Off
On
Auto Store Pages
USB CD
STBT
Off
Off
Research
Searching ...
>>>>
USB CD
STBT
On
89.1 91.9 93.1 95.1 95.9 97.3
Audio Mute
1
USB CD
STBT
File Check
RPT RDM INT
USB
BT
001/016 00:12
RPT RDM INT
USB
BT
CD Information
RPT RDM INT
USB
BT
Pause
RPT RDM INT
USB
BT
File name
RDM INT
USB
BT
DIR 0012
RPT
Audio MP3
USB CD
BT
Mode Selection
CALL AUDIO PLAY UNPAIRING
Mode Selection
USB CD
BT
CALL AUDIO PLAY PAIRING
Incoming Call…
BT
ANSWER DECLINE
89.1 91.9 93.1 95.1 95.9 97.3
Volume :
1
USB CD
STBT
AM
530 600 780 1000 1400 1600
530
4
USB CD
STBT
On
Auto Store Pages
USB CD
STBT
Off
On
Auto Store Pages
USB CD
STBT
Off
Off
Research
Searching ...
>>>>
USB CD
STBT
On
89.1 91.9 93.1 95.1 95.9 97.3
Audio Mute
1
USB CD
STBT
File Check
RPT RDM INT
USB
BT
001/016 00:12
RPT RDM INT
USB
BT
CD Information
RPT RDM INT
USB
BT
Pause
RPT RDM INT
USB
BT
File name
RDM INT
USB
BT
DIR 0012
RPT
Audio MP3
Mode Selection
USB CD
BT
CALL AUDIO PLAY PAIRING
Incoming Call…
BT
ANSWER DECLINE
Bluetooth audio player
This section explains how to use the
Bluetooth audio player.
This unit supports the A2DP (Advanced
Audio Distribution Profile). If your Bluetooth
mobile phone or music player supports this
profile, then music can be played through
this unit and the car's speakers.
Also, this unit supports the AVRCP (Audio
Video Remote Control Profile). If your
Bluetooth mobile phone or music player
supports this profile, then it is possible
to advance to the next track or replay
previous tracks by using the buttons on the
unit or the steering wheel (if fitted).
► Pairing and connecting with a
Bluetooth device
For information on how to pair and connect
the unit with a Bluetooth device, refer
to "Connecting a Bluetooth device" on
previous page.
► Bluetooth audio player screen
To open the Bluetooth audio player screen:
1 Press the button to display the
Bluetooth mode screen.
2 Press the button under AUDIO
PLAY shortcuts.
The Bluetooth audio player screen will
be displayed.
If music is not yet playing from your
mobile device after switching to
streaming audio (Bluetooth Music) mode
or after pressing Play on the mobile
device itself, try to start music playback
by pressing the Play button again.
● This function only operates with
Bluetooth devices that support Audio
18
Video Remote Control Profile (AVRCP)
version 1.0 or above. Depending on the
Bluetooth device options, some devices
may display Audio Video Remote Control
Profile (AVRCP) being connected for the
initial connection.
● If the Bluetooth device is disconnected
while Bluetooth music is playing, the
music will also stop.
► Using the Pause function
Press the button under / shortcuts
to pause while a Bluetooth audio is playing
back.
USB CD
BT
Press the button under / shortcuts
again to start playing the Bluetooth audio.
► Change the playback track
Press the SEEK / buttons or button
under / shortcuts to move to the
previous or next track.
► Ending the Bluetooth audio
playback
Press the SRC button to select other
functions or press the button under
shortcut.
USB CD
BT
Phone functions
After connecting the unit to a smartphone,
you can use various call functions that are
available on the connected smartphone
from the unit.
► Making a call via last call
1 Press the button to display the
Bluetooth mode screen.
2 Press the button under CALL
shortcut.
Page 21

Bluetooth Connectivity
English
89.1 91.9 93.1 95.1 95.9 97.3
Volume :
1
USB CD
STBT
AM
530 600 780 1000 1400 1600
530
4
USB CD
STBT
On
Auto Store Pages
USB CD
STBT
Off
On
Auto Store Pages
USB CD
STBT
Off
Off
Research
Searching ...
>>>>
USB CD
STBT
On
89.1 91.9 93.1 95.1 95.9 97.3
Audio Mute
1
USB CD
STBT
File Check
RPT RDM INT
USB
BT
001/016 00:12
RPT RDM INT
USB
BT
CD Information
RPT RDM INT
USB
BT
Pause
RPT RDM INT
USB
BT
File name
RDM INT
USB
BT
DIR 0012
RPT
Audio MP3
USB CD
BT
Do you want to unpair?
USB CD
BT
YES NO
Mode Selection
USB CD
BT
CALL AUDIO PLAY UNPAIRING
Mode Selection
USB CD
BT
CALL AUDIO PLAY PAIRING
Make a Call
Incoming Call…
BT
ANSWER DECLINE
89.1 91.9 93.1 95.1 95.9 97.3
Volume :
1
USB CD
STBT
AM
530 600 780 1000 1400 1600
530
4
USB CD
STBT
On
Auto Store Pages
USB CD
STBT
Off
On
Auto Store Pages
USB CD
STBT
Off
Off
Research
Searching ...
>>>>
USB CD
STBT
On
89.1 91.9 93.1 95.1 95.9 97.3
Audio Mute
1
USB CD
STBT
File Check
RPT RDM INT
USB
BT
001/016 00:12
RPT RDM INT
USB
BT
CD Information
RPT RDM INT
USB
BT
Pause
RPT RDM INT
USB
BT
File name
RDM INT
USB
BT
DIR 0012
RPT
Mode Selection
USB CD
BT
CALL AUDIO PLAY PAIRING
ANSWER DECLINE
LAST CALL
3 Press the button under LAST
CALL shortcut.
The infotainment system shall display
"Dialing…" and “Connected...”.
► Incoming a call
This unit shall display "Incoming Call…" for
3 seconds, and then the audio shall display
"Incoming call number" until user press the
button under ANSWER or DECLINE
shortcut.
Incoming Call…
Press the button under ANSWER
shortcut for receiving a call.
Press the button under DECLINE
shortcut to reject the incoming call.
► Using options during a call
To turn the mute on/off for microphone,
press the button under MIC MUTE
shortcut.
To switch between Private and Hands-free
mode, press the button under PRIVATE
shortcut.
To end the call and return to the last mode,
press the button under HANG UP
shortcut.
BT
BT
19
Page 22

English
Troubleshooting
Problem Cause Solution
The unit does not
start.
The unit does not
operate.
The unit does not
play files.
The unit does not
play any sound.
The ignition switch is not
turned on.
The ignition switch is not in
the accessory (ACC) position.
The ignition switch is not
turned on.
The inserted USB device is
not formatted for FAT 1 6 or
FAT 3 2 file systems. The unit
recognizes USB devices only
when they are formatted for
FAT 1 6 or FAT 32 file systems.
The file format is not
supported by the unit.
The volume level is too low. Increase the volume. (See
The mute function is on. Turn off the mute function.
Place the ignition switch in the
IGN (ON) position.
Place the ignition switch in the
ACC position.
Place the ignition switch in the
IGN (ON) position.
Use a USB device formatted
for a FAT 1 6 or FAT 32 file
system.
Check the file format.
(See page 21)
page 6)
(See page 6)
20
Page 23

English
Specifications
Range of tuning AM: 530 ~ 1,710 kHz / 10 kHz Steps
FM: 87.5 ~ 108.0 MHz / 100 kHz Steps
Sensitivity AM: 28 dBuV
FM: 16 dBuV
Format logical file ISO 9660 (level 1, 2 & 3), Joliet
Usable sampling
rates and bit
ID3 Tags ID3v1, ID3v2
Bluetooth
● Output Power
● Profile
Usable media file
formats on USB
Devices
Note
This equipment operates on a secondary basis; it is not entitled to protection from
harmful interference, even from stations of the same type, and cannot cause interference
to systems operated on a primary basis.
MP3: Sampling Rate 44 kHz bit rate 32-320 KB/s with VBR
Version 2.1 + EDR
+ 4 dBm Max
Advanced Audio Distribution Profile, Audio Remote Control
Profile,
● Supported File System: FAT16 or FAT32 Only (This unit
does not recognize NTFS or exFAT file formats)
● Music: MP3, WMA
21
Page 24

PN : 3264-00164
SEA-C3000S Rev. 1.0
Page 25

FCC Information to User
This equipment has been tested and found to comply with the limits for a Class B digital device,
pursuant to Part 15 of the FCC Rules. These limits are designed to provide reasonable protection
against harmful interference in a residential installation. This equipment generates, uses and can
radiate radio frequency energy and, if not installed and used in accordance with the instructions, may
cause harmful interference to radio communications. However, there is no guarantee that interference
will not occur in a particular installation. If this equipment does cause harmful interference to radio or
television reception, which can be determined by turning the equipment off and on, the user is
encouraged to try to correct the interference by one of the following measures:
5HRULHQWRUUHORFDWHWKHUHFHLYLQJDQWHQQD
,QFUHDVHWKHVHSDUDWLRQEHWZHHQWKHHTXLSPHQWDQGUHFHLYHU
&RQQHFWWKH HTXLSPHQW LQWRDQ RXWOHW RQD FLUFXLW GLIIerent from that to which the receiver is con-
nected.
&RQVXOWWKHGHDOHURUDQH[SHULHQFed radio/TV technician for help.
Caution
0RGLILFDWLRQV QRWH[SUHVVO\ DSSURYHGE\WKH SDUW\UHsponsible for compliance could void the user’s
authority to operate the equipment.
FCC Compliance Information : This device complies with Part 15 of the FCC Rules. Operation is
subject to the following two conditions: (1) This device may not cause harmful interference, and (2)
this device must accept any interference received, including interference that may cause undesired
operation
IMPORTANT NOTE:
FCC RF Radiation Exposure Statement:
This equipment complies with FCC RF radiation H[SRVXUH OLPLWV VHW IRUWK IRU DQ XQFRQWUROOHG
environment. This equipment should be installed and operated with a minimum distance of 20
centimeters between the radiator and your body.This transmitter must not be co-located or operating
in conjunction with any other antenna or transmitter.
 Loading...