

Page 1

Infotainment System 0
Infotainment System
User’s Manual
[Only for INFO3.0]
[작업메모]
Initial Release
[Style of each level]
Level 1: Arial Bold
16
Level 2: Arial Bold 14
Level 3: Arial Bold 12
Level 4: Arial Bold 10
Main text (Item title): Arial Bold 9
Main text (Description): Arial Normal 9
Notes : Arial N or mal 8
Page 2

1 Infotainment System
?Warning
Drive safely at all times when using the
operating the Infotainment syst em.
Infotainment System
Introduction ...................... 1
Personalization ................ 8
Radio ............................... 10
Audio Players ................. 14
Phone .............................. 18
Introduction
Introduction
General Information
The Infotainment system provides you
with state-of-the-art in-car infotainment.
Using the radio tuner functions, you can
register a large number of stations on
different favorite pages.
You can connect external data storage
devices, e.g. iPod, USB devices, or
other auxiliary devices to the
Infotainment system as further audio
sources; either via a cable or via
Bluetooth.
The digital sound processor provides
you with several preset equalizer
modes for sound optimization.
In addition, the Infotainment system is
equipped with a Phone portal that
allows comfortable and safe use of your
mobile phone in the vehicle.
Optionally, the Infotainment system can
be operated using the control panel or
the controls on the steering wheel.
If provided by your mobile phone, the
system can also be operated via
speech recognition.
Note
This manual describes all options and
features available for the various
Infotainment systems.
Certain descriptions, including those for
display and menu functions, may not
apply to your vehicle due to model
variant, country specifications, special
equipment or accessories.
Important information on operation
and traffic safety
Infotainment s ystem.
If in doubt, stop the vehicle before
Page 3

Radio reception
Radio reception may be disrupted by
static, noise, distortion or loss of
reception due to:
changes in distance from the transmitter
multi-path reception due to reflec tion
shadowing
Theft-deterrent feature
The Infotainment system is equipped
with an electronic security system for
the purpose of theft deterrence.
The Infotainment system therefore
functions only in your vehicle and is
worthless to a thief.
Infotainment System 2
Page 4
3 Infotainment System
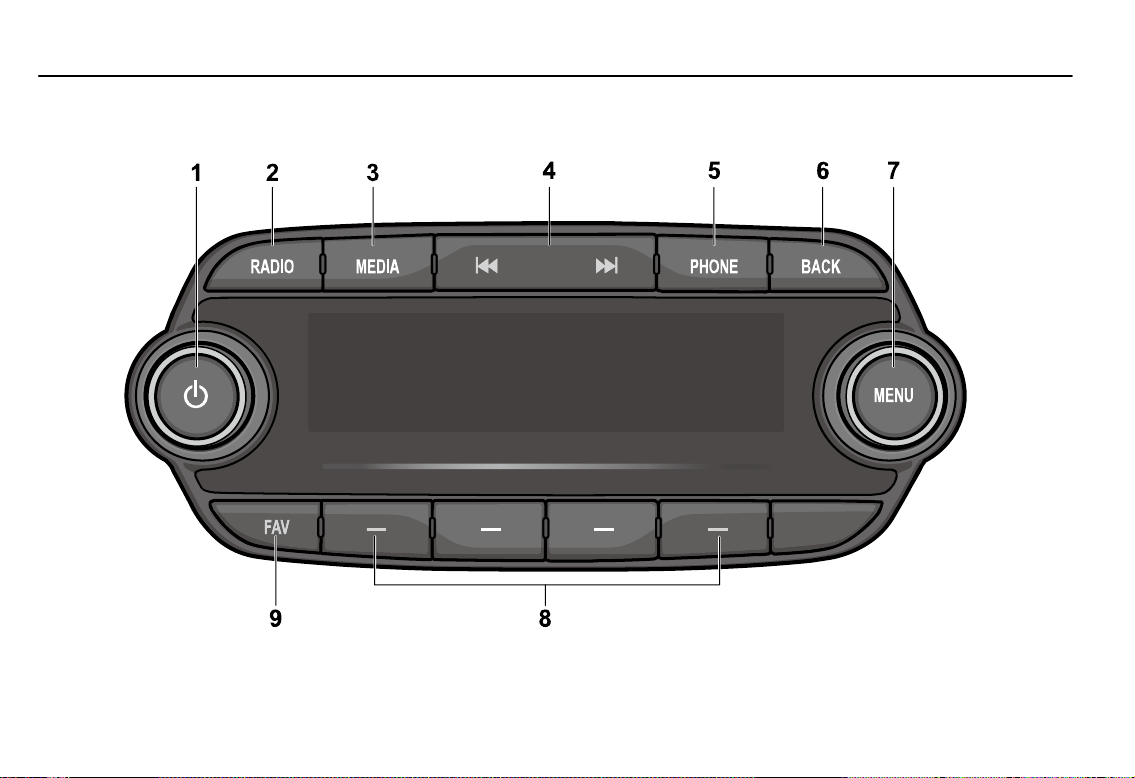
Overview
Page 5

Infotainment System 4
(1)
When power is off, press to turn power on.
When power is on, press and hold to turn
power off.
When power is on, press shortly to turn the
mute function on or off.
Turn to adjust volume.
(2) RADIO
Select R adio mode. Each time RADIO is
pressed, the mode is changed in order of
AM RADIO FM R ADIO DAB AM
RADIO ….
(3) MEDIA
Activate media or change media source.
(4) g /
In Radio mode:
In USB/iPod/Bluetooth audio playback:
d
When pressed shortly, automatic ally s eeks
station with superior reception.
When press ed and held, continuously
changes the station until
released. When releasing, the system
seeks the next station.
When press ed shortly, move to the
previous or next file.
When press ed and held, rewind or f ast
forward the file.
g or d is
(5) PHONE
Press to open phone menu.
(6) BACK
Cancel input c ontent or return to the
previous menu.
(7) MENU
Turn MENU to search the station/file on
the list screen or move/change s etup
content or setup values.
Press MENU to display the currently
functioning menu or s elect/practice setup
content and setup values.
(8) -
In Radio mode:
When pressed shortly, recall the stored
radio station.
When pressed and held, store the current
radio station to the Favorites page.
In Menu mode:
Press any of these buttons to s elect the
function linked to that button.
(9) FAV
Press FAV to select the page of saved
favorite channels.
Page 6
5 Infotainment System
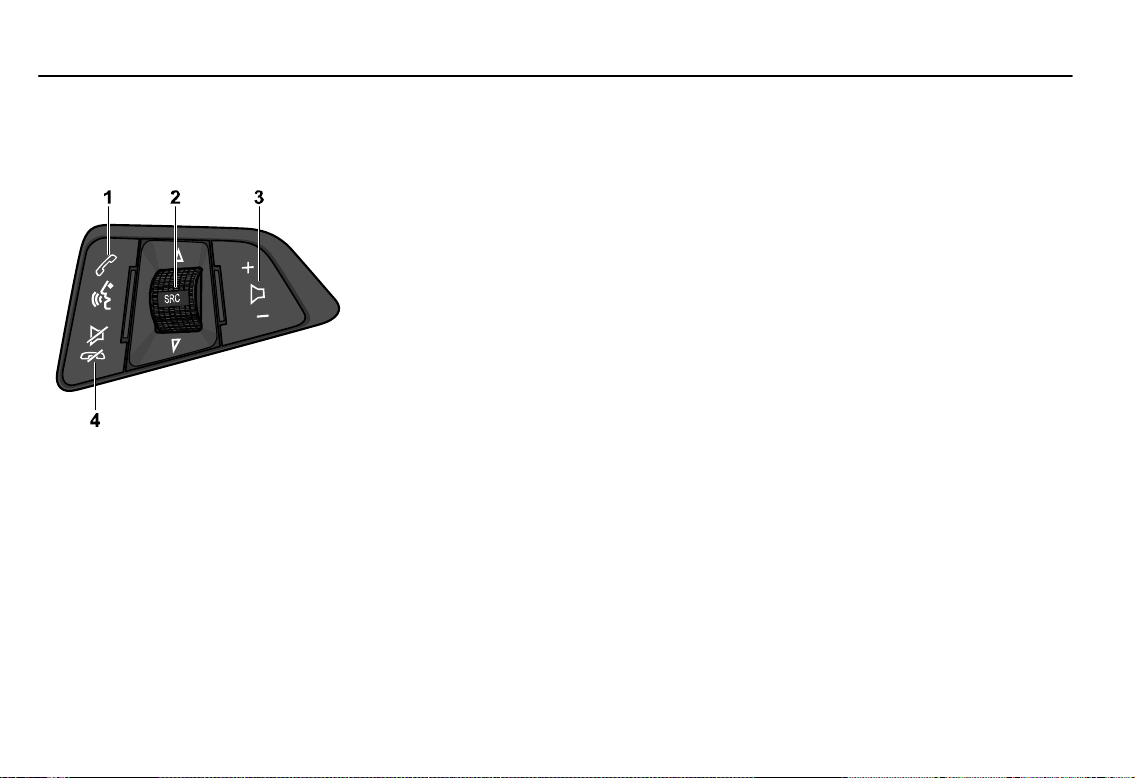
Steering wheel audio remote
control: option
(1) b / %
Press b or % to answer the call or enter
the recent call. If Siri function is enabled,
Siri is re-activated.
Press and hold b or % to enter the dialed
call log or to move back and forth from
hands-free mode and private call mode
during a call.
When iPhone is connected, press and hold
to enter the Siri function.
(2) SRC _ / ^
When SRC
In Radio modes, changes br oadcast
frequencies s aved to the − buttons.
In USB/iP od/Bluetooth audio modes,
changes the file.
Press SRC
source.
_ / ^ are turned up/down.
_ / ^ to change the audio
(3) x +/-
x +/- to increase/decrease the
Press
volume.
Press and hold
x +/- to quickly
increase/decrease the volume.
(4) $ / i
Press $ / i in any music play mode to
turn the mute function on or off.
Pr ess and hold $ / i to reject or finish
the call during a call.
Page 7

Infotainment System 6
Operation
Buttons and controlling device
The Infotainment system is operated by
using the function buttons,
multifunctional dial, and the m enu
indicated on the screen display.
The buttons and control devices used
in the system are as follows.
The Infotainment s ystem buttons and dial
The Steering wheel audio remote control
The Infotainment system is operated
via function buttons, a MENU knob and
menus that are shown on the display.
Inputs are made optionally via:
The control panel on the Infotainment
Audio controls on the steering wheel
The speech recognition
buttons
system
System on/off
Press
When the power is off, pressing the
Automatically turn power on
When the ext ern al source is connected on
When a call is received or initiated, the
When pressing a HVAC related button,
If no action is taken within 5 s ec onds, the
system will automatically turn power off.
Press and hold
When the Sys t em is turned off, the time of
to turn the power on.
will
turn the power on and play a radio
broadcast.
the power off mode, s ystem will turn pow er
on and play.
If this c onnection is removed, system is
automatically turn power off.
power is turned on and the action is carried
out.
If this action is ended, system is
automatically turn power off.
system will turn power on and operate this
action.
to turn the power off.
Day is displayed.
Volume control
Turn to adjust the volume.
When the Infotainment s ystem is switched
on, the last selected volume is s et,
provided that the volume is lower than the
maximum start-up volume
Mute control
Press to turn mute on.
Mute symbol “>” will display on the status
area and mute the sound.
To cancel the mute function, press
.
.
Tone settings
Press MENU > select the Settings >
select the Tone Settings to enter the
Tone Settings screen.
Turn MENU to select the Tone Settings
mode. Use MENU to switch between B ass
Midrange Treble Fad e Balanc e
EQ.
Highlight the desired tone setting option
and press MENU to be able to change its
current value.
Turning MENU will change the tone setting
value and the changes will be reflected in
the bar graphic on the display.
Page 8

7 Infotainment System
Press MENU to store the new setting
and return to the Tone Settings screen.
Tone setting menu
Bass: sets the bass sound level.
Midrange: sets the middle sound level.
Treble: sets the treble sound level.
Fade: sets the sound fade between the
front and rear s peaker.
Balance: sets the sound balance between
the right and left speaker.
EQ: selects the one of the 7 EQ styles
(Custom, Pop, R ock, Country, Jazz, Talk,
Class ic al)
The tone settings values range between -
12 and +12.
Speed compensated volume
When Auto volume is activated, the
volume is adapted automatically to
make up for the road and wind noises
as you drive.
Select function
AM/FM Radio or DAB
Press RADIO
DAB
function.
Press MENU to open the AM/FM or DAB
menu that includes options for selecting
broadcast stations.
USB/iPod/Bluetooth audio or
exterior sound (AUX) input play
Press MEDIA to select the audio player
functions.
Each time MEDIA is pressed, the
system switches between
Bluetooth music
Press MENU to open the menu with
options for the relevant function or the
menu of the relevant device.
to select AM/FM radio or
USB/ iPo d
AUX US B/iPo d …
Bluetooth Hands-free phone device
Press PHONE to establish a Bluetooth
connection between the Infotainment
system and a mobile phone.
If a connection can be established, the
main menu of the phone mode is
displayed.
If no connection can be established, a
corresponding menu is displayed.
For a detailed description of preparing
and establishing a Bluetooth
connection between the Infotainment
system and a mobile phone
Page 9

Infotainment System 8
Personalization
Personalization
How to use the Settings menu for
personalization
The MENU knob is one of the central
control elements for menu operation.
Turn:
to select a screen button or menu item
to scroll through a list of menu items
to change a settings value
Press:
to activate a selected scr een button or
menu item
to confirm a changed settings value
to switch to a different s ettings option
to display the application-specific submenu
Select the Settings in the Menu > Turn
MENU to move to the desired menu
it em > press MENU to enter the item’s
detailed menu.
Setting the Time and Date
Set Time
Select Set Time to enter the respective
submenu.
Select Auto Set at the bottom of the
screen. Activate either On - RDS or Off
(Manual).
If Off (Manual) is selected, adjust hours
and minutes.
Repeatedly select 12-24 HR at the
bottom of the screen to choose a time
mode.
If the 12-hour m ode is selected, a third
column for AM and PM selection is
displayed. Select the desired option.
Set Date
Select Set Date to enter the respective
submenu.
Select Auto Set at the bottom of the
screen. Activate either On - RDS or Off
(Manual).
If Off (Manual) is selected, adjust the
date settings.
Volume settings
Adjusting the speed compensated
volume
Press MENU to open the respective
audio menu.
Scroll through the list and select
Settings.
Select Auto Volum e Control.
The Auto Volume function can be
deactivated or the degree of volume
adaptation can be selected in the menu
displayed.
Scroll through the list and select the
desired option.
Adjusting the maximum startup
volume
Press MENU to open the respective
audio menu.
Scroll through the list and select
Settings.
Select Maximum Startup Volume.
Set the desired value.
Page 10

9 Infotainment System
Volume of traffic announcements
To adjust the volume of traffic
announcements, set the desired
volume while a traffic announcement is
given out by the system.
The respective setting is stored by the
system.
Setting the Language
Press MENU to open the respective
audio menu.
Select Settings, scroll through the list
and select Vehicle Settings.
Select Languages.
Scroll through the list and select the
desired language.
Return Factory Settings
Press MENU to open the respective
audio menu.
Select Settings, scroll through the list
and select Vehicle Settings.
Select Restore Factory Settings to
enter the respective subm enu.
Select the desired option and confirm
the m essage.
Software Information
The Software Information menu
contains specific information on the
software.
Press MENU to open the respective
audio menu.
Select Settings, scroll through the list
and select Vehicle Settings.
Select Software Information.
Page 11

Infotainment System 10
Radio
AM/FM Radio
Selecting the radio mode
Press RADIO to enter the radio
function.
Repeatedly press RADIO on the control
panel to toggle between the different
wavebands.
Seeking for radio station
Press g or l to move to the previous
or next station.
Press and hold g or l.
Release the button when the required
frequency has almost been reached.
Tuning a radio station manually
Press MENU to open the waveband
menu and then select Manual Tuning.
Depending on the waveband selected,
a list of all frequencies is displayed.
Select the desired frequency.
Station lists
Turn MENU to display a list of all
stations currently receivable.
Scroll through the list and select the
desired station.
Storing Radio Frequency
Repeatedly press FAV to select the
desired page of stored favorites
Press and hold any of th e - buttons to
store the current radio st at ion t o that
button of the select ed Favorites page.
.
Selecting Presets
Repeatedly press FAV to select the
desired FAV preset page.
Press a - to directly listen to the radio
station stored to that button.
FM/AM Menu
While listening to the radio, press
MENU to enter the FM/ AM menu.
Turn MENU to move the desired menu
item, and then press MENU to select
the relevant item or to enter the item's
detailed menu.
Station List: selects a station in the list of
strong stations.
Update Station List: Automatically search
and save receivable frequencies to Station
List.
Manual Tuning: Briefly turn the dial, moves
previous/next frequency.
Set Number of Favorites Page: sets the
number of the maximum number of
Favorites pages.
Page 12

11 Infotainment System
Digital audio broadcasting
(DAB)
Advantages of DAB
DAB stations ar e indicated by the program
name inst ead of the broadcasting
frequenc y.
With DAB, s everal radio programs
(servic es) can be br oadcasted on a single
frequenc y (ensemble).
Besides high-quality digital audio ser vices,
DAB is also able to transmit programass ociated data and a multitude of other
dat a services including travel and traffic
information.
As long as a given DAB receiver can pick
up the signal sent out by a broadcasting
station (even if the signal is very weak) ,
sound reproduction is ensur ed.
In the event of poor reception, the volume
is reduc ed automatic ally to avoid the
output of disagreeable noises.
If the DAB signal is too weak to be picked
up by the receiver, reception is interrupted
complet ely. This can be avoided by
activating DAB to DAB Linking and/or DAB
to F M Linking in the DAB option menu (see
below).
Interferenc e caus ed by stations that are on
nearby frequencies ( a phenomenon that is
typ ic al of AM and FM reception) does not
occur with DAB.
If the DAB signal is reflected by natural
obstacles or buildings, the reception quality
of DAB is improved, whereas AM or FM
reception is c onsiderably impaired in s uch
cas es.
When DAB reception is enabled, the FM
tuner of the Infotainment system remains
active in the background and continually
searches for the best receivable FM
stations. If TP is activated, traffic
announcements of the FM station with the
current best reception are issued.
Deactivate TP if DAB reception should not
be interrupted by FM traffic
announcements.
DAB settings
To configure the DAB settings options,
activate the radio function and then
select the DAB waveband.
Press MENU to display the DAB
waveband menu.
DAB Announcements
Besides their music programs, a lot of
DAB stations also broadcast
announcements of various categories.
If you activate som e or all categories,
the currently received DAB service is
interrupted when an announcement of
these categories is made.
Select DAB Announcements to display
the DAB categories list.
Select the desired categories. The
selected categories are marked with @.
DAB to DAB Linking
If this function is activated, the device
switches over to the sam e service
(program) on another DAB ensemble (if
available) when the DAB signal is too
weak to be picked up by the receiver.
Set DAB to DAB Linking to On or Off.
DAB to FM Linking
If this function is activated, the device
switches over to a corresponding FM
station of the active DAB service (if
available) when the DAB signal is too
weak to be picked up by the receiver.
Set DAB to FM Linking to On or Off.
Page 13

L Band
If L Band is activated, the Infotainment
system receives an additional
frequency range (1452 - 1492 MHz).
Set L-Band to On or Off.
Intellitext
The Intellitext function allows for the
reception of additional information such
as announcements, financial
information, sports, news etc.
Select one of the categories and
choose a specific item from the list to
display detailed information.
Infotainment System 12
Page 14

13 Infotainment System
Caution
USB storage devices c an only be
Audio Players
Auxiliary Devices
USB player
Cautions for using USB devices
Operation c annot be guaranteed if the
HDD built-in USB mass storage devic e or
CF or SD memory card is connected by
using a USB adaptor. Use a USB or flash
memory type storage device.
Take caution to avoid static electricity
discharge when connecting or
disconnecting the USB. If connection and
disconnection are repeated many times in
a short time, this may caus e a problem in
using the devic e.
Operation is not guaranteed if the
connecting terminal of the USB device is
not metal.
Connection with i-Stick Type USB storage
devices may be faulty due to vehicle
vibration, so their operation cannot be
guaranteed.
Be careful not to touch the USB connecting
terminal with an object or any part of your
body.
The USB storage device can only be
recognized when it is formatted in
FAT16/32 file format. Only devices with an
allocated unit size of 512 byt e/s ector or
2,048 byt e/sector can be us ed. NTFS and
other file systems cannot be recognized.
According to the type and capacity of the
USB storage device and the type of the
stored file, the time it takes to recognize
the files may differ. This is not a problem
with the product in this case, so please
wait for the files to be process ed.
Files in some USB storage devices may
not be recognized due to compatibility
problems, and connections with a memory
reader or a USB hub are not supported.
Please check the device’s operation in the
vehicle before use.
When devices such as an MP3 player or
digital c amera are connected through a
mobile disc, it may not operate normally.
Do not disconnect the USB stor age device
while it is being played.
This may cause damage to the product or
the perf ormance of the USB device.
Disconnect the connected USB storage
device when the vehicle ignition turned off.
If the ignition is turned on while the USB
storage device is connected, the USB
storage device may be damaged or may
not operate normally in some cases.
connected to this product for the purpose
of playing music files.
The product's USB terminal should not be
used to charge USB access ory equipment
since the heat generation using the USB
terminal may caus e performance issues or
damage to the product.
When the logical drive is separated from a
mass USB storage device, only the files
from the top-level logical drive can be
played for USB music files. This is the
reason that the music files to be played
should be stored in the top-level drive of
the devic e. Music files in particular USB
storage devices may also not be normally
played if an application is loaded by
partitioning a separate drive inside the
USB device.
Music files to which Digital Right
Management (DRM) is applied cannot be
played.
This product c an support USB storage
devices that are up to 16 Gigabytes in
capacit y with a limit of 6,000 f il es , 100
folders, and 8 stages of f older structur e.
Normal usage c annot be guaranteed for
storage devices that exceed this limit.
Page 15

Infotainment System 14
Caution for using USB music files
Damaged music files may be cut-off during
playback or may not be played at all.
About MP3 (WMA) music files
The MP3 files that can be played are as
follows.
- Bit rate: 8 kbps ~ 320 kbps
- Sampling frequency:
48 kHz, 44.1 kHz, 32 kHz (for MPEG-1)
24 kHz, 22.05 kHz, 16 kHz (for MPEG-2)
This product displays MP3 (W MA) files
with the mp3, .wma (lower c ase letters)
or .MP3 or .W MA (capital letters) file name
extensions.
This product can display ID3 tag (Version
1.0, 1.1, 2.2, 2.3, 2.4) inf ormation about
album, artist, etc. for MP 3 f il es.
The file/folder names that can be used
according to storage type are as f ollows ,
including the four character file name
extensions (.mp3).
This product can play MP3 files which use
VBR. W hen a VBR type MP3 file is being
played, the remaining time displayed may
be different from the actual time remaining.
Connecting the USB storage device
Connect the USB storage device in
which music files are stored to the USB
connection terminal.
Once the product finishes reading the
information on the USB storage device,
it will automatically start playing.
If a non-readable USB storage device
is connected, then an error message
will appear and the product will
automatically switch to the previously
used function or the FM radio function.
If the USB storage device to be played
is already connected, repeatedly press
MEDIA to select the USB player.
It will automatic ally play from the previous
playing point.
If there is no connected, “No Media
Available” with a DISMISS and PAIR
option in the display screen.
The information displayed includes the file
name, f older name, and ID3 T ag
information saved with the song.
If inc orrect ID3 Tag information (e.g. artist,
song title) was added to MP3 (W MA) files
bef or e t h ey are burnt to disc, this
information will be displayed as is by the
Infotainment s ystem.
Incorrect ID3 T ag information cannot be
modified or corrected on the Inf otainment
system (ID3 T ags can only be corrected on
a PC).
The information for songs express ed in
special symbols or in unavailable
languages may be displayed as “****” or
are not displayed at all.
Ending USB music files playback
Press RADIO or MEDIA to select other
functions.
Selecting playing file
While playing, press g or l to select
the previous or next file.
Turn MENU to move the desired file in
the file list, and then press MENU to
instantly change it.
Fast-forwarding and Re-winding the
file
While playing, press and hold g or l to
rewind or fast-forward through the song
until released.
Page 16

15 Infotainment System
Once released, the file will begin
playing at normal speed.
Using the USB menu
While playing the file, press MENU to
enter the USB menu.
Turn MENU to move the desired menu
it em , and then press MENU to select
the relevant item or to enter the item’s
detailed menu.
Folder View: Enter the Folder View mode,
and move to the previous or next folder.
Shuffle: Turn the shuffle feature on or off.
Browsing/Indexing Device
Browsing is not supported until indexing is
complet ed for the connected device.
While indexing, if select browse from the
menu, a pop-up “Feature not supported
during Indexing Use folder view to browse
contents” will display.
When a single devic e with greater than
6,000 s ongs is connected, a pop-up
“Media indexing memor y full Use folder
view or remove other device” will display.
Using the MTP menu
Charge Only: select the charge option
for the MTP device. MTP device will be
charged, and system will show the popup message, when it is connected.
The default is Charge Only.
When the Charge Only option is selected
in the Media Transfer Protocol (MTP)
Setting Menu, the audio source is not
changed and the connected device is only
charged.
If you change to USB mode while charging
the device, a Charge message with
charging activity indicator is shown on the
display screen. In this case, the system will
not start indexing the files on the device.
Charging may not be supported by some
MTP devices.
Scan Music Folder Only: select the
Music Folder Scan option for the MTP
device.
The system can display the Artist
Name/Song Nam e/Elapsed Time
regarding the current song and access
the playlist on the MTP device.
Scan All Folder: select the All Folder
scan option for the MTP device.
The device indexing time takes longer than
the setting of Scan Music Folder O nly. It
depends on the smartphone and the
files/folders on the smartphone.
With some phones f eaturing Media
Transfer Protocol (MTP), music search can
take a long time.
If the phone screen is locked, you c annot
search for music. To access music on the
phone, unlock the phone screen.
If you connect the abnormal devic e, the
system may not properly operate.
Page 17

Infotainment System 16
iPod player
Connecting iPod player
Connect the iPod device in which the
music files are stored to the USB
connection terminal.
Some iPod/iPhone product models may
not be supported.
If you connect the abnormal device, the
system may not properly operate.
Only connect the iPod to this product
with connection cables supported by
iPod products. Other connection cables
cannot be used.
In some cases, the iPod product may be
damaged if the ignition is turned off when it
is connected to the product.
When the iPod product is not being used,
keep it separately fr om this product with
the car ignition turned off.
Once the product finishes reading the
information on the iPod devic e, it will play
automatically.
If a non-r eadable iPod device is connected,
then the relevant error message will
appear and the product will automatically
switc h t o the previously used function or
the FM radio function.
If the iPod device to be played is
already connected, repeatedly press
MEDIA to select the iPod player.
It will automatic ally play from the
previously played point.
The playback functions and the information
display items of the iPod player used with
this product may be different from the iPod
in terms of play order, method, and the
information displayed.
Ending iPod playback
To end playback, press RADIO or
MEDIA to select other functions.
Using the iPod menu
While playing the file, press MENU to
enter the Menu iPod.
Turn MENU to move the desired menu
it em , and then press MENU to select
the relevant item or to enter the item’s
detailed menu.
Browse “Device Name”: selects a list item
in the list of br owse names such as
Playlists, Artists, Albums, Tracks, Genres,
Audio Books, and Composers.
Shuffle: turn the shuffle feature on/off.
Exterior Sound (AUX) Input
Connecting an exterior sound
Connect the audio output of the
external audio equipment to AUX input
terminal.
The Infotainment s ystem will automat ically
switch to the exterior sound (AUX) input
mode when the exterior sound device is
connected.
Press MEDIA to switch to the exterior
sound input mode if the exterior sound
system has already been connected.
Page 18

17 Infotainment System
Phone
Bluetooth
About Bluetooth
About Bluetooth wireless
technology
Bluetooth® Wireless Technology refers to
a short-distanc e wireless networking
technology which uses a 2.45GHz
frequenc y to c onnect various devices
within a certain distance.
Supported within PCs, external devices,
Bluetooth® phones, PDAs, various
electronic devic es, and automotive
environments, Bluetooth® Wireless
Technology to be transmitted at high
speeds without having to use a connector
cable.
Bluetooth® Hands-free refers to a device
which allows the user to conveniently
make phone calls with Bluetooth® mobile
phones through the multimedia system.
Before Connecting the Bluetooth
Unit
Before connecting the head unit with the
mobile phone, check to see that the mobile
phone supports Bluetooth f eatures.
Even if the phone supports Bluetooth
Wireless Technology, the phone will not be
found during devic e searches if the phone
has been set to hidden state or the
Bluetooth power is turned off.
Disable the hidden state or turn on the
Bluetooth power prior to searching or
connecting with the head unit.
If Auto Connection is used, the Bluetooth
phone is automatically connected when the
ignition is turned on, making it
unnec essary to have to connect the phone
with the head unit every time.
If you do not want automatic connection
with your Bluetooth device, turn the
Bluetooth feature off of the Bluetooth
device.
Park the vehicle when connecting the unit
with the mobile phone.
Bluetooth c onnection may bec ome
intermittently disconnected in s ome mobile
phones. Follow these steps to try again.
1. Turn the Bluetooth® function within the
mobile phone OFF/ON and try again.
2. Turn the mobile phone power OFF/ON
and try again.
3. Completely remove the mobile phone
battery, reboot, and then again.
4. Reboot this unit and try again.
5. Delete all paired devices, pair and try
again.
The hands-free call volume and qualit y
may differ depending on the mobile phone.
Pairing Bluetooth devices and use of other
Bluetooth features are not supported when
the vehicle is in motion. Please first park
your vehicle.
When downloading contacts, phenomenon
not described within this us er’s manual
may be related with the mobile device.
When s uch occurs, inquire within the
mobile phone manufacturer.
As a Bluetooth wireless connection c an
extend to 10 meters, your Bluetooth device
may automatically connect to this unit even
if the device is not in the c ar. Please
consider this, especially when pairing or
connecting Bluetooth devices to the car
radio when other Bluetooth devices may
be within wireless radio range of the car
rad io.
This unit us es the latest Digital Nois e &
Echo suppression system to provide the
best sound clarity with little or no distortion,
but in some conditions there may be some
echo and noise experienced. It is
recommended to keep the car windows
closed during hands-free calls f or best
results.
This unit us es the following Bluetooth
profiles :
Page 19

Infotainment System 18
1. Phone Book Access Profile (PBAP)
2. Hands Free Profile (HFP)
3. Advanced Audio Distribution Profile
(A2DP)
4. Audio Video R emote Control Profile
(AVRCP)
If Bluetooth profile does not matched,
system will display the “Action not
supported by this device” pop-up on the
display screen. (e.g.: device is not able to
control MENU.)
Before Using Bluetooth Music
mode
Bluetooth Audio mode can be us ed only
when a Bluetooth Audio mode capable
device has been connected.
If music is not yet playing from your mobile
devic e aft er converting to streaming audio
(Bluetooth Audio) mode or after pressing
Play on the mobile devic e itself, pressing
again the button once may begin playing
the music.
Check to see whether music is playing
from the Bluetooth device after converting
to streaming audio mode. The Str eaming
audio f eature may not be supported in
some mobile phones.
While Bluetooth Audio mode is playing, if
the Bluetooth phone is disconnected, then
the music will also stop.
Bluetooth streaming audio may not be
supported with some mobile phones.
If this indicator is not displayed, then no
Bluetooth device is c onnected or the
connection is not of satisfactory quality.
This unit can pair up to 5 Bluetooth devices.
Connecting Bluetooth
Registering the Bluetooth device
Register the Bluetooth device to be
connected to the Infotainment system.
Firstly, set up the Bluetooth device to
be connected from the Bluetooth
settings m enu to enable other devices
to search for the Bluetooth device.
Press PHONE to enter the Phone
application mode.
To select Pair, press −. The information
“Nam e: Device name / PIN: 0000”
appears in the display screen and then
the Pairing progress starts.
If no phone sourc e is connected, the status
region displays “No Device Paired”.
To change the PIN, press the − and select
New Pin in the Pair menu. Turn and press
MENU to change the PIN.
From the Bluetooth device, search for
this unit and pair the device.
1. Turn on the Bluetooth on your phone.
2. Search and select device “Device
name” in Bluetooth menu.
3. Enter this item on your phone.
To learn more about searching from
Bluetooth devices and pairing, refer to
the user's manual for your Bluetooth
device.
After a while, the Bluetooth device is
automatically registered.
If the registration of device to be c onnected
to the unit is successful, then the
“Bluetooth Connected” appears in the
display screen.
After Pairing is c omplete, a c ontacts
download request is sent to your mobile
phone. Please check your phone and
accept the download request if necess ary.
When pairing a second device, repeat
the above steps.
If a Bluetooth devic e is connected, a new
device c annot be paired. If you want to pair
a new phone, first disconnect the
connected Bluetooth device.
This unit can pair up to 5 Bluetooth devices.
Page 20

19 Infotainment System
When pairing a second device, repeat
the above steps.
If a Bluetooth devic e is connected, a new
device c annot be paired. If you want to pair
a new phone, first disconnect the
connected Bluetooth device.
This unit can pair up to 5 Bluetooth devices.
Adding/Connecting/Disconnecting/D
eleting the Bluetooth devices
Firstly, set up the Bluetooth device to
be connected from the Bluetooth setup
menu to enable other devices to search
for the Bluetooth device.
Press PHONE > press MENU to select
the Bluetooth Devices to enter the
Phone List menu > turn MENU to move
to the list device item > press - to select
the desired menu item.
Select Add: The inf ormation “Name:
Device name / PIN: 0000” appears in the
display screen and then the Pairing
progress starts.
Select Connect: After a while, the
Bluetooth device is automatically
connected, and “Bluetooth Connected”
appears on the display screen.
Select Disconnect: Disconnect t he
connected Bluetooth device from the
Phone List menu.
Select Delete: Delete the registered
Bluetooth device from the Phone List menu.
Bluetooth Music player
Connecting Bluetooth music player
Connect the Bluetooth device in which
the m usic files are stored.
Repeatedly press MEDIA to select the
Bluetooth Music mode.
Audio file within the Bluetooth device will
automatically play once "Bluetooth Music"
is displayed on the display screen.
If music is not yet playing from your mobile
device after switching to streaming audio
(Bluetooth Music) mode or after pressing
Play on the mobile devic e itself, try to start
music playb ack by pressing the Play
button again.
While playing, press g or l to moves
to the previous or next track.
This function only operates with Bluetooth
devices that support Audio Video Remote
Control Profile (AVRCP) version 1.0 or
above. Depending on the Bluetooth device
options, some devices may display Audio
Video Remote Control Profile (AVRCP)
being connected for the initial c onnection.
If the Bluetooth device is disconnected
while Bluetooth music is playing, the music
will also stop.
Using the Bluetooth Music menu
While playing, press MENU to enter the
Bluetooth Audio Menu.
Turn MENU to move the desired menu
it em , and then press MENU to select
the relevant item or to enter the item’s
detailed menu.
Browse “Device Name”: Select a list item
in the list of br owse names. If the Bluetooth
profiles do not match, the system will
display “Action not supported by
devices”.
Support Profile version: Audio Video
Remote C ontrol Profile (AVRCP) 1.4.
Shuffle: Turn the shuffle feature on or off.
Manage Bluetooth devices: Enter the
Phone List menu.
Page 21

Infotainment System 20
Phone
Emergency call
Warning: Connection setup cannot be
guaranteed in all situations. For this
reason, do not rely exclusively on a
mobile phone when a vitally important
communication (e.g. a medical
emergency) is concerned.
On some networ ks, it may be necessary
for a valid SIM card to be properly
inserted in the mobile phone.
Warning: Bear in mind that you can make
and receive calls wit h the mobile phone,
if it is in a service area with a sufficiently
strong signal. Under certain
circumstances emergency calls cannot
be made on all mobile phone networks; it
is possible that they cannot be made
when certain network services and/or
telephone functions are active. You can
enquire about this with the local network
operator s.
The emergency call number can differ
depending on the region and country.
Please enquire beforehand about the
correct emergency call number for the
relevant region.
Making an emergency call
Dial the em ergency call number (e.g.
112).
The telephone connection to the
emergency call center is set up.
Answer when the service personnel
questions you about the emergency.
Warning: Do not end the call until you are
requested to do so by the emergency call
center.
Using the Siri function
In order to use the Siri function, the
iPhone must be connected to the
Infotainment system via USB cable or
via Bluetooth.
When iPhone is connected, press and
hold b / % on the steering wheel audio
control to activate the Siri function.
Compatible with iPhone devices that
support iOS 4.0 or later.
When Siri is already enabled, press to re-
activate the Siri.
Siri commands that can be used in
conjunction with this product supports
dialing commands via the iPhone, select
the song and playbac k of iPhone Music
Player.
Incoming Call
When a phone call comes through the
connected Bluetooth mobile phone, the
playing track will be cut off and the
phone will ring with the relevant
information displayed.
To receive a call, press b / % on the
steering wheel audio control to move to
the Active Call screen or press - to
Page 22

21 Infotainment System
Caution
It is possible to transfer your ringtone
select the Answer to move to the Active
Call screen.
To reject a call, press and hold $ / i
on the steering wheel audio control or
press - to select the Ignore.
An ignored c all is sent to the voice mail
box, the ringtone stops, and the alert is
extinguished, returning the display to the
previous screen prior to the alert.
If the call is not ignored or answered
before it is transferred to the voice mail box,
the alert will extinguish returning to the
previous screen and the ringtone stops.
Call Waiting
If another person calls while you are
already on the phone, the system
displays a second incoming call pop-up.
Press PHONE or % on the steering
wheel audio control to switch between
1st call and 2nd call.
If two calls are active (call waiting
mode), a call waiting alert is not
displayed.
Phone Volume Control
Turn
to adjust the Phone Volume
while in an active phone call (e.g.
through volume steps 0 ~ 63).
depending on the mobile phones.
Adjust the ringtone volum e of the
mobile phone if the volum e is too low.
You can use the volume control to
adjust the Ring Tone Volume while the
ring tone is given out starting at a
defined minimum volume. The volume
ranges from level 3 to max.
During a Call
During the active call, the Active Call
screen displays information relevant to
an active phone call.
End: End an active phone call.
When a call is ended, the system
returns to the screen active before the
call.
Mute/Unmute: Mute the vehicle
microphone while in an active call by
pressing the button.
If the microphone is muted, the label
changes Unmute. Press the button
again to unmute the microphone.
Handset/Hands-free: Switch from
Hands-free m ode to the phone handset
by pressing - directly.
If the phone call on the active phone
source is handled in hands et mode, the
label changes to hands-free.
Pressing the button now returns the phone
conversation to hands-free mode.
The hands-free mode is default when a call
is initiated.
If there is an issue and the call is not
transferr ed to hands-free or handset as the
user requested, a message is displayed
notifying the user that the transfer could
not be c arried out. Please r etry.
Keypad: Enter the Keypad screen.
Ending a Call
If a call is ended while the system is
displaying any other screen than the
Active Call screen, the Call Ended
message is displayed.
Page 23

Infotainment System 22
The call may be ended by the person on
the other end of the line, from the
Bluetooth handheld device or by pressing
$ / i on the steering wheel audio remote
control.
After 5 seconds, the display returns to the
previous screen.
Re-dialing a Call
If the phone call was dropped, you can
re-dial the number before the time out
by pressing − directly below the display
labeled Redial.
Calling a number in the call log
Press PHONE to enter the Phone List
menu > turn MENU to select the
Recent Calls > press MENU > turn
MENU to select Missed Calls, Received
Calls or Sent Calls, then press MENU.
The recent calls list displays an
intermediate menu containing missed
calls, received calls, and sent calls.
Turn MENU to select a nam e or phone
number, and press MENU to make a
call.
Calling a Number in the Phone Book
Press PHONE to enter the Phone List
menu > turn MENU to select Contacts
> press MENU > turn MENU to select a
name or phone number, and press
MENU to make a call.
The last outgoing phone source is
retained at the next ignition cycle, if that
phone device is connected, and it is the
outgoing phone source.
Downloading the Phone Book
If the Bluetooth device supports a
phone book synchronization function,
the phonebook is downloaded
automatically after the connection has
been established.
The call history lists can be downloaded
from the connected Bluetooth devic e.
Sorting call histories by time is not
supported.
It is possible to download the call histor y
even when proceeding another action.
It is not possible to start the download
process when the call history download
feature is turned off within the Bluetooth
device.
After Pairing is c ompleted, a c ontacts
download request is sent to your mobile
phone. Some phones require additional
confirmation. Please check your phone
and accept the download request if
nec essary.
If a paired phone is deleted, its call history
lists will also be deleted from the system.
The system only us es inf ormation coded in
UTF-8 format.
Dial a Number by Keypad
Press PHONE to enter the Phone List
menu > turn MENU to select the
Keypad and press MENU to enter the
Keypad screen.
When users s elect Keypad from the Phone
Home Scr een, a phone dialer keypad is
displayed.
Users rotate the knob to highlight the
desired digit to dial and press the knob to
select it.
Turn MENU to highlight the desired
digit to dial and press MENU to select it.
You can enter max 24 digits.
If the user continues to turn the knob when
the end of the keypad is reached, it jumps
to the other side of the keypad.
Digits are displayed in the digit scr een as
they are entered.
Page 24

23 Infotainment System
The Call button is not active until the user
has input a digit.
Once the us er has enter ed the desired
phone number, press − to begin calling
that number.
While the connection is established, the
system displays the Active Call screen.
If the user made a mistake while entering a
phone number, turn MENU to highlight
Delete and pr ess the knob to delete the
last digit entered.
Pressing and holding MENU for the
standard time while Delete is highlighted
clears the entire digit field.
Bluetooth Devices View
Press PHONE to enter the Phone
menu > turn MENU to select the
Bluetooth Devices > press MENU to
enter the Phone List menu.
The list contains the device names of all
Bluetooth devices that have been paired
with the system.
If the device name received is blank,
empty string is displayed.
From the Bluetooth Devic e List menu, the
user may add (pair) a device, delete a
device, and connect a device.
Incoming Text Message
When a Text Message is received by
the connected Bluetooth mobile phone,
the phone will display the relevant
information.
If the sender is registered in the phone
book, the first and last name is displayed.
If the number is not stored in the phone
book, the phone number is displayed.
The Text Message alert is displayed as
soon as all information is available.
To display the entire message, press −
directly below the display labeled
“View”. The detail message screen is
now displayed.
This feature is not available while
vehicle is moving.
Page 25

FCC Information to User
This equipment has been tested and found to comply with the limits for a Class B digital device,
pursuant to Part 15 of the FCC Rules. These limits are designed to provide reasonable protection
against harmful interference in a residential installation. This equipment generates, uses and can
radiate radio frequency energy and, if not installed and used in accordance with the instructions, may
cause harmful interference to radio communications. However, there is no guarantee that interference
will not occur in a particular installation. If this equipment does cause harmful interference to radio or
television reception, which can be determined by turning the equipment off and on, the user is
encouraged to try to correct the interference by one of the following measures:
5HRULHQWRUUHORFDWHWKHUHFHLYLQJDQWHQQD
,QFUHDVHWKHVHSDUDWLRQEHWZHHQWKHHTXLSPHQWDQGUHFHLYHU
&RQQHFW WKH HTXLSPHQW LQWR DQ RXWOHW RQ D FLUFXLW GLIIerent from that to which the receiver is con-
nected.
&RQVXOWWKHGHDOHURUDQH[SHULHQFed radio/TV technician for help.
Caution
0RGLILFDWLRQV QRW H[SUHVVO\ DSSURYHG E\ WKH SDUW\ UHsponsible for compliance could void the user’s
authority to operate the equipment.
FCC Compliance Information : This device complies with Part 15 of the FCC Rules. Operation is
subject to the following two conditions: (1) This device may not cause harmful interference, and (2)
this device must accept any interference received, including interference that may cause undesired
operation
IMPORTANT NOTE:
FCC RF Radiation Exposure Statement:
This equipment complies with FCC RF radiation H[SRVXUH OLPLWV VHW IRUWK IRU DQ XQFRQWUROOHG
environment. This equipment should be installed and operated with a minimum distance of 20
centimeters between the radiator and your body.This transmitter must not be co-located or operating
in conjunction with any other antenna or transmitter.
Page 26

European Union Regulatory Notice
Compliance with these directives implies conformity to harmonized European standards (European
Norms) that are listed in the EU Declaration of Conformity issued by HP for this product or product
family. This compliance is indicated by the following conformity marking placed on the product.
The wireless telecommunications functionality of this product may be used in the
following EU and EFTA countries:
Austria, Belgium, Bulgaria, Cyprus, Czech Republic, Denmark, Estonia, Finland, France, Germany,
Greece, Hungary, Iceland, Ireland, Italy, Latvia, Liechtenstein, Lithuania, Luxembourg, Malta,
Netherlands, Norway, Poland, Portugal, Slovak Republic, Slovenia, Spain, Sweden, Switzerland, and
United Kingdom.
Products with 2.4-GHz wireless LAN devices France
For 2.4 GHz Wireless LAN operation of this product certain restrictions apply:
This product may be used indoor for the entire 2400-2483.5 MHz frequency band (channels 1-13).
For outdoor use, only 2400-2454 MHz frequency band (channels 1-9) may be used. For the latest
requirements, see
Italy :
License required for use. Verify with your dealer or directly withthe General Direction for Frequency
Planning and Management (Direzione Generale Pianificazione e Gestione Frequenze).
CE RF Radiation Exposure Statement:
http://www.art-telecom.fr.
Caution This equipment complies with European RF radiation exposure limits set forth for an
uncontrolled environment. This equipment should be installed and operated with a minimum distance
of 20 centimeters between the radiator and your body.This transmitter must not be co-located or
operating in conjunction with any other antenna or transmitter.
 Loading...