

Page 1

GIS-403
FORM AND BEHAVIOR
SPECIFICATION
FACEPLATE RADIO
INFOTAINMENT HMI
Release 1.7
April 2, 2014
Page 2
Revision History
FACEPLATE NGF RADIO
Date Version Update Note Author
Jun. 21, 2013 V1.4 • Last Release from GMNA GMNA
• HMI QnA is applied. (GMK Info <-> Humax HMI/SW)
• SWC Key
Dec. 02, 2013 V1.5
• OnStar
• Vehicle Setting
• Menu Tree
Jin Kim (GM)
<With Boil Kim (Humax)>
• Apple Siri
• Driving School
• Errors (# of 18) are cleared by DRE review.
• NGF Menu Tree(IA) is applied. (Appendix I)
• RBDS is applied. (Appendix II)
Jan. 29, 2014 V1.6
- RBDS is being the step of devolvement .
• Zoom Bubble is applied. (Appendix III)
<With Boil Kim (Humax)>
• Revised the T.O.D mode display by QAP issue.
- Added the (Date) Format on the Set Date in the menu
• HMI QnA is applied. (GMK Info <-> Humax HMI/SW)
Jin Kim
Feb.27.2014 V1.61
RELEASE VER 1.7
April 02, 2014
• Temporary Release for solving the GMK/ESIM issues
- Chapter 5.19.13
PREVIOUS / FAST REVERSE TRANSPORT CONTROLS
: Changed the condition of Previous Song Play
(10sec 5sec)
- Chapter 12.4 CONNECTING TO ONSTAR
: Added the rule of text display
- Added the Arabic Layout Guide (Appendix III)
- Added the Volume Control
(1.1.7 Rotating power knob (Volume),
1.2 STEERING WHEEL CONTROL HARDWARE)
GIS-403-FACEPLATE RADIO FORM AND BEHAVIOR SPECIFICATION
GMK CONFIDENTIAL © COPYRIGHT 2010-2020 GENERAL MOTORS
Jin Kim
<With Boil Kim (Humax)>
2
Page 3
Revision History
Date Version Update Note Author
April. 2, 2014 V1.7
• Combined the document GIS-403 V1.4 and GIS-403 V1.61
- GIS-403 V1.4 had been made by GMNA
- GIS-403 V1.61 had been made by GMNA with Humax
• Marked the changed/added figure & description which is
V1.61 document as Red Color.
FACEPLATE NGF RADIO
Jin Kim
<With Boil Kim (Humax)>
RELEASE VER 1.7
April 02, 2014
GIS-403-FACEPLATE RADIO FORM AND BEHAVIOR SPECIFICATION
GMK CONFIDENTIAL © COPYRIGHT 2010-2020 GENERAL MOTORS
3
Page 4
1. HARDWARE
FACEPLATE NGF RADIO
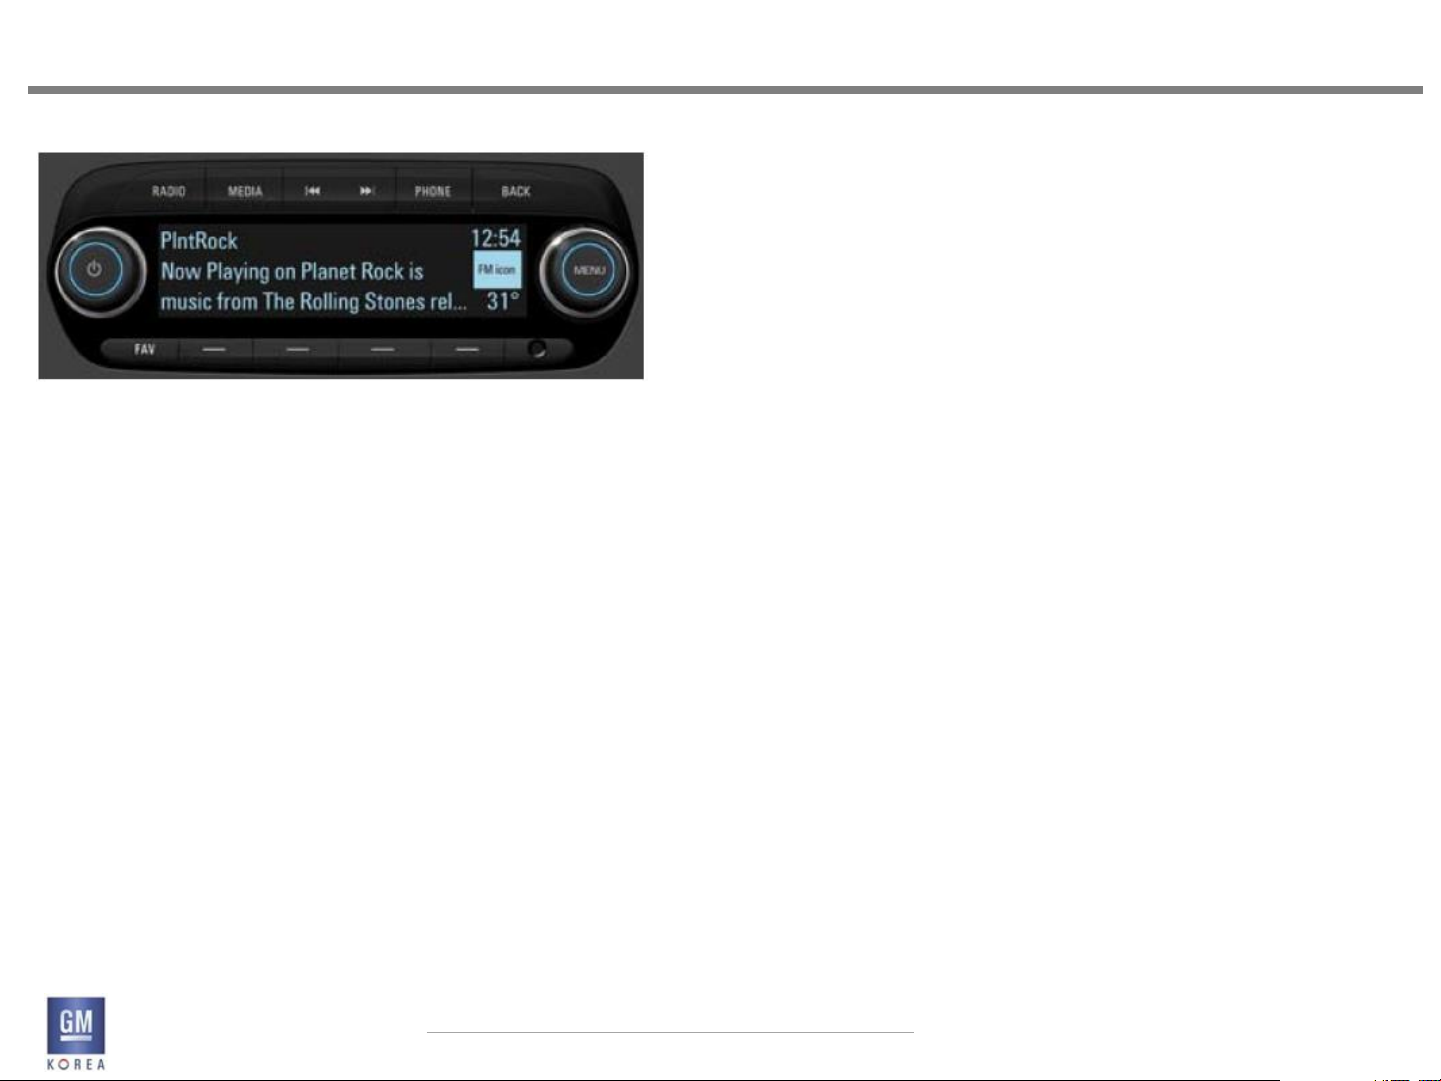
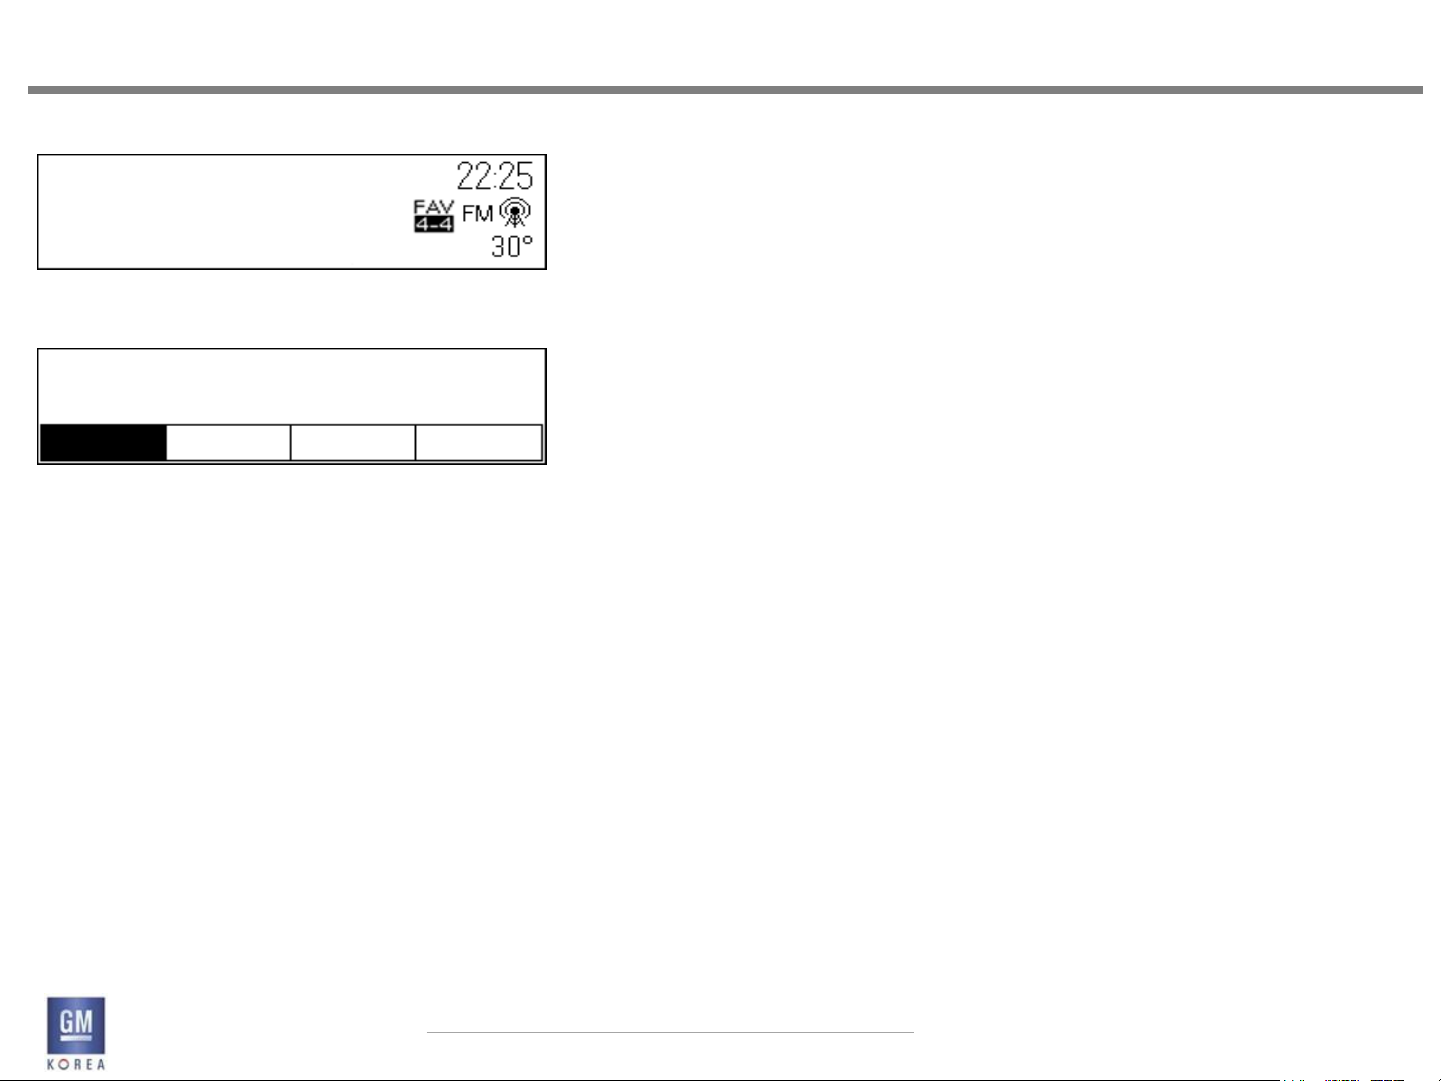
Figure 1.1.1 - FM Now Playing - uplevel faceplate configuration (example)
1.1 Overview
1.1.1 Radio
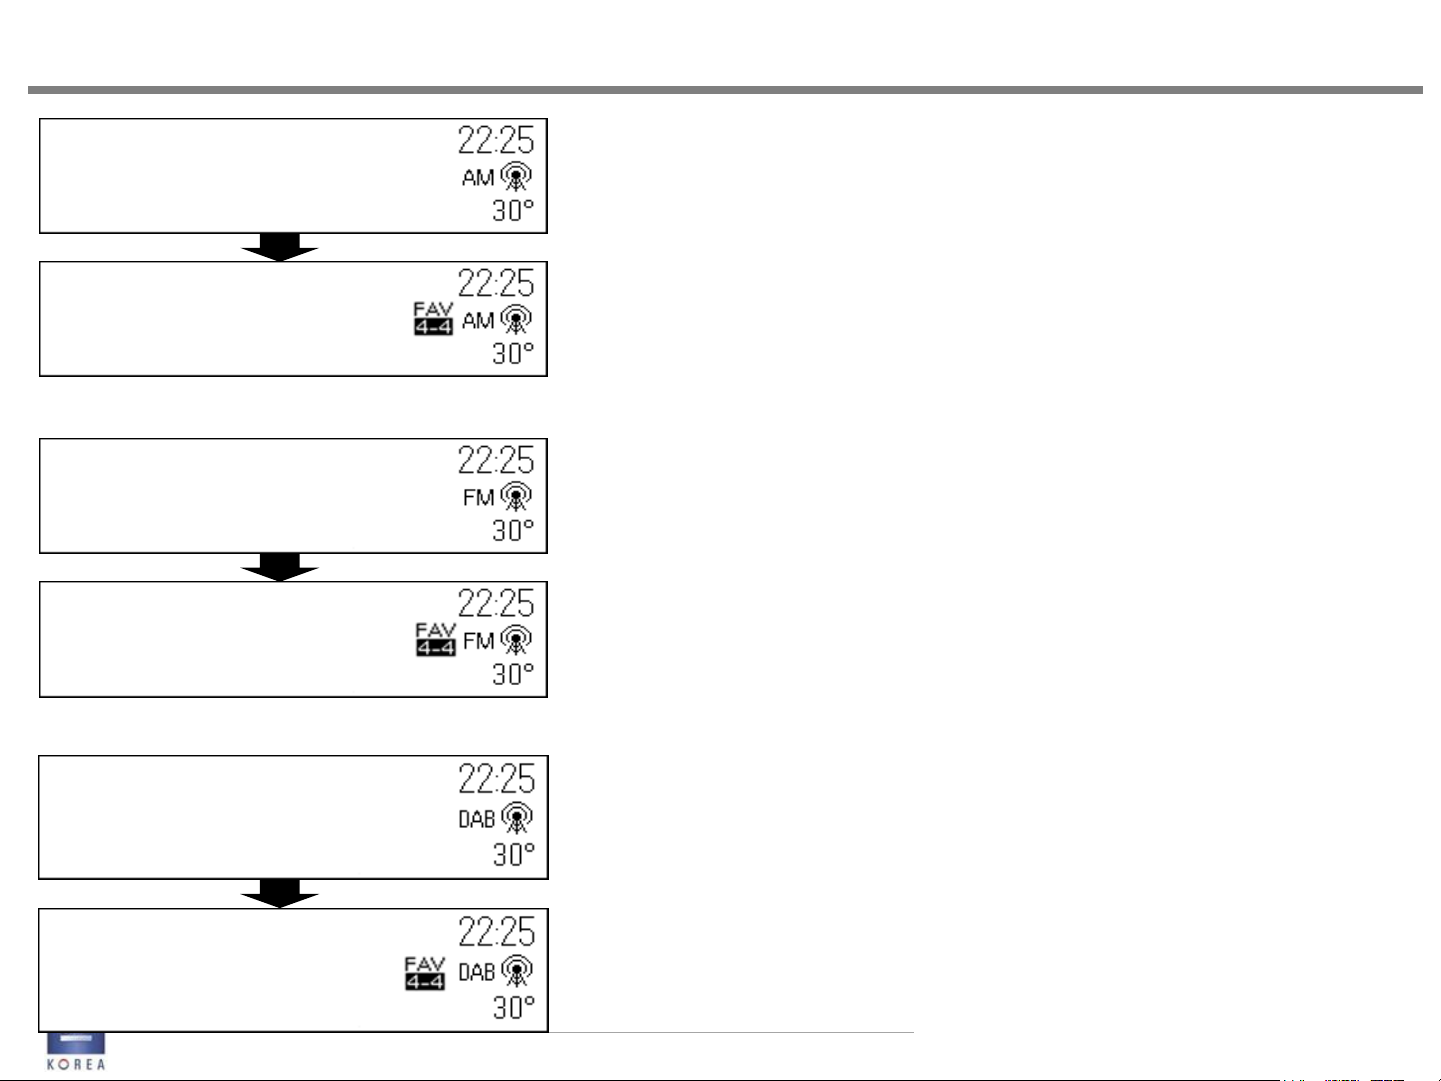
The Radio button cycles through the radio bands AM,
FM, and DAB in sequential order.
• Exceptions>
On the menu or FAV Page or Media/Phone Mode,
If the user presses the <RADIO>key,
system should be gone to the latest RADIO Band/Freq.
1.1.2 Media
The Media button cycles through the media sources
USB (mass storage device or media players such as an
iPod), SD, AUX, and Bluetooth Devices.
1.1.3 Seek Next/ Seek Previous
The arrows will perform seeking between strong stations
in broadcast sources and tracking next and previous
in media sources.
• Exceptions>
If the user presses the < - > key which means preset number
on the seeking, system should be recalled/tuned the preset
number.
1.1.4 Fav
Cycles through the users favorites in sets of four. This
button is located next to the preset buttons along the
bottom of the display.
1.1.5 Back
Allows the user to go back incrementally within a list
hierarchy or return to the Now Playing screen.
RELEASE VER 1.7
April 02, 2014
GIS-403-FACEPLATE RADIO FORM AND BEHAVIOR SPECIFICATION
GMK CONFIDENTIAL © COPYRIGHT 2010-2020 GENERAL MOTORS
4
Page 5

1. HARDWARE
RELEASE VER 1.7
April 02, 2014
1.1.6 power
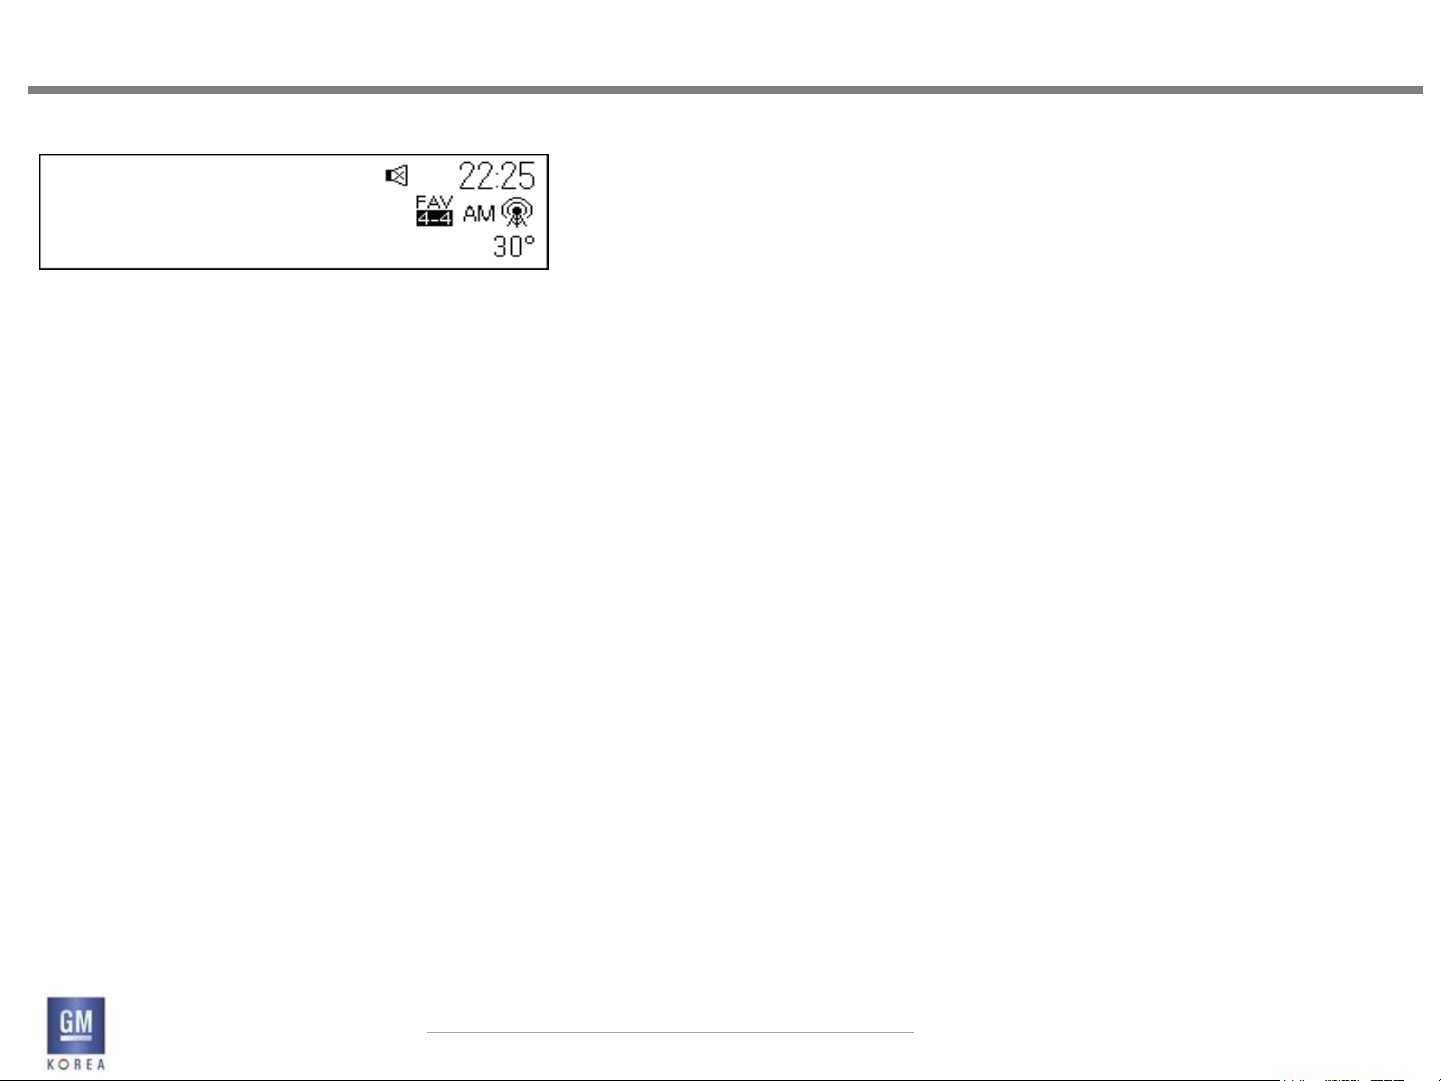
Turns the radio on and off.
• Power Key is operation as Mute On/Off when short pressing .
• Exceptions>
If Mute is On by Power Key,
this activation will be applied all of source(including TA) before
un-mute or volume-up by the user.
1.1.7 rotating power knob (Volume)
Adjusts the volume incrementally on the radio.
• Rotating power knob on the operating mode,
Volume is immediately decreased/increased per each step rotating.
• Exceptions >
During the Volume decrement changes in current Volume are
fundamentally possible by the User. However it is not allowed to
increment the volume above the calculated volume limit.
1.1.8 Menu
Enters in a source specific list of menu items from any
now playing screen. In list views, the menu button acts
as an enter press and selects items.
1.1.9 Rotating the menu knob
In broadcast now playing screens rotating the menu
knob will tune. In list screens rotating the menu knob
will scroll the highlight through list items.
EU radios will bring up a strong station list when the
menu knob is rotated.
1.1.10 Phone (2.1 F - uplevel system only)
Enters the user into the phone application screens.
1.1.11 Tone (2.0F - Base system only)
Enters the user into the tone settings screen.
Note: Only available in base faceplated radio version.
GIS-403-FACEPLATE RADIO FORM AND BEHAVIOR SPECIFICATION
GMK CONFIDENTIAL © COPYRIGHT 2010-2020 GENERAL MOTORS
FACEPLATE NGF RADIO
5
Page 6
1. HARDWARE
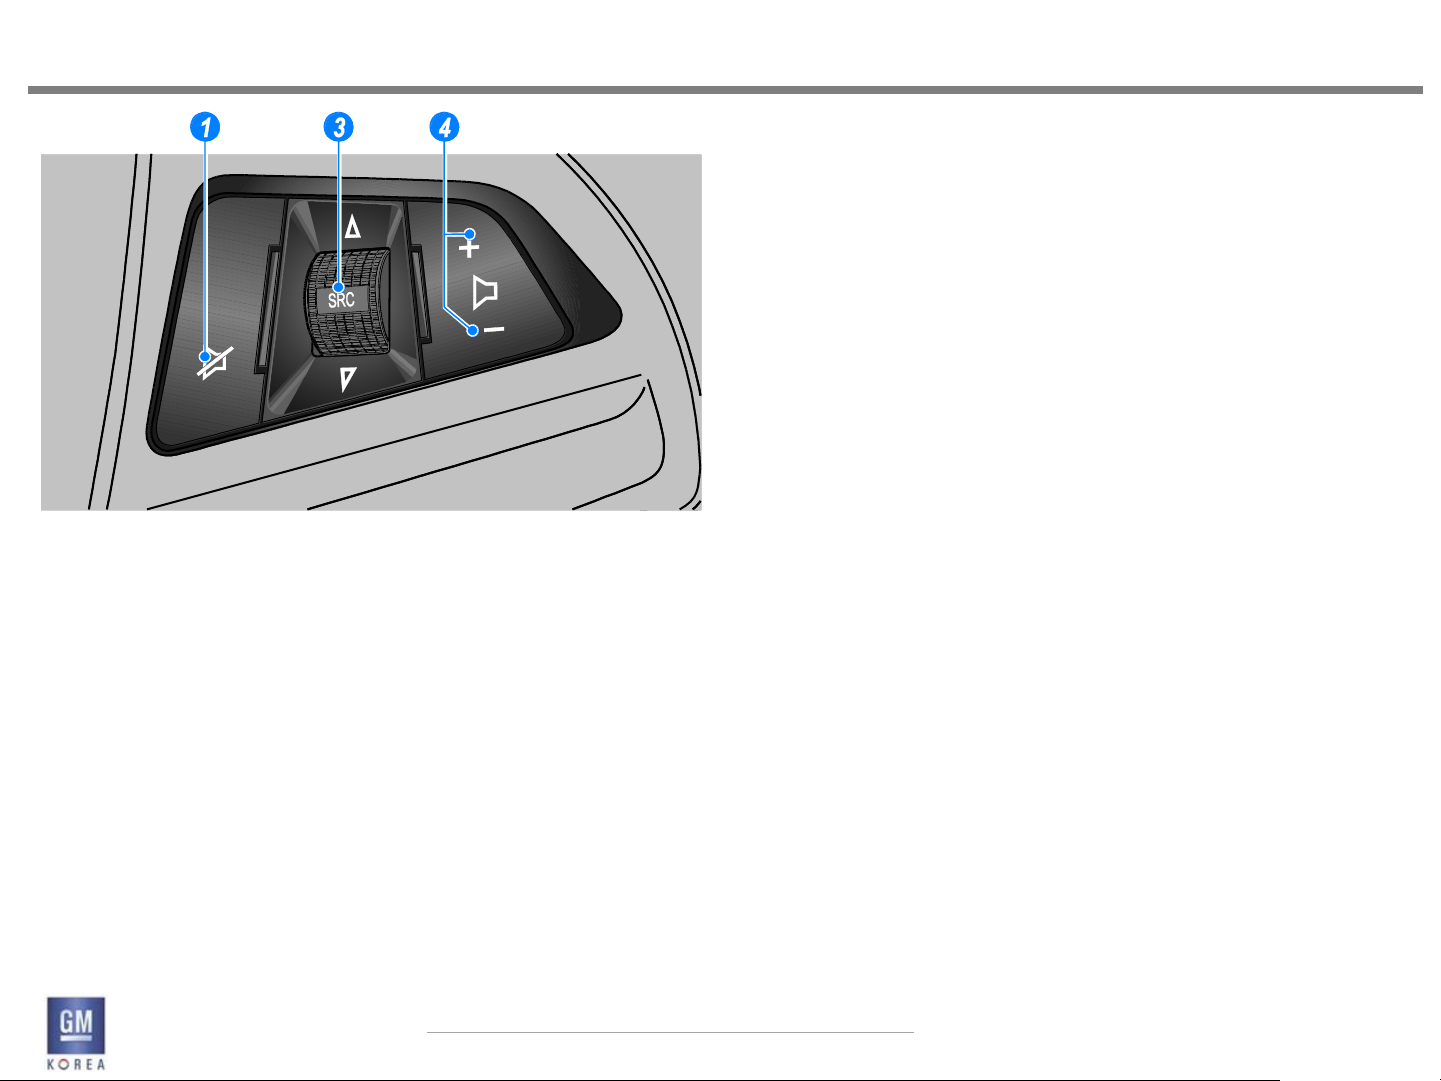
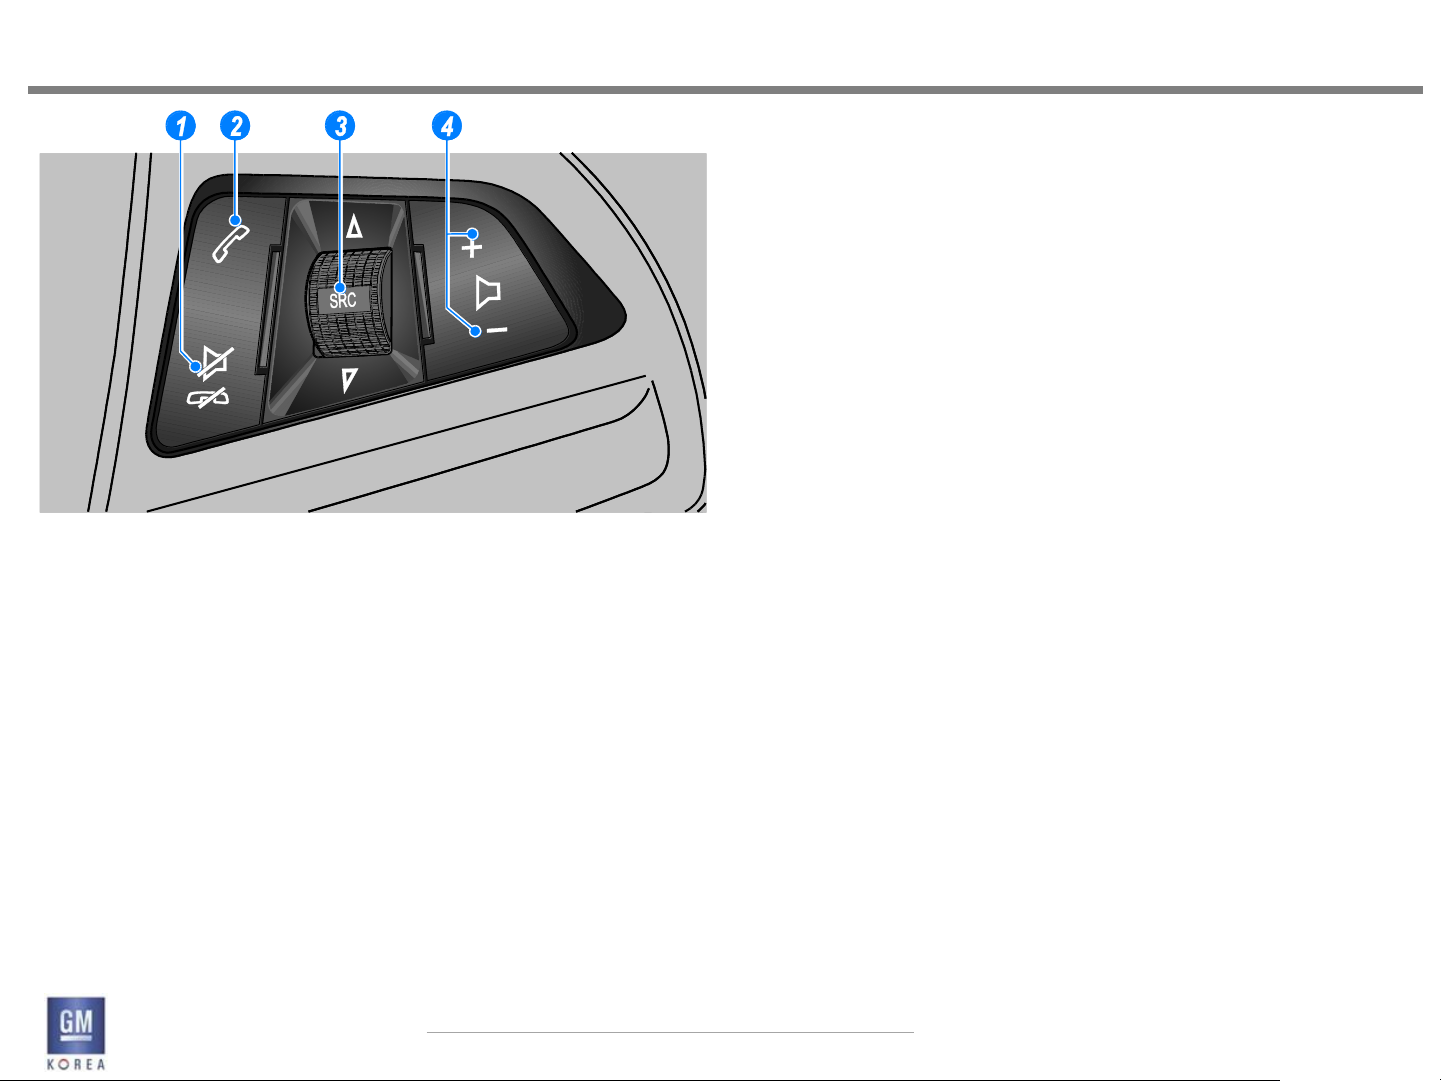
SWC (Case1)
BUTTONS
1. Mute/Hang up button
3. Source [▽SRC△] button/dial (wheel)
4. Volume Up/ Down buttons
FACEPLATE NGF RADIO
1.2 Steering Wheel Control Hardware
1.2.1 ACTION ON PRESS (Case1)
(1) Mute/Hang up button
• Press the button in any music play mode to turn the mute function on and off.
In engaged mode, you can press this button to reject calls to finish the call.
(3) Source [▽SRC△] button/dial (wheel)
• Press the button to select a sound play mode.
• Turn the dial to change the registered radio stations or change the music being
played.
(4) Volume buttons
• Press the + button to increase the volume, immediately.
• Press the - button to decrease the volume , immediately.
RELEASE VER 1.7
April 02, 2014
GIS-403-FACEPLATE RADIO FORM AND BEHAVIOR SPECIFICATION
GMK CONFIDENTIAL © COPYRIGHT 2010-2020 GENERAL MOTORS
6
Page 7
1. HARDWARE
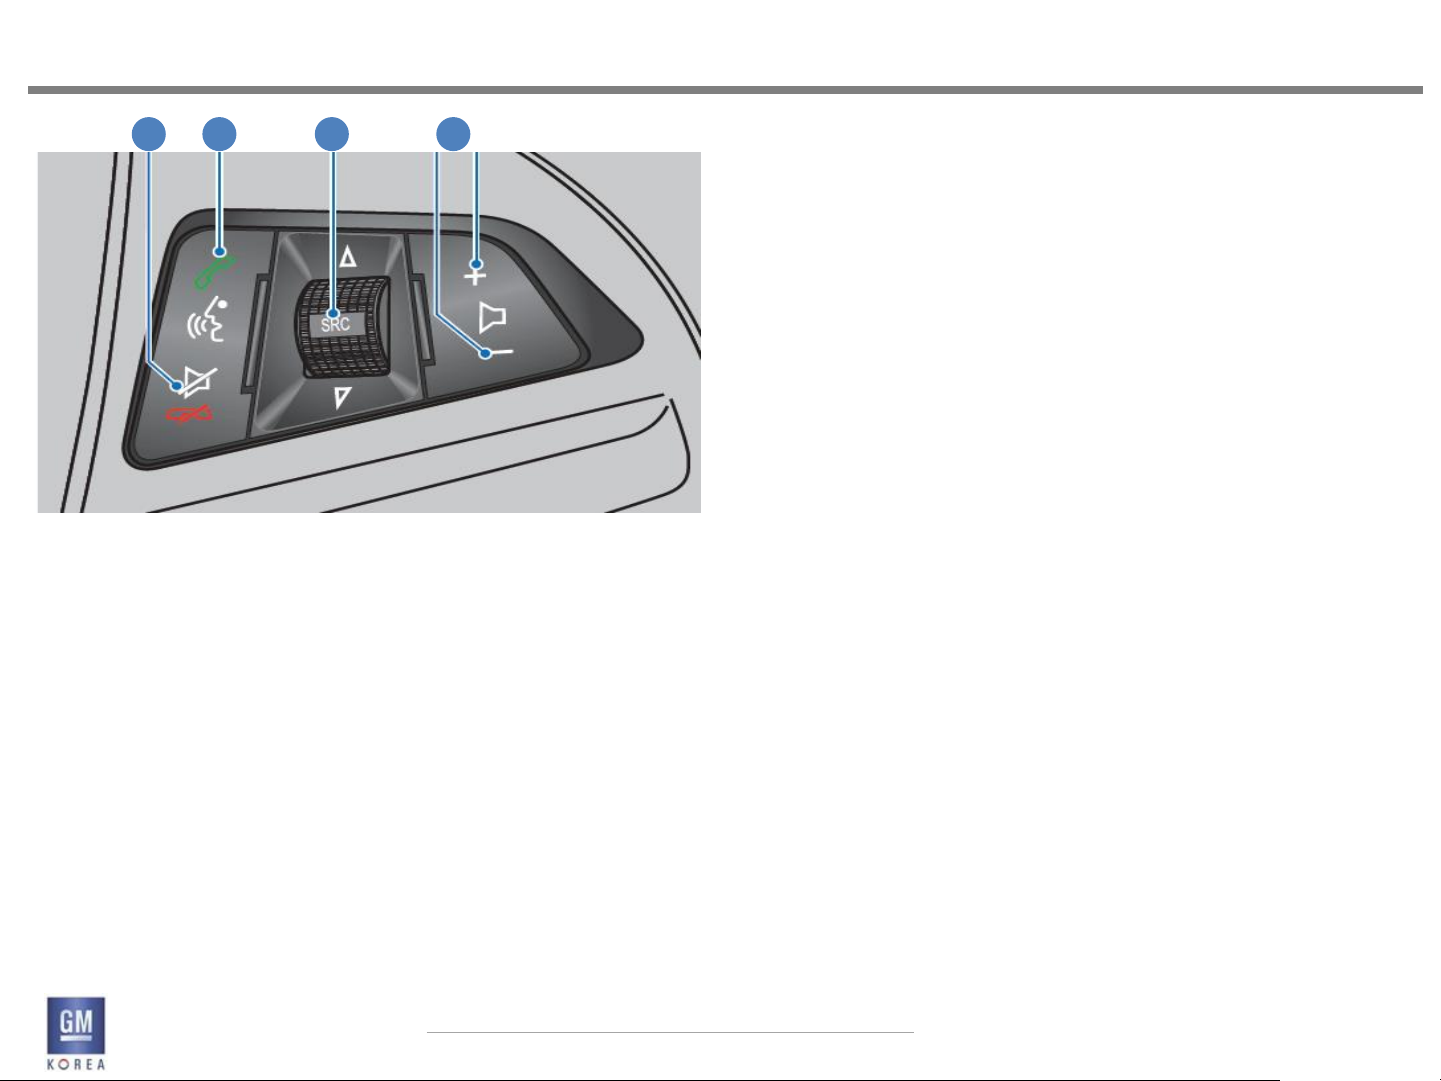
SWC (Case2)
BUTTONS
1. Mute/Hang up button
2. Call button
3. Source [▽SRC△] button/dial (wheel)
4. Volume Up/ Down buttons
FACEPLATE NGF RADIO
1.2 Steering Wheel Control Hardware
1.2.2 ACTION ON PRESS (Case2)
(1) Mute/Hang up button
• Press the button in any music play mode to turn the mute function on and off.
In engaged mode, you can press this button to reject calls to finish the call.
(2) Call Button
• Press the button to answer the call or enter the re-dial selection mode.
• Hold down the button to enter the dialed call log or to move back and forth from
hands-free mode and private call mode during a call.
(3) Source [▽SRC△] button/dial (wheel)
• Press the button to select a sound play mode.
• Turn the dial to change the registered radio stations or change the music being
played.
(4) Volume buttons
• Press the + button to increase the volume , immediately.
• Press the - button to decrease the volume , immediately.
RELEASE VER 1.7
April 02, 2014
GIS-403-FACEPLATE RADIO FORM AND BEHAVIOR SPECIFICATION
GMK CONFIDENTIAL © COPYRIGHT 2010-2020 GENERAL MOTORS
7
Page 8
1. HARDWARE
FACEPLATE NGF RADIO
2 1 3 4
SWC (Case3)
BUTTONS
1. Phone and push to talk (PTT)
2. Mute/Hang up button
3. Source [▽SRC△] button/dial (wheel)
4. Volume Up/ Down buttons
1.2 Steering Wheel Control Hardware
1.2.3 ACTION ON PRESS (Case3)
(1) Mute/Hang up button
• Press the button in any music play mode to turn the mute function on and off. In
engaged mode, you can press this button to reject calls to finish the call.
• When Siri was activated,
this key (Short Press)should be cancel the Siri
(2) Phone and push to talk (PTT)
• Press the button to answer the call or enter the re-dial selection mode.
• Press and Hold the button to enter the siri (Voice Command))
(3) Source [▽SRC△] button/dial (wheel)
• Press the button to select a sound play mode.
• Turn the dial to change the registered radio stations or change the music being
played.
(4) Volume buttons
• Press the + button to increase the volume , immediately.
• Press the - button to decrease the volume , immediately.
RELEASE VER 1.7
April 02, 2014
GIS-403-FACEPLATE RADIO FORM AND BEHAVIOR SPECIFICATION
GMK CONFIDENTIAL © COPYRIGHT 2010-2020 GENERAL MOTORS
8
Page 9
2. INTERACTIONS
FACEPLATE NGF RADIO
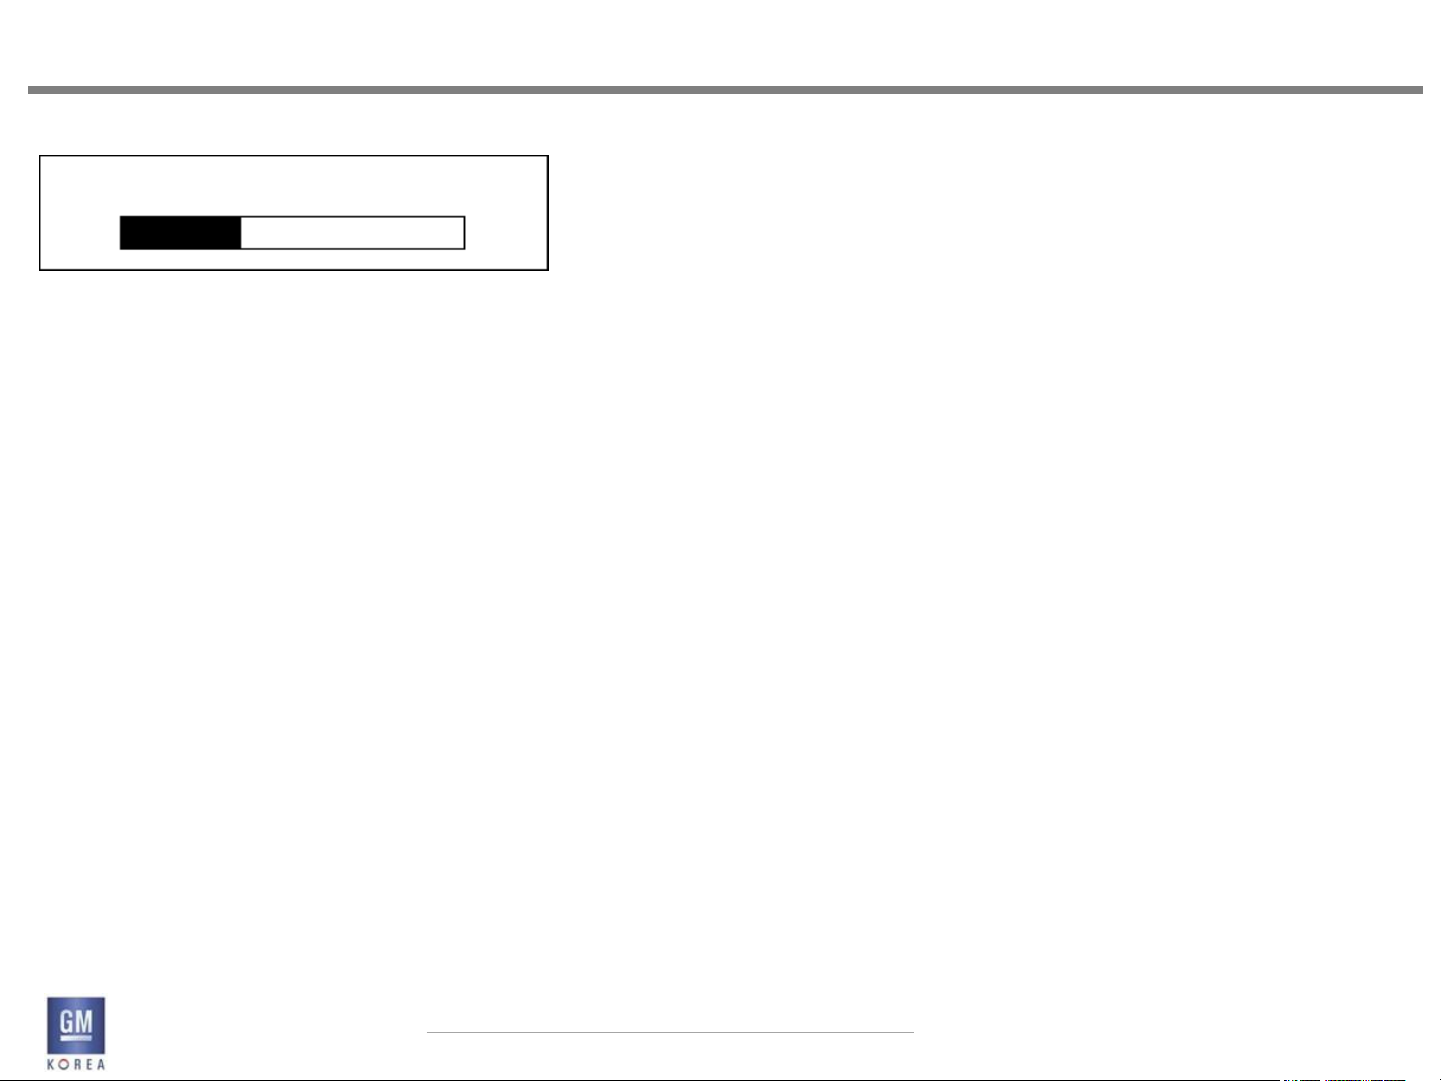
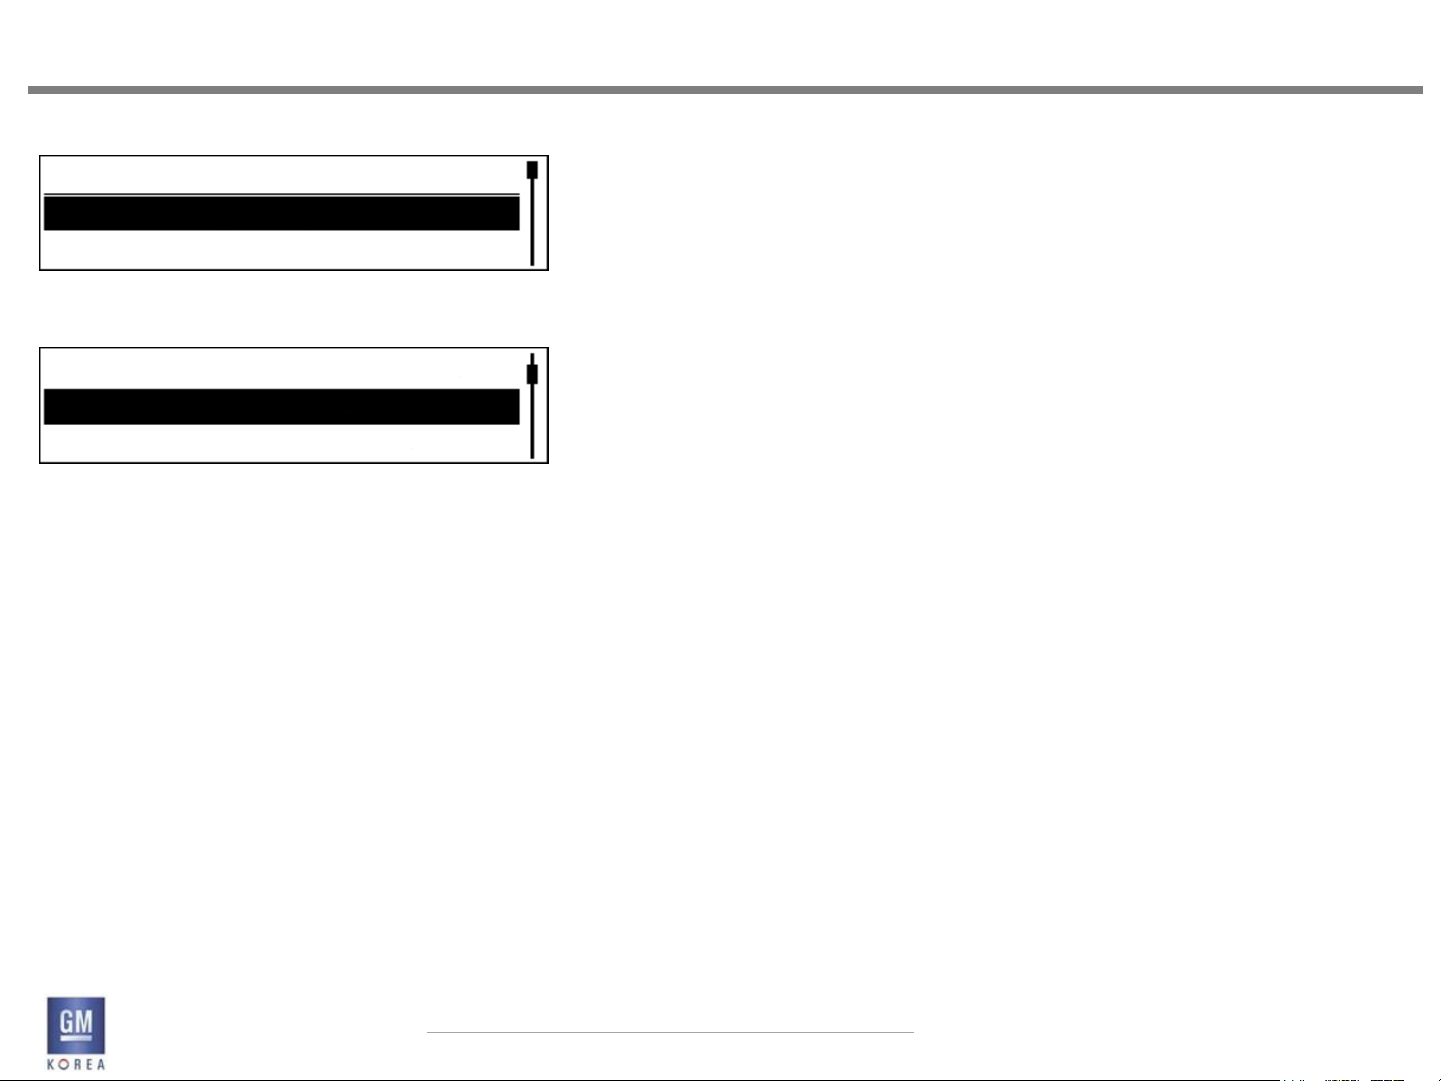
Figure 2.1.1 - Maximum Startup Volume setting screen
Maximum Startup Volume
17
2.1.1 Press and Hold
Users can Press and Hold certain faceplate switches
elements to perform specific functions such as to store a
favorite or fast seek.
Details of Press and Hold gestures, including specific
hold durations for an action to be executed, are described
in the application sections where they are used.
A Press and Hold is performed by pressing a switch with
a finger and holding that location for longer than 10001500 ms. The hold duration is calibratable with a default
setting of 1250 ms.
2.1.2 Rotate
Users can rotate the rotary-push knob to perform such
functions as tuning the radio or scrolling lists.
2.1.3 Volume
Users adjust the volume of the audio system, phone,
etc. by rotating the volume knob on the faceplate.
2.1.4 Maximum Startup Volume
This setting is found in the audio menus and titled
“Maximum Startup Volume”.
The maximum startup volume is the volume
that the system will be decreased to at startup, if the
volume was above this set level at shutdown. If the volume
is at or below this volume at shutdown, the user’s
previously set volume level will be retained.
This setting is adjusted by using the tune knob while in
the max startup volume view as shown in Figure 2.1.1. It
will have a lower limit threshold as defined by the radio
calibrations..
RELEASE VER 1.7
April 02, 2014
GIS-403-FACEPLATE RADIO FORM AND BEHAVIOR SPECIFICATION
GMK CONFIDENTIAL © COPYRIGHT 2010-2020 GENERAL MOTORS
9
Page 10
2. INTERACTIONS
FACEPLATE NGF RADIO
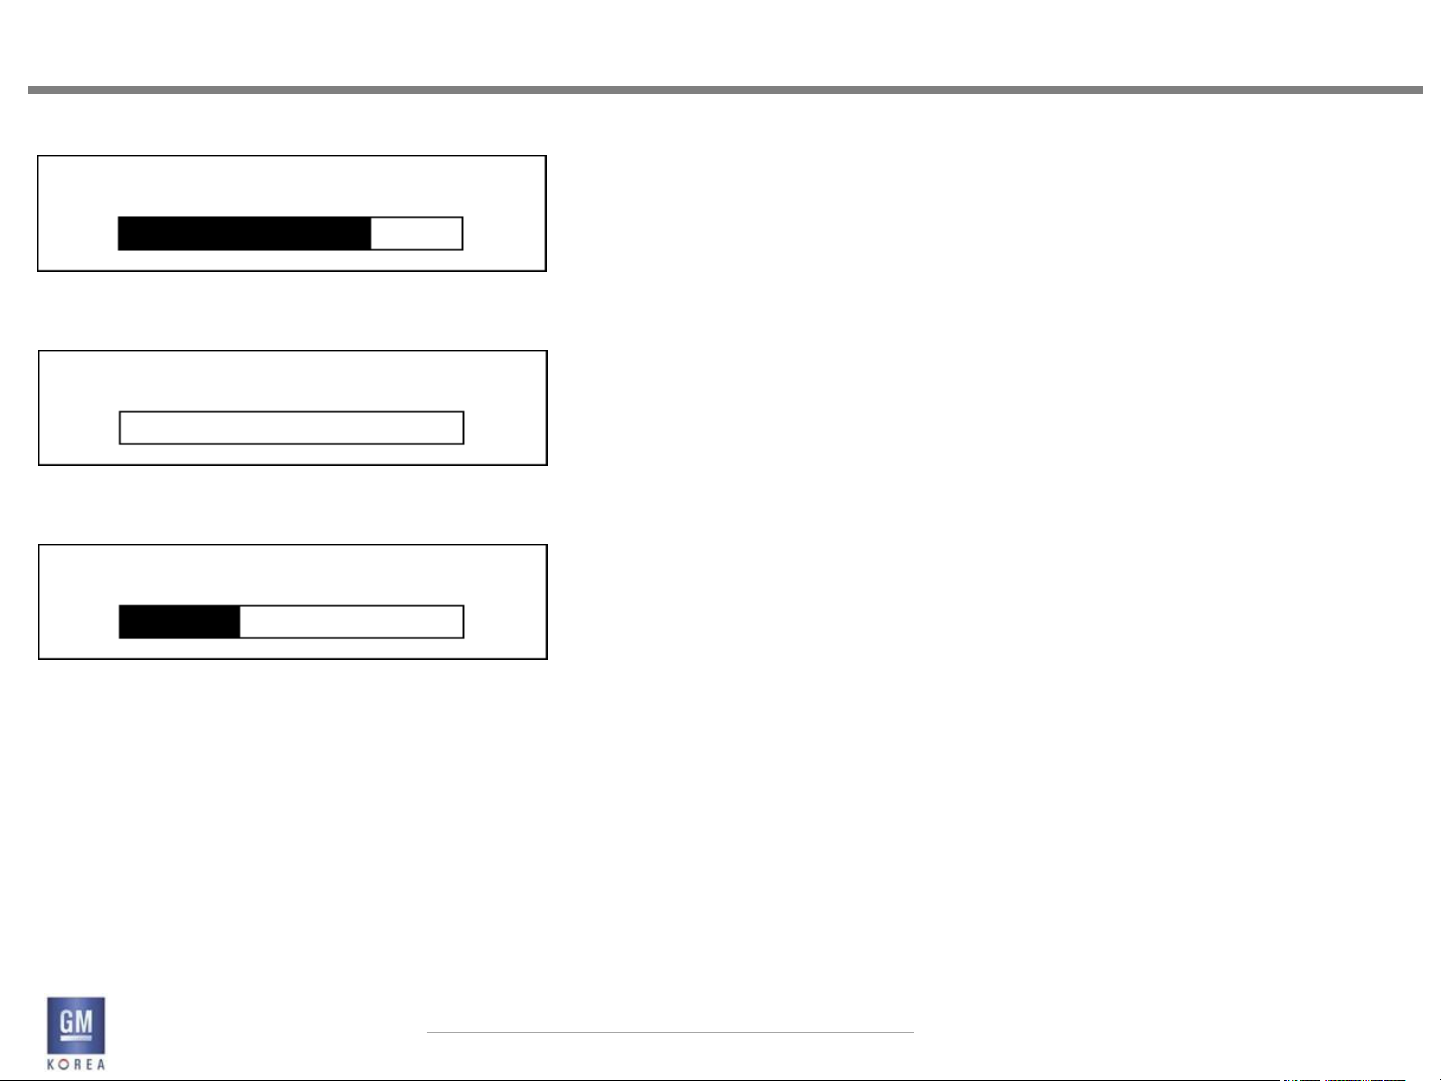
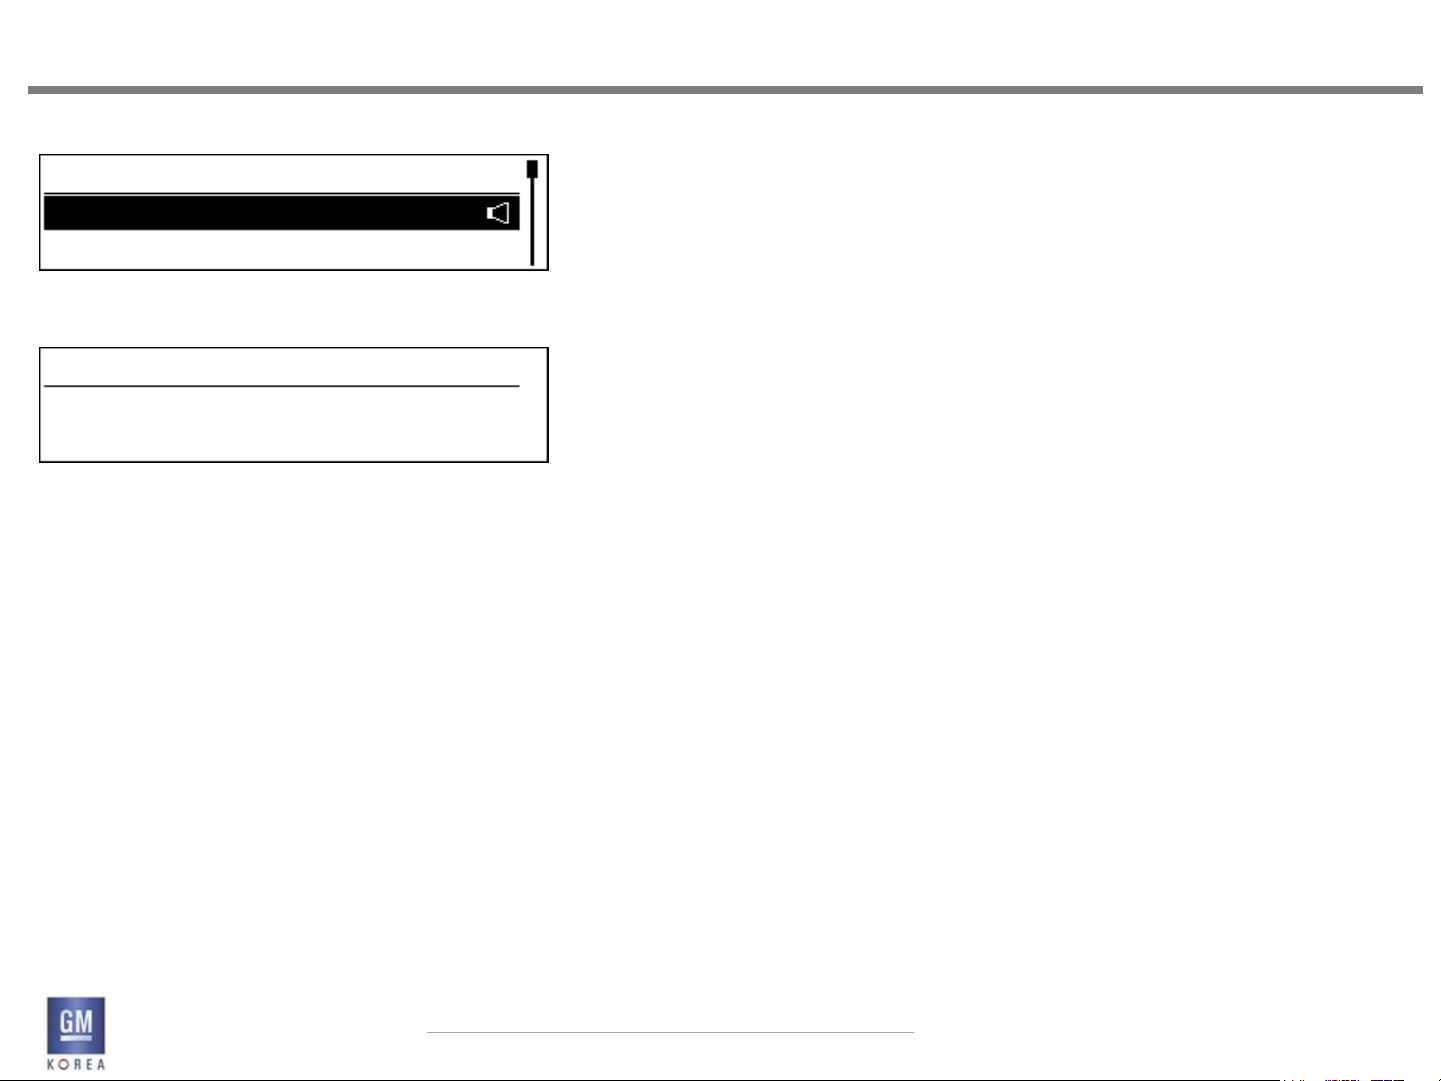
Figure 2.1.2 - Audio Playback Volume
Audio Volume
Figure 2.1.2 - Audio Playback Volume
Audio Volume
MUTE
Figure 2.1.2 - Audio Playback Volume
Phone Volume
38
17
2.1.5 Audio Playback Volume
The main audio channel plays broadcast audio and
media playback audio, referred to here as Audio
Playback Volume. Users can use the volume control on
the faceplate to adjust the Audio Volume through
the full range of volume settings from 0 to Max (e.g., 63
steps).
When the volume is set to zero, it is not considered as
equivalent to mute mode.
If the user attempts to adjust volume while the system
is muted, the view shown in Figure 2.1.3 is shown. The
details of placing the system in mute mode is found in
section 2.1.8.
2.1.6 Phone Volume
The phone audio channel plays the phone and advisor
phone audio. Users can use the volume control on the
faceplate to adjust the Phone Volume while in an active
phone call through the range of volume settings
from a zero to Max (e.g., through volume steps 0-63).
There is a minimum startup volume each time the
phone audio channel is sourced. The emergency phone
audio channel plays the emergency phone audio. This is
different from the normal phone audio channel in that
it has a defined minimum volume setting below which
the users can not go and its minimum startup volume
is different (i.e., greater than the phone audio channel
startup volume).
RELEASE VER 1.7
April 02, 2014
GIS-403-FACEPLATE RADIO FORM AND BEHAVIOR SPECIFICATION
GMK CONFIDENTIAL © COPYRIGHT 2010-2020 GENERAL MOTORS
10
Page 11

2. INTERACTIONS
FACEPLATE NGF RADIO
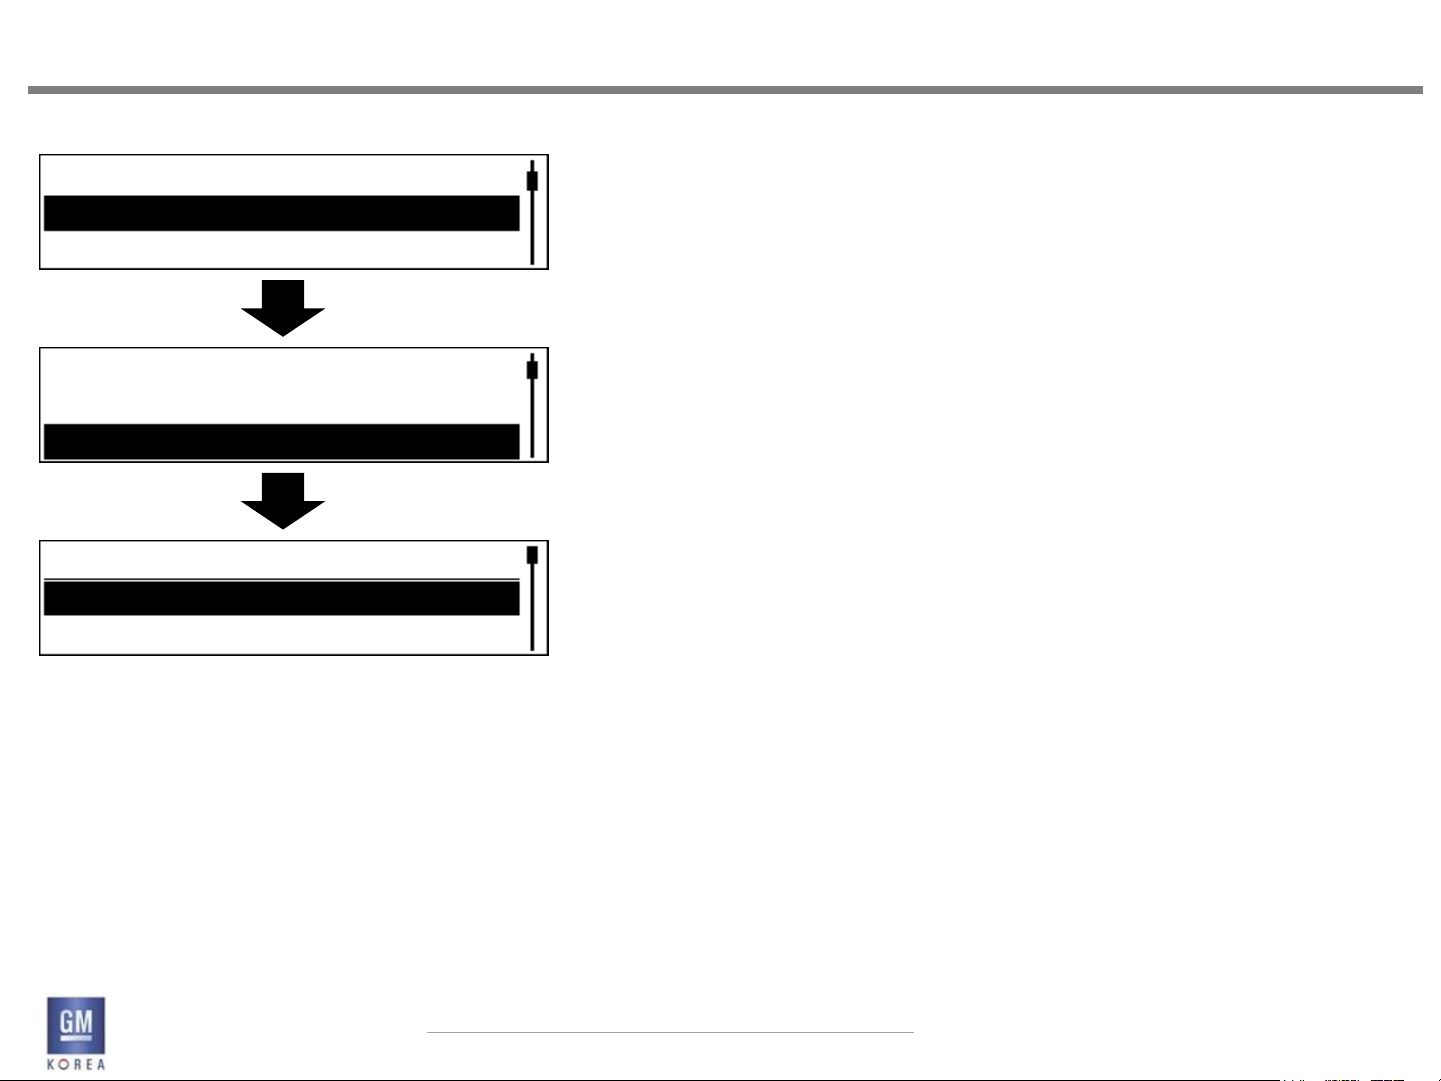
Figure 2.1.5 – System mute mode by short press of volume button
PlntRock
Now Playing on Planet
Rock is music from The …
Figure 2.1.6 – Off Mode with clean Screen
12:30
2014.DEC.17
Figure 2.1.7 - Ring Tone Volume
Ring Tone Volume
20
RELEASE VER 1.7
April 02, 2014
GIS-403-FACEPLATE RADIO FORM AND BEHAVIOR SPECIFICATION
GMK CONFIDENTIAL © COPYRIGHT 2010-2020 GENERAL MOTORS
2.1.7 Ring Tone Volume
The Ring Tone audio channel plays the audio associated
with the following:
• incoming call ring tones.
Users can use the volume control on the faceplate to
adjust the Ring Tone Volume while the Ring Tone is being
played through the range of volume settings from a
defined minimum to Max.
2.1.8 Power On/OFF Behavior
A single press of the power button will mute the audio
while displaying a mute symbol in the status area. A
press and hold will turn the system off and display the
clean screen as shown in the wireframe.
This full screen is shown when the user powers off the
Infotainment system (only shown when the vehicle is
powered on).
• T.O.D(Time of Date)
1) Key Input
If the user presses the <POWER>key, System should be ON.
it also should be operated by SWC : <Source> key
- Exception : If system is ON,
the status of mute(Volume) should be returned
to the un-mute .
2) Source Input (USB, SD, AUX, B/T)
If the some source is connected/inputted on the T.O.D,
System should be waked up/operated the mode
as plug and play.
But, If this connection/Input is un-connected/removed,
System should be gone to the T.O.D Mode.
(However, If the user operates to change the source/mode,
System should not be gone to the T.O.D Mode.)
11
Page 12

2. INTERACTIONS
FACEPLATE NGF RADIO
3) Interrupt B/T Phone, Message
When incoming(with text message), outgoing call is occurred,
System should be waked up/operated this interrupt action.
Also, if this interrupt action will be ended,
System should be gone to the T.O.D Mode.)
4) Traffic Alert
On the T.O.D Mode,
System ignores/does not process this Interrupt.
5) HVAC Control
If the user controls the HVAC, System should be
displayed/control the HVAC.
If no event which is user’s control is occurred during 5sec,
System should be gone to the T.O.D Mode .
2.1.9 Font
• No Fonts
On the RDS/DAB Now Playing or Media Now playing or
Phonebook name/ address/etc.,
If system does not have these mode’s meta data(Unicode),
System should be displayed “*”.
RELEASE VER 1.7
April 02, 2014
GIS-403-FACEPLATE RADIO FORM AND BEHAVIOR SPECIFICATION
GMK CONFIDENTIAL © COPYRIGHT 2010-2020 GENERAL MOTORS
12
Page 13
3. FAVORITES
FACEPLATE NGF RADIO
Figure 3.1.1 - Favorites inactive during now playing
PlntRock
Now Playing on Planet
Rock Is music from The …
Figure 3.1.2 - Favorites revealed after FAV button pressed
Favorites Page 1 of 3
1130 HR4 87.5 108.0
12:30
2014.Mar.17
3.1 Favorites Area Elements
The Favorites region contains all the Favorites that have
been stored by the user. The purpose of the Favorites
Area is for quick access to a user preset item by pressing
the desired Favorite buttons. The favorites are accessed
by pressing the FAV button on the faceplate.
3.1.1 Storage Limit
The maximum number of Favorites that a user can store
is 24.
3.1.2 Empty Favorites
Favorites spaces without stored information are shown
as outlined boxes with the number position of the Favorite
(1 through 24) indicating to the user that a Favorites
may be stored in that location.
The tuner Silverbox may have default Favorites calibrated
to it. When these defaults are calibrated to zero, the
Favorite for this location should be shown as empty.
3.1.3 Active Favorite Indication
An active Favorite will be shown as active through color
coding / shading.
3.1.4 Favorites Bar
The Favorites bar serves as the separation between
the Favorites region and the remaining display area.
RELEASE VER 1.7
April 02, 2014
GIS-403-FACEPLATE RADIO FORM AND BEHAVIOR SPECIFICATION
GMK CONFIDENTIAL © COPYRIGHT 2010-2020 GENERAL MOTORS
13
Page 14

3. FAVORITES
FACEPLATE NGF RADIO
Figure 3.1.3 - Favorites active view with favorite indication
Favorites Page 1 of 3
1130 HR4 87.5 108.0
Figure 3.1.4
12:30
2014.Mar.17
Favorites Page 2 of 3
1560 HR3 94.7 98.9
Figure 3.1.5
Favorites Page 3 of 3
DAB-BW 760 102.5 Bayern1
3.1.5 Page Indicator
Since there may be many pages (up to 6) of stored
Favorites, a text indication is provided to indicate where
the current Favorites page is relative to the dynamic
total number of Favorites pages that the user has available.
The page indication is determined by the most
recently selected favorite. If this information is not available,
the favorites page view defaults to page 1.
3.1.6 Paging Through Additional Favorites
The user pages through all of their stored Favorites by
using the FAV button on the faceplate. When paging
forward and the end of the stored Favorites is reached,
a row of empty Favorites is displayed to allow the user
to save additional Favorites.
The next page forward by the user causes the list to
wrap to the beginning of the Favorites list. The user may
also set a fixed number of favorites pages to be visible
in the Settings, in which case, the favorites list will wrap
after the set favorite page number has been reached.
The favorite highlight can also be moved between favorite
pages by using the rotary menu knob.
For example, if the user rotates the menu knob, the
highlight moves from ‘Plnt Rock’ on page 1 to ‘1560’ on
page2.
Note: by using the FAV button the faceplate there is no
highlight used unless the active station is on the selected
page or a user selects a new favorite for the page in
view.
RELEASE VER 1.7
April 02, 2014
GIS-403-FACEPLATE RADIO FORM AND BEHAVIOR SPECIFICATION
GMK CONFIDENTIAL © COPYRIGHT 2010-2020 GENERAL MOTORS
14
Page 15

3. FAVORITES
FACEPLATE NGF RADIO
3.1.7 Favorites - Selecting
A Favorite is selected by tapping on the desired Favorite
button in the Favorites Area of the faceplate. The station
associated with that Favorite is then tuned. It is not
required to display the favorites under this scenario.
However, if the user is viewing the favorites screen and
selects a new station, the station selected is tuned and
the favorites view is still active for 5 seconds (calibrateable).
• A Favorite is selected by tapping on the desired Favorite
button in the Favorites Area of the faceplate. The station
associated with that Favorite is then tuned. It is not
required to display the favorites under this scenario.
However, if the user is viewing the favorites screen and
selects a new station, the station selected is directly tuned.
• On the Radio Now playing Mode,
If the user selects the < - > key which means preset number.
System should be tuned the preset number of
latest favorite page.
Exception > If system does not memorized the latest favorite page,
System should be tuned the preset number
of favorite 1st page by pressing the <-> Key.
RELEASE VER 1.7
April 02, 2014
GIS-403-FACEPLATE RADIO FORM AND BEHAVIOR SPECIFICATION
GMK CONFIDENTIAL © COPYRIGHT 2010-2020 GENERAL MOTORS
15
Page 16

3. FAVORITES
FACEPLATE NGF RADIO
3.1.8 REMOVED
3.1.9 Storing Favorites
Items can be stored as Favorites by press and holding for
the standard press and hold timing, on a desired Favorite
location within the Favorites region. Feedback is provided
to the user once the favorite is successfully stored
in the form of a beep.
If a Favorite already exists in this location, the new information
will overwrite the previously stored Favorite.
Performing a press and hold on the Favorites in a non-
Audio application or list view will do nothing.
If no selection is made, the favorites timeout after 5 seconds
(calibrateable). If a selection is made, the favorite
stored is highlighted and the favorites region minimizes
dismisses to the previous view after 5 seconds (calibrateable).
RELEASE VER 1.7
April 02, 2014
GIS-403-FACEPLATE RADIO FORM AND BEHAVIOR SPECIFICATION
GMK CONFIDENTIAL © COPYRIGHT 2010-2020 GENERAL MOTORS
16
Page 17

3. FAVORITES
FACEPLATE NGF RADIO
Figure 3.1.6
Set Number of Favorites Page
1 Page
1130
2 Pages
Figure 3.1.7
1 Page
2 Pages
3 Pages
3.1.10 Setting The Number of Favorites Pages Shown
The user is able to set the number of Favorites pages
that are accessed through this setting. When selected
from the menu, a list of available pages to select via the
scroll knob is displayed.
This setting is reflected in the favorites page indication
text the next time the favorites are displayed as shown
in figure 3.1.3.
RELEASE VER 1.7
April 02, 2014
GIS-403-FACEPLATE RADIO FORM AND BEHAVIOR SPECIFICATION
GMK CONFIDENTIAL © COPYRIGHT 2010-2020 GENERAL MOTORS
17
Page 18
4. LISTS
FACEPLATE NGF RADIO
Figure 4.1.1 - Enter state of list view
List Name
List Item 1
List Item 2
1130
Figure 4.1.2 - Scroll state of list view
List Item 1
List Item 2
List Item 3
4.1 Lists
Users interact with Lists in a number of applications run
by the system. This section describes the major elements
and behaviors common in all Lists displayed by
the system. Elements and behaviors that are unique to
a specific application’s Lists are described in that application’s
sections in this Form and Behavior Specification.
4.1.1 List Elements
The following describes the major elements that may or
may not be displayed as part of a List, depending on the
specific application’s use of Lists.
List elements include:
• List Header
• List Items
• Scroll Bar/Position Indicator
4.1.2 List Items
Each row in a list contains the List Item (e.g., contact
name; song title). A List Item can be a single line of
text. The number of List Items displays is dependent
on the content of the list/sub-list. For example, a single
List Item may be displayed when there is only a single
Album or Song associated with the higher-level List Item
selected. Hundreds or even thousands of List Items may
be displayed when there is such content for a given list
such as All Songs from a connected device.
List Items are selectable by highlighting the desired List
Item by rotating the knob on the faceplate. Tapping the
knob when a particular List Item is highlighted displays
the associated sub-list (e.g., list of songs associated with
the album name tapped) or performs an action associated
with the List Item selected (e.g., start playback of a
song; display an edit screen for the List Item; etc.). The
action is performed “on release” when tapping.
RELEASE VER 1.7
April 02, 2014
GIS-403-FACEPLATE RADIO FORM AND BEHAVIOR SPECIFICATION
GMK CONFIDENTIAL © COPYRIGHT 2010-2020 GENERAL MOTORS
18
Page 19

4. LISTS
FACEPLATE NGF RADIO
4.1.3 Display of Long Text Information in List Items
When a List Item contains variable text that may be longer
than the available viewing area in a List Item, it does
the following:
• Truncation - if the text string is too long to fit with
Smart Truncation in the viewable area, the text
string is truncated and ellipses (...) are added at the
point where the text string was cut off.
4.1.4 List header Behavior
The initial view shown for a list includes the list header
which essentially defines the type of list that is being
viewed (e.g. FM Stations). This is shown regardless of
whether the list is displayed from rotating the tune knob
(for EU station lists) or from a menu button press (eg.
Artists list)
Once the user begins turning the knob to interact with
the list, the header is removed and all three available
lines are used for the list items as shown in figures 4.1.1.
and 4.1.2.
If 2 or less items are available in a list, the header will
remain visible.
RELEASE VER 1.7
April 02, 2014
GIS-403-FACEPLATE RADIO FORM AND BEHAVIOR SPECIFICATION
GMK CONFIDENTIAL © COPYRIGHT 2010-2020 GENERAL MOTORS
19
Page 20
4. LISTS
FACEPLATE NGF RADIO
Figure 4.1.3 - List Indicator Icon example
FM Stations
PlntRock
1130
REGNBOGN
Figure 4.1.4 - No Content Available
List Name
No Content Available
4.1.5 List Indicator Icons
Indicator Icons may be displayed on List Items; for
example, a “Now Playing” icon showing that a radio station
in a list is currently tuned.
Indicator Icons are visible at all times when the list is
displayed.
4.1.6 No Content Available
If the user has selected a list that happens to be empty,
such as a media, intellitext, or contact list that has no
content or information available, the list is shown empty
with a single list item that says “No Content Available”.
This list item cannot be highlighted or selected.
RELEASE VER 1.7
April 02, 2014
GIS-403-FACEPLATE RADIO FORM AND BEHAVIOR SPECIFICATION
GMK CONFIDENTIAL © COPYRIGHT 2010-2020 GENERAL MOTORS
20
Page 21
4. LISTS
FACEPLATE NGF RADIO
Figure 4.2.1 -
list item x
list item y
list item z
Figure 4.2.2 -
list item x
list item y
list item z
Figure 4.2.3 -
list item a
list item b
List Header
4.2 List Gestures
The following describes the gestures that may or may
not be operationalized as part of a list, depending on
the specific application’s use of lists.
List Gestures include:
• Scroll
• Tap
• Press and Hold
4.2.1 Scroll
Users rotate the rotary-push knob on the faceplate to
scroll List Items. The highlight bar moves down when
the knob is rotated clockwise and stops moving at the
last list item displayed and then the list scrolls
begins scrolling up behind the highlight bar until the
end of the list is reached.
When the list end is reached, the last list item is displayed
at the bottom of the list and the highlight bar
moves down to the bottom. An additional rotation of
the knob in the clockwise direction wraps the list to
the beginning and the highlight bar is now shown at
the top of the list. When rotating counter-clockwise,
the highlight bar stops at the list item at the top and
the list begins scrolling down until the start of the list is
reached. When the start of the list is reached, the first
list item is displayed at the top and the highlight bar is
in the top position. An additional rotation of the knob in
the counter-clockwise direction wraps the list to the end
and the highlight bar is shown at the bottom of the list.
RELEASE VER 1.7
April 02, 2014
GIS-403-FACEPLATE RADIO FORM AND BEHAVIOR SPECIFICATION
GMK CONFIDENTIAL © COPYRIGHT 2010-2020 GENERAL MOTORS
21
Page 22

4. LISTS
FACEPLATE NGF RADIO
When reaching the end (or start) of the list while scrolling,
the highlight bar will pause for 1 sec (calibratable
between 250 msecs and 2000 msecs) ignoring additional
inputs from the rotary encoder and the system
will play an auditory alert / beep. After the pause duration
has elapsed, the system will register the next rotary
input in the same direction as the cue to animate the list
to the next page and move the highlight bar to top (or
bottom). During the list animation, any rotary encoder
inputs are ignored. When the animation is complete and
the highlight bar is positioned in its new start location,
rotary inputs are again responded to according to the
description above.
4.2.2 Tap
Users tap the rotary-push knob on the faceplate to
perform desired functions associated with the List Item
currently highlighted.
4.2.3 Press and Hold
Users can Press and Hold the rotary-push knob on the
faceplate to perform desired functions associated with
the List Item currently highlighted. Details of Press and
Hold gestures are described in the appropriate application
sections where they are used.
A Press and Hold is performed by pressing and holding
the rotary-push knob for longer than 1000-1500 ms.
The hold duration is calibratable and is defined in detail
in the application sections where such Press and Hold
gestures are enabled.
RELEASE VER 1.7
April 02, 2014
GIS-403-FACEPLATE RADIO FORM AND BEHAVIOR SPECIFICATION
GMK CONFIDENTIAL © COPYRIGHT 2010-2020 GENERAL MOTORS
22
Page 23

4. LISTS
FACEPLATE NGF RADIO
4.3 List Interaction Behaviors
The following describes the interaction behaviors that
may or may not be operationalized as part of a given list,
depending on the specific application’s use of lists.
List Interaction Behaviors include:
• Wrapping
• List History
• List Views
4.3.1 Wrapping
Lists can wrap from start to finish or vice versa. The
method for wrapping a list is to be at the end or start of
the list and continue rotating the knob in the direction
to wrap the list past the last item (or first item) in the
list. The scroll highlight will go to the top (or bottom
depending direction of wrap) and continue scrolling.
Lists wrap only when the list is longer than what can be
displayed on the single screen (e.g., more than 3 List
Items).
4.3.2 List History
When navigating list hierarchies or navigating between
screens and lists, the system maintains a “history” of the
list position that was last displayed when the given list
was last viewed/displayed. The “List History” aids the
user in situations such as when backtracking up a station
or media search hierarchy; when returning to a station/
media list from a now playing screen; or when returning
to a Contacts List in the phone application from another
screen. The list history is cleared after ignition cycles.
RELEASE VER 1.7
April 02, 2014
GIS-403-FACEPLATE RADIO FORM AND BEHAVIOR SPECIFICATION
GMK CONFIDENTIAL © COPYRIGHT 2010-2020 GENERAL MOTORS
23
Page 24
5. BROADCAST SOURCES
Figure 5-1. AM Radio Intro View
AM Radio
522
Figure 5-2. FM Radio Intro View
FM Radio
FACEPLATE NGF RADIO
AM/FM Broadcast sources
The following section describes the data elements and
functions for AM/FM broadcast audio sources.
The Now Playing screens for these sources contain the data elements
dependent on the broadcast audio source.
• When the user changes Radio mode/Band by pressing the <Radio>key,
system displays radio intro view firstly as left figure.
102.3
Figure 5-3. DAB Radio Intro View
DAB
REGNBOGN HESSEN
Now Playing on BBC 6
Music is the latest relea…
RELEASE VER 1.7
April 02, 2014
GIS-403-FACEPLATE RADIO FORM AND BEHAVIOR SPECIFICATION
GMK CONFIDENTIAL © COPYRIGHT 2010-2020 GENERAL MOTORS
24
Page 25
5. BROADCAST SOURCES
FACEPLATE NGF RADIO
Figure 5.1.1 -
522
5.1 AM View
AM view should contain:
- AM icon
- Frequency (in larger font style)
- Time of Day and Outside Temperature
- FAV Label
- Mute icon
- Driving School
(If Driving School is on,
Speed is displayed on the location/instead of outside template.)
RELEASE VER 1.7
April 02, 2014
GIS-403-FACEPLATE RADIO FORM AND BEHAVIOR SPECIFICATION
GMK CONFIDENTIAL © COPYRIGHT 2010-2020 GENERAL MOTORS
25
Page 26
5. BROADCAST SOURCES
FACEPLATE NGF RADIO
Figure 5.2.1 - generic RDS layout example
RDS PSN
RDS Text
RDS Text (Continued from line1)
Figure 5.2.2 - EU RDS example
REGNBOGN
Now Playing on
BBC 6 Music
Figure 5.2.3 -
REGNBOGN
Now Playing on BBC 6
Music is the latest relea…
Figure 5.2.4 - FM w/o RDS now playing view
102.3
5.2 FM Now Playing Views
• PSN in line 1 (EU radios)
• RDS Text in line 1 and 2 using smart truncation
• FM icon
• Frequency centered with larger font (non EU radios)
• Time of Day and Outside Temperature
- FAV Label
- [TP] icon
- Mute icon
- Driving School
(If Driving School is on,
Speed is displayed on the location/instead of outside template.)
European RDS implementations will display the station’s
PSN without the frequency information in line 1. Otherwise,
the station frequency is displayed as shown in
figure 5.2.4.
If there is more content than will fit in the line field, the
information will page a single time at a rate of 5 seconds
per field. After the pagination is completed, the first
part of the text will be shown with ellipsis as shown in
the figure.
Lines 2 and 3 are for RDS text information. RDS text is
placed on Line 2 and, if necessary, wraps to Line 3 using
the smart truncation method as defined in the DAB
source section of this document.
If text overflows the space provided in Lines 2 and 3, the
information will page (clearing Lines 2 and 3), with the
overflow text starting again in Line 2.
If an RDS text update occurs during the paging, the
fields are cleared and the new information is displayed,
beginning in Line 2.
RELEASE VER 1.7
April 02, 2014
GIS-403-FACEPLATE RADIO FORM AND BEHAVIOR SPECIFICATION
GMK CONFIDENTIAL © COPYRIGHT 2010-2020 GENERAL MOTORS
26
Page 27
5. BROADCAST SOURCES
FACEPLATE NGF RADIO
Figure 5.3.1 – Figure Removed
Figure 5.3.2 - Sourcing a media device (specific example)
Reading USB…
Figure 5.3.3
Artist Name
Song Name
00:03:42
5.3 Changing Audio Source Using Faceplate
The user may also press the RADIO or MEDIA buttons
on the faceplate multiple times to rotate through audio
sources. The audio source is immediately changed upon
each press of the faceplate button.
RADIO presses rotate the user through broadcast sources.
MEDIA presses rotate the user through available
media sources.
The order of rotation for broadcast sources is
AM ->FM ->DAB->AM...
The order of the media source flow is USB1->USB2->SD>BT->AUX->USB1...for 2.1F systems.
The order of the media source flow is USB -> AUX -> USB
for 2.0F systems.
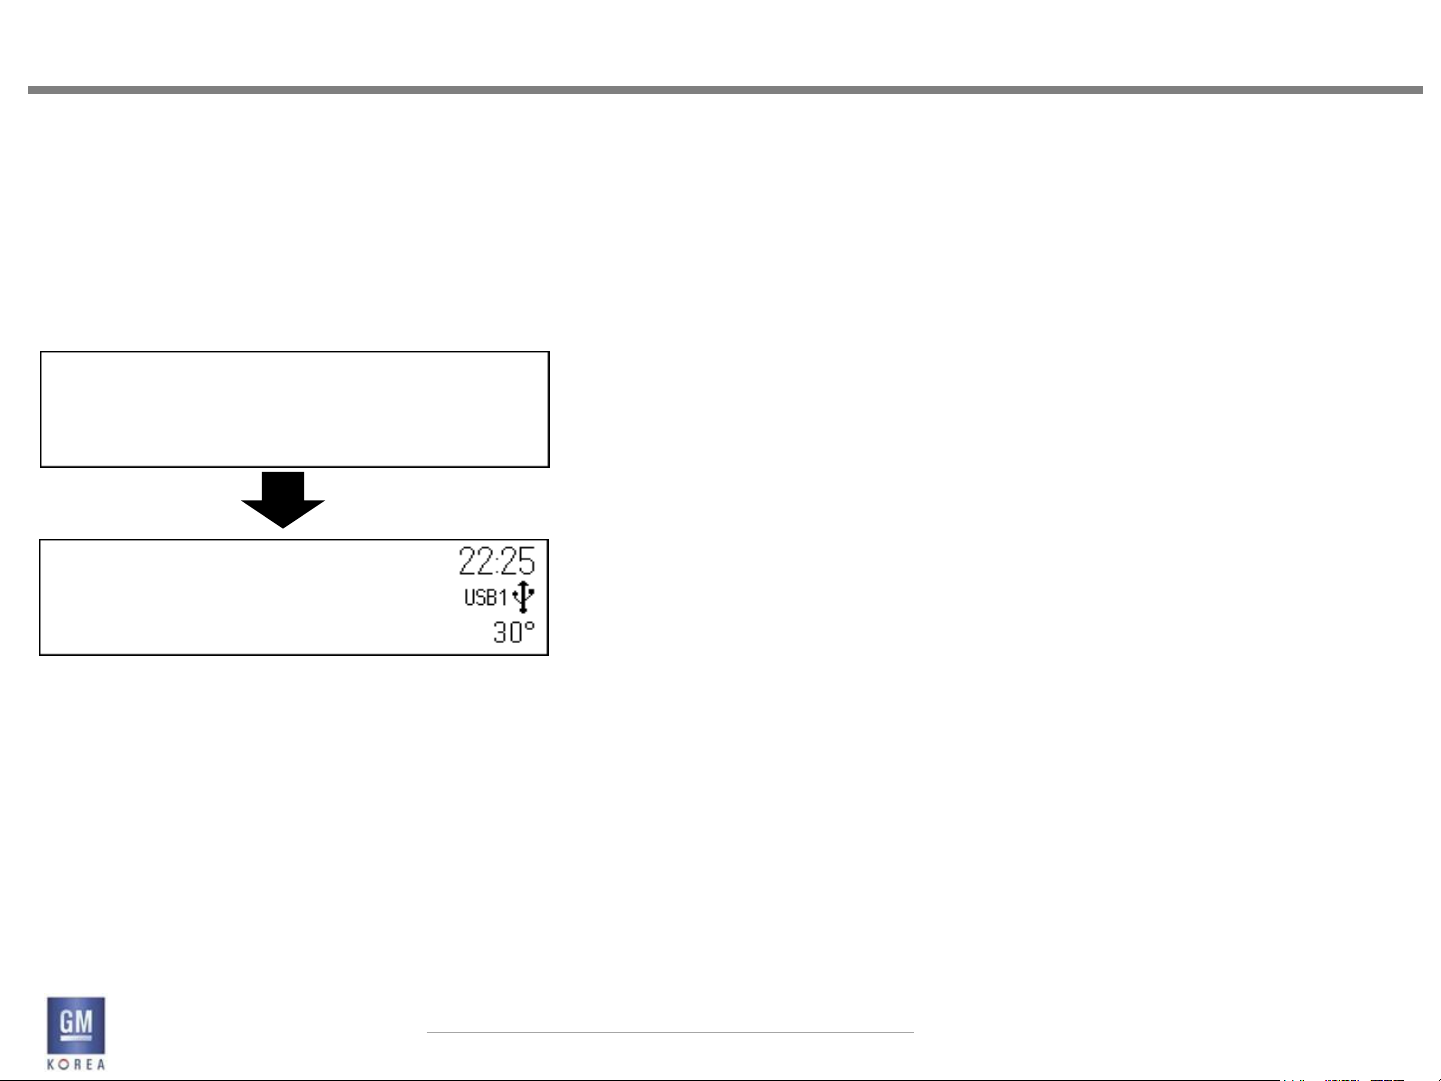
When the user selects a new media source, the display
will initially show the friendly device name in the text
field as shown . After a timeout of 5 seconds (calibrateable)
the display will be updated to reflect the applicable
metadata.
In situations where there is no friendly name, the system
displays Unknown Device as the device name and
then times out to the now playing view.
RELEASE VER 1.7
April 02, 2014
GIS-403-FACEPLATE RADIO FORM AND BEHAVIOR SPECIFICATION
GMK CONFIDENTIAL © COPYRIGHT 2010-2020 GENERAL MOTORS
27
Page 28

5. BROADCAST SOURCES
FACEPLATE NGF RADIO
Figure 5.3.4 -
No Media Available
Dismiss
Figure 5.3.5 -
No Media Available
Dismiss Pair
5.3.1 Media Source Flow - Skipping Sources With No
Device Connected Or Disc Inserted
Sources that do not have a connected device will be
skipped as users press the MEDIA button provided there
are two or more media devices connected.
5.3.2 Media Button Behavior With No Available
Media Sources
Scenarios where there is no available media present will
display the pop-up shown in Figure 5.3.4 for the base
(2.0F) system when the user selects the MEDIA button
while in broadcast source mode. The currently sourced
audio will continue to be heard while this pop-up is
displayed.
The pop-up in figure 5.3.5 is shown for the uplevel (2.1F)
system and also provides options to pair or manage
Bluetooth devices as discussed in the phone section of
this document.
RELEASE VER 1.7
April 02, 2014
GIS-403-FACEPLATE RADIO FORM AND BEHAVIOR SPECIFICATION
GMK CONFIDENTIAL © COPYRIGHT 2010-2020 GENERAL MOTORS
28
Page 29
5. BROADCAST SOURCES
FACEPLATE NGF RADIO
Figure 5.3.6 - Base Faceplate
No Other Media Available
Dismiss
Figure 5.3.7 - Uplevel faceplate view
No Other Media Available
Dismiss Pair
Figure 5.3.8 - US B/SD sources
No Media Found
Figure 5.3.9 - AUX Input devices
No Device Connected
5.3.3 Media Button Behavior With 1 Available Media Source
Scenarios where there is a single media source present
will display the pop-up shown in Figure 5.3.6 (or figure
5.3.7 for uplevel systems) when the user selects the MEDIA
button and is currently listening to the only media
source. The currently sourced media audio will continue
to be heard while this pop-up is displayed.
Pressing the MEDIA button from broadcast mode when
there is only 1 media source available will always take
the user to the only available media source.
If the single media source is disconnected while it is
the active screen, the screens defined in figures 5.3.8
through 5.3.10 will be shown for the appropriate source
mode. For instance, if an AUX device is ejected, the No
Device Connected screen would be displayed until the
user selects another source or inserts another device.
5.3.4 Disconnecting Active Sources
When the active media source is disconnected in situations
where there are 2 or more media sources present,
the system will display the screens shown in figures
5.3.8 through 5.3.10 and keep the user in that mode
until they reconnect.
Figure 5.3.10 - Bluetooth devices
No Device Connected
Pair
RELEASE VER 1.7
April 02, 2014
GIS-403-FACEPLATE RADIO FORM AND BEHAVIOR SPECIFICATION
GMK CONFIDENTIAL © COPYRIGHT 2010-2020 GENERAL MOTORS
29
Page 30

5. BROADCAST SOURCES
FACEPLATE NGF RADIO
5.3.5 Soft Key Behavior in No Media Pop-ups
The soft-keys associated with the no media views behave
as follows:
Dismiss -> this option returns the user to the previously
viewed screen
Pair -> this option takes the user to the Bluetooth pairing
screens as defined in phone section 6.1.7.
If the user elects to add a device via the Pair soft-key
and press the BACK button, the view in Figure 5.3.10 will
be displayed.
RELEASE VER 1.7
April 02, 2014
GIS-403-FACEPLATE RADIO FORM AND BEHAVIOR SPECIFICATION
GMK CONFIDENTIAL © COPYRIGHT 2010-2020 GENERAL MOTORS
30
Page 31

5. BROADCAST SOURCES
FACEPLATE NGF RADIO
5.4 Broadcast Seek Up/Down
The faceplate contains two switches for seeking to the
next or previous station or channel in broadcast modes.
5.4.1 AM/FM Seek
In AM/FM audio sources, tapping on the Seek Up
or Down switch tunes the radio to the next or previous
‘strong signal’ station as determined by the tuner. The
frequency field is updated during this process until the
tuner has found an acceptably strong station. This applies
to non-RDS based systems.
5.4.2 Fast Seek (AM/FM)
If the user presses and holds on either Seek Up or Down
button, the display shows the frequency/channel/
PSN changing at a rate of 5 frequency steps/channels/
PSN per second until they release their finger. After the
release, the system stops on the current channel or
frequency (if a strong signal station only) displayed or
tunes to the next strong signal station in the direction of
the fast seeking.
RELEASE VER 1.7
April 02, 2014
GIS-403-FACEPLATE RADIO FORM AND BEHAVIOR SPECIFICATION
GMK CONFIDENTIAL © COPYRIGHT 2010-2020 GENERAL MOTORS
31
Page 32

5. BROADCAST SOURCES
FACEPLATE NGF RADIO
5.4.3 Seek Operation With One Strong Station
If the user is tuned to the only available strong station
in the broadcast band and the user performs a seek
operation, the tuner will scan the entire band. If no
other strong stations are found the tuner will perform a
second pass of the band at a lower signal threshold. The
frequency information on the display will continue to
update as the tuner performs the seek function.
5.4.4 Seek Operation With Zero Strong Stations
If the user is tuned to a broadcast band with no strong
signal stations available and the user performs a seek
operation, the tuner will scan the entire band. If no
strong stations are found the tuner will perform a second
pass of the band at a lower signal threshold. The
frequency information on the display will continue to
update as the tuner performs the seek function.
RELEASE VER 1.7
April 02, 2014
GIS-403-FACEPLATE RADIO FORM AND BEHAVIOR SPECIFICATION
GMK CONFIDENTIAL © COPYRIGHT 2010-2020 GENERAL MOTORS
32
Page 33

5. BROADCAST SOURCES
FACEPLATE NGF RADIO
Figure 5.4.1 -
PlntRock
Now Playing on Planet
Rock Is music from The…
Figure 5.4.2 -
Tuning…
Figure 5.4.3 -
REGNBOGN
Now Playing Rumour Has
lt by Adele on RADIO RE…
5.4.5 EU FM RDS Seek
In the FM RDS source for single tuner EU radios, tapping
on the Seek Up or Down switch initially will display
a Tuning screen for 2 seconds (calibrateable) while the
next station available in the FM memory is tuned. The
text “Tuning” is displayed in line 2 of the metadata during
this time.
Once the available station is tuned in, the display is updated
with the FM now playing view.
If the user tunes to an RDS station for which the PSN is
unavailable, the display will show the frequency for that
station until the PSN is available.
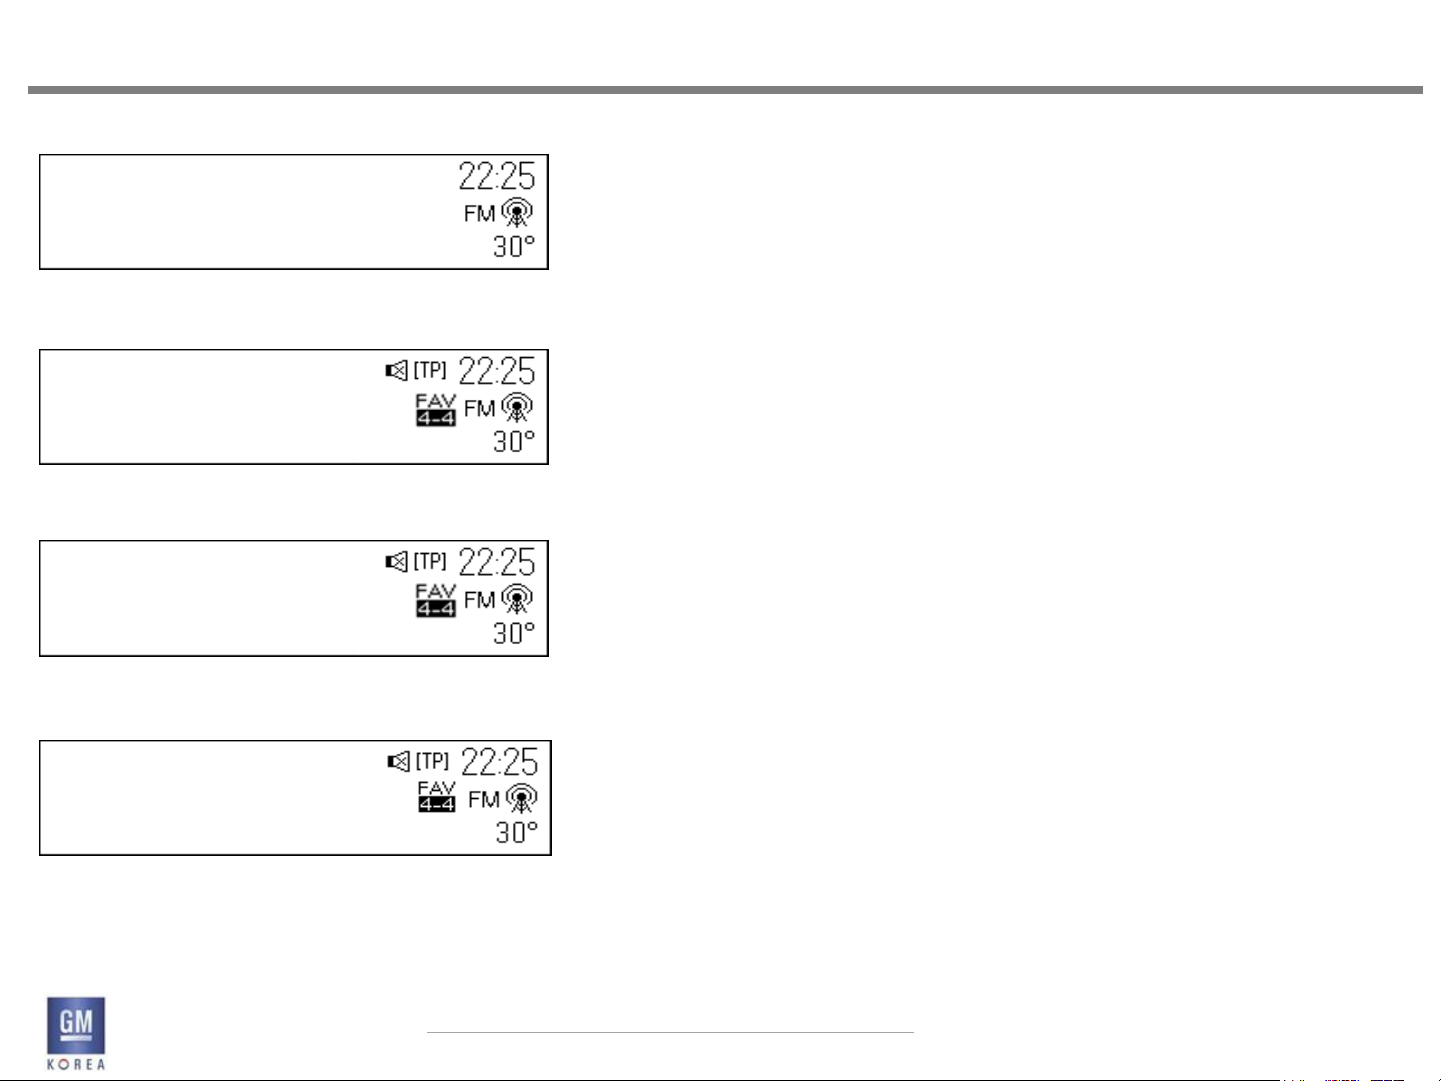
5.4.6 EU FM RDS Seek Behavior with TP On
When TP is ON in the menu, seeks will only include TP
supported stations or stations with EON-TA support.
When TP is OFF in the menu, seeks will include all available
stations from the tuner.
RELEASE VER 1.7
April 02, 2014
GIS-403-FACEPLATE RADIO FORM AND BEHAVIOR SPECIFICATION
GMK CONFIDENTIAL © COPYRIGHT 2010-2020 GENERAL MOTORS
33
Page 34

5. BROADCAST SOURCES
FACEPLATE NGF RADIO
Figure 5.4.4 -
PlntRock
Now Playing on Planet
Rock Is music from The…
Figure 5.4.5 -
TP Search…
Figure 5.4.6 -
REGNBOGN
Now Playing Rumour Has
lt by Adele on RADIO RE…
5.4.8 EU RDS - TP Off to On interaction
If TP is currently set to OFF in the vehicle and the user
switches TP to ON from the FM menu, then the system
will initiate a TP search in order to tune to the strongest
available TP station. This search is initiated only if the
user is not tuned a TP supported station.
Essentially, once the user has turned TP ON, audio
is muted, and a search is enabled. An intermediate
screen will be shown during a search with the words
“TP search” in the metadata field. After the station is
tuned, audio is restored and the RDS now playing view is
shown.
If the TP setting is toggled ON from a source menu other
than FM, the tuner will perform a background scan for
a TP supported station while remaining in the current
source mode. Please refer to the RDS TP Status section
which describes the remaining details for handling traffic
alerts while in other source modes.
If the tuner discovers a traffic alert already in progress
after the user toggles TP to the ON state from a non-FM
source menu, the alert will be ignored.
RELEASE VER 1.7
April 02, 2014
GIS-403-FACEPLATE RADIO FORM AND BEHAVIOR SPECIFICATION
GMK CONFIDENTIAL © COPYRIGHT 2010-2020 GENERAL MOTORS
34
Page 35

5. BROADCAST SOURCES
FACEPLATE NGF RADIO
5.5 Broadcast Manual Tuning
The faceplate contains a rotary-push knob that is used
for a multitude of functions associated with the Infotainment
system.
When listening to a broadcast audio source, rotating the
knob tunes to a different frequency or station for AM/
FM.
FM RDS and DAB tuning in EU radios via the tune knob is
handled in a later section.
If user rotates the <Menu>knob,
system acts as below.
1) AM : Act to tune the freq. as manual tune.
2) FM
3) DAM : Act the station list
5.5.1 AM/FM Tuning
In the AM/FM sources when the Now Playing screen is
displayed, rotating the knob tunes the radio one frequency
or channel/station step up or down for each
detent of rotation. When the end of the frequency/
channel spectrum is reached, the tuning wraps to the
beginning or end of the frequency spectrum depending
on the direction of tuning.
without
RDS/RBDS
Freq. Tune
(Manual Tune)
With RDS With RBDS
Station List Station List
RELEASE VER 1.7
April 02, 2014
GIS-403-FACEPLATE RADIO FORM AND BEHAVIOR SPECIFICATION
GMK CONFIDENTIAL © COPYRIGHT 2010-2020 GENERAL MOTORS
35
Page 36

5. BROADCAST SOURCES
FACEPLATE NGF RADIO
Figure 5.6.1 -
Traffic Volume
20
5.6 RDS Traffic Volume Setting
Traffic alert volume can be adjusted by simply turning
the volume up or down while the alert is playing. The
system will store this setting for future traffic alerts.
The default traffic volume will be set according to GIS
302.
If the user is currently listening to a source at a higher
volume than the TA volume setting, then the TA will play
back at the current source volume setting.
If the user is currently listening to a source at a lower
volume than the TA volume setting, then the TA will play
at the volume set by the user for traffic.
Once an alert is completed, the system volume returns
to its previously set level prior to the traffic alert.
If the user sets the traffic alert volume to zero during
an alert, the next traffic alert will arrive at the minimum
connection volume level as defined in GIS 302.
If the user selects a station that supports Traffic Programming
and a Traffic Announcement is already in
progress, then the radio will not increase the volume for
this traffic announcement.
The same process will apply to DAB Announcements.
• During TA the audio mode is switch to vocal frequency range
(VOICE)
- user is still allowed to change TONE settings during TA,
but next upcoming TA shall be played with ATC VOICE again
RELEASE VER 1.7
April 02, 2014
GIS-403-FACEPLATE RADIO FORM AND BEHAVIOR SPECIFICATION
GMK CONFIDENTIAL © COPYRIGHT 2010-2020 GENERAL MOTORS
36
Page 37

5. BROADCAST SOURCES
FACEPLATE NGF RADIO
Figure 5.6.2 -
PlntRock
Now Playing on Planet
Rock Is music from The…
5.6.1 RDS Traffic Program (TP) Status
In FM-RDS broadcast mode or any other audio source
mode, the Traffic Program status indicator can be shown
in one of four different states depending on whether the
user has TP set On or Off and whether or not a station
supports Traffic Programming.
As shown in the flow to the left, the user has TP set to
ON and the station supports Traffic Programming. When
the tuner detects a traffic alert, the Traffic Alert will
show while the traffic announcement begins playing and
the user can choose to dismiss it.
If the user was in a source other than FM, the Traffic
Alert would display as the alert begins playing. Playback
will be paused and the audio will change to the
traffic message. Once the traffic alert is completed or
dismissed by the user during playback, the audio will
switch back to the previous source mode.
If the user switches stations or sources during a Traffic
Alert, the current TA will be cancelled and the system
will respond to the user interaction.
Users that have RDS ON/OFF set to OFF will be automatically
placed in RDS ON mode if they configure TP on.
RELEASE VER 1.7
April 02, 2014
GIS-403-FACEPLATE RADIO FORM AND BEHAVIOR SPECIFICATION
GMK CONFIDENTIAL © COPYRIGHT 2010-2020 GENERAL MOTORS
37
Page 38

5. BROADCAST SOURCES
FACEPLATE NGF RADIO
Figure 5.6.3
PlntRock
Now Playing on Planet
Rock Is music from The…
Figure 5.6.4
Traffic Alert
REGNBOGN
Dismiss
RELEASE VER 1.7
April 02, 2014
5.6.2 RDS Traffic Alert Pop-Up
If the user has set Traffic Programming to the ON state
in the FM menu, the user will receive Traffic Alert Pop-
Ups during audio listening in any mode.
As the flow on the left shows, the pop-up will occupy
the full screen with a Dismiss option highlighted by default
for the alert.
Please see the pop-up widget for further pop-up framework
details.
If the user is currently tuned to a TP station, all traffic
alerts will be initiated from the current station and not
from other TP supported stations. Users must be tuned
to a TP station or a non-TP station that supports EONTA’s
to receive traffic alerts.
If the user tunes to the middle of an active TA (e.g.
vehicle startup), the Traffic Alert pop-up should not be
displayed. Additionally, if the tuner detects a TA already
in progress and the active source is not FM, then the TA
is ignored.
Exceptions>
- On TA,
If user inserts the USB/SD device to the media box,
system ignores to reading the USB/SD.
In other words, system should be act TA continuously.
If the user changes the TA Status to the media mode,
System should cancel to operate TA on this TA event.
- On TA,
If the phone which means incoming/outgoing call
is occurred, system should act call.
If the above phone event is ended,
system should go back latest radio mode.
(This means that TA event is canceled.)
GIS-403-FACEPLATE RADIO FORM AND BEHAVIOR SPECIFICATION
GMK CONFIDENTIAL © COPYRIGHT 2010-2020 GENERAL MOTORS
38
Page 39

5. BROADCAST SOURCES
FACEPLATE NGF RADIO
5.6.3 RDS PTY 31 Alert Pop-Up
PTY 31 alerts are high priority broadcast pop-ups that
are to be handled in the same manner as normal RDS
traffic alert pop-ups.
However, these alert pop-ups will always be played regardless
of the TP ON/OFF setting.
RELEASE VER 1.7
April 02, 2014
GIS-403-FACEPLATE RADIO FORM AND BEHAVIOR SPECIFICATION
GMK CONFIDENTIAL © COPYRIGHT 2010-2020 GENERAL MOTORS
39
Page 40

5. BROADCAST SOURCES
FACEPLATE NGF RADIO
5.7 Broadcast Audio Menu
The rotary-push knob is also used to call up and operate
specific broadcast audio source menus. When listening
to a broadcast audio source with the “Now Playing”
screen displayed, pressing the knob displays a menu list
tailored to the current broadcast audio source. Menu
options are highlighted by rotating the knob and selected
by pressing the knob.
Access to vehicle settings is also available from all
menus.
The system remembers the last menu option selected
or highlighted (within each source) and highlights that
menu option upon recall of that menu.
5.7.1 AM Audio Menu
Pressing the knob while the AM “Now Playing” screen
is displayed shows the AM Menu list in the following
order:
• Time & Date
• Tone Settings
• Station List
• Auto Volume
• Update Station List
• Set Number of Favorites Page
• Maximum Startup Volume
• Vehicle Settings
RELEASE VER 1.7
April 02, 2014
GIS-403-FACEPLATE RADIO FORM AND BEHAVIOR SPECIFICATION
GMK CONFIDENTIAL © COPYRIGHT 2010-2020 GENERAL MOTORS
40
Page 41

5. BROADCAST SOURCES
FACEPLATE NGF RADIO
Figure 5.7.1
FM Menu
Time & Date
1130
Tone Settings
Figure 5.7.2
Time & Date
Tone Settings
Station List
Figure 5.7.3
Time & Date
Tone Settings
Station List
Figure 5.7.4
Tone Settings
Station List
Auto Volume
Figure 5.7.5
Station List
Auto Volume
Update Station List
5.7.2 FM Audio Menu (Non RDS Regions)
Pressing the knob while the FM “Now Playing” screen
is displayed shows the FM Menu list in the following
order:
• Time & Date
• Tone Settings
• Station List
• Auto Volume
• Update Station List
• Set Number of Favorites Page
• Maximum Startup Volume
• Vehicle Settings
5.7.3 FM Audio Menu (EU Radios)
Pressing the knob while the FM “Now Playing” screen is
displayed shows the FM Menu list for european radios
in the following order:
• Time & Date
• Tone Settings
• Traffic Program (TP) - On/Off Toggle
• Update Station List
• Auto Volume
• Manual Tuning
• RDS - On/Off
• Region - On/Off Toggle
• Categories
• Set Number of Favorites Page
• Maximum Startup Volume
• Vehicle Settings
RELEASE VER 1.7
April 02, 2014
GIS-403-FACEPLATE RADIO FORM AND BEHAVIOR SPECIFICATION
GMK CONFIDENTIAL © COPYRIGHT 2010-2020 GENERAL MOTORS
41
Page 42

5. BROADCAST SOURCES
FACEPLATE NGF RADIO
Figure 5.10.1 - strong station list
FM Stations
88.7
1130
92.3
Figure 5.10.2 - strong station list cont’d
88.7
92.3
101.1
Figure 5.10.3 - manual tuning list
All FM Stations
99.5
99.6
Figure 5.10.4 - manual tuning list cont’d
99.5
99.6
99.7
5.8 FM Manual Tuning Option (EU Radios)
When users select the Manual Tuning option from the
FM menu, they will be presented a list of all the FM
station frequencies from lowest to highest frequency as
shown in figures 5.10.3 and 5.10.4.
5.9 Multiple Digits After Decimal Point
For regions that broadcast stations with more than one
digit after the decimal point (e.g. - Thailand), the display
will behave as follows:
When the tuned station contains a zero in the hundredths
column (e.g. 97.10), the display should read
97.1.
When the tune station contains a non-zero number in
the hundredths column, the display should show both
digits (e.g. 97.15).
5.10 Station List & Categories
A list of strong stations as determined by the tuner is
displayed when users select the “Station List” option
from broadcast audio menu.
When categories is selected from the FM menu, the list
contains category names associated with the broadcast
source. Selecting a given category name displays a list of
stations associated with that category. Selecting a station
from the list and pressing the knob tunes the radio
to that frequency and returns to the corresponding
“Now Playing” screen.
Figure 5.10.5 - Category View
Categories
POP
MUSIC
RELEASE VER 1.7
April 02, 2014
GIS-403-FACEPLATE RADIO FORM AND BEHAVIOR SPECIFICATION
GMK CONFIDENTIAL © COPYRIGHT 2010-2020 GENERAL MOTORS
42
Page 43

5. BROADCAST SOURCES
FACEPLATE NGF RADIO
The list header for category based stations is
the category name followed by the word stations
(e.g. Rock Stations). The list header for
All Strong Stations will be shown as either FM
Stations or AM Stations as shown.
The system remembers the last category name
selected or highlighted and highlights that category
name upon recall of the Category List.
For EU radios, the PSN can be dynamically
updated in the station list as provided by the
broadcast station as calibrated by the tuner.
The categories to be presented to the user for
the European market RDS implementations
are as follows: Pop, Music, Classic, Information,
Rock, and All. The separate program
types that make up the supercategories for
both regions are defined in the PTY table as
shown.
For AM and FM, the category list is built by
scanning the band and building the list of categories
and associated
stations. This scan is done whenever the radio
is not tuned to an AM or FM audio source. The
scan can also be forced to happen while listening
to an AM or FM audio source by selecting
the “Update Station List” from the menu.
RELEASE VER 1.7
April 02, 2014
GIS-403-FACEPLATE RADIO FORM AND BEHAVIOR SPECIFICATION
GMK CONFIDENTIAL © COPYRIGHT 2010-2020 GENERAL MOTORS
43
Page 44

5. BROADCAST SOURCES
FACEPLATE NGF RADIO
Figure 5.10.6
FM Stations
PlntRock
1130
REGNBOGN
Figure 5.10.7
PlntRock
REGNBOGN
Bayern 1
Figure 5.10.8
Tuning…
Figure 5.10.9
REGNBOGN
Now Playing on BBC 6
Music is the latest rele…
user turns knob one detent
user presses to select station
5.10.1 FM RDS EU Station List & Tuning
The FM RDS station list in European countries is generated
by the tuner using attibutes from the PI code. This
list is accessed by rotating the knob to display a list of
stations as provided by the tuner. In order to select a
station, the user presses the knob to tune the radio to
that station and the display returns to the corresponding
“Now Playing” screen.
For single tuner radios, the intermediate tuning screen
is shown for 2 seconds prior to returning to the “Now
Playing” view.
The list is sorted by RDS stations in order of signal
strength and followed by non-RDS stations grouped at
the end of the list. The exact ordering of the list with
respect to signal strength and other RDS attributes is
determined by the tuner.
For EU radios, the PSN can be dynamically updated in
the station list as provided by the broadcast station as
calibrated by the tuner.
Stations that support traffic programming are denoted
with the letters TP at the far right of the list entry regardless
of the TP on/off menu setting. In addition, non-
TP stations that support EON-TA are also denoted with a
TP in the list. In cases where the currently playing icon
and TP station indicator are both applicable, the TP indicator
will take precedence and be displayed.
RELEASE VER 1.7
April 02, 2014
GIS-403-FACEPLATE RADIO FORM AND BEHAVIOR SPECIFICATION
GMK CONFIDENTIAL © COPYRIGHT 2010-2020 GENERAL MOTORS
44
Page 45

5. BROADCAST SOURCES
FACEPLATE NGF RADIO
Figure 5.10.10
REGNBOGN
Now Playing on BBC 6
Music is the latest relea…
Figure 5.10.11
FM Stations
PlntRock
REGNBOGN
Figure 5.10.12
PlntRock
Tuning…
Any station can be selected from the list regardless of
whether TP is on or off. The TP status for the station
selected is shown in the status region.
When a selection is made from
a station list or favorite, the user will see the intermediate
“Tuning” screen for 2 seconds as defined previously.
If the tuner cannot find the station, a search of the AF
list is first done followed by a band scan at which time a
station list update is also performed. In this scenario, audio
is muted and the PSN or frequency is shown in line 1
and “Tuning” is shown in line 2. A cancel button soft-key
is also made available at this point of the process.
After the tuner performs the band scan and the station
is still not available, it is tuned, the frequency is displayed
and the user hears static. For either system, the
user will have to select another station manually when
they receive an unavailable station.
- In case that system has the station info(RDS PS),
The Figure 5.10.12 is displayed when tuning.
- In case of else,
the Figure 5.10.8 is displayed when tuning.
RELEASE VER 1.7
April 02, 2014
GIS-403-FACEPLATE RADIO FORM AND BEHAVIOR SPECIFICATION
GMK CONFIDENTIAL © COPYRIGHT 2010-2020 GENERAL MOTORS
45
Page 46

5. BROADCAST SOURCES
FACEPLATE NGF RADIO
Figure 5.10.13
Updating Station List…
Cancel
5.10.2 Update Station List
Users can select the Update Station List option from the
More menu to enable a station list refresh thus adding
all available stations and/or DAB multicasts to the
list. Categories are added during this scan as well. This
update can take anywhere from 2 -5 minutes in general,
therefore the system will allow the user to cancel out of
an update while it is processing.
During a station list update, the user can use the media
sources in the system. If the user selects a broadcast
source during the update, the wireframe shown in Figure
5.10.13 will be shown.
The seek/tune button functionality and menu button
will be inactive and the cancel soft-key replaces the
favorites for AM/FM/DAB sources.
When users press any inactive buttons in this mode, the
system will display the pop-up, “Action not supported
during station list update”.
To stop the station list update, the user can press the
cancel button soft-key. If the user is in a media source
view and presses the RADIO button, they will be returned
to the Updating Station List view shown in Figure
5.10.13 if the station list update is still active. Otherwise,
they will be taken to the Now Playing view for the last
tuned station of the last active broadcast source mode.
Exception>
If user presses the <Cancel>key,
System recover the previous station DB and display previous
viewing mode(latest Radio now playing)
RELEASE VER 1.7
April 02, 2014
GIS-403-FACEPLATE RADIO FORM AND BEHAVIOR SPECIFICATION
GMK CONFIDENTIAL © COPYRIGHT 2010-2020 GENERAL MOTORS
46
Page 47

5. BROADCAST SOURCES
FACEPLATE NGF RADIO
5.10.3 Returning From A Station List Update
After a manual station list update is completed, the user
is returned to the last selected station prior to the user
selecting the update option from the menu.
If the user is listening to another source mode when
the station list update has completed, they will not be
returned to the AM or FM broadcast mode.
5.10.4 RDS Off Behavior For EU Radios
When RDS is turned OFF from the menu on an EU radio,
the system applies this setting to the currently tuned
station only. This will cause the RDS text to be switched
off, the alternate frequency feature will not function,
and the frequency will be displayed in place of the PSN.
However, PSN’s will still be applied when the user selects
the station list browser.
RELEASE VER 1.7
April 02, 2014
GIS-403-FACEPLATE RADIO FORM AND BEHAVIOR SPECIFICATION
GMK CONFIDENTIAL © COPYRIGHT 2010-2020 GENERAL MOTORS
47
Page 48

5. BROADCAST SOURCES
FACEPLATE NGF RADIO
Figure 5.11.1
Bass
Midrange
Treble
Figure 5.11.3
Bass
Midrange
Treble
5
-1
3
Figure 5.11.2
Fade
Balance
-5
0
EQ Rock
5
-1
3
5.11 Tone Settings
The following tone settings are displayed when users
select the “Tone Settings” option from any audio source
menu:
• Bass
• Midrange
• Treble
• Fade
• Balance
• EQ (e.g., Rock, Pop, etc.)
Once tone settings are made, they are globally set
across all different sources.
For tone settings there is no imtermediate header for
this “list”. Users highlight the desired tone setting option
and press the knob to be able to change its current
value. Turning the knob will change the tone setting
value and be reflected on the display in the bar graphic.
When the user has finished adjusting a setting, he/she
presses the knob to store the new setting and return to
the Tone Settings option list.
The range of all tone settings are from -12 to +12 detent
settings.
RELEASE VER 1.7
April 02, 2014
GIS-403-FACEPLATE RADIO FORM AND BEHAVIOR SPECIFICATION
GMK CONFIDENTIAL © COPYRIGHT 2010-2020 GENERAL MOTORS
48
Page 49

5. BROADCAST SOURCES
FACEPLATE NGF RADIO
The EQ option allows users to select from predefined
tone settings and will cycle through the following types
as users adjust the setting by turning the knob:
Pop
Rock
Country
Jazz
Talk
Classical
Custom
The tone settings are also visually depicted in the x-y
coordinate graphic to the right of the individual settings
as shown in the wireframes.
RELEASE VER 1.7
April 02, 2014
GIS-403-FACEPLATE RADIO FORM AND BEHAVIOR SPECIFICATION
GMK CONFIDENTIAL © COPYRIGHT 2010-2020 GENERAL MOTORS
49
Page 50

5. BROADCAST SOURCES
FACEPLATE NGF RADIO
Figure 5.12.1
Off
Low
Figure 5.12.2
Off
Low
Medium
Auto Volume
5.12 Auto Volume
Auto Volume adjusts the volume of the audio based on
the speed or ambient noise of the vehicle. The following
Auto Volume settings are displayed when users
select the “Auto Volume” option:
• Off
• Low
• Medium-Low
• Medium
• Medium-High
• High
The current Auto Volume setting is shown as active in
the list (e.g., a check mark, etc.).
Alternatively, certain vehicles may be equipped with the
Bose AudioPilot system. In these cases, the Auto Volume
main menu item is replaced with the Bose AudioPilot
setting. This is an on/off toggle list entry.
When “Off” is selected, Auto Volume does not function.
When “Low” is selected, Auto Volume uses a lower
range volume curve to adjust volume with vehicle speed
changes.
When “Medium” is selected, a middle range volume
curve is used to adjust the audio volume with changes in
vehicle speed.
When “High” is selected, a more aggressive volume
curve is used to adjust the audio volume with changes in
vehicle speed.
Medium-Low and Medium-High will adjust Auto Volume
to approximately the range between low to medium and
medium to high respectively.
RELEASE VER 1.7
April 02, 2014
GIS-403-FACEPLATE RADIO FORM AND BEHAVIOR SPECIFICATION
GMK CONFIDENTIAL © COPYRIGHT 2010-2020 GENERAL MOTORS
50
Page 51

5. BROADCAST SOURCES
FACEPLATE NGF RADIO
Figure 5.13.1
REGNBOGN HESSEN
Iron Maiden
The Man Who Would Be…
Figure 5.13.2
REGNBOGN HESSEN
Now Playing on BBC 6
Music is the latest relea…
RELEASE VER 1.7
April 02, 2014
5.13 DA B Now Playing View
The following information is shown on the DAB now
playing view:
• Station Label (eg, BBC 6 Music) - listed first in line 1
• Ensemble Label (eg, BBC NATL)
• Graphic
• DAB Text - Program Information
An 8 character service label and an 8 character ensemble
label will be used.
- FAV Label
- [TP] icon
- Mute icon
- Driving School
(If Driving School is on,
Speed is displayed on the location/instead of outside template.)
5.13.1 DA B Metadata
The DAB radio fields are shown in the following order
and if there is more content than will fit in the area of
lines 2 and 3, they page a single time at a rate of 5 seconds
per field:
Line 1: DAB Station Label and Ensemble Label
Line 2: Dynamic Label Text
Line 3: Dynamic Label Text continued
For dynamic label plus scenarios, lines 2 and 3 are displayed
as follows when available from broadcast:
Line 2: Artist Info
Line 3: Song Info
When DAB signal information has been detected, the
metadata fields will be updated on the display to show
the information. The information and formatting displayed
with dynamic label text will vary based on the
broadcaster’s provided information and formatting.
DAB text should not be displayed until is received in its
entirety.
GIS-403-FACEPLATE RADIO FORM AND BEHAVIOR SPECIFICATION
GMK CONFIDENTIAL © COPYRIGHT 2010-2020 GENERAL MOTORS
51
Page 52

5. BROADCAST SOURCES
FACEPLATE NGF RADIO
Figure 5.13.3
REGNBOGN HESSEN
Now Playing on REGNBO
GEN is the latest relea…
Figure 5.13.4
REGNBOGN HESSEN
entitled Give Up The Gho
st from the album The …
Figure 5.13.5
REGNBOGN HESSEN
Now Playing on BBC 6
Music is the latest relea…
When tuned to a DAB + station, the default text displayed
for the user will be the dynamic label plus variant
for artist and song only. No other variations of DL+ will
be displayed. When this is not available from the broadcaster,
the text fields will be populated with the standard
dynamic label text.
5.13.2 Paging And Truncation of DA B Text
The three wireframes shown to the left describe how
the text fields of lines 2 and 3 of the metadata should
be paged using smart truncation (i.e. not breaking up
words in the middle between line 2 and 3) when there is
more information than can be fit in the alotted space.
For example, if the complete broadcasted text were the
phrase, “Now Playing on BBC 6 Music is the latest release
from Radiohead entitled Give Up The Ghost from
the album The King Of Limbs”, the information would
page a single time as shown. The final view after pagination
is shown in figure 5.1.13.5.
5.13.3 DA B Graphics
The graphics region will contain a graphic with the letters
DAB or DAB+ incorporated into the graphics region
based on the broadcast mode. For DMB broadcasts, the
DMB logo will be shown in the graphics field.
RELEASE VER 1.7
April 02, 2014
GIS-403-FACEPLATE RADIO FORM AND BEHAVIOR SPECIFICATION
GMK CONFIDENTIAL © COPYRIGHT 2010-2020 GENERAL MOTORS
52
Page 53

5. BROADCAST SOURCES
FACEPLATE NGF RADIO
Figure 5.13.6
REGNBOGN
Now Playing Rumour Has
lt by Adele on RADIO …
Figure 5.13.7
No Label HESSEN
Iron Maiden
The Man Who Would Be …
Figure 5.13.8
REGNBOGN No Label
Iron Maiden
The Man Who Would Be …
5.13.4 DA B Views without Station or Ensemble Labels
Instances where there is either no station label, no ensemble
label, or neither station and ensemble labels will
be handled as follows:
When there is no station information available but the
ensemble is known, the station field will be replaced with
the text “No Label” as shown.
When there is no ensemble information available but the
station label is known, the ensemble field will be replaced
with the text “No Label” as shown.
When there is no station or ensemble information available,
the display will show the block number and frequency
in the now playing view as shown in Figure 5.13.9
Figure 5.13.9 - no station label or ensemble label view
10C 213.360
RELEASE VER 1.7
April 02, 2014
GIS-403-FACEPLATE RADIO FORM AND BEHAVIOR SPECIFICATION
GMK CONFIDENTIAL © COPYRIGHT 2010-2020 GENERAL MOTORS
53
Page 54

5. BROADCAST SOURCES
FACEPLATE NGF RADIO
Figure 5.14.1
PlntRock Digital1
Now Playing on REGNB
OGEN is the latest relea…
Figure 5.14.2 - tuning screen used when changing ensembles
(also known as the intermediate tuning screen)
Tuning…
Figure 5.14.3
BBC Rad4 BBCNatl
Now playing on BBC4 is
the New album from Mu…
5.14 Seeking In DA B
The Now Playing screen supports the ability to seek up
and down to the next available DAB station - as stored in
the tuner ‘strong station’ list.
5.14.1 Seek Mode
In DAB, tapping on the Seek Up or Down button tunes
the radio to the next or previous station of the current
ensemble when available - based on the tuner supplied
DAB strong station list. The updated metadata is then
reflected on the display without any intermediate tuning
screen.
If the next or previous station is located in another
ensemble, then the first or last receivable strong station
of that ensemble is tuned, regardless of whether the
ensemble and its associated services were part of the
original strong station list. If intermediate strong ensembles
are located, then they are added to the strong
station list along with their services.
In this use case, a tuning message is displayed for a
minimum of 2 seconds (calibrateable) as shown in the
wireframe flow to the left.
RELEASE VER 1.7
April 02, 2014
GIS-403-FACEPLATE RADIO FORM AND BEHAVIOR SPECIFICATION
GMK CONFIDENTIAL © COPYRIGHT 2010-2020 GENERAL MOTORS
54
Page 55

5. BROADCAST SOURCES
FACEPLATE NGF RADIO
5.14.2 Press and Hold Seek Button
When the user presses and holds on either seek arrow
button, audio is muted and the metadata changes to
show the station and ensemble labels changing at a rate
of 3 steps per second (calibrateable) until they release
their finger. After the release, the system stops on the
next strong signal station in the direction of the fast
seeking and the DAB text will be updated.
Once the button is released and the tuner has to tune
to the next receivable ensemble to find a strong station,
HMI will display the intermediate tuning screen for a
minimum of 2 seconds (calibrateable).
5.14.3 Seek Operation With One Strong Station
If the user is tuned to the only available station in the
tuner’s station list and performs a SEEK operation, the
tuner will scan the entire band and be returned to the
original station currently tuned. The intermediate tuning
screen will be shown during the search.
RELEASE VER 1.7
April 02, 2014
GIS-403-FACEPLATE RADIO FORM AND BEHAVIOR SPECIFICATION
GMK CONFIDENTIAL © COPYRIGHT 2010-2020 GENERAL MOTORS
55
Page 56

5. BROADCAST SOURCES
FACEPLATE NGF RADIO
Figure 5.14.4 - No DA B Stations Available
No DAB Stations Available
5.14.4 Seek Operation With Zero Strong Stations
If the user is in the DAB source mode and there are no
strong signal stations available, the tuner will scan the
entire band a single time on a SEEK operation and be returned
to the original station currently tuned. The intermediate
tuning screen will be shown during the search.
Once the scan is completed, the display will show No
DAB Stations Available in the metadata field.
RELEASE VER 1.7
April 02, 2014
GIS-403-FACEPLATE RADIO FORM AND BEHAVIOR SPECIFICATION
GMK CONFIDENTIAL © COPYRIGHT 2010-2020 GENERAL MOTORS
56
Page 57

5. BROADCAST SOURCES
FACEPLATE NGF RADIO
Figure 5.15.1
DAB Stations
REGNBOGN
D-RADIO
Figure 5.15.2
REGNBOGN
D-RADIO
Bayern 1
Figure 5.15.3
HESSEN
HESSEN
HESSEN
HESSEN
BAYERN
D-RADIO HESSEN
Mumford & Sons
Ghosts That We Knew
User selects station from list
using enter button on tune knob
5.15 DA B Station Lists
The station list is accessed by turning the tune knob on
the faceplate. A list of strong DAB stations will appear
with the currently tuned station visually indicated in
the station list. Please refer to the list widget section for
further list handling details.
5.15.1 Information Displayed
The list shown is provided to the HMI by the tuner. Two
pieces of information are shown for each line item. An 8
character service label and an 8 character ensemble label
will be used. Based on character sizes, some services
or ensemble labels could be truncated within their text
entry box templates. These labels can be dynamically
updated in the station list as provided by broadcast as
calibrated by the tuner.
5.15.2 Selecting New Station
Once the desired station is found in the list, the user can
press the menu/tune knob to tune to that station and
be returned to the now playing view.
When the beginning or end of the station list is reached,
the tuning wraps to the beginning or end of the list depending
on the direction of tuning.
RELEASE VER 1.7
April 02, 2014
GIS-403-FACEPLATE RADIO FORM AND BEHAVIOR SPECIFICATION
GMK CONFIDENTIAL © COPYRIGHT 2010-2020 GENERAL MOTORS
57
Page 58

5. BROADCAST SOURCES
FACEPLATE NGF RADIO
Figure 5.15.4 - Station Not Available view
REGNBOGN HESSEN
Station Not Available
5.15.3 Selecting An Unavailable Station
When a station that is selected from either variant of
the station list is not available, the user returns to the
now playing view and the first line of dynamic label text
will show Station Not Available and the second line will
be blank. The station and ensemble selected will be
shown in the top line of the metadata field. If a selection
was made from the manual tuning list, the channel label
and frequency will be shown in top line of the metadata.
When the user selects a station that is not available
from a favorite preset, the now playing view is updated
with the station and ensemble label selected shown
in line 1 of the metadata and Station Not Available is
shown in line 2.
RELEASE VER 1.7
April 02, 2014
GIS-403-FACEPLATE RADIO FORM AND BEHAVIOR SPECIFICATION
GMK CONFIDENTIAL © COPYRIGHT 2010-2020 GENERAL MOTORS
58
Page 59

5. BROADCAST SOURCES
FACEPLATE NGF RADIO
Figure 5.15.5 -
All DAB Frequencies
BBC Rad3
BBC Rad4
Figure 5.15.6 -
BBC Rad3
BBC Rad4
220.352
Figure 5.15.7 -
All DAB Frequencies
PlntRock
222.064
BBC NATL
BBC NATL
BBC NATL
BBC NATL
11C
Digital1
11D
5.15.4 Manual Tuning (See DA B Menu)
The Manual Tuning list entry in the DAB Menu can be
selected to provide the user access to the internal tuner
station list. The tuner internal station list (i.e., all theoretically
available stations) is arranged in order of channel
labels (i.e. 5A, 5B,...13D and LA, LB,...LP if L-Band set to
ON mode).
Once the desired frequency is found in the list, the user
can press the menu/tune knob to tune to that frequency
and return to the now playing view. If an active ensemble
is available on that frequency, all metadata will
be updated on the now playing view. The next time the
user accesses the manual tuning list (by going back into
the menu and selecting manual tuning from the list), the
stations available for the selected ensemble will expand
out and be displayed in the list in the location formerly
populated by the channel label and frequency.
In the example wireframes shown, the user has selected
ensemble 11C. Figure 5.15.7 shows the result the next
time the manual tuning list is selected from the DAB
menu and displayed. In this case, ensemble 11C has
updated to ensemble label “Digital1” and the associated
station labels are also shown.
RELEASE VER 1.7
April 02, 2014
GIS-403-FACEPLATE RADIO FORM AND BEHAVIOR SPECIFICATION
GMK CONFIDENTIAL © COPYRIGHT 2010-2020 GENERAL MOTORS
59
Page 60

5. BROADCAST SOURCES
FACEPLATE NGF RADIO
5.16 DA B Categories
If the user selects Categories from the DAB Menu, they
will be taken to the categories list for DAB. The list
contains category names associated with DAB stations.
Selecting a given category name displays a list of stations
for that category. Selecting a station from the list
tunes the radio to that station and returns the display to
the “Now Playing” view.
DAB categories behave exactly as defined for FM-RDS
categories except for the information presented in the
category station list. In DAB, the station label and ensemble
label will be shown in the list.
RELEASE VER 1.7
April 02, 2014
GIS-403-FACEPLATE RADIO FORM AND BEHAVIOR SPECIFICATION
GMK CONFIDENTIAL © COPYRIGHT 2010-2020 GENERAL MOTORS
60
Page 61

5. BROADCAST SOURCES
FACEPLATE NGF RADIO
5.17 DA B Menu
When the user presses the faceplate menu button, the
list of settings or additional features for DAB are shown.
Users can browse the list by turning the rotary knob and
select an item by pressing the knob.
The contents and order of the DAB menu are as follows:
• Time & Date
• Tone Settings
• Traffic Program (TP) - On/Off Toggle
• Update Station List
• Auto Volume
• Manual Tuning
• Categories
• DAB Announcements
• DAB to DAB Linking - On/Off Toggle
• DAB to FM Linking - On/Off Toggle
• L Band - On/Off Toggle
• Intellitext
• Set Number of Favorite Pages
• Maximum Startup Volume
• Vehicle Settings
RELEASE VER 1.7
April 02, 2014
GIS-403-FACEPLATE RADIO FORM AND BEHAVIOR SPECIFICATION
GMK CONFIDENTIAL © COPYRIGHT 2010-2020 GENERAL MOTORS
61
Page 62

5. BROADCAST SOURCES
FACEPLATE NGF RADIO
Figure 5.17.1
DAB to DAB Linking…
5.17.1 DA B to DA B linking
When users have DAB to DAB linking set to the ON state
and the currently tuned DAB station weakens and falls
below a certain threshold, the tuner will attempt to link
to the same station if it is available on another ensemble.
During this process an intermediate screen is shown to
inform the user that DAB to DAB linking is taking place.
Once completed, the screen updates to the Now Playing
view for the new ensemble.
If the tuner is unable to find the DAB station on another
ensemble after searching the entire band a single time,
it will attempt a DAB to FM link. If this is unsuccessful,
the dynamic label information will be replaced with Station
Not Available.
RELEASE VER 1.7
April 02, 2014
GIS-403-FACEPLATE RADIO FORM AND BEHAVIOR SPECIFICATION
GMK CONFIDENTIAL © COPYRIGHT 2010-2020 GENERAL MOTORS
62
Page 63

5. BROADCAST SOURCES
FACEPLATE NGF RADIO
Figure 5.17.2
REGNBOGN HESSEN
Iron Maiden
The Man Who Would Be …
Figure 5.17.3
REGNBOGN DAB-FM
Now Playing is the latest
release from iron Maiden…
5.17.2 DA B to FM linking
When users have DAB to FM linking set to the ON state
and the currently tuned DAB station weakens and falls
below a certain threshold, the tuner will attempt to link
to the FM variant of the service provided DAB to DAB
linking is either OFF or has failed.
Once the linking is completed, the screen updates to the
Now Playing screen with the FM metadata for the tuned
station and the ensemble label field is replaced with the
text “DAB - FM” as shown in Figure 5.17.3 to indicate
DAB to FM following is active.
Note that there is no switching by the tuner to FM
source mode for this feature. Therefore, should the user
perform a SEEK operation, the tuner will perform this
operation in terms of the DAB source mode as defined.
When DAB to FM linking is active and the FM RDS station
weakens and the pi code is undeterminable, the
tuner switches back to the DAB metadata for the tuned
station and Station Not Available is displayed in line 2 of
the metadata.
In cases where DAB-FM is active and the broadcaster
changes the content such that it does not match the
original DAB broadcast, the system will behave based on
the RDS region setting. If the user has region set to ON,
then stay with the current broadcast content. If region is
OFF, then allow switching to occur which means a different
broadcast may be heard.
RELEASE VER 1.7
April 02, 2014
GIS-403-FACEPLATE RADIO FORM AND BEHAVIOR SPECIFICATION
GMK CONFIDENTIAL © COPYRIGHT 2010-2020 GENERAL MOTORS
63
Page 64

5. BROADCAST SOURCES
FACEPLATE NGF RADIO
Figure 5.17.4
Dismiss
DAB Announcement
Sports
5.17.3 L Band - On/Off Toggle
When users toggle the L Band to the ON state, DAB will
broaden its seek/tune and station list functionality to
include the LA to LW frequency blocks.
5.17.4 DA B Announcements
The user can select DAB Announcements from the
menu to select which types of announcements that they
would like to hear while in the vehicle. This is accomplished
by pressing the list entry of interest to toggle it
on or off.
DAB announcements are only provided when in DAB
mode and only occur from any station in the currently
tuned ensemble.
DAB Announcements are presented to the user as
shown in Figure 5.17.4. Dismissing the announcement
will either tune back to the station the user was listening
to prior to the announcement or simply clear the
pop-up and remain tuned to the station broadcasting
the announcement.
The DAB alarm announcement is set to ON by default
and is not user selectable from the announcements
menu.
If a DAB alarm type announcement occurs, any other
pending or current announcements are interrupted and
the DAB alarm is presented.
A PTY 31 RDS alert shall not be cancelled by any DAB
announcement.
RELEASE VER 1.7
April 02, 2014
GIS-403-FACEPLATE RADIO FORM AND BEHAVIOR SPECIFICATION
GMK CONFIDENTIAL © COPYRIGHT 2010-2020 GENERAL MOTORS
64
Page 65

5. BROADCAST SOURCES
FACEPLATE NGF RADIO
Figure 5.17.5
Intellitext
Football
News
Figure 5.17.6
Football
Premium League Table
1. Manchester United
Figure 5.17.7
Premium League Table
1. Manchester United
2. Sunderham
Figure 5.17.8
1. Manchester United
2. Sunderham
Results
Figure 5.17.9
5.17.5 Intellitext
The intellitext feature is selected from the DAB menu.
This feature allows the user to see specially broadcast
text providing information such as sports scores, headline
news, and others.
The basic broadcast format for intellitext is a Menu
to Submenu to Data format. This section provides an
example of how the user interface should function and
appear to the user.
Once the user selects intellitext from the menu, they
will be shown the main intellitext menu which provides
the main categories the user can select for viewing as
shown in Figure 5.17.5.
In the example shown, the user selects football and is
provided standings and results for the football category
in a list format as shown.
In this example, Football serves as the Menu and Premium
League Table and Results serve as the Submenu
items. The data is represented under each submenu in
an indented manner. This is determined from the information
provided through the broadcaster’s dynamic
label text.
By pressing the back button, the user can return to the
main Intellitext menu and select the news category or
press back again to return to the DAB menu.
2. Sunderham
Results
Arsenal 0, Wigan 3
RELEASE VER 1.7
April 02, 2014
GIS-403-FACEPLATE RADIO FORM AND BEHAVIOR SPECIFICATION
GMK CONFIDENTIAL © COPYRIGHT 2010-2020 GENERAL MOTORS
65
Page 66

5. BROADCAST SOURCES
FACEPLATE NGF RADIO
Figure 5.17.10
No Received Intellitext
Exceptions>
If there is no intellitext info when user selects some info,
system displays the pop-up(“No Received Intellitext”)
as the figure 5.17.10 and then go to the latest Radio Now Playing.
RELEASE VER 1.7
April 02, 2014
GIS-403-FACEPLATE RADIO FORM AND BEHAVIOR SPECIFICATION
GMK CONFIDENTIAL © COPYRIGHT 2010-2020 GENERAL MOTORS
66
Page 67

5. BROADCAST SOURCES
FACEPLATE NGF RADIO
5.18 Broadcast Audio Favorites
Broadcast audio stations for AM, FM, and DAB can be
stored as Favorites. Users must first tune to a desired
frequency or channel. Next, they press and hold the
desired Favorites button (1-4) on the faceplate to store
that station in the selected location on the Favorites
Page displayed.
For AM/FM favorites, the system stores and displays the
frequency in the selected Favorites tab.
FM RDS and DAB stations in Europe will store the station
PSN or service label in the favorites tab. If PSN or station
label is not available, the frequency is stored for RDS
and the block number (eg. 12B) is stored for DAB.
The favorite names are blind truncated per the favorites
widget of this document.
When a Favorites button is tapped for a broadcast
Favorite, the system tunes to that station or channel
and the display shows the corresponding “Now Playing”
screen unless specified otherwise elsewhere in this
document.
RELEASE VER 1.7
April 02, 2014
GIS-403-FACEPLATE RADIO FORM AND BEHAVIOR SPECIFICATION
GMK CONFIDENTIAL © COPYRIGHT 2010-2020 GENERAL MOTORS
67
Page 68

5. BROADCAST SOURCES
FACEPLATE NGF RADIO
Figure 5.19.1 -figure removed
Figure 5.19.2 - figure removed
Figure 5.19.3 - Aux Input Now playing view
Aux Input
Figure 5.19.4 - Bluetooth AVRC P 1.0 Now playing view
5.19 Media Sources
The following section describes the data elements and
functions for media-based audio sources for the base
and uplevel faceplated radios.
5.19.1 Media Now Playing Screen
The Now Playing screens for media-based audio contain
the following data elements, depending on the media
source.
5.19.2 Removed
5.19.3 AUX Now Playing
• “AUX Input”
• AUX Graphic
5.19.4 Bluetooth Audio Now Playing
• “Bluetooth Music” (i.e., for AVRCP 1.0)
• BT Graphic
or
• Artist Name (i.e., for AVRCP 1.3 and higher)
• Song Title (i.e., for AVRCP 1.3 and higher)
• BT Graphic
Bluetooth Music
Figure 5.19.5 - BT AVRC P 1.3 Now playing view
Artist Name
Song Name
RELEASE VER 1.7
April 02, 2014
GIS-403-FACEPLATE RADIO FORM AND BEHAVIOR SPECIFICATION
GMK CONFIDENTIAL © COPYRIGHT 2010-2020 GENERAL MOTORS
68
Page 69

5. BROADCAST SOURCES
FACEPLATE NGF RADIO
Figure 5.19.6 - USB/SD now playing view
Artist Name
Song Name
00:03:42
Figure 5.19.7 - iPod now playing view
Artist Name
Song Name
00:03:42
Figure 5.19.8 - folder/file view
Folder Name
File Name
00:03:42
5.19.5 US B/SD Now Playing
• Artist Name (if Metadata available)
• Song Title (if Metadata available)
• Folder Name / File Name (if Metadata not available)
• USB/SD Graphic
5.19.6 iPod (US B connection)
• Artist Name
• Song Title
• iPod Graphic
5.19.7 Removed
5.19.8 Audiobook Now Playing
• Audiobook Name
• Chapter Title
• Graphic
5.19.9 Podcast Now Playing
• Podcast Name (if Metadata available)
• Podcast Episode Name (if Metadata available)
• Graphic
RELEASE VER 1.7
April 02, 2014
GIS-403-FACEPLATE RADIO FORM AND BEHAVIOR SPECIFICATION
GMK CONFIDENTIAL © COPYRIGHT 2010-2020 GENERAL MOTORS
69
Page 70

5. BROADCAST SOURCES
FACEPLATE NGF RADIO
5.19.10 Handling of Non-Metadata Cases
In cases where there is no available metadata for the
selected artist for indexed sources, the artist field will be
populated with “No Artist Info”. In cases where there is
no song info, the filename will be displayed in the song
field.
5.19.11 List Handling of Incomplete ID 3 Tags
If the user’s device contains incomplete ID3 tag information
for a music type file (e.g. - missing album or genre
metadata), the system will first attempt to determine
the missing metadata from the filename. After this step,
the filename will be used in the songs filter mode list
alphabetically. Podcasts and audiobooks will also attempt
to use the filename for the relevant metadata
information. If this fails, the system should use the
filename alphabetically in the applicable filter mode
category.
RELEASE VER 1.7
April 02, 2014
GIS-403-FACEPLATE RADIO FORM AND BEHAVIOR SPECIFICATION
GMK CONFIDENTIAL © COPYRIGHT 2010-2020 GENERAL MOTORS
70
Page 71

5. BROADCAST SOURCES
FACEPLATE NGF RADIO
5.19.12 Next / Fast Forward Transport Controls
Tapping the Seek Up switch on the faceplate skips to the
next track/song in playback order.
A long press on the same key causes playback of the
song to fast forward at the rate of 5-15x playback (TBD,
calibratable). Fast-forward playback can continue into
the next track/song in playback order.
During press and hold, the fast forward function stops
when the user releases their finger from the soft-key
button and playback resumes.
5.19.13 Previous / Fast Reverse Transport Controls
Tapping the Seek Down switch on the faceplate skips to
the beginning of the current track/song. However, if less
than 5 seconds has elapsed since the start of the current
track/song, the system skips to the beginning of the
previous track/song in playback order.
A long press on the same key causes playback of the
song to fast reverse at the rate of 5-15x playback (TBD,
calibratable). Fast-reverse playback can continue into
the next track/song in playback order.
Fast-reverse playback can continue into the previous
track/song in playback order. During press and hold,
the fast reverse function stops when the user releases
their finger from the soft-key button and playback resumes.
RELEASE VER 1.7
April 02, 2014
GIS-403-FACEPLATE RADIO FORM AND BEHAVIOR SPECIFICATION
GMK CONFIDENTIAL © COPYRIGHT 2010-2020 GENERAL MOTORS
71
Page 72

5. BROADCAST SOURCES
FACEPLATE NGF RADIO
Figure 5.19.9 - shuffle icon
Dawes
From A Window Seat
Stories Don’t End
5.19.14 Shuffle
Shuffle mode can be initiated via an on/off toggle from
any media source menu that supports this mode.
Shuffle is not globally set across all sources when activated.
In USB, SD, or iPod playback, Shuffle functionality is
dependent on the filter mode for song playback (e.g.,
album, artist, genre). As filter modes change for the
present source, the shuffle setting is retained.
Returning to the menu and selecting
shuffle to the OFF setting exits Shuffle mode and the
tracks/songs are played in normal playback order based
on the filter mode.
Enabling Shuffle continues playing the current song
selection through its completion versus performing an
immediate shuffle advance. The same applies for disabling
Shuffle.
When shuffle is enabled, the now playing view contains
a shuffle status icon as shown in Figure 5.19.9. Please
see status widget section for ordering of all status icons.
Shuffle Off Cases
(1) Selected the Shuffle OFF in the menu.
(2) Removed/Disconnected the media source
which is shuffle on.
(3) Selected(press the menu knob)
a song which is not current song on the playlist
RELEASE VER 1.7
April 02, 2014
GIS-403-FACEPLATE RADIO FORM AND BEHAVIOR SPECIFICATION
GMK CONFIDENTIAL © COPYRIGHT 2010-2020 GENERAL MOTORS
72
Page 73

5. BROADCAST SOURCES
FACEPLATE NGF RADIO
When in shuffle mode, a song will not repeat until all
songs for the selected filter mode have been played
back provided there are no more than 128 songs available.
When the media associated with a filter has been
completed, shuffle playback will repeat for that filter
mode.
For larger media lists, a minimum of 128 songs must be
played back before a duplicate song can be replayed in
shuffle mode. The shuffle mode setting in the vehicle is
to be retained whenever mass storage or database type
devices are left in the vehicle over ignition cycles.
If USB/SD mass storage devices are removed from the
vehicle, the shuffle setting is cleared. If database type
devices such as iPod’s are removed, the shuffle setting
of the device when returned to vehicle is to be used
upon reconnect.
5.19.15 Unsupported Media
In scenarios where the connected device(s) contains
only unsupported file formats or only invalid media, the
system displays the pop-up, “No supported data found
on device”.
Unsupported files are never shown in media lists.
For example, if there are playable files on the device,
then the unsupported files are not shown along with the
playable content.
Otherwise, the No Media Found message as shown in
figure 5.3.8 in the metadata is displayed for USB/SD
sources when no media or files are found on the connected
device.
RELEASE VER 1.7
April 02, 2014
GIS-403-FACEPLATE RADIO FORM AND BEHAVIOR SPECIFICATION
GMK CONFIDENTIAL © COPYRIGHT 2010-2020 GENERAL MOTORS
73
Page 74

5. BROADCAST SOURCES
FACEPLATE NGF RADIO
5.20 Tune knob behavior in media modes
When listening to certain media sources, rotating the
knob on the faceplate displays the filtered media list for
that source.
For instance,
When the user rotates the <Menu> Knob on media now playing,
System filters down from current play folder/category.
The currently playing media is graphically
highlighted in the list.
Users highlight a desired media item by rotating the
knob and select the media to begin playback by pressing
the knob. The system begins playback of the selected
media and the system returns to the Now Playing
screen.
These lists are persistent views, so the user must press
the select knob once more on the highlighted track or
press the back button to return to the “Now Playing”
screen.
The following list defines the behavior for each source:
AUX -- no action taken
USB/SD/iPod -- media list or folder view based on
latest filter
BT use case 1 -- no action taken
BT use case 2 -- no action taken
BT use case 3 -- media list based on latest filter
(reference section 5.24.3 for details)
BT use case 4 -- display folder structure of device
(reference section 5.24.4 - 5.24.6 for details)
RELEASE VER 1.7
April 02, 2014
GIS-403-FACEPLATE RADIO FORM AND BEHAVIOR SPECIFICATION
GMK CONFIDENTIAL © COPYRIGHT 2010-2020 GENERAL MOTORS
74
Page 75

5. BROADCAST SOURCES
FACEPLATE NGF RADIO
Exceptions>
If the user presses the <SEEK>key on the Playlist,
system plays a previous/next song
from current song on the Playlist.
- Order of playlist : System sorts the ascending power
of ABC song name
Also,
Highlight and Now Playing icon are dynamically located to
the new selected file by <SEEK>key at same time.
RELEASE VER 1.7
April 02, 2014
GIS-403-FACEPLATE RADIO FORM AND BEHAVIOR SPECIFICATION
GMK CONFIDENTIAL © COPYRIGHT 2010-2020 GENERAL MOTORS
75
Page 76

5. BROADCAST SOURCES
FACEPLATE NGF RADIO
5.21 Media Menu
The rotary-push knob is also used to call up and operate
specific media source menus. When listening to
a media-based audio source with the “Now Playing”
screen displayed, pressing the knob displays a menu list
tailored to the current media source. Menu options are
highlighted by rotating the knob and selected by pressing
the knob.
The system remembers the last menu option selected or
highlighted and highlights that menu option upon recall
of that menu.
Access to the vehicle settings menus is also provided
from the media menus.
RELEASE VER 1.7
April 02, 2014
GIS-403-FACEPLATE RADIO FORM AND BEHAVIOR SPECIFICATION
GMK CONFIDENTIAL © COPYRIGHT 2010-2020 GENERAL MOTORS
76
Page 77

5. BROADCAST SOURCES
FACEPLATE NGF RADIO
5.21.1 Removed
5.21.2 AUX Media Menu
Pressing the knob while the AUX “Now Playing” screen
is displayed shows the AUX Menu list:
• Time & Date
• Tone Settings
• Traffic Program (TP) - On/Off Toggle (EU)
• Auto Volume
• Maximum Startup Volume
• Vehicle Settings
5.21.3 Bluetooth Audio Media Menu
Pressing the knob while the Bluetooth Audio “Now
Playing” screen is displayed shows the Bluetooth Audio
Menu list:
• Time & Date
• Browse “Device Friendly Name” (BT AVRCP 1.4 only)
• Shuffle - On/Off (if supported by device)
• Manage Bluetooth Devices
• Tone Settings
• Traffic Program (TP) - On/Off Toggle (EU)
• Auto Volume
• Maximum Startup Volume
• Vehicle Settings
No browse option required in menu for 1.0 and 1.3
AVRCP devices
RELEASE VER 1.7
April 02, 2014
GIS-403-FACEPLATE RADIO FORM AND BEHAVIOR SPECIFICATION
GMK CONFIDENTIAL © COPYRIGHT 2010-2020 GENERAL MOTORS
77
Page 78

5. BROADCAST SOURCES
FACEPLATE NGF RADIO
5.21.4 US B/SD Media Menu (2.1F MCR System)
Pressing the knob while the USB/SD “Now Playing”
screen is displayed shows the USB Menu list:
• Time & Date
• Browse “Device Friendly Name”
• Folder View (not applicable for media players, such
as iPod)
• Shuffle - On/Off
• Tone Settings
• Traffic Program (TP) - On/Off Toggle (EU)
• Auto Volume
• Maximum Startup Volume
• Vehicle Settings
5.21.5 iPod Media Menu
Pressing the knob while the iPod “Now Playing” screen
is displayed shows the iPod Menu list:
• Time & Date
• Browse “Device Friendly Name”
• Shuffle - On/Off
• Tone Settings
• Traffic Program (TP) - On/Off Toggle (EU)
• Auto Volume
• Maximum Startup Volume
• Vehicle Settings
For all applicable media device menus, the device
friendly name will be used along with the Browse list
entry as shown in the wireframes.
RELEASE VER 1.7
April 02, 2014
GIS-403-FACEPLATE RADIO FORM AND BEHAVIOR SPECIFICATION
GMK CONFIDENTIAL © COPYRIGHT 2010-2020 GENERAL MOTORS
78
Page 79

5. BROADCAST SOURCES
FACEPLATE NGF RADIO
5.21.6 US B/SD Media Menu (2.0F - US R System)
Pressing the knob while the USB/SD “Now Playing”
screen is displayed shows the USB Menu list:
• Time & Date
• Browse “Device Friendly Name” - when selected for
the USR system, the directory structure of the device
is shown since this system does not support indexing
• Shuffle - On/Off
• Tone Settings
• Traffic Program (TP) - On/Off Toggle (EU)
• Auto Volume
• Maximum Startup Volume
• Vehicle Settings
RELEASE VER 1.7
April 02, 2014
GIS-403-FACEPLATE RADIO FORM AND BEHAVIOR SPECIFICATION
GMK CONFIDENTIAL © COPYRIGHT 2010-2020 GENERAL MOTORS
79
Page 80

5. BROADCAST SOURCES
FACEPLATE NGF RADIO
Figure 5.22.1
Browse “Device Friendly Name”
Playlist
Artists
Figure 5.22.2 - user selected artists filter
Artists
Artist Name A
Artist Name B
Figure 5.22.3 - user browsing artists filter
Artist Name A
Artist Name B
Artist Name C
5.22 Browse Media
A list of browse names (e.g., Genre, Artist, Album, Song,
Playlist, etc.) (depending on MCR or USR option)is displayed
when users select the Browse “Device Friendly Name”
option from a USB, SD, or iPod media source
menu. Selecting a given name displays a list of additional
browse names and/or songs associated with
that search name. Selecting a song from the list starts
playback of that song and returns to the corresponding
“Now Playing” screen. Users highlight the desired
browse name or song by rotating the knob and select it
by pressing the knob.
A long press of the knob when highlighting a browse
name begins playback of songs associated with the
browse name selected. For example, if the browse name
was the artist “Rolling Stones”, a long press of the knob
when “Rolling Stones” was highlighted would begin
playback of songs by the Rolling Stones and the system
would display the “Now Playing” screen. This same
functionality can be achieved by selecting the All option
at the top of a media list. Playback of a filtered media
list is to be repeated when the filter has played back all
of its selections regardless of the starting point in the filtered
list (e.g. when a playlist is started from the middle
of its list of tracks). The filter list is retained over ignition
cycles.
When pressing the MENU button (i.e., knob) from the
“Now Playing” screen, the user will begin from the top
level media menu as shown in Figure 5.22.1.
RELEASE VER 1.7
April 02, 2014
GIS-403-FACEPLATE RADIO FORM AND BEHAVIOR SPECIFICATION
GMK CONFIDENTIAL © COPYRIGHT 2010-2020 GENERAL MOTORS
80
Page 81

5. BROADCAST SOURCES
FACEPLATE NGF RADIO
When the user selects the Browse option from the
menu, each of the previously selected filters for the
currently playing content will highlight as the user drills
down through the sub-menus. So if Artists was selected
at the top level menu, the next entry into Browse Device
Friendly Name would have artists highlighted as well as
each of the previously selected sub-menus.
Re-entering the browse media mode should show the
users currently playing item in its current filter mode.
These filters should be held over source changes and
ignition cycles. If the device is removed these filters
should be erased. If no previous browse history exists
folder should be chosen as the default.
RELEASE VER 1.7
April 02, 2014
GIS-403-FACEPLATE RADIO FORM AND BEHAVIOR SPECIFICATION
GMK CONFIDENTIAL © COPYRIGHT 2010-2020 GENERAL MOTORS
81
Page 82

5. BROADCAST SOURCES
RELEASE VER 1.7
April 02, 2014
GIS-403-FACEPLATE RADIO FORM AND BEHAVIOR SPECIFICATION
GMK CONFIDENTIAL © COPYRIGHT 2010-2020 GENERAL MOTORS
FACEPLATE NGF RADIO
5.22.1 Browse Media - Indexed Sources (2.1F MCR)
Some media sources have an accessible media index on
the user’s device (e.g., iPod) and the 2.1F MCR option radios
can index certain devices (e.g., USB memory stick, SD card,
AVRCP 1.4+ device, etc.). For these media sources, users
browse the content via a typical filter list:
Playlists
• Playlist Names
• Song Titles
Artists
• Artist Names
• Album Names
• Song Titles
Albums
• Album Names
• Song Titles
Songs
• Song Titles
Genres
• Genre Names
• Artist Names
• Album Names
• Song Titles
Podcasts
• Podcast Titles
• Episode Titles
Audio Books
• AudioBook Titles
• Chapter Titles / Track Titles
Composers
• Composer Names
• Album Names
• Song Titles
Videos (audio playback only)
• Video Titles
• Video Episode Titles
82
Page 83

5. BROADCAST SOURCES
FACEPLATE NGF RADIO
Figure 5.22.4
Artist Name
Song Name
00:03:42
Figure 5.22.5
USB Menu
Time & Date
Browse “Device Friendly Name”
Figure 5.22.6
Browse “Device Friendly Name”
Folder Name A
Folder Name B
5.22.5 Browse Media - Non-Indexed Sources (2.0F USR)
Some media sources have their files arranged in a
directory structure that will not be indexed (e.g., USB
memory stick; SD memory card; ). For these media
sources, users navigate the content via the devices
directory structure by selecting the Browse “Friendly
Device Name” menu option - the system is not required
to alphabetize the list.
The system supports up to TBD directories deep. Pressing
the BACK button moves up one level in the in the
directory hierarchy. A long press of BACK returns to the
top level in the directory hierarchy (i.e., Root).
RELEASE VER 1.7
April 02, 2014
GIS-403-FACEPLATE RADIO FORM AND BEHAVIOR SPECIFICATION
GMK CONFIDENTIAL © COPYRIGHT 2010-2020 GENERAL MOTORS
83
Page 84

5. BROADCAST SOURCES
FACEPLATE NGF RADIO
Figure 5.23.1
No Media Found
Figure 5.23.2
Reading USB…
Figure 5.23.3
Artist Name
Song Name
00:00:01
5.23 Media Indexing (MCR Option)
Indexing may supported for a maximum of 6,000 songs.
Upon insertion of a brand new USB or SD card, the radio
will determine the number of files on the connected
device as well as establish a folder view of the directory
structure of the device as it is indexing. A device i.d. will
also be established to be used in recalculating checksums
when devices are removed and/or re-inserted.
As shown in the wireframe flow to the left, if the user
plugs in a new device while they are in the “No Media
Found” view of the active source, the hardware determines
the first available file for playback while the figure 5.23.1
“Reading USB…” view is shown.
The now playing view with complete Artist/Song
metadata for the first file found is then displayed as that
track’s audio begins playing.
It is also applied MTP Device Inserted.
Feedback during indexing is provided to the user in the
elapsed time field. The elapsed time text field will state
“Device Indexing....” with the trailing ellipsis turning on
and off to indicate that indexing is occurring and processing.
Once indexing is complete, the elapsed time is
shown from that point forward.
RELEASE VER 1.7
April 02, 2014
GIS-403-FACEPLATE RADIO FORM AND BEHAVIOR SPECIFICATION
GMK CONFIDENTIAL © COPYRIGHT 2010-2020 GENERAL MOTORS
84
Page 85

5. BROADCAST SOURCES
FACEPLATE NGF RADIO
Figure 5.23.4
102.5
Figure 5.23.5
Reading USB…
Figure 5.23.6
Artist Name
Song Name
00:00:01
In most scenarios, however, users will first have to
source newly connected devices since they will be transitioning
from a different source mode. Therefore, they
will always be shown the now playing view with the
metadata (Artist/Song/Album info) for the first available
file after the device friendly name view. Please see wireframe
flow in figures 5.23.4 through 5.23.6.
RELEASE VER 1.7
April 02, 2014
GIS-403-FACEPLATE RADIO FORM AND BEHAVIOR SPECIFICATION
GMK CONFIDENTIAL © COPYRIGHT 2010-2020 GENERAL MOTORS
85
Page 86

5. BROADCAST SOURCES
FACEPLATE NGF RADIO
Figure 5.23.7
Artist Name
Song Name
00:03:42
Figure 5.23.8
USB Menu
Time & Date
Browse “Device Friendly Name”
Figure 5.23.9
Time & Date
Browse “Device Friendly Name”
Folder View
Figure 5.23.10
5.23.1 Folder View
The folder view is shown when selected from the menu
for the selected media source. Folder view represents
the directory structure of the connected device. It is
always available for any connected device regardless of
the media indexing limit.
This list is updated in real-time every 15 seconds (calibrateable)
while this view is being displayed and the
hardware is processing the directory structure of the
connected device.
Users may select content that already appears in the list
for playback from this view while it continues to update.
Define > Folder DB Hierarchy : 1depth folder structure
Folder View
Folder Name A
Folder Name B
RELEASE VER 1.7
April 02, 2014
GIS-403-FACEPLATE RADIO FORM AND BEHAVIOR SPECIFICATION
GMK CONFIDENTIAL © COPYRIGHT 2010-2020 GENERAL MOTORS
86
Page 87

5. BROADCAST SOURCES
FACEPLATE NGF RADIO
Figure 5.23.11
Feature not supported during Indexing
Use folder view to browse contents
OK
5.23.2 Browsing Device Not Available Until Indexing Completed
Browsing is not supported until indexing is completed
for the connected device.
If the user selects browse from the menu, a pop-up will
be displayed informing them that the feature is not currently
available. Please see figure 5.23.11 for this popup’s
details.
After the pop-up times out or is dismissed, the now
playing view is shown.
RELEASE VER 1.7
April 02, 2014
GIS-403-FACEPLATE RADIO FORM AND BEHAVIOR SPECIFICATION
GMK CONFIDENTIAL © COPYRIGHT 2010-2020 GENERAL MOTORS
87
Page 88

5. BROADCAST SOURCES
FACEPLATE NGF RADIO
Figure 5.23.12
Media indexing memory full Use
folder view or remove other devices
OK
5.23.3 Media Indexing Limit Reached
The pop-up shown in figure 5.23.12 is required when
the user attempts to connect devices which cause the
indexing memory to be exceeded. For example, if two
devices are connected presently, and content from a
third device causes the index limit to be exceeded, this
pop-up will be displayed the next time Browse device
is selected from the menu provided the directory structure
has been processed and the content that could be
indexed is completed for the device.
This also applies when a single device with greater than
6,000 songs is connected.
This pop-up is shown a single time only. If a device is
removed and the memory limit is no longer exceeded,
the next unique occurrence of the indexing limit being
full will cause the pop-up to be displayed again.
RELEASE VER 1.7
April 02, 2014
GIS-403-FACEPLATE RADIO FORM AND BEHAVIOR SPECIFICATION
GMK CONFIDENTIAL © COPYRIGHT 2010-2020 GENERAL MOTORS
88
Page 89

5. BROADCAST SOURCES
FACEPLATE NGF RADIO
5.23.4 Other Media Indexing Use Cases
6,000 songs will be indexed in a first-in, first-out basis
across 2 USB ports and 1 SD port.
If less than the 6,000 song total exists across all 3 devices,
then the individual device id’s should be remembered
such that if the device is modified and reconnected,
it can be quickly re-indexed. If another device
is connected prior to re-connecting the old device, that
device’s memory info will be lost and will be considered
a new device next time it is connected.
However, if all 3 devices are not changed and reconnected
they should not be re-indexed.
If a fourth stick is connected and the indexing limit is not
full, then the device is indexed and added to memory.
If one of the original three devices is connected under
these circumstances, it should not have to be re-indexed.
For new devices connected that cause the indexing limit
to be reached, the entire folder view can still be used
for such a device. The system should attempt to partially
index the connected device by order of the file structure
of the device.
RELEASE VER 1.7
April 02, 2014
GIS-403-FACEPLATE RADIO FORM AND BEHAVIOR SPECIFICATION
GMK CONFIDENTIAL © COPYRIGHT 2010-2020 GENERAL MOTORS
89
Page 90

5. BROADCAST SOURCES
FACEPLATE NGF RADIO
Figure 5.24.1 - BT AVRC P 1.0 Now Playing View
Bluetooth Music
RELEASE VER 1.7
April 02, 2014
5.24 Bluetooth Devices
There are a number of Bluetooth devices in the field
that do not support all Bluetooth features possible
based on the level of AVRCP supported. Because of this
issue, this specification will breakdown three separate
use cases for Bluetooth audio streaming.
Use cases where there are two bluetooth audio players
connected to the system, the system will always play
the last used device. When a new device is paired to the
system, playback should continue from the last known
location the device was in prior to pairing to the vehicle.
There will be certain AVRCP 1.0 and 1.3 devices that
require the user to start playback from the device itself
when they are first sourced to the system. For all Bluetooth
audio players, if the user shuts the device
off, the system will stay in Bluetooth source mode
until the users connects another BT device or changes
applications or sources.
- BT AVRCP Ver 1.0 : Now Playing view is displayed as “Bluetooth Music”
- BT AVRCP Ver 1.0 Over : Now playing View is displayed
ID3tag – Artist name and song name Only.
5.24.1 Use Case 1 - No Metadata Support
AVRCP 1.0 Bluetooth devices do not support metadata.
Not all devices in this scenario will be able to support all
possible transport controls. A fully supported device will
allow for previous and next track functionality via the
faceplate controls.
In the event the user presses on a non active transport
button on the faceplate, the system will be unable to respond
to the user input and the system will display the
pop-up message, “Action not supported by this device”.
Media indexing will not be possible in this scenario.
Users must also pick up the device itself to search audio
content in this case.
GIS-403-FACEPLATE RADIO FORM AND BEHAVIOR SPECIFICATION
GMK CONFIDENTIAL © COPYRIGHT 2010-2020 GENERAL MOTORS
90
Page 91

5. BROADCAST SOURCES
FACEPLATE NGF RADIO
Figure 5.24.2 - BT AVRC P 1.3 Now Playing View
Artist Name
Song Name
5.24.2 Use Case 2 - Metadata Support for Current
Bluetooth AVRCP 1.3 Bluetooth devices support metadata
for the current track selection only. Media indexing
will not be possible in this scenario. Not all devices in
this scenario will be able to support all possible transport
controls or the elapsed time. A fully supported
device will enable previous track, next track, and shuffle.
In the event the user taps on a non active transport button,
the system will display the pop-up message, “Action
not supported by this device”.
5.24.3 Use Case 3 - Metadata and Transport Control
Support AVRCP 1.4 Bluetooth devices will support metadata
and transport control availability. Media indexing is
supported under these Bluetooth protocols.
The above use cases should be determined by what the
Bluetooth manager reports to the connectivity module
such as transport controls available.
5.24.4 Bluetooth Use Case 4
Certain 1.4 devices can be further defined as database
unaware and database aware devices and the system
handling of these devices is discussed in this section.
5.24.5 Database Unaware Players
For 1.4 devices that are database unaware players, the
system will treat these exactly as use case 2/AVRCP 1.3
players.
RELEASE VER 1.7
April 02, 2014
GIS-403-FACEPLATE RADIO FORM AND BEHAVIOR SPECIFICATION
GMK CONFIDENTIAL © COPYRIGHT 2010-2020 GENERAL MOTORS
91
Page 92

5. BROADCAST SOURCES
FACEPLATE NGF RADIO
Figure 5.24.3 - Action not supported by device pop-up
Action not supported by device
OK
5.24.6 Database Aware Players
For 1.4 devices that are database aware players, the
system supports the browsing feature of these devices.
The browsing capability of these devices is exactly like a
MP3 CD. The system will not index these devices, but users
will be able to navigate the content via the device’s
directory structure.
5.24.7 Transport Control Handling For under AVRCP 1.4
Under AVRCP 1.4 devices are not able to control the <Menu>knob
as showing the playlist .
In case of above,
the system will display the “Action not supported by
this device” pop-up.
RELEASE VER 1.7
April 02, 2014
GIS-403-FACEPLATE RADIO FORM AND BEHAVIOR SPECIFICATION
GMK CONFIDENTIAL © COPYRIGHT 2010-2020 GENERAL MOTORS
92
Page 93

6. PHONE
FACEPLATE NGF RADIO
Figure 6.2.1 - Phone Home View
Frank T. User’s iPhone
Recent Calls
Contacts
6.1 Phone Home Screen
The phone application has a “home” screen where users
access the different Bluetooth phone functions. To
access the Phone Home screen users press the Phone
button on the faceplate. When viewing the Phone
Home Screen, the user can select the various functions
of the phone screen by scrolling and selecting with the
rotary knob.
6.2 Faceplate Controls
When a call is not active, pressing the Phone button on
the faceplate displays the Phone Home Screen. If the
Phone Home view is already displayed, pressing Phone
button on the faceplate does not change the display.
When a call is active and any other screen than the Active
Call screen is displayed, pressing the Phone button
on the faceplate displays the Active Call screen.
When the Active Call view is shown, pressing the Phone
button on the faceplate displays the Phone Home
Screen. The user can press the back button or the Phone
button to return to the active call screen from the Phone
Home view.
When there is an incoming call, user can answer the
phone by pressing the Phone button on the faceplate.
The Active Call view is then displayed.
RELEASE VER 1.7
April 02, 2014
GIS-403-FACEPLATE RADIO FORM AND BEHAVIOR SPECIFICATION
GMK CONFIDENTIAL © COPYRIGHT 2010-2020 GENERAL MOTORS
93
Page 94

6. PHONE
FACEPLATE NGF RADIO
Figure 6.2.2 - Phone Home View
Frank T. User’s iPhone
Recent Calls
Contacts
6.2.1 Phone Functions List
The Phone Home Screen displays all available phone
functions shown in the following list.
• Recent Calls
• Contacts
• Keypad
• Bluetooth Devices
The list is dynamic depending on the capabilities of the
connected phone. For example, if contacts list is not supported
or available, it is removed from the function list.
6.2.2 Phone Status Information
The Phone Home screen has a title bar at the top that
displays phone status information. The status information
includes:
• device friendly name of the outgoing source (Unknown
if device friendly name from device is blank),
• battery strength of the outgoing source - the icon
will have six different states ranging from level 0 for
minimum battery charge to level 5 for maximum battery
charge,
• signal strength of the outgoing source - the icon will
have six different states ranging from level 0 for no
reception to level 5 for maximum reception.,
• roaming status of the outgoing source, and
RELEASE VER 1.7
April 02, 2014
GIS-403-FACEPLATE RADIO FORM AND BEHAVIOR SPECIFICATION
GMK CONFIDENTIAL © COPYRIGHT 2010-2020 GENERAL MOTORS
94
Page 95

6. PHONE
FACEPLATE NGF RADIO
Figure 6.2.3 - Phone view with no phones connected
No Phone Connected
Bluetooth Devices
Figure 6.2.4 - Phone view with no phones paired
No Devices Paired
Pair
When no phone source is connected, the status region
displays “No Phone Connected” in place of outgoing
source name and no phone status icons. When a Bluetooth
phone device is not connected, no icon is shown.
A single list item called Bluetooth Devices is shown in
this scenario. This allows users to access the paired
phones list.
6.2.3 No Bluetooth Phone Device Paired
When a Bluetooth phone has not been paired to the
vehicle and the user accesses the Phone Home page, the
Bluetooth source view is shown with No Devices Paired
shown. The user may to a new Bluetooth device.
RELEASE VER 1.7
April 02, 2014
GIS-403-FACEPLATE RADIO FORM AND BEHAVIOR SPECIFICATION
GMK CONFIDENTIAL © COPYRIGHT 2010-2020 GENERAL MOTORS
95
Page 96

6. PHONE
FACEPLATE NGF RADIO
Figure 6.3.1 - Figure Removed
Figure 6.3.2 - Figure Removed
Figure 6.3.3 - phone icons legend - reference only
6.3 Recent Calls
The user may select Recent Calls from the phone function
list for the Recent Calls list to be displayed. When
phonebook is not available from the current Bluetooth
device, recent calls list is not available so the Recent
Calls button is not available in the phone function list.
6.3.1 Recent Calls View
When users select “Recent Calls” from the Phone Home
Screen, the Recent Calls list is a submenu displayed in
order of Missed, Received, and Sent calls as shown in
section 6.3.4
Once an option is selected, each call listed contains the
following informational elements:
• the first name and last name of the caller, if available
from the Contact List, else the phone number for the
incoming or outgoing call:
• an icon indicating which phone the call was made to or
received from (if available from the Contact List). Subscripts
are used when more than 1 phone is associated
with that type of phone, where supported by the phone)
The date is shown for all calls. The date is
provided by the Bluetooth device and in the same
format as the Bluetooth device. When the date is not
provided by the Bluetooth device, the date is not shown
for each call.
RELEASE VER 1.7
April 02, 2014
GIS-403-FACEPLATE RADIO FORM AND BEHAVIOR SPECIFICATION
GMK CONFIDENTIAL © COPYRIGHT 2010-2020 GENERAL MOTORS
96
Page 97

6. PHONE
FACEPLATE NGF RADIO
Figure 6.3.4
Received Calls
Mom
866-297-1212
Figure 6.3.5
Mom
866-297-1212
Cathy Thomason
Figure 6.3.6
Calling
Cathy Thomason
End Mute Handset Keypad
Figure 6.3.7
The recent call is an unavailable
phone number that cannot be dialed.
OK
If the phone number is unknown (i.e. restricted, unknown,
unavailable), the word Unavailable is shown.
6.3.2 Initiating Call from Recent Calls
The user rotates the knob on the faceplate to highlight
the desired call. The user presses the knob to begin
calling that number. While making the connection, the
system displays the Active Call screen with “Calling”
indication until the call is connected then the active call
view is shown. The initiation of the call to the current
outgoing sourced Bluetooth phone will be delayed 3 seconds
(calibratible) time to give the user a chance to end
the call in the case it was inadvertently initiated.
When the call is ended, the recent calls view is shown
and is updated with this outgoing call at the top of the
list. The recent calls list will be dynamically updated with
any calls that are incoming, outgoing, or missed. For
example, if the user is in a call and ignores a call waiting
alert, this list is updated with the missed call.
6.3.3 Unavailable Number from Recent Calls
An unavailable recent call can not be called since the
phone number is unknown. If the user attempts to call
from an unavailable number, a message is displayed.
Extension > Unavailable Number from Phone
On the contacts,
If contacts dose not have any phone number, name and etc.,
it should not be displayed.
RELEASE VER 1.7
April 02, 2014
GIS-403-FACEPLATE RADIO FORM AND BEHAVIOR SPECIFICATION
GMK CONFIDENTIAL © COPYRIGHT 2010-2020 GENERAL MOTORS
97
Page 98

6. PHONE
FACEPLATE NGF RADIO
Figure 6.3.8
Recent Calls
Missed
Received
Figure 6.3.9
Missed Calls
866-297-1212
Cathy Thomason
6.3.4 Recent Calls Combined List Not Available from
Source
A Bluetooth device may not provide a combined recent
calls list. In this case, the recent calls list displays an intermediate
menu containing missed calls, received calls,
and sent calls.
The header title states the type of recent call list
(missed, received, sent) once selected.
6.3.5 Missed Icon Not Required in Missed Calls List
If the missed calls option is selected from the recent
calls list, the missed call icon is not required in this list
view.
RELEASE VER 1.7
April 02, 2014
GIS-403-FACEPLATE RADIO FORM AND BEHAVIOR SPECIFICATION
GMK CONFIDENTIAL © COPYRIGHT 2010-2020 GENERAL MOTORS
98
Page 99

6. PHONE
FACEPLATE NGF RADIO
Figure 6.4.1
Contacts
Anna
Billy Jean
Figure 6.4.2
Billy Jean
Cathy Thomason
Cameron Worf
Figure 6.4.3
Calling
Cathy Thomason
End Mute Handset Keypad
6.4 Contacts
6.4.1 Contacts List View
When users select “Contacts” from the Phone Home
Screen, the Contacts list for the connected phone is
displayed. The contact list shown reflects the contact
information in the current outgoing phone source sorted
the same as in the Bluetooth device if known, otherwise,
in alphabetical order by first name. Typically, the
contact or POI name is shown in the list but if a name
has not been entered, it will be the first data entered for
the contact.
If there are no contacts for that contact source or
phonebook is not available from the current Bluetooth
device, the blank list with “No Content Available” text
shown in the first position of the list under the header
as defined in the Lists section.
6.4.2 Initiate Call from Contact List
The user rotates the knob on the faceplate to highlight
the desired contact. The user presses and holds the
knob to begin calling that contact. If that contact has
more than one number stored, the preferred number is
called. If that contact does not have a preferred number,
the first phone number populated is called.
While making the connection, the system displays the
“Calling” Active Call screen. The initiation of the call to
the current outgoing sourced Bluetooth phone will be
delayed 3 seconds (calibrate-able) time to give the user
a chance to end the call in the case it was inadvertently
initiated.
RELEASE VER 1.7
April 02, 2014
GIS-403-FACEPLATE RADIO FORM AND BEHAVIOR SPECIFICATION
GMK CONFIDENTIAL © COPYRIGHT 2010-2020 GENERAL MOTORS
99
Page 100

6. PHONE
FACEPLATE NGF RADIO
Figure 6.4.4
Billy Jean
Cathy Thomason
Cameron Worf
Figure 6.4.5
Cathy Thomason
XXX-XXX-XXXX
XXX-XXX-XXXX
Figure 6.4.6
Calling
Cathy Thomason
End Mute Handset Keypad
Figure 6.4.7
Downloading contact list…
6.4.3 View Contact Details from Contact List
The user rotates the knob on the faceplate to highlight
the desired contact. The user presses the knob (short
press) to view the details for that contact. The Contact
Details view is shown.
6.4.4 Contacts Detail
The user may select a contact from the contacts list view
for the contact details to be displayed.
The contact details display the v-card data for that contact.
The name is shown in the title . The phone numbers
are listed in the following order:
1. Preferred (maximum of one)
2. Mobile (maximum of two)
3. Home (maximum of two)
4. Work (maximum of two)
5. Other (maximum of two)
Each line may be truncated based upon the region size
and font size. The user may return to the contacts list by
pressing the Back button on the faceplate.
6.4.5 Initiate Call from Contact Details
The user rotates the knob on the faceplate to highlight
the desired phone number to call. The user presses the
knob to initiate the call. While making the connection,
the system displays the “Calling” Active Call screen.
6.4.6 Intermediate Contacts Download in Process
In edge cases where the contacts list is not immediately
available from the device, an intermediate screen may
be displayed informing the user that the contact list is
being generated. See figure 6.4.7 for details.
RELEASE VER 1.7
April 02, 2014
GIS-403-FACEPLATE RADIO FORM AND BEHAVIOR SPECIFICATION
GMK CONFIDENTIAL © COPYRIGHT 2010-2020 GENERAL MOTORS
100
 Loading...