

Page 1

Humax Freeview Play HD Recorder
Model: FVP-5000T
Product
Manual
Page 2

Welcome to your
Humax FVP-5000T
Freeview Play HD Recorder.
This manual contains all the detailed information for
you to explore and enjoy all the great features of this
smart HD TV recorder.
If you require any help installing or setting up, feel free
to call us on 0344 318 8800 (Mon-Fri 9am-5pm).
Your default PIN is: 0000
Text too small? Our latest product manuals can also be found online at:
uk.humaxdigital.com/support
Page 3

Contents
GETTING STARTED
Product Overview
Connections
Remote Control
Navigation
WATCHING TV
Live TV
Watching and recording live TV
Programme info & mini guide
Display options
On-screen icons
TV Guide
Browsing the guide
Setting reminders/recordings
Catch up via TV Guide
Smart Search
Freeview Play Home
Players
Top Picks
On Demand
On Now
Next
Recordings
2
3
4
5
6
8
10
11
12
13
SETTINGS
General Settings
Parental control
On-screen display
Network Settings
Wi-Fi/Ethernet settings
Network sever and file share
PVR Settings
Recording options
Storage options
Channel Settings
Setting favourite channels
Automatic/manual search
Advanced Settings
System Settings
Software update
Power management
Factory resetting
On-screen Setup
ADDITIONAL INFORMATION
Specification
Glossary
Troubleshooting
20
21
22
23
24
25
26
28
29
30
Recordings
Accessing your recorded content
Watching your recorded content
Media
via Home Network
via USB/Hard Drive
Playback content
HUMAX Live TV App
14
15
18
Universal Remote Control
For your information
For your safety
Open Source License Agreement
34
36
38
40
Page 4
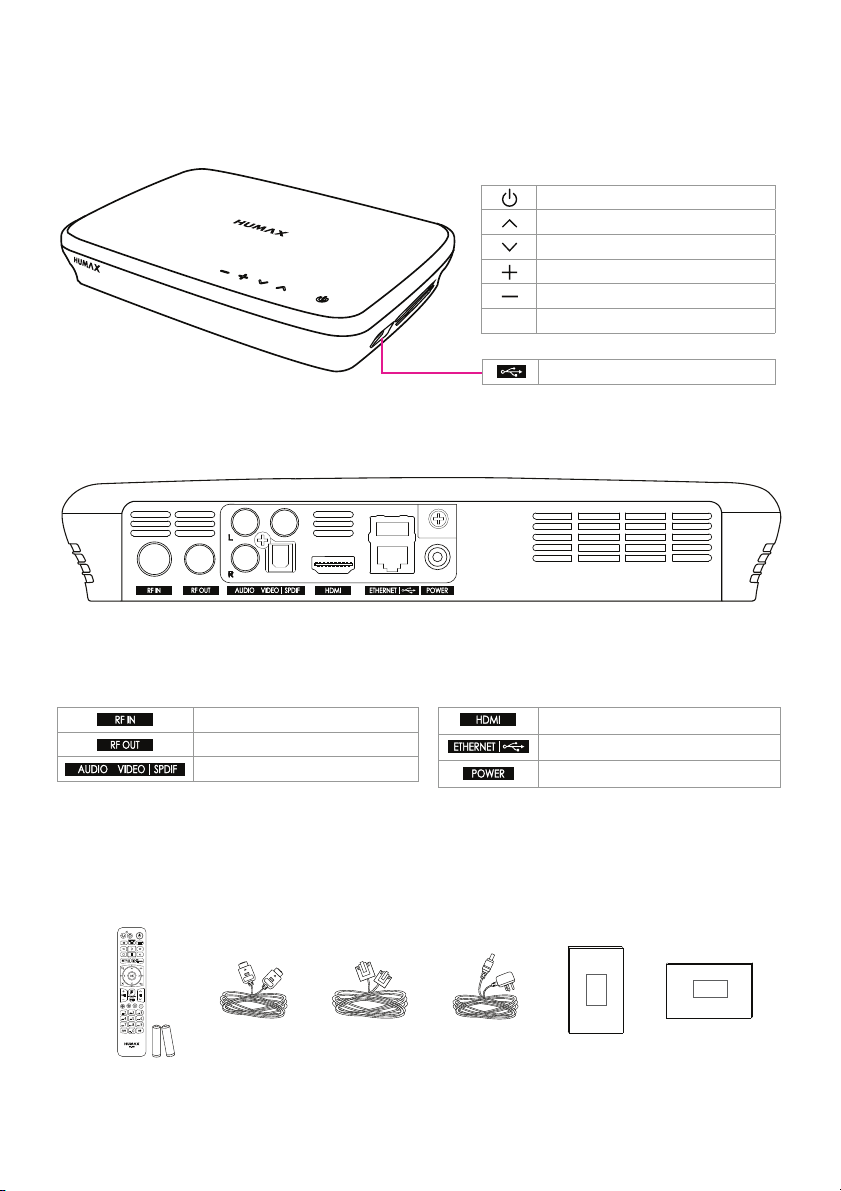
Product Overview
Front & Side
Back
Components
Power (Standby)
Channel up
Channel down
Volume up
Volume down
LED (Facing down on surface)
Side USB 2.0 port
Connection Ports
Aerial in port
Aerial out port (loop-through)
Audio Video | SPDIF port
What’s in the box
Remote Control
& Batteries
HDMI Cable Ethernet Cable AC Power
2
Adapter
HDMI audio/video port
Ethernet and USB 2.0 port
AC Power adapter port
Quick
Setup
Guide
Quick Setup
Guide
Product
Manual
Product
Manual
Page 5

Connections
Here’s what goes where for your new Freeview Play Recorder
Router
6
Aerial
RCA Cable
TV
HDMI
Ethernet
Connecting the aerial
This product is compatible with an aerial connection only.
Use the aerial connection that comes in to your house from
the main antenna. If you do not have one, you can try an
indoor aerial. (Satellite connections are not compatible.)
The cable from the aerial will plug in to the port at
the back of your box.
This recorder also supports loop-through functionality. If you
would like to receive a direct aerial signal back in to your
compatible TV, connect an aerial cable to the back of your
TV and the other end in to the RF OUT port at the back of
your box.
Connecting to the TV
Connecting to the internet
Ethernet Wired Connection (LAN)
Connect an Ethernet cable to your broadband router and
plug the other end in to the port at the back
of your box.
The internet should connect automatically, but if you have
trouble connecting you can find the on-screen settings later
by navigating to:
Freeview Play Home > SETTINGS > Network Settings
Wi-Fi Wireless Connection (WLAN)
Your product has a built-in wireless receiver.
You can configure these settings at any time by
navigating to:
Freeview Play Home > SETTINGS > Network Settings >
Configure WLAN
Using a HDMI cable
Use a HDMI cable to connect to the TV. This will provide up
to 1080p HD picture quality.
Plug one end in to your TV’s HDMI port and the other in to
the HDMI port at the back of your box.
Connecting the power
Use the AC adapter provided and plug in to a power socket.
Plug the other end in to the POWER port at the back of your
box.
Using a RCA cable
For the best picture quality, we recommend using a HDMI
cable.
Alternatively use a RCA cable to connect one end to your
TV and the other in to the port on the
back of your box.
HDMI CEC
HDMI CEC (Consumer Electronics Control) lets you to
control the TV and HDMI CEC supported devices through
the HDMI input. If your TV supports this feature, it will turn
on/off automatically when the recorder is powered on/off.
Tips:
• Make sure all the cables are secure before you power on.
• See the system settings section for on-screen setup instructions.
• Set Power Saving Mode to OFF when using the aerial loop-through function (RF OUT).
Connecting your TV directly to the audio/video output of the product will assure a more vivid picture and enhance your
•
viewing enjoyment.
3
Page 6
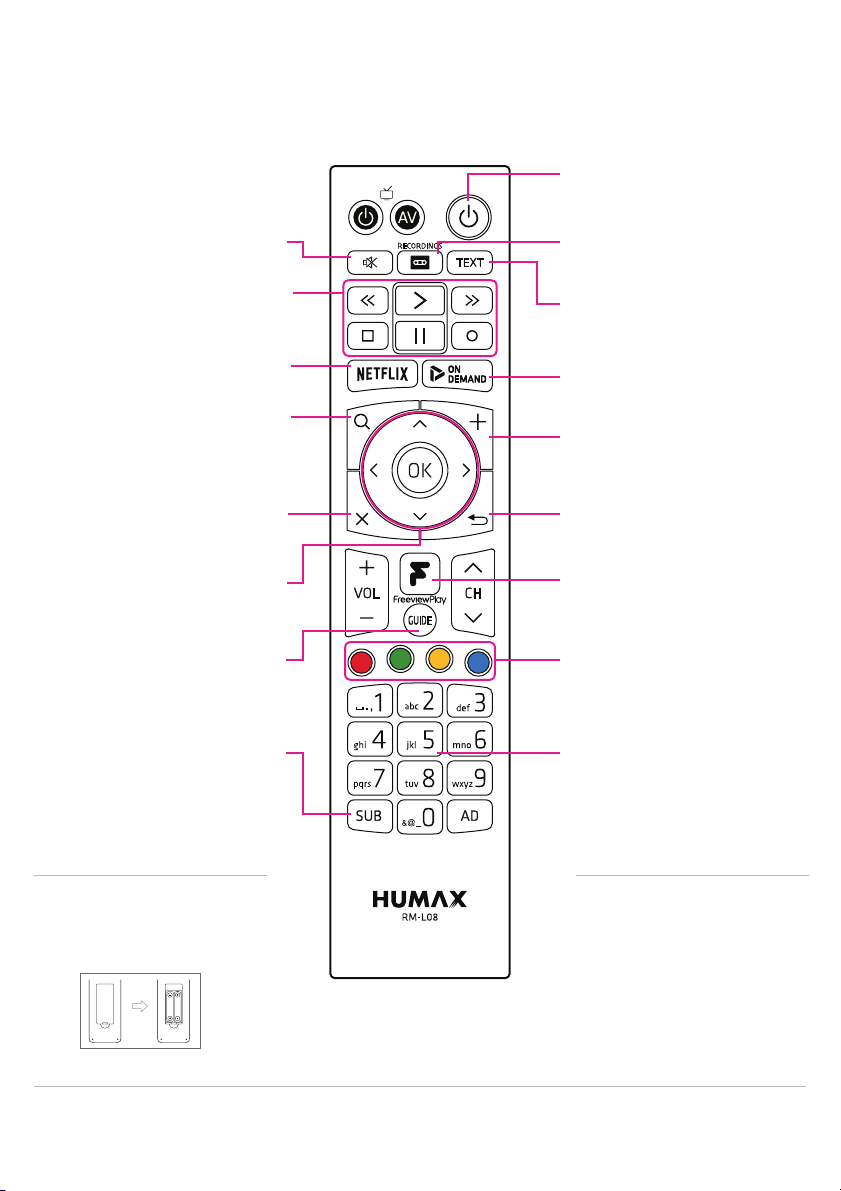
Remote Control
Breakdown of which buttons do what on your remote
Standby
Switch your recorder on/off
Mute
Mutes audio
Playback Controls
Rewind, Forward, Stop,
Record, Pause and Play
3JYʥN]
Access Netflix
Search
Search across Live TV,
Recordings, Catch up
& On Demand
Exit
Exit all windows
Navigation
Up, Down, Left,
Right and OK
Guide
Displays the
Live TV Guide
Subtitles
Switch subtitles on/off
for certain programmes
Recordings - Access your
recordings
Te x t
Access the digital text
services
On Demand
Access recommended on
demand content
Plus
Find additional
on-screen controls
Back
Go back a step
Freeview Play Home
Access all functions from
this Home Page
Colour buttons
Interactive buttons for
certain apps and features
Numeric Keypad
Numeric (0-9) keys that also
allow you to input letters
and symbols
Inserting Batteries
Insert the batteries matching the
plus(+) and minus(-) at each end.
i
Tips:
• If the remote controls batteries are running low, the STANDBY and TV STANDBY buttons will blink twice every time you
press the Freeview Play home button.
4
Universal Remote Control
Your remote control is compatible
with many popular TV’s. To control
your TV universally using this
remote control, see pages 34-35.
Page 7
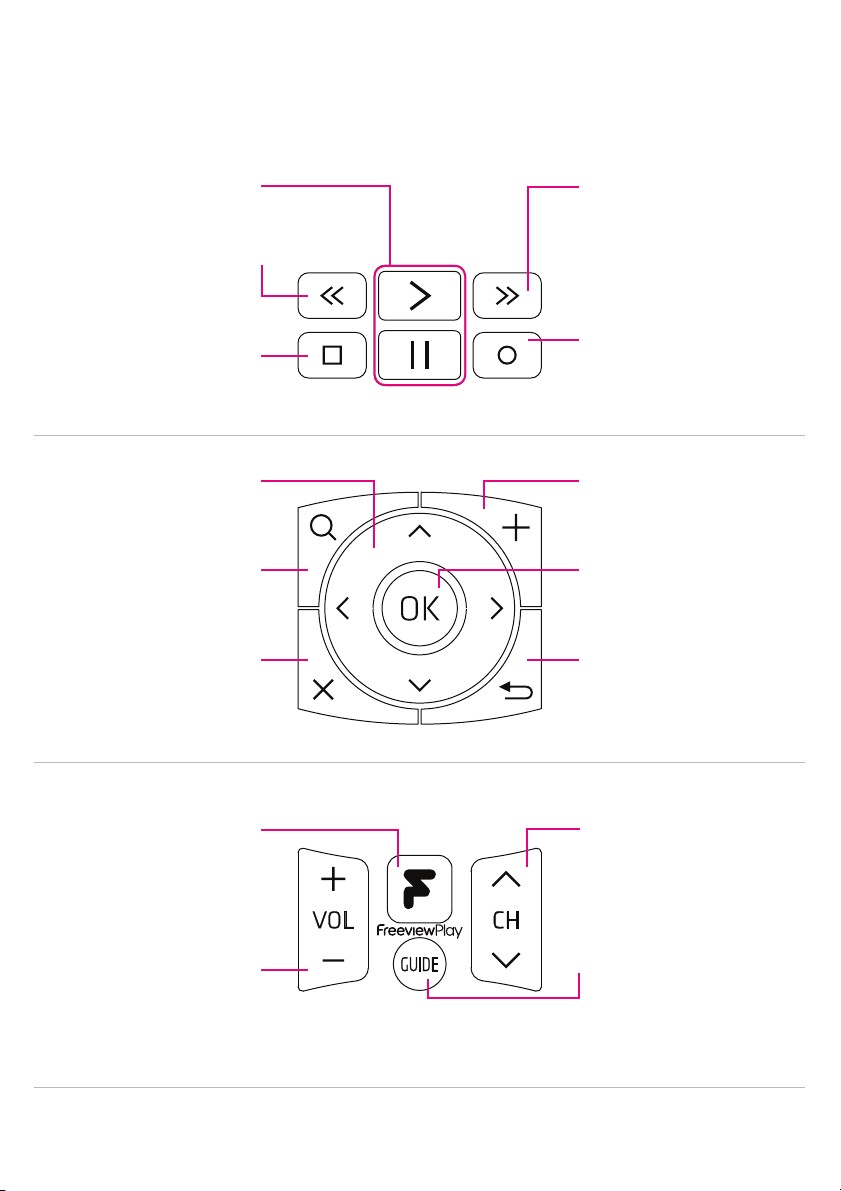
Navigation
Get to know these buttons on your remote, they’ll come in handy
• Controls the play and pause
PLAY/PAUSE
of live TV and recordings
REWIND
• Rewind recordings
• Jumps backwards 2 hours
in the TV Guide
STOP
• Stop playing
NAVIGATION KEYS
• Left, Right, Up, Down
SMART SEARCH
• Press to bring up
Smart Search screen
EXIT
• Jumps back to live TV
from any screen
FORWARD
• Forwards recordings
• Skips ahead 2 hours
in the TV guide.
RECORD
• Set a quick recording
• Schedule recordings
in the TV Guide
PLUS
• Brings up additional
on-screen options.
OK
• Press OK to make or
confirm selections
BACK
• Jumps back one
step or page
Freeview Play Home
• Brings you back to
the Home screen
VOLUME
• Control the volume
of your recorder
Tips:
• If you have a HDMI CEC enabled TV, you can control the volume of your TV universally at the same time. See page 34.
5
CHANNEL
• Changes channels
from live TV
• Skips by page in
the TV guide
GUIDE
• Brings up the TV
guide with one press
Page 8
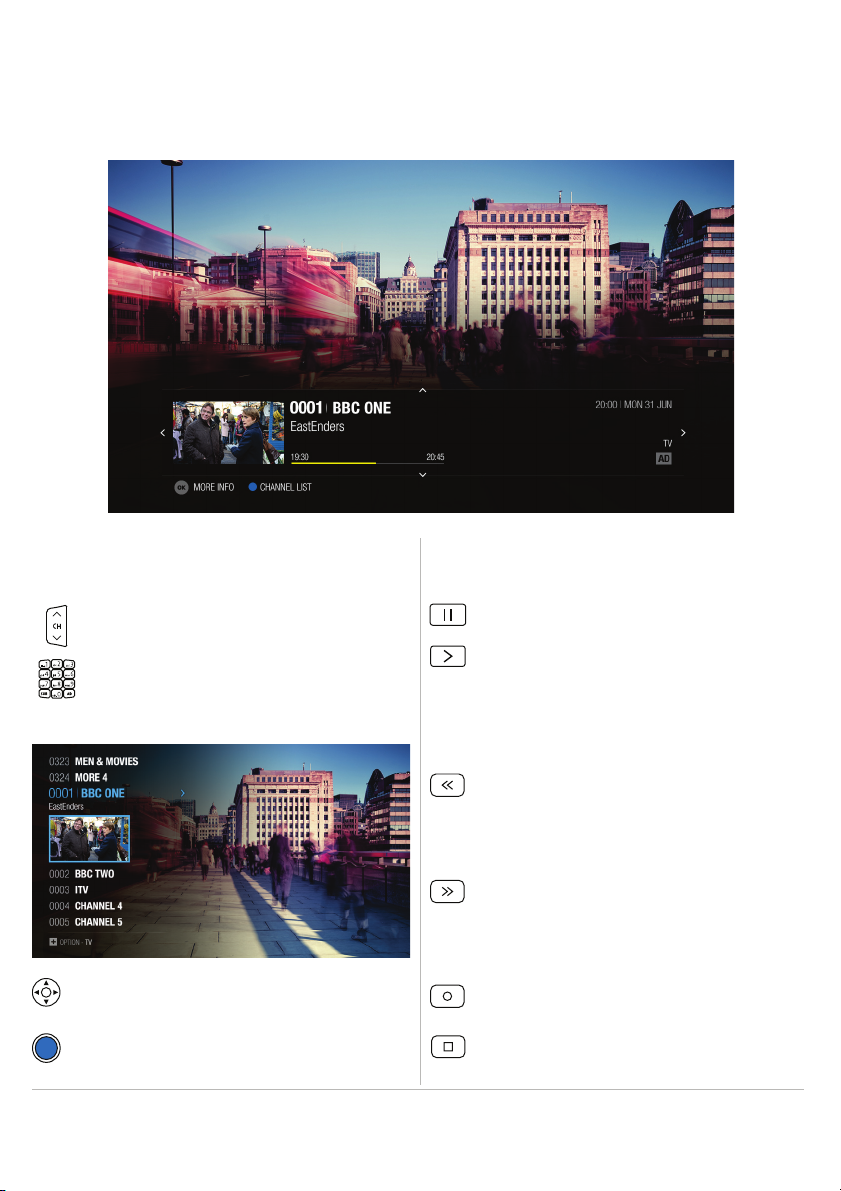
Live TV
Watch programmes live and find out more about them
Watching live TV
You can enjoy plenty of live TV channels in real time.
Use the channel buttons to flick through individual
channels.
Directly input channel numbers with the numerical
pad.
Pause, rewind and record live TV
Pausing live TV
Press the PAUSE button to pause live TV.
Press the PLAY button to continue watching from
where you paused live TV.
Pressing the Pause button starts a time gap
between live TV and the point you pressed pause.
Bringing up the Channel List
Rewinding live TV to watch missed scenes
Press the REWIND button to start rewinding back to
where you paused live TV. Press the Play button at
the point you want to start watching.
Forwarding live TV to skip scenes
Press the FORWARD button when there is a time
gap between the current watching point and the live
broadcast point.
Instantly recording live TV
Pressing the arrow keys will bring up the channel list.
You can also press the BLUE button within the
mini-guide to access this screen.
Tips:
• You can rewind live TV by up to x64 normal speed.
• Your recorder will start to temporarily store live TV footage 10 seconds after switching to that channel.
6
Whilst watching, press the RECORD button to record
to the end of the programme.
Press STOP if you want to manually end the recording.
Page 9
Time Shifted Recording (TSR)
Your Freeview Play Recorder supports time shifted recording (TSR) that allows you to pause a live programme and return to
it later where you left off. The TSR function temporarily records the programme you are watching on the hard drive for up to 2
hours.
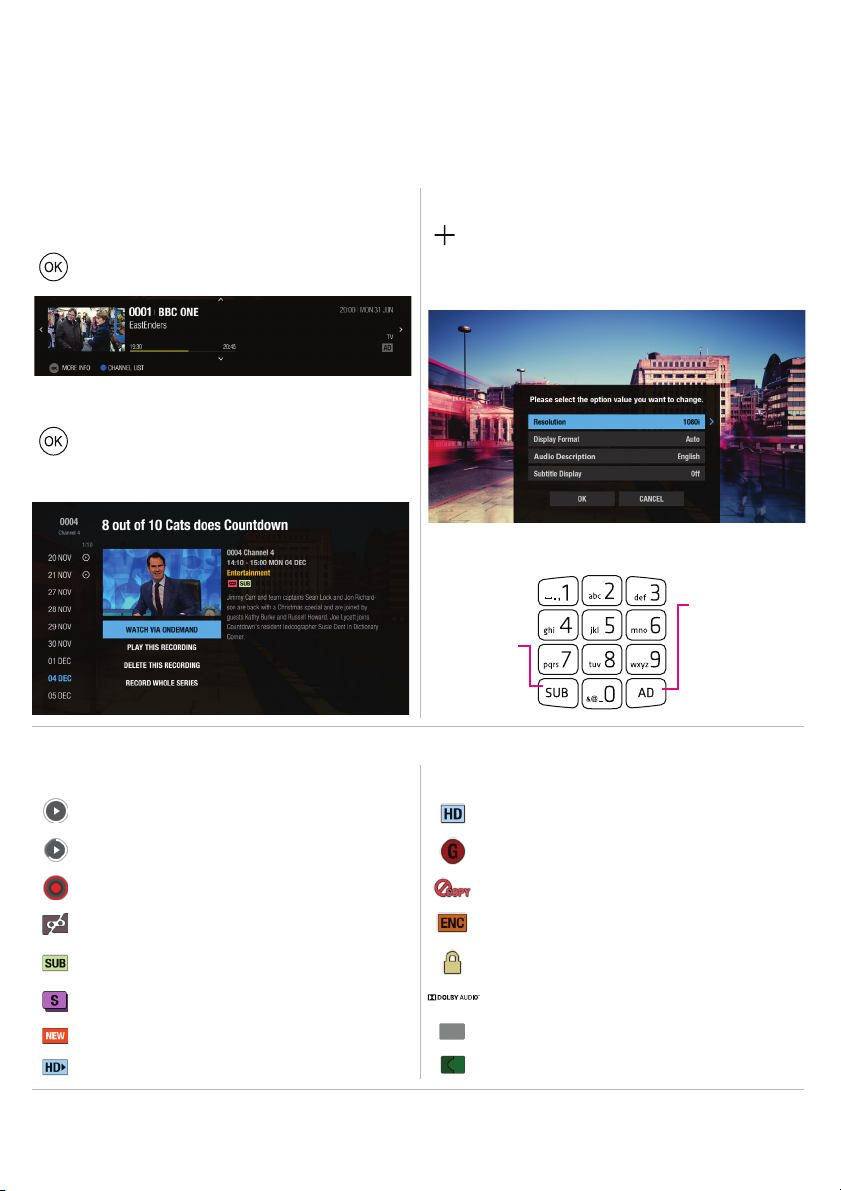
Programme information
Mini-guide (simple guide)
Pressing OK on live TV will bring up programme
information of what’s currently on.
Additional programme information
Press OK again to bring up additional programme
information. From here record this programme,
record whole series and set reminders.
On-screen icons
Recording icons
Display options
You can access the display options by pressing the
PLUS button.
Change the resolution, display subtitles and enable
audio descriptions.
Accessibility keys on your remote
AUDIO
DESCRIPTION
SUBTITLES
Programme icons
Watching completed
Partly watched
Recording in progress
Failed recording
Programme with subtitles
Series recording
New recording available
Also available in HD
High Definition programme
Parental Guidance programme
G
Blocked by digital recording management
ENC
Encrypted programme
Locked programme
Dolby Audio
AD
Available with Audio Description
Split programme
Tips:
• Access smart search from live TV by pressing the search button on your remote control.
• The TSR function will reset each time you change channels.
7
Page 10
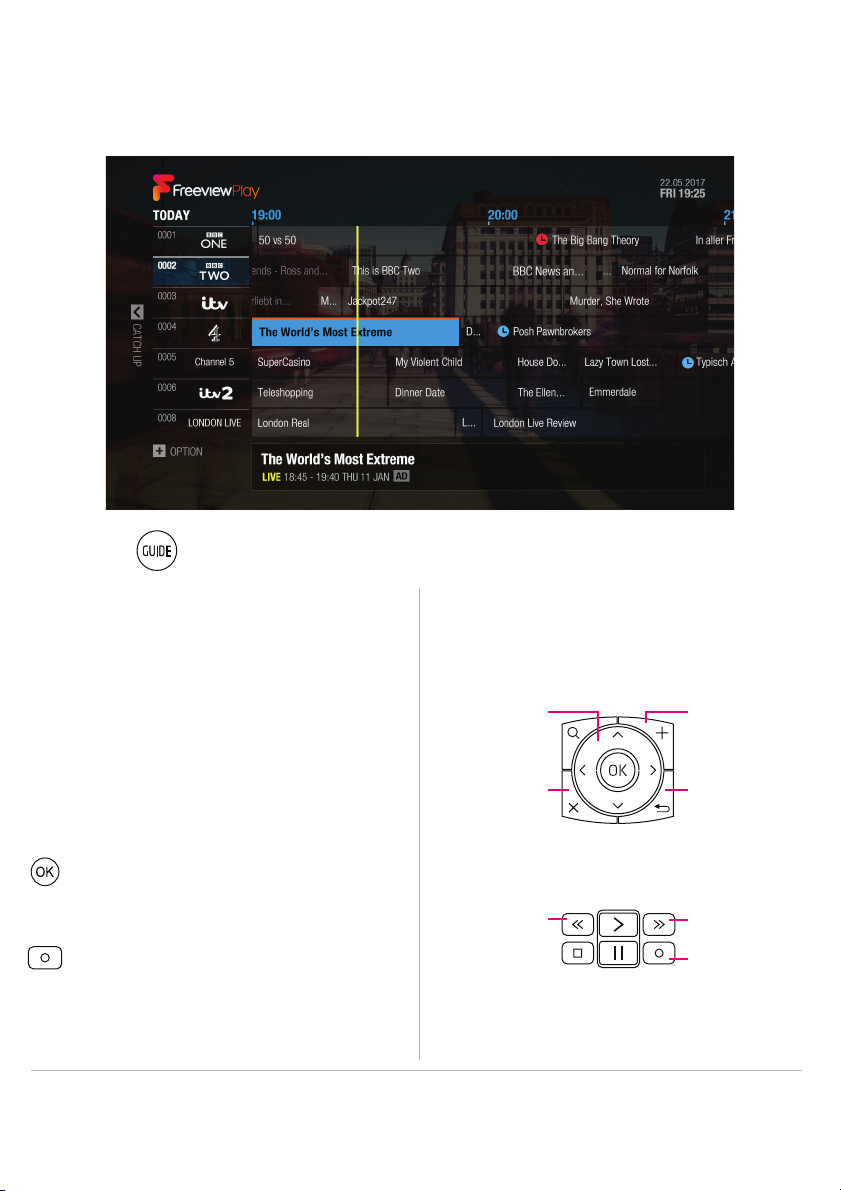
TV Guide
Browse up to 8 days in advance using the on-screen TV Guide
Use the button on your remote to access this screen.
Making a selection
Select a programme and press the OK button to start
watching it live or to bring up additional options. Alternatively,
you can enter the channel numbers to jump to that channel.
Changing programme genre
1. Press the PLUS button and select GENRE SEARCH.
2. Select the genre and press the OK button.
You can see the channels categorised for each genre.
Navigating the TV Guide:
Use the navigation keys to scroll listings one at a time.
Pressing the PLUS button will bring up further
on-screen options.
NAVIGATION
KEYS
EXIT
Setting quick reminders or recordings
Set a quick reminder
In the guide you can set a reminder by pressing OK
on a programme and selecting SET REMINDER.
Set a quick recording
Press the RECORD button on your remote when a
programme is highlighted in the guide.
Press OK for further options including series record.
Tips:
• Use change by group to quickly sort SD channels, HD channels and Radio channels.
Use the FORWARD and REWIND buttons to scroll the timeline back and forth by 2 hours.
8
PLUS
BACK
FORWARDREWIND
RECORD
Page 11
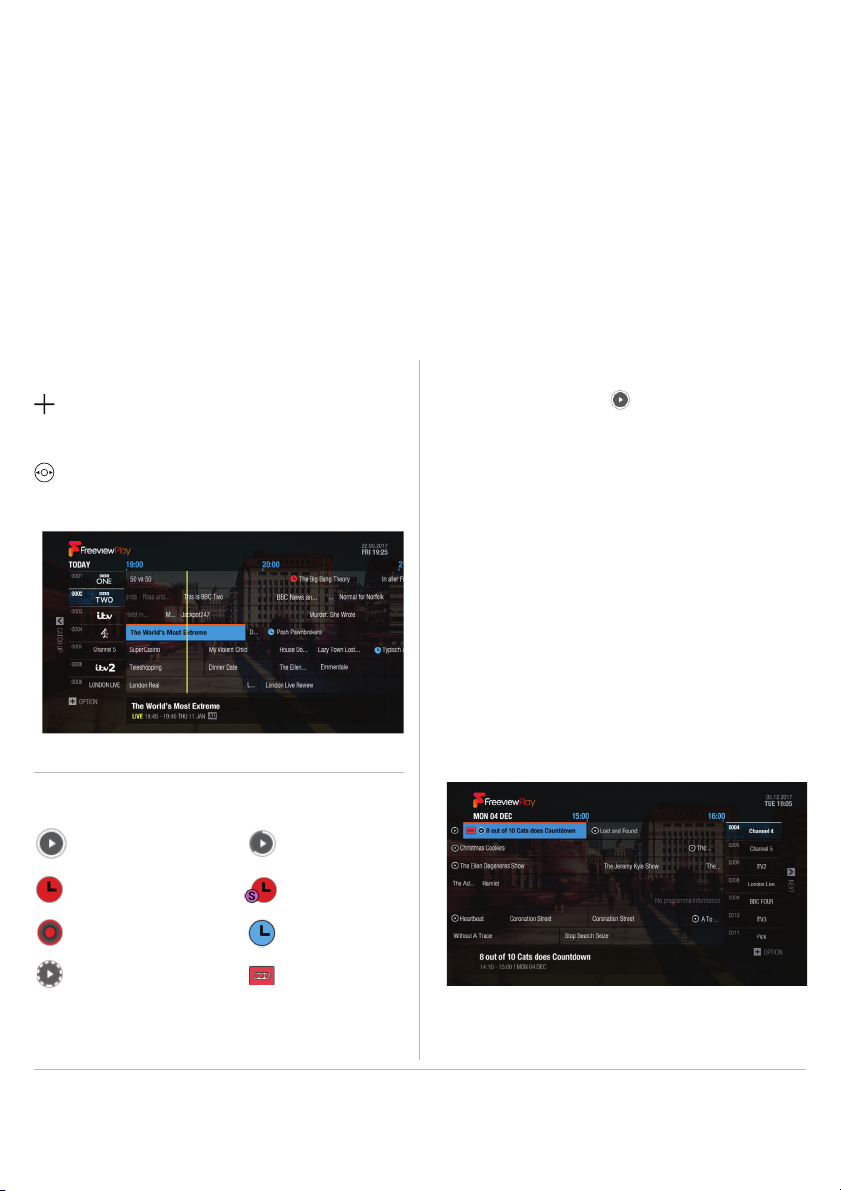
Setting reminders or recordings within the TV Guide
1. Select a programme and press the OK button.
2. Select an episode in the left column.
3. Select RECORD WHOLE SERIES, RECORD THIS PROGRAMME or SET REMINDER and press the OK button.
Note:
• If the programme conflicts with another programme, adjust the scheduling appropriately.
• If the channel is locked, you will be prompted to enter your password. The default password is 0000.
• If you have forgotten your password, please contact customer services.
Next or Previous Programmes
Viewing what’s on next via the TV Guide
Press the PLUS button and use JUMP TO DATE to
search for programmes up to 8 days in advance.
Alternatively, long press the navigation keys to move
to a previous or next day.
On-screen Icons:
Watching completed
Recording single episode
Recording in progress
Partly watched
Recording series set
Reminder set
Watching previous shows via catch up
You may have noticed the icon next to certain
programmes within the TV Guide.
This means you can watch that programme directly on
demand without waiting.
1. Press the LEFT navigation key to go back in the guide
to see past programmes available in Catch up.
2. Select a programme and press the OK button.
If the programme has been recorded or is available on
Catch up you can play it back.
Note:
Catch up programmes are accessible only when
connected to the internet and that programme is
available on catch up from the broadcaster.
Coming soon on demand
Tips:
• Alternatively, you can access this screen by navigating to TV Guide on the Freeview Play Home screen.
• Use the BACK button to exit programme selections.
In your recordings
9
Page 12
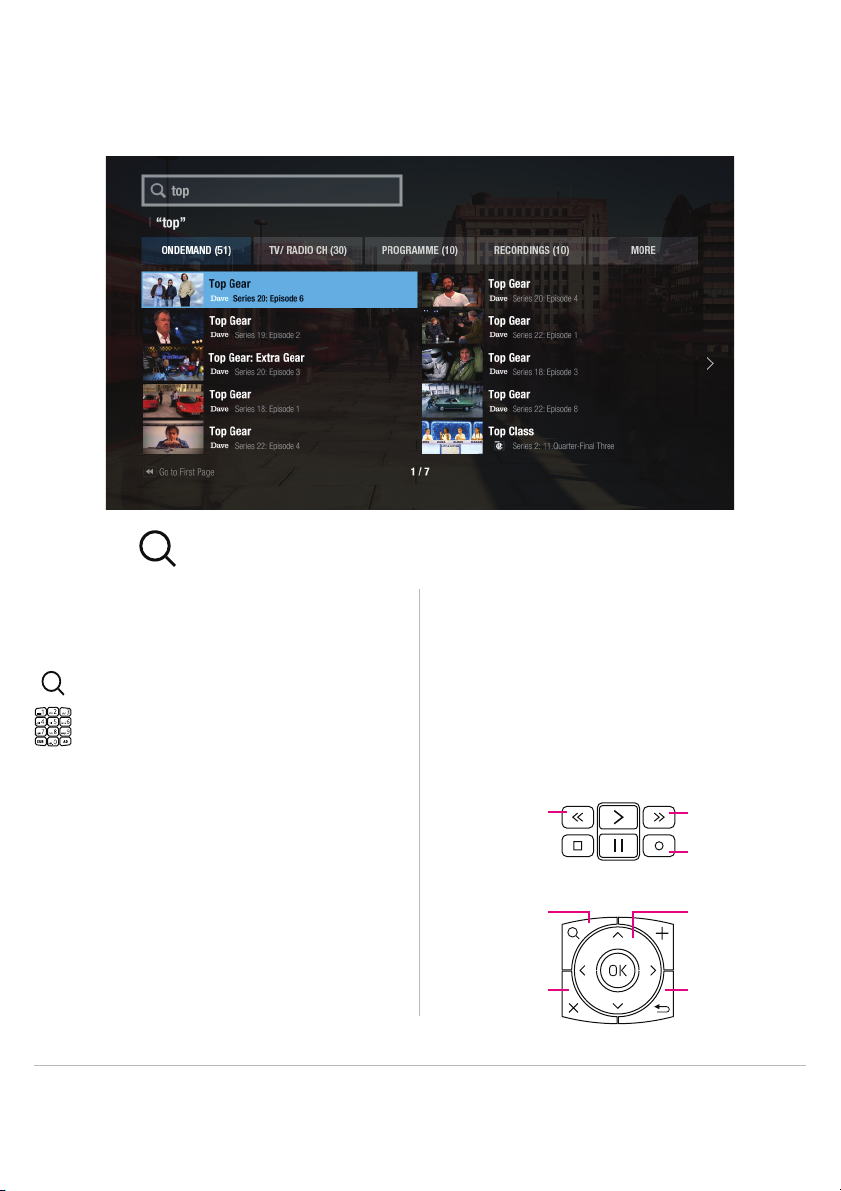
Smart Search
Find your favourite shows with our powerful search feature
Use the button on your remote to access this screen.
Searching via keyword
You can search for your favourites shows from Live TV,
Catch up, Recordings and On Demand.
Press the SEARCH button.
Start entering a keyword using the numerical pad or
select characters on-screen.
Suggested searches will appear on screen after you
start typing the first 3 characters.
Your recorder will categorize content by On Demand,
TV/Radio Channels, Programme, Recordings, Apps or
Network Server.
With the categorised content, you can search for your
favourites at a glance and watch it right on your TV.
Tips:
• Access smart search wherever you are by using the search button on your remote control.
• Enter at least three characters to start predictive searches.
Navigating the Smart Search screen:
Pressing the rewind button will go back to the first page
of results.
Use the navigation keys to select a programme.
Confirm selections by pressing OK.
Set recordings by pressing the record button in programme listings.
SEARCH NAVIGATION
EXIT
10
FORWARDREWIND
RECORD
KEYS
BACK
Page 13
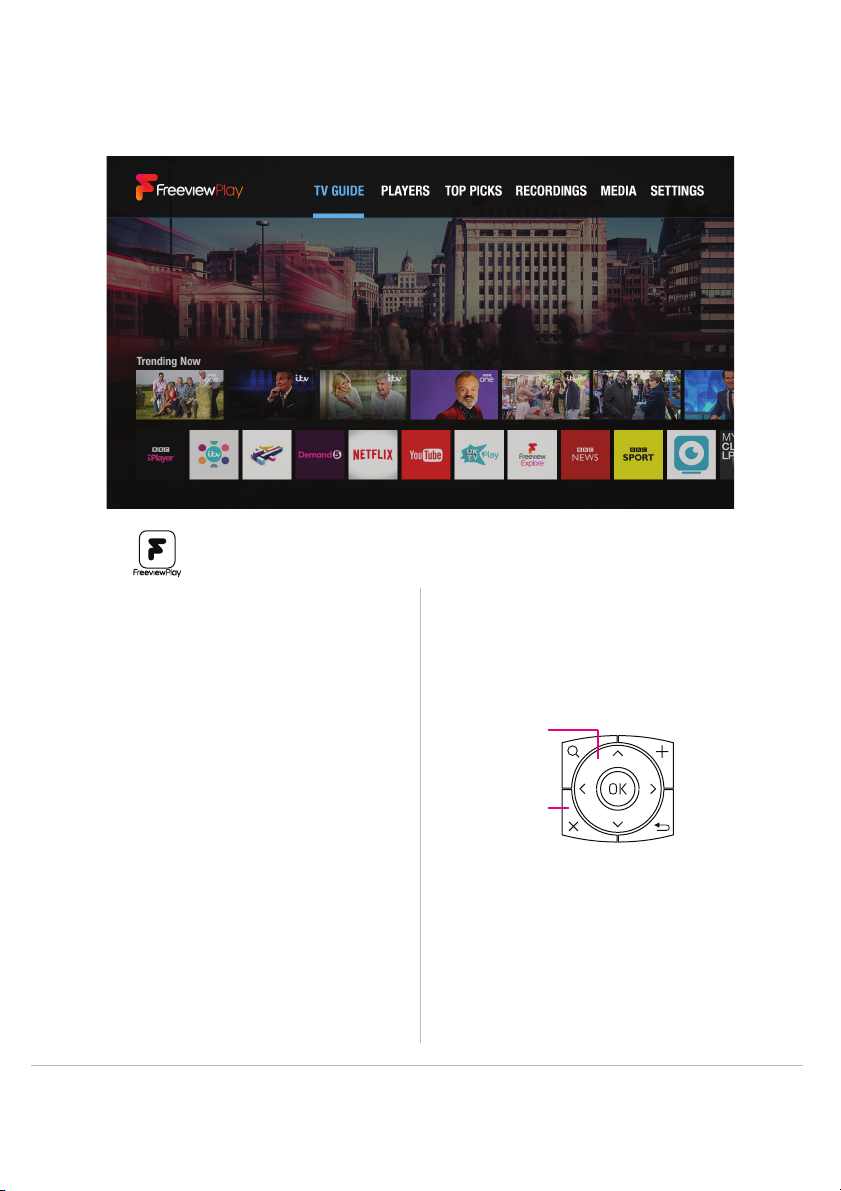
Freeview Play Home
The heart of your TV entertainment
Use the button on your remote to access this screen.
From the Freeview Play Home screen, access:
TV Guide
Browse through tons of TV channels, set reminders and
recordings all from one place.
Players
Access all on demand players from here.
Navigating Freeview Play Home:
Use the navigation keys to browse through the selections.
Press OK to confirm selections.
NAVIGATION
KEYS
Top Picks
View unmissable TV suggestions via Live TV, On Demand,
Catch up and Recordings.
EXIT
Recordings
Your Freeview Play recorder will store recorded content here.
Press EXIT to switch back to live TV.
Media
Playback your own custom media from video, music and
photos.
Settings
Access the settings of your Freeview Play recorder.
Tips:
• To get the most out of your product, make sure it is connected to the internet.
• Top Picks allows you to enjoy trending content that Freeview and Humax have recommended.
11
Page 14
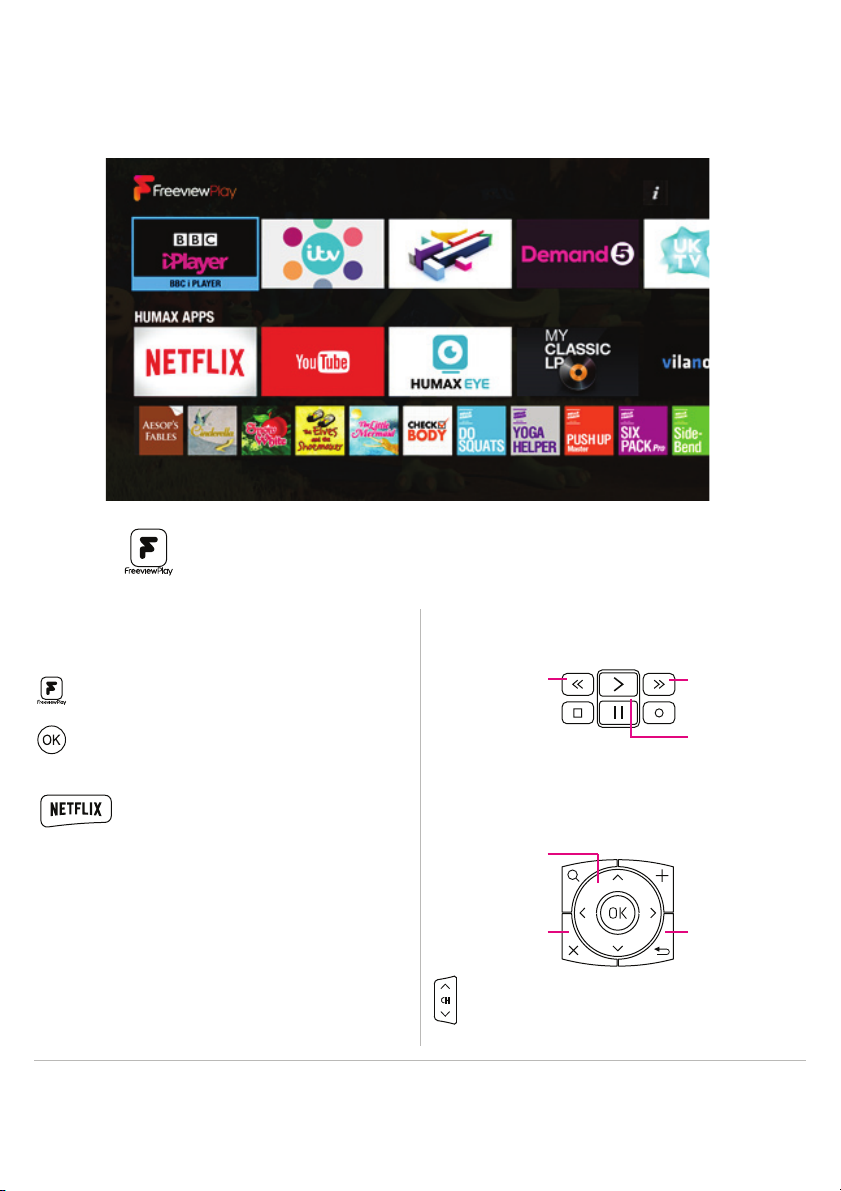
Players
Catch up and on demand all in one place
Use the button and navigate to PLAYERS to access this screen.
Navigating the Players section:Catch up apps and Players
It’s easier than ever to browse and watch the hottest
media content right on your TV.
Use the playback control buttons to control the content on
the selected player app.
Press the Freeview Play button to access Players.
Press OK to select a service and continue to follow
the on-screen setup instructions.
Use the navigation keys to scroll listings one at a time.
Use the Netflix hot-key located on your
remote to quickly access your favourite
Netflix shows.
(Netflix streaming membership required.)
Note:
• Apps may differ based on geographical location.
• TV APPS are subject to change without notice. HUMAX
is not responsible for the content or the discontinuity
of the services.
Tips:
• Remember to take full advantage of the Freeview Play and various HUMAX services offered by connecting your
recorder to the internet.
Confirm selections by pressing OK.
NAVIGATION
KEYS
EXIT
Use the channel buttons to jump by page.
12
FORWARDREWIND
PLAY/PAUSE
BACK
Page 15

Top Picks
Popular content based on suggestions and your viewing history
Use the button on your remote to access this screen.
You can also press the Freeview Play button and navigate to TOP PICKS.
Find On Demand, On Now, Next and Recordings under the Top Picks menu. Freeview and Humax recommend featured
content based on live viewing trends and categorise shows accordingly.
On Demand
View Freeview On Demand recommendations.
Recommended programmes are categorised by genre and
thus enables you to search content with ease.
Press OK on the selected programme to be taken to
the content provider’s on demand app.
Next
Not to be missed programmes coming on later in the day
across popular channels.
Press RECORD to set a quick recording.
Press OK on the selected programme to set a
reminder.
On Now
Easily see what’s on featured channels in real-time making
programme selection easier.
Press OK to watch the selected programme.
Press the PLUS button to replace channels.
Recordings
Saved recordings are categorised into two groups,
Recently Added and Continue Watching.
Press OK on the selected programme to start or
resume watching.
Tips:
• Top Picks helps select the most popular shows for you all in one place.
• Make sure you are connected to the internet to access all services.
13
Page 16

Recordings
Access all of your recordings from one place
Use the button on your remote to access this screen.
Playing recorded programmes
You can also press the Freeview Play button and
navigate to RECORDINGS.
From here you can watch the recordings stored on your
built-in hard disk drive. Recordings are categorised so that
it’s easier for you to find the programme you want.
Playing Recordings
1. Press the Freeview Play button and select RECORDINGS.
2. Select one from the recording category list and press the
OK button. The recorded programmes will be listed in
the right column.
3. Select a recording and press the OK button.
You can play back the programme, delete it or record
whole series if the programme is part of a series.
Recording on screen icons
Watching completed
Partly watched
Recording in progress
Tips:
• Recording Conflicts - When you attempt to schedule many programmes at the same time, the guide will suggest
alternative recording times to avoid clashes.
Failed recording
New recording available
Locked programme
Ways to record
Record via TV Guide
Press the GUIDE button a select a programme you
want to record. Press the RECORD button and a
prompt will ask to record once or the series.
Record via Live TV
Press the OK button whilst viewing live TV to bring
up the mini programme information and then press
RECORD. A prompt will ask you to record once or
the series.
Scheduling Recordings
You can schedule recordings or reminders manually.
1. Press the Freeview Play button, navigate to
or
RECORDINGS and then SCHEDULE.
2. Select ADD A SCHEDULE.
3. Set a schedule manually.
4. Select OK and press OK to confirm.
Editing Recordings or Schedules
Navigate to RECORDINGS and SCHEDULE then
press the PLUS button.
Select DELETE or RESCHEDULE.
Select OK and press OK to confirm.
14
Page 17
Media via Home Network
Set up and access your own content via your home network
Use the button and navigate to MEDIA to access this screen.
Playing files from Home Network
Devices
Your HUMAX product is a home network device capable of
sharing media files with other home network devices such
as the PC, NAS or another HUMAX PVR when they are
connected to the same home network.
You can play the video, music or photo files saved in your
home network devices on your product when the home
network device is connected to the same home network.
Connecting to Home Network
1. Press the Freeview Play button.
2. Navigate to SETTINGS and press OK.
3. Select Network Settings.
4. Set the options for the LAN or Wireless LAN.
Playing files from SAMBA server:
1. Select a SAMBA server.
2. Enter the ID and Password of the PC to access to the
shared folders.
3. Play the files from the SAMBA server on your TV.
• The list of supported home network media servers will
appear automatically.
• Home network media server software such as Window
Media Player 12 must be installed and executed on
the PC to share media files stored in the PC. The media
files must be stored in the library folder of the PC.
Playing content:
Use the playback control buttons to control your recorded
programmes.
Playing Files from Home Network Devices
1. Select a home network device.
2. Select VIDEO, MUSIC or PHOTO.
3. Select files you want to play.
Tips:
• Refer to the instructions of your operating system for setting up home network server.
15
STOP
FORWARDREWIND
PLAY/PAUSE
Page 18

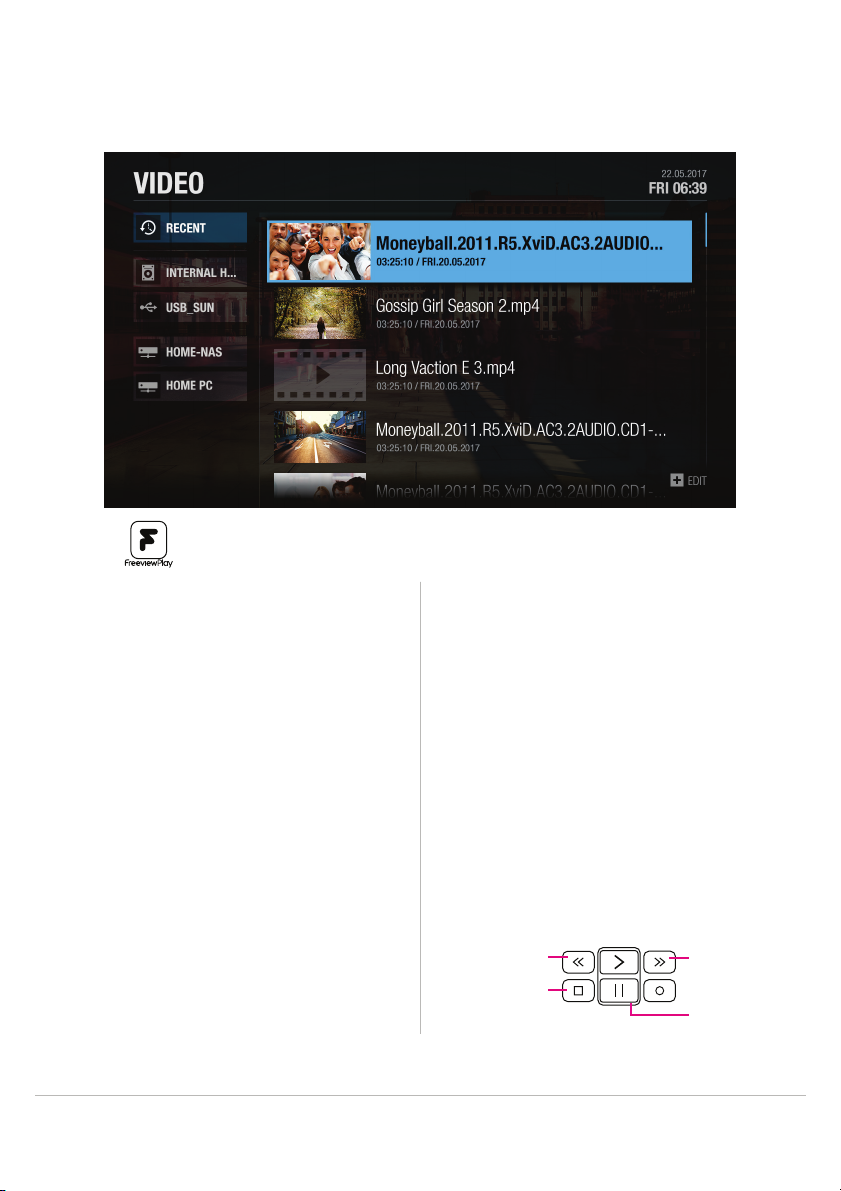
Media via USB/Hard Drive
Playback content via USB/Hard Drive
Use the button and navigate to MEDIA to access this screen.
Playing files from Storage Device
You can play files from the storage devices such as
internal or external HDD and USB storage devices.
1. Select a storage device.
2. Select VIDEO, MUSIC or PHOTO.
3. Select files you want to play.
Note:
• Use USB storage devices formatted by ext3, FAT or
NTFS only.
• Do not disconnect the USB storage device during
playback, the files or the USB storage device may be
damaged.
• It is recommended to use the USB storage devices
requiring external power supply.
• If the USB storage device is connected in standby
mode, it will automatically be recognized when the
product is turned on.
• HUMAX cannot guarantee compatibility with all USB
storage devices and assumes no responsibility for any
loss of data.
Tips:
• When you copy or move a file to an external storage device, the file is copied to its root folder.
• Files may not be copied or moved if the storage is full or the file size is too large.
Accessing your media:
1. Select VIDEO, PHOTO or MUSIC.
2. Select a storage or network server.
The recently played files appear.
Note:
• You cannot play the recently played files from the
external storage which is already disconnected.
• Some playback control buttons may not function
depending on the contents.
• HUMAX is not responsible for any data loss or file
damage.
Note: Certain files may not play depending on file formats
or video and audio codec.
Editing files
You can delete, copy, move files and change storage
configurations.
Select a file and press the PLUS button for onscreen options.
16
Page 19

Media Playback
Here’s how to play and control your own content
Playing your content
You can play video, music, photo files from the connected
storage, home network devices or the internal hard drive.
Press the Freeview Play button and navigate to
MEDIA.
Press OK to make selections.
Supported file formats
Video: MP4, VOD, AVI, ASF, MKV, MPEG-2TS
Photo: JPEG, PNG, BMP, GIF
Music: MP3
Using the media controls:
Use the playback control buttons to control your content.
Video content
REWIND
STOP
Displaying subtitles
Press the SUBTITLES button and press OK whilst
the play-bar is on screen to enable/disable subtitles.
Tips:
• Subtitle files may not be available for some video files. (Compatible files only.)
• You can play music whilst watching a photo slideshow by setting Play Music to ON.
FORWARD
PLAY/PAUSE
Music content
PREVIOUS
STOP
Playback options
Press the PLUS button for repeat, normal or shuffle.
Photo content
PREVIOUS
STOP
Playback options
Press the PLUS button for slideshow speed and music.
Use the navigation keys to scroll listings one at a time.
Confirm selections by pressing OK.
NAVIGATION
KEYS
EXIT
17
SKIP
PLAY/PAUSE
NEXT
PLAY/PAUSE
BACK
Page 20

Humax Live TV App
View live TV and your recordings via the Humax Live TV App
How to get started
1. Download the app
The FREE Humax Live TV App is available
on both Android & iOS.
On the App Store search for: HUMAX Live TV
Once installed, click to open the app.
2. Register to myhumax
To ensure access to all the features provided, we
recommend you register to myhumax.
Follow the registration process within the app:
Open App > Settings/Help > MyProfile > Register
or
online at: https://www.myhumax.net
3. Pair with your recorder
On your recorder:
Navigate to:
SETTINGS > Advanced Settings > Server Management
and make sure the Network Server is set to On.
On the app:
1. Tap on the LIVE TV tab and press CONNECT.
2. Select the recorder to pair with your smart device.
3. The app will ask for a registration code.
To retrieve a registration code, on your recorder go to:
HOME > SETTINGS > Advanced Settings >
Recorder Registration > Retrieve Registration Code
Accessing Live TV
Watch live TV, play back recordings, schedule recordings or
reminders and more from HUMAX Live TV App.
You can stream live TV directly to your mobile devices.
Watching live TV content on your smart device
You can bring a live programme from your TV to your mobile
device.
1. Tap anywhere while watching to display the icons on the
screen.
2. Tap the icon
to your mobile device.
to bring the programme from your TV
Sending live TV programmes to watch on
your recorder
Note:
• Pay TV channels may be limited.
• Live TV App performance relies on the recorder’s
built-in tuner and aerial signal.
• If no HUMAX product is detected, please check your
wireless network settings.
• The Humax Live TV App is subject to changes without
notice.
Tips:
• Disable power saving mode to remotely access functionality from the recorder while it’s in stand by.
• Your recorder and smart device should be connected to the same local network.
You can send your watching programme on your mobile
device to your TV.
1. Tap anywhere while watching to display the icons on
the screen.
2. Tap the icon
programme plays on your TV.
18
and select your HUMAX product. The
Page 21

Accessing the mobile TV Guide
From the home screen, tap
TV GUIDE.
Accessing your recordings
From the home screen, tap
RECORDINGS.
Explore a full TV Guide on
your mobile and select
programmes to watch live
whilst paired with your
recorder.
Set reminders or recordings
from the TV Guide.
Tap a programme to bring
up additional options.
You can schedule
recordings or reminders
on your HUMAX product
remotely using your mobile
device.
1. Tap GUIDE to go to TV
Guide.
2. Select a programme.
View recordings that are
available on your recorder.
(Some recordings may be
subject to copyright/playback law.)
Accessing your schedulesSchedule a remote reminder/recording
From the home screen, tap
SCHEDULES.
Tap a programme for
additional options.
You can schedule
recordings for whole series
if the programme is part of
a series.
3. Tap Record this
programme or Set
reminder.
Tips:
• Some features are not available outside of the home network.
• HUMAX Applications require at least Android 4.0 or later, and iOS 8 or later.
19
Page 22

General Settings
Control what content is displayed on your recorder
Use the button and navigate to SETTINGS to access this screen.
Parental Control
• Guidance Policy: You can set parental guidance
on recordings or internet content during the
watershed period between 21:00-05:30 for
adult content.
• Change Password: Enter a new password.
• Block Channel Settings: Set On if you want to
block access to the Channel Settings you have
previously made.
Note:
• Enter the password to view the blocked
programmes.
• The default password is 0000. If you have
forgotten your password, please contact your
local distributor.
Language Setting
You can set the preferred language for audio and
subtitles. (If applicable)
Video Setting
You can set the screen ratio, display format and
screen resolution.
Audio Setting
• S/PDIF: You can select the digital audio signal
output.
• HDMI: You can select the digital audio signal for
HDMI output.
• Audio Description: You can set to narrate the
on-screen visuals which is used for visually
impaired viewers.
• Lip-Sync Delay: You can adjust the sound
difference between audio and video.
Note: Not all channels will provide audio description.
For further information, contact the broadcaster.
On-screen Display
• Info Display Time: You can set the duration the
Simple Guide is displayed whenever you change
the channel.
• Subtitle Display: You can set to display the
subtitle automatically or not.
• Hard of Hearing: You can set to show the closed
captions.
• Subtitle Font: You can set the subtitle font.
Privacy Policy, Terms & Conditions
You can agree or disagree to send HUMAX your
watching information.
You watching information will be helpful for
HUMAX to improve products, software and
services.
20
Page 23

Network Settings
Optimise your internet connection for the best performance
Use the button and navigate to SETTINGS to access this screen.
Configuring LAN
1. Select Configure LAN for wired connection.
2. Select your IP configuration type between DHCP
and Manual.
• DHCP: If you use a router or modem that has a
DHCP (Dynamic Host Configuration Protocol)
server function, select DHCP. The IP address
will be automatically assigned.
• Manual: If there is no DHCP server on the
network and you want to set the IP address
manually, select Manual. Enter the values for
IP Address, Netmask, Gateway Address and
DNS Address.
3. Select APPLY to connect to the selected
network and press the OK button.
Note:
• When entering the IP address manually, enter 3
digits in a row.
• The network is connected by wired LAN when both
wireless and wired LAN are activated.
• HUMAX recommends the network connection over
a wired LAN.
Configuring Wireless LAN
1. Select Configure WLAN for wireless connection.
2. Select the wireless LAN network and press the
OK button.
3. Press the BACK button to save.
Note: If you choose a locked wireless network, you
need to enter the password to proceed The
network password is case-sensitive and cannot
contain spaces.
Network Connection Status
You can view the connection status of the local
area network or the Internet.
Select RETRY if either network is disconnected.
21
Page 24

PVR Settings
Set recordings outside of the home and optimise storage
Use the button and navigate to SETTINGS to access this screen.
Recording Options
• Start Padding Time / End Padding Time: You can set
the recording padding time to add extra recording
time to the start and end of all your scheduled
recordings.
Note: The start and end times set will override the
broadcast Accurate recording.
• Auto Delete: Set to On to add old recordings to the list
TO BE DELETED.
Playback Options
• Series Play: Set to On to play back all episodes of a
programme successively.
• Instant Replay Time: Select the replay time.
• Skip Forward Time: Select the skip time.
Storage
You can check the capacity of each storage or format
the storage when necessary.
• Internal HDD: Run the HDD test or format the
storage.
• External Devices: To remove the storage, select
Remove Storage Safely first.
Note: All data in the storage will be deleted after
formatting.
22
Page 25

Channel Settings
Add channels manually and create favourites
Use the button and navigate to SETTINGS to access this screen.
Favourite Channels
Select the channels from the left column and press the
PLUS button.
Add to
favourite
Change
Group
Select /
Deselect All
Select the channels from the right column and press the
PLUS button.
Remove
Move
Change
Favourite
Rename
Favourite
Select /
Deselect All
Add to favourite channels.
List channels in another channel group.
Mark or release all channels.
Remove from favourite group.
Move the channel in the favourite group.
Change to another favourite group.
Rename the favourite group.
Mark or release all channels.
Automatic Channel Search
You can search channels automatically without entering
any other information as long as your aerial is connected.
When the channel search is complete, select SAVE and
press the OK button to save the results.
Note: Select STOP and press the OK button to stop the
channel search. The searched channels will remain.
Editing Channel List
You can delete, lock or rename channels in the channel
list. Select a channel and press the PLUS button.
Delete Delete channels from channel list.
Lock/Unlock Lock channels to block access.
Rename Change channel name.
Select/Deselect
All
Change Group
Mark or release all channels.
To list the channels of another
favourite group, press the PLUS
button and select Change Favourite.
Select the group and press the OK
button.
Signal Test
You can check the signal strength and quality of the
searched channels.
Manual Channel Search
You can search channels manually by searching
parameters.
• Channel: Select the channel.
• Frequency: Enter the frequency. The corresponding
frequency value will be automatically displayed.
• Transmission: Select DVB-T or DVB-T2.
• Bandwidth: Select the bandwidth.
• Network Search: Select On or Off.
23
Page 26

Advanced Settings
Server, file sharing, recorder registration and remote record
Use the button and navigate to SETTINGS to access this screen.
Server Management
• Network Server: Set to On to share the live
broadcast, recordings and media files saved
in the internal HDD with other products that
support Home Network-Digital Media Player.
• Rename Server: Enter a new name to change
the server name.
• Server Status: You can see the information on
network servers.
• Server Activation Time: You can turn on the
server during the time even when the product is
in standby mode.
File Share
• SAMBA Server: When SAMBA Server is set
to On, the internal HDD can be accessed as a
network disk drive from your PC. You can copy
the video, music, photo files in the internal HDD
to the PC storage.
• FTP Server: When FTP Server is set to On, you
can copy the video, music, photo files in the
internal HDD to the PC storage using the FTP
client programme.
• Password: If Password is set, you can access the
internal HDD only by entering the password.
• Download Folder: When Download Folder is set
to Enable, you can copy the video, music, photo
files in the PC to the download folder in the
internal HDD.
Recorder Registration
You can set up recordings on your product from
your PC or mobile devices. To use this feature, you
need to register your product in the website.
1. Go to https://www.myhumax.net and create an
account and register your product.
2. To register your product, you need a registration
code for certification. Select Retrieve
Registration Code and press the OK button.
3. Enter the registration code in the website.
Remote Recording
• Remote Recording: Set to On to use the remote
recording feature.
• Update Period: Set the period to receive the
recording schedule from the HUMAX server.
• Update Interval: Set the update interval.
24
Page 27

System Settings
Search for system software updates and more
Use the button and navigate to SETTINGS to access this screen.
System Information
You can view the system information. Select
CHECK NEW SOFTWARE to see if new software is
available.
Power Timer
You can set the time the product powers on or
powers off.
Power Management
• Automatic Power Down: Select On to enter
standby mode automatically if no user
interaction occurs for 3 hours.
• Power Saving Mode: Select On to reduce the
power consumption in standby to below 0.5W.
If set to Off, the product will continue to transmit
a signal even in standby (required if the H3*
smart streamer is connected).
Note:
• A message will display 2 minutes before the
product enters standby mode. If you ignore this
message, the product enters standby mode
automatically.
• When set to On the product will not supply the
loop through aerial signal to any connected
device.
*H3 sold seperately.
HDMI-CEC
You can set your TV to turn on or off automatically
alongside the recorder.
Factory Reset
You can restore your HUMAX recorder to its
factory default settings with this option.
Use this if you need to reset your HUMAX recorder
to it’s out of the box settings.
WARNING: This will delete any preferences,
recordings and settings which can not be undone.
Shortly after you complete the factory reset, the
On-screen setup will appear automatically.
See the next page for a full walk through.
25
Page 28
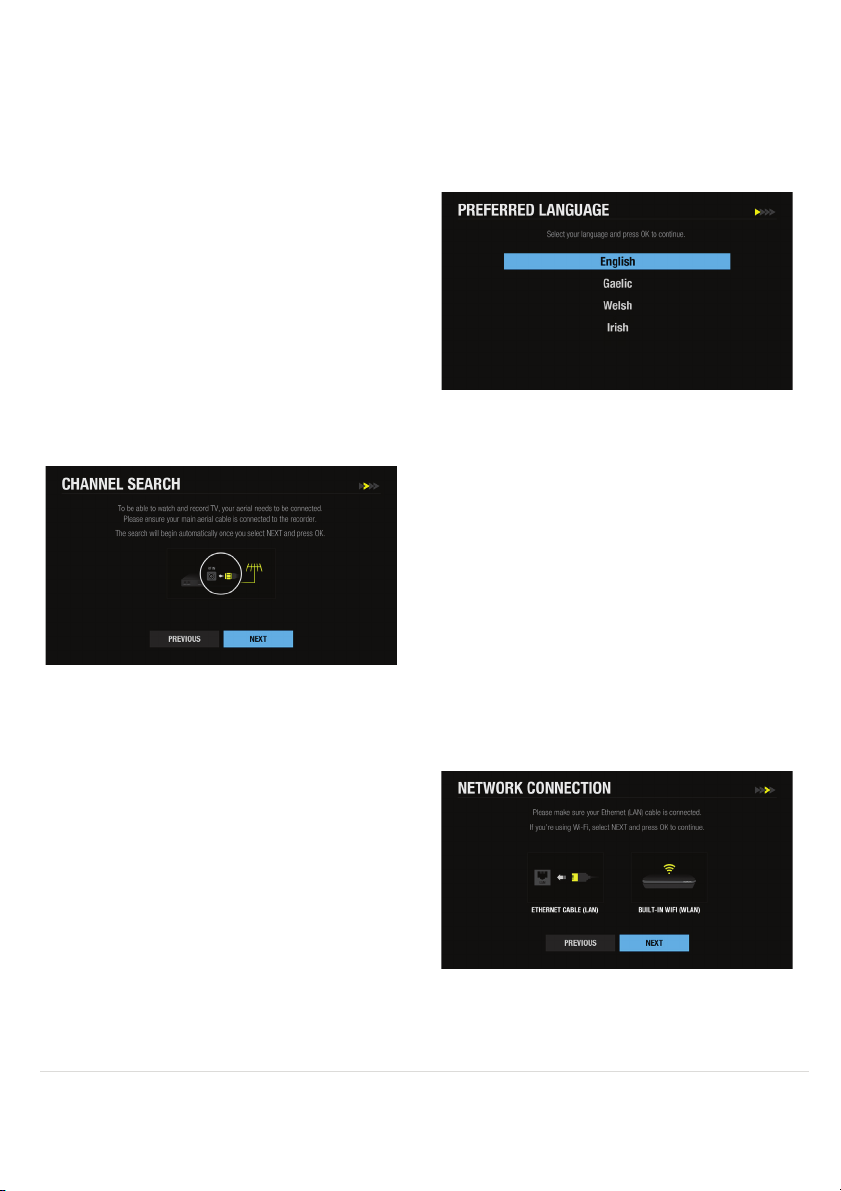
On-screen setup
A step-by-step guide to get your box up and running
1. Preferred Language
Select your preferred language.
Press OK to continue.
2. Channel Search
This is where your aerial will automatically pick up
any available channels. Select NEXT and press OK
to start searching.
Save the found channels once the search is
complete.
Note: You can also search channels manually.
See Channel Settings on page **
3. Network Connection
Make sure your Ethernet cable is connected to
your box and router.
The internet connection should be made
automatically once you select NEXT and press OK.
If you’re using Wi-Fi, select NEXT and press OK to
continue and follow the on-screen instructions.
Tips:
• The installation wizard operates automatically when you power on the product for the first time or complete a factory
reset from the settings menu.
26
Page 29

4. Privacy Policy, Terms & Conditions
Please read through the privacy policy and terms &
conditions to use HUMAX services.
Don’t forget, we will always treat all your personal
information as private and confidential.
Agreeing will help us improve our products,
software and services in the future.
Select NEXT and press OK to continue.
6. Setup Complete
Congratulations. You should see a summary of how
many channels your box has picked up within your
area.
5. Power Saving Mode
Setting power saving mode to On will consume less
power in standby mode (0.5W) but increase system
start times.
If you use loop-through or will use other devices to
interact with the recorder in standby mode, please
set this feature to Off now.
You can choose to enable/disable this feature at any
time within the settings.
Select NEXT and press OK to continue.
The on-screen setup is now complete. Select next
to go to the home screen.
You can now select channels, browse the TV guide,
view on-demand and more.
Select FINISH and press OK.
Tips:
• If you exit the installation wizard without fully completing the channel searching procedure, you may not have all of the
channels available. To add additional channels, on your recorder go to:
Freeview Play Home>SETTINGS>Channel Settings>Search Channels
27
Page 30

Specification
Tuner & Demodulator
Number of
Tuners
RF Input
Connector
RF Loop
though
Connector
Input
Frequency
Range
Modulation OFDM
Mode
FEC Mode
Guard
Interval
Constellation
Audio
Decoding
Audio Mode
Video
Decoding
Video Format 4:3, 16:9
Video
Resolution
Flash
Memory
RAM DDR3 1GB
Video RCA, HDMI/HDCP
Audio Audio L/R, S/PDIF
USB USB 2.0 Host (5 V
File Format JPEG, MP3
3 Tuners
IEC 169-2, female
IEC 169-2, male
470MHz ~ 862 MHz
DVB T: 2K, 8K
DVB T2: 1K, 2K, 4K, 8K, 16K, 32K
DVB T: 1/2, 2/3, 3/4, 5/6, 7/8
DVB T2: 1/2, 3/5, 2/3, 3/4, 4/5, 5/6
DVB T: 1/4, 1/8, 1/16, 1/32
DVB T2: 1/4, 1/8, 1/16, 1/32, 1/128,
19/128, 19/256
DVB T: QPSK, 16-QAM, 64-QAM
DVB T2: QPSK, 16-QAM, 64-QAM, 256QAM
Audio/Video Decoding
MPEG/MusiCam Layer I & II
Single channel/Dual channel/Joint stereo/
Stereo
MPEG-2 ISO/IEC 13818
Transport Stream Specification
1080p, 1080i, 720p, 576p, 576i
Memory
512MB
Audio/Video In/Out
Data In/Out
0.5A) x 2EA
Hard Disk
HDD 500GB/1TB/2TB
Power Supply
Input Voltage 200V - 240V ~ 50/60Hz 0.8A
Type Adaptor
Power
Consumption
Protection
Size (w/h/d) 280 x 48 x 200 (mm)
Weight 1.03 kg
12V
2.5A (Standby under 0.5W)
Separate internal fuse.
The input should be protected against
lightning.
Physical Specification
Note: The specification is subject to change without
notice.
28
Page 31

Glossary
CVBS (Composite Video Baseband Signal)
A technology for transmitting video signals via a cable. Mixes luminance (brightness) and the chrominance (colour)
signals together.
Dolby Digital
An encoding system that digitally compresses up to 5.1 discrete channels of audio (left front, centre, right front, left
surround, right surround) into a single Bit-stream. A low frequency effect (LFE) channel is included providing the sound
needed for special effects.
DVB (Digital Video Broadcasting)
A set of standards that define digital broadcasts using satellite, cable or terrestrial systems.
EPG (Electronic Program Guide)
An electronic equivalent to a printed television listings magazine. It is an application used with digital set-top boxes and
digital television sets to list current and scheduled programs that are or will be available on each channel, including
a short summary or commentary for each Program. The information supplied in the EPG is sent and updated by the
channel broadcaster.
Frequency
The property of a signal measured in cycles per second (=Hz).
FTA (Free-To-Air)
An unscrambled broadcaster allowing customers to view channels or services without paying any subscription.
HDD (Hard Disk Drive)
The primary computer storage medium, which is made of one or more aluminium or glass platters, coated with a
ferromagnetic material.
HDMI (High-Definition Multimedia Interface)
An all-digital audio/video interface that supports standard, enhanced, or high-definition video, plus multi-channel digital
audio on a single cable. It transmits all ATSC HDTV standards and supports 8-channel digital audio.
OTA (Over the Air)
A standard for the transmission of software for equipment, through a broadcast system. Manufacturers reserve the
right for deciding the release of the software for their products.
PVR (Personal Video Recorder)
A video recorder that can record and playback programmes directly using the built-in Hard Disc Drive.
RGB (Red – Green – Blue)
A technology for transmitting video signals via a cable. RGB is a system to represent red, green, and blue colours on a
TV or monitor display. Red, green, and blue can be combined in various proportions to obtain any colour.
S/PDIF (Sony/Philips Digital Interface format)
A standard format for the transfer of digital audio signals. It allows the transfer of digital audio between two devices
without any conversion to and from analogue, which could degrade the signal quality.
S-Video (Super-Video)
Sometimes referred to as Y/C video; a technology for transmitting video signals via a cable. It is a video signal
transmission in which the luminance (brightness) and the chrominance (colour) signals are transmitted separately to
achieve superior picture clarity.
TSR (Time Shifted Recording)
A function that records the present program temporarily to support trick-play.
UHF (Ultra High Frequency)
Channels 14-51 - Designation for radio frequencies in the range between 30 megahertz (MHz) and 300 (MHz)
VHF (Very High Frequency)
Channels 2-13 - Designation for radio frequencies in the range between 300 megahertz (MHz) and 3 gigahertz (GHz)
29
Page 32

Troubleshooting
Take a look at solutions to commonly known problems
Before contacting the customer service centre, make sure to read the tips below carefully. If the problem persists after you
complete the following procedure, please contact customer services on:
General
Problem Possible Cause What to Do
No red or blue
LED on the front
panel of the
product
No picture
(Nothing shows
on the TV)
No picture
(No channels)
Poor Picture
Sound quality
Mains adaptor unplugged.
Mains socket switched off.
HDMI cable not securely connected.
TV Set not on correct Input / Source
Aerial is disconnected.
Aerial is damaged/misaligned.
Out of digital signal area.
Aerial not positioned correctly.
Electro magnetics from electronic
devices around the product can cause
the issue.
Poor/faulty HDMI cable
• Check the main power cable and make sure it is plugged into a
suitable power outlet.
• Connect the power cable to a different power outlet.
• Make sure that the product is powered on and in operation mode.
• Make sure that the AV or HDMI cable is firmly connected to the TV.
• Check if the channel is currently on air.
• Check that you TV is on the correct input / source for the HDMI /
AV connection (refer to your TV manual for more details on how to
change the input / source.
• Check the brightness of the TV.
• Make sure that the product is powered on and in operation mode.
Press the STANDBY button.
• Make sure that the AV or HDMI cable is firmly connected to the TV
and the product.
• Make sure that the aerial cable is properly connected to the product.
• Press the Input or Source button on the TV remote and select AV or
HDMI mode depending on how your product is connected to the TV.
• Search channels again. Go to Freeview Play > SETTINGS > Channel
Settings > Automatic Channel Search.
• Check if the channel is currently on air.
• Make sure there is no mobile phone or microwave oven near the
product.
• Keep the power and the RF cables apart from each other.
• Adjust the antenna direction to get a better picture.
Note: If the antenna is covered with snow, the RF is weakened by
heavy rain, or the aerial position is changed by strong wind, the
condition of the sound and picture may temporarily be poor. However,
the poor sound and picture quality due to weather conditions cannot
be accepted as a malfunction of product.
0344 318 8800 (Mon-Fri 9am-5pm).
30
Page 33

Problem Possible Cause What to Do
• Check that your AV or HDMI cable is connected correctly.
• Check the volume levels of your TV and the product.
• Check if the product or TV is on mute.
• Check audio type or soundtrack option. (where applicable)
• Go to Freeview Play > SETTINGS > General Settings > Audio Setting -
change the HDMI audio setting to Stereo.
• Remove and reinsert the batteries in the remote control.
• Replace the batteries in the remote control for a new set.
• The default password is always 0000.
• Make sure that the aerial cable is properly connected to the product.
• [Terrestrial] Use the appropriate aerial capable of receiving VHF or
UHF channels for your area.
• Check if the network is configured properly. You can check the
network connection status by going to Freeview Play > SETTINGS >
Networks Settings > Network Connection Status.
Note: If your product stays connected to the network, every-time you
turn off the product it will search for any updates available on
air.
• To manually search for any updates available, go to Freeview Play >
SETTINGS > System Settings > System Information and then select
CHECK NEW SOFTWARE.
• To update the software via USB,
1. Download the latest software version and save it to an empty USB
memory stick.
2. Please make sure the software is saved in the root of the USB stick.
3. Insert the USB memory stick into a rear USB port of the product.
4. Go to Freeview Play > Settings > System Settings > System
Information and press the OK button on Check New Software.
5. When the download progress stops it may take up to 5 minutes for
it to restart so ‘DO NOT TURN OFF the product’
6. 9THTSʤWRXZHHJXXKZQZUIFYJUQJFXJLTYT+WJJ[NJ\5QF^ >
Settings > System Settings > System Information and check
Software Version.
• Go to Freeview Play > SETTINGS > System Settings > Power
Management and then check if Automatic Power Down is set to On.
• Go to Freeview Play > SETTINGS > System Settings > Power Timer
and then check if Power Off Timer is set to On.
No sound
No volume
control on HD
channels
No response to
remote control
No password
information
Channel search
does not work
Cannot update
the new software
Randomly Shuts
itself off
AV/HDMI cables are not connected
properly or faulty.
Volume is set to minimum or mute.
Check the HDMI Audio setting
Low batteries
Aerial is disconnected.
Aerial is damaged/misaligned.
Out of digital signal area.
Aerial is not positioned correctly.
Network is not set up.
Automatic Power Down Option On
Timer is set
Cautions: Electromagnetic interferences from other electronic devices or cables may cause malfunction to the HUMAX product.
31
Page 34

Recordings
Problem Possible Cause What to Do
• Check that there is a previous schedule conflicting with a new
schedule.
Cannot schedule
recordings or
reminders
Cannot record
programmes
Cannot change
channels while
recording.
How to set the
padding time
How enter
passive mode
Conflict of recordings
Full HDD
Conflict of recordings
Conflict of recordings
Cancel one of the schedules.
• This product has 3 tuners. This allows you to record up to 4 different
channels and watch another program. There may be limitations on
the 4th channel you can record or the live TV channel you try to view
depending on the channels you are recording.
• The hard disk is full. Delete unnecessary programmes and make
space for new recording.
• Check if recording conflicts with another channel. Stop the current
recording or wait until the recording is finished.
• Check that the product is switched on when recording starts.
• If you are missing first or end bits of the program, set the padding
time. Go to Freeview Play > SETTINGS > PVR Settings > Recording
options and set the padding times.
• Check if your product recognizes problems with the HDD. Go to
Freeview Play > SETTINGS > PVR Settings > Storage, select the
storage, and run the HDD test.
• This product has 3 tuners. This allows you to record up to 4 different
channels and view a 5th Live TV channel. The 4th channel recording
and the 5th you are trying to view maybe limited to channels being in
the same broadcast groups as the first 3 programmes you have set to
record.
• If you are missing first or end bits of the programme, set the padding
time. Go to Freeview Play > SETTINGS > PVR Settings > Recording
Options and set the padding times.
• Go to Freeview Play > SETTINGS > System Settings > Power
Management and set Power Saving in Standby to On.
Playback
Problem Possible Cause What to Do
• Go to Freeview Play > RECORDINGS and select a file. Press the PLUS
How to edit
recorded
programmes
How to edit
media files?
Problem Possible Cause What to Do
Does not
recognize larger
external HDDs.
How to read files
from external
HDD
How to delete
root folder?
HDD capacity is too large.
button (+) and delete.
If you want to delete more than 1 programme, press the PLUS button
(+) and select Select. You can mark files and then delete, copy or
move the multiple files.
• Go to Freeview Play > MEDIA and select Internal HDD. Select a file and
press the PLUS button (+). You can delete, copy or move the file.
• HUMAX recommends to use external HDDs up to 1TB.
• If the external HDD is making a ticking sound or not being recognized,
this may indicate that the electricity is not sufficient. Please connect
the power cable of the external HDD or connect another USB cable to
the product.
• Go to Freeview Play > MEDIA and select an external HDD. Select a file
and press the OK button.
• Some files may not be played depending on the file format.
• You cannot delete the root folder that is to store the downloaded files.
32
Page 35

Network
Problem Possible Cause What to Do
• Check if the network is connected properly. Go to Freeview Play >
SETTINGS > Network Settings and select Network Connection Status.
• If wireless network is not available in your home, use an Ethernet
cable to connect the product and the router.
• Turn off the product and the router and then on to refresh the
network.
• Move the product closer to the wireless router or remove any
obstacles from between them.
• If you use an Ethernet cable, change the Ethernet cable for another.
• Check if other network devices in the same network are connecting to
the Internet okay.
• Check the network password.
Note: The home network environment may cause the internet speed
slow down.
• Check if the network is connected properly. Go to Freeview Play >
SETTINGS > Network Settings and select Network Connection Status.
If not connected, refer to the troubleshooting guide for the network.
Note:
• Network traffic may cause temporary loss of network connectivity.
• Poor network connection may cause on demand to run slowly.
Cannot connect
to the Internet
On Demand does
not work.
Too far from the wireless router
Walls or obstacles between the product
and the router cause interference.
Faulty Ethernet cable
Wrong password
Media
Problem Possible Cause What to Do
Cannot play
YouTube video.
Network server
does not work
File
share(SAMBA/
FTP) does not
work
Some YouTube videos are played on
PC only.
HUMAX product is not connected
to the network or the network is not
configured.
Home network devices are not
connected to the network or the
network is not configured.
PC/Router settings are not correct.
Network connection error
File sharing options
• Play another video to view.
• Go to Freeview Play > SETTINGS > Advanced Settings > Server
Management and check if Network Server is set to On. When the
network server option is set to on, files stored in the internal HDD can
be shared with other Home Network compliant devices in the same
network.
• Make sure that the options to share media files are enabled on your
PC.
• Check if any firewall settings on your PC or router blocks Home
Network compatibility.
• Check if the network is connected properly. Go to Freeview Play >
SETTINGS > Networks Settings and select Network Connection Status.
• Make sure that your product and PCs are in the same network.
• Make sure that the SAMBA server is activated. Go to Freeview Play >
SETTINGS > Advanced Settings > File Share and set SAMBA Server to
On.
• Make sure that the FTP server is activated. Go to Freeview Play >
SETTINGS > Advanced Settings > File Share and set FTP Server to On.
• Check if the password is correct. Go to Freeview Play > SETTINGS >
Advanced Settings > File Share and set a new password.
Others
Problem Possible Cause What to Do
Can I use a
HUMAX product
from other
countries in UK?
Each country has their own
broadcasting system. HUMAX product
is made it possible for regional
broadcasting environment.
• HUMAX products from other countries are not available in UK.
Customer services may be limited.
33
Page 36

Universal Remote Control
Set the universal remote control by entering 3
digit code
1. Press the TV STANDBY and OK buttons at the same time for 3
seconds. The TV STANDBY button will light on.
2. Direct the remote control to your TV and enter the 3-digit code. The
button will blink when each digit is entered and it will blink twice
after the last digit is entered.
3. Once your TV turns off press the OK button to lock the code. Your
TV will turn off when matched with the code.
4. The TV STANDBY button will blink three times if the universal
remote control setting is successful.
Note:
• When no code is entered for 20 seconds, the universal setting mode
will switch to normal mode.
• Try several setting codes and select the code that has the most
functions.
Set the universal remote control to search mode
1. Press the TV STANDBY and OK buttons at the same time for 3
seconds. The TV STANDBY button will light on.
2. Direct the remote control to your TV and press the CH ^/v button to
search the brand code of the TV.
3. Once your TV turns off press the OK button to lock the code. Your
TV will turn off when matched with the code.
4. The TV STANDBY button will blink three times if the universal
remote control setting is successful.
Note: If the code setting process is not completed, the previously set
code remains as default.
Brand Code
Acer 261, 278, 305
Acoustic Solutions 210, 312, 324, 370, 386, 428, 477
Akai 102, 006, 098, 144, 145, 111, 061, 043, 074,
Alba 006, 144, 134, 204, 087, 064, 036, 005, 108,
Bang & Olufsen 014
Beko 006, 144, 086, 145, 111, 064, 072, 172,
BenQ 223, 328, 329
Black Diamond 444, 204, 211
Brionvega 006, 014, 062
Bush 102, 006, 144, 134, 204, 138, 087, 061, 043,
148, 232, 280, 128, 122, 461, 109, 462, 489,
094, 084, 083, 065, 035, 034, 033, 028, 023,
011, 004, 002, 154, 321
473, 455, 447, 388, 099, 084, 077, 072, 065,
059, 034, 023, 002
361, 405
036, 005, 108, 376, 373, 370, 361, 355, 352,
327, 388, 430, 431, 432, 440, 448, 451, 473,
476, 477, 478, 002, 033, 035, 044, 045, 056,
059, 065, 066, 095, 133, 164, 210, 213, 229,
232, 250
34
cello 397, 410, 418, 419, 420
Crown 006, 144, 134, 204, 086, 145, 087, 111, 143,
Daewoo 102, 006, 124, 444, 036, 441, 406, 341, 338,
Dell 235, 278
DMTech 260, 438, 449, 454, 456
Ferguson 006, 120, 098, 103, 030, 204, 012, 020, 029,
Finlux 102, 006, 144, 145, 333, 327, 172, 122, 118,
Fujitsu 002, 011, 032, 035, 042, 137, 173, 187
Fujitsu General 002, 032, 035, 137
Fujitsu Siemens 172, 211, 230, 246, 268, 369
Funai 144, 134, 043, 275, 336, 369, 407
GoldStar 006, 144, 145, 111, 061, 001, 007, 020, 023,
Gooding 087
Goodmans 102, 006, 120, 144, 103, 134, 124, 444, 204,
Graetz 144, 087, 061, 023, 053, 065, 211
Grundig 102, 006, 030, 087, 142, 005, 108, 498, 476,
Grunkel 211
Hannspree 262, 263, 264, 342, 401, 402, 463
Hantarex 006, 002, 094, 190, 260, 289
Hinari 006, 043, 036, 005, 002, 033, 059, 077, 443
Hisense 102, 092, 165, 254, 265, 366, 491
Hitachi 006, 098, 124, 204, 208, 005, 019, 037, 146,
Humax 505, 299, 506, 507, 245, 319, 322, 411,
Hyundai 164, 190, 192, 241, 244, 271, 291, 317, 338,
Inno Hit 036, 002, 011, 035, 045, 047, 094, 211
Irradio 006, 036, 002, 047, 065, 147
JVC 111, 036, 005, 129, 130, 015, 029
Keymat 258, 300, 398, 436, 437
Lenoir 002, 214
LG 102, 006, 144, 145, 138, 061, 064, 248, 281,
Loewe 006, 064, 014, 048, 093, 094, 123
064, 361, 135, 072, 071, 053, 033, 002
271, 249, 195, 192, 190, 164, 133, 119, 091,
079, 066, 035, 034, 002
046, 052, 054, 077, 292, 447, 476
094, 089, 084, 083, 070, 055, 035, 023, 018,
017, 014, 011, 010
027, 034, 035, 047, 067
087, 043, 036, 005, 478, 211, 232, 477, 250,
476, 271, 445, 355, 370, 373, 440, 376, 382,
383, 386, 002, 004, 011, 035, 047, 052, 054,
065, 066, 084, 091, 094, 119, 121, 133, 172,
195, 210
448, 447, 445, 430, 405, 370, 271, 267, 250,
225, 135, 121, 010, 101, 096, 028, 077
152, 153, 163, 169, 193, 197, 007, 206, 210,
217, 227, 295, 296, 330, 377, 399, 424, 483,
020, 021, 023, 027, 035, 054, 056, 060, 076,
081, 083, 084, 085, 089, 091, 094, 018, 106,
107, 011
433, 479
340, 341, 439
065, 072, 137, 149, 207, 264, 362
408, 496
354, 367, 368, 384, 396, 416, 417, 425, 426,
215, 209, 067, 047, 035, 034, 027, 023, 002,
001, 236, 257
131, 167, 414, 434
Page 37

Logik 204, 001, 003, 029, 162, 195, 224, 292, 376,
Logix 134, 095
Luxor 098, 204, 061, 023, 033, 035, 047, 055, 056,
Manhattan 006, 134, 204, 164, 192, 237, 293
Marantz 102, 006, 071, 140, 277, 317
Marks and Spencer 420
Matsui 102, 006, 144, 030, 204, 087, 005, 080, 074,
Mitsubishi 102, 006, 204, 005, 019, 014, 015, 027, 093,
Mivar 034, 035, 047, 048, 094, 112
NEC 005, 002, 003, 025, 035, 040, 049, 066, 140,
Nokia 098, 113, 111, 061, 023, 033, 049, 053, 055,
Nordmende 006, 144, 103, 030, 020, 046, 054, 242,
Onida 207, 226
Orion 102, 006, 144, 204, 467, 458, 457, 456, 448,
Orline 006, 036
Ormond 134, 204
Orsowe 094
Pacific 102, 144, 204, 208, 077, 256
Packard Bell 254, 293
Panasonic 006, 098, 061, 129, 038, 023, 063, 094, 187,
Panavision 006, 070
Philco 006, 064, 014, 021, 072
Philips 102, 006, 061, 459, 435, 429, 395, 310, 302,
Phonola 102, 006, 014, 029, 034
Pioneer 006, 086, 061, 064, 020, 023, 024, 046, 073,
Pionier 086, 064, 327
Radiomarelli 006, 014, 094
Relisys 190, 192, 193, 194, 220, 221, 271, 310, 333,
Saba 120, 098, 144, 103, 061, 014, 020, 023, 046,
Sagem 113, 080, 182, 253, 337
Samsung 102, 006, 043, 064, 108, 115, 231, 252, 276,
Sanyo 204, 064, 005, 019, 442, 370, 363, 358, 357,
Schaub Lorenz 098, 144, 086, 111, 061, 056, 066, 215,
Schneider 102, 006, 144, 134, 204, 061, 208, 036, 451,
SEG 006, 134, 204, 087, 043, 036, 005, 285, 211,
464, 465, 466
060, 083, 084, 122, 211
153, 195, 097, 094, 369, 445, 077, 447, 065,
059, 056, 052, 044, 035, 033, 028, 011, 008,
004, 003, 002
096, 191, 311
239, 379
056, 066, 083, 084, 089, 122
280, 499
445, 443, 385, 218, 195, 131, 097, 094, 077,
071, 059, 050, 049, 003
251, 294, 353, 359, 279, 306
297, 247, 125, 110, 101, 073, 066, 054, 029,
014, 002
093, 136, 159, 233, 277, 286, 381
338, 341, 355, 390
052, 054, 090, 094, 335
287, 332, 345, 350, 351, 372, 442, 474, 488,
490, 492, 228, 176, 175, 127, 095,047, 035,
034, 033, 027, 023, 011, 009, 002
356, 222, 200, 150, 140, 097, 053, 048,
035, 034, 033, 025, 023, 017, 011, 008, 003,
002, 240
256, 267
450, 293, 128, 097, 095, 065, 056, 054, 042,
035, 023, 010
210, 119, 062, 056, 035, 034, 002
Sei-Sinudyne 006, 014, 032, 094, 097
Seleco 023, 032, 042, 055, 062, 065, 070, 075, 099
Sharp 005, 130, 216, 015, 029, 088, 094, 177, 274,
Siemens 006, 030, 028, 096, 101
SKY 006, 195, 271, 300, 307, 308, 340, 341, 342,
Sonoko 006, 043, 002, 035, 045
Sony 006, 301, 005, 446, 412, 393, 375, 360, 325,
Strong 210, 211
Technika 422, 428, 465, 468, 480, 493
TechniSat 102, 131, 237
Technisson 144, 242, 361
Technosonic 102, 120, 091, 195, 256, 258, 436, 437,
Telefunken 006, 120, 144, 103, 086, 320, 202, 105, 090,
Tevion 102, 006, 144, 134, 204, 208, 468, 405, 403,
Thomson 006, 120, 103, 020, 046, 052, 054, 056,
Toshiba 030, 204, 005, 115, 129, 092, 447, 364, 313,
Tosumi 451
Vestel 006, 134, 204, 035, 211, 333, 370
Videocon 092
Viewsonic 307, 308, 323, 335, 349, 391, 394, 259, 331
Wharfedale 102, 006, 095, 189, 256, 327, 370, 452, 453,
Yamaha 169, 314, 330, 184
Zanussi 032, 035
Aiwa 445
Amstrad 026
Beko 086
Daewoo 444, 119
GoldStar 006
Grundig 102, 006, 030, 101, 445
Irradio 147
LG 027
Philips 102, 006
Saba 120
Samsung 442
Sanyo 442
Sharp 015
Thomson 120
United 445
Grundig 448
Orion 448
If the code for your equipment is not listed see MDB1.3 for a
complete list of supported codes from the following website:
http://www.humaxdigital.com/global/support/rcucodelist.asp
334, 365, 409, 166, 288
343, 344, 391, 400, 421
255, 203, 185, 174, 058, 003
451, 468
082, 055, 054, 052, 046, 020, 016, 012, 348
376, 355, 327, 298, 246, 242, 232, 230,
172, 128
082, 335
304, 242, 212, 211, 183, 100, 039, 022, 020,
010, 009, 004, 236, 257
477, 502
TV/VCR Combo
TV/VCR/DVD Combo
35
Page 38

For your information
Copyright © 2018 HUMAX Corporation
Not to be copied, used or translated in part or whole without HUMAX’s prior consent in writing except approval of
ownership of copyright and copyright law.
Meaning of Symbols
To reduce the risk of electric shock, do not remove cover (or back).
No user serviceable parts inside. Refer servicing to qualified service personnel.
This symbol indicates dangerous voltage inside the product that presents a risk of electric shock or
personal injury.
This symbol indicates important instructions accompanying the product.
Warnings, Cautions and Notes
Throughout the whole manual, pay special attention to the following headlines that indicate hazardous situations.
Warning:
Indicates a hazardous situation which could result in serious injury
Caution:
Indicates a situation which could damage the equipment or other apparatus
Note:
Indicates additional information to make the user aware of possible problems and information of any importance to help
understand, use and maintain the installation.
Warranty
The warranty does not cover parts which may become defective due to misuse of the information contained in this
manual.
1. The HUMAX Warranty is valid for a period of one year from the date of first purchase.
2. In the event that this product fails to function properly during the warranty period, the retailer or distributor will make
this product capable of operating for the purpose of which it was designed, without charging for labour and parts.
3. This warranty will be honoured only if the Warranty Certificate has been duly completed by the purchaser and is
presented to the retailer with the original invoice or receipt.
4. This warranty does not cover shipping or transportation charges from you to us.
5. The obligations of HUMAX are limited to the repair of defect parts. Costs and risks of transport to the retailer as well as
removal and installation of the product, and any other costs directly or indirectly related to its repair, are not covered by
the warranty.
6. All warranty repairs performed by non-authorized repair shops will not be reimbursed and if such repairs damage this
product such damage will not be covered by this warranty.
7. This warranty is not applicable in cases other than defects in materials or workmanship and, in particular, does not
cover:
a. Periodic check-ups, adjustments, maintenance or conversions as well as replacement of parts due to normal wear and
tear;
b. Damage caused by accidents, negligence, modifications, use of non-HUMAX parts, improper use, installation or
package;
c. Damage caused by lightning, water, fire, acts of war, public disturbances, incorrect mains voltages, incorrect ventilation
or any other cause beyond the control of HUMAX.
d. Products where the label bearing the serial number has been removed, defaced or is illegible.
8. This warranty is offered to any person who has legally obtained possession of this product within the warranty period.
9. HUMAX’s maximum liability shall not exceed the actual purchase price paid by you for the product. In no event shall
HUMAX be liable for special, incidental, consequential or indirect damages.
36
Page 39

Trademarks
• Manufactured under license from Dolby Laboratories.
Dolby, Dolby audio and the double-D symbol are trademarks of Dolby Laboratories.
• HDMI, the HDMI Logo, and High-Definition Multimedia interface are trademarks and registered trademarks of HDMI
Licensing LLC.
This item incorporates copy protection technology that is protected by
U.S. patents and other intellectual property rights of Rovi Corporation.
Reverse engineering and disassembly are prohibited.
Note: The model name is located on the bottom of this product.
Simplified EU Declaration of Conformity
The simplified EU declaration of conformity referred to in Article 10(9) shall be provided as follows:
Hereby, HUMAX declares that the radio equipment type [FVP-5000T] is in compliance with Directive 2014/53/EU and
relevant directives.
The full text of the EU declaration of conformity is available at the following internet address:
• United Kingdom : http://www.humaxdigital.com/uk/ec.php
• Germany : http://de.humaxdigital.com/ec
Wireless equipment use information
1. In France
Authorization for outdoor usage is limited to Channels
1~7 (2.400 ~ 2.454 GHz).
2. In Italy
For outdoor usage a general authorization is required
from the national spectrum authorities.
3. In Latvia
For outdoor usage an authorization is required from the
Electronic Communications Office.
4. 5GHz Radio Local Area Networks (RLANs) Band only
indoor use.
5. This equipment may be operated in all European Union
member countries and Turkey.
Radio Frequency Specification
Frequency mode (band) Wi-Fi b/g/n (20/40MHz)
RF output power Maximum power level is
not exceeding 20dBm
Frequency range (MHz) 2.4GHz
Radio Frequency Specification
Frequency mode (band) Wi-Fi a, n(20/40MHz),
ac(20/40/80MHz)
RF output power (EIRP) Maximum power level is
not exceeding 23dBm (for
TPC) / 20dBm (for without
TPC)
Frequency range (MHz) 5150MHz to 5350MHz
Appliance Classes
Double insulated Class II equipment
(IEC 60417-5172).
Do not require an earth connection.
For indoor use only (IEC 60417-5957).
Direct current (IEC 60417-5031).
Stand by (IEC 60417-5009).
Radio Frequency Specification
Frequency mode (band) Wi-Fi a, n(20/40MHz),
ac(20/40/80MHz)
RF output power (EIRP) Maximum power level is
not exceeding 14dBm
Frequency range (MHz) 5725MHz to 5875MHz
37
Page 40

For your safety
‘WEEE’ Instructions
This product should not be disposed with other household waste at the end of its working life. Please separate this from
other types of waste and recycle it responsibly to promote the sustainable reuse of material resources. This will prevent
possible harm to the environment or human health from uncontrolled disposal.
Domestic users:
Please contact either the retailer where you purchased this product or their local government office for details of where
and how they can take this item for environmentally safe recycling.
Business users:
Contact your supplier and check the terms and conditions of the purchase contract. This product should not be mixed
with other commercial waste for disposal.
Safety
1. POWER SUPPLY
• Operate this product only from the type of power supply shown on the marking label. If you do not
know the type of power supplied to your home, contact your local power company.
• Disconnect the power supply before you start any maintenance or installation procedures.
2. OVERLOADING
• Make sure that the wall outlet, extension cord and adapter have a sufficient power rating for the
appliance. If not, this can cause an electric fire shock.
3. LIQUID
• Do not expose this product to liquids. Do not put objects filled with liquid on the product.
4. CLEANING
• Disconnect the product from the wall outlet before you clean it.
• Use a moist cloth to clean the product. Do not use solvents. Wipe the surface gently with a soft cloth
as it may get scratched.
5. VENTILATION
• Make sure that the slots on top of the product are not blocked. It is necessary to have a sufficient
airflow into the unit.
• Do not put electronic equipment on the product.
• Do not put objects on the product. This will block the ventilation or cause damage to the surface.
6. ATTACHMENTS
• Do not use any unsupported attachments as these may be hazardous or cause damage to the
product.
7. LIGHTNING, STORM OR NOT IN USE
• Unplug the product from the wall outlet and disconnect the antenna during a thunderstorm or when
left unattended and unused for long periods of time. This will prevent damage to the unit due to
lightning and power-surges.
8. EXTRANEOUS OBJECTS
• Do not insert anything through the openings in the unit, where they can touch dangerous voltage
points or damage parts.
38
Page 41

9. REPLACEMENT OF PARTS
• When replacement of parts is required, be sure the service technician uses replacement parts
specified by the manufacturer or those that have the same characteristics as the original part.
Unauthorised substitution may result in additional damage to the unit.
10. CONNECTION TO THE SATELLITE DISH LNB/CABLE TV SIGNAL/AERIAL
• Disconnect the power supply before you connect or disconnect the cable from the satellite dish/
cable TV signal/aerial. If not, this can cause damage to the LNB/cable TV line/aerial.
11. CONNECTION TO THE TV
• Disconnect the power supply before you connect or disconnect the cable from the TV. If not, this can
cause damage to the TV.
12. ENVIRONMENT
• Attention should be drawn to the environmental aspects of battery disposal.
• Care is required for the use of this apparatus in tropical and/or moderate climates.
13. LOCATION
• Place the product indoors to avoid exposure to lightning, rain or sun. Do not place it near a radiator
or heat register.
• Keep at least 10 cm clearance from any other appliances susceptible to electromagnetic influences
such as a TV or a VCR.
• If you place the product on a rack or a bookcase, make sure that there is adequate ventilation and
that you have followed the manufacturer’s instructions for mounting.
• Do not place the product on an unstable surface where it can fall. A falling product can cause serious
injury to a personnel and serious damage to the appliance.
Cautions and Warnings
1. TO AVOID DAMAGE OF POWER CORD OR PLUG
• Do not modify or process the power cord or plug arbitrarily.
• Do not bend or twist the power cord.
• Make sure to disconnect the power cord while you hold the plug.
• Keep heating appliances as far as possible from the power cord to prevent the cover vinyl from
melting.
• The mains plug, as a disconnection device, shall remain readily accessible by the user.
• All-pole main switch shall remain readily operable. (For products with power switch)
2. TO AVOID ELECTRICAL SHOCK
• Do not open the main body.
• Do not insert metal or inflammable objects inside the product.
• Do not touch the power plug with wet hands.
• Disconnect the power cord in case of lightning.
• Unplug the power cable before you install the aerial cable.
3. TO AVOID DAMAGE OF PRODUCT
• Do not use the product when it is out of order. If you continue to use the product when defective, this
may cause serious damage. Make sure to contact the customer service centre if the product is out of
order.
• Do not insert metal or alien substance into the slots for the modules. It may cause damage to the
product and reduce its life span.
• Do not overly pile objects on the product. It may cause cracks, deformation and discolouration.
4. TO AVOID DAMAGE OF HDD
• Do not move the product or turn the power off suddenly while the hard disk drive is running.
• The company shall not be liable for any corruption of data on the hard disk drive caused by
carelessness or misuse of the user.
39
Page 42

works. But when you distribute the same sections as part of a whole which is a work based on the Program,
the distribution of the whole must be on the terms of this License, whose permissions for other licensees
extend to the entire whole, and thus to each and every part regardless of who wrote it.
Thus, it is not the intent of this section to claim rights or contest your rights to work written entirely by
you; rather, the intent is to exercise the right to control the distribution of derivative or collective works
Open Source
Software
Notice
HUMAX products use certain open source operating system software
GENERAL PUBLIC LICENSE Version 2 and GNU LESSER GENERAL LICENSE Version 2.1 each as defined and
published by the Free Software Foundation, Inc.
The following GPL and LGPL software source codes used in this product can be provided and this offer
is valid for up to three years from the date of original download of the software or purchase of product
containing such software. Please contact us at gnu@humaxdigital.com.
GPL Software
linux
busybox
e2fsprogs
rt3070
iptables
dnsmasq
libext2fs
compiler
mtd-utils
parted
xfsprogs
dosfstools
samba
proftpd
LGPL Software
uClibc
libexif
id3lib
lxc
FFmpeg
DirectFB
FreeType License (FTL) Software
freetype
Portions of this software are copyright © <2007> The FreeType Project (www.freetype.org).
All rights reserved.
OpenSSL License Software
OpenSSL
This product includes cryptographic software written by Eric Young.(eay@cryptsoft.com)
This product includes software written by Tim Hudson. (tjh@cryptsoft.com)
This product includes software developed by the OpenSSL Project for use in the OpenSSL Toolkit.(http://
www.openssl.org)
Use, modification and redistribution of the Open Source Software is governed by the terms and conditions
of the applicable Open Source License. The GNU General Public License (GPL) v2 is shown below.
The GNU General Public License (GPL)
Version 2, June 1991
Copyright (C) 1989, 1991 Free Software Foundation, Inc.51 Franklin Street, Fifth Floor, Boston, MA 021101301, USA Everyone is permitted to copy and distribute verbatim copies of this license document, but
changing it is not allowed.
Preamble
The licenses for most software are designed to take away your freedom to share and change it. By contrast,
the GNU General Public License is intended to guarantee your freedom to share and change free software-
-to make sure the software is free for all its users. This General Public License applies to most of the Free
Software Foundation’s software and to any other program whose authors commit to using it. (Some other
Free Software Foundation software is covered by the GNU Lesser General Public License instead.) You can
apply it to your programs, too. When we speak of free software, we are referring to freedom, not price.
Our General Public Licenses are designed to make sure that you have the freedom to distribute copies of
free software (and charge for this service if you wish), that you receive source code or can get it if you want
it, that you can change the software or use pieces of it in new free programs; and that you know you can
do these things.
To protect your rights, we need to make restrictions that forbid anyone to deny you these rights or to ask
you to surrender the rights. These restrictions translate to certain responsibilities for you if you distribute
copies of the software, or if you modify it.
For example, if you distribute copies of such a program, whether gratis or for a fee, you must give the
recipients all the rights that you have. You must make sure that they, too, receive or can get the source
code. And you must show them these terms so they know their rights.
We protect your rights with two steps: (1) copyright the software, and (2) offer you this license which gives
you legal permission to copy, distribute and/or modify the software.
Also, for each author’s protection and ours, we want to make certain that everyone understands that there
is no warranty for this free software. If the software is modified by someone else and passed on, we want its
recipients to know that what they have is not the original, so that any problems introduced by others will
not reflect on the original authors’ reputations.
Finally, any free program is threatened constantly by software patents. We wish to avoid the danger that
re-distributors of a free program will individually obtain patent licenses, in effect making the program
proprietary. To prevent this, we have made it clear that any patent must be licensed for everyone’s free
use or not licensed at all.
The precise terms and conditions for copying, distribution and modification follow.
TERMS AND CONDITIONS FOR COPYING, DISTRIBUTION AND MODIFICATION
0. This License applies to any program or other work which contains a notice placed by the copyright
holder saying it may be distributed under the terms of this General Public License. The “Program”, below,
refers to any such program or work, and a “work based on the Program” means either the Program or
any derivative work under copyright law: that is to say, a work containing the Program or a portion of it,
either verbatim or with modifications and/or translated into another language. (Hereinafter, translation is
included without limitation in the term “modification”.) Each licensee is addressed as “you”.
Activities other than copying, distribution and modification are not covered by this License; they are
outside its scope. The act of running the Program is not restricted, and the output from the Program is
covered only if its contents constitute a work based on the Program (independent of having been made by
running the Program). Whether that is true depends on what the Program does.
1. You may copy and distribute verbatim copies of the Program’s source code as you receive it, in any me
dium, provided that you conspicuously and appropriately publish on each copy an appropriate copyright
notice and disclaimer of warranty; keep intact all the notices that refer to this License and to the absence of
any warranty; and give any other recipients of the Program a copy of this License along with the Program.
You may charge a fee for the physical act of transferring a copy, and you may at your option offer warranty
protection in exchange for a fee.
2. You may modify your copy or copies of the Program or any portion of it, thus forming a work based
on the Program, and copy and distribute such modifications or work under the terms of Section 1 above,
provided that you also meet all of these conditions:
a) You must cause the modified files to carry prominent notices stating that you changed the files and the
date of any change.
b) You must cause any work that you distribute or publish, that in whole or in part contains or is derived
from the Program or any part thereof, to be licensed as a whole at no charge to all third parties under the
terms of this License.
c) If the modified program normally reads commands interactively when run, you must cause it, when
started running for such interactive use in the most ordinary way, to print or display an announcement
including an appropriate copyright notice and a notice that there is no warranty (or else, saying that you
provide a warranty) and that users may redistribute the program under these conditions, and telling the
user how to view a copy of this License. (Exception: if the Program itself is interactive but does not normally
print such an announcement, your work based on the Program is not required to print an announcement.)
These requirements apply to the modified work as a whole. If identifiable sections of that work are not derived from the Program, and can be reasonably considered independent and separate works in themselves,
then this License, and its terms, do not apply to those sections when you distribute them as separate
distributed pursuant to GNU
based on the Program. In addition, mere aggregation of another work not based on the Program with the
Program (or with a work based on the Program) on a volume of a storage or distribution medium does not
bring the other work under the scope of this License.
3. You may copy and distribute the Program (or a work based on it, under Section 2) in object code or
executable form under the terms of Sections 1 and 2 above provided that you also do one of the following:
a) Accompany it with the complete corresponding machine-readable source code, which must be
distributed under the terms of Sections 1 and 2 above on a medium customarily used for software
interchange; or,
b) Accompany it with a written offer, valid for at least three years, to give any third party, for a charge no
more than your cost of physically performing source distribution, a complete machine-readable copy of
the corresponding source code, to be distributed under the terms of Sections 1 and 2 above on a medium
customarily used for software interchange; or,
c) Accompany it with the information you received as to the offer to distribute corresponding source code.
(This alternative is allowed only for non-commercial distribution and only if you received the program in
object code or executable form with such an offer, in accord with Subsection b above.) The source code
for a work means the preferred form of the work for making modifications to it. For an executable work,
complete source code means all the source code for all modules it contains, plus any associated interface
definition files, plus the scripts used to control compilation and installation of the executable. However, as
a special exception, the source code distributed need not include anything that is normally distributed (in
either source or binary form) with the major components (compiler, kernel, and so on) of the operating
system on which the executable runs, unless that component itself accompanies the executable. If distribu
tion of executable or object code is made by offering access to copy from a designated place, then offering
equivalent access to copy the source code from the same place counts as distribution of the source code,
even though third parties are not compelled to copy the source along with the object code.
4. You may not copy, modify, sub-license, or distribute the Program except as expressly provided under
this License. Any attempt otherwise to copy, modify, sub-license or distribute the Program is void, and
will automatically terminate your rights under this License. However, parties who have received copies, or
rights, from you under this License will not have their licenses terminated so long as such parties remain
in full compliance.
5. You are not required to accept this License, since you have not signed it. However, nothing else grants
you permission to modify or distribute the Program or its derivative works. These actions are prohibited
by law if you do not accept this License. Therefore, by modifying or distributing the Program (or any
work based on the Program), you indicate your acceptance of this License to do so, and all its terms and
conditions for copying, distributing or modifying the Program or works based on it.
6. Each time you redistribute the Program (or any work based on the Program), the recipient automatically
receives a license from the original licensor to copy, distribute or modify the Program subject to these
terms and conditions. You may not impose any further restrictions on the recipients’ exercise of the rights
granted herein. You are not responsible for enforcing compliance by third parties to this License.
7. If, as a consequence of a court judgment or allegation of patent infringement or for any other reason
(not limited to patent issues), conditions are imposed on you (whether by court order, agreement or
otherwise) that contradict the conditions of this License, they do not excuse you from the conditions of
this License. If you cannot distribute so as to satisfy simultaneously your obligations under this License
and any other pertinent obligations, then as a consequence you may not distribute the Program at all.
For example, if a patent license would not permit royalty-free redistribution of the Program by all those
who receive copies directly or indirectly through you, then the only way you could satisfy both it and this
License would be to refrain entirely from distribution of the Program. If any portion of this section is held
invalid or unenforceable under any particular circumstance, the balance of the section is intended to apply
and the section as a whole is intended to apply in other circumstances. It is not the purpose of this section
to induce you to infringe any patents or other property right claims or to contest validity of any such claims;
this section has the sole purpose of protecting the integrity of the free software distribution system, which
is implemented by public license practices. Many people have made generous contributions to the wide
range of software distributed through that system in reliance on consistent application of that system; it is
up to the author/donor to decide if he or she is willing to distribute software through any other system and
a licensee cannot impose that choice.
This section is intended to make thoroughly clear what is believed to be a consequence of the rest of
this License.
8. If the distribution and/or use of the Program is restricted in certain countries either by patents or by
copyrighted interfaces, the original copyright holder who places the Program under this License may add
an explicit geographical distribution limitation excluding those countries, so that distribution is permitted
only in or among countries not thus excluded. In such case, this License incorporates the limitation as if
written in the body of this License.
9. The Free Software Foundation may publish revised and/or new versions of the General Public License
from time to time. Such new versions will be similar in spirit to the present version, but may differ in detail
to address new problems or concerns.
Each version is given a distinguishing version number. If the Program specifies a version number of
this License which applies to it and “any later version”, you have the option of following the terms and
conditions either of that version or of any later version published by the Free Software Foundation. If the
Program does not specify a version number of this License, you may choose any version ever published by
the Free Software Foundation.
10. If you wish to incorporate parts of the Program into other free programs whose distribution conditions
are different, write to the author to ask for permission. For software which is copyrighted by the Free
Software Foundation, write to the Free Software Foundation; we sometimes make exceptions for this. Our
decision will be guided by the two goals of preserving the free status of all derivatives of our free software
and of promoting the sharing and reuse of software generally.
NO WARRANTY
11. BECAUSE THE PROGRAM IS LICENSED FREE OF CHARGE, THERE IS NO WARRANTY FOR THE PROGRAM,
TO THE EXTENT PERMITTED BY APPLICABLE LAW. EXCEPT WHEN OTHERWISE STATED IN WRITING THE
COPYRIGHT HOLDERS AND/OR OTHER PARTIES PROVIDE THE PROGRAM “AS IS” WITHOUT WARRANTY OF
ANY KIND, EITHER EXPRESSED OR IMPLIED, INCLUDING, BUT NOT LIMITED TO, THE IMPLIED WARRANTIES
OF MERCHANTABILITY AND FITNESS FOR A PARTICULAR PURPOSE. THE ENTIRE RISK AS TO THE QUALITY
AND PERFORMANCE OF THE PROGRAM IS WITH YOU. SHOULD THE PROGRAM PROVE DEFECTIVE, YOU
ASSUME THE COST OF ALL NECESSARY SERVICING, REPAIR OR CORRECTION.
12. IN NO EVENT UNLESS REQUIRED BY APPLICABLE LAW OR AGREED TO IN WRITING WILL ANY COPYRIGHT
HOLDER, OR ANY OTHER PARTY WHO MAY MODIFY AND/OR REDISTRIBUTE THE PROGRAM AS PERMITTED
ABOVE, BE LIABLE TO YOU FOR DAMAGES, INCLUDING ANY GENERAL, SPECIAL, INCIDENTAL OR CONSE
QUENTIAL DAMAGES ARISING OUT OF THE USE OR INABILITY TO USE THE PROGRAM (INCLUDING BUT
NOT LIMITED TO LOSS OF DATA OR DATA BEING RENDERED INACCURATE OR LOSSES SUSTAINED BY YOU
OR THIRD PARTIES OR A FAILURE OF THE PROGRAM TO OPERATE WITH ANY OTHER PROGRAMS), EVEN IF
SUCH HOLDER OR OTHER PARTY HAS BEEN ADVISED OF THE POSSIBILITY OF SUCH DAMAGES.
END OF TERMS AND CONDITIONS
How to Apply These Terms to Your New Programs
If you develop a new program, and you want it to be of the greatest possible use to the public, the best
way to achieve this is to make it free software which everyone can redistribute and change under these
terms. To do so, attach the following notices to the program. It is safest to attach them to the start of each
source file to most effectively convey the exclusion of warranty; and each file should have at least the
“copyright” line and a pointer to where the full notice is found.
One line to give the program’s name and a brief idea of what it does.
Copyright (C) yyyy name of author This program is free software; you can redistribute it and/or modify it
under the terms of the GNU General Public License as published by the Free Software Foundation; either
version 2 of the License, or (at your option) any later version. This program is distributed in the hope that
it will be useful, but WITHOUT ANY WARRANTY; without even the implied warranty of MERCHANTABILITY
or FITNESS FOR A PARTICULAR PURPOSE. See the GNU General Public License for more details. You should
have received a copy of the GNU General Public License along with this program; if not, write to the Free
Software Foundation, Inc., 51 Franklin Street, Fifth Floor, Boston, MA 02110-1301, USA. Also add information
on how to contact you by electronic and paper mail. If the program is interactive, make it output a short
notice like this when it starts in an interactive mode:
Gnomovision version 69, Copyright (C) year name of author Gnomovision comes with ABSOLUTELY NO
WARRANTY; for details type `show w’. This is free software, and you are welcome to redistribute it under
certain conditions; type `show c’ for details.
The hypothetical commands `show w’ and `show c’ should show the appropriate parts of the General
Public License. Of course, the commands you use may be called something other than `show w’ and `show
c’; they could even be mouse-clicks or menu items-whatever suits your program. You should also get
your employer (if you work as a programmer) or your school, if any, to sign a “copyright disclaimer” for the
program, if necessary. Here is a sample; alter the names:
Yoyodyne, Inc., hereby disclaims all copyright interest in the program `Gnomovision’ (which makes passes
at compilers) written by Dru Smith.
Signature of Ty Coon, 1 April 1989
Ty Coon, President of Vice
This General Public License does not permit incorporating your program into proprietary programs. If your
program is a subroutine library, you may consider it more useful to permit linking proprietary applications
with the library. If this is what you want to do, use the GNU Library General Public License instead of this
License.
GNU Lesser General Public License (LGPL)
Version 2.1, February 1999
Copyright (C) 1991, 1999 Free Software Foundation, Inc. 51 Franklin Street, Fifth Floor, Boston, MA 021101301 USA Everyone is permitted to copy and distribute verbatim copies of this license document, but
changing it is not allowed.
[This is the first released version of the Lesser GPL. It also counts as the successor of the GNU Library Public
40
-
-
Page 43

License, version 2, hence the version number 2.1.]
Preamble
The licenses for most software are designed to take away your freedom to share and change it. By contrast,
the GNU General Public Licenses are intended to guarantee your freedom to share and change free
software--to make sure the software is free for all its users.
This license, the Lesser General Public License, applies to some specially designated software packag
es--typically libraries--of the Free Software Foundation and other authors who decide to use it. You can use
it too, but we suggest you first think carefully about whether this license or the ordinary General Public License is the better strategy to use in any particular case, based on the explanations below. When we speak
of free software, we are referring to freedom of use, not price. Our General Public Licenses are designed
to make sure that you have the freedom to distribute copies of free software (and charge for this service if
you wish); that you receive source code or can get it if you want it; that you can change the software and
use pieces of it in new free programs; and that you are informed that you can do these things. To protect
your rights, we need to make restrictions that forbid distributors to deny you these rights or to ask you to
surrender these rights. These restrictions translate to certain responsibilities for you if you distribute copies
of the library or if you modify it. For example, if you distribute copies of the library, whether gratis or for a
fee, you must give the recipients all the rights that we gave you. You must make sure that they, too, receive
or can get the source code. If you link other code with the library, you must provide complete object files
to the recipients, so that they can re-link them with the library after making changes to the library and
recompiling it. And you must show them these terms so they know their rights. We protect your rights
with a two-step method: (1) we copyright the library, and (2) we offer you this license, which gives you
legal permission to copy, distribute and/or modify the library. To protect each distributor, we want to make
it very clear that there is no warranty for the free library. Also, if the library is modified by someone else and
passed on, the recipients should know that what they have is not the original version, so that the original
author’s reputation will not be affected by problems that might be introduced by others.
Finally, software patents pose a constant threat to the existence of any free program. We wish to make sure
that a company cannot effectively restrict the users of a free program by obtaining a restrictive license from
a patent holder. Therefore, we insist that any patent license obtained for a version of the library must be
consistent with the full freedom of use specified in this license. Most GNU software, including some libraries, is covered by the ordinary GNU General Public License. This license, the GNU Lesser General Public License, applies to certain designated libraries, and is quite different from the ordinary General Public License.
We use this license for certain libraries in order to permit linking those libraries into non-free programs.
When a program is linked with a library, whether statically or using a shared library, the combination of the
two is legally speaking a combined work, a derivative of the original library. The ordinary General Public
License therefore permits such linking only if the entire combination fits its criteria of freedom. The Lesser
General Public License permits more lax criteria for linking other code with the library. We call this license
the “Lesser” General Public License because it does Less to protect the user’s freedom than the ordinary
General Public License. It also provides other free software developers Less of an advantage over competing non-free programs. These disadvantages are the reason we use the ordinary General Public License
for many libraries. However, the Lesser license provides advantages in certain special circumstances. For
example, on rare occasions, there may be a special need to encourage the widest possible use of a certain
library, so that it becomes a de-facto standard. To achieve this, non-free programs must be allowed to use
the library. A more frequent case is that a free library does the same job as widely used non-free libraries. In
this case, there is little to gain by limiting the free library to free software only, so we use the Lesser General
Public License. In other cases, permission to use a particular library in non-free programs enables a greater
number of people to use a large body of free software. For example, permission to use the GNU C Library
in non-free programs enables many more people to use the whole GNU operating system, as well as its
variant, the GNU/Linux operating system. Although the Lesser General Public License is Less protective of
the users’ freedom, it does ensure that the user of a program that is linked with the Library has the freedom
and the wherewithal to run that program using a modified version of the Library. The precise terms and
conditions for copying, distribution and modification follow. Pay close attention to the difference between
a “work based on the library” and a “work that uses the library”. The former contains code derived from the
library, whereas the latter must be combined with the library in order to run.
TERMS AND CONDITIONS FOR COPYING, DISTRIBUTION AND MODIFICATION
0. This License Agreement applies to any software library or other program which contains a notice placed
by the copyright holder or other authorized party saying it may be distributed under the terms of this
Lesser General Public License (also called “this License”). Each licensee is addressed as “you”. A “library”
means a collection of software functions and/or data prepared so as to be conveniently linked with
application programs (which use some of those functions and data) to form executables. The “Library”,
below, refers to any such software library or work which has been distributed under these terms. A “work
based on the Library” means either the Library or any derivative work under copyright law: that is to say,
a work containing the Library or a portion of it, either verbatim or with modifications and/or translated
straightforwardly into another language. (Hereinafter, translation is included without limitation in the term
“modification”.) “Source code” for a work means the preferred form of the work for making modifications
to it. For a library, complete source code means all the source code for all modules it contains, plus any
associated interface definition files, plus the scripts used to control compilation and installation of the
library. Activities other than copying, distribution and modification are not covered by this License; they are
outside its scope. The act of running a program using the Library is not restricted, and output from such
a program is covered only if its contents constitute a work based on the Library (independent of the use
of the Library in a tool for writing it). Whether that is true depends on what the Library does and what the
program that uses the Library does.
1. You may copy and distribute verbatim copies of the Library’s complete source code as you receive it,
in any medium, provided that you conspicuously and appropriately publish on each copy an appropriate
copyright notice and disclaimer of warranty; keep intact all the notices that refer to this License and to
the absence of any warranty; and distribute a copy of this License along with the Library. You may charge
a fee for the physical act of transferring a copy, and you may at your option offer warranty protection in
exchange for a fee.
2. You may modify your copy or copies of the Library or any portion of it, thus forming a work based on the
Library, and copy and distribute such modifications or work under the terms of Section 1 above, provided
that you also meet all of these conditions:
a) The modified work must itself be a software library.
b) You must cause the files modified to carry prominent notices stating that you changed the files and the
date of any change.
c) You must cause the whole of the work to be licensed at no charge to all third parties under the terms
of this License.
d) If a facility in the modified Library refers to a function or a table of data to be supplied by an application
program that uses the facility, other than as an argument passed when the facility is invoked, then you
must make a good faith effort to ensure that, in the event an application does not supply such function or
table, the facility still operates, and performs whatever part of its purpose remains meaningful. (For exam
ple, a function in a library to compute square roots has a purpose that is entirely well-defined independent
of the application. Therefore, Subsection 2d requires that any application-supplied function or table used
by this function must be optional: if the application does not supply it, the square root function must still
compute square roots.) These requirements apply to the modified work as a whole. If identifiable sections
of that work are not derived from the Library, and can be reasonably considered independent and separate
works in themselves, then this License, and its terms, do not apply to those sections when you distribute
them as separate works. But when you distribute the same sections as part of a whole which is a work
based on the Library, the distribution of the whole must be on the terms of this License, whose permissions
for other licensees extend to the entire whole, and thus to each and every part regardless of who wrote it.
Thus, it is not the intent of this section to claim rights or contest your rights to work written entirely by you;
rather, the intent is to exercise the right to control the distribution of derivative or collective works based
on the Library. In addition, mere aggregation of another work not based on the Library with the Library
(or with a work based on the Library) on a volume of a storage or distribution medium does not bring the
other work under the scope of this License.
3. You may opt to apply the terms of the ordinary GNU General Public License instead of this License to
a given copy of the Library. To do this, you must alter all the notices that refer to this License, so that they
refer to the ordinary GNU General Public License, version 2, instead of to this License. (If a newer version
than version 2 of the ordinary GNU General Public License has appeared, then you can specify that version
instead if you wish.) Do not make any other change in these notices. Once this change is made in a given
copy, it is irreversible for that copy, so the ordinary GNU General Public License applies to all subsequent
copies and derivative works made from that copy. This option is useful when you wish to copy part of the
code of the Library into a program that is not a library.
4. You may copy and distribute the Library (or a portion or derivative of it, under Section 2) in object code
or executable form under the terms of Sections 1 and 2 above provided that you accompany it with the
complete corresponding machine-readable source code, which must be distributed under the terms of
Sections 1 and 2 above on a medium customarily used for software interchange. If distribution of object
code is made by offering access to copy from a designated place, then offering equivalent access to copy
the source code from the same place satisfies the requirement to distribute the source code, even though
third parties are not compelled to copy the source along with the object code.
5. A program that contains no derivative of any portion of the Library, but is designed to work with the
Library by being compiled or linked with it, is called a “work that uses the Library”. Such a work, in isolation,
is not a derivative work of the Library, and therefore falls outside the scope of this License. However, linking
a “work that uses the Library” with the Library creates an executable that is a derivative of the Library
(because it contains portions of the Library), rather than a “work that uses the library”. The executable is
therefore covered by this License. Section 6 states terms for distribution of such executables.
When a “work that uses the Library” uses material from a header file that is part of the Library, the object
code for the work may be a derivative work of the Library even though the source code is not. Whether this
is true is especially significant if the work can be linked without the Library, or if the work is itself a library.
The threshold for this to be true is not precisely defined by law. If such an object file uses only numerical
parameters, data structure layouts and accessors, and small macros and small inline functions (ten lines or
less in length), then the use of the object file is unrestricted, regardless of whether it is legally a derivative
work. (Executables containing this object code plus portions of the Library will still fall under Section 6.)
Otherwise, if the work is a derivative of the Library, you may distribute the object code for the work under
the terms of Section 6. Any executables containing that work also fall under Section 6, whether or not they
-
-
41
are linked directly with the Library itself.
6. As an exception to the Sections above, you may also combine or link a “work that uses the Library” with
the Library to produce a work containing portions of the Library, and distribute that work under terms
of your choice, provided that the terms permit modification of the work for the customer’s own use and
reverse engineering for debugging such modifications.
You must give prominent notice with each copy of the work that the Library is used in it and that the
Library and its use are covered by this License. You must supply a copy of this License. If the work during
execution displays copyright notices, you must include the copyright notice for the Library among them, as
well as a reference directing the user to the copy of this License. Also, you must do one of these things:
a) Accompany the work with the complete corresponding machine-readable source code for the Library
including whatever changes were used in the work (which must be distributed under Sections 1 and 2
above); and, if the work is an executable linked with the Library, with the complete machine-readable “work
that uses the Library”, as object code and/or source code, so that the user can modify the Library and then
re-link to produce a modified executable containing the modified Library. (It is understood that the user
who changes the contents of definitions files in the Library will not necessarily be able to recompile the
application to use the modified definitions.)
b) Use a suitable shared library mechanism for linking with the Library. A suitable mechanism is one that (1)
uses at run time a copy of the library already present on the user’s computer system, rather than copying
library functions into the executable, and (2) will operate properly with a modified version of the library,
if the user installs one, as long as the modified version is interface-compatible with the version that the
work was made with.
c) Accompany the work with a written offer, valid for at least three years, to give the same user the materials specified in Subsection 6a, above, for a charge no more than the cost of performing this distribution.
d) If distribution of the work is made by offering access to copy from a designated place, offer equivalent
access to copy the above specified materials from the same place.
e) Verify that the user has already received a copy of these materials or that you have already sent this
user a copy.
For an executable, the required form of the “work that uses the Library” must include any data and utility
programs needed for reproducing the executable from it. However, as a special exception, the materials to
be distributed need not include anything that is normally distributed (in either source or binary form) with
the major components (compiler, kernel, and so on) of the operating system on which the executable runs,
unless that component itself accompanies the executable.
It may happen that this requirement contradicts the license restrictions of other proprietary libraries that
do not normally accompany the operating system. Such a contradiction means you cannot use both them
and the Library together in an executable that you distribute.
7. You may place library facilities that are a work based on the Library side-by-side in a single library together with other library facilities not covered by this License, and distribute such a combined library, provided
that the separate distribution of the work based on the Library and of the other library facilities is otherwise
permitted, and provided that you do these two things:
a) Accompany the combined library with a copy of the same work based on the Library, uncombined with
any other library facilities. This must be distributed under the terms of the Sections above.
b) Give prominent notice with the combined library of the fact that part of it is a work based on the Library,
and explaining where to find the accompanying uncombined form of the same work.
8. You may not copy, modify, sub-license, link with, or distribute the Library except as expressly provided
under this License. Any attempt otherwise to copy, modify, sub-license, link with, or distribute the Library is
void, and will automatically terminate your rights under this License. However, parties who have received
copies, or rights, from you under this License will not have their licenses terminated so long as such parties
remain in full compliance.
9. You are not required to accept this License, since you have not signed it. However, nothing else grants
you permission to modify or distribute the Library or its derivative works. These actions are prohibited by
law if you do not accept this License. Therefore, by modifying or distributing the Library (or any work based
on the Library), you indicate your acceptance of this License to do so, and all its terms and conditions for
copying, distributing or modifying the Library or works based on it.
10. Each time you redistribute the Library (or any work based on the Library), the recipient automatically
receives a license from the original licensor to copy, distribute, link with or modify the Library subject to
these terms and conditions. You may not impose any further restrictions on the recipients’ exercise of the
rights granted herein. You are not responsible for enforcing compliance by third parties with this License.
11. If, as a consequence of a court judgment or allegation of patent infringement or for any other reason
(not limited to patent issues), conditions are imposed on you (whether by court order, agreement or
otherwise) that contradict the conditions of this License, they do not excuse you from the conditions of this
License. If you cannot distribute so as to satisfy simultaneously your obligations under this License and any
other pertinent obligations, then as a consequence you may not distribute the Library at all. For example, if
a patent license would not permit royalty-free redistribution of the Library by all those who receive copies
directly or indirectly through you, then the only way you could satisfy both it and this License would be to
refrain entirely from distribution of the Library. If any portion of this section is held invalid or unenforceable
under any particular circumstance, the balance of the section is intended to apply, and the section as a
whole is intended to apply in other circumstances. It is not the purpose of this section to induce you to
infringe any patents or other property right claims or to contest validity of any such claims; this section has
the sole purpose of protecting the integrity of the free software distribution system which is implemented
by public license practices. Many people have made generous contributions to the wide range of software
distributed through that system in reliance on consistent application of that system; it is up to the author/
donor to decide if he or she is willing to distribute software through any other system and a licensee
cannot impose that choice. This section is intended to make thoroughly clear what is believed to be a
consequence of the rest of this License.
12. If the distribution and/or use of the Library is restricted in certain countries either by patents or by
copyrighted interfaces, the original copyright holder who places the Library under this License may add an
explicit geographical distribution limitation excluding those countries, so that distribution is permitted only
in or among countries not thus excluded. In such case, this License incorporates the limitation as if written
in the body of this License.
13. The Free Software Foundation may publish revised and/or new versions of the Lesser General Public
License from time to time. Such new versions will be similar in spirit to the present version, but may differ in
detail to address new problems or concerns.
Each version is given a distinguishing version number. If the Library specifies a version number of this
License which applies to it and “any later version”, you have the option of following the terms and
conditions either of that version or of any later version published by the Free Software Foundation. If the
Library does not specify a license version number, you may choose any version ever published by the Free
Software Foundation.
14. If you wish to incorporate parts of the Library into other free programs whose distribution conditions
are incompatible with these, write to the author to ask for permission. For software which is copyrighted by
the Free Software Foundation, write to the Free Software Foundation; we sometimes make exceptions for
this. Our decision will be guided by the two goals of preserving the free status of all derivatives of our free
software and of promoting the sharing and reuse of software generally.
NO WARRANTY
15. BECAUSE THE LIBRARY IS LICENSED FREE OF CHARGE, THERE IS NO WARRANTY FOR THE LIBRARY,
TO THE EXTENT PERMITTED BY APPLICABLE LAW. EXCEPT WHEN OTHERWISE STATED IN WRITING THE
COPYRIGHT HOLDERS AND/OR OTHER PARTIES PROVIDE THE LIBRARY “AS IS” WITHOUT WARRANTY OF
ANY KIND, EITHER EXPRESSED OR IMPLIED, INCLUDING, BUT NOT LIMITED TO, THE IMPLIED WARRANTIES
OF MERCHANTABILITY AND FITNESS FOR A PARTICULAR PURPOSE. THE ENTIRE RISK AS TO THE QUALITY
AND PERFORMANCE OF THE LIBRARY IS WITH YOU. SHOULD THE LIBRARY PROVE DEFECTIVE, YOU ASSUME
THE COST OF ALL NECESSARY SERVICING, REPAIR OR CORRECTION.
16. IN NO EVENT UNLESS REQUIRED BY APPLICABLE LAW OR AGREED TO IN WRITING WILL ANY COPYRIGHT
HOLDER, OR ANY OTHER PARTY WHO MAY MODIFY AND/OR REDISTRIBUTE THE LIBRARY AS PERMITTED
ABOVE, BE LIABLE TO YOU FOR DAMAGES, INCLUDING ANY GENERAL, SPECIAL, INCIDENTAL OR CONSE
QUENTIAL DAMAGES ARISING OUT OF THE USE OR INABILITY TO USE THE LIBRARY (INCLUDING BUT NOT
LIMITED TO LOSS OF DATA OR DATA BEING RENDERED INACCURATE OR LOSSES SUSTAINED BY YOU OR
THIRD PARTIES OR A FAILURE OF THE LIBRARY TO OPERATE WITH ANY OTHER SOFTWARE), EVEN IF SUCH
HOLDER OR OTHER PARTY HAS BEEN ADVISED OF THE POSSIBILITY OF SUCH DAMAGES.
END OF TERMS AND CONDITIONS
How to Apply These Terms to Your New Libraries
If you develop a new library, and you want it to be of the greatest possible use to the public, we recom
mend making it free software that everyone can redistribute and change. You can do so by permitting
redistribution under these terms (or, alternatively, under the terms of the ordinary General Public License).
To apply these terms, attach the following notices to the library. It is safest to attach them to the start of
each source file to most effectively convey the exclusion of warranty; and each file should have at least the
“copyright” line and a pointer to where the full notice is found. One line to give the library’s name and an
idea of what it does.> Copyright (C) year name of author This library is free software; you can redistribute
it and/or modify it under the terms of the GNU Lesser General Public License as published by the Free
Software Foundation; either version 2.1 of the License, or (at your option) any later version. This library is
distributed in the hope that it will be useful, but WITHOUT ANY WARRANTY; without even the implied
warranty of MERCHANTABILITY or FITNESS FOR A PARTICULAR PURPOSE. See the GNU Lesser General
Public License for more details.
You should have received a copy of the GNU Lesser General Public License along with this library; if not,
write to the Free Software Foundation, Inc., 51 Franklin Street, Fifth Floor, Boston, MA 02110-1301 USA Also
add information on how to contact you by electronic and paper mail. You should also get your employer
(if you work as a programmer) or your school, if any, to sign a “copyright disclaimer” for the library, if
necessary. Here is a sample; alter the names:
Yoyodyne, Inc., hereby disclaims all copyright interest in the library `Frob’ (a library for tweaking knobs)
written by Dru Smith.
Signature of Ty Coon, 1 April 1990
Ty Coon, President of Vice
-
-
Page 44

Don’t be anti-social
For news, support and offers find us on:
HumaxUK @HumaxUK @Humax_UK
Subscribe to our monthly newsletter at: uk.humaxdigital.com
Need some
extra help?
Customer support
For help with installing or setting up your new Freeview Play Recorder,
feel free to call us on 0344 318 8800 (Mon-Fri 9-5pm).
Alternatively visit uk.humaxdigital.com/support where you can find
FAQs, software updates, user manuals, etc.
 Loading...