

HP StoreOnce 2700, StoreOnce4500, StoreOnce 2900, StoreOnce 4700 Installation And Configuration Manual

HP StoreOnce
2700, 2900, 4500 and 4700 Backup
system
Installation and Configuration Guide
Abstract
This document describes how to install and configure HP StoreOnce 4700, 4500, 2900 and 2700 Backup systems. These
systems are also sometimes referred to as single-node StoreOnce products and they were introduced with StoreOnce software
version 3.9.0 (or 3.12.0 for HP StoreOnce 2900).
HP Part Number: BB877-90932
Published: March 2015
Edition: 4

© Copyright 2013–2015 Hewlett-Packard Development Company, L.P.
Confidential computer software. Valid license from HP required for possession, use or copying. Consistent with FAR 12.211 and 12.212, Commercial
Computer Software, Computer Software Documentation, and Technical Data for Commercial Items are licensed to the U.S. Government under
vendor's standard commercial license.
The information contained herein is subject to change without notice. The only warranties for HP products and services are set forth in the express
warranty statements accompanying such products and services. Nothing herein should be construed as constituting an additional warranty. HP shall
not be liable for technical or editorial errors or omissions contained herein.
WARRANTY STATEMENT: To obtain a copy of the warranty for this product, see the warranty information website:
http://www.hp.com/go/storagewarranty
Linear Tape-Open, LTO, LTO Logo, Ultrium and Ultrium Logo are trademarks of Quantum Corp, HP and IBM in the US, other countries or both.
Microsoft, Windows is a U.S. registered trademark of Microsoft Corporation.
Intel and Itanium are trademarks or registered trademarks of Intel Corporation or its subsidiaries in the United States and other countries.
AMD is a registered trademark of Advanced Micro Devices, Inc.
Revision History
October 2013Revision 1
This is the first edition of the guide for HP StoreOnce 2700, 4500 and 4700 Backup systems, issued with the 3.9.0 or later version of HP StoreOnce
software.
June 2014Revision 2
This is the second edition of the guide, issued with the 3.11.0 version of HP StoreOnce software.
December 2014Revision 3
This is the third edition of the guide, issued with the 3.12.0 version of HP StoreOnce software.
March 2015Revision 4
This is the fourth edition of the guide to include HP StoreOnce 2900 Backup. The part number has not been updated because edition 3 was not
released to hp.com.

Contents
1 Before you start..........................................................................................7
Introduction..............................................................................................................................7
HP StoreOnce 2900, 2700, 4500 and 4700 models....................................................................7
Software and hardware requirements..........................................................................................8
Supported Ethernet configurations..........................................................................................8
iLO 4 functionality................................................................................................................9
Supported Fibre Channel connections.....................................................................................9
Software requirements........................................................................................................10
Recommended web browser settings.........................................................................................10
2 Installing and cabling the HP StoreOnce Backup system................................11
Installing the rail kit.................................................................................................................11
Mounting the HP StoreOnce Backup system................................................................................11
Attaching SFPs, StoreOnce 2900, 4500 and 4700 only..............................................................12
HP StoreOnce 4700 Backup................................................................................................13
HP StoreOnce 2900 and 4500 Backup................................................................................14
Connecting the hardware........................................................................................................15
Connecting the HP StoreOnce 4700 Backup system................................................................15
Connecting the first storage enclosure at installation...........................................................16
Connecting the HP StoreOnce 4500 Backup system...............................................................17
Connecting the HP StoreOnce 2900 Backup system...............................................................17
Connecting the HP StoreOnce 2700 Backup system................................................................18
Attaching the security bezel.................................................................................................18
Connecting to the expansion enclosure (HP StoreOnce 4500 and 4700).......................................18
Installing expansion enclosures with the HP StoreOnce 4700...................................................19
Installing expansion enclosures with the HP StoreOnce 4500...................................................20
Adding disks for capacity expansion (StoreOnce 2900 only).......................................................22
3 Powering on and managing the StoreOnce Management system....................24
Powering on expansion shelves, HP 4500 and 4700 only............................................................24
Powering on the HP StoreOnce Backup system............................................................................24
Discovering the HP StoreOnce Backup system on the network.......................................................25
Accessing the StoreOnce Management Console.........................................................................25
The StoreOnce CLI.............................................................................................................25
The StoreOnce GUI............................................................................................................26
User roles and accounts .........................................................................................................26
Password best practices...........................................................................................................27
User account and password requirements..............................................................................27
4 Configuration using the system set config wizard..........................................28
System configuration using system set config command................................................................28
Configure network.............................................................................................................28
Configure Time..................................................................................................................28
Configure Licenses.............................................................................................................29
Verify Hardware health.......................................................................................................29
Finish Configuration (and reboot).........................................................................................29
5 Network configuration, understanding the StoreOnce networking concepts......30
Network configuration basics...................................................................................................30
Network configuration components......................................................................................30
Port numbering for hardware products..................................................................................32
Network bonding modes....................................................................................................32
VLAN Subnets with HP StoreOnce Backup............................................................................33
Contents 3

VLAN guidelines...........................................................................................................33
Example network environment.........................................................................................34
Network configuration guidelines.............................................................................................35
Deciding whether to use the StoreOnce CLI or the StoreOnce GUI................................................36
At installation....................................................................................................................36
After installation................................................................................................................36
Physical ports and IP addresses................................................................................................36
6 Network configuration, how to use StoreOnce CLI commands........................38
Identifying available ports on the StoreOnce CLI.........................................................................38
Identifying network ports available.......................................................................................38
Network bonding combinations...........................................................................................39
Before running net set wizard...................................................................................................39
Network configuration using net set wizard................................................................................41
Modifying the current network configuration...............................................................................48
Best practice.....................................................................................................................48
To add Data in Flight Encryption..........................................................................................49
License requirements......................................................................................................50
Configuring the StoreOnce Backup system........................................................................50
Encryption with replication.............................................................................................51
Configuring the backup media server...............................................................................51
Troubleshooting............................................................................................................51
7 Network configuration, how to use the StoreOnce GUI..................................53
To add a custom configuration.................................................................................................53
To edit a custom configuration..................................................................................................57
To add a VLAN–enabled Port Set and VLAN Subnet..............................................................57
To write protect or un-protect a configuration.........................................................................58
8 Completing the installation........................................................................59
Setting up time and date.........................................................................................................59
Configuring licenses................................................................................................................60
Licensing requirements for StoreOnce hardware products........................................................60
Applying the Instant On license...........................................................................................60
To apply a full license.........................................................................................................61
Expanding storage.................................................................................................................62
Accessing the StoreOnce Backup system over SFTP.....................................................................63
Accessing the StoreOnce folders..........................................................................................63
Software update process.........................................................................................................64
Upgrading BIOS or hardware firmware components...............................................................65
Configuring Remote Support....................................................................................................67
Introduction.......................................................................................................................67
Before configuring Remote Support.......................................................................................67
General procedure for setting up Remote Support on the StoreOnce GUI..................................68
Locating warranty info - HP 4700.........................................................................................71
Locating warranty info - HP 4500........................................................................................72
Locating warranty info — HP 2900......................................................................................73
Locating warranty info - HP 2700.........................................................................................73
Configuring SNMP.................................................................................................................74
HP Systems Insight Manager...............................................................................................74
Saving the configuration..........................................................................................................74
Restoring the configurations.................................................................................................74
Saving the encryption keystore..................................................................................................75
Managing and resetting the password for the HPresetpassword account........................................75
To change the password for the HPresetpassword account.......................................................75
To reset the password for the local Admin user to default.........................................................76
4 Contents

9 Fibre Channel installation and configuration................................................77
Fibre Channel connection........................................................................................................77
StoreOnce Catalyst over Fibre Channel......................................................................................77
Fibre Channel Settings tab..................................................................................................77
Fibre Channel with VTL............................................................................................................80
Creating a FC VTL library...................................................................................................81
Drive port assignment for StoreOnce Backup systems..............................................................81
Zoning..................................................................................................................................82
10 Configuring backup servers to work with HP StoreOnce...............................83
Configuring media servers to use StoreOnce Catalyst..................................................................83
Configuring Data in Flight encryption on Windows media servers.................................................83
Driver installation (optional, VTL only)........................................................................................92
iSCSI Initiator (optional, VTL only).............................................................................................93
Manual iSCSI initiator installation........................................................................................94
The iSCSI Initiator and Authentication...................................................................................94
The Microsoft iSCSI Initiator ................................................................................................94
11 Understanding LEDs..............................................................................103
Front view of the HP StoreOnce 4700 Backup system.................................................................104
Capacity upgrade kit LEDs.....................................................................................................105
Front view of the HP StoreOnce 4500 Backup system................................................................106
Front view of the HP StoreOnce 2900 Backup system................................................................107
Front view of the HP StoreOnce 2700 Backup system.................................................................108
Hot-plug drive LEDs...............................................................................................................109
Server units.....................................................................................................................109
Expansion shelves............................................................................................................110
1 Gbit ethernet port LEDs.......................................................................................................110
10 Gbit ethernet card LEDs....................................................................................................110
Fibre Channel card LEDs.......................................................................................................111
12 Troubleshooting....................................................................................112
Connecting to the network.....................................................................................................112
Connecting to the StoreOnce Backup system from the backup application....................................113
Performance.........................................................................................................................113
Power up and power off .......................................................................................................113
Powering up servers.........................................................................................................114
Powering off....................................................................................................................114
Rebooting the system........................................................................................................114
Power On/Off Problems...................................................................................................114
Licensing problems...............................................................................................................115
Instant On license expires.................................................................................................115
Problems expanding storage..................................................................................................115
Discover storage fails.......................................................................................................115
Add storage fails.............................................................................................................115
Cannot connect to a NAS share.............................................................................................115
NAS shares and IPv6............................................................................................................115
Cannot access a storage shelf ...............................................................................................116
13 More networking examples....................................................................117
Example 1...........................................................................................................................117
Example 2...........................................................................................................................118
StoreOnce GUI Status page..............................................................................................120
Example 3...........................................................................................................................120
About this guide........................................................................................123
Intended audience................................................................................................................123
Contents 5

Related documentation..........................................................................................................123
Document conventions and symbols........................................................................................123
HP technical support.............................................................................................................124
Customer self repair..............................................................................................................124
Registering your HP StoreOnce Backup system..........................................................................124
Subscription service..............................................................................................................125
HP Insight Remote Support.....................................................................................................125
HP websites.........................................................................................................................125
Documentation feedback.......................................................................................................125
A Regulatory information............................................................................126
Belarus Kazakhstan Russia marking.........................................................................................126
Turkey RoHS material content declaration.................................................................................126
Ukraine RoHS material content declaration..............................................................................126
Warranty information............................................................................................................126
Index.......................................................................................................128
6 Contents

1 Before you start
In this chapter:
• Introduction (page 7)
• HP StoreOnce Backup models (page 7)
• Software and hardware requirements (page 8)
• Supported Ethernet configurations (page 8)
• Supported Fibre Channel connections (page 9)
• Web browser settings (page 10)
Introduction
The HP StoreOnce Backup system is a disk-based storage appliance for backing up network media
servers or PCs to target devices on the appliance. These devices are configured as either
Network-Attached Storage (NAS), Catalyst Stores or Virtual Tape Library (VTL) targets for backup
applications.
This guide describes how to install and carry out the initial configuration of your HP StoreOnce
Backup system. The following documents are also available at http://www.hp.com/go/storage/
docs and http://www.hp.com/support/ (search on Product Name and then select the Product
Manuals link):
• HP StoreOnce Backup system Concepts and Configuration Guidelines: If you are new to the
HP StoreOnce Backup system, read this guide before system configuration. It describes the
StoreOnce technology, key performance parameters, and best practices for configuring it.
• HP StoreOnce Installation posters: Installation posters are available for each product family
and describe how to quickly install the product by connecting LAN Port 1 to a 1 Gbit ethernet
network.
• HP StoreOnce Backup system User Guide: This guide contains detailed information about the
StoreOnce Graphical User Interface (GUI) and troubleshooting information, including replacing
failed or failing hard disks.
• HP StoreOnce Backup system CLI Reference Guide: This is the full reference guide for the
StoreOnce Command Line Interface (CLI).
• HP StoreOnce Backup system Linux and UNIX Configuration Guide: This guide explains how
to configure HP StoreOnce Backup systems with supported Linux and UNIX operating systems.
• HP StoreOnce Backup 4500/4700 (24TB) and 4500 (48TB) Capacity Upgrade Guide: This
guide explains how to connect additional storage shelves to HP StoreOnce 4500 and 4700
Backup systems.
• HP StoreOnce Backup 2900 (24TB) Capacity Upgrade Guide: This guide explains how to
connect additional hard disks to HP StoreOnce 2900 Backup systems.
HP StoreOnce 2900, 2700, 4500 and 4700 models
The following products belong to the HP StoreOnce G3 Backup system family; they are also
sometimes referred to as single-node StoreOnce models, to differentiate them from the HP StoreOnce
B6200 and 6500 Backup systems which are multi-node StoreOnce products. (This node distinction
is important when configuring replication and Catalyst copy jobs and understanding target and
source IP addresses.) G3 indicates that the HP StoreOnce Backup systems will be running v3.x.x
StoreOnce software.
Introduction 7

Table 1 StoreOnce 2900, 2700/ 4500 and 4700 models
Storage expansionPortsInterfaces supportedDescriptionProduct model
Not supported4 x 1 Gbit ethernet
ports
iSCSI onlyA single server with
four 2TB hot-plug disks
HP StoreOnce 2700
8TB Backup , BB877A
One 6–disk expansion
kit, BB911A
4 x 1 Gbit ethernet
ports
iSCSI onlyA single server with
six 4TB hot-plug disks
HP StoreOnce 2900
24TB Backup,
BB910A
2 x 10 Gbit ethernet
ports
Up to three expansion
enclosures, which may
4 x 1 Gbit ethernet
ports
iSCSI and FCA single server with
twelve 2TB hot-plug
disks
HP StoreOnce 4500
24TB Backup,
BB878A be any combination of
the following:
2 x 10 Gbit ethernet
ports
1. 12–disk 24TB
expansion
enclosure, BB881A
2 x FC ports
2. 12–disk 48TB
expansion
enclosure, BB882A
Up to seven 12–disk
expansion enclosures,
BB881A
4 x 1 Gbit ethernet
ports
2 x 10 Gbit ethernet
ports
iSCSI and FCA head server unit
with two 1TB disks
and a pre-configured
storage array with
twelve 2TB disks
HP StoreOnce 4700
24TB Backup,
BB879A
4 x FC ports
Software and hardware requirements
Refer to http://www.hp.com/go/ebs for the latest connectivity and compatibility information.
Supported Ethernet configurations
The HP StoreOnce Backup system supports a wide range of network configurations. The following
list provides an overview of configuration details. See Network configuration, understanding the
concepts (page 30) for more details about network support and configuring the network. Also refer
to the latest release notes to find out if there are any configuration combinations that require specific
attention.
• An Ethernet connection is required for backing up to iSCSI VTL devices, for replication and
StoreOnce Catalyst Copy activities, and for all StoreOnce management tasks. It is also required
if you wish to backup to NAS shares and StoreOnce Catalyst stores across ethernet.
• The HP StoreOnce Backup system supports IPv4 and IPv6. IPv4 supports all target backup
devices and StoreOnce management tasks; IPv6 supports StoreOnce Catalyst target devices
only and StoreOnce management tasks using the StoreOnce GUI and CLI.
NOTE: IPv6 is not supported on the iSCSI data path for VTL nor the NFS/CIFS data path
for NAS Shares.
• The HP StoreOnce Backup system may be connected to a virtual LAN and supports VLAN
tagging.
• DHCP and static IP addressing are supported.
NOTE: If DHCP is used, it is recommended that once an IP address has been assigned, the
Network Administrator should permanently associate that IP address with the StoreOnce
Backup system. This association prevents the IP address of the device changing after reboots.
8 Before you start

• All StoreOnce Backup systems have four 1 Gbit ethernet ports. HP StoreOnce 2900, 4500
and 4700 Backup systems have two additional 10 Gbit ethernet ports.
• Mode 1, 4 and 6 network port bonding is supported on sets of 1 Gbit and 10 Gbit ethernet
ports (but not across 1 Gbit and 10 Gbit ethernet ports).
• Networking parameters are contained within a network configuration. For ease of installation,
a default configuration is initially applied to the StoreOnce Backup system. As long as LAN
port 1 of the appliance is connected to a DHCP–enabled 1 Gbit ethernet network switch, the
HP StoreOnce Backup system will be active on the network immediately after installation.
You can continue to use the default configuration or create and activate an additional
configuration that is tailored to your exact networking requirements using either the StoreOnce
CLI or the StoreOnce GUI.
NOTE: 100 Base-T Ethernet will limit performance.
• Users without a DHCP-enabled 1 Gbit ethernet network must create and activate a network
configuration before the StoreOnce Backup system can become active on the network. This
network configuration may use any available Ethernet port, but one Ethernet port must always
be connected, even if you are using only the FC ports to back up and restore data to the HP
StoreOnce Backup system. The port connection is required because the network is used to
access the StoreOnce Management Console remotely and for replication.
TIP: The recommended way to create an initial network configuration to support static IP
addressing is to run the StoreOnce CLI wizard, net set wizard, as described in Network
configuration, how to use StoreOnce CLI commands (page 38).
iLO 4 functionality
HP StoreOnce backup appliances are built on HP Proliant server hardware and use the embedded
HP Integrated Lights-Out 4 (iLO 4) management technology. iLO enables secure remote monitoring
and console access via a web browser. All HP StoreOnce Backup systems described in this guide
are supplied with an iLO password that should be changed after installation and stored safely
offsite with other passwords.
iLO is not required for daily management of the StoreOnce appliance but is useful in a lights-out
data center situation. iLO is also useful for diagnosing hardware failures that prevent access to the
appliance through the primary StoreOnce GUI or remote StoreOnce CLI interface.
NOTE: See also Password best practices (page 27).
Supported Fibre Channel connections
NOTE: Fibre Channel is not supported on the HP StoreOnce 2900 or 2700 Backup system.
For a more detailed discussion of Fibre Channel configuration options, see also Fibre channel
installation and configuration (page 77).
• When connecting to a Fibre Channel network, the HP StoreOnce Backup system is supplied
with the correct FC card pre-installed. Cables are not supplied.
• The number of FC ports available depends upon the HP StoreOnce model.
All models that support FC have two FC ports on the FC card; the HP StoreOnce 4700 has
two FC cards and, therefore, four FC ports are available.
Software and hardware requirements 9

• The HP StoreOnce Backup system supports both switched fabric and direct attach private loop
topologies.
A switched fabric topology utilizes one or more fabric switches to provide a flexible
configuration between several Fibre Channel hosts and Fibre Channel targets such as HP
StoreOnce Backup systems.
• Switched fabric configurations are implemented with Fibre Channel switches. Switches may
be cascaded or meshed together to form larger fabrics.
• The preferred topology for the HP StoreOnce Backup system is switched fabric using NPIV
(N_Port ID Virtualisation).
NOTE: Please refer to http://www.hp.com/go/ebs for the latest information about compatibility.
Software requirements
• Backup and restore to Virtual Tape Library targets requires software that supports tape libraries.
This software resides on a backup media server, not the HP StoreOnce Backup system.
StoreOnce target devices may be used with major backup applications from HP, Symantec,
EMC, Computer Associates and others.
• For supported Symantec backup products, the HP StoreOnce Catalyst OST plug-in application
is required on each backup application media server that will use the StoreOnce Catalyst
functionality. The minimum OST plug-in version is 2.1. To use StoreOnce over FC, OST plug-in
version 3.0 is required.
Refer to http://www.hp.com/go/ebs for the latest compatibility information.
Recommended web browser settings
The web browser used to communicate with the HP StoreOnce Backup system requires Active
Scripting or JavaScript enabled. Without these scripts enabled, some browser buttons may not
display.
With StoreOnce software version 3.12.0 and later, the StoreOnce Management GUI is supported
on the following web browsers:
• Internet Explorer 9, 10 and 11 (note that Internet Explorer 8 is not supported and some
StoreOnce features will not work)
• Mozilla FireFox v22 and above and Firefox ESR24
Please refer to http://www.hp.com/go/ebs for the latest information about which browser versions
are supported.
IMPORTANT: The HP StoreOnce Backup system software will not allow access if security is
disabled on the browser.
10 Before you start

2 Installing and cabling the HP StoreOnce Backup system
In this chapter:
• Installing the rail kit (page 11)
• Mounting the HP StoreOnce Backup System (page 11)
• Attaching SFPs (page 12)
• Connecting the hardware (page 15)
• Connecting to the Capacity Upgrade Kit (if required) (page 18)
IMPORTANT: See also the Safety Booklet on http://www.hp.com/go/storage/docs.
Installing the rail kit
The supplied rail kits allow you to install the HP StoreOnce Backup system into square and round
hole racks for 1U and 2U servers. If mounting the HP StoreOnce Backup system into threaded hole
or telco racks, please refer to http://www.racksolutions.com to purchase the required mounting
hardware.
This installation is to be performed by qualified individuals who have knowledge of the procedures,
precautions, and hazards associated with equipment containing hazardous electrical circuits.
WARNING! The rail kit that provides a secure mount to the server and rack, which allows the
servers to be pulled out for servicing. However, the rails for any additional storage enclosures form
only a shelf for the unit to rest on. The enclosure is not attached to the rail by any other means.
Use extreme caution when pulling the enclosure out from the rack; it can slip and fall, causing
damage to the enclosure or injury. HP is not responsible for any damage or injury caused by the
mishandling of the enclosure .
WARNING! Ensure that the rack is level and stable before working on the rack. Be sure the
leveling jacks (feet) extend to the floor and that the full weight of the rack rests firmly on the floor.
WARNING! Ensure that the rack has anti-tip measures in place. Such measures may include
floor-bolting, anti-tip feet, ballast, or a combination of these as specified by the rack manufacturer
and applicable codes.
WARNING! Ensure that sufficient personnel are on hand to support the product(s) during the
installation process. Use of the appropriate lifting device is recommended as an installation aid.
WARNING! Always load the rack from the bottom up. Load the heaviest items in the rack first.
This makes the rack bottom-heavy and helps prevent it from becoming unstable.
WARNING! Do not overload the branch circuit that provides power to the rack. The total rack
load should not exceed 80 percent of the branch circuit rating.
Mounting the HP StoreOnce Backup system
WARNING! Ensure that sufficient personnel are on hand to support the product(s) during the
installation process. Use of the appropriate lifting device is recommended as an installation aid.
NOTE: The HP StoreOnce 4700 Backup system consists of two units: a head server unit and a
storage enclosure. Make sure there is sufficient space to install both units adjacent to each other.
For both the HP StoreOnce 4700 and 4500 Backup system, plan ahead to ensure there is sufficient
space to add expansion enclosures at a later date.
Installing the rail kit 11
1. Install the rails in the rack, as required. Follow the instructions provided separately with the
rail kits.
2. Slide the HP StoreOnce Backup system into position in the rack and secure it to the rack rails
using thumbscrews on the unit's front bezel.
IMPORTANT: The label on the top of the HP StoreOnce Backup system contains useful identity
information, such as the MAC address and default network name. It also contains the iLO
password for the system. Make a note of this information before you install the HP StoreOnce
Backup system in the rack. See Password best practices (page 27) for more information about
passwords and best practices after initial configuration.
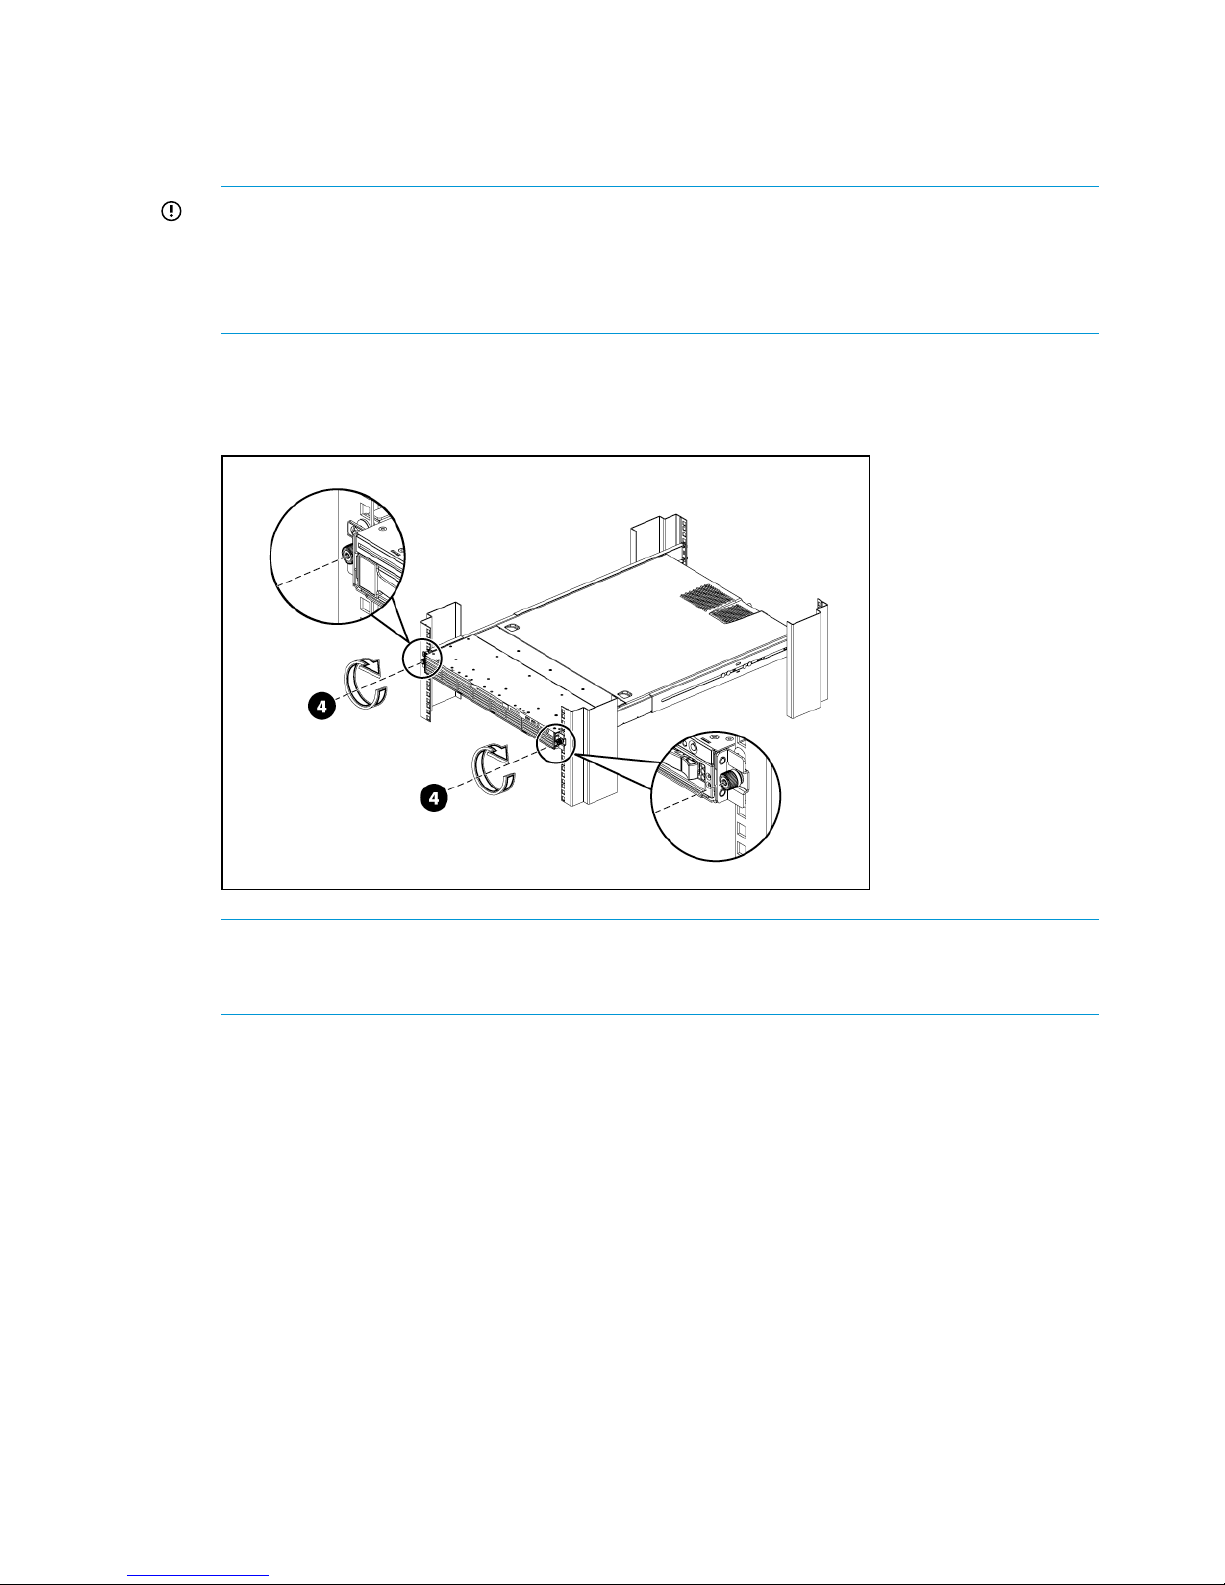
The following figure illustrates how to mount the HP StoreOnce Backup system, using the HP
StoreOnce 2700 model as an example.
Figure 1 Secure the HP StoreOnce Backup system to the rack
NOTE: The HP StoreOnce 2700 Backup system is supplied with a single power supply. If
you have purchased the optional second power supply, be sure to install it before continuing
with the installation.
Attaching SFPs, StoreOnce 2900, 4500 and 4700 only
The Accessory Kit supplied with the HP StoreOnce 4500 and 4700 Backup system contains the
appropriate number of 8Gb Short Wave FC SFP+ and 10Gb SR SFP+ transceivers.
The Accessory Kit supplied with the HP StoreOnce 2900 Backup system contains the appropriate
number of 10Gb SR SFP+ transceivers.
Unpack these and connect them to the corresponding ports on the rear of your product as shown
below.
12 Installing and cabling the HP StoreOnce Backup system

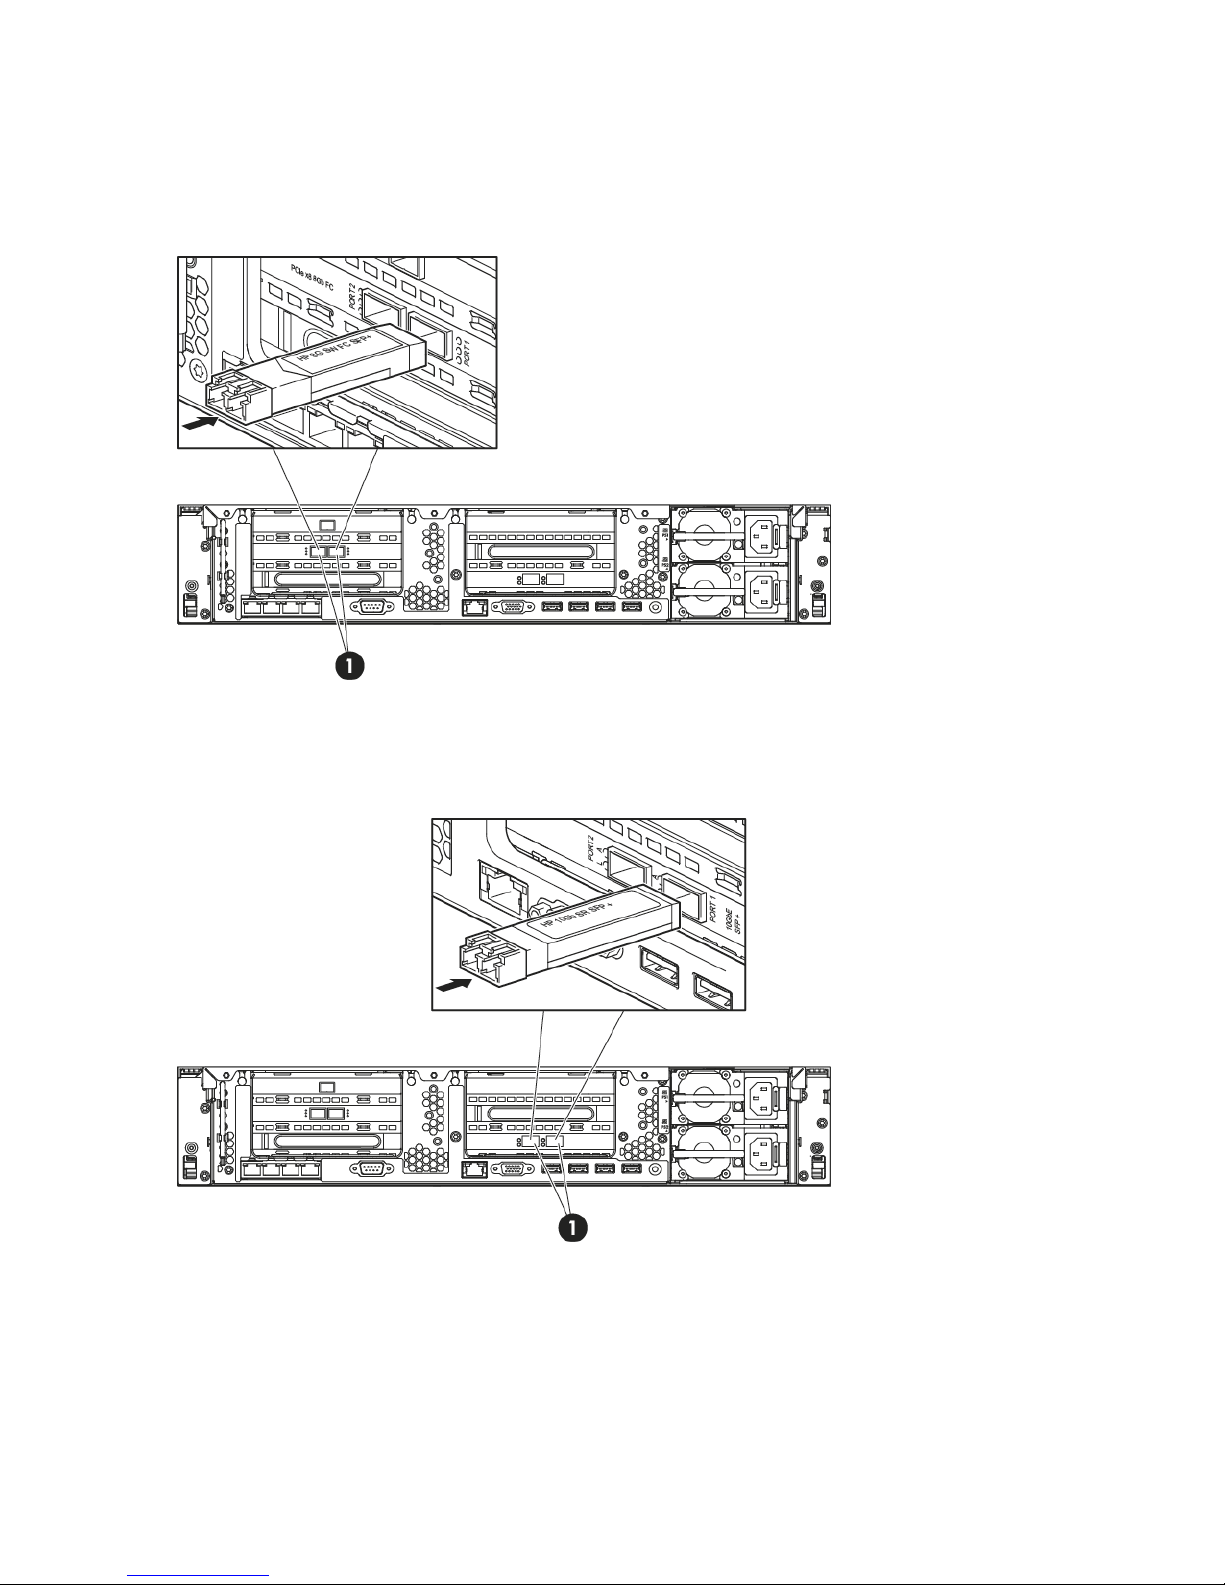
HP StoreOnce 4700 Backup
There are four FC ports and four 8Gb Short Wave FC SFP+s. Connect an SFP to each FC port, as
shown below (1).
Figure 2 Connecting FC SFPs on HP StoreOnce 4700
There are two 10 Gbit ethernet ports and two 10Gb SR SFP+s. Connect an SFP to each 10 Gbit
ethernet port, as shown below (1).
Figure 3 Connecting 10 Gbit ethernet SFPs on HP StoreOnce 4700
Attaching SFPs, StoreOnce 2900, 4500 and 4700 only 13
HP StoreOnce 2900 and 4500 Backup
There are two FC ports and two 8Gb Short Wave FC SFP+s.
Connect an SFP to each FC port on the HP StoreOnce 4500 Backup, as shown below (1). (The
StoreOnce 2900 Backup does not have FC ports.)
Figure 4 Connecting FC SFPs on HP StoreOnce 4500
There are two 10 Gbit ethernet ports and two 10Gb SR SFP+s. Connect an SFP to each 10 Gbit
ethernet port, as shown below (1).
Figure 5 Connecting 10 Gbit ethernet SFPs on HP StoreOnce 2900 and 4500
14 Installing and cabling the HP StoreOnce Backup system
Connecting the hardware
1. Use the supplied power cord(s) to connect the HP StoreOnce Backup system to the rack power
supply. This HP-approved cord is appropriate for your specific geographic region.
HP StoreOnce 2900, 4500 and 4700 Backup systems have a redundant power supply (this
also applies to the HP StoreOnce 2700, if a second power supply has been purchased and
installed). Make sure that both power cords are connected.
For detailed safety information, see the Safety Guide. Information about accessing this guide
can be found on the flyer included with your product.
2. HP StoreOnce 4700 Backup only: The storage enclosure supplied in the same pallet as the
head server unit must be connected to the HD SAS port on the RAID controller in slot 1, as
described in Connecting the first storage enclosure at installation (page 16).
3. For ease of installation connect LAN Port 1 on the head server unit to a 1 Gbit ethernet network
switch on a DHCP-enabled network. The appliance will use the default configuration and will
be available on the network after power up. You can then use the HP StoreOnce CLI commands
to further configure the network, as described in Network configuration, how to use StoreOnce
CLI commands (page 38).
NOTE: Use any CAT-5E or better network cable (also supplied with the product) to connect
to the 1 Gbit ethernet network switch. 100 Base-T Ethernet will limit performance.
If you are not using the quick install option, connect the required network port(s) and also
connect a console and keyboard to the video and USB connectors on the rear of the unit (see
drawings below for your product). You will need to configure the appliance manually after
power up so that it can be accessed on the network, see also Network configuration,
understanding the concepts (page 30)
4. If installing Capacity Upgrade enclosures at the same time, make sure they are cabled to the
HP StoreOnce Backup system and the rack power supply, as described in Connecting to the
Capacity Upgrade Kit (if required) (page 18).
5. Power up the HP StoreOnce Backup system. See Powering on and managing the StoreOnce
Management system (page 24).
NOTE: The HP StoreOnce Backup system also supports iLO4.
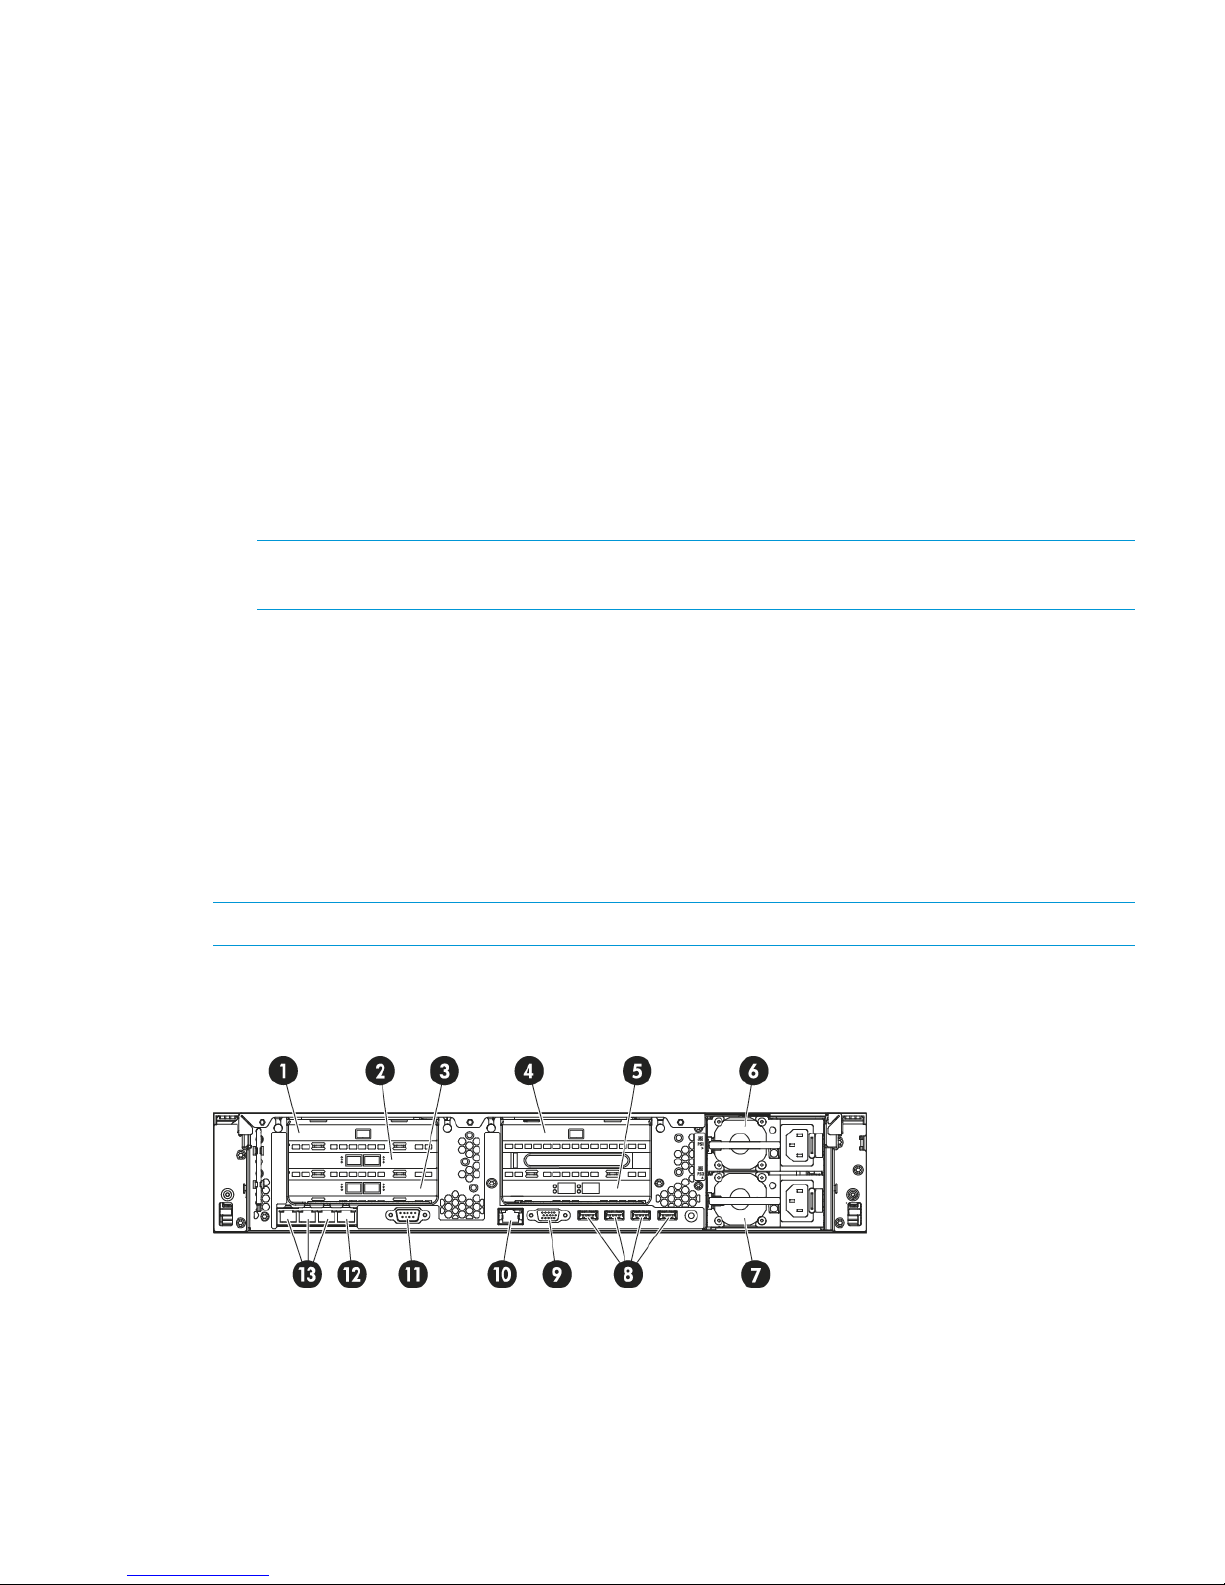
Connecting the HP StoreOnce 4700 Backup system
Figure 6 Rear view of the HP StoreOnce 4700 Backup system
FC card 12.RAID controller 11.
RAID controller 24.FC card 23.
Power supply bay 16.10 Gbit ethernet card5.
USB connectors (4)8.Power supply bay 27.
iLO4 port, do not use for data connection10.Video/monitor connector9.
Connecting the hardware 15
1 Gbit ethernet network port 1, connect for
Quick Install
12.Serial connector11.
1 Gbit ethernet network ports 2, 3 and 413.
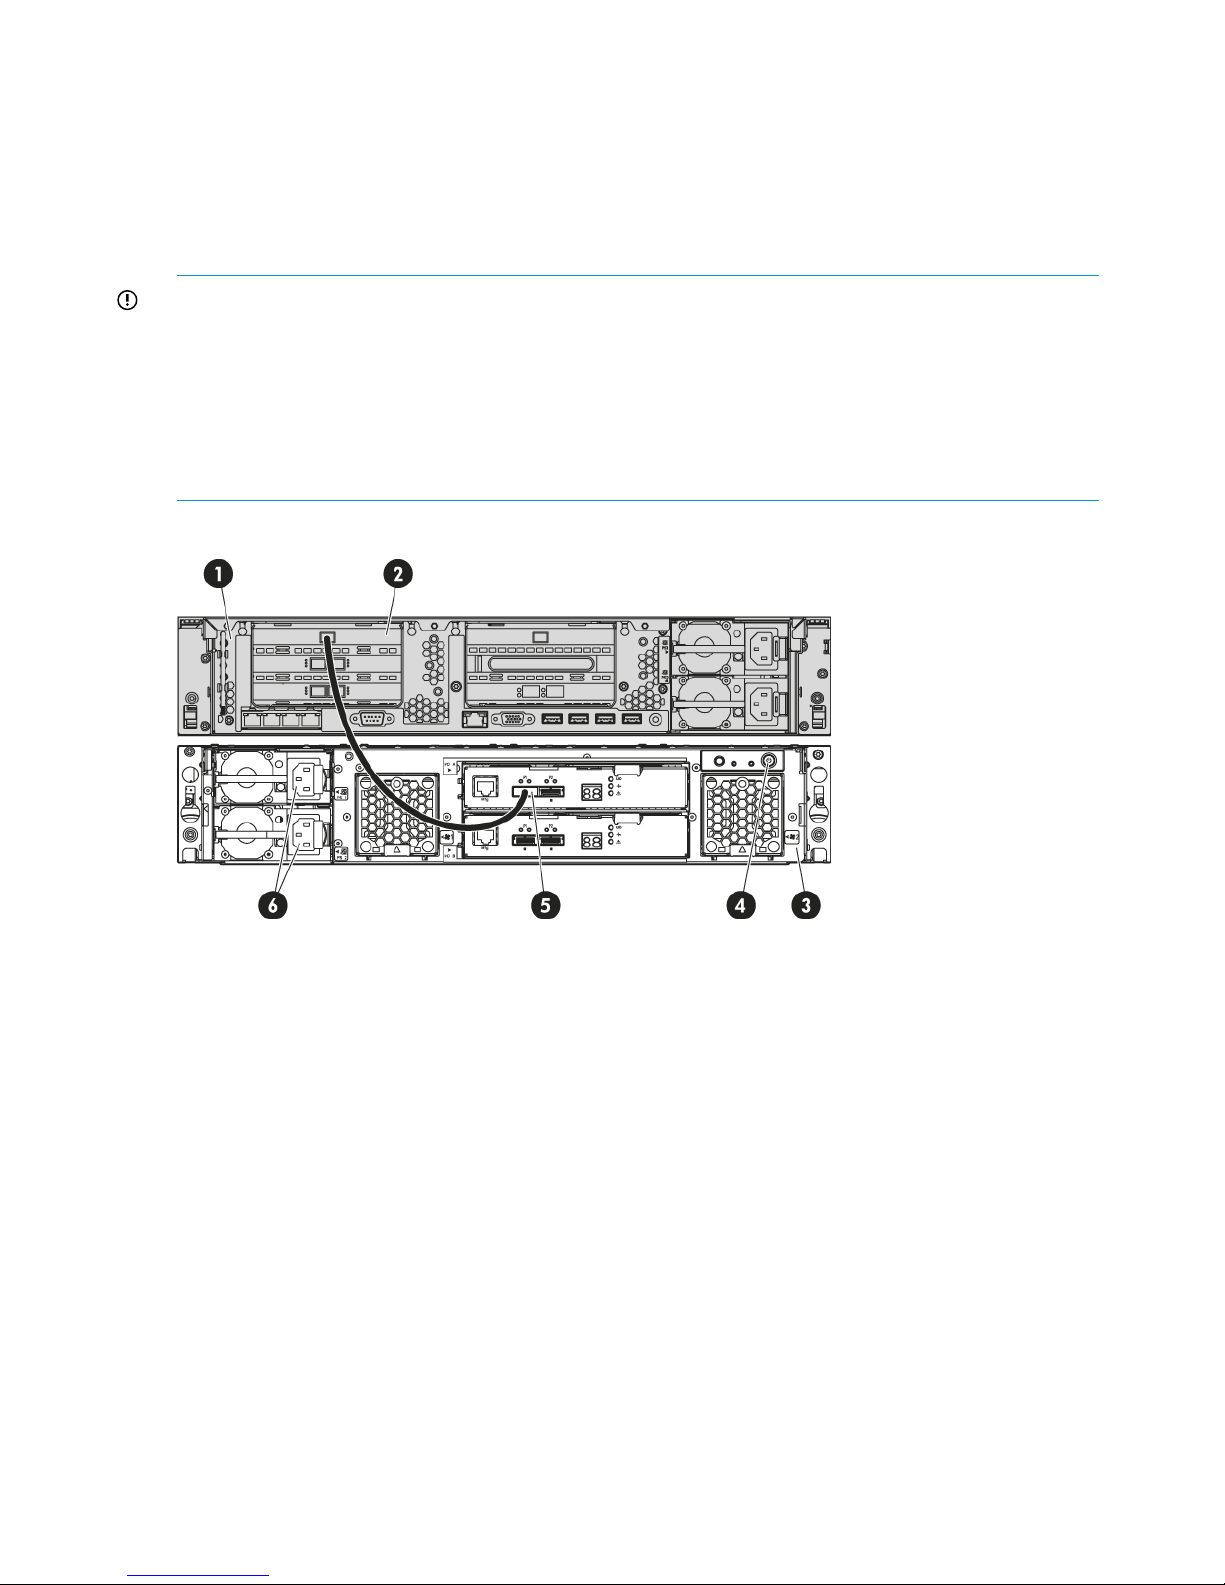
Connecting the first storage enclosure at installation
The HP StoreOnce 4700 Backup system consists of two units: a head server unit and a storage
enclosure in which the storage has already been configured.
IMPORTANT: The first enclosure is packaged along with the StoreOnce head server unit (in the
same pallet), its packaging and identification labels do not carry the part number BB881A. Any
4500/4700 24TB Capacity Kit expansions enclosures will be packed separately and will have
part number of an expansion kit (BB881A) on the outside and on the identification labels. It is very
important to connect the first enclosure to the correct RAID controller. Connecting the 4500/4700
24TB Capacity Kit to the enclosures incorrectly can result in incorrect behavior and may result in
failure to recognise the attached storage. Correction of this issue may result in the need for support
intervention.
Figure 7 Connecting the first storage enclosure to the HP StoreOnce 4700 Backup system
HD SAS port on RAID controller in slot 12.Head server unit1.
Power on button4.Expansion enclosure3.
Power connectors6.P1 port on expansion enclosure5.
1. Connect the square HD connector on the longer HD SAS cable to the single high-density SAS
port on the RAID controller in slot 1 on the rear of the HP StoreOnce Backup system. Ensure
that the cable connector is plugged in the correct way on the rear of the HP StoreOnce Backup
system. This connector is square and is not keyed. Insert the connector with the blue removed
tab at the top and push in until the connector clicks into place.
2. Connect the mini-SAS connector on the other end of the cable to the P1 connector on the rear
of the storage enclosure.
3. Use the supplied power cords to connect the storage enclosure to the mains power supply.
4. Power on the storage enclosure before the head server unit. You may need to hold down the
power on button for a few seconds.
16 Installing and cabling the HP StoreOnce Backup system

Connecting the HP StoreOnce 4500 Backup system
Figure 8 Rear view of the HP StoreOnce 4500 Backup system
FC card 12.RAID controller 11.
Power supply bay 14.10 Gbit ethernet card3.
USB connectors (4)6.Power supply bay 25.
iLO4 port, do not use for data connection8.Video/monitor connector7.
1 Gbit ethernet network port 1, connect for
Quick Install
10.Serial connector9.
1 Gbit ethernet network ports 2, 3 and 411.
Connecting the HP StoreOnce 2900 Backup system
Figure 9 Rear view of the HP StoreOnce 2900 Backup system
10 Gbit ethernet card2.RAID controller 11.
Power supply bay 24.Power supply bay 13.
Video/monitor connector6.USB connectors (4)5.
Serial connector8.iLO4 port, do not use for data connection7.
1 Gbit ethernet network ports 2, 3 and 410.1 Gbit ethernet network port 1, connect for
Quick Install
9.
Connecting the hardware 17
Connecting the HP StoreOnce 2700 Backup system
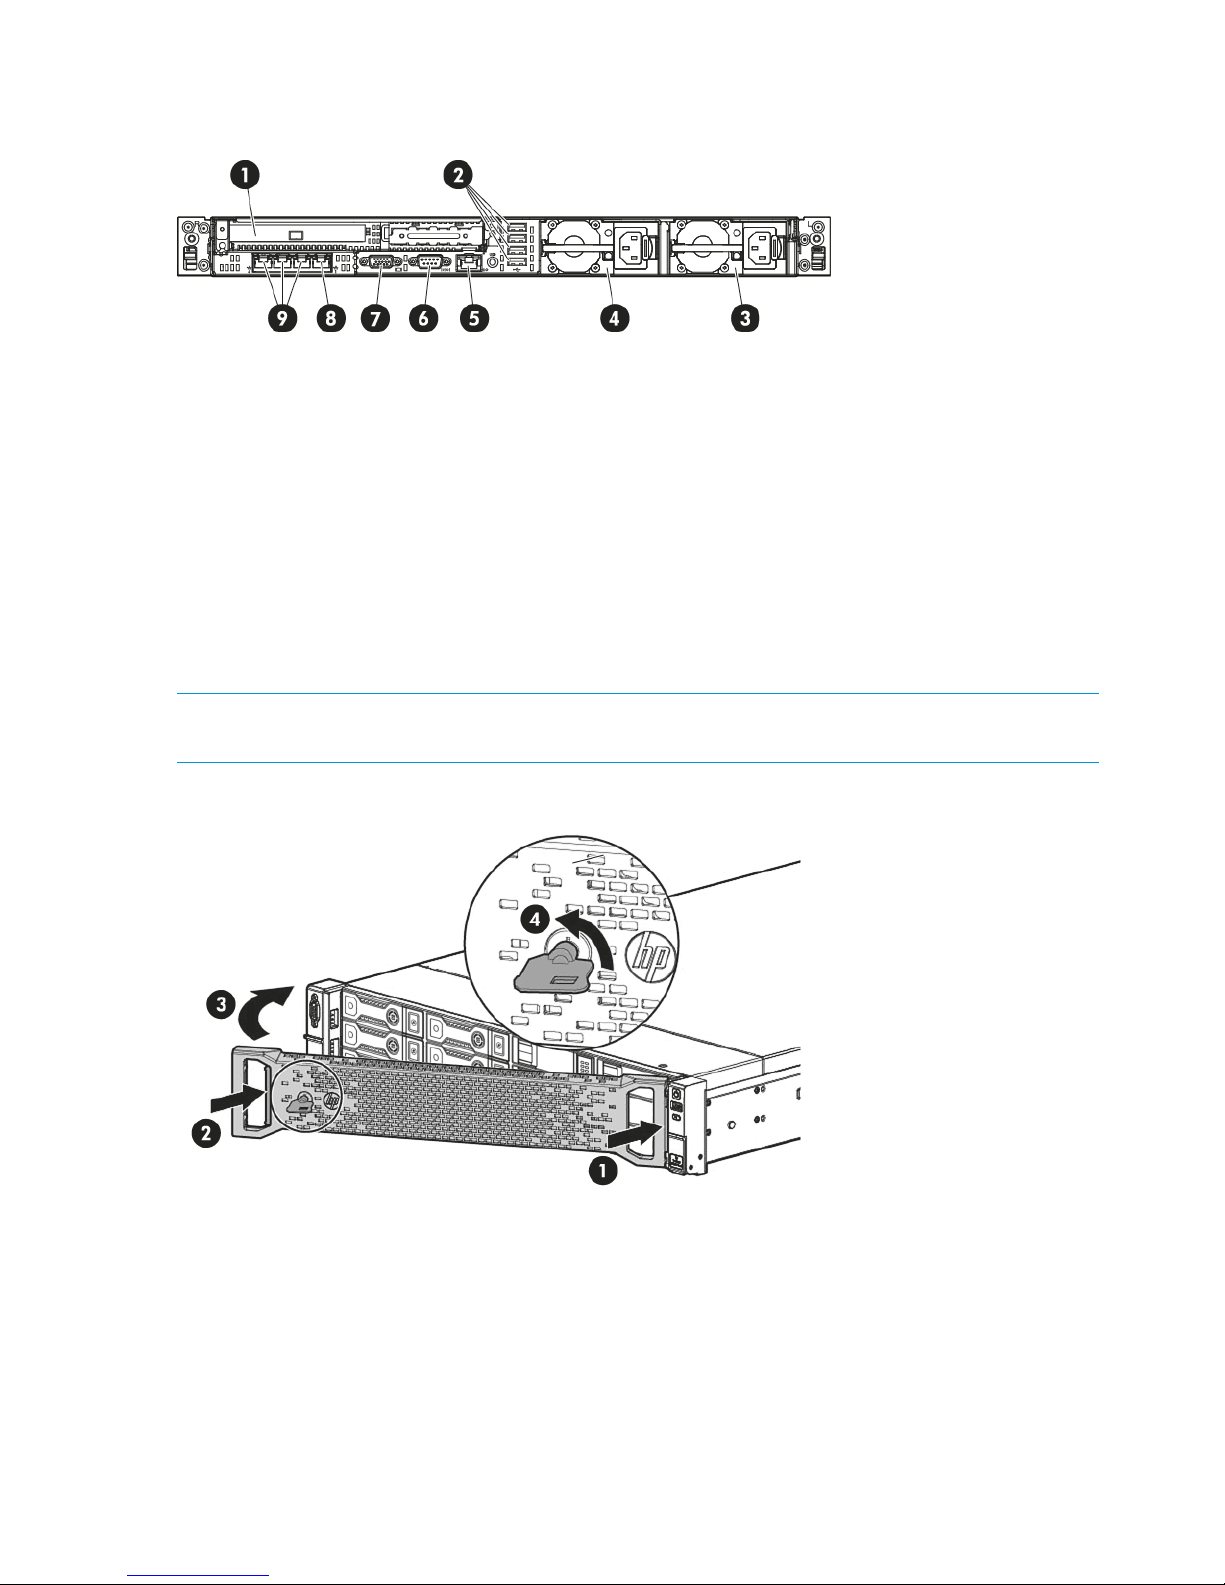
Figure 10 Rear view of the HP StoreOnce 2700 Backup system
USB connectors (4)2.RAID Controller – external port is unused1.
Power supply bay 2 (optional)4.Power supply bay 13.
Serial connector6.iLO4 port, do not use for data connection5.
1 Gbit ethernet network port 1, connect for
Quick Install
8.Video/monitor connector7.
1 Gbit ethernet network ports 2, 3 and 49.
Attaching the security bezel
The product is supplied with a security bezel that is placed inside the box, and not delivered
pre-installed on the servers. Once the server is installed within the rack, the security bezel may be
clipped to the front of the unit. No special tools are required to do this.
NOTE: The key to lock the bezel is attached to the back of the security bezel. Only one key is
supplied.
Figure 11 Attaching the security bezel
Connecting to the expansion enclosure (HP StoreOnce 4500 and 4700)
Install the rail kit and expansion module(s) immediately below or above the HP StoreOnce Backup
system.
• HP StoreOnce 4700 Backup system: The first 24TB disk enclosure must be installed at the
same time as the head server unit and connected to the correct RAID card as described in
Connecting the first storage enclosure at installation (page 16). Up to seven 24TB expansion
enclosures, HP StoreOnce 4500/4700 24TB Capacity Kit (BB881A), may be installed at the
same time or added later. Expansion enclosures may be daisy chained. The user is advised
18 Installing and cabling the HP StoreOnce Backup system

to make a record of which enclosure (serial number) is connected to which RAID card for
future reference.
• HP StoreOnce 4500 Backup system: Up to three expansion enclosures may be connected
and they are daisy chained. Two expansion options are available: HP StoreOnce 4500/4700
24TB Capacity Kit (BB881A) and HP StoreOnce 4500 48TB Capacity Kit (BB909A).
• HP StoreOnce 2700 Backup system: This model does not support connection of an expansion
enclosure.
• HP StoreOnce 2900 Backup system: This model supports capacity expansion, but the expansion
kit is a set of six 24TB hard disks that are installed in the head server unit. See Adding disks
for capacity expansion (2900 only) (page 22)
Installing expansion enclosures with the HP StoreOnce 4700
If you have purchased extra expansion enclosures, the storage in these additional enclosures will
not have been configured. For instructions on configuring additional expansion enclosures, see
Expanding storage (page 62).
Various cabling options are possible with the HP StoreOnce 4700 Backup system depending upon
available rack space, but the recommended configuration is to install the expansion enclosures
evenly above and below the head server unit.
The following table illustrates the recommended sequence in which enclosures should be attached
and distributed across the two RAID controller cards.
Table 2 HP 4700, the order in which shelves should be attached
Connect sequence for expansion shelves
to RAID card in Slot 4to RAID card in Slot 1Shelf
First1
Second2
Third3
Fourth4
Fifth5
Sixth6
Seventh7
Eighth8
Connecting to the expansion enclosure (HP StoreOnce 4500 and 4700) 19
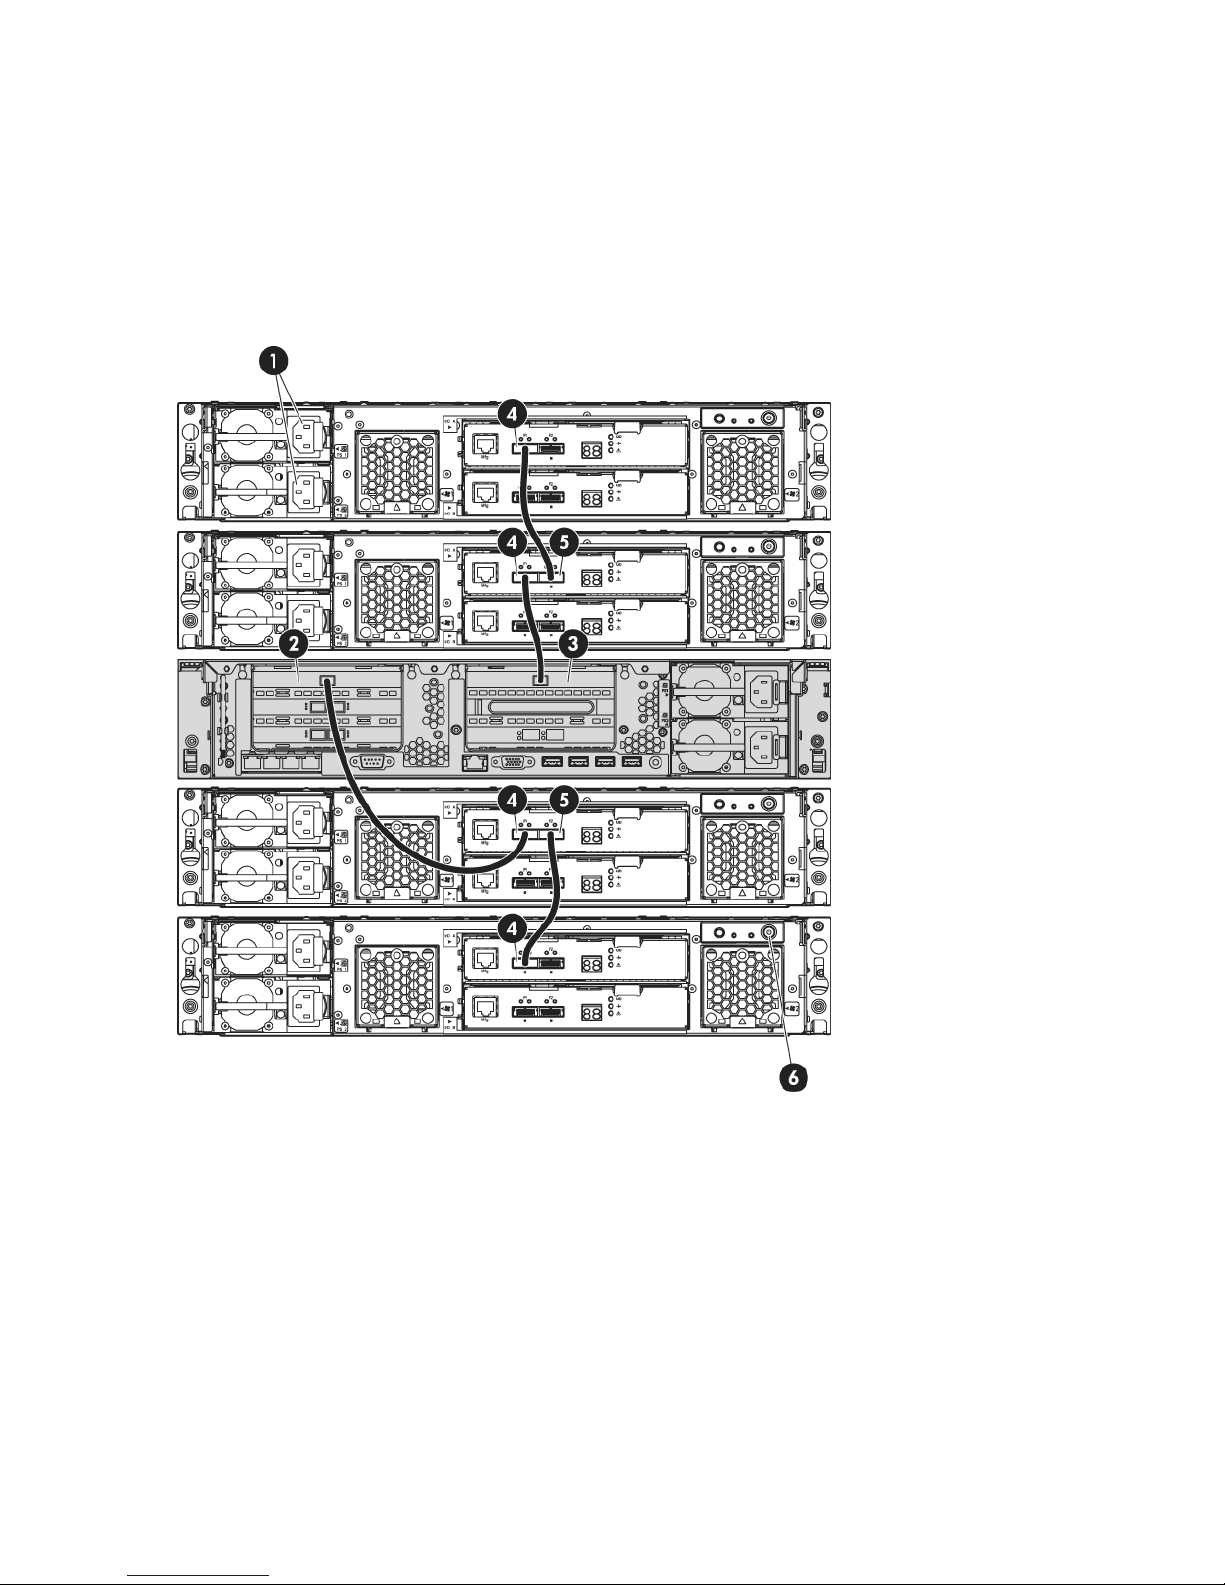
In the following example three further expansion shelves have been connected in addition to the
first shelf that is always required. When adding the second and subsequent shelves it is necessary
to expand storage.
The second expansion enclosure is connected to the RAID controller in slot 4, again using the
longer HD SAS cable. Subsequent expansion enclosures are daisy-chained using the half-meter
mini SAS cables; for example, expansion enclosure 3 to enclosure 1 and expansion enclosure 4
to enclosure 2. The connection is from P2 on the upper module of the previous enclosure to P1 on
the upper module of the next enclosure, as illustrated below.
Figure 12 Cabling example for the HP StoreOnce 4700 Backup system
HD SAS port on RAID controller 12.Power connectors1.
P1 port on expansion shelf (Note how
subsequent shelves may be daisy chained)
4.HD SAS port on RAID controller 23.
Power on button6.P2 port on expansion shelf (connects to P1 on
adjacent expansion enclosure)
5.
Installing expansion enclosures with the HP StoreOnce 4500
The HP StoreOnce 4500 Backup base system contains 12 disks. Up to three Capacity Upgrade
Kits may be connected if more storage is needed. Compatible cables are provided with the Capacity
Upgrade Kit; a longer HD SAS cable to connect the expansion shelf to the head unit and a half-meter
mini SAS cable for daisy-chaining subsequent shelves.
20 Installing and cabling the HP StoreOnce Backup system
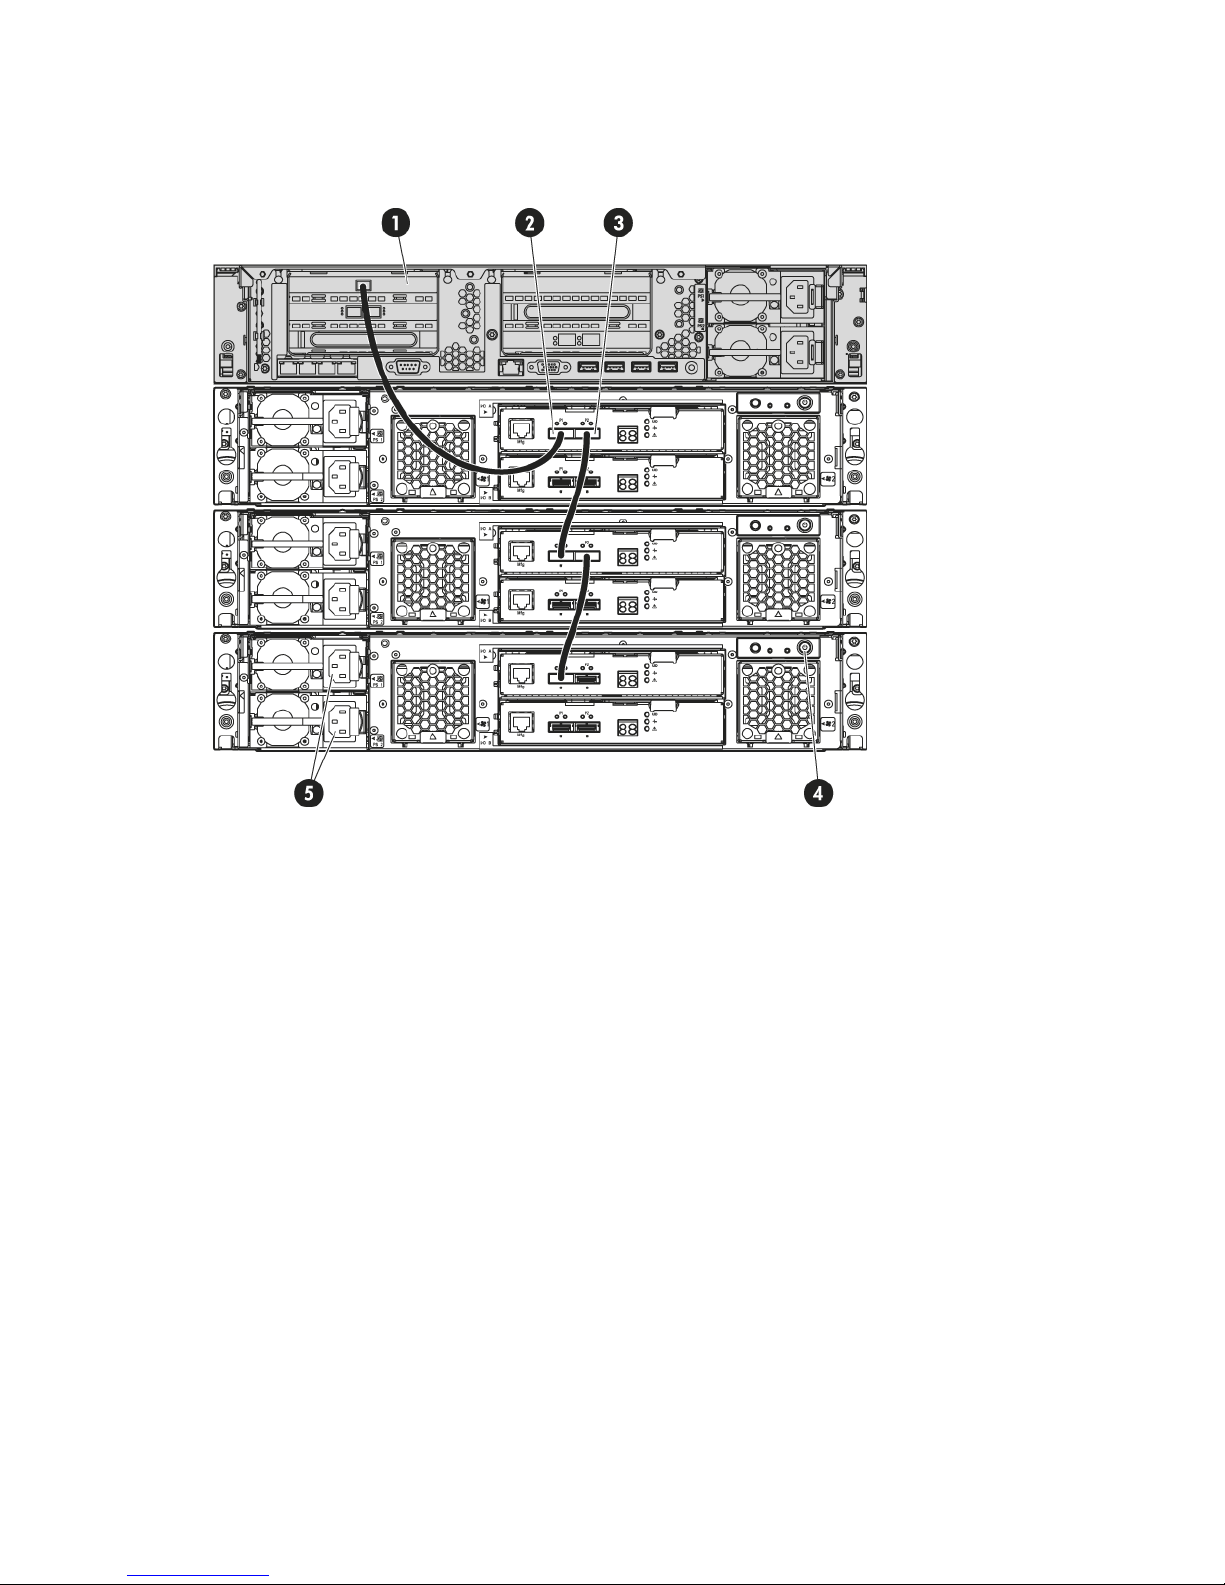
When installing an additional expansion enclosure with the HP StoreOnce 4500 Backup system,
the storage in that enclosure will not have been pre-configured and is not ready to use until storage
has been expanded. See Expanding storage (page 62).
Figure 13 Cabling example for the HP StoreOnce 4500 Backup system
P1 port on expansion enclosure (Note how
subsequent enclosures may be daisy chained)
2.head server unit1.
Power on button4.P2 port on expansion enclosure (connects to
P1 on adjacent expansion enclosure)
3.
Power connectors5.
1. Connect the square HD connector on the longer HD SAS cable to the single high-density SAS
port on the RAID controller on the rear of the HP StoreOnce Backup system. Ensure that the
cable connector is plugged in the correct way on the rear of the HP StoreOnce Backup system.
This connector is square and is not keyed. Insert the connector with the blue tab at the top
and push in until the connector clicks into place.
2. Connect the mini-SAS connector on the other end of the cable to the P1 connector on the rear
of the expansion enclosure.
3. If installing more than one expansion enclosure, use the supplied 0.5m mini SAS cables to
daisy chain up to three expansion enclosures in total. The connection is from P2 on the upper
module of the first enclosure to P1 on the upper module of the next enclosure, as illustrated
below.
4. Use the supplied power cords to connect the expansion enclosure to the main power supply.
Connecting to the expansion enclosure (HP StoreOnce 4500 and 4700) 21
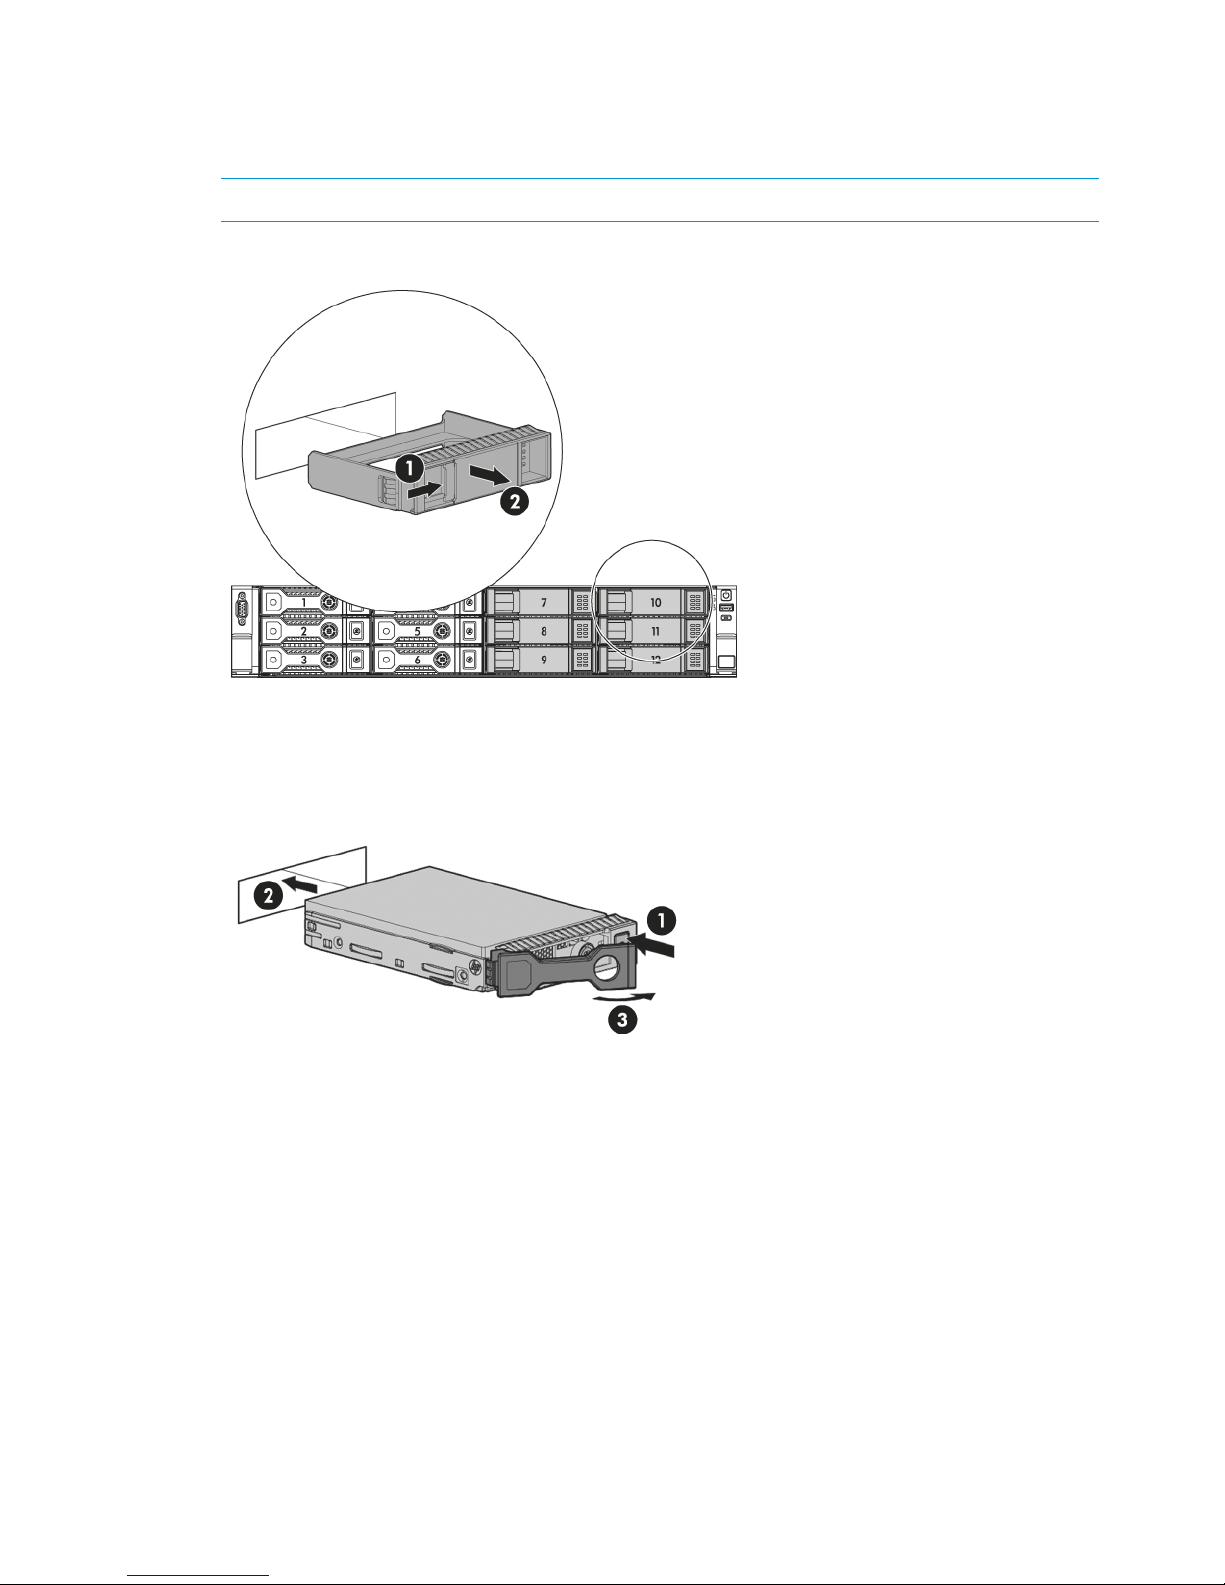
Adding disks for capacity expansion (StoreOnce 2900 only)
The Capacity Expansion kit contains six 4TB disks, which are installed in slots 7 to 12.
1. Remove the blanking plates from the disk bays.
NOTE: You must install all six disks at the same time.
Figure 14 Removing the blanking plates
2. Push the hard drive assembly into each drive bay (1) until it stops (2) and press the HDD
carrier latch (3) inward until it clicks.
Figure 15 Installing the hard disks
3. Attach the front bezel when all six disks are installed.
22 Installing and cabling the HP StoreOnce Backup system
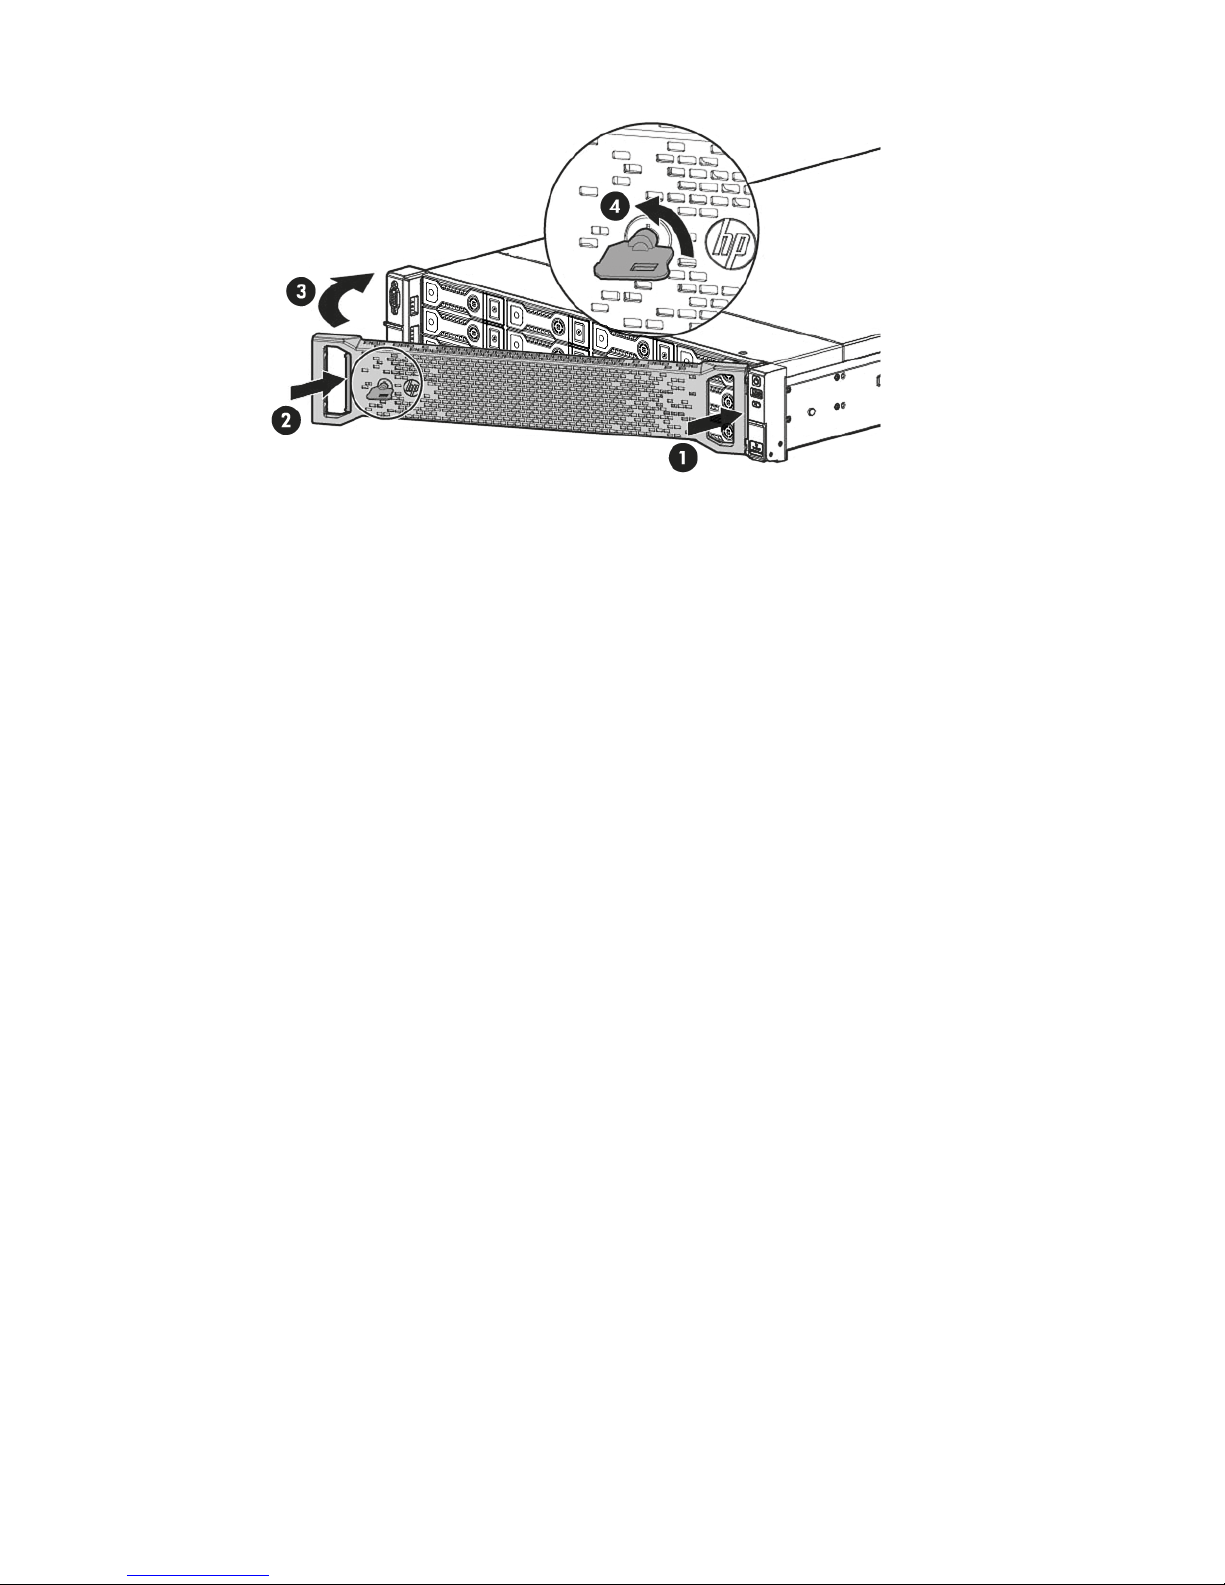
Figure 16 Attaching the front bezel
4. The license for the Capacity Expansion Kit must be applied and the storage expanded, using
StoreOnce CLI commands, before the extra capacity is available for use.
Adding disks for capacity expansion (StoreOnce 2900 only) 23
3 Powering on and managing the StoreOnce Management
system
In this chapter:
• Powering on expansion shelves (page 24)
• Powering on the HP StoreOnce Backup system (page 24)
• Discovering the HP StoreOnce Backup system on the network (page 25)
• Accessing the StoreOnce Management console (page 25)
• User roles and accounts (page 26)
• Password best practices (page 27)
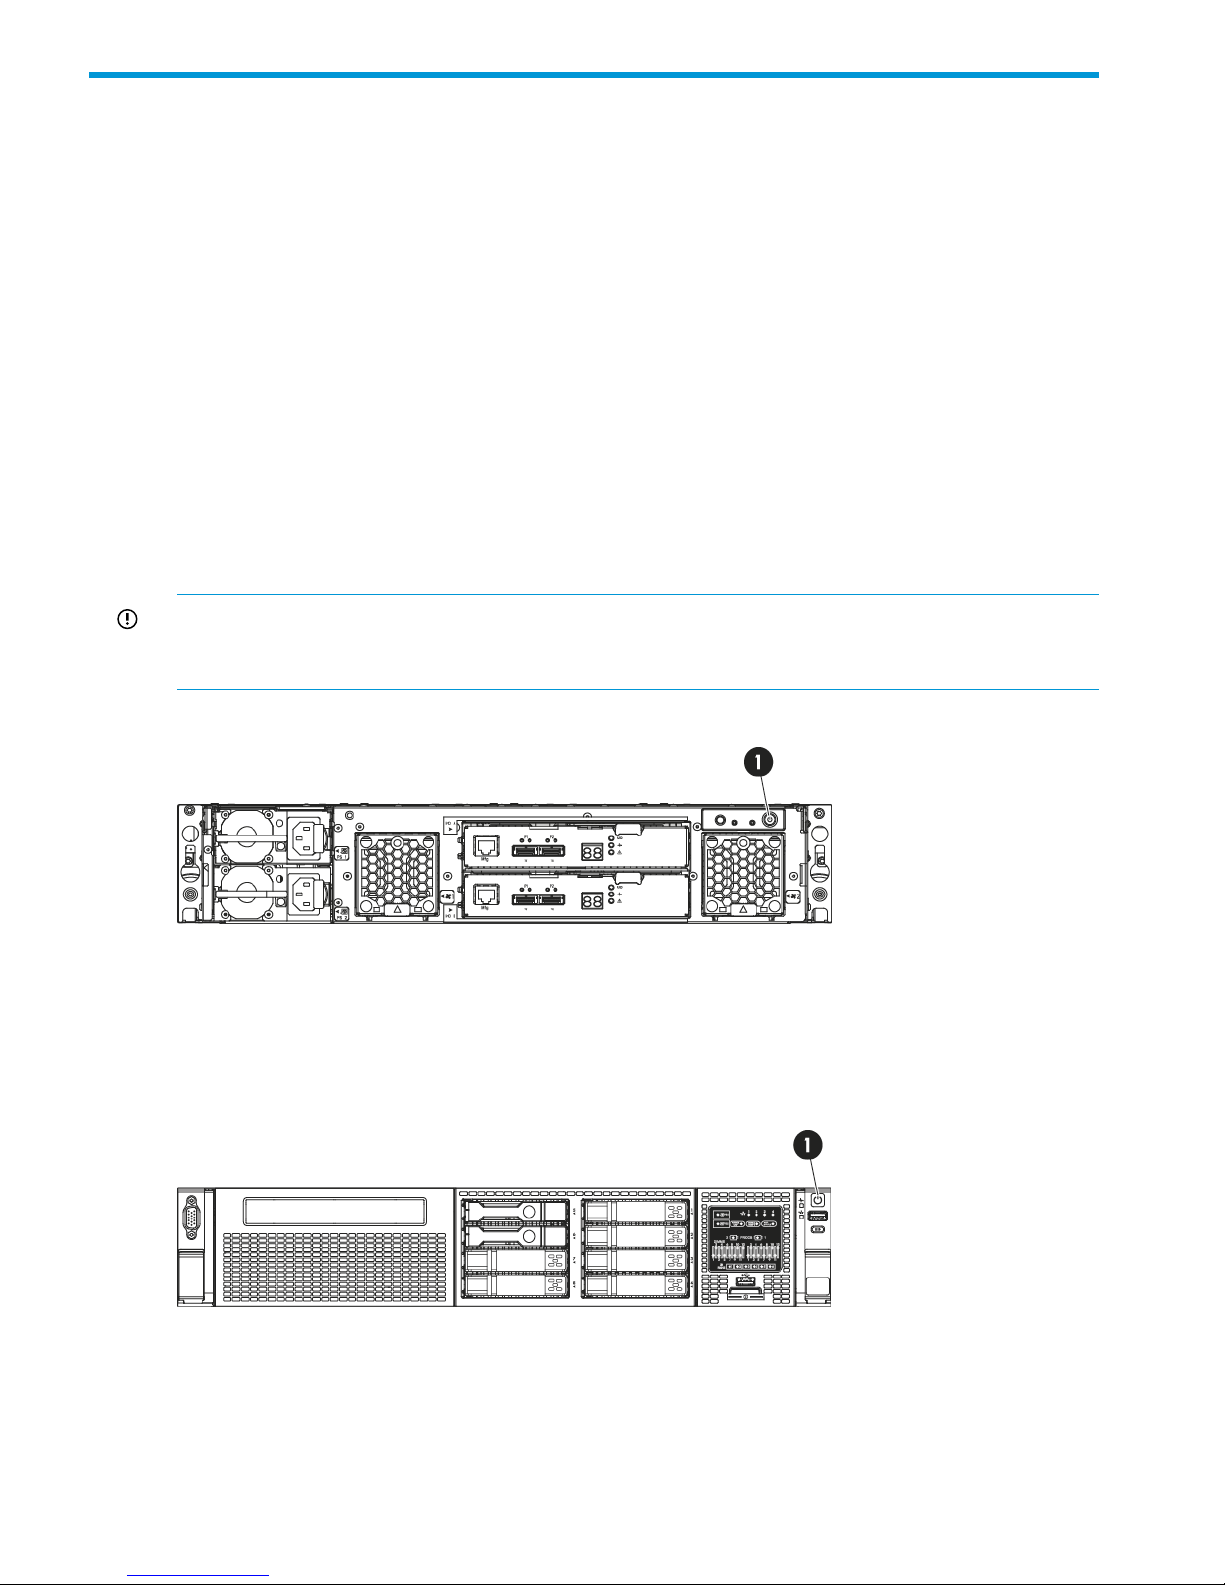
Powering on expansion shelves, HP 4500 and 4700 only
If expansion shelves have been connected, ensure that any expansion shelves attached to the
system are powered on (1) before pressing the Power button on the head server units. You may
need to hold down the power on button (on the rear of each unit) for a few seconds.
IMPORTANT: HP StoreOnce 4700 only: The first storage enclosure must always be connected to
the correct RAID card in the head server unit before power on. If it connected incorrectly, the
Hardware tree in the StoreOnce GUI will display errors.
Figure 17 Powering on expansion shelves
Powering on the HP StoreOnce Backup system
Press the Power on button (1) on the front of your HP StoreOnce Backup system. The normal boot
sequence takes approximately 5 minutes. On power up the HP StoreOnce Backup system runs its
fans at high speed for approximately 10 seconds before returning to normal speed.
Figure 18 Powering on the HP StoreOnce 4700 Backup system
24 Powering on and managing the StoreOnce Management system
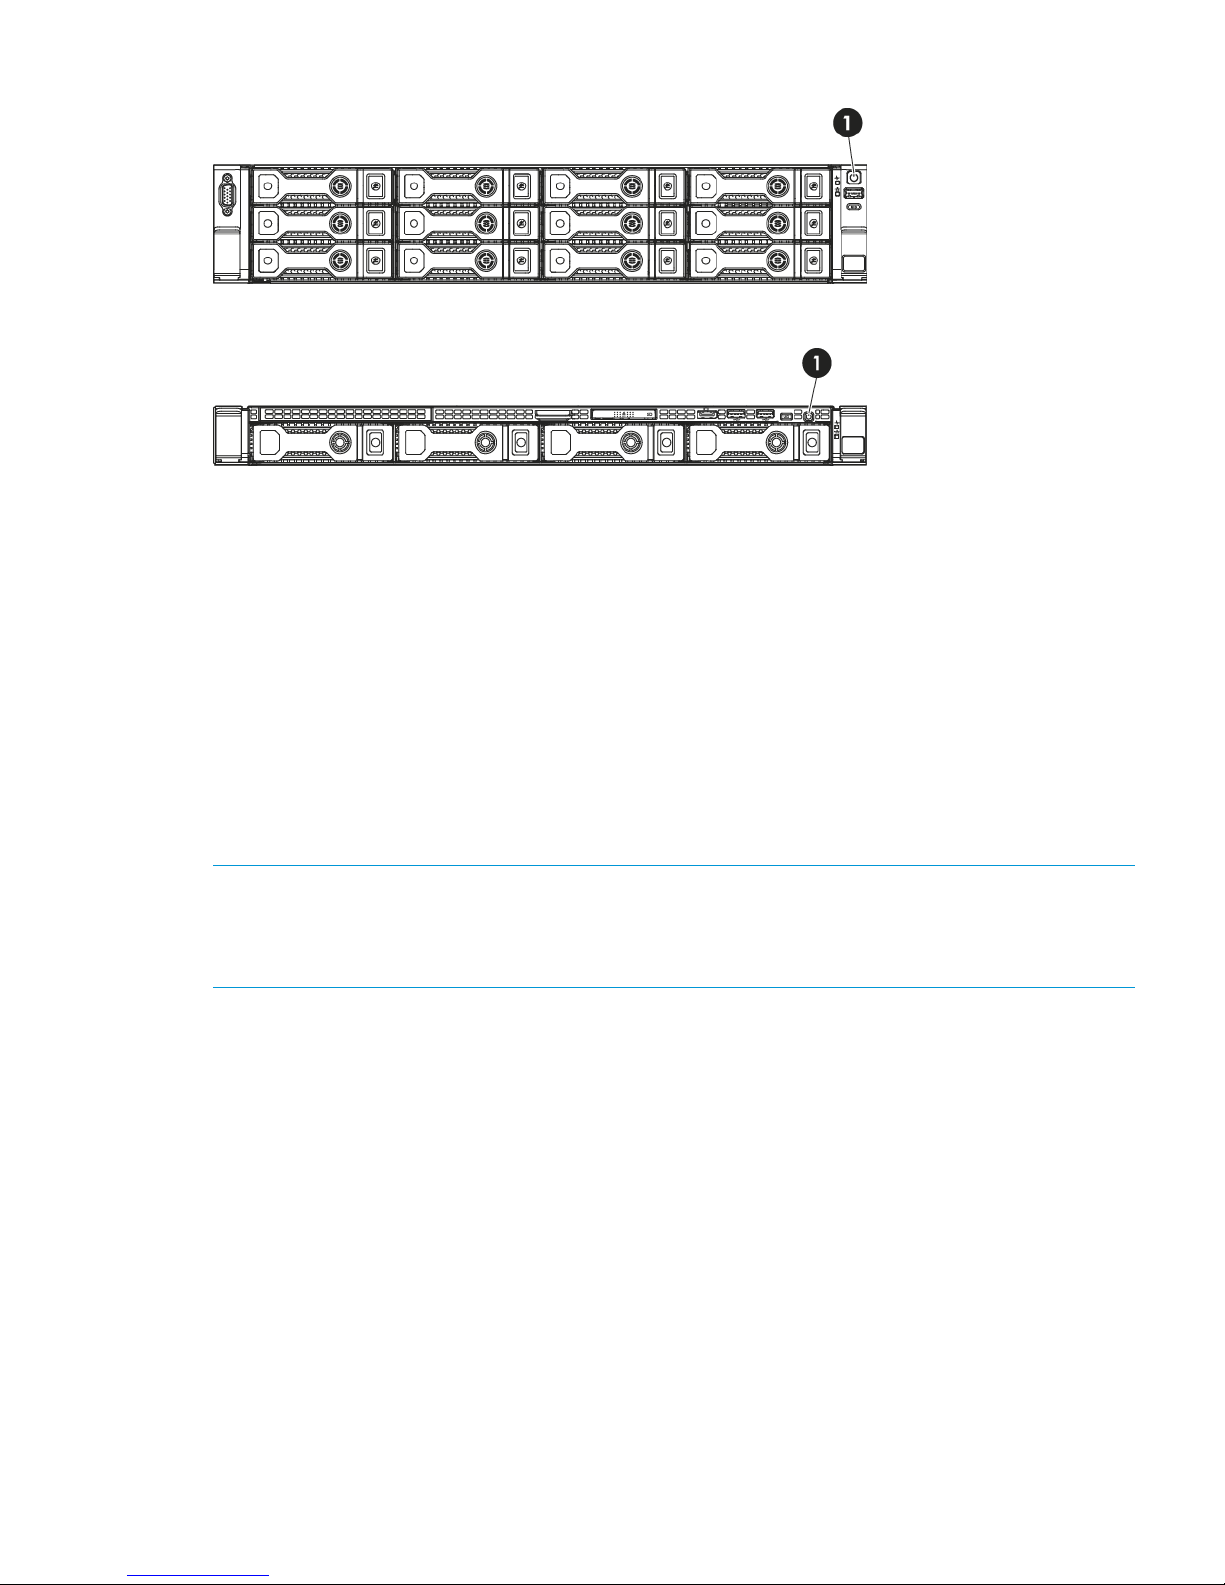
Figure 19 Powering on the HP StoreOnce 2900 and 4500 Backup system
Figure 20 Powering on the HP StoreOnce 2700 Backup system
1. Power On button
Discovering the HP StoreOnce Backup system on the network
If you have used the Quick Install option of connecting LAN Port 1 to a DHCP-enabled 1 Gbit
ethernet network, you can connect to and manage the StoreOnce Backup system from any client
attached to the same network using the appliance's Fully Qualified Domain Name (FQDN). The
FQDN is on a label/sticker on the server. Once connected, run the StoreOnce CLI network
commands to optimize your network configuration.
If your network is not DHCP enabled or you have attached to a different network port, connect a
monitor with keyboard directly to the appliance to configure initial network settings using the
StoreOnce CLI commands. As a minimum, you must configure network access to the StoreOnce
CLI and GUI across the internet. Once configured for internet access, use the StoreOnce CLI or
GUI, as appropriate, to manage the appliance and refine network settings, as appropriate.
NOTE: For ease of initial configuration HP recommends using the net set wizard StoreOnce
CLI command to configure the network. This wizard presents a series of questions, using the answers
you provide to configure the appliance on the network. See Network configuration, how to use
StoreOnce CLI commands (page 38) for more information and network configuration examples.
Accessing the StoreOnce Management Console
There are two ways of accessing the StoreOnce Management Console:
• Using the StoreOnce Command Line Interface, CLI
• Using the StoreOnce Web Management Interface, GUI
The StoreOnce CLI
The StoreOnce Command Line Interface (CLI) enables administration and monitoring of the system.
Many tasks, such as library and NAS share configuration and user management, and most network
configuration can be performed from either the StoreOnce GUI or the StoreOnce CLI; other tasks,
such as data in flight network configuration, SNMP configuration and date and time configuration,
can only be performed through the StoreOnce CLI. See the HP StoreOnce Backup system CLI
Reference Guide for more information about the StoreOnce CLI commands and their syntax.
Discovering the HP StoreOnce Backup system on the network 25

1. StoreOnce CLI commands require an SSH client application (freely available from the internet)
and must be run from a SSH terminal session on a machine that is on the same network as
the StoreOnce appliance:
ssh <username>@<ip_address>
NOTE: StoreOnce CLI commands can also be run from a local console (Keyboard and
Monitor) attached to the appliance, for example, if the network is not yet configured.
2. At the prompts provide a User Name and Password (Admin, admin).
The StoreOnce GUI
The HP StoreOnce Management Console (GUI) is the main interface for:
• Monitoring the status and health of the HP StoreOnce Backup system and all configured backup
devices.
• Creating and modifying VTL and NAS StoreOnce backup targets and Catalyst stores (VTL and
NAS backup targets may also be created and managed using the StoreOnce CLI).
• Managing replication relationships and housekeeping.
• Setting up Remote Support.
To log on to the Management Console using the StoreOnce GUI, use any machine connected to
the same network as the appliance. The HP StoreOnce Backup system uses a secure network
connection.
1. Enter: https://<IP_address>
You may also use the Fully Qualified Domain Name (FQDN)
NOTE: If you use http: in the URL, you are automatically forwarded to the https: secure
network connection.
2. The StoreOnce Management Console displays the Login prompt. Provide a User Name and
Password (Admin, admin). You can also set the local language to display the text within
StoreOnce GUI from the Login screen.
IMPORTANT: The web browser used to communicate with the HP StoreOnce Backup system
requires Active Scripting or JavaScript enabled. Without these scripts enabled, some browser
buttons may not display.
User roles and accounts
Two roles define the permissions associated with a user; admin and user. Two default user accounts,
one for each role, are created automatically when the system is installed.
• Administrator: Authorized users can create and edit management and StoreOnce functions
via the GUI and CLI. The default login and password are Admin and admin. The permissions
role of the Administrator is admin.
• Operator: This account limits access to the GUI and CLI to monitoring and viewing. The default
login and password are Operator and operator. The permissions role of the Operator is user.
It is good practice to determine what other users will be required and what access to the system
they should have as part of the planning process. In particular, will the HP StoreOnce Backup
system be added to an Active Directory Domain?
The following AD domain details will be required to configure AD.
• The AD domain name and whether it is on an IPv4 or IPv6 network
• The user name and password of the Domain Administrator or a delegated user with Domain
Administrative rights
26 Powering on and managing the StoreOnce Management system

Once the StoreOnce Backup system has been joined to an AD domain, you can configure external
users or external groups on the StoreOnce Backup system. The users or groups must already exist
on the AD domain. You can add AD domain users or groups with access to all StoreOnce features
or you can add them as Local Administrators for the CIFS server only. When you add AD domain
users through the CIFS server tab they are automatically created as Local Administrators, whether
or not they are admin users on the AD domain. This provides a way of implementing Delegated
Administration, which is not available for the StoreOnce device from the Active Directory
Management tool.
Only the name is required to configure AD users or groups on the StoreOnce Backup system;
passwords are configured on the AD domain server.
Password best practices
• Changing the passwords for the default user accounts (Administrator, Operator,
HPresetpassword and iLO) after installation is strongly recommended. Be sure to make a note
of the new passwords and save them to a secure location, such as an offline Password Security
tool.
NOTE: Note that once the Admin account password has been changed, its password cannot
be changed back to admin as this password is not sufficiently complex. The only way to revert
that password back to admin is via the HPresetpassword account which is only available on
the local console of the device.
• As you create new users, use the StoreOnce CLI system save config command to save
details of the new user accounts. This command does not save the password details, so
passwords for additional users should also be saved offline and kept in sync with the details
held on the HP StoreOnce Backup system.
User account and password requirements
• Local accounts can be between 1 & 16 characters in length and contain only alpha/numeric
and the following symbols - _
• External names may be up to 256 characters in length and contain alpha/numerics and the
following symbols: ~`!#$%()_-{}'.@\
• New passwords must be between 1 and to 24 characters and may contain only alpha\numerics
and the following symbols !@#$%^&* . The new password may not be the same as the current
password. The new password is not supplied for external users or groups.
Password best practices 27

4 Configuration using the system set config wizard
The StoreOnce CLI command set provides two configuration wizards:
• The system set config command sequence packages a number of commands, some of
which you may skip, if required. This wizard is recommend if you wish to configure time and
license settings at the same time as network settings and run a health check. The network
configuration element of this wizard uses the net set wizard command.
• The net set wizard command sequence configures network settings and is described in
detail in Network configuration, how to use StoreOnce CLI commands (page 38).
Abstract
It is recommended that you read Network configuration, understanding the concepts (page 30)
before running either wizard for the first time.
System configuration using system set config command
The recommended configuration option at installation is to use the StoreOnce CLI wizard, system
set config. This command sequence packages a number of commands, some of which you
may skip, if required.
Before running the wizard collect and verify the required network information, see Before running
net set wizard (page 39).
Four actions are available at each step, as shown in the example below; execute, skip, back
and quit. (The network must be configured.)
# system set config
The following configuration steps will be performed.
—>Configure Network
Configure Time
Configure Licenses
Verify Hardware health
Finish Configuration and reboot
Finish Configuration
Actions:
execute) Perform current step (Default)
skip) Skip to the next step
back) Go back to a previous step
quit) Exit the configuration immediately
Each of the configuration steps listed above in the wizard is now described in more detail.
Configure network
This step runs through the network configuration and is equivalent to running the net set wizard
command. This step must be completed.
The wizard guides you through the network configuration on the StoreOnce Backup system. It
configures all network settings for all subnets.
NOTE: See Network configuration using net set wizard (page 41) for an example net set
wizard sequence.
Configure Time
This step allows you to set the time explicitly or set it using NTP server. If you select NTP server you
will be asked to specify up to two NTP server names (or IP addresses) and select the timezone.
You may skip this step and configure time later. See Setting up time and date (page 59).
28 Configuration using the system set config wizard

Configure Licenses
The customer must provide license information if this step is to be executed.
You may skip this step and the customer may configure licenses later, if the required License To
Use (LTU), for example for replication, have not yet been obtained. See Configuring
licenses (page 60),
Verify Hardware health
This step generates a file called HealthReport<timestamp> in the health folder of the
StoreOnce folder structure, which you can copy after installation as a record of system health. This
file may be accesed over SFTP and contains status information on hardware, filesystem and service
set. For more information about accessing StoreOnce folders and the files in them, see Accessing
the StoreOnce Backup system over SFTP (page 63).
Finish Configuration (and reboot)
Choose either Finish Configuration and reboot or Finish Configuration. If you have reset the time
of the HP StoreOnce Backup system so that it has moved backwards, the configuration must be
completed with a reboot.
This performs a couple of tasks:
• Save the configuration details
Two configurations, devconfig<timestamp>.txt containing network and other device
management settings and devconfig<timestamp>.zip containing backup targets, email
settings, user accounts and so on are saved in the config folder. But at installation they
contain only the settings that have been configured during installation. It is strongly
recommended to use StoreOnce CLI commands to save the configuration again after backup
targets, email settings, user accounts and so on, have been configured, as described in Saving
configuration file (page 74).
• Collect a support ticket
This can take up to 20 minutes to complete because it is saving a record of the initial setup
and you will not be able to use the StoreOnce CLI during this period, although the StoreOnce
GUI will still be accessible.
If you choose the reboot option (recommended), the HP StoreOnce Backup system will then reboot.
System configuration using system set config command 29

5 Network configuration, understanding the StoreOnce
networking concepts
If you are new to the StoreOnce networking environment, read this chapter. For examples of using
the StoreOnce CLI commands to configure the network go to Network configuration, how to use
StoreOnce CLI commands (page 38). For information on using the StoreOnce GUI to configure
the network go to Network configuration, how to use StoreOnce GUI (page 53).
In this chapter:
• Network configuration basics (page 30)
• Network configuration guidelines (page 35)
• Deciding whether to use the StoreOncer CLI or the StoreOnce GUI (page 36)
• Physical ports and IP addresses (page 36)
Network configuration basics
HP StoreOnce Backup systems support both IPv4 and IPv6 address protocols. IPv4 is available for
all target devices and for appliance management; IPv6 is supported for all backup to StoreOnce
Catalyst stores, replication and Catalyst Copy, and for appliance management. It cannot be used
with VTL or NAS shares. All systems also support DHCP (v4 and v6).
Network configuration components
The network is defined in a single network configuration with three main components: DNS server
settings, Port Set settings and Subnet settings. The key points to understand when creating or
modifying the configuration are described below.
DNS servers
Up to three DNS servers may be configured for the StoreOnce Backup system. These may have
IPv4 and/or IPv6 addresses and apply across all Port Sets and Subnets defined within the
configuration.
In order to use FQDNs “Fully Qualified Domain Names” rather than an IP address to access the
StoreOnce system, the DNS server addresses that you provide should be able to resolve addresses
for all configured subnets. If you are using IPv4 and IPv6 addressing, then DNS servers configured
need to be able to resolve both IPV4 and IPV6 FQDNs. Up to three DNS servers (one primary,
and two backup servers if the primary is unavailable) may be configured for the StoreOnce Backup
system, which have IPv4 and/or IPv6 addresses.
NOTE: DNS Server and Gateway addresses will not be acquired in the following Subnet
configuration:
• VLAN Tag Enabled Subnet configured
• Addressing mode set to DHCP with the expectation of acquiring IPv6 address details
• DHCPv6 Server is running on a Windows Server operating system
In this configuration it is possible to manually provide the DNS Server and Gateway addresses
that should have been acquired via DHCPv6.
30 Network configuration, understanding the StoreOnce networking concepts
 Loading...