

Page 1

Altiris eXpress
™
Helpdesk Solution 5.6 SP1
User Guide
Page 2

Notice
Copyright © 2000-2003 Altiris Inc. All rights reserved.
Product Version: 5.6 SP1
Document Date: March 12, 2003
Bootworks U.S. Patent No. 5,764,593.
RapiDeploy U.S. Patent No. 6,144,992.
Due to the inherently complex nature of computer software, Altiris does not warrant that the Altiris
software is error-free, will operate without interruption, is compatible with all equipment and
software configurations, or will otherwise meet your needs.
The content of this documentation is furnished for informational use only, is subject to change
without notice, and should not be construed as a commitment by Altiris. Altiris Inc. assumes no
responsibility or liability for any errors or inaccuracies that may appear in this documentation. For
the latest documentation, visit our Web site at www.altiris.com.
Altiris, the Altiris logo, BootWorks, Inventory Solution, LabExpert, PC Transplant, RapiDeploy,
and RapidInstall are registered trademarks of Altiris, Inc. in the United States.
Carbon Copy is a registered trademark licensed to Altiris, Inc. in the United States and a trademark
of Altiris, Inc. in other countries.
Altiris eXpress, Altiris Vision, Application Mgmt Solution, Application Metering Solution, Asset
Control Solution, Asset Mgmt Suite, Client Mgmt Suite, Compliance Toolkit,
Conflict Analysis Solution, Contract Mgmt Solution, Deployment Server, Deployment Solution,
Education Mgmt Suite, Helpdesk, Helpdesk Solution, HP Client Manager Software, Lab Mgmt
Suite, Migration Toolkit, Mobile Client for SMS, My IT Forum, Notification Server, Problem Mgmt
Suite, Server Mgmt Suite, Server Monitor Solution, Site Monitor Solution, SW Delivery Solution,
TCO Mgmt Solution, Unix Client for SMS, Unix Inventory Solution, Unix SW Deliver Solution,
Web Admin for SMS, Web Reports and other product names are trademarks of Altiris, Inc. in the
United States and other countries.
Microsoft, Windows, and the Windows logo are trademarks, or registered trademarks of Microsoft
Corporation in the United States and/or other countries.
HP is a registered trademark of the Hewlett-Packard Corporation.
Compaq is a registered trademark of the Hewlett-Packard Corporation.
All other brand names are trademarks or registered trademarks of their respective companies.
Altiris Helpdesk Solution User Guide 2
Page 3

Contents
Notice . . . . . . . . . . . . . . . . . . . . . . . . . . . . . . . . . . . . . . . . . . . . . . . . . . . . . . . . . . . . . . . . . . . . . . . . . . . . . 2
Preface . . . . . . . . . . . . . . . . . . . . . . . . . . . . . . . . . . . . . . . . . . . . . . . . . . . . . . . . . . . . . . . . . . . . . . . . . . . . 6
Chapter 1: Introducing Helpdesk Solution . . . . . . . . . . . . . . . . . . . . . . . . . . . . . . . . . . . . . . . . . . . . . . . 9
Features and Benefits . . . . . . . . . . . . . . . . . . . . . . . . . . . . . . . . . . . . . . . . . . . . . . . . . . . . . . . . . . 11
System Requirements . . . . . . . . . . . . . . . . . . . . . . . . . . . . . . . . . . . . . . . . . . . . . . . . . . . . . . . . . . 12
Chapter 2: Installing and Setting Up eXpress. . . . . . . . . . . . . . . . . . . . . . . . . . . . . . . . . . . . . . . . . . . . 13
Step 1 - Notification Server Computer Requirements . . . . . . . . . . . . . . . . . . . . . . . . . . . . . . . . . . 14
Step 2 – Install Helpdesk Solution . . . . . . . . . . . . . . . . . . . . . . . . . . . . . . . . . . . . . . . . . . . . . . . . . 19
Step 3 – The Altiris eXpress .NET Configuration Wizard . . . . . . . . . . . . . . . . . . . . . . . . . . . . . . . . 19
Step 4 – The Configure Helpdesk Command . . . . . . . . . . . . . . . . . . . . . . . . . . . . . . . . . . . . . . . . . 20
Chapter 3: Helpdesk Overview . . . . . . . . . . . . . . . . . . . . . . . . . . . . . . . . . . . . . . . . . . . . . . . . . . . . . . . . 21
Architecture . . . . . . . . . . . . . . . . . . . . . . . . . . . . . . . . . . . . . . . . . . . . . . . . . . . . . . . . . . . . . . . . . . . . . . 21
Helpdesk Solution Consoles . . . . . . . . . . . . . . . . . . . . . . . . . . . . . . . . . . . . . . . . . . . . . . . . . . . . . . . . . 22
Workers and Worker Queues . . . . . . . . . . . . . . . . . . . . . . . . . . . . . . . . . . . . . . . . . . . . . . . . . . . . . . . . 23
Contacts . . . . . . . . . . . . . . . . . . . . . . . . . . . . . . . . . . . . . . . . . . . . . . . . . . . . . . . . . . . . . . . . . . . . . . . . . 24
Work Items . . . . . . . . . . . . . . . . . . . . . . . . . . . . . . . . . . . . . . . . . . . . . . . . . . . . . . . . . . . . . . . . . . . . . . . 25
Assets . . . . . . . . . . . . . . . . . . . . . . . . . . . . . . . . . . . . . . . . . . . . . . . . . . . . . . . . . . . . . . . . . . . . . . . . . . 25
Integration with Microsoft Systems Management Server (SMS) . . . . . . . . . . . . . . . . . . . . . . . . . . . . . . 26
Chapter 4: Installation . . . . . . . . . . . . . . . . . . . . . . . . . . . . . . . . . . . . . . . . . . . . . . . . . . . . . . . . . . . . . . . 27
Prerequisites . . . . . . . . . . . . . . . . . . . . . . . . . . . . . . . . . . . . . . . . . . . . . . . . . . . . . . . . . . . . . . . . . . . . . 27
Helpdesk Setup . . . . . . . . . . . . . . . . . . . . . . . . . . . . . . . . . . . . . . . . . . . . . . . . . . . . . . . . . . . . . . . . . . . 28
Localization . . . . . . . . . . . . . . . . . . . . . . . . . . . . . . . . . . . . . . . . . . . . . . . . . . . . . . . . . . . . . . . . . . . . . . 33
Chapter 5: Configuration . . . . . . . . . . . . . . . . . . . . . . . . . . . . . . . . . . . . . . . . . . . . . . . . . . . . . . . . . . . . 35
Web Administration Console Interface Elements . . . . . . . . . . . . . . . . . . . . . . . . . . . . . . . . . . . . . . . . . . 35
Console Security . . . . . . . . . . . . . . . . . . . . . . . . . . . . . . . . . . . . . . . . . . . . . . . . . . . . . . . . . . . . . . . . . . 36
Entry Points . . . . . . . . . . . . . . . . . . . . . . . . . . . . . . . . . . . . . . . . . . . . . . . . . . . . . . . . . . . . . . . . . . . . . . 40
Licensing . . . . . . . . . . . . . . . . . . . . . . . . . . . . . . . . . . . . . . . . . . . . . . . . . . . . . . . . . . . . . . . . . . . . . . . . 43
Chapter 6: User Interface . . . . . . . . . . . . . . . . . . . . . . . . . . . . . . . . . . . . . . . . . . . . . . . . . . . . . . . . . . . . 44
Altiris eXpress Helpdesk Consoles . . . . . . . . . . . . . . . . . . . . . . . . . . . . . . . . . . . . . . . . . . . . . . . . . . . . 46
Helpdesk Worker Console . . . . . . . . . . . . . . . . . . . . . . . . . . . . . . . . . . . . . . . . . . . . . . . . . . . . . . . 47
New Work Item . . . . . . . . . . . . . . . . . . . . . . . . . . . . . . . . . . . . . . . . . . . . . . . . . . . . . . . . . . . . . . . . . . . 50
Add New Work Item . . . . . . . . . . . . . . . . . . . . . . . . . . . . . . . . . . . . . . . . . . . . . . . . . . . . . . . . . . . . 52
Additional Work Item Information . . . . . . . . . . . . . . . . . . . . . . . . . . . . . . . . . . . . . . . . . . . . . . . . . . . . . . 54
Attachments . . . . . . . . . . . . . . . . . . . . . . . . . . . . . . . . . . . . . . . . . . . . . . . . . . . . . . . . . . . . . . . . . . 55
Altiris Helpdesk Solution User Guide 3
Page 4

Contents
Link Work Items . . . . . . . . . . . . . . . . . . . . . . . . . . . . . . . . . . . . . . . . . . . . . . . . . . . . . . . . . . . . . . . 56
E-mail Messages . . . . . . . . . . . . . . . . . . . . . . . . . . . . . . . . . . . . . . . . . . . . . . . . . . . . . . . . . . . . . . 58
View Contact Properties - New Work Item . . . . . . . . . . . . . . . . . . . . . . . . . . . . . . . . . . . . . . . . . . . 59
Find Contact - New Work Item . . . . . . . . . . . . . . . . . . . . . . . . . . . . . . . . . . . . . . . . . . . . . . . . . . . . 61
Select Contact - New Work Item . . . . . . . . . . . . . . . . . . . . . . . . . . . . . . . . . . . . . . . . . . . . . . . . . . 62
View Asset Properties - New Work Item . . . . . . . . . . . . . . . . . . . . . . . . . . . . . . . . . . . . . . . . . . . . . 63
Find Asset - New Work Item . . . . . . . . . . . . . . . . . . . . . . . . . . . . . . . . . . . . . . . . . . . . . . . . . . . . . . 64
Select Asset - New Work Item . . . . . . . . . . . . . . . . . . . . . . . . . . . . . . . . . . . . . . . . . . . . . . . . . . . . 65
Find Work Items . . . . . . . . . . . . . . . . . . . . . . . . . . . . . . . . . . . . . . . . . . . . . . . . . . . . . . . . . . . . . . . . . . . 66
Search in Comment or Title Field . . . . . . . . . . . . . . . . . . . . . . . . . . . . . . . . . . . . . . . . . . . . . . . . . . . . . 69
Using Queries . . . . . . . . . . . . . . . . . . . . . . . . . . . . . . . . . . . . . . . . . . . . . . . . . . . . . . . . . . . . . . . . . . . . 70
List Query . . . . . . . . . . . . . . . . . . . . . . . . . . . . . . . . . . . . . . . . . . . . . . . . . . . . . . . . . . . . . . . . . . . . 71
New Query . . . . . . . . . . . . . . . . . . . . . . . . . . . . . . . . . . . . . . . . . . . . . . . . . . . . . . . . . . . . . . . . . . . 71
Modify New Query Search . . . . . . . . . . . . . . . . . . . . . . . . . . . . . . . . . . . . . . . . . . . . . . . . . . . . . . . 72
Query Data Types . . . . . . . . . . . . . . . . . . . . . . . . . . . . . . . . . . . . . . . . . . . . . . . . . . . . . . . . . . . . . 73
Query Parameter Replacement . . . . . . . . . . . . . . . . . . . . . . . . . . . . . . . . . . . . . . . . . . . . . . . . . . . 76
Delete Queries . . . . . . . . . . . . . . . . . . . . . . . . . . . . . . . . . . . . . . . . . . . . . . . . . . . . . . . . . . . . . . . . 78
Last Query Results . . . . . . . . . . . . . . . . . . . . . . . . . . . . . . . . . . . . . . . . . . . . . . . . . . . . . . . . . . . . 79
Retrieve Queued Item . . . . . . . . . . . . . . . . . . . . . . . . . . . . . . . . . . . . . . . . . . . . . . . . . . . . . . . . . . 80
Contacts . . . . . . . . . . . . . . . . . . . . . . . . . . . . . . . . . . . . . . . . . . . . . . . . . . . . . . . . . . . . . . . . . . . . . . . . . 80
New Contact . . . . . . . . . . . . . . . . . . . . . . . . . . . . . . . . . . . . . . . . . . . . . . . . . . . . . . . . . . . . . . . . . . 82
Assets . . . . . . . . . . . . . . . . . . . . . . . . . . . . . . . . . . . . . . . . . . . . . . . . . . . . . . . . . . . . . . . . . . . . . . . . . . 84
New Asset . . . . . . . . . . . . . . . . . . . . . . . . . . . . . . . . . . . . . . . . . . . . . . . . . . . . . . . . . . . . . . . . . . . 85
Recents . . . . . . . . . . . . . . . . . . . . . . . . . . . . . . . . . . . . . . . . . . . . . . . . . . . . . . . . . . . . . . . . . . . . . . . . . 87
My Helpdesk Console . . . . . . . . . . . . . . . . . . . . . . . . . . . . . . . . . . . . . . . . . . . . . . . . . . . . . . . . . . . . . . 88
Work Item Request - NT User . . . . . . . . . . . . . . . . . . . . . . . . . . . . . . . . . . . . . . . . . . . . . . . . . . . . . . . . 91
Work Item Request - User . . . . . . . . . . . . . . . . . . . . . . . . . . . . . . . . . . . . . . . . . . . . . . . . . . . . . . . . . . . 92
Work Item Request - Guest . . . . . . . . . . . . . . . . . . . . . . . . . . . . . . . . . . . . . . . . . . . . . . . . . . . . . . . . . . 92
Create Custom URL to Access Helpdesk Consoles . . . . . . . . . . . . . . . . . . . . . . . . . . . . . . . . . . . . . . . 93
Support for Pocket PC (PPC) . . . . . . . . . . . . . . . . . . . . . . . . . . . . . . . . . . . . . . . . . . . . . . . . . . . . . . . . 94
Chapter 7: Administration . . . . . . . . . . . . . . . . . . . . . . . . . . . . . . . . . . . . . . . . . . . . . . . . . . . . . . . . . . . 95
Helpdesk Admin Console . . . . . . . . . . . . . . . . . . . . . . . . . . . . . . . . . . . . . . . . . . . . . . . . . . . . . . . . . . . . 97
The Admin Report . . . . . . . . . . . . . . . . . . . . . . . . . . . . . . . . . . . . . . . . . . . . . . . . . . . . . . . . . . . . . . . . . 98
Categories . . . . . . . . . . . . . . . . . . . . . . . . . . . . . . . . . . . . . . . . . . . . . . . . . . . . . . . . . . . . . . . . . . . . . . 100
Edit Categories . . . . . . . . . . . . . . . . . . . . . . . . . . . . . . . . . . . . . . . . . . . . . . . . . . . . . . . . . . . . . . . 101
Add New Category . . . . . . . . . . . . . . . . . . . . . . . . . . . . . . . . . . . . . . . . . . . . . . . . . . . . . . . . . . . . 102
Modify Category . . . . . . . . . . . . . . . . . . . . . . . . . . . . . . . . . . . . . . . . . . . . . . . . . . . . . . . . . . . . . 103
Move Category . . . . . . . . . . . . . . . . . . . . . . . . . . . . . . . . . . . . . . . . . . . . . . . . . . . . . . . . . . . . . . . 104
Copy Category . . . . . . . . . . . . . . . . . . . . . . . . . . . . . . . . . . . . . . . . . . . . . . . . . . . . . . . . . . . . . . . 105
Delete Category . . . . . . . . . . . . . . . . . . . . . . . . . . . . . . . . . . . . . . . . . . . . . . . . . . . . . . . . . . . . . . 106
Routing Rules . . . . . . . . . . . . . . . . . . . . . . . . . . . . . . . . . . . . . . . . . . . . . . . . . . . . . . . . . . . . . . . . . . . 107
List Routing Rules . . . . . . . . . . . . . . . . . . . . . . . . . . . . . . . . . . . . . . . . . . . . . . . . . . . . . . . . . . . . 107
Process Order of Routing Rules . . . . . . . . . . . . . . . . . . . . . . . . . . . . . . . . . . . . . . . . . . . . . . . . . . 108
Edit Routing Rule . . . . . . . . . . . . . . . . . . . . . . . . . . . . . . . . . . . . . . . . . . . . . . . . . . . . . . . . . . . . . 108
New Routing Rule . . . . . . . . . . . . . . . . . . . . . . . . . . . . . . . . . . . . . . . . . . . . . . . . . . . . . . . . . . . . . 109
Delete Routing Rules . . . . . . . . . . . . . . . . . . . . . . . . . . . . . . . . . . . . . . . . . . . . . . . . . . . . . . . . . . 111
Notify Rules . . . . . . . . . . . . . . . . . . . . . . . . . . . . . . . . . . . . . . . . . . . . . . . . . . . . . . . . . . . . . . . . . . . . . 112
New Notify Rule . . . . . . . . . . . . . . . . . . . . . . . . . . . . . . . . . . . . . . . . . . . . . . . . . . . . . . . . . . . . . . 113
Edit Notify Rule . . . . . . . . . . . . . . . . . . . . . . . . . . . . . . . . . . . . . . . . . . . . . . . . . . . . . . . . . . . . . . . 115
Altiris Helpdesk Solution User Guide 4
Page 5

Contents
Delete Notify Rules . . . . . . . . . . . . . . . . . . . . . . . . . . . . . . . . . . . . . . . . . . . . . . . . . . . . . . . . . . . . 116
E-mail Templates . . . . . . . . . . . . . . . . . . . . . . . . . . . . . . . . . . . . . . . . . . . . . . . . . . . . . . . . . . . . . . . . . 117
New Template . . . . . . . . . . . . . . . . . . . . . . . . . . . . . . . . . . . . . . . . . . . . . . . . . . . . . . . . . . . . . . . 118
Edit E-mail Templates . . . . . . . . . . . . . . . . . . . . . . . . . . . . . . . . . . . . . . . . . . . . . . . . . . . . . . . . . 119
E-mail Template Macros . . . . . . . . . . . . . . . . . . . . . . . . . . . . . . . . . . . . . . . . . . . . . . . . . . . . . . . . . . . 120
Bulletins . . . . . . . . . . . . . . . . . . . . . . . . . . . . . . . . . . . . . . . . . . . . . . . . . . . . . . . . . . . . . . . . . . . . . . . . 122
Add New Bulletin . . . . . . . . . . . . . . . . . . . . . . . . . . . . . . . . . . . . . . . . . . . . . . . . . . . . . . . . . . . . . 123
Delete Bulletin . . . . . . . . . . . . . . . . . . . . . . . . . . . . . . . . . . . . . . . . . . . . . . . . . . . . . . . . . . . . . . . 123
Sources . . . . . . . . . . . . . . . . . . . . . . . . . . . . . . . . . . . . . . . . . . . . . . . . . . . . . . . . . . . . . . . . . . . . . . . . 124
View Source . . . . . . . . . . . . . . . . . . . . . . . . . . . . . . . . . . . . . . . . . . . . . . . . . . . . . . . . . . . . . . . . . 124
New NS Source . . . . . . . . . . . . . . . . . . . . . . . . . . . . . . . . . . . . . . . . . . . . . . . . . . . . . . . . . . . . . . 125
New SMS Source . . . . . . . . . . . . . . . . . . . . . . . . . . . . . . . . . . . . . . . . . . . . . . . . . . . . . . . . . . . . . 125
Edit Source . . . . . . . . . . . . . . . . . . . . . . . . . . . . . . . . . . . . . . . . . . . . . . . . . . . . . . . . . . . . . . . . . . 126
Import from Source . . . . . . . . . . . . . . . . . . . . . . . . . . . . . . . . . . . . . . . . . . . . . . . . . . . . . . . . . . . 127
Configure Helpdesk . . . . . . . . . . . . . . . . . . . . . . . . . . . . . . . . . . . . . . . . . . . . . . . . . . . . . . . . . . . . . . . 128
Delete Work Items . . . . . . . . . . . . . . . . . . . . . . . . . . . . . . . . . . . . . . . . . . . . . . . . . . . . . . . . . . . . . . . . 130
Delete Contacts . . . . . . . . . . . . . . . . . . . . . . . . . . . . . . . . . . . . . . . . . . . . . . . . . . . . . . . . . . . . . . . . . . 133
Delete Assets . . . . . . . . . . . . . . . . . . . . . . . . . . . . . . . . . . . . . . . . . . . . . . . . . . . . . . . . . . . . . . . . . . . . 134
Workers . . . . . . . . . . . . . . . . . . . . . . . . . . . . . . . . . . . . . . . . . . . . . . . . . . . . . . . . . . . . . . . . . . . . . . . . 135
New Worker . . . . . . . . . . . . . . . . . . . . . . . . . . . . . . . . . . . . . . . . . . . . . . . . . . . . . . . . . . . . . . . . . 135
Edit Worker . . . . . . . . . . . . . . . . . . . . . . . . . . . . . . . . . . . . . . . . . . . . . . . . . . . . . . . . . . . . . . . . . . 136
List Queue . . . . . . . . . . . . . . . . . . . . . . . . . . . . . . . . . . . . . . . . . . . . . . . . . . . . . . . . . . . . . . . . . . . . . . 137
New Queue . . . . . . . . . . . . . . . . . . . . . . . . . . . . . . . . . . . . . . . . . . . . . . . . . . . . . . . . . . . . . . . . . . 138
Reports . . . . . . . . . . . . . . . . . . . . . . . . . . . . . . . . . . . . . . . . . . . . . . . . . . . . . . . . . . . . . . . . . . . . . . . . 139
Notification Policies . . . . . . . . . . . . . . . . . . . . . . . . . . . . . . . . . . . . . . . . . . . . . . . . . . . . . . . . . . . . . . . 140
Service Level Agreements . . . . . . . . . . . . . . . . . . . . . . . . . . . . . . . . . . . . . . . . . . . . . . . . . . . . . . . . . 141
Chapter 8: Troubleshooting . . . . . . . . . . . . . . . . . . . . . . . . . . . . . . . . . . . . . . . . . . . . . . . . . . . . . . . . . 142
Index . . . . . . . . . . . . . . . . . . . . . . . . . . . . . . . . . . . . . . . . . . . . . . . . . . . . . . . . . . . . . . . . . . . . . . . . . . . . 143
Altiris Helpdesk Solution User Guide 5
Page 6

Preface
Before using this documentation, we recommend that you review the document conventions (see
“Document Conventions” on page 6).
Detailed information about Altiris products is included in each product’s documentation. The
product’s documentation is installed when the product is installed. To access Altiris product
documentation from the Web, go to our documentation Web page at www.altiris.com/support/
documentation.
If you have questions that are not answered in the documentation, we recommend that you use one
of our support options (see “Support” on page 7).
If you have feedback about this documentation, please send an e-mail message to our documentation
group at doc@altiris.com.
Document Conventions
The following table describes the conventions used in this document.
Document Conventions
What you see Meaning
Altiris eXpress
Notification Server
User Guide
Interface Element Name
File > Save A series of mouse selections are represented in this format. The above
server name/altiris/
documents
set variable = 123
www.altiris.com Links to web pages are in blue text.
References to other documents are italicized.
Note Most references to Altiris documents are hypertext links to those
documents. For these links to work, the target document file must be in the
same location as the source document.
If viewing PDF documentation from our product CD or where the
documents were installed on your hard drive, the links will work.
If viewing a PDF document from our web site, the links to other Altiris
documents will not work. (The documents are stored in different folders).
If you download PDF documents from our web site and place them in the
same folder, the document references will link to the other PDF document
provided the target PDF document is in the folder.
Buttons, menu items, tabs, and field names are displayed in bold text.
example means click on the File command on the menu bar, and then click
on the Save command.
A value in a path that depends on the user’s system is in italics. In this
example, server name needs to be replaced by the name of the user’s
server.
Sample code is in Courier font.
Altiris Helpdesk Solution User Guide 6
Page 7

Preface
Support
Altiris is committed to providing world-class technical support and professional services to its
customers. Included with every product purchase is complimentary Electronic Support. For
customers who want a higher level of support, Altiris offers many fee-based services ranging from
Priority Support, which includes priority telephone and priority e-mail support, to on-site
consultation.
Before Contacting Support
We recommend that you do the following before contacting Support:
• Download and install the latest version of the product and product updates from our web site
(www.altiris.com).
• Read the product Release Notes. The Release Notes contain important information on the current
release including limitations and application specific workarounds. Many customer questions are
answered in the Release Notes.
• Review the information in the Altiris support forums (go to www.altiris.com and click on
Support and then Forums). If you cannot find the answer to your question in the forums, you can
post your own question. The forums are monitored by our Support engineers, who will help you
with your questions.
Support Contact Information
Altiris is a global organization with operational centers in the following geographies:
Training
• Americas in Lindon, Utah covering North and South America
• Asia Pacific in Sydney, Australia
• Europe, Middle East, and Africa (EMEA) in Landau, Germany
Contact information for each of these operational centers is available at www.altiris.com/contact.
When contacting Support, please include the following information in the e-mail or have it ready
when calling:
• Your name, e-mail address, and phone number
• Product name and product version
• Specific details about the problem, including specific system messages, error codes, and logs
• Details about your system, including the operating system, applied services packs, hardware
configuration, network details, and other applications running on the system.
To ensure that you are using Altiris products in the most effective way, Altiris offers in-depth,
instructor-led, hands-on courses. These courses will help you quickly learn the optimum methods
for installing, configuring, and managing your network using Altiris’ award-winning products. For
information about Altiris training, go to the following web sites:
• http://www.altiris.com/services/training/
• http://www.altiris-europe.com/services.htm
Altiris Helpdesk Solution User Guide 7
Page 8

Preface
Altiris Helpdesk Solution User Guide 8
Page 9
Chapter 1:
Introducing Helpdesk Solution
Altiris eXpress™ Helpdesk Solution gives you a low-cost, highly-integrated help desk management
system to automate the process of assigning, reporting, and resolving IT system management issues.
Helpdesk Solution reduces system downtime across the organization, reduces incoming help calls
and problem response time, and notifies administration personnel through desktop consoles or
handheld devices. Incident tracking, reporting and integration make Helpdesk Solution a flexible
tool to meet the ever-expanding, ever-changing demands placed on your IT department.
Helpdesk Solution is an easy-to-use, web-based solution designed to improve efficiency and reduce
costs for your IT organization by reacting quickly to critical problems, allowing you to
• Manage assets and inventories, migrate computers, and deploy software
• Respond appropriately to service-level agreements (SLAs)
• Generate web-based reports to identify worker performance, schedules, histories, TCO and other
business-critical information
• Access e-mail alerts or help desk issues remotely from desktops or handhelds
• Maximize worker efficiency by scheduling work items, allowing end-users to create their own
work items, and linking similar or duplicate help desk issues.
In many cases, Helpdesk Solution eliminates the need to deploy IT personnel to each desktop, saving
support costs and speeding problem resolution. And Helpdesk Solution allows you to easily design
and install a system specific to your needs.
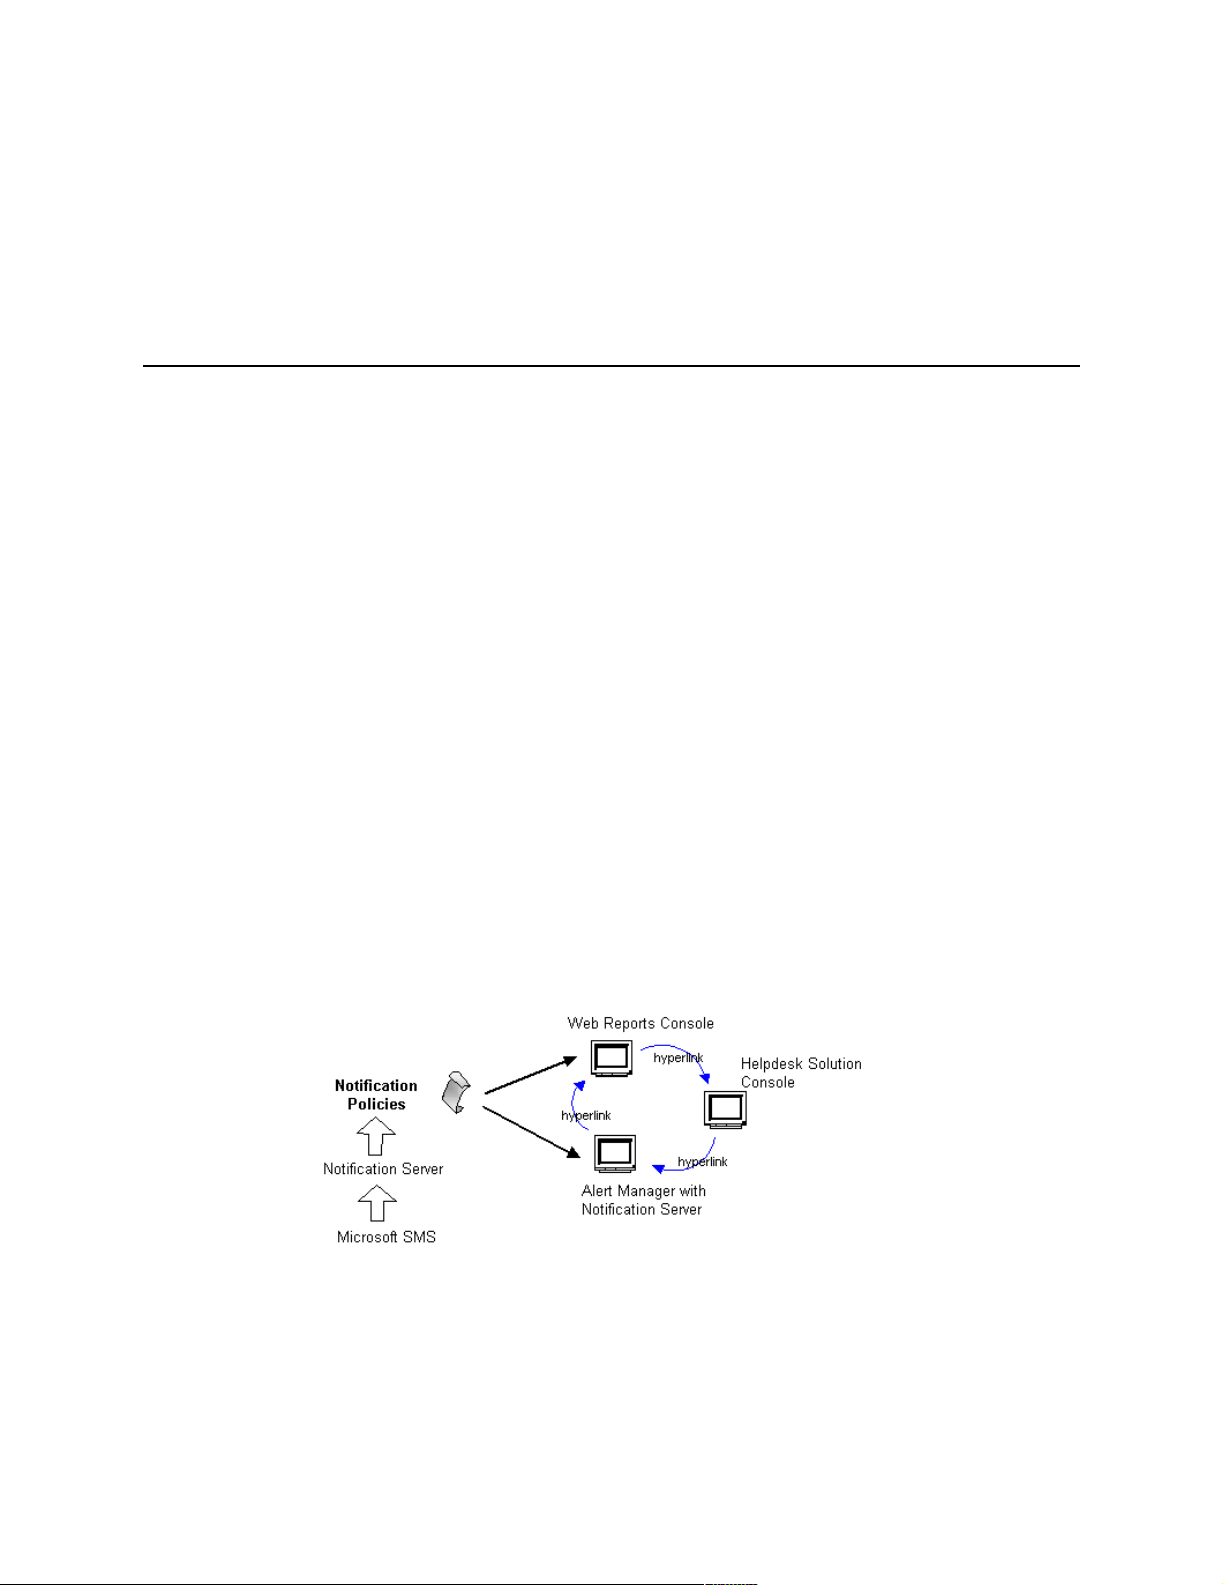
A Complete, Integrated System
Helpdesk Solution integrates natively with Microsoft SMS and other Altiris products using
Notification Policies that link reports, the Helpdesk Console, and Alert Manager.
Integrate with Microsoft SMS
Helpdesk Solution integrates natively with Microsoft Systems Management Server (SMS). When
combined with Altiris Web Admin for SMS, workers can access and extend native SMS features,
using features to gather and report the inventory of hardware and software resources, install software
packages, remotely control all types of computers, and integrate additional tools and Altiris eXpress
Solutions.
Altiris Helpdesk Solution User Guide 9
Page 10
Chapter 1: Introducing Helpdesk Solution
Helpdesk Solution integrates tightly with Microsoft SMS by reflecting work orders from Helpdesk
Solution into the SMS database and permitting SMS administrators to view problems and/or planned
work from their console. A thumbnail of the SMS inventory is recorded with the work item in the
Helpdesk Solution database.
Helpdesk Solution - Satellite Architecture
The Helpdesk Solution supports satellite installations. A satellite Helpdesk, is installed and
configured by running AeXHD.exe locally on a satellite machine, which does not have NS
installed, but otherwise meets all Helpdesk prerequisites. Point the configuration to the Notification
Server where the master Helpdesk Solution is hosted. The Configure Helpdesk command requests
the name of the master Helpdesk server that was previously installed and configured.
Satellites can be used to off-load Helpdesk UI activity from the master Helpdesk. Since the master
Helpdesk is running on the same server as Notification Server, it competes for resources with
inventory management, software distribution, and other functions. A satellite Helpdesk can provide
better response times and scaling, all other things being equal.
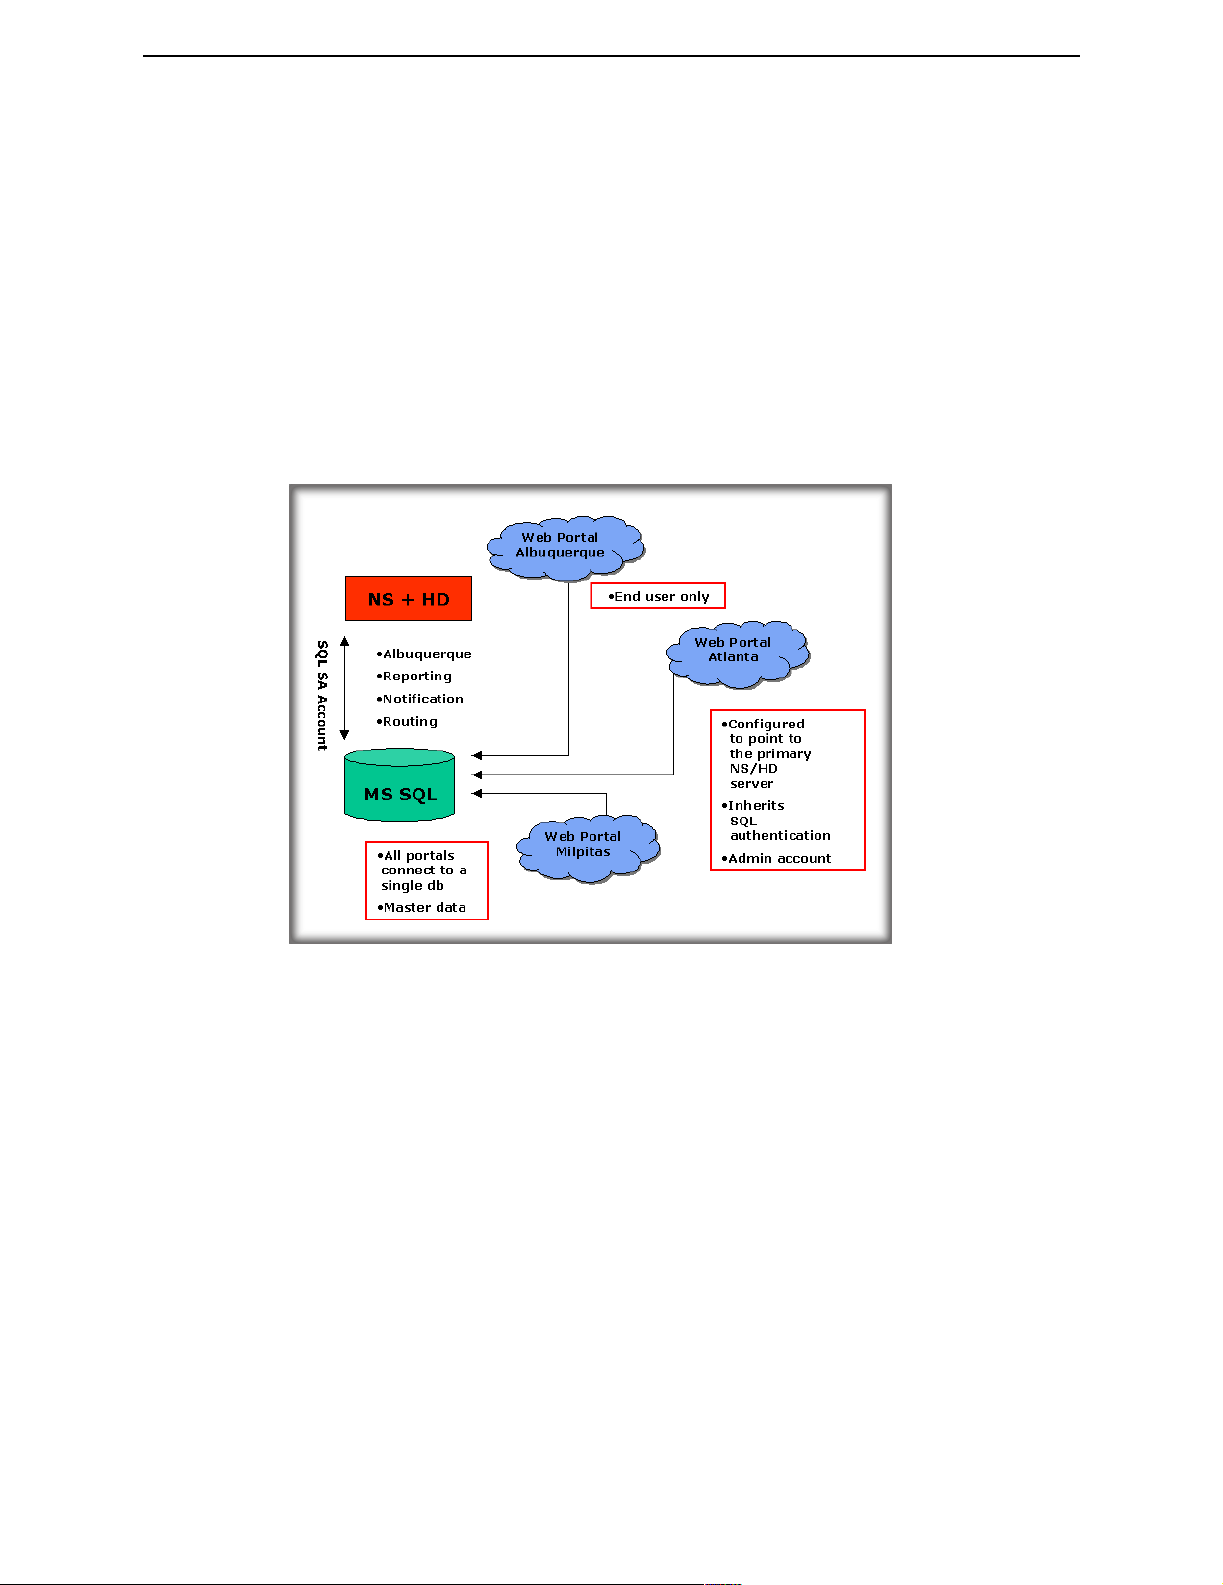
Scenario
Here is a Helpdesk satellite scenario. The primary Notification Server and master Helpdesk server
resides in Albuquerque, with satellites in Milpitas, Atlanta, and another in Austin for end users only.
The master and satellites in Milpitas and Atlanta provide web access to the Helpdesk database for
both workers and end users. Austin is a satellite for end users only - this is accomplished by
modifying the NTFS permissions on the Austin entry points to prevent the use of the worker
consoles.
In this scenario, the following is true:
• Satellites are on a separate domain than the primary Helpdesk and Notification Server
instance, SMTP server and the SQL database, this is not a requirement.
• Persistent VPN connection is used to connect the satellite servers to the master server. (Other
schemes, such as port-specific firewall management can also work but may require more
custom configuration). The satellites must be able to open SQLOLEDB connections to the
SQL database and submit HTTP requests to the master Helpdesk. They must also be able to
open the SMTP port on the machine designated during Notification Server installation as the
SMTP server.
• When satellites are in separate, non-trusted domains, Helpdesk must use standard SQL
Server logins and passwords accounts, not Windows accounts. This is controlled by the
master Helpdesk, its connection string and other configuration details are passed to the
Altiris Helpdesk Solution User Guide 10
Page 11

Chapter 1: Introducing Helpdesk Solution
satellites every 4 minutes. Windows accounts (trusted connections) can be used if the
Helpdesk identity, VPN, and domains are correctly configured.
• Attachments are stored on the satellites where they were uploaded.
Customize with Ease
Helpdesk Solution is 100% web-based to meet the needs of any organization. Helpdesk Solution
provides the ability to extend the database or simply change the look and feel of the interface with
the use of any text editor. Helpdesk Solution also comes with a selection of sample consoles that
allow users to create their own work items. By allowing end-users to create their own work items,
administrators can reduce the amount of time their workers spend on the phone and increase their
time solving issues.
Helpdesk Solution improves service levels and reduces IT costs across your organization, allowing
you to:
• Notify your IT department of business-critical events
• Allow workers to remotely manage their own Helpdesk tickets from any browser or CE device
• Use a self-help console to reduce the number of incoming calls to the help desk
• Report business critical information via the web
• Quickly install and configure Helpdesk Solution into any business environment.
• Customize the user interface for take advantage of different features and provide a custom look
and feel.
Features and Benefits
eXpress provides many features and benefits. The following lists describes some of these features:
Features
1 Web-based.
• Allows organizations to easily share and access data
2 Resource explorer drill-down.
• Link from Helpdesk allows workers to access summary and detailed hardware and software
inventory configuration
3 Helpdesk’s self-help center (My Helpdesk).
4 Web reports.
Benefits
1 Allows each IS and IT organization to effectively communicate by managing all tasks in single
web console.
2 View complete hardware and software inventory of the problem asset directly from the Helpdesk
console.
3 Increase service levels by being proactive, notifying users of work item status and allowing them
to submit work items and track status 24 x 7.
4 Maximize critical data by understanding work item trends and which assets and users require the
most Helpdesk resource.
Altiris Helpdesk Solution User Guide 11
Page 12

Chapter 1: Introducing Helpdesk Solution
System Requirements
The following is a list of minimum requirements for the Helpdesk Solution.
Server
• Altiris eXpress Notification Server 5.5 SP2 or later
• A CD-ROM drive with Microsoft 2000 Server/Advanced Server and SP2 or later
• Hard drive formatted with NTFS file system
• Microsoft IIS 5.0 (IIS 5.0 requires webs to be hosted on NTFS)
• Microsoft SQL Server 2000 is recommended, SQL 7.0 (approved), MSDE is not recommended
• Microsoft Internet Explorer 6.0 or greater is recommended; all others browsers are supported
• Pentium III 933 MHz or higher
• 512 MB RAM (1 GB is recommended)
Worker Console
• Microsoft Internet Explorer 6.0 or later, Netscape Navigator 3.0 or later, Opera 4.0 or later
End User Console
• Although Helpdesk Solution works from any web browser, it works best with Internet Explorer
6.0 (or later)
Altiris Helpdesk Solution User Guide 12
Page 13

Chapter 2:
Installing and Setting Up eXpress
The Installation and Setup topic list, includes the following:
• Step 1 - Notification Server Computer Requirements (page 14)
• Install Prerequisite Software to Notification Server (page 15)
• Install Notification Server (page 18)
• Step 2 – Install Helpdesk Solution (page 19)
• Satellite Helpdesk (page 19)
• Step 3 – The Altiris eXpress .NET Configuration Wizard (page 19)
• Step 4 – The Configure Helpdesk Command (page 20)
Installation Preview
The Helpdesk Solution setup process consists of the following tasks:
• Create a Helpdesk user on the Windows server running Notification Server
• Create Helpdesk user queues
• Configure Helpdesk
• Create Helpdesk accounts.
Using eXpress is easy. Most of the work required to set up and use this solution has already been
taken care of through predefined collections, policies, and reports. The following list outlines the
steps needed to get up and running.
• Altiris eXpress.NET Configuration Wizard.
• Configure the Helpdesk database
Software Requirements
The following must be installed before installing eXpress:
• Notification Server version 5.5 (or above)
For more information on installing Notification Server, see the
User GuideAltiris eXpress Notification Server User Guide.
Altiris eXpress Notification Server
Altiris Helpdesk Solution User Guide 13
Page 14

Chapter 2: Installing and Setting Up eXpress
Step 1 - Notification Server Computer Requirements
The computer you are going to install Notification Server on must meet or exceed the following
criteria.
Hardware
The following are minimum requirements. To scale to support thousands of clients, faster processors
and more memory are highly recommended on the server.
• Processor: Pentium Pro 200 MHz or faster
• RAM: 512 MB (1 GB is recommended)
• File System: 2 GB NTFS system partition
• Disk space: 30 MB for SQL database (4 GB recommended)
• CD-ROM: Required
Software
Note The Install Helper will help determine if the computer has the necessary prerequisite software
installed, and when possible it will help you download and install the needed software. For more
information, see “Install Prerequisite Software to Notification Server” on page 15.
Operating System (one of the following)
• Windows 2000 Server (recommended)
• Windows Advanced Server
• with Windows Internet Information Services (IIS) installed with FTP configured.
SQL Database (one of the following)
• Microsoft SQL Server 2000 (recommended)
• Microsoft SQL Server 7
Important If you do not have a SQL Server database installed, the Software Prerequisites Wizard
will give you the option to download and install MSDE. The MSDE database may be used for
evaluation purposes, but is not recommended for a live production environment.
Microsoft Windows Internet Information Services (IIS)
• Microsoft IIS 5.0 (requires Webs to be hosted on NTFS) -- This component is not installed
by default with Windows 2000 or later
Microsoft Windows Internet Information Services FTP Services
• The FTP component is installed by default with Windows 2000 or later
Web Browser
• Microsoft Internet Explorer 6.0 or later
Altiris Helpdesk Solution User Guide 14
Page 15
Chapter 2: Installing and Setting Up eXpress
Install Prerequisite Software to Notification Server
1 Start the Altiris eXpress Notification Server Install Helper (AeXNSInstallHelper.exe), read the
information on the screen, and click
2 When the Computer Prerequisites screen appears:
• If you do not want to install Notification Server on the computer, click
• If you want to install Notification Server on the computer, click
The Software Prerequisites Wizard checks the computer to make sure it has the needed
prerequisite software installed (such as Windows 2000/XP Internet Information Services
(IIS), and SQL 7 or 2000, or MSDE).
• If the required software is installed, click
page 18.
• If the required software is NOT installed, the Wizard goes to the next step.
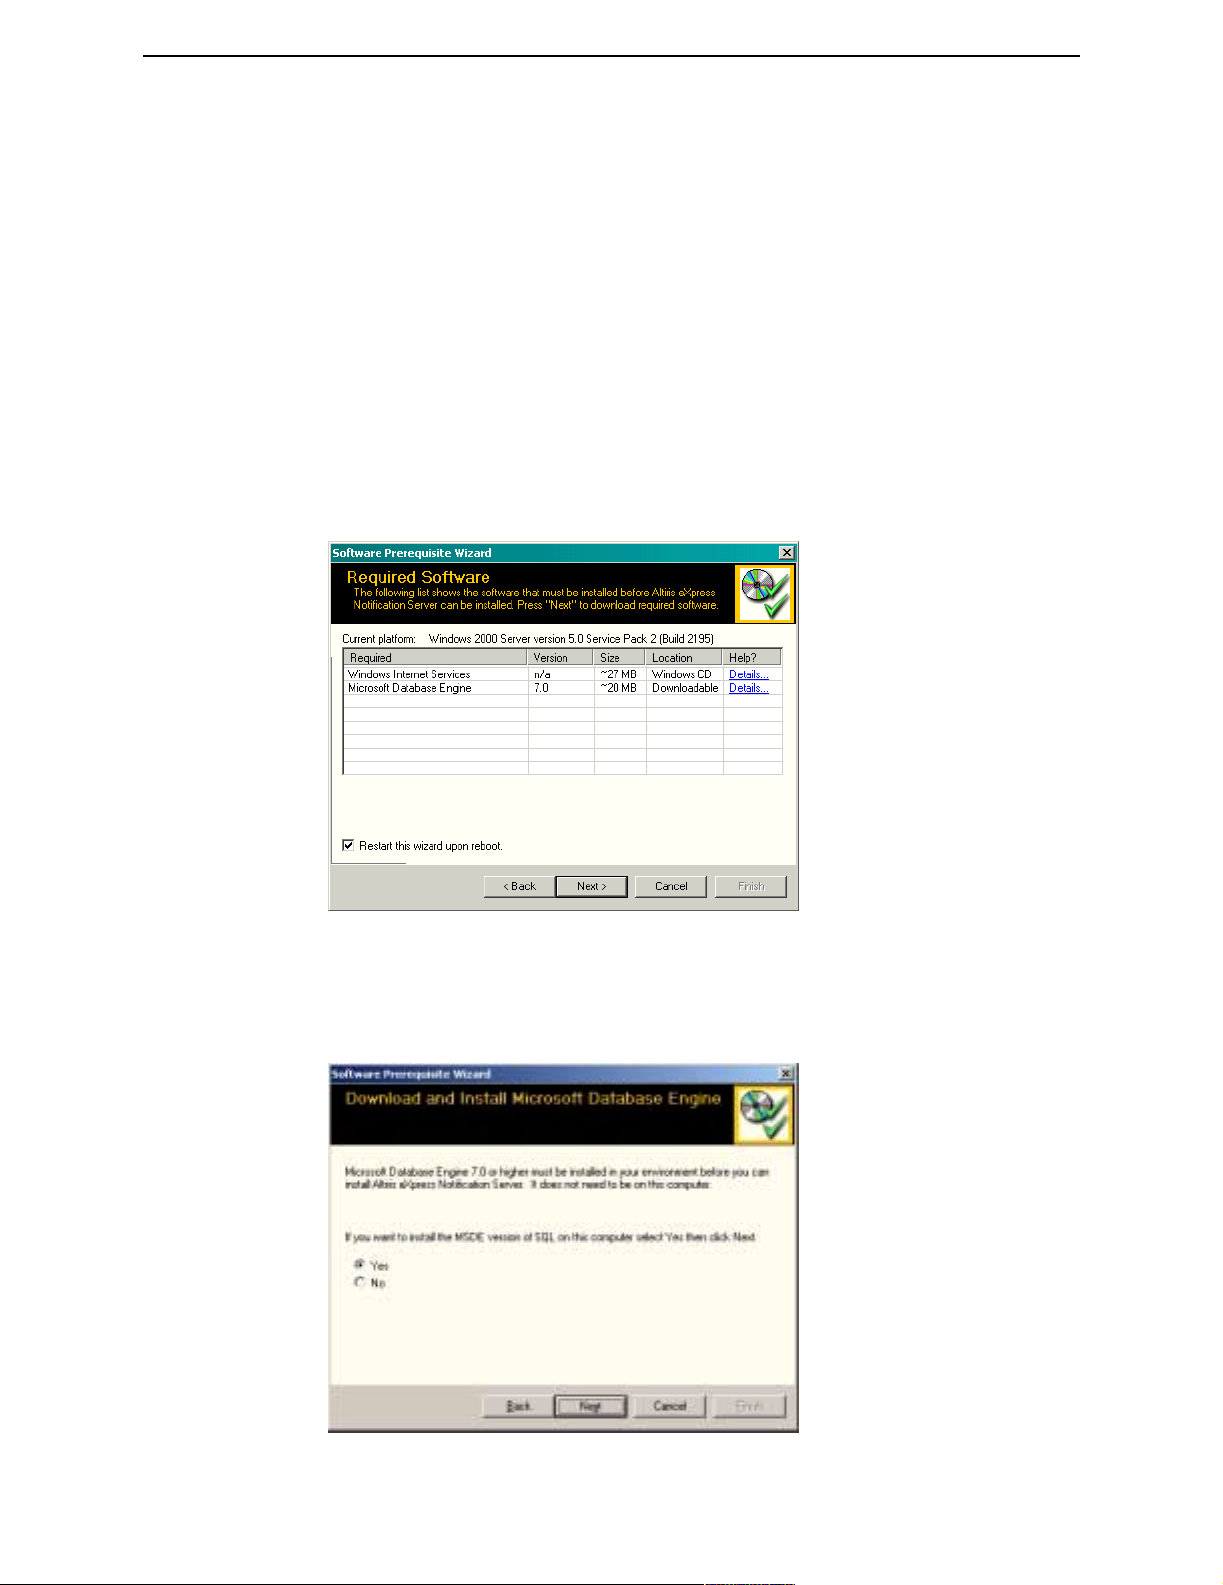
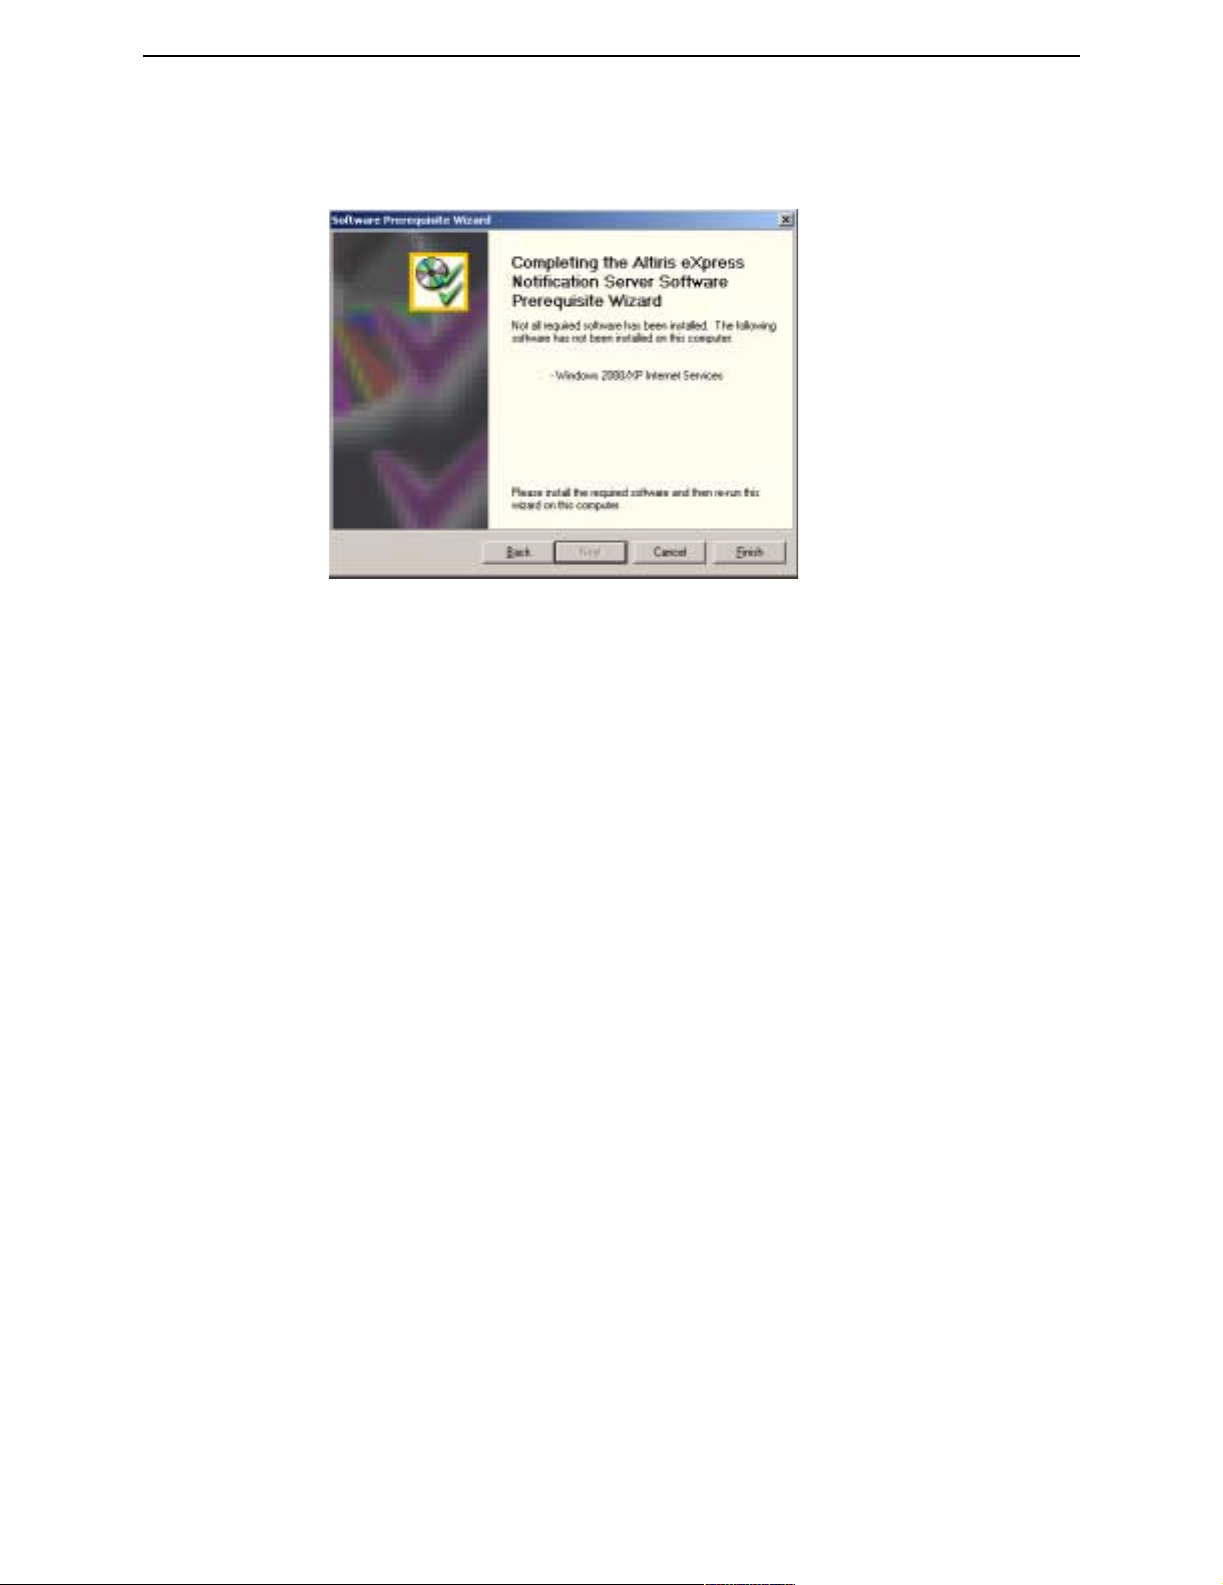
3 If the computer requires additional software to run Notification Server, a screen similar to the
following appears:
Next.
No, and then Next.
Yes, and then Next.
Finish. Go to “Install Notification Server” on
Note In this example, Windows 2000/XP Internet Information Services (also known as IIS) and
a SQL database were not on the computer.
Review the information and click
4 If the Download and Install Microsoft Database Engine screen appears, do the following:
Next.
Altiris Helpdesk Solution User Guide 15
Page 16
Chapter 2: Installing and Setting Up eXpress
a If you want to install the MSDE version of SQL (not recommended for Helpdesk Solution)
on the computer, click
Note If you have a SQL Server database that you want to use for the Notification Server
database, click No and Next then go to see if additional required software that can be
automatically downloaded is needed, download the software using a process similar to the
process specified in Step 4.
b When the File Download dialog box appears:
When using Internet Explorer 6 (with the current Microsoft updates), click
Important If using Internet Explorer 6 without the current Microsoft updates, click Save, and
then enter a folder to save the file in. When the download is completed, click Open.
When using Internet Explorer 5, click
c When asked if you want to install unixdbsetup.exe, click Yes.
d When the WinZip Self-Extractor dialog box opens, click Unzip.
e When the WinZip Self-Extractor confirmation dialog that the file is unzipped appears, click OK.
f When the command box appears, wait for the MSDE installation to complete. This
installation may take a few minutes.
g When the MSDE installation is completed, press any key to close the command box.
h When the Download and Installation screen appears. Click Next.
5 If additional required software that can be automatically downloaded is needed, download the
software using a process similar to the process specified in Step 4.
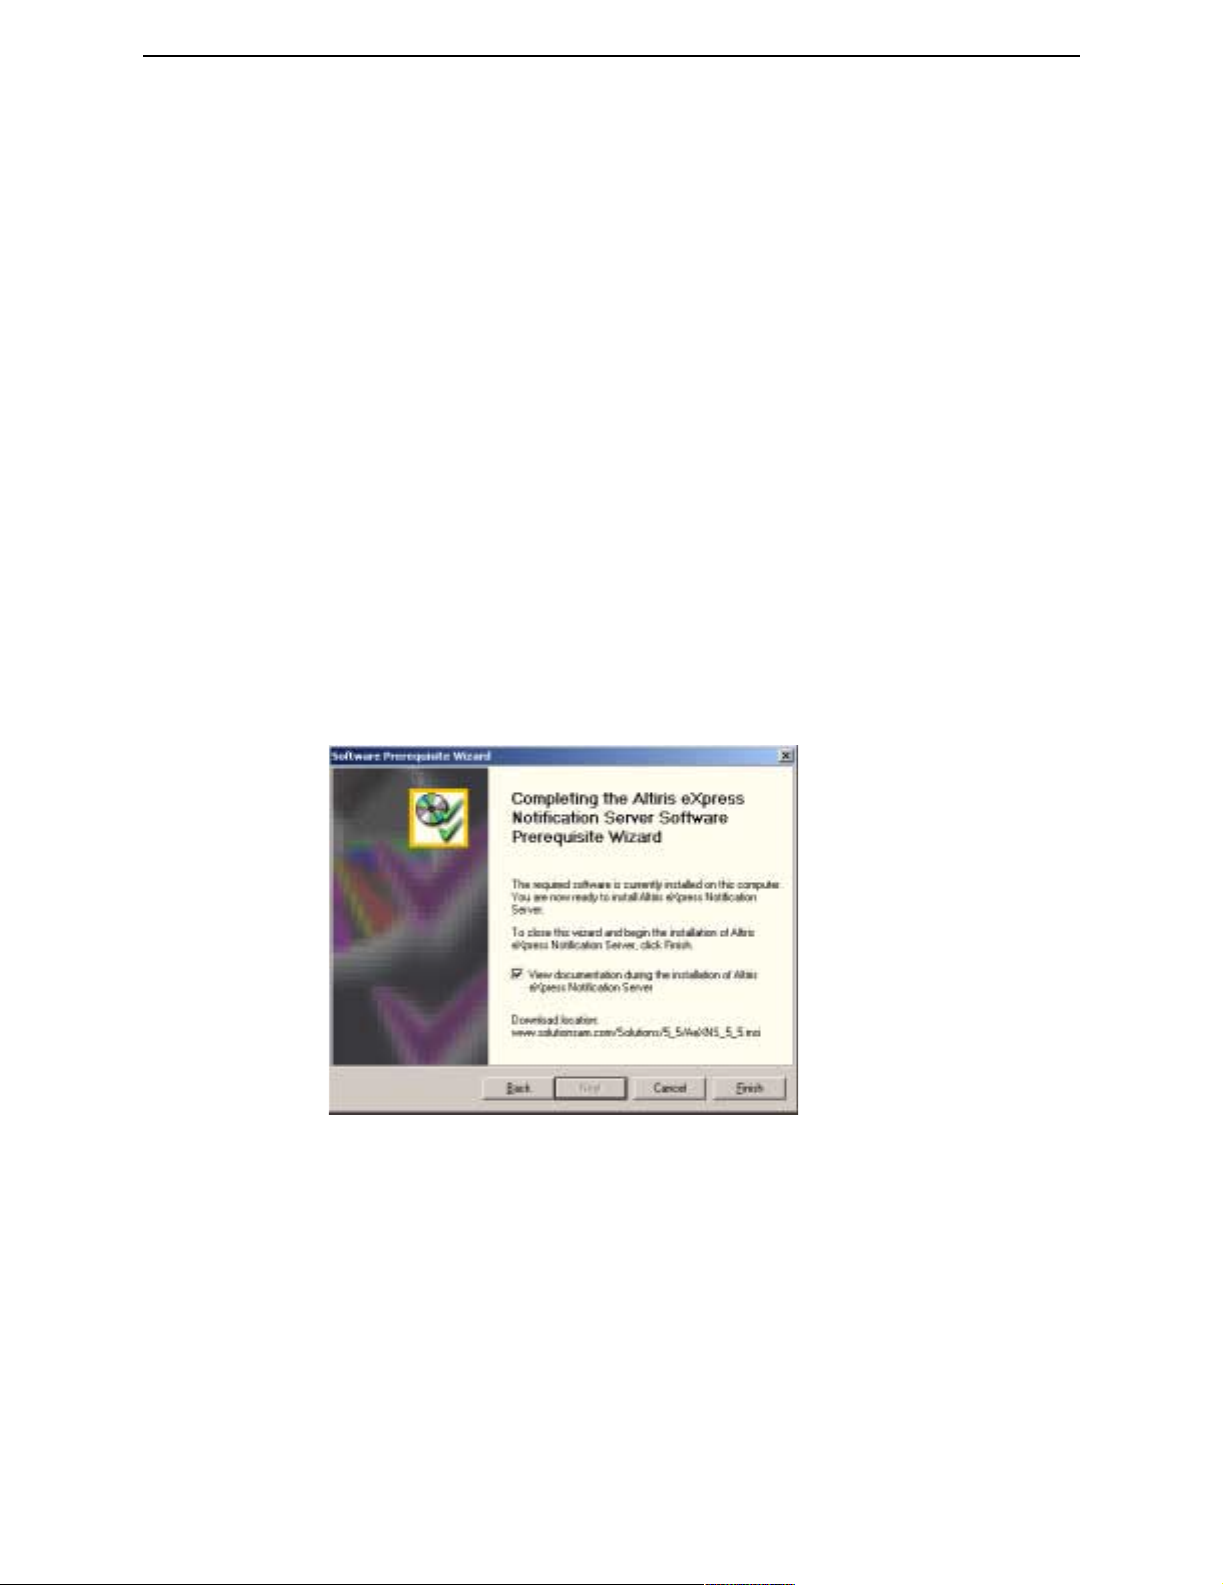
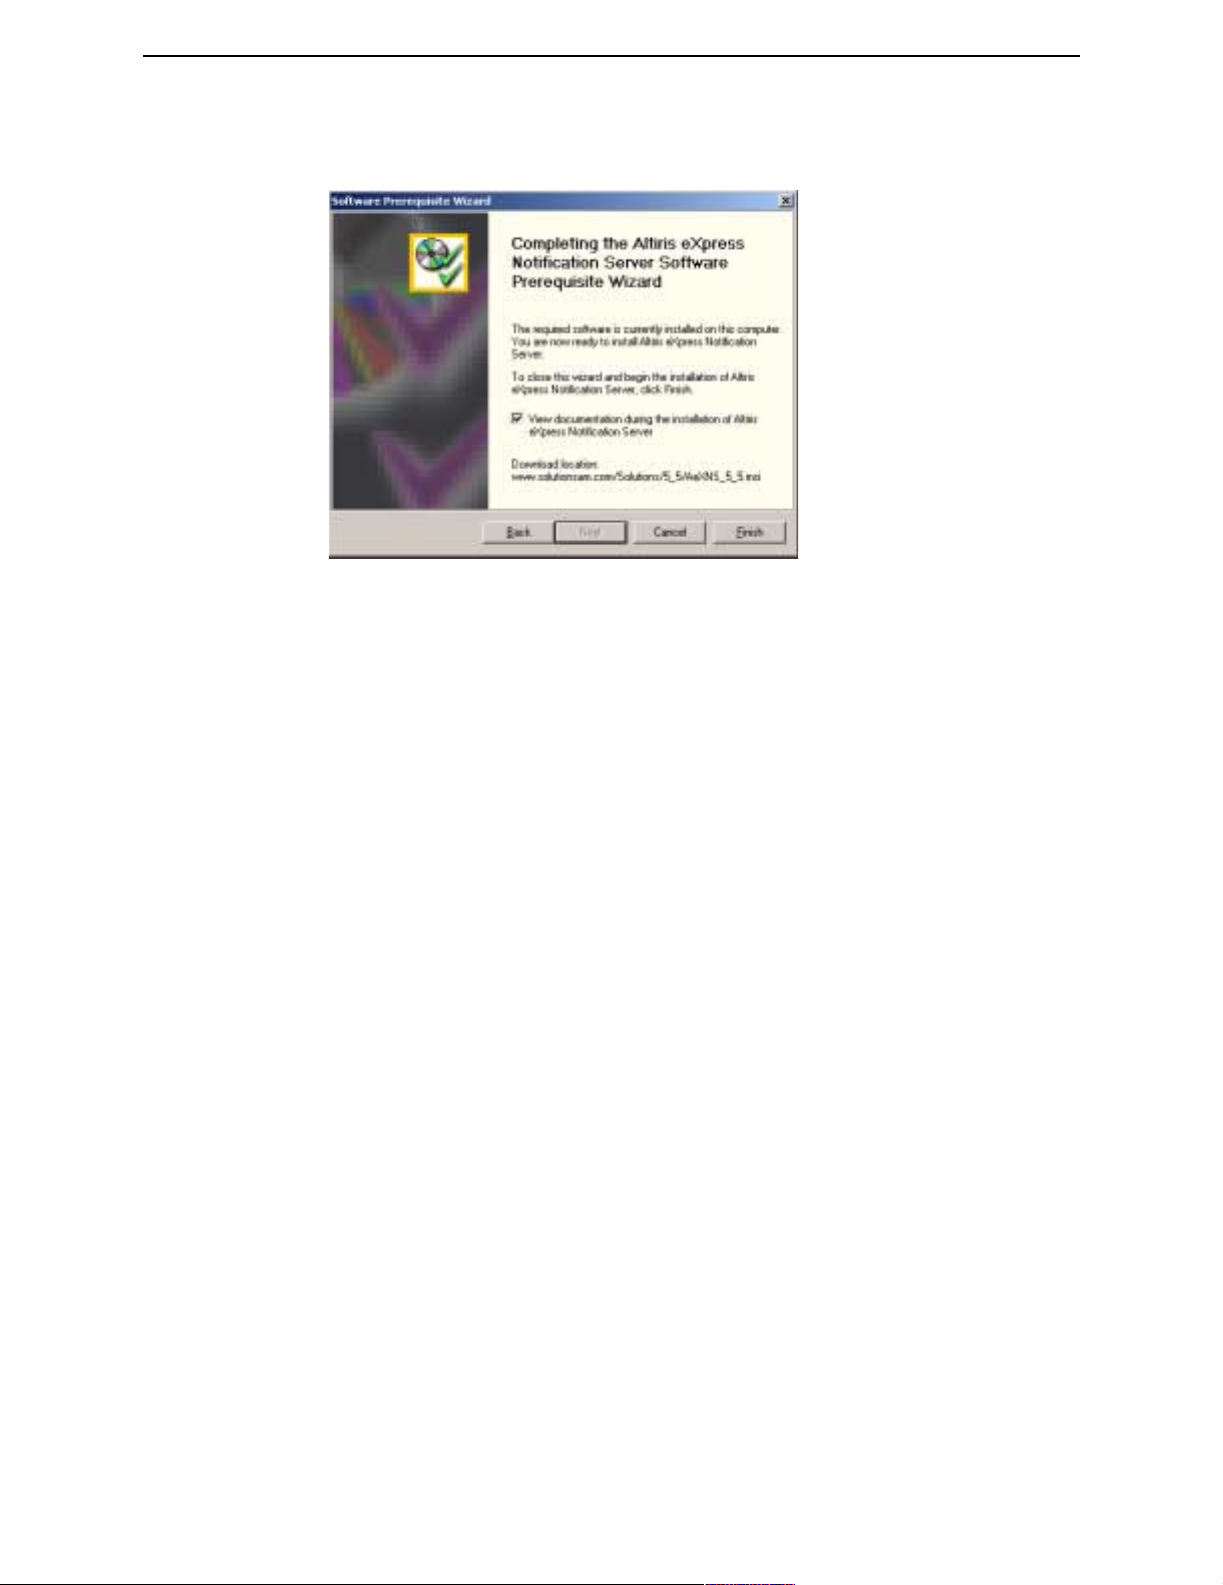
6 When all of the required prerequisite software is loaded, a screen similar to the following
appears. Go to“Install Notification Server” on page 18.
Yes and Next.
Open.
Run this program from its current location and click OK.
Altiris Helpdesk Solution User Guide 16
Page 17
Chapter 2: Installing and Setting Up eXpress
7 If all of the components that can be downloaded have been downloaded but additional software
needs to be installed, a screen similar to the following appears listing the additional software that
needs to be installed.
Note which software needs to be installed and then click
Important You need to install the software that could not be automatically loaded and then run
Finish.
the Software Prerequisites Wizard again.
8 If necessary, install Windows 2000/XP Internet Services as follows:
a On the Windows toolbar, click Start > Settings > Control Panel > Add/Remove Programs.
b In the left pane, click Add/Remove Windows Components.
c
Check the Internet Information Services (IIS) check box.
d Click Details.
e Check the File Transfer Protocol (FTP) Server an d World Wide Web Server subcomponents check
boxes.
f Click OK.
g Click Next.
h Follow the instructions on the screen to complete the Windows Components Wizard.
9 When all the required prerequisite software is installed, and if needed, restart the Software
Prerequisites Wizard again. See Step 1.
Altiris Helpdesk Solution User Guide 17
Page 18
Chapter 2: Installing and Setting Up eXpress
10 When all of the prerequisite software is installed and the following screen appears. Read the
information on the screen and click
The Install Helper will start the Notification Server installation.
Finish.
Install Notification Server
1 When you complete the Software Prerequisites Wizard, and then click Finish.
2 When the AeXNSInstallHelper dialog appears, read the information on the screen and click OK.
The Notification Server Installation will begin.
3 After the Altiris documentation page appears, the File Download dialog box is displayed, do one
of the following:
• Click
• Click
4 The AeXNS_5.5.msi file will download, the Windows Installer will start, and the Altiris
eXpress Notification Server 5.5 – Install Wizard
then click Next.
5 On the License Agreement screen, read the License Agreement, click I accept the terms of the
license agreement
6 On the Customer Information screen, enter applicable information, and then click Next.
7 On the Setup Type screen, click Complete, and then click Next.
8 On the Ready to Install the Program screen, click Install.
The Installing Altiris eXpress Notification Server 5.5 screen appears and the software is
installed.
9 When the Install Shield Wizard Completed screen appears, click Finish.
The Notification Server Installation is completed. The Notification Server Setup Wizard starts the
Altiris eXpress Notification Server Configuration.
Open to execute the file.
Save, and then browse to a folder to save the file. When the file is finished saving, click
Open.
will start. Read the information on the screen, and
, and click Next.
Tip If you know the groups that you will want to categorize your Helpdesk users into, you can create
the Windows NT Groups for the Helpdesk users now. For more information on creating Windows
NT Groups for Helpdesk, see “Create NT Groups for Helpdesk Users on a Windows Server” on
page 26.
Altiris Helpdesk Solution User Guide 18
Page 19

Chapter 2: Installing and Setting Up eXpress
Step 2 – Install Helpdesk Solution
When you install eXpress, eXpress collections, packages, reports, and policies are loaded onto the
Notification Server.
1 Log in to the Windows Server running Notification Server using the Helpdesk user.
If the Windows Server configuration screen appears, click
2 Start the Web Administration Console by clicking Start > Programs > Altiris > Altiris eXpress >
Notification Server
3 Click the Configuration tab.
4 In the left pane, click Solution Center.
5 Select the location of the Solution Center you want to install from.
• To install from the Altiris CD, insert the CD in to the CD-ROM drive, then select
CD drive on the Notification Server for the Solution Center
• To install from the Internet, select
• To install from another location, select
Solution Center box.
6 Click Apply.
7 Click the Solutions Center tab and wait a moment for the screen to refresh.
8 If you are using the Altiris CD for the Solution Center or a location other then the Altiris Web
site, the Browse For Folder dialog box appears. Browse to the CD or the directory where the
Solution Center is located and click OK.
9 Click Helpdesk and Problem Resolution.
10 Click Helpdesk Solution.
11 Click Start.
The download and installation process (Setup) starts.
> Web Administration Console.
Close.
Search the
.
Use the Solution Center on the Altiris Web site.
Specify another location and enter the URL in the
Beside the Helpdesk Solution files, the.NET Framework (Service Pack 2) and MDAC 2.7
components may have to be installed. This will happen automatically. You may have to reboot the
system after the installation has completed.
Satellite Helpdesk
A satellite Helpdesk, is installed and configured locally on a satellite computer, which does not have
NS installed, but otherwise meets all Helpdesk prerequisites. For details, see “Helpdesk Solution -
Satellite Architecture” on page 10.
To Install a Satellite Helpdesk
1 Copy the AeXHD.exe file to a computer, not running Notification Server.
2 Run the AeXHD.exe file, and then follow the instructions of the Helpdesk Wizard.
Step 3 – The Altiris eXpress .NET Configuration Wizard
When Setup is finished, the Altiris eXpress .NET Configuration Wizard is launched
automatically. You can also run the wizard at any time from the Start Menu shortcut. To run the
.NET Wizard manually, do the following.
1 Start Menu > Programs > Altiris > Altiris eXpress > Helpdesk Solutions > Helpdesk ASP.NET Config.
2
See “Altiris eXpress.NET Configuration Wizard” on page 29 for detailed instructions on how to
run this wizard.
Altiris Helpdesk Solution User Guide 19
Page 20

Chapter 2: Installing and Setting Up eXpress
Important You will not be able to run Helpdesk successfully until you run and complete this
wizard.
When you do, it will launch Helpdesk and usually present you with the
command
. See “Configure Helpdesk” on page 128 for more detailed instructions.
Step 4 – The Configure Helpdesk Command
When you finish the Configure Helpdesk Command, the Helpdesk Solution basic setup is now
complete.
Note When Helpdesk Solution is installed configured, and set up, all Notification Policies are
disabled by default. You will want to review and disable any policies not needed, to prevent excess
notifications. For information on policies, see “Notification Policies” on page 140.
Configure Helpdesk
Altiris Helpdesk Solution User Guide 20
Page 21

Chapter 3:
Helpdesk Overview
The Helpdesk Overview topic list, includes the following:
• Architecture (page 21)
• Helpdesk Solution Consoles (page 22)
• Workers and Worker Queues (page 23)
• Contacts (page 24)
• Work Items (page 25)
• Assets (page 25)
• Integration with Microsoft Systems Management Server (SMS) (page 26)
Architecture
Notification Server
Notification Server runs based on policies set by an administrator. These policies activate
components of Notification Server that are used to process and store inventory data, host web pages,
forward data to SMS, and many other tasks. This simplifies the administration of systems
management in your distributed network environment.
Notification Server runs on Windows 2000/Advanced Server SP2 and uses SQL 2000
(recommended) or SQL 7.0 SP1 (approved) database to store the information.
Notification Server provides security for console views and functions as well as reports.
For more information about Notification Server see the Altiris eXpress Notification Server User
Guide on the product CD or on our web site at http://www.altiris.com/support/documentation.
Consoles
Helpdesk Solution provides a web-based console for basic and advanced IT Management. Each
console is accessed through a unique URL, and has its own security properties.
Web Reports and Notification Policies
Helpdesk Solution provides numerous reports, such as: work items, worker activity, schedules,
Service Level Agreements (SLAs), and cost analysis to name a few.
Helpdesk Solution also provides Notification Policies and Notify Rules to select personnel when
defined conditions occur, such as: new work items received, high priority items not closed within a
select time frame and more. These Notification Policies automate the monitoring of work item
activity.
Additional Information
• “Helpdesk Solution Consoles” on page 22
• “Reports” on page 139
• “Notification Policies” on page 140
Altiris Helpdesk Solution User Guide 21
Page 22
Chapter 3: Helpdesk Overview Helpdesk Solution Consoles
• “Notify Rules” on page 112
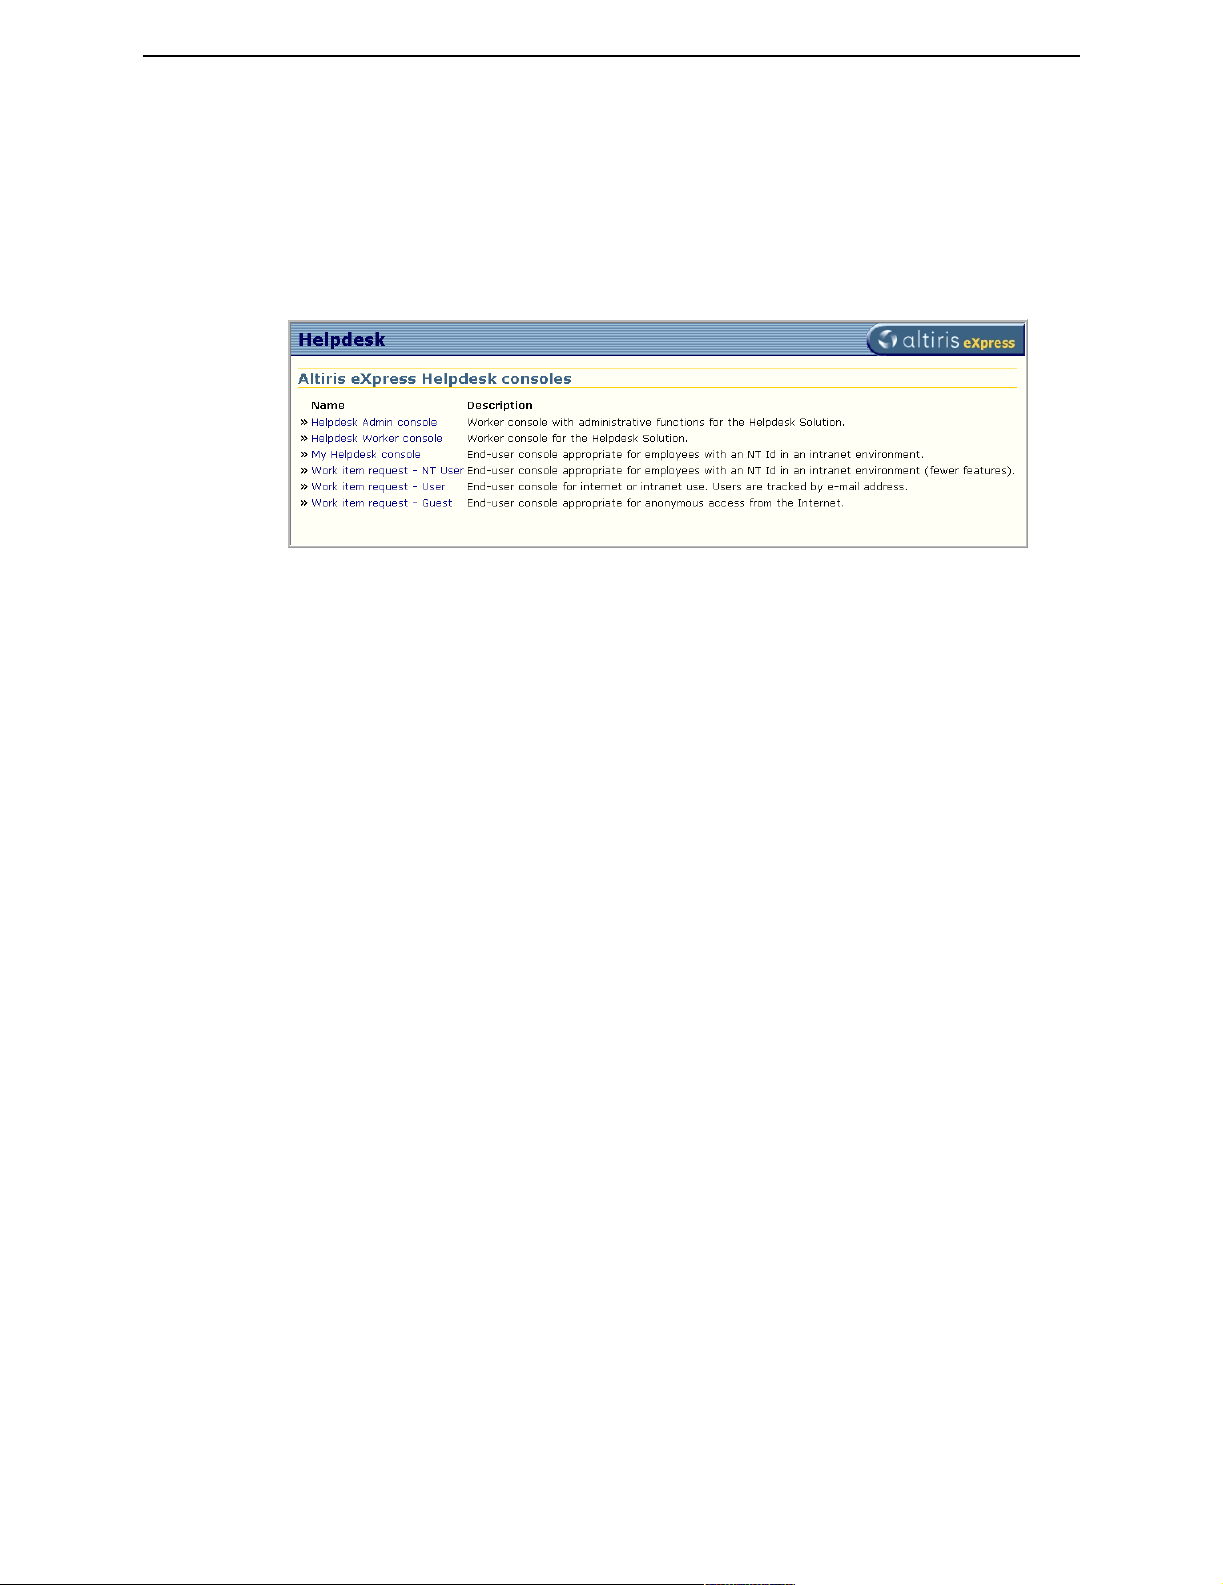
Helpdesk Solution Consoles
The Altiris eXpress Helpdesk Consoles page provides an easy way to access all necessary consoles.
Based on NT authentication, only the consoles available for the user logging on, will be visible on
this page.
1 Click Start > Programs > Altiris > Altiris eXpress > Helpdesk Solution > Helpdesk Consoles.
2
Type the following URL in your web browser - http://<server>/AeXHD.
3 Create a custom URL alias and type that alias in your web browser.
The following consoles are used in Helpdesk Solution.
Administrator Console
Admin console provides full access to the Worker console, as well as the following administrator
The
functions:
• Setup and configure
• Setup and configure queues
• Manage asset and contact data sources
• Publish bulletins
• Manage the work item category list
• Configure work item routing rules
• E-mail template content
• Configure and maintain the database
• Import data from multiple sources: Notification Server and Microsoft Systems Management
Server (SMS)
• Configure notify rules
Worker Consoles
The
Worker console allows workers to do the following:
• Create, search and manage work items
• Define and view detailed managed assets
• Create user contact information
• Run queries
• Create and manage service requests
• Generate custom worker reports
• Remotely control machines (requires Altiris Carbon Copy)
Altiris Helpdesk Solution User Guide 22
Page 23

Chapter 3: Helpdesk Overview Workers and Worker Queues
User Consoles
My Helpdesk console allows users to the following:
The
• submit work item requests track status of work items
• edit contact information
• submit comments to the help desk
• attach files or screen shots to work items
The Helpdesk Solution ships with a
and open environment.
See Also
• “Administration” on page 95
• “Altiris eXpress Helpdesk Consoles” on page 46
• “My Helpdesk Console” on page 88
• “Create Custom URL to Access Helpdesk Consoles” on page 93
• “Console Security” on page 36.
Work item request - Guest console, to allow anonymous access in
Workers and Worker Queues
Workers
A worker is a help desk worker or technician at any level. Workers are created in the Administrator
Console and must correspond to a valid Windows NT/2000 user account.
Administrators can assign a hourly rate to workers or to a worker’s queue, to track costs associated
with work items. The hourly rate is displayed in clear text, and is visible to Administrators so caution
should be used. It is recommended to include an average hourly rate for a queue instead of a specific
worker, to maintain security. Therefore, it is critical that workers be assigned to an appropriate queue
for successful cost analysis of labor hours.
Worker Queues
Queues are like workers in that it is possible to assign work items to a queue. Workers are able to
run queries to list work items assigned to queues, as well as retrieve work items from queues. A
worker has a specific queue that is assigned to the worker. The worker can be said to belong to that
queue. Another way to look at queues, is that they are groups of workers. For example, Workers
assigned to the queue named Level 1, are workers who all been assigned to the Level 1 queue.
Helpdesk provides eleven default queues, that correspond to classes of workers that are commonly
found in a production Helpdesk environment. These are:
• Level 1 Workers accept and qualify work item requests. If the work item cannot be resolved by
a worker in the Level 1 workgroup, they dispatch the work item to field a technician.
Additionally, Level 1 workers generally resolve issues such as password resets or How to type
questions.
• Level 2 Workers are generally more technical than a Level 1 worker. If a work item cannot be
resolved by a Level 1 worker, the first level of escalation is to a Level 2 worker. Typically, this
queue is assigned to a combination of telephone support people, system managers, or field
managers.
• Level 2 Desktop Level 2 workers trained to handle desktop issues.
• Level 2 Network Level 2 workers trained to handle network issues.
• Level 2 Server Level 2 workers trained to handle server issues.
• Operations Workers in the Operations queue are assigned work items generated for the
Operations department.
• Professional Services Workers in the Professional Services queue are assigned work items
generated for the Professional Services department.
Altiris Helpdesk Solution User Guide 23
Page 24

Chapter 3: Helpdesk Overview Contacts
• Human Resources Workers in the Human Resources queue are assigned work items generated
for the Human Resources department.
• Asset Management Workers in the Asset Management queue are assigned work items
generated for the Asset Management department.
• Deployment-SW Delivery Workers in the Deployment-SW Delivery queue are responsible for
tasks associated with the initial deployment of software packages and subsequent updates.
• Supervisor Used for managers, supervisors, or administrators.
Contacts
Contacts are users who request help, or managers acting as the contact point for another user for the
associated problem or request. Each user should be defined in the database as a contact. Workers are
also contacts and their information is stored in the database as well. Contacts are associated with
work items.
Contact information includes the following:
• Name
• NT ID (if applicable)
• E-mail
• Pager email
• Phone
• Cell phone
• Pager
• Location
• Organization
• Password
• Employee ID
• Comments
• Status
• VIP (Very Important Person)
• Title
• Department
• Company
Helpdesk Solution can also associate with end user information as defined in Notification Server.
Existing Notification Server data can be automatically imported into the Helpdesk Solution. Contact
data can be entered manually by the Helpdesk workers when a new work item is created.
Additionally, contact data from other data sources can be imported into Helpdesk Solution using the
SQL Import/Export Manager.
See Also
• “Contacts” on page 80
Note Contact data imported from Notification Server, but modified in Helpdesk is not
overridden on subsequent imports. For complete data integrity, contact data should be modified
in Notification Server via regular updates, then imported from Helpdesk on a scheduled basis.
Altiris Helpdesk Solution User Guide 24
Page 25

Chapter 3: Helpdesk Overview Work Items
Work Items
A work item defines a task to be performed. Work items are created by workers in the worker
console, by users via the self-help console or by events passed from Notification Server to Helpdesk.
Administrators can allow users to create work items themselves by providing an appropriate the
URL and access to a user console.
A work item is assigned to either a worker or a queue. Work item routing rules are applied to
determine which worker or queue will be assigned a given work item whenever a work item is
created or modified. Workers can use the
creation date from their assigned queue. Additionally, workers can find work items by generating
queries in the
Note The Retrieve command retrieves work items based on settings selected in the workers
preferences section in the
A work item may be a current issue to be solved or a task planned to be done in the future. A planned
work item is given a start date and a due date. The date and time information is used to determine
Service Level Agreements, worker schedules, and the elapsed time to completion.
See Also
• “New Work Item” on page 50
Work item queries page, and the Find work items page.
Admin console.
Retrieve command to retrieve work items with the earliest
Assets
Assets are real devices such as computers, printers, phones, or furniture that are identified as unique
objects in the database. Assets can be associated with work items and contacts.
For example, if an end user reports a problem printing to a network printer, a worker has the option
of associating that printer with the work item. Associating assets with work items is important when
running reports detailing machine/object history. This allows administrators to run reports based on
specific hardware devices and associated costs.
Asset information includes the following:
• Name
• Type
• Computer
• Printer
• Phone
• Modem
• Network Port
• Document
• Application
• Other
• External ID
• Location
• Manufacturer
• Model
• Serial #
• Asset Tag
• OS (Operating System)
• IP Address
• Organization
• Comment
• Asset is either active or not active
Altiris Helpdesk Solution User Guide 25
Page 26

Chapter 3: Helpdesk Overview Integration with Microsoft Systems Management Server (SMS)
Integration with Microsoft Systems Management Server
(SMS)
The integration with Microsoft SMS is bi-directional. Work items defined in Helpdesk Solution can
be linked into the SMS database, based on assets that were previously imported from SMS into
Helpdesk. This permits SMS administrators to view problems and plan work for those assets. In
addition, SMS administrators can create collections that will not advertise a program to machines
with open work items, if desired.
SMS resource information can be imported into Helpdesk Solution and associated with the work
items in the Helpdesk Solution database. This permits historical reporting based on platform, domain
and location as well as change management reporting for a machine over the life of the system.
See Also
• For more information about leveraging SMS functionality from a browser, see the Web Admin
for SMS User Guide on the product CD or on our web site at http://www.altiris.com/support/
documentation.
• For more information about registering SMS as a source for importing data, see “View Source”
on page 124.
Altiris Helpdesk Solution User Guide 26
Page 27

Chapter 4:
Installation
The Helpdesk Installation topic list, includes the following:
• Prerequisites (page 27)
• Installation (page 28)
• Helpdesk Setup (page 28)
• Altiris eXpress.NET Configuration Wizard (page 29)
• Modifying Helpdesk Solution Installation Configuration (page 31)
• Upgrading Releases (page 32)
• Uninstalling (page 32)
• Localization (page 33)
Prerequisites
Server
Helpdesk Solution requires the following:
• Altiris eXpress Notification Server 5.5 SP2 or later
• Microsoft 2000 Server/Advanced Server with SP2 with a CD-ROM drive
• Hard drive formatted with NTFS file system
• Microsoft IIS 5.0 (IIS 5.0 requires webs to be hosted on NTFS)
• Microsoft SQL Server 2000 is recommended, SQL 7.0 (approved), MSDE is not recommended
• Microsoft Internet Explorer 6.0 or later is recommended; all others browsers are supported
• Pentium III 933 MHz or higher
• 512 MB RAM (1 GB is recommended)
Altiris Helpdesk Solution User Guide 27
Page 28

Chapter 4: Installation Helpdesk Setup
Installation
Before installing Helpdesk Solution, review the “Prerequisites” on page 27.
Installation has three phases that occur one after the other as a part of a standard Windows Installer
installation:
1 Setup
2 Altiris eXpress.NET Configuration Wizard
3 Database Configuration
Caution Notification Server must be installed before installing Helpdesk Solution. Refer to the
Altiris eXpress Notification Server User Guide on the product CD or on our web site at http://
www.altiris.com/support/documentation.
Important Notification Server install will create a Helpdesk database called AeXNS_Helpdesk that
is used by Alert Manager. Helpdesk Solution can be configured to use the existing database or
create another. If Alert Manager has been used, you will want to use the AeXNS_Helpdesk
database to maintain existing data. If you are upgrading from a previous version of Helpdesk
Solution, then Helpdesk 5.6 will upgrade your existing database if you prefer.
Helpdesk Setup
Setup installs the program files and creates a virtual under the default web site on the target server.
Note The name of the web site is AeXHD (not case-sensitive). If that web site already exists, it is
overwritten. The logged in account should have full admin/sa privileges on the SQL Server that will
be used.
Beside the Helpdesk Solution files, the .NET Framework and MDAC 2.7 components may have to
be installed. This will happen automatically. You may have to reboot the system after the installation
has completed. Setup will resume automatically after the system is rebooted. Helpdesk Solution files
will not be installed until after the .NET Framework and MDAC 2.7 components have been
successfully installed.
IMPORTANT Helpdesk installs the latest .NET Framework service pack available at the time
Helpdesk Solution was released. Be sure to install the most current .NET Framework Service Packs
available or critical updates as soon as possible. You can find the .NET Framework and service
packs on the Microsoft Windows Update site.
4 Insert the Altiris CD.
Note If you are installing from the Altiris web site, you do not need the CD.
5 Click Start and select Programs > Altiris > Altiris eXpress > Notification Server > Web Administration
Console
6 Make sure that you are pointing to the Solution Center location you want to use (CD, Altiris web
site, or other).
a Click the Configuration tab.
b In the left pane, click Solution Center.
c Select the correct Solution Center location, then click Apply.
7 Click the Solutions Center tab.
8 Click Helpdesk and Problem Resolution.
9 Click Helpdesk Solution.
10 Click Start.
Setup will begin. If the .NET Framework and MDAC 2.7 components are not installed then
Setup will install them and probably require you to reboot the system. Setup will automatically
resume after the reboot.
to start the Web Administration Console.
Altiris Helpdesk Solution User Guide 28
Page 29
Chapter 4: Installation Helpdesk Setup
11 To start the Setup Wizard, click Next.
12 Read and agree to the license agreement and click Next.
13 Select the destination directory and click Next.
14 Click Finish. The Altiris eXpress.NET Configuration Wizard will launch, go to “Altiris
eXpress.NET Configuration Wizard” on page 29.
Important You will not be able to run Helpdesk successfully until you run and complete this wizard.
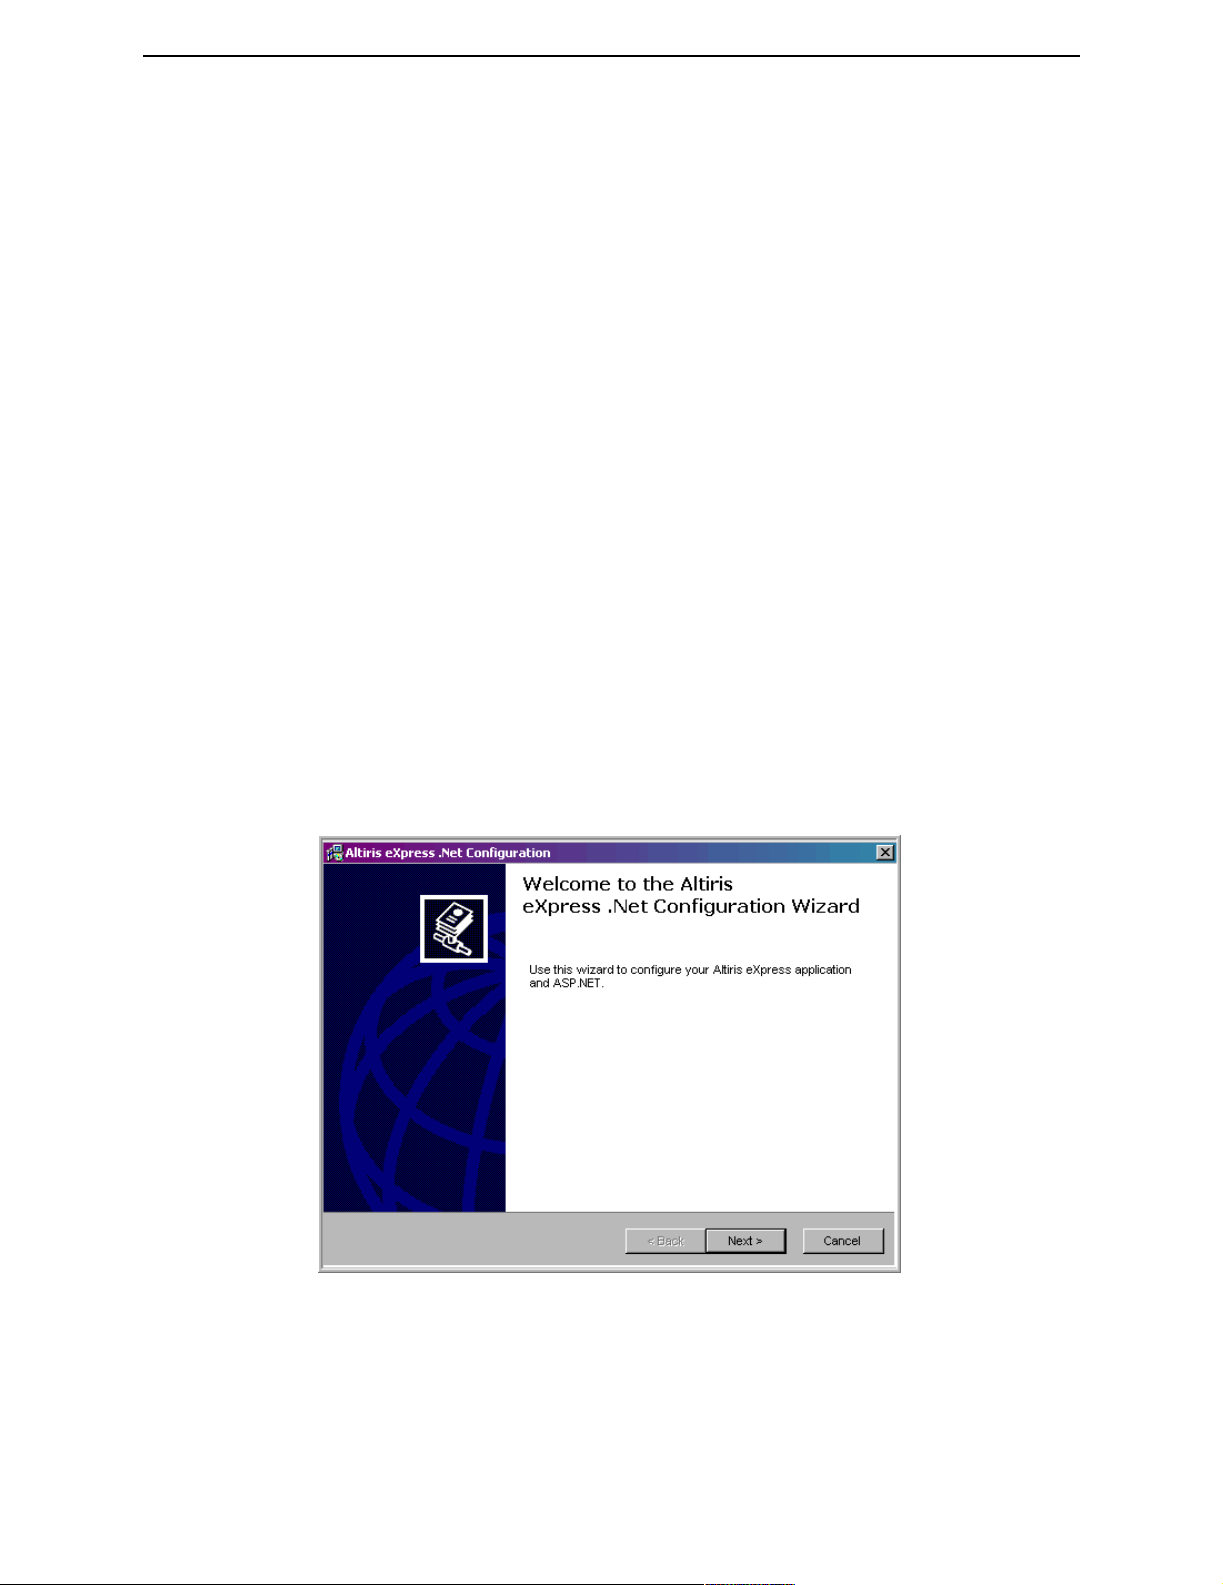
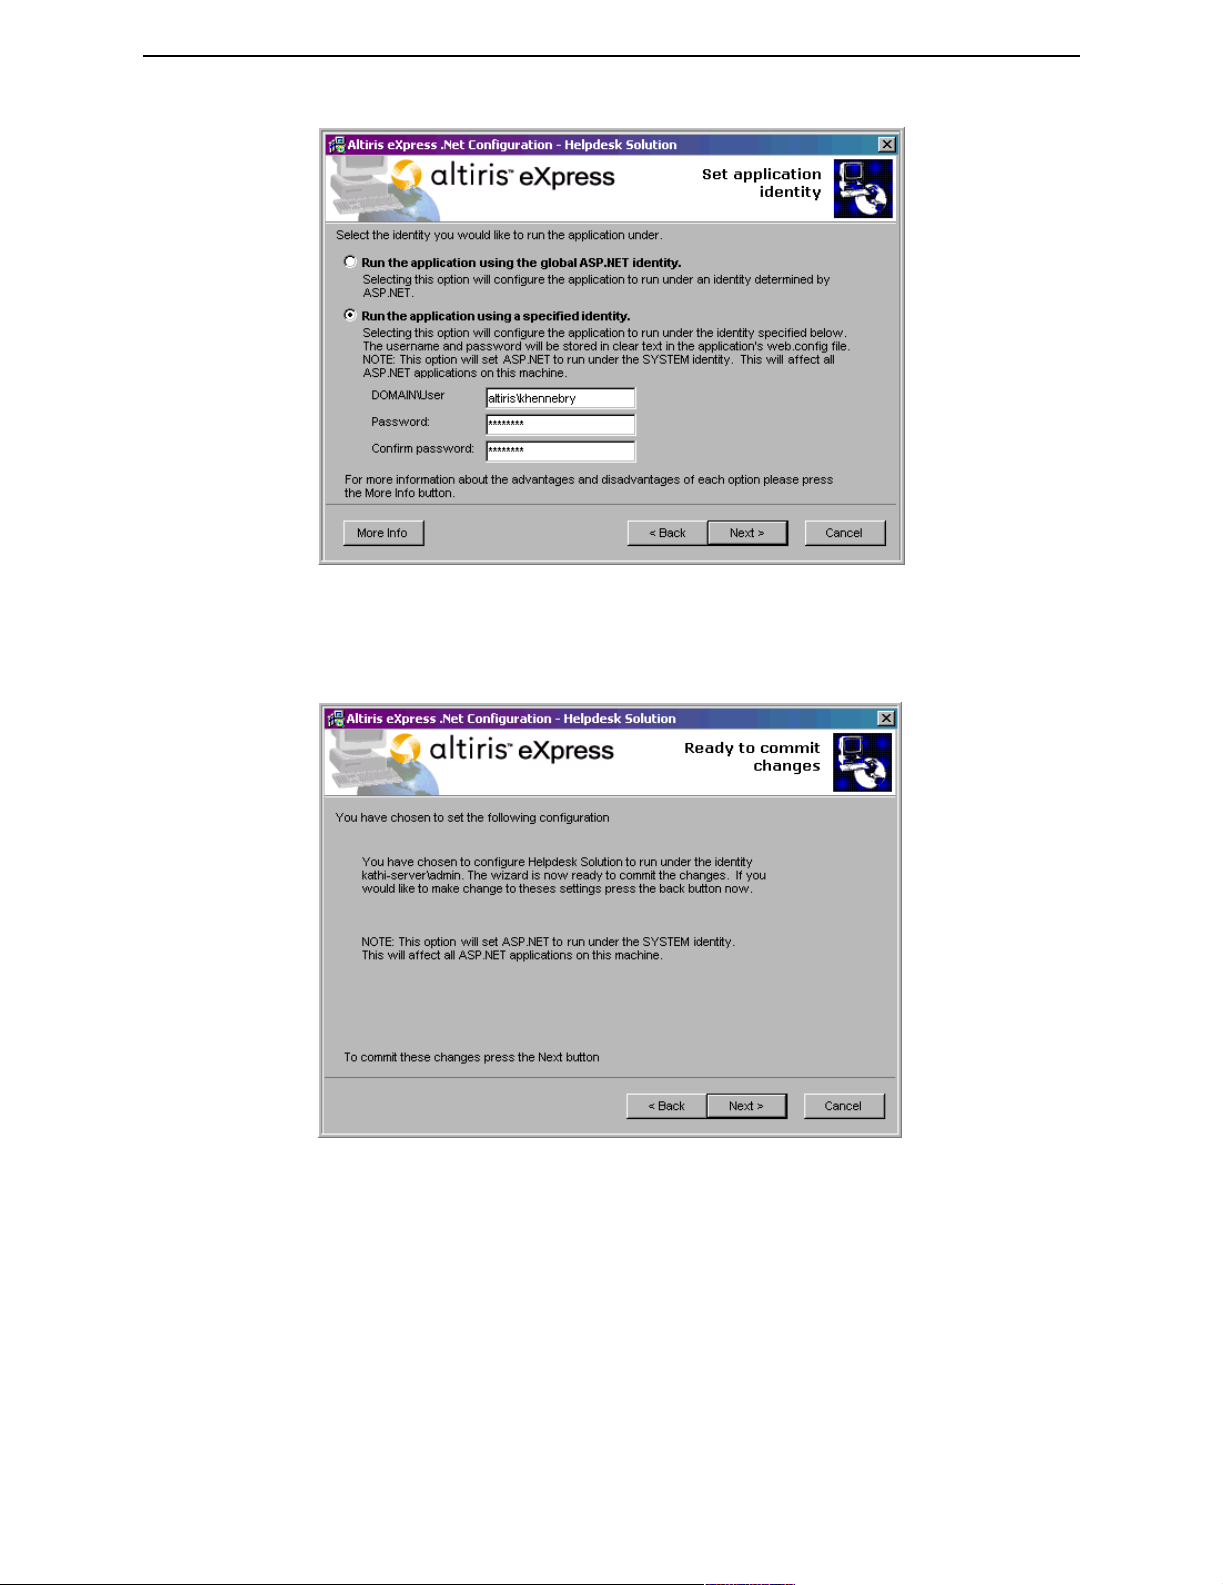
Altiris eXpress.NET Configuration Wizard
Altiris eXpress.NET Configuration Wizard lets you configure Helpdesk to run under the identity of a
user account set by an administrator. You must complete this wizard to finish the installation before
launching any Helpdesk console.
IMPORTANT Altiris recommends you choose the same account you supplied when you installed
Altiris Notification Server. That account should not be the account of a real user and it should be set
so that the password never expires. See the Notification Server documentation for more details about
configuring that account.
If Helpdesk Solution fails to run because the password has expired or changed, you will have to run
the Altiris eXpress.NET Configuration Wizard again, to reset the account. You may have to
manually restart IIS for the account changes to take effect.
The Helpdesk Solution account should belong to the local Administrators group and must be able to
do the following:
• Access and launch DCOM objects
• Only read, write, and modify all tables in the Helpdesk Solution database on the SQL Server you
select.
To configure the Helpdesk Configuration Wizard
1 Click Start>Programs>Altiris>Altiris eXpress>Helpdesk Solution>Helpdesk ASP.NET Config.
Click Next.
2
Altiris Helpdesk Solution User Guide 29
Page 30
Chapter 4: Installation Helpdesk Setup
3 Enter a domain\user and password.
Click More Info for more information.
a
4 Click Next.
5 You will receive the following confirmation.
6 Click Next
Altiris Helpdesk Solution User Guide 30
Page 31

Chapter 4: Installation Helpdesk Setup
7 Click Finish.
When the wizard is complete, the
configuration is necessary, so you will see the
command to finish the installation. See “Configure Helpdesk” on page 128 for details.
Note When Helpdesk Solution is installed, all Notification Policies are disabled by default. You will
want to review and disable any unneeded policies to prevent excess notifications. For information
on policies, see “Notification Policies” on page 140.
During the initial installation, the user installing Helpdesk, creates the first worker with his or her
NT ID; they can create new workers when the installation process is complete. See “Workers” on
page 135 for details.
Helpdesk Admin console will launch. Usually, further
Configure Helpdesk command. Complete the
Modifying Helpdesk Solution Installation Configuration
After the initial installation, you can run the Helpdesk ASP.NET Configuration Wizard to change your
Helpdesk Solution identity at any time.
1 Click Start and select Programs > Altiris > Altiris eXpress > Helpdesk Solution > Helpdesk ASP.NET
Config.
2
Make the appropriate changes and complete the wizard.
Altiris Helpdesk Solution User Guide 31
Page 32

Chapter 4: Installation Helpdesk Setup
Upgrading Releases
Upgrading released version of Helpdesk Solution can be done by doing an upgrade check in the
Solution Center. This will install over the top of the existing software. Downloading the latest
AeXHD.exe and running it manually will upgrade Helpdesk Solution also. If you use "Add/Remove
Programs
may be lost and have to reconstituted.
Upgrading an interim development database is not supported, and requires the creation of a new
database. An interim development database is defined as any database created by a non-released
version of Helpdesk Solution.
" to remove the previous version of Helpdesk, any customization to the web site you made
Interim builds during beta testing should be removed using the “
operating system. Subsequent builds can then be installed once the previous build has been removed.
Anytime Notification Server is being updated to a newer version along with Helpdesk Solution,
Notification Server should be upgraded before upgrading Helpdesk Solution.
IMPORTANT Beta releases are always required to be installed on test servers and kept separate from
released production installations of Helpdesk Solution.
Add/Remove Programs” in the
Uninstalling
You can use Add/Remove Programs in the Windows Control Panel to uninstall the Altiris
eXpress Helpdesk Solution.
We recommend stopping and restarting IIS before you uninstall Helpdesk Solution. This will
provide a cleaner uninstall.
Note Restarting IIS will cause current users to lose their work.
If you added files to the Helpdesk Solution custom directories, they will not be deleted by Uninstall,
but any files installed by the Setup program that you modified will be deleted.
Uninstall does not delete or modify data or tables in SQL Server databases, nor does it delete all
Helpdesk Solution registry settings. If you reinstall, you will be presented with the previously
configured SQL Server and database, and the Helpdesk license data is not removed from
Notification Server.
Altiris Helpdesk Solution User Guide 32
Page 33
Chapter 4: Installation Localization
Localization
Helpdesk Solution 5.6 supports localized versions of French, German, Portuguese and Spanish.
Assuming the browser is installed and properly configured, Helpdesk will automatically display its
content in the preferred language configured by the browser. All text in the user interface will be
localized to the above specified languages; however, database values in the drop-down lists, work
item titles and comments will not. Information from other components, such as error messages from
SQL Server, is displayed in the configured language of the server or will be in English, depending
on how other components were installed.
Note You must change the locale setting of the computer to view the language in Internet Explorer
5.5 or later.
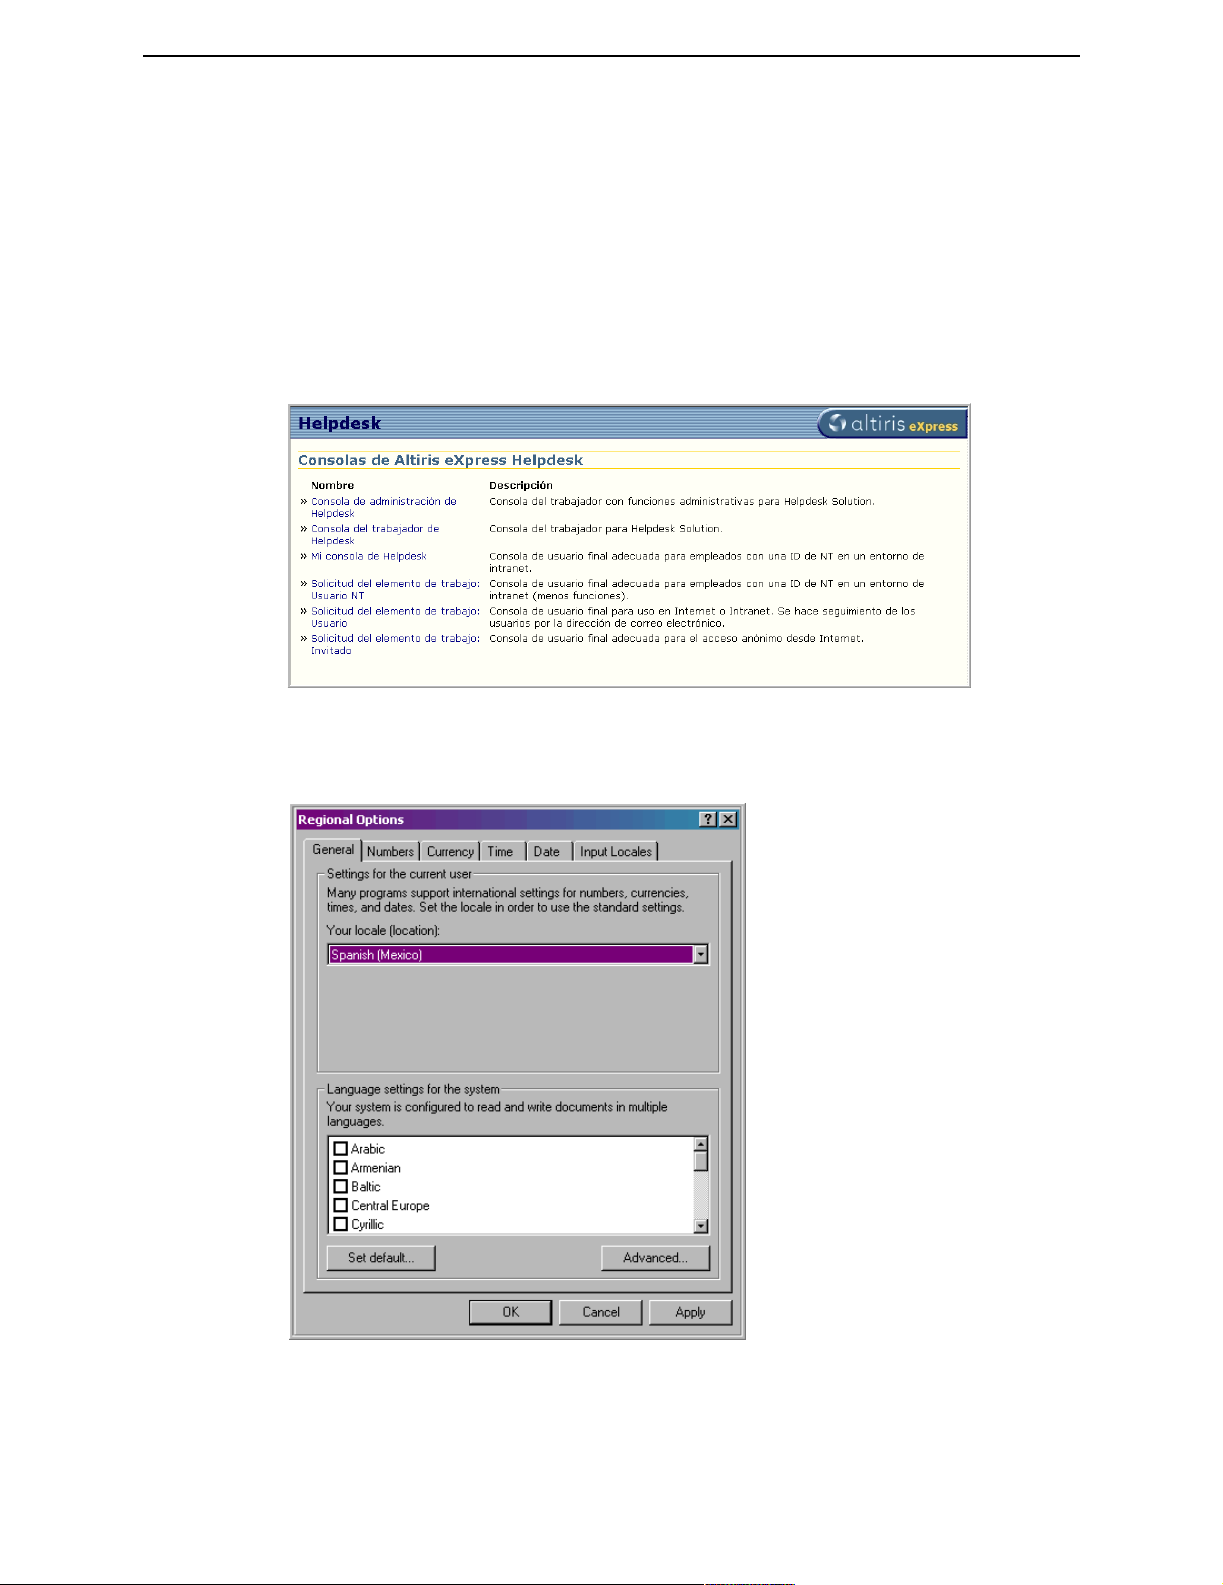
Configure Regional Option
1 Click Start>Settings>Control Panel>Regional Options.
Worker Console
• Microsoft Internet Explorer 6.0 or later, Netscape Navigator 3.0 or later, Opera 4.0 or later
Altiris Helpdesk Solution User Guide 33
Page 34

Chapter 4: Installation Localization
End User Console
• Although Helpdesk Solution works from any web browser, it works best with Internet Explorer
6.0 or later
2 Select the one of the supported languages from the drop-down list.
• Spanish
• French
• German
• Portuguese
3 Click Apply, then OK.
4 The changes will take affect when you refresh or launch the web browser.
Altiris Helpdesk Solution User Guide 34
Page 35

Chapter 5:
Configuration
The Configuration topic list, includes the following:
• Web Administration Console Interface Elements (page 35)
• Policies (page 35)
• Reports (page 36)
• Console Security (page 36)
• Administrators (page 37)
• Workers (page 37)
• End Users (page 38)
• Setting Permissions (page 39)
• Entry Points (page 40)
• Licensing (page 43)
Web Administration Console Interface Elements
Policies
Helpdesk Solution comes with Notification Policies that let Notification Server perform a variety of
actions when defined conditions occur.
Notification Policies provide active reporting for the NS Client. They can be found in the
Notification Server Web Administration Console under the
Policies > Notification Policies.
For more information on using Notification Policies, see the
GuideAltiris eXpress Notification Server User Guide.
The following are the provided Notification Policies:
• Escalate work item priority status
• High priority items not assigned within 30 minutes
• More than N open work items
• More than N open work items in level 1
• More than N open work items in level 2
• Open work items with no activity in over N minutes
• Re-opened work items
• Scheduled work items past due
• Scheduled work items past start date
• Top N new work items opened in M minutes
• Work items on hold more than N days
• Work items open more than N days
• Work items with more than N workers
• Workers with more than N open work items
Solutions tab, then Helpdesk Solution >
Altiris eXpress Notification Server User
Altiris Helpdesk Solution User Guide 35
Page 36

Chapter 5: Configuration Console Security
Reports
Helpdesk Solution has many reports that let you analyze your help desk, including cost analysis,
work item information, and worker performance. These reports are found in the Notification Server
Web Administration Console under the
reports are organized into the following categories:
• Cost Analysis - Analyze costs of work items to evaluate expenses by location, organization, and
operating system platform.
• Helpdesk Activity - Report help desk activity.
• High Priority - Report on high priority work items.
• List Work Items - List work items by end user, computer, or worker.
• Planned Work - Planned work reports help organize scheduling work items according to
workers and computers. You can view work items planned and scheduled, over-due, by worker
schedule, etc.
• Problem machines/platforms/users - Correlate Helpdesk work items with inventory.
• Service Level Agreement - Reports that help you meet the demands of your Service Level
Agreement.
• Track changes, moves, adds - Reports to track changes to computers.
• Work item Activity Trend - Work item activity and trend analysis reports.
• Worker Performance - Worker activity reports.
Solutions tab by selecting Helpdesk Solution > Reports. The
Console Security
This section contains the following security topics:
• Administrators
• Workers
• End Users
• Setting Permissions
• Entry Points
Helpdesk Solution relies on the security features provided by IIS, NTFS and ASP.NET to control
access to Helpdesk consoles and commands. A Helpdesk console is defined by a
file and a web.config file that resides in a directory in the AeXHD web. We call these directories
entry points to distinguish them from other AeXHD web folders that contain static content, such as
images or help files. While it is possible to define security settings on specific files, we recommend
defining security settings on entry points. Multiple consoles can exist in the same entry point and
will therefore share the same security settings.
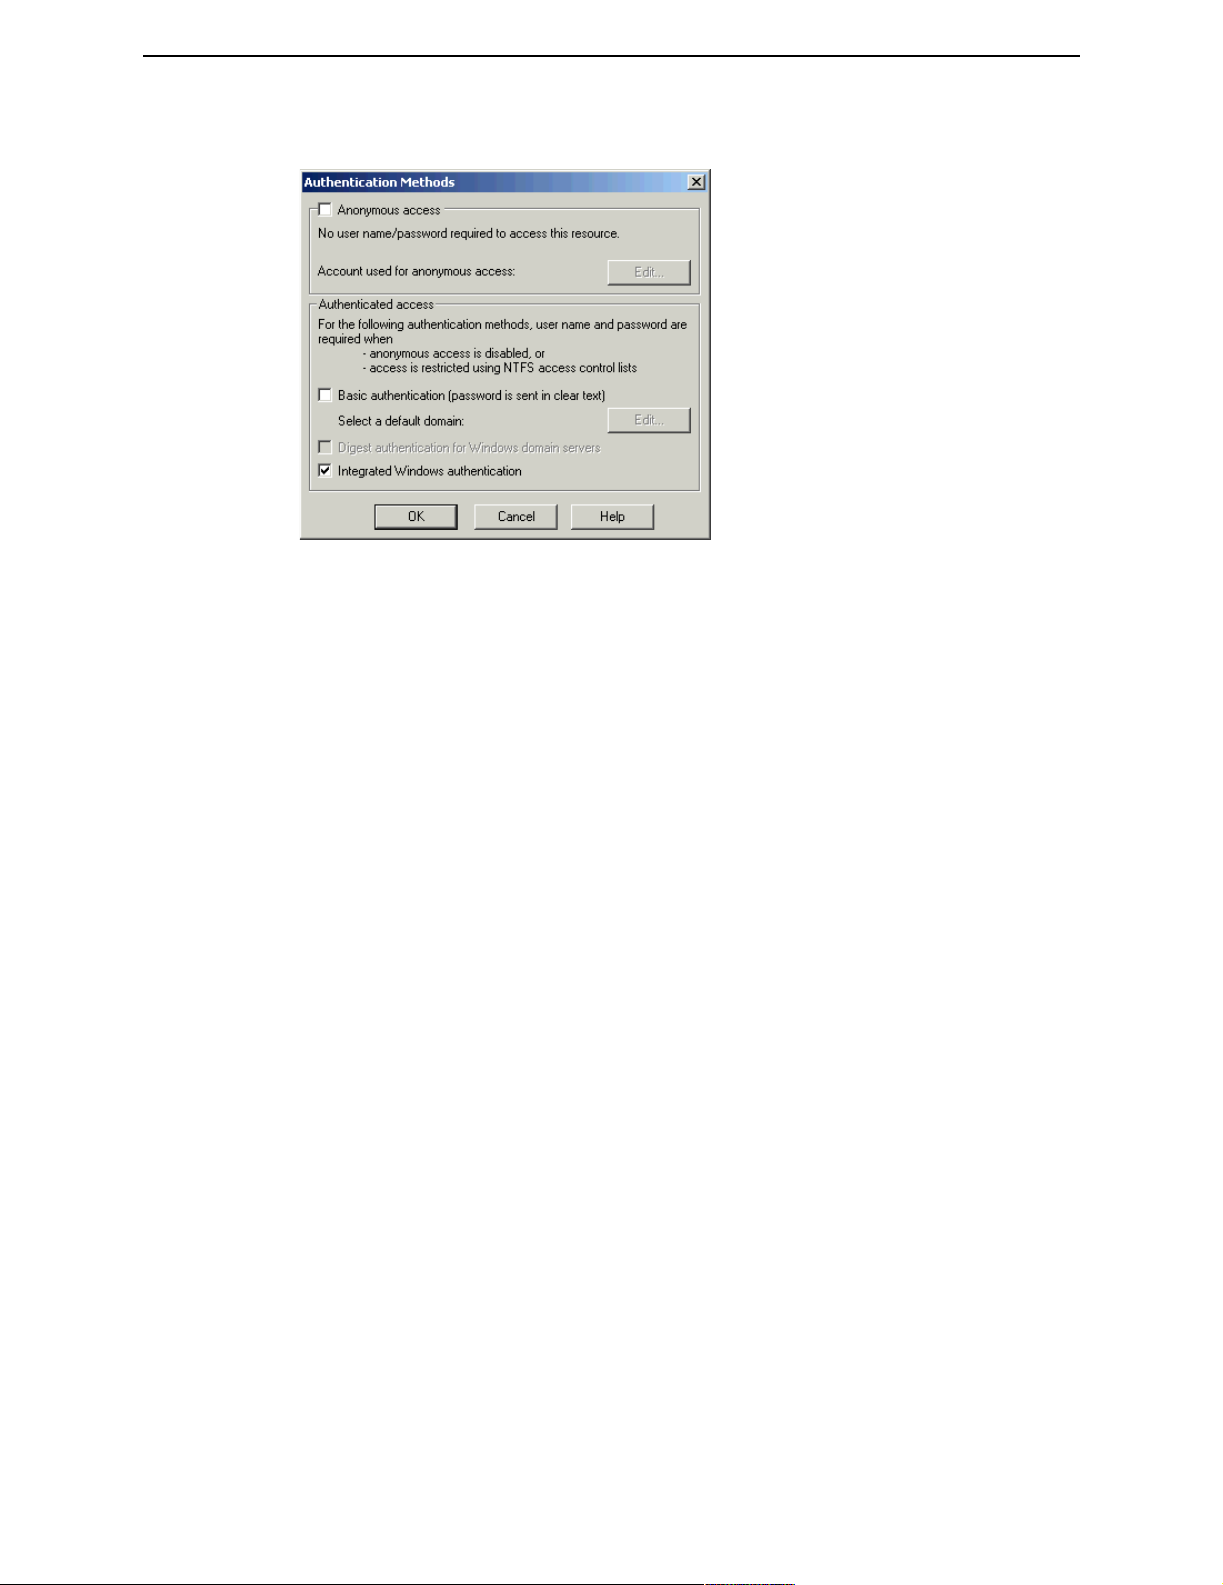
The IIS security settings for an entry point can be changed by doing the following:
1 Access Internet Services Manager.
2 In the left pane, select server name>Default Web Site>AeXHD>.
3 Right click on a folder name (for example: admin) and select Properties.
4 Click the Directory Security tab, then click Edit for Anonymous access and authentication control.
default.aspx
Altiris Helpdesk Solution User Guide 36
Page 37
Chapter 5: Configuration Console Security
5 Click Help to access help on these items. See“Administration” on page 95 for details.
• Anonymous access - Users can submit anonymous requests. Helpdesk will use a guest worker
account for these requests. It is important to not enable this for consoles or folders that contain
important Helpdesk commands like the Admin and Worker consoles. Instead, only consoles that
offer limited functionality, such as the Guest console, should be configured to permit anonymous
access.
• Basic authentication - Workers can submit their identification (domain\username) and a
password to be authenticated. Passwords are not transmitted using encryption, therefore we do
not recommend this method under normal circumstances; however, if Basic Authentication is not
enabled then Netscape and Opera users cannot connect to the Helpdesk Worker or Admin entry
points.
• Integrated Windows Authentication - This uses a cryptographic exchange with the user's
Internet Explorer web browser to confirm the identity of the user. You should always configure
every entry point to allow Integrated Windows authentication even if you do not expect the users
of the consoles in that entry point to use it.
We recommend that all environments use Integrated Windows Authentication for tighter security.
Workers with Internet Explorer 4.01 (or higher) can pass their login credentials without any
prompting. If IIS cannot authenticate the user logged in, then a dialog is displayed asking for a new
NT credential. Passwords are not transmitted in the clear.
Workers with other browsers (Netscape, Opera) will see a dialog asking for an NT domain\username
and a password (basic authentication). Because passwords are passed in the clear, we do not
recommend using either Netscape or Opera.
Administrators
Helpdesk administrators are workers who have IIS and NTFS access to the AexHD\Admin console
entry point. The Admin console defined in the Admin entry point contains all the administrative
functions that Helpdesk provides. Integrated Windows authentication is enabled for the Admin
console entry point.
See “Administration” on page 95 for details.
Workers
Workers are users who have been added to the Helpdesk database and created as workers by a
Helpdesk administrator using the New worker command. Workers are identified by their NT
domain\username and e-mail address.
The Worker entry point is through the Worker console, which contains all the Helpdesk
functionality needed to manage work items, assets and contacts.
Altiris Helpdesk Solution User Guide 37
Page 38

Chapter 5: Configuration Console Security
End Users
Helpdesk Solution installs three different entry points and consoles for end users. The winuser entry
point contains two consoles, My Helpdesk and NT User, for users authenticated by the Integrated
Windows Authentication. These consoles map users to a Helpdesk contact record in the Helpdesk
database.
The User console uses an e-mail address and a Helpdesk-only password to allow end users to create
work items and view previously created work items. These users are mapped to Helpdesk contacts
and therefore can participate in e-mail notification and other Helpdesk activities. Anonymous
access and Integrated Windows Authentication are enabled for this entry point. These Helpdesk
passwords are not secure and are not required.
The Guest console collects no special information and displays a simple create work item interface.
Anonymous access and Integrated Windows Authentication are enabled for this entry point.
The purpose of the Work Item Request - Guest Console is to allow non-workers the ability to
create work items that can be reviewed and assigned by workers. Therefore the special worker
guest" will be the worker that appears in the "Created by" field for all work items created using the
"
Work Item Request - Guest Console.
Altiris Helpdesk Solution User Guide 38
Page 39

Chapter 5: Configuration Console Security
Setting Permissions
Once IIS has authenticated the requesting user, then NTFS permissions on the directory holding the
requested default.aspx file is checked to determine if the user has NTFS read permissions for
the file (usually inherited from the directory). If so, the request is allowed to proceed and a response
page will be generated.
The directories and files being discussed are installed in the web directory created under the
installation location. Following is the directory structure.
Altiris recommends creating local NT groups on the server with IIS, adding domain accounts to
those groups, then giving each group appropriate permissions on each of the five entry point
subdirectories.
To set Web Console permissions, do the following.
1 Create a local group for each class of user:
• Administrator (Admin)
• End User (User)
• Worker (Worker)
• End User (Guest)
• End User (Anon)
Note These groups can be global groups in the domain or local groups on the Web server
(recommended).
To create local groups, you use the
Administrator (admin) and so on.
Computer Management tool to create a group called
Altiris Helpdesk Solution User Guide 39
Page 40

Chapter 5: Configuration Entry Points
2 Add NT users to the appropriate groups. These can be NT domain users or groups or local users
defined on the Web server.
3 Using Windows File Explorer, locate the physical directory location of the admin, worker, and
other entry points.
Note By default, the setup creates these in the following location:
C:/Program Files/Altiris/eXpress/Notification Server/HelpDesk/
AexHD
4 Right-click an entry point folder (i.e. Admin).
5 Click Properties. This displays the property sheet for the folder.
6 Click the Security tab.
7 Remove unwanted access (i.e. Everyone) and add the appropriate groups (i.e. Admins).
Note The "Read" permission is sufficient.
With permissions set, when a user invokes a URL inside one of these entry points they must be
logged on to NT as a member of the appropriate group or they will be prompted to log in. As
previously mentioned, the guest and user entry points do not require an NT ID.
Note Login credentials are automatically provided by Internet Explorer so IE users will not be
prompted for user information unless they are not a member of the correct group. Other browsers
don't participate with NTLM and will always be prompted.
Entry Points
Helpdesk uses a number of custom elements in entry point web.config files to define the
behavior of the Helpdesk consoles that are supplied through default.aspx pages inside the entry
point.
However there is one exception - Helpdesk administrators may want to control how workers and
users self-enroll into Helpdesk. How to do that is described below.
<configuration>
<appweaver.net>
<consoles>
<console>
<command/>
</console>
</consoles>
</appweaver.net>
<helpdesk.net>
<console.configuration/>
<credential/>
</helpdesk.net>
</configuration>
The <appweaver.net> element and its children define what consoles are available in that entry point
and what commands are available in those consoles.
The <helpdesk.net> element has two children that are described below:
<console.configuration>
This element has two or three attributes:
•
allowDatabaseConfig
Legal values are “yes” or “no”.
The value “yes” means that workers who use this entry point will be able to attempt to configure
the Helpdesk database by running a Helpdesk configuration command defined in the console.
This command will be run whenever Helpdesk determines it is not correctly configured - usually
when the application starts after an installation or upgrade. By default only the Admin entry point
and console has this value set to “yes.” It is dangerous and unhelpful to allow non-admins access
to this command.
Altiris Helpdesk Solution User Guide 40
Page 41

Chapter 5: Configuration Entry Points
The value “no” means that database configuration is not possible through this console. Helpdesk
will display an error instead of displaying the
The value “yes” means that the databaseConfigCmd attribute must be present.
Helpdesk configuration page.
The value “
•
databaseConfigCmd
The value of this attribute must match the value of an id attribute of a <command> element
defined in same web.config file. It should always refer to the ConfigureHelpdesk templated
command. This attribute is only necessary when allowDatabaseConfig is set to “yes.”
denyCmd
•
The value of this attribute must match the value of an id attribute of a <command> element
defined in same web.config file. Typically this command should refer to the Deny module. It is
required when allow
•
sessionTimeout
The value of this attribute must be an integer greater than 0: “20” for example. This attribute is
useful for consoles that do not have a keepalive mechanism to keep their IIS sessions alive: the
user and winuser consoles use this attribute by default. The default session timeout is configured
in the main
<credential>
This element defines how workers and users are authenticated by Helpdesk after being authenticated
or not by IIS and NTLM security. There is one required attribute: workerMode, and several other
attributes that may or may not be required depending on the value of
The five entry points/web.config files that ship with Helpdesk demonstrate all useful combinations
of attributes.
workerMode=”worker”|”winUser”|”guest”|”user”
no” means the error display command must be named in the denyCmd attribute.
DatabaseConfig is set to “no.”
web.config file and is initially set to 4 minutes.
workerMode.
• “worker”
This mode requires users of the consoles defined in this entry point to be enrolled as workers in
Helpdesk. The NT ID provided by the browser is used to identify the worker. Workers typically
have access to the full functionality of Helpdesk except for administrative functions.
Other required attributes:
• “winUser”
This mode requires users of the consoles defined in this entry point to be defined as contacts in
Helpdesk. An NT ID provided by the browser through IIS Integrated Windows Authentication
is required to identify the contact. Consoles defined using this mode usually have only limited
Helpdesk abilities: to create new work items and to review and updates work items previously
created by them. This mode is appropriate for end-users in an intranet environment where
Integrated Window Authentication is available. Workers can use consoles with this credential
also because workers are contacts with valid NT IDs. However, they will not be able to access
full worker functionality.
Other required attributes: a
• “guest”
This mode is for completely anonymous access to Helpdesk to create new work items, for
example, at a public walk-up kiosk. No authentication takes place and no contact information is
created about the end-user using the console. Any information collected by commands in a
“guest” mode console is typically inserted into the work item comment field to be interpreted by
a worker.
There are
no other required attributes.
allowSelfEnrollment, selfEnrollmentCmd, denyCmd.
llowSelfEnrollment, selfEnrollmentCmd, denyCmd.
• “user”
Altiris Helpdesk Solution User Guide 41
Page 42

Chapter 5: Configuration Entry Points
This mode allows the console to execute a login command to collect an email address and
password to identify the end-user as a contact in the Helpdesk database before permitting access
to the console. If a contact can be found and the optional password matches, the user is shown
the console and can perform operations similar to those available in a
console: create new work items with the end-user as the associated contact, review work items
previously created, etc.
winUser-mode
To speed up access to Helpdesk, administrators can set the save
“yes“ to allow Helpdesk to place a cookie on the client browser that serves as a valid “user”
mode credential. Then that user on that machine is not show the login command again after the
first successful login.
“user” mode has five other required attributes:
allowSelfEnrollment, selfEnrollmentCmd, denyCmd.
allowSelfEnrollment=”yes”|”no”
• “yes” means that Helpdesk will permit the user to add their contact and/or worker information
to the Helpdesk database and then grant them access to the console. Helpdesk executes the
command named in the selfEnrollmentCmd command.
no” means that users who cannot provide a valid credential: either an email address and
• “
password (“user” mode) or NT ID (“worker” or “winUser” mode) will be denied access to
Helpdesk. Helpdesk will execute the command named in the denyCmd attribute.
Note This is the only attribute that most Helpdesk administrators should ever directly change
in the installed Helpdesk entry points.
By default the Worker console does not allow self-enrollment. Some administrators may want to
edit the worker\web.config file using Notepad or other text editor to change the
allowSelfEnrollment from “ no ” to “ yes ” and save the file. This will cause Helpdesk to restart
and apply the new setting. Administrators should be sure to limit access to the Admin and
Worker consoles using NTLM and NT groups before enabling worker self-enrollment. After
most the workers have been created, administrators should turn self-enrollment off again.
On the other hand, the User console allows self-enrollment by default. This permits end-users to
create their own, possibly erroneous, contact records. Administrators can turn off self-enrollment
by editing the User\web.config file, setting allowSelfEnrollment from “yes” to “no.” Then no
end-users will be granted access to Helpdesk until their contacts are imported from an NS source
or created manually. Note that the default password is the empty string, i.e., no password at all.
userLoginCmd, saveUserLoginCookie,
UserLoginCookie attribute to
Passwords used by Helpdesk here are not and should not be NT or Active Directory passwords.
They are stored as clear text in the database. Workers can view and edit these passwords in the
Worker console.
selfEnrollmentCmd=” ”
The value of this attribute must match the value of an id attribute of a <command> element defined
in same web.config file.
denyCmd=” ”
The value of this attribute must match the value of an id attribute of a <command> element defined
in same web.config file.
userLoginCmd=” ”
The value of this attribute must match the value of an id attribute of a <command> element defined
in same web.config file. This attribute is valid only when workerMode=”user”. See the
User\web.config file for a sample.
saveUserLoginCookie =”yes”|”no”
This attribute is valid only when workerMode=”user.” See the User\web.config file for a sample.
• “yes” means the e-mail address entered by the worker is stored in a cookie in the user’s
computer. The cookie contains an integer. If the cookie is present then the login command is not
executed and the Helpdesk console is displayed. The same user will not be prompted for login
Altiris Helpdesk Solution User Guide 42
Page 43

Chapter 5: Configuration Licensing
credentials again until the cookie expires after one year. Users cannot decide whether to accept
the cookie or not.
• “
no” means Helpdesk will not write the user credential cookie. Users will see the login command
every time they start a new Helpdesk session.
Note that Helpdesk requires that cookies be enabled at all times but does not write permanent
cookies except for this one. This is a change from previous versions of Helpdesk, which managed
several cookies.
Licensing
From the time you install this solution, you have 7 days to register the product and obtain an
evaluation license from the Altiris web site.
For information on getting a license and how to purchase a product, see the Altiris eXpress Getting
Started Guide or Altiris eXpress Notification Server User Guide.
Note To see how long you have before the trial license expires, in the eXpress Web Administrator,
click on the
information in a yellow banner at the top of the each page of output.
Licensing tab, and look at the Expires column. Helpdesk will also display trial license
Altiris Helpdesk Solution User Guide 43
Page 44

Chapter 6:
User Interface
The User Interface topic list, includes the following:
• Altiris eXpress Helpdesk Consoles (page 46)
• Helpdesk Worker Console (page 47)
• Default Page Description (page 47)
• Commands (page 47)
• Common tasks (page 48)
• Toolbar Description (page 48)
• Item Count, Date and Time (page 49)
• Bulletins (page 49)
• The Worker Report (page 49)
• View or Edit Work Items (page 53)
• New Work Item (page 50)
• Toolbar Description (page 48)
• Work Item Page Description (page 51)
• Add New Work Item (page 52)
• View or Edit Work Items (page 53)
• Additional Work Item Information (page 54)
• Attachments (page 55)
• Attach Page Field Description (page 56)
• Link Work Items (page 56)
• Link Page Field Description (page 57)
• E-mail Messages (page 58)
• E-mail Page Field Description (page 59)
• View Contact Properties - New Work Item (page 59)
• Contact Page Field Description (page 60)
• Find Contact - New Work Item (page 61)
• Select Contact - New Work Item (page 62)
• View Asset Properties - New Work Item (page 63)
• Asset Page Field Description (page 64)
• Find Asset - New Work Item (page 64)
• Select Asset - New Work Item (page 65)
• Find Work Items (page 66)
• Find Work Items - Simple Tab (page 66)
Altiris Helpdesk Solution User Guide 44
Page 45

Chapter 6: User Interface
• Find Work Item Simple Field Description (page 67)
• Find Work Items - Advanced Tab (page 68)
• Find Work Item Advanced Field Description (page 69)
• Search in Comment or Title Field (page 69)
• Using Queries (page 70)
• List Query (page 71)
• List Query Page Field Description (page 71)
• New Query (page 71)
• Modify New Query Search (page 72)
• New Query Page Field Description. (page 73)
• Query Data Types (page 73)
• Query Parameter Replacement (page 76)
• Delete Queries (page 78)
• Last Query Results (page 79)
• Retrieve Queued Item (page 80)
• Contacts (page 80)
• Contacts Home (page 80)
• View Contacts (page 81)
• Find Contacts (page 81)
• Find Contacts Page Field Description (page 82)
• New Contact (page 82)
• New Contact Page Field Description (page 83)
• Assets (page 84)
• Assets Home (page 84)
• View Assets (page 84)
• Find Assets (page 85)
• New Asset (page 85)
• New Asset Page Field Description (page 86)
• Recents (page 87)
• My Helpdesk Console (page 88)
• My Helpdesk - New Work Item (page 89)
• Sort Work Item List (page 89)
• Edit My Info (page 90)
• Logoff (page 91)
• Work Item Request - NT User (page 91)
• Work Item Request - User (page 92)
• Work Item Request - Guest (page 92)
• Create Custom URL to Access Helpdesk Consoles (page 93)
• Support for Pocket PC (PPC) (page 94)
Altiris Helpdesk Solution User Guide 45
Page 46

Chapter 6: User Interface Altiris eXpress Helpdesk Consoles
Altiris eXpress Helpdesk Consoles
This section details the features and functionality of how to use Helpdesk consoles.
Server Access
1 Click Start > Programs > Altiris > Altiris eXpress > Helpdesk Solution > Helpdesk Consoles.
2
Select on of the following options:
Client Access
Helpdesk workers access the
internet browser.
Helpdesk console interface by typing the URL in the address box of the
• Altiris eXpress Helpdesk consoles - http://<server name>/aexhd/
• Helpdesk Admin console - http://<server name>/aexhd/admin/Default.aspx
• Helpdesk Worker console - http://<server name>/aexhd/worker/Default.aspx
• My Helpdesk console - http://<server name>/winuser/Default.aspx
• Work item request - NT User - http://<server name>/winuser/NTUser.aspx
• Work item request - User
• Work item request - Guest - http://<server name>/aexhd/guest/Default.aspx
Replace server name of the URL with the server name provided by the System Administrator. Using
Integrated Windows Authentication requires workers to be logged in to the client computer using
their NT account.
Note You can simplify access to the worker consoles by creating a URL alias shortcut, To create a
URL alias shortcut, see “Create Custom URL to Access Helpdesk Consoles” on page 93.
- http://<server name>/winuser/Default.aspx
Altiris Helpdesk Solution User Guide 46
Page 47

Chapter 6: User Interface Altiris eXpress Helpdesk Consoles
Helpdesk Worker Console
Default Page Description
Helpdesk worker console displays the Work report as the default page. The left-hand menu page
The
is divided into three sections, Commands, Common tasks and the Item and Count section. The first
two sections consist of links in cells that display additional menus ("fly-out" menus) when the cursor
hovers over them. Cells with a right-pointing arrow will open to display the additional commands.
Clicking on the link instead of hovering will execute the first command in the fly-out.
Each menu link and its fly-out menus (if any) is described below:
Commands
Work Items
Worker report - Default page for the Helpdesk Worker console.
New work item - Lets workers create a new work item. See “New Work Item” on page 50.
Find work items - Lets workers find work items using simple or advanced searches. See “Find
Work Items” on page 66.
Queries - Lets worker execute existing queries and create custom queries. See “Using Queries”
on page 70.
Last query results - Displays the results of the last query executed. See “Last Query Results” on
page 79
Retrieve queued item - Lets workers retrieve queued items. See “Retrieve Queued Item” on page 80
Contacts
Contacts home - Displays a list of contacts. See “Contacts Home” on page 80
Find contacts - Lets workers find contacts by entering a search criteria. See “Find Contacts” on
page 81
New contact - Lets workers add a new contact record. See “New Contact” on page 82
Altiris Helpdesk Solution User Guide 47
Page 48

Chapter 6: User Interface Altiris eXpress Helpdesk Consoles
Assets
Asset home - Displays a list of assets. See “Assets Home” on page 84
Find assets - Lets workers find assets by entering a search criteria. See “Find Assets” on page 85
New asset - Lets workers add a new asset. See “New Asset” on page 85
Recent
Work items - Displays la st work item entered by Helpdesk worker. See “View or Edit Work Items”
on page 53
Contacts- Displays last Contact entered by Helpdesk worker. See “Contacts” on page 80
Assets - Displays last Asset record entered by Helpdesk worker. See “Assets” on page 84
Common tasks
New work item - Lets a worker add a new work item. See “New Work Item” on page 50.
Find work items - Lets a worker find work items using simple or advanced searches. See “Find
Work Items” on page 66.
Work item queries - Displays the query list. See “List Query” on page 71.
Last query results - Displays the results of the last query. See “Last Query Results” on page 79
Retrieve queued item - Lets a worker retrieve queued items. See “Retrieve Queued Item” on page 80
Toolbar Description
The icons located in the upper right hand corner of the Worker console page represents the following
tasks.
Home - Returns the worker back to the Worker console page.
Notification Server Console Report - Link to Notification Server Web Reports
Format for print - Converts the screen text into a printable format within the browser. The last
command is displayed without the fly-out menu and banner.
Logoff Helpdesk - Logs the worker off the Helpdesk system.
Help - Opens online searchable Helpdesk files.
Altiris eXpress logo - Link to the Altiris web site, www.altiris.com.
Altiris Helpdesk Solution User Guide 48
Page 49
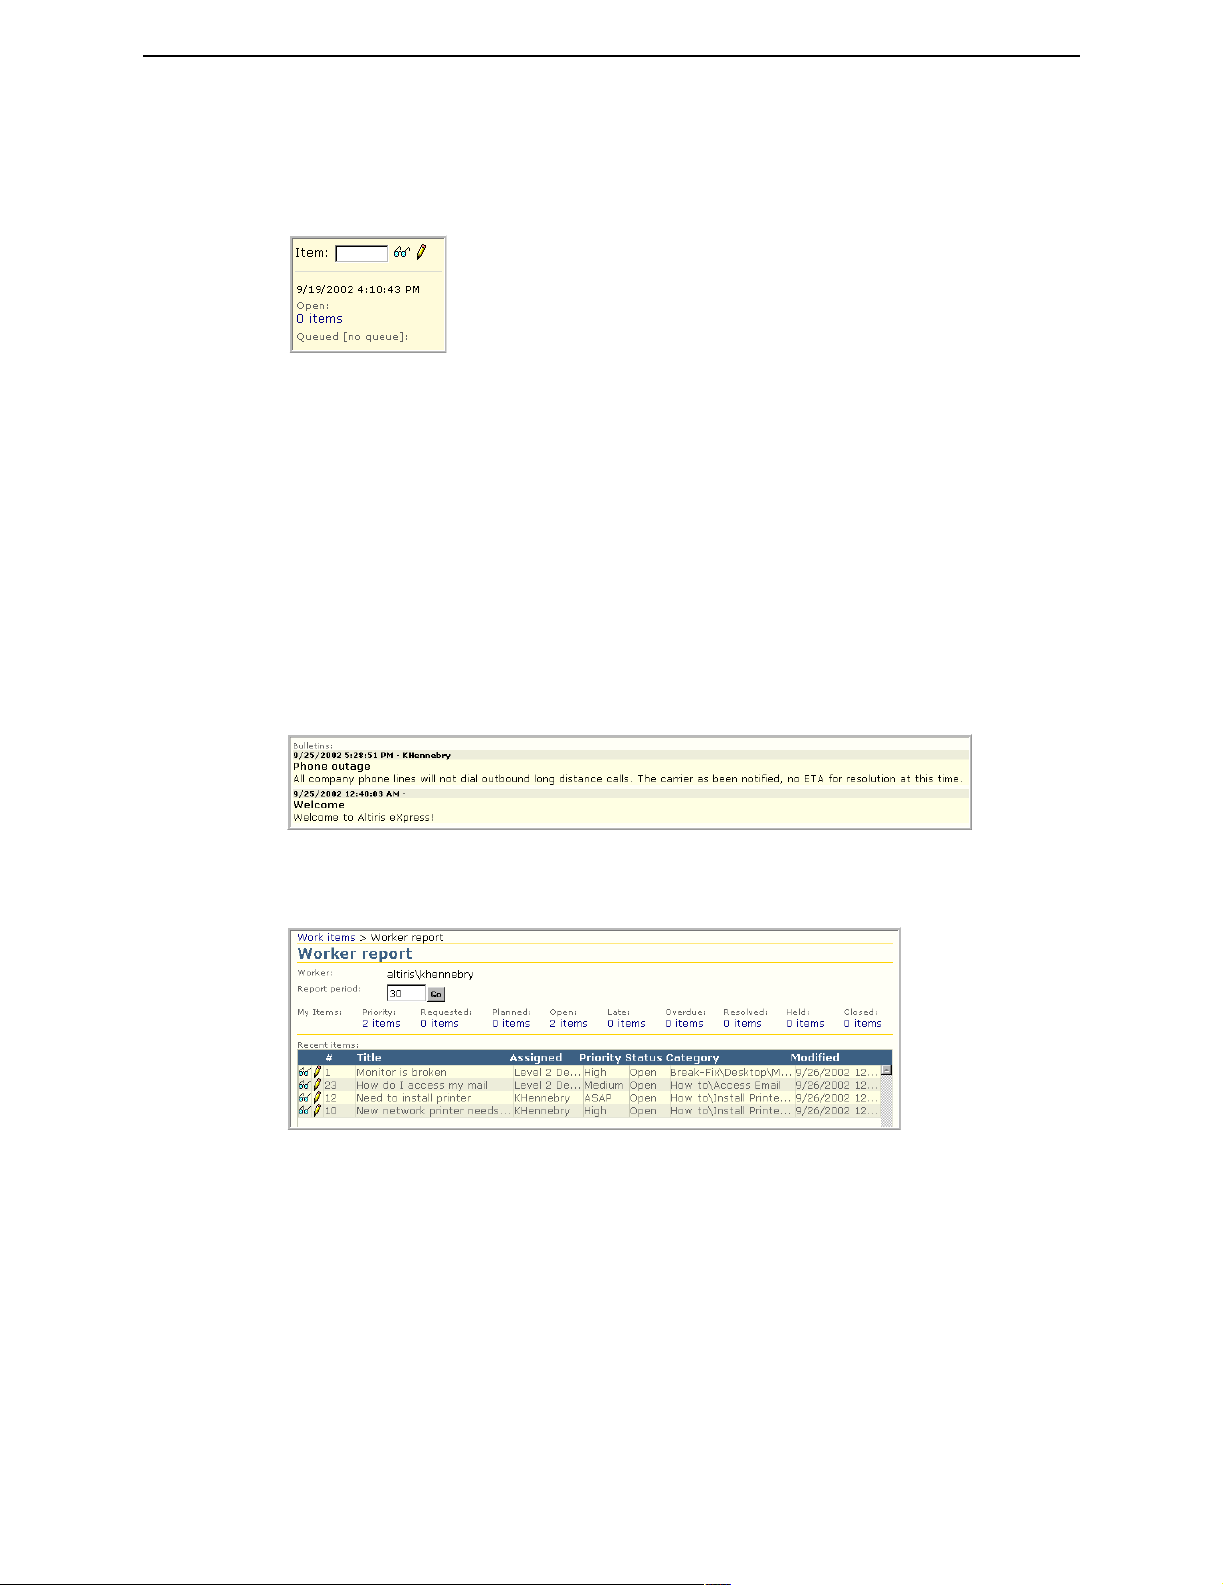
Chapter 6: User Interface Altiris eXpress Helpdesk Consoles
Item Count, Date and Time
The item box, current date and time, open item count and queued item count are displayed on the
lower left hand side of the
Item - Type the work item number you want to view or edit in the Item box.
View icon - Click to view the work item, whose number is in the Item box.
Edit icon - Click to edit the work item, whose number is in the Item box.
Date and time - Displays the current date and time of the Helpdesk server.
Open - Click the item count to display a list of open items assigned to you.
Queued [ ] - Click the item count to display a list of work items in the Your retrieve queue.
Worker console page.
Bulletins
The bottom of the Worker report is reserved for bulletins. Bulletins keep workers and users updated
on system maintenance, outages, pending problems or other Helpdesk information
The Worker Report
Worker - Displays the computer network ID and worker name using system.
Report period - Select the number of days to search back in time to view work items. There is no limit
as how far back a worker can view items. Type the number of days in the box, then click Go.
Priority - Lists the number of work items with High or ASAP priority and Open status.
Requested - Lists the number of work items with status as “Requested”. Work items submitted by
users from the
Planned - Lists the number of work items with the status as Planned. Work items can be scheduled
for a future or planned date. This feature is helpful for administrators that want accurate reporting
on work item activity and status.
Open - Lists the number of work items with the status as Open.
Altiris Helpdesk Solution User Guide 49
Work item request - User console automatically receive a “Requested” status.
Page 50

Chapter 6: User Interface New Work Item
Late - Lists the number of work items Planned after the start date.
Overdue - Lists the number of work items not Closed or Resolved after the due date.
Resolved - Lists the number of work items with the status as Resolved. Work items can have a status
of Resolved and still be open. Once verification is received, work items can be finalized with the
Closed status.
Held - Lists the number of work items with the status as Hold.
Closed - Lists the number of work items with the status as Closed.
New Work Item
The New work item page lets you create a New work item. Workers can perform a variety of tasks to
the item, such as: link work items together, associate assets and contacts to the work item, attach
uploaded files to the work item, and send e-mail.
To Open a New Work Item
1 Click Work items>New work item listed below Commands. <OR>
2 Click New work item listed below Common tasks.
Toolbar Description
The following diagram describes the toolbar:
Altiris Helpdesk Solution User Guide 50
Page 51

Chapter 6: User Interface New Work Item
Work Item Page Description
Page Items
Item Description
Title Description of the problem or request.
Category Categories
Assigned Worker or queue for the work item.
Priority Priority status is low, medium, high and ASAP.
Status Select a Status from the drop-down list. The default status is
open.
Type Type of work item.
Schedule The work item can be a scheduled event.
Start Type the work item start date or accept the default.
Due Type the work item due date.
External ID Type an External ID.
Comment Type additional details or further explain the work item.
Notify rules Notifications sent to workers, queues or other contacts to inform
them of work items.
Attach Attach files to a work item.
Attachments List of files attached to a work item.
Linked to List of other work items the current item is linked to.
Link Click to link an existing work item to the current work item.
Linked by Name of worker responsible for linking items.
E-mail Set e-mail notifications for the current work item.
Save Save work item changes.
Save and new Save and start another new work item
Cancel Discard the changes.
Time Spent
(minutes)
Total Time Total time spent by all workers on this work item - the sum of all
The Time spent (minutes) working on the current work item
starting from when the page is displayed. This number can be
changed if other work has been performed not related the time
spent using the Helpdesk work item user interface.
Time Spent values entered.
are associated to a worker or queue.
Altiris Helpdesk Solution User Guide 51
Page 52

Chapter 6: User Interface New Work Item
Add New Work Item
1 Type a description for the new work item in the Title box. The title is a required field. All the
other fields are optional, or have default values.
2 Type additional Comments in the box.
3 Select a Category from the drop-down list.
4 Select the Priority status from the drop-down list.
5 Select an Assigned worker or queue to assign the work item to from the drop-down list. The
default option of
according to the Routing Rules defined.
6 Select the Status of the work item from the drop-down list.
7 Select the Type of work item from the drop-down list.
8 Type an External ID number in the box.
9 Select either Scheduled or Not Scheduled from the drop-down list.
10 Select a Start date for the work item, the default option is the current day. Click the box icon to
the right of the date field to open the current calendar month and select the appropriate date. Click
the box icon again to close the calender window.
11 Select a Due date for the work item, the default option is the current day. Click the box to the
right of the date field to open the current calendar month and select the appropriate date. Click
the box again to close the calender window.
12 Select any Notify rules check boxes that you want associated with this work item. Default rules
will be pre-selected by the administrator. Additionally, the administrator can lock down notify
rules to prevent workers from making any changes. These rules are evaluated and e-mail
generated when the work item is saved.
13 Click View contact properties to view and edit the contact information associated with the work
item. For more information, see “View Contact Properties - New Work Item” on page 59.
14 Click View asset properties to view and edit the asset information associated with the work item.
For more information, see “View Asset Properties - New Work Item” on page 63.
15 Click E-mail to send an e-mail notifications about the current work item to other workers, queues
or select individuals. For more information, see “E-mail Messages” on page 58.
16 Click Link to link the current work item to another work item. For more information, see “Link
Work Items” on page 56.
17 Click Attach to add additional file information to the work item. For more information, see
“Attachments” on page 55.
18 Click Select a contact to associate a contact with the current work item. For more information,
see “Find Contact - New Work Item” on page 61.
19 Click Select an asset to associate an asset with the current work item. For more information, see
“Find Contact - New Work Item” on page 61.
20 Click Save. The work item you created will display in the View work item page.
<OR>
--(unassigned)-- will automatically assign the work item to the worker or queue
21 Click Save and start a new one. The work item is saved, and the New work item page is displayed
for you to create a new work item.
Altiris Helpdesk Solution User Guide 52
Page 53
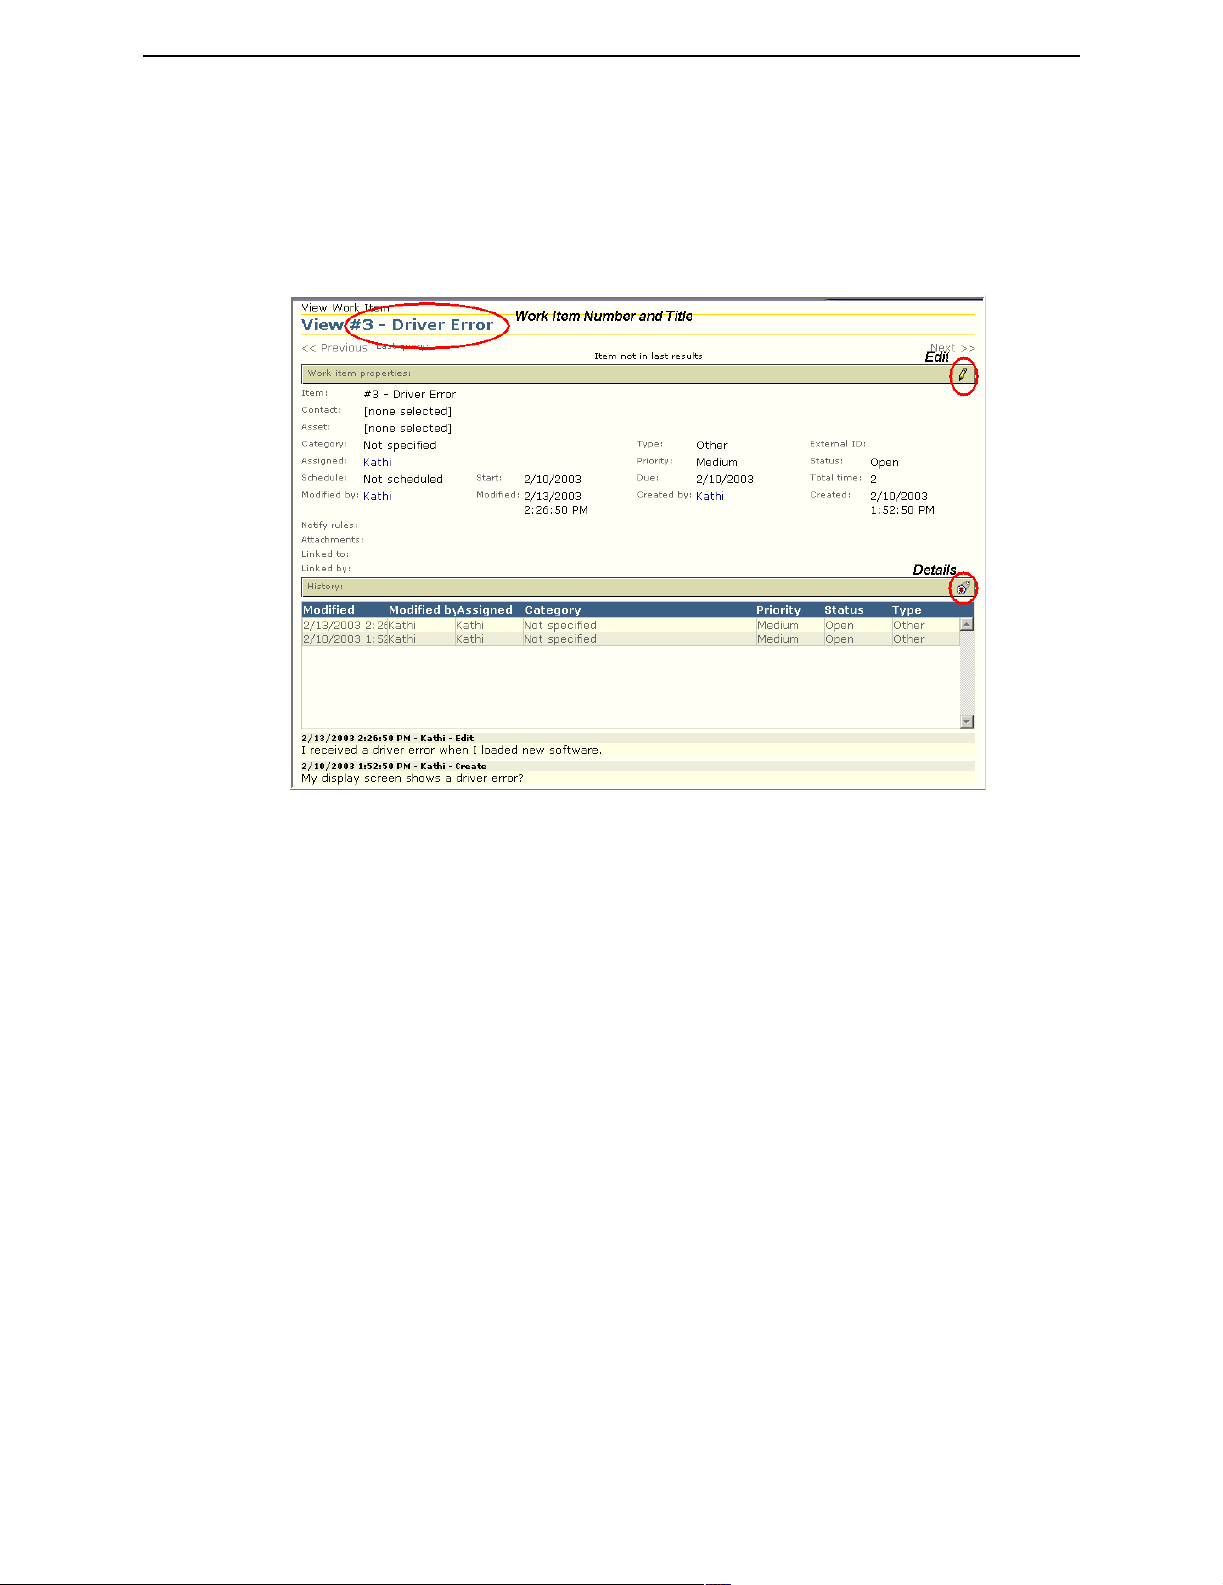
Chapter 6: User Interface New Work Item
View or Edit Work Items
The View work item page allows you to review any work item added to the Helpdesk database. This
page appears when you
glasses icon. The work item number, used as reference for problem resolution and tracking
purposes, is displayed in the upper left hand corner of the page. The information you entered when
adding a
New work item, in addition to the History of the work item, can be reviewed or edited.
Save a new work item, or when you select a work item by clicking on the
To View or Edit Work Items
1 When you Save a new work item, or you select a work item to view, the View work item page
appears.
2 Click Details to toggle between displaying or hiding the History of work items.
3 Click Edit to update or add work item information.
Altiris Helpdesk Solution User Guide 53
Page 54
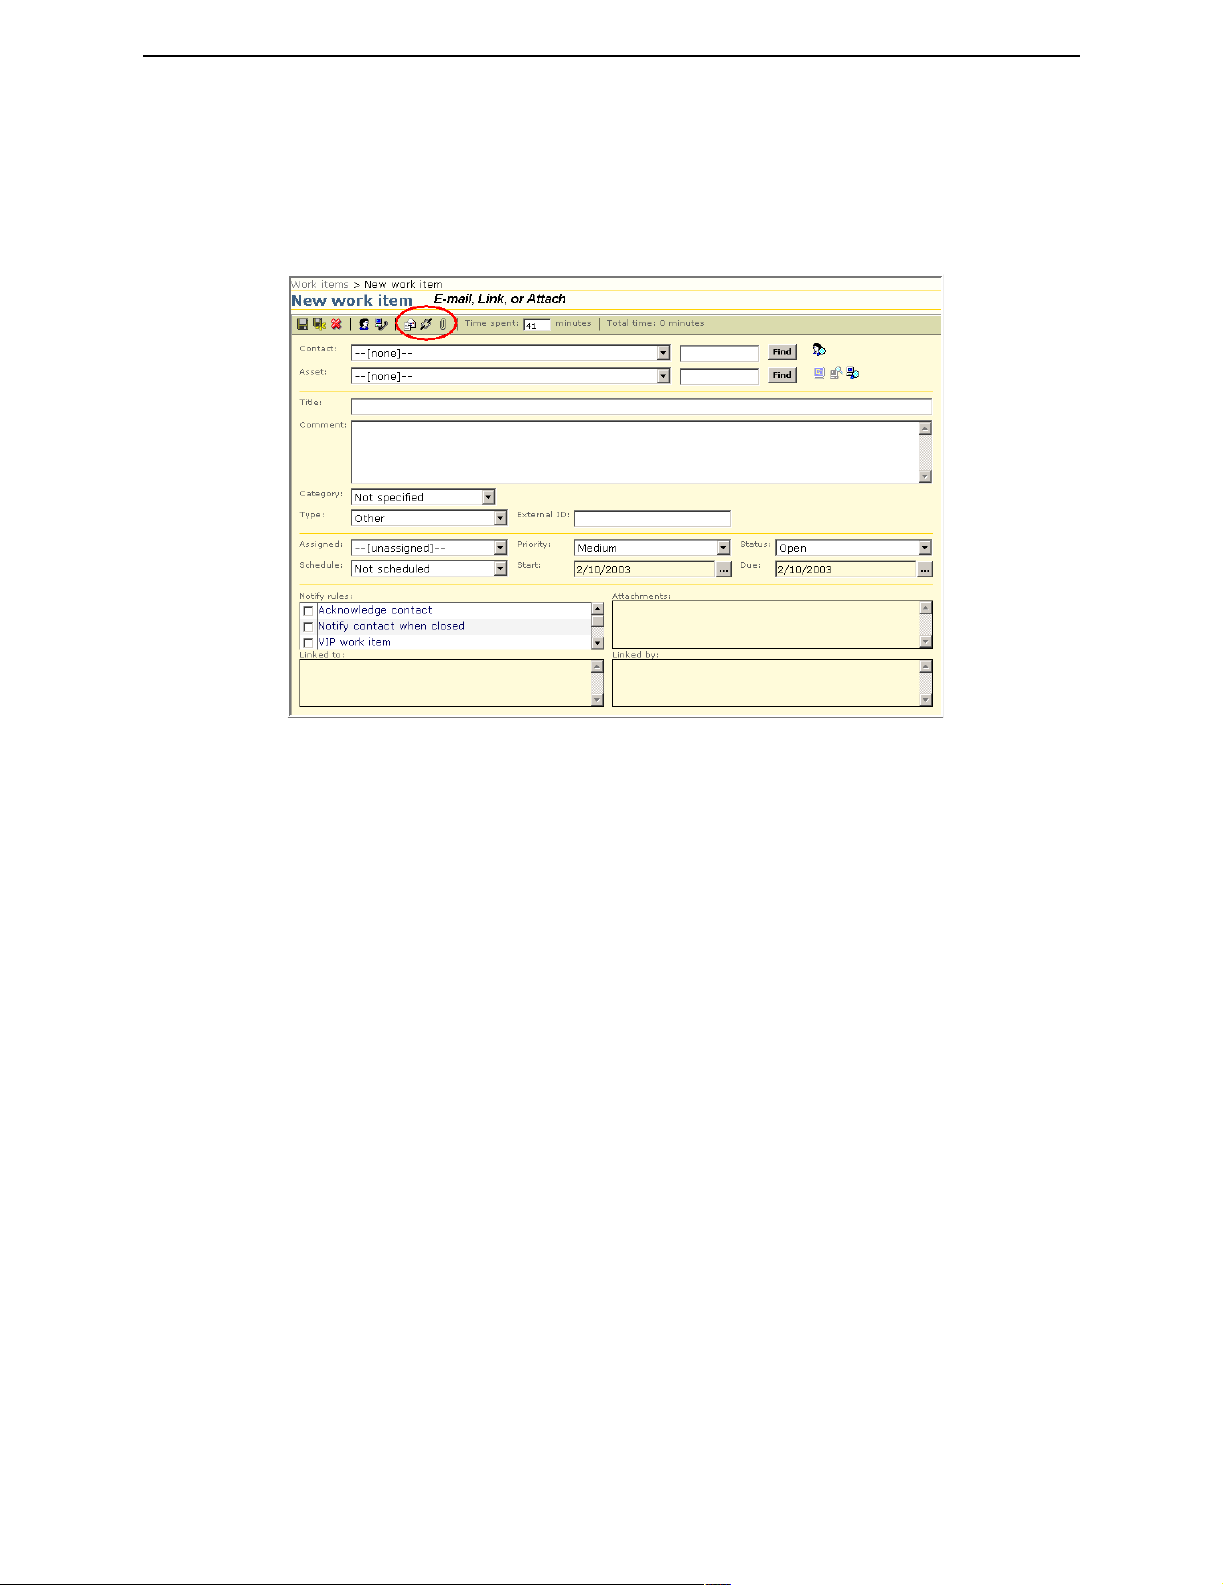
Chapter 6: User Interface Additional Work Item Information
Additional Work Item Information
Workers can attach files, link work items together, and send an e-mail about the work item. Workers
can also associate one Asset and one Contact to the work item and edit their respective data. Each of
these options are available by clicking the appropriate icon on the toolbar of the New work item page.
See also
Attachments (page 55)
Link Work Items (page 56)
E-mail Messages (page 58)
Altiris Helpdesk Solution User Guide 54
Page 55

Chapter 6: User Interface Additional Work Item Information
Attachments
Helpdesk allows you to upload files and attach them to the work item. Workers or queues retrieving
work items can use these files to debug and resolve the problems being reported. There is no
limitation on file types that can be attached to work items; however, IIS limits the size of files that
can be uploaded. Files that are too large will be rejected and an error message will be displayed. If
needed, the IIS Administrator can increase the file size limit.
To Attach a File to a Work Item
1 Click Work items>New work item.
Click Attach.
2
Click Browse to navigate to the location of the file to attach. When you select a file to upload, the
3
file path will appear in the
4 Type a description of the file to attach in the Description box.
Note If you type in the Description box, the text entered will display in the Uploaded files list box.
If you leave the description box empty, the file name you uploaded will display in the
list box.
files
5 Click Upload to attach the selected file.
6 If the files uploaded are not correct, highlight the file to discard and click Remove, the file will
be deleted from the Uploaded files list box.
7 Click Done to return to the New work item page.
Note If no files are uploaded, deleted, or you clicked this page option in error, click Done to
return to the New work item page. Only files you actually Uploaded or Removed on this page will
affect the work item. Changes are not permanent until the work item itself is saved.
Upload file box.
Uploaded
Altiris Helpdesk Solution User Guide 55
Page 56
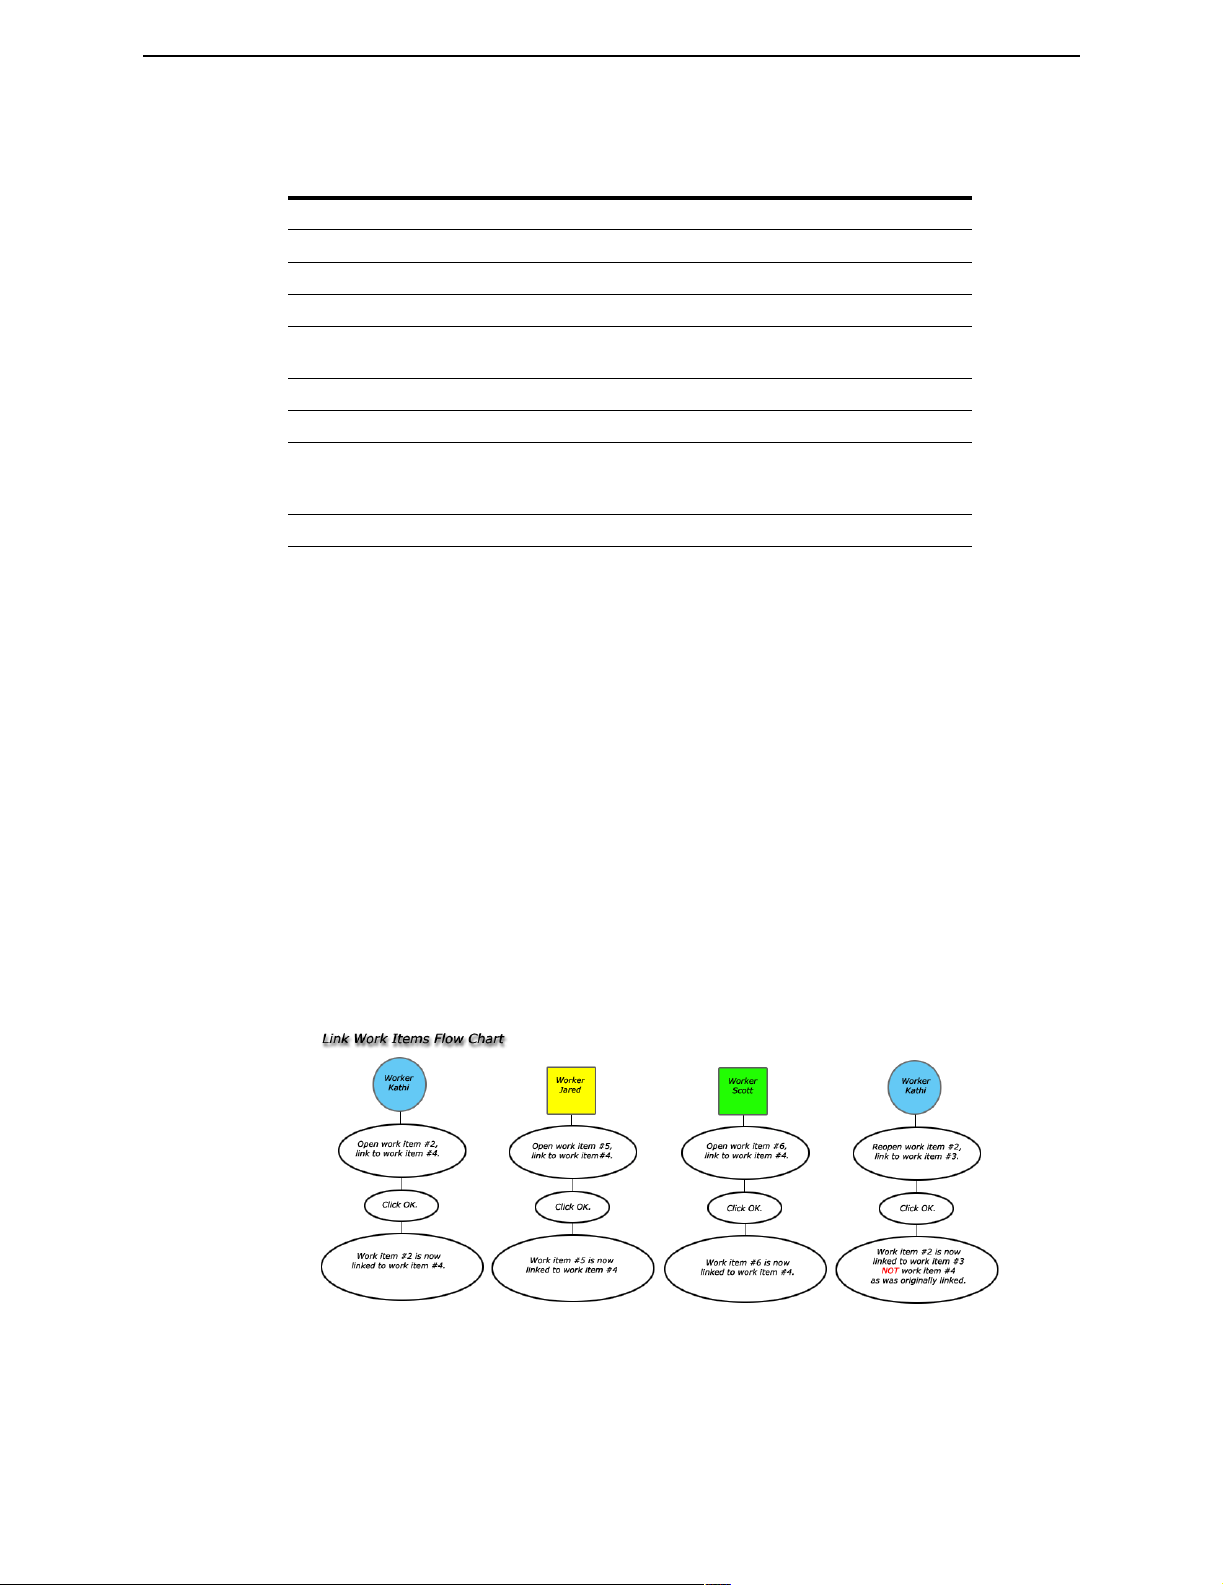
Chapter 6: User Interface Additional Work Item Information
Attach Page Field Description
Page Items
Item Description
Upload file Browse to the location of the file to attach.
Description Type a description for the file attachment.
Upload Click
Remove Click
Uploaded files Displays files attached to the new work item.
OK Click
Time Spent
(minutes)
Done Click to save the changes.
Upload to attach file to new work item.
Remove to delete the file attachment from the Upload files
list.
OK to continue with work item.
The time spent working on this work item. This number can be
changed if there has been work performed while not in the
console.
Link Work Items
A work item can link to one other work item, and multiple work items can link to the same work
item. If a work item was previously linked, it will be overwritten by the last selected link item.
To clarify this feature in more detail, be sure to read the scenario below.
Scenario
• Worker Kathi creates work item #2 reporting a need to move a PC. Work item #4 is referring to
moving the same PC. Kathi links work item #2 to work item #4.
• Worker Jared creates
office as work item #4. Jared links work item #5 to work item #4.
• Worker Scott creates
another, the same office move as stated in
.
#4
• Worker Kathi reopens
the same office as stated in
• The current
clicks the OK button.
work item open is linked to the most recently selected work item once the worker
work item #5 reporting computer equipment needs moving in the same
work item #6 reporting a printer needs moving from one office to
work item #4. Scott links work item #6 to work item
work item #2 to edit the record. Work item #3 is another PC move for
work item #2. Kathi links work item #2 to work item #3.
Altiris Helpdesk Solution User Guide 56
Page 57

Chapter 6: User Interface Additional Work Item Information
To Link a Work Item
1 Click Work items> New work item.
2 Click Link.
3 Click one of the following link item options:
•
Keep current - Default, Not currently linked.
Link recent item - Select a Work item from the drop-down list.
•
•
Find item - Type the title of the work item in the box, click Find.
• Select a work item from the drop-down list.
Item number - Type the record number of the work item in the box.
•
•
Remove current item - Unlink a work item.
4 Click OK, the most recent work item selected will be linked.
Link Page Field Description
Page Items
Item Description
Keep current Default option, the current work item is not linked.
Link-recent item Select a work item from the most recent drop-down list.
Find item Search for work items, requires search criteria.
Item number Type number of work item to link to.
Remove current
item
OK Click OK to continue with work item.
Time spent
(minutes)
Removes an attached work item.
The Time spent (minutes) working on the current work item.
This number can be changed if other work has been performed
not related to the work item yet the work item is currently open
on the screen.
Altiris Helpdesk Solution User Guide 57
Page 58

Chapter 6: User Interface Additional Work Item Information
E-mail Messages
E-mail messages can be sent to any worker, queue, or contact who has a valid e-mail address, as well
as to ant SMTP format e-mail addresses. These e-mails are delivered to the recipients specified as a
part of the work item save process and can be requests from the worker updating the work item for
additional information or to answer a question. E-mails are also sent when work items change using
the Notify rules feature. See “Notify Rules” on page 112.
To Send E-Mail Messages
1 Click Work items> New work item.
2 Click E-mail.
3 Select the check box to send e-mail notification to the Current contact.
4 Select the check box for each additional worker, use the scroll-bar to view options.
5 Type a SMTP format e-mail address for each additional mail recipient in the box.
6 Select an E-mail template from the drop-down list.
7 Type a message in the text box.
8 Click Done to return to the New work item page.
9 Click Clear to discard changes.
Altiris Helpdesk Solution User Guide 58
Page 59

Chapter 6: User Interface Additional Work Item Information
E-mail Page Field Description
Page Items
Item Description
Current contact Select check box to e-mail current contact.
These workers Select check box for all applicable workers.
These addresses SMTP e-mail address of recipients, separated by semicolons:
E-mail templates Format of the body of the e-mail message. The Message field
Message Main content of the e-mail notification. This is not the same as
Done Save changes.
Clear Clears the users selections from the page.
myname@mycompany.com;bas@buz.org
will be inserted into the body of the email as determined by the
template chosen
the work item comment.
View Contact Properties - New Work Item
The View contact properties page displays is used to view and edit information about the contact
associated with the current work item. The Items list at the bottom of the page, shows all work items
that are associated with the same contact. You can update contact information or select a different
contact from this page.
To View Contact Properties
1 Click Work items> New work item.
2 Click View contact properties.
If the information on the page needs updating; or, you want to select a different contact, click
3
Select to find a contact from the Helpdesk’s database. When you select a contact, the information
will populate this page.
4 Update the form on the page as needed, and then click Save.
Altiris Helpdesk Solution User Guide 59
Page 60

Chapter 6: User Interface Additional Work Item Information
Contact Page Field Description
Page Items
Item Description
Name Type the
NT ID Type the
E-mail Type the
Pager e-mail Type the
Phone Type the
Cell phone Type the
Pager Type the
Location Type the
Company Type the
Department Type the
Organization Select
Title Type the
Employee ID Type the
Password The contact's Helpdesk password. This should NOT be set to the
contact's NT password.
VIP Check the box to indicate
Comment Any additional free-form information about the contact. This is
a general purpose property of a contact but can be used to
specify a question or answer pair known only by the contact in
the even that they have forgotten their password.
Save Click to
if you cancel the work item later.
Cancel Click to cancel any edits made on the page. The work item itself
is not cancelled.
Name of the new contact.
NT ID of the new contact.
E-mail address of the new contact.
Pager e-mail address of the new contact.
Phone Number of the new contact.
Cell Phone number of the new contact.
Pager number of the new contact.
Location where the new contact resides.
Company name of the new contact.
Department name of the new contact.
Organization from the drop-down list.
Title of the contact’s position.
Employee’s ID.
VIP status.
Save the changes. Changes to the contact are saved even
Altiris Helpdesk Solution User Guide 60
Page 61

Chapter 6: User Interface Additional Work Item Information
Find Contact - New Work Item
The Find feature on the New work item page, allows users to enter a partial name or phone number
(this is configured by Professional Services) into the Find text box, and then click Find. The text
pattern can be any valid expression supported by Transact SQL LIKE, such as %, _, [], [^]. For
example, to search for all contacts named John, you could specify the pattern “John%”. The search
pattern will only be used to find active contacts.
As an added convenience, the
with “%” if a % symbol is not detected in the pattern. This will result in a slower search performance
as a table scan is performed. If a search pattern is not specified when Find is clicked, the user will be
presented with a validation message.
If one or more contacts match the specified pattern, then the contact drop-down list will be
populated. Additionally, a results count option will be added and automatically selected to indicate
the number of matches.
The data presented in the drop-down list will be a combination of the contact’s
number. If a phone number is not specified for the contact, the text message [phone unspecified] will
be displayed next to the contact’s name.
The contact selected from the drop-down list, will be the contact that is associated with the work
item when it is saved. If “--[none]--”, or the result count option ( --[select (2 found)]--) is selected,
then no contact will be associated with the item. If a contact and asset are specified when an item is
saved, then a contact-asset association will automatically be made. This association will be used for
the auto-association feature.
Auto-Associating an Item’s Asset Using the Contact
When a contact is selected, the system will determine if there are any assets associated with the
contact. This is done only if an asset has not been selected from the
drop-down list will be populated with any assets associated with the contact, and the first contact is
arbitrarily selected. Auto-association is attempted if a contact is selected from the Contact drop-
down list from the
from the Select a contact page (New contact, Recent contact and Find contact).
New work item page, or in any operation that results in a contact being selected
Find option will prefix and suffix the pattern entered in the text box,
name and phone
Asset drop-down list. The asset
To Find a Contact
1 Enter a partial name or phone number into the Find text box, and then click Find.
2 When the search results appear, click the Contact drop-down arrow and select a contact.
Altiris Helpdesk Solution User Guide 61
Page 62

Chapter 6: User Interface Additional Work Item Information
Select Contact - New Work Item
The Select a contact page allows workers to associate the current work item with a specific contact.
Workers can select from one of six options. The find option will only display those contacts already
in the Helpdesk system.
To Select a Contact
1 Click Work items> New work item.
2 Click Select a Contact.
Click one of the following options:
3
•
Keep current contact
• Remove current contact
• New contact
• Contact associated with current asset.
The drop-down list displays the contacts who have been associated with the currently selected
asset.
•
Recent contact.
• Find contact
• Type search criteria in any of the text boxes, click
• From the drop-down list below
4 Click Properties, to go to the Contact page. You can Edit the selected contact’s information, or
you can add a
Note The Properties button controls whether or not the next page will be the New work item page
or the Contact properties page. The only exception is when the New contact option is selected, in
which case, both
5 Click OK, the selected contact will be associated with the work item.
New contact altogether.
OK and Properties will take the user to the Contact properties page.
Find, select a contact from the list of results.
Find at the bottom of the page.
Altiris Helpdesk Solution User Guide 62
Page 63

Chapter 6: User Interface Additional Work Item Information
View Asset Properties - New Work Item
The View asset properties page displays an Asset form used to view and edit information about the
asset associated to the current work item. The Items list at the bottom of the page shows all work
items currently associated with the same asset.
To View Asset Properties
1 Click Work items> New work item.
2 Click View asset properties.
3
If the information on the page needs updating; or, you want to select a different asset, click Select
to find an asset from the Helpdesk’s database. When you select an asset, the information will
populate this page.
4 Update the form on the page as needed, and then click Save.
Altiris Helpdesk Solution User Guide 63
Page 64
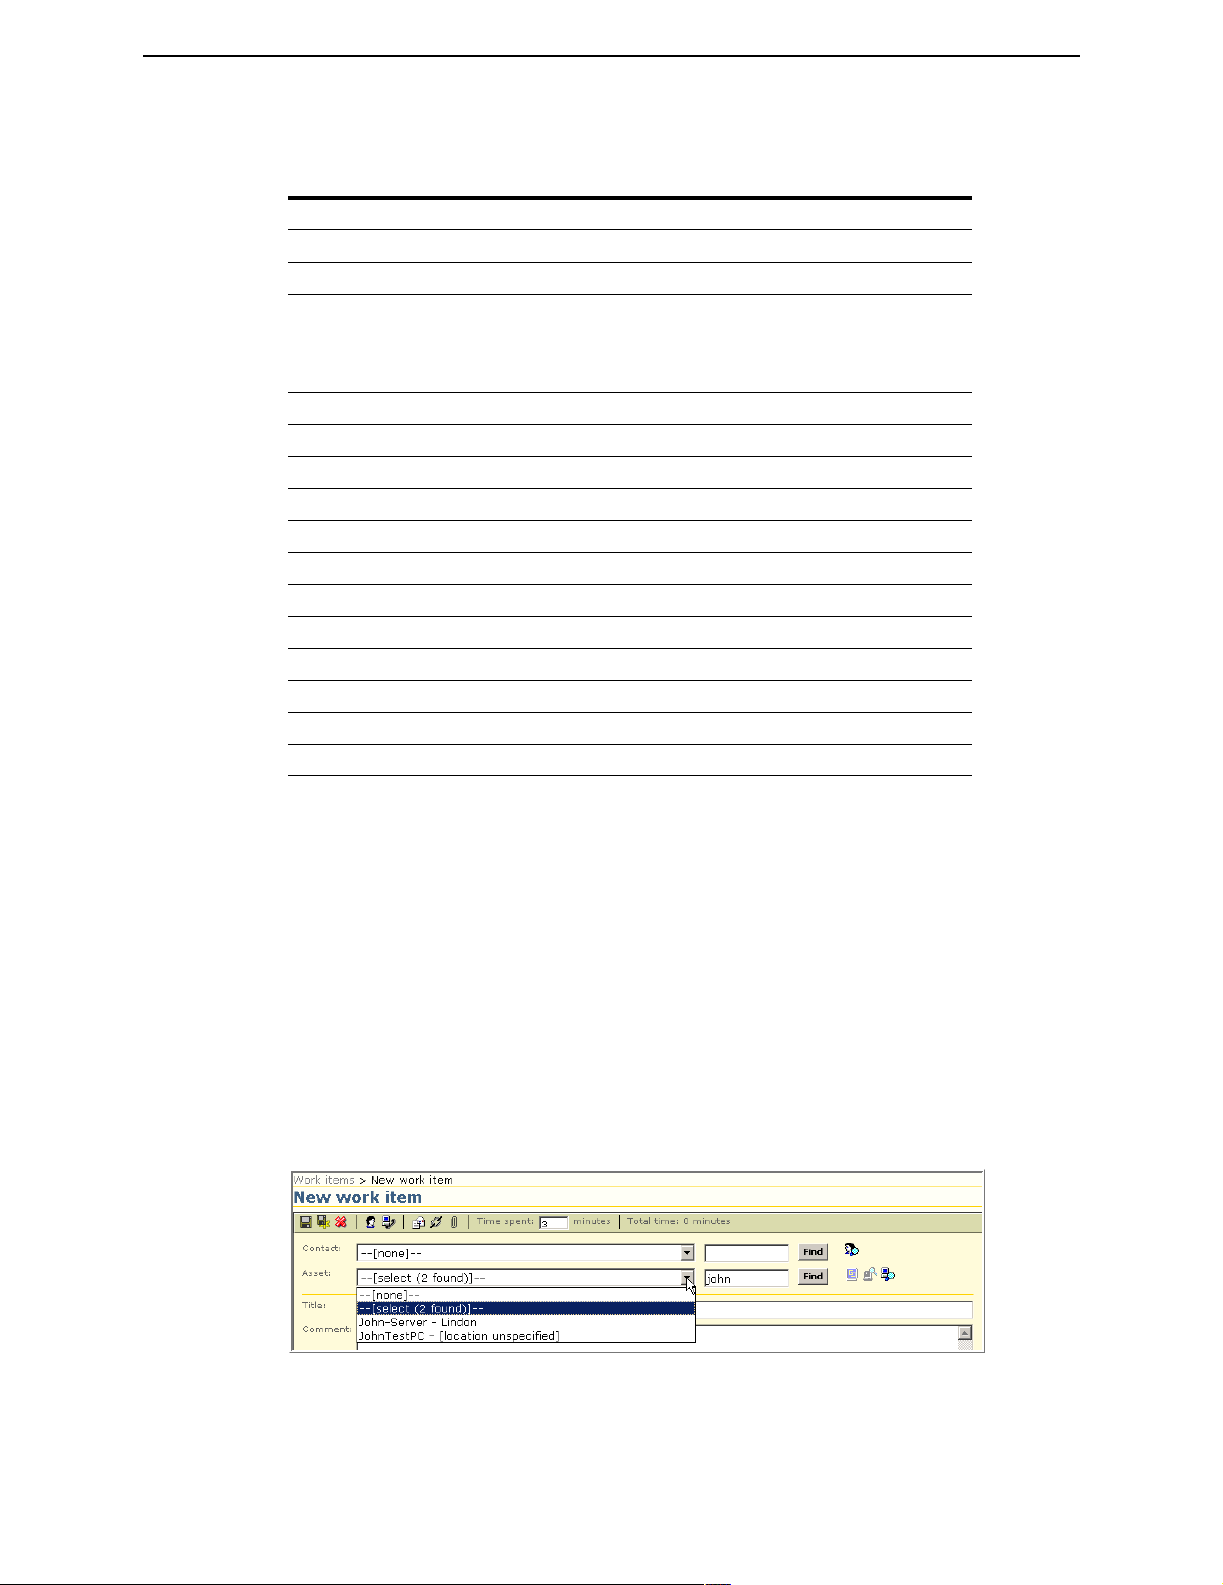
Chapter 6: User Interface Additional Work Item Information
Asset Page Field Description
Page Items
Item Description
Name Type a short description of the asset.
Type Select a category
External ID Type an
An External ID is appropriate for organizations managing
external customers who need to identify the external customer
with a unique ID.
Location Type the physical
Manufacturer Type the
Model Type the Model type of the asset.
Serial # Type the
Asset Tag Type the number of the asset tag.
IP Address Type the
Organization Select
Status Select
Comment Any additional free-form information about the asset.
Items List of
Save Click to
Cancel Click to abort function.
External ID.
Manufacturer of the asset.
Serial # of the asset
IP address of the asset.
Organization from the drop-down list.
Status from the drop-down list.
Work items associated with the asset.
Save the changes.
Type from the drop-down list.
Location of the asset.
Find Asset - New Work Item
The Find feature on the New work item page, allows users to enter a partial name or location (this is
configured by Professional Services) into the
entered, can be any valid expression supported by Transact SQL LIKE, such as %, _, [], [^]. For
example, to search for all contacts named John, you could specify the pattern “John%”. The search
pattern will only be used to find active assets.
As an added convenience, the
with “%” if a % symbol is not detected in the pattern. This will result in a slower search performance
as a table scan is performed. If a search pattern is not specified when
presented with a validation message.
If one or more contacts match the specified pattern, then the contact drop-down list will be
populated. Additionally, a results count option will be added and automatically selected to indicate
the number of matches.
The data presented in the drop-down list will be a combination of the asset’s
location is not specified for the asset, the text message [location unspecified] will be displayed next
to the asset’s name.
Find option will prefix and suffix the pattern entered in the text box,
Find text box, and then click Find. The text pattern
Find is clicked, the user will be
name and location. If a
Altiris Helpdesk Solution User Guide 64
Page 65

Chapter 6: User Interface Additional Work Item Information
The asset selected from the drop-down list, will be the asset that is associated with the work item
when it is saved. If “--[none]--”, or the result count option ( --[select (2 found)]--) is selected, then
no asset will be associated with the item.
When an asset is selected, the resource explorer and remote control image icons, may or may not be
visible and enabled. The remote control icon will be visible if the selected asset is a computer and
when the Altiris Carbon Copy Solution is installed. The resource explore icons will be enabled if the
selected asset was imported from a NS source.
If a contact and asset are specified when an item is saved, then a contact-asset association will
automatically be made. This association will be used for the auto-association feature.
Auto-Associating an Item’s Contact Using the Asset
When an asset is selected, the system will determine if there are any contacts associated with the
asset. This is done only if a contact has not been selected from the
Contact drop-down list will be populated with any contacts associated with the asset, and the first
asset arbitrarily selected. Auto-association is attempted if an asset is selected from the Asset dropdown list from the
the Select an asset page (New asset, Recent asset and Find asset).
Note Auto-association only occurs when creating an item, it does not occur when a work item is
being edited.
To Find an Asset
1 Enter a partial name or location into the Find text box, and then click Find.
2 When the search results appear, click the Asset drop-down arrow and select an asset.
New work item page, or in any operation that results in an asset being selected from
Contact drop-down list. The
Select Asset - New Work Item
To Select an Asset
1 Click Work items> New work item.
2 Click Select an Asset on the toolbar.
3 Click one of the following options:
•
Keep current contact.
• Remove current contact.
• New asset.
Asset associated with current contact.
•
Altiris Helpdesk Solution User Guide 65
Page 66

Chapter 6: User Interface Find Work Items
The drop-down list displays the assets which have been associated with the currently selected
contact.
•
Recent asset.
• Find asset
• Type search criteria in any of the text boxes, click Find at the bottom of the page.
• From the drop-down list below
4 Click Properties, to go to the Asset page. You can Edit the selected asset’s information, or you
can add a
Note The Properties button controls whether or not the next page will be the New work item page
or the Asset properties page. The only exception is when the New asset option is selected, in
which case, both
5 Click OK, the selected asset will be associated with the work item.
New asset altogether.
OK and Properties will take the user to the Asset properties page.
Find, select an asset from the list of results.
Find Work Items
Find Work Items - Simple Tab
The Find work items page lets you find works item by using specific search criteria. Helpdesk
Solution offers a simple and advanced search.
Workers can find work items through searches and queries. If you know the work item number you
can enter the item number in the either the
click Enter or click the green arrow next to the box.
It is possible to work on several work items at once in multiple browsers without the consoles
interfering with one another. The last console that has any activity will "win" with respect to saving
the user's preferences and state (for example: the list of last items worked on). Each time a console
is opened, it will inherit the state of the last console that had any activity.
View item or Edi t it em fields located below Common tasks,
1 Click Work items>Find work items listed below Commands. <OR>
2 Click Find work items listed below Common Tasks.
3 Type the search criteria in one or more of the boxes, then click Find.
Altiris Helpdesk Solution User Guide 66
Page 67

Chapter 6: User Interface Find Work Items
4 The Items list at the bottom of the page shows all work items the found based on the search
criteria you selected. Click
5 The Save query link at the bottom of the page, allows you to save the search criteria of the query
View or Edit next to the work item you want to view or edit.
that produced the results on the page. The Save query link will be disabled while you enter a
search criteria, but will enable when
When you click
Save query, the New query command will be invoked with context. The query
Find is clicked.
expression will be displayed in the Expression text box.
6 Click Reset to clear the search fields and start another search.
Note The Items list in the diagram above is sorted by number(#) in descending order. For details see
“Sort Work Item List” on page 89
Find Work Item Simple Field Description
Page Items
Item Description
Title Type the
Match all words Select the
Comment Type
Match all words Select the
Category Select
Scope Select option from the drop-down list.
Pattern Type string
Assigned Select
External ID Type an
An External ID is appropriate for organizations managing
external customers who need to identify the external customer
with a unique ID.
Priority Select the
Status Select
Type Select
Find Click to begin search for
Reset Click to clear the form.
Cancel Click to abort function.
Title of the work item.
Title match criteria from the drop-down list.
Comment word selection.
Comment match criteria from the drop-down list.
Category from the drop-down list.
Pattern for search.
Assigned worker group from the drop-down list.
External ID.
Priority from the drop-down list.
Status from the drop-down list.
Type from the drop-down list.
work item.
Altiris Helpdesk Solution User Guide 67
Page 68
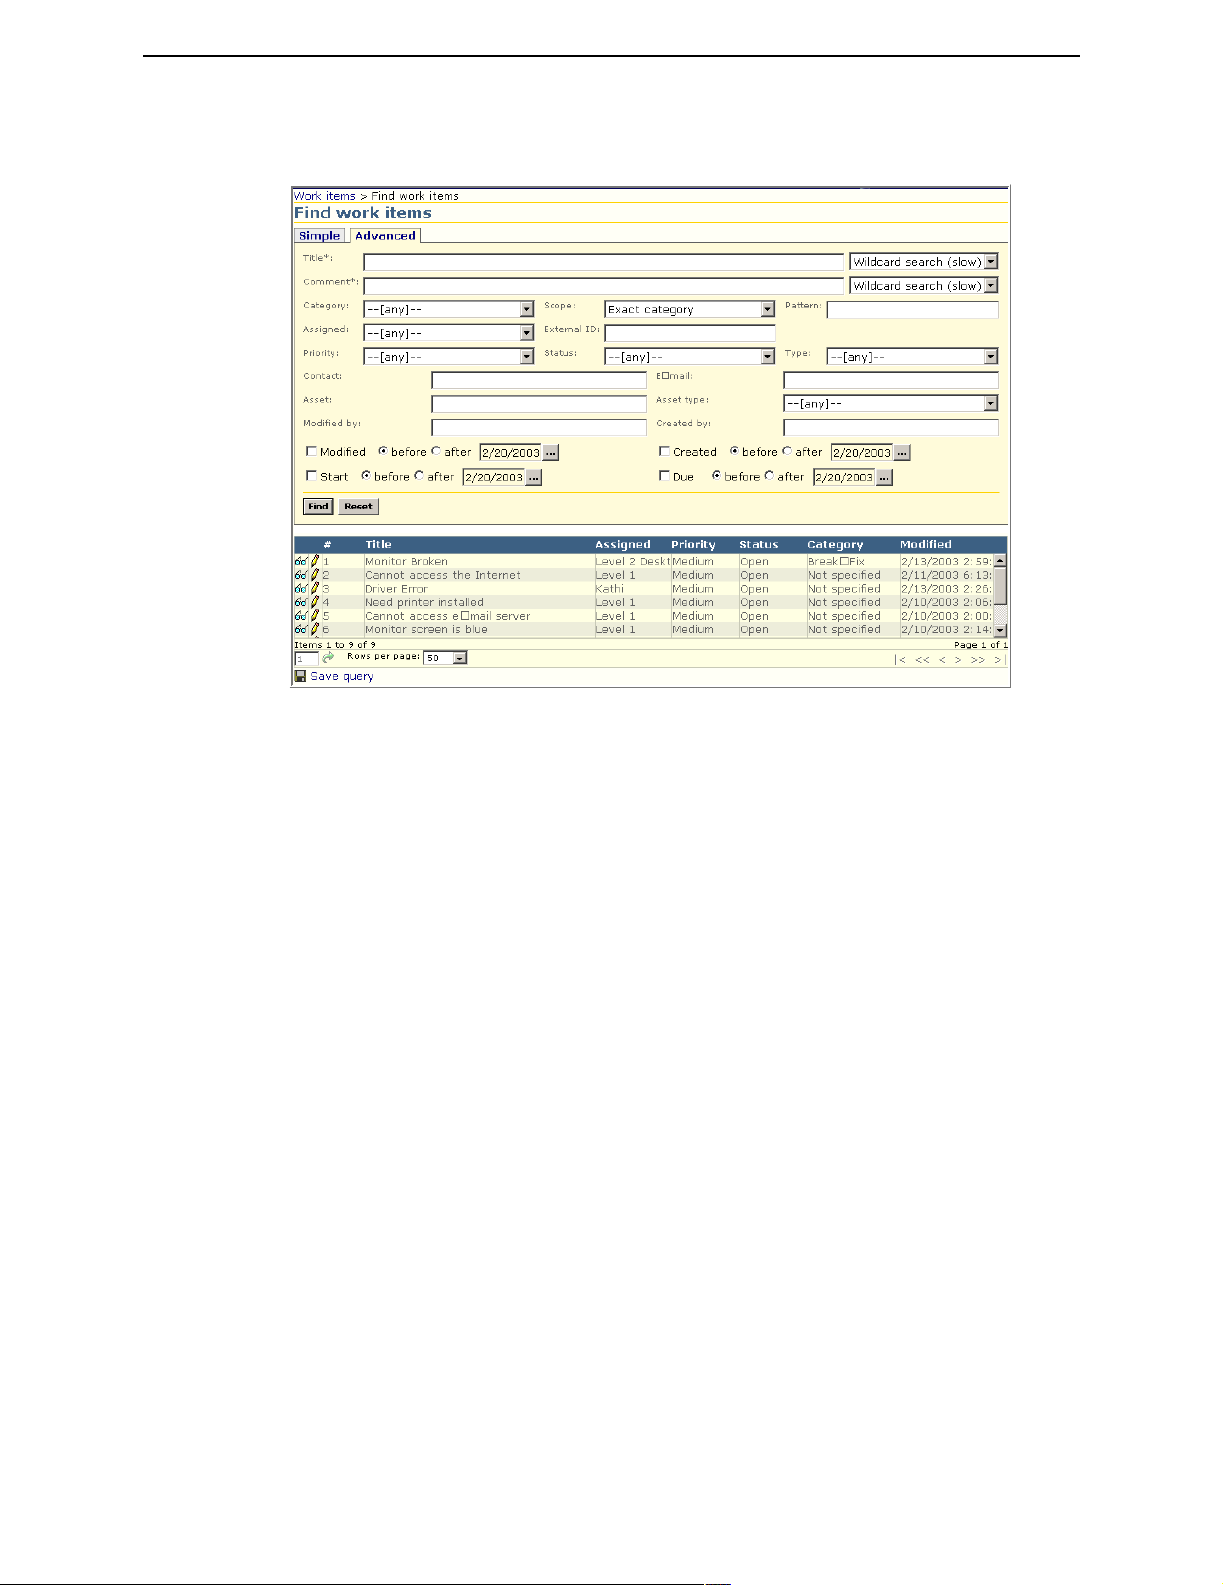
Chapter 6: User Interface Find Work Items
Find Work Items - Advanced Tab
1 Click Work items>Find work items listed below Commands. <OR>
2 Click Find work items listed below Common Tasks.
3 Click the Advanced Tab.
4 Type the search criteria in one or more of the boxes, then click Find.
5
The Items list at the bottom of the page shows all work items the found based on the search
criteria you selected. Click View or Edit next to the work item you want to view or edit.
6 The Save query link at the bottom of the page, allows you to save the search criteria of the query
that produced the results on the page. The
search criteria, but will enable when Find is clicked.
When you click
expression will be displayed in the
7 Click Reset to clear the search fields and start another search.
Note The Items list in the d iagram a bove is sorted by Priority in ascending order. For details see “Sort
Work Item List” on page 89
Save query, the New query command will be invoked with context. The query
Save query link will be disabled while you enter a
Expression text box.
Altiris Helpdesk Solution User Guide 68
Page 69

Chapter 6: User Interface Search in Comment or Title Field
Find Work Item Advanced Field Description
In addition to the Simple search field options, the Advanced search offers the following additional
search fields.
Page Items
Item Description
Contact Name Type the
Contact E-mail Type the
Asset Type a description of the asset.
Asset type Select the
Modified by Type a worker name who modified the asset.
Created by Type a worker name who created the asset
Modified by date
range
Created by date
range
Start by date range Type the
Due by date range Type the
Find Click to begin search.
Reset Click to clear form.
Type the
option.
Type the
option.
option.
option.
Name of the new contact.
E-mail address of the new contact.
Asset type from the drop-down list.
date range to search, then select either the before or after
date range to search, then select either the before or after
date range to search, then select either the before or after
date range to search, then select either the before or after
Search in Comment or Title Field
You can search within the comment field of a work item. Unlike searching in other fields, which
search only the current state of the work item, searching in comments- works against the current state
of the work item as well as historical work item data. This is very beneficial as workers search work
items for helpful solutions to similar problems.
Full-text searching using FREETEXT and CONTAINS (Transact SQL) syntax is supported, but
may require configuration. Full-text searching provides very powerful searching within the
comment field.
If MS SQL 7 or 2000 has not been configured for full-text searching, searches can still be done using
Transact SQL wildcard character searches (see “Wildcard Searches” below). These searches are
more limited than full-text and can be less efficient than full-text searching, especially as your
database grows larger.
Full-text (FREETEXT and CONTAINS) Searches
Note Full-text searching is only supported with MS SQL 7/2000, not MSDE.
During initial configuration, full-text search configuration is attempted. In order to do this, the FullText Search service, MSSearch, must be installed using an advanced options available during the
MS SQL installation. Additionally, this service can be activated post install. If successful, a full-text
index is created on the comment column of the workitem table, and a new catalog,
HD_workitem_comment, is created to store the full-text index.
When full-text searches have been correctly configured, a message is displayed beneath the
comment field that indicates that FREETEXT and CONTAINS syntax may be used. Additionally,
the message contains the date and time that the index in the catalog HD_workitem_comment was
last updated. Comment data modified after this date will not be found using a full-text search until
the catalog has been updated (repopulated). If full-text search has not been correctly configured, a
Altiris Helpdesk Solution User Guide 69
Page 70

Chapter 6: User Interface Using Queries
warning message, with a yellow background is displayed beneath the comment field that indicates
that full-text search is not enabled. When full-text search is not enabled, FREETEXT and
CONTAINS syntax may not be used.
Manual Configuration
If the Full-Text Search service, MSSearch, is not installed, full-text searches cannot be configured
and full-text searches will need to be configured manually. MSDN has a good article on
implementing full-text searches at http://msdn.microsoft.com/library/periodic/period01/
ntp0111.htm. This article includes information on installing the MSSearch service, creating a full-
text index and catalog, populating the full-text catalog, and scheduling catalog updates.
Syntax
When full-text search service is enabled, it recognizes whether the search being performed is a
FREETEXT or CONTAINS search.
IMPORTANT Do not include the FREETEXT or CONTAINS predicate in the search field, this will
be done for you.
FREETEXT is less precise than CONTAINS and matches values on meaning, not the exact word.
The following MSDN article discusses FREETEXT in detail: http://msdn.microsoft.com/library/
psdk/sql/ts_fa-fz_2juc.htm.
CONTAINS is more precise then FREETEXT and recognizes special syntax such as and, or, and
not, FORMSOF, NEAR, etc. The following MSDN article discusses CONTAINS in detail: http://
msdn.microsoft.com/library/psdk/sql/ts_ca-co_2y2h.htm.
If full-text searching is enabled, the user can override FREETEXT or CONTAINS searches by
checking
as discussed in “Wildcard Searches” below.
Wildcard Searches
Wildcard searches are not nearly as powerful as FREETEXT and CONTAIN searches. If full-text
searches have been configured, the user is limited to this type of search. Any valid Transact SQL
wildcard character can be used (e.g. %, _, [] [^]). The following MSDN article discusses wildcard
searches: http://msdn.microsoft.com/library/default.asp?URL=/library/psdk/sql/
ts_tsqlcon_6lyk.htm
IMPORTANT Do not include the LIKE predicate in the search field, this will be done for you.
Using Queries
The Queries option lets workers access work item data by running a query, creating a new query or
deleting an existing query they previously created.
Queries provide workers a flexible way to access work item data. A number of useful queries are
included as shared queries, or queries common to all workers.
The query system includes a parameter replacement system so that input can be solicited whenever
the query is run. Note that the query system only works against the most recent version of all work
items; however, any valid Tansact-SQL WHERE clause (minus the word “WHERE”) can be entered
as the expression to be evaluated.
See Also
List Query (page 71)
Disable full-text searching in the Find feature. This lets the user perform wildcard searches
New Query (page 71)
Modify New Query Search (page 72)
Query Data Types (page 73)
Query Parameter Replacement (page 76)
Altiris Helpdesk Solution User Guide 70
Page 71
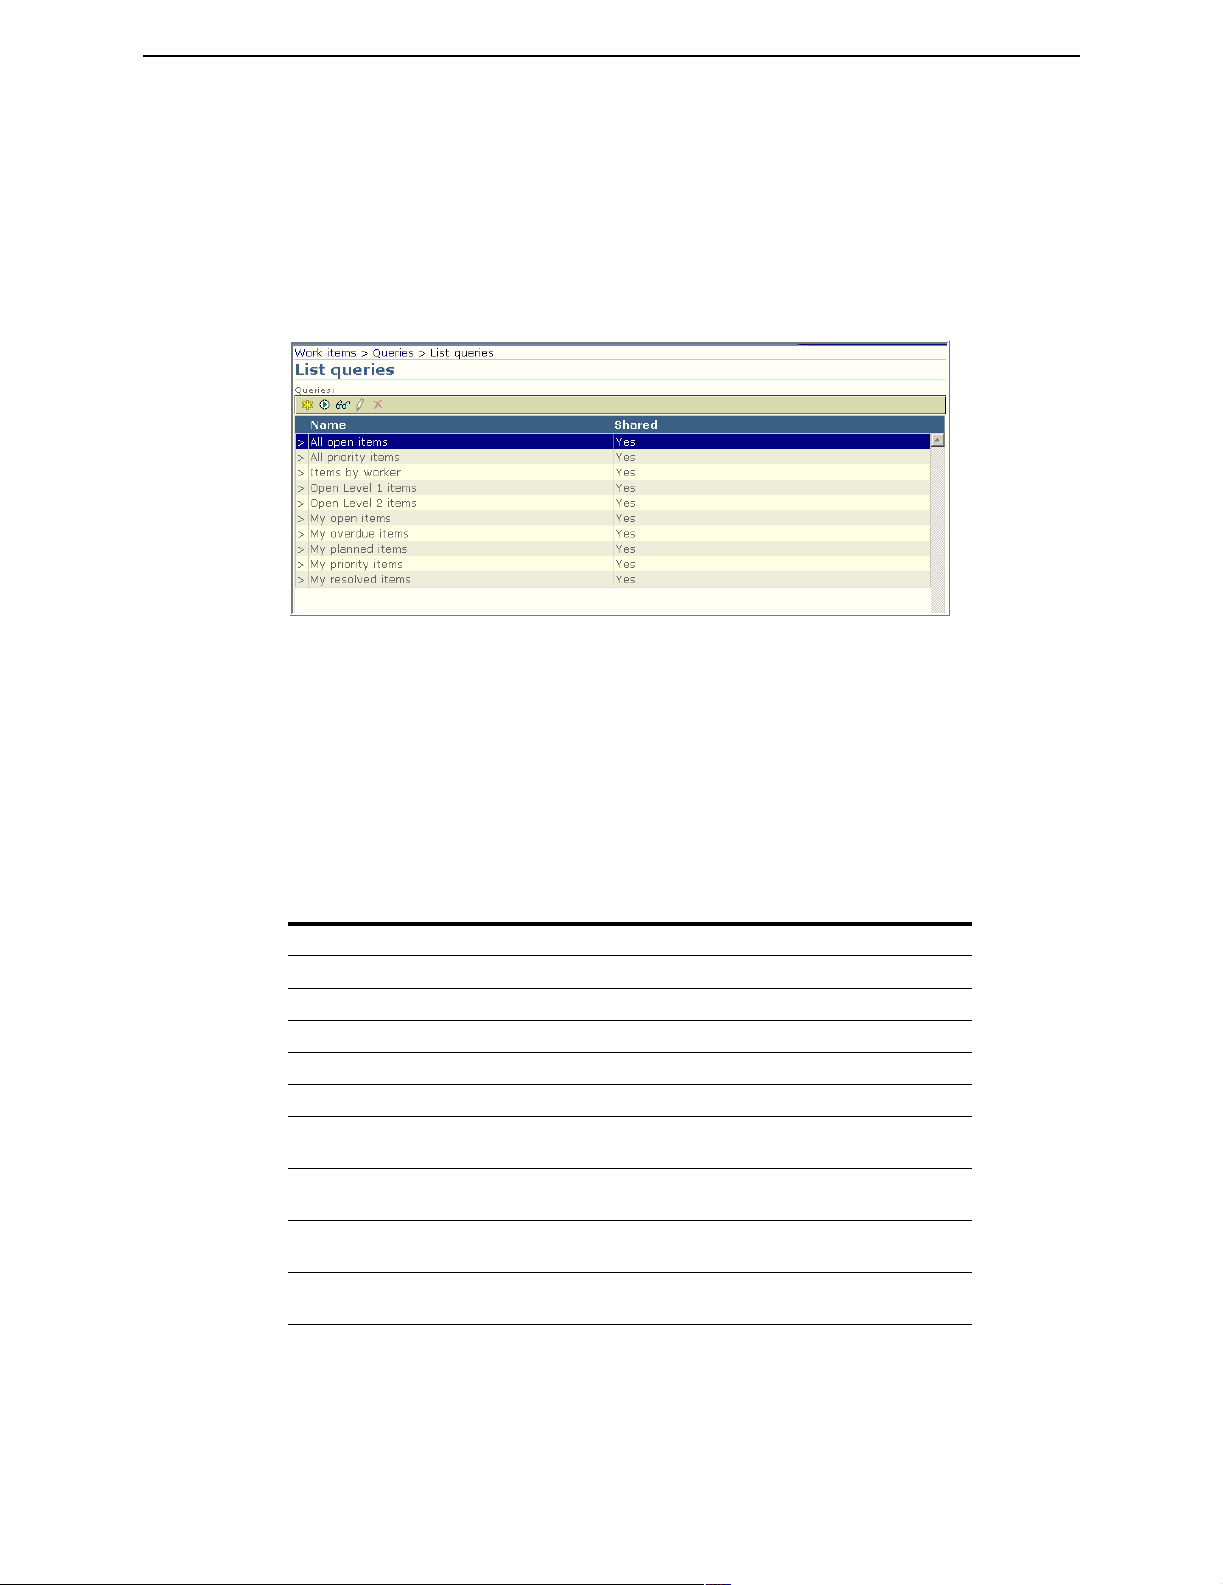
Chapter 6: User Interface Using Queries
Delete Queries (page 78)
Last Query Results (page 79)
List Query
The List query page displays a list of pre-defined queries to help you manage your work items. You
can select a query to modify or create a new query based on a query already listed.
To List Queries
1 Click Work items > Queries > List queries.
2 Click Run or View next to the query you want to run or view.
3 Click New to add a new query
4 Click Edit to modify a query you created.
5 Click Delete to remove a query you created from the Helpdesk system.
List Query Page Field Description
Page Items
Item Description
All open items List of all open items.
All priority items List of all priority items.
Items by worker List of items assigned to a specific worker.
Open Level 1 items List of all Open Level 1 items.
Open Level 2 items List of all Open Level 2 items.
My open items List of open items specific to the worker requesting the query
search.
My overdue items List of overdue items specific to the worker requesting the query
search.
My planned items List of planned items specific to the worker requesting the query
search.
My priority items List of priority items specific to the worker requesting the query
search.
New Query
The New query page allows you to select a pre-defined query from the drop-down list and edit the
query string to produce the results you want.
Altiris Helpdesk Solution User Guide 71
Page 72
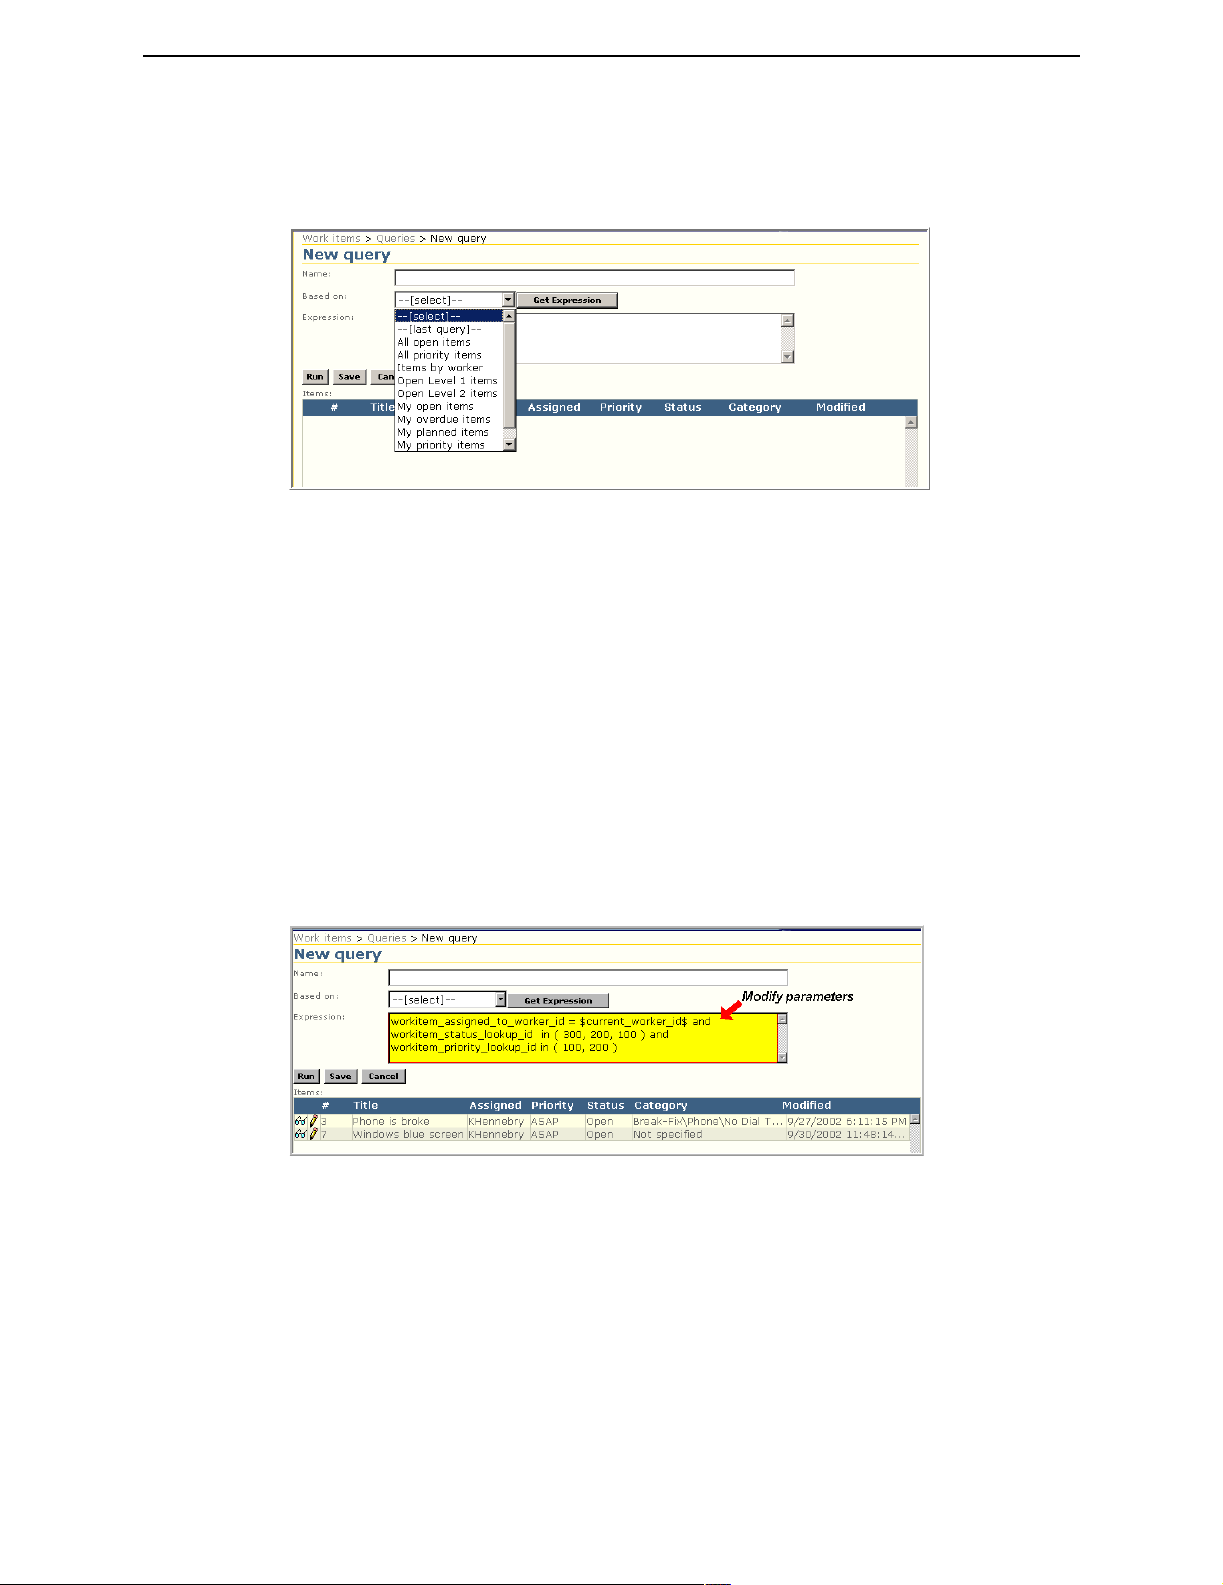
Chapter 6: User Interface Using Queries
The query editor will now allow the worker to build an expression based upon the Last query. The
option “--[last query]--” is one of the options in the
worker to “get” the query expression from the last query performed. If a last query has not been
established for the current session, then an appropriate message will be displayed.
To Create a New Query
1 Click Work items > Queries > New query.
2 Select a query option from the Based on drop-down list, then click Get Expression. The Name
field will populate the associated name of the query.
3 Click Run. The results will display in the Items list at the bottom of the page.
4 If you would like to save this query, you must give the query a name in the Name box.
5 Click Save.
6 Workers may view the Last query results run by selecting the option Work items>Last query results
listed below Commands or Last query results listed below Common tasks.
If the worker saved the query to a new name, the query will appear in the
list as well as in the List query page once the browser is refreshed.
Based on drop-down list, which allows the
Based on: drop-down
Modify New Query Search
Helpdesk Solution has a parameter replacement system so that input can be solicited whenever the
query is run.
Note that the query system only works against the most recent version of all work items - workers
cannot query against work item history directly unless they type in valid Transact-SQL sub-select
statements that query against the workitem_detail_view view.
To Modify a Query Search
1 Click Work items > Queries > New query.
2 Usually, it is easiest to modify the codes of an existing query. Select an existing query from the
Based on drop-down list.
3 Click Get Expression.
Altiris Helpdesk Solution User Guide 72
Page 73

Chapter 6: User Interface Using Queries
4 Modify the parameters of the query.
5 Click Run.
6 If you would like to save this query, you must give the query a name in the Name box.
7 Click Save.
8 Once the browser page is refreshed, the new query will appear in the Based on drop-down list as
well as in the List query page.
New Query Page Field Description.
Page Items
Item Description
Name Type a
Based on: Select a default query from the drop-down list.
Get Expression Click the
Expression Modify the text of the query parameters.
Run Click to perform the search.
Save Click to save the
Cancel Click to abort function.
Items: Displays the query search results.
Name for the new query search.
Get Expression to display the query parameters in the
Expression box.
New query search criteria.
Query Data Types
When creating queries the worker must be aware of the data types of the fields that are used in the
query so that single quotes can be added or omitted appropriately. There are three basic data types
for these fields: unit, string, and datetime. If the data type of the field is string or datetime the
argument must be quoted.
String Examples
workitem_external_reference like ‘SMS%’ (wild card character for partial string matching)
assigned_to_worker_name = 'mdavis'
Datetime Examples
workitem_modified_on > '12/11/00 10:10:00 AM'
workitem_modified_on > '12/11/00 10:05:00' (interpreted as 24 hour clock)
workitem_modified_on > '12/08/00 15:00:00'(interpreted as 24 hour clock)
workitem_modified_on > '12/11/00' (interpreted as midnight between 10th and 11th)
workitem_modified_on > 'Dec 09, 2000 10:00:00 AM'
workitem_modified_on > '20001209'
Uint Examples
workitem_number > 150
workitem_minutes_spent > 3
workitem_status_lookup_id = 100
Altiris Helpdesk Solution User Guide 73
Page 74

Chapter 6: User Interface Using Queries
The table below lists the field names that can be queried against, their type, and additional
information where appropriate.
Field Name Type Acceptable values (and
comments)
workitem_link_parent_number uint
workitem_number uint
workitem_is_last string 1, 0
workitem_has_attachments string 1, 0
workitem_version uint
workitem_external_reference string
workitem_priority_lookup_id uint
workitem_status_lookup_id uint
workitem_category_lookup_id uint
workitem_type_lookup_id uint
workitem_link_type_lookup_id uint
workitem_assigned_to_worker_id uint
workitem_created_on datetime
workitem_created_by_worker_id uint
workitem_start_on datetime (only date part is in db; e.g. 11/10/
00)
workitem_due_on datetime (only date part is in db; e.g. 11/10/
00)
workitem_modified_on datetime
workitem_modified_by_worker_id uint
workitem_minutes_spent uint
workitem_action string Create, Open, Assign, Attach,
Link, Edit, Associate contact,
Associate object, Resolve (values
that are provided, however this
field is customizable)
workitem_title string
workitem_managed_object_id uint
workitem_contact_id uint
workitem_tag_collection_id uint
workitem_is_scheduled string 1, 0
assigned_to_worker_name string
assigned_to_worker_status string a, i, v (a=active, i=inactive,
v=virtual; inactive workers can
be inactive virtual workgroups or
inactive real workers)
assigned_to_worker_email string
assigned_to_worker_phone string
assigned_to_worker_cell_phone string
assigned_to_worker_pager string
Altiris Helpdesk Solution User Guide 74
Page 75

Chapter 6: User Interface Using Queries
Field Name Type Acceptable values (and
comments)
assigned_to_worker_location string
created_by_worker_name string
created_by_worker_status string a, i, v (a=active, i=inactive,
v=virtual; inactive workers can
be inactive virtual workgroups or
inactive real workers)
created_by_worker_email string
created_by_worker_phone string
created_by_worker_cell_phone string
created_by_worker_pager string
created_by_worker_location string
modified_by_worker_name string
modified_by_worker_status string a, i, v (a=active, i=inactive,
v=virtual; inactive workers can
be inactive virtual workgroups or
inactive real workers)
modified_by_worker_email string
modified_by_worker_phone string
modified_by_worker_cell_phone string
modified_by_worker_pager string
modified_by_worker_location string
workitem_priority_lookup_value string
workitem_priority_lookup_ordinal uint
workitem_status_lookup_value string
workitem_status_lookup_ordinal uint
workitem_category_lookup_value string
workitem_category_lookup_ordinal uint
workitem_type_lookup_value string
workitem_type_lookup_ordinal uint
workitem_link_type_lookup_value string
workitem_link_type_lookup_ordinal uint
contact_name string
contact_email string
contact_phone string
contact_organization_name string
managed_object_name string
managed_object_type_lookup_id uint
managed_object_type_lookup_value string
managed_object_type_lookup_ordinal uint
workitem_comment string
Altiris Helpdesk Solution User Guide 75
Page 76

Chapter 6: User Interface Using Queries
Query Parameter Replacement
There are a number of special parameters that the query system recognizes. When a query is run the
parameters are resolved and the results are returned. With the exception of $current_worker_id$, all
queries containing parameters will present an intermediate page where the worker can provide input.
$current_worker_id$
The parameter $current_worker_id$ will automatically be resolved to the ID of the credential
worker. The resolved parameter will not be quoted.
Example [My open items]:
workitem_assigned_to_worker_id = $current_worker_id$ and workitem_status_lookup_id = 300
example - work items that the current worker created:
workitem_created_by_worker_id = $current_worker_id$
$prompt_number(“<prompt>”)$
The parameter $prompt_number(“<Prompt>”)$ will produce an edit control labeled with <prompt>
on an intermediate page where the worker can provide numeric data. The resolved parameter will
not be quoted.
Example $prompt_number(“<prompt>”)$:
workitem_number >= $prompt_number("Enter work item number lower boundary")$
$prompt_string(“<prompt>”)$
The parameter $prompt_string(“<Prompt>”)$ will produce an edit control labeled with <prompt>
on an intermediate page where the worker can provide string data. The resolved parameter will be
quoted.
Example $prompt_string(“<prompt>”)$:
assigned_to_worker_name >= $prompt_string("Enter a worker name")$
$prompt_lookup(“<prompt>”, “<lookup query name>”)$
The parameter $prompt_lookup(“<prompt>”, “<lookup query name>”)$ will produce a drop-down
on an intermediate page where the worker can select a value from the drop-down. The resolved
parameter will be the ID of the selected value and will not be quoted. The second parameter must be
the name of an existing lookup query. Lookups are customizable. As long as a query is created for
the lookup, and the lookup table follows the format of existing lookup tables the lookup prompt
parameter will produce a drop-down.
Example $prompt_lookup(“<prompt>”, “<lookup query name>”)$:
Altiris Helpdesk Solution User Guide 76
Page 77

Chapter 6: User Interface Using Queries
workitem_status_lookup_id=$prompt_lookup("Select work item status:", "StatusList")$
The following lookup queries are available:
• PriorityList
• StatusList
• TypeList
$prompt_datetime(“<prompt>”)$
The parameter $prompt_datetime(“<Prompt>”)$ will produce a datetime control labeled with
<prompt> on an intermediate page where the worker can provide datetime data. The control will be
initialized with the current date and time. The resolved parameter will be quoted.
Example: $prompt_datetime(“<prompt>”)$:
workitem_modified_on > $prompt_datetime("Work items modified after:")$
$prompt_date(“<prompt>”)$
The parameter $prompt_date(“<Prompt>”)$ will produce a datetime control labeled with <prompt>
on an intermediate page where the worker can provide date data. The control will be initialized with
the current date. This parameter is particularly useful when querying against workitem_start_on and
workitem_due_on fields because only the date portion of those fields are stored in the db. The
resolved parameter will be quoted.
Example $prompt_date(“<prompt>”)$:
Altiris Helpdesk Solution User Guide 77
Page 78

Chapter 6: User Interface Using Queries
workitem_start_on >= $prompt_date("Work items that will start on or after:")$
Delete Queries
The Delete query page allows workers to delete queries they have added or modified to the system.
They cannot delete the default (shared) queries that come with Helpdesk Solution.
1 Click Work items>Queries>Delete queries.
2 Select the check box next to the query Name you want to delete.
3 Click Next to continue.
4 The queries you selected will appear.
A prompt will display the following message:
Are you sure you want to delete the following items?
5 Click Back to change the selected queries to delete.
6 Click Finish to delete selected queries.
Altiris Helpdesk Solution User Guide 78
Page 79

Chapter 6: User Interface Using Queries
Last Query Results
This option will display the results from the last query run by the worker currently logged into the
Helpdesk Worker console.
1 Click the Work items>Last query results listed below Commands. <OR>
2 Click Last query results listed below Common tasks.
3 Click Refresh to re-run the query, the Items list will update the results.
4 The Save query link at the bottom of the page, allows you to save the last query. The Save query
link will be disabled unless a Last query has been established in the current session.
When you click
expression will be displayed in the Expression text box.
5 Click View or Edit next to the work item to view or edit the record.
Save query, the New query command will be invoked with context. The last query
Altiris Helpdesk Solution User Guide 79
Page 80
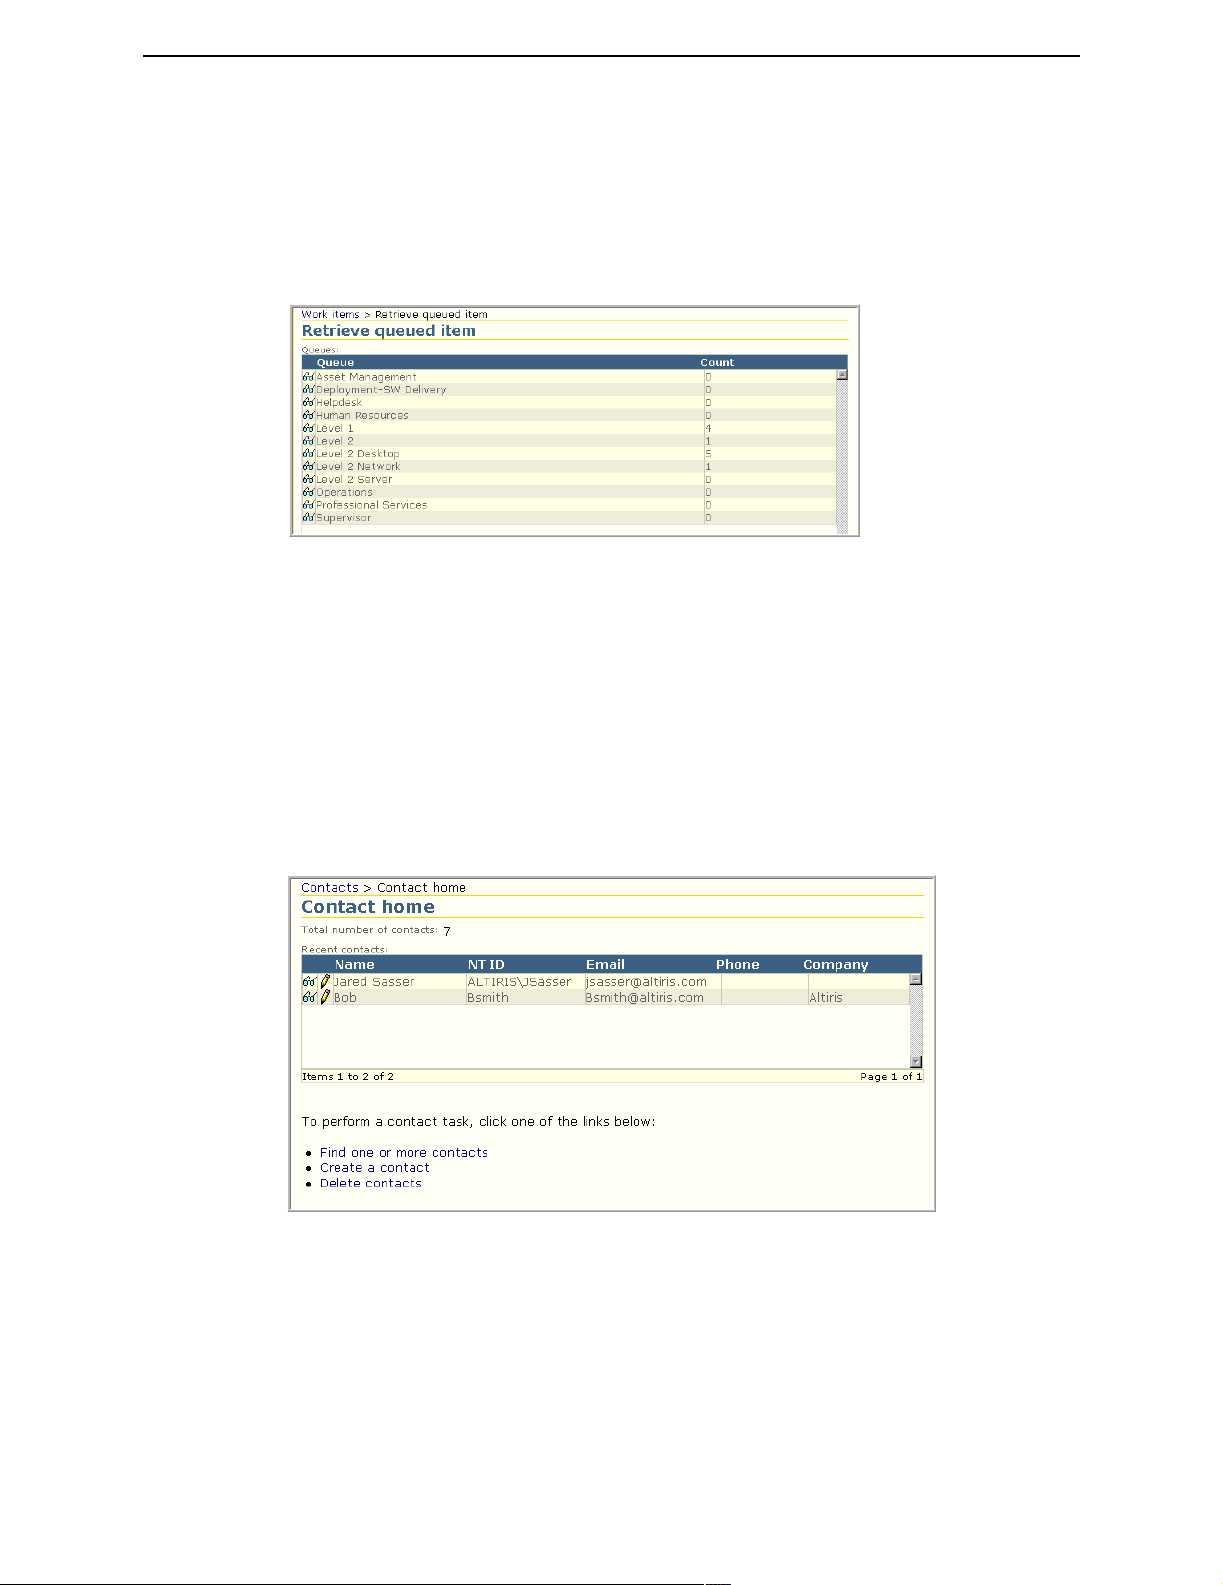
Chapter 6: User Interface Contacts
Retrieve Queued Item
The Retrieve function allows workers to retrieve the next available work item in a specified queue.
Workers retrieve from their assigned queue or are prompted to select a queue as shown below. Work
items in the queue display by order of their create date and time, displaying oldest to most recent.
Administrators determine which queue a worker can retrieve from through the
console
1 Click Work items>Retrieve queued item listed below Commands <OR>
2 Click Retrieve queued item listed below Common Tasks.
3 Click View next to the queue item name to display the next available work item.
. For more details see “List Workers” on page 135.
Helpdesk Admin
Contacts
Contacts Home
The Contacts home page displays a list of the contact records last accessed by the worker. Workers
can also link to the
1 Click Contacts > Contacts home.
2 Select one of the following options:
• Find one or more contacts
• Create a contact
• Delete contacts
Note A list of most Recent contacts will display on the Contacts home page.
Find contacts, New contacts and Delete contacts pages.
Altiris Helpdesk Solution User Guide 80
Page 81

Chapter 6: User Interface Contacts
View Contacts
To View a Contact
1 Click Edit to modify the contact information.
2 Click View or Edit next to the item from the Assets or Items list, if any, to view or edit assets or
items information.
Find Contacts
The Find contacts page lets you find an existing contact already entered into the Helpdesk database.
To Find a Contact
1 Click Contacts > Find contacts.
1
Type the search criteria in the form on the page.
2 Click Find.
The results from the
Find are displayed in the Contacts list at the bottom of the page.
Altiris Helpdesk Solution User Guide 81
Page 82
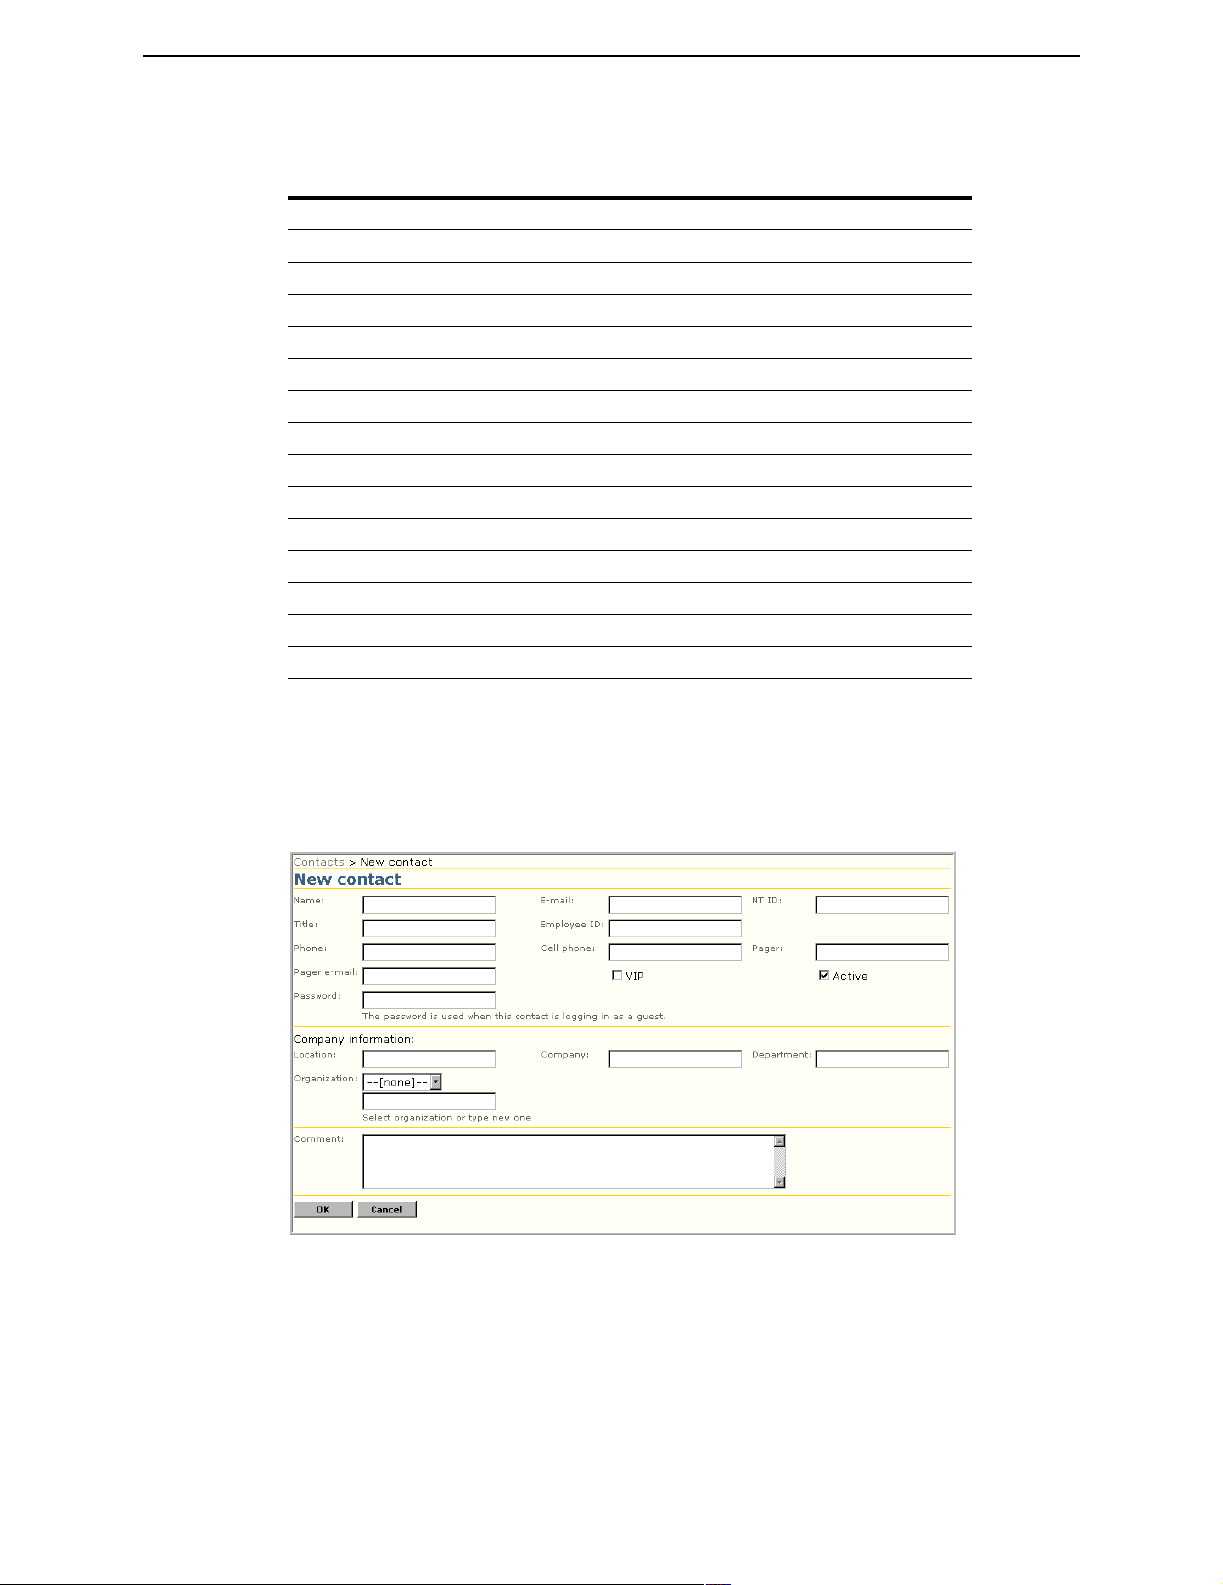
Chapter 6: User Interface Contacts
Find Contacts Page Field Description
Page Items
Item Description
Name Type the
NT ID Type the
E-mail Type the
Phone Type the
Company Type the
Department Type the
Organization Type the
Title Type the job
Employee ID. Type the
Status Select the check box to indicate
VIP Select the check box to indicate
Find Click
New Click to add
Delete Click to
Name of the new contact.
NT ID of the new contact.
E-mail address of the new contact.
Phone Number of the new contact.
Company name of the new contact.
Department name of the new contact.
Organization the new contact is associated with.
Title of the new contact.
Employee ID of the new contact.
Active or Inactive.
VIP status.
Find to perform search.
New contact information.
Find a contact to delete from the database.
New Contact
Contacts are the users who request help from Helpdesk workers. Although contacts can be added to
the system from this page and when work items are created, it is more efficient to import contact data
from Notification Server sources. Helpdesk workers are also contacts.
To Add a Contact
1 Click Contacts>New contact.
Type the contact information in the form on the page.
2
3 Click OK to save.
Altiris Helpdesk Solution User Guide 82
Page 83

Chapter 6: User Interface Contacts
New Contact Page Field Description
Page Items
Item Description
Name Type the
NT ID Type the
E-mail Type the
Pager e-mail Type the
Phone Type the
Cell Phone Type the
Pager Type the
Location Type the
Company Type the
Department Type the
Organization Type the
Title Type the job
Employee ID. Type the
VIP Select the check box to indicate
Active Select the check box to indicate
Password This password will be used to authenticate contacts trying to
access Helpdesk via the User console (or any entry point with
the credential workerMode="user"). This is not the contact's NT
password. This password is stored in clear text in the database.
Other workers can view and edit these passwords
Comments This is a general purpose property of a contact, but can be used
to specify a question/answer pair known only by the contact in
the event that they have forgotten their password.
OK Click to save changes.
Cancel Click to abort function
Name of the new contact.
NT ID of the new contact.
E-mail address of the new contact.
Pager e-mail address of the new contact.
Phone Number of the new contact.
Cell Phone number of the new contact.
Pager number of the new contact.
Location where the new contact resides.
Company name of the new contact.
Department name of the new contact.
Organization the new contact is associated with.
Title of the new contact.
Employee ID of the new contact.
VIP status.
Active status.
Altiris Helpdesk Solution User Guide 83
Page 84
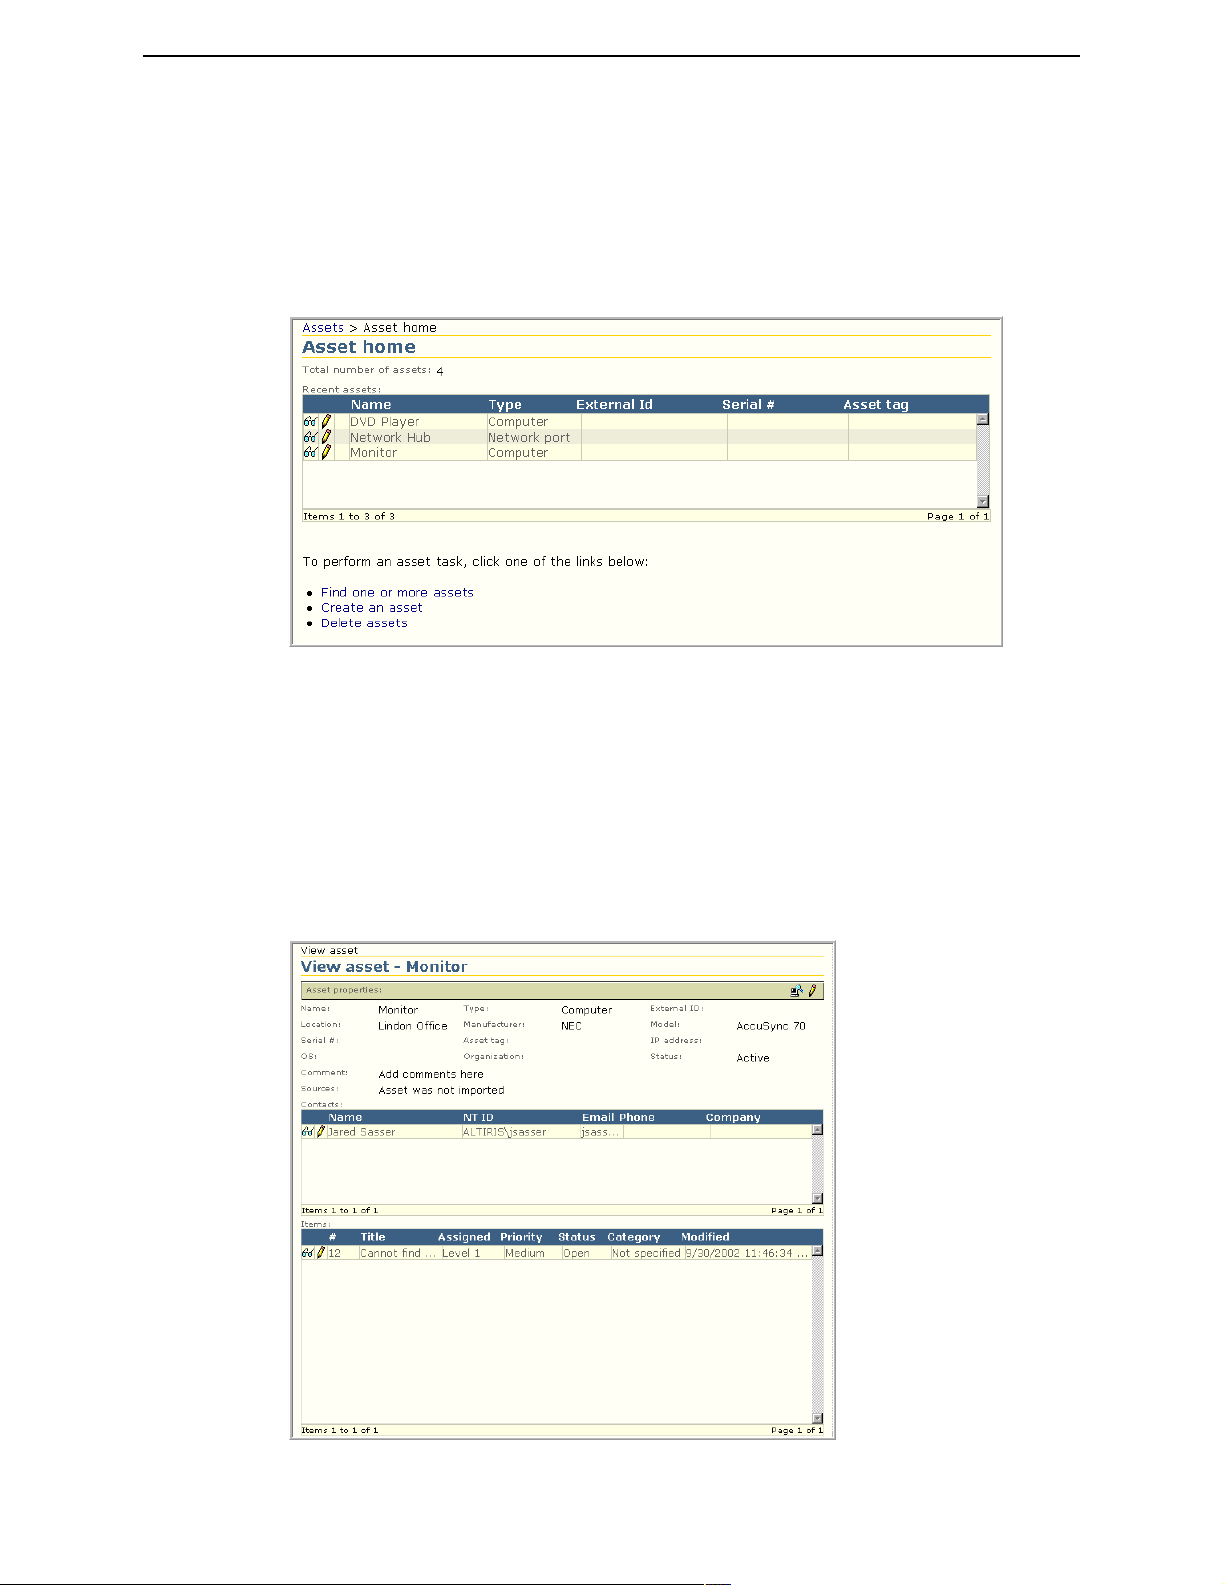
Chapter 6: User Interface Assets
Assets
Assets Home
The Assets home page displays a list of the assets recently viewed or edited by the current worker.
Workers can also link to the Find assets, New assets and Delete assets pages.
To Use the Assets Home Page
1 Click Assets>Assets home.
2 Select one of the following options:
• Find one or more assets
• Create a asset
• Delete assets
Note A list of most Recent assets will display on the Assets home page.
View Assets
Altiris Helpdesk Solution User Guide 84
Page 85
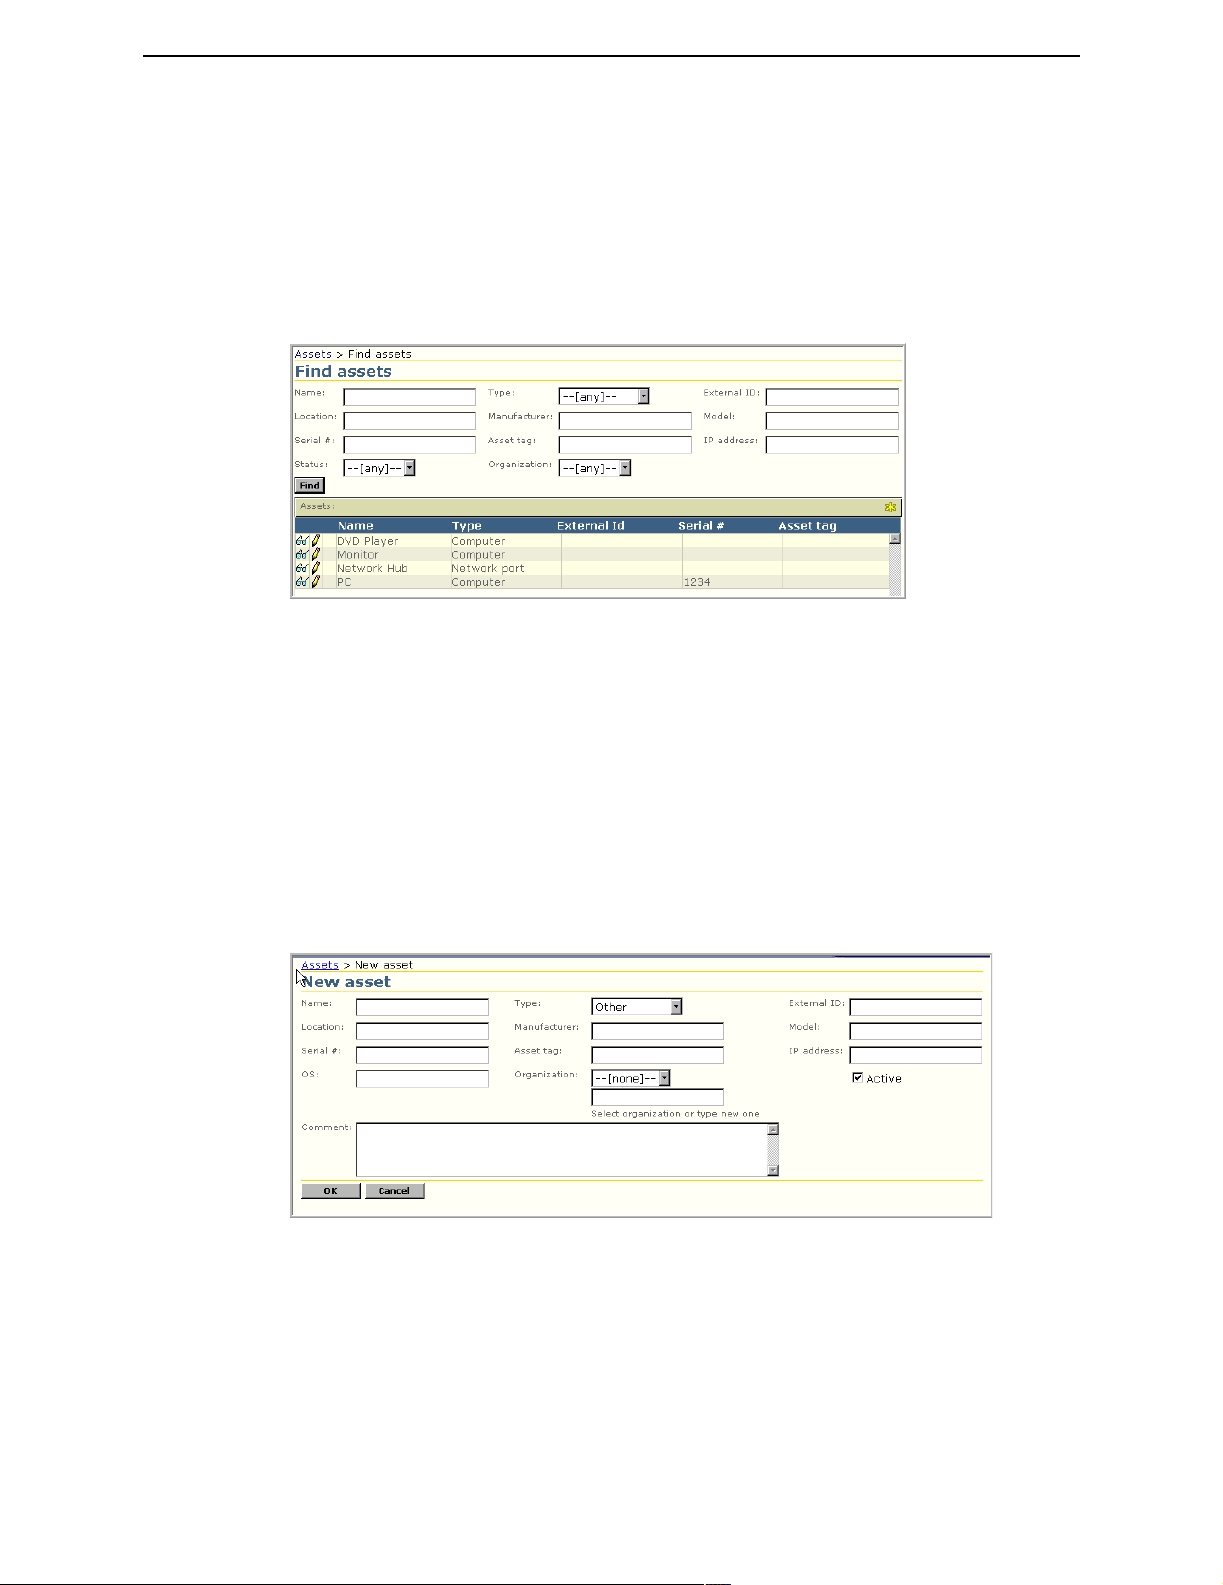
Chapter 6: User Interface Assets
To View Assets
1 Click Edit to modify the asset information.
2 Click View or Edit next to the item from the Contacts or Items list, if any, to view or edit contacts
or items information.
Find Assets
The Find Assets page lets you find assets within the Helpdesk database system.
To Find an Asset
1 Click Assets > Find assets.
Type the search criteria in the form on the page.
1
2 Click Find.
Note The results from the Find are displayed in the Assets list at the bottom of the page.
New Asset
This feature allows workers to add New assets to the Helpdesk systems database. Assets are any type
of item you want to track within an organization, such as: PCs, monitors, printers, software products
and more.
To Add a New Asset
1 Click Assets > New asset.
Type the asset information in the form on the page.
2
3 Click OK to save.
Altiris Helpdesk Solution User Guide 85
Page 86

Chapter 6: User Interface Assets
New Asset Page Field Description
Page Items
Item Description
Name Type a short description of the asset.
Type Select a
External ID Type an
An External ID is appropriate for organizations managing
external customers who need to identify the external customer
with a unique ID.
Location Type the physical
Manufacturer Type the
Model Type the Model type of the asset.
Serial # Type the
Asset tag Type the number of the asset tag.
IP address Type the
OS Type the operating system the asset is currently using.
Organization Select
in the box.
Comment Enter a text comment description of the new asset.
Status Check the box to indicate
OK Click to save changes.
Cancel Click to abort function
Category from the drop-down list.
External ID.
Location of the asset.
Manufacturer of the asset.
Serial # of the asset.
IP address of the asset.
Organization from the drop-down list or enter a new one
Active or Inactive.
Altiris Helpdesk Solution User Guide 86
Page 87
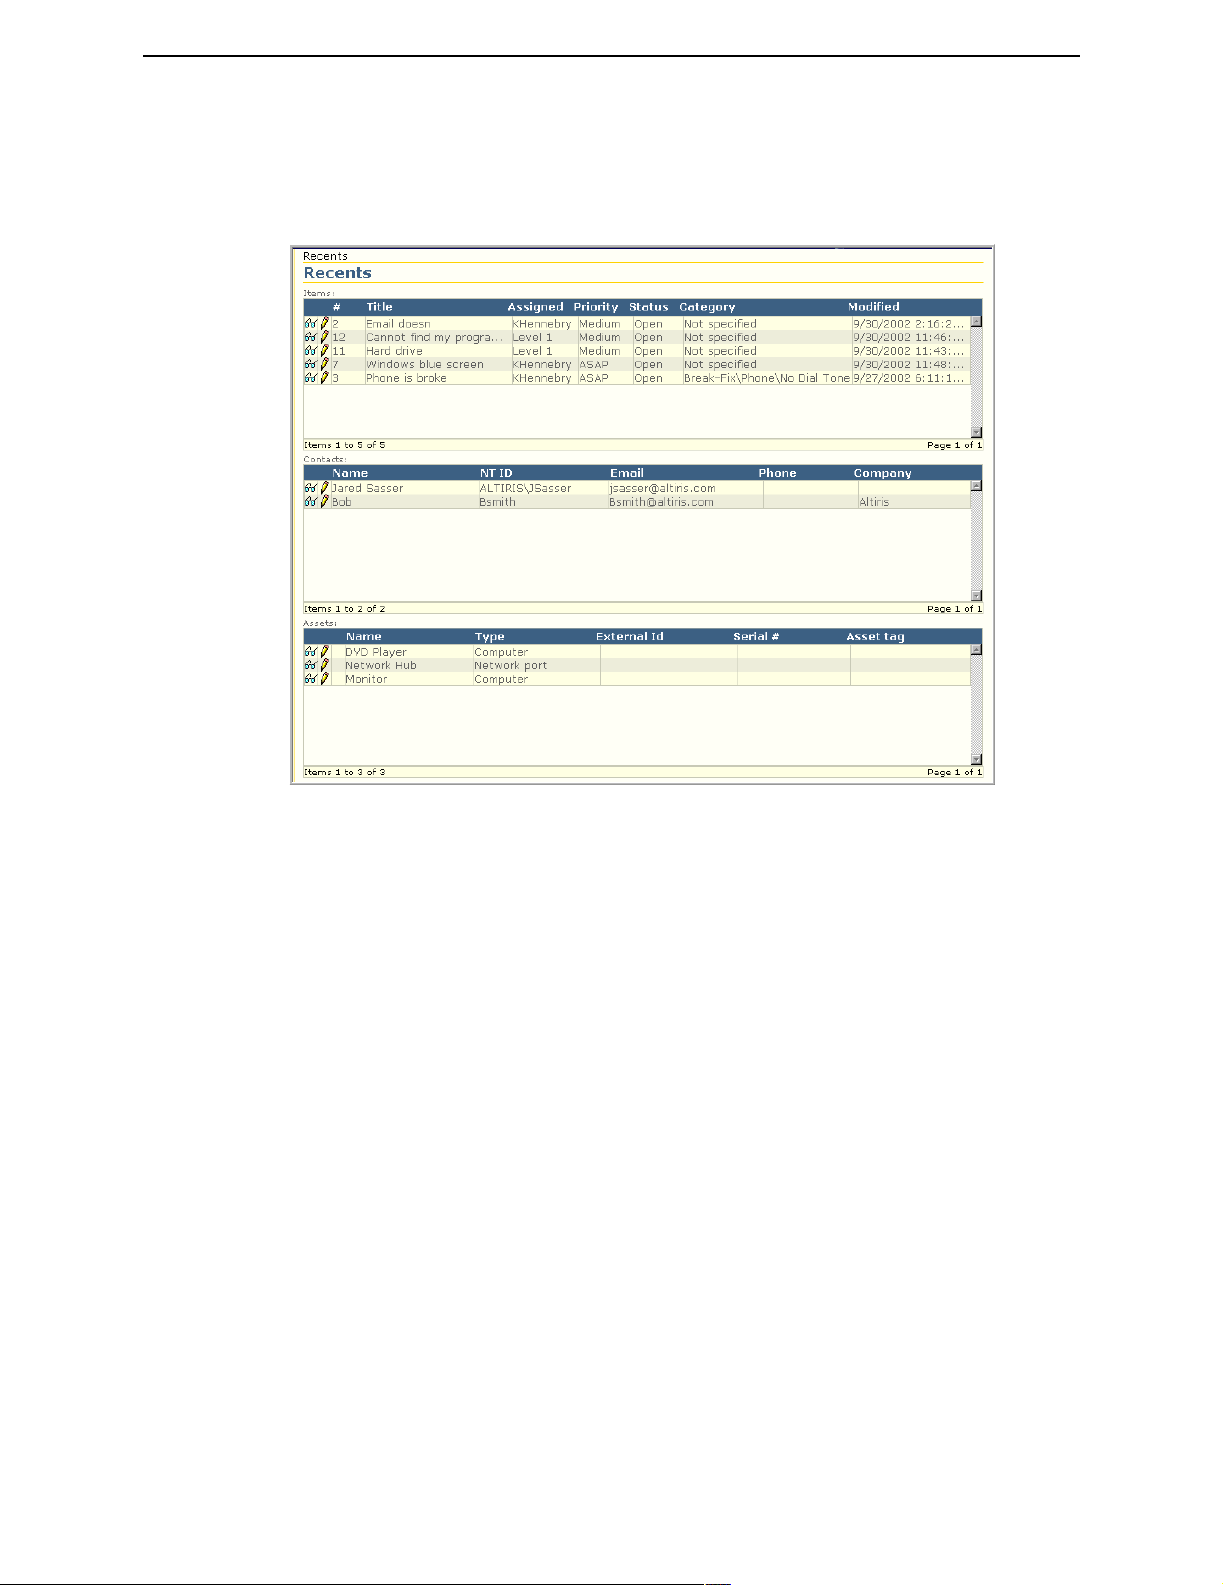
Chapter 6: User Interface Recents
Recents
The Recents page allows workers to access the most recent entries of Work items, Contacts and
Assets.
To Use the Recents Page
1 Click Recents on the left-hand menu, the above page appears <OR>.
2 Click Recents, then select an item from the pop-out menu.
3 Click View or Edit next to the item you want to view or edit.
Altiris Helpdesk Solution User Guide 87
Page 88
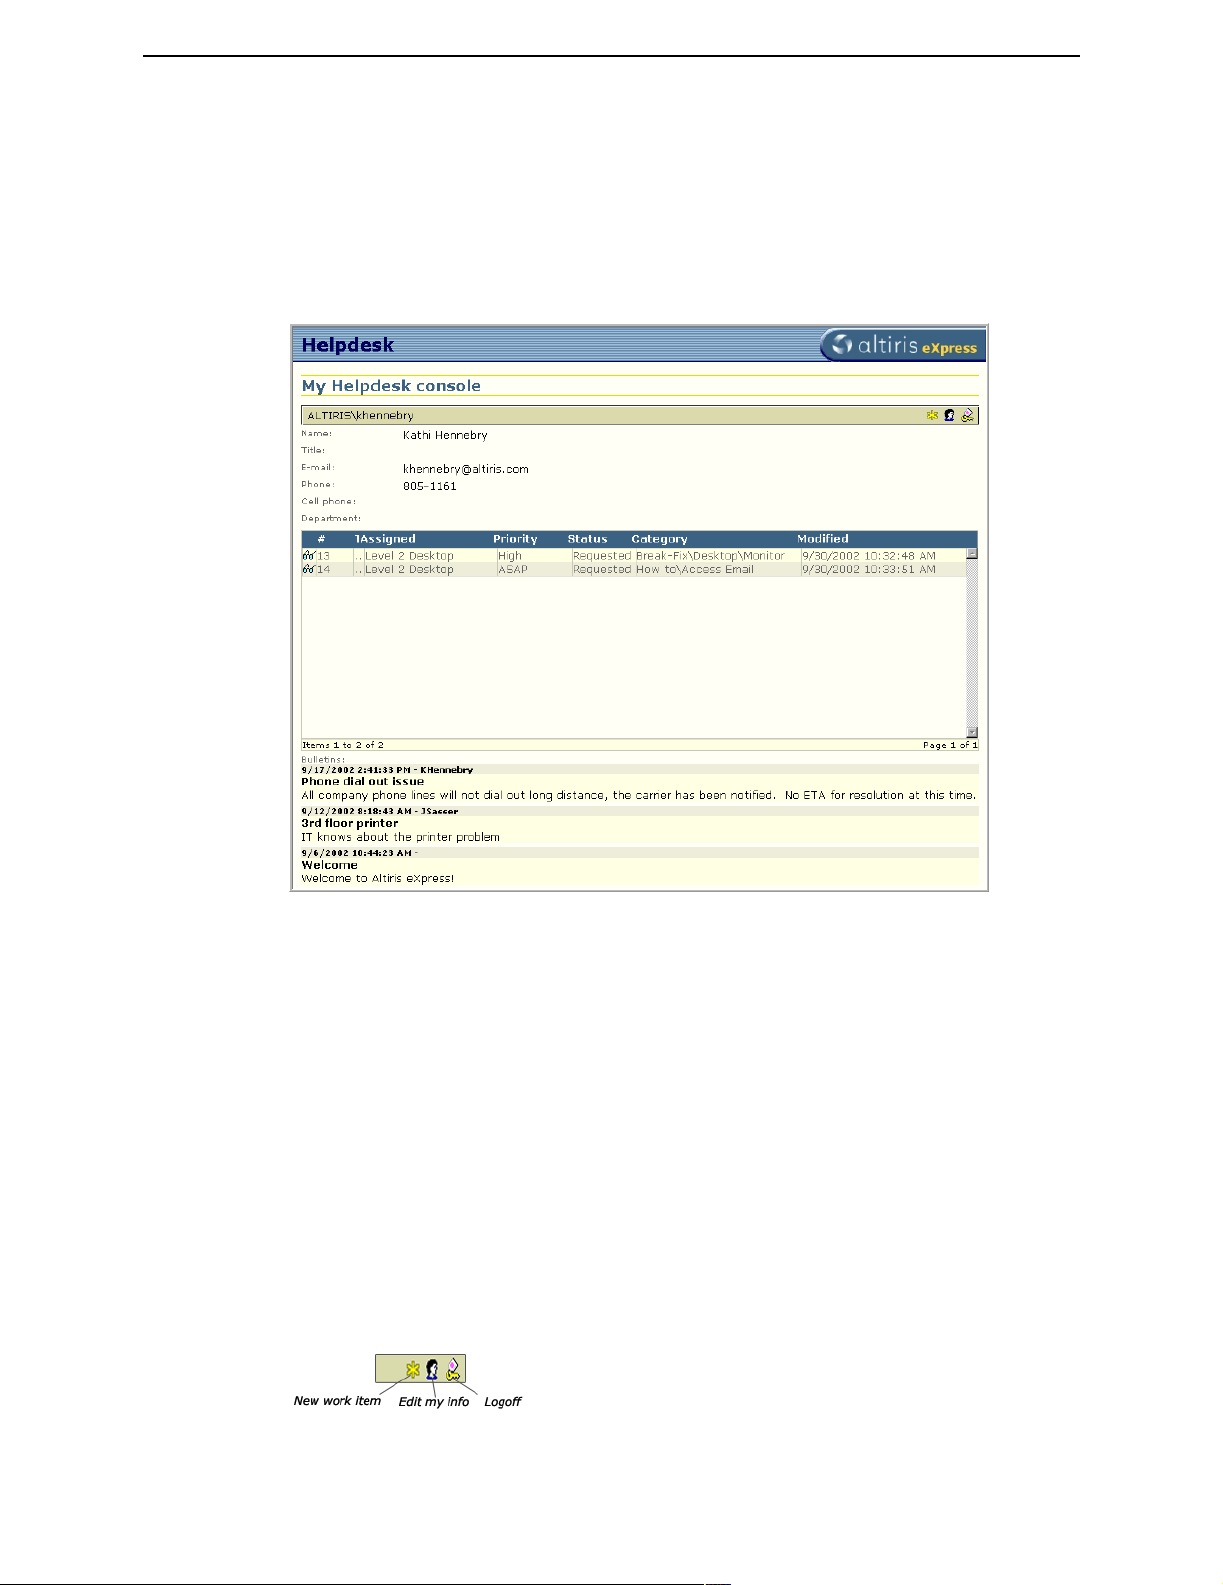
Chapter 6: User Interface My Helpdesk Console
My Helpdesk Console
My Helpdesk is intended for users with an NT ID in an organizational internet environment. Users
who logon to an intranet using NT authentication, then login to My Helpdesk console, automatically
have their contact information attached to the work item they create. Through this console, users can
create their own work items, view or partially edit previously added work items, and update their
own contact information. Additionally, bulletins posted by Workers or Administrators that are
designated for all users, can be viewed on the bottom of the
My Helpdesk Console page.
To Use My Helpdesk Console
1 Open My Helpdesk console by entering either the complete URL http://<server name>/aexhd/
winuser/Default.aspx or by entering a shortcut (URL alias) if created. <OR>
2 Enter through the main entry point Altiris eXpress Helpdesk consoles - http://<server
name>/aexhd/.
The options on the
• Click
added new work items.
• Click
new work items.
• Click
• Click
• Click
My Helpdesk toolbar description
My Helpdesk console page is as follows:
View next to the work item. The work item list only appears if you have preciously
Edit next to the work item. The work item list only appears if you have preciously added
New to add a new work item.
Edit my info to update your contact information.
LogOff to exit My Helpdesk console.
Altiris Helpdesk Solution User Guide 88
Page 89

Chapter 6: User Interface My Helpdesk Console
My Helpdesk - New Work Item
To Add a New Work Item
1 Type the required information in the form on the page.
For more details see “New Work Item” on page 50 and “Attachments” on page 55.
2 Click OK to save.
Sort Work Item List
The My Helpdesk Console page will display a list of the work items created by the current user,
located at the bottom of the page. The Work item list can be sorted as needed by selecting the sort
topic:
• #
• Title
• Assigned
• Priority
• Status
• Category
The sort topics toggle between ascending and descending sort order then they are selected.
Altiris Helpdesk Solution User Guide 89
Page 90

Chapter 6: User Interface My Helpdesk Console
For example Click #, an arrow appears next to the sort topic #. The up arrow indicates the sort order
is ascending to descending. Click # again, a down arrow appears to indicate the sort order is
descending to ascending.
Edit My Info
Users can update their user information once the account is added to the system. The following
information can be changed:
• Name
• Title
• E-mail
• Phone
• Cell phone
• Department
• Password - see note.
Note This is your Helpdesk password for the User console, not the user’s NT password.
To Edit My Info
1 Click Edit my info on the My Helpdesk Console page.
2 Type the required information in the form.
3 Click OK to save.
Altiris Helpdesk Solution User Guide 90
Page 91

Chapter 6: User Interface Work Item Request - NT User
Logoff
When you have completed all tasks within the My Helpdesk console, be sure to Logoff and close the
web browser to completely log out of the Helpdesk system. Logging off also conserves system
resources.
To Logoff My Helpdesk
1 Click Logoff to log off the My Helpdesk Console page.
2 Close the web browser.
Work Item Request - NT User
The NT User console is intended for users with a NT ID authentication through their own internet
environment and only want to log a work item. This console is similar to
only has the functionality to add a work item. Work items created in this console have their status
set to Requested.
1 Open My Helpdesk Console by entering either the complete URL http://<server name>/aexhd/
winuser/Default.aspx or by entering a shortcut (URL alias) if created. <OR>
2 Enter through the main entry point Altiris eXpress Helpdesk consoles: http://<server name>/
aexhd/.
3 Type the required information in the form on the page.
4 Click OK to save.
My Helpdesk console but
Altiris Helpdesk Solution User Guide 91
Page 92

Chapter 6: User Interface Work Item Request - User
Work Item Request - User
The Work item request - User allows a user to access the Helpdesk system from the internet, meaning
they do not use NT authentication at log on. Instead, users supply their e-mail address and an
optional password. If the e-mail address is associated with a contact in the Helpdesk database and
the password matches they are allowed to access the console. When a user adds a work item to the
system, it is automatically routed to a queue where workers can retrieve the requests.
1 Type your e-mail address in the E-mail box.
2 Type your password in the Password box.
3 Click OK to logon to the User console.
4 If your logon is not in the Helpdesk database, access will be denied. You can create a user
account for this entry point console by doing the following:
• Type your e-mail address in the
• Click, “click here to create a new account”.
• Type the required information in the form on the page.
• Click
OK to save.
E-mail box.
Work Item Request - Guest
The Work item request - Guest allows a user to access the Helpdesk system from the internet
anonymously, meaning they do not use NT authentication at log on nor do you need to have an email address. When a user adds a work item to the system, it is automatically routed to a queue where
workers can retrieve the requests.
1 Open Work item request- Guest console by entering either the complete URL http://<server
name>/aexhd/guest/Default.aspx or by entering a shortcut (URL alias) if created. <OR>
2 Enter through the main entry point Altiris eXpress Helpdesk consoles - http://<server
name>/aexhd/.
Altiris Helpdesk Solution User Guide 92
Page 93

Chapter 6: User Interface Create Custom URL to Access Helpdesk Consoles
3 Type the required information in the form on the page.
4 Click OK to save.
Work Item History
When a work item is created, a record of each action taken against the work item is recorded in the
work item history. It is not possible to remove information from the work item history.
Each history record includes the date and time used for historical reporting to determine:
• When the work item request was first processed
Create Custom URL to Access Helpdesk Consoles
You can give workers a custom URL so they can load a console more quickly.
To create a custom URL
1 Make sure that the DNS server is set up on the server that Helpdesk Solution is on. The server
that Helpdesk Solution is on must have a static IP address.
2 Add an alias (custom URL) into the DNS server and point it to the same URL as the server that
Helpdesk Solution is on.
3 Put a redirection script in your default.asp page.
For example:
<html>
<head>
<title></title>
<meta http-equiv="refresh" content="0; url=http://
user/default.aspx
</head>
</html>
servername/webname/
substituting servername and webname with the appropriate values.
4 Now you can type the alias name to access the Helpdesk Solution console.
Example:
Suppose you work for a company named “acme” and have a server called “brutus”. The URL to
access this server is “brutus.acme.com”. This server has an IP address of 172.16.10.400. When you
type in “brutus.acme.com”, the request goes to the DNS server, and the server sees that the URL
should point to 172.16.10.400.
Suppose you want to add the alias “helpdesk.acme.com”. You would add “helpdesk.acme.com” into
the DNS server and point it to the same URL as “brutus.acme.com”. Now, when you type either
“helpdesk.acme.com” or “brutus.acme.com”, the DNS server sees that both requests go to
172.16.10.400.
Next, you add a redirection script in the default.aspx page that points to the Helpdesk Solution
console you want to access. Now, when you type in “helpdesk” as the URL, the DNS sends the
request to the computer with the IP of 172.16.10.400, which is the server “brutus”, then “brutus”
delivers the default page and the page redirects to the Helpdesk Solution console.
Note Internally, to access either "brutus.acme.com", or "helpdesk.acme.com", you only need to type
in "brutus", or "helpdesk" respectively. Also, the alias you choose must not be ambiguous, it cannot
exist as an alias or as a computer on the network already.
Altiris Helpdesk Solution User Guide 93
Page 94

Chapter 6: User Interface Support for Pocket PC (PPC)
Support for Pocket PC (PPC)
Administrators and workers can access the worker console from any Windows CE device. Handheld
support is included with your product and does not require any additional cost or configurations.
Handheld support adds even greater flexibility for managing your product by extending
functionality beyond the desktop.
You can access the Worker Console using the worker URL. The Worker Console features that are
not supported include file upload. Some fields in lists throughout the Worker Console have been
scaled down for better viewing on the lower resolution Pocket PC.Requirements
• Windows CE version 3
• Microsoft Internet Explorer 5.0 or higher
• Resolution: Standard Pocket PC dimensions of 240 x 320
Note While the Worker Console is fully supported with the exceptions noted above, the
Administrator Console is not currently supported on the Pocket PC platform. The Administrative
Console will load on a Pocket PC device. However, the screen is not properly formatted for the
reduced screen resolution size of most handhelds. Administrative features can be executed on a
handheld device by directly accessing the URLs for those features.
Pocket PC Navigation
There is a dropdown for recent work items at the top of the Worker Console. Select a work item
number and click the
View Work Item icon to the left of the dropdown to view the report for the item.
To view the report for an item not displayed in the dropdown, the standard toolbar has been included
so that the worker can enter a work item number in the
to the left of the
Work item actions are not displayed as a horizontal list for the Pocket PC, but have been added to the
command dropdown. Select an action and click the green arrow icon to the left of the dropdown to
perform the action. The action will be performed on the work item that is selected in the recent work
item dropdown that appears to the left. This dropdown is shared by commands that are available on
Work items tab.
the
Work item commands are available by clicking the home icon at the top of the console. All commands
for the
work item command group will populate the command dropdown (this is a shared dropdown).
Execute a command by selecting it from the dropdown and clicking the green arrow icon.
Edit field on the toolbar.
Edit field and click the View Work Item icon
Altiris Helpdesk Solution User Guide 94
Page 95

Chapter 7:
Administration
The Administration topic list, includes the following:
• Helpdesk Admin Console (page 97)
• Commands (page 97)
• Common tasks (page 97)
• The Admin Report (page 98)
• Admin Report Page Field Description (page 99)
• Run Admin Reports (page 99)
• Categories (page 100)
• List Categories (page 100)
• List Categories Page Description (page 100)
• Edit Categories (page 101)
• Add New Category (page 102)
• Modify Category (page 103)
• Move Category (page 104)
• Copy Category (page 105)
• Delete Category (page 106)
• Routing Rules (page 107)
• List Routing Rules (page 107)
• Edit Routing Rule (page 108)
• Process Order of Routing Rules (page 108)
• New Routing Rule (page 109)
• Delete Routing Rules (page 111)
• Notify Rules (page 112)
• List Notify Rules (page 112)
• New Notify Rule (page 113)
• Edit Notify Rule (page 115)
• Delete Notify Rules (page 116)
• E-mail Templates (page 117)
• List Templates (page 117)
• New Template (page 118)
• Edit E-mail Templates (page 119)
• Default E-mail Templates. (page 119)
• E-mail Template Macros (page 120)
Altiris Helpdesk Solution User Guide 95
Page 96

Chapter 7: Administration
• Simple Macros (page 120)
• Complex Macros (page 121)
• Mail Macros (page 121)
• Bulletins (page 122)
• List Bulletins (page 122)
• Add New Bulletin (page 123)
• Delete Bulletin (page 123)
• Sources (page 124)
• List Sources (page 124)
• View Source (page 124)
• New NS Source (page 125)
• New SMS Source (page 125)
• Edit Source (page 126)
• Import from Source (page 127)
• Configure Helpdesk (page 128)
• Delete Work Items (page 130)
• Simple Tab (page 130)
• Delete Work Item Simple Field Description (page 131)
• Advanced Tab (page 132)
• Delete Work item Advanced Field Description (page 133)
• Delete Contacts (page 133)
• Delete Assets (page 134)
• Workers (page 135)
• List Workers (page 135)
• New Worker (page 135)
• Edit Worker (page 136)
• List Queue (page 137)
• View Queue (page 137)
• Edit Queue (page 138)
• New Queue (page 138)
• Reports (page 139)
• Notification Policies (page 140)
• Service Level Agreements (page 141)
Altiris Helpdesk Solution User Guide 96
Page 97

Chapter 7: Administration Helpdesk Admin Console
Helpdesk Admin Console
The Helpdesk Admin console page is similar to the Helpdesk Worker console yet it provides additional
functionality to perform administrative tasks. Access the Admin console through the Altiris eXpress
Helpdesk consoles
Helpdesk Admin console is launched, the Work report default page just as it is with Helpdesk
When
Worker console
The menu options are as follows:
Commands
Admin
Admin report - Lets you modify worker properties. See “The Admin Report” on page 98.
Categories - Lets you add or modify categories. See “Categories” on page 100.
Notify rules - Lets you view, create, or delete notify rules. See “Notify Rules” on page 112.
Routing rules - Lets you view, create, or delete work item routing rules. See “Routing Rules”
on page 107.
E-mail templates - Lets you view or create e-mail templates. See “E-mail Templates” on
page 117.
Bulletins - Lets you view, create, or delete bulletins. See “Bulletins” on page 122.
Sources - Displays a list of SMS and Notification Server sources. See “Sources” on page 124.
Configure helpdesk - Lets you configure the Helpdesk SQL database.on database. See
“Configure Helpdesk” on page 128.
. For further details see “Altiris eXpress Helpdesk Consoles” on page 46
. The left-hand menu is divided into two sections, Commands and Common tasks.
Work items
See “New Work Item” on page 50
Contacts
See “Contacts” on page 80
Assets
See “Assets” on page 84
Workers
See “Workers” on page 135
Recent
See “Recents” on page 87
Common tasks
New work items - See “New Work Item” on page 50
Work item queries - See “Using Queries” on page 70
Last query results - See “Last Query Results” on page 79
Retrieve queued item - See “Retrieve Queued Item” on page 80
Altiris Helpdesk Solution User Guide 97
Page 98
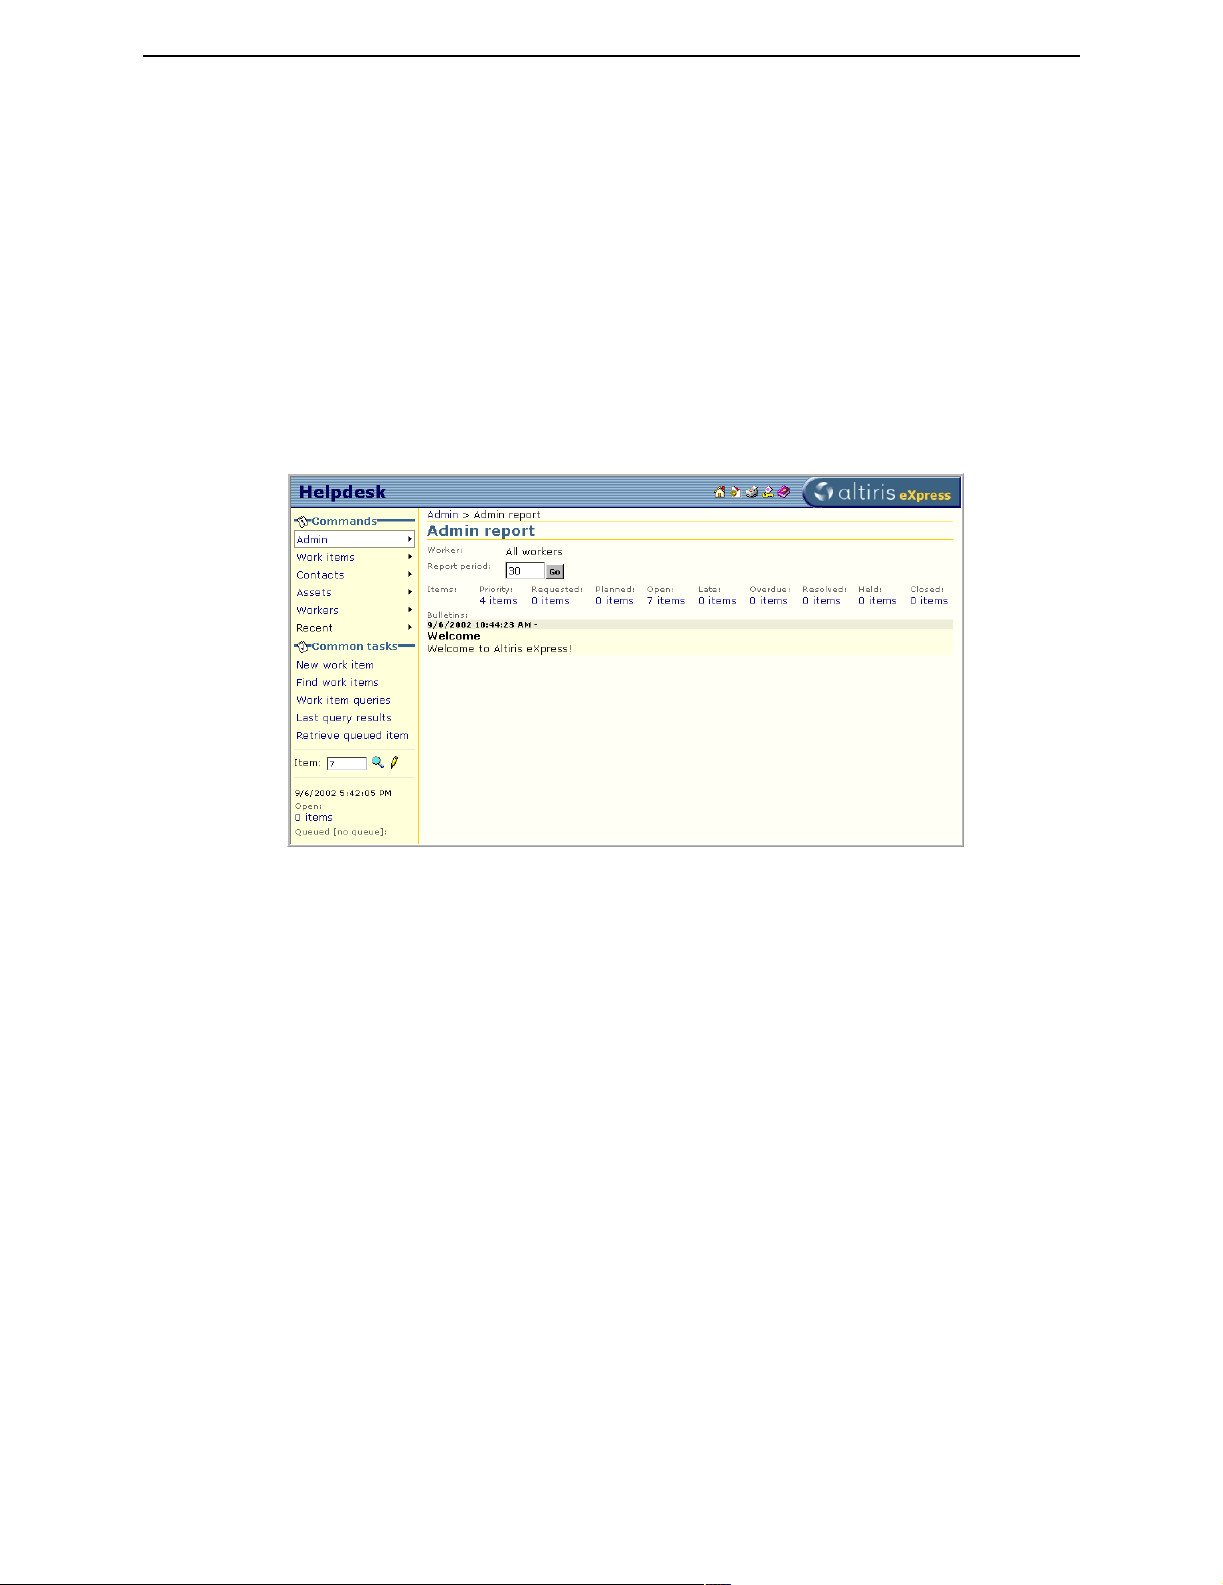
Chapter 7: Administration The Admin Report
The Admin Report
The Admin Report will help sort and manage work items based on the Report period and selected
query options. The report displays the item count for All workers in the following queries:
• Priority
• Requested
• Planned
• Open
• Late
• Overdue
• Resolved
• Held
• Closed
1 Open Admin console by entering either the complete URL http://<server name>/aexhd/admin/
Default.aspx or by entering a shortcut (URL alias) if created. <OR>
2 Enter through the main entry point Altiris eXpress Helpdesk consoles -
http://<server name>/aexhd/
3 Click Helpdesk Admin console.
Altiris Helpdesk Solution User Guide 98
Page 99
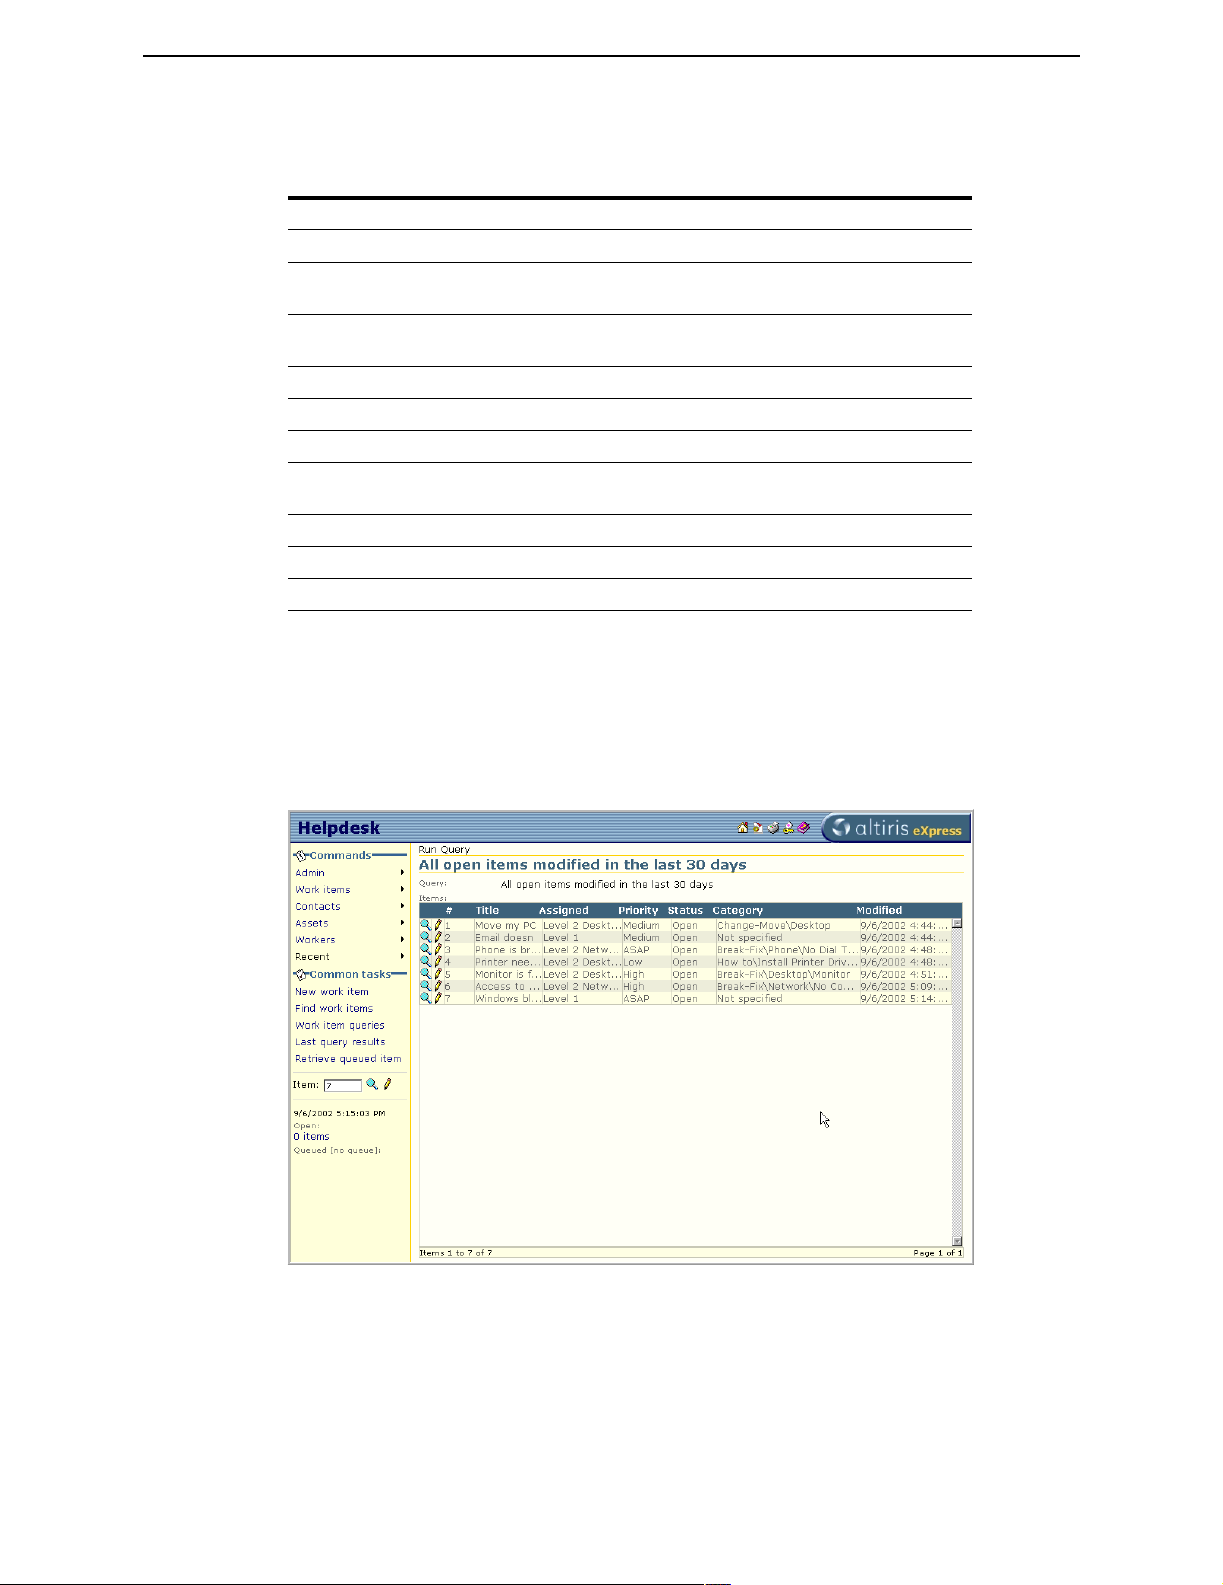
Chapter 7: Administration The Admin Report
Admin Report Page Field Description
Page Items
Item Description
Report Period Select how far back in time you want the summary report to go.
Priority items Lists the number of
priority status.
Requested items Lists the number of work items flagged with the status as
Requested.
Planned items List the number of work items flagged with the status as
Open items List the number of work items flagged as
Late items Lists the number of work items still
Overdue items List the number of work items not
due date.
Resolved items List the number of work items flagged with the status of
Closed items Lists the number of work items flagged with the status as
Cancel Click to discard the changes.
Open work items with either High or “ASAP”
Planned.
Open.
Planned after the start date.
Closed or Resolved after the
Hold.
Closed.
Run Admin Reports
1 Type the number of days to search back in time in the Report period box.
2 Click Go. The database will return an item count of all work items based on the number of days
search criteria.
3 Click the item count link to display the list of work items found.
Altiris Helpdesk Solution User Guide 99
Page 100

Chapter 7: Administration Categories
Categories
List Categories
All New work items entered into the Helpdesk system must be associated with a Category. The
Categories option is only available in the Admin console, you can List, Edit or Delete categories.
1 Open Admin console by entering either the complete URL http://<server name>/aexhd/admin/
Default.aspx or by entering a shortcut (URL alias) if created. <OR>
2 Enter through the main entry point Altiris eXpress Helpdesk consoles -
http://<server name>/aexhd/ then click
3 Click Admin>Categories>List categories.
Click Edit on the toolbar to go directly to the Edit categories page.
4
Helpdesk Admin console.
List Categories Page Description
Page Items
Item Description
Default category Select a
category is selected at the time a work item is created.
Name Name of the category work items will be associated with.
Status The category is
Default category for items to be associated with if no
Active.
Altiris Helpdesk Solution User Guide 100
 Loading...