

Page 1

HP Smart Update Manager User Guide
Version 6.0.0
Abstract
This document describes how to use HP SUM to apply firmware updates to HP ProLiant and HP Integrity servers, and apply
software updates to HP ProLiant servers. This document is intended for individuals who understand the configuration and
operations of Microsoft Windows, Windows Server, Linux, smart components, HP-UX, VMware, and the risk of data loss from
performing updates.
HP Part Number: 613175-401a
Published: November 2013
Edition: 2
Page 2

© Copyright 2009, 2013 Hewlett-Packard Development Company, L.P.
Confidential computer software. Valid license from HP required for possession, use or copying. Consistent with FAR 12.211 and 12.212, Commercial
Computer Software, Computer Software Documentation, and Technical Data for Commercial Items are licensed to the U.S. Government under
vendor's standard commercial license.
The information contained herein is subject to change without notice. The only warranties for HP products and services are set forth in the express
warranty statements accompanying such products and services. Nothing herein should be construed as constituting an additional warranty. HP shall
not be liable for technical or editorial errors or omissions contained herein.
Acknowledgments
Microsoft®, Windows®, Windows® XP, and Windows NT® are U.S. registered trademarks of Microsoft Corporation.
Page 3

Contents
1 Introduction...............................................................................................7
HP SUM overview.....................................................................................................................7
About the graphical user interface..............................................................................................8
Status icon descriptions.............................................................................................................9
HP SUM new terms...................................................................................................................9
2 Downloading, installing, and launching HP SUM..........................................10
Downloading HP SUM............................................................................................................10
Downloading HP SUM from the HP SUM website...................................................................10
Downloading HP SUM from the SDR website.........................................................................10
Migrating nodes from HP SUM 5.x to HP SUM 6........................................................................10
Deploying HP SUM.................................................................................................................11
Running HP SUM...............................................................................................................11
Deploying firmware for HP ProLiant servers using the HP Service Pack for ProLiant.......................11
Deploying HP Integrity firmware bundles with HP SUM...........................................................12
Deployment modes............................................................................................................12
Deployment scenarios.........................................................................................................12
Disabling BitLocker to permit firmware updates (Windows only)....................................................13
Launching and logging into HP SUM.........................................................................................14
Launching HP SUM............................................................................................................14
Logging into HP SUM.........................................................................................................15
Logging out of the HP SUM GUI...............................................................................................15
3 Using the HP SUM GUI.............................................................................16
Using the Home screen............................................................................................................16
Using the Activity screen..........................................................................................................16
Using Guided Update.............................................................................................................16
Using the Baseline Library screen..............................................................................................18
Adding a baseline.............................................................................................................18
Creating a custom baseline.................................................................................................19
Deleting a baseline............................................................................................................21
Configuring components.....................................................................................................21
Using the Nodes screen..........................................................................................................21
Selecting multiple nodes.....................................................................................................22
Adding a node..................................................................................................................22
Editing a node...................................................................................................................25
Aborting a node update.....................................................................................................25
Node inventory.................................................................................................................25
Deploying a node..............................................................................................................26
Deploying all partitions in an HP Integrity BL870c i4 or BL890c i4 node..............................27
Node reports....................................................................................................................28
Deleting a node.................................................................................................................28
Server overview.................................................................................................................29
Integrity node overview.......................................................................................................29
Using the Enclosures screen.....................................................................................................29
Adding an enclosure..........................................................................................................29
Editing an enclosure...........................................................................................................29
Aborting an enclosure update.............................................................................................29
Enclosure inventory............................................................................................................30
Deploying an enclosure......................................................................................................30
Enclosure reports...............................................................................................................30
Deleting an enclosure.........................................................................................................30
Contents 3
Page 4

Using the Servers screen..........................................................................................................30
Adding a server................................................................................................................30
Editing a server.................................................................................................................30
Aborting a server update....................................................................................................30
Server inventory.................................................................................................................30
Deploying a server.............................................................................................................31
Server reports....................................................................................................................31
Deleting a server...............................................................................................................31
Using the Switches screen........................................................................................................31
Adding a switch................................................................................................................31
Editing a switch.................................................................................................................31
Aborting a switch update....................................................................................................31
Switch inventory.................................................................................................................31
Deploying a switch.............................................................................................................31
Switch reports....................................................................................................................32
Deleting a switch...............................................................................................................32
Using the VM Hosts screen......................................................................................................32
Adding a VM host.............................................................................................................32
Editing a VM host..............................................................................................................32
Aborting a VM host update.................................................................................................32
VM hosts inventory.............................................................................................................32
Deploying a VM host.........................................................................................................32
VM host reports.................................................................................................................32
Deleting a VM host............................................................................................................33
Using the iLO screen...............................................................................................................33
Adding an iLO..................................................................................................................33
Editing an iLO...................................................................................................................33
Aborting an iLO update......................................................................................................33
iLO inventory.....................................................................................................................33
Deploying an iLO...............................................................................................................33
iLO reports........................................................................................................................33
Deleting an iLO.................................................................................................................33
Using the Intelligent Power Distribution Units screen.....................................................................33
Adding an iPDU................................................................................................................34
Editing an iPDU.................................................................................................................34
Aborting an iPDU update....................................................................................................34
iPDU inventory...................................................................................................................34
Deploying an iPDU............................................................................................................34
iPDU reports......................................................................................................................34
Deleting an iPDU...............................................................................................................34
Using the Virtual Connects screen.............................................................................................34
Adding a Virtual Connect...................................................................................................34
Editing a Virtual Connect....................................................................................................35
Aborting a Virtual Connect update.......................................................................................35
Virtual Connect inventory....................................................................................................35
Deploying a Virtual Connect...............................................................................................35
Virtual Connect reports.......................................................................................................35
Deleting a Virtual Connect..................................................................................................35
4 Using legacy scripts to deploy updates........................................................36
Command-line interface...........................................................................................................36
Command-line syntax.........................................................................................................36
Using Linux root credentials............................................................................................36
Prerequisites for using Linux root credentials.................................................................36
Switch update commands...............................................................................................37
4 Contents
Page 5

Command-line arguments...................................................................................................37
Command-line examples.....................................................................................................45
Return codes.....................................................................................................................46
Windows smart-component return codes...............................................................................47
Linux smart-component return codes.....................................................................................47
Linux RPM return codes.......................................................................................................48
VMware ESXi smart-component return codes.........................................................................48
Input files...............................................................................................................................48
Input file format and rules....................................................................................................49
File encoding....................................................................................................................49
Error reporting...................................................................................................................50
Input file parameters...........................................................................................................50
Reports..................................................................................................................................61
Downloading HP SUM and components from the SDR.................................................................62
5 Advanced topics......................................................................................63
Configuring IPv6 networks.......................................................................................................63
Network ports used by HP SUM...............................................................................................63
GatherLogs............................................................................................................................64
6 Troubleshooting........................................................................................65
Collecting trace directories.......................................................................................................65
Baseline troubleshooting..........................................................................................................66
HP SUM lists SUSE Enterprise Linux dependencies for Red Hat Enterprise Linux systems................66
HP SUM displays two versions of the same component when creating a custom baseline.............66
HP SUM stops responding when performing inventory on large baselines..................................66
HP SUM does not return an error when you enter incorrect credentials forDownload from
hp.com.............................................................................................................................66
Node troubleshooting.............................................................................................................66
HP SUM does not respond when editing a node with sudo......................................................66
HP SUM does not display the Deploy button on the Deploy Nodes screen.................................67
An HP-UX node displays the error Inventory failed. The pciinfo module requires manual update
on remote target................................................................................................................67
HP SUM does not detect solid state hard drives......................................................................67
After HP SUM finishes an inventory, the inventory screen does not close....................................67
Cannot add a Windows node when running HP SUM on a Linux host......................................67
HP SUM does not display the Reboot button after it finishes a deployment.................................67
HP SUM does not automatically reboot a node......................................................................67
HP SUM does not display a reboot message in Guided Update...............................................67
When multiple nodes are selected, HP SUM does not display the most correct status..................67
HP SUM displays message Unable to locate the item you requested.........................................67
HP SUM stops responding when performing inventory on multiple nodes...................................67
HP SUM displays the message Unable to login or identify node as a supported device when HP
SUM cannot find a node.....................................................................................................67
HP SUM displays the message Ready for deployment while HP SUM is performing inventory on
a node.............................................................................................................................68
HP SUM does not display an entire screen............................................................................68
HP SUM displays extra credentials boxes on the Edit Node screen...........................................68
You can edit a node while HP SUM is deploying updates to the node.......................................68
HP SUM displays an associated node multiple times...............................................................68
HP SUM automatically performs inventory on a node after editing the node..............................68
Activity screen troubleshooting..................................................................................................68
HP SUM does not update the Activity screen accurately..........................................................68
VMware troubleshooting..........................................................................................................68
HP SUM displays an inventory error on a VMware node.........................................................68
Reports troubleshooting...........................................................................................................68
Contents 5
Page 6

HP SUM does not generate reports for nodes that are offline...................................................68
HP SUM displays only requested reports in CSV and XML format.............................................68
HP SUM service troubleshooting...............................................................................................69
HP SUM service stops running when HP SUM is mounted from a virtual media source.................69
HP SUM allows all users to log in.........................................................................................69
Some screens are not translated from English.........................................................................69
Legacy CLI commands troubleshooting......................................................................................69
HP SUM does not deploy multiple components at in one command..........................................69
The /use_web Legacy CLI command does not work................................................................69
7 Support and other resources......................................................................70
Contacting HP........................................................................................................................70
Subscription service................................................................................................................70
Related information.................................................................................................................70
Typographic conventions.........................................................................................................71
HP Insight Remote Support software..........................................................................................72
HP Insight Online...................................................................................................................72
8 Documentation feedback...........................................................................73
Glossary....................................................................................................74
Index.........................................................................................................75
6 Contents
Page 7

1 Introduction
HP SUM overview
HP SUM is a technology included in many HP products for installing and updating firmware and
software on HP ProLiant servers, and firmware on HP Integrity servers.
HP SUM provides a web-based GUI and a command-line scriptable interface for:
• Deployment of firmware for single or one-to-many HP ProLiant and HP Integrity servers and
network-based targets such as iLO, OA, and VC Ethernet and Fibre Channel modules.
• Deployment of software for single or one-to-many HP ProLiant servers (supported in Windows
and Linux environments).
HP SUM has an integrated hardware and software discovery engine that finds the installed hardware
and current versions of firmware and software in use on nodes you identify. HP SUM installs updates
in the correct order and ensures that all dependencies are met before deploying an update. HP
SUM prevents an installation if there are version-based dependencies that it cannot resolve.
Key features of HP SUM include:
• Dependency checking, which ensures appropriate installation order and component readiness
• Automatic and wizard-like Guided Update process
• Web browser based application
• Create custom baselines and ISOs
• Assign specific baselines to nodes
• Download updates from the web
• Intelligent deployment of only required updates
• Simultaneous firmware and software deployment for multiple remote nodes in GUI and CLI
modes
• Improved deployment performance
• Local online deployment of HP ProLiant servers and enclosures
• Remote (one-to-many) online deployment of HP ProLiant and HP Integrity servers and enclosures
• Local offline firmware deployments with HP Service Pack for ProLiant deliverables
• Remote offline deployment when used with the SmartStart Scripting Toolkit (HP ProLiant G7
and earlier servers), Scripting Toolkit (HP ProLiant Gen8 and later), iLO Virtual Media, or PXE
booted media
• GUI or CLI scripts with extensive logging
• Remote command-line deployment
• Support for updating firmware on network-based targets such as the OA, iLO through the
Network Management Port, VC Ethernet and Fibre Channel switches, and 3Gb/6Gb SAS BL
Switch interconnects on HP ProLiant servers
• Support for deploying firmware updates to supported Integrity servers and Superdome 2
enclosures
• Support for updating VC modules on Integrity servers
HP SUM overview 7
Page 8
NOTE: HP SUM does not support third-party controllers. This includes flashing hard drives
behind these controllers.
• Remote online deployment of I/O Card firmware on HP ProLiant and HP Integrity targets
running HP-UX
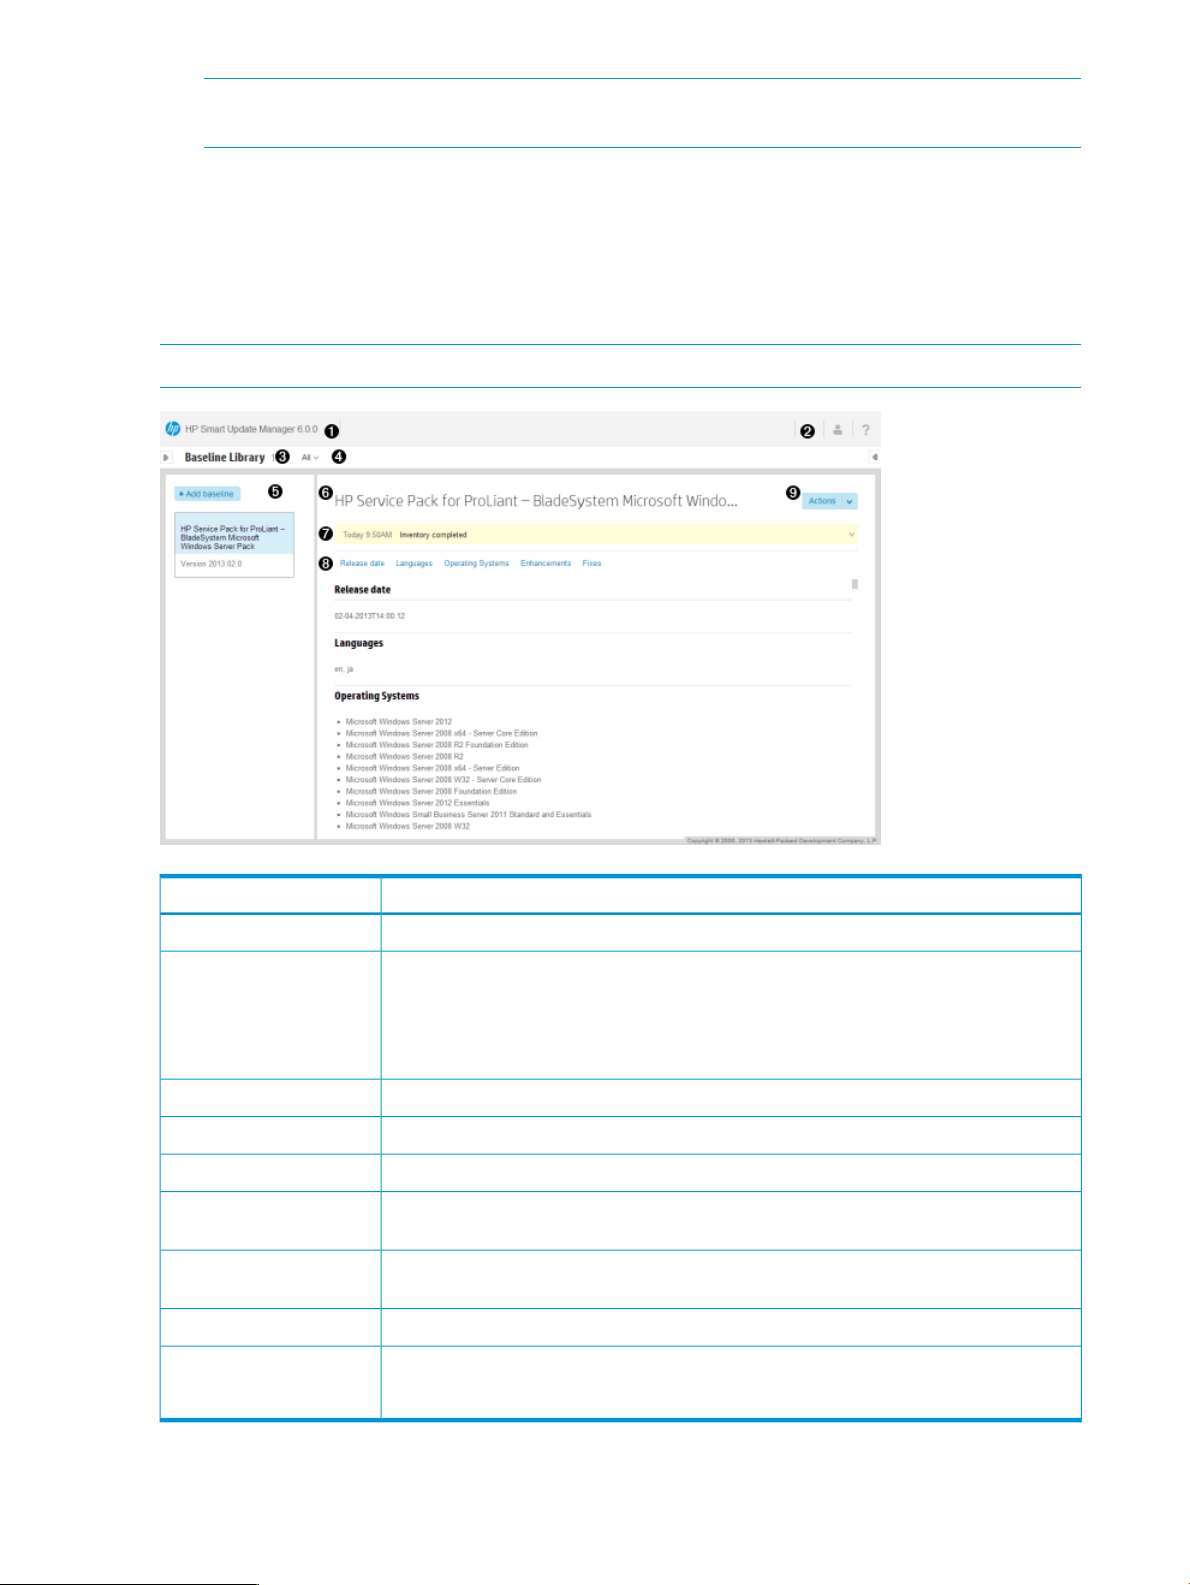
About the graphical user interface
HP SUM is a browser-based application. The screenshot below shows the major sections of the
screen.
NOTE: Do not use the Back button press F5 in your browser window.
DescriptionItem
Main menu - This menu provides links to all HP SUM screens.1
2
6
7
• Activity list - Status updates appear briefly, and the activity icon displays the status of
recent activities. Click the Activities icon, to open the Activity panel.
• Login information - Displays the currently logged-in user, and offers a logout function.
• Help panel - Opens the help pane.
Screen name - Displays the name of the screen.3
Screen filters - Filters screen objects.4
Screen list - Displays a list of items on this screen.5
Baseline or Node name - This lists the baseline or node that you selected in the screen
list. This example shows the name of the selected baseline.
Informational highlight - This bar highlights information that you might need to perform or
know about for the selected item. Click to expand this box if there is more information.
Item details - This area provides full details about the selected item.8
Actions - Lists the available actions.9
NOTE: Screen options vary based on the screen you are viewing.
8 Introduction
Page 9
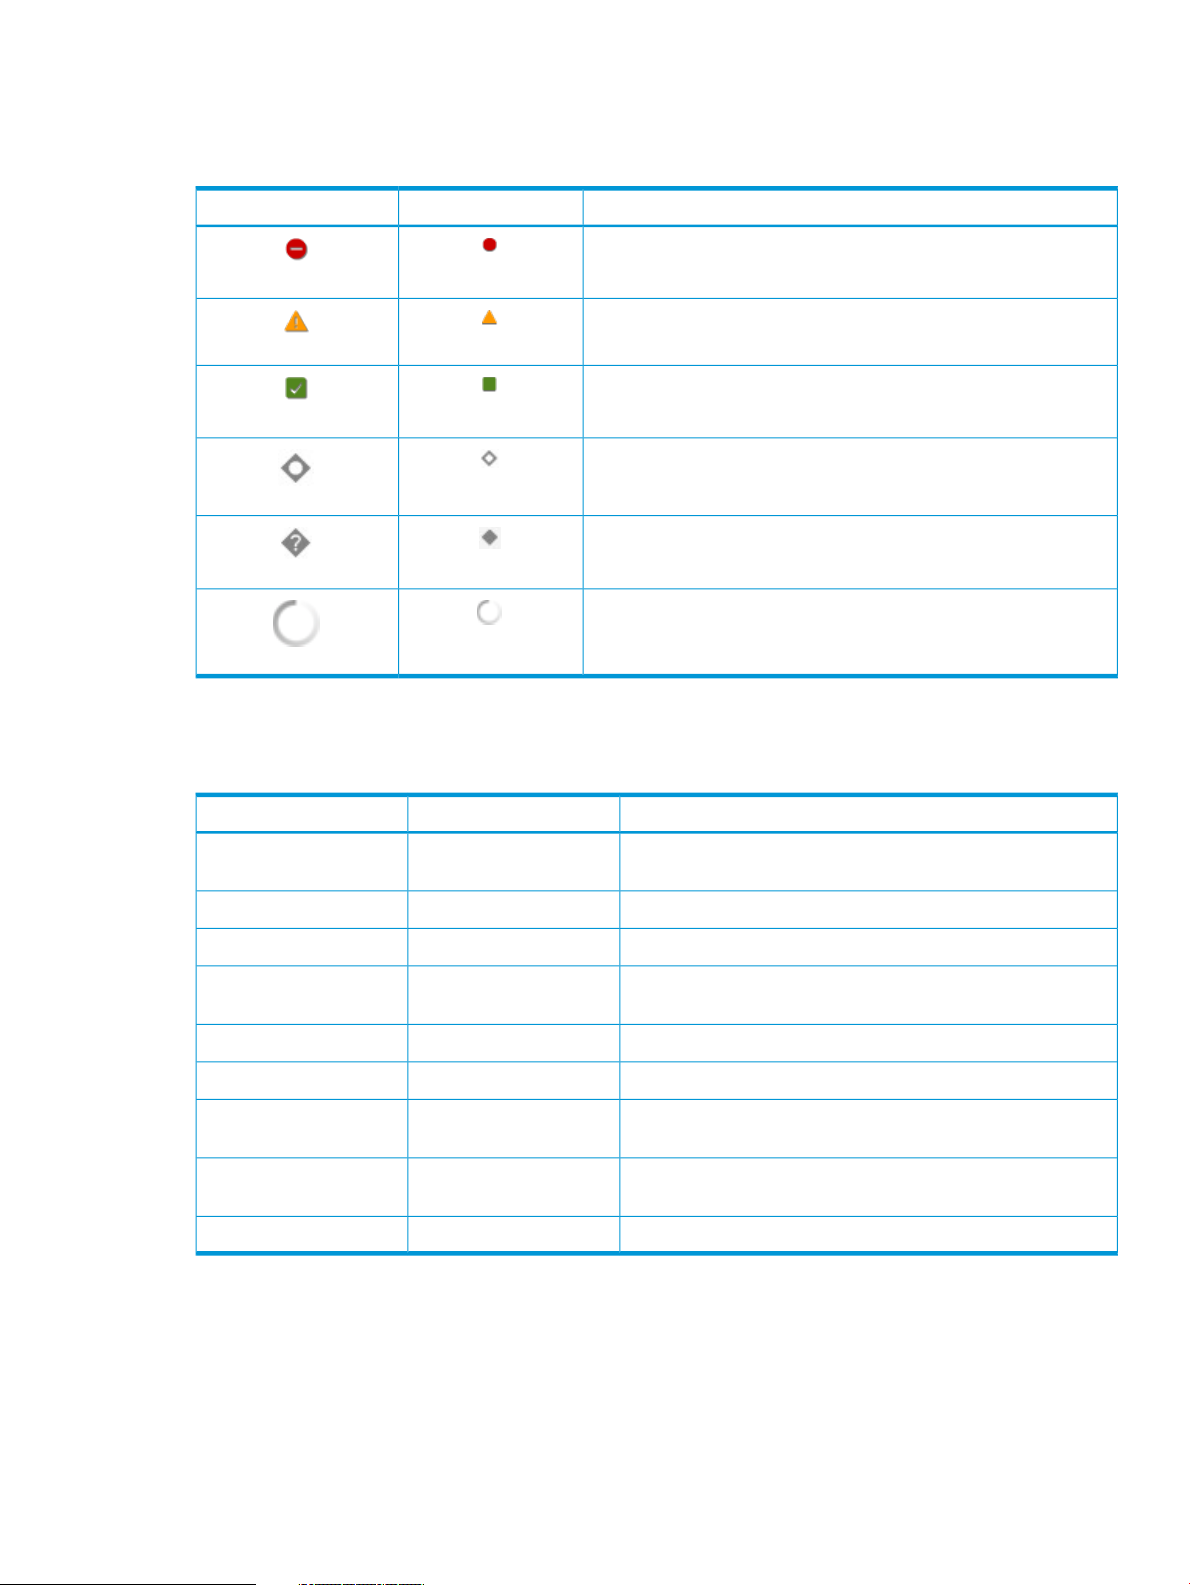
Status icon descriptions
HP SUM uses icons to represent the current status of resources and alerts and to control the display.
Table 1 Status icons
DescriptionSmall iconLarge icon
Critical
Failed/Interrupted
Warning
OK
Successful
Disabled
Unknown
An In progress rotating icon indicates a change is being applied
or a task is running.
HP SUM new terms
The following terminology has changed from HP SUM 5.x to HP SUM 6:
DescriptionHP SUM 6HP SUM 5.x
BaselineRepository
InventoryDiscovery
ModeN/A
AnalyzeN/A
A collection of components for use in updating a node. For
example, HP SPP or a custom baseline.
Hardware you want to update.NodeTarget
The process where HP SUM determines node type.ScoutingDiscovery
The process where HP SUM determines the contents of a node
or baseline.
Network directory for baseline updates.LocationN/A
An automated or wizard-style method to update the local node.Guided UpdateN/A
You can run HP SUM in either interactive or non-interactive
mode.
The process where HP SUM verifies all dependencies are met
before beginning deployment.
The process where HP SUM begins the update process.DeployInstall
Status icon descriptions 9
Page 10

2 Downloading, installing, and launching HP SUM
Downloading HP SUM
Downloading HP SUM from the HP SUM website
You can download the latest version of HP SUM from the HP SUM website at http://www.hp.com/
go/hpsum.
Unzip the file and save it to a directory on your system.
NOTE: Do not put HP SUM 6.x files in the same directory as HP SUM 5.3.5 and earlier versions
of HP SUM.
Downloading HP SUM from the SDR website
You can download HP SUM as an RPM from the HP Software Delivery Repository at http://
downloads.linux.hp.com/. The SDR contains a version of the HP SUM RPM for each supported
operating system and architecture type.
You can use yum commands to search for HP SUM and download it to your system. You can also
use a web browser to navigate the HP SDR and download the rpm.
Use the following commands to search, download, or install HP SUM from the SDR:
Command exampleAction
yum search hpsumSearch for HP SUM with yum
yum install hpsumInstall HP SUM with yum
rpm -Uvh hpsum-5.3.5-66.rhwl5.i386.rpmDownload HP SUM from the SDR with a web browser, and
then install the RPM.
For more information on using the HP SDR, see the Getting Started and FAQ sections on the HP
Software Delivery Repository website at http://downloads.linux.hp.com/SDR/index.html.
For more information on using HP SUM with the SDR, see Linux best practices using HP Service
Pack for ProLiant (SPP) and Software Delivery Repository (SDR) at http://h20000.www2.hp.com/
bc/docs/support/SupportManual/c03479393/c03479393.pdf.
Migrating nodes from HP SUM 5.x to HP SUM 6
HP provides scripts that migrate the targets you added to HP SUM 5.x into nodes that HP SUM 6
recognizes. If you want to edit the targets that you migrate to HP SUM 6, use the /script
parameter. This generates a file that you can edit with a text editor application.
NOTE: The migration script does not support sudo credentials.
To migrate nodes to HP SUM 6:
1. Navigate to the directory that holds HP SUM.
2. Double-click port_targets.bat (Windows) or port_targets.sh (Linux).
You can also run the scripts from the command line.
Script syntax:
port_targets.bat [/y] [/h] [/script] [/user {username} /password
{password}
10 Downloading, installing, and launching HP SUM
Page 11

The script supports the following options:
DefinitionOption
Continue the migration without using prompts./y
Print the script help./h
/script
/user {username} /password {password}
Deploying HP SUM
The following sections discuss deployment from HP SUM. For more information on planning an
update, see the HP ProLiant and Integrity Firmware Management Best Practices Overview, HP
ProLiant and Integrity Firmware Management Best Practices Planning Guide, or HP ProLiant and
Integrity Firmware Management Best Practices Implementer Guide, available on the HP website:
http://www.hp.com/go/hpsum/documentation.
Running HP SUM
HP SUM provides the following modes:
This option creates a file with the migration commands, it
does not run the script. You can edit the script commands
manually before migrating the targets.
NOTE: Use this option to select the targets you migrate,
or edit the user credentials for an individual target.
This options sets a default username and password
credentials for each node that HP SUM migrates. If you do
not use this option, each node is given the following
credentials:
• user=username
• password=passwd
• GUI—For firmware and software deployments
• Scripted—For silent firmware and software deployments
HP SUM supports local and remote deployments. HP SUM runs in Windows and Linux in online
and offline mode. For more information about deployment modes, see “Deployment modes” (page
12).
NOTE: You cannot use Windows Hyper-V systems to run HP SUM and deploy updates. You can
select Hyper-V systems as a node from HP SUM running on a Windows or Linux system.
NOTE: Before deploying software updates to a server, be sure that a recent backup of the server
is available in the event the deployment procedure fails.
For information on the minimum requirements to run HP SUM, see the HP Smart Update Manager
Release Notes on the HP website:
http://www.hp.com/go/hpsum/documentation
Deploying firmware for HP ProLiant servers using the HP Service Pack for ProLiant
The SPP is a re-packaging of HP ProLiant system software and firmware for HP ProLiant BL/ML/DL/SL
servers and their options, and BladeSystem enclosures including OA, VC, and 3 Gb SAS switches
running supported Windows, Linux, VMware (supported firmware updates only) operating systems.
The single SPP image contains a comprehensive collection of firmware and system software
components including drivers, agents, tools, utilities, and firmware that is tested, managed, and
deployed together as a single solution.
The SPP includes HP SUM for deployment of the SPP components.
Deploying HP SUM 11
Page 12

For a complete list of HP ProLiant systems and software supported by SPP, and updates available
in an SPP release, see the HP Service Pack for ProLiant Release Notes on the HP website:
http://www.hp.com/go/spp/documentation
Deploying HP Integrity firmware bundles with HP SUM
You can use HP SUM to deploy components delivered with the HP Integrity firmware bundles.
Deploying firmware to HP Integrity servers is done remotely and is the same as deploying other
firmware, such as OA, with the following exceptions:
• Specify the IP address of the Monarch (primary) OA on Superdome 2, or the Monarch iLO 3
management processor on multi-blade servers.
• Specify the server IP address as the target to update I/O firmware on HP-UX servers. You can
only update remote HP-UX targets.
For more information on HP Integrity firmware bundles, see the Manage HP Integrity Servers
Firmware Updates website at http://www.hp.com/go/smartupdate/integrity.
Deployment modes
The following key terms apply when using HP SUM to deploy updates:
DefinitionTerm
Local
Remote
Online
Offline
The installation runs on the physical hardware you are
updating. For example, running a utility on a server to
update the system ROM of the server.
The installation runs on one system, but updates other
physical nodes. For example, updating the OA or HP
Integrity server firmware across a network.
The installation occurs while the host processor is running
in the normal server environment. For example, if the server
runs Microsoft Windows Server 2012, the update occurs
under this environment. The update does not require you
to boot to a special environment to update the firmware.
You might need to reboot the node to activate the firmware.
In offline mode, the HP SUM boots a small Linux kernel
and enables updates to occur on a single server.
• Only updates the local system
• Only uses a single baseline
NOTE: Some features of HP SUM that require the
regular local host operating systems are not supported
in offline mode.
These terms can be used in combination to designate the type of environment required for updates
to occur, such as local-online or remote-online.
Deployment scenarios
HP SUM deploys updates from a local host to one or more remote hosts. If the host running HP
SUM uses Windows, you can update Windows, Linux, VMware, or HP-UX targets. If the host
running HP SUM uses Linux, you can update Linux, VMware, or HP-UX nodes. You can also update
remote HP ProLiant or HP Integrity iLO, OA, and VC nodes from Windows or Linux systems.
12 Downloading, installing, and launching HP SUM
Page 13

The following table describes when typical HP SUM deployment scenarios are used.
Used whenScenario
Graphical deployment on a local host
Scripted deployment on a local host
Graphical deployment to a remote host
Scripted deployment to a remote host
• You are not familiar with command line tools.
• You are deploying components on a local, single host.
• Updates do not require scripting.
• You are familiar with command line tools.
• You are deploying components on a local, single host.
• Updates require a customized, scripted deployment.
• You are not familiar with command line tools.
• You are deploying components on one or more remote
hosts.
• Updates do not require scripting.
• You are familiar with command line tools.
• You are deploying components on one or more hosts.
• Updates require a customized, scripted deployment to
one or more host systems.
Disabling BitLocker to permit firmware updates (Windows only)
The TPM, when used with BitLocker, measures a system state. Upon detection of a changed ROM
image, it restricts access to the Windows file system if the user cannot provide the recovery key.
HP SUM detects if a TPM is enabled in your system. For some newer models of HP ProLiant servers,
if a TPM is detected in your system or with any remote server selected as a target, HP SUM utilities
for HP iLO, Smart Array, NIC, and BIOS warn users prior to a flash. If the user does not temporarily
disable BitLocker and does not cancel the flash, the BitLocker recovery key is needed to access the
user data upon reboot.
A recovery event is triggered in the following situations:
• You do not temporarily disable BitLocker before flashing the system BIOS when using the
Microsoft BitLocker Drive Encryption.
• You have optionally selected to measure HP iLO, Smart Array, and NIC firmware.
If HP SUM detects a TPM, a warning message appears:
CAUTION: A Trusted Platform Module (TPM) has been detected in this system. Failure to perform
proper OS encryption procedures will results in loss of access to your data if recovery key is not
available. Recommended procedure for Microsoft Windows (R) BitLocker (TM) is to \”suspend\”
BitLocker prior to System ROM or Option ROM firmware flash. If you do not have your recovery
key or have not suspended BitLocker, exit this flash. Failure to follow these instructions will results
in loss of access to your data.
To enable firmware updates without the need to type in the TPM password on each server, the
BitLocker Drive Encryption must be temporarily disabled. Disabling the BitLocker Drive Encryption
keeps the hard drive data encrypted. However, BitLocker uses a plain text decryption key that is
stored on the hard drive to read the information. After the firmware updates have been completed,
Disabling BitLocker to permit firmware updates (Windows only) 13
Page 14

the BitLocker Drive Encryption can be re-enabled. Once the BitLocker Drive Encryption has been
re-enabled, the plain text key is removed and BitLocker secures the drive again.
CAUTION: Temporarily disabling BitLocker Drive Encryption can compromise drive security and
should only be attempted in a secure environment. If you are unable to provide a secure
environment, HP recommends providing the boot password and leaving BitLocker Drive Encryption
enabled throughout the firmware update process. This requires setting the /tpmbypass parameter
for HP SUM or the firmware update is blocked.
To temporarily disable BitLocker support to allow firmware updates:
1. Click Start, and then search for gpedit.msc in the Search Text box.
2. When the Local Group Policy Editor starts, click Local Computer Policy.
3. Click Computer Configuration→Administrative Templates→Windows Components→BitLocker
Drive Encryption.
4. When the BitLocker settings are displayed, double-click Control Panel Setup: Enable Advanced
startup options.
5. When the dialog box appears, click Disable.
6. Close all windows, and then start the firmware update.
To enable advanced startup options:
1. Enter cscript manage-bde.wsf -protectors -disable c:
2. When the firmware update process is completed, the BitLocker Drive Encryption support can
be re-enabled by following steps 1 through 4 but clicking Enabled in step 5 instead. The
following command can be used to re-enable BitLocker Drive Encryption after firmware
deployment has completed.
3. Enter cscript manage-bde.wsf -protectors -enable c:
The following table describes TPM detection scenarios that you might encounter.
If TPM is detected and enabled, the installation is not silent,
and a system ROM must be updated.
If TPM is detected and enabled, the installation is silent,
the /tpmbypass switch is not given, and any firmware
updated must be applied to the server. Because the installation is silent, the installation is
If TPM is detected and enabled with Option ROM
Measuring, the installation is not silent, and a system ROM
must be updated.
If TPM is detected and enabled with Option ROM
Measuring, the installation is silent, the /tpmbypass
switch is not given, and any firmware updated must be
applied to the server.
the installation occurs, and the /tpmbypass switch is
supplied.
Launching and logging into HP SUM
ResultScenario
A warning message appears. Select OK to continue. The
installation is not canceled.
No warning appears. A new log file is generated
(%systemdrive%\cpqsystem\log\cpqstub.log).
terminated and cannot continue.
A warning message appears. After selecting OK, you can
continue. The installation is not canceled.
No warning appears. A new log file is generated
(%systemdrive%\cpqsystem\log\cpqstub.log).
Because the installation is silent, the installation is
terminated and cannot continue.
The installation occurs.If TPM is detected and enabled, the installation is silent,
Launching HP SUM
HP SUM supports 32–bit and 64–bit processors. When you launch HP SUM, a script chooses the
version of HP SUM to run. HP SUM logs you in using your current user credentials. To run HP SUM,
your userid needs to be part of the administrator group, or, on a Linux system, you can run HP
14 Downloading, installing, and launching HP SUM
Page 15

SUM using the sudo command. If you are using Windows Server 2012, you must log in with the
Administrator account, or select Run as Administrator.
NOTE: Do not open HP SUM in more than one browser tab or window or run HP SUM CLI
commands when the GUI is open.
For more information about supported browsers, see the HP Smart Update Manager Release Notes,
available at the HP Smart Update Manager Information Library, http://www.hp.com/go/hpsum/
documentation.
Launching HP SUM from an HP SUM download on a Windows host
1. Unzip the file you downloaded.
2. In the HP SUM directory, double-click hpsum.bat.
Launching HP SUM from an HP SUM download on a Linux host
1. From a command-line, type ./hpsum.
Logging into HP SUM
If HP SUM is already running, and no user is logged in, use your computer’s credentials to log
into HP SUM.
Logging out of the HP SUM GUI
1. Click the user icon, and then click Logout.
2. Select one of the following:
• Log Off - Current user.
• Shutdown - This option will shutdown HP SUM service.
3. Click OK.
HP SUM stores node information between sessions, including user credentials for nodes. The
information is stored in a database file in hex format. To clear the information, run the
clean-cache.cmd (Windows) or clean-cache.sh (Linux). To run clear-cache:
1. Shut down the HP SUM service.
2. From a command-line window, navigate to the directory that contains HP SUM.
3. Type clear-cache.bat (Windows) or clear-cache.sh (Linux).
NOTE: If you are using a GUI, you can navigate to the directory that holds HP SUM and
double-click the file to clear the cache.
NOTE: Running the clean-cache command erases all nodes, baselines, and other information
entered in HP SUM.
Logging out of the HP SUM GUI 15
Page 16

3 Using the HP SUM GUI
Using the Home screen
When you launch HP SUM, HP SUM displays the Home screen. From this screen, you can click
Guided Update, Baseline Library, or Nodes. There is also a Get Started button that launches Guided
Update. To navigate to other screens, use the navigation menu in the upper-left corner.
Using the Activity screen
The Activity screen provides a brief update of the activities that HP SUM is performing, or has
recently performed. The table displays the source, message, state, and last update time of an
activity.
Using Guided Update
HP SUM's Guided Update function allows you to update the localhost using the default baseline.
The default baseline is the directory from which you are running HP SUM.
NOTE: If the directory from which you are running HP SUM has no updates, then you cannot
use Guided Update. If there is no default baseline, HP SUM displays a message in the Inventory
of Baseline section.
• Interactive: In this mode HP SUM uses the default baseline to update the localhost. You can
choose the updates that HP SUM applies to the localhost.
NOTE: HP SUM does not support configuring components in Guided Update.
• Automatic: In this mode HP SUM automatically updates the localhost and uses the default
baseline.
NOTE: In automatic mode, HP SUM automatically begins updates when you click OK.
16 Using the HP SUM GUI
Page 17
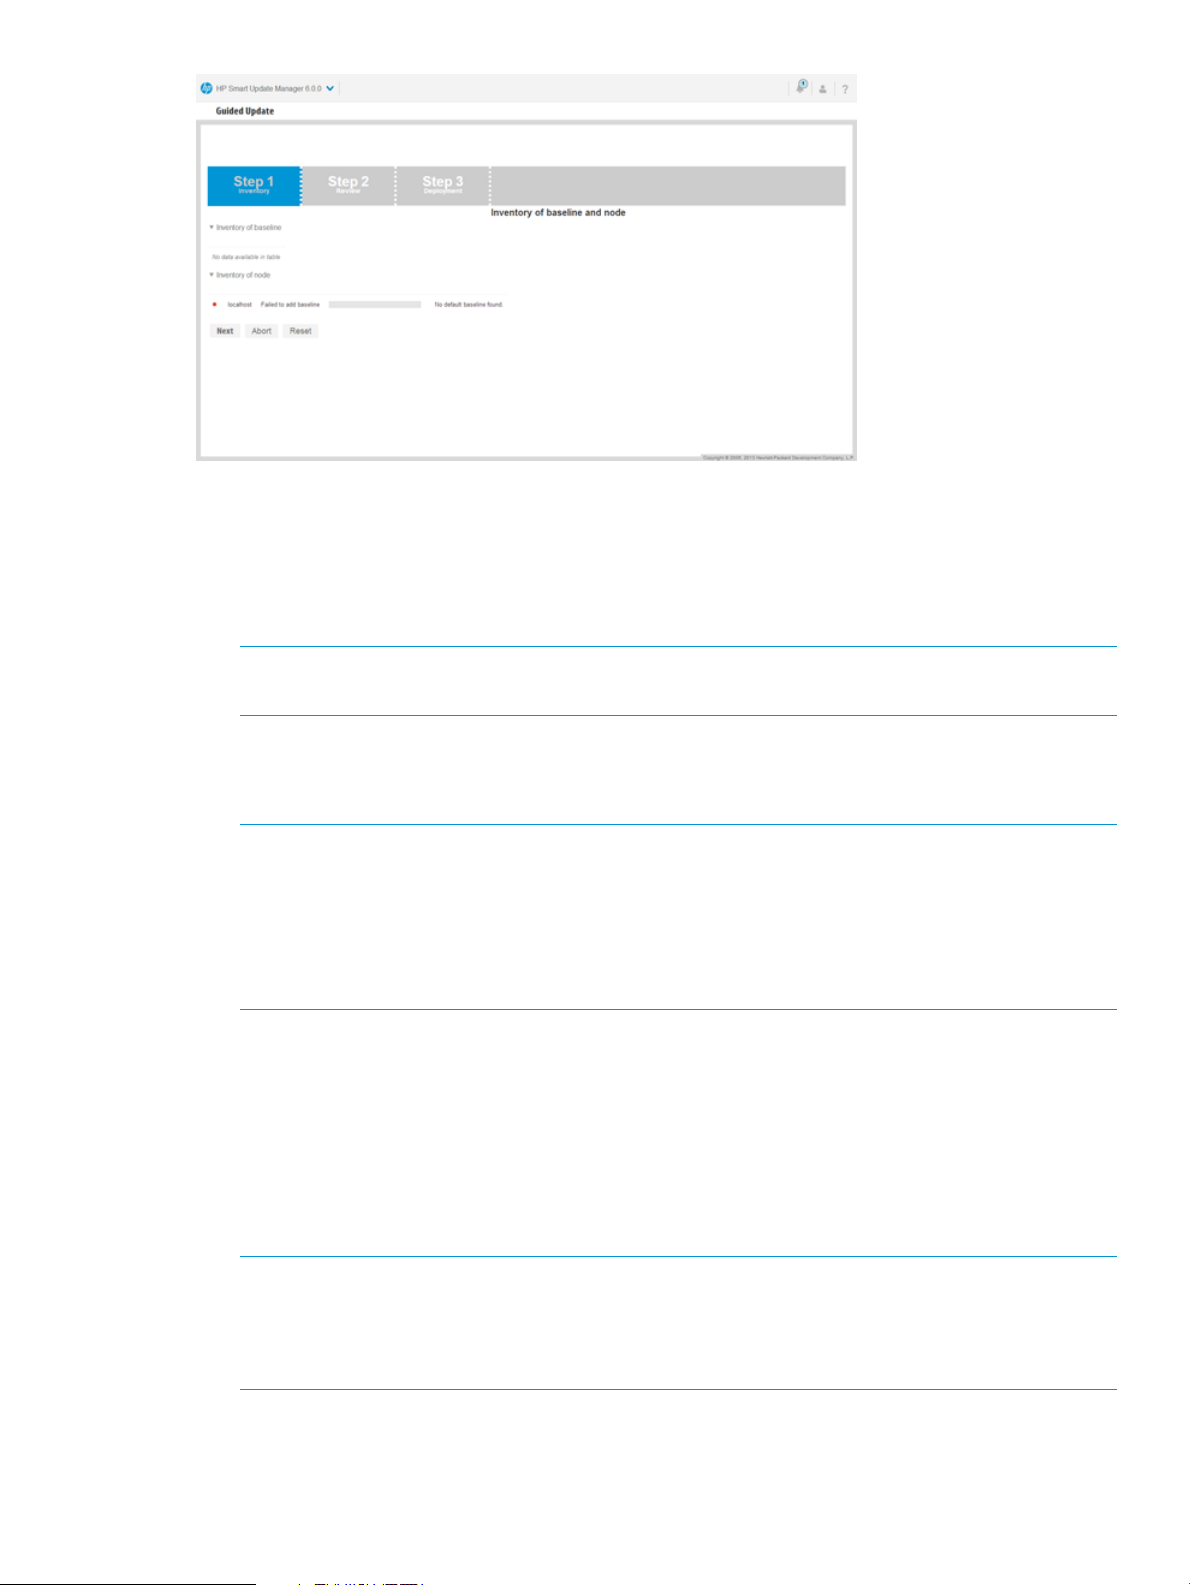
Using Guided Update in Interactive mode
1. In the navigation menu, click Guided Update.
2. Click Interactive.
3. Click OK.
4. HP SUM displays the baseline and the localhost.
NOTE: HP SUM automatically starts to take inventory of the baseline and the node. The
inventory process duration varies based on the number of updates in the baseline.
5. Click Next after HP SUM finishes the inventory.
Recommended updates ready to deploy are highlighted in blue and HP SUM displays a green
icon in the Ready to proceed column.
NOTE: Items that are up-to-date or optional are not highlighted. Click Force to deploy these
updates. If you want to globally select all components to rewrite or downgrade, click
Actions+Advanced Options and select Rewrite or Downgrade. Click Analyze, and HP SUM
performs an analysis again.
NOTE: Double-click an update to view the component details. If you want to view the
information in the new update, click the hyperlink.
6. Click Deploy.
HP SUM performs component analysis before deploying updates.
7. Review the installation log files.
Using Guided Update in Automatic mode
1. In the navigation menu, click Guided Update.
2. Click Automatic.
3. Click OK.
NOTE: HP SUM begins to deploy updates after you click OK. HP SUM does not support
aborting updates in the Guided Update Automatic mode.
NOTE: HP SUM does not support installing SNMP, WBEM Providers, and AMS components
in automatic mode. Use Interactive mode if you want to install these components.
Using Guided Update 17
Page 18
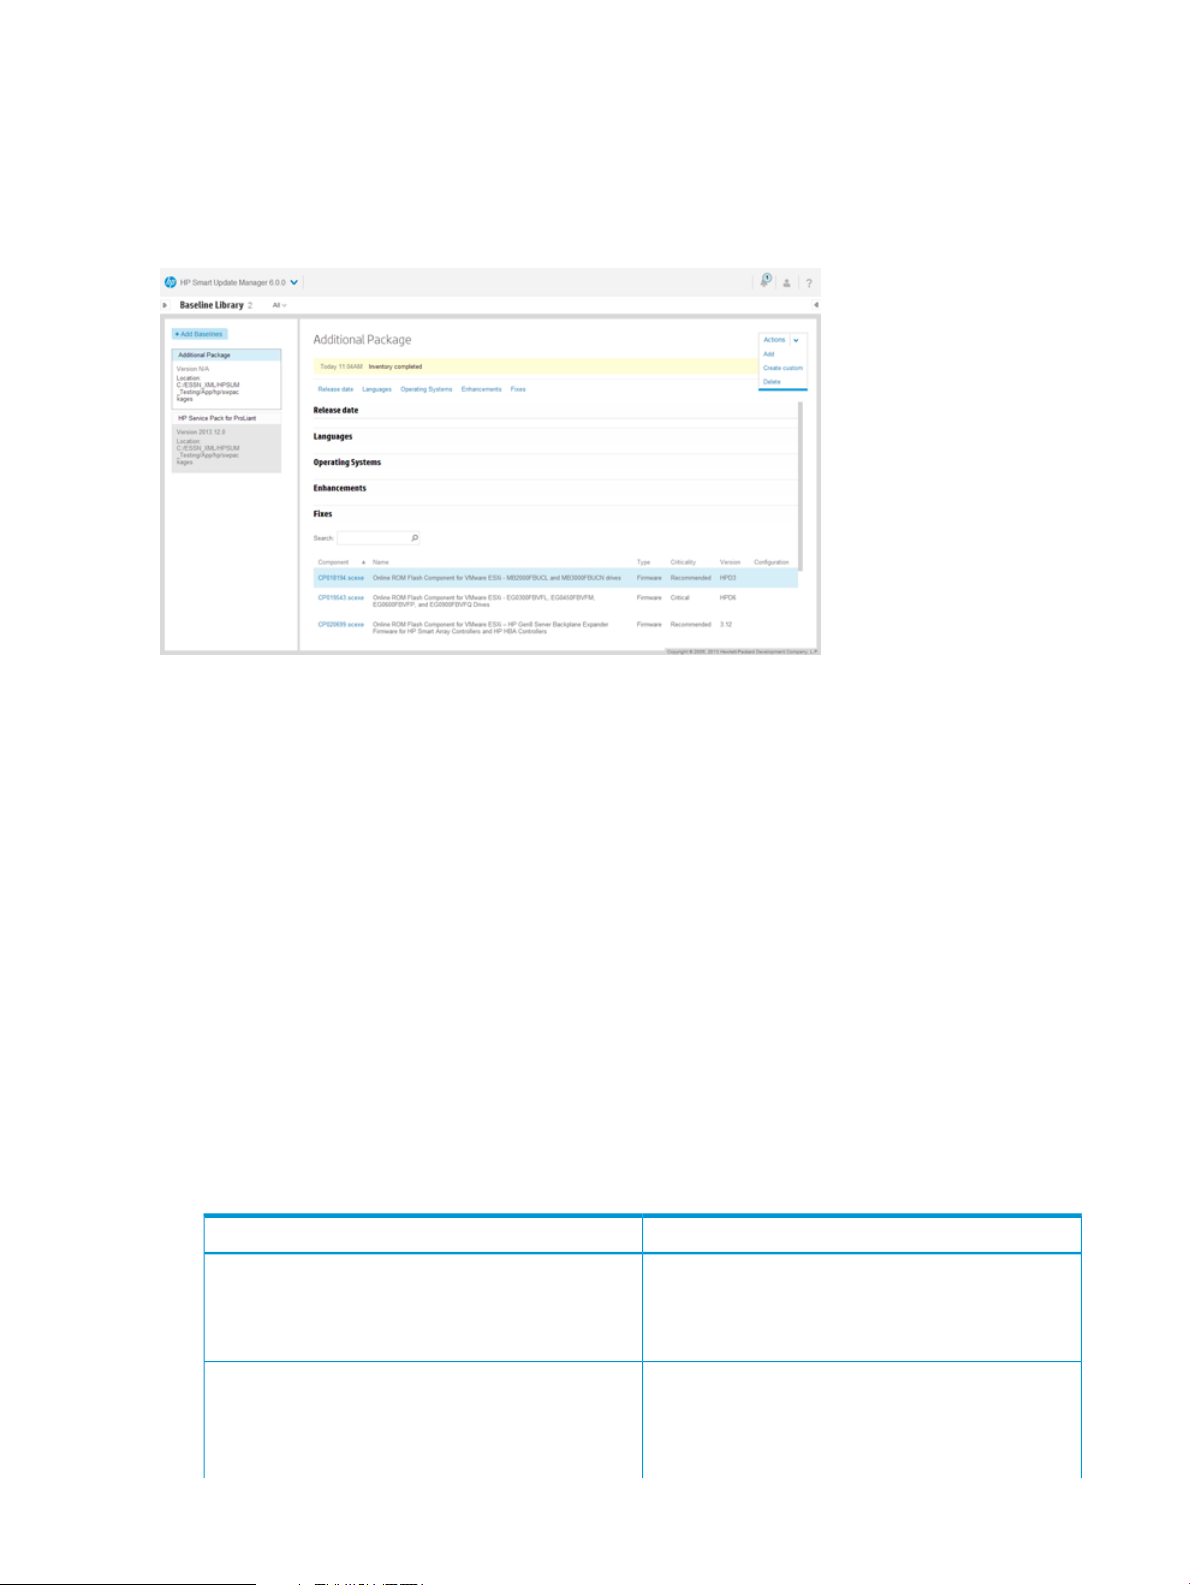
Using the Baseline Library screen
The Baseline Library screen displays the baselines and additional packages you will use to update
your nodes. Baselines include the HP SPP, HP Integrity bundle, or custom baselines that include
updates that you select from other baselines or additional packages. Additional packages are
directories that hold updates that are not included in a named update package, for example a
Hot Fix. HP SUM saves baseline information between sessions.
HP SUM displays each added baseline in the left pane. Select a baseline, and HP SUM displays
the following information for each baseline and additional package.
• Release date
• Languages
• Operating systems
• Enhancements
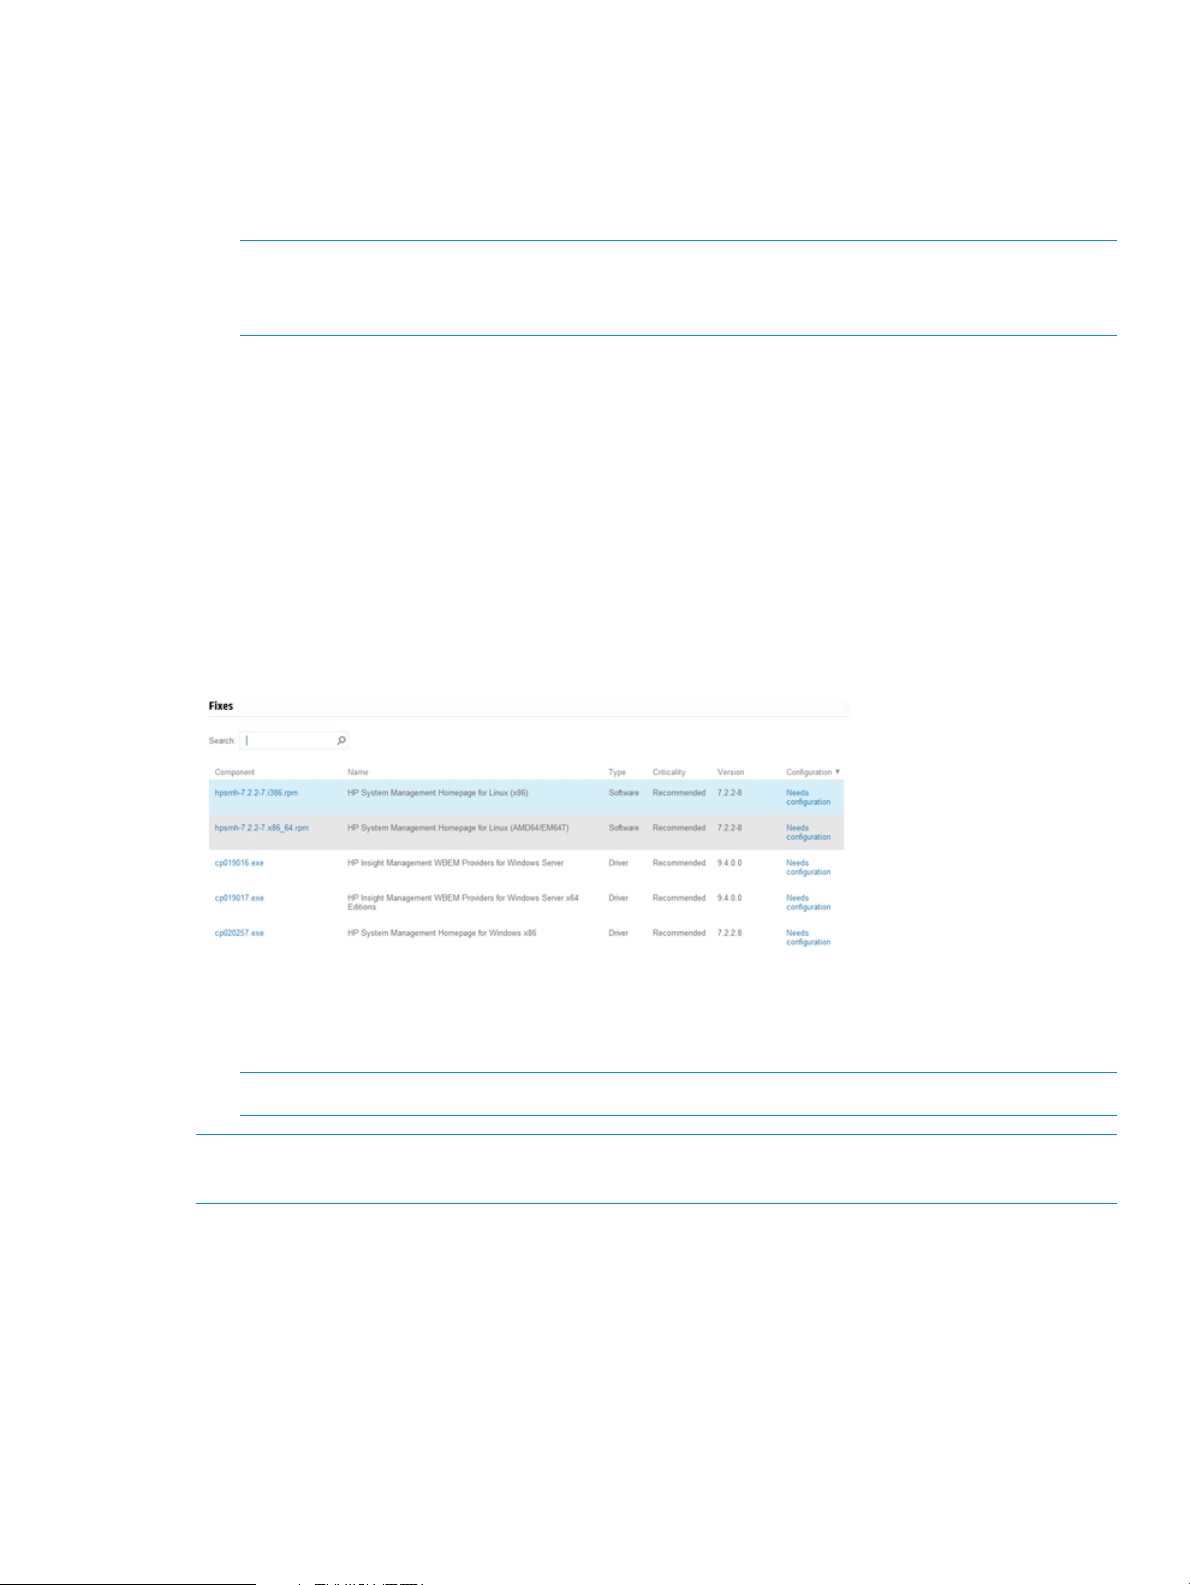
• Fixes – HP SUM includes a search box for finding updates that meet the search parameters.
You can search on file name, description, and update type.
Double-click an update to view its details.
• Component configuration – You need to configure some components before you can deploy
the update. For more information about configuring components, see “Configuring components”
(page 21).
Adding a baseline
1. On the Baseline Library screen, click Add baselines.
2. Do one of the following:
HP SUM default location: This location uses a directory
or file share that the system running HP SUM can access.
Follow these steps:To add this baseline:
a. Select the location type HP SUM default location.
b. Enter the directory path to the baseline, or click
Browse and use the menu to navigate to the
directory.
UNC path (for example \\host\dir): This location uses
UNC paths that the system can access.
NOTE: UNC path is only supported in Windows
systems.
18 Using the HP SUM GUI
a. Select the location type UNC path (for example
\\host\dir).
b. In the Enter URI for the baseline field, type the UNC
address for the source baseline.
Page 19

Follow these steps:To add this baseline:
c. Enter the username, required.
d. Enter the password, required
NOTE: HP SUM does not support mapped UNC
drives.
Download from hp.com: This location downloads
updates from ftp.hp.com. HP SUM downloads the latest
versions of updates that HP has released.
a. Select the location type Download from HP.
b. Click Browse and use the menu to navigate to the
directory where you want to save the custom
baseline.
c. Enter the URI for the proxy server. (Only required if
you chose to use proxy server.)
d. Enter the username. (Only required if you chose to
use proxy server.)
e. Enter the password. (Only required if you chose to
use proxy server.)
f. Click Done.
NOTE: HP SUM adds all baselines in a directory.
3. Click Add.
Check the activity log to see the status of the baseline.
NOTE: If the baseline does not appear in the baseline list, make sure there are updates in
the directory.
NOTE: HP SUM begins to inventory a baseline as soon as you finish adding the baseline. To
minimize the impact on system resources, HP SUM does not recommend adding other baselines
until the baseline inventory process finishes.
Creating a custom baseline
Creating a custom baseline allows you to deploy specific updates, minimize the size of update
baselines or bootable and non-bootable ISOs, and standardize the updates that you deploy to
your environment.
NOTE: To create a custom bootable ISO, you must have a bootable HP SPP or HP SUM ISO
available in your source baselines.
1. From the Baseline Library screen, click Actions→Create Custom.
2. In the Description text box, enter a description for the baseline. The maximum length for the
description is 50 characters.
3. In the Version boxes, use the navigation arrows to create a version number, for example
2013.5.21.
NOTE: The Baseline Name is automatically generated by combining the description and
version.
4. In the Output Location field, click Browse to navigate to a directory where you want to save
the baseline.
NOTE: HP SUM does not support creating a new directory when it creates the custom
baseline. Create the new directory outside of HP SUM.
NOTE: Do not save more than one custom baseline in a directory.
Using the Baseline Library screen 19
Page 20

5. Select Make Bootable ISO file if you want to create a bootable ISO with your baseline.
If you choose to make a bootable ISO, click Browse and choose a directory where HP SUM
can find the source for the bootable ISO. The custom baseline bootable ISO includes the
version of HP SUM included in the source ISO. For example, if you choose the HP SUM 6
ISO as the source ISO, HP SUM 6 is included in the ISO. If you choose the ISO with the SPP
2013.09.0 as the source ISO, then HP SUM 5.3.5 is included in the ISO.
6. Select whether you want to Run in background or not.
If you select to create the baseline in the background, you can monitor the progress in the
Activity screen. For more information, see “Using the Activity screen” (page 16).
7. In the Baseline Sources section, select the baselines that contain the components you want to
include in the custom baseline.
NOTE: If the same component is included in more than one source baseline, HP SUM lists
the component multiple times. If you select the component from multiple baselines, HP SUM
displays the component multiple times when you add it as a baseline, but the baseline only
includes one copy of the component file.
8. In the Filters section, select the Component Type you want to choose, Firmware, Software, or
Both.
9. In the Filters section, select each kind of update you want to include in the baseline:
• Critical Updates: Updates that HP requires you to deploy immediately.
• Recommended Updates: Updates that HP recommends you deploy at your earliest
convenience.
• Optional Updates: Update to this version if your system is affected by one of the
documented fixes, or if there is a desire to utilize any of the enhanced functionality
provided by this version.
10. Select the Advanced Filters you want to apply to the baseline:
OptionsFilter category
Select the system architecture to include in the baseline.Architecture
Select the operating systems to include in the baseline.OS Type
Select the device types to include in your baseline.Device Type
11. Click Apply Filters. HP SUM displays a list of available updates.
12. Select the individual component updates you want to include in your baseline.
Use the search function to find specific updates in the list.
13. Click Create ISO or Save Baseline to create the baseline.
When you click Create ISO or Save Baseline, HP SUM does not close the Create Custom
Baseline screen, in case you want to create another custom baseline.
NOTE: If you create an ISO, HP SUM also creates a baseline in the directory. You can add
this baseline to HP SUM so you can use it locally.
IMPORTANT: Do not create more than one custom baseline containing a large number of
components at a time.
14. Click Close to close the Create Custom Baseline screen.
NOTE: HP SUM does not automatically add the custom baseline to the Baseline Library. For more
information on adding a baseline, see “Adding a baseline” (page 18).
20 Using the HP SUM GUI
Page 21
Deleting a baseline
HP SUM does not support deleting a baseline if it is associated with a node.
To delete a baseline:
1. On the Baseline Library screen, select a baseline.
2. Click Actions→Delete.
NOTE: If the baseline is associated with one or more nodes, HP SUM displays a list of the
nodes. Edit the nodes to change the associated baseline, or delete the node. For more
information, see “Editing a node” (page 25) or “Deleting a node” (page 28).
3. Click Yes, delete to confirm that you want to delete the baseline.
Configuring components
Some components might have required or optional configuration settings. Configuration parameters
include information necessary to set up the component correctly or passwords required for software
installed by the component. The configuration is stored within the component and is propagated
to all nodes. If the optional configuration data of a component is not provided and the component
has not been installed previously, the default values for that configuration data are used. If the
component has been previously installed and configured and no changes are made to the
configuration data, the existing configuration information is preserved. Component configuration
requires that Smart Components are in a write-accessible location. A CD, DVD, or read-only network
share is not supported. You can change component options from the Baseline Library screen.
To configure components:
1. On the Baseline Library screen, scroll down to the list of components, and then click Needs
Configuration for each component you need to configure.
NOTE: Configuration options vary based on the component.
NOTE: HP SUM 6.0 does not support configuring components released prior to the HP SPP
2013.09.0. Use HP SUM 5.3.5 to update these components.
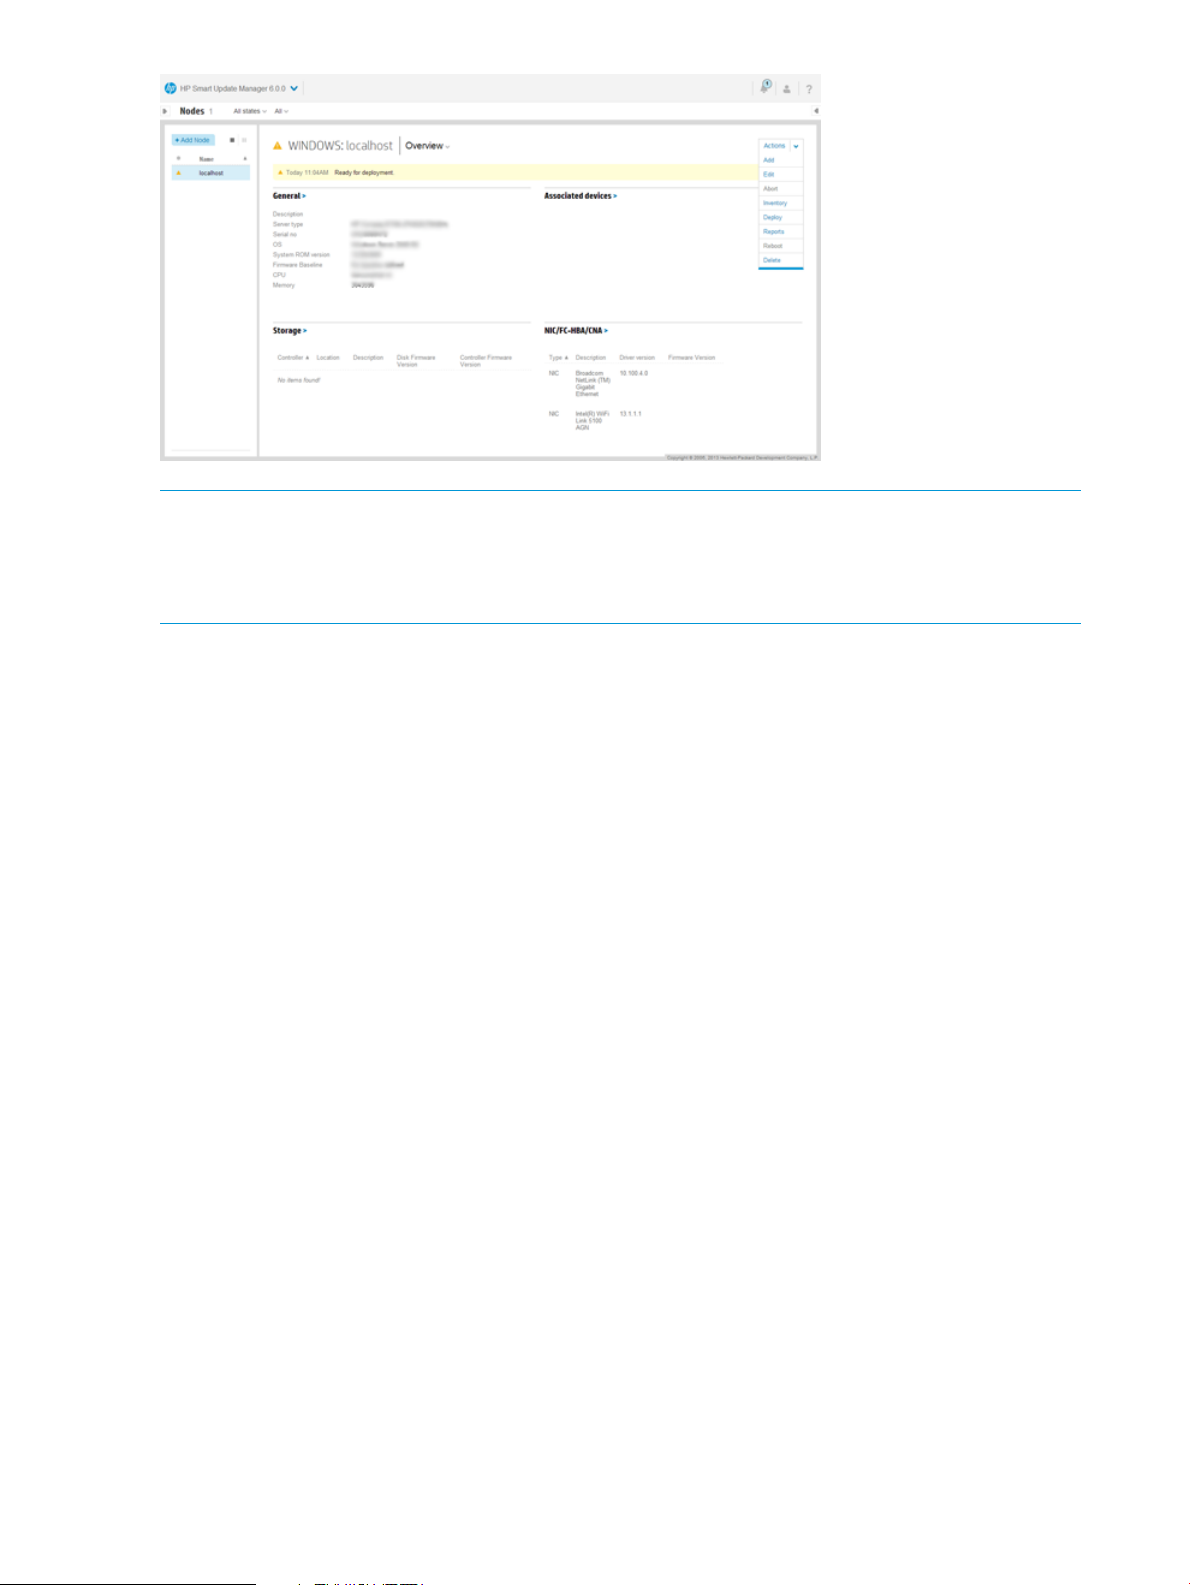
Using the Nodes screen
Nodes are hardware environment components. The Nodes screen displays the nodes that you
have added to HP SUM and HP SUM can manage. On the Nodes screen, HP SUM displays four
sets of information about the node:
• General
• Associated devices
• Storage
• NIC/FC-HBA/CNA
Using the Nodes screen 21
Page 22
NOTE: The details that HP SUM displays vary based on the node type.
NOTE: If this is the first time you are running HP SUM 6, and have set up targets in HP SUM 5.x,
you can use a migration script to populate the Nodes screen in HP SUM 6.0. For more information,
see “Migrating nodes from HP SUM 5.x to HP SUM 6” (page 10).
Selecting multiple nodes
On the Nodes screen, select more than one node by pressing CTRL and clicking the other nodes.
If you select multiple nodes, you can:
• View node IP address, node type, and other information
• Generate, set report options, and view reports in the Reports Center
• Choose baselines to use with the nodes
• Set reboot and force options
• Change credentials
Adding a node
You can add a node using a specific IP address, or by searching an IP address range.
Adding a single node by IP address
1. From the Nodes screen, click Add Node.
2. Enter the IP address for the new node in the IP/DNS field.
22 Using the HP SUM GUI
Page 23
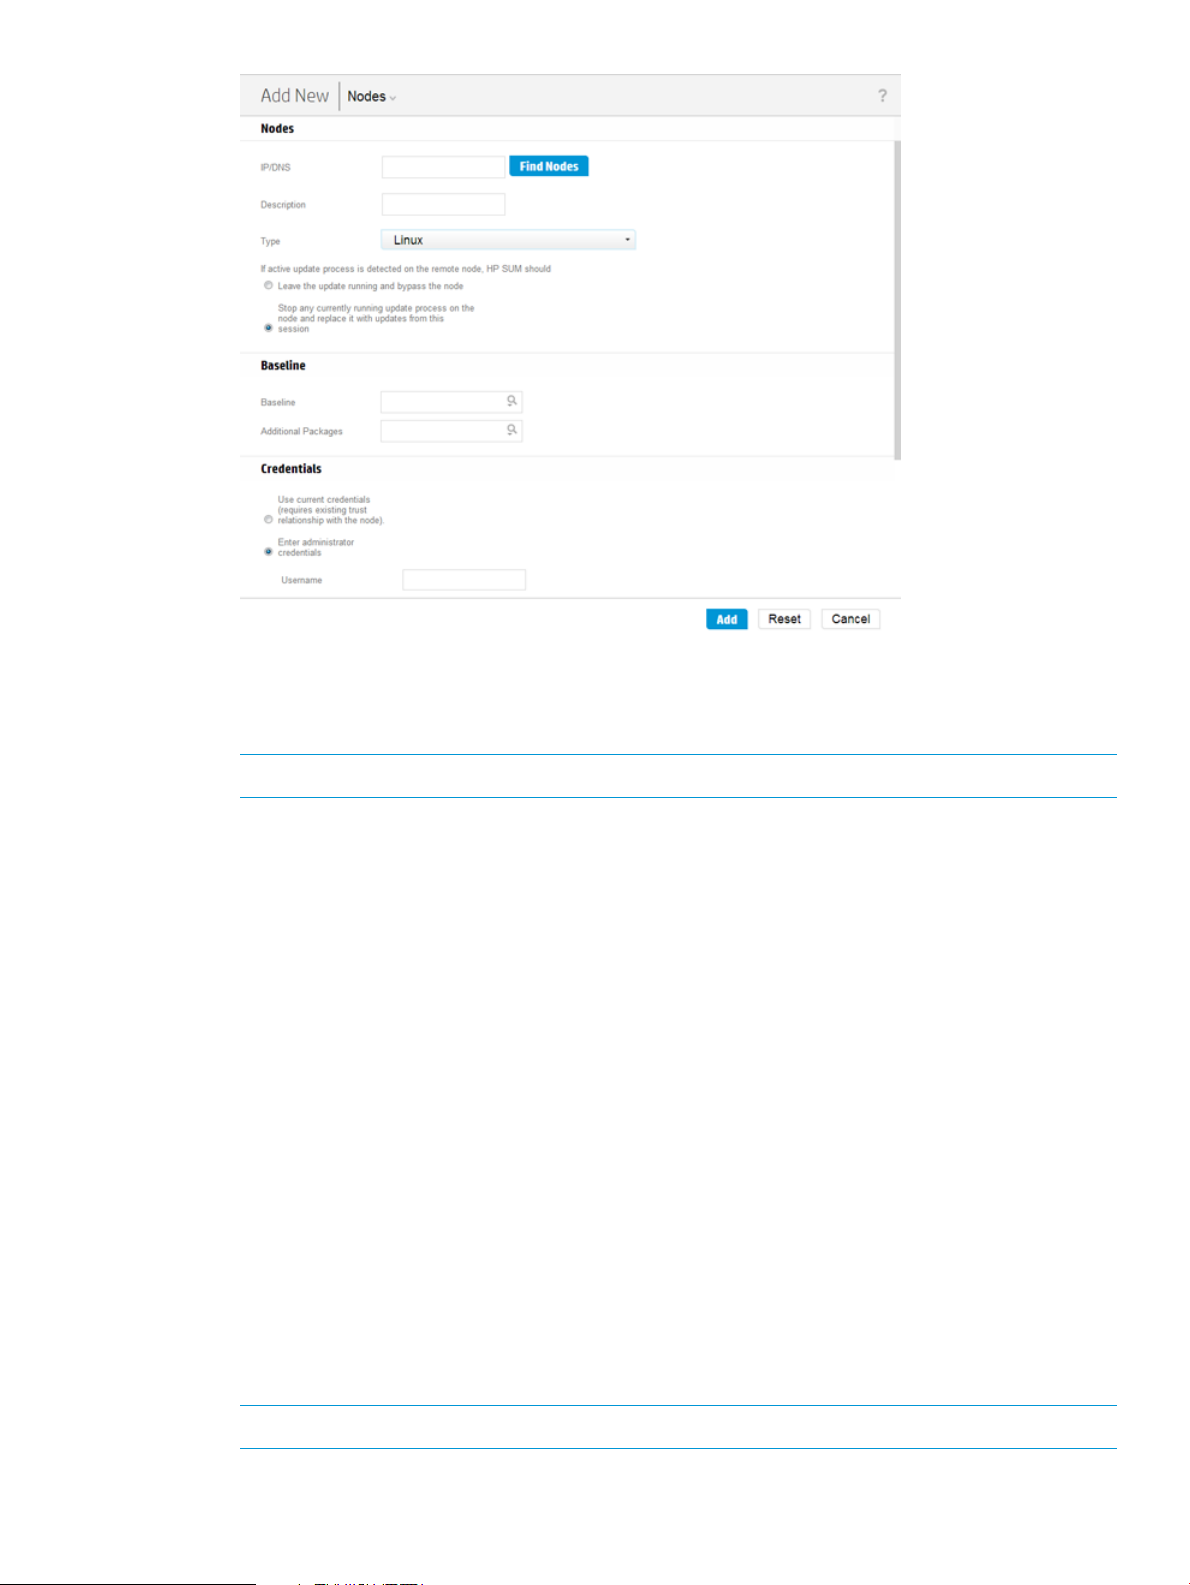
3. Enter a description for the node.
4. In the Type field, select the node type. If you do not know the node type, select Unknown.
During the inventory process, HP SUM determines the node type.
NOTE: Selecting the correct node type might help HP SUM complete node inventory faster.
Some nodes allow you to select the check-box so that HP SUM automatically adds Associated
Devices. The associated devices identified varies based on the node type. Select what you
want HP SUM to do if it discovers updates already running on the node:
• Leave the update running and bypass the node
• Stop any currently running update process on the node and replace it with updates from
this session
5. If you want, select the baseline, additional package, or both to apply to this node. For more
information on adding a baseline, see “Adding a baseline” (page 18).
6. Select one of the following:
• Use current credentials (requires existing trust relationship with the node): This option is
for Windows nodes only.
• Enter administrator credentials
7. Linux nodes allow you to use sudo credentials to deploy updates without logging into the node
with root credentials. To use sudo commands, you have to install sudo capabilities on the
node.
If you want to use sudo, in the Access Level field, select one of the following.
• Click Use sudo to update components if you want to use sudo credentials.
• Click Enter super user credentials to update components if you want to enter sudo
credentials.
NOTE: Enter the sudo credentials in the Credentials field.
8. Click Add.
Using the Nodes screen 23
Page 24
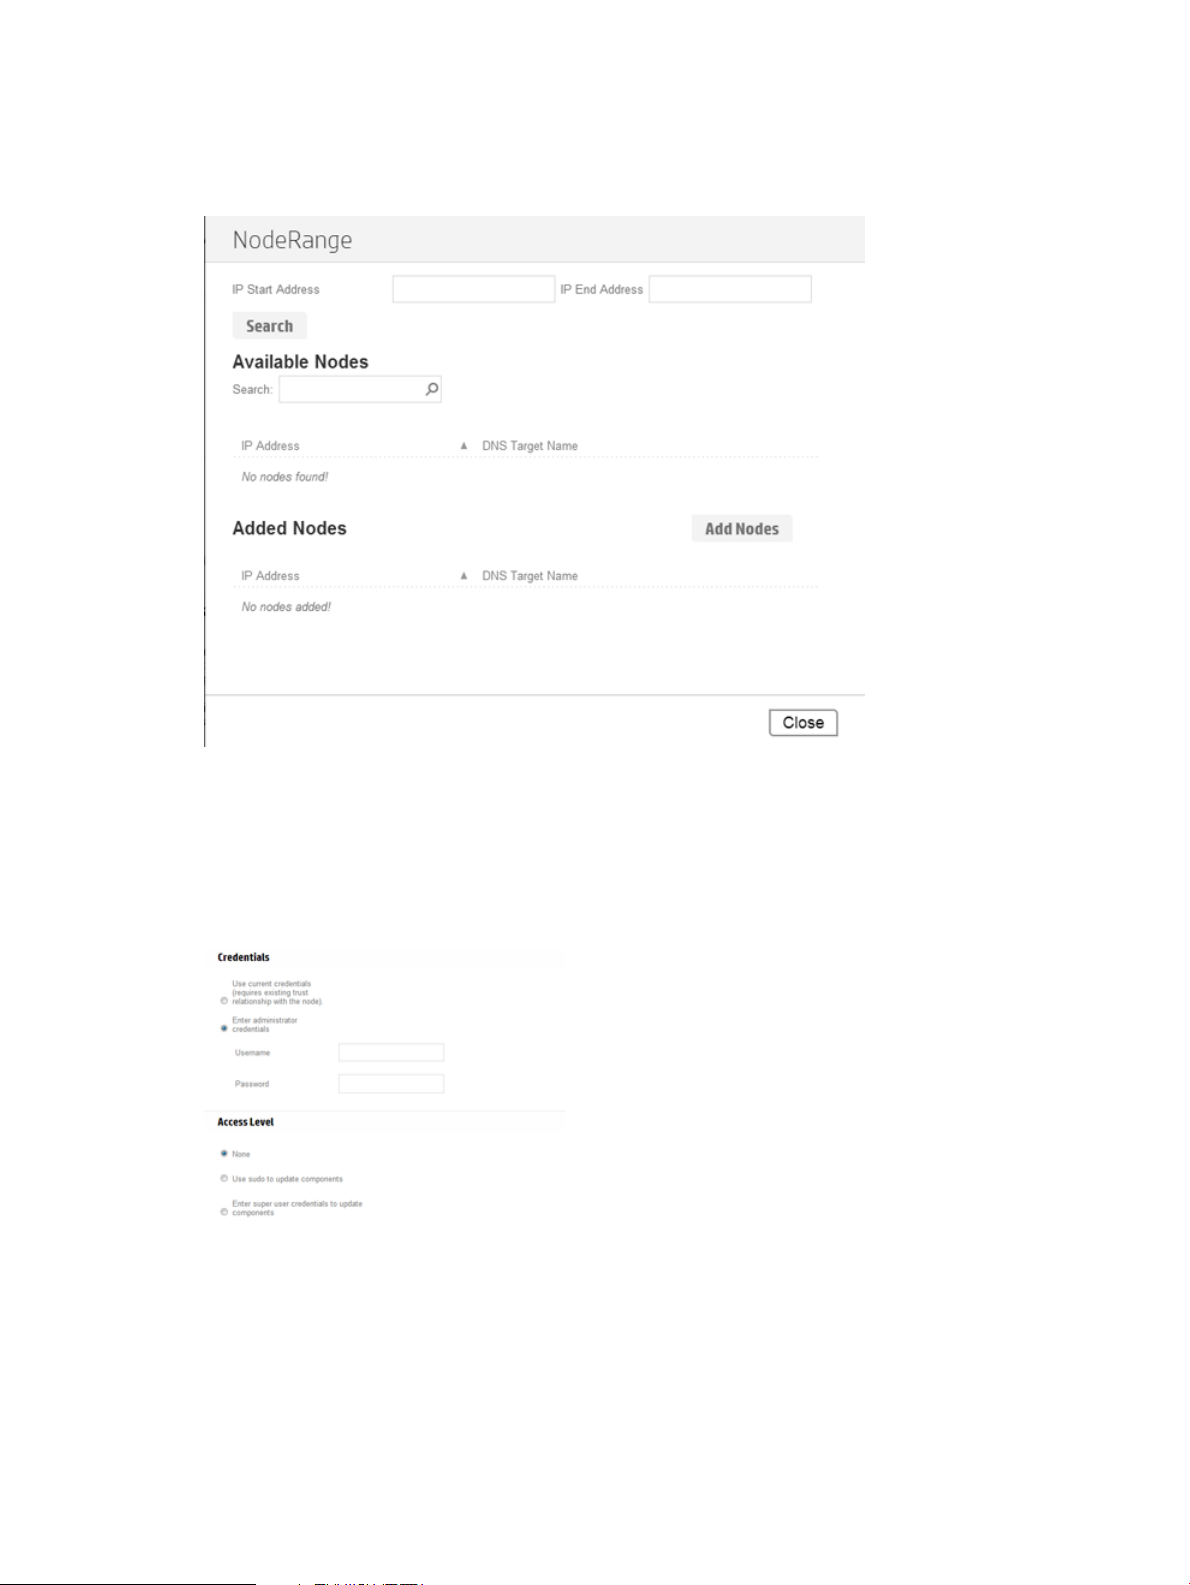
Adding a node by searching a range of IP addresses
1. From the Nodes screen, click Add Node.
2. Click Find Nodes.
3. Enter a range of IP addresses for HP SUM to search, and click Search.
4. Select the nodes you want to add, and then click Add.
5. In the Baselines section, select a Baseline, Additional Packages, or both (Optional).
6. In the Credentials section, select whether to Use current user credentials or Enter administrator
credentials (Windows only).
If you choose to enter administrator credentials, enter a username and password.
7. Click Add.
In the Added Nodes section, HP SUM displays the nodes you selected.
8. Click Close to go back to the Nodes screen.
24 Using the HP SUM GUI
Page 25

Editing a node
1. From the Nodes screen, highlight the node and then click Actions→Edit.
2. Change the items you want to edit:
• Description
• Type
• HP SUM displays the currently selected baseline and additional package. Use the
• Credentials
• OS Management Options – None, Use SNMP, Agentless Management Service, Use
• Reboot Options – Reboot system, Reboot delay, Reboot message
• Installation Options – Downgrade or rewrite versions
NOTE: Select the check-box if you want HP SUM to automatically add Associated
Devices. (Not available for all node types.)
drop-down menu if you want to change these.
NOTE: If you want to delete a baseline or additional package, the baseline or additional
package cannot be associated with a node. Associate a new baseline or delete the node
to delete a baseline.
WBEM
• Force Options – Show firmware or software updates
3. Click OK to accept the changes and return to the Nodes screen.
NOTE: Make sure HP SUM has completed all functions, for example, node inventory or
deployment, before you edit a node.
Aborting a node update
If you have deployed updates to a node and want to cancel the updates:
1. From the Nodes screen, highlight the node, click Actions→Abort.
NOTE: If HP SUM has started to perform updates, it completes the component update it is
deploying, and then abort the remaining component updates.
Node inventory
The node inventory collects information about the node, and the firmware, software, and driver
versions installed on the node.
NOTE: HP SUM cannot inventory a node if the credentials are not valid. If the credentials are
not valid for the node, edit the node credentials. For more information, see “Editing a node” (page
25).
To inventory a node:
1. From the Nodes screen, highlight the node and then click Actions→Inventory.
2. Select a baseline, additional package, or both to apply to the node.
3. Click Inventory.
Using the Nodes screen 25
Page 26

NOTE: If you perform inventory on an OA node, HP SUM automatically adds and inventories
the associated nodes if you select the check box on the Add Nodes screen. You need to add VC
credentials separately. If you perform inventory on other nodes, HP SUM does not find an associated
OA until the end of the inventory process. You need to add credentials to the OA and then perform
inventory on the OA node.
Deploying a node
When you open the Deploy screen, HP SUM displays the IP/DNS address for the node and the
node type. To set deployment options:
1. From the Nodes screen, select a node to update, and then click Actions→Deploy.
NOTE: The Deploy function only deploys the current partition if you are updating an HP
Integrity BL870c i4 and BL890c i4 server. If you want to deploy an enclosure, see “Deploying
all partitions in an HP Integrity BL870c i4 or BL890c i4 node” (page 27).
2. If you want to change installation options, click Installation Options and then select from the
following:
• Downgrade: This allows you to downgrade all of the components in the node to an older
firmware version without clicking Force for each component in the baseline library list.
• Rewrite: This allows you to rewrite the current firmware version to components in the node
without clicking Force for each component in the baseline library list.
3. If you want to downgrade or rewrite options to firmware or software only, click Force options
can be applied to, and then select from the following:
• Firmware: This displays only firmware updates.
• Software: This displays only software updates.
4. In the Associated Node Details field, select any nodes that you want to update.
5. In the Baseline Library field, select each component that you want to update. Use the Search
box to type in search terms for the components. For more information about an update, click
26 Using the HP SUM GUI
Page 27

the version number. If you are deploying a Linux node, HP SUM displays only RPM updates
that are valid for your node.
NOTE: You can click Force to downgrade or rewrite a component that is available for
downgrade or rewrite. If you select Downgrade, Rewrite, or both in the Installation Options,
HP SUM does not display the Force button.
NOTE: HP SUM supports configuring components on the Baseline Library screen. For more
information, see “Configuring components” (page 21).
6. If you want to change when the node reboots after an update, click Reboot Options and do
the following:
a. In Reboot System After Installation, select No, If Needed, or Always.
b. In Reboot Delay (seconds), enter the number of seconds you want the node to wait before
beginning the reboot.
c. In the text box, enter a reboot message of up to 255 characters to display before the
node reboots.
NOTE: If HP SUM cannot successfully deploy all updates in a node, it does not reboot the
node. View the deployment logs to find and resolve the issue before you reboot the node.
7. Click Analyze, and then click Deploy to begin the deployment.
NOTE: To begin the deployment, all dependency issues must be resolved, for example,
adding a baseline, administrator credentials, and supported installed versions.
8. Click View log for the node, in the General section of the Node screen, and then click View
log for the component you installed, to view the details of the installation.
Deploying all partitions in an HP Integrity BL870c i4 or BL890c i4 node
1. Inventory the HP Integrity BL870c i4 or BL890c i4 node partition.
When HP SUM completes the inventory, it displays associated partitions in the Associated
Devices section.
NOTE: You might need to inventory all of the associated nodes before proceeding with
deployment.
2. Click Do Deploy Domain in the yellow status box.
3. On the Deploy Integrity iLO Domain screen, click Deploy.
NOTE: If HP SUM does not display all the associated devices, manually add the nodes. For
more information about adding a node, see “Adding a node” (page 22).
4. Select the following
• In the Baselines section, select the baselines you want HP SUM to use.
• In the Installation Options section, select if you want to downgrade or rewrite the updates.
• In the Reboot Options, select any partitions you want to reboot after updating.
NOTE: If you make any changes to these sections, click Analysis.
5. Click Deploy.
HP SUM closes the Deploy Integrity iLO Domain screen, and updates the domain.
Using the Nodes screen 27
Page 28
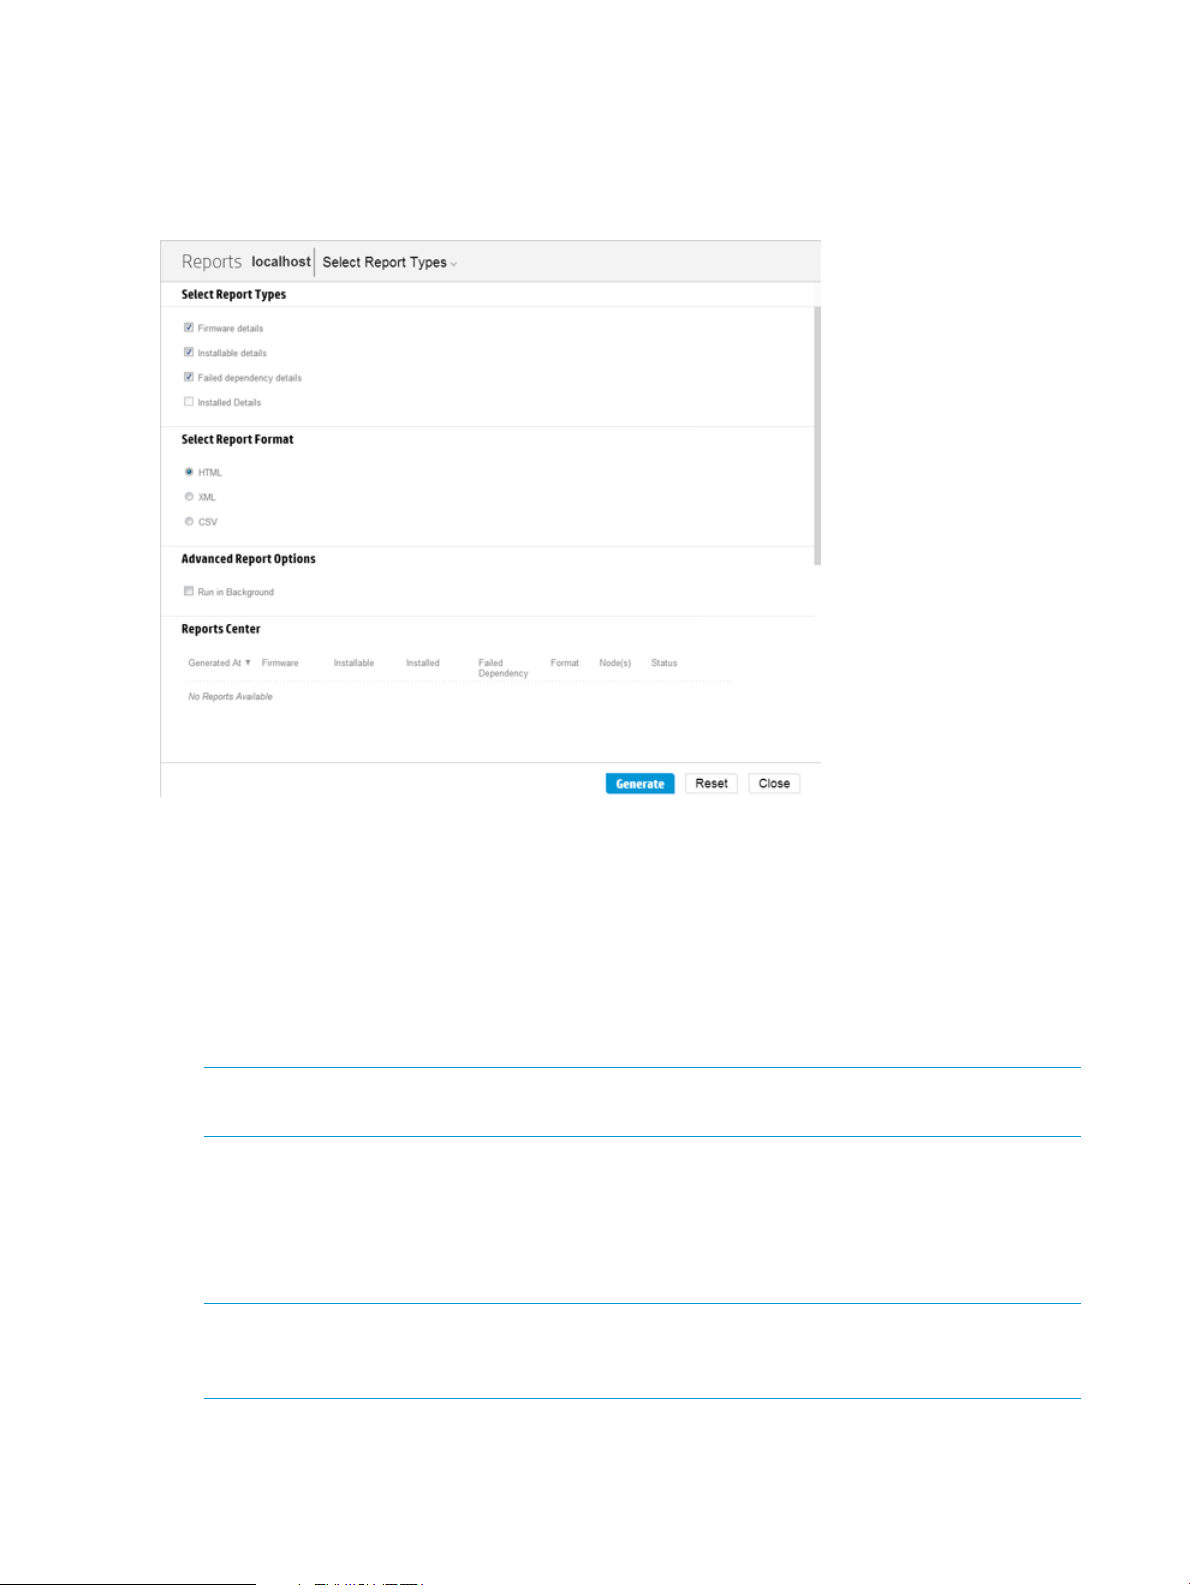
Node reports
You can generate reports that give details about the node firmware, software, and driver details,
components you can install, failed dependencies for nodes, and updates HP SUM installs. The
reports for a node enable you to generate HTML, XML, and CSV reports. On the Reports screen,
HP SUM includes a Reports Center that displays previous reports you have generated.
To generate a report:
1. From the Nodes screen, highlight a report, and then click Action→Report.
2. Select the reports you want to generate:
• Firmware details: This displays firmware versions that are currently installed on the node.
• Installable details: This displays components that HP SUM can install on the node.
• Failed Dependency details: This displays any failed dependencies on the node.
• Installed details: This displays details about what HP SUM installed on a node.
NOTE: If you cannot select a report, HP SUM might not have enough information to generate
the report.
3. Click the report format you want HP SUM to generate, HTML, CSV, or XML.
4. Click Generate.
Deleting a node
1. From the Nodes screen, highlight the node, and then click Actions→Delete.
NOTE: If you want to delete a baseline, the baseline cannot be associated with any nodes.
You can delete the node and then delete the baseline. If you delete the node, and want to
deploy updates to the node, you will have to re-add the node.
2. Click Yes, Delete to confirm you want to delete the node.
28 Using the HP SUM GUI
Page 29

Server overview
When you select a node, the Server Overview screen displays a progress bar for inventory and
deployment of the node, and information about the node. You can change the baseline for the
server on this screen.
During the inventory and deploy process, HP SUM displays a progress bar for current tasks.
NOTE: If you added an Integrity node, see “Integrity node overview” (page 29) for more
information.
Integrity node overview
If you added an Integrity node, HP SUM automatically displays the Server Overview screen after
HP SUM finishes inventorying and adding the node. HP SUM displays the following information:
• Model
• Associated OA (if the node is a blade)
• Complex firmware version
• Location
• Part number
• Serial number
• List of devices
The following actions are available from the Overview screen:
• Add: For more information, see “Adding an enclosure” (page 29).
• Edit: For more information, see “Editing a node” (page 25).
• Report: For more information, see “Node reports” (page 28).
• Deploy: For more information, see “Deploying a node” (page 26).
Using the Enclosures screen
The Enclosures screen displays all of the enclosure nodes that HP SUM has inventoried. You can
manage your enclosures from this screen.
Adding an enclosure
1. From the Enclosure screen, click Add Enclosure.
2. The Add Enclosure procedure is the same as the Add Node procedure. For more information,
see “Adding a node” (page 22).
Editing an enclosure
1. From the Enclosures screen, highlight the enclosure you want to edit.
2. Click Actions→Edit.
3. The Edit Enclosure procedure is the same as the Edit Node function. For more information,
see “Editing a node” (page 25).
Aborting an enclosure update
1. From the Enclosures screen, highlight the enclosure whose updates you want to cancel.
2. Click Actions→Abort.
Using the Enclosures screen 29
Page 30

Enclosure inventory
1. From the Enclosures screen, highlight the enclosure on which you want to take inventory.
2. Click Actions→Inventory.
3. The Enclosure Inventory procedure is the same as Node Inventory procedure. For more
information, see “Node inventory” (page 25).
Deploying an enclosure
1. From the Enclosures screen, highlight the enclosure you want to deploy.
2. Click Actions→Deploy.
3. The Enclosure Deploy procedure is the same as the Node Deploy procedure. For more
information, see “Deploying a node” (page 26).
Enclosure reports
1. From the Enclosures screen, highlight the enclosure for which you want to generate reports.
2. Click Actions→Reports.
3. The Enclosure Report procedure is the same as the Node Reports procedure. For more
information, see “Node reports” (page 28).
Deleting an enclosure
1. From the Enclosures screen, highlight the enclosure you want to delete.
2. Click Actions→Edit.
3. Click Yes, delete to delete the enclosure.
Using the Servers screen
The Servers screen displays all of the server nodes that HP SUM has inventoried. You can manage
your servers from this screen.
Adding a server
1. From the Server screen, click Add Server.
2. The Add Server procedure is the same as the Add Node procedure. For more information,
see “Adding a node” (page 22).
Editing a server
1. From the Server screen, highlight the server you want to edit.
2. Click Actions→Edit.
3. The Edit Server procedure is the same as the Edit Node procedure. For more information, see
“Editing a node” (page 25).
Aborting a server update
1. From the Servers screen, highlight the server whose updates you want to cancel.
2. Click Actions→Abort.
Server inventory
1. From the Servers screen, highlight the server on which you want to take inventory.
2. Click Actions→Inventory.
3. The Server Inventory procedure is the same as the Node Inventory procedure. For more
information, see “Node inventory” (page 25).
30 Using the HP SUM GUI
Page 31

Deploying a server
1. From the Servers screen, highlight the server you want to deploy.
2. Click Actions→Deploy.
3. The Server Deploy procedure is the same as the Node Deploy procedure. For more information,
see “Deploying a node” (page 26).
Server reports
1. From the Servers screen, highlight the server for which you want to generate reports.
2. Click Actions→Reports.
3. The Server Reports procedure is the same as the Node Reports procedure. For more information,
see “Node reports” (page 28).
Deleting a server
1. From the Server screen, highlight the server you want to delete.
2. Click Actions→Delete.
3. Click Yes, delete to delete the server.
Using the Switches screen
The Switches screen displays only switch nodes that HP SUM has inventoried.
Adding a switch
1. From the Switches screen, click Actions→Add.
2. The Add Switch procedure is the same as the Add Node procedure. For more information,
see “Adding a node” (page 22).
Editing a switch
1. From the Switches screen, highlight the switch, and then click Actions→Edit.
2. The Edit Switch procedure is the same as the Edit Node procedure. For more information, see
“Editing a node” (page 25).
Aborting a switch update
1. From the Switches screen, highlight the switch whose updates you want to cancel.
2. Click Actions→Abort.
Switch inventory
1. From the Switches screen, highlight the switch on which you want to take inventory.
2. Click Actions→Inventory.
3. The Switch Inventory procedure is the same as the Node Inventory procedure. For more
information, see “Node inventory” (page 25).
Deploying a switch
1. From the Switches screen, highlight the switch you want to deploy.
2. Click Actions→Deploy.
3. The Switch Deploy function uses the same function as the Node Deploy function. For more
information, see “Deploying a node” (page 26).
Using the Switches screen 31
Page 32

Switch reports
1. From the Switches screen, highlight the switch for which you want to generate reports.
2. Click Actions→Reports.
3. The Switch Reports procedure is the same as the Node Reports procedure. For more information,
see “Node reports” (page 28).
Deleting a switch
1. From the Switches screen, highlight the switch.
2. Click Actions→Delete.
3. Click Yes, delete.
Using the VM Hosts screen
The VM hosts screen displays only VM host nodes that HP SUM inventoried.
Adding a VM host
1. From the VM hosts screen, click Actions→Add.
2. The Add VM host procedure is the same as the Add Node procedure. For more information,
see “Adding a node” (page 22).
Editing a VM host
1. From the VM hosts screen, highlight the VM host, and then click Actions→Edit.
2. The Edit VM host procedure is the same as the Edit Node procedure. For more information,
see “Editing a node” (page 25).
Aborting a VM host update
1. From the VM hosts screen, highlight the VM host whose updates you want to cancel.
2. Click Actions→Abort.
VM hosts inventory
1. From the VM hosts screen, highlight the VM host you want to take inventory.
2. Click Actions→Inventory.
3. The VM host Inventory procedure is the same as the Node Inventory procedure. For more
information, see “Node inventory” (page 25).
Deploying a VM host
1. From the VM hosts screen, highlight the VM host you want to deploy.
2. Click Actions→Deploy.
3. The VM host Deploy procedure is the same as the Node Deploy procedure. For more
information, see “Deploying a node” (page 26).
VM host reports
1. From the VM hosts screen, highlight the VM host for which you want to generate reports.
2. Click Actions→Reports.
3. The VM host report function uses the same function as the Node report function. For more
information, see “Node reports” (page 28).
32 Using the HP SUM GUI
Page 33

Deleting a VM host
1. From the VM hosts screen, highlight the VM host.
2. Click Actions→Delete.
3. Click, Yes, delete.
Using the iLO screen
The iLO screen displays only iLO nodes that you have added to HP SUM.
Adding an iLO
1. From the iLO screen, click Actions→Add.
2. The Add iLO procedure is the same as the Add Node procedure. For more information, see
“Adding a node” (page 22).
Editing an iLO
1. From the iLO screen, highlight the iLO you want to edit.
2. Click Actions→Edit.
3. The Edit iLO procedure is the same as the Edit Node procedure. For more information, see
“Editing a node” (page 25).
Aborting an iLO update
1. From the iLO screen, highlight the iLO whose updates you want to cancel.
2. Click Actions→Abort.
iLO inventory
1. From the iLO screen, highlight the iLO on which you want to take inventory.
2. Click Actions→Inventory.
3. The iLO inventory procedure is the same as the Node Inventory procedure. For more
information, see “Node inventory” (page 25).
Deploying an iLO
1. From the iLO screen, highlight the iLO you want to deploy.
2. Click Actions→Deploy.
3. The iLO Deploy procedure is the same as the Node Deploy procedure. For more information,
see “Deploying a node” (page 26).
iLO reports
1. From the iLO screen, highlight the iLO for which you want to generate reports.
2. Click Actions→Reports.
3. The iLO Reports procedure is the same as the Node Reports procedure. For more information,
see “Node reports” (page 28).
Deleting an iLO
1. From the iLO screen, highlight the iLO.
2. Click Actions→Delete.
3. Click Yes, delete.
Using the Intelligent Power Distribution Units screen
The iPDU screen displays only iPDU nodes that you have added to HP SUM.
Using the iLO screen 33
Page 34

Adding an iPDU
1. From the iPDU screen, click Actions→Add.
2. The Add iPDU procedure is the same as the Add Node procedure. For more information, see
“Adding a node” (page 22).
Editing an iPDU
1. From the iPDU screen, highlight the iPDU you want to edit.
2. Click Actions→Edit.
3. The Edit iPDU procedure is the same as the Edit Node procedure. For more information, see
“Editing a node” (page 25).
Aborting an iPDU update
1. From the iPDU screen, highlight the iPDU whose updates you want to cancel.
2. Click Actions→Abort.
iPDU inventory
1. From the iPDU screen, highlight the iPDU on which you want to take inventory.
2. Click Actions→Inventory.
3. The iPDU Inventory procedure is the same as the Node Inventory procedure. For more
information, see “Node inventory” (page 25).
Deploying an iPDU
1. From the iPDU screen, highlight the iPDU you want to deploy.
2. Click Actions→Deploy.
3. The iPDU Deploy procedure is the same as the Node Deploy procedure. For more information,
see “Deploying a node” (page 26).
iPDU reports
1. From the iPDU screen, highlight the iPDU for which you want to generate reports.
2. Click Actions→Reports.
3. The iPDU Report procedure is the same as the Node Reports procedure. For more information,
see “Node reports” (page 28).
Deleting an iPDU
1. From the iPDU screen, highlight the iPDU.
2. Click Actions→Delete.
3. Click Yes, delete.
Using the Virtual Connects screen
The Virtual Connects screen displays only Virtual Connect nodes that you have added to HP SUM.
Adding a Virtual Connect
1. From the Virtual Connects screen, click Actions→Add.
2. The Add Virtual Connect procedure is the same as the Add Node procedure. For more
information, see “Adding a node” (page 22).
34 Using the HP SUM GUI
Page 35

Editing a Virtual Connect
1. From the Virtual Connects screen, highlight the Virtual Connect you want to edit.
2. Click Actions→Edit.
3. The Edit Virtual Connect procedure is the same function as the Edit Node procedure. For more
information, see “Editing a node” (page 25).
Aborting a Virtual Connect update
1. From the Virtual Connects screen, highlight the Virtual Connect whose updates you want to
cancel.
2. Click Actions→Abort.
Virtual Connect inventory
1. From the Virtual Connects screen, highlight the Virtual Connect on which you want to take
inventory.
2. Click Actions→Inventory.
3. The Virtual Connect Inventory procedure is the same as the Node Inventory procedure. For
more information, see “Node inventory” (page 25).
Deploying a Virtual Connect
1. From the Virtual Connects screen, highlight the Virtual Connect you want to deploy.
2. Click Actions→Deploy.
3. The Virtual Connect Deploy procedure is the same as the Node Deploy procedure. For more
information, see “Deploying a node” (page 26).
Virtual Connect reports
1. From the Virtual Connects screen, highlight the Virtual Connect for which you want to generate
reports.
2. Click Actions→Reports.
3. The Virtual Connect Reports procedure is the same as the Node Reports procedure. For more
information, see “Node reports” (page 28).
Deleting a Virtual Connect
1. From the Virtual Connects screen, highlight the Virtual Connect.
2. Click Actions→Delete.
3. Click Yes, delete.
Using the Virtual Connects screen 35
Page 36

4 Using legacy scripts to deploy updates
Command-line interface
You can use the HP SUM command-line interface to script custom installations.
Command-line syntax
The general command-line syntax for HP SUM is as follows:
hpsum [/h] [/f]:bundle] [/r[eboot]
HP SUM with OA requires a user ID and password to log in. The user ID must be an administrator
equivalent ID and not an operator or user equivalent level ID.
On Windows, use a slash before each argument. On Linux, use a hyphen before each argument.
If the /s[ilent] argument is not included on the command line, the HP SUM GUI appears.
NOTE: Command-line syntax does not support double-byte character sets. Any messages entered
through the command line via a double-byte character set will not be displayed correctly.
Using Linux root credentials
If you run HP SUM from a Linux system where you have not logged in to the system as a root user,
you can still update nodes from the CLI/Input file if you use Access level options sudo or super
user.
Prerequisites for using Linux root credentials
• If you have run HP SUM as a root user, remove the temp directory created by HP SUM.
• Make sure you have read/write access permissions to the /tmp and /var directories.
• If you create a sudo user, make sure that you add that user to the /etc/sudoers file. The
following table shows the privileges and specifications for users.
SpecificationPrivilegeUser
ALLALL= (ALL)Root
ALLALL= (ALL)Sudo_user
• Edit the entry in the /etc/sudoers file so the system asks for the sudo user password instead
of root user password when you run the sudo command.
The following table shows the privileges to comment or remove from /etc/sudoers.
SpecificationPrivilegeUser
ALLALL= (ALL)All
This often occurs in SUSE Linux systems.
#Defaults targetpw # ask for the password of the target user. For example,
WARNING! Only use this option with Defaults targetpw.
• To use super user functionality, configure the user as a super user with all root privileges. You
can also use non-root user with a root user to update components.
36 Using legacy scripts to deploy updates
Page 37

Switch update commands
G7 and earlier servers do not support AMS agents. The following tables show what updates occur
when you use the switch agent commands.
NOTE: To find out if you have any switches installed, use HP SUM to create the Firmware Details
Report.
The following table shows what updates occur if no switches are currently installed.
Gen8 serversG7 and earlier serversCommand
AMSSNMPno switches
NothingNothing/no_mgmt
AMSSNMP/use_ams
SNMPSNMP/use_snmp
WBEMSNMP and WBEM/use_wmi
AMS and SNMPSNMP/use_ams /use_snmp
AMS and WBEMSNMP and WBEM/use_ams /use_wmi
WBEM and SNMPWBEM and SNMP/use_wmi /use_snmp
AMS, SNMP, and WBEMWBEM and SNMP/use_ams /use_wmi /use_snmp
NOTE: G7 and earlier servers do not support AMS.
Command-line arguments
HP SUM recognizes the following command-line arguments. If you specify the node and credentials,
use the /s[ilent] parameter to proceed with the installation.
You cannot use some arguments, such as /romonly and /softwareonly, together.
/f[orce]
/f[orce]:bundle
/f[orce]:rom
/f[orce]:software
DescriptionHelp
Displays command line help information./h[elp] or /?
DescriptionInstallation options
Overrides or downgrades an existing component
installation. This produces the same results as
/f:software.
Overrides or downgrades the existing installation of
components in the selected bundle.
Overrides or downgrades the existing installation of the
selected firmware components (applies to firmware only).
Overrides or downgrades the existing installation of the
selected software components.
/f[orce]:all
/g or /downgrade
Overrides or downgrades the existing installation of the
selected software components, firmware components, and
bundles.
Downgrades to an earlier version of firmware for multi-node
devices such as hard drives and array controllers (applies
to firmware only).
Command-line interface 37
Page 38

DescriptionInstallation options
/e or /rewrite
/s[ilent]
/c[omponent]<component_to_install> or
<component1_to_install>
<component2_to_install>
Rewrites the current version of firmware for multi-node
devices such as hard drives and array controllers (applies
to firmware only).
Starts a GUI session of HP SUM./gui
Runs an HP SUM update automatically in offline mode./offline_automatic
Runs an HP SUM update in interactive (GUI) mode./offline_interactive
Causes the installation to run silently with no GUI output.
All data writes to the log file. Any generated prompts use
the default option and continue the installation without user
input. If a component requires input before installation
(such as configuration information), the component
installation fails, and an error message writes to the log
file.
Failed dependencies are not reported to the user when you
are using the /s[ilent] argument. To check for failed
dependencies, run HP SUM in GUI mode..
Specifies which components to install. Components to install
can be specified with or without the /c[omponent]
argument.
• If you are using the /c[omponent] argument, then
only one component can specified with the argument.
However, multiple /c arguments and components can
be specified on the same line.
• If you do not use the /c[omponent] argument, multiple
components can be specified at the same time, but the
components must be separated by a blank and listed
after all the arguments on the command line.
• The components are installed in the order provided
unless dependencies between components require
installation in a different order. If so, the utility changes
the installation order based on the component
dependencies to ensure the successful installation of as
many components as possible.
• Multiple components and bundles can be specified on
the same command line. When you are mixing
components and bundles on the command line, the filter
switches control what components and bundles are
installed.
• HP SUM only uses the component name. If you type the
entire directory path, HP SUM will ignore the path. If
you use /use_location and /c, HP SUM checks
both the default repository and the directory provided.
/group "group_name"
/b[undle] <bundle_to_install> or
<bundle1_to_install>
<bu/use_latestndle2_to_install>
38 Using legacy scripts to deploy updates
This argument specifies an already defined group name
in the HP SUM GUI.
This argument specifies bundles to install. Bundles to install
can be specified with or without the /b[undle] argument.
• If you are using the /b[undle] argument, only one
bundle can specified with the argument. However,
multiple /b arguments and bundles can be specified
on the same line.
• If you do not use the /b[undle] argument, multiple
bundles can be specified at the same time, but the
bundles must be separated by a blank and listed after
all the arguments on the command line.
Page 39

DescriptionInstallation options
/allow_update_to_bundle
/allow_non_bundle_components
/use_latest
/use_location "file_share"
This argument is a filter switch. It enables you to install
newer versions of components defined in a PSP, ISP, or
firmware bundle.
This argument enables these components to replace the
older versions of the same component that might have
shipped with the bundles.
This argument is a filter switch. It enables you to install
components that are not included in the bundle but reside
in the directory with the components in the bundle.
This argument is a filter switch for use with bundles. The
argument enables the latest version of the bundle to be
used when multiple versions of bundles are listed on the
command line. If there are no bundles specified on the
command line, and multiple bundles are in the directory,
the /use_latest argument allows HP SUM to use the
bundle that has the latest version for installation.
Specifies a directory or file share that contains the SPP, HP
Integrity Smart Update Firmware Bundles, and components
for use with HP SUM. The file_share format must be a
mapped file share or UNC format. If this argument is not
specified, the directory that contains hpsum.exe or HP
SUM is used by default.
The logged-in account must have access to this location.
The /user and /passwd arguments do not have any
effect when you are attempting to access the file share.
Use those arguments only when you are connecting to a
node system.
/use_web
/use_proxy <Proxy server>
/proxy_script <Proxy script>
/proxy_password <password>
/use_d[ownloaded]
/no_mgmt
/use_snmp
Selects Download from hp.com on the Add Baseline screen.
This enables HP SUM to download updates from
ftp.hp.com.
Enables the inclusion of a proxy server (and port number)
to access ftp.hp.com. This parameter must be used with
/use_web. For example, /use_web /use_proxy
<1.22.33.44:80>.
Enables the inclusion of a proxy script to access ftp.hp.com.
This parameter must be used with /use_web. For example,
/use_web /proxy_script <autoproxy.com>.
Sets the password to be used for an authenticating proxy
server.
Specifies that the check box for Use last downloaded
repository from ftp.hp.com on the Source Selection screen
in the GUI is selected. This enables the previously
downloaded components to be included in the list of
possible updates.
Specifies that AMS, SNMP, and WBEM Providers
management components are optional on the Components
Selection screen. In silent mode, HP SUM will not update
any management components.
Specifies that components that use SNMP protocol and the
AMS components are available for installation by default.
When the /use_snmp argument is used, the AMS
components are required, but the WMI components are
optional.
/use_wmi
Specifies that components that use the WMI protocol are
available for installation. These components are optional
Command-line interface 39
Page 40

DescriptionInstallation options
and are not installed unless this argument is used. When
the /use_wmi argument is used, and the /use_snmp &
/use_ams arguments are not, the SNMP and AMS
components are optional. This argument does not apply
to HP Integrity servers.
/use_ams
/romonly
/softwareonly
/express
Specifies which AMS components can be installed along
with SNMP components. The AMS and SNMP components
are available to select by default. When the /use_ams
argument is used, the SNMP components are required,
and the WMI components are optional.
This filter switch allows you to see only the firmware
components needed for installation. When you are using
this filter switch, you must exit and restart HP SUM if you
want to return to an unfiltered state.
Do not use the /romonly argument with the
/softwareonly argument. (Applies to firmware only.)
This filter switch allows you to see only the software
components needed for installation. When you are using
this filter switch, you must exit and restart HP SUM if you
want to return to an unfiltered state.
Do not use the /softwareonly argument with the
/romonly argument.
HP SUM 6.x does not support /express command. If you
scripts contain this command, HP SUM will execute this
command the same way it runs /silent.
DescriptionOverriding errors
/tpmbypass or /ignore_tpm
/ignore_warnings
/continue_on_error <error>
/override_existing_connection
/On_failed_dependency: <parameter>
Specifies that if a TPM is enabled, the warning message
should be ignored and component installation can continue.
For more information about TPM, see “Disabling BitLocker
to permit firmware updates (Windows only)” (page 13).
Allows the installation to proceed on a Superdome 2 node
even when warnings are returned during analysis.
Causes the installation to continue and ignore errors. Valid
values are as follows:
* <error>=ServerNotFound and
* <error>=BadPassword.
* <error>=FailedDependencies
You can use the ServerNotFound option to bypass
inactive or unavailable remote hosts when you are
deploying firmware or software to multiple remote hosts at
the same time.
Defines the behavior when a remote node has an existing
HP SUM session in progress. It overrides the session in
progress and re-initializes the installation framework on
the remote host.
Provides HP SUM <parameter> the information on how to
proceed when a component has a failed dependency. The
supported parameters for this argument are OmitHost
(default), OmitComponent , and Force. OmitHost
causes the host to be put into a failure state, and no
installation is attempted. OmitComponent deselects the
affected components and proceeds with any updates that
40 Using legacy scripts to deploy updates
Page 41

DescriptionOverriding errors
do not have dependency failures. Force attempts all
updates, even if they have dependency failures.
DescriptionReboot options
/r[eboot]
/reboot_message "reboot message"
/reboot_delay timeout_in_secs
/reboot_always
If the following conditions are met, this argument causes
the server (or host server in a remote installation) to reboot:
• The /reboot option is selected or given as a
command-line argument.
• All components selected for installation are successfully
installed.
• At least one of the installed components requires a
reboot to complete its installation.
Displays the specified reboot message on remote consoles
connected to the server that you want to reboot. You must
use this argument with the /reboot option, or the
argument is ignored.
Delays the reboot of the server for the length of time that
the timeout_in_seconds variable specifies. You must
use this argument with the /reboot option, or the
argument is ignored. Acceptable values are between 15
and 3600.
• The default timeout value is 15 seconds for Microsoft
Windows operating systems and 60 seconds for Linux.
• For Linux, the reboot delay time is converted from
seconds to minutes, and any value under a full minute
(59 seconds or less) rounds to the next minute.
If the following conditions are met, this argument forces
the server to reboot:
• The /reboot_always option is selected or given as
a command-line argument.
• All components selected for installation are successfully
installed.
/user<username> or /username <username>
/password <password>
HP SUM also supports passwd and pwd
/su_username
DescriptionSimulating HP SUM
HP SUM 6.0 does not support this command./dryrun
DescriptionNodes
Use this argument to log in to the remote nodes by using
the user ID. For the OA node, use the /oa_username
argument.
The user name needs to belong to the root or administrator
group.
Use this argument to use this password for the user ID
specified in the /user parameter (except for the OA
node). The password is used to log in to remote nodes. For
the OA node, use the /oa_password argument.
Use root (super user) username to start a session, and
inventory and update components when the credentials
specified in /username and /passwd do not have root
privileges to update components.
Command-line interface 41
Page 42

DescriptionNodes
/su_username cannot be used with /use_sudo access
level.
NOTE: Specifying /targettype linux reduces
inventory time for deployments. This is an optional
command line argument.
/su_password
/use_sudo
/target “netAddress”
Use root (super user) password to start a session, and
inventory and update components when the credentials
specified in /username and /passwd do not have root
privileges to update components.
/su_password cannot be used with /use_sudo access
level.
NOTE: Specifying /targettype linux reduces
inventory time for deployments. This is an optional
command line argument.
Specifies that username and passwd are sudo user
credentials.
When you specify /use_sudo in the CLI along with
username and passwd, then username and passwd
are considered as sudo credentials.
/use_sudo cannot be used with /su_username and
/su_password access level.
NOTE: Specifying /targettype linux reduces
inventory time for deployments. This is an optional
command line argument.
This is the IP address or the DNS name of a remote host,
which can be a remote server, remote iLO NIC port, Virtual
Connect Ethernet or Fibre Channel Module for c-Class
BladeSystem, or BladeSystem OA.
When two OAs are in an enclosure, this argument should
be the active OA. When specifying the IP address, use
either the IPv4 or IPv6 format.
/targettype “type”
Reduces inventory time for scripted deployments. This is
an optional command line argument.
The following are valid node types:
• Server
• Windows
• Linux
• HPUX
• EVA or Command View for EVA
• FC Switch or Fibre Channel Switch
• OA or Onboard Administrator
• SUPERDOME 2 or SUPERDOME2 or Superdome 2
Onboard Administrator
• iLO
• VC or Virtual Connect
• HP SAS or HP SAS B/L Interconnect Switch
• VMware or VMware Host
• iPDU or Intelligent Power Distribution
Unit (iPDU)
Use /targettype with /target parameter. You can
interchange the sequence of /targettype and /target.
42 Using legacy scripts to deploy updates
Page 43

DescriptionNodes
If the node name includes spaces, make sure you enclose
the name in quotation marks, “ “.
NOTE: /targettype is an optional command line
argument. Use /targettype and /target together.
/current_credential
/oa_username
/oa_password
Enables the credential of the local host to be used as the
credential to access the nodes instead of providing the user
name and password explicitly for each node. The
assumption is that the current credential is valid for the
nodes being accessed. (Applies to Windows only)
This argument provides the user name credential for OA
associated with VC specified with the target
command-line parameter. Only one set of OA credentials
can be specified with command-line parameters. You can
add multiple VC nodes to command-line parameters with
the target parameter only if the credentials of OAs
associated with specified VCs are the same. You do not
need to provide an OA network address associated with
VC. HP SUM queries it from a specified VC node.
To update multiple VCs with different user names and
passwords, or VCs with OAs that have different credentials,
use the corresponding input files OAUID and OAPWD.
Provides the password credential for OA associated with
VC specified with the "node" command-line parameter.
Only one set of OA credentials can be specified with
command-line parameters. You can add multiple VC nodes
to command-line parameters with the "node" parameter
only if the credentials of OAs associated with specified
VCs are the same. You do not need to provide an OA
network address associated with VC. HP SUM queries it
from a specified VC node.
To update multiple VCs with different user names and
passwords, or VCs with OAs that have different credentials,
use the corresponding input files OAUID and OAPWD .
/logdir “path"
/v[erbose] or /veryv[erbose]
/report
DescriptionLog files
Redirects the output from HP SUM or the HP BladeSystem
c-Class OA flash utility to a different directory than the
default location.
• For Windows components, the default location is
%SYSTEMDRIVE%\CPQSYSTEM\hp\
log<netAddress> and the redirected location is
<path>\hp\log\<netAddress>.
• For Linux components, the default location is /var/hp/
log/<netAddress> and the redirected location is
<path>/hp/log/<netAddress>.
Sets the verbosity level for the HP SUM execution log file,
hpsum_execution_log_<date>_<time>.log. It
increases the level of detail that is retained in the log file.
The default value is normal verbosity.
DescriptionGenerating reports
Generates a report listing of the node summary and
describes how the components in the repository affect the
node; for example, whether each component applies to
the node. The report is generated in HTML and XML with
Command-line interface 43
Page 44

DescriptionGenerating reports
file name formats of
HPSUM_Report_<date>_<time>.html and
HPSUM_Report_<date>_<time>.xml.
By default, the files are located in the present working
directory where HP SUM is initiated. If that location is
write-protected, you can find the files in the same directory
as the HP SUM log files.
/inventory_report
/firmware_report
/dependency_report
/installed_report
Generates a report listing of the components in the
specified repository. The report is generated in HTML and
XML with file name formats of
HPSUM_Inventory_Report_<date>_<time>.html
and
HPSUM_Inventory_Report_<date>_<time>.xml.
By default, the report is located in the present working
directory where HP SUM is initiated. If that location is
write-protected, you can find the report in the same
directory as the HP SUM log files.
Generates a report listing of the firmware installed and
details of the node. The report is generated in HTML and
XML with file names of HPSUM_Firmware_Report.html
and fwreport.xml in the directory named
HPSUM_Firmware_Report_<date>_<time>.
By default, the report is located in the present working
directory where HP SUM is initiated. If that location is
write-protected, you can find the report in the same
directory as the HP SUM log files.
Generates a report listing of the failed dependencies for
all nodes.
Generates a report that lists all installed firmware, software,
and driver versions installed on all nodes.
NOTE: HP SUM does not install any updates when you generate a report.
DescriptionUsing input files
/inputfile “filename”
/deleteinputfile
/update_type <type>
/device_list <device[,device]…>
Enables you to script the deployment of firmware and
software to multiple remote systems at one time. For more
information, see “Input files” (page 48).
Enables you to instruct HP SUM to delete the input file after
it has been read.
DescriptionSuperdome 2 server commands
Determines which Superdome 2 firmware is updated. You
can choose ALL, COMPLEX, or PARTITIONS. The default
selection is ALL.
Example: /update_type PARTITIONS
Use this argument when the /update_type argument is
PARTITIONS. This argument specifies the subset of
partitions or unassigned blades to update when you do
not want to update all partitions or unassigned blades.
Valid devices are: npar(number) and
blade(enc)/(bay). Do not put any spaces between the
parameters.
44 Using legacy scripts to deploy updates
Page 45

DescriptionSuperdome 2 server commands
Example: /device_list
npar1,npar2,blade1/1,blade1/2
/reboot_list <npar[,npar]…>
Command-line examples
The following command-line parameter examples can be executed within these environments:
• Firmware:
System ROM◦
◦ Smart Array controller
◦ Hard drives
◦ iLO
• Software—later version of:
HP Insight Diagnostics Online Edition for Windows Server 2003 (cp008097.exe)◦
◦ HP System Management Homepage (HP SMH) for Windows (cp008257.exe)
Use this argument when the /update_type is ALL or
PARTITIONS. This argument specifies specific partitions
to reboot after the partition firmware has been updated.
Valid npar values are npar(number). Do not put any
spaces between parameters.
Example: /reboot_list npar1,npar2
• HP SUM
◦ Defined groups: Management Servers—three servers (Management Server1, Management
Server2, Management Server3)
Example 1:
This command-line input deploys the latest PSP and firmware components:
hpsum /use_latest /allow_non_bundle_components /silent
Results: All software components and firmware components from the update bundle, which HP
SUM determined must be installed, were installed.
Example 2:
Either of the following command-line inputs can deploy the previous version of the PSP only and
force all the components to be installed:
• hpsum /f:bundle /softwareonly BP000315.xml
• hpsum /b BP000315.xml /f:bundle /softwareonly
Results: All software components and firmware components from the update bundle, which HP
SUM determined must be installed, were installed. No firmware was installed.
Example 3:
This command-line input deploys firmware:
hpsum /romonly
Results: All firmware components that must be installed, were installed. No software was installed.
Example 4:
Command-line interface 45
Page 46

Either of the following command-line inputs can deploy two software components:
• hpsum /f:software cp008097.exe cp008257.exe
• hpsum /c cp008097.exe /c cp008257.exe /f:software
Results: The two components were installed. No firmware or other software was installed.
Example 5:
Either of the following command-line inputs can deploy the latest PSP, later versions of components
in the bundle, and firmware to three remote hosts and force all components to be installed:
• hpsum /group "Management Servers" /current_credential /use_latest
/allow_update_to_bundle /allow_non_bundle_components /force:all
/override_existing_connection /continue_on_error ServerNotFound
/silent /logdir "Management_Server_Files"
• hpsum /target "Management Server1" /target "Management Server2"
/target "Management Server3" /user administrator /passwd letmein
/use_latest /allow_update_to_bundle /allow_non_bundle_components
/force:all /override_existing_connection /continue_on_error
ServerNotFound /silent /logdir "Management_Server_Files"
Example 6:
To use sudo to update components:
/hpsum / target 10.0.1.7 /targetype linux /username userid /passwd
password /use_sudo /silent
To use super user to update components:
/hpsum /target 10.0.1.7 /targetype linux /username userid /passwd
password /silent /su_username root /su_password rootpwd
Results: All software components and firmware components from the update bundle,
cp008097.exe, and cp008257.exe were installed on Management Server1, Management
Server2, and Management Server3.
Return codes
HP SUM has consolidated return codes from Linux and Windows smart components into a new,
enhanced return-code mapping. These return codes determine the status of the component
installation. You can also use return codes in a script to control the execution of the script and
determine any required branching.
In Linux, the negative return codes are reported. These return codes are determined by subtracting
the negative value from 256.
TextWindowsLinuxValueReturn code
The installation was successful.000SUCCESS_NO_REBOOT
111SUCCESS_REBOOT
333SUCCESS_NOT_REQUIRED
The installation was successful, but a
reboot is required.
The component was current or not
required.
46 Using legacy scripts to deploy updates
-1255-1FAILURE_GENERAL
-2254-2FAILURE_BAD_PARM
-3253-3FAILURE_COMPONENT_FAILED
A general failure occurred. For details,
see the error log.
A bad input parameter was
encountered.
The installation of the component
failed.
Page 47

Windows smart-component return codes
MeaningReturn code
0
2
3
Linux smart-component return codes
Single-node servers:
1
2
3
The smart component was not installed. For more
information, see the log file.
The smart component was installed successfully.1
The smart component was installed successfully, but the
system must be restarted.
The installation was not attempted because the required
hardware is not present, the software is current, or there
is nothing to install.
MeaningReturn code
The smart component was installed successfully.0
The smart component was installed successfully, but the
system must be restarted.
The installation was not attempted because the required
hardware is not present, the software is current, or there
is nothing to install.
The smart component was not installed. For more
information, see the log file.
Multi-node servers:
0
1
2
3
4
5
MeaningReturn code
The installation of the deliverable was successful. No reboot
is required.
The installation of the deliverable was successful. Reboot
is required for the deliverable to be enabled.
The installation was not attempted because the version to
be installed matches the version already installed.
The installation was not attempted because of one of the
following:
• The version to be installed is older than the version
already installed.
• The supported hardware is not present, not enabled,
or in a state that an installation could not be attempted.
• The smart component does not support the environment.
• There is nothing for the component to accomplish.
If the component is being installed to a remote node, such
as an OA or other network-based deployment, this return
code indicates that the node cannot be found.
A user canceled the installation before anything could be
installed.
Command-line interface 47
Page 48

MeaningReturn code
6
7
Linux RPM return codes
VMware ESXi smart-component return codes
0
1
2
The installer cannot run because of an un-met dependency
or installation tool failure.
The actual installation operation (not the installation tool)
failed.
MeaningReturn code
The Linux RPM installation was successful.0
The Linux RPM installation failed.1
MeaningReturn code
The installation of the deliverable was successful. No reboot
is required.
The installation of the deliverable was successful. Reboot
is required for the deliverable to be enabled.
The installation was not attempted because the version to
be installed matches the version already installed.
3
4
5
6
7
Input files
HP SUM provides the ability to script the update of multiple, individual nodes or groups of nodes
(HP ProLiant and Integrity servers and options) within a single operation through the input file
functionality. To protect your credentials, use a secure server or a management console.
To create an input file, use a text editor. All section headers and trailers must match. Failure to use
the option causes the GUI mode to be used, but the information provided enables you to skip
screens where information has already been provided. You can use the DRYRUN=YES option to
perform dry runs of installations to ensure the scripts are working without deploying the firmware
updates that might be required on each node. Remove the DRYRUN=YES option to perform the
updates.
The installation was not attempted because of one of the
following:
• The version to be installed is older than the version
already installed.
• The supported hardware is not present, not enabled,
or in a state that an installation could not be attempted.
• The smart component does not support the environment.
• There is nothing for the component to accomplish.
If the component is being installed to a remote node, such
as an OA or other network-based deployment, this return
code indicates that the node cannot be found.
A user canceled the installation before anything could be
installed.
The installer cannot run because of an un-met dependency
or installation tool failure.
The actual installation operation (not the installation tool)
failed.
48 Using legacy scripts to deploy updates
Page 49

For parameters that can take list values, list separators can be commas, semicolons, or spaces.
NOTE: The credentials can be omitted from the file for greater security and passed on the
command line to HP SUM. The only limitation that the user ID and credentials must be the same
on all.
When the file has been created, to use it with HP SUM, add it as the inputfile <filename>
parameter to a HP SUM command line. For example, if the name of the input file is hpsum.in,
the command-line syntax is hpsum -inputfile hpsum.in. Full paths can be added to the
input file location if the file is not stored in the same location as the HP SUM executable files. The
<filename> field can be enclosed in double quotes to enable paths with spaces. Also, the input
file itself might contain the same options on the command line. The usual command-line options
can still be used with the -inputfile option and they take precedence over any given input file.
Input file format and rules
The input file is divided into two sections:
• Configuration
The configuration section starts from the beginning of the file and proceeds until the first node
section is encountered. This section consists of a number of settings and their values. Each
configuration setting must appear on a fresh line in the file, along with its value. Comments
start with a pound (#) character at the beginning of the line. Only one pound character is
allowed on any line.
• Target
You can provide remote host nodes to HP SUM. This section can repeat any number of times
in the input file, providing a way to organize nodes in related sets.
The section starts with the following special header enclosed in brackets:
[TARGETS]
The section ends with the following special string enclosed brackets:
[END]
The keyword TARGETS can be suffixed with an optional arbitrary string. This string enables
you to tag the purpose of the TARGETS section. Other than the visible difference in the header,
the contents of such a section are not treated any differently. For example:
[TARGETS_WIN2003]
...
[END]
◦ Credentials: The TARGETS section allows the nodes to be grouped according to the
credentials needed for logging in remotely. Each TARGETS section must have a set of
login credentials, which applies to all nodes in that section. If you want to use the current
host's login credentials to log in to one or more remote nodes, you can do so by setting
the variable USECURRENTCREDENTIAL to YES. You can supply login credentials for
one or more hosts by using the variables UID and PWD. If you want to provide the variables
at the beginning of a TARGETS section, use both of them. If you want to provide the
variables in the middle of a TARGETS section, use one or the other to override the selected
variable and continue using the active value for the remaining variable.
◦ Remote node: You can specify a remote node by using the variable HOST. Possible values
File encoding
To allow for the inclusion of double-byte characters, the input file is in UTF-8 format.
are a DNS name or an IP address.
Input files 49
Page 50

Error reporting
If errors occur in the input file, HP SUM exits with a return value of –2 (bad parameter). The details
of the location and nature of the error are recorded in
hpsum_execution_log_<date>_<time>.raw.
Input file parameters
Possible valuesDescriptionParameter
SILENT
TARGETTYPE
to run silently without GUI or console
output. All data is written to the log
file. Any generated prompts use the
default option and continue the
installation without user input.
If a component requires input before
installation (such as configuration
information), the component
installation fails (unless the
IGNOREERRORS =
"FailedDependencies" parameter is
supplied), and an error message is
written to the log file.
and can shorten the inventory process.
YES, NOThis parameter causes the installation
/targettype vcThis parameter specifies the node type
The following are valid node types:
• Server
• Windows
• Linux
• HPUX
• EVA or Command View for
EVA
• FC Switch or Fibre
Channel Switch
• OA or Onboard
Administrator
• SUPERDOME 2 or
SUPERDOME2 or Superdome
2 Onboard Administrator
• iLO
• VC or Virtual Connect
• HP SAS or HP SAS B/L
Interconnect Switch
• VMware or VMware Host
• iPDU or Intelligent
Power Distribution Unit
(iPDU)
If you use the command with a
group, the HP SUM assumes all
nodes in the group are the same
node type.
FORCEALL
FORCEROM
50 Using legacy scripts to deploy updates
YES, NOForces updates to both firmware and
software components.
YES, NOForces updates to firmware
components.
Page 51

Possible valuesDescriptionParameter
FORCESOFTWARE
FORCEBUNDLE
DOWNGRADE
REWRITE
REBOOTMESSAGE
COMPONENTSLIST
BUNDLESLIST
components.
an existing installation of components
in the selected bundle.
firmware for multi-node devices such
as hard drives and array controllers.
(Applies to firmware only.)
only for multi-node devices such as
hard drives and array controllers.
(Applies to firmware only.)
Create a message to be displayed
prior to rebooting.
Limit the list of components to be
updated.
filtered.
YES, NOForces updates to software
YES, NOEnables you to override or downgrade
YES, NODowngrade to an earlier version of
YES, NORewrite the same version of firmware
YES, NOEnables you to reboot, if required.REBOOTALLOWED
Any string (not exceeding 256
characters)
Time in secondsDelay before rebooting.REBOOTDELAY
Component names with file
extensions (.exe, .rpm, or .scexe)
Bundle file namesLimit the list of bundle xml files to be
ALLOWUPDATEBUNDLE
SKIPTARGET
IGNOREERRORS
to install newer versions of
components defined in a PSP, ISP, or
bundle.
This parameter enables these
components to replace the older
versions of the same component that
might have shipped with the bundles.
node has an existing HP SUM session
in progress.
Use this parameter to skip the host if
an existing HP SUM session already
exists. A value of NO overrides the
session in progress and reinitializes
the installation framework on the
remote host.
NOTE: If an HP SUM session
discovers a remote node is running HP
SUM locally, HP SUM ignores the
SKIPTARGET command and skips the
remote node.
Causes the installation to continue and
ignore errors.
The ServerNotFound option can be
used to bypass inactive or unavailable
remote hosts when deploying firmware
or software to multiple remote hosts at
the same time.
Use FailedDependencies to
ignore any failed dependencies and
proceed with the ones that are ready
to be installed.
YES, NOThis is a filter switch and enables you
YES, NODefines the behavior when a remote
ServerNotFound, BadPassword,
FailedDependencies
Input files 51
Page 52

Possible valuesDescriptionParameter
SOURCEPATH
USELATEST
DRYRUN
OPTIONS
Directory pathProvide a single local baseline path.
This action creates an inventory from
the given path instead of the local or
default baseline.
YES, NOThis is a filter switch for use with
bundles. The parameter enables you
to use the latest version of the bundle
when multiple versions of bundles are
listed on the command line.
If no bundles are specified on the
command line, and multiple bundles
are in the directory, this parameter
enables HP SUM to use the bundle
that has the latest version for
installation.
YES, NOSimulates the installation for a test run.
Nothing is installed.
One or more CLI switchSpecify the HP SUM CLI options inside
the input file, which overrides the
configuration settings. Parameters can
be separated by a semi-colon, comma,
or a space.
This parameter replaces the
LSPOPTIONS parameter that was
previously supported with LDU.
NOMGMT
USEWMI
USEAMS
AMS and WBEM Providers listed as
optional updates on the Components
Selection screen.
In silent mode, HP SUM does not
update AMS or WBEM Providers.
NOTE: You can only configure
SNMP in HP SUM GUI mode.
WMI protocol are available to be
selected for installation.
These components are optional by
default and are not installed unless this
parameter is used. When the
/usewmi parameter is used. This
parameter does not apply to HP
Integrity servers.
management service components are
available to be selected for
installation.
This option will only apply to Gen8
and later servers. If this parameter is
set for a ProLiant G7 and earlier
server model, it will be ignored.
These components are only installed
by default on Gen8 and later servers.
This parameter does not apply to HP
Integrity servers.
YesSpecifies that components that use
No
YES, NOSpecifies that components that use
YES, NOSpecifies that AMS agentless
52 Using legacy scripts to deploy updates
Page 53

Possible valuesDescriptionParameter
ROMONLY
SOFTWAREONLY
USECURRENTCREDENTIAL
WEBUPDATENEEDED
YES, NOThis is a filter switch that allows you
to view only the firmware components
required for installation.
Do not use the /romonly parameter
with the /softwareonly parameter.
YES, NOThis is a filter switch that allows you
to view only the software components
required for installation.
Do not use the /softwareonly
parameter with the /romonly
parameter.
YES, NOEnables the credentials of the local
host to be used as the credentials to
access the nodes instead of providing
the user name and password explicitly
for each node.
The assumption is that the current
credentials are valid for the nodes that
are being accessed. (Applies to
Windows only.)
YES, NOInstructs HP SUM to include the
components from the HP FTP site
(ftp://ftp.hp.com) in the list of possible
updates.
USEPROXYSERVER
USEPROXYSCRIPT
DELETEINPUTFILE
ONFAILEDDEPENDENCY
HOST
to access the HP FTP site (ftp://
ftp.hp.com).
Include a proxy script to access the
HP FTP site (ftp://ftp.hp.com).
file after it has been read.
This parameter instructs HP SUM how
to proceed when a component has a
failed dependency.
The default of OmitHost causes the
host to be put in a failure state, and
no installation is attempted on it.
OmitComponent clears the affected
components and proceeds with any
updates that do not have dependency
failures. Force attempts all updates,
even if they have dependency failures.
DNS name of a remote server, remote
iLO NIC port, Virtual Connect Ethernet
or Fibre Channel Module for c-Class
BladeSystem, or BladeSystem OA.
When two OAs are in an enclosure,
this parameter is the active OA. When
specifying the IP address, you can use
either the IPv4 or IPv6 format.
This parameter specifies an already
defined group name in the HP SUM
GUI.
String valueUse a proxy server (and port number)
For example, 11.22.33.44:80
Web URL (for example,
autoproxy.com)
YES, NO (default)Instructs HP SUM to delete the input
OmitHost (default),
OmitComponent, Force
IP address, DNS nameThis parameter is the IP address or the
Input files 53
Page 54

Possible valuesDescriptionParameter
NODE
PWD
LOGFILENAME = "path"
IP address, DNS nameThis parameter is the IP address or the
DNS name of a remote server, remote
iLO NIC port, Virtual Connect Ethernet
or Fibre Channel Module for c-Class
BladeSystem, or BladeSystem OA.
When two OAs are in an enclosure,
this parameter is the active OA. When
specifying the IP address, you can use
either the IPv4 or IPv6 format.
This parameter specifies an already
defined group name in the HP SUM
GUI.
<username>Logs in to the nodes with your user ID.UID
<password>Uses the password for the user ID
specified in the UID.
The password is used to log in to
nodes.
Log file nameRedirects the output from HP SUM or
the HP BladeSystem c-Class OA flash
utility to a different directory than the
default location.
* For Windows components, the
default location is %SYSTEMDRIVE%\
CPQSYSTEM\hp\log<netAddress>
and the redirected location is
<path>\hp\log\<netAddress>.
* For Linux components, the default
location is /var/hp/log/
<netAddress> and the redirected
location is <path>/hp/log/
<netAddress>.
CMAMGMTSTATIONRWIPORDNS
CMAMGMTSTATIONROIPORDNS
CMASYSCONTACT
CMASYSLOCATION
CMASTARTWEBAGENT
CMASTARTSTORAGEAGENT
name of a system with read/write
access to serve as a management
station. You can specify multiple
locations separated by a space.
(Applies to Linux SPP only.)
name of a system with read-only
access to serve as a management
station. You can specify multiple
locations separated by a space.
(Applies to Linux SPP only.)
for administration of this system.
(Applies to Linux SPP only.)
(Applies to Linux SPP only.)
Determines whether the HP Systems
Insight Manager Web Agent is started
when the health application loads.
(Applies to Linux SPP only.)
Determines whether the HP Systems
Insight Manager Storage Agent is
IP address, DNS nameSpecifies the IP address or DNS host
IP address, DNS nameSpecifies the IP address or DNS host
String valueSpecifies a person or phone number
String valueDesignates the location of this system.
• YES (start the web agent)
• NO (do not start the web agent)
• YES (start the storage agent)
• NO (do not start the storage
agent)
54 Using legacy scripts to deploy updates
Page 55

started when the health application
loads. (Applies to Linux SPP only.)
Possible valuesDescriptionParameter
CMASTARTNICAGENT
CMANOTAINTEDKERNEL
HPVCAVCRMSERVER
FORCE-OVERWRITE
ADMIN-GROUP
USER-GROUP
OPERATOR-GROUP
Determines whether the HP Systems
Insight Manager NIC agent is started.
(Applies to Linux SPP only).
Determines whether the HP Lights-Out
management driver is started when
the health application loads. (Applies
to Linux SPP only.)
VCRM to use as a software distribution
baseline. (Applies to Linux SPP only.)
(hpsmh) uses this parameter to force
overwrite the SMH settings of an
existing configuration file.
HP Systems Management Homepage
(hpsmh) uses this parameter to set up
security for the web server. (Applies
to Linux SPP only.)
HP Systems Management Homepage
uses this parameter to set up security
for the web server. (Applies to Linux
SPP only.)
HP Systems Management Homepage
uses this parameter to set up security
for the web server. (Applies to Linux
SPP only.)
• YES (start the web agent)
• NO (do not start the web agent)
• YES (start the HP Lights-Out
management driver)
• NO (do not start the HP
Lights-Out management driver)
VCRM nameInforms the VCA of the name of the
YES, NO (default)HP Systems Management Homepage
Up to five Linux groups, separated
by spaces or semicolons, to enable
administrative access to the web
services.
Up to five Linux groups, separated
by spaces or semicolons, to enable
user-level access to the web
servers.
Up to five Linux groups, separated
by spaces or semicolons, to enable
operator-level access to the web
servers.
ANONYMOUS-ACCESS
IP-BINDING
IP-BINDING-LIST
IP-RESTRICTED-LOGINS
user can access HP Systems
Management Homepage. (Applies to
Linux SPP only.)
uses this parameter to determine
whether HP SMH can use all available
NICs and detect subnets for its web
services. (Applies to Linux SPP only.)
HP Systems Management Homepage
uses this parameter to restrict the NICs
and subnets to use for its web servers.
The IP-BINDING parameter must be
set to yes for this parameter to be
used during installation. (Applies to
Linux SPP only.)
uses this parameter to restrict login
access. (Applies to Linux SPP only.)
YES, NO (default)Determines whether an anonymous
YES, NO (default)HP Systems Management Homepage
IP address pairs separated by
semicolons (for example,
10.1.1.1/255.255.255.0;
10.2.2.2/255.255.255.0)
YES, NO (default)HP Systems Management Homepage
To enable restrictions on who can
log in to the web server, this
parameter must be set to yes, and
values must be provided to the
IP-RESTRICTED-EXCLUDE or
IP-RESTRICTED-INCLUDE
parameters.
Input files 55
Page 56

Possible valuesDescriptionParameter
IP-RESTRICTED-EXCLUDE
IP-RESTRICTED-INCLUDE
LOCALACCESS-ENABLED
LOCALACCESS-TYPE
HP Systems Management Homepage
uses this parameter to exclude specific
IP address/netmask pairs from logging
into the web services. (Applies to Linux
PSP only.)
This parameter is ignored unless the
IP-RESTRICTED-LOGINS parameter
is set to yes.
HP Systems Management Homepage
uses this parameter to enable login
only from the IP address/netmask
pairs specified. (Applies to Linux SPP
only.)
This parameter is ignored unless the
IP-RESTRICTED-LOGINS parameter
is set to yes.
HP Systems Management Homepage
uses this parameter to determine
whether to enable local anonymous
access to the web services. (Applies
to Linux SPP only.)
HP Systems Management Homepage
uses this parameter to determine the
type of access granted to local users.
(Applies to Linux SPP only.)
List of IP address ranges separated
by semicolons (for example,
10.1.1.1-10.1.1.10;
10.2.2.2-10.2.2.10)
List of IP address ranges separated
by semicolons (for example,
10.1.1.1-10.1.1.10;
10.2.2.2-10.2.2.10)
• YES (default to include
anonymous access)
• NO
• Anonymous (default)
• Administrator
CAUTION: Selecting local
access with administrator
privileges as the login provides
full access to any user who has
access to the local console,
without prompting for a user
name or password.
TRUSTMODE
CERTLIST
HP Systems Management Homepage
uses this parameter to set up the trust
relationship mode. (Applies to Linux
SPP only.)
Enables you to provide a list of
certificate files or servers where
certificates can be obtained for trust
relationships for the HP Systems
Management Homepage. (Applies to
Linux SPP only.)
• TrustByCert—If you use this
value, you must define the
CERTLIST parameter to
enable access to the server.
• TrustByName—If you use this
value, you must define the
XENAMELIST.
• TrustByAll—HP does not
recommend using this value
because of possible negative
security consequences.
CAUTION: The accepted
values are case-sensitive and
must be capitalized as shown.
Failure to do so prevents the
trust relationship from being set
up properly during installation
and might affect access to the
web server.
Certificate file name or Server
DNS name
56 Using legacy scripts to deploy updates
Page 57

Possible valuesDescriptionParameter
XENAMELIST
HPQLA2X00FO
HPQLA2X00FORCE
OAUID
servers, separated by semicolons, for
trust relationships for the HP Systems
Management Homepage. (Applies to
Linux SPP only.)
This parameter is valid only if the
TRUSTMODE parameter is set to
TrustByName. (Applies to Linux SPP
only.)
The hp_qla2x00 QLogic Fibre
Channel Driver uses this parameter to
determine the failover mode to use.
(Applies to Linux SPP only.)
Channel Driver uses this parameter to
determine whether to skip detection of
third-party storage. (Applies to Linux
SPP only.)
Provides the user name credentials for
the OA associated with VC. You must
define a value of these variables
before the HOST variable in the
[TARGETS] section. This parameter
applies only for VC firmware.
You can also use OAUSER or
OAUSERNAME.
Server DNS nameEnables you to provide a list of
• SinglePath
• SecurePath
• QLogicFailure
NOTE: No default value
Y, N (default)The hp_qla2x00 QLogic Fibre
User can define the OAUID
variable multiple times before each
HOST variable.
OAPWD
IGNOREWARNINGS
UPDATETYPE
DEVICELIST
REBOOTLIST
Provides the password credentials for
the OA associated with VC. You must
define a value of these variables
before the HOST variable in the
[TARGETS] section. This parameter
applies only for VC firmware.
You can also use OAPASSWORD.
a Superdome 2 node even when
warnings are returned during analysis.
Superdome 2 firmware is updated.
Use this argument when the
UPDATETYPE=PARTITIONS. This
argument specifies the subset of
partitions or blades to update when
you do not want to update all
partitions. Valid devices are:
npar(number) and
blade(enc)/(bay).
Use this argument when the
UPDATETYPE= ALL or
UPDATETYPE= PARTITIONS. This
argument specifies specific partitions
to reboot after the partition firmware
has been updated. Valid npar values
are npar(number).
User can define OAPWD variable
multiple times before each HOST
variable.
YES, NOAllows the installation to proceed on
Superdome 2 servers only
ALL, COMPLEX, PARTITIONSThis argument determines which
Superdome 2 servers only
For example:
DEVICELIST=npar1,blade1/1
Do not put spaces between the
parameters
Superdome 2 servers only
For example:
REBOOTLIST=npar1,npar2
Do not put spaces between the
parameters
Superdome 2 servers only
Input files 57
Page 58

Possible valuesDescriptionParameter
SUUSERNAME
SUPASSWORD
USESUDO
<superusername>Use this argument to provide a
superuser username.
SUUSERNAME cannot be used with
USESUDO access level.
NOTE: Specifying TARGETTYPE =
linux reduces inventory time for
deployments. This is an optional input
file argument.
<superuserpassword>Use this argument to provide a
superuser password.
SUPASSWORD cannot be used with
USESUDO access level.
NOTE: Specifying TARGETTYPE =
linux reduces inventory time for
deployments. This is an optional input
file argument.
Yes, NoUse this argument to use the sudo
command.
When you specify USESUDO = YES
in the input file, along with UID and
PWD, UID and PWD are considered
sudo users.
USESUDO cannot be used with
SUUSERNAME and SUPASSWORD
access level.
NOTE: Specifying TARGETTYPE =
linux reduces inventory time for
deployments. This is an optional input
file argument.
Examples of the HP SUM input file include the following:
REBOOTALLOWED = YES
REBOOTREQUIRED = NO
REBOOTMESSAGE = "Server is going down for a reboot"
REBOOTDELAY = 15
COMPONENTSLIST = cp001234.exe, cp001235.exe
BUNDLESLIST = bp001234.xml
ALLOWUPDATEBUNDLE = YES
SKIPTARGET = NO
IGNOREERRORS = ServerNotFound, FailedDependencies
SOURCEPATH = c:\pkgsource1
USELATEST = YES
SILENT = YES
OPTIONS = /f:rom
[TARGETS]
HOST = schinta1
HOST = schinta2
UID = root
58 Using legacy scripts to deploy updates
Page 59

PWD = root123
HOST = 234.567.765.432
[END]
USAGE: hpsum /inputfile <path:\inputfile.txt>
Examples of inputfile.txt file:
Example: The two nodes are passed to be updated. The nodes do not necessarily have to be OAs.
They can be any node that HP SUM supports.
DRYRUN = YES
SILENT = YES
[TARGETS]
HOST = BL465C-01
HOST = 192.168.1.2
[END]
Example A host DNS is passed along with the user ID and password to use for the hosts in the
group.
DRYRUN = YES
SILENT = YES
[TARGETS]
HOST = BL685cG6
UID = Bigboss2
PWD = password
[END]
Example
SILENT = YES
IGNOREERRORS = ServerNotFound,BadPassword, FailedDepedencies
SKIPTARGET = NO
SOURCEPATH = C:\fwcd\firmware-8.70-0\hp\swpackages
[GROUPS]
HOST=winserver
UID=Userid
PWD=password
[END]
Example
SILENT = YES
IGNOREERRORS = ServerNotFound,BadPassword, FailedDepedencies
SKIPTARGET = NO
SOURCEPATH = C:\ fwcd\firmware-8.70-0\hp\swpackages
FORCEALL = YES
REBOOTALLOWED = YES
REBOOTDELAY = 30
REBOOTMESSAGE = “Install complete, server will reboot in 30 seconds”
[TARGETS]
Input files 59
Page 60

HOST=16.83.62.141
UID=Userid
PWD=password
[END]
[TARGETS]
HOST=16.83.61.48
UID=Userid
PWD=password
[END]
[TARGETS]
HOST=16.83.62.196
UID=Userid
PWD=password
[END]
[TARGETS]
HOST=16.83.61.24
UID=Userid
PWD=password
[END]
Example: Superdome 2 input files:
IGNOREWARNINGS = TRUE
[TARGET] HOST = 10.0.0.206
UID = Userid
PWD = password
UPDATETYPE = PARTITIONS
DEVICELIST=npar1,npar2,blade1/4,blade 1/5
REBOOTLIST=npar1,npar2
[END]
Usage example of access level.
USAGE: hpsum /inputfile <path:\inputfile.txt>
Example: Using sudo to update components on Linux:
SILENT = YES
[TARGETS]
HOST = 10.0.1.7
UID = Userid
PWD = password
[END]
Example: To update multiple targets using sudo in an input file:
SILENT = YES
USESUDO = YES
[TARGETS]
60 Using legacy scripts to deploy updates
Page 61

HOST = 10.0.1.7
UID = Userid
PWD = password
[END]
[TARGETS]
HOST = 10.0.1.73
UID = Userid
PWD = password
[END]
Example: Using super user to update Linux components:
SILENT = YES
[TARGETS]
HOST = 10.0.1.7
UID = Userid
PWD = password
SUUSERNAME = root
SUPASSWORD = rootpwd
Reports
[END]
Example: To update multiple targets using super user in an input file when all targets have the
same super user credentials:
SILENT = YES
SUUSERNAME = root
SUPASSWORD = rootpwd
[TARGETS]
HOST = 10.0.1.7
UID = Userid
PWD = password
[END]
[TARGETS]
HOST = 10.0.1.73
UID = Userid
PWD = password
[END]
HP SUM generates three types of reports about the specified system or repository. HP SUM generates
these reports by using the command-line arguments. If no additional arguments are specified on
the command line, HP SUM uses the local host and default repository locations (the directory where
HP SUM was initiated). You can specify a node if you provide the appropriate credentials. You
Reports 61
Page 62

can specific a repository by using other command-line parameters to generate reports. For specific
commands, see “Command-line interface” (page 36).
Report file information*DescriptionReport type
/report
/inventory_report
/firmware_report
/dependency_report
/installed_report
listing, a node summary, and
description of how the
components in the repository
affect the node. For example,
whether each component applies
to the node.
Usage: hpsum /report
listing of the components in the
specified repository.
Usage: hpsum
/inventory_report
listing of the firmware in the
specified repository.
Usage: hpsum
/firmware_report
that lists failed dependencies for
all nodes.
that lists all installed firmware,
software, and driver versions
installed on nodes.
The following report files are generated:This argument generates a report
• hpsum_Report_<date>.html
• hpsum_Report_<date>.xml
• hpsum_Report_<date>.csv
The following report files are generated:This argument generates a report
• hpsum_Inventory_Report_<date>.html
• hpsum_Inventory_Report_<date>.xml
• hpsum_Inventory_Report_<date>.csv
The following report files are generated:This argument generates a report
• HPSUM_Firmware_Report_<date>
• fwreport.xml is placed in a folder named
HPSUM_Firmware_Report_<date>
The following report file is generated:This argument generates a report
HPSUM_FailedDependency_Reports_<datatime>.xml,
.html, or .csv.
The following report file is generated:This argument generates a report
HPSUM_Installed_Report_<datatime>.xml ,
.html, or .csv.
HP SUM generates the reports as XML or HTML files that you can view in a JavaScript-enabled
web browser. The supported browsers for viewing the report files are Microsoft Internet Explorer
6.0 and Mozilla Firefox 3.5 and later. By default, the reports are located in the current working
directory from where HP SUM was initiated. If that current location is write-protected, the reports
are located in the same directory as the HP SUM log files.
HP SUM generates reports in CSV format that you can open in any application that supports CSV
format.
The HP SUM log files are located in these folders:
• On Windows operating systems: C:\cpqsystem\hp\log
• On Linux: /var/hp/log
When HP SUM generates the report, the HP SUM GUI does not appear. When the report is
generated, HP SUM displays the report file location.
Downloading HP SUM and components from the SDR
If you are using a Linux system, you can download HP SUM as an RPM from the HP SDR. This
allows you to download and install HP SUM and components from the SDR using common YUM
commands. For more information about downloading and installing HP SUM as an RPM, see the
document Linux best practices using HP Service Pack for ProLiant (SPP) and Software Delivery
Repository (SDR) at http://h20000.www2.hp.com/bc/docs/support/SupportManual/c03479393/
c03479393.pdf.
For information on using the SDR, go to http://www.hp.com/go/sdr.
62 Using legacy scripts to deploy updates
Page 63

5 Advanced topics
Configuring IPv6 networks
You can deploy to remote nodes in IPv6-based networks for Windows and Linux node servers.
Using HP SUM with IPv6 networks presents challenges for IT administrators.
For Windows-based servers, to communicate with remote node servers, HP SUM uses either existing
credentials or the user-provided user name and password to connect to the admin$ share. This
share is an automatic share provided by Windows Server. After HP SUM connects to the admin$
share, it copies a small service to the node server for the duration of the installation. After this
service starts, HP SUM uses this service to communicate between the local and remote node server.
During this process, HP SUM opens ports in the Windows firewall to enable HP SUM to communicate
with the HP SUM engine on the node over SSL to pass data among local and remote systems. For
more information about the ports used, see “Network ports used by HP SUM” (page 63). After the
installation is completed or canceled, HP SUM stops the remote service, removes it from the node,
closes the port on the Windows firewall, and then releases the share to the node server admin$
share.
For Linux-based servers, to communicate to remote node servers, HP SUM starts by using the
user-provided user name and password to create a SSH connection to the node server. After it
connects, HP SUM copies a small service to the node server for the duration of the installation.
After this service starts, HP SUM uses this service to communicate between the local and remote
node server. During this process, HP SUM opens ports in the iptables firewall to enable HP SUM
to communicate with the HP SUM engine over SSL to pass data between the local and remote
systems. For more information about the ports used, see “Network ports used by HP SUM” (page
63). When the installation is completed or canceled, HP SUM stops the remote service, removes
it from the target server, closes the port in the iptables firewall, and then closes the SSH connection
to the node server.
To set up IPv6 networking, refer the documentation for your operating system.
Network ports used by HP SUM
HP SUM requires that certain network ports are available for proper operation. If you lock down
network ports, make sure that the ports listed in the network port tables are open so that HP SUM
works correctly when connecting to remote node servers and hosts. If you are unable to unlock
these network ports, the only option is to run HP SUM locally and update network-based hosts,
such as the OA, iLO, and VC modules, through their web interfaces.
Updates for most node types require network traffic in both directions between the server running
HP SUM and the node. The server running HP SUM creates a local HTTP server, which is used to
serve firmware binaries to the node and to communicate node status. The remote node issues HTTP
requests and posts status updates to the server running HP SUM during the update process. If there
is a routing problem or firewall blocking traffic back from the remote node to the system running
HP SUM, firmware updates might be blocked, status updates blocked or delayed, or both.
Table 2 HP SUM Windows network ports
DescriptionPorts
Establishes a connection to a remote node via SSH to perform node inventory.Port 22
A secure data port used to transfer information.Port 443
Ports 445 and 137/138/139 (Port
137 is used only if you are using
NetBIOS naming service.) connect remotely to a remote Windows file share on the node server, you
Connects to the remote ADMIN$ share on node servers. These are the standard
ports Windows servers use to connect to the remote file shares. If you can
have the correct ports open.
Configuring IPv6 networks 63
Page 64

Table 2 HP SUM Windows network ports (continued)
DescriptionPorts
Port 62286
Ports 63001–63002
Default for some internal communications. This port listens on the remote side
if there is no conflict. If a conflict occurs, the next available port is used.
Updates are passed to the node and retrieved through an internal secure web
server that uses the first available port in the range of 63001-63002. This
allows iLO and VC firmware updates without having to access the host server.
It also allows the servers to run VMware or other virtualization platforms to
update the iLO firmware without requiring a server reboot or a migration of
the virtual machines to other servers.
Remote HP Integrity iLO and Superdome 2 updates require these ports to be
open on systems for network traffic in both directions to transfer firmware files.
You can use these FTP ports to perform switch updates.Ports 21 or 63006–63010
Table 3 HP SUM Linux network ports
DescriptionPorts
Establishes a connection to a remote node via SSH to perform node inventory.Port 22
A secure data port used to transfer information.Port 443
Port 62286
Ports 63001–63002
Default for some internal communications. This port listens on the remote side if
there is no conflict. If a conflict occurs, the next available port is used.
Updates are passed to the node and retrieved through an internal secure web
server that uses the first available port in the range of 63001-63002. This support
allows iLO and VC firmware updates without having to access the host server. It
also allows servers running VMware or other virtualization platforms to update
their iLO without having to reboot their server or to migrate their virtual machines
to other servers.
Remote HP Integrity iLO and Superdome 2 updates require these ports to be open
on systems for network traffic in both directions to transfer firmware files.
Special network configuration note for HP Integrity servers
HP Integrity servers have management network and production interfaces. These are usually kept
on separate subnets in an installation. To perform full remote administration of the server, access
is required for both networks. If you keep both networks isolated, you need to perform management
and operating systems tasks separately.
GatherLogs
HP SUM provides a tool that collects all log files into one file. If you are troubleshooting an issue,
run GatherLogs. The script is available in the same directory that holds HP SUM.
You can use these FTP ports to perform switch updates.Ports 21 or 63006–63010
64 Advanced topics
Page 65

6 Troubleshooting
Collecting trace directories
HP SUM generates a set of debug trace logs located in the %TEMP%\HPSUM directory on Windows
systems. These files contain internal process and debug information which can be useful in
determining HP SUM failures.
The debug trace files are located under %temp%\hp_sum for Windows. The log files are located
under C:\cpqsystem\hp\log. These files provide the following information and are appended
in each HP SUM session.
HP SUM 5.0.0 and later includes a utility named GatherLogs.bat (Windows) or
Gatherlogs.sh (Linux) to create a compressed .zip (Windows) or tar.Z (Linux) file with all the
logs. If you need to review the log files, you can run this utility to gather all the logs in one file.
NOTE: Exit HP SUM before running the GatherLogs utility.
FunctionDebug Trace Files
InventoryResults.xml
Settings.xml
SourceClient.trace
Hpsumiserver\HpsumserverW32.log
Sesssion.log
RepositoryManager
<target>\Discoverymanager.log
<target>\Installmanager.log
Contains details of the component inventory from the
repositories.
Includes general settings information of HP SUM such as
Force downgrade or upgrade.
Includes trace data of repository manager and general
errors if any.
Contains trace data for HP SUM SOAP server sessions.Hpsumiserver\Hpsumiserver.log
Contains remote trace data for HP SUM SOAP server
sessions.
Contains information of the HP SUM SOAP server.Hpsumiserver\localhpsumsoapserver.log
Contains the data and time for each session has started.
This file is saved in separate directory named with the date.
Provides the repository and component information This
directory can be excluded in the trace data when collecting
the trace files.
Provides the details of interaction between the Operations
Manager and the remote discovery client. If a discovery
tool fails, it is reported to this trace file and surfaced as a
Discovery Failed message. This log is target specific.
Provides the interaction between the Operations Manager
and the remote discovery client. If a discovery tool fails, it
is reported to this trace file and surfaced as a Discovery
Failed message. This log is target specific.
<target>\<target name>_log.txt
<target>\Settings.xml
Provides the trace data from operations manager for
specific target.
<target> is the name of the target in the source selections
screen.
Provides general settings information of HP SUM such as
Force downgrade or upgrade for specific target.
Collecting trace directories 65
Page 66

FunctionLog Files
<target>\hpsum_log.txt
If you are running HP SUM in offline mode, use the following instructions to collect trace directories
and logs.
1. Launch HP SUM in offline mode.
2. Launch the command prompt from the HP SUM GUI by pressing CTRL-ALT-D-B-X.
NOTE: After approximately 30 seconds, the command prompt will appear over the HP SUM
GUI window.
3. Change the directory to the directory running HP SUM. For example, cd
/mnt/bootdevice/SPP2012060B/hp/swpackages.
4. Type ./GatherLogs.sh to collect the HP SUM logs. All logs are collected in a .tar.gz
file in the directory where you placed HP SUM. The log file is named
HPSUM_Logs_$(datetime).tar.
5. Place the logs on a removable media if you want to view them on another computer.
Contains information of HP SUM discovery, installation
status and errors if any.
<target> is the name of the target in the source selections
screen.
Contains the log data of the components.Hpsum_detail_log.txt
Stores persistent data on the user's system.hpsum.ini
Baseline troubleshooting
HP SUM lists SUSE Enterprise Linux dependencies for Red Hat Enterprise Linux systems
Solution: No action to take. HP SUM incorrectly lists the SUSE components. HP SUM will install
the Red Hat components.
HP SUM displays two versions of the same component when creating a custom baseline
Solution: Multiple instances of the same component can be seen when creating a custom baseline
because the same component exists in the multiple baselines that were selected to be included in
the custom baseline. When you create a custom baseline, make sure you only select one version
of a component if it is included in multiple source baselines.
HP SUM stops responding when performing inventory on large baselines
Solution: Only perform inventory on one large (SPP-size) baseline at a time. Performing inventory
on more than one inventory might use too many system resources.
HP SUM does not return an error when you enter incorrect credentials forDownload
from hp.com
Solution: Verify that the user credentials are correct.
Node troubleshooting
HP SUM does not respond when editing a node with sudo
Solution: Make sure the user that is logged into HP SUM is part of the administrator group for the
system.
66 Troubleshooting
Page 67

HP SUM does not display the Deploy button on the Deploy Nodes screen
Solution: Make sure that HP SUM has resolved all dependencies before attempting to deploy
updates. If HP SUM discovers a failed dependency, it does not activate the Deploy button.
An HP-UX node displays the error Inventory failed. The pciinfo module requires manual update on remote target
Solution: Use the following instructions to resolve the error:
1. Close all tasks and back up important data on the node server.
2. Log in to the node server with root privileges.
3. Transfer the file pciinfo.depot, located in the HP SUM directory /ia64/ to the node
server.
4. Run swinstall -x autoreboot=true -s ‘pwd’ ./pciinfo.depot PCCIINFO.
5. After the update finishes, you can re-run HP SUM on a remote host to continue with additional
updates.
HP SUM does not detect solid state hard drives
Solution: If HP SUM does not detect the solid state hard drive, run the smart component individually.
After HP SUM finishes an inventory, the inventory screen does not close
Solution: Click the Cancel button to close the inventory screen.
Cannot add a Windows node when running HP SUM on a Linux host
Solution: This is a known issue. Run HP SUM on a Windows host to add Windows nodes.
HP SUM does not display the Reboot button after it finishes a deployment
Solution: Verify that no node updates had issues. HP SUM does not display the Reboot button until
all updates are successful. Do not reboot the node until all issues are resolved. This minimizes the
chances that components can be on unsupported versions.
HP SUM does not automatically reboot a node
Solution: Verify all components updated properly. If there are no issues, reboot the node manually.
HP SUM does not display a reboot message in Guided Update
Solution: No action to take.
When multiple nodes are selected, HP SUM does not display the most correct status
Solution: No action to take. This is a known issue. To view the correct state, view a single node.
HP SUM displays message Unable to locate the item you requested
Solution: Press F5 when HP SUM displays this message.
HP SUM stops responding when performing inventory on multiple nodes
Solution: Inventory only one node at a time. When performing inventory on multiple nodes at the
same time, the host might run low on resources.
HP SUM displays the message Unable to login or identify node as a supported device when HP SUM cannot find a node
Solution: Ping the node to make sure it is on the network. HP SUM might not be able to connect
to the node.
Node troubleshooting 67
Page 68

HP SUM displays the message Ready for deployment while HP SUM is performing inventory on a node
Solution: Make sure that HP SUM completes an inventory before attempting to deploy updates to
a node.
HP SUM does not display an entire screen
Solution: Change the resolution of a display or browser.
HP SUM displays extra credentials boxes on the Edit Node screen
Solution: Do not use the boxes beneath the Access Level section.
You can edit a node while HP SUM is deploying updates to the node
Solution: Wait for HP SUM to finish deployment before editing a node. Editing a node before HP
SUM finishes deployment might cause issues with the deployment.
HP SUM displays an associated node multiple times
Solution: No action to take. HP SUM lists the associated node each time that it performs inventory
based on the main node.
HP SUM automatically performs inventory on a node after editing the node
Solution: No action. This is a known issue.
Activity screen troubleshooting
HP SUM does not update the Activity screen accurately
Solution: No action. This is a known issue.
VMware troubleshooting
HP SUM displays an inventory error on a VMware node
Solution: Use the following steps to make sure the VMware service is running.
1. Log in to the VMware ESXi shell.
2. Check the provider version, type esxcli software vib list | grep smx.
3. Verify that the provider service is running, type /etc/init.d/sfcbd-watchdog status.
4. Verify that the provider responds to queries, type enum_instances
SMX_SCInstallationService root/hpq.
5. If you need to restart the service, type /etc/init.d/sfcbd-watchdog restart;
/etc/init.d/sfcbd-watchdog status;.
Reports troubleshooting
HP SUM does not generate reports for nodes that are offline
Solution: Verify that HP SUM can ping the node.
HP SUM displays only requested reports in CSV and XML format
Solution: No action to take. This is the expected result.
68 Troubleshooting
Page 69

HP SUM service troubleshooting
HP SUM service stops running when HP SUM is mounted from a virtual media source
Solution: Do not mount a virtual media source through an iLO. A known issue causes the iLO to
restart and causes HP SUM to stop working.
HP SUM allows all users to log in
Solution: All users can log into HP SUM. Only users with administrator permission can deploy
updates or add nodes.
Some screens are not translated from English
Solution: No action. This is a known issue that will be fixed in a future version.
Legacy CLI commands troubleshooting
HP SUM does not deploy multiple components at in one command
Solution: Copy the components into a directory and use the /use_location command. If you
are deploying more than ten components, use the work around.
The /use_web Legacy CLI command does not work
Solution: No action. This is a known issue. This version of HP SUM does not support this command.
HP SUM service troubleshooting 69
Page 70

7 Support and other resources
Contacting HP
For worldwide technical support information, see the HP support website:
http://www.hp.com/support
Before contacting HP, collect the following information:
• Product model names and numbers
• Technical support registration number (if applicable)
• Product serial numbers
• Error messages
• Operating system type and revision level
• Detailed questions
Subscription service
HP recommends that you register your product at the Subscriber's Choice for Business website:
http://www.hp.com/country/us/en/contact_us.html
After registering, you will receive email notification of product enhancements, new driver versions,
firmware updates, and other product resources.
Related information
Documents
You can find these documents on the SPP documentation page:
http://www.hp.com/go/spp/documentation
• HP Smart Update Manager Release Notes
• HP Service Pack for ProLiant Release Notes
• HP Service Pack for ProLiant Server Support Guide
• HP ProLiant and Integrity Firmware Management Best Practices Overview
• HP ProLiant and Integrity Firmware Management Best Practices Planning Guide
• HP ProLiant and Integrity Firmware Management Best Practices Implementer Guide
The following document is available for HP Integrity firmware update best practices:
• Using HP Smart Update Manager with Integrity Servers
http://bizsupport2.austin.hp.com/bc/docs/support/SupportManual/c03572337/
c03572337.pdf
Websites
For more information about HP SUM, see the HP SUM website:
http://www.hp.com/go/hpsum
For more information about SPP, see the SPP website:
http://www.hp.com/go/spp
70 Support and other resources
Page 71

To download the latest SPP and available hot fixes, see the SPP download page:
http://www.hp.com/go/spp/download
For information about HP Subscriber's Choice, see the Subscriber's Choice website:
http://www.hp.com/go/subscriberschoice
For information on the HP Systems Insight Manager, see the following documents on the HP Systems
Insight Manager website:
http://www.hp.com/go/insightmanagement/sim/docs
• HP Systems Insight Manager Installation and Configuration Guide for MS Windows
• HP Systems Insight Manager User Guide
For more information about HP ProLiant Gen8 servers and software see the HP website:
http://www.hp.com/go/proliantgen8/docs
For information about HP Insight Control Management Software, see the HP website:
http://www.hp.com/servers/rdp
For information about operating systems supported by HP ProLiant servers, see the operating system
support matrices:
http://www.hp.com/go/supportos
For information about support for updating SATA hard drives in a Modular Smart Array
20/50/60/70 storage enclosure connected to an HP ProLiant server using a Smart Array controller,
see the support matrix on the HP StorageWorks Modular Smart Arrays website:
http://www.hp.com/go/msa
Typographic conventions
Table 4 Document conventions
Bold text
Monospace text
ElementConvention
Cross-reference links and e-mail addressesBlue text: Table 4 (page 71)
Website addressesBlue, underlined text: http://www.hp.com
• Keys that are pressed
• Text typed into a GUI element, such as a box
• GUI elements that are clicked or selected, such as menu
and list items, buttons, tabs, and check boxes
Text emphasisItalic text
• File and directory names
• System output
• Code
• Commands, their arguments, and argument values
Monospace, italic text
• Code variables
• Command variables
Emphasized monospace textMonospace, bold text
CAUTION: Indicates that failure to follow directions could result in damage to equipment or data.
Typographic conventions 71
Page 72

IMPORTANT: Provides clarifying information or specific instructions.
NOTE: Provides additional information.
TIP: Provides helpful hints and shortcuts.
HP Insight Remote Support software
HP strongly recommends that you install HP Insight Remote Support software to complete the
installation or upgrade of your product and to enable enhanced delivery of your HP Warranty,
HP Care Pack Service, or HP contractual support agreement. HP Insight Remote Support supplements
your monitoring continuously to ensure maximum system availability by providing intelligent event
diagnosis, and automatic, secure submission of hardware event notifications to HP, which will
initiate a fast and accurate resolution, based on your product’s service level. Notifications may be
sent to your authorized HP Channel Partner for onsite service, if configured and available in your
country.
For more information, see the HP website at http://www.hp.com/go/insightremotesupport. The
HP Insight Remote Support Release Notes detail the prerequisites, supported hardware, and
associated operating systems. The release notes are available on the HP website at http://
www.hp.com/go/insightremotesupport/docs. HP Insight Remote Support is included as part of
HP Warranty, HP Care Pack Service, or HP contractual support agreement.
HP Insight Online
HP Insight Online is a new capability of the HP Support Center portal. Combined with HP Insight
Remote Support 7.x, it automatically aggregates device health, asset, and support information
from iLO Management Engine with contract and warranty information, and then secures it in a
single, personalized dashboard that is viewable from anywhere at any time. The dashboard
organizes your IT and service data to help you understand and respond to that information more
quickly. With specific authorization from you, an authorized HP Channel Partner can also remotely
view your IT environment at HP Insight Online.
• For more information about using HP Insight Online, see the HP Insight Online Getting Started
Guide at http://www.hp.com/go/proliantgen8/docs.
• To install HP Insight Remote Support and enable HP Insight Online, see the HP Insight Online
Integrated Solution and Management Setup Guide at http://www.hp.com/go/proliantgen8/
docs.
72 Support and other resources
Page 73

8 Documentation feedback
HP is committed to providing documentation that meets your needs. To help us improve the
documentation, send any errors, suggestions, or comments to Documentation Feedback
(docsfeedback@hp.com). Include the document title and part number, version number, or the URL
when submitting your feedback.
73
Page 74

Glossary
AMS Agentless Management Service
Analyze The process where HP SUM verifies all dependencies before deploying updates
Baseline A set of updates for your hardware
CPLD complex programmable logic device
Deploy The process where HP SUM begins the update process by installing the component update files
to the node.
DNS domain name system
Guided Update An automated or wizard-style method to update the local node
iLO Integrated Lights-Out
Inventory The process where HP SUM determines baseline and node contents
iPDU intelligent power distribution unit
ISP Integrity Support Pack
Location Network directory for baseline updates
Node A piece of hardware you want to update, for example a server, iLO, or NIC.
OA Onboard Administrator
RILOE II Remote Insight Lights-Out Edition II
Scouting The process where HP SUM determines node type
SDR Software Delivery Repository
SPP HP Service Pack for ProLiant
SSH Secure Shell
SSL Secure Sockets Layer
TPM Trusted Platform Module
UNC Universal Naming Convention
URI Uniform resource identifier, commonly known as the web address
VC Virtual Connect
WBEM Web-Based Enterprise Management
WMI Windows Management Instrumentation
74 Glossary
Page 75

Index
A
abort update
enclosure, 29
iLO, 33
iPDU, 34
servers, 30
switch, 31
Virtual Connects, 35
VM host, 32
activity, 16
add
baseline, 18
adding
enclosures, 29
iLO, 33
iPDU, 34
node, 22
servers, 30
switch, 31
Virtual Connects, 34
VM Hosts, 32
advanced topics, 63
appliance
describing icons, 9
arguments, 37
B
baseline
adding, 18
create custom, 19
delete, 21
baselines, 18
C
CLI (Command Line Interface)
Command-line arguments, 37
Command-line examples, 45
Command-line interface, 36
Command-line syntax, 36
command line arguments, 37
command line examples, 45
command line interface, using, 36
command line syntax, 36
contacting HP, 70
conventions
document, 71
creating input files, 48
custom
baseline, 19
D
delete
baseline, 21
enclosure, 30
iLO, 33
node, 28
servers, 31
switch, 32, 34
Virtual Connect, 35
VM Hosts, 33
deploy
enclosure, 30
from Integrity bundle, 12
from SPP, 11
iLO, 33
iPDU, 34
node, 26
servers, 31
switch, 31
Virtual Connects, 35
VM host, 32
deployment
modes, 12
scenarios, 12
deployment methods, 12
deployment overview, 11
deployment, scripted, 36
document
conventions, 71
related documentation, 70
documentation
HP website, 70
providing feedback on, 73
double-byte characters
File encoding, 49
downloading
HP SUM, 10
E
edit
enclosures, 29
iLO, 33
iPDU, 34
servers, 30
switch, 31
Virtual Connects, 35
VM Hosts, 32
editing
node, 25
enclosure
abort update, 29
delete, 30
deploy, 30
inventory, 30
report, 30
enclosures, 29
adding, 29
edit, 29
F
files, creating input
75
Page 76

Input file format and rules, 49
Input files, 48
G
GUI
using, 16
Guided Update, 16
H
health icon, 9
help
obtaining, 70
HP
technical support, 70
HP Insight Online, 72
I
icon description, 9
iLO, 33
abort update, 33
add, 33
delete, 33
deploy, 33
edit, 33
inventory, 33
report, 33
input file parameters
Input file format and rules, 49
Input file parameters, 50
installing
HP SUM, 10
Integrity
node
overview, 29
Intelligent Power Distribution Unit, 33
introduction, 7
inventory
enclosure, 30
iLO, 33
iPDU, 34
node, 25
servers, 30
switch, 31
Virtual Connects, 35
VM host, 32
iPDU, 33
abort update, 34
add, 34
deploy, 34
edit, 34
inventory, 34
report, 34
IPv6 network configurations
Configuring IPv6 networks with HP SUM, 63
L
launching
HP SUM, 10, 14
Linux, 15
Windows, 15
Linux RPM return codes, 48
Linux smart components, return codes, 47
logging in, 15
logging off, 15
M
migrating
nodes, 10
modes
deployment, 12
N
node
aborting update, 25
adding, 22
deleting, 28
deploy, 26
editing, 25
Integrity
overview, 29
inventory, 25
overview, 29
reports, 28
nodes, 21
migrating, 10
O
overview
node, 29
overview, HP SUM, 7
P
parameters
Error reporting, 50
Input file parameters, 50
R
related documentation, 70
report
enclosure, 30
iLO, 33
iPDU, 34
servers, 31, 32
Virtual Connects, 35
VM host, 32
reports
node, 28
Reports, 61
reports, creating
Reports, 61
return codes
Linux RPM return codes, 48
Return codes, 46
VMware ESXi return codes, 48
return codes, Linux smart components, 47
return codes, VMware ESXi, 48
return codes, Windows smart components, 47
RPM return codes, Linux, 48
76 Index
Page 77

running
HP SUM, 11
S
screen components, 8
scripted deployment, 36
servers, 30
abort update, 30
adding, 30
delete, 31
deploy, 31
edit, 30
inventory, 30
report, 31, 32
shutting down
HP SUM, 15
status icon, 9
switch
abort update, 31
adding, 31
delete, 32, 34
deploy, 31
edit, 31
inventory, 31
switches, 31
report, 32
VM Hosts, 32
adding, 32
delete, 33
edit, 32
VMware ESXi return codes, 48
W
websites
product manuals, 70
welcome screen, 16
Windows smart components, return codes, 47
T
technical support
HP, 70
terminology
definitions, 9
TPM (Trusted Platform Module)
Trusted Platform Module, 14
troubleshooting
Troubleshooting, 65
Trusted Platform Module, 13
Trusted Platform Module (TPM)
Trusted Platform Module, 14
typographic conventions, 71
U
update
guided, 16
using GUI, 16
V
Virtual Connect
delete, 35
Virtual Connects
abort update, 35
add, 34
deploy, 35
edit, 35
inventory, 35
report, 35
VM host
abort update, 32
deploy, 32
inventory, 32
77
 Loading...