


HP SmartTracker
User Guide

© Copyright 2021 HP Development Company,
L.P.
Edition 7
Legal notices
The information contained herein is subject to
change without notice.
The only warranties for HP Products and
services are set forth in the express warranty
statement accompanying such products and
services. Nothing herein should be construed as
constituting an additional warranty. HP shall not
be liable for technical or editorial errors or
omissions contained herein.
NOTE: HP SmartTracker software is only
compatible with Original HP ink supplies.
Safety notice
Read and follow the operating and safety
instructions before starting the printer.
Trademarks
Microsoft® and Windows® are U.S. registered
trademarks of Microsoft Corporation.

Table of contents
Your HP SmartTracker software application ............................................................................................................................................. 1
Introduction ............................................................................................................................................................................... 1
Launching HP SmartTracker the rst time ........................................................................................................................... 1
Connectivity ............................................................................................................................................................................... 2
HP SmartTracker’s email service ....................................................................................................................... 3
Server address conguration ............................................................................................................................. 4
Conguration via Active Directory (AD) ............................................................................................................. 4
Advanced Network Interface .............................................................................................................................. 6
Printers ....................................................................................................................................................................................... 7
Conguring printers ............................................................................................................................................. 7
Editing a printer ................................................................................................................................................. 10
Creating a group of printers ............................................................................................................................. 10
Editing a group of printers ............................................................................................................................... 12
Deleting a group of printers ............................................................................................................................. 13
Permissions ............................................................................................................................................................................. 14
Options ..................................................................................................................................................................................... 16
Setting the application language .................................................................................................................... 16
Setting the application units ............................................................................................................................ 16
Setting the currency .......................................................................................................................................... 16
Setting the costs and prices conguration .................................................................................................... 16
Setting a company logo for reports ................................................................................................................ 16
Selecting the required touch points ................................................................................................................ 16
Touch points .................................................................................................................................. 16
Costs ......................................................................................................................................................................................... 17
Prices ........................................................................................................................................................................................ 18
About the home screen ......................................................................................................................................................... 19
Conguring users of printers and printer groups .............................................................................................................. 20
Marking a job as billable ........................................................................................................................................................ 22
Filtering .................................................................................................................................................................................... 22
Removing a lter .................................................................................................................................................................... 23
Projects .................................................................................................................................................................................... 23
Departments ........................................................................................................................................................................... 23
Import/Export CSV ................................................................................................................................................................. 24
Conguration — Import CSV ........................................................................................................................... 24
Export CSV .......................................................................................................................................................... 26
Generating reports ................................................................................................................................................................. 26
Summary ................................................................................................................................................................................. 27
Reports .................................................................................................................................................................................... 30
Custom ..................................................................................................................................................................................... 33
ENWW iii

Raw data .................................................................................................................................................................................. 35
Custom logo ............................................................................................................................................................................ 35
Scheduling and emailing reports ......................................................................................................................................... 36
Schedule and email Users, Projects or Departments Reports ....................................................................................... 38
Printing workow authentication ........................................................................................................................................ 38
Printing from the user’s PC .............................................................................................................................. 38
Authentication error cases ............................................................................................................................... 39
Printing, scanning or copying from the printer’s front panel ..................................................................... 40
Database management ........................................................................................................................................................ 41
Backup/restore database ................................................................................................................................. 42
Restore ................................................................................................................................................................ 43
Cleanup database .............................................................................................................................................. 43
Support tool ............................................................................................................................................................................ 44
Manual update ........................................................................................................................................................................ 49
Logging out ............................................................................................................................................................................. 49
iv ENWW
Your HP SmartTracker software application
Introduction
HP SmartTracker has been designed to help you control your printing costs and accurately charge your
customers for the prints you do for them.
NOTE: HP SmartTracker software is only compatible with Original HP ink supplies.
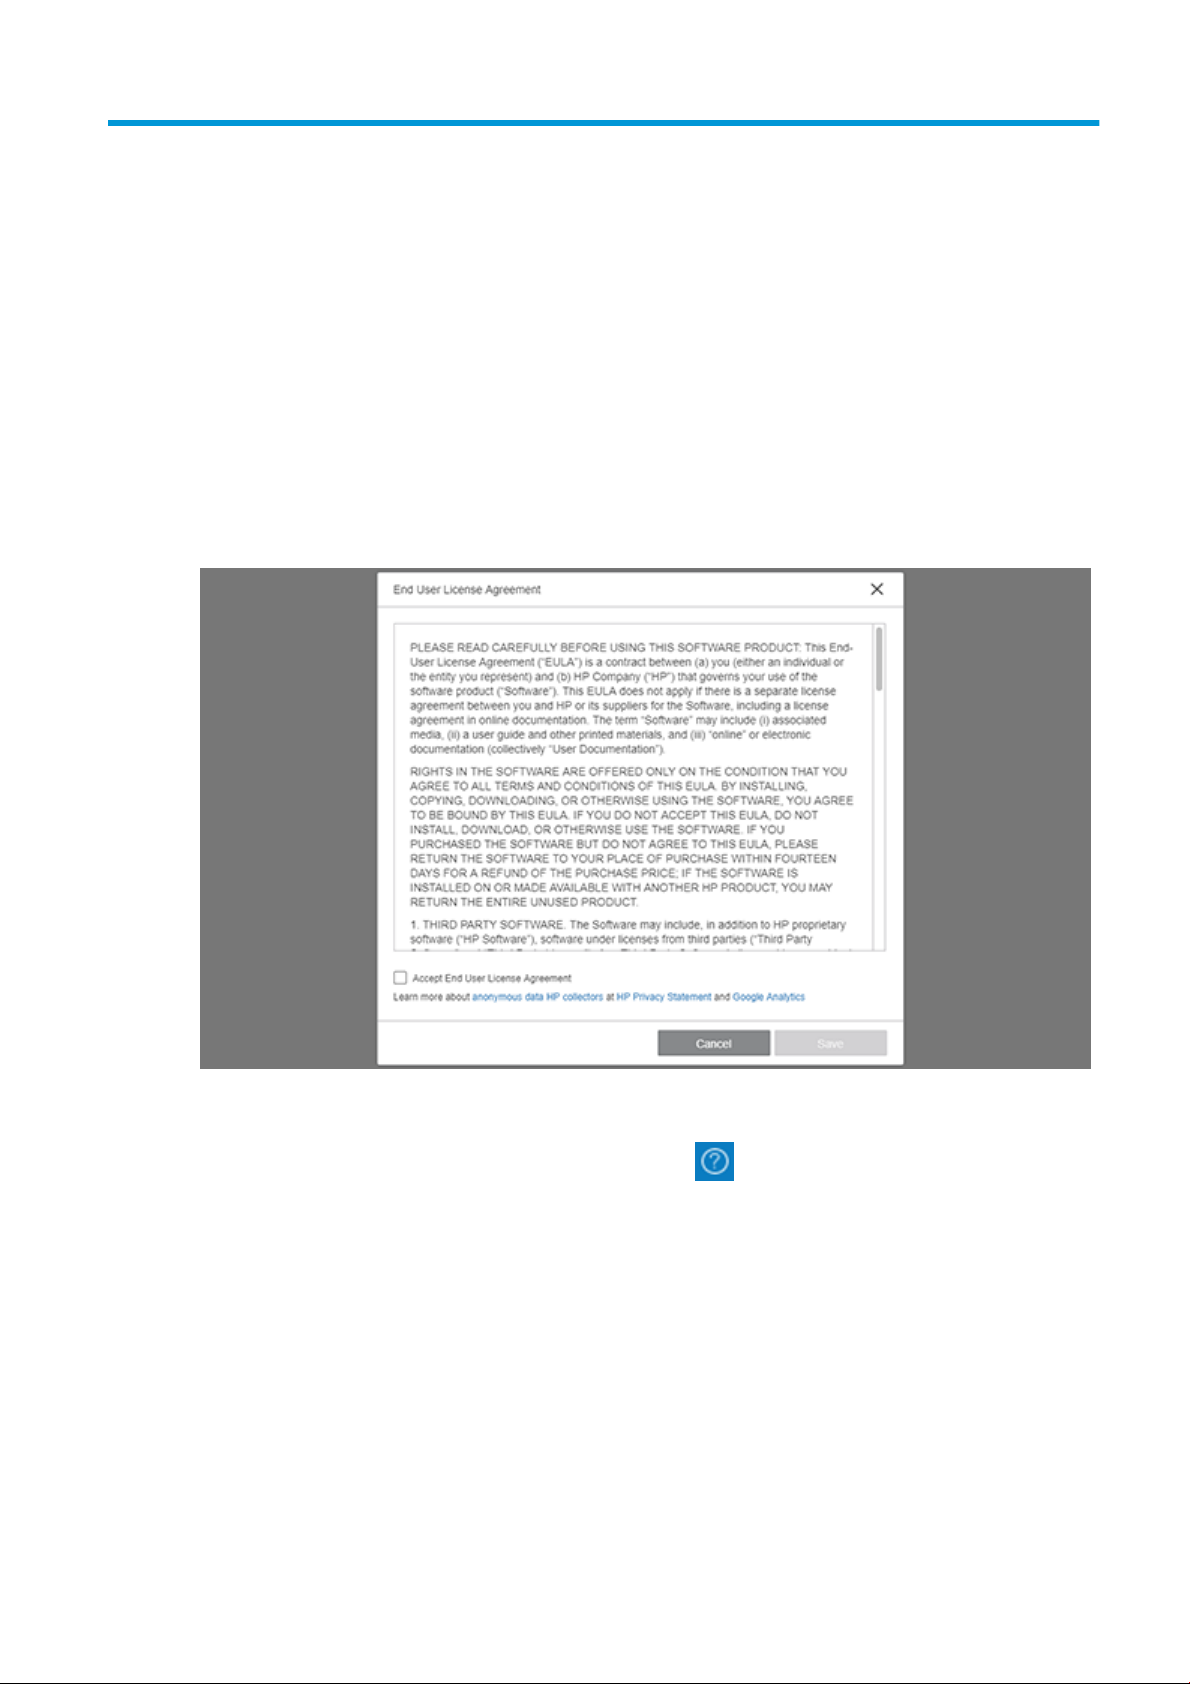
Launching HP SmartTracker the rst time
The rst time you access the application, a popup with the EULA (End User License Agreement) terms is
displayed, as shown below:
You must accept these terms and click Save in order to use HP SmartTracker.
If at any time you want to stop sending personal data, if logged-in as an administrator, you can opt out. To do so,
or to review the data collection terms and conditions, click the icon on the main screen and choose Product
Improvement. A window opens as shown below:
ENWW Introduction 1
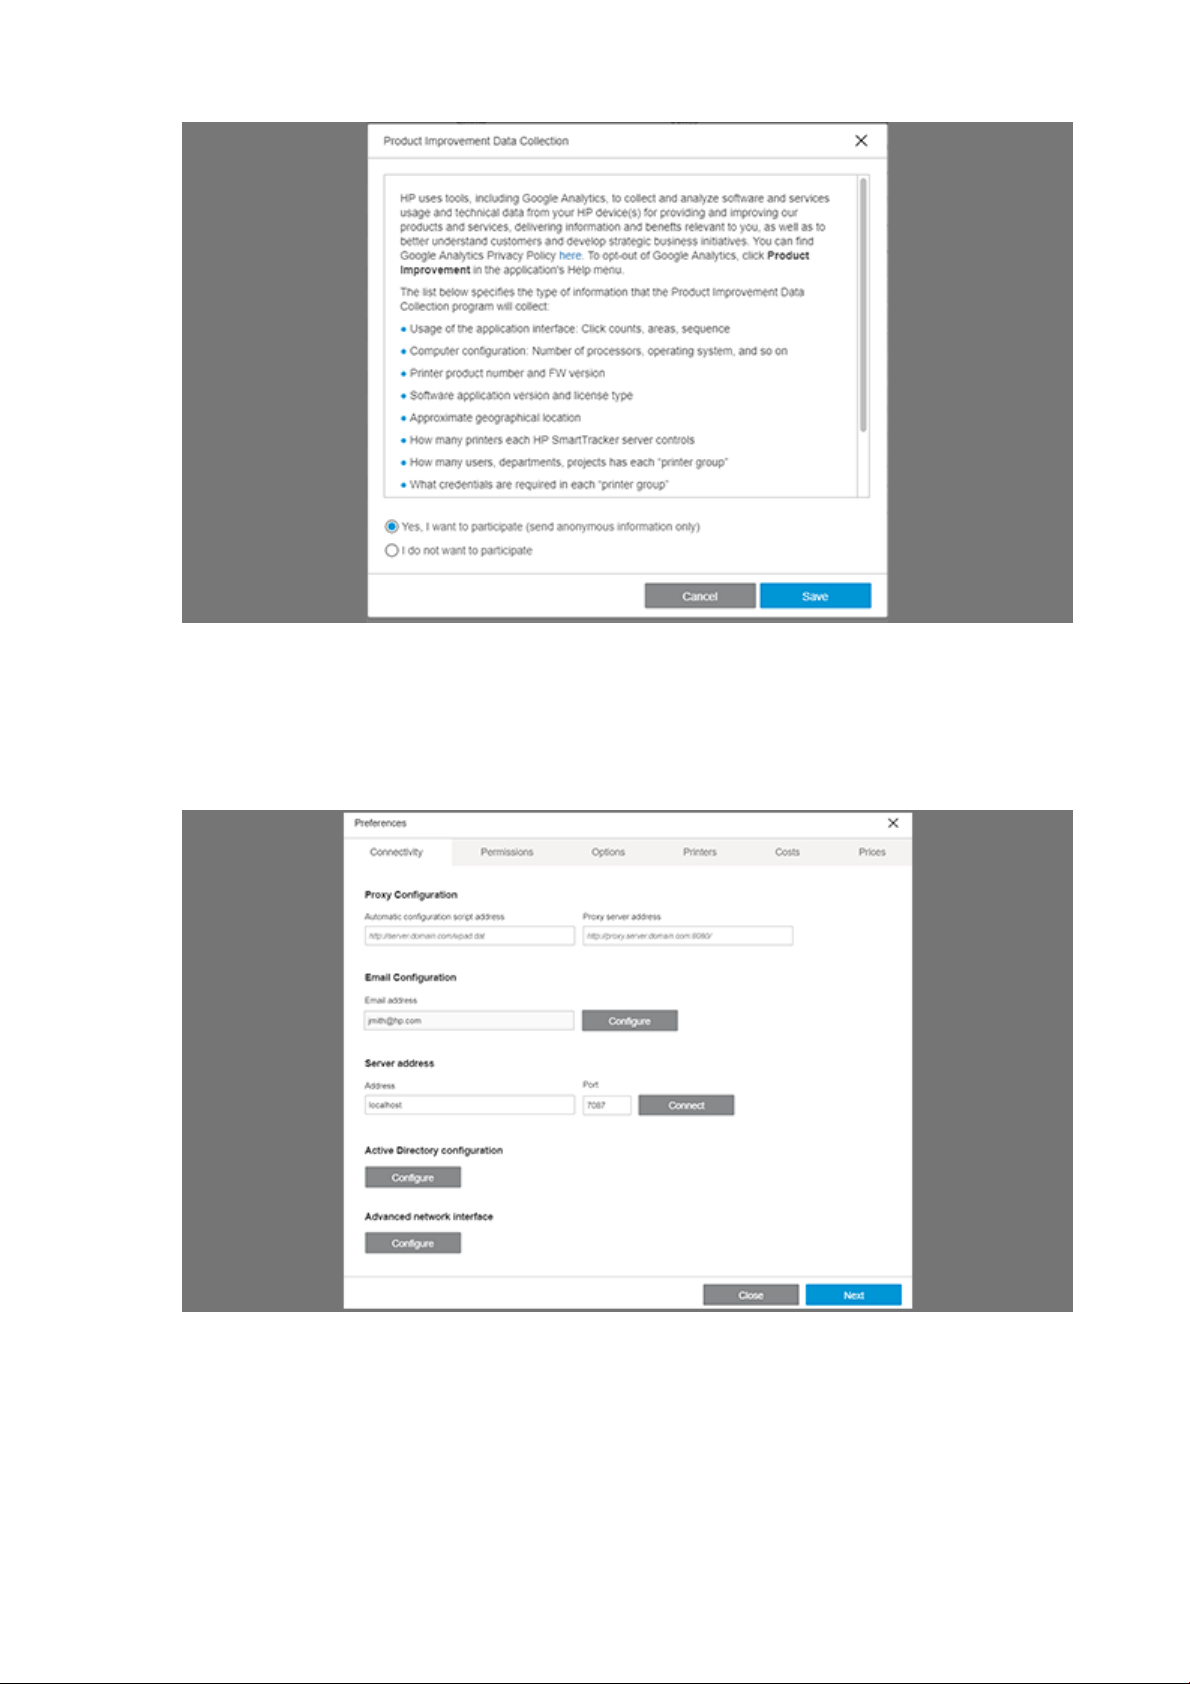
Choose whether you want to participate or not and click the Save button.
Connectivity
The very rst time that the HP SmartTracker application opens, the Preferences panel is automatically displayed.
The Connectivity tab is selected by default:
2 Your HP SmartTracker software application ENWW
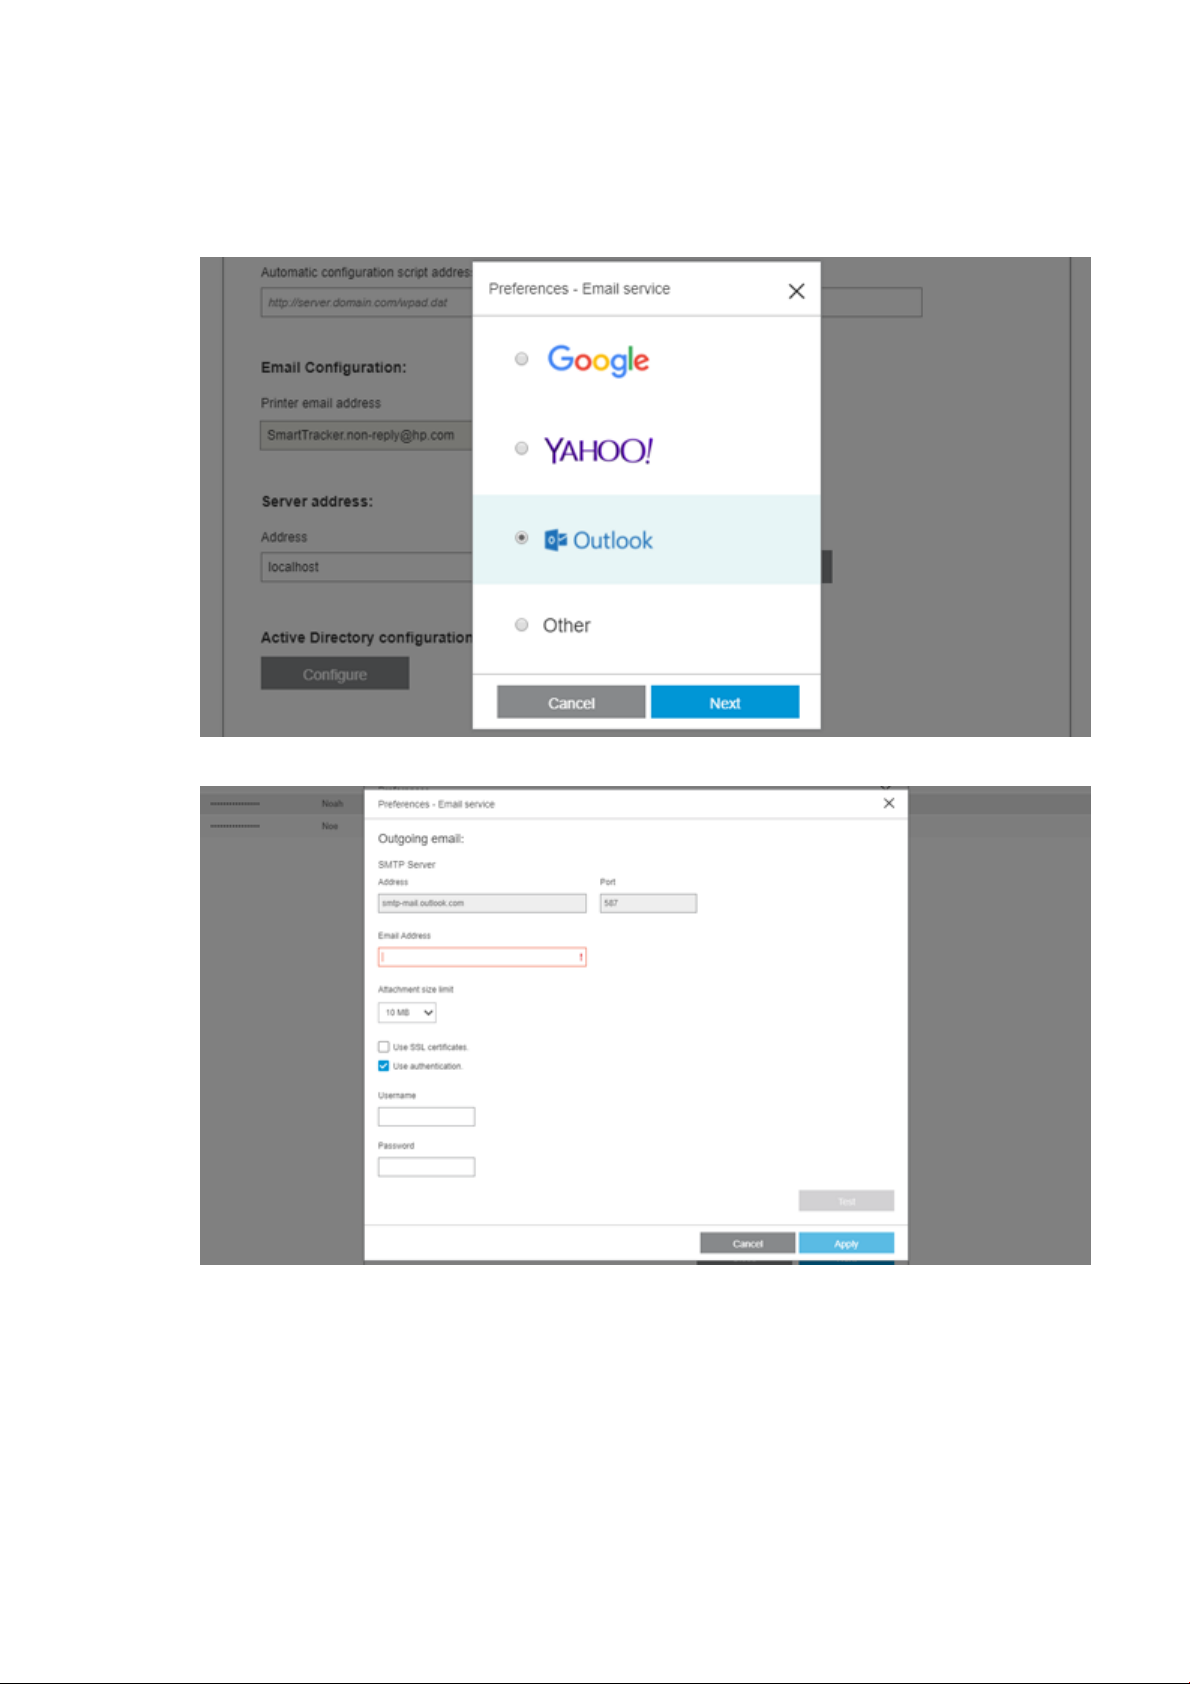
HP SmartTracker’s email service
HP SmartTracker has an email service that it uses whenever it needs to send messages. It is highly
recommended to congure this service during setup. To congure this service, click the Congure button. The
following window is displayed:
Congure the preferred e-mail service, then press Next. The following window is displayed:
Enter the email address and port in the corresponding elds of this window. Select the attachment size limit
from the drop-down list. The Test button can be used to send an email to the administrator, using the settings
you make here, and allows you to check the conguration before applying it.
You can also enable the use of SSL certicates and authentication by marking the corresponding checkboxes.
Once you have entered all the data, click the Apply button to return to the Preferences panel.
ENWW Connectivity 3
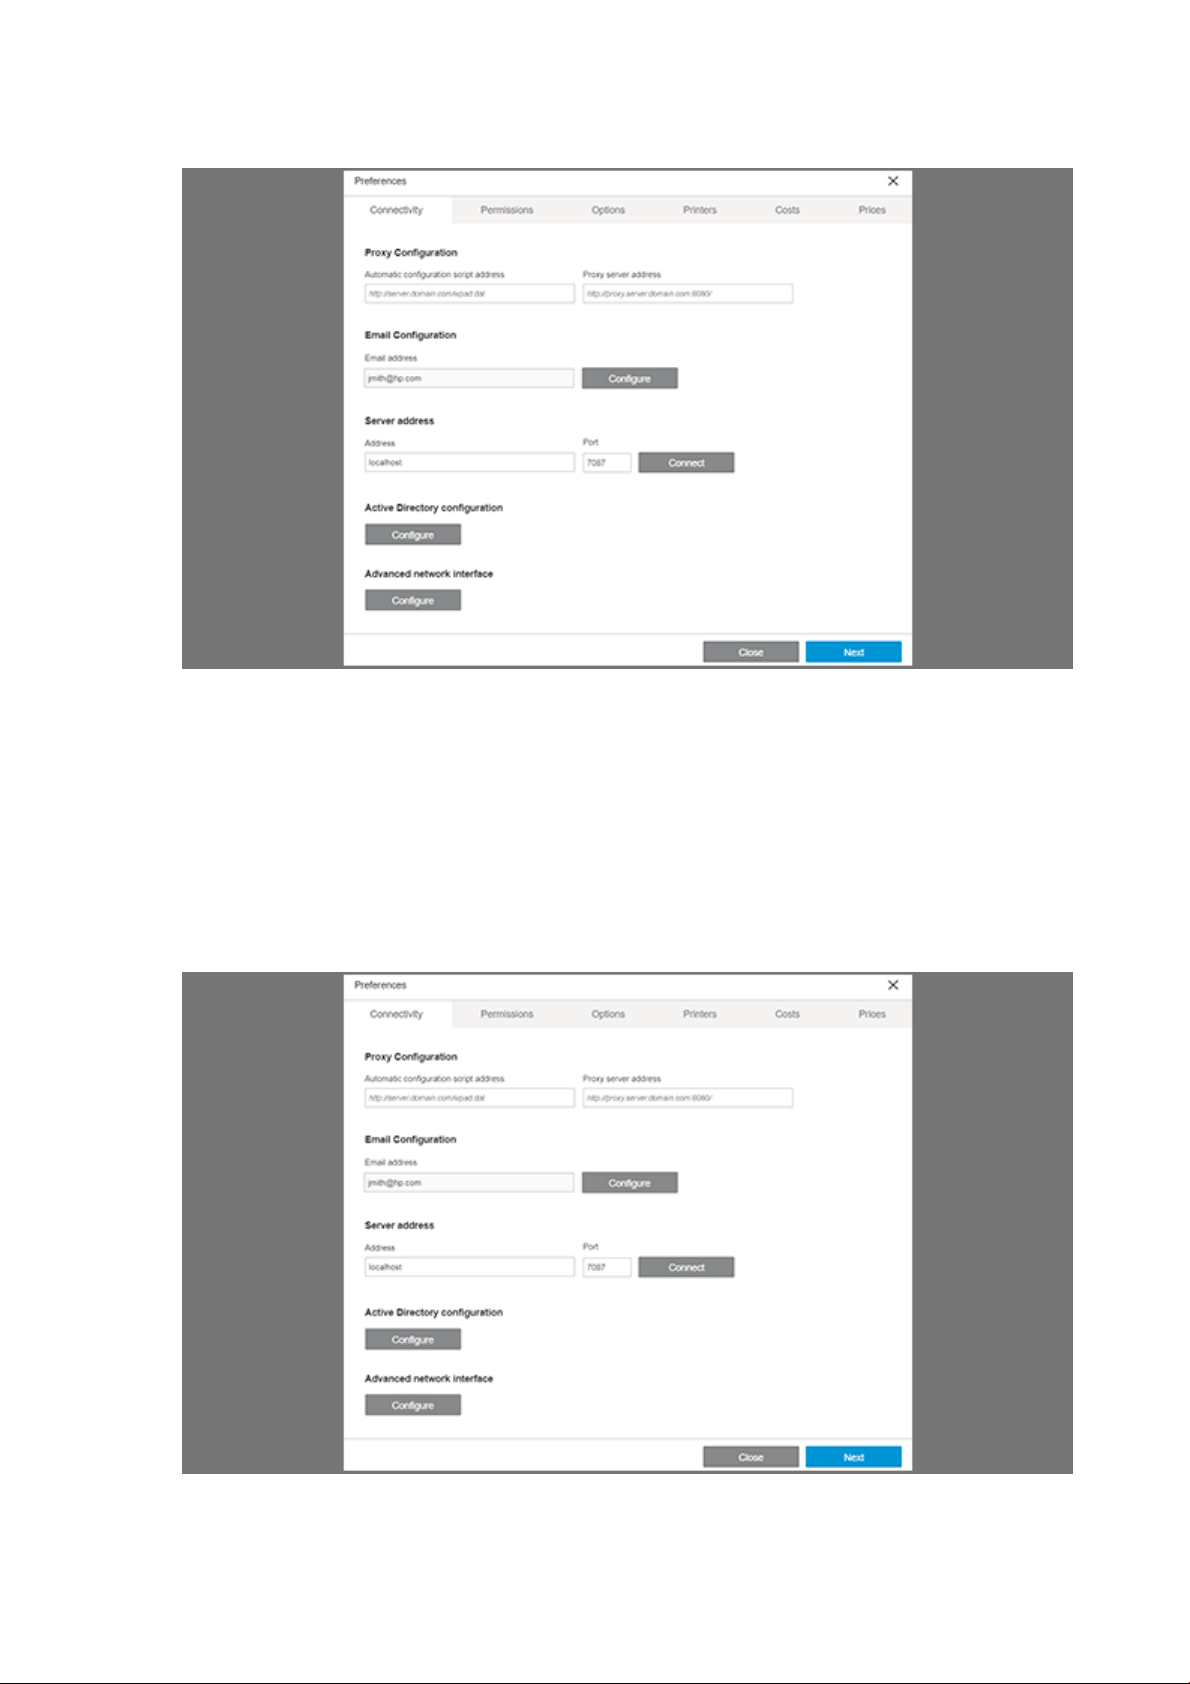
Server address conguration
When setting the HP SmartTracker server address and port number, make sure that you enter the same server
address and port number as you used during the installation of HP SmartTracker Server, by default the port
number is 7087. Next, click the Connect button to validate the data.
Once you have entered all the necessary data, click the Next button.
Conguration via Active Directory (AD)
If you want HP SmartTracker to make use of your active directory, you need to congure Active Directory
Conguration in the Preferences panel.
Go to the Connectivity tab and click the corresponding Congure button.
The Server does not require authentication option is enabled by default. The Username and Password elds are
disabled, as illustrated below:
4 Your HP SmartTracker software application ENWW
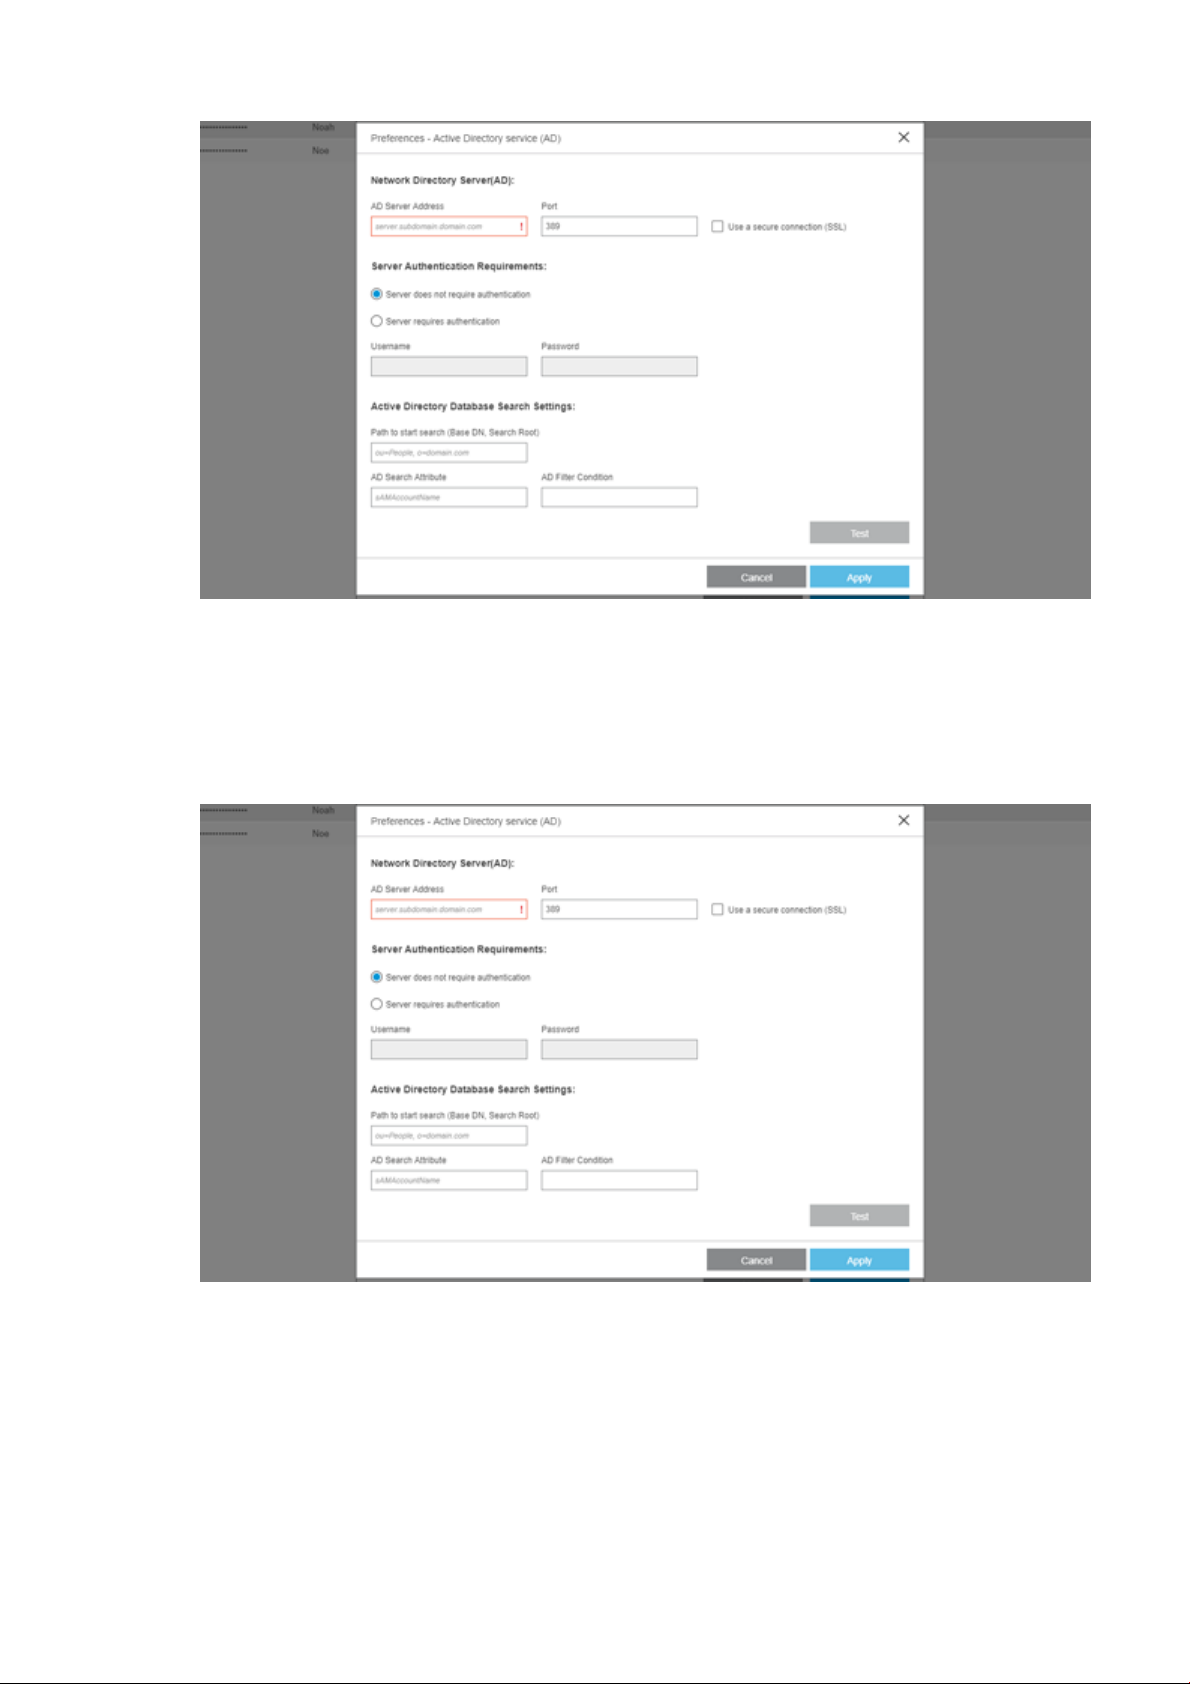
Add the address of your Active Directory server in the AD Server Address and Port elds.
If the Active Directory server has been congured to use a secure connection (SSL), check the Use a secure
connection (SLL) checkbox.
If the Active Directory server has been congured to request authentication, select the Server requires
authentication option, the Username and Password elds will be enabled, enter here the details of a user that
has permissions to search in the active directory.
The Path to start search (Base DN, Search Root) is the location where the search in the active directory tree will
start. This is a compulsory eld.
In the AD Search Attribute eld, add the SAM Account Name Attribute eld of the AD tree structure to search for.
This is a compulsory eld.
In the AD Filter Condition eld, add a complex lter to be applied during the search for the user. This is a optional
eld.
Click the Test button to verify the connection before saving changes.
ENWW Connectivity 5
Click the Apply button to save the changes, at the same time a background test for the connection is performed.
If an error is encountered, a warning will be displayed.
Click the Cancel button to close the window without saving any changes.
NOTE: In order for the AD to work, locker of users must be Use Active directory.
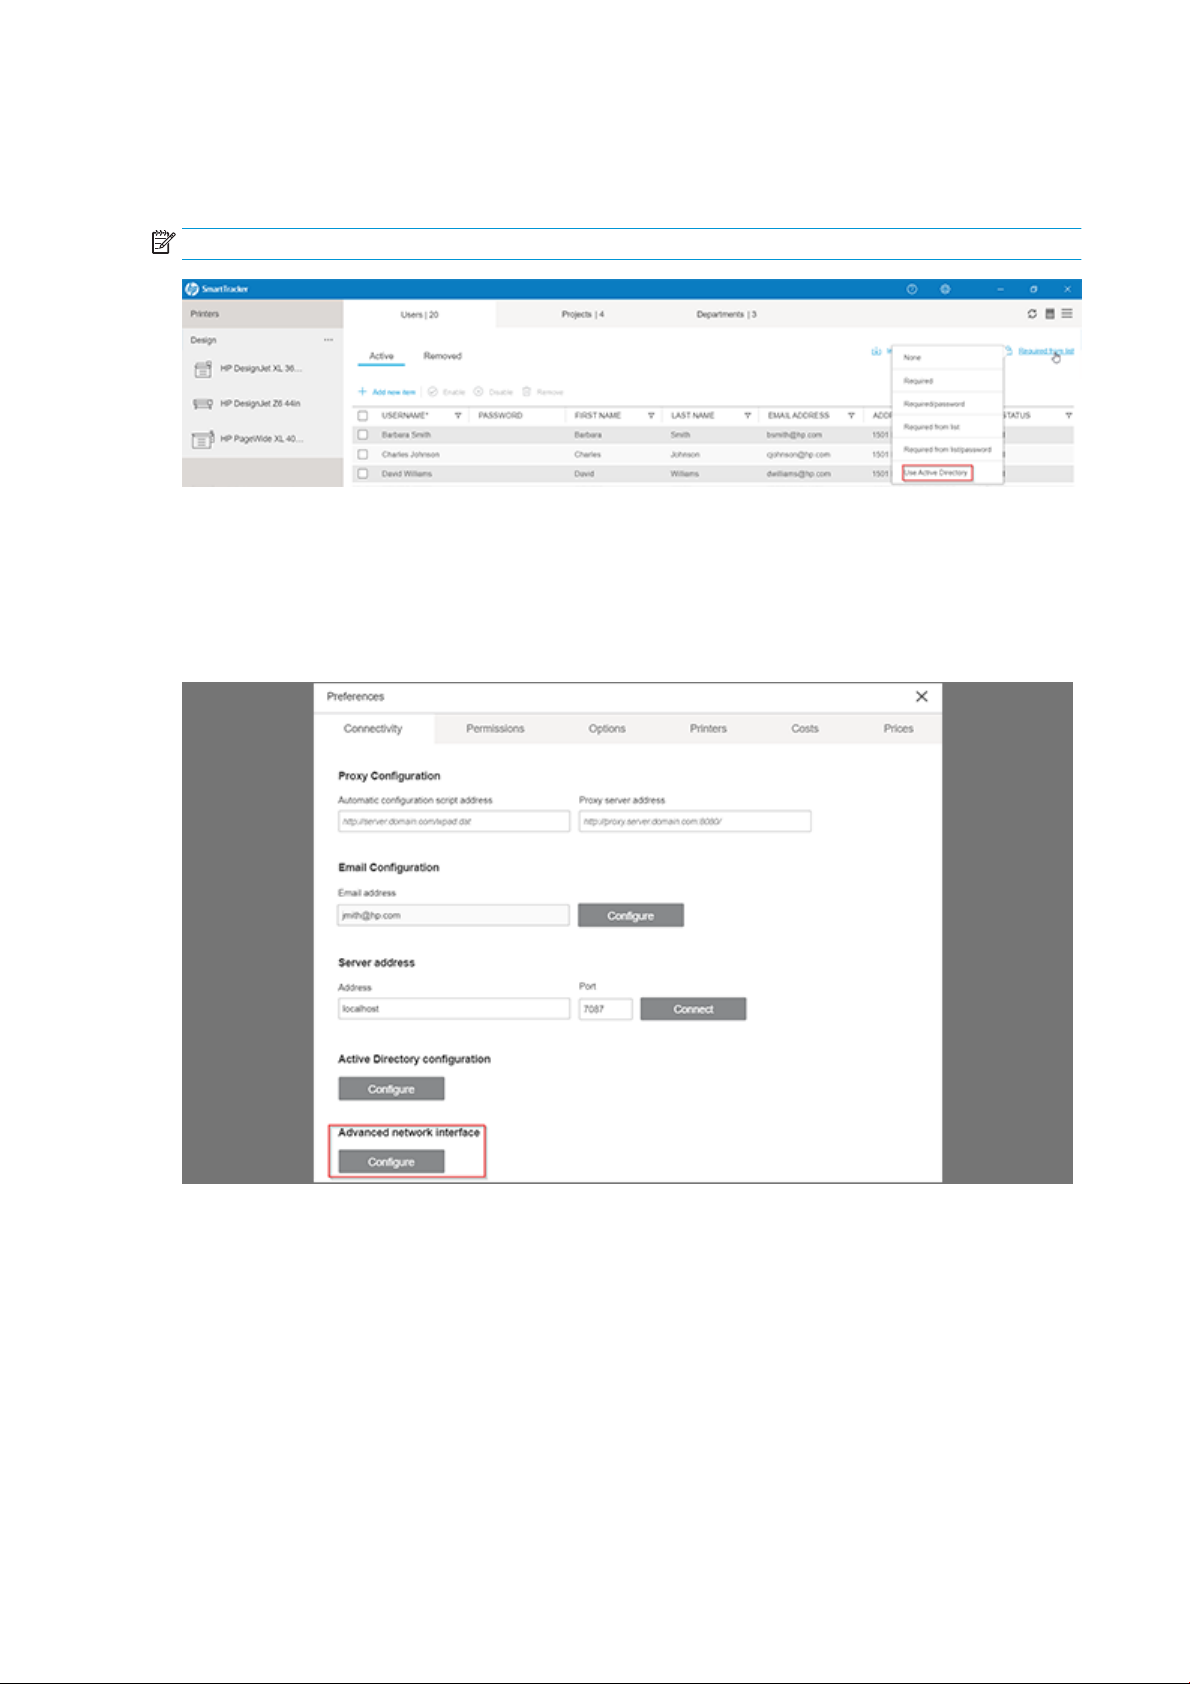
Advanced Network Interface
Log in as administrator, access the Preferences > Connectivity, and the Advanced Network Interface is visible. As
HP SmartTracker requires all setup to be done within the same network, it is possible that in environments
where more than one LAN is dened, communication between the client-server printer could fail. With this
feature an administrator can select the desired network Interface.
When conguring the network Interface, a popup window appears to apply the changes. The network interface
HP SmartTracker detected is used as the default.
If you want to select a dierent network, it can be manually changed by adding a new IP.
6 Your HP SmartTracker software application ENWW
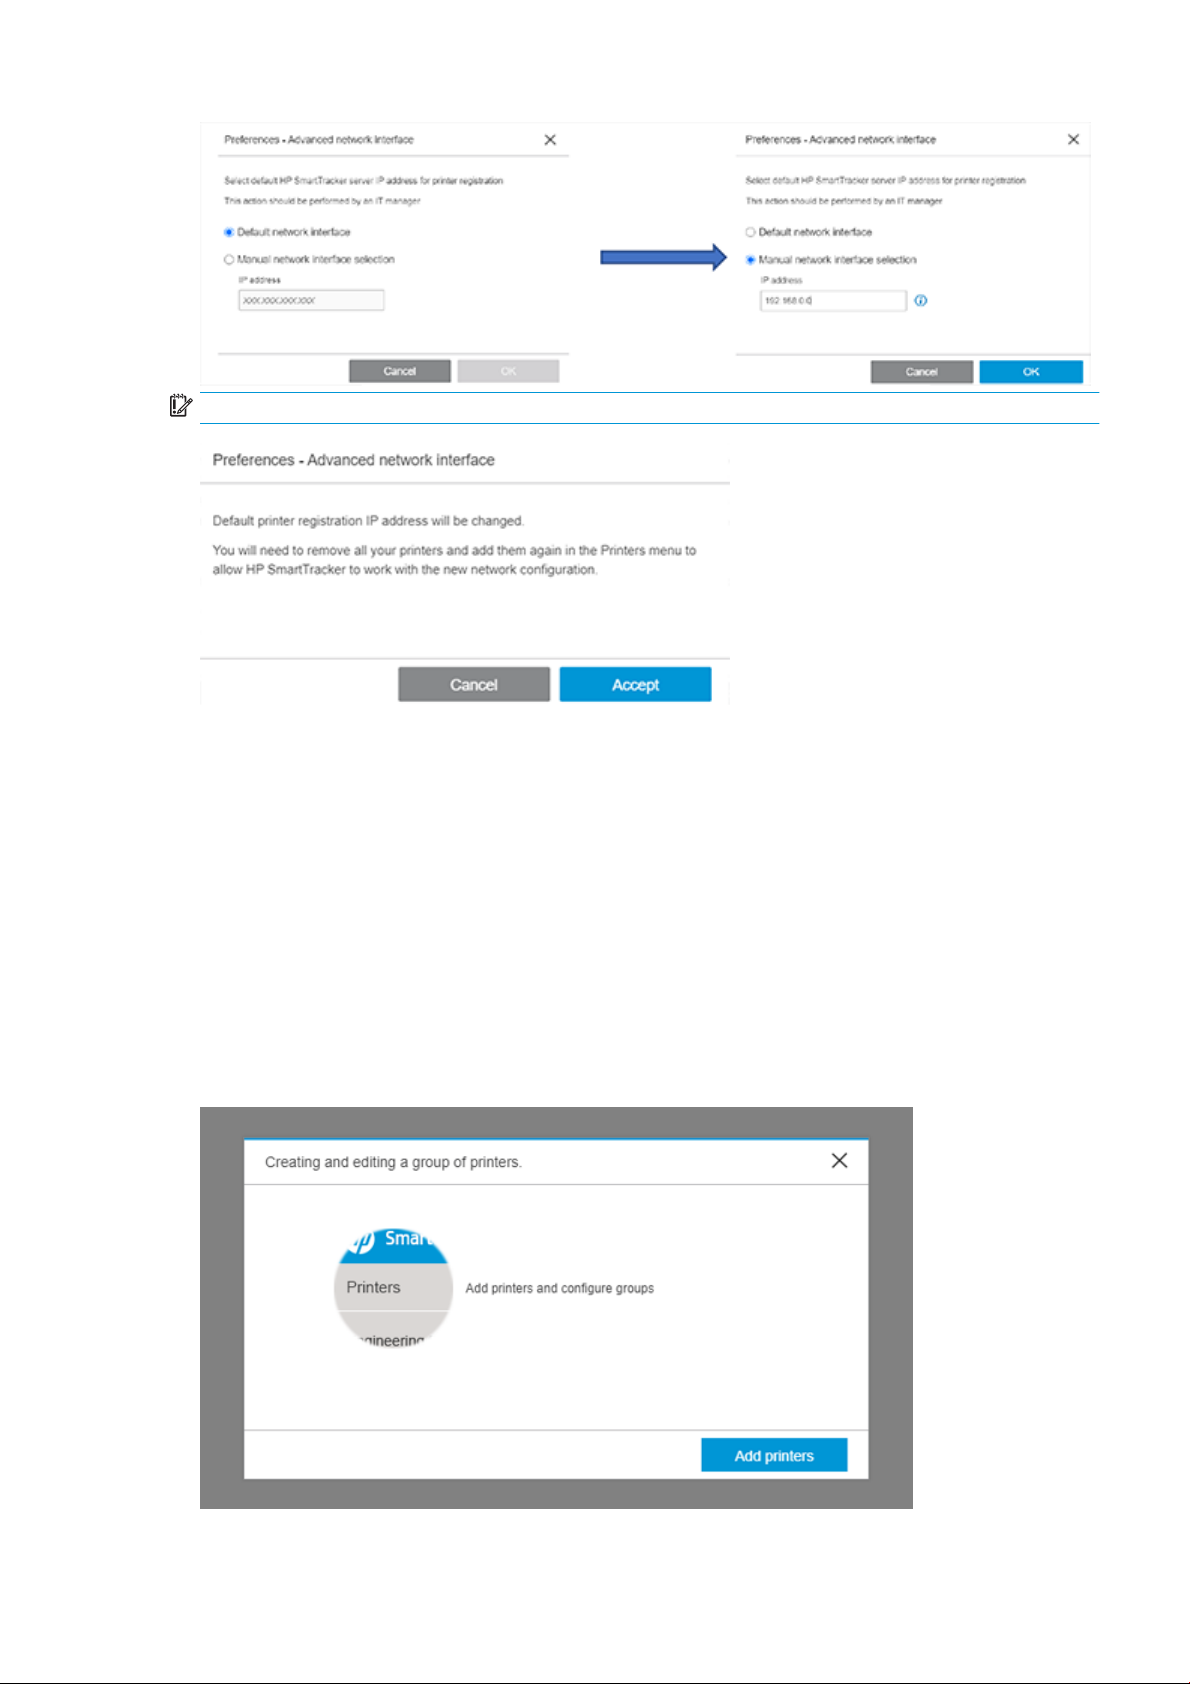
IMPORTANT: When changing the network interface, this message appears:
This message informs you as administrator that the printers already added to HP SmartTracker need to be
removed and added again for them to "be informed" about the latest manually introduced IP:
If the administrator clicks on Accept it changes the default network interface to the new one, if they click on
Cancel it goes back to the previous window.
Printers
Conguring printers
You can, at any time you choose, search for and add printers. Here we explain how to do that:
In the case where you have completed all the conguration steps and you have no printers already congured,
the screen illustrated below will automatically be displayed the rst time the HP SmartTracker application is
launched:
ENWW Printers 7

Clicking the Add printers button in the window illustrated above, or alternatively, when you have printers already
congured, by going to the Preferences panel and opening the Printers tab, a window similar to the one shown
below will open:
Any previously added printers will appear in the list illustrated above.
NOTE: Printers to be managed by HP SmartTracker MUST have been congured with an Administrator
password in both the printer itself and in HP SmartTracker.
Click Add printers and HP SmartTracker will automatically search for any supported printers that are connected
to your network as illustrated below:
Select the printer you want to add and click the Add button.
As an alternative to choosing the automatic discovery mode you could stop the discovery process and, without
selecting any printer, click the Add button. In this case you will see the following screen:
8 Your HP SmartTracker software application ENWW
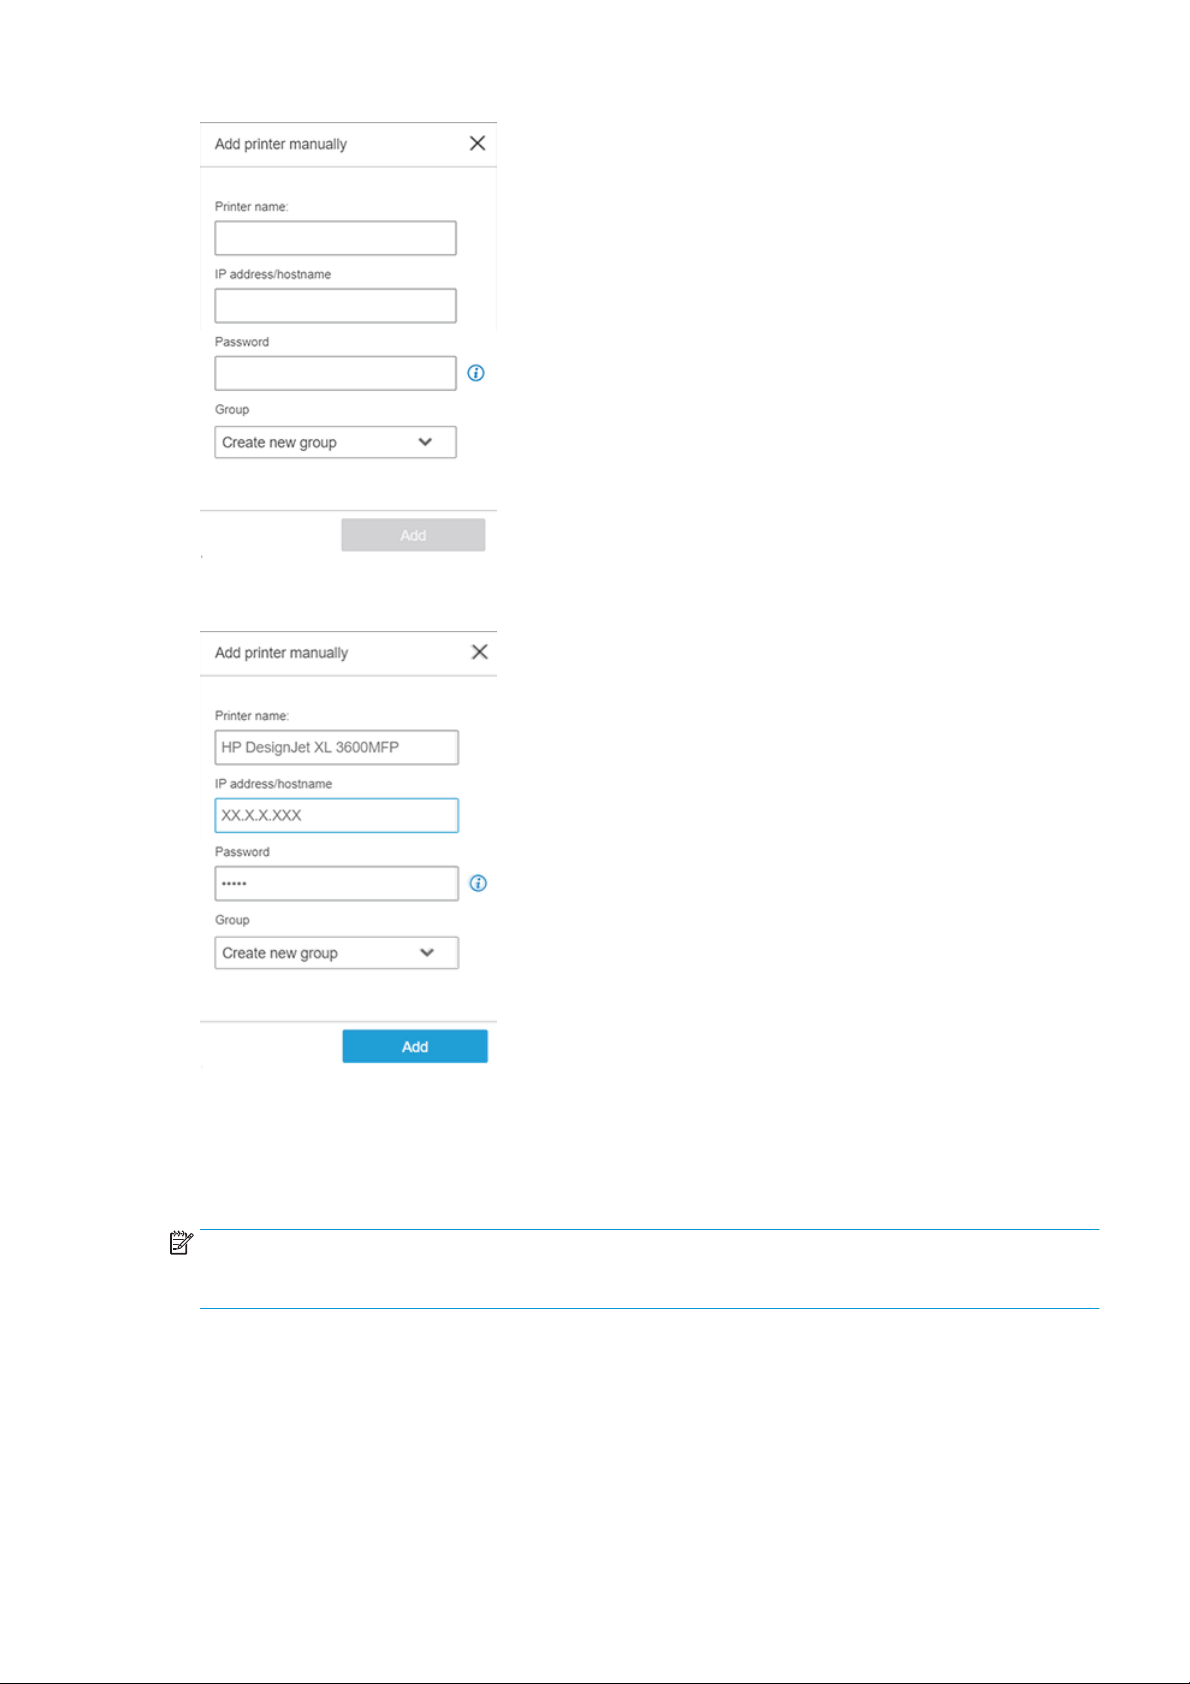
Enter the name you would like to assign to the printer, its IP address/hostname, the Administrator password, and
assign an existing group[1] where the printer will be placed, or create a new one if desired. Below is an example:
Once you have lled in all the required elds click the Add button and, if they are correct, the printer will be added
to HP SmartTracker.
[1] Groups can be used to aggregate dierent printers under the same clump. This can interact when being in the
Summary/Reports view as when selecting the group name, the view will show the consumption of the whole
group.
NOTE: Printers that are to be used with HP SmartTracker MUST have an Administrator’s password that has
been congured using the printer’s embedded web server. Please refer to the HP SmartTracker Installation Guide
for further information.
ENWW Printers 9
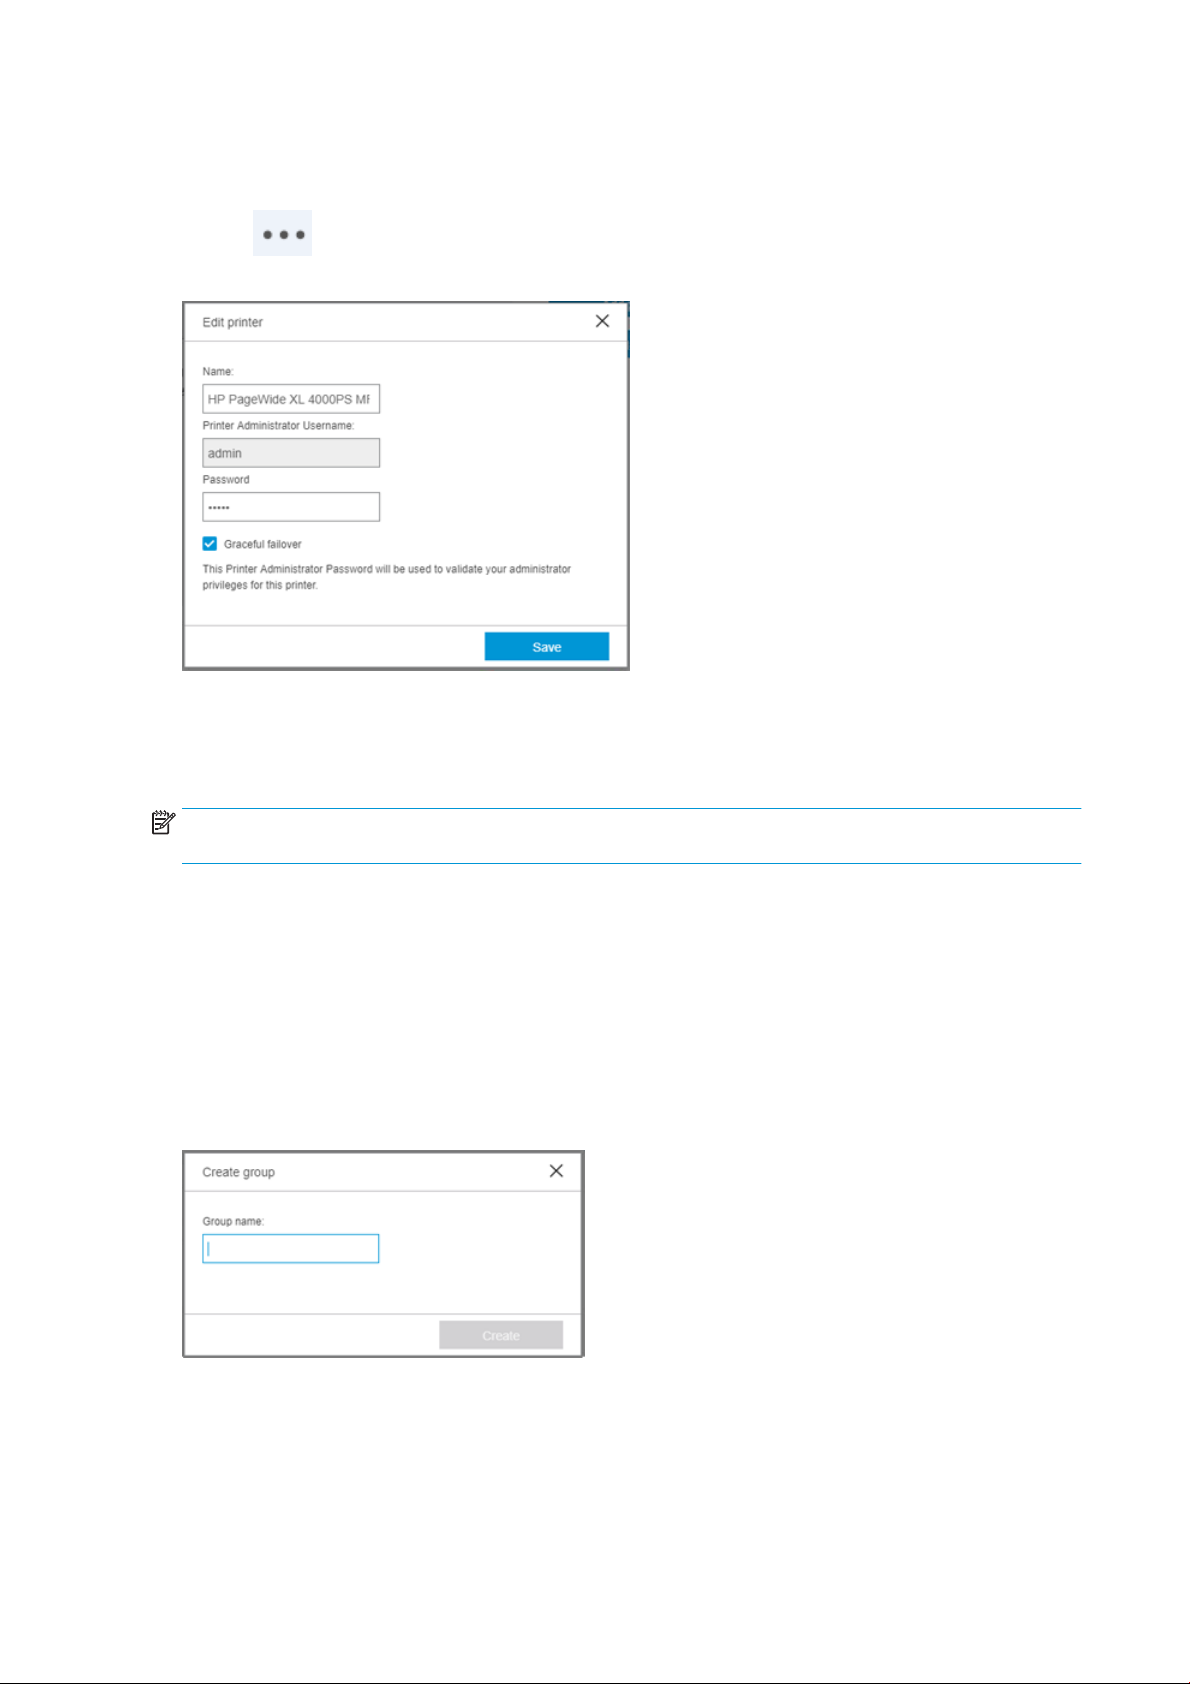
Editing a printer
Click the Printers tab in the Preferences panel.
Click the icon alongside the printer you want to edit, choose Edit from the menu that opens and you will
see a screen as illustrated below:
By default, Graceful Failover mode is selected.
Graceful failover mode determines printing behavior in the event that the server fails. If it is enabled in a printer, it
means that even if HP SmartTracker fails, jobs will still be printed. If it is not selected and the server fails, no jobs
will be printed.
NOTE: If there is a server failure, any jobs that have been printed will be included in the reports and assigned to
“Unknown”.
You can edit the printer name and/or password.
Make the changes and click the Save button.
Creating a group of printers
Ensure there are printers available.
Click the Printers tab in the Preferences panel.
Click the Create group button. You will see the following screen:
Enter the group name.
Click the Create button.
Next, select the printers you want to add and drag-and-drop them into the group.
10 Your HP SmartTracker software application ENWW
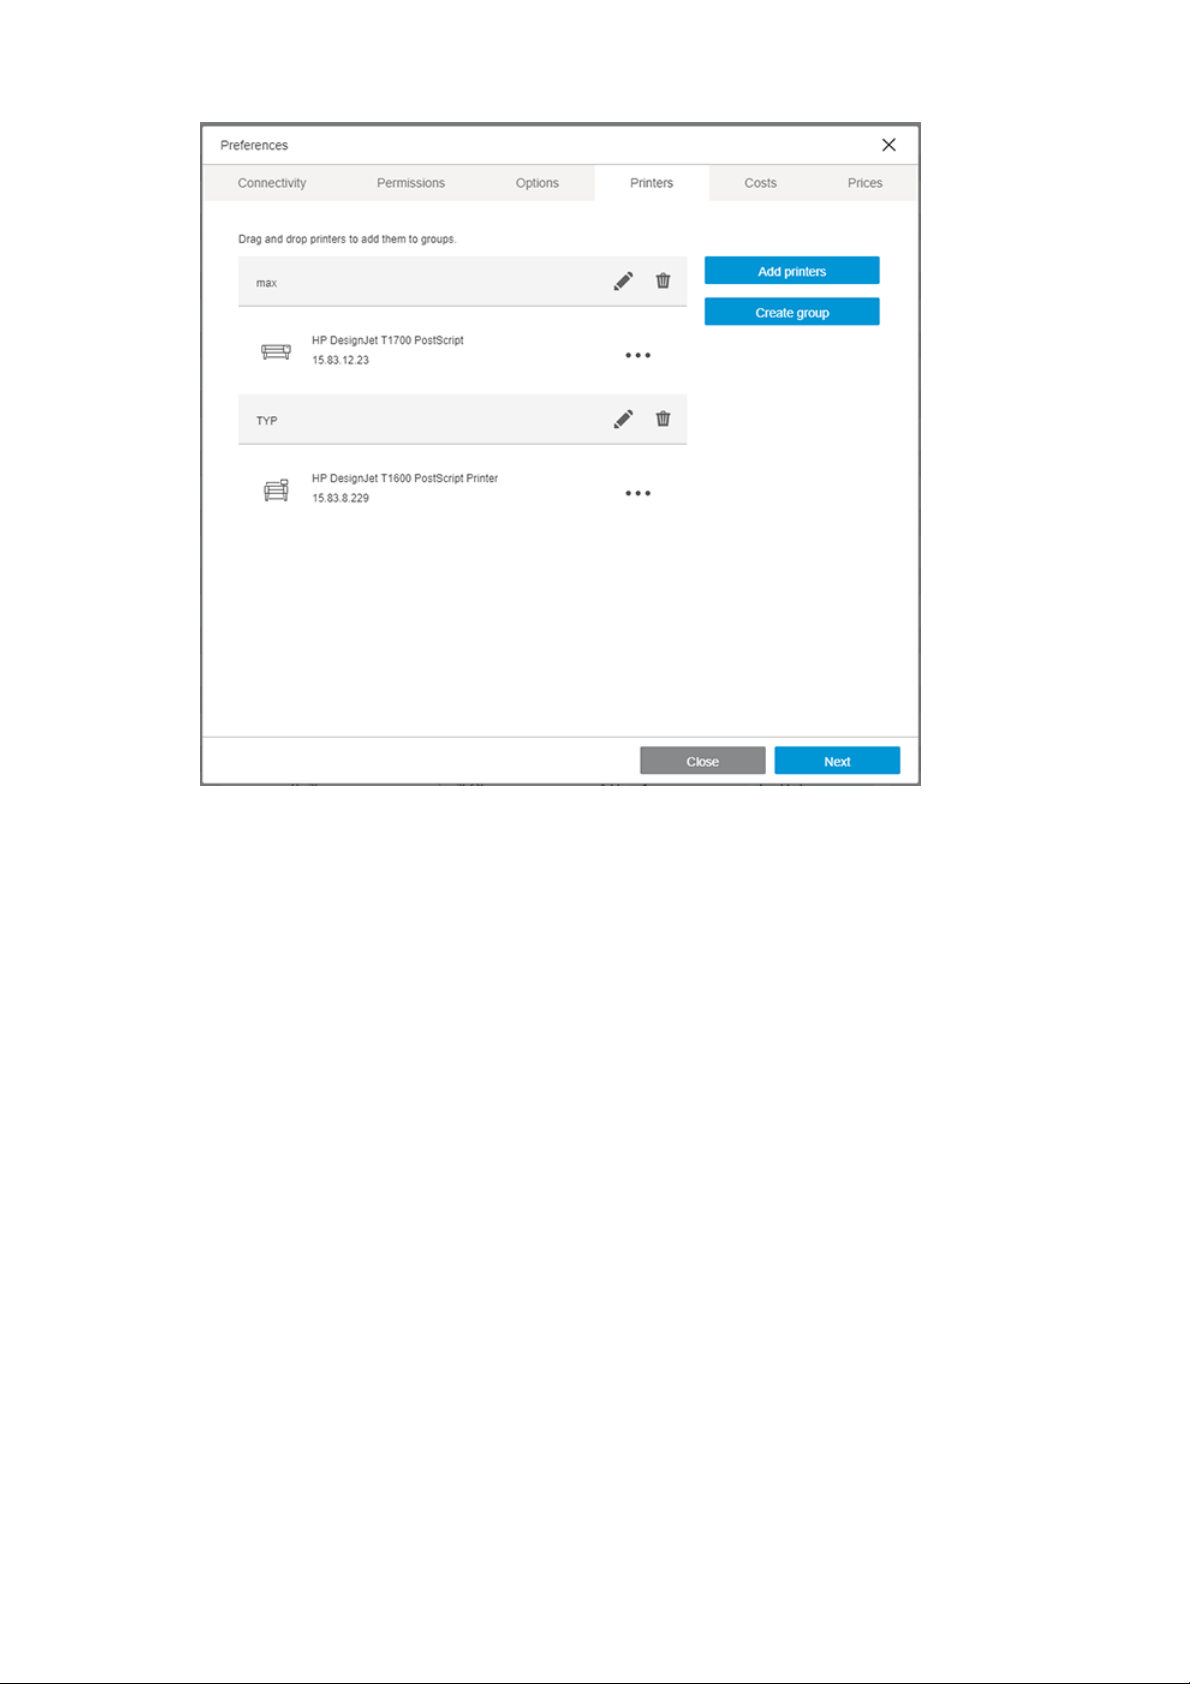
Click the Next button.
ENWW Printers 11

Editing a group of printers
Use the icon to edit a particular group of printers.
Click the icon.
Make the changes.
Click the Done button.
12 Your HP SmartTracker software application ENWW

Deleting a group of printers
Use the icon to remove a particular group of printers.
Click the icon.
Click the Accept button.
You are now returned to the home screen.
ENWW Printers 13

Permissions
In the Permissions tab you can assign permissions to Administrators and Bookeepers. At this point there is a
minimum requirement to congure at least one Administrator.
In this screen you can congure two types of HP SmartTracker user: Administrator and Bookkeeper. Users of the
printers will be congured later.
NOTE: It is mandatory to enter an email address in the screen above. Provided that HP SmartTracker’s email
server is correctly congured, it is this address that will be used to receive notications sent by HP SmartTracker.
Administrators can:
● Open the conguration panel and reports.
● Create new reports.
● Retrieve data.
● Set permissions, costs, prices, printers, projects, users and groups.
● Set language, measurement units and currency to be used by HP SmartTracker.
● View previous reports.
Bookkeepers can:
● Create new reports.
● Retrieve data.
● View previous reports.
The rst time you congure permissions you must create at least one user who is an Administrator.
To create an Administrator user, enter data directly in the elds in the Administrators section of the Permissions
tab illustrated below:
14 Your HP SmartTracker software application ENWW

Press the Enter key.
Once an Administrator user has been created, the login screen, illustrated below, appears:
The above screen will become the initial screen for your HP SmartTracker application.
Enter your username and password and click the Login button to return to the Preferences panel.
Here you can add more Administrators and/or create Bookkeepers.
To create a Bookkeeper, enter their data directly in the elds in the Bookkeepers section:
Press the Enter key.
To edit a user, click the data, make the necessary changes, then press the Enter key.
To delete a user, right-click it.
NOTE: There is no request for conrmation when you delete a user. If you delete a user by mistake, you will
have to re-enter that user’s data again.
ENWW Permissions 15

Options
In the Options tab you can congure a variety of settings for the HP SmartTracker application: application
language, accounting units, accounting currency, logo to be included in reports, and touch points where
authentication will be required.
Setting the application language
You can select the language to be used by the application from the ones available in the Language drop-down
list.
Setting the application units
You can select which units are to be used for paper accounting purposes, either Imperial units (inches, square
feet) or Metric units (millimeters, square meters).
Setting the currency
In this section you can select the currency to be used by typing its three character code (e.g. USD or EUR).
Setting the costs and prices conguration
You can choose to assign the cost or price value based on the ink or media used in print jobs. Distribution of cost/
price can be done by print category (Mono lines, Color lines, Low density and High density images) or by total
coverage (Color and Mono percentage).
NOTE: The selection you make here applies to all printers and will be eective for the Costs and Prices tabs.
Changing this selection in one of these tabs will automatically change the selection used by the other tab.
Setting a company logo for reports
A company logo can be added to your custom reports by simply clicking the Upload button and navigating to the
image (jpg or png format) of your choice, some restrictions exist.
Your current company logo can be removed by clicking the Remove button.
Selecting the required touch points
By checking job submission points you can select the touch points that will require authentication and tracking
(by default all points require authentication). If a submission point is left unchecked, unauthenticated printing will
be enabled, consequently there will be no tracking of activities that use that submittal point.
Touch points
You can select whether HP SmartTracker requires authentication from the following print agents:
HP SmartStream, HP Click, Driver and the printer.
NOTE: If a print agent is left deselected, unidentied users are free to print from that particular print agent.
16 Your HP SmartTracker software application ENWW

Costs
Click the Costs tab. This is where you can congure the units to be used for accounting and those that will also
appear in the reports.
If for example you selected Print categories in the Options tab:
If for example you selected Print Coverage in the Options tab:
ENWW Costs 17

Prices
You can introduce costs specic to each of the printer models installed.
You can assign the costs based on milliliter usage, area printed, area used, and linear meters. You can also select
the Hybrid option which provides a combination of two metrics.
If you need to change the metrics, you can select an alternative unit of measurement from the drop-down menu.
By clicking the icon a window opens showing the complete list of possible paper types and you can select
which of them will be taken into account and the cost associated with each of them.
NOTE: In Costs and Prices you can introduce the total price with or without taxes. Later in the reports, you can
select whether to apply the tax or not.
When you click the Prices tab, you will see the screen illustrated here:
18 Your HP SmartTracker software application ENWW

In this tab you will be able to include the prices to be charged to your customers. The introduction of prices works
in exactly the same way as the introduction of costs.
About the home screen
The home screen consists of a vertical bar on the left-hand side where all printers and printer groups that you
congured are listed. There are three tabs, by default they are named: Users, Projects, and Departments. The
User tab name is not editable, the remaining two can be re-named, but only by Administrators.
Each tab has a grid where you can enter data for each printer and printer group:
NOTE: The information displayed in the grid depends on the printer group you currently have selected on the
left-hand side.
Below are brief explanations of the various parts of the screen.
A Example of a printer group.
B Users tab containing grid with data for the selected printer group.
C Removed items view with the Users, Projects and Departments already removed.
D Users, Projects or Departments in Disabled status are not available from the agents' authentication form.
E Authentication mode.
You can edit the home screen tabs and customize the data to suit your needs.
ENWW About the home screen 19

NOTE: FOR ADMINISTRATORS ONLY: To edit the name of one of the Projects or Departments tabs, double-click
the tab name.
NOTE: The Projects and Departments tabs cannot both have the same name.
The number that appears in each tab corresponds to the number of active rows in the grid.
Conguring users of printers and printer groups
Here we congure the users of the printers and the various printer groups, not to be confused with
Administrators and Bookeepers who are users of the application.
Select a printer/printer group from the list on the left-hand side.
Click the Users tab.
A grid appears on screen where you can enter and store all the data for that printer group, as seen in the
following screen:
By default, the authentication mode to control access to the printer is set to None. To change it, click the
icon and choose the option you want from the drop-down list:
20 Your HP SmartTracker software application ENWW

Below is an explanation of the authentication options in the menu:
None: No authentication needed
Required: System asks for a Username
Required/password: System asks for a Username and Password
Required from list: Username can be selected from a drop-down list
Required from list/password: Username can be selected from a drop-down list and a Password must be entered
Use Active Directory: User is identied using their credentials as congured in the earlier section titled Active
Directory. (This option appears only after having congured “Active Directory Conguration”
correctly.)
To add users, click Add new item to enter the data directly in the elds where it says Enter... and click the Enter
key after you have lled in the last eld.
NOTE: Users, Projects, Departments cannot be given the name “Guest”, “Others”, “Service” nor “Unknown”.
NOTE: Users, Projects, Departments maximum length is 100 characters in English. For other languages with
special characters the length can be smaller.
To lter by a Status, right-click it. You will see the following screen:
Below is an explanation of the options in the menu:
Enabled/Disabled:
Removed: Remove selected row.
Enable or disable selected row.
ENWW Conguring users of printers and printer groups 21

NOTE: Disabled users are those with credentials that are not valid for printing temporarily. As a result they will
not appear in a drop-down list. The credentials can be enabled at any time.
To enable a Disabled user, select the row using the checkbox and press Enable.
NOTE: Users, projects and departments that are no longer valid in the organization can be removed from this
list. They go to the Removed view that can be emptied from the Cleanup tab in the Database Management menu
(explained later).
NOTE: When Use Active Directory is selected as the authentication method, the existing list is disabled and a
warning message Using Active Directory, HP SmartTracker users are disabled is displayed.
NOTE: Multiple selection is available to execute the same operation as Enable, Disable or Remove for the
selected rows.
Marking a job as billable
In the screen illustrated below, you will see a setting that is to be used to allow users to decide, on a job-by-job
basis, which particular jobs are billable or non-billable.
In the same illustration you can see a setting where, like the setting discussed above, you can choose to provide
users with the option to add a comment to a job.
To do so, click the icon next to the printer group.
NOTE: In the illustration above you will see the “Allow users to decide if a job is billable” eld, it can be enabled
or disabled. Your choice for this setting is independent of, and should not be confused with, the decision
regarding whether, or not, ALL jobs for the printer are billable. To modify this setting you must select each printer
group, one by one, and make the appropriate selection. If this setting is enabled, HP SmartTracker will ask the
user to make this decision every time they send a job to the printer.
Select the options you want and click out of the box.
Filtering
You can lter by clicking the icon and choosing an option from the drop-down list:
22 Your HP SmartTracker software application ENWW

Below are brief descriptions of the options in the menu.
Text box: you can type directly in the eld to lter the content of the table dynamically.
Sort Z to A: organizes users in reverse alphabetical order.
Sort A to Z: organizes users in alphabetical order.
You can also lter by enabled and/or disabled users by clicking the User status column lter.
Once a lter is selected, the icon turns blue.
Removing a lter
To remove the dynamic lter, click the icon to open the lter and then delete the text from the box. Click out
of the
lter.
Other lters are only removed once you exit the current view. To exit the current view, click a dierent printer
group.
Projects
Click the Projects tab. This is where you can congure data for the projects using the selected printer group as
shown in the following screen:
To create project data, click Add new item to enter the data directly in the elds where it says Enter... and click
Enter after you have lled in the last eld.
Departments
Click the Departments tab. This is where you can congure data about the departments included in this printer
group as seen in the following screen:
ENWW Removing a lter 23

To add data for dierent departments, click Add new item to enter data directly in the elds where it says Enter...
and click Enter after you have lled in the last eld.
NOTE: In the 3 tabs you will nd here you are able to edit:
● the name of the tab (Departments and Projects) Administrators only, and
● the names of several of the columns.
Import/Export CSV
Conguration — Import CSV
You can import or export a CSV in order to import and/or export user, project and department congurations to
and from the HP SmartTracker application.
To import a .CSV le into HP SmartTracker, click the Import CSV option on the home screen, a window like the one
illustrated below will be displayed:
WARNING! The .CSV imported le requires specic elds delimitation and formatting.
TIP: Export a CSV le rst, add your data, and then import it.
If you choose to check the Link this path checkbox, the imported CSV le must be located in the same PC where
the HP SmartTracker Server application is installed (a network folder, or a path to another PC in which an instance
of HP SmartTracker Client is running, will not work).
24 Your HP SmartTracker software application ENWW

WARNING! If you check the Link this path checkbox, a warning message will be displayed. The reason for this is
that with this checkbox selected you are creating a dynamic link with this le. This causes the conguration you
have uploaded here to be refreshed, within the space of a few minutes, to reect any changes made in this le,
for as long an this option is checked. If the Link this path option is checked and properly congured, the Users/
Projects/Departments management will be disabled in the HP SmartTracker Client's home screen.
After you click Next, the following window is displayed:
All the elds from the imported .CSV le and the existing elds from the tab, are displayed.
To create a mapping between the two columns of elds, you need to drag and drop the elds from left column to
the right column.
After nishing the drag and drop process, press Save and the conguration is completed. If changes are made in
the source .csv le and during the .csv le import process you enabled the Link this path option, the changes are,
after a few minutes delay, applied to the HP SmartTracker database.
ENWW Import/Export CSV 25

Export CSV
To export a CSV le, rst of all you should enter all the data, that you want to export, on the home screen. Click
the Export CSV option:
Generating reports
For Bookkeeper users, the reports screen is the home screen. However, Administrator users will have to click the
icon to open the Reports screen.
This screen provides three options: Summary, Reports, and Custom.
The Summary report can provide an overview of: all printers; a specic printer group or; a specic printer.
The Custom report lets you customize the content of your report to contain the tables and charts you choose.
The Reports option is a standard report that provides a detailed analysis of either a particular user, a department,
a project, or individual jobs.
Default reports can be created per printer and per printer group.
NOTE: Cumulative cost/price data are updated once a day based on the costs/prices congured. If changes are
made to the congured cost/price data, these changes will be immediately eective, however the changes will
not have any eect on the cumulative data from previous days.
26 Your HP SmartTracker software application ENWW

Summary
The information presented in the summary screens reect how the costs/prices have been entered: Print
categories or Printing supplies. The graphics here are illustrations of one possible conguration.
Here are examples of Summary reports:
You can view a global summary for all printers, a specic printer group or a specic printer.
You can choose the time frame of when the data is collected.
ENWW Summary 27

Below are brief descriptions of the various parts of the screen:
A View global summary for all printers.
B View global summary for selected printer group.
C View global summary for selected printer.
D Summary: Totals of cost and usage for the period.
E Set the date that the data started being collected.
F Report: totals by users, projects or departments.
G Set the date that the data stopped being collected.
You can export the data in dierent le formats.
28 Your HP SmartTracker software application ENWW

Below are brief descriptions of the various parts of the screen:
A Export data as PDF or Excel le.
B Open the Preferences panel*.
C Send data in an email as a PDF or Excel le. (This option is active only if the HP SmartTracker Email Server was properly congured
in the Connectivity tab.)
D Refresh current view.
E Open the Administrator panel*.
F Open the menu.
G Include/Exclude taxes.
*These icons are visible to Administrator users only.
There are pie charts displaying the total number of pages and printed units according to the settings you
congured in the Preferences panel. There is another pie chart with the total ink consumed by color and a wheel
showing the percentage average coverage:
ENWW Summary 29

The summary provides a comparative overview of both costs and prices:
NOTE: The graphics that appear in the Summary tab depend on the preferences you have selected. Any
unselected features will appear in gray in the report. If you set any values to zero, the charts will appear as
empty, even though the features were selected.
NOTE: When you select the Tax checkbox, reports take into account the tax rate congured in the Costs/Prices
tab.
Reports
There are 4 types of standard report: by Users, by Projects, by Departments, and Export All (raw data of all jobs
in a csv le format).
Here are examples of reports by Projects:
30 Your HP SmartTracker software application ENWW

You can view the default report for all printers, a specic printer group or a specic printer.
You can choose the time frame of when the data is collected and the le format to be used when the data is
exported.
NOTE: The application uses the time recorded by the server at the moment the job is printed.
Below are brief descriptions of the various parts of the screen:
A View report for all printers.
B View report for selected printer group.
C Set the date that the data started being collected.
D View report for selected printer.
E View reports for projects included in the selected printer group.
F Set the date that the data stopped being collected.
In the example above, the Projects tab is selected. However, you can also view reports for users and departments
by clicking the respective tabs.
You can view the data by billable jobs, non-billable jobs as well as jobs by price or by cost. At the top of the screen
you can select the options that t your needs. This is shown in the next image.
ENWW Reports 31

Below are brief descriptions of the various parts of the screen:
A Activate to view only billable jobs.
B Activate to view only non-billable jobs.
C Activate to view quantities taking tax into account.
D Select one of the following options:
Cost: View report data by cost.
Price: View report data by price.
Data is organized by name in pie charts according to the units of measurement and currency selected when you
congured the Preferences panel:
The doughnut charts make it easy to view the percentage of the categories being consumed.
There are tables listing the data by ink, media and scanner usage according to data recorded by the printers:
32 Your HP SmartTracker software application ENWW

The table makes it easy to view and compare data per project including the number of pages used, quantity of
ink consumed, the total cost and the total price.
You can see specic data for the preferences you congured in the table:
Custom
Choose the Custom tab to create your own report according to your needs.
Next, decide if you want to create a report based on users, projects or departments. Make your choice by clicking
the corresponding sub-tab. In the example below, the Projects sub-tab is selected:
You can see the template of your custom report contains gray panels. The smaller panels are where the graphs
you choose will be displayed. The larger panels are for displaying tables depending on the data you choose to
show.
To create a panel, click the New panel button.
To congure a panel, click the icon. The following window opens:
ENWW Custom 33

The type of image you want to display aects the options available later:
● Graphic: to add a graph
● Data table: to add a table
If you selected Graph, you can choose which values to compare.
● Same values: to add a pie chart
● Dierent values: to add a bar chart
You can then choose the units you want to display in your custom report:
● Usage: this will display the use of ink, media and scanner
● Fees: this will display data by: cost/price, billable, non-billable, both billable and non-billable together.
Select the value you want to show based on the unit you chose above.
Finally, select the name of the project you are creating the report for. In this example, the report is for a project
since the project sub-tab was selected at the beginning. However you also have the option to create reports for
departments and users.
If on the other hand you selected Data table, the window below is displayed:
You can now choose all the values and projects (or users or departments, depending on the sub-tab selected)
that you want to see in the report. Selected projects/users/departments move to the top of the list.
Click the Create button to save your choices and close the window.
Once you have created the panels you want, you can drag-and-drop them to the position you prefer.
To delete a panel, click the icon.
To view previously created custom reports, hover over the Custom menu:
34 Your HP SmartTracker software application ENWW

Click the report you want to open.
To delete a report, hover over the Custom menu and, when the menu appears, choose the report you want to
delete. Once the report is displayed on-screen, click the Delete button. If you hover over the Custom tab again,
you will see that the deleted report no longer appears in the list.
You can also create a customized Raw data report with all the information related to the jobs and export it to a
csv formatted le. First you must select the information per job to be exported, such as: Username, Project,
Department, Date, Ink cost by usage, Paper price, etc. The end and start dates for the report must also be
selected.
Raw data
Raw data reports are a special type of data table report where the User can select the information to be shown
for each job that has been printed during the selected time frame.
When hovering over the icon, a new window will appear showing all the available values for a job, the user
can select values to be used in the report and the order in which they should appear.
Once all the desired values have been selected and placed in the correct order, the User can click the Create
button to close the window and conrm the selections made.
Once the values have been conrmed, the report is automatically populated with the values stored in the
database for each job included in the time frame selected.
Custom logo
NOTE: Administrators only
To congure or change a logo to be included in the reports, click the icon to open the Preferences panel and
by clicking the Options tab a screen, as shown below, will be displayed:
ENWW Raw data 35

To upload a logo image le click the Upload button and a window will open so you can browse for the image to be
used. The uploaded image must adhere to the characteristics mentioned in this screen.
If a logo has already been uploaded, click the Remove button to remove it.
Once a logo is uploaded, it is immediately available to an Administrator or Bookkeeper for use in a report to be
exported.
By default the option to Include company logo is checked.
Scheduling and emailing reports
Administrator and Bookkeeper users can email reports to a specic user, project or department. They can also
choose the format of the report, PDF and/or xslx.
To email a report, click Email .pdf/.xls. The following window opens:
36 Your HP SmartTracker software application ENWW

In the Email destination eld, enter the email address(es) where you want to send the report. Next choose
whether you want to send the report in PDF or Excel format and click the Send button.
NOTE: Reports saved in Excel format do not contain any images.
To schedule and email a Summary report, click Schedule Summary. A window like the one shown below is
displayed:
In the Start sending reports since eld, select the date on which you want to send the rst report. Choose the
time from the drop-down menu.
You can also choose how often the email should be sent by selecting a value from the using Recurrency dropdown list.
In the Email destination eld, enter the email address where the report is to be sent. To send to more than one
destination, separate each address by a semicolon (;) character.
Next, by checking the PDF and Excel checkboxes, choose the format(s) to be used for the exported report.
Finally, click the Send button.
ENWW Scheduling and emailing reports 37

Schedule and email Users, Projects or Departments Reports
To schedule and email a specic report, click the Users, Projects or Departments tab and then click Schedule
Reports. The following window opens:
In the Start sending reports eld, select the date on which you want to send the rst report. Choose the time
from the drop-down menu.
You can also choose how often the email should be sent by selecting a value from the Recurrency drop-down
list.
In the Email destination eld, enter the email address where the report is to be sent. To send to more than one
destination, separate each address by a semicolon (;) character.
Next, by checking the PDF and Excel checkboxes, choose the format(s) to be used for the exported report.
The All or individual projects eld can be used to select one particular project from the list of available projects.
(the information displayed in the list will depend on user selection)
Printing workow authentication
Printing from the user’s PC
The printing workow to a HP SmartTracker enabled printer is similar to the regular printing workow from any
of the submittal tools: HP SmartStream, HP Click or, HP driver.
You can send a job to be printed in the usual way (i.e.:when printing through the driver, by selecting the File, Print
option from any application) and, while the HP SmartTracker conguration is obtained from the server, the
following popup will be shown:
38 Your HP SmartTracker software application ENWW

In the case where the printer has been congured to ask for authentication through HP SmartTracker, a popup
will appear asking for the credentials that have been congured for the printer group of the printer. For example,
in the case where the printer group has been congured to require a username with password, Project and
Department , the popup will look similar to the following:
Once you have entered all the information that has been requested (Username, Project, Department, comments
and passwords), the OK button must be clicked in order to continue the authentication process and send the job
to the printer. You can also select the Cancel button to cancel the printing workow at any time.
In many cases the information you enter in the authentication window will be the same, in order to avoid that
you have to re-enter the same authentication data each time in order to print you can check the Remember data
checkbox and, as long as the congured credentials for the printer group are not changed, the next time the
authentication popup is shown it will be populated with the data entered last time.
After clicking the OK button, the printer proceeds to check whether the provided credentials are valid or not, the
Connecting to server and printer popup will be shown and in the case where the authentication is successful, the
job will be sent to the printer without any more on-screen messages.
Authentication error cases
If you have completed all the information asked by the authentication popup but the credentials provided don’t
match any of the previously stored credentials on the HP SmartTracker Server, an “Authentication error: invalid
credentials” error will be shown:
ENWW Printing workow authentication 39

In these cases you will be able to either re-enter the credentials, click OK to repeat the authentication process or
click Cancel to cancel the job printing.
If the communication between the user’s PC and either the printer or the HP SmartTracker server is lost, a Server
not available error will be shown and the user will be prompted to cancel the job or continue printing without the
use of credentials, however this will happen only if the Administrator has enabled the Graceful failover mode for
that particular printer. Otherwise the printer cannot be used again until the HP SmartTracker server is back
online.
If you click Continue anyway, the job will be directly printed and will be assigned to User/Project/Department
"Unknown” in the reports section.
Printing, scanning or copying from the printer’s front panel
In order to be able to print, scan or copy from the printer’s front panel, you must be authenticated by providing
any credentials congured on the HP SmartTracker server for the printer.
40 Your HP SmartTracker software application ENWW

The authentication process starts whenever you start any of the restricted actions (print from USB, print a job
from the job queue, scan or copy), in these cases an authentication popup is shown on the printer’s front panel
asking for the credentials stored on the server:
Once you provide all the required information and click OK, the credentials are validated with the server and, if
they are correct, the user is “logged in” and can continue with the workow that has been initiated.
You will remain authenticated on the printer provided you continue performing actions from the front panel, no
new authentication will be required when starting any of the restricted actions (print from front panel, scan or
copy).
After a period of front-panel inactivity, you will be automatically logged out and you will have to repeat the
authentication in order to start any of the restricted actions.
You can also choose to log out of the printer by clicking the user log-out icon on the front panel, any new user
will have to go through the authentication process in order to start any of the restricted actions.
Database management
Database management is available inside the menu.
ENWW Database management 41

If the SmartTracker client is installed in a dierent PC than the server, the Database management option is
unavailable (the option is only for administrator roles).
Backup/restore database
Select the Backup and Restore Database tab, the screen below appears:
Select a le name to backup or restore and select and click the button to manually either start backup or restore.
A window appears to inform that the process will take several minutes. The server automatically restarts, and
during the process, the SmartTracker server is unreachable.
NOTE: You cannot save a backup le directly to C:\, another location must be chosen.
Below, there is an option to activate/deactivate the Backup Scheduler functionality. Automatic backups can be set
periodically (weekly, monthly) starting at a certain date and time. Activate/Deactivate the toggle to enable/
disable the congured schedule:
42 Your HP SmartTracker software application ENWW

Restore
To restore the database with a previous backup, select the Database management option and under Restore
backup, click the Restore now button. This opens le explorer where you can select the required backup to
restore (backups are stored with a .bk le extension).
Cleanup database
As database content increases, there is no automatic process to delete the content. The Cleanup tab enables
administrators the possibility to remove some data permanently, including users, projects, departments and
jobs.
In the home screen there is an option to remove users, projects and departments no longer required by setting
the Remove status to the desired items:
To delete an item already selected to Remove, click the icon, then in Database Management click the
Cleanup tab, select the desired items to delete permanently, and click Delete.
ENWW Database management 43

To delete jobs older than a 5 years permanently, select the desired option in Delete jobs and click Delete.
NOTE: Only jobs older than 5 years can be deleted. You cannot delete jobs with enabled or disabled users,
projects or departments, only the items deleted temporarily or permanently will be removed. You can save
historical data by exporting a .CSV le before deletion.
Support tool
For troubleshooting, an integrated support tool has been added to the menu:
It gathers information about the computer running it, and the server and client versions:
44 Your HP SmartTracker software application ENWW

It also includes the following options to help test the printer and SmartTracker software recover from a problem.
Fill the printer IP address or hostname:
ENWW Support tool 45

Press the Check button and a set of checks run automatically:
46 Your HP SmartTracker software application ENWW

You can save the client and server logs:
ENWW Support tool 47

NOTE: Server logs package generation is unavailable when the HP SmartTracker Client is installed on a PC
other than the Server.
48 Your HP SmartTracker software application ENWW

Manual update
Whenever a new version of the application is available, SmartTracker client noties you. You can download the
client and the server from hp.com. If you don’t want to update at that time, just discard the message and check
for updates anytime you want to from the About menu in the client application.
If the outgoing email has been properly congured, an email is sent to the administrator.
Make sure to update the server, plus any client that is installed, with exactly the same version number. Other
versions may not be compatible.
Logging out
To log out of the HP SmartTracker, simply click the icon and choose Log out from the menu.
You are successfully logged out of the application. To log in again, you will need to enter your username and
password.
ENWW Manual update 49
 Loading...