

Page 1

HP SmartStream 3D Command Center
User Guide
Page 2

© Copyright 2018 HP Development Company,
L.P.
Edition 1
Legal notices
The information contained herein is subject to
change without notice.
Trademarks
Intel® and Intel Core™ are trademarks of Intel
Corporation in the U.S. and other countries.
The only warranties for HP products and
services are set forth in the express warranty
statement accompanying such products and
services. Nothing herein should be construed as
constituting an additional warranty. HP shall not
be liable for technical or editorial errors or
omissions contained herein.
Microsoft® and Windows® are U.S. registered
trademarks of Microsoft Corporation.
Page 3

Table of contents
1 About Command Center .......................................................................................................................................................................... 1
2 Quick start .................................................................................................................................................................................................. 2
Download the application ....................................................................................................................................................... 2
Connect to a server .................................................................................................................................................................. 3
Add your rst HP 3D printer .................................................................................................................................................... 3
Start monitoring your printer ................................................................................................................................................. 4
3 Set up preferences .................................................................................................................................................................................... 5
General preferences ................................................................................................................................................................. 5
Network connectivity ............................................................................................................................................................... 5
Manage servers .................................................................................................................................................... 5
Connect to proxy server ...................................................................................................................................... 6
Run network diagnostics .................................................................................................................................... 6
Device management ................................................................................................................................................................ 7
Add a device .......................................................................................................................................................... 7
Manage the list of devices .................................................................................................................................. 7
Help and About ..................................................................................................................................................... 7
4 Access and security .................................................................................................................................................................................. 8
Network connection security .................................................................................................................................................. 8
Network and computer requirements .................................................................................................................................. 9
Network requirements ........................................................................................................................................ 9
Computer requirements ..................................................................................................................................... 9
Connectivity troubleshooting ............................................................................................................................................... 10
Cannot connect to proxy server ...................................................................................................................... 10
Cannot add a device .......................................................................................................................................... 10
Cannot connect to a server .............................................................................................................................. 12
Run network diagnostics .................................................................................................................................. 13
5 Monitoring basics .................................................................................................................................................................................... 15
Types of devices ..................................................................................................................................................................... 17
3D printers .......................................................................................................................................................... 17
Processing stations ........................................................................................................................................... 18
ENWW iii
Page 4

Device alerts ............................................................................................................................................................................ 19
6 Notication center .................................................................................................................................................................................. 20
Types of notications ............................................................................................................................................................ 20
New versions available ..................................................................................................................................... 20
Connectivity issues ............................................................................................................................................ 20
Device alerts ....................................................................................................................................................... 20
iv ENWW
Page 5
1 About Command Center
HP Smartstream 3D Command Center is a client application that fully monitors your HP 3D printers, and all other
complementary devices such as processing stations, build units, and other 3D accessories, to fully utilize the
power of the HP 3D ecosystem. Command Center must be installed with your 3D devices. It helps you to make all
of your 3D printing builds successful: review print jobs and be ahead of the printer’s needs by remotely viewing
rmware updates, warnings, and errors.
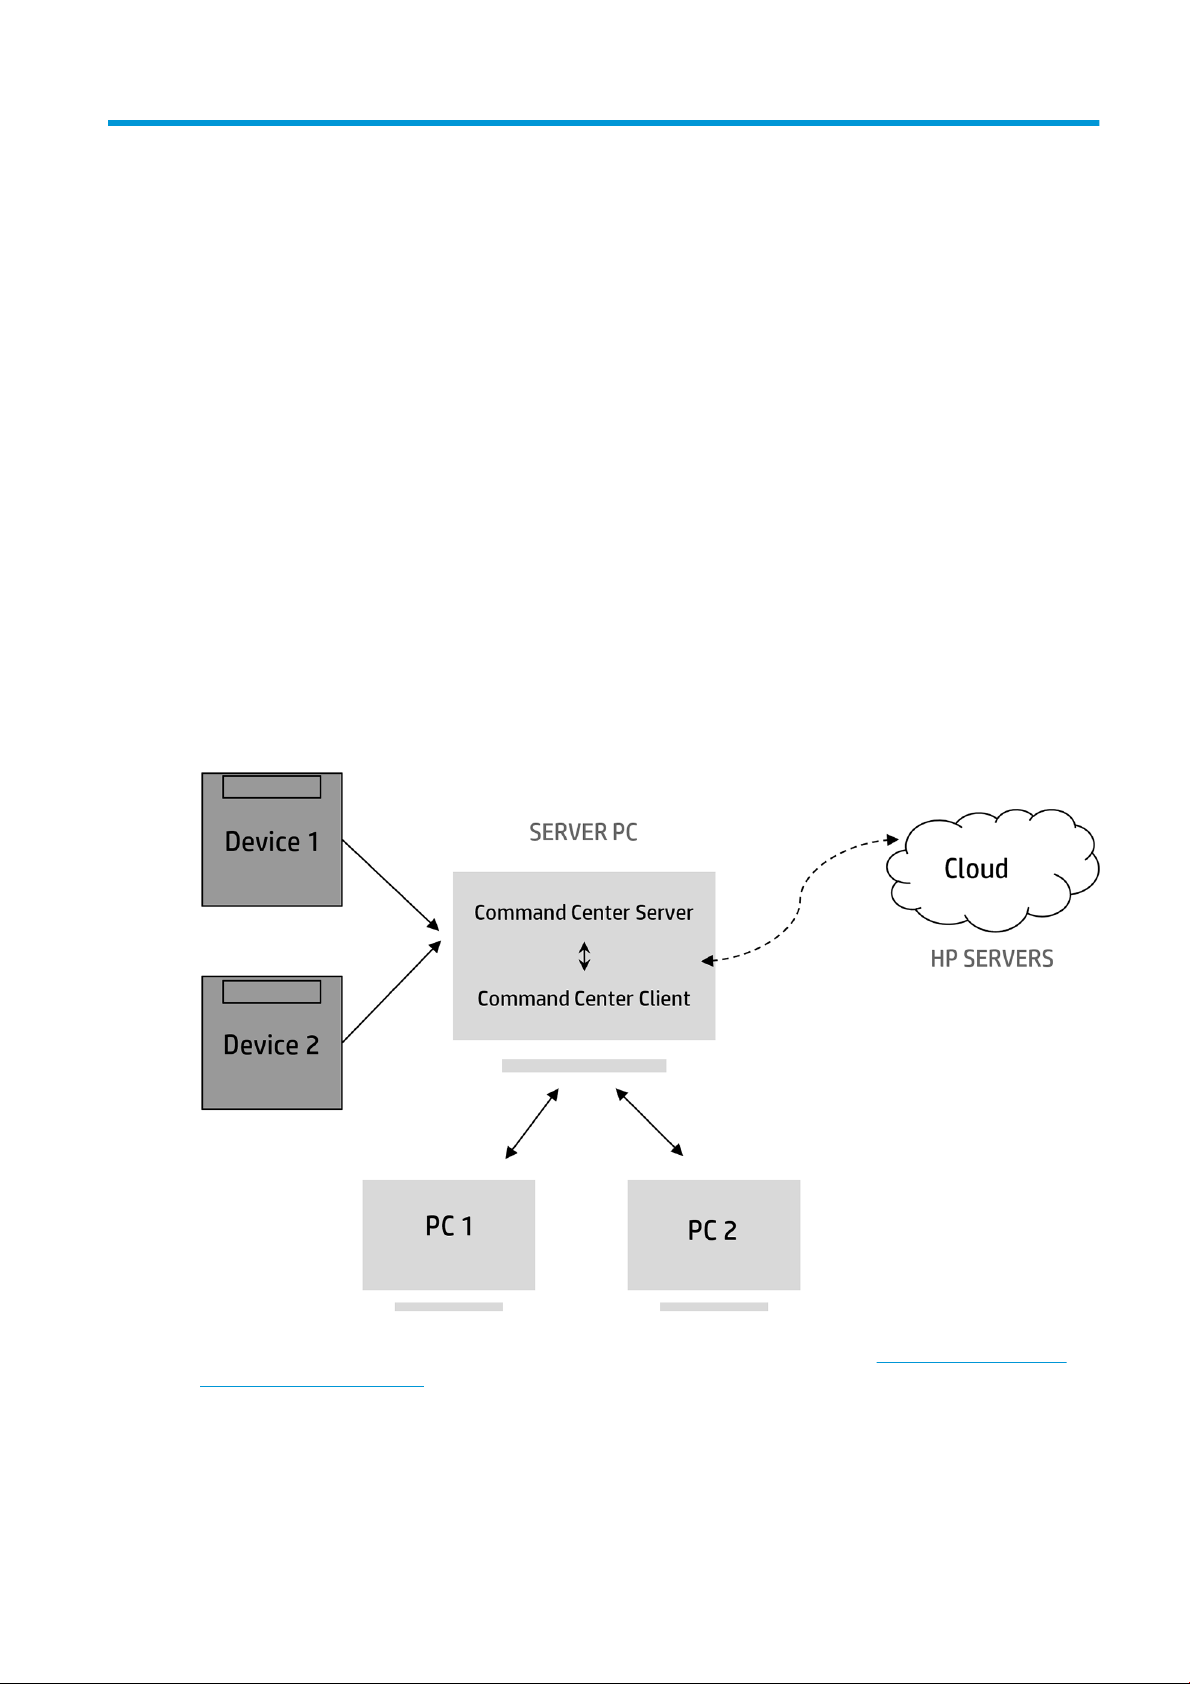
HP Smartstream 3D Command Center consists of two dierent pieces of software: Server and Client.
● Command Center Server needs to be installed in only one computer that is permanently running and
connected to the cloud, while there can be as many instances of Command Center Client in dierent
computers as needed.
● Command Center Server is the central connection point between all the HP 3D devices and the HP Cloud.
The dierent instances of HP SmartStream 3D Command Center Client access the Server to get information
about the devices; they do not connect directly to them.
For more information on how the HP Cloud works, and what information is sent and how, please read the
document HP Jet Fusion 3D Cloud Connection Security, which you can download from http://www.hp.com/go/
jetfusion580color/software/.
ENWW 1
Page 6
2 Quick start
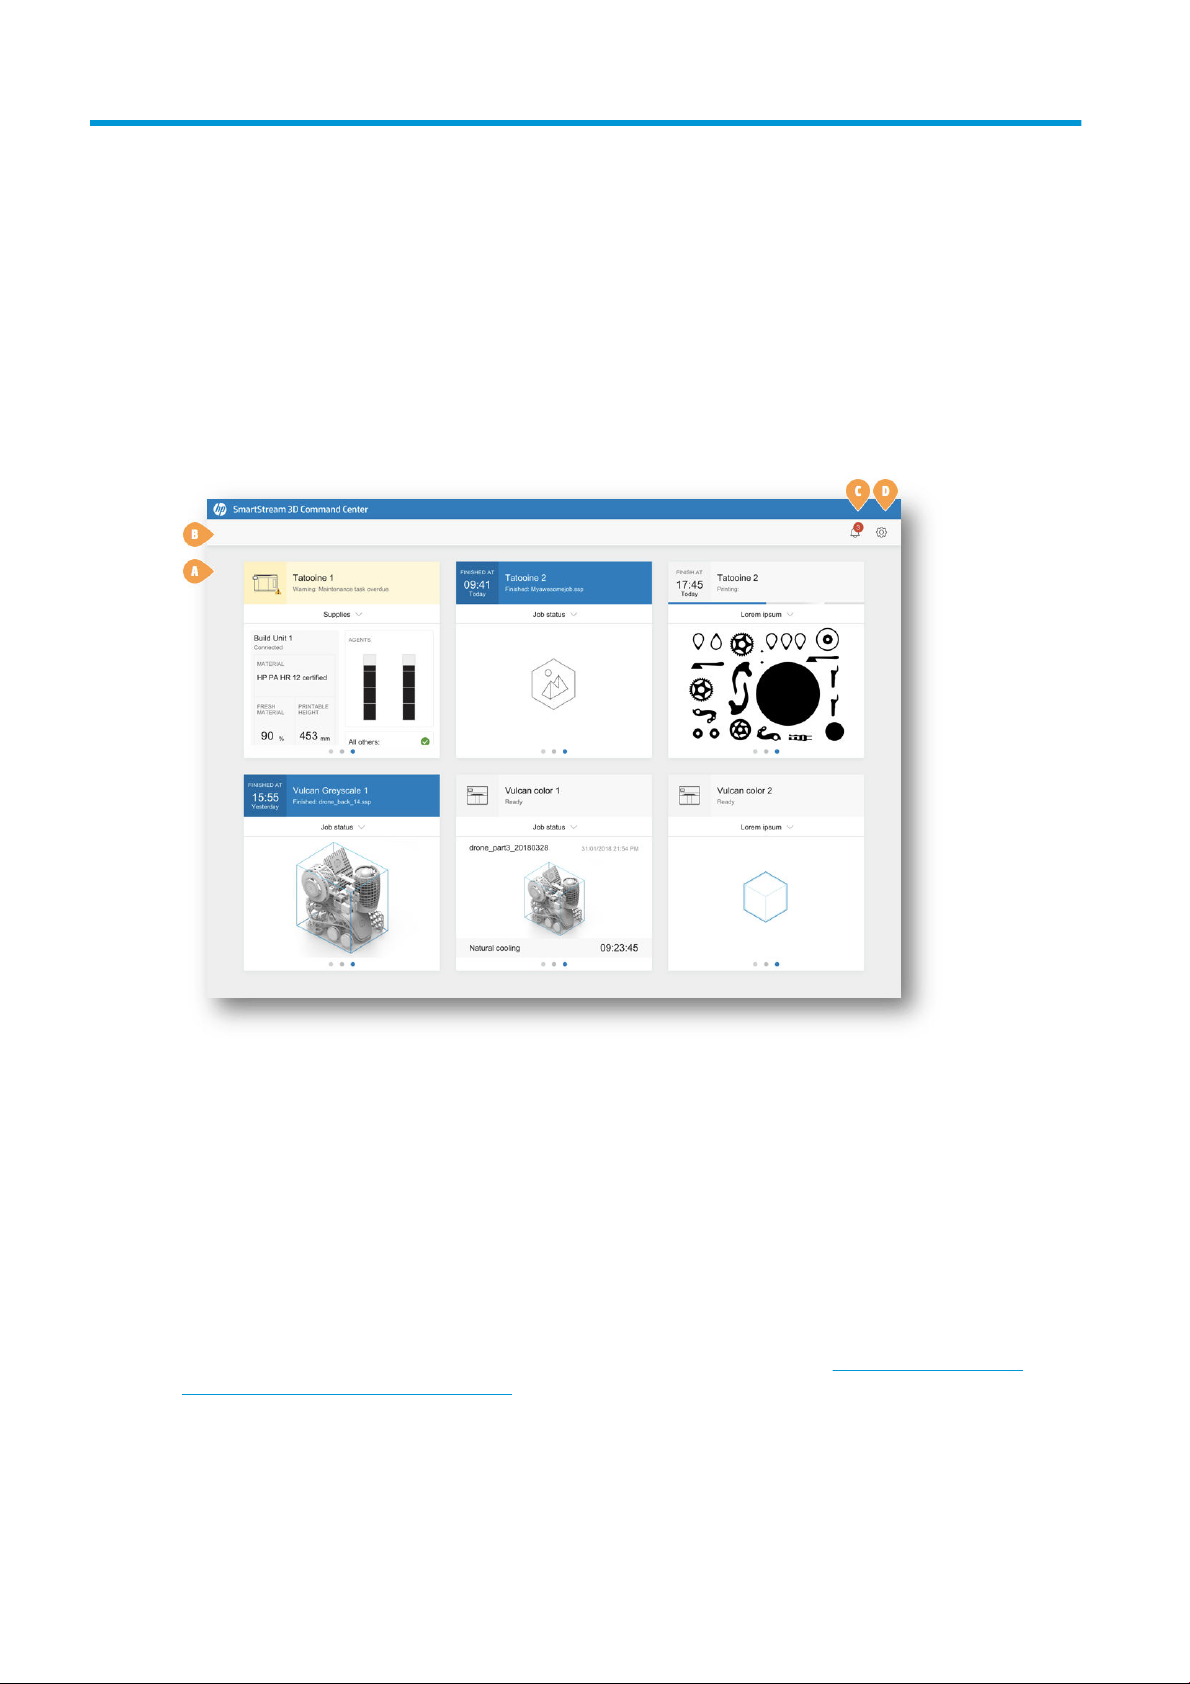
After installing, connecting, and setting up the application, you will see the following window, showing
information about the various devices that you have added to it.
a. Monitoring overview area
b. Main bar
c. Notication icon
d. Preferences icon
Before using the application for the rst time, please read the documentation to get a basic understanding of the
application and its uses. To open the user guide, press F1.
Download the application
You can download HP SmartStream 3D Command Center (Client and Server) from http://www.hp.com/go/
SmartStream3DCommandCenter/manual.
Operating systems
● Microsoft Windows 10 (64-bit)
● Microsoft Windows 8.1 (64-bit)
2 Chapter 2 Quick start ENWW
Page 7
● Microsoft Windows 8 (64-bit)
● Microsoft Windows 7 (64-bit)
Software updates are notied through Notication Center, and you can automatically install new versions.
Connect to a server
Once the printer and the assigned computer are connected to your local network and to the HP Cloud, open the
HP SmartStream 3D Command Center Client that you have just installed, and go to Network connectivity >
Server.
By default, all available servers on your network are displayed. Your computer is connected automatically to the
auto-detected server if there is a single server. If multiple servers are available, select which server you want to
use. Select a server and click . Once you are successfully connected, the icon indicates that the server is
connected.
To save an auto-discovered server into the server list, click .
If the server does not appear automatically, you can add it manually by clicking Add server. A new row appears in
the server list. Enter the server computer’s hostname or IP address, and the corresponding port.
IMPORTANT: HP strongly recommends conguring a hostname or static IP address rather than a DHCP address
for the server computer, to allow Command Center Clients to nd the Command Center Server reliably. IP
addresses can change in DHCP environments.
NOTE: The hostname/IP address and the port number are also displayed in the notication area icon.
Add your rst HP 3D printer
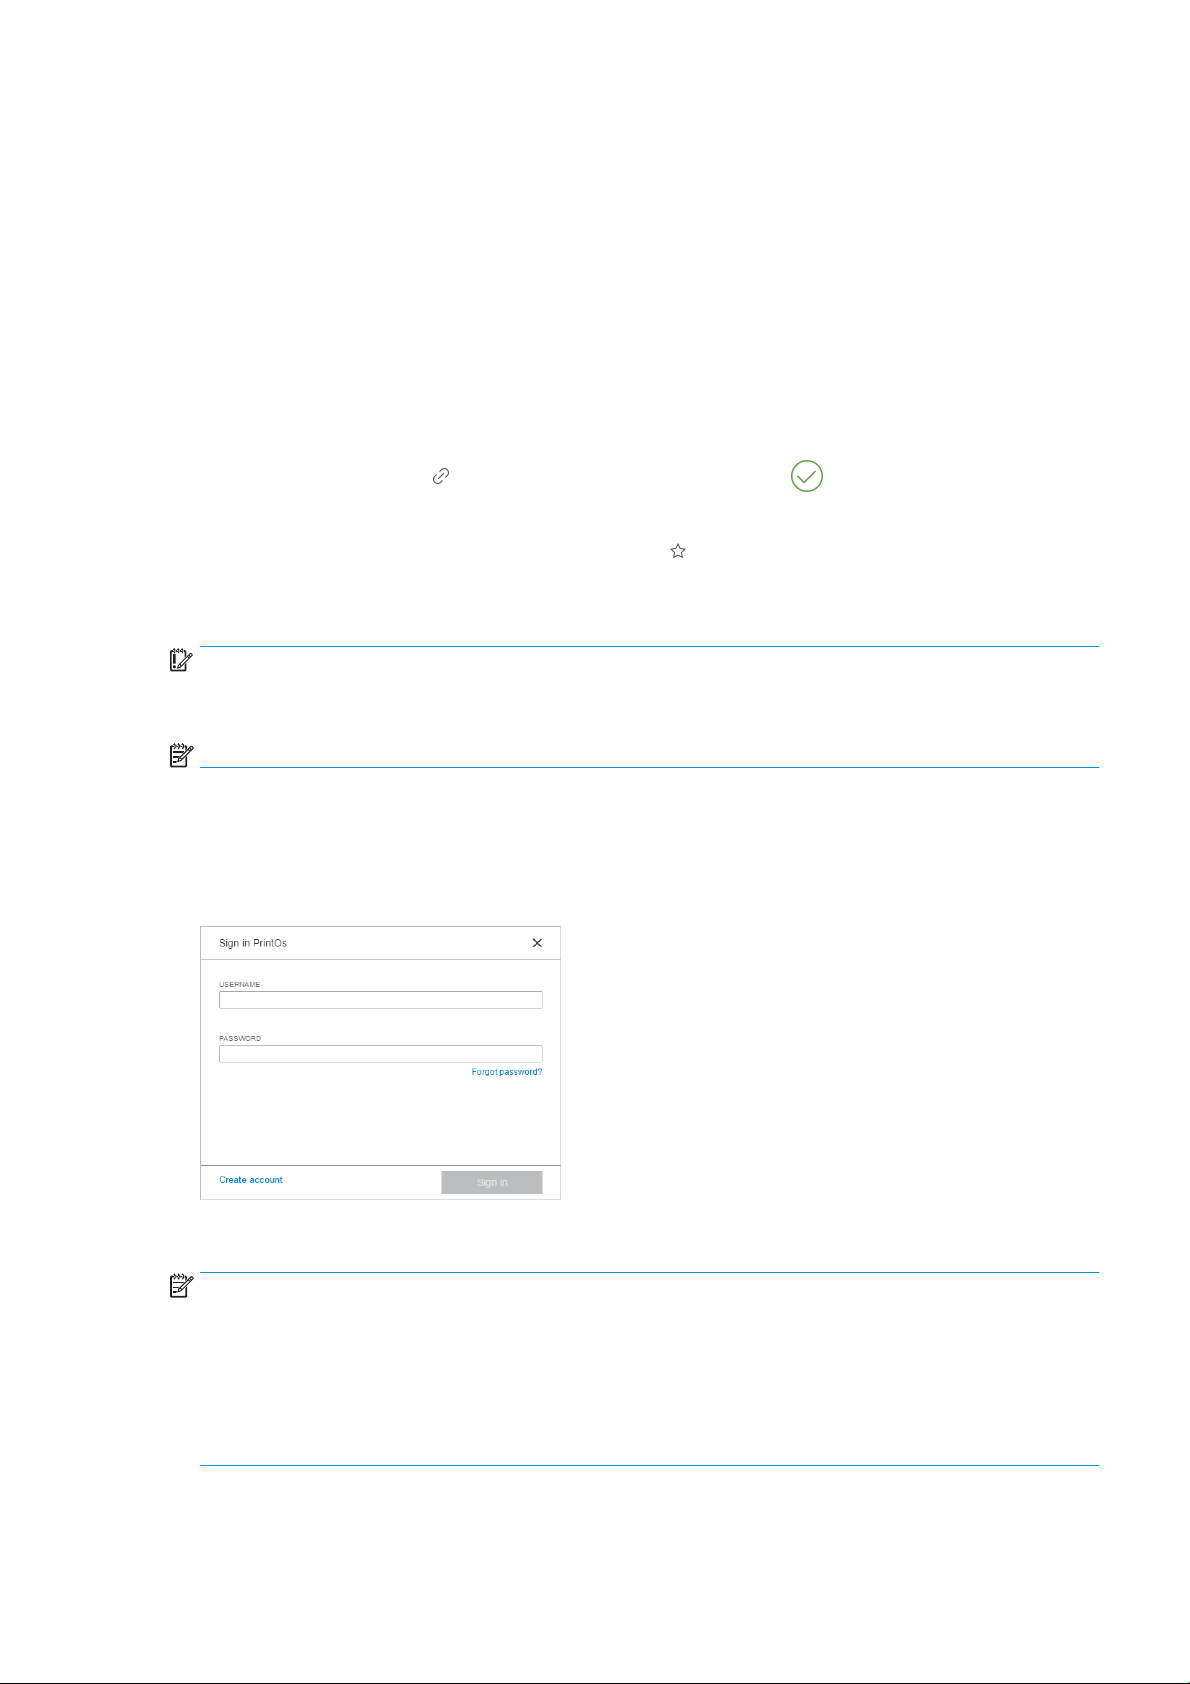
Complete the printer conguration in Device management > Add device. To add a new device, you need to
connect to PrintOS. If you already have an account, enter your username and password.
If you have no account, click Create account. A new window opens in which you can create an account. Once it is
created, return to Command Center and introduce your new credentials.
NOTE: If there is an error in the login to PrintOS, check that the connectivity icon has no warnings (such as Not
connected to Command Center Server) and that you are using a Customer/PSP account (not a Reseller account)
to access PrintOS. If you have both accounts associated with the same email address, the last sign-in and signout should be done with the Customer account.
If you need to create a Customer/PSP PrintOS account, you must register with your information. You will receive
an email invitation to log in to your new account, and then you will need to accept the terms and conditions to
enable your account.
After signing in to PrintOS, enter the device information.
ENWW Connect to a server 3
Page 8
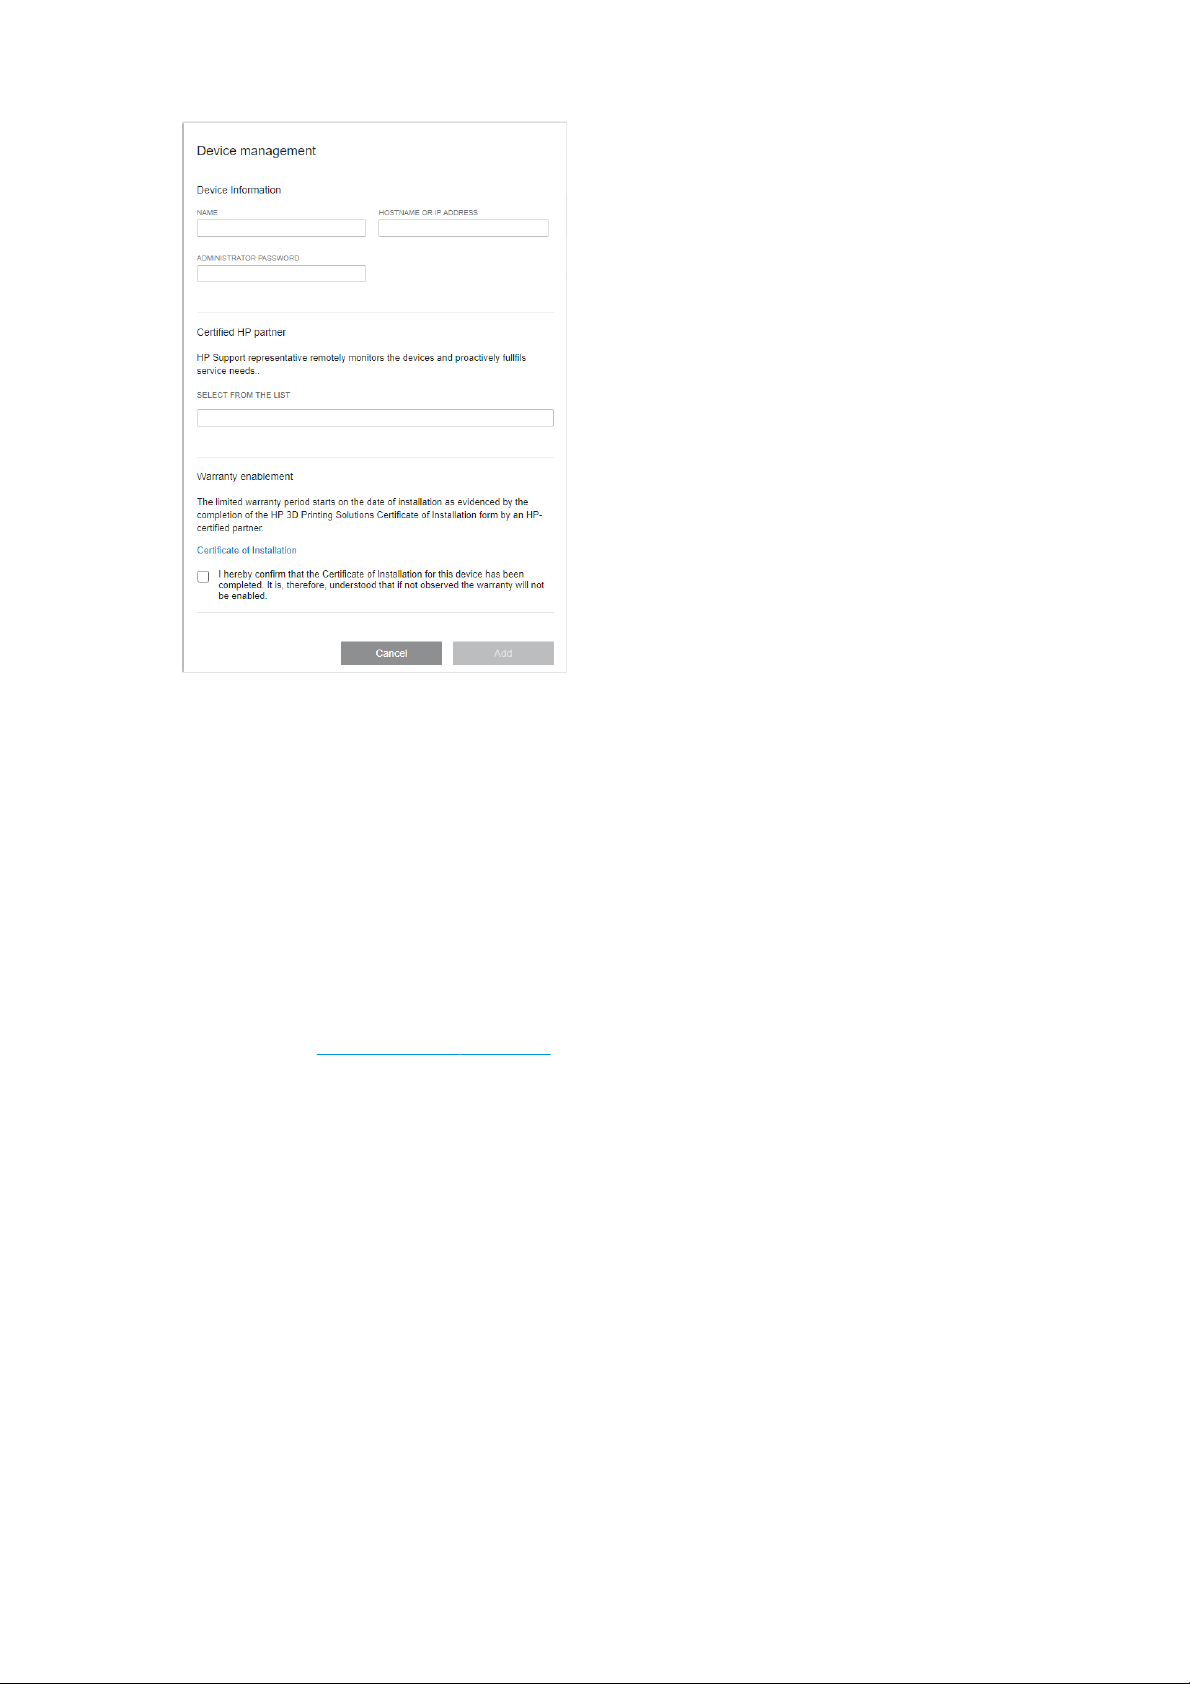
● NAME: Enter any name you choose to identify your printer.
● HOSTNAME OR IP ADDRESS: HP recommends using the hostname, or alternatively a static IP address, to
avoid future connectivity problems.
● ADMINISTRATOR PASSWORD: This password is set in your printer.
● SELECT FROM THE LIST: You can either select from the list or enter the name of your HP partner or reseller.,
● Certicate of Installation: When you click this, a new window opens. You must ll in the form to activate
your warranty.
Start monitoring your printer
If you completed the above steps successfully, your rst device is added to the monitoring area. For more
information, see Monitoring basics on page 15.
4 Chapter 2 Quick start ENWW
Page 9

3 Set up preferences
General preferences
Select your preferred language and units from the drop-down menus.
Network connectivity
In the Network connectivity tab, you can manage servers, connect to a proxy server, or run network diagnostics.
Manage servers
On the Server tab you can see a list of all available servers in your network. Select a server and click . Once you
are successfully connected, indicates the server that is connected.
If the server you are looking for is not in the list, click Add server to add it manually. A new row appears in the list.
Enter the hostname or IP address, and the corresponding port.
To save an auto-discovered server in the server list, click .
Server list order
1. The server to which Command Center is connected appears rst on the list.
2. Then the other servers that you have saved as favorites.
3. Then any other servers automatically discovered on your network.
ENWW General preferences 5
Page 10

Connect to proxy server
Under Advanced you can connect to a private proxy server, which can be password-protected. Enter the proxyserver settings if you want to use a proxy server to connect to the Internet.
Run network diagnostics
You can also run network diagnostics to troubleshoot connectivity problems.
6 Chapter 3 Set up preferences ENWW
Page 11

Device management
Add a device
To add a printer or processing station, see Add your rst HP 3D printer on page 3.
To add a build unit, you need to ll in only two elds:
● Device name: Whatever name you choose to identify your build unit.
● Serial number: The serial number of the build unit.
Manage the list of devices
In the Device management tab, you have a list of all the 3D devices that have been registered in Command
Center as your 3D eet. They are ordered by date of installation, from the oldest to the newest. You can edit or
delete them at any time, and update the device rmware when a new version is available.
● Edit : You can change the name of the device at any time. Once it is changed, save the new name by
clicking OK.
The other device information is not editable. If the hostname is changed, you must add delete the device
and add it again as a new device.
● Delete : You can delete any device at any time, but you must enter the administrator password for that
specic device to conrm the deletion.
● Firmware : Click the Firmware button to download the latest version of the rmware for that 3D device.
Then go to the 3D device with a USB ash drive, and install the rmware.
Help and About
In this tab, you can nd links to user guides, and information about the installed version of Command Center.
ENWW Device management 7
Page 12

4 Access and security
Network connection security
● Device data are accessed through HTTPS from HP SmartStream 3D Command Center Servers using the
Web Services from the devices.
● Data connections to the cloud are always initiated by HP SmartStream 3D Command Center Server. No
incoming network ports need to be opened.
● Neither the HP SmartStream 3D Command Center, nor any devices connected to it, are accessed from the
general Internet.
● HP 3D Printing Solution status and health monitoring require frequent uploads of small data payloads
(every 5 minutes). Outgoing connections are opened and immediately closed for each payload, reducing
any potential security risks.
● The HP SmartStream 3D Command Center Server uses HTTPS Web protocol but it is not a Web browser: It
cannot be used to access anything other than the HP Cloud and it is not aected by Web browser
vulnerabilities.
● The HP SmartStream 3D Command Center software transmits device data to HP Cloud servers using
HTTPS. The identity of the servers is veried, and the communication between the HP SmartStream 3D
Command Center software and the HP Cloud servers is encrypted using the Advanced Encryption Standard
(AES) algorithm in Cipher Block Chaining (CBC) mode. This ensures that the device data cannot be viewed or
modied by any third party.
● Full security audits and vulnerability scans are performed on the HP SmartStream 3D Command Center
software before release.
● Printers and supporting devices run on dedicated hardware and rmware that are not aected by typical
personal computer vulnerabilities.
● Full security audits and vulnerability scans are performed on all HP device rmware before release, and
rmware update les are digitally signed by HP and veried by the HP device before installation.
● Device non-anonymous data is never shared with unauthorized third parties without the customer’s
consent. The HP Cloud stores the device data in HP authorized data centers which meet strict HP security
standards, and the system is periodically audited to help ensure the highest level of data security.
● The HP SmartStream 3D Command Center software transmits device data to HP Cloud servers using
HTTPS. The identity of the servers is veried, and communication between the HP SmartStream 3D
Command Center software and the HP Cloud servers is encrypted using the Advanced Encryption Standard
(AES) algorithm in Cipher Block Chaining (CBC) mode, to ensure that the device data cannot be viewed or
modied by any third party.
8 Chapter 4 Access and security ENWW
Page 13

Network and computer requirements
Network requirements
● Use hostnames or static IP addresses in devices and in the Command Center Server computer, which will
prevent disconnections due to changes of IP address.
● The Command Center Server computer needs to open port 8080-8090 to allow Clients to connect to it.
● To allow the Command Center Server access to the cloud, you need to check that the rewall is not blocking
the following endpoints:
– http://www.printos.com, port 443 (or https://www.printos.com)
– http://3dpcong.heleni.me, port 443 (or https://3dpcong.heleni.me)
– http://*.amazonaws.com, port 443 (or https://*.amazonaws.com)
● Proxy details are taken from the system conguration.
● Proxy authentication is supported with an additional tool.
● Between client and server, HTTP is used; ensure that it is enabled in the rewall rules.
Computer requirements
Command Center Server computer
● 24/7 uptime (it never switches o or goes to sleep)
● Local network access to all HP 3D devices
● 24/7 access to HP Cloud
● Intel Core i3 2.4 GHz with four virtual cores/threads
● Computer running Windows 7, 8, 10 (64-bit), or Windows Server 2008 R2
● 4 GB RAM
● 5 GB available hard disk space
● Ethernet (IPv4) connection, at least 100 MB/s
● Shielded CAT-6 LAN cables to connect the printer to your LAN
Command Center Client computers
● Local network access to the computer running SmartStream 3D Command Center Server
NOTE: Connection to printers is not required.
● Intel Core i3 2.4 GHz with four virtual cores/threads
● Computer running Windows 7, 8, 10 (64-bit), or Windows Server 2008 R2
● 4 GB RAM
● 5 GB available hard disk space
● Ethernet (IPv4) connection, at least 100 MB/s
● Shielded CAT-6 LAN cables to connect the printer to your LAN
ENWW Network and computer requirements 9
Page 14

NOTE: Your local network conguration may require that a member of your IT department performs all the
procedures described in this chapter, before and during the installation. This is to ensure that all the instances of
the software are up and running and properly connected to the HP Cloud and to the printer. Make sure they are
available on the agreed date of printer installation. If you require further help, contact your HP service
representative, who can connect you to a HP network specialist.
Connectivity troubleshooting
Cannot connect to proxy server
If your network uses a corporate proxy server, you may see an error alert when you rst install Command Center,
showing that you cannot connect to the HP Cloud, because outgoing connections are blocked.
In this case, you must enter the credentials and URL of the proxy server into the advanced section of the network
connectivity settings.
Once you have done this, a connection should be established within a few minutes, and the error alert will
disappear.
Cannot add a device
After signing in to PrintOS, you must enter a name for the device, the hostname (limited to 32 characters), and
nally the administrator password already congured in the front panel of the device. If the hostname fails to
work, you can use a static IP address. HP does not recommend dynamic IP addresses (provided by a DHCP
server), because the connection to Command Center will be lost when the address changes, and you will need to
delete the device and add it again every time.
10 Chapter 4 Access and security ENWW
Page 15

The next step is to select from the list the certied HP partner who installed your device.
The last step is the Certicate of Installation.
ENWW Connectivity troubleshooting 11
Page 16

Possible error messages
● Invalid device name
The name of the device is not acceptable: some characters are not supported.
● Invalid device credentials
The administrator password that you have given for the device is incorrect.
● Device not supported
The PrintOS account is not associated with a 3D printing device, or the device serial number is incorrect.
● Device already associated with another PrintOS account
The device is registered with a dierent PrintOS account (perhaps belonging to another customer).
● Admin credentials not congured
The device has no administrator password.
Cannot connect to a server
Each Command Center Client needs to connect to a Command Center Server. The available servers in your
network are displayed in the network connectivity settings.
12 Chapter 4 Access and security ENWW
Page 17

● The list shows servers that have been detected automatically, with their IP addresses. If only one server is
detected, the client is automatically connected to it. If more than one are detected, you should select one of
them.
● If no servers appear, you can click Add server to add a server manually. Enter the IP address and 8080 port
of the server computer. The IP address and port are displayed in the notication area. You can save
manually added servers by clicking the star.
If you have connected to a server that then ceases to be available, the message Check your server connection is
displayed. You may need to restart the Command Center Server software on the server computer.
Run network diagnostics
You can run network diagnostics to identify and correct connectivity problems.
The diagnostics include tests of the basic network components, and tests of the connections to external
resources that the Command Center needs.
Principal services
● http://www.printos.com, port 443 (or https://www.printos.com)
● http://3dpcong.heleni.me, port 443 (or https://3dpcong.heleni.me)
● http://*.amazonaws.com, port 443 (or https://*.amazonaws.com)
If the diagnostics nd no error, you will see the following window.
ENWW Connectivity troubleshooting 13
Page 18

If an error is found, you will see an error message that varies according to the cause of the problem. The
following window is an example.
14 Chapter 4 Access and security ENWW
Page 19

5 Monitoring basics
Each device is represented by a card that summarizes the most important information about the device. By
default, the build status information is shown.
The upper part of the card shows the following information:
● Icon that helps to identify the type of device.
● Shows the expected nish time, if a part is being built.
● Name of the device chosen by the user who registered it in Command Center.
● Current status of the device.
You can use the drop-down menu to view information on builds and supplies.
Builds Supplies
Click the card for more detailed information about the device.
ENWW 15
Page 20

The Build status tab
The Builds tab
16 Chapter 5 Monitoring basics ENWW
Page 21

The Supplies tab
The About tab
Click Back or the breadcrumb to go back to the monitoring overview area (see Quick start on page 2).
Types of devices
Command Center can monitor all models of 3D printers, processing stations, build units, and cooling frames.
3D printers
3D printers have the following sections:
● Build status: Information about the ongoing activity of the printer.
ENWW Types of devices 17
Page 22

While a job is being printed, you can see the following information:
– JOB NAME
– MATERIAL
– PRINT PROFILE
– LAYERS: The number of layers printed, and the total number of layers to print
– HEIGHT: The height printed, and the total height to print
– PARTS: The number of parts printed, and the total number of parts to print
● Builds: Information about the current job le that is being printed, the upcoming jobs, and the pending jobs
to be printed.
– UPCOMING JOB: This appears only when a new job has been submitted while the current job is
printing, to be printed in the same build chamber
– PENDING JOBS: Jobs that are already stored in the printer, waiting to be printed when selected
● Supplies: Information about the health of all your supplies, with further information in case of any warning
or error.
NOTE: Dierent printer models may have dierent types of supplies.
– BUILD UNIT: Shows the status of the build unit and type of material in the build chamber, if the printer
supports build units.
– FRESH MATERIAL: The percentage of material that is fresh (from a material cartridge); the rest of the
material is from the storage tank.
– AGENTS: A real-time display of the level of the agents.
– PRINTHEADS: Displays alerts or errors if any.
– OTHER SUPPLIES: Displays alerts or errors if any.
– FUSING LAMPS: Displays alerts or errors if any.
– HEATING LAMPS: Displays alerts or errors if any.
● About: Information about the printer, such as model and product number, as well as a link to activate the
warranty, and a link to the printer’s user guide.
Processing stations
● Printed builds: Shows the job les that have been printed inside the inserted build unit.
● Supplies: Information about the health of all your supplies, with further information in case of any warning
or error.
NOTE: Dierent printer models may have dierent types of supplies.
● About: Information about the processing station, such as model and product number, as well as a link to
activate the warranty, and a link to the processing station’s user guide.
18 Chapter 5 Monitoring basics ENWW
Page 23

Device alerts
Cards may display warnings or errors, which may override the printer status, depending on their importance,
which is determined by the printer.
● Warnings are about non-urgent issues, such as a maintenance routine. A warning about a particular
component is displayed on the icon representing that component.
● Errors are about urgent issues that could stop the printer from starting a job, such as a broken lamp. An
error about a particular component is displayed on the icon representing that component.
ENWW Device alerts 19
Page 24

6 Notication center
Click to open the panel. The number of unread messages is displayed beside the icon. To close the panel, click
again, or click anywhere else outside the notication drawer.
Types of notications
New versions available
● Software updates are notied through the notication center; you can install new versions automatically.
● If there is a rmware update available, the Command Center displays a new message in the notication
center. Go to the front panel of the printer and/or processing station to proceed. Click the message,
download the new rmware, copy it to a USB ash drive, and insert it into the USB port in the printer or
processing station.
Connectivity issues
● Not connected to PrintOS
● Not connected to Command Center Server
If the problem persists, see Connectivity troubleshooting on page 10.
These issues can arise when a specic device is no longer connected because of a reorganization.
Device alerts
Device alerts may consist of warnings, errors, a build that has been completed, a canceled job, device
connectivity issue, and so on, related to a specic device.
20 Chapter 6 Notication center ENWW
 Loading...