

Page 1

2–Tier Installation
April 1999
Page 2

This software manual is documentation for Panthert. It is as accurate as possible at this time; however,
both this manual and Panther itself are subject to revision.
Prolifics and JAM are registered trademarks and JAM/TPi and Panther are trademarks of JYACC, Inc.
BEA TUXEDO is a registered trademark and BEA WebLogic Enterprise is a trademark of BEA Systems,
Inc.
DynaText is a registered trademark of Inso Corporation.
FLEXlm is a registered trademark of GLOBEtrotter Software, Inc.
HP is a trademark of Hewlett-Packard Company.
INFORMIX and C-ISAM are registered trademarks of Informix Software, Inc.
IBM, DB2, and RISC System/6000 are registered trademarks and CICS is a trademark of International
Business Machines Corporation.
Microsoft, MS-DOS, Windows, Windows NT, SQL Server, ActiveX, and Visual C++ are registered trade-
marks and Microsoft Windows 95, Authenticode, Microsoft Transaction Server, Microsoft Access, Microsoft Internet Explorer, Microsoft Internet Information Server, Microsoft Management Console, and Microsoft Open Database Connectivity are trademarks of Microsoft Corporation.
Motif is a trademark of the Open Software Foundation, Inc.
Oracle and SQL*Net are registered trademarks and Oracle7, Oracle8, PL/SQL, Pro*C, Rdb7, and Rdb8 are
trademarks of Oracle Corporation.
Netscape and Netscape Navigator, and Netscape Fast Track Server are registered trademarks of Netscape
Communications Corporation.
Sun, SunOS, Solaris, JavaScript, JDK, and Java are trademarks and Sun Workstation is a registered trade-
mark of Sun Microsystems, Inc.
SYBASE is a registered trademark and Client-Library and DB-Library are trademarks of Sybase, Inc.
UNIX is a registered trademark in the United States and other countries, licensed exclusively through
X/Open Company Limited.
The X Window System is a trademark of the Massachusetts Institute of Technology.
Other product names mentioned in this manual may be trademarks or registered trademarks of their respective owners, and are used for identification purposes only.
Send suggestions and comments regarding this document to:
Technical Publications Manager
Prolifics http://www.prolifics.com
116 John Street support@prolifics.com
New York, NY 10038 (212) 267–7722
1997, 1998, 1999 JYACC, Inc.
All rights reserved.
Printed in USA.
Page 3

Table of Contents
About this Guide vii. . . . . . . . . . . . . . . . . . . . . . . . . . . . . . . . . . . . . . . . . . . . . . . . . .
Organization of this Guide vii. . . . . . . . . . . . . . . . . . . . . . . . . . . . . . . . . . . . .
Conventions viii. . . . . . . . . . . . . . . . . . . . . . . . . . . . . . . . . . . . . . . . . . . . . . . .
Text Conventions viii. . . . . . . . . . . . . . . . . . . . . . . . . . . . . . . . . . . . . . . . .
Keyboard Conventions viii. . . . . . . . . . . . . . . . . . . . . . . . . . . . . . . . . . . .
Panther Documentation ix. . . . . . . . . . . . . . . . . . . . . . . . . . . . . . . . . . . . . . .
Online Documentation xi. . . . . . . . . . . . . . . . . . . . . . . . . . . . . . . . . . . . . . . .
Installation Checklist 1. . . . . . . . . . . . . . . . . . . . . . . . . . . . . . . . . . . . . . . . . . . . . .
Chapter 1 General Information 3. . . . . . . . . . . . . . . . . . . . . . . . . . . . . .
Contents of the Installation Package 3. . . . . . . . . . . . . . . . . . . . . . . . . . . . .
Application Architecture 4. . . . . . . . . . . . . . . . . . . . . . . . . . . . . . . . . . . . . .
Which Panther Components to Install? 4. . . . . . . . . . . . . . . . . . . . . . . . . . .
For More Information 5. . . . . . . . . . . . . . . . . . . . . . . . . . . . . . . . . . . . . . . . .
Chapter 2 Client: Windows Installation 7. . . . . . . . . . . . . . . . . . . . . . .
Client: Pre-Installation for Windows 7. . . . . . . . . . . . . . . . . . . . . . . . . . . . .
Hardware and Software Requirements 7. . . . . . . . . . . . . . . . . . . . . . . .
Upgrading 8. . . . . . . . . . . . . . . . . . . . . . . . . . . . . . . . . . . . . . . . . . . . . .
Client: Installation for Windows 9. . . . . . . . . . . . . . . . . . . . . . . . . . . . . . . .
iii
Page 4

Installation Procedure 9. . . . . . . . . . . . . . . . . . . . . . . . . . . . . . . . . . . . .
Installing a Database Driver 10. . . . . . . . . . . . . . . . . . . . . . . . . . . . . . . .
Client: Post-Installation for Windows 13. . . . . . . . . . . . . . . . . . . . . . . . . . . .
Post-Installation Overview 13. . . . . . . . . . . . . . . . . . . . . . . . . . . . . . . . .
Create New Prolifics Executables 13. . . . . . . . . . . . . . . . . . . . . . . . . . . .
Configure the Client Environment 15. . . . . . . . . . . . . . . . . . . . . . . . . . .
Verify the Installation 16. . . . . . . . . . . . . . . . . . . . . . . . . . . . . . . . . . . . .
Look at Sample Applications 16. . . . . . . . . . . . . . . . . . . . . . . . . . . . . . .
Troubleshooting 16. . . . . . . . . . . . . . . . . . . . . . . . . . . . . . . . . . . . . . . . . .
Chapter 3 Web Application Server: Windows 19. . . . . . . . . . . . . . . . .
Web Application Server: Pre-Installation for Windows 19. . . . . . . . . . . . . .
Before Installing 20. . . . . . . . . . . . . . . . . . . . . . . . . . . . . . . . . . . . . . . . .
Web Application Server: Post-Installation for Windows 21. . . . . . . . . . . . . .
Post-Installation Overview 21. . . . . . . . . . . . . . . . . . . . . . . . . . . . . . . . .
Licensing for Prolifics Web Application Server 21. . . . . . . . . . . . . . . . .
Configure the Web Application Server Environment 23. . . . . . . . . . . . .
Verify the Installation 24. . . . . . . . . . . . . . . . . . . . . . . . . . . . . . . . . . . . .
Look at Samples 25. . . . . . . . . . . . . . . . . . . . . . . . . . . . . . . . . . . . . . . . .
Chapter 4 Client: UNIX Installation 27. . . . . . . . . . . . . . . . . . . . . . . . . . .
Client: Pre-Installation for UNIX 27. . . . . . . . . . . . . . . . . . . . . . . . . . . . . . . .
Hardware and Software Requirements 27. . . . . . . . . . . . . . . . . . . . . . . .
File Ownership and Protection 28. . . . . . . . . . . . . . . . . . . . . . . . . . . . . .
Determine File Location 29. . . . . . . . . . . . . . . . . . . . . . . . . . . . . . . . . . .
Client: Installation for UNIX 30. . . . . . . . . . . . . . . . . . . . . . . . . . . . . . . . . . .
Installation Procedure 30. . . . . . . . . . . . . . . . . . . . . . . . . . . . . . . . . . . . .
Configuring the Installation 31. . . . . . . . . . . . . . . . . . . . . . . . . . . . . . . .
Client: Post-Installation for UNIX 33. . . . . . . . . . . . . . . . . . . . . . . . . . . . . . .
Post-Installation Overview 33. . . . . . . . . . . . . . . . . . . . . . . . . . . . . . . . .
Licensing for Prolifics 33. . . . . . . . . . . . . . . . . . . . . . . . . . . . . . . . . . . . .
Create New Prolifics Executables 36. . . . . . . . . . . . . . . . . . . . . . . . . . . .
Configure the Client Environment 38. . . . . . . . . . . . . . . . . . . . . . . . . . .
Verify the Installation 40. . . . . . . . . . . . . . . . . . . . . . . . . . . . . . . . . . . . .
Look at A Sample Application 40. . . . . . . . . . . . . . . . . . . . . . . . . . . . . .
Post-Installation Notes 41. . . . . . . . . . . . . . . . . . . . . . . . . . . . . . . . . . . .
Troubleshooting 41. . . . . . . . . . . . . . . . . . . . . . . . . . . . . . . . . . . . . . . . . .
Chapter 5 Web Application Server: UNIX 43. . . . . . . . . . . . . . . . . . . . .
Web Application Server: Pre-Installation for UNIX 43. . . . . . . . . . . . . . . . .
iv 2-Tier Installation
Page 5

Web Application Server: Post-Installation for UNIX 44. . . . . . . . . . . . . . . .
Post-Installation Overview 44. . . . . . . . . . . . . . . . . . . . . . . . . . . . . . . . .
Configure the Web Application Server Environment 45. . . . . . . . . . . . .
Creating Your Web Application 46. . . . . . . . . . . . . . . . . . . . . . . . . . . . .
Verify the Installation 46. . . . . . . . . . . . . . . . . . . . . . . . . . . . . . . . . . . . .
Look at Samples 47. . . . . . . . . . . . . . . . . . . . . . . . . . . . . . . . . . . . . . . . .
Appendix A Notes for Microsoft Windows 49. . . . . . . . . . . . . . . . . . . . . .
DLLs for JPEG Decoding 49. . . . . . . . . . . . . . . . . . . . . . . . . . . . . . . . . . . . . .
Environment Space 50. . . . . . . . . . . . . . . . . . . . . . . . . . . . . . . . . . . . . . . . . . .
Visual C++ Floating-Point Options 50. . . . . . . . . . . . . . . . . . . . . . . . . . . . . .
Using Prolifics Utilities 50. . . . . . . . . . . . . . . . . . . . . . . . . . . . . . . . . . . . . . .
Appendix B Initialization and Databases 53. . . . . . . . . . . . . . . . . . . . . . .
Appendix C License Administration 57. . . . . . . . . . . . . . . . . . . . . . . . . . .
Licensing in Prolifics 58. . . . . . . . . . . . . . . . . . . . . . . . . . . . . . . . . . . . . . . . .
License Daemons and License Types 58. . . . . . . . . . . . . . . . . . . . . . . . .
Options File 59. . . . . . . . . . . . . . . . . . . . . . . . . . . . . . . . . . . . . . . . . . . . . . . .
FLEXlm Utilities 61. . . . . . . . . . . . . . . . . . . . . . . . . . . . . . . . . . . . . . . . . . . .
Appendix D License File 73. . . . . . . . . . . . . . . . . . . . . . . . . . . . . . . . . . . . . .
Contents of the License File 73. . . . . . . . . . . . . . . . . . . . . . . . . . . . . . . . . . . .
Appendix E Error Messages 77. . . . . . . . . . . . . . . . . . . . . . . . . . . . . . . . . . .
Prolifics Installation Error Messages 77. . . . . . . . . . . . . . . . . . . . . . . . . . . . .
DLL Messages 79. . . . . . . . . . . . . . . . . . . . . . . . . . . . . . . . . . . . . . . . . . . . . .
Informix-Specific Messages 79. . . . . . . . . . . . . . . . . . . . . . . . . . . . . . . .
Microsoft SQL Server-Specific Messages 79. . . . . . . . . . . . . . . . . . . . .
ODBC-Specific Messages 80. . . . . . . . . . . . . . . . . . . . . . . . . . . . . . . . . .
Oracle-Specific Messages 80. . . . . . . . . . . . . . . . . . . . . . . . . . . . . . . . . .
Sybase-Specific Messages 81. . . . . . . . . . . . . . . . . . . . . . . . . . . . . . . . . .
DLL Version Mismatch Messages 81. . . . . . . . . . . . . . . . . . . . . . . . . . .
Graph-Related Messages 81. . . . . . . . . . . . . . . . . . . . . . . . . . . . . . . . . . . . . .
License Manager Error Messages 81. . . . . . . . . . . . . . . . . . . . . . . . . . . . . . .
Prolifics License-Related Messages 82. . . . . . . . . . . . . . . . . . . . . . . . . .
FLEXlm Informational Messages 86. . . . . . . . . . . . . . . . . . . . . . . . . . . .
FLEXlm Configuration Problem Messages 88. . . . . . . . . . . . . . . . . . . .
Daemon Software Error Messages 89. . . . . . . . . . . . . . . . . . . . . . . . . . .
Index 93. . . . . . . . . . . . . . . . . . . . . . . . . . . . . . . . . . . . . . . . . . . . . . . . . . . . . . . . . . . . .
Table of Contents v
Page 6

About this Guide
The Installation Guide contains complete instructions for installing Panther and for
setting up the initial configuration on machines for the supported platforms. It also
discusses system requirements, contents of the installation package, licensing, and
linking in databases.
The guide assumes that the person doing the installation is a system administrator
or someone familiar with UNIX and Windows operating systems.
Organization of this Guide
This guide includes the following information:
` Pre-installation information — An overview of application architectures, the
Prolifics components which make up Panther, and requirements and
procedures necessary to install Panther.
` Installation instructions — Installing Prolifics software components on UNIX
and Windows systems.
` Post-installation notes — Instructions on verifying installation and configura-
tion, how to install the licensing software, creating new Prolifics executables
for your installation, and information about sample applications distributed
with Panther.
vii
Page 7

Conventions
In addition, appendices provide information on modifications you can make to the
distributed initialization files, background information on licensing including
license utility programs, and the format and content of the password-enabled
license file.
Conventions
The following typographical and terminological conventions are used in this guide:
Text Conventions
expression
KEYWORDS
numeric_value
[option_list]
{x | y}
x ...
new terms
Monospace (fixed-spaced) text is used to indicate:
` Code examples.
` Words you’re instructed to type exactly as indicated.
` Filenames, directories, library functions, and utilities.
` Error and status messages.
Uppercase, fixed-space font is used to indicate:
` SQL keywords.
` Mnemonics or Prolifics constants.
Italicized helvetica is used to indicate placeholders for information you supply.
Items inside square brackets are optional.
One of the items listed inside curly braces needs to be selected.
Ellipses indicate that you can specify one or more items, or that an element can be
repeated.
Italicized text is used:
` To indicate defined terms when used for the first time in the guide.
` Occasionally for emphasis.
Keyboard Conventions
XMIT
viii
Prolifics logical keys are indicated with uppercase characters.
2-Tier Installation
Page 8

Panther Documentation
Alt+A
Physical keys are indicated with initial capitalization, and keys that you press
simultaneously are connected with a plus sign.
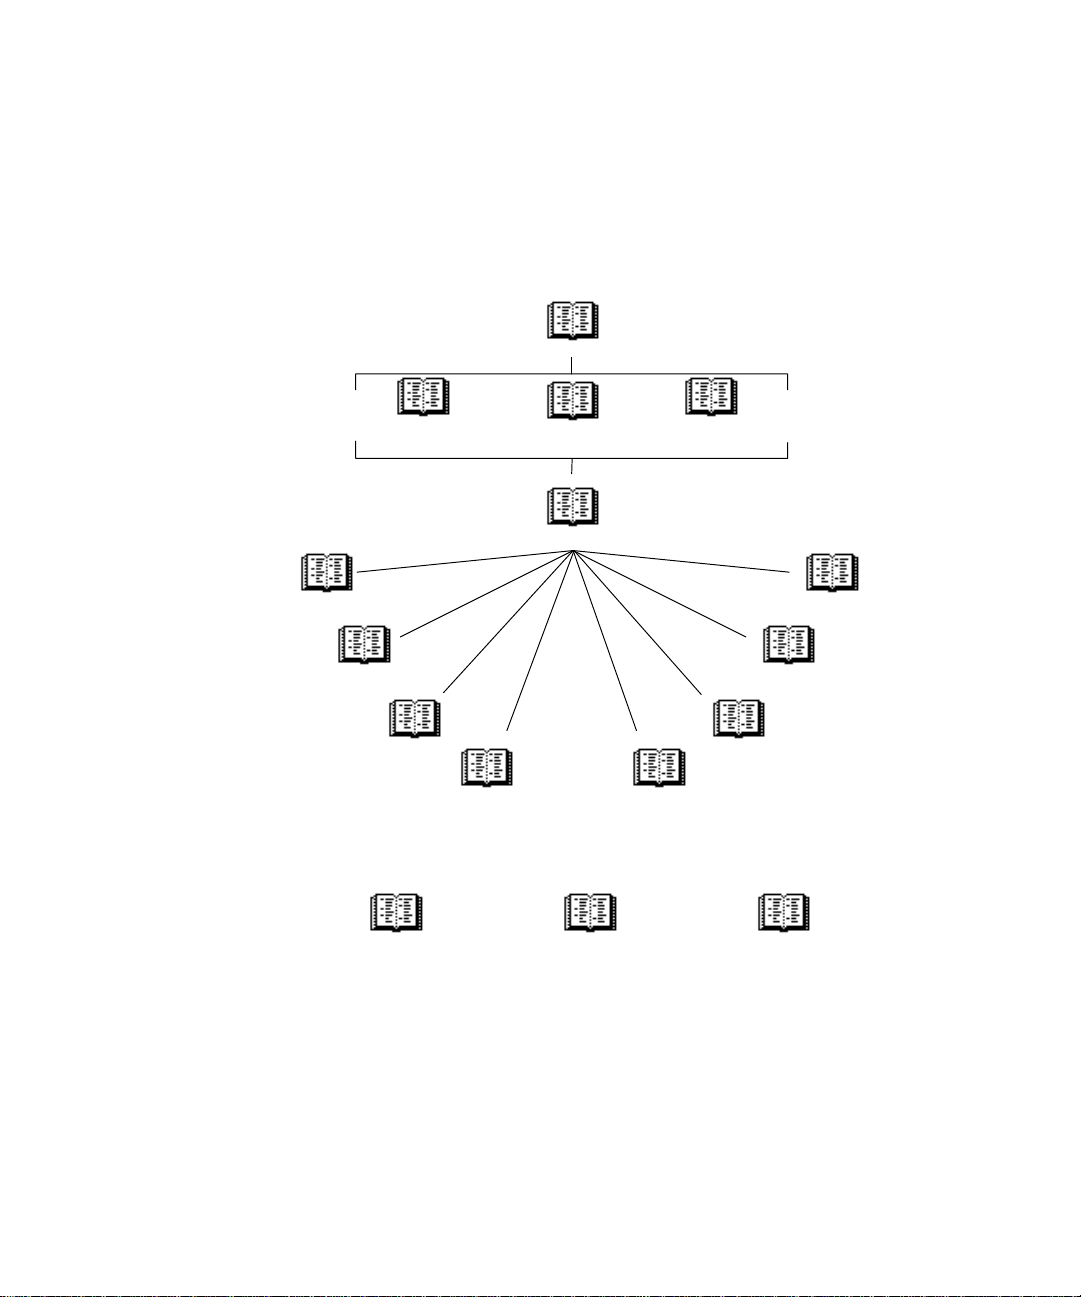
Panther Documentation
The Panther documentation set includes the following guides and reference
material (available as indicated), as illustrated in Figure NO TAG:
Installation — Instructions for installing software and licensing for Panther
products in the following books: JetNet Installation, TUXEDO Installation, MTS
Installation, WebLogic Enterprise Installation, and 2-Tier Installation.
New Features Guide — Information about new features in Panther, including Java
support, enhanced three-tier and web functionality, new properties, new library
functions, and, for Windows 32–bit platforms, tab controls and dockable toolbars.
Upgrade Guide — Information for upgrading from JAM to Panther.
Getting Started — Introduction to the Prolifics products and the tutorial, with
step-by-step instructions that help you get started with understanding, setting up
and developing either a two- or three-tier Prolifics application.
Developer’s Guide — Introduction and process of how to use Prolifics to build
two- and three-tier Prolifics database applications. As the major developer’s
manual, it includes information for each step of the development path.
Web Developer ’s Guide — Introduction and process of how to build and deploy a
Prolifics web application.
Using the Editors — Instructions for using the Prolifics graphical authoring
environment—the screen editor, screen and report wizards, JIF editor, menu bar
editor, and styles editor—to build two- and three-tier applications.
Programming Guide — Describes JPL, Prolifics’s scripting language, and
Prolifics’s Java programming interface. Also includes alphabetical listings of JPL
commands, built-in functions, Prolifics’s library functions, transaction manager
commands, and database commands and variables.
Reports — Instructions for using Prolifics’s report generation utility to build,
modify and run reports.
JDB — Instructions for using JDB, Prolifics’s prototyping database, and JISQL,
the interactive SQL editor for JDB. Also describes how to build SQL statements
and the SQL commands available in JDB.
About this Guide ix
Page 9
Panther Documentation
Database Drivers — Instructions for using Prolifics’s database drivers. Each driver
has its own section containing the information specific to that relational database
engine.
Configuration — Instructions for configuring Prolifics on various platforms and to
your preferences. Also includes information on GUI resource and initialization
files.
Installation*
Getting Started*
(for new users)
Using the Editors
Web Developer’s Guide
Reports
Additional Reference:
Quick Reference
New Features Guide
(for Prolifics upgrades)
Programming
Guide
Developer’s Guide
WebLogic Enterprise Guide
Properties Reference
(online only)
Upgrade Guide
(for JAM upgrades)
JetNet Guide
TUXEDO Guide
MTS Guide
(three-tier only)
Database Drivers
Configuration
JDB
Master Index/Glossary
Figure 1. A suggested reading path for the Panther documentation set. An asterisk (*)
indicates that there are multiple versions of the book for different environments.
JetNet Guide — Instructions for configuring and monitoring your Prolifics
three-tier JetNet application.
TUXEDO Guide — Instructions for configuring and monitoring your Prolifics
three-tier TUXEDO application.
x
2-Tier Installation
Page 10

MTS Guide — Instructions for building and deploying COM components in your
Prolifics three-tier application.
WebLogic Enterprise Guide — Instructions for building and deploying WebLogic
Enterprise components in your Prolifics three-tier application.
Quick Reference — Easy reference to all Prolifics properties and definitions
associated with application objects. Also includes quick reference to database and
transaction manager commands, library functions, JPL commands, Prolifics
development utilities, and application variables.
Master Index/Glossary — Master index for all manuals—online and printed. Also
a reference to terms used throughout the documentation set.
Online Documentation
Panther’s documentation set is available online and included with the Panther
distribution. The books can be viewed through the DynaTextTM browser on GUI
platforms. To access the books, choose Help from within Prolifics or run
DynaText’s read-only browser by clicking on the DynaText icon or typing dtext
at the command line. For instructions on using DynaText, choose Help from within
a DynaText browser window, or refer to the Using DynaText title in the Collection
window.
Online Documentation
Using DynaText
About this Guide xi
DynaText is a full-featured online documentation system with support for:
` Text searches
After you open a title in the Collection window, the search panel is at the
bottom of the DynaText window. When you type in a search string, DynaText
lists the number of hits next to the title of each book, chapter and subsection.
Two wildcard characters are available: ? (a single character) and * (0 or more
characters). DynaText performs an exact match on the search string; you will
need to enter a wildcard if a word is used in both singular and plural contexts.
For example:
server returns: server
server* returns: server, servers, server.lib,
client/server
Common words can be on the search engine stop list or be one of the query
keywords. Either condition produces a DynaText error. Enclose the search
string in quotation marks and submit again. For example:
”use in select”
Page 11

Online Documentation
` Proximity searches
If desired, you can include proximity search parameters in your text searches.
For example:
connection within 5 words of database
screen within 2 words before editor
` Boolean searches
You can also include Boolean search parameters in your text searches using
the following keywords: and, not, or. For example:
procedure or module
` Search forms
Prolifics provides additional search forms which search for library functions
and for text within code examples. Choose Book⇒Search Forms (Windows)
or Search⇒Forms (Motif).
` Alternate documentation views
To automatically open the graphics, instead of displaying them as icons, on the
View menu, choose View⇒Main⇒Inline. (The default setting is Fulltext.)
xii
To view a list of tables in the documentation, on the View menu, choose
View⇒TOC⇒Tabletoc.
` Public and private annotations
You can create your own notes inside the documentation using annotations.
The annotations are stored in the directory location specified in your .ebtrc
(Motif) or dynatext.ini (Windows) file.
` Print capability
You can print any section of the documentation or its table of contents to a
PostScript printer or file. After you choose File⇒Print:
• Highlight the desired section of the documentation. (It defaults to the
current section of documentation in the book window.)
• Choose the desired print format: full text or table of contents.
• To print to a PostScript file, modify the Print Setup in Windows, or select
the Print to File check box in Motif.
Note: Unless you print an entire chapter, the introductory paragraphs will not
be printed. If you highlight Prolifics, DynaText will attempt to print the entire
documentation set.
2-Tier Installation
Page 12

Online Documentation
For more information on using DynaText, refer to the Using DynaText title in the
Collection window.
Collateral
Documentation
Additional Help
The following information is also provided with your Prolifics installation:
` Online README file.
Contact Prolifics for more information on the following services:
` Product Support
` Consulting Services
` Educational Services
About this Guide xiii
Page 13

Page 14

Installation Checklist
Use this checklist to ensure that you complete the appropriate steps to install and
configure your Prolifics development environment for the chosen architecture.
Pre-Installation
Determine the application architecture. p. 4
-
Based on architecture, decide which components to
-
install.
Satisfy hardware and software requirements for the
-
components you plan to install.
Installation
Install each Prolifics component. Windows: p. 9
-
Post-Installation
Submit request for permanent license (in the mean-
-
time, you can start using Prolifics since it is installed
with a Start-up License).
Create new Prolifics executables, if necessary. Windows: p. 13
-
Configure the client environment. Windows: p. 15
-
(Web application development only) Configure the
-
web application server environment.
p. 4
Windows: p. 7
Windows Web: p. 19
UNIX: p. 27
UNIX Web: p. 43
UNIX: p. 30
Windows Web: p. 21
UNIX: p. 33
UNIX: p. 36
UNIX: p. 38
Windows Web: p. 23
UNIX Web: p. 45
Verify installation and configuration. Windows: p. 16
-
Windows Web: p. 24
UNIX: p. 40
UNIX Web: p. 46
Look at sample applications. Windows: p. 16
-
Windows Web: p. 25
UNIX: p. 40
UNIX Web: p. 47
When you complete the appropriate steps in the installation checklist, and set up
your application environment, you are ready to build a Prolifics application.
1
Page 15

General Information
In order to help you install the appropriate components, this chapter describes the
contents of the Panther installation package, application architectures, and the
functionality of the Prolifics software components that make up your Panther
distribution.
Before you begin the installation process, review the Release Notes for the latest
information about Panther, including known problems.
Contents of the Installation Package
The Panther installation package consists of the items listed below. Some of these
items may not be required or appropriate for your particular installation, and
therefore are not included in your package. For a complete list of files included in
the installation, refer to packlist.txt in the notes subdirectory of the
installation.
11
` Prolifics client and web application server executables, with corresponding
utilities, tools, and configuration files.
` JDB, the Prolifics single-user database.
3
Page 16

Application Architecture
` Database drivers for connecting to third-party relational databases, such as
Oracle and Sybase.
` Files for C program development.
` Files for Java program development.
` License management software.
` Online documentation and help system; sample two-tier applications and a
tutorial; and the Prolifics Gallery, which includes a variety of sample web
applications.
Application Architecture
Choose the appropriate architecture for your application based on your requirements.
- Two-tier application
The two-tier client/server model typically separates
data from the logic of an application.
- Web application
A web application is an application deployed on the
web application server and viewed from a web
browser. The web application server works with your
HTTP server software.
Which Panther Components to Install?
For Panther, you are required to install the Prolifics client software. You can also
choose to install a web application server. Each component is described, as well as
the platforms on which each component is supported. Based on your chosen
architecture, install the appropriate Prolifics components purchased.
` Prolifics client — Provides the development and runtime environment for
building two-tier applications. Client platforms supported are:
UNIX
-
Windows 32-bit (95/98 and NT 4)
-
` Prolifics web application server — Provides the runtime environment for
client-server applications that are accessed through web browsers. Web
application server platforms supported are:
UNIX
-
Windows NT 4
-
4 2-Tier Installation
Page 17

For More Information
After Panther is installed and configured, you can refer to the online documentation for information on specific topics. The preface, About this Guide, contains a
suggested reading path and more information about the documentation.
Refer to: For:
Getting Started Step-by-step instructions for building a two-tier
online New Features Guide New features in Panther.
online Upgrade Guide Upgrade information from JAM to Panther.
online Configuration Prolifics variables used for configuring Prolifics on
Developer’s Guide Introduction and process of how to build database
For More Information
application, including setting up a client environment as well as a web application server.
various platforms and to your preferences. Information on GUI resource and initialization files.
applications.
online Using the Editors Basic guide to the Prolifics graphical authoring
environment.
Web Developer ’s Guide Guide to building and deploying a Prolifics web
application.
Reports Guide to using Prolifics’s report generation utility
to build, modify and run reports.
Programming Guide Guide to JPL, Prolifics’s programming language,
and using Java and C library functions in Prolifics.
online JDB Guide to JDB, Prolifics’s prototyping database, and
JISQL, the interactive SQL editor for JDB.
readme.* in the notes
subdirectory
fixlist.txt in the
notes subdirectory
Database-specific release notes detailing the setup
of your Prolifics application as a database client.
List of bugs fixed in Prolifics.
Chapter51 General Information
Page 18

Client: Windows
Installation
Client: Pre-Installation for Windows
This section discusses hardware and software requirements and upgrade information for Prolifics software running under Windows.
Hardware and Software Requirements
The full installation of the Panther development environment requires the
following:
` 80486 or better processor; Pentium processor is recommended.
22
` A maximum of 137 MB of disk space (of which 35 is for the online documen-
tation). However, the disk space required can be less depending on the options
installed. The installation checks for adequate space.
` Microsoft Windows 95/98 or Microsoft NT 4.
Note: Under Windows platforms, web application servers are only supported
on Windows NT, version 4.
7
Page 19

Client: Pre-Installation for Windows
` 32 MB of memory.
` Database vendor’s client and network software installed if you are using a
database other than JDB. For more information, consult the database-specific
release notes online.
` To use Java files, you must have either JDK 1.1 (Java Development Kit) or the
JRE (Java Runtime Environment), or compatible versions, installed. To
compile Java programs, the JDK is required. If you are using Microsoft’s
Virtual Machine for Java, use version 5.00.3167 (1/25/99) or later.
` If you are going to add your own C functions to Prolifics, install the Microsoft
Visual C (MSVC) compiler (version 6 for Windows 95/98 and NT 4). You also
need to install the MFC (Microsoft Foundation Class) portion of MSVC along
with the compiler.
If you are installing a Prolifics client and web application server on the same
Windows NT machine, you must install them in the same directory. This allows
them to share common environment settings that point to the location of required
files. It also saves disk space.
Upgrading
If you are upgrading from an earlier version of Prolifics, install Panther in a
separate directory from previous installations, for example, C:\Panther.
The setup program unsets any existing SMVARS, SMPATH, SMTERM, SMMSGS, SMKEY,
and SMVIDEO settings in your autoexec.bat file. The setup program lets you
choose from the following three options:
` Let the setup program modify the autoexec.bat file. The existing
autoexec.bat is saved to autoexec.xxx where xxx is a three-number
extension.
` Save the required changes to autoexec.new file.
` Not make any changes for the autoexec.bat file.
After successfully installing Prolifics software, there are several post-installation
steps required to start using Prolifics. This chapter discusses licensing, building
Prolifics executables, the steps required to set up the environment for each of the
Prolifics components installed, and post-installation issues and troubleshooting
tips.
8 2-Tier Installation
Page 20

Client: Installation for Windows
These instructions apply to both first-time installations and to upgrades from
previous versions of JAM and Prolifics. Before beginning the installation, review
the requirements and other pre-installation steps discussed earlier in this chapter.
This section discusses running the setup program to install a Prolifics client and
database drivers under Windows.
Installation Procedure
Panther is supplied in compressed form on CD-ROM along with a Windows-based
setup program.
To run the setup program:
1. Insert the CD-ROM in the appropriate drive.
2. If the setup program does not start automatically, choose Start⇒Run. In the
Run dialog box, type
you are installing).
D:SETUP (where D is the letter of the drive from which
Client: Installation for Windows
Choose to install the Client software.
The setup guides you through the steps to install and configure your
installation.
3. During the installation you can select a setup type. Each setup type includes
certain Prolifics components. The components are:
• Program Files — Required to run Prolifics. Contains all configuration
• Development Files — Optional. Only necessary if you want to add your
• Samples and Tutorial Files — Optional. Installs the sample applications
• Help Files and Online Documentation — Optional. Since these can be
Chapter92 Client: Windows Installation
files, utilities, and DLLs necessary to run the Prolifics development
environment.
own C code, link out certain options, link statically with a database driver,
or use Java files with the client or web application server.
VideoBiz (two-tier application), Enterprise Bank (three-tier application),
sample ActiveX controls, and the Tutorial.
quite large, consider sharing a copy across a network if disk space is a
concern. Or, if you are installing from CD-ROM, leave the files on the
CD-ROM rather than copying them to your PC.
Page 21

Client: Installation for Windows
Installing a Database Driver
After you install the Prolifics client and or web application server on a machine,
you can begin the database driver installation.
To install database drivers:
1. Insert CD-ROM.
2. Choose Start⇒Run. In the Run dialog box, type D:/setup (where D is the
letter of the drive from which you are installing).
3. Choose to install database drivers.
4. Select appropriate database.
5. Select from the following options:
• Complete Install — Copies the driver files to your PC and configures
PROL4W32.INI for your database version. Choose this option if you have
not previously installed database driver software.
• Configuration — Updates PROL4W32.INI for another version of the
database. Choose this option if you already installed the database driver
and want to modify the database version in PROL4W32.INI.
Informix
6. Select or confirm the version of your database software. If your version is not
listed, choose the option Other.
If you are using a database for which DLLs are not provided (see list of provided
DLLs that follows), you must edit the makefile to link in your database, and then
recompile Prolifics using a C compiler. Refer to page 13 for information on
creating new Prolifics executables.
Since database vendors frequently update database versions, your particular
database version may not be listed in the Prolifics install program. In this case,
choose the latest version for your Prolifics database driver installation. Prolifics
provides DLLs for the currently available versions of the following database client
software:
Windows 95/98: Informix Version 7.20.TDI
Or latest version
Other
Windows NT: Informix Version 7.10
Informix Version 7.20.TDI
Informix Version 7.20.TEI
Or latest version
Other
10 2-Tier Installation
Page 22

Microsoft SQL
Server
ODBC
Client: Installation for Windows
For more information, refer to readme.inf in the Prolifics notes subdirectory.
If you don’t know your Informix version, check the release number listed in the
text files provided in INFORMIXDIR\release where INFORMIXDIR is the root
Informix installation.
Windows 95/98 and NT: Microsoft SQL Server Version 6
Or latest version
Other
Windows 95/98 and NT: Microsoft Open Database Connectivity version 2
Microsoft Open Database Connectivity version 3
Or latest version
Other
If your ODBC version is 2.x or earlier, choose Version 2. ODBC version 1 is
compatible with version 2.
Oracle
Windows 95/98: Oracle Version 7 to 7.2 using OCI
Windows NT: Oracle Version 7.3 using OCI
Check for the supported version in the entry in
ORACLE_HOME\orainst\win95.rgs or ORACLE_HOME\orainst\winNT.rgs.
Note that Pro*C 1.5.x is equivalent to Oracle 7.
Chapter112 Client: Windows Installation
Oracle Version 7 to 7.2 using Pro*C
Oracle Version 7.3 using OCI
Oracle Version 7.3 using Pro*C
Oracle Version 8 using OCI
Oracle Version 8 using Pro*C
Or latest version
Other
Oracle Version 7.3 using Pro*C
Oracle Version 8 using OCI
Oracle Version 8 using Pro*C
Or latest version
Other
Page 23

Client: Installation for Windows
Oracle supports two development interfaces: a C language API called OCI and an
embedded SQL language, Pro*C. Most applications can use Prolifics’s OCI or
Pro*C interfaces interchangeably. Typically, Prolifics developers use the OCI
interface unless they are linking their own custom Pro*C functions with Prolifics.
To use Oracle’s stored procedures, you must use the OCI interface.
Sybase
Windows 95/98 and NT: Sybase Version 10 using DB-Library
For versions of Sybase earlier than 10, Prolifics/Sybase requires the DB-Library
interface. With Prolifics/Sybase’s support for Sybase Open Client Version 10, two
interfaces are supported, DB-Library and CT-Library.
If you do not know your Sybase version, run the Sybase Windows program
sqlver.exe or refer to the About menu option of any of the Sybase Windows
program (for example, sybping.exe).
Sybase Version 10 using CT-Library
Sybase Version 11 using DB-Library
Sybase Version 11 using CT-Library
Or latest version
Other
12 2-Tier Installation
Page 24

Client: Post-Installation for Windows
Post-Installation Overview
As part of post-installation, you need to perform the following general steps for
client installations, some of which are based on the architecture of your application. The details of the steps are provided in the pages that follow.
1. Create new Prolifics executables if required.
2. Configure the client environment (refer to page 15).
3. Verify the Prolifics installation based on what you installed (refer to page 16).
4. Look at sample applications (refer to page 16).
Create New Prolifics Executables
As part of the Prolifics installation package, a set of standard Prolifics executables
is provided. Depending on your configuration and on the platform and database
being used, you might need to create new executables. Specifically, a new
executable is required if you are using a database for which DLLs are not provided
(that is, your database is not among those listed starting on page 10).
Client: Post-Installation for Windows
To create new executables, Prolifics distributes a single makefile that can be
invoked via the command line utility, nmake. The instructions are detailed below.
Alternatively, Prolifics distributes a workspace and project files for use with
Microsoft Developer Studio. Instructions on how to use the workspace are
provided in the Release Notes.
To create a new Prolifics executable:
1. Complete the Prolifics installation process.
2. Ensure that the appropriate application variables (SMBASE, etc.) have been
applied to your environment.
3. Go to your application directory (or create one) and copy all files from the
Prolifics link subdirectory to it.
4. Edit the makefile in your application directory, commenting or uncomment-
ing lines as needed to build the appropriate executables. For further information, refer to page 14.
Chapter132 Client: Windows Installation
Page 25

Client: Post-Installation for Windows
5. Uncomment the appropriate database in the makefile and edit the databasespecific
choose the correct version of your database software. For further information,
refer to page 15.
makevars.dbs (where dbs is the extension of the database) file to
Specifying the
Executables
6. Type
nmake at the command line to build the executable. By default, the
makefile in the current directory is used for the make (and nmake)
command.
7. The make process creates a new Prolifics executable, prodev32.exe. Give
the executable file a unique name to distinguish it from the distributed
executable or others that you have built differently.
8. If you built a new web application server executable (jserver), modify the
SERVER variable in your application’s initialization file to reference the new
jserver executable in its own directory. Do not overwrite the jserver
executable in the util directory.
To indicate the executables to build, edit the
makefile in your application
directory:
1. Comment or uncomment the appropriate client executables as needed (these
are uncommented by default):
PRORUN = prorun32.exe Runtime executable
PRODEV = prodev32.exe Development executable
RWRUN = rwrun32.exe Report utility
If web application server software has been installed, comment or uncomment
the server executable as needed:
JSERVER = jserver.exe Web application server executable (un-
commented by default)
2. To override the value of certain application variables such as SMBASE,
uncomment the appropriate lines in the PARAMETERS section.
3. If you have the Prolifics web application server on the same machine as other
Prolifics software, it is recommended that they be installed in the same
directory. However, if they are not in the same directory, set WEBBASE (in WEB
PARAMETERS
section) to the web application server installation directory.
4. The Prolifics debugger allows you to trace JPL and Prolifics screen events and
is installed by default for clients. If you do not wish to use the debugger,
comment the lines in the DEBUGGER PARAMETERS section.
5. If you want to add Microsoft Codeview debugging information, uncomment
the corresponding block.
14 2-Tier Installation
Page 26

Client: Post-Installation for Windows
Linking in the
Database
If you are using a database for which DLLs are not provided, you must edit the
makefile in your application directory to link in the appropriate database.
To include the appropriate database in your executables:
1. Uncomment the appropriate include statement in the SELECT DATABASE
SOFTWARE
By default, JDB is uncommented. If you choose another database, you can
leave JDB uncommented (and include it in your executable), or you can
comment out JDB and include only your database.
2. Edit the corresponding
database) file to choose the correct version of your database software.
In the
section of the makefile.
makevars.dbs (where dbs is the extension of the
makevars.dbs file, verify or update the following:
• Set the flag dbs_INIT to one of the following: d, l, u, p. This flag
controls the handling for case sensitivity. The default is d. To find out
what the default is for your database engine, refer to the online databasespecific driver notes.
• In the databaseName PARAMETERS section of makevars, verify your
database engine’s version. Uncomment the appropriate block of
parameters based upon this version. Also, verify and correct the
pathnames if necessary.
• Set the flag dbs_ENGNAME to specify the default engine name.
For more information, refer to the online database-specific driver notes for
additional information on database engines and on case handling.
Configure the Client Environment
A Prolifics client provides the development environment required to build two-tier
applications. The environment must contain properly set application variables in
order to run Prolifics. To set up the development environment, complete the
following platform-specific steps. Refer to the Developer’s Guide for more details
on setting up the client environment.
For each Windows client:
Set the following variables in the following initialization files: prol4w32.ini for
Prolifics and mbedit32.ini for the menu bar editor.
` SMFLIBS — Specify the names of libraries to open automatically during
development and at runtime.
Chapter152 Client: Windows Installation
Page 27

Client: Post-Installation for Windows
` JAVA_HOME and CLASSPATH — These path names are specific to Java files
and event handlers and need to be set to the location where your Java classes
sit. Additionally, you can change the defaults for SMJAVAEDITOR and
SMJAVAFACTORY and SMJAVALIBRARY. For more information, refer to the
Developer’s Guide.
Verify the Installation
After you install and configure the Prolifics client, you should verify that it starts
up properly. If Prolifics software is not installed and configured correctly, an error
message is displayed. Depending on the problem, the program might also
terminate. Refer to page 77 for a list of the more common error messages related to
system configuration, and how to resolve them.
Client
Installation
On a client machine, a correct installation is verified if you can invoke the Prolifics
editor.
To verify a Windows client installation:
Select the Panther item from the Start menu or double-click on the Panther icon.
Look at Sample Applications
Before you begin building your applications, you might want to look at the
following sample application:
VideoBiz (two-tier application)
Choose the VideoBiz sample on the Start menu. For more information on
VideoBiz, refer to the Developer’s Guide.
Troubleshooting
The information in this section is intended to provide you with additional guidance
when you encounter error messages.
Graph
Functionality
Prolifics’s graph capabilities rely upon external programs (for example, DLLs),
therefore, it is possible for Prolifics to be working properly except for the business
graph component. If you have problems with the graph functionality, check the
following:
Note: The setup program normally performs all of these steps.
16 2-Tier Installation
Page 28

Client: Post-Installation for Windows
` Ensure that libsti.ini (distributed in the config directory) resides in the
Windows directory and contains the correct paths in it for the
` Ensure that libsti.dll (distributed in the util directory) can be found in a
IPT variable.
directory along the PATH.
Windows PATH
Settings
Online Help and
Manuals
Adding Panther
Documents
If you are upgrading from JAM or an earlier version of Prolifics, remember that
Prolifics’s
since the installation process inserts the Prolifics
of the
util directory must be on your PATH. Normally, this is not an issue
util directory at the beginning
PATH variable. However, the PATH might contain the older util directory. If
this is the case, manually edit the PATH specification in the autoexec.bat file to
remove the older
util directory.
Prolifics’s online help and manuals are built and displayed with DynaText by Inso
Corporation. To verify that you can access the online documents, double-click the
DynaText icon. You should see a dialog containing a list of documents available
through DynaText. If you have problems accessing the documents:
Note: The setup program normally performs all of these steps for you.
` Ensure that the Prolifics util directory is included in the PATH variable.
` Ensure that the dynatext.ini resides in the Windows directory.
` Ensure that SMBASE is set to point to your Prolifics installation.
If DynaText was previously installed, you can use your existing DynaText
configuration file (dynatext.ini) to include the Panther manuals with your
existing list of documents.
To include the Panther manuals in an existing DynaText collection:
Add the following to the COLLECTION line:
` Windows: In dynatext.ini: ProlificsInstallDir\docs = Panther
Chapter172 Client: Windows Installation
Page 29

33
Web Application
Server: Windows
This chapter contains information for installing the Prolifics web application
server. For information about installing Prolifics client software, refer to page 7.
Web Application Server: Pre-Installation for Windows
Web application servers are only supported on Windows NT, version 4 or higher.
To install a web application server, an HTTP server must be configured and
running on the same system. Prolifics supports industry favorites, such as
Netscape’s Enterprise Server and Microsoft Internet Information Server.
Prolifics supports CGI, ISAPI, and NSAPI architectures. You can select one
according to your preferred configuration.
The Prolifics web application server requires a maximum of 40 MB of disk space.
To use Java files, you must have either JDK 1.1 (Java Development Kit) or the JRE
(Java Runtime Environment), or compatible versions, installed. To compile Java
programs, the JDK is required. If you are using Microsoft’s Virtual Machine for
Java, use version 5.00.3167 (1/25/99) or later.
19
Page 30

Web Application Server: Pre-Installation for Windows
If you are installing a Prolifics client and web application server on the same
Windows NT machine, it is recommended that you install them in the same
directory. This allows them to share common environment settings that point to the
location of required files. It also saves disk space.
Before Installing
Before installing a Prolifics web application server, determine the HTTP server
name and the name of the CGI or ISAPI or NSAPI program directory. Also, verify
that your HTTP server is running. Consult your system administrator or your web
server administrator to determine the correct names. Enter the names here for
future reference:
` My HTTP server name is _____________________________________
` My HTTP server \www\scripts directory is
_________________________________________________________
The \scripts\ directory stores the server ’s gateway programs. Another common
name for this directory is cgi–bin.
20 2-Tier Installation
Page 31

Web Application Server: Post-Installation for Windows
Web Application Server: Post-Installation for Windows
Refer to page 9 for information on running the setup program to install Prolifics
software under Windows. You will be prompted during the installation process for
the Start-up License, which is provided on a separate floppy disk.
If you install the web application server on a separate machine from Prolifics client
software, you must also install the database drivers on that machine.
Post-Installation Overview
As part of post-installation, you need to perform the following general steps for
web application server installations. The details of the steps are provided in the
pages that follow.
1. Obtain a permanent license file before the Start-up License file expires.
2. Create new Prolifics executables if required (refer to page 13).
3. Configure the web server environment (refer to page 23).
4. Verify the web application server installation (refer to page 24).
5. Look at samples (refer to page 25).
Licensing for Prolifics Web Application Server
The Prolifics installation includes a Start-up License, provided on a floppy
diskette, that lets you use Prolifics (and run Prolifics applications) immediately.
The temporary license, license.dat, is installed in the licenses subdirectory
of the Prolifics installation directory. Since the license will expire, you must
contact the Prolifics License Desk to receive your permanent license file. Make
your request now and return to this section when you receive the permanent license
file.
The setup program prompts you for the Start-up License floppy disk during the
initial installation.
Obtaining a
Permanent
License File
You must obtain a permanent license file before the Start-up License expires to
continue to develop Prolifics web applications. Each web application server must
have access to a license file.
Note: The Prolifics web application server requires a license during development
and deployment.
Chapter213 Web Application Server: Windows
Page 32

Web Application Server: Post-Installation for Windows
During installation, the setup program prompted you to provide the License Desk
with the appropriate information to obtain your permanent license file. It also
generated license request files (*.lcl) in the licenses subdirectory of your
Prolifics installation directory for each component installed on a given machine.
To obtain the license file:
1. Submit the license request file (for each component on a given machine) to the
Prolifics License Desk. The License Desk returns the password-enabled file
for each component on a given machine via the requested method (as specified
during setup).
2. Install the license file or files.
Refer to Appendix C for more information on licensing, and to Appendix D for a
description of the contents of a license file.
Installing the
License File
The web application server (
Install the password-enabled license file on the appropriate machine, and then, run
the create_license utility to create a license.dat for each machine. Follow
the directions for the method of receipt.
Note: In the following procedures, replace references to SMBASE with the full
pathname of the Prolifics installation directory.
To install a permanent license file:
1. If you received a license file via e-mail, copy it to the licenses directory:
proweb.lic (web application server). Proceed to Step 3.
2. If you received a license file via fax or mail, make a copy of the license
request file (having *.lcl extension) in the licenses directory, giving the
copy a .lic extension. For example:
proweb) receives its own license file (proweb.lic).
• Open the license request file using a text editor (such as Wordpad) and
save it with a .lic extension. For example, open SMBASE\li-
censes\prodev.lcl (client development license template), choose
File⇒Save As, and save it as prodev.lic.
• Update the copy of the license file (*.lic file) with the information
provided in the password-enabled file you received.
Replace text in angle brackets (and the angle brackets) with the
corresponding information provided on the Feature line. For example,
replace <number of tokens> and <password> with the appropriate
information from the password-enabled license file.
Repeat Steps 2 and 3 for each license file you received for this machine.
22 2-Tier Installation
Page 33

Web Application Server: Post-Installation for Windows
3. Create the license.dat:
Choose Start⇒Run, and type:
SMBASE\licenses\create_license
All .lic files for the machine are merged into a single license.dat file in
the licenses directory and the Start-up License is saved as license.bak.
Location of the
License File
Prolifics searches for the license file in the following order:
` The pathname given by the setting of LM_LICENSE_FILE in the
prol4w32.ini files.
` The pathname given by the LMLicenseFile variable in your web application
initialization.
` The pathname given by the LM_LICENSE_FILE variable.
` license.dat in licenses subdirectory of the Prolifics installation
(recommended location).
` c:\flexlm\license.dat.
Configure the Web Application Server Environment
To ensure that your Prolifics application can be viewed on a web browser,
complete the following platform-specific steps, most of which were applied as part
of the Prolifics setup program. For further information on configuring web
applications, refer to the Web Developer ’s Guide.
1. Confirm that the following web application server executables reside in your
HTTP server’s CGI directory; otherwise, copy them from the Prolifics util
subdirectory:
• websetup.exe (Prolifics Web Setup Manager)
• jwsamp.exe (sample application executable)
2. Confirm that the following initialization file resides in your Windows system
directory; otherwise, copy it from the Prolifics config subdirectory:
• jwsamp.ini
3. Check jwsamp.ini in the Windows directory for the correct setting for each
of the following variables:
Chapter233 Web Application Server: Windows
Page 34

Web Application Server: Post-Installation for Windows
• AppDirectory — Full pathname to the Prolifics samples subdirectory
to provide initialization information for the sample web application.
• Dispatcher — Full pathname of the dispatcher.exe program in the
util subdirectory of the installation directory.
• Server — Full pathname of the jserver.exe program in the util
subdirectory of the installation directory.
• SMBASE — Full pathname of the Prolifics installation directory.
• PATH — Full pathname of the util subdirectory of the installation
directory.
Creating a Web
Application
Prolifics provides the Prolifics Web Setup Manager to guide you through
configuring your customized web application. For more information, refer to the
Web Developer ’s Guide. Choose Prolifics Web Setup Manager on the Start Menu.
Verify the Installation
After you install and configure the Prolifics web application server, you should
verify that it starts up properly on web application server machines. If Prolifics
software is not installed and configured correctly, an appropriate error message is
displayed. Depending on the problem, the program might also terminate. Refer to
Appendix E for a list of the more common error messages related to system
configuration, and how to resolve them.
Web Application
Server
Installation
On the Prolifics web application server machine, verify the installation by running
the Prolifics Gallery, and verify the configuration by running your own application.
To verify the Prolifics web application server installation:
Run the Prolifics Gallery:
` Choose Start Prolifics Gallery Server on the Start Menu.
` Choose View Prolifics Gallery Samples on the Start Menu.
` Choose Stop Prolifics Gallery Server on the Start Menu when you are finished.
To verify that your web application server configuration and licensing are correct:
` Configure a new application by running Web Setup Manager from the Start
Menu.
` Start the application by typing:
monitor –install applicationName
netstart applicationName
24 2-Tier Installation
Page 35

` Run the application in your browser:
If you get the message “No Service Requested!” you were successful.
Look at Samples
Before you begin building your applications, you might want to look at the
following sample applications:
QuickStart
QuickStart provides step-by-step instructions on building and deploying sample
applications on the web.
Choose QuickStart on the Start menu.
Prolifics Gallery (web application)
Provides several pre-built sample applications for the web.
Web Application Server: Post-Installation for Windows
http://serverName/program_directory/applicationName
` Choose Start Prolifics Gallery Server on the Start Menu.
` Choose View Prolifics Gallery Samples on the Start Menu.
` Choose Stop Prolifics Gallery Server on the Start Menu when you are finished.
Chapter253 Web Application Server: Windows
Page 36

Client: UNIX
Client: Pre-Installation for UNIX
This section discusses issues to consider before installing Panther on UNIX. They
are:
` Hardware and software requirements.
` File ownership and protection.
` Location of files.
44
Installation
For web application development, refer to page 43 for information about installing
a Prolifics web application server.
Hardware and Software Requirements
` Prolifics software requires a maximum of 138 MB of disk space, of which 41
MB is for online documentation.
27
Page 37

Client: Pre-Installation for UNIX
` Running Prolifics under character mode has no special requirements.
` The supported version of Motif for AIX 4.3, HPUX 11, and Solaris 7 is Motif
2.1; for all other platforms, it is Motif 1.2.x.
For information on obtaining your Motif version number, refer to page 41.
` Database vendor’s client and network software if you are using a database
other than JDB. For more information, consult the database-specific release
notes located in the
` A TCP/IP network is required to run the license management software.
` A C compiler is required to add code in C, relink the executables, or add
support for a database.
` To use Java files, you must have either JDK 1.1 (Java Development Kit) or a
JRE (Java Runtime Environment) installed. To compile Java files, JDK 1.1 is
required.
File Ownership and Protection
notes directory.
Implement File
Protection
Before installing Prolifics software on a UNIX platform, consider the issues of file
ownership and protection.
Once they are installed, the files distributed with Prolifics software should not be
modified except under special circumstances, for example, to create a new
executable. To prevent inadvertent changes to the files, it is recommended that
write-access to them be limited to a system administrator (or a specially created
prolifics login), and that general Prolifics users be allowed only read-access.
Two suggested ways of implementing the above recommendations are:
` Login as root to install the files. After installation is complete, set the
permissions so that only root can modify the files but all others can read
and/or execute them. See chmod in your system manual, or type man chmod
for information on setting permissions.
` Create a dummy login ID (for example, prolifics), then login as that user
and perform the installation. This allows whomever has access to the
prolifics login account to control ownership, permissions, and modifica-
tions. This approach accommodates systems for which access to the root
account is tightly controlled.
Do not install Prolifics software into a particular user’s account; it most likely will
cause maintenance problems.
28 2-Tier Installation
Page 38

Determine File Location
After deciding who is going to own the Prolifics files (root or a dummy login ID),
determine where they will be installed (referred to as the Prolifics installation
directory or
are likely to embed the directory name in makefiles, shell scripts, and so forth. The
default installation directory is /usr/prolifics.
Client: Pre-Installation for UNIX
SMBASE). Once this directory is set up, do not change it, since users
Upgrading
If your system layout does not permit you to put the files in
might allow a symbolic link from
command.
-s
/usr/prolifics to the directory using the ln
/usr/prolifics, it
If you are upgrading from a version of JAM or Prolifics, it is recommended that
you install Panther in a different directory from your previous installations.
Chapter294 Client: UNIX Installation
Page 39

Client: Installation for UNIX
Client: Installation for UNIX
These instructions apply to both first-time installations and to upgrades from
previous versions of JAM and Prolifics. Before beginning the installation, review
the requirements and other pre-installation steps discussed earlier in this chapter.
This section discusses installing a Prolifics client, database drivers (if necessary),
and the setup requirements for a UNIX client.
To install Panther, you need to perform the following steps. The details of the steps
are provided in the pages that follow.
1. Install Prolifics software from the supplied media. If you are using a database
other than JDB, install the appropriate database drivers from the supplied
media.
2. Run the setup program to configure the installation.
3. Install the Start-up License.
The installation process might require several additional steps, depending on your
system configuration and requirements.
Installation Procedure
The procedure described here assumes that /usr/prolifics is the Prolifics
installation directory, often referred to as SMBASE. If you are not installing to
/usr/prolifics, substitute the name of the directory you are using.
Installing Prolifics software on UNIX requires you to copy the distribution from
the delivered media.
The Panther installation package comes with supported database drivers for each
platform.
To install Panther from a CD-ROM:
1. Log in as root or with the login you devised for the installation.
2. At the command line, type:
mkdir /usr/prolifics
3. Go to the /usr/prolifics directory by typing:
cd /usr/prolifics
30 2-Tier Installation
Page 40

Client: Installation for UNIX
4. Mount the CD-ROM device as /cdrom.
5. In /usr/prolifics, to uncompress and extract the contents of the Panther
distribution, type:
zcat < /cdrom/CompressedTarFilename | tar –xvf –
On HPUX, type:
zcat < /cdrom/”CompressedTarFilename“ | tar –xvf –
Filenames for the Panther distribution are:
Filename Product
prlstd2t400.tar.Z Two-tier Client
prlstdwb400.tar.Z Two-tier Web Application Server
prldbs400.tar.Z Database driver(s)
When Prolifics software is loaded, your normal prompt displays.
Configuring the Installation
After you copy the distribution from the tape, run the setup program to configure
your installation.
To configure the installation:
1. If you are installing the web application server on the same machine, complete
the pre-installation steps on page 44.
2. Go to the installation directory by typing:
cd /usr/prolifics
3. Access the setup program which guides you through the steps to configure
your installation by typing:
Setup
Once you finish running the setup program, refer to page 40 to verify the
installation and configuration.
Start-up License
Chapter314 Client: UNIX Installation
Prolifics requires licensing in order to develop and run Prolifics applications. A
Start-Up License is provided to allow you to begin using Prolifics immediately
Page 41

Client: Installation for UNIX
while your request for a permanent license is being processed. The Start-up
License is provided on a PC floppy disk and on paper.
If you wish to install the license from the PC floppy disk, you may need to mount
the floppy on another computer and then transfer the Start-up License file to the
computer on which you are installing Prolifics software, using a transfer file utility
such as ftp. Copy the license.dat file to /usr/prolifics/licenses or to
the
/licenses subdirectory of your Prolifics installation.
Additional
Procedures
Alternatively, enter the contents of
license.dat from the paper copy provided.
The following additional procedures might be required to configure Prolifics on a
UNIX system:
` If you are installing Prolifics as a UNIX client, you need to set several
application variables and set up access to several configuration files for the
client. For information on configuring the client environment, refer to page 38.
` If you are using a database other than JDB, you must edit the makefile and
the database-specific file, and then rebuild Prolifics executables to link in
support for your database. Refer to page 36 for information on creating new
Prolifics executables.
32 2-Tier Installation
Page 42

Client: Post-Installation for UNIX
After successfully installing Prolifics software, there are several post-installation
steps required to start using Prolifics. This chapter discusses licensing, building
Prolifics executables, setting up the environment for each of the Prolifics
components installed, and post-installation issues and troubleshooting tips.
Post-Installation Overview
As part of post-installation, you need to perform the following general steps, some
of which are based on the architecture of your application. The details of the steps
are provided in the pages that follow.
1. Obtain a permanent license file before the Start-up License file expires.
2. Create new Prolifics executables if required (refer to page 36).
3. Configure the client environment (refer to page 38).
4. Verify the Prolifics installation based on what you installed (refer to page 40).
Client: Post-Installation for UNIX
5. Look at a sample application (refer to page 40).
Licensing for Prolifics
The Prolifics installation includes a Start-up License that lets you use Prolifics (and
run Prolifics applications) immediately. The temporary license, license.dat, is
located in the licenses subdirectory of the Prolifics installation directory. Since
the license expires in 45 days, you must contact the Prolifics License Desk during
this period to receive your permanent license file. Make your request as soon as
possible and return to this section when you receive the permanent license file.
Obtaining a
Permanent
License File
You must obtain a permanent license file before the Start-up License expires to
continue to develop and run Prolifics applications. Each development client must
have access to a license file.
Note: All development components require licenses. In a deployed application, the
web application server (if applicable) requires a license, but the client does not.
During installation, the setup program prompted you to provide the License Desk
with the appropriate information to obtain your permanent license file. It also
generated license request files (*.lcl) in the licenses subdirectory of your
Prolifics installation directory for each component installed on a given machine.
Chapter334 Client: UNIX Installation
Page 43

Client: Post-Installation for UNIX
To obtain the license file:
1. Submit the license request file (for each component on a given machine) to the
Prolifics License Desk. The License Desk returns the password-enabled file
for each component on a given machine via the requested method (as specified
during setup).
2. Install the license file or files.
3. Start the license manager daemon.
For more information on licensing, refer to Appendix C, and to Appendix D for a
description of the contents of a license file.
Installing the
License File
Each component you install on a machine—client (
server (
proweb)—receives its own license file (*.lic). Install each password-en-
abled license file on its appropriate machine, and then, via the
prodev) and web application
create_license
utility, merge them into a single license.dat for each machine. Follow the
directions for the method of receipt.
To install a permanent license file:
1. If you received license files via e-mail, copy them to the licenses directory:
prodev.lic (client development license) and proweb.lic (web application
server) if applicable. Proceed to Step 4.
2. If you received a license file via fax or mail, make a copy of the license
request file (having *.lcl extension) in the licenses directory, giving the
copy a .lic extension. For example:
In the licenses directory, type:
cp prodev.lcl prodev.lic
3. Update the copy of the license file (*.lic file) with the information you
received (via fax or mail).
Replace text in angle brackets (and the angle brackets) with the corresponding
information provided on the Feature line. For example, replace <number of
tokens> and <password> with the appropriate information from the
password-enabled license file.
Repeat Steps 2 and 3 for each license file you received for this machine.
4. Create the license.dat:
From the licenses directory, type:
./create_license
All .lic files for the machine are merged into a single license.dat file in
the licenses directory and the Start-up License is saved as license.bak.
34 2-Tier Installation
Page 44

Client: Post-Installation for UNIX
Note: After installing the license, if your environment has an old LM_LI-
CENSE_FILE
setting, you need to unset it as follows:
Location of the
License File
Starting the
License
Manager
Bourne or Korn shell:
unset LM_LICENSE_FILE
C Shell: unsetenv LM_LICENSE_FILE
Or you can explicitly set it to the license file.
Prolifics searches for the license file in the following order:
` The pathname given by the LMLicenseFile variable in your web application
initialization (web only).
` The pathname given by the LM_LICENSE_FILE variable.
` license.dat in licenses subdirectory of the Prolifics installation
(recommended location).
` /usr/local/flexlm/licenses/license.dat.
After you create the license.dat file, you can start the license manager. Make
sure that you are using version 5.0 or higher of the license manager daemon,
lmgrd.
Note: The web application server does not require the license daemon.
To determine the version of lmgrd:
At the command line, type:
ProlificsInstallDir/util/lmver lmgrd.exe
To start the license manager:
At the command line, type:
ProlificsInstallDir/util/lmgrd –c ProlificsInstallDir/licenses/license.dat> log&
where log is the name of a log file to which output is redirected.
Starting the license manager does not interfere with another lmgrd that might be
running to license another application. However, if you are running lmgrd for
previous versions of Prolifics, you must stop the license daemon using lmdown and
restart lmgrd as described, or run lmreread to incorporate new Prolifics license
daemon information.
Note: It is recommended that you add this command to the system startup scripts
file so that the daemon runs automatically when the system is rebooted.
Chapter354 Client: UNIX Installation
Page 45

Client: Post-Installation for UNIX
Create New Prolifics Executables
As part of the Prolifics installation package, a set of standard Prolifics executables
is provided. Depending on your configuration and on the platform and database
being used, you might need to create new executables. Specifically, a new
executable is required if you are:
` Using a database other than JDB.
` Using IXI Motif libraries.
To create a new Prolifics executable:
1. Complete the Prolifics installation process, including licensing.
2. Ensure that the appropriate application variables (SMBASE, etc.) have been
applied to your environment.
3. Go to your application directory (or create one) and copy all files from the
Prolifics link subdirectory to it.
4. Edit the makefile in your application directory, commenting or uncommenting lines as needed to build the appropriate executables. For further information, refer to page 37.
5. Uncomment the appropriate database in the makefile and edit the databasespecific makevars.dbs (where dbs is the extension of the database) file to
choose the correct version of your database software. For further information,
refer to page 37.
6. Type make at the command line to build the executable. By default, the
makefile in the current directory is used for the make command.
7. The make process creates a new Prolifics executable, prodev. Give the
executable file a unique name to distinguish it from the distributed executable
or others that you have built differently.
8. If you are running IXI Motif, and you rebuilt the prorun executable, copy the
new prorun to jiutil in the Prolifics util subdirectory.
9. If you built a new web application server executable (jserver), modify the
SERVER variable in your applications’ initialization files to reference the new
jserver executable in its own directory. Do not overwrite the jserver
executable in the util directory.
36 2-Tier Installation
Page 46

Client: Post-Installation for UNIX
Specifying the
Executables
To indicate the executables to build, edit the makefile in your application
directory:
1. Comment or uncomment the appropriate client executables as needed (these
are uncommented by default):
PRORUN = prorun Runtime executable
PRODEV = prodev Development executable
RWRUN = rwrun Report batch utility
For platforms that have been installed with web application server software,
comment or uncomment the server executable as needed:
JSERVER = jserver Web application server executable (uncom-
mented by default)
2. To override the value of certain application variables such as SMBASE,
uncomment the appropriate lines in the PARAMETERS section.
3. If you have the Prolifics web application server on the same machine as other
Prolifics software, it is recommended that they be installed in the same
directory. However, if they are not in the same directory, set WEBBASE (in WEB
PARAMETERS section) to the web application server installation directory.
4. The Prolifics debugger allows you to trace JPL and Prolifics screen events and
is installed by default for clients. If you do not wish to use the debugger,
comment the lines in the DEBUGGER PARAMETERS section.
Linking in the
Database
If you are using a database other than JDB, you must edit the makefile in your
application directory to link in the appropriate database.
To include the appropriate database in your executables:
1. Uncomment the appropriate include statement in the SELECT DATABASE
SOFTWARE section of the makefile.
By default, JDB is uncommented. If you choose another database, you can
leave JDB uncommented (and include it in your executable), or you can
comment out JDB and include only your database.
2. Edit the corresponding makevars.dbs (where dbs is the extension of the
database) file to choose the correct version of your database software.
In the makevars.dbs file, verify or update the following:
• Set the flag dbs_INIT to one of the following: d, l, u, p. This flag
Chapter374 Client: UNIX Installation
controls the handling for case sensitivity. The default is d. To find out
what the default is for your database engine, refer to the online databasespecific driver notes.
Page 47

Client: Post-Installation for UNIX
• In the databaseName PARAMETERS section of makevars, verify your
database engine’s version. Uncomment the appropriate block of
parameters based upon this version. Also, verify and correct the
pathnames if necessary.
• Set the flag dbs_ENGNAME to specify the default engine name.
Before changing these values, refer to the online Database Drivers for
additional information on database engines and on case handling.
Configure the Client Environment
A Prolifics client provides the development environment required to build two-tier
applications. The environment must contain properly set application variables in
order to run Prolifics. To set up the development environment, complete the
following platform-specific steps. Refer to the online Developer’s Guide for more
details on setting up the client environment.
1. For each client, copy the following files in the installation config directory to
each developer ’s home directory:
• .ebtrc — Used by the online help systems. Copy the file or set the
EBTRC variable to point to it; refer to Step 4.
• Prolifics — X resource file used by the Prolifics client. Copy to each
user’s app-defaults directory (if there is one) or to the user’s home
directory.
2. The setup shell scripts are useful for setting Prolifics application variables.
The setup program determined values for some of these variables, based on
your system’s configuration, and modified the scripts accordingly. Review
setup.sh (Bourne or Korn shell users) and setup.csh (C shell users) in the
application directory (if it exists) or the file $SMBASE/config/setup.sh
($SMBASE/config/setup.csh) to ensure proper settings for the following
application variables:
• SMBASE — Full pathname of the Prolifics installation directory. The
installation recommends /usr/prolifics; therefore, SMBASE would be
set to equal /usr/prolifics. If Prolifics was installed in a different
directory, use that directory’s name.
• PATH — Identifies directories to search when looking for executable
programs. PATH should include the path to Prolifics’s util directory so
that the system can find the development executable (prodev) and
Prolifics utilities. If Prolifics’s util directory is not on the PATH,
business graphs and online help will not work.
38 2-Tier Installation
Page 48

Client: Post-Installation for UNIX
• JAVA_HOME and CLASSPATH — These path names are specific to Java
files and event handlers and need to be set to the location where your Java
classes sit. Additionally, you can change the defaults for SMJAVAEDITOR
and SMJAVAFACTORY and SMJAVALIBRARY. For more information refer
to the online Developer’s Guide.
• SMTERM — Specifies the type/model console the client is using. For
Motif, set SMTERM to X.
If you are running a character mode terminal with Prolifics, then you need
to have appropriate video and key files, which instruct Prolifics on how to
drive your terminal. Prolifics provides files to support several popular
terminal types, which are in turn often emulated by other brands of
terminals. Refer to the Configuration Guide for details on video files.
Then examine the file $SMBASE/config/smvars. There you should find
a setting of SMTERM which meets your needs.
• LM_LICENSE_FILE — Full pathname of the license file (default location
is $SMBASE/licenses/license.dat).
• LD_LIBRARY_PATH — Identifies directories to search when looking for
shared libraries. On HPUX, use SHLIB_PATH in place of LD_LI-
BRARY_PATH. On AIX, use LIBPATH. LD_LIBRARY_PATH should include
the path to the Motif shared library directory, and the path to the Prolifics
lib directory to find shared libraries.
• XNLSPATH — Some implementations of Motif require you to set the
3. You can set SMFLIBS in setup.sh to point to shared Prolifics application
libraries in the application directory and have them open automatically.
4. To use online documentation, set and export EBTRC. The variable should point
to the .ebtrc file, distributed in the Prolifics config directory if the .ebtrc
file is not copied to the user’s home directory.
5. To automatically set up the environment, execute the setup shell script directly
from each users logon script (.profile or .cshrc).
• Korn or Bourne shell — Append the following line to the .profile:
• C-shell — Append the following line to the .cshrc:
Chapter394 Client: UNIX Installation
XNLSPATH application variable before Prolifics can be successfully used.
Check the documentation for your implementation of Motif to see if this
is the case for you.
. applicationDir/setup.sh
source applicationDir/setup.csh
Page 49

Client: Post-Installation for UNIX
This assumes that you are using setup script files in your application directory.
If you are using setup script files in the installation directory, replace
applicationDir with the full pathname to the Prolifics config directory, for
example, /usr/prolifics/config/setup.sh.
Note: If application variables are set in the user’s environment for previous
versions of JAM or Prolifics, they should be removed so that they do not
interfere with the setup for this version.
6. If a user ’s terminal type is different from the value of SMTERM in the setup
script, override that value by adding a line to the
SMTERM correctly. The line should immediately follow the script invocation.
For example:
. /usr/prolifics/config/setup.sh
SMTERM=vt100
Alternatively, you can merge the appropriate setup script file into .profile
or .cshrc, and modify the value of SMTERM as needed.
Overriding other application variables for a given user can be implemented in
the same way.
Verify the Installation
.profile or .cshrc to set
After you install and configure the Prolifics client, you should verify that it starts
up properly. If Prolifics software is not installed and configured correctly, an
appropriate error message is displayed. Depending on the problem, the program
might also terminate. Refer to Appendix E for a list of the more common error
messages related to system configuration, and how to resolve them.
Client
Installation
On a client machine, a correct installation is verified if you can invoke the Prolifics
editor.
To verify a UNIX client installation:
Type prodev at the command line.
Look at A Sample Application
Before you begin building your applications, you might want to look at the
following sample application:
VideoBiz (two-tier application)
Run the following script from your home or working directory (make sure your
current directory has write-permissions):
$SMBASE/samples/vidstore/vbizunix
For more information on VideoBiz, refer to the online Developer ’s Guide.
40 2-Tier Installation
Page 50

Post-Installation Notes
The following additional information might be required to configure and run
Prolifics software on your system.
Client: Post-Installation for UNIX
Implementing
Character-Mode
Utilities
Several character-mode specific utilities,
showkey.cm (key translation utility), are provided in the distributed util
directory. You may need to use these if you are running Prolifics using charactermode and your system does not have Motif installed. To ensure that directions and
menu options that reference these utilities can be used and accessed, rename the
executables:
1. In the
2. Copy the character-mode utilities to the utility name having no extension. For
Troubleshooting
The information in this section is intended to provide you with additional guidance
when you encounter error messages.
mbedit.cm (menu bar editor) and
util directory, save the Motif versions of the utilities by giving each a
new extension to distinguish it from their corresponding character-mode
utilities. For example:
cp mbedit mbedit.xm
cp showkey showkey.xm
example:
cp mbedit.cm mbedit
cp showkey.cm showkey
License
Manager
Motif Version
Number
Graph
Functionality
Chapter414 Client: UNIX Installation
If the license manager is not able to process the license file, an appropriate error
message is displayed. Appendix E lists error messages generated by FLEXlm and
hints for resolving them.
If the Prolifics license server is not running, its clients will not be able to run.
To determine your Motif version number:
From your Motif installation directory, run the following command:
strings libXm.a | grep –i version
Prolifics’s graph capabilities rely upon external programs, therefore, it is possible
for Prolifics to be working properly except for the business graph component. If
you have problems with the graph functionality, check the following:
Page 51

Client: Post-Installation for UNIX
` Ensure that the grafcap file (distributed in the config directory) is located
in one of the directories pointed to by
` Ensure that the files gdsp and swsdrvr (distributed in the util directory)
can be found along the search PATH for executables (Prolifics must be able to
execute these programs).
SMPATH.
Online Help and
Manuals
Adding Panther
Documents
Prolifics’s online help and manuals are built and displayed with DynaText by Inso
Corporation. To verify that you can access the online documents, run dtext (in the
util directory). You should see a dialog containing a list of documents available
through DynaText. If you have problems accessing the documents:
` Ensure that the Prolifics util directory is included in the PATH variable.
` Ensure that the .ebtrc can be accessed. Do this by either placing a copy of it
in your home directory (and each user’s home directory) or by having an
EBTRC variable specification which points to a copy (in the config directory).
` Ensure that the contents of the .ebtrc file are correct. Since .ebtrc relies on
the SMBASE variable, that must be set and exported.
If DynaText was previously installed, you can use your existing DynaText
configuration file (.ebtrc) to include the Panther manuals with your existing list
of documents.
To include the Panther manuals in an existing DynaText collection:
Add the following to the COLLECTION line:
In the .ebtrc file: $SMBASE/docs = Panther
42 2-Tier Installation
Page 52

Web Application
Server: UNIX
This chapter contains information for installing the Prolifics web application
server. For information about installing Prolifics client software, refer to page 27.
Web Application Server: Pre-Installation for UNIX
To run a Prolifics web application server, an HTTP server must be configured and
running on the same system. Prolifics supports some of the industry favorites, such
as Netscape’s Enterprise Server, and Apache Server.
55
Prolifics supports CGI, ISAPI, and NSAPI architectures. You can select one
according to your preferred configuration.
If you have the Prolifics web application server on the same machine as other
Prolifics software, it is recommended that they be installed in the same directory.
However, if they are not in the same directory, set WEBBASE (in WEB PARAMETERS
section) to the web application server installation directory.
The Prolifics web application server requires a maximum of 44 MB of disk space.
43
Page 53

Web Application Server: Post-Installation for UNIX
Preliminary
Steps
If you plan to install a Prolifics web application server on UNIX, you must create a
user account called
To prepare your UNIX system for installing a web application server:
1. Add a user called
passwd
creates a user account for the web application server.
2. Create a web home directory for the web application server user account. For
example: /home/proweb.
3. Set the permissions of proweb so that both the Prolifics web application
server and the HTTP server can access the files in the web home directory.
Follow these steps:
file on the machine on which your HTTP server is running. This
proweb.
proweb (this name assignment is required) to the /etc/
• Determine the name of the HTTP server user account (for example,
webmast).
• Create a permission group consisting of the web user account (proweb)
and the HTTP server user account (webmast).
• Give the group permission to access files in the web home directory
(/home/proweb). You may need to assign the same permissions to all of
the parent directories as well.
4. In your web home directory, create an ini subdirectory. Make sure that it has
read-write permissions for everyone. Your subdirectory might look like this:
/home/proweb/ini
Web Application Server: Post-Installation for UNIX
For information about installing and setting up Prolifics software, refer to page 30.
After successfully installing Prolifics software and running the setup script, there
are several post-installation steps required to start using Prolifics. This section
discusses or provides references to licensing, building Prolifics executables, setting
up the environment for each of the Prolifics components installed, and post-installation issues and troubleshooting tips.
If you install the web application server on a separate machine from Prolifics client
software, you must also install the database drivers on that machine.
Post-Installation Overview
As part of post-installation, you need to perform the following general steps. The
details of the steps are provided in the pages that follow.
44 2-Tier Installation
Page 54

Web Application Server: Post-Installation for UNIX
1. Obtain a permanent license file before the Start-up License file expires (refer
to page 33).
2. Create new Prolifics executables if required (refer to page 36).
3. Configure the web server environment (refer to page 45).
4. Verify the web application server installation (refer to page 46).
5. Look at sample applications (refer to page 47).
Configure the Web Application Server Environment
To ensure that your Prolifics application can be viewed on a web browser,
complete the following platform-specific steps, most of which were applied as part
of the Prolifics setup program. For further information on configuring web
applications, refer to the Web Developer ’s Guide.
1. Confirm that the following web application server executables reside in your
HTTP server’s CGI directory; otherwise, copy them from $SMBASE/util.
• websetup (web setup manager)
• jwsamp (sample application executable)
2. Confirm that the following web application server files reside in the document
root directory (consult your system administrator for the correct name) used
by your HTTP server; otherwise, copy them from $SMBASE/notes.
• *.htm (configuration HTML files)
• *.gif (graphics files)
3. Confirm that the following initialization file resides in the Prolifics web
initialization directory (/home/proweb/ini); otherwise, copy it from
$SMBASE/config.
• jwsamp.ini
4. Check jwsamp.ini in the Prolifics web initialization directory (/home/pro-
web/ini) for the correct setting of the following variables:
• AppDirectory — Full pathname to the Prolifics samples subdirectory
to provide initialization information for the sample web application.
• Dispatcher — Full pathname of the dispatcher program in the util
subdirectory of the installation directory.
Chapter455 Web Application Server: UNIX
Page 55

Web Application Server: Post-Installation for UNIX
• Server — Full pathname of the jserver program in the util
subdirectory of the installation directory.
• SMBASE — Full pathname of the Prolifics installation directory.
• PATH — Full pathname to the util subdirectory of the installation
directory.
Determine File
Locations
Determine the following:
` The location of your HTTP server’s program directory, such as /usr/web/
cgi–bin
` That the Prolifics Web Setup Manager is installed on your HTTP server and
ready to run via a web browser. The default URL location is:
Name/program_directory/websetup. Make a note of its location for later
reference:
. Make a note of this for later reference:
The server’s program directory is installed at:
______________________________________________________
The Setup Manager is accessed from the following URL:
______________________________________________________
Creating Your Web Application
The Prolifics Web Setup Manager guides you through configuring your customized
web application. For more information, refer to the Web Developer ’s Guide.
To run the Web Setup Manager, enter the URL recorded above into a web browser.
Verify the Installation
http://server-
After you install and configure the Prolifics web application server, you should
verify that it starts up properly on the web application server machine.
Web Application
Server
Installation
46 2-Tier Installation
On the Prolifics web application server machine, verify the installation by running
the Prolifics Gallery, and verify the configuration by running your own application.
To verify the Prolifics web application server installation:
Run the Prolifics Gallery:
` Start the Gallery application by typing the following on the command line in
the Prolifics util directory:
monitor –start jwsamp
Page 56

` Run the Gallery by entering the following URL in your browser:
To verify your web application server configuration (and licensing):
` Configure a new application by running the Web Setup Manager.
` Start the application by typing the following on the command line in the
` Run the application in your browser:
If you get the message “No Service Requested!” you were successful.
Look at Samples
Before you begin building your applications, you might want to look at the
following sample applications:
Web Application Server: Post-Installation for UNIX
http://serverName/program_directory/jwsamp/main
Prolifics util directory:
monitor –start applicationName
http://serverName/program_directory/applicationName
QuickStart
QuickStart provides step-by-step instructions on building and deploying sample
applications on the web.
From your web browser, access the following URL:
http://serverName/qstart.htm
Prolifics Gallery (web application)
Provides several pre-built sample applications for the web. These applications may
be accessed to verify the web server installation.
` Start the Gallery application by typing the following on the command line in
the Prolifics util directory:
monitor –start jwsamp
` Run the Gallery by entering the following URL in your browser:
http://serverName/program_directory/jwsamp/main
For example:
http://myServer/cgi–bin/jwsamp/main
Chapter475 Web Application Server: UNIX
Page 57

Notes for Microsoft
The information in this appendix provides troubleshooting notes for installing and
running Prolifics on Microsoft Windows.
DLLs for JPEG Decoding
WECJLIB.DLL is a dynamic link library which performs JPEG decoding. There are
two versions of the DLL. The version that comes with Prolifics can be freely
distributed. An enhanced version, which has added functionality, can be ordered
from Express Compression Labs (ECL).
In the version of the DLL provided with Prolifics, images are rendered using
ordered dithering. The enhanced version of the DLL supports Hi-Color and
Tru-Color display hardware. With such hardware, dithering is not necessary and
the best possible picture quality can be achieved. Two-pass color quantization and
improved dithering are also supported in the enhanced version, which results in
better picture quality on 256-color display devices.
AA
Windows
To order single- and multiple-user licenses for the enhanced version of the DLL,
email: ecl@netcom.com, or write:
Dr. Y. Shan
P.O. Box 367
Caulfield East VIC 3145, Australia
49
Page 58

Environment Space
Environment Space
If COMMAND.COM runs out of environment space when you issue a SET command,
add the following line to your CONFIG.SYS file:
SHELL=C:\COMMAND.COM /E:1000 /P
If COMMAND.COM resides on a different drive or directory, modify the line
accordingly.
Visual C++ Floating-Point Options
For Microsoft Visual C++ distributions, all the distributed libraries created in the
current version of Prolifics are compiled with the /FPc switch, so that you can
choose at link time which floating-point library to use. You can use either the math
coprocessor library (LLIBC7.LIB), the emulator library (LLIBCE.LIB, the
default), or the alternate math library (LLIBCA.LIB).
Using Prolifics Utilities
Because of various limitations of Windows, it can be challenging to use Prolifics’s
utilities when launched from the Program Manager or the Start menu. The problem
arises because Windows’s notion of the current directory is hidden from the user.
By default, all Prolifics’s utilities are designed to be run from the DOS command
line, with the following exceptions: binherit.exe, f2asc.exe.
clnt2svr.exe, and isqlw.exe (refer to the Note below). In the DOS environ-
ment, there is a current directory, and when the utilities run they operate on files in
that directory by default. Under Windows, however, the current directory is usually
set to the directory holding the executable, for example, c:\prolific\util.
Therefore, if you launch a utility, such as f2asc, from the Program Manager or the
Start menu and type –a foo.asc foo.pro in the Parameters window, f2asc
looks for foo.pro in the util directory and creates its output foo.asc there as
well. Since this is usually not what you want, consider one of the following
approaches:
` Enter full paths in the parameters window, for example,
–a d:\myproj\foo.asc d:\myproj\foo.pro.
` Edit the .PIF files to set the directory elsewhere than the util directory.
50 2-Tier Installation
Page 59

Using Prolifics Utilities
` Run the utilities from DOS.
Note: The utilities listed are distributed as Microsoft C QuickWin applications. If
you are interested in the behavior of QuickWin applications, refer to the QuickWin
chapter in the Programming Techniques manual that comes with Visual C/C++.
Notes for Microsoft WindowsAppendix51A
Page 60

BB
Initialization and
Databases
The installation procedure for Windows automatically modifies PROL4W32.INI to
work with your database driver or drivers. The settings corresponding to your
database and version are added to the Prolifics initialization file.
For Windows 95/98 and Windows NT:
Database and Version Settings
Microsoft Open Database Connectivity
(ODBC) Version 2
Microsoft Open Database Connectivity
(ODBC) Version3
Microsoft SQL Server Version 6
[databases]
installed=odbc
[dbms odbc]
driver=odb2dm32.dll
model=tmodb132.dll
[databases]
installed=odbc
[dbms odbc]
driver=odb3dm32.dll
model=tmodb132.dll
[databases]
installed=sqlsrvr
[dbms sqlsrvr]
driver=mssdm32.dll
model=tmmss132.dll
53
Page 61

Database and Version Settings
Sybase Version 10 using DB-Library
Sybase Version 10 using CT-Library
Sybase Version 11 using DB-Library
Sybase Version 11 using CT-Library
[databases]
installed=sybase
[dbms sybase]
driver=db10dm32.dll
model=tmsyb132.dll
[databases]
installed=sybase
[dbms sybase]
driver=ct10dm32.dll
model=tmsyb132.dll
[databases]
installed=sybase
[dbms sybase]
driver=db11dm32.dll
model=tmsyb132.dll
[databases]
installed=sybase
[dbms sybase]
driver=ct11dm32.dll
model=tmsyb132.dll
For Windows 95/98:
Database and Version Settings
Informix Version 7.20.TDI
Oracle Version 7–7.2 using OCI
Oracle Version 7–7.2 using Pro*C
Oracle Version 7.3 using OCI
[databases]
installed=informix
[dbms informix]
driver=inf7dm32.dll
model=tminf132.dll
[databases]
installed=oracle
[dbms oracle]
driver=ora7dm32.dll
model=tmora132.dll
[databases]
installed=oracle
[dbms oracle]
driver=emb7dm32.dll
model=tmora132.dll
[databases]
installed=oracle
[dbms oracle]
driver=or73dm32.dll
model=tmora132.dll
54 2-Tier Installation
Page 62

Database and Version Settings
Oracle Version 7.3 using Pro*C
Oracle Version 8 using OCI
Oracle Version 8 using Pro*C
[databases]
installed=oracle
[dbms oracle]
driver=em73dm32.dll
model=tmora132.dll
[databases]
installed=oracle
[dbms oracle]
driver=ora8dm32.dll
model=tmora132.dll
[databases]
installed=oracle
[dbms oracle]
driver=emb8dm32.dll
model=tmora132.dll
For Windows NT:
Database and version Settings
Informix Version 7.10
Informix Version 7.20TE1 or higher
Oracle Version 7.3 using OCI
Oracle Version 7.3 using Pro*C
[databases]
installed=informix
[dbms informix]
driver=inf7dmnt.dll
model=tminf132.dll
[databases]
installed=informix
[dbms informix]
driver=inf7dmn4.dll
model=tminf132.dll
[databases]
installed=oracle
[dbms oracle]
driver=ora7dmnt.dll
model=tmoral132.dll
[databases]
installed=oracle
[dbms oracle]
driver=emb7dmnt.dll
model=tmora132.dll
Initialization and DatabasesAppendix55B
Page 63

Database and version Settings
Oracle Version 8 using OCI
Oracle Version 8 using Pro*C
[databases]
installed=oracle
[dbms oracle]
driver=ora8dmnt.dll
model=tmoral132.dll
[databases]
installed=oracle
[dbms oracle]
driver=emb8dmnt.dll
model=tmora132.dll
56 2-Tier Installation
Page 64

CC
License
Administration
This appendix provides background information on licensing in Prolifics. To
manage Prolifics usage, the Flexible License Manager (FLEXlm), a product of
Globetrotter Software, Inc., is used. FLEXlm Version 5.0 is installed with Prolifics
as part of the installation process only on server machines.
The appendix describes the license options file and the following FLEXlm license
administration utilities provided with Prolifics.
` lmcksum — Performs a checksum of a license file.
` lmdiag — Diagnoses licensing problems.
` lmdown — Gracefully shuts down the license daemons on all nodes.
` lmgrd — Starts the license manager daemon.
` lmhostid — Prints the correct hostid value on any machine supported by
FLEXlm.
` lmremove — Removes a single user’s license for a specified feature.
` lmreread — Causes the license daemon to reread the license file and start
any new vendor daemons that have been added.
57
Page 65

Licensing in Prolifics
` lmstat — Monitors the status of all licensing activity.
` lmswitchr — Switches the log file for the specified feature.
` lmver — Reports the FLEXlm version of a library or binary.
Licensing in Prolifics
Prolifics components use local or remote licensing schemes and are defined as
follows:
` Local licensing is when the license file for the application resides on the same
machine as the Prolifics component being used.
` Remote licensing is when the license file for the application resides on a
different machine from the Prolifics component being used.
The setup program recommends a default licensing scheme for each Prolifics
component. If you accept the default, the setup program guides you through the
appropriate steps to obtain a permanent license file. You can choose a different
scheme if your license administrator recommends it. In this case, the setup program
requests contact information, and the Prolifics License Desk will contact you or
your license administrator to arrange for licensing. Default license schemes are:
Component name Platforms Licensing scheme
Prolifics client UNIX Local
Prolifics web application server UNIX
Windows NT
Local
Local
License Daemons and License Types
The license daemons are programs that manage the license types that allow limited
access to users. License daemons are only required for node-locked counted and
floating licenses. Thus, only the Prolifics development client requires daemons,
and the license daemons always run on the license host machine.
The license type and number used at your site was determined when Prolifics was
purchased.
Types of
Daemons
58 2-Tier Installation
The two types of daemons are:
` License daemon (lmgrd) — Manages the license file and starts the vendor
daemon prold. Only one license daemon can be active for a given license
Page 66

Options File
file. However, there might be other license daemons managing other license
lmgrd runs on the license host.
files.
` Vendor daemon (prold) — Works with lmgrd to dispense tokens. Each
feature of a floating (development client) license has a limited number of
tokens.
License Types
Options File
Two types of licenses are available with Prolifics; each type is specific to the
component installed:
` A Prolifics web application server uses a license type that allows for an
unlimited number of application servers to run on a specific computer. The
license does not require a license daemon. This type of license is referred to as
node-locked uncounted.
` Prolifics UNIX clients use floating licenses. This type of license is not
associated with a particular machine, but is assigned by the license server to
each Prolifics development client when the executable is run. This license type
requires a license daemon.
Note: Because a floating license is associated with the Prolifics development
executable, and not with an actual machine, it is possible for a developer to
use more than one license. For example, if a developer is running two Prolifics
sessions simultaneously on one machine, the license manager assigns two
licenses, not one.
The daemon options file allows you to customize Prolifics license usage at your
site. The information in the file can specify such information as:
` Which users or groups of users can use Prolifics.
` Which messages will be included in the log file.
` How long a copy of Prolifics will remain idle before timing out.
There is no default location or name for the options file. If used, its name appears
as the fourth argument on the DAEMON line of the license file license.dat, in the
optional field options–file. If there are multiple DAEMON lines in the license.dat
file, then there can be multiple options files, one for each DAEMON line. Not all of
the lines in an options file refer to a feature, so the site administrator must set up
separate options files in order to use the NOLOG and REPORTLOG features.
License AdministrationAppendix59C
Page 67

Options File
Contents of the
Options File
The options file has the following basic format:
{INCLUDE|EXCLUDE} feature {USER|HOST|DISPLAY|GROUP} name
{IN|OUT|DENIED|QUEUED}
NOLOG
GROUP group–name member–list
LINGER feature checkout-time
REPORTLOG filename
RESERVE numlic feature {USER|HOST|DISPLAY|GROUP} name
TIMEOUT feature idletime
Lines beginning with a pound sign (#) indicate comments and are ignored.
INCLUDE/EXCLUDE
INCLUDE and EXCLUDE specify which users (or hosts, displays, or groups) are
allowed to use a particular feature. Any user who is
not able to use that feature. Specifying an
INCLUDE line has the effect of excluding
EXCLUDEd from a feature is
everyone else from that feature; thus, only those users specifically INCLUDEd are
able to use that feature. The INCLUDE|EXCLUDE line has the following format:
{INCLUDE|EXCLUDE} feature {USER|HOST|DISPLAY|GROUP} name
NOLOG
NOLOG causes messages of the specified type to be filtered out of the daemon’s log
file. Specifying a NOLOG option reduces the amount of output to the log file, which
can be useful in those cases where the log file grows too quickly. The NOLOG line
has the following format:
NOLOG {IN|OUT|DENIED|QUEUED}
GROUP
GROUP defines collections of users, which can then be used in RESERVE, INCLUDE,
or EXCLUDE commands. The GROUP line has the following format:
GROUP group–name member–list
LINGER
LINGER prevents the license manager from taking back a license until the indicated
checkout-time has expired, regardless of whether or not the license token is being
used. The LINGER line has the following format:
LINGER feature checkout-time
REPORTLOG
REPORTLOG creates a log file suitable for use with the FLEXlm report writing
tools. This log file maintains more detailed information than the standard log file,
60 2-Tier Installation
Page 68

FLEXlm Utilities
but is not meant to be human readable. If the filename starts with a plus character
(+), the file will be opened in append mode. The
REPORTLOG line has the following
format:
REPORTLOG filename
RESERVE
RESERVE reserves the specified number of licenses for the specified user, host,
display, or group. Reserving a license decreases the number of generally available
licenses. The RESERVE line has the following format:
RESERVE numlic feature {USER|HOST|DISPLAY|GROUP} name
TIMEOUT
TIMEOUT sets up a minimum idle time after which a user ’s license is lost if it is not
being used. This can prevent users from wasting a license (by keeping it checked
out when it is not in use) when someone else wants one. The
TIMEOUT line has the
following format:
TIMEOUT feature idletime
Example
The following is an example of an options file:
REPORTLOG /usr/adm/gsi.replog
RESERVE compile USER pat
RESERVE compile USER less
RESERVE compile HOST terry
NOLOG QUEUED
FLEXlm Utilities
The following sections describe the FLEXlm utility programs provided with
Prolifics. These utilities are located in the distributed util directory.
License AdministrationAppendix61C
Page 69

FLEXlm Utilities
lmcksum
Performs a checksum of a license file
lmcksum [–k] [–c license_file]
–k
–c license_file
Description
Force the encryption code checksum to be case-sensitive (in general, lmcksum is
not case-sensitive) and not prompt for any input.
Name of license file to checksum. By default lmcksum operates on license.dat
in the current directory. If this switch is not specified, lmcksum looks for the
environment variable
lmdiag looks for the file /usr/local/flexlm/licenses/license.dat.
lmcksum prints a line-by-line checksum for the file as well as an overall file
checksum. If the license file contains “lmcksum=nn” attributes, the bad lines are
indicated.
lmcksum ignores all fields that do not enter into the encryption code computation;
thus the server node name and port number, as well as the daemon pathname and
options file names, are not checksummed. In addition lmcksum treats non-case
sensitive fields correctly (in general, lmcksum is not case-sensitive). lmcksum
takes the –k switch to force the encryption code checksum to be case-sensitive.
lmcksum takes an optional daemon name; if a name is specified, only license file
lines for the selected daemon are used to compute the checksums.
LM_LICENSE_FILE. If the environment variable is not set,
62 2-Tier Installation
Page 70

lmdiag
Diagnoses licensing problems
lmdiag [–c license_file] [–n] [feature]
FLEXlm Utilities
–c license_file
–n
feature
Description
Name of license file to diagnose. If this switch is not specified, lmdiag looks for
the environment variable
set, lmdiag looks for the file /usr/local/flexlm/licenses/license.dat.
Non-interactive mode; lmdiag does not prompt for any input. In this mode,
extended connection diagnostics are not available.
Diagnose only the specified feature.
If no feature is specified, lmdiag operates on all features in the license file in your
path. lmdiag first prints information about the license, then attempts to check out
each license. If the checkout succeeds, lmdiag indicates this. If the checkout fails,
lmdiag gives you the reason for the failure. If the checkout fails because lmdiag
cannot connect to the license server, then you have the option of running “extended
connection diagnostics.”
Extended diagnostics attempt to connect to each port on the license server node,
and can detect if the port number in the license file is incorrect. lmdiag indicates
each port number that is listening, and if it is an lmgrd process, lmdiag indicates
this as well. If lmdiag finds the vendor daemon for the feature being tested, then it
indicates the correct port number for the license file to correct the problem.
LM_LICENSE_FILE. If the environment variable is not
License AdministrationAppendix63C
Page 71

FLEXlm Utilities
lmdown
Takes down license daemons
lmdown [–c license_file] [–q]
–c license_file
–q
Description
Use the specified license_file. If this switch is not specified, lmdown looks for the
environment variable
lmdown looks for the file /usr/local/flexlm/licenses/license.dat.
Quiet mode; lmdown does not ask for confirmation. If the switch is not specified,
lmdown asks for confirmation before asking the license daemons to shut down.
lmdown sends a message to every license daemon asking it to shut down. The li-
cense daemons write out their last messages to the log file, close the file, and exit.
All licenses which have been given out by those daemons are rescinded, so that the
next time a client program goes to verify its license, it will not be valid.
The end-user system administrator should protect the execution of lmdown since
shutting down the servers causes loss of licenses.
Note: lmdown can be used only by a “FLEXlm administrator” (i.e., a member of
group lmadmin or, if the lmadmin group does not exist, a member of group 0).
LM_LICENSE_FILE. If the environment variable is not set,
64 2-Tier Installation
Page 72

FLEXlm Utilities
lmgrd
Starts up the license manager daemon
lmgrd [–2] [–b] [–c license_file] [–d] [–l logfile] [–p] [–s interval] [–t timeout]
–2
–b
–c license_file
–d
–l logfile
–p
–s interval
–t timeout
Specify V2 startup arguments, in contrast to the –b switch. This switch is required
if you intend to use the
–p switch (available in lmgrd v2.4 and later).
Specify backward compatibility mode. Use this switch if you are running a v2.1 or
later lmgrd with a v1.5 or earlier vendor daemon. This is the default switch in
FLEXlm v2.4 and later.
Use the specified license_file. If this switch is not specified, lmgrd looks for the
environment variable LM_LICENSE_FILE. If the environment variable is not set,
lmgrd looks for the file /usr/local/flexlm/licenses/license.dat.
Specify that hostnames which are read from the license file should have the local
domain name appended to them before sending to a client. Useful when clients are
accessing licenses from another domain. (Available in lmgrd v2.4 and later.)
Specify the output log file to use.
Specify that the lmdown and lmremove utilities can only be run by a license
administrator. A license administrator is a member of the lmadmin group, or, if the
lmadmin group does not exist, a member of group 0. (This is available in lmgrd
v2.4 and later.)
Specify the logfile timestamp interval, in minutes. Default is 360 minutes.
Specify the timeout interval, in seconds, during which daemons must complete
their connections to each other. Default value is 10 seconds. A larger value might
be preferable if the daemons are being run on busy systems or a very heavily
loaded network.
Environment
Description
License AdministrationAppendix65C
UNIX
lmgrd is the main daemon program for the FLEXlm distributed license manage-
ment system. When invoked, it looks for a license file containing all required information about vendors and features.
Page 73

FLEXlm Utilities
lmhostid
Prints the correct hostid value on any machine supported by FLEXlm
lmhostid [type]
type
Description
The type of the hostid to print. type must be one of long, idmodule, ether, or
string, and is currently used only on HP and SCO systems. On HP, type specifies
the ID module, the machine id as returned from the uname command, or the
Ethernet address. The HP default is long–uname. On SCO, long specifies the
pre-3.0 default, which was a 32-bit long int, while string specifies a string host,
which is the new default.
Output from lmhostid is similar to the following:
lmhostid – Copyright (C) 1997, Globetrotter Software, Inc.
The FLEXlm host ID of this machine is “1700abcd”
66 2-Tier Installation
Page 74

lmremove
Removes a user license and returns it to the license pool
lmremove [–c license_file] [feature] [user] [host] [display]
FLEXlm Utilities
–c license_file
feature
user
host
Description
Use the specified license file. If this switch is not specified, lmremove looks for
the environment variable
LM_LICENSE_FILE. If the environment variable is not
set, it looks for the file /usr/local/flexlm/licenses/license.dat.
Remove only from the specified feature.
The
user to be removed.
Node from which the
lmremove allows the system administrator to remove a single user ’s license for a
user is to be removed.
specified feature. This might be required in the case where the licensed user is running the software on a node that subsequently crashed. This situation can sometimes cause the license to remain unusable. lmremove allows the license to be re-
turned to the pool of available licenses.
lmremove removes all instances of user on node host at the specified display from
usage of feature. The end-user system administrator should protect the execution of
lmremove since removing a user ’s license can be disruptive.
Note: lmremove can be used only by a “FLEXlm administrator” (i.e., a member
of group lmadmin or, if the lmadmin group does not exist, a member of group 0).
License AdministrationAppendix67C
Page 75

FLEXlm Utilities
lmreread
Tells the license daemon to reread the license file
lmreread [–c license_file]
–c license_file
Description
Use the specified license file. If this switch is not specified, lmreread looks for
the environment variable
set, it looks for the file /usr/local/flexlm/licenses/license.dat.
lmreread allows the system administrator to tell the license daemon to reread the
license file. This can be useful if the data in the license file has changed; the new
data can be loaded into the license daemon without shutting down and restarting it.
lmreread uses the license file from the command line (or the default file, if none
specified) only to find the license daemon to send it the command to reread the
license file. The license daemon always rereads the original file that it loaded. If
you need to change the path to the license file, then you must shut down the
daemon and restart it with that new license file path.
You cannot use lmreread if the SERVER node names or port numbers have been
changed in the license file. In this case, you must shut down the daemon and restart
it in order for those changes to take effect.
lmreread does not change any option information specified in an options file. If
the new license file specifies a different options file, that information is ignored. If
you need to reread the options file, you must shut down the daemon and restart it.
LM_LICENSE_FILE. If the environment variable is not
68 2-Tier Installation
Page 76

FLEXlm Utilities
lmstat
Reports status on license manager daemons and feature usage
lmstat [–a] [–A] [–c license_file] [–f [feature]] [–l [reg_expression]] [–s [server]] [–S [daemon]]
[–t timeout]
–a
–A
–c license_file
–f [feature]
–l [reg_expression]
–s [server]
–S [daemon]
–t timeout
Description
Display everything.
List all active licenses.
Use the specified license file. If this switch is not specified, lmstat looks for the
environment variable LM_LICENSE_FILE. If the environment variable is not set,
lmstat looks for the file /usr/local/flexlm/licenses/license.dat.
List all users of the specified features.
List all users of the features matching the given regular expression.
Display the status of the specified server nodes.
List all users of the specified daemon’s features.
Specify the timeout interval, in seconds, during which daemons must complete
their connections to each other. Default value is 10 seconds. A larger value might
be desirable if the daemons are being run on busy systems or a very heavily loaded
network.
lmstat provides information about the status of the server nodes, vendor daemons, vendor features, and users of each feature. Information can optionally be
qualified by specific server nodes, vendor daemons, or features.
lmstat provides:
` Total licenses available for each feature.
` Who is using the license.
` Who is using features served by a specific daemon.
License AdministrationAppendix69C
Page 77

FLEXlm Utilities
lmswitchr
Switches the FLEXadmin log file (REPORTLOG) for the specified feature
lmswitchr [feature] [new-file]
feature
new-file
Description
Any feature this daemon supports.
New file pathname.
The FLEXlm daemons create an ASCII log file on stdout. There are several pro-
cesses in a parent-child hierarchy which share the same file pointer, so this log file
cannot be changed after the vendor daemons have been started, since each process
has a copy of the current offset, etc.
There is another way to switch the log file output data; however, this involves
piping the stdout of lmgrd to a shell script that appends a file for each line.
Instead of the “normal” startup:
Start lmgrd this way:
% lmgrd –z | sh –c ’while read line; do echo “$line” >> LOG;
done’
For more information on the log file, refer to page 60 for a description of
REPORTLOG.
% lmgrd > LOG
70 2-Tier Installation
Page 78

lmver
Reports the FLEXlm version of a library or binary
lmver [filename]
FLEXlm Utilities
filename
Description
Use the specified license file. If a filename is not specified, lmver looks for the
environment variable
lmver looks for the file /usr/local/flexlm/licenses/license.dat.
If the filename is specified, the FLEXlm version incorporated into this file is displayed; otherwise lmver looks for the library file liblmgr.a to detect its version.
LM_LICENSE_FILE. If the environment variable is not set,
License AdministrationAppendix71C
Page 79

This appendix describes the basic format and content of the password-enabled
license file.
If you already have a license file in place, either from a previous version of JAM or
Prolifics, or from another application that uses FLEXlm, you can combine license
files by inserting the license file information provided by the License Desk.
Contents of the License File
The license file has the following basic format:
SERVER sname hostid port
DAEMON
FEATURE product daemon-name version exp_date number password\
INCREMENT product daemon-name version exp_date number password\
Note: FEATURE and INCREMENT lines should not be changed: they contain the
license password and other information which, if modified, could prevent Prolifics
from running. Also, the host ID of the server on the SERVER line should not be
changed.
daemon-name path
ISSUED=date SN=serial number HOSTID=hostid ck=checksum
ISSUED=date SN=serial number HOSTID=hostid ck=checksum
DD
License File
SERVER
Specifies the server on which a license manager can run. License files require a
SERVER line only for the Prolifics development client. The SERVER line has the
following format:
73
Page 80

Contents of the License File
SERVER sname hostid port
sname — Server ’s name.
hostid — Host ID of the server.
port — TCP/IP port number used by this server.
DAEMON
Specifies the name and location of the license manager vendor daemon for the
Prolifics development client. It also provides the location of the Prolifics options
file. It has the following format:
DAEMON daemon-name path [options_file]
daemon-name — Name of the daemon; always prold.
path — Full path for the daemon.
options_file (optional) — Name and path of the options file allowing you to
customize Prolifics license management (Appendix C).
FEATURE
Describes the license for the Prolifics application server or the web application
server. It has the following format:
FEATURE product daemon-name version exp_date number password\
ISSUED=date SN=serial number HOSTID=hostid ck=checksum
product
— Name of the product with which the license is associated, in this case,
the appropriate Prolifics executable: prolifics-web-server (Prolifics web
application server or Jserver), or prolifics–web–mgr (dispatcher).
daemon-name — Always no_daemon; this indicates that the feature requires no
license daemons.
version — Highest version number of product; 4 for Prolifics.
exp_date
01-jan-0000 to indicate that the Prolifics license has no expiration date.
number — Number of licenses allowed under this license agreement: it is always 0
— Expiration date of the license in the form dd-mmm-yyyy; normally
for a node-locked uncounted license.
password — Encrypted alphanumeric string provided by the License Desk. It
contains encoded information about your license, such as the type of license and
your system configuration.
74 2-Tier Installation
Page 81

Contents of the License File
date — Date issued. The license is not valid before this date.
serial number — Product serial number; more than one feature can share a serial
number.
hostid — Hostid of the server. Used only if the feature is to be bound to a particular
host, whether its use is counted or not.
checksum — Verifies that the license has been entered correctly by the end-user.
INCREMENT
Describes the license for the Prolifics development client. It has the following
format:
INCREMENT product daemon-name version exp_date number password\
ISSUED=date SN=serial number HOSTID=hostid ck=checksum
product — Name of the product with which the license is associated, in this case,
the appropriate Prolifics executable: prolifics-web-server (Prolifics web
application server or Jserver), prolifics–web–mgr (dispatcher), or prolifics-
client
(UNIX clients).
daemon-name — Name of the daemon; always prold.
version — Highest version number of product; 4 for Prolifics.
exp_date
01-jan-0000 to indicate that the Prolifics license has no expiration date.
number — Number of licenses allowed under this license agreement: it is always
— Expiration date of the license in the form dd-mmm-yyyy; normally
greater than 0 for a counted license.
password — Encrypted alphanumeric string provided by the License Desk. It
contains encoded information about your license, such as the type of license and
your system configuration.
date — Date issued. The license is not valid before this date.
serial number — Product serial number; more than one feature can share a serial
number.
hostid — Hostid of the server. Required for a Prolifics web application server and
absent for a development client.
checksum — Verifies that the license has been entered correctly by the end-user.
License FileAppendix75D
Page 82

Error Messages
Prolifics Installation Error Messages
A Prolifics installation was not successful if you receive an error message and the
program terminates. The following messages describe some of the more common
error messages and how to resolve them.
Recurring errors: Occasionally, errors described in this section seem to recur even
though the file smvars is in order. More often than not, the problem is that the
smvars file (in the config directory), although correct, has not been converted to
binary (smvars.bin), which is the required format used by Prolifics. If the ASCII
version of smvars has been edited, be sure to run var2bin to convert it to binary
format. Otherwise Prolifics is not aware of the changes, and it will seem as though
smvars was not updated.
Please enter terminal type or <RETURN> to exit.
Cause: SMTERM is not set (and, under UNIX, TERM is also not set) or the value
could not be found in smvars.bin (left column of smvars).
Action: Enter the terminal type, if known, or press Enter to set SMTERM correctly.
Once the variable is defined, run prodev again.
EE
See the left column of the smvars file and correct the specification. Use
var2bin to convert the file to binary. And/Or:
UNIX: Set the variable at the command line.
77
Page 83

Prolifics Installation Error Messages
Windows: Set the variable to win in PROL4W32.INI.
If you are running in character mode and the screen appears disorganized,
with all the text bunched together along with special characters, check the
value of
may also need to create a new video file.
Filename: No such file or directory
Cause: The filename in brackets is specified as the value of the SMVIDEO, SMKEY,
SMMSGS, or some similar configuration variable in the environment or in
smvars.bin, but the file could not be found.
Action: Correct the name, and use the full pathname of the file. If you correct it in
smvars, recompile smvars with the var2bin utility.
[Variable]: Environment variable missing
Cause: Prolifics could not find an entry for the cited variable in SMVARS or in the
environment (refer to the following note). This error usually means that
you have some variables defined in your environment, but not all that are
required, and
Note: Most Prolifics setup variables can be set in the environment, rather
than depending on values set in an SMVARS-defined file. If Prolifics can’t find
a required variable specification in either the environment or in the SMVARS
file, that variable will be cited as missing. Refer to the Configuration Guide
for more details.
SMTERM; you probably only need to change its value, but you
SMVARS is not defined.
SMVARS: Bad file format
Cause: SMVARS is set to be the name of an existing file, but it is not a binary
SMVARS file. The most common incorrect value for SMVARS in this case is
the path and name of the source SMVARS file instead of the binary SMVARS
file.
Action: Point to the binary file that has the .bin extension.
SMVARS: Environment variable missing
Cause: SMBASE (or SMVARS, if you are using one) is not set, or not set properly.
Normally, Prolifics looks for smvars.bin in the config directory under
the directory pointed to by SMBASE. If SMBASE is not set, you must have
an SMVARS variable to tell Prolifics explicitly where the SMVARS file can
be found. If SMBASE is not set properly, and Prolifics cannot find an
SMVARS variable, the above message is given.
Action: Correct (or set) the SMBASE variable specification, or determine why
setting it is not taking effect.
Windows: Check to see that SMBASE is being set in autoexec.bat and
that you have not run out of environment space.
78 2-Tier Installation
Page 84

UNIX: Make sure that the variable is exported (via the export sh/ksh
command or setenv csh command).
SMVARS: No such file or directory
Cause: SMVARS is not set correctly.
Action: Check that the full pathname (including drive letter under Windows) of
the file is included and correct.
DLL Messages
The following error messages might occur after a Windows installation and are
specific to DLLs required for Prolifics’s database drivers and to DLL version
mismatches.
Informix-Specific Messages
DLL Messages
Cannot load DLL INF7DM32.DLL
Cannot load DLL INF7DMNT.DLL
Cannot load DLL INF7DMN4.DLL
Cannot load DLL TMINF132.DLL
Cause: Windows is unable to find the Prolifics database driver DLLs or the
Informix software.
Action: Check that the Prolifics util directory is on the PATH. If you do not wish
to use the Prolifics database driver DLLs, edit PROL4W32.INI to remove
the database name from the install entry.
Microsoft SQL Server-Specific Messages
Cannot load DLL mssdm32.dll
Cannot load DLL tmmss132.dll
Cause: Windows is unable to find the Prolifics database driver DLLs or the
Microsoft SQL Server software.
Action: Check that the Prolifics util directory is on the PATH. If you do not wish
to use the Prolifics database driver DLLs, edit PROL4W32.INI to remove
the database name from the install entry.
Error MessagesAppendix79E
Page 85

DLL Messages
ODBC-Specific Messages
Cannot load DLL odb2dm32.dll
Cannot load DLL odb3dm32.dll
Cannot load DLL tmodb132.dll
Cause: Windows is unable to find the Prolifics database driver DLLs or the
ODBC software.
Action: Check that the Prolifics
to use the Prolifics database driver DLLs, edit
the database name from the
Oracle-Specific Messages
Cannot load DLL ora7dm32.dll
Cannot load DLL emb7dm32.dll
Cannot load DLL or73dm32.dll
Cannot load DLL em73dm32.dll
Cannot load DLL ora8dm32.dll
Cannot load DLL emb8dm32.dll
Cannot load DLL ora7dmnt.dll
Cannot load DLL emb7dmnt.dll
Cannot load DLL oxa7dmnt.dll
Cannot load DLL exa7dmnt.dll
Cannot load DLL ora8dmnt.dll
Cannot load DLL emb8dmnt.dll
Cannot load DLL oxa8dmnt.dll
Cannot load DLL exa8dmnt.dll
Cannot load DLL tmora132.dll
Cause: Windows is unable to find the Prolifics database driver DLLs or the
Oracle software.
Action: Check that the Prolifics util directory is on the PATH. Verify that Oracle
is installed correctly. If you do not wish to use the Prolifics database
driver DLLs, edit PROL4W32.INI to remove the database name from the
install entry.
util directory is on the PATH. If you do not wish
PROL4W32.INI to remove
install entry.
80 2-Tier Installation
Page 86

Sybase-Specific Messages
Cannot load DLL db10dm32.dll
Cannot load DLL ct10dm32.dll
Cannot load DLL db11dm32.dll
Cannot load DLL ct11dm32.dll
Cannot load DLL tmsyb132.dll
Cause: Windows is unable to find the Prolifics database driver DLLs or the
Sybase software.
Action: Check that the Prolifics util directory is on the PATH. If you do not wish
to use the Prolifics database driver DLLs, edit PROL4W32.INI to remove
the database name from the install entry.
DLL Version Mismatch Messages
Application Error: Call to Undefined Dynalink
Cause: Prolifics is picking up an older version of cktbl16.dll from a previous
installation.
Action: Check that the current Prolifics util directory with the correct
cktbl16.dll is in the PATH or copy cktbl16.dll to the Windows
directory.
Graph-Related Messages
Graph-Related Messages
If graph widgets are not displaying correctly, the following graph-specific errors
might be displayed:
Warning: chart <Begin> failed: –1
Cause: All graphs are blank indicating that the gdsp program (in the util
directory) was not found in the path. (UNIX only.)
Warning: missing graph files in $SMPATH
Cause: All graphs are blank indicating that: the grafcap file is invalid or not
found in SMPATH (UNIX) and the IPT setting in the file LIBSTI.INI
does not point to the directory that contains the grafcap file (Windows).
License Manager Error Messages
In most circumstances, Prolifics license management is transparent to the
developer. This section describes the error messages that can be generated from
Prolifics and from the underlying license manager software, FLEXlm.
Error MessagesAppendix81E
Page 87

License Manager Error Messages
Prolifics License-Related Messages
The messages described in this section can appear when the screen editor is
invoked.
All License
Types
Prolifics License Manager: Bad date in license file.
Cause: The date on one of the FEATURE or INCREMENT lines is not correct.
Action: Verify that the FEATURE and INCREMENT lines in the license file are
correct or contact your system administrator.
Prolifics License Manager: Bad encryption code in license
file.
Cause: The password on one of the FEATURE or INCREMENT lines is not correct.
Action: Verify that the
FEATURE and INCREMENT lines in the license file are
correct and that none of the backspaces indicating continued lines are
followed by a space, or contact your system administrator.
Prolifics License Manager: Cannot communicate with server.
cannot connect to license server ([code,code])
Cause: Could not connect with the license server.
Action: Make sure the license server daemon lmgrd is started in the system
specified in the SERVER line of the license file, or contact your system
administrator. The two codes can help locate the problem.
Prolifics License Manager: Cannot connect daemon prold with
license server.
Cause: There is no DAEMON line in the license file for prold.
Action: Verify that the license file entry is correct or contact your system
administrator.
Prolifics License Manager: Cannot find license file.
Cause: The license manager is unable to find the license file.
Action: Make sure LM_LICENSE_FILE in your initialization file or environment
points to the correct license file and that it is readable.
Prolifics License Manager: Cannot read license file
Cause: The license manager could not read the license file because of a
permissions or access problem.
Action: Correct the problem or contact your system administrator.
Prolifics License Manager: ERROR #[code] , [message]
Cause: An unexpected error occurred in the license manager.
Action: Contact your system administrator.
Prolifics License Manager: [product] feature does not exist.
Cause: There is no FEATURE or INCREMENT line in the license file for [product].
Action: Verify that the FEATURE or INCREMENT lines in the license file are
correct, obtain a new license file, or contact your system administrator.
82 2-Tier Installation
Page 88

License Manager Error Messages
Prolifics License Manager: Feature [product], Version
[version] has expired.
Cause: The expiration date in the license file of [product] has been reached.
Action: Obtain a new license file or contact your system administrator.
Prolifics License Manager: Initialization failed.
Cause: Problems in the license file.
Action: Contact your system administrator.
Prolifics License Manager: Invalid data received from license
server.
Cause: The license server did not respond to a request or the response was
invalid.
Action: Contact your system administrator.
Prolifics License Manager: Invalid license file syntax.
Cause: A feature name, daemon name, or server name is too long or a FEATURE
or INCREMENT line specifies no hostid, or the number of licenses is not
greater than zero.
Action: Verify that the license file entry is correct or contact your system
administrator.
Prolifics License Manager: malloc() call failed
Cause: License manager could not allocate memory that it needed. The most
likely cause is that the program’s heap has been corrupted.
Action: Contact your system administrator.
Prolifics License Manager: Network software (TCP/IP) not
available.
Cause: Could not communicate with the license manager because network
software is not present or is incorrectly configured.
Action: Contact your system administrator.
Prolifics License Manager: Platform not enabled.
Cause: Should not happen. Indicates that license daemon prold is not licensed to
run on your platform.
Action: Contact your system administrator.
Prolifics License Manager: Server does not support feature
[product].
Cause: The feature [product] does not have a FEATURE or INCREMENT line in the
license file.
Action: Verify that the license file entry is correct, obtain a new license file, or
contact your system administrator.
Prolifics License Manager: Time zone offset from GMT more
than 24 hours
Action: Fix the TZ environment variable or contact your system administrator.
Error MessagesAppendix83E
Page 89

License Manager Error Messages
Prolifics License Manager: Unknown vendor key type
Cause: Program’s object file is corrupt.
Action: Contact your system administrator.
Floating
Licenses
Prolifics License Manager: All [product] licenses are
currently in use.
Cause: All available licenses for [product] are in use. If your license request has
been queued, you get a series of messages showing who has the licenses
reserved or how many licenses are in use.
Action: Try again later or contact your system administrator.
Prolifics License Manager: Cannot communicate with license
server or your [product] license was obtained by another user
when the license server was restarted.
Cause: Occurs when you select an item from the New or Open menu options;
indicates that the license server has been taken down. If the license server
was then restarted, another user got the license for the [product] you were
using.
Action: You can continue editing and can save any screens that are currently open
in the editor but must restart Prolifics (prodev) before you can pick any
New and Open menu options.
Prolifics License Manager: FLEXlm key data bad.
Cause: Program’s object file is corrupt.
Action: Contact your system administrator.
Prolifics License Manager: Bad server hostname in license
file.
Cause: Server named on a SERVER line could not be found.
Action: Obtain a new license file or contact your system administrator.
Prolifics License Manager: No SERVER lines in license file.
Cause: The license file cannot be used because there are no SERVER lines for a
counted feature.
Action: Verify that the license file entry is correct, obtain a new license file, or
contact your system administrator.
Prolifics License Manager: Version [version] not supported on
server.
Cause: The version [version] of the program being run is greater than that
supported by the license file.
Action: Obtain a new license file or contact your system administrator.
Node-locked
Licenses
The following Prolifics startup error information is specific to node-locked
licenses.
84 2-Tier Installation
Page 90

License Manager Error Messages
Prolifics License Manager: Cannot find ethernet device.
Cause: On most systems, the license manager must locate an ethernet board to
verify the password on the
FEATURE or INCREMENT lines.
Action: Contact your system administrator.
Prolifics License Manager: [product] not authorized for this
computer.
Cause: [product] is not licensed to run on the current computer.
Action: Contact your system administrator.
Prolifics License Manager: Version [version] not supported.
Cause: The version [version] of the program being run is greater than that
supported by the license file.
Action: Obtain a new license file or contact your system administrator.
Create License
Utility
The following error information is specific to the create_license utility.
No license files (.lic) were detected.
Cause: Could not detect any license files (.lic) in the current directory.
Action: Check the filenames of the license files in $SMBASE/licenses. Your
license files should have one of the following names: proserv.lic
(Prolifics application server), prodev.lic (development client),
proweb.lic (web application server).
Unable to create license.dat
Cause: Encountered an error when trying to create the license.dat file.
Action: Check file permissions and disk space to allow the create_license
utility to write to disk.
Inconsistent DAEMON lines.
Cause: Two license files (.lic) have DAEMON lines, but they are inconsistent
with each other. Since the resulting license.dat file and the vendor
daemon (prold) are for a single machine, any DAEMON lines among
license files should be the same.
Action: Check the license files with DAEMON lines for typographical errors.
Inconsistent SERVER lines.
Cause: Two license files (.lic) have SERVER lines, but they are inconsistent
with each other. Since the resulting license.dat file is meant for one
server machine, any SERVER lines among license files should be the same.
Action: Check the license files with SERVER lines for typographical errors.
Error MessagesAppendix85E
Page 91

License Manager Error Messages
FLEXlm Informational Messages
The following messages are generated by FLEXlm license management software,
and are provided courtesy of the FLEXlm Programmer’s Guide.
Connected to node
Cause: This daemon is connected to its peer on node.
CONNECTED, master is name
Cause: License daemon logs this message when a quorum is achieved and
everyone has selected a master.
DENIED: N feature to user (mm/dd/yy hh:mm)
Cause: user was denied access to N licenses of feature.
EXITING DUE TO SIGNAL nnn
EXITING WITH CODE nnn
Cause: An interrupt signal has been intercepted. All daemons list the reason that
the daemon has exited.
EXPIRED: feature
Cause: feature has passed its expiration date.
IN: feature by user (N licenses) (used: d:hh:mm:ss)
Cause: user at d:hh:mm:ss.
IN server died: feature by user (N licenses) (used: d:hh:mm:ss)
Cause: user has checked in N licenses of feature by virtue of the fact that his
server died.
License Manager server started
Cause: License daemon has been started.
Lost connection to host
Cause: A daemon can no longer communicate with its peer on node host, which
can cause the clients to have to reconnect, or cause the number of
daemons to go below the minimum number, in which case clients may
start exiting. If license daemons lose the connection to the master, they
will kill all vendor daemons; vendor daemons will shut themselves down.
Lost quorum
Cause: Not enough servers to satisfy quorum number. The daemon will process
only connection requests from other daemons.
Action: Check network connection between servers.
86 2-Tier Installation
Page 92

License Manager Error Messages
MASTER SERVER died due to signal nnn
Cause: License daemon received fatal signal nnn.
MULTIPLE xxx servers running.
Please kill, and restart license daemon
Cause: License daemon has detected that multiple copies of vendor daemon xxx
are running.
Action: Kill all xxx daemon processes and restart the license daemon.
OUT: feature feature by user (N licenses) (used: d:hh:mm:ss)
Cause: user has checked out N licenses of feature at d:hh:mm:ss.
Removing clients of children
Cause: Top-level daemon logs this message when one of the child daemons dies.
RESERVE feature for HOST name
RESERVE feature for USER name
Cause: A license of feature is reserved for either user name or host name.
Action: None.
Restarted xxx (internet port nnn)
Cause: Vendor daemon xxx was restarted at internet port nnn.
Retrying socket bind (address in use)
Cause: The license server tries to bind sockets for approximately 6 minutes if it
detects address in use errors.
Action: Check for multiple lmgrds using the same TCP port number.
Selected (EXISTING) master node
Cause: This license daemon has selected an existing master (node) as the master.
SERVER shutdown requested
Cause: Daemon received shutdown request from a user-generated kill command.
[NEW] Server started for: feature-list
Cause: A (possibly new) server was started for the features listed.
Shutting down xxx
Cause: The license daemon is shutting down the vendor daemon xxx.
Error MessagesAppendix87E
Page 93

License Manager Error Messages
SIGCHLD received. Killing child servers.
Cause: Vendor daemon logs this message when a shutdown is requested by the
license daemon.
Started name
Cause: License daemon logs this message whenever it starts a new vendor
daemon.
Trying connection to node
Cause: Daemon is attempting a connection to node.
FLEXlm Configuration Problem Messages
hostname: Not a valid server host, exiting
Cause: This daemon was run on an invalid hostname.
Action: Run lmgrd on the host(s) specified in the SERVER lines.
hostname: Wrong hostid, exiting
Cause: Hostid is wrong for hostname.
Action: Check the license file and ensure the hostnames match the hostids.
BAD CODE for feature-name
Cause: Specified feature name has a bad encryption code.
Action: Check the password received from Prolifics.
CANNOT OPEN options file file
Cause: Options file specified in the license file could not be opened.
Action: Check the path for the options file on the DAEMON line in the license file.
Couldn’t find a master
Cause: Daemons could not agree on a master.
Action: Kill and then restart lmgrd on servers.
license daemon: lost all connections
Cause: Indicates all the connections to a server are lost, which often indicates a
network problem.
Action: Check the network and restart the daemons.
lm_server: lost all connections
Cause: All the connections to a server are lost; probably indicates a network
problem.
lost lock, exiting
Cause: Error closing lock file.
NO DAEMON line for daemon
Cause: License file does not contain a DAEMON line for daemon.
Action: Add DAEMON line for daemon in the license file.
88 2-Tier Installation
Page 94

License Manager Error Messages
NO DAEMON line for name
Cause: Vendor daemon logs this error if it cannot find its own DAEMON name in
the license file.
Action: Edit license file.
NO DAEMON lines, exiting
Cause: License daemon logs this message if there are no DAEMON lines in the
license file; with no vendor daemons to start, there is nothing to do.
Action: Edit license file.
No features to serve!
Cause: Vendor daemon found no features to serve. This could be caused by bad
data in the license file.
Action: Inspect the license file for bad data.
No license data for feature, feature unsupported
Cause: No feature line for feature in the license file.
Action: Edit the license file.
Unable to re-open lock file
Cause: Vendor daemon has a problem with its lock file, usually because of an
attempt to run more than one copy of the daemon on a single node.
Action: Locate the other daemon that is running via a ps command, and kill it
with kill –9.
Unknown host: hostname
Cause: hostname specified on a SERVER line in the license file does not exist in
your host’s database.
Action: Check with your system administrator for the correct hostname. FLEXlm
uses standard network services to find the host: Domain Name Server
(DNS), Network Information Services (NIS or YP) or in /etc/hosts.
UNSUPPORTED FEATURE request: feature by user
Cause: user has requested a feature that this vendor daemon does not support.
This can happen for a number of reasons: the license file is bad, the
feature has expired, or the daemon is accessing the wrong license file.
Daemon Software Error Messages
ATTEMPT TO START VENDOR DAEMON xxx with NO MASTER
Cause: Vendor daemon was started with no master selected. This is an internal
consistency error in the daemons.
Action: Report error to Prolifics technical support.
Error MessagesAppendix89E
Page 95

License Manager Error Messages
BAD PID message from nnn: xxx (msg)
Cause: Top-level vendor daemon received an invalid PID message from one of its
BAD SCONNECT message: (message)
Cause: An invalid server connect message was received.
Cannot create pipes for server communication
Cause: The pipe system call failed.
Action: Report error to Prolifics technical support.
Can’t allocate server table space
Cause: A malloc error.
Action: Check swap space
Connection to node TIMED OUT
Cause: Daemon could not connect to node.
Action: Check the network.
Error sending PID to master server
Cause: Vendor server could not send its PID to the top-level server in the
Action: Report error to Prolifics technical support.
children (daemon number
hierarchy.
xxx).
f-do-notify called with no valid feature
Cause: Internal inconsistency error.
Action: Report error to Prolifics technical support.
Illegal connection request to DAEMON
Cause: A connection request was made to DAEMON, but this vendor daemon is
not DAEMON.
Action: Report error to Prolifics technical support.
Illegal server connection request
Cause: A connection request came in from another server without a DAEMON
name.
Action: Report error to Prolifics technical support.
KILL of child failed, errno = nnn
Cause: A daemon could not kill its child.
Action: Get PID of daemon and kill with kill –9.
No internet port number specified
Cause: Vendor daemon was started without an Internet port.
Action: Specify an Internet port on the SERVER line.
90 2-Tier Installation
Page 96

License Manager Error Messages
Not enough descriptors to re-create pipes
Cause: Top-level daemon detected the death of one of its sub-daemons. In trying
to restart the chain of sub-daemons, it was unable to get the file
descriptors to set up the pipes to communicate.
Action: This is a fatal error. The daemons must be restarted.
read: error message
Cause: An error in a read system call was detected.
recycle_control BUT WE DIDN’T HAVE CONTROL
Cause: The hierarchy of vendor daemons has become confused over who holds
the control token. This is an internal error.
return_reserved: can’t find feature listhead
Cause: When a daemon is returning a reservation to the free reservation list, it
could not find the listhead of features.
select: message
Cause: An error in a select system call was detected.
Action: Report error to Prolifics technical support.
Server exiting
Cause: Server is exiting; normally due to an error.
Action: Report error to Prolifics technical support.
SHELLO for wrong DAEMON
Cause: Vendor daemon was sent a server hello message that was destined for
a different DAEMON.
Unsolicited msg from parent!
Cause: Normally, the top-level vendor daemon sends no unsolicited messages. If
one arrives, this message is logged. This is a bug.
Action: Report error to Prolifics technical support.
WARNING: CORRUPTED options list (o–>next == 0)
Options list TERMINATED at bad entry
Cause: Internal inconsistency was detected in the daemon’s option list.
Action: Report error to Prolifics technical support.
Error MessagesAppendix91E
Page 97

Index
A
Application, samples, 16, 40
Windows, 25
autoexec.bat, 8
C
C compiler, 28
Character–mode, 28
Client
configuring environment of
UNIX, 38
Windows, 15
executables, 14, 37
license–related messages, 84
licensing, 59
supported platforms, 4
CONFIG.SYS, 50
Create license, error messages, 85
create_license utility, 23, 34
D
Database driver
Informix, 10
installing on UNIX, 30
installing on Windows, 10
Microsoft SQL Server, 11
ODBC, 11
Oracle, 11
Sybase, 12
Databases, defined in Prolifics initialization file, 53
Debugger, 14, 37
DLLs, 10
JPEG decoding, 49
provided, 10
related messages, 79
Documentation, online access, 38
Dynalink, 81
E
Environment space, 50
Executable, creating, 13
on UNIX, 36
93
Page 98

F
File protection, 28
FLEXlm, 57
configuration errors, 88
error messages, 86
utilities, 61
Floating license, 59
messages about, 84
G
Graph widget, error messages, 81
H
HTTP server
on UNIX, 43
on Windows, 19
I
Informix
error messages, 79
versions supported, 10
Installation
error messages, 77
verifying, 40
on UNIX, 46
on Windows, 16
Windows, 24
remove user, 67
REPORTLOG, 60
schemes, 58
status, 69
types, 59
version of file, 71
License administration, 57
utilities, 61
License file
location of, 23, 35
requesting, 22, 34
License manager
determining version, 35
messages, 81
start, 65
License options file, 59–61
License request file, 22, 33
license.dat, 23, 34, 73–75
LM_LICENSE_FILE, 35
setting in environment, 39
lmcksum, 62
lmdiag, 63
lmdown, 64
lmgrd, 65
version, 35
lmhostid, 66
lmremove, 67
lmreread, 68
lmstat, 69
lmswitchr, 70
lmver, 71
L
License
about, 21, 33
daemons, 58
diagnostics, 63
file contents, 73
read file, 68
Microsoft SQL Server
Motif version, 28
94 2-Tier Installation
M
error messages, 79
versions supported, 11
Page 99

N
Node–locked license, 59
messages about, 84
O
ODBC
error messages, 80
versions supported, 11
Oracle
error messages, 80
versions supported, 11
P
Prolifics Gallery, 25, 47
Windows initialization file, databases defined in, 53
Q
SMTERM, 39, 40
Start–up License, backup, 23, 34
Sybase
error messages, 81
versions supported, 12
T
Two–tier application, 4
U
UNIX
requirements, client, 27
verifying installation of client, 40
Upgrade
on UNIX, 29
on Windows, 8
Utilities
character–mode, renaming, 41
using in Windows, 50
QuickStart, 25, 47
V
R
REPORTLOG, 60
VideoBiz sample application, 16, 40
W
S
Samples, web applications, 47
Server
executables, 37
web, executables, 14
Setup
on UNIX, 31
on Windows, 9
SMBASE, determining, 29
SMFLIBS, 15, 39
Index 95
Web application, 4
creating, on UNIX, 46
Web application server, 14, 37, 43
configuring, on UNIX, 45
supported platforms, 4
WEBJLIB.DLL, 49
Windows
client configuration, 15
preinstallation, 7
requirements, 7
verifying installation of client, 16
web application server, preinstallation, 19
Page 100

 Loading...