

Page 1

HP PageWide Pro MFP 477 series
User Guide
Page 2

Copyright and License
Trademark Credits
© 2016 Copyright HP Development Company,
L.P.
All rights reserved. Reproduction, adaptation,
or translation of this material is prohibited
without prior written permission of HP, except
as allowed under copyright laws.
The information contained in this document is
subject to change without notice.
The only warranties for HP products and
services are set forth in the express warranty
statements accompanying such products and
services. Nothing herein should be construed
as constituting an additional warranty. HP shall
not be liable for technical or editorial errors or
omissions contained herein.
Edition 1, 2/2016
Adobe®, Acrobat®, and PostScript® are
trademarks of Adobe Systems Incorporated.
Intel® Core™ is a trademark of Intel Corporation
in the U.S. and other countries.
Java™ is a US trademark of Sun Microsystems,
Inc.
Microsoft®, Windows®, Windows® XP, and
Windows Vista® are U.S. registered trademarks
of Microsoft Corporation.
UNIX® is a registered trademark of The Open
Group.
ENERGY STAR and the ENERGY STAR mark are
registered trademarks owned by the U.S.
Environmental Protection Agency.
Page 3

Table of contents
1 Product basics ............................................................................................................................................... 1
Product features .................................................................................................................................................... 2
Environmental features ...................................................................................................................... 3
Accessibility features ........................................................................................................................... 3
Product views ......................................................................................................................................................... 4
Front left view ..................................................................................................................................... 4
Front right view ................................................................................................................................... 5
Back view ............................................................................................................................................. 5
Cartridge door view ............................................................................................................................. 6
Power on and o .................................................................................................................................................... 7
Turn the product on ............................................................................................................................. 7
Manage power ..................................................................................................................................... 7
Turn the product o ............................................................................................................................ 8
Use the control panel ............................................................................................................................................. 9
Control panel buttons .......................................................................................................................... 9
Control panel home screen ............................................................................................................... 10
Control panel dashboard ................................................................................................................... 11
Control panel application folders ..................................................................................................... 11
Control panel shortcuts ..................................................................................................................... 12
Help features ..................................................................................................................................... 12
Printer information ......................................................................................................... 13
Help animations .............................................................................................................. 13
Quiet Mode ........................................................................................................................................................... 14
To turn Quiet Mode on or o from the control panel ........................................................................ 14
To turn Quiet Mode on or o from the EWS ...................................................................................... 14
2 Connect the product ..................................................................................................................................... 15
Connect the product to a computer or a network ............................................................................................... 16
To connect the product using a USB cable ........................................................................................ 16
To connect the product to a network ................................................................................................ 17
Supported network protocols ......................................................................................... 17
Connect the product using a wired network .................................................................. 17
ENWW iii
Page 4

Connect the product using a wireless network (wireless models only) ......................... 17
To connect the product to a wireless network using the Wireless Setup
Wizard ........................................................................................................... 18
To connect the product to a wireless network using WPS ........................... 18
To connect the product to a wireless network manually ............................. 19
Use Wi-Fi Direct to connect a computer or device to the product ...................................................................... 20
To turn on Wi-Fi Direct ....................................................................................................................... 20
To print from a wireless-capable mobile device ............................................................................... 20
To print from a wireless-capable computer (Windows) .................................................................... 20
To print from a wireless-capable computer (OS X) ........................................................................... 20
Install HP printer software for a wireless product already on the network ....................................................... 22
Open the printer software (Windows) ................................................................................................................. 22
Manage network settings .................................................................................................................................... 22
View or change network settings ..................................................................................................... 22
Set or change the product password ................................................................................................ 23
Manually congure TCP/IP parameters from the control panel ....................................................... 23
Link speed and duplex settings ........................................................................................................ 23
3 Printer management and services ................................................................................................................. 25
HP Embedded Web Server ................................................................................................................................... 26
About the EWS ................................................................................................................................... 26
About cookies .................................................................................................................................... 26
Open the EWS .................................................................................................................................... 27
Features ............................................................................................................................................. 27
Home tab ......................................................................................................................... 27
Scan tab ........................................................................................................................... 28
Fax tab ............................................................................................................................. 29
Web Services tab ............................................................................................................. 29
Network tab .................................................................................................................... 29
Tools tab .......................................................................................................................... 29
Settings tab ..................................................................................................................... 30
Web Services ........................................................................................................................................................ 31
What are Web Services? .................................................................................................................... 31
HP ePrint ......................................................................................................................... 31
Print apps ........................................................................................................................ 31
Set Up Web Services .......................................................................................................................... 31
Use Web Services ............................................................................................................................... 32
HP ePrint ......................................................................................................................... 32
Print apps ........................................................................................................................ 33
Remove Web Services ....................................................................................................................... 34
HP Web Jetadmin software ................................................................................................................................. 34
iv ENWW
Page 5

Product security features .................................................................................................................................... 34
Security statements .......................................................................................................................... 35
Firewall .............................................................................................................................................. 35
Security settings ............................................................................................................................... 36
Firmware updates ............................................................................................................................. 36
HP Printer Assistant in the printer software (Windows) ..................................................................................... 36
Open the HP Printer Assistant ........................................................................................................... 36
Features ............................................................................................................................................. 36
Connected tab ................................................................................................................. 37
Print, Scan & Fax tab ....................................................................................................... 37
Shop tab .......................................................................................................................... 37
Help tab ........................................................................................................................... 38
Tools tab .......................................................................................................................... 38
Estimated Levels tab ...................................................................................................... 38
HP Utility (OS X) ................................................................................................................................................... 38
AirPrint™ (OS X) ................................................................................................................................................... 38
4 Paper and print media .................................................................................................................................. 39
Understand paper use ......................................................................................................................................... 40
Supported media sizes ........................................................................................................................................ 41
Supported paper and print media sizes ............................................................................................ 41
Supported envelope sizes ................................................................................................................. 42
Supported card and label sizes ......................................................................................................... 42
Supported photo media sizes ........................................................................................................... 42
Supported paper types and tray capacity ........................................................................................................... 43
Tray 1 (multipurpose) on left side of the product ............................................................................ 43
Tray 2 (default tray) and Tray 3 (accessory tray) .............................................................................. 44
Congure trays .................................................................................................................................................... 44
Load media .......................................................................................................................................................... 45
Load Tray 1 ........................................................................................................................................ 45
Load Tray 2 ........................................................................................................................................ 46
Load optional Tray 3 .......................................................................................................................... 48
Load envelopes ................................................................................................................................. 49
Load letterhead or preprinted forms ................................................................................................ 51
Load the automatic document feeder .............................................................................................. 52
Load the scanner ............................................................................................................................... 53
Tips for selecting and using paper ...................................................................................................................... 55
5 Cartridges ................................................................................................................................................... 56
HP PageWide cartridges ...................................................................................................................................... 57
HP policy on non-HP cartridges ........................................................................................................ 57
ENWW v
Page 6

Counterfeit HP cartridges .................................................................................................................. 57
Manage cartridges ............................................................................................................................................... 57
Store cartridges ................................................................................................................................. 58
Print with General Oice mode ......................................................................................................... 58
Print when a cartridge is at estimated end of life ............................................................................ 58
Check the estimated cartridge levels ................................................................................................ 58
Order cartridges ................................................................................................................................ 59
Recycle cartridges ............................................................................................................................. 60
Replace cartridges ............................................................................................................................................... 60
Tips for working with cartridges ......................................................................................................................... 62
6 Print ........................................................................................................................................................... 63
Print from a computer ......................................................................................................................................... 64
To print from a computer (Windows) ................................................................................................ 64
To print from a computer (OS X) ........................................................................................................ 65
To set up printing shortcuts (Windows) ............................................................................................ 66
To set up printing presets (OS X) ....................................................................................................... 66
To adjust or manage colors ............................................................................................................... 67
Choose a preset color theme for a print job ................................................................... 67
Adjust the color options for a print job manually ........................................................... 67
Match colors to your computer screen ........................................................................... 68
Control access to color printing ...................................................................................... 69
Print from the control panel ................................................................................................................................ 69
Print using job storage ...................................................................................................................... 69
To enable job storage ...................................................................................................... 69
Disable or enable job storage (Windows) ..................................................... 69
Disable or enable job storage (OS X) ............................................................ 69
To apply job storage to one or all print jobs ................................................................... 70
Apply job storage to one or all print jobs (Windows) ................................... 70
Apply job storage to one or all print jobs (OS X) .......................................... 71
To print a job stored on the printer ................................................................................. 71
To delete a job stored on the printer .............................................................................. 71
Print from a USB device ..................................................................................................................... 72
Print with NFC ...................................................................................................................................................... 72
Print with HP ePrint ............................................................................................................................................. 72
Print o site by sending an email with the HP ePrint app ................................................................ 32
Print from an on-site computer or mobile device ............................................................................. 73
Print with AirPrint (OS X) ...................................................................................................................................... 73
Tips for print success ........................................................................................................................................... 74
Cartridge tips ..................................................................................................................................... 74
Paper loading tips ............................................................................................................................. 74
vi ENWW
Page 7

Printer settings tips (Windows) ......................................................................................................... 75
Printer settings tips (OS X) ................................................................................................................ 75
7 Copy and scan .............................................................................................................................................. 76
Copy ..................................................................................................................................................................... 77
Copy settings ..................................................................................................................................... 77
Adjust lightness or darkness for copies ......................................................................... 77
Select a paper tray and paper size for copies ................................................................. 77
Reduce or enlarge a copy ................................................................................................ 77
Load and copy identication cards ................................................................................................... 78
Copy photos ....................................................................................................................................... 79
Load and copy mixed-size originals .................................................................................................. 80
Copy on both sides automatically ..................................................................................................... 80
Cancel a copy job ............................................................................................................................... 80
Scan ...................................................................................................................................................................... 81
Scan to a USB drive ............................................................................................................................ 81
Scan to a computer ............................................................................................................................ 81
To set up scan to computer ............................................................................................. 81
Set up scanning to a computer (Windows) ................................................... 82
Set up scanning to a computer (OS X) .......................................................... 82
To scan to a computer from the control panel ............................................................... 82
Scan to email ..................................................................................................................................... 82
To set up scan to email ................................................................................................... 82
To scan a document or photo to email ........................................................................... 83
Scan a document or photo to email from the control panel ........................ 83
Scan a document or photo to email from the printer software .................. 83
To change account settings ............................................................................................ 83
Scan to a network folder ................................................................................................................... 83
To set up scan to a network folder ................................................................................. 84
Set up scan to a network folder in the EWS ................................................. 84
Set up scan to a network folder in the HP Printer Assistant ........................ 84
To scan to a network folder ............................................................................................ 84
Scan to a network folder from the control panel ......................................... 84
Scan to a network folder from the printer software .................................... 84
Scan to SharePoint ............................................................................................................................ 85
To set up scan to SharePoint .......................................................................................... 85
To scan to SharePoint ..................................................................................................... 85
Scan using HP scanning software ..................................................................................................... 85
Scan using other software ................................................................................................................ 86
To scan from a TWAIN-compliant program .................................................................... 86
To scan from a WIA-compliant program ......................................................................... 86
ENWW vii
Page 8

Scan using Webscan .......................................................................................................................... 87
Scan documents as editable text ...................................................................................................... 87
Guidelines for scanning documents as editable text ..................................................... 87
To scan a document to editable text (Windows) ............................................................ 88
To scan documents as editable text (OS X) .................................................................... 89
Tips for copy and scan success ............................................................................................................................ 90
8 Fax ............................................................................................................................................................. 91
Set up fax ............................................................................................................................................................. 92
Connect fax to a telephone line ........................................................................................................ 92
Congure fax settings ....................................................................................................................... 92
To congure fax settings from the control panel ........................................................... 92
To congure fax settings using the HP Digital Fax Setup Wizard (Windows) ................ 93
Set up HP Digital Fax ......................................................................................................................... 93
HP Digital Fax requirements ........................................................................................... 93
To set up HP Digital Fax .................................................................................................. 94
Set up HP Digital Fax (Windows) .................................................................. 94
Set up HP Digital Fax (OS X) .......................................................................... 94
Set up HP Digital Fax in the EWS .................................................................. 94
To modify HP Digital Fax settings ................................................................................... 94
Modify HP Digital Fax settings (Windows) ................................................... 94
Modify HP Digital Fax settings (OS X) ........................................................... 94
Modify HP Digital Fax settings in the EWS ................................................... 94
To turn o HP Digital Fax ................................................................................................ 95
Fax programs, systems, and software .............................................................................................. 95
Supported fax programs ................................................................................................. 95
Supported phone services - analog ................................................................................ 95
Alternate phone services - digital ................................................................................... 95
DSL ................................................................................................................ 95
PBX ................................................................................................................ 95
ISDN .............................................................................................................. 96
VoIP ............................................................................................................... 96
Set fax settings .................................................................................................................................................... 96
Send-fax settings .............................................................................................................................. 96
Set pauses or ash hooks ............................................................................................... 96
Set a dialing prex .......................................................................................................... 97
Set tone-dialing or pulse-dialing .................................................................................... 97
Set autoredial and the time between redials ................................................................. 97
Set the light/dark setting ................................................................................................ 98
Set the default resolution ............................................................................................... 98
Use cover-page templates .............................................................................................. 99
viii ENWW
Page 9

Receive-fax settings .......................................................................................................................... 99
Set fax forwarding .......................................................................................................... 99
Block or unblock fax numbers ...................................................................................... 100
Set the number of rings-to-answer ............................................................................. 100
Set distinctive ring ........................................................................................................ 101
Use autoreduction for incoming faxes ......................................................................... 102
Set the fax sounds volume ........................................................................................... 102
Set stamp-received faxes ............................................................................................. 102
Send a fax .......................................................................................................................................................... 102
Send a fax from the control panel .................................................................................................. 103
Use speed dials and group-dial entries .......................................................................................... 103
Send a standard fax from the computer ......................................................................................... 103
Send a fax from the software ......................................................................................................... 104
Send a fax using monitor dialing .................................................................................................... 105
Send a fax using printer memory ................................................................................................... 105
Receive a fax ...................................................................................................................................................... 106
Receive a fax manually ................................................................................................................... 106
Fax memory ..................................................................................................................................... 107
Reprint a fax .................................................................................................................. 107
Delete faxes from memory ........................................................................................... 107
Use the phone book ........................................................................................................................................... 107
Create and edit individual speed-dial entries ................................................................................. 108
Create and edit group-dial entries .................................................................................................. 108
Delete speed-dial entries ................................................................................................................ 108
Use reports ........................................................................................................................................................ 108
Print fax conrmation reports ........................................................................................................ 109
Print fax error reports ..................................................................................................................... 110
Print and view the fax log ............................................................................................................... 110
Clear the fax log .............................................................................................................................. 110
Print the details of the last fax transaction .................................................................................... 111
Print a Caller ID Report .................................................................................................................... 111
View the Call History ....................................................................................................................... 111
9 Solve problems .......................................................................................................................................... 112
Problem-solving checklist ................................................................................................................................. 113
Check that the product power is on ................................................................................................ 113
Check the control panel for error messages .................................................................................. 113
Test print functionality .................................................................................................................... 113
Test copy functionality .................................................................................................................... 114
Test the fax-sending functionality ................................................................................................. 114
Test the fax-receiving functionality ................................................................................................ 114
ENWW ix
Page 10

Try sending a print job from a computer ........................................................................................ 114
Test the plug-and-print USB functionality ..................................................................................... 114
Factors that aect product performance ....................................................................................... 114
Information pages ............................................................................................................................................. 115
Factory-set defaults .......................................................................................................................................... 116
Cleaning routines ............................................................................................................................................... 116
Clean the printhead ......................................................................................................................... 117
Clean the scanner glass strip and platen ........................................................................................ 117
Clean the document feeder pick rollers and separation pad ......................................................... 118
Clean the touch screen .................................................................................................................... 118
Jams and paper-feed issues .............................................................................................................................. 119
The product does not pick up paper ............................................................................................... 119
The product picks up multiple sheets of paper .............................................................................. 119
Prevent paper jams ......................................................................................................................... 119
Clear jams ........................................................................................................................................ 120
Jam locations ................................................................................................................ 120
Clear jams from the document feeder ......................................................................... 121
Clear jams in Tray 1 (multipurpose tray) ...................................................................... 122
Clear jams in Tray 2 ....................................................................................................... 122
Clear jams in optional Tray 3 ........................................................................................ 123
Clear jams in the left door ............................................................................................ 124
Clear jams in the output bin .......................................................................................... 125
Clear jams in the duplexer ............................................................................................ 126
Cartridge issues ................................................................................................................................................. 127
Relled or remanufactured cartridges ........................................................................................... 127
Interpret control panel messages for cartridges ........................................................................... 127
Cartridge Depleted ........................................................................................................ 127
Cartridge Low ................................................................................................................ 128
Cartridge Very Low ....................................................................................................... 128
Counterfeit or used [color] cartridge installed ............................................................. 128
Do not use SETUP cartridges ........................................................................................ 128
Genuine HP cartridge installed ..................................................................................... 128
Incompatible [color] ...................................................................................................... 129
Incompatible cartridges ................................................................................................ 129
Install [color] cartridge ................................................................................................. 129
Non-HP cartridges installed ......................................................................................... 129
Printer Failure ............................................................................................................... 130
Problem with Print System ........................................................................................... 130
Problem with Printer Preparation ................................................................................ 130
Problem with SETUP cartridges .................................................................................... 130
Use SETUP cartridges ................................................................................................... 130
x ENWW
Page 11

Used [color] installed .................................................................................................... 131
Printing issues ................................................................................................................................................... 131
The product does not print ............................................................................................................. 131
The product prints slowly ............................................................................................................... 132
Plug-and-print USB issues .............................................................................................................. 132
The Memory Device Options menu does not open when you insert the USB
accessory ...................................................................................................................... 132
The le does not print from the USB storage device ................................................... 132
The le that you want to print is not listed in the Memory Device Options menu ...... 133
Improve print quality ...................................................................................................................... 133
Check for genuine HP cartridges .................................................................................. 133
Use paper that meets HP specications ...................................................................... 133
Use the correct paper type setting in the printer driver .............................................. 134
Change the paper type and size setting (Windows) .................................. 134
Change the paper type and size setting (OS X) .......................................... 134
Use the printer driver that best meets your printing needs ........................................ 134
Align the printhead ....................................................................................................... 135
Print a print-quality report ........................................................................................... 135
Scan issues ........................................................................................................................................................ 135
Fax issues ........................................................................................................................................................... 136
Fax troubleshooting checklist ......................................................................................................... 136
Change error correction and fax speed ........................................................................................... 137
Set the fax-error-correction mode ............................................................................... 137
Change the fax speed ................................................................................................... 137
Fax logs and reports ........................................................................................................................ 137
Print individual fax reports ........................................................................................... 137
Set the fax error report ................................................................................................. 138
Fax error messages ......................................................................................................................... 138
Communication error. ................................................................................................... 138
Document feeder door is open. Canceled fax. ............................................................. 139
Fax is busy. Canceled send. .......................................................................................... 139
Fax is busy. Redial pending. .......................................................................................... 139
Fax receive error. .......................................................................................................... 140
Fax Send error. .............................................................................................................. 140
Fax storage is full. Canceling the fax receive. .............................................................. 141
Fax storage is full. Canceling the fax send. .................................................................. 141
No dial tone. .................................................................................................................. 141
No fax answer. Canceled send. ..................................................................................... 142
No fax answer. Redial pending. .................................................................................... 142
No fax detected. ............................................................................................................ 142
Solve problems sending faxes ........................................................................................................ 143
ENWW xi
Page 12

An error message displays on the control panel .......................................................... 143
Document feeder paper jam ...................................................................... 143
Scanner error .............................................................................................. 143
The control panel displays a Ready message with no attempt to send the fax. ......... 143
The control panel displays the message "Receiving Page 1" and does not progress
beyond that message ................................................................................................... 144
Faxes can be received, but not sent ............................................................................. 144
Unable to use fax functions from the control panel .................................................... 144
Unable to use speed dials ............................................................................................. 144
Unable to use group dials ............................................................................................. 144
Receive a recorded error message from the phone company when trying to send
a fax ............................................................................................................................... 145
Unable to send a fax when a phone is connected to the product ................................ 145
Solve problems receiving faxes ...................................................................................................... 145
An error message displays on the control panel .......................................................... 145
The fax does not respond ............................................................................................. 145
Voice mail is available on the fax line ........................................................ 145
The product is connected to a DSL phone service ..................................... 146
The product uses a fax over IP or VoIP phone service ............................... 146
Sender receives a busy signal ....................................................................................... 146
A handset is connected to the product ...................................................... 146
A phone line splitter is being used ............................................................. 146
Cannot send or receive a fax on a PBX line .................................................................. 146
Solve general fax problems ............................................................................................................ 146
Faxes are sending slowly .............................................................................................. 146
Fax quality is poor ......................................................................................................... 147
Fax cuts o or prints on two pages .............................................................................. 147
Connectivity issues ............................................................................................................................................ 147
Solve USB direct-connect problems ............................................................................................... 147
Solve network problems ................................................................................................................. 148
Poor physical connection .............................................................................................. 148
The computer is using the incorrect IP address for the product .................................. 148
The computer is unable to communicate with the product ......................................... 148
The product is using incorrect link and duplex settings for the network .................... 149
New software programs might be causing compatibility problems ........................... 149
The computer or workstation might be set up incorrectly .......................................... 149
The product is disabled, or other network settings are incorrect ............................... 149
Wireless network issues .................................................................................................................................... 149
Wireless connectivity checklist ....................................................................................................... 149
The product does not print, and the computer has a third-party rewall installed ...................... 150
The wireless connection does not work after moving the wireless router or product .................. 150
xii ENWW
Page 13

Cannot connect more computers to the wireless product ............................................................. 150
The wireless product loses communication when connected to a VPN ......................................... 151
The network does not appear in the wireless networks list .......................................................... 151
The wireless network is not functioning ........................................................................................ 151
Product software issues (Windows) .................................................................................................................. 151
Product software issues (OS X) ......................................................................................................................... 153
The printer driver is not listed in the Print & Scan list .................................................................... 153
The product name does not appear in the product list in the Print & Scan list ............................. 153
The printer driver does not automatically set up the selected product in the Print & Scan list .... 153
A print job was not sent to the product that you wanted ............................................................... 153
When connected with a USB cable, the product does not appear in the Print & Scan list after
the driver is selected. ...................................................................................................................... 153
You are using a generic printer driver when using a USB connection ............................................ 154
10 Service and support ................................................................................................................................. 155
Customer support .............................................................................................................................................. 156
HP limited warranty statement ......................................................................................................................... 157
UK, Ireland, and Malta ..................................................................................................................... 158
Austria, Belgium, Germany, and Luxemburg .................................................................................. 158
Belgium, France, and Luxemburg ................................................................................................... 159
Italy .................................................................................................................................................. 160
Spain ................................................................................................................................................ 160
Denmark .......................................................................................................................................... 161
Norway ............................................................................................................................................ 161
Sweden ............................................................................................................................................ 161
Portugal ........................................................................................................................................... 162
Greece and Cyprus ........................................................................................................................... 162
Hungary ........................................................................................................................................... 162
Czech Republic ................................................................................................................................ 163
Slovakia ........................................................................................................................................... 163
Poland ............................................................................................................................................. 163
Bulgaria ........................................................................................................................................... 164
Romania .......................................................................................................................................... 164
Belgium and the Netherlands ......................................................................................................... 164
Finland ............................................................................................................................................. 165
Slovenia ........................................................................................................................................... 165
Croatia ............................................................................................................................................. 165
Latvia ............................................................................................................................................... 165
Lithuania .......................................................................................................................................... 166
Estonia ............................................................................................................................................. 166
Russia .............................................................................................................................................. 166
ENWW xiii
Page 14

Appendix A Technical information ................................................................................................................. 167
Product specications ....................................................................................................................................... 168
Print specications .......................................................................................................................... 168
Physical specications .................................................................................................................... 168
Power consumption and electrical specications .......................................................................... 168
Acoustic emission specications .................................................................................................... 168
Environmental specications ......................................................................................................... 168
Environmental product stewardship program .................................................................................................. 170
Protecting the environment ............................................................................................................ 171
Ozone production ............................................................................................................................ 171
Power consumption ........................................................................................................................ 171
European Union Commission Regulation 1275/2008 .................................................................... 171
Paper ............................................................................................................................................... 171
HP PageWide printing supplies ....................................................................................................... 171
Plastics ............................................................................................................................................ 171
Electronic hardware recycling ......................................................................................................... 172
Material restrictions ........................................................................................................................ 172
General battery information ......................................................................................... 172
Battery disposal in Taiwan ............................................................................................ 172
California Perchlorate Material Notice ......................................................................... 172
EU Battery Directive ...................................................................................................... 172
Battery notice for Brazil ................................................................................................ 173
Chemical substances ....................................................................................................................... 173
EPEAT ............................................................................................................................................... 173
Disposal of waste equipment by users ........................................................................................... 173
Toxic and hazardous substance table (China) ................................................................................ 174
Restriction on hazardous substances statement (Turkey) ............................................................ 174
Restriction on hazardous substances statement (Ukraine) ........................................................... 174
Restriction of hazardous substance statement (India) .................................................................. 174
China energy label for printer, fax, and copier ............................................................................... 175
China SEPA Eco Label user information .......................................................................................... 175
Regulatory information ..................................................................................................................................... 176
Regulatory notices .......................................................................................................................... 176
Regulatory model identication number ..................................................................... 176
FCC statement ............................................................................................................... 176
VCCI statement (Japan) ................................................................................................................... 177
Power cord instructions .................................................................................................................. 177
Power cord statement (Japan) ........................................................................................................ 177
EMC statement (Korea) ................................................................................................................... 177
Visual display workplaces statement for Germany ........................................................................ 177
European Union Regulatory Notice ................................................................................................. 178
xiv ENWW
Page 15

European Union Regulatory Notice .............................................................................. 178
Wireless models only .................................................................................................... 178
Models with fax capability only .................................................................................... 178
Additional statements for telecom (fax) products ......................................................................... 179
New Zealand telecom statements ................................................................................ 179
Additional FCC statement for telecom products (US) .................................................. 179
Industry Canada CS-03 requirements .......................................................................... 180
Notice to users of the Canadian telephone network .................................................... 181
Australia wired fax statement ...................................................................................... 181
Notice to users of the German telephone network ...................................................... 181
Additional statements for wireless products ................................................................................. 182
Exposure to radio frequency radiation ......................................................................... 182
Notice to users in Brazil ................................................................................................ 182
Canadian statements .................................................................................................... 182
Japan statement ........................................................................................................... 183
Notice to users in Korea ................................................................................................ 183
Taiwan statement ......................................................................................................... 183
Mexico statement ......................................................................................................... 183
Index ........................................................................................................................................................... 184
ENWW xv
Page 16

xvi ENWW
Page 17

1 Product basics
●
Product features
●
Product views
●
Power on and o
●
Use the control panel
●
Quiet Mode
ENWW 1
Page 18

Product features
PageWide Pro MFP 477dn
D3Q19A, D3Q19B, D3Q19C,
D3Q19D
Tray capacity (75 GSM or 20–lb
Bond paper)
●
Tray 1: 50 sheets
●
Tray 2: 500 sheets
●
Optional Tray 3: 500 sheets
●
Automatic Document Feeder
(ADF): 50 sheets
●
Standard output bin: 300
sheets
Print
●
Simplex speeds up to 40 pages
per minute (ppm) for both color
and black with Professional
quality
●
Duplex speeds up to 21 ppm
for both color and black with
Professional quality
●
Up to 55 ppm in General Oice
mode
●
Walkup Plug-and-Print USB
Device port
●
Walkup printing of MS Oice
documents
Copy
●
Simplex speeds up to 40 ppm
in black and color
●
Single-pass, two-sided copying
for speeds up to 26 ppm in
black and color
●
50-sheet ADF supports page
sizes up to 356 mm (14.0 in) in
length and 216 mm (8.5 in) in
width
Scan
●
Duplex speeds up to 26 ppm
for both color and black
●
Scan to walkup USB device,
email address, network folder,
or SharePoint site
●
Glass supports page sizes up to
356 mm (14.0 in) in length and
up to 216 mm (8.5 in) in width
●
HP software enables scanning
a document to a le that can be
edited
●
Compatible with TWAIN, WIA,
and WS-Scan programs
Fax
Connectivity
●
802.3 LAN (10/100)
Ethernet port
●
Host USB Type A and Type B
ports (back)
●
USB 2.0 Device port (front)
PageWide Pro MFP 477dw
D3Q20A, D3Q20B, D3Q20C,
D3Q20D
Has the same features as the
PageWide Pro MFP 477dn, and
includes the following:
●
Embedded wireless capability
●
802.11n 5GHz dual band
support
●
HP ePrint—send documents to
the product email address for
printing
●
HP Wireless Direct support
●
Fax to email address or
network folder
●
Fax from walkup control panel
or from program on connected
computer
●
Fax archive, fax log, junk-fax
blocking, non-volatile fax
memory, fax redirect feature
●
NFC-enabled (Near Field
Communications); walkup
printing from smart phones
and tablets
●
Scan to smart phone
2 Chapter 1 Product basics ENWW
Page 19

Environmental features
Feature Environmental benet
Duplex printing Automatic duplex printing is available on all models of HP PageWide Pro MFP
Print multiple pages per sheet Save paper by printing two or more pages of a document side-by-side on one
Copies multiple pages per sheet Save paper by copying two pages of an original document side-by-side on one
Recycling Reduce waste by using recycled paper.
Energy savings Sleep modes and timer options enable this product to quickly go into reduced
Accessibility features
The product includes several features that aid users with limited vision, hearing, dexterity or strength.
●
Online user guide that is compatible with text screen-readers.
●
Cartridges can be installed and removed using one hand.
477dn/dw series. Duplex printing saves the environment and saves you money.
sheet of paper. Access this feature through the printer driver.
sheet of paper.
Recycle cartridges by using the HP Planet Partners return process.
power states when not printing, thus saving energy.
●
All doors and covers can be opened using one hand.
ENWW Product features 3
Page 20
Product views
●
Front left view
●
Front right view
●
Back view
●
Cartridge door view
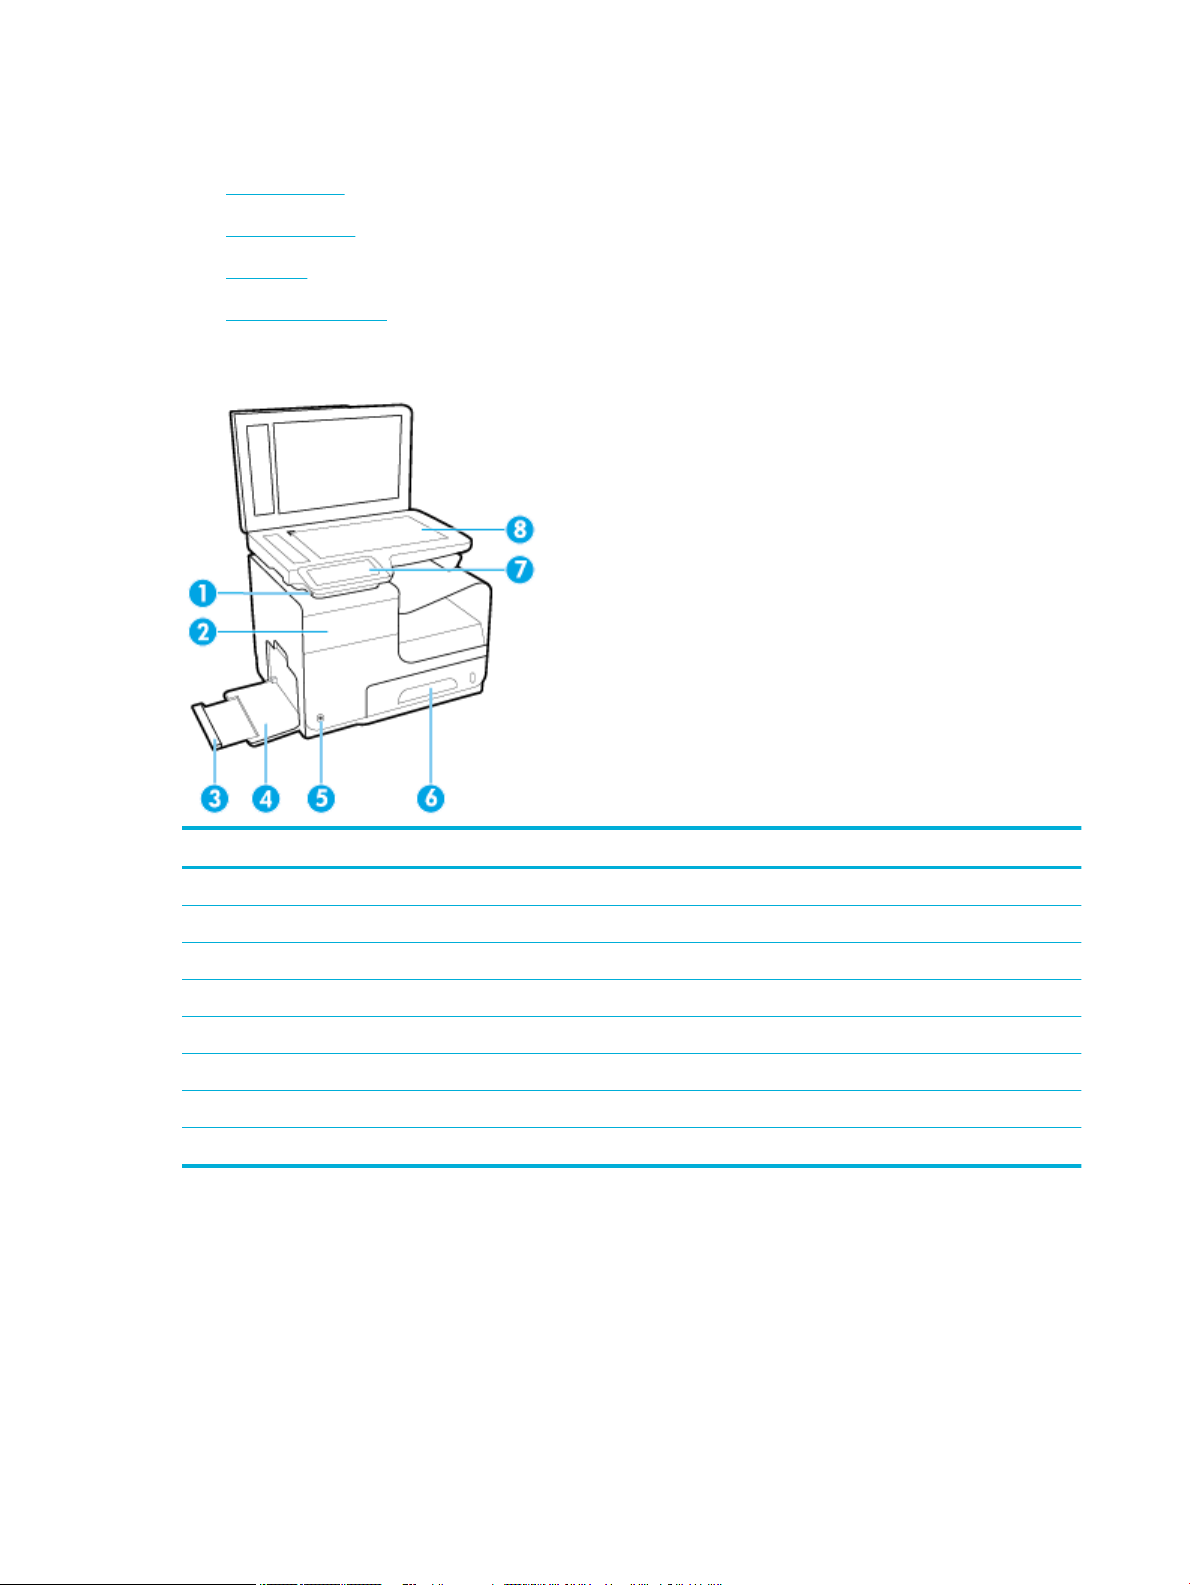
Front left view
Label Description
1 USB device connection port
2 Cartridge door
3 Tray 1 extension
4 Tray 1
5 Power button
6 Tray 2–main paper tray
7 Control panel
8 Scanner glass
4 Chapter 1 Product basics ENWW
Page 21
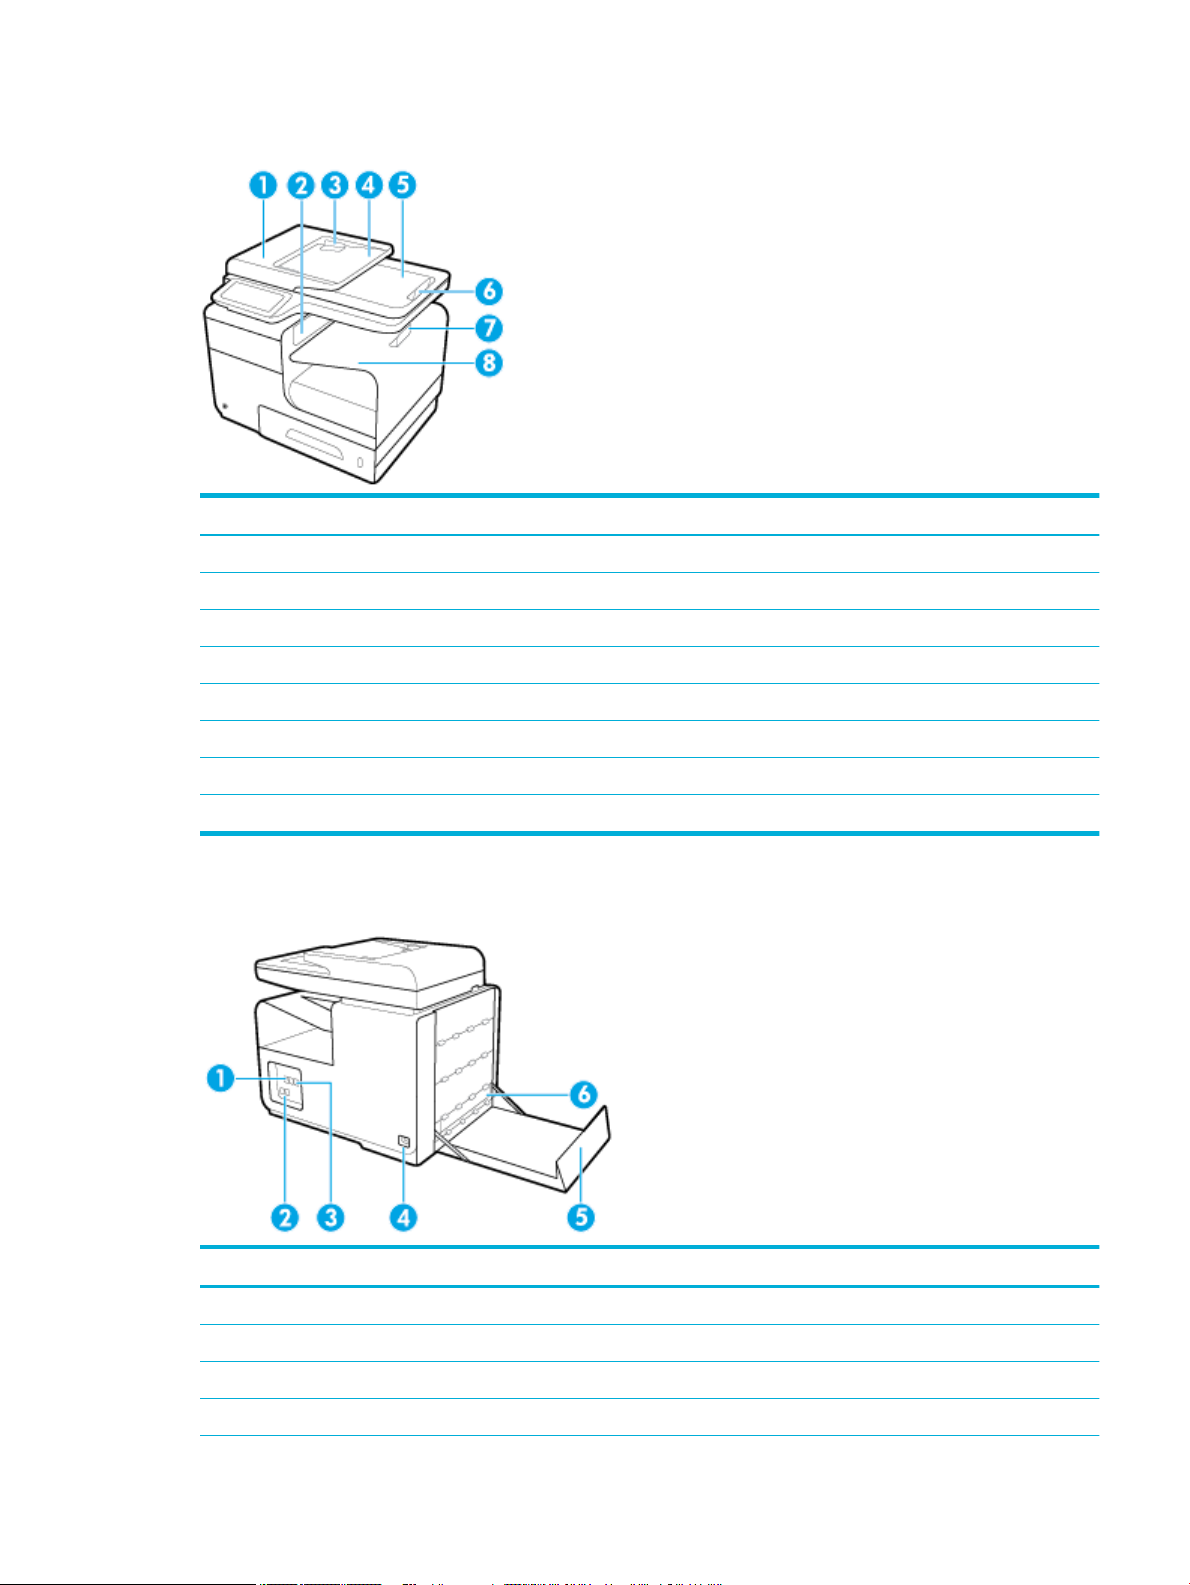
Front right view
Label Description
1 Automatic document feeder (ADF) cover
2 Main output door
3 ADF paper guides
4 ADF loading area
5 ADF output bin
6 ADF output bin stop
7 Main output bin stop
8 Main output bin
Back view
Label Description
1 Ethernet connection port
2 Fax connection ports
3 USB Type A and USB Type B ports
4 Power cord connection
ENWW Product views 5
Page 22
Label Description
5 Left door
6 Duplexer
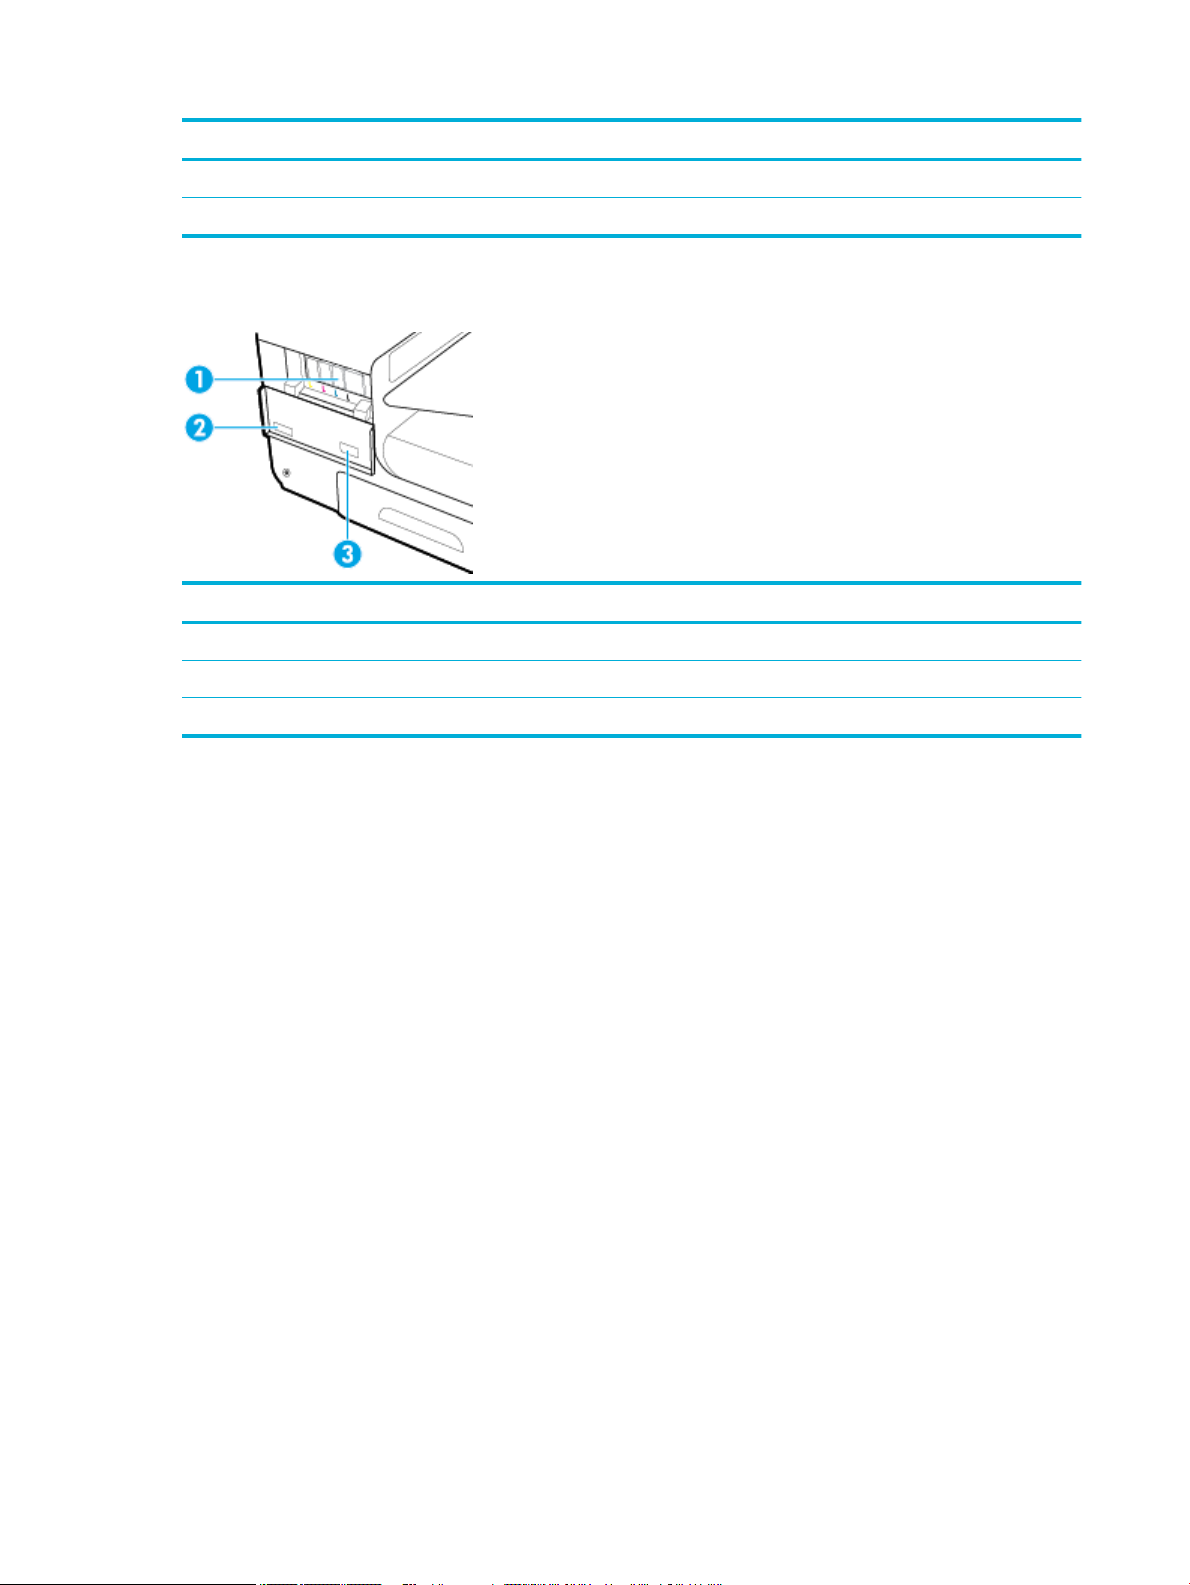
Cartridge door view
Label Description
1 Cartridge slots
2 Product serial number and product number
3 Cartridge part numbers
6 Chapter 1 Product basics ENWW
Page 23
Power on and o
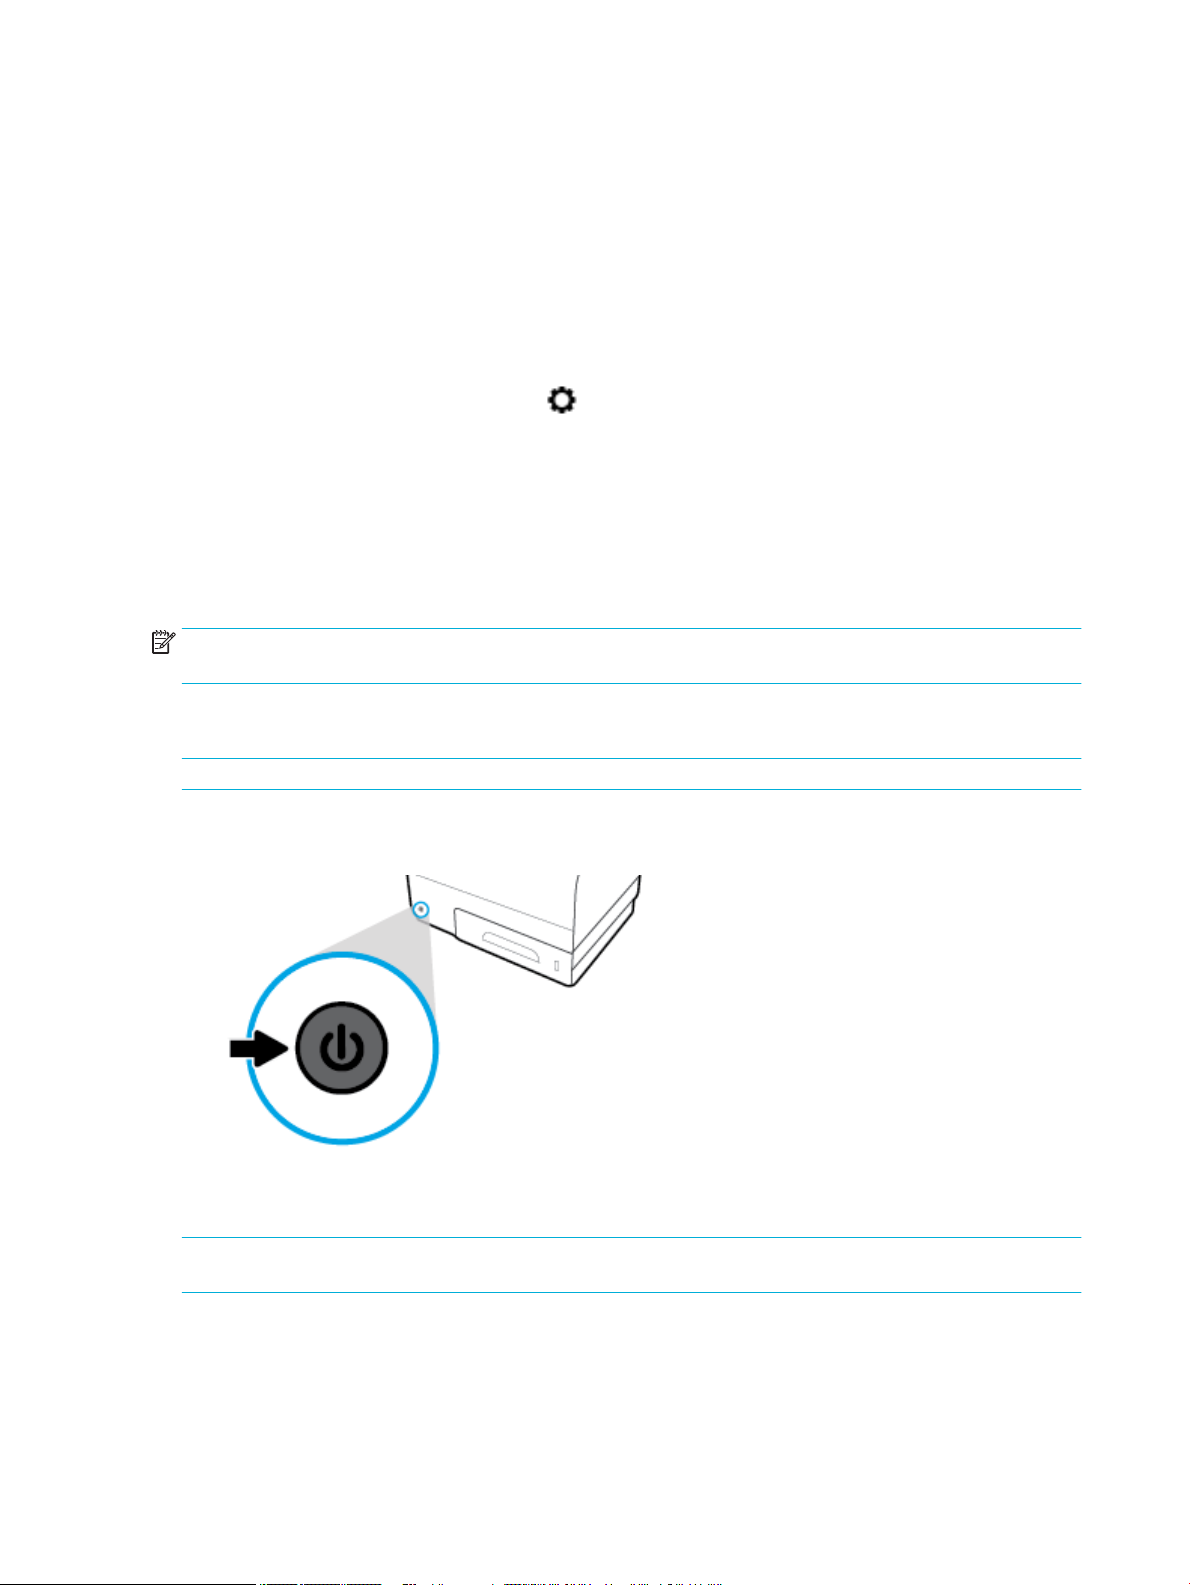
NOTICE: To prevent damage to the product, use only the power cord that is provided with the product.
●
Turn the product on
●
Manage power
●
Turn the product o
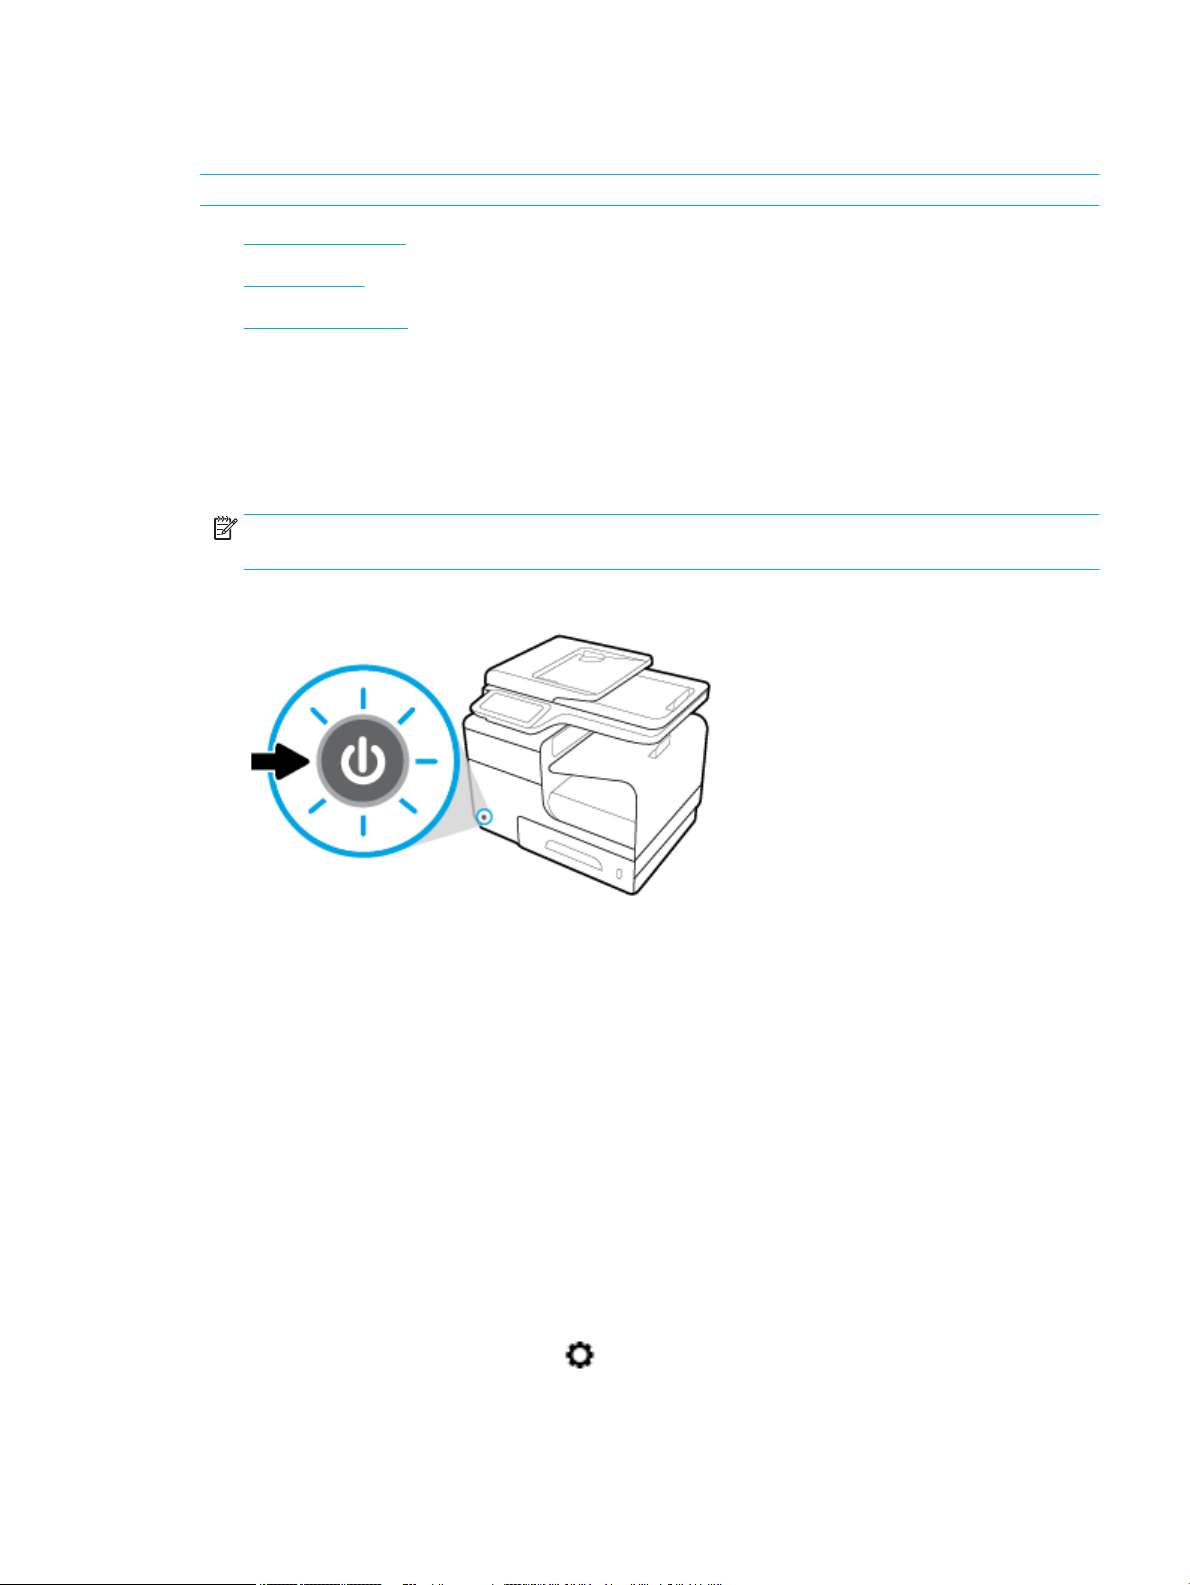
Turn the product on
1. Connect the power cord that is provided with the product to the connection port on the back of the
product.
2. Connect the power cord to a wall outlet with an adequate voltage rating.
NOTE: Make sure that your power source is adequate for the product voltage rating. The product uses
either 100-240 Vac or 200-240 Vac and 50/60 Hz.
3. Press and release the power button on the front of the product.
Manage power
HP PageWide Pro MFP 477dn/dw series printers include power-management features that can help reduce
power consumption and save energy.
●
Sleep Mode puts the product in a reduced power-consumption state if it has been idle for a specic
length of time. You can set the length of time before the product enters Sleep Mode from the control
panel.
●
Schedule On/O enables you to turn the product on or o automatically at days and time that you set
from the control panel. For example, you can set the product to turn o at 6 p.m. on Monday through
Friday.
Set the Sleep Mode time
1. Open the control panel dashboard (swipe the dashboard tab at the top of any screen downward, or
touch the dashboard area on the home screen).
2.
On the control panel dashboard, touch .
ENWW Power on and o 7
Page 24
3. Touch Power Management, and then touch Sleep Mode.
4. Select one of the time-interval options.
The product switches into a reduced power-consumption state when it has been idle for the amount of time
that you select.
Schedule the product to turn on or o
1. Open the control panel dashboard (swipe the dashboard tab at the top of any screen downward, or
touch the dashboard area on the home screen).
2.
On the control panel dashboard, touch .
3. Touch Power Management, and then touch Schedule Printer On/O.
4. Turn the Schedule On or Schedule O option on.
5. Select the Schedule On or Schedule O options at the bottom of the screen, and then select the day and
time that you want to schedule.
The product switches on or o at the time you select on the day you select.
NOTE: The product cannot receive faxes when it is turned o. Faxes sent during a scheduled o interval will
print when the product is turned on.
Turn the product o
NOTICE: Do not turn o the product if a cartridge is missing. Damage to the product can result.
▲
Press and release the power button on the front of the product to turn o your HP PageWide Pro MFP
477dn/dw series printer.
A warning message appears on the control panel if you attempt to turn the product o when one or
more cartridges are missing.
NOTICE: To prevent print-quality problems, turn o the product by using the power button on the front
only. Do not unplug the product, turn o the powerstrip, or use any other method.
8 Chapter 1 Product basics ENWW
Page 25
Use the control panel
●
Control panel buttons
●
Control panel home screen
●
Control panel dashboard
●
Control panel application folders
●
Control panel shortcuts
●
Help features
NOTE: The small text on the control panel is not designed for prolonged viewing.
Control panel buttons
Buttons and indicator lights on the control panel of HP PageWide Pro MFP 477dn/dw series printers appear lit
when their function is available, and are darkened if their function is not available.
1 Home button.
Touch to view the control panel home screen.
2 Wireless network indicator.
Solid blue when the product is connected to a wireless network. Blinks when the product is searching for a
wireless connection. O when the product is connected to a wired network or by a USB cable.
3 NFC (Near Field Communications) indicator.
The product can be enabled for walkup printing from tablets and smart phones.
4 Back or Cancel button.
Touch to return to the previous screen, or to cancel the current process.
5 Help button.
Touch to view the Help menu options.
ENWW Use the control panel 9
Page 26
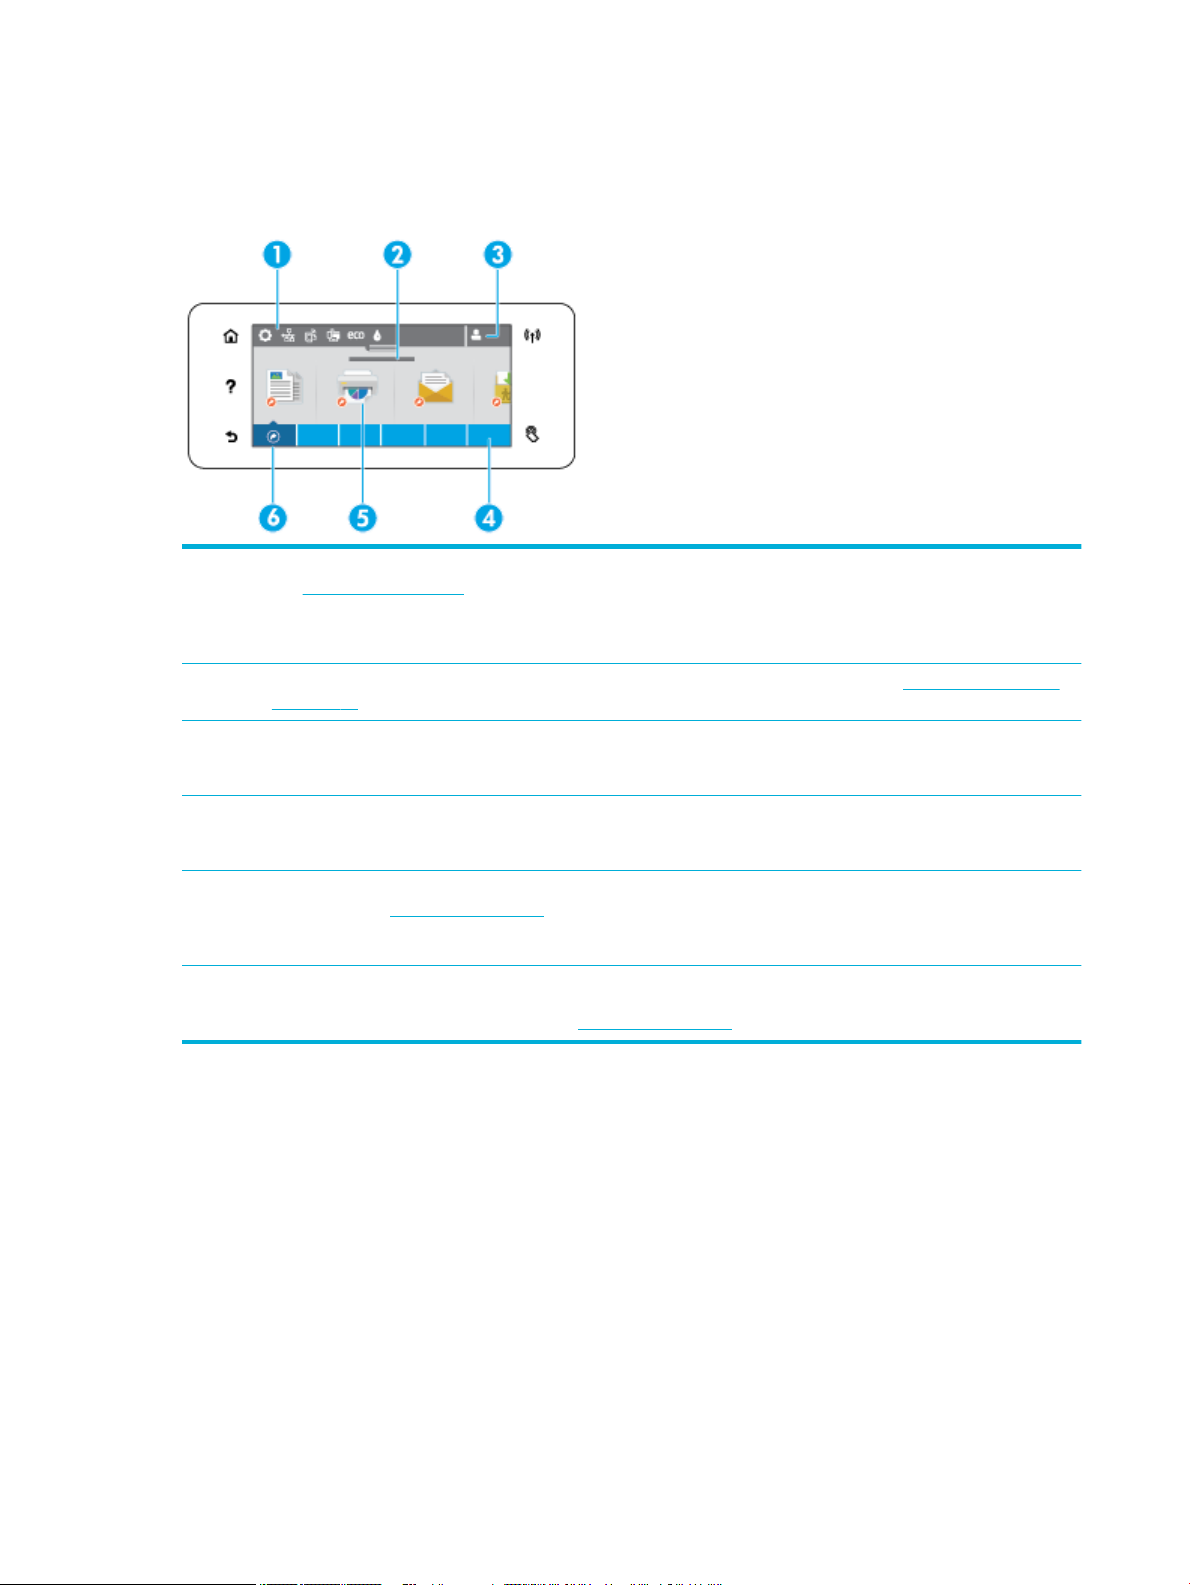
Control panel home screen
The control panel home screen displays a dashboard, application folders, and user-dened shortcuts to
screens for performing tasks.
1 Dashboard. Dashboard icons show current product status and provide access to screens for changing product settings
(see Control panel dashboard).
To view the full dashboard, touch the strip at the top of the home screen, or press and drag the handle at the center of the
dashboard strip.
2 Time and date display. This section also displays scheduled events, like scheduled o time (see Schedule the product to
turn on or o).
3 Sign in icon. The product can be set up to require users to sign in before using some applications.
Touch here to sign in with a PIN (personal identication number) or user name and password.
4 Application folders. These folders contain icons for dened tasks (for example, Print > Private Job).
Touch a folder to view the application icons that it contains.
5 Application or setup icons. You can create shortcuts to icons contained within application folders and place them on the
home screen (see Control panel shortcuts).
Press and drag to scroll horizontally through the available icons. Touch an icon to view an application or setup screen.
6 Shortcuts. You can create a shortcut to any application or setup icon contained within the application folders.
Touch to show all available shortcut icons (see Control panel shortcuts).
10 Chapter 1 Product basics ENWW
Page 27
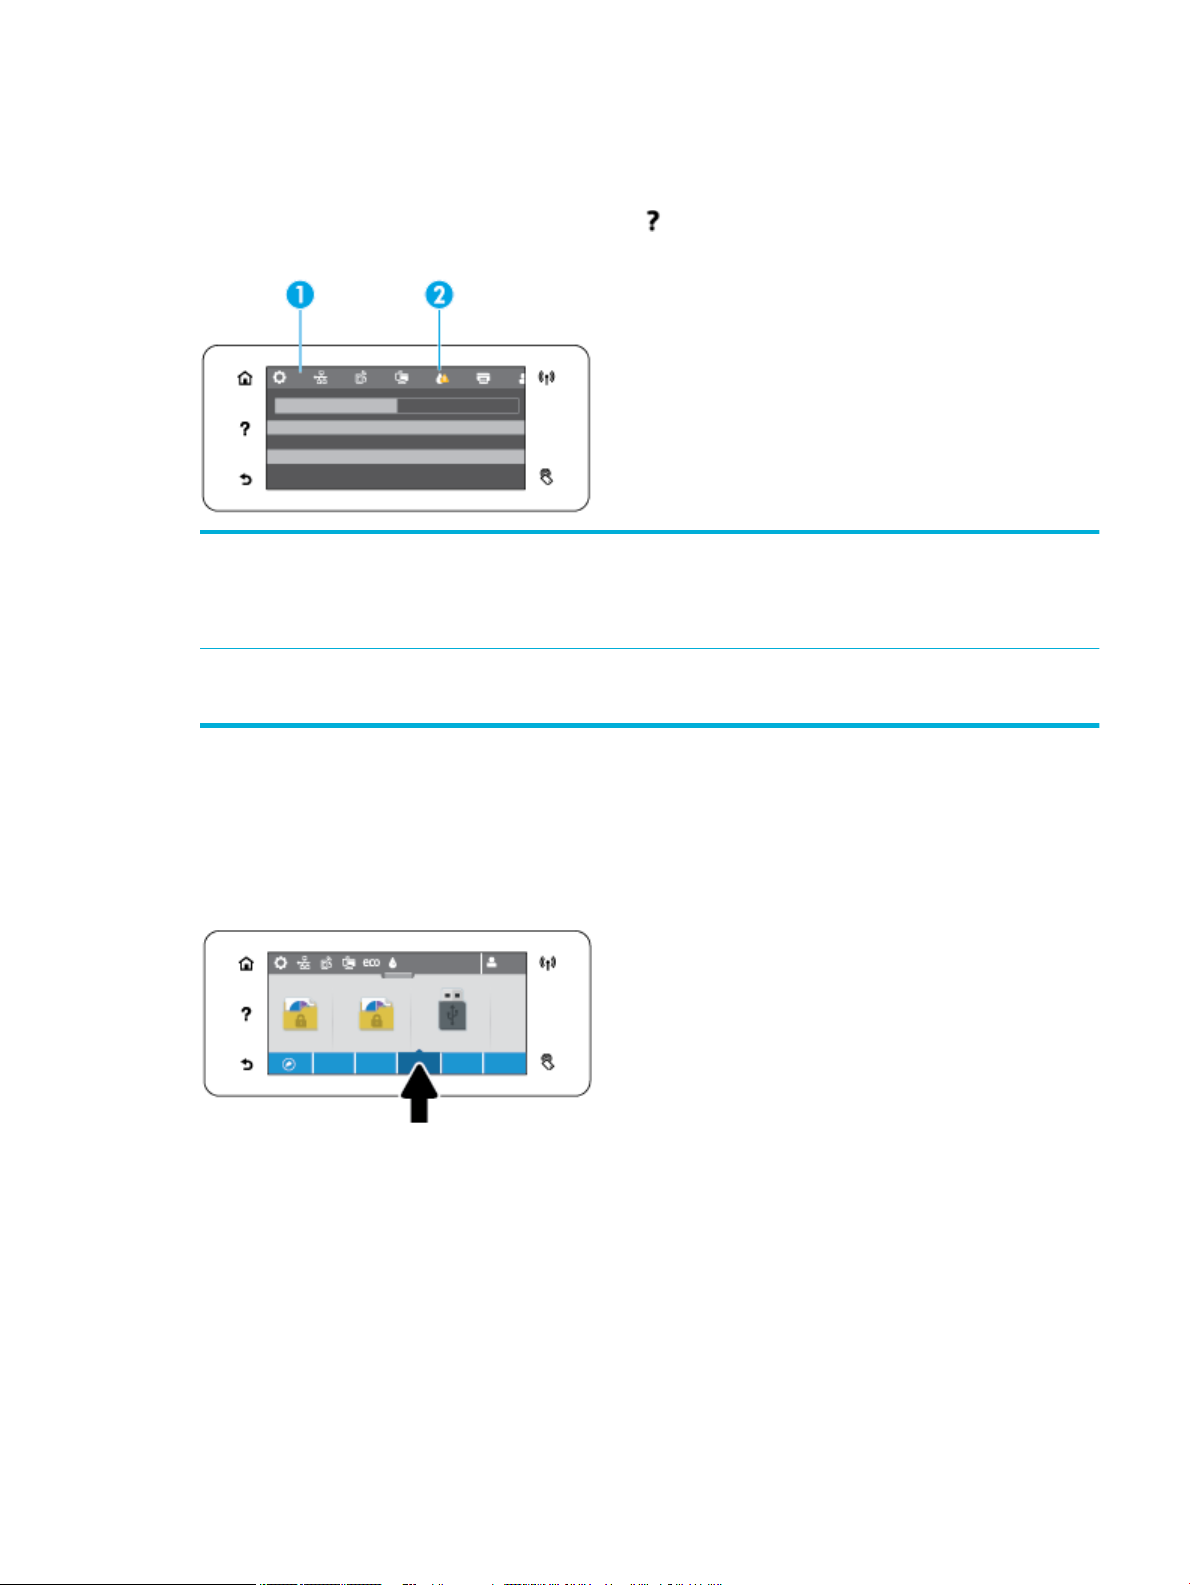
Control panel dashboard
To open the dashboard, touch the strip at the top of the home screen or swipe the dashboard tab downward.
To learn more about how to use the dashboard, touch on the control panel, and then select Control Panel
Tips > Use the Dashboard.
1 Larger icons appear across the top of the dashboard. These icons indicate the status of the product and enable you to
change product settings.
Swipe to scroll horizontally through the available icons. Touch an icon to view a status screen or to change product
settings.
2 A yellow or red triangle appears on an icon to indicate that user attention is required.
In the example above, a yellow warning indicates that the contents of one or more cartridges are low.
Control panel application folders
Folder icons appear on a strip across the bottom of the control panel home screen. Touch a folder icon to view
the application icons that it contains.
Application folders for HP PageWide Pro MFP 477 series printers include:
●
Copy
●
Scan
●
Print
●
Fax
●
Apps
ENWW Use the control panel 11
Page 28
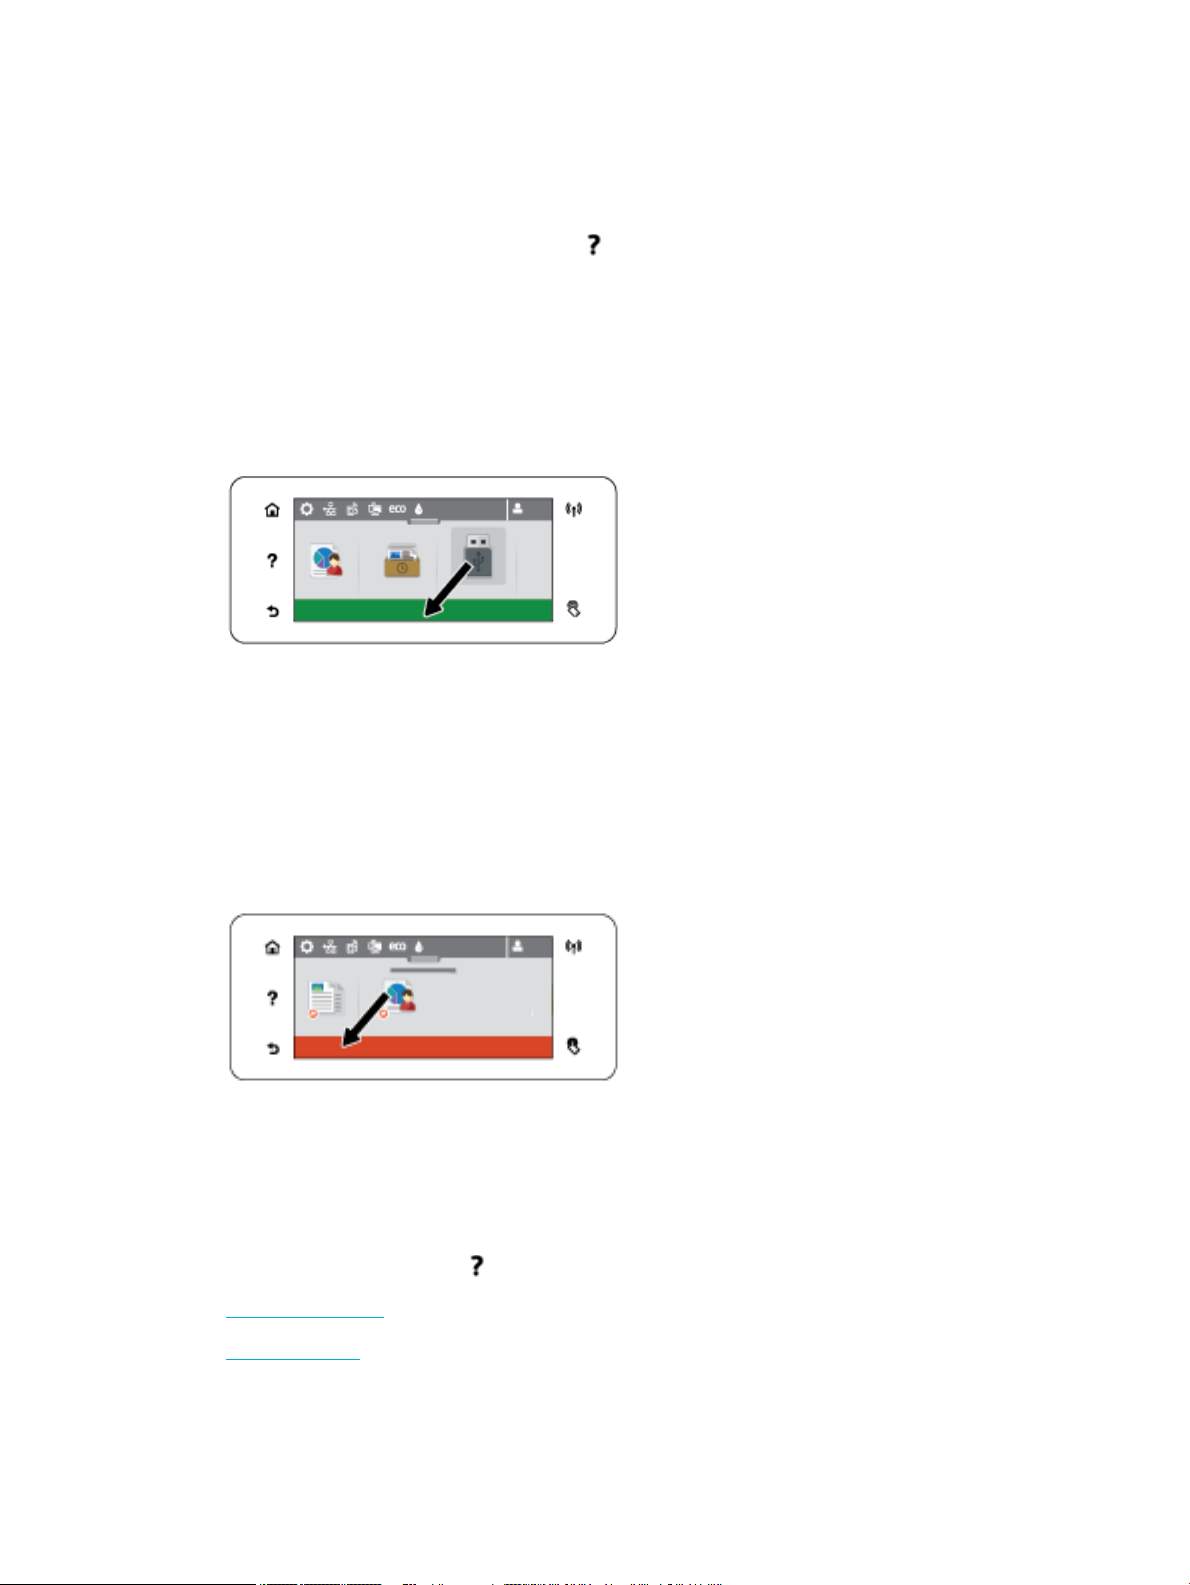
Control panel shortcuts
You can create a shortcut to any application or setup icon contained within the application folders, and then
place that shortcut on the control panel home screen.
To learn more about how to use shortcuts, touch and then select Control Panel Tips.
Create a shortcut on the home screen
1. Open an application folder, and then navigate to the application or setup icon for which you want to
create a shortcut.
2. Touch and hold the icon until the application folder strip turns green.
3. Drag the icon onto the green strip and then release it.
Remove a shortcut from the home screen
1. Touch the shortcuts icon at the lower left of the control panel home screen to display all available
shortcuts.
2. If necessary, scroll to view the shortcut icon that you want to remove.
3. Touch and hold the shortcut icon until the application folder strip turns red.
4. Drag the icon onto the red strip and then release it.
Help features
HP PageWide Pro MFP 477dn/dw series printers have built-in help that is accessible from the control panel.
Help features include tips, important product information that you can view or print, and animations that
show how to perform tasks or solve problems.
To view these help features, touch on the printer control panel.
●
Printer information
●
Help animations
12 Chapter 1 Product basics ENWW
Page 29

Printer information
The Printer Information page displays the following information about your HP PageWide Pro MFP 477dn/dw
series printer:
●
Model name and number
●
Product serial number
●
Product Service ID
●
Current rmware version number
●
Usage, status, and settings information if you print the full product information and printer status
report pages.
View or print a Printer Information page
1. On the printer control panel, touch .
2. Touch Printer Information.
3. If you want to print the full product information and printer status report pages, touch Print.
Help animations
The built-in help contains animations that show how to perform tasks or solve problems. To select and view
an available help animation:
1. On the printer control panel, touch .
2. Touch How To Videos.
3. Select the animation that you want to play in the printer control panel display.
ENWW Use the control panel 13
Page 30

Quiet Mode
To minimize printer noise, use Quiet Mode. You can enable this mode from either the control panel or the HP
Embedded Web Server (EWS).
NOTE: Quiet Mode slows the printer speed. If it hinders productivity, you can turn the mode o.
To turn Quiet Mode on or o from the control panel
1. Open the control panel dashboard (swipe the dashboard tab at the top of any screen downward, or
touch the dashboard area on the home screen).
2.
On the control panel dashboard, touch .
3. Touch Quiet Mode and turn it on or o.
To turn Quiet Mode on or o from the EWS
1. Open the EWS. For more information, see Open the EWS.
2. Click the Settings tab.
3. In the Preferences section, click Quiet Mode and turn it on or o.
4. Click Apply.
14 Chapter 1 Product basics ENWW
Page 31

2 Connect the product
●
Connect the product to a computer or a network
●
Use Wi-Fi Direct to connect a computer or device to the product
●
Install HP printer software for a wireless product already on the network
●
Open the printer software (Windows)
●
Manage network settings
ENWW 15
Page 32

Connect the product to a computer or a network
To connect the product using a USB cable
You can use a USB cable to connect the product to a computer.
This product supports a USB 2.0 connection. Use an A-to-B type USB cable. HP recommends using a cable that
is no longer than 2 m (6.5 ft).
NOTICE: Do not connect the USB cable until the installation software prompts you to connect it.
1. Quit all open programs on the computer.
2. Install the printer software from 123.hp.com/pagewide (recommended) or from the HP software CD
provided with the printer, and follow the onscreen instructions.
NOTE: If you are installing on a Mac, click About HP Easy Start to install the software.
3. When prompted, select the USB-Connect the printer to the computer using a USB cable option, and
then click the Next button.
NOTE: A dialog box displays a warning that Web Services (HP ePrint and print Apps) are unavailable
with a USB installation. Click Yes to proceed with the USB installation, or click No to cancel it.
4. When the software prompts you, connect the Type B end of the USB cable to the connection port (1) at
the rear of the product.
5. When the installation is complete, print a page from any program to make sure that the printing
software is correctly installed.
16 Chapter 2 Connect the product ENWW
Page 33

To connect the product to a network
The product supports connection to either a wired or a wireless network.
Supported network protocols
HP PageWide Pro MFP 477 products support the following network protocols.
●
TCP/IPv4
●
IPv6
●
DHCP, AutoIP
●
DHCP v6
●
HTTP server, HTTP client
●
SMTP client for alerts
●
SNMP v1
●
Open_ssl library
●
Bonjour
Connect the product using a wired network
Use this procedure to install the product on a wired network using Windows.
1. Connect the Ethernet cable to the product (1) and to the network. Turn the product on.
●
gSOAP
●
SAND box
●
LPD
●
Bootp, Bootp TCE improvement
●
Netbios
●
WINS
●
LLMNR
●
CIFS v6
2. Wait for 60 seconds before continuing. During this time, the network recognizes the product and assigns
an IP address or host name for the product.
3. Open the control panel dashboard (swipe the dashboard tab at the top of any screen downward, or
touch the dashboard area on the home screen).
4.
On the control panel dashboard, touch to display the IP address. Touch Print Details to print a page
with the IP address.
Connect the product using a wireless network (wireless models only)
You can connect the product to a wireless network using one of the following methods.
●
To connect the product to a wireless network using the Wireless Setup Wizard
●
To connect the product to a wireless network using WPS
●
To connect the product to a wireless network manually
ENWW Connect the product to a computer or a network 17
Page 34

If your wireless router does not support Wi-Fi Protected Setup (WPS), obtain the wireless router network
settings from your system administrator, or complete the following tasks.
●
Obtain the wireless network name or service set identier (SSID).
●
Determine the security password or encryption key for the wireless network.
NOTE: Before installing the product software, make sure the product is not connected to the network using
an Ethernet cable.
To connect the product to a wireless network using the Wireless Setup Wizard
The Wireless Setup Wizard is the best method for installing the product on a wireless network.
1. Open the control panel dashboard (swipe the dashboard tab at the top of any screen downward, or
touch the dashboard area on the home screen).
2.
On the control panel dashboard, touch .
3. Touch Network Setup, and then touch Wireless Settings.
4. Touch Wireless Setup Wizard.
5. The product scans for available wireless networks and returns a list of network names (SSIDs). Select
the SSID for your wireless router from the list if it is available. If the SSID for your wireless router is not in
the list, touch Enter SSID. When prompted for the type of network security, select the option that your
wireless router uses. A keypad opens on the control panel display.
6. Do one of the following:
●
If your wireless router uses WPA security, type the passphrase on the keypad.
●
If your wireless router uses WEP security, type the key on the keypad.
7. Touch OK , and wait while the product establishes a connection with the wireless router. Establishing the
wireless connection can take a few minutes.
To connect the product to a wireless network using WPS
Before you can connect your printer to a wireless network using WPS, make sure you have the following:
●
A wireless 802.11b/g/n network that includes a WPS-enabled wireless router or access point.
NOTE: The printer supports only connections using 2.4GHz.
●
A computer connected to the wireless network that you intend to connect the printer to. Be sure you
have installed the HP printer software on the computer.
If you have a WPS router with a WPS push button, follow the Push Button method. If you are not certain your
router has a push button, follow the PIN method.
18 Chapter 2 Connect the product ENWW
Page 35

Push Button method
1.
On the control panel, press and hold on the printer for more than three seconds to start WPS push
mode. The
2. Press the WPS button on your router.
The product begins a timer for approximately two minutes while a wireless connection is established.
PIN method
1. Locate the WPS PIN.
a. Open the control panel dashboard (swipe the dashboard tab at the top of any screen downward, or
b.
c. Touch Network Setup, and then touch Wireless Settings.
d. Touch Wi-Fi Protected Setup, and then touch PIN.
2.
On the control panel, press and hold on the printer for more than three seconds to start WPS push
mode. The indicator starts blinking.
3. Open the conguration utility or software for the wireless router or wireless access point, and then enter
the WPS PIN.
indicator starts blinking.
touch the dashboard area on the home screen).
On the control panel dashboard, touch .
NOTE: For more information about using the conguration utility, see the documentation provided
with the router or wireless access point.
4.
Wait for about two minutes. If the printer connects successfully, the indicator stops blinking but
remains lit.
To connect the product to a wireless network manually
During the rst 120 minutes of product setup, or after resetting the product's network defaults (and without a
network cable attached to the product), the product's wireless radio will broadcast a wireless setup network
for the product.
The name of this network is “HP-Setup-xx-[product name]”.
NOTE: The “xx” in the network name is the last two characters of the product's MAC address. The product
name is HP PageWide Pro MFP 477dw.
1. From a wireless enabled product, connect to the setup network for the device.
2. Open a web browser while connected to this setup network, and open the HP Embedded Web Server
(EWS) using the following IP address.
●
192.168.223.1
3. Find the Wireless Setup Wizard in the EWS and follow the instructions to manually connect the product.
NOTE: The product uses Automatic DHCP by default.
ENWW Connect the product to a computer or a network 19
Page 36

Use Wi-Fi Direct to connect a computer or device to the product
With Wi-Fi Direct, you can print wirelessly from a computer, smart phone, tablet, or other wireless-capable
device—without connecting to an existing wireless network.
Guidelines for using Wi-Fi Direct
●
Make sure your computer or mobile device has the necessary software.
◦
If you are using a computer, make sure you have installed the printer software from 123.hp.com/
pagewide (recommended) or from the HP software CD provided with the printer.
If you have not installed the HP printer software on the computer, connect to Wi-Fi Direct rst and
then install the printer software. Select Wireless when prompted by the printer software for a
connection type.
◦
If you are using a mobile device, make sure you have installed a compatible printing app. For more
information about mobile printing, visit the HP Mobile Printing website.
●
Make sure Wi-Fi Direct for your printer is turned on.
●
Up to ve computers and mobile devices can use the same Wi-Fi Direct connection.
●
Wi-Fi Direct can be used while the printer is also connected either to a computer using a USB cable or to
a network using a wireless connection.
●
Wi-Fi Direct cannot be used to connect a computer, mobile device, or printer to the Internet.
To turn on Wi-Fi Direct
1. Open the control panel dashboard (swipe the dashboard tab at the top of any screen downward, or
touch the dashboard area on the home screen).
2.
On the control panel dashboard, touch .
3.
Touch .
4. If the display shows that Wi-Fi Direct is o, touch Wi-Fi Direct and switch it on.
TIP: You can also turn on Wi-Fi Direct from the EWS. For more information about using the EWS, see HP
Embedded Web Server.
To print from a wireless-capable mobile device
Make sure you have installed a compatible printing app on your mobile device. For more information, visit the
HP Mobile Printing website.
1. Make sure you have turned on Wi-Fi Direct on the printer.
2. Turn on the Wi-Fi connection on your mobile device. For more information, see the documentation
provided with the mobile device.
NOTE: If your mobile device does not support Wi-Fi, you are not able to use Wi-Fi Direct.
3. From the mobile device, connect to a new network. Use the process you normally use to connect to a
new wireless network or hotspot. Choose the Wi-Fi Direct name from the list of wireless networks
20 Chapter 2 Connect the product ENWW
Page 37

shown such as DIRECT-**-HP PageWide XXXX (where ** are the unique characters to identify your
printer and XXXX is the printer model located on the printer).
Enter the Wi-Fi Direct password when prompted.
4. Print your document.
To print from a wireless-capable computer (Windows)
1. Make sure Wi-Fi Direct for your printer is turned on.
2. Turn on the computer's Wi-Fi connection. For more information, see the documentation provided with
the computer.
NOTE: If your computer does not support Wi-Fi, you are not able to use Wi-Fi Direct.
3. From the computer, connect to a new network. Use the process you normally use to connect to a new
wireless network or hotspot. Choose the Wi-Fi Direct name from the list of wireless networks shown
such as DIRECT-**-HP PageWide XXXX (where ** are the unique characters to identify your printer and
XXXX is the printer model located on the printer).
Enter the Wi-Fi Direct password when prompted.
NOTE: To nd the password, touch (Wi-Fi Direct) on the home screen.
4. Proceed to step 5 if the printer has been installed and connected to the computer over a wireless
network. If the printer has been installed and connected to your computer with a USB cable, follow the
steps below to install the printer software using the HP Wi-Fi Direct connection.
a. Open the printer software. For more information, see Open the printer software (Windows).
b. Click Printer Setup & Software, and then select Connect a new printer.
c. When the Connection Options software screen appears, select Wireless.
Select your HP printer software from the list of detected printers.
d. Follow the onscreen instructions.
5. Print your document.
To print from a wireless-capable computer (OS X)
1. Make sure Wi-Fi Direct for your printer is turned on.
2. Turn on Wi-Fi on the computer.
For more information, see the documentation provided by Apple.
3. Click the Wi-Fi icon and choose the Wi-Fi Direct name, such as DIRECT-**-HP PageWide XXXX (where **
are the unique characters to identify your printer).
If Wi-Fi Direct is turned on with security, enter the password when prompted.
4. Add the printer.
a. Open System Preferences.
b. Click Printers & Scanners.
ENWW Use Wi-Fi Direct to connect a computer or device to the product 21
Page 38

c. Click + below the list of printers at the left.
d. Select the printer from the list of detected printers (the word “Bonjour” is listed in the right column
beside the printer name), and click Add.
Install HP printer software for a wireless product already on the network
If the product already has an IP address on a wireless network and you want to install product software on a
computer, complete the following steps.
1.
Obtain the product IP (on the control panel dashboard, touch ).
2. install the printer software from 123.hp.com/pagewide (recommended) or from the HP software CD
provided with the printer.
3. Follow the onscreen instructions.
4. When prompted, select Wireless - Connect the printer to your wireless network and internet, and then
click Next .
5. From the list of available printers, select the printer that has the correct IP address.
Open the printer software (Windows)
Depending on your operating system, you can open the printer software as follows:
●
Windows 10: From the computer desktop, click Start, select All apps, click HP, click the folder for the
printer, and then select the icon with the printer's name.
●
Windows 8.1: Click the down arrow in lower left corner of the Start screen, and then select the printer
name.
●
Windows 8: Right-click an empty area on the Start screen, click All Apps on the app bar, and then select
the printer name.
●
Windows 7, Windows Vista, and Windows XP: From the computer desktop, click Start, select All
Programs, click HP, click the folder for the printer, and then select the icon with the printer's name.
Manage network settings
●
View or change network settings
●
Set or change the product password
●
Manually congure TCP/IP parameters from the control panel
●
Link speed and duplex settings
View or change network settings
Use the HP Embedded Web Server to view or change IP conguration settings.
22 Chapter 2 Connect the product ENWW
Page 39

1.
Obtain the product IP (on the control panel dashboard, touch ).
2. Type the product IP address into the address bar of a web browser to open the HP Embedded Web
Server.
3. Click the Network tab to obtain network information. You can change settings as needed.
Set or change the product password
Use the HP Embedded Web Server to set a password or change an existing password for a product on a
network so unauthorized users cannot change the product settings.
1.
Obtain the product IP (on the control panel dashboard, touch ).
2. Type the product IP address into the address bar of a web browser. Click the Settings tab, click Security,
and then click the Password Settings link.
NOTE: If a password has previously been set, you are prompted to type the password. Type “admin”
for User Name along with the password, and then click Apply.
3. Type the new password in the Password eld and in the Conrm Password eld.
4. At the bottom of the window, click Apply to save the password.
Manually congure TCP/IP parameters from the control panel
Use the control panel menus to manually set an IPv4 address, subnet mask, and default gateway.
1. Open the control panel dashboard (swipe the dashboard tab at the top of any screen downward, or
touch the dashboard area on the home screen).
2.
On the control panel dashboard, touch .
3. Touch Network Setup, and then touch Ethernet Settings.
4. Touch Advanced Settings, and then touch IP Settings.
5. Touch Manual, and then touch IP Address.
6. Using the numeric keypad, do the following:
●
Enter the IP address, and touch Done .
●
Enter the subnet mask, and touch Done .
●
Enter the default gateway, and touch Done .
7. Touch Apply.
Link speed and duplex settings
NOTE: This information applies only to Ethernet (wired) networks. It does not apply to wireless networks.
The link speed and communication mode of the print server must match the network hub. For most
situations, leave the product in automatic mode. Incorrect changes to the link speed and duplex settings
might prevent the product from communicating with other network devices. If you need to make changes, use
the printer control panel.
ENWW Manage network settings 23
Page 40

NOTE:
●
The setting must match with the network product to which you are connecting (a network hub, switch,
gateway, router, or computer).
●
Making changes to these settings causes the product to turn o and then on. Make changes only when
the product is idle.
1. Open the control panel dashboard (swipe the dashboard tab at the top of any screen downward, or
touch the dashboard area on the home screen).
2.
On the control panel dashboard, touch .
3. Touch Network Setup, and then touch Ethernet Settings.
4. Touch Advanced Settings, and touch Link Speed.
5. Select one of the following options.
Setting Description
Automatic The print server automatically congures itself for the highest link speed and communication
mode allowed on the network.
10-Full 10 Mbps, full-duplex operation
10-Half 10 Mbps, half-duplex operation
100-Full 100 Mbps, full-duplex operation
100-Half 100 Mbps, half-duplex operation
24 Chapter 2 Connect the product ENWW
Page 41

3 Printer management and services
●
HP Embedded Web Server
●
Web Services
●
HP Web Jetadmin software
●
Product security features
●
HP Printer Assistant in the printer software (Windows)
●
HP Utility (OS X)
●
AirPrint™ (OS X)
ENWW 25
Page 42

HP Embedded Web Server
●
About the EWS
●
About cookies
●
Open the EWS
●
Features
About the EWS
This product is equipped with the HP Embedded Web Server (EWS), which provides access to information
about product and network activities. EWS provides an environment in which Web programs may run, much in
the same way that an operating system, such as Windows, provides an environment for programs to run on a
computer. The output from these programs can then be displayed by a web browser.
The EWS resides on a hardware device (such as an HP printer) or in rmware, rather than as software that is
loaded on a network server.
The advantage of the EWS is that it provides an interface to the product that anyone with a networkconnected product and computer can use. There is no special software to install or congure, but you must
have a supported web browser on the computer. To gain access to the EWS, type the IP address for the
product in the address bar of the browser.
About cookies
The EWS places very small text les (cookies) on your hard drive when you are browsing. These les let the
EWS recognize your computer the next time you visit. For example, if you have congured the EWS language,
a cookie helps remember which language you have selected so that the next time you access the EWS, the
pages are displayed in that language. Though some cookies are cleared at the end of each session (such as
the cookie that stores the selected language), others (such as the cookie that stores customer-specic
preferences) are stored on the computer until you clear them manually.
IMPORTANT: The cookies that the EWS stores on your computer are used only for saving settings on your
computer or for sharing information between the printer and the computer. These cookies are not sent to any
HP websites.
You can congure your browser to accept all cookies, or you can congure it to alert you every time a cookie is
oered, which allows you to decide which cookies to accept or refuse. You can also use your browser to
remove unwanted cookies.
Depending on your printer, if you disable cookies, you also disable one or more of the following features:
●
Starting where you left the application (especially useful when using setup wizards).
●
Remembering the EWS browser language setting.
●
Personalizing the EWS home page.
For information about how to change your privacy and cookie settings and how to view or delete cookies, see
the documentation available with your web browser.
26 Chapter 3 Printer management and services ENWW
Page 43

Open the EWS
To open the EWS, do one of the following:
●
In a supported web browser, type the product IP address into the address box. (To obtain the IP address,
on the control panel dashboard, touch .)
●
In the printer software, open the HP Printer Assistant and on the Print tab, of the Print, Scan & Fax tab,
click Printer Home Page (EWS).
For more information, see Open the HP Printer Assistant.
●
In OS X, use HP Utility or click System Preferences > Printers & Scanners > HP PageWide Pro MFP 477 >
Options & Supplies > General > Show Printer Webpage.
NOTE: If an error occurs while opening the EWS, conrm that the proxy settings are correct for your
network.
TIP: After you open the URL, bookmark it so that you can return to it quickly in the future.
Features
●
Home tab
●
Scan tab
Home tab
●
Fax tab
●
Web Services tab
●
Network tab
●
Tools tab
●
Settings tab
NOTE: Changing network settings in the EWS might disable some product or product software features.
Use the Home tab to access frequently used items from the Scan, Fax, Web Services, Network, Tools, and
Settings tabs. The Home tab includes the following items.
NOTE: Not all of the following items are visible by default. Use the Personalize button to show or hide the
items of your choice.
Item Description
Scan to Email Congure target email proles for the scan-to-email feature
Scan to Network Folder Congure a target network folder for the scan-to-network feature
HP Digital Fax Congure the printer to save faxes to the network or forward them to email
Energy Save Settings Congure energy-saving features that switch the printer to Sleep Mode or turn the printer on or
o automatically
Web Services Enable or disable HP ePrint or print apps that allow you to print from email
ENWW HP Embedded Web Server 27
Page 44

Item Description
Printer Update Check for new printer updates
Estimated Cartridge Levels Review cartridge level status
Network Summary View wired (802.3) status or wireless (802.11) status
Print Quality Toolbox Run maintenance tools to improve print quality
Wireless Setup Wizard Set up a wireless connection using the wizard
Wi-Fi Direct Set up Wi-Fi Direct to print from a mobile device directly to the printer without connecting to a
wireless network
AirPrint Set up AirPrint™ for printing from Apple-supported products
Printer Information View information about the printer, such as product serial number, service ID, rmware version,
and total page count
Administrator Set up administrator control of printer features
Backup Back up the printer settings into a password-encrypted le
Fax Log Display and manage all fax-related activities (including digital fax log)
Fax Setup Wizard Run the wizard to set up fax features
Firewall Congure the network rewall
Printer Reports Print the information pages about your printer
Scan tab
Scan to SharePoint Congure the target SharePoint folder for the scan-to-folder feature
Usage Report Display usage counters for print, fax, and copy jobs
Webscan Enable Webscan, which allows anyone with access to the printer to scan whatever is on the
scanner glass
NOTE: Settings for this page are automatically saved in the web browser's cookies. If the web browser's
cookies are deleted, these settings are lost.
Use the Scan tab to congure the product's scan features. The Scan tab includes the following items.
Item Description
Scan to Computer Use Webscan
IMPORTANT: For security purposes, Webscan is disabled by default. To enable Webscan, open
the Settings tab, click Administrator Settings, select the Enable checkbox beside Webscan,
and then click Apply.
When Webscan is enabled, anyone with access to the printer can scan whatever is on the
scanner glass.
28 Chapter 3 Printer management and services ENWW
Page 45

Item Description
Fax tab
Scan to Email
Scan to Network Folder Network Folder Setup: Congure a network folder for saving scanned images or documents
Scan to SharePoint SharePoint Setup: Congure a SharePoint destination for saving scanned documents from the
●
Scan to Email Setup: Use this to set up the Scan-to-Email function and to congure the
sender of the scanned documents
●
Email Address Book: Congure the list of people to whom you can send the scanned
documents
●
Email Options: Congure a default SUBJECT line and body text and congure the default
scan settings
from the printer
printer
Use the Fax tab to congure the product's fax features. The Fax tab includes the following items.
Item Description
Fax Setup Wizard Congure the printer's fax feature
Basic Fax Settings Change the header name/fax number and set other basic fax settings
Advanced Fax Settings Set fax details such as Error Reporting, Conrmation, and so on
Fax Speed-dial Enter and store speed dial numbers
Fax Forwarding Automatically redirect incoming faxes to another fax number
Junk Fax Blocker Block faxes from specic people or businesses
Information Fax Log: View a list of the faxes that have been sent from or received by this product
HP Digital Fax Digital Fax Prole: Save incoming black-and-white faxes to a designated folder on the network
Web Services tab
Use the Web Services tab to congure and enable HP Web Services for this product. You must enable HP Web
Services to use the HP ePrint feature.
Network tab
Use the Network tab to congure and secure network settings for the product when it is connected to an IPbased network. The Network tab does not appear if the product is connected to other types of networks.
Tools tab
Use the Tools tab to view or manage product utilities. The Tools tab includes the following items.
or forward them as email
ENWW HP Embedded Web Server 29
Page 46

Item Description
Product Information
Reports
Utilities
Backup and Restore
●
Printer Information: View information about the printer, such as product serial number,
service ID, rmware version, and total page count
●
Cartridge Level Gauge: Review cartridge level status
●
Cartridge Settings: Set the threshold at which the printer provides notications that
cartridges are running low
●
Usage Report: View the number of pages processed for printing, scanning, copying, and
faxing
●
Printer Reports: Print various reports, such as font lists
●
Event Log: View the printer's last 50 error messages
●
Job Log: View a list of the most recent jobs performed by the printer
●
Color Usage Job Log: View the number of pages printed in black-and-white/grayscale and
color for all jobs and for individual jobs
●
Bookmarking: Bookmark pages in the EWS
●
Print Quality Toolbox: Run maintenance tools to improve the print quality of your
printouts
●
Asset Tracking: Assign an asset number/location to this device
●
Backup: Create a password-encrypted le that stores the printer's settings
●
Restore: Restore the printer's settings using a backup le created by the EWS
Printer Restart Power Cycle: Turn o and restart the printer
Printer Updates Firmware Updates: Set up the printer to alert you of updates or to automatically install
Settings tab
Use the Settings tab to set and maintain various options on your product including power management, date
and time, printing and paper settings, email alerts, factory defaults, and rewall settings.
Item Description
Power Management Set up the Energy Save mode to minimize the amount of power that the product consumes
Preferences Congure the default settings for general printer features such as date and time, language,
Security Configure settings to prevent unauthorized use of the printer or specific printer features. For
Email Alerts Set the default values for the email server, alert destinations, and alert settings
Copy/Print Settings Configure default settings for printing (such as font, print quality, duplexing, and black-
updates
when idle and to reduce wear on electronic components
display, and anonymous usage information. You can also set the default values for specic
features such as manual feed, tray and paper management, image registration, ColorLok, and
Quiet Mode.
more information, see Security settings.
and-white or color printing) and copying (such as tray selection and copy quality)
Restore Defaults Restore the factory defaults or the network settings
Firewall Congure rewall settings such as rules, addresses, services, and other options
30 Chapter 3 Printer management and services ENWW
Page 47

Web Services
●
What are Web Services?
●
Set Up Web Services
●
Use Web Services
●
Remove Web Services
What are Web Services?
The printer oers innovative, web-enabled solutions that can help you quickly access the Internet, obtain
documents, and print them faster and with less hassle—and all without using a computer.
NOTE: To use these web features, the printer must be connected to the Internet (either using an Ethernet
cable or wireless connection). You cannot use these web features if the printer is connected using a USB cable.
HP ePrint
HP ePrint is a free service from HP that allows you to print to your HP ePrint-enabled printer anytime, from
any location. It's as simple as sending an email to the email address assigned to your printer when you enable
Web Services on the printer. No special drivers or software are needed. If you can send an email, you can print
from anywhere, using HP ePrint.
NOTE:
●
You can sign up for an account at the HP Connected website (might not be available in all countries/
regions), and sign in to congure the ePrint settings.
●
After you sign up for an account at the HP Connected website, you can sign in to view your HP ePrint job
status, manage your HP ePrint printer queue, control who can use your printer's HP ePrint email address
to print, and get help for HP ePrint.
Print apps
●
Print apps allow you to easily locate and print preformatted web content, directly from your printer. You
can also store your documents digitally on the web.
●
Preformatted content designed specically for your printer means no cut-o text and pictures and no
extra pages with only one line of text. On some printers, you can also choose paper and print quality
settings on the print preview screen.
Set Up Web Services
Before you set up Web Services, make sure your printer is connected to the Internet using either an Ethernet
or wireless connection.
To set up Web Services, use one of the following methods.
To set up Web Services using the control panel
1. Open the control panel dashboard (swipe the dashboard tab at the top of any screen downward, or
touch the dashboard area on the home screen).
2.
On the control panel dashboard, touch .
ENWW Web Services 31
Page 48

3. Touch Web Services Setup.
4. Touch Accept to accept the Web Services terms of use and enable Web Services.
5. On the screen that appears, touch OK to allow the printer to automatically check for product updates.
NOTE: If prompted for proxy settings and if your network uses proxy settings, follow the onscreen
instructions to set up a proxy server. If you do not have the proxy details, contact your network
administrator or the person who set up the network.
6. If the Printer Update Options screen appears, touch Install Automatically (Recommended) or Alert When
Available
7. When the printer is connected to the server, the printer prints an information page. Follow the
instructions on the information page to nish the setup.
To set up Web Services using the EWS
1. Open the EWS. For more information, see Open the EWS.
2. Click the Web Services tab.
3. In the Web Services Settings section, click Setup, click Continue, and follow the onscreen instructions
to accept the terms of use.
4. If prompted, choose to allow the printer to check for and install printer updates.
.
NOTE: If prompted for proxy settings and if your network uses proxy settings, follow the onscreen
instructions to set up a proxy server. If you do not have the proxy details, contact your network
administrator or the person who set up the network.
5. When the printer is connected to the server, the printer prints an information page. Follow the
instructions on the information page to nish the setup.
Use Web Services
●
HP ePrint
●
Print apps
HP ePrint
To use HP ePrint, do the following:
●
Be sure you have an Internet- and email-capable computer or mobile device.
●
Enable Web Services on the printer. For more information, see Set Up Web Services.
For more information about managing and conguring HP ePrint settings and to learn about the latest
features, visit HP Connected . This site might not be available in all countries/regions.
32 Chapter 3 Printer management and services ENWW
Page 49

To print documents using HP ePrint
1. On your computer or mobile device, open your email application.
2. Create a new email message, and then attach the le that you want to print.
3. Enter the HP ePrint email address in the “To” eld, and then select the option to send the email
message.
NOTE: Do not enter any additional email addresses in either the "To" or "Cc" elds. The HP ePrint
server does not accept print jobs if there are multiple email addresses.
To nd the HP ePrint email address
1. Open the control panel dashboard (swipe the dashboard tab at the top of any screen downward, or
touch the dashboard area on the home screen).
2.
On the control panel dashboard, touch .
3. Touch Web Services Setup, and then touch Print Info Page. The printer prints an information page that
contains the printer code and instructions on how to customize the email address.
To turn o HP ePrint from the control panel
1. Open the control panel dashboard (swipe the dashboard tab at the top of any screen downward, or
touch the dashboard area on the home screen).
2.
On the control panel dashboard, touch .
3.
Touch , and then touch HP ePrint and turn it o.
To turn o HP ePrint in the EWS
1. Open the EWS. For more information, see Open the EWS.
2. Click the Web Services tab.
3. In the Web Services Settings section, for HP ePrint, click Turn O.
4. In the conrmation dialog box that appears, click Yes.
Print apps
Print apps allow you to easily locate and print preformatted web content, directly from your printer.
To use print apps
1. On the control panel, touch the Apps application folder.
2. Touch the print app you want to use.
For more information about an individual print app, visit the HP Connected website. This site might not be
available in all countries/regions.
ENWW Web Services 33
Page 50

To manage print apps
You can add, congure, or remove print apps, and set the order in which they appear on your printer control
panel display.
1. On the control panel, touch the Apps application folder.
2. In the display, touch the Manage icon and follow the onscreen instructions.
NOTE: You can also manage your print apps at the HP Connected website.
Remove Web Services
Use the following instructions to remove Web Services.
To remove Web Services using the control panel
1. Open the control panel dashboard (swipe the dashboard tab at the top of any screen downward, or
touch the dashboard area on the home screen).
2.
On the control panel dashboard, touch .
3.
Touch , and then touch Remove Web Services and touch Yes.
To remove Web Services using the EWS
1. Open the EWS. For more information, see Open the EWS.
2. Click the Web Services tab.
3. In the Web Services Settings section, click Remove Web Services.
4. Click Remove Web Services to conrm.
5. Click Yes to remove Web Services from your printer.
HP Web Jetadmin software
HP Web Jetadmin is an award-winning, industry-leading tool for eiciently managing a wide variety of
networked HP devices, including printers, multifunction products, and digital senders. This single solution
allows you to remotely install, monitor, maintain, troubleshoot, and secure your printing and imaging
environment — ultimately increasing business productivity by helping you save time, control costs, and
protect your investment.
HP Web Jetadmin updates are periodically made available to provide support for specic product features.
Visit the HP Web Jetadmin website, and click Download now.
Product security features
●
Security statements
●
Firewall
●
Security settings
●
Firmware updates
34 Chapter 3 Printer management and services ENWW
Page 51

Security statements
This product supports security standards and protocols that help secure the product, protect information on
your network, and simplify monitoring and maintenance of the product.
For information about HP's secure imaging and printing solutions, visit the www.hp.com/go/Secureprinting
website. The site provides links to white papers and FAQ documents about security features and may
include information about additional security features that are not contained in this document.
Firewall
The HP Embedded Web Server allows you to enable and congure product rewall rules, priorities, templates,
services, and policies. The rewall feature provides a network layer of security on both IPv4 and IPv6
networks. The rewall conguration capability gives you control over IP addresses that are allowed to access
the product. It also lets you set permissions and priorities for digital send, management, discovery, and print
services. All of this helps provide a more secure way of controlling access to the product.
The irewall feature also allows you to disable unused protocols and services. These protocol and services
settings can also be protected from being changed by setting the EWS admin password. These protocols and
services include the following.
Protocol or service Description
IPv4 and IPv6 To operate properly on a TCP/IP network, the product must be congured with valid TCP/IP
network conguration settings, such as an IP address that is valid for your network.
This product supports two versions of this protocol: version 4 (IPv4) and version 6 (IPv6). IPv4
and IPv6 can be enabled/disabled individually or simultaneously enabled.
Bonjour Bonjour services are typically used on small networks for IP address and name resolution
where a conventional DNS server is not used. The Bonjour service can be enabled or disabled.
SNMP SNMP (Simple Network Management Protocol) is used by network management applications
for product management. This product supports the SNMPv1 protocol on IP networks. This
product allows the ability to enable/disable SNMPv1.
WINS If you have a Dynamic Host Conguration Protocol (DHCP) service on your network, the product
automatically obtains its IP address from that server and registers its name with any RFC 1001
and 1002-compliant dynamic name services as long as the Windows Internet Name Service
(WINS) server IP address has been specied.
The WINS server IP address conguration can be enable or disabled. If enabled, then the
primary and secondary WINS server can be specied.
SLP Service Location Protocol (SLP) is an Internet standard network protocol that provides a
framework to allow network applications to discover the existence, location and conguration
of networked services in enterprise networks. This protocol can be enabled or disabled.
LPD Line Printer Daemon (LPD) refers to the protocol and programs associated with line-printer
spooling services that may be installed on various TCP/IP systems. LPD can be enabled or
disabled.
LLMNR Link-Local Multicast Name Resolution (LLMNR) is a protocol based on the Domain Name System
(DNS) packet format that allows both IPv4 and IPv6 hosts to perform name resolution for hosts
on the same local link. LLMNR can be enabled or disabled.
Port 9100 The product supports raw IP printing through TCP Port 9100. This HP-propriety TCP/IP port on
the product is the default port for printing and it is accessed by HP software. Port 9100 can be
enabled or disabled.
ENWW Product security features 35
Page 52

Protocol or service Description
Web Services The product supports the ability to enable or disable Microsoft Web Services Dynamic Discovery
Internet Printing Protocol (IPP) Internet Printing Protocol (IPP) is an Internet-standard protocol that allows you to print
Security settings
On the Settings tab of the Embedded Web Server, under Security, you can nd the following options.
Item Description
Password Settings Set a password to prevent unauthorized users from remotely conguring the printer or viewing
Administrator Settings Customize your printer by enabling or disabling features related to network connectivity, Web
Control Panel Shortcuts Select which shortcuts appear in the Shortcuts folder on the printer control panel
Access Control Enable and congure sign-in methods to control user access to specic printer tasks
Protect Stored Data Congure settings to protect jobs stored on the printer from unauthorized users
(WS Discovery) protocols or Microsoft Web Services for Devices (WSD) Print services supported
on the product. These web services can be enabled or disabled together or WS Discovery can be
enabled separately.
documents and manage jobs over the internet. IPP can be disabled or enabled.
printer settings from the EWS
Services, printer functions (such as color printing), memory devices, and rmware updates
For more information about security settings, see the EWS administrator guide (English only).
Firmware updates
The printer rmware can be automatically updated. On the Tools tab of the Embedded Web Server, click
Printer Updates, Firmware Updates, and then Install updates automatically. HP recommends using this
option.
HP Printer Assistant in the printer software (Windows)
The HP Printer Assistant provides access to HP printer features and resources from the Windows programs
menu or the desktop icon on your computer.
Open the HP Printer Assistant
1. On your computer, click Start , and then click All Programs.
2. Click HP, click the name of the product, and then click your printer.
Features
●
Connected tab
●
Print, Scan & Fax tab
●
Shop tab
36 Chapter 3 Printer management and services ENWW
Page 53

●
Help tab
●
Tools tab
●
Estimated Levels tab
Connected tab
Click the Connected tab to access the HP Connected website (might not be available in all countries/regions).
HP Connected gives you a single login for select HP apps and cloud solutions plus access to the HP Connected
platform from a smartphone, tablet, computer, or web-enabled HP printer. You can sign into HP Connected
using your existing ePrintCenter account or sign up for a new HP Connected account.
Print, Scan & Fax tab
Use the Print, Scan & Fax tab to view or manage print, scan, and fax utilities. This tab includes the following
items.
Item Description
Print
Scan
Fax
●
Connect Printer to the Web: Click to open the HP website and get new content and solutions for
your HP web-connected printer
●
Set Preferences: Click to open your Printing Preferences dialog box to view and change defaults
for paper size, print quality, and more
●
Maintain Your Printer: Click to open the Toolbox to align and clean cartridges or print a diagnostic
page
●
Print From Your Mobile Devices: Click to open the HP Mobile Printing website to learn how to print
from your smartphone or tablet. If a local version of this website is not available in your country/
region, you might be directed to the HP Mobile Printing site in another country/region or language.
●
See What's Printing: Click to open the print monitor and view, pause, or cancel your print jobs
●
Customize Your Printer: Click to open your Printing Preferences dialog box to change the name,
security settings, or other properties of your printer
●
Printer Home Page (EWS): Click to open the HP Embedded Web Server to congure, monitor, and
maintain your printer
●
Scan a Document or Photo: Open the scan dialog box
●
Scan to Network Folder Wizard: Scan from your printer to a network folder
●
Scan to E-mail Wizard: Send scans as email attachments from your printer
●
Manage Scan to Computer: Turn on scanning from your printer's control panel to this computer
over a network
●
Send a Fax: Send an individual or group fax
●
Digital Fax Setup Wizard: Save your upcoming faxes digitally
●
Manage Fax Settings: View fax history, block junk faxes, and manage fax settings
Shop tab
Use the Shop tab to shop for HP supplies and other products online.
ENWW HP Printer Assistant in the printer software (Windows) 37
Page 54

Help tab
Use the Help tab to access resources such as online help and HP Eco Solutions.
Tools tab
Use the Tools tab to set and maintain the printer driver and software and to diagnose and resolve printing,
scanning, and connectivity problems.
Estimated Levels tab
Use the Estimated Levels tab to review cartridge levels and to order new cartridges, if needed.
HP Utility (OS X)
HP Utility contains tools to congure print settings, calibrate the printer, order supplies online, and nd
website support information.
NOTE: The features available in HP Utility vary depending on the selected printer.
Cartridge level warnings and indicators provide estimates for planning purposes only. When you receive
a low-cartridge warning message, consider having a replacement cartridge available to avoid possible
printing delays. You do not need to replace cartridges until the print quality becomes unacceptable.
Open HP Utility
▲
Double-click HP Utility in the HP folder, in the Applications folder.
AirPrint™ (OS X)
Your product supports printing with Apple’s AirPrint for iOS 4.2 and Mac OS X v10.9 or later. Use AirPrint to
print wirelessly to the printer from an iPad (iOS 4.2), iPhone (3GS or later), or iPod touch (third generation or
later).
For more information, see Print with AirPrint (OS X).
38 Chapter 3 Printer management and services ENWW
Page 55

4 Paper and print media
●
Understand paper use
●
Supported media sizes
●
Supported paper types and tray capacity
●
Congure trays
●
Load media
●
Tips for selecting and using paper
ENWW 39
Page 56

Understand paper use
HP PageWide cartridges for business are specically developed for use with HP printheads. Unique
formulations help extend the life of the printheads and enhance reliability. When used with ColorLok® paper,
these cartridges provide laser-like color output that dries quickly and is ready for distribution.
NOTE: Based on HP internal testing using a range of plain papers, HP highly recommends using papers with
the ColorLok® logo for this product. For details, visit the HP print permanence website.
This product supports a variety of paper and other print media. Paper or print media that does not meet the
following guidelines might cause poor print quality, increased jams, and premature wear on the product.
It is possible for paper to meet all of these guidelines and still not produce satisfactory results. This might be
the result of improper handling, unacceptable temperature and/or humidity levels, or other variables over
which HP has no control.
NOTICE: Using paper or print media that does not meet HP specications might cause problems for the
product, requiring repair. This repair is not covered by the HP warranty or service agreements.
Use the following guidelines to obtain satisfactory results when using special paper or print media. Set the
paper type and size in the printer driver to obtain the best results.
Media type Do Do not
Envelopes
Labels
Letterhead or
preprinted forms
Heavy paper
Glossy or coated
paper
●
Store envelopes at.
●
Use envelopes where the seam extends all the way
to the corner of the envelope.
●
Use fresh labels. Old labels are more likely to
delaminate during printing.
●
Use only labels that have no exposed backing
between them.
●
Use labels that lie at.
●
Use only full sheets of labels.
●
Use only letterhead or forms approved for use in
HP PageWide products.
●
Use only heavy paper that is approved for use in
HP PageWide products and meets the weight
specications for this product.
●
Use only glossy or coated paper that is approved
for use in HP PageWide products.
●
●
●
●
●
●
●
Do not use envelopes that are wrinkled, nicked,
stuck together, or otherwise damaged.
Do not use envelopes that have clasps, snaps,
windows, or coated linings.
Do not use labels that have wrinkles or bubbles, or
are damaged.
Do not print partial sheets of labels.
Do not use raised or metallic letterhead.
Do not use paper that is heavier than the
recommended media specication for this product
unless it is HP paper that has been approved for
use in this product.
Do not use glossy or coated paper designed for
use in laser products.
NOTICE: Do not use any media that contains staples or paper clips.
40 Chapter 4 Paper and print media ENWW
Page 57

Supported media sizes
For best results, use the appropriate paper and media sizes:
●
Supported paper and print media sizes
●
Supported envelope sizes
●
Supported card and label sizes
●
Supported photo media sizes
Supported paper and print media sizes
Size Dimensions Tray 1 Tray 2 Optional Tray 3 Electronic duplex
printing
Letter 216 x 279 mm (8.5 x 11
inches)
Ocio 8.5 x 13 (8.5 x 13 inches)
Ocio 216x340 mm 216 x 340 mm
Legal 216 x 356 mm (8.5 x 14
inches)
A4 210 x 297 mm (8.3 x 11.7
inches)
Executive 184 x 267 mm (7.25 x 10.5
inches)
Statement 140 by 216 mm (5.5 x 8.5
inches)
A5 148 x 210 mm (5.8 x 8.3
inches)
A6 105 x 148.5 mm (4.13 x 5.83
inches)
B5 (JIS) 182 x 257 mm (7.17 x 10.12
inches)
B6 (JIS) 128x182 mm (5 x 7 inches)
16k 184 x 260 mm (7.24 x 10.23
inches)
195 x 270 mm (7.68 x 10.62
inches)
197 x 273 mm (7.75 x 10.75
inches)
Custom Minimum: 76 x 127 mm (3 x
5 inches)
Maximum: 216 x 356 mm
(8.5 x 14 inches)
Width: 76 to 216
mm (3 to 8.5
inches)
Length: 127 to 356
mm (5 to 14
inches)
Width: 102 to 216
mm (4 to 8.5
inches)
Length: 210.06 to
297.2 mm (8.27 to
11.7 inches)
Width: 102 to 216
mm (4 to 8.5
inches)
Length: 210.06 to
356 mm (8.27 to
14 inches)
ENWW Supported media sizes 41
Page 58

Supported envelope sizes
Size Dimensions Tray 1 Tray 2
Envelope #10 105 x 241 mm (4.13 x 9.49 inches)
Envelope DL 110 x 220 mm (4.33 x 8.66 inches)
Envelope C5 162 x 229 mm (6.4 x 9 inches)
Envelope B5 176 x 250 mm (6.7 x 9.8 inches)
Envelope C6 114 x 162 mm (4.5 x 6.4 inches)
Monarch 98.4 x 190.5 mm (3.875 x 7.5 inches)
Japanese Envelope Chou #3 120 x 235 mm (4.7 x 9.3 inches)
Japanese Envelope Chou #4 90 x 205 mm (3.5 x 8.1 inches)
Supported card and label sizes
Size Dimensions Tray 1 Tray 2 Optional Tray 3
3x5 (76.2 x 127 mm) (3 x 5 inches)
4x6 (102 x 152 mm) (4 x 6 inches)
5x8 (127 x 203 mm) (5 x 8 inches)
A6 (105 x 148.5 mm) (4.13 x 5.83 inches)
Japanese Postcard (100 x 148 mm) (3.9 x 5.8 inches)
Double Japan Postcard Rotated (148 x 200 mm) (5.8 x 7.9 inches)
Labels (Letter and A4)
Supported photo media sizes
Size Dimensions Tray 1 Tray 2 Optional Tray 3
4x6 (102 x 152 mm) (4 x 6 inches)
10x15cm (100 x 150 mm) (3.9 x 5.9 inches)
L (89 x 127 mm) (3.5 x 5 inches)
5x7 Photo Media (5 x 7 in no-tabs) (127 x 178 mm) (5 x 7 inches)
Photo Media (Letter & A4)
Japanese Postcard (100 x 148 mm) (3.9 x 5.8 inches)
Custom Minimum: 76 x 127 mm (3 x 5
inches)
Width: 76 to 216 mm
(3 to 8.5 inches)
Width: 102 to 216 mm
(4 to 8.5 inches)
Width: 102 to 216 mm
(4 to 8.5 inches)
Maximum: 216 x 356 mm (8.5 x
14 inches)
Length: 127 to 356
mm (5 to 14 inches)
Length: 210.06 to
297.2 mm (8.27 to
11.7 inches)
Length: 210.06 to 356
mm (8.27 to 14 inches)
42 Chapter 4 Paper and print media ENWW
Page 59

Supported paper types and tray capacity
For best results, use the appropriate paper types and tray capacities:
●
Tray 1 (multipurpose) on left side of the product
●
Tray 2 (default tray) and Tray 3 (accessory tray)
Tray 1 (multipurpose) on left side of the product
Paper type Weight
Every day:
●
Unspecied
●
HP EcoFFICIENT
●
Letterhead
●
Preprinted
●
Prepunched
●
Light 60-74g
●
Intermediate 85-95g
●
Mid-Weight 96-110g
●
Heavy 111-130g
●
HP Premium Presentation Matte 120g
●
Extra Heavy 131-175g
●
HP Brochure Matte 180g
●
HP Brochure Glossy 180g
●
Cardstock 176-220g
and Plain
60 to 175 g/m2 (16 to 47 lb)
Up to 220 g/m2 (58 lb)
1
Capacity
Up to 50 sheets Side to be printed on face-
1
Up to 25 sheets Side to be printed on face-
Paper orientation
do
wn, with the top edge
toward the printer
do
wn
●
HP Cover Matte 200g
●
HP Advanced Photo Papers
●
Envelope
●
Heavy Envelope
●
Labels
1
Capacity can vary depending on paper weight and thickness, and environmental conditions.
Up to 7 envelopes or labels Side to be printed on face-
do
wn
ENWW Supported paper types and tray capacity 43
Page 60

Tray 2 (default tray) and Tray 3 (accessory tray)
Paper type Weight
●
Unspecied and Plain
●
HP EcoFFICIENT
●
Letterhead
●
Preprinted
●
Prepunched
●
Light 60-74g
●
Intermediate 85-95g
●
Mid-Weight 96-110g
●
Heavy 111-130g
●
HP Premium Presentation Matte 120g
●
Extra Heavy 131-175g
●
HP Brochure Matte 180g
●
HP Brochure Glossy 180g
●
Cardstock 176-220g
●
HP Cover Matte 200g
60 to 175 g/m2 (16 to 47 lb)
Up to 220 g/m
2
(58 lb)
1
Capacity
Up to 500 sheets Side to be printed on face-up,
Up to 100 sheets Side to be printed on face-up
Paper orientation
with the top edge toward the
left
●
HP Advanced Photo Papers
●
Envelope
●
Heavy Envelope
●
Labels
1
Capacity can vary depending on paper weight and thickness, and environmental conditions.
Congure trays
By default, the product pulls paper from Tray 2. If Tray 2 is empty, the product pulls paper from Tray 1, or
from the optional Tray 3 if it is installed.
NOTE: If you change the default tray to Tray 1, be sure to congure the tray for the correct paper size and
type.
If you use special paper for all or most print jobs on the product, change this default tray setting on the
product.
The following table lists possible ways you can use the tray settings to meet your printing needs.
Up to 30 envelopes or labels.
NOTE: Tray 3 does not
support envelope printing.
Side to be printed on face-up
44 Chapter 4 Paper and print media ENWW
Page 61

Paper use Congure the product Print
Load Tray 1 and one other tray with the
same paper, and have the product pick
paper from one tray if the other one is
empty.
Frequently use special paper, such as
heavy paper or letterhead, from one tray.
Load media
●
Load Tray 1
●
Load Tray 2
●
Load optional Tray 3
●
Load envelopes
●
Load letterhead or preprinted forms
●
Load the automatic document feeder
Load paper in Tray 1, and congure the
tray for the correct paper and type. Do not
use Any Size/Any Type.
Load special paper in Tray 1, and congure
the tray for the paper type.
From the software program, print the job.
From the software program print dialog,
choose the paper type that matches the
special paper loaded in the tray before
sending the print job. Select Tray 1 as the
Paper Source from the Paper/Quality tab
(Windows) or Paper Feed pop-up menu (OS
X).
●
Load Tray 1
Tray 1 is the multipurpose tray at the left side of the product.
NOTE: If you are not using Alternate Letterhead Mode (ALM), place the paper with the side to be printed on
face-down, with the top edge toward the printer. For ALM orientation, see Load letterhead or preprinted
forms.
1. Open Tray 1.
Load the scanner
ENWW Load media 45
Page 62

2. Pull out the Tray 1 extension.
3. Open the paper guides completely, and then load the paper stack into Tray 1.
4. Close the paper guides against the loaded media.
Load Tray 2
Tray 2 is the default (main) paper tray at the front of the product.
NOTE: If you are not using Alternate Letterhead Mode (ALM), place the paper with the side to be printed on
face-up, with the top edge toward the left side of the tray. For ALM orientation, see Load letterhead or
preprinted forms.
1. Pull the tray out of the product.
46 Chapter 4 Paper and print media ENWW
Page 63
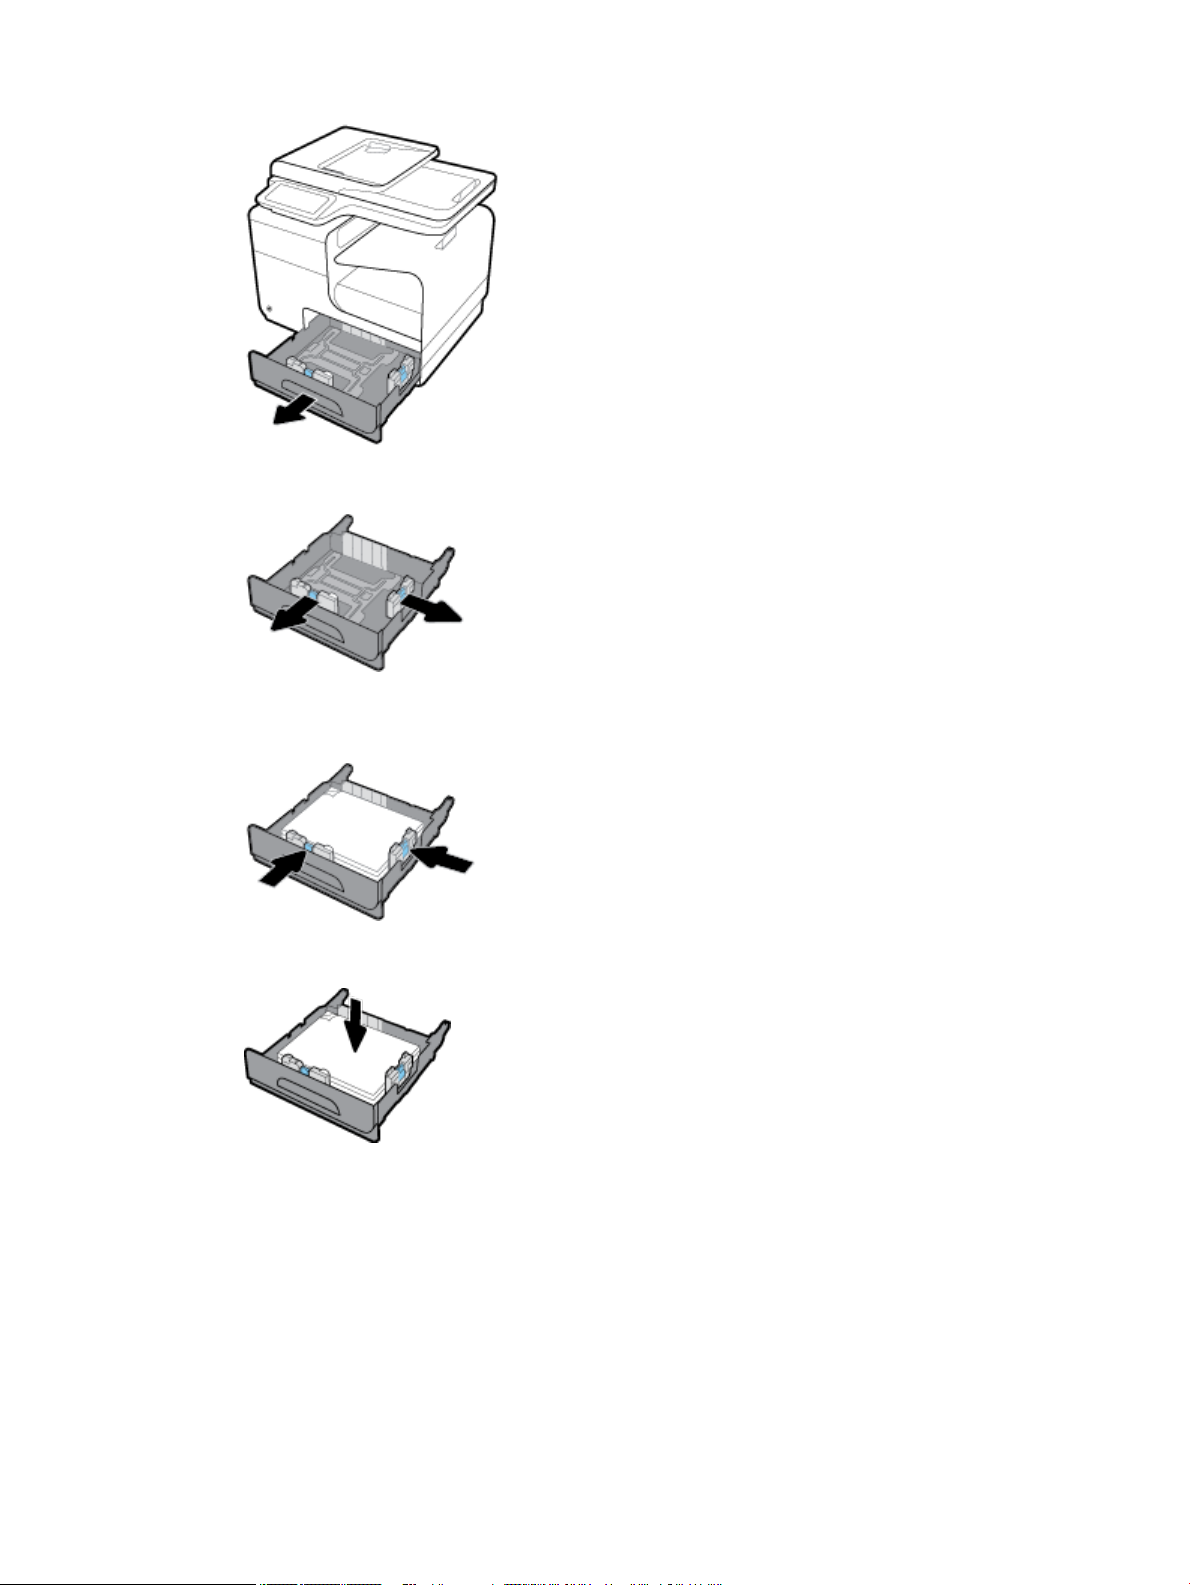
2. Open the paper length and width guides completely.
3. Place the paper in the tray and make sure that it is at at all four corners. Close the length and width
paper guides against the loaded media.
4. Push down on the paper to make sure that the stack is below the paper limit tabs on the side of the tray.
ENWW Load media 47
Page 64

5. Put the tray into the product.
Load optional Tray 3
Tray 3 is an optional accessory tray that attaches to the bottom of the product. It can hold longer media, such
as legal (216 x 356 mm, 8.5 x 14 inches) paper.
NOTE: If you are not using Alternate Letterhead Mode (ALM), place the paper with the side to be printed on
face-up, with the top edge toward the left side of the tray. For ALM orientation, see Load letterhead or
preprinted forms.
1. Pull the tray out of the product.
2. Open the paper length and width guides completely.
3. Place the paper in the tray and make sure that it is at at all four corners. Close the length and width
paper guides against the loaded media.
48 Chapter 4 Paper and print media ENWW
Page 65

4. Push down on the paper to make sure that the stack is below the paper limit tabs on the front and the
side of the tray.
5. Put the tray into the product.
Load envelopes
You can load envelopes into Tray 1 or Tray 2.
To load envelopes into Tray 1
1. Open Tray 1.
2. Pull out the Tray 1 extension.
ENWW Load media 49
Page 66

3. Place envelopes in Tray 1 face-down, with the top of the envelope oriented toward the front of the
printer.
4. Close the paper guides.
To load envelopes into Tray 2
1. Pull the tray out of the product.
2. Stack envelopes face-up, with the top of the envelopes oriented toward the front of the tray.
3. Place the envelopes in the tray and make sure that they are at at all four corners. Close the length and
width paper guides against the loaded media.
50 Chapter 4 Paper and print media ENWW
Page 67

4. Push down on the envelopes to make sure that the envelopes are below the paper limit tabs on the side
of the tray.
5. Put the tray into the product.
Load letterhead or preprinted forms
You can load letterhead, preprinted, or prepunched forms into any tray. Paper orientation depends on
whether you are printing in simplex or duplex mode. If Alternative Letterhead Mode (ALM) is enabled, you can
print in both simplex and duplex modes without reorienting the paper.
NOTE: With ALM enabled, you must select Letterhead, Preprinted, or Prepunched as the paper type in the
Printer Properties dialog box.
To enable or disable ALM from the control panel
1. Open the control panel dashboard (swipe the dashboard tab at the top of any screen downward, or
touch the dashboard area on the home screen).
2.
On the control panel dashboard, touch .
3. Touch Tray and Paper Management, and then touch Alternative Letterhead Mode and turn it on or o.
To enable or disable ALM from the EWS
1. Type the product IP address into the address box of a web browser to open the EWS. (To obtain the
product IP, on the control panel dashboard, touch .)
2. Click the Settings tab.
3. Click Preferences , and then click Tray and Paper Management.
4. In the Alternative Letterhead Mode section, select Enabled or Disabled.
5. Click Apply.
To load letterhead or preprinted forms with ALM enabled
1. Depending on the tray, orient the paper as follows.
Tray 1
Place the letterhead face-up, with the top of the page oriented
toward the left.
Other tray(s)
Place the letterhead face-down, with the top of the page
oriented toward the right.
2. Complete the steps in Load Tray 1, Load Tray 2, or Load optional Tray 3.
ENWW Load media 51
Page 68

To load letterhead or preprinted forms with ALM disabled
1. Depending on the tray, orient the paper as follows.
Tray 1 Other tray(s)
Simplex Place the letterhead face-down, with the top of
the page oriented toward the right.
Duplex Place the letterhead face-up, with the top of the
page oriented toward the left.
2. Complete the steps in Load Tray 1, Load Tray 2, or Load optional Tray 3.
Load the automatic document feeder
The automatic document feeder (ADF) holds up to 50 sheets of 75 g/m2 (20 lb bond) paper.
NOTICE: When using the automatic document feeder (ADF), make sure that your documents contain no
staples, paper clips, tape, or similar items that can damage the product.
1. Open the ADF paper guides.
Place the letterhead face-up, with the top of the
page oriented toward the left.
Place the letterhead face-down, with the top of
the page oriented toward the right.
2. For longer documents, pull the ADF loading area extension outward if necessary.
3. Place the documents to be copied in the ADF loading area face up.
52 Chapter 4 Paper and print media ENWW
Page 69

4. Push the documents to the left until they are stopped by the feeder mechanism under the ADF cover. A
Document Loaded message appears on the printer control panel.
5. Close the paper guides securely against the loaded documents.
Load the scanner
1. Open the scanner lid.
2. Use the media mark at the back-left of the scanner glass to orient the original document.
ENWW Load media 53
Page 70

3. Place the original face down on the scanner glass.
4. Close the scanner lid.
54 Chapter 4 Paper and print media ENWW
Page 71

Tips for selecting and using paper
For the best results, observe the following guidelines.
●
Load only one type of paper at a time into a tray or document feeder.
●
Make sure the paper is loaded correctly when loading from the input tray or document feeder.
●
Do not overload the tray or document feeder.
●
To prevent jams, poor print quality, and other printing problems, avoid loading the following paper in the
tray or document feeder:
◦
Multipart forms
◦
Media that is damaged, curled, or wrinkled
◦
Media with cutouts or perforations
◦
Media that is heavily textured, embossed, or otherwise diicult to print on
◦
Media that is too lightweight or stretches easily
◦
Media that contains staples or clips
ENWW Tips for selecting and using paper 55
Page 72

5 Cartridges
●
HP PageWide cartridges
●
Manage cartridges
●
Replace cartridges
●
Tips for working with cartridges
56 Chapter 5 Cartridges ENWW
Page 73

HP PageWide cartridges
HP policy on non-HP cartridges
IMPORTANT:
●
HP does not guarantee the quality or reliability of non-HP contents in HP cartridges.
●
HP’s cartridge warranty does not cover non-HP cartridges or cartridges with non-HP contents.
●
HP’s printer warranty does not cover repairs or service due to use of non-HP cartridges or cartridges
with non-HP contents.
NOTE:
●
This printer is not designed to use continuous ink systems. To resume printing, remove the continuous
ink system and install original HP (or compatible) cartridges.
●
This printer is designed for cartridges to be used until they are empty. Relling cartridges before they
are depleted might cause your printer to fail. If this happens, insert a new cartridge (either genuine HP
or compatible) to continue printing.
Counterfeit HP cartridges
Your cartridge might not be a genuine HP cartridge if you notice the following:
●
The control panel or printer status report indicates that a used or counterfeit cartridge is installed.
●
You are experiencing a high number of problems with the cartridge.
●
The cartridge does not look like it usually does (for example, the packaging diers from HP packaging).
Visit the HP anticounterfeit website when you install an HP print cartridge and the control panel message
says the cartridge is used or counterfeit. HP will help resolve the problem.
Manage cartridges
Correctly storing, using, and monitoring cartridges can help ensure high-quality print output and extend the
life of cartridges.
●
Store cartridges
●
Print with General Oice mode
●
Print when a cartridge is at estimated end of life
●
Check the estimated cartridge levels
●
Order cartridges
●
Recycle cartridges
ENWW HP PageWide cartridges 57
Page 74

Store cartridges
●
Do not remove the cartridge from its package until you are ready to use it.
●
Store cartridges at room temperature (15-35° C or 59-95° F) for at least 12 hours before using them.
●
Handle cartridges carefully. Dropping, jarring, or rough handling during installation can cause temporary
printing problems.
Print with General Oice mode
General Oice mode produces slightly lighter printouts, which might extend the life of the cartridge.
1. On the File menu in the software program, click Print.
2. Make sure your printer is selected.
3. Click the link or button that opens the Properties dialog box.
Depending on your software application, this link or button might be called Properties , Options,
Printer Setup, Printer Properties, Printer, or Set Preferences.
Do one of the following.
●
Windows: Click Print Options, and then click Properties.
●
OS X: From the pop-up menu, select Copies and Pages.
4. Click the Paper/Quality tab.
5. Select General Oice from the Print Quality drop-down list (Windows) or pop-up menu (OS X).
Print when a cartridge is at estimated end of life
Supply-related notications are communicated on the printer control panel.
●
Cartridge Low message appears when a cartridge is nearing the estimated end of its useful life. Printing
can continue, but consider having a replacement cartridge available.
●
Cartridge Very Low message appears when the cartridge is near its estimated end of useful life. Have a
replacement cartridge available.
●
Cartridge Depleted message appears when the cartridge is empty.
NOTE: Although using the Continue setting allows printing beyond Cartridge Very Low without replacing
the cartridge, the product will shut down before any print problems occur.
Check the estimated cartridge levels
You can check the estimated cartridge levels from the printer control panel or from the printer software.
To check the cartridge levels from the control panel
1. Open the control panel dashboard (swipe the dashboard tab at the top of any screen downward, or
touch the dashboard area on the home screen).
2.
On the control panel dashboard, touch to display the estimated cartridge levels.
58 Chapter 5 Cartridges ENWW
Page 75

To check the cartridge levels from the EWS
1. Open the EWS. For more information, see Open the EWS.
2. Click the Tools tab, and then click Cartridge Level Gauge.
To check the cartridge levels from the product software (Windows)
1. Open the HP Printer Assistant. For more information, see Open the HP Printer Assistant.
2. On the Print, Scan & Fax tab, under Print , click Maintain Your Printer.
3. Click the Estimated Cartridge Levels tab.
To check the cartridge levels from the product software (OS X)
1. Open HP Utility. For more information, see Open HP Utility.
2. Make sure your printer is selected.
3. Click Supplies Status.
The estimated cartridge levels appear.
4. Click All Settings to return to the Information and Support pane.
NOTE:
●
If you have installed a relled or remanufactured cartridge, or a cartridge that has been used in another
printer, the cartridge level indicator might be inaccurate or unavailable.
●
Cartridge-level alerts and indicators provide estimates for planning purposes only. When you receive
a low-cartridge alert, consider having a replacement cartridge available to avoid possible printing
delays. You do not need to replace the cartridges until you are prompted to.
●
Ink from the cartridges is used in the printing process in a number of dierent ways, including in the
initialization process, which prepares the printer and cartridges for printing, and in printhead servicing,
which keeps the cartridges printing smoothly. Some residual ink is left in the cartridge after it is used.
For more information, visit the
Order cartridges
To order cartridges, visit the HP website . (At this time, some portions of the HP website are available in
English only.) Ordering cartridges online is not supported in all countries/regions. However, many countries
have information on ordering by telephone, locating a local store, and printing a shopping list. In addition, you
can visit the HP SureSupply website to obtain information about purchasing HP products in your country.
Use only the replacement cartridges that have the same cartridge number as the cartridge you are replacing.
You can nd the cartridge number in the following places:
●
On the label of the cartridge you are replacing.
●
On a sticker inside the printer. Open the cartridge access door to locate the sticker.
HP SureSupply website.
●
In the printer software, open the HP Printer Assistant, click Shop, and then click Shop For Supplies
Online.
●
In the HP Embedded Web Server, click the Tools tab and then, under Product Information, click
Cartridge Level Gauge. For more information, see HP Embedded Web Server.
ENWW Manage cartridges 59
Page 76

NOTE: The SETUP cartridge that comes with the printer is not available for separate purchase.
Recycle cartridges
Visit the HP sustainability website for full information on recycling and to order postage-paid labels,
envelopes, and boxes for recycling.
Replace cartridges
The product uses four colors and has a dierent cartridge for each color: yellow (Y), magenta (M), cyan (C),
and black (K).
NOTICE:
●
To prevent print-quality problems, HP recommends replacing any missing cartridges with genuine HP
cartridges as soon as possible. For more information, see Order cartridges.
●
Never turn o the printer if any cartridges are missing.
1. Open the cartridge door.
2. Push the old cartridge inward to unlock and release it.
3. Grasp the edge of the old cartridge and then pull the cartridge straight out to remove it.
60 Chapter 5 Cartridges ENWW
Page 77

4. Do not touch the metal contacts on the cartridge. Fingerprints on the contacts can cause connection
errors.
5. Insert the new cartridge into its slot.
6. Close the cartridge door.
ENWW Replace cartridges 61
Page 78
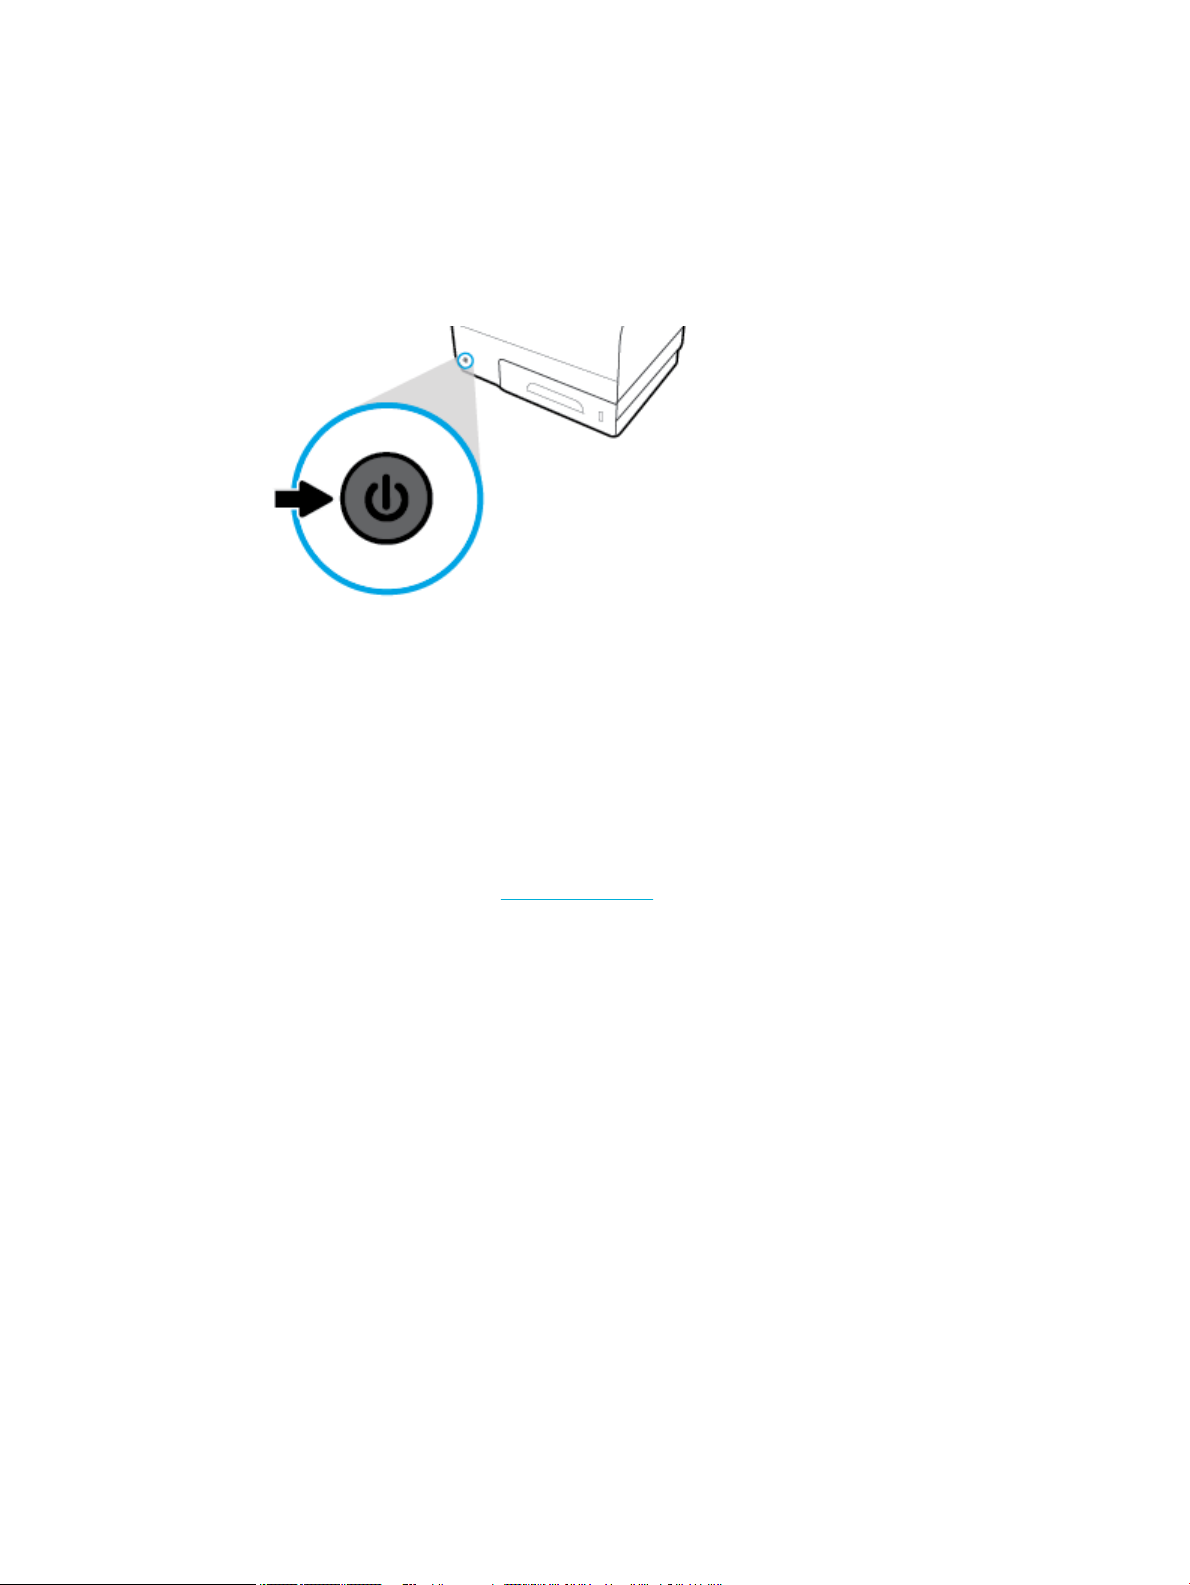
Tips for working with cartridges
Use the following tips to work with cartridges:
●
To prevent print-quality problems, do the following:
◦
Always turn the printer o using the power button on the front, and wait until the power button
light goes out.
◦
Make sure that all the cartridge slots are lled.
●
If you remove a cartridge from the printer for any reason, try to replace it again as soon as possible.
●
Do not open or unpackage cartridges until you are ready to install them.
●
Insert the cartridges into the correct slots. Match the color and icon of each cartridge to the color and
icon for each slot. Make sure the cartridges snap into place.
●
When the Estimated Cartridge Levels screen shows one or more cartridges in a low state, consider
getting replacement cartridges to avoid possible printing delays. You do not need to replace the
cartridges until prompted to. See Replace cartridges for more information.
●
Do not clean the printhead unnecessarily. This shortens the life of the cartridges.
●
If you are transporting the printer, do the following to prevent leaking from the printer or other damage
from occurring.
◦
Make sure you turn o the printer by pressing the power button in the front. Wait until all sounds
of internal motion stop before unplugging the printer.
◦
Make sure you leave the cartridges installed.
◦
The printer must be transported sitting at; it should not be placed on its side, back, front, or top.
62 Chapter 5 Cartridges ENWW
Page 79

6 Print
●
Print from a computer
●
Print from the control panel
●
Print with NFC
●
Print with HP ePrint
●
Print with AirPrint (OS X)
●
Tips for print success
ENWW 63
Page 80

Print from a computer
To print from a computer (Windows)
These instructions apply to printing on various media including the following.
●
Plain paper
●
Letterhead or preprinted forms
To print from a computer (Windows)
1. Load the supported media in the correct tray.
For more information, see Supported media sizes.
2. On the File menu in the software program, click Print.
3. Make sure your printer is selected.
4. Click the link or button that opens the Properties dialog box.
Depending on your software application, this link or button might be called Properties , Options,
Printer Setup, Printer Properties, Printer, or Set Preferences.
5. Set the correct print options for your type of media (plain paper, letterhead or preprinted, envelope,
photo paper, label, and so forth).
The following table describes the tabs and options that might be available in your software program.
Tab Description
●
●
Envelopes
Photos
●
●
Brochures
Labels
Printing Shortcuts A printing shortcut stores the settings that are appropriate for a particular kind of job, so that you
can set all the options with a single click.
This tab displays the current printing shortcuts and their settings, such as paper type, paper
source, and color or grayscale.
Paper/Quality This tab contains settings that dene the type of print job. For example, printing on envelopes
requires dierent size, source, and type of paper than printing on plain paper.
You can select from the following options:
●
Paper size: Includes Letter, Envelope #10, and Japanese Envelope Chou #3
●
Paper source: Includes Printer Auto Select, Manual Feed, Tray 1, and Tray 2
●
Paper type: Includes Plain, Letterhead, Preprinted, Envelope, HP Advanced Photo Papers,
HP Brochure Matte 180g, and Labels
NOTE: If Alternative Letterhead Mode (ALM) is enabled, and you are printing on
letterhead, preprinted, or prepunched forms, select Letterhead, Preprinted, or Prepunched
as the paper type. For more information, see Load letterhead or preprinted forms.
●
Special pages: Includes front and back covers, blank sheets, and preprinted sheets
●
Print quality: Includes Professional (for high-quality jobs) and General Oice (for everyday
jobs)
NOTE: You cannot print envelopes in General Oice mode.
64 Chapter 6 Print ENWW
Page 81

Tab Description
Eects This tab contains settings that temporarily aect the presentation of the print job.
You can select from the following options:
●
Resizing options: Includes actual size, a percentage of actual, or scaled to a specic media
size such as Letter or Envelope #10
●
Watermarks: Includes Condential and Draft
Finishing This tab contains settings that inuence the output of the print job.
You can select from the following options:
●
Print on both sides: Includes the option to print with room for binding on the left, right, or
neither side
●
Pages per sheet: Print more than one page per sheet, with the option to print borders
around each page
●
Orientation: Includes Portrait and Landscape
Job Storage This tab contains settings for printing a stored job from the control panel. Only one setting is
described here:
●
O (default): Prints a job without storing it on the printer
For information about the other settings, see Print using job storage.
Color This tab contains settings for printing in color or grayscale.
You can select from the following:
●
Print in Grayscale: Print in black ink only, or high-quality grayscale (which uses the color
cartridges in addition to the black cartridge)
●
Color Themes: These options determine how colors are rendered. They include various redgreen-blue themes such as in Default, Photo, or Vivid. For more information, see To adjust
or manage colors.
Advanced This tab contains settings that you may use or change infrequently.
You can select from the following:
●
Copies: Select the number of copies and whether to collate them
●
Reverse page order: Prints from the last page of the job to the rst page
●
Print all text as black: Helps reduce color cartridge usage
●
Ink Settings: Use the sliders to select the dry time, saturation level, and black ink spread
for the print job. For more information, see To adjust or manage colors.
6. Click OK to return to the Properties dialog box.
7. Click OK , and then click Print or click OK in the Print dialog box.
NOTE: After printing, remove any special media, such as envelopes or photo paper, from the product.
To print from a computer (OS X)
These instructions apply to printing on various media including the following.
ENWW Print from a computer 65
Page 82

●
Plain paper
●
Envelopes
●
Brochures
●
Letterhead or preprinted forms
To print from a computer (OS X)
1. Load the supported media in the correct tray.
For more information, see Supported media sizes.
2. On the File menu in the software program, click Print.
3. Make sure your printer is selected.
4. In the Presets menu, select a printing preset if needed.
5. On the Paper/Quality tab, click the pop-up menu next to the media type.
Set the correct print options for your media (plain paper, letterhead, preprinted, prepunched, envelope,
photo paper, label, and so forth). Print options can include size, type, tray, print resolution, and
automatic adjustments.
If you do not see options on the Print dialog box, click Show Details.
6. Click Print .
NOTE: After printing, remove any special media, such as envelopes or photo paper, from the product.
●
Photos
●
Labels
To set up printing shortcuts (Windows)
1. On the File menu in the software program, click Print.
2. Click the link or button that opens the Properties dialog box.
Depending on your software application, this link or button might be called Properties , Options,
Printer Setup, Printer Properties, Printer, or Set Preferences.
3. Click the Printing Shortcuts tab.
4. Select an existing shortcut as a base.
NOTE: Always select a shortcut before adjusting any of the settings on the right side of the screen. If
you adjust the settings and then select a shortcut, all your adjustments are lost.
5. Select the print options for the new shortcut.
6. Click the Save As button.
7. Type a name for the shortcut, and click the OK button.
To set up printing presets (OS X)
1. On the File menu in the software program, click Print.
2. Make sure your printer is selected.
3. From the Presets pop-up menu, select Default Settings.
66 Chapter 6 Print ENWW
Page 83

4. Click Save Current Settings as Preset.
5. Type a descriptive name for the preset, and save it for Only this printer or All printers.
To adjust or manage colors
Adjust the color of print output for the product by changing the settings in the printer driver software.
●
Choose a preset color theme for a print job
●
Adjust the color options for a print job manually
●
Match colors to your computer screen
●
Control access to color printing
Choose a preset color theme for a print job
1. On the File menu in the software program, click Print.
2. Make sure your printer is selected.
3. Click the link or button that opens the Properties dialog box.
Depending on your software application, this link or button might be called Properties , Options,
Printer Setup, Printer Properties, Printer, or Set Preferences.
4. Click the Color tab, and select a color theme from the Color Themes drop-down list (Windows) or the
RGB Color pop-up menu (OS X).
●
Default (sRGB): This theme sets the product to print RGB data in raw device mode. When using this
theme, manage color in the software program or in the operating system for correct rendering.
●
Vivid: The product increases the color saturation in the midtones. Use this theme when printing
business graphics.
●
Photo: The product interprets RGB color as if it were printed as a photograph using a digital mini
lab. The product renders deeper, more saturated colors dierently than with the Default (sRGB)
theme. Use this theme when printing photos.
●
Photo (Adobe RGB 1998): Use this theme with printing digital photos that use the AdobeRGB color
space rather than sRGB. Turn o color management in the software program when using this
theme.
●
None: No color theme is used.
Adjust the color options for a print job manually
Use the printer driver software to clear default color settings and adjust settings manually. Use the built-in
help in the driver software to understand how each setting aects print output.
1. On the File menu in the software program, click Print.
2. Make sure your printer is selected.
3. Do one of the following.
●
Windows: Click the link or button that opens the Properties dialog box.
ENWW Print from a computer 67
Page 84

Depending on your software application, this link or button might be called Properties , Options,
Printer Setup, Printer Properties, Printer, or Set Preferences.
●
OS X: From the Copies & Pages pop-up menu, select Color. Then, deselect HP EasyColor.
4. Continue to the Advanced tab or pane.
●
Windows: On the Advanced tab, click Ink Settings.
●
OS X: Click the disclosure triangle next to Advanced.
5. Use the sliders to make the following adjustments.
●
Dry Time: Move the slider to the right to increase the amount of time that the printer takes to dry a
printed page. Increasing the drying time works best for jobs printed on plain paper.
●
Saturation: Move the slider to the right to increase the amount of ink applied. Increasing the
saturation works best for jobs printed on brochure or photo paper.
●
Black Ink Spread: Move the slider to the left to limit the spread of black ink onto adjacent areas of
color on the printed page. Decreasing the spread works best for jobs printed on plain paper.
NOTE: Changing color settings manually can aect output. HP recommends that only color
graphics experts change these settings.
6. Click OK to save your adjustments and close the window, or click Reset to return the settings to the
factory defaults (Windows).
Match colors to your computer screen
For most users, the best method for matching colors is to print sRGB colors.
The process of matching printer output color to your computer screen is complex, because printers and
computer monitors use dierent methods of producing color. Monitors display colors by using light pixels
that use an RGB (red, green, blue) color process, but printers print colors by using a CMYK (cyan, magenta,
yellow, and black) process.
Many factors can inuence your ability to match printed colors to those on your monitor:
●
Print media
●
Printing process (cartridge, press, or laser technology, for example)
●
Overhead lighting
●
Personal dierences in perception of color
●
Software programs
●
Printer drivers
●
Computer operating systems
●
Monitors
●
Video cards and drivers
●
Operating environment (humidity, for example)
68 Chapter 6 Print ENWW
Page 85

Control access to color printing
HP’s suite of color access control tools allows you to enable or disable color by individual users or groups and
applications. For more information, visit the HP Universal Print Driver website.
The HP Embedded Web Server also allows you to disable color faxing, color copying, and color print from
memory devices. For more information, see HP Embedded Web Server.
Print from the control panel
Print using job storage
You can create and store jobs on the product, which you or others can print later. To save printer memory or
to protect sensitive information, you can delete the stored jobs from the product.
●
To enable job storage
●
To apply job storage to one or all print jobs
●
To print a job stored on the printer
●
To delete a job stored on the printer
To enable job storage
Job storage is enabled, by default. You can disable or re-enable it, as needed.
Disable or enable job storage (Windows)
1. Click Start, and do one of the following, depending on your operating system.
●
Windows 10: Click Settings, click Devices, and then click Printers and Scanners.
●
Windows 8, 8.1: Click Control Panel, click Hardware and Sound, and then click Devices and
Printers.
●
Windows 7: Click Devices and Printers.
2. Right-click your printer, and then click Properties or Printer properties.
3. In the Printer Properties window, click the Device Settings tab.
4. From the Job Storage drop-down list, select Disable to turn the feature o or select Automatic to turn it
on.
5. Click Apply, and then click OK.
Disable or enable job storage (OS X)
1. Open HP Utility. For more information, see Open HP Utility.
2. Make sure your printer is selected.
3. Click Devices.
4. Select Allow Stored Jobs on this printer, and set the storage job settings.
ENWW Print from the control panel 69
Page 86

To apply job storage to one or all print jobs
You can apply the job storage feature to a single job or to all print jobs. When you do this, the single job or all
jobs are stored in the printer memory so that you can print them later from the printer control panel.
Apply job storage to one or all print jobs (Windows)
1. Do one of the following.
●
For one print job: On the File menu in the software program, click Print.
●
For all print jobs: Click Start, and do one of the following, depending on your operating system.
◦
Windows 10: Click Settings, click Devices, and then click Printers and Scanners.
◦
Windows 8, 8.1: Click Control Panel, click Hardware and Sound, and then click Devices and
Printers.
◦
Windows 7: Click Devices and Printers.
2. Make sure your printer is selected.
3. Continue to the Job Storage tab.
●
For one print job: Click the link or button that opens the Properties dialog box. Then, click the Job
Storage tab.
●
For all print jobs: Right-click your printer, click Printing preferences, and then click the Job
Storage tab.
4. On the Job Storage tab, select one of the following options:
●
Proof and Hold: Prints the rst copy of a multiple-copy job so you can verify the print quality and
prints the remaining copies when you request them at the printer control panel
●
Personal Job: Does not print the job until you request it at the printer control panel
●
Quick Copy: Prints the requested number of copies of the job and stores a copy of it so you can
print it again later
●
Stored Job: Prints the job on the printer and lets other users print it at any time
●
Make Job Private/Secure: Applies to Personal or Stored Jobs. You can require a personal
identication number (PIN) or password to print the stored job from the control panel.
◦
None: No PIN or password is required.
◦
PIN to print: A four-digit PIN is required.
◦
Encrypt Job (with password) (for Windows 7 or later): A password, consisting of 4-32
characters, is required.
5. To use a custom user name or job name, click Custom and then type the user name or the job name.
If you type a job name that is already in use, select one of the following:
●
Use Job Name + (1-99): Append a unique number to the end of the job name
●
Replace Existing File: Overwrite the existing stored job with the new one
6. Click OK , and then click Print to store the job on the printer.
70 Chapter 6 Print ENWW
Page 87

Apply job storage to one or all print jobs (OS X)
1. Do one of the following.
●
For one print job: On the File menu in the software program, click Print. Then, in the pop-up menu
below Presets, select Job Storage.
●
For all print jobs: From the Copies & Pages pop-up menu, select Job Storage.
2. Make sure your printer is selected.
3. From the Mode pop-up menu, select one of the following options:
●
Quick Copy: Prints the requested number of copies of the job and stores a copy of it so you can
print it again later
●
Proof and Hold: Prints the rst copy of a multiple-copy job so you can verify the print quality and
prints the remaining copies when you request them at the printer control panel
●
Stored Job: Prints the job on the printer and lets other users print it at any time
●
Personal Job: Does not print the job until you request it at the printer control panel
4. To use a custom user name or job name, click Custom and then type the user name or the job name.
●
If you type a job name that is already in use, select one of the following:
◦
Use Job Name + (1-99): Append a unique number to the end of the job name
◦
Replace Existing File: Overwrite the existing stored job with the new one
5. For Personal or Stored Jobs, select Use PIN to Print if you want to require a four-digit personal
identication number (PIN) to print the stored job from the control panel.
6. Click Print to store the job on the printer.
To print a job stored on the printer
1. On the control panel, touch the Print application folder.
2. In the display, touch the Job Storage icon.
3. Navigate to the stored job you want, and open it.
NOTE: If the job is private or encrypted, enter the PIN or password.
4. Select the number of copies, and touch Print.
To delete a job stored on the printer
1. On the control panel, touch the Print application folder.
2. In the display, touch the Job Storage icon.
3. Open the folder containing your stored job, and do one of the following.
●
To delete one job, touch the job you want to delete.
●
To delete all the jobs in the folder, touch the trash icon, and then touch Delete.
ENWW Print from the control panel 71
Page 88

NOTE: If some jobs are protected with a PIN or password, touch All jobs without a PIN or
password or All jobs with the same PIN or password and follow the onscreen instructions.
NOTE: If the job is private or encrypted, enter the PIN or password.
4. If needed, touch the trash icon, and then touch Delete.
Print from a USB device
This product features printing directly from a USB storage device (Plug and Print), so you can quickly print
les without sending them from a computer. The product accepts standard USB storage accessories in the
USB port near the control panel.
You can print the following types of les.
●
.DOC
●
.DOCX
●
.JPEG
1. Insert the USB device into the USB port on the front of the product. The Memory Device Options menu
opens.
2. In the display, touch the Print Documents icon.
3. Navigate to the job you want on the USB device, and open it.
4. Select the number of copies, and touch Start Black or Start Color to start printing.
Print with NFC
With Near Field Communications (NFC), you can walk up to the product and print from your smart phone or
tablet. To print using NFC, in the control panel touch , and follow the onscreen instructions.
Print with HP ePrint
With HP ePrint, you can print anywhere, anytime, from a mobile phone, laptop, or any other mobile device.
HP ePrint works with any email-capable device. If you can email, you can print to an HP ePrint-enabled
product. For more details, visit the HP Connected website.
●
.JPG
●
.PDF
●
.PNG
●
.PPT
●
.PPTX
●
.TIFF
To use HP ePrint, ensure the following:
●
You have an Internet- and email-capable computer or mobile device.
●
HP Embedded Web Server and HP ePrint are enabled on the printer. For more information, see HP
Embedded Web Server.
Print o site by sending an email with the HP ePrint app
If you are on the road, you can print a document by sending an email with the HP ePrint app to your HP ePrintenabled printer. See Web Services for more information.
72 Chapter 6 Print ENWW
Page 89

NOTE: Obtain your HP ePrint email address while in the oice. For instructions, see To nd the HP ePrint
email address.
1. On your computer or mobile device, open your email application.
2. Create a new email message, and then attach the le that you want to print.
3. Enter the HP ePrint email address in the “To” eld, and then select the option to send the email
message.
NOTE: Do not enter any additional email addresses in either the "To" or "Cc" elds. The HP ePrint
server does not accept print jobs if there are multiple email addresses.
Print from an on-site computer or mobile device
If you are at home or in the oice, you can print from a smartphone or tablet to your printer easily.
NOTE: If you want to print without accessing the network, see Use Wi-Fi Direct to connect a computer or
device to the product for more information.
1. Make sure your mobile device and printer are on the same network.
2. Select the photo or document you want to print and choose your printer.
3. Conrm print settings and print.
Print with AirPrint (OS X)
Printing using Apple’s AirPrint is supported for iPad (iOS 4.2), iPhone (3GS or later), iPod touch (third
generation or later), and Mac (OS X v10.9 or later).
To use AirPrint, ensure the following:
●
The printer and the Apple device are connected to the same network as your AirPrint-enabled device. For
more information, visit the HP Mobile Printing website. If a local version of this website is not available
in your country/region, you might be directed to the HP Mobile Printing site in another country/region or
language.
●
Load paper that matches the paper settings of the printer.
To re-enable AirPrint
AirPrint is enabled, by default. If it becomes disabled, you can use the following instructions to enable it
again.
1. Open the EWS. For more information, see Open the EWS.
2. On the Network tab, click AirPrint and then click Status.
3. In the AirPrint Status row, click Turn On AirPrint.
ENWW Print with AirPrint (OS X) 73
Page 90

Tips for print success
Software settings selected in the print driver apply only to printing. They do not apply to copying or scanning.
●
Cartridge tips
●
Paper loading tips
●
Printer settings tips (Windows)
●
Printer settings tips (OS X)
Cartridge tips
●
If the print quality is unacceptable, see Improve print quality for more information.
●
Use Original HP cartridges.
Original HP cartridges are designed and tested with HP printers and papers to help you easily produce
great results, time after time.
NOTE: HP cannot guarantee the quality or reliability of non-HP cartridges. Product service or repairs
required as a result of using a non-HP cartridge will not be covered under warranty.
If you believe you purchased Original HP cartridges, visit the HP anticounterfeit website.
●
Install the black and color cartridges correctly.
For more information, see Replace cartridges.
●
Check the estimated cartridge levels to make sure there is suicient ink.
Supply level warnings and indicators provide estimates for planning purposes only.
For more information, see Check the estimated cartridge levels.
NOTE: When you receive a low-cartridge warning message, consider having a replacement cartridge
available to avoid possible printing delays. You do not need to replace the cartridges until prompted to.
●
To protect the product from damage, always turn o the printer by using the power button on the front.
Paper loading tips
For more information, see Supported media sizes.
●
Ensure the paper is loaded in the input tray properly, and set the correct media size and media type.
Upon loading paper in input tray, you will be prompted to set the media size and media type.
●
Load a stack of paper (not just one page). All the paper in the stack should be of the same size and type
to avoid a paper jam.
●
Ensure that paper loaded in the input tray lays at and the edges are not bent or torn.
●
Adjust the paper-width guides in the input tray to t snugly against all paper. Make sure the guides do
not bend the paper in the tray.
74 Chapter 6 Print ENWW
Page 91

Printer settings tips (Windows)
●
To change default print settings, do one of the following:
◦
In the HP Printer Assistant, click Print, Scan & Fax , and then click Set Preferences.
◦
On the File menu in the software program, click Print. Open the Printer Properties dialog box.
●
On the Color or Finishing tab of the printer driver, set the following options as needed:
◦
Print in Grayscale: Allows you to print a black-and-white document using only the black cartridge.
Click Black Ink Only, and then click OK .
◦
Pages per sheet: Helps you specify the order of the pages if you print document in more than two
pages per sheet.
◦
Booklet Layout: Allows you to print a multiple-page document as a booklet. It places two pages on
each side of a sheet that can then be folded into a booklet in half size of the paper. Select a binding
method from the drop-down list, and then click OK .
●
Left binding: The binding side after folded into a booklet appears at the left side. Select the
option if your reading habit is from left to right.
●
Right binding: The binding side after folded into a booklet appears at the right side. Select
the option if your reading habit is from right to left.
◦
Print page borders: Allows you to add the borders to the pages if you print the document with two
or more pages per sheet.
●
You can use printing shortcuts to save time setting printing preferences.
Printer settings tips (OS X)
●
In the software program, be sure to select the correct paper size loaded in the printer.
a. From the File menu, select Page Setup.
b. In Format For, make sure your printer is selected.
c. From the pop-up menu, select Paper Size.
●
In the software program, be sure to select the correct paper type and quality loaded in the printer.
a. On the File menu in the software program, click Print.
b. From the Copies & Pages pop-up menu, select Paper/Quality, and select the correct paper type
and quality.
●
To print a black-and-white document using only the black cartridge, do the following.
a. On the File menu in the software program, click Print.
b. In the Print window, from the pop-up menu, select Copies & Pages, and then select Color.
c. Deselect HP EasyColor, and then select Print Color as Gray.
d. Select Black Ink Only.
ENWW Tips for print success 75
Page 92

7 Copy and scan
●
Copy
●
Scan
●
Tips for copy and scan success
76 Chapter 7 Copy and scan ENWW
Page 93

Copy
●
Copy settings
●
Load and copy identication cards
●
Copy photos
●
Load and copy mixed-size originals
●
Copy on both sides automatically
●
Cancel a copy job
Copy settings
Adjust lightness or darkness for copies
1. Load your original print-side down on the scanner glass or print-side up in the automatic document
feeder.
For more information, see Load the scanner or Load the automatic document feeder.
2. On the control panel, touch the Copy application folder.
3. In the display, touch the Document icon.
4.
Touch to view the Copy Settings menu.
5. Touch Lighter/Darker.
6. Use the slider to lighten or darken the printed copies.
Select a paper tray and paper size for copies
1. Load the paper onto which you want to copy into a tray.
For more information, see Supported media sizes.
2. On the control panel, touch the Copy application folder.
3. In the display, touch the Document icon.
4.
Touch to view the Copy Settings menu.
5. Touch Tray Selection.
6. Select the tray into which you loaded the paper in step 1.
Reduce or enlarge a copy
1. Load your original print-side down on the scanner glass or print-side up in the automatic document
feeder.
For more information, see Load the scanner or Load the automatic document feeder.
2. On the control panel, touch the Copy application folder.
ENWW Copy 77
Page 94

3. In the display, touch the Document icon.
4.
Touch to view the Copy Settings menu.
5. Touch Resize, and select one of the resize menu options.
Load and copy identication cards
Use this feature to copy both sides of identication cards, or other small-sized documents, onto the same
side of one sheet of paper. The product prompts you to copy the rst side, and then to rotate the second side
on the scanner glass and copy again. The product prints both images on a single page.
1. Load the ID card onto the scanner glass. Orient the card using the media mark at the back-left of the
scanner glass.
For more information, see Load the scanner.
2. Close the scanner lid.
3. On the control panel, touch the Copy application folder.
4. In the display, touch the ID Card icon.
5.
Touch to view the Copy Settings menu.
6. Select the tray, copy quality, and lightness/darkness settings.
78 Chapter 7 Copy and scan ENWW
Page 95

7. Follow the prompts on the control panel to copy the rst side of the ID card, rotate and orient the card
Copy photos
NOTE: Copy photos from the scanner glass, not from the document feeder.
1. Place the photo on the scanner glass, picture-side down at the upper-left corner of the glass, and close
on the scanner glass, and then complete copying and printing the ID card.
the scanner lid.
For more information, see Load the scanner.
2. On the control panel, touch the Copy application folder.
3. In the display, touch the Document icon.
4.
Touch to view the Copy Settings menu.
5. Touch Enhancements, and then touch Mixed.
6.
Touch to return to the home page, and then touch the Copy Document icon.
7. Touch Start Black or Start Color to start copying.
ENWW Copy 79
Page 96

Load and copy mixed-size originals
Use the scanner glass to make copies of mixed-size originals.
NOTE: You can use the document feeder to copy mixed-size originals only if the pages share a common
dimension. For example, you can combine Letter and Legal size pages because they have the same width.
Stack the pages so the top edges are even with each other, and so that the pages have the same width but
varying lengths.
1. Load paper that is large enough for the largest page in the original document into a tray.
2. Place one page of the original document face down on the scanner glass. Use the media mark at the
back-left of the glass to orient the document.
For more information, see Load the scanner.
3. On the control panel, touch the Copy application folder.
4. In the display, touch the Document icon.
5. Specify the number of copies, and select the tray containing the paper for this job.
6. Follow the prompts on the control panel to copy the document loaded on the glass. Repeat steps 2–6 for
each original page.
Copy on both sides automatically
1. Load originals in the document feeder.
For more information, see Load the automatic document feeder.
2. On the control panel, touch the Copy application folder.
3. In the display, touch the Document icon.
4.
Touch to view the Copy Settings menu.
5. Touch 2–sided, and select a two-sided copying option.
Cancel a copy job
●
If a copying job is in progress, touch on the printer control panel at any time to cancel the job.
●
If the originals for the job are loaded in the document feeder, wait until the product stops feeding
originals, and then remove the originals from the ADF loading area and the ADF output tray.
80 Chapter 7 Copy and scan ENWW
Page 97

Scan
●
Scan to a USB drive
●
Scan to a computer
●
Scan to email
●
Scan to a network folder
●
Scan to SharePoint
●
Scan using HP scanning software
●
Scan using other software
●
Scan using Webscan
●
Scan documents as editable text
Scan to a USB drive
1. Load your original print-side down on the scanner glass or print-side up in the automatic document
feeder.
For more information, see Load the scanner or Load the automatic document feeder.
2. Insert a USB device into the USB port on the front of the product.
3. On the control panel, touch the Scan application folder. Then, touch the USB icon.
4.
Touch to select color, size, and resolution options from the Settings menu.
5.
Touch to return to the Scan to USB menu, and select a le type from the Save As list.
6. Touch Filename, and use the keypad to assign a name to the scanned le. Touch Done .
7. Touch Start Scan.
Scan to a computer
Before scanning to a computer, make sure you have already installed the HP recommended printer software.
The printer and computer must be connected and turned on.
In addition, on Windows computers, the printer software must be running before you scan.
NOTE: You can use the HP printer software to scan documents into editable text. For more information, see
Scan documents as editable text.
To set up scan to computer
The scan to a computer feature is enabled by default from the factory. Follow these instructions if the feature
has been disabled, and you want to enable it again.
ENWW Scan 81
Page 98

Set up scanning to a computer (Windows)
1. Open the printer software. For more information, see Open the printer software (Windows).
2. Go to the Scan section.
3. Select Manage Scan to Computer.
4. Click Enable.
Set up scanning to a computer (OS X)
1. Open HP Utility. For more information, see Open HP Utility.
2. Select Scan to Computer.
3. Select Enable Scan to Computer.
To scan to a computer from the control panel
1. Load your original print-side down on the scanner glass or print-side up in the automatic document
feeder.
For more information, see Load the scanner or Load the automatic document feeder.
2. On the control panel, touch the Scan application folder.
3. In the display, touch the Computer icon and select the computer.
4. Touch Scan Shortcut, select a scan option, and then touch Start Scan.
Scan to email
The Scan-to-Email App is an application that allows you to quickly scan and email photos or documents to the
specied recipients directly from your HP printer. You can set up your email addresses, log in to your accounts
with the given PIN codes, and then scan and email your documents.
To set up scan to email
1. Make sure that HP Embedded Web Server is enabled on the printer. For more information, see HP
Embedded Web Server.
2. On the control panel, touch the Scan application folder.
3. In the display, touch the Email icon.
4. On the screen, touch Next, and then touch one of the following:
●
Using the HP Software Installed on a Computer: Follow the onscreen instructions for setting up the
scan-to-email feature in the printer software.
●
Using a Web Browser: Follow the onscreen instructions for setting up the scan-to-email feature in
the HP Embedded Web Server (EWS).
82 Chapter 7 Copy and scan ENWW
Page 99

To scan a document or photo to email
Scan a document or photo to email from the control panel
1. Load your original print-side down on the scanner glass or print-side up in the automatic document
feeder.
For more information, see Load the scanner or Load the automatic document feeder.
2. On the control panel, touch the Scan application folder.
3. In the display, touch the Email icon, and select the email account you want.
NOTE: If you do not have an account, set up the scan-to-email feature.
4. If prompted, enter the PIN.
5. Verify or change the information in the To, Subject, and File Name elds. To change the email recipients,
touch
6. Touch Touch to Preview, and then touch Start Scan.
Scan a document or photo to email from the printer software
1. Load your original print-side down on the scanner glass or print-side up in the automatic document
feeder.
.
For more information, see Load the scanner or Load the automatic document feeder.
2. Double-click the printer icon on the desktop and then click Scan a Document or Photo.
3. Select the type of scan you want, and click Scan and follow the onscreen instructions.
NOTE:
●
Click the More link in the top-right corner of the Scan dialog box to review and modify settings for
any scan.
●
If Show Viewer After Scan is selected, you can make adjustments to the scanned image in the
preview screen.
To change account settings
1. Open the EWS. For more information, see Open the EWS.
2. On the Scan tab, click Scan to Email, and then click Scan to Email Setup.
3. In the setup page, click Edit to change an outgoing email prole and follow the onscreen instructions.
4. To verify the changes to the prole, click Save and Test and follow the onscreen instructions.
5. When done, click Apply.
Scan to a network folder
●
To set up scan to a network folder
●
To scan to a network folder
ENWW Scan 83
Page 100

To set up scan to a network folder
Set up scan to a network folder in the EWS
1. Open the EWS. For more information, see Open the EWS.
2. On the Scan tab, click Scan to Network Folder, and then click Network Folder Setup.
3.
In the setup page, click , and follow the onscreen instructions for adding network folder proles.
When nished, click Next .
4. In the authentication page, follow the onscreen instructions to set up credentials for logging into
SharePoint. When nished, click Next .
5. In the settings page, follow the onscreen instructions for conguring scan settings, such as paper size
and scan resolution. When nished, click Save.
Set up scan to a network folder in the HP Printer Assistant
1. Open the HP Printer Assistant. For more information, see Open the HP Printer Assistant.
2. On the Scan tab, click Scan to Network Folder Wizard and follow the onscreen instructions.
To scan to a network folder
Scan to a network folder from the control panel
1. Load your original print-side down on the scanner glass or print-side up in the automatic document
feeder.
For more information, see Load the scanner or Load the automatic document feeder.
2. On the control panel, touch the Scan application folder.
3. Touch the Network Folder icon, and then navigate to the network folder.
4. If prompted, enter the PIN.
5. Verify or change the information in the Save As and File Name elds.
6. Touch Touch to Preview, and then touch Start Scan.
Scan to a network folder from the printer software
1. Load your original print-side down on the scanner glass or print-side up in the automatic document
feeder.
For more information, see Load the scanner or Load the automatic document feeder.
2. Double-click the printer icon on the desktop and then click Scan to Network Folder Wizard.
3. Select the type of scan you want, and click Scan and follow the onscreen instructions.
84 Chapter 7 Copy and scan ENWW
 Loading...