

HP PageWide P77940dn+, PageWide P77950dn+, PageWide P77960dn+, E77650z+, E77660z+ Installation Guide [id]
Page 1
HP PageWide Managed Color Flow MFP E77650z+, E77660z+
HP PageWide Managed Color MFP P77940dn+, P77950dn+, P77960dn+
FDSV
ORFN
$ 6 ' ) * + - . /
VKLIW
=
; & 9 % 1 0
#
D
OW
³
H
QWH
U
µ
"
DOW
V
K
L
IW
EN
Installation Guide
ZHCN
安装指南
ID
Panduan Penginstalan
JA
設置ガイド
E77650z+
E77660z+
KO
설치 설명서
TH
ZHTW
安裝指南
P77940dn+
P77950dn+
P77960dn+
support.hp.com
www.hp.com/videos/PageWide
www.hp.com/support/pwcolormfpE77650
www.hp.com/support/pwcolormfpE77660
www.hp.com/support/pwcolorP77940mfp
www.hp.com/support/pwcolorP77950mfp
www.hp.com/support/pwcolorP77960mfp
1
Page 2
&
)
&
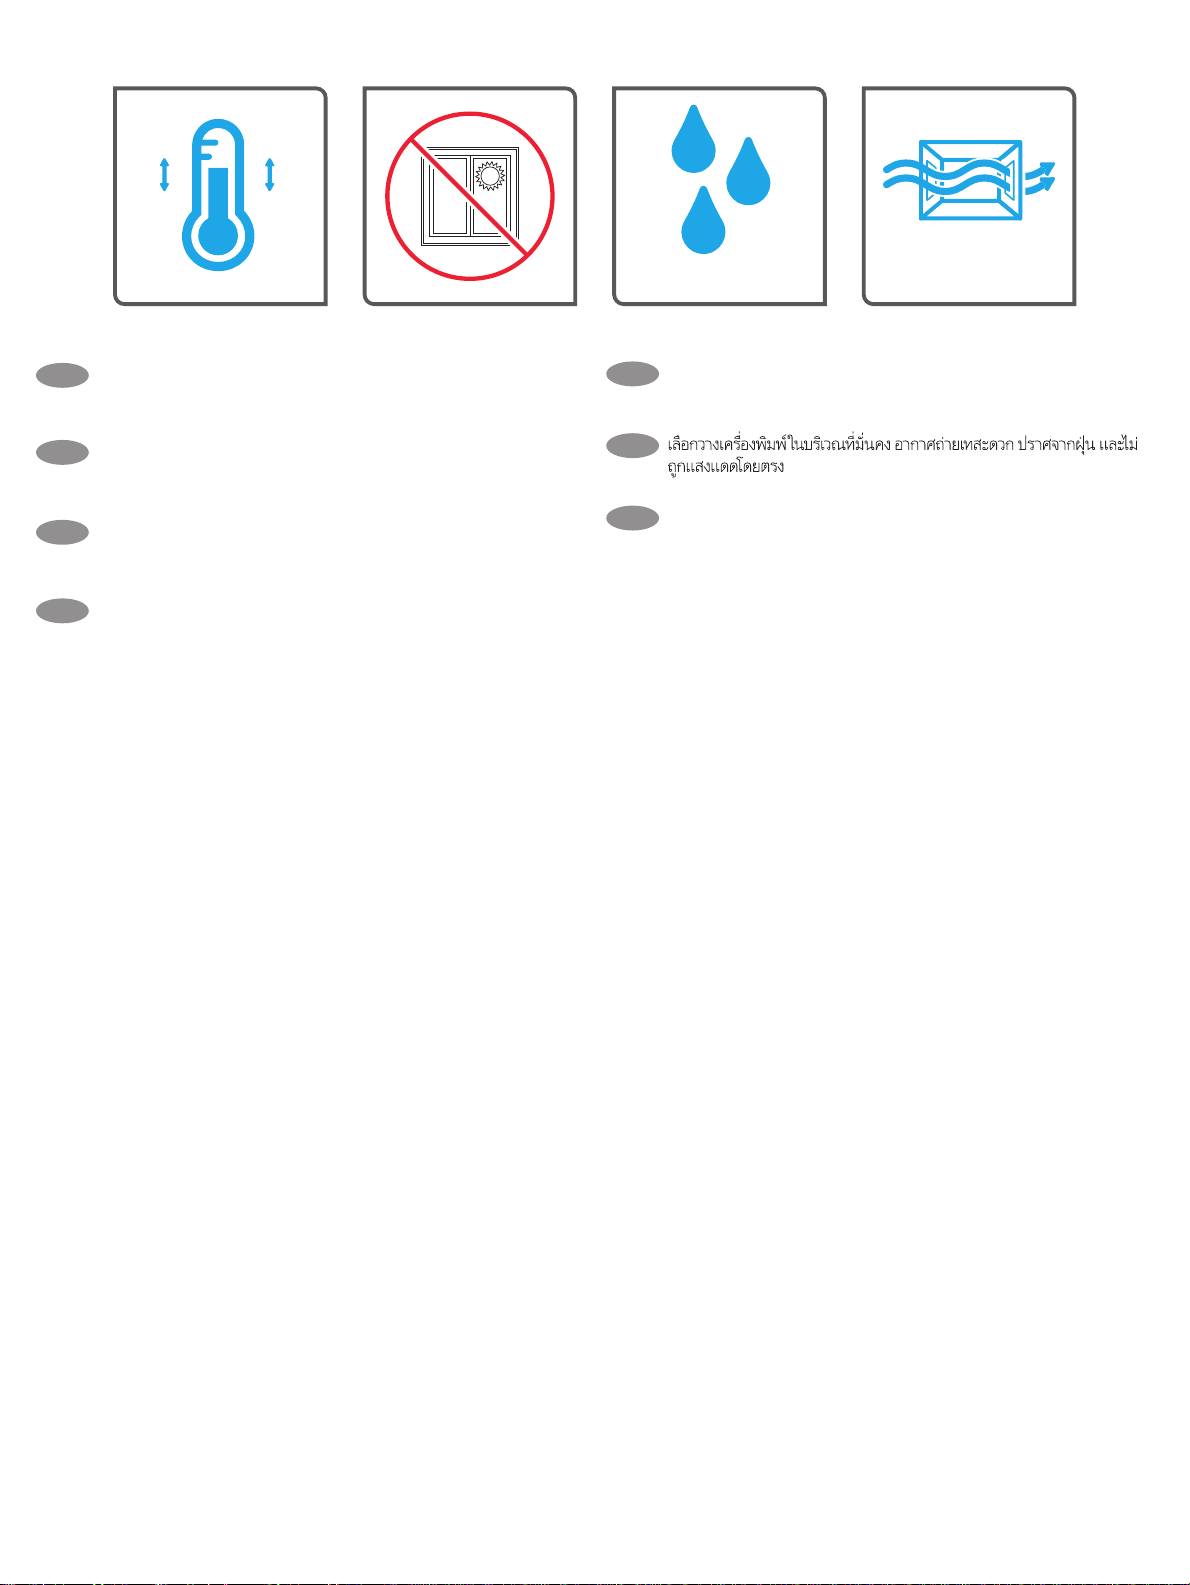
Select a sturdy, well-ventilated, dust-free area, away from direct
EN
sunlight to position the printer.
ZHCN
选择一个稳固、通风良好、无尘且远离日光直射
)
的区域放置打印机。
Untuk meletakkan printer, pilih tempat yang kokoh, berventilasi
ID
baik, bebas debu, dan jauh dari sinar matahari langsung.
プリンタの設置場所には、直射日光を避け、通気がよく埃の
JA
少ない、しっかりした場所を選んでください。
직사광선을 피해 바닥이 단단하고 환기가 잘 되며 먼지가 없는 장
KO
소를 선택하여 프린터를 내려 놓습니다.
TH
請選擇平整穩固、通風良好且沒有灰塵的區域放置本印表機,
ZHTW
並避免陽光直射。
2
Page 3
& 0
< .
PP
LQ
NJ
OE
PP
LQ
3
LQ
PP
Page 4
1
39$ 39$ 39$
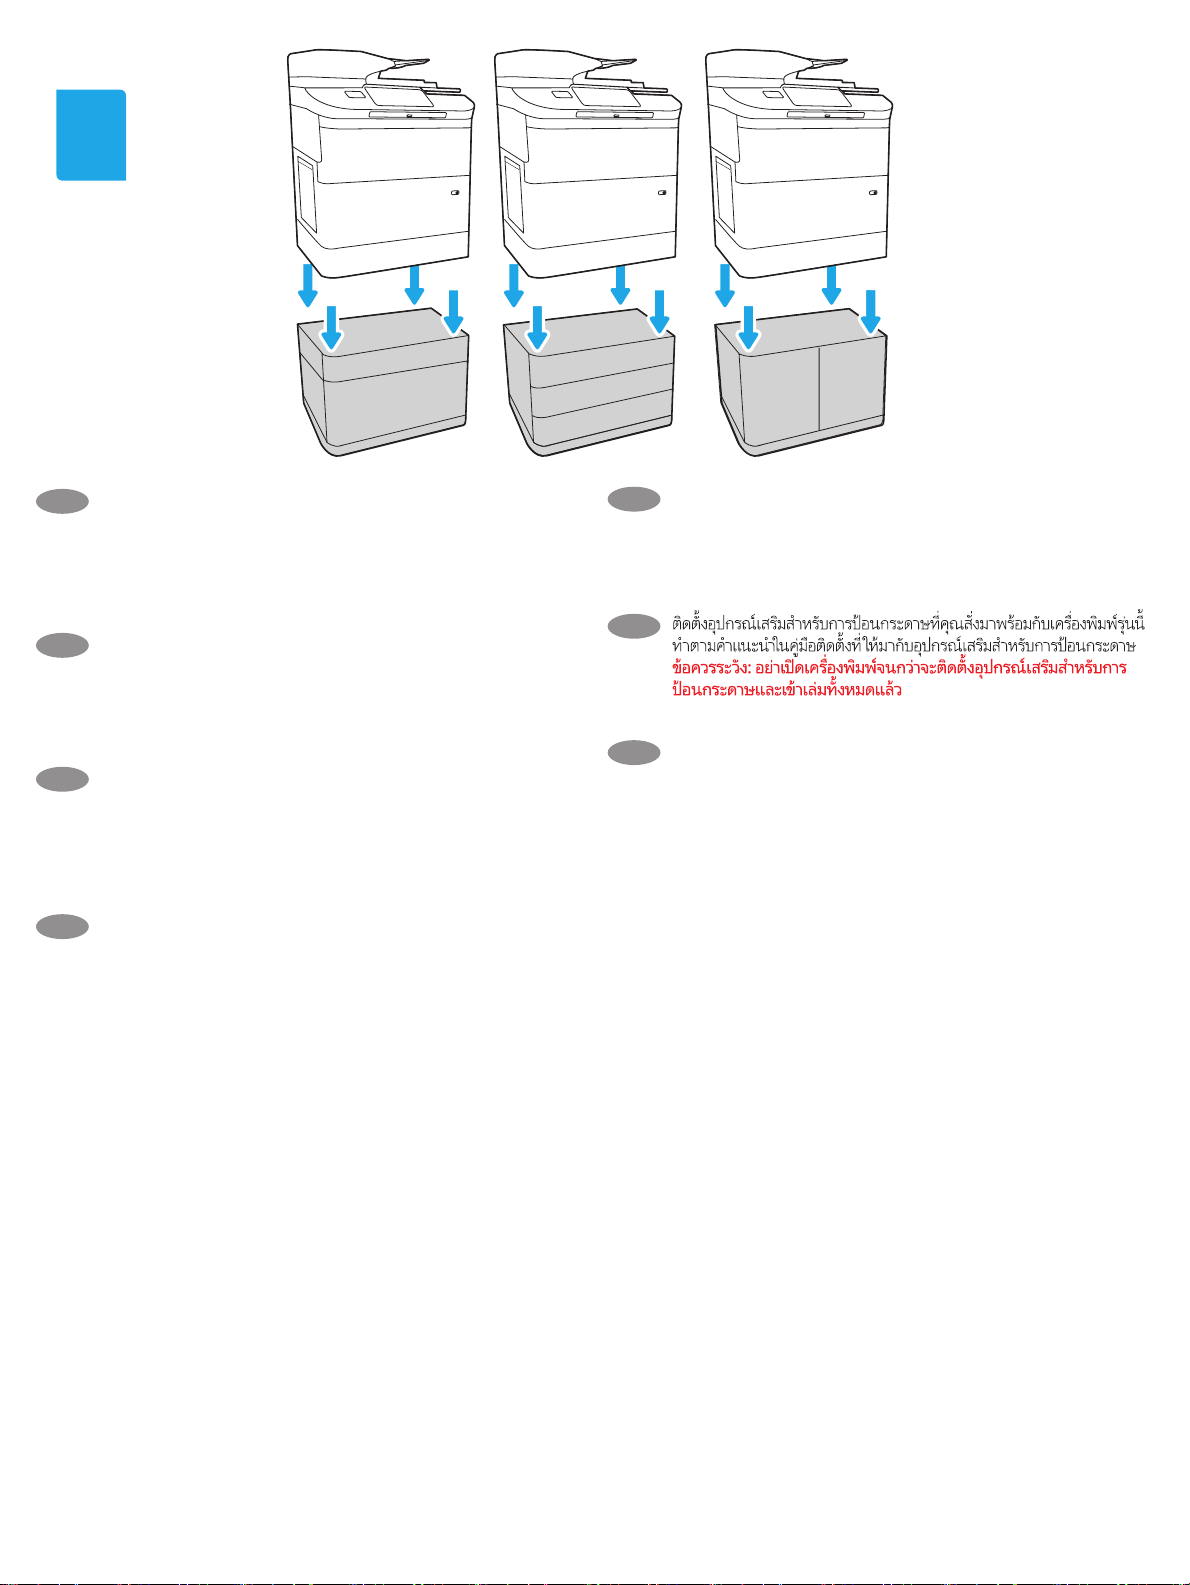
Install the input accessory that you ordered with this model.
EN
Followthe instructions on the install guide that came with the
input accessory.
CAUTION: Do not power on the printer until the input and
nishing accessories are attached.
安装随此型号订购的进纸附件。请按照进纸附件
ZHCN
随附的安装指南上的说明进行操作。
注意:在所有进纸附件和装订附件安装完成前,
请勿开启打印机。
Pasang aksesori input yang telah dipesan bersama model ini. Ikuti
ID
petunjuk pada panduan penginstalan yang disertakan bersama
aksesori input.
PERHATIAN: Pasang semua aksesori input dan nishing sebelum
menyalakan printer.
このモデルと共に注文した給紙アクセサリを取り付けま
JA
す。給紙アクセサリに付属していた設置ガイドの手順に従
ってください。
注意:すべてのアクセサリを接続するまでプリンタの電源
は入れないでください。
이 모델과 함께 주문한 입력 액세서리를 설치하십시오. 입력
KO
부속품과 함께 제공된 설치 가이드의 지침을 따릅니다.
주의: 입력 및 피니셔 부속품이 부착될 때까지 프린터 전원을
켜지 않습니다.
TH
ZHTW
安裝您根據此機型訂購的進紙附件。依照進紙附件隨附的安
裝指南的指示進行安裝。
注意:在所有進紙附件和完稿器附件都裝好之前,請勿開啟
印表機電源。
4
Page 5
1.
2.
3.
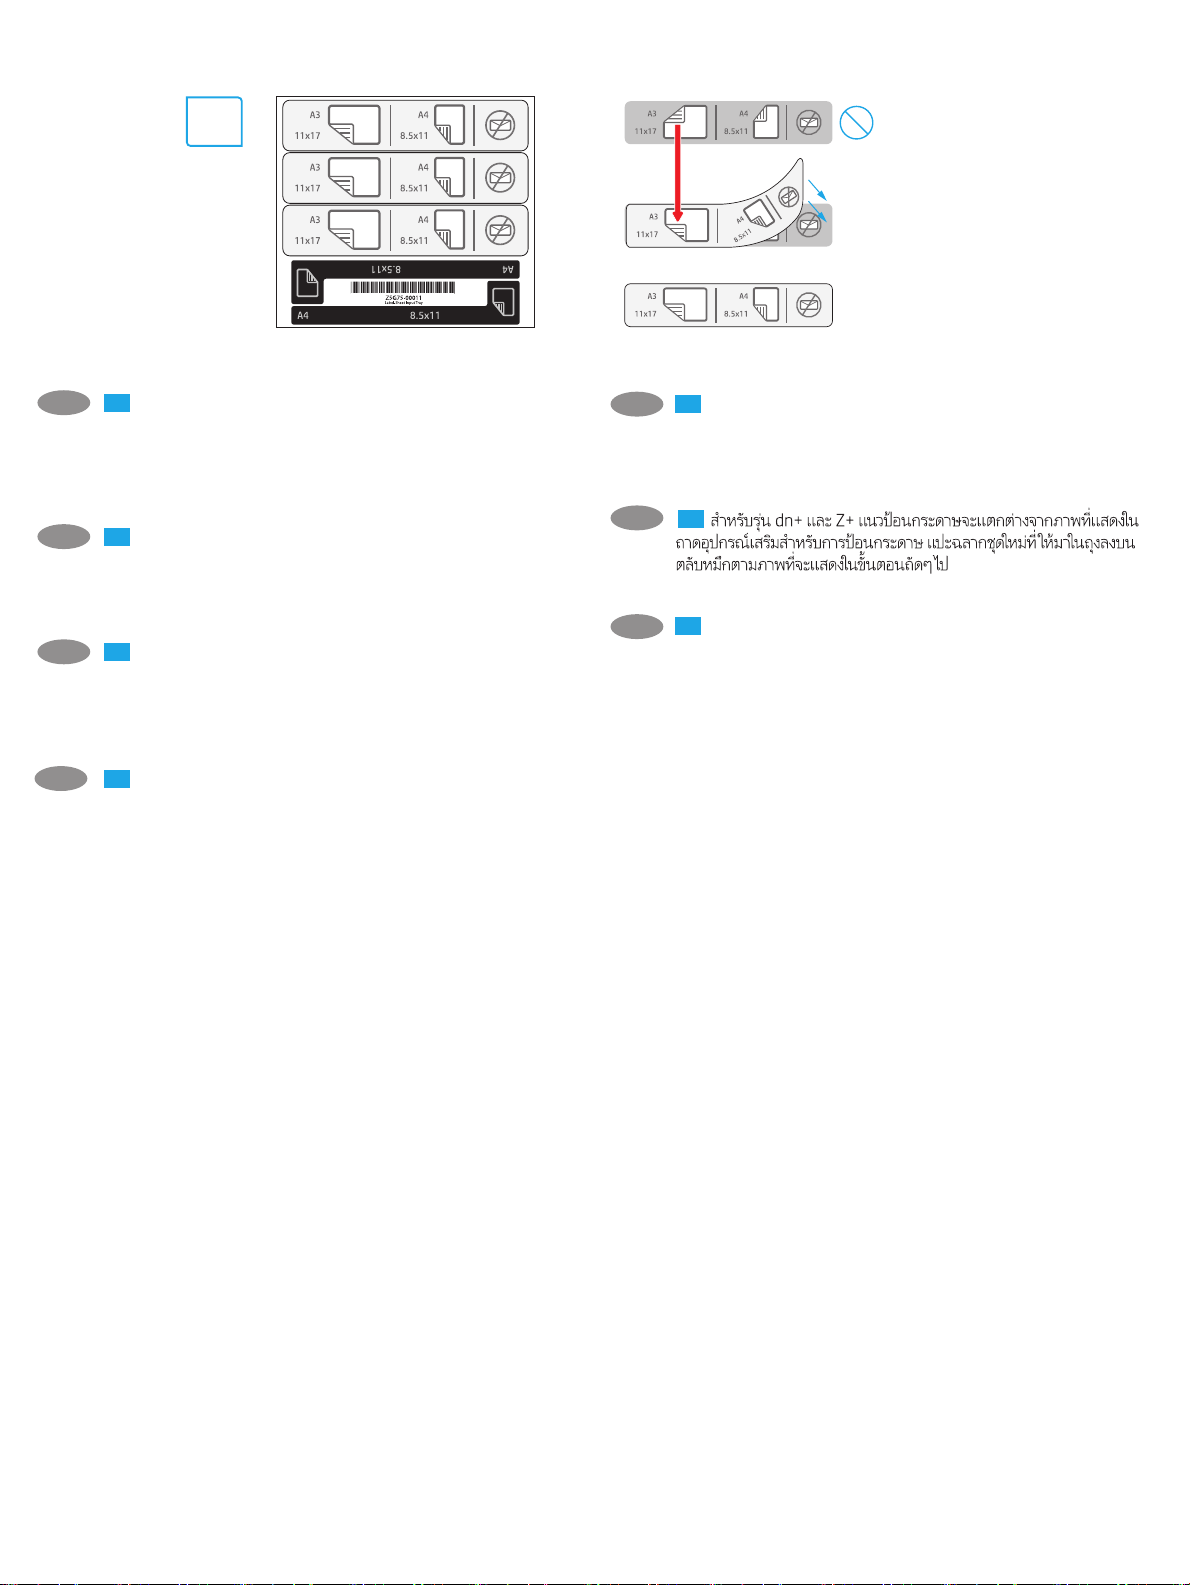
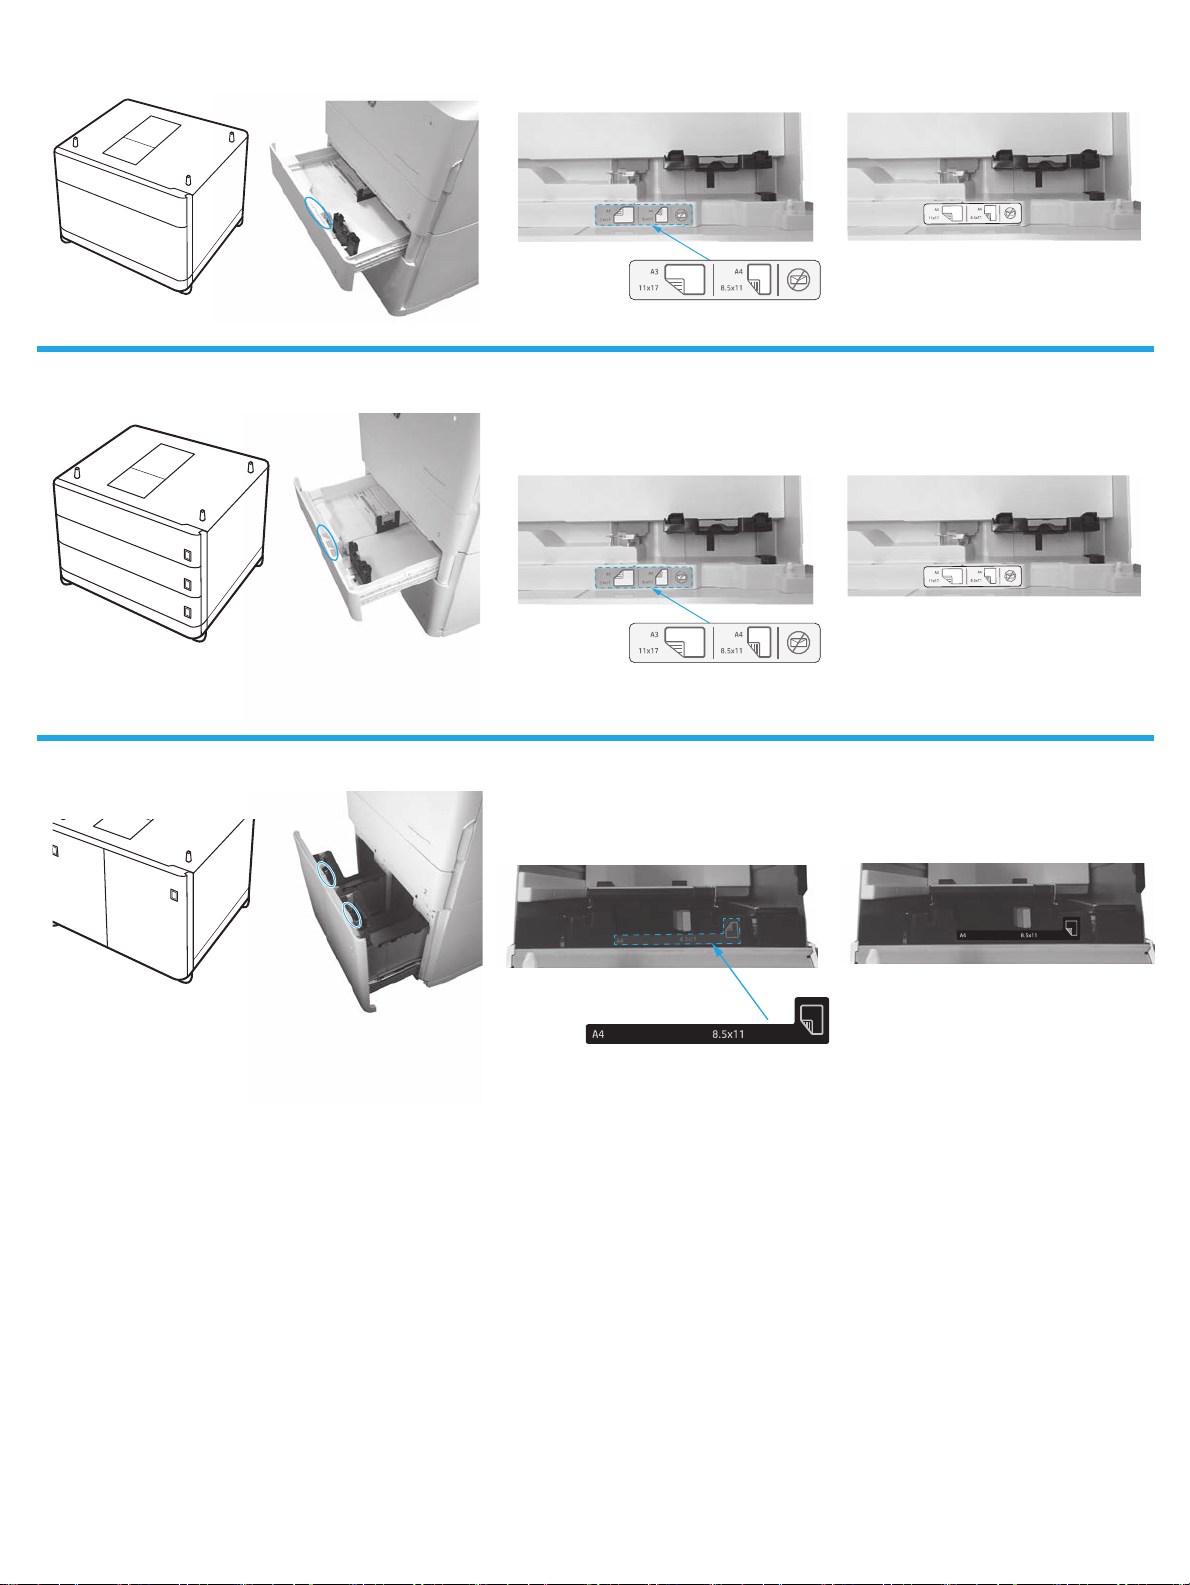
1.1
EN
1.1
For dn+ and Z+ models, the paper input orientation is
dierent from what is shown on the input accessory tray. Aix the
new set of labels that are provided in the bag with the cartridges
as shown in the next steps
ZHCN
1.1
对于 dn+ 和 Z+ 型号,进纸方向与进纸盘附件
上所示方向不同。按照后续步骤的说明,粘贴碳
粉盒随附袋子中提供的一组新标签。
.
KO
1.1
dn+ 및 Z+ 모드에서는 용지 투입 방향이 입력 부속품
용지함에 나타난 것과 다릅니다. 봉투에 제공되는 새로운 레이블
세트를 다음 단계에 나타난 바와 같이 카트리지에 부착합니다.
TH
1.1
ID
1.1
Untuk model dn+ and Z+, arah input kertas berbeda dari
yang ditunjukkan pada baki aksesori input. Rekatkan set label
baru yang tersedia di kantung bersama kartrid seperti ditunjukkan
padalangkah berikutnya.
JA
1.1
dn+モデルとZ+モデルでは、給紙の向きが、給紙アクセ
サリ トレイに示されている向きとは異なります。次のステ
ップで示されているように、袋に入っている新しいラベル
のセットをカートリッジに貼り付けてください。
ZHTW
1.1
使用 dn+ 與 Z+ 機型時,實際進紙方向與進紙附件紙匣所
示方向並不相同。依照下列步驟所示,黏貼碳粉盒包裝袋中
的全新成套標籤。
5
Page 6
1.1A
P1V17A
1.1B
P1V18A
1.1C
P1V19A
x3
x2
6
Page 7
2
2.1 2.2
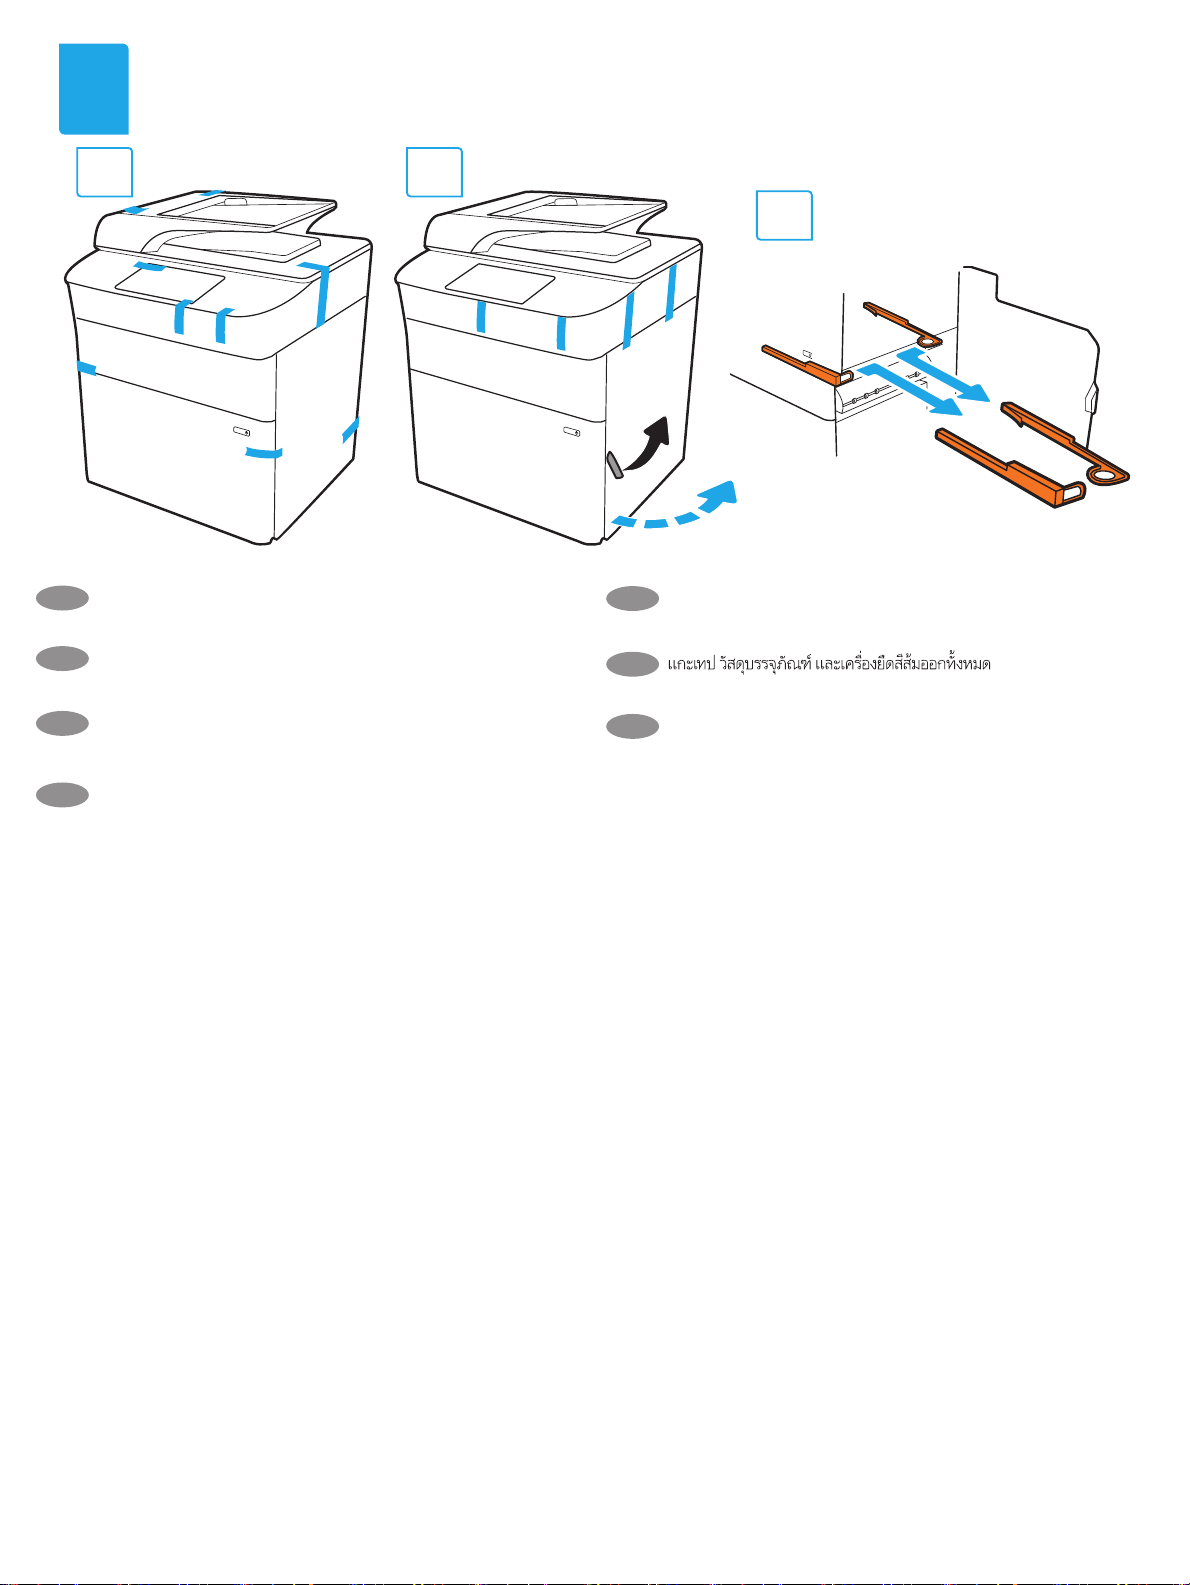
Remove all tape, packing material and orange restraints.
EN
ZHCN
取下所有胶带、包装材料和橙色束带。
2.3
테이프, 포장재 및 주황색 고정 장치를 모두 제거합니다.
KO
TH
Lepaskan semua perekat, bahan kemasan, dan pembatas oranye.
ID
すべてのテープ、梱包材、オレンジ色の固定具を取り外し
JA
ます。
移除所有膠帶、包裝材料和橘色限動器。
ZHTW
7
Page 8
3
3.1
3.3
3.2
3.4
3.5
3.6
8
Page 9
4
5
5.1
5.3
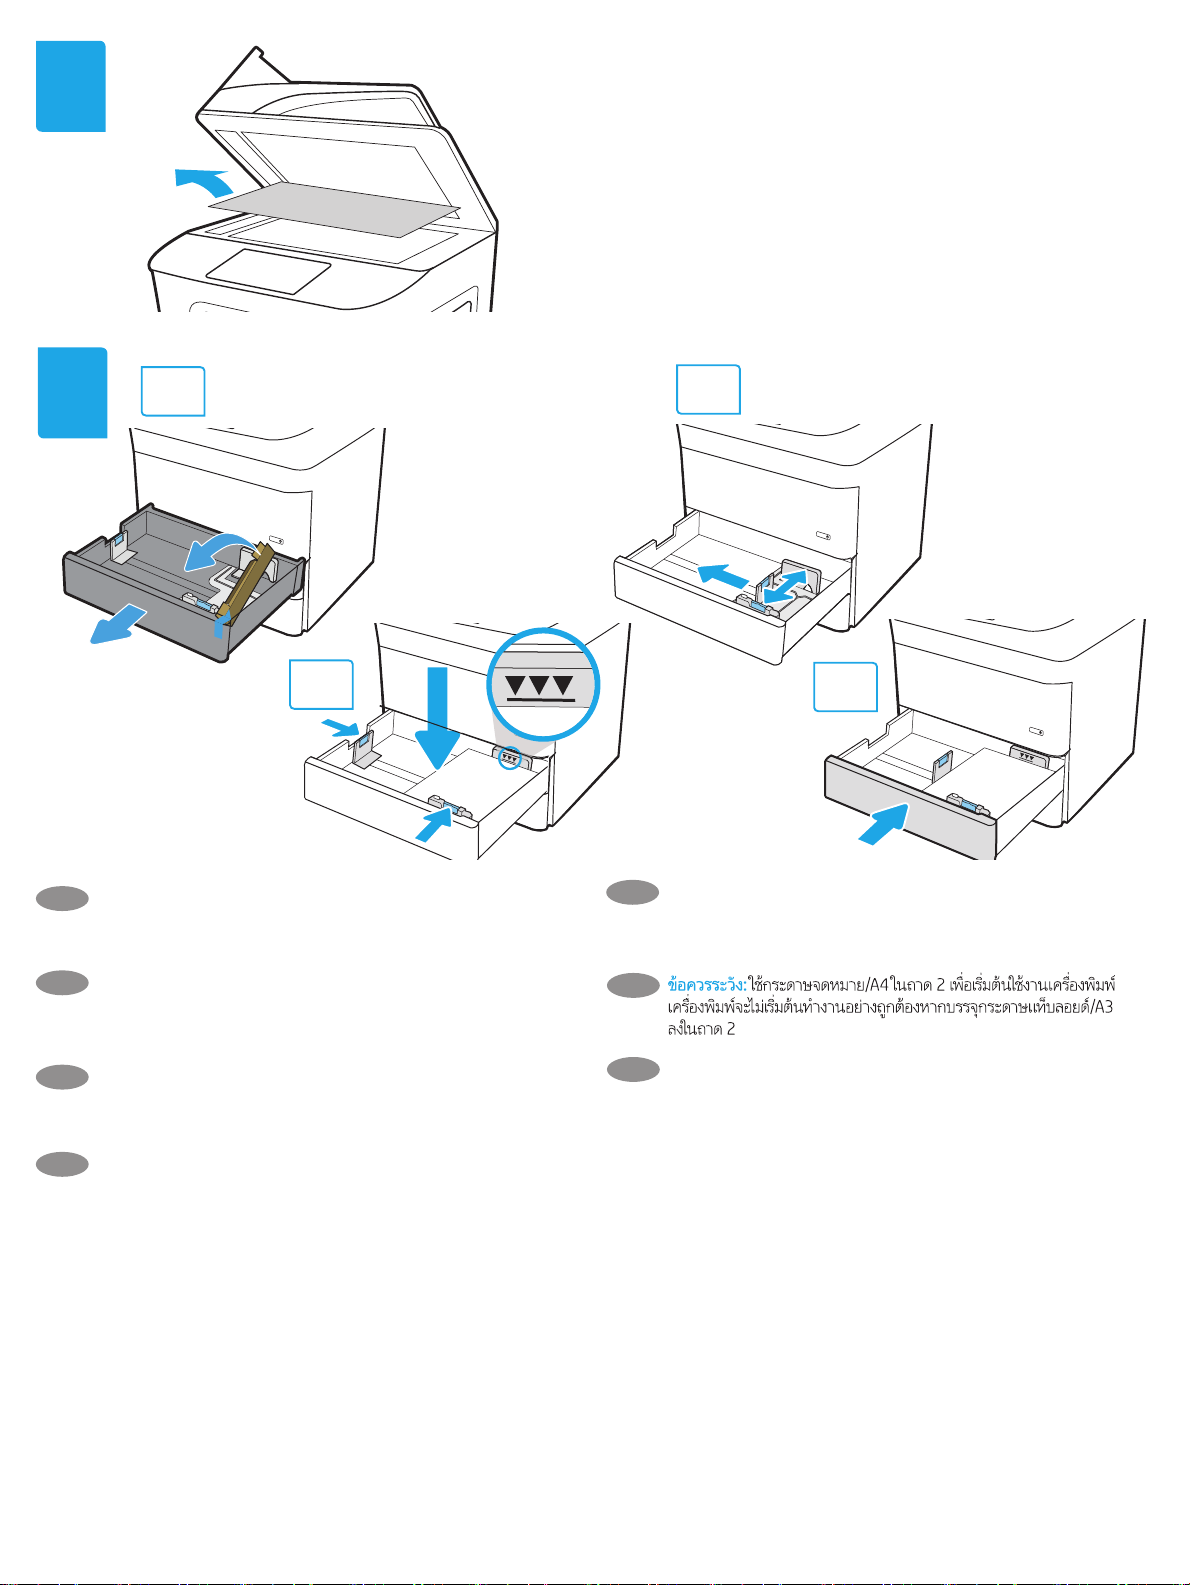
CAUTION: Use Letter/A4 paper in Tray 2 to initialize the printer.
EN
The printer will not initialize correctly with Tabloid/A3 paper
loaded in Tray 2.
5.2
5.4
주의: 용지함 2에서 Letter/A4 용지를 사용하여 프린터를
KO
시작하십시오. 용지함 2에서 타블로이드/A3 용지를 사용하여
시작하면 프린터가 제대로 작동하지 않습니다.
ZHCN
注意:使用纸盘 2 中的 Letter/A4 纸张初始化打印
机。如果纸盘 2 中装入 Tabloid/A3 纸张,则打印
机无法初始化。
PERHATIAN: Gunakan kertas Letter/A4 dalam Baki 2 untuk
ID
menginisialisasi printer. Printer tidak akan diinisialisasi dengan benar
jika menggunakan kertas Tabloid/A3 yang dimuat dalam Baki 2.
注意:プリンタを初期化する場合は、レター/A4 用紙をトレ
JA
イ 2 で使用します。タブロイド/A3 用紙をトレイ 2 に給紙す
ると正しく初期化されません。
9
TH
注意:使用 2 號紙匣中的 Letter/A4 紙張初始化印表機。2 號紙
ZHTW
匣中裝入 Tabloid/A3 紙張時,無法正確初始化印表機。
Page 10

CAUTION: Do not extend more than one paper tray at a time.
EN
Do not use paper tray as a step.
Keep hands out of paper trays when closing.
All trays must be closed when moving the printer.
Remove paper from the nisher accessory before moving it.
注意:请勿一次伸出多个纸盘。
ZHCN
请勿使用纸盘作为阶梯。
闭合时,手远离纸盘。
移动打印机时,必须合上所有纸盘。
在移动装订器附件前,请先移除附件中的纸张。
주의: 한 번에 용지함을 두 개 이상 확장하지 마십시오.
KO
용지함을 계단으로 사용하지 마십시오.
닫을 때 용지함에서 손을 떼십시오.
프린터 이동할 때 모든 용지함을 닫아야 합니다.
피니셔 부속품을 이동하기 전에 용지를 제거합니다.
TH
PERHATIAN: Jangan rentangkan lebih dari satu baki kertas sekaligus.
ID
Jangan gunakan baki kertas sebagai pijakan.
Jauhkan tangan dari baki kertas saat menutup.
Semua baki harus ditutup saat memindahkan printer.
Keluarkan kertas dari aksesori akhir sebelum memindahkannya.
注意:一度に複数の用紙トレイを引き出さないでください。
JA
用紙トレイを踏み台として使用しないでください。
閉じるときに、用紙トレイの中に手を入れないでください。
プリンタを移動する場合は、すべてのトレイを閉じてくだ
さい。
移動する前に、フィニッシャ アクセサリから用紙を取り出
します。
ZHTW
注意:每次限延伸一個紙匣。
請勿將紙匣當成梯級使用。
關閉時,請勿將手放在紙匣上。
移動印表機時必須關閉所有紙匣。
如要搬動完稿器附件,請先取出其中的紙張。
10
Page 11

6
FDSV
ORFN
$ 6 ' ) * + - . /
VKLIW
=
; & 9 % 1 0
#
D
OW
EN
Unbox the nisher accessory that you ordered with this model.
ZHCN
拆开随此型号订购的装订器附件的包装箱。
³
H
Q
WH
U
µ
"
DOW
V
K
L
IW
NJ
OE
=/$
이 모델과 함께 주문한 피니셔 액세서리를 상자에서 꺼내십시오.
KO
TH
Keluarkan aksesori akhir yang telah dipesan bersama model ini.
ID
このモデルと共に注文したフィニッシャアクセサリを箱か
JA
ら取り出します。
從包裝箱中拿出您根據此機型訂購的完稿器附件。
ZHTW
11
Page 12

7
Remove all tape and packing material.
EN
ZHCN
去除胶带和包装材料。
Lepaskan semua perekat dan bahan kemasan.
ID
JA
テープと梱包材をすべて取り除きます。
KO
테이프와 포장재를 모두 제거합니다.
TH
ZHTW
移除所有膠帶和包裝材料。
8
Install the nisher stabilizer.
EN
ZHCN
安装装订器稳定设备。
ID
Pasang stabilizer akhir.
JA
フィニッシャの固定脚を取り付けます。
피니셔 스태빌라이저를 설치합니다.
KO
TH
ZHTW
安裝完稿機穩定器。
12
Page 13

9
9.1
EN
9.1
Install the two metal brackets in the slots on the nisher
chassis plate, and then install the two smaller screws to fasten the
brackets to the nisher.
KO
9.1
피니셔 섀시 플레이트의 구멍에 두 개의 금속 브래킷을
설치한 다음 작은 나사 두 개로 브래킷을 조여 피니셔에
고정시킵니다.
ZHCN
9.1
将两根金属支架安装到装订器机箱底盘上的插
槽中,然后安装两颗较小的螺丝将支架固定到装
订器上。
9.1
ID
JA
Pasang kedua pelindung logam pada slot pelat chassis akhir,
lalu pasang kedua sekrup kecil untuk mengencangkan pelindung
pada pelat akhir.
9.1
フィニッシャのシャーシ プレートのスロットに 2 本の
金属製ブラケットを取り付けた後、2 本の小さなネジを取り
付けてブラケットをフィニッシャに固定します。
9.2
9.1
TH
ZHTW
9.1
在完稿機的機箱板安裝槽內裝入兩片金屬固定架,接著裝
上兩根小螺絲釘,將固定架鎖緊到完稿機上。
9.2
EN
ZHCN
Place the lower output bin on the brackets, press down to align
the four screw holes in the bin with the holes in the brackets, and
then install the four larger screws.
9.2
将下出纸槽放到支架上,按下以将该出纸糟上
的四个螺丝孔与支架上的孔对齐,然后安装四颗
较大的螺丝。
ID
9.2
Taruh nampan keluaran bawah pada pelindung, tekan untuk
meluruskan keempat lubang sekrup pada nampan dengan lubang
pada pelindung, lalu pasang keempat sekrup besar.
JA
9.2
下側の排紙ビンをブラケットに設置し、押し下げて排紙
ビンの 4 つのねじ穴をブラケットの穴に合わせ、大きな 4 つ
のネジを取り付けます。
13
KO
9.2
하부 출력함을 브래킷에 맞추고 아래쪽으로 눌러 출력함에
있는 네 개의 나사 구멍을 브래킷의 구멍과 정렬한 다음 큰 나사
네 개를 설치합니다.
9.2
TH
9.2
ZHTW
將下層的出紙槽放在固定架上,接著向下壓,將紙槽的四
個螺絲孔洞對齊固定架的孔洞,接著裝上四根大螺絲釘。
Page 14

9.3
EN
To install the top output bin, align the four tabs on the edge of
the bin, with the four slots in the nisher. Insert the tabs with the
far end of the bin lifted up, and then once the tabs are inserted,
carefully lower the far end of the bin into position.
9.3
9.3
KO
상부 출력함을 설치하려면 출력함 가장자리에 있는 네 개의
탭을 피니셔에 있는 네 개의 구멍에 맞춥니다. 출력함을 들어
올려 가장 먼 쪽부터 탭을 삽입한 다음 출력함의 가장 먼 쪽을
천천히 내려 제 위치에 놓습니다.
ZHCN
9.3
要安装上出纸槽,请将其边缘的四个凸舌与
印后装置上的四个插槽对齐。将出纸槽远端提起
后插入凸舌,插入凸舌后,小心地将出纸槽远端
放低就位。
ID
9.3
Untuk memasang nampan keluaran atas, luruskan keempat
tab di tepi nampan, dengan keempat slot pada nisher. Masukkan
tab dengan bagian ujung nampan terangkat, setelah tab masuk,
turunkan bagian ujung nampan ke posisinya dengan hati-hati.
9.3
JA
上部排紙ビンを取り付けるには、排紙ビンの端にあ
る 4 つのタブをフィニッシャの 4 つのスロットに合わせま
す。ビンの先端を持ち上げた状態でタブを挿入し、タブが
挿入されたら、慎重に排紙ビンの端を所定の位置に下ろし
ます。
TH
ZHTW
9.3
9.3
在安裝上層出紙槽時,紙槽邊緣的四張彈片必須對齊完
稿機的四條安裝槽。紙槽向上抬高,接著插入其最遠端的彈
片,當彈片都插好之後,小心地將紙槽最遠端向下放到固定
位置。
14
Page 15

10
10.1
10.2
EN
ZHCN
ID
JA
10 .1
Use the handle to open the nisher rear door, and then
10.2
remove the shipping screw. Discard shipping screw and label.
10 .1
通过手柄打开装订器后挡盖,然后
10.2
去除装运螺丝。丢弃装运螺丝和标签。
10 .1
Gunakan gagang untuk membuka pintu belakang nisher, lalu
10.2
lepaskan sekrup pengiriman. Buang sekrup dan label pengiriman.
10 .1
ハンドルを使ってフィニッシャの後部ドアを開き、
10.2
出荷用ねじを取り外します。出荷用のねじとラベルを処
分します。
KO
TH
ZHTW
10 .1
손잡이를 사용하여 피니서 후면 도어를 연 다음
10.2
배송용 테이프 제거합니다. 배송용 나사와 레이블을 버립
니다.
10 .1
10.2
10 .1
使用手柄,打開完稿器後側擋門,然後
10.2
拆下裝運用螺絲。丟棄裝運用螺絲和標籤。
15
Page 16

11
11 .1
EN
ZHCN
Turn the green wheel left to roll the stapler carriage away
from you until the carriage spins.
to roll the stapler carriage TOWARD you until it reaches its closest
position.
11 .1
向左旋转绿色滚轮让订书钉盒转动并远离
您,直到订书钉盒开始旋转。
11.2
Turn the green wheel right
11.2
向右旋转绿色
滚轮让订书钉盒转动并靠近您,直到到达极限。
11 .1
ID
JA
Putar roda hijau ke kiri untuk menggulung kartrid stapler
menjauh dari Anda hingga kartrid berputar.
11.2
Putar roda hijau ke kanan untuk menggulung kartrid stapler
KEARAH Anda hingga mencapai posisi terdekat.
11 .1
緑色のホイールを左に回してステイプラー キャリッジ
を転がし、キャリッジが回転するまで自分から離れていく
方向に動かします。
イプラーキャリッジを転がし、キャリッジが最も近い位置
に達するまで動かします。
11.2
緑色のホイールを右に回してステ
11.1
11.2
KO
11 .1
녹색 휠을 왼쪽으로 돌려서 카트리지가 회전할 때까지 스테
이플러 카트리지를 자신과 반대쪽으로 회전시킵니다.
휠을 오른쪽으로 돌려서 가장 가까운 위치에 도달할 때까지 스테
이플러 카트리지를 자신 쪽으로 회전시킵니다.
TH
11 .1
11.2
ZHTW
11 .1
將綠色輪子向左轉,將釘書針匣推離您的方向,直到釘書
針匣旋轉起來。
方向推進,直到釘書針匣抵達其最密合位置。
11.2
將綠色輪子向右轉,將釘書針匣朝您的
11.2
녹색
16
Page 17

12.1 12.2
12
EN
12.1
Insert the new staple cartridge by holding the green wheel
with one hand while pushing the staple cartridge into the slot.
12.2
Close the nisher rear door.
KO
12.1
스테이플 카트리지를 슬롯에 밀어 넣는 동안 한 손으로 녹색
휠을 잡고 새 스테이플 카트리지를 삽입합니다.
12.2
피니셔 후면 덮개를 닫습니다.
ZHCN
12.1
用一只手握住绿色滚轮的同时将订书钉盒推
入插槽,插入新的订书钉盒。
12.2
合上装订器后
挡盖。
ID
12.1
Masukkan kartrid staples yang baru dengan memegang roda
hijau dengan satu tangan sambil mendorong kartrid staples ke
dalam slotnya.
JA
12.1
片方の手で緑色のホイールを掴んで新しいステイプル
カートリッジを挿入し、ステイプル カートリッジをスロッ
トに押し込みます。
す。
If you are connecting to a network, connect the network cable now.
EN
CAUTION: Do not connect the USB cable now.
NOTE: The cables are not included with the printer.
12.2
Tutup pintu belakang nisher.
12.2
フィニッシャの後部ドアを閉じま
TH
ZHTW
KO
12.1
12.2
12.1
將釘書針匣推入插槽時,用一隻手按住綠色轉輪插入新
釘書針匣。
네트워크에 연결하려면 지금 네트워크 케이블을 연결합니다.
주의: 아직 USB 케이블을 연결하지 마십시오.
참고: 케이블은 프린터에 포함되어 있지 않습니다.
12.2
關閉完稿器後側擋門。
ZHCN
如果要连接到网络,则现在连接网络电缆。
注意:现在请勿连接 USB 电缆。
注:打印机未随附电缆。
Jika Anda menyambung ke jaringan, sambungkan kabel jaringan
ID
sekarang.
PERHATIAN: Jangan sambungkan kabel USB sekarang.
CATATA N: Kabel tidak diberikan bersama printer.
ネットワークに接続している場合は、ネットワーク ケーブ
JA
ルを接続します。
注意:この時点では、USB ケーブルを接続しないでくださ
い。
注記:このケーブルはプリンタに付属していません。.
17
TH
ZHTW
如果要連接至網路,請在此時連接網路纜線。
注意:請勿在此時連接 USB 纜線。
附註:本印表機未隨附纜線。
Page 18

13
Adjust foot casters up or down to properly line up the nishing
EN
accessory with the printer. After following the instructions in
Step 14, ensure that the accessory is fully docked, leaving no gap
that could cause paper jams.
ZHCN
上下调整脚轮,使印后处理配件与打印机对齐。
在按照步骤 14 中的说明进行操作后,请确保配
件完全对接,不要留缝隙,以免造成卡纸。
Atur roda kaki ke atas atau ke bawah untuk menyejajarkan aksesori
ID
akhir dengan printer. Setelah mengikuti petunjuk pada Langkah 14,
pastikan aksesori tersambung sepenuhnya tanpa celah yang dapat
menyebabkan kertas macet.
フットキャスタを上下に調整して、フィニッシング アクセ
JA
サリとプリンタがぴったりと一致するようにします。ステッ
プ 14 の指示に従った後、このアクセサリが完全にはめ込ま
れ、紙詰まりの原因となる隙間が残らないようにします。
KO
TH
ZHTW
풋 캐스터를 위 아래로 조절하여 피니셔 부속품과 프린터가
적절하게 일렬로 정렬되도록 합니다. 14 단계의 지침을 따른
후에 부속품이 완전히 잠겨 용지 걸림의 원인이 될 수 있는
간격이 없는지 확인합니다.
上下調整腳輪,正確對齊完稿配件和印表機。在依照步驟 14
的指示執行過後,確保配件完全固定,不留任何可能造成發
生夾紙的縫隙。
18
Page 19

14
14.1
14.2
X
14.3
EN
14.1
Connect the nisher cable to the printer.
and a grounded AC outlet.
and the time zone. NOTE: For advanced conguration of network-connected printers, see the User Guide on the printer CD or go to
www.hp.com/support/pwcolormfpE77650, or www.hp.com/support/pwcolormfpE77660, or www.hp.com/support/pwcolorP77940mfp, or
www.hp.com/support/pwcolorP77950mfp, or www.hp.com/support/pwcolorP77960mfp.
CAUTION: Make sure your power source is adequate for the printer voltage rating. The voltage rating is on the printer label. The printer uses either
100-127 Vac or 220-240 Vac and 50/60 Hz. To prevent damage to the printer, use only the power cable that is provided with the printer.
ZHCN
14.1
将装订器线缆连接到打印机上。
的交流电源插座。
14.4
Turn on the printer, and then wait for it to initialize. On the control panel, set the language, the date/time format,
14.4
开启打印机电源并等待其完成初始化。在控制面板上,设置语言、日期/时间格式和
14.2
Attach the nisher accessory to the printer.
14.2
将装订器附件安装到打印机上。
14.3
14.4
Connect the power cable between the printer
14.3
用电源线将打印机连接到接地
时区。注:要对联网打印机进行高级配置,请参阅打印机 CD 上的《用户指南》或访问
www.hp.com/support/pwcolormfpE77650、www.hp.com/support/pwcolormfpE77660、
www.hp.com/support/pwcolorP77940mfp、www.hp.com/support/pwcolorP77950mfp 或
www.hp.com/support/pwcolorP77960mfp。
注意:确保电源符合打印机的额定电压要求。额定电压标注在打印机标签上。打印机使用 100-127 伏(交流)
或 220-240 伏(交流)电压,频率为 50/60 赫兹。为防止损坏打印机,请仅使用打印机随附的电源线。
ID
14.1
Sambungkan kabel nisher ke printer.
AC yang diarde.
CATATA N: Untuk kongurasi lanjutan pada printer yang tersambung ke jaringan, lihat Panduan Pengguna di CD printer atau kunjungi
www.hp.com/support/pwcolormfpE77650, atau www.hp.com/support/pwcolormfpE77660, atau www.hp.com/support/pwcolorP77940mfp, atau
www.hp.com/support/pwcolorP77950mfp, atau www.hp.com/support/pwcolorP77960mfp.
PERHATIAN: Pastikan catu daya telah memadai untuk tingkat tegangan printer. Tingkat tegangan tercantum pada label printer. Printer
menggunakan 100-127 Vac atau 220-240 Vac dan 50/60 Hz. Untuk mencegah kerusakan pada printer, gunakan hanya kabel daya yang diberikan
bersama printer.
14.4
Hidupkan printer, lalu tunggu hingga diinisialisasi. Pada panel kontrol, atur bahasa, format tanggal/waktu, dan zona waktu.
14.2
Pasang aksesori akhir ke printer.
19
14.3
Sambungkan kabel daya antara printer dan stopkontak
Page 20

JA
14.1
フィニッシャ ケーブルをプリンタに接続します。
で、プリンタをアース付き AC コンセントに接続します。
14.2
フィニッシャ アクセサリをプリンタに取り付けます。
14.4
電源をオンにし、プリンタが初期化されるまで待ちます。コントロー
14.3
電源ケーブル
ル パネルで、言語、日付/時刻の形式、タイム ゾーンを設定します。注記:ネットワークに接続されたプリンタの詳細な設定につ
いては、プリンタ CD に収録されているユーザー ガイドを参照するか、
www.hp.com/support/pwcolormfpE77650、 www.hp.com/support/pwcolormfpE77660、またはwww.hp.com/support/pwcolorP77940mfp、
またはwww.hp.com/support/pwcolorP77950mfp、またはwww.hp.com/support/pwcolorP77960mfpをご覧ください。
注意:使用する電源が、プリンタの定格電圧に適しているか確認してください。定格電圧は、プリンタのラベルに記載されていま
す。プリンタで使用する電圧は 100~127VAC または 220~240VAC、周波数は 50/60Hz です。プリンタの損傷を防ぐため、プリンタ
に付属の電源ケーブル以外は使用しないでください。
KO
14.1
피니셔 케이블을 프린터에 연결합니다.
사이에 연결합니다.
14.4
전원을 켠 다음 프린터가 초기화될 때까지 기다립니다. 제어판에서 언어, 날짜/시간 형식 및 시간대를 설정합니다.
14.2
피니셔 부속품을 프린터에 부착합니다.
14.3
전원 케이블을 프린터와 접지된 AC 콘센트
참고: 네트워크에 연결된 프린터의 고급 구성에 대해서는 제품 CD에 있는 사용자 설명서를 참조하거나 www.hp.com/support/pwcolormfpE77650,
or www.hp.com/support/pwcolormfpE77660, or www.hp.com/support/pwcolorP77940mfp, or www.hp.com/support/pwcolorP77950mfp,
or www.hp.com/support/pwcolorP77960mfp로 이동하십시오.
주의: 콘센트의 전압이 프린터 전압에 맞는지 확인하십시오. 전압은 프린터 라벨에 나와 있습니다. 프린터에는 100~127V AC 또는 220~240V AC
및 50/60Hz를 사용합니다. 프린터의 손상을 방지하려면 프린터와 함께 제공된 전원 케이블만 사용하십시오.
14.1 14.2 14.3
TH
14.4
ZHTW
14.1
Kabel nišera priključite u pisač.
s uzemljenjem za izmjeničnu struju.
14.2
Pričvrstite pomoćni uređaj nišera na pisač.
14.4
Uključite pisač i pričekajte da se pokrene. Na upravljačkoj ploči postavite jezik, format datuma/vremena
14.3
Kabelom za napajanje povežite pisač i električnu utičnicu
ivremensku zonu. NAPOMENA: za naprednu konguraciju pisača povezanih na mrežu pogledajte korisnički priručnik na CD-u pisača ili idite na
www.hp.com/support/pwcolormfpE77650 ili www.hp.com/support/pwcolormfpE77660 ili www.hp.com/support/pwcolorP77940mfp ili
www.hp.com/support/pwcolorP77950mfp ili www.hp.com/support/pwcolorP77960mfp.
OPREZ: Provjerite odgovara li izvor napajanja specikacijama za napon pisača. Specikacija za napon nalazi se na naljepnici pisača. Pisač se koristi strujom
napona 100 – 127 VAC ili 220 – 240 VAC pri 50/60 Hz. Kako ne biste oštetili pisač, koristite se samo kabelom za napajanje koji je isporučen uz pisač.
20
Page 21

Windows: Do not connect the USB cable until prompted during
EN
the software installation in the next step. If the network cable was
connected previously, proceed to the next section.
Mac: Connect the USB cable now.
NOTE: The cables are not included with the printer.
ZHCN
Windows:直到软件安装过程的下一步中出现提
示后,再连接 USB 电缆。如果以前连接了网络电
缆,则继续执行下一部分。
Mac:现在连接 USB 电缆。
注:打印机未随附电缆。
Windows: Jangan sambungkan kabel USB sebelum diminta
ID
saat penginstalan perangkat lunak berlangsung pada langkah
berikutnya. Jika kabel jaringan telah tersambung sebelumnya,
lanjutkan ke bagian berikutnya.
Mac: Sambungkan kabel USB sekarang.
CATATA N: Kabel tidak diberikan bersama printer.
Windows: 次の手順でソフトウェアのインストール中にメッ
JA
セージが表示されるまで、USB ケーブルを接続しないでく
ださい。事前にネットワーク ケーブルを接続していた場合
は、次のセクションに進みます。
Mac: USB ケーブルを接続します。
注記:このケーブルはプリンタに付属していません。
Windows: 다음 단계에서 소프트웨어를 설치하는 동안 메시지가
KO
나타날 때까지 USB 케이블을 연결하지 마십시오. 네트워크
케이블을 이미 연결한 경우 다음 섹션으로 진행합니다.
Mac: USB 케이블을 지금 연결하십시오.
참고: 케이블은 프린터에 포함되어 있지 않습니다.
TH
Windows: nemojte spajati USB kabel dok se to ne zatraži tijekom
ZHTW
instalacije softvera u sljedećem koraku. Ako je mrežni kabel već
spojen, prijeđite na sljedeći dio.
Mac: sada povežite USB kabel.
NAPOMENA: Kabeli se ne isporučuju s pisačem.
21
Page 22

Download the software installation les.
EN
Method 1: Download HP Easy Start (Windows and macOS clients)
1. Go to 123.hp.com/pagewide and click Download.
2. Follow the onscreen instructions.
Method 2: Download from product support website
(Windows clients and servers)
1. Go to the product support website:
www.hp.com/support/pwcolormfpE77650, or
www.hp.com/support/pwcolormfpE77660, or
www.hp.com/support/pwcolorP77940mfp, or
www.hp.com/support/pwcolorP77950mfp, or
www.hp.com/support/pwcolorP77960mfp.
2. Select software and drivers.
3. Download the software for your printer model and
operating system.
4. Launch the software le from the folder where the le was
saved, and follow the on-screen instructions.
Method 3: IT managed setup (Windows only - clients and servers)
Visit hp.com/go/upd to download and install the
HP Universal Print Driver.
ZHCN
下载软件安装文件。
方法 1:下载 HP Easy Start(Windows 和 macOS
客户端)
1. 访问 123.hp.com/pagewide,然后单击下载。
2. 按照屏幕上的说明进行操作。
方法 2:从产品支持网站下载(Windows 客户端
和服务器)
1. 访问产品支持网站:
www.hp.com/support/pwcolormfpE77650、
www.hp.com/support/pwcolormfpE77660、
www.hp.com/support/pwcolorP77940mfp、
www.hp.com/support/pwcolorP77950mfp 或
www.hp.com/support/pwcolorP77960mfp。
2. 选择软件和驱动程序。
3. 下载适用于您的打印机型号和操作系统的软
件。
4. 从保存软件文件的文件夹启动该文件,然后
按照屏幕上的说明进行操作。
方法 3:IT 托管设置(仅限 Windows - 客户端和服
务器)
访问 hp.com/go/upd 以下载并安装
HP Universal Print Driver。
Download le penginstalan perangkat lunak.
ID
Metode 1: Download HP Easy Start (Klien Windows dan macOS)
1. Kunjungi 123.hp.com/pagewide lalu klik Download.
2. Ikuti petunjuk di layar.
Metode 2: Download dari situs web dukungan produk
(Klien dan server Windows)
1. Kunjungi situs web dukungan produk:
www.hp.com/support/pwcolormfpE77650, atau
www.hp.com/support/pwcolormfpE77660, atau
www.hp.com/support/pwcolorP77940mfp, atau
www.hp.com/support/pwcolorP77950mfp, atau
www.hp.com/support/pwcolorP77960mfp.
2. Pilih Software and drivers (Perangkat lunak dan driver).
3. Download perangkat lunak untuk model printer dan
sistem operasi Anda.
4. Jalankan le perangkat lunak dari folder tempat menyimpan
le, lalu ikuti petunjuk di layar.
Metode 3: Kongurasi yang dikelola TI (Hanya klien dan server
Windows)
Kunjungi hp.com/go/upd untuk men-download dan menginstal
HP Universal Print Driver.
ソフトウェアのインストール ファイルをダウンロードしま
JA
す。
方法1:HP Easy Start をダウンロードする (Windows および
macOS クライアント)
1. 123.hp.com/pagewide にアクセスして[ダウンロード]をク
リックします。
2. 画面に表示される手順に従います。
方法2:製品サポート Web サイトからダウンロードする
(Windowsのクライアントおよびサーバー)
1. 製品サポートに関する以下の Web サイトにアクセスしま
す。www.hp.com/support/pwcolormfpE77650、または
www.hp.com/support/pwcolormfpE77660、または
www.hp.com/support/pwcolorP77940mfp、または
www.hp.com/support/pwcolorP77950mfp、または
www.hp.com/support/pwcolorP77960mfp をご覧ください。
2. [Software and Drivers] (ソフトウェアとドライバ) を選択
します。
3. お使いのプリンタ モデルとオペレーティング システム
に適した
ソフトウェアをダウンロードします。
4. ファイルが保存されたフォルダからソフトウェア ファ
イルを起動し、画面に表示される手順に従います。
方法3:IT 管理セットアップ (Windows 専用 - クライアントお
よびサーバ)
hp.com/go/upd にアクセスし、 HP Universal Print Driver をダウ
ンロードしてインストールします。
22
Page 23

소프트웨어 설치 파일을 다운로드합니다.
KO
방법 1: HP Easy Start 다운로드 (Windows 및 macOS 클라이언트)
1. 123.hp.com/pagewide 로 이동한 다음 다운로드를 클릭합니다.
2. 화면에 표시되는 안내를 따릅니다.
방법 2: 제품 지원 웹사이트에서 다운로드
(Windows 클라이언트 및 서버)
1. 제품 지원 웹 사이트:
www.hp.com/support/pwcolormfpE77650,
www.hp.com/support/pwcolormfpE77660,
www.hp.com/support/pwcolorP77940mfp,
www.hp.com/support/pwcolorP77950mfp,
www.hp.com/support/pwcolorP77960mfp로 이동하십시오.
2. 소프트웨어 및 드라이버를 선택합니다.
3. 해당 프린터 모델 및
운영 체제용 소프트웨어를 다운로드합니다.
4. 파일이 저장된 폴더에서 소프트웨어 파일을 실행한 다음
화면에 표시되는 안내를 따릅니다.
방법 3: IT 관리 설정(Windows만 해당 - 클라이언트 및 서버)
hp.com/go/upd로 이동하여 HP UPD(Universal Print Driver)를
다운로드하고 설치합니다.
TH
Preuzmite datoteke za instalaciju softvera.
ZHTW
Prva metoda: preuzimanje alata HP Easy Start
(klijenti sa sustavima Windows i macOS)
1. Idite na 123.hp.com/pagewide i kliknite Preuzmi.
2. Slijedite upute na zaslonu.
Druga metoda: preuzmite s web-mjesta podrške za proizvod
(Windows klijenti i poslužitelji)
1. Otvorite web-mjesto podrške za proizvod:
www.hp.com/support/pwcolormfpE77650 ili
www.hp.com/support/pwcolormfpE77660 ili
www.hp.com/support/pwcolorP77940mfp ili
www.hp.com/support/pwcolorP77950mfp ili
www.hp.com/support/pwcolorP77960mfp.
2. Odaberite software and drivers (softver i upravljački programi).
3. Preuzmite softver za svoj model pisača i
operacijski sustav.
4. Pokrenite softversku datoteku iz mape u koju ste spremili
datoteku i slijedite upute na zaslonu.
Treća metoda: IT upravljano podešavanje (klijenti i poslužitelji
samo sa sustavom Windows)
Posjetite hp.com/go/upd kako biste preuzeli i instalirali program
HP Universal Print Driver.
23
Page 24

For information on rmware updates, advanced conguration using
EN
the Embedded Web Server, and remote and mobile printing using
HP ePrint, see the user guide on the printer CD or go to
www.hp.com/support/pwcolormfpE77650, or
www.hp.com/support/pwcolormfpE77660, or
www.hp.com/support/pwcolorP77940mfp, or
www.hp.com/support/pwcolorP77950mfp, or
www.hp.com/support/pwcolorP77960mfp.
ZHCN
有关固件更新、使用内嵌式 Web 服务器进行高级
配置以及使用 HP ePrint 进行远程和移动打印的信
息,请参阅打印机 CD 上的《用户指南》或访问
www.hp.com/support/pwcolormfpE77650、
www.hp.com/support/pwcolormfpE77660、
www.hp.com/support/pwcolorP77940mfp、
www.hp.com/support/pwcolorP77950mfp 或
www.hp.com/support/pwcolorP77960mfp。
Untuk informasi tentang pembaruan rmware, kongurasi lanjutan
ID
menggunakan Server Web Tertanam, serta pencetakan jarak jauh
dan perangkat bergerak menggunakan HP ePrint, lihat panduan
pengguna di CD printer atau kunjungi
www.hp.com/support/pwcolormfpE77650, atau
www.hp.com/support/pwcolormfpE77660, atau
www.hp.com/support/pwcolorP77940mfp, atau
www.hp.com/support/pwcolorP77950mfp, atau
www.hp.com/support/pwcolorP77960mfp.
펌웨어 업데이트, 내장형 웹 서버를 통한 고급 구성, HP ePrint
KO
를 통한 원격 및 모바일 인쇄에 대한 자세한 내용은 프린터 CD의
사용 설명서를 참조하거나
www.hp.com/support/pwcolormfpE77650,
www.hp.com/support/pwcolormfpE77660,
www.hp.com/support/pwcolorP77940mfp,
www.hp.com/support/pwcolorP77950mfp,
www.hp.com/support/pwcolorP77960mfp로 이동하십시오.
TH
Za informacije o ažuriranjima rmvera, naprednim konguracijama
ZHTW
pri upotrebi ugrađenog web-poslužitelja te daljinskog i mobilnog
ispisa s pomoću usluge HP ePrint pogledajte korisnički priručnik na
CD-u pisača ili posjetite
www.hp.com/support/pwcolormfpE77650 ili
www.hp.com/support/pwcolormfpE77660 ili
www.hp.com/support/pwcolorP77940mfp ili
www.hp.com/support/pwcolorP77950mfp ili
www.hp.com/support/pwcolorP77960mfp.
ファームウェアの更新、埋め込み Web サーバーを使用する
JA
高度な設定、および HP ePrint を使用するリモート印刷とモ
バイル印刷については、プリンタ CD に収録されているユー
ザー ガイドを参照するか、
www.hp.com/support/pwcolormfpE77650、または
www.hp.com/support/pwcolormfpE77660、または
www.hp.com/support/pwcolorP77940mfp、または
www.hp.com/support/pwcolorP77950mfp、または
www.hp.com/support/pwcolorP77960mfpをご覧ください。
24
Page 25

For more information, see the user guide on the printer CD or go to
EN
www.hp.com/support/pwcolormfpE77650, or
www.hp.com/support/pwcolormfpE77660, or
www.hp.com/support/pwcolorP77940mfp, or
www.hp.com/support/pwcolorP77950mfp, or
www.hp.com/support/pwcolorP77960mfp.
Select the Help
Help topics.
有关详细信息,请参阅打印机 CD 上的《用户指
ZHCN
button on the printer control panel to access
南》或访问
www.hp.com/support/pwcolormfpE77650、
www.hp.com/support/pwcolormfpE77660、
www.hp.com/support/pwcolorP77940mfp、
www.hp.com/support/pwcolorP77950mfp 或
www.hp.com/support/pwcolorP77960mfp。
选择打印机控制面板上的帮助按钮
主题。
Untuk informasi lebih lanjut, lihat panduan pengguna di CD printer
ID
atau kunjungi
www.hp.com/support/pwcolormfpE77650, atau
www.hp.com/support/pwcolormfpE77660, atau
www.hp.com/support/pwcolorP77940mfp, atau
www.hp.com/support/pwcolorP77950mfp, atau
www.hp.com/support/pwcolorP77960mfp.
Pilih tombol Help (Bantuan)
mengakses topik Help (Bantuan)
pada panel kontrol printer untuk
以访问帮助
자세한 내용은 프린터 CD의 사용 설명서를 참조하거나
KO
www.hp.com/support/pwcolormfpE77650,
www.hp.com/support/pwcolormfpE77660,
www.hp.com/support/pwcolorP77940mfp,
www.hp.com/support/pwcolorP77950mfp,
www.hp.com/support/pwcolorP77960mfp로 이동하십시오.
도움말을 보려면 프린트 제어판의 도움말
선택하십시오.
TH
Više informacija potražite u korisničkom priručniku na CD-u pisača
ZHTW
ili posjetite
www.hp.com/support/pwcolormfpE77650 ili
www.hp.com/support/pwcolormfpE77660 ili
www.hp.com/support/pwcolorP77940mfp ili
www.hp.com/support/pwcolorP77950mfp ili
www.hp.com/support/pwcolorP77960mfp.
Pritisnite gumb Pomoć
temama pomoći.
na upravljačkoj ploči pisača za pristup
버튼을
詳細については、プリンタ CD に収録されているユーザー ガ
JA
イドを参照するか、
www.hp.com/support/pwcolormfpE77650、または
www.hp.com/support/pwcolormfpE77660、または
www.hp.com/support/pwcolorP77940mfp、または
www.hp.com/support/pwcolorP77950mfp、または
www.hp.com/support/pwcolorP77960mfp をご覧ください。
プリンタのコントロール パネル上のヘルプ
すると、ヘルプ トピックにアクセスできます。
ボタンを選択
25
Page 26

Page 27

Page 28

www.hp.com
Copyright and license
© Copyright 2018 HP Development Company, L.P.
Reproduction, adaptation or translation without prior written permission
isprohibited, except as allowed under the copyright laws.
The information contained herein is subject to change without notice.
The only warranties for HP products and services are set forth in the
express warranty statements accompanying such products and services.
Nothing herein should be construed as constituting an additional warranty.
HP shall not be liable for technical or editorial errors or omissions
contained herein.
Edition 1, 7/2018
FCC Regulations
This equipment has been tested and found to comply with the limits for
aClass A digital device, pursuant to Part 15 of the FCC rules. These limits
are designed to provide reasonable protection against harmful interference
in a residential installation. This equipment generates, uses, and can
radiate radio frequency energy, and if not installed and used in accordance
with the instruction manual, may cause harmful interference to radio
communications. Operation of this equipment in a residential area is likely
to cause harmful interference in which case the user will be required to
correct the interference at his own expense.
NOTE: Any changes or modifications to the printer that are not expressly
approved by HP could void the user’s authority to operate this equipment.
Use of a shielded interface cable is required to comply with the Class A
limits of Part 15 of FCC rules.
Trademark Credits
Windows®, Windows® XP, Windows Vista®, Windows® 7, Windows® 8,
Windows® 10, and Windows Server® are trademarks of the Microsoft
Group of companies.
macOS is a trademark of Apple Inc., registered in the U.S. and other countries.
AirPrint and the AirPrint logo are trademarks of Apple Inc.
版权与许可
© Copyright 2018 HP Development Company, L.P.
未经事先书面许可,严禁进行任何形式的复制、改编
或翻译,除非版权法另行允许。
此处包含的信息如有更改,恕不另行通知。
HP 产品和服务的专用保修事项已在 产品和服务所附带
的保修声明中列出。本文档中的任何内容均不应理解
为构成 任何额外保证。HP 对本文档中出现的技术错
误、编辑 错误或遗漏之处概不负责。
Edition 1, 7/2018
FCC 规则
本设备经测试,确认符合 FCC 规则第 15 部分有关 A 类
数字设备的限制规定。这些限制旨在针对住宅安装中
的有害干扰提供合理的保护。本设备会产生、使用并
可能辐射射频能量;如果不按照说明手册进行安装和
使用,可能会对无线电通信造成有害干扰。在住宅区
使用本设备可能会产生有害干扰,排除此类干扰所需
的费用应由用户自行承担。
注:未经 HP 公司的明确同意而擅自更改或 改装本打印
机,用户将失去操作 此设备的权力。根据 FCC 规则第
15 部分的 A 类设备的限制规定,用户必须使用屏蔽的
接口电缆。
商标说明
Windows®、Windows® XP、Windows Vista®、
Windows® 7、Windows® 8、Windows® 10、和
Windows Server® 是 Microsoft 集团公司的商标。
macOS 是 Apple Inc. 在美国和其他国家/地区的注册商标。
AirPrint 和 AirPrint 徽标是 Apple Inc. 的商标。
 Loading...