

HP PageWide Enterprise Color 765, PageWide Enterprise Color 780, PageWide Enterprise Color 785 Troubleshooting Manual
Page 1

HP PageWide Enterprise Color 765 and MFP
780/785
HP PageWide Managed Color E75160 and
MFP E77650/P77660
Troubleshooting Manual
Page 2

Copyright and License
Trademark Credits
© Copyright 2017 HP Development Company,
L.P.
Reproduction, adaptation, or translation without
prior written permission is prohibited, except as
allowed under the copyright laws.
The information contained herein is subject to
change without notice.
The only warranties for HP products and
services are set forth in the express warranty
statements accompanying such products and
services. Nothing herein should be construed as
constituting an additional warranty. HP shall not
be liable for technical or editorial errors or
omissions contained herein.
Edition 1, 9/2017
Microsoft®, Windows®, Windows® XP, and
Windows Vista® are U.S. registered trademarks
of Microsoft Corporation.
Adobe®, Acrobat®, and PostScript® are
trademarks of Adobe Systems Incorporated.
UNIX® is a registered trademark of The Open
Group.
Page 3

Conventions used in this guide
TIP: Helpful hints or shortcuts.
NOTE: Information that explains a concept or how to complete a task.
Reinstallation tip: Reinstallation helpful hints, shortcuts, or considerations.
IMPORTANT: Information that help the user to avoid potential printer error conditions.
CAUTION: Procedures that the user must follow to avoid losing data or damaging the printer.
WARNING! Procedures that the user must follow to avoid personal injury, catastrophic loss of data, or extensive
damage to the printer.
ENWW iii
Page 4

iv Conventions used in this guide ENWW
Page 5

For additional service and support information
HP service personnel, go to one of the following Web-based Interactive Search Engines (WISE) sites:
AMS
●
https://support.hp.com/wise/home/ams-en
●
https://support.hp.com/wise/home/ams-es
●
https://support.hp.com/wise/home/ams-pt
APJ
●
https://support.hp.com/wise/home/apj-en
●
https://support.hp.com/wise/home/apj-ja
●
https://support.hp.com/wise/home/apj-ko
●
https://support.hp.com/wise/home/apj-zh-Hans
●
https://support.hp.com/wise/home/apj-zh-Hant
EMEA
●
https://support.hp.com/wise/home/emea-en
Channel partners, go to HP Channel Services Network (CSN) at www.hp.com/partners/csn .
At these locations, nd information on the following topics:
●
Install and congure
●
Printer specications
●
Up-to-date control panel message (CPMD) troubleshooting
●
Solutions for printer issues and emerging issues
●
Remove and replace part instructions and videos
●
Service advisories
●
Warranty and regulatory information
Channel partners, access training materials in the HP University and Partner Learning Center at
https://content.ext.hp.com/sites/LMS/HPU.page.
To access HP PartSurfer information from any mobile device, go to http://partsurfermobile.hp.com/ or scan the
Quick Response (QR) code below.
ENWW v
Page 6

vi For additional service and support information ENWW
Page 7

Table of contents
1 Theory of operation .................................................................................................................................................................................. 1
Basic operation ......................................................................................................................................................................... 2
Function structure ............................................................................................................................................... 2
Operation sequence ............................................................................................................................................ 4
System control .......................................................................................................................................................................... 6
................................................................................................................................................................................. 6
Formatter and data path .................................................................................................................................... 6
Engine control ...................................................................................................................................................... 8
Pen interface (I/F) .............................................................................................................................................. 10
Power supply ...................................................................................................................................................... 11
AC control module ............................................................................................................................................. 11
Cabling system ....................................................................................................................................................................... 13
Flat Flexible Cables ........................................................................................................................................... 13
FFC routing .......................................................................................................................................................... 16
Discrete cables ................................................................................................................................................... 19
Ground wires ...................................................................................................................................................... 20
Connectors .......................................................................................................................................................... 21
Ferrites ................................................................................................................................................................ 23
Cable management ........................................................................................................................................... 23
Print subsystem ..................................................................................................................................................................... 25
Printhead ............................................................................................................................................................ 25
Printhead air management system ................................................................................................................ 26
Printhead lift ....................................................................................................................................................... 26
Print cartridges .................................................................................................................................................. 26
Optical scan carriage ......................................................................................................................................... 26
Print system operational states ...................................................................................................................... 26
Paper-handling system ......................................................................................................................................................... 29
Printer sensors ................................................................................................................................................... 29
High Capacity Input (HCI) sensors ................................................................................................................... 30
3x550 tray sensors ........................................................................................................................................... 31
1x550 tray sensors ........................................................................................................................................... 32
Inline nisher sensors ....................................................................................................................................... 33
ENWW vii
Page 8

Printer motors/solenoids ................................................................................................................................. 34
High capacity input (HCI) motors/solenoids .................................................................................................. 35
3x550 tray motors/solenoids .......................................................................................................................... 36
1x550 tray motors/solenoids .......................................................................................................................... 37
Inline nisher motors ........................................................................................................................................ 38
Printer printing system ..................................................................................................................................... 39
Input trays ........................................................................................................................................................... 40
Paper path zones ............................................................................................................................................... 43
Jam detection ..................................................................................................................................................... 45
Servicing system .................................................................................................................................................................... 48
Printhead wiper .................................................................................................................................................. 48
Service uid and aerosol management systems ............................................................................................................. 49
Airow system ........................................................................................................................................................................ 51
Function .............................................................................................................................................................. 51
Heating ................................................................................................................................................................ 51
Airow ................................................................................................................................................................. 51
Modes .................................................................................................................................................................. 51
Components ....................................................................................................................................................... 52
Document feeder system ..................................................................................................................................................... 53
Document feed system .................................................................................................................................... 53
Sensors in the document feeder .................................................................................................................... 53
Document feeder paper path .......................................................................................................................... 54
Document feeder simplex operation ............................................................................................................. 55
Document feeder e-duplex operation ........................................................................................................... 56
Deskew operation ............................................................................................................................................. 57
Document feeder hinges .................................................................................................................................. 57
Scanning and image capture system (780/785) .............................................................................................................. 59
Fax functions and operation ................................................................................................................................................. 60
Computer and network security features ..................................................................................................... 60
PSTN operation .................................................................................................................................................. 60
The fax subsystem ............................................................................................................................................ 60
Fax card in the fax subsystem ......................................................................................................................... 60
Fax page storage in ash memory ................................................................................................................. 62
Output accessories ................................................................................................................................................................ 63
Inline nisher ...................................................................................................................................................... 64
2 Solve problems ....................................................................................................................................................................................... 91
Problem-solving checklist .................................................................................................................................................... 92
Step 1: Check that the printer power is on .................................................................................................... 92
Step 2: Check the control panel for error messages ................................................................................... 92
Step 3: Test print functionality ........................................................................................................................ 93
viii ENWW
Page 9

Step 4: Test copy functionality (MFP models only) ...................................................................................... 93
Step 5: Test the fax sending functionality (785f/785zs/785z+) ............................................................... 94
Step 6: Test the fax receiving functionality (fax models only) ................................................................... 94
Step 7: Try sending a print job from a computer ......................................................................................... 94
Step 8: Test the Plug and Print USB Drive printing functionality ............................................................... 94
Factors that aect printer performance ........................................................................................................ 94
Troubleshooting process ...................................................................................................................................................... 96
Determine the problem source ....................................................................................................................... 96
Power subsystem .............................................................................................................................................. 98
Tools for troubleshooting ................................................................................................................................................... 129
Print the conguration and printhead information pages ........................................................................ 129
Event log messages ........................................................................................................................................ 132
Tools for troubleshooting: Individual component diagnostics ................................................................ 133
Diagrams .......................................................................................................................................................... 146
Print-quality troubleshooting tools .............................................................................................................. 159
Control panel menus ...................................................................................................................................... 168
Control panel message document (CPMD) ................................................................................................. 243
Print quality troubleshooting guide .................................................................................................................................. 244
Printer pre-checks .......................................................................................................................................... 244
Printer specic image defects ....................................................................................................................... 258
Solve copy/scan problems (780/785) .............................................................................................................................. 297
Solve copy problems (780/785 models only) ............................................................................................ 297
Solve scan problems (780/785 models only) ............................................................................................ 302
Solve paper jam or feed problems ................................................................................................................................... 308
Printer does not pick up paper or misfeeds ................................................................................................ 308
Clear paper jams ............................................................................................................................................. 310
Solve performance problems ............................................................................................................................................ 340
Factors aecting print performance ............................................................................................................ 340
The printer does not print or it prints slowly .............................................................................................. 341
The printer prints slowly ................................................................................................................................ 342
Solve connectivity problems .............................................................................................................................................. 343
Solve USB connection problems ................................................................................................................... 343
Solve wired network problems ..................................................................................................................... 343
Service mode functions ...................................................................................................................................................... 345
Service menu ................................................................................................................................................... 345
Printer resets ................................................................................................................................................... 354
Format Disk and Partial Clean functions ..................................................................................................... 356
Firmware upgrades ............................................................................................................................................................. 359
Determine the installed revision of rmware ............................................................................................. 359
Perform a rmware upgrade ........................................................................................................................ 361
Solve fax problems .............................................................................................................................................................. 365
ENWW ix
Page 10

Solve email problems ......................................................................................................................................................... 366
Appendix A Printer specications ......................................................................................................................................................... 367
Printer dimensions and weight ......................................................................................................................................... 368
Printer space requirements ............................................................................................................................................... 369
Power consumption, electrical specications, and acoustic emissions ...................................................................... 369
Operating-environment range .......................................................................................................................................... 370
Certicate of Volatility ......................................................................................................................................................... 371
Index ........................................................................................................................................................................................................... 415
x ENWW
Page 11

List of tables
Table 1-1 Operation sequence ................................................................................................................................................................ 4
Table 1-2 Printbar components ............................................................................................................................................................ 25
Table 1-3 Service Fluid and Aerosol Management System Components ...................................................................................... 50
Table 1-4 Document feeder sensors ................................................................................................................................................... 54
Table 1-5 Document feeder paper path .............................................................................................................................................. 54
Table 2-1 Troubleshooting owchart .................................................................................................................................................. 97
Table 2-2 MPCA LEDs ........................................................................................................................................................................... 100
Table 2-3 MPCA LED sequence at printer power on ....................................................................................................................... 100
Table 2-4 MPCA LEDs ........................................................................................................................................................................... 133
Table 2-5 MPCA LED sequence at printer power on ....................................................................................................................... 134
Table 2-6 ACCM LEDs ........................................................................................................................................................................... 135
Table 2-7 ACCMA LED sequence at printer power on ..................................................................................................................... 135
Table 2-8 Heartbeat LED, product initialization ............................................................................................................................... 136
Table 2-9 Heartbeat LED, product operational ................................................................................................................................ 139
Table 2-10 Reports menu ................................................................................................................................................................... 169
Table 2-11 Settings menu ................................................................................................................................................................... 171
Table 2-12 Copy menu (MFP only) ..................................................................................................................................................... 197
Table 2-13 Scan menu (780/785) ..................................................................................................................................................... 203
Table 2-14 Fax menu (fax models only) ........................................................................................................................................... 231
Table 2-15 Print Options menu .......................................................................................................................................................... 235
Table 2-16 Supplies menu .................................................................................................................................................................. 236
Table 2-17 Trays menu ........................................................................................................................................................................ 237
Table 2-18 Backup/Restore menu ..................................................................................................................................................... 238
Table 2-19 Calibrate/Cleaning menu ................................................................................................................................................. 238
Table 2-20 Troubleshooting menu .................................................................................................................................................... 240
Table 2-21 Printhead health score .................................................................................................................................................... 251
Table 2-22 Solve performance problems ......................................................................................................................................... 340
Table 2-23 Service menu .................................................................................................................................................................... 345
Table A-1 Dimensions for printer base model (SFP; all) ................................................................................................................. 368
Table A-2 Dimensions for base models (780dn, 785f; MFP) ......................................................................................................... 368
Table A-3 Dimensions for 785zs (MFP) ............................................................................................................................................. 368
Table A-4 Dimensions for the 1x550-sheet paper feeder ............................................................................................................. 368
ENWW xi
Page 12

Table A-5 Dimensions for the 1x550-sheet paper feeder with stand ......................................................................................... 369
Table A-6 Dimensions for the 3x550-sheet paper feeder with stand ......................................................................................... 369
Table A-7 Dimensions for the 4,000-sheet HCI with stand ........................................................................................................... 369
Table A-8 Operating-environment specications ............................................................................................................................ 370
xii ENWW
Page 13

List of gures
Figure 1-3 FFC insertion line ................................................................................................................................................................. 13
Figure 1-4 FFC support tape ................................................................................................................................................................. 14
Figure 1-5 FFC label ................................................................................................................................................................................ 14
Figure 1-6 FFC wing feature .................................................................................................................................................................. 15
Figure 1-7 ZIF connector ........................................................................................................................................................................ 15
Figure 1-8 FFC hook arm retainers ...................................................................................................................................................... 16
Figure 1-9 FFC pill bump retainers ....................................................................................................................................................... 17
Figure 1-10 FFC die-cut retainers ........................................................................................................................................................ 18
Figure 1-11 FFC double-sided tape retainer ...................................................................................................................................... 18
Figure 1-12 Discrete cable ferrite ........................................................................................................................................................ 19
Figure 1-13 Discrete cable tie-wraps .................................................................................................................................................. 20
Figure 1-14 Ground wires ...................................................................................................................................................................... 21
Figure 1-16 FFC wing feature ............................................................................................................................................................... 22
Figure 1-17 ZIF connector ..................................................................................................................................................................... 23
Figure 1-18 FFC spacing ........................................................................................................................................................................ 24
Figure 1-19 Printhead components ..................................................................................................................................................... 25
Figure 1-20 Print engine sensors ......................................................................................................................................................... 29
Figure 1-21 HCI sensors ........................................................................................................................................................................ 30
Figure 1-22 3x550 Tray sensors .......................................................................................................................................................... 31
Figure 1-23 1x550 tray sensors ........................................................................................................................................................... 32
Figure 1-24 Inline nisher sensors ....................................................................................................................................................... 33
Figure 1-25 HCI motors/solenoids ....................................................................................................................................................... 35
Figure 1-26 3x550 tray motors/solenoids ......................................................................................................................................... 36
Figure 1-27 1x550 tray motors/solenoids ......................................................................................................................................... 37
Figure 1-28 Inline nisher motors ........................................................................................................................................................ 38
Figure 1-29 Printer printing system .................................................................................................................................................... 39
Figure 1-30 Tray 1 pick and separation system ................................................................................................................................ 40
Figure 1-31 Service uid and aerosol management system .......................................................................................................... 50
Figure 1-32 Airow system components ........................................................................................................................................... 52
Figure 1-33 Document feeder sensors ............................................................................................................................................... 54
Figure 1-34 Document feeder paper path .......................................................................................................................................... 54
Figure 1-35 Deskew operation ............................................................................................................................................................. 57
ENWW xiii
Page 14

Figure 1-36 Document feeder open (book mode) ............................................................................................................................ 58
Figure 1-37 Document feeder open (60º to 80º) .............................................................................................................................. 58
Figure 1-38 FFC insertion line ............................................................................................................................................................... 67
Figure 1-39 FFC support tape ............................................................................................................................................................... 68
Figure 1-40 FFC label ............................................................................................................................................................................. 68
Figure 1-41 FFC hook arm retainers .................................................................................................................................................... 69
Figure 1-42 FFC pill bump retainers .................................................................................................................................................... 70
Figure 1-43 FFC die-cut retainers ........................................................................................................................................................ 71
Figure 1-44 FFC double-sided tape retainer ...................................................................................................................................... 71
Figure 1-45 Discrete cable ferrite ........................................................................................................................................................ 72
Figure 1-46 Discrete cable tie-wraps .................................................................................................................................................. 73
Figure 1-47 Connectors ......................................................................................................................................................................... 74
Figure 1-48 FFC spacing ........................................................................................................................................................................ 75
Figure 1-49 Inline nisher control diagram (front) ............................................................................................................................ 76
Figure 1-50 Inline nisher sensor control diagram (front) ............................................................................................................... 77
Figure 1-51 Inline nisher motor control diagram (front) ................................................................................................................ 78
Figure 1-52 Inline nisher sensor diagram (1 of 2) ........................................................................................................................... 79
Figure 1-53 Inline nisher sensor diagram (2 of 2) ........................................................................................................................... 80
Figure 1-54 Inline nisher motor diagram .......................................................................................................................................... 81
Figure 1-55 Inline nisher stapler control diagram ........................................................................................................................... 82
Figure 1-56 Inline nisher stapler sensor diagram ........................................................................................................................... 83
Figure 1-57 Inline nisher stapler motor control diagram ............................................................................................................... 84
Figure 2-1 MPCA LEDs ......................................................................................................................................................................... 100
Figure 2-2 Formatter heartbeat LED ................................................................................................................................................. 101
Figure 2-3 Diagnostic-tests access button (765 printers) ............................................................................................................. 104
Figure 2-4 Diagnostic-tests access button (780/785 printers) .................................................................................................... 104
Figure 2-5 Press the diagnostics-access button (780/785 printers) ........................................................................................... 105
Figure 2-6 Control panel version A yellow screen ........................................................................................................................... 105
Figure 2-7 Exit the diagnostic mode ................................................................................................................................................. 107
Figure 2-8 Open the Pre-boot menu ................................................................................................................................................. 108
Figure 2-9 Pre-boot menu .................................................................................................................................................................. 109
Figure 2-10 Access the administration menu .................................................................................................................................. 110
Figure 2-11 Access the diagnostics menu ........................................................................................................................................ 110
Figure 2-12 Open the screen test ...................................................................................................................................................... 111
Figure 2-13 Blue vertical gradient screen ........................................................................................................................................ 111
Figure 2-14 Open the touch test ........................................................................................................................................................ 115
Figure 2-15 Touch the white grid ....................................................................................................................................................... 115
Figure 2-16 Verify the mark ............................................................................................................................................................... 116
Figure 2-17 Open the softkey test .................................................................................................................................................... 117
Figure 2-18 Select Home .................................................................................................................................................................... 117
Figure 2-19 Successful test ................................................................................................................................................................ 118
xiv ENWW
Page 15

Figure 2-20 Open the backlight test .................................................................................................................................................. 119
Figure 2-21 Open the sound test ....................................................................................................................................................... 120
Figure 2-22 Open the keyboard test ................................................................................................................................................. 121
Figure 2-23 Open the sound test ....................................................................................................................................................... 122
Figure 2-24 Touchscreen blank, white, or dim (no image) ............................................................................................................ 124
Figure 2-25 Touchscreen has an unresponsive zone ..................................................................................................................... 125
Figure 2-26 No control panel sound .................................................................................................................................................. 126
Figure 2-27 Home key is unresponsive ............................................................................................................................................ 127
Figure 2-28 Hardware integration pocket (HIP) is not functioning (control panel functional) ................................................ 128
Figure 2-29 Conguration page ......................................................................................................................................................... 129
Figure 2-30 Printhead information page .......................................................................................................................................... 131
Figure 2-31 MPCA LEDs ....................................................................................................................................................................... 133
Figure 2-32 ACCM LEDs ....................................................................................................................................................................... 135
Figure 2-33 Defeating interlocks (cartridge door) .......................................................................................................................... 141
Figure 2-34 Defeating interlocks (left door) .................................................................................................................................... 142
Figure 2-35 Defeating interlocks (right door) .................................................................................................................................. 142
Figure 2-36 Plug/jack locations (external printer) .......................................................................................................................... 146
Figure 2-37 Print engine sensors ...................................................................................................................................................... 148
Figure 2-38 HCI sensors ...................................................................................................................................................................... 149
Figure 2-39 3x550 tray sensors ........................................................................................................................................................ 150
Figure 2-40 1x550 tray sensors ........................................................................................................................................................ 151
Figure 2-41 Inline nisher sensors .................................................................................................................................................... 152
Figure 2-42 Printer motors/solenoids .............................................................................................................................................. 153
Figure 2-43 HCI motors/solenoids ..................................................................................................................................................... 154
Figure 2-44 3x550 tray motors/solenoids ....................................................................................................................................... 155
Figure 2-45 1x550 tray motors/solenoids ....................................................................................................................................... 156
Figure 2-46 Inline nisher motors ..................................................................................................................................................... 157
Figure 2-47 Printer printing system .................................................................................................................................................. 158
Figure 2-50 Ink smear/redeposit ....................................................................................................................................................... 255
Figure 2-51 Print Quality Report page .............................................................................................................................................. 260
Figure 2-52 Print Head Diagnostic Page ........................................................................................................................................... 262
Figure 2-53 Printhead Details page .................................................................................................................................................. 264
Figure 2-67 Paper jam locations (765) ............................................................................................................................................. 310
Figure 2-68 Paper jam locations (780/785) .................................................................................................................................... 312
Figure 2-69 Open the Pre-boot menu .............................................................................................................................................. 355
Figure 2-70 Open the Pre-boot menu .............................................................................................................................................. 357
Figure 2-71 Open the Pre-boot menu .............................................................................................................................................. 358
Figure 2-72 Determine the installed revision of rmware ............................................................................................................ 360
Figure 2-73 Open the Pre-boot menu .............................................................................................................................................. 363
Figure A-1 Certicate of Volatility (750dn; 1 of 3) ........................................................................................................................... 371
Figure A-2 Certicate of Volatility (750dn; 2 of 3) ........................................................................................................................... 372
ENWW xv
Page 16

Figure A-3 Certicate of Volatility (750dn; 3 of 3) ........................................................................................................................... 373
Figure A-4 Certicate of Volatility (750dw; 1 of 4) .......................................................................................................................... 374
Figure A-5 Certicate of Volatility (750dw; 2 of 4) .......................................................................................................................... 375
Figure A-6 Certicate of Volatility (750dw; 3 of 4) .......................................................................................................................... 376
Figure A-7 Certicate of Volatility (750dw; 4 of 4) .......................................................................................................................... 377
Figure A-8 Certicate of Volatility (772dn; 1 of 3) ........................................................................................................................... 378
Figure A-9 Certicate of Volatility (772dn; 2 of 3) ........................................................................................................................... 379
Figure A-10 Certicate of Volatility (772dn; 3 of 3) ........................................................................................................................ 380
Figure A-11 Certicate of Volatility (772dw; 1 of 4) ........................................................................................................................ 381
Figure A-12 Certicate of Volatility (772dw; 2 of 4) ........................................................................................................................ 382
Figure A-13 Certicate of Volatility (772dw; 3 of 4) ........................................................................................................................ 383
Figure A-14 Certicate of Volatility (772dw; 4 of 4) ........................................................................................................................ 384
Figure A-15 Certicate of Volatility (777z; 1 of 4) ........................................................................................................................... 385
Figure A-16 Certicate of Volatility (777z; 2 of 4) ........................................................................................................................... 386
Figure A-17 Certicate of Volatility (777z; 3 of 4) ........................................................................................................................... 387
Figure A-18 Certicate of Volatility (777z; 4 of 4) ........................................................................................................................... 388
Figure A-19 Certicate of Volatility (75050dn; 1 of 3) .................................................................................................................... 389
Figure A-20 Certicate of Volatility (75050dn; 2 of 3) .................................................................................................................... 390
Figure A-21 Certicate of Volatility (75050dn; 3 of 3) .................................................................................................................... 391
Figure A-22 Certicate of Volatility (75050dw; 1 of 4) ................................................................................................................... 392
Figure A-23 Certicate of Volatility (75050dw; 2 of 4) ................................................................................................................... 393
Figure A-24 Certicate of Volatility (75050dw; 3 of 4) ................................................................................................................... 394
Figure A-25 Certicate of Volatility (75050dw; 4 of 4) ................................................................................................................... 395
Figure A-26 Certicate of Volatility (77740dn; 1 of 3) .................................................................................................................... 396
Figure A-27 Certicate of Volatility (77740dn; 2 of 3) .................................................................................................................... 397
Figure A-28 Certicate of Volatility (77740dn; 3 of 3) .................................................................................................................... 398
Figure A-29 Certicate of Volatility (77740dw; 1 of 4) ................................................................................................................... 399
Figure A-30 Certicate of Volatility (77740dw; 2 of 4) ................................................................................................................... 400
Figure A-31 Certicate of Volatility (77740dw; 3 of 4) ................................................................................................................... 401
Figure A-32 Certicate of Volatility (77740dw; 4 of 4) ................................................................................................................... 402
Figure A-33 Certicate of Volatility (77740z; 1 of 4) ...................................................................................................................... 403
Figure A-34 Certicate of Volatility (77740z; 2 of 4) ...................................................................................................................... 404
Figure A-35 Certicate of Volatility (77740z; 3 of 4) ...................................................................................................................... 405
Figure A-36 Certicate of Volatility (77740z; 4 of 4) ...................................................................................................................... 406
Figure A-37 Certicate of Volatility (77750z; 1 of 4) ...................................................................................................................... 407
Figure A-38 Certicate of Volatility (77750z; 2 of 4) ...................................................................................................................... 408
Figure A-39 Certicate of Volatility (77750z; 3 of 4) ...................................................................................................................... 409
Figure A-40 Certicate of Volatility (77750z; 4 of 4) ...................................................................................................................... 410
Figure A-41 Certicate of Volatility (77760z; 1 of 4) ...................................................................................................................... 411
Figure A-42 Certicate of Volatility (77760z; 2 of 4) ...................................................................................................................... 412
Figure A-43 Certicate of Volatility (77760z; 3 of 4) ...................................................................................................................... 413
xvi ENWW
Page 17

Figure A-44 Certicate of Volatility (77760z; 4 of 4) ...................................................................................................................... 414
ENWW xvii
Page 18

xviii ENWW
Page 19

1 Theory of operation
●
Basic operation
●
System control
●
Cabling system
●
Print subsystem
●
Paper-handling system
●
Servicing system
●
Service uid and aerosol management systems
●
Airow system
●
Document feeder system
●
Scanning and image capture system (780/785)
●
Fax functions and operation
●
Output accessories
ENWW 1
Page 20
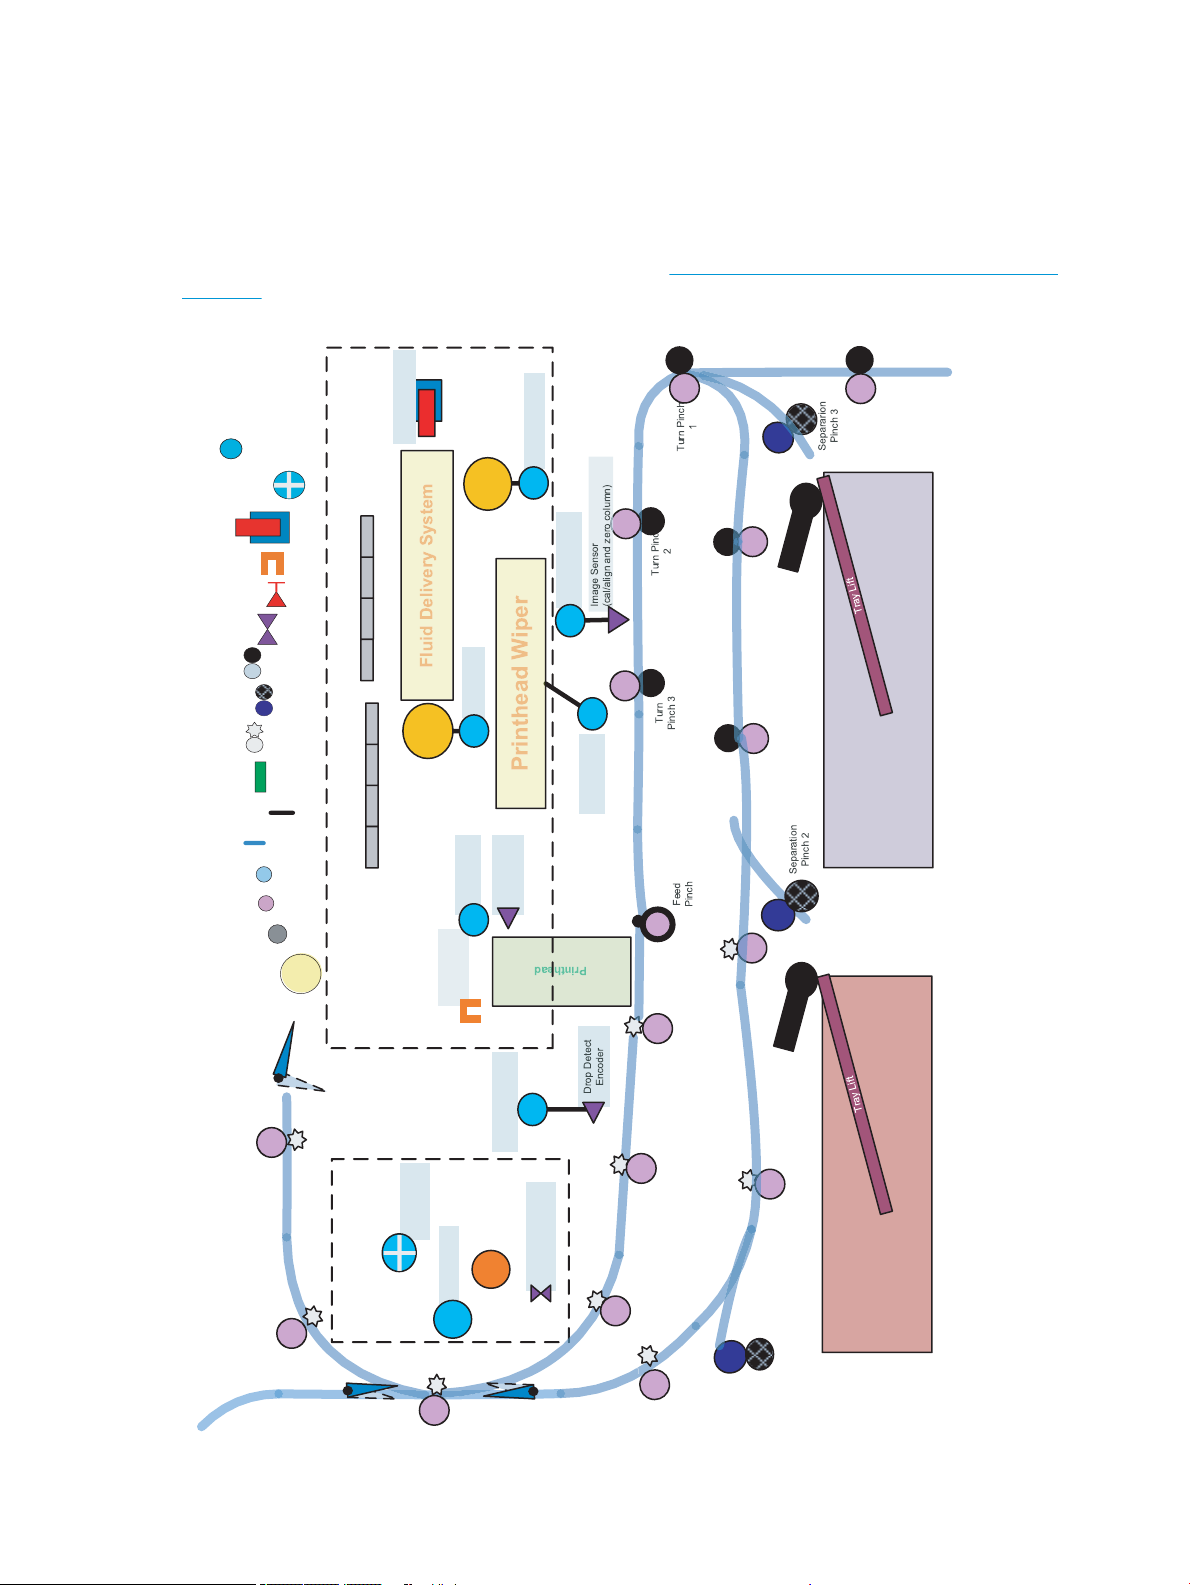
Airflow Assembly
Printhead Lift
Motor
Printhea d
Wiper Mo tor
N
S
Air Pump
Fluid Pump
Vent Soleno id
Air Pump
Motor
Fluid Pump Motor
Drop Detect
Carriage Motor
Image Sensor
Carriage Motor
Fluid Level Sensors
Acumen
Printhead Lift
Sensor
Printhead Lift
Encoder
Aerosol Fan
Motor
Airflow Fan
Motor
Airflow Heater
Airflow Ass embl y
Thermistor
F
Sheet 500 Tray 3
500 Sheet Tray 2
Duplex
Pinch 1
Duplex
Pinch 2
Output
Pinch 1
Ejection
Pinch 1
Output
Pinch 2
Tray 1
Separation
Pinch
Outpu t
Pinch 3
Duplex
Pinch 3
Duplex
Pinch 4
Duplex
Pinch 5
Left Vertical
Pinch 2
Tray 2 Pick
Roller
Tray 3 Pick
Roller
Printhead Assembly
Legend
Pinch roller
Motor
Star Wheel
Media Path
Retard Roller
Switch/Hall
Effect Sensor
Fan/Digital Tach
F
Other Sensors
Torque Coupling
12.13 mm Dia
16.17 mm Dia
PTO connection
150 LPI, 1200 Line
Digital Encoder
Opto Sensor
Solenoid
N
S
Reflective REDI
Basic operation
Function structure
HP recommends printing the following document (on A3 size paper) for troubleshooting reference. It is available
on the HP Web-based Interactive Search Engines (WISE). See HP Web-based Interactive Search Engines (WISE)
on page 3.
Figure 1-1 Printer printing system
2 Chapter 1 Theory of operation ENWW
Page 21

HP Web-based Interactive Search Engines (WISE)
The printer print system document is available on the HP Web-based Interactive Search Engines (WISE). Go to
the appropriate Web site (listed below), and then search information by printer name.
NOTE: Make sure that this document is printed on A3 size paper.
AMS
●
https://support.hp.com/wise/home/ams-en
●
https://support.hp.com/wise/home/ams-es
●
https://support.hp.com/wise/home/ams-pt
APJ
●
https://support.hp.com/wise/home/apj-en
●
https://support.hp.com/wise/home/apj-ja
●
https://support.hp.com/wise/home/apj-ko
●
https://support.hp.com/wise/home/apj-zh-Hans
●
https://support.hp.com/wise/home/apj-zh-Hant
EMEA
●
https://support.hp.com/wise/home/emea-en
ENWW Basic operation 3
Page 22

Operation sequence
The engine-control system on the main printed circuit board MPCA controls the operational sequences. The
following table describes the durations and the operations for each period of a print operation from when the
printer is turned on to when the motors stop rotating.
Table 1-1 Operation sequence
Period Duration Purpose
Initial startup and
calibrations
Servicing operations Performed just before the
Print preparation From the time the printer
When the printer is set up for the
rst time from the factory.
NOTE: Startup is disabled if the
temperature is 5°C (41°F) or
lower. The recommend
temperature range for this
function is 15°C (59°F) to 40°C
(104°F).
printhead enters the capped
state after printing, when leaving
the capped state after a print job
is initiated, or during printer idle
times when a print job is not
impacted.
receives a print command until
paper enters the print zone.
This one-time setup process gets the printer ready to print for the rst
time.
●
Fluid replacement—The printer ushes the shipping and
handling uid out of the printhead and replaces it with ink. No
pages are printed.
●
Pen energy calibration (TTOE)—No pages are printed.
●
Die alignment—The printer aligns the 14 die on the printhead
active face, and then prints and internally analyzes one page.
●
Die density leveling—The printer measures and compensates
for the drop variation, and then prints and internally analyzes
multiple pages.
Servicing maintains print quality by removing debris and excess ink.
Nozzle presence detection is employed to replace missing nozzles.
●
Nozzle presence detection—The optical scan carriage detects
and disables inoperable nozzles, and replaces them with
operable nozzles.
●
Printhead servicing—The web wipe on the printhead wiper
moves under the printhead to clean the active face and res the
nozzles into the ink collection unit to clear clogged or blocked
nozzles.
Prepares the printer for a print job.
●
The printhead leaves the capping state as the printhead wiper
moves away from the printhead.
●
If needed, some servicing occurs.
●
The printhead lowers to the printing position. The media type
and printing mode determine the print zone height.
●
The printer picks paper from one of the input trays.
●
Every page from Tray 1 is measured for edge detection. For Tray
2/3 and optional Trays 3, 4 and 5, the printer performs media
edge detection after printing the rst sheet. The last sheet of
each job is also measured for edge detection if at least ve
sheets have been printed.
●
The printer monitors environmental conditions. The printer can
slow the print speed if conditions are signicantly dierent from
a normal oce environment (23°C (73.4°F), 50% relative
humidity).
●
The formatter PCA processes print data and transmits the data
to the printhead.
4 Chapter 1 Theory of operation ENWW
Page 23

Table 1-1 Operation sequence (continued)
Period Duration Purpose
Printing From the start of media pick in
the designated input tray until
the last sheet is delivered to the
designated output bin.
End of print job Performed after the print job is
completed, and continues until
the next job is initiated.
Processes the print job.
●
The page is picked from the designated tray and travels through
the media path to the print zone.
●
As the page passes under the printhead, the printhead applies
ink to the page.
●
The page then enters the airow assembly area where heated
air might be applied to reduce the moisture content of the page.
●
For Simplex print jobs, the page then proceeds to the output bin
(face-down).
●
For Duplex print jobs, the page then advances until the trailing
edge of the media moves past the left side vertical path sensor.
The page then reverses direction and proceeds down through
the duplex path and underneath the left duplexer (service uid
container). Then the page turns upward, and re-enters the print
zone.
Ink is then applied to the second side of the page by the
printhead.
●
The process continues until all the pages of the print job are
completed. The process might be interrupted by occasional
printhead servicing events if the job includes many pages.
This period puts the printer in a state where it’s ready for the next
print job.
●
After a short dwell interval, the printhead will be allowed to cap.
Standby The printer is sitting idle, waiting
for the next print job to be
initiated.
●
If needed, servicing or nozzle presence detection occurs, but
these events are interruptible if another job is initiated.
●
The printhead moves to the capping position.
●
The printhead wiper moves to cap the printhead.
This period is intended to conserve energy while the printer is sitting
idle. Certain functions might be disabled to save power, and then
restarted when needed. The printer has two standby modes:
●
Idle mode—The printhead is capped and the printer is ready to
immediately start a new job
●
Sleep 1 mode—After the printer is inactive for about 10 minutes
(a setting that can be adjusted from the control panel or the
Embedded Web Server), the control panel turns o and the
power LED blinks to indicate the unit is in Sleep mode. When in
Sleep mode, the printer must wake up and go to idle mode
before all printer functions are available. The printer is designed
to wake up from Sleep mode based on certain interactions with
the printer, such as touching the control panel or opening a
paper tray.
●
Sleep 2 mode-After the printer is inactive for a longer period of
time (typically 2 hours), the engine controller powers down to
minimize power consumptions. This setting can be adjusted
from the control panel.
ENWW Basic operation 5
Page 24
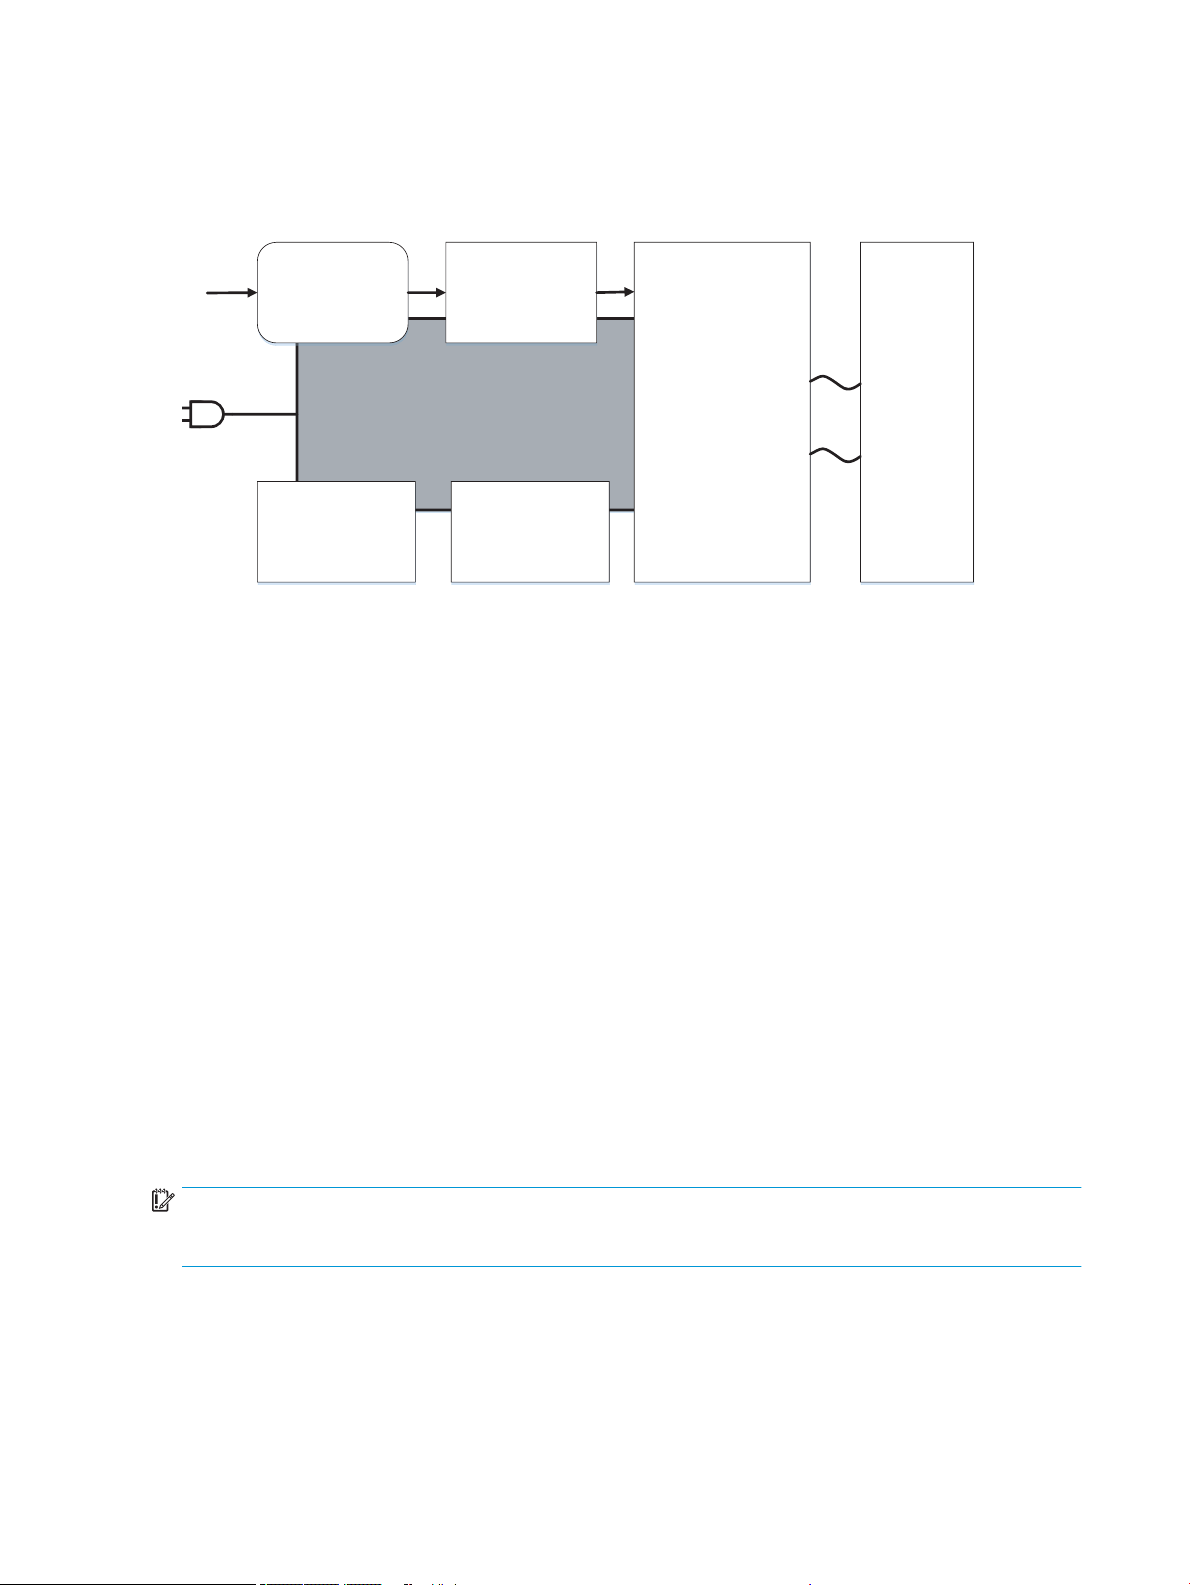
System control
Power supply
FormaƩer
I/O, PDL, UI Control
Datapath
ASIC + memory
Pen I/F
Pen energy control
Pen voltage sequencing
Signal integrity
Ink-short protecƟon
Ink pumps
Printhead interconnects
Ink supply
Engine control
Motor + sensor drive
Printhead
56,000 nozzles
I/O
AC control
module
Airflow system
The system control coordinates all the other systems, according to commands from the MPCA.
Figure 1-2 System control
●
MPCA
●
Data path
●
Engine control
●
Pen interface
●
Power supply
●
AC control module
MPCA digital ASIC
The MPCA digital ASIC contains dual ARM CPUs (one at 512 MB and one at 600MHz) that execute rmware code
that provides high-level device control. The digital ASIC uses a standard PCle interface to pass data to the
formatter ASIC.
MPCA analog ASIC
The MPCA ASIC generates the system voltage for the MPCA, formatter drives the scanner and ADF motors,
manages the real-time clock, and drives the fax speaker.
Formatter and data path
IMPORTANT: Do not simultaneously install a replacement trusted platform module (TPM), hard disk drive (HDD
MFP), eMMC (SFP) and formatter PCA. Remove and install each part separately, making sure to turn the printer
power on between installations. Failure to do so results in an unusable printer.
The formatter controller ASIC controls the input/output (I/O) control, the user interface, and the rendering of
page description language les into printer-specic commands.
6 Chapter 1 Theory of operation ENWW
Page 25

Input/output (I/O) control
The printers support 10/100/1000 Ethernet, 802.11 wireless and NFC (some 765 and 780/785 models), a rear
USB host port, a rear USB device port, a walk-up USB host port, and analog fax port (some 780/785 models).
The formatter PCA controls the USB device and USB host. The optional dual USB host port accessory is also
connected to the formatter after user installation.
Wireless and NFC I/O are provided via a separate radio module.
User interface
The printers contain either a 4.3-in (765 models) or an 8-in (780/785 models) color graphics display. For
wireless models, there is an icon on the control panel to denote that the wireless feature is enabled. The printers
include a walk-up USB host port for connection to thumb drives.
Formatter digital ASIC
The formatter digital ASIC has dual ARM CPUs (1.2 GHz) that execute rmware code that provides high-level
device control. The digital ASIC uses a standard PCle interface to pass data to the engine control ASIC. The
formatter rmware is located on either a 320 GB hard-disk drive (HDD) on 780/785 models, or an embedded 8
GHz MultiMedia Card (eMMC) or optional HDD on 765 models.
Additionally, the formatter digital ASIC manages the real-time clock, interfaces to the mass storage controller
ASIC, provides control of USB ports, and interfaces with the Ethernet LAN ASIC and fax module.
Formatter Ethernet ASIC
The formatter Ethernet ASIC connects to the formatter digital ASIC with a PCIe interface to transmit and receive
network packets.
Formatter mass storage ASIC
The formatter mass storage ASIC bridges between the formatter digital ASIC (via PCIe interface) and the mass
storage device (via SATA interface). The 780/785 models use a rotating media HDD, while the 765 models use
eMMC an optional HDD is available.
Formatter memory
Formatter memory is installed on-board and there is support for additional DIMM memory installation. The size
of the memory on the formatter is 1.5 GB for 765 models and 2.5-3.0 GB for 780/785 models. An optional 1GB
DIMM is available as a customer accessory.
Real-time clock
The real-time clock (RTC) allows the fax module to time-stamp outgoing faxes. It also determines the elapsed
time between printhead and ISS calibration events. The RTC uses a separate device connected to the formatter
digital ASIC, along with a crystal and a battery.
Late point dierentiation conguration (LPDC)
Allows the channel partner to congure the speed to the printer depending on the customer’s order. LPDC
conguration is stored on the Trusted Platform Module (TPM). There are three methods to program the speed to
the printer.
ENWW System control 7
Page 26

●
Automatic
●
O line
●
Manual
Engine control
The engine controller digital ASIC receives high-level commands from the MPCA, and it then provides low-level
control to the print mechanism. In particular, the engine controller digital ASIC and its rmware control motors,
system sensors, and the printhead. The engine controller analog ASICs integrate motor drivers, voltage
regulators, sensor interfaces, and supervisory circuits.
Engine controller digital ASIC
The engine controller digital ASIC has a high-performance 480 MHz ARM CPU and DSP co-processors that
execute rmware code to provide low-level engine control. It also drives a FPGA which then creates the
printhead 15 high-speed LVDS transmission signals. The signals are routed from the engine PCA to the printhead
via two large FFC cables. The engine controller digital ASIC receives pre-rendered data from the MPCA digital
ASIC over a standard PCle interface.
When a printer enters Sleep mode, many functions of the printer go into a low-power mode. If a print job is
received while the printer is in Sleep mode, the printer will take a short period of time to "wake up". This can take
up to 15 seconds, which will delay the rst page out (FPO) time accordingly.
Engine controller analog ASICs
The engine uses six analog ASICs to generate the system voltages for the engine, drive the engine motors,
control various engine sensors, and monitor printhead power delivery for correct operation.
The engine contains 24 motors, 3 solenoids and 2 fans:
NOTE: The air ow fan is created using a DC motor.
Certain models might have fewer motors, depending upon the exact conguration of the paper trays.
Motors
●
Tray 1 pick motor
●
Tray 2 lift motor
●
Tray 3 lift motor
●
Tray 1 separation motor
●
Tray 2 separation motor
●
Tray 3 separation motor
●
Duplex diverter motor
●
Duplex entry motor
●
Duplex exit motor
●
Finisher diverter motor
●
Vertical motor
8 Chapter 1 Theory of operation ENWW
Page 27

Solenoids
●
Deskew motor (front)
●
Deskew turn motor (back)
●
Scanning carriage motor
●
Stack control motor
●
Printhead wiper motor
●
Eject motor
●
Drop detect carriage motor
●
Print zone feed motor
●
Ink pump motor
●
Ink prime motor
●
Air ow fan motor (for the air ow fan)
●
Printhead lift motor
●
Tray 2 pick solenoid (E-clutch)
●
Tray 3 pick solenoid (E-clutch)
●
Ink prime vent solenoid
Fans
●
Airow fan
Aerosol fan
Most motors are DC motors with encoder feedback, to provide precision servo control. These motors are driven
directly by one of the engine analog ASICs.
The printer uses many sensors to track the media as it travels through the paper path. Most of these are optical
reective edge detection interrupter (REDI) sensors, which are used in conjunction with mirrors to sense the
presence or absence of paper in the paper path. These are carefully aligned and calibrated at the factory, so care
must be taken when servicing these sensors. See the remove and Replace chapter of the Repair manual for
more details.
Other printed circuit assemblies
In addition to hosting the system ASICs, the engine printed circuit assembly (PCA) incorporates many of the
circuits required to interface with sensors and other sub-system components. In some cases, this circuitry is
located on a smaller remote PCAs (SLBs) to optimize cable interconnects. The following table lists the various
PCAs in the base mechanism engine/MPCA.
IMPORTANT: Do not simultaneously install a replacement trusted platform module (TPM), hard disk drive (HDD
MFP), eMMC (SFP) and formatter PCA. Remove and install each part separately, making sure to turn the printer
power on between installations. Failure to do so results in an unusable printer.
ENWW System control 9
Page 28

Name Description/Function Name Description/Function
Left door PCA Distribution Main bin full sensor PCA Main bin paper out sensor
Printhead lift encoder PCA Printhead lift Heat zone temperature
thermistor PCA
Feed motor encoder PCA Feed motor Contact size detect PCA Paper length/width detect
Left front upper PCA Distribution SIM PCA SHAID and distribution
Air ow assembly PCA Air ow assembly TT dashboard PCA Tabletop control panel interface
Center rear lower PCA Distribution HE1 PCA Hall eect sensor
Left rear lower PCA Distribution Button on/o PCA Base mechanism on/o
AC control module PCA AC control for air ow assembly Power button interface PCA Base mechanism on/o button
Printhead registration sensor
PCA
Main logic PCA MPCA and engine Power button PCA Base mechanism on/o button
Through beam optical drop
detect (TBODD) PCA
Drop detect carriage PCA TBODD carriage Main bin LED PCA Main bin LED
Opto OOP lift plate sensor PCA Tandem tray sensor Hall eect left door PCA Left door hall eect
Separation PCA Tandem tray distribution Temperature/humidity
Printhead sensor eMMC module PCA (8 GB) eMMC module
TBODD sensor Light pipe PCA Light pipe LED
sensor/NVM/HE PCA
Air ow assembly temperature
sense
interface
Multiple sensors
Connector width adjust sensor
PCA
Duplex spittoon contact PCA Duplex spittoon contact Flatbed scan interconnect PCA Flatbed scan interface
Duplex spittoon EEPROM PCA Duplex spittoon EEPROM ADF PCA ADF interface
Right rear lower PCA Distribution eMMC module PCA (16 GB) eMMC module
Left rear upper PCA Distribution Acumen contact PCA Acumen PCA
Pen interface (I/F)
The printhead is the key component that dierentiates this printer from other inkjet printers. The conventional
approach is to print a page in horizontal swaths by moving a “scanning” printhead horizontally over a xed sheet
of paper, advancing the paper a xed amount, and then printing the next swath. This printer moves the paper
underneath a xed page-wide printhead in a single, smooth motion.
Single-pass page-wide printing requires that data and power be delivered to the printhead at a very high rate,
while also maintaining good control of paper position as it moves past the printhead nozzles.
The engine printed circuit assembly (PCA) sends power and data to the printhead via two large at exible cables
(80 pins for the data and 26 pins for the power). The printhead PCA routes power and data to 14 printhead die,
which are attached to the printhead PCA using a exible tab circuit and wire-bonding process.
The printers also contain electronics to control the ink supply station (ISS). The SIM PCA has several functions. It
detects low-ink conditions by detecting presence of ink and/or ink foam in the X-chamber. The SIM PCA also
collects and distributes electrical signals that drive the ink pump and prime motors, engage the solenoids, and
Multi-purpose tray sensor Carriage drop detect motor PCA Motor cable connect
10 Chapter 1 Theory of operation ENWW
Page 29

read the ink supply acumen data. All data communications between the ISS and engine PCA are routed through a
single 20-pin FFC.
Each ink supply has a memory tag that stores information about its type of ink, the amount of ink remaining, and
other critical data. It uses a special authentication scheme to ensure that only genuine HP supplies are used and
the printer is not damaged by using invalid supplies. Acumen uses a two-line serial bus which, along with 3.3 V
and ground, is cabled via the SIM PCA to the engine PCA and the engine control digital ASIC.
Power supply
The power supply module converts 100-240 VAC to 34 VDC to power the system. The power supply module has
a sleep mode that reduces power consumption in system low-power modes. When in its sleep mode, the power
supply generates less than 20 W.
The power supply module supplies 34 V to the engine PCA. The power supply module has two operating modes,
depending upon the state of its nSLEEP input pin:
●
●
The power supply is a self-contained module that can be replaced if it is defective (see the Remove and Replace
chapter of the Repair manual).
To ensure safe operation, the power supply will “latch o” if a persistent over-current fault condition exists. This
would typically be caused by a short-circuit from 34 V to ground in the printer. Less severe faults can cause the
power supply to latch o, if present for an extended period of time, or if the printer is operated above the
recommended operating temperature range. In addition, the power supply output is split into 7 “rails”, each with
separate output fusing as an additional safety feature.
Printing = up to 170 W ( nSLEEP = high logic level)
Sleep mode = < 20 W ( nSLEEP = low logic level)
NOTE: The power supply includes fusible links for the AC output from the power supply to the AC control
module, and then to the airow assembly.
AC control module
The AC control module performs the following functions related to the heating elements in the air ow
assembly:
●
Low-cost voltage monitor
a. The voltage of the outlet, which the printer is attached, is monitored to ensure the printer remains
operational, even in a low-quality-power environment. This is done by instantly shutting o heater
power until the minimum voltage threshold is met. Hysteresis is included to avoid rapid uctuations in
voltage.
b. This circuit generates a frequency modulated signal that is sent across the isolation barrier, and
interpreted by rmware in the engine.
●
Isolation
–
Isolates the low voltage heater control signals from the high voltage AC power that is applied to the
heater. This is a safety feature to ensure line transients (i.e. lightning) aren’t coupled into the low
voltage system, which could cause damage to the printer or user.
●
AC switch
ENWW System control 11
Page 30

–
Switches AC power on/o to the heater using TRIACs.
●
Heating Element Conguration
–
Using relays, the heating element conguration is changed between series and parallel, in
coordination with applied voltage. This is done to have a predictable temperature prole that is
functional across the full range of worldwide voltages (90-240VAC).
12 Chapter 1 Theory of operation ENWW
Page 31
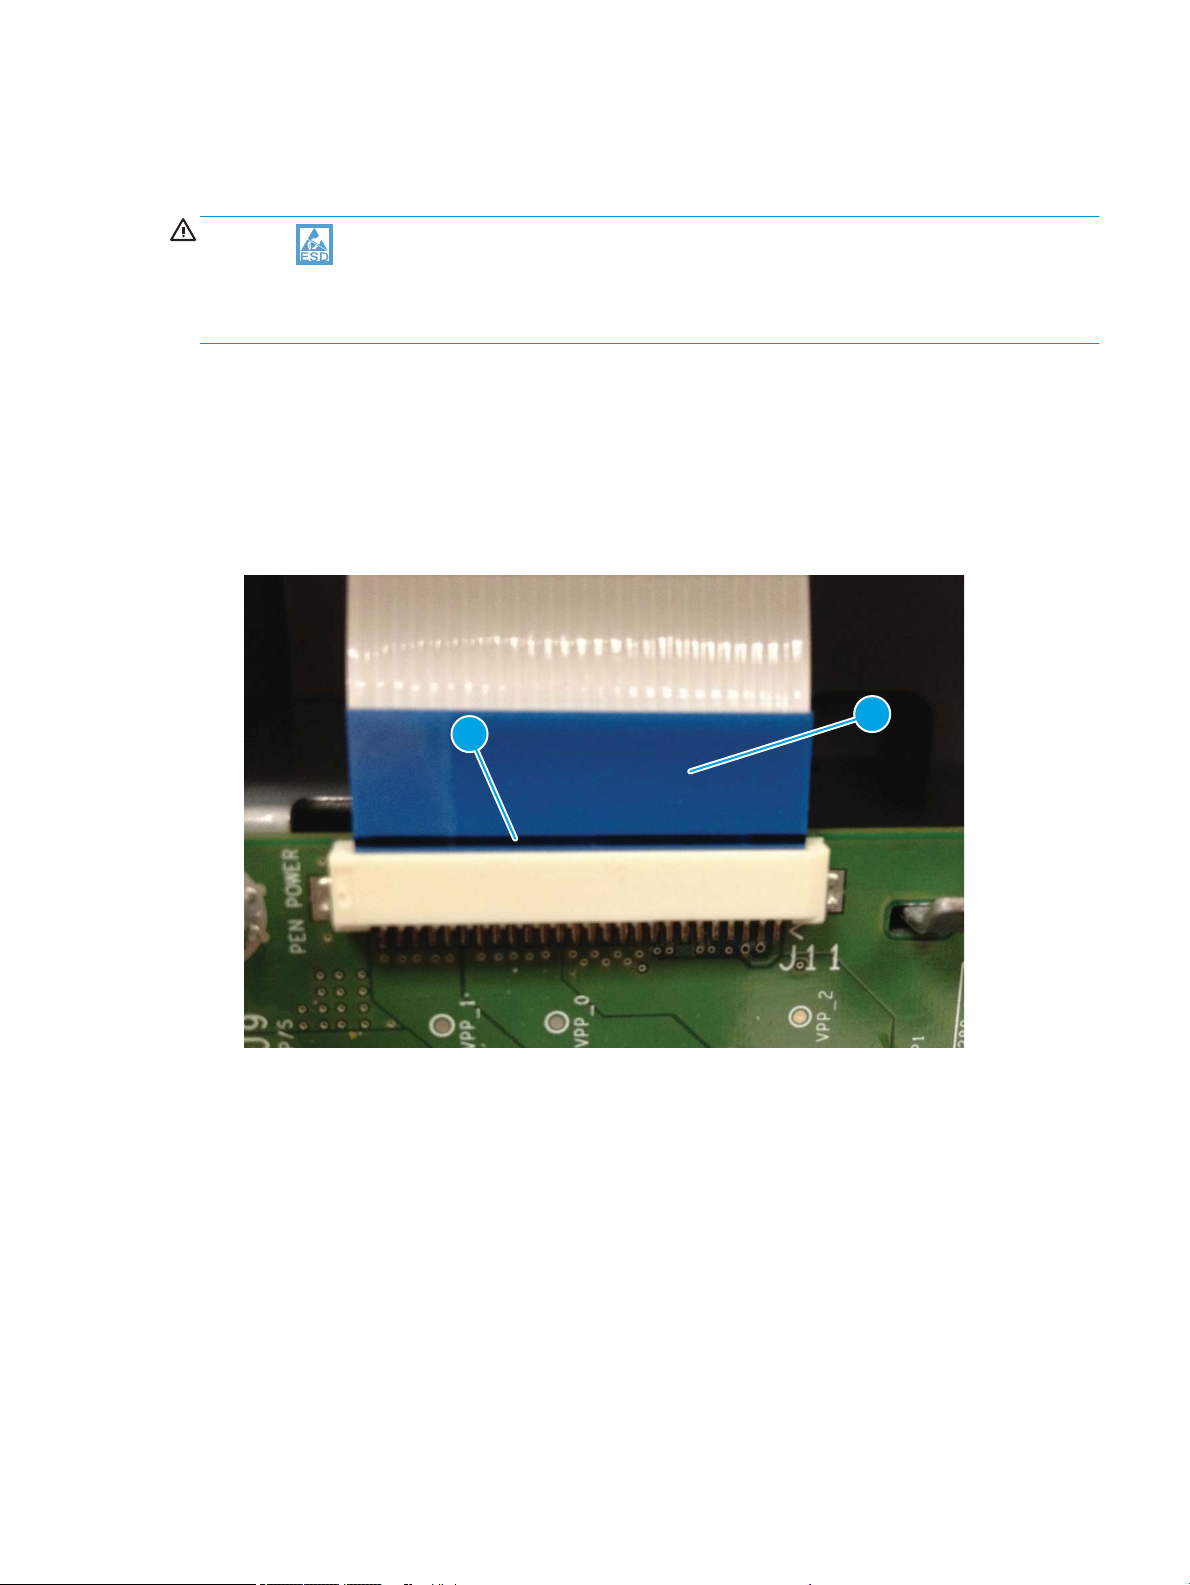
Cabling system
1
2
The printer cabling system includes both discrete cables and at-exible conductor (FFC) cables.
CAUTION: Cables and printed circuit assemblies (PCAs) are sensitive to electrostatic discharge (ESD). If an
ESD workstation or mat is not available, touch the sheet-metal chassis to provide a static ground before
touching an ESD-sensitive assembly. Protect the ESD-sensitive assemblies by placing them in ESD pouches
when they are out of the printer.
Flat Flexible Cables
The printer at exible cables (FFCs) have several standard attributes.
●
Each end of the cable has a contrasting color line (callout 1) that shows the shape and depth of insertion
into the PCA connector. Each end of the cable has a support tape (callout 2), typically blue, on the nonconductor side.
Figure 1-3 FFC insertion line
ENWW Cabling system 13
Page 32

●
1
1
Each end of the FFC has a support tape (typically blue) on the non-conductor side.
The support tape usually has a free region (callout 1) for use as a handle to insert and remove the cable.
Figure 1-4 FFC support tape
●
Some FFCs have a label printed on them that shows the function or the corresponding connector number.
Figure 1-5 FFC label
14 Chapter 1 Theory of operation ENWW
Page 33

●
1
2
1
2
The 0.5 mm (ne pitch) FFC ends have an extra wing feature (callout 1) that locks into the PCA connector
(callout 2) and denes the installation motion. These FFC cables also have gold contacts instead of tin
contacts to prevent dendrite growth between lines.
CAUTION: FFCs must be inserted and removed straight into a connector, not rocked in side-to-side.
Figure 1-6 FFC wing feature
●
The example shown in the following gure is a zero insertion force (ZIF) connector. Open the latch to
remove or install a FFC in a ZIF connector. This gure shows the latch in the closed (callout 1) position, and
in the open (callout 2) position. See Zero insertion force on page 22 for more information.
Figure 1-7 ZIF connector
ENWW Cabling system 15
Page 34

FFC routing
1
The printer FFCs are routed using a set of common retaining methods.
●
Hook arms (callout 1) retain the edges of the FFCs. Installation and removal involves sequentially
positioning and releasing the FFC edges under the hooks.
Figure 1-8 FFC hook arm retainers
16 Chapter 1 Theory of operation ENWW
Page 35

●
Pill bumps also retain the edges of the FFCs. The FFC is pressed down against the plastic mount until the
edges are positioned under the bumps. Removal involves lifting the FFC out of the bumps.
Figure 1-9 FFC pill bump retainers
ENWW Cabling system 17
Page 36

●
1
Die-cut pieces (callout 1), adhered to FFCs and hooked into plastic mounts, are used to prevent wear in
regions where vibration or motion might damage the FFC.
Figure 1-10 FFC die-cut retainers
●
Double-sided-tape (DST) is used to secure FFCs directly to a sheet-metal or plastic part. This is a special
case, acceptable only for some simple electrical circuits, due to EMC or EMI risks.
Figure 1-11 FFC double-sided tape retainer
18 Chapter 1 Theory of operation ENWW
Page 37

Discrete cables
1
NOTE: Remove discrete cable connectors by grasping the connector body rather than pulling on the wires.
The printer discrete cables share many standard attributes.
●
Ferrites (callout 1) might be located in a stationary location or slide freely along the wires.
Figure 1-12 Discrete cable ferrite
ENWW Cabling system 19
Page 38

●
1
Tie-wraps (callout 1) constrain the wire bundle and the dene position for installation.
Figure 1-13 Discrete cable tie-wraps
Ground wires
Ground wires (callout 1) on several components, including the document feeder and FAX modules, must be
secured to the indicated locations to perform correctly.
20 Chapter 1 Theory of operation ENWW
Page 39

Figure 1-14 Ground wires
1
1
Connectors
FFC connectors on PCAs are oriented so the installation line is visible when holding the blue support handle.
NOTE: When correctly installed, the installation line is parallel to the edge of the connector body (callout 1).
Figure 1-15 Connectors
ENWW Cabling system 21
Page 40

Low insertion force
1
2
The standard low insertion force (LIF) connectors require a straight-in motion when removing and installing the
FFC. Friction between the conductive arms of the connector retain the FFC.
Zero insertion force
NOTE: This printer uses very few of this type of connector.
Zero insertion force (ZIF) connectors use a mechanical locking method to secure 0.5 mm (ne pitch) FFCs with
extra wing features at each end. These wing features interface with posts on the PCA connector and are then
secured by a rotating lock-door.
ZIF connectors
Following are examples of where ZIF connectors are used in the printer.
●
Main printed circuit board (MPCA) to printhead assembly
●
MPCA to control panel PCA
Figure 1-16 FFC wing feature
Follow these instructions to install a ZIF connector
1. Rotate the lock-door open.
2. Place the FFC into the bottom of the installation zone at a slight angle.
3. Stand the FFC upright in the connector to trap the wing features behind the locking posts.
4. Rotate the lock-door closed.
22 Chapter 1 Theory of operation ENWW
Page 41

1
2
Ferrites
NOTE: To remove the FFC, rotate the lock-door open.
The example shown in the following gure is a ZIF connector. This gure shows the latch in the closed
(callout 1) position, and in the open (callout 2) position.
Figure 1-17 ZIF connector
The printer cabling system includes many ferrites to enable proper EMC/EMI performance for regulatory
agencies. All ferrites on FFCs and discrete cables must be included and located in the intended position to make
sure performance matches the tested behavior.
CAUTION: Ferrites are fragile. Use care when removing or installing them.
Cable management
The printer cabling system uses several distribution PCAs to connect many sensors and motors to the main PCA
(MPCA) in a controlled manner. One FFC delivers signals, power, and ground lines from the MPCA to the
distribution PCA. Then FFCs connect from the distribution PCA to individual components. The printer has several
rooftop modules that integrate to the common engine. Cable routing of the dierent rooftops to the MPCA
creates the top layer of cable routing in the rear region.
Spacing
Proper spacing is required between FFCs to prevent crosstalk, maintain signal integrity, and perform to EMC/EMI
expectations. The printer cables utilize plastic mounts, die-cut spacers adhered to FFCs, and foam adhered to
FFCs to maintain spacing to other FFCs or sheet-metal components. All spacing must be maintained for proper
performance.
ENWW Cabling system 23
Page 42
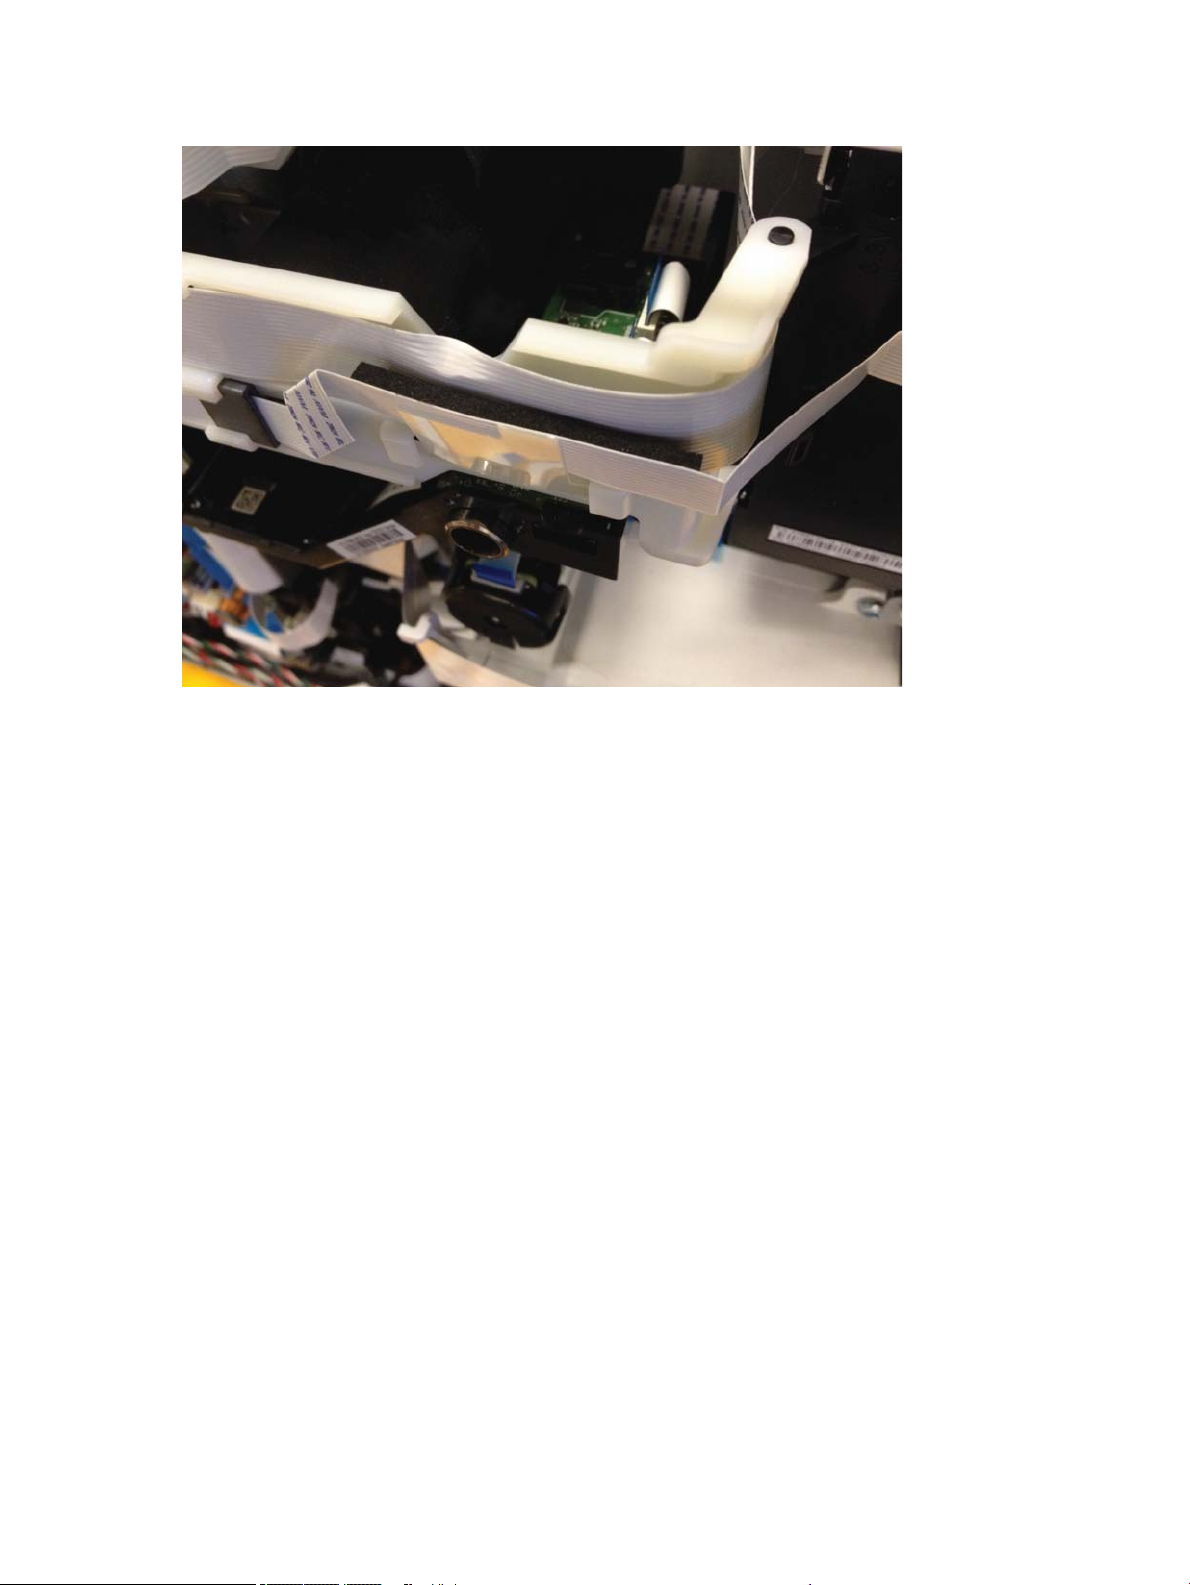
Figure 1-18 FFC spacing
Electrostatic discharge prevention
Electrostatic charge might build up on plastic and metal surfaces due to tape removal, dry conditions, or other
causes. Exposing the conductors at the ends of FFCs and discrete cables to these surfaces might cause
electrostatic discharge (ESD) and damage the cables.
24 Chapter 1 Theory of operation ENWW
Page 43
Print subsystem
1
4
2
3
Printhead
The fundamental purpose of the printhead is to convert the digital ring instructions from the printer electronics
into properly formed and timed microscopic drops of the four ink colors. The printhead spans the full length of a
ledger/A3-size sheet (297 mm (11.0 in /297 mm) by (17 in/431.8mm), which allows the printhead to be
statically positioned within the printer and have the media move sideways underneath it; printing the entire page
in a single motion.
Figure 1-19 Printhead components
Table 1-2 Printbar components
Item Description
1 Cartridge connections
2 Thermal inkjet (TIJ) die array
3 Data/power ow and regulation
4 Ink ow channels and pressure regulation
ENWW Print subsystem 25
Page 44

The printhead has a xed array of 14 thermal inkjet (TIJ) dice oriented in two staggered rows. Each die contains
more than 1,000 nozzles for each of the four ink colors—black (K), cyan (C), magenta (M) and yellow (Y).
Behind the dice array are the ink ow channels and pressure regulation mechanisms that supply the dice array
with ink at the proper pressure and ow. The dice must also be fed power and data at the appropriate levels and
rates, which is the function of the onboard electronic circuitry. Finally, situated at the top of the printhead, are
connections to four cartridge receptacles, one for each color. These cartridges are connected by tubes to the
printhead and supply the ink necessary for its operation.
Printhead air management system
The printhead uses a passive air gain management system. Air can enter the printhead from the following
sources:
●
Die outgassing (from air in the ink).
●
Air entering nozzles due to temperature or pressure variations.
●
Air entry through the printhead and tubing materials.
●
Air entry through the nozzles due to shipment vibration.
Air that enters the printhead is warehoused. There is no mechanism to remove the air in the eld. Of the various
mechanisms for air entry, the rst three are generally benign, and rarely cause issues during the expected life of
the printer. The fourth mechanism generally occurs during shipment. When not printing, the print bar is kept in a
zero-clearance condition that does not allow lateral motion of the print bar. This condition is automatic and
requires no user intervention to activate.
Printhead lift
The printhead lift is responsible for positioning the printhead within the printer and moving it up and down as
required. This vertical motion is both to establish proper spacing to the paper during printing, and to raise it to
access the active face or to perform necessary calibrations.
During printing, the lift mechanism sets the printhead height depending on the type of paper, image content,
and other print job specic information.
Print cartridges
These printers have new, state-of-the-art pigmented inks. They are ltered using proprietary processes to
prevent printhead contamination. These inks are designed to produce optimal print quality on ColorLok oce
papers, but also produce very good print quality on regular oce papers and specialty paper.
Optical scan carriage
The optical scan carriage has an optical sensor used for calibration. Its motion is along the long axis of the
printhead. This sensor is used by a number of printer calibration features that are important for proper
subsystem function. The Through Beam Optical Drop Detect (TBODD) sensor is located on the optical scan
carriage.
Print system operational states
Startup
When it leaves the factory, the printhead is initially lled with an inert ink-substitute called Shipping and Handling
Fluid (SHF). This uid, essential for the manufacture and transportation of the printhead, must be ushed and
26 Chapter 1 Theory of operation ENWW
Page 45

replaced with actual ink. This is accomplished during the Startup phase. The ushing process automatically
commences when user chooses to initialize the system, following the prompts to install ink supplies and paper,
and then conrms they want to perform initialization. The SHF is removed by sustained printhead operation and
replaced by ink from the supplies. The process terminates once all the SHF is ushed from the printhead.
Special host supplies are supplied with the printer prior to its rst use. These host (or setup) supplies can only be
used to initialize the printer. If they are inserted in an already initialized printer, they will be rejected—do not use
setup supplies. These supplies contain additional ink so that there is a 100 percent ink level after the startup is
complete.
NOTE: The initial startup is immediately followed by calibrations. Total time for startup and calibrations is
approximately 25 minutes.
Pen energy calibration
The printer automatically runs a pen energy calibration called Thermal Turn On Energy (TTOE) after start up. This
calibration varies the energy to each die while watching the die temperature. At optimal pen energy, all of the
energy will go to ejecting the drop. If the energy is too low, then the drop is not ejected and the re pulse will
heat up the die. If the energy is too high, then some of that energy will go to ejecting the drop but the rest will go
to heating up the die. During TTOE, the printer varies the pen energy to the die and then watches the die
temperature. Once the optimal energy setting is found, the printer increases the energy slightly to make sure
that the die will always re ink. If TTOE fails for some reason, there are default values that have been stored in
the printer. These energy values are higher than optimal but not too high to cause a problem. The pen will have
no problem surviving printer life with the default values.
Die alignment
Fourteen die comprise the printhead active face each with associated positional tolerances. An active calibration
must be performed to prevent errors and allow a uniform ink application to the paper (without any gaps or
overlaps between adjacent die). The die alignment is done by printing a special diagnostic image on a sheet of
paper and then scanning it with the optical scan carriage. Die alignment is performed as part of initial unit
startup, and can be performed manually as part of the print quality recovery tool.
Die density leveling
Tolerances are also associated with the drops red by the individual printhead die. Variations are measured and
compensated by another active calibration to produce a visually uniform ink application to the paper. Another set
of diagnostic images are printed and scanned by the optical scan carriage to achieve this die density leveling. Die
alignment and die density leveling are usually paired together.
Nozzle presence detection
In printing, all the ink is applied in a single smooth motion of the paper past the printhead; any inoperable nozzle
can show up as a noticeable streak. The operational state of each of the thousands of nozzles on the printhead
is periodically measured. The printhead lift raises the printhead, and the Through-Beam Optical Drop-Detect
(TBODD) assembly on the optical scan carriage watches for drop presence as each nozzle is red. Inoperable
nozzles are turned o and other operable nozzles are used on subsequent printed pages to apply the missing
ink. Nozzle presence detection is fully interruptible by new incoming print jobs.
Media edge position detection
The printer uses a learning algorithm to dene media center as a function of input source—all trays, including
optional accessory trays, are all tracked independently. The calibration scanner is located upstream of the print
zone. A measurement is taken roughly every ve pages. The rear edge is measured just after being deskewed.
ENWW Print subsystem 27
Page 46

As paper is scanned, the media center database is updated. The image is registered to the page using the media
center database.
Servicing and capping
When in the capped state, the printhead is fully raised, the printhead wiper is positioned underneath, and the
printhead cap is engaged against the printhead active face. Storing the printhead in a capped state re-humidies
the nozzles when not in active use
Service spitting is the ring of the nozzles to help maintain nozzle health. This also is eective at clearing ink
plugs, external debris, or color mixing. These error conditions might occur when uncapping the printhead, or
between pages when nozzles prepare for printing, or following a job or service wipe.
Service spitting to correct these error conditions might occur when uncapping can also be implemented by using
menus on the control panel.
Printing
The printing state begins by the printbar leaving the capping state, and being lowered to the printing position
after the service sled moves out of the way. At the same time, a sheet of paper is picked from one of the three
trays and the leading edge staged at the entrance to the print zone. Once the print data has been sent, the sheet
of paper is fed at a constant velocity through the print zone and the ink applied by the printbar.
In the case of one-sided printing, the inked sheet is moved up, over and out to the output tray. For two-sided
printing, the sheet is moved until its trailing edge is past the merge to the vertical path, and then it is reversed
down through the duplex path underneath the maintenance ink module, and reintroduced into the print zone for
inking of the second side.
This process continues until all the pages of the print job are completed. If the print job is large enough, it can be
interrupted by servicing processes.
28 Chapter 1 Theory of operation ENWW
Page 47
Paper-handling system
Top Of Form
Sensor
500 Sheet Tray 3
500 Sheet Tray 2
Left Side Vertical
Path Sensor
Left Door Open
Sensor
Tray Out of Paper
Sensor
Print zone
Sensor
Duplex
Pinch 1
Duplex
Pinch 2
Left Vertical
Pinch 1
Left Vertical
Pinch 2
Outpu t
Pinch 1
Ejection
Pinch 1
Tray Open
Sensor
Outpu t
Pinch 2
Duplex Exit
Sensor
Tray 3 Multi-Pick
Sensor
Tray Size
Sensor
Tray Lift
Sensor
Deskew Rear Sensor
Deskew Front Sensor
Right Side Vertical
Path Sensor
Ejection
Sensor
Tray 1 Pick
Roller
Tray 1
Separation
Pinch
Turn Path
Sensor
Tray Out of
Paper Sensor
Outpu t
Pinch 3
Duplex
Pinch 3
Duplex
Pinch 4
Duplex
Pinch 5
Tray 2 Pick
Roller
Tray 3 Pick
Roller
Tray Open
Sensor
Tray Out of Paper
Sensor
Tray 2 Multi-Pick
Sensor
Tray Size Detect
Sensor
Tray 2 Lift
Sensor
Right Door Open
Sensor
Print head Assembly
Airflow Ass y
Drop Detection
Sensor
Duplex Entry
Sensor
Standard Bin Full
Sensor
Tray Size
Sensor
Print Zone
Encoder
Cartridge Door
Open Sensor
Duplex
Diverter
Legend
Motor
Solenoid
Fan/Digital Tach
Reflective REDI
Other Sensors
Opto Sensor
Pinch roller
Retard Roller
Star Wheel
Torque Coupling
Media Path
Switch/Hall
Effect Sensor
150 LPI, 1200 Line
Digital Encoder
F
12.13 mm Dia
16.17 mm Dia
PTO connection
N
S
Printer sensors
Figure 1-20 Print engine sensors
ENWW Paper-handling system 29
Page 48

High Capacity Input (HCI) sensors
Printer
A4 HCI Left Tray
Tray out of Paper
Sensor
LeŌ Tray MulƟ-Pick
Sensor
Tray Lift
Tray Lift
Tray Open Sensor
HCI Right Door
Open Sen sor
Tray Si ze
Detect Sensor
Tray lift up Sensor
A4 HCI Right Tray
Right Tray MulƟ-Pick
Sensor
HCI Tunnel
Sensor
HCI Jam
Cassette Open
Sensor
Tray out of Paper
Sensor
Tray lift up Sensor
A4 HCI
Left Pick
A4 HCI
Right Pick
Tray Open Sensor
Tray Si ze
Detect Sensor
Legend
Pinch roller
Motor
Star Wheel
Media Path
Retard Roller
Switch/Hall
Effect Sensor
Fan/Digital Tach
F
Other Sensors
Torque Coupling
12.13 mm Dia
16.17 mm Dia
PTO connection
150 LPI, 1200 Line
Digital Encoder
Opto Sensor
Solenoid
N
S
Reflective REDI
Figure 1-21 HCI sensors
30 Chapter 1 Theory of operation ENWW
Page 49

Printer
A3 Accessory Lower Tray
A3 Accessory Upper Tray
Tray Out of
Paper Sensor
Tray Lift
Sensor
Pick R oller
A3 Acc essory T ray Right
Door open sensor
Width Detect
Sensor
Tray Out of
Paper Sensor
Middle Vertical
Sensor
Rick Roller
Tray Out of
Paper Sensor
Tray Lift
Sensor
Pick R oller
Length Detect
Sensor
Tray Lift
Sensor
A3 Accessory Middle Tray
Tray Open Sensor
Tray Open Sensor
Tray Open Sensor
Width Detect
Sensor
Length Detect
Sensor
Width Detect
Sensor
Length Detect
Sensor
Multi-Pick Sensor
Multi-Pick Sensor
Multi-Pick Sensor
Upper Vertical
Sensor
Legend
Pinch roller
Motor
Star Wheel
Media Path
Retard Roller
Switch/Hall
Effect Sensor
Fan/Digital Tach
F
Other Sensors
Torque Coupling
12.13 mm Dia
16.17 mm Dia
PTO connection
150 LPI, 1200 Line
Digital Encoder
Opto Sensor
Solenoid
N
S
Reflective REDI
3x550 tray sensors
Figure 1-22 3x550 Tray sensors
ENWW Paper-handling system 31
Page 50

1x550 tray sensors
Printer
A3 Accessory Tray
Tray Out of
Paper Sensor
Tray Lift
Sensor
Pick R oller
Width Detect
Sensor
Length Detect
Sensor
Tray Open Sensor
Multi-Pick Sensor
Legend
Pinch roller
Motor
Star Wheel
Media Path
Retard Roller
Switch/Hall
Effect Sensor
Fan/Digital Tach
F
Other Sensors
Torque Coupling
12.13 mm Dia
16.17 mm Dia
PTO connection
150 LPI, 1200 Line
Digital Encoder
Opto Sensor
Solenoid
N
S
Reflective REDI
Figure 1-23 1x550 tray sensors
32 Chapter 1 Theory of operation ENWW
Page 51

Inline nisher sensors
Rear
Meazzanine
Motor
Stapler Cartridge
Door Sensor
X Registration
Motor
Floor Motor
Low Stapler
Sensor
Out of Staples
Sensor
Stapler
Stapler Motor
Home Sensor
fns_bin_full sen
Front Mezzanine
Rear Mezzanine
+
/-Y
Stapler Carriage
Motor
Puller
Motor
Leading Edge
Clamp Motor
Stapler
Motor
Stapler Media
Edge Sensor
Finisher
Eject
Pinch
Eject
Sensor
Shelf Motor
Jam
Illumination
LEDs
Puller Entry
Sensor
Trailing Edge
Clamp Motor
Rear Channel
Front Channel
Channel Lift
Motor
Channel X
Rear Motor
End of Sheet
Clamp
Channel X
Registration Sensor
Channel Mezzanine
Sensor
Bin Full
Sensor
Edge Clamp
Motor
+/- X
Finisher
Spur
Pinch
Shelf
Rear Puller
Front Puller
Leading Edge Clamp
Leading Edge Clamp
Channel X
Front Motor
Front Puller
Home Sensor
Rear Puller
Home Sensor
Edge Clamp
Edge Clamp
Bin
Illumination
LEDs
Jam
Illumination
LEDs
Stapler Carriage
Movement
Front
Meazzanine
Motor
Eject
Roller
Motor
Left Door Media
Path
Floor Movement
Direction
Legend
Motor
Reflective REDI
Opto Sensor
Pinch roller
Star Wheel
Switch/Hall Effect
Sensor
Other Sensors
LEDs
Figure 1-24 Inline nisher sensors
ENWW Paper-handling system 33
Page 52

Sheet 500 Tray 3
500 Sheet Tray 2
Tray 2 Separation
Motor
Duplex
Pinch 1
Duplex
Pinch 2
Outpu t
Pinch 1
Ejection
Pinch 1
Outpu t
Pinch 2
Ejection Motor
Tray 2 Lift
Motor
Tray 1 (MP)
Pick Roller
Tray 1
Separation
Pinch
Tray 1 Separation
Motor
Output
Pinch 3
Left Side
Vertical Motor
Duplex
Pinch 3
Duplex
Pinch 4
Duplex
Pinch 5
Tray 2 Pick
Clutch
Tray 3 Lift
Motor
Tray 3 Pick
Clutch
Tray 1 Pick
Motor
Finisher
Diverter
N
S
N
S
Duplex Diverter
Motor
Stack Contr ol Motor
Tray 3 Separati on
Motor
Stapl er/
Stack er
Print head Assembly
Airflow Ass y
Left Vertical
Pinch 2
Left Vertical
Pinch 1
Tray 2 Pick
Roller
Tray 3 Pick
Roller
N
N
S
S
Legend
Pinch roller
Motor
Star Wheel
Media Path
Retard Roller
Switch/Hall
Effect Sensor
Fan/Digital Tach
F
Other Sensors
Torque Coupling
12.13 mm Dia
16.17 mm Dia
PTO connection
150 LPI, 1200 Line
Digital Encoder
Opto Sensor
Solenoid
N
S
Reflective REDI
Printer motors/solenoids
34 Chapter 1 Theory of operation ENWW
Page 53

High capacity input (HCI) motors/solenoids
Printer
A4 HCI Left Tray
Tray Lift
A4 HCI Left Tray
Lift Motor
A4 HCI
Left Pick
Tray Lift
A4 HCI Right Tray
Lift Motor
A4 HCI Right Tray
OW TL
OW
TL
OW
A4 HCI
Right Pick
LATCH
LATCH
A4 HCI Left Tray
Separation Motor
A4 HCI Right Tray
Separation Motor
A4 HCI Tray
Pick Clutch
A4 HCI Tray
Pick Clutch
N
S
N
S
Legend
Pinch roller
Motor
Star Wheel
Media Path
Retard Roller
Switch/Hall
Effect Sensor
Fan/Digital Tach
F
Other Sensors
Torque Coupling
12.13 mm Dia
16.17 mm Dia
PTO connection
150 LPI, 1200 Line
Digital Encoder
Opto Sensor
Solenoid
N
S
Reflective REDI
Figure 1-25 HCI motors/solenoids
ENWW Paper-handling system 35
Page 54

3x550 tray motors/solenoids
Printer
A3 Accessory Lower Tray
A3 Accessory Upper Tray
Tray Lift Motor
A3 Accessory Middle Tray
N
S
N
S
N
S
Tray Lift Motor
Tray Lift Motor
Tray Pick Clutch
Tray Pick Clutch
Tray Pick Clutch
Tray Separation
Motor
Pick R oller
Pick Roller
Pick Roller
Tray Separation
Motor
Tray Separation
Motor
Legend
Pinch roller
Motor
Star Wheel
Media Path
Retard Roller
Switch/Hall
Effect Sensor
Fan/Digital Tach
F
Other Sensors
Torque Coupling
12.13 mm Dia
16.17 mm Dia
PTO connection
150 LPI, 1200 Line
Digital Encoder
Opto Sensor
Solenoid
N
S
Reflective REDI
Figure 1-26 3x550 tray motors/solenoids
36 Chapter 1 Theory of operation ENWW
Page 55

1x550 tray motors/solenoids
Printer
A3 Accessory Tray
N
S
Tray Lift Motor
Tray Pick Clutch
Pick Roller
Tray Separation
Motor
Legend
Pinch roller
Motor
Star Wheel
Media Path
Retard Roller
Switch/Hall
Effect Sensor
Fan/Digital Tach
F
Other Sensors
Torque Coupling
12.13 mm Dia
16.17 mm Dia
PTO connection
150 LPI, 1200 Line
Digital Encoder
Opto Sensor
Solenoid
N
S
Reflective REDI
Figure 1-27 1x550 tray motors/solenoids
ENWW Paper-handling system 37
Page 56

Inline nisher motors
Rear
Meazzanine
Motor
X Registration
Motor
Floor Motor
Stapler
fns_bin_full sen
Front Mezzanine
Rear Mezzanine
+/-Y
Stapler Carriage
Motor
Puller
Motor
Leading Edge
Clamp Motor
Stapler
Motor
Finisher
Eject
Pinch
Shelf Motor
Jam
Illumination
LEDs
Trailing Edge
Clamp Motor
Rear Channel
Front Channel
Channel Lift
Motor
Channel X
Rear Motor
End of Sheet
Clamp
Edge Clamp
Motor
+/- X
Finisher
Spur
Pinch
Shelf
Rear Puller
Front Puller
Leading Edge Clamp
Leading Edge Clamp
Channel X
Front Motor
Edge Clamp
Edge Clamp
Bin
Illumination
LEDs
Jam
Illumination
LEDs
Stapler Carriage
Movement
Front
Meazzanine
Motor
Eject
Roller
Motor
Left Door Media
Path
Floor Movement
Direction
Legend
Pinch roller
Motor
Star Wheel
Media Path
Retard Roller
Switch/Hall
Effect Sensor
Fan/Digital Tach
F
Other Sensors
Torque Coupling
12.13 mm Dia
16.17 mm Dia
PTO connection
150 LPI, 1200 Line
Digital Encoder
Opto Sensor
Solenoid
N
S
Reflective REDI
Figure 1-28 Inline nisher motors
38 Chapter 1 Theory of operation ENWW
Page 57

Airflow Assembly
Printhead Lift
Motor
Printhea d
Wiper Mo tor
N
S
Air Pump
Fluid Pump
Vent Soleno id
Air Pump
Motor
Fluid Pump Motor
Drop Detect
Carriage Motor
Image Sensor
Carriage Motor
Fluid Level Sensors
Acumen
Printhead Lift
Sensor
Printhead Lift
Encoder
Aerosol Fan
Motor
Airflow Fan
Motor
Airflow Heater
Airflow Ass embl y
Thermistor
F
Sheet 500 Tray 3
500 Sheet Tray 2
Duplex
Pinch 1
Duplex
Pinch 2
Output
Pinch 1
Ejection
Pinch 1
Output
Pinch 2
Tray 1
Separation
Pinch
Outpu t
Pinch 3
Duplex
Pinch 3
Duplex
Pinch 4
Duplex
Pinch 5
Left Vertical
Pinch 2
Tray 2 Pick
Roller
Tray 3 Pick
Roller
Printhead Assembly
Legend
Pinch roller
Motor
Star Wheel
Media Path
Retard Roller
Switch/Hall
Effect Sensor
Fan/Digital Tach
F
Other Sensors
Torque Coupling
12.13 mm Dia
16.17 mm Dia
PTO connection
150 LPI, 1200 Line
Digital Encoder
Opto Sensor
Solenoid
N
S
Reflective REDI
Printer printing system
Figure 1-29 Printer printing system
ENWW Paper-handling system 39
Page 58
Input trays
Tray 1 (Multipurpose)
Tray 1 consists of two subsystems.
●
The media support tray with media guides and width sensor.
●
The pick and separation system.
The pick and separation system includes the upper pick roller, the lower separation roller, a lift plate, two
motors, and an out-of-paper (OOP) sensor.
Figure 1-30 Tray 1 pick and separation system
When a sheet is picked, the following sequence occurs:
1. Both motors are started simultaneously.
2. The tray_1_pick motor drives the upper pick roller forward and moves the lift plate upwards, so the paper
contacts the pick roller. The lift plate spring controls the force applied by the lift plate to the pick roller.
3. The lift plate will lower after the page enters the roller nip.
4. The tray_1_sing motor turns the lower separation roller in the reverse direction. There is a slip clutch on
the separation roller and when only one sheet of media is in the nip, the roller is forced to follow the upper
pick roller and paper as it moves forward. As the separation roller is over-driven in the forward direction, a
reverse torque is applied by the slip clutch. This action will separate multiple-fed sheets so that only one
page at a time enters the printer. The separation spring controls the force applied by the separation roller
and the pick roller.
The OOP sensor is attached to the lift plate. It is a REDI type sensor using a mirror attached to the upper paper
guide. Paper present in the tray will block the light path from the sensor to the mirror.
NOTE: Both the pick roller and the separation roller are replaceable in the eld.
40 Chapter 1 Theory of operation ENWW
Page 59

Trays 2/5 (A3/A4 main trays)
Some printer models support up to three 550-sheet letter A3/A4 size main trays. Each tray includes the
following components:
●
A removable tray body that holds the printer paper. The tray body includes the following components:
●
Width and length adjusters to support and align the paper.
●
A lift plate to raise the paper.
●
A Hall Eect sensor determines if the tray is closed. The sensor is located at the back of the printer and
detects a magnet located in the tray body.
●
A lift mechanism with a DC motor and encoder mounted on the rear wall that engages the lift plate to raise
the paper to the height where it can be picked and fed into the printer.
●
A size detect module mounted on the rear wall to detect the paper size loaded in the tray based on the
position of the width adjusters.
●
A pick system mounted above the tray to feed paper into the paper path. The pick system includes the
following components:
–
A replaceable pick roller.
–
An electric solenoid to engage the pick gear train.
–
A spring plunger to raise the pick arm when the paper tray is opened.
●
A separation system mounted above the tray to separate multiple sheets of paper into single sheets. The
separation system includes the following components:
–
Two replaceable separation tires.
–
A torque limiter to provide resistance to the lower roller for paper separation.
–
A DC motor and encoder to drive the mechanism.
–
An optical sensor to determine if the paper stack is raised to the correct height.
–
An optical sensor to detect if there is paper loaded in the tray.
–
An optical sensor and reector to detect paper presence at the separation rollers.
–
A spring mechanism to separate the tires when the tray is open to aid in jam clearing and roller
replacement.
Following is the operational sequence for paper pick and feed from Trays 2-x. This process repeats for each
page:
1. The lift mechanism raises the lift plate until the tray lift sensor detects that it is raised to the correct height.
2. The paper presence sensor is checked to be sure paper is loaded before proceeding.
3. The electric solenoid is engaged to connect the pick shaft to the drive train.
4. The motor runs, turning the pick roller and the separation tires and advancing the paper out of the tray into
the separation system.
ENWW Paper-handling system 41
Page 60

5. The electric solenoid is disengaged after paper is detected at the separation roller sensor, but the motor
continues to turn the separation tires and advance the paper into the printer.
6. After the trailing edge of the paper leaves the separation tires the motor stops.
In between each page, the lift motor may make small motor moves to adjust the height of paper stack as paper
is depleted from the tray.
After a sheet is picked, it is not uncommon for an additional sheet to be left in the separation roller. If the sensor
detects this has occurred on the last page of a print job, the tray will lower, the electric solenoid will engage to
lift the pick roller, and the motor will run in reverse to pull the sheet back in the input tray.
NOTE: The construction and operation of Tray 4, 5, and 6 is a similar sequence.
1x550-sheet tray
The 1x550-sheet tray is a table top or oor standing input capacity accessory for the printer (both have the
same operational mode). It holds 550 sheets of additional input capacity (media sizes A5 up to A3).
The accessory is driven by the lift motor and the separation motors. In addition to the two motors, an electric
clutch arrangement transfers torque from the separation motor to the pick shaft.
The lift motor lifts the paper stack to the pick roller and keeps the paper stack at the correct height while the
paper stack is depleted. The separation motor drives the tray paper drive components.
In the forward direction, the separation motor drives the counter rotating separation system and also the pick
shaft. The drive of the separation system feeds and separates sheets into the print mechanism.
During the forward separation motor rotation, an e-clutch (which is electrically powered) transfers torque to the
pick shaft to pick sheets from the stack.
A reverse separation motor rotation has two functions:
●
It moves sheets left on the curved separation wall (or sheets separated by the separation system) back
into the stack (healing).
●
When the e-clutch is engaged it raises the pick arm away from the paper stack which allows sheets being
healed to return to the input stack.
Sheets picked from the accessory are fed into the vertical path of the printer, where a reversing separation
motor from Trays 2-x (depending on printer conguration) turns the vertical path shaft in reverse, which drives
sheets into the turn roller path
3x550-sheet tray
The 3x550-sheet accessory is a oor standing accessory for the printer. It holds an additional 1650 sheets of
additional input capacity (media sizes A5-11x17). The accessory is a duplicate of the 1x550-sheet tray with two
additional trays in one accessory.
The accessory functions similarly to the 1x550-sheet tray. It uses a two motor arrangement. In each tray a lift
motor and a separation motor drive the system, and an electric clutch engages the pick roller when the clutch is
activated.
For all trays, the lift motor lifts the paper stack to the paper position sensor and out of the paper sensor. The lift
motor keeps the top sheet of the stack in the optimal position to pick it onto the curved pick wall.
Picking from Tray 4 is done the in the same way as the 1x550-sheet tray. Rotating the Tray 4 separation motor
forward, and then engaging the clutch to pick a sheet of paper into the paper path.
42 Chapter 1 Theory of operation ENWW
Page 61

Tray 5 and Tray 6 perform in the same manner (separation motor runs forward, and the clutch is engaged to pick
a sheet).
To feed a sheet up the accessory vertical path (while picking from Tray 5 or Tray 6), the separation motors in the
downstream trays are run in reverse. This rotates the vertical path turn shafts which are linked to the separation
system by a set of gears.
For example; when picking from Tray 6, the Tray 6 separation motor rotates in the forward direction and the
vertical path feed shafts for Tray 5 and Tray 4 (the downstream trays) rotate the associated separation motors
in reverse to activate the vertical path shafts.
4,000-sheet HCI tray
Two optional 2000-sheet A4 size accessory trays are available for the printer: These optional trays use the same
media pick and feed system as Trays 2-x. See Trays 2/5 (A3/A4 main trays) on page 41 or more information.
Tray sensors
The Trays 1 and 2 (A4 and A3) and optional accessory trays (A3) contain the following sensors (HCI tray not
included):
●
A Hall Eect sensor and magnet determines if the tray is closed.
●
A ag/opto sensor determines if there is paper in the tray.
●
A ag/opto sensor determines if the lift plate is in the lifted position.
●
A separation REDI sensor and REDI sensors in the paper path determine if the printer successfully picked
the paper.
Paper size detection
The paper size detection system utilizes movable surfaces on the rear of the input tray to interact with a size
detect module when the input tray is installed in the printer. These surfaces on the tray press a combination of
mechanical buttons on the module that indicates to the printer the position of the paper adjusters. On A4 size
trays the movable surface consists simply of a rotating barrel that is positioned by the rear width adjuster. On A3
size trays, in addition to a barrel, a sliding piece positioned by the length adjuster is also used. The size detect
modules are located on the rear wall of the printer chassis directly behind the input trays. Each module includes
three spring-loaded buttons which, when pressed, actuate respective electrical switches on a printed circuit
board. The combination of activated electrical switches communicates to the printer the position of the width
adjuster (for A4 trays) or the position of both the width and length adjusters (for A3 trays), along with the
presumed paper size.
Paper path zones
Turnpath/deskew
The turnpath zone is the paper path between separation pinch of Tray 3 and turnshaft 2 as well as the paper
path between duplex exit shaft 5 and turnpath 2 that is between accessory vertical path roller1 and turnshaft 2.
This zone has only one roller, turn 1 roller, which is driven by deskew-turn motor. This zone also has only one
paper edge sensor, deskew-turn sensor, which is housed in the right door paper guide and is downstream of
turn 1 roller. Turnpath is the region where dierent paper paths (duplex path, simplex path from Tray 3 and
vertical path from accessory trays) come together to feed into the deskew zone. The function of turnpath is to
collect paper from dierent sources and feed into the deskew zone.
ENWW Paper-handling system 43
Page 62

Print zone
The deskew zone is the paper path between turnshaft 2 and the feed roller. This zone has four half-length
shafts, turnshaft 2 front/rear and turnshaft 3 front/rear. The two front half shafts are driven by the deskew
motor, independent of the two rear halves, which are driven by the deskew-turn motor. The deskew zone also
has two edge detect sensors, deskew and deskew-oset, past turnshaft 3, which together measure the paper
skew. In response to this measured skew, two pairs of half-shafts are driven at dierent speeds for a particular
distance to achieve skew correction. Skew correction is completed before the paper leading edge reaches the
top-of-form (TOF) sensor, which is another edge detect sensor in the deskew zone, upstream of the feed roller.
A jam in turnpath occurs when paper arrives at the TOF sensor, any of the two deskew sensors, or to the
deskew-turn sensor after a specied time period. Jams can also be declared if paper is determined to not clear
any of these sensors in time. When the control panel indicates removing a jam at the right door, the right paper
tray may be removed to access and remove jammed paper. This tray may be pulled out using any combination of
the three green handles. When pulled out, the tray remains attached to the printer via telescoping links. If
needed, the right tray can be completely separated from the printer by removing two black locks on the front
and rear white chassis rails.
The deskew zone also houses the calibration scanner on the upper paper guide in between the turnshaft 2 pair
and turnshaft 3 pair. Some portion of the upper paper guide in this region is made of glass. The calibration
scanner is used for print head calibrations, skew system calibrations, and print margin calibrations. It is also used
to detect the zero column of paper dynamically during printer’s operation. During print head calibrations, the
paper is pushed up closer to the scan glass by a pressure plate. This plate is housed inside of the right tray and
can be deployed by the duplex exit motor running in reverse.
This is the section of the paper path between the feed roller and output 1 pinch roller. The feed roller, which has
a high resolution digital quadrature encoder, precisely controls the paper in the paper feed direction. Printing of
the image is controlled by this encoder to reduce errors from rotational velocity variation of the feed roller. The
feed roller is precisely positioned in the axial direction by a bias spring in the rear of the shaft and a center pivot
at the front. For approximately the last 20 mm (0.78 in) of a page, the paper is controlled by the output 1 pinch
roller through a series of high accuracy gears.
A combination of the feed roller, paper bias guides, platen, oating star-wheel carrier and output 1 pinch roller
controls the paper vertical position during printing. The user can remove the left duplex module after opening
the left door for jam access. This opens the pinches at output 1, 2 and 3 to facilitate removal of jammed paper.
The print zone contains no paper path sensors. If a jam occurs in the print zone, it is not detected until the
leading edge of the paper is determined to be late in reaching the jam sensor in the output path.
When a user pulls on jammed paper in the print zone that is still partially in the feed roller pinch, the servo
control detects a slight movement of the feed roller and assists the user by applying a forward torque to the
roller. This feature reduces the pulling force needed by the user and which reduces the chance of leaving torn
pieces of paper in the paper path.
Left duplex / service uid container
After opening the left door, the left duplexer can be pulled out of the printer to clear jams. The left duplexer
remains attached to the printer, but can be completely removed by releasing the left duplexer latch on the rear
duplexer mounting rail. The duplex assembly also serves as an ink-collection unit for the printhead (termed the
service uid container).
The left duplexer includes an EEPROM that is used to detect if the left duplexer is present, stores the occurrence
of a startup event, and records the number of ink spits. The EEPROM information prevents the left duplexer
(service uid container) from experiencing more than one start up event, and also disables the printer when the
service uid container is full (printing is restored when a replacement unit is installed).
44 Chapter 1 Theory of operation ENWW
Page 63

Output
Ejection
The output path begins at output pinch roller 1 and continues to eject pinch. Three REDI sensors in this path
detect leading and trailing edges and jams.
The feed motor drives the output pinch 1, 2 and 3 rollers. The vertical motor drives rollers vertical pinch 1 and 2.
The Eject pinch is the only roller driven by the eject motor. All the pinch rollers in the output and exit path are star
wheels to prevent roller tracking on wet or damp ink. However, the feed roller pinch is solid and has a high
amount of force for media control in the print zone.
The vertical path paper guides and drive rollers are attached to the left door. The left door can be opened for jam
clearance, and includes a
The eject portion of the paper path includes the zone from vertical pinch 2 to the eject roller. The eject motor
only rotates the eject roller.
To control media the printer has 4 sheet kickers that straddle each eject cot. The sheet kickers help direct the
trailing edge of the media towards the output bin.
The eject system also has a bail which is used to control output stack quality. The bail is controlled by an eject
drive shaft with a cross pin that interacts with the bail.
The bail has 3 modes:
●
Down with full bail weight mode. This mode is used for A4 printed in portrait mode and all smaller media.
hall-eect sensor to determine if it is closed.
●
Counter weighted with a spring mode. This mode is used for larger media that needs to push under the
bail.
●
Bail up mode. This mode can be used for media that is too light to get under the bail when in counter
weight mode.
Jam detection
The product makes use of various device sensors to detect and report printer jams.
Jam detection during boot
When the product is powered on and was left in an uncapped state, the state of the following REDI sensors is
checked to identify if paper was left in the paper path when the printer was previously shutdown.
●
DESKEW
●
DESKEW_TURN
●
DUPLEX_JAM1
●
DUPLEX_JAM3
●
EJECT_TRIGGER
●
PZONE_JAM
●
PZONE_TOF
●
VERTICAL_JAM
ENWW Paper-handling system 45
Page 64

If any of the above sensors indicate paper presence, the printer will attempt to ush the paper path. If
unsuccessful, the printer reports a power on jam.
NOTE: While booting into service mode, sensors are read to determine paper presence, but the printer will not
attempt to ush the paper and instead proceed to reporting a power-on jam if paper is detected.
Jam detection during print
The printer detects paper jams that occur when a door is opened while printing or when paper jams in the paper
path.
Door open jams while printing
If the left or right doors are opened while processing a job, paper motion is halted, and a jam reported. This
condition is detected and reported when the left or right door Hall Eect sensors indicate the door has been
opened, and the printer is processing a job.
NOTE: Opening Tray 1 when the printer is printing does not cause a jam.
The following sensors are monitored for the left and right doors:
●
DOOR_LEFT (Hall Eect)
●
DOOR_LEFT_SAFETY (Hall Eect)
●
DOOR_RIGHT (Hall Eect)
NOTE: If the front door (ink supply door) is opened during print operation, the printer will complete printing any
pages which have been successfully picked and then halt, waiting for the front door to be closed. A jam is not
reported for this condition.
Paper path jams while printing
The following REDI sensors are used to detect paper movement through the paper path during printing. If paper
fails to arrive or leave a given sensor position at the expected time, then a paper jam is reported, entered into
the event log and presented displayed on the control panel as one of the following:
●
EJECT_TRIGGER
●
VERTICAL_JAM
●
PZONE_JAM
●
PZONE_TOF
●
DESKEW
●
DESKEW_OFFSET
●
DESKEW_TURN
●
TRAY_ACCY_VERT_PATH
●
TRAY_X_MULTIPICK
●
DUPLEX_JAM3
●
DUPLEX_JAM1
46 Chapter 1 Theory of operation ENWW
Page 65

●
TRAY_4_JAM
●
TRAY_5_JAM
Paper path jams may occur while recovering from a previous error (such as a residual paper jam) and other
errors (including paper jams) which halt printer transport of paper. These jams are recoverable. If paper is
detected in the paper path when the printer re- initializes, the printer attempts are made to eject it into the
standard output bin. If unsuccessful, a residual paper jam error occurs.
Jam event codes
NOTE: For instructions about clearing specic jams in the printer, see the Clear jams section in the printer
troubleshooting manual.
When a paper jam is detected, a jam condition is reported as an event code and/or control-panel message. Event
code and control-panel message descriptions and solutions are provided in a separate Control Panel Message
Document.
The CPMD is not provided in this service manual. The CPMD for this printer is available on the HP Web-based
Interactive Search Engines. Go to the appropriate Web site (listed below), and then search by printer name.
AMS
●
https://support.hp.com/wise/home/ams-en
●
https://support.hp.com/wise/home/ams-es
●
APJ
●
●
●
●
●
EMEA
●
Motor stalls
When a motor is detected to have stalled unexpectedly, a motor stall condition is reported. Motor stalls are
uniquely identied by a dierent event code indicating a stall occurred as opposed to a paper jam. The control
panel messaging and recovery behavior of stall events is very similar to paper jams in most cases.
https://support.hp.com/wise/home/ams-pt
https://support.hp.com/wise/home/apj-en
https://support.hp.com/wise/home/apj-ja
https://support.hp.com/wise/home/apj-ko
https://support.hp.com/wise/home/apj-zh-Hans
https://support.hp.com/wise/home/apj-zh-Hant
https://support.hp.com/wise/home/emea-en
ENWW Paper-handling system 47
Page 66

Servicing system
Printhead wiper
The printhead wiper system keeps the printhead nozzles ring correctly throughout the life of the printer as it
performs the wiping and capping functions.
●
The wiping function cleans the nozzles of ink residue and particulates.
●
The capping function keeps the nozzles moist during storage and when the printer is idle.
The printhead wiper system uses its own motor to power the horizontal sled motion as it perform its functions.
The web fabric is on a supply reel that advances after wiping takes place. Advancing is done by backing into a
stationary trigger mechanism located on the rear frame that turns a gear to advance the web. Because the web
is on a supply reel, the web will eventually run out of material. The printer reports a low-web condition with
approximately 12,000 pages remaining. If the sled is not replaced after the low warning is given and the printer
continues to be used, the printer mechanism will reach a point where the web is so low that the unit will stop
functioning until a new sled is installed. The estimated life of a printhead wiper is approximately 150,000 pages.
To perform the capping function, the printhead wiper moves underneath the printhead (which is elevated from
the print position). This allows the rubber cap to seal the print nozzles from the environment.
48 Chapter 1 Theory of operation ENWW
Page 67

Service uid and aerosol management systems
There are two types of service uid, shipping uid and ink. New printheads are lled with shipping uid to
prevent nozzles from clogging. Printing with shipping uid results in very poor print quality. Shipping uid must
be discharged from the printhead and replaced with ink before the printhead is used for printing. Once all the
shipping uid is replaced with ink, the printhead periodically discharges ink out the nozzles before, between, and
after printed pages in order to prevent the nozzles from clogging.
The service uid management system is contained entirely within the duplexer module. Service uid is
discharged out of the nozzles of the printhead through the holes in the platen and into the container inside the
duplexer module. Absorbers in the container capture the service
duplexer module is tipped.
The service uid is discharged out of the nozzles in drops. As the drop travels through the air, it starts to break
up into multiple droplets of varying size. Some of the droplets are called aerosol because they are so small that
they are lighter than air. Aerosol can oat inside the printer and collect on the lens of optical sensors, producing
false failures.
The aerosol management system transports the aerosol and collects it in a safe place where it can do the printer
no harm. It consists of an aerosol fan, mounted on the rear wall of the air ow assembly, which creates air ow
that pulls the aerosol through the holes in the platen and into the aerosol lter inside the duplexer module. Most
of the aerosol is captured in the aerosol lter. Over time, the aerosol lter will get clogged and must be replaced.
Some aerosol does pass through the aerosol lter and get into the aerosol fan. If too much aerosol gets to the
aerosol fan, the fan stalls.
There is an EPROM memory device on the duplexer module that keeps track of how much service uid has been
discharged into it. When the duplexer module is full of service uid, it must be replaced. Because the aerosol
lter is inside the duplexer module, replacing the duplexer module also replaces the aerosol lter.
uid and prevent it from leaking out when the
ENWW Service uid and aerosol management systems 49
Page 68

Figure 1-31 Service uid and aerosol management system
Table 1-3 Service Fluid and Aerosol Management System Components
Item Description
1 Duplexer Module
2 Air Flow Rear Wall Assembly
3 Printhead
4 Platen (component of the service uid container/left duplex module)
5 Absorbers (component of the service uid container/left duplex module)
6 Aerosol Filter (component of the service uid container/left duplex module)
7 Aerosol Fan
8 EPROM memory device (component of the service uid container/left duplex module)
50 Chapter 1 Theory of operation ENWW
Page 69

Airow system
Function
The airow system conditions the printed pages to avoid page curling due to the ink on the page.
The setting of the airow system is dictated by the attributes of the image to be printed on the page and the
ambient air temperature.
The airow system functionally consists of a fan and heating elements. The pressurized air is blown on the page
through the nozzles that are placed on the paper path of the
Heating
Heating elements are programmed to heat the air for variable temperatures above ambient.
Independent of the ambient temperature maximum air temperature allowed is 56°C (133°F).
Each side (front and rear) of the heating element is protected by a thermal fuse which would open the circuit if
elevated temperatures are sustained due to unexpected malfunctions to the rest of the system.
Airow
The fan produces airow which dissipates heat generated by the heating element coil. Heated air is exhausted
on to the page.
airow system between print and eject zone.
Modes
The control schemes for the airow are varied in combination with the heating element controls.
Mode Description
1 Fan speed: 1700 RPM, Air Temperature: Ambient + 32° F (0° C)
2 Fan speed: 1700 RPM, Air Temperature: Ambient + 41° F (5° C)
3 Fan speed: 1700 RPM, Air Temperature: Ambient + 79-90° F (15 °C)
4 Fan speed: 1700 RPM, Air Temperature: Ambient + 79-90° F (26-32° C)
5 Fan speed: 2200 RPM, Air Temperature: Ambient + 79-90° (26-32° C)
6 Fan speed: 2800 RPM, Air Temperature: Ambient + 79-90° (26-32° C)
ENWW Airow system 51
Page 70

Components
Figure 1-32 Airow system components
Item Description
1 Heating Element
2 Impeller/Fan
3 Thermistor
4 Motor
5 Aerosol System
52 Chapter 1 Theory of operation ENWW
Page 71

Document feeder system
Document feed system
This section describes the following:
●
Sensors in the document feeder
●
Document feeder paper path
●
Simplex single-pass scanning
●
Electronic duplexing (e-duplex) single-pass scanning
●
Deskew operation
●
Document feeder hinges
The printer supports single-pass electronic duplexing (e-duplex) copy jobs. Two separate scan modules scan the
front-side and back-side of an e-duplex copy job page in a single pass through the document feeder.
For the WF class, this ADF supports a smart background, which auto-crops and adjusts the image extents.
Sensors in the document feeder
The document feeder contains the following sensors:
●
ADF paper present sensor: Detects whether a document is present in the document feeder. If paper is
present in the document feeder when copies are made, the printer scans the document using the
document feeder. If no paper is present when copies are made, the printer scans the document using the
scanner glass.
●
ADF Y (length) sensor: Detects whether a legal-size original is present in the document feeder.
●
ADF jam cover sensor: Detects whether the document feeder cover is open or closed.
●
ADF paper path deskew sensor: Detects the top of the page as it enters the deskew rollers.
●
ADF paper path pick success sensor: Detects a successful one-page feed from the document feeder tray.
NOTE: This sensor uses ultrasonic sound to detect a multi-page paper feed.
●
Paper path sensor 1: Detects the top of the page as it approaches the front-side scan module (document
feeder glass).
ENWW Document feeder system 53
Page 72

Figure 1-33 Document feeder sensors
Table 1-4 Document feeder sensors
Item Description
1 ADF Y (length) sensor
2 ADF paper present sensor
3 ADF deskew sensor
4 Paper path sensor 1
NOTE: For an e-duplex copy job, this sensor is used to activate the front-side scan module (in the scanner
base) and the front-side background selector (in the document feeder), if needed.
5 ADF jam cover sensor (open the jam access cover and insert a folded piece of paper to activate the ag)
Document feeder paper path
Figure 1-34 Document feeder paper path
Table
1-5 Document feeder paper path
Item Description Item Description
1 Input tray 7 Front-side scan module
NOTE: This scan module (document feeder glass) is
located in the scanner base.
2 Pre-pick roller 8 Back-side scan module
54 Chapter 1 Theory of operation ENWW
Page 73

Table 1-5 Document feeder paper path (continued)
Item Description Item Description
3 Pick roller 9 ADF pick success transmitter
4 ADF pick success receiver 10 Separator roller
5 Deskew drive roller 11 Exit drive roller
6 Prescan drive roller 12 Lift plate
Document feeder simplex operation
Following is the basic sequence of operation for a document feeder simplex job:
1. The ADF jam cover sensor detects when the cover door is closed.
2. The ADF paper present sensor activates when paper is loaded onto the input tray.
3. The feed motor rotates to raise the lift plate and starts to pick the loaded paper.
4. The ADF multi-pick (ultrasonic) sensor activates when the leading edge of the paper is driven past the
sensor. The printer rmware registers a successful pick operation.
5. The ADF paper path deskew activates when the leading edge of the paper passes it. The printer rmware
registers the leading edge of the paper position.
6. The leading edge of the paper drives into the nip point of the deskew drive roller and the deskew pinch
rollers. This creates a buckle of paper by the nip point for pick-skew correction.
7. The deskew motor rotates the deskew drive roller to pull the paper into the prescan drive roller.
8. The pick motor stops turning and allows both the pick and feed roller to turn freely while the paper is
pulled in by the deskew drive roller.
9. The feed motor rotates to drive the paper into the prescan front-side sensor. The rmware registers the
leading edge position of the paper as the multi-pick sensor activates.
10. The feed motor continues to rotate and drive the leading edge of the paper through the preset distance
from the multi-pick sensor to the front-side scan zone. The scanner begins the scanning and data retrieval
process.
11. The ADF multi-pick (ultrasonic) sensor deactivates when the trailing edge of the paper passes the sensor.
The rmware registers the trailing edge of the paper position.
12. The feed motor continues to rotate and drive the trailing edge of the paper through the preset distance
from the ADF multi-pick (ultrasonic) sensor to the front-side scan zone. The scanner ends the scanning and
data retrieval process.
13. The feed motor continues to rotate and ejects the trailing edge of the paper into the output bin.
14. One of the following occurs:
–
If the copy job is complete, the ADF paper present sensor deactivates. The feed motor reverses
rotation to raise the pick roller.
–
If the copy job is not complete, the ADF paper present sensor is active. The printer rmware detects
additional pages in the input tray and the process repeats.
ENWW Document feeder system 55
Page 74

Document feeder e-duplex operation
Following is the basic sequence of operation for a document feeder simplex job:
NOTE: For an e-duplex copy job, the background scan operation begins immediately after the simplex
sequence of operation ends.
1. The feed motor continues to drive the paper until the leading edge activates the prescan back-side sensor.
The printer rmware registers the position of the leading edge of the paper.
2. The feed motor continues to rotate to drive the leading edge of the paper through the preset distance from
prescan back-side sensor to the back-side background selector scan zone. The back-side background scan
module begins the scanning and retrieval of the data.
3. The prescan back-side sensor deactivates when the trailing edge of the paper passes it. The printer
rmware registers the trailing edge of the paper position.
4. The feed motor continues to rotate to drive the trailing edge of the paper edge past the back-side
background selector scan zone.
5. The feed motor continues to rotate and ejects the trailing edge of the paper into the output bin.
6. One of the following occurs:
–
If the copy job is complete, the ADF paper present sensor deactivates. The feed motor reverses
rotation to raise the pick roller.
–
If the copy job is not complete, the ADF paper present sensor is active. The printer rmware detects
additional pages in the input tray and the process repeats.
56 Chapter 1 Theory of operation ENWW
Page 75

Deskew operation
Sliding side guides on the input tray make sure that the paper stack is correctly aligned at the center of the input
tray when paper is loaded in the tray. The correct position of the loaded paper is parallel with the direction of
travel into the document feeder paper path.
The document feeder further reduces paper skew due to improper loading of paper in the input tray by buckling
the paper to create a paper buer.
The document feeder aligns the leading edge of the paper parallel with the deskew drive rollers before the
paper is driven further into the document feeder paper path.
NOTE: If the page to be copied is smaller than the minimal sliding guide setting, do not use the document
feeder for the copy job. Attempting to copy too small of a page using the document feeder can result in
document feeder jams and/or damage to the original page. Instead, use the atbed glass to copy the page.
Figure 1-35 Deskew operation
Document feeder hinges
The document feeder hinges allow positioning the feeder above the scanner glass to accommodate the
placement of books and other objects up to 25 mm (1.0 in) in height on the scanner glass. The document feeder
still closes (the bottom of the feeder is kept parallel to the scanner glass) and allows the printer to operate.
The document feeder will withstand a downward force of about 4.5 kg (10 lb) applied at the front edge center of
the assembly—when the fulcrum (such as the spine of a book) is located anywhere on the scanner glass and
parallel to its long axis—without breaking, deforming, detaching or experiencing performance degradation.
The document feeder hinges support the assembly in the open position and prevent the document feeder from
suddenly closing and causing damage or a loud noise.
The hinges can hold the document feeder static in all positions higher than 100 mm (3.93 in); measured at the
front of the assembly. Less than 2.3 kg (5 lb) of force is required to open or close the document feeder.
ENWW Document feeder system 57
Page 76

The hinges allow the document feeder to open to an angle of between 60º and 80º from the horizontal position
(this angle will not allow the printer to tip over).
Figure 1-36 Document feeder open (book mode)
Figure 1-37 Document feeder open (60º to 80º)
58 Chapter 1 Theory of operation ENWW
Page 77

Scanning and image capture system (780/785)
The scanner is a carriage-type platen scanner that includes the frame, glass, scan module, and a scan control
board (SCB). The scanner has a sensor to detect legal-sized paper and a switch to indicate when the document
feeder is opened.
The document feeder and control panel are attached to the scanner. If the scanner fails, it can be replaced as a
whole unit. The scanner replacement part does not include the document feeder, control panel, or SCB.
ENWW Scanning and image capture system (780/785) 59
Page 78

Fax functions and operation
The following sections describe the printer fax capabilities.
Computer and network security features
The printer can send and receive fax data over telephone lines that conform to public switch telephone network
(PSTN) standards. The secure fax protocols make it impossible for computer viruses to be transferred from the
telephone line to a computer or network.
The following printer features prevent virus transmission:
●
No direct connection exists between the fax line and any devices that are connected to the USB or Ethernet
ports.
●
The internal rmware cannot be modied through the fax connection.
●
All fax communications go through the fax subsystem, which does not use Internet data-exchange
protocols.
PSTN operation
The PSTN operates through a central oce (CO) that generates a constant voltage on the TIP and RING wires,
usually 48 V. A device goes o-hook by connecting impedance, such as 600 Ω for the USA, across the TIP and
RING so that a line current can ow. The CO can detect this current and send impulses like dial tones. The printer
generates more signaling tones, such as dialing digits, to tell the CO how to connect the call. The printer can also
detect tones, such as a busy tone from the CO, which tells it how to behave.
When the call is connected, the CO behaves like a wire connecting the sender and receiver. This is the period
during which all of the fax signaling and data transfer occurs. When a call is completed, the circuit opens again
and the line-current ow ceases, removing the CO connection from both the sender and the receiver.
On most phone systems, the TIP and RING signals appear on pins three and four of the RJ-11 modular jack (the
one on the fax card, as dened in the common 6-wire RJ standard). These two signals do not have to be
polarized because all the equipment works with TIP on one pin and RING on the other pin. This means that
cables of either polarity can interconnect and still work.
These basic functions of PSTN operation are assumed in the design of the fax subsystem. The printer generates
and detects the signaling tones, currents, and data signals that are required to transmit and receive faxes using
the PSTN.
The fax subsystem
The MPCA, fax card, rmware, and software all contribute to the printer fax functionality. The designs of the
formatter and fax card, along with parameters in the rmware, determine the majority of the regulatory
requirements for telephony on the printer.
The fax subsystem is designed to support V.34 fax transmission, medium speeds (such as V.17 fax), and the
lower speeds of older fax machines.
Fax card in the fax subsystem
The fax card contains the modem chipset (DSP and CODEC) that controls the basic fax functions of tone
generation and detection, along with channel control for fax transmissions. The CODEC and its associated
circuitry act as the third-generation silicon data access arrangement (DAA) to comply with worldwide regulatory
requirements.
60 Chapter 1 Theory of operation ENWW
Page 79

Safety isolation
The fax card provides safety isolation between the high-voltage, transient-prone environment of the telephone
network (telephone network voltage—TNV) and the low-voltage analog and digital circuitry of the formatter
(secondary extra-low voltage—SELV). This safety isolation provides both customer safety and printer reliability
in the telecom environment.
Any signals that cross the isolation barrier do so magnetically. The breakdown voltage rating of barrier- critical
components is greater than 5 kV.
Safety-protection circuitry
In addition to the safety barrier, the fax card protects against overvoltage and overcurrent events.
Telephone overvoltage events can be either dierential mode or common mode. The event can be transient in
nature (a lightning-induced surge or ESD) or continuous (a power line crossed with a phone line). The fax card
protection circuitry provides a margin of safety against combinations of overvoltage and overcurrent events.
Common mode protection is provided by the selection of high-voltage, barrier-critical components (transformer
and relay). The safety barrier of the fax card PCA and the clearance between the fax card and surrounding
components also contribute to common mode protection.
A voltage suppressor (a crowbar-type thyristor) provides dierential protection. This device becomes low
impedance at approximately 300 V dierential, and crowbars to a low voltage.
Data path
TIP and RING are the two-wire paths for all signals from the telephone network. All signaling and data
information comes across them, including fax tones and fax data.
The telephone network uses DC current to determine the hook state of the telephone, so the line current must
be present during a call. The silicon DAA provides a DC holding circuit to keep the line current constant during a
fax call.
The silicon DAA converts the analog signal to a digital signal for DSP processing, and also converts the digital
signal to an analog signal for transmitting data through a telephone line.
The magnetically coupled signals that cross the isolation barrier go through a transformer.
The DSP in the fax card communicates with the ASIC on the formatter using the high-speed serial interface.
Ring detect
Ring detect is performed by the line voltage monitoring module of the silicon DAA, and is a combination of
voltage levels and cadence (time on and time o). Both must be present to detect a valid ring. The CODEC works
with DSP and the rmware to determine if an incoming signal is an answerable ring.
Line current control
The DC current from the CO needs to have a path to ow from TIP to RING. The DC impedance emulation line
modulator and DC termination modules in the silicon DAA act as a DC holding circuit, and work with the rmware
to achieve the voltage-current characteristic between TIP and RING. The impedance (the current- voltage
characteristic) changes in correspondence to certain special events (for example, pulse dialing or when the
printer goes on-hook).
ENWW Fax functions and operation 61
Page 80

Fax page storage in ash memory
Fax pages are the electronic images of the document page. They can be created in one of three ways:
●
Scanned, to be sent to another fax machine.
●
Generated, to be sent by the computer.
●
Received from a fax machine, to be printed.
The printer automatically stores all fax pages in ash memory. After these pages are written into ash memory,
they are stored until the pages are sent to another fax machine, printed on the printer, transmitted to the
computer, or erased by the user.
These pages are stored in ash memory, which is the nonvolatile memory that can be repeatedly read from,
written to, and erased. The printer can have dierent amounts of ash memory, shared between rmware,
customer settings, job storage and fax storage.
NOTE: The exact amount of ash memory depends upon the model and options of the printer.
Advantages of ash memory storage
Fax pages that are stored in ash memory are persistent. They are not lost as a result of a power failure, no
matter how long the power is o. Users can reprint faxes if a cartridge runs out of ink or the printer experiences
other errors while printing faxes.
The printer also has scan-ahead functionality that makes use of ash memory. Scan-ahead automatically scans
pages into ash memory before a fax job is sent. This allows the sender to pick up the original document
immediately after it is scanned, eliminating the need to wait until the fax transmission is complete.
Because fax pages are stored in ash memory rather than RAM, more RAM is available to handle larger and
more complicated copy and print jobs.
62 Chapter 1 Theory of operation ENWW
Page 81

Output accessories
●
Inline nisher
ENWW Output accessories 63
Page 82

Inline nisher
●
MPCA digital ASIC
●
Finisher control
●
Finisher controller digital ASIC
●
Finisher controller analog ASICs
●
Engine controller analog ASICs
●
Other printed circuit assemblies (PCAs)
●
Power supply
●
Cabling system
●
Inline nisher paper-handling system
●
Inline nisher operation
●
Jetlink communication
●
Jam detection
MPCA digital ASIC
The nisher MPCA digital ASIC contains a CPU operating at 1.2 GHz that executes rmware code that provides
high-level device control. The digital ASIC uses a standard PCle interface to pass data to the engine control ASIC.
Finisher control
The nisher controller digital ASIC receives high-level commands from the MPCA, and it then provides low-level
control to the nisher mechanism. In particular, the nisher controller digital ASIC and its rmware control
motors and system sensors. The nisher controller analog ASICs integrate motor drivers, voltage regulators,
sensor interfaces, and supervisory circuits.
Finisher controller digital ASIC
The nisher controller digital ASIC has a high-performance 1.3 GHz ARM A7 CPU and DSP co-processors that
execute rmware code to provide low-level nisher control. Depending on settings the nisher will enter Sleep
mode within 60 seconds of completing the last page. In sleep mode the nisher is turned o. If a print job is
received while the printer is in Sleep mode, the printer will take a short period of time to "wake up" and during
this time an additional “wake up” command will be sent to the nisher. This nisher “wake up” time can take up
to 10 seconds. This time will be transparent to the user as it is accomplished within the “wake up” time for the
engine.
Finisher controller analog ASICs
The nisher uses four analog ASICs to generate the system voltages for the nisher, drive the nisher motors,
and to control various nisher sensors for correct operation. The engine contains 16 motors:
●
Eject roller motor
●
Trailing edge clamp motor
●
Channel X rear motor
64 Chapter 1 Theory of operation ENWW
Page 83

●
Channel X front motor
●
End-of-sheet clamp motor
●
X registration motor
●
Channel lift motor
●
Edge clamp motor
●
Puller motor
●
Front mezzanine motor
●
Rear mezzanine motor
●
Floor motor
●
Shelf motor
●
Leading edge clamp motor
●
Stapler motor
●
Stapler carriage motor
Inline nisher sensors
●
Eject sensor
●
Puller entry sensor
●
Rear puller home sensor
●
Front puller home sensor
●
X registration sensor
●
Mezzanine sensor
●
Stapler motor home sensor
●
Stapler staple low sensor
●
Stapler staple out sensor
●
Stapler door present sensor
●
Stapler edge sensor
●
Bin full sensor
Engine controller analog ASICs
The engine uses four analog ASICs to generate the system voltages for the engine, drive the engine motors and
control various engine sensors, for correct operation. The engine contains 16 motors. One of these motors is
used to divert the sheet from the engine paper path to the nisher:
●
Diverter motor
ENWW Output accessories 65
Page 84

Other printed circuit assemblies (PCAs)
In addition to hosting the nisher system ASICs, the nisher main printed circuit assembly (MPCA) incorporates
many other circuits required to interface with sensors and other sub-system components. In some cases, this
circuitry is located on a smaller remote PCAs (SLBs) to optimize cable interconnects. The following table lists the
various PCAs in the nisher mechanism/MPCA:
PCA name Description/function
Stapler stacker top left PCA Distribution
Distribution channel PCA Distribution
LED bin illumination PCA LED board
Bin full sensor PCA Bin full
Stapler stacker rear channel PCA Distribution
Stapler stacker top right PCA Distribution
Media path PCA Distribution
Bin empty infrared PCA Bin empty
Stapler stacker staple carriage PCA Distribution and edge sensing
HE1 stapler door Stapler door sensing
Stapler stacker front channel ground PCA Grounding path for front and rear channels (2 boards)
Power supply
The nisher does not have a separate power supply (the engine supplies all nisher power requirements).
Cabling system
The printer cabling system includes both discrete cables and at-exible conductor (FFC) cables.
CAUTION:
ESD workstation or mat is not available, touch the sheet-metal chassis to provide a static ground before
touching an ESD-sensitive assembly. Protect the ESD-sensitive assemblies by placing them in ESD pouches
when they are out of the printer.
Cables and printed circuit assemblies (PCAs) are sensitive to electrostatic discharge (ESD). If an
66 Chapter 1 Theory of operation ENWW
Page 85

Flat Flexible Cables
1
2
The printer at exible cables (FFCs) have several standard attributes.
●
Each end of the cable has a contrasting color line (callout 1) that shows the shape and depth of insertion
into the PCA connector. Each end of the cable has a support tape (callout 2), typically blue, on the nonconductor side.
Figure 1-38 FFC insertion line
ENWW Output accessories 67
Page 86

●
1
1
Each end of the FFC has a support tape (typically blue) on the non-conductor side.
The support tape usually has a free region (callout 1) for use as a handle to insert and remove the cable.
Figure 1-39 FFC support tape
●
Some FFCs have a label printed on them that shows the function or the corresponding connector number.
Figure 1-40 FFC label
68 Chapter 1 Theory of operation ENWW
Page 87

FFC routing
1
The printer FFCs are routed using a set of common retaining methods.
●
Hook arms (callout 1) retain the edges of the FFCs. Installation and removal involves sequentially
positioning and releasing the FFC edges under the hooks.
Figure 1-41 FFC hook arm retainers
ENWW Output accessories 69
Page 88

●
Pill bumps also retain the edges of the FFCs. The FFC is pressed down against the plastic mount until the
edges are positioned under the bumps. Removal involves lifting the FFC out of the bumps.
Figure 1-42 FFC pill bump retainers
70 Chapter 1 Theory of operation ENWW
Page 89

●
1
Die-cut pieces (callout 1), adhered to FFCs and hooked into plastic mounts, are used to prevent wear in
regions where vibration or motion might damage the FFC.
Figure 1-43 FFC die-cut retainers
●
Double-sided-tape (DST) is used to secure FFCs directly to a sheet-metal or plastic part. This is a special
case, acceptable only for some simple electrical circuits, due to EMC or EMI risks.
Figure 1-44 FFC double-sided tape retainer
ENWW Output accessories 71
Page 90
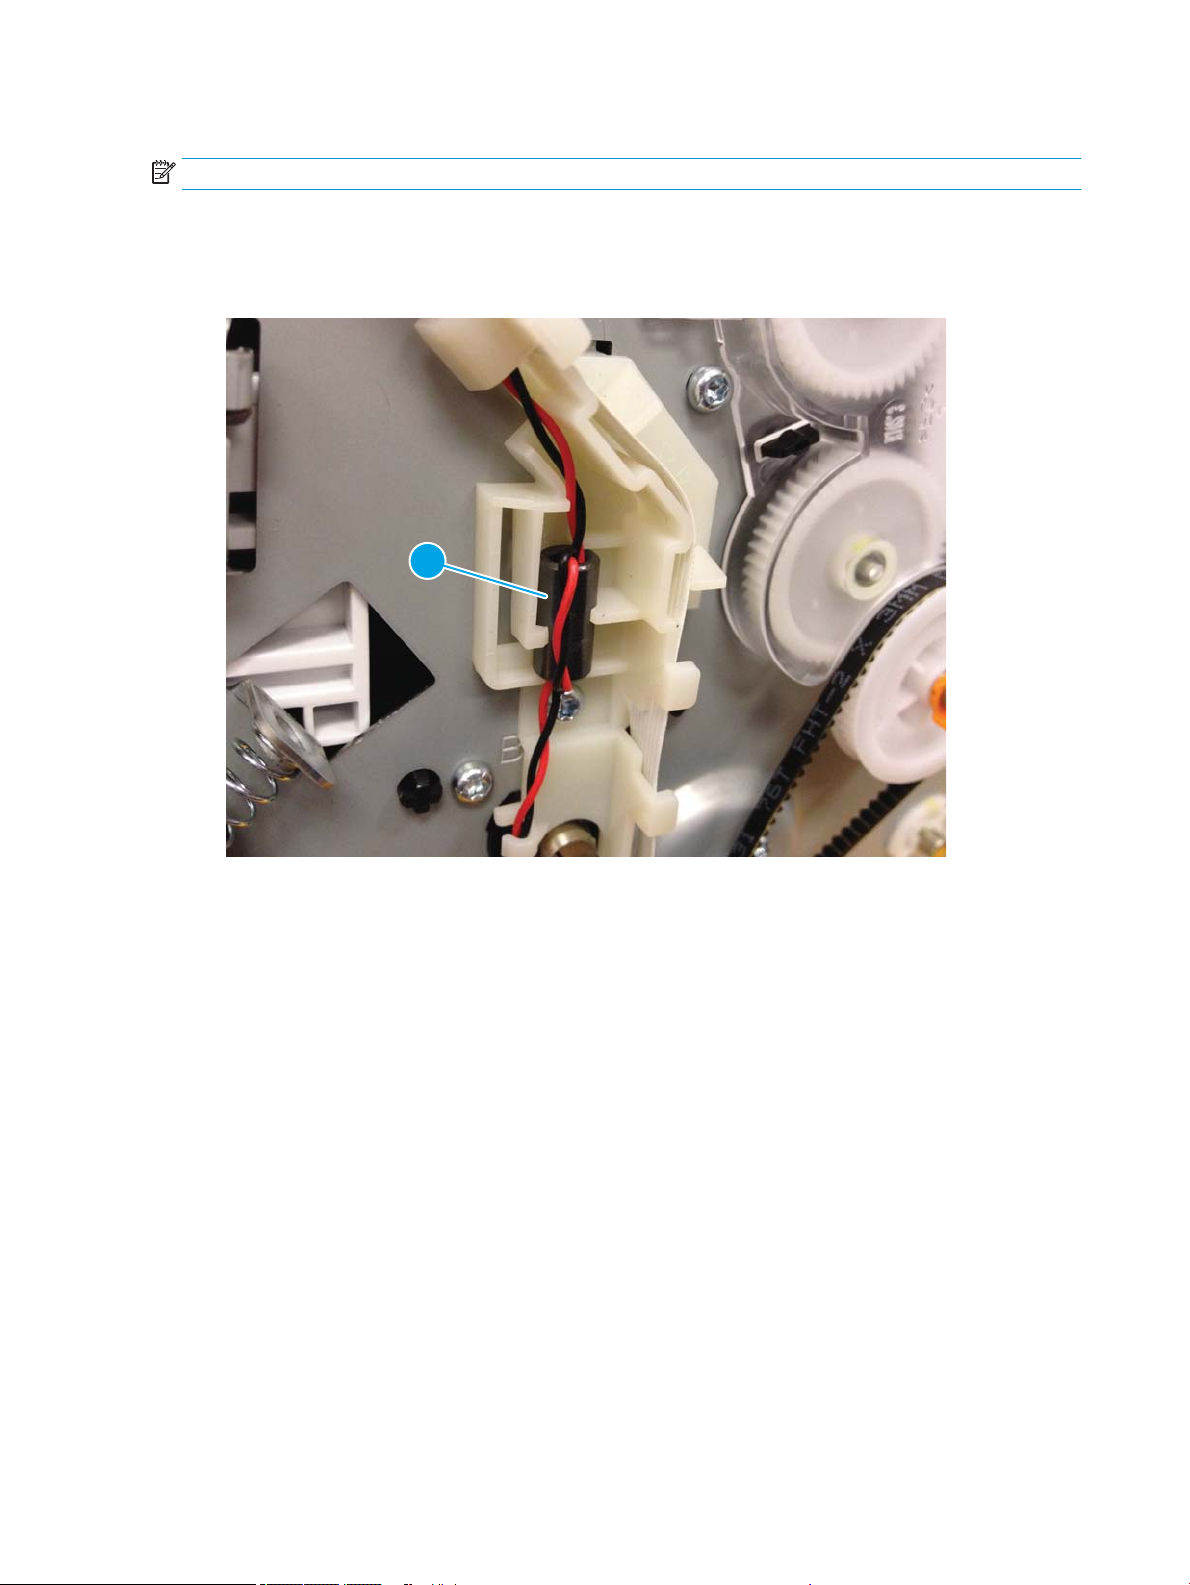
Discrete cables
1
NOTE: Remove discrete cable connectors by grasping the connector body rather than pulling on the wires.
The printer discrete cables share many standard attributes.
●
Ferrites (callout 1) might be located in a stationary location or slide freely along the wires.
Figure 1-45 Discrete cable ferrite
72 Chapter 1 Theory of operation ENWW
Page 91

●
1
Tie-wraps (callout 1) constrain the wire bundle and the dene position for installation.
Figure 1-46 Discrete cable tie-wraps
Connectors
FFC connectors on PCAs are oriented so the installation line is visible when holding the blue support handle.
NOTE: When correctly installed, the installation line is parallel to the edge of the connector body (callout 1).
ENWW Output accessories 73
Page 92

Figure 1-47 Connectors
1
Ferrites
The printer cabling system includes many ferrites to enable proper EMC/EMI performance for regulatory
agencies. All ferrites on FFCs and discrete cables must be included and located in the intended position to make
sure performance matches the tested behavior.
CAUTION: Ferrites are fragile. Use care when removing or installing them.
Cable management
The printer cabling system uses several distribution PCAs to connect many sensors and motors to the main PCA
(MPCA) in a controlled manner. One FFC delivers signals, power, and ground lines from the MPCA to the
distribution PCA. Then FFCs connect from the distribution PCA to individual components. The printer has several
rooftop modules that integrate to the common engine. Cable routing of the dierent rooftops to the MPCA
creates the top layer of cable routing in the rear region.
Spacing
Proper spacing is required between FFCs to prevent crosstalk, maintain signal integrity, and perform to EMC/EMI
expectations. The printer cables utilize plastic mounts, die-cut spacers adhered to FFCs, and foam adhered to
FFCs to maintain spacing to other FFCs or sheet-metal components. All spacing must be maintained for proper
performance.
74 Chapter 1 Theory of operation ENWW
Page 93

Figure 1-48 FFC spacing
Electrostatic discharge prevention
Electrostatic charge might build up on plastic and metal surfaces due to tape removal, dry conditions, or other
causes. Exposing the conductors at the ends of FFCs and discrete cables to these surfaces might cause
electrostatic discharge (ESD) and damage the cables.
ENWW Output accessories 75
Page 94
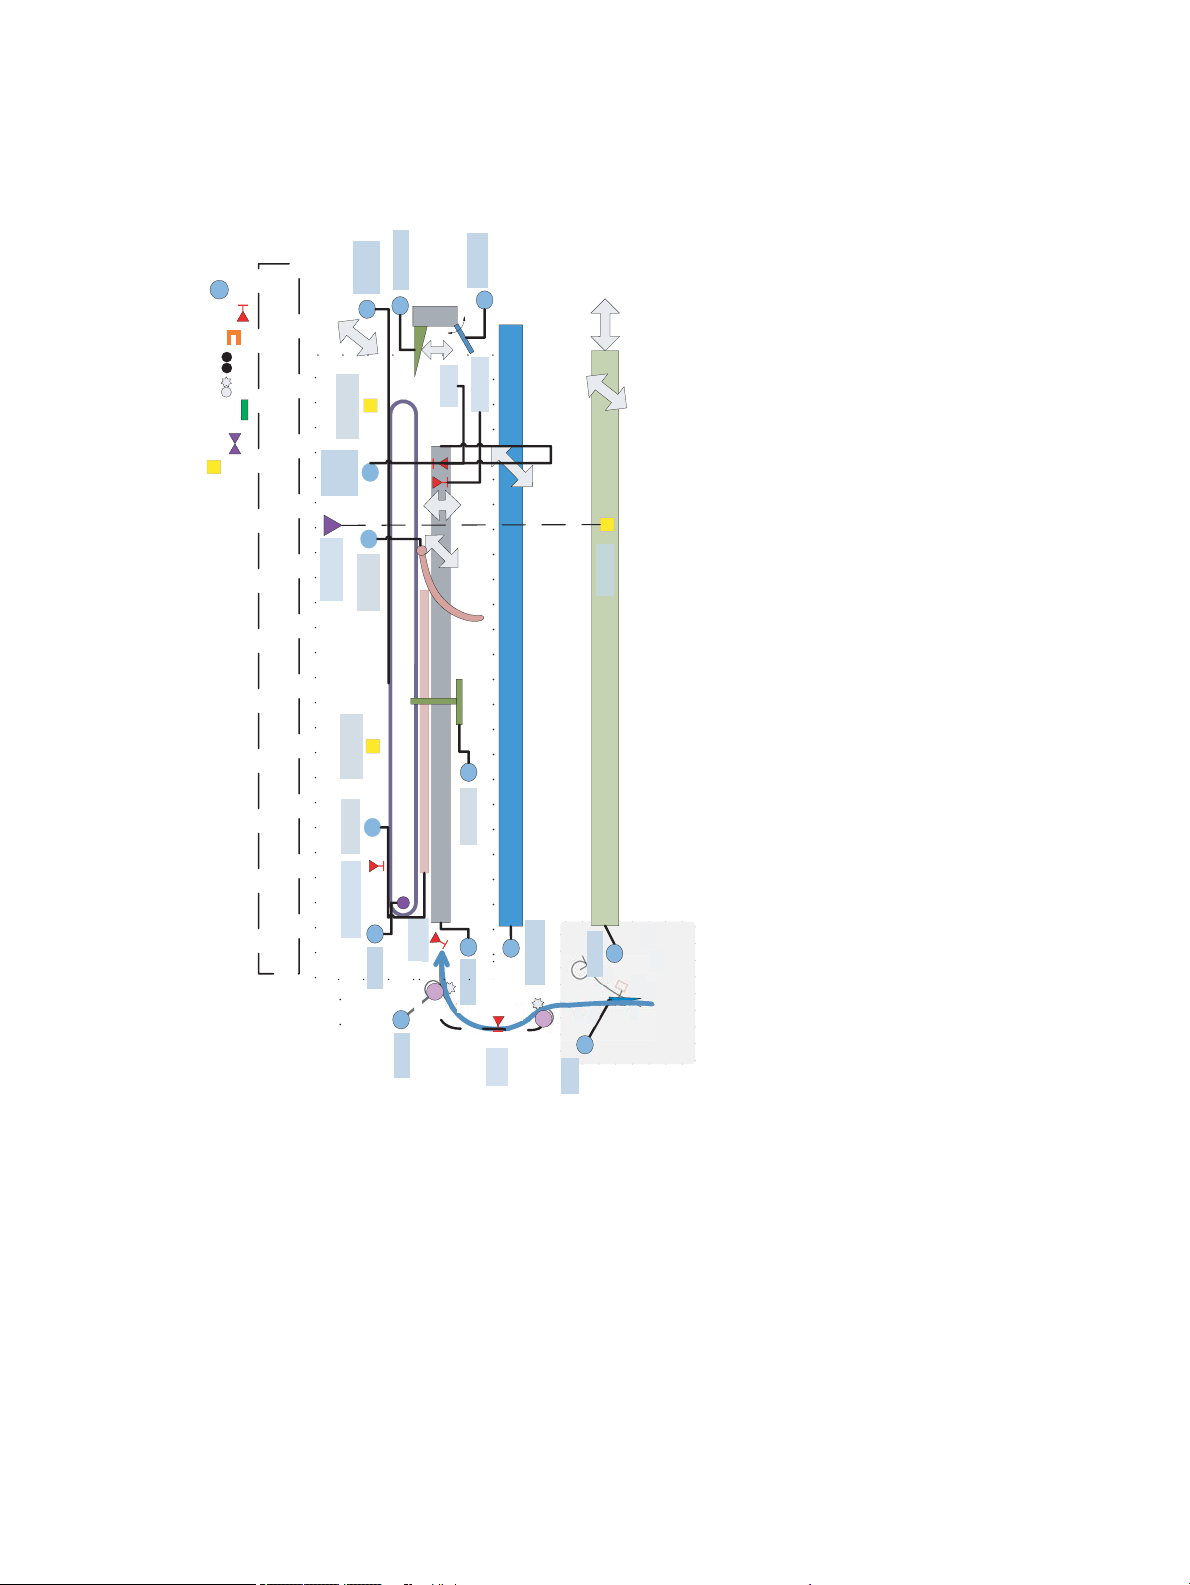
Inline nisher paper-handling system
Top Plate Service
Assembly
Base Mech
Front or Rear Puller Track
Puller Home Sensor (2)
Mezzanine Motors
(2)
Puller X
Registration
Motor
Bin Full Sensor
Front or Rear Mezzanine
Puller
Motor
Finisher
Spur
Pinch
Finisher
Eject
Pinch
Eject Motor
Eject
Sensor
4:1
Finisher
Diverter
Diverter
Motor
Puller Entry
Sensor
+
/
-X
Front or Rear Channel
Channel X
Translation
Motors (2)
End of Sheet
Clamp Motor
X Registration
Sensor
Mezzanine
Sensor
Edge Clamp
Motor
Front or Rear Edge Clamps
+
/
-
Z
+
/-
X
Leading Edge
Clamp Motor
Shelf Motor
+/-Z
+/- θX
Floor
+
/
-
X
Bin Empty
Infra-red LED
Floor Motor
End of Sheet Clamp
Trailing Edge
Clamp Motor
Trailing Edge Clamp
+/-Y
+
/
-
X
Jam Illumination
LEDs (2)
Bin Illumination
LED
Channel
Motor Lift
See Finisher Stapler
Legend
Motor
Reflective REDI
Opto Sensor
Pinch roller
Star Wheel
Switch/Hall Effect
Sensor
Other Sensors
LEDs
The following diagram describe the inline nisher hardware design.
Figure 1-49 Inline nisher control diagram (front)
76 Chapter 1 Theory of operation ENWW
Page 95

Figure 1-50 Inline nisher sensor control diagram (front)
Top Plate Service
Assembly
Base Mech
Front or Rear Puller Track
Puller Home Sensor (2)
Mezzanine Motors
(2)
Puller X
Registration
Motor
Bin Full Sensor
Front or Rear Mezzanine
Puller
Motor
Finisher
Spur
Pinch
Finisher
Eject
Pinch
Eject Motor
Eject
Sensor
4:1
Finisher
Diverter
Diverter
Motor
Puller Entry
Sensor
+
/
-X
Front or Rear Channel
Channel X
Translation
Motors (2)
End of Sheet
Clamp Motor
X Registration
Sensor
Mezzanine
Sensor
Edge Clamp
Motor
Front or Rear Edge Clamps
+
/
-
Z
+
/-
X
Leading Edge
Clamp Motor
Shelf Motor
+/-Z
+/- θX
Floor
+
/
-
X
Bin Empty
Infra-red LED
Floor Motor
End of Sheet Clamp
Trailing Edge
Clamp Motor
Trailing Edge Clamp
+/-Y
+
/
-
X
Jam Illumination
LEDs (2)
Bin Illumination
LED
Channel
Motor Lift
See Finisher Stapler
Legend
Motor
Reflective REDI
Opto Sensor
Pinch roller
Star Wheel
Switch/Hall Effect
Sensor
Other Sensors
LEDs
ENWW Output accessories 77
Page 96

Figure 1-51 Inline nisher motor control diagram (front)
Top Plate Service
Assembly
Base Mech
Front or Rear Puller Track
Mezzanine Motors
(2)
Puller X
Registration
Motor
Front or Rear Mezzanine
Puller
Motor
Finisher
Spur
Pinch
Finisher
Eject
Pinch
Eject Motor
4:1
Finisher
Diverter
Diverter
Motor
+/
-
X
Front or Rear Channel
Channel X
Translation
Motors (2)
End of Sheet
Clamp Motor
Edge Clamp
Motor
Front or Rear Edge Clamps
+/
-
Z
+/
-X
Leading Edge
Clamp Motor
Shelf Motor
+/-Z
+/- θX
Floor
+
/
-
X
Bin Empty
Infra-red LED
Floor Motor
End of Sheet Clamp
Trailing Edge
Clamp Motor
Trailing Edge Clamp
+
/-
Y
+
/
-
X
Jam Illumination
LEDs (2)
Bin Illumination
LED
Channel
Motor Lift
See Finisher Stapler
Legend
Motor
Reflective REDI
Opto Sensor
Pinch roller
Star Wheel
Switch/Hall Effect
Sensor
Other Sensors
LEDs
78 Chapter 1 Theory of operation ENWW
Page 97

Rear
Meazzanine
Motor
Stapler Cartridge
Door Sensor
X Registration
Motor
Floor Motor
Low Stapler
Sensor
Out of Staples
Sensor
Stapler
Stapler Motor
Home Sensor
fns_bin_full sen
Front Mezzanine
Rear Mezzanine
+/-Y
Stapler Carriage
Motor
Puller
Motor
Leading Edge
Clamp Motor
Stapler
Motor
Stapler Media
Edge Sensor
Finisher
Eject
Pinch
Eject
Sensor
Shelf Motor
Jam
Illumination
LEDs
Puller Entry
Sensor
Trailing Edge
Clamp Motor
Rear Channel
Front Channel
Channel Lift
Motor
Channel X
Rear Motor
End of Sheet
Clamp
Channel X
Registration Sensor
Channel Mezzanine
Sensor
Bin Full
Sensor
Edge Clamp
Motor
+/- X
Finisher
Spur
Pinch
Shelf
Rear Puller
Front Puller
Leading Edge Clamp
Leading Edge Clamp
Channel X
Front Motor
Front Puller
Home Sensor
Rear Puller
Home Sensor
Edge Clamp
Edge Clamp
Bin
Illumination
LEDs
Jam
Illumination
LEDs
Stapler Carriage
Movement
Front
Meazzanine
Motor
Eject
Roller
Motor
Left Door Media
Path
Floor Movement
Direction
Legend
Motor
Reflective REDI
Opto Sensor
Pinch roller
Star Wheel
Switch/Hall Effect
Sensor
Other Sensors
LEDs
Figure 1-52 Inline nisher sensor diagram (1 of 2)
ENWW Output accessories 79
Page 98

Figure 1-53 Inline nisher sensor diagram (2 of 2)
Stapler Cartridge
Door Sensor
Low Stapler
Sensor
Out of Staples
Sensor
Stapler
Stapler Motor
Home Sensor
fns_bin_full sen
Front Mezzanine
Rear Mezzanine
+/-Y
Stapler Media
Edge Sensor
Finisher
Eject
Pinch
Eject
Sensor
Jam
Illumination
LEDs
Puller Entry
Sensor
Rear Channel
Front Channel
Channel X
Registration Sensor
Channel Mezzanine
Sensor
Bin Full
Sensor
+/- X
Finisher
Spur
Pinch
Shelf
Rear Puller
Front Puller
Leading Edge Clamp
Leading Edge Clamp
Front Puller
Home Sensor
Rear Puller
Home Sensor
Edge Clamp
Edge Clamp
Bin
Illumination
LEDs
Jam
Illumination
LEDs
Stapler Carriage
Movement
Left Door Media
Path
Floor Movement
Direction
Legend
Motor
Reflective REDI
Opto Sensor
Pinch roller
Star Wheel
Switch/Hall Effect
Sensor
Other Sensors
LEDs
80 Chapter 1 Theory of operation ENWW
Page 99

Figure 1-54 Inline nisher motor diagram
Rear
Meazzanine
Motor
X Registration
Motor
Floor Motor
Stapler
fns_bin_full sen
Front Mezzanine
Rear Mezzanine
+/
-Y
Stapler Carriage
Motor
Puller
Motor
Leading Edge
Clamp Motor
Stapler
Motor
Finisher
Eject
Pinch
Shelf Motor
Jam
Illumination
LEDs
Trailing Edge
Clamp Motor
Rear Channel
Front Channel
Channel Lift
Motor
Channel X
Rear Motor
End of Sheet
Clamp
Edge Clamp
Motor
+/- X
Finisher
Spur
Pinch
Shelf
Rear Puller
Front Puller
Leading Edge Clamp
Leading Edge Clamp
Channel X
Front Motor
Edge Clamp
Edge Clamp
Bin
Illumination
LEDs
Jam
Illumination
LEDs
Stapler Carriage
Movement
Front
Meazzanine
Motor
Eject
Roller
Motor
Left Door Media
Path
Floor Movement
Direction
Legend
Motor
Reflective REDI
Opto Sensor
Pinch roller
Star Wheel
Switch/Hall Effect
Sensor
Other Sensors
LEDs
ENWW Output accessories 81
Page 100

Figure 1-55 Inline nisher stapler control diagram
Stapler Door
Sensor
Staple ³Low´
Sensor
Staple ³Out´
Sensor
Stapler
Stapler Home
Sensor
Bin Full Sensor
Stapler Carriage
Motor
Stapler
Motor
Stapler Media Edge Sensor
Legend
Motor
Reflective REDI
Opto Sensor
Pinch roller
Star Wheel
Switch/Hall Effect
Sensor
Other Sensors
LEDs
82 Chapter 1 Theory of operation ENWW
 Loading...