

Page 1

administrator’s
guide
hp OpenView
storage area manager
Product Version: 3.2
July 2004
Part Number: T2533-90002
This guide describes periodic or one-time Storage Area Manager administrative procedures.
Page 2

© Copyright 2002–2004 Hewlett-Packard Development Company, L.P.
Hewlett-Packard Company makes no warranty of any kind with regard to this material, including, but not limited to,
the implied warranties of merchantability and fitness for a particular purpose. Hewlett-Packard shall not be liable for
errors contained herein or for incidental or consequential damages in connection with the furnishing, performance,
or use of this material.
This document contains proprietary information, which is protected by copyright. No part of this document may be
photocopied, reproduced, or translated into another language without the prior written consent of Hewlett-Packard.
The information contained in this document is subject to change without notice. The only warranties for HP products
and services are set forth in the express warranty statements accompanying such products and services. Nothing
herein should be construed as constituting an additional warranty. HP shall not be liable for technical or editorial
errors or omissions contained herein.
Contains Embedded Engine™ software. Copyright © 2002 Solid Information Technology. All rights reserved.
Contains SNMP API software from AdventNet, Inc. Copyright © 1996-2002 AdventNet, Inc. All rights reserved.
Contains ILOG JViews Component Suite™
This product includes software developed by Apache Software Foundation (
This product includes code licensed from RSA Data Security.
Compaq Computer Corporation is a wholly-owned subsidiary of Hewlett-Packard Company.
Java™ is a U.S. trademark of Sun Microsystems, Inc.
Microsoft®, Windows®, and Windows NT® are U.S. registered trademarks of Microsoft Corporation.
UNIX® is a registered trademark of The Open Group.
Adobe® and Acrobat® are trademarks of Adobe Systems Incorporated.
Hewlett-Packard Company shall not be liable for technical or editorial errors or omissions contained herein. The
information is provided “as is” without warranty of any kind and is subject to change without notice. The warranties
for Hewlett-Packard Company products are set forth in the express limited warranty statements for such products.
Nothing herein should be construed as constituting an additional warranty.
Copyright © 1987-2002 by ILOG S.A. All rights reserved.
http://www.apache.org
).
Storage Area Manager Administrator’s Guide
July 2004
Part Number: T2533-90002
Page 3

contents
About this guide . . . . . . . . . . . . . . . . . . . . . . . . . . . . . . . . . . . . . . . . . . . . . . . . . . .15
Overview. . . . . . . . . . . . . . . . . . . . . . . . . . . . . . . . . . . . . . . . . . . . . . . . . . . . . . . . . . . . . . . . . 16
Intended audience. . . . . . . . . . . . . . . . . . . . . . . . . . . . . . . . . . . . . . . . . . . . . . . . . . . . . . . 16
Prerequisites . . . . . . . . . . . . . . . . . . . . . . . . . . . . . . . . . . . . . . . . . . . . . . . . . . . . . . . . . . . 16
Related documentation. . . . . . . . . . . . . . . . . . . . . . . . . . . . . . . . . . . . . . . . . . . . . . . . . . . 16
Conventions . . . . . . . . . . . . . . . . . . . . . . . . . . . . . . . . . . . . . . . . . . . . . . . . . . . . . . . . . . . . . . 18
Document conventions. . . . . . . . . . . . . . . . . . . . . . . . . . . . . . . . . . . . . . . . . . . . . . . . . . . 18
Text symbols . . . . . . . . . . . . . . . . . . . . . . . . . . . . . . . . . . . . . . . . . . . . . . . . . . . . . . . . . . 19
Getting help . . . . . . . . . . . . . . . . . . . . . . . . . . . . . . . . . . . . . . . . . . . . . . . . . . . . . . . . . . . . . . 20
HP Technical Support . . . . . . . . . . . . . . . . . . . . . . . . . . . . . . . . . . . . . . . . . . . . . . . . . . . 20
HP websites . . . . . . . . . . . . . . . . . . . . . . . . . . . . . . . . . . . . . . . . . . . . . . . . . . . . . . . . . . . 20
HP authorized reseller . . . . . . . . . . . . . . . . . . . . . . . . . . . . . . . . . . . . . . . . . . . . . . . . . . . 20
1 hp OpenView storage area manager. . . . . . . . . . . . . . . . . . . . . . . . . . . . . . . . . . . .21
hp OpenView storage area manager features . . . . . . . . . . . . . . . . . . . . . . . . . . . . . . . . . . . . . 22
Managing hp OpenView storage area manager users. . . . . . . . . . . . . . . . . . . . . . . . . . . . . . . 24
Adding a user . . . . . . . . . . . . . . . . . . . . . . . . . . . . . . . . . . . . . . . . . . . . . . . . . . . . . . . . . . 24
Managing device discovery . . . . . . . . . . . . . . . . . . . . . . . . . . . . . . . . . . . . . . . . . . . . . . . . . . 26
Starting device discovery. . . . . . . . . . . . . . . . . . . . . . . . . . . . . . . . . . . . . . . . . . . . . . . . . 26
Starting a comprehensive discovery cycle. . . . . . . . . . . . . . . . . . . . . . . . . . . . . . . . . 26
Starting the ongoing discovery process. . . . . . . . . . . . . . . . . . . . . . . . . . . . . . . . . . . 26
Stopping device discovery . . . . . . . . . . . . . . . . . . . . . . . . . . . . . . . . . . . . . . . . . . . . . . . . 26
Setting the device discovery interval . . . . . . . . . . . . . . . . . . . . . . . . . . . . . . . . . . . . . . . . 27
Managing and using device maps. . . . . . . . . . . . . . . . . . . . . . . . . . . . . . . . . . . . . . . . . . . . . . 28
Using the layout manager. . . . . . . . . . . . . . . . . . . . . . . . . . . . . . . . . . . . . . . . . . . . . . . . . 28
Configuring device links . . . . . . . . . . . . . . . . . . . . . . . . . . . . . . . . . . . . . . . . . . . . . . . . . 30
Adding device links. . . . . . . . . . . . . . . . . . . . . . . . . . . . . . . . . . . . . . . . . . . . . . . . . . 30
Moving device links . . . . . . . . . . . . . . . . . . . . . . . . . . . . . . . . . . . . . . . . . . . . . . . . . 31
Removing device links . . . . . . . . . . . . . . . . . . . . . . . . . . . . . . . . . . . . . . . . . . . . . . . 32
Filtering device maps. . . . . . . . . . . . . . . . . . . . . . . . . . . . . . . . . . . . . . . . . . . . . . . . . . . . 33
Contents
3Storage Area Manager Administrator’s Guide
Page 4

Contents
Managing folders . . . . . . . . . . . . . . . . . . . . . . . . . . . . . . . . . . . . . . . . . . . . . . . . . . . . . . . . . . 35
Adding folders . . . . . . . . . . . . . . . . . . . . . . . . . . . . . . . . . . . . . . . . . . . . . . . . . . . . . . 35
Adding members to folders . . . . . . . . . . . . . . . . . . . . . . . . . . . . . . . . . . . . . . . . . . . . 36
Managing organizations . . . . . . . . . . . . . . . . . . . . . . . . . . . . . . . . . . . . . . . . . . . . . . . . . . . . . 37
Defining an organization’s properties . . . . . . . . . . . . . . . . . . . . . . . . . . . . . . . . . . . . . . . 37
Adding members to the organization. . . . . . . . . . . . . . . . . . . . . . . . . . . . . . . . . . . . . . . . 38
Implementing in cluster environments . . . . . . . . . . . . . . . . . . . . . . . . . . . . . . . . . . . . . . . . . . 39
Implementing in MSCluster environments . . . . . . . . . . . . . . . . . . . . . . . . . . . . . . . . . . . 39
How hp OpenView storage area manager operates in AIX cluster environments. . . . . . 40
Requirements. . . . . . . . . . . . . . . . . . . . . . . . . . . . . . . . . . . . . . . . . . . . . . . . . . . . . . . 40
Description. . . . . . . . . . . . . . . . . . . . . . . . . . . . . . . . . . . . . . . . . . . . . . . . . . . . . . . . . 40
Failover . . . . . . . . . . . . . . . . . . . . . . . . . . . . . . . . . . . . . . . . . . . . . . . . . . . . . . . . . . . 41
Recommendation. . . . . . . . . . . . . . . . . . . . . . . . . . . . . . . . . . . . . . . . . . . . . . . . . . . . 41
2 Managing events . . . . . . . . . . . . . . . . . . . . . . . . . . . . . . . . . . . . . . . . . . . . . . . . . .43
Managing events. . . . . . . . . . . . . . . . . . . . . . . . . . . . . . . . . . . . . . . . . . . . . . . . . . . . . . . . . . . 44
Acknowledging events. . . . . . . . . . . . . . . . . . . . . . . . . . . . . . . . . . . . . . . . . . . . . . . . . . . 44
Exporting events. . . . . . . . . . . . . . . . . . . . . . . . . . . . . . . . . . . . . . . . . . . . . . . . . . . . . . . . 45
Exporting events to the Windows event log . . . . . . . . . . . . . . . . . . . . . . . . . . . . . . . . . . 46
Deleting events. . . . . . . . . . . . . . . . . . . . . . . . . . . . . . . . . . . . . . . . . . . . . . . . . . . . . . . . . 47
Deleting events from the event panel . . . . . . . . . . . . . . . . . . . . . . . . . . . . . . . . . . . . 47
Configuring automatic event deletion . . . . . . . . . . . . . . . . . . . . . . . . . . . . . . . . . . . . 48
Adding event filters . . . . . . . . . . . . . . . . . . . . . . . . . . . . . . . . . . . . . . . . . . . . . . . . . . . . . 50
Adding event triggers. . . . . . . . . . . . . . . . . . . . . . . . . . . . . . . . . . . . . . . . . . . . . . . . . . . . 52
Adding constraints to event triggers . . . . . . . . . . . . . . . . . . . . . . . . . . . . . . . . . . . . . 53
Application category and event list . . . . . . . . . . . . . . . . . . . . . . . . . . . . . . . . . . . . . . . . . . . . 56
3 hp OpenView storage accountant . . . . . . . . . . . . . . . . . . . . . . . . . . . . . . . . . . . . . .63
hp OpenView storage accountant features . . . . . . . . . . . . . . . . . . . . . . . . . . . . . . . . . . . . . . . 64
Billing basics . . . . . . . . . . . . . . . . . . . . . . . . . . . . . . . . . . . . . . . . . . . . . . . . . . . . . . . . . . . . . 65
How charges are calculated . . . . . . . . . . . . . . . . . . . . . . . . . . . . . . . . . . . . . . . . . . . . . . . 65
How charges become bills . . . . . . . . . . . . . . . . . . . . . . . . . . . . . . . . . . . . . . . . . . . . . . . . 65
Getting started with billing. . . . . . . . . . . . . . . . . . . . . . . . . . . . . . . . . . . . . . . . . . . . . . . . 66
Service level setup and administration . . . . . . . . . . . . . . . . . . . . . . . . . . . . . . . . . . . . . . . . . . 68
Creating service levels . . . . . . . . . . . . . . . . . . . . . . . . . . . . . . . . . . . . . . . . . . . . . . . . . . . 68
Adding LUNs to service levels . . . . . . . . . . . . . . . . . . . . . . . . . . . . . . . . . . . . . . . . . . . . 69
Deleting service levels . . . . . . . . . . . . . . . . . . . . . . . . . . . . . . . . . . . . . . . . . . . . . . . . . . . 70
4 Storage Area Manager Administrator’s Guide
Page 5

Contents
Account setup and administration . . . . . . . . . . . . . . . . . . . . . . . . . . . . . . . . . . . . . . . . . . . . . 71
Adding accounts to organizations . . . . . . . . . . . . . . . . . . . . . . . . . . . . . . . . . . . . . . . . . . 71
Adding LUNs to accounts . . . . . . . . . . . . . . . . . . . . . . . . . . . . . . . . . . . . . . . . . . . . . . . . 72
Removing LUNs from accounts. . . . . . . . . . . . . . . . . . . . . . . . . . . . . . . . . . . . . . . . . . . . 73
Closing accounts . . . . . . . . . . . . . . . . . . . . . . . . . . . . . . . . . . . . . . . . . . . . . . . . . . . . . . . 74
Billing configuration. . . . . . . . . . . . . . . . . . . . . . . . . . . . . . . . . . . . . . . . . . . . . . . . . . . . . . . . 75
Setting the billing period . . . . . . . . . . . . . . . . . . . . . . . . . . . . . . . . . . . . . . . . . . . . . . . . . 75
Setting export options . . . . . . . . . . . . . . . . . . . . . . . . . . . . . . . . . . . . . . . . . . . . . . . . . . . 76
Setting a billing event trigger. . . . . . . . . . . . . . . . . . . . . . . . . . . . . . . . . . . . . . . . . . . . . . 76
Billing data management . . . . . . . . . . . . . . . . . . . . . . . . . . . . . . . . . . . . . . . . . . . . . . . . . . . . 78
Setting the bill retention period . . . . . . . . . . . . . . . . . . . . . . . . . . . . . . . . . . . . . . . . . . . . 78
Setting the audit retention period . . . . . . . . . . . . . . . . . . . . . . . . . . . . . . . . . . . . . . . . . . . 78
Archiving and restoring bills . . . . . . . . . . . . . . . . . . . . . . . . . . . . . . . . . . . . . . . . . . . . . . 79
To archive monthly bills . . . . . . . . . . . . . . . . . . . . . . . . . . . . . . . . . . . . . . . . . . . . . . 79
To restore an archived bill to Storage Accountant . . . . . . . . . . . . . . . . . . . . . . . . . . 79
File name format . . . . . . . . . . . . . . . . . . . . . . . . . . . . . . . . . . . . . . . . . . . . . . . . . . . . 80
Integrating bills with other applications . . . . . . . . . . . . . . . . . . . . . . . . . . . . . . . . . . . . . . . . . 81
4 hp OpenView storage builder . . . . . . . . . . . . . . . . . . . . . . . . . . . . . . . . . . . . . . . . .83
hp OpenView storage builder features . . . . . . . . . . . . . . . . . . . . . . . . . . . . . . . . . . . . . . . . . . 84
Physical and logical space . . . . . . . . . . . . . . . . . . . . . . . . . . . . . . . . . . . . . . . . . . . . . . . . . . . 86
Definition of terms. . . . . . . . . . . . . . . . . . . . . . . . . . . . . . . . . . . . . . . . . . . . . . . . . . . . . . 87
About NAS devices . . . . . . . . . . . . . . . . . . . . . . . . . . . . . . . . . . . . . . . . . . . . . . . . . . . . . 87
Managed applications . . . . . . . . . . . . . . . . . . . . . . . . . . . . . . . . . . . . . . . . . . . . . . . . . . . . . . . 88
Licensing . . . . . . . . . . . . . . . . . . . . . . . . . . . . . . . . . . . . . . . . . . . . . . . . . . . . . . . . . . . . . 88
Supported applications. . . . . . . . . . . . . . . . . . . . . . . . . . . . . . . . . . . . . . . . . . . . . . . . . . . 89
Microsoft . . . . . . . . . . . . . . . . . . . . . . . . . . . . . . . . . . . . . . . . . . . . . . . . . . . . . . . . . . 89
Oracle. . . . . . . . . . . . . . . . . . . . . . . . . . . . . . . . . . . . . . . . . . . . . . . . . . . . . . . . . . . . . 89
Capacity data collection . . . . . . . . . . . . . . . . . . . . . . . . . . . . . . . . . . . . . . . . . . . . . . . . . . . . . 90
Scheduling capacity collection. . . . . . . . . . . . . . . . . . . . . . . . . . . . . . . . . . . . . . . . . . . . . 91
Collecting interim capacity data . . . . . . . . . . . . . . . . . . . . . . . . . . . . . . . . . . . . . . . . . . . 92
Managed application data collection . . . . . . . . . . . . . . . . . . . . . . . . . . . . . . . . . . . . . . . . . . . 93
Scheduling managed application data collection. . . . . . . . . . . . . . . . . . . . . . . . . . . . . . . 93
Collecting interim managed application data. . . . . . . . . . . . . . . . . . . . . . . . . . . . . . . . . . 94
Capacity data archiving . . . . . . . . . . . . . . . . . . . . . . . . . . . . . . . . . . . . . . . . . . . . . . . . . . . . . 96
Scheduling capacity summaries. . . . . . . . . . . . . . . . . . . . . . . . . . . . . . . . . . . . . . . . . . . . 96
Managed directories . . . . . . . . . . . . . . . . . . . . . . . . . . . . . . . . . . . . . . . . . . . . . . . . . . . . . . . . 98
Adding managed directories . . . . . . . . . . . . . . . . . . . . . . . . . . . . . . . . . . . . . . . . . . . . . 100
Removing managed directories . . . . . . . . . . . . . . . . . . . . . . . . . . . . . . . . . . . . . . . . . . . 100
5Storage Area Manager Administrator’s Guide
Page 6

Contents
Capacity thresholds. . . . . . . . . . . . . . . . . . . . . . . . . . . . . . . . . . . . . . . . . . . . . . . . . . . . . . . . 102
Setting domain thresholds . . . . . . . . . . . . . . . . . . . . . . . . . . . . . . . . . . . . . . . . . . . . . . . 102
Setting organization thresholds . . . . . . . . . . . . . . . . . . . . . . . . . . . . . . . . . . . . . . . . . . . 103
Setting thresholds on specific resources . . . . . . . . . . . . . . . . . . . . . . . . . . . . . . . . . . . . 104
Deleting capacity thresholds . . . . . . . . . . . . . . . . . . . . . . . . . . . . . . . . . . . . . . . . . . . . . 105
Entering threshold properties. . . . . . . . . . . . . . . . . . . . . . . . . . . . . . . . . . . . . . . . . . . . . 106
Managed application thresholds . . . . . . . . . . . . . . . . . . . . . . . . . . . . . . . . . . . . . . . . . . . . . . 108
Setting managed application thresholds on specific resources . . . . . . . . . . . . . . . . . . . 109
Setting managed application thresholds on domain resources. . . . . . . . . . . . . . . . . . . . 109
Deleting managed application thresholds . . . . . . . . . . . . . . . . . . . . . . . . . . . . . . . . . . . 110
Storage Builder reports. . . . . . . . . . . . . . . . . . . . . . . . . . . . . . . . . . . . . . . . . . . . . . . . . . . . . 111
Setting the file format of detailed file/directory lists . . . . . . . . . . . . . . . . . . . . . . . . . . . 112
Defining file reports. . . . . . . . . . . . . . . . . . . . . . . . . . . . . . . . . . . . . . . . . . . . . . . . . . . . 112
Defining Top-N managed application reports . . . . . . . . . . . . . . . . . . . . . . . . . . . . . . . . 114
Defining stale mailbox store reports . . . . . . . . . . . . . . . . . . . . . . . . . . . . . . . . . . . . . . . 115
Storage Builder cluster support . . . . . . . . . . . . . . . . . . . . . . . . . . . . . . . . . . . . . . . . . . . . . . 117
Supported clustering platforms . . . . . . . . . . . . . . . . . . . . . . . . . . . . . . . . . . . . . . . . . . . 117
HP-UX: MC/ServiceGuard . . . . . . . . . . . . . . . . . . . . . . . . . . . . . . . . . . . . . . . . . . . 117
Windows: Microsoft Cluster Server (MSCS) . . . . . . . . . . . . . . . . . . . . . . . . . . . . . 118
Oracle Real Application Clusters (RAC) . . . . . . . . . . . . . . . . . . . . . . . . . . . . . . . . 118
Oracle Single-Instance Failover . . . . . . . . . . . . . . . . . . . . . . . . . . . . . . . . . . . . . . . 118
Viewing Storage Builder cluster information. . . . . . . . . . . . . . . . . . . . . . . . . . . . . . . . . . . . 119
Setting the Storage Builder volume retention timeout value . . . . . . . . . . . . . . . . . . . . . 120
Storage Builder volume manager support . . . . . . . . . . . . . . . . . . . . . . . . . . . . . . . . . . . . . . 121
5 hp OpenView storage node manager . . . . . . . . . . . . . . . . . . . . . . . . . . . . . . . . . .123
hp OpenView storage node manager features . . . . . . . . . . . . . . . . . . . . . . . . . . . . . . . . . . . 124
Configuring device-specific application links . . . . . . . . . . . . . . . . . . . . . . . . . . . . . . . . . . . 125
Adding an application link to a device. . . . . . . . . . . . . . . . . . . . . . . . . . . . . . . . . . . . . . 125
Adding an application link to a device model . . . . . . . . . . . . . . . . . . . . . . . . . . . . . . . . 128
Starting device-specific application links. . . . . . . . . . . . . . . . . . . . . . . . . . . . . . . . . . . . . . . 131
Viewing device status summary . . . . . . . . . . . . . . . . . . . . . . . . . . . . . . . . . . . . . . . . . . . . . . 132
6 hp OpenView storage optimizer . . . . . . . . . . . . . . . . . . . . . . . . . . . . . . . . . . . . . .133
hp OpenView storage optimizer features . . . . . . . . . . . . . . . . . . . . . . . . . . . . . . . . . . . . . . . 134
Performance metrics . . . . . . . . . . . . . . . . . . . . . . . . . . . . . . . . . . . . . . . . . . . . . . . . . . . . . . . 135
All metrics . . . . . . . . . . . . . . . . . . . . . . . . . . . . . . . . . . . . . . . . . . . . . . . . . . . . . . . . . . . 135
Common metrics . . . . . . . . . . . . . . . . . . . . . . . . . . . . . . . . . . . . . . . . . . . . . . . . . . . . . . 136
6 Storage Area Manager Administrator’s Guide
Page 7

Contents
Performance data collection . . . . . . . . . . . . . . . . . . . . . . . . . . . . . . . . . . . . . . . . . . . . . . . . . 138
Scheduling performance data collection . . . . . . . . . . . . . . . . . . . . . . . . . . . . . . . . . . . . 138
Performance data management. . . . . . . . . . . . . . . . . . . . . . . . . . . . . . . . . . . . . . . . . . . . . . . 139
Data consolidation . . . . . . . . . . . . . . . . . . . . . . . . . . . . . . . . . . . . . . . . . . . . . . . . . . . . . 139
Database dependency. . . . . . . . . . . . . . . . . . . . . . . . . . . . . . . . . . . . . . . . . . . . . . . . . . . 140
Archiving and restoring performance data. . . . . . . . . . . . . . . . . . . . . . . . . . . . . . . . . . . 140
Performance data retention. . . . . . . . . . . . . . . . . . . . . . . . . . . . . . . . . . . . . . . . . . . . . . . . . . 141
Scheduling performance data retention . . . . . . . . . . . . . . . . . . . . . . . . . . . . . . . . . . . . . 141
Performance baselines and automatic thresholds . . . . . . . . . . . . . . . . . . . . . . . . . . . . . . . . . 142
Baseline parameters . . . . . . . . . . . . . . . . . . . . . . . . . . . . . . . . . . . . . . . . . . . . . . . . . . . . 143
Baseline limitation . . . . . . . . . . . . . . . . . . . . . . . . . . . . . . . . . . . . . . . . . . . . . . . . . . . . . 143
Setting baseline thresholds. . . . . . . . . . . . . . . . . . . . . . . . . . . . . . . . . . . . . . . . . . . . . . . 143
Performance charts . . . . . . . . . . . . . . . . . . . . . . . . . . . . . . . . . . . . . . . . . . . . . . . . . . . . . . . . 145
Managing performance charts . . . . . . . . . . . . . . . . . . . . . . . . . . . . . . . . . . . . . . . . . . . . 146
Deleting performance charts . . . . . . . . . . . . . . . . . . . . . . . . . . . . . . . . . . . . . . . . . . . . . 147
Restoring default charts . . . . . . . . . . . . . . . . . . . . . . . . . . . . . . . . . . . . . . . . . . . . . . . . . 147
7 hp OpenView storage allocater . . . . . . . . . . . . . . . . . . . . . . . . . . . . . . . . . . . . . . .149
hp OpenView storage allocater features. . . . . . . . . . . . . . . . . . . . . . . . . . . . . . . . . . . . . . . . 150
Groups. . . . . . . . . . . . . . . . . . . . . . . . . . . . . . . . . . . . . . . . . . . . . . . . . . . . . . . . . . . . . . . . . . 151
Security groups. . . . . . . . . . . . . . . . . . . . . . . . . . . . . . . . . . . . . . . . . . . . . . . . . . . . . . . . 151
Share groups . . . . . . . . . . . . . . . . . . . . . . . . . . . . . . . . . . . . . . . . . . . . . . . . . . . . . . 151
Associated LUN groups. . . . . . . . . . . . . . . . . . . . . . . . . . . . . . . . . . . . . . . . . . . . . . 152
Organizational groups . . . . . . . . . . . . . . . . . . . . . . . . . . . . . . . . . . . . . . . . . . . . . . . . . . 153
Managing assignments . . . . . . . . . . . . . . . . . . . . . . . . . . . . . . . . . . . . . . . . . . . . . . . . . . . . . 154
Assignment types . . . . . . . . . . . . . . . . . . . . . . . . . . . . . . . . . . . . . . . . . . . . . . . . . . . . . . 154
Assignment rules . . . . . . . . . . . . . . . . . . . . . . . . . . . . . . . . . . . . . . . . . . . . . . . . . . . . . . 154
Special unassignments . . . . . . . . . . . . . . . . . . . . . . . . . . . . . . . . . . . . . . . . . . . . . . . . . . 155
Using the Special Unassign command . . . . . . . . . . . . . . . . . . . . . . . . . . . . . . . . . . 156
Assigning LUNs for Windows Clustering. . . . . . . . . . . . . . . . . . . . . . . . . . . . . . . . . . . 157
Setting Up a Server Cluster Share Group . . . . . . . . . . . . . . . . . . . . . . . . . . . . . . . . 158
Assigning LUNs for volume management software . . . . . . . . . . . . . . . . . . . . . . . . . . . 159
Assigning LUNs for HP-UX and Solaris VERITAS Volume Manager Storage
Administrator . . . . . . . . . . . . . . . . . . . . . . . . . . . . . . . . . . . . . . . . . . . . . . . . . . . . . . . . . 159
Managing LUNs with Windows 2000 dynamic volumes . . . . . . . . . . . . . . . . . . . . . . . 160
Unassigning and reassigning dynamic volumes . . . . . . . . . . . . . . . . . . . . . . . . . . . 161
Viewing assigned LUNs on HP-UX hosts. . . . . . . . . . . . . . . . . . . . . . . . . . . . . . . . . . . 164
Assigning storage to an HP-UX host. . . . . . . . . . . . . . . . . . . . . . . . . . . . . . . . . . . . 165
Listing newly assigned LUNs . . . . . . . . . . . . . . . . . . . . . . . . . . . . . . . . . . . . . . . . . 165
7Storage Area Manager Administrator’s Guide
Page 8

Contents
Managing hosts. . . . . . . . . . . . . . . . . . . . . . . . . . . . . . . . . . . . . . . . . . . . . . . . . . . . . . . . . . . 166
Moving a host from one management server to another . . . . . . . . . . . . . . . . . . . . . . . . 166
Managing a “dead” host. . . . . . . . . . . . . . . . . . . . . . . . . . . . . . . . . . . . . . . . . . . . . . . . . 166
Restoring a dead host. . . . . . . . . . . . . . . . . . . . . . . . . . . . . . . . . . . . . . . . . . . . . . . . 167
Managing LUNs . . . . . . . . . . . . . . . . . . . . . . . . . . . . . . . . . . . . . . . . . . . . . . . . . . . . . . . . . . 168
Viewing or modifying logical unit information. . . . . . . . . . . . . . . . . . . . . . . . . . . . . . . 168
Viewing or deleting missing LUNs . . . . . . . . . . . . . . . . . . . . . . . . . . . . . . . . . . . . . . . . 169
hp OpenView storage allocater interoperability. . . . . . . . . . . . . . . . . . . . . . . . . . . . . . . . . . 171
With FC60 storage arrays. . . . . . . . . . . . . . . . . . . . . . . . . . . . . . . . . . . . . . . . . . . . . . . . 171
FC60: Windows mode. . . . . . . . . . . . . . . . . . . . . . . . . . . . . . . . . . . . . . . . . . . . . . . 171
FC60: HP-UX mode . . . . . . . . . . . . . . . . . . . . . . . . . . . . . . . . . . . . . . . . . . . . . . . . 173
With AIX cfgmgr. . . . . . . . . . . . . . . . . . . . . . . . . . . . . . . . . . . . . . . . . . . . . . . . . . . . . . 175
With HP-UX ioscan . . . . . . . . . . . . . . . . . . . . . . . . . . . . . . . . . . . . . . . . . . . . . . . . . . . . 176
With Linux device files . . . . . . . . . . . . . . . . . . . . . . . . . . . . . . . . . . . . . . . . . . . . . . . . . 176
About RUID-based device files. . . . . . . . . . . . . . . . . . . . . . . . . . . . . . . . . . . . . . . . 177
Device file names: Disk LUNs . . . . . . . . . . . . . . . . . . . . . . . . . . . . . . . . . . . . . . . . 178
Device file names: Generic LUNs. . . . . . . . . . . . . . . . . . . . . . . . . . . . . . . . . . . . . . 180
Device file names: Tape LUNs . . . . . . . . . . . . . . . . . . . . . . . . . . . . . . . . . . . . . . . . 180
Viewing RUIDs on Linux hosts . . . . . . . . . . . . . . . . . . . . . . . . . . . . . . . . . . . . . . . 181
With Linux tape LUNs. . . . . . . . . . . . . . . . . . . . . . . . . . . . . . . . . . . . . . . . . . . . . . . . . . 182
With Linux 16-byte CDBs . . . . . . . . . . . . . . . . . . . . . . . . . . . . . . . . . . . . . . . . . . . . . . . 182
With Linux Command View SDM . . . . . . . . . . . . . . . . . . . . . . . . . . . . . . . . . . . . . . . . 182
With Solaris HBAs. . . . . . . . . . . . . . . . . . . . . . . . . . . . . . . . . . . . . . . . . . . . . . . . . . . . . 183
Adding or upgrading an HBA driver. . . . . . . . . . . . . . . . . . . . . . . . . . . . . . . . . . . . 183
HBA driver configuration . . . . . . . . . . . . . . . . . . . . . . . . . . . . . . . . . . . . . . . . . . . . 183
With Solaris tape and nondisk devices. . . . . . . . . . . . . . . . . . . . . . . . . . . . . . . . . . . . . . 184
With Solaris Omniback II, Data Protector, and tape libraries . . . . . . . . . . . . . . . . . . . . 186
With Solaris SecurePath. . . . . . . . . . . . . . . . . . . . . . . . . . . . . . . . . . . . . . . . . . . . . . . . . 187
8 Configuring the bridge . . . . . . . . . . . . . . . . . . . . . . . . . . . . . . . . . . . . . . . . . . . . .189
hp OpenView storage area manager bridge . . . . . . . . . . . . . . . . . . . . . . . . . . . . . . . . . . . . . 190
User accounts . . . . . . . . . . . . . . . . . . . . . . . . . . . . . . . . . . . . . . . . . . . . . . . . . . . . . . . . . . . . 191
Creating Bridge user accounts . . . . . . . . . . . . . . . . . . . . . . . . . . . . . . . . . . . . . . . . . . . . 191
Multiple management servers. . . . . . . . . . . . . . . . . . . . . . . . . . . . . . . . . . . . . . . . . . . . . . . . 192
Authorizing the primary server as a client. . . . . . . . . . . . . . . . . . . . . . . . . . . . . . . . . . . 193
Modifying the Bridge configuration file . . . . . . . . . . . . . . . . . . . . . . . . . . . . . . . . . . . . 193
8 Storage Area Manager Administrator’s Guide
Page 9

Contents
SSL . . . . . . . . . . . . . . . . . . . . . . . . . . . . . . . . . . . . . . . . . . . . . . . . . . . . . . . . . . . . . . . . . . . . 194
Creating a server keystore and certificate . . . . . . . . . . . . . . . . . . . . . . . . . . . . . . . . . . . 194
Procedure. . . . . . . . . . . . . . . . . . . . . . . . . . . . . . . . . . . . . . . . . . . . . . . . . . . . . . . . . 194
Sample run. . . . . . . . . . . . . . . . . . . . . . . . . . . . . . . . . . . . . . . . . . . . . . . . . . . . . . . . 195
Modifying the Bridge configuration file . . . . . . . . . . . . . . . . . . . . . . . . . . . . . . . . . . . . 196
Distributing server certificates . . . . . . . . . . . . . . . . . . . . . . . . . . . . . . . . . . . . . . . . . . . . 196
Changing the default port . . . . . . . . . . . . . . . . . . . . . . . . . . . . . . . . . . . . . . . . . . . . . . . . . . . 197
9 Using third-party reporting applications. . . . . . . . . . . . . . . . . . . . . . . . . . . . . . . . .199
Overview. . . . . . . . . . . . . . . . . . . . . . . . . . . . . . . . . . . . . . . . . . . . . . . . . . . . . . . . . . . . . . . . 200
Intended audience. . . . . . . . . . . . . . . . . . . . . . . . . . . . . . . . . . . . . . . . . . . . . . . . . . . . . . 200
Related documents . . . . . . . . . . . . . . . . . . . . . . . . . . . . . . . . . . . . . . . . . . . . . . . . . . . . . 200
Database reports . . . . . . . . . . . . . . . . . . . . . . . . . . . . . . . . . . . . . . . . . . . . . . . . . . . 200
Storage Optimizer reports . . . . . . . . . . . . . . . . . . . . . . . . . . . . . . . . . . . . . . . . . . . . 201
Extracting data from the database. . . . . . . . . . . . . . . . . . . . . . . . . . . . . . . . . . . . . . . . . . . . . 202
Installing the ODBC driver . . . . . . . . . . . . . . . . . . . . . . . . . . . . . . . . . . . . . . . . . . . . . . 202
Configuring the ODBC driver . . . . . . . . . . . . . . . . . . . . . . . . . . . . . . . . . . . . . . . . . . . . 205
Configuring reports: Crystal Reports tutorial . . . . . . . . . . . . . . . . . . . . . . . . . . . . . . . . 207
Linking tables. . . . . . . . . . . . . . . . . . . . . . . . . . . . . . . . . . . . . . . . . . . . . . . . . . . . . . . . . 212
Extracting Storage Optimizer data . . . . . . . . . . . . . . . . . . . . . . . . . . . . . . . . . . . . . . . . . . . . 213
Installing the reporting module . . . . . . . . . . . . . . . . . . . . . . . . . . . . . . . . . . . . . . . . . . . 213
Reporting module files . . . . . . . . . . . . . . . . . . . . . . . . . . . . . . . . . . . . . . . . . . . . . . 215
Creating the data store and tables. . . . . . . . . . . . . . . . . . . . . . . . . . . . . . . . . . . . . . . . . . 215
Creating a CSV data store . . . . . . . . . . . . . . . . . . . . . . . . . . . . . . . . . . . . . . . . . . . . 216
Creating tables: CSV data store. . . . . . . . . . . . . . . . . . . . . . . . . . . . . . . . . . . . . . . . 218
Creating a database data store . . . . . . . . . . . . . . . . . . . . . . . . . . . . . . . . . . . . . . . . . 219
Creating database tables . . . . . . . . . . . . . . . . . . . . . . . . . . . . . . . . . . . . . . . . . . . . . 220
Creating the XML report specifications. . . . . . . . . . . . . . . . . . . . . . . . . . . . . . . . . . . . . 221
Understanding report configuration files. . . . . . . . . . . . . . . . . . . . . . . . . . . . . . . . . 221
Creating a report configuration file . . . . . . . . . . . . . . . . . . . . . . . . . . . . . . . . . . . . . 224
Managing report configuration files . . . . . . . . . . . . . . . . . . . . . . . . . . . . . . . . . . . . 228
About RepGather.cfg . . . . . . . . . . . . . . . . . . . . . . . . . . . . . . . . . . . . . . . . . . . . . . . . . . . 229
Populating the data store . . . . . . . . . . . . . . . . . . . . . . . . . . . . . . . . . . . . . . . . . . . . . . . . 230
Designing reports: Crystal Reports tutorial . . . . . . . . . . . . . . . . . . . . . . . . . . . . . . . . . . 230
Scheduling the gatherer . . . . . . . . . . . . . . . . . . . . . . . . . . . . . . . . . . . . . . . . . . . . . . . . . 239
Uninstalling the reporting tools . . . . . . . . . . . . . . . . . . . . . . . . . . . . . . . . . . . . . . . . . . . . . . 242
Uninstalling the ODBC driver . . . . . . . . . . . . . . . . . . . . . . . . . . . . . . . . . . . . . . . . . . . . 242
Uninstalling the performance reporting module . . . . . . . . . . . . . . . . . . . . . . . . . . . . . . 242
9Storage Area Manager Administrator’s Guide
Page 10

Contents
10 Troubleshooting . . . . . . . . . . . . . . . . . . . . . . . . . . . . . . . . . . . . . . . . . . . . . . . . . .243
hp OpenView storage accountant. . . . . . . . . . . . . . . . . . . . . . . . . . . . . . . . . . . . . . . . . . . . . 244
When the management server stops. . . . . . . . . . . . . . . . . . . . . . . . . . . . . . . . . . . . . . . . 244
Events do not appear in the event panel. . . . . . . . . . . . . . . . . . . . . . . . . . . . . . . . . . . . . 246
Accounting windows do not show a currency symbol for fiscal data . . . . . . . . . . . . . . 247
Old bills are missing in the bill and report viewers . . . . . . . . . . . . . . . . . . . . . . . . . . . . 248
An error message appears when you create a new account or service level . . . . . . . . . 249
hp OpenView storage builder. . . . . . . . . . . . . . . . . . . . . . . . . . . . . . . . . . . . . . . . . . . . . . . . 250
A managed directory has zero used space . . . . . . . . . . . . . . . . . . . . . . . . . . . . . . . . . . . 250
Data is unavailable in the Add Directories window. . . . . . . . . . . . . . . . . . . . . . . . . . . . 251
There is no Capacity tab. . . . . . . . . . . . . . . . . . . . . . . . . . . . . . . . . . . . . . . . . . . . . . . . . 252
hp OpenView storage optimizer. . . . . . . . . . . . . . . . . . . . . . . . . . . . . . . . . . . . . . . . . . . . . . 253
There is “no data” in a performance list or chart . . . . . . . . . . . . . . . . . . . . . . . . . . . . . . 253
There is no Performance tab . . . . . . . . . . . . . . . . . . . . . . . . . . . . . . . . . . . . . . . . . . . . . 254
hp OpenView storage allocater: All platforms . . . . . . . . . . . . . . . . . . . . . . . . . . . . . . . . . . . 255
LUNs are not listed in the Available to Assign list . . . . . . . . . . . . . . . . . . . . . . . . . . . . 255
LUN Allocation and LUN Discovery do not appear in the user interface. . . . . . . . . . . 256
LUN Allocation and LUN Discovery are disabled in the user interface . . . . . . . . . . . . 257
Assigned LUNs are not available on a host . . . . . . . . . . . . . . . . . . . . . . . . . . . . . . . . . . 258
A multiple writer situation is detected . . . . . . . . . . . . . . . . . . . . . . . . . . . . . . . . . . . . . . 259
hp OpenView storage allocater: Windows . . . . . . . . . . . . . . . . . . . . . . . . . . . . . . . . . . . . . . 261
A LUN cannot be unassigned from a Windows host. . . . . . . . . . . . . . . . . . . . . . . . . . . 261
An assigned disk is not accessible . . . . . . . . . . . . . . . . . . . . . . . . . . . . . . . . . . . . . . . . . 262
Dynamic disks are offline (Windows 2000) . . . . . . . . . . . . . . . . . . . . . . . . . . . . . . . . . 263
hp OpenView storage allocater: HP-UX . . . . . . . . . . . . . . . . . . . . . . . . . . . . . . . . . . . . . . . 264
Verifying that the daemon is running. . . . . . . . . . . . . . . . . . . . . . . . . . . . . . . . . . . . . . . 264
An assigned LUN is not accessible to an HP-UX host . . . . . . . . . . . . . . . . . . . . . . . . . 265
Error during mounting: “not a block device”. . . . . . . . . . . . . . . . . . . . . . . . . . . . . . . . . 266
A LUN cannot be unassigned from an HP-UX host . . . . . . . . . . . . . . . . . . . . . . . . . . . 267
A Storage Data Protector snapshot backup involving an HP-UX hosts fails . . . . . . . . 268
A rogue host event is displayed for an HP-UX host that is running VERITAS Volume
Manager . . . . . . . . . . . . . . . . . . . . . . . . . . . . . . . . . . . . . . . . . . . . . . . . . . . . . . . . . . . . . 269
hp OpenView storage allocater: Solaris . . . . . . . . . . . . . . . . . . . . . . . . . . . . . . . . . . . . . . . . 270
Error during mounting: “not a block device”. . . . . . . . . . . . . . . . . . . . . . . . . . . . . . . . . 270
A LUN cannot be unassigned from a Solaris host. . . . . . . . . . . . . . . . . . . . . . . . . . . . . 271
An assigned tape library or nondisk device is not available . . . . . . . . . . . . . . . . . . . . . 272
Assigned LUNs are suddenly unavailable . . . . . . . . . . . . . . . . . . . . . . . . . . . . . . . . . . . 273
A Host with an Emulex HBA reports errors in the /var/adm/messages log. . . . . . . . . . 274
10 Storage Area Manager Administrator’s Guide
Page 11

Contents
hp OpenView storage allocater: Linux. . . . . . . . . . . . . . . . . . . . . . . . . . . . . . . . . . . . . . . . . 275
A LUN cannot be unassigned from a Linux host. . . . . . . . . . . . . . . . . . . . . . . . . . . . . . 275
A Linux host cannot see RUIDs. . . . . . . . . . . . . . . . . . . . . . . . . . . . . . . . . . . . . . . . . . . 276
A Linux host cannot see LUNs . . . . . . . . . . . . . . . . . . . . . . . . . . . . . . . . . . . . . . . . . . . 277
You cannot assign more than 40 LUNs to a Linux host . . . . . . . . . . . . . . . . . . . . . . . . 278
The boot process hangs on a Linux host . . . . . . . . . . . . . . . . . . . . . . . . . . . . . . . . . . . . 279
hp OpenView storage allocater: AIX . . . . . . . . . . . . . . . . . . . . . . . . . . . . . . . . . . . . . . . . . . 280
Verifying that the daemon is running. . . . . . . . . . . . . . . . . . . . . . . . . . . . . . . . . . . . . . . 280
A LUN cannot be unassigned from an AIX host. . . . . . . . . . . . . . . . . . . . . . . . . . . . . . 281
Storage Area Manager and third-party reporting tools. . . . . . . . . . . . . . . . . . . . . . . . . . . . . 282
CSV data store errors . . . . . . . . . . . . . . . . . . . . . . . . . . . . . . . . . . . . . . . . . . . . . . . . . . . 282
CSV files and database tables are not populated with data . . . . . . . . . . . . . . . . . . . . . . 283
CSV files and database tables are partially populated . . . . . . . . . . . . . . . . . . . . . . . . . . 284
CSV files and database tables contain duplicate data . . . . . . . . . . . . . . . . . . . . . . . . . . 284
Index . . . . . . . . . . . . . . . . . . . . . . . . . . . . . . . . . . . . . . . . . . . . . . . . . . . . . . . . . .285
Figures
1 Create Storage Area Manager users. . . . . . . . . . . . . . . . . . . . . . . . . . . . . . . . . . . . . . . . . 24
2 Set the device discovery interval . . . . . . . . . . . . . . . . . . . . . . . . . . . . . . . . . . . . . . . . . . . 27
3 Layout Manager . . . . . . . . . . . . . . . . . . . . . . . . . . . . . . . . . . . . . . . . . . . . . . . . . . . . . . . . 29
4 Add device links. . . . . . . . . . . . . . . . . . . . . . . . . . . . . . . . . . . . . . . . . . . . . . . . . . . . . . . . 30
5 Move device links . . . . . . . . . . . . . . . . . . . . . . . . . . . . . . . . . . . . . . . . . . . . . . . . . . . . . . 31
6 Remove device links . . . . . . . . . . . . . . . . . . . . . . . . . . . . . . . . . . . . . . . . . . . . . . . . . . . . 32
7 Filter map nodes. . . . . . . . . . . . . . . . . . . . . . . . . . . . . . . . . . . . . . . . . . . . . . . . . . . . . . . . 33
8 Add folders. . . . . . . . . . . . . . . . . . . . . . . . . . . . . . . . . . . . . . . . . . . . . . . . . . . . . . . . . . . . 35
9 Add organizations . . . . . . . . . . . . . . . . . . . . . . . . . . . . . . . . . . . . . . . . . . . . . . . . . . . . . . 38
10 AIX cluster example . . . . . . . . . . . . . . . . . . . . . . . . . . . . . . . . . . . . . . . . . . . . . . . . . . . . 40
11 Acknowledge events . . . . . . . . . . . . . . . . . . . . . . . . . . . . . . . . . . . . . . . . . . . . . . . . . . . . 44
12 Export events . . . . . . . . . . . . . . . . . . . . . . . . . . . . . . . . . . . . . . . . . . . . . . . . . . . . . . . . . . 45
13 Delete events . . . . . . . . . . . . . . . . . . . . . . . . . . . . . . . . . . . . . . . . . . . . . . . . . . . . . . . . . . 48
14 Configure event deletion . . . . . . . . . . . . . . . . . . . . . . . . . . . . . . . . . . . . . . . . . . . . . . . . . 49
15 Add event filters. . . . . . . . . . . . . . . . . . . . . . . . . . . . . . . . . . . . . . . . . . . . . . . . . . . . . . . . 51
16 Add event triggers . . . . . . . . . . . . . . . . . . . . . . . . . . . . . . . . . . . . . . . . . . . . . . . . . . . . . . 52
17 Add trigger constraints. . . . . . . . . . . . . . . . . . . . . . . . . . . . . . . . . . . . . . . . . . . . . . . . . . . 54
18 Set up storage accountant. . . . . . . . . . . . . . . . . . . . . . . . . . . . . . . . . . . . . . . . . . . . . . . . . 66
19 Physical and logical views of storage capacity . . . . . . . . . . . . . . . . . . . . . . . . . . . . . . . . 86
20 Managed directories view panel: selected host . . . . . . . . . . . . . . . . . . . . . . . . . . . . . . . . 99
11Storage Area Manager Administrator’s Guide
Page 12

Contents
21 Add application links . . . . . . . . . . . . . . . . . . . . . . . . . . . . . . . . . . . . . . . . . . . . . . . . . . . 125
22 Select a device . . . . . . . . . . . . . . . . . . . . . . . . . . . . . . . . . . . . . . . . . . . . . . . . . . . . . . . . 126
23 Enter the application name and type . . . . . . . . . . . . . . . . . . . . . . . . . . . . . . . . . . . . . . . 126
24 Enter the application command . . . . . . . . . . . . . . . . . . . . . . . . . . . . . . . . . . . . . . . . . . . 127
25 Associate the application with a device type or device . . . . . . . . . . . . . . . . . . . . . . . . . 128
26 Select a device model. . . . . . . . . . . . . . . . . . . . . . . . . . . . . . . . . . . . . . . . . . . . . . . . . . . 129
27 Enter the application name and type . . . . . . . . . . . . . . . . . . . . . . . . . . . . . . . . . . . . . . . 129
28 Enter the application command . . . . . . . . . . . . . . . . . . . . . . . . . . . . . . . . . . . . . . . . . . . 130
29 Storage domain status summary. . . . . . . . . . . . . . . . . . . . . . . . . . . . . . . . . . . . . . . . . . . 132
30 Sample performance data directory . . . . . . . . . . . . . . . . . . . . . . . . . . . . . . . . . . . . . . . . 139
31 Sample performance chart with baseline . . . . . . . . . . . . . . . . . . . . . . . . . . . . . . . . . . . . 142
32 Sample performance chart . . . . . . . . . . . . . . . . . . . . . . . . . . . . . . . . . . . . . . . . . . . . . . . 145
33 Security groups. . . . . . . . . . . . . . . . . . . . . . . . . . . . . . . . . . . . . . . . . . . . . . . . . . . . . . . . 151
34 Organizational groups . . . . . . . . . . . . . . . . . . . . . . . . . . . . . . . . . . . . . . . . . . . . . . . . . . 153
35 Hierarchical groups . . . . . . . . . . . . . . . . . . . . . . . . . . . . . . . . . . . . . . . . . . . . . . . . . . . . 153
36 Configuration status window . . . . . . . . . . . . . . . . . . . . . . . . . . . . . . . . . . . . . . . . . . . . . 157
37 Offline dynamic disks . . . . . . . . . . . . . . . . . . . . . . . . . . . . . . . . . . . . . . . . . . . . . . . . . . 161
38 Foreign disks . . . . . . . . . . . . . . . . . . . . . . . . . . . . . . . . . . . . . . . . . . . . . . . . . . . . . . . . . 162
39 Add foreign disks to the system configuration . . . . . . . . . . . . . . . . . . . . . . . . . . . . . . . 163
40 Verify foreign disk volumes. . . . . . . . . . . . . . . . . . . . . . . . . . . . . . . . . . . . . . . . . . . . . . 163
41 Edit logical unit information . . . . . . . . . . . . . . . . . . . . . . . . . . . . . . . . . . . . . . . . . . . . . 168
42 FC60 virtual disk icon . . . . . . . . . . . . . . . . . . . . . . . . . . . . . . . . . . . . . . . . . . . . . . . . . . 173
43 hp OpenView storage area manager bridge topology . . . . . . . . . . . . . . . . . . . . . . . . . . 190
44 hp OpenView storage area manager Bridge with multiple management servers . . . . . 192
45 License agreement window . . . . . . . . . . . . . . . . . . . . . . . . . . . . . . . . . . . . . . . . . . . . . . 202
46 Select the setup type. . . . . . . . . . . . . . . . . . . . . . . . . . . . . . . . . . . . . . . . . . . . . . . . . . . . 203
47 Choose an installation location . . . . . . . . . . . . . . . . . . . . . . . . . . . . . . . . . . . . . . . . . . . 203
48 Select the components to install. . . . . . . . . . . . . . . . . . . . . . . . . . . . . . . . . . . . . . . . . . . 204
49 Confirm the installation settings . . . . . . . . . . . . . . . . . . . . . . . . . . . . . . . . . . . . . . . . . . 205
50 Create New Data Source window . . . . . . . . . . . . . . . . . . . . . . . . . . . . . . . . . . . . . . . . . 206
51 SOLID ODBC Driver Setup window . . . . . . . . . . . . . . . . . . . . . . . . . . . . . . . . . . . . . . 206
52 Storage Area Manager data source . . . . . . . . . . . . . . . . . . . . . . . . . . . . . . . . . . . . . . . . 207
53 Crystal Reports Data Explorer . . . . . . . . . . . . . . . . . . . . . . . . . . . . . . . . . . . . . . . . . . . . 208
54 Data Explorer: Select tables. . . . . . . . . . . . . . . . . . . . . . . . . . . . . . . . . . . . . . . . . . . . . . 209
55 Crystal reports: Report expert . . . . . . . . . . . . . . . . . . . . . . . . . . . . . . . . . . . . . . . . . . . . 210
56 Sample report . . . . . . . . . . . . . . . . . . . . . . . . . . . . . . . . . . . . . . . . . . . . . . . . . . . . . . . . . 211
57 Linking tables. . . . . . . . . . . . . . . . . . . . . . . . . . . . . . . . . . . . . . . . . . . . . . . . . . . . . . . . . 212
58 License agreement . . . . . . . . . . . . . . . . . . . . . . . . . . . . . . . . . . . . . . . . . . . . . . . . . . . . . 214
12 Storage Area Manager Administrator’s Guide
Page 13

Contents
59 CSV data store window . . . . . . . . . . . . . . . . . . . . . . . . . . . . . . . . . . . . . . . . . . . . . . . . . 214
60 Enter the CSV data store directory path. . . . . . . . . . . . . . . . . . . . . . . . . . . . . . . . . . . . . 215
61 Create New Data Source window . . . . . . . . . . . . . . . . . . . . . . . . . . . . . . . . . . . . . . . . . 216
62 ODBC Text Setup window . . . . . . . . . . . . . . . . . . . . . . . . . . . . . . . . . . . . . . . . . . . . . . 216
63 SAMRepDB data source . . . . . . . . . . . . . . . . . . . . . . . . . . . . . . . . . . . . . . . . . . . . . . . . 217
64 ODBC Microsoft Access Setup window . . . . . . . . . . . . . . . . . . . . . . . . . . . . . . . . . . . . 219
65 New Database window. . . . . . . . . . . . . . . . . . . . . . . . . . . . . . . . . . . . . . . . . . . . . . . . . . 220
66 Crystal Reports sample . . . . . . . . . . . . . . . . . . . . . . . . . . . . . . . . . . . . . . . . . . . . . . . . . 231
67 Data Explorer window . . . . . . . . . . . . . . . . . . . . . . . . . . . . . . . . . . . . . . . . . . . . . . . . . . 232
68 Insert Group window . . . . . . . . . . . . . . . . . . . . . . . . . . . . . . . . . . . . . . . . . . . . . . . . . . . 233
69 Report template . . . . . . . . . . . . . . . . . . . . . . . . . . . . . . . . . . . . . . . . . . . . . . . . . . . . . . . 234
70 Chart Expert window . . . . . . . . . . . . . . . . . . . . . . . . . . . . . . . . . . . . . . . . . . . . . . . . . . . 235
71 Chart expert Data tab . . . . . . . . . . . . . . . . . . . . . . . . . . . . . . . . . . . . . . . . . . . . . . . . . . . 235
72 Group Header #2 . . . . . . . . . . . . . . . . . . . . . . . . . . . . . . . . . . . . . . . . . . . . . . . . . . . . . . 236
73 Chart Options window . . . . . . . . . . . . . . . . . . . . . . . . . . . . . . . . . . . . . . . . . . . . . . . . . . 236
74 Set the gridlines . . . . . . . . . . . . . . . . . . . . . . . . . . . . . . . . . . . . . . . . . . . . . . . . . . . . . . . 237
75 Enable Stagger Labels . . . . . . . . . . . . . . . . . . . . . . . . . . . . . . . . . . . . . . . . . . . . . . . . . . 237
76 Add Chart titles . . . . . . . . . . . . . . . . . . . . . . . . . . . . . . . . . . . . . . . . . . . . . . . . . . . . . . . 238
77 Apply changes to the chart. . . . . . . . . . . . . . . . . . . . . . . . . . . . . . . . . . . . . . . . . . . . . . . 239
78 Scheduled Task Wizard . . . . . . . . . . . . . . . . . . . . . . . . . . . . . . . . . . . . . . . . . . . . . . . . . 240
79 Select a date and time. . . . . . . . . . . . . . . . . . . . . . . . . . . . . . . . . . . . . . . . . . . . . . . . . . . 240
80 Disabled LUN Allocation commands . . . . . . . . . . . . . . . . . . . . . . . . . . . . . . . . . . . . . . 257
81 Inaccessible disks. . . . . . . . . . . . . . . . . . . . . . . . . . . . . . . . . . . . . . . . . . . . . . . . . . . . . . 262
82 Dynamic disks: Offline . . . . . . . . . . . . . . . . . . . . . . . . . . . . . . . . . . . . . . . . . . . . . . . . . 263
Tables
1 Document conventions. . . . . . . . . . . . . . . . . . . . . . . . . . . . . . . . . . . . . . . . . . . . . . . . . . . 18
2 Event severity mapping to Windows event log . . . . . . . . . . . . . . . . . . . . . . . . . . . . . . . . 46
3 Events in the Accountant category. . . . . . . . . . . . . . . . . . . . . . . . . . . . . . . . . . . . . . . . . . 56
4 Events in the Allocater category . . . . . . . . . . . . . . . . . . . . . . . . . . . . . . . . . . . . . . . . . . . 57
5 Events in the Capacity category. . . . . . . . . . . . . . . . . . . . . . . . . . . . . . . . . . . . . . . . . . . . 58
6 Events in the Database category . . . . . . . . . . . . . . . . . . . . . . . . . . . . . . . . . . . . . . . . . . . 60
7 Events in the Discovery category. . . . . . . . . . . . . . . . . . . . . . . . . . . . . . . . . . . . . . . . . . . 60
8 Events in the Device category . . . . . . . . . . . . . . . . . . . . . . . . . . . . . . . . . . . . . . . . . . . . . 60
9 Events in the PassphraseCache category . . . . . . . . . . . . . . . . . . . . . . . . . . . . . . . . . . . . . 61
10 Events in the Model category. . . . . . . . . . . . . . . . . . . . . . . . . . . . . . . . . . . . . . . . . . . . . . 61
11 Events in the Performance category. . . . . . . . . . . . . . . . . . . . . . . . . . . . . . . . . . . . . . . . . 61
12 Events in the ManagedApplication category . . . . . . . . . . . . . . . . . . . . . . . . . . . . . . . . . . 62
13Storage Area Manager Administrator’s Guide
Page 14

Contents
13 Events in the EventManagement category. . . . . . . . . . . . . . . . . . . . . . . . . . . . . . . . . . . . 62
14 Events in the Framework category. . . . . . . . . . . . . . . . . . . . . . . . . . . . . . . . . . . . . . . . . . 62
15 Supported Oracle versions . . . . . . . . . . . . . . . . . . . . . . . . . . . . . . . . . . . . . . . . . . . . . . . . 89
16 Device-specific application link keywords . . . . . . . . . . . . . . . . . . . . . . . . . . . . . . . . . . 127
17 Storage Allocater assignments . . . . . . . . . . . . . . . . . . . . . . . . . . . . . . . . . . . . . . . . . . . . 154
18 Installed reporting module files . . . . . . . . . . . . . . . . . . . . . . . . . . . . . . . . . . . . . . . . . . . 215
19 XML file details. . . . . . . . . . . . . . . . . . . . . . . . . . . . . . . . . . . . . . . . . . . . . . . . . . . . . . . 227
14 Storage Area Manager Administrator’s Guide
Page 15

about this
guide
This administrator’s guide provides information to help you:
■ Perform periodic and one-time Storage Area Manager administrative
About this Guide
About this guide
procedures.
■ Understand Storage Area Manager interoperability issues
■ Troubleshoot Storage Area Manager operation
About this Guide topics include:
■ Overview, page 16
■ Conventions, page 18
■ Getting help, page 20
15Storage Area Manager Administrator’s Guide
Page 16

About this Guide
Overview
This section covers the following topics:
■ Intended audience
■ Prerequisites
■ Related documentation
Intended audience
This book is intended for use by customers and HP authorized service providers
who are experienced with the following:
■ Storage Area Manager
■ Storage networks
■ Third-party products that will be used on the same storage network as Storage
Area Manager (if applicable)
Prerequisites
Before you begin using Storage Area Manager, make sure you consider the items
below.
■ Is the installation and setup procedure complete? See the hp OpenView
storage area manager installation guide for more information.
Related documentation
■ hp OpenView storage area manager 3.2 upgrade guide (T2533-90000). The
upgrade guide includes information about upgrading from Storage Area
Manager 3.1 to Storage Area Manager 3.2.
■ hp OpenView storage area manager 3.2 installation guide (T2533-90001).
The installation guide describes requirements and procedures for installing,
setting up, and uninstalling Storage Area Manager version 3.2.
■ hp OpenView storage area manager 3.2 CLUI reference manual
(T2533-90003). The CLUI reference manual includes information on how to
operate the CLUI and its various modes and includes reference information on
each CLUI command.
16 Storage Area Manager Administrator’s Guide
Page 17

About this Guide
■ hp OpenView integration guides. These guides provide the information
necessary to integrate Storage Area Manager with various hp OpenView
products. The integration guides are in the
ov_integration directory on the
Storage Area Manager CD-ROM.
■ Online help system. The online help provides immediate user assistance for
the tasks that can be performed within the Storage Area Manager user
interface.
■ man pages. The man pages provide immediate user assistance for all Storage
Area Manager Command Line User Interface (CLUI) commands.
■ Release notes. The release notes alert customers to known issues and
late-breaking information.
Storage Area Manager Administrator’s Guide
17
Page 18
About this Guide
Conventions
Conventions consist of the following:
■ Document conventions
■ Text symbols
Document conventions
This document follows the conventions shown in Tabl e 1.
Table 1: Document conventions
Cross-reference links Blue text: Figure 1
Key names, menu items, and buttons Bold
Element Convention
File names and text emphasis
User input, command and directory
names, and system responses (output
and messages)
Variables <monospace, italic font>
Website addresses Blue, underlined sans serif font text:
Italics
Monospace font
http://www.hp.com
18 Storage Area Manager Administrator’s Guide
Page 19

Text symbols
About this Guide
The following symbols may be found in the text of this guide. They have the
following meanings.
Caution: Text set off in this manner indicates that failure to follow directions
could result in damage to equipment or data.
Note: Text set off in this manner presents commentary, sidelights, or interesting points
of information.
Storage Area Manager Administrator’s Guide
19
Page 20

About this Guide
Getting help
If you still have a question after reading this guide, contact an HP authorized
service provider or access our website:
HP Technical Support
Telephone numbers for worldwide technical support are listed on the following
HP web site:
of origin.
Note: For continuous quality improvement, calls may be recorded or monitored.
Be sure to have the following information available before calling:
■ hp OpenView storage area manager version number
■ Applicable error messages
■ Detailed, specific questions
http://www.hp.com
http://www.hp.com/support/
.
. From this web site, select the country
HP websites
■ Access storage at:
From this website, select the appropriate product or solution.
■ For product information, patches, and documentation, access the hp
OpenView website:
http://h18006.www1.hp.com/products/storage/software/sam/index.html
■ To download hp OpenView device plug-ins (DPIs), visit the DPI website:
http://www.openview.hp.com/products/dpi/index.html
http://www.hp.com/country/us/eng/prodserv/storage.html
.
.
HP authorized reseller
For the name of your nearest HP authorized reseller:
■ In the United States, call 1-800-345-1518
■ In Canada, call 1-800-263-5868
■ Elsewhere, see the HP website for locations and telephone numbers:
http://www.hp.com
20 Storage Area Manager Administrator’s Guide
.
.
Page 21

hp OpenView storage area manager
This chapter describes Storage Area Manager tasks that can be performed
regardless of which application(s) you install and license. The major topics
covered include:
■ hp OpenView storage area manager features, page 22
■ Managing hp OpenView storage area manager users, page 24
■ Managing device discovery, page 26
■ Managing and using device maps, page 28
■ Managing folders, page 35
■ Managing organizations, page 37
■ Implementing in cluster environments, page 39
1
21Storage Area Manager Administrator’s Guide
Page 22

hp OpenView storage area manager
hp OpenView storage area manager features
HP OpenView Storage Area Manager provides comprehensive, centralized
management across distributed, heterogeneous storage networks. The following
features are available regardless of which application(s) you install and license.
■ Device discovery and mapping. Automatically discovers hosts, interconnect
devices, bridges, storage devices, and NAS devices and places them in the
Resources tree and a device map. Storage Area Manager displays the
relationship of these devices by linking them within each device map.
You can customize Storage Area Manager to discover only devices that you
want to manage and to hide or display specified nodes on the device map.
If the storage network is using interconnect hardware to support fabric zoning,
Storage Area Manager identifies the pre-configured zones and lists them in
the Resources tree.
■ Event management. Storage Area Manager probes the storage network and its
own processes and generates and displays events in the event panel.
Framework and discovery-related events display regardless of which
applications you installed and licensed. Device status, LUN allocation,
performance, capacity, and billing-related events only display if the
applicable application is installed and licensed. Storage Area Manager is also
able to receive SNMP traps from devices that support trap forwarding.
Storage Area Manager provides several features to help you manage events
once they are displayed in the event panel. You can configure event triggers to
perform certain action based on event criteria that you define. You can also
configure event filters to control which events display in the event panel
based on event criteria that you define. You can export all or selected events
that appear in the event panel to a TXT, CSV, or XML file. Finally, you can
configure Storage Area Manager to automatically delete events based on a
maximum number threshold and on criteria that you define.
■ Manager of Managers (MoM). MoM enables you to monitor up to 50 storage
domains from one console. You can configure MoM to retrieve and display
event and inventory information from each of the domains it manages. A
storage domain is a management server and the resources that it manages.
22 Storage Area Manager Administrator’s Guide
Page 23

hp OpenView storage area manager
■ User authentication and authorization. Storage Area Manager user accounts
are created with different levels of privilege. User accounts with
Administrator privilege can perform any Storage Area Manager task
including making changes that are saved in the database. User accounts with
Operators privilege can perform the same tasks as Administrators except they
cannot add, modify, or delete Storage Area Manager users. User accounts
with User privileges can view the information provided by Storage Area
Manager but are not able to make changes to the database. When starting
Storage Area Manager you login with your user name and password, with the
privileges for that session.
■ Command Line User Interface (CLUI). Storage Area Manager provides an
extensive CLUI. Nearly all tasks that can be performed in the user interface
can also be performed from the CLUI.
■ Integration. Storage Area Manager provides several methods for integrating
with other framework management applications. Storage Area Manager
provides tight integration with the following HP OpenView products:
— HP OpenView Operations for Windows
— HP OpenView Operations for Unix
— HP OpenView Service Desk
— HP OpenView Reporter
Refer to the product documentation provided in the ov_integration directory
of Storage Area Manager CD #1 for instructions on integrating Storage Area
Manager with these products.
Contact HP Services to find out more about integrating Storage Area Manager
with other, third-party applications.
■ Storage Management Initiative Specification (SMI-S). Storage Area Manager
managed devices through this specification for those devices that support it.
■ Data extraction. Storage Area Manager provides report utilities that extract
Storage Area Manager data for use with third-party reporting tools. You can
use any third-party reporting application that supports Open Database
Connectivity (ODBC) drivers.
23Storage Area Manager Administrator’s Guide
Page 24

hp OpenView storage area manager
Managing hp OpenView storage area manager users
Storage Area Manager’s authentication and authorization feature enables you to
create users specific to Storage Area Manager. Each user is assigned to a user
group, which determines the tasks that the user is able to perform within
Storage Area Manager.
Members of the Administrators group can perform all tasks including making
changes that are saved in the database. Members of the Operators group can
perform the same tasks as Administrators except they cannot add, modify, or
delete Storage Area Manager users. Members of the Users group can view all
information presented within Storage Area Manager but cannot make changes that
are saved to the database.
Adding a user
1. Select Tools > Configure Security. The Administer Users window displays.
2. Click the New User button. The Create User window displays.
Figure 1: Create Storage Area Manager users
3. Enter a user name for this user in the Username box.
4. Enter a description for this user in the Description box. This is an optional
field and may not exceed 512 characters.
5. Enter a password for this user in the Password box.
24 Storage Area Manager Administrator’s Guide
Page 25

hp OpenView storage area manager
6. Re-enter the password in the Confirm Password box. The Username and
Password fields are case sensitive.
7. Select the user group to which you want to assign the user in the Not Member
Of box, and click the right arrow button to move the user group to the
Member Of box.
8. Click the OK button to save changes and close the window.
9. Verify that the user you created appears in the Administer Users window, and
click the Close button to close the window.
25Storage Area Manager Administrator’s Guide
Page 26

hp OpenView storage area manager
Managing device discovery
Discovery is the process in which Storage Area Manager searches the storage
network for devices it supports and then adds them to the database and user
interface. When discovered, devices are placed under the appropriate node in the
Resources tree and added to the appropriate device map.
Discovery is an ongoing process; however, you must initiate the process after
installing Storage Area Manager. Completing the Setup Assistant initiates the
discovery process.
Starting device discovery
Storage Area Manager provides two methods for starting device discovery. You
can start a comprehensive discovery cycle in which Storage Area Manager
attempts contact with each device, or you can start the ongoing discovery process
in which Storage Area Manager continuously probes the storage network for
changes to the device information stored in its database.
Starting a comprehensive discovery cycle
1. Select Tools > Start Comprehensive Discovery. A confirmation window
displays.
2. Click the OK button.
Starting the ongoing discovery process
1. Select Tools > Configure.
2. In the Configuration tree, select Discovery.
3. Select the Yes, run discovery button.
4. Click the OK button to save changes and close the window.
Stopping device discovery
Device discovery is an ongoing process; however, you can instruct Storage Area
Manager to stop the discovery process.
1. Select Tools > Configure.
2. In the Configuration tree, select Discovery.
3. Select the No, do not run discovery button.
4. Click the OK button to save changes and close the window.
26 Storage Area Manager Administrator’s Guide
Page 27

Setting the device discovery interval
Storage Area Manager contacts each SAN host at a regular interval to obtain any
new device discovery information. The default interval is 15 minutes.
Note: Setting the discovery interval too low may result in higher levels of network
traffic and CPU usage as well as event processing difficulty within Storage Area
Manager. Hewlett-Packard recommends setting the interval no lower than the default
setting of 15 minutes.
1. Select Tools > Configure.
2. In the Configuration tree, select Discovery.
hp OpenView storage area manager
Figure 2: Set the device discovery interval
3. Modify the hours (HH) and minutes (MM) fields to the settings you prefer.
4. Click the OK button to save changes and close the window.
27Storage Area Manager Administrator’s Guide
Page 28

hp OpenView storage area manager
Managing and using device maps
As Storage Area Manager discovers your storage network, it places devices in
device maps using default layouts. Storage Area Manager offers many features
that allow you to work with the map to customize it to your preferences.
Using the layout manager
As Storage Area Manager discovers the storage network, it places devices in
device maps. While placing devices in the map, Storage Area Manager also links
them using information offered by the devices.
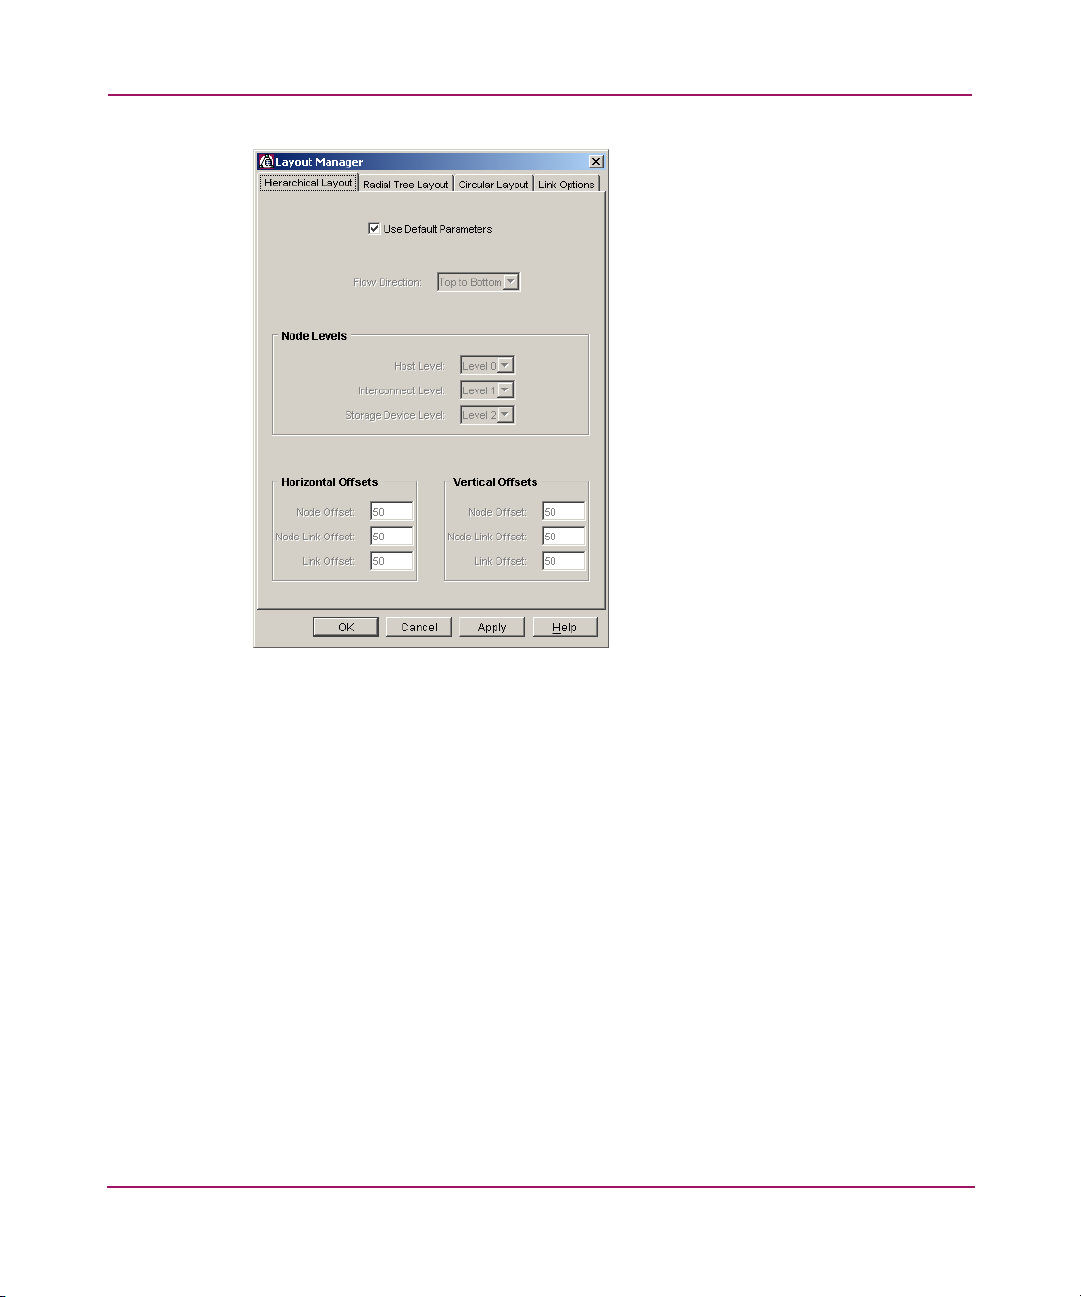
Storage Area Manager uses a default layout when positioning and linking devices.
If the device map contains less than 25 nodes, the default layout is Hierarchical. If
the device map contains 25 or more nodes, the default layout is Radial Tree.
Layout Manager offers additional pre-configured layouts for your device maps:
■ Radial Tree positions devices in a tree. Branches are determined by device
links.
■ Circular positions devices in a circle.
■ Hierarchical positions device types (host, interconnect, and storage) together
and in a hierarchy (top-to-bottom, left-to-right, etc.).
1. Display the map for which you want to change the layout.
2. Click the Layout Manager button on the map toolbar. The Layout
Manager window displays.
28 Storage Area Manager Administrator’s Guide
Page 29
hp OpenView storage area manager
Figure 3: Layout Manager
3. Click the appropriate tab for the layout you want.
4. Click the Apply button to modify the map.
5. If the map layout is acceptable, click the OK button to close the Layout
Manager window.
29Storage Area Manager Administrator’s Guide
Page 30
hp OpenView storage area manager
Configuring device links
Upon discovery of the storage network, Storage Area Manager displays the
devices it discovers and connects them with links. You can add, move, and
remove the links provided by Storage Area Manager.
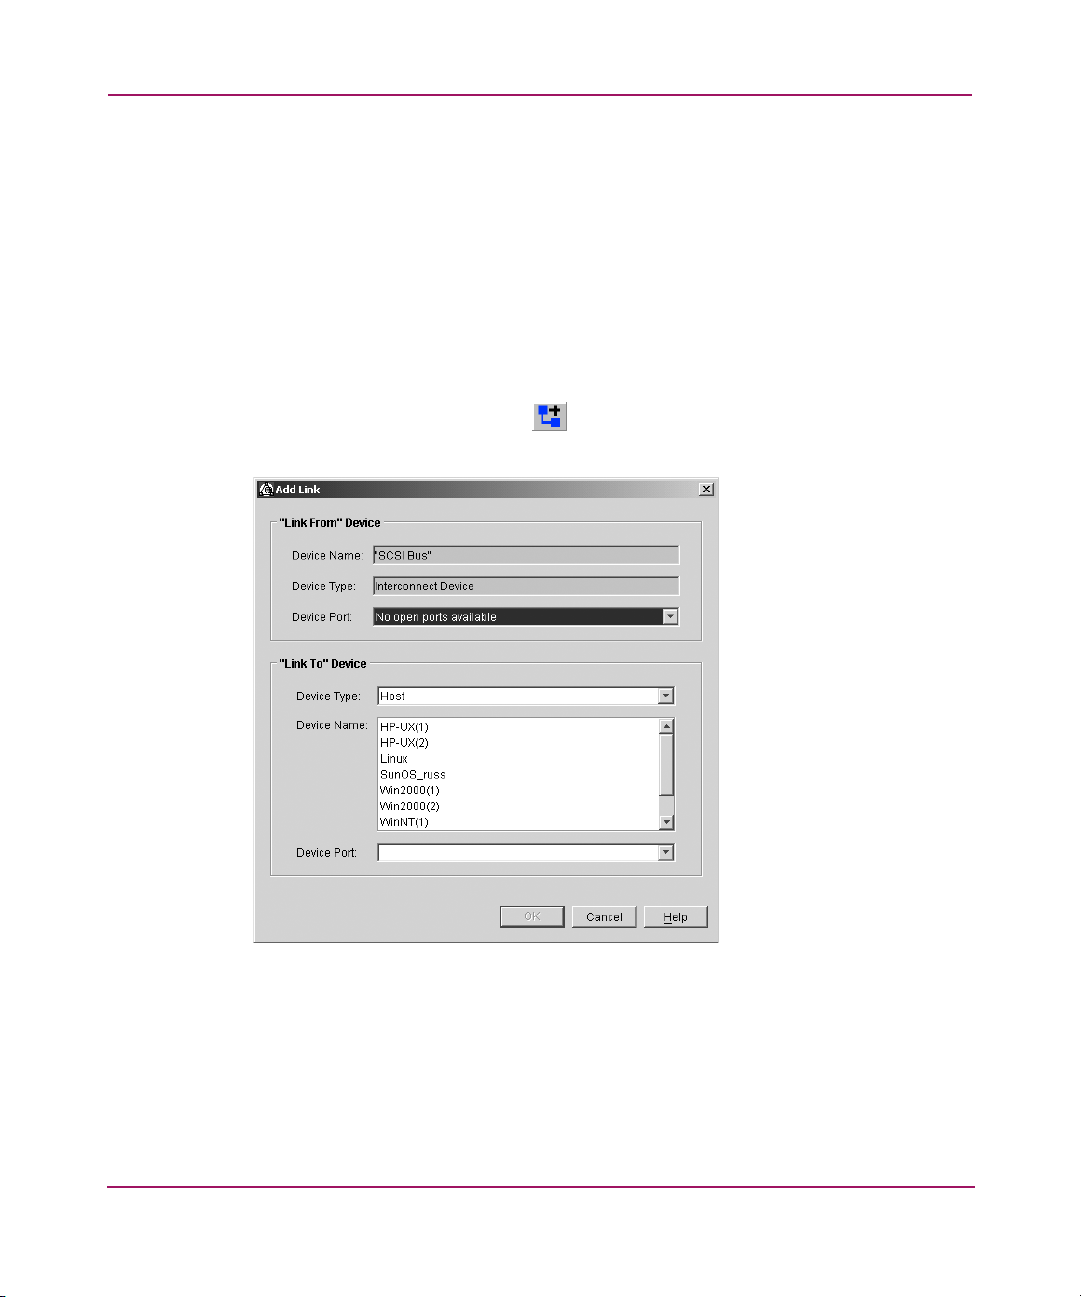
Adding device links
1. Display the device map which includes the device from which you want to
draw the link.
2. Select the icon for the device you want to link to another device.
3. Click the Add Link button on the map toolbar. The Add Link window
displays.
Figure 4: Add device links
4. In the Link From Device section, select the device port from which the link is
drawn.
5. In the Link To Device section, select the type of device (host, interconnect,
bridge, storage, unknown, or all devices) to which you are connecting.
6. Select the device to which the link is connecting.
30 Storage Area Manager Administrator’s Guide
Page 31

7. Select the device port to which the link is drawn.
8. Click the OK button. A confirmation message displays.
9. Click the Ye s button to add the device link.
Moving device links
You can only move user-defined links. You cannot move physical links.
1. Display the device map that includes the device link you want to move.
When moving links, one “end” of the link will remain the same while the
other end is moved. For the next step, select the device icon that will remain
the same.
2. Select the device icon that is connected to the link you want to move.
3. Click the Move Link button on the map toolbar. The Move Link window
displays.
hp OpenView storage area manager
Figure 5: Move device links
Note: You can click the Swap Links button to change the “end” of the link that will
move. The devices displayed in the Link From Device and Currently Linked Device
boxes will interchange.
4. In the Existing Link section, select the device port from which the applicable
link is drawn.
31Storage Area Manager Administrator’s Guide
Page 32

hp OpenView storage area manager
5. In the New Link section, select the type of device (host, interconnect, bridge,
storage, unknown, or all devices) to which you are moving the link.
6. Select the device to which you want to move the link in the Name box.
7. Select the device port to which you want to move the link in the Port box.
8. Click the OK button. A confirmation message displays.
9. Review the information in the message, and click the Yes button.
Removing device links
If you remove a physical link, the link may reappear as part of the ongoing
discovery process if the factors that resulted in the original link still exist.
1. Display the device map which includes the device from which you want to
remove the link.
2. Select the icon for the device from which you want to remove the link.
3. Click the Remove Link button on the map toolbar. The Remove Link
window displays.
Figure 6: Remove device links
4. In the Link From Device section, select the device port from which you want
to remove the link.
5. Verify that you are removing the link you want by reviewing the information
in the Currently Linked Device section.
6. Click the OK button. A confirmation message displays.
7. Click the Ye s button if this is the link you want to remove.
32 Storage Area Manager Administrator’s Guide
Page 33

Filtering device maps
By default, Storage Area Manager displays all hosts, devices, and managed
applications it discovers in the applicable device map. However, you can choose
to hide certain nodes on a map. For example, you may want to hide all managed
applications and unknown devices to reduce clutter in a particular device map.
1. Display the device map for which you want to filter nodes.
2. Click the Filter Nodes button on the map toolbar. The Filter Map Nodes
window displays.
hp OpenView storage area manager
Figure 7: Filter map nodes
3. In the Hosts list, clear the checkbox next to each host that you do not want to
display in the device map. Any devices connected to the host are
automatically unchecked in the Other Devices list.
4. In the Other Devices list, clear the checkbox next to each device that you do
not want to display in the device map.
Unlike the Hosts list, checking or clearing devices in this list does not effect
any other device.
33Storage Area Manager Administrator’s Guide
Page 34

hp OpenView storage area manager
Note: Click the Show All button to display all nodes in the device map. Click the
Hide All button to hide all nodes on the device map. Click the Hide Unknown Devices
button to hide all unknown devices on the device map.
5. Verify that all check boxes are checked for nodes that you want to display in
the device map.
6. Click the OK button. The device map redisplays according to the filter
settings you selected. If any nodes are filtered from being displayed in the
map, “[Filtered]” is displayed in the map titlebar.
34 Storage Area Manager Administrator’s Guide
Page 35

Managing folders
Storage Area Manager’s folder feature enables you add nodes (folders) to the
Resources tree and then structure resources under the folders.
This feature is intended for sizeable storage networks in which many nodes,
subnodes, and resources may appear in the Resources tree. You can add a folder to
all nodes in the Resources tree except the Domain and Storage Networks nodes.
You can also add subfolders under folders that you added previously.
For example, if a storage network contained 50 hosts at three different locations,
you could create folders that represent each of the locations and then structure the
hosts under the applicable location. When scanning the Resources tree, you would
only have to scroll past the three “location” folders rather than all 50 hosts.
A cloning feature enables you to add copies of the folder at the same time you add
the original folder. For example, you can create a folder named “Site A” under the
Hosts, Interconnect Devices, and Storage Devices nodes.
Adding folders
1. In the Resources tree, right-click the node or folder under which you want to
add a folder, and select New Folder from the shortcut menu.
hp OpenView storage area manager
Figure 8: Add folders
2. Enter the folder’s name in the Name box. Folders may have the same name as
long as they reside under different parent nodes.
3. Enter a description for the folder in the Description box.
If you want to add “clones” of this folder to other Resource tree nodes,
continue with step 4. If you want to create this folder only, continue with the
next section, “Adding members to folders.”
35Storage Area Manager Administrator’s Guide
Page 36

hp OpenView storage area manager
4. Click the Cloning tab.
5. Check the Enable Folder Cloning checkbox.
6. Check all boxes that represent nodes under which you want to add a clone of
this folder.
7. Check the Replicate Description Fields checkbox if you want to copy the
description you entered on the Properties tab to all cloned folders.
Adding members to folders
1. Click the Membership tab.
2. Click the Add Members button.
3. Use the Look in box and Up button to display the node that contains the
resource you want to add to the folder’s membership.
4. Select the resource you want to add from the Member list. You can select
multiple resources.
5. Click the OK button to add the resource as a member of the folder and close
the Add Members window.
6. Click the OK button to add the folder and close the New Folder window.
36 Storage Area Manager Administrator’s Guide
Page 37

Managing organizations
Organizations enable you to define storage resources as a unique entity. Storage
resources can include hosts, bridges, storage devices, interconnect devices, NAS
devices, and unknown devices.
Organizations do not necessarily reflect a physical relationship within the storage
network. Any storage resource discovered by Storage Area Manager can be added
to any organization. A storage resource can be a member of more than one
organization.
Once an organization’s membership is defined, you can use Storage Builder to
view capacity data specific to the organization’s membership. (Storage Builder
must be installed and licensed.)
You can also use Storage Accountant to add accounts to an organization, which
enables Storage Accountant to bill for the storage used by the organization’s
accounts. (Storage Accountant must be installed and licensed.)
Note: The maximum recommended number of organizations within one folder is 500.
If necessary, create additional folders under the Organizations node to accommodate
organizations that exceed the recommended maximum.
hp OpenView storage area manager
Defining an organization’s properties
1. Select the Organizations node in the Resources tree to view the
Organizations view panel.
2. Click the New Organization button. The New Organization window
displays.
37Storage Area Manager Administrator’s Guide
Page 38

hp OpenView storage area manager
Figure 9: Add organizations
3. If you want to modify the automatically generated organization ID, clear the
Automatically Generate ID checkbox, and enter the ID you want in the
Organization ID box.
4. Enter a name for this organization in the Organization Name box.
5. Complete the Contact Information section for this organization’s primary
contact. This is an optional step.
Adding members to the organization
1. Click the Membership tab.
2. Click the Add button, and select the device type for the resource you want to
add as a member. The Add Members of type window displays.
3. Select the resource you want to add, and click the OK button. You can select
more than one resource at a time.
4. Repeat step 2 and step 3 until all the members you want to add to this
organization are displayed on the Membership tab.
5. Click the OK button to add the organization and close the window.
38 Storage Area Manager Administrator’s Guide
Page 39

Implementing in cluster environments
Refer to the following subsection when implementing Storage Area Manager in
MSCluster and AIX cluster environments.
Implementing in MSCluster environments
1. Install MS Cluster on both Windows 2000 management servers (servers A
and B).
2. Format a share disk for both servers.
3. Install Storage Area Manager onto the share disk server A (server B pause).
See the hp OpenView storage area manager installation guide for complete
instructions on installing Storage Area Manager.
4. Start MSCluster Admin.
5. Select Disk Group, right-click the Share disk, then select move group from
the shortcut menu.
6. Install Storage Area Manager onto the share disk of server B.
hp OpenView storage area manager
Note: Storage Area Manager must be installed in the same directory on server B as it
is on server A.
7. Use MSCluster Admin to create general service resources for Storage Area
Manager’s services, including:
— HP OpenView SAM Bridge
— HP OpenView SAM Embedded DB
— HP OpenView SAM ManagementServer
8. Start Storage Area Manager on server B.
9. Change the Network Order Binding to use LAN connection before private
connection on server A and server B.
a. Select Start > Settings > Control Panel.
b. Double-click Network and Dial-up Connections.
c. Select Advanced > Advanced Settings.
d. On the Adapters and Bindings tab, ensure that Local Area Connection is
listed first in the Connections box.
39Storage Area Manager Administrator’s Guide
Page 40

hp OpenView storage area manager
10. In MSCluster Admin, bring on the general services you created in step 7.
11. Remotely install the Storage Area Manager Host Agent software to each SAN
host.
12. Fail over to server A.
13. Start Storage Area Manager on server A.
14. Select Tools > Manage Host Agent > Update Host Agent Access.
15. Select all hosts in the managed host list, and click the Update Access on
Selected Hosts button.
All hosts should now appear under the Hosts node in the Resources tree.
How hp OpenView storage area manager operates in AIX cluster environments
Requirements
Storage Area Manager requires the following to operate in a cluster environment.
■ Each host in the cluster must have one static, non-migrating IP address.
■ The IP Address must be accessible by the Storage Area Manager management
server.
These requirements necessitate that each AIX host contain a minimum of two and
possibly three NIC cards.
Description
Figure 10: AIX cluster example
40 Storage Area Manager Administrator’s Guide
Page 41

Failover
hp OpenView storage area manager
From Storage Area Manager’s perspective, an AIX cluster is a group of hosts with
each host containing a floating IP address in addition to its static IP address. One
host in the cluster is a master for the clustered resource. In this example, AIX #A
is the master with floating IP address 15.32.74.107.
In addition, AIX clusters require a heartbeat to be transmitted between hosts
(illustrated by IP address 15.33.X.X). This heartbeat can be sent by serial
connection although that is not recommended.
During failover, the floating IP address assumes ownership of a NIC card, which
hides the consumed IP address and exposes the old NIC card’s IP address on the
host that failed (after it is rebooted).
In Figure 10, the IP address 15.32.74.100 is not accessible to Storage Area
Manager until after failover and the subsequent reboot occur, at which time the
floating address migration enables the old IP address to resume ownership of the
NIC card.
This example reflects a single resource failover. In some environments, multiple
resources may be simultaneously monitored (for example, a web server on AIX
#A and a database on AIX #B). In these configurations, each host acts as a
primary and secondary for its peer. Failover can potentially occur in either
direction.
Recommendation
In order for the cluster illustrated in Figure 10 to satisfy Storage Area Manager’s
cluster requirements, we recommend that a separate NIC be supplied, which
cannot be a failover candidate.
Add the IP address of this separate NIC to the AIX host’s commIpAddr.txt file,
which is located in the /etc/opt/sanmgr/hostagent/config directory.
Storage Area Manager will then identify each host by this new, non-migrating IP
address.
41Storage Area Manager Administrator’s Guide
Page 42

hp OpenView storage area manager
42 Storage Area Manager Administrator’s Guide
Page 43

Managing events
This chapter contains instructions for Storage Area Manager event management
and provides a description of each trap.
■ Managing events, page 44
■ Application category and event list, page 56
2
43Storage Area Manager Administrator’s Guide
Page 44

Managing events
Managing events
As Storage Area Manager monitors the storage network, it displays events in the
event panel. Each entry in the event panel displays a corresponding event severity
level, the date and time the event occurred, the source of the event, and a brief
description of the event. In addition to severity level, events are also defined by
their event category.
Once events are displayed in the event panel, Storage Area Manager offers many
features that enable you to work with the information displayed.
Acknowledging events
Storage Area Manager’s event management system enables you to acknowledge
events that are displayed in the event panel or are stored in the database.
Note: Storage Area Manager may have additional events stored in its database that
are not displayed in the event panel. For example, if you apply an event filter to the
event panel, then only events meeting the filter’s criteria are displayed in the event
panel.
1. If you want to acknowledge only selected events, select the events you want to
acknowledge in the event panel. Skip this step if you want to acknowledge all
events in the event viewer or database.
2. Click the Acknowledge Events button on the event toolbar. The
Acknowledge Events window displays.
Figure 11: Acknowledge events
44 Storage Area Manager Administrator’s Guide
Page 45

3. Select the appropriate button depending on if you want to acknowledge
selected events, all events in the event panel, or all events in the database.
4. Click the OK button.
5. Verify that the acknowledged event icon displays in the event panel’s
Acknowledgement column for the appropriate events.
Exporting events
You can export events to a TXT, CSV, or XML file. For example, you may want to
export events for record-keeping purposes before deleting them from the event
panel.
1. If you want to export only selected events, select the events you want to export
in the event panel. Skip this step if you want to export all events in the event
viewer or database.
2. Click the Export Events button on the event toolbar. The Export Events
window displays.
Managing events
Figure 12: Export events
3. Select the appropriate button depending on whether you want to export
selected events, all events in the event panel, or all events in the database.
4. Select the file type (.txt, .csv, or .xml) for the exported event file in the File
Type box.
5. Click the Select File button to browse to the location where you want to save
the file and to enter a name for the file.
6. Click the OK button.
45Storage Area Manager Administrator’s Guide
Page 46

Managing events
Exporting events to the Windows event log
You can also export events to the Windows Application Event Log. Storage event
severities are mapped to Windows event log severities as shown in Table 2.
Table 2: Event severity mapping to Windows event log
Storage Area Manager
event severity
Windows event log
event severity
Informational Informational
Warn ing Warn ing
Minor
Major
Critical Error
Exporting events to the Windows event log is accomplished with Storage Area
Manager’s event trigger feature. When adding the event trigger, you determine
which events will be exported by the criteria you select.
Events are defined by their category (for example, Device), specific type (for
example, STATUS_CHANGED_EVENT) and severity level (for example,
WARNING). An event is exported to the Windows event log when all three event
criteria are met.
Note: If the local of the management server is changed between instances of the HP
OpenView ManagementServer service being stopped and restarted, the previously
exported event descriptions are not translated to the new locale.
1. Click the Event Triggers button on the event toolbar.
2. Click the Add button. The Add Trigger window displays.
3. Enter a name for this event trigger in the Name box. The trigger name may not
included spaces, brackets, or periods.
4. Select the event category you want to include in the Category box.
46 Storage Area Manager Administrator’s Guide
Page 47

5. Select the event severities you want to include in the Threshold box.
6. Check the checkbox for each event you want to include in the Events box.
7. Select WindowsEventLoggingAction in the Action box.
8. Click the OK button to add the event trigger to the list and close the Add
9. Click the OK button to save changes and close the Events: Trigger window.
Deleting events
Events are saved in the Storage Area Manager database and contribute
significantly to the growing size of the database. In order to manage the number of
events in the event panel and the size of the database, you should delete events on
a regular basis.
Storage Area Manager offers two methods for deleting events. You can delete
events directly from the event panel, or you can configure Storage Area Manager
to automatically delete events based on criteria you set.
Managing events
Events for this trigger include the selected severity and above. For example, if
you select INFORMATIONAL, all event severities are included. However, if
you select MAJOR, only events with severity levels of Major and Critical are
included.
Available events depend on the selected Category (step 4). You can check
more than one event checkbox.
Trigger window.
Deleting events from the event panel
1. If you want to delete only selected events, select the events you want to delete
in the event panel. Skip this step if you want to delete all events in the event
viewer or database.
2. Click the Delete Events button on the event toolbar. The Delete Events
window displays.
47Storage Area Manager Administrator’s Guide
Page 48

Managing events
Figure 13: Delete events
3. Select the appropriate button depending on if you want to delete selected
events, all events in the event panel, or all events in the database.
4. Click the OK button. A confirmation message displays.
5. Click the Yes , De le te button to confirm deletion.
Configuring automatic event deletion
You can define rules that Storage Area Manager uses to automatically delete
events on an hourly basis. You can define multiple event deletion rules.
For example, you could define a rule to automatically delete all Informational
events that are 60 days or older. You could define a second rule to automatically
delete all acknowledged events. If an event matches the criteria of either rule, it
will be deleted during the next event cleanup cycle.
The event cleanup process consists of two phases. If the number of events stored
in the database exceeds the maximum number of events threshold, phase 1 is
initiated. In this phase, events are automatically deleted based on the criteria set
on the Selection Rules tab. If the number of events stored in the database
continues to exceed the threshold after phase 1 is complete, then phase 2 is
initiated. In this phase, the oldest events are automatically deleted until the
maximum event threshold is met.
Note: You cannot restore events once they have been deleted. Consider exporting
events at regular intervals for record-keeping purposes.
48 Storage Area Manager Administrator’s Guide
Page 49

1. Select Tools > Configure.
2. In the Configuration tree, expand the Events menu, and select
Hourly Cleanup.
Managing events
Figure 14: Configure event deletion
3. Enter the hourly event threshold in the Maximum Number of Events box.
4. Click the Selection Rules tab.
5. Click the Add button to add a row to the Hourly Event Selection Rules for
Deletion list. Each entry represents an event cleanup rule. The cells in each
entry define the rule’s criteria.
Caution: If the table contains a blank row, all events are deleted when the
hourly cleanup occurs.
49Storage Area Manager Administrator’s Guide
Page 50

Managing events
6. To define the rule’s criteria, click a cell that represents the criteria you want to
add, then select the applicable value.
For example, click the Severity cell, then select the applicable severity level.
7. Repeat step 5 and step 6 to add another deletion rule.
8. Click the OK button to save changes and close the window. If the threshold
criteria is met, Storage Area Manager performs the cleanup process
immediately and then in hourly intervals thereafter.
Adding event filters
Storage Area Manager includes several default event filters to help you manage
what you see in the event panel. However, you may want to customize your own
event filters. For example, you may want to create an event filter that displays only
Critical events for a particular device.
When adding an event filter, each row in the Filter Editor window represents a rule
to apply when filtering the event panel. Each rule is defined by a set of criteria. In
order for an event to display in the event panel when this filter is applied, the event
must meet all criteria set for a particular rule. For example, if you define an event
severity criteria of “Critical” and a source criteria of “Device A”, then only
Critical events for Device A meet the criteria of this rule.
An event filter may also include more than one rule. If an event filter includes
more than one rule, then any event that meets the criteria of one or more of the
rules will display in the event panel when this filter is applied. For example, an
event filter includes two rules. The first rule defines event severity of Critical as its
only criteria. The second rule defines Source criteria of Device A as its only
criteria. All events with a Critical event severity and all events from Device A
meet the criteria of this event filter.
50 Storage Area Manager Administrator’s Guide
Page 51

Managing events
1. Click the Event Filters button on the event toolbar.
2. Click the Add button. The Filter Editor window displays. A row that
represents the filter’s first rule is automatically added.
Figure 15: Add event filters
3. Enter a name for this event filter in the Name box.
4. Define the criteria for this event filter by clicking a cell and selecting from the
list of options within that cell. For example, click the Severity cell and select
the applicable event severity level.
5. Repeat step 4 until you have defined all criteria for this rule (row).
6. Click the Add button, and repeat step 4 and step 5 if you want to add
additional rules to this event filter.
7. Click the OK button to save the event filter and close the Filter Editor
window.
51Storage Area Manager Administrator’s Guide
Page 52

Managing events
Adding event triggers
Event triggers enable you to assign actions to events that meet criteria you
specify. Storage Area Manager includes several default event triggers; however,
you may want to create additional event triggers that are appropriate for your
environment. For example, you can define an event trigger to send e-mail
notification to the on-call contact when Critical events occur.
1. Click the Event Triggers button on the event toolbar.
2. Click the Add button. The Add Trigger window displays.
Figure 16: Add event triggers
3. Enter a name for this event trigger in the Name box. The trigger name may not
included spaces, brackets, or periods.
Events are defined by their category (for example, Device), specific type (for
example, STATUS_CHANGED_EVENT) and severity level (for example,
WARNING). The action defined by this event trigger will initiate when all
three event criteria are met.
4. Select the event category you want to include in the Category box.
52 Storage Area Manager Administrator’s Guide
Page 53

Managing events
5. Select the event severities you want to include in the Threshold box.
Events for this trigger include the selected severity and above. For example, if
you select INFORMATIONAL, all event severities are included. However, if
you select MAJOR, only events with severity levels of Major and Critical are
included.
6. Check the checkbox for each event you want to include in the Events box.
Available events depend on the selected Category (step 4). You can check
more than one event checkbox.
7. Select which action to initiate for this trigger in the Action box. The
parameters displayed in the table below the Action box are based on the action
you select. The StoreAction and WindowsEventLoggingAction actions do not
have any parameters associated with them.
8. Click the Value cell next to each Parameter, and enter the appropriate
information.
For example, if you selected ForwardTrapAction in the Action box, click the
cell next to HOSTS, and enter the IP address of the host to which you want to
forward events.
9. Click the OK button to add the event trigger to the list and close the Add
Trigger window.
10. Click the OK button to save changes and close the Events: Trigger window.
Adding constraints to event triggers
You can constrain an event trigger in order to prevent it from initiating based on
certain event criteria. You can also configure exceptions to the constraint based on
count and duration of the constraint.
For example, if you configure an event trigger for a source type of interconnect
devices, the trigger will initiate for all interconnect devices discovered by Storage
Area Manager. However, if you do not want the trigger to act on events
contributed by a particular interconnect device (Device A), you could add a
constraint that prevents the trigger from acting on events contributed by Device A.
When adding a constraint, each row in the Trigger Constraints window represents
a constraint to apply to the event trigger. Each constraint is defined by a set of
criteria. In order for a constraint to take effect, the event that initiated the event
trigger must meet all criteria set for the constraint.
53Storage Area Manager Administrator’s Guide
Page 54

Managing events
An event trigger can include more than one constraint. If a trigger includes more
than one constraint, the constraints are applied in the order in which they are listed
in the Trigger Constraints window. For example, if an event meets the criteria of
two different constraints, the constraint that is listed first in the list is applied
Caution: If the first row (rule) in the table is blank and succeeding rows
contain rule criteria, this feature interprets the blank row as “always constrain
this trigger” and applies it as such. If the first row is blank and there are no
other rows for this constraint, then the trigger is not constrained.
1. From the Add Trigger or Edit Trigger window, click the Trigger Constraints
button. The Trigger Constraints window displays. A row that represents the
first constraint is automatically added if the event trigger does not already
include a constraint.
Figure 17: Add trigger constraints
2. Click the Add button if the table does not already include a blank row.
3. Define the criteria for this constraint by clicking the Severity, Event Type,
Source Type, and Source cells and selecting the value you want.
54 Storage Area Manager Administrator’s Guide
Page 55

Managing events
4. If you want to add an exception to this constraint based on the number of
times the trigger is constrained, enter a numerical value in the Minimum
Count column.
For example, if the count criteria is 5, the event trigger is constrained the next
five times the trigger constraint’s criteria is met, initiates the trigger the sixth
time the constraint’s criteria is met, and then is constrained again for the next
five times.
5. If you want to add an exception to this constraint based on how long the
trigger is constrained, enter a numerical value (in seconds) in the Minimum
Duration column.
For example, if the duration count is 1800 (30 minutes), the event trigger is
constrained for 30 minutes from the time the trigger constraint’s criteria is
met, initiates the trigger the next time the constraint criteria is met, and then is
constrained again for the next 30 minutes.
6. Repeat step 2 through step 5 to add additional rules to this event trigger
constraint.
7. Click the OK button to add the constraint to the event trigger and close the
Trigger Constraints window.
55Storage Area Manager Administrator’s Guide
Page 56

Managing events
Application category and event list
See Tabl e 3 through Tab le 14 for the complete list of Storage Area Manager
events generated for each application category.
Table 3: Events in the Accountant category
Event Name Event Identifier Event Description
AGING_DATA FILES 0x0000000000000010
ACCOUNT_CREATED 0x0000000000000100
ACCOUNT_CLOSED 0x0000000000000200
ACCOUNT_MODIFIED 0x0000000000000400
LUN_ASSIGNED_TO_ACCOUNT 0x0000000000000800
LUN_DEASSIGNED_FROM_ACCOUNT 0x0000000000001000
SERVIDE_LEVEL_CREATED 0x0000000000010000
SERVIDE_LEVEL_DELETED 0x0000000000020000
SERVIDE_LEVEL MODIFIED 0x0000000000040000
LUN_ASSIGNED_TO_SERVIDE_LEVEL 0x0000000000080000
LUN_DEASSIGNEDFROM_SERVIDE_LEVEL 0x0000000000100000
BILL_EXPORTED 0x0000000000200000
BILL_SCHEDULE_CHANGED 0x0000000000400000
BILL_GENERATED 0x0000000004000000
USAGE-COLLECTED 0x0000000008000000
GENERATED_MISSED_BILL 0x0000000010000000
LUN_STATUS_CHANGED 0x0000000020000000
LUN_SIZE_CHANGED 0x0000000040000000
LUN_DELETED 0x0000000000800000
Data files aging out
Account created
Account deactivated
Account modified
Assign LUN to Account
Deassign LUN from
Account
Service Level created
Service Level deleted
Service Level modified
Service Level LUN
assignment
Service Level LUN
deassignment
Bill Report exported
Bill Schedule changed
Bill Generated
Usage collected
Missed bill generated
Device reported LUN
status changed
Device reported LUN size
changed
Device reported LUN
deleted
56 Storage Area Manager Administrator’s Guide
Page 57

Table 4: Events in the Allocater category
Event Name Event Identifier Event Description
LIMBO_COMMAND_STATUS 0x0000000000000002
REALITY_TO_POLICY 0x0000000000000010
MULTIPLE_WRITER_SCENARIO 0x0000000000000020
ILLEGAL_OBJECT_DELETION 0x0000000000000040
HOST_DELETION 0x0000000000000080
CONFIGURE_REQUEST_SUB_STATUS 0x0000000000000200
SCSI_SCAN 0x0000000000000400
CONVERT_SEVENT_TO_STORGE_EVENT 0x0000000000080000
ACTIVATION_WIZARD_CONFIGURE_REQUEST 0x0000000000100000
ROGUE_SERVER 0x0000000000000100
HOST_COMMAND_SET_COMPLETED 0x0000000000000800
POSSIBLE_ROGUE_SERVER 0x0000000000002000
RUID_ENABLED_BUT_NOT_VISIBLE 0x0000000000004000
CONFIGURE_REQUEST_STATUS 0x0000000000000001
Managing events
A Limbo command state
Reality to policy event
Very dangerous! Client
needs to take care of this
An illegal object was
deleted
A host was deleted
Part of a whole
configuration request
A host initiated a SCSI
scan
Convert to Storage
Events
Activation Wizard
Rogue Server
Host Command Set
Completed
Possible Rogue Ser ver
LUN assigned but not
visible to the host
Allocater configuration
dialog status Capacity
Events
57Storage Area Manager Administrator’s Guide
Page 58

Managing events
Table 5: Events in the Capacity category
Event Name Event Identifier Event Description
UNKNOWN_THRESHOLD_EXCEEDED 0x0000000000000001
STORAGE_DOMAIN_THRESHOLD_EXCEEDED 0x0000000000000002
STORAGE_DEVICE_THRESHOLD_EXCEEDED 0x0000000000000004
HOST_THRESHOLD_EXCEEDED 0x0000000000000008
NAS_DEVICE_THRESHOLD_EXCEEDED 0x0000000000000010
VOLUME_THRESHOLD_EXCEEDED 0x0000000000000020
MANAGED_DIRECTORY_THRESHOLD_EXCEEDED 0x0000000000000040
USER_ACCOUNT_THRESHOLD_EXCEEDED 0x0000000000000080
Value of some capacity
measurement falls outside
a preconfigured threshold
range
Value of a storage domain
capacity measurement
falls outside a
preconfigured threshold
range
Value of a storage device
capacity measurement
falls outside a
preconfigured threshold
range
Value of a host capacity
measurement falls outside
a preconfigured threshold
range
Value of a NAS device
capacity measurement
falls outside a
preconfigured threshold
range
Value of a volume
capacity measurement
falls outside a
preconfigured threshold
range
Value of a managed
directory capacity
measurement falls outside
a preconfigured threshold
range
Value of a user account
capacity measurement
falls outside a
preconfigured threshold
range
58 Storage Area Manager Administrator’s Guide
Page 59

Table 5: Events in the Capacity category (Continued)
Event Name Event Identifier Event Description
USER_THRESHOLD_EXCEEDED 0x0000000000000100
CONSUMPTION_BLOCK_THRESHOLD_EXCEEDED 0x0000000000000200
ORGANIZATION_THRESHOLD_EXCEEDED 0x0000000000000400
VOLUME_GROUP_THRESHOLD_EXCEEDED 0x0000000000000800
COLLECTION_ERROR 0x0000000000001000
APP_ORACLE_THRESHOLD_EXCEEDED 0x0000000000002000
APP_EXCHANGE_THRESHOLD_EXCEEDED 0x0000000000004000
Managing events
Value of a user-related
capacity measurement
falls outside a
preconfigured threshold
range
Value of a consumption
block capacity
measurement falls outside
a preconfigured threshold
range
Value of an organization
related capacity
measurement falls outside
a preconfigured threshold
range
Value of a group-wide
capacity measurement
falls outside a
preconfigured threshold
range
Lists corrupt volumes
encountered when
gathering file data on a
host
Value of an Oracle
application capacity
measurement falls outside
a preconfigured threshold
range
Value of an Exchange
application capacity
measurement falls outside
a preconfigured threshold
range
59Storage Area Manager Administrator’s Guide
Page 60

Managing events
Table 6: Events in the Database category
Event Name Event Identifier Event Description
SPACE_ALERT 0x0000000000000001
Not enough free space for
database to get to maximum size
PERCENT_ALERT 0x0000000000000002
Database has reached the
configured percentage
EVENT_ALERT 0x0000000000000004
Total number of events are
greater than the configured
setting
SPACE_PANIC 0x0000000000000008
Free space in database is less
than configured amount
FLAT_DIRECTORY_DISK_SPACE_ALERT 0x0000000000000010
Free disk space on a volume
being used for binary data
storage is very low
Table 7: Events in the Discovery category
Event Name Event Identifier Event Description
CYCLE_START 0x0000000000000001
CYCLE_DONE 0x0000000000000002
CYCLE_LONG 0x0000000000000004
NEW_DEFS_JAR 0x0000000000000008
Discovery cycle started
Discovery cycle finished
Discovery cycle long
New discovery class/device object/device
properties/icons on server
TURNED_ON 0x0000000000000010
TURNED_OFF 0x0000000000000020
Discovery turned on by user
Discovery turned off by user
Table 8: Events in the Device category
Event Name Event Identifier Event Description
STATUS_CHANGED_EVENT 0x0000000000000001
Signifies a status change was detected
for a device
POLLED_EVENT 0x0000000000000002
Signifies an event was retrieved from a
device via polling
60 Storage Area Manager Administrator’s Guide
Page 61

Table 8: Events in the Device category (Continued)
Event Name Event Identifier Event Description
INTERRUPT_EVENT 0x0000000000000004
Signifies an SNMP trap was received by
management
LINK_STATUS_UP 0x0000000000000008
Signifies a status change was detected
for a link
LINK_STATUS_DOWN 0x0000000000000010
Signifies a status change was detected
for a link
Table 9: Events in the PassphraseCache category
Event Name Event Identifier Event Description
Bad_Passphrase 0x0000000000000001
A passphrase requested is not know or is wrong. the
user needs to correct this
Table 10: Events in the Model category
Event Name Event Identifier Event Description
OBJECT_ADDED 0x0000000000000001
OBJECT_DELETED 0x0000000000000002
OBJECT_UPDATED 0x0000000000000004
ATTRIBUTE_ADDED 0x0000000000000008
ATTRIBUTE_DELETED 0x0000000000000010
ATTRIBUTE_UPDATED 0x0000000000000020
Model object added
Model object deleted
Model object updated
Model object attribute added
Model object attribute deleted
Model object attribute updated
Managing events
Table 11: Events in the Performance category
Event Name Event Identifier Event Description
COLLECTION_STARTED 0x0000000000000001
COLLECTION_STOPPED 0x0000000000000002
COLLECTION_BACKLOG 0x0000000000000004
THRESHOLD_ALERT 0x0000000000000008
PB_TOOL_NOT_INSTALLED 0x0000000000000010
Performance data collection has started
Performance data collection has stopped
Performance data collection has
backlogged
Threshold for a particular metric has
been exceeded
Tool for collecting performance data is
not installed
61Storage Area Manager Administrator’s Guide
Page 62

Managing events
Table 11: Events in the Performance category (Continued)
Event Name Event Identifier Event Description
PB_TOOL_NOT_RUNNING 0x0000000000000020
Tool for collecting performance data is
not running
SNAPSHOTS_PURGED 0x0000000000000040
Performance data collection has been
purged from database
BASELINES_EXCEEDED 0x0000000000000080
Number of available baselines has been
exceeded
PROCESS_WAITING 0x0000000000000100 Scheduled process is waiting
Table 12: Events in the ManagedApplication category
Event Name Event Identifier Event Description
APP_INSTANCE_STATUS_CHANGED_EVENT 0x0000000000000001
Signifies a status change was
detected for a managed
application instance
Table 13: Events in the EventManagement category
Event Name Event Identifier Event Description
PERIODIC_EVENT_DELETION 0x0000000000000001
AUTO_CONSTRAIN_ADDED 0x0000000000000002
Periodic Storage Event deletion
Automatically added a constraint to
block events (SNMP traps) from an
unmanaged device
Table 14: Events in the Framework category
Event Name Event Identifier Event Description
COMPONENT_STARTED 0x0000000000000001
All components of the server have
been initialized/started
COMPONENT_SHUTDOWN 0x0000000000000002
All components of the server have
been shutdown
CLIENT LOGIN 0x0000000000000004
A client has connected and logged in
successfully
CLIENT LOGOFF 0x0000000000000008
A client has logged out and
disconnected
CLIENT DEAD 0x0000000000000010
a client has disconnected without
logging in
SERVER BROKEN 0x0000000000000020
62 Storage Area Manager Administrator’s Guide
Server connection heartbeat fails
Page 63

hp OpenView storage accountant
This chapter describes initial accounting setup procedures and periodic Storage
Accountant administrative tasks.
■ hp OpenView storage accountant features, page 64
■ Billing basics, page 65
■ Service level setup and administration, page 68
■ Account setup and administration, page 71
■ Billing configuration, page 75
■ Billing data management, page 78
■ Integrating bills with other applications, page 81
3
63Storage Area Manager Administrator’s Guide
Page 64

hp OpenView storage accountant
hp OpenView storage accountant features
Storage Accountant meters storage space in organization accounts and reports the
associated cost at the end of each month. You must install and license Storage
Accountant to use its features.
■ Monthly and interim bill reports. Storage Accountant rolls up daily charges
into a monthly bill that is arranged by organization and account. Detailed bills
describe the charges for each LUN. Summary bills show only the total charges
for each organization and account. Using the Bill Viewer, you can view,
export, and print bills for the current (interim) or past billing periods and for
all or individual organizations.
■ Storage device and service level billing reports. Storage Accountant creates
monthly reports of billed and unbilled storage capacity by storage device and
service level. Summary reports show the total charges for the storage device
or service level. Detailed reports show LUN-by-LUN charges.
■ Service Level, Organization and Account nodes in the Resources tree. Storage
Accountant associates LUNs with service levels and then attaches these LUNs
to organization accounts. You can view, create, add LUNs to, and modify
service levels and organization accounts from these nodes.
■ Audit log of billing transactions and LUN events. A quick look at the audit log
shows you when changes were made to organizations, accounts, service
levels, or the billing schedule; if daily usage is being regularly collected; when
bills were generated and exported; and if a LUN’s status changed. The Audit
Log Viewer lets you view, export, and print the audit log.
■ Accountant scheduler. The Storage Accountant billing cycle scheduler lets
you specify when the monthly bill is generated, when old bills and audit
entries are deleted, and where and how files are exported.
■ Exported bills in CSV, HTML, and XML format. Storage Accountant
automatically exports monthly bills in a format and location that you choose.
You can set event triggers that launch a third-party billing application once the
bill is exported. The details that you need to integrate Storage Accountant
bills with other applications are provided on page 81 and in Storage Area
Manager's document directory (sanmgr\client\doc\export_files).
■ Service level price calculator. Storage Area Manager’s service level price
calculator helps you calculate a service level price/GB/hour that considers the
total cost associated with storage service.
64 Storage Area Manager Administrator’s Guide
Page 65

Billing basics
Bills are summaries of storage charges to organizations. Bills are produced in two
formats:
■ Text that is displayed in the Bill Viewer window
■ An exportable file that is automatically saved at the end of each billing period
How charges are calculated
Storage Accountant charges are based on the size and price of the LUNs that a
Storage Area Manager administrator attaches to an organization’s accounts. The
price of a LUN depends on its associated service level. The amount charged in a
monthly bill is the product of the LUN size and price per GB per hour and the
number of hours that the LUN belonged to the account during the billing period.
Charge = LUN size in gigabytes (GB) x price per GB per hour x hours
For example, if organization A has an account with an attached 9-GB LUN whose
price is 5 cents per GB per hour, the charge after 20 hours would be 9 GB x
$.05/GB/hour x 20 hours, or $9.00.
Storage Accountant records day-to-day changes in the factors that make up the
charge and sums up the charges at the end of the billing period.
hp OpenView storage accountant
How charges become bills
At the end of each day, Storage Accountant records all the day’s transactions that
affect storage charges; for example, a LUN is added or removed from an account,
the service level price is changed, or the LUN is resized. Once a month, these
daily records are compiled into a single binary file of usage information, such as
LUN 01 used by Account AA from October 1, 2001, 09:27:54, to October 30,
2001, 23:59:59, at a price of $.07/GB/hr. The information in this file is sorted by
organization and account to display requested bills in the Bill Viewer and to
produce specially formatted files that can be imported by a third-party billing
application.
65Storage Area Manager Administrator’s Guide
Page 66

hp OpenView storage accountant
Getting started with billing
Before Storage Accountant can produce bills, you must set up service levels and
organization accounts and attach LUNs to them. Figure 18 illustrates the setup
steps.
Figure 18: Set up storage accountant
The arrows in Figure 18 indicate necessary sequences. For example, you cannot
place LUNs in a service level (step 2) until you create a service level (step 1).
Most importantly, you cannot add LUNs to accounts (step 5) until you have
completed all the other actions (1, 2, 3, and 4).
Note: You do not need to create the organization (step 3) if it already exists in Storage
Area Manager.
66 Storage Area Manager Administrator’s Guide
Page 67

See the instructions for each setup step as follows:
1. “Creating service levels” on page 68.
2. “Adding LUNs to service levels” on page 69.
3. “Managing organizations” on page 37.
4. “Adding accounts to organizations” on page 71.
5. “Adding LUNs to accounts” on page 72.
hp OpenView storage accountant
67Storage Area Manager Administrator’s Guide
Page 68

hp OpenView storage accountant
Service level setup and administration
Service levels determine the price that will be charged for LUN use and typically
reflect the relative value of the LUN or LUN service. You must create service
levels and add LUNs to them before Storage Accountant can charge for their use.
Creating service levels
Use this procedure to define a service level that you will later add LUNs to.
1. In the Applications tree, expand Storage Accountant.
2. Right-click Service Levels and select New Service Level.
3. Enter the service level name and an optional description in the New Service
Level window. For quick entry, accept the automatically generated identifier.
4. Enter a service level price or click Calculate to open the service level price
calculator. To use the price calculator, follow step a through step c.
a. Enter the Cost of storage space in this service level, Total storage in this
service level (GB), and Amortization time period (days). These values are
required.
b. Enter the Cost of storage utilities, supporting infrastructure, storage
management software, and other costs. These values are optional.
c. Click OK to accept the calculated price/GB/hour and enter it into the New
Service Level window.
5. Click OK to save the changes and close the window.
The new service level is listed in the Service Levels view panel and under
Service Levels in the Applications tree.
The next step is to add LUNs to the new service level.
68 Storage Area Manager Administrator’s Guide
Page 69

Adding LUNs to service levels
Use this procedure to place LUNs in a service level. LUNs must be placed in a
service level before they can be attached to accounts.
1. Expand Storage Accountant in the Applications tree.
2. Expand Service Levels.
3. Right-click a specific service level and select Add/Remove LUNs from the
shortcut menu.
The Add/Remove LUNs window lists available LUNs on the left and LUNs
already in the service level (but not yet attached to an account) on the right.
Note: To limit the list of available LUNs to a specific storage device, select the device
from the Select Source of LUNs list.
4. Select one or more LUNs from the list on the left and click the Add button.
The selected LUNs are dimmed in the LUNs not in Service Levels list and
added in blue to the LUNs in Service Level list. A green arrow in the leftmost
column indicates that the action is pending.
hp OpenView storage accountant
You can continue selecting LUNs and clicking Add. You can also select and
remove LUNs from the list on the right. All actions remain pending until you
click the Apply or OK button.
Note: There will be a short delay before the view panel is updated. Moving large
numbers of LUNs will increase the time it takes to apply the changes, about a minute for
every 2000 LUNs.
For best performance, HP recommends limiting the total number of LUNs in a service
level to 2000. If more than 2000 LUNs will use the same price, create another service
level with the same price.
5. Click OK to save the changes and close the window.
69Storage Area Manager Administrator’s Guide
Page 70

hp OpenView storage accountant
Deleting service levels
Use this procedure to discontinue an obsolete service level. Any LUNs in the
service level will be freed for placement in other service levels. Affected LUNs
must be removed from accounts before the service level can be deleted.
1. In the Applications tree, expand Storage Accountant.
2. Expand Service Levels.
3. If the service level contains LUNs that are in use by accounts, remove the
LUNs from the accounts (see page 73).
4. Right-click the service level and select Delete from the shortcut menu.
A confirmation window shows the name of the service level, the number of
affected accounts, and the number of LUNs that will be freed by deleting the
service level.
5. Click OK to delete the service level and close the window.
The service level is removed from the Applications tree and the Service
Levels view panel.
70 Storage Area Manager Administrator’s Guide
Page 71

Account setup and administration
Storage is billed by account. An organization can have many accounts, but must
have at least one. Human Resources, for example, could be an organization
account.
Adding accounts to organizations
Use this procedure to define an account for an existing organization. If you need
to create the organization, complete the procedures in“Managing organizations,”
on page 37, and then return to this procedure.
1. In the Resources tree, expand Organizations.
2. If organizations are organized into folders, expand the folder to view included
organizations.
3. Right-click the organization name and select New Account from the shortcut
menu.
The New Account window shows the organization ID and name and provides
places to enter account information. The only required information is the
account ID, which Storage Accountant generates for you.
4. If you want to change the automatically generated account ID, clear the
Automatically Generate ID check box and enter the desired ID in the
corresponding text box. The ID must be unique among all accounts in the
storage domain.
hp OpenView storage accountant
5. Optionally, enter a name for the account. Account names must be unique
within the organization. If you do not enter a name, the account will be
identified in the Resources tree by its ID.
6. Click OK to add the account and close the window.
The new account is listed under its respective organization in the Resources
tree and in the Accounting tab of the organization view panel.
Note: The organization will not be charged until you attach LUNs to one of its
accounts.
71Storage Area Manager Administrator’s Guide
Page 72

hp OpenView storage accountant
Adding LUNs to accounts
Use this procedure to attach LUNs to an account. If the LUNs are not already
attached to a service level, complete the procedure “Adding LUNs to service
levels,” described on page 69, and then return to this procedure.
Caution: Be sure that LUNs are physically and logically accessible to the
organization before you add them to an organization account.
1. In the Resources tree, expand Organizations.
2. If organizations are organized into folders, expand the folder to view included
organizations.
3. Expand a specific organization to reveal its accounts.
4. Right-click a specific account and select Add/Remove LUNs from the
shortcut menu.
The Add/Remove LUNs window lists available LUNs on the left and LUNs
already attached to the account on the right.
Note: To limit the list of available LUNs to a particular storage device or service level,
select Storage Devices or Service Levels from the top box above the list. Then select a
specific storage device or service level from the bottom box.
5. Select one or more LUNs from the list on the left and click the Add button.
The selected LUNs are dimmed in the LUNS not in Accounts list and added
in blue to the LUNs in Account list. A green arrow in the leftmost column
indicates that the action is pending.
You can continue selecting LUNs and clicking Add. You can also select and
remove LUNs from the list on the right. All actions remain pending until you
click the Apply or OK button.
Note: There will be a short delay before the view panel is updated. Moving large
numbers of LUNs will increase the time it takes to apply the changes, about a minute for
every 2000 LUNs.
For best performance, HP recommends limiting the total number of LUNs in an account
to 2000.
72 Storage Area Manager Administrator’s Guide
Page 73

6. Click OK to save the LUN placements and close the window.
Removing LUNs from accounts
Use this procedure to discontinue billing for specific LUNs. Billed hours will stop
accumulating at the moment that the LUNs are removed, and the LUNs will be
available to other accounts.
1. In the Resources tree, expand Organizations.
2. If organizations are organized into folders, expand the folder to view included
organizations.
3. Expand the organization that includes the desired account.
4. Right-click the account name and select Add/Remove LUNs from the
shortcut menu.
The Add/Remove LUNs window lists all unattached LUNs on the left and all
LUNs that are already attached to the account on the right.
5. Select the LUN(s) to be removed from the list on the right.
6. Click the Remove button.
The selected LUNs are dimmed in the list on the right and added in blue to the
list on the left. A green arrow in the leftmost column indicates that the action
is pending.
hp OpenView storage accountant
You can continue selecting LUNs and clicking Remove. You can also select
and add LUNs from the list on the left. All actions remain pending until you
click the Apply or OK button.
Note: There will be a short delay before the view panel is updated. Moving large
numbers of LUNs will increase the time it takes to apply the changes, about a minute for
every 2000 LUNs.
7. Click OK to save the LUN placements and close the window.
73Storage Area Manager Administrator’s Guide
Page 74

hp OpenView storage accountant
Closing accounts
Use this procedure to discontinue billing for a specific account. Charges will be
billed up to the moment that the account is closed. The account will be removed
from the Resources tree, and attached LUNs will become available to other
accounts.
Note: Although closed accounts are not deleted from the database, they cannot be
reopened. To restore an account, you need to add a new account. Because closed
accounts are not deleted, their IDs cannot be reused.
1. In the Resources tree, expand Organizations.
2. If organizations are organized into folders, expand the folder to view included
organizations.
3. Expand the individual organization that includes the account.
4. Right-click the name of the account and select Close on the shortcut menu.
A confirmation window shows the name of the account and the number of
LUNs that will become available by closing the account.
5. Click OK to close the account and close the window.
The account is removed from the Resources tree and the organization’s view
panel.
Note: To view closed accounts, select Show All Accounts or Show Closed Accounts
Only from the Select View box in the organization view panel.
74 Storage Area Manager Administrator’s Guide
Page 75

Billing configuration
Billing occurs on a monthly cycle. The billing period starts on the day and hour
that a bill is generated for the previous period. The period ends a month later. For
example, a bill is generated on June 28 at 23:00 for the period that ended on June
28 at 23:00, and the bill for the new period, June 28 (23:00) through July 28
(23:00), will be generated on July 28 at 23:00. The billing period is the same for
all organizations. You can change the billing period.
When bills are generated, copies are automatically exported to a special location
for access by a third-party billing application. You can change the format and
location of these copies to accommodate your billing application. Storage
Accountant does not monitor the export directory, so you may want to set up your
own procedures for aging and purging these files.
You can set an event trigger that launches a billing application when Storage
Accountant bills are generated. Instructions are on page 76.
Setting the billing period
Use this procedure to specify the day and hour that Storage Accountant generates
bills and begins a new billing period.
hp OpenView storage accountant
1. Select Tools > Configure.
2. Find Scheduling in the Configuration tree and select Storage Accountant
Billing Cycle.
3. For Generate bill on, enter the day of the month that the bill will be
generated; for example, 5. The number must be between 1 and 31. The default
day is 1, the first day of the month.
Note: If you choose 29, 30, or 31 as the day of the month to generate a bill, during
months that have fewer than 29, 30, or 31 days, the bill will be generated on the last
day of the month.
4. For Generate bill at, enter the time of day (hh:mm) that the bill will be
generated; for example, 22:30 (10:30 pm). The default time is 01:30 (1:30
am).
Text below the editable boxes shows you the date and time that the next bill
will be generated and the duration of the next billing period.
5. Click OK to save the changes and close the window.
75Storage Area Manager Administrator’s Guide
Page 76

hp OpenView storage accountant
Setting export options
Use this procedure to specify the file format and location for bills that you want to
import into a third-party billing application.
1. Select Tools > Configure.
2. Find Scheduling in the Configuration tree and select Storage Accountant
Billing Cycle.
3. In the Bill Export section of the Configuration window, select .csv, .html,
and/or .xml for the Exporter Output Formats. CSV and HTML are selected
by default.
4. For Exporter Output Directory, enter the name of the directory where
export files will be stored. The default location is <install
directory>\managementserver\data\accountant\
exporter\reports.
5. Click OK to save the changes and close the window.
Setting a billing event trigger
Use this procedure to create an event trigger that will invoke a script to import
newly generated bills into a third-party application. When bills are generated and
exported, an event is recorded in the audit log, and this procedure associates that
event with a Storage Area Manager event trigger.
1. Select Tools > Configure.
2. Select Triggers under Events in the Configuration tree.
3. Click the Add button.
4. Enter a name for the event trigger in the Name box. The name cannot include
spaces.
5. Select Storage Accountant in the Category box.
6. Select Informational in the Threshold box.
7. Select Bill_Exported in the Events list.
Caution: Do not select Bill_Generated, because this event occurs when bills
begin to be generated, and an incomplete or corrupt bill could be imported.
8. Select Run Command Action in the Action box.
76 Storage Area Manager Administrator’s Guide
Page 77

hp OpenView storage accountant
9. Select COMMAND in the Parameter list.
10. Enter a command (including the path) in the Value box next to the COMMAND
parameter, for example: C:\script.cmd
11. Click the OK button to add the trigger to the list and close the Add Trigger
window.
12. Click OK to save the changes and close the Configuration window.
77Storage Area Manager Administrator’s Guide
Page 78

hp OpenView storage accountant
Billing data management
Billing data includes bills and the Storage Accountant audit log. The audit log is a
record of all billing transactions and system events that affect storage charges. It
can help you identify the source of changes or problems in organizations’ bills.
(See “Viewing the audit log” in online help.) All this billing data accumulates over
the months in a growing database. To control the size of the database, Storage
Accountant deletes bills and audit log entries that have reached a specified age.
You can specify the maximum age of bills and audit log entries according to your
priorities for the availability of data versus storage space.
If you need permanent billing records, see “Archiving and restoring bills” on
page 79.
Setting the bill retention period
Use this procedure to specify how long bills are kept. Bills are deleted at the end
of the next billing period after the specified retention period. Until they are
deleted, bills can be viewed in the Bill Viewer.
1. Select Tools > Configure.
2. Select Storage Accountant Billing Cycle under Scheduling in the
Configuration tree.
3. In the Data Retention section, enter the number of days that you want to keep
monthly bills. The default is 365 days.
Note: The audit log lists the files that are purged and the files that will be purged with
the next bill.
4. Click OK to save the changes and close the window.
Setting the audit retention period
Use this procedure to specify the maximum age of entries in Storage Accountant’s
audit log. Entries older than the days specified are automatically deleted from the
log.
1. Select Tools > Configure.
2. Find Scheduling in the Configuration tree and select Storage Accountant
Billing Cycle.
78 Storage Area Manager Administrator’s Guide
Page 79

3. In the Purge audit log records older than box, enter the number of days that
you want to keep entries in the audit log. The default is 365 days.
4. Click OK to save the changes and close the window.
Archiving and restoring bills
Use this procedure to make duplicate monthly bills that you can save indefinitely
and restore when needed. When you restore a bill that you have archived, you can
view, print, or export it just like any other bill.
To archive monthly bills
Once a month, copy the entire contents or just the newest file from the
<install directory>\managementserver\data\accountant\
exporter directory to a secure backup location.
Note: The audit log lists the files that are deleted and the files that will be deleted with
the next bill.
To restore an archived bill to Storage Accountant
hp OpenView storage accountant
1. Copy the desired file from its backup location to <install
directory>\managementserver\data\accountant\
exporter on the management server. See “File name format” to identify the
file for the specified billing period.
2. Execute the CLUI command or open the Bill Viewer to view the restored file.
The billing period of the restored file will appear in the Billing Period list.
Note: If a restored file is older than Storage Accountant’s bill retention period, the file
will be deleted when the next bill is generated.
79Storage Area Manager Administrator’s Guide
Page 80

hp OpenView storage accountant
File name format
Bill file names are the times of the first and last daily records that are summarized
in the monthly bill. If bills are generated on the first day of the month at 01:00 and
daily records are created at 23:00, the bill will include records from the first
through the last day of the previous month. Times are specified by year, month,
day, hour, minute, and second, and separated by an underscore (“_”), as shown
below:
<yyyymmddhhmmss_yyyymmddhhmmss>.xml
■ Where yyyy is the year
■ mm is the month
■ dd is the day
■ hh is the hour
■ mm is the minute
■ ss is the second
For example, the file corresponding to the billing period January 1, 2001, through
January 31, 2001, is named 20010101230000_20010131230000.xml.
The file extension is XML for internal billing files and CSV, HTML, or XML for
exported files.
80 Storage Area Manager Administrator’s Guide
Page 81

Integrating bills with other applications
Use this procedure to integrate Storage Accountant with a billing application that
produces finished customer statements.
1. Set Storage Accountant’s export options to the file format and directory
location that your billing application will use. See “Setting export options” on
page 76.
2. Set up the billing application to retrieve the current bill file from the export
location. See “File name format” on page 80 for the bill naming convention.
Note: Consider using Storage Area Manager events and action triggers to start your
billing application as soon as Storage Accountant generates the monthly bill. See
“Setting a billing event trigger” on page 76.
3. Map billing application fields to the Storage Accountant export file. Although
contents vary depending on the format (.csv, .html, or .xml), all export files
contain the following information for each active organization:
— Unique organization identifier
hp OpenView storage accountant
— Unique account identifier
— Size of each billed LUN (in GBs)
— Price of each billed LUN per GB per hour
— Total charge for each billed LUN
— Total charge for each account
— Total organization charge
See the complete specifications for CSV and XML files in “Integrating hp
OpenView storage accountant with third-party billing applications”
(ThirdParty_Billing.pdf). This document and sample CSV and XML files are
located in ./client/doc/export_files (where “.” represents the
directory where Storage Area Manager is installed).
81Storage Area Manager Administrator’s Guide
Page 82

hp OpenView storage accountant
82 Storage Area Manager Administrator’s Guide
Page 83

hp OpenView storage builder
This chapter describes basic concepts and configuration procedures for Storage
Builder. The major topics covered include:
■ hp OpenView storage builder features, page 84
■ Physical and logical space, page 86
■ Managed applications, page 88
■ Capacity data collection, page 90
■ Managed application data collection, page 93
■ Capacity data archiving, page 96
■ Managed directories, page 98
■ Capacity thresholds, page 102
■ Managed application thresholds, page 108
■ Storage Builder reports, page 111
■ Storage Builder cluster support, page 117
■ Storage Builder volume manager support, page 121
4
83Storage Area Manager Administrator’s Guide
Page 84

hp OpenView storage builder
hp OpenView storage builder features
Storage Builder monitors and reports storage capacity in a storage network. It
routinely discovers the physical capacity of storage devices and the logical
capacity of hosts and NAS devices, and analyzes the information for current
usage, past and future usage trends, and threshold violations. You must install and
license Storage Builder to use these features.
■ Capacity views of hosts, NAS devices, storage devices, and the domain. For
hosts and NAS devices, view panels show the used and free file space. For
storage devices, view panels show the disk space that is visible to hosts, still
unformatted, and spent in overhead.
■ Lists of the directories, disks, users, volumes, and volume groups on each
host. Click any of these labels in the Resources tree to view corresponding
capacity data, including file system and logical volume metrics. Select a
specific resource from the list to view more information about the individual
directory, disk, user, volume, and so on.
■ Physical and logical cross references. At the storage device view, you can see
how LUN space is distributed to hosts and volumes. At the host view, you can
see the LUNs where volumes reside. When logical volume managers are
present, a graphical map shows you the LUN-volume correspondence within
volume groups.
■ Past and future usage trends. Display a line graph of past and future capacity.
Storage Builder predicts future capacity using sophisticated statistical models
that are sensitive to directional tendencies, seasonal variation, and the recency
of the data. You can select the model and adjust these factors to fit the nature
of the data and the purpose of the prediction. You can also set the confidence
level of the prediction and view the corresponding range of possible values.
■ Capacity thresholds and threshold events. Storage Builder monitors the
current and predicted capacity of individual resources for threshold violations.
If measured or predicted capacity exceeds or falls below a specified target,
Storage Builder sends a threshold violation to Storage Area Manager’s event
panel as soon as data becomes available on the management server.
Administrators can set thresholds and configure event triggers.
84 Storage Area Manager Administrator’s Guide
Page 85

hp OpenView storage builder
■ File analysis. View reports on stale files, junk files, the largest files, largest
directories, and all files and directories on each and all hosts in the domain.
■ Backup assessment. Line graphs show you the space needed for full and
incremental backups and the number of files modified each day.
■ Volume manager data. Storage Builder collects and displays information
about volume groups on hosts that use Veritas (VxVM), Logical Volume
Manager (LVM), or Windows Logical Disk Manager (LDM).
85Storage Area Manager Administrator’s Guide
Page 86

hp OpenView storage builder
Physical and logical space
Storage Builder displays capacity information independently for hosts, NAS
devices, and storage devices, but host and device capacity are actually two views
of the same space. When you view capacity on a host, you see an analysis of its
file systems. File systems are logical space that is physically distributed on various
storage and NAS devices. Conversely, when you view capacity on a storage
device, you see the physical space that contains parts of various file systems
(logical space). In Figure 19, matching fill patterns show where the same space
appears as logical space on a host or NAS device and as physical space on a
storage device.
Free
Space
Used
Space
Storage Device
Visible to Hosts
Host
Not Visible
to Hosts
Host
R:
Storage Network
Unreported
Space
Unconfigured
Figure 19: Physical and logical views of storage capacity
Host
R:
NAS Device
Free
R:
Space
Used
Space
86 Storage Area Manager Administrator’s Guide
Page 87

Definition of terms
The terms shown in Figure 19 have the following meanings in Storage Builder:
■ Free space is unused space in a host’s or NAS device’s file systems. File
systems are created on physical space, but their capacity does not equal the
size of the assigned physical space. Some physical space is consumed by
system overhead. Also, the capacity that you see when you select a host may
include file systems that reside on devices not discovered by Storage Area
Manager.
■ Used space is file system space that is occupied by files. You see used space
when you select a host or NAS device and view its capacity.
■ Visible to Hosts denotes disk or LUN space that has a physical path to one or
more Storage Area Manager hosts. A host can “see” space that it does not
have access to because Storage Allocater or another logical management tool
has assigned the space to another host.
■ Not Visible to Hosts denotes formatted disk or LUN space that is not reported
by a Storage Area Manager host. The space may be used by hosts that have no
Storage Area Manager Host Agent.
■ Unconfigured space is raw, unformatted disk space. The term applies
specifically to disk arrays, before the space is allocated to LUNs.
hp OpenView storage builder
About NAS devices
Storage Builder discovers space on a NAS device through host data collection, but
the space is reported with the NAS device. Figure 19 shows NAS device space
mounted as drive R: on two hosts.
Note: NAS device space must be mounted on a UNIX host to be discovered by Storage
Builder.
87Storage Area Manager Administrator’s Guide
Page 88

hp OpenView storage builder
Managed applications
Managed applications are business applications whose status and storage
consumption you want to monitor. To use the managed applications feature, set up
the Oracle AMP, configure data collection for applications and reports, define
domain and resource thresholds, and set up Exchange reports. Managed
application data is summarized according to the Capacity summarization
schedule.
Managed application maps visually display the hierarchical relationships of
entities within the business application, and the relationships between the
supported application and hosts, volumes, LUNs, and storage devices on a storage
network. The status monitoring provides early warnings of application problems
that may be caused by the storage subsystem.
Storage Builder provides a view of storage usage by application, including the
used, free and total storage capacity. For Oracle, capacity views are available for
tablespaces, data files, and log files. View panels for Oracle nodes show the total,
used, and free logical space. For Microsoft Exchange Server capacity views are
available for public folder stores, and mailbox stores.
In addition to capacity views and application status, Storage Builder
provides reports for Microsoft Exchange organizations.
Licensing
To take advantage of Storage Builder’s capacity views of managed applications,
Storage Builder must be installed and licensed. If Storage Builder is not installed
and licensed, a partial set of managed application features is available. This partial
feature set includes panels that show application status and logical application
mapping.
88 Storage Area Manager Administrator’s Guide
Page 89

Supported applications
Microsoft
■ Exchange 2000 – Single Instance, Windows 2000
■ Exchange 2003 – Single Instance, Windows 2003 (32-bit)
Oracle
Table 15: Supported Oracle versions
hp OpenView storage builder
Oracle single
instance
version
8.1.7.4
9.0.1.4
9.2.0.3 X X X X* X
9.2.0. 4 X X X X* X
*Note: Oracle supports the 64-bit version of 9.2.0 on Windows Server 2003 64-bit
hosts. The 32-bit version of 9.2.0 is not supported with Windows Server 2003 (64-bit).
HP-UX
11.xx
XXX X
XXX X
Solaris
8 and 9
Windows
2000
Windows Server
2003 (32- and
64-bit)
Tru64 version
5.1a and 5.1b
89Storage Area Manager Administrator’s Guide
Page 90

hp OpenView storage builder
Capacity data collection
Storage Builder collects capacity information about storage devices, NAS devices,
hosts, volumes, volume groups, directories, files, users, and managed applications.
All this information is typically collected several times a day and saved for as long
as past data is needed, or as long as there is space for the growing database.
Information about storage devices is collected by Storage Area Manager during
the discovery cycle. All other capacity information is collected by Storage Builder
collectors that are deployed with the Storage Area Manager Host Agents:
■ The volume data collector collects the used and free space in a volume’s file
systems, the size of the volume, and the association of logical volumes with
LUNs and volume groups on the selected host.
■ The file data collector collects the size and activity of the files and directories
on the selected host. File data must be collected to manage directories, report
files, monitor user consumption, and determine the space needed for backups.
Note: HP recommends collecting file data when the management server is not in heavy
use.
Note: File data cannot be collected for NAS devices on Windows 2000 systems. NAS
device capacity is reported only for volumes that are mounted on UNIX hosts.
■ The user data collector identifies the users on the selected host. If the host is a
domain controller or NIS (Network Information Name Service) server, all
users are identified. Otherwise, only the local users are identified. The
capacity associated with user accounts is collected by the file data collector.
■ The application gatherer collects Exchange data, including the top-N largest
mailbox stores, the top-N largest public folder stores, and stale mailbox
stores.
90 Storage Area Manager Administrator’s Guide
Page 91

Scheduling capacity collection
Use this procedure to change Storage Builder’s schedules for collecting capacity
information.
1. Select Tools > Configure.
Note: To edit the collection schedule for a single host, you may want to select the host
in the Resources tree and click the Configure button in the host’s Capacity view panel.
2. Select Capacity Collection under Scheduling in the Configuration tree. The
Capacity Collection scheduling panel displays a list of hosts and the dates and
times of the next scheduled collections on each. Click the Show
Organizations button to filter the list by a selected organization.
3. Select the host(s) whose schedule(s) you want to change. (To select multiple
hosts, use the Shift or Control key.)
4. Click the Set Schedule button.
5. Click the tab of the collection schedule—for volume, file, user, or Exchange
data—that you want to change.
6. To enable or disable collection of the selected data, click the Enable Data
Collection check box. Enabling data collection activates other text boxes in
the window.
hp OpenView storage builder
7. Once collection is enabled, specify the hours of collection as follows:
— Enter the hour (0 through 23) and the minute (0 through 59) of the first
collection of the day in the Start at boxes.
— For periodic collections until the end of the day, check the Repeat box,
and in the box at the right, enter the number of hours that will elapse
between each collection.
8. In the Collection Days section, select each day of the week that data will be
collected. The hours specified in Collection Hours will apply to each day you
select.
Note: To return the settings to the factory defaults, click the Restore Defaults button.
91Storage Area Manager Administrator’s Guide
Page 92

hp OpenView storage builder
9. To change another capacity collection schedule for the same host, click its tab
and repeat steps 6 through 8.
10. When you are satisfied with the volume, file, user , and Exchange data
schedules, click OK in the Edit Collection Schedules window.
11. Click the Apply button in the Capacity Collection scheduling panel to
implement your schedule changes and continue scheduling collection for
other hosts, or click OK to apply your changes and close the Configuration
window.
Collecting interim capacity data
Use this procedure to collect capacity data immediately on a selected host. The
procedure displays the Start Collection window and allows you to choose which
type of data to collect.
Data will appear in Capacity view panels after it is collected and stored in the
database. Depending on the amount of data requested and other factors, this may
take awhile.
Note: If the host or Host Agent is unavailable, a Storage Builder event will alert you
that data collection failed to start. Check the status of the Host Agent on the specified
host.
1. Select Tools > Configure.
2. Select Capacity Collection under Scheduling in the Configuration tree. The
Capacity Collection scheduling panel displays a list of hosts and the next
scheduled collections on each. Click the Show Organizations button to filter
the list by a selected organization.
3. Select the host(s) that you want to collect data from. (Use the Shift or Control
key to select multiple hosts.)
4. Click the Start Collection button.
5. In the Start Collection window, select one or more types of data to collect:
Volume Da ta , File Data, User Data, and/or Exchange Report Data.
6. Click OK to start collecting the selected capacity data on the selected host(s).
92 Storage Area Manager Administrator’s Guide
Page 93

Managed application data collection
Storage Builder collects managed application data for Microsoft Exchange and
Oracle. This information is typically collected several times a day and saved for as
long as past data is needed, or as long as there is space for the growing database.
The application gatherer collects the following data:
■ Oracle data includes information about LUNs and volumes used by Oracle
database tablespaces, datafiles, redo logs, and archive log destinations. The
collected data also includes Oracle instance properties such as instance state,
archive mode, alert log size, and dump space used.
■ Exchange data includes usage information about LUNs and volumes used by
an Exchange organization, administrative group, server, storage group,
mailbox store, public folder store, and log files, the average size of mailboxes
in a mailbox store, the average size of public folders in a public folder store,
and Exchange instance properties such as instance state, version and host.
Scheduling managed application data collection
Use this procedure to change Storage Builder’s schedules for collecting managed
application data. The Configuration window displays the editable collection
schedules for individual hosts and for two types of data:
hp OpenView storage builder
1. Select Tools > Configure.
Note: If you want to edit the collection schedule for a single host, you may want to
select the host in the Resources tree and click the Configure button in the host’s
Capacity view panel.
2. Select Managed Application Collection under Scheduling in the
Configuration tree. The Managed Application Collection scheduling panel
displays a list of hosts and the dates and times of the next scheduled
collections on each. Click the Show Organizations button to filter the list by
a selected organization.
3. Select the host(s) whose schedule(s) you want to change. (To select multiple
hosts, use the Shift or Control key.)
4. Click the Set Schedule button at the top of the view panel.
5. Click the tab of the collection schedule (Oracle or Exchange) that you want to
change.
93Storage Area Manager Administrator’s Guide
Page 94

hp OpenView storage builder
6. To enable or disable collection of the selected data, click the Enable Data
Collection check box. A check mark indicates data will be collected as
specified by the other entries in the window.
7. Once collection is enabled, specify the hours of collection as follows.
— Enter the hour (0 through 23) and the minute (0 through 59) of the first
— For periodic collections until the end of the day, check the Repeat check
8. In the Collection Days section, select each day of the week that data will be
collected. The hours specified in Collection Hours will apply to each day you
select.
Note: To return the settings to the factory defaults, click the Restore Defaults button.
9. To change another managed application collection schedule for the same host,
click its tab and repeat steps 6 through 8.
10. When you are satisfied with the Oracle and Exchange data schedules, click
OK in the Edit Collection Schedules window.
11. Click the Apply button in the Managed Application Collection scheduling
panel to implement your schedule changes and continue scheduling collection
for other hosts, or click OK to apply your changes and close the
Configuration window.
collection of the day in the Start at boxes.
box and, in the box at the right, enter the number of hours that will elapse
between each collection.
Collecting interim managed application data
Use this procedure to collect managed application data immediately on a selected
host. The procedure displays the Start Collection window and allows you to
choose which type of data to collect.
Data will appear in Capacity view panels after it is collected and stored in the
database. Depending on the amount of data requested and other factors, this may
take awhile.
94 Storage Area Manager Administrator’s Guide
Page 95

hp OpenView storage builder
Note: If the host or Host Agent is unavailable, a Storage Builder event will alert you
that data collection failed to start. Check the status of the Host Agent on the specified
host.
1. Select Tools > Configure.
2. Select Managed Application Collection under Scheduling in the
Configuration tree. The Capacity Collection scheduling panel displays a list
of hosts and the next scheduled collections on each. Click the Show
Organizations button to filter the list by a selected organization.
3. Select the host(s) that you want to collect data from. (Use the Shift or Control
key to select multiple hosts.)
4. Click the Start Collection button.
5. In the Start Collection window, select one or more types of data to collect:
Exchange Data and/or Oracle Data.
6. Click OK to start collecting the selected data on the selected host(s).
95Storage Area Manager Administrator’s Guide
Page 96

hp OpenView storage builder
Capacity data archiving
Storage Builder routinely summarizes the data that has been collected over several
days and then discards the original data. Summaries contain the weighted average,
minimum and maximum values, and standard deviation for each measurement
that Storage Builder collects. These values enable Storage Builder to display
capacity history, predict future capacity, and conserve space in the database.
Summarized data is saved for as long as you want to view historical data, or as
long as there is space for the growing database.
Scheduling capacity summaries
Use this procedure to set the schedule for summarizing collected capacity and
managed application data and for deleting aged summaries. The procedure
displays the Configuration window with the current summarization settings in
editable text boxes.
1. Select Tools > Configure.
2. Select Total Capacity Summarization under Scheduling in the
Configuration tree.
3. To change the minimum number of days that data is kept before it can be
summarized, enter a value for Accept measurements for summary after ___
days. Higher values increase the time that unsummarized data is displayed in
capacity graphs. The default is 7 days. Collected data is deleted after it is
summarized.
4. To change the number of days of collected data that summaries include, enter
a value for Summarize collected measurements every ___ days. Higher values
increase the interval between summaries in capacity graphs. The default is 7
days.
Note: Higher summary intervals also affect the period for which unsummarized data is
displayed in capacity graphs. For example, if data must be kept 7 days before it can be
summarized and summaries occur every 5 days, some data will be 12 days old before
it is summarized.
96 Storage Area Manager Administrator’s Guide
Page 97

hp OpenView storage builder
5. To increase or decrease the number of days that capacity summaries will be
kept, enter a value for Keep summary measurements for ___ days. Historical
data is displayed in capacity graphs for as long as summaries exist. The
default is 365 days.
Note: To return settings to the factory settings, click the Restore Defaults button.
6. Click the Apply button to implement your changes and continue working in
the Configuration window, or click OK to apply your changes and close the
window.
97Storage Area Manager Administrator’s Guide
Page 98

hp OpenView storage builder
Managed directories
Managed directories are directories whose size you want to monitor. When
directories are managed, you can view, report, and set thresholds on their size.
Directory size in capacity view panels is the sum of the sizes of all files in the
directory, excluding subdirectories and their files. To get the size of a directory
including its subdirectories and their files, use the Command Line User Interface
(CLUI).
You can select directories to manage once Storage Builder has collected file data.
Until then, Storage Area Manager’s Directories folders and tabs are empty. A
Directories folder contains managed directories, not all directories.
Note: To view a list of all directories, managed and unmanaged, on a selected host or
volume, click the File/Directory detailed list button in the host Capacity tab or the
volume Properties tab.
You can view managed directories for a host, a volume, or the whole domain.
Figure 20 shows the contents of a managed directories folder for a selected host:
98 Storage Area Manager Administrator’s Guide
Page 99

hp OpenView storage builder
Figure 20: Managed directories view panel: selected host
Click the Line Graph button in managed directory view panels to view
directory sizes in the past and predictable future. Click the Pie Chart button
to compare directory sizes. Double-click in a list of managed directories to view
the properties of the selected directory, including how much of the volume the
directory occupies.
99Storage Area Manager Administrator’s Guide
Page 100

hp OpenView storage builder
Adding managed directories
Use this procedure to select directories whose size you want to monitor. The
procedure displays a hierarchical list of all directories and subdirectories on a
selected host or NAS device.
Note: Volume and file data must be collected before you can complete this procedure.
1. In the Resources tree, expand Hosts or NAS Devices.
2. Expand the specific host or NAS device where the directories exist, and click
the Directories subfolder.
3. Click the Add Directories button at the bottom of the Managed Directories
view panel. The Add Directories window displays a tree of volumes,
directories, and subdirectories.
Note: If no volumes or directories appear in the Add Directories window, make sure
that volume and file data was successfully collected. See the Troubleshooting topic
“Data is unavailable in the Add Directories window” on page 251.
4. In the Add Directories window, select one or more directories to be managed.
(Use the Control or Shift key to select multiple directories.)
5. Click OK to add the selected directories and close the Add Directories
window, or click Apply to add the selected directories and leave the window
open and make more selections.
Removing managed directories
Use this procedure to discontinue monitoring selected managed directories. The
removed directories will no longer appear in the host or NAS device’s directories
view panels. Removing a managed directory has no effect on the existence of the
directory.
1. In the Resources tree, expand Hosts or NAS Devices.
2. Expand the specific host or NAS device where the directories exist and click
the Directories subfolder.
100 Storage Area Manager Administrator’s Guide
 Loading...