

Page 1

Page 2

Notice
In a continuing effort to improve the quality of our products, technical and environmental information
in this document is subject to change without notice.
This manual and any examples contained herein are provided “as is” and are subject to change
without notice. Hewlett-Packard Company makes no warranty of any kind with regard to this manual,
including, but not limited to, the implied warranties of merchantability and fitness for a particular
purpose. Hewlett-Packard Co. shall not be liable for any errors or for incidental or consequential
damages in connection with the furnishing, performance, or use of this manual or the examples herein.
Consumer transactions in Australia and the United Kingdom: The above disclaimers and limitations
shall not apply to Consumer transactions in Australia and the United Kingdom and shall not affect the
statutory rights of Consumers.
© Copyright Hewlett-Packard Company 2000. All rights reserved. Reproduction, adaptation, or
translation of this manual is prohibited without prior written permission of Hewlett-Packard
Company, except as allowed under the copyright laws.
The programs that control this product are copyrighted and all rights are reserved. Reproduction,
adaptation, or translation of those programs without prior written permission of Hewlett-Packard Co.
is also prohibited.
Portions of the programs that control this product may also be copyrighted by Microsoft Corporation,
SystemSoft Corporation, Crystal Semiconductor Corporation, Phoenix Technologies, Ltd., Silicon
Motion Corporation, ESS, and Adobe Systems Incorporated. See the individual programs for
additional copyright notices.
Microsoft®, MS-DOS®, and Windows® are U.S. registered trademarks of Microsoft Corporation.
Pentium® and the Intel Inside logo are U.S. registered trademarks of Intel Corporation. Adobe® and
Acrobat® are trademarks of Adobe Systems Incorporated.
All certifications may not be completed at product introduction. Check with your HP reseller for
certification status.
This equipment is subject to FCC rules. It will comply with the appropriate FCC rules before final
delivery to the buyer.
Hewlett-Packard Company
Mobile Computing Division
19310 Pruneridge Ave.
Cupertino, CA 95014, U.S.A.
Edition History
Edition 1......................... August 2000
ii HP OmniBook XE3
Page 3

Contents
1. Product Information ................................................................................................. 1-1
Technology Codes.........................................................................................................................1-2
Features .........................................................................................................................................1-3
Operation....................................................................................................................................... 1-6
Turning the Notebook On and Off ......................................................................................... 1-6
Checking the Notebook’s Status ............................................................................................ 1-7
Using Fn Hot Keys................................................................................................................. 1-9
Resetting the Notebook ........................................................................................................ 1-10
Using the CD-ROM or DVD Player .................................................................................... 1-11
Specifications .............................................................................................................................. 1-12
Hardware Specifications....................................................................................................... 1-12
Software Specifications........................................................................................................ 1-14
System Resources................................................................................................................. 1-15
Internal Design............................................................................................................................1-18
2. Removal and Replacement .......................................................................................2-1
Disassembly Flowchart ................................................................................................................. 2-2
Removing the Battery (User-Replaceable) ................................................................................... 2-4
Removing an SDRAM Module (User-Replaceable)..................................................................... 2-5
Removing the Mini-PCI PCA (User-Replaceable).......................................................................2-7
Removing the Keyboard Cover (with Hinge Covers) (User-Replaceable)...................................2-9
Removing the Keyboard (User-Replaceable) ............................................................................. 2-11
Removing the Hard Disk Drive Assembly (User-Replaceable).................................................. 2-13
Replacing Small Parts (User-Replaceable) ................................................................................. 2-16
Removing the Display Assembly (HP Authorized Service Providers Only)..............................2-17
Removing the Top Case (HP Authorized Service Providers Only)............................................ 2-20
Removing the CD Player PCA (HP Authorized Service Providers Only).................................. 2-22
Removing the Hinge Saddle Set (HP Authorized Service Providers Only) ............................... 2-23
Removing the Video PCA (HP Authorized Service Providers Only)......................................... 2-25
Removing the Heatsink Assembly (with Fan) (HP Authorized Service Providers Only).......... 2-27
Removing the CPU Module (HP Authorized Service Providers Only)...................................... 2-29
Removing the Floppy Disk Drive (HP Authorized Service Providers Only) ............................. 2-31
Removing the CD-ROM/DVD Drive (HP Authorized Service Providers Only) ....................... 2-33
Removing the Motherboard or Bottom Case (HP Authorized Service Providers Only) ............ 2-34
Reinstalling the Motherboard............................................................................................... 2-37
Replacing the Bottom Case.................................................................................................. 2-38
Removing Notebook Components (HP Authorized Service Providers Only)............................2-40
HP OmniBook XE3 iii
Page 4

3. Troubleshooting and Diagnostics............................................................................. 3-1
Troubleshooting ............................................................................................................................ 3-2
Troubleshooting the Problem................................................................................................. 3-3
Verifying the Repair............................................................................................................... 3-3
Suggestions for Troubleshooting ........................................................................................... 3-4
Diagnostic Tools ......................................................................................................................... 3-17
DiagTools............................................................................................................................. 3-17
Power-On Self-Test..............................................................................................................3-24
Sycard PCCtest 450 CardBus Card (Optional) .................................................................... 3-27
Desktop Management Interface (DMI)................................................................................ 3-28
BIOS Setup Utility ............................................................................................................... 3-30
4. Replaceable Parts ......................................................................................................4-1
5. Reference Information..............................................................................................5-1
Password Removal Policy............................................................................................................. 5-1
Hewlett-Packard Display Quality Statement ................................................................................ 5-2
Service Notes ................................................................................................................................ 5-4
iv HP OmniBook XE3
Page 5

Figures
Figure 1-1. Top/Right View................................................................................................................. 1-3
Figure 1-2. Front View......................................................................................................................... 1-4
Figure 1-3. Rear/Left View.................................................................................................................. 1-4
Figure 1-4. Bottom View ..................................................................................................................... 1-5
Figure 1-5. Status Lights...................................................................................................................... 1-7
Figure 1-6. Resetting the Notebook................................................................................................... 1-10
Figure 1-7. Multimedia Buttons......................................................................................................... 1-11
Figure 1-8. Replaceable Module Diagram......................................................................................... 1-18
Figure 2-1. Disassembly Flow ............................................................................................................. 2-2
Figure 2-2. Removing the Battery........................................................................................................ 2-4
Figure 2-3. Removing the SDRAM Cover .......................................................................................... 2-5
Figure 2-4. Removing an SDRAM Module......................................................................................... 2-6
Figure 2-5. Removing the Mini-PCI Card ........................................................................................... 2-8
Figure 2-6. Removing the Keyboard Cover Retaining Screws............................................................2-9
Figure 2-7. Removing the Keyboard Cover....................................................................................... 2-10
Figure 2-8. Loosening the Keyboard Retaining Screws .................................................................... 2-11
Figure 2-9. Disconnecting the Keyboard Cable................................................................................. 2-12
Figure 2-10. Removing the Hard Disk Drive.....................................................................................2-13
Figure 2-11. Removing the Hard Disk Carrier................................................................................... 2-14
Figure 2-12. Removing the Display................................................................................................... 2-18
Figure 2-13. Video PCA DIP Switches.............................................................................................. 2-19
Figure 2-14. Removing the Top Case Retaining Screws...................................................................2-20
Figure 2-15. Removing the Top Case................................................................................................ 2-21
Figure 2-16. Removing the CD Player PCA...................................................................................... 2-22
Figure 2-17. Removing the Hinge Saddle Retaining Screws............................................................. 2-23
Figure 2-18. Removing the Hinge Saddle..........................................................................................2-24
Figure 2-19. Removing the Video PCA.............................................................................................2-26
Figure 2-20. Removing the Heatsink Assembly................................................................................ 2-28
Figure 2-21. Removing the CPU Module.......................................................................................... 2-30
Figure 2-22. Removing the Floppy Disk Drive ................................................................................. 2-32
Figure 2-23. Removing the CD-ROM/DVD Drive............................................................................ 2-33
Figure 2-24. Removing the Motherboard...........................................................................................2-36
Figure 2-25. Installing Docking Doors .............................................................................................. 2-38
Figure 2-26. Installing the PCMCIA Doors....................................................................................... 2-39
Figure 2-27. Example of Serial Number Label.................................................................................. 2-39
Figure 3-1. Basic Troubleshooting Steps............................................................................................. 3-2
Figure 3-2. DiagTools Screens — Basic and Advanced....................................................................3-17
Figure 3-3. Serial and Parallel Loopback Connectors ....................................................................... 3-19
Figure 4-1. Exploded View.................................................................................................................. 4-2
HP OmniBook XE3 v
Page 6

Tables
Table 1-1. OmniBook XE3 Series Models .......................................................................................... 1-1
Table 1-2. Activating Power Modes.................................................................................................... 1-6
Table 1-3. Status Lights....................................................................................................................... 1-8
Table 1-4. Fn Hot Keys........................................................................................................................ 1-9
Table 1-5. XE3 Series Hardware Specifications................................................................................ 1-12
Table 1-6. XE3 Series Software Specifications................................................................................. 1-14
Table 1-7. System Interrupts.............................................................................................................. 1-15
Table 1-8. System Memory................................................................................................................ 1-15
Table 1-9. System Input/Output Addresses (100-3FF)...................................................................... 1-16
Table 1-10. DMA Channels............................................................................................................... 1-16
Table 1-11. XE3 Series Accessories.................................................................................................. 1-17
Table 1-12. Functional Structure ....................................................................................................... 1-19
Table 2-1. Removal Cross-Reference.................................................................................................. 2-1
Table 2-2. Required Equipment........................................................................................................... 2-3
Table 2-3. Recommended Screw Torques........................................................................................... 2-3
Table 2-4. Replacing Small Parts (User-Replaceable)....................................................................... 2-16
Table 2-5. Removing Notebook Components.................................................................................... 2-40
Table 3-1. Scope of Diagnostic Tools.................................................................................................. 3-4
Table 3-2. Troubleshooting Suggestions ............................................................................................. 3-5
Table 3-3. DiagTools Error Codes..................................................................................................... 3-20
Table 3-4. POST Terminal-Error Beep Codes................................................................................... 3-24
Table 3-5. POST Messages................................................................................................................ 3-25
Table 3-6. Sycard PCCtest Commands..............................................................................................3-27
Table 3-7. BIOS Setup Menus and Parameters.................................................................................. 3-30
Table 4-1. Replaceable Parts................................................................................................................ 4-3
Table 4-2. Accessory Replaceable Parts.............................................................................................. 4-5
Table 4-3. Part Number Reference ...................................................................................................... 4-6
Table 5-1. XE3 TFT LCD Guidelines ................................................................................................. 5-3
vi HP OmniBook XE3
Page 7

Introduction
This manual provides reference information for servicing the HP OmniBook XE3 notebook PC. It is
for use by HP-authorized service personnel while installing, servicing, and repairing these products.
The manual is designed as a self-paced guide that will train you to install, configure, and repair XE3
notebooks. The manual is self-contained, so you can follow it without having equipment available.
The following table lists other sources of information about the notebook and related products.
Source Address or Number Comments
HP Notebook Web Site http://www.hp.com/notebooks
http://www.europe.hp.com/notebooks
(European mirror)
HP Partnership Web http://partner.americas.hp.com Restricted to Authorized Resellers
HP Asia Pacific Channel
Support Centre for DPSP
Partners
HP/MCD Web Site http://www.mcd.hp.com HP’s internal web site for division
America Online Keyword: HP Call (800) 827-6364 for membership
CompuServe GO HP Call (800) 524-3388 for membership
HP Support Assist CD-ROM (800) 457-1762 US and Canada.
Microsoft Windows manual Information about Windows operating
Microsoft Web http://www.microsoft.com Information and updates for Windows
http://www.hp.com.au Restricted to DPSP Partners only.
(801) 431-1587 Outside US and Canada.
No usage restriction.
only.
information.
within the US.
within the US.
system.
operating systems.
HP OmniBook XE3 vii
Page 8

Page 9

The OmniBook XE3 series is HP’s value all-in-one business notebook computer, targeted at small- to
medium-sized businesses. It combines affordability, value, ease-of-use, and quality in a convenient
package that integrates easily into any SMB environment at a wide range of prices. It also
incorporates several new technologies and an enhanced industrial design for greater ease-of-use,
quality, and reliability.
Table 1-1. OmniBook XE3 Series Models
Product
1
F2112X Celeron 550 MHz 12.1-in TFT SVGA 5 GB 64 MB 24x CD-ROM Modem NiMh 98/2K
F2113X Celeron 600 MHz 12.1-in TFT SVGA 5 GB 64 MB 24x CD-ROM Modem LiIon 98/2K
F2114X Pentium III 650 MHz 12.1-in TFT SVGA 5 GB 64 MB 24x CD-ROM Modem LiIon 98/2K
F2115X Celeron 650 MHz 14.1-in TFT XGA 5 GB 64 MB 8x DVD Modem/LAN LiIon 98/2K
F2116X Pentium III 700 MHz 14.1-in TFT XGA 10 GB 64 MB 8x DVD Modem/LAN LiIon 98/2K
F2117X Pentium III 700 MHz 15.0-in TFT XGA 10 GB 64 MB 8x DVD Modem/LAN LiIon 98/2K
F2118X Pentium III 700 MHz 15.0-in TFT XGA 10 GB 128 MB 8x DVD Modem/LAN LiIon 98/2K
F2119X
F2120X
F2121X
F2122X
F2123X
F2124X
F2126X
5
5
6
6
6
6
7
This table lists only base product configurations—custom configurations are not included.
1
For the products listed:
“
x
” suffix means
“W”, “WT”, or “WG” for Windows 95 or Windows 98 installed, or
“K”, “KT”, or “KG” for Windows 2000 installed (marketing distinction only).
2
Intel Mobile Pentium III or Intel Mobile Celeron processor.
3
All modems 56K. All LAN support Ethernet 10Base-T (10 Mbps) and 100Base-T (100 Mbps).
4
OS = Windows 98 (98), Windows 2000 (2K), or Windows Millennium Edition (ME).
5
North America (U.S.) only.
6
Europe only (modemless).
7
Japan only.
2
CPU
Display Hard
Drive
Standard
SDRAM
CD-ROM/DVD
(max. speed)
Mini-PCI
3
Card
Battery OS
Celeron 600 MHz 12.1-in TFT SVGA 5 GB 64 MB 24x CD-ROM Modem/LAN LiIon 98/2K
Pentium III 650 MHz 12.1-in TFT SVGA 5 GB 64 MB 24x CD-ROM Modem/LAN LiIon 98/2K
Celeron 600 MHz 12.1-in TFT SVGA 5 GB 64 MB 24x CD-ROM None LiIon 98/2K
Pentium III 650 MHz 12.1-in TFT SVGA 5 GB 64 MB 24x CD-ROM None LiIon 98/2K
Celeron 650 MHz 14.1-in TFT XGA 5 GB 64 MB 8x DVD None LiIon 98/2K
Pentium III 700 MHz 15.0-in TFT XGA 10 GB 64 MB 8x DVD None LiIon 98/2K
Celeron 600 MHz 14.1-in TFT XGA 10 GB 64 MB 24x CD-ROM Modem/LAN LiIon 98/2K
4
HP OmniBook XE3 Product Information 1-1
Page 10

Technology Codes
HP does not change the name of a product every time the product’s technology changes. While this
helps ensure continuing market momentum for HP products, it complicates technology deployment
and support processes.
To help solve this problem, HP has added a technology code to the serial number of each of its
products. Since the BIOS must be matched to the notebook’s hardware, the same code is used for the
BIOS and the hardware. This manual refers to technology code deferences where applicable.
The table below shows the technology codes and the changes they signify for the products. Before
downloading software or drivers or performing repairs, note the technology code for the HP notebook
model.
Note that the first two characters of the BIOS ID (for example, GC.M1.02) indicate the hardware
technology. You can also determine the BIOS ID using the BIOS Setup Utility, or by pressing ESC
during the boot process when the HP logo appears.
This manual contains service information for products having the following technology codes.
Technology code Product name Details
GC OmniBook XE3
Pavilion Notebook
N5130/50/70/90/95
Initial platform technology.
1-2 Product Information HP OmniBook XE3
Page 11

Features
The following illustrations show the notebook’s main external features. For an exploded view of the
notebook, see page 4-2.
Figure 1-1. Top/Right View
1. One-Touch buttons.
2. Power button.
3. Status lights (left to right: power status, battery
status, caps lock, num lock, scroll lock, floppy
drive access, hard drive access, CD-ROM or DVD
access. See page 1-7).
4. Pad Lock touch pad on/off button.
5. Touch pad (pointing device).
6. Scroll up/down toggle.
7. Click buttons.
8. CD-ROM or DVD drive.
9. Built-in microphone.
10. CD-ROM or DVD eject button.
11. Standby button (blue). Suspends and resumes
operation.
12. Modem port (on certain models).
13. LAN port (on certain models).
HP OmniBook XE3 Product Information 1-3
Page 12
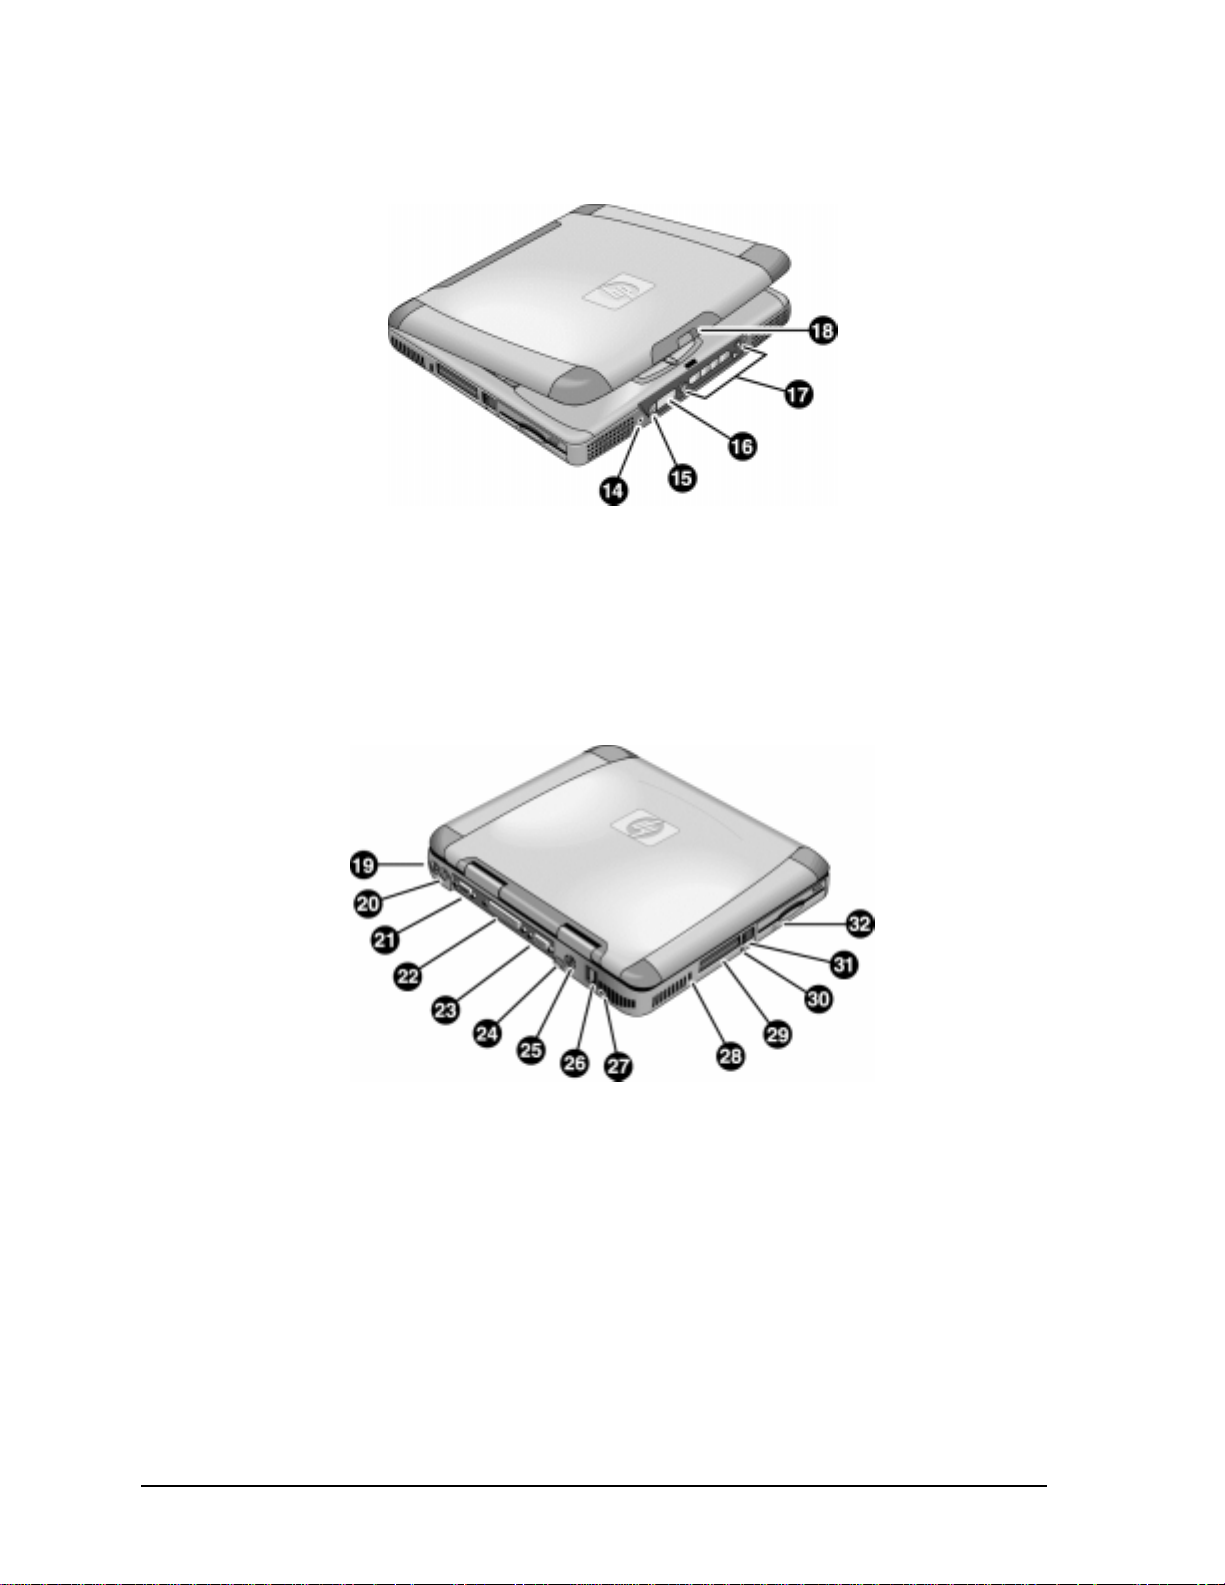
Figure 1-2. Front View
14. Headphone jack.
15. Status panel mode select button.
16. Status panel.
Figure 1-3. Rear/Left View
19. AC adapter jack.
20. PS/2 port (external mouse or keyboard).
21. Serial port.
22. Parallel port.
23. VGA port (external monitor).
24. Infrared port.
25. TV output port.
17. Multimedia buttons.
18. Latch (to open display).
26. Two USB ports.
27. Microphone jack.
28. Kensington lock slot (security connector).
29. PC card slots (upper and lower).
30. System-off switch (for resetting notebook).
31. PC card eject buttons.
32. Floppy disk drive.
1-4 Product Information HP OmniBook XE3
Page 13

Figure 1-4. Bottom View
33. Battery.
34. Battery latch.
35. SDRAM cover.
36. Port replicator (docking) connector.
37. Mini-PCI card cover.
HP OmniBook XE3 Product Information 1-5
Page 14

Operation
This section gives an overview of the notebook’s operation.
Turning the Notebook On and Off
You can start and stop the notebook using its power button or blue standby button. However, at times
you may want to use certain methods to start or stop the notebook—depending on power
considerations, types of active connections, and start-up time.
Table 1-1. Activating Power Modes
Power mode To enter this mode To turn on again
Display-off mode
(Power status LED stays green.)
Saves minimal power.
Turns off display and hard disk.
Restarts quickly.
Maintains network connections.
Standby mode
(Power status LED turns amber.)
Saves significant power.
Turns off display, hard drive, and other
components.
Maintains current session in SDRAM.
Restarts quickly.
Restores network connections.
Hibernate mode
(Power status LED turns off.)
Saves maximum power.
Saves current session to disk, then shuts down.
Restores network connections.
Shut down (off)
(Power status LED turns off.)
Saves maximum power.
Turns off without saving current session.
At startup, resets everything, starts a new session,
and restores network connections with mini-PCI
card, and with some PCMCIA cards.
Allow timeout. Press any key or
move a pointing
device to restore
the display (“Instant
On”).
Press the blue standby button
–or–
click Start, Shutdown, Standby
–or–
allow timeout (Windows 98 only).
Press Fn+F12
–or–
Click Start, Shut Down, Hibernate
(Windows 2000 only)
–or–
allow timeout (Windows 98 only).
Click Start, Shut Down, Shut down
(recommended)
–or–
slide the power button.
Press the blue
standby button to
display your current
session (“InstantOn”).
Press the blue
standby button to
restart and restore
your previous
session.
Press the blue
standby button to
restart with a new
session.
1-6 Product Information HP OmniBook XE3
Page 15
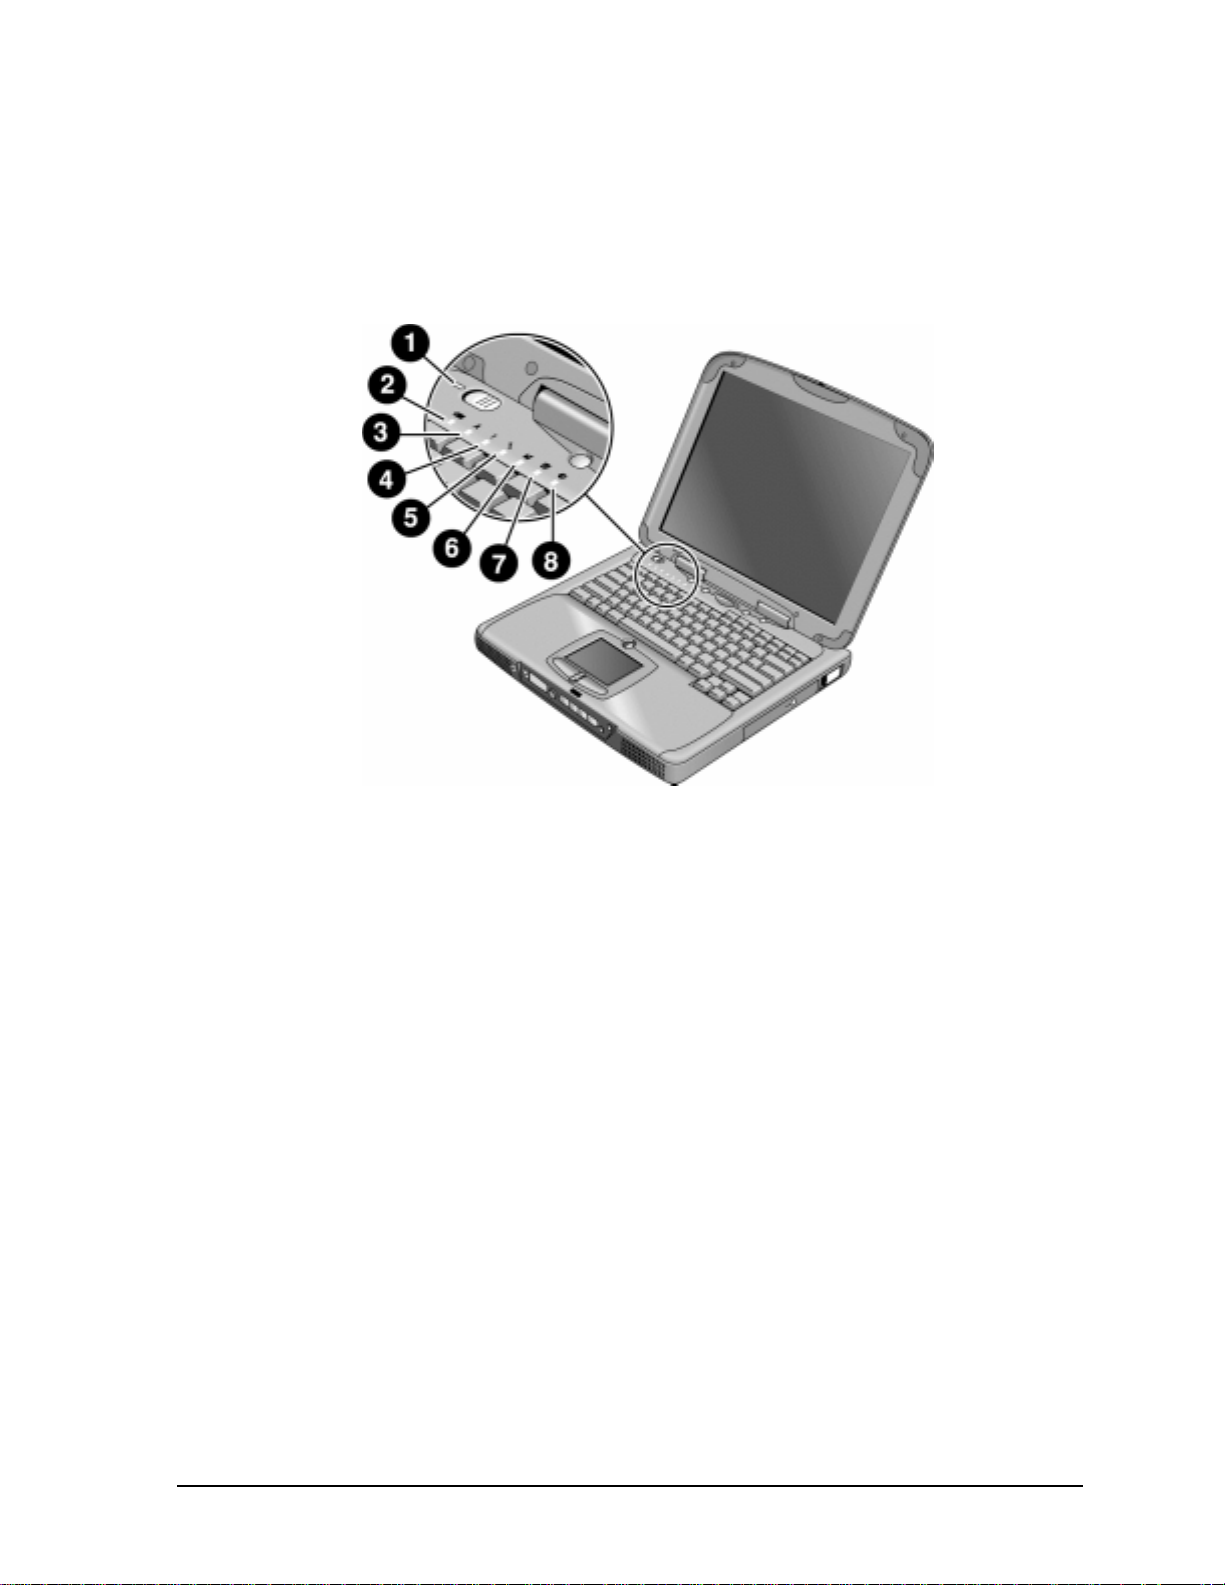
Checking the Notebook’s Status
The notebook’s status lights—located above the keyboard—report power and battery status, keyboard
status, and drive activity.
Figure 1-5. Status Lights
1. Power status.
2. Battery status.
3. Caps lock.
4. Num lock.
5. Scroll lock.
6. Floppy disk drive activity.
7. Hard disk drive activity.
8. CD-ROM or DVD drive activity.
HP OmniBook XE3 Product Information 1-7
Page 16
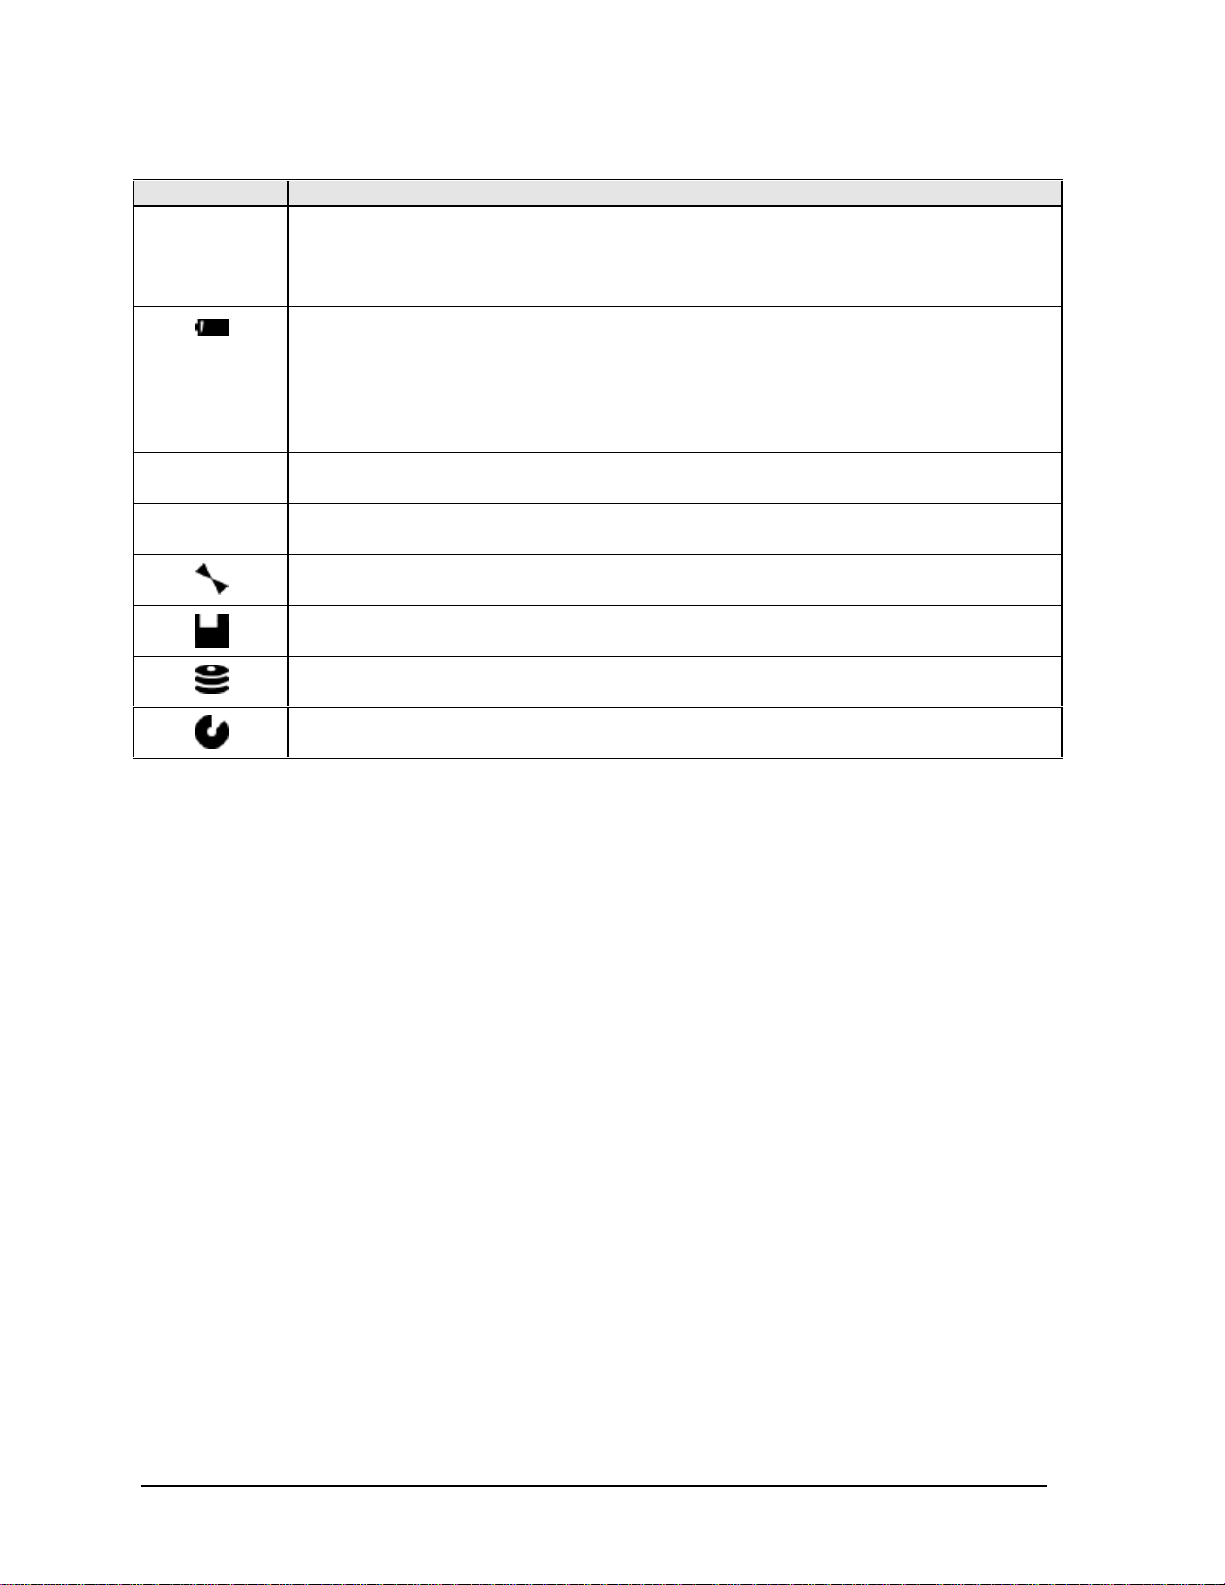
Indicator Meaning
LED next to
power button
A
1
Power status
Green: notebook is on.
Amber: notebook is in Standby mode.
No light: notebook is off or in Hibernate mode.
Battery status
Green: The AC adapter is connected and the battery is fully charged.
Amber: The AC adapter is connected and the battery is charging.
Red. The AC adapter is connected and the battery has a fault.
Off: The AC adapter is not connected, or the adapter is connected but the battery is
missing.
Caps Lock
Caps Lock is active.
Num Lock
Num Lock is active. (The Keypad Lock must also be on to use the embedded keypad.)
Scroll Lock
Scroll Lock is active.
Floppy disk drive activity
Green: notebook is accessing the floppy disk drive.
Hard disk drive activity
Green: notebook is accessing the hard disk drive.
CD-ROM or DVD drive activity
Green: notebook is accessing the CD-ROM or DVD drive.
Table 1-1. Status Lights
In addition, the status panel on the front of the notebook provides CD playback status and other
system information. For details, see the section “Status panel” in the notebook’s Reference Guide.
1-8 Product Information HP OmniBook XE3
Page 17

Using Fn Hot Keys
The combination of the Fn key plus another key creates a hot key—a shortcut key sequence—for
various system controls. To use a hot key, press and hold Fn, press the appropriate second key, then
release both keys.
External keyboards support only Fn+F5, Fn+F7, and Fn+F12. To use these, press and hold left
CTRL+left ALT, press the appropriate second key, then release both keys.
Table 1-1. Fn Hot Keys
Hot Key Effect
Fn+F1 Decreases the display brightness.
Fn+F2 Increases the display brightness.
Fn+F5 Toggles among the built-in display, an external display, and simultaneous display on
both.
Fn+F7 Mutes the notebook’s speakers.
Fn+F8 Toggles the built-in numeric keypad on and off. Does not affect an external keyboard. If
Num Lock is on, the numeric functions are active; otherwise, cursor control is active.
Fn+F12 Enters Hibernate mode (Windows 2000 only).
Fn+NumLock Toggles Scroll Lock on and off (except on external keyboards).
Fn+Up arrow Increases sound volume (except on external keyboards).
Fn+Down arrow Decreases sound volume (except on external keyboards).
HP OmniBook XE3 Product Information 1-9
Page 18
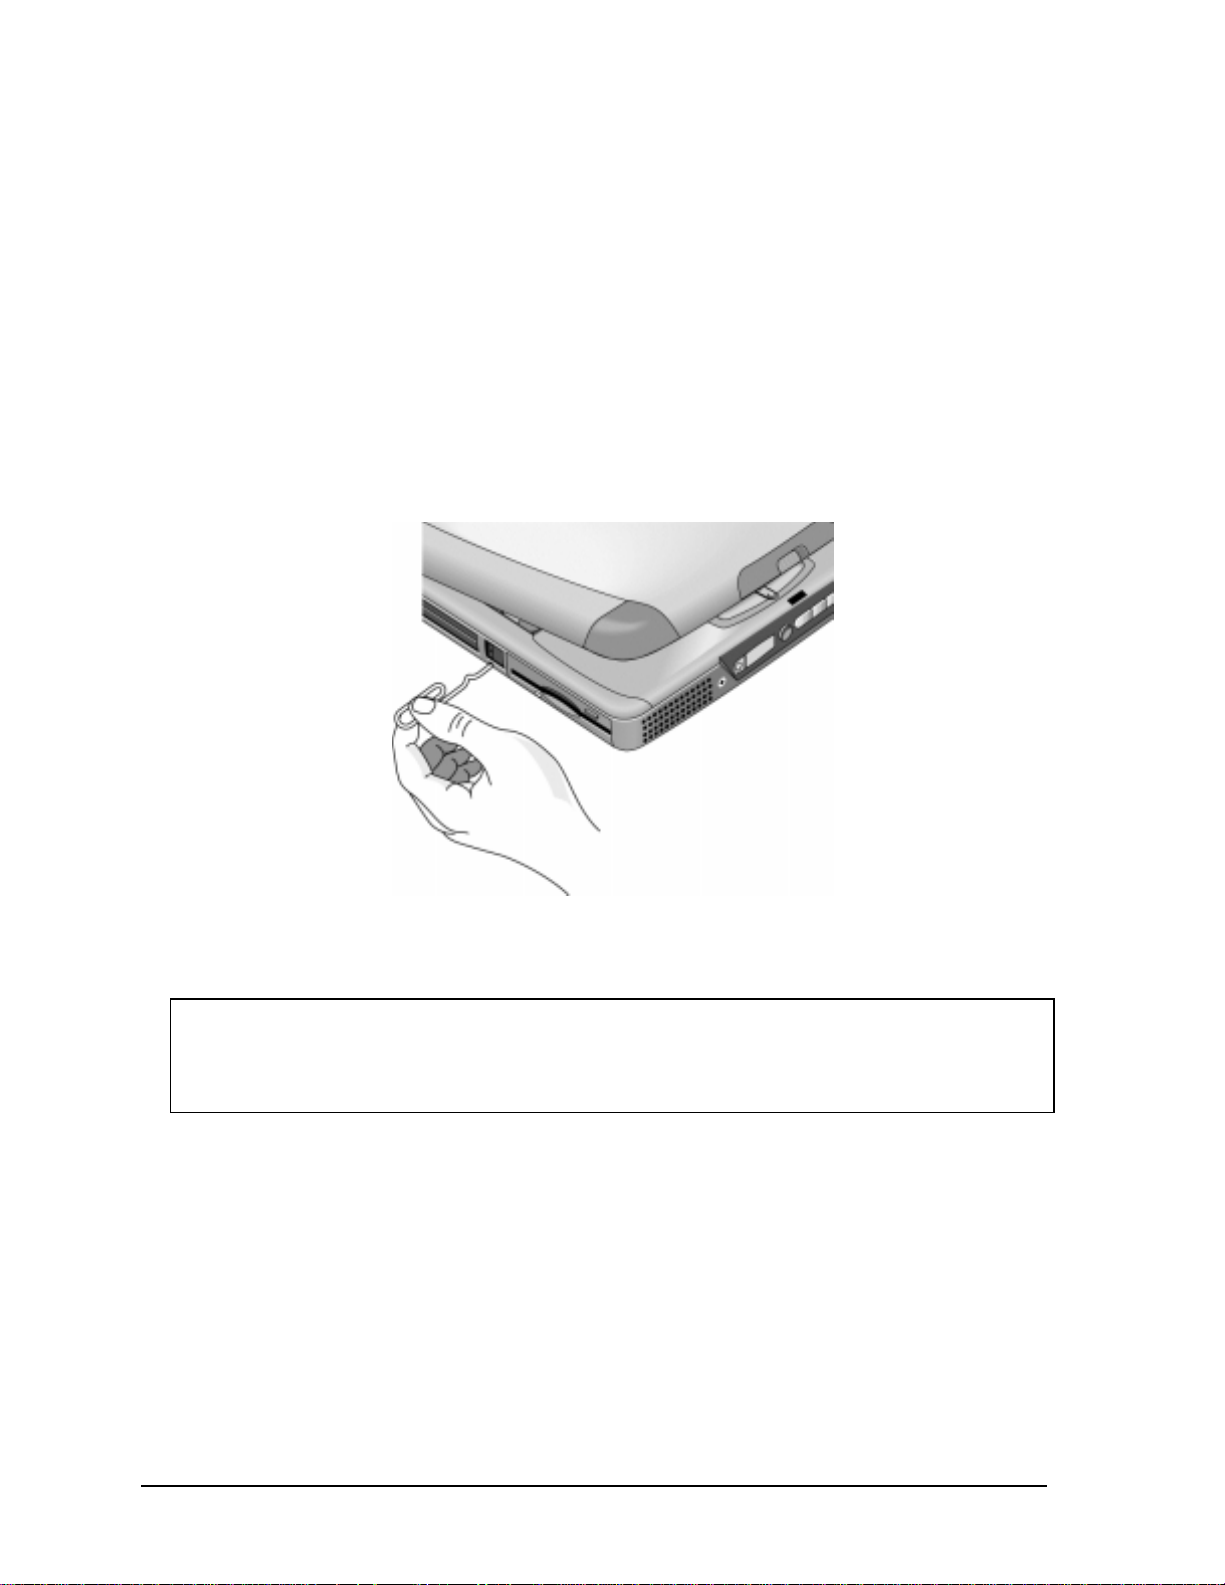
Resetting the Notebook
Occasionally, Windows or the notebook may stop responding, so that you cannot turn the notebook
off. If this happens, try the following in the order listed:
• If possible, shut down Windows: press CTRL+ALT+DEL, then click Shut Down. Press the blue
standby button to restart.
• Slide and hold the power button for about four seconds, until the display shuts down, then press
the blue standby button to restart.
• Insert a straightened paper clip into the system-off switch on the left side of the notebook
(beneath the PC card eject buttons), then press the blue standby button to restart.
Figure 1-6. Resetting the Notebook
Note
To boot from a CD-ROM or DVD drive in the module bay, insert a bootable CD (such as the
Recovery CD,
appear, then select the CD-ROM/DVD drive as the temporary boot device.
1-10 Product Information HP OmniBook XE3
) into the drive, then restart. Press ESC twice when the HP logo and prompt
Page 19

Using the CD-ROM or DVD Player
The multimedia buttons on the front of the notebook control the CD-ROM/DVD player, and work in
much the same way as do the controls of a standalone CD-ROM or DVD player. The CD-ROM/DVD
player operates whether the notebook is on, off, or in standby or hibernate mode. (When the notebook
is on, the volume control buttons also govern the volume for most other audio applications.)
If the notebook is off or in standby or hibernate mode, slide the multimedia power switch to the left to
activate the player. For details about using the CD-ROM/DVD player, see the notebook’s Reference
Guide.
Figure 1-7. Multimedia Buttons
1. Multimedia power (use only when notebook is
turned off or in standby or hibernate mode).
2. Previous track button.
3. Play/pause button.
4. Stop button (when notebook is on).
Stop/eject (when notebook is off).
5. Next track button.
6. Volume control down button.
7. Volume control up button.
HP OmniBook XE3 Product Information 1-11
Page 20

Specifications
The following tables list the specifications for the notebook and its accessories. These are subject to
change: for the latest versions, see the HP Notebook web site, www.hp.com/notebooks (in Europe:
www.europe.hp.com/notebooks).
Hardware Specifications
Table 1-1. XE3 Series Hardware Specifications
Dimensions 14.1/12.1-in display: 331 × 272.3 × 40.5 mm (13.03 × 10.72 × 1.59 in).
15/13-in display: 331 × 272.3 × 42.0 mm (13.03 × 10.72 × 1.65 in).
Weight 3.0–3.4 kg (6.7–.7.4 lb), depending on configuration.
Processor Intel Pentium III 500/550/600/650/700/750/800 MHz by µPGA2 with SpeedStep.
Intel Celeron 500/550/600/650/700 MHz by µPGA2.
100-MHz FSB.
Display 800 x 600 SVGA TFT 12.1-in LCD.
1024 x 768 XGA TFT 13-in LCD.
1024 x 768 XGA TFT 14.1-in LCD.
1024 x 768 XGA TFT 15-in LCD.
Graphics Controller S3 Savage/IX:
– Integrated 4 MB SGRAM.
– Supports AGP 2x mode.
– 128-bit, single-cycle 3D architecture.
– Simultaneous LCD/CRT and LCD/CRT/TV capability.
– Optimized hardware motion compensation.
– New high-performance, 128-bit 2D engine.
– Integrated single-channel 110-MHz LVDS interface.
– Integrated NTSC/PAL encoder.
Chip Set Intel 440ZXM-100.
SDRAM 100 MHz SDRAM (PC100).
No SDRAM on board.
Two 1.25-in. slots for expansion up to 256 MB, using two 128-MB SODIMM modules
(144 pin, 3.3 V).
Power Battery: rechargeable 9-cell:
– Lithium ion: 11.1 V, 5400 mAh, 18650 size.
– Nickel metal hydride: 10.8 V, 4000 mAh, 17670 size.
– Operating time: up to 3.3 hours typical (varies with configuration and usage).
– Recharge time: 2.2 hours.
– Standby/resume capability.
– Smart pack, SM bus.
AC adapter: Universal 60-watt, 100-240 Vac (50/60 Hz) input, 19 Vdc output.
Mass Storage Hard disk drive:
– 5 or 10 GB, PCI Bus Master Enhanced IDE.
– 9.5 mm, 2.5-in.
– Supports Ultra DMA/33.
Floppy disk drive: 1.44-MB, 12.7 mm, 3-mode module.
CD-ROM/DVD drive: 24x CD-ROM or 4x CD-RW, 12.7 mm module.
1-12 Product Information HP OmniBook XE3
Page 21

Keyboard and
Pointing Device
Audio System ESS Allegro (1988):
CD Player OZ-163 controller. CD can play while notebook is off.
Communications LAN:
Input/Output Super I/O controller: SMC 869.
PCMCIA TI 1420: two slots
Options 32/64/128 MB PC-100 SODIMM: 3.3V, 144-pin, SDRAM.
Keyboard:
– 87-/88-/90-key touch-type QWERTY keyboard with 101/102 key emulation.
– Embedded numeric keypad, 12 function (Fn) keys.
– Spill-resistant.
– NS 87570 keyboard controller.
Pointing device: touch pad with on/off and scroll up/down buttons.
– Integrated AC’97 CODEC.
– HSP modem interface via MC’97 link.
– Support wake-up on ring.
Modem CODEC ESS 2828 on mini-PCI slot.
Stereo sound via two built-in speakers.
Built-in microphone.
Microphone and headphone jacks.
– Transmission rate: 10 or 100 Mbps based on Auto-Negotiation.
– Data standard: supports Category 3 (10BaseT/100BaseT) and Category 5 (100
Base TX) media coupler.
– 10BASE-T/100BASE-TX: 10BASE-T/100BASE-TX MAC+PHY integrated controller
solution.
– Power management: supports remote power-up using Wake on LAN (WOL)
technology and Deep power-down mode support.
Modem:
– Data modem standard: supports V.90, V.34, V.32bis, V.32, V.22bis, V.22, V.23,
and V.21; Bell 212A and 103.
– Error correction: V.42 LAPM, and MNP 2-4 error correction.
– Data compression: V.42bis and MNP 5 data compression.
– Fax modem standard: send/receive rates up to 14400 bps, V.17, V.29, V.27ter,
and V.21 channel 2.
– Power management: supports ACPI Power Management and wake up on ring.
Serial port: 9-pin (RS232), 115,200-bps (16550 UART).
Parallel port: 25-pin, bi-directional, high-speed, with ECP/EPP capability.
PS/2 port: 6-pin keyboard/keypad/mouse port (Y adapter compatible).
VGA video out: 15-pin, with hot plug/unplug CRT-detect. (Resolution from 640 × 480
up to 1024 × 768, depending on available SDRAM.)
Two universal serial bus (USB) ports.
One IrDA-compliant fast infrared (FIR) port.
Docking port for simple port replicator.
DC-in jack.
Composite TV out: supports LCD, CRT, LCD/CRT, LCD/TV.
– PC Card 95 supports one type III or two type II sockets.
– Complies with PCI power management, ACPT 2.0, PCI local bus spec. Rev. 2.2.
– 3.3-volt core logic with universal PCI interface, compatible with 3.3/5-volt PCA
signaling environment.
– Supports burst transfers to maximize data throughput on both PCI buses.
– Supports parallel PCI interrupts, parallel ISA IRQ with parallel PCI interrupts, serial
ISA IRQ with parallel PCI interrupts, and serial ISA IRQ with PCI interrupts.
– Can wake up from D3 (cold).
– No Zoomed Video support.
Simple port replicator.
Mini-PCI modem, supporting wake-up on Ring# from D3 (cold) with AC-in.
Mini-PCI modem/LAN combo, supporting wake-up on Ring# & PME# from D3 (cold)
with AC-in.
HP OmniBook XE3 Product Information 1-13
Page 22

Mechanical Features Kensington MicroSaver lock slot.
Continuously variable-speed fan.
Standards PC99, ACPI.
Environmental Limits
Operating temperature: 0 to 40 °C (32 to 104 °F).
Operating humidity: 10 to 90 percent RH without condensation.
Operating altitude: up to 3050 m (10,000 ft).
Storage temperature: –20 to 65 °C (–4 to 149 °F).
Storage altitude: up to 12,200 m (40,000 ft).
Mean time between failure: 20,000 hours.
Software Specifications
Table 1-1. XE3 Series Software Specifications
Operating Software Microsoft Windows 98SE, 2000, or Millennium Edition (all in ACPI mode).
512KB flash BIOS ROM (PLCC type with socket for B-Test only).
Supports standby to RAM or hard disk.
Hot keys for system control.
Password protection.
Auto-configuration when using simple port replicator.
PC99 ready with Plug-and-Play.
Keyboard BIOS flashable.
ACPI 1.0b compatible.
Smart battery support.
DMI EEPROM (2 KB) extension.
Bootable devices; FDD, HDD, CD-ROM/DVD.
Applications Adobe Acrobat Reader.
MusicMatch MP3 software (certain models only).
DVD player (models with DVD only).
One-Touch Button software.
Fax software (included in Windows 2000).
Virus protection software.
For additional information about the notebook’s software, see the HP Notes.
1-14 Product Information HP OmniBook XE3
Page 23

System Resources
The following tables list the default values for the notebook’s system resources. Use the BIOS Setup
utility (see page 3-29) to view all available port and audio device configurations in the System
Devices menu.
The tables in this section show typical resource usage as set up by the notebook’s BIOS. Plug-andplay operating systems, drivers, and BIOS Setup settings may change some of the entries.
Table 1-1. System Interrupts
0 System timer
1 Keyboard
2 Cascade from secondary interrupt controller
3 Free
4 COM1 (serial port)
5 Audio
6 Floppy disk drive
7 LPT1 (ECP parallel port)
8 Real-time clock
9 SCI
10 PCI IRQ (shared by all PCI devices)
11 Free (or MIDI if enabled)
12 Touch pad, PS/2 mouse
13 Numeric coprocessor
14 Internal hard disk drive (primary IDE controller)
15 Internal CD-ROM drive (secondary IDE controller)
Table 1-2. System Memory
00000–9FFFF System memory
A0000–BFFFF Video
C0000–CFFFF Video BIOS
D0000–DBFFF Free: can be used for upper memory blocks
(UMBs) or PC card memory windows
DC000–FFFF System BIOS
HP OmniBook XE3 Product Information 1-15
Page 24

Table 1-3. System Input/Output Addresses (100-3FF)
170–177 Internal CD-ROM drive (secondary IDE controller)
1F0–1F7 Internal hard disk drive (primary IDE controller)
220–22F DOS games (FM decoding)
376 Internal CD-ROM drive (secondary IDE controller)
378–37F LPT1 (printer port)
388–38B DOS games (FM decoding)
3B0–3BB VGA adapter
3C0–3DF VGA adapter
3E0–3E1 PCMCIA controller
3F0–3F5 Floppy disk drive controller
3F6 Internal hard disk drive (primary IDE controller)
3F7 Floppy disk drive controller
3F8–3FF COM1 (serial port)
Table 1-4. DMA Channels
0 Free
1 Free
2 Floppy disk drive
3 LPT1 (ECP parallel port)
4 Cascade from secondary DMA controller
5 Free
6 Free
7 Free
1-16 Product Information HP OmniBook XE3
Page 25

Table 1-5. XE3 Series Accessories
Accessory Description
Memory
F1456B 32-MB SDRAM PC-100 expansion module
F1457B 64-MB SDRAM PC-100 expansion module
F1622B 128-MB SDRAM PC-100 expansion module
Power Options
F1454A AC adapter (60-watt)
F1781A Ultra Slimline AC adapter (60-watt)
F1455A Auto/airline AC adapter (75-watt)
F2024A LiIon battery (9 cell)
Adapters
F1469A PS/2 “Y” adapter
PC Cards
F1623A 10/100-Mbps Ethernet +56-Kbps modem PC Card by Xircom
F1625A 56-Kbps global modem PC Card by Xircom
F1626A 10/100 LAN CardBus PC Card by 3Com
F1626B 10/100 LAN CardBus PC Card by 3Com
F1627A 56-Kbps US modem PC Card by Xircom
F1643A RealPort 10/100-Mbps Ethernet + 56-Kbps modem PC Card by Xircom
F1985A USB-NIC Ethernet adapter by 3Com
Docks
F2025A Simple port replicator
Wireless Accessories
F2135A Wireless LAN access point
F2136A Wireless LAN PC Card
F2137A Wireless LAN PCI adapter
F2138A Wireless card
Security Accessories
F1645A Kensington MicroSaver Notebook Security System
F1747A Port Defcon 1 Notebook Security System
F1611C Mobile ProtectTools 2000 Smart Card Kit (128-bit version for U.S. and
Canada only)
F1612C Mobile ProtectTools 2000 Smart Card Kit (40-bit version for outside U.S. and
Canada)
HP OmniBook XE3 Product Information 1-17
Page 26
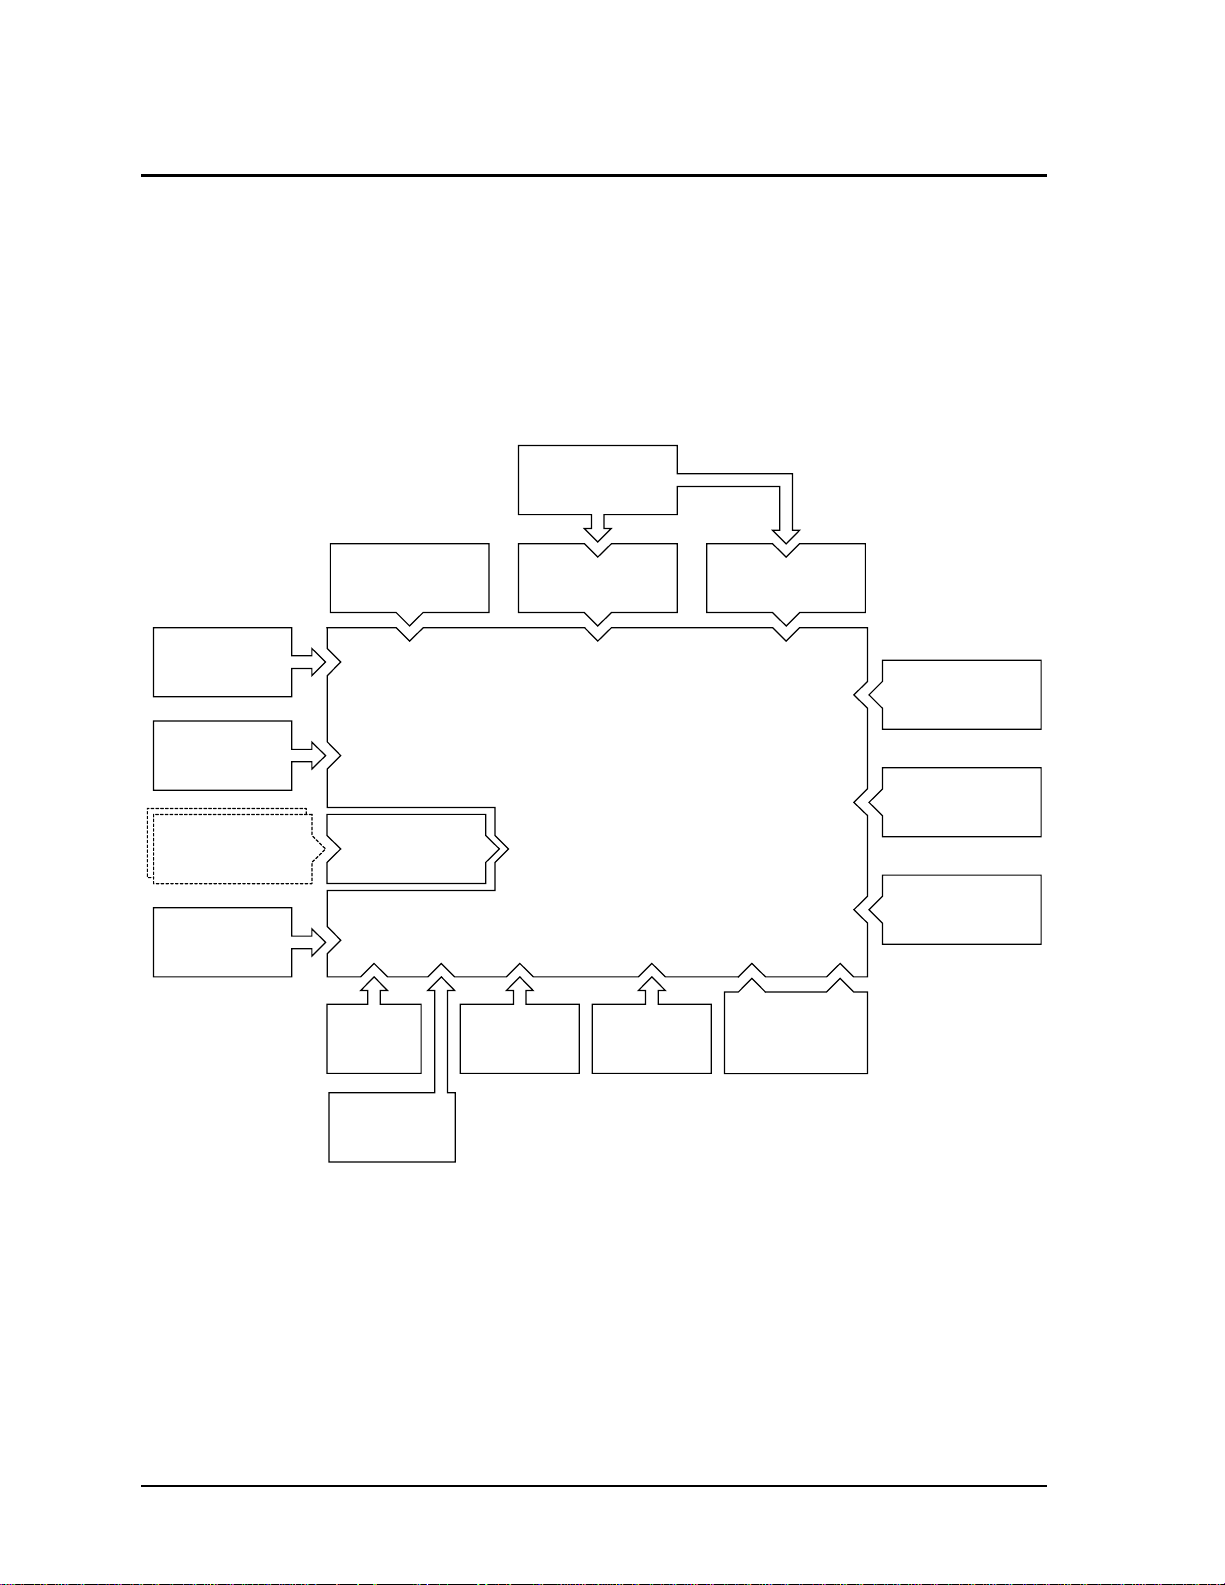
Internal Design
y
The motherboard PCA is the central component of the notebook’s design, and plays a role in virtually
all system functions. The CPU module and most other subsystems connect to the motherboard.
The following figure shows the connections among the notebook’s replaceable electronic modules. In
addition, the table on page 1-18 lists the roles that the replaceable modules play in each of the
notebook’s functional subsystems.
Display
Assembly
CPU Module Video PCA Switchboard PCA
Top Case
(speakers, touch
pad, click buttons)
Heatsink/fan
assembl
PCMCIA
Cards
Motherboard PCA
PCMCIA
Sockets (2)
Mini-PCI
P
CD-ROM or DVD
Module
A
Floppy Disk
Drive
Earphone
PCA
Hard Disk
Drive
CD Player
PCA
Keyboard
Battery
Figure 1-8. Replaceable Module Diagram
SDRAM
Module
1-18 Product Information HP OmniBook XE3
Page 27

Table 1-1. Functional Structure
Function Components Used Component Roles
Bootup CPU module
Motherboard
Floppy disk module
Hard disk drive
Processor CPU module
Motherboard
Memory Motherboard
SDRAM module
Video PCA
Power Battery
Motherboard
Switchboard PCA
AC adapter
Display Motherboard
Display assembly
Video PCA
Hard disk Motherboard
Hard disk drive
Floppy drive Motherboard
Floppy disk module
Keyboard Motherboard
Keyboard
Touch pad Motherboard
Top case
Audio Motherboard
Switchboard PCA
Headphone PCA
Top case
Status Motherboard
Switchboard PCA
CD player PCA
Serial Motherboard I/O controller, serial connector.
Parallel Motherboard I/O controller, parallel connector.
Infrared Motherboard I/O controller, infrared transmitter/receiver.
PS/2 port Motherboard Keyboard controller, PS/2 connector.
USB Motherboard Bus controller, USB connectors.
Docking port Motherboard Docking logic, docking connector.
PCMCIA Motherboard
PCMCIA sockets
Main processor.
Primary system circuitry.
First source of disk-based startup code.
Second source of disk-based startup code.
Main processor, numeric data processor, L1 and L2 cache.
Primary system circuitry.
No onboard RAM.
Changeable RAM (2 slots).
Video RAM.
Power storage.
Power control circuitry, AC adapter socket, lid switch, system-off switch,
power supply.
Power button, standby button.
AC-to-DC converter.
Video controller.
Display output, backlight, power converter for backlight.
Display drivers, LVDS processing, display/graphics controller, video
RAM.
Hard disk controller.
Hard disk mechanism.
I/O controller, floppy connector.
Floppy disk mechanism.
Keyboard controller, keyboard BIOS.
Key switches.
Keyboard BIOS.
Touch pad sensor, click buttons, controller (PS/2 output).
Audio controller, audio decoder, speaker amplifier, external microphone
jack.
Microphone.
Earphone amplifier.
Speakers.
LED circuitry, keyboard controller.
Status LEDs.
CD-ROM/DVD status display.
PCMCIA controller.
PCMCIA connectors.
HP OmniBook XE3 Product Information 1-19
Page 28

Page 29
This chapter tells you how to remove and replace the notebook’s removable components and
assemblies. The items marked by
• Battery (page 2-3).
• Carrier, hard disk drive (page 2-14).
Case, bottom (page 2-34).
Case, top (page 2-20).
• Cover, keyboard (page 2-9).
• Cover, mini-PCI (page 2-16).
• Cover, SDRAM (page 2-16).
• Covers, screw (page 2-16).
Display assembly (page 2-17).
Doors, docking (page 2-38).
Doors, PCMCIA (page 2-39).
Drive, CD-ROM/DVD (page 2-33).
Drive, floppy disk (page 2-31).
• in the following table are user-replaceable.
Table 2-1. Removal Cross-Reference
Heatsink assembly (with fan) (page 2-27).
• Keyboard (page 2-11).
Module, CPU (page 2-29).
• Module, SDRAM (page 2-5).
PCA, CD player (page 2-22).
PCA, headphone (page 2-41).
• PCA, mini-PCI (page 2-7).
PCA, motherboard (page 2-34).
PCA, switchboard (page 2-41).
PCA, video (page 2-25).
Plate, CPU support (page 2-42).
Saddle, hinge set (page 2-22).
Socket, PCMCIA (page 2-42).
• Drive, hard disk assembly (page 2-13).
Caution
Always provide proper grounding when performing repairs. Without proper
grounding, an electrostatic discharge can damage the notebook and its
components.
Notes
To reassemble a component, perform the removal procedure in reverse order. Any special notes
required for reassembly are included at the end of each section.
Symbols like this throughout this chapter show approximate full-size screw outlines. You can
use these to verify the sizes of screws before you install them. Installing a wrong-size screw can
damage the notebook. (The symbol at the left represents an M2.5×5mm T-head screw.)
HP OmniBook XE3 Removal and Replacement 2-1
Page 30
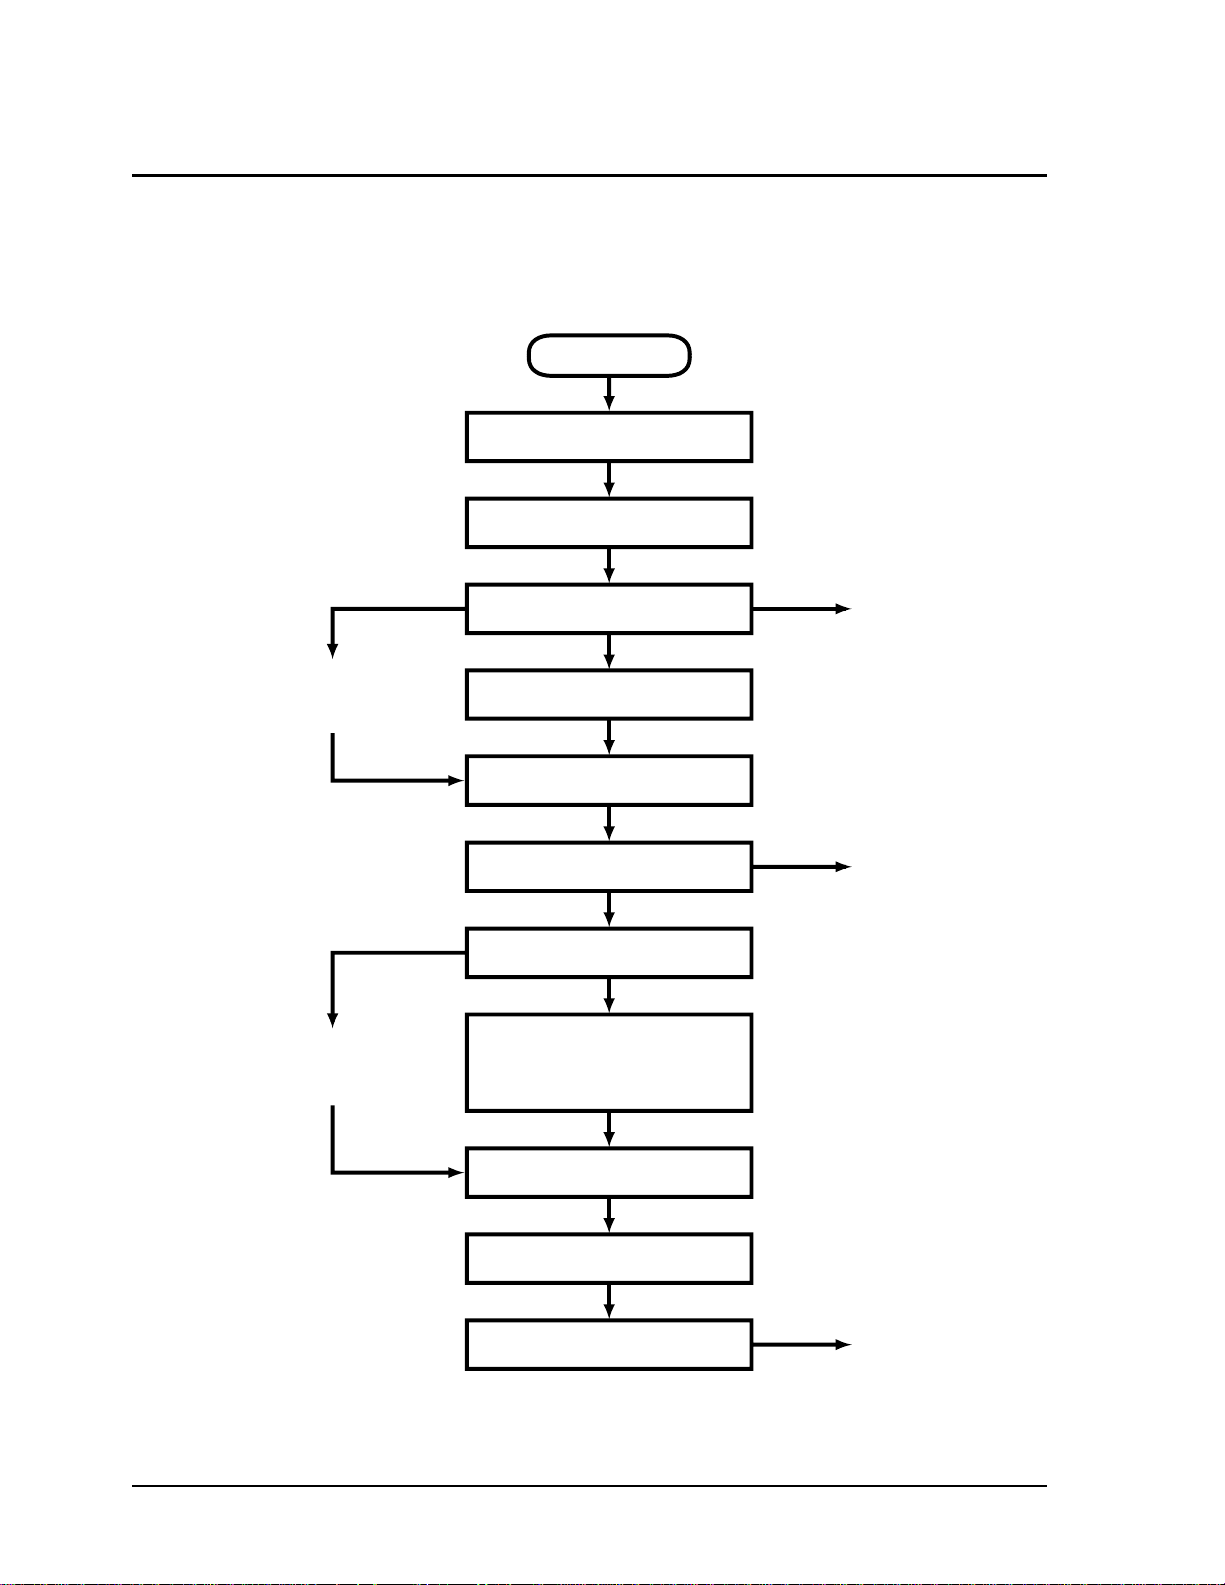
Disassembly Flowchart
y
The following diagram shows the general “path” you will use in disassembling the notebook to access
any particular component.
Start
Battery, AC adapter,
SDRAM modules, mini-PCI card
Keyboard cover
Only if not removing
motherboard
or bottom case
If removing only
heatsink assembly
or CPU module
Keyboard
Hard disk drive assembl
Display assembly
Top case assembly
Hinge saddle set
• CD-ROM/DVD drive assembly
• Video PCA
• Floppy disk drive assembly
• Headphone PCA
Heatsink assembly (with fan)
Switchboard PCA
(also remove if removing
motherboard or bottom
case assembly)
CD player PCA
CPU module
Motherboard or
bottom case
• CPU support plate
• Docking doors
• PCMCIA doors
Figure 2-1. Disassembly Flow
2-2 Removal and Replacement HP OmniBook XE3
Page 31

Table 2-1. Required Equipment
• Small Phillips screwdriver, preferably magnetized.
• Small flat-blade screwdriver.
• 5mm hexagonal socket screwdriver.
Table 2-2. Recommended Screw Torques
Screw Thread Size Torque (cm-kgf) Torque (in-lbf)
M2.5 (2–11 mm long) 3.0 – 3.5 2.6 – 3.0
M2.5 (12–19 mm long) 2.5 – 3.0 2.2 – 2.6
M3 3.0 – 3.5 2.6 – 3.0
NOTES
HP OmniBook XE3 Removal and Replacement 2-3
Page 32

Removing the Battery
(User-Replaceable)
Required Equipment
• None.
Removal Procedure
• Slide the battery’s release latch, then lift the battery out of its compartment.
Figure 2-2. Removing the Battery
Reassembly Notes
• Insert the front (rounded) end of the battery into the battery compartment, and lower the back end
in until it clicks into place.
2-4 Removal and Replacement HP OmniBook XE3
Page 33

Removing an SDRAM Module
(User-Replaceable)
The notebook has no SDRAM on its motherboard, but has slots for two SDRAM modules. One slot
contains an SDRAM module installed at the factory.
See Table 4-2 on page 4-5 for a listing of replacement SDRAM modules and part numbers.
Caution
Provide proper grounding and handle the SDRAM module only by its edges, or you could damage
the module through electrostatic discharge.
Required Equipment
• Small Phillips screwdriver.
Removal Procedure
1. Unplug the AC adapter, if present, and remove the battery.
2. On the bottom of the notebook, loosen both screws holding the SDRAM cover (the cover retains
the screws), and remove the cover.
Figure 2-3. Removing the SDRAM Cover
HP OmniBook XE3 Removal and Replacement 2-5
Page 34

3. Press outward to release the latches at the sides of the SDRAM module, so the free edge of the
module pops up.
Figure 2-4. Removing an SDRAM Module
4. Pull the module out of the connector.
Reassembly Notes
• Gently press the SDRAM module into the connector at an angle of about 30°, until it is fully
inserted. Then press down on both sides of the module until the latches snap closed.
2-6 Removal and Replacement HP OmniBook XE3
Page 35

Removing the Mini-PCI PCA
(User-Replaceable)
Certain notebook models include a mini-PCI PCA that contains either a modem or modem/LAN. See
Table 4-2 on page 4-5 for a listing of replacement PCAs and part numbers.
Caution
Provide proper grounding and handle the PCA only by its edges, or you could damage it through
electrostatic discharge.
Required Equipment
• Small Phillips screwdriver.
Removal Procedure
1. Unplug the AC adapter, if present, and remove the battery.
2. Loosen the screw holding the mini-PCI cover (the cover retains the screw), and remove the cover.
3. Press outward to release the latches at the sides of the PCA, so that its free edge pops up.
4. Disconnect the cable (modem models only) or cables (modem/LAN models only) from the PCA.
5. Gently pull the PCA out of its connector.
HP OmniBook XE3 Removal and Replacement 2-7
Page 36

Figure 2-5. Removing the Mini-PCI Card
Reassembly Notes
• Reattach the cable (modem models only) or cables (modem/LAN models only) to the PCA, and
tuck them into the compartment.
• Gently press the mini-PCI card into the connector at an angle of about 30°, until it is fully inserted.
Then press down on both sides of the card until the latches snap closed.
2-8 Removal and Replacement HP OmniBook XE3
Page 37

Removing the Keyboard Cover (with Hinge Covers)
(2)
(User-Replaceable)
Required Equipment
• Small Phillips screwdriver.
• Small flat-blade screwdriver.
Removal Procedure
1. Unplug the AC adapter, if present, and remove the battery.
2. Close the display, and remove both screws from the backs of the hinge covers.
Screws,
M2.5x4 mm
Figure 2-6. Removing the Keyboard Cover Retaining Screws
3. Open the notebook’s display 180°, so that it lays flat.
4. Use the flat-blade screwdriver to carefully pry up the inside edges of the hinge covers until the
cover pops loose, then lift the cover off.
HP OmniBook XE3 Removal and Replacement 2-9
Page 38

Figure 2-7. Removing the Keyboard Cover
Reassembly Notes
• Tuck the display cables into the notch just to the right of the left display hinge.
• Hold the cover by the hinges and snap it into place. Note that the cover is held in place partly by
tabs at the left and center of its bottom edge, and at its upper left and right corners. Make sure these
tabs snap back into place when reinstalling the cover.
2-10 Removal and Replacement HP OmniBook XE3
Page 39

Removing the Keyboard
(User-Replaceable)
Required Equipment
• Small Phillips screwdriver.
• Small flat-head screwdriver.
Removal Procedure
1. Unplug the AC adapter, if present, and remove the battery.
2. Remove the keyboard cover (page 2-9).
3. Loosen the four retaining screws along the top of the keyboard (the keyboard retains the screws).
Figure 2-8. Loosening the Keyboard Retaining Screws
4. Raise the top of the keyboard, then lift the keyboard up and out of the notebook. Be careful not to
pull on the ribbon cable connecting the keyboard to the notebook.
Caution
Be careful not to touch the heatsink until it has cooled. It could be hot if the notebook was running
recently.
5. Lay the keyboard face down on the top case, forward of its normal position, and disconnect the
ribbon cable from the motherboard.
HP OmniBook XE3 Removal and Replacement 2-11
Page 40

Keyboard
ribbon cable
Figure 2-9. Disconnecting the Keyboard Cable
Reassembly Notes
• Lay the keyboard face down on the top case forward of its normal position, then reconnect the
ribbon cable.
• Slip the metal tabs on the bottom of the keyboard into their slots in the top case, then lower the
keyboard into place.
2-12 Removal and Replacement HP OmniBook XE3
Page 41

Removing the Hard Disk Drive Assembly
(User-Replaceable)
See Table 4-2 on page 4-5 for a listing of replacement hard disk drives and part numbers.
Required Equipment
• Small Phillips screwdriver.
Removal Procedure
1. Unplug the AC adapter, if present, and remove the battery.
2. Remove these additional assemblies:
• Keyboard cover (page 2-9).
• Keyboard (page 2-11).
Caution
Be careful not to touch the heatsink until it has cooled. It could be hot if the notebook was running
recently.
3. Loosen the four screws attaching the hard drive carrier to the motherboard (the carrier retains the
screws).
4. Use the strap on the hard drive to carefully pull the drive off of its connector and out of the
notebook.
Figure 2-10. Removing the Hard Disk Drive
HP OmniBook XE3 Removal and Replacement 2-13
Page 42

5. Remove all four screws from the underside of the hard drive carrier, then slide the drive back and
(2)
(2)
up out of the case.
Pin connector
Screws,
M3x6 mm
Screws,
M3x6 mm
Figure 2-11. Removing the Hard Disk Carrier
6. Carefully remove the pin connector from the end of the drive by working alternately at each side,
so that the connector slides off evenly without bending the connector pins.
Reassembly Notes
• Carefully put the pin connector back onto the pins on the end of the new hard drive. Work at each
end alternately so that the connector slides on evenly without bending the connector pins.
• Be careful not to trap the heatsink and keyboard cables beneath the hard drive.
2-14 Removal and Replacement HP OmniBook XE3
Page 43

Recovering and Reinstalling Software
You can use the Recovery CD to recover an original build or reinstall the HP custom software. To
recover a specific application, see “To recover an application” in the Reference Guide.
The Recovery CD provides all HP notebook–specific Windows drivers; these drivers are in the
following directories:
• On the hard drive, under c:\hp\drivers.
• On the Recovery CD, under \hp\drivers.
• On the HP notebook web site at http://www.hp.com/notebooks. This web site contains the latest
software drivers.
To recover the factory software installation
The following procedure describes how to recover the notebook’s original Windows software and
operating system.
This process can take about 10 or 15 minutes. Do not interrupt the process or unplug the AC adapter
before the process is complete, or you will have to begin again.
Caution
This procedure formats the hard disk drive, which erases all data on the drive. After formatting,
you must reinstall any applications.
1. Back up all data from the hard disk.
2. Connect the AC adapter to the notebook.
3. Insert the Recovery CD in the notebook’s CD-ROM drive.
4. Restart the notebook. When the HP logo appears, press F2.
5. Select the CD-ROM drive as the first boot device, then restart the notebook again.
You can find more details about recovering the factory installation of Windows on the Recovery CD:
the file readme.txt is in the CD’s root directory.
Note
Windows 98 supports the FAT16 and FAT32 file systems. Windows 2000 supports the FAT16,
FAT32, and NTFS file systems.
HP OmniBook XE3 Removal and Replacement 2-15
Page 44

Replacing Small Parts
(User-Replaceable)
The user can replace the following small parts.
Table 2-1. Replacing Small Parts (User-Replaceable)
Part Replacement Procedure
Cover, mini-PCI On the bottom of the notebook, loosen the screw in the mini-PCI cover (the cover
retains the screw) and remove the cover.
Cover, SDRAM On the bottom of the notebook, loosen the screws in the SDRAM module cover (the
cover retains the screws) and remove the cover.
Covers, screw (on
display bezel)
Insert a small flat-blade screwdriver under the cover and pry it loose. To replace,
firmly press the adhesive side of the cover into the recess.
2-16 Removal and Replacement HP OmniBook XE3
Page 45

Removing the Display Assembly
(HP Authorized Service Providers Only)
Required Equipment
• Small Phillips screwdriver.
Removal Procedure
1. Unplug the AC adapter, if present, and remove the battery.
2. Remove these additional assemblies:
• Keyboard cover (page 2-9).
• Keyboard (page 2-11).
3. Remove both screws from the switchboard PCA, and carefully lift the PCA off the connector
underneath it. Be carefully not to pull on the cable attached to the PCA.
4. Disconnect the cable from the switchboard PCA, and remove the PCA from the notebook.
5. Disconnect the cable from the video PCA.
6. Remove the four flanged screws from the display hinges. This may be easier if you support the
display so that it remains approximately flat.
7. Lift the display off of the notebook.
HP OmniBook XE3 Removal and Replacement 2-17
Page 46

Screws (flanged)
M2.5x8 mm (4)
Screws,
M2.5x4 mm
Figure 2-12. Removing the Display
Reassembly Notes
• While installing the hinge screws, support the display so that it remains approximately flat.
• Before installing the switchboard PCA, make sure the large display cable lies within the notch in
the hinge saddle.
• When in stalling a new display assembly, follow the procedure given in “Installing a New Display
Assembly” on the following page.
2-18 Removal and Replacement HP OmniBook XE3
Page 47

Installing a New Display Assembly
When installing a new display, you must make sure to set the DIP switches on the video PCA to match
the particular display assembly. Do this as follows.
Caution
Setting the DIP switches improperly could damage the display assembly.
1. Find the manufacturer of the display: this is shown on a label attached to the display assembly.
2. Find the display’s manufacturer and model in the table below, and set the DIP switches on the
video PCA as shown.
Model 1 2 3 4
CPT 14.1-in TFT XGA ON OFF ON OFF
Hitachi 15.0-in TFT XGA OFF ON OFF OFF
LG 13.3-in TFT XGA ON OFF OFF ON
LG 14.1-in TFT XGA OFF ON OFF ON
LG 15.0-in TFT XGA ON ON ON OFF
Mitsubishi 12.1-in TFT SVGA ON OFF ON ON
Samsung 12.1-in TFT SVGA ON ON OFF OFF
Samsung 14.1-in TFT XGA OFF ON ON OFF
Sanyo 12.1-in TFT SVGA OFF OFF ON ON
Unipac 13.3-in TFT XGA OFF OFF ON OFF
Unipac 14.1-in TFT XGA OFF OFF OFF ON
As an example, the following figure shows the DIP switches set to OFF-ON-ON-ON:
2134
FOF
Figure 2-13. Video PCA DIP Switches
HP OmniBook XE3 Removal and Replacement 2-19
Page 48

Removing the Top Case
(HP Authorized Service Providers Only)
Required Equipment
• Small Phillips screwdriver.
Removal Procedure
1. Unplug the AC adapter, if present, and remove the battery.
2. Remove these additional assemblies:
• Keyboard cover (page 2-9).
• Keyboard (page 2-11).
• Display assembly (page 2-17).
3. Remove the eight retaining screws from the bottom case.
Screws,
M2.5x8 mm
Screws,
M2.5x8 mm
Figure 2-14. Removing the Top Case Retaining Screws
4. Disconnect the touch pad cable and speaker cable from the motherboard.
5. Remove the six retaining screws from the top case.
6. Raise the back of the top case, then gradually loosen the case, moving toward the front of the
notebook (the right rear corner may require extra care to work free).
7. Carefully lift the top cover forward and off of the notebook. Be careful not to pull on the CD
player PCA ribbon cable beneath the case.
2-20 Removal and Replacement HP OmniBook XE3
Page 49

8. Release the CD player PCA cable from the motherboard.
M2.5x4 mm
cables
Touch pad
cable
Screw,
M2.5x8 mm
Speaker
CD player
ribbon cable
Screws,
Figure 2-15. Removing the Top Case
Reassembly Notes
• Make sure the touch pad cable and speaker cable connectors are fully inserted squarely in their
sockets.
• Make sure both tabs along the front of the case snap shut.
HP OmniBook XE3 Removal and Replacement 2-21
Page 50

Removing the CD Player PCA
(HP Authorized Service Providers Only)
Required Equipment
• Small Phillips screwdriver.
Removal Procedure
1. Unplug the AC adapter, if present, and remove the battery.
2. Remove these additional assemblies:
• Keyboard cover (page 2-9).
• Keyboard (page 2-11).
• Display assembly (page 2-17).
• Top case (page 2-19).
3. Remove both standoff screws (requires a 5mm socket driver), and lift the PCA out of the top case.
CD player PCA standoff
screws, 5 mm (2)
Figure 2-16. Removing the CD Player PCA
2-22 Removal and Replacement HP OmniBook XE3
Page 51

Removing the Hinge Saddle Set
(HP Authorized Service Providers Only)
Required Equipment
• Small Phillips screwdriver.
Removal Procedure
1. Unplug the AC adapter, if present, and remove the battery.
2. Remove these additional assemblies:
• Keyboard cover (page 2-9).
• Keyboard (page 2-11).
• Display assembly (page 2-17).
• Top case (page 2-19).
3. Remove the two retaining screws from the bottom case.
Screws,
M2.5x8 mm
Figure 2-17. Removing the Hinge Saddle Retaining Screws
HP OmniBook XE3 Removal and Replacement 2-23
Page 52

4. Remove the retaining screws from the back of the notebook, just below the display hinges.
M2.5x8 mm
5. Remove both retaining screws from the hinge saddle set.
6. Lift the hinge saddle set out of the notebook. You may need to free the hinge saddle from the clip
in the bottom case near the LAN/modem ports to remove it.
Screws,
Screws,
M2.5x8 mm
Figure 2-18. Removing the Hinge Saddle
Reassembly Notes
• Make sure the posts on the underside of the hinge saddle line up with the hinge support openings in
the bottom case, and that the holes in the front ends of the saddle fit over the alignment posts in the
bottom case.
2-24 Removal and Replacement HP OmniBook XE3
Page 53

Removing the Video PCA
(HP Authorized Service Providers Only)
Required Equipment
• Small Phillips screwdriver.
Removal Procedure
1. Unplug the AC adapter, if present, and remove the battery.
2. Remove these additional assemblies:
• Keyboard cover (page 2-9).
• Keyboard (page 2-11).
• Display assembly (page 2-17).
• Top case (page 2-19).
• Hinge saddle set (page 2-23).
3. Note and record the settings of the PCA’s DIP switches.
HP OmniBook XE3 Removal and Replacement 2-25
Page 54

4. Remove all three retaining screws from the PCA, and carefully lift it off of the connectors
underneath it.
Screws,
M2.5x4 mm
Figure 2-19. Removing the Video PCA
Reassembly Notes
• Set the DIP switches on the new PCA to match the settings from the PCA you are replacing and
the notebook’s display type. See “Installing a New Display Assembly” on page 2-19.
2-26 Removal and Replacement HP OmniBook XE3
Page 55

Removing the Heatsink Assembly (with Fan)
(HP Authorized Service Providers Only)
Required Equipment
• Small Phillips screwdriver.
Removal Procedure
1. Unplug the AC adapter, if present, and remove the battery.
2. Remove these additional assemblies:
• Keyboard cover (page 2-9).
• Keyboard (page 2-11).
• Display assembly (page 2-17).
• Top case (page 2-19).
• Hinge saddle set (page 2-22).
3. Disconnect the fan cable from the motherboard.
4. Remove all four retaining screws (their springs are attached to them).
5. Lift the heatsink out of the notebook.
HP OmniBook XE3 Removal and Replacement 2-27
Page 56

Heatsink retaining
screws (with springs)
(4)
Figure 2-20. Removing the Heatsink Assembly
Reassembly Notes
• Make sure the fan cable is not pinned under the assembly.
• Make sure the thermal pad on the heatsink is not damaged, and replace if necessary.
2-28 Removal and Replacement HP OmniBook XE3
Page 57

Removing the CPU Module
(HP Authorized Service Providers Only)
See Table 4-1 on page 4-3 for a listing of replacement hard disk drives and part numbers.
Required Equipment
• Small Phillips screwdriver.
• Small flat-blade screwdriver.
Removal Procedure
Caution
Be careful not to touch the upper surface of the CPU module. Handle it only by its edges, or you
could damage it.
1. Unplug the AC adapter, if present, and remove the battery.
2. Remove these additional assemblies:
• Keyboard cover (page 2-9).
• Keyboard (page 2-11).
• Display assembly (page 2-17).
• Top case (page 2-19).
• Hinge saddle set (page 2-22).
• Heatsink assembly (page 2-27).
3. To release the CPU module from the motherboard, carefully insert the tip of the flat-blade
screwdriver in the CPU module lock mechanism, and turn the screwdriver a few degrees
counterclockwise until the mechanism clicks into its OPEN position. (The CPU socket moves
slightly to the left when this happens.)
4. Grasp the CPU module by its edges, and carefully lift it straight up and off of its socket.
HP OmniBook XE3 Removal and Replacement 2-29
Page 58

CPU module
Figure 2-21. Removing the CPU Module
Reassembly Notes
• Make sure the module is fully seated on its socket, and that none of its pins are bent or otherwise
damaged.
• Make sure the yellow triangle marked on the corner of the CPU module lines up with the
corresponding yellow triangle on the corner of the socket.
• Carefully insert the tip of the flat-blade screwdriver in the CPU module lock mechanism, and turn
the screwdriver a few degrees clockwise until the mechanism clicks into its LOCK position. (The
CPU socket moves slightly to the right when this happens.)
CPU module
lock mechanism
2-30 Removal and Replacement HP OmniBook XE3
Page 59

Removing the Floppy Disk Drive
(HP Authorized Service Providers Only)
Required Equipment
• Small Phillips screwdriver.
Removal Procedure
1. Unplug the AC adapter, if present, and remove the battery.
• Keyboard cover (page 2-9).
• Keyboard (page 2-11).
• Display assembly (page 2-17).
• Top case (page 2-19).
• Hinge saddle set (page 2-22).
2. Release the drive’s ribbon cable from its connector on the motherboard.
3. Remove the two retaining screws.
4. Lift the floppy drive out of the notebook.
HP OmniBook XE3 Removal and Replacement 2-31
Page 60

Screws,
M2.5x4 mm
Figure 2-22. Removing the Floppy Disk Drive
Reassembly Notes
• Make sure the headphone PCA cable lies under the FDD bracket.
2-32 Removal and Replacement HP OmniBook XE3
Page 61

Removing the CD-ROM/DVD Drive
(HP Authorized Service Providers Only)
Required Equipment
• Small Phillips screwdriver.
Removal Procedure
1. Unplug the AC adapter, if present, and remove the battery.
• Keyboard cover (page 2-9).
• Keyboard (page 2-11).
• Hard disk drive assembly (page 2-13).
• Display assembly (page 2-17).
• Top case (page 2-19).
• Hinge saddle set (page 2-22).
2. Pull the CD-ROM or DVD assembly to the right, off of its connector and out of the notebook.
Figure 2-23. Removing the CD-ROM/DVD Drive
Reassembly Notes
• Place the assembly so that its connector aligns with that on the motherboard, then gently press the
assembly to the left and into place.
HP OmniBook XE3 Removal and Replacement 2-33
Page 62

Removing the Motherboard or Bottom Case
(HP Authorized Service Providers Only)
Required Equipment
• Small Phillips screwdriver.
• 5mm socket driver.
When Installing a New Motherboard
Before replacing the motherboard, you must (if possible) electronically store the motherboard’s serial
number and service ID for transfer to the new motherboard.
1. Exit Windows and boot to a DOS prompt:
• For Windows 98 or ME, press F8 during reboot and select Command Prompt Only.
• For Windows 2000, boot from a DOS boot floppy disk.
2. Run ESN.EXE from one of these sources:
• On a factory software installation, change to the \HP\Drivers\Hputils directory and type
the prompt.
• Otherwise, copy \HP\Drivers\Hputils\ESN.EXE from the Recovery CD, then run it on the
notebook.
3. Save the serial number and service ID.
esn at
2-34 Removal and Replacement HP OmniBook XE3
Page 63

Removal Procedure
1. Unplug the AC adapter, if present, and remove the battery.
2. Remove these additional assemblies:
• Battery (page 2-3).
• SDRAM modules (page 2-5).
• Mini-PCI card (page 2-7).
• Keyboard cover (page 2-9).
• Keyboard (page 2-11).
• Hard disk drive assembly (page 2-13).
• Display assembly (page 2-17).
• Top case (page 2-19).
• Hinge saddle set (page 2-22).
• Video PCA (page 2-25).
• Heatsink assembly (page 2-25).
• CPU module (page 2-29).
• Floppy disk drive assembly (page 2-29).
• CD-ROM/DVD drive (page 2-33).
3. Remove all six standoff screws from the back of the notebook.
4. Remove both retaining screws from the motherboard.
5. Disconnect the cable (modem models only) or cables (modem/LAN models only) at the right rear
corner of the motherboard.
6. Disconnect the cable from the headphone PCA.
7. Remove all four CPU standoffs.
8. Remove the clip from near the right rear corner of the motherboard.
9. Lift the front edge of the motherboard slightly, then lift the motherboard forward and out of the
bottom case.
10. Remove the CPU support plate from the bottom case.
HP OmniBook XE3 Removal and Replacement 2-35
Page 64

Headphone
PCA
CPU standoff
screws, 5 mm (4)
CPU support
plate
Screw,
M2.5x5 mm
Screw,
M2.5x5 mm
Standoff screws, 5 mm (6)
Reassembly Procedure
• When reinstalling the motherboard, see “Reinstalling the Motherboard” on page 2-37.
CD/DVD support
Figure 2-24. Removing the Motherboard
• When reinstalling the bottom case, see “Replacing the Bottom Case” on page 2-38.
2-36 Removal and Replacement HP OmniBook XE3
Page 65

Reinstalling the Motherboard
Reassembly Procedure
1. Install the CPU support plate.
2. Insert the I/O connectors through their openings in the bottom case, then lower the motherboard
into place.
• Be careful not to trap the modem or modem/LAN cable(s) under the motherboard (modem and
modem/LAN models only).
• Fit the modem cable through the notch on the edge of the motherboard, and make sure the
LAN cable doesn’t block the nearby screw tab.
• Make sure the alignment posts in the bottom case fit through the holes at the back left and
front right corners of the motherboard.
3. Reconnect the cable (modem models only) or cables (modem/LAN models only) at the right rear
corner of the motherboard.
When Installing a New Motherboard
After installing a new motherboard, you must electronically transfer to it the serial number and service
ID from the previous motherboard.
1. Exit Windows and boot to a DOS prompt:
• For Windows 98 or ME, press F8 during reboot and select Command Prompt Only.
• For Windows 2000, boot from a DOS boot floppy disk.
2. Run ESN.EXE from the same source you ran it from when saving the serial number and service ID
from the previous motherboard:
• On a factory software installation, change to the \HP\Drivers\Hputils directory and type
the prompt.
• Otherwise, copy \HP\Drivers\Hputils\Esn.exe from the Recovery CD, then run it on the
notebook.
3. Install the serial number and service ID.
• If you are prompted for the serial number, type the serial number shown on the bottom of the
case.
• If a serial number has already been stored, you must call an HP support center to change it.
esn at
HP OmniBook XE3 Removal and Replacement 2-37
Page 66

Replacing the Bottom Case
Installation Procedure
1. Install a new Microsoft Product ID label.
2. Transfer the old serial number label and install a new overlay, or create a new serial number label
using the steps below.
3. If you need to install or replace the docking or PCMCIA doors, refer to the figures below.
Figure 2-25. Installing Docking Doors
2-38 Removal and Replacement HP OmniBook XE3
Page 67

Figure 2-26. Installing the PCMCIA Doors
Installing a New Serial Number Label
Download the latest version of the serial number label template (Microsoft Word format) from the
Partnership Web site (see page vii) under Support/Service in Technical Support Information, or from
http://www.mcd.hp.com. Store it with other Word templates on a PC connected to a laser printer. The
latest version includes fields for warranty period and manufacturing location.
1. Open a new document based on the serial label template.
2. Enter the information from the old serial label, and print the new label on plain white paper. The
new label does not have barcodes.
3. Carefully cut out the new serial label just inside the border and place it into the inner recess in the
bottom case. The bottom of the label goes toward the front of the case.
4. While holding the paper label in place, attach a serial label overlay into the outer recess. It covers
and protects the serial label.
HP Serial Number (S)TW711A1234 1YR
(1P) F2072 W EA MFG# TW711A1234
Made in Taiwan
Figure 2-27. Example of Serial Number Label
HP OmniBook XE3 Removal and Replacement 2-39
Page 68

Removing Notebook Components
(HP Authorized Service Providers Only)
Required Equipment
• Small Phillips screwdriver.
• Small flat-blade screwdriver.
Removal Procedure
1. Unplug the AC adapter, if present, and remove the battery.
2. Remove the assemblies and follow the additional steps given in the table below.
Table 2-1. Removing Notebook Components
Component Removal Procedure Additional Steps
Case, bottom See page 2-34.
Case, top See page 2-19.
Cover, keyboard See page 2-9.
CPU module See page 2-29.
Display assembly See page 2-17.
Doors, docking Mini-PCI card (page 2-7).
Keyboard cover
(page 2-9).
Keyboard (page 2-11).
Hard disk drive assembly
(page 2-13).
Display assembly
(page 2-17).
Top case assembly
(page 2-19).
Hinge saddle set
(page 2-22).
Video PCA (page 2-25).
Heatsink assembly
(page 2-25).
CPU module (page 2-29).
Floppy disk drive assembly
(page 2-31).
CD-ROM/DVD drive
(page 2-33).
Motherboard (page 2-34).
See the figure on page 2-38.
2-40 Removal and Replacement HP OmniBook XE3
Page 69

Component Removal Procedure Additional Steps
Doors, PCMCIA Mini-PCI card (page 2-7).
Keyboard cover
(page 2-9).
Keyboard (page 2-11).
Hard disk drive assembly
(page 2-13).
Display assembly
(page 2-17).
Top case assembly
(page 2-19).
Hinge saddle set
(page 2-22).
Video PCA (page 2-25).
Heatsink assembly
(page 2-25).
CPU module (page 2-29).
Floppy disk drive assembly
(page 2-31).
CD-ROM/DVD drive
(page 2-33).
Motherboard (page 2-34).
Drive, CD-ROM/DVD See page 2-33.
Drive, floppy disk See page 2-29.
Heatsink (with fan) See page 2-25.
Keyboard See page 2-11.
PCA, CD player See page 2-22.
PCA, headphone Keyboard cover
(page 2-9).
Keyboard (page 2-11).
Display assembly
(page 2-17).
Top case (page 2-19).
Hinge saddle set
(page 2-22).
PCA, motherboard See page 2-34.
PCA, switchboard Keyboard cover
(page 2-9).
Keyboard (page 2-11).
PCA, video See page 2-25.
See the figure on page 2-39.
Remove the retaining screw from the PCA, disconnect
the cable to the motherboard, and lift the PCA out of
the notebook. You can lift the floppy drive slightly for
access.
Remove both screws (M2.5x4) from the PCA, and
carefully lift the PCA off of the connector beneath it.
careful not to pull on the cable attached to the PCA.
Disconnect the cable from the PCA and remove the
PCA from the notebook.
Be
HP OmniBook XE3 Removal and Replacement 2-41
Page 70

Component Removal Procedure Additional Steps
Plate, CPU support Mini-PCI card (page 2-7).
Keyboard cover
(page 2-9).
Keyboard (page 2-11).
Hard disk drive assembly
(page 2-13).
Display assembly
(page 2-17).
Top case assembly
(page 2-19).
Hinge saddle set
(page 2-22).
Video PCA (page 2-25).
Heatsink assembly
(page 2-25).
CPU module (page 2-29).
Floppy disk drive assembly
(page 2-31).
CD-ROM/DVD drive
(page 2-33).
Motherboard (page 2-34).
Saddle, hinge set See page 2-22.
Socket, PCMCIA Keyboard cover
(page 2-9).
Keyboard (page 2-11).
Display assembly
(page 2-17).
Top case (page 2-19).
Hinge saddle set
(page 2-22).
Remove the four screws attaching the PCMCIA socket
to the motherboard (M2.5x4), and remove the socket.
2-42 Removal and Replacement HP OmniBook XE3
Page 71

This chapter includes troubleshooting and diagnostic information for testing the functionality of the
notebook, and for identifying faulty modules:
• Troubleshooting information
Troubleshooting the problem (page 3-3).
Verifying the repair (page 3-3).
Suggestions for troubleshooting (page 3-4).
• Diagnostic tools
DiagTools diagnostic program (page 3-17).
Power-on self-test (page 3-24).
Sycard PCCtest 450 PC Card (page 3-27).
Desktop Management Interface (page 3-28).
BIOS Setup utility (page 3-30).
HP OmniBook XE3 Troubleshooting and Diagnostics 3-1
Page 72

Troubleshooting
The suggestions in this section can help isolate and repair the cause of a problem. To ensure quality
repair, HP recommends that you follow the basic troubleshooting steps shown in the illustration
below.
Check the customer’s description
of the problem and any supporting
information.
Try to duplicate the customer’s
problem.
Troubleshoot the problem using
- Diagnostic tools.
- Troubleshooting suggestions.
Verify the repair by testing the
functionality of the complete unit.
Figure 3-1. Basic Troubleshooting Steps
3-2 Troubleshooting and Diagnostics HP OmniBook XE3
Page 73

Troubleshooting the Problem
Record pertinent information about the notebook:
• Model and serial number.
• Operating system and version.
• BIOS version.
• Accessories and peripherals used.
Analyze the problem:
Observe Symptoms. Using the customer’s information, try to duplicate the problem. Determine
•
how the problem differs from proper behavior. Also, take note of the functions that do work
properly.
Separate Problems. If there is more than one symptom, separate them into distinct problems.
•
•
Consider Causes. Keep in mind possible causes for each problem. Use the diagnostic tools and
troubleshooting suggestions to help find the possible causes.
The DiagTools diagnostic program tests most of the notebook’s components using automatic
and interactive tests, and will be your primary troubleshooting tool. Other tools include the
power-on self-test, DMI/TopTools (if installed), the BIOS Setup utility, and the Sycard
PCCtest. The table on page 3-4 shows how you can use these tools to isolate the cause of the
notebook’s problem.
The troubleshooting suggestions on page 3-5 include general suggestions for repairing units
that show specific failure symptoms.
Swapping modules that may be defective with others known to be good is generally an ideal way to
find the module responsible for the problem. A failure symptom is rarely caused by more than one
module, so you will not usually need to replace more than one module to correct a particular failure.
After you replace a module, the notebook will normally be in a confused state and lock up when you
apply power. If this happens, press the system-off switch: this resets the notebook, so that you can
restart it in a known state.
Verifying the Repair
Before returning the repaired notebook to the customer, verify the repair by running the following
tests:
DiagTools Basic Diagnostic Test. Run the basic test of the DiagTools diagnostic program
•
(page 3-17).
–and–
Function Tests. Run tests that check the repaired function, such as in the DiagTools diagnostic
•
program (page 3-17).
–and–
Failed Tests. Run any other tests that failed during troubleshooting.
•
HP OmniBook XE3 Troubleshooting and Diagnostics 3-3
Page 74

Suggestions for Troubleshooting
Table 3-1. Scope of Diagnostic Tools
Function DiagTools Power-On
Self-Test
Bootup Tests Describes Configures
Processor Tests
Tests Describes
(System menu)
Memory Tests
Tests Describes Describes
(Memory menu)
Battery Describes
Display Tests
(Video menu)
Hard disk Tests
Tests Describes Configures
(IDE menu)
Floppy drive Tests
Tests Describes Describes
(FDD menu)
Keyboard Tests
Tests Describes
(KBD menu)
Audio Tests (System,
Misc menus)
Serial Tests*
(Misc menu)
Parallel Tests*
(Misc menu)
LAN Tests**
(User menu)
Modem Tests**
(User menu)
Infrared
Tests
†
(Misc menu)
PS/2 port
Tests
†
(KBD,
Misc menus)
USB
Tests
†
(USB menu)
Docking port Tests
(using docks)
PCMCIA Tests
(Misc menu)
AC adapter Status
Docking
products
CD-ROM
drive
Tests ports and
internal bus
Tests
(IDE menu)
Tests (with
boot CD)
Other plug-in
modules
* The diagnostic test is more thorough if you use a loop-back connector.
** 3Com modem only; the test checks only the internal hardware up to the mini-PCI card, and does
not check the mini-PCI panel or any external cabling.
†
Use an appropriate external device to exercise the port. See the help text for the tests in the menu.
Sycard
PCCtest 450
DMI/TopTools
(if installed)
Describes
Describes Configures
Describes Configures
Describes
Describes Configures
Describes
Tests Describes
Status Configures
Describes Configures
Describes
BIOS Setup
Configures
3-4 Troubleshooting and Diagnostics HP OmniBook XE3
Page 75

If you cannot isolate the cause of a problem using the above diagnostic tools, use the suggestions in
the following table to help find the problem.
Table 3-2. Troubleshooting Suggestions
Symptom Call Center:
Suggestions
To help determine likely causes, check to see what replaceable modules are involved in the system function and
what roles they play. See the figure on page 1-18 and the table on page 1-18.
Startup
Does not boot on
AC or battery.
Beeps once, spins
hard disk, repeats,
but does not boot.
Does not boot on
battery, but boots
on AC.
Does not boot from
floppy drive.
Check power source.
Press system-off switch to
reset notebook, then press
blue standby button to turn
notebook on.
Unplug AC adapter, remove
battery, remove any PC
cards, undock, then
reconnect power and try
again.
Remove all but one SDRAM
module and try again.
Reinsert any other SDRAM
modules and try again.
Make sure battery is properly
installed and fully charged.
Check battery contacts. If
available, try another battery.
Make sure floppy disk is
bootable.
Make sure floppy drive is
installed correctly.
Use BIOS Setup to check
boot order and make sure
floppy boot is enabled as first
boot device.
Repair Center:
Likely Causes
AC adapter.
SDRAM module.
CPU module.
Video PCA.
Motherboard.
Display assembly.
Hard drive.
SDRAM module. Make sure at least one
Battery or contacts.
Motherboard.
Floppy drive or
contacts.
Motherboard.
Repair Center:
Comments
Check AC adapter. Remove
any SDRAM modules and try
again.
If power status light does not
turn on, replace
motherboard.
If power status light turns on
but display remains off, try
external monitor. If monitor
shows successful boot,
replace display assembly. If
monitor shows activity but
BIOS does not complete,
replace display assembly. If
monitor is blank, replace
switchboard PCA, replace
motherboard.
If power status light and
display turn on and BIOS
completes, but OS does not
start from hard disk or from
floppy drive, replace CPU
module, then motherboard. If
OS starts from floppy drive,
reload hard drive, replace
hard drive.
SDRAM module is installed.
HP OmniBook XE3 Troubleshooting and Diagnostics 3-5
Page 76

Symptom Call Center:
Suggestions
Does not boot from
CD-ROM or DVD in
CD-ROM/DVD
drive.
Error message such
as “Invalid system
disk” or “Auto IDE
error”.
Sluggish startup or
shutdown.
Password forgotten. Verify proper ownership, then
Power/Battery
No power. Make sure charged battery is
Does not run on
battery; empty
battery indication.
Notebook beeps. Notebook beeps for 15
Notebook turns off
immediately after
turning on.
Battery does not
charge.
AC adapter does
not power
notebook.
Make sure CD-ROM or DVD
is bootable.
Use BIOS Setup to check
boot order and make sure
CD-ROM/DVD Drive is
enabled as first boot device.
Restart notebook.
Test DVD drive with
DiagTools diagnostics.
Check for disk in floppy drive.
Check boot order in BIOS
Setup.
Remove and reinstall hard
drive.
Run ScanDisk and Disk
Defragmenter to check and
optimize hard drive.
Delete temporary and
unneeded files.
follow removal procedure
with owner and record
appropriate data. See
page 5-1.
installed or AC adapter
connected.
Try another battery or AC
adapter if available.
Check battery and contacts.
Try another battery if
available.
seconds when battery is low.
Connect AC adapter or
replace battery.
Battery is probably extremely
low. Connect AC adapter or
replace battery.
Make sure AC adapter is
connected properly and
battery installed properly.
Check battery contacts. If
available, try another battery
and AC adapter.
Move notebook away from
any nearby heat source.
Unplug AC adapter and allow
battery to cool down. Check
for blocked air vents.
Try another AC adapter, if
available.
Repair Center:
Likely Causes
CD-ROM/DVD drive
module.
Motherboard.
Hard drive contacts.
Hard drive.
AC adapter.
Battery.
Motherboard.
Battery or contacts.
Motherboard.
Battery.
Battery.
Battery or contacts.
AC adapter.
Motherboard.
Heatsink assembly.
AC adapter.
Motherboard.
Repair Center:
Comments
If notebook boots from floppy
drive, check for corrupt files
on hard drive, reload hard
drive, replace hard drive.
Use suggestions shown at
left.
User must call Technical
Support and provide proof of
ownership. Password
removal is restricted to
certain sites. See page 5-1.
Check battery and AC
adapter.
Check heatsink assembly.
AC adapter cannot be
repaired, and must be
replaced.
3-6 Troubleshooting and Diagnostics HP OmniBook XE3
Page 77

Symptom Call Center:
Suggestions
Battery has short
operating time.
Battery indicator is
inaccurate.
Display
Dark display, no
light.
Turn down display
brightness.
Check Intel SpeedStep
Technology settings in BIOS
Setup Power menu. Try
default setting.
Check settings in Power
Management in Control
Panel.
Certain applications can
cause excess CPU and
power usage. (User can get
Intel Power Monitor from
www.intel.com and monitor
CPU load.)
When using applications with
automatic save feature (such
as MS Word), extend save
time or disable to reduce
hard disk access and power
usage.
PCMCIA card use can affect
battery life. Some PCMCIA
cards draw power even while
not in use.
Heavy modem use can affect
battery operating time.
Time Remaining is an
estimate based on how
quickly the notebook is using
power at that moment. It
therefore depends on the
current task, and assumes
power will be used at the
same rate until the battery
runs out. So, for example, if
the notebook is performing a
task requiring a good deal of
power (such as reading from
a CD-ROM or DVD), the
value will probably show too
little time remaining.
Make sure notebook is
turned on.
Check power supply.
Adjust display brightness.
Press Fn+F5 several times.
Make sure SDRAM modules
are installed properly.
Make sure video PCA is
installed properly.
Make sure CPU module is
installed properly.
Try external monitor.
Repair Center:
Likely Causes
Battery.
Motherboard.
Display cable
connection.
SDRAM modules.
Video PCA.
CPU module.
Display assembly.
Motherboard.
Repair Center:
Comments
Battery capacity often
decreases after a year or
more.
Set DIP switch on video PCA
to match label on display
(see page 2-19).
Check cable connection.
Replace SDRAM modules.
Replace CPU module.
Replace display assembly.
If external monitor displays
no image, replace
motherboard.
HP OmniBook XE3 Troubleshooting and Diagnostics 3-7
Page 78

Symptom Call Center:
Suggestions
White display. Adjust display brightness. Display assembly.
Erratic display. Display cable
Bright or missing
pixels or lines.
External display
does not work.
Display difficult to
read or part of
desktop not visible.
Hard disk
Hard disk never
spins.
Hard disk makes
clunking or
scratching noise.
Hard disk makes
buzzing or whining
noise.
Files are corrupted. Run virus scan program.
Drive capacity is
less than normal.
See quality statement on
page 5-2.
Check connections.
Press Fn+F5 several times.
Check settings in BIOS
Setup.
Check display resolution
(default is 800 × 600 for
12.1-in displays, 1024 × 768
for others).
Check power source.
Remove and reinstall hard
drive. Check connector.
Back up drive immediately.
Was notebook or drive
dropped?
Back up drive immediately.
Check hard drive installation.
Check for alternate noise
sources, such as PCMCIA
drive or fan.
Check disk surface by
running Scandisk (Windows
98) or by using Tools tab in
disk’s Properties sheet
(Windows 2000).
Test hard disk drive with
DiagTools diagnostics.
Use
Recovery CD,
original factory software.
Check disk surface by
running Scandisk (Windows
98) or by using Tools tab in
disk’s Properties sheet
(Windows 2000).
Check partitions using FDISK
(Windows 98) or Control
Panel, Administrative Tools,
Computer Management
under Storage (Windows
2000).
to restore
Repair Center:
Likely Causes
Switchboard PCA.
connection.
Video PCA.
Display assembly.
Motherboard.
Display cable
connection.
Display assembly.
Motherboard.
Hard drive or
connector.
Motherboard.
Hard drive. Check notebook and drive for
Depends on source of
noise.
Hard drive. Use suggestions shown at
Repair Center:
Comments
See quality statement on
page 5-2.
If drive case is damaged,
drive may not operate
properly.
evidence of customer abuse.
Use suggestions shown at
left.
left.
Recreate Hibernate partition,
then partition and format
disk.
3-8 Troubleshooting and Diagnostics HP OmniBook XE3
Page 79

Symptom Call Center:
Suggestions
Floppy drive
General problems. Make sure floppy drive is
installed correctly.
Check settings in BIOS
Setup.
Drive does not write
to 1.44-MB floppy
disks.
Drive reads from
but does not write
to 720- or 360-KB
floppy disks.
CD-ROM/DVD
Particular
CD-ROM/DVD not
playing properly.
DVD movie stops
playing.
Region Code error. DVD is intended for different
“System Error:
Unable to read
drive” message.
Keyboard
Some or all keys do
not work properly.
External keyboard
does not work.
Embedded numeric
keypad does not
work.
Make sure floppy disk is not
write-protected.
Make sure floppy disks are
not write-protected.
Format floppy disks using
DOS “format /f:720” or
“format /f:360” command.
Check disk for dirt or
damage, and clean with soft
cloth or replace.
DVD may be double-sided.
Movie may be paused. Press
Play button.
world region.
Make sure disk is clean and
inserted correctly.
Wait 5 to 10 seconds after
closing tray before pressing
Play.
Restart notebook.
Make sure CD-ROM/DVD
drive is installed properly.
Check settings in BIOS
Setup.
Check settings in BIOS
Setup.
Press Fn+F8 to activate
numeric keypad, and Lock
key to turn on number lock.
Avoid touching touch pad
while booting or resuming.
Repair Center:
Likely Causes
Floppy drive module
or contacts.
Motherboard.
Floppy drive module.
Floppy drive module.
CD-ROM/DVD drive
assembly.
Motherboard.
Keyboard.
Motherboard.
External keyboard.
Motherboard.
Keyboard.
Top case.
Motherboard.
Repair Center:
Comments
Try reinserting ribbon cable
in connector on motherboard.
HP OmniBook XE3 Troubleshooting and Diagnostics 3-9
Page 80

Symptom Call Center:
Suggestions
Touch pad
General problems. Slide and hold power button
four seconds to reset
notebook.
Avoid touching touch pad
while booting or resuming.
Check settings in Control
Panel. Make sure touch pad
is enabled in Mouse
Properties.
Make sure touch pad is
enabled in BIOS Setup.
Check pointing stick settings
in Control Panel.
Click button does
not work.
Mouse
External PS/2
mouse doesn’t
work.
Audio
No sound is
audible.
Built-in microphone
does not record.
PC card detection
beep at startup is
loud and cannot be
adjusted.
Check connection.
Put notebook in standby
mode or shut down before
attaching mouse.
Install all drivers included
with mouse.
Restart notebook.
Increase sound volume
(Fn+Up arrow, software
controls, volume control up
button).
Make sure sound is enabled
(software controls).
Check for sound resource
conflicts in Device Manager.
Sound may not operate
properly in MS-DOS mode.
Check speaker cable
connection.
Check software controls for
recording sound.
Make sure switchboard PCA
is connected properly.
Test audio with DiagTools
diagnostics.
Download latest audio driver
from technical support area
of HP Notebook web site
(see page vii).
Repair Center:
Likely Causes
Top case.
Motherboard.
Top case.
Motherboard.
Mouse.
Top case.
Motherboard.
Top case.
Motherboard.
Switchboard PCA.
Top case.
Motherboard.
Repair Center:
Comments
Check operation using
headphones or external
speakers.
Check operation using
external microphone.
3-10 Troubleshooting and Diagnostics HP OmniBook XE3
Page 81

Symptom Call Center:
Suggestions
Serial/Parallel/USB
General problems. Check connections.
Restart notebook.
Check settings in BIOS
Setup.
Check settings in Control
Panel.
Use troubleshooters in
Windows Help.
Test ports with DiagTools
diagnostics.
For USB: contact device
vendor and HP Notebook
web site (see page vii) for
latest USB drivers.
Serial mouse
doesn’t work.
Serial modem
doesn’t work.
Modem
Modem will not
connect at 56K.
Make sure mouse was
installed according to
manufacturer’s instructions.
Use Modem Troubleshooter
in Windows Help.
Disable internal modem.
Verify that host modem
supports 56K (V.90)
connection speed.
Try connecting at later time in
case line quality or other
external factor is cause of
problem.
Repair Center:
Likely Causes
Serial device.
Motherboard.
Repair Center:
Comments
Use loop-back connector
when testing serial or parallel
port—see page 3-19.
HP OmniBook XE3 Troubleshooting and Diagnostics 3-11
Page 82

Symptom Call Center:
Suggestions
Modem will not
connect at any
speed.
General problems. If serial or PC card modem is
One-Touch button
problems
Buttons not working
properly.
On-screen display
does not appear
when button is
pressed.
Make sure notebook’s
modem is properly connected
to wall telephone jack.
Make sure telephone line is
not already in use.
Verify settings in Modems in
Control Panel (Windows 98)
or Phone And Modem
Options (Windows 2000).
Make sure parity, speed,
word length, and stop bits
match on sending and
receiving modems.
Restart notebook.
Run Windows modem
diagnostics or Windows Help
Modem Troubleshooter.
Open hardware Device
Manager. If modem is
disabled, try to enable it. If it
has a conflict, try disabling
another device.
Use an analog telephone line
(2, 3, or 4 wires), not a PBX
or digital line. In a hotel, ask
for a data line.
Try disabling error correction
and data compression.
not working, disable internal
modem:
- Windows 98: Device
Manager tab of System in
Control Panel.
– Windows 2000: Modems
tab of Phone And Modem
Options in Control Panel.
Download latest modem
driver from technical support
area of HP Notebook web
site (see page vii).
Make sure correct
applications are associated
with buttons in One-Touch
tab of Keyboard in Control
Panels.
Make sure Onscreen Display
is enabled in One-Touch tab
of Keyboard in Control
Panels.
Repair Center:
Likely Causes
Mini-PCI card.
Motherboard.
Mini-PCI card.
Motherboard.
Keyboard cover.
Switchboard PCA.
Motherboard.
Repair Center:
Comments
3-12 Troubleshooting and Diagnostics HP OmniBook XE3
Page 83

Symptom Call Center:
Suggestions
Printing
Serial or parallel
printer doesn’t print
Left edge of printed
output is missing.
LAN/Network
General problems. Check connections.
Infrared
General problems. Infrared is disabled and no
Make sure printer is on.
Make sure printer cable is
securely attached at both
ends.
Make sure cable or cable
adapter is appropriate for
printer type.
Use Print Troubleshooter in
Windows Help.
Try using 300-dpi print driver.
Try connecting cable to a
different computer.
Check settings in BIOS
Setup.
Check settings in Control
Panel.
Make sure LAN cable is
Category 3, 4, or 5 for
10Base-T operation, or
Category 5 for 100Base-TX
operation. Maximum cable
length is 100 m (330 ft).
Run DiagTools LAN test.
drivers installed as shipped.
(Drivers are included.)
Check settings in BIOS
Setup.
Remove any PC Cards from
notebook (possible IRQ
conflict).
For fast-IrDA, check for DMA
conflict with ECP parallel
port.
Repair Center:
Likely Causes
Cable.
Motherboard.
Mini-PCI card.
Motherboard.
Motherboard.
Repair Center:
Comments
HP OmniBook XE3 Troubleshooting and Diagnostics 3-13
Page 84

Symptom Call Center:
Suggestions
PC card
Miscellaneous
problems.
PC card modem not
working.
Miscellaneous
Out of memory
error.
Clock loses time. Plug in AC adapter for 24
Notebook gets
abnormally hot.
Remove and reinsert PC
card.
Restart notebook.
Try card in other slot or in
another computer.
If card requires an IRQ, make
sure one is available in
Device Manager.
Check for conflicts or refresh
device list in Device
Manager.
Check HP Notebook web site
for installation instructions
and information about
supported PC cards
(page vii).
When using PC card in a
docking system, insert or
remove card while system is
turned on.
Download current drivers
from card manufacturer’s
web site.
Disable internal modem.
Use Memory Troubleshooter
in Windows Help.
hours to charge CMOS
battery.
Always set notebook on a flat
surface, so air can flow freely
around and underneath it.
Make sure air vents are
clear.
Check heatsink installation.
Games and other programs
that drive CPU usage toward
100% can contribute, as can
charging battery.
Repair Center:
Likely Causes
PC card.
PCMCIA socket.
Motherboard.
SDRAM module.
Motherboard.
Heatsink. Check heatsink for proper fan
Repair Center:
Comments
Using a flashlight, look for
bent pins inside PCMCIA
socket.
If both slots have problems,
replace motherboard. If only
one slot has a problem, try
replacing PCMCIA socket.
operation or damage.
3-14 Troubleshooting and Diagnostics HP OmniBook XE3
Page 85

Symptom Call Center:
Suggestions
Notebook pauses or
runs sluggishly.
Notebook still on
but stops
responding.
May be normal Windows
behavior (background
processing can affect
response time).
Certain background
operations (such as virus
scanning software) can affect
performance.
Press CTRL+ALT+DEL to
see if an application is not
responding.
Restart notebook.
If hard disk has spun down to
conserve power, it can take
several seconds to spin up. If
needed, use Power
Management in Control
Panels to change hard disk
time-out to match standby
time-out.
Some file browsers respond
slowly while processing
graphics or waiting for broken
network connections to time
out.
Check for overheating—see
previous symptom.
If notebook’s hard disk drive
runs frequently (as indicated
by notebook’s hard disk drive
access light) while notebook
appears to be paused or
running slowly, consider
installing additional SDRAM.
Check available free disk
space. Delete temporary and
unneeded files.
Run BIOS Setup utility and
set Intel SpeedStep
Technology to Maximum
Performance.
Press CTRL+ALT+DEL and
end any application not
responding.
Slide and hold power button
four seconds to turn off and
reset notebook, then press
blue standby button to turn
notebook back on.
If this fails, insert a
straightened paper clip into
system-off switch, then press
blue standby button to turn
notebook back on.
Repair Center:
Likely Causes
Heatsink.
CPU module.
Motherboard.
Repair Center:
Comments
If notebook slows after period
of continuous activity, check
heatsink—see previous
symptom.
HP OmniBook XE3 Troubleshooting and Diagnostics 3-15
Page 86

Symptom Call Center:
Suggestions
Port replicator
Docking product I/O
problems.
Notebook locks up
when docking or
undocking.
Make sure AC power is
connected to port replicator.
Make sure notebook is fully
inserted in port replicator.
Check notebook’s power
supply.
Check settings in BIOS
Setup.
Try using corresponding port
on notebook while undocked.
Make sure notebook has
completely entered or
resumed from standby or
hibernate mode before
docking or undocking.
Repair Center:
Likely Causes
Port replicator.
Motherboard.
Repair Center:
Comments
Test corresponding notebook
ports while undocked.
Port replicator is not
repairable, and must be
exchanged.
3-16 Troubleshooting and Diagnostics HP OmniBook XE3
Page 87

Diagnostic Tools
This section describes the following diagnostic tools you can use for troubleshooting and repairing the
notebook:
• DiagTools diagnostic program (below).
• Power-on self-test (page 3-24).
• Sycard PCCtest 450 PC Card (page 3-27).
• Desktop Management Interface (page 3-28).
• BIOS Setup utility (page 3-30).
DiagTools Diagnostic Program
The DiagTools hardware diagnostic program (version 2.30G as of this writing) provides two levels of
testing:
• Automated testing using a basic hardware test.
• Advanced testing using individual hardware tests.
Figure 3-2. DiagTools Screens — Basic and Advanced
The tests are designed to run after the system restarts, so that the notebook will be in a predictable
state during the tests. The tests are non-destructive, and are intended to preserve the state of the
notebook. The notebook restarts when you exit the program so drivers can be loaded.
Updating DiagTools
You can download the latest version of DiagTools from the HP Notebook web site (see page vii).
Follow the instructions included with the new version.
HP OmniBook XE3 Troubleshooting and Diagnostics 3-17
Page 88

Running DiagTools
1. Restart the notebook.
2. When the HP logo appears, press F10 to start the diagnostic test.
3. When the initial diagnostics screen appears, press F2 twice to continue.
4. When the hardware detection finishes, check the list of detected hardware. The following
information and devices should be listed if applicable:
Product name Serial number IDE drives
Processor type Cache memory Audio device
BIOS version Main memory
Note
If a device is not detected or fails its test, it might be configured incorrectly in BIOS Setup
(see page 3-30). You can confirm this by running BIOS Setup and checking the settings.
5. Run the basic test. Press F2 to start the basic hardware test.
If the basic test fails, you can press F6 and start a Wizard that runs a set of advanced tests for the
failed component. Then generate a support ticket.
6. If you intend to exit without running the advanced tests, press F4 to save system and test
information in the Support Ticket log file. Then remove the floppy disk, if present, and press F3
to exit.
Run the advanced tests. Press F2 twice to open the advanced test screen.
7.
8. Select and run the appropriate tests. Tests are not listed if no such hardware is detected. Press the
following keys to run tests:
ENTER Runs the highlighted test.
F5 or SPACE Marks/unmarks the highlighted test.
F6 Marks/unmarks all tests in the current menu.
F7 Marks/unmarks all tests in all menus.
F10 Runs all marked tests.
(Press F9 for a list of all function keys.)
If any test fails, the error code is displayed temporarily, and the error code description is logged.
If several errors occur, look for patterns that might indicate a common cause. See the table on
page 3-20 for repair suggestions. Consider these suggestions in combination with other
troubleshooting information.
3-18 Troubleshooting and Diagnostics HP OmniBook XE3
Page 89

9. When you are finished, press ESC to exit the advanced tests.
10. Press F4 twice (from the advanced test screen) or three times (from the basic test screen) to save
system and test information in the Support Ticket log file. (You can save this to a floppy disk, or
to the notebook’s hard disk.) Press F7 to view the Support Ticket.
Exit. Press F3 twice to exit and restart the notebook.
11.
Optional: Check the log. The log file contains a hardware summary and a list of all test results
12.
and errors. Run C:\Dmi\Hpdiags\Hpsuppt.exe to retrieve the log file to this directory and open it
in Notepad.
Note that the serial and parallel port tests are more thorough if you connect a loop-back connector to
the port before running the test for that port. See the wiring diagrams below.
13
5
1
9
6
25
14
1
Figure 3-3. Serial and Parallel Loopback Connectors
HP OmniBook XE3 Troubleshooting and Diagnostics 3-19
Page 90

Interpreting the Results
• The following table lists test groups, error codes, and suggestions for follow-up actions. Consider
these suggestions in combination with other troubleshooting information.
Table 3-1. DiagTools Error Codes
Code Suggestions
System Tests
0001h –
0008h
0009h Replace the CPU module. Replace the
0010h –
0016h
001Eh Make sure the CPU module is seated properly.
0020h –
002Fh
0030h –
0032h
0040h Replace the motherboard.
0041h Run BIOS Setup and check IRQ assignments
0050h –
0052h
0060h –
0063h
0070h Replace the motherboard.
0071h –
0076h
0077h Replace the motherboard.
0078h Reset the system, then run BIOS Setup and
0079h Replace the motherboard.
0083h –
008Ah
00C0h –
00CCh
Memory Tests
The addresses below are absolute (32-bit) addresses,
and are not in the segment:offset format.
0100h –
0102h
0120h Replace the SDRAM module (each 01000000h
0130h Test with cache off. Replace the SDRAM
0131h Replace the SDRAM module (each 01000000h
0132h Replace the SDRAM module (each 01000000h
0135h –
0137h
0140h –
0150h
Make sure the CPU module is seated properly.
Replace the CPU module.
motherboard.
Make sure the CPU module is seated properly.
Replace the CPU module.
Replace the CPU module. Replace the
motherboard.
Make sure the CPU module is seated properly.
Replace the CPU module.
Replace the motherboard.
for all devices.
Replace the motherboard.
Replace the motherboard.
Reset the notebook, then run BIOS Setup and
check settings. Replace the motherboard.
check settings. Replace the motherboard.
Replace the motherboard.
Replace the CPU module.
Replace the motherboard.
represents 16 MB). Replace the motherboard.
module (each 01000000h represents 16 MB).
Replace the motherboard.
represents 16 MB). Replace the motherboard.
represents 16 MB).
Replace the SDRAM module (each 01000000h
represents 16 MB).
Replace the SDRAM module (each 01000000h
represents 16 MB). Replace the motherboard.
Code Suggestions
0160h Remove all but one SDRAM module and repeat
0170h –
0172h
0180h Replace the SDRAM module (each 01000000h
0181h Enable external cache memory through BIOS
0182h Unload HIMEM.SYS or any programs using the
0183h Check installation of the SDRAM module.
0184h Check installation of the SDRAM module.
0190h –
01A0h
01A1h –
01A4h
01B0h Test with cache off. Replace the SDRAM
01B1h Replace the SDRAM module (each 01000000h
01B2h Replace the SDRAM module (each 01000000h
01B3h Replace motherboard.
Hard Disk Tests
0201h Replace the hard disk. Replace the
0202h,
0204h
0205h Replace the motherboard.
0207h Run BIOS Setup and check the hard disk type.
0208h –
0209h
020Ah –
0211h
0220h Replace the motherboard.
0240h Replace the hard disk. Replace the
0252h,
0254h
025Ah,
0260h
the test. Check the CPU module for shorts.
Replace the CPU module. Replace the
motherboard.
Replace the motherboard.
represents 16 MB). Replace the motherboard.
Setup. Replace the CPU module.
extended memory allocated by HIMEM.SYS.
Replace the SDRAM module. Replace the
motherboard.
Replace the SDRAM module. Replace the CPU
module. Replace the motherboard.
Replace the SDRAM module (each 01000000h
represents 16 MB). Replace the motherboard.
Replace the CPU module.
module (each 01000000h represents 16 MB).
Replace the motherboard.
represents 16 MB). Replace the motherboard.
represents 16 MB).
motherboard.
Check test parameters and repeat the test.
Replace the hard disk.
Check the hard disk connection. Replace the
hard disk. Replace the motherboard.
Transient DMA error. Repeat the test.
Repeat the test. Run SCANDISK or equivalent.
motherboard.
Re-enter test parameters and repeat the test.
Replace the hard disk.
Repeat the test. Run SCANDISK or equivalent,
Replace the hard disk.
3-20 Troubleshooting and Diagnostics HP OmniBook XE3
Page 91

Code Suggestions
0265h Check hard disk connection. Replace the hard
0275h Replace the hard disk.
0280h Check hard disk connection. Replace the hard
0281h Replace the hard disk.
0290h Repeat the test.
0293h,
0295h –
0296h
02AAh Check hard disk connection. Replace the hard
02CCh Re-enter the drive parameters and repeat the
02EEh Run BIOS Setup and temporarily select a drive
02F1h Reformat the hard disk. Recreate the Hibernate
02F3h Run SCANDISK or equivalent. Reformat the
02F4h –
02F5h
02FFh Check hard disk connection. Replace the hard
9602h –
9607h
Floppy Disk Tests
0301h –
0304h
0305h Run the Floppy Disk Controller test. Make sure
0306h Replace the floppy drive.
0307h –
030Bh
030Ch Replace the floppy drive.
Keyboard Tests
0400h –
0401h
0410h –
0414h
0415h Replace the keyboard. Replace the
0416h –
0418h
disk. Replace the motherboard.
disk. Replace the motherboard.
Replace the hard disk.
disk. Replace the motherboard.
test, Run BIOS Setup and check the hard disk
type. Replace the hard disk. Replace the
motherboard.
type that has more than 200 cylinders, then
repeat the test.
partition, then run FDISK to partition the hard
disk.
hard disk. If necessary, recreate the Hibernate
partition, then run FDISK to partition the hard
disk.
Reformat the hard disk. If necessary, recreate
the Hibernate partition, then run FDISK to
partition the hard disk.
disk. Replace the motherboard.
(See Hard Disk Tests at end of table.)
Replace the floppy drive. Replace the
motherboard.
the floppy diskette is fully inserted in the drive.
Make sure the drive is properly installed.
Replace the diskette. Replace the floppy drive.
Replace the motherboard.
Run the Floppy Disk Controller test. Make sure
the floppy diskette is fully inserted in the drive.
Make sure the drive is properly installed.
Replace the diskette. Replace the floppy drive.
Replace the motherboard.
Replace the motherboard.
Check the keyboard ribbon cable connection.
Replace the keyboard. Replace the
motherboard.
switchboard PCA. Replace the motherboard.
Replace the keyboard. Replace the
motherboard.
Code Suggestions
Serial Port Tests
0601h For the external loopback test, make sure the
0602h Replace the motherboard.
0603h For the external loopback test, make sure the
0604h –
0605h
0606h For the external loopback test, make sure the
0607h Make sure the loopback connector is installed
0608h –
0617h
Parallel Port Tests
0701h For the external loopback test, make sure the
0702h Replace the motherboard.
0704h –
0706h
0707h Connect the loopback connector.
0708h Replace the motherboard.
Audio Tests
0801h –
0805h
0806h,
0816h
08C0h –
08C2h
08D0h Replace the motherboard.
08E0h –
08E4h
08F0h –
08F3h
Video Tests
0900h –
0905h
0911h If this test fails on the internal display, replace
0912h –
0913h
0920h Replace the video PCA. Replace the
0931h –
0933h
loopback connector is installed and constructed
properly. For the external or internal loopback
test, replace the motherboard.
loopback connector is installed and constructed
properly. For the external or internal loopback
test, replace the motherboard.
Replace the motherboard.
loopback connector is installed and constructed
properly. For the external or internal loopback
test, replace the motherboard.
and constructed properly. Replace the
motherboard.
Replace the motherboard.
loopback connector is installed and constructed
properly. For the external or internal loopback
test, replace the motherboard.
Replace the motherboard.
Check the speaker connection. Replace the top
case. Replace the motherboard.
If external speakers are being used, make sure
the speakers are properly connected. Rerun
the test. Replace the speakers that fail this test
repeatedly.
Check the speaker connections. Replace the
top case. Replace the motherboard.
Replace the motherboard.
Replace the motherboard.
Replace the video PCA. Replace the
motherboard.
the video PCA; replace the motherboard.
Replace the video PCA. Replace the
motherboard.
motherboard.
Replace the video PCA. Replace the
motherboard.
HP OmniBook XE3 Troubleshooting and Diagnostics 3-21
Page 92

Code Suggestions
2100h –
2102h
2110h –
2120h
2130h Replace the display assembly. Replace the
2140h –
2141h
2150h Replace the display assembly. Replace the
9016h Reset the notebook. Replace the motherboard.
9017h See chapter 5 for cosmetic guidelines. If
CD-ROM Tests
0A00h Insert a CD in the drive.
0A01h Repeat the test. Replace the CD-ROM drive.
0A02h No repair. (Automatic close not supported.)
0A03h Insert a different CD in the drive and repeat the
0A04h Insert a data CD in the drive and repeat the
0A05h Insert a different CD in the drive and repeat the
0A06h Insert a data CD in the drive and repeat the
0A07h Repeat the test. Replace the drive.
0A08h Insert an audio CD and repeat the test.
0A09h Repeat the test. Replace the drive.
0A10h –
0A11h
0A12h Insert a different multisession CD and repeat
SMBUS Tests
0E00h –
0E20h
TI CardBus Tests
1201h Remove any attached ISA or PCI cards and
1202h –
1203h
1205h –
1206h
1207h Reset the notebook. Replace the motherboard.
USB Tests
1301h –
1306h
1312h –
1316h
Replace the display assembly. Replace the
video PCA. Replace the motherboard. If error
also occurs with external monitor, replace the
motherboard.
Replace the video PCA. Replace the
motherboard. Replace the display assembly.
video PCA. Replace the motherboard. If error
also occurs with external monitor, replace the
motherboard.
Replace the video PCA. Replace the
motherboard. Replace the display assembly.
video PCA. Replace the motherboard. If error
also occurs with external monitor, replace the
motherboard.
warranted, replace the display assembly.
test. Make sure the CD-ROM drive is installed
properly. Replace the CD-ROM drive. Replace
the motherboard.
test.
test. Make sure the CD-ROM drive is installed
properly. Replace the CD-ROM drive. Replace
the motherboard.
test. Replace the drive.
Replace the drive.
Insert an audio CD and repeat the test.
Replace the drive.
the test. Replace the drive.
Replace the motherboard.
repeat the test.
Replace the motherboard.
Insert a different PC Card and repeat the test.
Replace the PCMCIA socket. Replace the
motherboard.
Replace the motherboard.
Replace the motherboard.
Code Suggestions
9006h (See USB Port Test below.)
ACPI Tests
1701h –
1702h
DVD Tests
1900h –
1902h
Fan Tests
9001h If the fan is already running, you may not hear
9002h Reset the notebook. Replace the motherboard.
USB Port Test
9006h Make sure a USB device is connected to the
IR Tests (FIR enabled, undocked)
9002h Reset the notebook. Replace the motherboard.
9007h –
9008h
9009h Do not run this test in Windows. For the one-
900Ah Repeat the test. For the two-unit test, make
900Ch Repeat the test. Make sure the IR ports on the
Dock Tests
9071h,
9073h
9075h,
9077h –
907Ah
907Bh Replace LED/button assembly in dock.
9082h Rerun test with known good computer. Replace
9088h Replace electronics PCA in dock.
Hard Disk Tests
9602h
9603h
9604h Back up data if possible, then reinstall
Replace the motherboard.
Insert a different DVD in the drive and repeat
the test. Replace the DVD drive.
a change. Check the heatsink connection.
Replace the heatsink. Replace the
motherboard.
USB port being tested. Select the correct speed
for the device. Try another USB device.
Replace the motherboard (or dock component,
if applicable).
Reset the notebook. Run BIOS Setup and
restore default settings. Replace the
motherboard.
unit test, replace the motherboard. For the twounit test, make sure the IR ports on the reflector
and test computers are lined up. Replace the
motherboard.
sure the IR ports on the reflector and test
computers are lined up. Replace the
motherboard.
reflector and test computers are lined up.
Restart the reflector unit. Replace the
motherboard.
Update the notebook BIOS. Replace the dock’s
electronics PCA.
Replace the dock’s electronics PCA.
electronics PCA in dock.
Failure may occur soon. Back up data and
replace the hard disk.
Repeat the hard disk test. If other errors occur,
follow the instructions for those errors.
applications. Reformat the hard disk. If
necessary, recreate the Hibernate partition,
then run FDISK to partition the hard disk.
3-22 Troubleshooting and Diagnostics HP OmniBook XE3
Page 93

Code Suggestions
9605h Run full HDD test, For a notebook that does not
give an F10 prompt at boot (no Hibernate
partition) or that has a non-Windows operating
system, this error may not indicate a failure.
Otherwise, reformat the hard disk. If necessary,
recreate the Hibernate partition, then run
FDISK to partition the hard disk.
Code Suggestions
9606h Run the full HDD test. Reformat the hard disk.
If necessary, recreate the Hibernate partition,
then run FDISK to partition the hard disk.
9607h Back up data if possible, then reformat the hard
disk. Replace the hard disk.
HP OmniBook XE3 Troubleshooting and Diagnostics 3-23
Page 94

Power-On Self-Test
Note
If Quiet Boot is enabled in BIOS Setup (the default setting), press ESC during boot to see POST
messages.
The POST (Power-On Self-Test) is a series of initialization routines and diagnostic tests that the
system BIOS runs when the notebook boots. The system BIOS will not boot the operating system if
system memory, the CPU, DMA, or the interrupt controller fails the POST diagnostic tests. POST
progress is indicated by a sequence of codes, and error messages are displayed if possible.
You should not necessarily interpret the failure of one or more POST tests as a hardware, software, or
firmware failure. First, confirm the failure by performing a “clean” boot:
• Remove all accessories, including SDRAM modules, port replicator, PC cards, printer, external
monitor, pointing device, and keyboard.
• Provide “clean” AC power—no auto adapter or unusual AC adapter configuration.
• Press the system-off switch to return the notebook to a known state.
If the notebook fails to boot with a clean boot, it requires repair. If an error message appears, confirm
the problem using other diagnostic tools. Not all POST messages indicate a hardware, software, or
firmware failure—some messages are for information only.
If the BIOS detects a terminal error condition, it halts POST after issuing a terminal error beep code
(see the following table). The beep code indicates the POST routine in which the terminal error
occurred.
Table 3-1. POST Terminal-Error Beep Codes
Beep Codes* POST Description
1 One short beep before boot.
1-2 Search for option ROMs.
1-2-2-3 BIOS ROM checksum.
1-3-1-1 Test DRAM refresh.
1-3-1-3 Test 87570 Keyboard Controller (part of motherboard).
1-3-4-1 RAM failure on address line
1-3-4-3 RAM failure on data bits
1-4-1-1 RAM failure on data bits
2-1-2-3 Check ROM copyright notice.
2-2-3-1 Test for unexpected interrupts.
1 long-2 short Improper video configuration (check video PCA DIP switches, replace video PCA)
or external ROM checksum failure.
1 long-5 short Display DIP switches and EEPROM settings do not match (check DIP switch
settings, reprogram EEPROM).
* Up to four groups of short beeps, except as noted.
xxxx
.
xxxx
of low byte of memory bus.
xxxx
of high byte of memory bus.
3-24 Troubleshooting and Diagnostics HP OmniBook XE3
Page 95

The following table lists POST messages and explanations for reported problems. If the system fails
after you make changes in BIOS Setup, reset the notebook, enter BIOS Setup, and install the defaults
or correct the error.
Table 3-2. POST Messages
Message Description
0200 Failure Fixed Disk
0210 Stuck key
0211 Keyboard error
0212 Keyboard Controller Failed
0213 Keyboard locked – Unlock key switch
0220 Monitor type does not match CMOS – Run SETUP
0230 Shadow RAM Failed at offset:
0231 System RAM Failed at offset:
0232 Extended RAM Failed at offset:
0250 System battery is dead – Replace and run SETUP
0251 System CMOS checksum bad – Default configuration used
0260 System timer error
0270 Real time clock error
0280 Previous boot incomplete – Default configuration used
0281 Memory Size found by POST differed from CMOS
02B0 Diskette drive A error
02B1 Diskette drive B error
02B2 Incorrect Drive A type – run SETUP
02B3 Incorrect Drive B type – run SETUP
02D0 System cache error – Cache disabled
02F0: CPU ID:
02F4: EISA CMOS not writeable
Fixed disk is not working or not configured properly. Make sure the fixed disk is attached
properly. Run BIOS Setup. Find out if the fixed-disk type is correctly identified.
Stuck key on keyboard.
Keyboard not working.
Keyboard controller failed test. May require replacing motherboard (contains keyboard
controller).
Unlock the system to proceed.
Monitor type not correctly identified in BIOS Setup.
nnnn
Shadow RAM failed at offset
nnnn
System RAM failed at offset
nnnn
Extended memory not working or not configured properly at offset
BIOS version.
The CMOS clock battery indicator shows the battery is dead. Connect the AC adapter for at
least 24 hours. Replace the motherboard.
System CMOS has been corrupted or modified incorrectly, perhaps by an application program
that changes data stored in CMOS. The BIOS installed Default Setup Values. If you do not
want these values, enter BIOS Setup and enter your own values. If the error persists, check
the system battery. Connect the AC adapter for at least 24 hours; replace the motherboard.
The timer test failed. Replace the motherboard.
Real-time clock fails BIOS test. May need to replace motherboard.
Previous POST did not complete successfully. POST loads default values and offers to run
BIOS Setup. If failure was caused by incorrect values and these values are not corrected, the
next boot will likely fail. This error is cleared the next time the system is booted.
Memory size found by POST differed from CMOS.
Drive A: or B: is present but fails the BIOS POST diskette tests. Make sure the drive is
installed properly and defined with the proper diskette type in BIOS Setup.
Type of floppy drive A: not correctly identified in BIOS Setup.
Type of floppy drive B: not correctly identified in BIOS Setup.
RAM cache failed and BIOS disabled the cache. CPU may need to be replaced. A disabled
cache slows system performance considerably.
CPU socket number for Multi-Processor error.
BIOS test error: Cannot write to EISA CMOS.
nnnn
in the 64k block at which the error was detected.
nnnn
in the 64k block at which the error was detected.
nnnn
. Update to the latest
HP OmniBook XE3 Troubleshooting and Diagnostics 3-25
Page 96

Message Description
02F5: DMA Test Failed
02F6: Software NMI Failed
02F7: Fail-Safe Timer NMI Failed
device
Address Conflict
Allocation Error for:
CD ROM Drive
Entering SETUP ...
Failing Bits:
Fixed Disk
Invalid System Configuration Data
I/O device IRQ conflict
PS/2 Mouse Boot Summary Screen:
nnnn
nnnn
nnnn
nnnn
Operating system not found
Parity Check 1
Parity Check 2
Press <F1> to resume, <F2> to Setup, <F3> for previous
Press <F2> to enter Setup
PS/2 Mouse:
System BIOS shadowed
UMB upper limit segment address:
Video BIOS shadowed
nnnn
n
kB Extended RAM Passed
Cache SRAM Passed
kB Shadow RAM Passed
kB System RAM Passed
device
nnnn
nnnn
BIOS test error: Cannot write to extended DMA (Direct Memory Access) registers.
BIOS test error: Cannot generate software NMI (Non-Maskable Interrupt).
BIOS test error: Fail-Safe Timer takes too long.
Address conflict for specified device.
Resolve resource conflict for the specified device.
CD ROM Drive identified.
Starting BIOS Setup program.
The hex number
Each 1 (one) in the map indicates a failed bit. See errors 230, 231, or 232 above for offset
address of the failure in System, Extended, or Shadow memory.
Fixed disk n (0–3) identified.
Problem with NVRAM (CMOS) data.
I/O device IRQ conflict error.
PS/2 Mouse installed.
Where
nnnn
nnnn
Where
nnnn
Where
Where
nnnn
Operating system cannot be located on drive A: or drive C:. Enter BIOS Setup and see if fixed
disk and drive A: are properly identified.
Parity error found in the system bus. BIOS attempts to locate the address and display it on the
screen. If it cannot locate the address, it displays ????. Parity is a method for checking errors
in binary data. A parity error indicates that some data has been corrupted.
Parity error found in the I/O bus. BIOS attempts to locate the address and display it on the
screen. If it cannot locate the address, it displays ????.
Displayed after any recoverable error message. Press <F1> to start the boot process or <F2>
to enter BIOS Setup and change the settings. Press <F3> to display the previous screen
(usually an initialization error of an Option ROM, such as an add-on card). Write down and
follow the information shown on the screen.
Optional message displayed during POST.
PS/2 mouse identified.
System BIOS copied to shadow RAM.
nnnn
is a map of the bits at the RAM address which failed the memory test.
is the amount of RAM in kilobytes successfully tested.
is the amount of system cache in kilobytes successfully tested.
is the amount of shadow RAM in kilobytes successfully tested.
is the amount of system RAM in kilobytes successfully tested.
nnnn
Displays the address
segments of the BIOS which can be reclaimed by a virtual memory manager.
Video BIOS copied to shadow RAM.
nnnn
of the upper limit of Upper Memory Blocks, indicating released
3-26 Troubleshooting and Diagnostics HP OmniBook XE3
Page 97

Sycard PCCtest 450 CardBus Card (Optional)
The PCCtest 450 CardBus Card (version 1.05) available from Sycard Technology is the only
recommended diagnostic tool that tests the functionality of the PCMCIA slots using a PCMCIA card.
It is a Type II CardBus Card that works with compatible test software to exercise PCMCIA functions.
(For details, see the Sycard Technology Web site: http://www.sycard.com.) The PCCtest 450 product
contains these components:
• PCCtest 450 CardBus Card, version 1.05.
• PCCtest 450 software disk. (Software updates are available at the Sycard Technology Web site:
http://www.sycard.com.)
• Configuration headers (PC Card/16-bit and CardBus/32-bit) that attach to the card.
In addition, you will need this item:
• CardBus extender card (such as the Sycard PCCextend 70) to avoid wear on the Sycard PCMCIA
connector.
The Sycard PCCtest 450 provides the following tests. See the Sycard documentation for details about
running the tests.
Table 3-1. Sycard PCCtest Commands
XE3/N5000
(technology code GC)
(PCI1420)
Slot PCMCIA PC Card (16-bit) test
(PC Card configuration header)
Upper
Lower
PCT450 -1 -v -b75
PCT450 -0 -v -b75
CardBus (32-bit) test
(CardBus configuration header)
TESTCB -1 -v -b75
TESTCB -0 -v -b75
HP OmniBook XE3 Troubleshooting and Diagnostics 3-27
Page 98

Desktop Management Interface (DMI)
The Desktop Management Interface (DMI) is basically a set of rules for accessing information about a
personal computer. Using DMI, an application program can determine, for example, which hardware
and software components are present in the computer, the operating system being used, and the
number of accessory board slots available. Using the DMI interface, a local or remote application
program can check which hardware and software components are installed on your notebook, and may
be able to tell how well they are working or whether any needs replacing. All this information is
stored in a special Management Information Format (MIF) file, installed on each computer as part of
the DMI package.
Installing the DMI Package
The DMI package is included with your notebook, but must be properly installed before it can be
used. Install the package as follows.
To install the DMI preloaded on the hard disk:
• In Windows, click Start, Programs, HP TopTools for Notebooks, Setup.
To install the DMI from the Recovery CD, or from floppy disks:
1. Insert the Recovery CD, into the CD-ROM/DVD drive, or insert disk #1 into the floppy drive.
2. Select and run the SETUP program from the dmi\disk1 directory on the CD (under \hp\Drivers),
or from floppy disk #1.
Contents of the DMI Package
The DMI software and associated documentation is supplied either preinstalled on the notebook’s
hard disk drive or on the Recovery CD. The contents of the package are the same for both.
Since the information accessed by the DMI software is specific to each particular computer, it must be
installed on each computer separately. The DMI package included with a notebook can therefore be
used only with that notebook.
The DMI package includes the following software:
• A Microsoft Windows utility (SETUP.EXE) to install and initialize the DMI software.
• A Windows utility, HP TopTools. After DMI is installed, this utility can display information
about the notebook through the DMI.
• A Management Information Format (MIF) file. This file contains information about everything on
the notebook that can be controlled using DMI facilities, and is initialized during installation.
• A component code, identifying the version of MIF file to use for specific models of HP notebook
computers.
• Windows-compatible DMTF Service Layer software, which controls access to the DMI.
• A client agent. The HP Remote DMI Agent is a DMI application and also a network server-side
stream-based application. The Remote Agent is listening for Remote Application connection
requests. If the main window of the Remote Agent is hidden, then no icon appears on the screen
when it is running.
3-28 Troubleshooting and Diagnostics HP OmniBook XE3
Page 99

Using the DMI Interface
For a complete explanation of how to take full advantage of DMI, see the following documentation
(provided with your notebook):
• A README.TXT file.
• A Windows online help file describing Hewlett-Packard’s implementation of DMI (group and
attribute definitions). Since not all models support all of Hewlett-Packard enhanced features, this
document also describes any restrictions that apply.
Description of DMI
The Desktop Management Interface (DMI) is the result of the efforts of the Desktop Management
Task Force (DMTF) founded in 1992 by a group of leading computer manufacturers—including
Hewlett-Packard—to define a standard method of managing the physical and logical components of
personal computers.
Hewlett-Packard has developed a number of extensions to DMI to allow it to manage the enhanced
features of HP notebook computers, including passwords and tattooing (identifying a computer using
a unique string of characters).
For full details of the structure of the MIF file (including an explanation of the fields of groups and
attributes, and how to write an application program that accesses this information), access the DMTF
FTP server ftp.dmtf.org or the DMTF web pages at the http://www.dmtf.org.
Uninstalling the DMI Package
1. Click Start, Programs, HP TopTools for Notebooks, Uninstall DMI.
2. Restart the notebook.
HP OmniBook XE3 Troubleshooting and Diagnostics 3-29
Page 100

BIOS Setup Utility
The BIOS Setup utility provides access to basic configuration settings. It is independent of the
operating system.
Running the BIOS Setup Utility
1. Close all applications, then click Start, Shut Down, Reboot. (If necessary, you can press
CTRL+ALT+DEL to reboot.)
2. When the HP logo appears, press F2 to enter the BIOS Setup utility.
3. The pointing devices are not active in BIOS Setup, so you will need to use the keyboard to
navigate:
• Press the LEFT and RIGHT arrow keys to move among menus.
• Press the UP and DOWN arrow keys to move among parameters in a menu.
• Press F5 or F6 to move through values for the current parameter, or press ENTER to change a
setting.
4. After you select the options you want, press F10 or use the Exit menu to exit BIOS Setup.
If the settings cause a conflict between devices during reboot, the system prompts you to run
BIOS Setup again, and marks the conflicting settings.
Table 3-1. BIOS Setup Menus and Parameters
OmniBook XE3: Introduced with BIOS version GC.M1.00 (Summer 2000).
Main Menu Description Default
BIOS Revision Shows the current BIOS version. Detected
automatically
System Time Sets the time using 24-hour format. Values set take effect
immediately.
System Date Sets the date using mm/dd/yy format.
Floppy Drive Sets the floppy drive type. Detected and set
automatically
Internal Hard Disk Sets the hard disk drive type and various drive parameters. Detected and set
automatically
Quiet Boot When enabled, hides summary of power-on self-test and
messages during boot.
Video Display Device Sets whether the notebook automatically switches to an
external display if one is detected (Auto), or uses both the
built-in and external displays (Both).
Video Expansion When enabled, the video image covers the entire display in
lower resolution modes. When disabled, the video image is
centered in the display.
Television Type NTSC or PAL standard. NTSC
Base Memory Shows the system memory size. 640 KB
Extended Memory Shows the extended memory size. Detected
CPU Serial Number When enabled, makes Intel CPU serial number available to
software.
Enabled
Auto
Disabled
automatically
Enabled
3-30 Troubleshooting and Diagnostics HP OmniBook XE3
 Loading...