

Page 1
HP LaserJet P2015 Series
User Guide
Page 2

Page 3

HP LaserJet P2015 Series
User Guide
Page 4

Copyright information
© 2006 Copyright Hewlett-Packard
Development Company, L.P.
Reproduction, adaptation or translation
without prior written permission is prohibited,
except as allowed under the copyright laws.
Part number: CB366-90951
Edition 1, 09/2006
The information contained herein is subject
to change without notice.
The only warranties for HP products and
services are set forth in the express warranty
statements accompanying such products
and services. Nothing herein should be
construed as constituting an additional
warranty. HP shall not be liable for technical
or editorial errors or omissions contained
herein.
Trademark credits
Microsoft
®
and Windows® are
U.S. registered trademarks of Microsoft
Corporation.
PostScript
®
is a registered trademark of
Adobe Systems Incorporated.
Energy Star
®
and the Energy Star mark® are
US registered marks of the United States
Environmental Protection Agency.
Page 5

Table of contents
1 Product information
Product features ................................................................................................................................... 2
HP LaserJet P2015 printer .................................................................................................. 2
HP LaserJet P2015d printer ................................................................................................ 2
HP LaserJet P2015n printer ................................................................................................ 3
HP LaserJet P2015dn printer .............................................................................................. 3
HP LaserJet P2015x printer ................................................................................................. 3
Identify product parts ............................................................................................................................ 4
2 Control panel
3 Product software
Supported operating systems ............................................................................................................. 10
Printer connections ............................................................................................................................. 11
USB connections ............................................................................................................... 11
Network connections ......................................................................................................... 11
Connect the printer to the network .................................................................... 11
Install the printer software for the network printer ............................................. 12
Software for Windows ........................................................................................................................ 13
Windows printer drivers ..................................................................................................... 13
Windows driver types ........................................................................................ 13
Install the Windows printer software ................................................................. 13
To install printer software for Windows XP (64-bit) and Windows
Server 2003 ...................................................................................... 13
To install printer software for Windows 98 (driver only), Me (driver
only), 2000, and XP (32–bit) ............................................................. 13
Configure the Windows printer driver ................................................................ 13
HP ToolboxFX ................................................................................................................... 14
Embedded Web server ...................................................................................................... 14
Software for Macintosh ....................................................................................................................... 15
Macintosh printer drivers ................................................................................................... 15
Install the Macintosh printer driver .................................................................... 15
Configure the Macintosh printer driver .............................................................. 15
PostScript Printer Description files (PPDs) ........................................................................ 16
4 Supported paper and other media
Optimize print quality for media types ................................................................................................ 18
Guidelines for using media ................................................................................................................. 19
HP media ........................................................................................................................... 19
ENWW iii
Page 6

5 Print tasks
Load media ......................................................................................................................................... 24
Print-quality settings ........................................................................................................................... 26
Print on special media ........................................................................................................................ 27
Print on both sides of the page (duplex) ............................................................................................. 32
Print multiple pages on a single sheet of paper (N-up printing) ......................................................... 40
Print booklets ...................................................................................................................................... 41
Print watermarks ................................................................................................................................ 42
Cancel a print job ............................................................................................................................... 43
Media to avoid ................................................................................................................... 19
Media that can damage the printer .................................................................................... 19
Paper ................................................................................................................................. 20
Labels ................................................................................................................................ 20
Label construction ............................................................................................. 20
Transparencies .................................................................................................................. 20
Envelopes .......................................................................................................................... 20
Envelope construction ....................................................................................... 20
Envelopes with double-side seams ................................................................... 21
Envelopes with adhesive strips or flaps ............................................................ 21
Envelope storage .............................................................................................. 21
Card stock and heavy media ............................................................................................. 21
Card stock construction ..................................................................................... 22
Card stock guidelines ........................................................................................ 22
Letterhead and preprinted forms ....................................................................................... 22
Tray 1 ................................................................................................................................. 24
Tray 2 and optional tray 3 .................................................................................................. 24
Straight-through output path .............................................................................................. 25
Manual feed ....................................................................................................................... 25
Print on an envelope .......................................................................................................... 27
Print on transparencies or labels ....................................................................................... 28
Print on letterhead and preprinted forms ........................................................................... 29
Print on custom-size media and card stock ....................................................................... 30
Manual two-sided printing .................................................................................................. 32
Manual two-sided printing using the top output bin ........................................... 32
Manual two-sided printing using the straight-through output door .................... 35
Automatic two-sided printing .............................................................................................. 38
6 Managing and maintenance
Printer information pages ................................................................................................................... 46
Demo page ........................................................................................................................ 46
Configuration page ............................................................................................................ 46
Supplies Status page ......................................................................................................... 46
Network Configuration page .............................................................................................. 46
HP ToolboxFX .................................................................................................................................... 47
To view HP ToolboxFX ...................................................................................................... 47
Status ................................................................................................................................. 48
Alerts .................................................................................................................................. 49
Set up status alerts ........................................................................................... 49
Set up e-mail alerts ........................................................................................... 49
iv ENWW
Page 7

Help ................................................................................................................................... 49
Device settings .................................................................................................................. 50
Device information ............................................................................................ 50
Paper handling .................................................................................................. 51
Print quality ....................................................................................................... 51
Paper types ....................................................................................................... 51
System setup .................................................................................................... 52
Service .............................................................................................................. 52
Print settings ...................................................................................................................... 52
Printing .............................................................................................................. 52
PCL 5e .............................................................................................................. 52
PCL 6 ................................................................................................................ 52
PostScript .......................................................................................................... 53
Network settings ................................................................................................................ 53
Embedded Web server ....................................................................................................................... 54
Open the embedded Web server ....................................................................................... 54
Status tab ........................................................................................................................... 55
Settings tab ........................................................................................................................ 55
Networking tab ................................................................................................................... 55
Links .................................................................................................................................. 56
Replace the print cartridge ................................................................................................................. 57
Redistribute toner ............................................................................................................................... 59
Clean the printer ................................................................................................................................. 60
Clean the print-cartridge area ............................................................................................ 60
Clean the printer media path ............................................................................................. 61
Clean the pickup roller (tray 1) ........................................................................................................... 63
Clean the pickup roller (tray 2) ........................................................................................................... 66
EconoMode ........................................................................................................................................ 72
7 Problem solving
Finding the solution ............................................................................................................................ 74
Status-light patterns ........................................................................................................................... 76
Common Macintosh problems ............................................................................................................ 83
HP postscript level 3 emulation errors ................................................................................................ 86
Media problem solving ....................................................................................................................... 87
Printed page is different than what appeared on screen .................................................................... 89
Printer software problems .................................................................................................................. 91
Improve print quality ........................................................................................................................... 92
Step 1: Is the printer set up correctly? ............................................................................... 74
Step 2: Is the Ready light on? ............................................................................................ 74
Step 3: Can you print a demo page? ................................................................................. 74
Step 4: Is the print quality acceptable? .............................................................................. 75
Step 5: Is the printer communicating with the computer? .................................................. 75
Step 6: Does the printed page look like you expected? ..................................................... 75
Contact HP support ........................................................................................................... 75
Garbled, incorrect, or incomplete text ................................................................................ 89
Missing graphics or text, or blank pages ........................................................................... 89
Page format is different than on another HP LaserJet printer ........................................... 90
Graphics quality ................................................................................................................. 90
Light print or faded ............................................................................................................. 92
ENWW v
Page 8

Toner specks ..................................................................................................................... 92
Dropouts ............................................................................................................................ 92
Vertical lines ...................................................................................................................... 93
Gray background ............................................................................................................... 93
Toner smear ...................................................................................................................... 93
Loose toner ........................................................................................................................ 94
Vertical repetitive defects ................................................................................................... 94
Misformed characters ........................................................................................................ 94
Page skew ......................................................................................................................... 95
Curl or wave ....................................................................................................................... 95
Wrinkles or creases ........................................................................................................... 95
Toner scatter outline .......................................................................................................... 96
Clearing jams ..................................................................................................................................... 97
Print-cartridge area ............................................................................................................ 97
Input trays .......................................................................................................................... 99
Output bin ........................................................................................................................ 102
Straight-through output path ............................................................................................ 103
Automatic two-sided printing path .................................................................................... 104
Network setup problem solving ........................................................................................................ 109
Appendix A Accessory/Consumable addendum
Order supplies and accessories ....................................................................................................... 112
10/100 networking print servers ....................................................................................................... 113
HP print cartridges ............................................................................................................................ 114
HP policy on non-HP print cartridges ............................................................................... 114
Storing print cartridges ..................................................................................................... 114
Print cartridge life expectancy .......................................................................................... 114
Saving toner ..................................................................................................................... 114
DIMMs (memory or font) .................................................................................................................. 115
Install a memory DIMM ................................................................................................... 115
Test the DIMM installation ............................................................................................... 117
Remove a DIMM .............................................................................................................. 117
Appendix B Service and support
Hardware service ............................................................................................................................. 122
Extended warranty ........................................................................................................................... 122
Guidelines for repacking the printer ................................................................................................. 123
How to contact HP ............................................................................................................................ 123
Appendix C Printer specifications
Environmental specifications ............................................................................................................ 126
Acoustic emissions ........................................................................................................................... 126
Electrical specifications .................................................................................................................... 127
Physical specifications ..................................................................................................................... 129
Printer capacities and ratings ........................................................................................................... 130
Memory specifications ...................................................................................................................... 130
Port availability ................................................................................................................................. 130
Appendix D Regulatory information
vi ENWW
Page 9

FCC compliance ............................................................................................................................... 132
Declaration of Conformity statements .............................................................................................. 133
Regulatory statements ..................................................................................................................... 134
Laser safety statement .................................................................................................... 134
Canadian DOC regulations .............................................................................................. 134
Korean EMI statement ..................................................................................................... 134
Laser statement for Finland ............................................................................................. 135
Environmental product stewardship program ................................................................................... 136
Protecting the environment .............................................................................................. 136
Ozone production ............................................................................................................ 136
Power consumption ......................................................................................................... 136
Toner consumption .......................................................................................................... 136
Paper use ........................................................................................................................ 136
Plastics ............................................................................................................................ 136
HP LaserJet printing supplies .......................................................................................... 136
HP printing supplies returns and recycling program information ..................................... 137
Paper ............................................................................................................................... 137
Material restrictions .......................................................................................................... 137
Disposal of Waste Equipment by Users in Private Household in the European
Union ............................................................................................................................... 137
Material safety data sheet ................................................................................................ 138
For more information ....................................................................................................... 138
Appendix E Warranty and licensing
Hewlett-Packard limited warranty statement .................................................................................... 140
Hewlett-Packard software license agreement .................................................................................. 141
Limited warranty for print cartridge life ............................................................................................. 142
Index ................................................................................................................................................................. 143
ENWW vii
Page 10

viii ENWW
Page 11

1 Product information
This chapter provides information on the following topics:
Product features
●
Identify product parts
●
ENWW 1
Page 12

Product features
The following are the standard configurations for the HP LaserJet P2015 Series printers.
HP LaserJet P2015 printer
27 ppm (Letter-size), 26 ppm (A4–size)
●
First page out in as few as 8.5 seconds
●
ProRes 1200 (provides fine-line detail at 1200 x 1200 dpi)
●
600 dpi (provides 600 x 600 dpi output with Resolution Enhancement Technology (REt) for
●
improved text)
50-sheet multipurpose tray (tray 1)
●
250-sheet enclosed input tray (tray 2)
●
Optional additional 250-sheet input tray (tray 3)
●
EconoMode
●
Print watermarks, booklets, multiple pages per sheet (N-up), and first page on different media than
●
the rest of the document
32 MB RAM
●
Memory can be upgraded to 288 MB
●
3,000-page or 7,000-page print cartridge
●
PCL 6, PCL 5e, and HP postscript level 3 emulation (printer automatically determines and switches
●
to the appropriate language)
Compatible with USB 2.0 specifications
●
Supported by Windows® 98 (printer driver only), Me (printer driver only), 2000, Server 2003 (printer
●
driver only), XP 32-bit, XP 64-bit (printer driver only)
Supported by Macintosh OS X V10.2.8, V10.3.9, V10.4.3
●
On/off switch
●
HP ToolboxFX (provides printer status information, troubleshooting information, and printer
●
configuration information)
Embedded Web server (EWS) with internal pages that are localized in 16 languages
●
46 HP fonts
●
35 HP postscript emulation level 3 fonts
●
HP LaserJet P2015d printer
The HP LaserJet P2015d printer includes all of the features of the HP LaserJet P2015 plus automatic
two-sided (duplex) printing.
2 Chapter 1 Product information ENWW
Page 13

HP LaserJet P2015n printer
The HP LaserJet P2015n printer includes all of the features of the HP LaserJet P2015 plus an HP internal
network port.
HP LaserJet P2015dn printer
The HP LaserJet P2015dn printer includes all of the features of the HP LaserJet P2015d plus an
HP internal network port.
HP LaserJet P2015x printer
The HP LaserJet P2015x printer includes all of the features of the HP LaserJet P2015dn plus an
additional 250-sheet input tray (tray 3).
ENWW Product features 3
Page 14

Identify product parts
The following illustrations identify the components of the HP LaserJet P2015 Series printers. The HP
LaserJet P2015dn model is shown.
Figure 1-1 HP LaserJet P2015dn, front view
1 Output bin
2 Print-cartridge door
3 Tray 1 (50–sheet multipurpose tray)
4 Model number
5 Tray 2 (250-sheet enclosed input tray)
6 On/off switch
7 Print-cartridge-door button
8 Control panel
Figure 1-2 HP LaserJet P2015dn, back view
1 Straight-through output door
2 Power receptacle
4 Chapter 1 Product information ENWW
Page 15

3 Automatic two-sided-printing media-size selector (duplex models only)
4 HP internal network port (network-ready models only)
5 USB port
6 Rear automatic two-sided path door (duplex models only)
7 Jam-clearing levers
8 Serial number
ENWW Identify product parts 5
Page 16

6 Chapter 1 Product information ENWW
Page 17

2 Control panel
The printer control panel is comprised of six lights and two buttons. The lights produce patterns that
identify the printer status.
1 Jam light: Indicates that there is a jam in the printer.
2 Toner light: When the print cartridge is low, the Toner light illuminates. When the print cartridge is out of the printer, the
Toner light blinks.
3 Paper out light: Indicates that the printer is out of paper.
4 Attention light: Indicates that the print cartridge door is open or other errors exist.
5 Ready light: Indicates that the printer is ready to print.
6 Go button and light.
7 Cancel button: To cancel the print job that is currently printing, press the Cancel button.
NOTE See Status-light patterns for a description of the light patterns.
ENWW 7
Page 18

8 Chapter 2 Control panel ENWW
Page 19

3 Product software
For easy printer setup and access to the full range of printer features, HP strongly recommends that
you install the software that is provided with the printer.
The following sections describe the software that is provided with the HP LaserJet P2015 Series printers:
Supported operating systems
●
Printer connections
●
Software for Windows
●
Software for Macintosh
●
ENWW 9
Page 20

Supported operating systems
The printer comes with software for the following operating systems:
Windows 98 (printer driver only)
●
Windows Me (printer driver only)
●
Windows 2000
●
Windows Server 2003 (printer driver only)
●
For more information about upgrading from Windows 2000 Server to Windows Server 2003; using
Windows Server 2003 Point and Print; or using Windows Server 2003 Terminal Services and
Printing, go to
Windows XP (32-bit)
●
Windows XP (64-bit) (printer driver only)
●
Macintosh OS X V10.2.8, V10.3.9, and V10.4.3
●
http://www.microsoft.com/.
10 Chapter 3 Product software ENWW
Page 21

Printer connections
This section shows you how to connect the printer to your computer or network by a USB or network
connection.
USB connections
All HP LaserJet P2015 Series printers support USB connections.
1. Insert the software installation CD into the computer CD-ROM drive.
2. If the installation program does not start automatically, browse the CD contents and run the
SETUP.EXE file.
3. Follow the on-screen instructions.
Network connections
The HP LaserJet P2015n, HP LaserJet P2015dn, and HP LaserJet P2015x printers can connect to
networks through the HP internal networking port. External network print servers are available for the
HP LaserJet P2015 and HP LaserJet P2015d printers. The following table identifies what is required to
add networking to any HP LaserJet P2015 Series printer.
Table 3-1 Networking options
HP LaserJet model 10/100Base-TX
P2015 and P2015d HP Jetdirect 175x
HP Jetdirect en3700
P2015n, P2015dn, P2015x Included
To order the print server, see 10/100 networking print servers.
Connect the printer to the network
To connect a networking-equipped HP LaserJet P2015 Series printer to your network, you need the
following items:
Functional wired network
●
CAT-5 Ethernet cable
●
To connect the printer to your network, perform the following steps:
1. Connect the CAT-5 Ethernet cable to an available port on the Ethernet hub or router.
ENWW Printer connections 11
Page 22

2. Connect the Ethernet cable to the Ethernet port on the back of the printer.
3. Verify that one of the network lights (10 or 100) is illuminated on the network port located on the
back of the printer.
4. Print a Network Configuration page: When the printer is in the Ready state, press and hold the
Go button for 5 seconds. The Network Configuration page automatically prints with the
Configuration page.
NOTE To resolve network connection problems, see Network setup problem solving.
Install the printer software for the network printer
To use the printer on the network, install the printer software on a computer that is connected to the
network. See
software.
Software for Windows or Software for Macintosh for information about installing the printer
12 Chapter 3 Product software ENWW
Page 23

Software for Windows
The following sections describe the Windows software that is available for the HP LaserJet P2015 Series
printers.
Windows printer drivers
A printer driver is the software that provides access to printer features and provides the means for the
computer to print to the printer.
Windows driver types
Three Windows printer drivers are available: PCL 5e, PCL 6, and HP postscript level 3 emulation.
Choose a printer driver based on the way you use the printer.
Use the PCL 5e printer driver for faster printer performance and a quick first page out with 600
●
dpi print quality.
Use the PCL 6 printer driver for enhanced print quality. The PCL 6 driver allows you to take
●
advantage of HP’s proprietary ProRes 1200 and FastRes 1200 technologies. Printer performance
and first page out may be slower with this driver.
Use the HP postscript level 3 emulation printer driver for HP postscript level 3 emulation. Certain
●
printer features are not available in this printer driver.
The printer automatically switches between HP postscript level 3 emulation and PCL printer languages
depending on the driver that you have selected.
Install the Windows printer software
The following sections provide instructions for installing the printer driver on Windows operating
systems.
To install printer software for Windows XP (64-bit) and Windows Server 2003
See the operating system documentation for instructions on installing a printer driver.
To install printer software for Windows 98 (driver only), Me (driver only), 2000, and XP (32–bit)
Insert the software CD that came with the printer into the computer CD-ROM drive. Follow the on-screen
installation instructions.
NOTE If the Welcome screen does not open, click Start on the Windows task bar, click Run,
type Z:\setup (where Z is your CD drive letter), and click OK.
Configure the Windows printer driver
Use one of the following methods to open the Windows printer driver from your computer:
ENWW Software for Windows 13
Page 24

Operating system To change the settings for all
print jobs until the software
program is closed
To change the print job default
settings (for example, turn on
Print on Both Sides by default)
To change the configuration
settings (for example, add a
tray or enable/disable Manual
Duplexing)
Windows 98, Me,
2000, XP (32–bit and
64–bit), and Server
2003
1. On the File menu in the
software program, click
Print.
2. Select the name of the
printer, and then click
Properties or
Preferences.
The steps can vary; this
procedure is most common.
1. Click Start, click Settings,
and then click Printers or
Printers and Faxes.
2. Right-click the printer icon,
and then select Printing
Preferences.
HP ToolboxFX
HP ToolboxFX is software that you can use to complete the following tasks:
Check the printer status.
●
Configure the printer settings.
●
View troubleshooting information.
●
View online documentation.
●
See
HP ToolboxFX for more information.
1. Click Start, click Settings,
and then click Printers or
Printers and Faxes.
2. Right-click the printer icon,
and then select
Properties.
3. Click the Device Settings
tab.
Embedded Web server
You can use the embedded Web server to configure the printer, view status information, and obtain
problem-solving information.
Embedded Web server for more information.
See
14 Chapter 3 Product software ENWW
Page 25

Software for Macintosh
The following sections describe the Macintosh software that is available for the HP LaserJet P2015
Series printers.
Macintosh printer drivers
A printer driver is the software component that provides access to printer features and provides the
means for the computer to communicate with the printer.
Install the Macintosh printer driver
This section explains how to install the printing system software for Macintosh OS X V10.2.8, V10.3.9
and V10.4.3.
NOTE USB queues are created automatically when the printer is attached to the computer.
However, the queue will use a generic PPD if the installer has not been run before the USB cable
is connected. To change the queue PPD, open the Print Center or Printer Setup Utility, select
the correct printer queue, and then click Show Info to open the Printer Info dialog box. In the
pop-up menu, select Printer Model, and then, in the pop-up menu in which Generic is selected,
select the correct PPD for the printer.
Use the following procedure to install the Macintosh printer driver:
1. Insert the printer CD into the CD-ROM drive and run the installer.
2. Double-click the CD icon on the desktop
3. Double-click the Installer icon.
4. Follow the instructions on the computer screen.
5. Print a test page or a page from any software program to make sure that the printer software is
correctly installed.
If installation fails, reinstall the software. If this fails, see the Late-Breaking Information section of the
Install Notes. The Install Notes are located on the printer CD or at the support Web site (see
How to
contact HP for the Web address).
Configure the Macintosh printer driver
Use one of the following methods to open the Macintosh printer driver from your computer:
Operating System To change the settings for all
print jobs until the software
program is closed
Macintosh OS X V10
.2.8, V10.3.9, and
V10.4.3
1. On the File menu, click
Print.
2. Change the settings that
you want on the various
pop-up menus.
To change the print job default
settings (for example, turn on
Print on Both Sides by default)
1. On the File menu, click
Print.
2. Change the settings that
you want on the various
pop-up menus.
To change the configuration
settings (for example, add a
tray or enable/disable Manual
Duplexing)
1. Open Printer Setup Utility
by selecting the hard drive,
clicking Applications,
clicking Utilities, then
double-clicking Printer
Setup Utility.
3. On the Presets pop-up
menu, click Save as and
type a name for the preset.
2. Click the print queue.
ENWW Software for Macintosh 15
Page 26

Operating System To change the settings for all
print jobs until the software
program is closed
To change the print job default
settings (for example, turn on
Print on Both Sides by default)
To change the configuration
settings (for example, add a
tray or enable/disable Manual
Duplexing)
These settings are saved in the
Presets menu. To use the new
settings, you must select the
saved preset option every time
you open a program and print.
3. On the Printers menu,
click Show Info.
4. Click the Installable
Options menu.
PostScript Printer Description files (PPDs)
PPDs, in combination with the HP postscript level 3 emulation driver, access the printer features and
allow the computer to communicate with the printer. An installation program for the PPDs is provided
on the HP LaserJet P2015 Series printer CD.
16 Chapter 3 Product software ENWW
Page 27

4 Supported paper and other media
The HP LaserJet P2015 Series printer can use a variety of paper and other print media in accordance
with the guidelines in this user guide. Media that does not meet these guidelines might cause the
following problems:
Poor print quality
●
Increased jams
●
Premature wear on the printer, requiring repair
●
For best results, use only HP brand paper and print media. Hewlett-Packard Company cannot
recommend the use of other brands. Because they are not HP products, HP cannot influence or control
their quality.
It is possible for media to meet all of the guidelines in this user guide and still not produce satisfactory
results. This might be the result of improper handling, unacceptable temperature and humidity levels,
or other variables over which Hewlett-Packard has no control.
Before you purchase a large quantity of media, test the media and make sure that it meets the
requirements specified in this user guide and in HP LaserJet printer family media guide. The guidelines
can be downloaded from
accessories for more information about ordering the guidelines.
CAUTION Using media that does not meet Hewlett-Packard's specifications might cause
problems for the printer, requiring repair. This repair is not covered by the Hewlett-Packard
warranty or service agreements.
http://www.hp.com/support/ljpaperguide/, or see Order supplies and
ENWW 17
Page 28

Optimize print quality for media types
The HP LaserJet P2015 Series printers provide a number of print modes that allow the unit to adapt to
various media. You can change the print modes on the Paper tab in the printer driver, in
HP ToolboxFX, or in the embedded Web server.
NOTE When using the CARDSTOCK, ENVELOPE, LABEL, and ROUGH modes, the printer
pauses between pages and the number of pages per minute decreases.
Table 4-1 Driver print modes
Mode Media type
PLAIN
LIGHT
HEAVY
CARDSTOCK Card stock or thick media
TRANSPARENCY 4-mil, 0.1 Monochrome Overhead Transparencies (OHTs)
ENVELOPE Standard HP LaserJet envelopes
LABEL Standard HP LaserJet labels
BOND Bond paper
ROUGH Rough paper
75 to 104 g/m2 (20 to 27 lb)
Less than 75 g/m2 (20 lb)
90 to 105 g/m2 (24 to 28 lb)
18 Chapter 4 Supported paper and other media ENWW
Page 29

Guidelines for using media
You can print on a variety of media, such as paper (including up to 100% recycled-fiber-content paper),
envelopes, labels, transparencies, and custom-size media. The following are the supported media sizes:
Minimum: 76 by 127 mm (3 x 5 inches)
●
Maximum: 216 by 356 mm (8.5 x 14 inches)
●
Properties such as weight, grain, and moisture content are important factors that affect printer
performance and quality. To achieve the best possible print quality, only use high-quality media that is
designed for laser printers.
NOTE Always test a sample of the media before you purchase large quantities.
HP media
HP recommends a variety of media. See the HP LaserJet Printer Family Print Media Guide
http://www.hp.com/support/ljpaperguide/) for a full list.
(
Media to avoid
Media outside the printer specifications will cause a loss of print quality and increase the occurrence of
jams.
Do not use paper that is too rough.
●
Do not use paper with cutouts or perforations other than standard 3-hole punched paper.
●
Do not use multi-part or multi-page forms.
●
Do not use paper with a watermark if you are printing solid patterns.
●
Media that can damage the printer
Avoid media that can damage the printer.
Do not use media with staples attached.
●
Do not use transparencies designed for inkjet printers or other low temperature printers. Use only
●
transparencies that are specified for use with HP LaserJet printers.
Do not use photo paper intended for inkjet printers.
●
Do not use paper that is embossed or coated and is not designed for the temperatures of the
●
printer's image fuser. Select media that can tolerate temperatures of 200° C (392° F) for 0.1 second.
HP produces a selection of media that is designed for the HP LaserJet P2015 Series printers.
Do not use letterhead paper with low temperature dyes or thermography. Preprinted forms or
●
letterhead must use inks that can tolerate temperatures of 200° C (392° F) for 0.1 second.
Do not use any media that produces hazardous emissions, or that melts, offsets, or discolors when
●
exposed to 200° C (392° F) for 0.1 second.
To order HP LaserJet printing supplies, go to
http://www.hp.com/ghp/buyonline.html/ worldwide.
ENWW Guidelines for using media 19
http://www.hp.com/go/ljsupplies/ in the U.S. or to
Page 30

Paper
For best results, use conventional 75 g/m2 (20 lb) paper. Make sure that the paper is of good quality
and free of cuts, nicks, tears, spots, loose particles, dust, wrinkles, voids, and curled or bent edges.
Labels
Print labels from tray 1 using the straight-through output path. See Print on transparencies or labels
Straight-through output path for more information.
and
CAUTION Do not feed a sheet of labels through the printer more than once. The adhesive
degrades and might damage the printer.
Label construction
When selecting labels, consider the quality of the following components:
Adhesives: The adhesive material should be stable at 200° C (392° F), the printer's maximum
●
temperature.
Arrangement: Only use labels with no exposed backing between them. Labels can peel off sheets
●
that have spaces between the labels, causing serious jams.
Curl: Prior to printing, labels must lie flat with no more than 13 mm (0.5 in.) of curl in any direction.
●
Condition: Do not use labels with wrinkles, bubbles, or other indications of separation.
●
Transparencies
Transparencies must be able to withstand 200° C (392° F), the printer's maximum temperature.
Envelopes
Print envelopes from tray 1 using the straight-through paper path. See Print on an envelope and Straight-
through output path for more information.
Envelope construction
Envelope construction is critical. Envelope fold lines can vary considerably, not only between
manufacturers but also within a box from the same manufacturer. When selecting envelopes, consider
the following components:
Weight: The weight of the envelope paper should not exceed 90 g/m
●
result.
Construction: Prior to printing, envelopes should lie flat with less than 6 mm (0.25 in.) curl and
●
should not contain air. Envelopes that trap air may cause problems. Do not use envelopes that
contain clasps, snaps, tie strings, transparent windows, holes, perforations, cut outs, synthetic
materials, stamping, or embossing. Do not use envelopes with adhesives that do not require
moistening, but rely instead on pressure to seal them.
2
(24 lb), or jamming might
Condition: Make sure that the envelopes are not wrinkled, nicked, or otherwise damaged. Make
●
sure that the envelopes do not have any exposed adhesive.
Sizes: From 90 x 160 mm (3.5 x 6.3 in.) to 178 x 254 mm (7 x 10 in.).
●
20 Chapter 4 Supported paper and other media ENWW
Page 31

Envelopes with double-side seams
An envelope with double-side-seam construction has vertical seams at both ends of the envelope rather
than diagonal seams. This style might be more likely to wrinkle. Make sure that the seam extends all
the way to the corner of the envelope as shown in the following illustration:
1 acceptable envelope construction
2 unacceptable envelope construction
Envelopes with adhesive strips or flaps
Envelopes with a peel-off adhesive strip or with more than one flap that folds over to seal must use
adhesives compatible with the heat and pressure in the printer: 200° C (392° F). The extra flaps and
strips might cause wrinkling, creasing, or jams.
Envelope storage
Proper storage of envelopes contributes to good print quality. You should store envelopes flat. If air is
trapped in an envelope, creating an air bubble, the envelope might wrinkle during printing.
Card stock and heavy media
You can print many types of card stock from the paper input tray, including index cards and postcards.
Some card stock performs better than others because its construction is better suited for feeding through
a laser printer.
For optimum printer performance, do not use paper heavier than 157 g/m
heavy might cause misfeeds, stacking problems, paper jams, poor toner fusing, poor print quality, or
excessive mechanical wear.
NOTE You might be able to print on heavier paper if you do not fill the input tray to capacity
and if you use paper with a smoothness rating of 100-180 Sheffield.
2
(42 lb). Paper that is too
ENWW Guidelines for using media 21
Page 32

Card stock construction
2
Smoothness: 135-157 g/m
●
100-180 Sheffield. 60-135 g/m
100-250 Sheffield.
Construction: Card stock should lie flat with less than 5 mm (0.2 in.) of curl.
●
Condition: Make sure that the card stock is not wrinkled, nicked, or otherwise damaged.
●
Sizes: Only use card stock within the following size ranges:
●
Minimum: 76 x 127 mm (3 x 5 in.)
●
Maximum: 216 x 356 mm (8.5 x 14.0 in.)
●
(36-42 lb) card stock should have a smoothness rating of
2
(16-36 lb) card stock should have a smoothness rating of
Card stock guidelines
Set margins at least 2 mm (0.08 in.) away from the edges.
Letterhead and preprinted forms
Many manufacturers now offer premium paper advertised as laser-compatible or laser-guaranteed.
Some of the rougher surface finishes, such as cockle, laid, or linen, might require the special fuser
modes that are available on some printer models in order to achieve adequate toner adhesion.
NOTE Some page-to-page variation is normal when printing with laser printers. This variation
cannot be observed when printing on plain paper. However, this variation is obvious when printing
on preprinted forms because the lines and boxes are already placed on the page.
To avoid problems when using preprinted forms, embossed paper, and letterhead, observe the following
guidelines:
Avoid using low-temperature inks (the kind used with some types of thermography).
●
Use preprinted forms and letterhead paper that have been printed by offset lithography or
●
engraving.
Use forms that have been created with heat-resistant inks that will not melt, vaporize, or release
●
undesirable emissions when heated to 200° C (392° F) for 0.1 second. Typically, oxidation-set or
oil-based inks meet this requirement.
When the form is preprinted, be careful not to change the moisture content of the paper, and do
●
not use materials that change the paper's electrical or handling properties. Seal the forms in
moisture-proof wrap to prevent moisture changes during storage.
Avoid processing preprinted forms that have a finish or coating.
●
Avoid using heavily embossed or raised-letterhead papers.
●
Avoid papers that have heavily textured surfaces.
●
Avoid using offset powders or other materials that prevent printed forms from sticking together.
●
22 Chapter 4 Supported paper and other media ENWW
Page 33

5 Print tasks
This chapter provides information on the following topics:
Load media
●
Print-quality settings
●
Print on special media
●
Print on both sides of the page (duplex)
●
Print multiple pages on a single sheet of paper (N-up printing)
●
Print booklets
●
Print watermarks
●
Cancel a print job
●
ENWW 23
Page 34

Load media
The following sections describe how to load media into the different input trays.
CAUTION If you try to print on media that is wrinkled, folded, or damaged in any way, a jam
might occur. See
Tray 1
Tray 1 is accessed from the front of the printer. The printer prints from tray 1 before attempting to print
from other trays.
Clearing jams for more information.
Tray 1 holds up to fifty sheets of 75 g/m2 (20 lb) media or ten envelopes, ten transparencies, or ten
cards. You can use tray 1 to print the first page on media different from the remainder of the document.
Media guides ensure that the media is correctly fed into the printer and that the print is not skewed
(crooked on the media). When loading media, adjust the media guides to match the width of the media
that you are using.
Tray 2 and optional tray 3
Tray 2 and optional tray 3 hold up to 250 pages of 75 g/m2 (20 lb) paper, or fewer pages of heavier
media (25 mm (0.9 in) or less stack height). Load media with the top forward and the side to be printed
on facing down.
24 Chapter 5 Print tasks ENWW
Page 35

Media guides ensure that the media feeds correctly into the printer and that the print is not skewed. Tray
2 has side and rear media guides. When loading media, adjust the media guides to match the length
and width of the media that you are using.
NOTE When you add new media, make sure that you remove all of the media from the input
tray and straighten the stack of new media. This reduces jams by preventing multiple sheets of
media from feeding through the printer at one time.
Straight-through output path
Use the straight-through output path when printing envelopes, transparencies, heavy media, or any
media that tends to curl when printed. If you open the straight-through output door before printing media
from tray 1, tray 2, or optional tray 3, the media exits the printer through the straight-through output path.
NOTE Printed media does not stack when you use the straight-through output path. The media
drops to the surface below unless you remove each sheet as it exits the printer.
Manual feed
You can use manual feed when printing mixed media. For example, you can use manual feed to print
an envelope, then a letter, then an envelope, and so on. Load envelopes in tray 1 and load letterhead
into tray 2.
To print using manual feed, open the printer Properties or Printer Setup, and then select Manual Feed
(tray 1) from the Source Tray drop-down list. See
the Macintosh printer driver for instructions. After you have enabled manual feed, press the Go button
to print.
ENWW Load media 25
Configure the Windows printer driver or Configure
Page 36

Print-quality settings
Print-quality settings affect print resolution and toner usage.
Use the following procedure to change print-quality settings:
1. Open the printer Properties (or Printing Preferences in Windows 2000 and XP). See
Windows printer driver or Configure the Macintosh printer driver for instructions.
2. On the Paper/Quality tab or the Finishing tab (the Paper Type/Quality tab for some Mac drivers),
select the print quality setting you want to use. The following options are available:
1200 dpi: This setting uses ProRes 1200 to provide fine-line detail at 1200 x 1200 dpi.
●
1200 dpi effective output quality: This setting provides 1200 dpi effective output quality
●
using FastRes 1200.
600 dpi: This setting provides 600 x 600 dpi output with Resolution Enhancement technology
●
(REt) for improved text.
EconoMode: Text is printed using less toner. This setting is useful when you are printing
●
drafts. You can turn on this option independently of other print-quality settings. See
EconoMode for more information.
NOTE Not all printer features are available in all drivers or operating systems. See the printer
Properties (driver) online Help for information about availability of features for that driver.
Configure the
26 Chapter 5 Print tasks ENWW
Page 37

Print on special media
The following sections explain how to print on a variety of media.
Print on an envelope
Only use envelopes that are recommended for laser printers. See Guidelines for using media for more
information.
1. Open the straight-through output door.
2. Open tray 1 and adjust the media guides to the width of the envelope.
ENWW Print on special media 27
Page 38

3. Place the envelope with the side to be printed facing up and the top edge along the left media
guide.
NOTE If the envelope has a flap on the short edge, feed that edge into the printer first.
4. Open the printer Properties (or Printing Preferences in Windows 2000 and XP). See Configure the
Windows printer driver or Configure the Macintosh printer driver for instructions.
5. On the Paper/Quality tab or the Paper tab (the Paper Type/Quality tab for some Mac drivers),
choose the correct media type.
NOTE Not all printer features are available in all drivers or operating systems. See the
printer Properties (driver) online Help for information about availability of features for that
driver.
6. Print the document.
To print using manual feed, see
Manual feed.
Print on transparencies or labels
Use transparencies and labels that are recommended for use in laser printers. See Guidelines for using
media for more information.
CAUTION Be sure to set the correct media type in the printer settings as instructed below. The
printer adjusts the fuser temperature according to the media type setting. When printing on
special media such as transparencies or labels, this adjustment prevents the fuser from damaging
the media as it passes through the printer.
CAUTION Inspect the media to make sure that it is not wrinkled or curled and that it does not
have any torn edges or missing labels.
1. Open the straight-through output door.
2. Open tray 1 and adjust the media guides to the width of the media.
3. Load media in tray 1. Make sure that the top of the media is forward and the side to be printed on
(rough side) is facing up.
NOTE Transparencies can be printed from tray 2, but the printing speed is slower.
Transparencies should not be printed from optional tray 3.
28 Chapter 5 Print tasks ENWW
Page 39

4. Open the printer Properties (or Printing Preferences in Windows 2000 and XP). See Configure the
Windows printer driver or Configure the Macintosh printer driver for instructions.
5. On the Paper/Quality tab or the Paper tab (the Paper Type/Quality tab for some Mac drivers),
choose the correct media type.
NOTE Not all printer features are available in all drivers or operating systems. See the
printer Properties (driver) online Help for information about availability of features for that
drivers.
6. Print the document. Remove the media from the back of the printer as it prints to prevent it from
sticking together, and place the printed pages on a flat surface.
Print on letterhead and preprinted forms
For media specifications, see Guidelines for using media.
1. Open tray 1 and adjust the media guides to the width of the media.
ENWW Print on special media 29
Page 40

2. Feed the media with the top forward and the side to be printed on facing up.
3. Open the printer Properties (or Printing Preferences in Windows 2000 and XP). See Configure the
Windows printer driver or Configure the Macintosh printer driver for instructions.
4. On the Paper/Quality tab or the Paper tab (the Paper Type/Quality tab for some Mac drivers),
choose the correct media type.
NOTE Not all printer features are available in all drivers or operating systems. See the
printer Properties (driver) online Help for information about availability of features for that
drivers.
5. Print the document.
To print using manual feed, see
NOTE To print a single-page cover letter on letterhead, followed by a multiple-page
document, load the letterhead face-up in tray 1, and load the paper for the other pages in
tray 2. The printer automatically prints from tray 1 first.
Manual feed.
Print on custom-size media and card stock
For media specifications, see Guidelines for using media.
CAUTION Make sure that the sheets are not stuck together before you load them.
1. Open the straight-through output door.
30 Chapter 5 Print tasks ENWW
Page 41

2. Open tray 1 and adjust the media guides to the width of the media.
3. Load media in tray 1 with the narrow side forward and the side to be printed on facing up.
4. Open the printer Properties (or Printing Preferences in Windows 2000 and XP). See
Windows printer driver or Configure the Macintosh printer driver for instructions.
5. On the Paper/Quality tab or the Paper tab (the Paper Type/Quality tab for some Mac drivers),
select the custom size option. Specify the dimensions of the custom-size media.
NOTE Not all printer features are available in all drivers or operating systems. See the
printer Properties (driver) online Help for information about availability of features for that
driver.
6. Print the document.
To print using manual feed, see
Manual feed.
Configure the
ENWW Print on special media 31
Page 42

Print on both sides of the page (duplex)
The section explains the manual and automatic methods of printing on both sides of the paper.
Manual two-sided printing
To manually print on both sides of the paper, you must run the paper through the printer twice. You can
print using either these options:
Top output bin (for lightweight paper)
●
Straight-through output door (for heavy media or media that curls)
●
NOTE Manual two-sided printing can cause the printer to become dirty, reducing print quality.
Clean the printer for instructions if the printer becomes dirty.
See
Manual two-sided printing using the top output bin
The following sections provide instructions for the different operating systems.
Windows
1. Close the straight-through output door.
2. From the Windows desktop, click Start, Settings, and then Printers (or Printers and Faxes for
some Windows versions).
3. Right-click on the HP LaserJet P2015 Series printer and select Properties.
4. Click the Device Settings tab.
32 Chapter 5 Print tasks ENWW
Page 43

5. In the Installable Options section, select Not Installed from the Duplex Unit (for 2–Sided
Printing) drop-down list.
6. Click OK.
7. Open the Print dialog in the software program from which you are printing. In most programs this
is done by clicking File and then Print.
8. Select the HP LaserJet P2015 Series printer.
9. Click Properties or Preferences. The exact option name depends on the software program from
which you are printing.
10. Click the Finishing tab.
11. Click to clear the Correct Order for Straight Paper Path check box.
12. Click the Print On Both Sides check box.
13. Click OK.
ENWW Print on both sides of the page (duplex) 33
Page 44
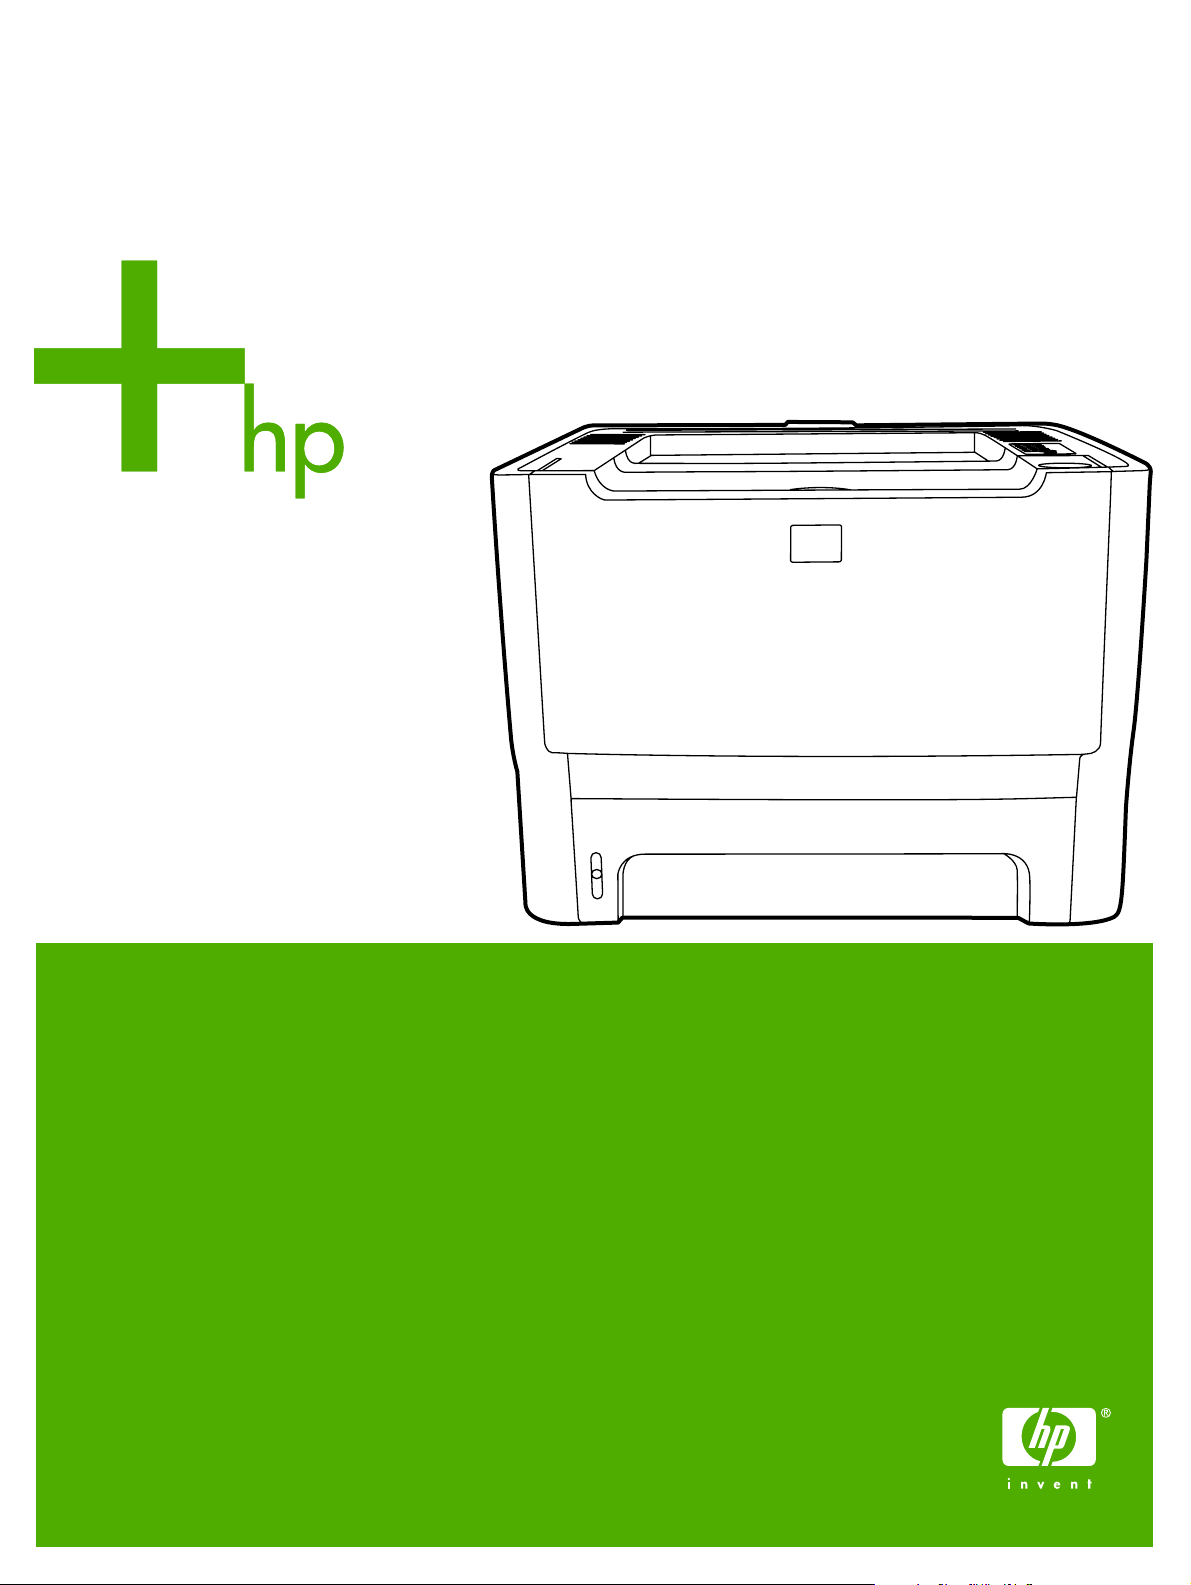
14. Print side one of the document using tray 1.
15. After side one has printed, remove the remaining paper from tray 1 and set it aside until after you
finish the manual two-sided print job.
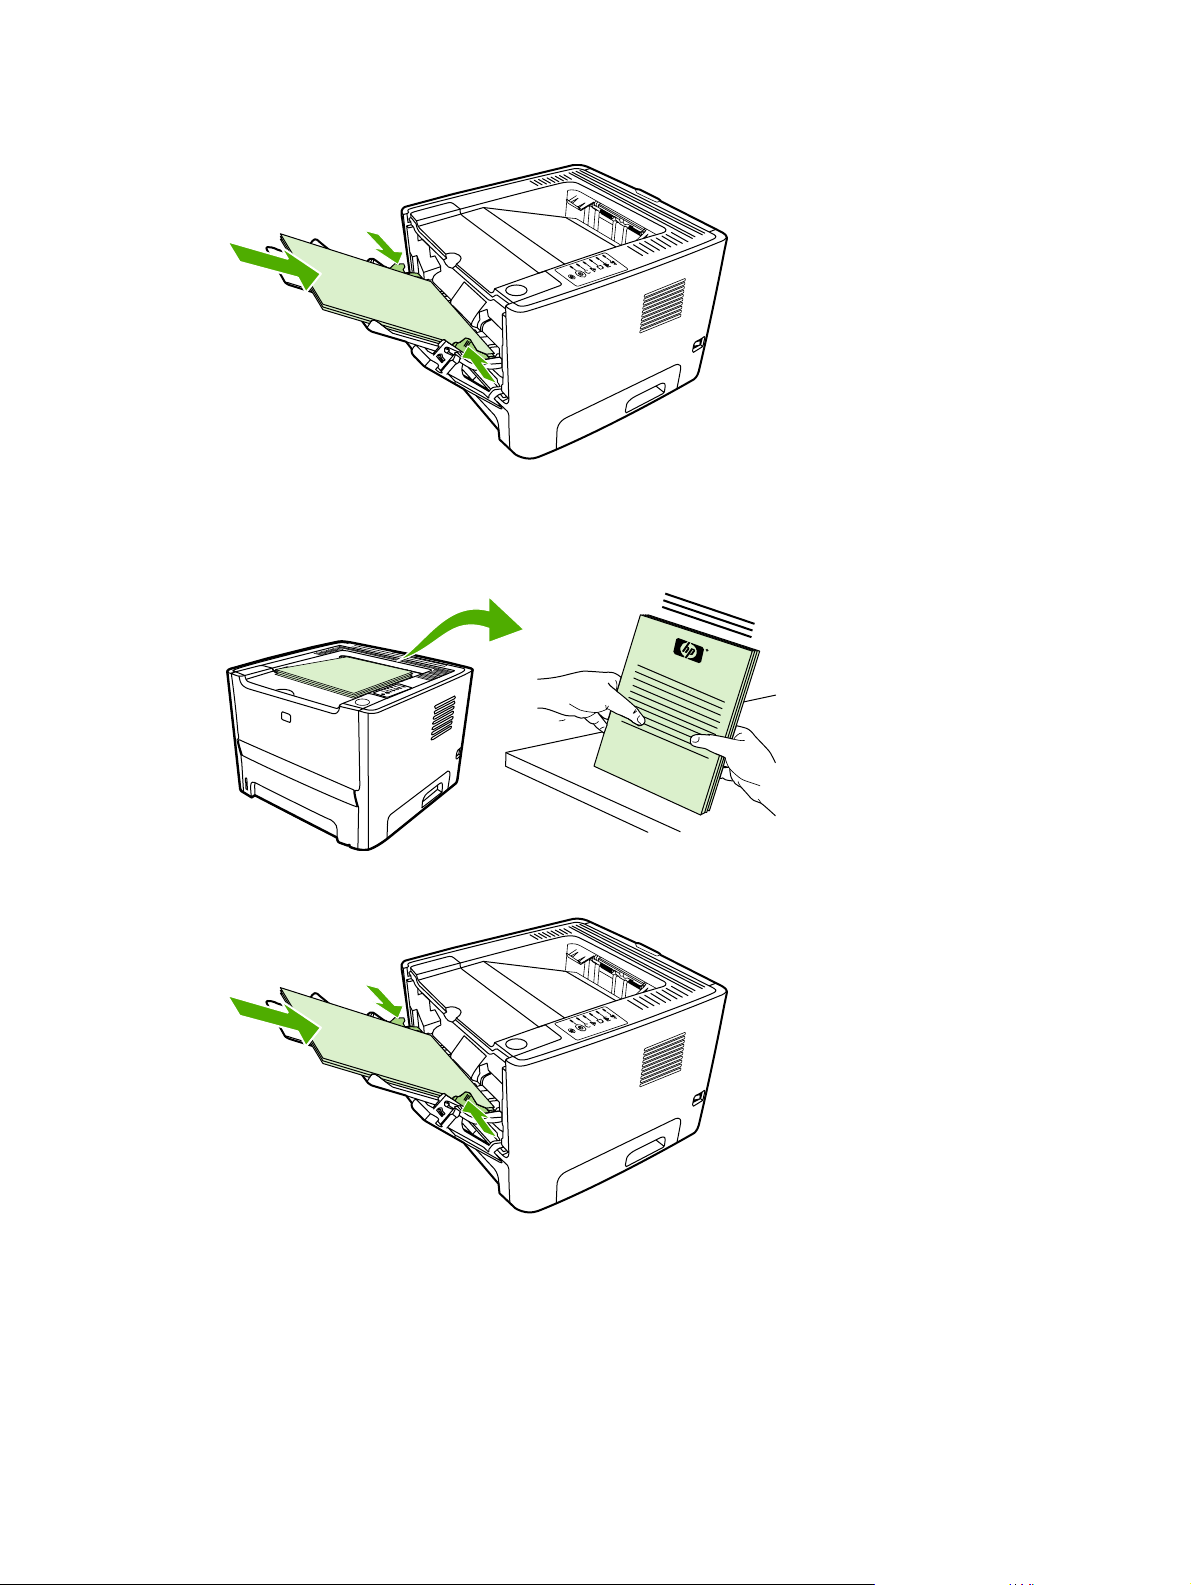
16. Gather the printed pages, and straighten the stack.
in
v
e
n
t
17. Return the stack to tray 1 with the printed side down and the top edge toward the printer.
18. Press the Go button to print side two.
34 Chapter 5 Print tasks ENWW
Page 45

Mac OS X
1. Close the straight-through output door.
2. If Manual Duplex does not appear as a printer option, perform the following steps:
a. Verify that HP Manual Duplex&Booklet (Classic) was selected when the software driver
was installed with the Custom Install option.
b. Do a File-Print, select Plug-In Preferences, and click the right-facing arrow. The right-facing
arrow changes to a down-facing arrow, and the HP Manual Duplex&Booklet feature displays.
c. Select Print Time Filters, select HP Manual Duplex&Booklet, and click Save Settings.
d. Select Manual Duplex, and select Print on Both Sides.
3. Print the document.
4. After side one has printed, remove the remaining paper from tray 1 and set it aside until after you
finish the manual two-sided print job.
5. Gather the printed pages, and straighten the stack.
6. Return the stack to tray 1 with the printed side down and the top edge toward the printer.
7. Press the Go button on the control panel to print side two.
Manual two-sided printing using the straight-through output door
The following sections provide instructions for the different operating systems.
Windows
1. Open the straight-through output door.
2. Open the printer Properties (or Printing Preferences in Windows 2000 and XP). See Configure the
Windows printer driver for instructions.
3. On the Finishing tab, select the Correct Order for Straight Paper Path check box.
NOTE Not all printer features are available in all drivers or operating systems. See the
printer Properties (driver) online Help for information about availability of features for that
driver.
4. On the Finishing tab, select the Print On Both Sides (Manually) check box.
ENWW Print on both sides of the page (duplex) 35
Page 46

5. Click OK.
6. Print side one of the document from tray 1.
7. Gather the printed pages, and straighten the stack.
8. Return the stack to tray 1 with the printed side facing down and the top edge toward the printer.
9. Press the Go button to print side two.
36 Chapter 5 Print tasks ENWW
Page 47

Mac OS X
1. Open the straight-through output door.
2. If Manual Duplex does not appear as a printer option, perform the following steps:
a. Verify that HP Manual Duplex&Booklet (Classic) was selected when the software driver
was installed with the Custom Install option.
b. Do a File-Print, select Plug-In Preferences, and click the right-facing arrow. The right-facing
arrow changes to a down-facing arrow, and the HP Manual Duplex&Booklet feature displays.
c. Select Print Time Filters, select HP Manual Duplex&Booklet, and click Save Settings.
d. Select Manual Duplex, and select Print on Both Sides.
e. Select Alternate output bin is open (straight through paper path).
3. Print side one of the document from tray 1.
4. Gather the printed pages, and straighten the stack.
ENWW Print on both sides of the page (duplex) 37
Page 48

5. Return the stack to tray 2 with the printed side down and the top edge toward the printer.
6. Press the Go button to print side two.
Automatic two-sided printing
Automatic two-sided printing is available for the HP LaserJet P2015d, HP LaserJet P2015dn, and HP
LaserJet P2015x printers.
Automatic two-sided printing is supported for the following media sizes:
A4
●
Letter
●
Legal
●
The following sections provide instructions for the different operating systems.
Windows
1. Close the straight-through output door.
2. Open the printer Properties (or Printing Preferences in Windows 2000 and XP). See
Windows printer driver for instructions.
3. On the Finishing tab, click to clear the Correct Order for Straight Paper Path check box.
4. Select the Print On Both Sides check box.
5. Click OK.
6. Print the document.
Mac OS X
1. Do a File-Print, select Duplex, and select Print on Both Sides.
2. If the Print on Both Sides check box does not appear, perform the following steps:
Configure the
a. In Print Center (Printer Setup Utility for Mac OS X v10.3), click Printer queue.
b. On the Menu bar, select Printers-Show Info.
c. On the Installable Options menu, check Duplex Unit.
38 Chapter 5 Print tasks ENWW
Page 49

d. Click Apply Changes.
e. Close the menu.
ENWW Print on both sides of the page (duplex) 39
Page 50

Print multiple pages on a single sheet of paper (N-up
printing)
Use N-Up printing to place multiple document pages on a single printed page.
1. Open the printer Properties (or Printing Preferences in Windows 2000 and XP). See Configure the
Windows printer driver or Configure the Macintosh printer driver for instructions.
2. On the Finishing tab (the Layout tab for some Mac drivers), select the desired number of pages
per sheet.
NOTE Not all printer features are available in all drivers or operating systems. See the
printer Properties (driver) online Help for information about availability of features for that
driver.
3. If desired, use the check box for page borders and the pull-down menu to specify the order of pages
printed on the sheet.
40 Chapter 5 Print tasks ENWW
Page 51

Print booklets
You can print booklets on letter, legal, or A4 paper.
NOTE This feature is not available for all Macintosh OS X versions .
1. Load paper in tray 1.
2. Close the straight-through output door.
3. Open the printer Properties (or Printing Preferences in Windows 2000 and XP). See Configure the
Windows printer driver for instructions.
4. On the Finishing tab (the Paper Type/Quality tab for some Mac drivers), click to clear the Correct
Order for Straight Paper Path check box.
5. Select the Print On Both Sides check box.
6. Select Left Edge Binding or Right Edge Binding from the Booklet Layout drop-down list.
7. Set the number of pages per sheet to 2.
8. Click OK.
9. Print the document.
10. Fold and staple the pages.
ENWW Print booklets 41
Page 52

Print watermarks
You can use the watermark option to print text "underneath" (in the background) of an existing document.
For example, you might want to have large gray letters reading Draft or Confidential printed diagonally
across the first page or all of the pages of a document.
1. Open the printer Properties (or Printing Preferences in Windows 2000 and XP). See Configure the
Windows printer driver or Configure the Macintosh printer driver for instructions.
2. On the Effects tab (the Watermark/Overlay tab for some Mac drivers), select the watermark you
want to use.
NOTE Not all printer features are available in all drivers or operating systems. See the
printer Properties (driver) online Help for information about availability of features for that
driver.
42 Chapter 5 Print tasks ENWW
Page 53

Cancel a print job
You can cancel a print job from the following locations:
Printer control panel: To cancel the print job, press and release the Cancel button on the printer
●
control panel.
Software application: Typically, a dialog box appears briefly on your screen, allowing you to
●
cancel the print job.
Windows print queue: If a print job is waiting in a print queue (computer memory) or print spooler,
●
delete the job there. To go to the Printer screen in Windows 98, Me, 2000, or XP, click Start,
Settings, and Printers. Double-click the HP LaserJet P2015 icon to open the window, select your
print job, and click Delete.
Desktop print queue (Mac OS): For Mac OS X, open Print Center (or Printer Setup Utility
●
in V10.3.9), double-click the printer name, select the print job, and click Delete.
HP ToolboxFX: Open HP ToolboxFX, browse to the Device Status page, and click Cancel Job.
●
See
HP ToolboxFX for more information.
Embedded Web server: Open the printer's embedded Web server page, and click Cancel Job.
●
See
Embedded Web server for more information.
If the status lights on the control panel continue to blink after you cancel a print job, the computer is still
sending the job to the printer. Either delete the job from the print queue or wait until the computer finishes
sending data. The printer will return to the Ready state.
ENWW Cancel a print job 43
Page 54

44 Chapter 5 Print tasks ENWW
Page 55

6 Managing and maintenance
This chapter provides information on the following topics:
Printer information pages
●
HP ToolboxFX
●
Embedded Web server
●
Replace the print cartridge
●
Redistribute toner
●
Clean the printer
●
Clean the pickup roller (tray 1)
●
Clean the pickup roller (tray 2)
●
EconoMode
●
ENWW 45
Page 56

Printer information pages
You can print the following information pages.
Demo page
The Demo page contains examples of text and graphics. To print the Demo page, press the Go button
when the printer Ready light is on and no other jobs are printing.
Configuration page
The Configuration page lists current settings and properties of the printer. It also contains a status log
report. You can print a Configuration page from the following locations:
Printer control panel. Press the Go button for five seconds when the printer Ready light is on and
●
no other jobs are printing.
Embedded Web server
●
HP ToolboxFX
●
NOTE You can also get the information contained in the Event log and the Configuration page
through the HP ToolboxFX without printing the pages. See
Supplies Status page
HP ToolboxFX for more information.
The Supplies Status page automatically prints when you print a Configuration page from the control
panel. The Supplies Status page provides the following information:
The estimated percentage of toner remaining in the print cartridge
●
The number of pages and print jobs that have been processed
●
Ordering and recycling information
●
Network Configuration page
NOTE The Network Configuration page is only available on printers with an HP internal network
port.
The Network Configuration page automatically prints when you print a Configuration page from the
control panel. The Network Configuration page provides the following information about the printer
network configuration:
IP address
●
firmware version
●
network statistics
●
protocol information
●
46 Chapter 6 Managing and maintenance ENWW
Page 57

HP ToolboxFX
HP ToolboxFX is software that you can use to complete the following tasks:
Check the printer status.
●
Configure the printer settings.
●
View troubleshooting information.
●
View online documentation.
●
You can view HP ToolboxFX when the printer is directly connected to your computer or when it is
connected to the network. You must perform a typical software installation to install HP ToolboxFX.
NOTE HP ToolboxFX is not supported for Windows 98 SE, Windows Me, Windows
Server 2003, or Macintosh operating systems.
NOTE You do not need Internet access to open and use HP ToolboxFX.
To view HP ToolboxFX
Open HP ToolboxFX in one of these ways:
In the Windows system tray or on your desktop, double-click the HP ToolboxFX icon.
●
On the Windows Start menu, click Programs (or All Programs in Windows XP), click HP, click
●
HP LaserJet 2015 Series, and then click HP ToolboxFX.
The HP ToolboxFX software contains the following sections:
Status
●
Alerts
●
Help
●
Device settings
●
Print settings
●
Network settings
●
ENWW HP ToolboxFX 47
Page 58

Status
The HP ToolboxFX Status folder contains links to the following main pages:
Device Status. View printer status information. This page indicates printer conditions such as a
●
jam or an empty tray. After you correct a problem with the printer, click Refresh to update the printer
status.
Supplies Status. View detailed supplies status such as the estimated percentage of toner
●
remaining in the print cartridge and the number of pages that have been printed with the current
print cartridge. This page also has links to order supplies and to find recycling information.
Device Configuration. View a detailed description of the current printer configuration, including
●
the amount of memory installed and whether optional trays are installed.
Network Configuration. View a detailed description of the current network configuration, including
●
the IP address and network status.
Print Info Pages. Print the Configuration page and various other information pages that are
●
available for the printer, such as the Supplies Status page and the Demo page.
Event Log. View a four-column table where printer events and error codes are logged for your
●
reference. The number in the Page Count column specifies the total number of pages that the
printer had printed when the error occurred. The Event log also contains a brief description of the
error.
48 Chapter 6 Managing and maintenance ENWW
Page 59

Alerts
The HP ToolboxFX Alerts folder contains links to the following main pages:
Set up Status Alerts. Set up HP ToolboxFX to send you pop-up alerts for certain events, such as
●
low toner levels.
Set up E-mail Alerts. Set up HP ToolboxFX to send you e-mail alert messages for certain events,
●
such as low toner levels.
Set up status alerts
HP ToolboxFX can open pop-up alerts on your computer when certain events occur. Events that trigger
alerts include jams, low levels of toner in HP print cartridges, non-HP print cartridge in use, empty input
trays, and error messages.
Alerts only appear when the printer is printing from the computer on which you set up the alerts.
NOTE You must click Apply to save your changes.
Set up e-mail alerts
Use HP ToolboxFX to configure up to two e-mail addresses to receive alerts when certain events occur.
You can specify different events for each e-mail address. Enter the information for the e-mail server that
will send out the e-mail alert messages for the printer.
NOTE You must click Apply to save your changes.
Help
The HP ToolboxFX Help folder contains links to the following main pages:
Troubleshooting. Print troubleshooting pages and clean the printer.
●
How Do I? View the How Do I? Help for help with specific tasks.
●
Animated demonstrations
●
User Guide. View information about the printer usage, warranty, specifications, and support. The
●
user guide is available in both HTML and PDF formats.
Readme. View important information about the printer that is not available in the user guide.
●
ENWW HP ToolboxFX 49
Page 60

Device settings
The HP ToolboxFX Device Settings folder contains links to the following main pages:
Device Information. View information about the printer, such as the printer description and a
●
contact person.
Paper Handling. Change the printer paper-handling settings, such as default paper size and
●
default paper type.
Print Quality. Change the printer print-quality settings.
●
Paper types. Change the printer mode settings for a each media type, such as letterhead,
●
prepunched, or glossy paper.
System Setup. Change the printer system settings, such as printer language and jam recovery.
●
Service. Gain access to various procedures required to maintain the printer.
●
Device information
The information that you type in these fields appears on the Configuration page. See Configuration
page.
NOTE You must click Apply to save your changes.
50 Chapter 6 Managing and maintenance ENWW
Page 61

Paper handling
Use the HP ToolboxFX paper-handling options to configure your default settings.
Three options are available for handling print jobs when the product is out of media:
Select Wait For Paper To Be Loaded.
●
Select Cancel from the Paper out action drop-down list to cancel the print job.
●
Select override from the Paper out time drop-down list to send the print job to another paper tray.
●
The Paper out time field specifies how long the printer waits before acting on your selections. You can
specify from 0 to 3600 seconds.
NOTE You must click Apply to save your changes.
Print quality
Use the HP ToolboxFX print-quality options to improve the appearance of your print jobs.
Resolution. Select 600 resolution for quality print jobs and Fast Res 1200 for higher-quality print
●
jobs. Select ProRes 1200 for the highest-quality print job (printing time increases).
REt. Activate REt to improve print quality.
●
Print density. For increased print density, select a higher number. For decreased print density,
●
select a lower number.
EconoMode. EconoMode is a feature that allows the printer to use less toner per page. Selecting
●
this option may extend the life of the print cartridge and reduce your cost per page. However, it will
also reduce print quality. The printed image is lighter, but it is adequate for printing drafts or proofs.
HP does not recommend full-time use of EconoMode. See
NOTE You must click Apply to save your changes.
EconoMode for more information.
Paper types
Use these HP ToolboxFX Paper types options to configure print modes that correspond to the various
media types. When you select RESTORE MODES, all of the modes are reset to the factory settings.
NOTE You must click Apply to save your changes.
ENWW HP ToolboxFX 51
Page 62

System setup
Use the HP ToolboxFX system settings options to configure miscellaneous print settings.
NOTE You must click Apply to save your changes.
Service
During the printing process, paper, toner, and dust particles can accumulate inside the printer. Over
time, this buildup can cause print-quality problems such as toner specks or smearing. HP ToolboxFX
provides an easy method for cleaning the paper path. For more information, see
path.
Clean the printer media
Print settings
The HP ToolboxFX Print Settings tab contains links to the following main pages:
Printing. Change the default print settings, such as number of copies and paper orientation.
●
PCL 5e. View and change the PCL 5e settings.
●
PCL 6. View and change the PCL 6 settings.
●
Postscript. View and change the HP postscript level 3 emulation settings.
●
Printing
Use the HP ToolboxFX printing settings options to configure the settings for all print functions.
NOTE You must click Apply to save your changes.
PCL 5e
Use the PCL 5e options to configure the settings when you are using the PCL 5e print personality.
NOTE You must click Apply to save your changes.
PCL 6
Use the PCL 6 printer driver to take full advantage of all printer features. Unless complete backward
compatibility with previous PCL drivers or older printers is necessary, the PCL 6 driver is recommended.
NOTE You must click Apply to save your changes.
52 Chapter 6 Managing and maintenance ENWW
Page 63

PostScript
Use the PostScript option when you are using the HP postscript level 3 emulation print personality. When
the Print PostScript Errors option is turned on, the HP postscript level 3 emulation error page
automatically prints when HP postscript level 3 emulation errors occur.
NOTE You must click Apply to save your changes.
Network settings
The network administrator can use the HP ToolboxFX Network Settings folder to control the networkrelated settings for the printer when it is connected to a TCP/IP-based network.
The following options are available:
IP Configuration
●
Advanced
●
SNMP
●
Network Summary
●
ENWW HP ToolboxFX 53
Page 64

Embedded Web server
The embedded Web server allows you to view printer and network status and to manage printing
functions from your computer instead of from the printer control panel. Below are examples of what you
can do using the embedded Web server:
View printer status information
●
View and print internal pages
●
Determine the remaining life on all supplies and order new ones
●
Set the size and type of media loaded in each tray
●
View and change tray configurations
●
View and change the printer default configuration settings
●
View and change network configuration
●
The embedded Web server provides the same functions as the Advanced Printer Settings section of
the HP ToolboxFX. The main differences between using the embedded Web server and using the
HP ToolboxFX are the following:
You do not need to install any software on the computer. You only need to use one of these
●
supported Web browsers:
Internet Explorer 6.0 (and later)
●
Netscape Navigator 7.0 (and later)
●
Firefox 1.0 (and later)
●
Mozilla 1.6 (and later)
●
Opera 7.0 (and later)
●
Safari 1.2 (and later)
●
Konqueror 3.2 (and later)
●
The embedded Web server is available in sixteen languages.
●
The embedded Web server does not provide e-mail or status alerts.
●
The embedded Web server works when the printer is connected to an TCP/IP-based network. The
embedded Web server does not support IPX-based printer connections.
NOTE You do not have to have Internet access to open and use the embedded Web server.
However, if you click a link on any of the pages, you must have Internet access in order to go to
the site associated with the link.
Open the embedded Web server
To open the embedded Web server, type the IP address or hostname of the printer in the address field
of a supported Web browser. To find the IP address, print a Configuration page at the printer by pressing
and holding the Go button for 5 seconds.
54 Chapter 6 Managing and maintenance ENWW
Page 65

Hint After you open the URL, bookmark it so that you can return to it quickly in the future.
The embedded Web server has three tabs that contain settings and information about the printer: the
Status tab, the Settings tab, and the Networking tab.
Status tab
The Status pages group consists of the following pages.
Device Status. This page displays the status of the printer and HP supplies.
●
Device Configuration. This page shows the information found on the printer Configuration
●
page.
Supplies Status. This page shows the status of HP supplies and provides supplies part numbers.
●
To order new supplies, click Order Supplies in the upper-right part of the window.
Event log. This page shows a list of all printer events and errors.
●
Print Info Pages. This page has links that allow you to print the various information pages that
●
reside within the memory of the printer.
Network Summary. This page shows the information found on the printer Network Summary page.
●
Settings tab
This tab allows you to configure the printer from your computer. If this printer is networked, always
consult with the printer administrator before changing settings on this tab.
The Settings tab contains the following pages:
Device Information. View and change basic information about the printer.
●
Paper Handling. View and change the settings for the printer's input tray.
●
Printing. View and change the default printer job settings.
●
PCL 5e. View and change the PCL font information.
●
Postscript. View and change the settings for HP postscript level 3 emulation errors.
●
Print Quality. View and change the print-quality settings.
●
Paper Types. View and change the print modes for various media types.
●
System Setup. View and change system information.
●
Service. Initiate the cleaning mode.
●
Networking tab
This tab allows the network administrator to control network-related settings for the printer when it is
connected to an IP-based network.
ENWW Embedded Web server 55
Page 66

Links
Links are located in the upper-right part of the Status pages. You must have Internet access in order to
use any of these links. If you use a dial-up connection and did not connect when you first opened the
embedded Web server, you must connect before you can visit these Web sites. Connecting might
require that you close the embedded Web server and reopen it.
Order Supplies. Click this link to connect to the Sure Supply Web site and order genuine
●
HP supplies from HP or a reseller of your choice.
Product Support. Connects to the support site for the HP LaserJet P2015 Series printer. You can
●
search for help regarding general topics.
56 Chapter 6 Managing and maintenance ENWW
Page 67

Replace the print cartridge
1. Press the print-cartridge-door button, and then remove the print cartridge from the printer. For
recycling information, see the inside of the print-cartridge box.
CAUTION To prevent damage, do not expose the print cartridge to light. Cover it with a
piece of paper.
2. Remove the new print cartridge from the packaging.
3. Bend the tab on the left side of the cartridge to break it loose.
4. Pull the tab until all the tape is removed from the cartridge. Put the tab in the print-cartridge box to
return for recycling.
ENWW Replace the print cartridge 57
Page 68

5. Gently rock the toner cartridge from front to back to distribute the toner evenly inside the cartridge.
6. Insert the print cartridge in the printer and close the print-cartridge door.
CAUTION If toner gets on your clothing, wipe it off with a dry cloth and wash the clothing
in cold water. Hot water sets toner into the fabric.
58 Chapter 6 Managing and maintenance ENWW
Page 69

Redistribute toner
When toner is low, faded or light areas appear on the printed page. You might be able to temporarily
improve print quality by redistributing the toner.
1. Open the print-cartridge-door button, and then remove the print cartridge from the printer.
CAUTION To prevent damage, do not expose the print cartridge to light. Cover it with a
sheet of paper.
2. To redistribute the toner, gently rock the print cartridge from front to back.
CAUTION If toner gets on your clothing, wipe it off with a dry cloth and wash the clothing
in cold water. Hot water sets toner into the fabric.
3. Reinsert the print cartridge into the printer, and close the print cartridge door.
If the print is still light, install a new print cartridge. See Replace the print cartridge for instructions.
ENWW Redistribute toner 59
Page 70

Clean the printer
Clean the outside of the printer with a clean, damp cloth when necessary.
CAUTION Do not use ammonia-based cleaners on or around the printer.
During the printing process, paper, toner, and dust particles can accumulate inside the printer. Over
time, this buildup can cause print quality problems, such as toner specks or smearing, and paper jams.
To correct and prevent these types of problems, you can clean the print cartridge area and the printer
media path.
Clean the print-cartridge area
You do not need to clean the print-cartridge area often. However, cleaning this area can improve the
quality of your printed sheets.
WARNING! Before cleaning the printer, turn the printer off by unplugging the power cord, and
wait for the printer to cool.
1. Press the print-cartridge-door button, and then remove the print cartridge from the printer.
CAUTION Do not touch the black sponge-transfer roller inside the printer. Doing so can
damage the printer.
CAUTION To prevent damage, do not expose the print cartridge to light. Cover it with a
piece of paper.
60 Chapter 6 Managing and maintenance ENWW
Page 71

2. With a dry, lint-free cloth, wipe any residue from the media-path area and the print-cartridge cavity.
3. Replace the print cartridge, and close the print-cartridge door.
4. Plug the power cord back into the printer.
Clean the printer media path
If you are experiencing toner specks or dots on the printouts, clean the printer media path. This process
uses a transparency to remove dust and toner from the media path. Do not use bond or rough paper.
ENWW Clean the printer 61
Page 72

NOTE For best results use a sheet of transparency. If you do not have any transparencies, you
2
can use copier grade media (70 to 90 g/m
(18 to 24 lb.)) with a smooth surface.
1. Make sure that the printer is idle and the Ready light is on.
2. Load the transparency in tray 1.
3. Print a cleaning page using one of the following methods:
Open HP ToolboxFX. See
●
HP ToolboxFX for instructions. Click the Troubleshooting tab,
and then click Print Quality Tools. Select the cleaning page.
On the printer control panel, press and hold the Go button until the Attention, Ready, and Go
●
lights come on (about 10 seconds). When all three lights come on, release the Go button.
NOTE The cleaning process takes approximately 2 minutes. The cleaning page will stop
periodically during the cleaning process. Do not turn the printer off until the cleaning process has
finished. You might need to repeat the cleaning process several times to thoroughly clean the
printer.
62 Chapter 6 Managing and maintenance ENWW
Page 73

Clean the pickup roller (tray 1)
If you want to clean the pickup roller for tray 1, follow these instructions:
1. Unplug the power cord from the printer, and allow the printer to cool.
2. Press the print-cartridge-door button to open the print-cartridge door.
3. Remove the pickup-roller cover.
ENWW Clean the pickup roller (tray 1) 63
Page 74

4. Press the two black retaining tabs outward until the pickup roller is released from its seat.
5. Remove the pickup roller from the printer.
6. Dab a lint-free cloth in water, and scrub the roller.
7. Using a dry, lint-free cloth, wipe the pickup roller to remove loosened dirt.
64 Chapter 6 Managing and maintenance ENWW
Page 75

8. Allow the pickup roller to dry completely.
9. Line up the black retaining tabs in the printer with the grooves in the pickup roller, and then press
the pickup roller into the pickup-roller seat until the retaining tabs click.
10. Replace the pickup-roller cover.
11. Close the print-cartridge door.
ENWW Clean the pickup roller (tray 1) 65
Page 76

Clean the pickup roller (tray 2)
If you want to clean the pickup roller for tray 2, follow these instructions:
1. Unplug the power cord from the printer, and allow the printer to cool.
2. Press the print-cartridge-door button, and then remove the print cartridge from the printer.
3. Remove tray 2.
66 Chapter 6 Managing and maintenance ENWW
Page 77

4. Open the automatic two-sided path door on the front of the printer (HP LaserJet P2015d,
HP LaserJet P2015dn, and HP LaserJet P2015x printers only).
5. Place the printer on the work surface with the front of the printer facing up.
6. Pull the white tabs outward, and rotate the tabs up.
ENWW Clean the pickup roller (tray 2) 67
Page 78

7. Slide the right tab to the right, and leave the tab in this position throughout the procedure.
8. Slide the pickup roller assembly to the right, and remove the left end cap.
68 Chapter 6 Managing and maintenance ENWW
Page 79

9. Remove the pickup roller.
10. Dab a lint-free cloth in water, and scrub the roller.
11. Using a dry, lint-free cloth, wipe the pickup roller to remove loosened dirt.
12. Allow the pickup roller to dry completely.
ENWW Clean the pickup roller (tray 2) 69
Page 80

13. Insert the left side of the pickup roller into the left slot (1), and insert the right side (the side that
has the notches in the shaft) into the right slot (2).
14. Place the end cap over the shaft on the left side, push the end cap to the right, and rotate the tab
downward into position.
15. Rotate the shaft until the notches engage and the shaft clicks into place.
16. Push the right tab to the left, and rotate the tab downward into position.
17. Place the printer on the work surface with the top of the printer facing up.
70 Chapter 6 Managing and maintenance ENWW
Page 81

18. Close the automatic two-sided path door.
19. Reinstall the print cartridge, and close the print-cartridge door.
20. Plug the printer in to turn it back on.
ENWW Clean the pickup roller (tray 2) 71
Page 82

EconoMode
EconoMode is a feature that allows the printer to use less toner per page. Selecting this option may
extend the life of the print cartridge and reduce your cost per page. However, it will also reduce print
quality. The printed image is lighter, but it is adequate for printing drafts or proofs.
HP does not recommend the full-time use of EconoMode. If EconoMode is used full-time when the
average toner coverage is significantly less than 5%, it is possible that the toner supply will outlast the
mechanical parts in the print cartridge. If print quality begins to degrade under these circumstances, you
must install a new print cartridge, even if there is toner supply remaining in the cartridge.
1. To use EconoMode, open the printer Properties (or Printing Preferences in Windows 2000 and XP).
Configure the Windows printer driver or Configure the Macintosh printer driver for instructions.
See
2. On the Paper/Quality tab or the Finishing tab (the Paper Type/Quality tab for some Mac drivers),
select the EconoMode checkbox.
NOTE Not all printer features are available in all drivers or operating systems. See the printer
Properties (driver) online Help for information about availability of features for that driver.
72 Chapter 6 Managing and maintenance ENWW
Page 83

7 Problem solving
This chapter provides information on the following topics:
Finding the solution
●
Status-light patterns
●
Common Macintosh problems
●
HP postscript level 3 emulation errors
●
Media problem solving
●
Printed page is different than what appeared on screen
●
Printer software problems
●
Improve print quality
●
Clearing jams
●
Network setup problem solving
●
ENWW 73
Page 84

Finding the solution
You can use this section to find the solution to common printer problems.
Step 1: Is the printer set up correctly?
Is the printer plugged into a power outlet that is known to work?
●
Is the on/off switch in the on position?
●
Is the print cartridge properly installed? See
●
Is paper properly loaded in the input tray? See
●
Yes If you answered yes to the questions above, go to Step 2: Is
No If the printer will not turn on, Contact HP support.
Replace the print cartridge.
Load media.
the Ready light on?
Step 2: Is the Ready light on?
Verify that the Ready light (1) is illuminated on the control panel.
Yes Go to Step 3: Can you print a demo page?
No If the control panel lights do not look like the picture above,
see
Status-light patterns.
If you are unable to resolve the problem,
Contact HP support.
Step 3: Can you print a demo page?
Press the Go button to print a demo page.
74 Chapter 7 Problem solving ENWW
Page 85

Yes If the demo page printed, go to Step 4: Is the print quality
No If no paper came out, see Media problem solving.
acceptable?
If you are unable to resolve the problem,
Contact HP support.
Step 4: Is the print quality acceptable?
Yes If the print quality is acceptable, go to Step 5: Is the printer
communicating with the computer?
No If the print quality is poor, see Improve print quality.
Verify that the print settings are correct for the media you are
using. See
information on adjusting the settings for various types of
media.
If you are unable to resolve the problem, Contact HP support.
Optimize print quality for media types for
Step 5: Is the printer communicating with the computer?
Try printing a document from a software application.
Yes If the document prints, go to Step 6: Does the printed page look
No If the document does not print, see Printer software
like you expected?
problems.
If you are using a Macintosh computer, see
Macintosh problems.
If you are using an HP postscript level 3 emulation driver,
HP postscript level 3 emulation errors.
see
If you are unable to resolve the problem,
Common
Contact HP support.
Step 6: Does the printed page look like you expected?
Yes The problem should be resolved. If it is not resolved, Contact
HP support.
No See Printed page is different than what appeared on screen.
If you are unable to resolve the problem,
Contact HP support.
Contact HP support
In the United States, see
●
In other locations, see
●
http://www.hp.com/support/ljP2015/ for the HP LaserJet P2015 printer.
http://www.hp.com/.
ENWW Finding the solution 75
Page 86

Status-light patterns
Table 7-1 Status-light legend
Symbol for "light off"
Symbol for "light on"
Symbol for "light blinking"
Table 7-2 Control-panel light messages
Light status State of the printer Action
Initialization/Startup
While in the Startup state, the Go, Ready,
and Attention lights cycle (at the rate of
500 ms) one after another.
Reconfiguration Initialization
During the printer start up, you can
request special initialization sequences
that reconfigure the printer. When one of
the sequences is requested, such as cold
reset, the lights cycle as in the
Initialization/Startup state.
Job Cancel
After the cancellation process has been
completed, the printer returns to the
Ready state.
During the Initialization, Reconfiguration,
and Job Cancel processes, pressing
buttons has no effect.
76 Chapter 7 Problem solving ENWW
Page 87

Table 7-2 Control-panel light messages (continued)
Light status State of the printer Action
Ready
The printer is ready with no job activity.
Processing Data
The printer is processing or receiving
data.
To print a Configuration page, press and
hold the Go button for 5 seconds.
To print a Demo page, press and release
the Go button.
To cancel the current job, press the
Cancel button.
ENWW Status-light patterns 77
Page 88

Table 7-2 Control-panel light messages (continued)
Light status State of the printer Action
Manual Feed or Continuable Error
This state can be reached in the following
circumstances:
Manual feed
●
General continuable error
●
Memory configuration error
●
Personality/Job related error
●
Attention
The print-cartridge door is open.
To recover from the error and print
whatever data is possible, press the Go
button.
If the recovery is successful, the printer
goes to the Processing Data state and
completes the job.
If the recovery is unsuccessful, the
printer returns to the Continuable Error
state.
Close the print-cartridge door.
78 Chapter 7 Problem solving ENWW
Page 89

Table 7-2 Control-panel light messages (continued)
Light status State of the printer Action
Fatal Error
Accessory Error To display additional error information,
Turn off the printer, wait 10
●
seconds, and turn on the printer.
If you are unable to resolve the
●
problem,
press the Go button. The light pattern
changes. For more information about the
light pattern now displayed, see
7-3 Accessory error indicators. When
you release the Go button, the printer
returns to the initial Accessory Error
state.
Contact HP support.
Table
ENWW Status-light patterns 79
Page 90

Table 7-2 Control-panel light messages (continued)
Light status State of the printer Action
Toner Low
The Go, Ready, and Attention lights act
independently of the Toner Low state.
Toner Missing
The print cartridge has been removed
from the printer.
Order a new print cartridge and have it
ready. See
accessories.
Reinsert the print cartridge in the printer.
Order supplies and
80 Chapter 7 Problem solving ENWW
Page 91

Table 7-2 Control-panel light messages (continued)
Light status State of the printer Action
Jam Clear the jam. See Clearing jams.
ENWW Status-light patterns 81
Page 92

Table 7-2 Control-panel light messages (continued)
Light status State of the printer Action
Paper Out Load paper or other media.
Paper Mount
The loaded paper or other media is not
supported.
Load acceptable paper or other media.
Supported paper and other media.
See
Press the Go button to override the
condition.
Table 7-3 Accessory error indicators
Accessory error Attention light Ready light Go light
DIMM slot incompatible error Off Off On
82 Chapter 7 Problem solving ENWW
Page 93

Common Macintosh problems
This section lists problems that can occur when using Mac OS X.
Table 7-4 Problems with Mac OS X
The printer driver is not listed in the Print Center or Printer Setup Utility.
Cause
The printer software might not have been installed or was installed
incorrectly.
The PostScript Printer Description (PPD) file is corrupt. Delete the PPD file from the following hard-drive folder: Library/
The printer name, IP address, or Rendezvous or Bonjour host name does not appear in the printer list in the Print Center or Printer
Setup Utility.
Cause
The printer might not be ready. Make sure that the cables are connected correctly, the printer is on,
The wrong connection type might be selected. Make sure that USB, IP Printing, or Rendezvous or Bonjour is
Solution
Make sure that the printer PPD is in the following hard-drive folder:
Library/Printers/PPDs/Contents/Resources/
<lang>.lproj, where <lang> is the two-letter language code for
the language that you are using. If necessary, reinstall the software.
See the Getting Started Guide for instructions.
Printers/PPDs/Contents/Resources/<lang>.lproj,
where <lang> is the two-letter language code for the language that
you are using. Reinstall the software. See the Getting Started
Guide for instructions.
Solution
and the ready light is on. If you are connecting through a USB or
Ethernet hub, try connecting directly to the computer or use a different
port.
selected, depending on the type of connection that exists between
the printer and the computer.
The wrong printer name, IP address, or Rendezvous or Bonjour host
name is being used.
The interface cable might be defective or of poor quality. Replace the interface cable. Make sure to use a high-quality cable.
The printer driver does not automatically set up your selected printer in the Print Center or Printer Setup Utility.
Cause
The printer might not be ready. Make sure that the cables are connected correctly, the printer is on,
The printer software might not have been installed or was installed
incorrectly.
Print a configuration page to check the printer name, IP address, or
Rendezvous or Bonjour host name. Verify that the name, IP address,
or Rendezvous or Bonjour host name on the configuration page
matches the printer name, IP address, or Rendezvous or Bonjour
host name in the Print Center or Printer Setup Utility.
Solution
and the ready light is on. If you are connecting through a USB or
Ethernet hub, try connecting directly to the computer or use a different
port.
Make sure that the printer PPD is in the following hard-drive folder:
Library/Printers/PPDs/Contents/Resources/
<lang>.lproj, where <lang> is the two-letter language code for
the language that you are using. If necessary, reinstall the software.
See the Getting Started Guide for instructions.
ENWW Common Macintosh problems 83
Page 94

Table 7-4 Problems with Mac OS X (continued)
The printer driver does not automatically set up your selected printer in the Print Center or Printer Setup Utility.
Cause Solution
The PostScript Printer Description (PPD) file is corrupt. Delete the PPD file from the following hard-drive folder: Library/
Printers/PPDs/Contents/Resources/<lang>.lproj,
where <lang> is the two-letter language code for the language that
you are using. Reinstall the software. See the Getting Started
Guide for instructions.
The printer might not be ready. Make sure that the cables are connected correctly, the printer is on,
and the ready light is on. If you are connecting through a USB or
Ethernet hub, try connecting directly to the computer or use a different
port.
The interface cable might be defective or of poor quality. Replace the interface cable. Make sure to use a high-quality cable.
A print job was not sent to the printer that you wanted.
Cause
The print queue might be stopped. Restart the print queue. Open print monitor and select Start Jobs.
The wrong printer name or IP address is being used. Another printer
with the same or similar name, IP address, or Rendezvous or Bonjour
host name might have received your print job.
You are unable to print from a third-party USB card.
Cause Solution
This error occurs when the software for USB printers is not
installed.
When connected with a USB cable, the printer does not appear in the Print Center or Printer Setup Utility after the driver is selected.
Cause
This problem is caused by either a software or a hardware
component.
Solution
Print a configuration page to check the printer name, IP address, or
Rendezvous or Bonjour host name. Verify that the name, IP address,
or Rendezvous or Bonjour host name on the configuration page
matches the printer name, IP address, or Rendezvous or Bonjour
host name in the Print Center or Printer Setup Utility.
When adding a third-party USB card, you might need the Apple USB
Adapter Card Support software. The most current version of this
software is available from the Apple Web site.
Solution
Software troubleshooting
Check that your Macintosh supports USB.
●
Verify that your Macintosh operating system is Mac OS X v10.2
●
or later.
Ensure that your Macintosh has the appropriate USB software
●
from Apple.
Hardware troubleshooting
Check that the printer is turned on.
●
Verify that the USB cable is connected correctly.
●
Check that you are using the appropriate high-speed USB cable.
●
84 Chapter 7 Problem solving ENWW
Page 95

Table 7-4 Problems with Mac OS X (continued)
When connected with a USB cable, the printer does not appear in the Print Center or Printer Setup Utility after the driver is selected.
Cause Solution
Ensure that you do not have too many USB devices drawing
●
power from the chain. Disconnect all of the devices from the
chain, and connect the cable directly to the USB port on the host
computer.
Check to see if more than two nonpowered USB hubs are
●
connected in a row on the chain. Disconnect all of the devices
from the chain and connect the cable directly to the USB port on
the host computer.
NOTE The iMac keyboard is a nonpowered USB hub.
ENWW Common Macintosh problems 85
Page 96

HP postscript level 3 emulation errors
The following situations are HP postscript level 3 emulation language-specific and can occur when
several printer languages are being used.
NOTE To receive a printed or screen displayed message when HP postscript level 3 emulation
errors occur, open the Print Options dialog box and click the desired selection next to the PS
Errors section. You can also access this from the embedded Web server.
Table 7-5 HP postscript level 3 emulation errors
Symptom Possible cause Solution
The job prints in Courier (the printer's
default typeface) instead of the typeface
you requested.
A legal page prints with clipped margins. Print job too complex. You may need to print your job at
An HP postscript level 3 emulation error
page prints.
Limit Check Error Print job is too complex. You may need to print your job at
VM Error Font Error Select unlimited downloadable fonts
Range Check Font Error Select unlimited downloadable fonts
The requested typeface is not
downloaded. A personality switch may
have been performed to print a PCL job
just before the HP postscript level 3
emulation printing job was received.
Print job may not be HP postscript level
3 emulation.
Download the desired font and send the
print job again. Verify the type and
location of the font. Download to printer
if applicable. Check with the software
documentation.
600 dots per inch, reduce the complexity
of the page, or install more memory.
Make sure the print job is an HP
postscript level 3 emulation job. Check to
see whether the software application
expected a setup or HP postscript level
3 emulation header file to be sent to the
printer.
600 dots per inch, reduce the complexity
of the page, or install more memory.
from printer driver.
from printer driver.
86 Chapter 7 Problem solving ENWW
Page 97

Media problem solving
The following problems with media cause print-quality deviations, jamming, or damage to the printer.
Problem Cause Solution
Poor print quality or toner adhesion The paper is too moist, too rough, too
heavy or too smooth, or it is embossed
or from a faulty paper lot.
Dropouts, jamming, or curl The paper has been stored incorrectly. Store paper flat in its moisture-proof
The paper has variability from one side
to the other.
Excessive curl The paper is too moist, has the wrong
grain direction, or is of short-grain
construction
The paper varies from side-to-side. Turn the paper over.
Jamming, damage to printer The paper has cutouts or perforations. Use paper that is free of cutouts or
Problems with feeding The paper has ragged edges. Use high-quality paper that is made for
The paper varies from side-to-side. Turn the paper over.
The paper is too moist, too rough, too
heavy or too smooth, has the wrong grain
direction, or is of short-grain construction
or it is embossed or from a faulty paper
lot.
Try another kind of paper, between 100
and 250 Sheffield, with 4 to 6% moisture
content.
wrapping.
Turn the paper over.
Open the rear output bin, or use longgrain paper.
perforations.
laser printers.
Try another kind of paper, between 100
and 250 Sheffield, 4 to 6% moisture
content.
Open the rear output bin, or use longgrain paper.
Print is skewed (crooked). The media guides might be incorrectly
More than one sheet feeds at one time. The media tray might be overloaded. Remove some of the media from the tray.
The printer does not pull media from the
media input tray.
The printer does not pull media from
media input tray when using the
automatic two-sided printing feature.
adjusted.
The media might be wrinkled, folded, or
damaged.
The printer might be in manual-feed
mode.
The pickup roller might be dirty or
damaged.
The paper-length adjustment control in
tray 2 or optional tray 3 is set at a length
that is greater than the media size.
The automatic two-sided printing mediasize selector is not set to the correct page
size.
Remove all media from the input tray,
straighten the stack, and then load the
media in the input tray again. Adjust the
media guides to the width and length of
the media that you are using and try
printing again.
See
Load media.
Verify that the media is not wrinkled,
folded, or damaged. Try printing on
media from a new or different package.
Verify that the printer is not in manual
feed mode and print your job again.
Contact HP Customer Care. See How to
contact HP or the support flyer that came
in the box.
Adjust the paper-length adjustment
control to the correct length.
Push in the media selector for letter/
legal-size media. Pull out the media-size
selector for A4–size media. See
product parts for the location of the
Identify
ENWW Media problem solving 87
Page 98

Problem Cause Solution
automatic two-sided printing media-size
selector.
88 Chapter 7 Problem solving ENWW
Page 99

Printed page is different than what appeared on screen
Choose the item that best describes the problem:
Garbled, incorrect, or incomplete text
●
Missing graphics or text, or blank pages
●
Page format is different than on another HP LaserJet printer
●
Graphics quality
●
Garbled, incorrect, or incomplete text
The wrong printer driver might have been selected when the software was installed. Make sure
●
that the HP LaserJet P2015 printer driver is selected in the printer Properties.
If a specific file prints garbled text, there might be a problem with that specific file. If a specific
●
application prints garbled text, there might be a problem with that application. Make sure that the
appropriate printer driver is selected.
There might be a problem with your software application. Try printing from another software
●
application.
The USB cable might be loose or defective. Try the following:
●
Disconnect the cable and reconnect it at both ends.
●
Try printing a job that you know works.
●
If possible, attach the cable and printer to another computer, and try printing a job that you
●
know works.
Try using a new USB 2.0 cable that is 3 m (10 ft) or less. See
●
accessories.
Turn off the printer and the computer. Remove the USB cable, and inspect both ends of the
●
cable for damage. Reconnect the cable, making sure that the connections are tight. Make
sure that the printer is directly connected to the computer. Remove any switchboxes, tape
backup drives, security keys, or any other devices that are attached between the USB port
on the computer and the printer. These devices can sometimes interfere with communication
between the computer and the printer. Restart the printer and the computer.
Order supplies and
Missing graphics or text, or blank pages
Make sure that your file does not contain blank pages.
●
The sealing tape might still be in the print cartridge. Remove the print cartridge, and pull the tab
●
on the end of the cartridge until the entire length of the tape is removed. Reinstall the print cartridge.
See
Replace the print cartridge for instructions. To check the printer, print a demo page by pressing
the Go button.
The graphic settings in the printer Properties might not be correct for the type of job that you are
●
printing. Try a different graphic setting in the printer Properties. See
driver or Configure the Macintosh printer driver for more information.
Configure the Windows printer
Clean the printer, particularly the contacts between the print cartridge and the power supply.
●
ENWW Printed page is different than what appeared on screen 89
Page 100

Page format is different than on another HP LaserJet printer
If you used an older or different HP LaserJet printer driver (printer software) to create the document, or
if the printer Properties settings in the software are different, the page format might change when you
try to print using your new printer driver or settings. To help eliminate this problem, try the following:
Create documents and print them using the same printer driver (printer software) and printer
●
Properties settings regardless of which HP LaserJet printer you use to print them.
Change the resolution, paper size, font settings, and other settings. See
●
printer driver or Configure the Macintosh printer driver for more information.
Configure the Windows
Graphics quality
The graphics settings might be unsuitable for your print job. Check the graphic settings, such as
resolution, in the printer Properties and adjust them as necessary. See
driver or Configure the Macintosh printer driver for more information.
NOTE Some resolution may be lost when converting from one graphics format to another.
Configure the Windows printer
90 Chapter 7 Problem solving ENWW
 Loading...