

Page 1
Getting Started Guide
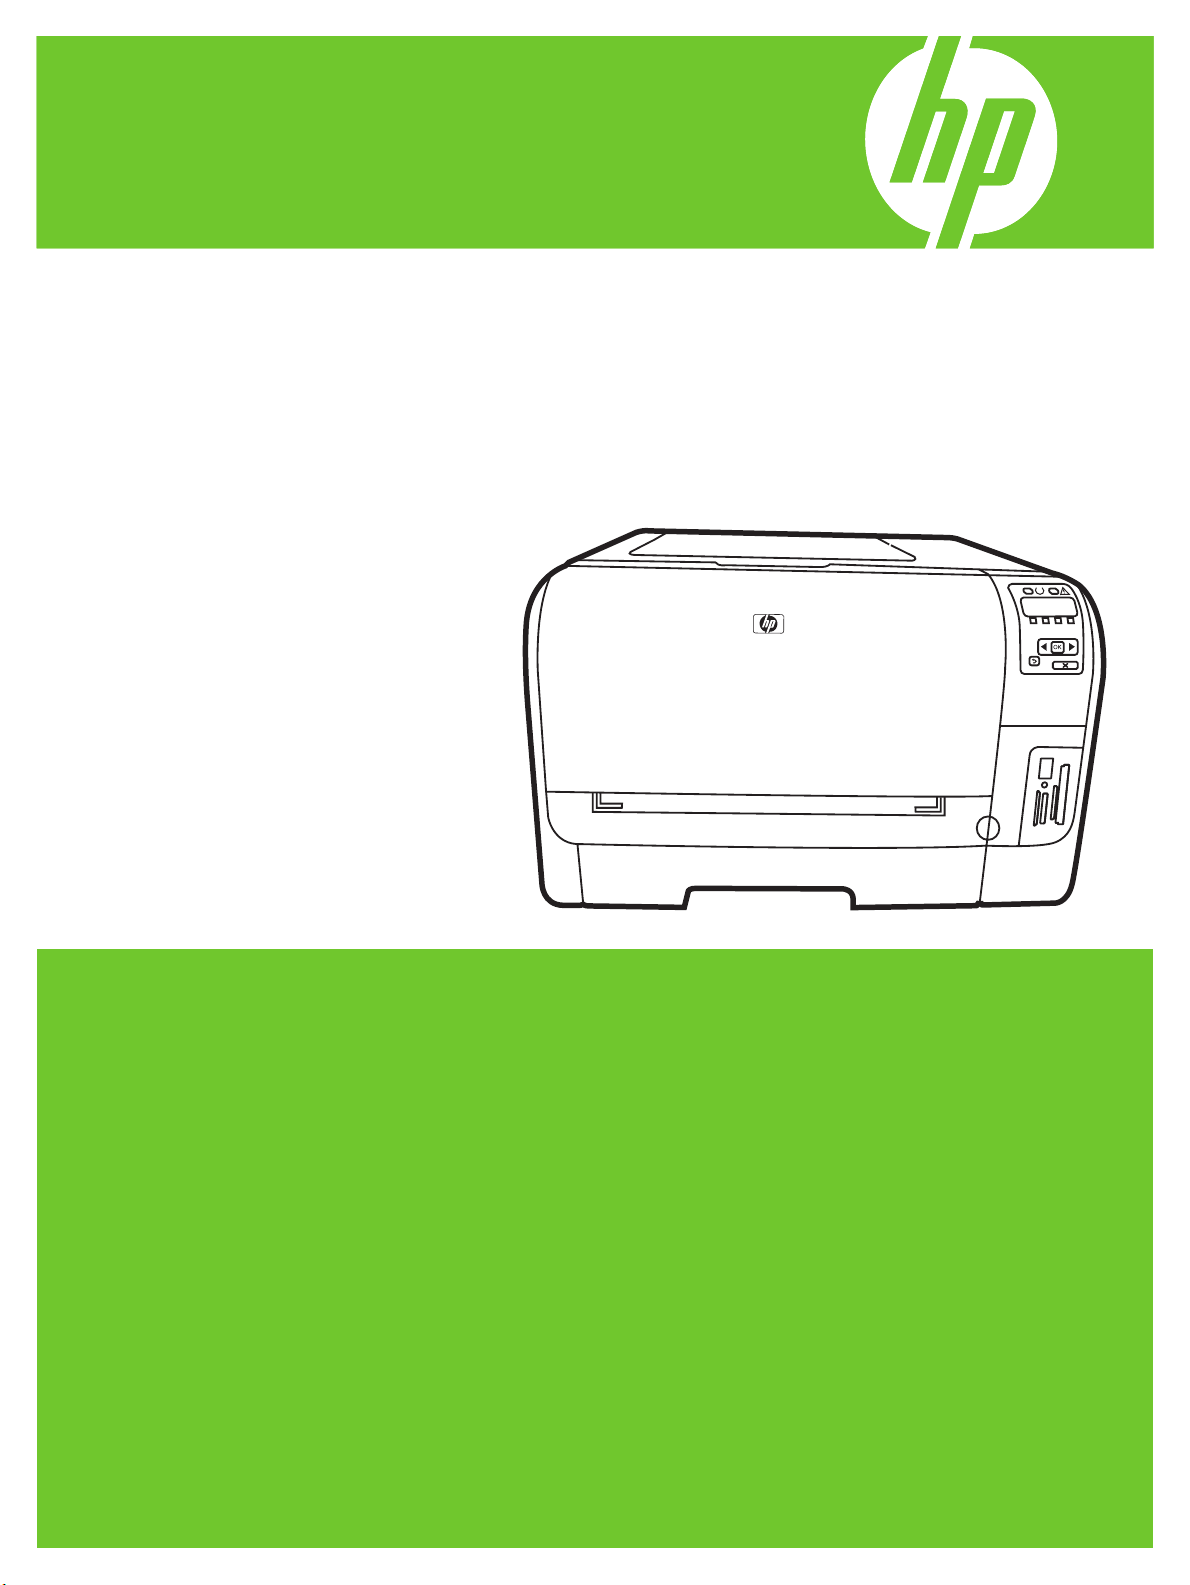
HP Color LaserJet CP1510 Series Printer
HP Color LaserJet CP1510 系列打印机
入门指南
Panduan Persiapan Awal
セットアップ ガイド
시작 설명서
คู่มือเริ่มต้นการใช้งาน
入門指南
Hương Dâ n Băt Đâ u Sư Du ng
Terdaftar di Deperindag Provinsi DKI Jakarta No :
0089/1.824.51
Page 2

Copyright and License
© 2007 Copyright Hewlett-Packard Development Company, L.P.
Reproduction, adaptation or translation without prior written
permission is prohibited, except as allowed under the copyright
laws.
The information contained herein is subject to change without
notice.
The only warranties for HP products and services are set forth in
the express warranty statements accompanying such products
and services. Nothing herein should be construed as constituting
an additional warranty. HP shall not be liable for technical or
editorial errors or omissions contained herein.
Part number: CC378-90943
Edition 1, 11/2007
FCC Regulations
This equipment has been tested and found to comply with the
limits for a Class B digital device, pursuant to Part 15 of the FCC
rules. These limits are designed to provide reasonable protection
against harmful interference in a residential installation. This
equipment generates, uses, and can radiate radio-frequency
energy. If this equipment is not installed and used in accordance
with the instructions, it may cause harmful interference to
radio communications. However, there is no guarantee that
interference will not occur in a particular installation. If this
equipment does cause harmful interference to radio or television
reception, which can be determined by turning the equipment
off and on, correct the interference by one or more of the
following measures:
• Reorient or relocate the receiving antenna.
• Increase separation between equipment and receiver.
• Connect equipment to an outlet on a circuit different from
that to which the receiver is located.
• Consult your dealer or an experienced radio/TV technician.
Any changes or modications to the product that are not
expressly approved by HP could void the user’s authority to
operate this equipment. Use of a shielded interface cable is
required to comply with the Class B limits of Part 15 of FCC
rules. For more regulatory information, see the electronic
user guide. Hewlett-Packard shall not be liable for any direct,
indirect, incidental, consequential, or other damage alleged in
connection with the furnishing or use of this information.
Trademark Credits
Windows® is a U.S. registered trademark of Microsoft
Corporation.
版权与许可
© 2007 Copyright Hewlett-Packard Development
Company, L.P.
除非版权法/著作权法许可,否则,在事先未经书
面许可的情况下,严禁复制、改编或翻译本书。
此处包含的信息如有更改,恕不另行通知。
HP 产品和服务的保修仅以随该产品和服务提供的
书面保修声明为准。 此处内容不代表任何额外保
修。 HP 公司对此处任何技术性或编辑性的错误或
遗漏概不负责。
部件号:CC378-90943
Edition 1, 11/2007
FCC 规则
本设备经测试,确认符合 FCC 规则第 15 部分有关
B 级数字设备的限制规定。 在住宅区安装时,这些
限制为防止有害干扰提供了合理保护。 本设备可
以产生、利用并发射无线射频能量。 如果不按说
明中的要求安装和使用本设备,有可能对无线电通
信产生有害干扰。 但也不能保证在特定的安装中
不会产生干扰。 如果本设备确实对无线电或电视
接收造成干扰(可以通过开关设备来确定),
可通过以下一种或多种措施排除干扰:
• 重新调整接收天线的方向或位置。
• 增加设备和接收器之间的距离。
• 将设备连接到与接收设备所用电路不同的电源
插座上。
• 咨询代理商或经验丰富的无线电/电视技术人员。
未经 HP 书面批准而对产品进行任何更改或修改都
将导致用户不能操作此设备。 使用屏蔽的接口电
缆时必须遵循 FCC 规则第 15 部分中的 B 类限制。
有关更多管制信息,请参阅电子版用户指南。
对于由本信息的提供或使用所引起的任何直接、
间接、偶然、继发性或其它损失,Hewlett-Packard
概不负责。
商标说明
Windows® 是 Microsoft Corporation 在美国的注册
商标。
Page 3
1
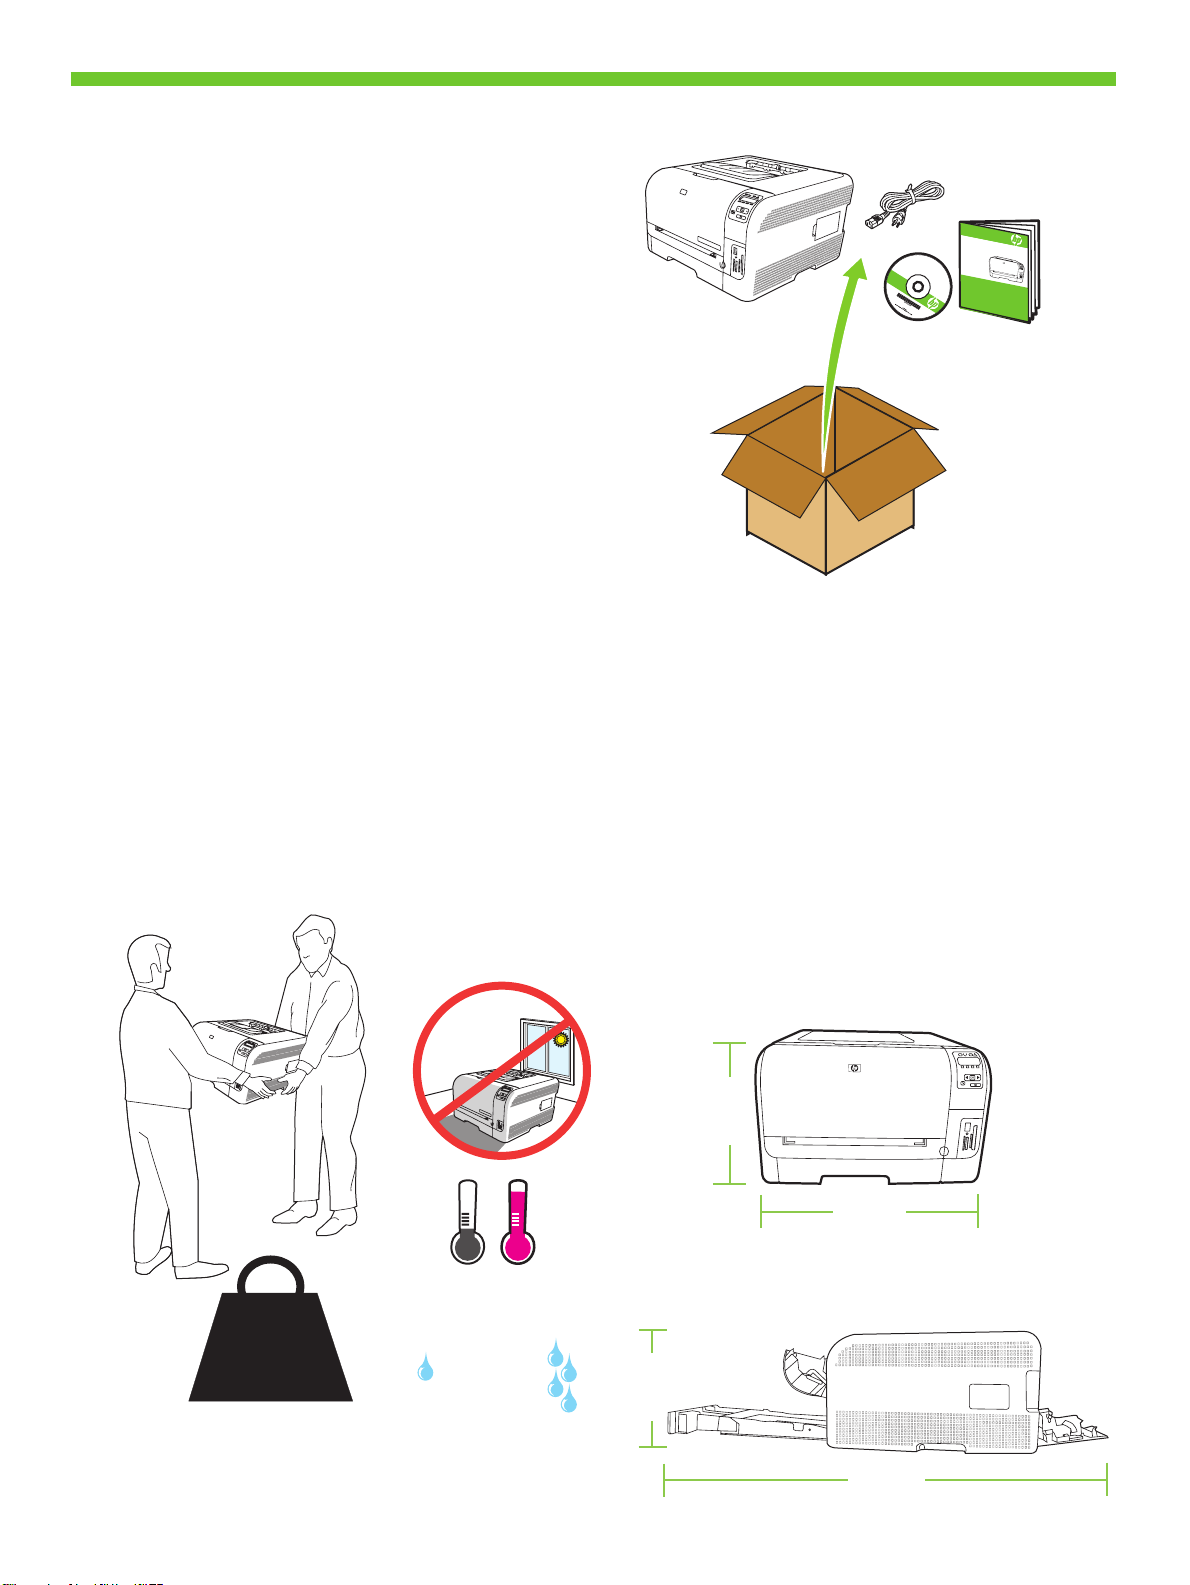
15° - 30°C
(59° - 86°F)
10% - 80%
18.2 kg
40 lb
254 mm
(10.0 inches)
1045 mm
(41.1 inches)
254 mm
(10.0 inches)
399 mm
(15.7 inches)
HP
Co
lor
L
as
e
rJet CP
1
51
0
Se
ri
es
H
P
C
o
lo
r
L
a
s
e
r
J
e
t
C
P
1
5
1
0
S
e
r
i
e
s
P
r
i
n
t
e
r
G
e
t
t
i
n
g
S
t
a
r
t
e
d
G
u
i
d
e
G
e
t
t
i
n
g
S
t
a
r
t
e
d
G
u
i
d
e
G
e
t
t
i
n
g
S
t
a
r
t
e
d
G
u
i
d
e
G
e
t
t
i
n
g
S
t
a
r
t
e
d
G
u
i
d
e
G
e
t
t
i
n
g
S
t
a
r
t
e
d
G
u
i
d
e
G
e
t
t
i
n
g
S
t
a
r
t
e
d
G
u
i
d
e
G
e
t
t
i
n
g
S
t
a
r
t
e
d
G
u
i
d
e
G
e
t
t
i
n
g
S
t
a
r
t
e
d
G
u
i
d
e
L
e
a
e
s
t
o
p
r
i
m
e
r
o
Unpack the product.
打开产品包装。
Buka kemasan produk.
製品を梱包から取り出します。
제품의 포장을 풉니다.
นำเครื่องออกจากกล่องบรรจุ
拆開產品的包裝。
Mở sản phẩm.
Select a sturdy, well-ventilated, dust-free area to position the product.
选择一个稳固、通风良好且无尘的区域放置产品。
Pilih tempat yang kokoh, berventilasi baik, dan bebas debu untuk meletakkan produk.
風通しがよく、ほこりの少ない安全な場所に製品を設置します。
단단하고 환기가 잘 되며 먼지가 없는 장소를 선택하여 제품을 내려 놓습니다.
เลือกสถานที่ตั้งเครื่องไว้ในบริเวณที่ปราศจากฝุ่น อากาศถ่ายเทสะดวก และมั่นคง
選擇一個穩固、通風情況良好且沒有灰塵的區域來放置本產品。
Chon nơi vưng chăc, đươc thông hơi tôt, không co bui băm đê đăt sản phẩm.
1
Page 4
For Windows, go to page 3.
对于 Windows,请转至第 3 页。
Untuk Windows, pindah ke halaman 3.
Windows の場合は、3 ページに進んでください。
Windows는 3페이지를 참고하십시오.
สำหรับ Windows โปรดไปที่หน้า 3
對於 Windows,請移至步驟 3。
Đối với Windows, xem trang 3.
For Macintosh, go to page 19.
对于 Macintosh,请转至第 19 页。
Untuk Macintosh, pindah ke halaman 19.
Macintosh の場合は、19 ページに進んでください。
Macintosh는 19페이지를 참고하십시오.
สำหรับ Macintosh โปรดไปที่หน้า 19
對於 Macintosh,請移至步驟 19。
Đối với Macintosh, xem trang 19.
2
Page 5

Setup and installation instructions for Windows
Windows 设置和安装说明
Petunjuk pengaturan dan instalasi untuk Windows
Windows でのセットアップとインストールの手順
Windows용 설치 지침
คำแนะนำในการติดตั้งและการตั้งค่าสำหรับ Windows
Windows 的設定與安裝說明。
Hướng dẫn cài và lắp đặt cho Windows
3
Page 6
HP
C
olor
La
serJet CP1
51
0 Se
ri
es
H
P
C
o
lo
r
L
a
se
r
J
e
t
C
P
1
2
1
0
S
er
ie
s
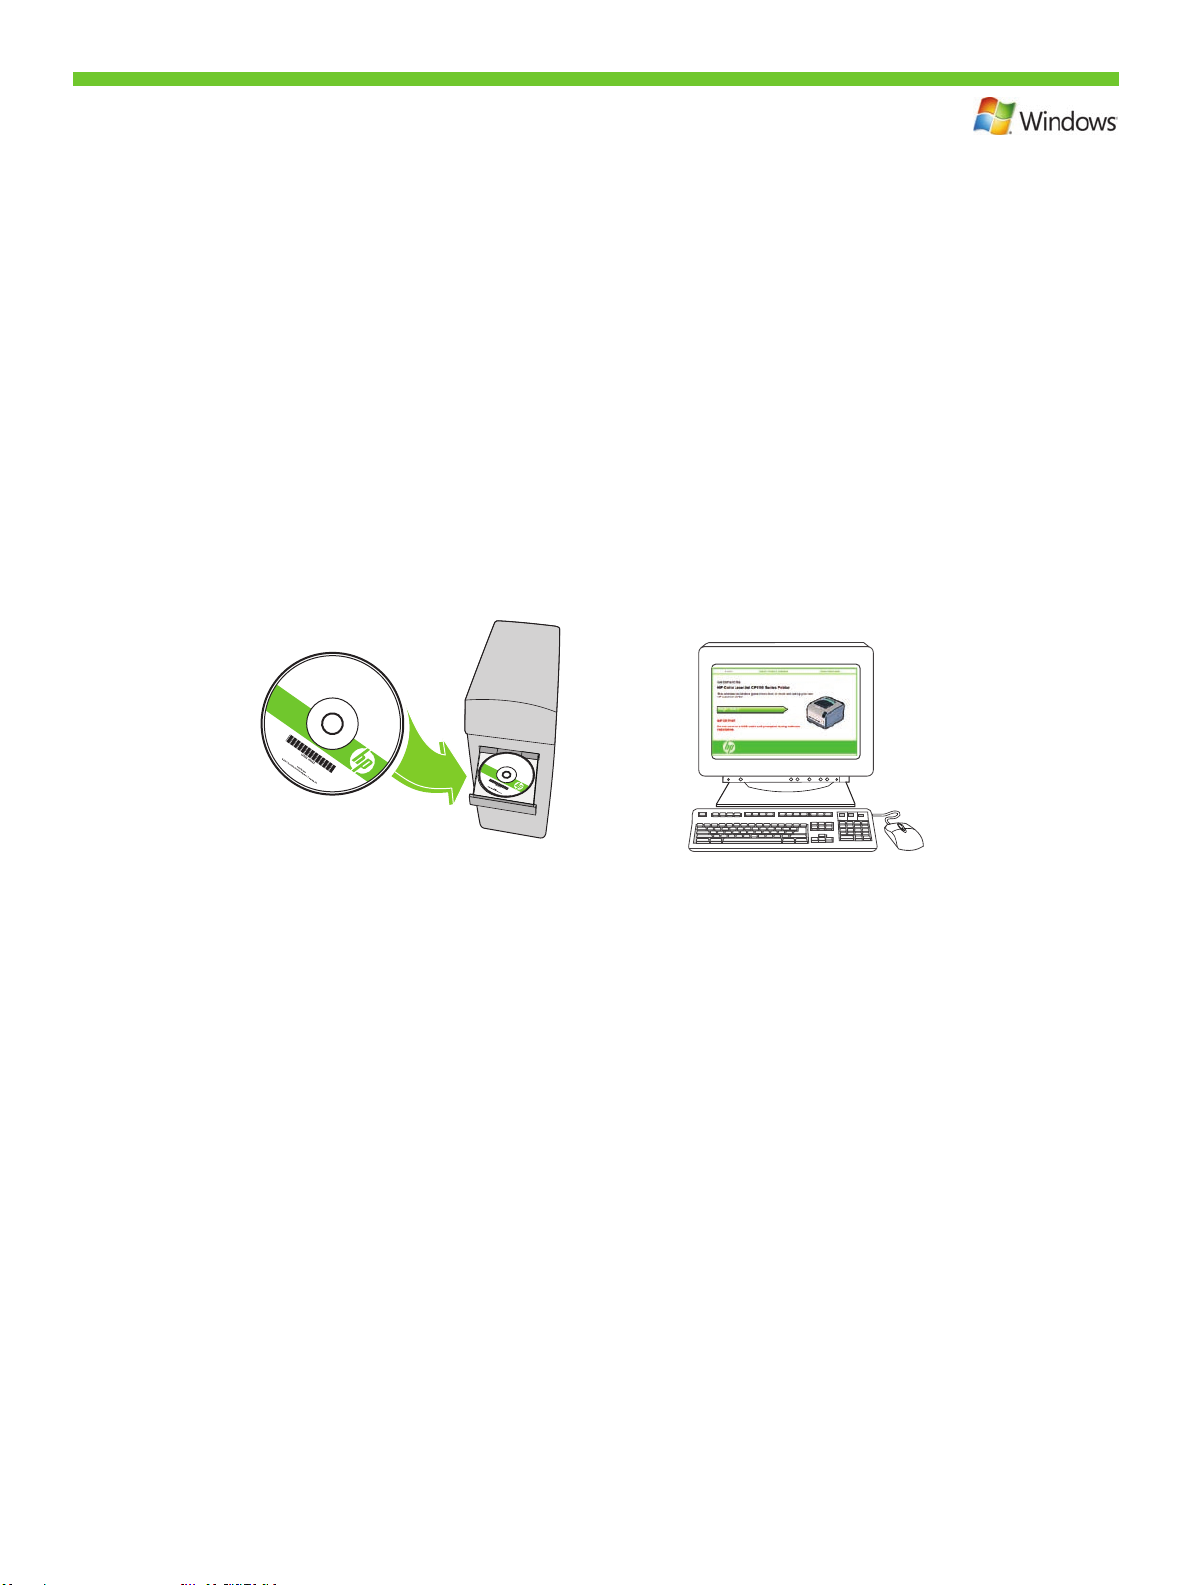
Windows Setup.
2
Place the CD in the CD-ROM drive, and click Begin Setup.
Windows 设置。
将 CD 放入 CD-ROM 驱动器,然后单击开始安装。
Pengaturan Windows.
Masukkan CD ke dalam drive CD-ROM dan klik Begin Setup [Mulai Pengaturan].
Windows でのセットアップ。
CD-ROM ドライブに CD を入れ、[セットアップの開始] をクリックします。
Windows에서 설치
CD-ROM 드라이브에 CD를 넣고, 설치 시작을 누르십시오.
การตั้งค่าสำหรับ Windows
ใส่แผ่น CD ลงในไดรฟ์ CD-ROM และคลิก เริ่มต้นการติดตั้ง
Windows 設定。
將 CD 放入 CD-ROM 光碟機中,然後按一下開始安裝。
Cài đặt Windows.
Cho đĩa CD vào ổ CD-ROM, và nhấp vào Bắt đầu Cài đặt.
4
Page 7
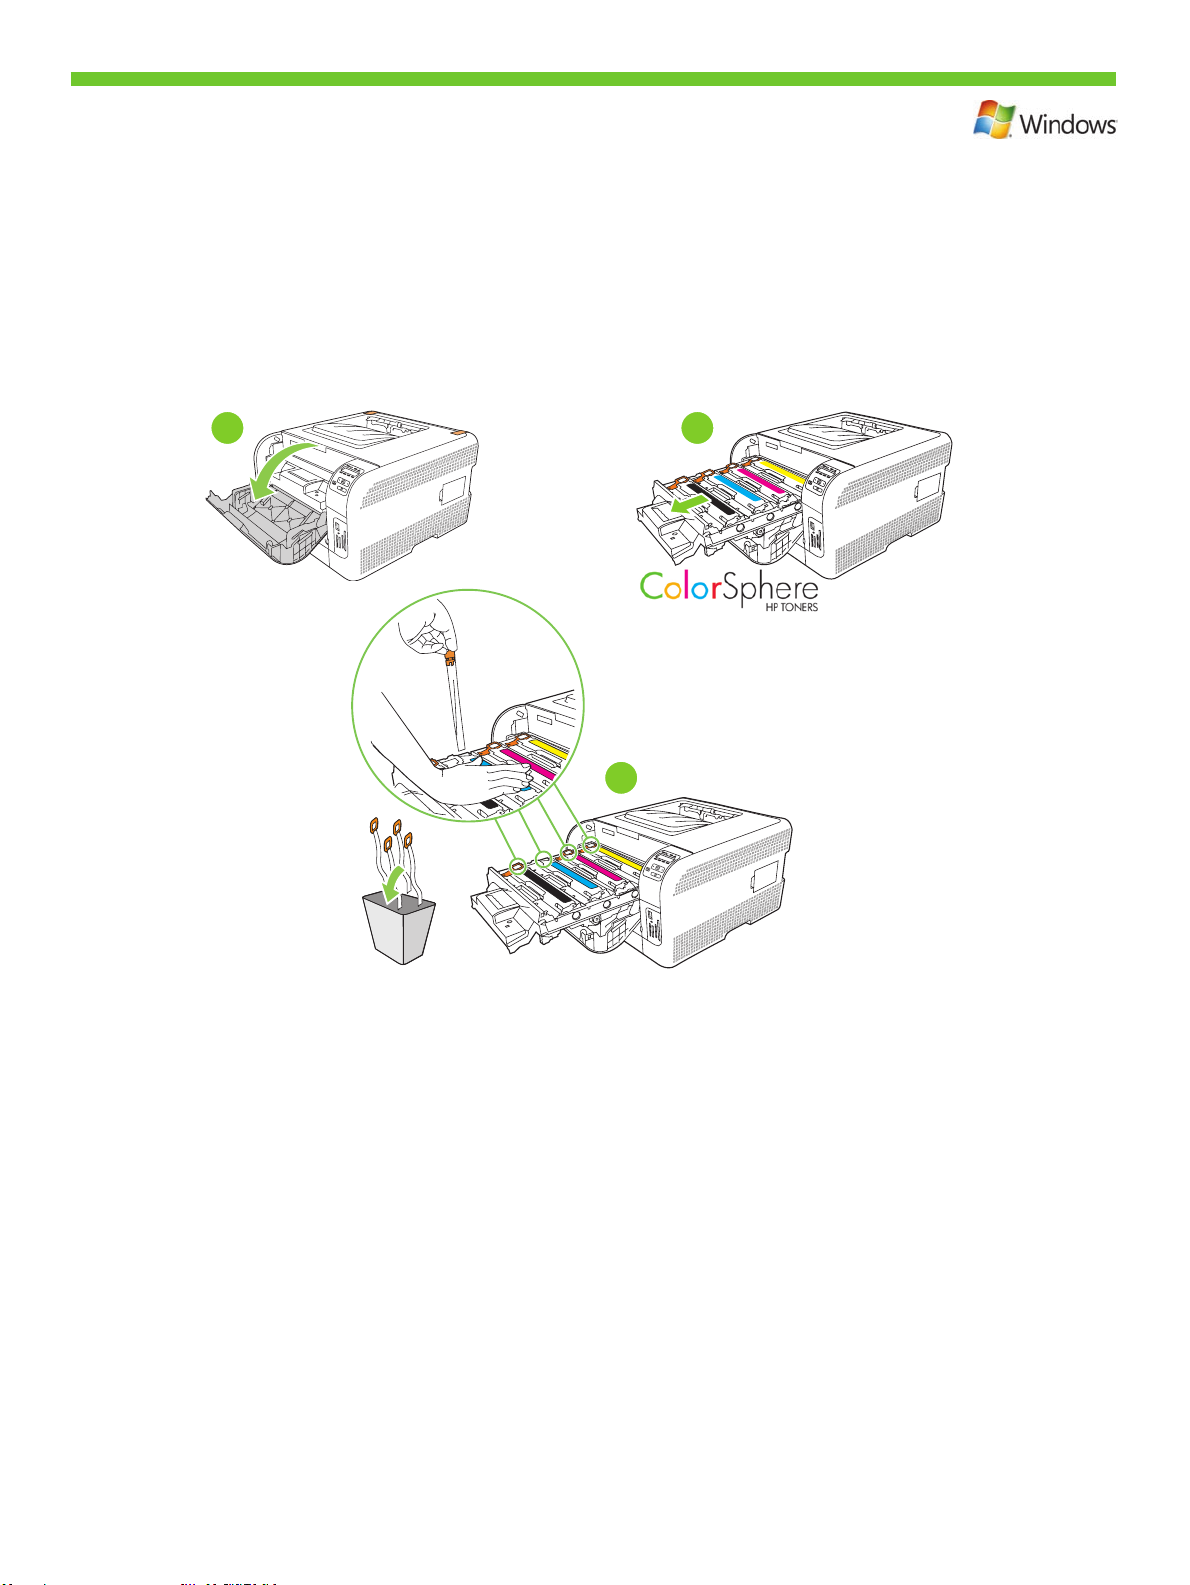
Remove the tape from all four print cartridges.
3
从所有四个打印碳粉盒上撕下胶带。
Lepas pita dari keempat kartrid cetak.
すべてのプリント カートリッジ (4つ) からテープをはがします。
카트리지 4개의 테이프를 제거하십시오.
ลอกเทปออกจากตลับหมึกทั้ง 4 ตลับ
去除四個碳粉匣上的膠帶。
Gỡ băng dán ra khỏi tất cả các hộp mực.
1
2
4X
3
5
Page 8
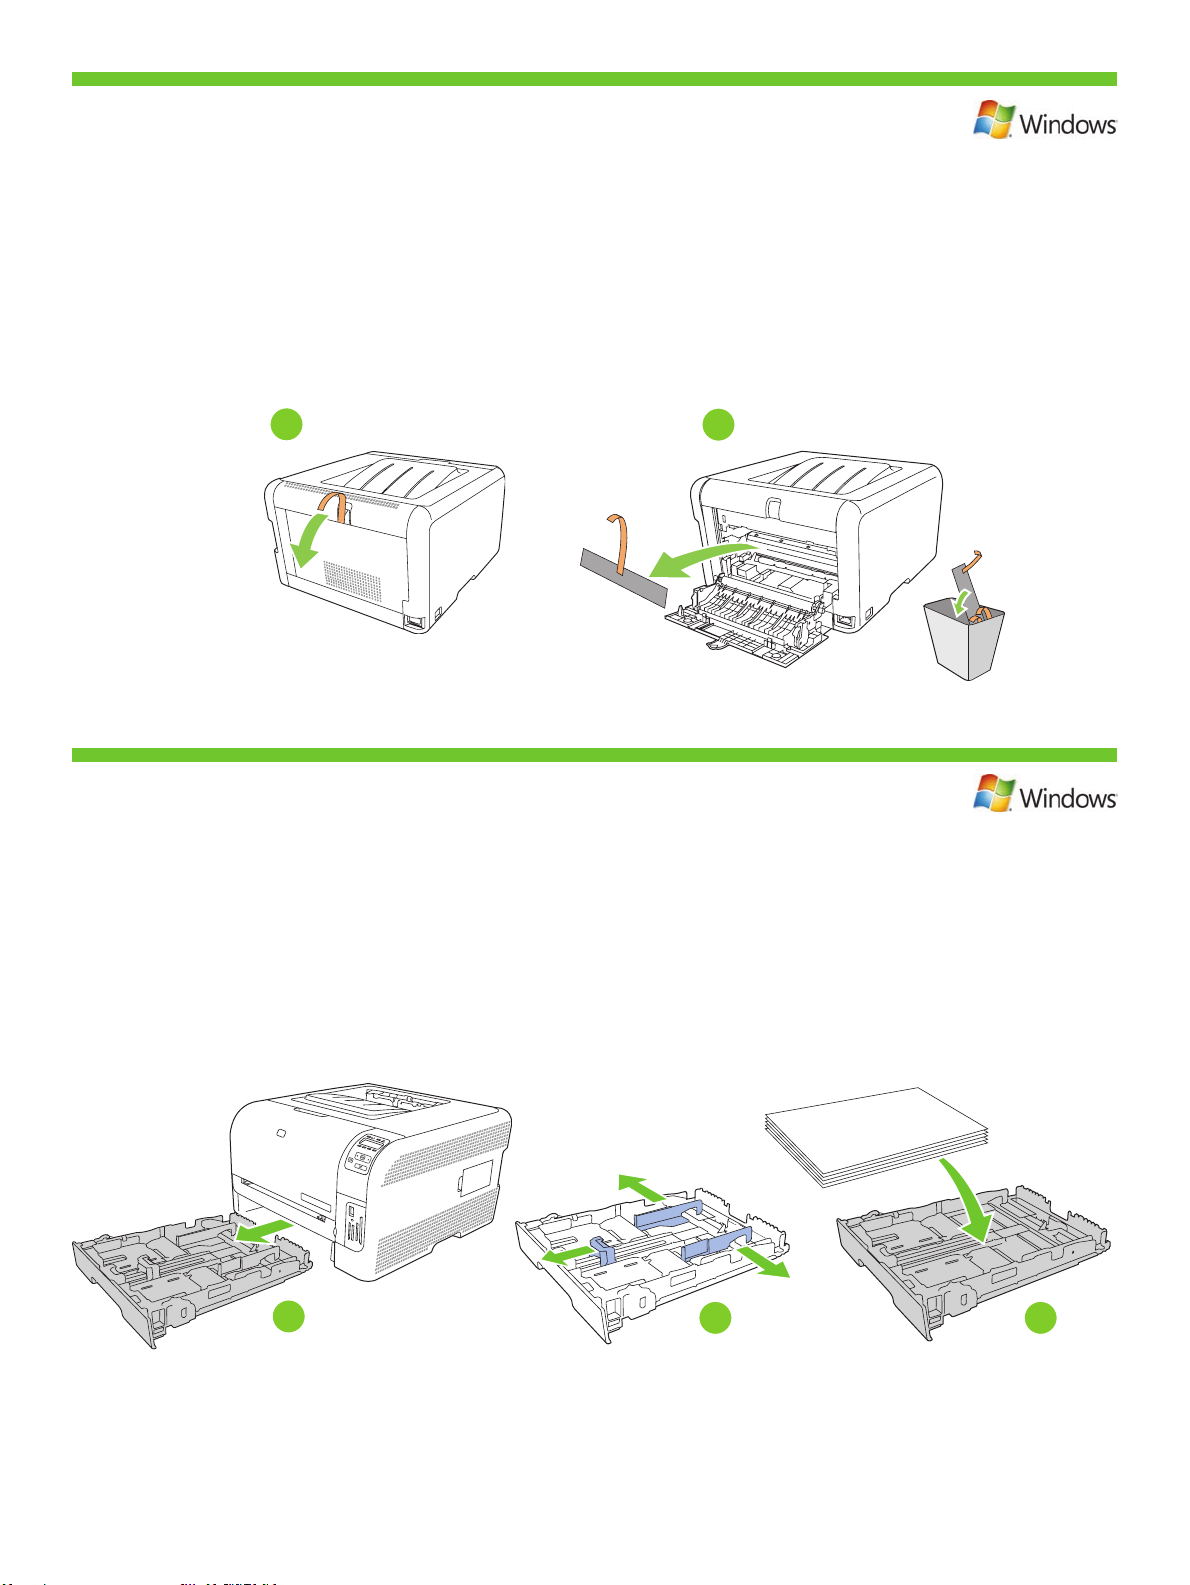
Remove the packing material from the back of the product.
4
从产品后部取下包装材料。
Lepas bahan kemasan dari bagian belakang produk.
製品の背面から梱包材を取り除きます。
제품 뒤쪽의 포장재를 제거하십시오.
นำวัสดุที่ใช้ในการบรรจุหีบห่อออกจากด้านหลังของผลิตภัณฑ
去除本產品背面的包裝材料。
Gỡ vật liệu đóng gói ra khỏi mặt sau của sản phẩm.
1
Load paper.
5
装入纸张。
Muat kertas.
์
2
用紙をセットします。
용지를 넣으십시오.
ใส่กระดาษ
裝入紙張。
Nap giây.
1
2
3
6
Page 9
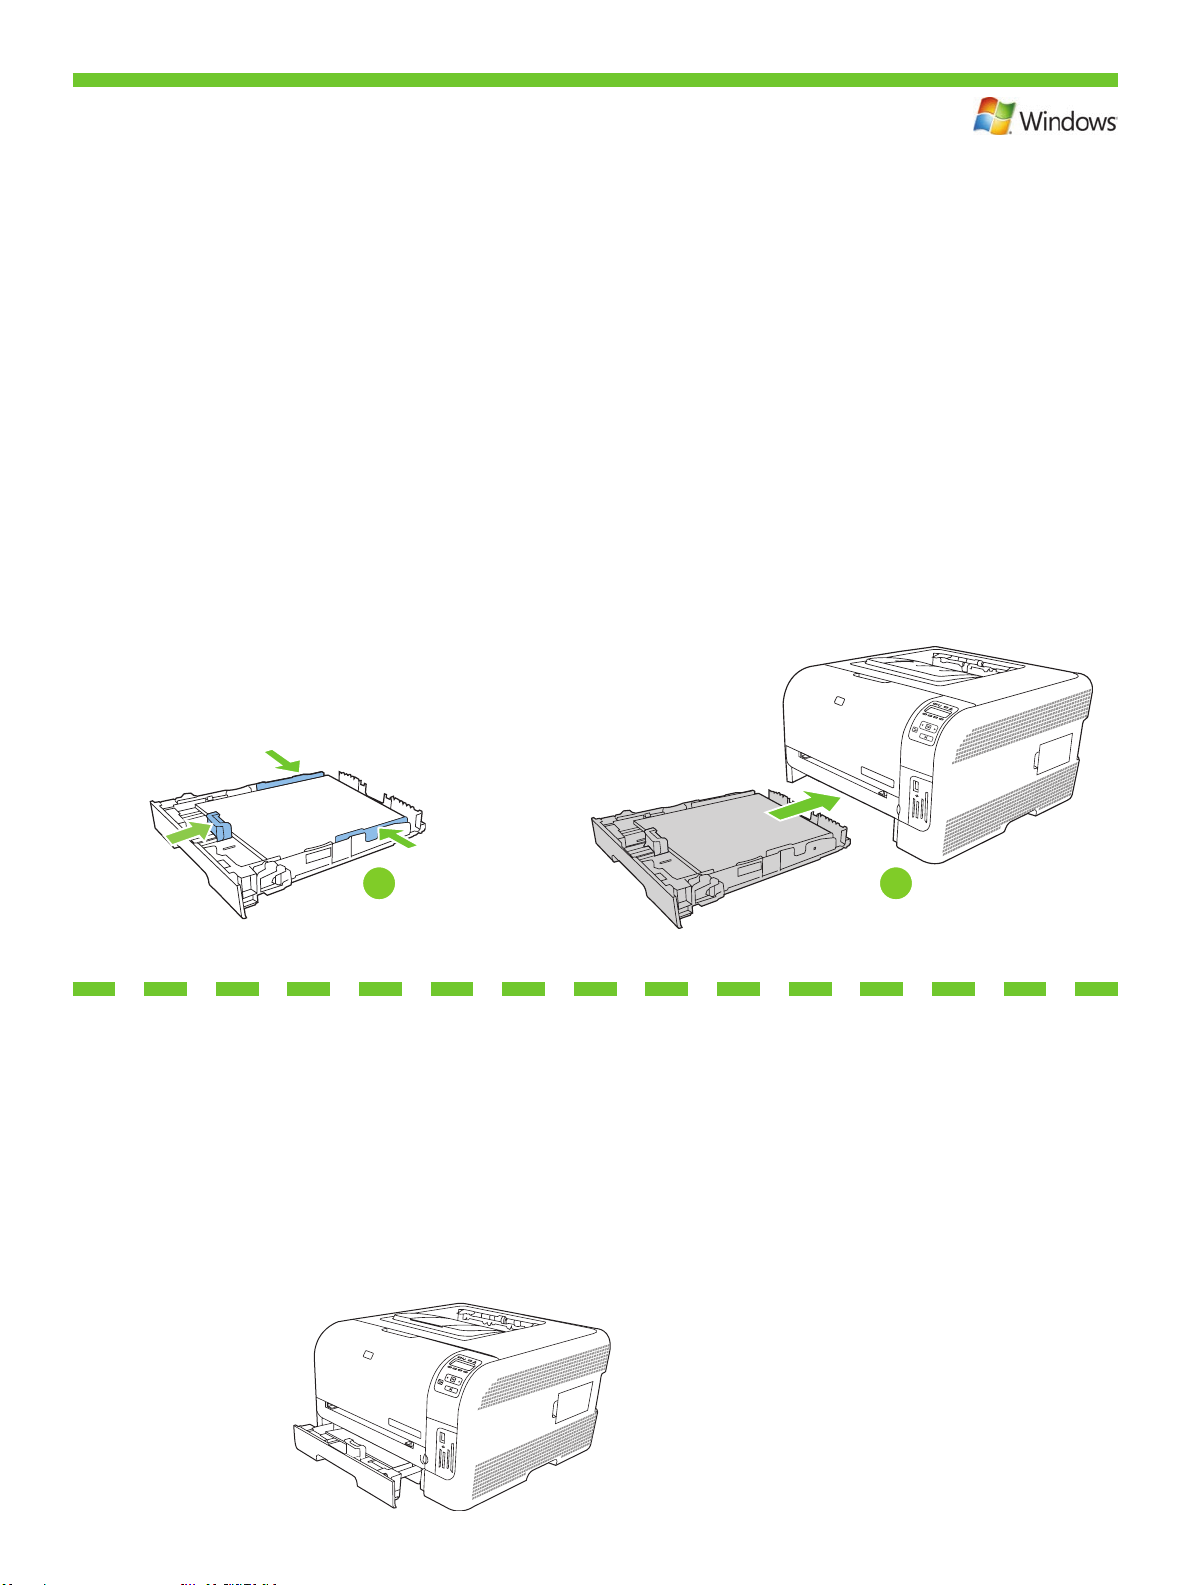
Adjust the three guides against the paper, and reinsert the tray.
6
调整三个导板使其紧贴纸张,然后重新插入纸盘。
Sesuaikan ketiga pemandu terhadap kertas, dan masukkan lagi bakinya.
用紙に合わせて用紙ガイド (3つ) を調節し、トレイをもう一度挿入します。
3개의 용지 조정대를 용지에 맞게 조정한 다음 용지함을 다시 넣으십시오.
ปรับตัวกั้นกระดาษ และใส่ถาดกลับเข้าไปอีกครั้ง
將三個導板向紙張靠緊,然後重新插入紙匣。
Điều chỉnh ba thanh dẫn cho sát vào giấy, và lắp khay vào.
Note: To avoid jams later, make sure that you completely close tray 2.
注: 为避免以后卡纸,请务必完全合上纸盘 2。
Catatan: Untuk menghindari kemacetan, pastikan Anda menutup rapat baki 2.
注記: 紙詰まりを防ぐために、トレイ 2 を完全に閉じてください。
주: 나중에 용지가 걸리지 않도록 하려면 용지함 2가 제대로 닫혔는지 확인하십시오.
หมายเหตุ: เพื่อป้องกันไม่ให้เกิดปัญหากระดาษติดในภายหลัง ตรวจสอบให้แน่ใจว่าคุณปิดถาด 2 ไว้แน่นแล้ว
註: 為避免以後卡紙,請確定已完全合上 2 號紙匣。
Lưu y: Để tránh bị kẹt giấy sau này, nhớ đóng hoàn toàn khay 2.
1 2
For Legal-size paper, the tray extends from the front of the product.
装入 Legal 尺寸纸张时,请拉开纸盘延伸板,使其伸至产品前面。
Untuk kertas ukuran Legal, baki akan memanjang dari depan produk.
リーガル サイズの用紙をセットすると、トレイは製品の前部から飛び出た状態になります。
리갈 용지의 경우 용지함을 제품의 앞쪽에서 당겨 빼십시오.
สำหรับกระดาษขนาด Legal ถาดจะยื่นออกจากด้านหน้าของเครื่อง
裝入 Legal 尺寸紙張時,紙匣會從本產品前端伸出。
Đối với giấy khổ Legal, khay sẽ kéo dài ra quá mặt trước của sản phẩm.
7
Page 10
For USB connections, go to page 9.
对于 USB 连接,请转至第 9 页。
Untuk koneksi USB, pindah ke halaman 9.
USB 接続の場合は、9 ページに進んでください。
USB 연결은 9페이지를 참고하십시오.
สำหรับการเชื่อมต่อ USB โปรดไปที่หน้า 9
對於 USB 連線,請移至步驟 9。
Với kết nối USB, xem trang 9.
For network connections, go to page 13.
对于网络连接,请转至第 13 页。
Untuk koneksi jaringan, pindah ke halaman 13.
ネットワーク接続の場合は、13 ページに進んでください。
네트워크 연결은 13페이지를 참고하십시오.
สำหรับการเชื่อมต่อกับเครือข่าย โปรดไปที่หน้า 13
對於網路連線,請移至步驟 13。
Với kết nối mạng, xem trang 13.
8
Page 11
3
1
2
USB connection
7
USB 连接
Koneksi USB
USB 接続
USB 연결
การเชื่อมต่อ USB
USB 連線
Kết nối USB
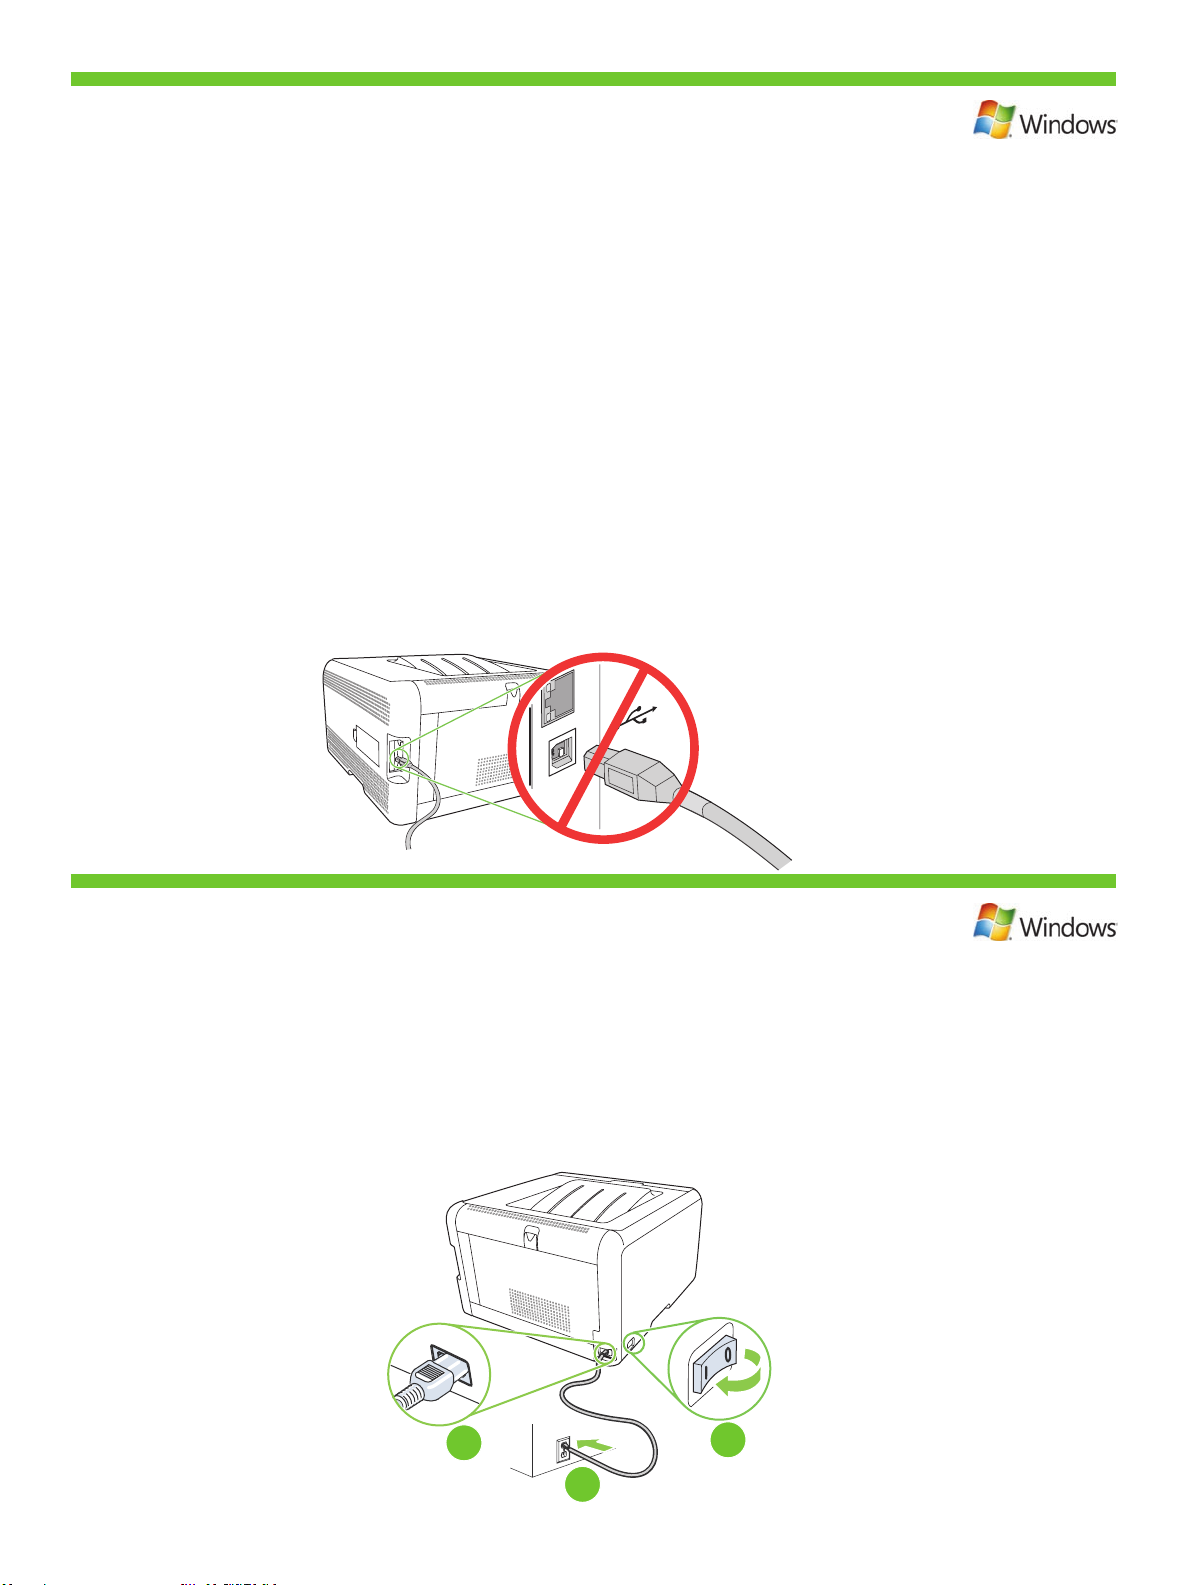
Caution! Do not connect USB now. Wait until the software prompts you.
注意! 现在先不要连接 USB。 请在稍后软件提示时再连接。
Perhatian! Jangan hubungkan USB sekarang. Tunggu hingga diminta oleh perangkat lunak.
注意: USB にはまだ接続しないでください。 指示されてから接続してください。
주의! 지금 USB를 연결하지 마십시오. 메시지가 나타날 때까지 기다리십시오.
ข้อควรระวัง! อย่าเสียบสาย USB ในขั้นตอนนี้ ให้รอจนกว่าจะได้รับแจ้งจากซอฟต์แวร
注意: 此時請勿連接 USB。 請等待軟體提示您再連接。
Cân thân! Chưa cắm cáp USB vội. Chờ cho tới khi phần mềm nhắc bạn.
Connect the power, and then turn on the product.
8
连接电源,然后打开本产品电源。
Hubungkan daya kemudian hidupkan produk.
電源に接続し、製品の電源を入れます。
전원을 연결하고 제품의 전원을 켜십시오.
ต่อสายไฟ และเปิดเครื่อง
連接電源,然後開啟本產品電源。
์
Cắm dây nguồn vào, và bật sản phẩm lên.
9
Page 12
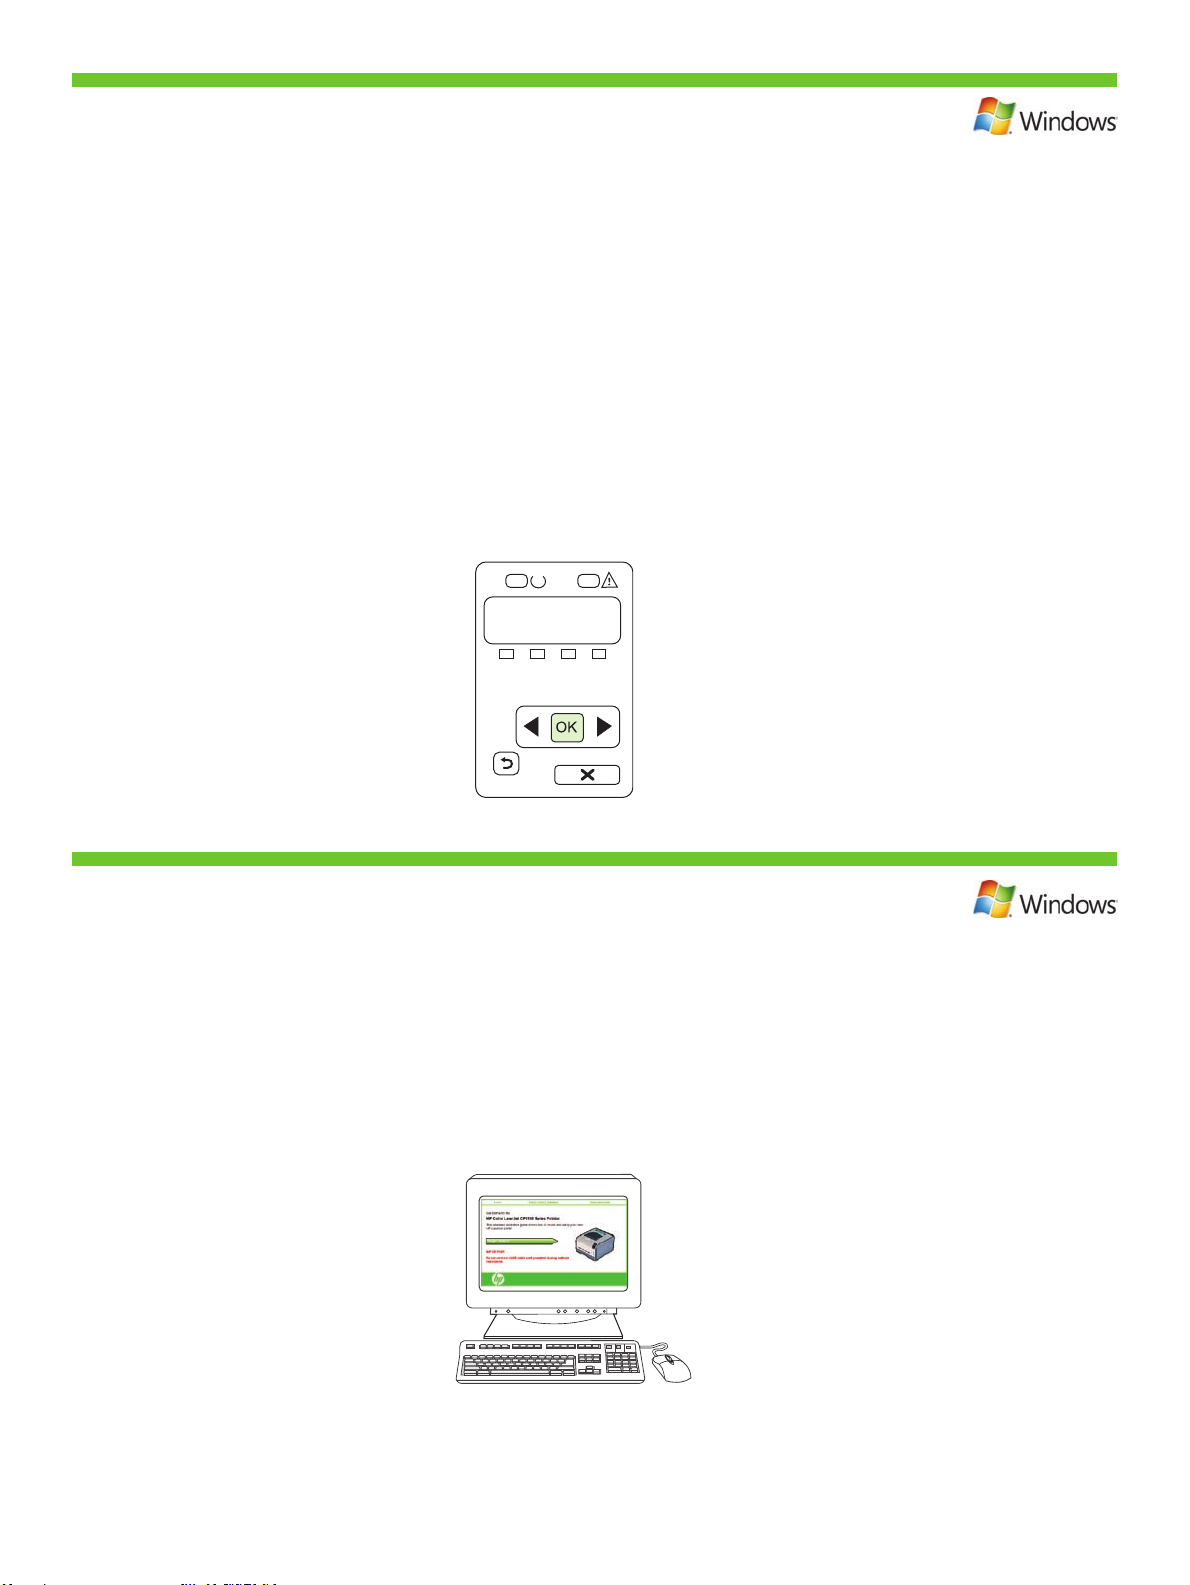
On the control panel, if prompted, select a language and location for the product.
9
Press OK to accept selections.
如果控制面板上出现提示,请为产品选择语言和位置。
按 OK 接受选择。
Pada panel kontrol, jika diminta, pilih bahasa dan lokasi produk.
Tekan OK untuk menerima pilihan.
要求された場合、コントロール パネルで製品に使用する言語と場所を選択します。
[OK] を押して選択内容を確定します。
제어판에 제품의 언어와 위치 선택 화면이 나타나면 해당 정보를 선택하십시오.
확인을 눌러 선택을 적용하십시오.
10
หากมีข้อความปรากฏขึ้นบนแผงควบคุม ให้เลือกภาษาและตำแหน่งของผลิตภัณฑ
์
กดปุ่ม OK เพื่อยอมรับรายการที่เลือก
系統提示時,在控制面板上選擇產品的語言與位置。
按下 OK 以接受選擇。
Trên panen điều khiển, nếu được nhắc, hãy chọn ngôn ngữ và vị trí cho sản phẩm.
Nhấn OK để chấp nhận lựa chọn.
Install the software. Follow the onscreen instructions.
安装软件。 按照屏幕说明进行操作。
Instal perangkat lunak. Ikuti petunjuk di layar.
ソフトウェアをインストールして、画面の指示に従います。
소프트웨어를 설치하십시오. 화면에 나타난 지침을 따릅니다.
ติดตั้งซอฟต์แวร์ ปฏิบัติตามคำแนะนำที่ปรากฏบนหน้าจอ
安裝軟體。 依照螢幕上的說明進行。
Cài đặt phần mềm. Hay thưc hiên theo cac hương dân trên man hinh.
10
Page 13

Control-panel overview
控制面板概览
Ringkasan panel kontrol
コントロール パネルの概要
제어판 개요
ภาพรวมของแผงควบคุม
控制面板概述
Tổng quan về Panen điều khiển
1
2
3
4
6
5
• Ready light
• 就绪指示灯
• Lampu Siap
• 印字可ランプ
• Attention light
• 注意指示灯
• Lampu Peringatan
• 注意ランプ
• Control-panel display
• 控制面板显示屏
• Layar panel kontrol
• コントロール パネルのディスプレイ
• Print cartridge status
• 打印碳粉盒状态
• Status kartrid cetak
• プリント カートリッジのステータス
• Left arrow button
• 左箭头按钮
• Tombol panah kiri
• 左矢印ボタン
• OK button
• OK 按钮
• Tombol OK
• [OK] ボタン
• 준비 표시등
• ไฟพร
• 就緒指示燈
• Đen Săn sang
• 주의 표시등
• ไฟพิจารณา
• 注意指示燈
• Đen chu y
• 제어판 디스플레이
• หน
• 控制面板顯示幕
• Hiển thị bảng điều khiển
• 카트리지 상태
• สถานะตลับหมึกพิมพ
• 碳粉匣狀態
• Tình trạng hộp mực
• 왼쪽 화살표 버튼
• ปุ
• 向左箭頭按鈕
• Nút mũi tên trái
• 확인 버튼
• ปุ
• OK 按鈕
• Nút OK
อม
้
าจอแผงควบคุม
้
มลูกศรซ้าย
่
ม OK
่
์
7
8
9
• Right arrow button
• 右箭头按钮
• Tombol panah kanan
• 右矢印ボタン
• Back button
• 后退按钮
• Tombol kembali
• 戻るボタン
• Cancel job button
• 取消作业按钮
• Tombol Batalkan pekerjaan
• ジョブのキャンセルボタン
11
• 오른쪽 화살표 버튼
• ปุ
มลูกศรขวา
่
• 向右箭頭按鈕
• Nút mũi tên phải
• 뒤로 버튼
• ปุ
มย้อนกลับ
่
• 返回按鈕
• Nút Trở về
• 작업 취소 버튼
• ปุ
มยกเลิกงานพิมพ
่
• 取消工作按鈕
• Nút Hủy lệnh in
์
Page 14

Windows USB setup is complete. For more information about the following topics, see the electronic User Guide
on the CD-ROM or go to www.hp.com/support/ljcp1510series:
• Detailed user instructions. • Important safety notices. • Troubleshooting information. • Regulatory information.
Windows USB 设置完成。 有关以下主题的更多信息,请参阅 CD-ROM 上的电子版《用户
指南》,或者访问 www.hp.com/support/ljcp1510series:
• 详细的用户说明。 • 重要安全注意事项。 • 故障排除信息。 • 管制信息。
Pengaturan USB Windows selesai. Untuk informasi lebih lanjut tentang topik-topik berikut, lihat Panduan Pengguna
elektronik pada CD-ROM atau kunjungi www.hp.com/support/ljcp1510series:
• Petunjuk rinci untuk pengguna. • Informasi penting tentang keselamatan. • Informasi pemecahan masalah.
• Informasi peraturan.
Windows での USB セットアップが完了しました。 次の項目の詳細については、CD-ROM に収録されている電子版
ユーザー ガイドを参照するか、www.hp.com/support/ljcp1510series にアクセスしてください:
• 手順の詳細。 • 安全に関する重要な情報。 •トラブルシューティング情報。 • 規制に関する情報。
Windows USB 설치가 완료되었습니다. 다음 주제에 관한 자세한 정보는 CD-ROM의 전자 사용 설명서 또는
www.hp.com/support/ljcp1510series를 참고하십시오.
• 세부 사용자 지침 • 중요 안전 정보 • 문제 해결 정보 • 규격 정보
การตั้งค่า USB สำหรับ Windows เสร็จสมบูรณ์แล้ว สำหรับข้อมูลเพิ่มเติมเกี่ยวกับหัวข้อต่อไปนี้ โปรดดูคู่มือผู้ใช้ในแบบอิเล็กทรอนิกส์ในแผ่น
CD-ROM หรือไปที่ www.hp.com/support/ljcp1510series:
• คำแนะนำสำหรับผู
Windows USB 設定即已完成。 如需有關下列主題的更多資訊,請參閱 CD-ROM 上的電子使用指南,或造訪
www.hp.com/support/ljcp1510series:
• 詳細的使用說明。 • 重要安全提示。 • 疑難排解資訊。 • 法規資訊。
Cài đặt USB cho Windows đã hoàn tất. Để biết thêm thông tin về các chủ đề sau, hãy xem Hướng dẫn Sử
dụng điện tử trên đĩa CD-ROM hoặc truy cập vào trang web www.hp.com/support/ljcp1510series:
• Hướng dẫn người sử dụng chi tiết. • Các thông báo an toàn quan trọng. • Thông tin xử lý sự cố. • Thông tin
vê tuân thu quy đinh.
โดยละเอียด • คำประกาศด้านความปลอดภัยที่สำคัญ • ข้อมูลการแก้ไขปัญหา • ข้อมูลเกี่ยวกับข้อบังคับ
้ใช้
12
Page 15

Network connection.
7
Connect the network cable to the product and to the network.
网络连接。
将网络电缆连接至本产品和网络。
Koneksi jaringan.
Hubungkan kabel jaringan ke produk dan ke jaringan.
ネットワーク接続。
ネットワークケーブルで製品とネットワークを接続します。
네트워크 연결
네트워크 케이블을 제품과 네트워크에 연결하십시오.
การเชื่อมต่อกับเครือข่าย
เชื่อมต่อสายเคเบิลเครือข่ายกับผลิตภัณฑ์และเครือข่าย
網路連線。
將網路纜線連接至產品與網路。
Kết nối mạng.
Cắm cáp mạng vào sản phẩm và vào mạng.
13
Page 16

3
1
2
Connect the power, and then turn on the product.
8
连接电源,然后打开本产品电源。
Hubungkan daya kemudian hidupkan produk.
電源に接続し、製品の電源を入れます。
전원을 연결하고 제품의 전원을 켜십시오.
ต่อสายไฟ และเปิดเครื่อง
連接電源,然後開啟本產品電源。
Cắm dây nguồn vào, và bật sản phẩm lên.
On the control panel, if prompted, select a language and location for the product.
9
Press OK to accept selections.
如果控制面板上出现提示,请为产品选择语言和位置。
按 OK 接受选择。
Pada panel kontrol, jika diminta, pilih bahasa dan lokasi produk. Tekan OK untuk menerima pilihan.
要求された場合、コントロール パネルで製品に使用する言語と場所を選択します。
[OK] を押して選択内容を確定します。
제어판에 제품의 언어와 위치 선택 화면이 나타나면 해당 정보를 선택하십시오.
확인을 눌러 선택을 적용하십시오.
หากมีข้อความปรากฏขึ้นบนแผงควบคุม ให้เลือกภาษาและตำแหน่งของผลิตภัณฑ์ กดปุ่ม OK เพื่อยอมรับรายการที่เลือก
系統提示時,在控制面板上選擇產品的語言與位置。 按下 OK 以接受選擇。
Trên panen điều khiển, nếu được nhắc, hãy chọn ngôn ngữ và vị trí cho sản phẩm.
Nhấn OK để chấp nhận lựa chọn.
14
Page 17

10
Find the IP address by printing a Conguration page. At the product control panel, press OK
to select Main Menu, and then press OK. Press the or buttons to select Cong Report,
and then press OK. On the printed report, the IP address is listed under Product settings.
打印配置页以查找 IP 地址。 在产品控制面板上按 OK 以选择 Main Menu(主菜单),
然后再按 OK。 按 或 按钮选择 Cong Report(配置报告),然后按下 OK。 您将
在所打印报告的 Product Settings(产品设置)下看到 IP Address(IP 地址)。
Temukan alamat IP dengan mencetak Conguration page [Halaman kongurasi]. Pada panel kontrol produk,
tekan OK untuk memilih Main Menu [Menu utama], kemudian tekan OK. Tekan tombol atau untuk memilih
Cong Report [Laporan Kongurasi], kemudian tekan OK. Pada laporan yang dicetak, alamat IP dicantumkan
pada Product settings [Pengaturan produk].
設定ページを印刷して IP アドレスを確認します。 そのためには、製品のコントロール パネルで [OK] を押してメイ
ン メニューを選択し、もう一度 [OK] を押します。 または ボタンを押して [Cong Report] (設定レポート) を選
択し、[OK] を押します。 IP アドレスは、印刷されたレポートの「Product settings」(製品設定) の下にあります。
구성 페이지를 인쇄하여 IP 주소를 찾으십시오. 제품 제어판에서 확인을 눌러 기본 메뉴를 선택한 다음 확인을
누르십시오. 또는 버튼을 눌러 Cong Report(구성 보고서)를 선택한 다음 확인을 누르십시오. IP 주소가
보고서 인쇄본의 제품 설정 목록에 표시됩니다.
ค้นหาที่อยู่ IP โดยพิมพ์หน้าการกำหนดค่า ที่แผงควบคุมของเครื่องพิมพ์ กดปุ่ม OK เพื่อเลือก Main Menu (เมนูหลัก) และกดป
ุ
ม OK กดปุ่ม
่
หรือ เพื่อเลือก Cong Report (รายงานคอนฟิเกอเรชัน) และกดปุ่ม OK ในรายงานที่พิมพ์ออกมา ที่อยู่ IP จะแสดงอยู่ภายใต้หัวข้อการตั้ง
ค่าผลิตภัณฑ
列印組態頁以尋找 IP 位址。 在產品控制面板上,按下 OK 以選擇 Main Menu (主功能表),然後按下 OK。
按下 或 按鈕以選擇 Cong Report (組態報告),然後按下 OK。 在列印的報告上,Product settings (產品
設定)下會列出 IP 位址。
Tìm địa chỉ IP bằng cách in trang Cấu hình. Trên panen điều khiển của sản phẩm, nhấn OK để chọn Main
Menu (Menu Chính), sau đó nhấn OK. Nhấn nút hoặc để chọn Cong Report (Báo cáo Cấu hình), sau đó
nhấn OK. Trên trang được in, địa chỉ IP được liệt kê dưới mục Cài đặt Sản phẩm.
์
15
Page 18

If you need to manually assign an IP address, at the product control panel, press OK to select
11
the Main Menu. Press the or buttons to select Network Cong, and then press OK. Press
the or buttons to select TCP/IP Cong, and then press OK. Press the or buttons to
select Manual. Use the control panel buttons to specify each digit of the IP address, and then
press OK.
如果您需要手动分配 IP 地址,请在产品控制面板上,按下 OK 以选择主菜单。 按 或
按钮选择 Network Cong(网络配置),然后按下 OK。 按 或 按钮选择 TCP/IP
Cong(TCP/IP 配置),然后按下 OK。 按 或 按钮选择 Manual(手动)。 使用控
制面板按钮指定 IP 地址的每个数字,然后按下 OK。
Jika Anda perlu menetapkan alamat IP secara manual, pada panel kontrol produk, tekan OK untuk memilih Main
Menu [Menu Utama]. Tekan tombol atau untuk memilih Network Report [Laporan Jaringan], kemudian
tekan OK. Tekan tombol atau untuk memilih TCP/IP Cong [Kongurasi TCP/IP], kemudian tekan OK. Tekan
tombol atau untuk memilih Manual. Gunakan tombol-tombol panel kontrol untuk memasukkan setiap digit
alamat IP, kemudian tekan OK.
IP アドレスを手動で設定する必要がある場合は、製品のコントロール パネルで [OK] を押してメイン メニューを選
択します。 または ボタンを押して [Network Cong] (ネットワーク設定) を選択し、[OK] を押します。 または
ボタンを押して [TCP/IP Cong] (TCP/IP 設定) を選択し、[OK] を押します。 または ボタンを押して [Manual]
(手動) を選択します。 コントロール パネルのボタンを使って IP アドレスの各数字を指定し、[OK] を押します。
IP 주소를 직접 할당하려면 제품 제어판에서 확인을 눌러 기본 메뉴를 선택하십시오. 또는 버튼을 눌러 네
트워크 보고서를 선택한 다음 확인을 누르십시오. 또는 버튼을 눌러 TCP/IP 구성을 선택한 다음 확인을
누르십시오. 또는 버튼을 눌러 Manual(수동)을 선택하십시오. 제어판 버튼을 이용해 IP 주소의 각 숫자를
지정한 다음 확인을 누르십시오.
หากคุณจำเป็นต้องกำหนดที่อยู่ IP ด้วยตนเอง ที่แผงควบคุมของเครื่องพิมพ์ กดปุ่ม OK เพื่อเลือกเมนูหลัก กดปุ่ม หรือ เพื่อเลือก Network
Cong (การตั้งค
าคอนฟิกเครือข่าย) และกดปุ่ม OK กดปุ่ม หรือ เพื่อเลือก TCP/IP Cong (ค่าคอนฟิเกอเรชัน TCP/IP) และกดปุ่ม OK
่
กดปุ่ม หรือ เพื่อเลือก Manual (ด้วยตนเอง) ใช้ปุ่มบนแผงควบคุมในการระบุหมายเลขของที่อยู่ IP แต่ละตัว และกดปุ่ม OK
如果需要手動指派 IP 位址,請在產品控制面板上按下 OK 以選擇主功能表。 按下 或 按鈕以選擇 Network
Cong (網路組態),然後按下 OK。 按下 或 按鈕以選擇 TCP/IP Cong (TCP/IP組態),然後按下 OK。
按下 或 按鈕以選擇 Manual (手動)。 使用控制面板按鈕指定 IP 位址的每個數字,然後按下 OK。
Nếu bạn cần gán địa chỉ IP theo cách thủ công, trên panen điều khiển của sản phẩm, nhấn OK để chọn Menu
Chính. Nhấn nút hoặc để chọn Network Cong (Cấu hình Mạng), sau đó nhấn OK. Nhấn nút hoặc
để chọn TCP/IP Cong (Cấu hình TCP/IP), sau đó nhấn OK. Nhấn nút hoặc để chọn Manual (Thủ công).
Sử dụng các nút trên điều khiển để nhập từng chữ số của địa chỉ IP, sau đó nhấn OK.
16
Page 19

Quit all open programs on the print server or on each computer that will share the product.
12
Install the software from the CD. Follow the onscreen instructions. When prompted, select
Through the Network, and then click Next. The installer shows the available printers. Select
the appropriate IP address. Click Finish. If prompted, restart the computer.
退出将共享产品的打印服务器或每台计算机上的所有打开程序。 从 CD 安装软件。 按照屏
幕说明进行操作。 出现提示时,选择通过网络,然后单击下一步。 安装程序会显示可用打
印机。 选择相应的 IP 地址。 单击完成。 如果系统提示重新启动计算机,则重新启动。
Tutup semua program yang sedang dibuka pada server cetak atau pada setiap komputer yang memakai bersama
produk tersebut. Instal perangkat lunak dari CD. Ikuti petunjuk di layar. Bila diminta, pilih Through the Network
[Melalui Jaringan] kemudian klik Next [Lanjut]. Installer akan menampilkan printer yang tersedia. Pilih alamat IP
yang sesuai. Klik Finish [Selesai]. Jika diminta, hidupkan ulang komputer.
プリント サーバ上または製品を共有する各コンピュータ上で開いているすべてのプログラムを終了します。 CD か
らソフトウェアをインストールして、画面の指示に従います。 要求されたら、[ネットワーク経由] を選択し、[次へ] をク
リックします。 使用できるプリンタが表示されたら、 適切な IP アドレスを選択します。 [完了] をクリックします。 コン
ピュータの再起動を要求された場合は、再起動します。
프린터 서버나 각 컴퓨터에서 제품과 공유하게 될 열려 있는 프로그램을 모두 종료하십시오. CD의 소프트웨어
를 설치하십시오. 화면에 나타난 지침을 따릅니다. 메시지가 나타나면 네트워크를 통해를 선택한 후 다음을 누
르십시오. 프린터 목록이 표시됩니다. 올바른 IP 주소를 선택하십시오. 완료를 누릅니다. 컴퓨터를 다시 시작
하라는 메시지가 나타나면 컴퓨터를 다시 시작합니다.
ออกจากโปรแกรมที่เปิดอยู่ทั้งหมดในเซิร์ฟเวอร์การพิมพ์ หรือคอมพิวเตอร์แต่ละเครื่องที่จะใช้เครื่องพิมพ์ร่วมกัน ติดตั้งซอฟต์แวร์จากแผ่นซีดี ปฏิบัติต
ามคำแนะนำที่ปรากฏบนหน้าจอ เมื่อได้รับข้อความ ให้เลือก Through the Network (ผ่านเครือข่าย) และคลิก Next (ถัดไป) โปรแกรมติดตั้งจะแ
สดงเครื่องพิมพ์ที่มีอยู่ เลือกที่อยู่ IP ที่ถูกต้อง คลิก Finish (เสร็จ) หากมีข้อความแจ้ง ให้ปิดและเปิดคอมพิวเตอร์อีกครั้ง
結束將共用本產品的列印伺服器 (或每台電腦) 上所有開啟之程式。 從 CD 安裝軟體。 依照螢幕上的說明進行。
系統提示時,選擇 Through the Network (透過網路),然後按一下下一步。 安裝程式會顯示可用的印表機。 選擇
適當的 IP 位址。 按一下完成。 系統提示時,請重新啟動電腦。
Thoát tất cả các chương trình đang mở trên máy chủ in hoặc trên mỗi máy tính sử dụng chung sản phẩm này.
Cai đăt phân mêm tư đĩa CD. Hay thưc hiên theo cac hương dân trên man hinh. Khi được nhắc, chọn Through
the Network (Qua Mạng), sau đó nhấp Next (Tiếp). Bộ cài đặt sẽ hiển thị những máy in khả dụng. Chọn địa chỉ
IP thích hợp. Nhấp Finish (Kết thúc). Nếu được nhắc, hãy khởi động lại máy tính.
17
Page 20

Windows network setup is complete. For more information about the following topics, see
the electronic User Guide on the CD-ROM or go to www.hp.com/support/ljcp1510series:
• Detailed user instructions. • Important safety notices.
• Troubleshooting information. • Regulatory information
Windows 网络设置完成。 有关以下主题的更多信息,请参阅 CD-ROM 上的电子版《用户
指南》,或者访问 www.hp.com/support/ljcp1510series:
• 详细的用户说明。 • 重要安全注意事项。
• 故障排除信息。 • 管制信息
Pengaturan jaringan Windows selesai. Untuk informasi lebih lanjut tentang topik-topik berikut, lihat Panduan
Pengguna elektronik pada CD-ROM atau kunjungi www.hp.com/support/ljcp1510series:
• Petunjuk rinci untuk pengguna. • Informasi penting tentang keselamatan.
• Informasi pemecahan masalah. • Informasi peraturan
Windows での ネットワーク セットアップが完了しました。 次の項目の詳細については、CD-ROM に収録されている
電子版ユーザー ガイドを参照するか、www.hp.com/support/ljcp1510series にアクセスしてください:
• 手順の詳細。 • 安全に関する重要な情報。
• トラブルシューティング情報。 • 規制に関する情報。
Windows 네트워크 설치가 완료되었습니다. 다음 주제에 관한 자세한 정보는 CD-ROM의 전자 사용 설명서 또는
www.hp.com/support/ljcp1510series를 참고하십시오.
• 세부 사용자 지침 • 중요 안전 정보
• 문제 해결 정보 • 규격 정보
การตั้งค่าเครือข่ายสำหรับ Windows เสร็จสมบูรณ์แล้ว สำหรับข้อมูลเพิ่มเติมเกี่ยวกับหัวข้อต่อไปนี้ โปรดดูคู่มือผู้ใช้ในแบบอิเล็กทรอนิกส์ในแผ่น
CD-ROM หรือไปที่ www.hp.com/support/ljcp1510series:
• คำแนะนำสำหรับผู้ใช้โดยละเอียด • คำประกาศด้านความปลอดภัยที่สำคัญ
• ข้อมูลการแก้ไขปัญหา • ข้อมูลเกี่ยวกับข้อบังคับ
Windows 網路設定即已完成。 如需有關下列主題的更多資訊,請參閱 CD-ROM 上的電子使用指南,或造訪
www.hp.com/support/ljcp1510series:
• 詳細的使用說明。 • 重要安全提示。
• 疑難排解資訊。 • 法規資訊
Cài đặt mạng cho Windows đã hoàn tất. Để biết thêm thông tin về các chủ đề sau, hãy xem Hướng dẫn Sử
dụng điện tử trên đĩa CD-ROM hoặc truy cập vào trang web www.hp.com/support/ljcp1510series:
• Hướng dẫn người sử dụng chi tiết. • Các thông báo an toàn quan trọng.
• Thông tin xử lý sự cố. • Thông tin vê Tuân thu Quy đinh
18
Page 21

Setup and installation instructions for Macintosh
Macintosh 设置和安装说明
Petunjuk pengaturan dan instalasi untuk Macintosh
Macintosh でのセットアップとインストールの手順
Macintosh용 설치 지침
คำแนะนำในการติดตั้งและการตั้งค่าสำหรับ Macintosh
Macintosh 的設定與安裝說明
Hướng dẫn cài và lắp đặt cho Macintosh
19
Page 22

Macintosh Setup.
2
Remove the tape from all four print cartridges.
Macintosh 设置。
从所有四个打印碳粉盒上撕下胶带。
Pengaturan Macintosh.
Lepas pita dari keempat kartrid cetak.
Macintosh でのセットアップ。
すべてのプリント カートリッジ (4つ) からテープをはがします。
Macintosh에서 설치
카트리지 4개의 테이프를 제거하십시오.
การตั้งค่าสำหรับ Macintosh
ลอกเทปออกจากตลับหมึกทั้ง 4 ตลับ
Macintosh 設定。
去除四個碳粉匣上的膠帶。
Cài đặt Macintosh.
Gỡ băng dán ra khỏi tất cả các hộp mực.
1
2
4X
3
20
Page 23

Remove the packing material from the back of the product.
3
从产品后部取下包装材料。
Lepas bahan kemasan dari bagian belakang produk.
製品の背面から梱包材を取り除きます。
제품 뒤쪽의 포장재를 제거하십시오.
นำวัสดุที่ใช้ในการบรรจุหีบห่อออกจากด้านหลังของผลิตภัณฑ
去除本產品背面的包裝材料。
Gỡ vật liệu đóng gói ra khỏi mặt sau của sản phẩm.
1
Load paper.
4
装入纸张。
Muat kertas.
์
2
用紙をセットします。
용지를 넣으십시오.
ใส่กระดาษ
裝入紙張。
Nap giây.
1
2
3
21
Page 24

Adjust the three guides against the paper, and reinsert the tray.
5
调整三个导板使其紧贴纸张,然后重新插入纸盘。
Sesuaikan ketiga pemandu terhadap kertas, dan masukkan lagi bakinya.
用紙に合わせて用紙ガイド (3つ) を調節し、トレイをもう一度挿入します。
3개의 용지 조정대를 용지에 맞게 조정한 다음 용지함을 다시 넣으십시오.
ปรับตัวกั้นกระดาษ และใส่ถาดกลับเข้าไปอีกครั้ง
將三個導板向紙張靠緊,然後重新插入紙匣。
Điều chỉnh ba thanh dẫn cho sát vào giấy, và lắp khay vào.
Note: To avoid jams later, make sure that you completely close tray 2.
注: 为避免以后卡纸,请务必完全合上纸盘 2。
Catatan: Untuk menghindari kemacetan, pastikan Anda menutup rapat baki 2.
注記: 紙詰まりを防ぐために、トレイ 2 を完全に閉じてください。
주: 나중에 용지가 걸리지 않도록 하려면 용지함 2가 제대로 닫혔는지 확인하십시오.
หมายเหตุ: เพื่อป้องกันไม่ให้เกิดปัญหากระดาษติดในภายหลัง ตรวจสอบให้แน่ใจว่าคุณปิดถาด 2 ไว้แน่นแล้ว
註: 為避免以後卡紙,請確定已完全合上 2 號紙匣。
Lưu y: Để tránh bị kẹt giấy sau này, nhớ đóng hoàn toàn khay 2.
1
For Legal-size paper, the tray extends from the front of the product.
装入 Legal 尺寸纸张时,请拉开纸盘延伸板,使其伸至产品前面。
Untuk kertas ukuran Legal, baki akan memanjang dari depan produk.
リーガル サイズの用紙をセットすると、トレイは製品の前部から飛び出た状態になります。
리갈 용지의 경우 용지함을 제품의 앞쪽에서 당겨 빼십시오.
สำหรับกระดาษขนาด Legal ถาดจะยื่นออกจากด้านหน้าของเครื่อง
裝入 Legal 尺寸紙張時,紙匣會從本產品前端伸出。
Đối với giấy khổ Legal, khay sẽ kéo dài ra quá mặt trước của sản phẩm.
22
Page 25

For USB connections, go to page 24.
对于 USB 连接,请转至第 24 页。
Untuk koneksi USB, pindah ke halaman 24.
USB 接続の場合は、24 ページに進んでください。
USB 연결은 24페이지를 참고하십시오.
สำหรับการเชื่อมต่อ USB โปรดไปที่หน้า 24
對於 USB 連線,請移至步驟 24。
Với kết nối USB, xem trang 24.
For network connections, go to page 30.
对于网络连接,请转至第 30 页。
Untuk koneksi jaringan, pindah ke halaman 30.
ネットワーク接続の場合は、30 ページに進んでください。
네트워크 연결은 30페이지를 참고하십시오.
สำหรับการเชื่อมต่อกับเครือข่าย โปรดไปที่หน้า 30
對於網路連線,請移至步驟 30。
Với kết nối mạng, xem trang 30.
23
Page 26

6
3
1
2
USB connection
Connect the power, and then turn on the product.
USB 连接
连接电源,然后打开本产品电源。
Koneksi USB
Hubungkan daya kemudian hidupkan produk.
USB 接続
電源に接続し、製品の電源を入れます。
USB 연결
전원을 연결하고 제품의 전원을 켜십시오.
การเชื่อมต่อ USB
ต่อสายไฟ และเปิดเครื่อง
USB 連線
連接電源,然後開啟本產品電源。
Kết nối USB
Cắm dây nguồn vào, và bật sản phẩm lên.
24
Page 27

On the control panel, if prompted, select a language and location for the product.
7
Press OK to accept selections.
如果控制面板上出现提示,请为产品选择语言和位置。
按 OK 接受选择。
Pada panel kontrol, jika diminta, pilih bahasa dan lokasi produk.
Tekan OK untuk menerima pilihan.
要求された場合、コントロール パネルで製品に使用する言語と場所を選択します。
[OK] を押して選択内容を確定します。
제어판에 제품의 언어와 위치 선택 화면이 나타나면 해당 정보를 선택하십시오.
OK(확인)를 눌러 선택을 적용하십시오.
หากมีข้อความปรากฏขึ้นบนแผงควบคุม ให้เลือกภาษาและตำแหน่งของผลิตภัณฑ์
กดปุ่ม OK เพื่อยอมรับรายการที่เลือก
系統提示時,在控制面板上選擇產品的語言與位置。
按下確定以接受選擇。
Trên panen điều khiển, nếu được nhắc, hãy chọn ngôn ngữ và vị trí cho sản phẩm.
Nhấn OK để chấp nhận lựa chọn.
Install the software from the CD.
8
Click Quit when the installation is nished.
从 CD 安装软件。
安装完成后单击退出。
Instal perangkat lunak dari CD.
Klik Quit [Keluar] bila instalasi selesai.
CD からソフトウェアをインストールします。
インストールが完了したら、[終了] をクリックします。
CD의 소프트웨어를 설치하십시오.
설치가 끝나면 Quit(종료)를 누르십시오.
ติดตั้งซอฟต์แวร์จากแผ่นซีดี
คลิก Quit เมื่อการติดตั้งเสร็จสิ้น
從 CD 安裝軟體。
安裝完成時,按一下結束。
Cai đăt phân mêm tư đĩa CD.
Nhấp vào Quit (Thoát) khi hoàn tất cài đặt.
25
Page 28

Connect the USB cable between the product and the computer.
9
Restart the computer.
用 USB 电缆连接产品和计算机。
重新启动计算机。
Hubungkan kabel USB antara produk dan komputer.
Hidupkan ulang komputer.
USB ケーブルで製品とコンピュータを接続します。
コンピュータを再起動します。
제품과 컴퓨터를 USB 케이블로 연결합니다.
컴퓨터를 다시 시작하십시오.
เสียบสาย USB เข้ากับเครื่องพิมพ์และคอมพิวเตอร์
รีสตาร์ตเครื่องคอมพิวเตอร
連接本產品與電腦之間的 USB 纜線。
重新啟動電腦。
Cắm cáp USB vào sản phẩm và máy tính.
Khởi động lại máy tính.
์
26
Page 29

10
At the computer, open the Print Center or Printer Setup Utility, or go to Print & Fax
under System Preferences (depending on your version of MacOS) and see if the
product name appears in the Printer list. If the product name displays in the Printer list,
this step is complete; go to page 29. Otherwise, go to the next step.
在计算机上打开打印中心或打印机设置实用程序,或者转至系统预置下的打印和传真
(具体视 MacOS 版本而定),看看产品名称是否显示在打印机列表中。 如果产品名称
显示在打印机列表中,则此步骤即已完成;请转至第 29 页。否则,请继续下一步骤。
Di komputer, buka Print Center [Pusat Cetak] atau Printer Setup Utility [Utilitas Pengaturan Printer], atau pindah
ke Print & Fax [Cetak & Faks] pada System Preferences [Preferensi Sistem] (tergantung pada versi MacOS Anda)
dan lihat apakah nama produk muncul dalam Printer list [Daftar printer]. Jika nama produk ditampilkan dalam
Printer list [Daftar printer], berarti langkah ini selesai; pindah ke halaman 29. Jika tidak, pindah ke langkah
berikutnya.
コンピュータで [プリントセンター] または [プリンタ設定ユーティリティ] を開くか、[システム環境設定] の下の [プ
リントとファクス] を開き (Mac OS のバージョンによって異なる)、[プリンタ] リストに製品名が表示されているかを
確認します。 [プリンタ] リストに製品名が表示されている場合は、この手順は完了です。29 ページに進んでくださ
い。そうでない場合は次の手順に進んでください。
컴퓨터에서 Print Center(인쇄 관리자) 또는 Printer Setup Utility(프린터 설정 유틸리티)를 열고 System
Preferences(시스템 환경 설정)(MacOS 버전에 따라 다름)에서 Print & Fax(인쇄 및 팩스)의 프린터 목록에 해
당 제품 이름이 나타나는지 확인하십시오. 프린터 목록에 제품 이름이 표시되면 이 단계가 완료된 것입니다.
29페이지로 가십시오. 표시되지 않으면 다음 단계로 가십시오.
เปิด Print Center หรือ Printer Setup Utility ที่เครื่องคอมพิวเตอร์ หรือไปที่ Print & Fax ภายใต้หัวข้อ System Preferences
(ขึ้นอยู่กับเวอร์ชันของ MacOS ของคุณ) และตรวจดูว่ามีชื่อเครื่องพิมพ์แสดงอยู่ใน Printer list หรือไม่ หากชื่อเครื่องพิมพ์แสดงอยู่ใน Printer
list แสดงว
在電腦上,開啟列印中心或印表機設定公用程式,或移至系統預置下的列印與傳真 (視 MacOS 的版本而定),然
後查看印表機清單中是否出現本產品名稱。 如果印表機清單中顯示本產品名稱,即已完成此步驟;請移至第 29
頁。否則,請移至下一步。
าขั้นตอนนี้เสร็จสมบูรณ์แล้ว ให้ไปที่หน้า 29 หรือไปที่ขั้นตอนถัดไป
่
Trên máy tính, mở Print Center (Trung tâm In) hoặc Printer Setup Utility (Tiện ích Cài đặt In) hoặc go to Print
& Fax (In & Fax) dưới System Preferences (Sở thích Hệ thống) (tùy vào phiên bản MacOS) và xem tên sản
phẩm có xuất hiện trong danh sách Máy in không. Nếu tên sản phẩm hiển thị trong danh sách Máy in, bước
này đã hoàn tất, đến trang 29. Nếu không, chuyển sang bước kế tiếp.
27
Page 30

11
If the product name does not display in the Printer list, click Add or +, and then select USB
or Browser from the drop-down list. Select the product name from the Printer list. Click Add.
The product name displays in the Printer list.
如果产品名称未显示在打印机列表中,请单击添加或 +,然后从下拉列
表中选择 USB 或浏览器。 从打印机列表中选择产品名称。 单击添加。
产品名称将出现在打印机列表中。
Jika nama produk tidak ditampilkan dalam Printer list [Daftar printer], klik Add [Tambah] atau +, kemudian
pilih USB atau Browser dari daftar buka-bawah. Pilih nama produk dari Printer list [Daftar printer]. Klik Add
[Tambah]. Nama produk ditampilkan dalam Printer list [Daftar printer].
[プリンタ] リストに製品名が表示されていない場合は、[追加] または + をクリックして、ドロップダウン リストか
ら [USB] または [ブラウザ] を選択します。 [プリンタ] リストから製品名を選択します。 [追加] をクリックします。
[プリンタ] リストに製品名が表示されます。
프린터 목록에 제품 이름이 표시되지 않으면 추가 또는 +를 누른 다음 드롭다운 목록에서 USB 또는
Browser(브라우저)를 선택하십시오. 프린터 목록에서 제품 이름을 선택합니다. 추가를 누르십시오. 제품
이름이 프린터 목록에 표시됩니다.
หากชื่อเครื่องพิมพ์ไม่ได้แสดงอยู่ใน Printer list ให้คลิก Add หรือ + และเลือก USB หรือ Browser จากรายการดรอปดาวน์
เลือกชื่อผลิตภัณฑ์จาก Printer list คลิก Add ชื่อผลิตภัณฑ์จะแสดงอยู่ใน Printer list
如果印表機清單中未顯示本產品名稱,請按一下新增或 +,然後從下拉式清單中選取 USB 或瀏覽。 從印表
機清單中選擇本產品名稱。 按一下新增。 本產品名稱會顯示在印表機清單中。
Nếu tên sản phẩm không hiển thị trong danh sách Máy in, nhấp Add (Thêm) hoặc dấu +, sau đó chọn USB
hoặc Browser (Trình duyệt) từ danh sách thả xuống. Chọn tên sản phẩm từ danh sách Máy in. Nhấp Add
(Thêm). Tên sản phẩm sẽ hiển thị trong danh sách Máy in.
28
Page 31

Macintosh USB setup is complete. For more information about the following topics, see the electronic User Guide
on the CD-ROM or go to www.hp.com/support/ljcp1510series:
• Detailed user instructions. • Important safety notices. • Troubleshooting information. • Regulatory information.
Macintosh USB 设置完成。 有关以下主题的更多信息,请参阅 CD-ROM 上的电子版《用户
指南》,或者访问 www.hp.com/support/ljcp1510series:
• 详细的用户说明。 • 重要安全注意事项。 • 故障排除信息。 • 管制信息。
Pengaturan USB Macintosh selesai. Untuk informasi lebih lanjut tentang topik-topik berikut, lihat Panduan
Pengguna elektronik pada CD-ROM atau kunjungi www.hp.com/support/ljcp1510series:
• Petunjuk rinci untuk pengguna. • Informasi penting tentang keselamatan. • Informasi pemecahan masalah.
• Informasi peraturan.
Macintosh での USB セットアップが完了しました。 次の項目の詳細については、CD-ROM に収録されている電子版
ユーザー ガイドを参照するか、www.hp.com/support/ljcp1510series にアクセスしてください:
• 手順の詳細。 • 安全に関する重要な情報。 • トラブルシューティング情報。 • 規制に関する情報。
Macintosh USB 설치가 완료되었습니다. 다음 주제에 관한 자세한 정보는 CD-ROM의 전자 사용 설명서 또는
www.hp.com/support/ljcp1510series를 참고하십시오.
• 세부 사용자 지침 • 중요 안전 정보 • 문제 해결 정보 • 규격 정보
การตั้งค่า USB สำหรับ Macintosh เสร็จสมบูรณ์แล้ว สำหรับข้อมูลเพิ่มเติมเกี่ยวกับหัวข้อต่อไปนี้ โปรดดูคู่มือผู้ใช้ในแบบอิเล็กทรอนิกส์ในแผ่น
CD-ROM หรือไปที่ www.hp.com/support/ljcp1510series:
• คำแนะนำสำหรับผู
Macintosh USB 設定即已完成。 如需有關下列主題的更多資訊,請參閱 CD-ROM 上的電子使用指南,或造訪
www.hp.com/support/ljcp1510series:
• 詳細的使用說明。 • 重要安全提示。 • 疑難排解資訊。 • 法規資訊。
โดยละเอียด • คำประกาศด้านความปลอดภัยที่สำคัญ • ข้อมูลการแก้ไขปัญหา • ข้อมูลเกี่ยวกับข้อบังคับ
้ใช้
Cài đặt USB cho Macintosh đã hoàn tất. Để biết thêm thông tin về các chủ đề sau, hãy xem Hướng dẫn Sử
dụng điện tử trên đĩa CD-ROM hoặc truy cập vào trang web www.hp.com/support/ljcp1510series:
• Hướng dẫn người sử dụng chi tiết. • Các thông báo an toàn quan trọng. • Thông tin xử lý sự cố. • Thông tin
vê tuân thu quy đinh.
29
Page 32

Network connection.
6
Connect the network cable to the product and to the network.
网络连接。
将网络电缆连接至本产品和网络。
Koneksi jaringan.
Hubungkan kabel jaringan ke produk dan ke jaringan.
ネットワーク接続。
ネットワークケーブルで製品とネットワークを接続します。
네트워크 연결
네트워크 케이블을 제품과 네트워크에 연결하십시오.
การเชื่อมต่อกับเครือข่าย
เชื่อมต่อสายเคเบิลเครือข่ายกับผลิตภัณฑ์และเครือข่าย
網路連線。
將網路纜線連接至產品與網路。
Kết nối mạng.
Cắm cáp mạng vào sản phẩm và vào mạng.
Caution! Do not connect USB now. Wait until the software prompts you.
注意! 现在先不要连接 USB。 请在稍后软件提示时再连接。
Perhatian! Jangan hubungkan USB sekarang. Tunggu hingga diminta oleh perangkat lunak.
注意: USB にはまだ接続しないでください。 指示されてから接続してください。
주의! 지금 USB를 연결하지 마십시오. 메시지가 나타날 때까지 기다리십시오.
ข้อควรระวัง! ห้ามต่อ USB ในขั้นตอนนี้ ให้รอจนกว่าซอฟต์แวร์จะพรอมต์ให้คุณดำเนินการ
注意: 此時請勿連接 USB。 請等待軟體提示您再連接。
Cân thân! Chưa cắm cáp USB vội. Chờ cho tới khi phần mềm nhắc bạn.
30
Page 33

3
1
2
Connect the power, and then turn on the product.
7
连接电源,然后打开本产品电源。
Hubungkan daya kemudian hidupkan produk.
電源に接続し、製品の電源を入れます。
전원을 연결하고 제품의 전원을 켜십시오.
ต่อสายไฟ และเปิดเครื่อง
連接電源,然後開啟本產品電源。
Cắm dây nguồn vào, và bật sản phẩm lên.
31
Page 34

On the control panel, if prompted, select a language and location for the product.
8
Press OK to accept selections.
如果控制面板上出现提示,请为产品选择语言和位置。
按 OK 接受选择。
Pada panel kontrol, jika diminta, pilih bahasa dan lokasi produk.
Tekan OK untuk menerima pilihan.
要求された場合、コントロール パネルで製品に使用する言語と場所を選択します。
[OK] を押して選択内容を確定します。
제어판에 제품의 언어와 위치 선택 화면이 나타나면 해당 정보를 선택하십시오.
OK(확인)를 눌러 선택을 적용하십시오.
หากมีข้อความปรากฏขึ้นบนแผงควบคุม ให้เลือกภาษาและตำแหน่งของผลิตภัณฑ์
กดปุ่ม OK เพื่อยอมรับรายการที่เลือก
系統提示時,在控制面板上選擇產品的語言與位置。
按下 OK 以接受選擇。
Trên panen điều khiển, nếu được nhắc, hãy chọn ngôn ngữ và vị trí cho sản phẩm.
Nhấn OK để chấp nhận lựa chọn.
32
Page 35

Control-panel overview
控制面板概览
Ringkasan panel kontrol
コントロール パネルの概要
제어판 개요
ภาพรวมของแผงควบคุม
控制面板概述
Tổng quan về Panen điều khiển
1
2
3
4
6
5
• Ready light
• 就绪指示灯
• Lampu Siap
• 印字可ランプ
• Attention light
• 注意指示灯
• Lampu Peringatan
• 注意ランプ
• Control-panel display
• 控制面板显示屏
• Layar panel kontrol
• コントロール パネルのディスプレイ
• Print cartridge status
• 打印碳粉盒状态
• Status kartrid cetak
• プリント カートリッジのステータス
• Left arrow button
• 左箭头按钮
• Tombol panah kiri
• 左矢印ボタン
• OK button
• OK 按钮
• Tombol OK
• [OK] ボタン
• 준비 표시등
• ไฟพร
• 就緒指示燈
• Đen Săn sang
• 주의 표시등
• ไฟพิจารณา
• 注意指示燈
• Đen chu y
• 제어판 디스플레이
• หน
• 控制面板顯示幕
• Hiển thị bảng điều khiển
• 카트리지 상태
• สถานะตลับหมึกพิมพ
• 碳粉匣狀態
• Tình trạng hộp mực
• 왼쪽 화살표 버튼
• ปุ
• 向左箭頭按鈕
• Nút mũi tên trái
• 확인 버튼
• ปุ
• 確定按鈕
• Nút OK
อม
้
าจอแผงควบคุม
้
มลูกศรซ้าย
่
ม OK
่
์
7
8
9
• Right arrow button
• 右箭头按钮
• Tombol panah kanan
• 右矢印ボタン
• Back button
• 后退按钮
• Tombol kembali
• 戻るボタン
• Cancel job button
• 取消作业按钮
• Tombol batalkan pekerjaan
• ジョブのキャンセルボタン
33
• 오른쪽 화살표 버튼
• ปุ
มลูกศรขวา
่
• 向右箭頭按鈕
• Nút mũi tên phải
• 뒤로 버튼
• ปุ
มย้อนกลับ
่
• 返回按鈕
• Nút Trở về
• 작업 취소 버튼
• ปุ
มยกเลิกงานพิมพ
่
• 取消工作按鈕
• Nút Hủy lệnh in
์
Page 36

Install the software from the CD and follow the instructions on the screen.
9
从 CD 安装软件,然后按照屏幕上的说明操作。
Instal perangkat lunak dari CD dan ikuti petunjuk di layar.
CD からソフトウェアをインストールして、画面の指示に従います。
CD의 소프트웨어를 설치하고 화면의 지침을 따릅니다.
ติดตั้งซอฟต์แวร์จากแผ่น CD และทำตามคำแนะนำที่ปรากฏบนหน้าจอ
從 CD 安裝軟體,然後按照螢幕上的說明進行。
Cài đặt phần mềm từ đĩa CD và thực hiện theo hướng dẫn trên màn hình.
34
Page 37

10
At the computer, open the Print Center or Printer Setup Utility, or go to Print & Fax
under System Preferences. Click Add or +, and then select Rendezvous or Bonjour
(depending on your version of MacOS) from the drop-down menu or simply view the list
of available printers.
在计算机上打开打印中心或打印机设置实用程序,或者转至系统预置下的打印和传真。
单击添加或 +,然后从下拉菜单中选择 Rendezvous 或 Bonjour(具体视 MacOS 版本而
定)或者只查看可用打印机列表。
Di komputer, buka Print Center [Pusat Cetak] atau Printer Setup Utility [Utilitas Pengaturan Printer], atau pindah
ke Print & Fax [Cetak & Faks] pada System Preferences [Preferensi Sistem]. Klik Add [Tambah] atau +, kemudian
pilih Rendezvous atau Bonjour (tergantung pada versi MacOS Anda) dari menu buka-bawah atau cukup lihat
daftar printer yang tersedia.
コンピュータで [プリントセンター] または [プリンタ設定ユーティリティ] を開くか、[システム環境設定] の下の
[プリントとファクス] を開きます。 [追加] または + をクリックして、ドロップダウン メニューから [Rendezvous] または
[Bonjour] (Mac OS のバージョンによって異なる) を選択するか、使用できるプリンタのリストを表示します。
컴퓨터에서 Print Center(인쇄 관리자) 또는 Printer Setup Utility(프린터 설정 유틸리티)를 열고 System
Preferences(시스템 환경 설정)의 Print & Fax(인쇄 및 팩스)로 이동하십시오. 추가 또는 +를 누른 다음 드롭다
운 메뉴에서 Rendezvous 또는 Bonjour (MacOS 버전에 따라 다름)를 선택하거나 프린터 목록을 봅니다.
เปิด Print Center หรือ Printer Setup Utility ที่เครื่องคอมพิวเตอร์ หรือไปที่ Print & Fax ภายใต้หัวข้อ System Preferences คลิก Add
หรือ + และเลือก Rendezvous หรือ Bonjour (ขึ้นอยู่กับเวอร์ชันของ MacOS ของคุณ) จากเมนูดรอปดาวน์ หรือดูรายการเครื่องพิมพ์ที่มีอยู
在電腦上,開啟列印中心或印表機設定公用程式,或移至系統預置下的列印與傳真。 按一下新增或 +,然後從
下拉式功能表中選擇 Rendezvous 或 Bonjour (視 MacOS 的版本而定),或僅檢視可用印表機的清單。
่
Trên máy tính, mở Print Center (Trung tâm In) hoặc Printer Setup Utility (Tiện ích Cài đặt In), hoặc go to Print
& Fax (In & Fax) dưới System Preferences (Sở thích Hệ thống). Nhấp Add (Thêm) hoặc dấu +, sau đó chọn
Rendezvous hoặc Bonjour (tùy thuộc vào phiên bản MacOS) từ menu thả xuống hoặc chỉ cần xem sử dụng
những máy in khả dụng.
Note: If more than one similar product exists on your network, you might have to print a Network Report to obtain
the unique Bonjour name for the product you are installing.
注: 如果您的网络上有多台类似产品,则可能必须打印 Network Report(网络报告),才
能知道您要安装的产品的唯一 Bonjour 名称。
Catatan: Jika ada lebih dari satu produk yang serupa pada jaringan, Anda mungkin harus mencetak Network
Report [Laporan Jaringan] untuk memperoleh nama unik Bonjour untuk produk yang sedang Anda instal.
注記: ネットワークに類似の製品が複数存在する場合は、ネットワーク レポートを印刷して、インストールする製品
に固有の Bonjour 名を確認します。
주: 네트워크에 비슷한 제품이 두 개 이상 있을 경우 현재 설치하려는 제품용 고유 Bonjour 이름을 얻으려면
Network Report(네트워크 보고서)를 인쇄 해야 할 수도 있습니다.
หมายเหตุ: หากมีเครื่องพิมพ์ที่เหมือนกันอยู่ในเครือข่ายมากกว่าหนึ่งเครื่อง คุณอาจต้องพิมพ์รายงานเครือข่ายเพื่อดูชื่อ Bonjour เฉพาะของเครื่อง
พิมพ์ที่คุณกำลังติดตั้ง
註: 如果網路上存在多個類似的產品,您可能必須列印網路報告以取得要安裝產品之唯一 Bonjour 名稱。
Lưu y: Nếu có một sản phẩm tương tự trên mạng, bạn có thể phải in Báo cáo Mạng để biết tên Bonjour riêng
cho sản phẩm bạn đang cài đặt.
35
Page 38

11
Select the product name from the Printer list. Click Add. The product name displays in
the Printer list.
从打印机列表中选择产品名称。 单击添加。 产品名称将出现在打印
机列表中。
Pilih nama produk dari Printer list [Daftar printer]. Klik Add [Tambah]. Nama produk
ditampilkan dalam Printer list [Daftar printer].
[プリンタ] リストから製品名を選択します。 [追加] をクリックします。 [プリンタ] リストに
製品名が表示されます。
프린터 목록에서 제품 이름을 선택합니다. 추가를 누르십시오. 제품 이름이 프린터
목록에 표시됩니다.
เลือกชื่อผลิตภัณฑ์จาก Printer list คลิก Add ชื่อผลิตภัณฑ์จะแสดงอยู่ใน Printer list
從印表機清單中選擇本產品名稱。 按一下新增。 本產品名稱會顯示在印表機清單中。
Chọn tên sản phẩm từ danh sách Máy in. Nhấp Add (Thêm). Tên sản phẩm sẽ hiển
thị trong danh sách Máy in.
36
Page 39

Macintosh network setup is complete. For more information about the following topics, see
the electronic User Guide on the CD-ROM or go to www.hp.com/support/ljcp1510series:
• Detailed user instructions. • Important safety notices.
• Troubleshooting information. • Regulatory information.
Macintosh 网络设置完成。 有关以下主题的更多信息,请参阅 CD-ROM 上的电子版《用户
指南》,或者访问 www.hp.com/support/ljcp1510series:
• 详细的用户说明。 • 重要安全注意事项。
• 故障排除信息。 • 管制信息。
Pengaturan jaringan Macintosh selesai. Untuk informasi lebih lanjut tentang topik-topik berikut, lihat Panduan
Pengguna elektronik pada CD-ROM atau kunjungi www.hp.com/support/ljcp1510series:
• Petunjuk rinci untuk pengguna. • Informasi penting tentang keselamatan.
• Informasi pemecahan masalah. • Informasi peraturan.
Macintosh での ネットワーク セットアップが完了しました。 次の項目の詳細については、CD-ROM に収録されてい
る電子版ユーザー ガイドを参照するか、www.hp.com/support/ljcp1510series にアクセスしてください:
• 手順の詳細。 • 安全に関する重要な情報。
• トラブルシューティング情報。 • 規制に関する情報。
Macintosh 네트워크 설치가 완료되었습니다. 다음 주제에 관한 자세한 정보는 CD-ROM의 전자 사용 설명서 또는
www.hp.com/support/ljcp1510series를 참고하십시오.
• 세부 사용자 지침 • 중요 안전 정보
• 문제 해결 정보 • 규격 정보
การตั้งค่าเครือข่ายสำหรับ Macintosh เสร็จสมบูรณ์แล้ว สำหรับข้อมูลเพิ่มเติมเกี่ยวกับหัวข้อต่อไปนี้ โปรดดูคู่มือผู้ใช้ในแบบอิเล็กทรอนิกส์ในแผ่น
CD-ROM หรือไปที่ www.hp.com/support/ljcp1510series:
• คำแนะนำสำหรับผู้ใช้โดยละเอียด • คำประกาศด้านความปลอดภัยที่สำคัญ
• ข้อมูลการแก้ไขปัญหา • ข้อมูลเกี่ยวกับข้อบังคับ
Macintosh 網路設定即已完成。 如需有關下列主題的更多資訊,請參閱 CD-ROM 上的電子使用指南,或造訪
www.hp.com/support/ljcp1510series:
• 詳細的使用說明。 • 重要安全提示。
• 疑難排解資訊。 • 法規資訊。
Cài đặt mạng cho Macintosh đã hoàn tất. Để biết thêm thông tin về các chủ đề sau, hãy xem Hướng dẫn Sử
dụng điện tử trên đĩa CD-ROM hoặc truy cập vào trang web www.hp.com/support/ljcp1510series:
• Hướng dẫn người sử dụng chi tiết. • Các thông báo an toàn quan trọng.
• Thông tin xử lý sự cố. • Thông tin vê tuân thu quy đinh.
37
Page 40

*CC378-90943*
*CC378-90943*
CC378-90943
© 2007 Hewlett-Packard Development Company, L.P.
www.hp.com
 Loading...