

Page 1

Technical white paper
HP JetAdvantage Security
Manager
Reporting, Email Alert Subscriptions &
Remediation Summary, Auditing & Syslog
Functionality
Table of Contents
Overview ............................................................................................................................................ 3
Assessment and Remediation ..................................................................................................... 3
Difference between Assesment and Remediation ....................................................................................... 3
Viewing Device Recommendations ................................................................................................................. 3
Policy changes to ignore not supported settings for a device ................................................................. 5
Configuring Risk Level in a Policy ................................................................................................................... 5
Resetting a device to Unassessed .................................................................................................................... 5
Dashboard .......................................................................................................................................... 6
Device Lists ......................................................................................................................................... 7
Groups .................................................................................................................................................................. 10
Autogrouping .................................................................................................................................................. 13
Exporting Device Lists ....................................................................................................................................... 16
Reports ............................................................................................................................................... 16
Executive Summary ............................................................................................................................................ 19
Executive Fleet Assessment Summary ........................................................................................................... 22
Devices Assessed ............................................................................................................................................... 23
Devices Unassessed .......................................................................................................................................... 27
Policy Items Assessed ........................................................................................................................................ 28
Recommendations .............................................................................................................................................. 29
Remediations ....................................................................................................................................................... 32
Repetitive Remediations .................................................................................................................................... 34
Page 2

Understanding Assesment and Remediation Status and Results ................................. 34
Emailing Summary of Task Results ......................................................................................... 37
Policy Change Notification ......................................................................................................... 39
Configuring Policy Change Notification Email Recipients ..................................................................... 39
Disabling Policy Change Notification .......................................................................................................... 39
Subscribing to Email Alerts ......................................................................................................... 40
Configuring the Alert Interval .......................................................................................................................... 42
HPSM User Activity Logging (Auditing) .................................................................................. 43
Audit log files location and logged events ................................................................................................. 43
Remote Syslog logging ................................................................................................................ 46
SIEM Tool Integration ................................................................................................................... 47
Appendix A: ..................................................................................................................................... 48
Configuring Email Server and Email Recipients for Emailing Task Results and Policy
Change Notification ...................................................................................................................... 48
Appendix B ...................................................................................................................................... 50
Extracting Assement and Remediation Data from the SQL Database ....................... 50
Page 3

3
Overview
HP JetAdvantage Security Manager is a tool designed to assess a fleet of devices against a policy containing
security settings and remediate (fix) the settings that are out of compliance. Reporting is available to indicate
which devices can be assessed, which are out of compliance, and which were remediated back into
compliance. This document discusses the various types of reports available in Security Manager as well as
techniques for extracting assessment and remediation data for use in your own tools for reporting.
Assessment and Remediation
Difference between Assesment and Remediation
The Tasks tab offers the ability to perform Assess Only or Assess and Remediate tasks. An Assess Only
task (assessment) reads policy security settings from devices and indicates which settings are in or out of
compliance. An Assess and Remediate task (remediation) fixes any settings on devices that are out of
compliance by placing them back into compliance.
The result of the assessment task is indicated in the Assessment Status column in the device list.
Recommendations reveal the actions necessary to bring a device back into policy compliance as a result of an
assessment that is performed. If the assessment status indicates Passed, there will be no recommendations.
Assessment status of High/Medium/Low always includes a number next to the status to indicate how many
policy items are out of compliance. These are called recommendations.
Viewing Device Recommendations
A recommendation can be viewed by clicking on the number next to the assessment status. There is also a
report that can be generated to indicate recommendations that will be discussed later.
Page 4

Assessment and remediation tasks on a policy for a group can be scheduled to occur at any desired frequency.
Security Manager can complete approximately 1500 devices per hour in a remediation task of a policy
Page 5

5
equivalent of the Base policy. If the Allow Automatic Remediation option in Security Manager Instant-On
Security is enabled, device remediation occurs automatically on a device anytime the device sends an
announcement to Security Manager.
Policy changes to ignore not supported settings for a device
Settings in a policy can be instructed to Ignore if they are not supported for a device in which case the
assessment will pass on that setting if it is not supported. Settings can conversely be instructed to Fail if not
supported for a device in which case they will fail in an assessment if not supported on a device.
Configuring Risk Level in a Policy
Settings in a policy can be customized to indicate a risk level of High, Medium, or Low. The highest risk in the
assessment is always reported in the assessment status column.
Resetting a device to Unassessed
Device recommendations can be cleared by selecting Reset to Unassessed when right-clicking on devices.
However, device remediations can only be cleared by deleting the device then re-adding the device (manual or
auto-discovery).
Page 6

Remember, when scheduling an assessment, the Assess Only option provides a report but does not change
any device settings. The Assess and Remediate option actually fixes out-of-compliance devices.
• Assessment—identifies and reports any noncompliant features during the scheduled assessment
• Remediation—applies the correct policy settings to all noncompliant features
Dashboard
The dashboard is the default screen when initially launching Security Manager and contains a high level
summary of the fleet that indicates which devices have been assessed or not and their status. For assessed
devices, the dashboard indicates the assessment status of passed, high, medium or low. For unassessed
devices, the dashboard indicates the device status. The icon is the upper right corner
Allows for the dashboard to be exported to pdf file.
Page 7

7
Beginning in Security Manager 3.3, the dashboard can be viewed over time to indicate how the assessments
have progressed in the past 90 days by clicking on Historical Fleet Status. A user can visualize how the fleet
compliance has been changing over the timeline. Snapshot data collection starts with the new version
installation. Snapshots are created every day at every Assessment or Remediation.
The number of days in the timeline can be controlled by the box in the upper right corner. Minimum value 1
and maximum value is the number of days since new version installation or 90, whichever is less. Hover over
any bar to see the fleet status on that day in numbers. The right column shows the comparative view of the
fleet status on current days vs. first day of the timeline/range. Percentages are added for highlighting the
strength of compliance.
Device Lists
The main purpose of Security Manager is to make sure a fleet of devices stays in compliance with desired
security settings. It isn’t an asset collecting tool, although it does have several device attributes it collects and
Page 8

displays in columns. HP Web Jetadmin is focused more on obtaining an exhaustive list of device settings to
see how they are configured on a fleet and allows for exporting those settings for inclusion into other tools.
Security Manager focuses strictly on security settings, and what can be exported includes which security
settings are out of compliance or which security settings have been placed into compliance.
The first three columns in a device list essentially determine which devices can be assessed and which ones
are out of compliance. The first column indicates the assessment status and is defined as such:
- Not assessed
- Assessed and all settings in compliance
- Assessed with only low risk items out of compliance
- Assessed with medium risk items (and possibly low) items out of compliance
- Assessed with high risk items (and possibly low/medium) items out of compliance
Page 9

9
The second column indicate device status. The second column includes a visual icon to indicate Good (green
check mark) or some sort of error (red x) indicating a problem. It also includes a textual description of the
error as follows:
❖ Network Connection Error - Security Manager uses both of these errors typically to indicate an issue trying
to communicate with a device over a specific protocol. Many times Security Manager is trying to securely
connect to the device over SSL/TLS and cannot for some reason. Most common reasons for either of
these errors include:
➢ No response from device on basic network communications such as ping. Device may be powered off
or disconnected from network. Pings may be filtered at router or firewall.
➢ Device responds to pings but does not respond to Web Services (WS*) queries.
➢ Can’t browse to EWS page, perhaps EWS has been disabled.
➢ SSL/TLS handshake fails so transaction cannot be encrypted. Operating system controls the TLS
versions in the handshake, not HPSM. You can select the device and click Do Not Enforce SSL/TLS.
➢ Certificate has MD5 hash which Microsoft no longer supports, so SSL/TLS handshake is rejected. Can
right-click device and choose Set SSL\TLS Enforcement, then choose Do Not Enforce to temporarily
fix. Now Verify again to see if state clears. If so, for a permanent solution, regenerate the self-signed
certificate under EWS (might require newer Jetdirect firmware) to generate a new certificate with a
supported hash.
➢ ACL (Access Control List) blocking.
➢ No certificate support, already set to not enforce SSL/TLS (grayed out).
➢ Ports blocked, perhaps by firewall
➢ Some cases have been reported whereby DAT indicates SNMPv1/v2 passes for Gets and Sets yet
SNMPv3 cannot be enabled using SNMPv1/v2 and this error is generated. Many ties a second
remediation clears the error.
❖ Connection Refused / Invalid Identity Certificate - If Security Manager installed an identity certificate on
the device, it tags it in the database to enforce trust for future communications.
➢ Removed, expired or revoked certificates.
➢ Cannot connect to CRL (certificate revocation list) to check revocation.
❖ Credentials Failed – HPSM was unable to find a match between what is stored in the HPSM database and
what is on the device. Security Manager will always try the device specific credentials first, then credential
stored in the Global Credential Store and then finally public/blank. The device specific credentials can be
configured by selecting a device, clicking on Set Credentials and then using Configure/Copy/Paste or
Page 10

Reset. If all three attempts fail, Security Manager posts Credentials Failed as it needs proper credentials in
order to communicate with the device.
➢ SNMP behavior is to not respond to SNMP REQ packet when community name is wrong.
➢ Older devices had two location under EWS for Admin Password.
Remember, browsing to EWS is strictly HTTP traffic. Security Manager and tools such as Web Jetadmin use
WS*, LEDM, SNMP, DSMP, EWSCONFIG, XDM, etc. to communicate to devices for the various settings
depending upon how they are exposed for fleet management per device family. For example, you could
disable SNMP on devices and not affect EWS browsing at all, but tools such as Web Jetadmin and Security
Manager would be severely hampered as they could not communicate with the device using a critical protocol.
Groups
Any discovered device will always be present in the All Devices group. Devices can be added to custom
groups as desired. The primary purpose of groups is to represent a security policy. For example, if the entire
fleet will receive the exact same security settings, you could merely create a remediation task that applies
your one security policy to the All Devices group. If different regions will receive different security settings
per region, then you could create a group for each region and schedule a remediation for each group applying
its respective security policy.
To create groups, select Manage groups from the pull-out screen on the left hand side of the Devices tab.
Enter the desired Group Name and select the Parent Group under which the new group will be created.
Page 11

11
Groups can be nested as desired by creating subgroups for each parent group. Groups are selected for
viewing by clicking on the icon in the upper left hand corner of the Devices tab to expose a drop-down list of
groups. The number in parentheses after each group indicates how many devices are present that group.
Devices are added to groups by clicking the desired devices, right-click and select Add to Group.
Page 12

Clicking on the All Groups selection from the drop-down list of groups displays all of the groups in the main
window. Here the numbers after each group include the immediate devices in that group plus a cumulative
total of devices in the parent group plus devices in any children groups.
Page 13

13
Some users still prefer to see devices in groups for organizational purposes, even though the devices may all
receive the same security settings. Reports could then be run per group to indicate which devices are out on
compliance per group.
Autogrouping
Automatic groups can be created where a set of filters or criteria are defined for the group. Filters are applied
immediately to all devices and devices are added accordingly. For every discovery, filters are applied and
devices are added. Filters are also applied to all devices at a scheduled frequency that can be defined in the
HPSM_service.exe.config file, default is 24 hours:
<add key="autoGroupFilterExecutionFrequency" value="24:0:0" />
By default, the maximum number of autogroups that can be created is 10 to protect performance. If more
autogroups are desired, change the following entry to indicate more than 10 in both the
HPSM_Service.exe.config file and the Web.config file:
<add key="maxAllowedAutoGroups" value="10" />
Page 14

Starting with Security Manager v3.4, a policy can be assigned to each autogroup in which all items in the policy
are automatically remediated when a device is added to the autogroup. Check the box named Allow
Automatic Remediation and choose the desired policy from the drop-down selection. This can be in addition
to the policy that is remediated under the Instant On settings. If it is desired to have multiple policies
automatically remediated via autogrouping, create multiple autogroups where a device would be added.
Devices are added to each group in alphabetical order, thus policies are applied in that order.
Page 15

15
The primary use case for this feature is for devices discovered via Instant On to be fully secured by allowing
multiple policies to be automatically remediated. However, remediations can be configured to occur in the
following scenarios if the autogroup has a policy assigned to it:
• Device discovered via Instant-on
• Device discovered via any discovery method
• Edit auto group
• Edit auto group policy
The following config file values found under \Program Files x86\HP JetAdvantage Security
Manager\HPSM_service.exe.config can dictate the behavior of automatic remediations as such:
<add key="autoGroupEditOrDailyRefreshAutoRemediationEnable" value="false" />
Set to true if it desired to allow automatic remediations when autogroup filters are edited and the nightly
refresh autogroup filter runs.
<add key="autoGroupDiscoveryAutoRemediationEnable" value="false" />
Set to true if it is desired to allow automatic remediations for devices discovered thru discovery methods other
than Instant On.
<add key="skipInstantOnPolicy" value="false" />
Page 16

Both Instant On and autogroup policy will be remediated for instant on discovered devices if this value is set
to true. Otherwise, if set to false, only the autogroup policy will be remediated.
Exporting Device Lists
It is possible to export any device list by selecting the desired devices, right-click and select Export Device. An
.xml or .csv file will be created that contains all of the information that is displayed in columns.
Exporting the column data could provide a simple report to indicate which devices are in compliance or not.
However, the reporting area of Security Manager provides much more specific data regarding assessments
and remediations.
Reports
Security Manager offers several types of reports to indicate which devices are in or out compliance. These
reports could potentially be used to pass audits, as one example. Use the Reports tab to generate or schedule
the following types of reports:
• Executive Summary
• Devices Assessed
• Devices Not Assessed
• Policy Items Assessed
• Recommendation
• Remediation
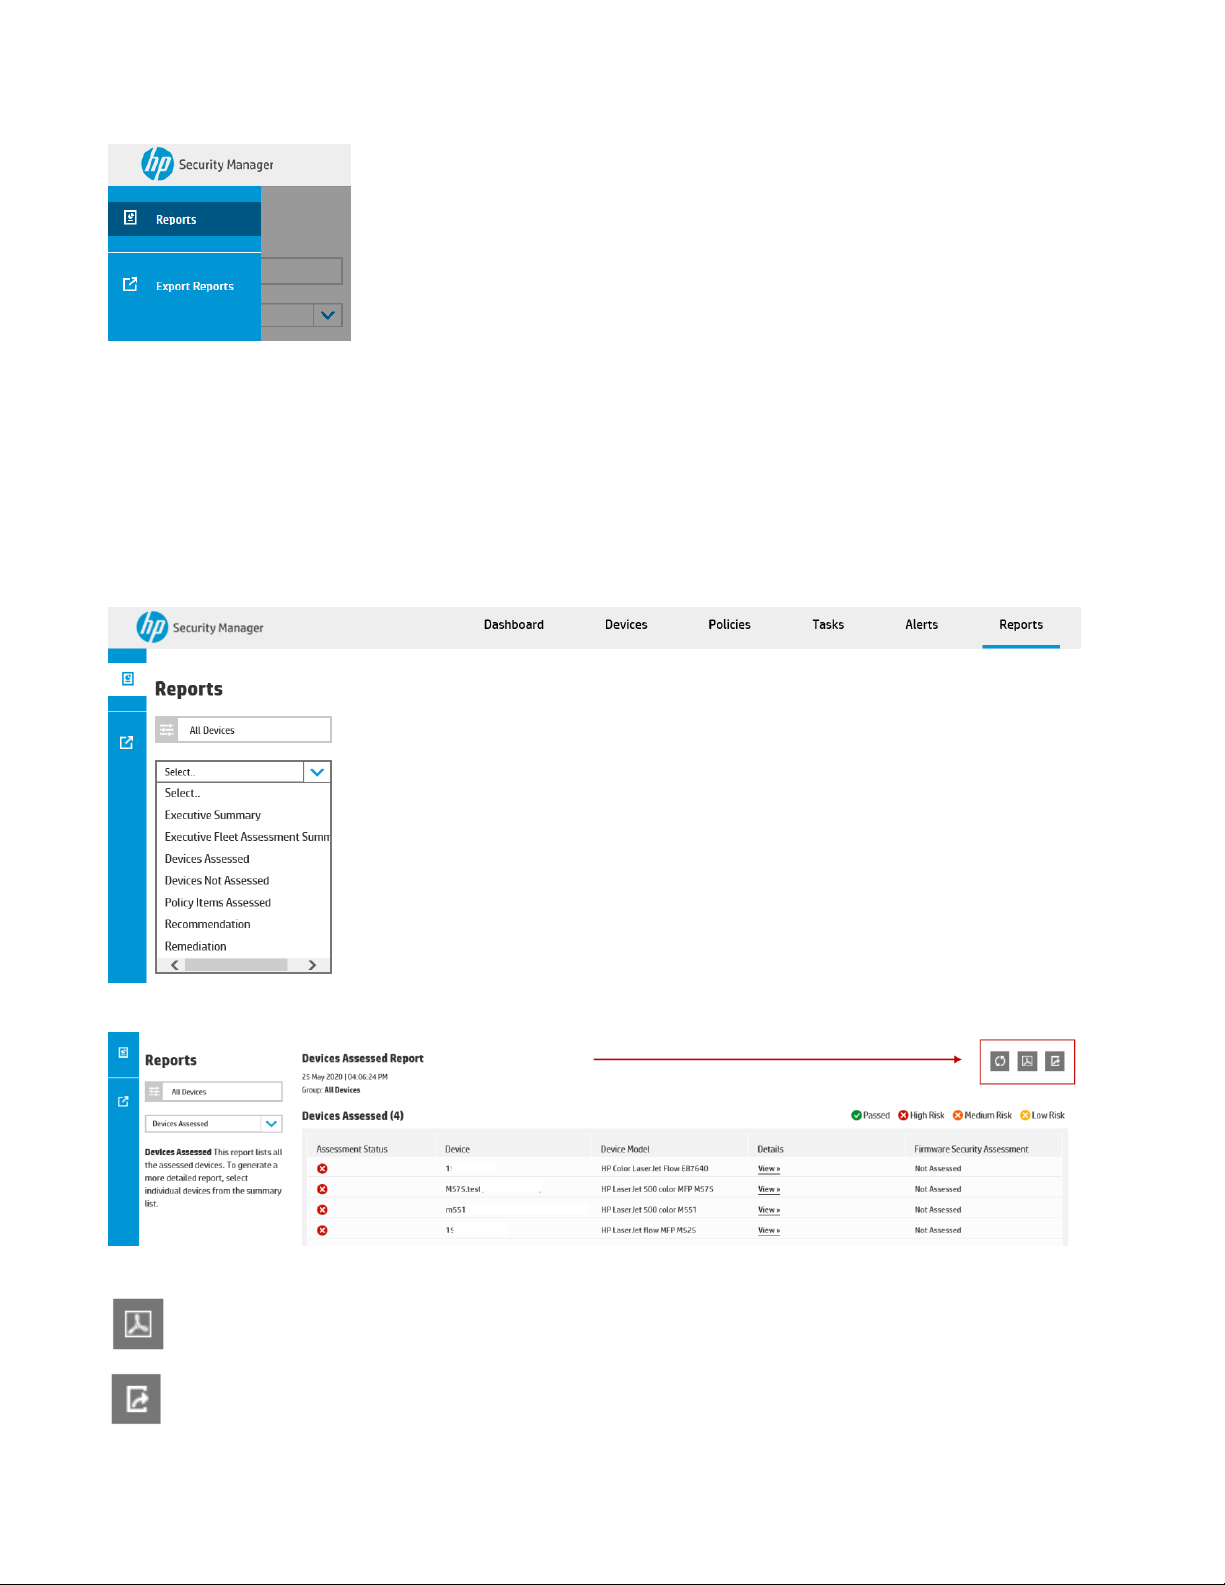
The drag-in bar on the left hand side of the screen offers two choices: Reports and Export Reports.
Page 17
17
Selecting Reports offers the ability to manually generate a report. Boxes are available to select the type of
report and the group upon which to generate the report.
Once these options are chosen, select Show Report to display the selected report for the desired group.
Every report allows for exporting a summary of results by choosing either the icon in the toolbar to Export as
PDF or Export as CSV. The PDF option will basically provide a file containing exactly what is displayed on
screen. Exporting to CSV produces a file containing all of the details about each device such as assessed or
remediated items.
Export as PDF
Export as CSV
Page 18
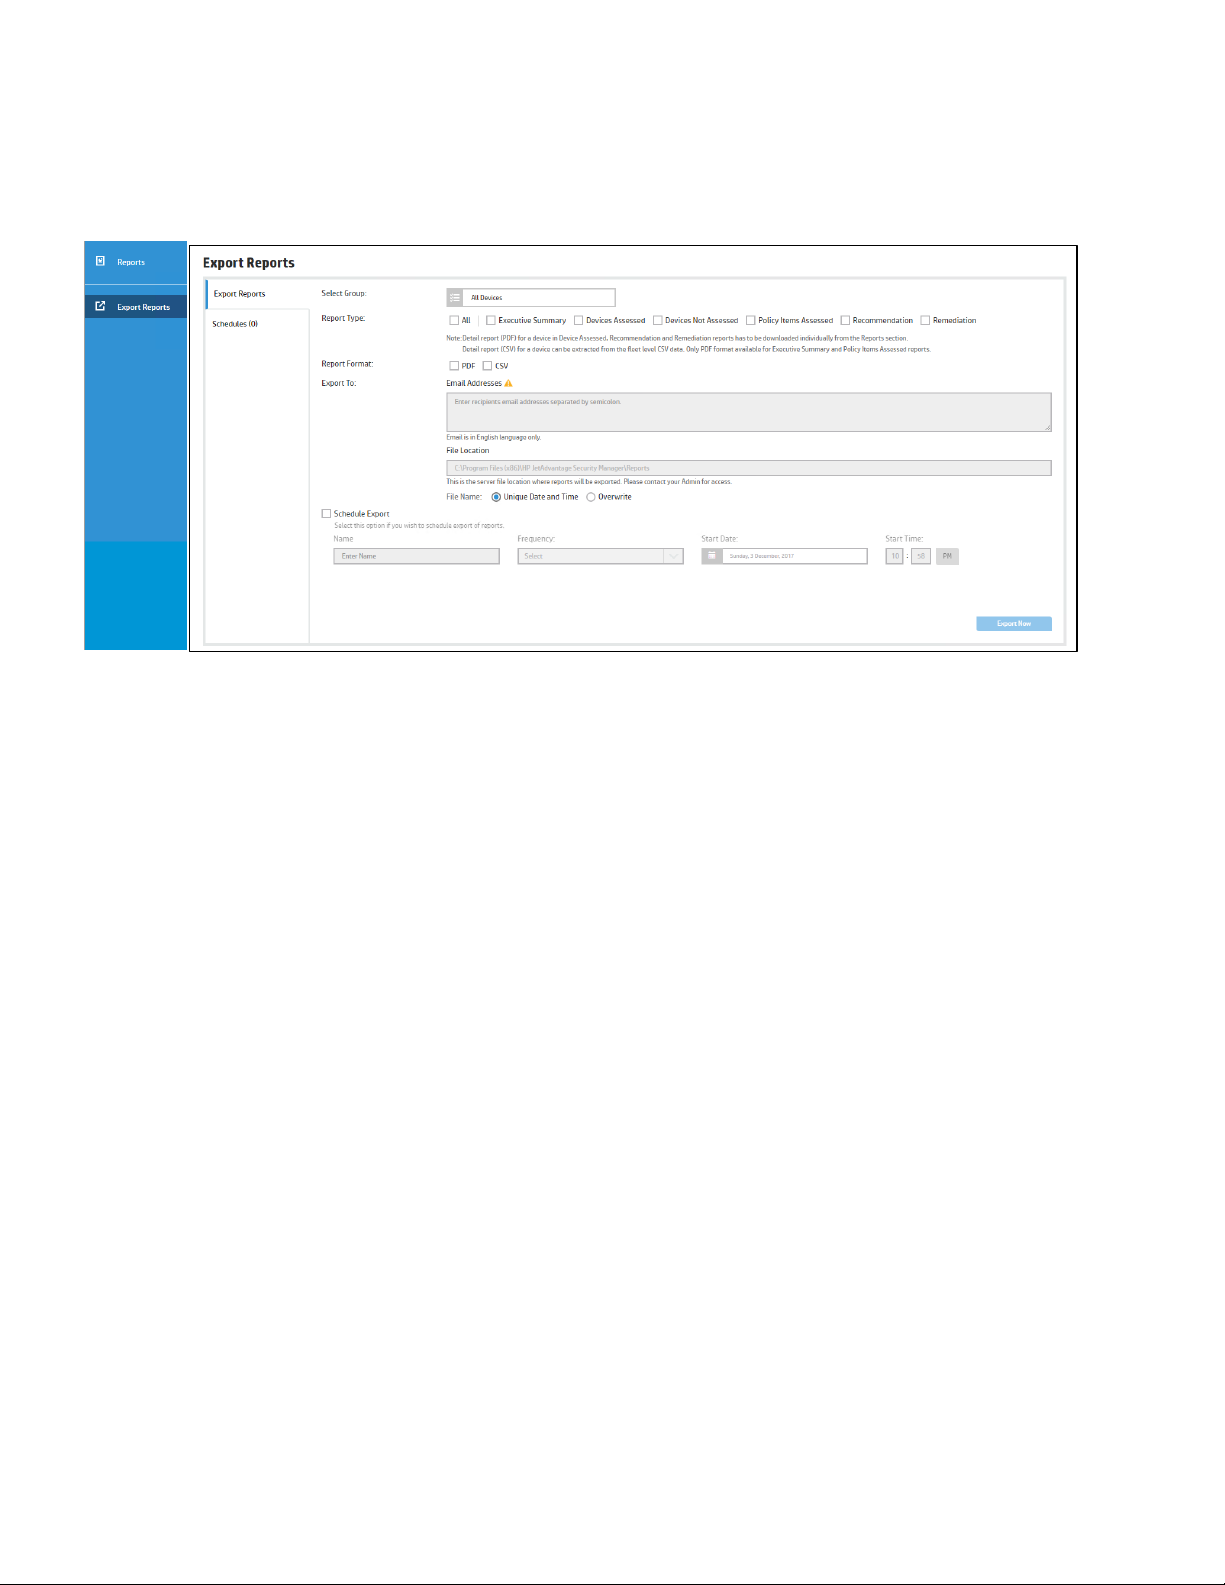
Selecting Export Reports from the drag-in on the left-hand side of the screen while viewing the Reports tab
offers the ability to schedule reports to be output to either file or email addresses at a desired frequency.
Multiple schedules can be created, each containing any or all of the possible report types. Report format can
be .CSV or .PDF. The Executive Summary and Policy Items Assed reports are only available in .PDF format.
Each report includes detailed information about every device in the group selected. Reports for individual
devices must be generated manually, or the data of an individual printer can be extracted from the fleet
report.
Output options include Email Addresses and/or File Location. Multiple email addresses can be entered
separated by a semi-colon. File output can be either the same filename overwritten every time or a unique
filename each time with a unique date and time stamp.
The file location is specified in the UI but is grayed out. If it is desired to change the location, edit the entries in
the following configuration file:
C:\Program Files\HP JetAdvantage Security Manager\HPSM_Service.exe.config
C:\Program Files\HP JetAdvantage Security Manager\Web\Web.config
Change the file location under exportReportsFileLocation to the desired location. The default location is:
C:\Program Files (x86)\HP JetAdvantage Security Manager\Reports
However, it may be desired to write reports to another location where desired users have access to them.
There is one additional configuration to send only the Executive Summary report over email and the rest of all
the reports as export to file location under sendOnlyExecutiveSummaryOverEmail. This configuration
setting exists in case the SMTP server doesn’t have capacity to send large files over email.
Page 19

19
Executive Summary
The Executive Summary report displays the current state of the system in a dashboard type of display. The
report includes the assessment risk by device, devices not assessed, assessment risk by policy item,
assessment risk by feature category, and risk summary.
A desired group can be chosen in the drop-down menu in the upper left hand corner. The first graph contains
pie charts to indicate the percentage of devices that were assessed and their respective risk levels as well as
all devices that were not assessed and reasons for not being assessed.
The second graph breaks down the assessment risks per policy items to indicate the percentage of policy
items that passed or failed with their respective risk levels. It places the policy items into categories including
Authentication, Protect the Device, Protect the Document, Protect the Network.
Page 20

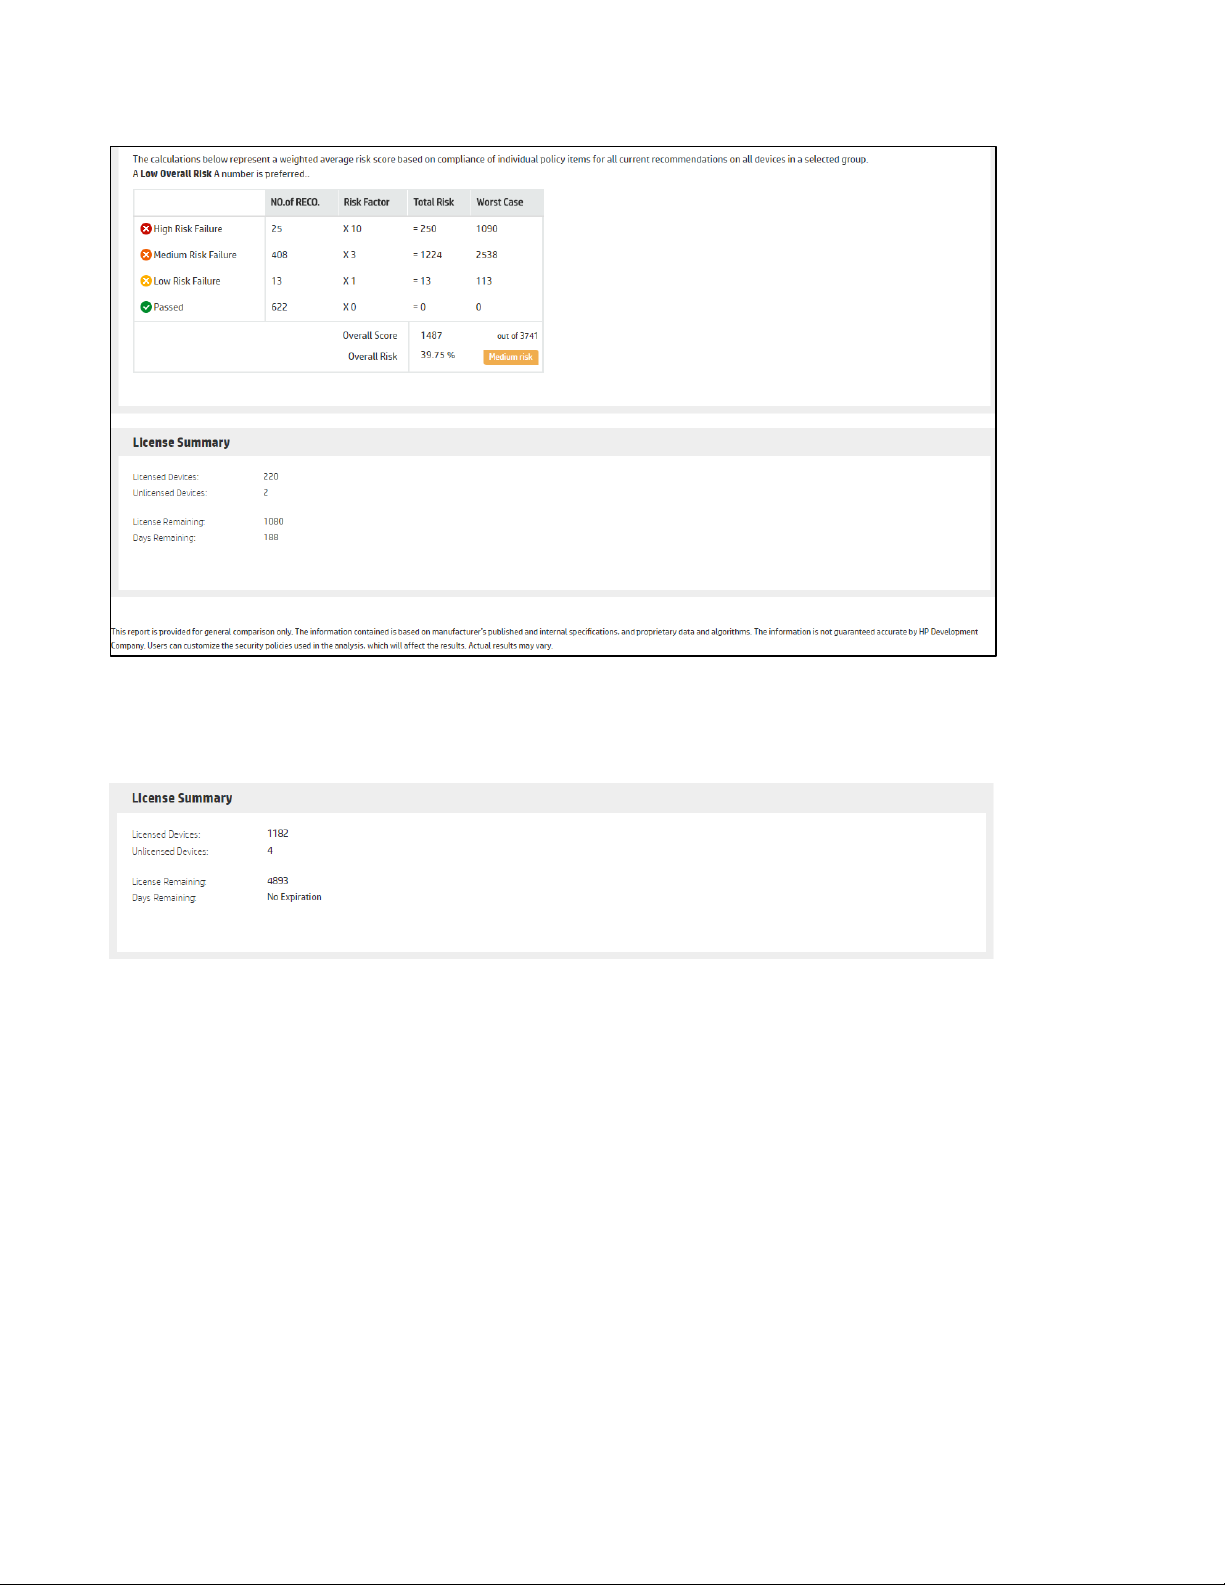
The third graph provides a Risk Summary to perform calculations based upon each risk level and indicate a
final overall Risk Score.
0 – 30 = low risk
30 – 60 = medium risk
60 – 100 = high risk
Page 21
21
The final box indicates the license summary.
Page 22

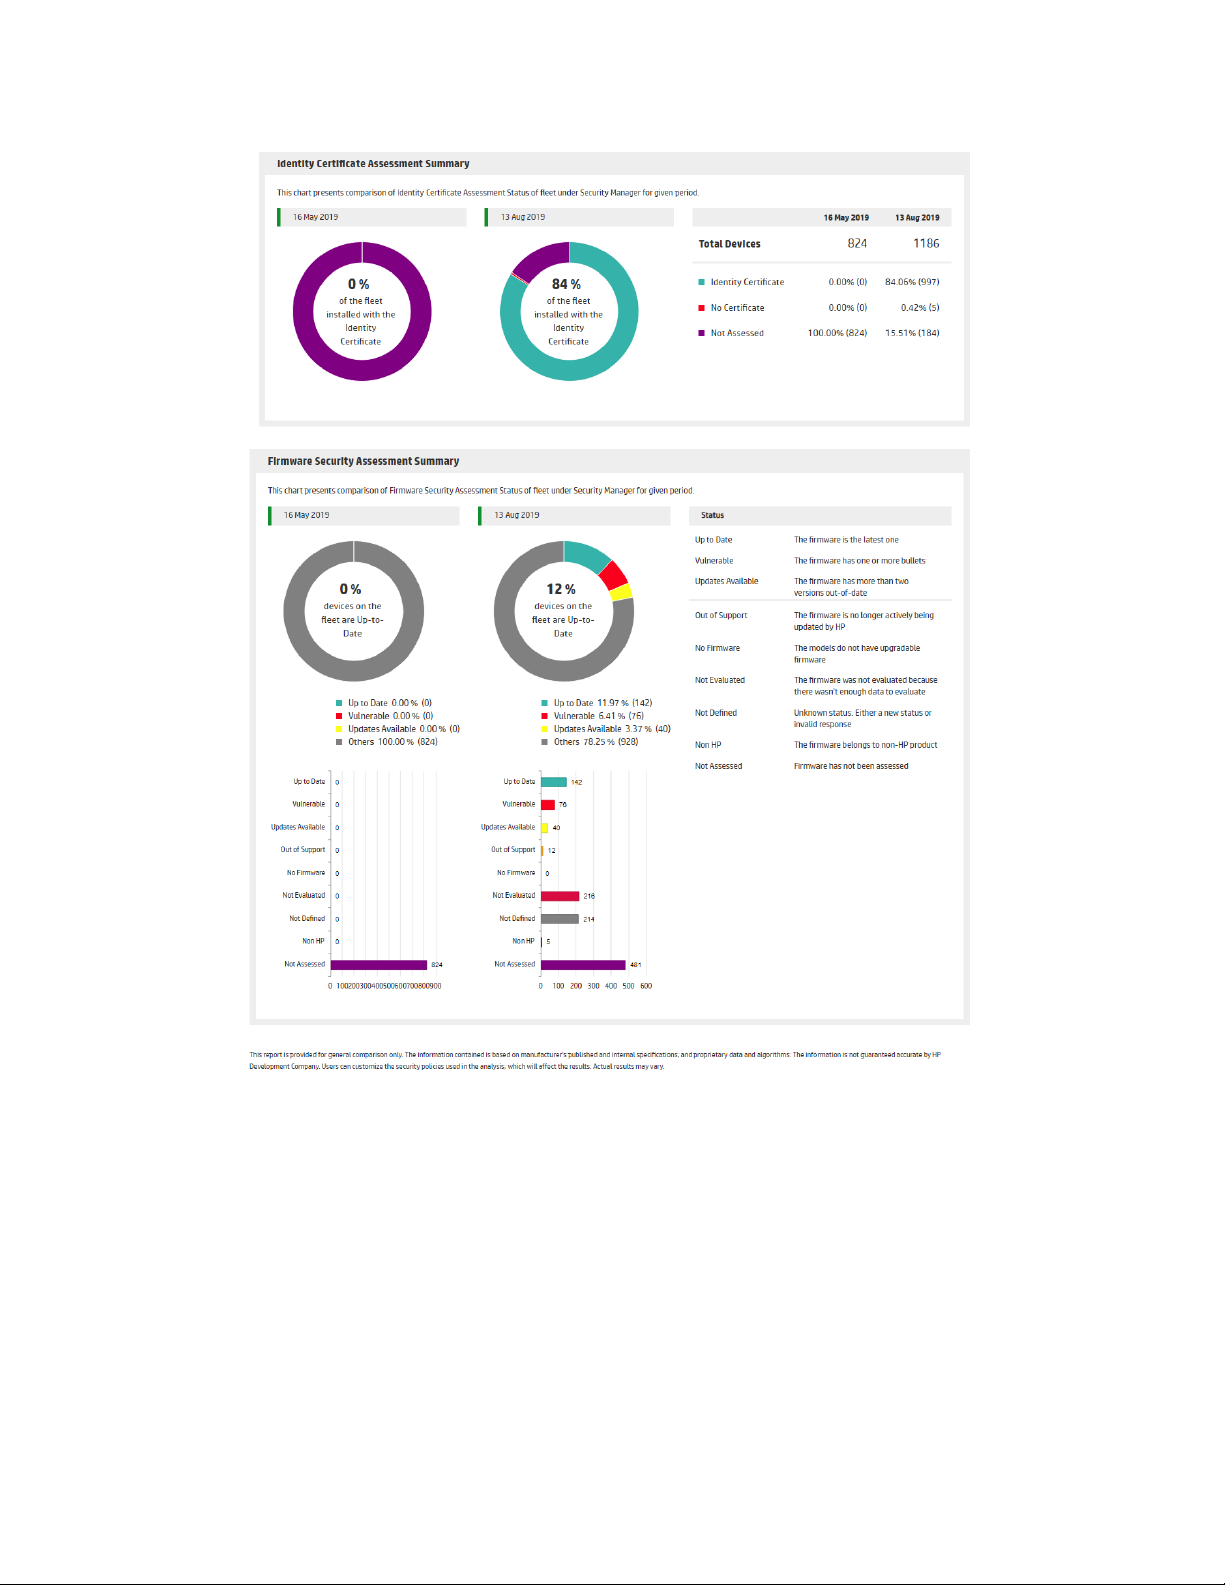
Executive Fleet Assessment Summary
The Executive Fleet Assessment Summary report presents a comparison of
Assessment Status, Identity Certificate Assessment Status, and Firmware
Security Assessment Status over a period of time. This is designed to be a high
level overview of the improvements made for the important aspects of the
fleet over a period of time such as overall assessment status, percentage of
fleet with identity certificates installed, and percentages of printers with up-todate firmware or with older firmware that potentially has vulnerabilities posted
against it.
The report can be customized to include any of these important aspects, and
the time interval can be customized to a value between 1-90 days.
Page 23
23
Devices Assessed
The Devices Assessed report lists all the assessed devices. A desired group can be chosen in the drop-down
menu in the upper left hand corner.
Page 24

To generate a more detailed report, select individual devices from the Details column.
This report indicates every security setting that was assessed, whether it passed or not, the risk level if it didn’t
pass, and the current value on the device vs. the value in the policy.
Page 25

25
It may be desirable to see this granular level of detail per device in a complete device list. Click the Export as
CSV icon in upper right-hand corner to generate a.csv file that contains all of the granular assessment results
data per device.
The example below shows the data exported to .csv file format then opened in MS Excel where the data could
be sorted and manipulated to provide a custom report or graph.
Beginning in Security Manager version 3.3, a new column appears in the Assessment report indicating the
Firmware Security Assessment status. If Firmware Security Service is selected as the Firmware Index File
Source and Firmware Security Assessment Reporting is enabled for the Check for Latest Firmware policy
item, if the firmware installed on a device has any vulnerabilities posted against it, the vulnerabilities appear in
the report by clicking on the View link under the Firmware Security Assessment column. Examples include:
Page 26

Out of Support:
Vulnerable:
Page 27

27
Updates Available:
Devices Unassessed
The Devices Unassessed report lists all the devices that could not be assessed and the reasons why. It helps
to identify devices that can be deleted to free up licenses. A desired group can be chosen in the drop-down
menu in the upper left hand corner.
Page 28
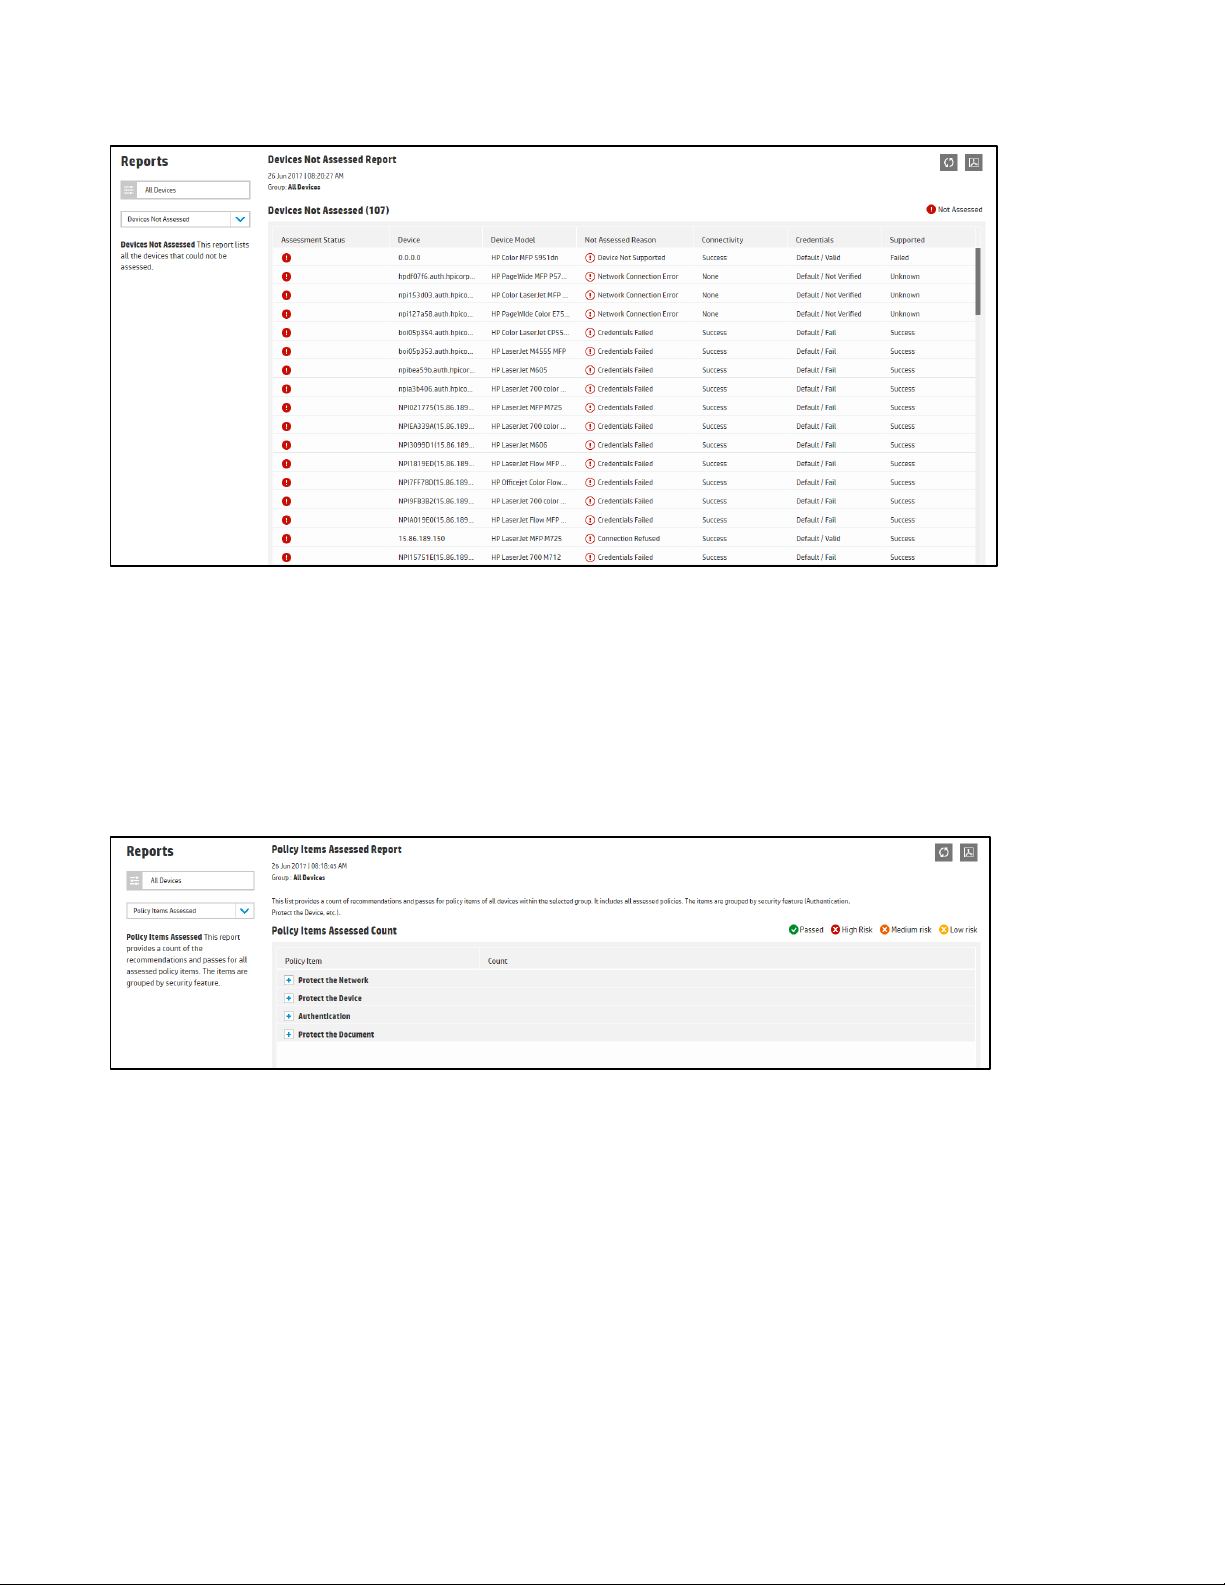
Select the Export to PDF icon to generate the results in PDF format.
Policy Items Assessed
The Policy Items Assessed report provides a count of the recommendations and passes for all assessed policy
items. The items are grouped by security feature. A desired group can be chosen in the drop-down menu in
the upper left hand corner.
Page 29

29
Select the Export to PDF icon to generate the results in PDF format.
Recommendations
The Recommendations report lists all the devices that have at least one recommendation, meaning they did
not pass the assessment and had at least one setting out of compliance. The list is sorted by the number of
recommendations. A desired group can be chosen in the drop-down menu in the upper left hand corner.
Page 30

To generate a more detailed report, select individual devices from the summary list. This will display every
setting that is out of compliance on the device, the risk level, and the current value on device compared to
value in the policy.
Page 31

31
It may be desirable to see this granular level of detail per device in a complete device list. Click the Export as
CSV icon in the toolbar to generate a .csv file that contains all of the granular assessment results data per
device.
Now the data can be manipulated in tools such as MS Excel to create custom reports or graphs.
Page 32
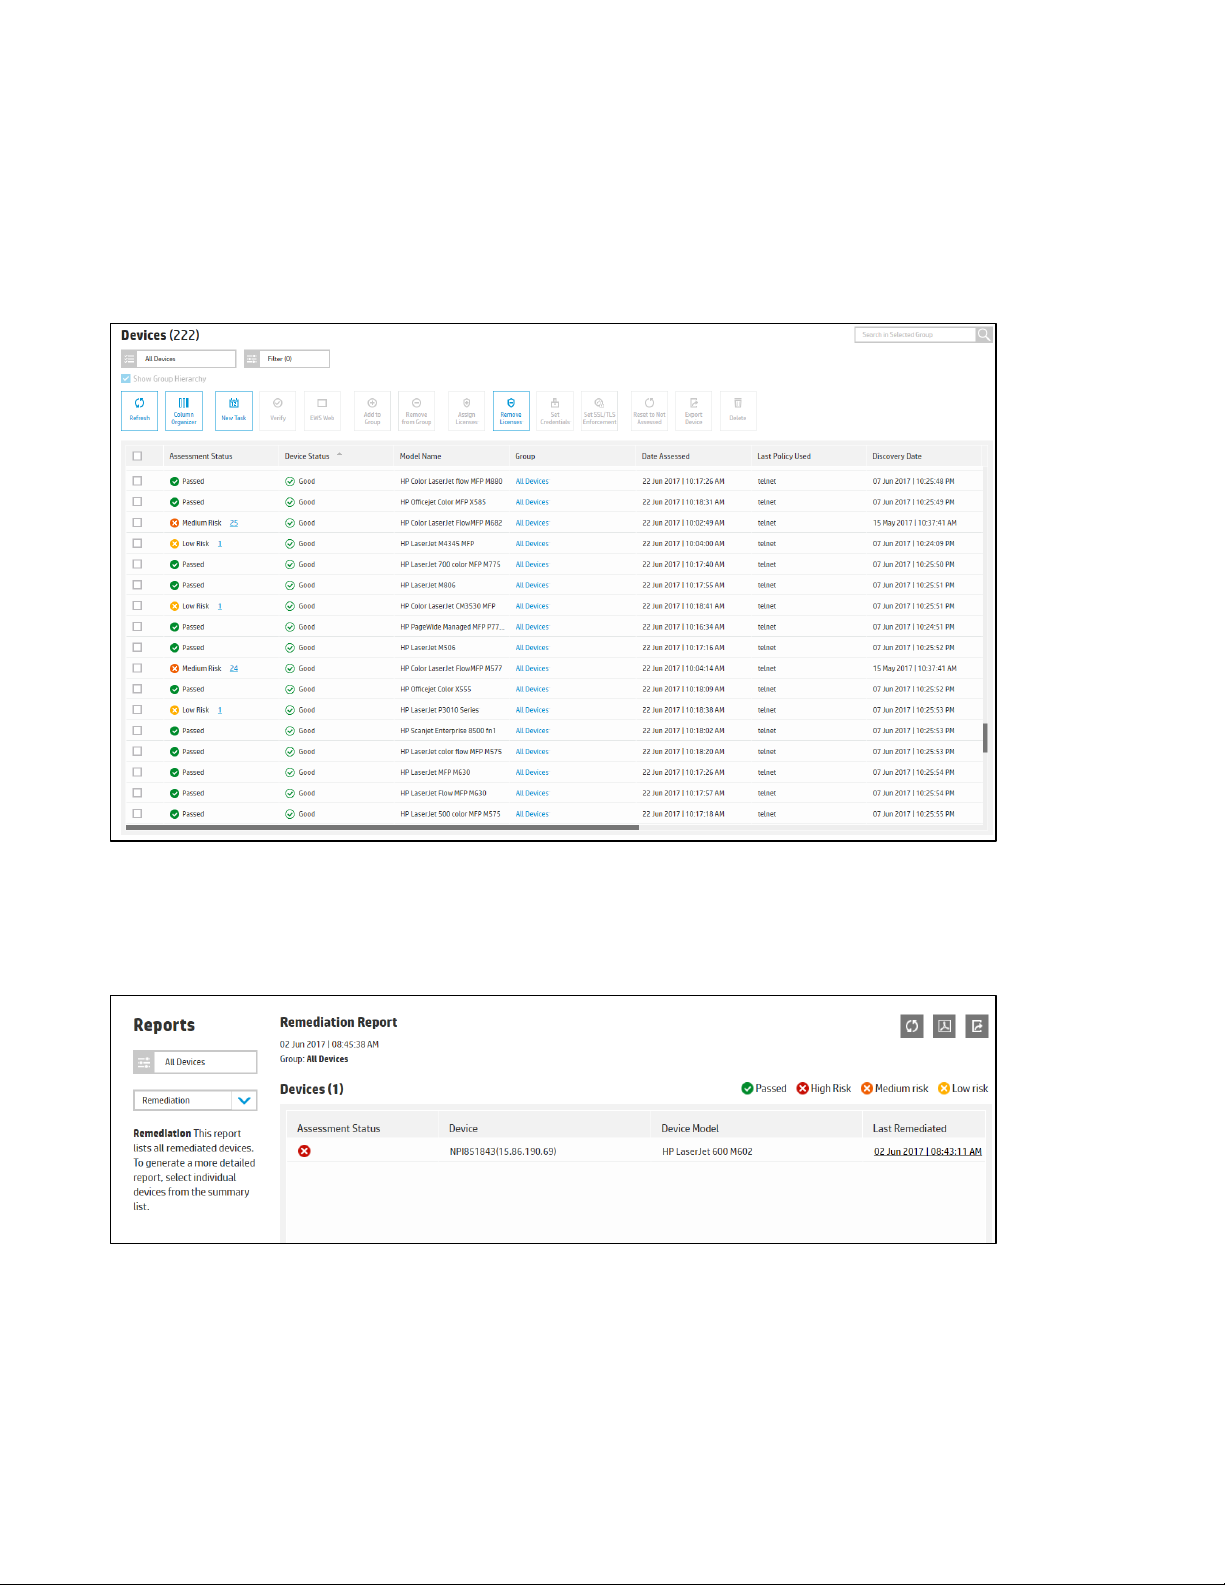
Remediations
Once an Assess and Remediate task is performed, the devices change in the device list to having a green
check mark for Assessment status indicating passed since all settings are now in compliance. No number is
present in the Assessment Status column to indicate complete compliance.
The Remediations report lists all the remediated devices. A desired group can be chosen in the drop-down
menu in the upper left hand corner.
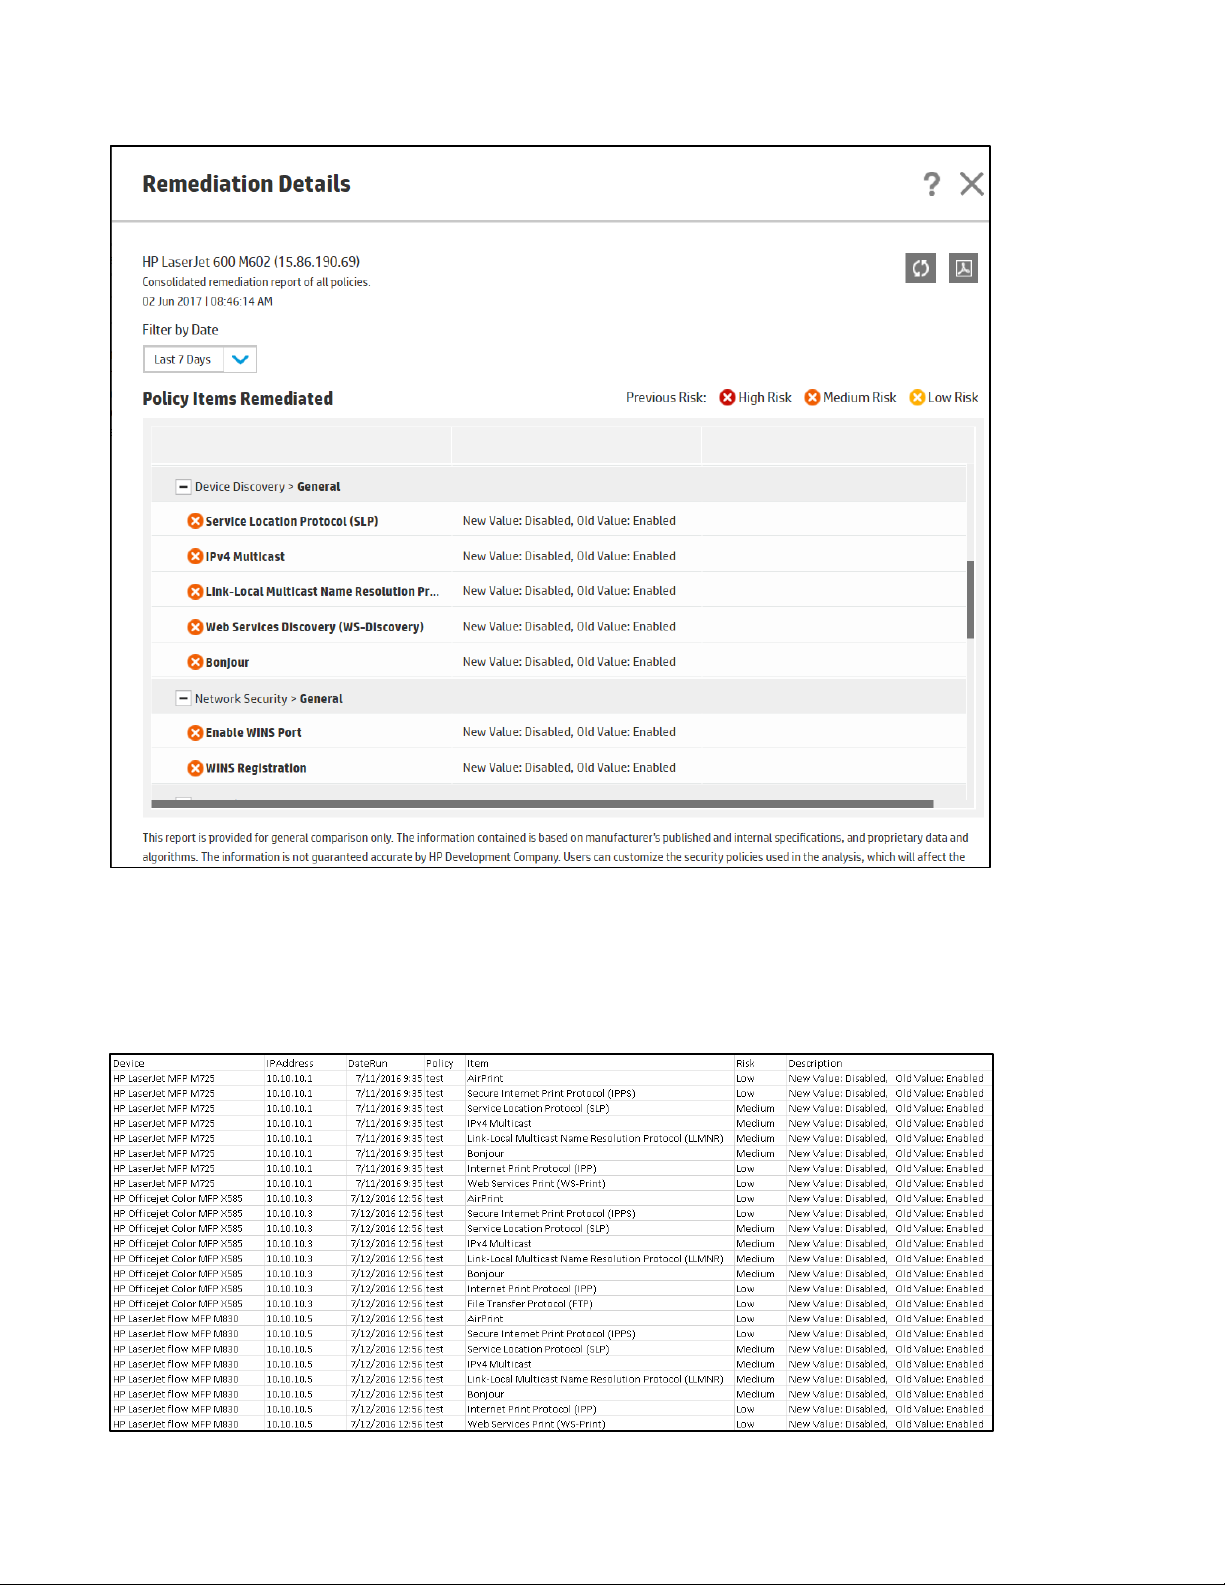
To generate a more detailed report, select individual devices from the summary list. Each setting that was
remediated is listed along with the old and new values on the device.
Page 33
33
It may be desirable to see this granular level of detail per device in a complete device list. Click the Export to
CSV icon in the toolbar to generate a .csv file that contains all of the granular assessment results data per
device.
Page 34

Now the data can be manipulated in tools such as MS Excel to create custom reports or graphs.
The data can be sorted by IP Address and used to spot patterns such as the same device being changed to be
out of compliance each day on certain settings.
Repetitive Remediations
A Repetitive Remediation report is an optional report that includes devices being remediated for the same
item(s) multiple times over a period of time defined by the user. This report is a mechanism to report devices
that are continually out of compliance which could be due to conflicting policies between multiple instances of
Security Manager o from other tools such as HP Printer Security Plug-in or HP Web Jetadmin managing
security settings ins the same environment. The feature is enabled under Settings, General under the
Repetitive Remediation Report category:
Select the Start Date to begin the counting of remediations, then select the duration of counting. If the
number of remediations defined in the Remediation Threshold occurs during the duration of counting, the
device appears on the Repetitive Remediations report.
Understanding Assesment and Remediation Status and Results
An assessed device will appear on various reports depending upon the results of the assessment. An
Assessment report is the most informative report as it displays that last known assessment status for every
policy item that has been run as an assessment task on devices. The assessment status column includes a
symbol to indicate if the assessment passed (green check mark) or if a mismatch occurred (red, orange or
yellow X).
A Passed assessment status means the last time the policy item was assessed, it matched the value in the
policy. Either it already matched before the assessment occurred, or if the task was an
assessment/remediation task, the value was mismatched initially but configured to match during the
remediation. Such items appear on the Remediation report indicating the date it occurred with the old
mismatched value and new matching value.
Page 35

35
If the assessment status indicates a mismatch occurred on the last attempt, these items appear on the
Recommendations report also. They can also be viewed by clicking on the number link next to the device in
the Assessment Status column of the device list. There are many reasons why a mismatch occurs. If the task
was Assess Only, it would not be uncommon to see a variety of mismatches because nothing was instructed
to fix the mismatches. If the task run was an Assessment/Remediation task and some items still indicate a
mismatch, there are a variety of reasons why this can occur.
The most common and understandable reason for a mismatch is a legitimate mismatch where the value on
the device dos not match the value in the policy:
Value Mismatch {Policy : Enabled, Device : Disabled }
Some policy items cannot be remediated at all. The policy indicates they are Assess Only types of items and
can only be read from a device and compared to the policy value but not configured. The following items are
Assess Only and an Assessment report indicates *Cannot Remediate:
• Check for Latest Firmware
• Check for Latest Jetdirect Firmware
• Secure Boot Presence
• Intrusion Detection Presence
• Whitelisting Presence
• Disk Encryption Status
• Fax Pin Presence
If the policy contains the Check for Latest Firmware item, the firmware version on the device is compared to
the firmware version contained in an index file on an FTP server. If there is no newer firmware version
released for a device, the index file will have no entry, and the mismatch appears as such:
The device's firmware information is unavailable in the device's firmware index. *Cannot Remediate
This can be fixed immediately if desired by manually downloading the index file, changing the policy to
compare firmware against File instead of Web, and edit the index file to include an entry.
Other mismatches are fairly apparent by the error in the report:
• SNMP Read-Only Mode *Cannot Remediate
• Cannot access the device. HTTP authorization failed with the provided password. *Cannot Remediate
Some mismatch errors are a little more vague and may require some troubleshooting:
• Device Error *Cannot Remediate
• General Error *Cannot Remediate
• Network Timeout *Cannot Remediate
• Unable To Communicate With Device *Cannot Remediate
• Write verification failed. The device setting failed to change after multiple write attempts. *Cannot
Remediate
All of the above indicate some sort of communication issue attempting to read or write values perhaps using a
protocol that is blocked. It could be that an attempt cannot be made to communicate securely such as the TLS
handshake failed to negotiate properly. Write verification failed usually means an attempt was made to set
the policy item but the attempt to verify it was set correctly failed. There are various reasons communication
issues exist. Log files may shed some light on which protocol is being blocked and why.
It is also important to understand how the numbers are calculated for total devices or policy items in the
various reports.
Page 36

If the same policy item is being assessed on the same device because either two policies contain the same
setting or the device belongs in two groups where the same setting is being assed, then the device is counted
twice in the Policy Editor Settings report and the Policy Items section of the Executive Summary report.
If a device is temporarily powered down during a scheduled assessment attempt, the assessment status
remains at the last successful assessment attempt. For example, if a device receives assessments on four
different policies every day, if any of the assessments fail because device is powered down, assessment
status still indicates Passed because it shows results of last successful attempt. This skews both the Email
Summary report and the Dashboard/Executive Summary report as devices appear in Passed state when really
it is unknown whether Passed or not because one or more assessments were not completed.
If it is desired to have an incomplete assessment attempt indicate an error instead of indicating Passed. an
optional configuration file entry exists to change the behavior. Change the following from false to true:
<add key="enableErrorDeviceAssessmentStatus" value="false" />
This will have to be changed in the following two configuration files:
C:\Program Files (x86)\HP JetAdvantage Security Manager\
HPSM_Service.exe.config
C:\Program Files (x86)\ HP JetAdvantage Security Manager
\WebApp\Web.config
Restart the Security Manager service to trigger the behavior change.
Now if an assessment cannot be performed because device it is in error state, the Assessment Status now
indicates Error instead of the result of the last successful attempt, even if this is the first attempt. Error is
the most severe condition, so if a device had four assessments performed where two Passed, one was High
Risk, and one was Error because it couldn’t complete, the Assessment Status indicates Error. Now the Email
Summary report no longer incorrectly indicates a device Passed when it could not complete the assessment.
The Dashboard/Executive Summary report now indicates Error state for a device that had at least one
assessment attempt fail. The device Properties page now includes a link to quickly and easily see which
policy caused the Error status without having to look at the Assessment report
When comparing numbers between reports, the following rules generally apply.
The Assessment report and Recommendation report should match as they count policy items the same. For
example:
• Assessment report
o 290 total assessments (62 recommendations of which 9 were high and 53 were medium)
• Recommendation report (counts sub-category items)
o 62 recommendations of which 9 were high and 53 were medium
The Policy Items report and the Executive Summary report should match as they count policy items the same.
For example:
• Policy Items report (counts category items)
o 272 total category items ( 232 passed, 4 high, 36 medium)
Page 37

37
• Executive Summary report - Policy Items (counts category items)
o 272 total category items ( 232 passed, 4 high, 36 medium)
The reason why all four reports may not match exactly is if Authentication Manager is included in the policy.
Authentication Manager is broken up into several categories. Some devices support more sub-category
items under each category than others. The Assessment and Recommendation reports count the subcategory items for Authentication Manager, while the Policy Items and Executive Summary report count just
the main categories.
Emailing Summary of Task Results
HPSM offers the option to receive an email summary when a Remediation task is complete. This feature is
only meant to provide a summary count of remediated devices after a scheduled remediation occurs, not the
details of each remediation on each device. The Email is more or less an indicator that Security Manager is
actively performing remediations behind the scenes. Full remediation reports can be either manually viewed
or scheduled to be generated and emailed at a desired interval. See the previous section: Reports.
After a remediation task is completed and if the Email Results checkbox is selected during task creation, then
an email will be sent with a summary count of the devices remediated. The Email Results checkbox is only
visible if the following occur:
• Automated Email settings have been configured (valid SMTP Server and Email Notifications settings). See
Appendix A for details.
• The task type is Assess and Remediate.
The Email Results checkbox is not visible if the task type is Assessment only.
The Email message is intended to be a tickler to remind an administrator that a remediation ran. This
message, like all Emails, typically goes over the network in clear text, so only minimal information is included
in the Email. The Email contains simple information such as the task name, policy name, and device group. In
addition, the Assessment & Remediation Results section highlights certain results.
Page 38

The Email can list the following under the Assessment & Remediation Results heading:
•
N
Device(s) were successfully assessed and remediated
•
N
Device(s) were unassessed, of these
M
– No Information
M
– Network Connection Error
M
– Device(s) Not Supported
M
– Connection Refused
M
– Credentials Failed
M
– Device(s) Not Authorized
M
– License Required for Assessment
M
– Hostname Resolution Error
M
– General Error
M
– Good
Page 39
39
•
N
– Device(s) with Low Risk Issues remaining
•
N
– Devices(s) with Medium Risk Issues remaining
•
N
– Device(s) with High Risk Issues remaining
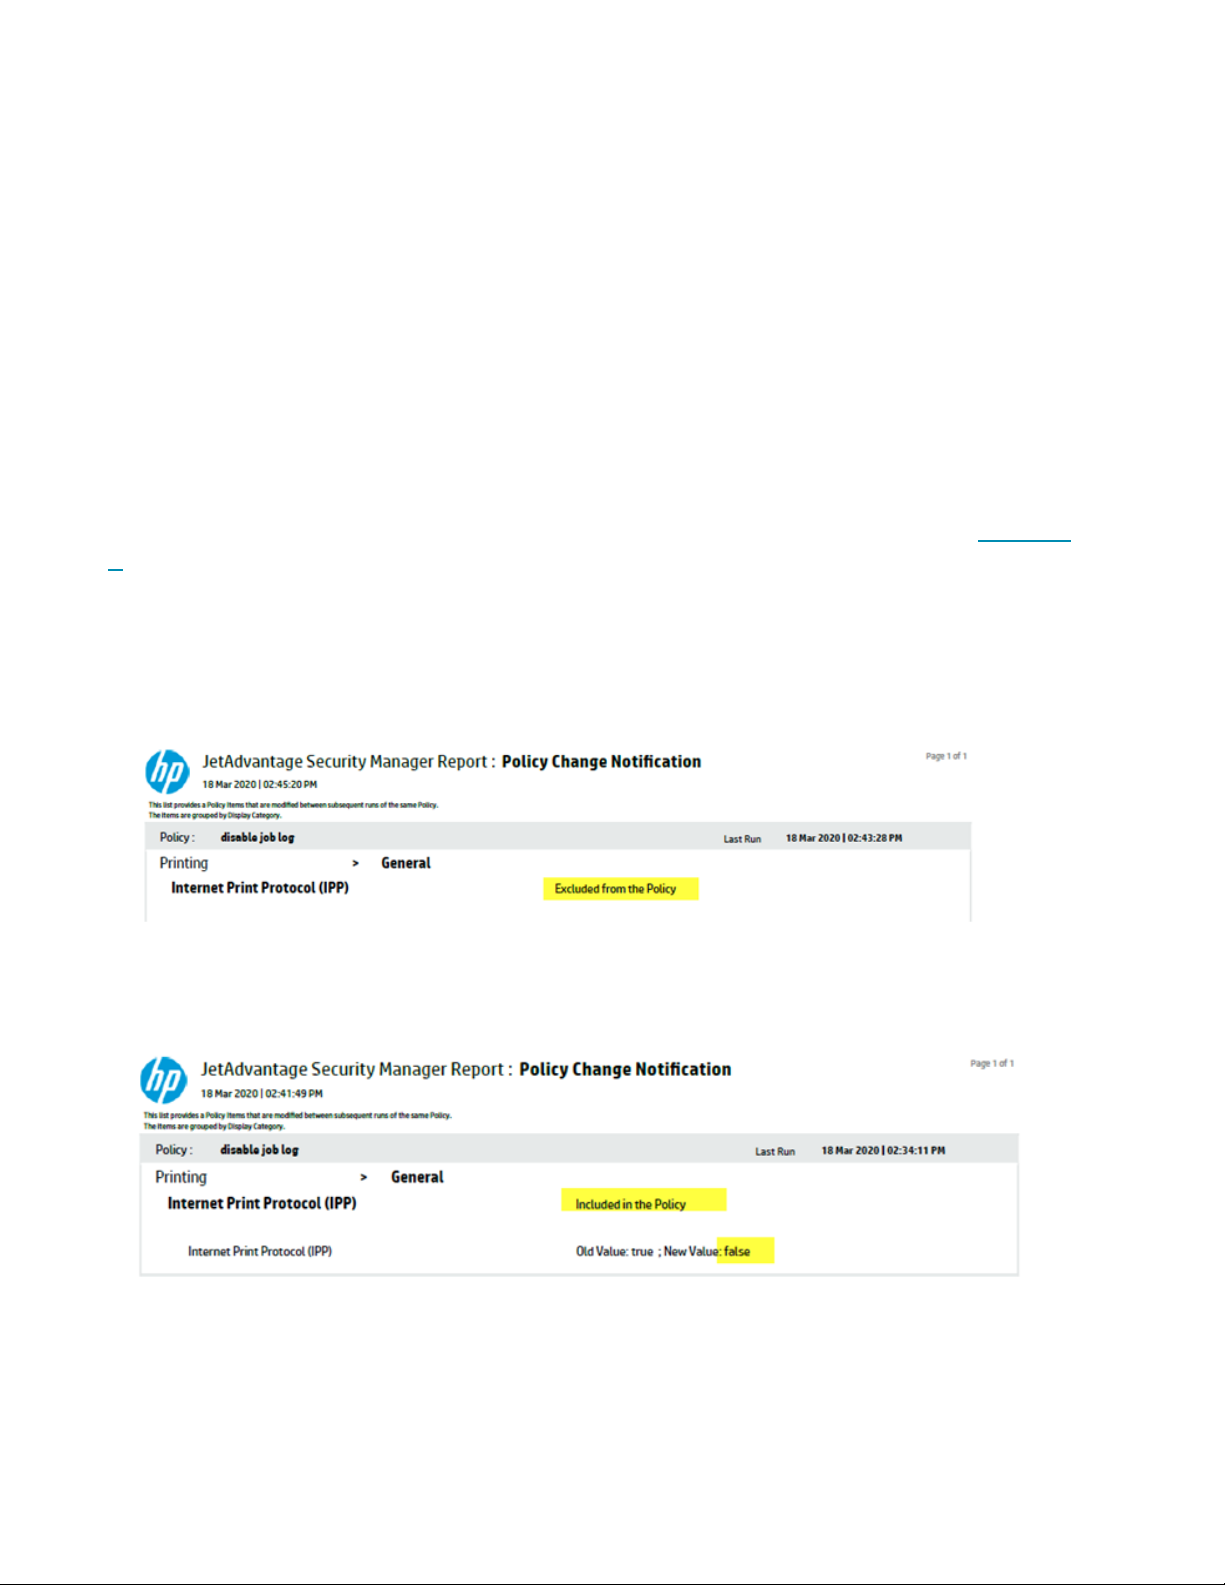
Policy Change Notification
Configuring Policy Change Notification Email Recipients
The default audit logging will log when a user has changed a policy. However, in order to detect this change,
the HPSM administrator will have to go through the HPSM_WebAudit.log in order to detect this. This is very
cumbersome, while it’s very important to know when a policy has been changed which is used in a re-occuring
task. To simplify this policy change notification was added in HPSM 3.4: when a task is running and it’s using a
policy which has been changes since the task ran last time, then HPSM will send out an email to the configured
email recipients. The Email Recipients have to be configured under Settings, Automated Email. See Appendix
A for details.
Example of Policy Change Notification for a policy setting which was removed from the policy:
Example of a Policy Change Notification for a policy setting which had been configured with a different value:
Disabling Policy Change Notification
By default this functionality is enabled. This can be disabled by updating the following entries in HPSM service
configuration file (HPSM_service.exe.config) to false:
Page 40

<!-- Enable/Disable Policy Change Notification-->
<add key="enablePolicyChangeNotification" value="false" />
<add key="emailPolicyChangeNotification" value="false" />
After making the changes the HP Jetadvantage Security Manager service will have to be restarted.
Subscribing to Email Alerts
In addition to scheduled email reports and emailed remediation summary reports, users can receive email
alerts based upon changes in the device fleet or security compliance of the fleet. Subscriptions are available
for the following types of alerts:
• Assessment Status – If percentage of devices with Pass/High/Medium/Low assessment state
increases or decreases beyond user configured percent.
• Device Status – if percentage of devices which are in Good/Error/Not Assessed/Not Supported state
increases or decreases beyond user configured percent.
• Device List – When new device is added, or existing device is deleted from device list.
• License – If number of licenses utilized/unutilized increases or decreases beyond user configured
count.
An Alert condition is shown in the form of a Category, Criteria, Condition and Value. To configure an Alert
condition, user must first choose a Category, then Criteria, Condition, and suitable Value if applicable.
and restart the Security Manager service to trigger the behavior change.
Category Criteria Condition Value
Passed Less Than
Failed Greater Than
High Risk Failure
Medium Risk Failure
Low Risk Failure
Not Assessed
Good Less Than
Error Greater Than
Not Verified
Instant On Add
Discovery Update
Auto Refresh
Utilized Less Than
Unutilized Greater Than
Licenses
0 to 100%
Assessment Status
0 to 100%
Device Status
0 to 100%
Device List
NA
Page 41

41
The Alerts tab displays all alerts subscriptions that have been created.
Click New Alert from the drag-in screen on the left to create a new alert subscription. Complete all fields for
Category, Criteria, Condition, Value, and Alert Condition. Select groups to which the alert applies, create a
name for the alert subscription, and enter email addresses for the alert subscription.
Page 42

Notification is in the form email. An attachment contains a list of devices relevant for specified alert condition
Configuring the Alert Interval
Security Manager executes alerts under the following conditions:
• After every task execution be it Verification, Assessment, Remediation or Discovery.
Page 43

43
• Once in 24 hours. This can be customized by editing the following value in the
HPSM_service.exe.config file:
<add key="alertConditionCheckSuppressInterval" value="1:0:0:0" />
(restart Security Manager service after customizing).
HPSM User Activity Logging (Auditing)
Audit log files location and logged events
Security Manager logs events for who did what and when in two different Audit logs:
C:\Program Files (x86)\HP JetAdvantage Security
Manager\WebApp\log\HPSM_WebAudit.log
This file will have events that are triggered from the user.
C:\Program Files (x86)\HP JetAdvantage Security Manager\log\
HPSM_ServiceApp.log
This file will have events that are triggered from HPSM service.
Logging is performed for the following types of events:
User logged in
User logged off
User failed to login
Global device credentials updated
Device credentials updated
Device credentials set
Devices deleted
Device set to unassessed
Device licenses allocation
License added
Smtp settings updated
Instant On settings updated
TLS enforcement set on device
Discovery initiated
Policy created
Policy locked
Policy unlocked
Policy deleted
Policy edited
Policy imported
Assessment report generated
Device summary report generated
Device details report generated
Device summary report for export generated
Policy item assessed report generated
Task created
Page 44

Task updated
Task initiated
Task deleted
License service initiated
Allocate licenses for devices
Deallocate licenses from devices
Log file
Functionalities to be logged
Data that would be logged
Sys Log level
HPSM_WebAudit.log
User Logged in/Logged off at
time and date, login failure if
any
username , date, time
INFO,ERROR
HPSM_WebAudit.log
Create policy
username , Policy name,
date , time, operation
INFO
HPSM_WebAudit.log
Delete policy
username , Policy name,
date , time, operation
INFO
HPSM_WebAudit.log
Edit and Rename policy
username , Policy name,
date , time, operation
INFO
HPSM_WebAudit.log
Policy Imported/Exported by
User at time and date
Policy names, username ,
time , date, operation
INFO
HPSM_WebAudit.log
Discovery performed by user at
time and date
Type of discovery, Ranges,
username, date, time
INFO
HPSM_ServiceApp.log
Instant ON
only message
INFO
HPSM_WebAudit.log
Global Credentials modified
only message
INFO
HPSM_ServiceApp.log
Credential failure on devices
Device hostname, Time
WARN
HPSM_WebAudit.log
License added
message, date, time
INFO
HPSM_ServiceApp.log
License applied
INFO
Page 45

45
HPSM_ServiceApp.log
License exhausted
WARN
HPSM_WebAudit.log
Automated email settings
updated
username , message
INFO
HPSM_WebAudit.log
InstantOn Settings updated
username, message
INFO
HPSM_WebAudit.log
Reports
username, date, time
INFO
HPSM_ServiceApp.log
Licensing service started
stopped
INFO
HPSM_WebAudit.log
Who reran the task
Task (all tasks)
Who deleted the task
Who edited the task
HPSM_WebAudit.log
Create task
username, date, time, type of task
HPSM_WebAudit.log
Export devices
Who exported the devices, when and which
devices.
HPSM_WebAudit.log
Delete devices
Deleted – who , when
INFO
HPSM_WebAudit.log
Policy lock and unlock
policy name,user,date,time
INFO
HPSM_WebAudit.log
Device credentials modified
only message
Device state - Reset to
unassessed
Enable SSL/TLS
Import devices
Sample log file:
Page 46
Remote Syslog logging
HP Security Manager can also write messages to a remote syslog server by enabling it in config file for both
Web app (HPSM_WebAudit.log) and HPSM service (HPSM_ServiceApp.log).
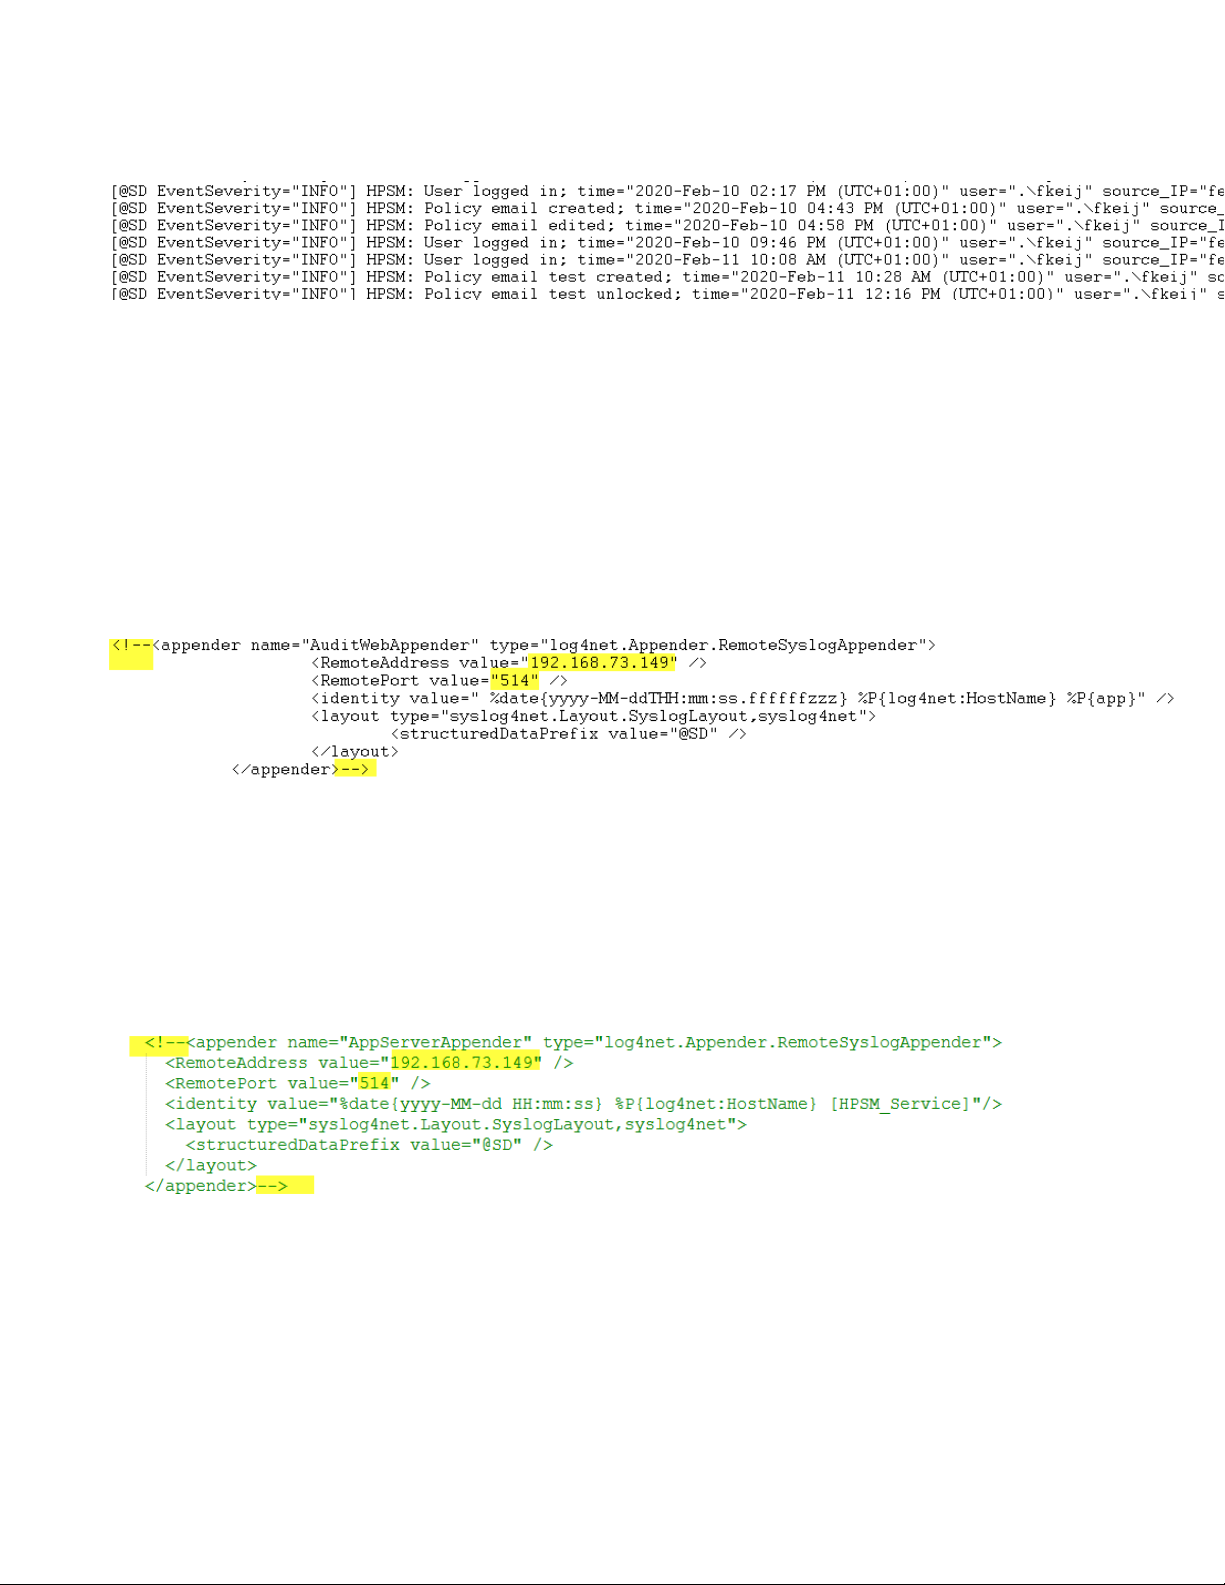
For Web App, uncomment section appender name="AuditWebAppender" in:
C:\Program Files (x86)\HP JetAdvantage Security Manager\WebApp\web.config
Sections which are commented out start with <!-- and end with --> .This has to be removed. Of course
the Syslog Server IP address and Port number needs to be configured correctly. The sections which have to be
modified or deleted are highlighted in yellow in the following screenshot:
For HPSM service, uncomment section appender name="RemoteSyslogAppender" in:
C:\Program Files (x86)\HP JetAdvantage Security Manager\WebApp\
HPSM_Service.exe.config
Sections which are commented out start with <!-- and end with --> .This has to be removed. Of course
the Remote Address (Syslog Server IP address) and Remote Port number needs to be configured correctly.
The sections which have to be modified or deleted are highlighted in yellow in the following screenshot:
The HPSM Jetadvantage security Manager service and the HPSM application pool have to be restarted once
enabled in the config files.
Page 47

47
SIEM Tool Integration
A Security Information and Event Management (SIEM) system gives security managers a holistic overview of
multiple security systems. SIEM tools centrally store and analyze logs from different locations in order to spot
patterns and trends that might signal an emerging security threat or attack. SIEM software collects and
aggregates log data generated throughout the organization's technology infrastructure, from host systems
and applications to network and security devices such as firewalls and antivirus filters. The software then
identifies and categorizes incidents and events, as well as analyzes them. They provide real-time analysis of
security alerts generated by applications and network hardware. A SIEM system collates and normalizes data
from various locations within an IT infrastructure – and as most SMEs can create up to 500,000 logs per day,
this is a task that would be impossible for a single employee to undertake. In a climate of chronic IT skills
shortages, it makes little sense for a highly trained and competent IT professional to spend hours trawling
through data logs to search for events, when a SIEM with a well-designed search function can pinpoint a log in
seconds.
Security Manager stores auditing data into standard syslog format log files. Any SIEM tool can pull the desired
information from the logs.
Page 48
Appendix A:
Configuring Email Server and Email Recipients for Emailing Task Results
and Policy Change Notification
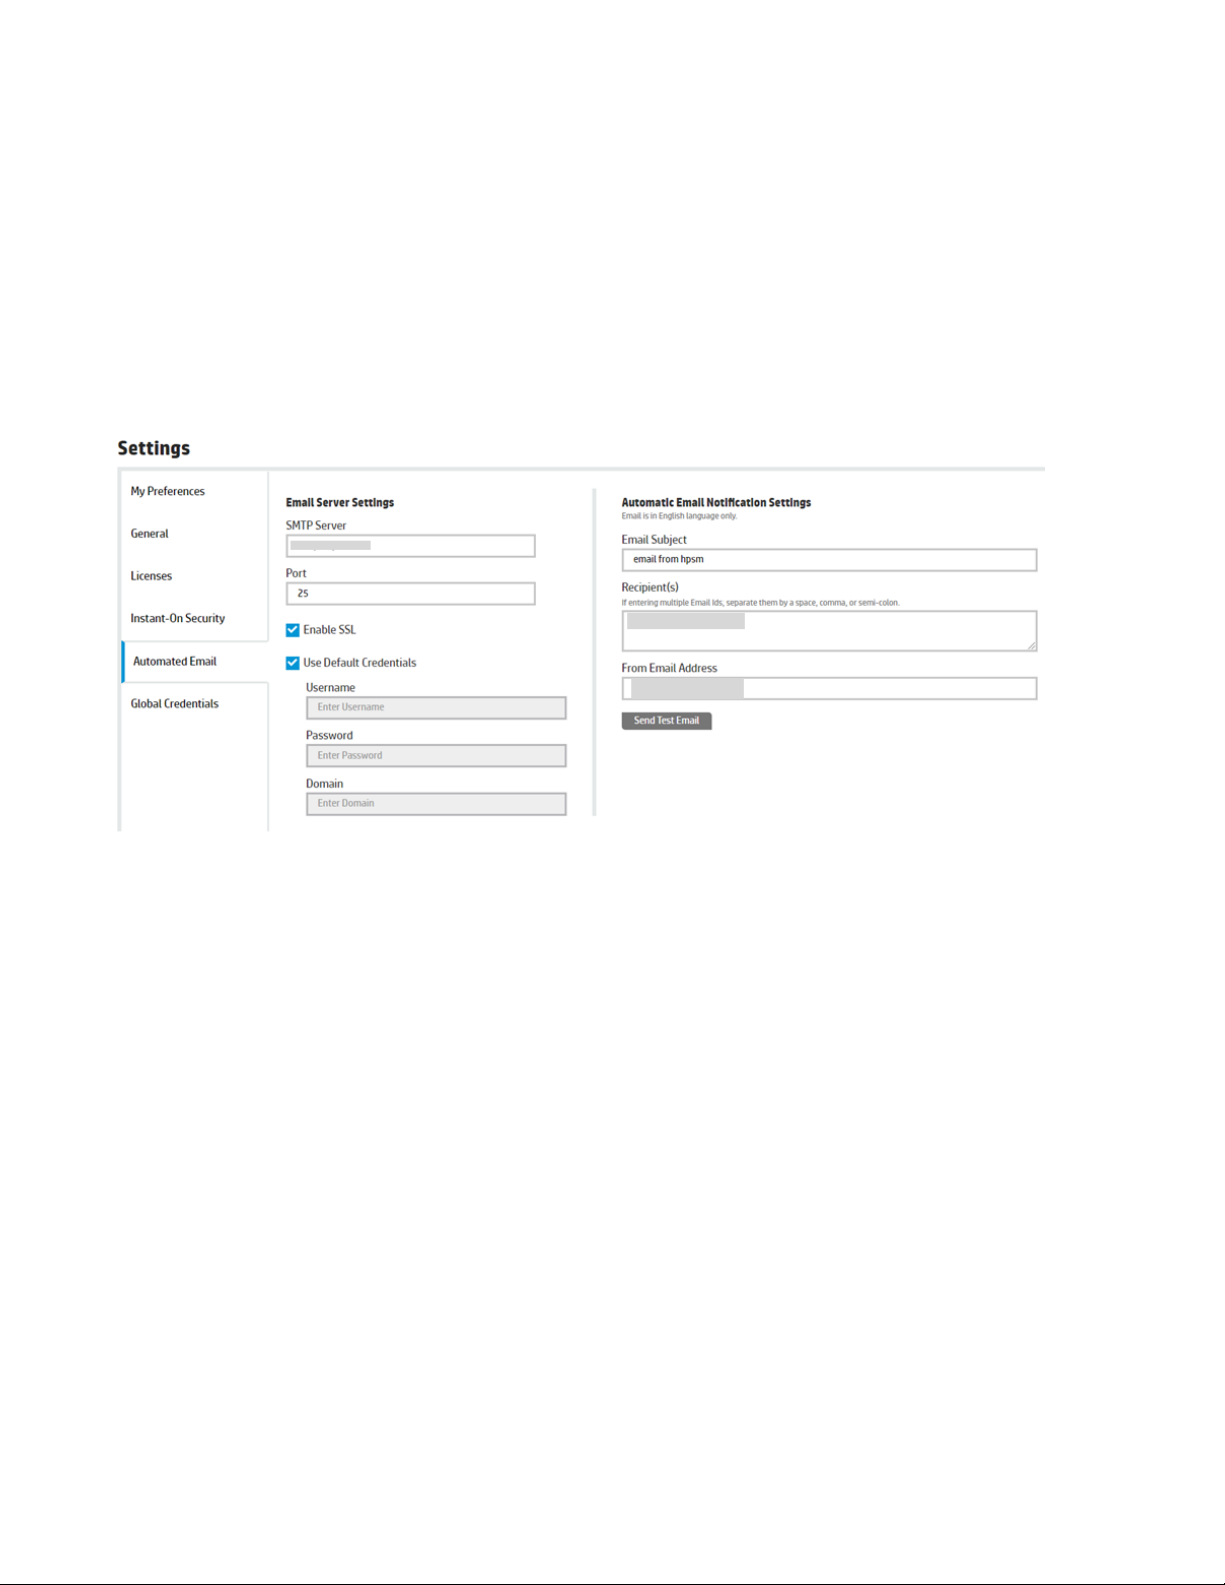
The Automated Email tab is used to configure both the email server settings used to send the email as well
as some of the specifics of the email to be sent.
The E-mail Server Settings section contains settings that identify the Email server used to send Emails and
how to authenticate if required. These settings include the following:
• SMTP Server—The hostname or IP address of the Email server.
• Port—The network port used to contact the Email server (typically 25).
• Enable SSL—Enables or disables the use of SSL when working with the Email server.
• Use Default Credentials—Specifies if user credentials are required. If selected, the Username, Password,
and Domain fields are disabled.
• Username—The username used to log in to the SMTP (Email) server.
• Password—The password used to log in to the SMTP server. This is a password text box, so the characters
are hidden as they are entered.
• Domain—If the username is related to a domain, the domain is required to qualify the username. This value
is optional.
The Automatic Email Notification Settings section contains settings for the Email message such as:
• Email Subject—The subject used in the Email.
• From Address—The Email address used for the sender in the Email.
• Recipient(s)—One or more recipient email addresses. If more than one address is specified, they must be
separated by a space, comma, or semicolon.
Page 49

49
A test Email can be sent by clicking the Send Test Email button. This might take a second or two to complete.
Page 50

Appendix B
Extracting Assement and Remediation Data from the SQL Database
It may be desired to extract assessment and remediation data into other tools for reporting or auditing
purposes. While many of the reports can be exported into desirable formats such as .csv, .xml or MS Word, it
requires someone manually exporting the data each time it is desired. However, all of the data is stored in an
MS SQL database on the back end. With proper rights on the database and some knowledge on creating SQL
queries, the assessment and remediation data can be extracted from the database whenever it is desired. The
key is understanding which tables to query and how to understand the values. The following table
information is provided “As Is”, which means HP Support cannot be expected to provide assistance as they are
not trained SQL experts.
NOTE: Even if you have permissions to write information to the database such as DBO rights, never alter any
of the information in the SQL tables for fear of breaking the software. Reading information is fine, but altering
any data in the tables could affect the functionality of the software itself.
The Security Manager database is always named HPIPSC. The database includes many tables, but the one
table containing the most valuable device data is named dbo_DeviceTable. The following describes the
columns and values in this table responsible for storing information pertaining to which devices have been
assessed or unassessed and the risk levels for each that has been assessed.
Columns of interest in dbo_DeviceTable include:
• State - Indicates if device is present in All Devices List or not
o 2 = Valid and present in All Devices List
o 3 = Deleted and no longer present. There is a nightly process that cleans up and removes
devices in State=3, but you will want to exclude these from queries if they exist since they
represent deleted devices.
• IpAddress - IP Address
• HostName - Hostname
• Model - Device Model
• LastAssessedDate - Date of last assessment
• LastPolicyName - Last policy used for assessment
• SerialNumber - Device serial number
• NumberRecommendations - Any number here other than 0 indicates a device out of compliance
• uiDeviceStatus
o 1 = No information
o 2 = Good
o 4 = Connection Refused, Credentials Failed, Error, Not Supported, Network Connection Error,
Hostname Resolution Error
• UIDeviceStatusExtended
o 1 = No information (not verified)
o 2 = Good
o 3 = Error
o 4 = Network Connection Error
Page 51

o 5 = Credentials Failed, SNMP invalid, can’t retrieve device model or nic
o 6 = Not Supported
o 7 = Connection Refused
o 8 = Credentials Failed, SNMP valid
o 11 = Hostname Resolution Error
• uiAssessmentStatus
o 1 = Passed, no remediation necessary as device is in compliance with policy
o 2 = Not Assessed because of statuses such as Error, Network Connection Error, Connection
Refused, Not Supported, No Information, Credentials Failed, Hostname Resolution Error
o 3 = Low Risk
o 4 = Medium Risk
o 5 = High Risk
• ConnectivityStatus
o 1 = No information (not verified)
o 2 = Valid Connection including statuses such as Good, Connection Refused, Credentials
Failed, Not Supported, Hostname Resolution Error
o 3 = No Connection because of Network Connection Error status
o 4 = No Connection because of Error status
• hasValidCredentials
o 1 = Credentials Valid including statuses of Good , Connection Refused, Not Supported
o 2 = Credentials Failed = 2
o 3 = Cannot determine credentials because of Error, Network Connection Error, No Information
(not verified) statuses
• isDeviceSupported
o 1 = Device Supported including statuses of Good, Credentials Failed, Network Connection
Error, Connection Refused, Hostname resolution Error
o 2 = Device Not Supported including statuses of Error, Not Supported
o 3 = Haven’t determined if supported because of status of No information (not verified)
• isLicensed 1 = Device is licensed
• AdminCredentialWorks
o 1 = Yes
o 2 = No
o 3 = Not Verified, perhaps because no SNMP read access
• SNMPV1ReadWorks
1 = Yes
o 2 = No
o 3 = Not Verified, perhaps because no OID support
• HostnameResolutionFailed
1 = Yes
o 2 = No
o 3 = Not Verified, perhaps because no OID support
51
Page 52

hp.com/go/support
Current HP driver, support, and security alerts
delivered directly to your desktop.
© Copyright 2020 HP Development Company, L.P. The information contained herein is subject to change without notice. The o nly warranties for HP
products and services are set forth in the express warranty statements accompanying such products and services. Nothing herein should be
construed as constituting an additional warranty. HP shall not be liable for technical or editoria l errors or omissions contained herein.
c05201811 ENW, Rev. 5, January 2021
 Loading...