

Page 1

Insight Diagnostics
User Guide
HP Part Number: 390374-007
Published: October 2010
Edition: 7.0
Page 2

© Copyright 2010 Hewlett-Packard Development Company, L.P.
Confidential computer software. Valid license from HP required for possession, use or copying. Consistent with FAR12.211and12.212, Commercial
Computer Software, Computer Software Documentation, and Technical Data for Commercial Items are licensed to the U.S. Government under
vendor's standard commercial license.
The information contained herein is subject to change without notice. The only warranties for HP products and services are set forth in the express
warranty statements accompanying such products and services. Nothing herein should be construed as constituting an additional warranty. HP
shall not be liable for technical or editorial errors or omissions contained herein.
Intel, Itanium, Pentium, Intel Inside, and the Intel Inside logo are trademarks or registered trademarks of Intel Corporation or its subsidiaries in
the United States and other countries.
Microsoft, Windows, Windows XP, and Windows NT are U.S. registered trademarks of Microsoft Corporation.
Adobe and Acrobat are trademarks of Adobe Systems Incorporated.
Java is a US trademark of Sun Microsystems, Inc.
Oracle is a registered US trademark of Oracle Corporation, Redwood City, California.
UNIX is a registered trademark of The Open Group.
Printed in the US
Page 3

Table of Contents
1 HP Insight Diagnostics overview...................................................................................7
HP Insight Diagnostics editions.............................................................................................................7
Key features and benefits.......................................................................................................................7
Theory of operation................................................................................................................................7
System requirements..............................................................................................................................8
2 Getting started................................................................................................................9
Installing the Online Edition..................................................................................................................9
Removing the HP Server Utility........................................................................................................9
Removing the HP Survey Utility for Windows®........................................................................9
Removing the HP Survey Utility for Linux.................................................................................9
Installing HP Insight Diagnostics for Windows Online Edition.......................................................9
Installing from the HP ProLiant Support Pack............................................................................9
Installing from the Smart Component.........................................................................................9
Installing HP Insight Diagnostics for Linux Online edition.............................................................9
Installing from the HP ProLiant Linux Support Pack.................................................................9
Installing from the Linux RPM Package Manager (RPM).........................................................10
Locating files..............................................................................................................................10
Starting the Online Edition...................................................................................................................10
Starting HP Insight Diagnostics for Windows Online Edition.......................................................10
Starting from the Windows Start menu.....................................................................................10
Starting from HP Systems Insight Manager..............................................................................10
Starting from the HP System Management Homepage.............................................................10
Starting HP Insight Diagnostics for Linux Online Edition from the HP System Management
Homepage........................................................................................................................................11
Starting the Online Edition from a browser....................................................................................11
Modifying browser settings on a Linux server...............................................................................12
Starting the Online Edition from Microsoft Internet Explorer........................................................12
Starting the Online Edition from Firefox.........................................................................................12
Using the Online Edition from a command line.............................................................................13
Using Insight Diagnostics Commands in Linux.............................................................................14
Using Insight Diagnostics Commands in Windows.......................................................................14
Starting the Offline Edition...................................................................................................................14
Starting from an HP SmartStart CD................................................................................................14
3 Using HP Insight Diagnostics......................................................................................15
Using the Survey tab.............................................................................................................................15
Scheduling a survey.........................................................................................................................16
Saving survey configuration information.......................................................................................16
Deleting a survey session................................................................................................................16
Comparing configurations..............................................................................................................17
Using the Diagnose tab.........................................................................................................................18
Using the Test tab (HP Insight Diagnostics Offline Edition only)........................................................19
Running a Quick Test......................................................................................................................19
Running a Complete Test................................................................................................................20
Running a Custom Test...................................................................................................................21
Using the Status tab..............................................................................................................................22
Viewing Diagnose test status...........................................................................................................22
Viewing offline test status...............................................................................................................23
Table of Contents 3
Page 4

The Log tab...........................................................................................................................................24
Diagnosis Log tab............................................................................................................................24
Test Log............................................................................................................................................25
Error Log tab....................................................................................................................................25
Integrated Management Log tab.....................................................................................................26
Help tab.................................................................................................................................................27
About HP Insight Diagnostics.........................................................................................................27
Error codes.......................................................................................................................................28
Test components..............................................................................................................................29
Saving and printing information in HP Insight Diagnostics................................................................29
Exiting HP Insight Diagnostics.............................................................................................................29
Uninstalling HP Insight Diagnostics Online Edition............................................................................30
Uninstalling HP Insight Diagnostics from a Windows server........................................................30
Uninstalling HP Insight Diagnostics from a Linux server..............................................................30
4 Troubleshooting............................................................................................................31
Troubleshooting memory......................................................................................................................31
Troubleshooting disk drives and storage systems................................................................................31
Where to go for additional help............................................................................................................32
Related documentation....................................................................................................................32
HP websites.....................................................................................................................................32
IT Resource Center..........................................................................................................................32
Support and drivers.........................................................................................................................33
Subscription service..............................................................................................................................33
5 HP Technical Support..................................................................................................35
HP contact information.........................................................................................................................35
Customer Self-Repair............................................................................................................................35
A Acronyms and abbreviations......................................................................................37
Index.................................................................................................................................39
4 Table of Contents
Page 5

List of Figures
2-1 The Webapps tab...........................................................................................................................11
3-1 Survey tab – current configuration................................................................................................16
3-2 Survey tab – Compare configurations...........................................................................................18
3-3 Diagnose tab..................................................................................................................................19
3-4 Test tab – Quick Test......................................................................................................................20
3-5 Test tab – Complete Test................................................................................................................21
3-6 Test tab – Complete Test................................................................................................................22
3-7 Test status......................................................................................................................................23
3-8 Custom test results........................................................................................................................24
3-9 Test Log..........................................................................................................................................25
3-10 Error Log.......................................................................................................................................26
3-11 Integrated Management Log.........................................................................................................27
3-12 HP Insight Diagnostics Help tab...................................................................................................28
3-13 Find Error Codes ..........................................................................................................................28
3-14 Test Components...........................................................................................................................29
5
Page 6

List of Tables
2-1 Optional command line parameters..............................................................................................13
6 List of Tables
Page 7

1 HP Insight Diagnostics overview
HP Insight Diagnostics editions
HP Insight Diagnostics Online Edition is a web-based application that captures hardware and
operating system configuration information, records critical information for documentation and
disaster recovery, and compares historical configurations on the same server or a baseline server.
Available in Microsoft® Windows® and Linux versions, Insight Diagnostics helps to ensure
proper system operation. Online diagnosis of hard drives and assessment of power supplies for
potential issues under the following conditions:
• Hard drives attached to an HP Smart Array Controller
• Power supplies that are HP common slot power supplies and are deemed "diagnosable" by
Power Supply Diagnosis software using specific HP part numbers and HP servers
HP Insight Diagnostics Offline Edition captures system configuration information and provides
detailed diagnostic testing capabilities. The Offline Edition provides a comprehensive suite of
offline system and component tests, providing in-depth testing of critical hardware components
for devices such as processors, memory, and hard drives. During offline testing, the user-installed
OS is not running. Therefore, software information from the system is not reported. Insight
Diagnostics Offline Edition runs when the computer is started from one of the following CDs:
• HP SmartStart CD on HP ProLiant servers
• HP Documentation CD, USB Key created from the SmartStart CD, or the HP Documentation
and Diagnostics CD on HP business PC or HP workstation computers
IMPORTANT: Third-party devices not supported by HP might not be detected by HP Insight
Diagnostics.
Key features and benefits
HP Insight Diagnostics simplifies the process of effectively identifying, diagnosing, and isolating
hardware issues.
System availability is maintained through the following key features:
• Testing and diagnosing apparent hardware failures
• Documenting system configurations for upgrade planning, standardization, inventory
tracking, disaster recovery, and maintenance
• Sending or printing configuration information to another location for more in-depth analysis
• Managing the Integrated Management Log (IML)
In addition to system management tools, service tools can resolve system problems quickly. To
streamline the service process and resolve problems quickly, you must have the right information
available at the time that a service call is placed. This combination of features simplifies the
service process and minimizes downtime.
Theory of operation
HP Insight Diagnostics is a useful step in troubleshooting procedures. If a system problem occurs,
do the following:
• Check the computer health and status LEDs.
• Use the HP Insight Diagnostics Survey Utility feature to verify the hardware configuration
and firmware versions.
• Use the HP Insight Diagnostics Offline Edition Test feature to help validate the hardware.
• Use the Integrated Management Log (if supported) to identify system errors.
HP Insight Diagnostics editions 7
Page 8

System requirements
HP Insight Diagnostics Online Edition for Windows® requires the following:
• HP Advanced System Management Driver
• HP System Management Homepage
• HP Server Management Application and Agents
• Memory: 512 MB
• Graphics controller support: 1024x768
HP Insight Diagnostics Online Edition for Linux requires the following:
• HP System Management Homepage
• HP Server Management Application and Agents
• HP ProLiant Linux Deployment Utility
• Memory: 512 MB
• Graphics controller support: 1024x768
HP Insight Diagnostics Offline Edition requires the following:
• System support for a bootable CD-ROM
• Memory: 512 MB
• Graphics controller support: 1024x768
NOTE: If the system has less than 1 GB of memory, some tests may be unavailable. Also, a
memory of 1 GB or more is required while testing offline for time periods longer than 12 hours.
8 HP Insight Diagnostics overview
Page 9

2 Getting started
Installing the Online Edition
Use the appropriate procedures for your OS environment.
Removing the HP Server Utility
Before installing the HP Insight Diagnostics Online Edition, HP recommends removing the HP
Survey Utility. Use the procedures in this section to remove the software.
Removing the HP Survey Utility for Windows®
If installed, remove the HP Survey Utility for Windows® before installing HP Insight Diagnostics
Online Edition.
1. Go to Add or Remove Programs.
2. Select Hewlett-Packard Survey Utility.
3. Click Remove.
Removing the HP Survey Utility for Linux
If installed, remove the HP Survey Utility for Linux before installing HP Insight Diagnostics
Online Edition.
1. Identify which version of the HP Survey Utility is installed. Enter the following command:
rpm -qa|grep survey.
2. Remove the HP Survey Utility. Enter the following command: rpm -e survey.
Installing HP Insight Diagnostics for Windows Online Edition
Installing from the HP ProLiant Support Pack
Install the HP ProLiant Support Pack (PSP) from the HP SmartStart CD. HP Insight Diagnostics
for Windows® installs during the PSP installation.
For more information on the PSP, see the HP ProLiant Support Pack and Deployment Utilities User
Guide.
Installing from the Smart Component
1. Log on to the Windows® server with administrator access rights.
2. Download the Smart Component executable file.
3. Copy the executable file to a temporary directory on the target server.
4. Run the Smart Component executable file to start the HP Diagnostics interactive installation
program.
During the installation, the Insight Diagnostics files are copied to the \hp\hpdiags directory
on the same drive in which Windows is installed, usually the C: drive.
Installing HP Insight Diagnostics for Linux Online edition
Installing from the HP ProLiant Linux Support Pack
Install the HP ProLiant Linux Support Pack (LSP) from the HP SmartStart CD. HP Insight
Diagnostics for Linux installs during the LSP installation.
For more information on the LSP, see the HP ProLiant Support Pack and Deployment Utilities User
Guide.
Installing the Online Edition 9
Page 10

Installing from the Linux RPM Package Manager (RPM)
HP Insight Diagnostics for Linux is available for use with the Linux RPM utility. The following
RPM options are available:
• Install
• Query
• Refresh
• Uninstall
To install the Insight Diagnostics for Linux RPM file:
1. Obtain the Insight Diagnostics RPM file.
2. Log in to the target server as root.
3. Enter the following command:
rpm -Uvh <rpmFilename>
For example:
rpm -Uvh hpdiags-8.6.0-12.linux.x86_64.rpm
Locating files
During the installation, the HP Insight Diagnostics files are copied to the following directories:
• The HP Insight Diagnostics executable file is copied to the /opt/hp/hpdiags directory.
• The files for the web-based user interface, provided as a webapp, in the HP System
Management Homepage are copied to the /opt/hp/hpsmh/data/htdocs/hpdiags
directory.
Starting the Online Edition
Starting HP Insight Diagnostics for Windows Online Edition
Starting from the Windows Start menu
1. Go to Start > All Programs > HP Insight Diagnostics Online Edition for Windows.
2. Select HP Insight Diagnostics Online Edition for Windows.
Starting from HP Systems Insight Manager
1. In HP Systems Insight Manager, go to the Device page.
2. Select HP Insight Diagnostics from the Device Links box.
Starting from the HP System Management Homepage
1. Click HP System Management Homepage on the Windows desktop.
2. Click Webapps.
3. Click HP Insight Diagnostics in Other Agents.
10 Getting started
Page 11
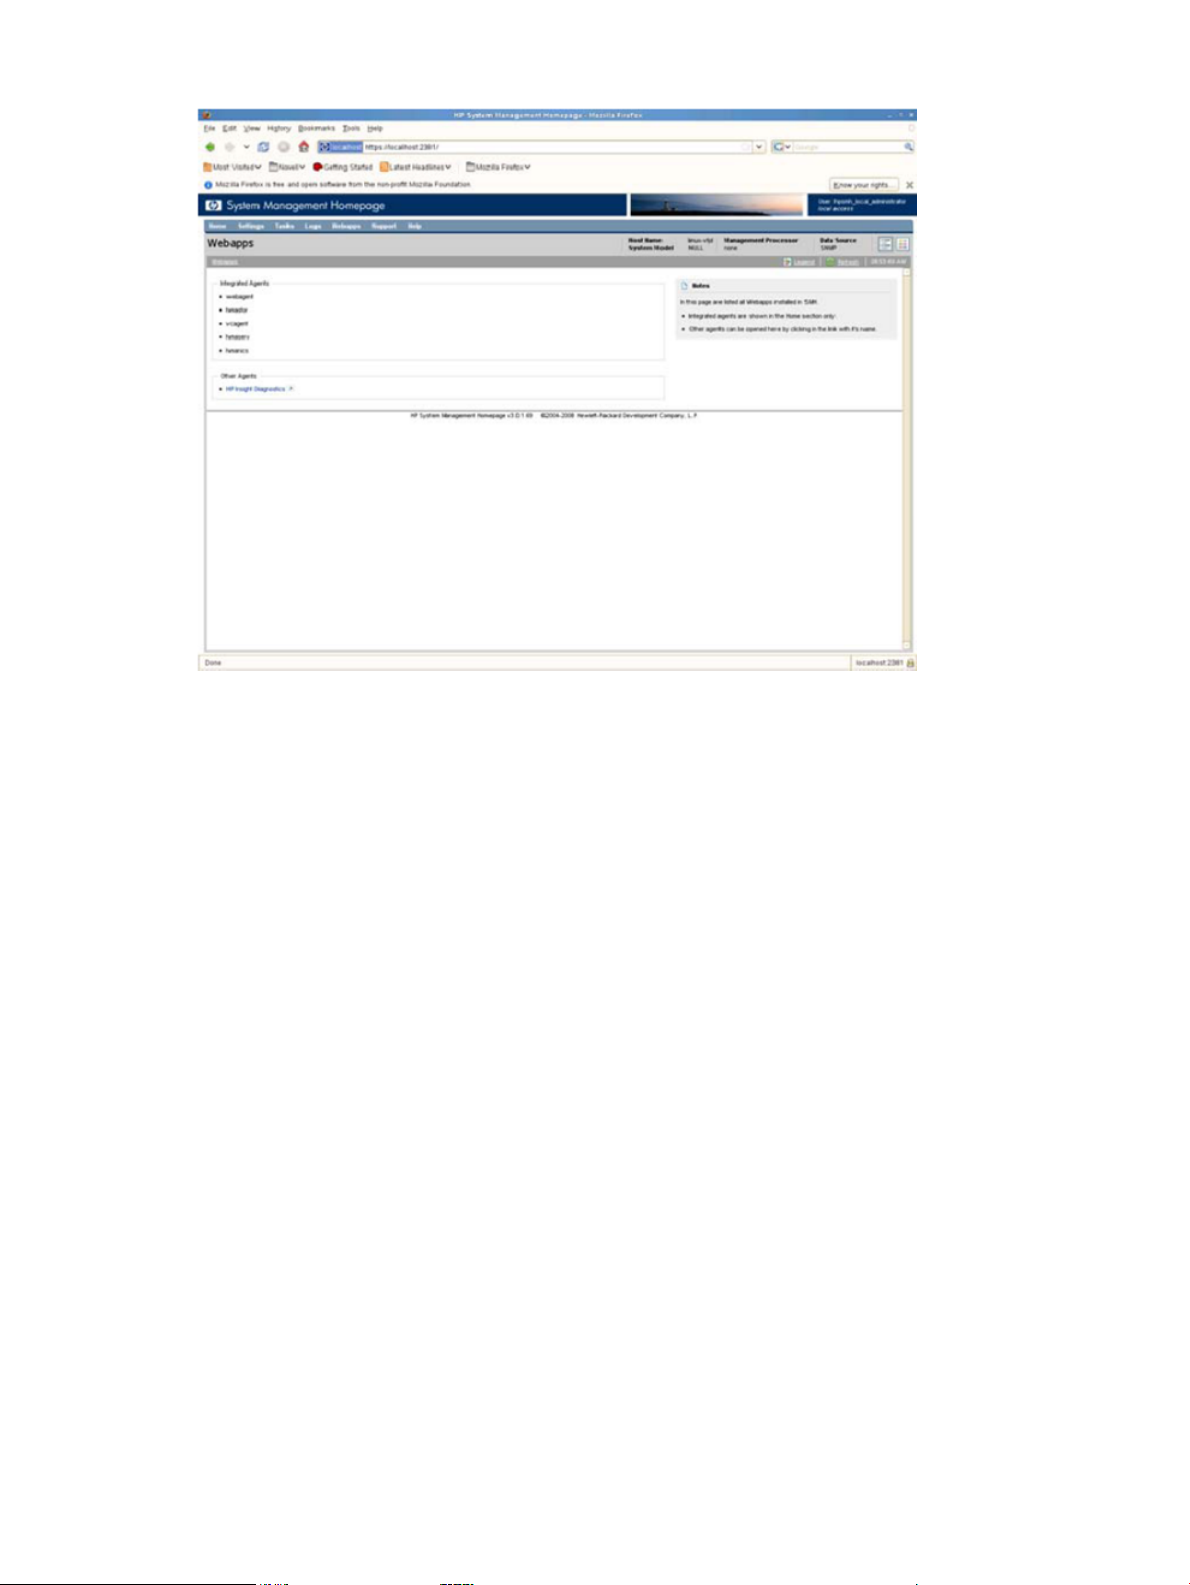
Figure 2-1 The Webapps tab
Starting HP Insight Diagnostics for Linux Online Edition from the HP System Management Homepage
1. Open the browser.
2. In the address field, enter the following:
https://localhost:2381
3. Press Enter. The System Management Homepage appears.
4. Click Webapps.
5. Click HP Insight Diagnostics in Other Agents.
Starting the Online Edition from a browser
HP Insight Diagnostics Online Edition enables you to view information from a browser meeting
the following requirements:
• Microsoft Internet Explorer 6.0 or later
• Firefox 1.5 or later
• Support for TCP/IP
• Support enabled for the following:
— Accept all cookies
— Java™
— JavaScript
— CSS
— Tables and frames
To start HP Insight Diagnostics from the browser:
1. Open the browser.
2. In the address field, enter the following:
https://localhost:2381/hpdiags/frontend2/frontend.php
Starting the Online Edition 11
Page 12

3. Press Enter.
Modifying browser settings on a Linux server
Both the browser menu bar that displays the address and the menu bar directly below it must
be minimized so that the HP Insight Diagnostics screens fit in the browser window correctly.
To minimize the menu bars:
1. Click the down arrow located between the Back and Forward buttons and the address field
to minimize the menu bar that displays the address.
2. To minimize the bottom menu bar:
1. Right-click an open space in the menu bar.
2. Select Properties.
3. Select Auto hide.
4. Click Apply.
Starting the Online Edition from Microsoft Internet Explorer
To log on to the System Management Homepage from Microsoft Internet Explorer:
1. Open the browser.
2. In the address field, enter the following:
https://devicename:2381
3. Press Enter.
The Security Alert dialog box appears the first time you navigate to a system without a
Certificate Authority Root Certificate.
The Security Alert dialog box does not display if a Certificate Authority Root Certificate is
installed on the browsers to be used for management. If it does display after this is
implemented, you might have browsed to the wrong system. For more information about
installing the Certificate Authority Root Certificate, refer to the online help in your browser.
4. Click Yes. The Login page appears.
If Anonymous access is enabled, the System Management Homepage appears.
5. Enter your user name and password.
6. Click Login. The System Management Homepage appears.
Starting the Online Edition from Firefox
To log in to the System Management Homepage with Firefox:
1. Open the browser.
2. In the address field, enter the following:
https://devicename:2381
The first time you navigate to this link, the Website Certified by an Unknown Authority
dialog box appears.
3. Click OK. The Login page appears.
If Anonymous access is enabled, the System Management Homepage appears.
4. Enter your user name and password.
5. Click Login. The System Management Homepage appears.
12 Getting started
Page 13

Using the Online Edition from a command line
The optional command line parameters are listed in Table 2-1 “Optional command line
parameters”.
Table 2-1 Optional command line parameters
DescriptionParameter
–1<LanguageCode>
-v <Level>
-s "mmhhddMMDD"
–u
-c <File1><File2>
Language Code options:
• en (for English, the default language)
• de (for German)
• es (for Spanish)
• fr (for French)
• it (for Italian)
• ja (for Japanese)
Verbosity of output where Level is an integer between 1 and 5. Level 1 is the most
filtered and Level 5 is the most verbose. The default is Level 3.
Schedule automatic execution. mm=minute (0-59), hh=hour (0-23), dd=day (1-31),
MM=month (1-12), DD=day of week (0-6). All fields must be two digits (for example,
02 instead of 2).
Use a single asterisk (*) for any value. If you use an asterisk, you must quote the
date/time value (-s "0023***"). If no asterisk is used, the quotes are optional.
This command adds an entry to your crontab for Linux-based systems, or to the
Windows Scheduled Tasks list for Windows-based systems. For more information
on crontab, enter man crontab at a Linux command prompt.
Unschedule of HP Insight Diagnostics running.
This command removes all entries that refer to HP Insight Diagnostics in your
crontab. For a Windows system, this command removes the entries in the Windows
Scheduled Tasks list.
Compare a file to the current output, or if two files are specified, compare the files
without generating a new report.
-t
-p
—o <File1>
-f
-a
–rd
-? , -h
Run a new HP Survey Utility snapshot and output to the terminal.
This option is ignored if -o is not specified.
HP Survey Utility captures and comparisons can be to a file as plain text. The default
is XML format.
Run a new HP Survey Utility snapshot and output to a file. The default is formed
using the current date in this format: surveyCCYY-MM-DD-HH-mm-ss.xml
(CC=century, YY=year, MM=month, DD=day, HH=hour, mm=minute, and
ss=second).
-t and -o cannot be used together.
Overwrite the output file if it already exists.
If the -o parameter is not specified this option is ignored.
Append the output to an existing output file.
If no -o option is specified, this option is ignored. To avoid XML parsing errors,
use this option with the plain text (-p).
Run a diagnosis of all diagnosable devices. The test results are posted to the
Diagnosis Log (diagnosislog.xml).
Display help.
Starting the Online Edition 13
Page 14

Using Insight Diagnostics Commands in Linux
To use the command line switches in Linux:
1. Open a terminal window if necessary.
2. Change to the /opt/hp/hpdiags directory.
3. Enter the command with the preferred switch.
See the following examples:
• To capture Survey configuration information for your system, and then send the XML file
to a terminal, enter either of the following commands:
— # ./hpdiags -t
— # /opt/hp/hpdiags/hpdiags -t
• For example, if, every Monday at 5:00 AM, you want Insight Diagnostics to compare the
original HP Survey Utility configuration file to the current HP Survey Utility configuration,
and then save the result to a remote file in plain-text format, enter the following command:
# ./hpdiags -s "0005**01" -c surveybase.xml -p -o
/mnt/remoteserver/surveycompare.txt
• To verify the System Management Homepage status on a Linux server, enter the following
command:
/etc/init.d/hpsmhd status
Using Insight Diagnostics Commands in Windows
To use the command line switches in Windows:
1. Open a console window if necessary.
2. Change to the C:\hp\hpdiags directory.
3. Enter the command with the preferred switch.
See the following examples:
• To capture HP Survey Utility configuration information, and then send the XML file to a
terminal, enter either of the following commands:
— C:\hp\hpdiags> hpdiags.exe -t
— Or from any directory, run C:\hp\hpdiags\hpdiags.exe -t
• For example, if, every Monday at 5:00 AM, you want Insight Diagnostics to compare the
original HP Survey Utility configuration file to the current HP Survey Utility configuration,
and then save the result to a remote file in plain-text format, and enter the following
command: C:\hp\hpdiags> hpdiags.exe -s "0005**01" -c surveybase.xml
-p -o \\server\share\surveycompare.txt
Starting the Offline Edition
Starting from an HP SmartStart CD
On an HP ProLiant server, start HP Insight Diagnostics Offline Edition from the HP SmartStart
CD:
1. Insert the HP SmartStart CD into the optical drive.
2. Shut down the operating system, and then power off the server.
3. Power on the server. The system boots from the SmartStart CD.
If the system does not boot to the CD in the optical drive, you might need to change the boot
order in the Computer Setup (F10) utility so that the system boots to the optical drive before
booting to the hard drive. For more information, see the Computer Setup (F10) Utility Guide
on the Documentation CD.
14 Getting started
Page 15

3 Using HP Insight Diagnostics
HP Insight Diagnostics contains the following primary tabs:
• Survey
• Diagnose
• Test (available only in Offline Edition)
• Status
• Log
• Help
Using the Survey tab
The HP Insight Diagnostics Survey feature displays system configuration information on the
Survey tab.
When Insight Diagnostics starts, summary information for the Overview category appears. To
view configuration details for a different subject:
1. Select the configuration details to view from the View Level list:
• Select Summary to view summary configuration information.
• Select Advanced to view detailed configuration information.
2. Select the subject to view from the Categories list:
• All displays all information about the system and subsystems.
• Overview displays general information about the system.
• Architecture displays the type of bus the system uses, the BIOS, and PCI-related
information.
• Asset Control displays the product name, serial number, asset tag, and processor
information (system identification number).
• Communication displays information about the system parallel (LPT) port, serial
(COM) port, USB, and network interface controller.
• Graphics displays information about the graphics subsystem, including the graphics
card, graphics mode, ROM, and video memory.
• Input Devices displays information about the type of keyboard, mouse, and other input
devices connected to the computer.
• Internal Conditions (if supported on system) displays information about the health of
the computer, including the fan, temperature, power supply, and health LED
information.
• Memory displays detailed information about system memory.
• Remote Management (if supported on system) displays information about iLO.
• Miscellaneous displays information obtained from CMOS, BIOS data area, Interrupt
Vector table, TPM, and diagnostics component information.
• Resources displays information about the system resources, real-time clock, and
operating system settings for certain settings, such as I/O and IRQs.
• Operating System displays information on the OS, when run in online mode.
• Storage displays information about the storage controllers and storage media connected
to the system, including hard drives, diskette drives, and optical drives. It also shows
logical volume information for all connected hard drives.
• System displays information about the system ROM, product type, processor type and
speed, and coprocessor.
Using the Survey tab 15
Page 16

Figure 3-1 Survey tab – current configuration
Scheduling a survey
1. Click Schedule Captures.
2. Select either Weekly or Monthly for the capture frequency.
3. Select the day of the week/day of the month for the capture.
4. Select the time for the capture.
5. Click OK.
Saving survey configuration information
1. Click Save to save the configuration information. The saved information is for the current
view and category on the Survey tab.
2. Save the configuration file to a USB storage device:
1. Click USB flash drive to save the file to the USB device. If a USB storage device is not
attached to the system, the USB flash drive radio button does not appear.
2. If you attach a USB storage device after clicking Save, click Rescan for devices to
detect the attached USB storage device.
3. Enter the file name in the File Name box.
3. Click Save.
The file is saved in HTML format and can be viewed by any standard Web browser.
To get an XML formatted Survey report, copy the session file from the \hpdiags directory. Survey
session files are named using the format: SurveyDATE.xml, where DATE is the date and time the
sessions were captured. A Save button, under Manage System Configurations, saves a copy
of the Survey XML file.
Deleting a survey session
1. Select Manage Configurations.
2. Check the sessions to delete.
3. Click Delete.
16 Using HP Insight Diagnostics
Page 17

Comparing configurations
1. Click Compare System Configuration.
2. Select a survey session from the Configuration 1 list.
3. Select a survey session from the Configuration 2 list.
4. Select View Changes Only to display only the differences.
5. Select the configuration details to view from the View Level list:
• Select Summary to view summary configuration information.
• Select Advanced to view detailed configuration information.
6. Select the subject to view from the Categories list:
• All displays all information about the system and subsystems.
• Overview displays general information about the system.
• Architecture displays the type of bus the system uses, the BIOS, and PCI-related
information.
• Asset Control displays the product name, serial number, asset tag, and processor
information (system identification number).
• Communication displays information about the system parallel (LPT) port, serial
(COM) port, USB, and network interface controller.
• Graphics displays information about the graphics subsystem, including the graphics
card, graphics mode, ROM, and video memory.
• Input Devices displays information about the type of keyboard, mouse, and other input
devices connected to the computer.
• Internal Conditions (if supported on system) displays information about the health of
the computer, including the fan, temperature, power supply, and health LED
information.
• Memory displays detailed information about system memory.
• Remote Management (if supported on system) displays information about iLO and
RILOE II cards.
• Miscellaneous displays information obtained from CMOS, BIOS data area, Interrupt
Vector table, TPM, and diagnostics component information.
• Resources displays information about the system resources, real-time clock, and
operating system settings for certain settings, such as I/O and IRQs.
• Operating System displays information on the OS.
• Storage displays information about the storage controllers and storage media connected
to the system, including hard drives, diskette drives, and optical drives. It also shows
logical volume information for all connected hard drives.
• System displays information about the system ROM, product type, processor type and
speed, and coprocessor.
7. Click View Comparison Results.
8. Click Current Configuration to return to the current configuration information.
9. Click Print to print the configuration comparison details.
10. Click Save to save the configuration comparison details to a file.
Using the Survey tab 17
Page 18

Figure 3-2 Survey tab – Compare configurations
Using the Diagnose tab
The HP Insight Diagnostics Diagnose feature performs diagnosis on the following devices:
• Hard drives attached to an HP Smart Array Controller
• Power supplies that are deemed diagnosable
To start a diagnostic test:
1. Click Diagnose.
2. Select the device to diagnose:
• Select All Devices to assess the health of all logical volumes and power supplies.
• Select one or more specific logical volumes or power supplies to assess the health of
the selected devices.
3. Click Diagnose.
18 Using HP Insight Diagnostics
Page 19

Figure 3-3 Diagnose tab
If the computer does not have any logical volumes or power supplies that are diagnosable, the
following message appears:
System does not have any diagnosable devices installed.
Using the Test tab (HP Insight Diagnostics Offline Edition only)
IMPORTANT: This feature is available only in HP Insight Diagnostics Offline Edition.
The offline HP Insight Diagnostics Test feature provides options for diagnostic testing of all
major hardware components in the system. Three tests are available on the Test tab:
• Quick Test runs a predetermined test script for which a sample of each hardware component
is exercised and requires no user intervention.
• Complete Test runs a predetermined script for which each hardware component is tested
fully.
• Custom T est runs only the tests selected. This test is the most flexible option, with selections
for specifying devices, tests, and test parameters.
Running a Quick Test
1. Click Quick Test.
2. Select the test mode:
• Interactive runs all tests, some of which require user input.
• Unattended runs the tests that do not require user input.
3. Select the test duration:
• Loops runs the test for the specified number of test cycles.
• Total Test Time (minutes) runs the test for the specified length of time.
4. Select Stop on First Error to stop all tests if an error occurs.
Using the Test tab (HP Insight Diagnostics Offline Edition only) 19
Page 20

5. Select the device to test:
• Select the All Devices check box to test all devices.
• Select the check box for one or more devices to test specific devices.
6. Click Begin Testing.
Figure 3-4 Test tab – Quick Test
The Status tab displays test progress. The logs, on the Log tab, display detailed test results.
Running a Complete Test
1. Click Complete Test.
2. Select the test mode:
• Interactive runs all tests, some of which require user input.
• Unattended runs the tests that do not require user input.
3. Select the test duration:
• Loops runs the test for the specified number of test cycles.
• Total Test Time (minutes) runs the test for the specified length of time.
4. Click Stop on First Error to stop all tests if an error occurs.
5. Select the device to test:
• Select All Devices to test all devices.
• Select the check box for one or more devices to test specific devices.
6. Click Begin Testing.
20 Using HP Insight Diagnostics
Page 21

Figure 3-5 Test tab – Complete Test
The Status tab displays test progress. The logs, on the Log tab, display detailed test results.
Running a Custom Test
1. Click Custom Test.
2. Select the test mode:
• Interactive runs all tests, some of which require user input.
• Unattended runs the tests that do not require user input.
3. Select the test duration:
• Loops runs the test for the specified number of test cycles.
• Total Test Time (minutes) runs the test for the specified length of time.
4. Click Stop on First Error to stop all tests if an error occurs.
5. Select the device and tests:
• Click Check All to run all device-specific tests.
• Click Uncheck All to clear any check boxes that are selected.
• Click Expand to view the available device-specific tests, and then select the check box
for tests to run. Click on the test to enable any parameter updates/changes. Edits to the
parameters can be made in the window on the right of the screen.
6. Click Begin Testing.
Using the Test tab (HP Insight Diagnostics Offline Edition only) 21
Page 22

Figure 3-6 Test tab – Complete Test
The Status tab displays test progress. The logs, on the Log tab, display detailed test results.
Using the Status tab
The Status tab displays testing progress and results
Viewing Diagnose test status
The progress and status of the Diagnose process appears on the Status tab when Diagnose
completes
The progress bar shows the test progress. During tests of longer duration, the Status screen
refresh rate varies.
To cancel the test in progress, click Cancel.
To repeat the test, click Retest.
The Device Diagnosis sections display device-specific details and test results and details for each
device.
Test results are indicated as follows:
• Canceled: The test did not complete or was canceled.
• Passed: The test passed and the device is operating within specifications.
• Failed: The device failed the test, or the test itself failed. A failure indicates that additional
testing should be performed on the device.
• Further Troubleshooting Required: A communication problem exists that could be related
to the health of the device. Perform additional troubleshooting procedures to determine the
problem or use the Custom Test option on the Test tab to retest the device. Custom testing
can be performed only with HP Insight Diagnostics Offline Edition.
• Abnormal termination: The test terminated abnormally.
Click Identify Drive to identify the specific hard drive in the computer that may contain the
volume. The hard drive LED indicates the location of the volume as follows:
• A SCSI hard drive containing the logical volume flashes the hard drive LED.
• A SATA or SAS hard drive containing the logical volume illuminates a blue hard drive LED.
22 Using HP Insight Diagnostics
Page 23

Figure 3-7 Test status
Viewing offline test status
The progress and status of offline quick, complete, or custom testing appears on the Status tab
as follows:
• Device displays the specific device being tested.
• Test displays the specific test running.
• Status displays the test results as follows:
— Canceled: The test did not complete or was canceled.
— Passed: The test passed, and the device is operating within specifications.
— Failed: The device failed the test, or the test itself failed. A failure indicates that
additional testing should be performed on the device.
— Further Troubleshooting Required: A communication problem exists that could be
related to the health of the device. Perform additional troubleshooting procedures to
determine the problem or use the Custom test option on the Test tab to retest the device.
— Abnormal termination: The test terminated abnormally.
• Test Progress displays the progress of the testing.
• Time displays the time elapsed for the specific test.
To cancel the test in progress, click Cancel.
To repeat the testing, click Retest.
To view all test failure information, view the Error Log on the Log tab.
Using the Status tab 23
Page 24

Figure 3-8 Custom test results
The Log tab
The Log tab includes four logs containing historical testing and diagnosis information:
• Diagnosis Log displays the following details on the tested devices after Diagnose completes.
— The pass/fail status
— The list of devices diagnosed
— The number of times Diagnose ran
— The number of times the test failed
— The number of times the test passed
— The time it took to run Diagnose on each device during the last execution
• Test Log (available only in HP Insight Diagnostics Offline Edition) displays detailed offline
test details.
• Error Log displays the tests that have failed during the diagnostic testing.
• Integrated Management Log displays POST errors and diagnostic errors. The IML records
system events, critical errors, power-on messages, memory errors, and any catastrophic
hardware or software errors that typically cause a system to fail. The IML enables the
manipulation of this data.
Diagnosis Log tab
Detailed results of Diagnose appear in the Diagnosis Log on the Log tab.
The Diagnosis Log displays the following information:
• The status indicator for each power supply or logical volume diagnosed
• The specific power supply or logical volume diagnosed
• The number of times the diagnostic test was run
• The number of times the diagnostic test failed
• The time required to complete the diagnostic test
To clear the contents of the Diagnose Log, click Clear Diagnosis Log.
24 Using HP Insight Diagnostics
Page 25

Test Log
To save the Diagnose Log to an HTML file onto a storage device such as a USB disk or diskette,
click Save.
IMPORTANT: This feature is available only in HP Insight Diagnostics Offline Edition.
Detailed test results of offline testing appear in the Test Log on the Log tab.
The Test Log displays the following information:
• The status indicator for each test
• The completed tests
• The number of times the test was run
• The number of times the test failed
• The time it took to complete the test
• The date that this same test was last completed
To clear the contents of the Test Log, click Clear Test Log.
To save the Test Log to an HTML file onto a storage device such as a USB disk or diskette, click
Save.
Figure 3-9 Test Log
Error Log tab
The Error Log tab displays the following diagnostic information for failed devices:
• The device and test that failed
• A description of and details about the error
• The recommended repair action for the failed hardware issue
• The failed count, the number of times the test has failed
To remove the Error Log entries, click Clear Error Log.
To save the Error Log to an HTML file onto a storage device such as a USB disk or diskette, click
Save.
The Log tab 25
Page 26

To find detailed information about specific error codes, see (page 28).
Figure 3-10 Error Log
Integrated Management Log tab
The Integrated Management Log (IML) tab contains system errors discovered during POST and
by the System Management driver during normal operations. IML entries are dated and have
severity levels and error counts that can be used to help isolate a problem. The Integrated
Management Log on the Log tab displays the current entries in the IML.
Each IML entry displays the following information about a failed device
• One of the following severity levels:
— Information indiciates general information about a system event
— Repaired indicates this entry has been repaired
— Caution indicates a non-fatal error condition has occurred
— Critical/Failed indicates a device failure
• Class
• Last Update
• Initial Update
• Count
• Description
From this tab, the following actions are available:
• To change the severity level to Repaired, click Set Selected Items to Repaired.
• To select all IML entries, click Check All.
• To deselect any selected IML entries, click Uncheck All.
• To enter any text or note into the IML, click Add Maintenance Note.
26 Using HP Insight Diagnostics
Page 27

• To remove all IML entries, click Clear IML. HP recommends saving the current contents in
a file before clearing the log.
• To save the IML Log to an HTML file onto a storage device such as a USB disk or diskette,
click Save. This operation does not affect the current contents of the IML, but it does archive
IML data for use when working with HP to diagnose issues.
Figure 3-11 Integrated Management Log
Help tab
The Help tab provides information on using HP Insight Diagnostics, such as the tab interface,
overview categories, test mode descriptions, device test descriptions, error codes and descriptions,
logging capabilities, and failure information.
About HP Insight Diagnostics
The HP Insight Diagnostics tab provides the details of the Insight Diagnostics software and
searchable help information about operating Insight Diagnostics.
To search the help files, click Search Help Files.
Help tab 27
Page 28

Figure 3-12 HP Insight Diagnostics Help tab
Error codes
IMPORTANT: This feature is available only in HP Insight Diagnostics Offline Edition.
The Error Codes tab describes each numerical error code and the recommended actions for each
error.
To find a specific error code description:
1. Enter the error code into the text box.
2. Click Find Error Codes.
To find general error code information, use the scroll bar to browse the list of the Insight
Diagnostics error codes and a description of each.
Figure 3-13 Find Error Codes
28 Using HP Insight Diagnostics
Page 29

Test components
IMPORTANT: This feature is available only in HP Insight Diagnostics Offline Edition.
The Test Components tab provides a detailed description of the test that was run.
Figure 3-14 Test Components
Saving and printing information in HP Insight Diagnostics
You can save the information displayed in the HP Insight Diagnostics Survey and Log tabs to a
diskette or a USB HP Drive Key. You cannot save to the hard drive if you are using HP Insight
Diagnostics Offline Edition. The system automatically creates an HTML file that has the same
appearance as the information displayed on the screen.
To save and print:
1. Insert a diskette or USB HP Drive Key:
• If you insert an HP Drive Key, click Reload for the system to recognize the new device.
• If you inserted an HP Drive Key before booting to the CD, you do not need to click
Refresh.
2. Click Save.
3. Select Save to the floppy or Save to USB key. For supported USB devices, see the system
documentation.
4. Enter a file name in the File Name field, and then click Save. An HTML file is saved to the
diskette or USB HP Drive Key.
5. Print the information from the storage device, when using Offline Edition.
Exiting HP Insight Diagnostics
To exit HP Insight Diagnostics Online Edition, close the browser window. Click Exit Diagnostics.
To exit HP Insight Diagnostics Offline Edition:
1. Click Exit Diagnostics.
2. Remove the CD from the optical drive.
Saving and printing information in HP Insight Diagnostics 29
Page 30

Uninstalling HP Insight Diagnostics Online Edition
Uninstalling HP Insight Diagnostics from a Windows server
1. Go to Add/Remove Programs, and then select HP Insight Diagnostics Online Edition
for Windows.
2. Click Uninstall. HP Insight Diagnostics program files and Insight Diagnostics registry data
are deleted.
3. Manually remove the \hp\hpdiags directory and any of the following files that remain
on the computer:
• Survey session files
• Test log files
• Error log files
Uninstalling HP Insight Diagnostics from a Linux server
1. Enter the following RPM command:
rpm -e hpdiags
2. Manually remove the \hp\hpdiags directory and any of the following files that remain
on the computer:
• Survey session files
• Test log files
• Error log files
30 Using HP Insight Diagnostics
Page 31

4 Troubleshooting
Troubleshooting memory
The memory test component can perform the following tests:
• Address test–This test verifies the integrity of the address buses connecting the processors
to the memory modules. Verification is done by writing data to all possible addresses that
have only 1 bit either set (1) or reset (0), having alternate bits set, having all bits high, and
having all bits low. The purpose of this test is to check for address lines that are either shorted
to ground, shorted to a highvoltage signal, shorted to other address lines, or floating
(disconnected). This test alone might not indicate a hard failure.
• Walk test–This test verifies the integrity of the data buses connecting the processors to the
memory modules. Verification is done by writing data to all possible addresses that have
only 1 bit either set (1) or reset (0), having alternate bits set, having all bits high, and having
all bits low. The purpose of this test is to check for data lines that are either shorted to ground,
shorted to a high-voltage signal, shorted to other address lines, or floating (disconnected).
This test alone might not indicate a hard failure.
• Noise test–This test verifies memory integrity by writing the inverse of the current test
address to the current test address. The current test address alternates between the start and
the end of the current test block, incrementing or decrementing the address until the entire
block has been accessed. The purpose of this test is to check for address and data bus
transition problems when these lines are forced high and low as rapidly as possible. A failure
of this test indicates a failure of the DIMM.
• March test–This test is similar to a true walk bit test and is able to detect the following:
address faults, stuck-at faults, transition faults, coupling faults, and linked coupling faults.
These types of faults occur when memory cells within a bit cell array affect the operation of
nearby memory cells. In many cases, static type tests do not detect these failures. A failure
of this test indicates a failure of the DIMM.
• Random address test–This test verifies memory integrity by running a random pattern
across a given test range. The addresses used to store the patterns are selected randomly
and normalized to fit within the current test block. The purpose of this test is to detect
intermittent memory problems that can be caused by temperature, variable clock speeds,
variable voltages, signal timing, manufacturing faults, variable refresh rates, and decay.
This test is also useful in detecting memory faults that might not be detected by other static
tests. A failure of this test indicates a failure of the DIMM.
Not all the memory in a system can be tested because of the operating system and applications
that are installed. As a best practice, use the default setting for each test. The default settings
help ensure the maximum amount of memory that is available is tested.
To test memory thoroughly, run as many loops as possible in the time allowed. If time is critical,
and all memory tests cannot be run, then HP recommends running the Random Address test
and the Noise test. These two tests can catch the most errors.
Troubleshooting disk drives and storage systems
To further troubleshoot a disk drive, or if you continue experiencing storage-related issues after
running Diagnose, perform the following tasks:
• Search for known storage-related issues on the HP website at http://www.hp.com. To search
for customer advisories related to ProLiant servers configured with Smart Array controllers,
use the following search string: +ProLiant +Advisory +"Smart Array".
• Update the controller driver and firmware revision and any drive-related software
components such as firmware updates, management agents, and storage utilities.
Troubleshooting memory 31
Page 32

• Re-seat physical drives and controllers.
• Check drive cables and connectors for any signs of damage or bent pins.
IMPORTANT: To minimize downtime, HP recommends that steps involving the reseating of
drives and controllers be performed simultaneously. Perform steps involving multiple drive
reseating, controller reseating, and cable inspection with the server powered off.
TIP: When powering down a system using external storage, power down the server before
powering down the external storage. When powering up the system, power on the external
storage before powering on the server. This action prevents the possibility of drives being failed
erroneously by the controller.
A server power failure before the test, can also cause erroneous failures.
For more troubleshooting procedures, see the HP ProLiant Servers Troubleshooting Guide located
on the HP website at http://www.hp.com.
To troubleshoot the backplane, controller, and cables, do the following:
• Check drive cables for any signs of damage or bent pins. Try another drive cable from another
server, if possible.
• If you are able to identify a bad bay, replace the hard drive backplane.
If the backplane and drive cables have already been replaced, the problem may be a bad
controller.
• Determine if the controller is good by moving it to another server. Boot the server,and watch
for any POST errors. If the controller has already been replaced, the problem is likely to be
a bad backplane or cable.
Where to go for additional help
Related documentation
The following documents [and websites] provide related information:
• HP ProLiant Support Pack and Deployment Utilities User Guide
• HP ProLiant Servers Troubleshooting Guide
You can find these documents from the Manuals page of the HP Business Support Center website:
http://www.hp.com/support/manuals
In the server section, click link label and then select your product.
HP websites
For additional information, see the following HP websites:
• http://www.hp.com
• http://www.hp.com/service_locator
• http://www.hp.com/support/manuals
IT Resource Center
The IT Resource Center contains software and drivers, user guides, part information, technical
forums, and information on training and education. For more information, see http://itrc.hp.com.
32 Troubleshooting
Page 33

Support and drivers
For support software, driver updates, ROM updates, product bulletins, warranty information,
manuals, and email-based support, see http://www.hp.com/go/support.
Subscription service
HP recommends that you register your product at the Subscriber's Choice for Business website:
http://www.hp.com/go/e-updates
After registering, you will receive e-mail notification of product enhancements, new driver
versions, firmware updates, and other product resources.
Subscription service 33
Page 34

34
Page 35

5 HP Technical Support
For worldwide technical support information, see the HP support website:
http://www.hp.com/support
Before contacting HP, collect the following information:
• Product model names and numbers
• Technical support registration number (if applicable)
• Product serial numbers
• Error messages
• Add-on boards or hardware
• Operating system type and revision level
• Detailed questions
HP contact information
For the name of the nearest HP authorized reseller:
• See the Contact HP Worlwide webpage at http://welcome.hp.com/country/us/en/
wwcontact.html
For HP technical support:
• In the United States, for contact options see the Customer Service/Contact HP United States
webpage at http://welcome.hp.com/country/us/en/contact_us.html. To contact HP by phone:
— Call 1-800-HP-INVENT (1-800-474-6836). This service is available 24 hours a day, 7 days
a week. For continuous quality improvement, calls may be recorded or monitored.
— If you have purchased a Care Pack (service upgrade), call 1-800-633-3600. For more
information about Care Packs, refer to the HP website at http://www.hp.com/hps.
• In other locations, see the Contact HP Worldwide (in English) webpage at http://
welcome.hp.com/country/us/en/wwcontact.html.
Customer Self-Repair
HP products are designed with many Customer Self Repair (CSR) parts to minimize repair time
and allow for greater flexibility in performing defective parts replacement. If during the diagnosis
period HP (or HP service providers or service partners) identifies that the repair can be
accomplished by the use of a CSR part, HP will ship that part directly to you for replacement.
There are two categories of CSR parts:
• Mandatory–Parts for which customer self repair is mandatory. If you request HP to replace
these parts, you will be charged for the travel and labor costs of this service.
• Optional–Parts for which customer self repair is optional. These parts are also designed for
customer self repair. If, however, you require that HP replace them for you, there may or
may not be additional charges, depending on the type of warranty service designated for
your product.
NOTE: Some HP parts are not designed for customer self repair. In order to satisfy the customer
warranty, HP requires that an authorized service provider replace the part. These parts are
identified as No in the Illustrated Parts Catalog.
Based on availability and where geography permits, CSR parts will be shipped for next business
day delivery. Same day or four-hour delivery may be offered at an additional charge where
geography permits. If you require assistance, you can call the HP Technical Support Center and
a technician will help you over the telephone. HP specifies in the materials shipped with a
HP contact information 35
Page 36

replacement CSR part whether a defective part must be returned to HP. In cases where it is
required to return the defective part to HP, you must ship the defective part back to HP within
a defined period of time, normally five (5) business days. The defective part must be returned
with the associated documentation in the provided shipping material. Failure to return the
defective part may result in HP billing you for the replacement. With a customer self repair, HP
will pay all shipping and part return costs and determine the courier/carrier to be used.
For more information about the HP Customer Self Repair program, contact your local service
provider. For the North American program, refer to the HP website at http://www.hp.com/go/
selfrepair.
36 HP Technical Support
Page 37

A Acronyms and abbreviations
Basic Input/Output SystemBIOS
Complementary Metal-Oxide SemiconductorCMOS
Serial port interfaceCOM
Customer Self RepairCSR
Cascading Style SheetsCSS
HyperText Markup LanguageHTML
Integrated Lights-OutiLO
Integrated Management LogIML
Interrupt ReQuestIRQ
Light-Emitting DiodeLED
Line Print TerminalLPT
Linux Support PackLSP
Operating SystemOS
Peripheral Component InterconnectPCI
Power-On Self TestPOST
ProLiant Support PackPSP
Read-Only MemoryROM
Red Hat Package ManagerRPM
Serial Attached SCSISAS
Serial ATASATA
Small Computer System InterfaceSCSI
Transmission Control Protocol/Internet ProtocolTCP/IP
Trusted Platform ModuleTPM
Universal Serial BusUSB
EXtensible Markup LanguageXML
37
Page 38

38
Page 39

Index
A
about HP Insight Diagnostics
editions, 7
B
benefits, 7
browser
modifying in Linux, 12
starting from, 11
C
command line
starting from, 13
command line parameters, 13
Complete test, 20
configurations
compare, 17
Custom test, 21
customer self repair, 35
D
Diagnose log, 24
Diagnose tab, 18
Diagnose test status, 22
document
related documentation, 32
documentation
HP website, 32
E
error codes, 28
Error log, 25
F
features, 7
Firefox
starting from, 12
H
help, 27
about HP Insight Diagnostics, 27
additional, 32
obtaining, 35
HP
technical support, 35
HP contact, 35
HP Insight Diagnostics
exiting, 29
HP Insight System Management Homepage
starting from, 10
HP Proliant Linux Support Pack
Installing from, 9
HP Proliant Support Pack
installing from, 9
HP SmartStart CD
starting from, 14
HP Systems Insight Manager
starting from, 10
I
IML log, 26
Insight Diagnostics Commands
in Linux, 14
Insight Diagnostics commands
in Windows, 14
IT resource center, 32
L
locating files, 10
Log tab, 24
M
MS Internet Explorer
starting from, 12
O
offline test status, 23
Q
Quick test, 19
R
related documentation, 32
related documents, 32
remove HP Server Utility, 9
RPM Package Manager
installing from, 10
S
saving and printing information, 29
Smart Component
installing from, 9
Status tab, 22
Subscriber's Choice, 33
Subscriber's Choice, HP, 33
support and drivers, 33
survey
configuration, 16
deleting a session, 16
scheduling, 16
Survey tab, 15
system requirements, 8
T
technical support
HP, 35
service locator website, 32
test components, 29
Test log, 25
theory of operation, 7
troubleshooting
39
Page 40

disk drives and storage systems, 31
memory, 31
U
using HP Insight Diagnostics, 15
W
Webapps, 11
websites, 32
customer self repair, 35
HP , 32
HP Subscriber's Choice for Business, 33
product manuals, 32
Windows Start menu
starting from, 10
40 Index
 Loading...