

Page 1
x4
?
Read these instructions carefully...
What you will need for this procedure
- Because some of the components of the printer
are bulky, you will need up to four people to
lift them. When this is necessary, this symbol
is displayed:
- To assemble the printer you will need at least
3 × 5 m (10 × 16 ft) of empty oor space, and
about four hours.
Bu yönergeleri dikkatle okuyun...
Bu yordam için nelere gereksiniminiz var?
- Yazıcının bazı bileşenleri büyük olduğundan
taşımak için dört kişi gerekebilir. Bu gerektiğinde
bir simge görüntülenir.
- Yazıcının montajı için etrafında en az 3 x 5 m boş
alan olmalıdır. Bu işlem yaklaşık dört saat sürer.
Přečtěte si pozorně následující pokyny…
Co budete potřebovat při sestavení tiskárny
- Protože jsou některé části tiskárny objemné, bude
možná zapotřebí čtyř lidí pro jejich zdvižení.
V případě potřeby se zobrazí tento symbol:
- Pro sestavení tiskárny bude potřeba nejméně
3 × 5 m volného prostoru na zemi a asi čtyři
hodiny času.
Kérjük, tanulmányozza át az alábbi
utasításokat...
Mire lesz szüksége a nyomtató üzembe
helyezéséhez
- A nyomtató egyes alkatrészei nagyon nehezek,
megemelésükhöz akár négy emberre is szükség
lehet. Ezeket a műveleteket az alábbi ikon jelzi:
- A nyomtató összeszereléséhez legalább 3 x 5 m
szabad terület és körülbelül négy óra szükséges.
HP Designjet 4520 with Scanner.
If you have bought the HP Designjet 4520 with
a scanner, you can reduce the overall setup time
by assembling the scanner rst and then switching
it on. The scanner will take one hour to warm up
when started for the rst time.
Tarayıcılı HP Designjet 4520.
Tarayıcılı HP Designjet 4520 satın aldıysanız,
önce tarayıcıyı monte edip açarak toplam
kurulum süresini azaltabilirsiniz. Tarayıcının
ilk başlatıldığında ısınması bir saat sürecektir.
Tiskárna HP Designjet 4520 se skenerem.
Pokud jste zakoupili zařízení HP Designjet 4520
se skenerem, můžete snížit celkový čas instalace
tím, že nejprve sestavíte a zapnete skener. Skener
bude při prvním spuštění potřebovat jednu hodinu
na zahřátí.
HP Designjet 4520 lapolvasóval.
Ha a HP Designjet 4520 lapolvasóval kiegészített
változatát vásárolta meg, akkor a teljes üzembe
helyezési idő csökkentéséhez előbb szerelje
össze és kapcsolja be a lapolvasót. Az első
bekapcsoláskor a lapolvasó bemelegedése
egy órát vesz igénybe.
In case of difculty, please consult:
- Your printer’s Embedded Web Server
- Driver and Documentation CD
Sorun olması durumunda lütfen buraya başvurun:
- Yazıcınızın Katıştırılmış Web Sunucusu
- Driver and Documentation CD
(Sürücü ve Belge CD’si)
V případě potížíse obraťte na:
- Integrovaný webový server tiskárny
- Disk CD s ovladači a dokumentací
Nehézség esetén a segítségére lehet:
- A nyomtató beépített webszervere
- Driver and Documentation
(Illesztőprogram és dokumentáció) CD
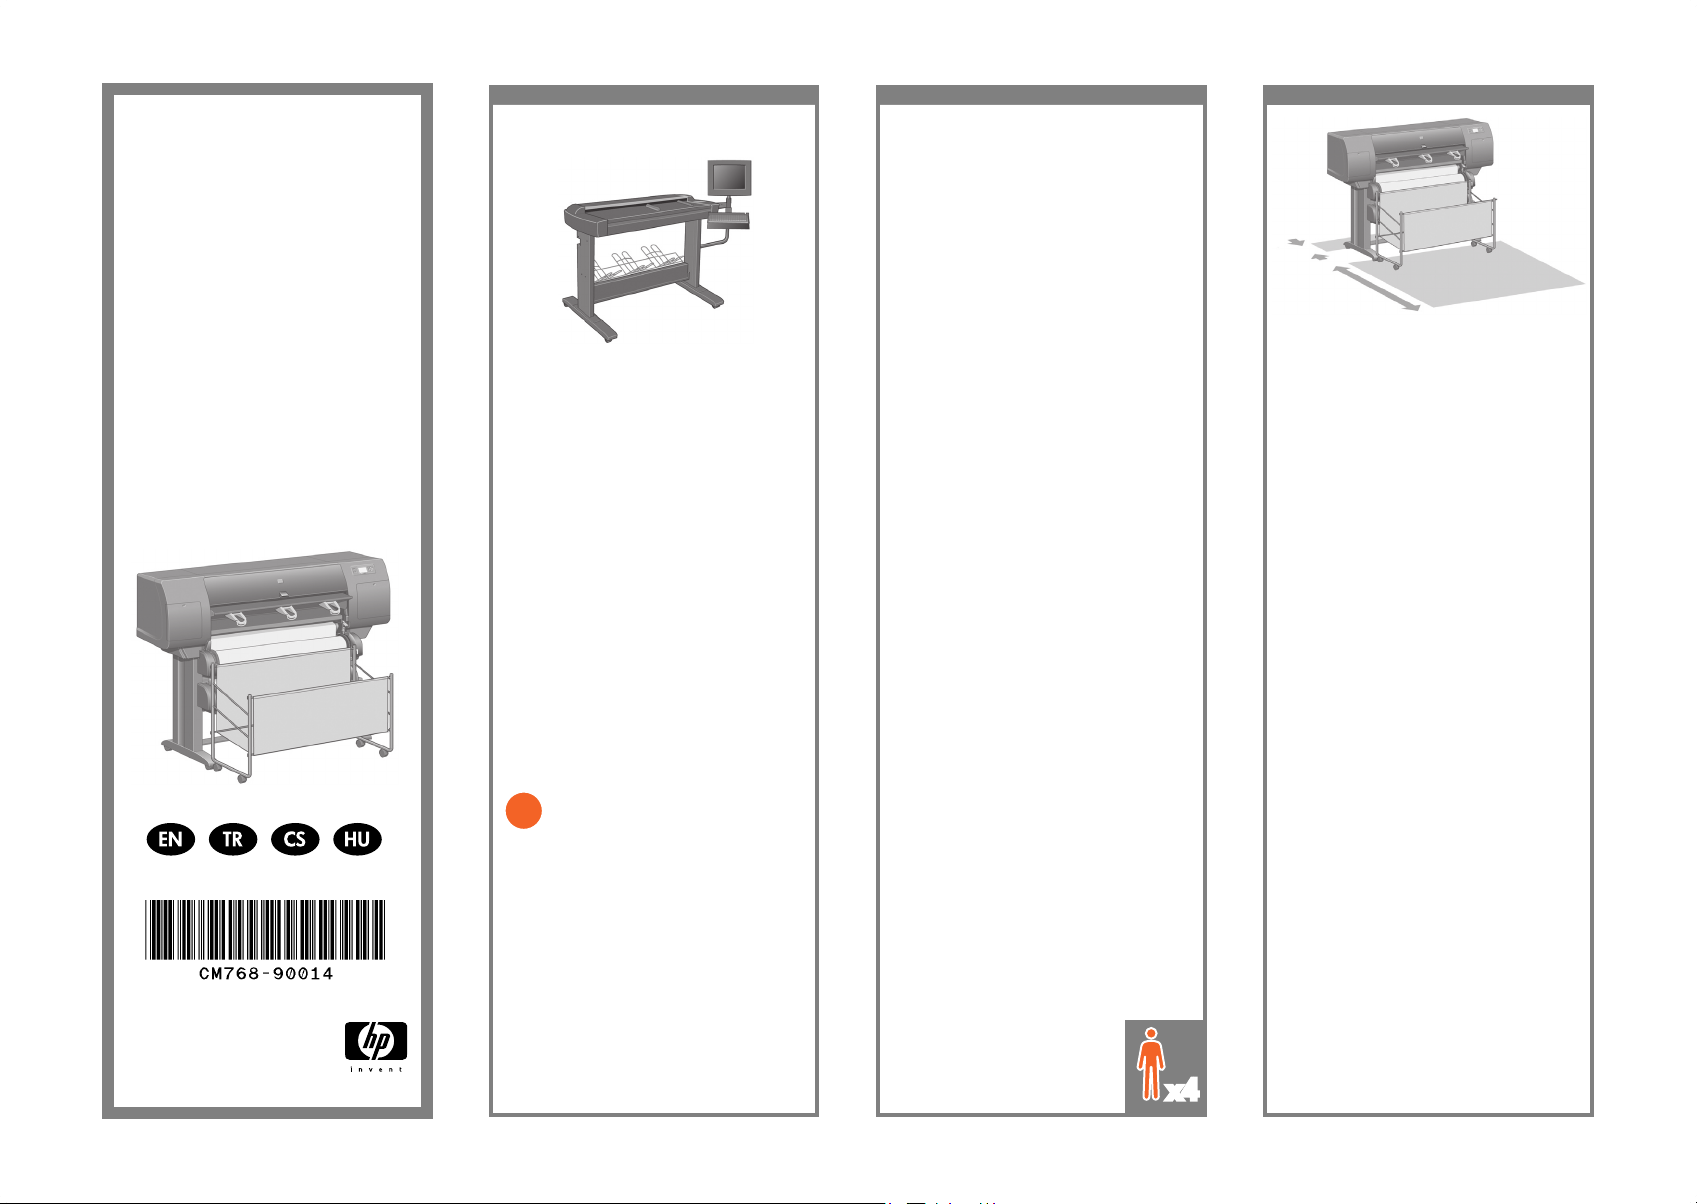
Printer working area
Before you start unpacking, consider where
you are going to put the assembled printer.
You should allow some clear space on all sides
of the printer box. The recommended clearances
are shown in the illustration above.
Yazıcının çalışma alanı
Ambalajları açmaya başlamadan önce monte
edilen yazıcıyı koyacağınız yeri dikkatlice
belirleyin. Yazıcının arkasında ve önünde biraz
boş alan bırakmalısınız. Önerilen boş alanlar
yukarıdaki şekilde gösterilmiştir.
Pracovní oblast tiskárny
Než začnete tiskárnu rozbalovat, rozmyslete si,
kam chcete sestavenou tiskárnu umístit. U zadní
a přední strany tiskárny by měl být ponechán
dostatečný volný prostor. Doporučené volné
místo je zobrazeno na obrázku výše.
A nyomtató üzembe helyezésének helye
Mielőtt elkezdené kicsomagolni, gondolja
át, hova fogja elhelyezni a már összeszerelt
nyomtatót. Fontos, hogy a nyomtató háta mögött
és előtt is maradjon szabad terület. Az ajánlott
távolságokat a fenti ábráról olvashatja le.
HP Designjet 4520/4520ps
Printer Assembly Instructions
HP Designjet 4520/4520ps
Printer Montaj Yönergeleri
HP Designjet 4520/4520ps
Printer Pokyny pro sestavení
HP Designjet 4520/4520ps
Printer Összeszerelési
utasítások
Scanner (mfp only)/Tarayıcı (yalnızca mfp)/
Skener (pouze víceúčelové zařízení)/Lapolvasó
(csak többfunkciós készülék esetén)
© 2009 Hewlett-Packard Company
Inkjet Commercial Division
Avenida Graells 501 · 08174
Sant Cugat del Vallès
Barcelona · Spain
All rights reserved
Printed in Germany · Imprimé en Allemagne · Stampato in Germania
10 cm
179 cm
Page 2

1 2 3 4
Cut the strap around the boxes carefully, as
the boxes may fall as soon as the strap is cut.
Bant kesildiğinde kutular düşebileceğinden,
kutuların etrafındaki bandı dikkatlice kesin.
Opatrně přestřihněte pásku kolem krabic tak,
aby krabice po přestřižení nespadly.
Vágja el óvatosan a dobozokat tartó pántot,
ügyelve arra, nehogy a dobozok leessenek.
Preliminary unpacking: Outside Europe
Paketi ilk defa açma: Avrupa Dışında
Předběžné rozbalení: Mimoevropské země/oblasti
Előkészületek: Európán kívüli területek
The shapes on the boxes identify the contents.
Kutulardaki şekiller içindekileri belirtir.
Symboly na krabicích označují jejich obsah.
A dobozokon levő jelek a dobozok tartalmát jelölik.
Shape
Kutudaki
işaret
Značka
na krabici
Jelzés a
dobozon
Contents
Kutunun içindekiler
Obsah krabice
Tartalom
Printer body
Yazıcı gövdesi
Tělo tiskárny
A nyomtató
Stand and bin assembly
Sehpa ve kağıt rafı düzeneği
Podstavec a zásobník
Állvány és papírtartó egység
Consumables box, including…
Maintenance Kit (keep safe)
Tüketim malzemeleri; içindekiler…
Bakım Seti (lütfen bunu saklayın)
Krabice se spotřebním materiálem včetně …
soupravy pro údržbu (bezpečně uschovejte)
Tartozékok doboza, többek között...
a Karbantartási csomag (ezt őrizze meg).
Spare box (used on page I and J of these
setup instructions)
Yedek kutu (bu kurulum yönergelerinin
I ve J sayfalarında kullanılır)
Krabice s náhradním materiálem (viz
strany I a J těchto pokynů k sestavení)
Tartalék doboz (amelyre az Üzembe
helyezési útmutató I. és J. oldalán lesz
szükség)
Roll module
Rulo modülü
Modul s nekonečným papírem
Tekercsegység
Scanner body (mfp only)
Tarayıcı gövdesi (yalnızca mfp)
Tělo skeneru (pouze víceúčelové zařízení)
A lapolvasó (csak többfunkciós készülék
esetén)
Scanner stand (mfp only)
Tarayıcı sehpası (yalnızca mfp)
Stojan skeneru (pouze víceúčelové
zařízení)
A lapolvasó állványa (csak többfunkciós
készülék esetén)
Preliminary unpacking: Europe
Paketi ilk defa açma: Avrupa
Předběžné rozbalení: Evropa
Előkészületek: Európa
Page 3
5 6 7 8
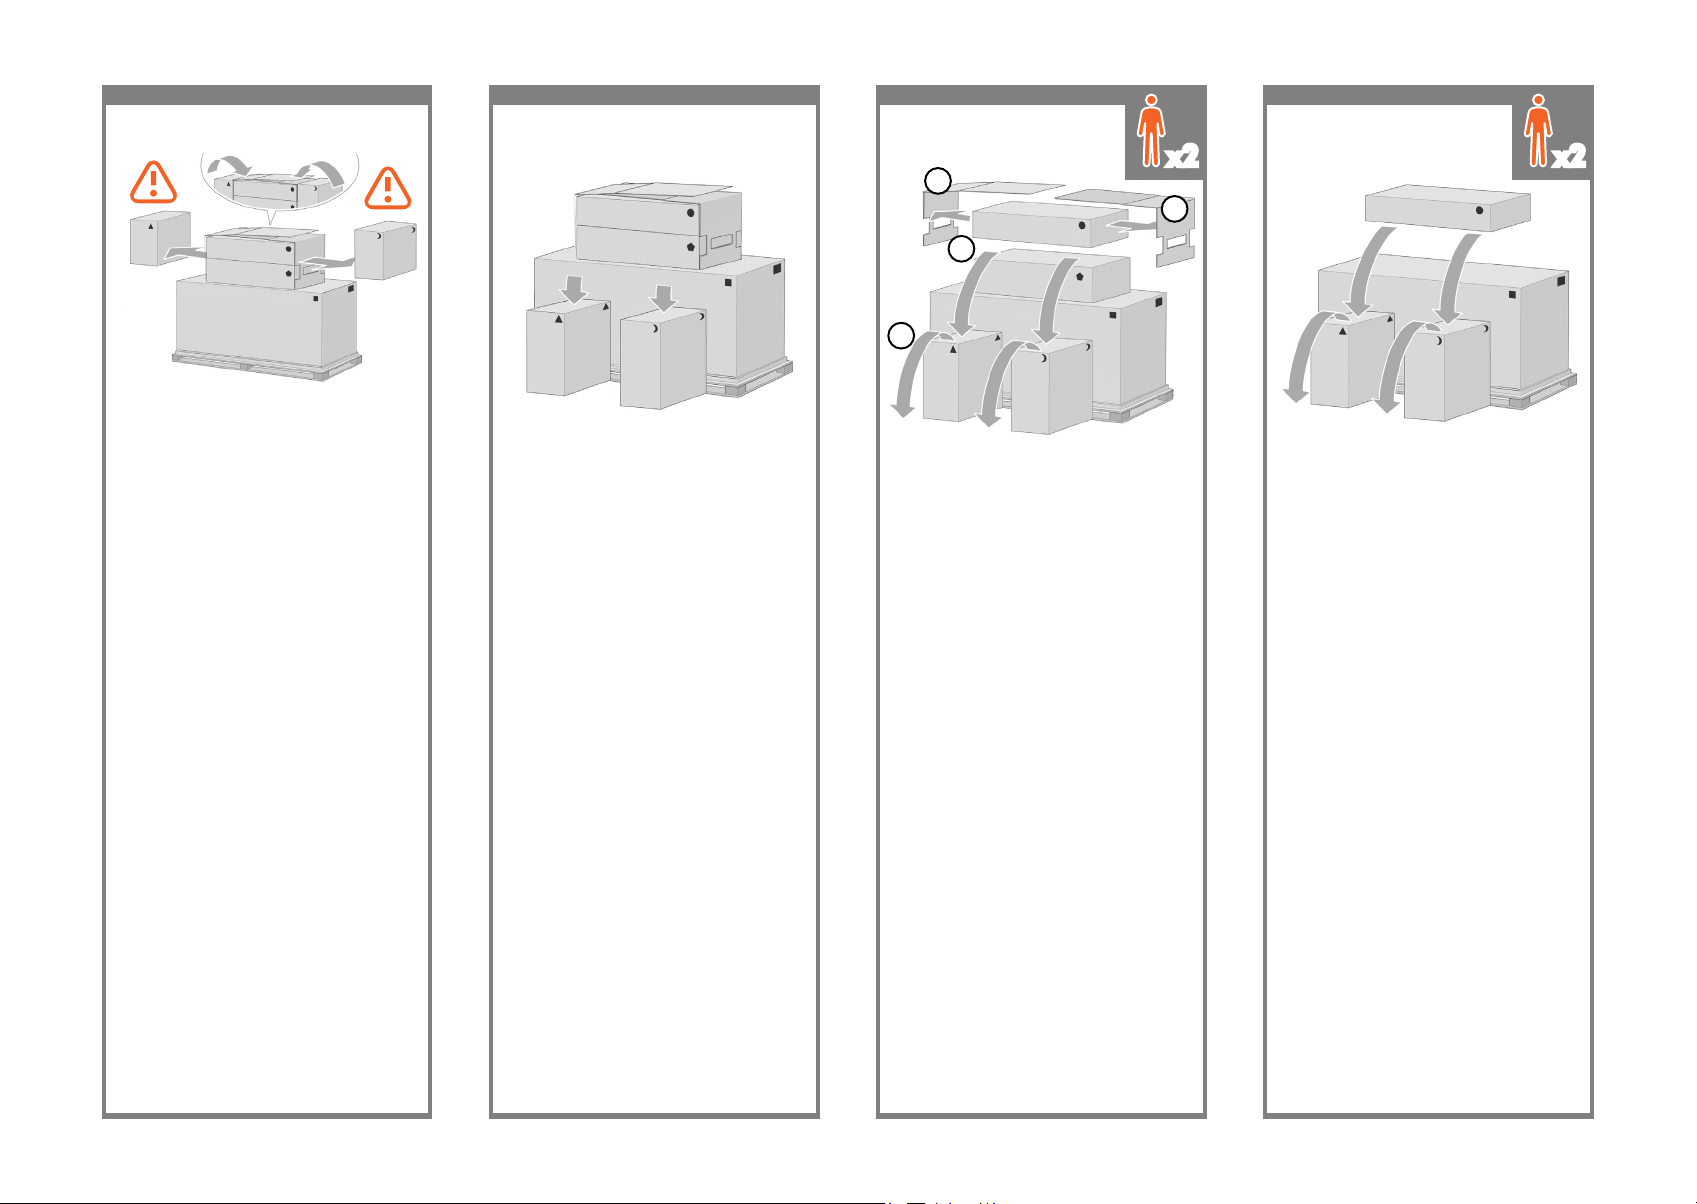
Remove the 2 lids. Place the consumables
and spare boxes in front of the printer body.
Then lower the stand and bin box onto the
consumables and spare boxes.
İki kapağı çıkarın. Tüketim malzemesi ve yedek
kutularını yazıcının gövdesinin önüne yerleştirin.
Ardından rulo modülünü tüketim malzemelerinin
ve yedek kutularının üzerine indirin.
Sejměte dva kryty. Krabice se spotřebním
materiálem a náhradními díly umístěte
dopředu před tiskárnu. Pak krabici s modulem
pro nekonečný papír položte na krabici se
spotřebním materiálem a náhradními díly.
Távolítsa el a két fedelet. Ezután helyezze az
állvány és papírtartó dobozát a tartozékok
dobozára és a tartalék dobozra.
Lower the roll module box onto the consumables
and spare boxes. Then lower the roll module box
onto the oor. Then remove the consumables and
spare boxes.
Sehpa ve bölme kutusunu tüketim malzemelerinin
ve yedek kutularının üzerine indirin. Sonra
rulo modülünü yere indirin. Ardından tüketim
malzemeleri ve yedek kutularını kaldırın.
Krabici podstavce a zásobníku položte na krabici
se spotřebním materiálem a náhradními díly. Poté
položte krabici s modulem pro nekonečný papír
na podlahu. Pak odeberte krabice se spotřebním
materiálem a náhradními díly.
Az állvány és papírtartó dobozát helyezze
a tartozékok dobozára és a tartalék dobozra.
Ezután tegye le a tekercsegység dobozát
a padlóra. Ezután távolítsa el a tartozékok
dobozát és a tartalék dobozt.
1
1
2
3
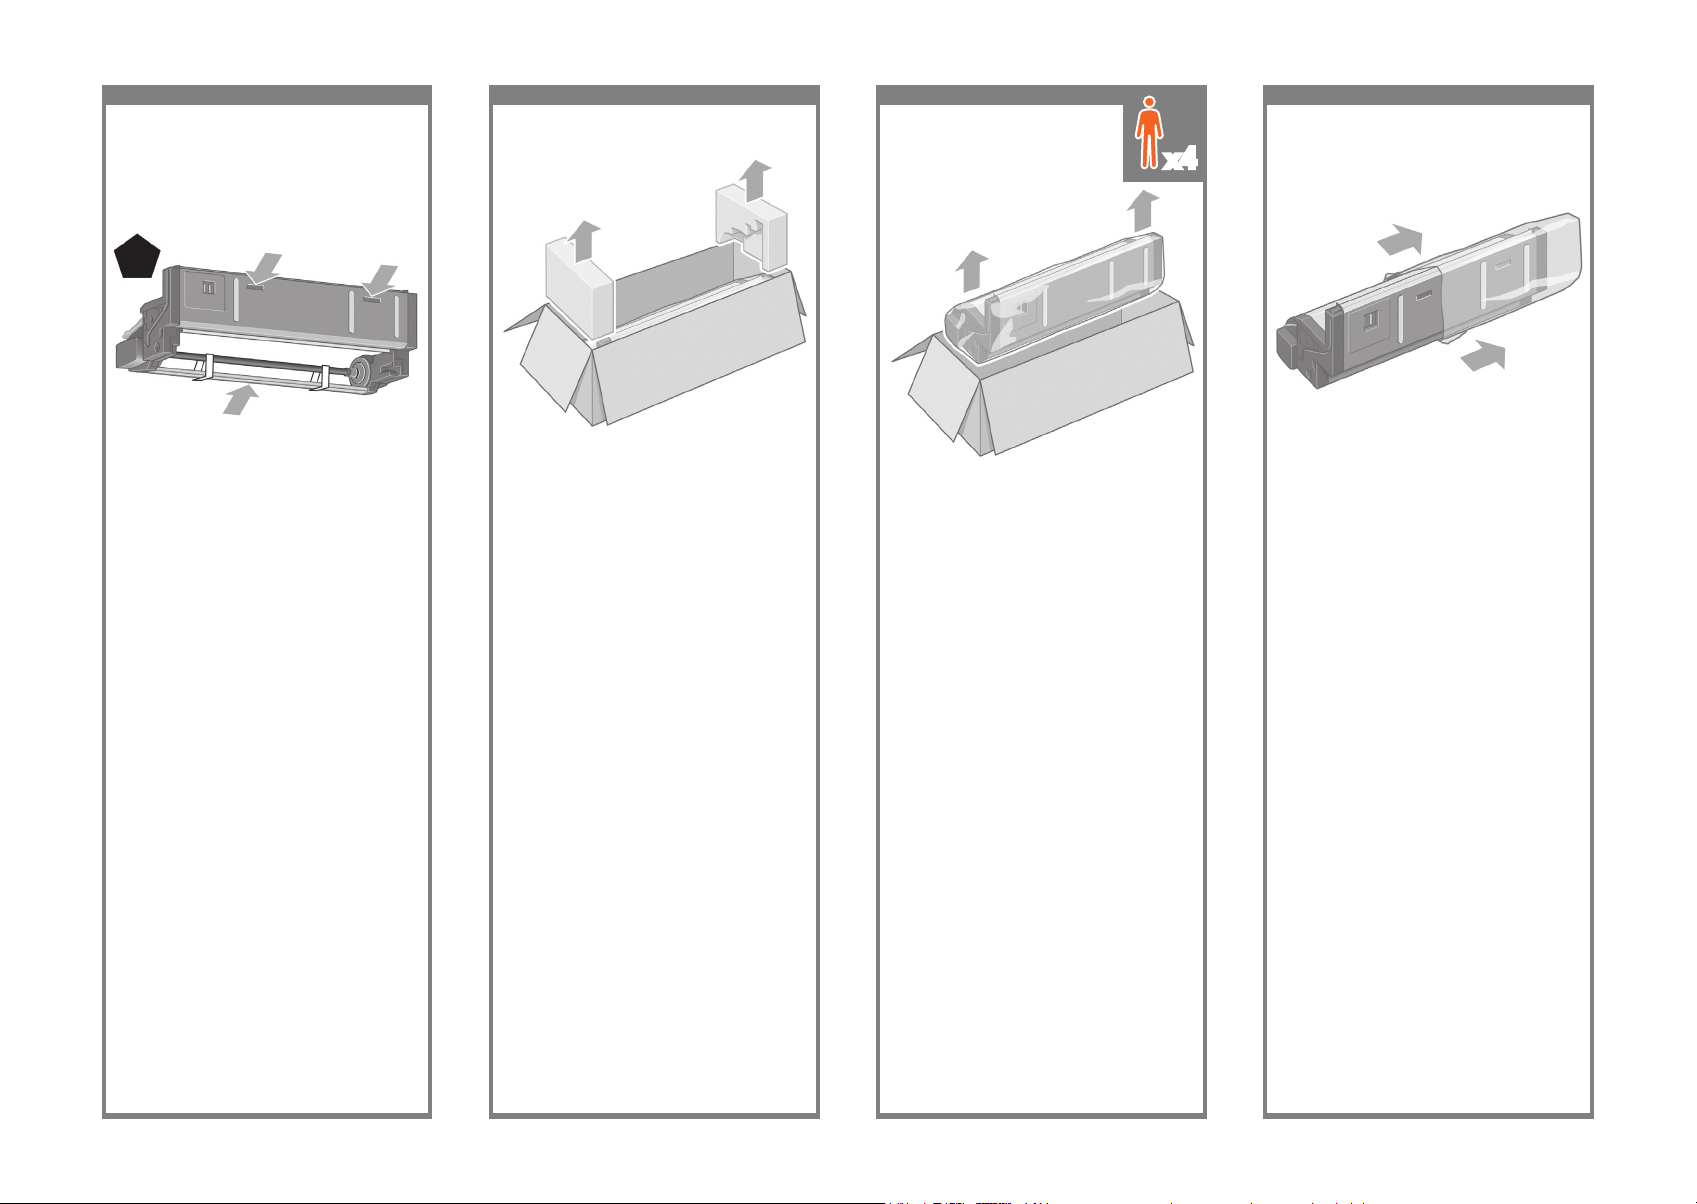
Remove all the upper four plastic handles from
both sides of the box (two each side). Carefully
fold the two side lids up onto the top of the box
as shown, then remove the two boxes.
Kutunun her iki yanındaki toplam dört plastik
sapı çıkarın (her yanda iki tane). Şekilde
görüldüğü gibi, iki yan kapağı kutunun üstüne
dikkatlice katlayın, daha sonra iki kutuyu kaldırın.
Vyndejte všechna čtyři horní plastová držadla
z obou stran krabice (dvě na každé straně).
Opatrně složte dva postranní kryty na horní stranu
krabice, viz obrázek. Potom odeberte dvě krabice.
Távolítsa el a felső négy műanyag fogantyút
a doboz két oldaláról (2 fogantyú mindkét
oldalon). Az ábrán látható módon óvatosan
hajtsa fel a két oldalsó fedelet a doboz tetejére,
majd távolítsa el a két dobozt.
x2 x2
Page 4
9 10 11 12
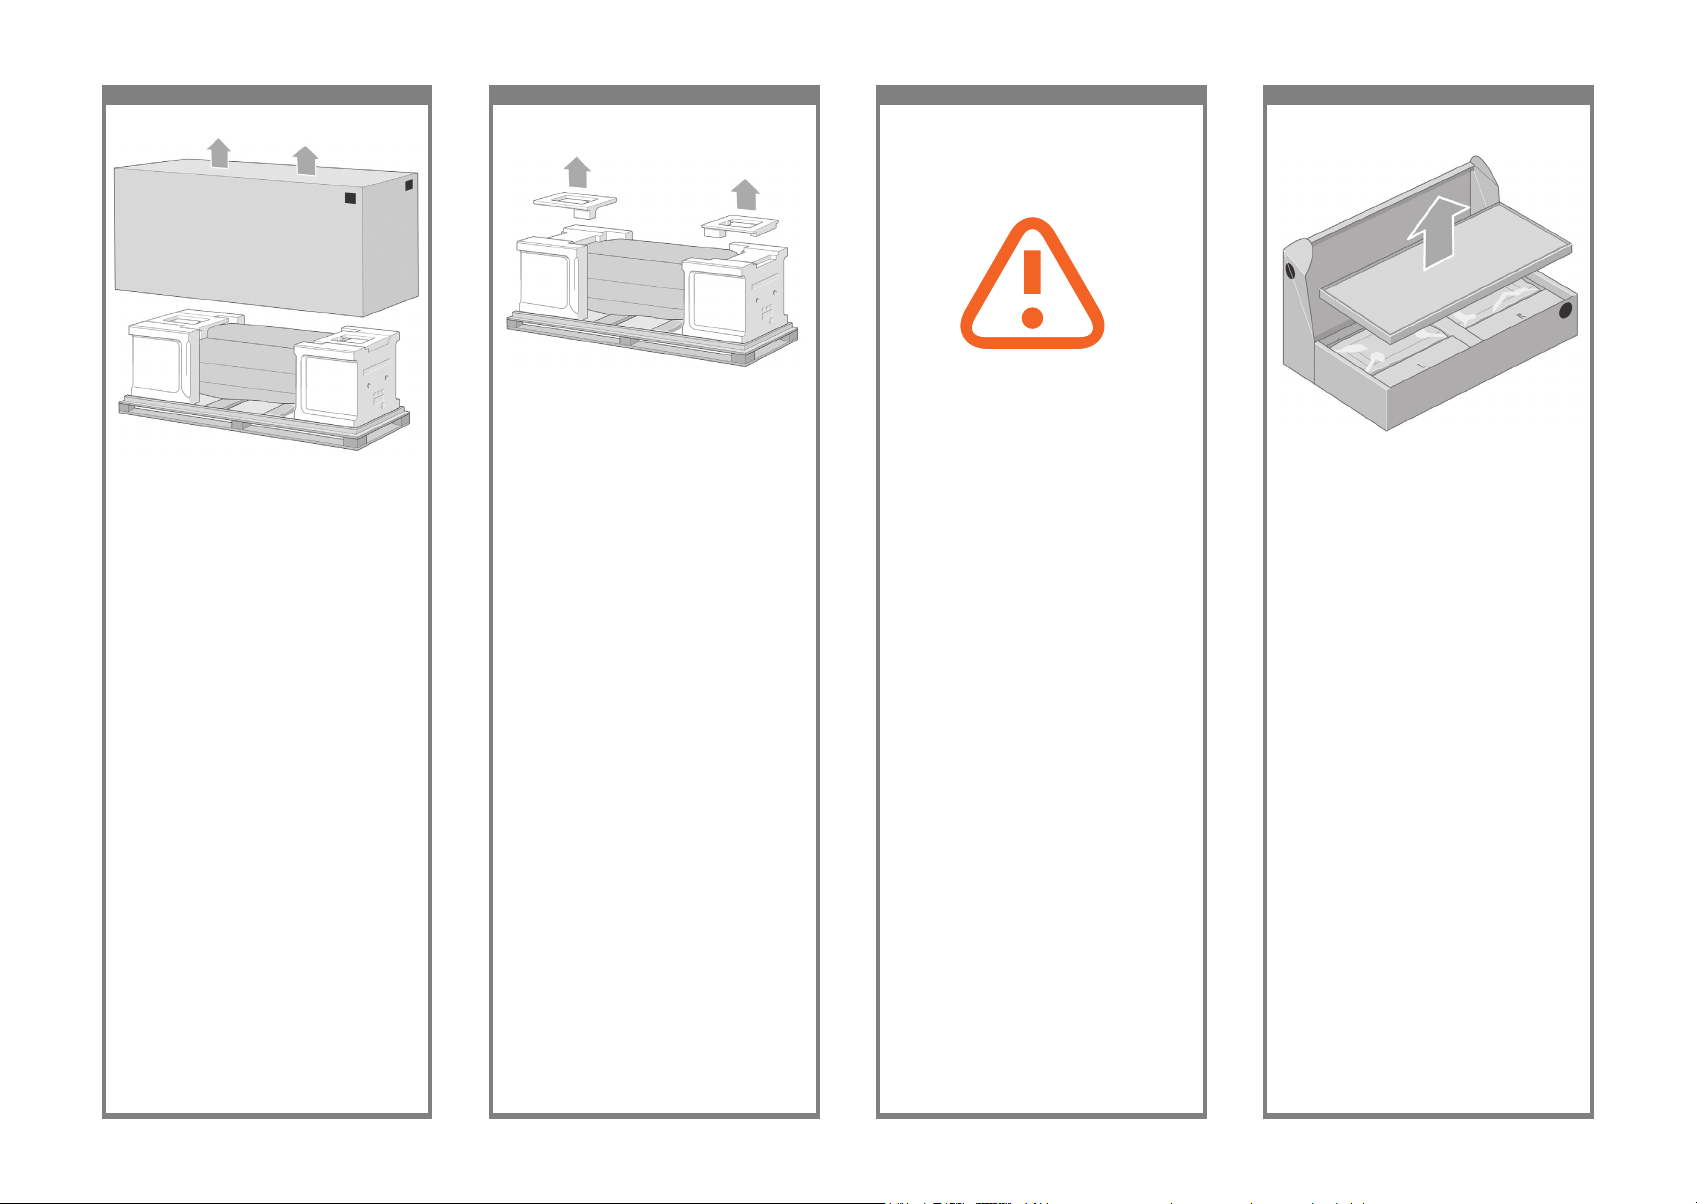
Remove the rst tray containing the parts for
the bin.
Bölmenin parçalarını içeren ilk tepsiyi çıkarın.
Odeberte první přihrádku obsahující součásti
zásobníku.
Vegye le a papírtartó alkatrészeit tartalmazó
első tálcát.
Remove the main printer box.
Ana yazıcı kutusunu çıkarın.
Vyndejte hlavní krabici tiskárny.
Távolítsa el a nyomtató dobozát.
Remove the two packing pieces.
İki ambalaj parçasını çıkarın.
Odeberte tyto dva prvky obalu.
Távolítsa el az ábrán látható két
csomagolóanyagot.
When you are unpacking the stand assembly,
you will see that there is anti-slip material
around two of the wheels on the feet.
DO NOT REMOVE this material yet.
Sehpa aksamının paketini açarken, uç
tarafındaki iki tekerleğin etrafında kaymayı
engelleyen bir malzeme olduğunu görürsünüz.
Bu malzemeyi henüz ÇIKARMAYIN.
Při rozbalování stojanu uvidíte kolem dvou
koleček na spodní straně protiskluzový materiál.
NEODSTRAŇUJTE ještě tento materiál.
A nyomtatóállvány kicsomagolásakor
látni fogja, hogy az állvány két görgője
csúszásgátló anyaggal van ellátva.
Ezeket még NE TÁVOLÍTSA EL.
Page 5
13 14 15 16
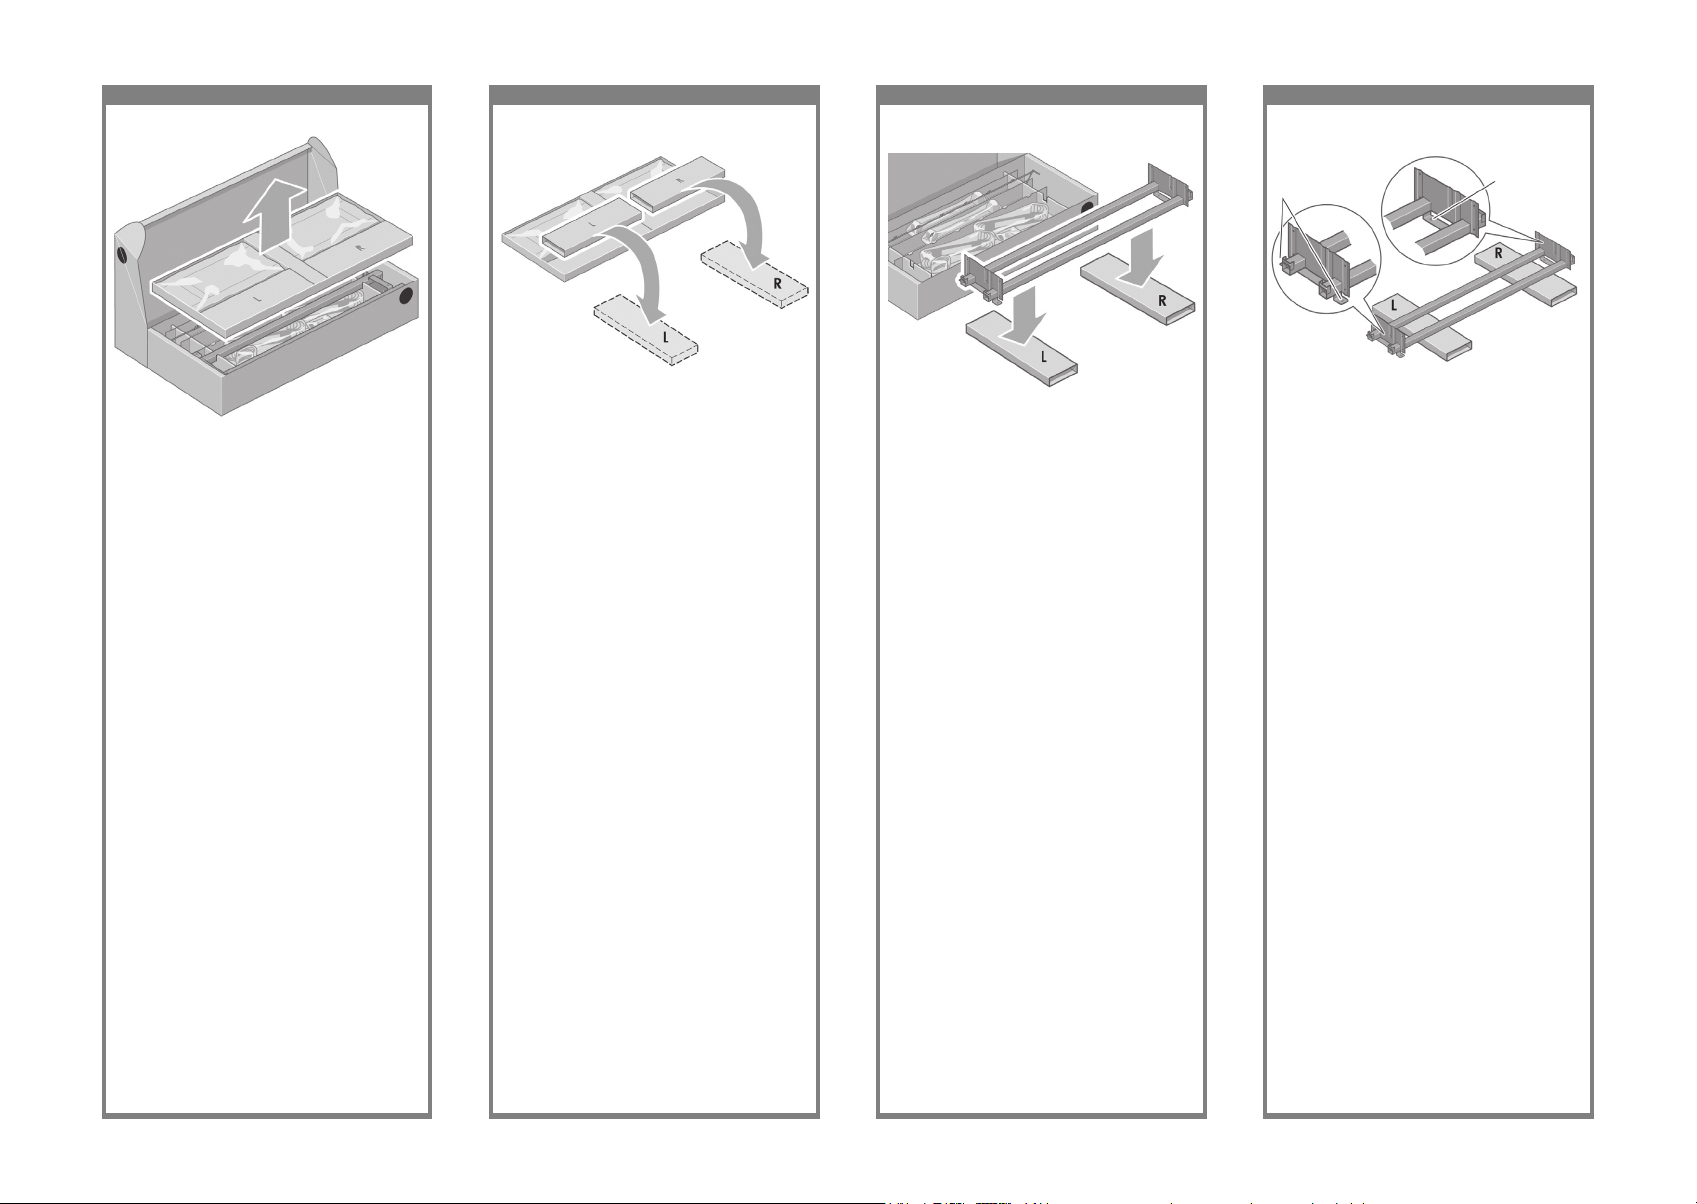
You now need to identify which is the left and
the right side of the cross-brace.
Şimdi destek gergi çubuğunun sol ve sağ
tarafını belirlemeniz gerekir.
Nyní potřebujete určit levou a pravou stranu
příčné vzpěry.
Azonosítsa a keresztmerevítő bal és jobb oldalát.
Remove the second tray from the stand and bin
assembly box. This tray contains the stand legs.
İkinci tepsiyi sehpadan ve bölme aksamı kutusundan
çıkarın. Bu tepsi sehpa ayaklarını içerir.
Odeberte druhou přihrádku z krabice podstavce a
zásobníku. Tato přihrádka obsahuje nohy stojanu.
Vegye ki a második tálcát az állvány és papírtartó
egység dobozából. Ez a tálca tartalmazza az
állvány lábait.
From the second tray, remove the two boxes
marked with L and R. Place them on the oor
as shown.
İkinci plakadan L ve R hareriyle işaretlenen
iki kutuyu çıkarın. Bunları aşağıda gösterildiği
şekilde yere koyun.
Z druhé přihrádky vyndejte dvě krabice označené
písmeny L a R. Položte je na zem podle znázornění
na obrázku.
Vegye le az L (bal) és az R (jobb) jelölésű dobozt
a második tálcáról, és helyezze azokat a padlóra
az ábrán látható módon.
Lower the cross-brace on to the L and R boxes.
Destek gergi çubuğunu L ve R kutularının
üzerine koyun.
Položte příčnou vzpěru na krabice L a R.
Helyezze a keresztmerevítőt az L és R jelölésű
dobozra.
Two holes/İki delik/
Dva otvory/
Két nyílás
Left/Sol/
Levá strana/
Bal oldal
Right/Sağ
Pravá strana/
Jobb oldal
One hole/
Tek delik
Jeden otvor/
Egy nyílás
Page 6
17 18 19 20
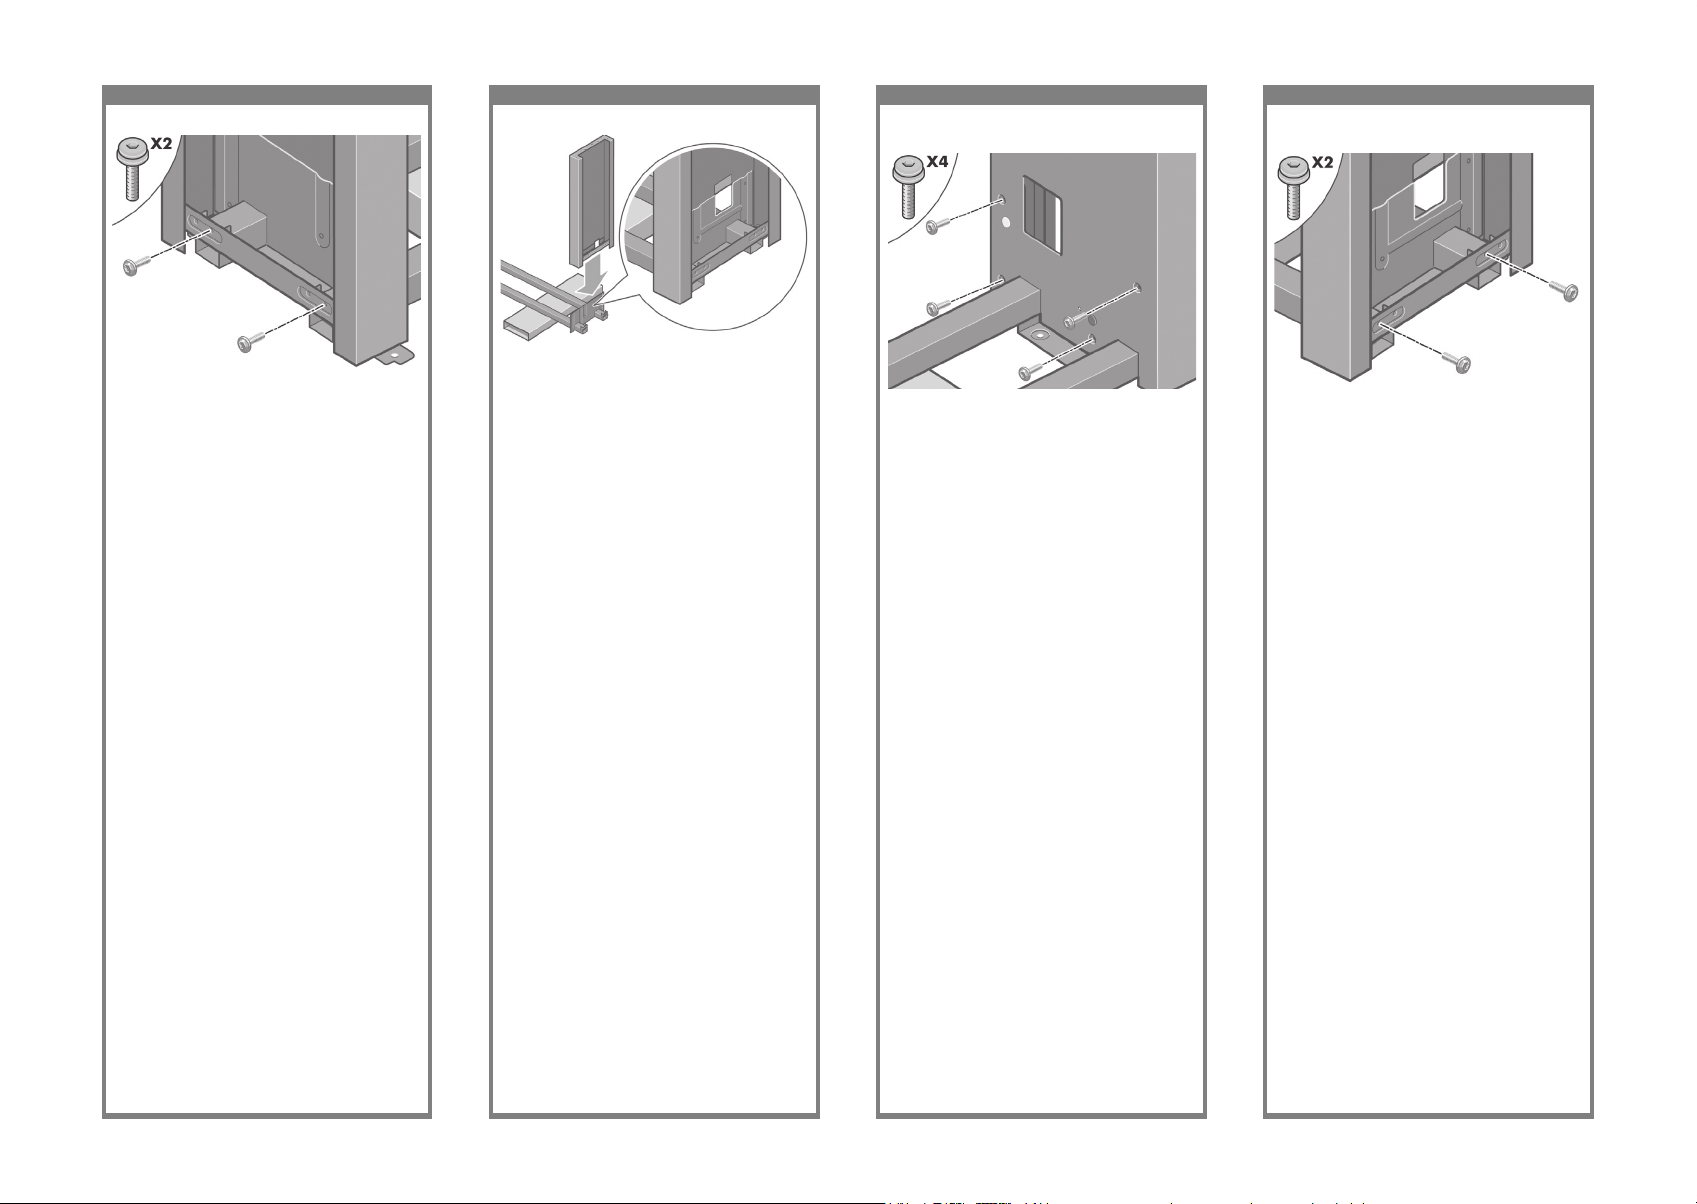
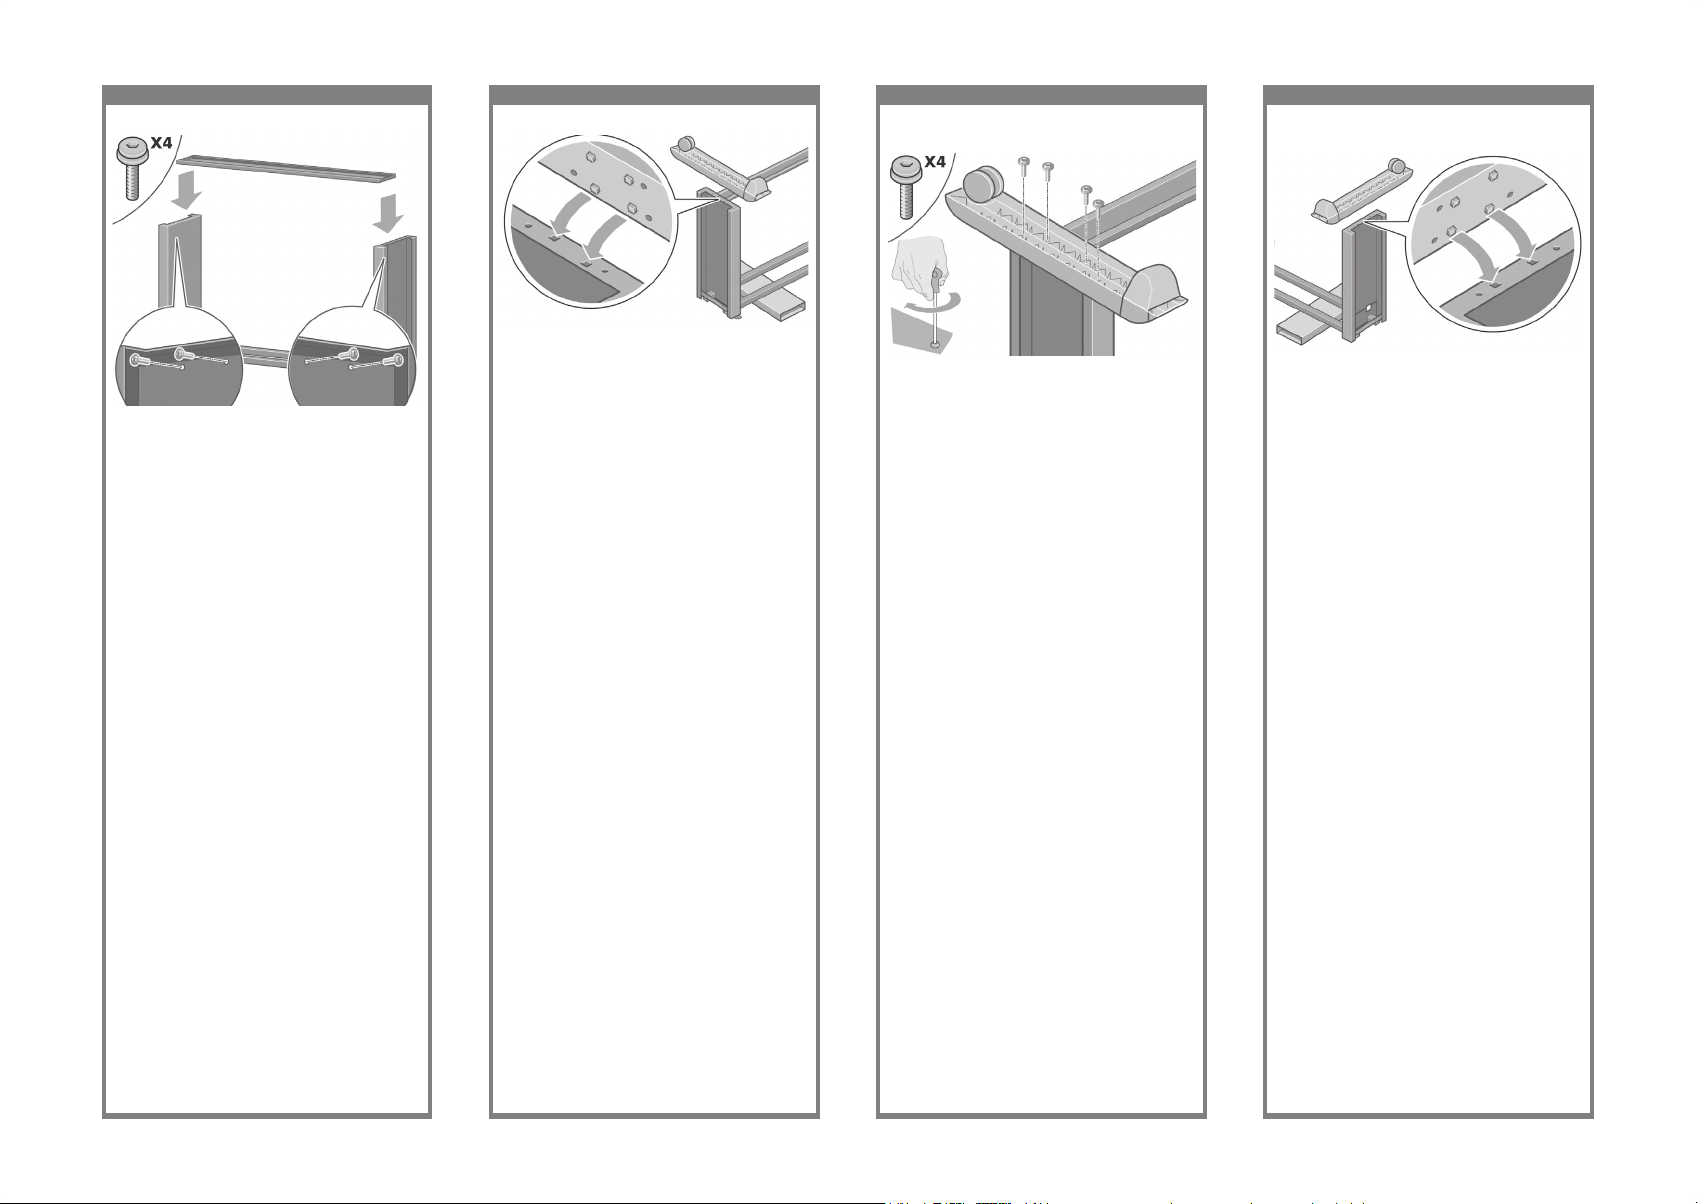
Fix the left leg to the cross-brace using four
screws on the inner side of the leg.
Bacağın iç kısmındaki dört vidayı kullanarak
sol bacağı destek gergi çubuğuna sabitleyin.
Připevněte levou nohu k příčné vzpěře čtyřmi
šroubky na vnitřní straně nohy.
Rögzítse a bal oldali lábat a keresztmerevítőhöz
négy csavarral a láb belső oldalán.
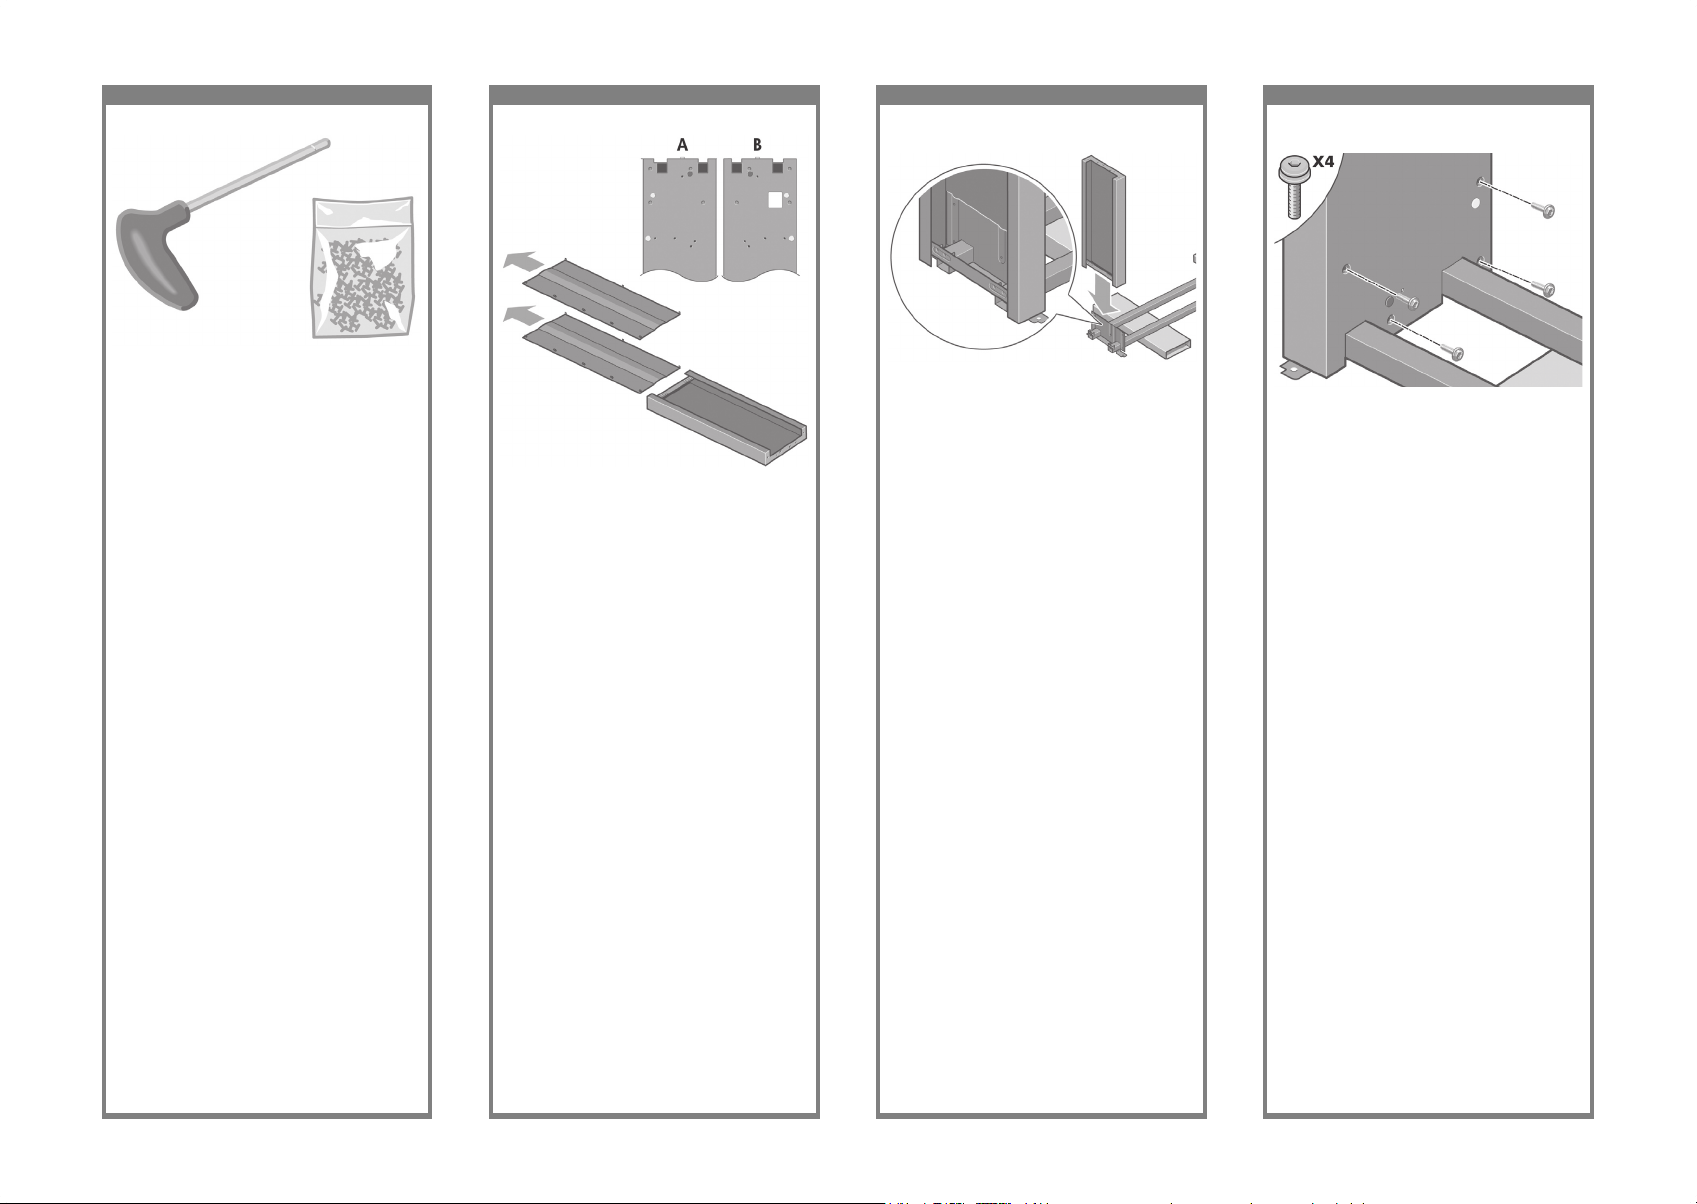
Now you will need the bag of screws and the
screwdriver provided. You may notice that the
screwdriver is slightly magnetic.
Şimdi, sağlanan vida ve tornavida paketine
gerek vardır. Tornavidanın az da olsa manyetik
olduğunu fark edebilirsiniz.
Budete potřebovat přiložený balíček se šrouby
a šroubovák. Všimněte si, že šroubovák je mírně
magnetický.
Keresse meg a csavarhúzót és a csavarokat
tartalmazó csomagot. A csavarhúzó kissé
mágneses.
Identify the left leg (A) and the right leg (B) as
shown above. Remove the two leg covers from
the left leg.
Sol ayağı (A) ve sağ ayağı (B) yukarıda
gösterildiği biçimde tanımlayın. Sol bacaktan
iki kapak malzemesini çıkarın.
Určete levou nohu (A) a pravou nohu (B) podle
obrázku.Z levé nohy sundejte dva kryty.
Azonosítsa a bal lábat (A) és a jobb lábat (B)
a fenti ábra alapján. Távolítsa el az állvány
bal oldali lábáról a két borítólapot.
Lower the left leg onto the left side of the
cross-brace. The left leg will t only on the
left side of the cross-brace.
Sol bacağı destek gergi çubuğunun sol tarafına
yerleştirin. Sol bacak destek gergi çubuğunun
yalnızca sol tarafına uyar.
Postavte levou nohu na levou stranu příčné
vzpěry. Levou nohu lze správně připevnit
pouze na levou stranu příčné vzpěry.
Helyezze a bal oldali lábat a keresztmerevítő
bal oldalára. A bal oldali láb csak a
keresztmerevítő bal oldalához illeszkedik.
Page 7
21 22 23 24
Fix the right leg to the cross-brace using
two screws on the outer side of the leg.
Bacağın dış kısmındaki iki vidayı kullanarak
sağ bacağı destek gergi çubuğuna sabitleyin.
Připevněte pravou nohu k příčné vzpěře dvěma
šrouby na vnější straně podstavy.
Rögzítse a jobb oldali lábat a keresztmerevítőhöz
két csavarral a láb külső oldalán.
Fix the left leg to the cross-brace using
two screws on the outer side of the leg.
Bacağın dış kısmındaki iki vidayı kullanarak
sol bacağı destek gergi çubuğuna sabitleyin.
Připevněte levou nohu k příčné vzpěře dvěma
šroubky na vnější straně nohy.
Rögzítse a bal oldali lábat a keresztmerevítőhöz
két csavarral a láb külső oldalán.
Lower the right leg onto the right side of the
cross-brace. The right leg will t only on the
right side of the cross-brace.
Sağ bacağı destek gergi çubuğunun sağ tarafına
yerleştirin. Sağ bacak destek gergi çubuğunun
yalnızca sağ tarafına uyar.
Postavte pravou nohu na pravou stranu příčné
vzpěry. Pravou nohu lze správně připevnit pouze
na pravou stranu příčné vzpěry.
Helyezze a jobb oldali lábat a keresztmerevítő
jobb oldalára. A jobb oldali láb csak
a keresztmerevítő jobb oldalához illeszkedik.
Fix the right leg to the cross-brace using
four screws on the inner side of the leg.
Bacağın iç kısmındaki dört vidayı kullanarak
sağ bacağı destek gergi çubuğuna sabitleyin.
Připevněte pravou nohu k příčné vzpěře čtyřmi
šrouby na vnitřní straně nohy.
Rögzítse a jobb oldali lábat a keresztmerevítőhöz
négy csavarral a láb belső oldalán.
Page 8
25 26 27 28
Position a foot on the right leg. There are pins
to help you to position the foot correctly. Do not
remove the anti-slip material from the wheel.
Sağ bacağın üzerine ayağın alt bölümünü
yerleştirin. Ayağı doğru yerleştirmenize
yardımcı olacak pimler vardır. Tekerlekteki
kaymayı önleyen malzemeyi çıkarmayın.
Na pravou nohu umístěte podstavu. Správné
umístění podstavy zajistí čepy. Nesundávejte
protiskluzový materiál z koleček.
Helyezze a talpat a jobb oldali lábra. A talp
lábra való pontos felhelyezését peckek segítik.
Ne távolítsa el a csúszásgátló anyagot
a görgőről.
Fix the stand cross-bar using four screws.
Dört vidayı kullanarak sehpa destek çubuğunu
sabitleyin.
Upevněte příčnou vzpěru podstavce pomocí
čtyř šroubů.
Négy csavar segítségével rögzítse az állvány
keresztmerevítőjét.
Position a foot on the left leg. There are pins
to help you to position the foot correctly. Do not
remove the anti-slip material from the wheel.
Sol bacağın üzerine ayağın alt bölümünü
yerleştirin. Ayağı doğru yerleştirmenize yardımcı
olacak pimler vardır. Tekerlekteki kaymayı
önleyen malzemeyi çıkarmayın.
Na levou nohu umístěte podstavu. Správné
umístění podstavy zajistí čepy. Nesundávejte
protiskluzový materiál z koleček.
Helyezze a talpat a bal oldali lábra. A talp
lábra való pontos felhelyezését peckek segítik.
Ne távolítsa el a csúszásgátló anyagot a görgőről.
Fix the left foot using four screws.
Dört vidayı kullanarak sol ayağı sabitleyin.
Levou podstavu připevněte čtyřmi šrouby.
Rögzítse a bal talpat négy csavarral.
Page 9
29 30 31 32
Please take note of the colored plugs located
on the legs.
Ayakların üzerindeki renkli tapaları lütfen
not edin.
Povšimněte si barevných záslepek na nohách.
Kérjük, ügyeljen a lábakon található színes
dugókra.
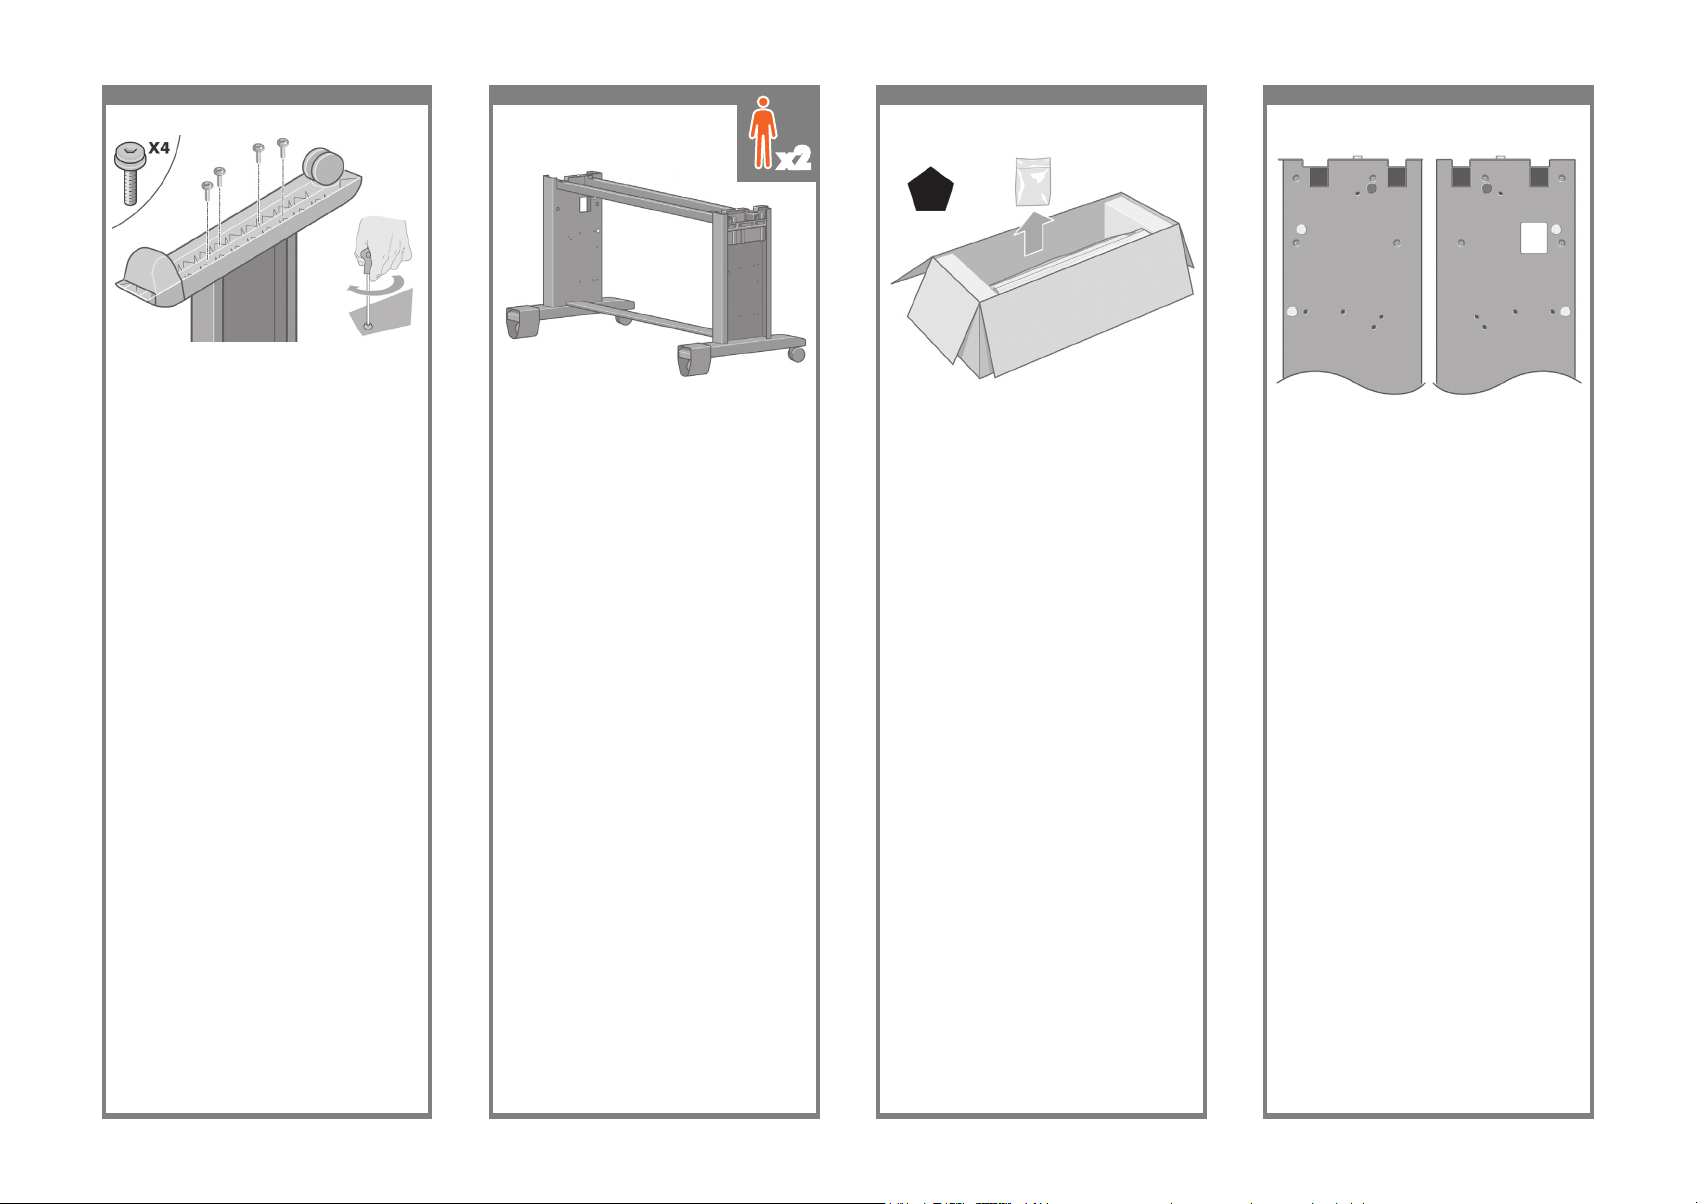
Fix the right foot using four screws.
Dört vidayı kullanarak sağ ayağı sabitleyin.
Pravou podstavu připevněte čtyřmi šrouby.
Rögzítse a jobb talpat négy csavarral.
Turn the stand assembly into an upright position
as shown above.
Sehpa düzeneğini yukarıda gösterildiği gibi dik
konuma gelecek biçimde döndürün.
Otočte sestavený podstavec do správné polohy
podle obrázku. Povšimněte si barevných záslepek
na nohách. Sejměte modrou záslepku z levé nohy.
A fenti ábrának megfelelően állítsa függőleges
helyzetbe az állványt.
Open the box containing the roll module.
Remove the plastic bag containing the screws.
Rulo modülünü içeren kutuyu açın. Vidaların
olduğu plastik torbayı çıkarın.
Otevřete krabici obsahující modul pro nekonečný
papír. Vyjměte plastový obal obsahující šroubky.
Nyissa ki a tekercsegységet tartalmazó dobozt.
Vegye ki a csavarokat tartalmazó műanyag
zacskót.
x2
Left Leg/Sol ayak
Levá noha/Bal
Right Leg/Sağ ayak
Pravá noha/Jobb
Page 10
33 34 35 36
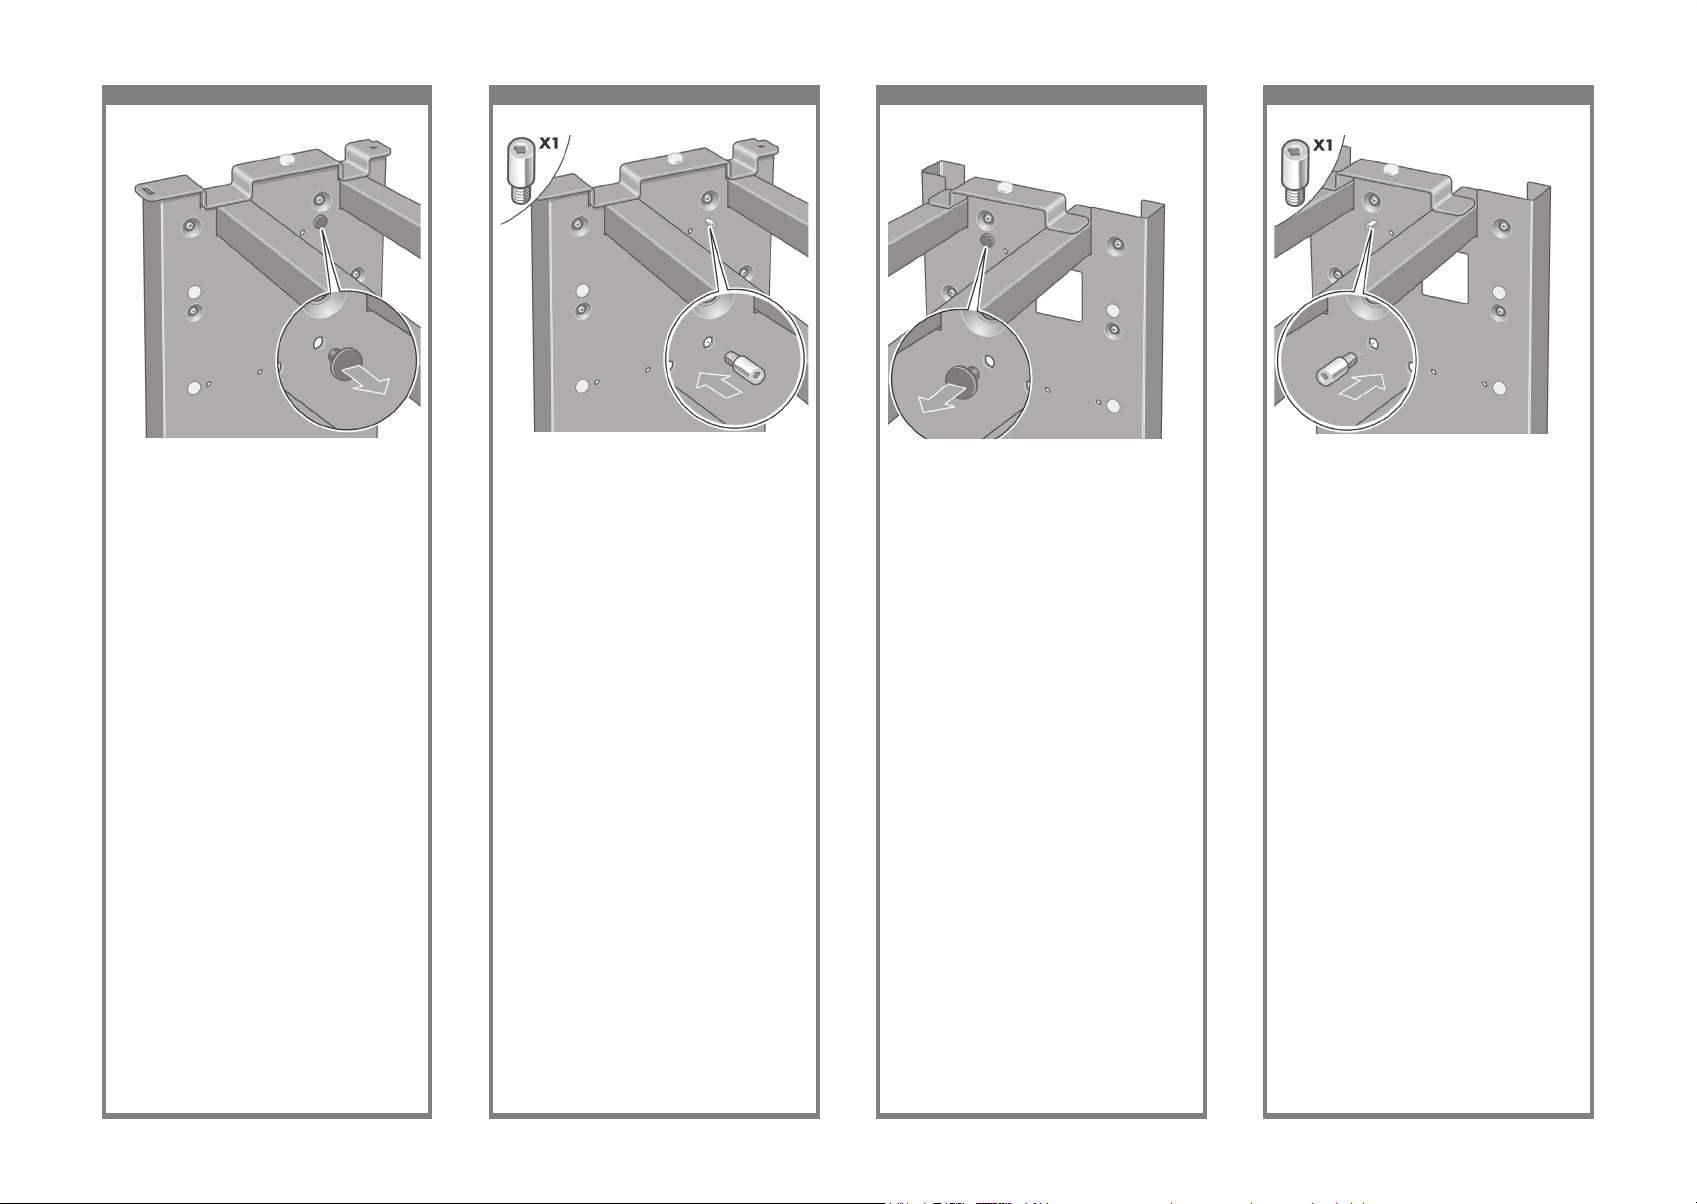
Locate the pin into the right leg.
Pimi sağ ayağa yerleştirin.
Do pravé nohy nasaďte čep.
Helyezze be a pecket a jobb lábba.
Remove the blue plug on the left leg.
Sol ayaktaki mavi tapayı çıkarın.
Sejměte modrou záslepku z levé nohy.
Távolítsa el a bal lábon levő kék dugót.
Locate the pin into the left leg.
Pimi sol ayağa yerleştirin.
Do levé nohy nasaďte čep.
Helyezze be a pecket a bal lábba.
Remove the blue plug on the right leg.
Sağ ayaktaki mavi tapayı çıkarın.
Sejměte modrou záslepku z pravé nohy.
Távolítsa el a jobb lábon levő kék dugót.
Page 11
37 38 39 40
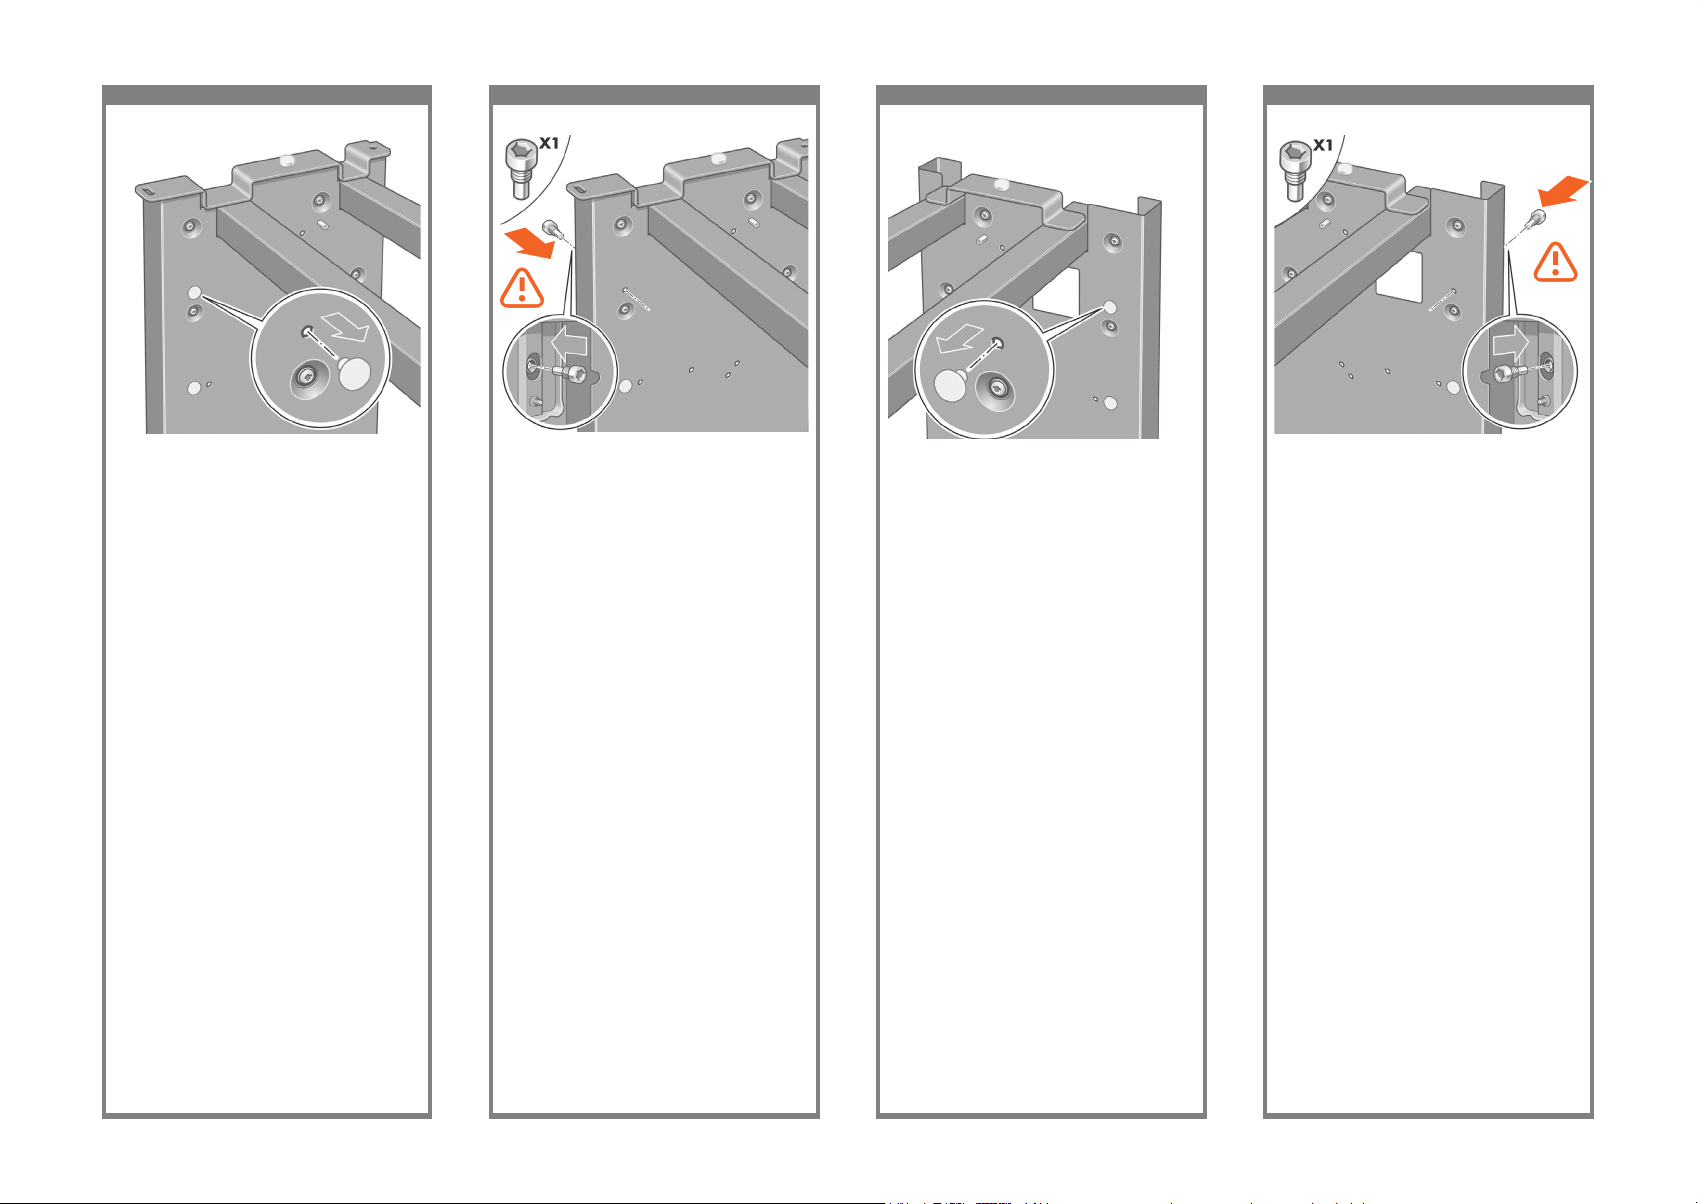
Locate the pin into the interior of the right leg.
Pimi sağ ayağın içine yerleştirin.
Do vnitřní části pravé nohy nasaďte čep.
Helyezze be a pecket a jobb láb belsejébe.
Remove the top yellow plug on the left leg.
Sol ayaktaki üst sarı tapayı çıkarın.
Sejměte horní žlutou záslepku z levé nohy.
Távolítsa el a bal lábon levő felső sárga dugót.
Locate the pin into the interior of the left leg.
Pimi sol ayağın içine yerleştirin.
Do vnitřní části levé nohy nasaďte čep.
Helyezze be a pecket a bal láb belsejébe.
Remove the top yellow plug on the right leg.
Sağ ayaktaki üst sarı tapayı çıkarın.
Sejměte horní žlutou záslepku z pravé nohy.
Távolítsa el a jobb lábon levő felső sárga dugót.
Page 12
41 42 43 44
Slide Drawer 1 out until it touches the foam
packaging.
1. Gözü köpük paketine değene kadar kaydırın.
Vysuňte zásuvku 1 tak, aby se dotýkala pěnové
výplně.
Húzza ki az 1. ókot a habszivacs
védőcsomagolásig.
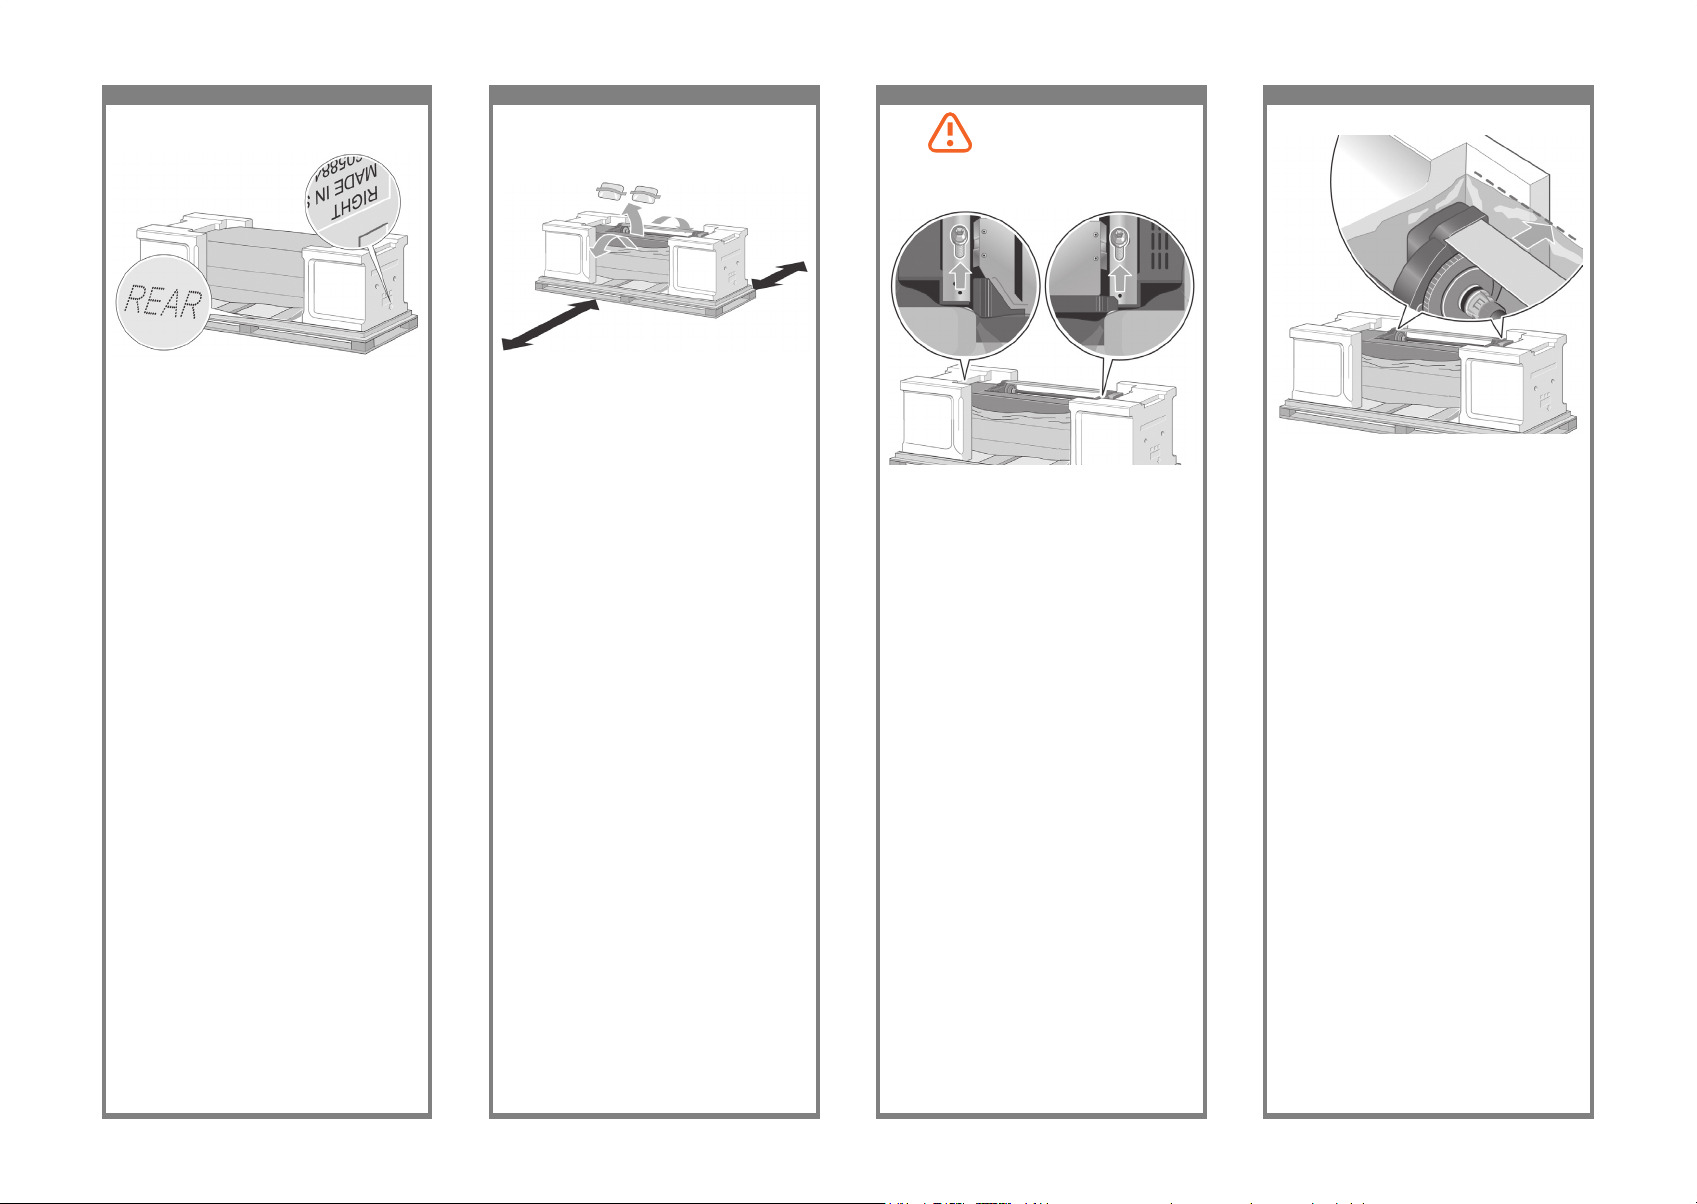
You now need to identify the left and right of the
printer. This information is shown on the foam
end packs. Also identify the rear of the printer.
Şimdi yazıcının solunu ve sağını belirlemeniz
gerekiyor. Bu bilgiler ambalajın ucundaki
köpükte gösterilir. Ayrıca yazıcının arkasını
da belirleyin.
Budete muset rozpoznat levou a pravou stranu
tiskárny. Tato informace je zobrazena na
obalovém materiálu z pěnové hmoty. Určete
i zadní stranu tiskárny.
Ellenőrizze, hogy melyik a nyomtató bal
(left) és jobb (right) oldala. Ezt a habszivacs
védőcsomagolás két végéről olvashatja le.
Keresse meg a nyomtató hátulját (rear) is.
Pull open the protective plastic from the base
of the printer. Please ensure that there is a
three-meter space clear of obstructions to the
rear of the printer and one meter at the front
of the printer.
Remove the two desiccant bags from the printer.
Yazıcının alt kısmından koruyucu plastiği çekerek
açın. Yazıcının arkasında engel oluşturacak
nesne bulunmayan üç metrelik ve önündeyse
bir metrelik boş bir alan olduğundan emin olun.
Nem emici poşetleri yazıcıdan çıkarın.
Odstraňte ochranný plast ze spodní části
tiskárny. Dbejte na to, abyste měli k dispozici
tři metry prostoru bez překážek za tiskárnou
a jeden metr prostoru před tiskárnou.
Z tiskárny vyndejte dva sáčky s vysoušecím
činidlem.
Húzza szét és nyissa fel a nyomtató aljánál
a műanyag védőcsomagolást. Gondoskodjon
arról, hogy a nyomtató hátsó felénél legalább
három méter, a nyomtató elejénél pedig egy
méter széles szabad terület maradjon.
Távolítsa el a két nedvszívó csomagolóanyagot
a nyomtatóból.
Using the screwdriver supplied, remove the two
screws that hold Drawer 1 in place. Note: the
screws are only for transit, they are not to be
replaced.
Verilen tornavidayı kullanarak 1. Gözü yerinde
tutan iki vidayı çıkarın. Not: Vidalar yalnızca
taşıma amaçlıdır yeniden yerlerine takmayın.
Pomocí přiloženého šroubováku odstraňte
šrouby, kterýmije zajištěna zásuvka 1.
Poznámka: Tyto šrouby jsou určeny pouze pro
přepravu, nesmí se vracet na původní místo.
A mellékelt csavarhúzóval távolítsa el
a két csavart, amelyek az 1. ókot tartják.
Megjegyzés: Ezek a csavarok csak a szállításhoz
szükségesek, ne helyezze vissza azokat.
Do not replace these screws after
removal!/Bu vidaları çıkarttıktan sonar
yeniden takmayın!/Po vyjmutí tyto
šrouby nevkládejte zpět!/Amennyiben
eltávolította, ne helyezze vissza ezeket
a csavarokat!
Page 13
45 46 47 48
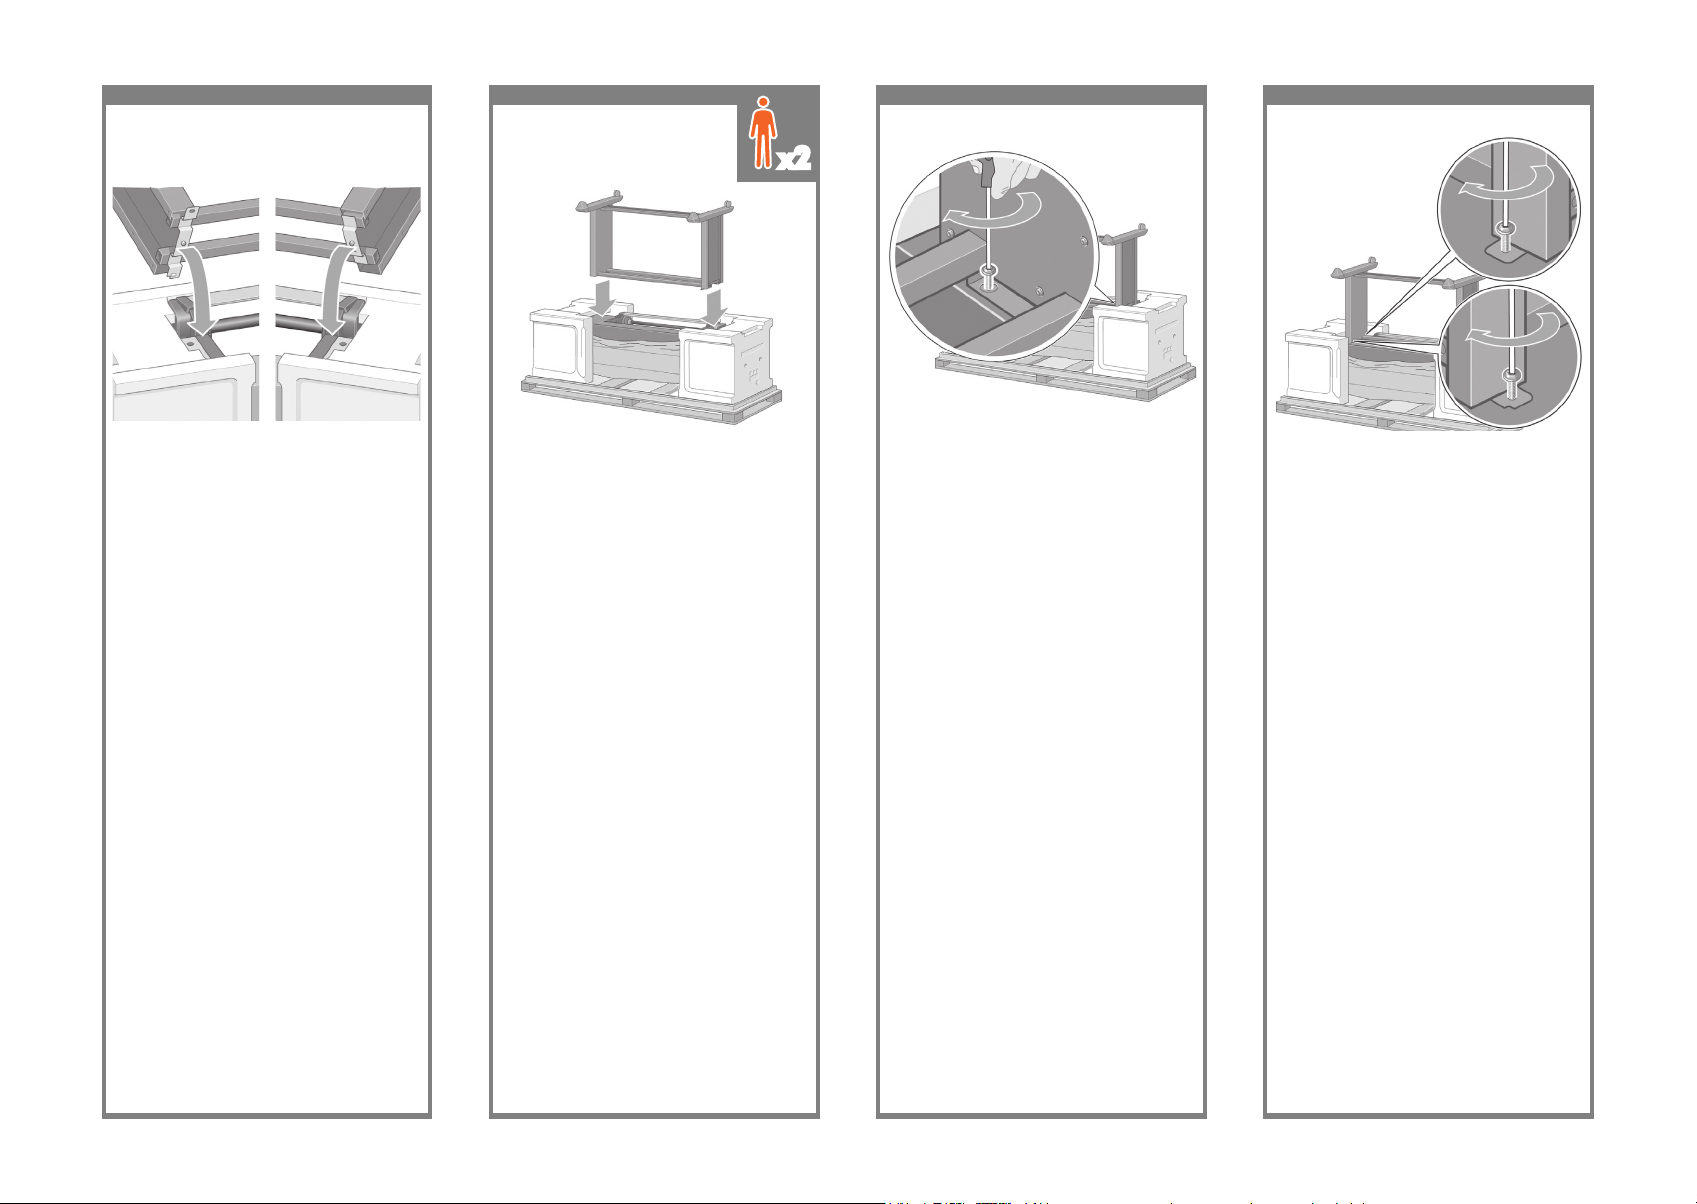
Slide Drawer 1 forwards to gain better access
for the front screw. Fix the left side of the stand
to the printer using two screws. Make sure that
the screws are fully tightened.
Ön vidaya daha iyi erişebilmek için 1. Gözü
ileri doğru kaydırın. İki vida kullanarak sehpanın
sol tarafını yazıcıya sabitleyin. Vidaların tam
olarak sıkıştırıldığından emin olun.
Vysuňte zásuvku 1 dopředu, abyste získali
lepší přístup k přednímu šroubu. Dvěma šrouby
připevněte levou stranu podstavce k tiskárně.
Zkontrolujte, zda jsou šrouby utaženy.
Tolja előre az 1. ókot, hogy jobban hozzáférjen
az elülső oldali csavarhoz. Rögzítse az állvány
bal oldalát a nyomtatóhoz két csavarral. Húzza
meg a csavarokat.
Advance warning: in the next step, make sure
you position the stand pins in the holes in the
center of the printer body brackets.
Önceden uyarı: bir sonraki adımda, sehpa
pimlerini yazıcı gövde desteklerinin ortasındaki
yuvalara yerleştirdiğinizden emin olun.
Předběžné upozornění: V následujícím kroku
zkontrolujte, zda jsou čepy podstavce umístěny
v otvorech ve středu konzolí těla tiskárny.
Előzetes gyelmeztetés: a következő lépésnél
gyeljen arra, hogy az állványon levő peckeket
a nyomtató középső nyílásaiba helyezze.
Lift the stand assembly onto the printer body.
The anti-slip material should face to the rear
of the printer.
Sehpa düzeneğini yazıcı gövdesinin üzerine
yerleştirin.
Kaymayı önleyici malzeme yazıcının arkasına
doğru bakmalıdır.
Zvedněte sestavený podstavec na tělo tiskárny.
Protiskluzový materiál by měl směřovat k zadní
části tiskárny.
Emelje az állványt a nyomtatóra.
A csúszásgátló anyagnak a nyomtató hátoldala
felé kell néznie.
Fix the right side of the stand to the printer using
one screw. Make sure that the screw is fully
tightened.
Vidalardan birini kullanarak sehpanın sağ
tarafını yazıcıya sabitleyin. Vidanın tam olarak
sıkıştırıldığından emin olun.
Jedním šroubem připevněte pravou stranu
podstavce k tiskárně. Zkontrolujte, zda je šroub
utažen.
Rögzítse az állvány jobb oldalát a nyomtatóhoz
egy csavarral. Húzza meg a csavart.
Left Leg/Sol ayak.
Levá noha/Bal láb
Right Leg/Sağ ayak.
Pravá noha/Jobb láb
x2
Page 14
49 50 51 52
Remove the roll module from the plastic bag.
Plastik torbadan rulo modülünü çıkarın.
Vyjměte modul pro nekonečný papír
z plastového obalu.
Vegye ki a tekercsegységet a műanyag
csomagolásból.
Before unpacking the roll module, note that you
should only handle this piece of equipment using
the points indicated by the arrows shown above.
Rulo modülünün paketinden çıkarmadan önce
bu donatı parçasını yalnızca yukarıda gösterilen
yeşil oklarla belirtilen noktaları kullanarak
taşımanız gerektiğini unutmayın.
Před vybalením modulu pro nekonečný papír
mějte na paměti, že byste tuto součást zařízení
měli držet pouze za místa označená zelenými
šipkami, jak je znázorněno na obrázku.
A tekercsegység kicsomagolása előtt vegye
gyelembe, hogy ezt az egységet csak a fenti
ábrán zöld nyilakkal jelzett pontokon szabad
megfogni.
Open the box containing the roll module, then
remove the two foam supports.
Rulo modülünün olduğu kutuyu açın ve iki destek
köpüğünü çıkarın.
Otevřete krabici obsahující modul pro nekonečný
papír a vyjměte obě pěnové výplně.
Nyissa ki a tekercsegységet tartalmazó dobozt,
majd távolítsa el a két habszivacs tartóelemet.
Remove the roll module from the packaging box.
Rulo modülünü paketleme kutusundan çıkarın.
Vyjměte modul pro nekonečný papír z krabice.
Vegye ki a tekercsegységet a dobozból.
IMPORTANT INFORMATION
Önemli bilgiler
Důležité informace
Fontos információ
x4
Page 15

53 54 55 56
Before the roll module is moved into its nal
position, please note that the roll module
should sit on the pins that were located on
the stand legs earlier.
Rulo modülünün son konumuna taşınmadan
önce, daha önce sehpa ayaklarının üzerine
yerleştirilen pimlerin üzerine oturması
gerektiğini unutmayın.
Až bude modul umístěn do nální pozice, mějte
na paměti, že by měl být usazen na čepech,
které byly předtím nasazeny na nohy podstavce.
Mielőtt a végleges helyére tenné
a tekercsegységet, vegye gyelembe, hogy
a tekercsegységnek az állványba korábban
behelyezett peckekre kell felfeküdnie.
Remove the remaining two yellow plugs from the
left and right legs. It is important to remember
the positions of these holes.
Sağ ve sol bacakta kalan iki sarı tapayı çıkarın.
Bu deliklerin konumunu hatırlamak önemlidir.
Sejměte zbývající dvě žluté záslepky z levé
a pravé nohy. Je důležité, abyste si pamatovali
pozice těchto otvorů.
Távolítsa el a két fennmaradó sárga dugót a bal
és jobb oldali lábból. Fontos, hogy ne felejtse el
a nyílások helyzetét.
Turn the roll module over into an inverted
position as shown above. Then carry it to the
front of the inverted printer.
Yukarıda gösterildiği gibi rulo modülünü içeri
konuma doğru döndürün. Ardından ters çevrilmiş
yazıcının önüne taşıyın.
Otočte modul pro nekonečný papír do obrácené
pozice podle tohoto obrázku. Pak modul
zvedněte k přední části obrácené tiskárny.
A tekercsegységet fordítsa fejjel lefelé a fenti
ábrának megfelelően. Ezután vigye a felfordított
nyomtató elejéhez.
Rest the roll module next to the rst printer
crossbar.
Rulo modülünü yazıcının ilk destek çubuğunun
yanına bırakın.
Položte modul vedle první rozpěry tiskárny.
A tekercsegységet helyezze a nyomtató első
keresztmerevítőjéhez.
x4x4
Rear of printer
Yazıcının arkası/Zadní strana tiskárny/
A nyomtató hátulja
Page 16

57 58 59 60
Fix the roll module to the left leg of the stand
using two collar-headed screws.
İki yakalı vidayı kullanarak, rulo modülünü
sehpanın sol ayağına sabitleyin.
Upevněte modul pro nekonečný papír k levé
noze podstavce dvěma dalšími šrouby.
A tekercsegységet két peremes csavarral
rögzítse az állvány bal lábához.
Three people are needed, two at the front and
one at the rear of the printer. The two at the front
should lift the roll module and then, with the help
of the third person at the rear, lower it vertically
onto the pins located earlier on the stand.
İkisi yazıcının önünde, diğeri arkasında olacak
biçimde üç kişi gereklidir. Öndeki iki kişi rulo
modülünü kaldırmalı ve arkadaki üçüncü kişinin
yardımıyla daha önce sehpaya yerleştirilen
pimlerin üzerine dikey olarak indirmelidir.
Je potřeba spolupráce tří osob. Dvě by měly být
u přední a jeden u zadní části tiskárny. Dvojice
vpředu by měla zvednout modul a poté za pomoci
třetí osoby vzadu jej spustit na čepy na stojanu.
Három ember szükséges, kettő a nyomtató
elejénél, egy pedig a hátuljánál helyezkedjen
el. A két első ember emelje fel a tekercsegységet,
majd a hátul levő harmadik segítségével engedjék
rá függőlegesen az állványra korábban felszerelt
peckekre.
Look at the front of the roll module and check
that it comes close to the legs of the stand
Rulo modülünün önüne bakın ve sehpanın
ayaklarına yaklaşıp yaklaşmadığını kontrol edin.
Podívejte se na modul zepředu a zkontrolujte,
jestli dosedá těsně na nohy stojanu.
Tekintse meg elölről a tekercsegységet, és
ellenőrizze, hogy szorosan az állvány lábai
mellett helyezkedik-e el.
Fix the roll module to the right leg of the stand
using two additional screws.
Ek iki vidayı kullanarak, rulo modülünü sehpanın
sağ ayağına sabitleyin.
Upevněte modul pro nekonečný papír k pravé
noze podstavce dvěma dalšími šrouby.
Rögzítse a tekercsegységet további két csavarral
az állvány jobb lábához.
x3
x2
x1
Page 17

61 62 63 64
Using four people, rotate the printer on to the
spare and consumables boxes.
Dört kişi bir araya gelerek yazıcıyı yedek ve
tüketim malzemeleri kutularının üzerine doğru
döndürün.
Ve čtyřech lidech otočte tiskárnu ke krabicím
s náhradním a spotřebním materiálem.
Négy ember együttesen forgassa rá a nyomtatót
a tartalék dobozra és a tartozékok dobozára.
Fix the roll module to the right leg of the stand.
Rulo modülünü sehpanın sağ ayağına sabitleyin.
Upevněte modul pro nekonečný papír k pravé
noze podstavce.
Rögzítse a tekercsegységet az állvány jobb
lábához.
Fix the roll module to the left leg of the stand.
Rulo modülünü sehpanın sol ayağına sabitleyin.
Upevněte modul pro nekonečný papír k levé
noze podstavce.
Rögzítse a tekercsegységet az állvány bal
lábához.
Place the spare and consumables boxes against
the rear of the printer box. The arrows on the
boxes must point towards the printer box. Check
that the anti-slip material is still xed to the two
rear wheels.
Yedek ve tüketim malzemeleri kutularını yazıcı
kutusunun arkasına bakacak şekilde yerleştirin.
Kutuların üzerindeki oklar yazıcı kutusunu
göstermelidir. Kaymayı önleyen malzemenin
hala arkadaki iki tekerlekte takılı olduğunu
kontrol edin.
Umístěte krabice s náhradním a spotřebním
materiálem k zadní straně krabice tiskárny.
Šipky na krabici musí ukazovat směrem
ke krabici s tiskárnou. Zkontrolujte, zda je
protiskluzový materiál stále připevněn ke
dvěma zadním kolečkům.
Helyezze a tartalék dobozt és a tartozékok
dobozát a nyomtató dobozának hátoldalához.
A dobozokon levő nyilaknak a nyomtató
doboza felé kell mutatniuk. Ellenőrizze, hogy
a csúszásgátló anyag még mindig rajta van-e
a hátsó görgőkön.
x4
Page 18

65 66 67 68
Rotate the printer into an upright position. The
anti-slip material should stop the printer from
sliding forwards.
Yazıcıyı dik duruma getirecek şekilde döndürün.
Kaymayı önleyici malzeme yazıcının ileri doğru
kaymasını durdurmalıdır.
Otočte tiskárnu do svislé pozice. Protiskluzový
materiál by měl zabránit posouvání tiskárny
dopředu.
Állítsák fel a nyomtatót függőleges állásba.
A csúszásgátló anyag nem engedi előre
csúszni a nyomtatót.
Rotate the printer until its rear rests on the spare
and consumables boxes and the wheels with the
anti-slip material touch the oor.
Yazıcıyı arka kısmı yedek ve tüketim malzemeleri
kutularının üzerine yerleşinceye ve kaymayı
önleyen malzemelerin takılı olduğu tekerlekler
yere değinceye kadar döndürün.
Otáčejte tiskárnu, dokud její zadní strana
nespočine na krabicích s náhradním a spotřebním
materiálem a kolečka s protiskluzovým materiálem
se dotknou podlahy.
Addig forgassák a nyomtatót, amíg az teljesen
biztonságosan ül a tartalék dobozon és a
tartozékok dobozán, úgy, hogy a csúszásgátló
anyaggal bevont görgők érintsék a padlót.
Remove the pallet before trying to lift the printer
into an upright position.
Yazıcıyı dik konuma getirmeden önce paleti
kaldırın.
Před zvednutím tiskárny do polohy na výšku
vysuňte paletu.
Távolítsa el a raklapot, mielőtt megpróbálnák
felállítani a nyomtatót.
Using four people and the hand holds on the
rear of the printer body, carefully lift the printer
into an upright position.
Dört kişi ile yazıcı gövdesinin arkasından tutarak
yazıcıyı dikkatli bir şekilde dik duruma getirin.
Ve čtyřech lidech opatrně zdvihněte tiskárnu
za držadla na zadní části do polohy na výšku.
Négy ember fogja meg a nyomtatót
a hátoldalán levő fogantyúknál, és óvatosan
emeljék a nyomtatót függőleges helyzetbe.
x4
Page 19

69 70 71 72
Remove the anti-slip material from the two rear
wheels on the stand assembly.
Sehpa düzeneğinde arkadaki iki tekerlekte
bulunan kaymayı önleyen malzemeyi çıkarın.
Sundejte protiskluzový materiál s obou zadních
koleček na podstavci.
Távolítsa el a csúszásgátló anyagot az állvány
két hátsó görgőjéről.
Remove the two foam end packs and the plastic
covering the printer.
Uçlardaki iki köpüğü ve yazıcı üzerindeki plastik
malzemeyi çıkarın.
Sundejte oba těsnicí díly z pěnové hmoty
a plastový obal.
Távolítsa el a nyomtató két végéről a habszivacsot
és a műanyag borítást.
Position the left leg cover on the front of the left
leg (1), then clip the rear edge (2) into place.
Sol bacağın kapak malzemesini sol bacağın
önüne getirin (1), sonra arka ucu (2) yerine takın.
Umístěte kryt levé nohy před levou nohu (1)
a zaklapněte zadní hranu (2) na místo.
Igazítsa a bal láb borítólapját a bal láb elejéhez
(1), majd pattintsa helyére a hátsó élét (2).
Position the right leg cover on the front of the right
leg (1), then clip the rear edge (2) into place.
Sağ bacağın kapak malzemesini sağ bacağın
önüne getirin (1), sonra arka ucu (2) yerine takın.
Umístěte kryt pravé nohy před pravou nohu
(1), a zaklapněte zadní hranu (2) na místo.
Igazítsa a jobb láb borítólapját a jobb
lábelejéhez (1), majd pattintsa helyére
a hátsó élét (2).
Page 20

73 74 75 76
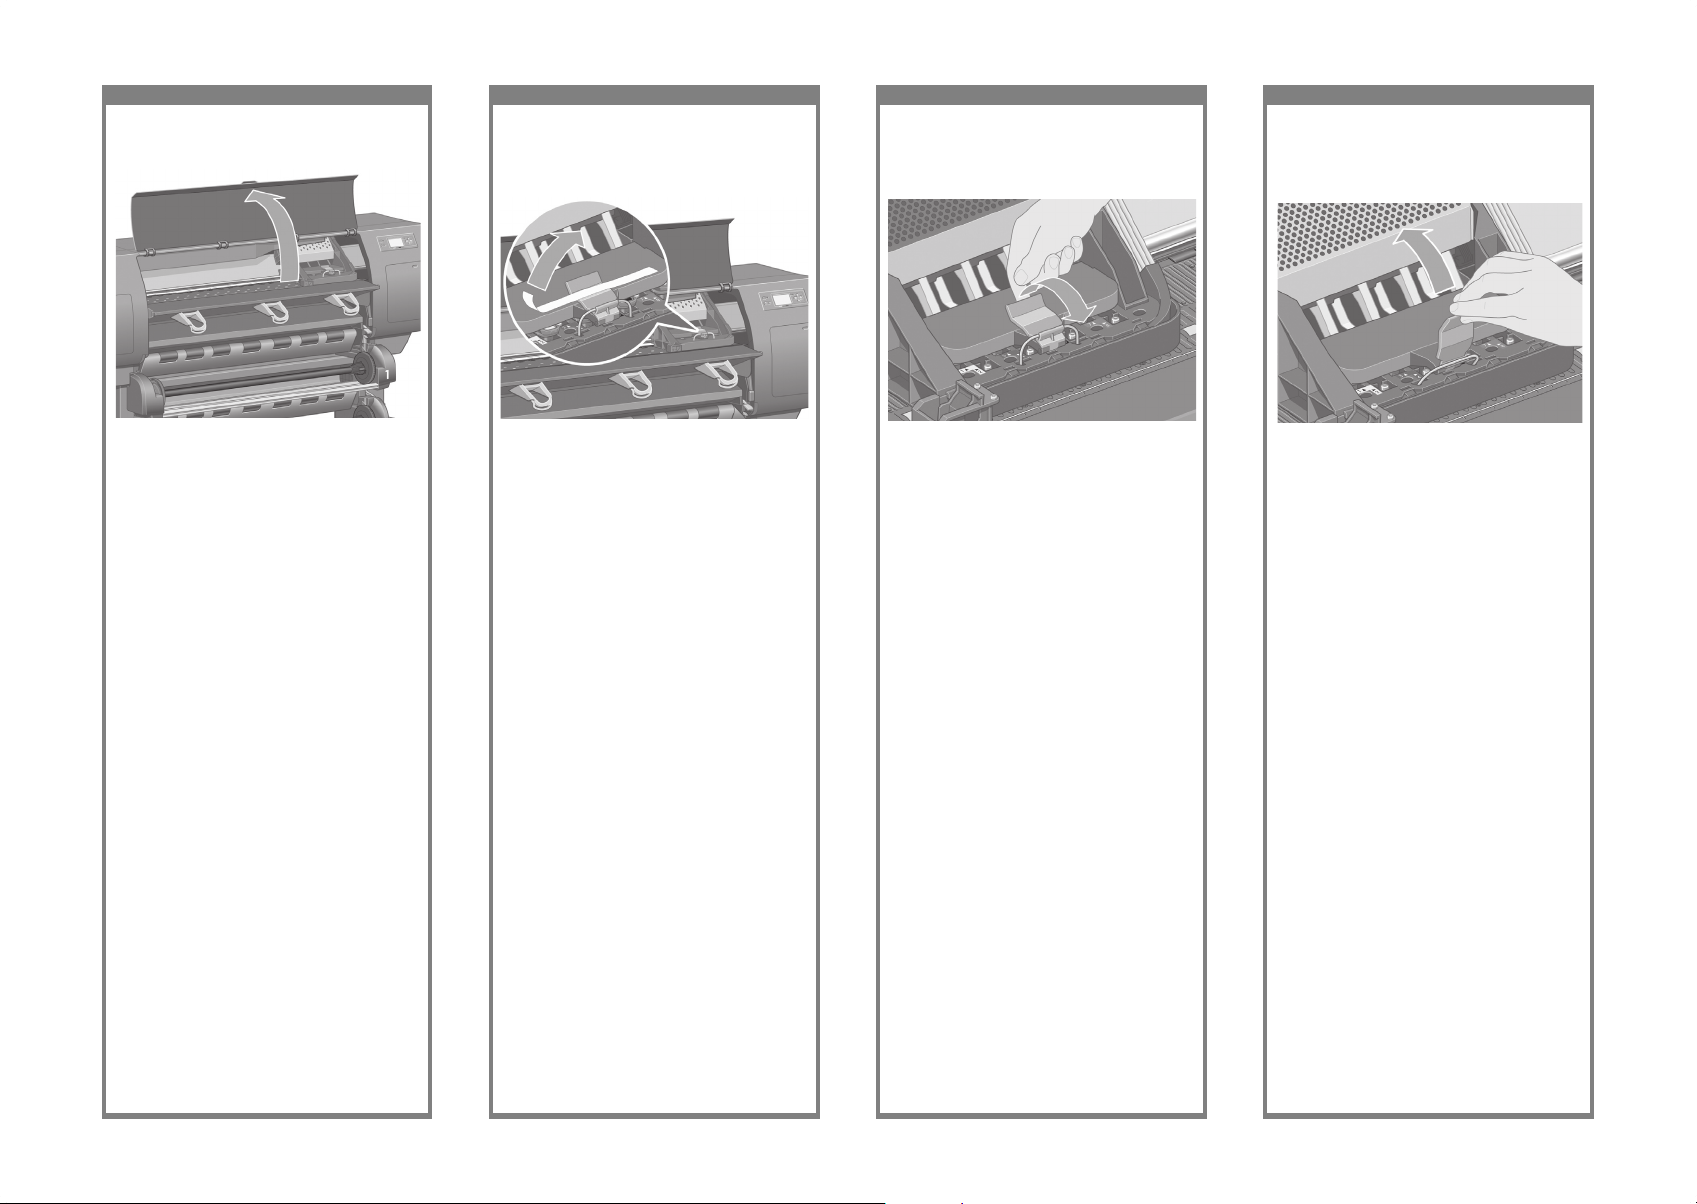
Open the printhead cleaner door and remove
the carriage packing material. Then close the
cleaner door.
Yazıcı kafası temizleyicisinin kapağını açın
ve taşıyıcının ambalaj malzemesini çıkarın.
Temizleyici kapağını kapatın.
Otevřete dvířka pro čisticí kazetu tiskové hlavy
a odstraňte obal vozíku. Potom dvířka pro čisticí
kazetu zavřete.
Nyissa fel a nyomtatófej-tisztítók ajtaját,
és távolítsa el a kocsi csomagolóanyagát.
Csukja be a tisztítóajtót.
Remove the packing tapes 1 to 10.
Ambalaj bantlarını (1 - 10 ile numaralı) çıkarın.
Sundejte balicí pásky 1 až 10.
Távolítsa el az 1–10 jelzésű rögzítőszalagokat.
Open the printer window. Then remove the two
window inserts and the ink tube packing material.
Yazıcı penceresini açın. Ardından iki pencere
ekini ve mürekkep tüpü paket malzemesini
çıkarın.
Otevřete průhledný kryt tiskárny. Pak sejměte
ochranné vložky z krytu a balicí výplň
z inkoustové hlavy.
Nyissa fel a nyomtató ablakát. Távolítsa el a két
ablakbetétet és a festéktömlő csomagolóanyagát.
Remove the protective covering from the printer
window and the front panel screen.
Yazıcı penceresindeki ve ön panel ekranındaki
koruyucu kaplamayı çıkarın.
Sundejte ochranný obal průhledného krytu
tiskárny a obrazovky předního panelu.
Távolítsa el a nyomtató ablakának és az előlap
kijelzőjének védőborítását.
Page 21

77 78 79 80
A Gigabit Ethernet socket is provided for
connection to a network.
Two FireWire® sockets are provided for direct
connection to computers.
Ağa bağlamak için bir Gigabit Ethernet yuvası
sağlanmıştır.
Bilgisayarlara doğrudan bağlamak için
FireWire® yuvaları sağlanmıştır.
Zásuvka Gigabit Ethernet slouží pro připojení
k síti.
Dvě zásuvky FireWire® slouží k přímému
připojení k počítači.
Hálózati kapcsolathoz használja a nyomtatón
levő Gigabit Ethernet csatlakozót.
Számítógépek közvetlen csatlakoztatásához
két FireWire® csatlakozó áll rendelkezésre.
Remove the two yellow plastic screws from the
right and left side of the paper feed. Caution:
Be very careful when removing.
Kağıt besleyicinin sağındaki ve solundaki
iki sarı plastik vidayı çıkarın. Çıkarırken çok
dikkatli olun.
Odstraňte dva žluté plastové šroubky z pravé
a levé strany podavače papíru. Při vyjímání
buďte velmi opatrní.
Távolítsa el a két sárga műanyag csavart
a papíradagoló jobb és bal oldaláról.
Az eltávolításkor legyen nagyon óvatos.
Remove the two yellow plastic screws from the
left and right side of Drawer 2. Caution: Be very
careful when removing.
2. Gözün sağındaki ve solundaki iki sarı plastik
vidayı çıkarın. Çıkarırken çok dikkatli olun.
Odstraňte dva žluté plastové šroubky z levé
a pravé strany zásuvky 2. Při vyjímání buďte
velmi opatrní.
Távolítsa el a két sárga műanyag csavart
a 2. ók bal és jobb oldaláról. Az eltávolításkor
legyen nagyon óvatos.
Using the cable supplied, connect the roll
module to the printer.
Verilen kabloyu kullanarak rulo modülünü
yazıcıya bağlayın.
Pomocí kabelu, který je součástí balení, připojte
modul pro nekonečný papír k tiskárně.
A mellékelt kábelekkel csatlakoztassa
a tekercsegységet a nyomtatóhoz.
Page 22

81 82 83 84
Wait until you see this message (~10 minutes).
Highlight your language using the Up and
Down keys. Press the Select (ü) key.
(~10 dakika) mesajını görene kadar bekleyin.
Yukarı ve Aşağı tuşlarını kullanarak dilinizi
vurgulayın. Seç (ü) tuşuna basın.
Počkejte, až uvidíte tuto zprávu (asi 10 minut).
Označte vybraný jazyk pomocí tlačítek Nahoru
a Dolů. Stiskněte tlačítko Vybrat (ü).
Várjon a fenti üzenet megjelenéséig (kb. 10 perc).
Válassza ki a kívánt nyelvet a Fel és Le gombok
segítségével. Nyomja meg a Kiválasztás (ü)
gombot.
Plug the power cable into the rear of the printer,
then plug the other end into the AC power outlet.
Elektrik kablosunu yazıcının arkasına takın, diğer
ucunu da AC elektrik prizine takın.
Zapojte napájecí kabel do zadní části tiskárny
a druhý konec kabelu do zásuvky se střídavým
proudem.
Csatlakoztassa a tápkábelt a nyomtató
hátoldalához, a másik végét pedig a fali aljzatba.
Turn the power switch at the rear of the printer
to the on position.
Yazıcının arkasındaki güç düğmesini açık
konumuna getirin.
Zapněte vypínač na zadní straně tiskárny.
Állítsa a nyomtató hátoldalán levő tápellátás
kapcsolót bekapcsolt állásba.
If the power light on the front panel remains off,
press the Power key to switch on the printer.
Note: This printer is Energy Star compliant and
can be left switched on without wasting energy.
Leaving it on improves response time and overall
system reliability.
Ön paneldeki güç ışığı kapalıysa, yazıcıyı
açmak için Güç düğmesine basın.
Not: Bu yazıcı Energy Star uyumludur ve elektrik
tüketmeden açık olarak bırakılabilir. Açık olarak
bırakmak yanıt süresini ve genel sistem
güvenilirliğini arttırır.
Pokud zůstane kontrolka napájení na předním
panelu zhasnutá, zapněte tiskárnu stisknutím
tlačítka Napájení.
Poznámka: Tato tiskárna splňuje normy
standardu Energy Star a může být ponechána
zapnutá, aniž by docházelo k plýtvání energií.
Ponecháním tiskárny zapnuté zlepšíte dobu
odezvu a celkovou spolehlivost systému.
Ha az előlapon továbbra sem világít a tápellátás
jelzőfény, nyomja meg a nyomtató Tápellátás
gombját.
Megjegyzés: Ez a nyomtató megfelel az Energy
Star előírásaink, és az energia pazarlása nélkül
bekapcsolva hagyható. A készüléket bekapcsolva
hagyva a készülék hamarabb reagál, valamint
növekszik a teljes rendszer megbízhatósága.
Page 23

85 86 87 88
Open the ink cartridge door.
Mürekkep kartuşu kapağını açın.
Otevřete dvířka pro inkoustovou kazetu.
Nyissa ki a tintapatron ajtaját.
The front panel will now display how to install
the ink supplies.
Ön panel şimdi mürekkep sarf malzemelerini
nasıl takacağınızı görüntüler.
Na předním panelu se zobrazí informace o tom,
jak vložit inkoustové kazety.
Az előlapon megjelennek a tintakellékek
telepítésére vonatkozó utasítások.
Remove the printheads, printhead cleaners,
and ink cartridges from the consumables box.
Yazıcı kafalarını, yazıcı kafası temizleyicilerini
ve mürekkep kartuşlarını tüketim malzemeleri
kutusundan çıkarın.
Vyjměte tiskové hlavy, čisticí kazety tiskových
hlav a inkoustové kazety z krabic se spotřebním
materiálem.
Vegye ki a nyomtatófejeket, a nyomtatófej-tisztítókat
és a tintapatronokat a tartozékok dobozából.
Find the ink cartridge door, which is on the left
side of the printer.
Yazıcının sol tarafında bulunan mürekkep
kartuşu kapağını bulun.
Vyhledejte dvířka pro inkoustovou kazetu na levé
straně tiskárny.
Keresse meg a tintapatron ajtaját a nyomtató
bal oldalán.
Page 24

89 90 91 92
Position the ink cartridge at the rear of the
drawer as indicated.
Mürekkep kartuşunu şekilde gösterildiği gibi
gözün arkasındaki yerleşim konumunda tutun.
Vložte inkoustovou kazetu do zadní části
zásuvky podle obrázku.
Helyezze a tintapatront az ábrán látható
módon a ók hátuljába.
To release the ink cartridge drawer, gently pull
the blue handle down.
Mürekkep kartuşu gözünün serbest kalması için
mavi tutamacı yavaşça aşağı itin.
Uvolněte zásuvku pro inkoustovou kazetu
zatažením za modrý úchyt.
A tintapatronók kioldásához húzza óvatosan
lefelé a kék kart.
Slide the ink cartridge drawer out.
Mürekkep kartuşu gözünü dışarı doğru kaydırın.
Vysuňte zásuvku pro inkoustovou kazetu.
Húzza ki a tintapatronókot.
Place the ink cartridge onto the ink cartridge
drawer. Note that there are marks on the drawer
showing the correct location.
Mürekkep kartuşunu mürekkep kartuşu gözüne
yerleştirin. Gözün üzerinde doğru konumu
gösteren işaretlerin olduğuna dikkat edin.
Vložte inkoustovou kazetu do zásuvky. Na zásuvce
jsou značky, které ukazují správné umístění.
Helyezze a tintapatront a tintapatronókra.
Figyelje meg a ókon levő jelzéseket, amelyek
a megfelelő helyzetet mutatják.
Page 25

93 94 95 96
Wait (about a minute) until you see this front
panel message.
Bu ön panel iletisini görünceye kadar (yaklaşık
bir dakika) bekleyin.
Čekejte asi minutu, až se na předním panelu
zobrazí tato zpráva.
Várjon (körülbelül egy percet), hogy megjelenjen
az előlapon az ábrán látható üzenet.
Push the ink cartridge drawer back into the
printer until it locks into position.
Mürekkep kartuşu gözünü yerine tam olarak
yerleşinceye kadar yazıcının içine doğru itin.
Zatlačte zásuvku pro inkoustovou kazetu zpět
do tiskárny, až zapadne do své polohy.
Tolja vissza a tintapatron ókját a nyomtatóba,
amíg helyére nem kattan.
Following the same instructions, install the other
three ink cartridges.
Aynı yönergeleri izleyerek, diğer üç mürekkep
kartuşunu da takın.
Stejným způsobem vložte ostatní tři inkoustové
kazety.
Ugyanilyen módon helyezze be a további három
tintapatront is.
Close the ink cartridge door.
Mürekkep kartuşu kapağını kapatın.
Zavřete dvířka pro inkoustovou kazetu.
Csukja be a tintapatron ajtaját.
Page 26
97 98 99 100
Lift up the cover. This will give you access to the
setup printheads.
Kapağı yukarı kaldırın. Bunu yapmak ayar yazıcı
kafalarına erişmenizi sağlar.
Zvedněte kryt. Získáte tím přístup k nastavovacím
tiskovým hlavám.
Így már hozzáférhet a telepítő nyomtatófejekhez.
Open the printer window.
Yazıcı penceresini açın.
Otevřete průhledný kryt tiskárny.
Nyissa fel a nyomtató ablakát.
Remove the packing tape that is holding down
the printhead carriage latch.
Yazıcı kafası taşıyıcı mandalını aşağıda tutan
ambalaj bandını çıkarın.
Odstraňte balicí pásku, která přidržuje západku
vozíku tiskové hlavy.
Távolítsa el a nyomtatófejkocsi zárját rögzítő
ragasztószalagot.
Pull up and release the latch on top of the
carriage assembly.
Taşıyıcı düzeneğinin üstünde bulunan mandalı
yukarı çekin ve bırakın.
Zatáhnutím uvolněte západku v horní části vozíku.
Felfelé húzva oldja ki a kocsi tetején levő zárat.
Page 27

101 102 103 104
Lift the setup printhead until it is released from
the carriage assembly. Then remove the other
setup printheads.
Ayar yazıcı kafasını, taşıyıcı düzeneğinden
çıkıp serbest kalıncaya kadar yukarı çekin.
Sonra diğer ayar yazıcı kafalarını çıkarın.
Zvedejte tiskovou hlavu, dokud se neuvolní
z vozíku. Potom vyjměte ostatní nastavovací
tiskové hlavy.
Emelje fel a telepítő nyomtatófejet, amíg az ki
nem jön a kocsiból. Távolítsa el a többi telepítő
nyomtatófejet is.
Before removing the setup printheads, look at the
window on top of each one and check that the
printhead contains ink.
Ayar yazıcı kafalarını çıkarmadan önce her
birinin üzerindeki pencereye bakarak yazıcı
kafasında mürekkep olup olmadığını kontrol edin.
Před výměnou nastavovacích tiskových hlav
se podívejte do okénka na každé z nich a
zkontrolujte, zda tisková hlava obsahuje inkoust.
Mielőtt eltávolítaná a telepítő nyomtatófejeket,
a nyomtatófej tetején levő kis ablakban
ellenőrizze, hogy van-e a nyomtatófejben tinta.
To remove a setup printhead, lift up the blue
handle.
Ayar yazıcı kafasını çıkarmak için mavi tutamacı
yukarı kaldırın.
Zvedněte modrý úchyt, abyste mohli nastavovací
tiskovou hlavu vyjmout.
A telepítő nyomtatófej eltávolításához emelje fel
a kék színű kart.
Using the blue handle, gently disengage the
setup printhead from the carriage.
Mavi kolu kullanarak kurulum yazıcı kafasını
yavaşça taşıyıcıdan ayırın.
Pomocí modrého úchytu nastavovací tiskovou
hlavu jemně uvolněte z vozíku.
A kék fogantyú segítségével noman mozdítsa
ki a telepítő nyomtatófejet.
Page 28

105 106 107 108
Make sure the printheads are correctly seated.
When all the printheads are installed, the front
panel prompts, “Close printhead cover and
window”.
Yazıcı kafalarının doğru şekilde yerine
oturduğundan emin olun. Tüm yazıcı kafaları
takıldığında, ön panelde “Close printhead
cover and window” (Yazıcı kafası kapağını
ve pencereyi kapatın) yazısı görüntülenir.
Zkontrolujte, zda jsou tiskové hlavy správně
usazeny. Při správném umístění všech tiskových
hlav se na předním panelu zobrazí zpráva:
„Close printhead cover and window“ (Zavřete
kryt tiskových hlav a průhledný kryt tiskárny).
Ellenőrizze, hogy a nyomtatófejeket
megfelelően helyezte-e be a nyomtatóba.
Amikor mindegyik nyomtatófej a helyére került,
az előlapon a „Close printhead cover and
window” (Csukja be a nyomtatófejek fedelét
és a nyomtató ajtaját) üzenet jelenik meg.
Remove the blue protective cap and the clear
protective tape from the printhead.
Mavi koruyucu kapsülü çıkarın ve yazıcı
kafasındaki koruyucu bandı sökün.
Sundejte modrou ochrannou čepičku a odstraňte
ochrannou pásku z tiskové hlavy.
Távolítsa el a kék színű kupakot és az átlátszó
védőszalagot a nyomtatófejről.
Lower all the printheads vertically into their
correct positions.
Tüm yazıcı kafalarını dikey olarak doğru
konumlarına indirmek üzere bastırın.
Vložte všechny tiskové hlavy svislým směrem
do správných poloh.
Engedje le a nyomtatófejeket a helyükre.
Seat the printheads slowly and carefully.
Yazıcı kafalarını yavaşça ve dikkatli bir şekilde
yerlerine oturtun.
Pomalu a opatrně tiskové hlavy usaďte.
A nyomtatófejeket lassan, óvatosan helyezze el.
Page 29

109 110 111 112
Close the printer window.
Yazıcı penceresini kapatın.
Zavřete průhledný kryt tiskárny.
Csukja le a nyomtató ablakát.
If “Reseat” is displayed on the front panel,
check that the protective tape has been removed.
Then try reseating the printhead more rmly.
If the problem persists, refer to the Driver and
Documentation CD.
Ön panelde “Reseat” (Yeniden Yerleştir)
görüntüleniyorsa, koruyucu bant çıkarılmamış
olabilir. Daha sonra yazıcı kafasını yerine daha
sıkıca oturtmayı deneyin. Sorun devam ederse
Driver and Documentation CD’sine (Sürücü ve
Belge CD’si) bakın.
Objeví-li se na hlavním panelu zpráva „Reseat“
(Usadit znovu), zkontrolujte, zda jsou ochranné
pásky odstraněny. Poté zkuste usadit tiskové hlavy
znovu a stabilněji. Pokud problémy přetrvávají,
vyhledejte informace na disku CD „Drivers and
Documentation“ (Ovladače a dokumentace).
Ha az előlapon a „Reseat“ (Igazítás) felirat
jelenik meg, ellenőrizze, hogy eltávolította-e
a védőszalagot. Ezt követően helyezze be kicsit
határozottabb mozdulattal a nyomtatófejet. Ha
a probléma továbbra is fennáll, tanulmányozza
a Driver and Documentation (Illesztőprogram és
dokumentáció) CD-lemezt.
Close the carriage assembly cover.
Taşıyıcı aksamının kapağını kapatın.
Zavřete kryt vozíku.
Csukja vissza a kocsi fedelét.
Make sure the latch engages correctly.
Mandalın doğru bir şekilde yerine oturduğundan
emin olun.
Zkontrolujte, zda západka dobře zaklapla.
Ellenőrizze, hogy a rögzítőkar megfelelően zár-e.
Page 30

11 3 11 4 11 5 116
Open the printhead cleaner door.
Yazıcı kafası temizleyici kapağını açın.
Otevřete dvířka pro čisticí kazetu tiskové hlavy.
Nyissa ki a nyomtatófej-tisztítók ajtaját.
Please wait while the printer checks the
printheads (~1 minute).
Yazıcının yazıcı kafalarını denetlemesini
bekleyin (~1 dakika).
Počkejte asi minutu, než tiskárna tiskové
hlavy zkontroluje.
Várjon, amíg a nyomtató elvégzi a
nyomtatófejek ellenőrzését (kb. 1 perc).
Wait until you see this front panel message.
Bu ön panel iletisini görünceye kadar bekleyin.
Čekejte, dokud se na předním panelu nezobrazí
tato zpráva.
Várjon, amíg meg nem jelenik az előlapon
a következő üzenet.
Press the printhead cleaner door, which is on the
right side of the printer.
Yazıcının sağ tarafında bulunan yazıcı kafası
temizleyici kapağına bastırın.
Stiskněte dvířka pro čisticí kazetu tiskové hlavy
na pravé straně tiskárny.
Nyomja meg a nyomtatófej-tisztítók ajtaját
a nyomtató jobb oldalán.
Page 31

117 118 119 120
Close the printhead cleaner door.
Yazıcı kafası temizleyici kapağını kapatın.
Zavřete dvířka pro čisticí kazetu tiskové hlavy.
Csukja be a nyomtatófej-tisztítók ajtaját.
Push the printhead cleaner in and down until
it clicks into place.
Yazıcı kafası temizleyiciyi içeri doğru itin ve
yerine yerleşene kadar aşağı doğru bastırın.
Zasuňte čisticí kazetu tiskové hlavy a zatlačte
ji dolů, až zapadne do správné polohy.
Nyomja helyére a nyomtatófej-tisztítót, egészen
addig, amíg a helyére nem pattan.
Insert the other seven printhead cleaners into
the correct slots.
Diğer yedi yazıcı kafası temizleyiciyi doğru
yuvalara yerleştirin.
Vložte ostatních sedm čisticích kazet tiskových
hlav do příslušných patic.
Helyezze be a másik hét nyomtatófej-tisztítót,
ügyelve arra, hogy a megfelelő foglalatba
kerüljenek.
Insert the printhead cleaner into the slot of the
correct color.
Yazıcı kafası temizleyiciyi doğru renkteki
yuvaya takın.
Vložte čisticí kazetu tiskové hlavy do patice
příslušné barvy.
Helyezze be a nyomtatófej-tisztítót a megegyező
színű foglalatba.
Page 32

121 122 123 124
The front panel displays the above. Highlight
‘Load roll 1’ and press the Select key.
Ön panelde yukarıdaki görüntülenir. ‘Load roll
1’ (Rulo 1’i yükle) seçeneğini vurgulayın ve Seç
(ü) tuşuna basın.
Na předním panelu se zobrazí výše uvedené
údaje. Označte možnost „Load roll 1“ (Vložit
do zásuvky 1) a stiskněte tlačítko Vybrat (ü).
Az előlapon a fenti képernyő jelenik meg.
Jelölje ki a „Load roll 1” (1. tekercs betöltése)
lehetőséget, és nyomja meg a Kiválasztás (ü)
gombot.
To load the paper roll from Drawer 1 into the
printer. From the front panel, highlight the Paper
icon and press the Select key.
1. Gözden yazıcıya kağıt rulosunu yükleme.
Ön panelde Paper (Kağıt) simgesini vurgulayın
ve Seç (ü) tuşuna basın.
Vložte nekonečný papír do zásuvky 1 v tiskárně.
Na předním panelu označte ikonu Papír a
stiskněte tlačítko Vybrat (ü).
Az 1. ókból az alábbi módon töltheti be
a tekercspapírt a nyomtatóba. Jelölje ki az
előlapon a Paper (Papír) ikont, majd nyomja
meg a Kiválasztás (ü) gombot.
From the front panel, highlight ‘Paper load’
and press the Select key.
Ön panelde ‘Paper load’ (Kağıt yükleme)
simgesini vurgulayın ve Seç (ü) tuşuna basın.
Na předním panelu označte možnost ‘Paper
load’ (Vkládání papíru) a stiskněte tlačítko
Vybrat (ü).
Jelölje ki az előlapon a „Paper load”
(Papírbetöltés) sort, majd nyomja meg
a Kiválasztás (ü) gombot.
Wait until you see this front panel message.
Press the Select key.
Bu ön panel iletisini görünceye kadar bekleyin.
Seç (ü) tuşuna basın.
Čekejte, dokud se na předním panelu nezobrazí
tato zpráva. Stiskněte tlačítko Vybrat (ü).
Várjon, amíg meg nem jelenik az előlapon
a következő üzenet. Nyomja meg a Kiválasztás
(ü) gombot.
Page 33

125 126 12 7 128
Remove the blue-colored stop from the left end
of the spindle. Keep the spindle horizontal.
Milin sol ucundan mavi renkli durdurucuyu
çıkarın. Silindiri yatay konumda tutun.
Sejměte modrou zarážku z levého konce
vřetena. Udržujte vřeteno ve vodorovné poloze.
Vegye le a kék színű papírvezetőt az orsó bal
oldali végéről. Tartsa vízszintesen az orsót.
Remove spindle from Drawer 1.
1. Gözden silindiri çıkarın.
Vyjměte vřeteno ze zásuvky 1.
Vegye le az orsót az 1. ókról.
Shown above is one of the core adaptors
supplied. Use these when the roll core is of
a larger diameter.
Yukarıda verilen çekirdek adaptörlerinden biri
gösterilmiştir. Rulo çekirdeğinin daha büyük çapı
olduğunda bunu kullanın.
Zde je vyobrazen jeden z dodaných adaptérů
pro jádro. Lze je použít v případě, že jádro má
širší průměr.
A fenti ábrán az egyik mellékelt hengeradaptert
láthatja. Ezeket használja, ha a tekercs belső
hengere nagyobb átmérőjű.
Using two hands, pull out Drawer 1.
İki elinizi kullanarak 1. Gözü çekin.
Oběma rukama vysuňte zásuvku 1.
Húzza ki két kézzel az 1. ókot.
Page 34

129 13 0 131 132
Push the blue left-hand stop onto the roll. Make
sure it is correctly seated.
Soldaki siyah renkli durdurucuyu ruloya doğru
itin. Doğru oturduğundan emin olun.
Nasaďte na levou stranu nekonečného papíru
modrou zarážku. Zkontrolujte, zda je nasazena
správně.
Nyomja a bal oldali kék papírvezetőt az orsóra.
Ellenőrizze, hogy megfelelően felfekszik-e.
Push the black right-hand stop onto the roll.
Make sure it is correctly seated.
Sağdaki siyah renkli durdurucuyu ruloya doğru
itin. Doğru oturduğundan emin olun.
Nasaďte na nekonečný papír černou zarážku
na pravou stranu. Zkontrolujte, zda je nasazena
správně.
Nyomja a jobb oldali fekete papírvezetőt
az orsóra. Ellenőrizze, hogy megfelelően
felfekszik-e.
Put the blue-colored stop onto the spindle.
Mavi renkli durdurucuyu silindire koyun.
Nasaďte na vřeteno modrou zarážku.
Helyezze fel a kék színű papírvezetőt az orsóra.
Slide the roll of paper that came with your
printer onto the spindle. Make sure the paper
is oriented exactly as shown.
Mile yazıcıyla birlikte verilen kağıt rulosunu
geçirin. Kağıt yönünün gösterildiği gibi
olduğuna emin olun.
Na vřeteno nasuňte nekonečný papír, který se
dodává s tiskárnou. Zkontrolujte, zda je papír
orientován přesně podle obrázku.
Csúsztassa a nyomtatóhoz mellékelt
papírtekercset az orsóra. Vigyázzon, hogy
a papírt az ábrán jelzett módon helyezze fel.
Page 35

13 3 13 4 13 5 13 6
Feed the paper from roll 1 onto the drawer
1 platen. Align the paper parallel with the blue
lines on the right side of the platen. The paper
edge does not need to be aligned exactly with a
specic blue line, but between the two outer lines.
Kağıdı, 1. Gözün plakasına doğru besleyin.
Kağıdı, plakanın sağ tarafında bulunan mavi
çizgilerle paralel olacak şekilde hizalayın.
Kağıdın kenarını belirli bir mavi çizgiyle tam
olarak hizalamanız gerekmez, ancak dıştaki
iki çizginin arasında olmal dır.
Zaveďte papír z vřetena 1 na desku zásuvky
1. Zarovnejte papír s modrými čárami na
pravé straně desky. Hrany papíru nemusí
být zarovnány přesně s modrou čárou, ale
musí být mezi dvěma vnějšími čárami.
Az 1. tekercsről töltse be a+ papírt az 1. ók
támaszlemezére. Igazítsa a papírt úgy, hogy
az a támaszlemez jobb oldalán levő kék
vonalakkal párhuzamosan álljon. A papír
szélének nem kell szükségképpen pontosan
illeszkednie valamelyik kék vonalra, elegendő,
ha a két szélső vonal között helyezkedik el.
With the blue stop on the left, lower the spindle
into Drawer 1.
Silindiri, sol ucundaki mavi durdurucuyla birlikte
1. Gözün içine doğru indirin.
S modrou zarážkou na levé straně spusťte
vřeteno do zásuvky 1.
Ha visszahelyezte a kék papírvezetőt az orsó
bal oldalára, engedje le az orsót az 1. ókba.
Lift the blue lever on Drawer 1. This is located
on the righthand side of the printer and above
Drawer 1.
1. Gözdeki mavi kolu kaldırın. Bu, yazıcının sağ
tarafında ve 1. Gözün üzerinde yer alır.
Zvedněte modrou páčku u zásuvky 1. Nachází
se na pravé straně tiskárny nad zásuvkou 1.
Emelje fel az 1. ók kék karját. Ez a nyomtató
jobb oldalán található, az 1. ók felett.
As shown above, hold the spindle assembly
using the blue and black stops.
Yukarıda gösterildiği gibi silindir düzeneğini
mavi ve siyah durdurucularla tutun.
Držte vřeteno podle obrázku za modrou a černou
zarážku.
A fenti ábra szerint fogja meg az orsót a kék
és fekete papírvezetőnél.
Page 36

137 13 8 139 14 0
Using the stops, carefully wind the excess
paper back on to the spindle.
Durdurucuları kullanarak fazla kağıdı dikkatli
bir şekilde yeniden silindir üzerine sarın.
Pomocí zarážek opatrně naviňte přebytečný
papír zpět na vřeteno.
Az orsó végén levő papírvezetők segítségével
tekerje vissza a feleslegesen kilógó papírt az
orsóra.
Lower the blue lever for Drawer 1.
1. Gözün mavi kolunu aşağıya indirin.
Sklopte modrou páčku zásuvky 1.
Engedje le az 1. ók kék karját.
Push in Drawer 1.
1. Gözü itin.
Zasuňte zásuvku 1.
A nyomtató hangjelzése után még engedje
a papírt néhány centiméterrel tovább, majd
a papír megfelelő megfeszítéséhez csavarja
a tekercset visszafelé.
Feed the paper for a few centimeters more after
the printer beeps, then turn the roller backwards
to tension the paper correctly.
Yazıcı bip sesi çıkardıktan sonra, kağıdı
birkaç santimetre daha besleyin, ardından
kağıdı düzgün biçimde germek için silindiri
geriye doğru döndürün.
Posuňte papír o několik centimetrů až tiskárna
pípne. Pak otočte s vřetenem nazpět, aby byl
papír správně napnutý.
A nyomtató hangjelzése után még engedje
a papírt néhány centiméterrel tovább, majd
a papír megfelelő megfeszítéséhez csavarja
a tekercset visszafelé.
Page 37

141 14 2 14 3 144
From the front panel, highlight ‘Paper load’ and
press the Select key.
Ön panelde ‘Paper load’ (Kağıt yükleme)
simgesini vurgulayın ve Seç (ü) tuşuna basın.
Na předním panelu označte možnost ‘Paper
load’ (Vkládání papíru) a stiskněte tlačítko
Vybrat (ü).
Jelölje ki az előlapon a „Paper load”
(Papírbetöltés) sort, majd nyomja meg
a Kiválasztás (ü) gombot.
Select the roll length if known.
Biliyorsanız, rulo uzunluğunu seçin.
Vyberte délku role papíru, pokud ji znáte.
Válassza ki a tekercs hosszát, ha ismeri.
To load the roll paper from Drawer 2: from the
front panel, highlight the Paper icon and press
the Select key.
2. Gözden rulo kağıdı yüklemek için: ön
panelde Paper (Kağıt) simgesini vurgulayın
ve Seç (ü) tuşuna basın.
Zavedení nekonečného papíru ze zásuvky 2: Na
předním panelu označte ikonu Papír a stiskněte
tlačítko Vybrat (ü).
A 2. ókból az alábbi módon töltheti be
a tekercspapírt: jelölje ki az előlapon a Paper
(Papír) ikont, majd nyomja meg a Kiválasztás
(ü) gombot.
The front panel displays the above. Highlight
the paper type you have loaded and press the
Select key.
Ön panelde yukarıdaki görüntülenir. Yüklediğiniz
kağıt türünü vurgulayın ve Seç (ü) tuşuna basın.
Na předním panelu se zobrazí výše uvedené
údaje. Označte typ papíru, který jste vložili
a stiskněte tlačítko Vybrat (ü).
Az előlapon a fenti képernyő jelenik meg. Jelölje
ki a betöltött papírnak megfelelő papírtípust, és
nyomja meg a Kiválasztás (ü) gombot.
Page 38

14 5 14 6 14 7 14 8
Load the spindle using the same procedure as
described by points 127 to 133.
127 - 133 noktalarında açıklanan aynı yordamı
kullanarak silindiri yükleyin.
Vložte vřeteno podle pokynů uvedených
v bodech 127 až 133.
Töltse be az orsót az 127 - 133. pontoknál már
ismertetett módon.
Using two hands, pull out Drawer 2.
İki elinizi kullanarak 2. Gözü çekin.
Oběma rukama vysuňte zásuvku 2.
Húzza ki két kézzel a 2. ókot.
Remove the spindle from Drawer 2.
2. Gözden silindiri çıkarın.
Vyjměte vřeteno ze zásuvky 2.
Vegye le az orsót a 2. ókról.
The front panel displays the above. Highlight
‘Load roll 2’ and press the Select key.
Ön panelde yukarıdaki görüntülenir. ‘Load roll 2’
(Rulo 2’yi yükle’) seçeneğini vurgulayın ve Seç (ü)
tuşuna basın.
Na předním panelu se zobrazí výše uvedené
údaje. Označte možnost „Load roll 2“ (Vložit
nekonečný papír 2) a stiskněte tlačítko Vybrat (ü).
Az előlapon a fenti képernyő jelenik meg.
Jelölje ki a „Load roll 2” (2. te ercs betöltése)
lehetőséget, és nyomja meg a Kiválasztás (ü)
gombot.
Page 39

14 9 15 0 151 152
Feed the paper for a few centimeters more
after the printer beeps, then turn the roller
backwards to tension the paper correctly.
Yazıcı bip sesi çıkardıktan sonra, kağıdı birkaç
santimetre daha besleyin, ardından kağıdı
düzgün biçimde germek için silindiri geriye
doğru döndürün.
Posuňte papír o několik centimetrů až tiskárna
pípne. Pak otočte s vřetenem nazpět, aby byl
papír správně napnutý.
A nyomtató hangjelzése után még engedje
a papírt néhány centiméterrel tovább, majd
a papír megfelelő megfeszítéséhez csavarja
a tekercset visszafelé.
Lift the blue lever on Drawer 2. This is located
on the right-hand side of the printer and under
Drawer 1.
2. Gözdeki mavi kolu kaldırın. Bu, yazıcının sağ
tarafında ve 1. Gözün altında yer alır.
Zvedněte modrou páčku u zásuvky 2. Nachází
se na pravé straně tiskárny pod zásuvkou 1.
Emelje fel a 2. ók kék karját. Ez a nyomtató
jobb oldalán taláható, az 1. ók alatt.
Feed the paper from roll 2 onto the drawer
2 platen. Align the paper parallel with the blue
lines on the right side of the platen. The paper
edge does not need to be aligned exactly with
a specic blue line, but between the two outer
lines.
Kağıdı, 2. Gözün plakasına doğru besleyin.
Kağıdı, plakanın sağ tarafındaki mavi çizgilerle
paralel olacak şekilde hizalayın. Kağıdın kenarını
belirli bir mavi çizgiyle tam olarak hizalamanız
gerekmez, ancak dıştaki iki çizginin arasında
olmalıdır.
Zaveďte papír z vřetena 2 na desku zásuvky
2. Zarovnejte papír s modrými čárami na pravé
straně desky. Hrany papíru nemusí být zarovnány
přesně s modrou čárou, ale musí být mezi dvěma
vnějšími čárami.
Az 2. tekercsről töltse be a papírt az 2. ók
támaszlemezére. Igazítsa a papírt úgy, hogy az
a támaszlemez jobb oldalán levő kék vonalakkal
párhuzamosan álljon. A papír szélének nem kell
szükségképpen pontosan illeszkednie valamelyik
kék vonalra, elegendő, ha a két szélső vonal
között helyezkedik el.
With the blue stop on the left, lower the spindle
into Drawer 2.
Silindiri, sol ucundaki mavi durdurucuyla birlikte 2.
Gözün içine doğru indirin.
S modrou zarážkou na levé straně spusťte
vřeteno do zásuvky 2.
Ha visszahelyezte a kék papírvezetőt az orsó
bal oldalára, engedje le az orsót a 2. ókba
Page 40

153 15 4 155 15 6
The front panel displays the above. Highlight
the paper type you have loaded and press the
Select key.
Ön panelde yukarıdaki görüntülenir. Yüklediğiniz
kağıt tününü vurgulayın ve Seç (ü) tuşuna basın.
Na předním panelu se zobrazí výše uvedené
údaje. Označte typ papíru, který jste vložili
a stiskněte tlačítko Vybrat (ü).
Az előlapon a fenti képernyő jelenik meg. Jelölje
ki a betöltött papírnak megfelelő papírtípust,
és nyomja meg a Kiválasztás (ü) gombot.
Using two hands, push in Drawer 2.
İki elinizi kullanarak 2. Gözü itin.
Oběma rukama zasuňte zásuvku 2.
Tolja be két kézzel a 2. ókot.
Using the stops, carefully wind the excess paper
back on to the spindle.
Durdurucuları kullanarak fazla kağıdı dikkatli bir
şekilde yeniden silindir üzerine sarın.
Pomocí zarážek opatrně naviňte přebytečný
papír zpět na vřeteno.
Az orsó végén levő papírvezetők segítségével
tekerje vissza a feleslegesen kilógó papírt az
orsóra.
Lower the blue lever for Drawer 2.
2. Gözün mavi kolunu aşağıya indirin.
Sklopte modrou páčku zásuvky 2.
Engedje le a 2. ók kék karját.
Page 41

157 15 8 159 16 0
Your printer can be connected to a computer
directly or to one or more computers via a
network.
Yazıcınız bir bilgisayara doğrudan bağlanabilir
veya bir ya da birkaç bilgisayara ağ aracılığıyla
bağlanabilir.
Tiskárna může být k počítači připojena přímo
nebo může být připojena k více počítačům
pomocí sítě.
A nyomtató közvetlen kapcsolattal egy
s zámítógépre, hálózaton keresztül pedig
akár több számítógépre is csatlakoztatható.
PC/Mac/Workstation
PC, Macintosh veya iş istasyonu
PC, Macintosh nebo pracovní stanice
PC, Macintosh vagy munkaállomás
PC/Mac/Workstation
PC, Macintosh veya iş
istasyonu
PC, Macintosh nebo
pracovní stanice
PC, Macintosh
vagy munkaállomás
Server
Sunucu
Server
Szerver
Printer
Yazıcı
Tiskárna
Nyomtató
Pass the LAN cable through the hook at the rear
of the printer.
LAN kablosunu yazıcının arkasındaki askıdan
geçirin.
Připevněte kabel sítě LAN pomocí háčku na
zadní straně tiskárny.
Vezesse át a hálózati kábelt a nyomtató
hátoldalán található kampón.
The roll module provides an extra socket to
connect an optional accessory.
Caution: do not attempt to use this socket for
any other purpose.
Rulo modülü ek aksesuarları bağlamak için ek
yuva sağlar.
Uyarı: bu yuvayı başka bir amaç için kullanmayı
denemeyin.
Modul pro nekonečný papír poskytuje další
zásuvku pro připojení doplňkového zařízení.
Varování: nepokoušejte se používat tuto zásuvku
pro žádné jiné účely.
A tekercsegységen egy további csatlakozó áll
rendelkezésre külön beszerezhető tartozékok
csatlakoztatásához.
Figyelmeztetés: Ezt a csatlakozót semmilyen más
célra ne használja.
Select the roll length if known.
Biliyorsanız, rulo uzunluğunu seçin.
Vyberte délku role papíru, pokud ji znáte.
Válassza ki a tekercs hosszát, ha ismeri.
Page 42

161 162 16 3 16 4
x2
Page 43

165 16 6 167
Locate the bin against the printer.
Now you have completed the assembly of your
printer. The following pages describe how to
congure your computer for successful printing.
Bölmeyi yazıcının karşısına yerleştirin.
Yazıcınızın montajını böylece tamamlamış
oldunuz. Bundan sonraki sayfalarda yazıcınızı
başarılı baskılar elde etmek için nasıl
yapılandırabileceğiniz açıklanmıştır.
Postavte zásobník před tiskárnu.
Nyní je sestavení tiskárny dokončeno. Následuje
popis kongurace počítače pro správný tisk.
Helyezze a papírtartót a nyomtatóhoz.
Ezzel befejezte a nyomtató üzembe helyezését.
A következő oldalakon megtudhatja, hogyan
kongurálhatja a számítógépet a sikeres
nyomtatáshoz.
Page 44

Note for MAC & Windows USB
connection:
Do not connect the computer to the printer yet.
You must rst install the printer driver software
on the computer.
Insert the HP start up Kit CD/DVD into your computer.
For Windows:
* If the CD/DVD does not start automatically,
run autorun.exe program on the root folder on
the CD/DVD.
* To install a Network Printer click on Express Network
Install otherwise click on Custom Install and follow
the instructions on your screen.
For Mac:
* If the CD/DVD does not start automatically, open the
CD/DVD icon on your desktop.
* Open the Mac OS X HP Designjet Installer icon and
follow the instructions on your screen.
NOTE: You can download the latest software from:
http://www.hp.com/go/4520/drivers
or
http://www.hp.com/go/4520PS/drivers
MAC ve Windows USB bağlantısı
için not:
Bilgisayarı yazıcıya şu anda bağlamayın. Önce yazıcı
sürücüsü yazılımını bilgisayara yüklemeniz gerekir.
HP Start-Up Kit CD’sini veya DVD’sini bilgisayarınıza
takın.
Windows için:
* CD veya DVD otomatik olarak başlatılmazsa,
CD veya DVD’nin kök klasöründeki autorun.exe
programını çalıştırın.
* Bir Ağ Yazıcısı kurmak için Express Network Install
(Hızlı Ağ Kurulumu) seçeneğini, aksi durumda
Custom Install (Özel Kurulum) seçeneğini tıklatıp
ekranınızdaki yönergeleri izleyin.
Mac için:
* CD veya DVD otomatik olarak başlatılmazsa, masa
üstünüzdeki CD veya DVD simgesini açın.
* Mac OS X HP Designjet Installer simgesini açın ve
ekranınızdaki yönergeleri izleyin.
NOT: En yeni yazılımı aşağıdaki adreslerden
yükleyebilirsiniz:
http://www.hp.com/go/4520/drivers
veya
http://www.hp.com/go/4520PS/drivers
Poznámka pro uživatele připojené
pomocí připojení USB (systémy
Macintosh a Windows):
Počítač zatím nepřipojujte k tiskárně. Nejprve musíte
nainstalovat do počítače software ovladače tiskárny.
Vložte do počítače disk CD či DVD se službou
podpory HP Start-Up Kit.
V systému Windows:
* Pokud se disk CD či DVD nespustí automaticky,
spusťte program autorun.exe, který je umístěn
v kořenové složce na disku CD či DVD.
* Chcete-li nainstalovat tiskárnu do sítě, klepněte
na možnost Expresní síťová instalace, případně
klepněte na možnost Vlastní instalace a postupujte
podle pokynů na obrazovce.
V systému Macintosh:
* Pokud se disk CD či DVD nespustí automaticky,
použijte ikonu disku CD/DVD na ploše.
* Spusťte instalační program pomocí ikony Mac OS X
HP Designjet Installer a postupujte podle pokynů na
obrazovce.
POZNÁMKA: Nejnovější software lze stáhnout
z webu:
http://www.hp.com/go/4520/drivers
nebo
http://www.hp.com/go/4520PS/drivers
Megjegyzés USB-kapcsolat
használata esetén MAC és
Windows számítógépeken:
Még ne csatlakoztassa a nyomtatót a számítógéphez.
Először a nyomtatóillesztő-programot kell telepíteni
a számítógépre.
Helyezze be a HP kezdőcsomag CD/DVD-lemezt
a számítógépbe.
Windows rendszer esetén:
* Ha a telepítés nem indul el automatikusan,
a CD/DVD gyökérmappájából indítsa el
az autorun. exe programot.
* Hálózati nyomtató telepítése esetén kattintson az
Express Network Install (Expressz hálózati telepítés)
gombra. Máskülönben kattintson a Custom Install
(Egyéni telepítés) gombra, és kövesse a képernyőn
megjelenő utasításokat.
Mac rendszer esetén:
* Ha a telepítés nem indul el automatikusan, nyissa
meg a CD/DVD ikonját az íróasztalon.
* Nyissa meg a Mac OS X HP Designjet Installer
ikont, majd kövesse a képernyőn megjelenő
utasításokat.
MEGJEGYZÉS: A legfrissebb szoftver letölthető
a következő webhelyről:
http://www.hp.com/go/4520/drivers
vagy
http://www.hp.com/go/4520PS/drivers
Legal notices
© Copyright 2009 Hewlett-Packard
Development Company, L.P.
The information contained herein is subject to change without
notice. The only warranties for HP products and services are set
forth in the express warranty statements accompanying such
products and services. Nothing herein should be construed as
constituting an additional warranty. HP shall not be liable for
technical or editorial errors or omissions contained herein.
Trademarks
Microsoft ®; and Windows ®; are U.S. registered
trademarks of Microsoft Corporation.
FireWire is a trademark of Apple Computer, Inc.,
registered in the U.S. and other countries.
Yasal bildirimler:
© Telif Hakkı 2009 Hewlett-Packard
Development Company, L.P.
Burada yer alan bilgiler bildirimde bulunulmadan değiştirilebilir.
HP ürün ve hizmetleri için yalnızca söz konusu ürün ve hizmetlere
eşlik eden açık garanti belgelerinde belirtilen garantiler geçerlidir.
Burada kullanılan hiçbir ifade ek garanti olarak yorumlanamaz.
Ticari Markalar:
Microsoft® ve Windows® Microsoft Corporation’ın
ABD’de kayıtlı ticari markalarıdır.
FireWire, Apple Computer, Inc. şirketinin,ABD’de
ve diğer ülkelerde kayıtlı ticari markasıdır.
Právní informace:
© Copyright 2009 Hewlett-Packard
Development Company, L.P.
Informace v tomto dokumentu mohou být změněny bez
předchozího upozornění. Jediné záruky poskytované k produktům
a službám HP jsou výslovně uvedeny v prohlášeních o záruce,
která se dodávají společně s těmito produkty a službami. Žádné
z informací uvedených v tomto dokumentu nemohou sloužit jako
podklad pro vyvození dalších záruk.
Ochranné známky:
Microsoft® a Windows® jsou registrované ochranné
známky společnosti Microsoft Corporation v USA.
FireWire je ochranná známka společnosti
Apple Computer, Inc. registrovaná v USA a dalších
zemích/oblastech.
Jogi kitételek:
© Copyright 2009 Hewlett-Packard
Development Company, L.P.
Az itt található információk előzetes értesítés nélkül
megváltozhatnak. A HP termékekre és szolgáltatásokra
vonatkozó garanciákat kizárólag az ilyen termékek és
szolgáltatások kifejezett garancianyilatkozatában rögzítettek
szerint vállaljuk. Az itt talált információk semmilyen módon nem
tekinthetők további garanciának. A HP nem felelős az itt található
semmilyen technikai vagy szerkesztési hibáért vagy kihagyásért.
Védjegyek:
A Microsoft® és a Windows® a Microsoft Corporation
bejegyzett védjegye az Egyesült Államokban.
A FireWire az Apple Computer, Inc., bejegyzett védjegye
az Egyesült Államokban és más országokban.
 Loading...