

Page 1

Printing Specifications
Product: HP Designjet 4000/4500 Printer Quick Reference Guide
Part number: Q1272-90001 EN
TEXT
PAGES
Page Count 204 (with cover)
Paper Type HP standard 50# book (69 to 80g/m ) recycled offset or equivalent
Ink 4-color process (CMYK)
Co
verage 4/4
COVER PAGES
Page Count 2 front and back
Paper
Type Up to DCs: whatever is normally used for QRGs (170/200g)
Ink 4-color
Coverage 4/4
Fini
sh Up to DCs
2
FINISH
Page Trim Size A5
Bindery SS or as prefered
ing Instruction None
Fold
Special
Instruc
tions
If the print location is different from the location stated, change the print location to the
appropriate
If recycled paper is used, add the recycled paper logo and text.
Refer to the Pantone Matching System for accurate spot color reproduction.
location.
Printed on recycled
paper
Do not print this page. This page is for reference only.
Page 2

HP Designjet 4000/4500 Printer series
Quick reference guide
EN
Page 3

Page 4

HP Designjet 4000 and 4500 Printer
series
Quick Reference Guide
Page 5

Legal notices
The information contained in this document
is subject to change without notice.
Hewlett-Packard makes no warranty of any
kind with regard to this material, including,
but not limited to, the implied warranties of
merchantability and fitness for a particular
purpose.
Hewlett-Packard shall not be liable for
errors contained herein or for incidental or
consequential damages in connection with
the furnishing, performance, or use of this
material.
No part of this document may be
photocopied or translated to another
language without the prior written consent
of Hewlett-Packard Company.
Trademarks
Adobe®, Acrobat®, Adobe Photoshop®,
and PostScript® are trademarks of Adobe
Systems Incorporated.
Microsoft® and Windows® are U.S.
registered trademarks of Microsoft
Corporation.
PANTONE® is Pantone, Inc.'s checkstandard trademark for color.
Page 6

Table of contents
1 Introduction
2 How do I... (printer operation topics)
3 How do I... (paper topics)
Using this guide.................................................................................................................................2
Introduction.................................................................................................................2
How do I ....................................................................................................................2
The problem is ...........................................................................................................2
Tell me about .............................................................................................................2
Legal information........................................................................................................2
Index..........................................................................................................................2
The printer's main features................................................................................................................2
The printer's main components [4000]...............................................................................................3
Front view...................................................................................................................3
Rear view...................................................................................................................4
The printer's main components [4500]...............................................................................................4
Front view...................................................................................................................5
Front view with optional stacker..................................................................................6
Rear view...................................................................................................................6
The front panel..................................................................................................................................7
Printer software.................................................................................................................................8
Scanner software [4500]....................................................................................................................8
Switch on and off.............................................................................................................................12
Restart.............................................................................................................................................13
Access the Embedded Web Server.................................................................................................13
Using IP over FireWire with Mac OS X 10.3 and later...............................................14
Password-protect the Embedded Web Server.................................................................................14
Change the sleep mode setting.......................................................................................................15
Turn off the buzzer...........................................................................................................................15
Load a roll onto the spindle [4000]...................................................................................................18
Load a roll into the printer [4000].....................................................................................................20
Unload a roll from the printer [4000].................................................................................................24
The normal procedure (roll attached to spindle)........................................................24
Roll detached from spindle.......................................................................................25
No paper visible........................................................................................................25
Load a single sheet [4000]...............................................................................................................25
Unload a single sheet [4000]...........................................................................................................28
Load a roll onto the spindle [4500]...................................................................................................29
ENWW iii
Page 7

Load a roll into the printer [4500].....................................................................................................31
Unload a roll from the printer [4500].................................................................................................35
The normal procedure (roll attached to spindle)........................................................35
Roll detached from spindle.......................................................................................36
No paper visible........................................................................................................36
Trim the paper with the manual cutter [4500]...................................................................................36
View information about the paper....................................................................................................38
Download media profiles..................................................................................................................39
Use non-HP paper...........................................................................................................................39
Cancel the drying time.....................................................................................................................40
Change the drying time....................................................................................................................40
4 How do I... (print job topics)
Submit a job with the Embedded Web Server..................................................................................42
Save a job........................................................................................................................................42
Print a saved job..............................................................................................................................43
Cancel a job.....................................................................................................................................43
Manage the print queue...................................................................................................................43
Turning off the queue [4000].....................................................................................44
The When To Start Printing options..........................................................................44
Identifying a job in the queue....................................................................................44
Prioritizing a job in the queue....................................................................................44
Deleting a job from the queue...................................................................................45
Making copies of a job in the queue..........................................................................45
Understanding job status..........................................................................................45
Nest jobs to save roll paper.............................................................................................................46
When does the printer try to nest pages?.................................................................46
Which pages can be nested?....................................................................................47
Which pages qualify for nesting?..............................................................................47
How long does the printer wait for another file?........................................................47
5 How do I... (stacker topics) [4500]
Install the stacker.............................................................................................................................50
Uninstall the stacker........................................................................................................................50
Change paper rolls while using the stacker......................................................................................51
Clean the stacker rollers..................................................................................................................51
Move or store the stacker................................................................................................................52
6 How do I... (image adjustment topics)
Change the page size......................................................................................................................54
Change the print quality...................................................................................................................54
Choose print quality settings............................................................................................................54
Print at maximum speed..................................................................................................................56
Adjust the margins...........................................................................................................................57
Print on oversize pages...................................................................................................................57
Print without added margins............................................................................................................58
Select the orientation of the image...................................................................................................58
Rotate an image..............................................................................................................................59
Autorotate.................................................................................................................60
iv ENWW
Page 8

Print a mirror image.........................................................................................................................60
Scale an image................................................................................................................................60
7 How do I... (color topics)
Perform color calibration..................................................................................................................64
Perform black point compensation...................................................................................................64
Set the rendering intent....................................................................................................................65
8 How do I... (ink system topics)
Remove an ink cartridge..................................................................................................................68
Insert an ink cartridge......................................................................................................................71
Remove a printhead........................................................................................................................73
Insert a printhead.............................................................................................................................76
Manage printhead monitoring..........................................................................................................78
Recover (clean) the printheads........................................................................................................79
Clean a printhead's electrical connections.......................................................................................79
Align the printheads.........................................................................................................................83
Remove a printhead cleaner............................................................................................................84
Insert a printhead cleaner................................................................................................................86
Check the status of the ink system..................................................................................................88
Get ink cartridge statistics................................................................................................................88
Get printhead statistics....................................................................................................................89
9 How do I... (Image Diagnostics Print topics)
Print the Image Diagnostics Print.....................................................................................................92
Respond to the Image Diagnostics Print..........................................................................................92
Interpret Image Diagnostics part 1...................................................................................................92
Corrective action.......................................................................................................94
Interpret Image Diagnostics part 2...................................................................................................94
Banding....................................................................................................................94
Horizontal bands across strips of one color only.......................................................95
Corrective action.......................................................................................................95
Horizontal bands across all the colored strips...........................................................95
Corrective action.......................................................................................................96
Interpret Image Diagnostics part 3...................................................................................................96
Corrective action.......................................................................................................97
If I still have a problem.....................................................................................................................97
10 How do I... (paper advance calibration topics)
Overview of the calibration process.................................................................................................99
The calibration process in detail.....................................................................................................100
After calibration..............................................................................................................................103
11 How do I... (scanner topics) [4500]
Calibrate the scanner.....................................................................................................................106
Calibrate the touch screen pointer.................................................................................................106
Create a new media profile............................................................................................................107
Copy a document...........................................................................................................................107
ENWW v
Page 9

Scan a document to a file..............................................................................................................110
Print a file.......................................................................................................................................111
View or delete a file.......................................................................................................................111
Scan heavyweight paper or cardboard...........................................................................................112
Adjust color....................................................................................................................................113
Enable or disable scanner accounts..............................................................................................114
Check the printer queue.................................................................................................................114
Collate copies................................................................................................................................115
Clean the glass..............................................................................................................................115
Set sleep and wake-up timers........................................................................................................115
12 The problem is... (paper topics)
The paper cannot be loaded successfully [4000]...........................................................................118
Rolls.......................................................................................................................118
Sheets....................................................................................................................118
The paper cannot be loaded successfully [4500]...........................................................................119
A paper jam (paper stuck in the printer) [4000]..............................................................................120
Check printhead path..............................................................................................120
Check paper path...................................................................................................122
A paper jam (paper stuck in the printer) [4500]..............................................................................122
Check printhead path..............................................................................................122
Check paper path...................................................................................................131
A paper jam in drawer 2 [4500]......................................................................................................131
Prints do not stack properly in the bin [4000].................................................................................138
Prints do not stack properly in the basket [4500]............................................................................139
The printer uses a lot of paper to align the printheads...................................................................139
The paper moves while the printer is in standby mode [4500]........................................................139
The printer unloads or trims the paper after a long period of disuse [4500]....................................139
The printer unloads the paper while switched off [4500].................................................................139
The printer unloads the paper when switched on [4500]................................................................140
13 The problem is... (print quality topics)
General advice...............................................................................................................................142
Banding (horizontal lines across the image)...................................................................................142
Lines are missing or thinner than expected....................................................................................143
Solid bands or lines printed over the image...................................................................................143
The print smudges when touched..................................................................................................144
Ink marks on the paper..................................................................................................................144
Smears on the front of coated paper.......................................................................145
Smears or scratches on the front of glossy paper...................................................145
Ink marks on the back of the paper.........................................................................145
Ink marks when the stacker is in use [4500]...........................................................145
A defect near the start of a print.....................................................................................................145
Lines are stepped..............................................................................................................
Lines are printed double or in wrong colors....................................................................................147
Lines are discontinuous.................................................................................................................147
Lines are blurred (ink bleeds from lines)........................................................................................148
Lines are slightly warped...............................................................................................................148
Color accuracy...............................................................................................................................149
Color accuracy using EPS or PDF images in page layout applications...................149
............146
vi ENWW
Page 10

PANTONE color accuracy.............................................................................................................149
Using Automatic PANTONE Calibration (the best choice)......................................149
Converting PANTONE colors manually..................................................................149
Tips........................................................................................................................150
Color matching between different HP Designjets...........................................................................150
Printing via separate PostScript drivers..................................................................150
Printing via separate HP-GL/2 drivers.....................................................................151
Printing the same HP-GL/2 file...............................................................................151
14 The problem is... (image error topics)
The print is completely blank..........................................................................................................154
The output contains only a partial print..........................................................................................154
The image is clipped......................................................................................................................154
The image is in one portion of the printing area.............................................................................155
The image is unexpectedly rotated................................................................................................155
The print is a mirror image of the original.......................................................................................155
The print is distorted or unintelligible..............................................................................................155
One image overlays another on the same sheet............................................................................156
Pen settings seem to have no effect..............................................................................................156
Some objects are missing from the printed image..........................................................................156
A PDF file is clipped or objects are missing...................................................................................156
No output when printing from Microsoft Visio 2003........................................................................156
15 The problem is... (ink system topics)
I cannot insert an ink cartridge.......................................................................................................160
The printer will not accept a large black ink cartridge.....................................................................160
I cannot remove an ink cartridge....................................................................................................160
I cannot insert a printhead.............................................................................................................160
I cannot insert a printhead cleaner.................................................................................................160
The front panel keeps telling me to reseat or replace a printhead..................................................161
An ink cartridge status message....................................................................................................161
A printhead status message...........................................................................................................161
A printhead cleaner status message..............................................................................................162
16 The problem is... (stacker topics) [4500]
Paper scrolling...............................................................................................................................164
The trailing edge of the paper curling up........................................................................................164
The paper is not completely ejected...............................................................................................164
17 The problem is... (scanner topics) [4500]
The diagnostics light is flashing.....................................................................................................166
The wait light is flashing.................................................................................................................166
The wait and diagnostics lights are both flashing...........................................................................166
The scanner displays a warning message.....................................................................................167
The scanner software is in the wrong language.............................................................................167
The scanner software does not start..............................................................................................167
The CD or DVD cannot be read by my computer...........................................................................168
A media profile cannot be generated.............................................................................................168
The printer puts the job on hold.....................................................................................................168
ENWW vii
Page 11

The printer loads the wrong roll......................................................................................................168
The margins are too wide..............................................................................................................168
Streaks in the scanned image........................................................................................................168
18 The problem is... (other topics)
The printer's start-up process does not complete...........................................................................170
A front panel message ..................................................................................................................170
A “printhead monitoring” message.................................................................................................172
A “printheads are limiting performance” message..........................................................................173
An “on hold for paper” message [4500]..........................................................................................173
The printer does not print...............................................................................................................174
An out-of-memory error..................................................................................................................175
The platen rollers squeak...............................................................................................................175
19 Legal information
Worldwide Limited Warranty—HP Designjet 4000/4500 Printer series and 4500mfp.....................180
A. Extent of HP Limited Warranty...........................................................................180
B. Limitations of liability..........................................................................................182
C. Local law............................................................................................................182
Hewlett-Packard Software License Agreement..............................................................................183
HP SOFTWARE LICENSE TERMS .......................................................................183
Open source acknowledgments.....................................................................................................184
Regulatory notices.........................................................................................................................185
Regulatory Model Number......................................................................................185
ELECTROMAGNETIC COMPATIBILITY (EMC).....................................................185
FCC statements (U.S.A.)........................................................................................185
Shielded cables......................................................................................................185
Normes de sécurité (Canada).................................................................................186
DOC statement (Canada).......................................................................................186
Korean EMI statement............................................................................................186
VCCI Class A (Japan).............................................................................................186
Safety power cord warning.....................................................................................186
Taiwanese EMI statement......................................................................................186
Chinese EMI statement..........................................................................................187
Sound.....................................................................................................................187
DECLARATION OF CONFORMITY...............................................................................................188
declares that the product........................................................................................188
conforms to the following product specifications.....................................................188
Additional information.............................................................................................188
Local contacts for regulatory topics only.................................................................189
Index....................................................................................................................................................................191
viii ENWW
Page 12

1 Introduction
Using this guide
●
The printer's main features
●
The printer's main components [4000]
●
The printer's main components [4500]
●
The front panel
●
Printer software
●
Scanner software [4500]
●
Introduction
ENWW 1
Page 13

Using this guide
Introduction
Using your printer (on CD) and the Quick Reference Guide (on paper) are organized into the following
chapters.
Introduction
This chapter provides a brief introduction to the printer and its documentation for new users.
How do I ...
These chapters help you to carry out various procedures such as loading paper or changing an ink
cartridge. Many of these procedures are illustrated with drawings, and some are also illustrated with
animations (in Using your printer only, on CD).
The problem is ...
These chapters help you to solve problems that may occur while printing. The most complete source for
this type of information is in in Using your printer, on CD.
Tell me about ...
Available in Using your printer only, on CD, these chapters contain reference information, including the
specifications of the printer, and the part numbers of paper types, ink supplies, and other accessories.
Legal information
This chapter contains HP's limited warranty statement, software license agreement, open source
acknowledgments, regulatory notices, and declaration of conformity.
Index
In addition to the table of contents, there is an alphabetical index to help you to find topics quickly.
The printer's main features
Your printer is a color inkjet printer designed for printing high-quality images on paper up to 42 in (1.06
m) wide. Some major features of the printer are shown below:
Production speeds of up to 1.5 m²/min (16 ft²/min), using HP Universal Inkjet Bond Paper with the
●
Fast print quality option and the Optimize for Lines and Text option
Print resolution of up to 2400×1200 optimized dpi, from a 1200×1200 dpi input, using the Best print
●
quality option, the Maximum Detail and Optimize for Images options, and glossy paper (for more
information on print resolution, see Using your printer on CD)
● Unattended printing using 400 cm³ color ink cartridges and 775 cm³ black cartridges (see Using
your printer on CD), and rolls of paper up to 300 ft (90 m) in length
NOTE The HP Designjet 4500 series supports rolls of paper up to 575 ft (175 m) in
length.
High productivity features such as multi-file job submitting, job previewing, queueing, and nesting
●
using the printer's Embedded Web Server (see Using your printer on CD)
2 Chapter 1 Introduction ENWW
Page 14
Ink and paper usage information is available from the front panel, and on the Web from the
●
Embedded Web Server
Accurate and consistent color reproduction features:
●
● Press emulations for U.S., European, and Japanese standards; and color monitor RGB
emulations (see Using your printer on CD)
● Automatic color calibration
The printer's main components [4000]
NOTE This topic applies to the HP Designjet 4000 Printer series only.
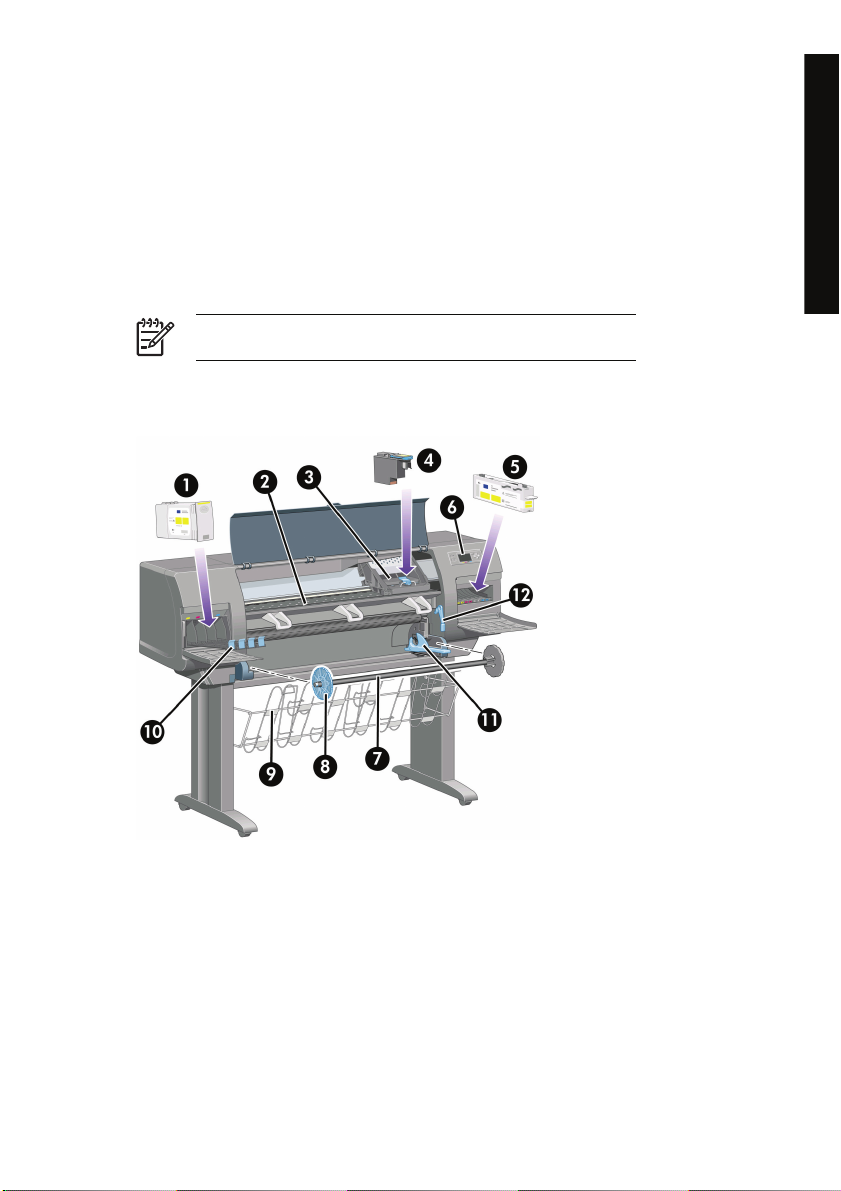
The following front and rear views of the printer illustrate the main components.
Front view
Introduction
1. Ink cartridge
2. Platen
3. Printhead carriage
4. Printhead
5. Printhead cleaner
ENWW The printer's main components [4000] 3
Page 15
Introduction
6. Front panel
7. Spindle
8. Blue removable paper stop
9. Bin
10. Ink cartridge drawer
11. Spindle lever
12. Paper load lever
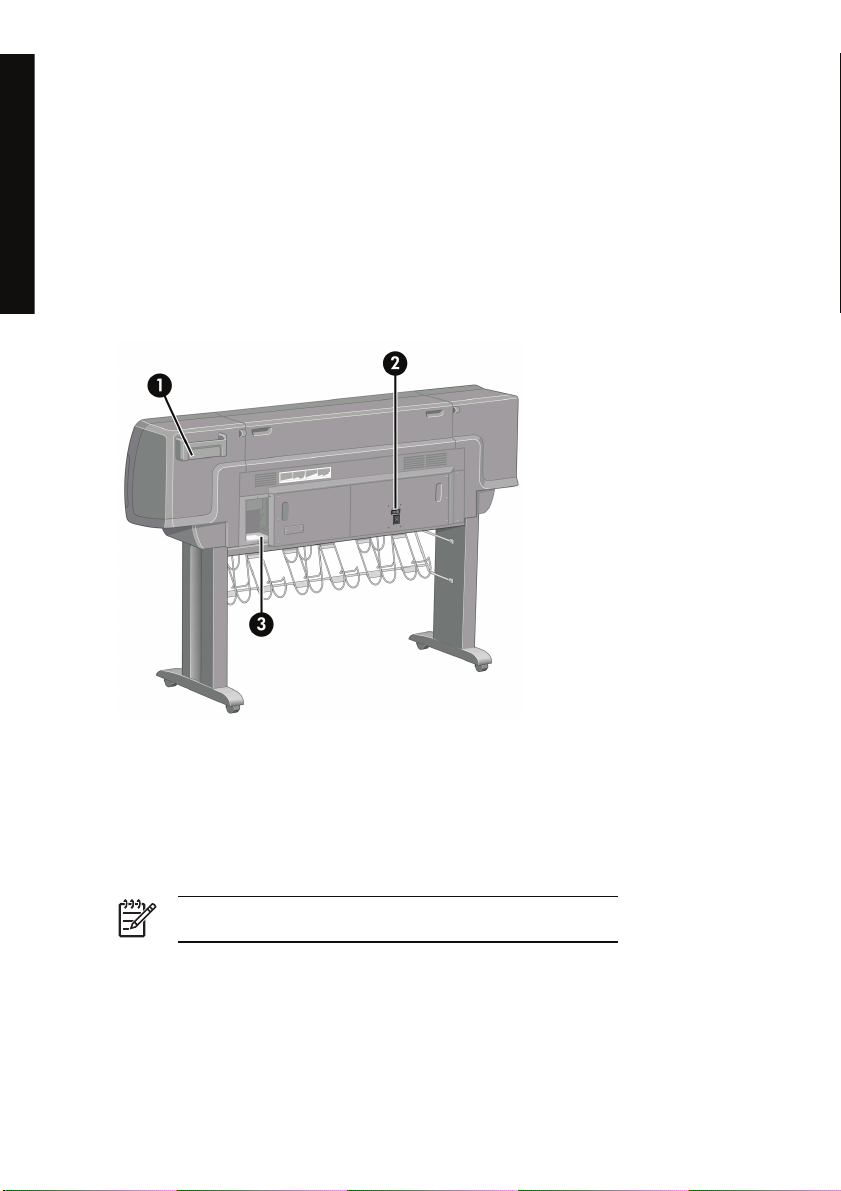
Rear view
1. Quick Reference Guide holder
2. Power socket and on/off switch
3. Sockets for communication cables and optional accessories
The printer's main components [4500]
NOTE This topic applies to the HP Designjet 4500 Printer series only.
The following front and rear views of the printer illustrate the main components.
4 Chapter 1 Introduction ENWW
Page 16

Front view
1. Ink cartridges
2. Platen
3. Printhead carriage
4. Printhead
5. Printhead cleaner
6. Front panel
7. Paper load lever (roll 1)
8. Spindle
9. Paper load lever (roll 2)
10. Bin
11. Spindle drawer (roll 1)
12. Spindle drawer (roll 2)
Introduction
ENWW The printer's main components [4500] 5
Page 17
Introduction
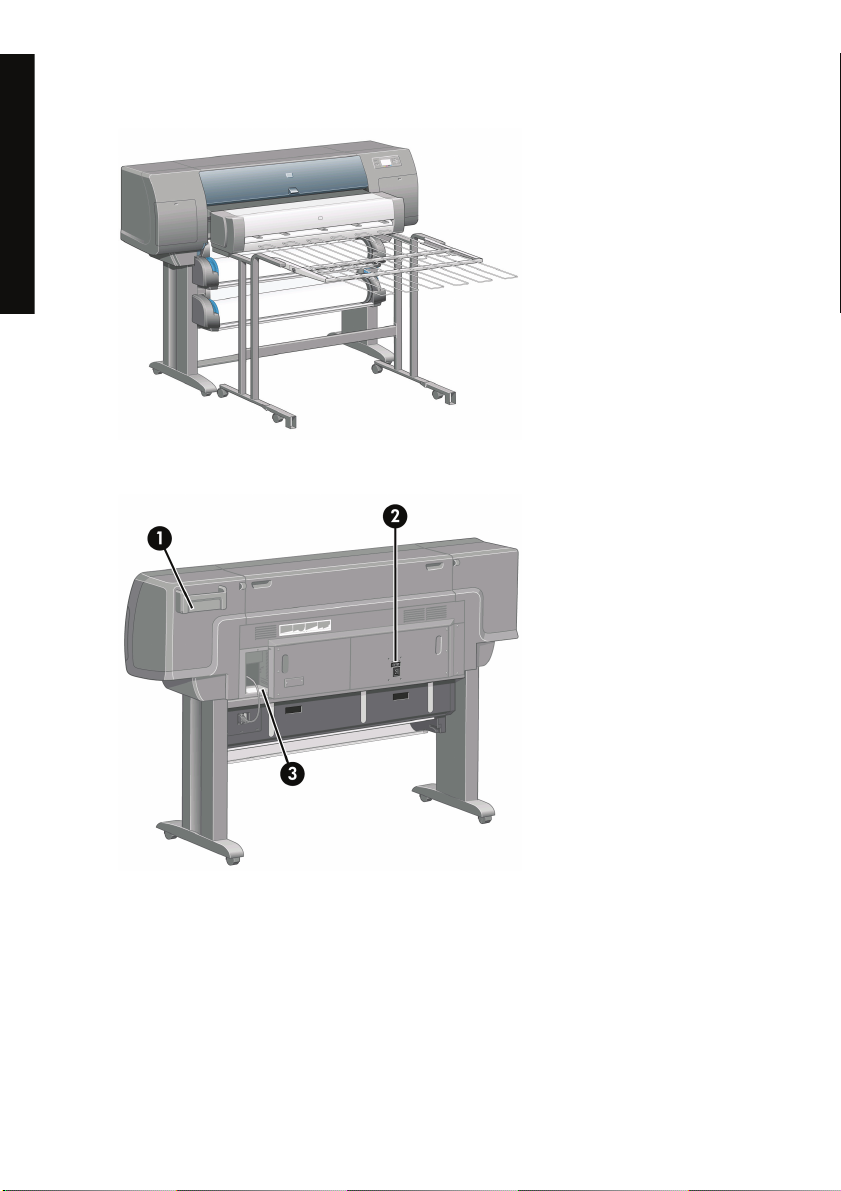
Front view with optional stacker
Rear view
1. Quick Reference Guide holder
2. Power socket and on/off switch
3. Sockets for communication cables and optional accessories
6 Chapter 1 Introduction ENWW
Page 18
The front panel
Your printer's front panel is located on the front of the printer, on the right-hand side. It has the following
important functions:
● It must be used to perform certain operations, such as loading and unloading paper.
● It can display up-to-date information about the status of the printer, the ink cartridges, the
printheads, the paper, the print jobs, etc.
● It can provide guidance in using the printer.
It displays warning and error messages when appropriate.
●
It can be used to change the values of printer settings and thus change the operation of the printer.
●
However, settings in the printer are overridden by settings in the Embedded Web Server or in the
driver.
Introduction
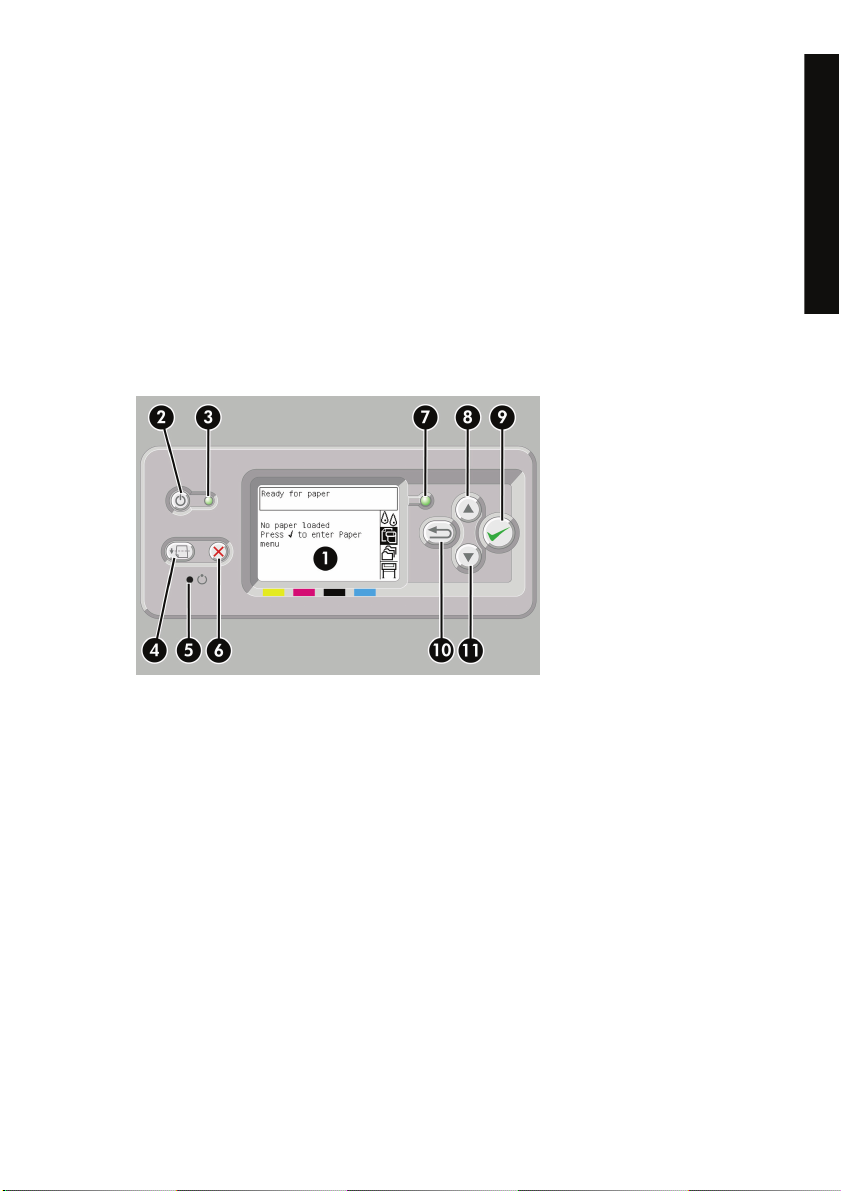
The front panel has the following components:
1. The display area, where information, icons, and menus are displayed.
2. The Power key turns the printer on and off. If the printer is in sleep mode, this key will wake it up.
3. The Power light is off when the printer is off; amber when the printer is in sleep mode; green when
the printer is on; green and flashing when the printer is in transition between off and on.
4. The Form Feed and Cut key normally ejects the sheet (if a sheet is loaded) or advances and cuts
the roll (if a roll is loaded). However, if the printer is waiting for more pages to be nested, this key
cancels the waiting time and prints the available pages immediately.
5. The Reset key restarts the printer (as if it were switched off and switched on again). You will need
an implement with a narrow tip to operate the Reset key.
6. The Cancel key cancels the current operation. It is often used to stop printing the current print job.
7. The Status light is off when the printer is not ready to print: it may be off, or in sleep mode. It is
green when the printer is ready and idle; green and flashing when the printer is busy; amber when
a serious internal error has occurred; amber and flashing when awaiting human attention.
ENWW The front panel 7
Page 19

8. The Up key moves to the previous item in a list, or increases a numerical value.
Introduction
9. The Select key selects the item that is currently highlighted.
10. The Back key goes back to the previous menu. If you press it repeatedly, or hold it down, you will
11. The Down key moves to the next item in a list, or decreases a numerical value.
To highlight an item in the front panel, press the Up or Down key until the item is highlighted.
To select an item in the front panel, first highlight it and then press the Select key.
The four front-panel icons are all found in the main menu. If you need to select or highlight an icon, and
you don't see the icons in the front panel, press the Back key until you can see them.
When this guide shows a series of front panel items like this: Item1 > Item2 > Item3, it means that you
should select Item1, then select Item2, then select Item3.
Information about specific uses of the front panel can be found throughout this guide.
Printer software
The following software is provided with your printer:
● The Embedded Web Server, which runs in the printer and enables you to use a Web browser on
● The HP-GL/2 and RTL driver for Windows
● The PostScript driver for Windows (HP Designjet 4000ps and 4500ps only)
●
●
● The ADI driver for AutoCAD 14
soon return to the main menu.
any computer to submit and manage print jobs, and check ink levels and printer status
The PostScript driver for Mac OS 9 (HP Designjet 4000ps only)
The PostScript driver for Mac OS X (HP Designjet 4000ps and 4500ps only)
Scanner software [4500]
NOTE This topic applies to the HP Designjet 4500 Printer series only.
The scanner software is installed in the scanner's touch screen, and will run automatically when you
switch on the touch screen. The first page that you see can be divided into two main sections:
● The viewing section on the left, for viewing scanned images
The control section on the right
●
8 Chapter 1 Introduction ENWW
Page 20
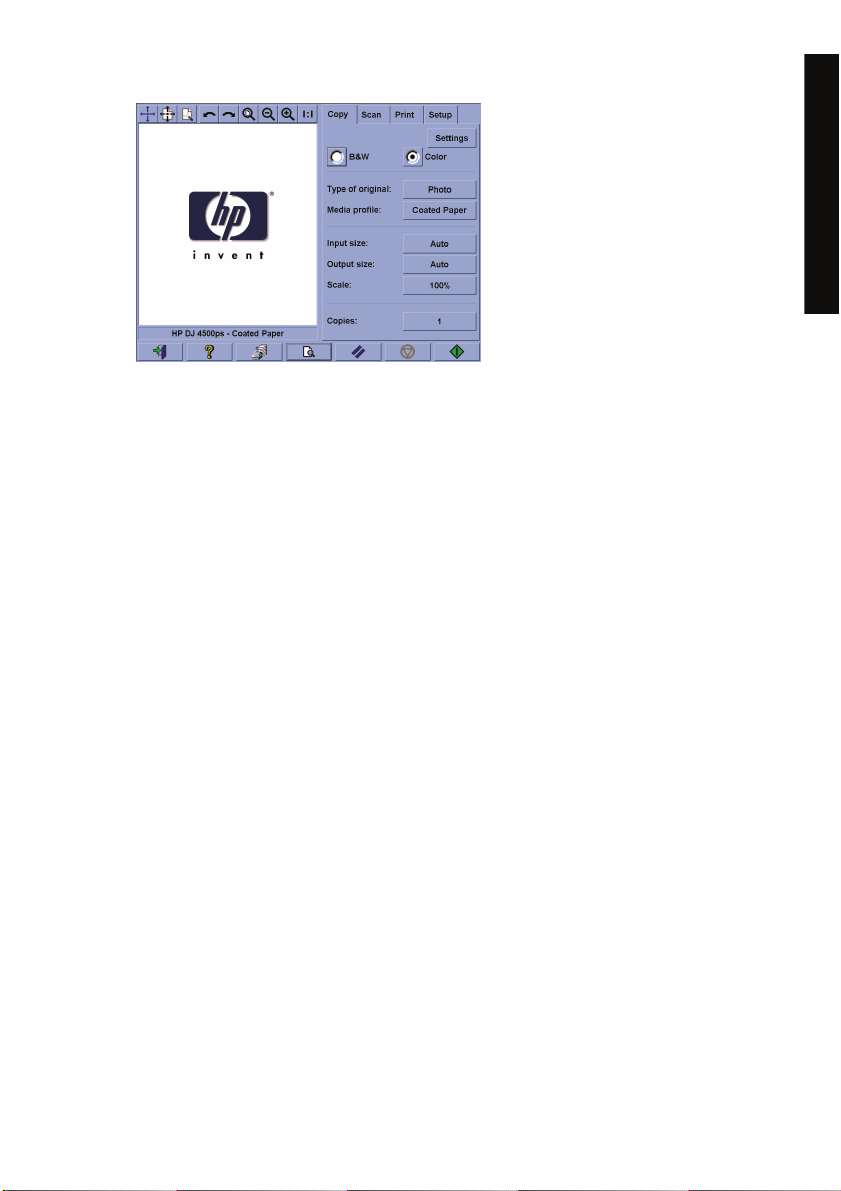
The preview window fills most of the viewing section. Above it is the image toolbar, with nine buttons
that can be used to change the preview in some way (see Using your printer on CD).
The control section contains four tabs: Copy, Scan, Print, and Setup. Each tab provides options that you
can set when performing copy, scan, print, or setup tasks.
At the bottom of the page are seven larger buttons. From left to right:
1. Quit : shuts down or restarts the touch screen
2. Online help : provides more information on some topics than this document
3. Print queue : manages the print queue
4. Preview : scans the document to preview the image and select the area of interest
5. Reset : resets settings to default values
6. Stop : cancels the current activity
7. Copy, Scan, or Print depending on the selected tab
Introduction
ENWW Scanner software [4500] 9
Page 21

Introduction
10 Chapter 1 Introduction ENWW
Page 22

2 How do I... (printer operation topics)
Switch on and off
●
Restart
●
Access the Embedded Web Server
●
Password-protect the Embedded Web Server
●
Change the sleep mode setting
●
Turn off the buzzer
●
topics)
How do I... (printer operation
ENWW 11
Page 23
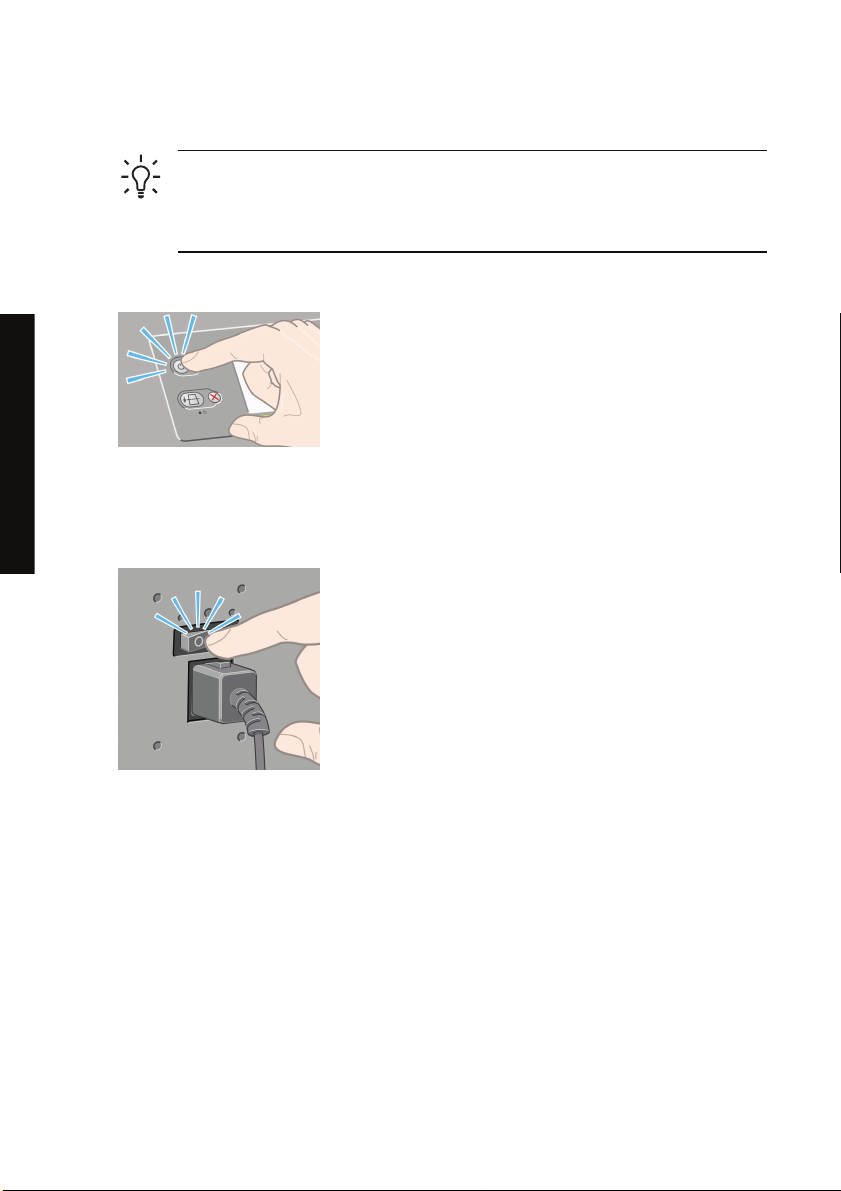
Switch on and off
If you wish to switch the printer on or off, the normal and recommended method is to use the Power key
on the front panel.
How do I... (printer operation
topics)
When you switch off the printer this way, the printheads are automatically stored with the printhead
cleaners, which prevents them from drying out.
However, if you plan to leave the printer switched off for a long period of time, you are recommended to
switch it off using the Power key, and then also switch off the power switch at the rear.
Hint The printer is Energy Star compliant and can be left switched on without wasting
energy. Leaving it on improves response time and overall system reliability. When the printer
has not been used for a certain period of time (30 minutes by default), it will save power by
going into sleep mode. However, any interaction with the printer will return it to active mode,
and it can resume printing immediately.
To switch it back on later, use the power switch at the rear, and then the Power key.
When the printer is switched on, it will take some time to initialize itself. This time is about three minutes
for the HP Designjet 4000 series, and about three and a half minutes for the Designjet 4500 series.
12 Chapter 2 How do I... (printer operation topics) ENWW
Page 24

Restart
In some circumstances you may be advised to restart the printer. Please proceed as follows:
1. Press the Power key on the front panel to switch the printer off, wait a few moments, then press
the Power key again. This should cause the printer to restart; if not, continue with step 2.
2. Use the Reset key on the front panel. You will need an implement with a narrow tip to operate the
Reset key. This normally has the same effect as step 1 above, but may work if step 1 does not.
3. If neither of the above steps seem to have any effect, you should switch off the printer using the
power switch at the rear of the printer.
4. Remove the power cord from the power socket.
5. Wait for 10 seconds.
6. Insert the power cord into the power socket and switch on the printer using the power switch.
7. Check that the Power light on the front panel comes on. If it does not, use the Power key to switch
the printer on.
Access the Embedded Web Server
The Embedded Web Server enables you to manage your printer and your printing jobs remotely using
an ordinary Web browser running on any computer.
NOTE In order to use the Embedded Web Server, you must have a TCP/IP connection to
your printer. If you have an AppleTalk, Novell, or USB connection to your printer, you will not
be able to use the Embedded Web Server.
The following browsers are known to be compatible with the Embedded Web Server:
Internet Explorer 5.5 or later, for Windows.
●
Internet Explorer 5.2.1 or later, for Mac OS 9.
●
● Internet Explorer 5.1 or later, for Mac OS X.
● Netscape Navigator 6.01 or later.
Mozilla 1.5 or later.
●
● Safari.
There are several ways to access the Embedded Web Server:
● On any computer, open your Web browser and give the address of your printer. You can find out
the address of your printer (starting with http:) from the front panel, by highlighting the
● Select Status of my printer or Manage my printer's queue from the Services tab of your
Windows printer driver, or from the Services panel of your Mac OS printer driver.
● On a computer running Windows with your printer software installed, double-click the Printer
Access Utility icon on your desktop, then select your printer.
topics)
How do I... (printer operation
icon.
ENWW Restart 13
Page 25

How do I... (printer operation
topics)
If you have followed these instructions but failed to get through to the Embedded Web Server, see
Using your printer on CD.
Using IP over FireWire with Mac OS X 10.3 and later
If you are using Mac OS X 10.3 or a later version, and have a FireWire connection to your printer, it is
possible to set up an IP address for the printer in order to use the Embedded Web Server. To do this:
1. Open System Preferences and click Network.
2. Choose Network Port Configurations from the Show popup menu.
3. If you see no FireWire port configuration in the list, click New, then choose FireWire from the Port
popup menu. You can give the new port configuration a name, such as FireWire.
4. Drag the port configuration to the top of the Port Configuration list. This ensures that the port is
assigned an IP address.
5. Click Apply Now.
If you don't drag the FireWire port configuration to the top of the Port Configuration list, you need to
choose Manually (or DHCP with manual address) from the Configure IPv4 popup menu, and then
enter an IP address. See
over FireWire.
When the printer is connected through FireWire, we recommend adding the printer using the FireWire
modules in order to take full advantage of FireWire printing, and to use the IP over FireWire only to visit
the printer’s Embedded Web Server.
If you connect your printer through FireWire and the printer is also connected to the network through
Fast Ethernet or Gigabit Ethernet, the printer’s IP over FireWire will not be available and you will not be
able to access the Embedded Web Server from the Printer Dialog. However, you will be able to print
through FireWire.
Also in the case of printer sharing over FireWire, remote users will not be able to access the Embedded
Web Server from the Printer Dialog, although they will be able to print.
http://www.apple.com/ for more detail or updated information on activating IP
Password-protect the Embedded Web Server
1. In the Embedded Web Server, go to the Security page, which you can find in the Settings tab.
2. Enter a password of your own choice in the New password field.
3. Enter it again in the Confirm password field to guard against misspelling.
4. Click Set password.
Now no-one will be able to perform the following actions with the Embedded Web Server without giving
the password:
Manage print jobs in the queue (cancel, delete)
●
● View previews of print jobs
● Delete stored jobs
14 Chapter 2 How do I... (printer operation topics) ENWW
Page 26

Clear accounting information
●
● Update the printer's firmware
NOTE If you forget the password, see Using your printer on CD.
Change the sleep mode setting
If the printer is left switched on but unused for a certain period of time, it will go automatically into sleep
mode to save power. To change the time the printer waits before it goes into sleep mode, go to the front
panel and select the
time you want, then press the Select key.
icon, then Printer configuration > Sleep mode wait time. Highlight the wait
Turn off the buzzer
To turn the printer's buzzer on or off, go to the front panel and select the icon, then Printer
configuration > Front panel options > Enable buzzer.
topics)
How do I... (printer operation
ENWW Change the sleep mode setting 15
Page 27

How do I... (printer operation
topics)
16 Chapter 2 How do I... (printer operation topics) ENWW
Page 28

3 How do I... (paper topics)
Load a roll onto the spindle [4000]
●
Load a roll into the printer [4000]
●
Unload a roll from the printer [4000]
●
Load a single sheet [4000]
●
Unload a single sheet [4000]
●
Load a roll onto the spindle [4500]
●
Load a roll into the printer [4500]
●
Unload a roll from the printer [4500]
●
Trim the paper with the manual cutter [4500]
●
View information about the paper
●
Download media profiles
●
Use non-HP paper
●
Cancel the drying time
●
Change the drying time
●
ENWW 17
How do I... (paper topics)
Page 29
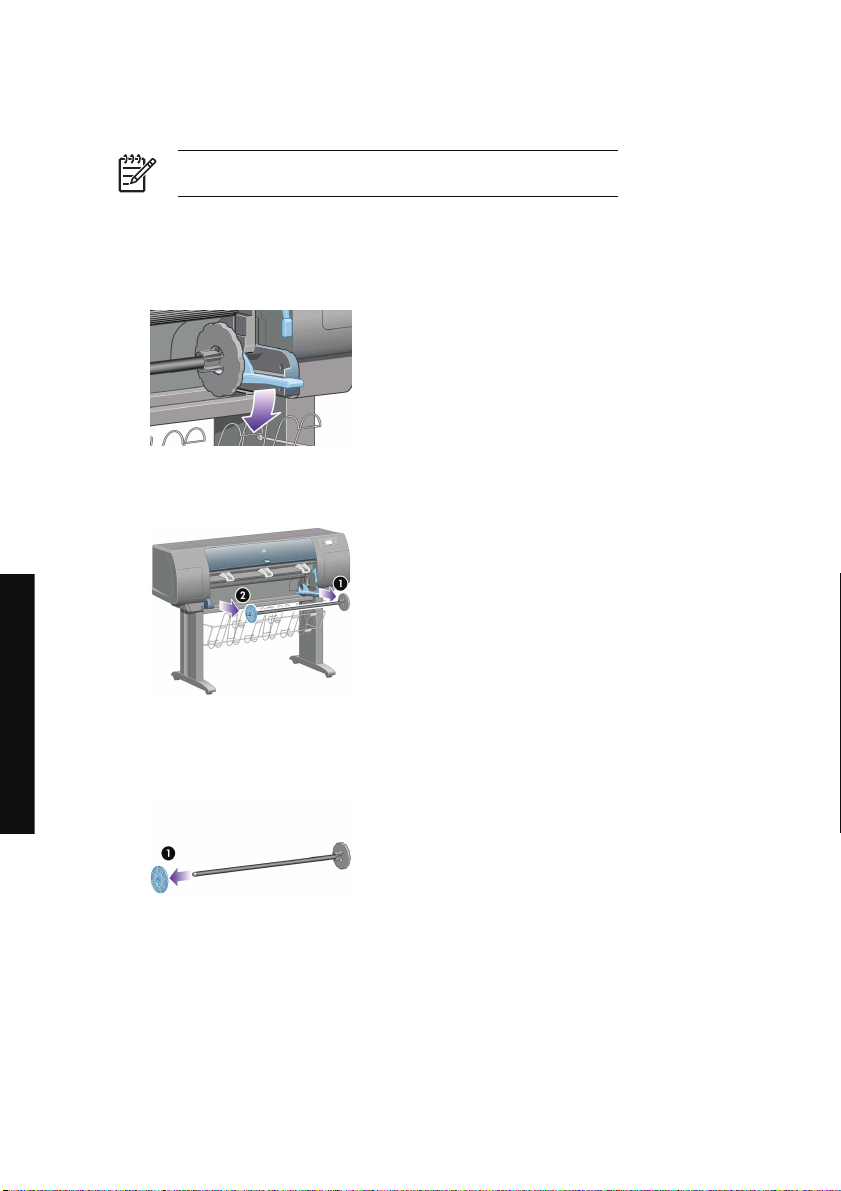
Load a roll onto the spindle [4000]
NOTE This topic applies to the HP Designjet 4000 Printer series only.
1. Make sure the printer wheels are locked (the brake lever is pressed down) to prevent the printer
from moving.
2. Lower the spindle lever.
3. Remove the right-hand end of the spindle (1) from the printer, then move it to the right in order to
extract the other end (2). Do not insert your fingers into the spindle supports during the removal
process.
How do I... (paper topics)
The spindle has a stop at each end to keep the roll in position. The stop at the left-hand end can be
removed to mount a new roll, it slides along the spindle to hold rolls of different widths.
4. Remove the blue paper stop (1) from the left-hand end of the spindle.
18 Chapter 3 How do I... (paper topics) ENWW
Page 30
5. If your roll has a three-inch cardboard core, ensure that the core adaptors supplied with the printer
have been installed. See below:
6. The roll may be very long; rest the spindle horizontally on a table and load the roll on the table.
Bear in mind that you may need two people to handle it.
7. Slide the new roll onto the spindle. Make sure the paper type is oriented as shown. If it is not,
remove the roll, turn it 180 degrees and slide it back on to the spindle.
NOTE There is also a label on the spindle showing the correct orientation.
Ensure there is no space between the roll and the fixed stop at the right-hand end of the spindle.
8. Put the blue paper stop on to the upper end of the spindle, and push it towards the end of the roll.
ENWW Load a roll onto the spindle [4000] 19
How do I... (paper topics)
Page 31

How do I... (paper topics)
9. Ensure the blue paper stop is pushed in as far as it will go, without using excessive force.
10. With the blue paper stop on the left, slide the spindle into the printer left and then right as shown by
the arrows 1 and 2.
11. To make sure that the right end of the spindle is in place, check that the spindle lever is in its top
position (horizontal). You can move the lever yourself if necessary.
If you are a regular user of different paper types, you can change rolls more quickly if you pre-load rolls
of different paper types on different spindles. Extra spindles are available for purchase.
Load a roll into the printer [4000]
NOTE This topic applies to the HP Designjet 4000 Printer series only.
To start this procedure you need to have a roll loaded on the spindle. See
spindle [4000].
20 Chapter 3 How do I... (paper topics) ENWW
Load a roll onto the
Page 32

1.
At the printer's front panel, select the
2. The front panel displays a list of paper types.
3. Select the paper type you are using. If it is not clear which you should select, see Using your
printer on CD.
4. Wait until the front panel prompts you to open the window.
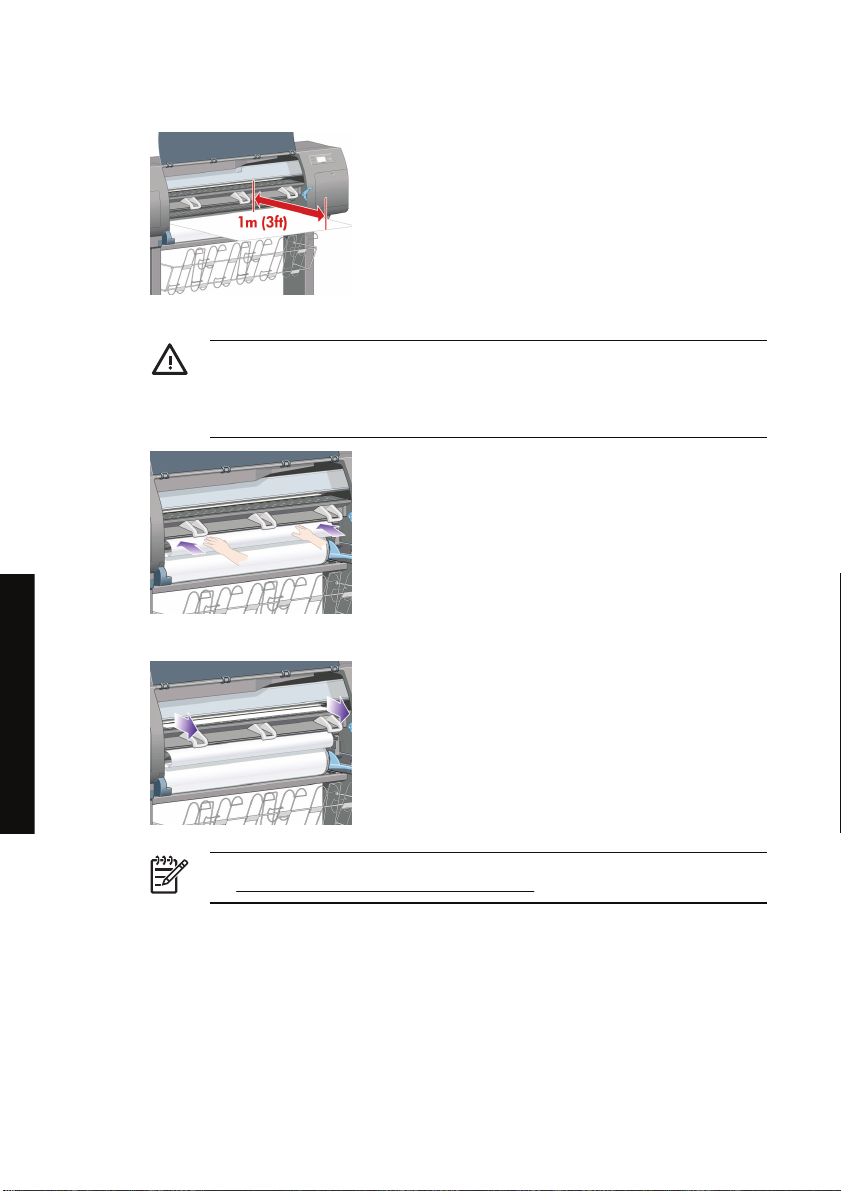
5. Lift the paper load lever.
icon, then Paper load > Load roll.
ENWW Load a roll into the printer [4000] 21
How do I... (paper topics)
Page 33
How do I... (paper topics)
6. Pull out approximately 1 m (3 ft.) of paper.
7. Carefully insert the leading edge of the roll above the black roller.
WARNING! Take care not to touch the rubber wheels on the platen while loading
paper: they may rotate and trap skin, hair, or clothing.
WARNING! Take care not to push your fingers inside the printer's paper path. It is not
designed to accommodate fingers, and the results may be painful.
8. Wait until the paper emerges from the printer as shown below.
NOTE If you have an unexpected problem at any stage of the paper loading process,
see
The paper cannot be loaded successfully [4000].
22 Chapter 3 How do I... (paper topics) ENWW
Page 34
9. Align the right-hand edge of the paper with the blue line and the left edge of the half-circle on the
right of the platen.
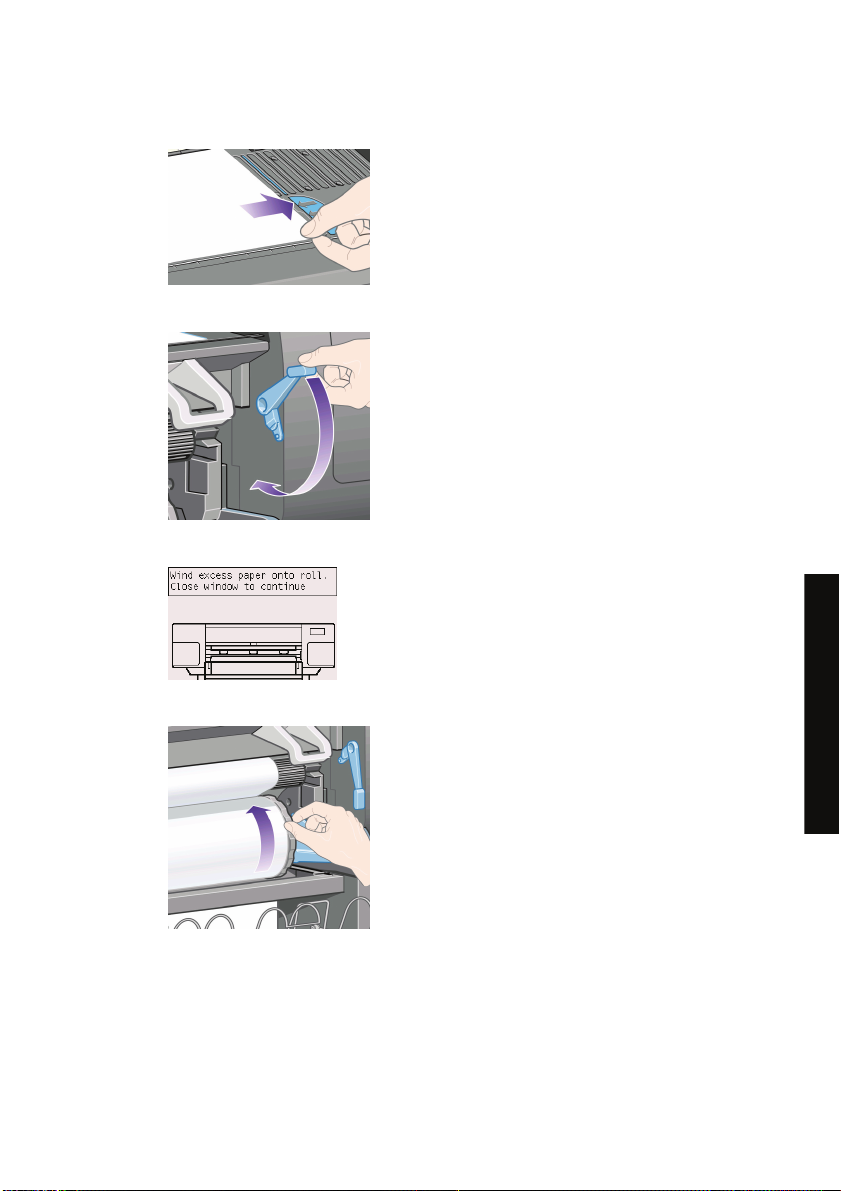
10. When the paper is correctly aligned with the blue line and half-circle, lower the paper load lever.
11. The front panel prompts you to wind excess paper onto the roll.
12. Wind the excess paper onto the roll. Use the paper stop to turn the roll in the direction shown.
13. Lower the window.
ENWW Load a roll into the printer [4000] 23
How do I... (paper topics)
Page 35
14. The front panel again prompts you to wind excess paper onto the roll.
15. The printer will perform a color calibration, if it has not already calibrated the paper type you are
using, and if color calibration is turned on. See
16. The front panel displays the Ready message and the printer is ready to print.
Perform color calibration.
Unload a roll from the printer [4000]
NOTE This topic applies to the HP Designjet 4000 Printer series only.
Before unloading a roll, check whether the end of the roll is still attached to the spindle, and follow the
appropriate procedure as described below.
The normal procedure (roll attached to spindle)
If the end of the roll is still attached to the spindle, use the following procedure.
How do I... (paper topics)
24 Chapter 3 How do I... (paper topics) ENWW
1.
At the printer's front panel, select the
2. The paper will normally be removed from the printer.
If the paper is not automatically removed from the printer, the front panel will prompt you to lift the
paper load lever and turn the paper stop (1) by hand until the paper is removed from the printer.
When you have finished, lower the paper load lever.
3. Turn the paper stop (1) by hand, until the paper is fully wound onto the roll.
4. Press the Select key.
5. Press the spindle lever (2) down and remove the roll from the printer, pulling out the right-hand end
first. Do not insert your fingers into the spindle supports during the removal process.
icon, then Paper unload > Unload roll.
Page 36

Roll detached from spindle
If the end of the roll is visible but no longer attached to the spindle:
1. If you have already selected Paper unload at the front panel, press the Cancel key to cancel that
procedure.
2. Lift the paper load lever. If the front panel displays a warning about the lever, ignore it.
3. Pull out the paper from the front of the printer.
4. Press the spindle lever down and remove the empty spindle from the printer, pulling out the right-
hand end first. Do not insert your fingers into the spindle supports during the removal process.
5. Lower the paper load lever.
6. If the front panel is displaying a warning message, press the Select key to clear it.
No paper visible
If the end of the roll has entirely disappeared into the printer:
1. Press the Form Feed and Cut key on the front panel, and the remaining paper will be ejected.
2. Press the spindle lever down and remove the empty spindle from the printer, pulling out the right-
hand end first. Do not insert your fingers into the spindle supports during the removal process.
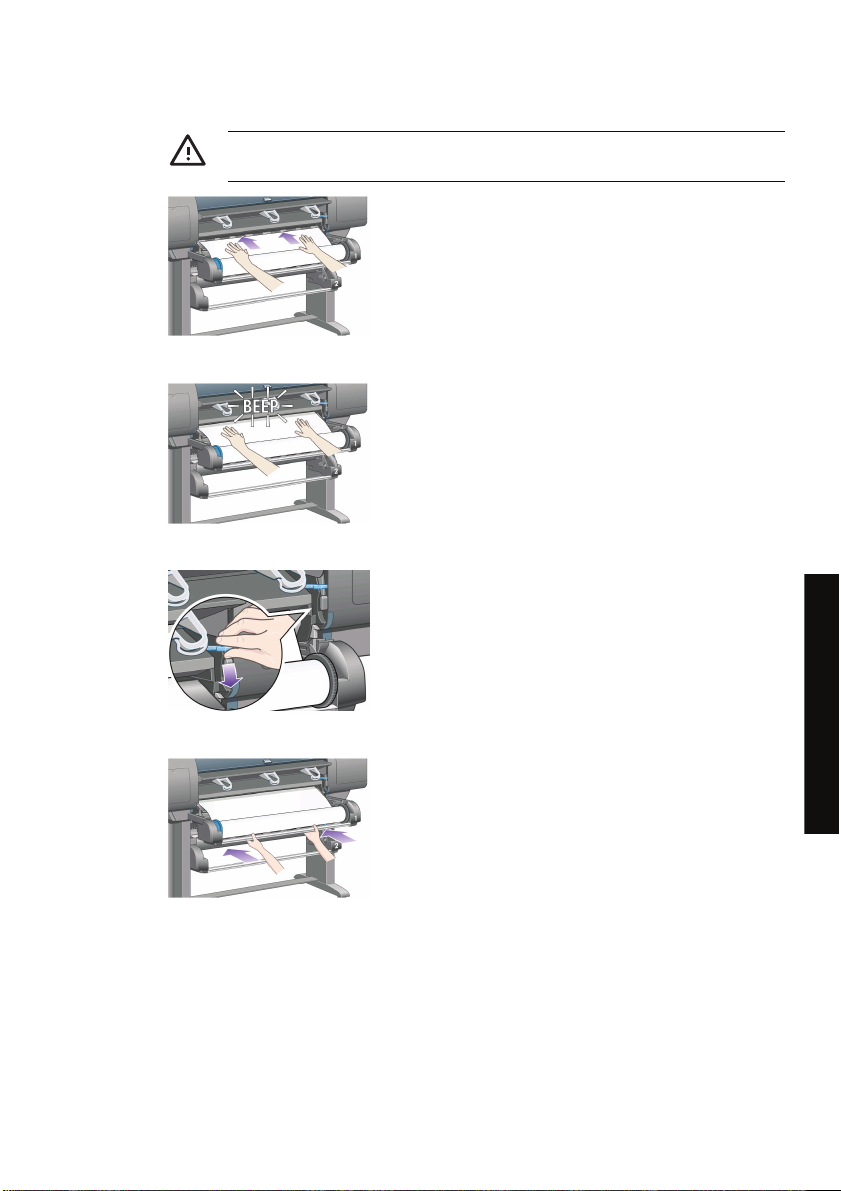
Load a single sheet [4000]
NOTE This topic applies to the HP Designjet 4000 Printer series only.
Any loaded roll must be unloaded before loading a sheet. See Unload a roll from the printer [4000].
1.
At the printer's front panel, select the
NOTE As usual, you must press the Select key to select this option.
ENWW Load a single sheet [4000] 25
icon, then Paper load > Load sheet.
How do I... (paper topics)
Page 37

How do I... (paper topics)
2. The front panel displays a list of paper types.
3. Select the paper type you are using. If it is not clear which you should select, see Using your
printer on CD.
4. Wait until the front panel prompts you to open the window.
5. Lift the paper load lever.
6. Insert the sheet into the printer as shown below.
26 Chapter 3 How do I... (paper topics) ENWW
Page 38

7. Insert the sheet until it reappears from the printer as shown below.
WARNING! Take care not to touch the rubber wheels on the platen while loading
paper: they may rotate and trap skin, hair or clothing.
WARNING! Take care not to push your fingers inside the printer's paper path. It is not
designed to accommodate fingers, and the results may be painful.
8. Pull the sheet out from the top.
9. Align the leading edge of the sheet with the metal bar in the platen.
Align the right-hand edge of the sheet with the left edge of the half-circle on the platen, as shown
below.
10. Lower the window.
ENWW Load a single sheet [4000] 27
How do I... (paper topics)
Page 39

11. Lower the paper load lever.
12. If the paper has been loaded successfully, the front panel displays the Ready message and the
printer is ready to print. If something has gone wrong (paper mispositioned or misaligned), follow
the instructions on the front panel.
13. If you are printing on a sheet of paper less than 900 mm in length (up to A1 size), deploy the three
mobile stoppers on the bin.
How do I... (paper topics)
NOTE When printing on sheet paper you are recommended to select Normal or Best print
quality, see
NOTE If you have an unexpected problem at any stage of the paper loading process, see
The paper cannot be loaded successfully [4000].
Change the print quality.
Unload a single sheet [4000]
NOTE This topic applies to the HP Designjet 4000 Printer series only.
At the printer's front panel, select the icon, then Paper unload > Unload sheet.
To give the ink time to dry, the printer holds the sheet for some time (see Using your printer on CD).
28 Chapter 3 How do I... (paper topics) ENWW
Page 40
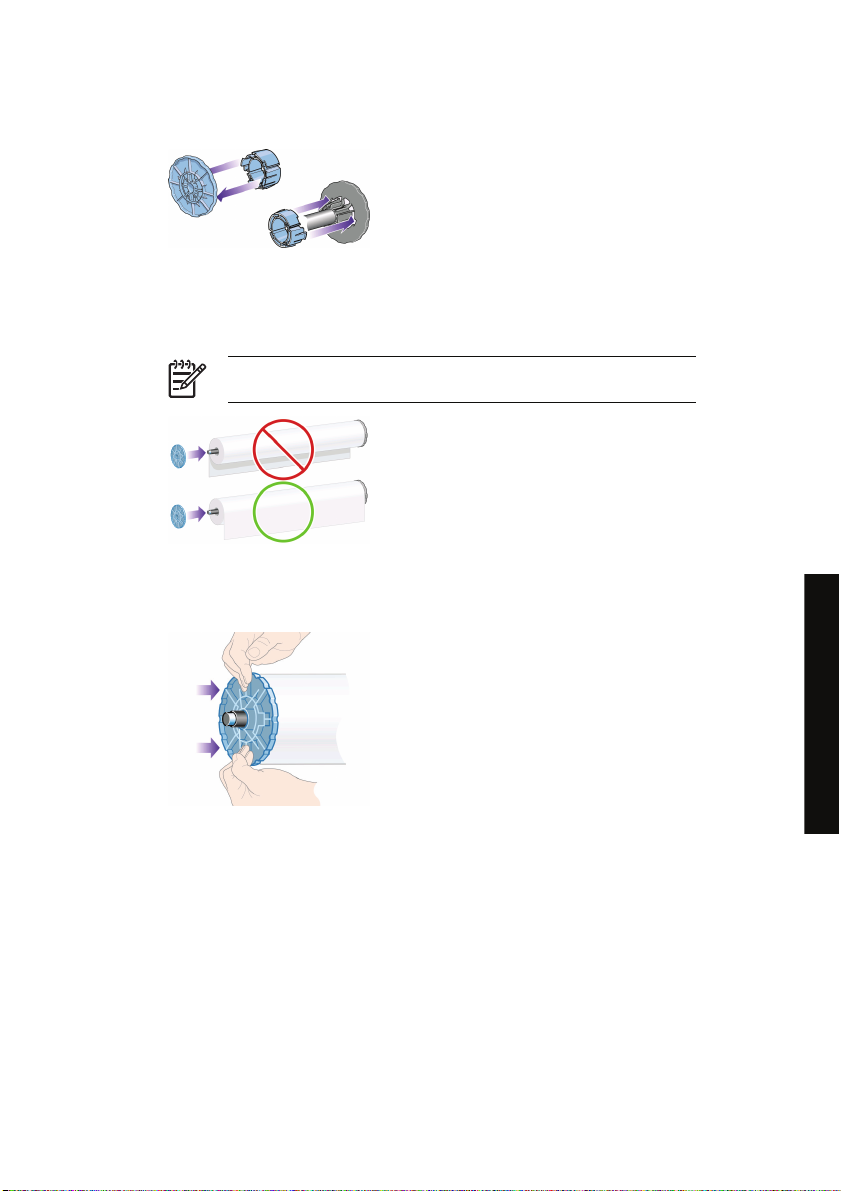
Load a roll onto the spindle [4500]
NOTE This topic applies to the HP Designjet 4500 Printer series only.
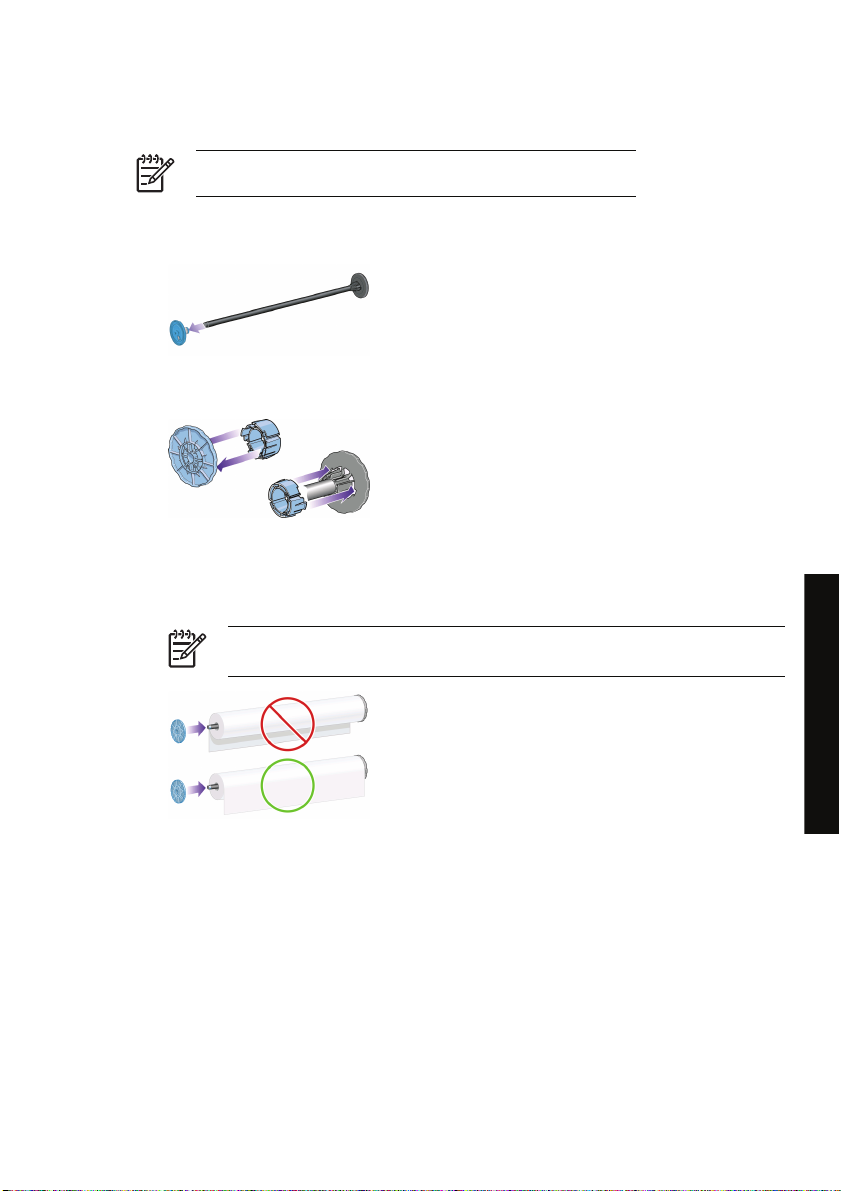
1. Push the grey button and remove the blue paper stop from the spindle.
2. If your roll has a three-inch cardboard core, ensure that the core adaptors supplied with the printer
have been installed. See below:
3. The roll may be long and heavy; rest the spindle horizontally on a table and load the roll on the
table. Bear in mind that you may need two people to handle it.
4. Slide the new roll onto the spindle. Make sure the paper type is oriented as shown. If it is not,
remove the roll, turn it 180 degrees and slide it back on to the spindle.
NOTE There is also a diagram on the outside face of each paper stop showing the
correct orientation.
ENWW Load a roll onto the spindle [4500] 29
How do I... (paper topics)
Page 41

How do I... (paper topics)
5. Press the roll towards the black paper stop until it clicks into place.
NOTE If you have difficulty with this, try turning the spindle to a vertical position, so that
gravity presses the roll against the stop.
6. Ensure there is no space between the roll and the black stop.
7. Put the blue paper stop on to the other end of the spindle, and push it towards the end of the roll.
30 Chapter 3 How do I... (paper topics) ENWW
Page 42

8. Ensure there is no space between the roll and the blue stop.
If you are a regular user of different paper types, you can change rolls more quickly if you pre-load rolls
of different paper types on different spindles. Extra spindles are available for purchase.
Load a roll into the printer [4500]
NOTE This topic applies to the HP Designjet 4500 Printer series only.
To start this procedure you need to have a roll loaded on the spindle. See
spindle [4500].
Load a roll onto the
1.
At the printer's front panel, select the
Hint This step is optional. You may skip it and start the loading process without using
the front panel, by pulling out the drawer as shown below.
ENWW Load a roll into the printer [4500] 31
icon, then Paper load > Load roll 1 or Load roll 2.
How do I... (paper topics)
Page 43

How do I... (paper topics)
2. Lift the drawer upwards a little, then pull it towards you.
3. Load the roll and spindle into the drawer. Hold the roll as shown by the paper stops at each end of
the spindle. Try to avoid touching the paper surface.
CAUTION Two people may be needed to load a heavy roll.
4. Lift the paper load lever. Lift the upper lever if you are loading the upper roll, the lower lever if you
are loading the lower roll.
5. Make sure that the leading edge of the paper is free from wrinkles, tears, and excessive curl, as
these defects may cause a paper jam. If necessary, trim the leading edge before loading (see
the paper with the manual cutter [4500]).
32 Chapter 3 How do I... (paper topics) ENWW
Trim
Page 44
6. Carefully insert the leading edge of the roll into the front path.
WARNING! Take care not to push your fingers inside the front path. It is not designed
to accommodate fingers, and the results may be painful.
7. The printer beeps when the paper has been inserted far enough.
8. Lower the paper load lever.
9. Push the drawer back into position.
ENWW Load a roll into the printer [4500] 33
How do I... (paper topics)
Page 45
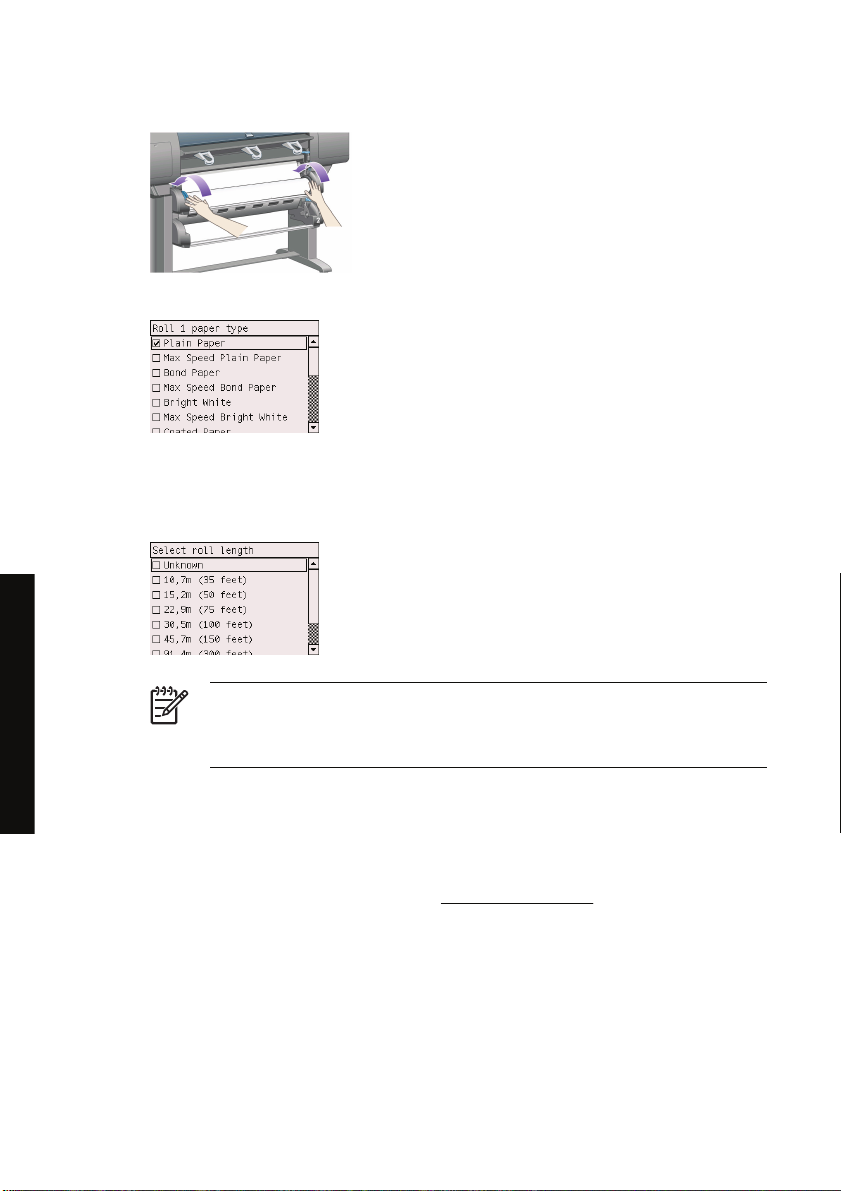
How do I... (paper topics)
10. Wind excess paper back onto the roll. Use the paper stop to turn the roll in the direction shown.
11. The front panel displays a list of paper types.
12. Select the paper type you are using. If it is not clear which you should select, see Using your
printer on CD.
13. The front panel asks you to specify the length of the roll you are loading. After you have done so, it
will start to load the roll.
NOTE Specifying the roll length is not obligatory (you can select Not known) and has
no effect on the printer's behavior. However, if you give the length, subsequently the
printer will keep track of how much paper is used, and will keep you informed of the
remaining length (assuming that the value you originally gave was accurate).
14. If the printer's first attempt to load the roll is unsuccessful, it will automatically wind the paper
backwards and try again without requiring any assistance.
If this second attempt is unsuccessful, it will try a third time, but this time the front panel will request
your assistance.
15. The printer will perform a color calibration, if it has not already calibrated the paper type you are
using, and if color calibration is turned on. See
34 Chapter 3 How do I... (paper topics) ENWW
Perform color calibration.
Page 46
16. The front panel displays the Ready message and the printer is ready to print.
The roll currently ready to print is shown highlighted on the front panel (roll 1 in the above example).
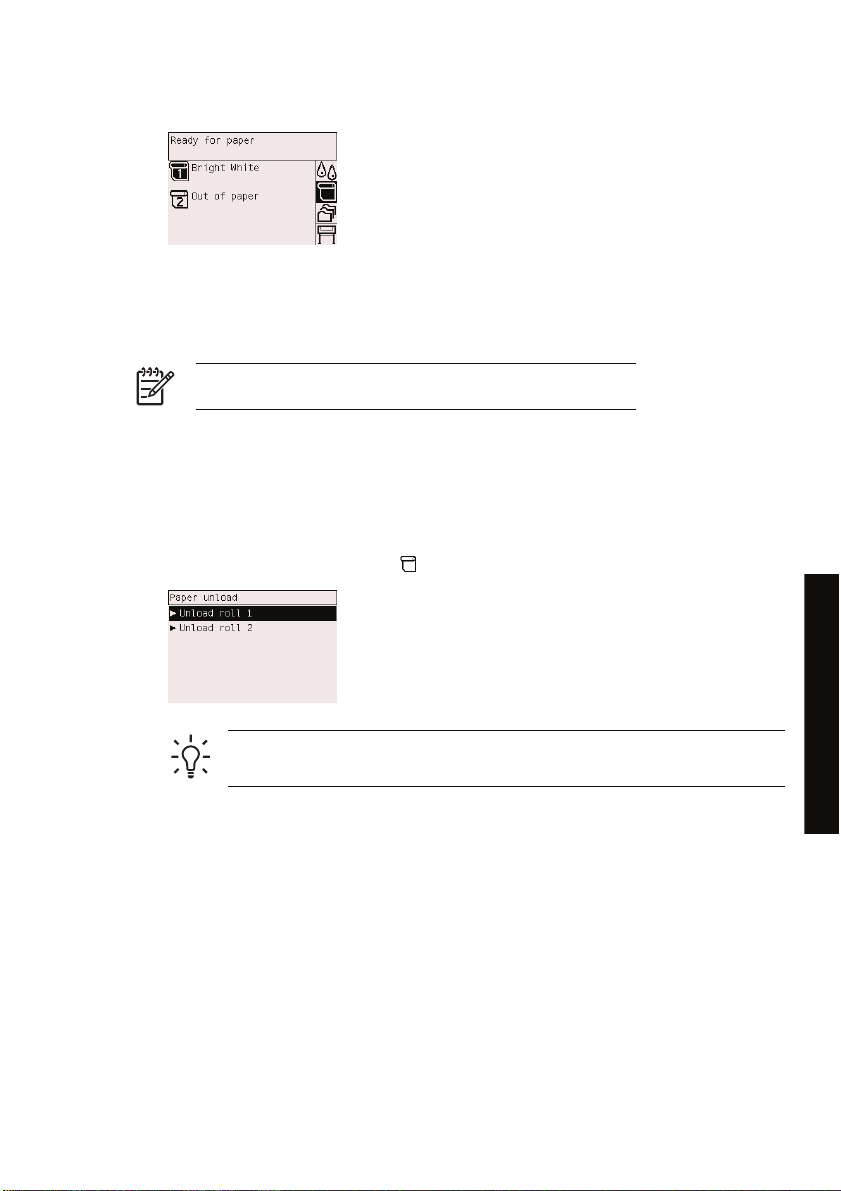
Unload a roll from the printer [4500]
NOTE This topic applies to the HP Designjet 4500 Printer series only.
Before unloading a roll, check whether the end of the roll is still attached to the spindle, and follow the
appropriate procedure as described below.
The normal procedure (roll attached to spindle)
If the end of the roll is still attached to the spindle, use the following procedure.
1.
At the printer's front panel, select the
icon, then Paper unload > Unload roll 1 or Unload roll 2.
Hint Alternatively, you may start the unloading process without using the front panel, by
lifting and then lowering the paper load lever.
2. The paper will normally be removed from the printer.
If the paper is not automatically removed from the printer, the front panel will prompt you to lift the
paper load lever and turn the paper stop by hand until the paper is removed from the printer. When
you have finished, lower the paper load lever.
3. Turn the paper stop by hand, until the paper is fully wound onto the roll.
4. Press the Select key.
5. Lift the drawer upwards a little, then pull it towards you.
6. Remove the roll from the printer, pulling out the right-hand end first. Do not insert your fingers into
the spindle supports during the removal process.
ENWW Unload a roll from the printer [4500] 35
How do I... (paper topics)
Page 47

How do I... (paper topics)
Roll detached from spindle
If the end of the roll is visible but no longer attached to the spindle:
1. If you have already selected Paper unload at the front panel, press the Cancel key to cancel that
procedure.
2. Lift the paper load lever.
3. Lift the drive pinch lever.
If the front panel displays a warning about the levers, ignore it.
4. Pull out the paper from the front of the printer.
5. Lift the drawer upwards a little, then pull it towards you.
6. Remove the empty spindle from the printer, pulling out the right-hand end first. Do not insert your
fingers into the spindle supports during the removal process.
7. Lower the drive pinch and paper load levers.
8. If the front panel is displaying a warning message, press the Select key to clear it.
No paper visible
If the end of the roll has entirely disappeared into the printer:
1. Press the Form Feed and Cut key on the front panel, and the remaining paper will be ejected.
2. Lift the drawer upwards a little, then pull it towards you.
3. Remove the empty spindle from the printer, pulling out the right-hand end first. Do not insert your
fingers into the spindle supports during the removal process.
Trim the paper with the manual cutter [4500]
NOTE This topic applies to the HP Designjet 4500 Printer series only.
36 Chapter 3 How do I... (paper topics) ENWW
Page 48

The manual cutter can be used to trim the leading edge of the paper if it is dirty or uneven. This helps to
avoid paper jams during loading.
1. Open the drawer of the roll that you intend to trim.
2. With your left hand, pull the leading edge of the paper over the top of the roll and then down in
front of the drawer.
3. Find the manual cutter on the right side of the drawer.
4. With your right hand, grip the cutter and rotate it as shown on the cutter's top cover, to make the
initial cut, then pull it gently across the paper.
ENWW Trim the paper with the manual cutter [4500] 37
How do I... (paper topics)
Page 49

5. Remove the cut-off piece of paper.
6. Rotate the spindle backwards to move the paper edge out of the way.
How do I... (paper topics)
7. Return the cutter to the right-hand side of the drawer.
View information about the paper
At the printer's front panel, select the or icon, then Paper information, then choose the paper
source on which you want information.
38 Chapter 3 How do I... (paper topics) ENWW
Page 50

You will see the following information displayed on the front panel:
● The roll or sheet status
NOTE The HP Designjet 4500 Printer series prints on roll paper only.
● The paper manufacturer's name
The paper type you have selected
●
The width of the paper in millimeters (estimated by the printer)
●
● The length of the paper in millimeters (estimated by the printer)
If no paper is loaded, the message Out of paper is displayed.
The same information (apart from the manufacturer's name) is displayed on the Embedded Web
Server's Supplies page.
Download media profiles
Each supported paper type has its own characteristics. For optimum print quality, the printer changes
the way it prints on each different paper type. For example, some may need more ink and some may
require a longer drying time. So the printer must be given a description of the requirements of each
paper type. This description is called the “media profile”. The media profile contains the ICC profile,
which describes the color characteristics of the paper; it also contains information on other
characteristics and requirements of the paper that are not directly related to color. Existing media
profiles for your printer are already installed in the printer's software.
However, you would find it inconvenient to scroll through a list of all paper types available for your
printer, so your printer contains media profiles for only the most commonly used paper types. If you buy
a paper type for which your printer has no media profile, you will find that you cannot select that paper
type in the front panel. To download the correct media profile, go to:
http://www.hp.com/support/designjet-downloads/ for the HP Designjet 4000 series
●
http://www.hp.com/support/designjet/profiles4500/ for the HP Designjet 4500
●
http://www.hp.com/support/designjet/profiles4500ps/ for the HP Designjet 4500ps
●
http://www.hp.com/support/designjet/profiles4500mfp/ for the HP Designjet 4500mfp
●
If you do not find the media profile you want on the Web, you may find that it has been added to the
latest firmware for your printer. You can check the firmware release notes for information. See Using
your printer on CD.
How do I... (paper topics)
Use non-HP paper
HP's own paper types have been fully tested with the printer and can be expected to give the best print
quality.
However, you can print on paper from any manufacturer. In that case, you should select (in the front
panel) the HP paper type that is most similar to the paper you will be using. If in doubt, try several
ENWW Download media profiles 39
Page 51

different HP paper type settings, and choose the one that provides you with the best print quality. If
results are not entirely satisfactory with any paper type setting, see
Cancel the drying time
Press the Form Feed and Cut key (1) on the front panel.
CAUTION A print that has had insufficient time to dry can suffer from quality problems.
Change the drying time
You may wish to change the drying time setting to suit special printing conditions.
General advice.
How do I... (paper topics)
40 Chapter 3 How do I... (paper topics) ENWW
Select the
For more information, see Using your printer on CD.
icon, then Select drying time. You can select Extended, Optimal, Reduced, or None.
Page 52

4 How do I... (print job topics)
Submit a job with the Embedded Web Server
●
Save a job
●
Print a saved job
●
Cancel a job
●
Manage the print queue
●
Nest jobs to save roll paper
●
ENWW 41
How do I... (print job topics)
Page 53

Submit a job with the Embedded Web Server
1. Access the Embedded Web Server (see Access the Embedded Web Server).
2. Go to the Submit job page.
3. Browse your computer and select the file to print.
NOTE Submitting a job to be printed via the Embedded Web Server does not require
you to have the printer driver nor the file's native application installed on your computer.
4. If you want to submit more than one file, click the Add files button and select all the files you want.
NOTE If you are not using Internet Explorer for Windows, you will see the Add another
file button, which allows you to select additional files one at a time.
5. Set the job options.
If you leave an option set to Default, the setting saved in the job will be used. If the job contains no
setting for that option, the setting in the printer will be used. The setting in the printer can be
changed from the front panel, or in some cases from the Device Setup page in the Embedded Web
Server.
How do I... (print job topics)
6. Click the Print button.
Save a job
If you intend to reprint a job later with some changes to the job settings (such as size or quality), you
can store the job inside your printer so that you will not need to resubmit it later.
NOTE If you want to reprint a job without changes, you can do that from the print queue
without needing to save the job.
42 Chapter 4 How do I... (print job topics) ENWW
Page 54

You can save a job only while submitting it for printing:
1. Access the Embedded Web Server (see
2. Go to the Submit job page.
3. Browse your computer and select the file to print.
4. If you want to submit more than one file, click the Add another file button to add another file. All
files submitted together will have the same job settings.
NOTE If you are using Windows and Internet Explorer, you can click the Add files
button and select multiple files at once.
5. In the job options, check the Store job in printer option.
6. Set the rest of the job options.
7. Click the Print button.
Print a saved job
1. Access the Embedded Web Server (see Access the Embedded Web Server).
2. Go to the Stored jobs page.
3. Select the job or jobs that you want to print, using the check box beside each job name.
4. Click the Print button to print the job with the original settings, or Advanced Print to change the
settings.
Cancel a job
A job can be canceled from the front panel by pressing the Cancel key, or from the Embedded Web
Server by selecting the job and clicking the Cancel icon..
The printer advances the paper as though the print were finished.
Access the Embedded Web Server).
NOTE A multi-page job or a big file may take longer to stop printing than other files.
Manage the print queue
Your printer can store pages in a queue while it is printing the current page. The queue may contain
pages from more than one job.
NOTE This information applies only if you are using one of the drivers that came with your
printer or the Embedded Web Server to submit printing jobs.
ENWW Print a saved job 43
How do I... (print job topics)
Page 55

Turning off the queue [4000]
HP Designjet 4000 series users can turn off the queue from the Web server (Settings tab > Device
setup > Queue), or from the front panel: select the
Disable queue.
HP Designjet 4500 series users cannot turn off the queue.
icon and then Job management options >
The When To Start Printing options
NOTE The When To Start Printing options cannot be used with PostScript jobs.
You can select at what point you want to print a file you have in the queue. From the Web server, select
the Settings tab > Device setup > When to start printing; or, from the front panel, select the
and then Job management options > When to start printing.
There are three options you can select:
When After Processing is selected, the printer waits until the whole page has been processed
●
and then it starts to print. This is the slowest setting but offers the best print quality.
When Immediately is selected, the printer prints the page as it is processed. This is the quickest
●
setting, but the printer may stop halfway through a print to process data. This setting is not
recommended for complex images with dense color.
● When Optimized is selected (this is the default setting), the printer calculates the best time to
begin printing the page. It is usually the best compromise between the After Processing and
Immediately settings.
icon
Identifying a job in the queue
The best way to look at the queue is in the Embedded Web Server (Information > Jobs queue), where
you can manage the queue and get full information on every job (by clicking the name of the file).
However, you can also manage the queue from the front panel. To do so, select the
Job queue, where you can see a list of the jobs in the queue.
Each has an identifier, comprising:
<position in queue>: <image name>
The job currently being printed is in position 0. The next job to be printed is in position 1, the previous
job already printed is in position -1.
How do I... (print job topics)
44 Chapter 4 How do I... (print job topics) ENWW
Prioritizing a job in the queue
To make any job in the queue the next one to be printed, select it and choose Reprint (in the
Embedded Web Server) or Move to front (in the front panel).
If nesting is turned on, the prioritized job may still be nested with others. If you really want this job to be
printed next, and on its own on the roll, first turn nesting off and then move it to the front of the queue as
described above.
icon and then
Page 56
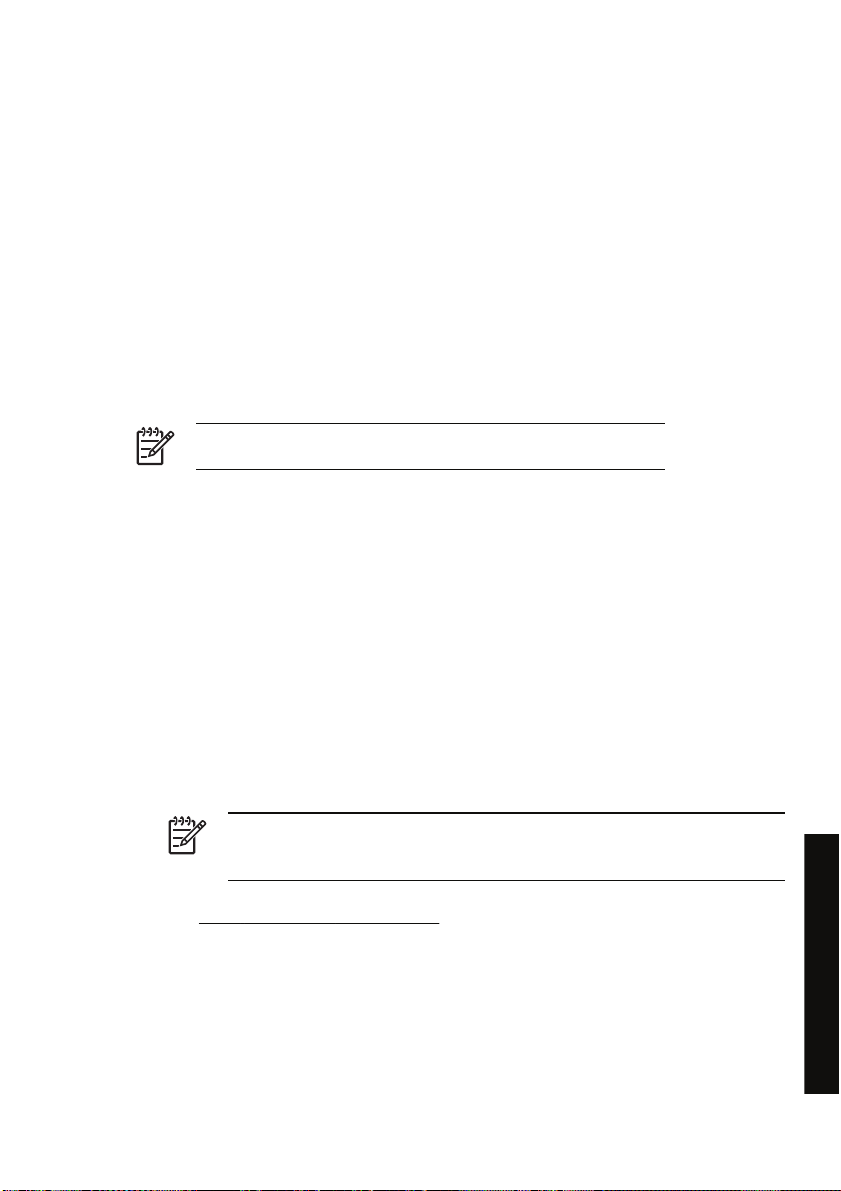
Deleting a job from the queue
Under normal circumstances, there is no need to delete a job from the queue after printing it, as it will
just fall off the end of the queue as more files are sent. However, if you have sent a file in error, and
want to avoid any chance of it being reprinted, you can simply delete it, by selecting it and choosing
Delete (in the Embedded Web Server or in the front panel).
In the same way, you can delete a job that has not been printed yet.
If the job is currently being printed (Status = printing in the Web server, or its queue position is 0 in the
front panel), and you want both to cancel the job and to delete it, first click the Cancel icon in the Web
server, or press the Cancel key on the front panel, and then delete it from the queue.
Making copies of a job in the queue
To make extra copies of any job in the queue, select the job in the Embedded Web Server and click the
Reprint icon, then specify the number of copies you want. The job will be moved to the top of the queue.
You can also do this from the front panel: select the job and choose Copies, then specify the number of
copies required and press the Select key. This overrides any value set by your software.
NOTE If Rotate was On when you sent the file, every copy will be rotated.
If the job has already been printed, use Move to front to move it to the top of the queue.
Understanding job status
These are the possible job status messages, approximately in the order in which they may be seen:
receiving: the printer is receiving the job from the computer
●
waiting to process: the job has been received by the printer and is waiting to be rendered (for
●
jobs submitted through the Embedded Web Server only)
processing: the printer is parsing and rendering the job
●
● preparing to print: the printer is performing writing system checks before printing the job
● waiting to print: the job is waiting for the print engine to become free to proceed with printing
waiting for nest: the printer is set up with Nesting=On and is waiting for other jobs in order to
●
complete the nest and proceed with printing
on hold: the job was sent with the on hold for preview option and is on hold
●
NOTE If the printer hangs up while printing a job, and the queue facility is turned on, the
partially printed job will appear in the queue as on hold when the printer is next turned
on. When you resume the job, it will start printing at the page at which it was interrupted.
● on hold for paper: the job can't be printed because the paper it needs is not loaded in the printer
(see
An “on hold for paper” message [4500]): load the required paper and then click Continue to
resume the job
● on hold for accounting: the job can't be printed because the printer requires all jobs to have an
account ID: enter the account ID and then click Continue to resume the job
● printing
ENWW Manage the print queue 45
How do I... (print job topics)
Page 57

drying
●
● cutting paper
● ejecting page
canceling: the job is being canceled, but will remain in the printer job queue
●
deleting: the job is being deleted from the printer
●
● printed
● canceled: the job has been canceled by the printer
canceled by user
●
● empty job: the job does not contain anything to print
Nest jobs to save roll paper
Nesting means placing pages side by side on the paper, rather than one after the other. This is done to
avoid wasting paper.
1. Direction of paper flow
2. Nesting off
3. Nesting on
4. Paper saved by nesting
How do I... (print job topics)
46 Chapter 4 How do I... (print job topics) ENWW
When does the printer try to nest pages?
When both of the following are true:
● The printer is loaded with roll paper, not sheet paper.
In the front panel's Job Management menu or the Embedded Web Server's Device Setup page,
●
Nest is On.
Page 58

Which pages can be nested?
All pages can be nested, unless they are so large that two of them cannot fit side by side on the roll, or
unless there are too many of them to fit into the remaining length of the roll. A single group of nested
pages cannot be split between two rolls.
Which pages qualify for nesting?
In order to be in the same nest, the individual pages must be compatible in all of the following ways:
All pages must have the same print quality setting (Fast, Normal, or Best).
●
Pages must be all Optimized for Drawings/Text or all Optimized for Images.
●
● The Maximum Detail setting must be the same on all pages.
● The Margins setting must be the same for all pages (Extended or Normal).
The Mirror setting must be the same for all pages.
●
● The Rendering Intent must be the same for all pages.
● The Cutter setting must be the same for all pages.
The color adjustment settings must be the same for all pages. These are known as Advanced
●
Color Settings in the Windows driver, and CMYK Settings in the Mac OS driver.
● Pages must be all color, or all grayscale: not some in color and some in grayscale.
All pages must be in one or other of the following two groups (the two groups cannot be mixed in
●
the same nest):
HP-GL/2, RTL, CALS G4
●
PostScript, PDF, TIFF, JPEG
●
JPEG, TIFF, and CALS G4 pages with resolutions greater than 300 dpi may not nest with other
●
pages in some cases.
How long does the printer wait for another file?
So that the printer can make the best nest possible, it waits after a file has been received to check
whether a subsequent page will nest with it or with pages already in the queue. This waiting period is
the nest wait time; the factory default nest wait time is two minutes. This means that the printer waits for
up to two minutes after the last file is received before printing the final nest. You can change this waiting
time from the printer's front panel: select the
Select wait time. The available range is 1 to 99 minutes.
While the printer is waiting for nesting to time out, it displays the remaining time on the front panel. You
can print the nest (cancel the nest wait) by pressing the Cancel key.
ENWW Nest jobs to save roll paper 47
icon, then Job management options > Nest options >
How do I... (print job topics)
Page 59

How do I... (print job topics)
48 Chapter 4 How do I... (print job topics) ENWW
Page 60
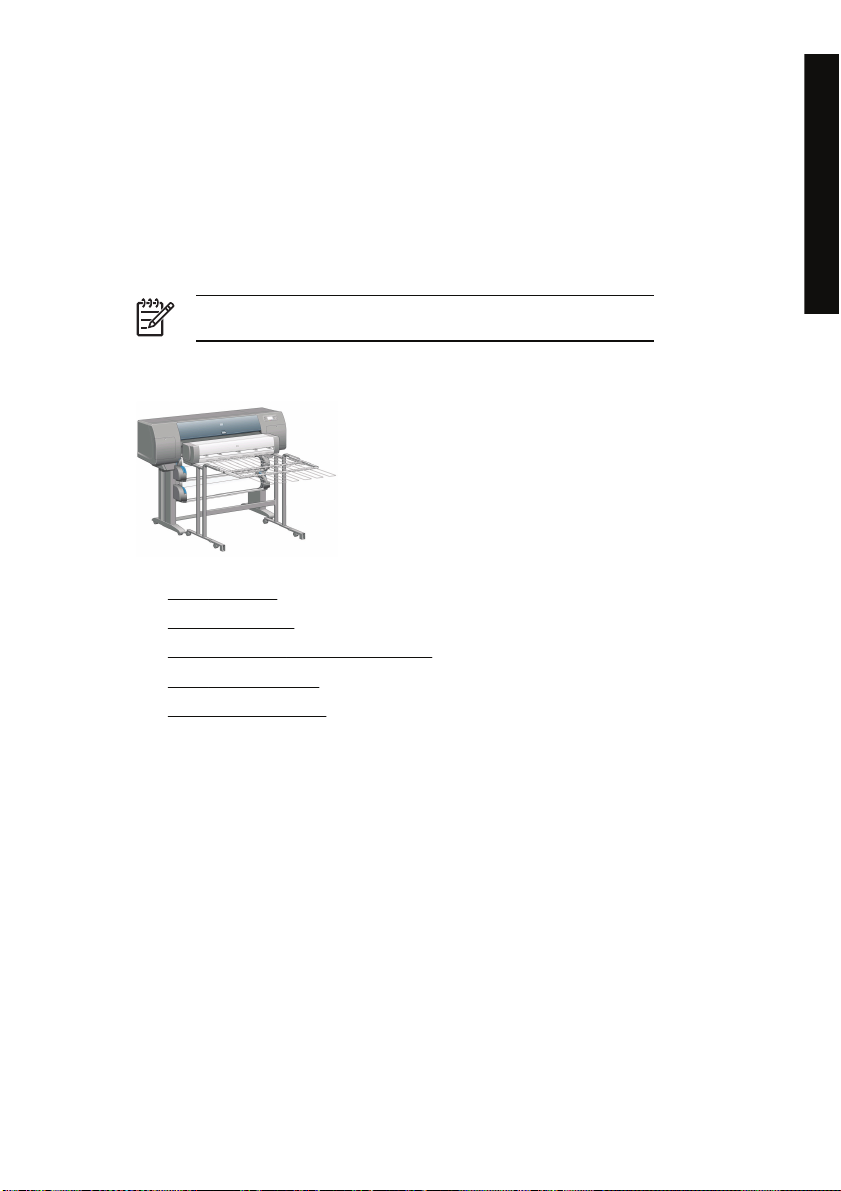
5 How do I... (stacker topics) [4500]
NOTE This chapter applies to the HP Designjet 4500 Printer series only.
The stacker is an optional accessory for the HP Designjet 4500 Printer series. It stacks prints flat, on top
of one another, instead of letting them fall into the bin.
● Install the stacker
Uninstall the stacker
●
Change paper rolls while using the stacker
●
Clean the stacker rollers
●
Move or store the stacker
●
How do I... (stacker topics) [4500]
ENWW 49
Page 61
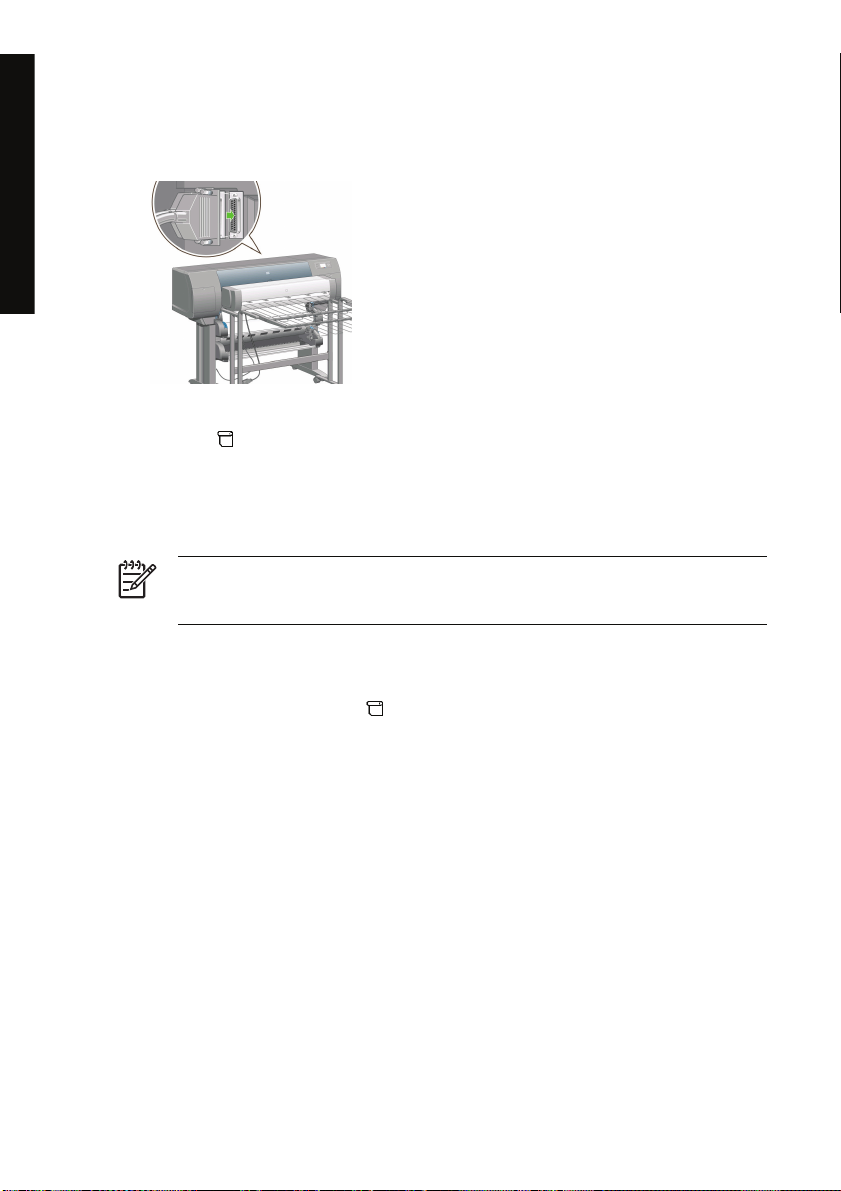
How do I... (stacker topics) [4500]
Install the stacker
1. Connect the cables between the stacker and the printer.
2. Switch on the stacker.
3.
Select the
front panel will prompt you to attach the stacker to the printer.
4. There are two latches on the stacker that engage with the printer deflectors. To attach the stacker
to the printer, attach first one side and then the other (because less force is required that way).
Some warm-up time is necessary, especially when the stacker has just been switched on.
icon on the printer's front panel, then Accessories > Stacker > Install stacker. The
NOTE The stacker operates on cut sheets of paper. When it is switched on, the cutter is
automatically enabled. It cannot work if the cutter is turned off or if the printing material cannot
be cut (canvas, for example).
Uninstall the stacker
1.
To uninstall the stacker, select the
Stacker > Uninstall stacker.
2. The front panel will then prompt you to detach the stacker from the printer. Pull the stacker from
one side to detach it on that side, then detach the other side.
50 Chapter 5 How do I... (stacker topics) [4500] ENWW
icon on the printer's front panel, then Accessories >
Page 62

3. Disconnect the stacker cables.
Change paper rolls while using the stacker
1. Remove the stack of cut paper from the stacker in order to make the stacker easier to handle.
2. Detach the stacker from the printer: first one side, then the other.
3. Change the rolls in the normal way: see
the printer [4500].
Unload a roll from the printer [4500] and Load a roll into
Clean the stacker rollers
WARNING! The stacker becomes hot during use. Before cleaning, switch it off and give it
time to cool.
Ink tends to stick to the main stacker roller and the small output rollers, which should therefore be
cleaned regularly using a fabric cloth dampened with water.
The frequency with which cleaning is needed depends to some extent on the paper type in use.
● For plain, coated, or heavyweight coated paper, once a month may be sufficient.
For translucent, vellum, glossy, or natural tracing paper, cleaning may be required once a week
●
even with the slowest print modes.
How do I... (stacker topics) [4500]
ENWW Change paper rolls while using the stacker 51
Page 63

How do I... (stacker topics) [4500]
Move or store the stacker
Before moving or storing the stacker, take a couple of steps to reduce the amount of space it occupies.
1. Undo the screws at either side of the stacker tray, and let the tray hang vertically.
2. Remove the pin from each leg extension, and rotate the leg extension upwards.
52 Chapter 5 How do I... (stacker topics) [4500] ENWW
Page 64

6 How do I... (image adjustment topics)
Change the page size
●
Change the print quality
●
Choose print quality settings
●
Print at maximum speed
●
Adjust the margins
●
Print on oversize pages
●
Print without added margins
●
Select the orientation of the image
●
Rotate an image
●
Print a mirror image
●
Scale an image
●
topics)
How do I... (image adjustment
ENWW 53
Page 65

Change the page size
The page size can be specified in the following ways:
● Using a Windows printer driver: select the Paper/Quality tab, then Size is.
Using a Mac OS printer driver: select Page Setup from the File menu, select your printer in the
●
Format for popup menu, then Paper size.
Using the Embedded Web Server: go to the Page Size section of the Submit Job page.
●
●
Using the front panel: select the
How do I... (image adjustment
paper size.
NOTE If a page size is set with the printer driver or with the Embedded Web Server, it
overrides the page size set with the front panel.
topics)
Change the print quality
Your printer has three different print quality options: Best, Normal, and Fast. There are also two
supplementary options that have an effect on print quality: Optimize for drawings/text or Optimize for
images, and Maximum detail. See
these options.
You can specify the print quality in the following ways:
● Using a Windows printer driver: go to the Print Quality section of the Paper/Quality tab.
● Using a Mac OS printer driver: go to the Image Quality panel.
Using the Embedded Web Server: go to the Image Quality section of the Submit Job page.
●
●
Using the front panel: select the
icon, then Default printing options > Paper options > Select
Choose print quality settings for guidance on choosing among
icon, then Default printing options > Image quality.
NOTE If a print quality is set with the printer driver or with the Embedded Web Server, it
overrides the print quality setting from the front panel.
NOTE You cannot change the print quality of pages that the printer is already receiving or
has already received (even if they have not started to print yet).
Choose print quality settings
The following table shows suggested print quality settings and paper types for various different kinds of
prints, assuming that you are using roll paper. You are not obliged to follow these suggestions, but you
may find them helpful.
If you are using sheet paper, you are recommended to set print quality to Best.
If you are not sure how to change the print quality settings, see
54 Chapter 6 How do I... (image adjustment topics) ENWW
Change the print quality.
Page 66
NOTE High-density images should be printed on heavier paper (heavyweight or glossy).
Print content
Print quality Optimized for Maximum detail
Lines (draft) Fast Drawings/text Off (or On for
Lines Normal Drawings/text Off Bright White
Lines and fills (fast) Normal Drawings/text On Bright White
Lines and fills Best Drawings/text Off Bright W hite
Lines and images –
high quality maps
Best Drawings/text On Coated Paper
Image quality settings Paper types
higher quality,
lower speed)
Bright White
Bond Paper
Translucent materials*
Coated Paper
Bond Paper
Translucent materials*
Coated Paper
Bond Paper
Translucent materials*
Coated Paper
Heavyweight Coated Paper
Productivity Photo Gloss
Bond Paper
Translucent materials*
Coated Paper
Heavyweight Coated Paper
Productivity Photo Gloss
Heavyweight Coated Paper
Productivity Photo Gloss
topics)
How do I... (image adjustment
In-store advertising Normal Images Off Coated Paper
Heavyweight Coated Paper
ENWW Choose print quality settings 55
Page 67

How do I... (image adjustment
Print content
Print quality Optimized for Maximum detail
Renderings Best Images Off Heavyweight Coated Paper
Image quality settings Paper types
Productivity Photo Gloss
Productivity Photo Gloss
topics)
Photographs Best Images Off Productivity Photo Gloss
* Translucent materials include Vellum, Translucent Bond, Natural Tracing Paper, Clear Film, and Matte
Film.
For technical details of print resolution, see Using your printer on CD.
Print at maximum speed
There are two paper type settings in the front panel especially designed for printing at maximum speed.
Print content
Lines (draft) Fast Drawings/text Off Max Speed Bright White*
* To use Max Speed Bright White, load HP Bright White Inkjet Bond Paper and select Max Speed Bright
White from the list of paper types in the front panel.
† To use Max Speed Bond Paper, load HP Universal Inkjet Bond Paper and select Max Speed Bond
Paper from the list of paper types in the front panel.
Image quality settings Paper types (front panel)
Print quality Optimized for Maximum detail
Max Speed Bond Paper†
56 Chapter 6 How do I... (image adjustment topics) ENWW
Page 68
Adjust the margins
The printer margins determine the printable area of the page that can be used by your application.
There are three margin options: Small, Normal, and Extended (see also
For the dimensions of the margins, see Using your printer on CD.
You can specify the margins in the following ways:
Using the Windows HP-GL/2 printer driver: Normal margins are selected by default. To select the
●
other options, select the Paper/Quality tab and press the Margins/Layout button.
● Using the Windows PostScript printer driver: select the Paper/Quality tab, then Size is. You select
the page size and the margins at the same time.
● Using a Mac OS printer driver: select Page Setup from the File menu, then Paper size. You select
the page size and the margins at the same time.
● Using the Embedded Web Server: select from the Margins list on the Submit Job page.
●
Using the front panel: select the
margins.
NOTE If margins are set with the printer driver or with the Embedded Web Server, they
override the margins set with the front panel.
Print without added margins).
icon, then Default printing options > Paper options > Select
topics)
Print on oversize pages
For technical reasons, it is impossible to print an image that covers the full width or length of the paper.
There must always be a margin around the image. However, if you want to print, for example, an A3sized image with no margins around it, you can print on paper larger than A3 (leaving margins around
the image as usual), and then cut off the margins after printing.
Oversize page layouts are designed for this purpose. Each oversize page is large enough to
accommodate a standard paper size plus margins.
You can specify an oversize page layout in the following ways:
Using the Windows HP-GL/2 printer driver: select the Paper/Quality tab and press the Margins/
●
Layout button, then select Oversize from the layout options.
Using the Windows PostScript printer driver: select the Paper/Quality tab, then Size is. You select
●
the oversize page and the margins at the same time.
Using a Mac OS 9 or 10.1 printer driver: create a custom paper size with zero margins, and take
●
into account that the margins added to the final job will be the ones that are set in the printer's front
panel.
Using a newer Mac OS printer driver: select the printer in the Format for popup menu, select the
●
paper size, and then margins options will appear. You can select the oversize page and the
margins at the same time.
● Using the Embedded Web Server: on the Submit Job page, select Oversize from the Margin
layout list.
Using the front panel: select Default printing options > Paper options > Select layout > Oversize.
●
ENWW Adjust the margins 57
How do I... (image adjustment
Page 69

When using oversize pages, you can select the width of the margins as usual (see Adjust the margins).
Print without added margins.
See also
Print without added margins
For technical reasons, it is impossible to print an image that covers the full width or length of the paper.
There must always be a margin around the image. However, if your image already contains adequate
margins (white space around the edges) then you can tell the printer not to add margins to the image
when printing it. In this case it will, in fact, clip the edges of your image, assuming that the edges contain
nothing that needs to be printed.
How do I... (image adjustment
topics)
You can request no added margins in the following ways:
● Using the Windows HP-GL/2 printer driver: select the Paper/Quality tab and press the Margins/
Layout button, then select Clip Contents By Margins from the layout options.
● Using the Embedded Web Server: on the Submit Job page, select Clip Contents By Margins
from the Margin layout list.
● Using the front panel: select Default printing options > Paper options > Select layout > Clip
contents by margins.
This option is not available from the Windows PostScript driver or the Mac OS drivers.
When using this option, you can select the width of the margins as usual (see
printer continues to use margins: it just takes them out of the image instead of adding them to the image.
Select the orientation of the image
The orientation of the image may be portrait or landscape. When you see it on screen:
● The height of a portrait image is greater than its width (a tall image).
Adjust the margins). The
The width of a landscape image is greater than its height (a wide image).
●
You should select the orientation that your image has when you see it on screen. If you have a
landscape image and you select portrait, or if you have a portrait image and you select landscape, the
image may be clipped when printed.
58 Chapter 6 How do I... (image adjustment topics) ENWW
Page 70
You can select the orientation using a printer driver or the Embedded Web Server.
● Using the PostScript printer driver for Windows NT: go to the Orientation section of the Page Setup
tab.
● Using any other printer driver for Windows: go to the Orientation section of the Finishing tab.
● Using the PostScript printer driver for Mac OS: select Page Setup from the File menu, then go to
the Orientation section of the Page Attributes panel.
● Using the Embedded Web Server: go to the Orientation section of the Submit Job page.
Rotate an image
By default, images are printed with their shorter sides parallel to the leading edge of the paper, like this:
You may wish to rotate your images by 90 degrees in order to save paper, like this:
topics)
How do I... (image adjustment
You can do this in the following ways:
Using a Windows printer driver: select the Finishing tab, then Rotate by 90 degrees.
●
Using a Mac OS printer driver: select the Finishing panel, then Rotate.
●
ENWW Rotate an image 59
Page 71
Using the Embedded Web Server: select the Submit Job page, then Rotate.
●
●
Using the front panel: select the
How do I... (image adjustment
topics)
Autorotate
The HP-GL/2 printer driver provides an Autorotate option, which will automatically rotate by 90 degrees
any oversized portrait images in order to save paper.
Print a mirror image
If you are using clear imaging paper, sometimes called backlit, you may want to print a mirror image of
your drawing, so that when the paper is lit from behind it is in the correct orientation. To do this without
changing the image in your application:
● Using a Windows printer driver: select the Finishing tab, then Mirror image.
Using a Mac OS printer driver: select the Finishing panel, then Mirror image.
●
● Using the Embedded Web Server: select the Submit Job page, then Mirror image.
●
Using the front panel: select the
Enable mirror.
icon, then Default printing options > Paper options > Rotate.
NOTE If rotation is set with the printer driver or with the Embedded Web Server, it overrides
the setting in the front panel.
NOTE When you rotate a job, the page length may be increased to avoid clipping, because
the top and bottom margins are usually larger than the side margins.
CAUTION With either rolls or sheets, if you rotate an image to landscape whose original
orientation was portrait, the paper may not be wide enough for the image. For example,
rotating a portrait D/A1-size image on D/A1-size paper by 90 degrees will probably exceed the
width of the paper. If you are using the Embedded Web Server, the preview screen will
confirm this with a warning triangle. If you are using the HP Designjet 4500 Printer series, the
job will be put “on hold for paper”.
icon, then Default printing options > Paper options >
NOTE If mirror image is set with the printer driver or with the Embedded Web Server, it
overrides the setting in the front panel.
Scale an image
You can send an image to the printer at a certain size but tell the printer to rescale it to a different size
(normally larger). This may be useful:
If your software does not support large formats
●
● If your file is too large for the printer's memory—in this case you can reduce the page size in your
software and then scale it up again using the front panel option
60 Chapter 6 How do I... (image adjustment topics) ENWW
Page 72

You can rescale an image in the following ways:
● Using a Windows printer driver: select the Effects tab, then Resizing options.
● The Print document on option adjusts the image size to the page size selected for your
printer. For example, if you have selected ISO A2 as the page size and you print an A4-size
image, it will be enlarged to fit the A2 page. If the ISO A3 page size is selected, the printer
would reduce a larger image to fit the A3 size.
The % of normal size option enlarges the printable area of the original page by the
●
percentage indicated and adds the printer margins to make up the output page size.
● Using a Mac OS printer driver: select the Finishing panel, then Print document on.
The driver adjusts the image size to the page size selected for your printer.
● Using the Embedded Web Server: select the Submit Job page, then Resizing.
●
Using the front panel: select the
If you are printing to a single sheet, you must ensure that the image can actually fit onto the page,
otherwise clipping will occur.
icon, then Default printing options > Paper options > Scale.
topics)
How do I... (image adjustment
ENWW Scale an image 61
Page 73

How do I... (image adjustment
topics)
62 Chapter 6 How do I... (image adjustment topics) ENWW
Page 74

7 How do I... (color topics)
Perform color calibration
●
Perform black point compensation
●
Set the rendering intent
●
ENWW 63
How do I... (color topics)
Page 75

Perform color calibration
Color calibration improves color consistency between prints, and from one printer to another.
It is normally performed whenever a printhead is replaced, and whenever a new paper type is
introduced that has not been calibrated yet with the new printhead(s). However, this automatic behavior
can be turned off, and a default color correction used for each of the known paper types.
How do I... (color topics)
1.
From the front panel, select the
2. The available options for color calibration are:
● On: the printer performs color calibration whenever you introduce a new paper type that has
not yet been calibrated with the current set of printheads. The color correction resulting from
the calibration is then used for subsequent prints on that paper type with the same print
quality setting.
● Off: the printer uses a default color correction, different for each paper type and print quality
setting.
3. The printer calibrates the colors by printing a calibration strip, scanning the strip with a built-in
optical sensor, and calculating the color corrections required. The color calibration strip is 269 mm
wide, and 18 mm long when using glossy paper; on other paper types, it is 109 mm long. Color
calibration takes about three to six minutes, depending on the paper type.
NOTE Color calibration can be requested manually at any time from the front panel, by
selecting the
CAUTION Color calibration can be performed successfully on opaque materials only. Do not
attempt to calibrate transparent film.
icon, then Printhead management > Calibrate color.
icon, then Printer configuration > Color calibration.
Perform black point compensation
The black point compensation option controls whether to adjust for differences in black points when
converting colors between color spaces. When this option is selected, the full dynamic range of the
source space is mapped into the full dynamic range of the destination space. It can be very useful in
preventing blocking shadows when the black point of the source space is darker than that of the
destination space. This option is allowed only when the relative colorimetric rendering intent is selected
(see
Set the rendering intent).
64 Chapter 7 How do I... (color topics) ENWW
Page 76

Black point compensation can be specified in the following ways:
● Using a Windows PostScript printer driver: select the Color tab, then Black point compensation.
● Using a Mac OS printer driver: select the Color Options panel, then Black point compensation.
Using the Embedded Web Server: select the Submit Job page, then Black point compensation.
●
●
Using the front panel: select the
point compensation.
Set the rendering intent
Rendering intent is one of the settings used when doing a color transformation. As you probably know,
some of the colors you want to print may not be reproducible by the printer. The rendering intent allows
you to select one of four different ways of handling these so–called out–of–gamut colors.
● Saturation (graphics): best used for presentation graphics, charts, or images made up of bright,
saturated colors.
● Perceptual (images): best used for photographs or images in which colors blend together. It tries
to preserve the overall color appearance.
Relative colorimetric (proofing): best used when you want to match a particular color. This
●
method is mainly used for proofing. It guarantees that, if a color can be printed accurately, it will be
printed accurately. The other methods will probably provide a more pleasing range of colors but do
not guarantee that any particular color will be printed accurately. It maps the white of the input
space to the white of the paper on which you are printing.
Absolute colorimetric (proofing): the same as relative colorimetric, but without mapping the
●
white. This rendering is also used mainly for proofing, where the goal is to simulate the output of
one printer (including its white point).
The rendering intent can be specified in the following ways:
● Using a Windows PostScript printer driver: select the Color tab, then Rendering intent.
Using a Mac OS printer driver: select the Color Options panel, then Rendering intent.
●
Using the Embedded Web Server: select the Submit Job page, then Rendering intent.
●
●
Using the front panel: select the
rendering intent.
icon, then Default printing options > Color options > Black
icon, then Default printing options > Color options > Select
How do I... (color topics)
ENWW Set the rendering intent 65
Page 77

How do I... (color topics)
66 Chapter 7 How do I... (color topics) ENWW
Page 78

8 How do I... (ink system topics)
Remove an ink cartridge
●
Insert an ink cartridge
●
Remove a printhead
●
Insert a printhead
●
Manage printhead monitoring
●
Recover (clean) the printheads
●
Clean a printhead's electrical connections
●
Align the printheads
●
Remove a printhead cleaner
●
Insert a printhead cleaner
●
Check the status of the ink system
●
Get ink cartridge statistics
●
Get printhead statistics
●
ENWW 67
How do I... (ink system topics)
Page 79

Remove an ink cartridge
There are two types of ink cartridge removal.
● The ink cartridge is very low and you want to replace it with a full cartridge for unattended printing
(you can use up the remaining ink in the first cartridge at a more convenient time).
● The ink cartridge is empty or faulty, and you must replace it to continue printing.
CAUTION Do not try to remove an ink cartridge while printing.
CAUTION Remove an ink cartridge only if you are ready to insert another one.
WARNING! Make sure the printer wheels are locked (the brake lever is pressed down) to
prevent the printer from moving.
1.
At the printer's front panel, select the
2. The ink cartridge door is on the left-hand side of the printer.
icon, then Replace ink cartridges.
How do I... (ink system topics)
68 Chapter 8 How do I... (ink system topics) ENWW
Page 80

3. Release the door catch by pressing on the top until it clicks.
4. Pull the door fully open.
5. Grip the blue tab in front of the cartridge you wish to remove.
ENWW Remove an ink cartridge 69
How do I... (ink system topics)
Page 81

6. Pull the blue tab down.
7. Then pull it outwards, towards you.
8. The cartridge comes out, in its drawer.
How do I... (ink system topics)
70 Chapter 8 How do I... (ink system topics) ENWW
Page 82

9. Lift the cartridge out of its drawer.
NOTE Avoid touching the end of the cartridge that is inserted into the printer, as there
may be ink on the connection.
NOTE Avoid storing partially used ink cartridges on their ends.
10. The front panel display will identify the missing ink cartridge.
Insert an ink cartridge
1. Pick up the new ink cartridge and find the label identifying the ink color. Hold the ink cartridge so
that you can see the identifying colored label at the top of the side facing you.
2. Check that the colored label above the empty slot in the printer matches the color of the label on
the cartridge.
ENWW Insert an ink cartridge 71
How do I... (ink system topics)
Page 83

3. Insert the ink cartridge into the cartridge drawer.
Position the cartridge at the rear of the drawer as indicated below.
NOTE A larger black ink cartridge is available that uses the whole length of the drawer.
4. Slide the drawer and cartridge into the slot until it locks into position.
How do I... (ink system topics)
If you have difficulty, see I cannot insert an ink cartridge.
72 Chapter 8 How do I... (ink system topics) ENWW
Page 84

5. When all cartridges have been inserted, close the door (push it until it clicks shut).
6. The front panel display confirms that all cartridges have been correctly inserted.
Remove a printhead
WARNING! Make sure the printer wheels are locked (the brake lever is pressed down) to
prevent the printer from moving.
Printhead replacement must be performed with the printer switched on at the power isolation switch.
1.
At the printer's front panel, select the
2. The printer moves the carriage into the correct position.
CAUTION If the carriage is left in the central part of the printer for more than seven
minutes. it will try to move back to its normal position in the right-hand end.
ENWW Remove a printhead 73
icon, then Printhead management > Replace printheads.
How do I... (ink system topics)
Page 85

3. When the carriage has stopped moving, the front panel will ask you to open the window.
4. Locate the carriage.
5. Pull up and release the latch on top of the carriage.
6. Lift up the cover. This will now give you access to the printheads.
How do I... (ink system topics)
74 Chapter 8 How do I... (ink system topics) ENWW
Page 86

7. To remove a printhead, lift up the blue handle.
8. Using the blue handle, gently disengage the printhead.
9. Gently pull the blue handle upward until the printhead is released from the carriage.
CAUTION Do not pull abruptly because this can damage the printhead.
ENWW Remove a printhead 75
How do I... (ink system topics)
Page 87
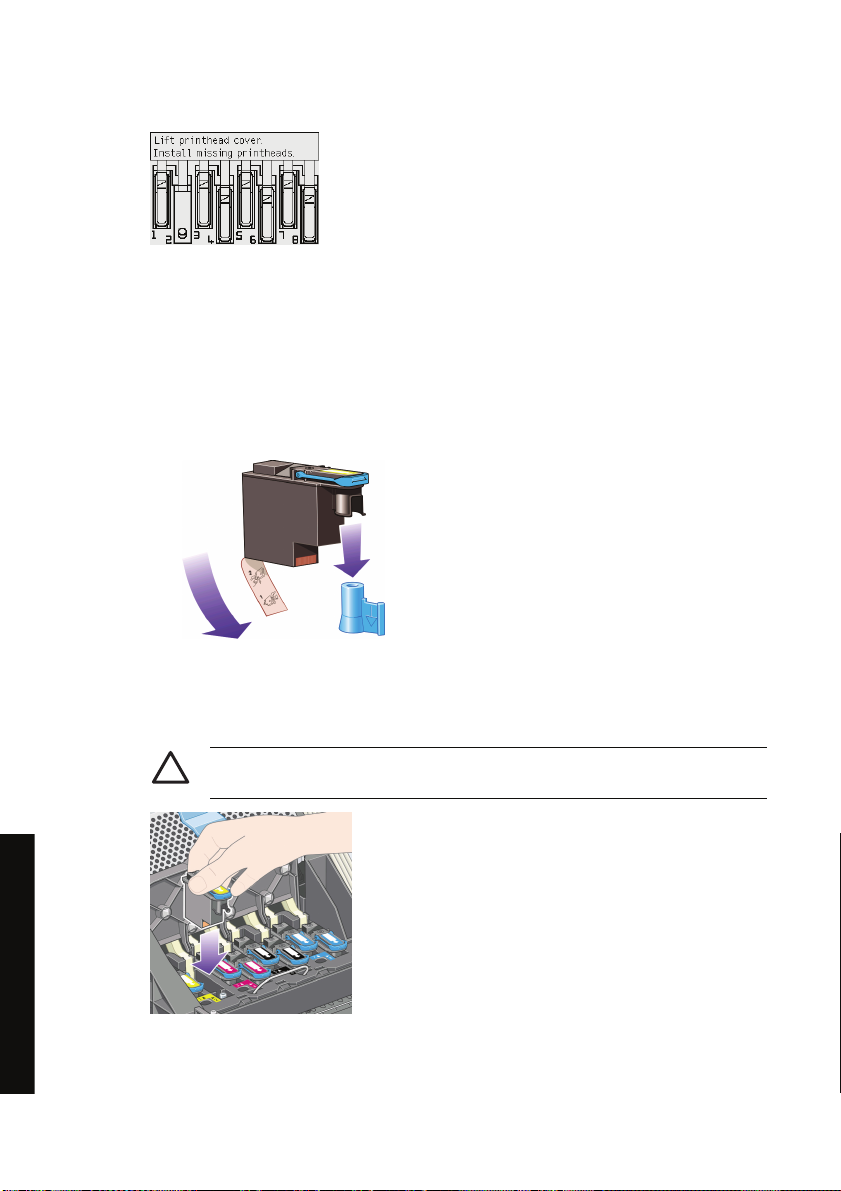
10. The front panel display identifies the missing printhead.
Insert a printhead
1. If the printhead is new:
a. Remove the blue protective cap by pulling down on it.
b. Remove the clear protective tape from the printhead's nozzles by pulling on the paper tab.
The printhead is designed to prevent you from accidentally inserting it into the wrong position.
Check that the colored label on the printhead matches the colored label of the carriage position
into which the printhead is to be inserted.
2. Insert the new printhead into its correct position in the carriage.
CAUTION Insert the printhead slowly and vertically, straight down. It may be damaged
if you insert it too fast, or at an angle, or if you turn it as you insert it.
How do I... (ink system topics)
76 Chapter 8 How do I... (ink system topics) ENWW
Page 88
3. Push down as indicated by the arrow shown below.
When installing the new printhead there may be some resistance, so you need to press it down
firmly but smoothly.
If you have difficulty, see
4. Insert any other printheads that need to be installed, and close the carriage cover.
I cannot insert a printhead.
When all the printheads have been inserted correctly and accepted by the printer, the printer will
beep.
NOTE If the printer does not beep when you insert the printhead and the Replace
message appears on the front panel, the printhead may need to be reseated.
ENWW Insert a printhead 77
How do I... (ink system topics)
Page 89
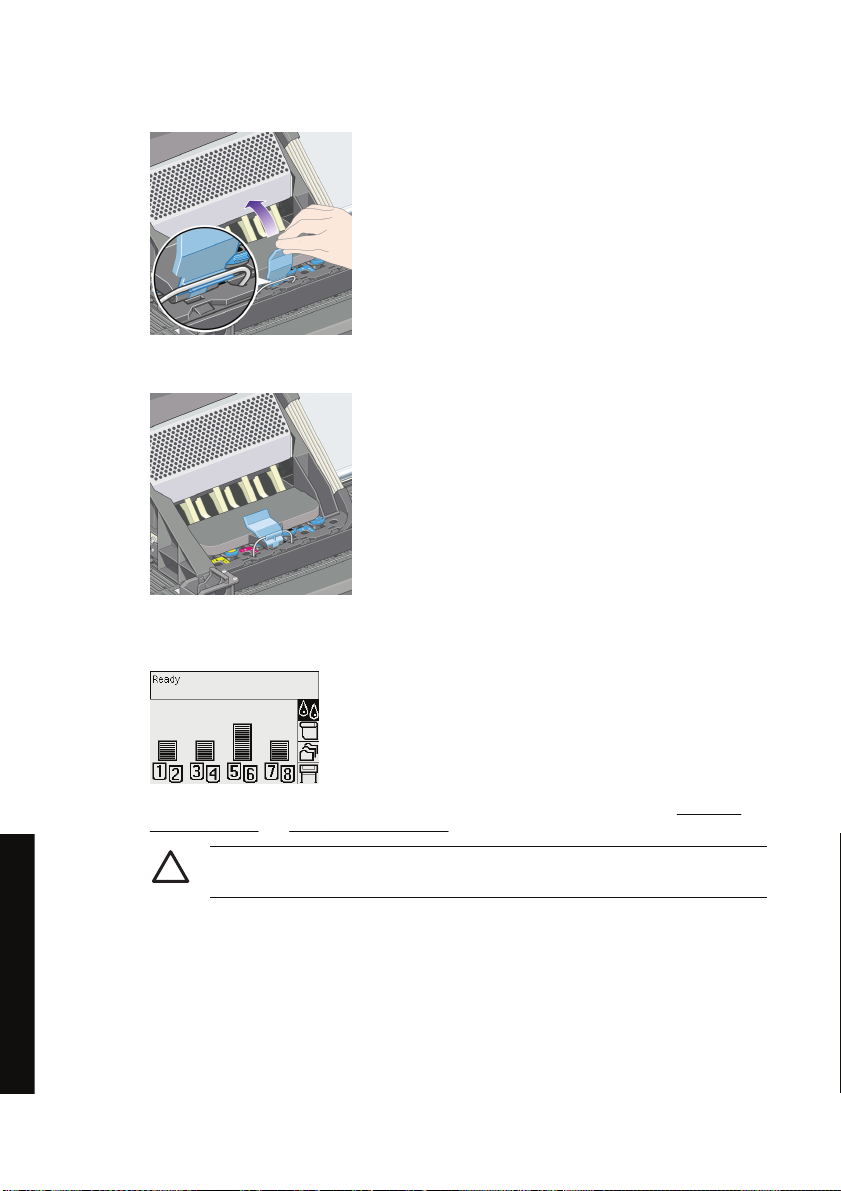
5. Latch the carriage cover.
When the carriage has been correctly latched, it looks like this:
6. Close the window.
7. The front panel display confirms that all printheads are correctly inserted.
8. Now replace the printhead cleaners for any printheads that have been changed. See Remove a
How do I... (ink system topics)
printhead cleaner and Insert a printhead cleaner.
CAUTION Leaving the old printhead cleaner in the printer will shorten the new
printhead's life and possibly damage the printer.
Manage printhead monitoring
The printer automatically checks the status of the printheads from time to time in order to monitor their
health and detect any problems that might affect print quality. The frequency of these checks is
optimized to maintain good throughput.
78 Chapter 8 How do I... (ink system topics) ENWW
Page 90

If you want to increase the frequency of printhead monitoring in order to detect any problems sooner,
select the
is printing and printhead monitoring is set to Intensive, the front panel and the Embedded Web Server
printer status line will display the following message: Printing. Printhead monitoring (instead of just
Printing).
To return to the default printhead monitoring frequency, select the icon, then Printer configuration
> Printhead monitoring > Optimized.
icon, then Printer configuration > Printhead monitoring > Intensive. When the printer
NOTE When Intensive is selected, the throughput of the printer will be reduced because of
the increased frequency of printhead checks.
Recover (clean) the printheads
To clean the printheads (which often enables them to recover from problems), go to the printer's front
panel and select the
about two to four minutes.
icon, then Printhead management > Recover printheads. Cleaning takes
Clean a printhead's electrical connections
In some extreme cases it is possible that the printer will not recognize a printhead after it has been
installed. This is due to the build-up of ink deposits on the electrical connections between the printhead
and the printhead carriage. Under these circumstances you are recommended to clean the printhead's
electrical connections. Routine cleaning of the connections when there are no apparent problems is not
recommended.
Included with your printer (in the Maintenance Kit box) is a carriage interconnect wiper.
ENWW Recover (clean) the printheads 79
How do I... (ink system topics)
Page 91

This should be used for cleaning the electrical interconnects of both the printhead carriage and the
printhead, which should be done if the front panel persistently displays the Reseat or Replace message
next to the printhead.
1. Remove a new pre-moistened replacement sponge from its pouch.
A supply of sponges is included in the box with the wiper. If all sponges have been used, more can
be obtained by contacting your customer service representative.
2. Open the carriage interconnect wiper.
3. Load the sponge into the carriage interconnect wiper by positioning the sponge on the face of the
carriage interconnect wiper with the shorter tab in the locating slot.
How do I... (ink system topics)
80 Chapter 8 How do I... (ink system topics) ENWW
4. Close the carriage interconnect wiper, trapping the sponge in place.
Page 92
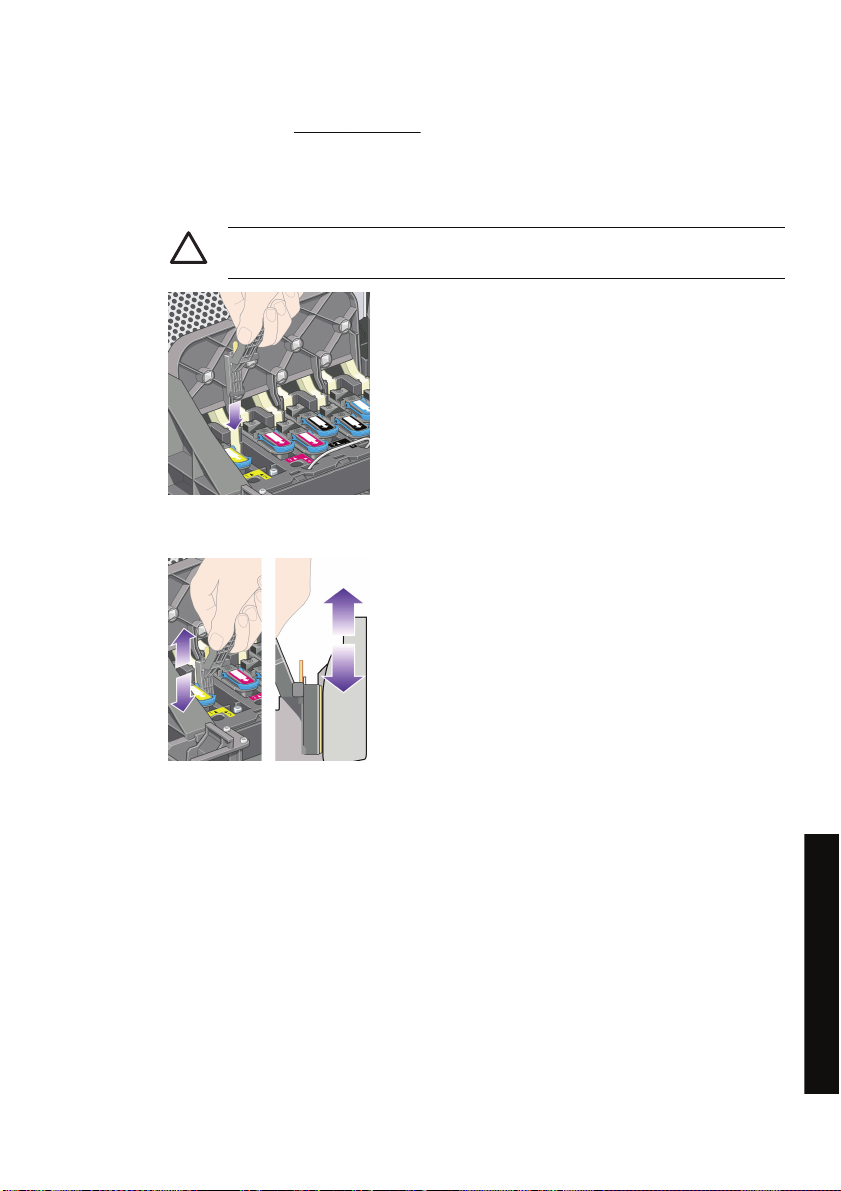
5. Open the printhead carriage latch and extract the printhead that has the problem, as indicated on
the front panel. See
6. Insert the carriage interconnect wiper into the printhead slot at the back. Wipe the electrical
contacts by inserting the tool between the electrical connections at the back of the slot and the
steel spring with the sponge facing away from you and towards the electrical contacts. Try to avoid
picking up any ink deposit which may have accumulated on the bottom surface of the slot.
CAUTION If the carriage is left in the central part of the printer for more than seven
minutes. it will try to move back to its normal position in the right-hand end.
7. Rub the sponge against the contacts with a light force along the entire depth of the flex connector
as allowed by the mechanical stop on the tool.
Remove a printhead.
ENWW Clean a printhead's electrical connections 81
How do I... (ink system topics)
Page 93

8. Take special care to clean all contacts thoroughly, including the ones at the lowest point of the
connector.
9. Using the same sponge, clean the lower strip of electrical contacts on the printhead (unless the
printhead is new), avoid touching the upper set of electrical contacts.
CAUTION Do not touch the surface of the printhead containing the nozzles, which are
easily damaged.
10. After waiting a few moments to allow both connectors to dry, replace the printhead into the
printhead carriage. See
11. On completion of the cleaning process, open the carriage interconnect wiper by pulling on the
sponge tab.
Insert a printhead.
How do I... (ink system topics)
82 Chapter 8 How do I... (ink system topics) ENWW
Page 94

12. Remove the soiled sponge from the carriage interconnect wiper.
13. Dispose of the soiled sponge in a safe place to prevent the transfer of ink onto hands and clothing.
If the front panel continues to display the Reseat or Replace message, replace the printhead or contact
your customer service representative.
Align the printheads
The printer will normally perform printhead alignment whenever printheads are replaced. If there is no
paper loaded when a printhead is replaced, the printer will perform the alignment the next time you load
paper.
NOTE You can turn off these automatic printhead alignments from the front panel: select the
icon, then Printer configuration > Auto printhead alignment > Off.
In addition, you should align the printheads if the Image Diagnostics Print indicates an alignment error.
See
How do I... (Image Diagnostics Print topics).
1. Make sure that you have a roll of opaque paper loaded in the printer; the best results will be
achieved with the type of paper that you normally use for printing. Single sheets of paper, and
transparent materials such as translucent bond, clear film, matte film, tracing paper, and vellum are
not suitable for printhead alignment.
ENWW Align the printheads 83
How do I... (ink system topics)
Page 95

2. To request printhead alignment (if the alignment is not being performed automatically), go to the
front panel, select the
3. If you are close to the beginning of a roll, the front panel will report that the printer may need to
feed up to 3 m (≈ 10 ft) of paper before starting the printhead alignment. This is necessary to
ensure a successful alignment. In this case, you will be given the following options:
To continue with the printhead alignment, allowing the printer to feed as much paper as
●
necessary
To schedule the printhead alignment to be performed later, after you have used a few meters
●
of paper for printing
To cancel the printhead alignment
●
4. If you choose to continue with the printhead alignment, the process will start immediately, unless
an image is currently being printed, in which case the alignment will be done as soon as the
current print job is finished.
The alignment process takes about twelve minutes.
icon, and then Printhead management > Align printheads.
Remove a printhead cleaner
After you have replaced a printhead, the front panel will prompt you to replace the printhead cleaner.
CAUTION When replacing a printhead, always replace the corresponding printhead cleaner.
Leaving the old cleaner in the printer will seriously shorten the new printhead's life and
possibly damage the printer. A new printhead cleaner is provided with each new printhead.
When removing a printhead cleaner:
● Be careful not to get ink on your hands. There may be ink on, around, and inside the replaced
printhead cleaner.
● Always handle and store the replaced printhead cleaner upright to avoid spilling any ink.
How do I... (ink system topics)
84 Chapter 8 How do I... (ink system topics) ENWW
WARNING! Make sure the printer wheels are locked (the brake lever is pressed down) to
prevent the printer from moving.
Page 96

1. The printhead cleaners are located in slots underneath the front panel, at the front of the printer.
Press the top of the service station door to release the catch.
2. Open the door.
3. Each printhead cleaner has a handle on the front. To remove the cleaner, press inward and
upward as indicated by the arrow shown here, until the cleaner is released.
ENWW Remove a printhead cleaner 85
How do I... (ink system topics)
Page 97

4. Lift up the printhead cleaner to remove it from the slot, and slide it out horizontally as shown below.
See also Insert a printhead cleaner.
Insert a printhead cleaner
The plastic bag in which the new printhead cleaner comes can be used to dispose of the old printhead
and printhead cleaner.
1. Insert each printhead cleaner into the correct color slot location, in the service station, in the
direction indicated by the arrow shown here.
How do I... (ink system topics)
86 Chapter 8 How do I... (ink system topics) ENWW
Page 98

2. When the printhead cleaner has been pushed all the way in, press inwards and downwards as
indicated by the arrow shown here, until it clicks into place.
If you have difficulty, see I cannot insert a printhead cleaner.
NOTE The front panel will not show the new printhead cleaner until the right-hand door
is closed.
3. When you have inserted the printhead cleaner(s) into the printer, close the door.
NOTE The printer needs all the ink cartridges, printheads, and printhead cleaners to be
installed before it can continue.
4. If no paper is loaded, the front panel will instruct you to load some.
Whenever you insert a new printhead and cleaner, the printer will normally perform a printhead
alignment and color calibration. Both are recommended for best print quality. In some cases, you may
decide to postpone printhead alignment until after some further printing has been done.
NOTE If you prefer to save some time at the expense of print quality, you can turn off these
automatic procedures from the front panel, by selecting the
configuration > Auto printhead alignment > Off and Printer configuration > Color
calibration > Off.
ENWW Insert a printhead cleaner 87
icon, then Printer
How do I... (ink system topics)
Page 99

The front panel may request that you load paper that is suitable for printhead alignment. The printhead
alignment procedure requires a roll of opaque paper: not a single sheet, and not any kind of transparent
or translucent material.
When the front panel displays Ready, you are ready to print.
NOTE Make sure the printer window and the right-hand door are closed after you replace the
supplies. The printer will not print while these are open.
Check the status of the ink system
1. Access the Embedded Web Server (see Access the Embedded Web Server).
2. Go to the Supplies page.
The Supplies page shows you the status of the ink cartridges (including the ink levels), the printheads,
the printhead cleaners, and the loaded paper.
Get ink cartridge statistics
How do I... (ink system topics)
88 Chapter 8 How do I... (ink system topics) ENWW
To get information on your ink cartridges:
1.
Go to the front panel and select the
2. Select Ink cartridge information, then select the cartridge on which you want information.
3. The front panel displays:
Its color
●
● Its product name
icon.
Page 100

Its product number
●
● Its serial number
● Its status
Its ink level, if known
●
Its total ink capacity in milliliters
●
● Its manufacturer
● Its warranty status
You can also get most of this information without leaving your computer by using the Embedded Web
Server.
For an explanation of the ink cartridge status messages, see
Get printhead statistics
To get information on your printheads:
1.
Go to the front panel and select the
2. Select Printhead information, then select the printhead on which you want information.
3. The front panel displays:
Its color
●
● Its product name
● Its product number
Its serial number
●
Its status
●
● The volume of ink it has used
● Its warranty status
The status of its cleaner
●
You can also get most of this information without leaving your computer by using the Embedded Web
Server.
For an explanation of the printhead and printhead cleaner status messages, see
message and A printhead cleaner status message.
If the warranty status is See warranty note, this indicates that non-HP ink is being used. See
Worldwide Limited Warranty—HP Designjet 4000/4500 Printer series and 4500mfp for details of the
warranty implications.
An ink cartridge status message.
icon.
A printhead status
ENWW Get printhead statistics 89
How do I... (ink system topics)
 Loading...