

Page 1
x4
?
In case of difculty, please consult:
- Your printer’s Embedded Web Server
- Using your printer CD
En cas de problème, reportez-vous au :
- Serveur Web intégré de votre imprimante
- CD-ROM Utilisation de votre imprimante
Hilfsmittel bei Problemen:
- Integrierter Web-Server des Druckers
- Drucker-CD
In caso di difcoltà, consultare:
- su EWS della stampante
- sul CD della stampante
Read these instructions carefully...
What you will need for this procedure
- Some of the printer components are bulky, you
will need up to four people to lift them. When
this is necessary, the symbol shown at the bottom
is shown.
- To assemble the printer you will need at least
3 × 5 m (10 × 16 ft) of empty oor space, and
about four hours.
Lisez attentivement les instructions suivantes...
Conditions requises pour cette procédure
- Dans la mesure où certains des composants
de l’imprimante sont volumineux, jusqu’à quatre
personnes peuvent être requises pour les soulever.
Dans ce cas, le symbole ci-dessous s’afche.
- Pour assembler l’imprimante, vous devez disposer
d’un espace libre d’au moins 3 × 5 m et compter
environ deux heures.
Lesen Sie diese Anleitung sorgfältig durch
Voraussetzungen
- Da einige Komponenten des Druckers relativ
unhandlich und schwer sind, werden zum
Anheben des Geräts bis zu vier Personen
benötigt. In Situationen, in denen dies
erforderlich, wird dieses Symbol verwendet.
- Für den Zusammenbau des Druckers wird eine
freie Bodenäche von ca. 3 x 5 m benötigt.
Die Aktion dauert etwa zwei Stunden.
Leggere queste istruzioni attentamente...
Cosa è necessario per questa procedura
- Poiché alcuni componenti della stampante sono
ingombranti e voluminosi, potrebbero essere
necessarie anche quattro persone per sollevarli.
In questo caso, viene visualizzato il seguente
simbolo.
- Per assemblare la stampante è necessario uno
spazio pari a 3 × 5 m e circa due ore di tempo.
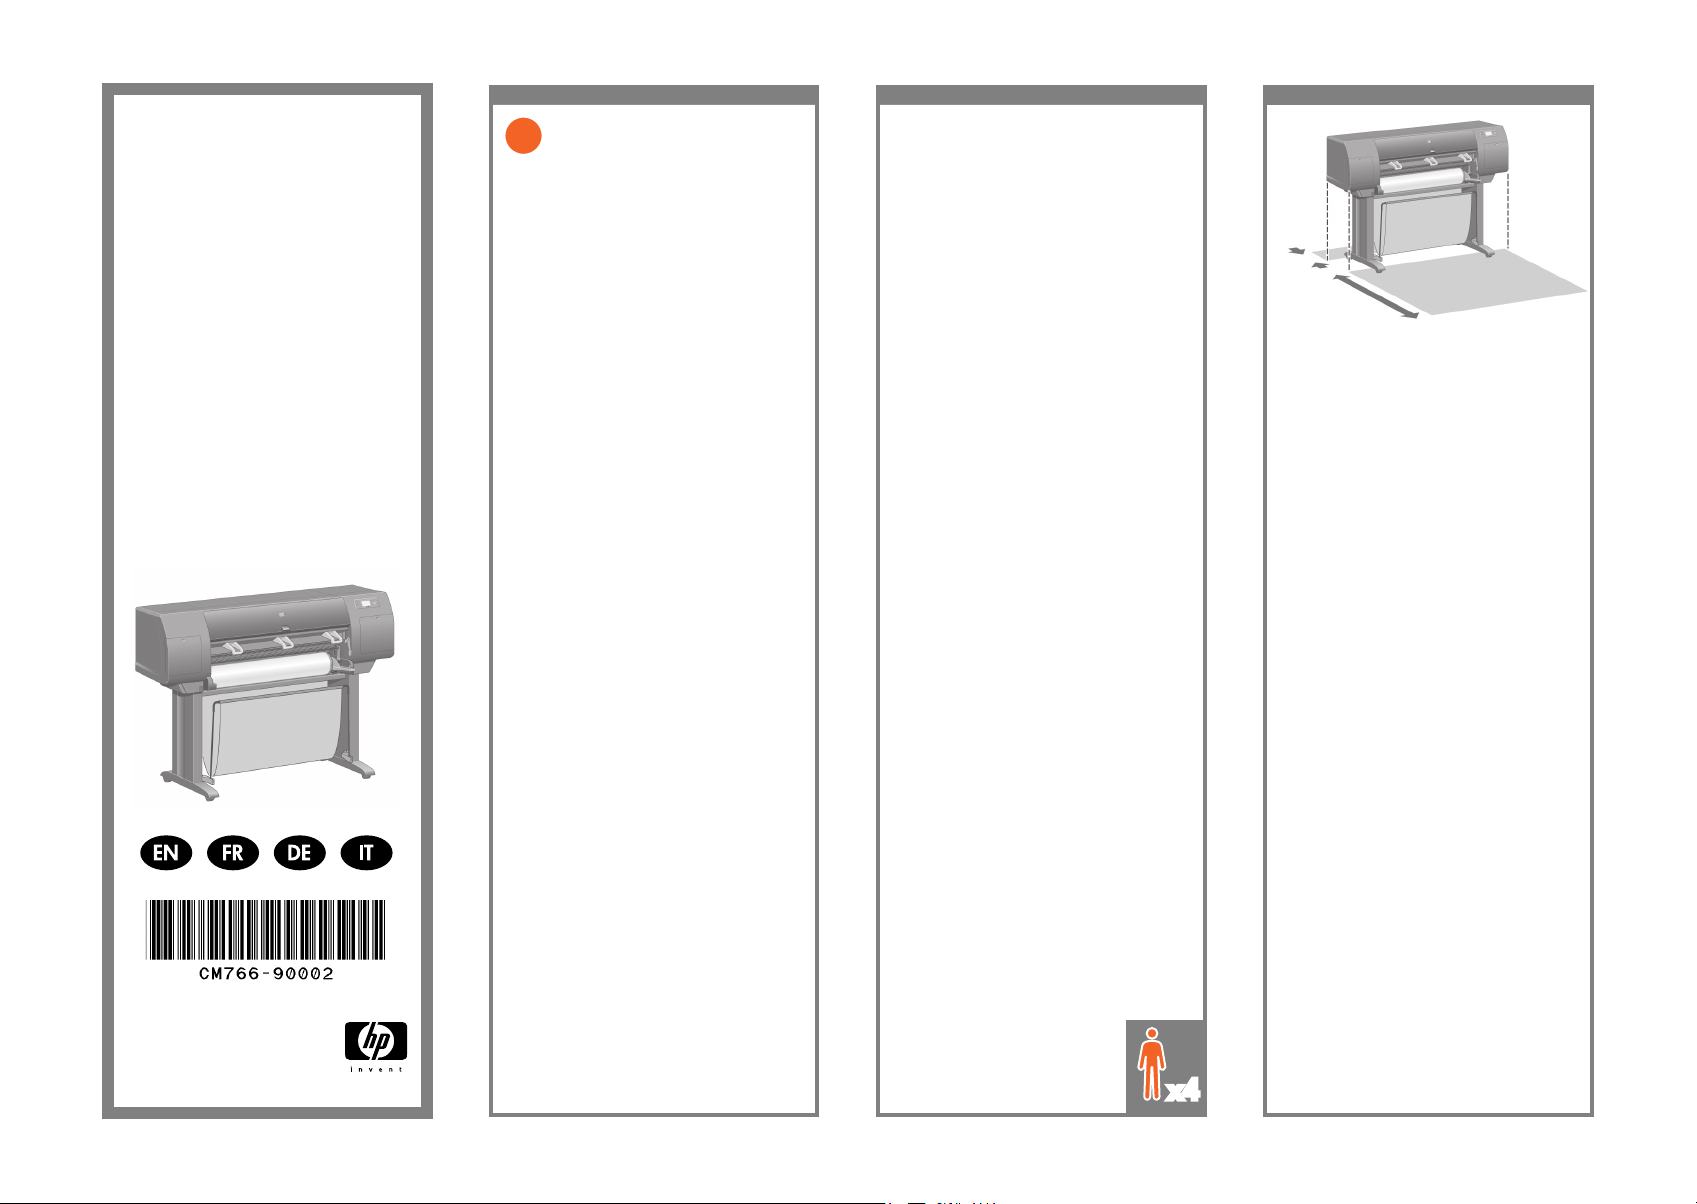
Printer working area
Before you start unpacking, consider where
you are going to put the assembled printer.
You should allow some clear space on all sides
of the printer box. The recommended clearances
are shown in the illustration above.
Zone de travail de l’imprimante
Avant de commencer le déballage, pensez
à l’emplacement où l’imprimante assemblée
sera placée. Vous devez laisser de l’espace
à l’arrière et à l’avant de l’imprimante.
La supercie des espaces libres conseillée
est indiquée dans l’illustration ci-dessous.
Aufstellort des Druckers
Bevor Sie mit dem Auspacken beginnen, sollten
Sie sich bereits darüber im Klaren sein, wo der
Drucker aufgestellt wird. An der Vorder- und
Rückseite des Druckers muss genügend Platz frei
bleiben. Die empfohlenen Abstände zu Wänden
und anderen Gegenständen sind in der
folgenden Abbildung angegeben.
Area operativa della stampante
Prima di cominciare a disimballare la
stampante, considerare lo spazio in cui verrà
sistemata una volta assemblata. È necessario
lasciare dello spazio sia dietro che davanti alla
stampante. Lo spazio consigliato è riportato
nella gura di seguito.
HP Designjet 4020/4020ps
Printer Assembly Instructions
HP Designjet 4020/4020ps
Printer Instructions
d’assemblage
HP Designjet 4020/4020ps
Printer Montageanleitung
HP Designjet 4020/4020ps
Printer Istruzioni per
l’installazione
© 2009 Hewlett-Packard Company
Inkjet Commercial Division
Avenida Graells 501 · 08174
Sant Cugat del Vallès
Barcelona · Spain
All rights reserved
Printed in Germany · Imprimé en Allemagne · Stampato in Germania
10 cm
179 cm
Page 2
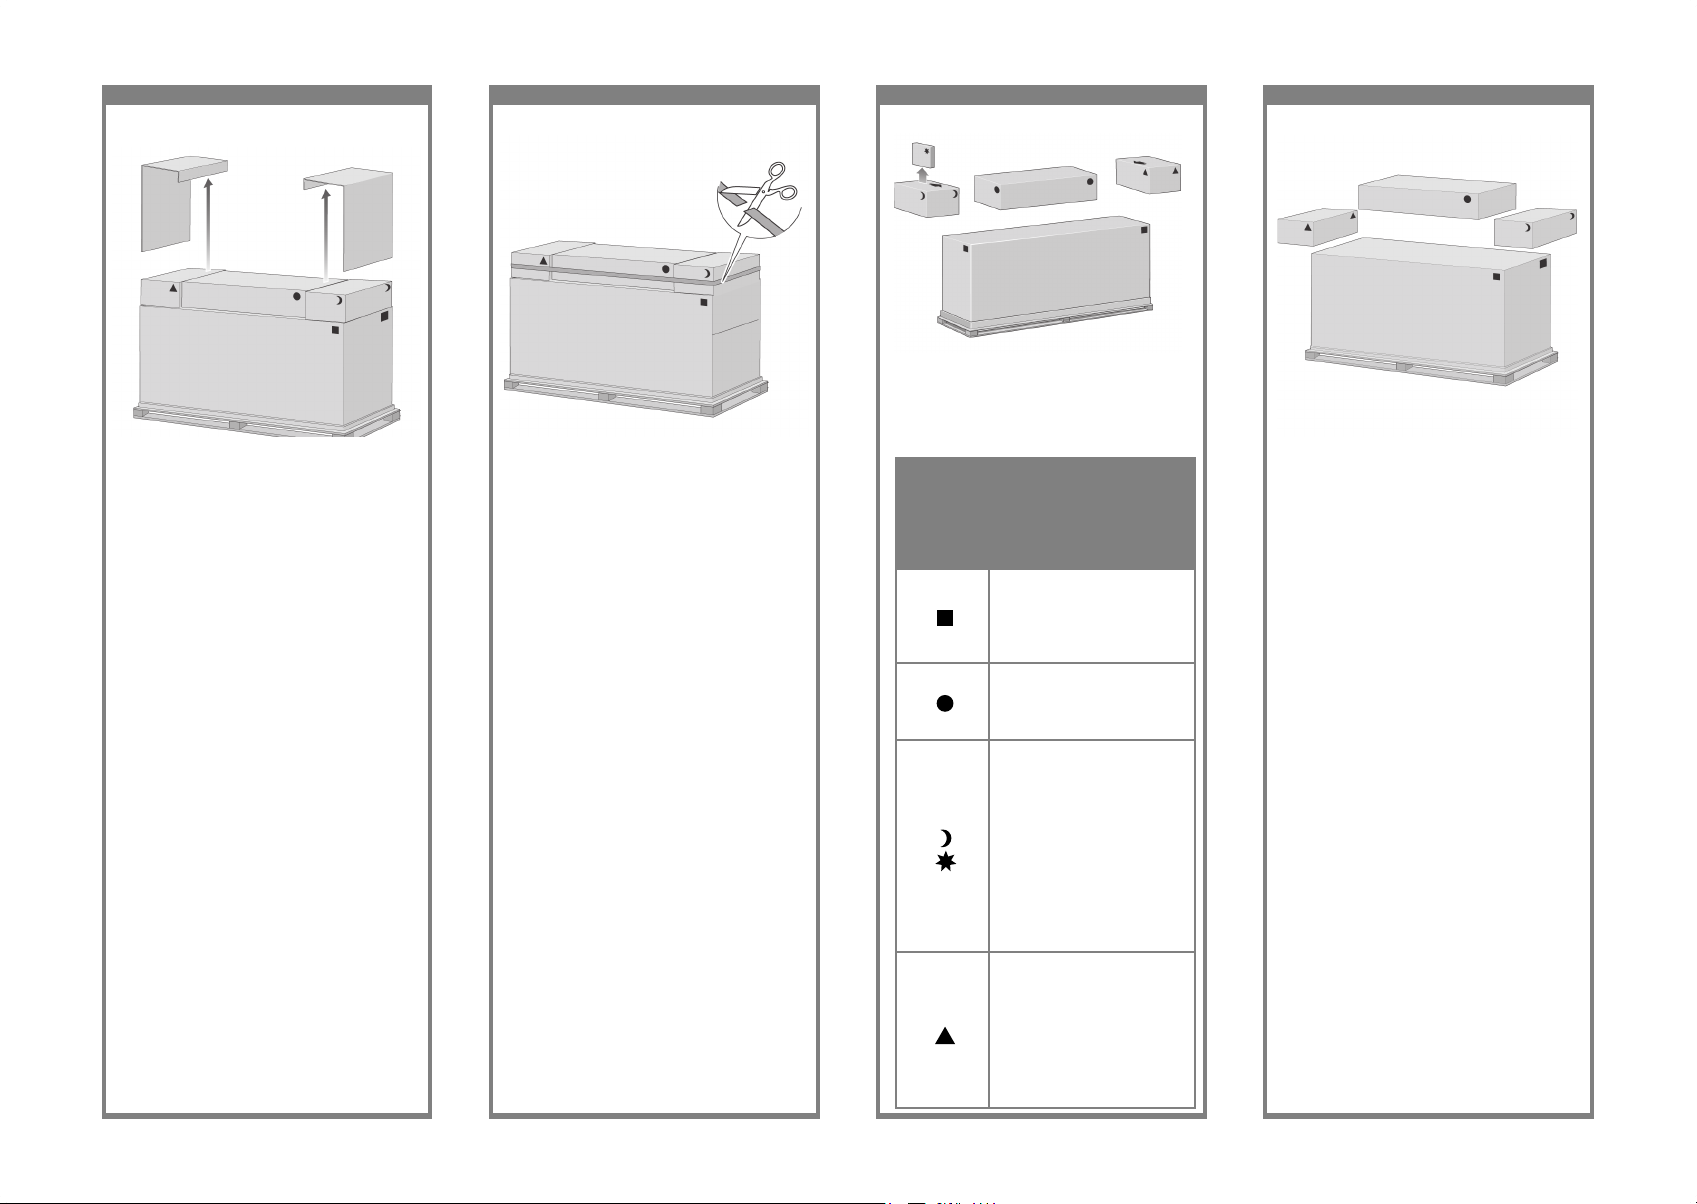
1 2 3 4
Remove the boxes from the top of the main
printer box.
Retirez les cartons de la partie supérieure
du carton principal de l’imprimante.
Entfernen Sie die Behälter, die auf der
Verpackung der Druckerbasiseinheit liegen.
Rimuovere le scatole dalla parte superiore
della scatola principale.
The shapes on the boxes identify the contents.
Les formes qui gurent sur les cartons permettent
d’identier le contenu.
Die Behälter sind mit Symbolen gekennzeichnet,
an denen sich ihr Inhalt erkennen lässt.
Le gure sulle scatole ne identicano il contenuto.
Mark on box
Marque sur
le carton
Symbol
Segno sulla
scatola
Contents of box
Contenu du carton
Inhalt
Contenuto della scatola
Printer body
Partie principale de
l’imprimante
Druckerbasiseinheit
Stampante
Stand and bin assembly
Assemblage du bac et du support
Sockel-/Ablagefachbaugruppe
Cavalletto e vassoio
Consumables box, including…
Maintenance Kit (keep safe)
Carton des consommables,
y compris le kit de maintenance
(à conserver en lieu sûr)
Verbrauchsmaterialien,
einschließlich… Wartungskit
(bitte sicher aufbewahren)
Scatola di consumabili,
comprendente il kit di
manutenzione (fare particolare
attenzione)
Spare box (used later)
Carton des pièces détachées
(utilisée à la section 3 de ces
instructions d’installation)
Zubehör (siehe Abschnitt
3 dieser Anleitung)
Scatola dei pezzi di ricambio
(utilizzata nella Sezione 3 di
questo documento)
Remove the two side lids.
Retirez les deux capots latéraux.
Nehmen Sie die beiden seitlichen Abdeckungen ab.
Rimuovere i due coperchi laterali.
Cut the strap around the boxes carefully, as the
boxes may fall as soon as the strap is cut.
Coupez avec précaution la sangle qui entoure
les cartons, car ceux-ci peuvent tomber dès que
la sangle est coupée.
Schneiden Sie vorsichtig das, Verpackungsband
durch, mit dem die Kartons gesichert sind.
Achten Sie dabei darauf, dass die Kartons
nicht herabfallen
Nastro Scatola principale della stampante
Tagliare la cinghia di chiusura delle scatole
con cautela perché la scatola potrebbe cadere
nel momento in cui si taglia la cinghia.
Page 3
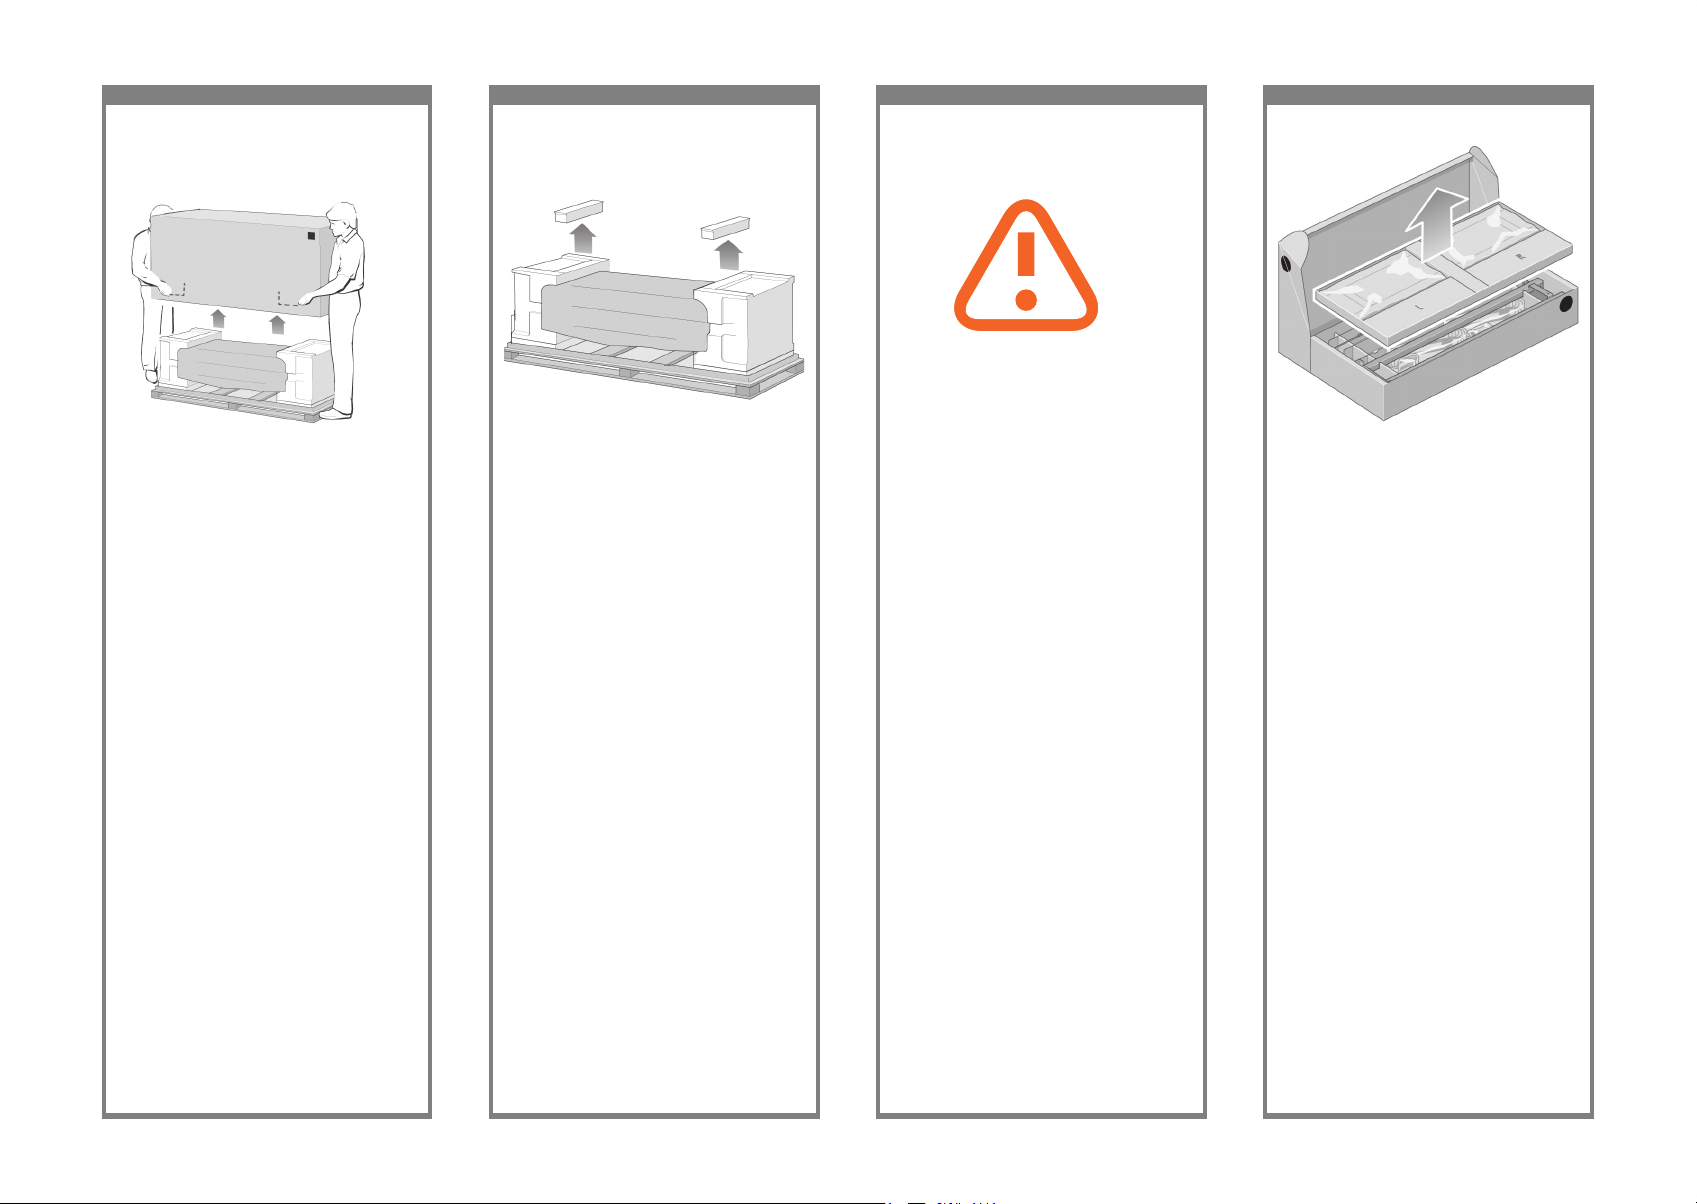
5 6 7 8
Remove the rst tray from the stand and bin
assembly box.
Retirez le premier bac du carton de l’assemblage
du bac et du support.
Nehmen Sie das erste Tablett aus dem Behälter
mit der Sockel-/Ablagefachbaugruppe.
Rimuovere il primo cassetto dalla scatola del
cavalletto e del vassoio.
When you are unpacking the leg assembly,
you will see that there is anti-slip material
around two of the wheels on the feet.
DO NOT REMOVE this material yet.
Lorsque vous déballez les montants, vous
constatez qu’une bande antidérapante entoure
deux des roues des pieds.
N’ENLEVEZ PAS encore cette bande. Retirez
le premier bac du carton de l’assemblage du
bac et du support.
Beim Auspacken der Standbeinbaugruppe
werden Sie feststellen, dass sich an zwei Rollen
der Füße rutschhemmendes Material bendet.
Entfernen Sie dieses Material jetzt noch NICHT.
Quando si disimballa la confezione delle
gambe, è possibile notare che è presente un
materiale anti-sdrucciolo attorno a due ruote.
NON RIMUOVERE ancora questo materiale.
Remove the main printer box.
Retirez le carton principal de l’imprimante.
Nehmen Sie die Verpackung der
Druckerbasiseinheit ab.
Rimuovere la scatola principale della stampante.
Remove the two packing pieces.
Retirez les deux cales d’emballage.
Entfernen Sie die beiden Sicherungselemente.
Rimuovere le due parti dell’imballaggio.
Page 4
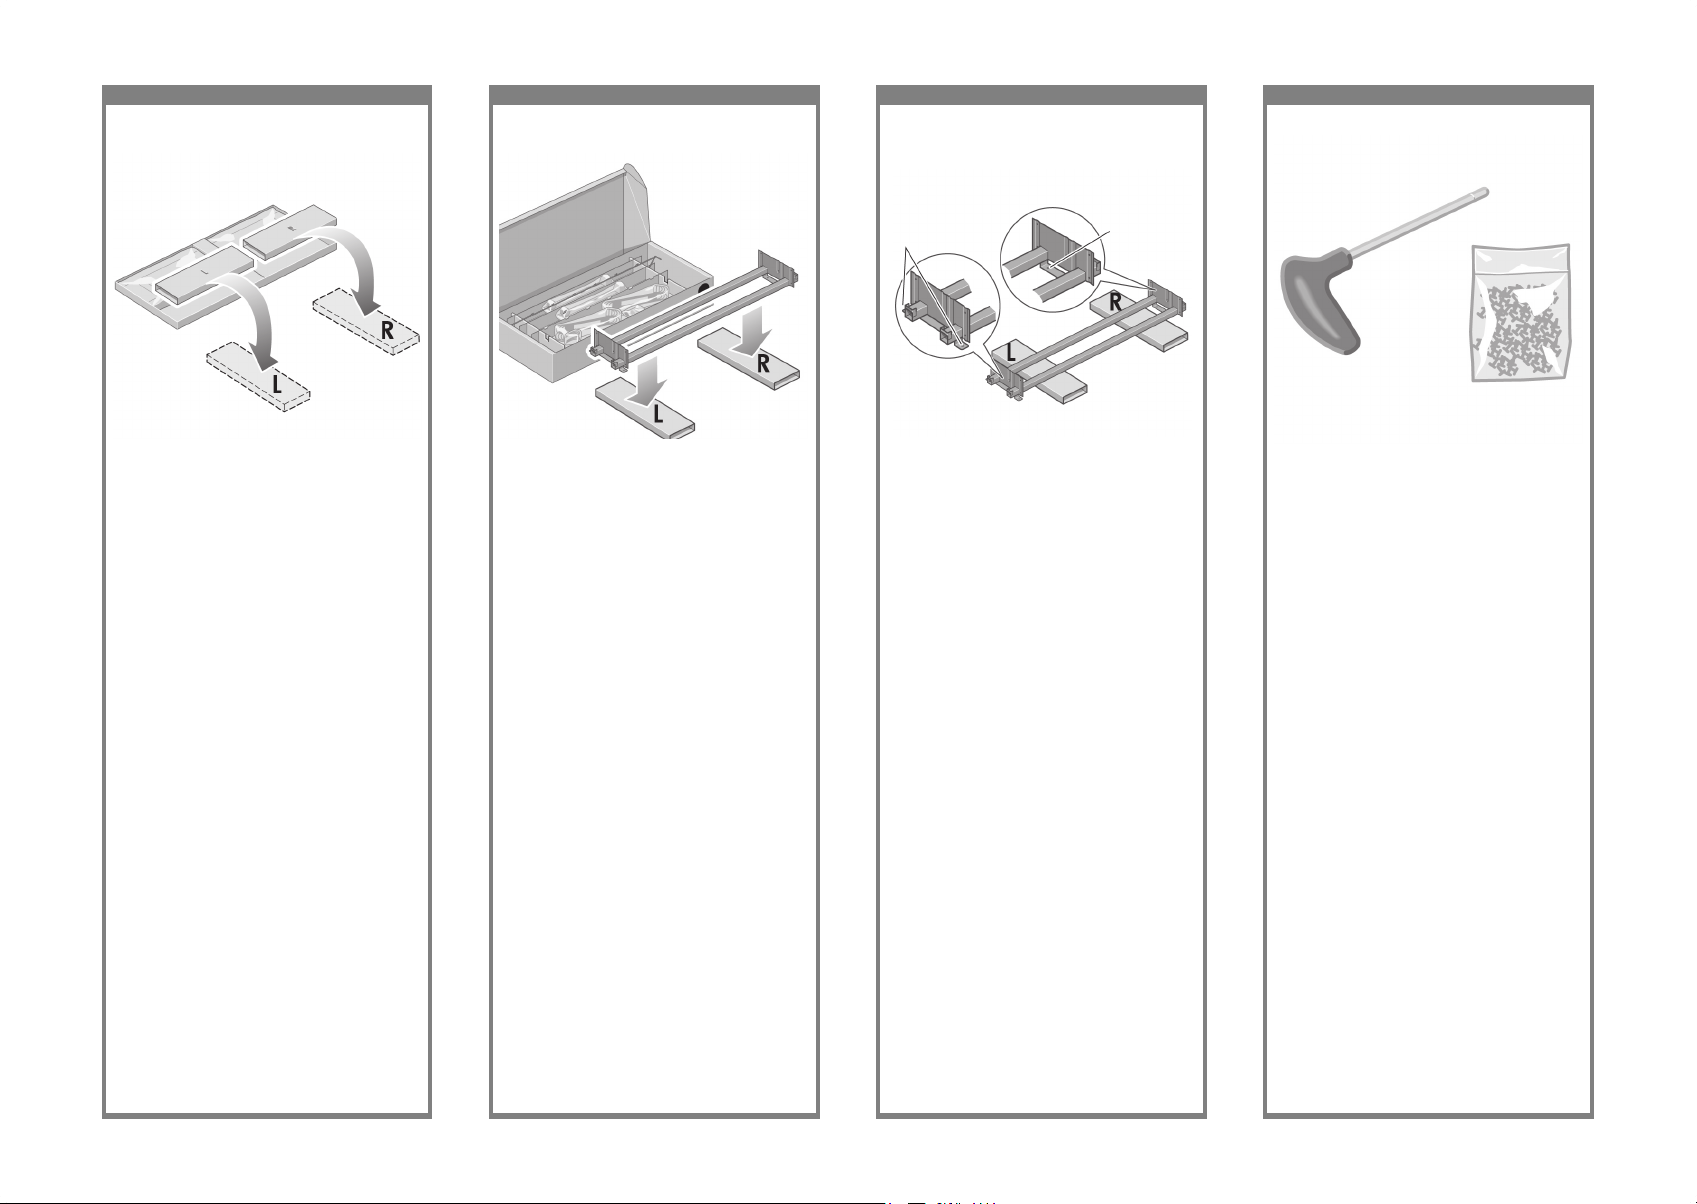
9 10 11 12
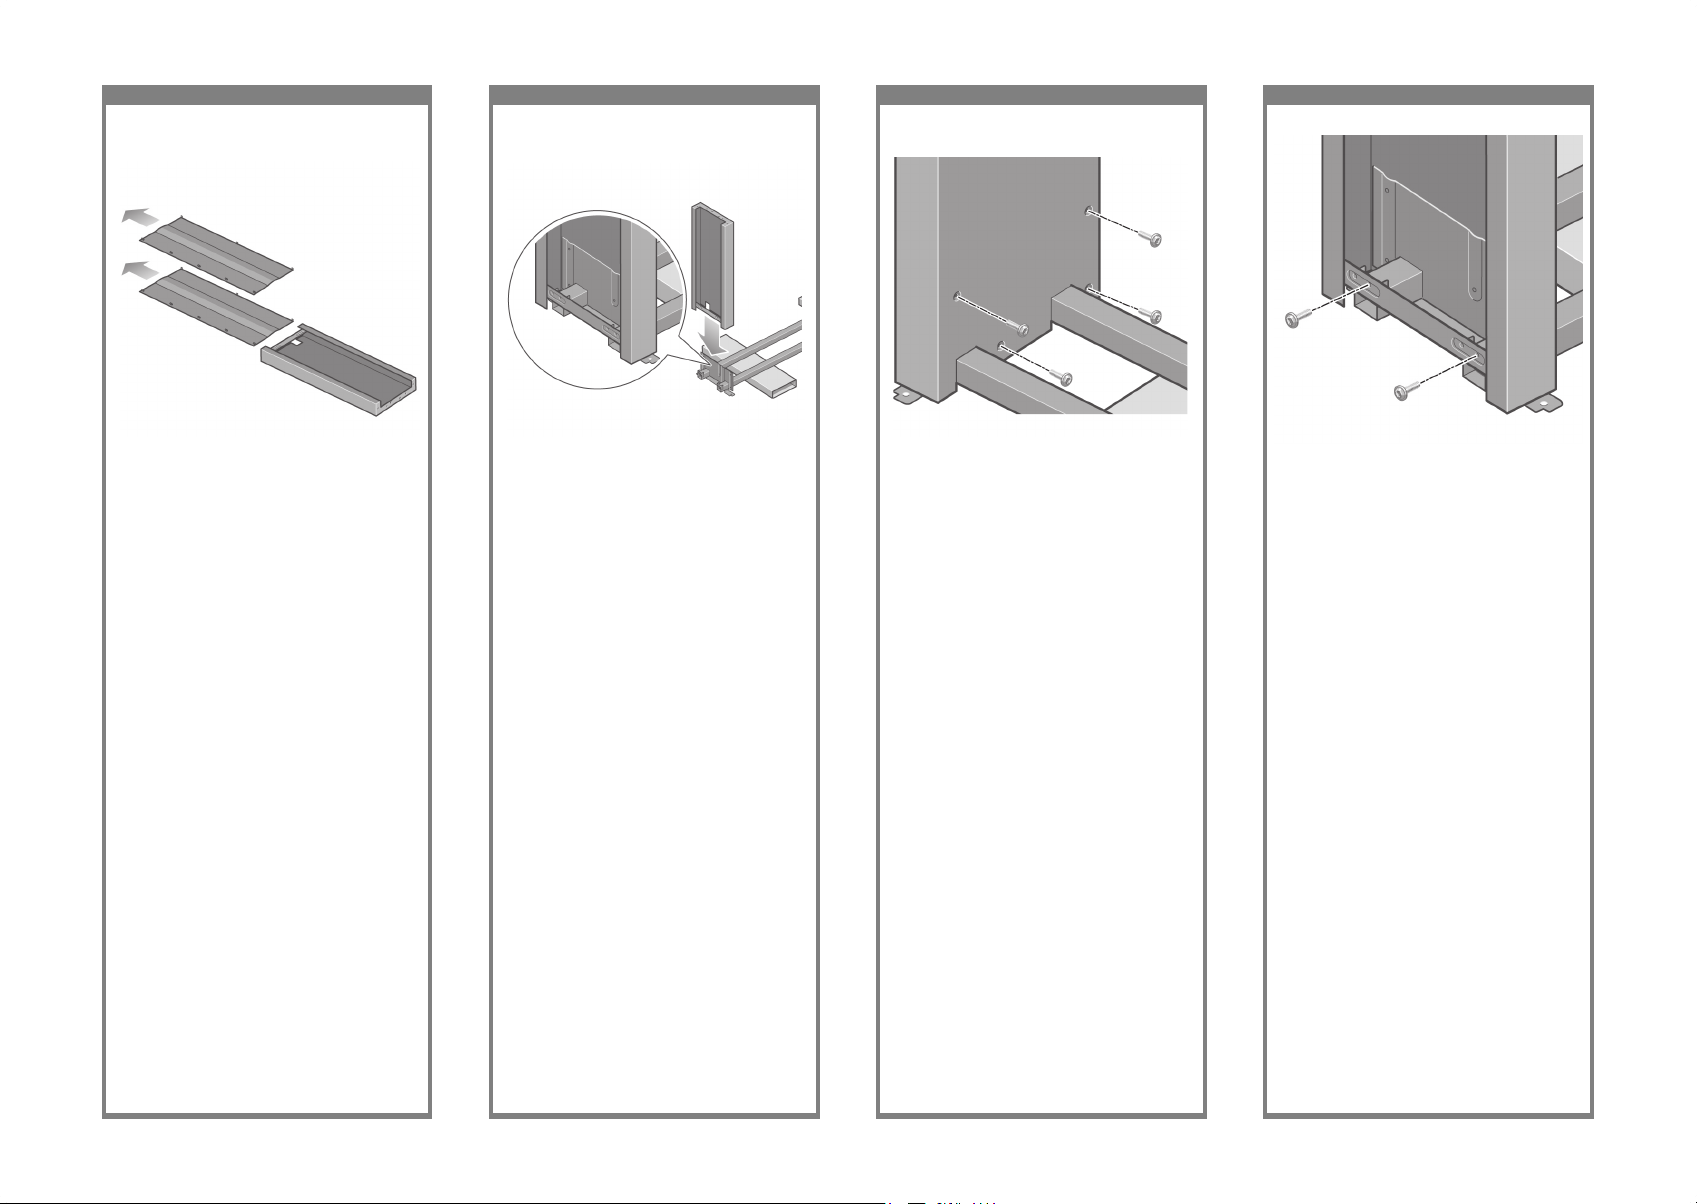
You now need to identify which is the left and
the right side of the cross-brace.
Vous devez à présent identier les côtés
gauche et droit de la traverse.
Stellen Sie fest, welche die linke und welche die
rechte Seite der Querverstrebung ist.
È necessario identicare quale è il lato sinistro
e quale è quello destro del sostegno.
From the rst tray, remove the two boxes marked
with L and R. Place them on the oor as shown.
Retirez du premier bac les deux cartons sur
lesquels sont inscrits L et R. Placez-les sur le
sol comme indiqué.
Nehmen Sie die beiden mit L und R beschrifteten
Elemente heraus, und legen Sie sie auf den
Boden, wie in der Abbildung dargestellt.
Dal primo cassetto rimuovere le due scatole
contrassegnate con L e R (sinistra e destra).
Posizionarle sul pavimento come riportato
di seguito.
Lower the cross-brace on to the L and R boxes.
Abaissez la traverse sur les cartons L et R.
Legen Sie die Querverstrebung auf die mit L und R
beschrifteten Elemente.
Abbassare il sostegno sulle scatole L e R.
2 holes/Deux trous/
Zwei Bohrungen/
Due fori
Left/Gauche/
Links/Sinistra
Right/Droit/
Rechts/Destra
1 hole/Un trou/
Eine Bohrung/
Un foro
Now you will need the bag of screws and the
screwdriver provided. You may notice that the
screwdriver is slightly magnetic.
Vous devez maintenant utiliser le sac de vis et
le tournevis fournis. Vous pouvez noter que le
tournevis est légèrement magnétique.
Sie benötigen nun den Beutel mit den Schrauben
und den mitgelieferten Schraubendreher. Der
Schraubendreher besitzt eine magnetische Spitze.
A questo punto, è necessaria la borsa fornita con
le viti e il cacciavite. Il cacciavite è leggermente
magnetico.
Page 5
13 14 15 16
Fix the left leg to the cross-brace using four
screws on the inner side of the leg.
Fixez le montant gauche à la traverse à l’aide
de quatre vis placées sur le côté interne du
montant.
Befestigen Sie das linke Standbein an
der Innenseite mit vier Schrauben an der
Querverstrebung.
Fissare la gamba sinistra al sostegno mediante
quattro viti sul lato interno della gamba.
Remove the two leg covers from the left leg.
Retirez les deux plaques du montant gauche.
Entfernen Sie die beiden Abdeckungen vom
linken Standbein.
Rimuovere i due coperchi dalla gamba sinistra.
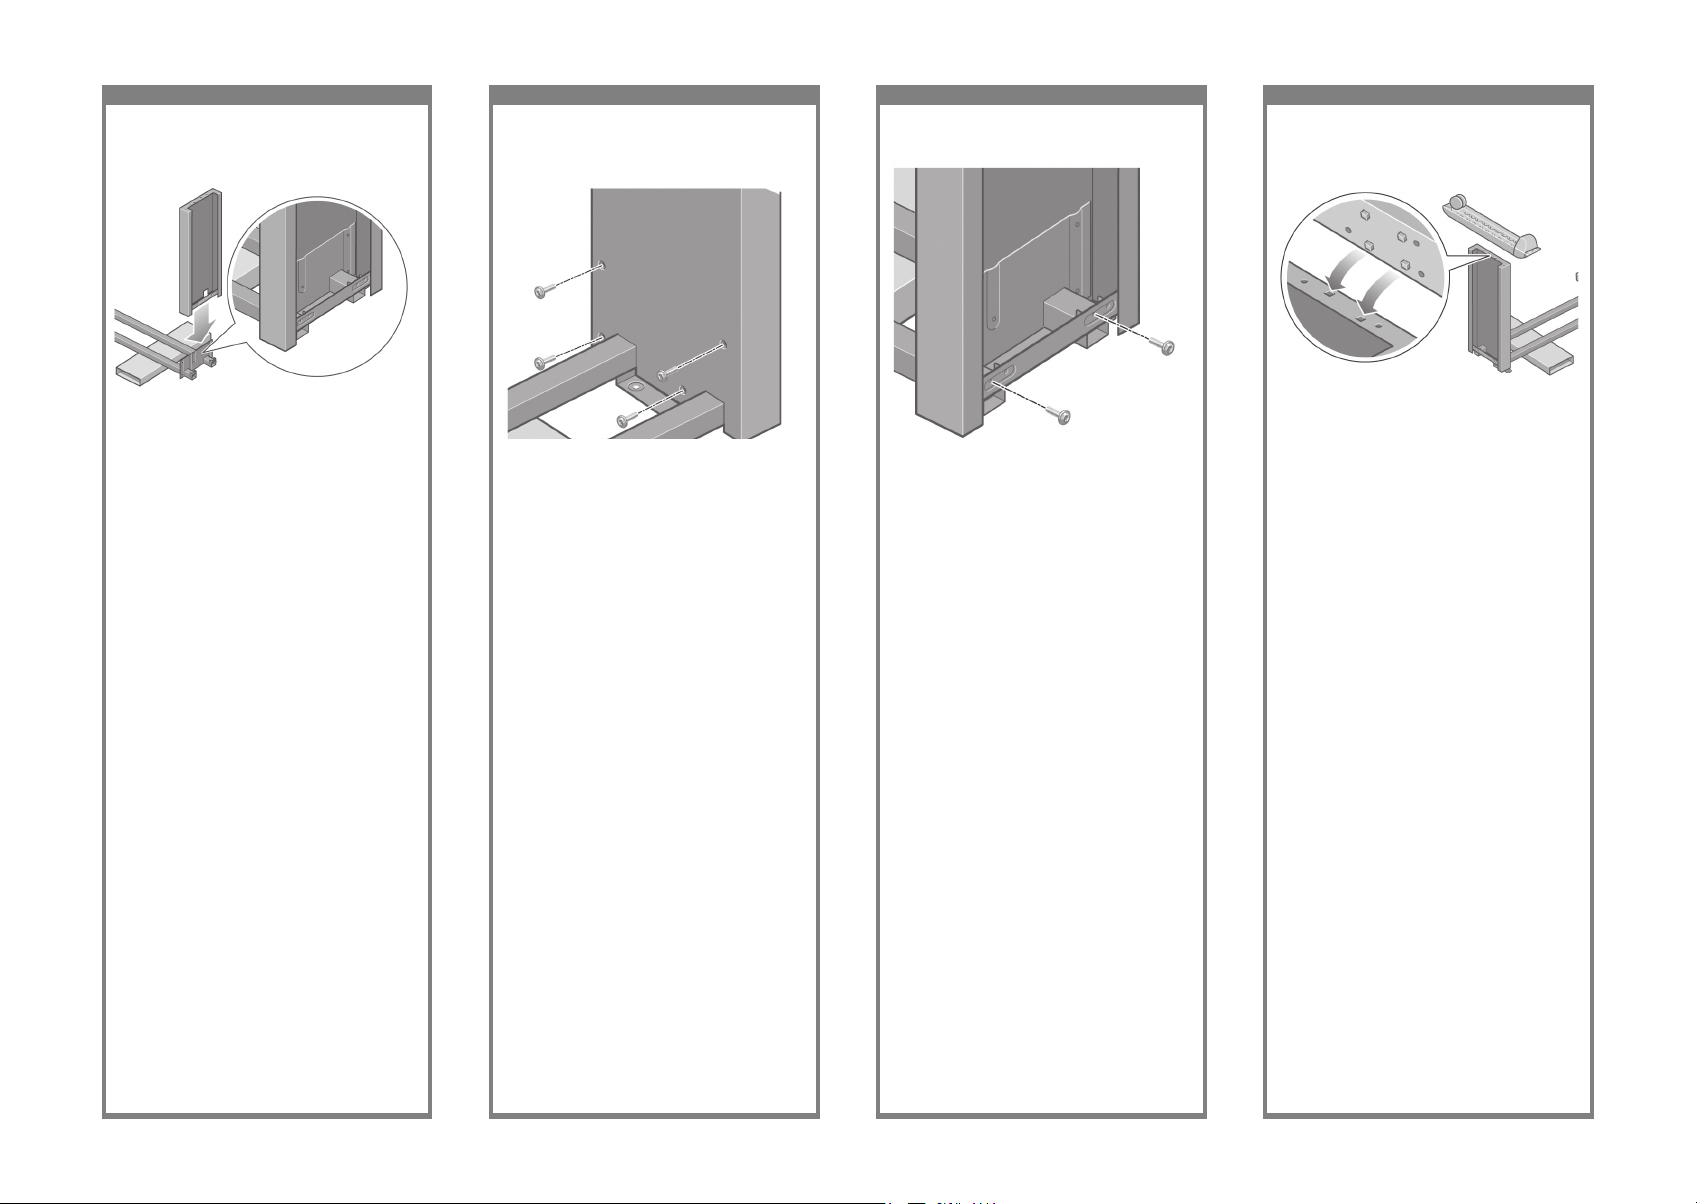
Lower the left leg onto the left side of the
cross-brace. The left leg will t only on the
left side of the cross-brace.
Abaissez le montant gauche vers le côté gauche
de la traverse. Le montant gauche s’adapte
uniquement au côté gauche de la traverse.
Setzen Sie das linke Standbein an der linken
Seite der Querverstrebung an. Das linke
Standbein lässt sich nur an der linken Seite
der Querverstrebung anbringen.
Abbassare la gamba sinistra sul lato sinistro del
sostegno. La gamba sinistra può essere ssata
soltanto al lato sinistro del sostegno.
Fix the left leg to the cross-brace using two
screws on the outer side of the leg.
Fixez le montant gauche à la traverse à l’aide de
deux vis placées sur le côté externe du montant.
Befestigen Sie das linke Standbein an der
Außenseite mit zwei Schrauben an der
Querverstrebung.
Fissarla quindi utilizzando altre due viti sul
lato esterno della gamba.
Page 6
17 18 19 20
Fix the right leg to the cross-brace using
two screws on the outer side of the leg.
Fixez le montant droit à la traverse à l’aide
de deux vis placées sur le côté externe du
montant.
Befestigen Sie das rechte Standbein an
der Außenseite mit zwei Schrauben an
der Querverstrebung.
Fissarla quindi utilizzando altre due viti
sul lato esterno della gamba.
Lower the right leg onto the right side of the
cross-brace. The right leg will t only on the
right side of the cross-brace.
Abaissez le montant droit vers le côté droit de
la traverse. Le montant droit s’adapte uniquement
au côté droit de la traverse.
Setzen Sie das rechte Standbein an der rechten
Seite der Querverstrebung an. Das rechte
Standbein lässt sich nur an der rechten Seite
der Querverstrebung anbringen.
Abbassare la gamba destra sul lato destro del
sostegno. La gamba destra può essere ssata
soltanto al lato destro del sostegno.
Fix the right leg to the cross-brace using four
screws on the inner side of the leg.
Fixez le montant droit à la traverse à l’aide de
quatre vis placées sur le côté interne du montant.
Befestigen Sie das rechte Standbein an
der Innenseite mit vier Schrauben an der
Querverstrebung.
Fissare la gamba destra al sostegno mediante
quattro viti sul lato interno della gamba.
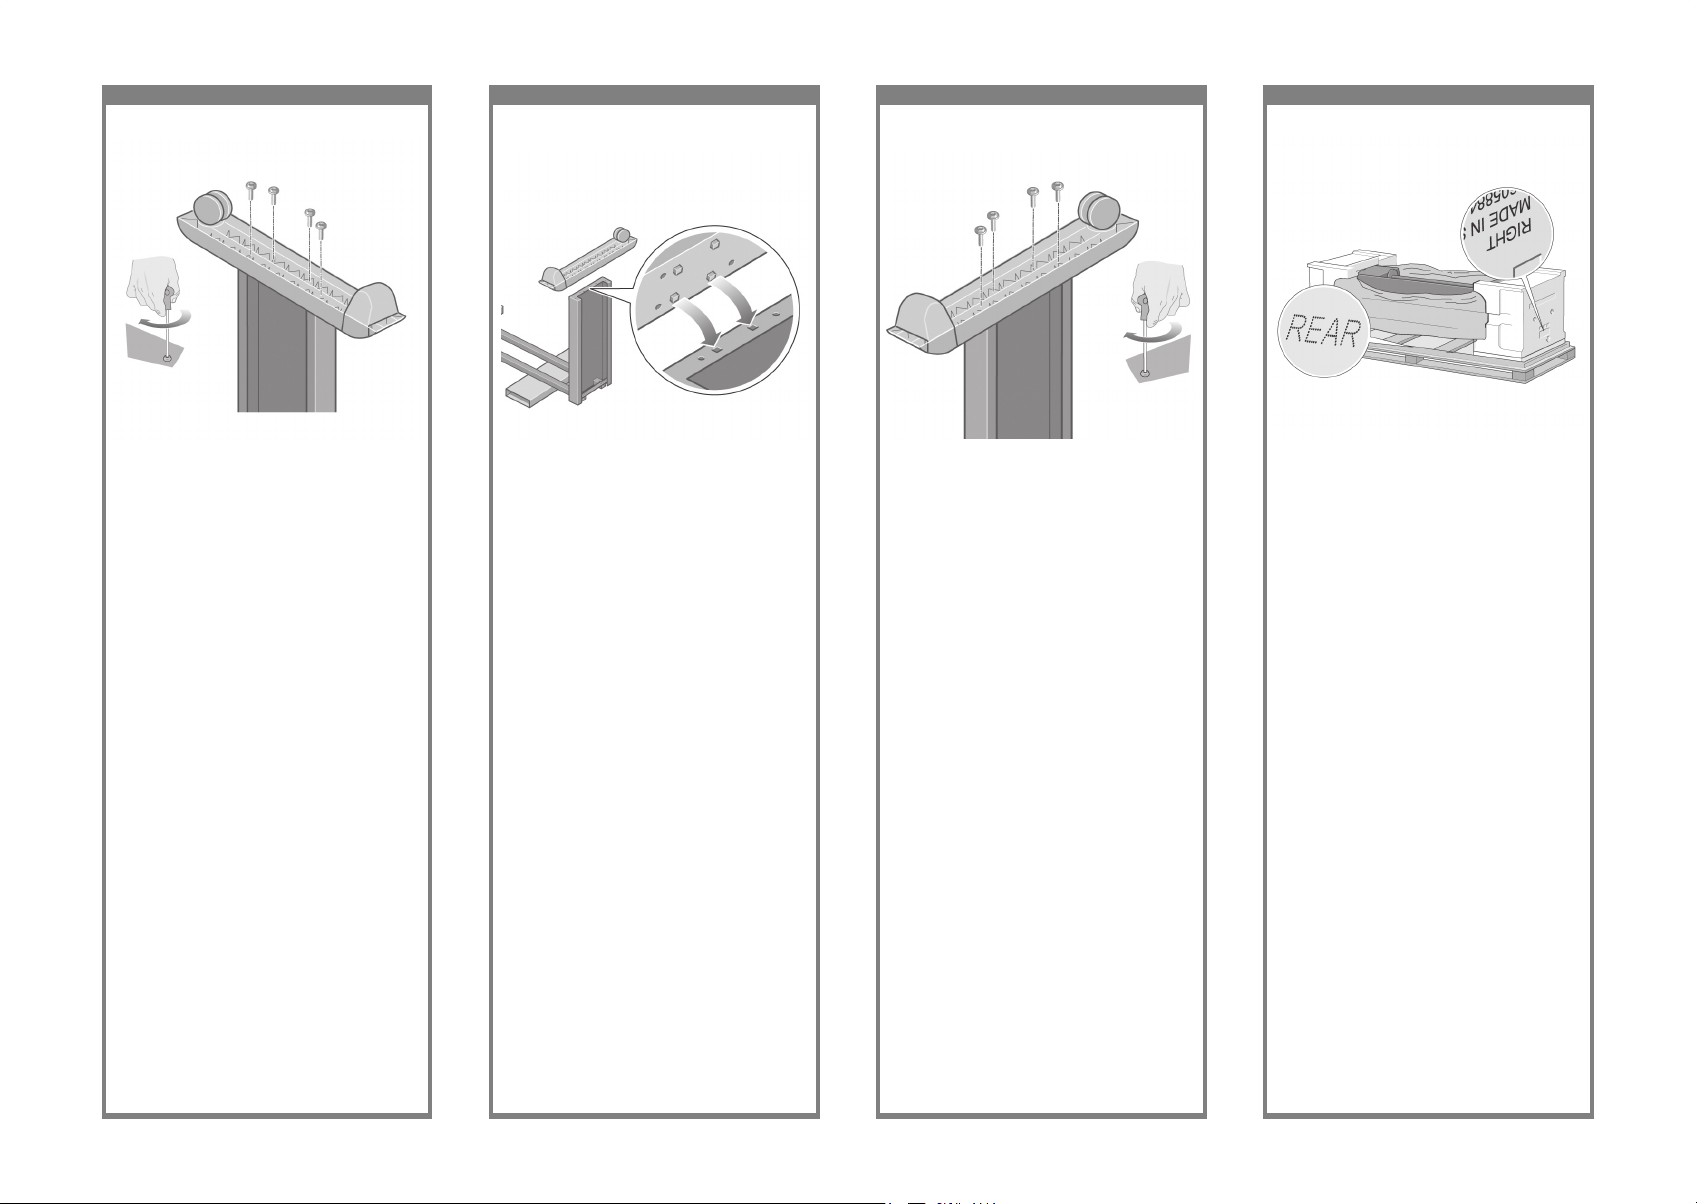
Position a foot on the left leg. There are pins to
help you to position the foot correctly. Do not
remove the anti-slip material from the wheel.
Placez un pied sur le montant gauche. Des broches
vous permettent de positionner correctement le
pied. Ne retirez pas la bande antidérapante de
la roue.
Setzen Sie einen Fuß auf das linke Standbein
auf. Die vorhandenen Noppen erleichtern Ihnen
das Positionieren des Fußes. Belassen Sie das
rutschhemmende Material an der Rolle.
Posizionare un piede sulla gamba sinistra. I pioli
onsentono di posizionare correttamente il piede.
Non rimuovere ancora il materiale
anti-sdrucciolo dalla ruota.
Page 7
21 22 23 24
Fix the right foot using four screws.
Fixez le pied droit à l’aide de quatre vis.
Befestigen Sie den rechten Fuß mit vier
Schrauben.
Fissare il piede destro utilizzando quattro viti.
Fix the left foot using four screws.
Fixez le pied gauche à l’aide de quatre vis.
Befestigen Sie den linken Fuß mit vier Schrauben.
Fissare il piede sinistro utilizzando quattro viti.
Position a foot on the right leg. There are pins
to help you to position the foot correctly. Do not
remove the anti-slip material from the wheel.
Placez un pied sur le montant droit. Des broches
vous permettent de positionner correctement le
pied. Ne retirez pas la bande antidérapante de
la roue.
Setzen Sie einen Fuß auf das rechte Standbein
auf. Die vorhandenen Noppen erleichtern Ihnen
das Positionieren des Fußes. Belassen Sie das
rutschhemmende Material an der Rolle.
Posizionare un piede sulla gamba destra.
I pioli consentono di posizionare correttamente
il piede. Non rimuovere ancora il materiale
anti-sdrucciolo dalla ruota.
You now need to identify the left and right of the
printer. This information is shown on the foam
end packs. Also identify the rear of the printer.
Vous devez à présent identier les côtés gauche
et droit de l’imprimante. Ces informations sont
indiquées sur les emballages en mousse aux
extrémités. Identiez également l’arrière de
l’imprimante.
Stellen Sie fest, welche die linke und welche
die rechte Seite des Druckers ist. Auf den
Styroporab-deckungen an den beiden Seiten
benden sich entsprechende Beschriftungen.
Stellen Sie außerdem fest, wo sich die Rückseite
des Druckers bendet.
È necessario distinguere il lato sinistro da quello
destro della stampante. Queste informazioni
sono riportate sull’imballaggio laterale di
polistirolo. Identicare anche il lato posteriore
della stampante.
Page 8
25 26 27 28
x2
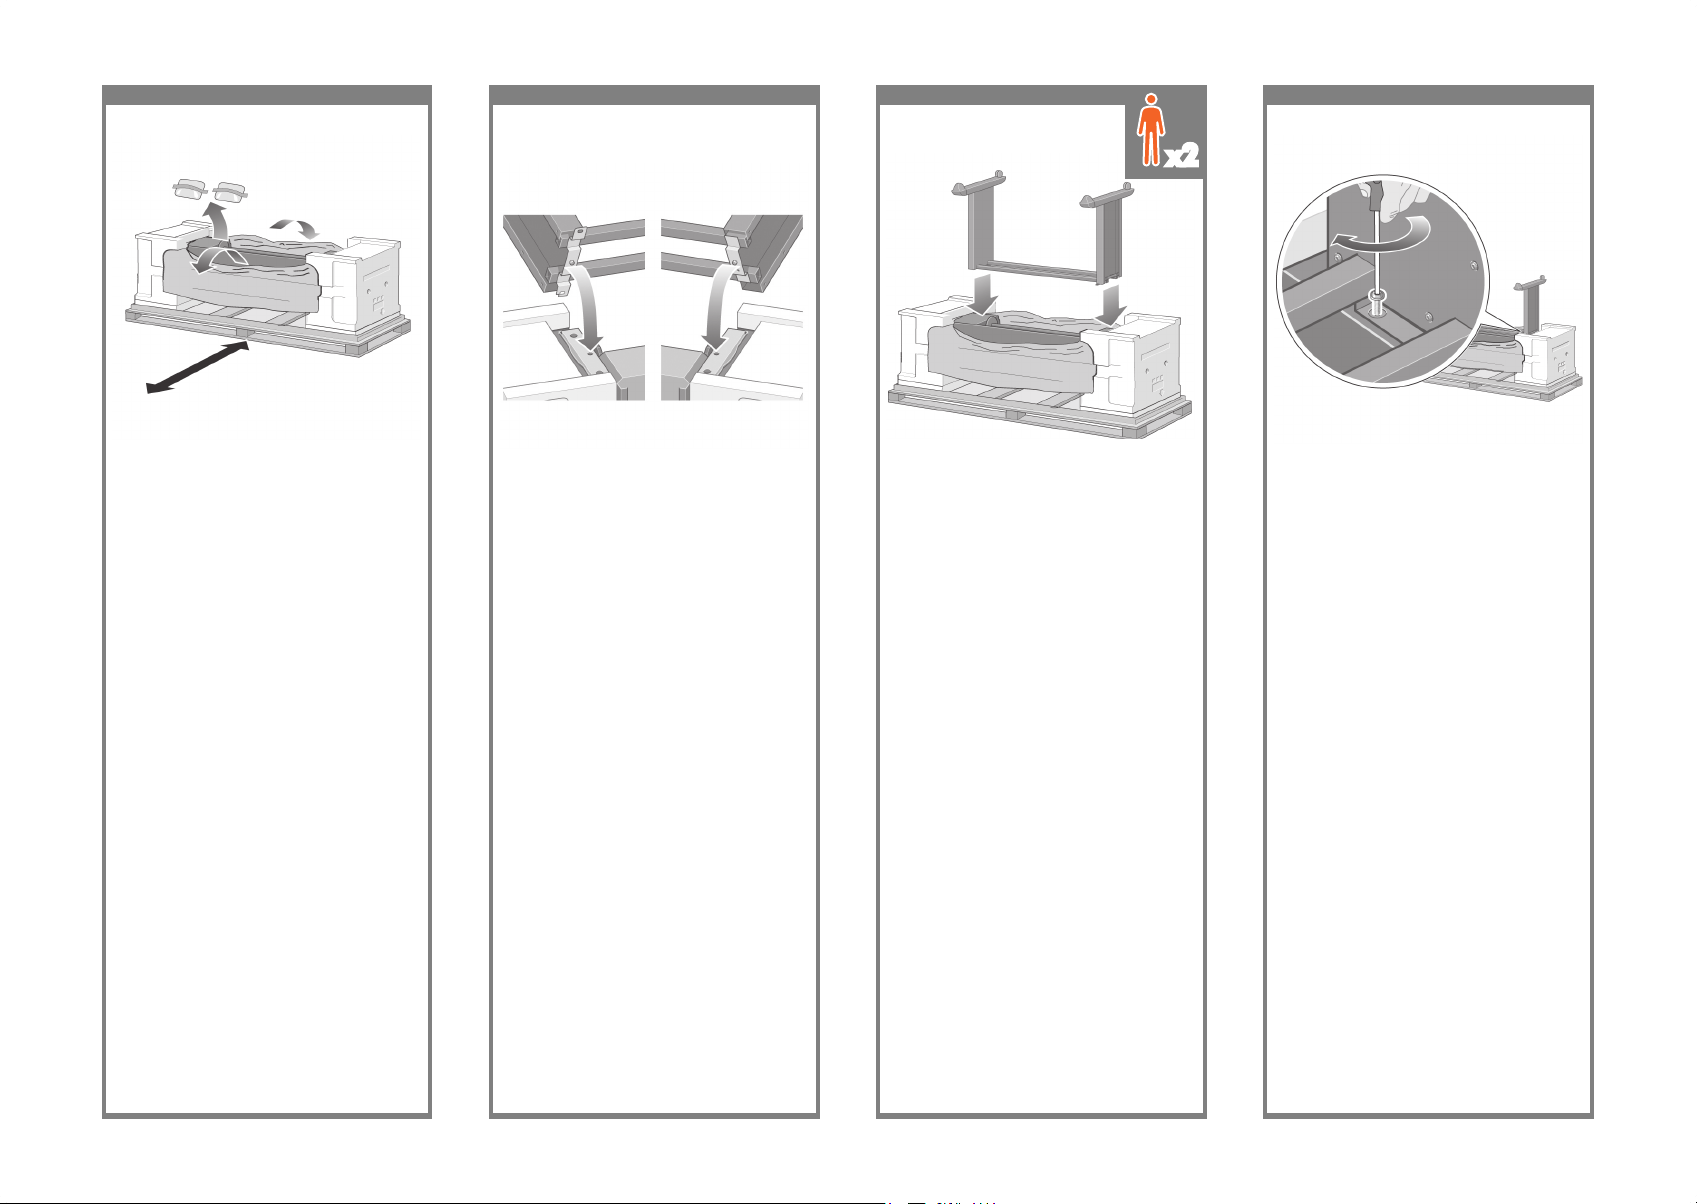
Lift the stand assembly onto the printer body.
The anti-slip material should face to the rear
of the printer.
Soulevez l’assemblage du support pour le
poser sur la partie principale de l’imprimante.
La bande antidérapante doit être face
à l’arrière de l’imprimante.
Setzen Sie die Sockelbaugruppe auf die
Druckerbasiseinheit auf. Das rutschhemmende
Material muss zur Rückseite des Druckers
zeigen.
Sollevare l’assemblaggio del cavalletto sulla
stampante. Il materiale anti- sdrucciolo deve
essere rivolto verso il lato posteriore della
stampante.
Pull open the protective plastic from the base
of the printer. Please ensure that there is a threemeter space clear of obstructions to the rear of
the printer. Remove the two desiccant bags from
the printer.
Ouvrez le plastique de protection en tirant dessus
à la base de l’imprimante. Assurez-vous que
vous disposez d’un espace libre de tout obstacle
d’une supercie de trois mètres à l’arrière de
l’imprimante. Retirez les deux sacs dessiccatifs de
l’imprimante.
Öffnen Sie die Schutzhülle, in der die
Druckerbasiseinheit verpackt ist. Achten Sie
darauf, dass an der Rückseite des Druckers
drei Meter freier Platz vorhanden ist. Nehmen Sie
die beiden Beutel mit dem Trockenmittel aus dem
Drucker.
Togliere la plastica protettiva dalla base della
stampante. Vericare che siano disponibili
almeno tre metri di spazio libero dal lato
posteriore della stampante. Rimuovere le
due bustine di essiccante dalla stampante.
Advance warning: in the next step, make sure
you position the stand pins in the holes in the
center of the printer body brackets.
Avertissement : lors de la prochaine étape,
veillez à positionner les broches du support dans
les trous au centre des attaches de la partie
principale de l’imprimante.
Achtung: Im nächsten Schritt müssen die Stifte
am Sockel unbedingt in die dafür vorgesehenen
Aussparungen in den Schienen der Druckerbasiseinheit eingepasst werden.
Avvertenza: nel passo successivo, assicurarsi
di posizionare i pioli del cavalletto nei fori al
centro del sostegno principale della stampante.
3m (9ft)
3m
3 m
3m (9 piedi)
Left leg/
Montant gauche/
Linkes Standbein/
Gamba sinistra
Right leg/
Montant droit/
Rechtes Standbein/
Gamba destra
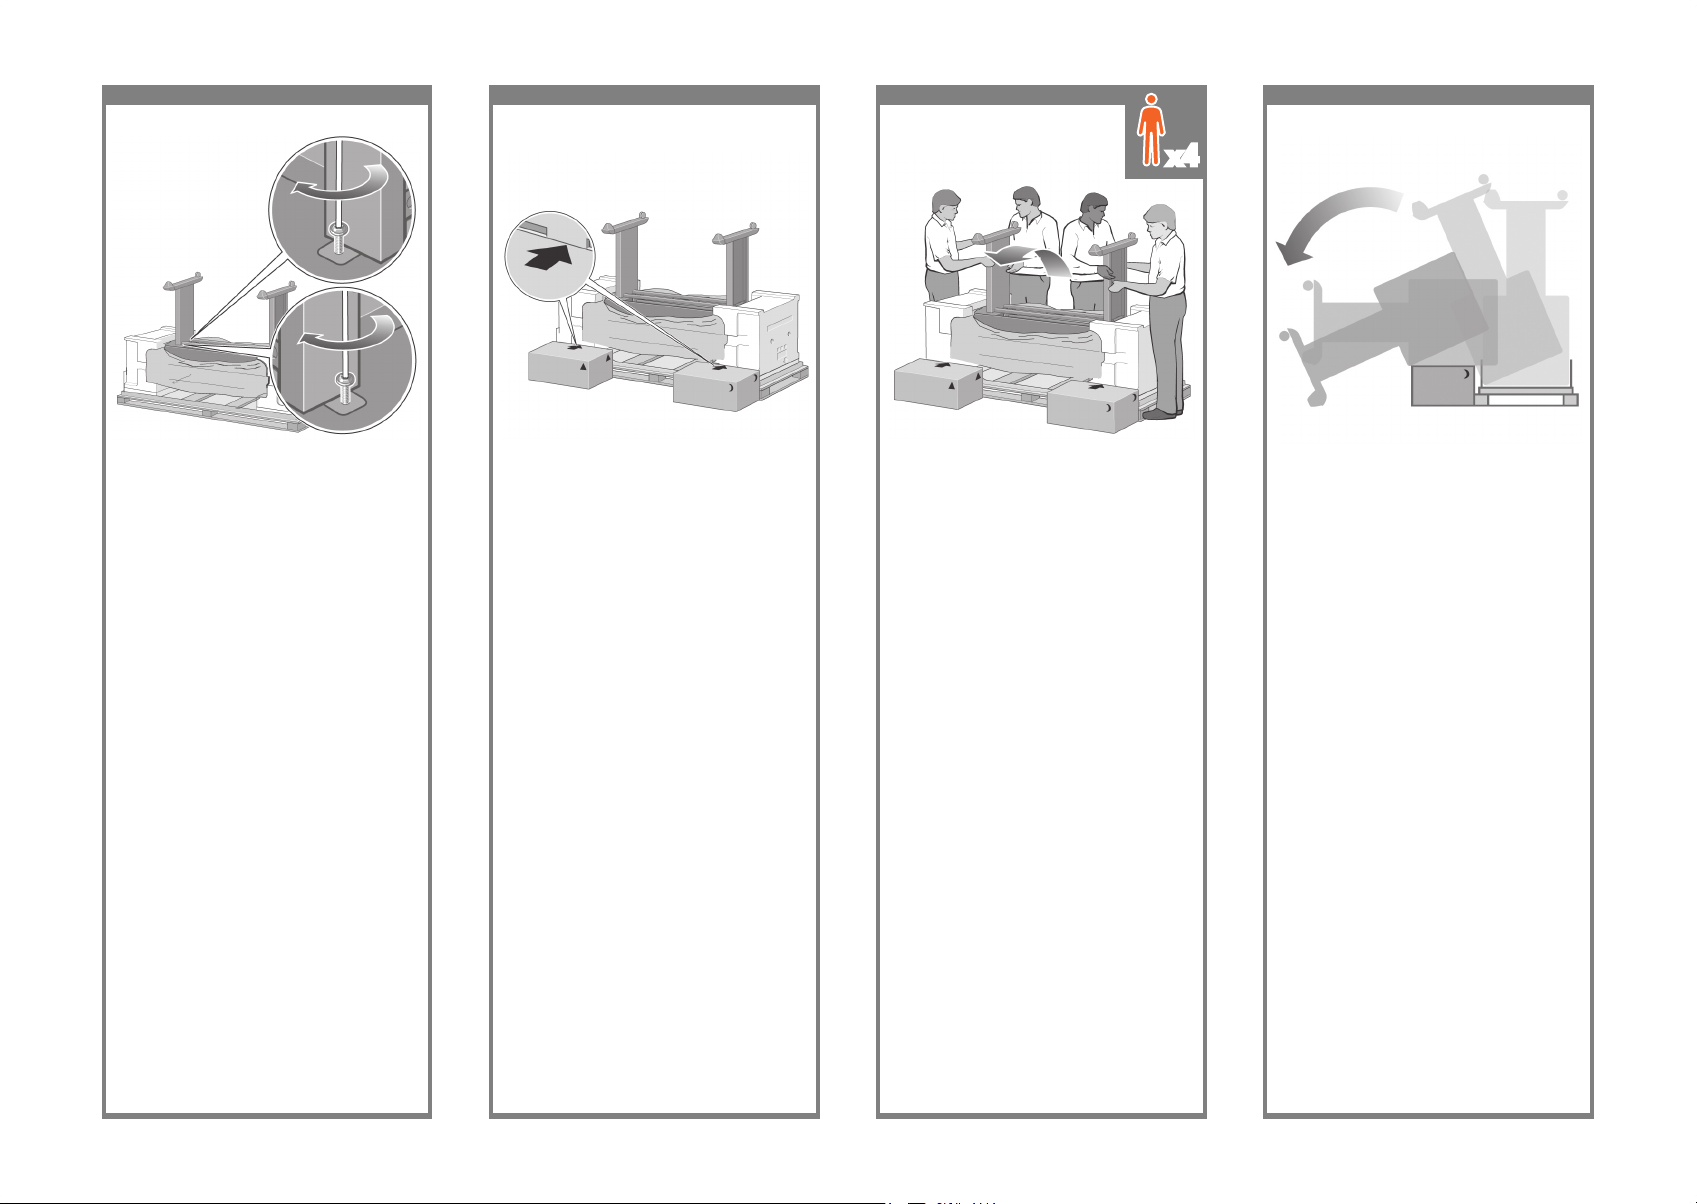
Fix the right side of the stand to the printer using
one screw. Make sure that the screw is fully
tightened.
Fixez le côté droit du support à l’imprimante
à l’aide d’une vis. Assurez-vous que la vis est
bien serrée.
Befestigen Sie die rechte Seite des Sockels mit
einer Schraube am Drucker. Achten Sie darauf,
dass die Schraube fest angezogen ist.
Fissare il lato destro del cavalletto alla stampante
utilizzando una vite. Vericare che la vite sia
stretta completamente.
Page 9
29 30 31 32
x4
Using four people, rotate the printer on to the
spare and consumables boxes.
Vériez que la bande antidérapante est toujours
xée aux deux roues situées à l’arrière.
Kippen Sie mit vier Personen den Drucker auf
die Behälter.
Con l’aiuto di altre tre persone, ruotare
la stampante sulle scatole dei consumabili
e dei pezzi di ricambio.
Fix the left side of the stand to the printer using
two screws. Make sure that the screws are
fully tightened.
Fixez le côté gauche du support à l’imprimante à
l’aide de deux vis. Assurez-vous que les vis sont
bien serrées.
Befestigen Sie die linke Seite des Sockels mit
zwei Schrauben am Drucker. Achten Sie darauf,
dass die Schrauben fest angezogen sind.
Fissare il lato sinistro del cavalletto alla stampante
utilizzando due viti. Vericare che le viti siano
strette completamente.
Place the spare and consumables boxes against
the rear of the printer box. The arrows on the
boxes must point towards the printer box. Check
that the anti-slip material is still xed to the two
rear wheels.
Placez les cartons des pièces détachées et des
consommables contre l’arrière du carton de
l’imprimante. Les èches situées sur les cartons
doivent pointer vers le carton de l’imprimante.
Setzen Sie die Behälter mit dem Zubehör und
den Verbrauchsmaterialien an der Rückseite der
Druckereinheit an. Die Pfeile auf den Behältern
müssen zum Drucker zeigen. Stellen Sie sicher,
dass sich das rutschhemmende Material noch an
den beiden rückwärtigen Rollen bendet.
Posizionare le scatole dei consumabili e dei
pezzi di ricambio contro il lato posteriore della
scatola della stampante. Le frecce disegnate
sulle scatole devono puntare alla scatola
della stampante. Vericare che il materiale
anti-sdrucciolo sia ancora ssato alle due ruote
posteriori.
Rotate the printer until its rear rests on the spare
and consumables boxes and the wheels with the
anti-slip material touch the oor.
Faites pivoter l’imprimante jusqu’à ce que sa
partie arrière soit posée sur les cartons des
pièces détachées et des consommables, et que
les roues équipées de la bande antidérapante
touchent le sol.
Kippen Sie den Drucker so weit, bis seine
Rückseite auf den Behältern mit dem Zubehör
bzw. den Verbrauchsmaterialien auiegt und die
Rollen mit dem rutschhemmenden Material den
Fußboden berühren.
Ruotare la stampante no a che il lato posteriore
si appoggia alle scatole e le ruote su cui è
presente il materiale anti- sdrucciolo toccano
il pavimento.
Page 10
33 34 35 36
x4
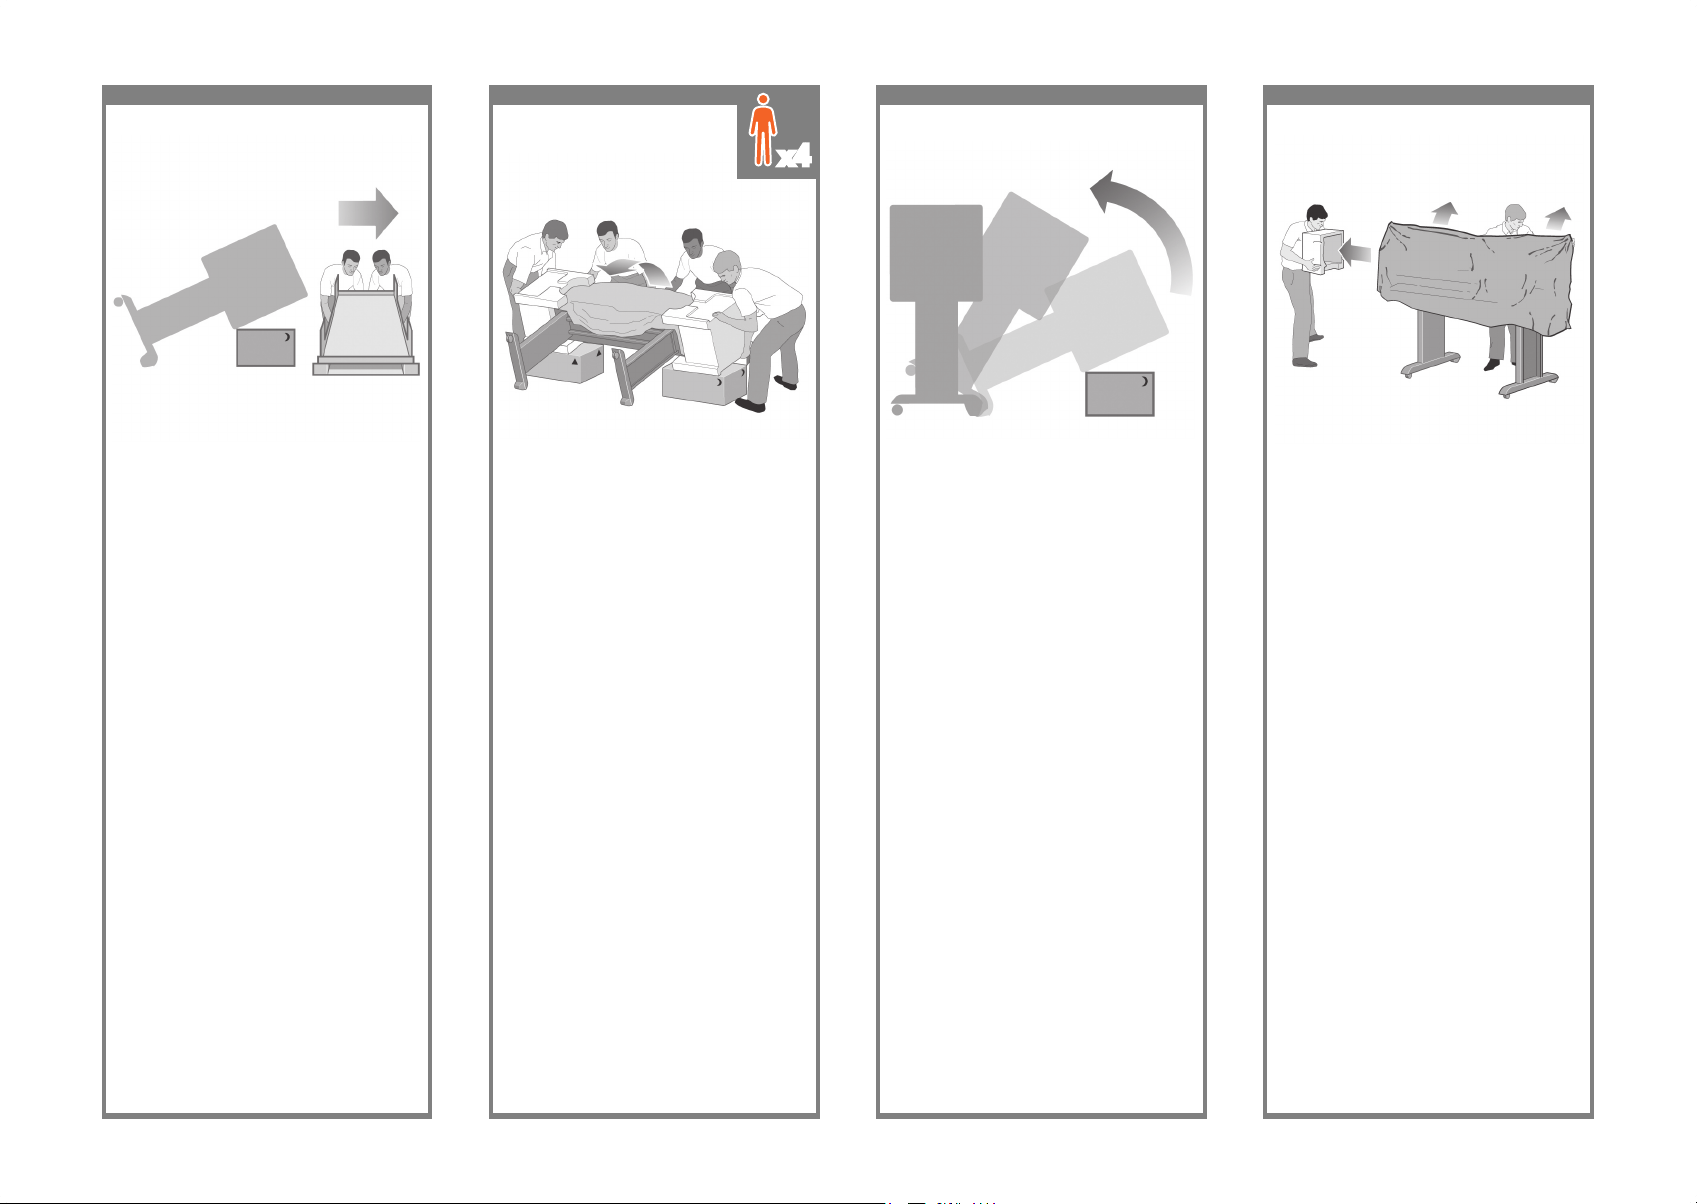
Rotate the printer into an upright position. The
anti-slip material should stop the printer from
sliding forwards.
Faites pivoter l’imprimante pour la mettre en
position verticale. La bande antidérapante doit
empêcher l’imprimante de glisser vers l’avant.
Bringen Sie den Drucker in eine aufrechte
Position. Das rutschhemmende Material
verhindert ein Verrutschen des Druckers
nach vorne.
Ruotare la stampante in posizione perpendicolare.
Il materiale anti- sdrucciolo evita che la stampante
scivoli in avanti.
Remove the pallet before trying to lift the printer
into an upright position.
Retirez la palette avant d’essayer de soulever
l’imprimante pour la mettre en position verticale.
Entfernen Sie die Palette, bevor Sie den Drucker
aufstellen.
Rimuovere il ripiano su cui appoggia la stampante
prima di sollevarla per metterla in posizione
perpendicolare.
Using four people and the hand holds on the
rear of the printer body, carefully lift the printer
into an upright position.
Aidé de quatre personnes et avec une prise
de main sur l’arrière de la partie principale
de l’imprimante, soulevez l’imprimante avec
précaution pour la mettre en position verticale.
Heben Sie den Drucker mit vier Personen unter
Zuhilfenahme der Haltegriffe an der Rückseite
des Geräts vorsichtig hoch.
Con l’aiuto di altre tre persone e mantenendo
con le mani il lato posteriore della stampante,
sollevare delicatamente la stampante no al
raggiungimento della posizione perpendicolare.
Remove the two foam end packs and the plastic
covering the printer.
Retirez les deux emballages en mousse aux
extrémités et le plastique qui recouvrent
l’imprimante.
Entfernen Sie die beiden Styroporseitenteile und
die Kunststoffhülle des Druckers.
Rimuovere i due imballaggi laterali di polistirolo
e la plastica che copre la stampante.
Page 11
37 38 39 40
Remove the anti-slip material from the two rear
wheels on the stand assembly.
Retirez la bande antidérapante des deux roues
situées à l’arrière sur l’assemblage du support.
Entfernen Sie das rutschhemmende Material
von den beiden rückwärtigen Rollen der
Sockelbaugruppe.
Rimuovere il materiale anti-sdrucciolo dalle
due ruote posteriori dell’assemblaggio del
cavalletto.
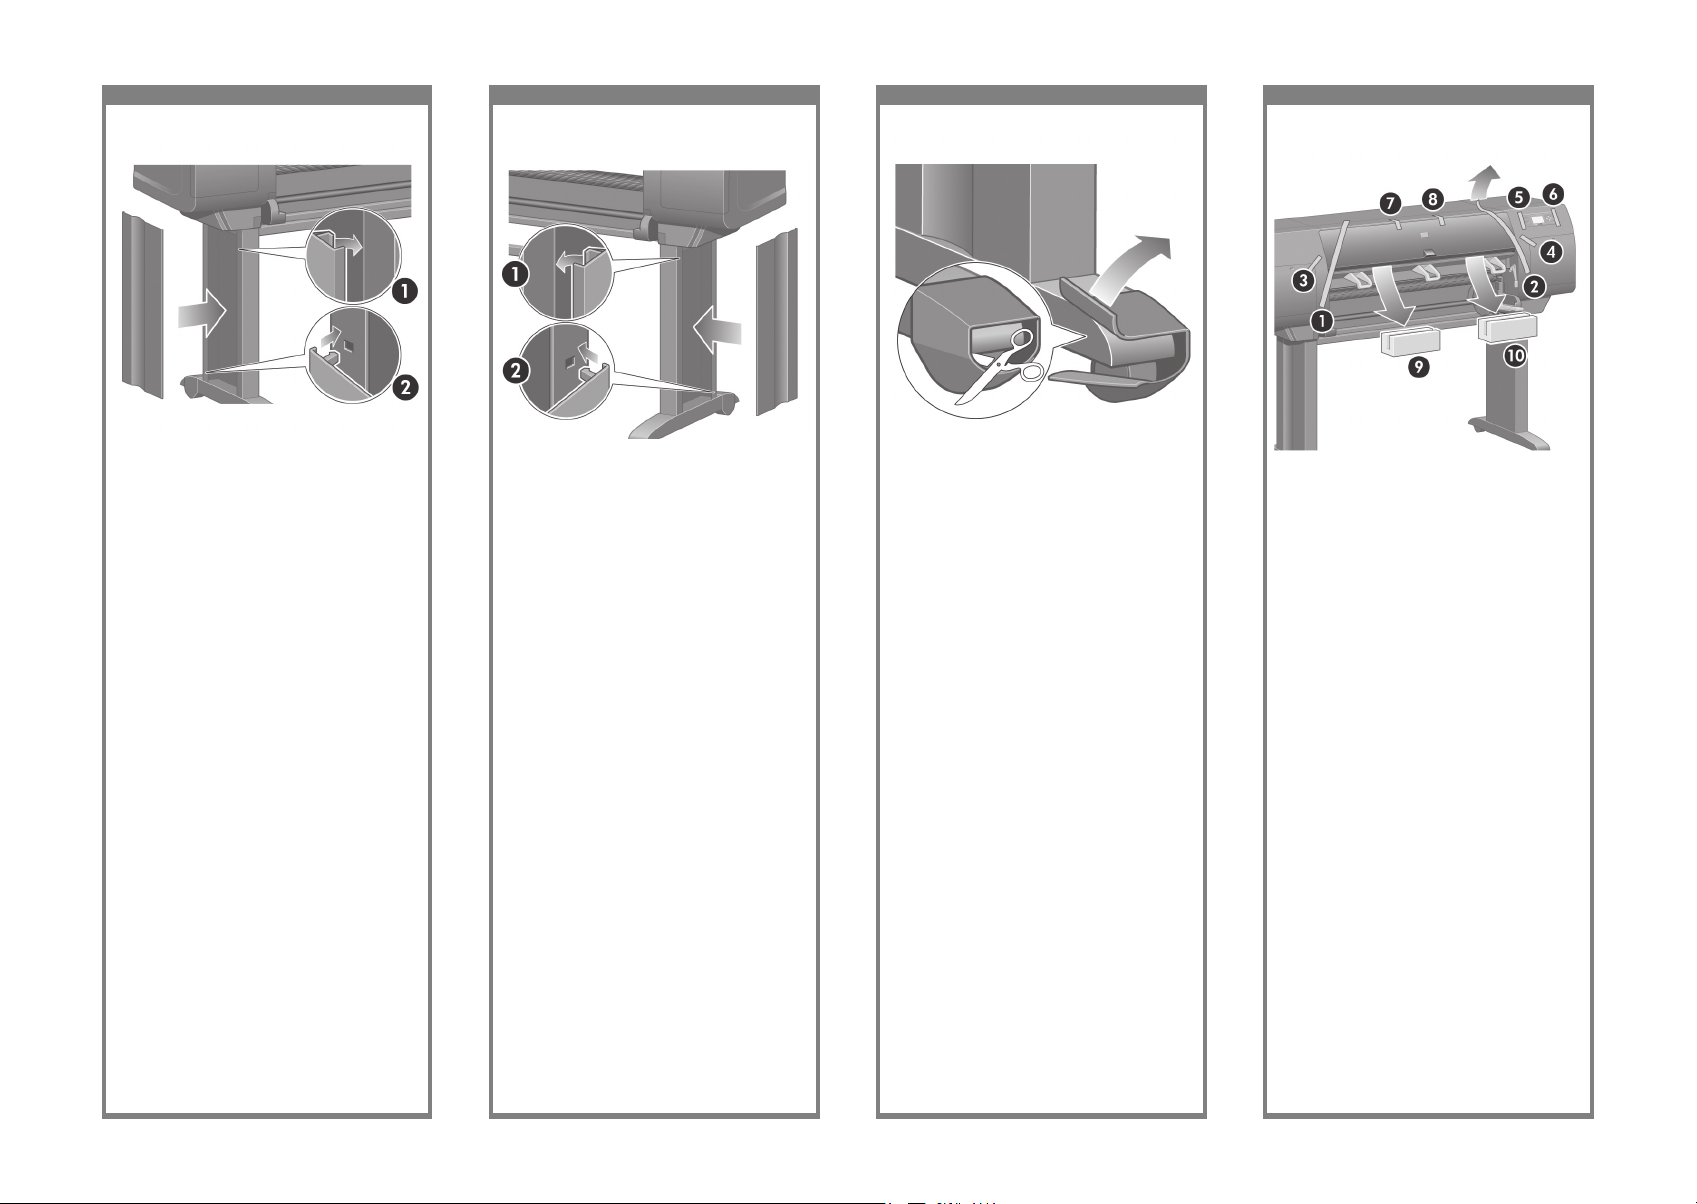
Position the left leg cover on the front of the left
leg (1), then clip the rear edge (2) into place.
Placez la plaque du montant gauche à l’avant
du montant gauche (1), puis enclenchez le bord
arrière (2).
Setzen Sie die Abdeckung des linken Standbeins
an der Vorderseite des linken Beins (1) an, und
lassen Sie die rückseitige Kante (2) einrasten.
Posizionare il coperchio della gamba sinistra
davanti alla gamba (1), quindi agganciare
il bordo posteriore (2).
Position the right leg cover on the front of the
right leg (1), then clip the rear edge (2) into
place.
Placez la plaque du montant droit à l’avant du
montant droit (1), puis enclenchez le bord arrière
(2).
Setzen Sie die Abdeckung des rechten
Standbeins an der Vorderseite des rechten
Beins (1) an, und lassen Sie die rückseitige Kante
(2) einrasten.
Posizionare il coperchio della gamba destra
davanti alla gamba (1), quindi agganciare
il bordo posteriore (2).
Remove the packing tapes 1 to 8. Open the
printer window and remove the two window
inserts 9 and 10.
Retirez les rubans adhésifs d’emballage 1 à 8.
Ouvrez la fenêtre de l’imprimante et retirez les
deux garnitures de fenêtre 9 et 10.
Entfernen Sie die Verpackungsstreifen 1 bis 8.
Öffnen Sie die Druckerabdeckung und entfernen
Sie die beiden Einsätze 9 und 10.
Rimuovere i nastri di imballaggio da 1 a 8.
Aprire la nsetra della stampante e rimuovere
i due inserti 9 e 10.
Page 12

41 42 43 44
Open the printhead cleaner door and remove
the carriage packing material. Then close the
cleaner door.
Ouvrez la porte du dispositif de nettoyage
de la tête d’impression et retirez le matériel
d’emballage du chariot. Fermez ensuite la
porte du dispositif de nettoyage.
Öffnen Sie die Druckkopfreinigerklappe,
und entfernen Sie das Verpackungsmaterial.
Schließen Sie dann die Reinigerklappe wieder.
Aprire lo sportello dei puliscitestine e rimuovere
il materiale dai carrelli. Chiudere lo sportello
dei puliscitestine.
Remove the protective covering from the printer
window and the front panel screen.
Retirez l’enveloppe de protection de la fenêtre de
l’imprimante et de l’écran du panneau avant.
Ziehen Sie die Schutzhülle vom Druckerfenster
und vom Bedienfeld- Display ab.
Rimuovere la copertura protettiva dalla nestra
della stampante e dal pannello frontale.
Remove the spindle lock.
Retirez le verrou de la bobine.
Entfernen Sie die Transportsicherung der Spindel.
Rimuovere il blocco del mandrino.
Press the spindle lever down, which will unseat
the right-hand end of the spindle. Remove that
end of the spindle rst, and then the left.
Appuyez sur le levier de la bobine, ce qui
permet de sortir l’extrémité droite de la bobine.
Retirez d’abord cette extrémité, puis la gauche.
Drücken Sie den Spindelhebel nach unten, um
die Arretierung auf der rechten Seite der Spindel
zu lösen. Nehmen Sie die Spindel zuerst an
dieser Seite und danach an der linken Seite
heraus.
Premere la leva del mandrino verso il basso,
rilasciando l’estremità destra. Rimuovere prima
questa parte del mandrino, quindi rimuovere
l’estremità sinistra.
Page 13

45 46 47 48
Use four screws to attach the brackets to the
lower part of the printer legs. (Each bracket
requires two screws.)
Fixez les attaches à la partie inférieure des
montants de l’imprimante à l’aide de quatre
vis. (Chaque attache nécessite deux vis.)
Befestigen Sie die Halterungen mit vier
Schrauben unten an den Standbeinen des
Druckers. (Für jede Halterung werden zwei
Schrauben benötigt.)
Con quattro viti, collegare le staffe alla parte
inferiore dei piedi stabilizzatori della stampante
(ogni staffa richiede due viti).
Remove the spindle lock foam piece.
Then replace the spindle.
Retirez l’élément en mousse du verrou de la
bobine. Remettez ensuite la bobine en place.
Entfernen Sie das Styroporelement, mit dem
die Spindel während des Transport gesichert
ist. Setzen Sie die Spindel danach wieder ein.
Rimuovere il pezzo di polistirolo del blocco
del mandrino. Quindi, sostituire il mandrino.
Remove the two brackets from the box that
contains the stand and the bin.
Note: The brackets are marked L and R.
Retirez les deux attaches du carton contenant
le support et le bac.
Remarque : Les attaches sont marquées
d’un L et d’un R.
Nehmen Sie die beiden Halterungen aus dem
Karton mit dem Standfuß und der Ablage.
Hinweis: Die Halterungen sind mit L und R
beschriftet.
Rimuovere le due staffe dalla scatola contenente
il piedistallo e il vassoio.
Nota: le staffe sono contrassegnate con le
lettere L e R.
Attach the two plastic brackets to the top part of
the printer legs. Insert the tab at the bottom of the
bracket into the leg, and then ‘click’ the top of the
bracket into place.
Fixez les attaches en plastique à la partie
supérieure des montants de l’imprimante. Insérez
la patte au bas de l’attache dans le montant,
puis enclenchez le haut de l’attache en position.
Befestigen Sie die beiden Kunststoffhalterungen
oben an den Standbeinen des Druckers. Setzen
Sie die Lasche an der Unterseite der Halterung in
die Aussparung am Standbein ein, und drücken
Sie die Halterung dann oben zum Standbein,
bis sie hörbar einrastet.
Collegare le due staffe in plastica alla parte
superiore dei piedi stabilizzatori della stampante
Inserire la linguetta situata nella parte inferiore
della staffa nel piede stabilizzatore e far scattare
la parte superiore della staffa in posizione.
Page 14

49 50 51 52
Insert the bin cross-bar into the two plastic
brackets.
Insérez la traverse du bac dans les deux
attaches en plastique.
Setzen Sie die Enden der Querverstrebung
in die beiden Kunststoffhalterungen ein.
Inserire il sostegno del vassoio nelle due
staffe in plastica.
Remove the bin assembly from the box that
contains the stand and the bin.
Retirez l’assemblage du bac du carton contenant
le support et le bac.
Nehmen Sie die Ablage aus dem Karton.
Rimuovere il gruppo vassoio dalla scatola
contenente il piedistallo e il vassoio.
Insert the two bin arms into the bin cross-bar.
Insérez les deux bras du bac dans la traverse
du bac.
Setzen Sie die beiden Arme in die Querverstrebung der Ablage ein.
Inserire i due bracci del vassoio nel relativo
sostegno.
Click the ends of both bin arms into the metal
brackets.
Enclenchez les extrémités des deux bras du bac
dans les attaches en métal.
Drücken Sie die Enden der beiden Arme in die
Metallhalterungen. Die Arme müssen mit einem
Klickgeräusch einrasten.
Inserire le estremità dei due bracci del vassoio
nelle staffe metalliche e farle scattare in
posizione.
Page 15
53 54 55 56
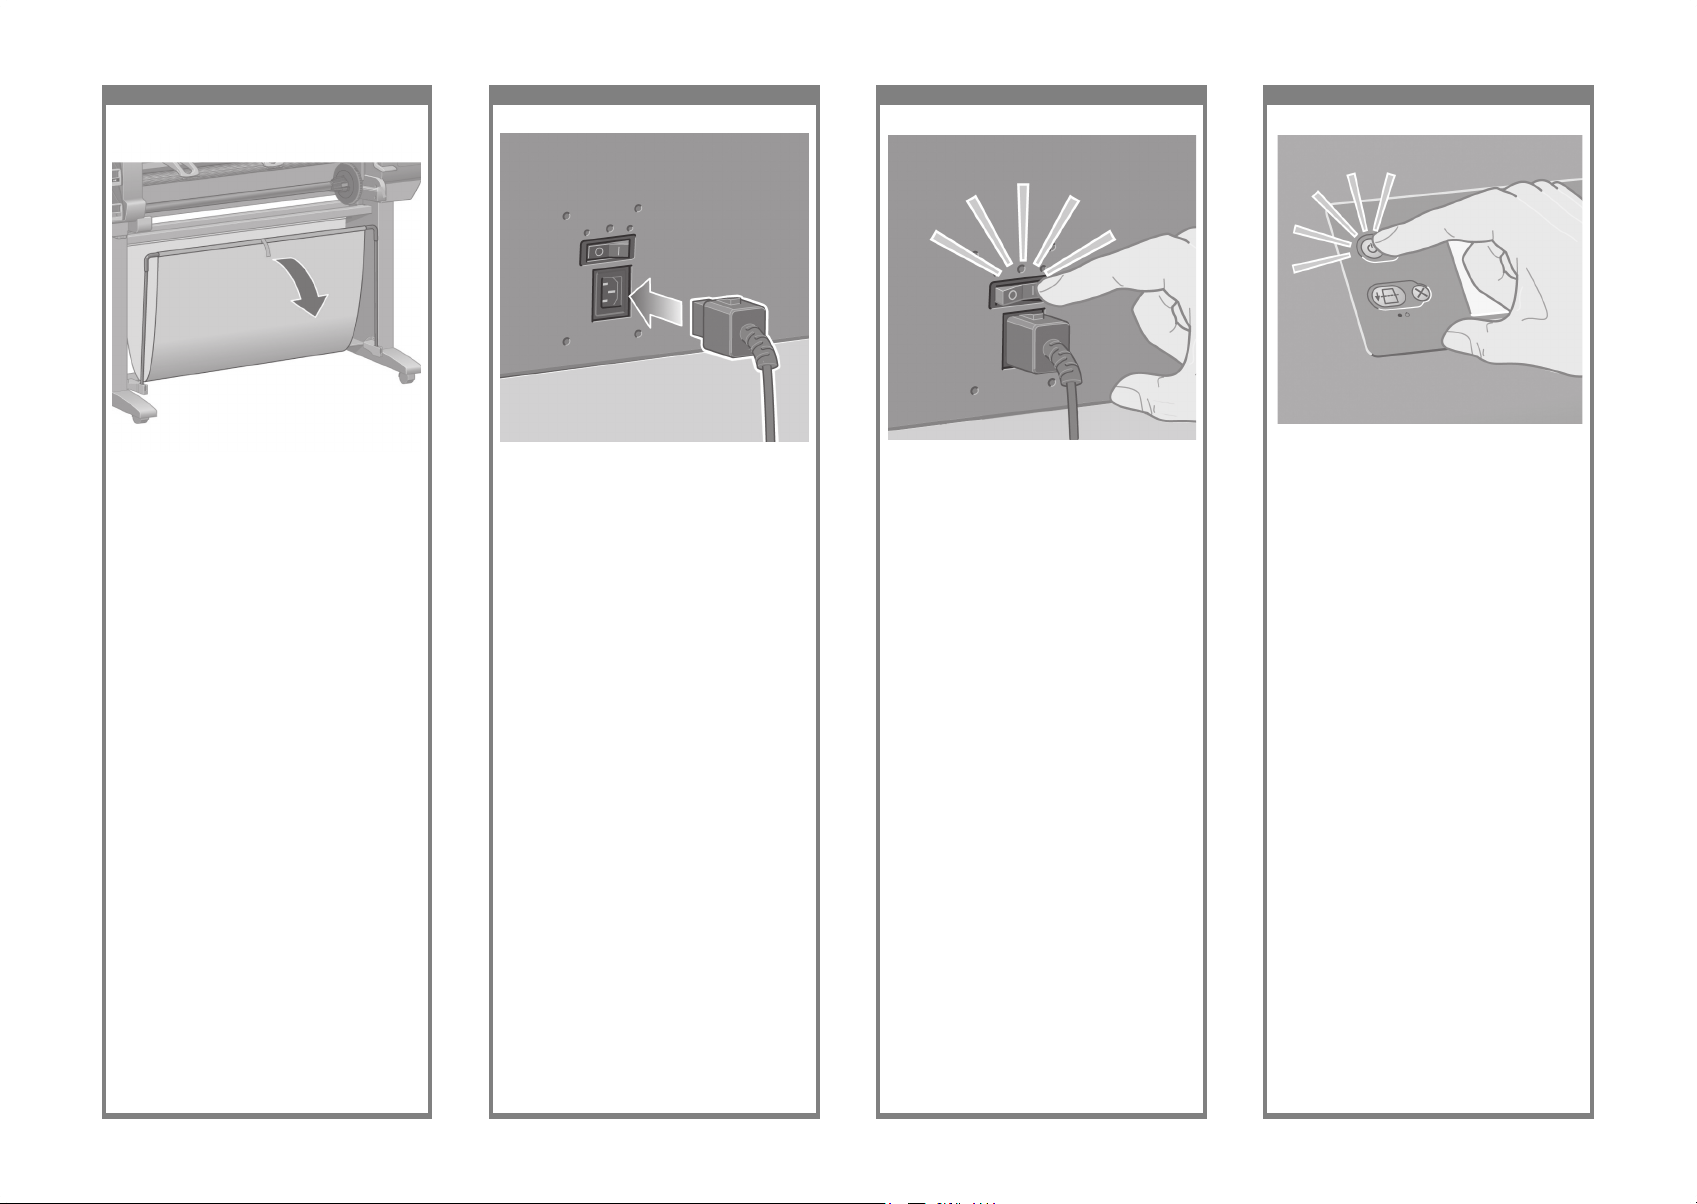
Use the blue handle to open the bin.
HP recommends that you leave the bin in the
closed position while completing the printer
assembly procedures.
Ouvrez le bac en utilisant la poignée bleue. HP
recommande de laisser le bac en position fermée
pendant les procédures d’assemblage
de l’imprimante.
Die Ablage kann mit Hilfe des blauen Griffs
geöffnet werden. Es wird jedoch empfohlen,
die Ablage während des Zusammenbaus des
Druckers geschlossen zu lassen.
Aprire il vassoio utilizzando la maniglia blu.
HP consiglia di lasciare il vassoio chiuso
durante il completamento dell’installazione
della stampante.
If the power light on the front panel remains off,
press the Power key to switch on the printer.
Si le voyant d’alimentation du panneau avant
est éteint, appuyez sur la touche d’alimentation
pour mettre l’imprimante sous tension.
Falls die Netzkontrollleuchte am Bedienfeld
nicht leuchtet, drücken Sie den Netzschalter, um
den Drucker einzuschalten.
Se l’indicatore luminoso di accensione sul
pannello frontale resta spento, premere il tasto
Alimentazione per accendere la stampante.
Plug the power cable into the rear of the printer,
then plug the other end into the AC power outlet.
Branchez le câble d’alimentation à l’arrière de
l’imprimante, puis l’autre extrémité à la prise
électrique.
Verbinden Sie das eine Ende des Netzkabels mit
dem entsprechenden Anschluss auf der Rückseite
des Druckers, und stecken Sie das andere Ende
in eine Netzsteckdose.
Collegare il cavo di alimentazione sul retro della
stampante, quindi inserire l’altra estremità in una
presa CA.
Turn the power switch at the rear of the printer to
the on position.
Mettez l’interrupteur de marche/arrêt à l’arrière
de l’imprimante en position Marche.
Schalten Sie den Drucker mit dem Netzschalter
auf der Rückseite des Geräts ein.
Premere l’interruttore di alimentazione sul retro
della stampante.
Page 16
57 58 59 60
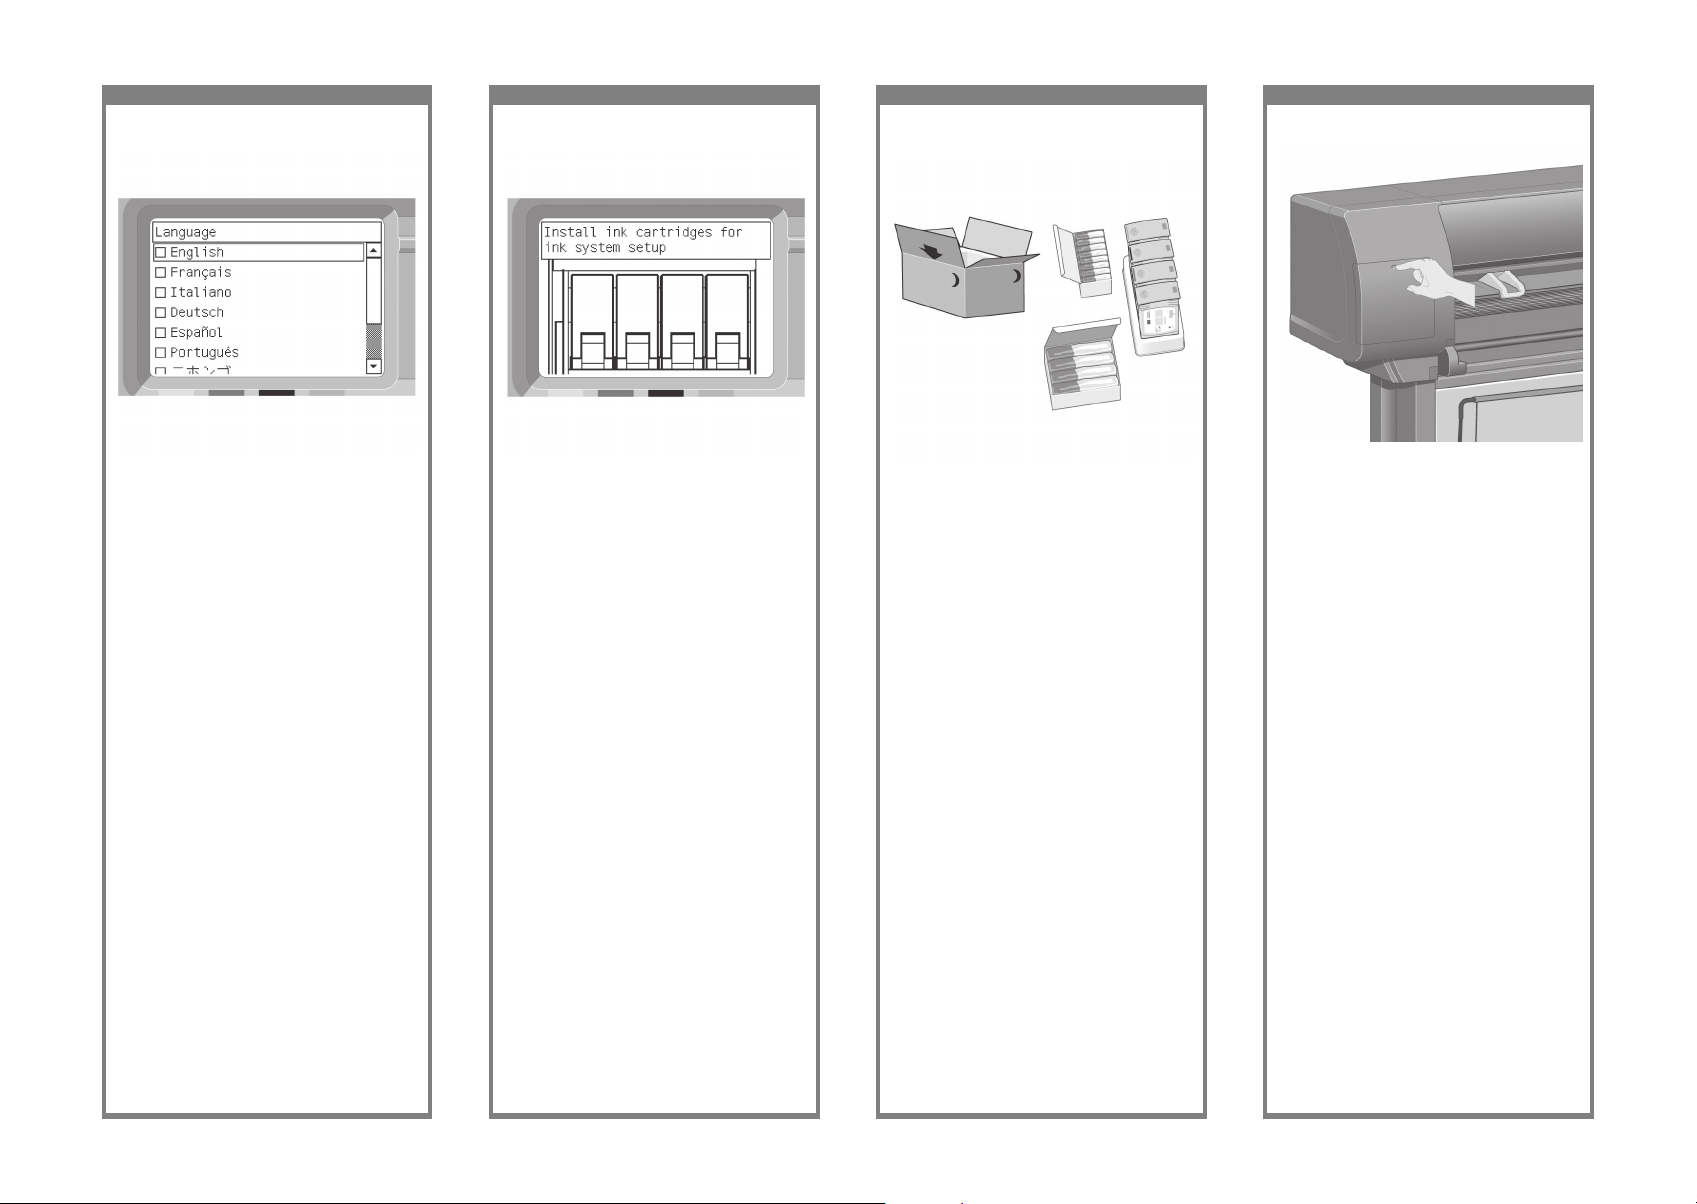
Find the ink cartridge door, which is on the left
side of the printer.
Recherchez la porte d’accès aux cartouches
d’encre, qui se trouve sur le côté gauche de
l’imprimante.
Suchen Sie die Tintenpatronenklappe, die sich
auf der linken Seite des Druckers bendet.
Individuare lo sportello delle cartucce di inchiostro,
ubicato sul lato sinistro della stampante.
Wait until you see this message (~10 minutes).
Highlight your language using the Up and Down
keys. Press the Select (ü) key.
Patientez jusqu’à l’afchage de ce message
(environ 10 minutes). Sélectionnez votre langue
à l’aide des touches Haut et Bas. Appuyez sur
la touche Sélectionner (ü).
Warten Sie etwa 10 Minuten, bis diese Meldung
angezeigt wird. Markieren Sie die gewünschte
Sprache mithilfe der Aufwärts- und Abwärtstaste.
Drücken Sie die Taste „Auswählen” (ü).
Attendere la visualizzazione del seguente
messaggio (circa 10 minuti). Selezionare la
lingua desiderata utilizzando i tasti Su e Giù.
Premere il tasto Seleziona (ü).
The front panel will now display how to install
the ink supplies.
Le panneau avant afche à présent la procédure
d’installation des cartouches d’encre.
Auf dem Bedienfeld werden nun Anleitungen für
das Einsetzen der Tintenpatronen angezeigt.
Sul pannello frontale verrà visualizzato come
installare le cartucce di inchiostro.
Remove the printheads, printhead cleaners, and
ink cartridges from the consumables box.
Retirez les têtes d’impression, les dispositifs de
nettoyage de têtes d’impression et les cartouches
d’encre du carton des consommables.
Nehmen Sie die Druckköpfe, Druckkopfreiniger
und die Tintenpatronen aus dem Behälter mit
den Verbrauchsmaterialien.
Rimuovere le testine, i puliscitestine e le cartucce
di inchiostro dalla scatola dei consumabili.
Page 17
61 62 63 64
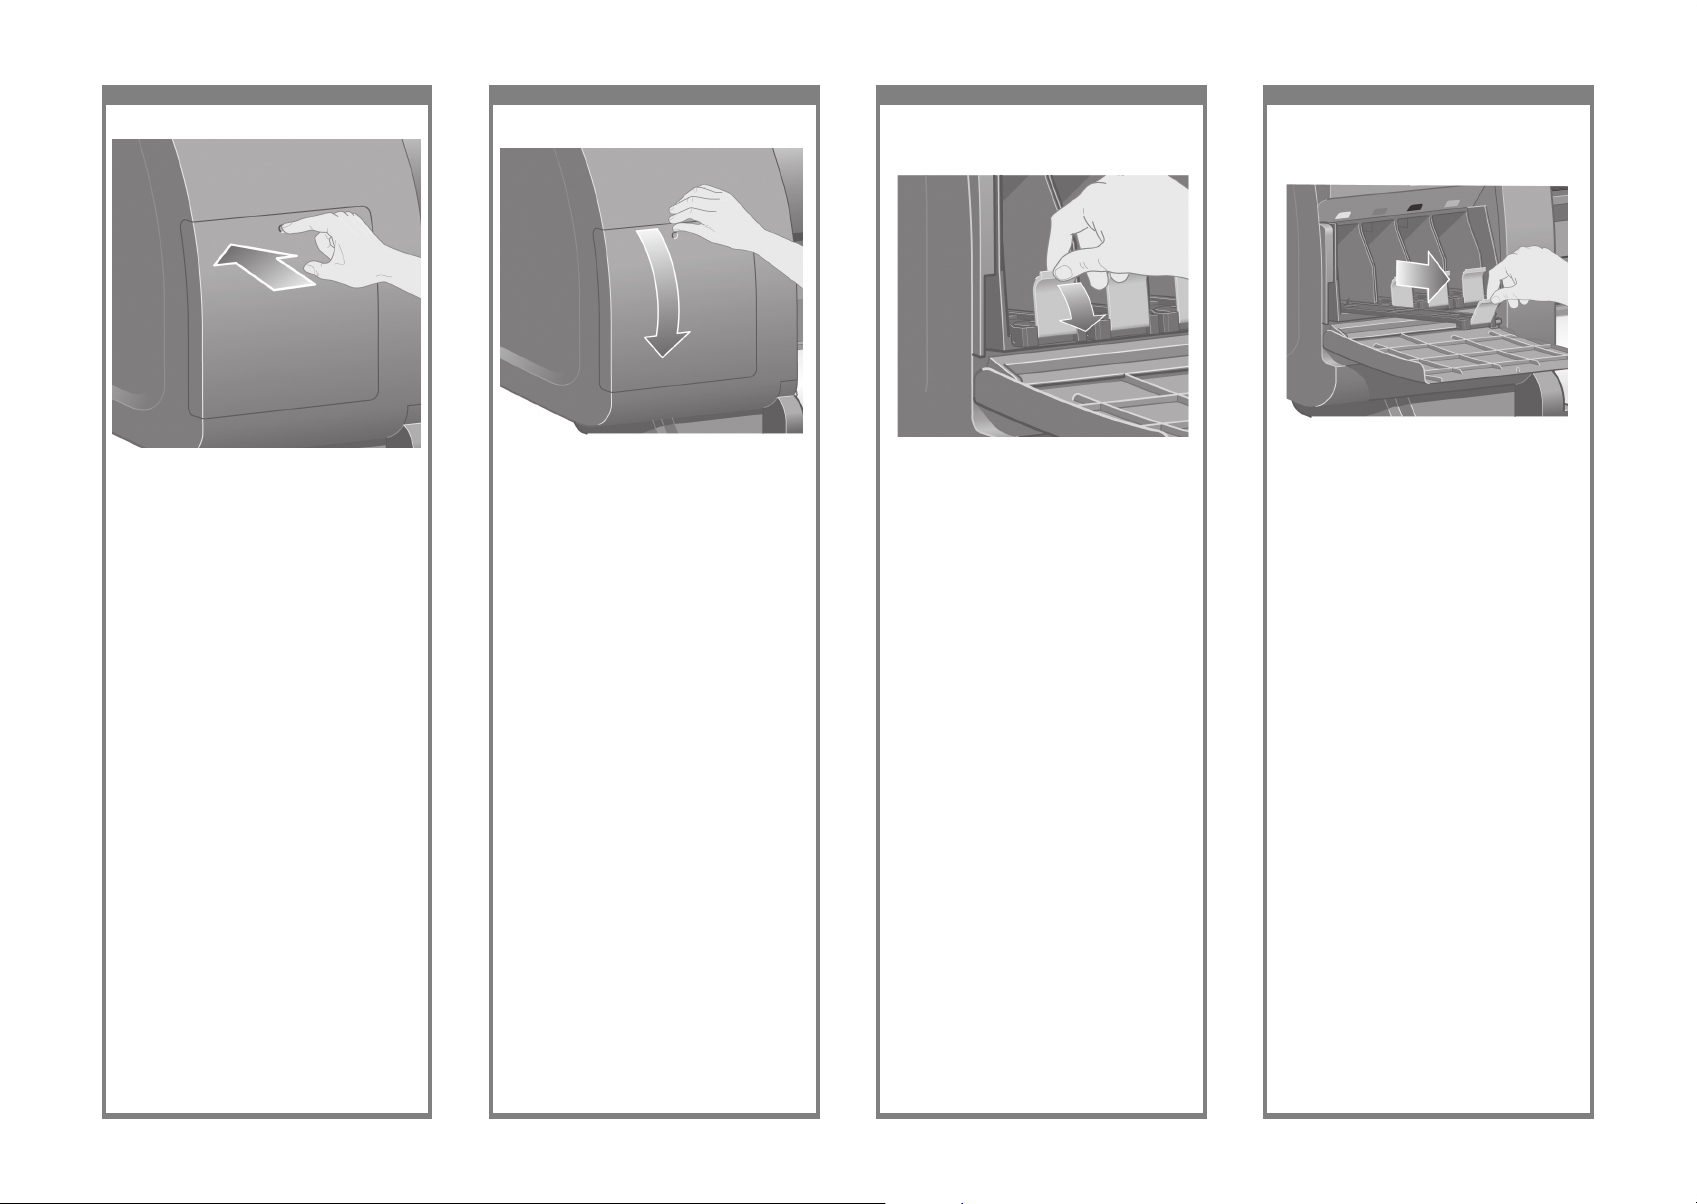
Slide the ink cartridge drawer out.
Faites glisser le tiroir des cartouches d’encre
vers l’extérieur.
Ziehen Sie den Einschub für die Tintenpatrone
heraus.
Far scorrere verso l’esterno il cassetto delle
cartucce.
Press the ink cartridge door.
Appuyez sur la porte d’accès aux cartouches
d’encre.
Drücken Sie auf die Tintenpatronenklappe.
Premere lo sportello.
Open the ink cartridge door.
Ouvrez la porte d’accès aux cartouches d’encre.
Öffnen Sie die Tintenpatronenklappe.
Aprire lo sportello.
To release the ink cartridge drawer, pull the
blue handle down.
Pour libérer le tiroir des cartouches d’encre,
appuyez sur la poignée bleue.
Drücken Sie den blauen Hebel nach unten, um
die Arretierung des Tintenpatroneneinschubs zu
lösen.
Per rilasciare il cassetto delle cartucce di
inchiostro, abbassare la leva blu.
Page 18
65 66 67 68
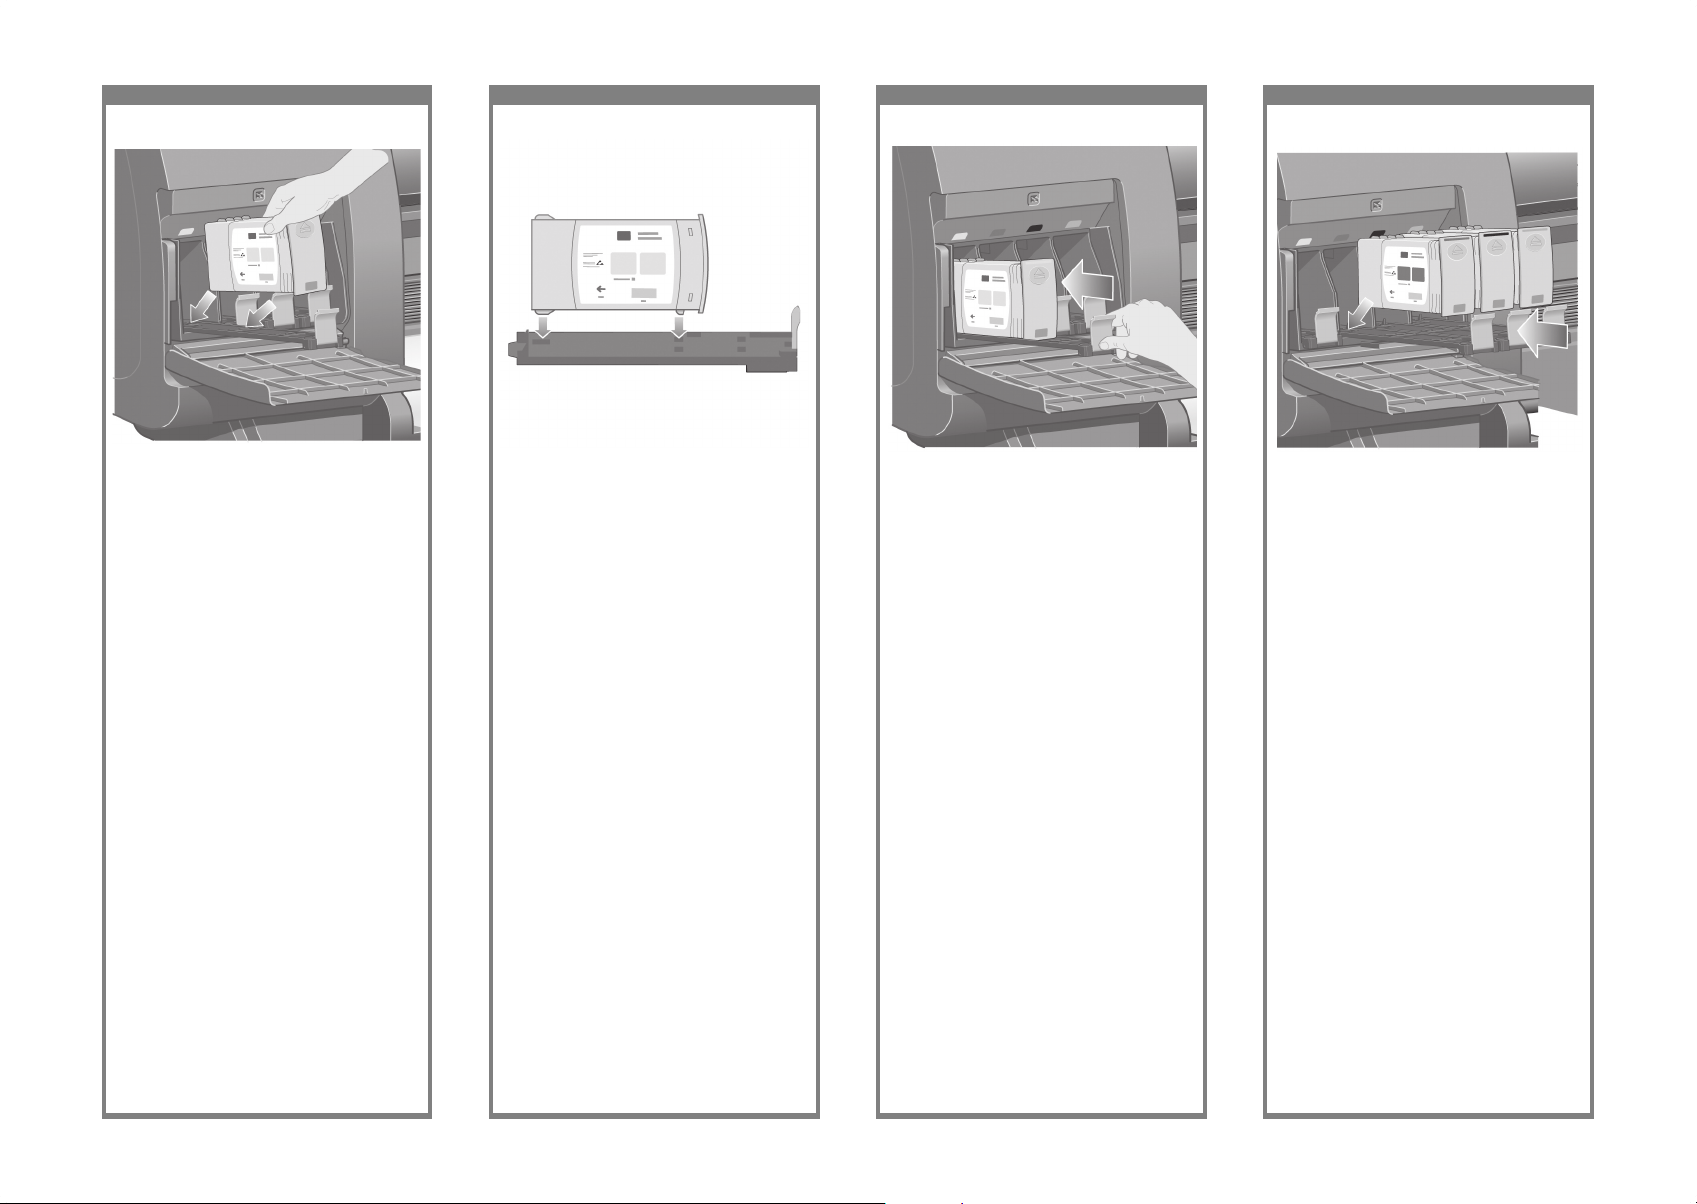
Following the same instructions, install the other
three ink cartridges.
En suivant les mêmes instructions, installez les
trois autres cartouches d’encre.
Setzen Sie die drei restlichen Tintenpatronen
auf dieselbe Weise ein.
Seguendo queste stesse istruzioni, installare
le rimanenti tre cartucce di inchiostro.
Place the ink cartridge onto the ink cartridge
drawer. Note that there are marks on the drawer
showing the correct location.
Placez la cartouche d’encre dans le tiroir des
cartouches d’encre. Notez que des marques gurent
sur le tiroir pour indiquer l’emplacement exact.
Legen Sie die Tintenpatrone auf den Einschub.
Achten Sie auf die Markierungen auf dem
Einschub, die für die richtige Positionierung
der Patrone sorgen.
Inserire la cartuccia di inchiostro nel cassetto. Sul
cassetto sono presenti dei segni che indicano la
posizione corretta.
Position the ink cartridge at the rear of the
drawer as indicated.
Placez la cartouche d’encre à l’arrière du tiroir
de la façon indiquée.
Platzieren Sie die Tintenpatrone an der Rückseite
des Einschubs, wie in der Abbildung gezeigt.
Posizionare la cartuccia nella parte posteriore
del cassetto come indicato.
Push the ink cartridge drawer back into the
printer until it locks into poition.
Remettez le tiroir des cartouches d’encre
en place dans l’imprimante en le poussant
jusqu’à ce qu’il s’enclenche.
Schieben Sie den Einschub wieder in den
Drucker, bis er einrastet.
Spingere il cassetto delle cartucce all’interno
della stampante no al raggiungimento della
posizione corretta.
Page 19

69 70 71 72
Remove the packing tape that is holding down
the printhead carriage latch.
Faites glisser le chariot de la tête d’impression
vers la gauche jusqu’à ce qu’il soit facilement
accessible. Retirez le ruban adhésif d’emballage
qui maintient en place le loquet du chariot de
la tête d’impression.
Ziehen Sie den Druckkopfwagen nach links,
damit er gut zugänglich ist. Entfernen Sie das
Klebeband, mit dem die Verriegelung des
Druckkopfwagens befestigt ist.
Far scorrere il carrello delle testine in modo da
raggiungere facilmente le testine. Rimuovere il
nastro che tiene abbassata la levetta del carrello
delle testine.
Close the ink cartridge door.
Fermez la porte d’accès aux cartouches d’encre.
Schließen Sie die Tintenpatronenklappe.
Chiudere lo sportello.
Wait (about a minute) until you see this front
panel message.
Patientez (environ une minute) jusqu’à ce que
ce message s’afche sur le panneau avant.
Nach etwa einer Minute sehen Sie diese
Bedienfeldmeldung.
Attendere circa un minuto no a che viene
visualizzato il messaggio sul pannello frontale.
Open the printer window.
Ouvrez la fenêtre de l’imprimante.
Öffnen Sie das Druckerfenster.
Aprire la nestra della stampante.
Page 20
73 74 75 76
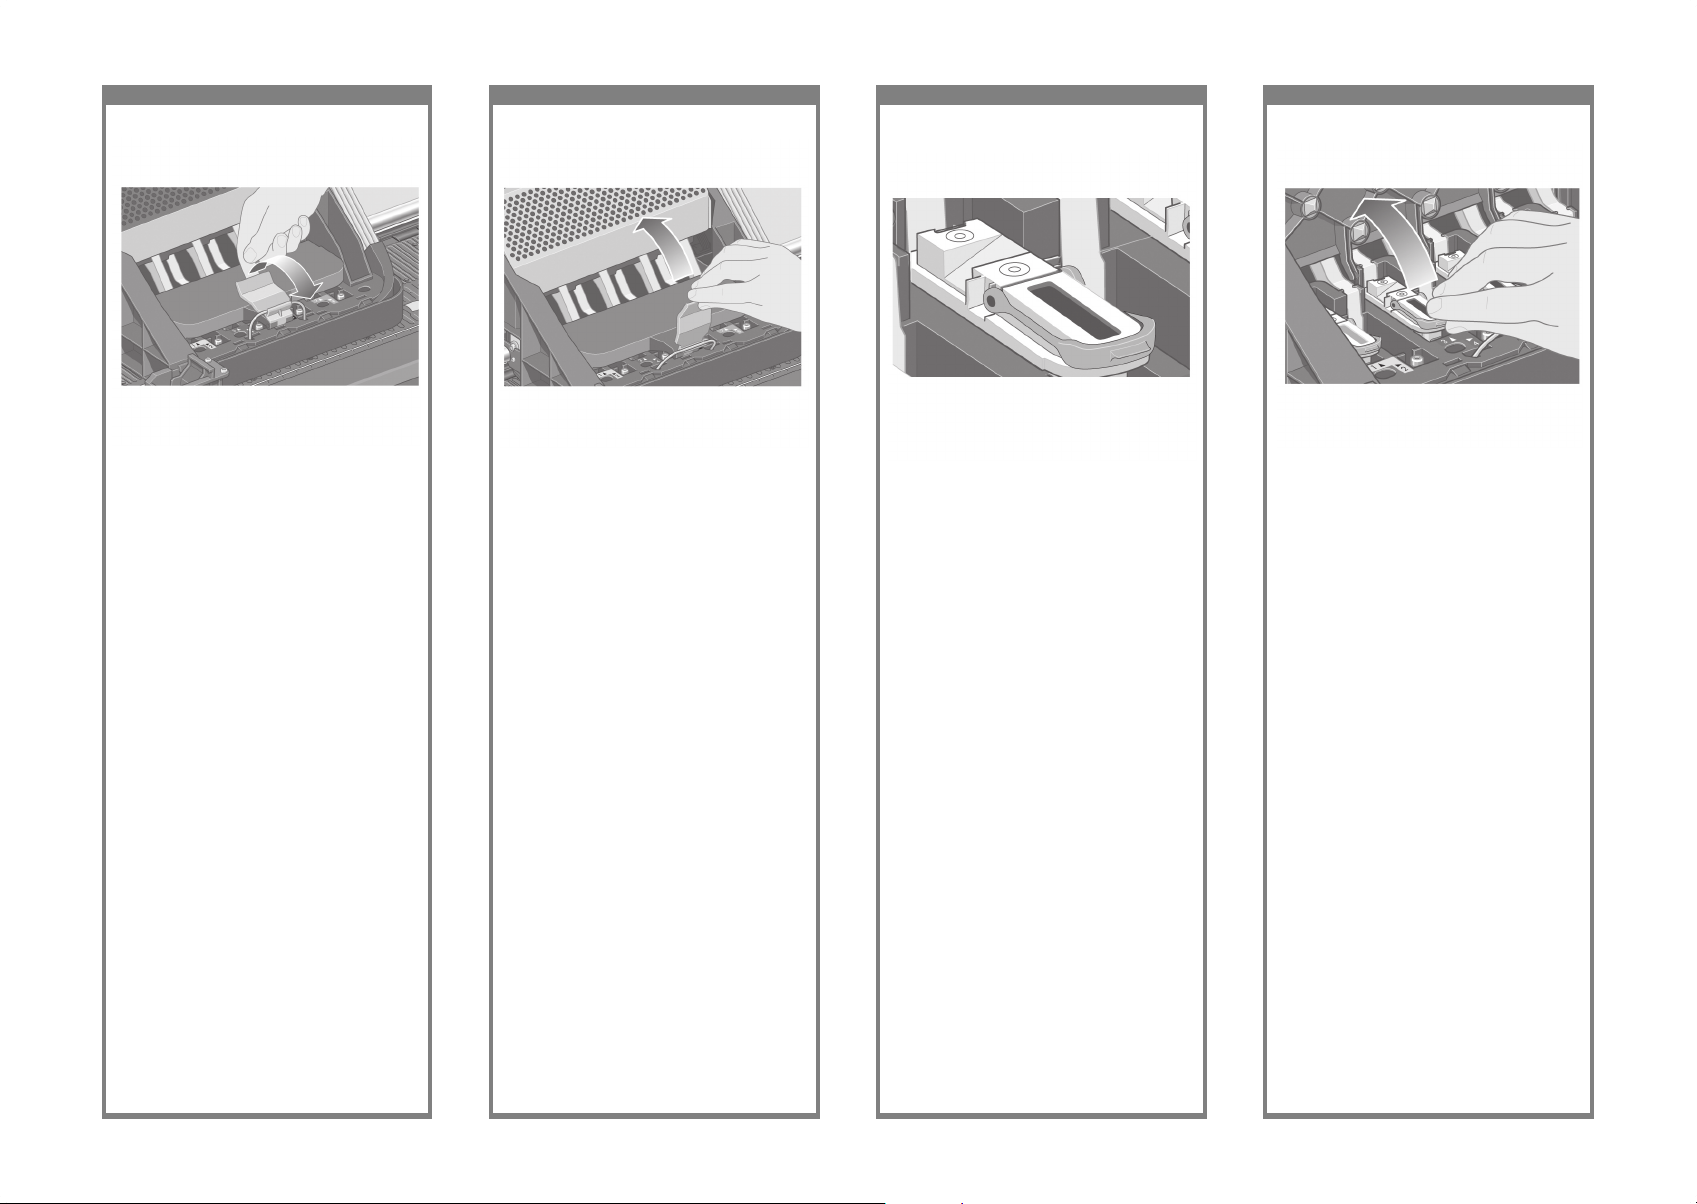
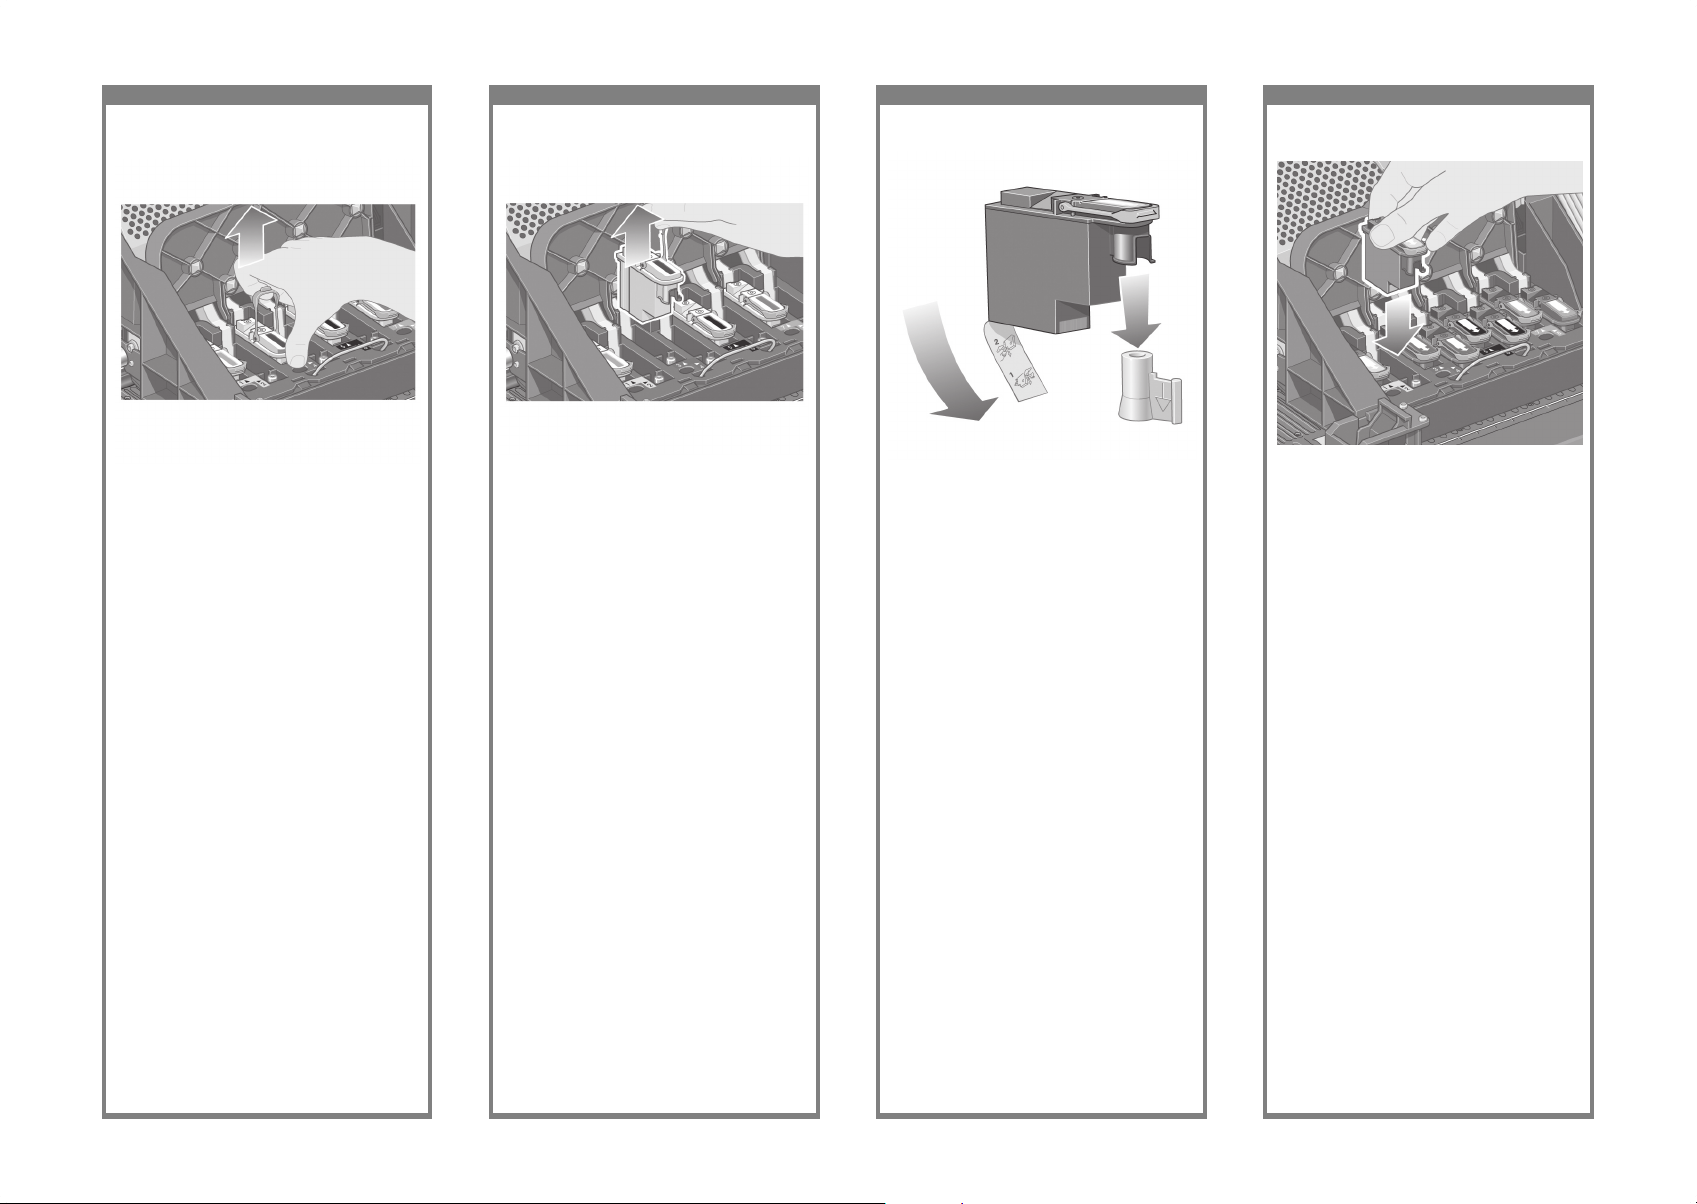
To remove a setup printhead, lift up the blue
handle.
Pour retirer une tête d’impression de conguration,
soulevez la poignée bleue.
Um einen provisorischen Druckkopf zu entfernen,
klappen Sie zunächst den blauen Griff nach
oben.
Per rimuovere una testina di impostazione,
sollevare la levetta blu.
Pull up and release the latch on top of the
carriage assembly.
Remontez et relâchez le loquet au-dessus de
l’assemblage du chariot.
Klappen Sie die Verriegelung der Wageneinheit
nach vorne, um sie zu lösen.
Sganciare e rilasciare la levetta sull’assemblaggio
del carrello.
Lift up the cover. This will give you access to the
setup printheads.
Soulevez le couvercle. Vous accédez ainsi aux
têtes d’impression de conguration.
Heben Sie die Abdeckung an. Die provisorischen
Druckköpfe sind nun zugänglich.
Sollevare il coperchio. In questo modo è possibile
accedere alle testine di impostazione.
Before removing the setup printheads, look at
the window on top of each one and check that
the printhead contains ink.
Avant de retirer les têtes d’impression de
conguration, examinez la fenêtre située
au-dessus de chacune d’elles et vériez que
la tête d’impression contient de l’encre.
Überprüfen Sie anhand der Sichtfenster an
der Oberseite der Druckköpfe, ob diese Tinte
enthalten, bevor Sie die Druckköpfe entfernen.
Prima di rimuovere le testine di impostazione,
dare un’occhiata alla nestra su ognuna di esse
e vericare che la testina contenga l’inchiostro.
Page 21
77 78 79 80
Lower all the printheads vertically into their
correct positions.
Abaissez toutes les têtes d’impression à la
verticale jusqu’à ce qu’elles atteignent les
positions appropriées.
Drücken Sie die Druckköpfe senkrecht nach
unten in die richtige Position.
Abbassare tutte le testine nelle posizioni
corrette.
Using the blue handle, gently disengage the
setup printhead from the carriage.
Faites passer votre index par la boucle de la
poignée bleue et soulevez doucement la tête
d’impression de conguration.
Umfassen Sie den Griff mit dem Zeigenger,
und ziehen Sie den provisorischen Druckkopf
vorsichtig heraus.
Inserire l’indice nel gancio della levetta
blu e sollevare delicatamente la testina di
impostazione.
Lift the setup printhead until it is released from
the carriage assembly. Then remove the other
setup printheads.
Soulevez la tête d’impression de conguration
jusqu’à ce qu’elle sorte de l’assemblage
du chariot. Retirez ensuite les autres têtes
d’impression de conguration.
Ziehen Sie den Druckkopf nach oben, bis er
sich von der Wageneinheit löst. Entfernen Sie
die anderen provisorischen Druckköpfe auf die
gleiche Weise.
Sollevare la testina no al completo rilascio
dall’assemblaggio del carrello. Quindi,
rimuovere le altre testine di impostazione.
Remove the blue protective cap and the clear
protective tape from the printhead.
Retirez le capuchon bleu de protection et la
bande de protection transparente de la tête
d’impression.
Entfernen Sie die blaue Schutzkappe und die
durchsichtige Schutzfolie vom Druckkopf.
Rimuovere la protezione blu e il nastro protettivo
dalla testina.
Page 22

81 82 83 84
Close the carriage assembly cover.
Fermez le couvercle de l’assemblage du chariot.
Schließen Sie die Abdeckung der Wageneinheit.
Chiudere il coperchio dell’assemblaggio dei
carrelli.
Seat the printheads slowly and carefully.
Installez les têtes d’impression doucement
et avec précaution.
Drücken Sie die Druckköpfe langsam und
vorsichtig fest.
Collocare le testine lentamente e delicatamente.
Make sure the printheads are correctly seated.
When all the printheads are installed, the front
panel prompts, “Close printhead cover and
window”.
Vériez que les têtes d’impression sont
correctement positionnées. Lorsque toutes les
têtes d’impression sont installées, le panneau
avant afche le message « Refermez couvercle
des têtes d’impression et la fenêtre ».
Überprüfen Sie die Druckköpfe auf ordnungsgemäßen Sitz. Wenn alle Druckköpfe eingesetzt
sind, wird auf dem Bedienfeld die Aufforderung
„Fenster und Druckkopfabdeckung schließen”
angezeigt.
Assicurarsi che le testine siano state collocate
correttamente. Una volta installate tutte le testine,
sul pannello frontale viene visualizzato il
messaggio “Chiudere coperchio e nestra
delle testine di stampa”.
If “Reseat” is displayed on the front panel,
check that the protective tape has been removed.
Then try reseating the printhead more rmly.
If the problem persists, refer to the Using Your
Printer CD.
Si « Réinstaller » s’afche sur le panneau avant,
vériez que la bande de protection a été retirée.
Essayez ensuite de réinstaller plus fermement
la tête d’impression. Si le problème persiste,
reportez-vous au CD-ROM Utilisation de votre
imprimante.
Wenn auf dem Bedienfeld die Meldung „Neu
einsetzen“ angezeigt wird, überprüfen Sie, ob
die Schutzfolie abgezogen wurde. Setzen Sie
den Druckkopf dann erneut mit etwas stärkerem
Druck ein. Bleibt das Problem bestehen, nden
Sie auf der Drucker-CD weitere Informationen.
Se sul pannello frontale viene visualizzato il
messaggio “Ricollocare”, vericare che il nastro
protettivo sia stato rimosso completamente.
Quindi, provare a ricollocare la testina in
maniera più alda. Se il problema persiste,
fare riferimento al CD Utilizzo della stampante.
Page 23

85 86 87 88
Wait until you see this front panel message.
Patientez jusqu’à ce que ce message s’afche
sur le panneau avant.
Warten Sie, bis diese Bedienfeldmeldung
angezeigt wird.
Attendere no alla visualizzazione del messaggio
sul pannello frontale.
Make sure the latch engages correctly
Assurez-vous que le loquet s’enclenche correctement.
Stellen Sie sicher, dass die Verriegelung richtig
anliegt.
Assicurarsi che la levetta venga bloccata
correttamente.
Close the printer window.
Fermez la fenêtre de l’imprimante.
Schließen Sie das Druckerfenster.
Chiudere la nestra della stampante.
Please wait while the printer checks the
printheads (~1 minute).
Patientez pendant que l’imprimante vérie
les têtes d’impression (environ 1 minute).
Warten Sie etwa 1 Minute, bis der Drucker
die Druckköpfe überprüft hat.
Attendere che la stampante verichi
l’installazione delle testine (circa 1 minuto).
Page 24

89 90 91 92
Push the printhead cleaner in and down until
it clicks into place.
Poussez le dispositif de nettoyage de la tête
d’impression vers l’intérieur et vers le bas
jusqu’à ce qu’il s’enclenche.
Setzen Sie den Druckkopfreiniger ein, und
drücken Sie ihn nach unten, bis er hörbar
einrastet.
Spingere verso il basso e in avanti il
puliscitestine no al raggiungimento della
posizione corretta.
Press the printhead cleaner door, which is on the
right side of the printer.
Appuyez sur la porte du dispositif de nettoyage
de la tête d’impression, qui se trouve sur le côté
droit de l’imprimante.
Drücken Sie auf die Druckkopfreinigerklappe auf
der rechten Seite des Druckers.
Premere lo sportello dei puliscitestine, ubicato sul
lato destro della stampante.
Open the printhead cleaner door.
Ouvrez la porte du dispositif de nettoyage
de la tête d’impression.
Öffnen Sie die Druckkopfreinigerklappe.
Aprire lo sportello dei puliscitestine.
Insert the printhead cleaner into the slot of the
correct color.
Insérez le dispositif de nettoyage de la tête
d’impression dans l’emplacement associé
à la couleur appropriée.
Setzen Sie den Druckkopfreiniger in die Öffnung
mit der entsprechenden Farbe ein.
Inserire il puliscitestine nell’alloggiamento del
colore corretto.
Page 25

93 94 95 96
Lower the spindle lever.
Abaissez le levier de la bobine.
Drücken Sie den Spindelhebel nach unten.
Abbassare la leva del mandrino.
Insert the other seven printhead cleaners into the
correct slots.
Insérez les sept autres dispositifs de nettoyage
aux emplacements appropriés.
Setzen Sie die restlichen sieben Druckkopfreiniger
in die entsprechenden Öffnungen ein.
Inserire gli altri sette puliscitestine nei relativi
alloggiamenti.
Close the printhead cleaner door.
Fermez la porte du dispositif de nettoyage de
la tête d’impression.
Schließen Sie die Druckkopfreinigerklappe.
Chiudere lo sportello dei puliscitestine.
Wait until you see this front panel message.
Press the Select (ü) key.
Patientez jusqu’à ce que ce message s’afche
sur le panneau avant. Appuyez sur la touche
Sélectionner (ü).
Warten Sie, bis diese Bedienfeldmeldung
angezeigt wird. Drücken Sie die Taste
„Auswählen” (ü).
Attendere no alla visualizzazione del
messaggio sul pannello frontale. Premere
il tasto Seleziona (ü).
Page 26

97 98 99 100
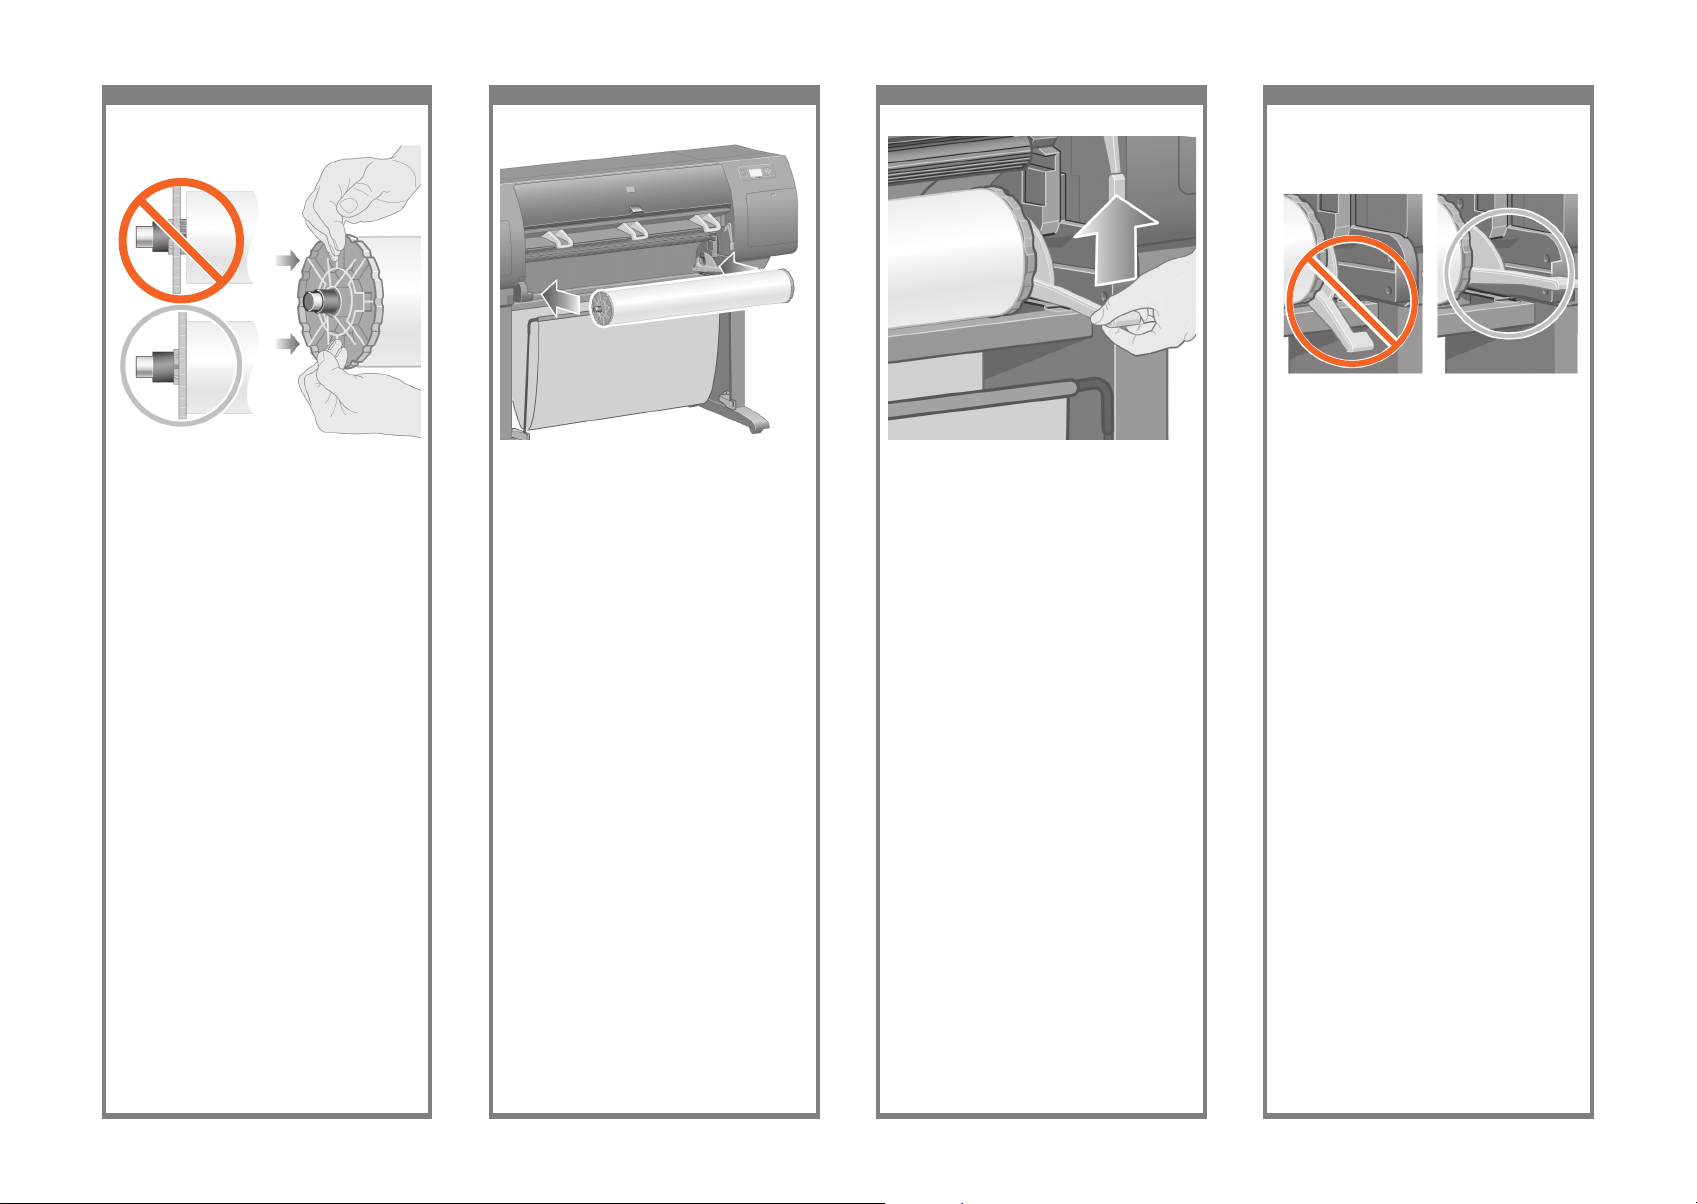
Put the blue-colored stop onto the spindle and
push it on as far as it will go without using
excessive force.
Placez le taquet de couleur bleue sur la bobine
et poussez-le aussi loin que possible sans forcer.
Bringen Sie das blaue Endstück wieder an
der Spindel an, und schieben Sie es an die
Papierrolle, ohne dabei zu viel Druck auszuüben.
Inserire il fermo blu sul mandrino e spingerlo
no in fondo, ma senza utilizzare una forza
eccessiva.
Remove the right-hand end of the spindle (1) from
the printer, then move it to the right in order to
extract the other end (2).
Retirez l’extrémité droite de la bobine (1) de
l’imprimante, puis déplacez-la vers la droite pour
dégager l’autre extrémité (2).
Nehmen Sie das rechte Ende der Spindel (1)
aus dem Drucker heraus, und bewegen Sie die
Spindel nach rechts, damit das andere Ende (2)
frei gegeben wird.
Rimuovere l’estremità destra del mandrino (1)
dalla stampante, quindi spostarla sulla destra
per estrarre l’altra estremità (2).
Remove the blue-colored stop (1) from the
left-hand end of the spindle. Keep the spindle
horizontal.
Retirez le taquet de couleur bleue (A) de
l’extrémité gauche de la bobine. Maintenez
la bobine à l’horizontale.
Entfernen Sie das blaue Endstück (A) an der
linken Seite der Spindel. Halten Sie die Spindel
waagrecht.
Rimuovere il fermo blu (A) dall’estremità
sinistra del mandrino. Mantenere il mandrino
in posizione rizzontale.
Slide a roll of paper onto the spindle. Make sure
the paper is oriented exactly as shown.
Enroulez le rouleau de papier fourni avec
l’imprimante sur la bobine. Assurez-vous que
le papier est orienté exactement de la façon
indiquée.
Schieben Sie die mitgelieferte Papierrolle auf die
Spindel. Die Rolle muss so wie in der Abbildung
gezeigt ausgerichtet werden.
Far scorrere il rotolo di carta fornito con la
stampante sul mandrino. Vericare che la
carta sia orientata esattamente come riportato.
Page 27
101 102 103 104
The spindle lever will be in the horizontal
position when the spindle has been correctly
inserted.
Le levier de la bobine est en position horizontale
lorsque la bobine est correctement insérée.
Wenn die Spindel ordnungsgemäß eingelegt ist,
bendet sich der Hebel in waagrechter Stellung.
Se il mandrino è stato inserito nella posizione
corretta, la leva si troverà inposizione orizzontale.
With the blue stop on the left, slide the spindle
into the printer. The blue spindle lever will drop
down automatically as you insert the spindle.
Le taquet bleu étant placé sur la gauche, faites
glisser la bobine dans l’imprimante. Le levier
bleu de la bobine s’abaisse automatiquement
lorsque vous insérez la bobine.
Schieben Sie die Spindel in den Drucker.
Das blaue Endstück muss sich dabei auf der
linken Seite benden. Der blaue Spindelhebel
fällt automatisch nach unten, wenn Sie die
Spindel einlegen.
Con il fermo blu sulla sinistra, far scorrere
il mandrino nella stampante. La leva blu del
mandrino verrà abbassata automaticamente
nel momento in cui il mandrino viene inserito.
Make sure the blue-colored stop is seated
correctly.
Assurez-vous que le taquet de couleur bleue
est correctement installé.
Überprüfen Sie den richtigen Sitz des blauen
Endstücks.
Assicurarsi che il fermo blu sia posizionato
correttamente.
Once you meet resistance, lift the blue lever to
seat the spindle properly.
Si vous sentez une résistance, soulevez le levier
bleu pour installer correctement la bobine.
Sobald Sie beim Einlegen der Spindel Widerstand
spüren, drücken Sie den blauen Hebel nach oben
und setzen die Spindel richtig ein.
Se si incontra una certa resistenza, sollevare
la leva blu in modo da posizionare il mandrino
correttamente.
Page 28

105 106 107 108
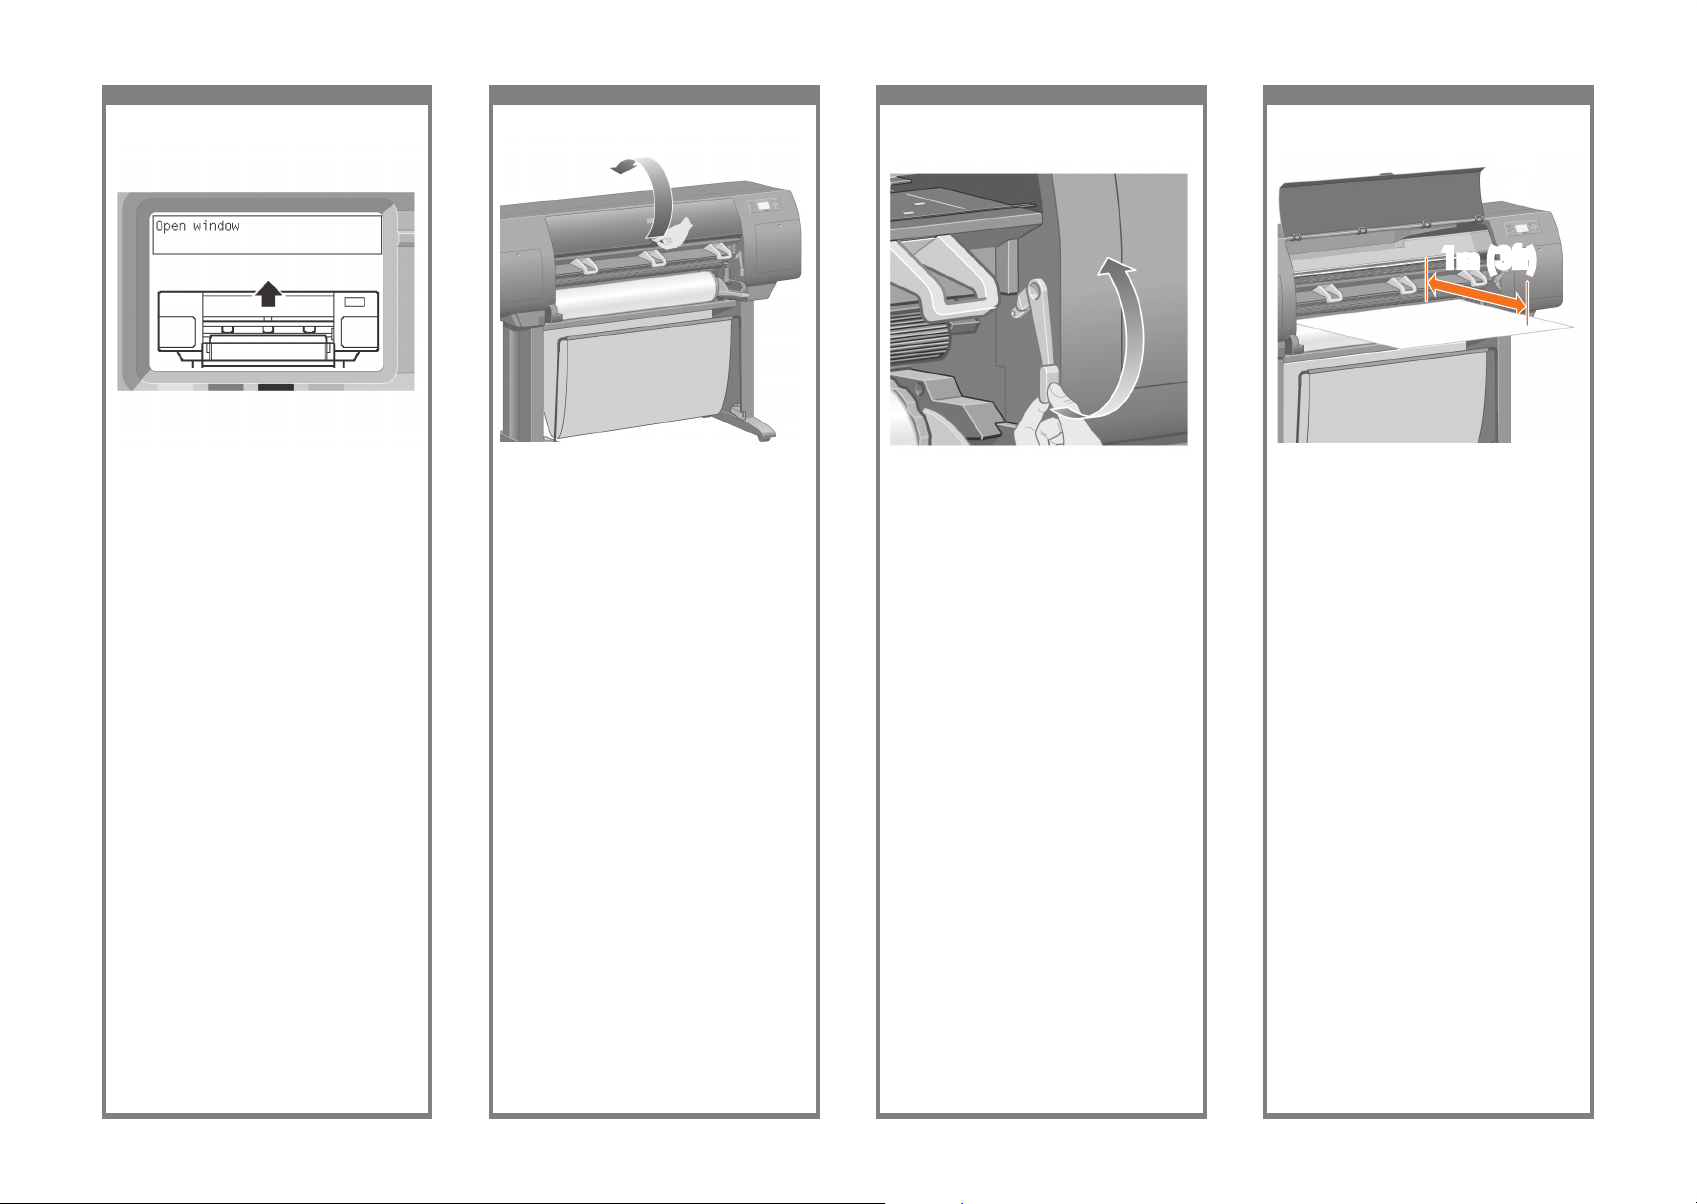
From the front panel, highlight the Paper icon and
press the Select (ü) key.
Dans le panneau avant, sélectionnez l’icône
Papier et appuyez sur la touche Sélectionner (ü).
Markieren Sie auf dem Bedienfeld das
Papiersymbol, und drücken Sie die Taste
„Auswählen” (ü).
Dal pannello frontale selezionare l’icona Carta
e premere il tasto Seleziona (ü).
The front panel displays the above. Highlight
the paper type you have loaded and press the
Select (ü) key.
Le panneau avant afche les éléments
ci-dessus. Sélectionnez le type de papier que
vous avez chargé et appuyez sur la touche
Sélectionner (ü).
Das Bedienfeld enthält die oben gezeigten
Informationen. Markieren Sie die Papiersorte
des eingelegten Papiers,und drücken Sie die
Taste „Auswählen” (ü).
Sul pannello frontale verrà visualizzata
l’opzione selezionata. Selezionare il tipo di
carta caricato e premere il tasto Seleziona (ü).
From the front panel, highlight ‘Roll’ and press
the Select (ü) key.
Dans le panneau avant, sélectionnez « Rouleau »
et appuyez sur la touche Sélectionner (ü).
Markieren Sie auf dem Bedienfeld „Rolle”,
und drücken Sie die Taste „Auswählen” (ü).
Dal pannello frontale selezionare ‘Rotolo’
e premere il tasto Seleziona (ü).
The front panel displays the above. Highlight
‘Load roll now’ and press the Select (ü) key.
Le panneau avant afche les éléments ci-dessus.
Sélectionnez « Charger le rouleau » et appuyez
sur la touche Sélectionner (ü).
Das Bedienfeld enthält die oben gezeigten
Informationen. Markieren Sie „Rolle laden”,
und drücken Sie die Taste „Auswählen” (ü).
Sul pannello frontale verrà visualizzata l’opzione
selezionata. Selezionare ‘Carica rotolo’
e premere il tasto Seleziona (ü).
Page 29
109 110 111 112
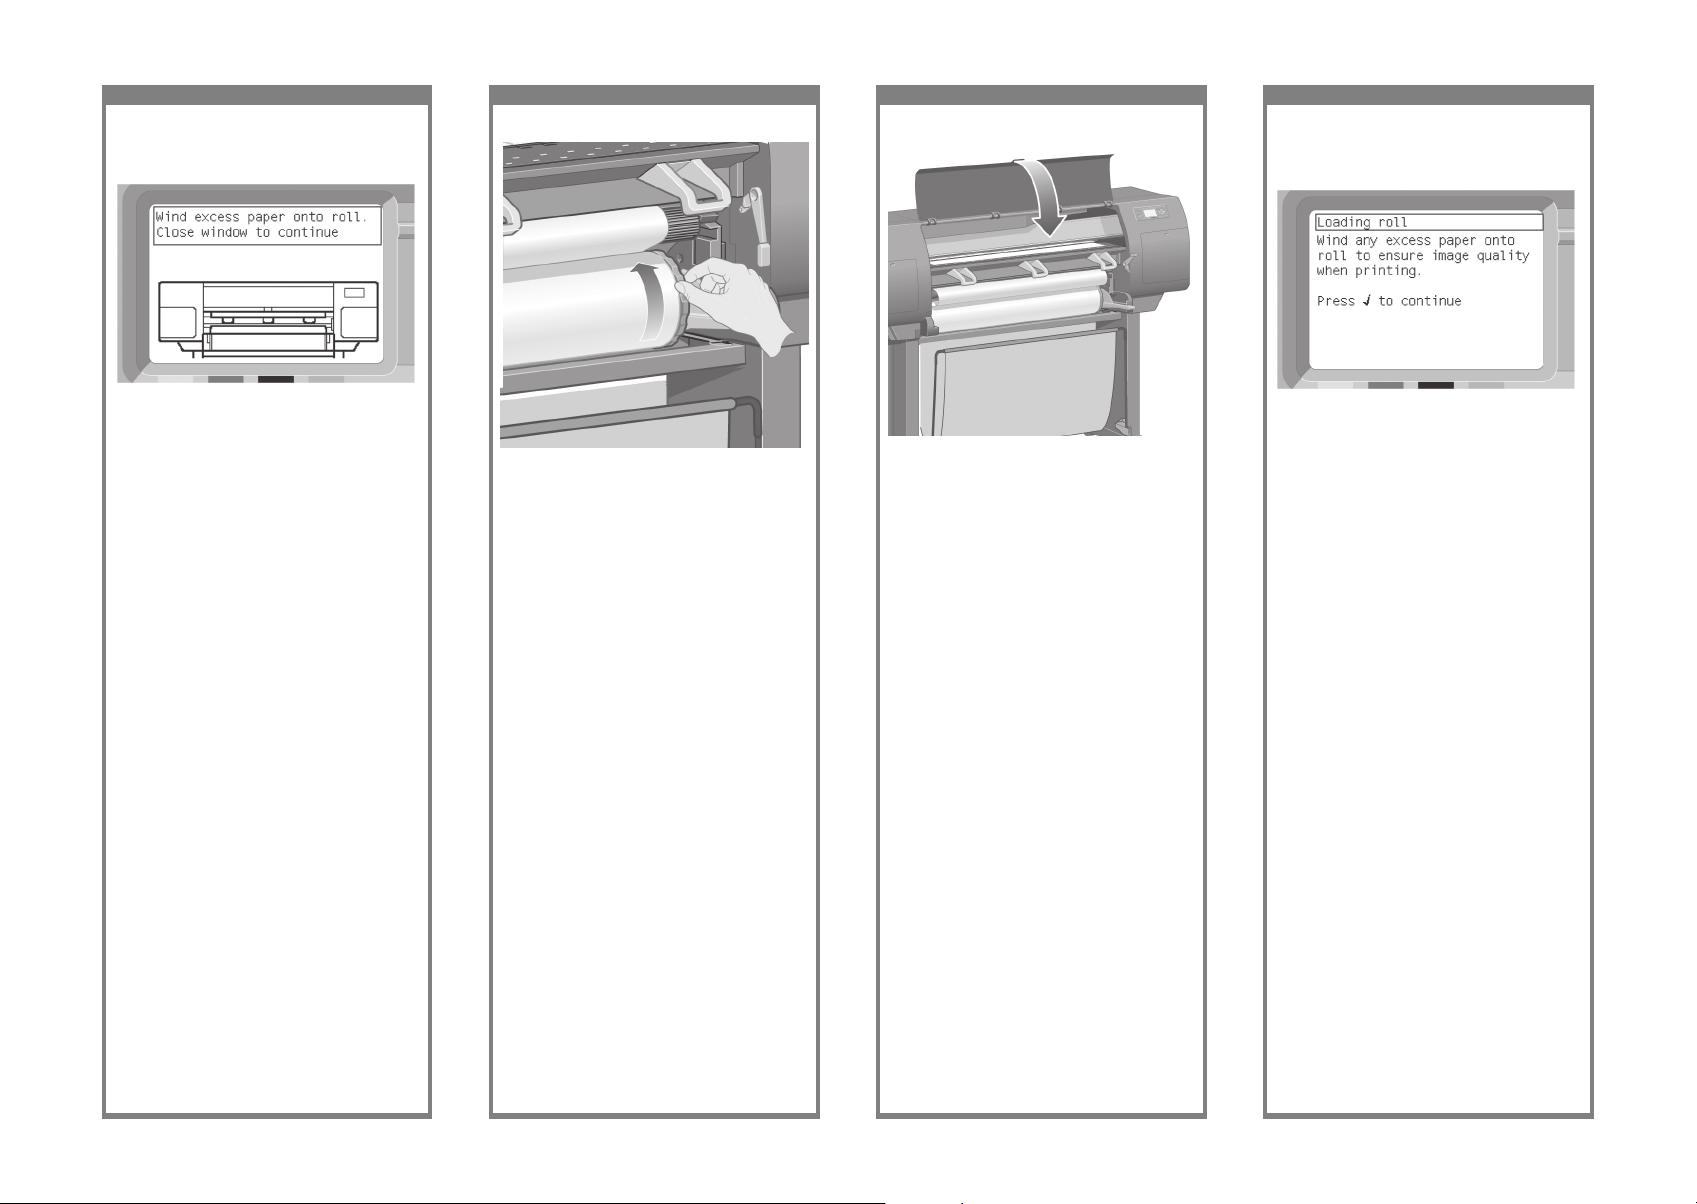
Pull out approximately 1 m (3 ft) of the roll.
Tirez environ 1 m du rouleau.
Ziehen Sie etwa 1 m Papier nach vorne heraus.
Estrarre approssimativamente un metro di carta
del rotolo.
Open the printer window.
Ouvrez la fenêtre de l’imprimante.
Öffnen Sie das Druckerfenster.
Aprire la nestra della stampante.
Lift the paper load lever.
Soulevez le levier de chargement du papier.
Drücken Sie den Papierladehebel nach oben.
Sollevare la leva per il caricamento della carta.
Wait until you see this front panel message.
Patientez jusqu’à ce que ce message s’afche
sur le panneau avant.
Warten Sie, bis diese Bedienfeldmeldung
angezeigt wird.
Attendere no alla visualizzazione del messaggio
sul pannello frontale.
1m (3ft)
Page 30

11 3 11 4 11 5 11 6
Lower the paper load lever.
Abaissez le levier de chargement du papier.
Drücken Sie den Papierladehebel nach unten.
Abbassare la leva per il caricamento della carta.
Wait until the paper emerges from the printer
as shown above.
Attendez que le papier sorte de l’imprimante
de la façon indiquée ci-dessus.
Warten Sie, bis das Papier wie oben gezeigt aus
dem Drucker austritt.
Attendere no a che la carta appare di nuovo
dalla stampante come riportato nella gura.
Make sure the paper is aligned with the blue
line and half circle on the platen.
Assurez-vous que le papier est aligné sur la ligne
et le demi-cercle bleus du cylindre.
Stellen Sie sicher, dass das Papier an der
blauen Linie und am Halbkreis auf der Walze
ausgerichtet ist.
Assicurarsi che la carta sia allineata con la linea
blu e con la mezza luna della piastra.
Insert the edge of the roll above the black roller.
Insérez le bord du rouleau au-dessus du galet noir.
Führen Sie die Kante des Papiers über der
schwarzen Walze ein.
Inserire il bordo del rotolo sopra il rullo nero.
Page 31
117 11 8 119 120
You should see the front panel message above.
Le message ci-dessus doit s’afcher sur le
panneau avant.
Die obige Bedienfeldmeldung wird angezeigt.
Sul pannello frontale viene visualizzato un
messaggio.
Using the stops, carefully wind the excess paper
back on to the spindle.
A l’aide des taquets, enroulez avec précaution le
papier supplémentaire sur la bobine.
Wickeln Sie das überschüssige Papier mithilfe
der Stopper wieder auf die Spindel auf.
Mediante i fermi, avvolgere la carta in eccesso
sul mandrino.
Lower the printer window.
Abaissez la fenêtre de l’imprimante.
Schließen Sie das Druckerfenster.
Abbassare la nestra della stampante.
You should see the front panel message above.
Le message ci-dessus doit s’afcher sur le
panneau avant.
Die obige Bedienfeldmeldung wird angezeigt.
Sul pannello frontale viene visualizzato un
messaggio.
Page 32
121 122 12 3 124
Locate the area at the back of the printer where
you can connect the printer to your computer or
network, or install an optional accessory.
Recherchez l’emplacement à l’arrière de
l’imprimante qui vous permet de connecter
celle-ci à votre ordinateur ou à un réseau,
ou installez un accessoire facultatif.
Suchen Sie auf der Rückseite des Druckers die
Stelle, an der Sie das Gerät mit Ihrem Computer
oder einem Netzwerk verbinden oder optionales
Zubehör anschließen können.
Individuare l’area sul retro della stampante in cui
è possibile collegare la stampante al computer
o alla rete oppure installare un accessorio
opzionale.
The printer will automatically perform printhead
alignment and a color calibration for the paper
type that you have inserted. During this process
the printer will advance the paper up to 3 m
(~10 ft) before printing. Please do not try to stop
the paper advance; it is necessary to ensure
a successful printhead alignment. The whole
alignment and calibration process will take about
twenty minutes; while it is going on, you can
proceed to the next section.
L’imprimante effectue automatiquement
l’alignement des têtes d’impression et un
calibrage de la couleur pour le type de papier
inséré. Lors de ce processus, l’imprimante fait
avancer le papier de 3 m au maximum avant
l’impression. N’essayez pas d’arrêter l’avance
du papier ; elle est nécessaire pour garantir
un alignement des têtes d’impression réussi.
L’intégralité du processus d’alignement et de
calibrage dure environ vingt minutes ; pendant
son déroul ment, vous pouvez passer à la section
suivante.
Der Drucker führt nun automatisch eine
Druckkopfausrichtung und Farbkalibrierung
für die Papiersorte durch, die Sie eingelegt
haben. Dabei gibt das Gerät bis zu 3 m
unbedrucktes Papier aus. Versuchen Sie icht,
den Papiervorschub zu stoppen, da er für die
ordnungsgemäße Ausrichtung des Druckkopfs
erforderlich ist. Der gesamte Ausrichtungs- und
Kalibriervorgang dauert etwa 20 Minuten.
Während dieser Zeit können Sie mit dem
nächsten Abschnitt fortfahren.
La stampante eseguirà automaticamente
l’allineamento delle testine e la calibrazione del
colore per il tipo di carta inserito. Durante questa
operazione la stampante farà avanzare la carta
di 3 m prima di iniziare la stampa. Non cercare
di bloccare l’avanzamento della carta; questa
operazione è necessaria per assicurare un
corretto allineamento delle testine. L’operazione
di allineamento e di calibrazione impiegherà
circa venti minuti; nel frattempo, è possibile
passare alla sezione successiva.
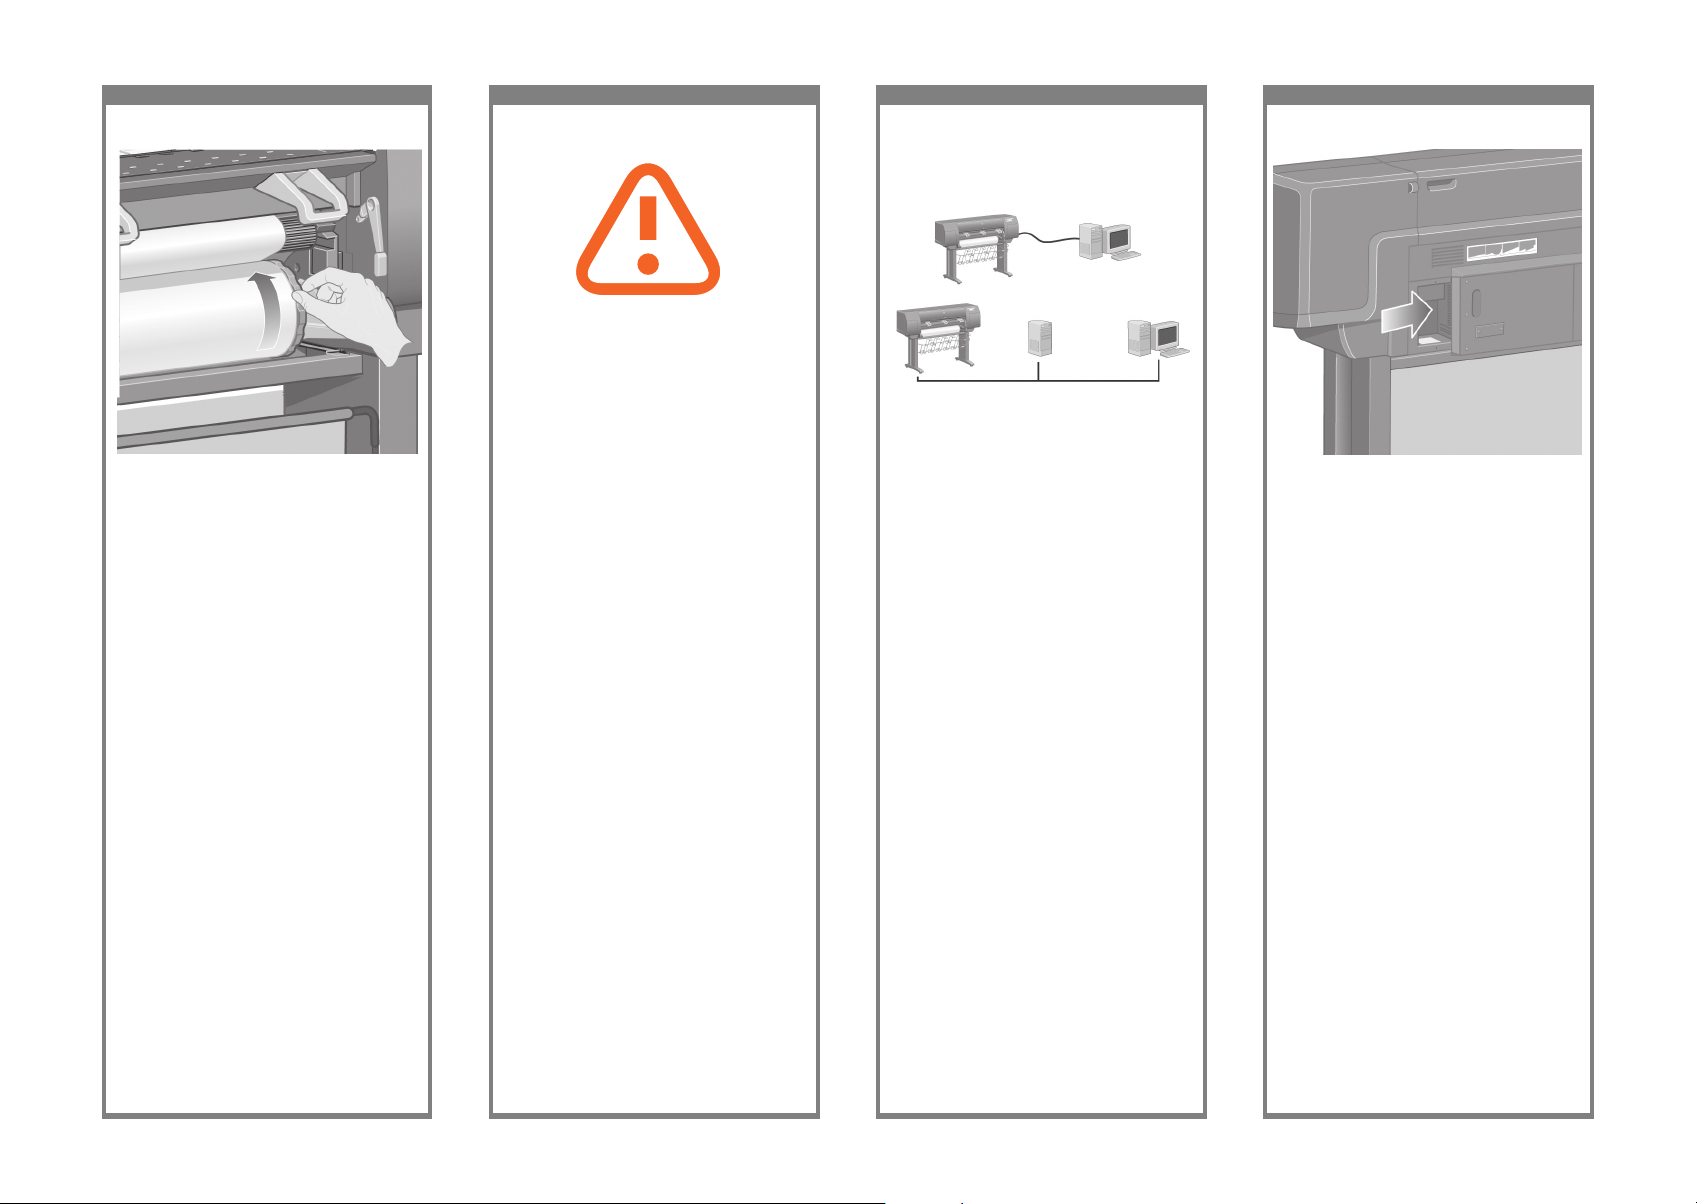
Your printer can be connected to a computer
directly or to one or more computers via a network.
Votre imprimante peut être connectée directement
à un ordinateur ou à un ou plusieurs ordinateurs
via un réseau.
Der Drucker kann entweder direkt an einen
Computer angeschlossen oder über ein Netzwerk
mit mehreren Computern verbunden werden.
La stampante può essere collegata direttamente
a un computer oppure a uno o più computer su
una rete.
Using the stops, carefully wind the excess paper
back on to the spindle.
A l’aide des taquets, enroulez avec précaution
le papier supplémentaire sur la bobine.
Wickeln Sie das überschüssige Papier mithilfe
der Stopper wieder auf die Spindel auf.
Mediante i fermi, avvolgere la carta in eccesso
sul mandrino.
PC/Mac/Workstation
PC, Macintosh ou station de travail
PC, Macintosh oder Arbeitsstation
PC, Macintosh o workstation
PC/Mac/Workstation
PC, Macintosh ou
station de travail
PC, Macintosh oder
Arbeitsstation
PC, Macintosh
o workstation
Server
Serveur
Server
Server
Printer
Imprimante
Drucker
Stampante
Page 33

125 12 6 127 12 8
Now you have completed the assembly of your
printer. The following pages describe how to
congure your computer for successful printing.
Vous avez maintenant terminé l’assemblage de
votre imprimante. Les pages suivantes décrivent
le mode de conguration de votre ordinateur
pour réussir vos impressions.
Der Drucker ist nun betriebsbereit. Auf den
folgenden Seiten wird beschrieben, wie Sie
Ihren Computer für das Drucken kongurieren.
A questo punto, l’assemblaggio della stampante
è stato completato. Nelle pagine seguenti
è riportato come congurare il computer per
eseguire correttamente le operazioni di stampa.
A larger socket is provided to connect an
optional accessory. Caution: do not attempt
to use this socket for any other purpose.
Un socket plus important est fourni pour la
connexion d’un accessoire facultatif. Attention :
n’essayez pas d’utiliser ce socket pour un
autre usage.
Für das Anschließen von optionalem Zubehör
steht ein größerer Anschluss zur Verfügung.
Achtung: Dieser Anschluss darf nicht für andere
Zwecke verwendet werden.
Per collegare un accessorio opzionale, è fornita
una presa di dimensioni maggiori. Attenzione:
non provare a utilizzare questa presa per
altri scopi.
Pass the LAN cable through the hook at the rear
of the printer.
Passez le câble LAN à travers le crochet à l’arrière
de l’imprimante.
Führen Sie das LAN-Kabel durch die Aussparung
an der Rückseite des Druckers.
Passare il cavo LAN all’interno del gancio sul
retro della stampante.
A Gigabit Ethernet socket is provided for
connection to a network. Two FireWire sockets
are provided for direct connection to computers.
Un socket Gigabit Ethernet est fourni pour la
connexion à un réseau. Deux sockets FireWire
sont fournis pour la connexion directe aux
ordinateurs.
Für die Verbindung mit einem Netzwerk steht ein
Gigabit Ethernet-Anschluss zur Verfügung. Für
eine direkte Verbindung zu Computern sind zwei
FireWire-Anschlüsse vorhanden.
Per collegare la stampante a una rete, viene
fornita una Gigabit Ethernet veloce. Per
collegare la stampante ai computer, vengono
invece fornite due prese FireWire.
Page 34

Note for MAC & Windows
USB connection:
Do not connect the computer to the printer yet.
You must rst install the printer driver software
on the computer.
Insert the HP start up Kit CD/DVD into your computer.
For Windows:
* If the CD/DVD does not start automatically,
run autorun.exe program on the root folder on
the CD/DVD.
* To install a Network Printer click on Express
Network Install otherwise click on Custom Install
and follow the instructions on your screen.
For Mac:
* If the CD/DVD does not start automatically, open the
CD/DVD icon on your desktop.
* Open the Mac OS X HP Designjet Installer icon
and follow the instructions on your screen.
NOTE: You can download the latest software from:
HP Designjet 4020: http://www.hp.com/go/4020/
drivers
or
HP Designjet 4020ps: http://www.hp.com/
go/4020ps/drivers
Remarque pour la connexion
USB MAC & Windows :
Ne connectez pas encore l’ordinateur à l’imprimante.
Vous devez d’abord installer le pilote de l’imprimante
sur l’ordinateur.
Insérez le CD/DVD du Kit de démarrage HP dans
votre ordinateur.
Pour Windows :
* Si le CD/DVD ne s’exécute pas automatiquement,
exécutez le programme autorun.exe dans le dossier
racine du CD/DVD.
* Pour installer une imprimante réseau, cliquez sur
Installation réseau express ; sinon cliquez sur
Installation personnalisée et suivez les instructions
à l’écran.
Pour Mac :
* Si le CD/DVD ne s’exécute pas automatiquement,
ouvrez l’icône du CD/DVD sur votre Bureau.
* Ouvrez l’icône Mac OS X HP Designjet Installer
et suivez les instructions à l’écran.
Remarque : vous pouvez télécharger le logiciel le
plus récent à partir des adresses suivantes :
HP Designjet 4020 : http://www.hp.com/go/4020/
drivers
ou
HP Designjet 4020ps : http://www.hp.com/
go/4020ps/drivers
Hinweis zur USB-Verbindung auf
Mac- und Windows-Computern:
Schließen Sie den Drucker jetzt noch nicht an den
Computer an. Sie müssen zuerst den Druckertreiber
auf dem Computer installieren. Gehen Sie dazu
folgendermaßen vor:
Legen Sie die CD/DVD mit dem HP Start-up Kit in
das Laufwerk des Computers ein.
Windows:
* Wenn die CD/DVD nicht automatisch gestartet wird,
doppelklicken Sie im Stammverzeichnis der CD/DVD
auf die Datei autorun.exe.
* Zur Installation eines Netzwerkdruckers klicken Sie
auf „Express-Netzwerkinstallation“. Andernfalls
klicken Sie auf „Benutzerdenierte Installation“ und
folgen der Anleitung auf dem Bildschirm.
Mac:
* Wenn die CD/DVD nicht automatisch gestartet wird,
öffnen Sie das CD/DVD-Symbol auf dem Desktop.
* Öffnen Sie das Symbol für das Mac OS X HP
Designjet-Installationsprogramm, und folgen Sie
der Anleitung auf dem Bildschirm.
Hinweis: Sie können die neueste Software von den
folgenden Websites herunterladen:
HP Designjet 4020: http://www.hp.com/go/4020/
drivers
oder
HP Designjet 4020ps: http://www.hp.com/go/
4020ps/drivers
Nota per la connessione USB
per MAC e Windows:
Non collegare ancora il computer alla stampante.
È necessario prima installare il software del driver
della stampante nel computer.
Inserire il CD/DVD HP Start-Up Kit nella relativa
unità del computer.
Per Windows:
* se il CD/DVD non si avvia automaticamente,
eseguire il programma autorun.exe nella cartella
root del DVD/CD.
* Per installare una stampante di rete, fare clic su
Express Network Install (Installazione di rete rapida);
altrimenti, fare clic su Installazione personalizzata
e seguire le istruzioni a video.
Per Mac:
* se il CD/DVD non si avvia automaticamente aprire
l’icona del CD/DVD sul desktop.
* Aprire l’icona del programma di installazione
HP Designjet per Mac OS X e seguire le istruzioni
a video.
NOTA: il software più recente è disponibile per il
download ai seguenti indirizzi:
HP Designjet 4020: http://www.hp.com/go/4020/
drivers
oppure
HP Designjet 4020ps: http://www.hp.com/
go/4020ps/drivers
Legal notices
© Copyright 2009 Hewlett-Packard
Development Company, L.P.
The information contained herein is subject to change without
notice. The only warranties for HP products and services are set
forth in the express warranty statements accompanying such
products and services. Nothing herein should be construed as
constituting an additional warranty. HP shall not be liable for
technical or editorial errors or omissions contained herein.
Trademarks
Microsoft®; and Windows®; are U.S. registered trademarks of
Microsoft Corporation.
FireWire is a trademark of Apple Computer, Inc., registered in
the U.S. and other countries.
Informations légales :
© Copyright 2009 Hewlett-Packard
Development Company, L.P.
Les informations contenues dans ce document sont susceptibles
d’être modiées sans préavis. Les seules garanties s’appliquant
aux services et produits HP sont expressément indiquées dans
la documentation accompagnant ces produits et services.
Rien dans le présent document ne peut être considéré comme
constituant une garantie supplémentaire. HP n’est en aucun
cas responsable des éventuelles omissions ou erreurs d’ordre
technique ou éditorial contenues dans le présent document.
Marques commerciales :
Microsoft® et Windows® sont des marques de
Microsoft Corporation déposées aux Etats-Unis.
FireWire est une marque d’Apple Computer, Inc.,
déposée aux Etats-Unis et dans d’autres pays.
Rechtliche Hinweise:
© Copyright 2009 Hewlett-Packard
Development Company, L.P.
Die vorliegenden Informationen können ohne vorherige
Ankündigung geändert werden. Für HP Produkte und
Dienste gelten ausschließlich die Bestimmungen in der
Gewährleistungserklärung des jeweiligen Produkts bzw.
Dienstes. Aus dem vorliegenden Dokument sind keine weiter
reichenden Garantieansprüche abzuleiten. HP haftet nicht für
technische oder redaktionelle Fehler bzw. für Auslassungen in
diesem Dokument.
Marken:
Microsoft® und Windows® sind in den USA eingetragene
Marken der Microsoft Corporation.
FireWire ist eine Marke von Apple Computer Inc.,
die in den USA und anderen Ländern/Regionen eingetragen ist.
Note legali:
© Copyright 2009 Hewlett-Packard
Development Company, L.P.
Le informazioni contenute in questo documento sono soggette
a modica senza preavviso. Le sole garanzie per prodotti
e servizi HP sono esposte in modo esplicito nelle dichiarazioni
di garanzia accluse ai relativi prodotti e servizi. Nessuna
delle informazioni qui contenute deve essere interpretata come
garanzia aggiuntiva. HP non sarà responsabile per omissioni
o errori tecnici o editoriali contenuti nel presente documento.
Marchi:
Microsoft® e Windows® sono marchi registrati negli Stati Uniti
d’America di proprietà di Microsoft Corporation.
FireWire è un marchio di Apple Computer, Inc., registrati negli
Stati Uniti e in altri paesi.
 Loading...