

Page 1

x4
?
In case of difculty, please consult:
- Your printer’s Embedded Web Server
- Using your printer CD
Informasi lebih lanjut tersedia pada:
- CD Menggunakan printer Anda
- Server Web Terpadu printer Anda
Read these instructions carefully...
What you will need for this procedure
- Some of the printer components are bulky, you
will need up to four people to lift them. When
this is necessary, the symbol shown at the bottom
is shown.
- To assemble the printer you will need at least
3 × 5 m (10 × 16 ft) of empty oor space, and
about four hours.
Bacalah petunjuk ini dengan seksama...
Yang akan Anda perlukan untuk
prosedur ini
- Karena beberapa komponen printer
berukuran besar, Anda memerlukan
sampai empat orang untuk
mengangkatnya. Apabila hal ini
diperlukan, simbol ini ditampilkan
- Untuk merakit printer Anda memerlukan
ruang lantai kosong sedikitnya 3 × 5 m
(10 × 16 ft),dan kurang lebih dua jam.
Printer working area
Before you start unpacking, consider where
you are going to put the assembled printer.
You should allow some clear space on all sides
of the printer box. The recommended clearances
are shown in the illustration above.
Daerah kerja printer
Sebelum mulai membuka kemasan,
pertimbangkan di mana Anda
akan menempatkan printer setelah dirakit. Anda
harus menyisakan
ruang kosong di belakang dan di depan printer.
Jarak ruang yang
dianjurkan ditunjukkan pada ilustrasi di bawah
ini.
HP Designjet 4020/4020ps
Printer Assembly Instructions
HP Designjet 4020/4020ps
HP Designjet 4020/4020ps
HP Designjet 4020/4020ps
Printer Petunjuk pengaturan
© 2009 Hewlett-Packard Company
Inkjet Commercial Division
Avenida Graells 501 · 08174
Sant Cugat del Vallès
Barcelona · Spain
All rights reserved
Printed in Singapore
10 cm
179 cm
Page 2

1 2 3 4
The shapes on the boxes identify the contents.
Bentuk dari kotak menunjukkan isinya. Rujuk
pada tabel di bawah ini:
Mark on box
Tanda pada
kotak
Contents of box
Isi kotak
Printer body
Badan printer
Stand and bin assembly
Rakitan penyangga dan nampan
Consumables box, including…
Maintenance Kit (keep safe)
Kotak suplai sekali pakai,
termasuk…
Kit Perawatan (harap disimpan
dengan aman)
Spare box (used later)
Kotak suku cadang (digunakan
dalam. Bagian 3 dari petunjuk
pengaturan ini)
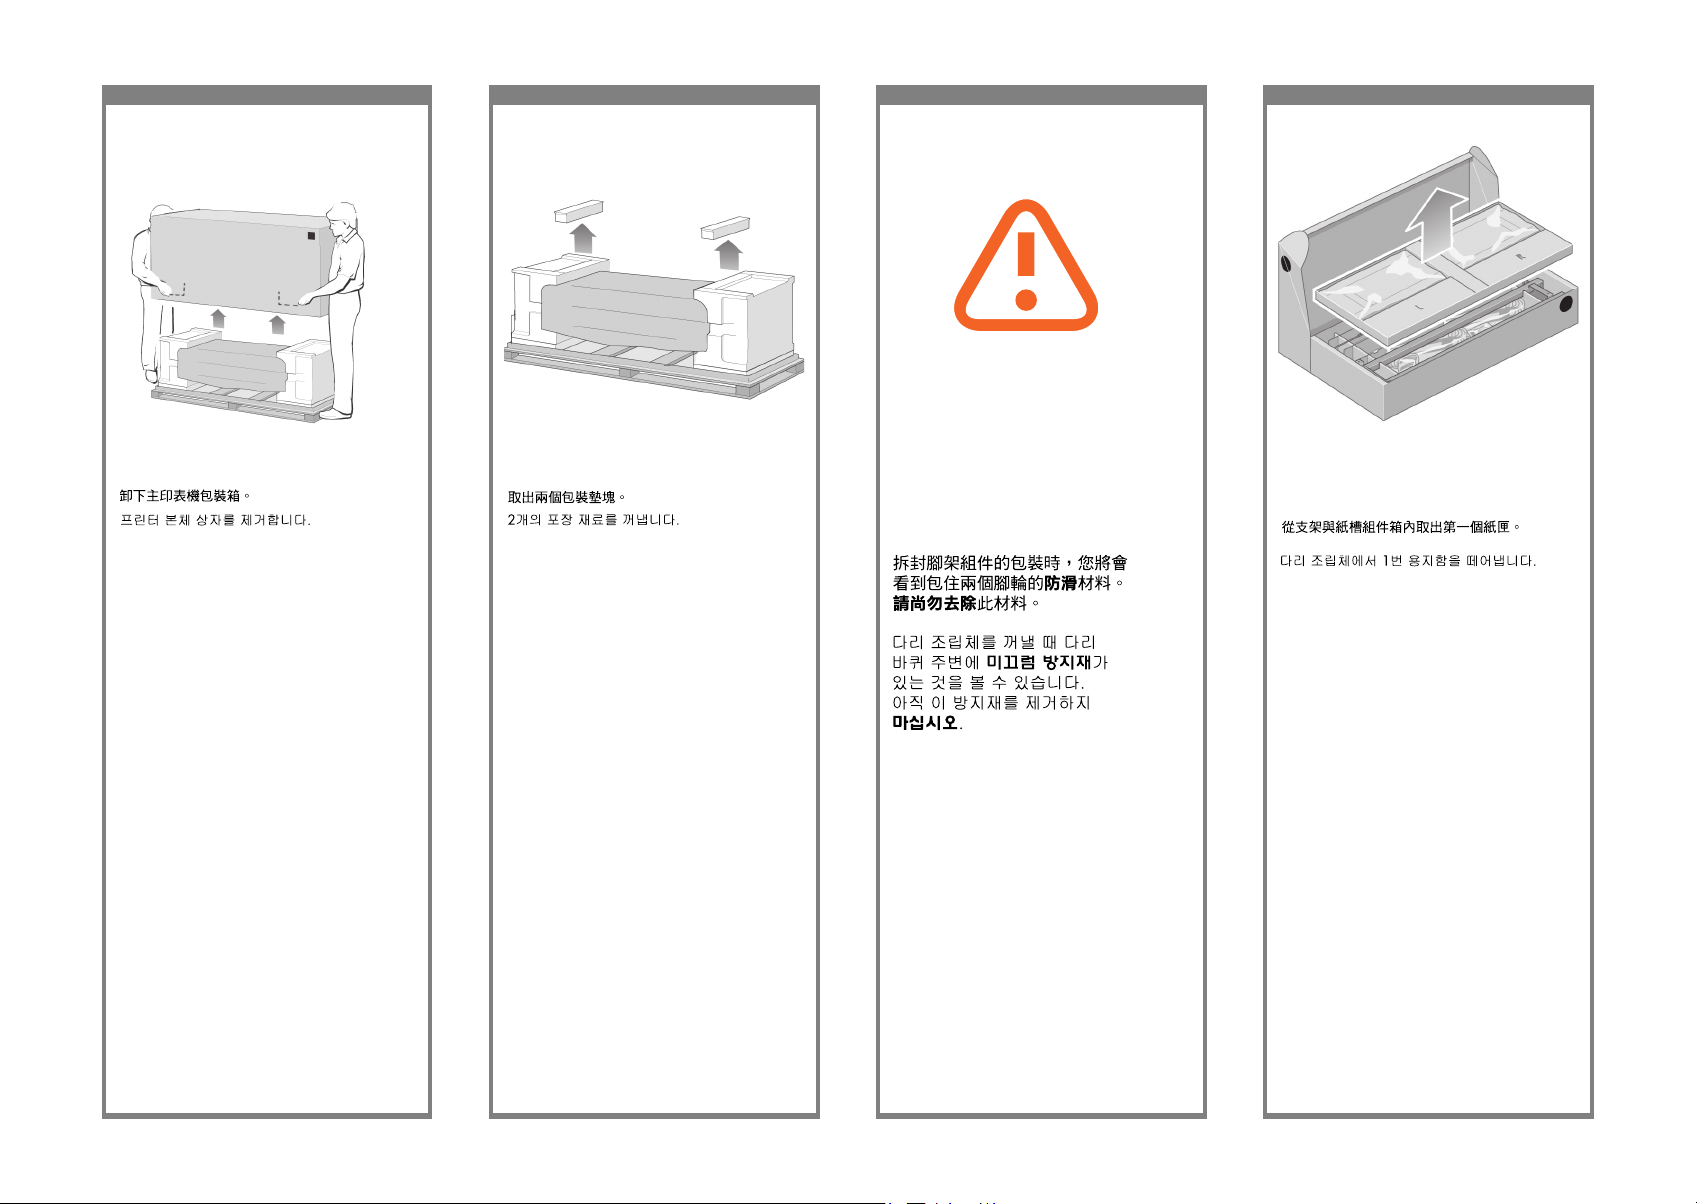
Remove the two side lids.
Lepaskan kedua tutup samping.
Cut the strap around the boxes carefully, as the
boxes may fall as soon as the strap is cut.
Potong tali pengikat di sekeliling kotak
dengan hati-hati, karena kotak mungkin
jatuh begitu tali dipotong.
Remove the boxes from the top of the main
printer box.
Lepaskan kotak dari bagian atas kotak utama
printer.
Page 3
5 6 7 8
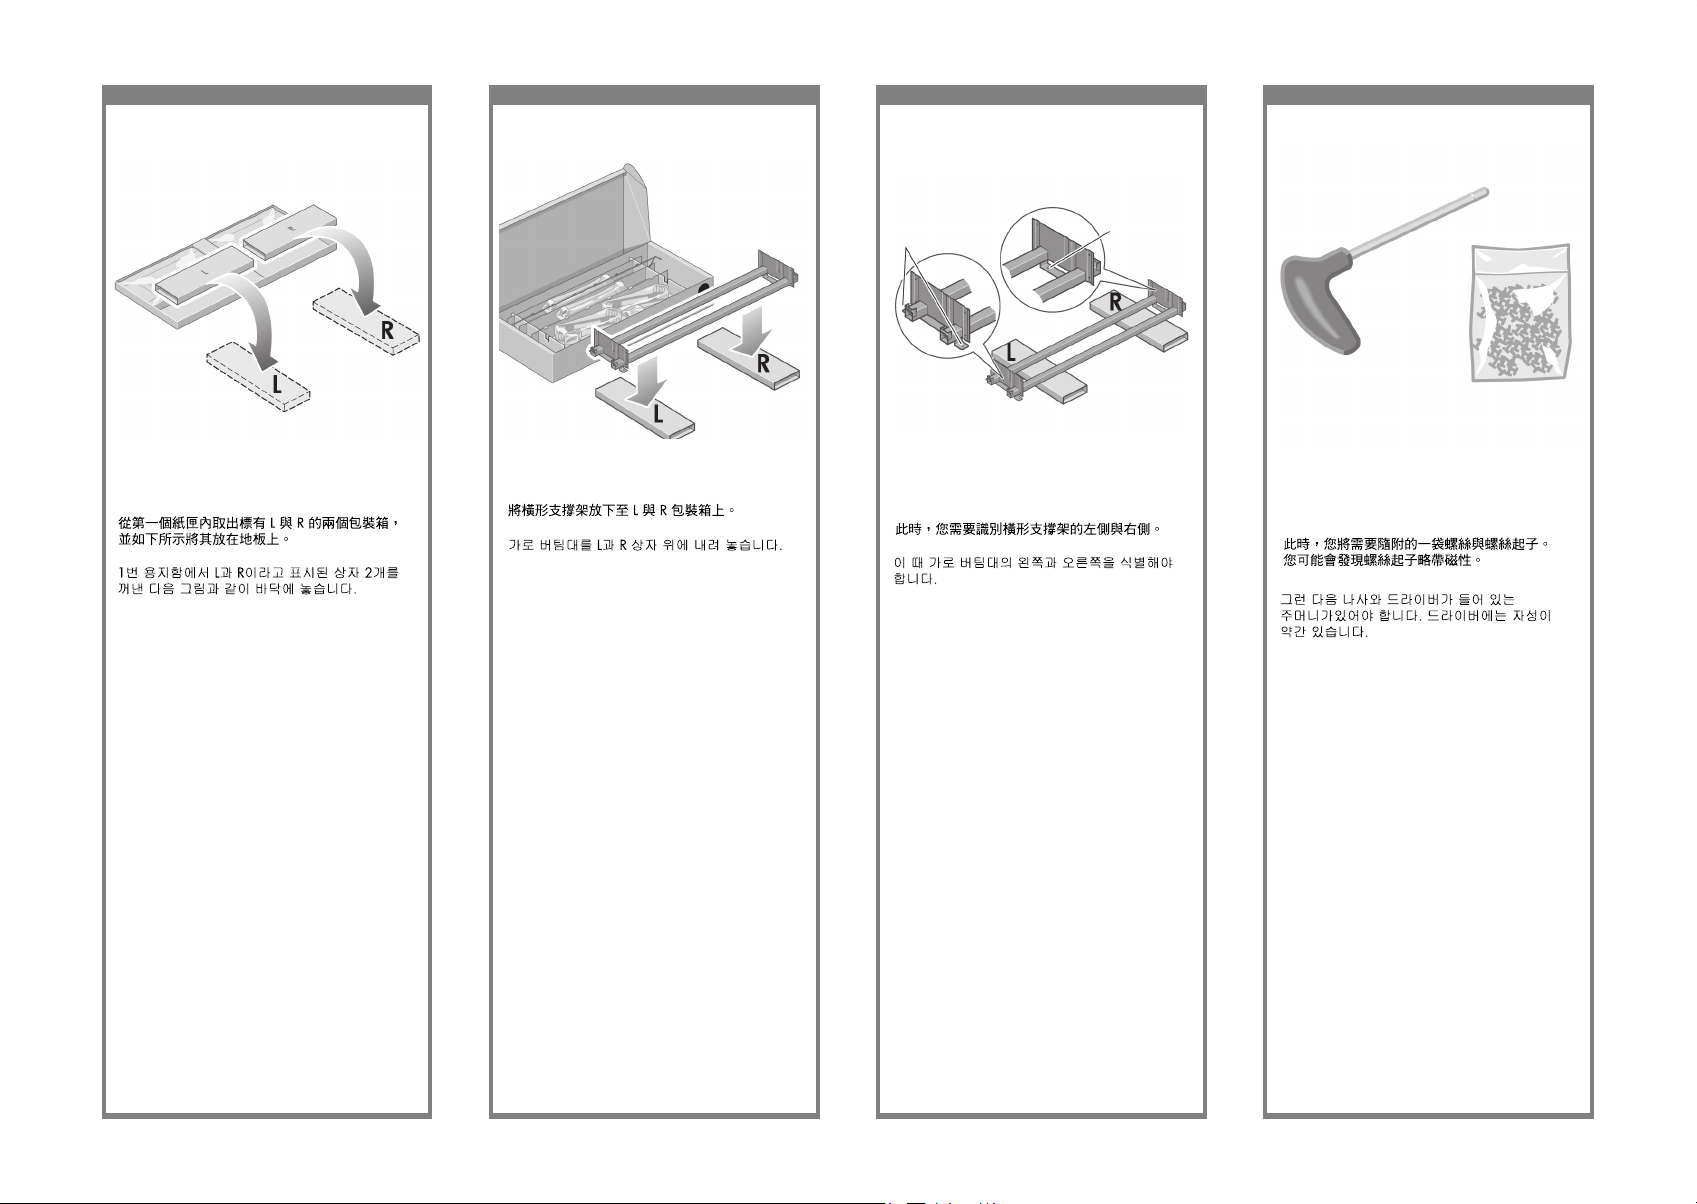
Remove the rst tray from the stand and bin
assembly box.
Keluarkan baki pertama dari kotak rakitan
penyangga dan nampan.
When you are unpacking the leg assembly,
you will see that there is anti-slip material
around two of the wheels on the feet.
DO NOT REMOVE this material yet.
Pada waktu membuka kemasan rakitan kaki
printer, Anda akan melihat bahwa ada bahan
anti-selip di sekitar kedua roda pada kaki.
JANGAN MELEPASKAN bahan ini pada tahap
ini.
Remove the main printer box.
Buka kemasan kotak utama printer.
Remove the two packing pieces.
Lepaskan kedua bantalan kemasan.
Page 4
9 10 11 12
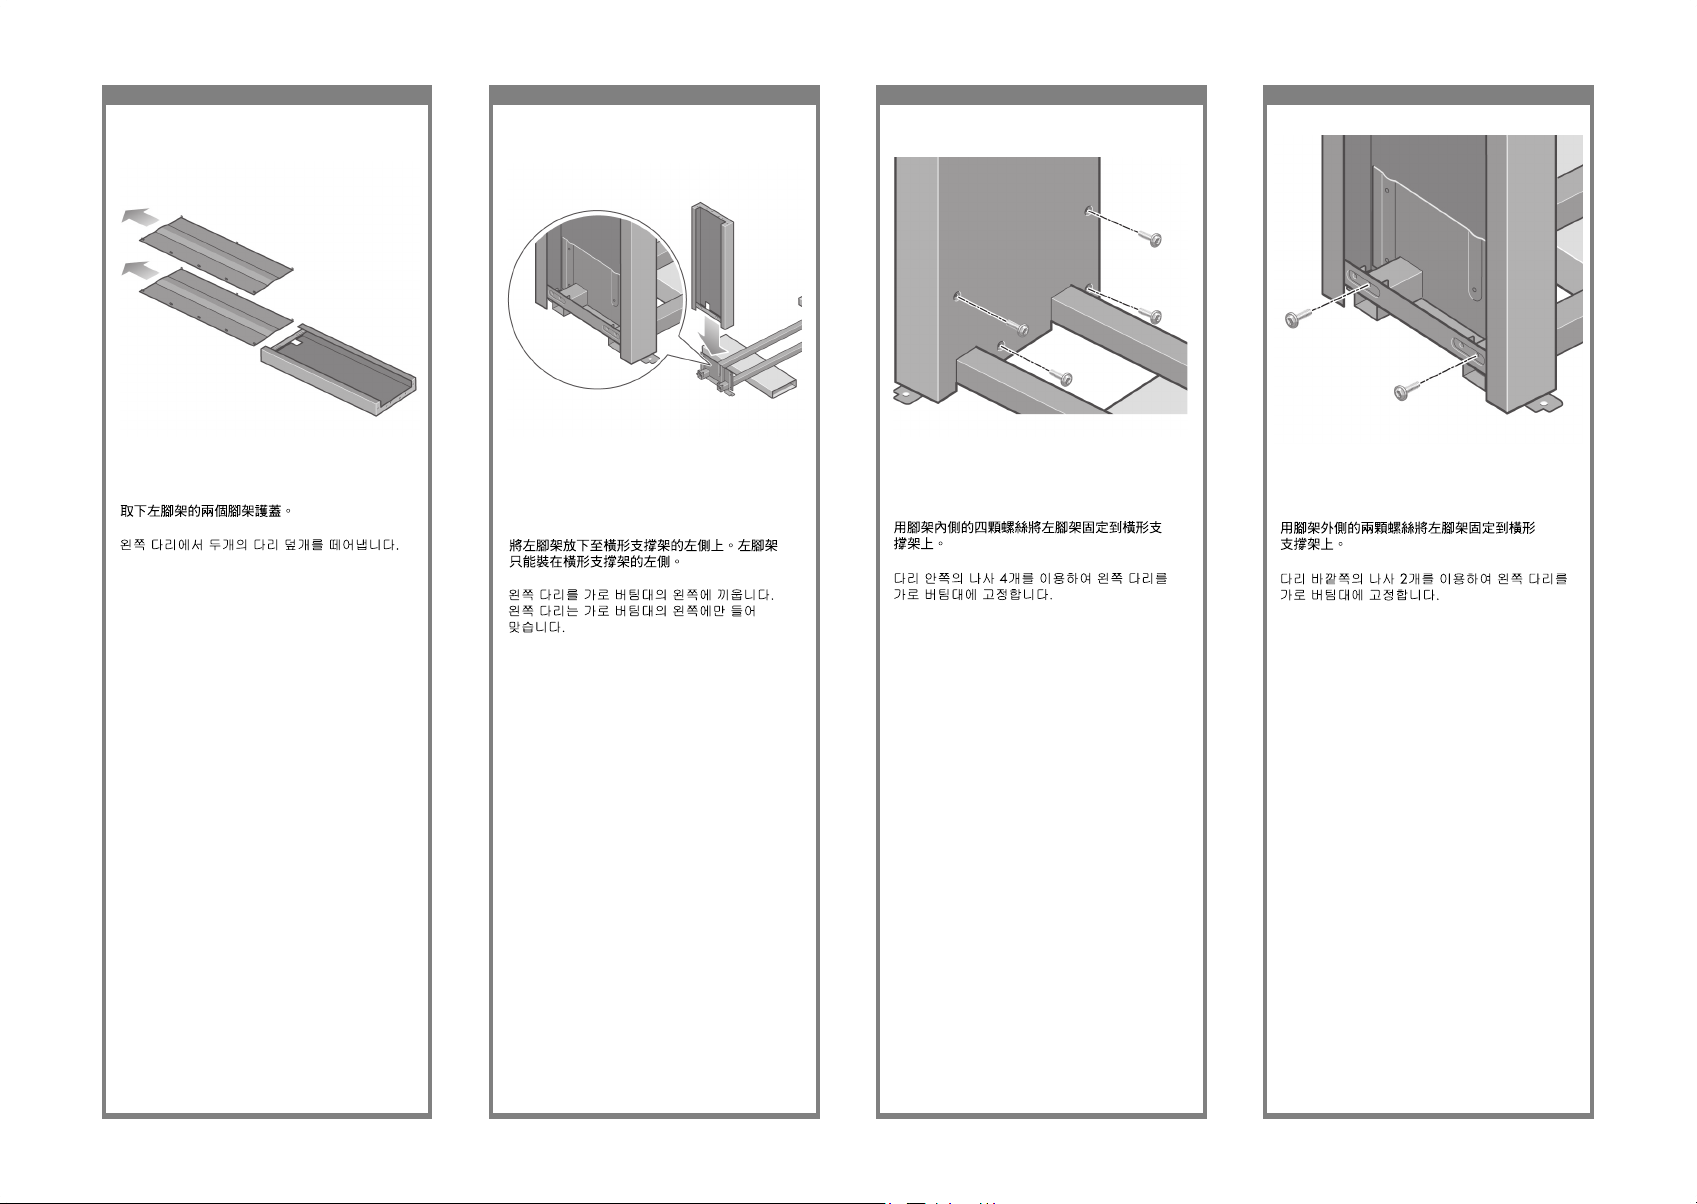
You now need to identify which is the left and
the right side of the cross-brace.
Anda perlu mengenali sisi palang penahansilang yang kiri dan yang kanan.
From the rst tray, remove the two boxes marked
with L and R. Place them on the oor as shown.
Dari baki pertama, keluarkan kedua kotak
bertanda L dan R. Letakkan keduanya di lantai
seperti ditunjukkan.
Lower the cross-brace on to the L and R boxes.
Turunkan palang penahan-silang ke atas kotak L
dan R.
2 holes
Left
Right
1 hole
Now you will need the bag of screws and the
screwdriver provided. You may notice that the
screwdriver is slightly magnetic.
Pada tahap ini Anda memerlukan kantong
sekrup dan obeng yang disertakan. Anda dapat
melihat bahwa obeng sedikit berdaya magnet.
Page 5
13 14 15 16
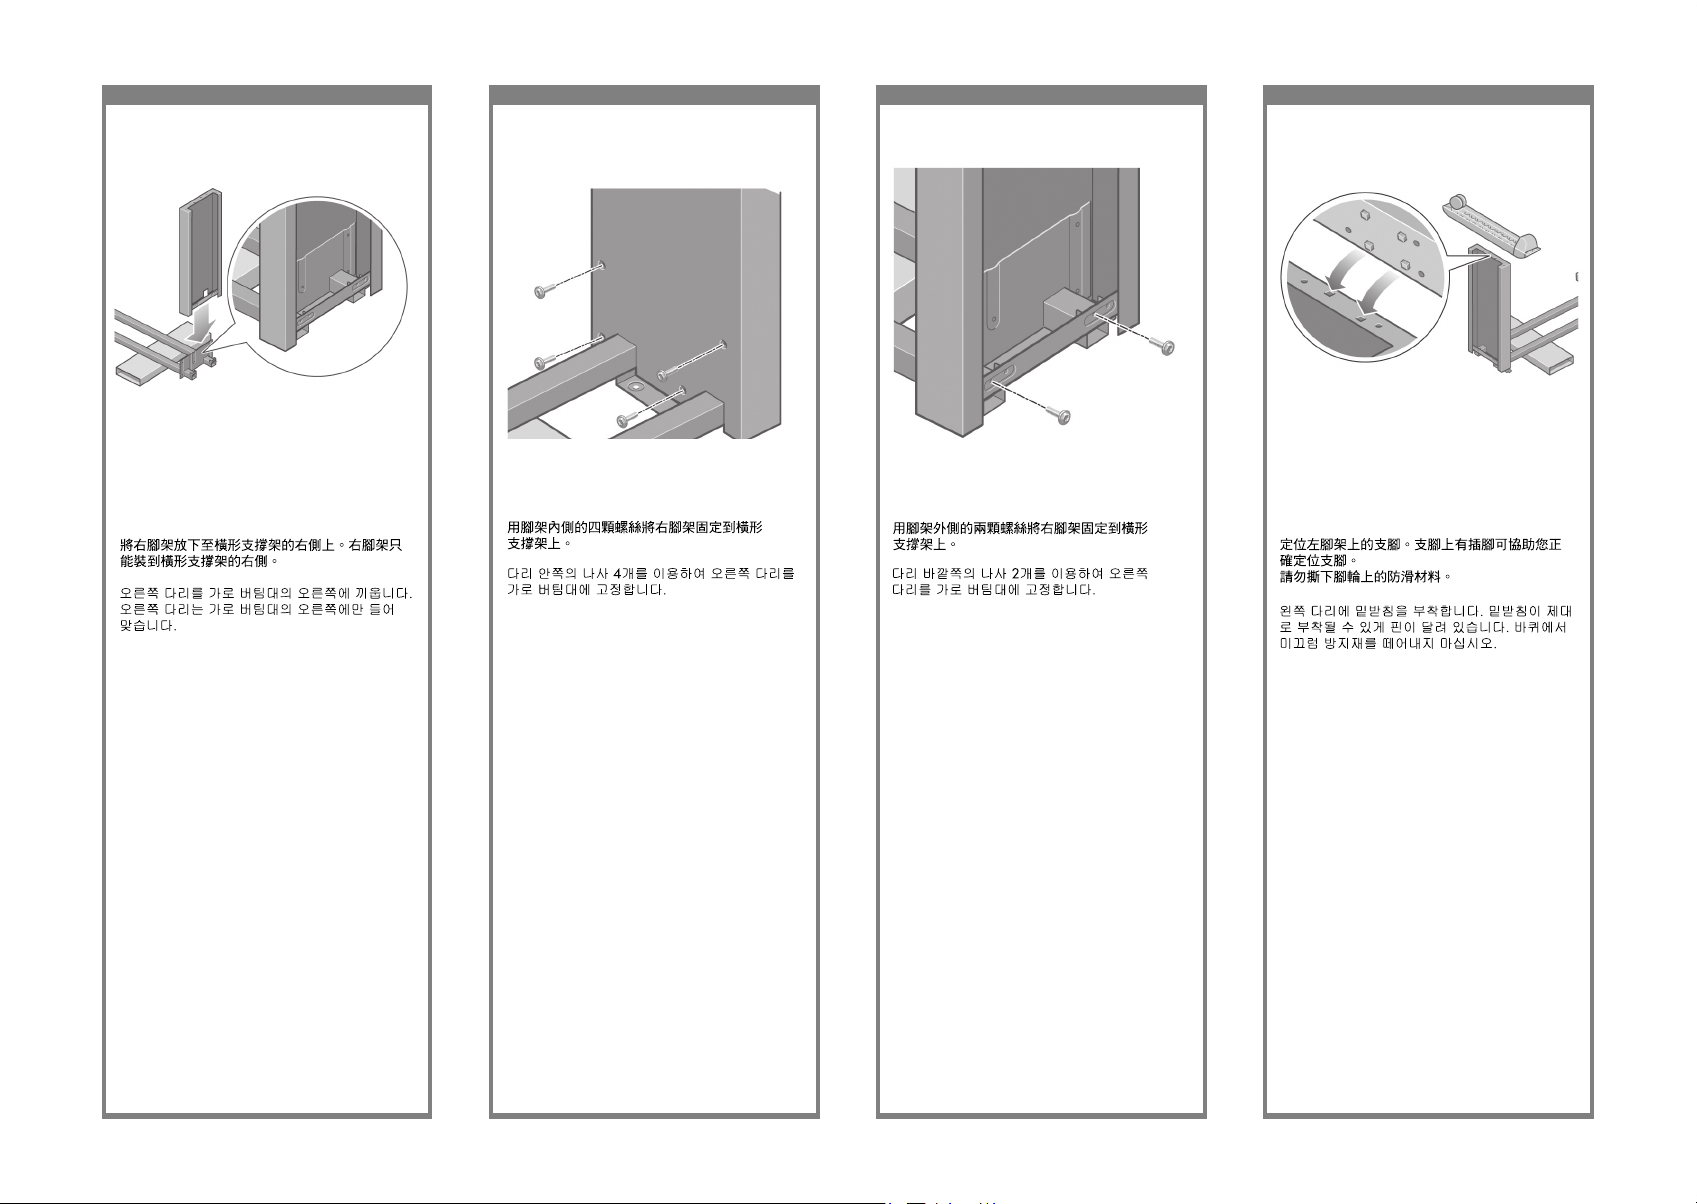
Fix the left leg to the cross-brace using four
screws on the inner side of the leg.
Kencangkan kaki kiri ke palang penahan-silang
dengan menggunakan keempat sekrup di sisi
dalam kaki.
Remove the two leg covers from the left leg.
Lepaskan kedua penutup kaki dari kaki kiri.
Lower the left leg onto the left side of the
cross-brace. The left leg will t only on the
left side of the cross-brace.
Turunkan kaki kiri ke sisi kiri dari palang
penahan-silang. Kaki kiri hanya akan pas pada
sisi kiri palang penahan-silang.
Fix the left leg to the cross-brace using two
screws on the outer side of the leg.
Kencangkan kaki kiri ke palang penahan-silang
dengan menggunakan dua sekrup di sisi luar
kaki.
Page 6
17 18 19 20
Fix the right leg to the cross-brace using
two screws on the outer side of the leg.
Kencangkan kaki kanan ke palang penahansilang dengan menggunakan dua sekrup di sisi
luar kaki.
Lower the right leg onto the right side of the
cross-brace. The right leg will t only on the
right side of the cross-brace.
Turunkan kaki kanan ke sisi kanan dari palang
penahan-silang. Kaki kanan hanya akan pas
pada sisi kanan palang penahan-silang.
Fix the right leg to the cross-brace using four
screws on the inner side of the leg.
Kencangkan kaki kanan ke palang penahansilang dengan menggunakan keempat sekrup di
sisi dalam kaki.
Position a foot on the left leg. There are pins to
help you to position the foot correctly. Do not
remove the anti-slip material from the wheel.
Tempatkan satu pijakan di kaki kiri. Tersedia pin
untuk membantu Anda menempatkan pijakan
dengan benar. Jangan melepaskan bahan antiselip dari roda.
Page 7
21 22 23 24
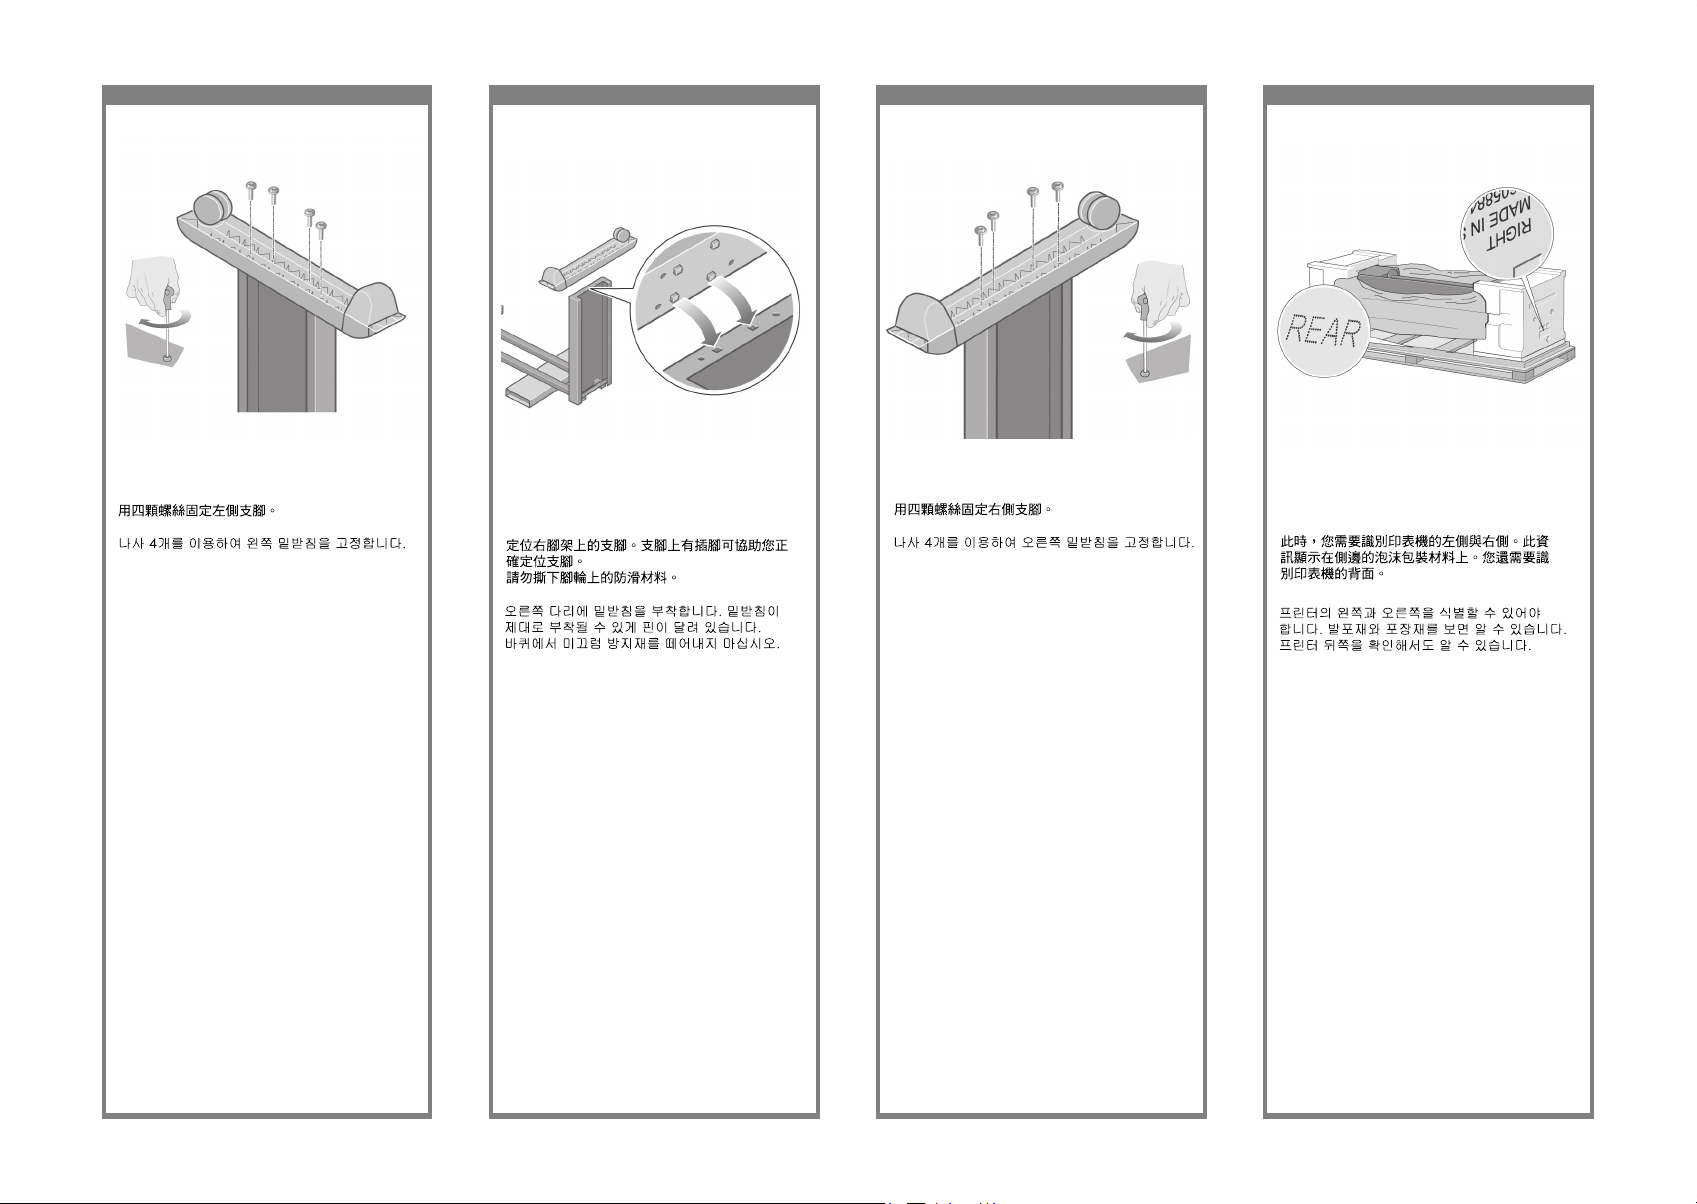
Fix the right foot using four screws.
Kencangkan kaki kanan dengan menggunakan
empat sekrup.
Fix the left foot using four screws.
Kencangkan kaki kiri dengan menggunakan
empat sekrup.
Position a foot on the right leg. There are pins
to help you to position the foot correctly. Do not
remove the anti-slip material from the wheel.
Tempatkan satu pijakan di kaki kanan. Tersedia
pin untuk membantu Anda menempatkan
pijakan dengan benar. Jangan melepaskan
bahan anti-selip dari roda.
You now need to identify the left and right of the
printer. This information is shown on the foam
end packs. Also identify the rear of the printer.
Anda perlu mengenali sisi kiri (left) dan kanan
(right) printer. Informasi ini ditunjukkan pada
gabus di bagian ujung. Kenali juga bagian
belakang (rear) printer.
Page 8

25 26 27 28
x2
Lift the stand assembly onto the printer body.
The anti-slip material should face to the rear
of the printer.
Angkat rakitan penyangga ke badan printer.
Bahan anti-selip harus menghadap ke bagian
belakang printer.
Pull open the protective plastic from the base
of the printer. Please ensure that there is a threemeter space clear of obstructions to the rear of
the printer. Remove the two desiccant bags from
the printer.
Tarik keluar plastik pelindung dari alas printer.
Pastikan bahwa tersedia jarak ruang tiga meter
tanpa terhalang di belakang printer.
Keluarkan dua kantong desiccant dari printer.
Advance warning: in the next step, make sure
you position the stand pins in the holes in the
center of the printer body brackets.
Peringatan dini: pada langkah berikutnya,
pastikan Anda menempatkan pin penyangga
pada lubang di bagian tengah braket badan
printer.
3m (9ft)
Left leg
Right leg
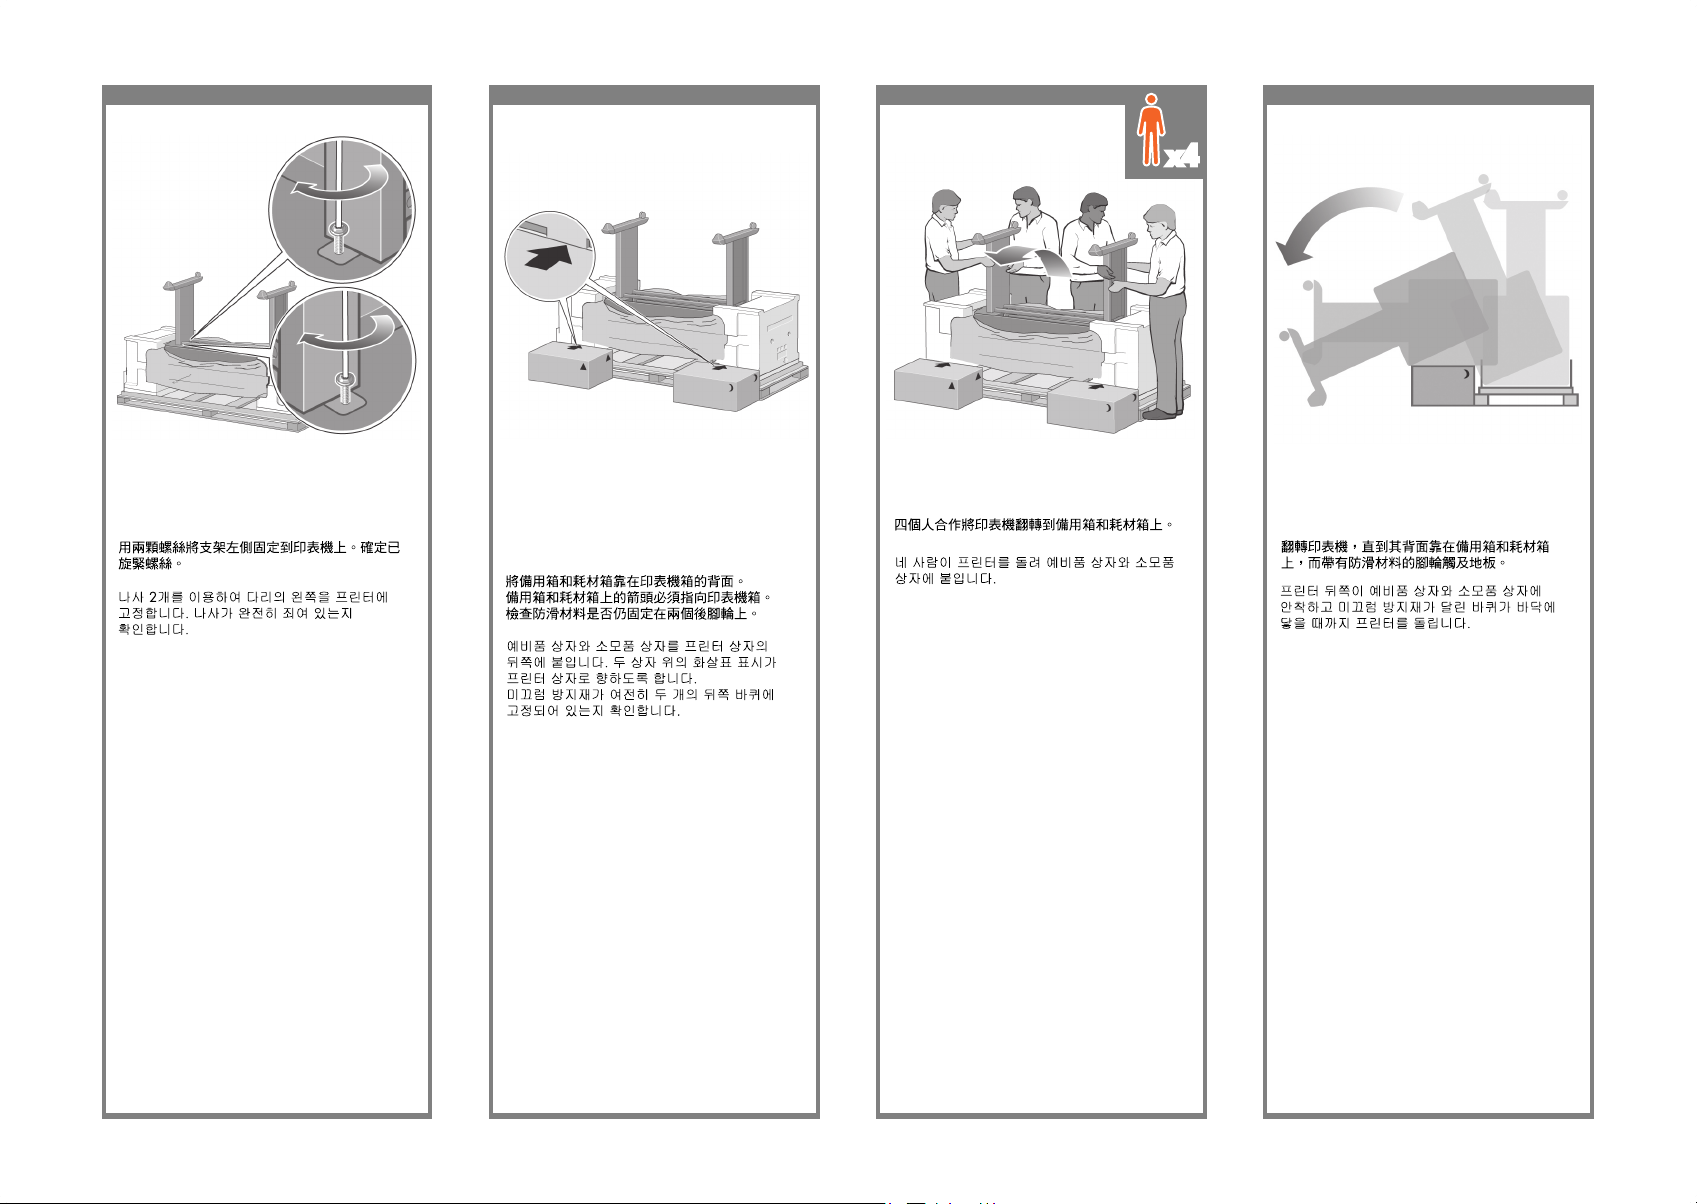
Fix the right side of the stand to the printer using
one screw. Make sure that the screw is fully
tightened.
Kencangkan sisi kanan penyangga ke printer
dengan menggunakan satu sekrup. Pastikan
bahwa sekrup dikencangkan dengan kuat.
Page 9
29 30 31 32
x4
Using four people, rotate the printer on to the
spare and consumables boxes.
Dengan mengerahkan empat orang, putar
printer ke atas kotak suku cadang dan suplai
sekali pakai.
Fix the left side of the stand to the printer using
two screws. Make sure that the screws are
fully tightened.
Kencangkan sisi kiri penyangga ke printer
dengan menggunakan dua sekrup. Pastikan
bahwa semua sekrup dikencangkan dengan kuat.
Place the spare and consumables boxes against
the rear of the printer box. The arrows on the
boxes must point towards the printer box. Check
that the anti-slip material is still xed to the two
rear wheels.
Letakkan kotak suku cadang dan suplai sekali
pakai tepat menempel bagian belakang kotak
printer. Anak panah pada kotak harus
mengarah ke kotak printer. Periksa apakah
bahan anti-selip masih menempel di kedua roda
belakang.
Rotate the printer until its rear rests on the spare
and consumables boxes and the wheels with the
anti-slip material touch the oor.
Putar printer sampai bagian belakangnya
menumpu kotak suku cadang dan suplai sekali
pakai dan roda dengan bahan anti-selip
menyentuh lantai.
Page 10
33 34 35 36
x4
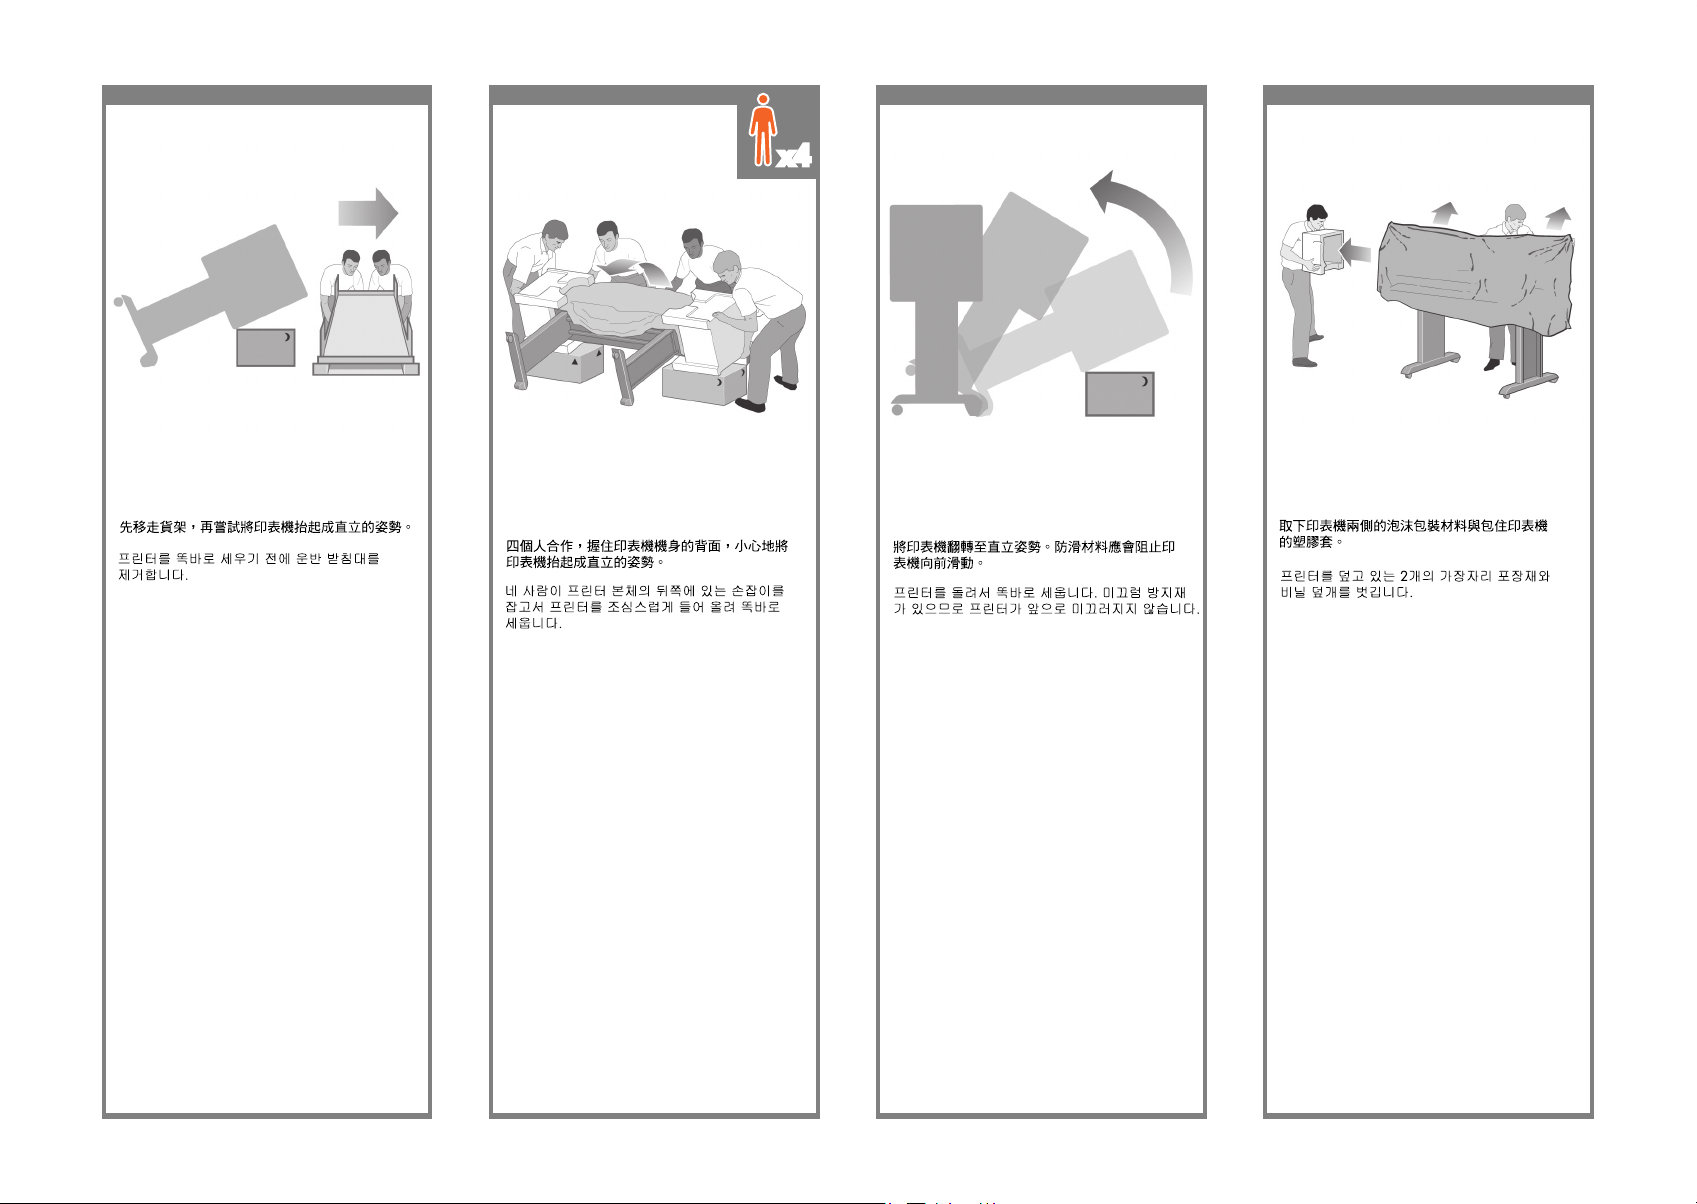
Rotate the printer into an upright position. The
anti-slip material should stop the printer from
sliding forwards.
Putar printer ke posisi tegak. Bahan anti-selip
seharusnya mencegah printer dari meluncur
ke depan.
Remove the pallet before trying to lift the printer
into an upright position.
Lepaskan palet sebelum mencoba menegakkan
printer.
Using four people and the hand holds on the
rear of the printer body, carefully lift the printer
into an upright position.
Dengan empat orang menahan bagian
belakang badan printer, tegakkan printer
dengan hati-hati.
Remove the two foam end packs and the plastic
covering the printer.
Lepaskan kedua gabus di ujung dan plastik
pembungkus printer.
Page 11
37 38 39 40
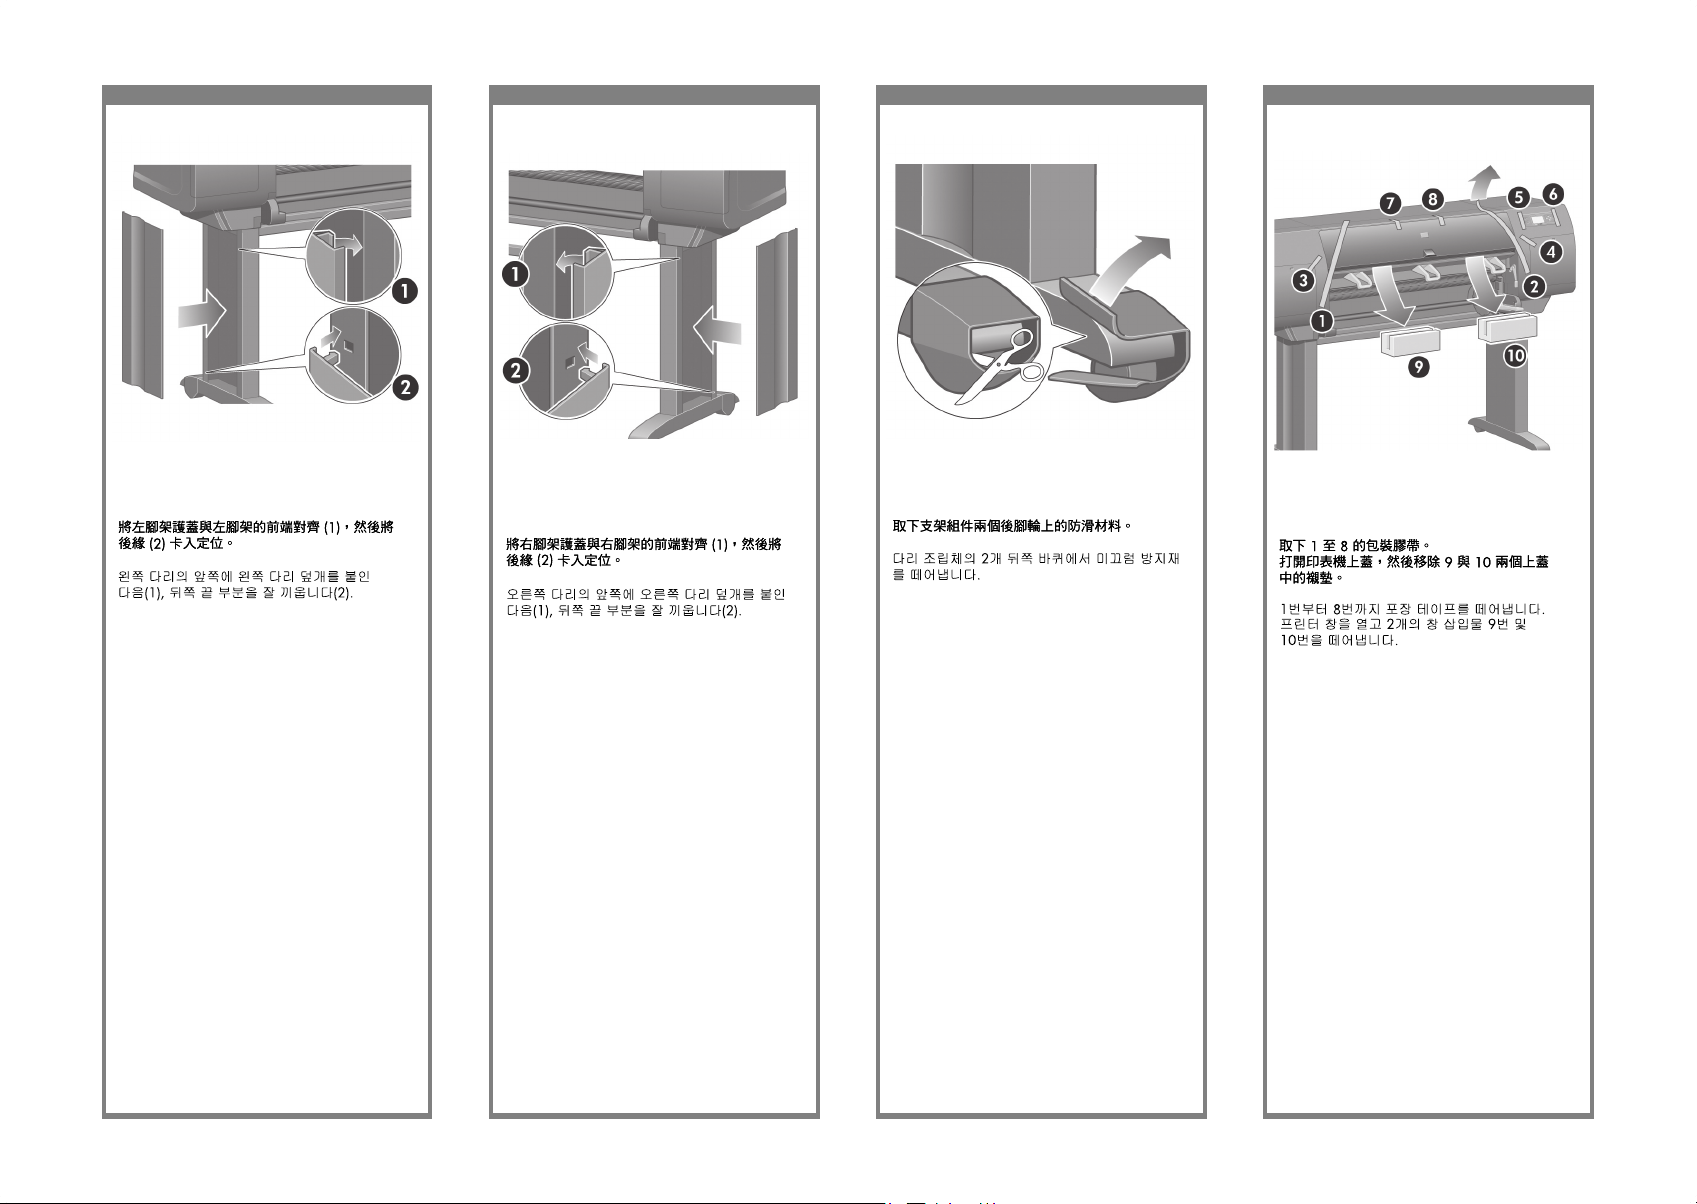
Remove the anti-slip material from the two rear
wheels on the stand assembly.
Lepaskan bahan anti-selip dari kedua roda
belakang pada rakitan penyangga.
Position the left leg cover on the front of the left
leg (1), then clip the rear edge (2) into place.
Tempatkan penutup kaki kiri di depan kaki
kiri (1), kemudian jepitkan sisi belakang (2) ke
tempatnya.
Position the right leg cover on the front of the
right leg (1), then clip the rear edge (2) into
place.
Tempatkan penutup kaki kanan di depan kaki
kanan (1), kemudian jepitkan sisi belakang (2)
ke tempatnya.
Remove the packing tapes 1 to 8. Open the
printer window and remove the two window
inserts 9 and 10.
Lepaskan pita kemasan 1 s/d 8. Buka jendela
printer dan lepaskan kedua bantalan jendela 9
dan 10.
Page 12

41 42 43 44
Open the printhead cleaner door and remove
the carriage packing material. Then close the
cleaner door.
Buka pintu pembersih kepala cetak dan
keluarkan bahan kemasan carriage. Kemudian
tutup pintu pembersih.
Remove the protective covering from the printer
window and the front panel screen.
Lepaskan tutup pelindung dari jendela printer
dan layar panel depan.
Remove the spindle lock.
Lepaskan kunci tangkai gulungan.
Press the spindle lever down, which will unseat
the right-hand end of the spindle. Remove that
end of the spindle rst, and then the left.
Tekan tuas tangkai gulungan ke bawah, yang
akan melepaskan ujung kanan tangkai ulungan.
Lepaskan ujung tangkai gulungan tersebut,
kemudian ujung yang kiri.
Page 13

45 46 47 48
Use four screws to attach the brackets to the
lower part of the printer legs. (Each bracket
requires two screws.)
Gunakan empat sekrup untuk memasang braket
ke bagian bawah kaki printer. (Setiap braket
memerlukan dua sekrup.)
Remove the spindle lock foam piece.
Then replace the spindle.
Lepaskan gabus kunci tangkai gulungan.
Kemudian pasang kembali tangkai gulungan.
Remove the two brackets from the box that
contains the stand and the bin.
Note: The brackets are marked L and R.
Keluarkan dua braket dari boks yang berisi
dudukan dan nampan. Catatan: Braket ini diberi
tanda L dan R.
Attach the two plastic brackets to the top part of
the printer legs. Insert the tab at the bottom of the
bracket into the leg, and then ‘click’ the top of the
bracket into place.
Pasang kedua braket plastik di bagian atas kaki
printer. Masukkan tonjolan di bagian bawah
braket ke dalam kaki, kemudian ‘klik’ bagian atas
braket pada tempatnya.
Page 14

49 50 51 52
Insert the bin cross-bar into the two plastic
brackets.
Masukkan palang silang nampan ke dalam
kedua braket plastik.
Remove the bin assembly from the box that
contains the stand and the bin.
Keluarkan rakitan nampan dari boks yang berisi
dudukan dan nampan.
Insert the two bin arms into the bin cross-bar.
Keluarkan rakitan nampan dari boks yang berisi
dudukan dan nampan.
Click the ends of both bin arms into the metal
brackets.
Klik ujung kedua lengan nampan ke dalam
braket logam.
Page 15

53 54 55 56
Use the blue handle to open the bin.
HP recommends that you leave the bin in the
closed position while completing the printer
assembly procedures.
Gunakan tangkai biru untuk membuka nampan.
HP menganjurkan Anda untuk meninggalkan
nampan dalam posisi tertutup selama
menyelesaikan prosedur pemasangan printer.
If the power light on the front panel remains off,
press the Power key to switch on the printer.
Jika lampu daya pada panel depan tetap
tidak menyala, tekan tombol Daya untuk
menghidupkan printer.
Plug the power cable into the rear of the printer,
then plug the other end into the AC power outlet.
Tancapkan kabel listrik ke bagian belakang
printer, kemudian tancapkan ujung yang lain
ke stopkontak listrik AC.
Turn the power switch at the rear of the printer to
the on position.
Tekan saklar daya di bagian belakang printer
ke posisi hidup (on).
Page 16

57 58 59 60
Find the ink cartridge door, which is on the left
side of the printer.
Temukan pintu kartrid tinta, yaitu di samping kiri
printer.
Wait until you see this message (~10 minutes).
Highlight your language using the Up and Down
keys. Press the Select (ü) key.
Tunggu sampai Anda melihat pesan ini
(~10 menit). Sorot bahasa Anda dengan
menggunakan tombol Ke atas dan Ke bawah.
Tekan tombol Pilih (ü).
The front panel will now display how to install
the ink supplies.
Panel depan akan menampilkan cara memasang
suplai tinta.
Remove the printheads, printhead cleaners, and
ink cartridges from the consumables box.
Keluarkan kepala cetak, pembersih kepala cetak
dan kartrid tinta dari kotak suplai sekali pakai.
Page 17

61 62 63 64
Slide the ink cartridge drawer out.
Geser keluar dudukan kartrid tinta.
Press the ink cartridge door.
Tekan pintu kartrid tinta.
Open the ink cartridge door.
Buka pintu kartrid tinta.
To release the ink cartridge drawer, pull the
blue handle down.
Untuk melepaskan dudukan kartrid tinta, tarik
tuas biru ke bawah.
Page 18

65 66 67 68
Following the same instructions, install the other
three ink cartridges.
Dengan mengikuti petunjuk yang sama, pasang
ketiga kartrid tinta yang lain.
Place the ink cartridge onto the ink cartridge
drawer. Note that there are marks on the drawer
showing the correct location.
Letakkan kartrid tinta ke atas dudukan kartrid
tinta. Perhatikan bahwa ada tanda pada
dudukan yang menunjukkan lokasi yang benar.
Position the ink cartridge at the rear of the
drawer as indicated.
Tempatkan kartrid tinta di bagian belakang
dudukan seperti ditunjukkan.
Push the ink cartridge drawer back into the
printer until it locks into poition.
Dorong dudukan kartrid tinta kembali ke dalam
printer sampai terkunci di tempatnya.
Page 19

69 70 71 72
Remove the packing tape that is holding down
the printhead carriage latch.
Lepaskan pita kemasan yang menahan kait
carriage kepala cetak.
Close the ink cartridge door.
Tutup pintu kartrid tinta.
Tutup pintu kartrid tinta.
Tunggu (kurang lebih satu menit) sampai Anda
melihat pesan panel depan ini.
Open the printer window.
Buka jendela printer.
Page 20

73 74 75 76
To remove a setup printhead, lift up the blue
handle.
Untuk melepaskan kepala cetak pengaturan,
angkat tangkai berwarna biru.
Pull up and release the latch on top of the
carriage assembly.
Tarik ke atas dan lepaskan kait di bagian atas
rakitan carriage.
Lift up the cover. This will give you access to the
setup printheads.
Angkat penutupnya. Ini akan memberi Anda
akses ke kepala cetak.
Before removing the setup printheads, look at
the window on top of each one and check that
the printhead contains ink.
Sebelum melepaskan kepala cetak pengaturan,
lihat jendela di bagian atas dan periksa apakah
semua kepala cetak berisi tinta.
Page 21

77 78 79 80
Lower all the printheads vertically into their
correct positions.
Turunkan semua kepala cetak lurus ke bawah
ke posisinya yang benar.
Using the blue handle, gently disengage the
setup printhead from the carriage.
Dengan menggunakan tangkai biru, dengan
hati-hati lepaskan kepala cetak pengaturan
dari carriage.
Lift the setup printhead until it is released from
the carriage assembly. Then remove the other
setup printheads.
Angkat kepala cetak pengaturan sampai terlepas
dari rakitan carriage. Kemudian lepaskan kepala
cetak pengaturan yang lain.
Remove the blue protective cap and the clear
protective tape from the printhead.
Lepaskan tutup pelindung biru dan pita
pelindung bening dari kepala cetak.
Page 22

81 82 83 84
Close the carriage assembly cover.
Tutup kembali penutup rakitan carriage.
Seat the printheads slowly and carefully.
Tempatkan kepala cetak dengan perlahan dan
hati-hati.
Make sure the printheads are correctly seated.
When all the printheads are installed, the front
panel prompts, “Close printhead cover and
window”.
Pastikan apakah kepala cetak sudah terpasang
dengan benar. Setelah semua kepala cetak
terpasang, panel depan menampilkan pesan,
“Close printhead cover and window”.
If “Reseat” is displayed on the front panel,
check that the protective tape has been removed.
Then try reseating the printhead more rmly.
If the problem persists, refer to the Using Your
Printer CD.
Jika “Reseat” ditampilkan pada panel depan,
periksa apakah pita pelindung sudah
dilepaskan. Kemudian coba untuk memasang
kembali kepala cetak dengan lebih kuat. Jika
tetap bermasalah, rujuk pada CD Menggunakan
Printer Anda.
Page 23

85 86 87 88
Wait until you see this front panel message.
Tunggu sampai Anda melihat pesan panel depan
ini.
Make sure the latch engages correctly.
Pastikan bahwa kaitnya terkunci dengan benar.
Close the printer window.
Tutup jendela printer.
Please wait while the printer checks the
printheads (~1 minute).
Harap menunggu sampai printer selesai
memeriksa kepala cetak (~1 menit).
Page 24

89 90 91 92
Push the printhead cleaner in and down until
it clicks into place.
Dorong pembersih kepala cetak masuk dan ke
bawah sampai terkunci di tempatnya.
Press the printhead cleaner door, which is on the
right side of the printer.
Tekan pintu pembersih kepala cetak, yaitu di
samping kanan printer.
Open the printhead cleaner door.
Buka pintu pembersih kepala cetak.
Insert the printhead cleaner into the slot of the
correct color.
Masukkan pembersih kepala cetak ke celah
dengan warna yang benar.
Page 25

93 94 95 96
Lower the spindle lever.
Turunkan tuas tangkai gulungan.
Insert the other seven printhead cleaners into the
correct slots.
Masukkan ketujuh pembersih kepala cetak yang
lain ke celah yang benar.
Close the printhead cleaner door.
Tutup pintu pembersih kepala cetak.
Wait until you see this front panel message.
Press the Select (ü) key.
Tunggu sampai Anda melihat pesan panel
depan ini. Tekan tombol Pilih (ü).
Page 26

97 98 99 100
Put the blue-colored stop onto the spindle and
push it on as far as it will go without using
excessive force.
Pasang penahan berwarna-biru ke tangkai
gulungan dan dorong sejauh mungkin tanpa
menggunakan tenaga berlebihan.
Remove the right-hand end of the spindle (1) from
the printer, then move it to the right in order to
extract the other end (2).
Lepaskan ujung kanan tangkai gulungan (1) dari
printer, kemudian gerakkan ke kanan untuk
mengeluarkan ujung lainnya (2).
Remove the blue-colored stop (1) from the
left-hand end of the spindle. Keep the spindle
horizontal.
Lepaskan penahan berwarna-biru (A) dari ujung
kiri tangkai gulungan. Jaga agar tangkai
gulungan tetap horisontal.
Slide a roll of paper onto the spindle. Make sure
the paper is oriented exactly as shown.
Masukkan gulungan kertas yang disertakan
dengan printer Anda ke tangkai gulungan.
Pastikan orientasi arah kertas tepat seperti yang
ditunjukkan.
Page 27

101 102 103 104
The spindle lever will be in the horizontal
position when the spindle has been correctly
inserted.
Tuas tangkai gulungan harus berada pada posisi
horisontal setelah tangkai gulungan dimasukkan
dengan benar.
With the blue stop on the left, slide the spindle
into the printer. The blue spindle lever will drop
down automatically as you insert the spindle.
Dengan penahan biru di sebelah kiri, geser
tangkai gulungan ke dalam printer. Tuas tangkai
gulungan berwarna biru akan otomatis turun
saat Anda memasukkan tangkai gulungan.
Make sure the blue-colored stop is seated
correctly.
Pastikan bahwa penahan berwarna-biru
terpasang dengan benar.
Once you meet resistance, lift the blue lever to
seat the spindle properly.
Apabila ada hambatan, angkat tuas biru untuk
memasang tangkai gulungan dengan benar.
Page 28

105 106 107 108
From the front panel, highlight the Paper icon and
press the Select (ü) key.
Dari panel depan, sorot ikon Kertas dan tekan
tombol Pilih (ü).
The front panel displays the above. Highlight
the paper type you have loaded and press the
Select (ü) key.
Tampilan panel depan tampak seperti di atas.
Sorot jenis kertas yang telah Anda isikan dan
tekan tombol Pilih (ü).
From the front panel, highlight ‘Roll’ and press
the Select (ü) key.
Dari panel depan, sorot ‘Roll’ dan tekan tombol
Pilih (ü).
The front panel displays the above. Highlight
‘Load roll now’ and press the Select (ü) key.
Tampilan panel depan tampak seperti di atas.
Sorot ‘Load roll now’ dan tekan tombol Pilih (ü).
Page 29

109 11 0 111 112
Pull out approximately 1 m (3 ft) of the roll.
Tarik kurang lebih 1 m (3 ft) dari gulungan.
Open the printer window.
Buka jendela printer.
Lift the paper load lever.
Angkat tuas pengisian kertas.
Wait until you see this front panel message.
Tunggu sampai Anda melihat pesan panel
depan ini.
1m (3ft)
Page 30

11 3 11 4 11 5 11 6
Lower the paper load lever.
Turunkan tuas pengisian kertas.
Wait until the paper emerges from the printer
as shown above.
Tunggu sampai kertas keluar dari printer seperti
ditunjukkan di atas.
Make sure the paper is aligned with the blue
line and half circle on the platen.
Pastikan bahwa kertas rata dengan garis biru
dan setengah lingkaran pelat gulungan.
Insert the edge of the roll above the black roller.
Masukkan tepi gulungan di atas roller hitam.
Page 31

117 11 8 11 9 120
You should see the front panel message above.
Anda akan melihat pesan panel depan ini.
Using the stops, carefully wind the excess paper
back on to the spindle.
Dengan menggunakan penahan, gulung
kelebihan kertas kembali ke gulungan dengan
hati-hati.
Lower the printer window.
Turunkan jendela printer.
You should see the front panel message above.
Anda akan melihat pesan panel depan ini.
Page 32

121 122 12 3 124
PC/Mac/Workstation
PC/Mac/WorkstationServerPrinter
Locate the area at the back of the printer where
you can connect the printer to your computer or
network, or install an optional accessory.
Temukan daerah di belakang printer di mana
Anda dapat menghubungkan printer ke komputer
atau jaringan Anda, atau memasang aksesori
opsional.
The printer will automatically perform printhead
alignment and a color calibration for the paper
type that you have inserted. During this process
the printer will advance the paper up to 3 m
(~10 ft) before printing. Please do not try to stop
the paper advance; it is necessary to ensure
a successful printhead alignment. The whole
alignment and calibration process will take about
twenty minutes; while it is going on, you can
proceed to the next section.
Printer akan otomatis melakukan pengaturan
kepala cetak dan kalibrasi warna untuk jenis
kertas yang telah Anda masukkan. Selama proses
ini printer akan memajukan kertas hingga 3
m(~10 ft) sebelum mencetak. Jangan mencoba
menghentikan gerak maju kertas; ini diperlukan
untuk memastikan keberhasilan pengaturan kepala
cetak. Seluruh proses pengaturan dan kalibrasi
akan memakan waktu kurang lebih dua puluh
menit; selama proses berlangsung, Anda dapat
melanjutkan ke bagian berikutnya.
Your printer can be connected to a computer
directly or to one or more computers via a network.
Printer Anda dapat dihubungkan langsung ke
komputer atau ke satu atau lebih komputer
melalui jaringan.
Using the stops, carefully wind the excess paper
back on to the spindle.
Dengan menggunakan penahan, gulung
kelebihan kertas kembali ke gulungan dengan
hati-hati.
Page 33

125 12 6 127 12 8
Now you have completed the assembly of your
printer. The following pages describe how to
congure your computer for successful printing.
Pemasangan printer Anda sudah selesai.
Halaman-halaman berikut ini menguraikan cara
mengkongurasikan komputer Anda untuk
keberhasilan pencetakan.
A larger socket is provided to connect an
optional accessory. Caution: do not attempt
to use this socket for any other purpose.
Soket yang lebih besar tersedia untuk
menghubungkan aksesori opsional. Perhatian:
jangan mencoba menggunakan soket ini untuk
keperluan yang lain.
Pass the LAN cable through the hook at the rear
of the printer.
Lewatkan kabel LAN melalui kait di bagian
belakang printer.
A Gigabit Ethernet socket is provided for
connection to a network. Two FireWire sockets
are provided for direct connection to computers.
Soket Gigabit Ethernet tersedia untuk koneksi ke
jaringan. Dua soket FireWire tersedia untuk
koneksi langsung ke komputer.
Page 34

Note for MAC & Windows
USB connection:
Do not connect the computer to the printer yet.
You must rst install the printer driver software
on the computer.
Insert the HP start up Kit CD/DVD into your computer.
For Windows:
* If the CD/DVD does not start automatically,
run autorun.exe program on the root folder on
the CD/DVD.
* To install a Network Printer click on Express
Network Install otherwise click on Custom Install
and follow the instructions on your screen.
For Mac:
* If the CD/DVD does not start automatically, open the
CD/DVD icon on your desktop.
* Open the Mac OS X HP Designjet Installer icon
and follow the instructions on your screen.
NOTE: You can download the latest software from:
HP Designjet 4020: http://www.hp.com/go/4020/
drivers
or
HP Designjet 4020ps: http://www.hp.com/
go/4020ps/drivers
請注意,當 MAC 與 Windows
USB 連線時:
請不要急著將電腦連接到印表機。您必須先在電腦上
安 裝印表機驅動程式軟體。
將「HP Start-Up Kit」DVD 放入電腦。
在 Windows 中:
* 如果 DVD 沒有自動執行,請執行 DVD 根資料夾中
的 autorun.exe 程式。
* 如果要安裝網路印表機,請按一下「快速網路安
裝」
或「自訂安裝」,並且依照螢幕上的指示進行。
在 Mac 中:
* 如果 DVD 沒有自動執行,請開啟桌面上的「DVD」
圖示。
* 開啟「Mac OS X HP Designjet Installer」圖示,並
且 依照螢幕上指示進行。
註:如果安裝失敗,請在這裡重新安裝軟體:
HP Designjet 4020:
http://www.hp.com/go/4020/drivers
或
http://www.hp.com/go/4020PS/drivers
MAC 및 Windows USB 연결을
위한 안내
아직 컴퓨터를 프린터에 연결하지 마십시오. 먼저
프린터 드라이버 소프트웨어를 컴퓨터에 설치합니다.
HP Start-Up Kit(HP 시작 키트) DVD를 컴퓨터에
삽입합니다.
Windows의 경우:
* DVD가 자동으로 실행되지 않는 경우 DVD의 루트
폴더에서 autorun.exe 프로그램을 실행합니다.
* 네트워크 프린터를 설치하려면 Express 네트워크
설치를 클릭하거나 사용자 지정 설치를 클릭한 다음
화면의 지침을 따릅니다.
Mac의 경우:
* DVD가 자동으로 실행되지 않는 경우 바탕 화면에서
DVD 아이콘을 엽니다.
* Mac OS X HP Designjet Installer 아이콘을 열고
화면의 지침을 따릅니다.
주: 설치하는 데 실패한 경우 다음 위치에서 각각의
소프트웨어를 다시 설치합니다.
HP Designjet 4020:
http://www.hp.com/go/4020/drivers
또는
http://www.hp.com/go/4020PS/drivers
Catatan tentang sambungan USB
untuk MAC & Windows:
Jangan sambungkan dulu komputer ke printer. Anda
harus terlebih dulu menginstal perangkat lunak driver
printer di komputer.
Masukkan DVD HP Start Up Kit ke komputer
Untuk Windows:
* Jika DVD tidak memulai secara otomatis, jalankan
program autorun.exe pada folder akar DVD.
* Untuk menginstal Network Printer, klik Express
Network Install atau klik Custom Install, kemudian
jalankan petunjuk pada layar.
Untuk Mac:
* Jika DVD tidak memulai secara otomatis, buka ikon
DVD di desktop.
* Buka ikon Mac OS X HP Designjet Installer,
kemudian jalankan petunjuk pada layar.
CATATAN: Jika penginstalan gagal, instal ulang
perangkat lunak dari:
HP Designjet 4020:
http://www.hp.com/go/4020/drivers
or
http://www.hp.com/go/4020PS/drivers
Legal notices
法律聲明
법적 고지사항
Informasi hukum
© Copyright 2009 Hewlett-Packard Development Company, L.P.
The information contained herein is subject to change without
notice. The only warranties for HP products and services are set
forth in the express warranty statements accompanying such
products and services. Nothing herein should be construed as
constituting an additional warranty. HP shall not be liable for
technical or editorial errors or omissions contained herein.
此文件所包含資訊如有更改,恕不另行通知。HP 產
品和服務的唯一保固明確記載於該等產品和服務所隨
附的保固聲明中。本文件的任何部分都不可構成任何
額外的保固。HP 不負責本文件在技術上或編輯上的
錯誤或疏失。
여기에 수록된 정보는 예고 없이 변경될 수 있습니다.
HP는 HP 제품 및 서비스와 함께 제공된 보증서에
명시된 사항에 대해서만 보증합니다. 이 문서의 어떤
내용도 추가 보증으로 간주되어서는 안 됩니다. HP는
이 문서에 포함된 기술 또는 편집상의 오류나 누락된
내용에 대해 책임지지 않습니다.
Informasi yang terdapat dalam dokumen ini dapat berubah
tanpa pemberitahuan sebelumnya. Satu-satunya jaminan
untuk berbagai Produk dan layanan HP adalah yang terdapat
dalam pernyataan jaminan tertulis yang menyertai produk dan
layanan tersebut. Tidak ada informasi apapun dalam dokumen
ini yang dapat ditafsirkan sebagai jaminan tambahan. HP
tidak bertanggung jawab atas kesalahan teknis, editorial, atau
kelalaian yang terdapat dalam dokumen ini.
Trademarks
Microsoft®; and Windows®; are U.S. registered trademarks of
Microsoft Corporation.
FireWire is a trademark of Apple Computer, Inc., registered in
the U.S. and other countries.
 Loading...