

Page 1
Page 2

Legal notices
The information contained in this document is subject to change without notice.
Hewlett-Packard makes no warranty of any kind with regard to this material, including, but not limited to, the implied
warranties of merchantability and fitness for a particular purpose.
Hewlett-Packard shall not be liable for errors contained herein or for incidental or consequential damages in connection with
the furnishing, performance, or use of this material.
No part of this document may be photocopied or translated to another language without the prior written consent of HewlettPackard Company.
Trademarks
Adobe®, Acrobat®, Adobe Photoshop®, and PostScript® are trademarks of Adobe Systems Incorporated.
Microsoft® and Windows® are U.S. registered trademarks of Microsoft Corporation.
PANTONE® is Pantone, Inc.'s check-standard trademark for color.
Company address
Hewlett-Packard Company
Inkjet Commercial Division
Avenida Graells, 501
08174 Sant Cugat del Vallès
Barcelona, Spain
Page 3

Contents
1 Introduction ..........................................................................................................5
Using this guide .....................................................................................................5
The printer's main features ....................................................................................6
The printer's main components .............................................................................. 7
The front panel ......................................................................................................8
Printer software ...................................................................................................10
2 How do I operate the printer?............................................................................11
How do I switch the printer on and off? ................................................................ 11
How do I restart the printer? ................................................................................12
How do I change the language of the front panel? ..............................................12
How do I access the Embedded Web Server? ....................................................13
How do I change the language of the Embedded Web Server? ..........................14
How do I password–protect the Embedded Web Server? ...................................14
How do I request e-mail notification of specific error conditions? ........................15
How do I change the sleep mode setting? ...........................................................15
How do I turn off the buzzer? ...............................................................................15
How do I change the front panel contrast? ..........................................................15
How do I change the units of measurement? ......................................................15
How do I adjust for altitude? ................................................................................16
3 How do I handle paper?.....................................................................................17
How do I load a roll onto the spindle? ..................................................................17
How do I load a roll into the printer? ....................................................................21
How do I unload a roll from the printer? ...............................................................26
How do I load a single sheet? ..............................................................................27
How do I unload a single sheet? ..........................................................................31
How do I select supported paper types? .............................................................. 32
How do I view information about the paper? ........................................................33
How do I download media profiles? .....................................................................34
How do I use non-HP paper? ..............................................................................34
How do I cancel the drying time? .........................................................................34
How do I change the drying time? .......................................................................35
4 How do I handle the ink system?......................................................................37
How do I remove an ink cartridge? ......................................................................37
How do I insert an ink cartridge? .........................................................................42
How do I remove a printhead? .............................................................................44
How do I insert a printhead? ................................................................................48
How do I manage printhead monitoring? .............................................................51
How do I recover (clean) the printheads? ............................................................51
How do I clean a printhead's electrical connections? ..........................................51
How do I align the printheads? ............................................................................57
How do I remove a printhead cleaner? ................................................................58
How do I insert a printhead cleaner? ...................................................................60
How do I check the status of the ink system? ......................................................62
How do I get ink cartridge statistics? ...................................................................62
How do I get printhead statistics? ........................................................................63
1
Page 4

How do I check printer usage statistics? .............................................................. 63
5 How do I adjust my printed images?................................................................65
How do I change the page size? .........................................................................65
How do I create a custom page size? ..................................................................65
How do I change the print quality? ......................................................................67
How do I choose print quality settings? ...............................................................68
How do I print at maximum speed? .....................................................................70
How do I adjust the margins? ..............................................................................70
How do I print on oversize page sizes? ...............................................................71
How do I change the paper's orientation? ...........................................................71
How do I rotate an image? ...................................................................................72
How do I print a mirror image? ............................................................................72
How do I scale an image? ...................................................................................72
How do I change the palette settings? .................................................................73
How do I change the treatment of overlapping lines? ..........................................74
How do I change the graphic language setting? ..................................................75
6 How do I get accurate colors from my printer?...............................................77
How do I perform color calibration? .....................................................................77
How do I perform black point compensation? ......................................................78
How do I set the rendering intent? .......................................................................78
How do I select the color emulation mode? .........................................................79
How do I produce matching prints from different HP Designjets? ........................79
How do I get accurate colors from Adobe Photoshop CS (HP–GL/2 & RTL
driver)? ................................................................................................................79
How do I get accurate colors from Adobe Photoshop CS (PostScript
driver)? ................................................................................................................84
How do I get accurate colors from Adobe InDesign CS? .....................................89
How do I get accurate colors from QuarkXPress 6? ............................................93
How do I get accurate colors from Autodesk AutoCAD 2002? ............................96
How do I get accurate colors from Microsoft Office 2003? ..................................96
How do I get accurate colors from ESRI ArcGIS 9? ............................................96
7 How do I manage print jobs?...........................................................................101
How do I submit a job? ......................................................................................101
How do I save a job? .........................................................................................102
How do I print a saved job? ...............................................................................102
How do I check ink and paper usage for a job? .................................................102
How do I cancel a job? ......................................................................................102
How do I manage the print queue? ....................................................................103
How do I nest jobs to save roll paper? ...............................................................105
8 How do I maintain my printer?........................................................................107
How do I clean the exterior of the printer? .........................................................107
How do I clean the platen? ................................................................................107
How do I lubricate the printhead carriage? ........................................................109
How do I maintain the ink cartridges? ................................................................110
How do I move or store my printer? ...................................................................110
How do I update my printer's firmware? ............................................................111
9 How do I use the Image Diagnostics Print?...................................................113
How do I print the Image Diagnostics Print? ......................................................113
How do I respond to the Image Diagnostics Print? ............................................114
How do I interpret Image Diagnostics part 1? ....................................................114
2
Page 5

Contents
How do I interpret Image Diagnostics part 2? ....................................................116
How do I interpret Image Diagnostics part 3? ....................................................118
How do I proceed if I still have a problem? ........................................................119
10 How do I perform paper advance calibration?...............................................121
11 The problem is print quality.............................................................................127
General advice ..................................................................................................127
The problem is banding (horizontal lines across the image) ..............................128
The problem is lines are missing or thinner than expected ................................129
The problem is solid bands or lines printed over the image ...............................130
The problem is graininess ..................................................................................131
The problem is the paper is not flat ...................................................................131
The problem is the print smudges when touched ..............................................132
The problem is ink marks on the paper .............................................................. 132
The problem is a defect near the start of a print ................................................133
The problem is lines are stepped .......................................................................133
The problem is lines are printed double or in wrong colors ................................134
The problem is lines are discontinuous .............................................................. 135
The problem is lines are blurred (ink bleeds from lines) ....................................135
The problem is lines are slightly warped ............................................................135
The problem is color accuracy ...........................................................................136
The problem is PANTONE color accuracy .........................................................136
The problem is color matching between different HP Designjets .......................137
12 The problem is an image error........................................................................141
The problem is the print is completely blank ......................................................141
The problem is the output contains only a partial print ....................................... 141
The problem is the image is clipped ..................................................................142
The problem is the image is in one portion of the printing area .........................142
The problem is the image is unexpectedly rotated ............................................143
The problem is the print is a mirror image of the original ...................................143
The problem is the print is distorted or unintelligible ..........................................143
The problem is one image overlays another on the same sheet .......................144
The problem is pen settings seem to have no effect ..........................................144
13 The problem is with the ink system................................................................145
The problem is I cannot insert an ink cartridge ..................................................145
The problem is I cannot insert a printhead .........................................................145
The problem is I cannot insert a printhead cleaner ............................................145
The problem is the front panel keeps telling me to reseat or replace a
printhead ............................................................................................................145
The problem is an ink cartridge status message ...............................................146
The problem is a printhead status message ......................................................146
The problem is a printhead cleaner status message .........................................146
14 The problem is with the paper.........................................................................147
The problem is the paper cannot be loaded successfully ..................................147
The problem is a paper jam (paper stuck in the printer) ....................................149
The problem is prints do not stack properly in the bin ........................................151
The problem is the printer uses a lot of paper to align the printheads ...............151
15 The problem is something else.......................................................................153
The problem is the printer's start–up process does not complete ......................153
The problem is a front panel message ............................................................... 153
The problem is a “printhead monitoring” message ............................................156
3
Page 6

The problem is a “printheads are limiting performance” message .....................156
The problem is the printer does not print ...........................................................157
The problem is a print job is waiting for a time-out ............................................157
The problem is the printer seems slow ..............................................................157
The problem is communication failures between computer and printer .............158
The problem is I cannot access the Embedded Web Server from my
browser ..............................................................................................................159
The problem is an out-of-memory error .............................................................159
The problem is an AutoCAD 2000 memory allocation error ...............................160
The problem is the platen rollers squeak ...........................................................160
16 Legal information ............................................................................................163
Worldwide Limited Warranty—HP Designjet 4000 Printer series ......................163
Hewlett-Packard Software License Agreement .................................................166
Open source acknowledgments ........................................................................167
Regulatory notices .............................................................................................168
DECLARATION OF CONFORMITY ..................................................................171
Index.........................................................................................................................173
4
Page 7

1
Introduction
● “Using this guide” on page 5
● “The printer's main features” on page 6
● “The printer's main components” on page 7
● “The front panel” on page 8
● “Printer software” on page 10
Using this guide
The User's Guide and Quick Reference Guide are organized into the following
chapters.
Introduction
This chapter provides a brief introduction to the printer and its documentation for new
users.
How do I ...
These chapters help you to carry out various procedures such as loading paper or
changing an ink cartridge. Many of these procedures are illustrated with drawings, and
some are also illustrated with animations (in the User's Guide only).
The problem is ...
These chapters help you to solve problems that may occur while printing.
Introduction
Tell me about ...
Available in the User's Guide only, these chapters contain reference information,
including the specifications of the printer, and the part numbers of paper types, ink
supplies, and other accessories.
Legal information
This chapter contains HP's limited warranty statement, software license agreement,
open source acknowledgments, regulatory notices, and declaration of conformity.
Index
In addition to the table of contents, there is an alphabetical index to help you to find
topics quickly.
5
Page 8

Chapter 1
The printer's main features
Your printer is a color inkjet printer designed for printing high-quality images on paper
up to 42 in (1.06 m) wide. Some major features of the printer are shown below:
● Production speeds of up to 1.5 m²/min (16 ft²/min), using HP Universal InkJet
Introduction
Bond Paper with the Fast print quality option and the Optimize for Lines and
Text option
● Print resolution of up to 2400×1200 optimized dpi, from a 1200×1200 dpi input,
using the Best print quality option, the Maximum Detail and Optimize for
Images options, and glossy paper (for more information on print resolution, see
“Tell me about functional specifications” in the User's Guide)
● Unattended printing using 400 cm³ ink cartridges and rolls of paper up to 90 m or
300 ft in length (see ”Tell me about ink cartridges” in the User's Guide)
● High productivity features such as multi-file job submitting, job previewing,
queueing, and nesting using the printer's Embedded Web Server (see ”Tell me
about the Embedded Web Server” in the User's Guide)
● Ink and paper usage information is available from the front panel, and on the Web
from the Embedded Web Server
● Accurate and consistent color reproduction features:
– Press emulations for U.S., European, and Japanese standards; and color
monitor RGB emulations (see ”Tell me about color emulation modes” in the
User's Guide)
– Automatic color calibration
6
Page 9
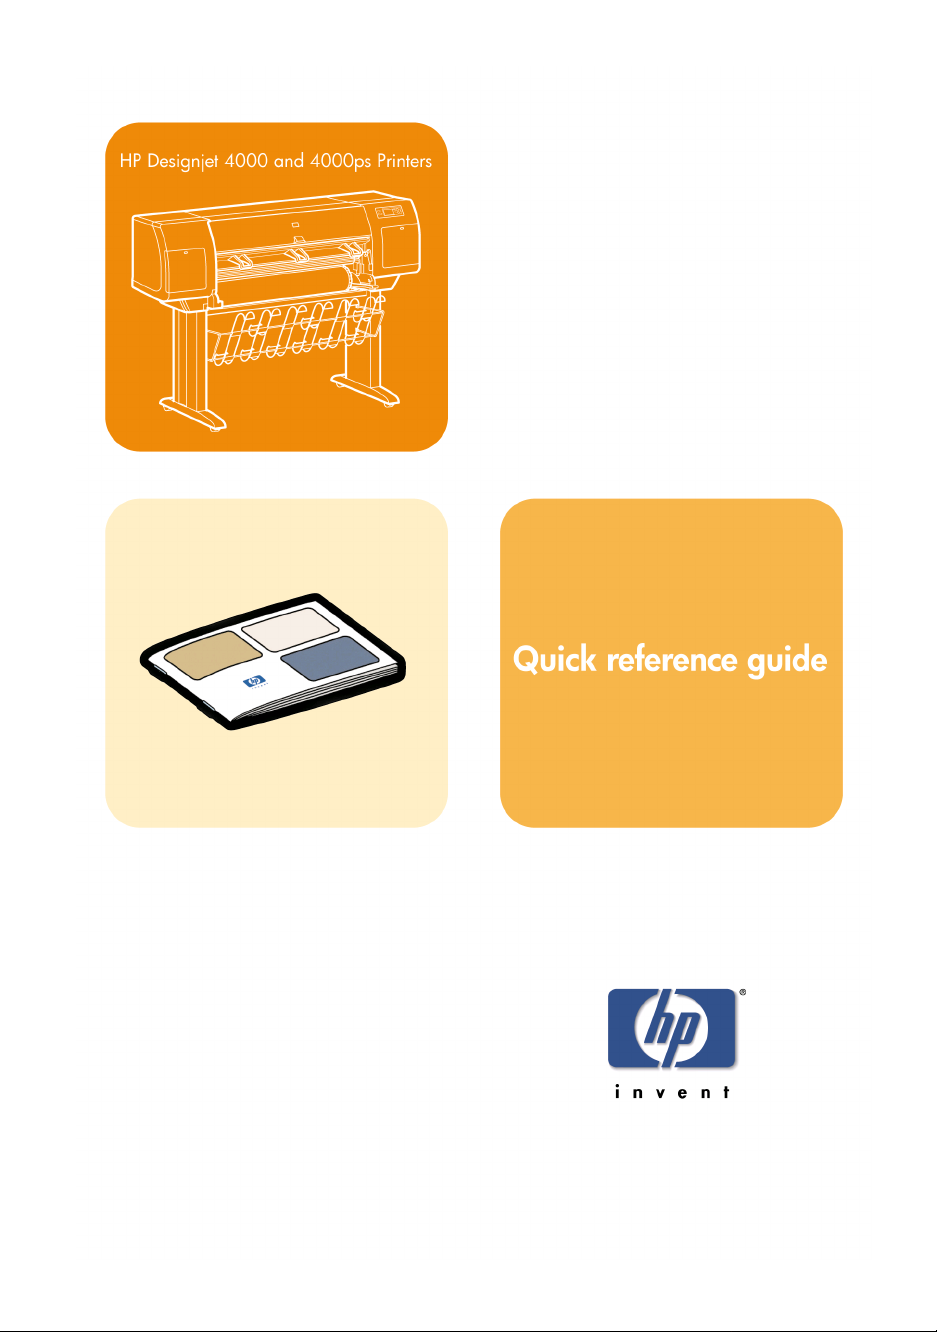
The printer's main components
The following front and rear views of the printer illustrate the main components.
Front view
Introduction
1. Ink cartridge
2. Platen
3. Printhead carriage
4. Printhead
5. Printhead cleaner
6. Front panel
7. Spindle
8. Blue removable paper stop
9. Bin
10. Ink cartridge drawer
11. Spindle lever
12. Paper load lever
7
Page 10
Chapter 1
Introduction
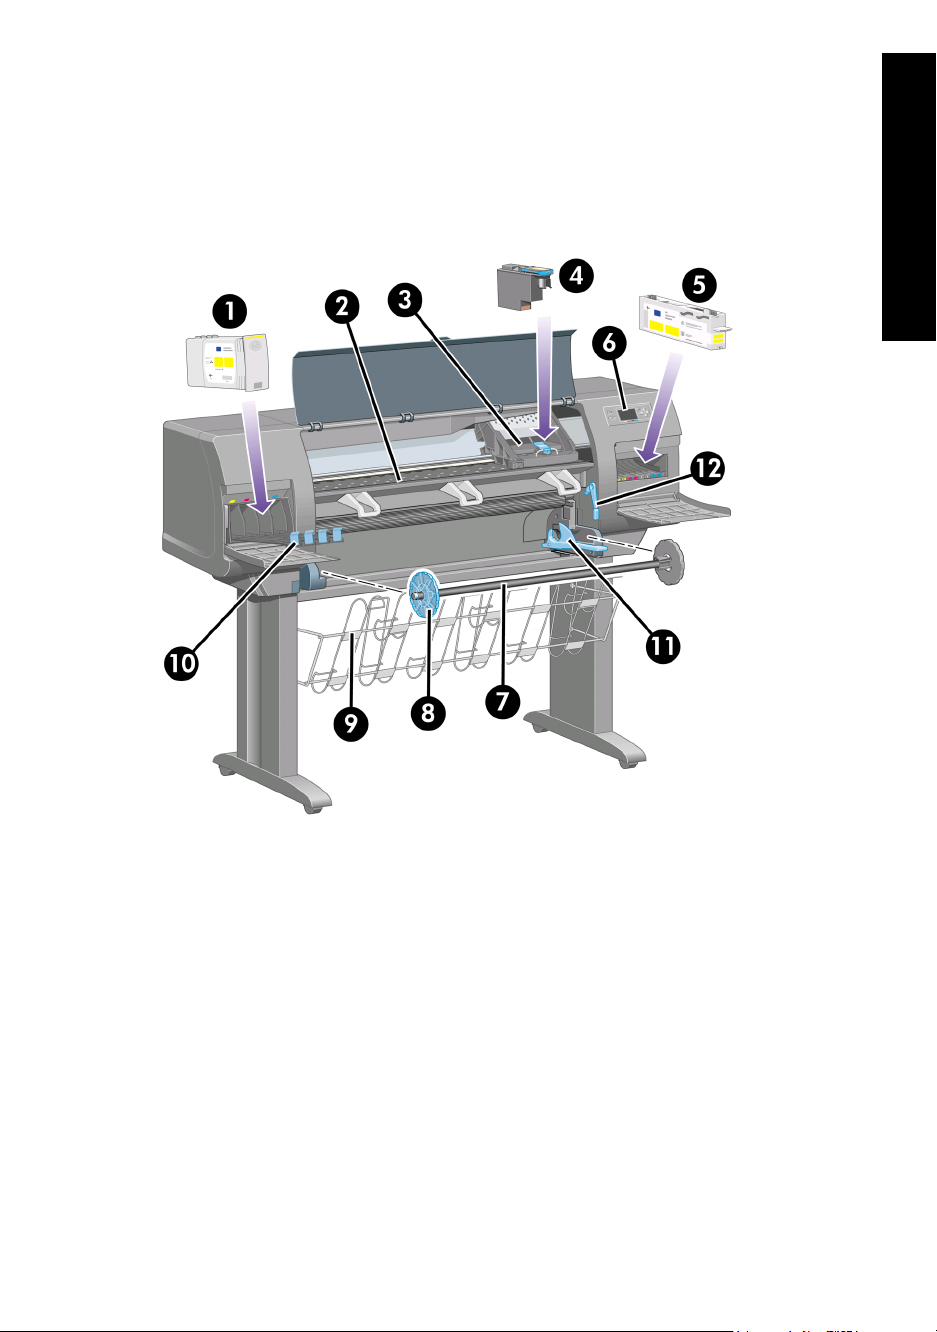
Rear view
1. Quick Reference Guide holder
2. Power socket and on/off switch
3. Sockets for communication cables and optional accessories
The front panel
Your printer's front panel is located on the front of the printer, on the right-hand side. It
has the following important functions:
● It must be used to perform certain operations, such as loading and unloading
paper.
● It can display up-to-date information about the status of the printer, the ink
cartridges, the printheads, the paper, the print jobs, etc.
● It can provide guidance in using the printer.
● It displays warning and error messages when appropriate.
● It can be used to change the values of printer settings and thus change the
operation of the printer. However, settings in the printer are overridden by
settings in the Embedded Web Server or in the driver.
8
Page 11
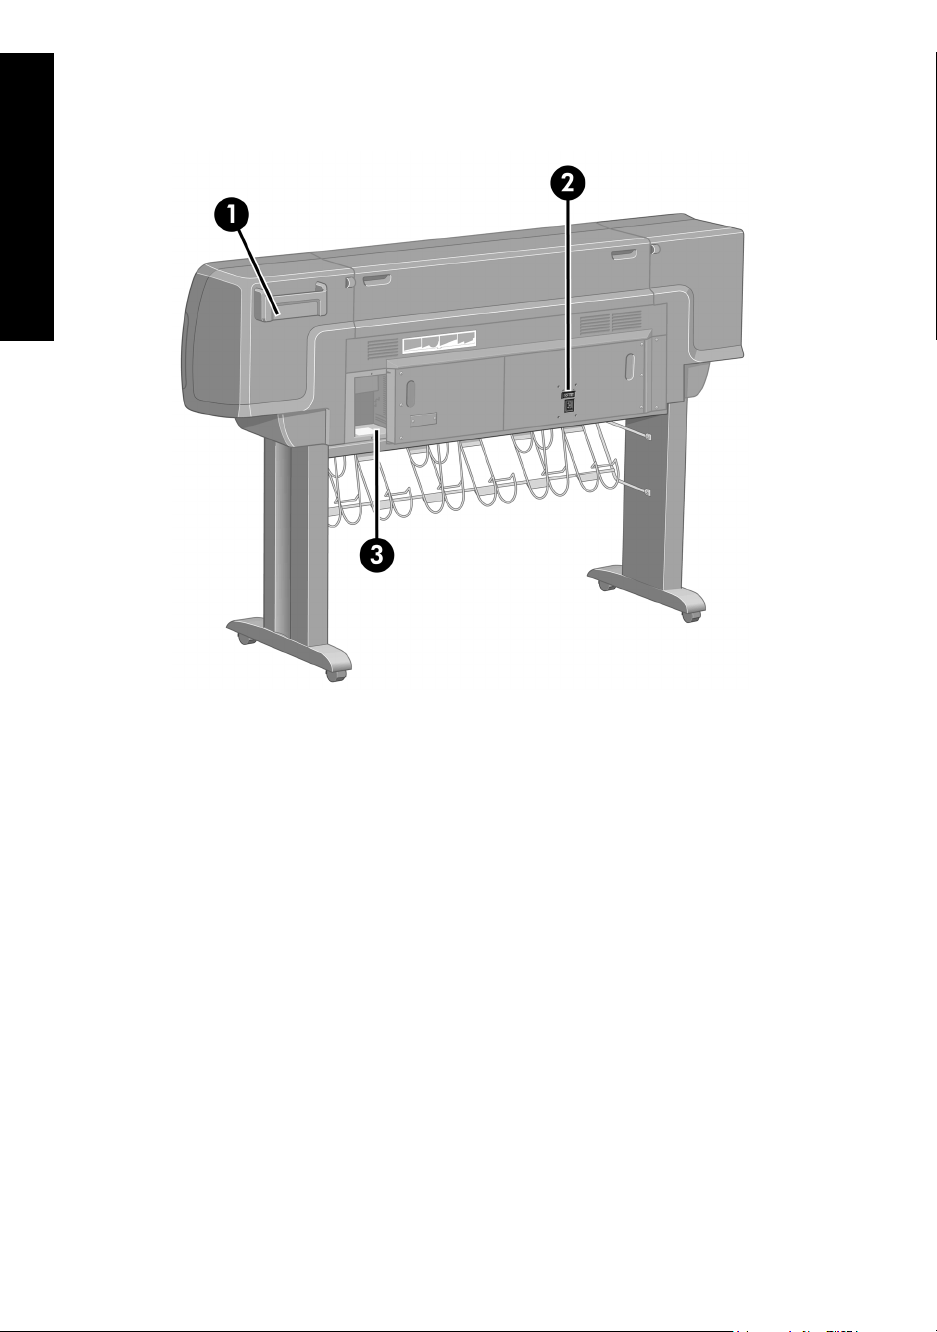
The front panel has the following components:
1. The display area, where information, icons, and menus are displayed.
2. The Power key turns the printer on and off. If the printer is in sleep mode, this
key will wake it up.
3. The Power light is off when the printer is off; amber when the printer is in sleep
mode; green when the printer is on; green and flashing when the printer is in
transition between off and on.
4. The Form Feed and Cut key normally ejects the sheet (if a sheet is loaded) or
advances and cuts the roll (if a roll is loaded). However, if the printer is waiting for
more pages to be nested, this key cancels the waiting time and prints the
available pages immediately.
5. The Reset key restarts the printer (as if it were switched off and switched on
again). You will need an implement with a narrow tip to operate the Reset key.
6. The Cancel key cancels the current operation. It is often used to stop printing the
current print job.
7. The Status light is off when the printer is not ready to print: it may be off, or in
sleep mode. It is green when the printer is ready and idle; green and flashing
when the printer is busy; amber when a serious internal error has occurred;
amber and flashing when awaiting human attention.
8. The Up key moves to the previous item in a list, or increases a numerical value.
9. The Select key selects the item that is currently highlighted.
10. The Back key goes back to the previous menu. If you press it repeatedly, or hold
it down, you will soon return to the main menu.
11. The Down key moves to the next item in a list, or decreases a numerical value.
To highlight an item in the front panel, press the Up or Down key until the item is
highlighted.
To select an item in the front panel, first highlight it and then press the Select key.
Introduction
9
Page 12

Chapter 1
The four front-panel icons are all found in the main menu. If you need to select or
highlight an icon, and you don't see the icons in the front panel, press the Back key
until you can see them.
When this guide shows a series of front panel items like this: Item1 > Item2 > Item3,
it means that you should select Item1, then select Item2, then select Item3.
Introduction
Information about specific uses of the front panel can be found throughout this guide.
Printer software
The following software is provided with your printer:
● The Embedded Web Server, which runs in the printer and enables you to use a
● The HP-GL/2 and RTL driver for Windows
● The PostScript driver for Windows
● The PostScript driver for Mac OS 9 and Mac OS X
● The ADI driver for AutoCAD 14
Web browser on any computer to submit and manage print jobs, and check ink
levels and printer status
10
Page 13

2
How do I operate the printer?
● “How do I switch the printer on and off?” on page 11
● “How do I restart the printer?” on page 12
● “How do I change the language of the front panel?” on page 12
● “How do I access the Embedded Web Server?” on page 13
● “How do I change the language of the Embedded Web Server?” on page 14
● “How do I password–protect the Embedded Web Server?” on page 14
● “How do I request e-mail notification of specific error conditions?” on page 15
● “How do I change the sleep mode setting?” on page 15
● “How do I turn off the buzzer?” on page 15
● “How do I change the front panel contrast?” on page 15
● “How do I change the units of measurement?” on page 15
● “How do I adjust for altitude?” on page 16
How do I switch the printer on and off?
The normal and recommended way to switch the printer on and off is to use the
Power key on the front panel.
How do I operate the printer?
When you switch off the printer this way, the printheads are automatically stored with
the printhead cleaners, which prevents them from drying out.
If you are not planning to use the printer for a long time (for instance, a day or more),
you are recommended to switch it off using the Power key, and then also switch off
the power switch at the rear.
11
Page 14

Chapter 2
To switch it back on later, use the power switch at the rear, and then the Power key.
When the printer has not been used for a certain period of time (30 minutes by
default), it will save power by going into sleep mode. However, any interaction with the
printer will return it to active mode, and it can resume printing immediately.
How do I restart the printer?
How do I operate the printer?
In some circumstances you may be advised to restart the printer. Please proceed as
follows:
1. Press the Power key on the front panel to switch the printer off, wait a few
moments, then press the Power key again. This should cause the printer to
restart; if not, continue with step 2.
2. Use the Reset key on the front panel. You will need an implement with a narrow
tip to operate the Reset key. This normally has the same effect as step 1 above,
but may work if step 1 does not.
3. If neither of the above steps seem to have any effect, you should switch off the
printer using the power switch at the rear of the printer.
4. Remove the power cord from the power socket.
5. Wait for 10 seconds.
6. Insert the power cord into the power socket and switch on the printer using the
power switch.
7. Check that the Power light on the front panel comes on. If it does not, use the
Power key to switch the printer on.
How do I change the language of the front panel?
To change the language of the front-panel menus and messages, start with the printer
powered off.
1. At the front panel, press the Select key and hold it down.
2. While holding the Select key down, press the Power key and hold it down.
3. Continue to hold down both keys until the green light on the left side of the front
panel starts flashing. You can expect a delay of about one second. If the green
light starts flashing without any delay, you may need to start again.
4. Release the Select and Power keys.
12
Page 15
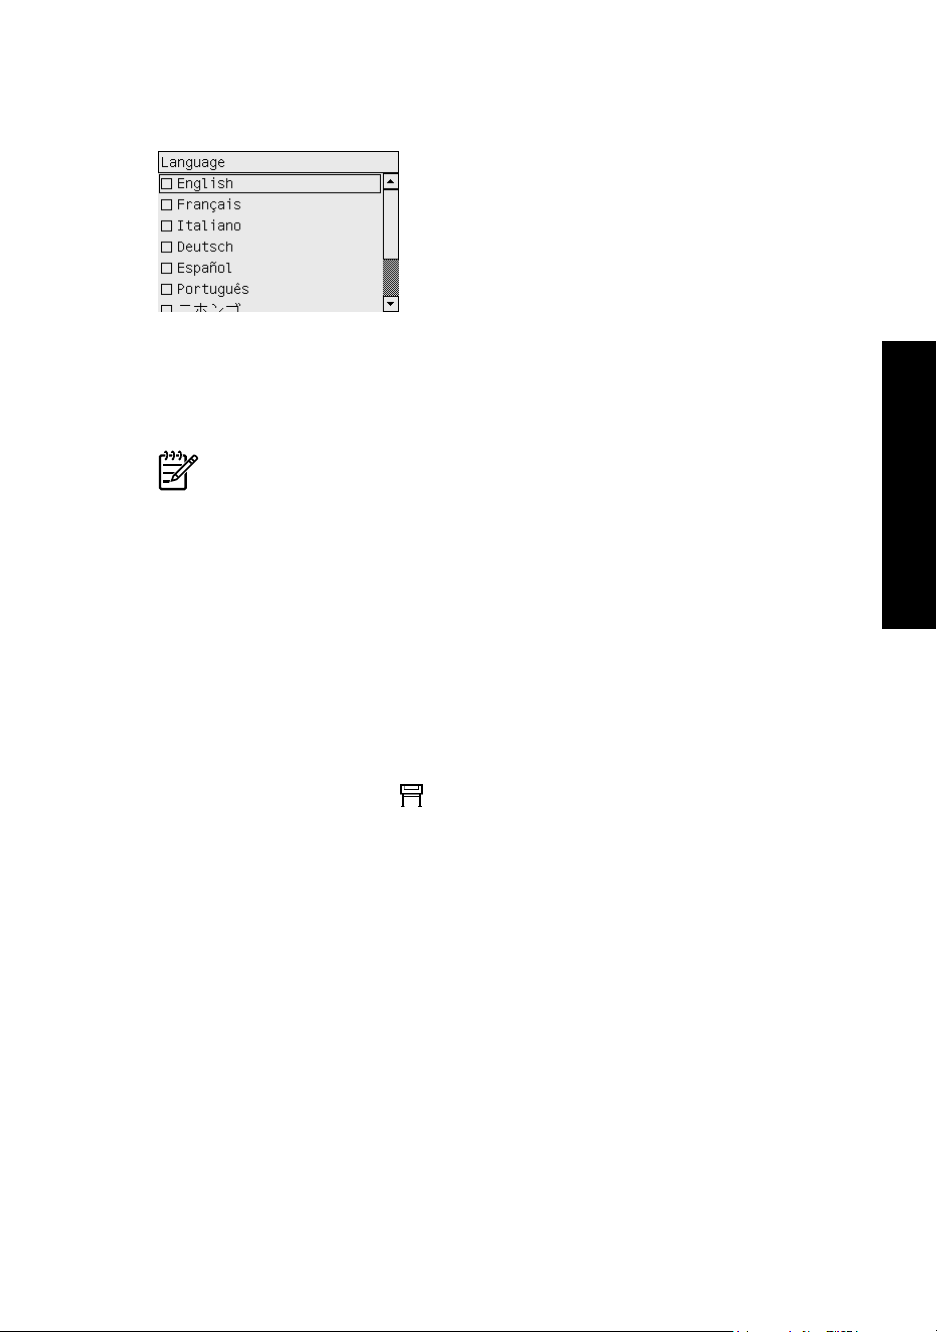
The language selection menu should now appear on the front panel.
How do I access the Embedded Web Server?
The Embedded Web Server enables you to manage your printer and your printing
jobs remotely using an ordinary Web browser running on any computer.
Note In order to use the Embedded Web Server, you must have a TCP/IP
connection to your printer. If you have an Appletalk, Novell, or USB connection
to your printer, you will not be able to use the Embedded Web Server.
The following browsers are known to be compatible with the Embedded Web Server:
● Internet Explorer 5.5 or later, for Windows.
● Internet Explorer 5.2.1 or later, for Mac OS 9.
● Internet Explorer 5.1 or later, for Mac OS X.
● Netscape Navigator 6.01 or later.
● Mozilla 1.5 or later.
● Safari.
There are several ways to access the Embedded Web Server:
● On any computer, open your Web browser and give the address of your printer.
You can find out the address of your printer (starting with http:) from the front
panel, by highlighting the
● Select Status of my printer, Check media available, or Manage my printer's
queue from the Services tab of your Windows printer driver, or from the Services
panel of your Mac OS printer driver.
● On a computer running Windows with your printer software installed, double–click
the Printer Access Utility icon on your desktop, then select your printer.
If you have followed these instructions but failed to get through to the Embedded Web
Server, see “The problem is I cannot access the Embedded Web Server from my
browser” on page 159.
icon.
How do I operate the printer?
Using IP over FireWire with Mac OS X 10.3
If you are using Mac OS X 10.3 and have a FireWire connection to your printer, it is
possible to set up an IP address for the printer in order to use the Embedded Web
Server. To do this:
1. Open System Preferences and click Network.
2. Choose Network Port Configurations from the Show pop-up menu.
13
Page 16

Chapter 2
3. Click New, and then choose FireWire from the Port pop-up menu. You can give
the new port configuration a name, FireWire.
4. Drag the port configuration to the top of the Port Configuration list. This ensures
that the port is assigned an IP address.
5. Click Apply Now.
If you don't drag the FireWire port configuration to the top of the Port Configuration
list, you need to choose Manually (or DHCP with manual address) from the
Configure IPv4 pop-up menu, and then enter an IP address. See
http://www.apple.com/ for more detail or updated information on activating IP over
FireWire.
When the printer is connected through FireWire, we recommend adding the printer
using the FireWire modules in order to take full advantage of FireWire printing, and to
use the IP over FireWire only to visit the printer’s Embedded Web Server.
If you connect your printer through FireWire and the printer is also connected to the
network through Fast Ethernet or Gigabit Ethernet, the printer’s IP over FireWire will
not be available and you will not be able to access the Embedded Web Server from
the Printer Dialog. However, you will be able to print through FireWire.
Also in the case of printer sharing over FireWire, remote users will not be able to
access the Embedded Web Server from the Printer Dialog, although they will be able
to print.
How do I operate the printer?
How do I change the language of the Embedded Web
Server?
The Embedded Web Server can work in the following languages: English,
Portuguese, Spanish, French, Italian, German, Simplified Chinese, Traditional
Chinese, Korean, and Japanese. It will choose whichever language you have
specified in your Web browser's options. If you have specified a language that it
cannot support, it will work in English.
To change the language, you must change your Web browser's language setting. For
example, in Internet Explorer version 6, go to the Tools menu and select Internet
Options, Languages. Then ensure that the language you want is at the top of the list
in the dialog box.
How do I password–protect the Embedded Web Server?
1. In the Embedded Web Server, go to the Security page, which you can find in the
Settings tab.
2. Enter a password of your own choice in the New password field.
3. Enter it again in the Confirm password field to guard against misspelling.
4. Click Set password.
Now no-one will be able to perform the following actions with the Embedded Web
Server without giving the password:
● Manage print jobs in the queue (cancel, delete)
● View previews of print jobs
● Delete stored jobs
14
Page 17

● Clear accounting information
● Update the printer's firmware
Note If you forget the password, see “The problem is I cannot access the
Embedded Web Server from my browser” on page 159.
How do I request e-mail notification of specific error
conditions?
1. In the Embedded Web Server, go to the E-mail server page, which you can find in
the Settings Tab, and ensure that the following fields are correctly filled in:
– SMTP server: the IP address of the outgoing mail server (SMTP) that will
process all e-mail messages from the printer. If the mail server requires
authentication, e-mail notifications will not work.
– Printer e-mail address: each e-mail message sent by the printer must
include a return address, which does not need to be a real, functional e-mail
address, but it should be unique, so that recipients of the message can
identify the printer that sent it.
2. Go to the Notification page, which is also in the Settings tab.
3. Click New to request new notifications (or Edit to edit notifications that have
already been set up). Then fill in the e-mail addresses to which notifications
should be sent, and select the incidents that should result in notification
messages. Initially the most commonly-specified incidents are shown; to see all
the possibilities, click Show all alerts.
How do I operate the printer?
How do I change the sleep mode setting?
If the printer is left switched on but unused for a certain period of time, it will go
automatically into sleep mode to save power. To change the time the printer waits
before it goes into sleep mode, go to the front panel and select the
Configuration menu > Sleep mode wait time.
How do I turn off the buzzer?
To turn the printer's buzzer on or off, go to the front panel and select the icon, then
Configuration menu > Buzzer.
How do I change the front panel contrast?
To change the contrast of the front panel display, select the icon, then
Configuration menu > Display contrast, and choose a value using the Up or Down
key. Press the Select key to set the value you have chosen.
How do I change the units of measurement?
To change the units of measurement displayed in the front panel, select the icon,
then Configuration menu > Unit selection, and select English or Metric.
icon, then
15
Page 18

Chapter 2
How do I adjust for altitude?
Your printer will work better if you tell it roughly at what altitude it is. To set the
altitude, go to the front panel and select the icon, then Configuration menu >
Altitude, and select a range.
How do I operate the printer?
16
Page 19
3
How do I handle paper?
● “How do I load a roll onto the spindle?” on page 17
● “How do I load a roll into the printer?” on page 21
● “How do I unload a roll from the printer?” on page 26
● “How do I load a single sheet?” on page 27
● “How do I unload a single sheet?” on page 31
● “How do I select supported paper types?” on page 32
● “How do I view information about the paper?” on page 33
● “How do I download media profiles?” on page 34
● “How do I use non-HP paper?” on page 34
● “How do I cancel the drying time?” on page 34
● “How do I change the drying time?” on page 35
How do I load a roll onto the spindle?
1. Make sure the printer wheels are locked (the brake lever is pressed down) to
prevent the printer from moving.
2. Lower the spindle lever.
How do I handle paper?
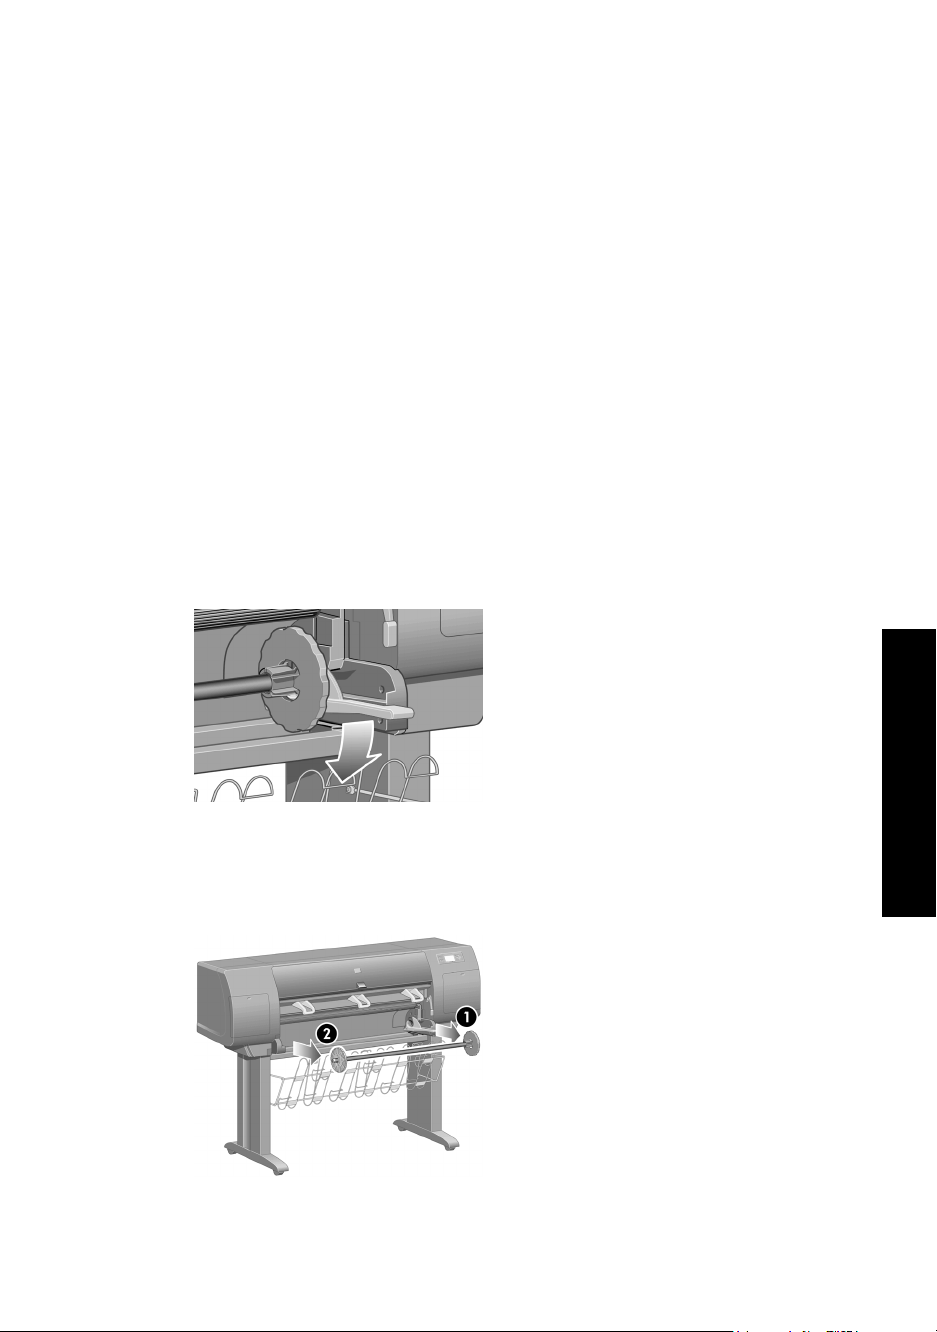
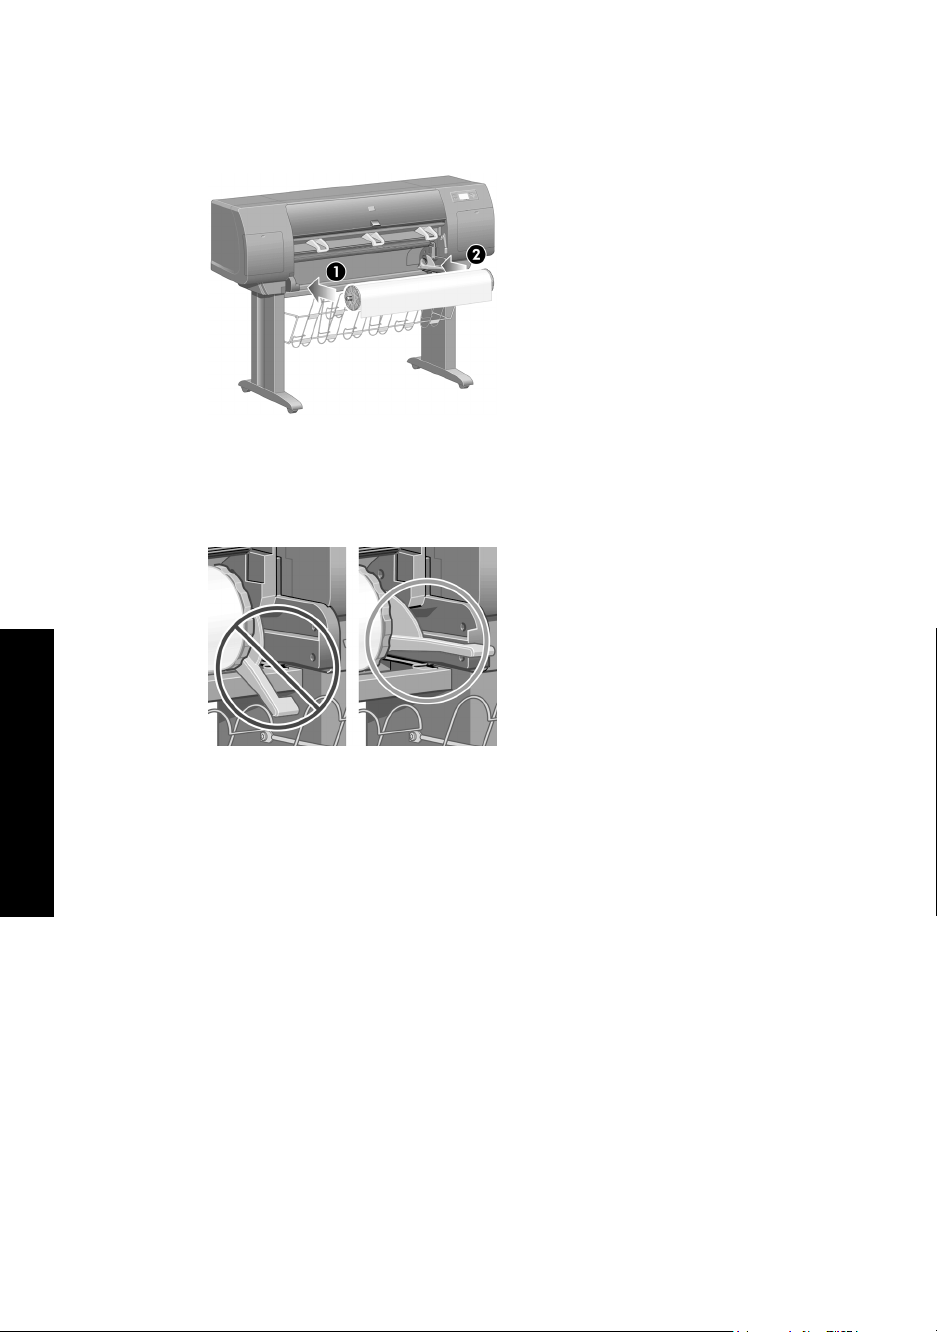
3. Remove the right-hand end of the spindle (1) from the printer, then move it to the
right in order to extract the other end (2). Do not insert your fingers into the
spindle supports during the removal process.
17
Page 20
Chapter 3
The spindle has a stop at each end to keep the roll in position. The stop at the lefthand end can be removed to mount a new roll, it slides along the spindle to hold
rolls of different widths.
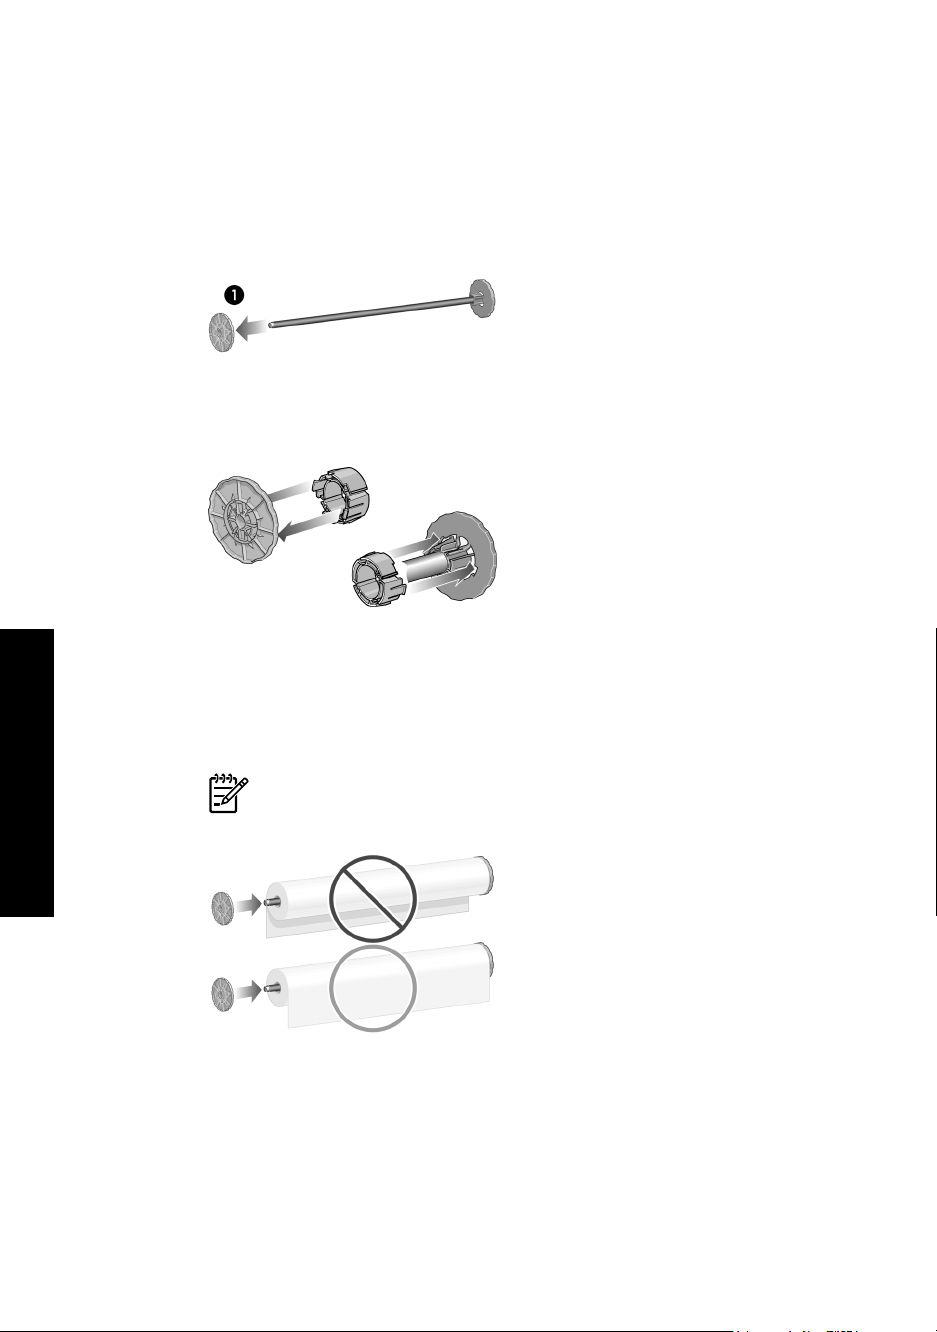
4. Remove the blue paper stop (1) from the left-hand end of the spindle.
5. If your roll has a three-inch cardboard core, ensure that the core adaptors
supplied with the printer have been installed. See below:
How do I handle paper?
6. The roll may be very long; rest the spindle horizontally on a table and load the roll
on the table. Bear in mind that you may need two people to handle it.
7. Slide the new roll onto the spindle. Make sure the paper type is oriented as
shown. If it is not, remove the roll, turn it 180 degrees and slide it back on to the
spindle.
Note There is also a label on the spindle showing the correct orientation.
18
Page 21
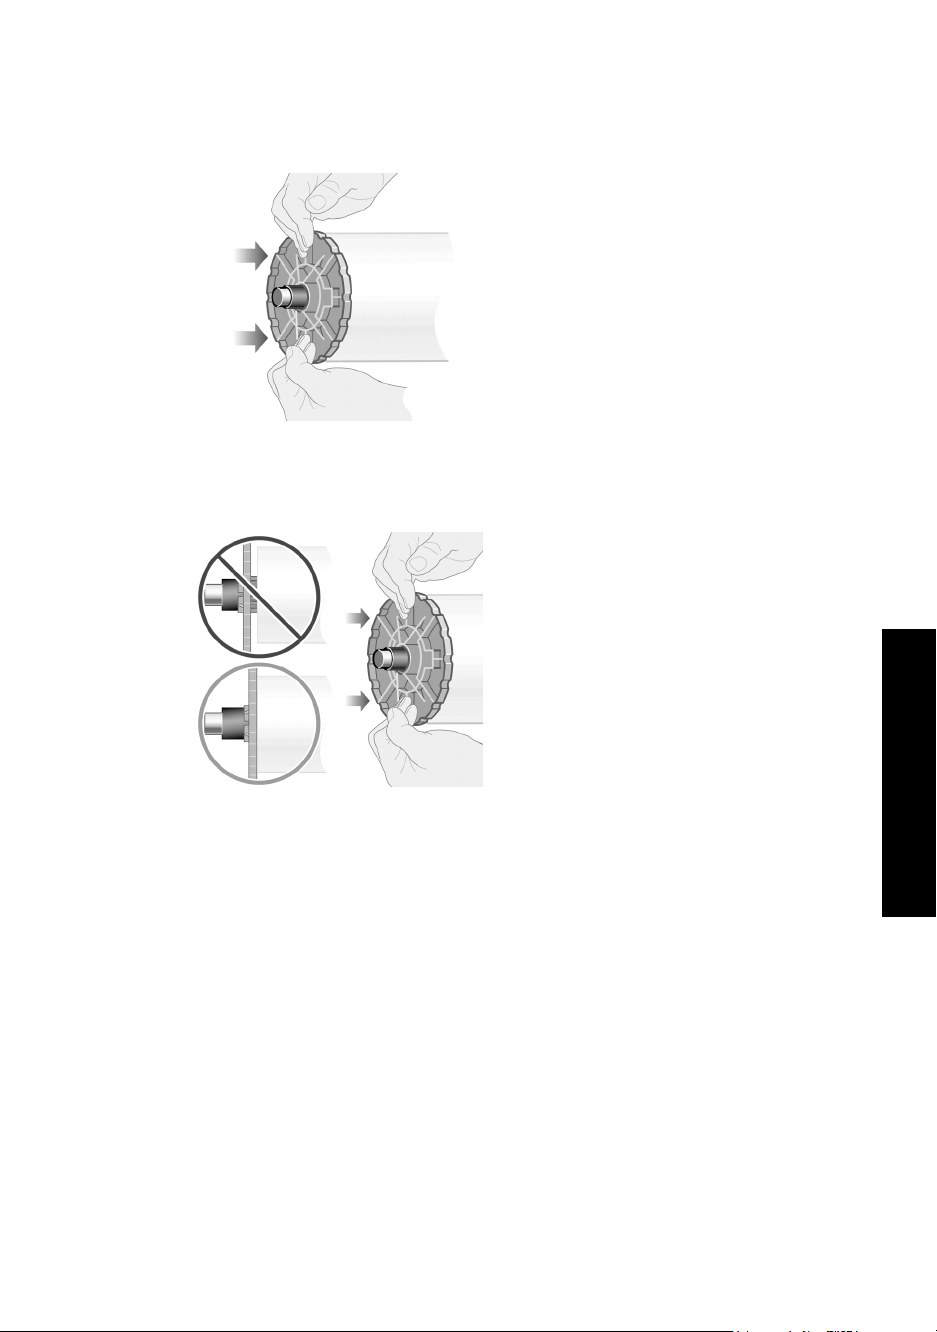
8. Put the blue paper stop on to the upper end of the spindle, and push it towards
the end of the roll.
9. Ensure the blue paper stop is pushed in as far as it will go, without using
excessive force.
How do I handle paper?
19
Page 22
Chapter 3
10. With the blue paper stop on the left, slide the spindle into the printer left and then
right as shown by the arrows 1 and 2.
11. To make sure that the right end of the spindle is in place, check that the spindle
lever is in its top position (horizontal). You can move the lever yourself if
necessary.
How do I handle paper?
If you are a regular user of different paper types, you can change rolls more quickly if
you pre-load rolls of different paper types on different spindles. Extra spindles are
available for purchase.
20
Page 23
How do I load a roll into the printer?
Note To start this procedure you need to have a roll loaded on the spindle.
See “How do I load a roll onto the spindle?” on page 17.
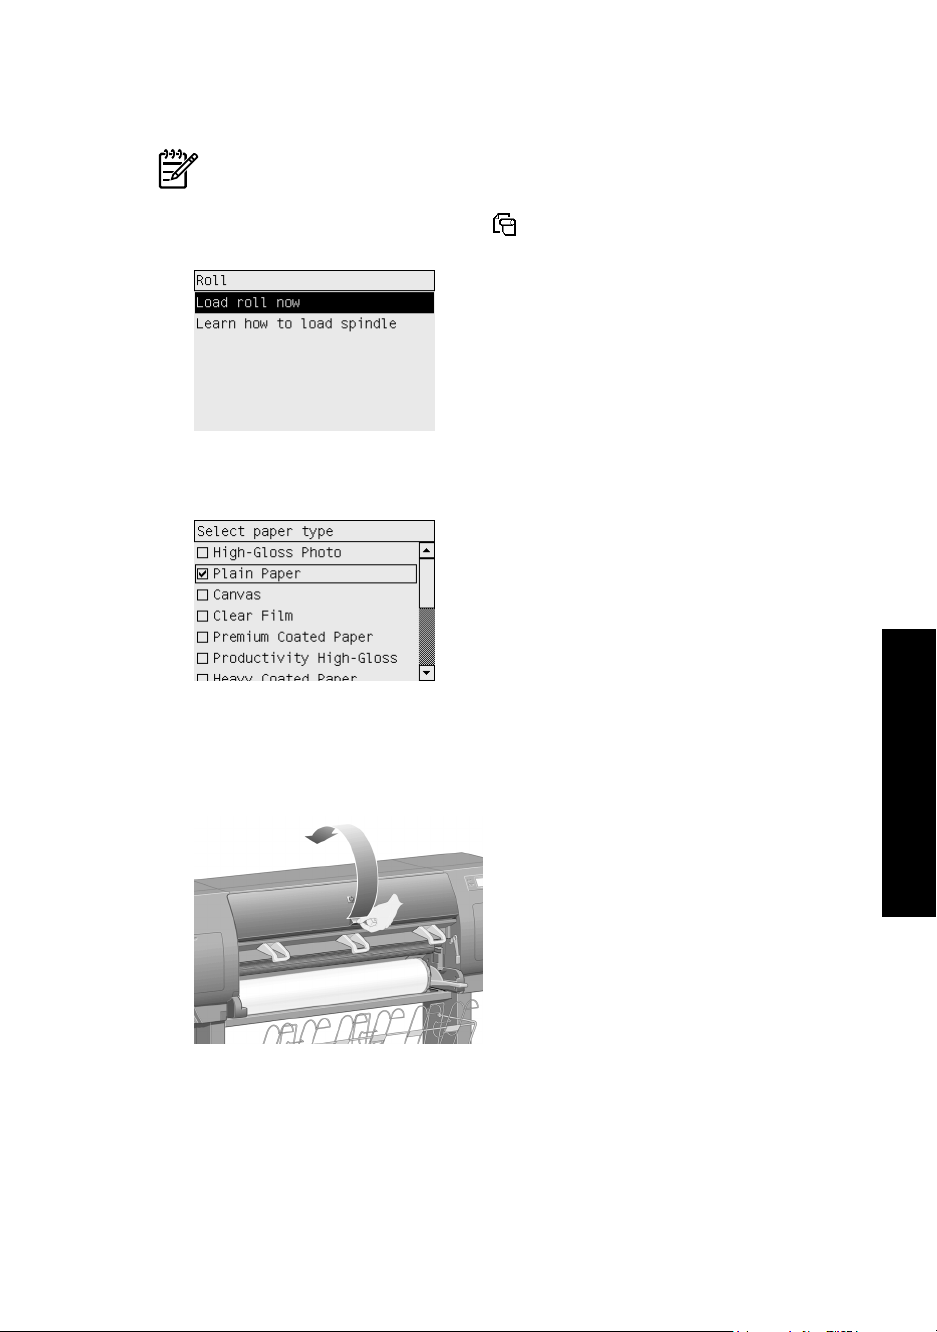
1.
At the printer's front panel, select the
2. The front panel displays a list of paper types.
icon, then Roll > Load roll now.
How do I handle paper?
3. Select the paper type you are using. If it is not clear which you should select, see
“How do I select supported paper types?” on page 32.
4. Wait until the front panel prompts you to open the window.
21
Page 24
Chapter 3
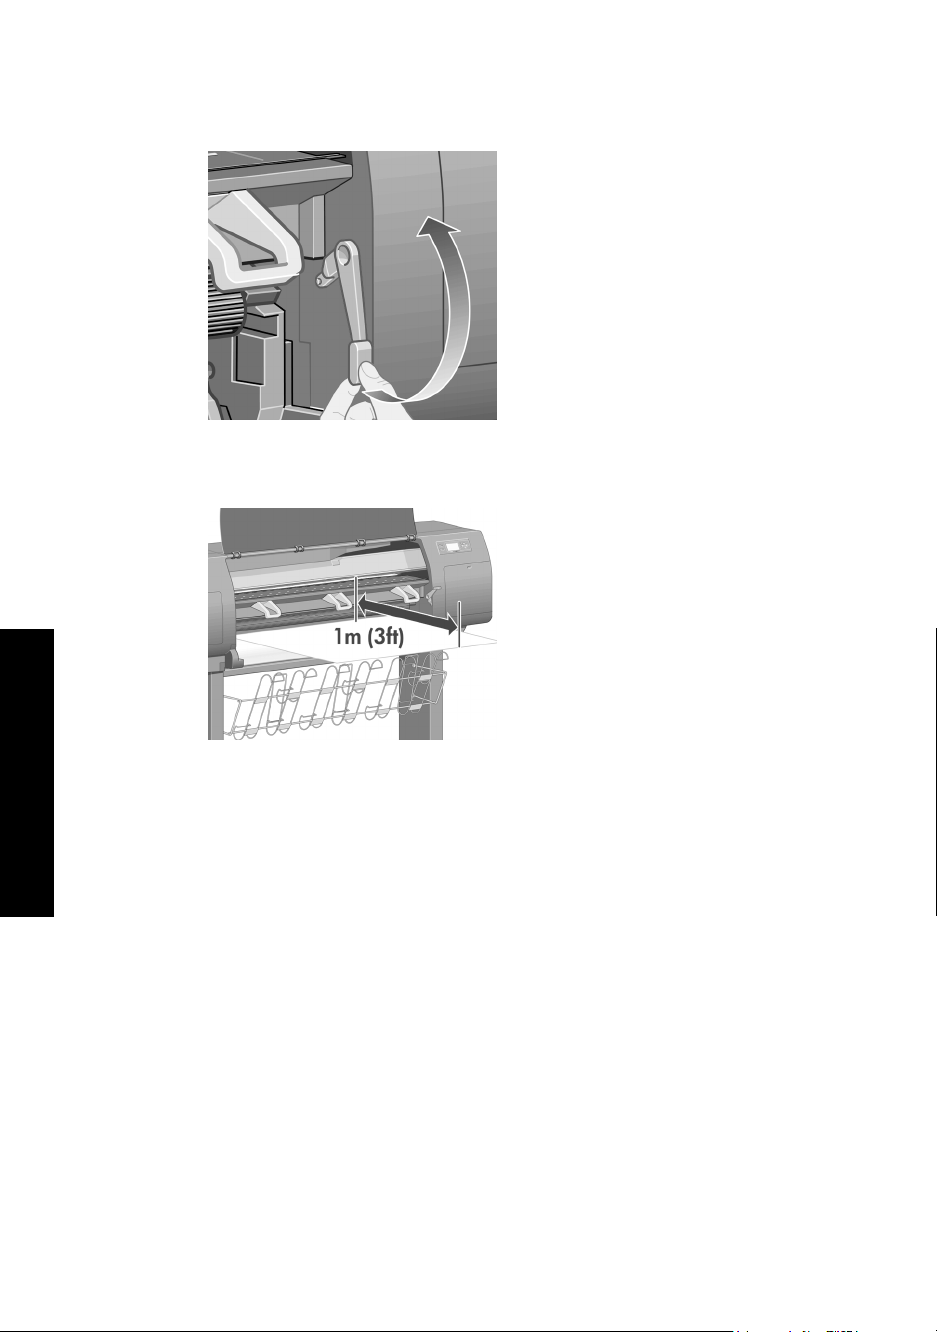
5. Lift the paper load lever.
6. Pull out approximately 1 m (3 ft.) of paper.
How do I handle paper?
22
Page 25
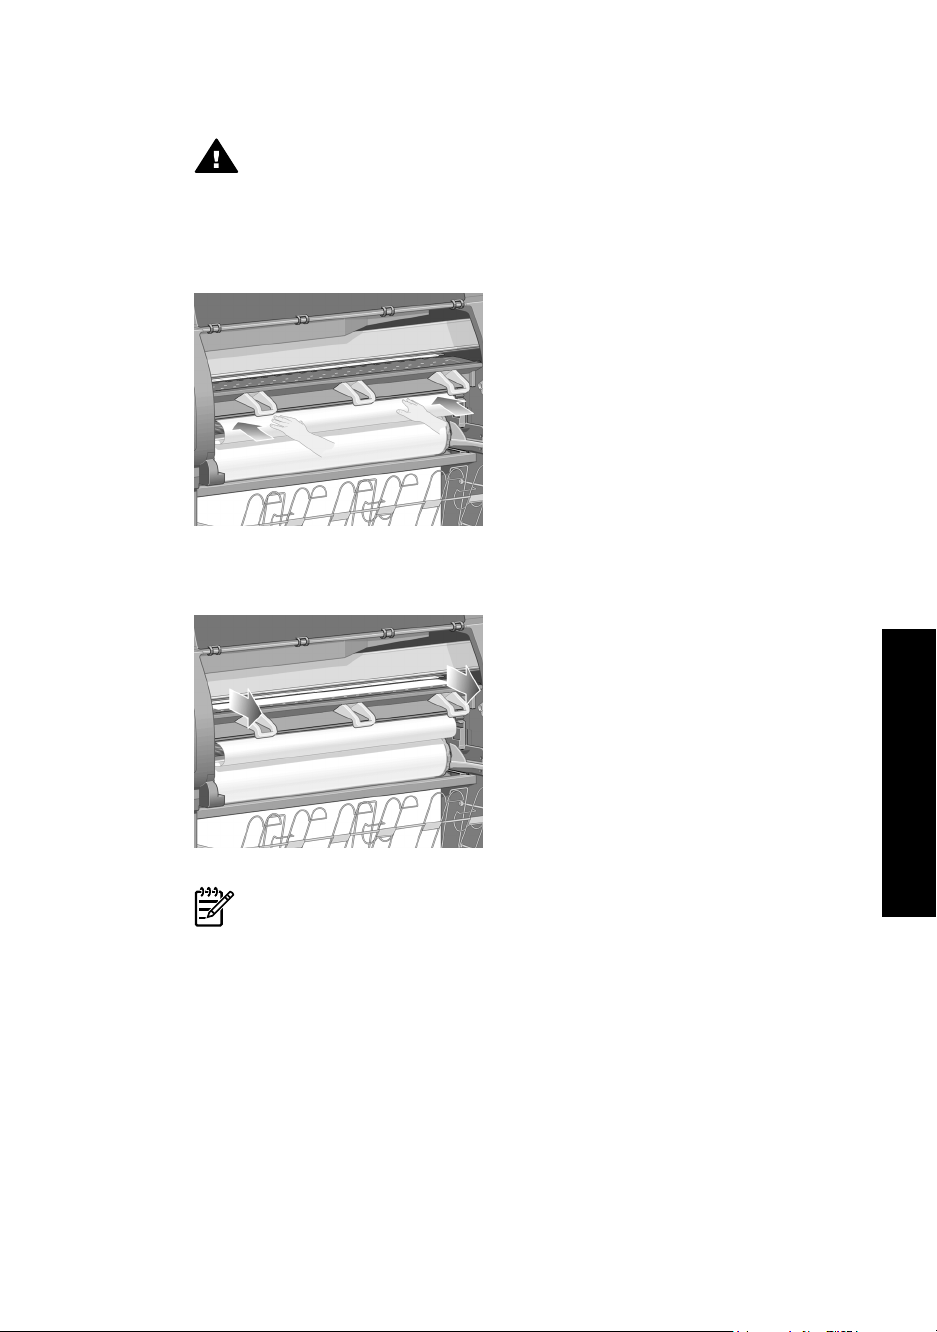
7. Carefully insert the leading edge of the roll above the black roller.
Warning 1 Take care not to touch the rubber wheels on the platen while
loading paper: they may rotate and trap skin, hair, or clothing.
Warning 2 Take care not to push your fingers inside the printer's paper
path. It is not designed to accommodate fingers, and the results may be
painful.
8. Wait until the paper emerges from the printer as shown below.
How do I handle paper?
Note If you have an unexpected problem at any stage of the paper
loading process, see “The problem is the paper cannot be loaded
successfully” on page 147.
23
Page 26
Chapter 3
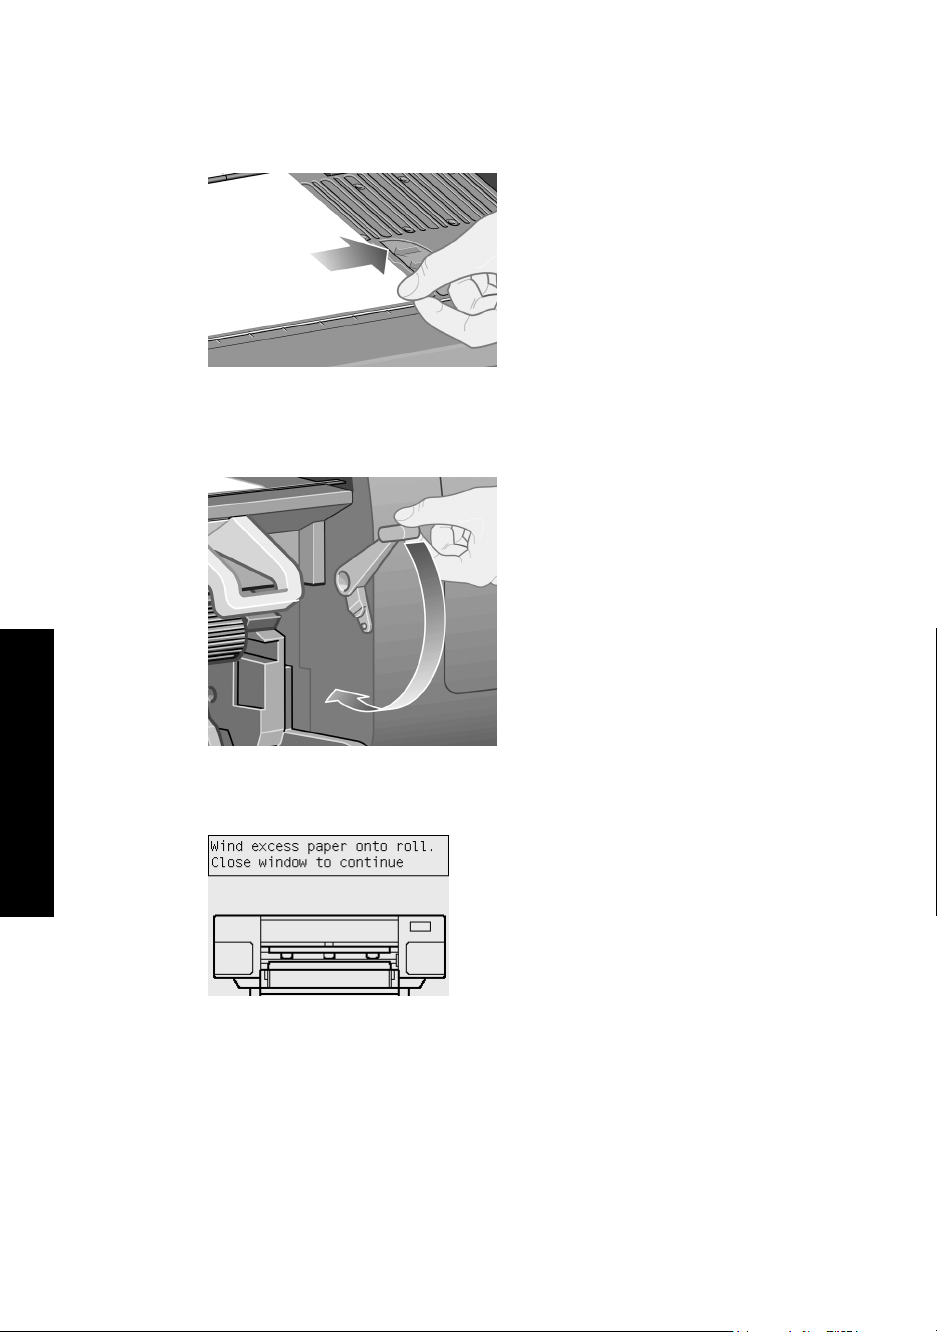
9. Align the right-hand edge of the paper with the blue line and the left edge of the
half-circle on the right of the platen.
10. When the paper is correctly aligned with the blue line and half-circle, lower the
paper load lever.
How do I handle paper?
11. The front panel prompts you to wind excess paper onto the roll.
24
Page 27
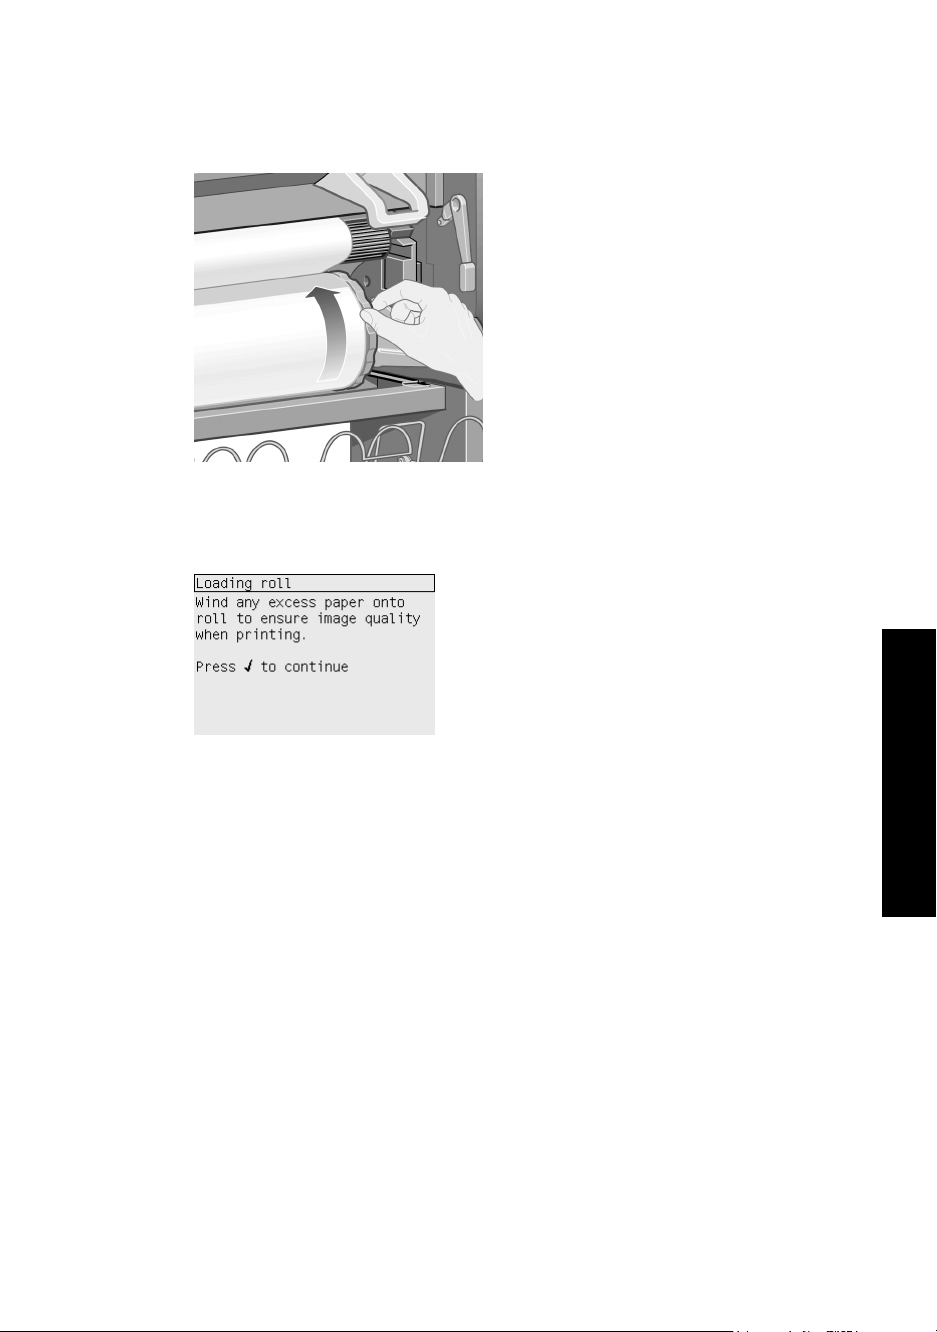
12. Wind the excess paper onto the roll. Use the paper stop to turn the roll in the
direction shown.
13. Lower the window.
14. The front panel again prompts you to wind excess paper onto the roll.
How do I handle paper?
15. The printer will perform a color calibration, if it has not already calibrated the
paper type you are using, and if color calibration is turned on. See “How do I
perform color calibration?” on page 77.
16. The front panel displays the Ready message and the printer is ready to print.
25
Page 28
Chapter 3
How do I unload a roll from the printer?
If there is more than 30 cm of paper remaining of the roll, use the following procedure.
1.
At the printer's front panel, select the
2. The paper will normally be removed from the printer.
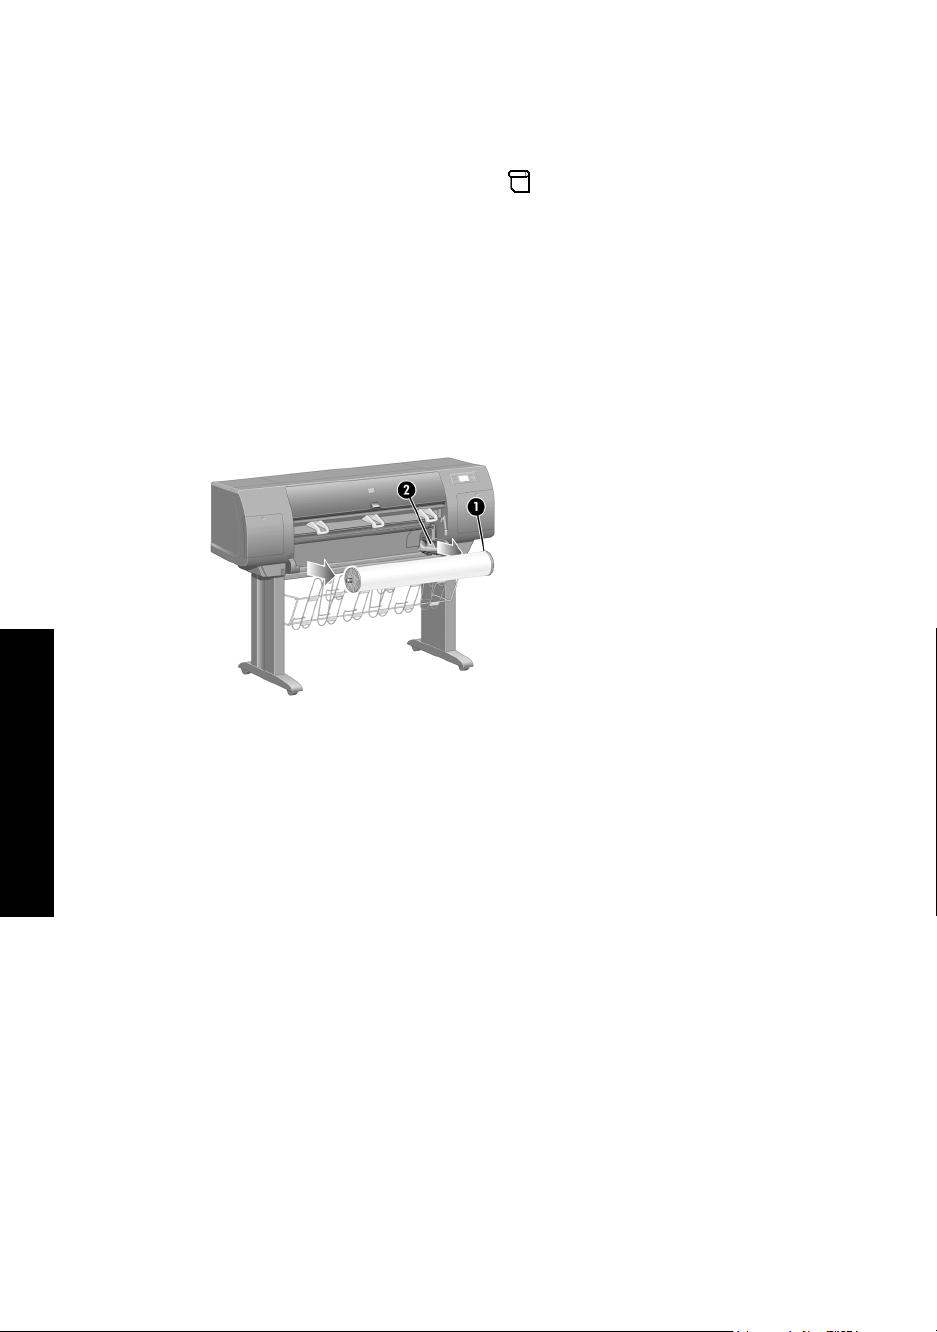
If the paper is not automatically removed from the printer, the front panel will
prompt you to lift the paper load lever and turn the paper stop (1) by hand until
the paper is removed from the printer. When you have finished, lower the paper
load lever.
3. Turn the paper stop (1) by hand, until the paper is fully wound onto the roll.
4. Press the Select key.
5. Press the spindle lever (2) down and remove the roll from the printer, pulling out
the right-hand end first. Do not insert your fingers into the spindle supports during
the removal process.
icon, then Unload paper now.
How do I handle paper?
If there is less than 30 cm remaining of the roll, use the following procedure:
1. If you have already selected Unload paper now at the front panel, press the
Cancel key to cancel that procedure.
2. Ensure that the paper load lever is in the down position, and press the Form
Feed and Cut key twice (or until the paper advances).
3. Raise the paper load lever and pull the paper out manually.
4. Press the spindle lever (2) down and remove the empty spindle from the printer,
pulling out the right-hand end first. Do not insert your fingers into the spindle
supports during the removal process.
26
Page 29
How do I load a single sheet?
Any loaded roll must be unloaded before loading a sheet. See “How do I unload a roll
from the printer?” on page 26.
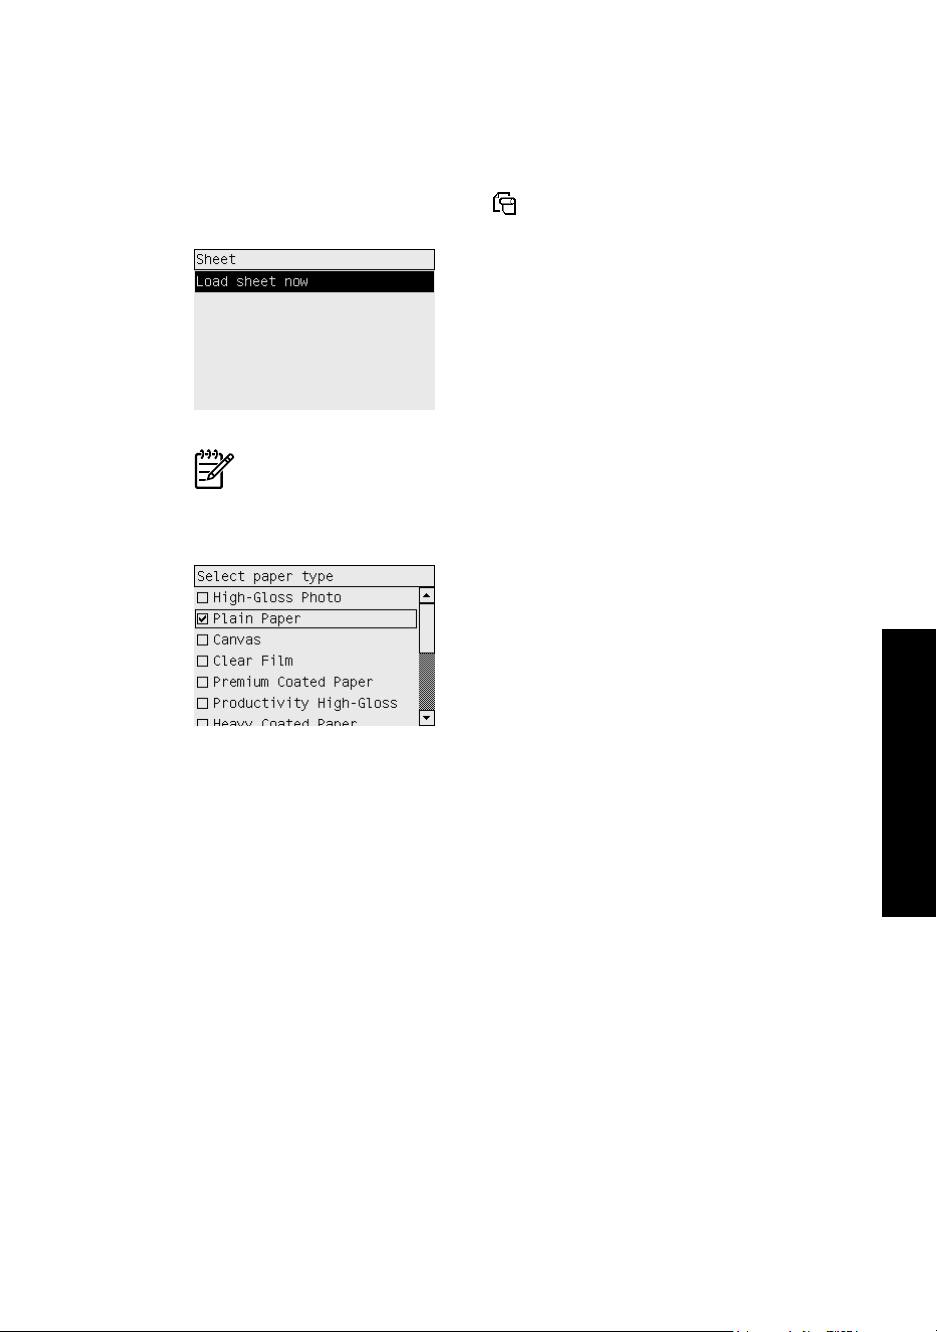
1.
At the printer's front panel, select the
Note As usual, you must press the Select key to select this option.
2. The front panel displays a list of paper types.
icon, then Sheet > Load sheet now.
How do I handle paper?
3. Select the paper type you are using. If it is not clear which you should select, see
“How do I select supported paper types?” on page 32.
27
Page 30

Chapter 3
4. Wait until the front panel prompts you to open the window.
5. Lift the paper load lever.
How do I handle paper?
6. Insert the sheet into the printer as shown below.
28
Page 31

7. Insert the sheet until it reappears from the printer as shown below.
Warning 1 Take care not to touch the rubber wheels on the platen while
loading paper: they may rotate and trap skin, hair or clothing.
Warning 2 Take care not to push your fingers inside the printer's paper
path. It is not designed to accommodate fingers, and the results may be
painful.
8. Pull the sheet out from the top.
How do I handle paper?
29
Page 32

Chapter 3
9. Align the leading edge of the sheet with the metal bar in the platen.
Align the right-hand edge of the sheet with the left edge of the half-circle on the
platen, as shown below.
10. Lower the window.
11. Lower the paper load lever.
How do I handle paper?
12. If the paper has been loaded successfully, the front panel displays the Ready
message and the printer is ready to print. If something has gone wrong (paper
mispositioned or misaligned), follow the instructions on the front panel.
30
Page 33

13. If you are printing on a sheet of paper less than 900 mm in length (up to A1 size),
deploy the three mobile stoppers on the bin.
Note 1 When printing on sheet paper you are recommended to select
Normal or Best print quality, see “How do I change the print
quality?” on page 67.
Note 2 If you have an unexpected problem at any stage of the paper loading
process, see “The problem is the paper cannot be loaded
successfully” on page 147.
How do I unload a single sheet?
At the printer's front panel, select the icon, then Unload paper now.
To give the ink time to dry, the printer holds the sheet for some time (see “Tell me
about drying time” in the User's Guide).
How do I handle paper?
31
Page 34

Chapter 3
How do I select supported paper types?
The following tables list the HP paper types that are suitable for use with your printer,
and show the name that you should select in the front panel when loading each paper
type. The “recommended” paper types, listed first, have been thoroughly tested and
are known to provide the best print quality when used with your printer. The “other
supported” paper types can be used with your printer but are not guaranteed to
provide the best print quality. For the part numbers, widths, and weights of these
papers, see “Tell me about ordering paper” in the User's Guide.
Note This list is likely to change over the course of time. For the latest
information, see http://www.hp.com/go/designjet.
Recommended paper types
Product name
HP Bright White Inkjet Bond Paper Bright White
HP Matte Film Matte Film
HP Clear Film Clear Film
HP Natural Tracing Paper Natural Tracing Paper
Front panel name
Max Speed Bright White
How do I handle paper?
HP Translucent Bond Translucent Bond
HP Vellum Vellum
HP Coated Paper Coated Paper
HP Heavyweight Coated Paper Heavyweight Coated Paper
HP Heavyweight Coated Paper—long roll Heavyweight Coated Paper
HP Productivity Photo Gloss Productivity Photo Gloss
HP Productivity Photo Semi-Gloss Productivity Photo Gloss
HP Photo Paper RC Matte High-Gloss Photo Paper
HP Proofing Paper RC Satin High-Gloss Photo Paper
HP Universal High-Gloss Photo Paper High-Gloss Photo Paper
HP Universal Semi-Gloss Photo Paper High-Gloss Photo Paper
HP Universal Inkjet Bond Paper Bond Paper
Max Speed Bond Paper
32
Page 35

Other supported paper types
Product name
HP Polyester Film Opaque White Glossy High-Gloss Photo Paper
HP Universal Coated Paper Bright White
HP Universal Heavyweight Coated Paper Heavyweight Coated Paper
HP Super Heavyweight Coated Paper Super Heavy Coated Paper
HP Banners with Tyvek Super Heavy Coated Paper
HP Colorfast Adhesive Vinyl High-Gloss Photo Paper
HP Backlit Film Reverse Print Matte Matte Film
HP Studio Canvas Canvas
HP Outdoor Billboard Paper Blue Back Super Heavy Coated Paper
HP Canvas Matte Canvas
HP Outdoor Paper Super Heavy Coated Paper
HP Canvas Paper 140 gsm Canvas
Front panel name
Max Speed Bright White
HP Canvas Paper 180 gsm Canvas
HP Fine Art Paper Aquarella Super Heavy Coated Paper
HP Fine Art Paper Cream Super Heavy Coated Paper
HP Fine Art Paper Sahara Super Heavy Coated Paper
HP Indoor Paper Self-Adhesive Super Heavy Coated Paper
How do I view information about the paper?
At the printer's front panel, highlight the or icon.
You will see the following information displayed on the front panel:
● The paper source (roll or sheet)
● The paper manufacturer's name
● The paper type you have selected
● The total width of the paper in millimeters (as measured by the printer)
If no paper is loaded, the message Out of paper is displayed.
The same information (apart from the manufacturer's name) is displayed on the
Embedded Web Server's Supplies page.
How do I handle paper?
33
Page 36

Chapter 3
How do I download media profiles?
Each supported paper type has its own characteristics. For optimum print quality, the
printer changes the way it prints on each different paper type. For example, some may
need more ink and some may require a longer drying time. So the printer must be
given a description of the requirements of each paper type. This description is called
the “media profile”. The media profile contains the ICC profile, which describes the
color characteristics of the paper; it also contains information on other characteristics
and requirements of the paper that are not directly related to color. Existing media
profiles for your printer are already installed in the printer's software.
However, you would find it inconvenient to scroll through a list of all paper types
available for your printer, so your printer contains media profiles for only the most
commonly used paper types. If you buy a paper type for which your printer has no
media profile, you will find that you cannot select that paper type in the front panel. To
download the correct media profile, go to http://www.hp.com/support/designjet-
downloads/, select the name of your printer, then select Media profiles.
If you do not find the media profile you want on the Web, you may find that it has been
added to the latest firmware for your printer. You can check the firmware release
notes for information. See “How do I update my printer's firmware?” on page 111.
How do I use non-HP paper?
HP's own paper types have been fully tested with the printer and can be expected to
give the best print quality.
However, you can print on paper from any manufacturer. In that case, you should
select (in the front panel) the HP paper type that is most similar to the paper you will
be using. If in doubt, try several different HP paper type settings, and choose the one
that provides you with the best print quality. If results are not entirely satisfactory with
any paper type setting, see “General advice” on page 127.
How do I cancel the drying time?
Press the Form Feed and Cut key (1) on the front panel.
How do I handle paper?
Caution A print that has had insufficient time to dry can suffer from quality
problems.
34
Page 37

How do I change the drying time?
You may wish to change the drying time setting to suit special printing conditions.
Select the
Extended, Optimal, Reduced, or None.
See “Tell me about drying time” in the User's Guide.
icon, then Drying options > Drying time. You can then select
How do I handle paper?
35
Page 38

Chapter 3
How do I handle paper?
36
Page 39

4
How do I handle the ink system?
● “How do I remove an ink cartridge?” on page 37
● “How do I insert an ink cartridge?” on page 42
● “How do I remove a printhead?” on page 44
● “How do I insert a printhead?” on page 48
● “How do I manage printhead monitoring?” on page 51
● “How do I recover (clean) the printheads?” on page 51
● “How do I clean a printhead's electrical connections?” on page 51
● “How do I align the printheads?” on page 57
● “How do I remove a printhead cleaner?” on page 58
● “How do I insert a printhead cleaner?” on page 60
● “How do I check the status of the ink system?” on page 62
● “How do I get ink cartridge statistics?” on page 62
● “How do I get printhead statistics?” on page 63
● “How do I check printer usage statistics?” on page 63
How do I remove an ink cartridge?
There are two types of ink cartridge removal.
● The ink cartridge is very low and you want to replace it with a full cartridge for
unattended printing (you can use up the remaining ink in the first cartridge at a
more convenient time).
● The ink cartridge is empty or faulty, and you must replace it to continue printing.
Caution 1 Do not try to remove an ink cartridge while printing.
Caution 2 Remove an ink cartridge only if you are ready to insert another one.
Warning Make sure the printer wheels are locked (the brake lever is pressed
down) to prevent the printer from moving.
37
How do I handle the ink system?
Page 40

Chapter 4
1.
At the printer's front panel, select the
icon, then Ink cartridges > Replace ink
cartridges now.
2. The ink cartridge door is on the left-hand side of the printer.
How do I handle the ink system?
3. Release the door catch by pressing on the top until it clicks.
38
Page 41

4. Pull the door fully open.
5. Grip the blue tab in front of the cartridge you wish to remove.
39
How do I handle the ink system?
Page 42

Chapter 4
6. Pull the blue tab down.
7. Then pull it outwards, towards you.
How do I handle the ink system?
40
Page 43

8. The cartridge comes out, in its drawer.
9. Lift the cartridge out of its drawer.
Note 1 Avoid touching the end of the cartridge that is inserted into the
printer, as there may be ink on the connection.
Note 2 Avoid storing partially used ink cartridges on their ends.
10. The front panel display will identify the missing ink cartridge.
How do I handle the ink system?
41
Page 44

Chapter 4
How do I insert an ink cartridge?
1. Pick up the new ink cartridge and find the label identifying the ink color. Hold the
ink cartridge so that you can see the identifying colored label at the top of the side
facing you.
2. Check that the colored label above the empty slot in the printer matches the color
of the label on the cartridge.
3. Insert the ink cartridge into the cartridge drawer.
Position the cartridge at the rear of the drawer as indicated below.
How do I handle the ink system?
42
Page 45

4. Slide the drawer and cartridge into the slot until it locks into position.
If you have difficulty, see “The problem is I cannot insert an ink
cartridge” on page 145.
5. When all cartridges have been inserted, close the door (push it until it clicks shut).
6. The front panel display confirms that all cartridges have been correctly inserted.
How do I handle the ink system?
43
Page 46

Chapter 4
How do I remove a printhead?
Warning Make sure the printer wheels are locked (the brake lever is pressed
down) to prevent the printer from moving.
Printhead replacement must be performed with the printer switched on at the power
isolation switch.
1.
At the printer's front panel, select the
printheads now.
2. The printer moves the carriage into the correct position.
Caution If the carriage is left in the central part of the printer for more
than seven minutes. it will try to move back to its normal position in the
right-hand end.
icon, then Printheads > Replace
How do I handle the ink system?
3. When the carriage has stopped moving, the front panel will ask you to open the
window.
44
Page 47

4. Locate the carriage.
5. Pull up and release the latch on top of the carriage.
6. Lift up the cover. This will now give you access to the printheads.
How do I handle the ink system?
45
Page 48

Chapter 4
7. To remove a printhead, lift up the blue handle.
8. Using the blue handle, gently disengage the printhead.
How do I handle the ink system?
46
Page 49

9. Gently pull the blue handle upward until the printhead is released from the
carriage.
Caution Do not pull abruptly because this can damage the printhead.
10. The front panel display identifies the missing printhead.
47
How do I handle the ink system?
Page 50

Chapter 4
How do I insert a printhead?
1. If the printhead is new:
a. Remove the blue protective cap by pulling down on it.
b. Remove the clear protective tape from the printhead's nozzles by pulling on
the paper tab.
The printhead is designed to prevent you from accidentally inserting it into the
wrong position. Check that the colored label on the printhead matches the
colored label of the carriage position into which the printhead is to be inserted.
2. Insert the new printhead into its correct position in the carriage.
How do I handle the ink system?
Caution Insert the printhead slowly and vertically, straight down. It may
be damaged if you insert it too fast, or at an angle, or if you turn it as you
insert it.
48
Page 51

3. Push down as indicated by the arrow shown below.
When installing the new printhead there may be some resistance, so you need to
press it down firmly but smoothly.
If you have difficulty, see “The problem is I cannot insert a printhead” on page 145.
4. Insert any other printheads that need to be installed, and close the carriage cover.
When all the printheads have been inserted correctly and accepted by the printer,
the printer will beep.
Note If the printer does not beep when you insert the printhead and the
Replace message appears on the front panel, the printhead may need to
be reseated.
How do I handle the ink system?
49
Page 52

Chapter 4
5. Latch the carriage cover.
When the carriage has been correctly latched, it looks like this:
How do I handle the ink system?
6. Close the window.
7. The front panel display confirms that all printheads are correctly inserted.
50
Page 53

8. Now replace the printhead cleaners for any printheads that have been changed.
See “How do I remove a printhead cleaner?” on page 58 and “How do I insert a
printhead cleaner?” on page 60.
Caution Leaving the old printhead cleaner in the printer will shorten the
new printhead's life and possibly damage the printer.
How do I manage printhead monitoring?
The printer automatically checks the status of the printheads from time to time in order
to monitor their health and detect any problems that might affect print quality. The
frequency of these checks is optimized to maintain good throughput.
If you want to increase the frequency of printhead monitoring in order to detect any
problems sooner, select the
monitoring > Intensive. When the printer is printing and printhead monitoring is set
to Intensive, the front panel and the Embedded Web Server printer status line will
display the following message: Printing. Printhead monitoring (instead of just
Printing).
Note When Intensive is selected, the throughput of the printer will be
reduced because of the increased frequency of printhead checks.
icon, then Configuration menu > Printhead
To return to the default printhead monitoring frequency, select the
Configuration menu > Printhead monitoring > Optimized.
icon, then
How do I recover (clean) the printheads?
To clean the printheads (which often enables them to recover from problems), go to
the printer's front panel and select the
printheads. Cleaning takes about two to four minutes.
icon, then Printheads > Recover
How do I clean a printhead's electrical connections?
In some extreme cases it is possible that the printer will not recognize a printhead
after it has been installed. This is due to the build-up of ink deposits on the electrical
connections between the printhead and the printhead carriage. Under these
circumstances you are recommended to clean the printhead's electrical connections.
Routine cleaning of the connections when there are no apparent problems is not
recommended.
How do I handle the ink system?
51
Page 54

Chapter 4
Included with your printer (in the Maintenance Kit box) is a carriage interconnect wiper.
This should be used for cleaning the electrical interconnects of both the printhead
carriage and the printhead, which should be done if the front panel persistently
displays the Reseat or Replace message next to the printhead.
1. Remove a new pre-moistened replacement sponge from its pouch.
How do I handle the ink system?
A supply of sponges is included in the box with the wiper. If all sponges have
been used, more can be obtained by contacting your customer service
representative.
2. Open the carriage interconnect wiper.
52
Page 55

3. Load the sponge into the carriage interconnect wiper by positioning the sponge
on the face of the carriage interconnect wiper with the shorter tab in the locating
slot.
4. Close the carriage interconnect wiper, trapping the sponge in place.
5. Open the printhead carriage latch and extract the printhead that has the problem,
as indicated on the front panel. See “How do I remove a printhead?” on page 44.
How do I handle the ink system?
53
Page 56

Chapter 4
6. Insert the carriage interconnect wiper into the printhead slot at the back. Wipe the
electrical contacts by inserting the tool between the electrical connections at the
back of the slot and the steel spring with the sponge facing away from you and
towards the electrical contacts. Try to avoid picking up any ink deposit which may
have accumulated on the bottom surface of the slot.
Caution If the carriage is left in the central part of the printer for more
than seven minutes. it will try to move back to its normal position in the
right-hand end.
How do I handle the ink system?
7. Rub the sponge against the contacts with a light force along the entire depth of
the flex connector as allowed by the mechanical stop on the tool.
54
Page 57

8. Take special care to clean all contacts thoroughly, including the ones at the
lowest point of the connector.
9. Using the same sponge, clean the lower strip of electrical contacts on the
printhead (unless the printhead is new), avoid touching the upper set of electrical
contacts.
Caution Do not touch the surface of the printhead containing the
nozzles, which are easily damaged.
10. After waiting a few moments to allow both connectors to dry, replace the
printhead into the printhead carriage. See “How do I insert a
printhead?” on page 48.
How do I handle the ink system?
55
Page 58

Chapter 4
11. On completion of the cleaning process, open the carriage interconnect wiper by
pulling on the sponge tab.
12. Remove the soiled sponge from the carriage interconnect wiper.
How do I handle the ink system?
13. Dispose of the soiled sponge in a safe place to prevent the transfer of ink onto
hands and clothing.
If the front panel continues to display the Reseat or Replace message, replace the
printhead or contact your customer service representative.
56
Page 59

How do I align the printheads?
The printer will normally perform printhead alignment whenever printheads are
replaced. If there is no paper loaded when a printhead is replaced, the printer will
perform the alignment the next time you load paper.
Note You can turn off these automatic printhead alignments from the front
panel: select the
alignment: Off.
In addition, you should align the printheads if the Image Diagnostics Print indicates an
alignment error. See “How do I use the Image Diagnostics Print?” on page 113.
1. Make sure that you have a roll of opaque paper loaded in the printer; the best
results will be achieved with the type of paper that you normally use for printing.
Single sheets of paper, and transparent materials such as translucent bond, clear
film, matte film, tracing paper, and vellum are not suitable for printhead alignment.
2. To request printhead alignment (if the alignment is not being performed
automatically), go to the front panel, select the
Align printheads.
icon, then Configuration menu > Auto. printhead
icon, and then Printheads >
3. If you are close to the beginning of a roll, the front panel will report that the printer
may need to feed up to 3 m (≈ 10 ft) of paper before starting the printhead
alignment. This is necessary to ensure a successful alignment. In this case, you
will be given the following options:
– To continue with the printhead alignment, allowing the printer to feed as
much paper as necessary
– To schedule the printhead alignment to be performed later, after you have
used a few meters of paper for printing
– To cancel the printhead alignment
4. If you choose to continue with the printhead alignment, the process will start
immediately, unless an image is currently being printed, in which case the
alignment will be done as soon as the current print job is finished.
The alignment process takes about twelve minutes.
How do I handle the ink system?
57
Page 60

Chapter 4
How do I remove a printhead cleaner?
After you have replaced a printhead, the front panel will prompt you to replace the
printhead cleaner.
Caution When replacing a printhead, always replace the corresponding
printhead cleaner. Leaving the old cleaner in the printer will seriously shorten
the new printhead's life and possibly damage the printer. A new printhead
cleaner is provided with each new printhead.
When removing a printhead cleaner:
● Be careful not to get ink on your hands. There may be ink on, around, and inside
the replaced printhead cleaner.
● Always handle and store the replaced printhead cleaner upright to avoid spilling
any ink.
Warning Make sure the printer wheels are locked (the brake lever is pressed
down) to prevent the printer from moving.
1. The printhead cleaners are located in slots underneath the front panel, at the
front of the printer. Press the top of the service station door to release the catch.
How do I handle the ink system?
58
Page 61

2. Open the door.
3. Each printhead cleaner has a handle on the front. To remove the cleaner, press
inward and upward as indicated by the arrow shown here, until the cleaner is
released.
4. Lift up the printhead cleaner to remove it from the slot, and slide it out horizontally
as shown below.
How do I handle the ink system?
59
Page 62

Chapter 4
See also “How do I insert a printhead cleaner?” on page 60.
How do I insert a printhead cleaner?
The plastic bag in which the new printhead cleaner comes can be used to dispose of
the old printhead and printhead cleaner.
1. Insert each printhead cleaner into the correct color slot location, in the service
station, in the direction indicated by the arrow shown here.
How do I handle the ink system?
2. When the printhead cleaner has been pushed all the way in, press inwards and
downwards as indicated by the arrow shown here, until it clicks into place.
If you have difficulty, see “The problem is I cannot insert a printhead
cleaner” on page 145.
Note The front panel will not show the new printhead cleaner until the
right-hand door is closed.
60
Page 63

3. When you have inserted the printhead cleaner(s) into the printer, close the door.
Note The printer needs all the ink cartridges, printheads, and printhead
cleaners to be installed before it can continue.
4. If no paper is loaded, the front panel will instruct you to load some.
Whenever you insert a new printhead and cleaner, the printer will normally perform a
printhead alignment and color calibration. Both are recommended for best print
quality. In some cases, you may decide to postpone printhead alignment until after
some further printing has been done.
Note If you prefer to save some time at the expense of print quality, you can
turn off these automatic procedures from the front panel, by selecting the
icon, then Configuration menu > Auto. printhead alignment > Off and
Configuration menu > Color calibration > Off.
The front panel may request that you load paper that is suitable for printhead
alignment. The printhead alignment procedure requires a roll of opaque paper: not a
single sheet, and not any kind of transparent or translucent material.
When the front panel displays Ready, you are ready to print.
Note Make sure the printer window and the right-hand door are closed after
you replace the supplies. The printer will not print while these are open.
How do I handle the ink system?
61
Page 64

Chapter 4
How do I check the status of the ink system?
1. Access the Embedded Web Server (see “How do I access the Embedded Web
Server?” on page 13).
2. Go to the Supplies page.
The Supplies page shows you the status of the ink cartridges (including the ink
levels), the printheads, the printhead cleaners, and the loaded paper.
How do I get ink cartridge statistics?
To get information on your ink cartridges:
1.
Go to the front panel and select the
2. Select Ink cartridges > Ink cartridge information, then select the cartridge on
which you want information.
3. The front panel displays:
– Its color
– Its product name
– Its serial number
– Its status
– Its ink level, if known
– Its total ink capacity in milliliters
How do I handle the ink system?
62
– Its warranty status
icon.
Page 65

You can also get most of this information without leaving your computer by using the
Embedded Web Server.
For an explanation of the ink cartridge status messages, see “The problem is an ink
cartridge status message” on page 146.
How do I get printhead statistics?
To get information on your printheads:
1.
Go to the front panel and select the
2. Select Printheads > Printhead information, then select the printhead on which
you want information.
3. The front panel displays:
– Its color
– Its product number
– Its serial number
– Its status
– The volume of ink it has used
– Its warranty status
– The status of its cleaner
You can also get most of this information without leaving your computer by using the
Embedded Web Server.
For an explanation of the printhead and printhead cleaner status messages, see “The
problem is a printhead status message” on page 146 and “The problem is a printhead
cleaner status message” on page 146.
If the warranty status is See warranty note, this indicates that non-HP ink is being
used. See “Worldwide Limited Warranty—HP Designjet 4000 Printer
series” on page 163 for details of the warranty implications.
icon.
How do I check printer usage statistics?
1. Access the Embedded Web Server (see “How do I access the Embedded Web
Server?” on page 13).
2. Go to the Usage page.
3. Go to the Historical tab to see the accumulated usage of the printer since the
first day.
4. Go to the Snapshot tab to save a record of the accumulated usage since the first
day, and reset the Accumulated tab's counters to zero.
5. Go to the Accumulated tab to view the accumulated usage since the last
snapshot.
How do I handle the ink system?
63
Page 66

Chapter 4
How do I handle the ink system?
64
Page 67

How do I adjust my printed
5
How do I adjust my printed
images?
● “How do I change the page size?” on page 65
● “How do I create a custom page size?” on page 65
● “How do I change the print quality?” on page 67
● “How do I choose print quality settings?” on page 68
● “How do I print at maximum speed?” on page 70
● “How do I adjust the margins?” on page 70
● “How do I print on oversize page sizes?” on page 71
● “How do I change the paper's orientation?” on page 71
● “How do I rotate an image?” on page 72
● “How do I print a mirror image?” on page 72
● “How do I scale an image?” on page 72
● “How do I change the palette settings?” on page 73
● “How do I change the treatment of overlapping lines?” on page 74
● “How do I change the graphic language setting?” on page 75
How do I change the page size?
The page size can be specified in the following ways:
● Using a Windows printer driver: select the Paper/Quality tab, then Size is.
● Using a Mac OS printer driver: select the Page Attributes panel, then Paper size.
● Using the Embedded Web Server: go to the Page Size section of the Submit Job
page.
●
Using the front panel: select the
options > Size.
icon, then Printing defaults menu > Paper
images?
Note If a page size is set with the printer driver or with the Embedded Web
Server, it overrides the page size set with the front panel.
How do I create a custom page size?
You can create a custom page size using a printer driver or the Embedded Web
Server.
Using the HP-GL/2 & RTL printer driver for Windows
1. Select the Paper/Quality tab.
2. Press the Custom button.
3. Choose one of the selectable names (Custom 1 to Custom 5) for your custom
page size.
4. Enter its width and height.
5. Press the OK button.
65
Page 68

Chapter 5
images?
Using the PostScript printer driver for Windows XP or Windows 2000
1. Select the Paper/Quality tab.
2. Press the Custom button.
3. Enter your choice of name for your custom page size.
4. Enter its width and height.
5. Press the Save button.
How do I adjust my printed
Using the PostScript printer driver for Windows Me or Windows 98
1. Select the Paper/Quality tab.
2. Select Custom page 1, Custom page 2, or Custom page 3 from the Size is list.
3. Choose the width and height of your custom page.
4. Press the OK button.
Using the PostScript printer driver for Windows NT
1. Select the Page Setup tab.
2. Select PostScript Custom Page Size from the list of page sizes.
3. Choose the width and height of your desired page size.
4. Press the OK button.
Using the PostScript printer driver for Mac OS X
1. Select Page Setup from the File menu.
2. Select the Custom Paper Size panel.
3. Press the New button.
4. Enter your choice of name for your custom page size.
5. Enter its width and height.
6. Press the Save button.
Using the PostScript printer driver for Mac OS 9
1. Select Page Setup from the File menu.
2. Select the Page Attributes panel.
3. Select the Custom Page Default panel.
4. Enter your choice of name for your custom page size.
5. Enter its width and height.
6. Press the Add button.
66
Using the Embedded Web Server
1. Go to the Page Size section of the Submit Job page.
2. Select the Custom option.
3. Choose the width and height of your desired page size.
Page 69

How do I change the print quality?
Your printer has three different print quality options: Best, Normal, and Fast. There
are also two supplementary options that have an effect on print quality: Optimize for
drawings/text or Optimize for images, and Maximum detail. See “How do I choose
print quality settings?” on page 68 for guidance on choosing among these options.
You can specify the print quality in the following ways:
● Using a Windows printer driver: go to the Print Quality section of the Paper/
Quality tab.
● Using a Mac OS printer driver: go to the Image Quality panel.
● Using the Embedded Web Server: go to the Image Quality section of the Submit
Job page.
●
Using the front panel: select the
quality.
Note 1 If a print quality is set with the printer driver or with the Embedded
Web Server, it overrides the print quality setting from the front panel.
Note 2 You cannot change the print quality of pages that the printer is already
receiving or has already received (even if they have not started to print yet).
icon, then Printing defaults menu > Image
How do I adjust my printed
images?
67
Page 70

images?
How do I adjust my printed
Chapter 5
How do I choose print quality settings?
The following table shows suggested print quality settings and paper types for various
different kinds of prints, assuming that you are using roll paper. You are not obliged to
follow these suggestions, but you may find them helpful.
If you are using sheet paper, you are recommended to set print quality to Best.
If you are not sure how to change the print quality settings, see “How do I change the
print quality?” on page 67.
Note High-density images should be printed on heavier paper (heavyweight
or glossy).
Print content
Print
quality
Lines (draft) Fast Drawings/
Lines Normal Drawings/
Lines and
area fills
Best Drawings/
Image quality settings Paper types (front
Optimized
for
text
text
text
Maximum
detail
On Bright White
Off Bright White
Off Bright White
panel)
Bond Paper
Translucent materials*
Coated Paper
Bond Paper
Translucent materials*
Coated Paper
Bond Paper
Translucent materials*
Coated Paper
Heavyweight Coated
Paper
Productivity Photo
Gloss
68
Page 71

Print content
Print
quality
Image quality settings Paper types (front
Optimized
for
Maximum
detail
panel)
How do I adjust my printed
images?
Lines and
images
Best Drawings/
text
On Coated Paper
Heavyweight Coated
Paper
Productivity Photo
Gloss
In-store
advertising
Normal Images Off Coated Paper
Heavyweight Coated
Paper
Productivity Photo
Gloss
Renderings Best Images Off Heavyweight Coated
Paper
Productivity Photo
Gloss
Photographs Best Images Off Productivity Photo
Gloss
* Translucent materials include Vellum, Translucent Bond, Natural Tracing Paper,
Clear Film, and Matte Film.
For technical details of print resolution, see “Tell me about functional specifications” in
the User's Guide.
69
Page 72

Chapter 5
How do I print at maximum speed?
There are two paper type settings in the front panel especially designed for printing at
maximum speed.
images?
How do I adjust my printed
Print content
Print
quality
Lines (draft) Fast Drawings/
* To use Max Speed Bright White, load HP Bright White Inkjet Bond Paper and select
Max Speed Bright White from the list of paper types in the front panel.
† To use Max Speed Bond Paper, load HP Universal Inkjet Bond Paper and select
Max Speed Bond Paper from the list of paper types in the front panel.
Image quality settings Paper types (front
Optimized
for
text
How do I adjust the margins?
The printer margins determine the printable area of the page that can be used by your
application. There are two margin options: Extended and Normal. For the dimensions
of the margins, see “Tell me about functional specifications” in the User's Guide.
You can specify the margins in the following ways:
● Using the Windows HP-GL/2 printer driver: Normal margins are selected by
default. To select Extended margins, select the Paper/Quality tab and check the
Extended margins box.
● Using the Windows PostScript printer driver: select the Paper/Quality tab, then
Size is. You select the page size and the margins at the same time.
● Using a Mac OS printer driver: select the Page Attributes panel, then Paper size.
You select the paper size and then select the margins.
With the Mac OS 10.1 driver, you can select only Normal margins.
● Using the Embedded Web Server: select the Submit Job page, then Margins.
●
Using the front panel: select the
options > Margins.
Maximum
detail
Off Max Speed Bright
icon, then Printing defaults menu > Paper
panel)
White*
Max Speed Bond
Paper†
70
Note If margins are set with the printer driver or with the Embedded Web
Server, they override the margins set with the front panel.
Page 73

How do I print on oversize page sizes?
For technical reasons, it is impossible to print an image that covers the full width or
length of the paper. There must always be a margin around the image. If you want to
print, for example, an A3–sized image with no margins around it, you must print on
paper larger than A3 (leaving margins around the image as usual), and then cut off
the margins after printing.
Oversize page sizes are designed to meet this need. Each oversize page size is large
enough to accommodate a standard paper size plus margins.
You can specify an oversize page size in the following ways:
● Using the Windows HP-GL/2 printer driver: select one of the oversize paper sizes
from the Size is list.
● Using the Windows PostScript printer driver: select the Paper/Quality tab, then
Size is. You select the oversize page size and the margins at the same time.
● Using a Mac OS 9 or 10.1 printer driver: create a custom paper size with zero
margins, and take into account that the margins added to the final job will be the
ones that are set in the printer's front panel.
● Using a newer Mac OS printer driver: select the Page Attributes panel, then
Paper size. You select the oversize paper size and then select the margins.
● Using the Embedded Web Server: for PDF, TIFF, and JPEG jobs, oversize page
sizes are automatically selected if you leave margins set to Default. If you select
Normal or Extended margins, normal page sizes will be used.
The Embedded Web Server does not support the use of oversize page sizes for
HP-GL/2, RTL, CALS G4, or PostScript jobs (you must use a printer driver).
● Using the front panel: for PDF, TIFF, and JPEG jobs, front panel margin settings
are ignored and you are assumed to be using oversize pages in all cases.
The front panel does not support the use of oversize page sizes for HP-GL/2,
RTL, CALS G4, or PostScript jobs (you must use a printer driver).
How do I adjust my printed
images?
How do I change the paper's orientation?
You can select portrait or landscape orientation of the paper using a printer driver or
the Embedded Web Server.
● Using the PostScript printer driver for Windows NT: go to the Orientation section
of the Page Setup tab.
● Using any other printer driver for Windows: go to the Orientation section of the
Finishing tab.
● Using the PostScript printer driver for Mac OS: select Page Setup from the File
menu, then go to the Orientation section of the Page Attributes panel.
● Using the Embedded Web Server: go to the Orientation section of the Submit Job
page.
71
Page 74

images?
How do I adjust my printed
Chapter 5
How do I rotate an image?
Images are normally printed in portrait orientation. You may wish to rotate an image
by 90 degrees in order to save paper. You can do this in the following ways:
● Using a Windows printer driver: select the Finishing tab, then Rotate by 90
degrees.
● Using a Mac OS printer driver: select the Finishing panel, then Rotate by 90
degrees.
● Using the Embedded Web Server: select the Submit Job page, then Rotate.
●
Using the front panel: select the
options > Rotate.
Note 1 If rotation is set with the printer driver or with the Embedded Web
Server, it overrides the setting in the front panel.
Note 2 When you rotate a job, the page length may be increased to avoid
clipping, because the top and bottom margins are usually larger than the side
margins.
Possibility of clipped images
With either rolls or sheets, if you rotate an image to landscape whose original
orientation was portrait, the paper may not be wide enough for the image, and it may
be clipped. For example, rotating a portrait D/A1-size image on D/A1-size paper by 90
degrees will probably result in a clipped image. If you are using the Embedded Web
Server, the preview screen will confirm this with a warning triangle.
icon, then Printing defaults menu > Paper
How do I print a mirror image?
If you are using clear imaging paper, sometimes called backlit, you may want to print
a mirror image of your drawing, so that when the paper is lit from behind it is in the
correct orientation. To do this without changing the image in your application:
● Using a Windows printer driver: select the Finishing tab, then Mirror image.
● Using a Mac OS printer driver: select the Finishing panel, then Mirror image.
● Using the Embedded Web Server: select the Submit Job page, then Mirror.
●
Using the front panel: select the
options > Mirror.
Note If mirror image is set with the printer driver or with the Embedded Web
Server, it overrides the setting in the front panel.
How do I scale an image?
You can send an image to the printer at a certain size but tell the printer to rescale it
to a different size (normally larger). This may be useful:
● If your software does not support large formats
● If your file is too large for the printer's memory—in this case you can reduce the
page size in your software and then scale it up again using the front panel option
72
icon, then Printing defaults menu > Paper
Page 75

You can rescale an image in the following ways:
● Using a Windows printer driver: select the Effects tab, then Resizing options.
– The Print document on option (with Scale to fit checked) adjusts the image
size to the page size selected for your printer. For example, if you have
selected ISO A2 as the page size and you print an A4-size image, it will be
enlarged to fit the A2 page. If the ISO A3 page size is selected, the printer
would reduce a larger image to fit the A3 size.
– The % of normal size option enlarges the printable area of the original page
by the percentage indicated and adds the printer margins to make up the
output page size.
● Using a Mac OS printer driver: select the Finishing panel, then Print document on.
No Scale to fit option is displayed, because it is permanently on: the driver
always adjusts the image size to the page size selected for your printer.
● Using the Embedded Web Server: select the Submit Job page, then Scaling.
●
Using the front panel: select the
options > Scale.
If you are printing to a single sheet, you must ensure that the image can actually fit
onto the page, otherwise clipping will occur.
icon, then Printing defaults menu > Paper
How do I change the palette settings?
You cannot change the Factory palette, but you can define Palettes A and B to be
whatever you choose.
These palettes will be applied only to HP-GL/2 jobs with no software palette embedded.
How do I adjust my printed
images?
Note All HP-GL/2 jobs generated by the HP-GL/2 driver that comes with the
printer will include an embedded software palette, and thus any palette
settings in the front panel will be ignored.
To redefine Palette A:
1.
Go to the front panel, select the
GL/2 options > Define palette > Palette A.
2. Scroll to the pen number you want to change and press Select.
3. The current width assigned to this pen is displayed, for example Width=0.35 mm.
If you want to change it:
4. Press Select.
5. Scroll to the width you want.
icon, then Printing defaults menu > HP-
73
Page 76

images?
How do I adjust my printed
Chapter 5
6. Press Select again.
7. Press Back to get to the previous menu: Color/Width. Otherwise, scroll to Color.
8. The current color assigned to the pen is displayed, for example Color=110. If you
want to change it:
9. Press Select.
10. Scroll to the color you want.
11. Press Select again.
12. Press Back to get to the previous menu.
13. When both width and color are correct, press Back.
14. Scroll to the next pen number you want to change, press Select and then repeat
the above process.
15. When all pen definitions are correct, press Back to exit the menus.
Note The palette you have just defined will take effect only when you select it
to be the current palette.
If you do not get the results you expect, see “The problem is pen settings seem to
have no effect” on page 144.
How do I change the treatment of overlapping lines?
The Merge setting controls the overlapping lines in an image. There are two settings,
Off and On.
● If Merge is Off, where the lines cross only the color of the top line is printed.
● If Merge is On, where the lines cross the colors of the two lines are merged.
74
To turn Merge on, select the
options > Merge: On. You can set the merge setting from your software in some
applications. Settings in your software override the front-panel settings.
Note Merge settings have no effect on PostScript files.
icon, then Printing defaults menu > HP-GL/2
Page 77

How do I change the graphic language setting?
Unless you are troubleshooting one of the problems mentioned below, you should not
need to change the default setting (Automatic), and you are not recommended to do
so, because setting a specific graphic language means that you will be able to print
only files in that language.
How do I adjust my printed
images?
To change the graphic language setting, select the
menu > Graphic language, where the following options are available.
● Select Automatic to let the printer determine which type of file it is receiving. This
setting works for most software applications.
● Select HP-GL/2 if you are not working with PostScript files, and you have
experienced image position problems or timing problems.
● Select PS if you are printing only PostScript files and your PostScript jobs do not
start with the standard PostScript header (%!PS) and do not include PJL
language switching commands.
Alternatively, select PS if you have experienced problems while downloading
PostScript fonts. In this case, please reselect Automatic after you have
downloaded the fonts.
If you are downloading fonts over a USB connection, select the
Printing defaults menu > PS options > Encoding > ASCII.
● Select TIFF, JPEG, PDF, or CALS G4 only if you are sending a file of the
appropriate type directly to the printer without going through a printer driver. This
is normally done only from the Embedded Web Server, in which case the
language setting is done by the Embedded Web Server and you do not have to
do it yourself.
icon, then Printing defaults
icon, then
Note The PS and PDF options are available with PostScript printers only.
75
Page 78

images?
How do I adjust my printed
Chapter 5
76
Page 79

6
How do I get accurate colors
from my printer?
● “How do I perform color calibration?” on page 77
● “How do I perform black point compensation?” on page 78
● “How do I set the rendering intent?” on page 78
● “How do I select the color emulation mode?” on page 79
● “How do I produce matching prints from different HP Designjets?” on page 79
● “How do I get accurate colors from Adobe Photoshop CS (HP–GL/2 & RTL
driver)?” on page 79
● “How do I get accurate colors from Adobe Photoshop CS (PostScript
driver)?” on page 84
● “How do I get accurate colors from Adobe InDesign CS?” on page 89
● “How do I get accurate colors from QuarkXPress 6?” on page 93
● “How do I get accurate colors from Autodesk AutoCAD 2002?” on page 96
● “How do I get accurate colors from Microsoft Office 2003?” on page 96
● “How do I get accurate colors from ESRI ArcGIS 9?” on page 96
How do I perform color calibration?
Color calibration improves color consistency between prints, and from one printer to
another.
It is normally performed whenever a printhead is replaced, and whenever a new paper
type is introduced that has not been calibrated yet with the new printhead(s).
However, this automatic behavior can be turned off, and a default color correction
used for each of the known paper types.
1.
From the front panel, select the
calibration.
icon, then Configuration menu > Color
How do I get accurate colors
from my printer?
2. The available options for color calibration are:
– On: the printer performs color calibration whenever you introduce a new
paper type that has not yet been calibrated with the current set of printheads.
77
Page 80

from my printer?
How do I get accurate colors
Chapter 6
The color correction resulting from the calibration is then used for
subsequent prints on that paper type with the same print quality setting.
– Off: the printer uses a default color correction, different for each paper type
and print quality setting.
3. The printer calibrates the colors by printing a calibration strip, scanning the strip
with a built-in optical sensor, and calculating the color corrections required. The
color calibration strip is 269 mm wide, and 18 mm long when using glossy paper;
on other paper types, it is 109 mm long. Color calibration takes about three to six
minutes, depending on the paper type.
Note Color calibration can be requested manually at any time from the front
panel, by selecting the
icon, then Printheads > Calibrate color.
How do I perform black point compensation?
The black point compensation option controls whether to adjust for differences in
black points when converting colors between color spaces. When this option is
selected, the full dynamic range of the source space is mapped into the full dynamic
range of the destination space. It can be very useful in preventing blocking shadows
when the black point of the source space is darker than that of the destination space.
This option is allowed only when the relative colorimetric rendering intent is selected
(see “How do I set the rendering intent?” on page 78).
Black point compensation can be specified in the following ways:
● Using a Windows printer driver: select the Color tab, then Black point
compensation.
● Using a Mac OS printer driver: select the Color Options panel, then Black point
compensation.
● Using the Embedded Web Server: select the Submit Job page, then Black point
compensation.
●
Using the front panel: select the
options > Black point compensation.
icon, then Printing defaults menu > Color
How do I set the rendering intent?
Rendering intent is one of the settings used when doing a color transformation. As
you probably know, some of the colors you want to print may not be reproducible by
the printer. The rendering intent allows you to select one of four different ways of
handling these so–called out–of–gamut colors.
● Saturation (graphics): best used for presentation graphics, charts, or images
made up of bright, saturated colors.
● Perceptual (images): best used for photographs or images in which colors blend
together. It tries to preserve the overall color appearance.
● Relative colorimetric (proofing): best used when you want to match a particular
color. This method is mainly used for proofing. It guarantees that, if a color can be
printed accurately, it will be printed accurately. The other methods will probably
provide a more pleasing range of colors but do not guarantee that any particular
78
Page 81

color will be printed accurately. It maps the white of the input space to the white
of the paper on which you are printing.
● Absolute colorimetric (proofing): the same as relative colorimetric, but without
mapping the white. This rendering is also used mainly for proofing, where the
goal is to simulate the output of one printer (including its white point).
The rendering intent can be specified in the following ways:
● Using a Windows printer driver: select the Color tab, then Rendering intent.
● Using a Mac OS printer driver: select the Color Options panel, then Rendering
intent.
● Using the Embedded Web Server: select the Submit Job page, then Rendering
intent.
●
Using the front panel: select the
options > Rendering intent.
icon, then Printing defaults menu > Color
How do I select the color emulation mode?
You can set the color emulation mode in the following ways:
● Using a Windows printer driver: select the Color Management section of the Color
tab.
● Using a Mac OS printer driver: select the Color Options panel.
● Using the Embedded Web Server: select the Color Management section of the
Submit Job page.
●
Using the front panel: select the
options.
See “Tell me about color emulation modes” in the User's Guide.
icon, then Printing defaults menu > Color
How do I get accurate colors
from my printer?
How do I produce matching prints from different HP
Designjets?
See “The problem is color matching between different HP Designjets” on page 137.
How do I get accurate colors from Adobe Photoshop CS
(HP–GL/2 & RTL driver)?
This topic outlines one way to have good control over the printed colors you will obtain
from your printer; there are many other ways. Before starting, ensure that your paper
type has already been calibrated.
Application settings
1. Open Adobe Photoshop and select Color Settings from the Edit menu.
– Working spaces: the working space is the color space you want to use
when manipulating the image. We recommend using the color space that
comes with the image (see Color Management Policies below), if any;
otherwise, our recommended default settings are: RGB: Adobe RGB 1998,
CMYK: SWOP for the USA and Euroscale Coated v2 for the rest of the world.
– Color Management Policies: select 'Preserve Embedded Profiles'.
79
Page 82

from my printer?
How do I get accurate colors
Chapter 6
– Rendering Intent: see “How do I set the rendering intent?” on page 78.
– Black Point Compensation: this option is recommended if you have chosen
the Relative Colorimetric rendering intent. See “How do I perform black point
compensation?” on page 78.
80
2. Open the image. Accept the embedded color profile if there is one:
Page 83

Otherwise accept the default that Adobe Photoshop proposes:
How do I get accurate colors
from my printer?
81
Page 84

from my printer?
How do I get accurate colors
Chapter 6
3. Once you have defined the color space in which you are going to work, you can if
you like make a soft proof, which means emulating on the screen how the image
will look when printed. To do this, you will need an ICC profile for your monitor.
Select View > Proof Setup > Custom. Use the following information to select
options in the Proof Setup window.
– Profile: choose the profile based on the printer model and paper type you
intend to use.
– Preserve Color Numbers: this checkbox tells the application how to
simulate the document's appearance without converting colors from the
Document Space to the Proof Profile Space. It simulates the color shifts that
may occur when the document's color values are interpreted using the Proof
Profile instead of the Document Profile. This option is not recommended.
– Intent: this menu allows you to choose a rendering intent for the conversion
from document space to simulation space, letting you preview the effects of
different renderings. See “How do I set the rendering intent?” on page 78.
– Use Black Point Compensation: this option is recommended if you have
chosen the Relative Colorimetric rendering intent. See “How do I perform
black point compensation?” on page 78.
– Paper White: this checkbox emulates the whiteness of the paper on the
monitor. The effect is the same as using the Absolute Colorimetric rendering
intent.
– Ink Black: this checkbox turns off the black point compensation for the
rendering from simulation to the monitor. So, if the simulation space black is
lighter than the monitor black, you will see the washed-out blacks on the
monitor. This option is not recommended.
– Preview: if this checkbox is enabled (recommended), the changes you make
in this window are reflected in the image immediately.
82
Page 85

4. When you are ready to print the image, open the Print with Preview window from
the File menu. In the Color Management tab you can select:
– Source Space: 'Document' (automatically assigned for you).
– Profile: select the profile you will use. We recommend using Adobe RGB. If
neither Adobe RGB or sRGB is selected, then choose the appropriate ICC
profile for the paper loaded, and remember to select later on in the driver the
option Managed by Application.
– Intent: See “How do I set the rendering intent?” on page 78.
How do I get accurate colors
from my printer?
Driver settings
In the Paper/Quality tab (Windows) or Image Quality panel (Mac OS), set Print
Quality to Best.
In the Color tab (Windows) or Color Options panel (Mac OS), you have the following
Color Management options. Select the same option that you selected in the Print
dialog box above (Print Space section, Profile option).
● sRGB: this is the default color space. The input RGB data are converted to
CMYK using the printer's internal color maps, which depend on the paper type
and print quality selected. These are the most “versatile” color maps, producing
83
Page 86

from my printer?
How do I get accurate colors
Chapter 6
saturated colors for CAD and office applications and also producing good results
with photographic images.
● AdobeRGB: similar to sRGB, but using the AdobeRGB to CMYK internal color
maps, which are designed for AdobeRGB input data with a bigger source gamut.
Best suited to digital photography.
● Managed by Application: the driver will not perform any color correction. This
path can be used when building custom RGB printer profiles and applying them
within the application (the application is responsible for applying the right color
management by using the custom RGB printer profiles). In this case, make sure
that you have selected the right media profile in the "Print Space, Profile" option
in the application print command (see above).
Printer settings
Ensure that the Paper Type setting on the front panel corresponds to the paper you
intend to use.
How do I get accurate colors from Adobe Photoshop CS
(PostScript driver)?
This topic outlines one way to have good control over the printed colors you will obtain
from your printer; there are many other ways. Before starting, ensure that your paper
type has already been calibrated.
84
Page 87

Application settings
1. Open Adobe Photoshop and select Color Settings from the Edit menu
(Windows) or from the Photoshop menu (Mac OS).
– Working spaces: the working space is the color space you want to use
when manipulating the image. We recommend using the color space that
comes with the image (see Color Management Policies below), if any;
otherwise, our recommended default settings are: RGB: Adobe RGB 1998,
CMYK: SWOP for the USA and Euroscale Coated v2 for the rest of the world.
– Color Management Policies: select 'Preserve Embedded Profiles'.
– Rendering Intent: see “How do I set the rendering intent?” on page 78.
– Black Point Compensation: this option is recommended if you have chosen
the Relative Colorimetric rendering intent. See “How do I perform black point
compensation?” on page 78.
How do I get accurate colors
from my printer?
85
Page 88

from my printer?
How do I get accurate colors
Chapter 6
2. Open the image. Accept the embedded color profile if there is one:
Otherwise accept the default that Adobe Photoshop proposes:
86
3. Once you have defined the color space in which you are going to work, you can if
you like make a soft proof, which means emulating on the screen how the image
will look when printed. To do this, you will need an ICC profile for your monitor.
Select View > Proof Setup > Custom. Use the following information to select
options in the Proof Setup window.
– Profile: choose the profile based on the printer model and paper type you
intend to use.
– Preserve Color Numbers: this checkbox tells the application how to
simulate the document's appearance without converting colors from the
Document Space to the Proof Profile Space. It simulates the color shifts that
may occur when the document's color values are interpreted using the Proof
Profile instead of the Document Profile. This option is not recommended.
– Intent: this menu allows you to choose a rendering intent for the conversion
from document space to simulation space, letting you preview the effects of
different renderings. See “How do I set the rendering intent?” on page 78.
Page 89

– Use Black Point Compensation: this option is recommended if you have
chosen the Relative Colorimetric rendering intent. See “How do I perform
black point compensation?” on page 78.
– Paper White: this checkbox emulates the whiteness of the paper on the
monitor. The effect is the same as using the Absolute Colorimetric rendering
intent.
– Ink Black: this checkbox turns off the black point compensation for the
rendering from simulation to the monitor. So, if the simulation space black is
lighter than the monitor black, you will see the washed-out blacks on the
monitor. This option is not recommended.
– Preview: if this checkbox is enabled (recommended), the changes you make
in this window are reflected in the image immediately.
How do I get accurate colors
from my printer?
87
Page 90

from my printer?
How do I get accurate colors
Chapter 6
4. When you are ready to print the image, open the Print with Preview window from
the File menu. In the Color Management tab you can select:
– Source Space: 'Document' (automatically assigned for you). This is the color
space in which you have been working while editing the image.
– Profile: select PostScript Color Management. With this option, the
application tells the driver which source profile and rendering intent should
be used for the conversion to the print space. In this case the driver will use
the 'Document' profile and the rendering intent selected below. The driver's
Input Profile and Rendering Intent settings are overridden.
– Intent: see “How do I set the rendering intent?” on page 78.
88
Driver settings
The application's PostScript Color Management option will override the color settings
of the driver (Input Profile and Rendering Intent). In this case, the driver will use the
application's "Document" profile and selected rendering intent. Then, we have only to
select in the driver:
● In the Paper/Quality tab (Windows) or Image Quality panel (Mac OS), set Print
Quality to Best.
● In the Color tab (Windows) or Color Options panel (Mac OS), check the
Automatic PANTONE Calibration box.
Page 91

Printer settings
Ensure that the Paper Type setting on the front panel corresponds to the paper you
intend to use.
How do I get accurate colors from Adobe InDesign CS?
This topic outlines one way to have good control over the printed colors you will obtain
from your printer; there are many other ways. We describe the hard-proofing
technique that shows you on your printer how your colors will appear when
reproduced in a press. Before starting, ensure that your paper type has already been
calibrated.
Note EPS, PDF, and grayscale images don't allow page-layout applications
to manage their colors. In addition, such images are displayed very poorly on a
monitor.
How do I get accurate colors
from my printer?
89
Page 92

from my printer?
How do I get accurate colors
Chapter 6
Application settings
1. Open Adobe InDesign and select Color Settings from the Edit menu.
– Working spaces: the working space is the color space you want to use
when manipulating the image. We recommend using the color space that
comes with the image (see Color Management Policies below), if any;
otherwise, our recommended default settings are: RGB: Adobe RGB 1998,
CMYK: SWOP for the USA and Euroscale Coated v2 for the rest of the world.
– Color Management Policies: select 'Preserve Embedded Profiles'.
– Rendering Intent: see “How do I set the rendering intent?” on page 78.
– Black Point Compensation: this option is recommended if you have chosen
the Relative Colorimetric rendering intent. See “How do I perform black point
compensation?” on page 78.
90
2. Create or open the image with its own or the most appropriate color space. Then
retouch the image as needed.
3. When you have the image ready to send to the output device, that is the moment
to simulate on your printer what will appear on the output device. You must
Page 93

convert the image from the source or work profile to the output CMYK device, and
then again from the output CMYK device to the printer profile (calibrated).
In InDesign we recommend the Proof Setup command (View > Proof Setup ->
Custom). This command lets you select the "proof profile" in the source space
when printing. You can also see a simulation on your monitor. We recommend as
follows:
Each object in InDesign has its own color management. The InDesign elements
(native) use the working spaces (default profiles) and the rendering intent defined
in Color Settings , and the placed objects have their own assigned profile and
rendering intent. Then, each element is converted from its own color space to the
simulation color space, using its own rendering intent.
– Profile: select the profile that corresponds to the device you want to emulate
(usually a particular press profile or an standard press profile)
– Paper White: this checkbox emulates the whiteness of the paper on the
monitor. The effect is the same as using the Absolute Colorimetric rendering
intent.
– Ink Black: this checkbox turns off the black point compensation for the
rendering from simulation to the monitor. So, if the simulation space black is
lighter than the monitor black, you will see the washed-out blacks on the
monitor. This option is not recommended.
How do I get accurate colors
from my printer?
91
Page 94

from my printer?
How do I get accurate colors
Chapter 6
4. Select File > Print to print the image, converting it to an output space that
depends on the printer, the paper type, and the print quality.
– Select the Output tab (on the left), and then select Composite CMYK, in
order to see the CMYK profiles.
– Select the Color Management tab to see the following options.
– Source Space: select 'Proof' to emulate the proof color space.
– Profile: choose the profile based on the printer model and paper type you
intend to use.
– Intent: select Relative or Absolute Colorimetric. The only difference is that
Absolute Colorimetric emulates the background color of the paper to be used
by the press, while Relative Colorimetric maps the paper color of the press to
the paper color of the printer.
92
Driver settings
The PostScript driver is recommended for page-layout applications because it can
color–manage CMYK data, RGB data, or both simultaneously.
In the Paper/Quality tab (Windows) or Image Quality panel (Mac OS), set Print
Quality to Best.
In the Color tab (Windows) or Color Options panel (Mac OS), select 'Application
Managed Colors' and check the Automatic PANTONE Calibration box. When the
application performs color conversion to the printer's color space, the printer should
Page 95

accept these colors without changing them. Make sure you have selected the right
media profile in “Print Space, Profile” above.
Printer settings
Ensure that the Paper Type setting on the front panel corresponds to the paper you
intend to use.
How do I get accurate colors from QuarkXPress 6?
This topic outlines one way to have good control over the printed colors you will obtain
from your printer; there are many other ways. We describe the hard-proofing
technique that shows you on your printer how your colors will appear when
reproduced in a press. Before starting, ensure that your paper type has already been
calibrated.
Note EPS, PDF, and grayscale images don't allow page-layout applications
to manage their colors. In addition, such images are displayed very poorly on a
monitor.
Application settings
1. Open QuarkXPress and select Properties from the Edit menu (Windows) or from
the QuarkXPress menu (Mac OS). Then select Quark CMS from the Properties
dialog box.
– Ensure that the Color Management Active box is checked.
– The Destination Profiles area lets you choose profiles that correspond to
your devices: Monitor profile, Composite Output profile, and Separation
Output profile. Select in the Separation Output profile the profile of your
output device (press) which you want to emulate on your printer later. Select
in the Composite Output profile your printer profile; remember that it depends
on the printer model, paper type, and print quality option.
– In the Default Source Profiles you must set the default profiles for solid colors
and images that don't have embedded profiles. The following default profiles
are recommended: RGB: Adobe RGB 1998, CMYK: SWOP for the USA and
Euroscale Coated v2 for the rest of the world. Also select the rendering
intent, which QuarkXpress uses for all conversions; if in doubt, select
Relative Colorimetric. See “How do I set the rendering intent?” on page 78.
– Check the box Color Manage RGB sources to RGB destinations in the
RGB Default Source Profiles and Color Manage CMYK sources to CMYK
destinations in the CMYK Default Source Profiles.
– The Display Simulation tells QuarkXPress how the display simulation should
behave:
• None means that it doesn't simulate anything on the display.
• Monitor Color Space means that it converts from the source profile to
the display profile for display only.
How do I get accurate colors
from my printer?
93
Page 96

from my printer?
How do I get accurate colors
Chapter 6
• Composite Output Color Space makes the display simulate a
composite printer: that is, a printer without separate plates for different
colors, such as an inkjet printer.
• Separation Output Color Space makes the display simulate a
separations printer: that is, a printer with separate plates for different
colors, such as a digital press.
You can select Monitor Color Space if you want to display only, or you can
select the Separation Output Color Space if you also want to see the
simulation of the output device on the monitor. You can simulate the final
output with the printer (hard–proofing) and with the monitor (soft-proofing ).
94
2. Open and retouch the document as you like.
3. Select File > Print > Setup > Printer Description, and select your printer.
4. Select File > Print > Profiles.
– Select the appropriate Separation Output Profile (emulation) and Composite
Output Profile (printer).
– Check the Composite Simulates Separation box, then Quark will perform the
simulation.
Page 97

Note Each object in QuarkXpress has its own color management. The solid
colors use the color profile and rendering intent selected in the default source
profiles for Solid Colors (RGB, CMYK, or Hexachrome) of the Color
Management Preferences dialog box. The imported objects have their own
assigned profile and rendering intent. QuarkXPress will use the rendering
intent assigned to the image for both conversions, from the image color space
to the simulation color space, and from the simulation color space to the printer
color space.
Driver settings
The PostScript driver is the best choice for page-layout applications because it can
color–manage CMYK data, RGB data, or both simultaneously.
In the Image Quality panel, set Print Quality to Best.
In the Color Options panel, select Application Managed Colors and check the
Automatic PANTONE Calibration box. When the application performs color
conversion to the printer's color space, the printer should accept these colors without
changing them. Make sure you have selected the right media profile in Composite
Output in the Preferences dialog box.
How do I get accurate colors
from my printer?
Printer settings
Ensure that the Paper Type setting on the front panel corresponds to the paper you
intend to use.
95
Page 98

from my printer?
How do I get accurate colors
Chapter 6
How do I get accurate colors from Autodesk AutoCAD
2002?
AutoCAD has no color management settings, so the best you can do is to configure
the driver correctly. If you are using the HP-GL/2 and RTL driver, click the Properties
button and configure the driver as follows.
● In the Paper/Quality tab, set Print Quality to Best.
● In the Color tab, ensure that the Print In Grayscale box is unchecked, and set
Color Matching Method to 'sRGB'.
How do I get accurate colors from Microsoft Office 2003?
Microsoft Office has no color management settings, so the best you can do is to
configure the driver correctly. If you are using the HP-GL/2 and RTL driver, click the
Properties button and configure the driver as follows.
● In the Paper/Quality tab, set Print Quality to Best.
● In the Color tab, ensure that the Print In Grayscale box is unchecked, and set
Color Matching Method to 'sRGB'.
How do I get accurate colors from ESRI ArcGIS 9?
ArcGIS is a scalable system of software for geographic data creation, management,
integration, analysis, and dissemination for every organization, from an individual to a
globally distributed network of people.
The application always sends RGB data to the printer driver; you can choose between
several different printer engines. The printer engine determines the format and
method used by ArcMap to send the print job to the printer. There are from one to
three options available, depending on license and printer configurations.
● Windows is the default and is always available, regardless of the printer in use. It
allows the application to use the installed HP-GL/2 and RTL driver.
● PostScript is available only if your printer supports PostScript and the PostScript
driver was selected in the Name section. This allows you to output the file as a
Postscript file. This option may be useful in certain specific cases, but in general it
is not recommended.
● ArcPress is an extension that can be purchased for printing from ArcGIS. It is a
software RIP that takes the original metafile and rasterizes it before sending it to
the printer, so that the printer does not need to rasterize it. This is beneficial
because some printers are not capable of rasterization or do not have enough
memory to process large jobs. Use ArcPress always with HP RTL (RGB)
TrueColor.
96
Page 99

Printing with the Windows printer engine
1. Ensure that you have installed the HP-GL/2 and RTL driver.
2. When you are ready to print, select File > Page and Print Setup, and select the
HP-GL/2 and RTL driver.
How do I get accurate colors
from my printer?
3. Click the Properties button and configure the driver as follows.
– In the Paper/Quality tab, set Print Quality to Best.
– In the Color tab, ensure that the Print In Grayscale box is unchecked, and
set Color Matching Method to 'sRGB'.
4. Click the OK button.
5. Select File > Print.
– Printer Engine: select Windows Printer (it will use the selected raster driver).
– Output Image Quality (Resample Ratio): this setting alters the number of
pixels sampled when an ArcMap print file is generated; it determines how
many pixels in the map document will be used to create the file sent to the
printer.
• Fast = 1:5
• Normal = 1:3
• Best = 1:1 (as is)
The 'Best' choice requires a lot of resources to process the print job, and
could cause long processing times and perhaps out–of–memory messages,
97
Page 100

from my printer?
How do I get accurate colors
Chapter 6
depending on the map size. If you have these problems, select an Output
Image Quality lower than 'Best'. Bear in mind that you will gain no advantage
in print quality by sending an image whose resolution is higher than the
printer's input resolution.
98
6. You can print now (click the OK button).
Printing with the ArcPress printer engine
1. You must have the driver you need installed, although it will function only as a port.
2. When you are ready to print, select File > Page and Print Setup, select the
driver (the driver settings have no effect), and click the OK button.
3. Select File > Print.
– Printer Engine: select ArcPress.
– Click the Properties button, select the HP RTL (RGB) TrueColor driver, and
select the resolution that will be sent to the printer.
 Loading...