

Page 1

HP Designjet 4000 and 4000ps Printers
Setup instructions
In case of difficulty,
please consult:
Read these instructions carefully...
What you will need for this procedure
Because some of the components of the printer
are bulky, you will need up to four people to lift
them. When this is necessary, this symbol is
displayed:
Not for resale
© 2004 Hewlett-Packard Company
Made in
Disk only: QXXXX-XXXXX
CD
Using your printer
Your printer’s Embedded Web Server
To assemble the printer you will need at least
3 × 5 m (10 × 16 ft) of empty floor space, and
about two hours.
Before you start unpacking, consider where you are going to put the assembled
printer. You should allow some clear space at the back and at the front of
the printer. The recommended clearances are shown in the illustration below.
Remove the two side lids. Then remove all the upper four
plastic handles from both sides of the box (2 each side).
Strap
Main printer
box
Cut the strap around the boxes carefully, as the
boxes may fall as soon as the strap is cut.
1 Preliminary unpackingPrinter working area
The shapes on the boxes identify the contents. Refer to the table below:
Mark on box Contents of box
Printer body
Stand and bin assembly
Consumables box, including…
Maintenance Kit (please keep this safe)
Spare box (used in Section 3 of these
setup instructions)
1
Page 2
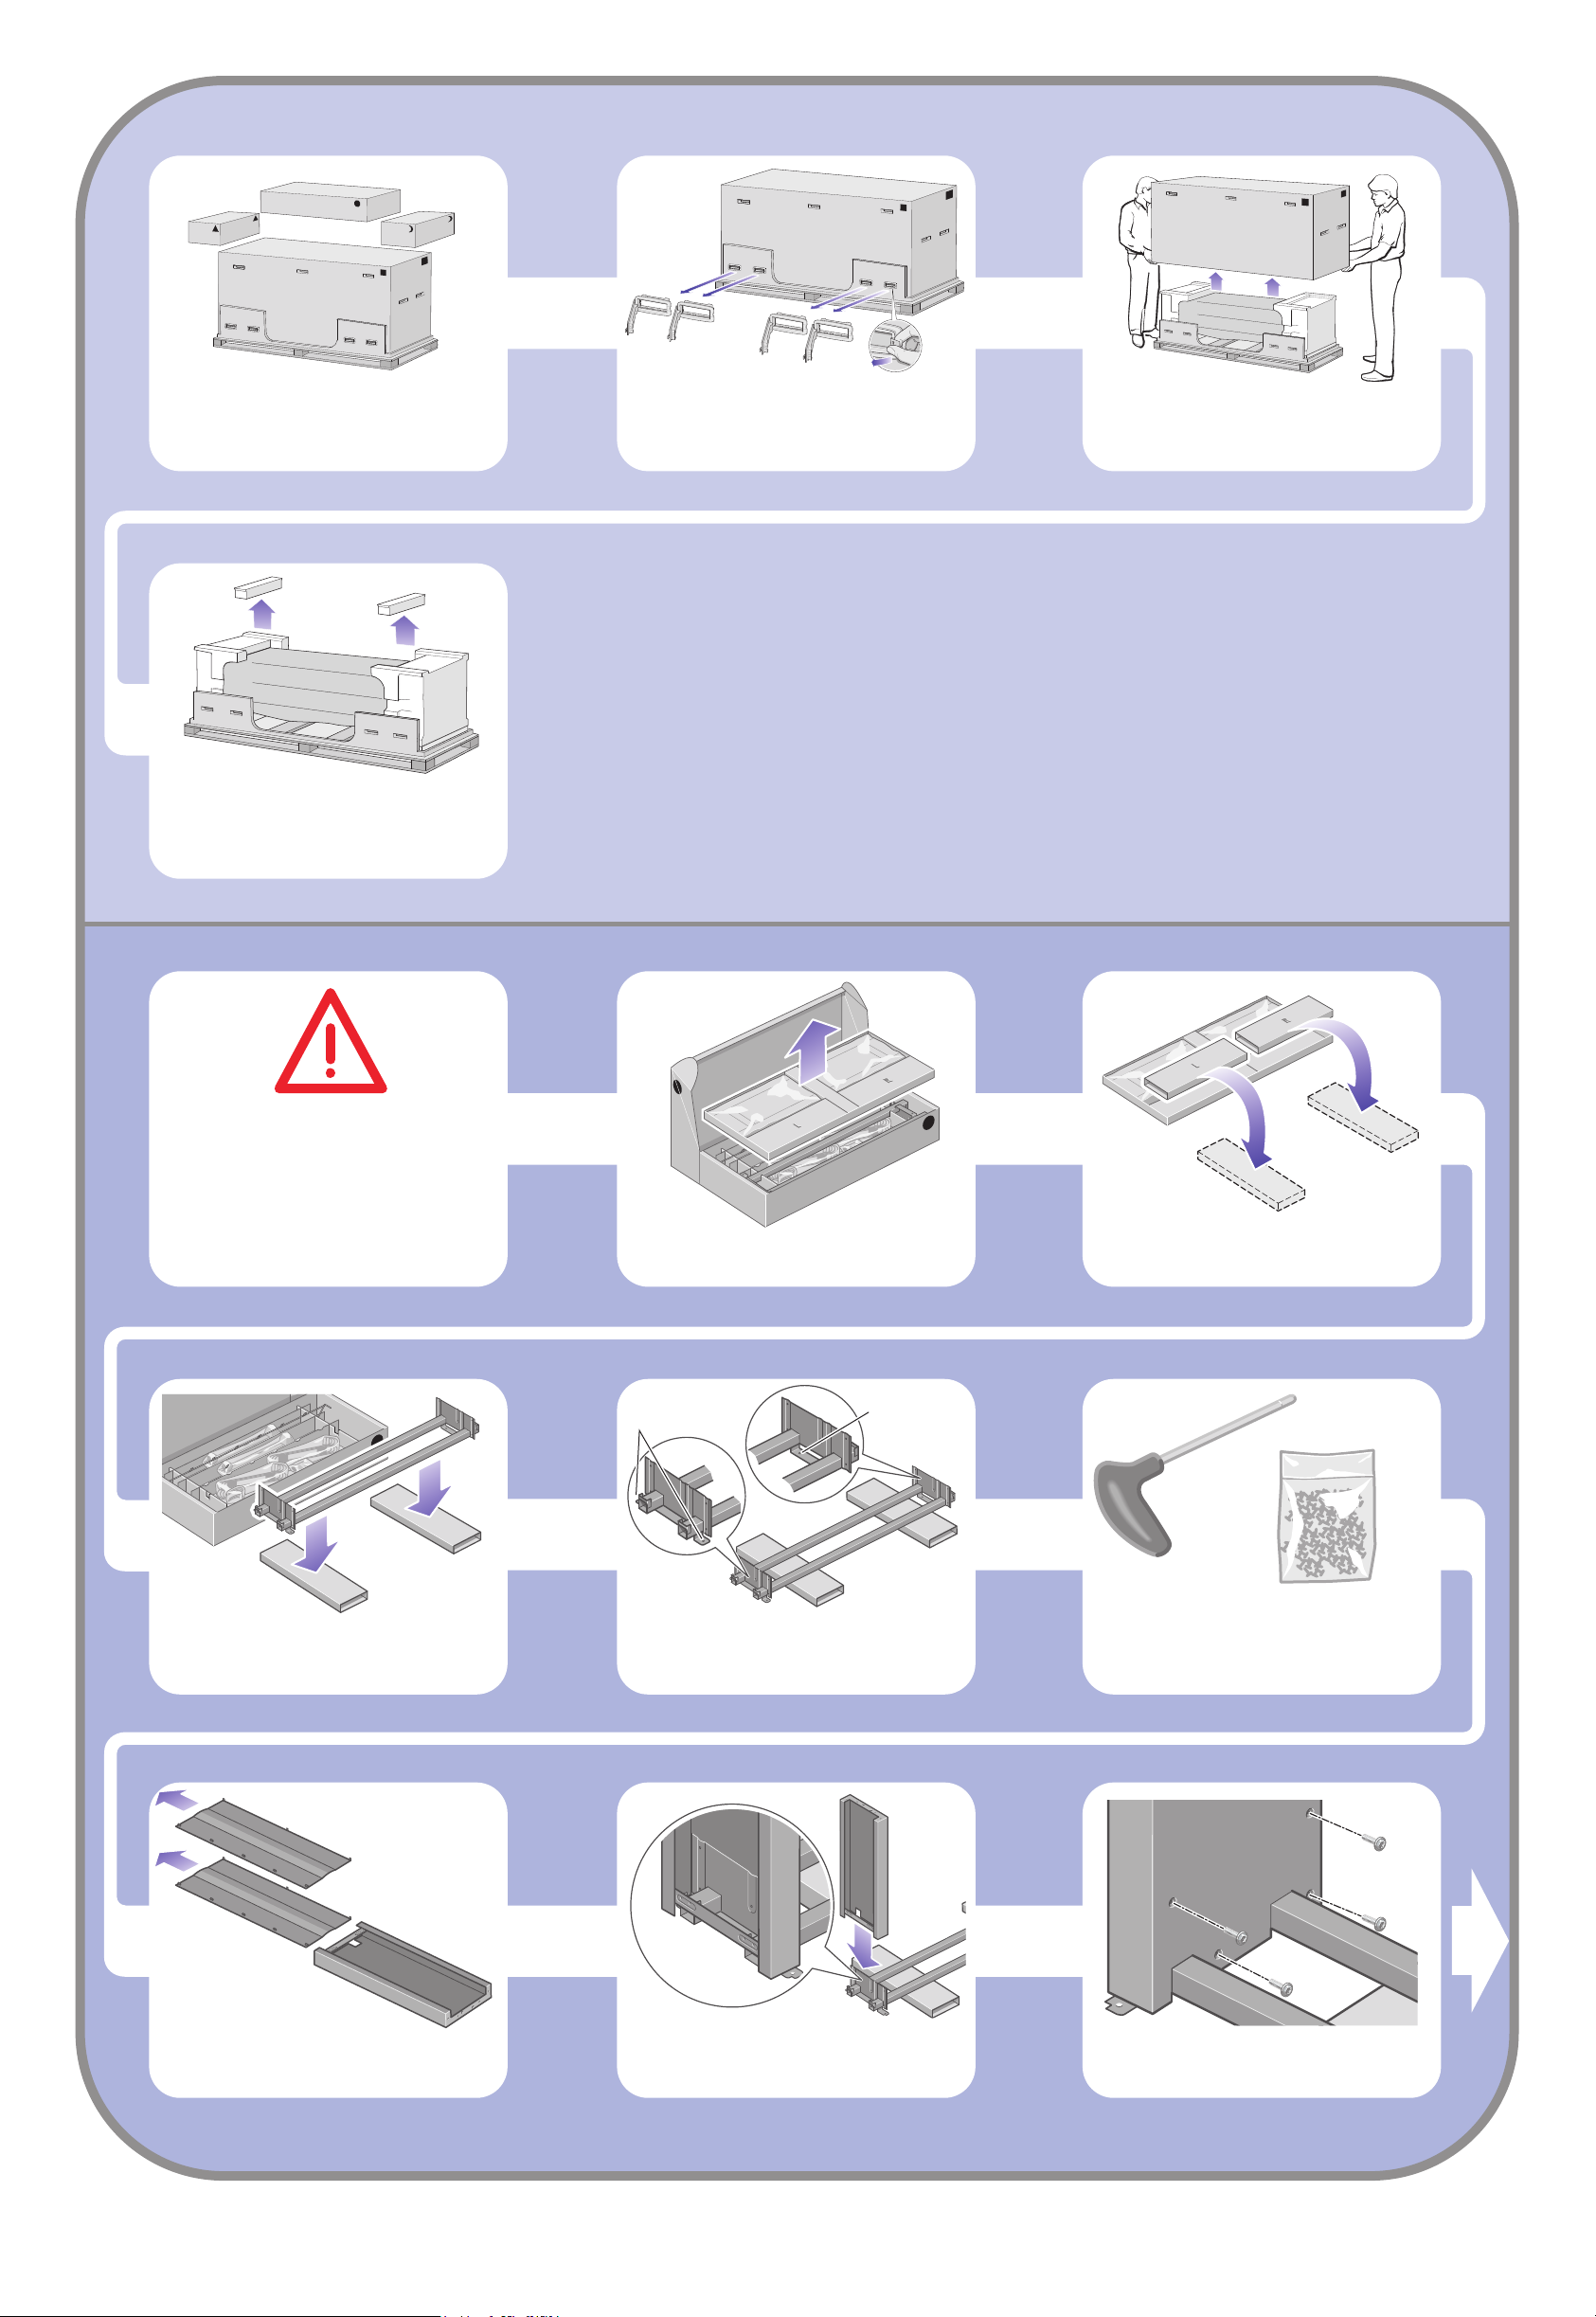
Remove the boxes from the top of the main
printer box.
Remove the two packing pieces.
Remove all eight plastic handles from both sides
of the box.
Remove the main printer box.
2 Stand assembly
When you are unpacking the leg
assembly, you will see that there
is anti-slip material around two
of the wheels on the feet.
DO NOT REMOVE this material yet.
Remove the first tray from the stand and bin
assembly box.
Two holes
One hole
From the first tray, remove the two boxes marked
with L and R. Place them on the floor as shown.
Right
Lower the cross-brace on to the L and R boxes.
Remove the two leg covers from the left leg.
Left
You now need to identify which is the left and
the right side of the cross-brace.
Lower the left leg onto the left side of the
cross-brace. The left leg will fit only on the left
side of the cross-brace.
2
Now you will need the bag of screws and
the screwdriver provided. You may notice that
the screwdriver is slightly magnetic.
Fix the left leg to the cross-brace using four screws
on the inner side of the leg.
Page 3
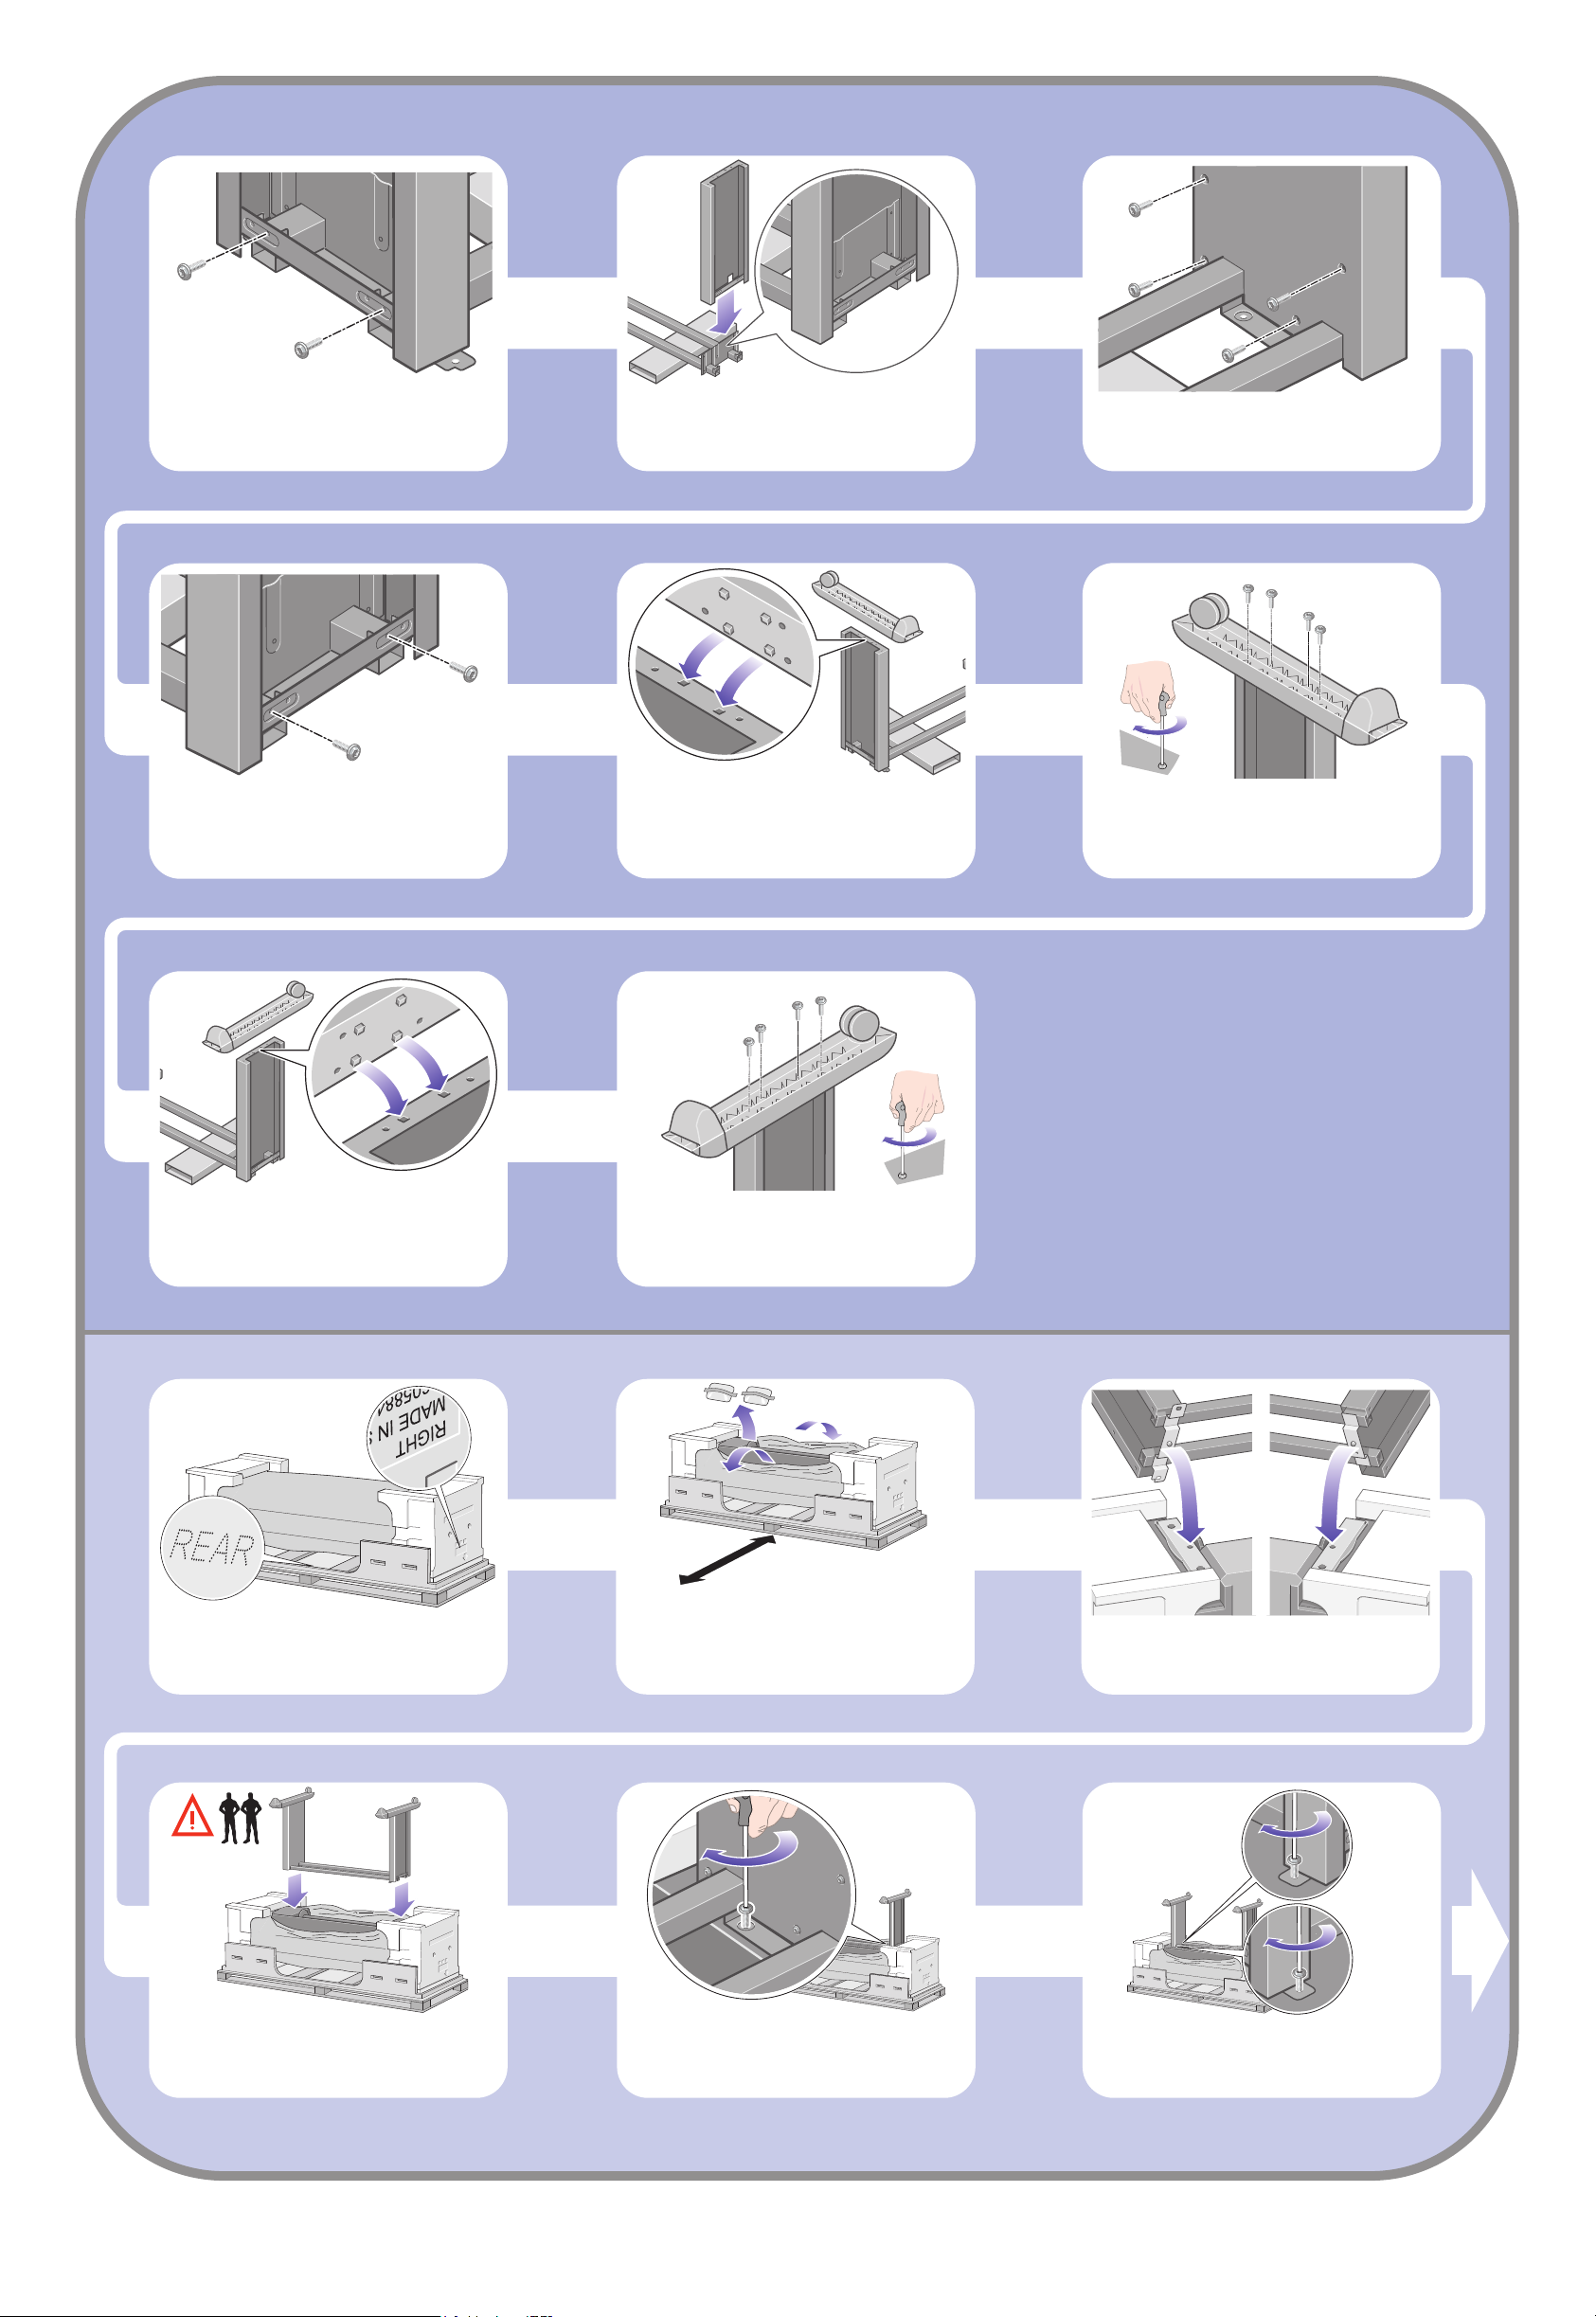
Fix the left leg to the cross-brace using two screws
on the outer side of the leg.
Fix the right leg to the cross-brace using two
screws on the outer side of the leg.
Lower the right leg onto the right side of the
cross-brace. The right leg will fit only on the right
side of the cross-brace.
Position a foot on the left leg. There are pins to
help you to position the foot correctly.
Do not remove the anti-slip material from the wheel.
Fix the right leg to the cross-brace using four
screws on the inner side of the leg.
Fix the left foot using four screws.
Position a foot on the right leg. There are pins to
help you to position the foot correctly
Do not remove the anti-slip material from the wheel.
3 Installing the stand onto the printer
You now need to identify the left and right of the
printer. This information is shown on the foam end
packs. Also identify the rear of the printer.
Fix the right foot using four screws.
3m (9ft)
Pull open the protective plastic from the base of
the printer. Please ensure that there is a threemeter space clear of obstructions to the rear of
the printer.
Remove the two desiccant bags from the printer.
Left
leg.
Advance warning: in the next step, make sure
you position the stand pins in the holes in the
center of the printer body brackets.
Right
leg.
Lift the stand assembly onto the printer body.
The anti-slip material should face to the rear of
the printer.
Fix the right side of the stand to the printer using
one screw. Make sure that the screw is fully
tightened.
3
Fix the left side of the stand to the printer using
two screws. Make sure that the screws are fully
tightened.
Page 4
Place the spare and consumables boxes against
the rear of the printer box. The arrows on the
boxes must point towards the printer box.
Check that the anti-slip material is still fixed to
the two rear wheels.
Using four people, rotate the printer on to the
spare and consumables boxes.
Rotate the printer until its rear rests on the spare
and consumables boxes and the wheels with the
anti-slip material touch the floor.
Remove the pallet before trying to lift the printer
into an upright position.
4 More unpacking
Remove the two foam end packs and the plastic
covering the printer.
Using four people and the hand holds on the rear
of the printer body, carefully lift the printer into an
upright position.
1
2
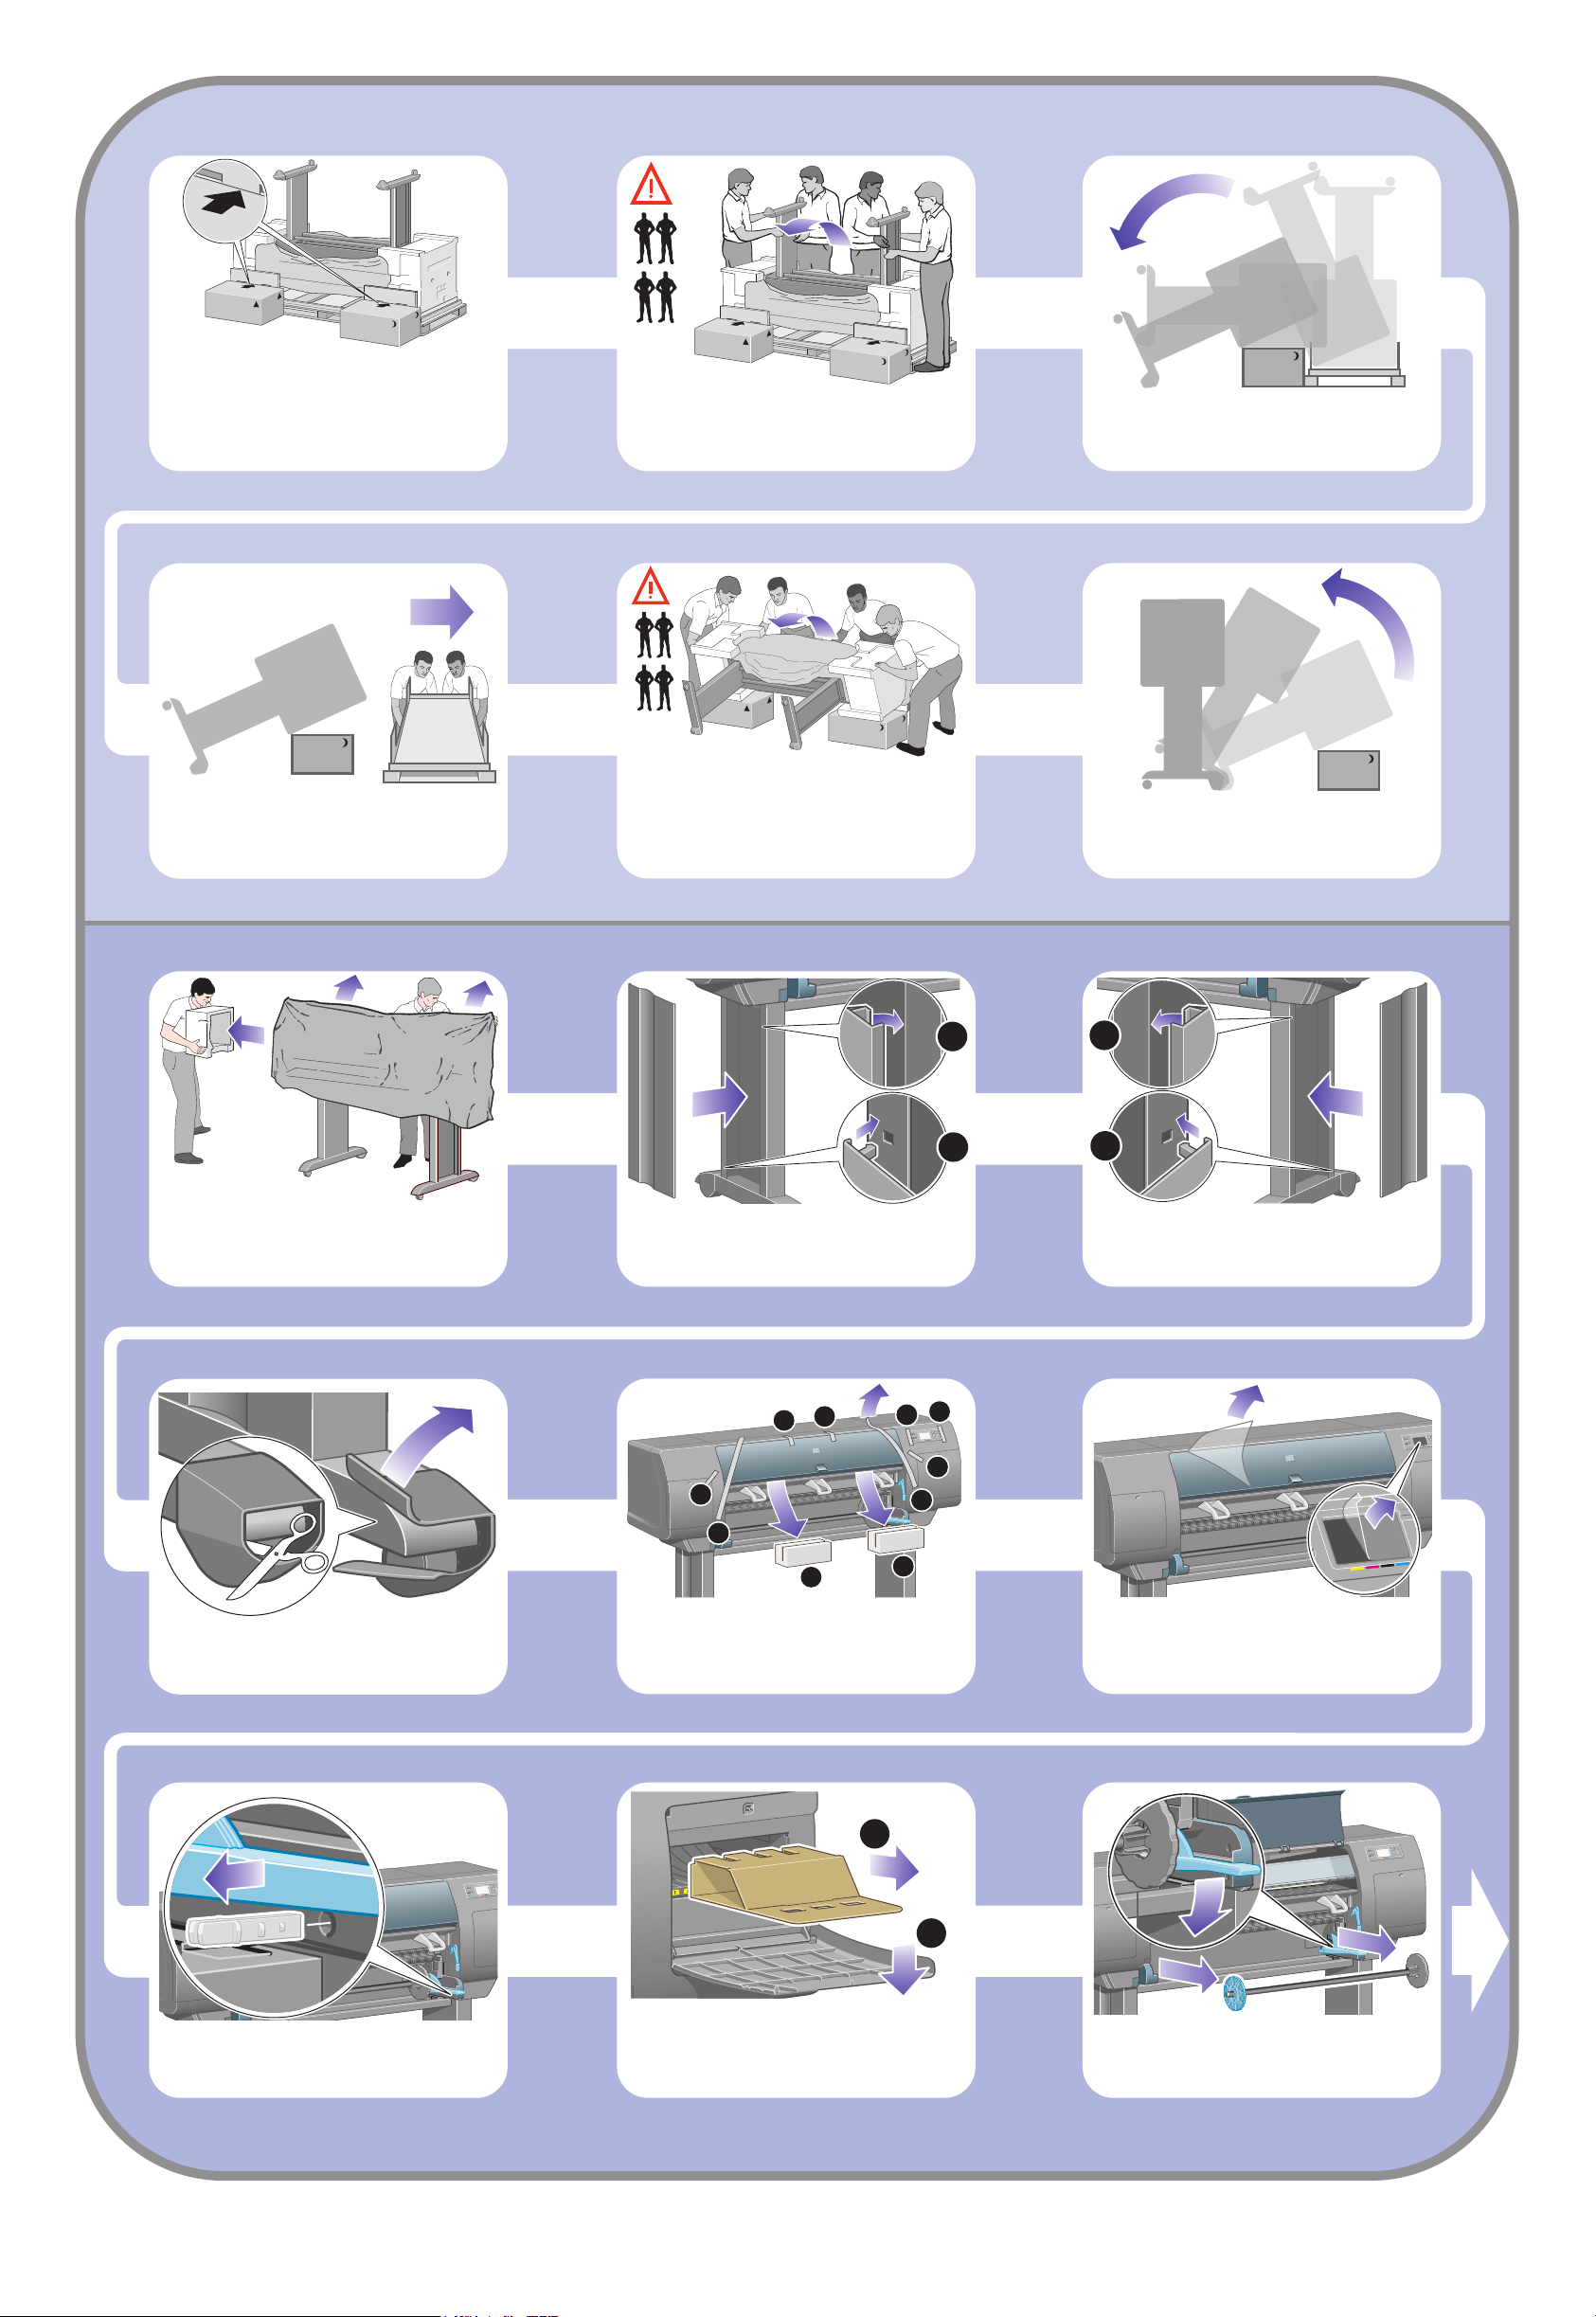
Position the left leg cover on the front of the left
leg (1), then clip the rear edge (2) into place.
Rotate the printer into an upright position. The
anti-slip material should stop the printer from
sliding forwards.
1
2
Position the right leg cover on the front of the right
leg (1), then clip the rear edge (2) into place.
Remove the anti-slip material from the two rear
wheels on the stand assembly.
8
7
3
1
9
Remove the packing tapes 1 to 8.
Open the printer window and remove the two
window inserts 9 and 10.
5
2
10
2
6
4
Remove the protective covering from the printer
window and the front panel screen.
1
Remove the spindle lock.
Open the printhead cleaner door and remove the
carriage packing material. Then close the cleaner
door.
4
Press the spindle lever down, which will unseat
the right-hand end of the spindle. Remove that
end of the spindle first, and then the left.
Page 5

Remove the spindle lock foam piece.
Then replace the spindle.
5 Bin assembly
Locate the bin components.
Fix one screw to the inside of the stand’s right leg.
Fix one screw to the inside of the stand’s left
leg.
Do not fully fit the screw.
Do not fully fit the screw.
Lift the supporting framework of the bin into
position in front of the printer.
Fix the top arms of the bin to the two screws that
you have just fitted.
6
5
4
3
2
1
Clip all six loops to the frame of the bin. Locate the
loops with rear extensions in positions 2, 4, and 6.
Fix the lower arms of the bin to the stand using
one screw for each leg.
Secure all six loops to the frame, using two clips
on each loop.
5
Now tighten the two top screws.
Fit all three mobile stoppers to the three loops
indicated above.
Page 6

1
2
Carefully squeeze the mobile stopper and then
fit it onto the loop.
When the mobile stopper is engaged with the
loop, release your grip.
6 Installing accessory parts and the power cable
Move the three mobile stoppers into their parked
position. These stoppers are used only when
printing on sheets of paper less than 900 mm
in length (up to A1 size).
Install the Quick Reference Guide holder. Angle
the holder at the top (1), then position the two
hooks and clip the lower part (2) to the rear of
the printer.
If the power light on the front panel remains off,
press the Power key to switch on the printer.
7 Installing ink cartridges
Plug the power cable into the rear of the printer,
then plug the other end into the AC power outlet.
Wait until you see this message (~10 minutes).
Highlight your language using the Up and Down
keys. Press the Select (
) key.
Turn the power switch at the rear of the printer to
the on position.
The front panel will now display how to install the
ink supplies.
Remove the printheads, printhead cleaners, and
ink cartridges from the consumables box.
Open the ink cartridge door.
Find the ink cartridge door, which is on the left
side of the printer.
To release the ink cartridge drawer, pull the blue
handle down.
6
Press the ink cartridge door.
Slide the ink cartridge drawer out.
Page 7

Place the ink cartridge onto the ink cartridge
drawer. Note that there are marks on the drawer
showing the correct location.
Position the ink cartridge at the rear of the drawer
as indicated.
Push the ink cartridge drawer back into the
printer until it locks into position.
Following the same instructions, install the other
three ink cartridges.
8 Removing setup printheads
Open the printer window.
Close the ink cartridge door.
Remove the packing tape that is holding down
the printhead carriage latch.
Wait (about a minute) until you see this front
panel message.
Pull up and release the latch on top of the
carriage assembly.
Lift up the cover. This will give you access to the
setup printheads.
Using the blue handle, gently disengage the setup
printhead from the carriage..
Before removing the setup printheads, look at the
window on top of each one and check that the
printhead contains ink.
Lift the setup printhead until it is released from
the carriage assembly. Then remove the other
setup printheads.
7
To remove a setup printhead, lift up the blue
handle.
Page 8

9 Installing printheads
Remove the blue protective cap and the clear
protective tape from the printhead.
Make sure the printheads are correctly seated.
When all the printheads are installed, the front
panel prompts, “Close printhead cover and
window”.
Lower all the printheads vertically into their correct
positions.
If “Reseat” is displayed on the front panel, check
that the protective tape has been removed. Then
try reseating the printhead more firmly. If the
problem persists, refer to the Using Your Printer
CD.
Seat the printheads slowly and carefully.
Close the carriage assembly cover.
Make sure the latch engages correctly.
10 Installing printhead cleaners
Wait until you see this front panel message.
Close the printer window.
Press the printhead cleaner door, which is on the
right side of the printer.
Please wait while the printer checks the
printheads (~1 minute).
Open the printhead cleaner door.
Insert the printhead cleaner into the slot of the
correct color.
Push the printhead cleaner in and down until
it clicks into place.
8
Insert the other seven printhead cleaners into the
correct slots.
Page 9

2
1
Close the printhead cleaner door.
11 Installing a roll
Wait until you see this front panel message.
Press the Select (
) key.
1
Lower the spindle lever.
Slide the roll of paper that came with your printer
onto the spindle. Make sure the paper is oriented
exactly as shown.
Remove the right-hand end of the spindle (1) from
the printer, then move it to the right in order to
extract the other end (2).
Put the blue-colored stop onto the spindle and
push it on as far as it will go without using
excessive force.
Remove the blue-colored stop (A) from the lefthand end of the spindle. Keep the spindle
horizontal.
Make sure the blue-colored stop is seated
correctly.
With the blue stop on the left, slide the spindle
into the printer. The blue spindle lever will drop
down automatically as you insert the spindle.
12 Loading the paper
From the front panel, highlight the Paper icon and
press the Select () key.
Once you meet resistance, lift the blue lever to
seat the spindle properly.
From the front panel, highlight ‘Roll’ and press
the Select (
) key.
9
The spindle lever will be in the horizontal position
when the spindle has been correctly inserted.
The front panel displays the above. Highlight
‘Load roll now’ and press the Select (
) key.
Page 10

The front panel displays the above. Highlight the
paper type you have loaded and press the
) key.
Select (
Wait until you see this front panel message.
Open the printer window.
Lift the paper load lever.
Wait until the paper emerges from the printer
as shown above.
Pull out approximately 1 m (3 ft) of the roll.
Make sure the paper is aligned with the blue
line and half circle on the platen.
Insert the edge of the roll above the black roller.
Lower the paper load lever.
You should see the front panel message above.
You should see the front panel message above.
back on to the spindle.
Lower the printer window.Using the stops, carefully wind the excess paper
The printer will automatically perform printhead
alignment and a color calibration for the paper
type that you have inserted. During this process
the printer will advance the paper up to 3 m
(~10 ft) before printing.
Please do not try to stop the paper advance; it
is necessary to ensure a successful printhead
alignment.
The whole alignment and calibration process
will take about twenty minutes; while it is going
on, you can proceed to the next section.
Using the stops, carefully wind the excess paper
back on to the spindle.
10
Page 11

13 Hardware setup
PC, Macintosh
or workstation
Printer Server PC, Macintosh
or workstation
Your printer can be connected to a computer
directly or to one or more computers via a
network.
A larger socket is provided to connect an optional
accessory. Caution: do not attempt to use this
socket for any other purpose.
Locate the area at the back of the printer where
you can connect the printer to your computer or
network, or install an optional accessory.
Pass the LAN cable through the hook at the rear
of the printer.
A Fast Ethernet socket is provided for connection
to a network. Two FireWire sockets are provided
for direct connection to computers.
Now you have completed the assembly of your
printer. The following pages describe how to
configure your computer for successful printing.
11
Page 12

Setting up and connecting your printer
Mac OS
1. Driver installation
OS X & OS 9
1.
Connect the cable from your computer or network to the printer.
2.
Insert the HP Designjet Software Setup CD into your CD drive, open the CD icon on
your screen, and look for these icons:
• ‘OS X HP DJ 4000ps Install’ (for Mac OS X Native)
• ‘OS 9 HP DJ 4000ps Install’ (for Mac OS X Classic or Mac OS 9)
3.
Double-click the appropriate icon for your operating system to launch the installer, and
then follow the instructions on your screen.
Note: We recommend that you select ‘Easy Install’ to install all elements.
4.
When the installation has finished, remove the CD from the CD-ROM drive.
5.
If you are connecting your printer directly to your computer with a FireWire or USB
cable, see ‘Direct connection’ for OS X or OS 9 below.
If you are connecting your printer to a network, see ‘Network connection’ for OS X or
OS 9 below.
2. Direct connection
OS X – FireWire
1. Ensure that the printer is connected to your computer by a FireWire cable, and that the
printer is turned on.
2. Open the Print Center or Printer Setup Utility, as follows:
a. Select the Finder icon on your desktop.
b. Click the Applications icon in the top right corner of the Finder window.
c. Select ‘Utilities’ from the list of applications.
d. Select ‘Print Center’ or ‘Printer Setup Utility’ from the list of utilities.
3. Click the Add button. The Printer List dialog box is displayed.
4. Select HP FireWire from the popup menu.
5. Click the name of the printer.
6. Click the Add button.
7. Your printer is now ready to use, printer setup is complete.
2. Network connection
OS X – Rendezvous
1. Make sure that the printer is on and connected to a working Ethernet network, and
that all computers in the network are on and connected (including hubs and routers).
2. From the Setup menu on your printer’s front panel, select ‘I/O setup’, then ‘Fast
Ethernet’, then ‘Show configuration’. Note the mDNS service name and IP address of
your printer, as shown on the front panel.
3. Open the Print Center or Printer Setup Utility, as follows:
a. Select the Finder icon on your desktop.
b. Click the Applications icon in the top right corner of the Finder window.
c. Select ‘Utilities’ from the list of applications.
d. Select ‘Print Center’ or ‘Printer Setup Utility’ from the list of utilities.
4. Click the Add button. The Printer List dialog box is displayed. Ensure that Rendezvous
is selected in this dialog box.
5. Click the name of the printer. If you cannot identify the printer by name (if there is
more than one printer with the same name), use the mDNS Service Name that you
noted in step 2.
6. The connection is configured automatically. Your printer is now available on the
network.
7. Now turn the page and go to the Embedded Web Server information.
2. Direct connection
OS 9
Mac OS 9 does not support a FireWire connection.
A direct USB connection is possible, but it requires an optional accessory card. If you
have the USB accessory card, see the Using Your Printer CD for setup instructions.
2. Network connection
OS 9 – TCP/IP
1. Make sure that
that all computers in the network are on and connected (including hubs and routers)
2.
From the Setup menu on your printer’s front panel, select ‘I/O setup’, then ‘Fast
Ethernet’, then ‘Show configuration’.
the front panel.
3. Go to your computer and open the Desktop Printer Utility located in the ‘HP Designjet
4000ps’ folder on the hard disk.
4. Choose the AdobePS driver and the Printer (LPR) connection. Click OK.
5. Use the first Change button to select the ‘HP Designjet 4000 PS3’ PostScript Printer
Description (PPD) file.
6. Use the second Change button to enter the printer’s IP address into the Printer Address
field. Click Verify and then OK.
7. Check that your changes appear correctly on the screen, then click Create.
8. Click Save to save your new printer setup on the Desktop.
9.
Now turn the page and go to the Embedded Web Server information.
the printer is on and connected to a working Ethernet network, and
.
Note the IP address of your printer, as shown on
12
For other network configurations or
further details, please refer to the
‘Using Your Printer’ CD.
Page 13

Connecting your printer
Windows
Network connection
Windows
A network connection is the best way to share your printer with your
team.
1. Make sure that the printer and the computer are both connected to the network.
2. Go to the printer’s front panel and highlight the Setup icon.
3. The front panel will display some information, including the printer’s IP address. Make
a note of the IP address.
4. Insert the HP Designjet 4000 Series Printer Software Setup for Windows CD into your
CD drive. If the CD does not autorun, run the SETUP.EXE program in the root folder of
the CD.
5. Follow the instructions on your screen to set up the printer.
6. When asked how the printer is connected, choose ‘Connected via the network’.
7. When asked what network setup you require, choose ‘Basic network setup’.
8. Select your printer from the list. If you have more than one HP Designjet printer, use
the IP address that you noted earlier to confirm that you have selected the correct
printer.
9. The network settings of the selected printer are displayed. Check that they are correct,
then click ‘Next’ to continue.
10. Select your printer model and click ‘Next’ to continue.
11. Click ‘Next’ until you have completed the installation of the printer driver.
12. We recommend that you take the opportunity to print a test page when prompted to
do so.
13. Now turn the page and go to the Embedded Web Server information.
Direct connection
Windows
A direct connection using FireWire or USB may be faster than a network
connection, but the cable is limited in length and it is more difficult to
share the printer.
Please note that a USB connection requires an optional accessory card.
1. Do not connect the computer to the printer yet. You must first install the printer driver
software on the computer, as follows.
2. Insert the HP Designjet 4000 Series Printer Software Setup for Windows CD into your
CD drive. If the CD does not autorun, run the SETUP.EXE program in the root folder of
the CD.
3. Follow the instructions on your screen to set up the printer.
4. When asked how the printer is connected, choose ‘Connected directly to this
computer’.
5. Choose your connection method and click ‘Next’.
6. Choose your printer model and click ‘Next’.
7. When prompted to do so, connect your computer to the printer, using a FireWire or
USB cable. Ensure that the printer is switched on. When the printer software has
detected the printer, the installation process will be completed automatically.
8. We recommend that you take the opportunity to print a test page when prompted to
do so.
9. Your printer is now ready to use, printer setup is complete.
For further details, please refer to
the ‘Using Your Printer’ CD.
13
Page 14

Setting up and connecting your printer
Embedded Web Server
Embedded Web Server
Windows and Mac OS
1. Open a Web browser on any computer with an Internet connection, and enter the IP
address of your printer (available only if you have a network connection to the
printer).
2. Check that the Embedded Web Server opens and you can see information about your
printer similar to that shown below.
Supplies window
Jobs queue window
You can now submit print jobs and control many aspects of your printer’s operation from
the Web browser.
Your printer is now ready to use, printer setup is complete.
Hewlett Packard Company
Avenida Graells, 501
08174 Sant Cugat del Vallés
Barcelona
Spain
14
© Hewlett-Packard Company, 2004
Printed in
Imprimé en
Stampato in
 Loading...