

Page 1
Page 2

Legal notices
The information contained in this document is subject to change without notice.
Hewlett-Packard makes no warranty of any kind with regard to this material, including, but not limited to, the implied
warranties of merchantability and fitness for a particular purpose.
Hewlett-Packard shall not be liable for errors contained herein or for incidental or consequential damages in connection with
the furnishing, performance, or use of this material.
No part of this document may be photocopied or translated to another language without the prior written consent of HewlettPackard Company.
Trademarks
Adobe®, Acrobat®, Adobe Photoshop®, and PostScript® are trademarks of Adobe Systems Incorporated.
Microsoft® and Windows® are U.S. registered trademarks of Microsoft Corporation.
PANTONE® is Pantone, Inc.'s check-standard trademark for color.
Company address
Hewlett-Packard Company
Inkjet Commercial Division
Avenida Graells, 501
08174 Sant Cugat del Vallès
Barcelona, Spain
Page 3

Contents
1 Introduction ..........................................................................................................7
Using this guide .....................................................................................................7
The printer's main features ....................................................................................8
The printer's main components .............................................................................. 9
The front panel ....................................................................................................10
Printer software ...................................................................................................12
2 How do I assemble the printer?........................................................................13
Getting started .....................................................................................................13
How do I unpack the printer? ...............................................................................14
How do I assemble the stand? ............................................................................16
How do I attach the stand to the printer? .............................................................22
How do I remove packaging materials from the printer? ...................................... 26
How do I assemble the bin? ................................................................................29
How do I switch on the printer for the first time? ..................................................34
How do I install ink cartridges? ............................................................................36
How do I remove the setup printheads? ..............................................................40
How do I install the printheads? ...........................................................................42
How do I install the printhead cleaners? ..............................................................45
How do I load a roll of paper onto the spindle? ....................................................47
How do I load the paper into the printer? .............................................................50
How do I connect the printer? ..............................................................................56
How do I install accessories? ..............................................................................58
3 How do I set up my printer software? ..............................................................63
How do I choose which connection method to use? ............................................63
How do I connect my printer to a network (Windows)? ........................................64
How do I connect my printer to a network (Mac OS X)? ......................................66
How do I connect my printer to a network (Mac OS 9)? ......................................68
How do I connect my printer directly to a computer (Windows)? .........................69
How do I connect my printer directly to a computer (Mac OS X)? .......................70
How do I connect my printer directly to a computer (Mac OS 9)? ........................71
How do I uninstall the printer driver (Windows)? .................................................72
How do I uninstall the printer driver (Mac OS 9)? ................................................72
4 How do I operate the printer?............................................................................73
How do I switch the printer on and off? ................................................................ 73
How do I restart the printer? ................................................................................74
How do I change the language of the front panel? ..............................................74
How do I access the Embedded Web Server? ....................................................75
How do I change the language of the Embedded Web Server? ..........................76
How do I password–protect the Embedded Web Server? ...................................76
How do I request e-mail notification of specific error conditions? ........................77
How do I change the sleep mode setting? ...........................................................77
How do I turn off the buzzer? ...............................................................................77
How do I change the front panel contrast? ..........................................................77
How do I change the units of measurement? ......................................................77
How do I adjust for altitude? ................................................................................78
1
Page 4

5 How do I handle paper?.....................................................................................79
How do I load a roll onto the spindle? ..................................................................79
How do I load a roll into the printer? ....................................................................83
How do I unload a roll from the printer? ...............................................................88
How do I load a single sheet? ..............................................................................89
How do I unload a single sheet? ..........................................................................93
How do I select supported paper types? .............................................................. 94
How do I view information about the paper? ........................................................95
How do I download media profiles? .....................................................................96
How do I use non-HP paper? ..............................................................................96
How do I cancel the drying time? .........................................................................96
How do I change the drying time? .......................................................................97
6 How do I handle the ink system?......................................................................99
How do I remove an ink cartridge? ......................................................................99
How do I insert an ink cartridge? .......................................................................104
How do I remove a printhead? ...........................................................................106
How do I insert a printhead? ..............................................................................110
How do I manage printhead monitoring? ...........................................................113
How do I recover (clean) the printheads? ..........................................................113
How do I clean a printhead's electrical connections? ........................................113
How do I align the printheads? ..........................................................................119
How do I remove a printhead cleaner? ..............................................................120
How do I insert a printhead cleaner? .................................................................122
How do I check the status of the ink system? ....................................................124
How do I get ink cartridge statistics? .................................................................124
How do I get printhead statistics? ......................................................................125
How do I check printer usage statistics? ............................................................ 125
7 How do I adjust my printed images?..............................................................127
How do I change the page size? .......................................................................127
How do I create a custom page size? ................................................................127
How do I change the print quality? ....................................................................129
How do I choose print quality settings? .............................................................130
How do I print at maximum speed? ...................................................................132
How do I adjust the margins? ............................................................................132
How do I print on oversize page sizes? .............................................................133
How do I change the paper's orientation? .........................................................133
How do I rotate an image? .................................................................................134
How do I print a mirror image? ..........................................................................134
How do I scale an image? .................................................................................134
How do I change the palette settings? ...............................................................135
How do I change the treatment of overlapping lines? ........................................136
How do I change the graphic language setting? ................................................137
8 How do I get accurate colors from my printer?.............................................139
How do I perform color calibration? ...................................................................139
How do I perform black point compensation? ....................................................140
How do I set the rendering intent? .....................................................................140
How do I select the color emulation mode? .......................................................141
How do I produce matching prints from different HP Designjets? ......................141
How do I get accurate colors from Adobe Photoshop CS (HP–GL/2 & RTL
driver)? ..............................................................................................................141
2
Page 5

Contents
How do I get accurate colors from Adobe Photoshop CS (PostScript
driver)? ..............................................................................................................146
How do I get accurate colors from Adobe InDesign CS? ...................................151
How do I get accurate colors from QuarkXPress 6? ..........................................155
How do I get accurate colors from Autodesk AutoCAD 2002? ..........................158
How do I get accurate colors from Microsoft Office 2003? ................................158
How do I get accurate colors from ESRI ArcGIS 9? ..........................................158
9 How do I manage print jobs?...........................................................................163
How do I submit a job? ......................................................................................163
How do I save a job? .........................................................................................164
How do I print a saved job? ...............................................................................164
How do I check ink and paper usage for a job? .................................................164
How do I cancel a job? ......................................................................................164
How do I manage the print queue? ....................................................................165
How do I nest jobs to save roll paper? ...............................................................167
10 How do I maintain my printer?........................................................................169
How do I clean the exterior of the printer? .........................................................169
How do I clean the platen? ................................................................................169
How do I lubricate the printhead carriage? ........................................................171
How do I maintain the ink cartridges? ................................................................172
How do I move or store my printer? ...................................................................172
How do I update my printer's firmware? ............................................................173
11 How do I use the Image Diagnostics Print?...................................................175
How do I print the Image Diagnostics Print? ......................................................175
How do I respond to the Image Diagnostics Print? ............................................176
How do I interpret Image Diagnostics part 1? ....................................................176
How do I interpret Image Diagnostics part 2? ....................................................178
How do I interpret Image Diagnostics part 3? ....................................................180
How do I proceed if I still have a problem? ........................................................181
12 How do I perform paper advance calibration?...............................................183
13 The problem is print quality.............................................................................189
General advice ..................................................................................................189
The problem is banding (horizontal lines across the image) ..............................190
The problem is lines are missing or thinner than expected ................................191
The problem is solid bands or lines printed over the image ...............................192
The problem is graininess ..................................................................................193
The problem is the paper is not flat ...................................................................193
The problem is the print smudges when touched ..............................................194
The problem is ink marks on the paper .............................................................. 194
The problem is a defect near the start of a print ................................................195
The problem is lines are stepped .......................................................................195
The problem is lines are printed double or in wrong colors ................................196
The problem is lines are discontinuous .............................................................. 197
The problem is lines are blurred (ink bleeds from lines) ....................................197
The problem is lines are slightly warped ............................................................197
The problem is color accuracy ...........................................................................198
The problem is PANTONE color accuracy .........................................................198
The problem is color matching between different HP Designjets .......................199
14 The problem is an image error........................................................................203
The problem is the print is completely blank ......................................................203
3
Page 6

The problem is the output contains only a partial print ....................................... 203
The problem is the image is clipped ..................................................................204
The problem is the image is in one portion of the printing area .........................204
The problem is the image is unexpectedly rotated ............................................205
The problem is the print is a mirror image of the original ...................................205
The problem is the print is distorted or unintelligible ..........................................205
The problem is one image overlays another on the same sheet .......................206
The problem is pen settings seem to have no effect ..........................................206
15 The problem is with the ink system................................................................207
The problem is I cannot insert an ink cartridge ..................................................207
The problem is I cannot insert a printhead .........................................................207
The problem is I cannot insert a printhead cleaner ............................................207
The problem is the front panel keeps telling me to reseat or replace a
printhead ............................................................................................................207
The problem is an ink cartridge status message ...............................................208
The problem is a printhead status message ......................................................208
The problem is a printhead cleaner status message .........................................208
16 The problem is with the paper.........................................................................209
The problem is the paper cannot be loaded successfully ..................................209
The problem is a paper jam (paper stuck in the printer) ....................................211
The problem is prints do not stack properly in the bin ........................................213
The problem is the printer uses a lot of paper to align the printheads ...............213
17 The problem is something else.......................................................................215
The problem is the printer's start–up process does not complete ......................215
The problem is a front panel message ............................................................... 215
The problem is a “printhead monitoring” message ............................................218
The problem is a “printheads are limiting performance” message .....................218
The problem is the printer does not print ...........................................................219
The problem is a print job is waiting for a time-out ............................................219
The problem is the printer seems slow ..............................................................219
The problem is communication failures between computer and printer .............220
The problem is I cannot access the Embedded Web Server from my
browser ..............................................................................................................221
The problem is an out-of-memory error .............................................................221
The problem is an AutoCAD 2000 memory allocation error ...............................222
The problem is the platen rollers squeak ...........................................................222
18 Tell me about the printer..................................................................................225
Tell me about color emulation modes ................................................................225
Tell me about connecting the printer .................................................................. 227
Tell me about the printer's rear lights .................................................................228
Tell me about the printer's internal prints ...........................................................228
Tell me about preventive maintenance ..............................................................229
19 Tell me about the Embedded Web Server......................................................231
20 Tell me about the ink system ..........................................................................233
Tell me about ink cartridges ...............................................................................233
Tell me about printheads ...................................................................................235
Tell me about printhead cleaners ......................................................................236
Tell me about ink system tips ............................................................................236
21 Tell me about paper..........................................................................................237
Tell me about using paper .................................................................................237
4
Page 7

Contents
Tell me about drying time ..................................................................................238
22 Tell me about printer specifications ..............................................................239
Tell me about functional specifications ..............................................................239
Tell me about physical specifications ................................................................. 242
Tell me about memory specifications ................................................................. 242
Tell me about power specifications ....................................................................242
Tell me about ecological specifications .............................................................. 242
Tell me about environmental specifications .......................................................242
Tell me about acoustic specifications ................................................................243
23 Tell me about ordering supplies and accessories.........................................245
Tell me about ordering ink supplies ...................................................................245
Tell me about ordering paper .............................................................................245
Tell me about ordering accessories ...................................................................248
24 Tell me about getting help...............................................................................249
Tell me about HP Instant Support ......................................................................249
Tell me about HP Customer Care ......................................................................249
Tell me about HP Designjet Online ....................................................................250
Tell me about other sources of information ........................................................251
25 Legal information ............................................................................................253
Worldwide Limited Warranty—HP Designjet 4000 Printer series ......................253
Hewlett-Packard Software License Agreement .................................................256
Open source acknowledgments ........................................................................257
Regulatory notices .............................................................................................258
DECLARATION OF CONFORMITY ..................................................................261
Index.........................................................................................................................263
5
Page 8

6
Page 9

1
Introduction
● “Using this guide” on page 7
● “The printer's main features” on page 8
● “The printer's main components” on page 9
● “The front panel” on page 10
● “Printer software” on page 12
Using this guide
The User's Guide and Quick Reference Guide are organized into the following
chapters.
Introduction
This chapter provides a brief introduction to the printer and its documentation for new
users.
How do I ...
These chapters help you to carry out various procedures such as loading paper or
changing an ink cartridge. Many of these procedures are illustrated with drawings, and
some are also illustrated with animations (in the User's Guide only).
The problem is ...
These chapters help you to solve problems that may occur while printing.
Introduction
Tell me about ...
Available in the User's Guide only, these chapters contain reference information,
including the specifications of the printer, and the part numbers of paper types, ink
supplies, and other accessories.
Legal information
This chapter contains HP's limited warranty statement, software license agreement,
open source acknowledgments, regulatory notices, and declaration of conformity.
Index
In addition to the table of contents, there is an alphabetical index to help you to find
topics quickly.
7
Page 10

Chapter 1
The printer's main features
Your printer is a color inkjet printer designed for printing high-quality images on paper
up to 42 in (1.06 m) wide. Some major features of the printer are shown below:
● Production speeds of up to 1.5 m²/min (16 ft²/min), using HP Universal InkJet
Introduction
Bond Paper with the Fast print quality option and the Optimize for Lines and
Text option
● Print resolution of up to 2400×1200 optimized dpi, from a 1200×1200 dpi input,
using the Best print quality option, the Maximum Detail and Optimize for
Images options, and glossy paper (for more information on print resolution, see
“Tell me about functional specifications” on page 239)
● Unattended printing using 400 cm³ ink cartridges and rolls of paper up to 90 m or
300 ft in length (see “Tell me about ink cartridges” on page 233)
● High productivity features such as multi-file job submitting, job previewing,
queueing, and nesting using the printer's Embedded Web Server (see “Tell me
about the Embedded Web Server” on page 231)
● Ink and paper usage information is available from the front panel, and on the Web
from the Embedded Web Server
● Accurate and consistent color reproduction features:
– Press emulations for U.S., European, and Japanese standards; and color
monitor RGB emulations (see “Tell me about color emulation
modes” on page 225)
– Automatic color calibration
8
Page 11
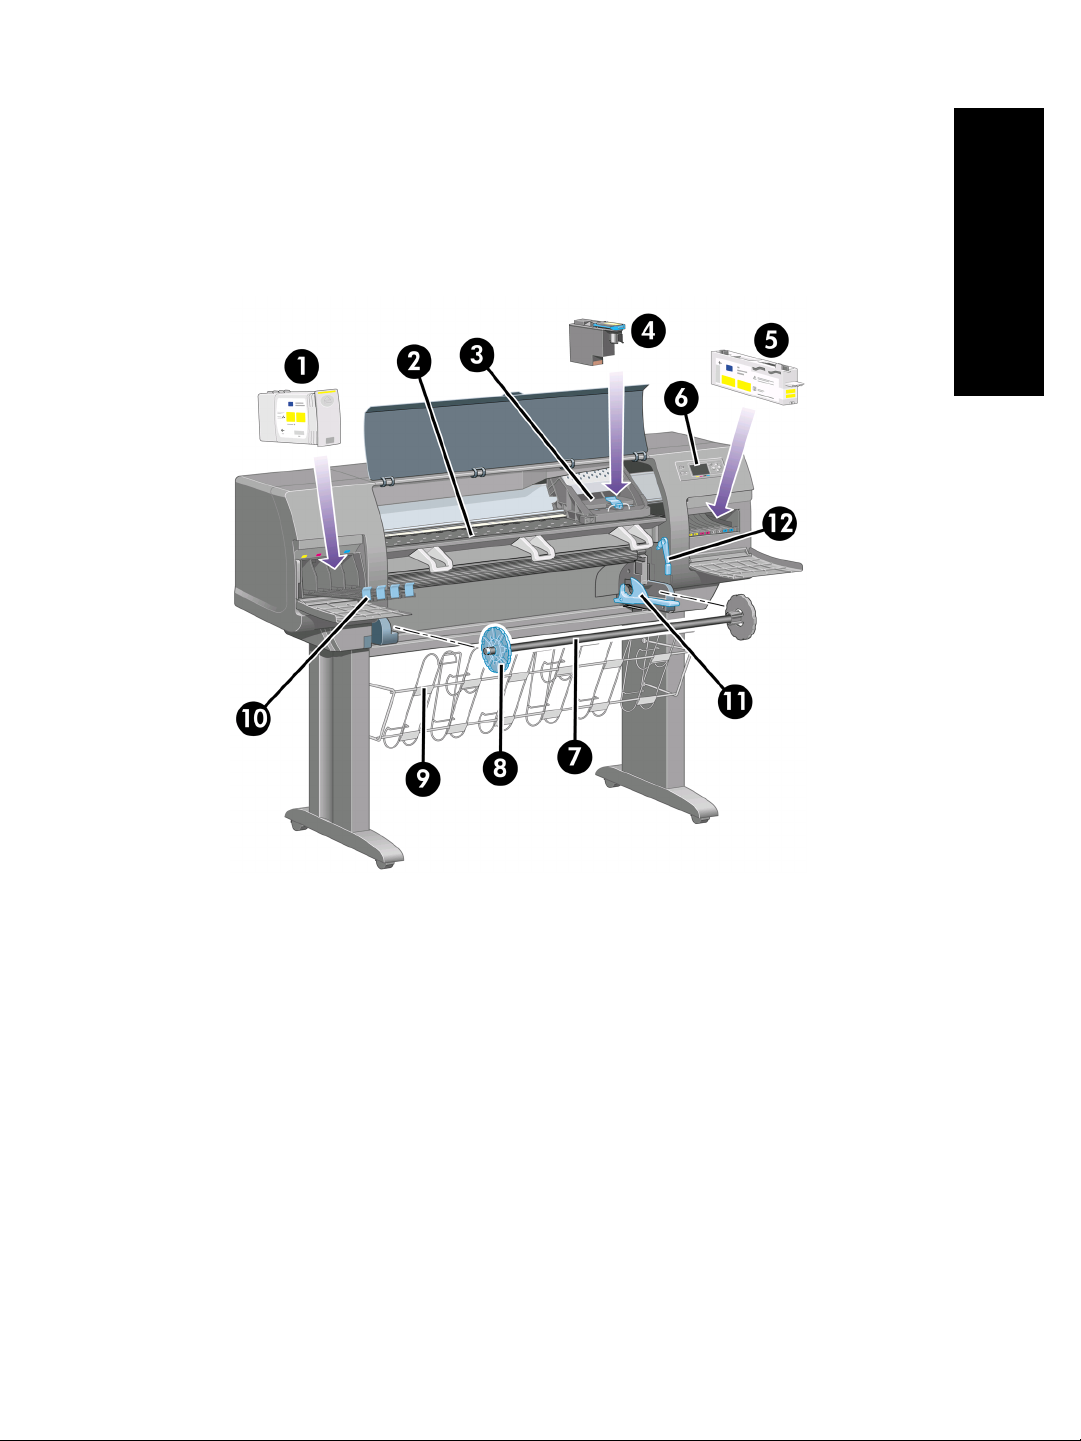
The printer's main components
The following front and rear views of the printer illustrate the main components.
Front view
Introduction
1. Ink cartridge
2. Platen
3. Printhead carriage
4. Printhead
5. Printhead cleaner
6. Front panel
7. Spindle
8. Blue removable paper stop
9. Bin
10. Ink cartridge drawer
11. Spindle lever
12. Paper load lever
9
Page 12
Chapter 1
Introduction
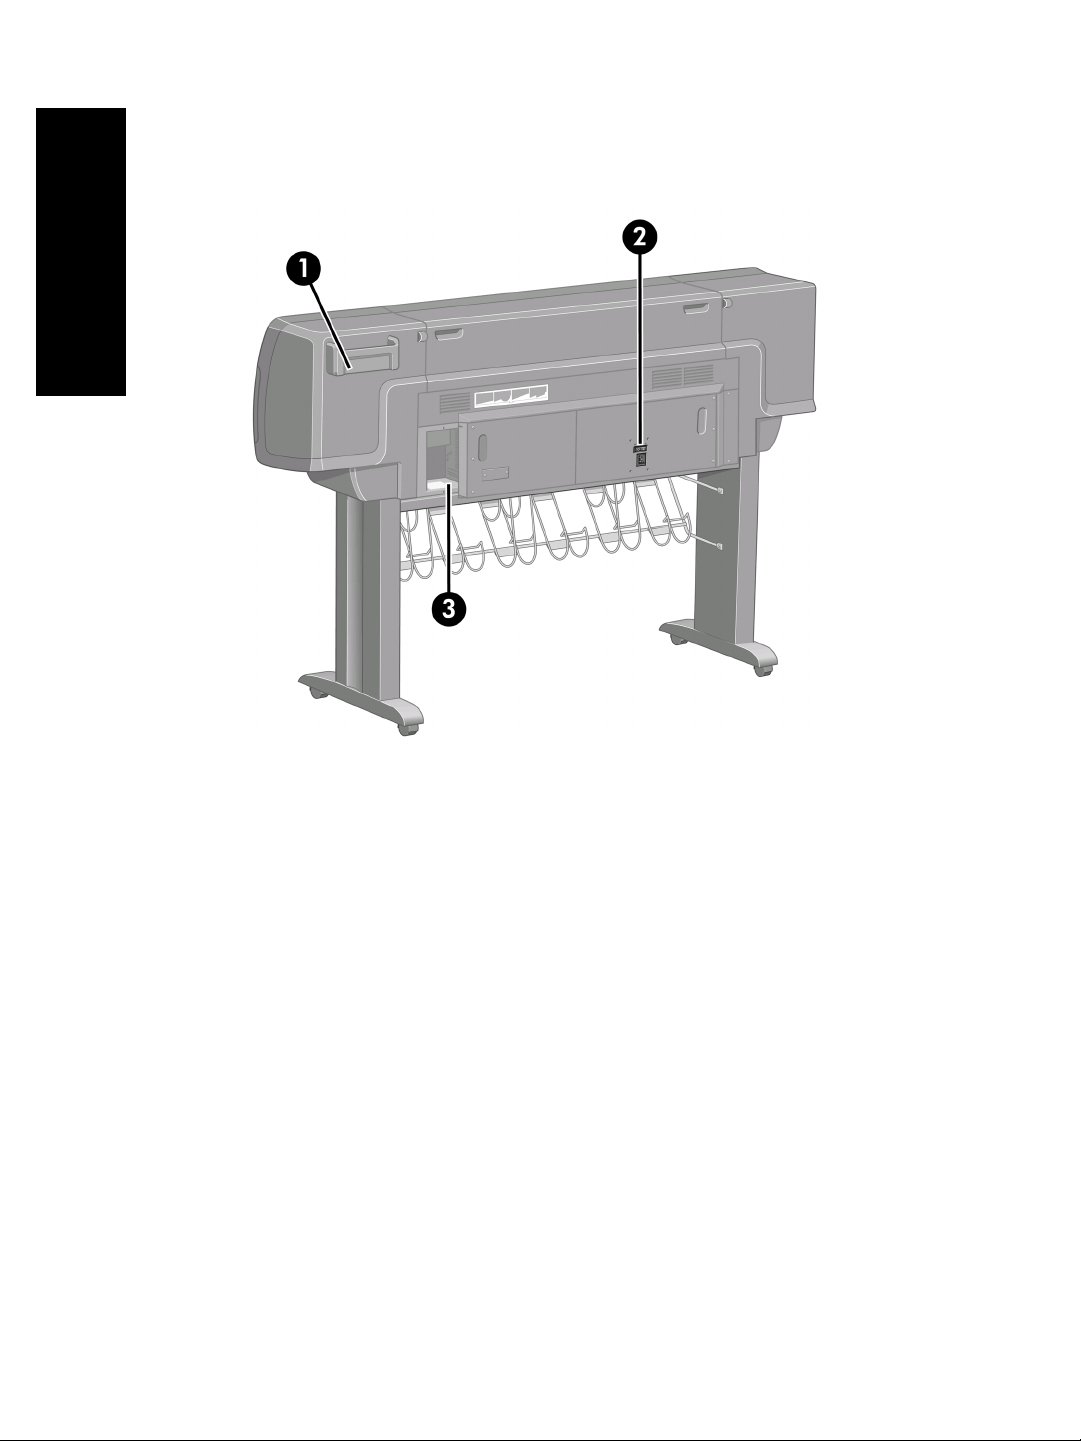
Rear view
1. Quick Reference Guide holder
2. Power socket and on/off switch
3. Sockets for communication cables and optional accessories
The front panel
Your printer's front panel is located on the front of the printer, on the right-hand side. It
has the following important functions:
● It must be used to perform certain operations, such as loading and unloading
paper.
● It can display up-to-date information about the status of the printer, the ink
cartridges, the printheads, the paper, the print jobs, etc.
● It can provide guidance in using the printer.
● It displays warning and error messages when appropriate.
● It can be used to change the values of printer settings and thus change the
operation of the printer. However, settings in the printer are overridden by
settings in the Embedded Web Server or in the driver.
10
Page 13
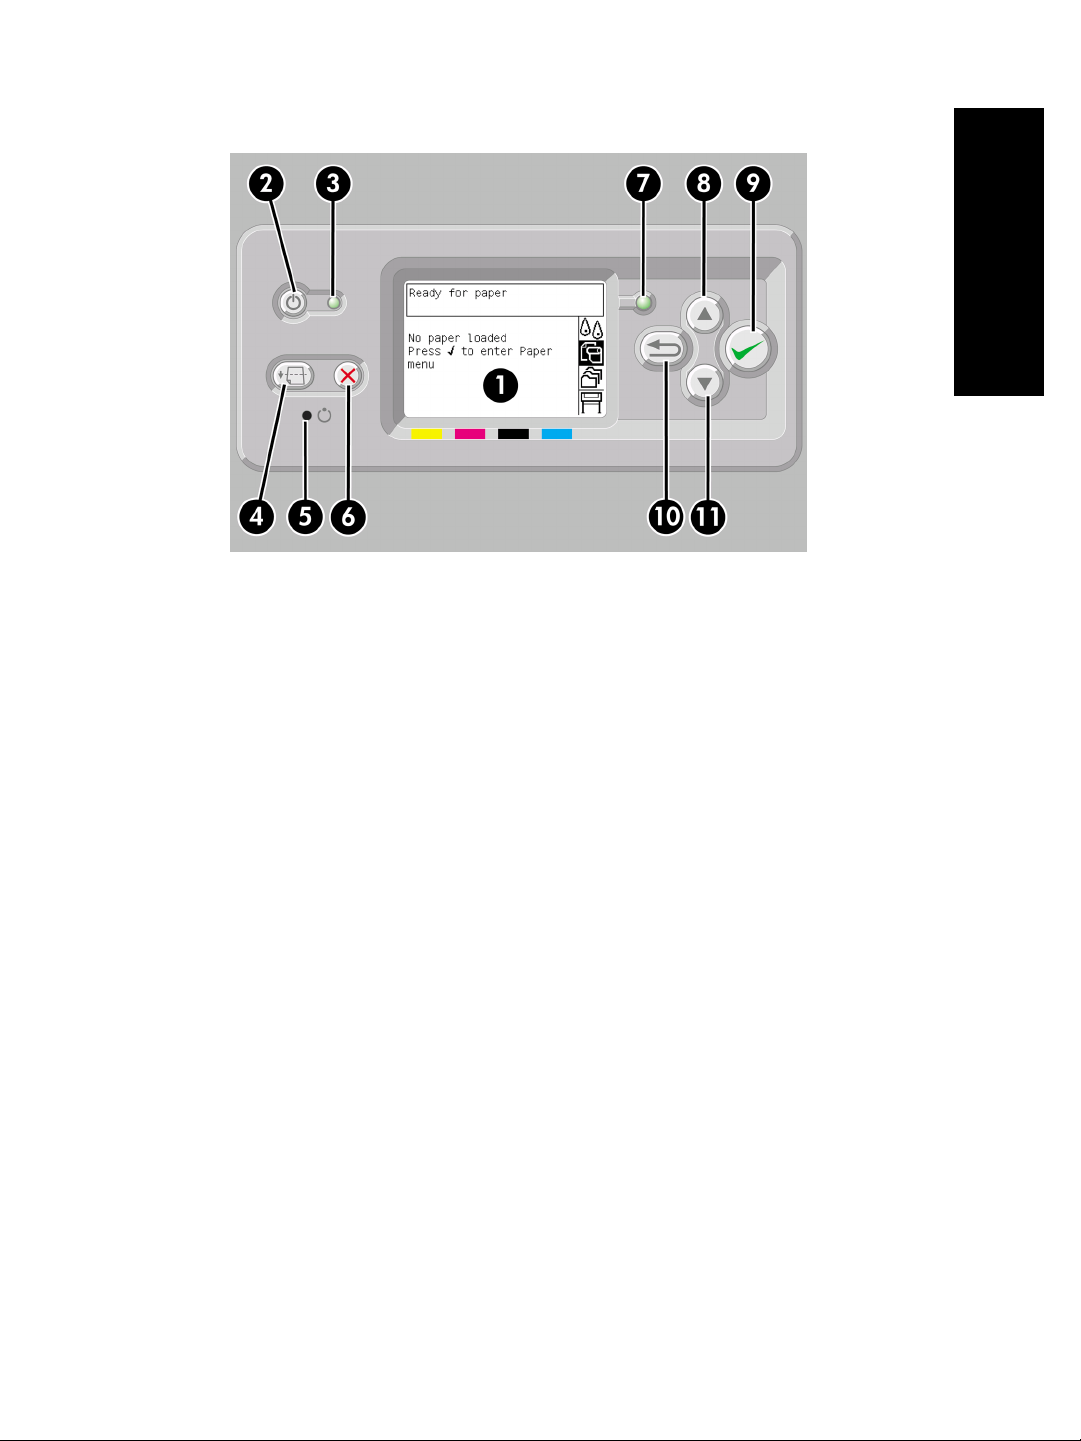
The front panel has the following components:
1. The display area, where information, icons, and menus are displayed.
2. The Power key turns the printer on and off. If the printer is in sleep mode, this
key will wake it up.
3. The Power light is off when the printer is off; amber when the printer is in sleep
mode; green when the printer is on; green and flashing when the printer is in
transition between off and on.
4. The Form Feed and Cut key normally ejects the sheet (if a sheet is loaded) or
advances and cuts the roll (if a roll is loaded). However, if the printer is waiting for
more pages to be nested, this key cancels the waiting time and prints the
available pages immediately.
5. The Reset key restarts the printer (as if it were switched off and switched on
again). You will need an implement with a narrow tip to operate the Reset key.
6. The Cancel key cancels the current operation. It is often used to stop printing the
current print job.
7. The Status light is off when the printer is not ready to print: it may be off, or in
sleep mode. It is green when the printer is ready and idle; green and flashing
when the printer is busy; amber when a serious internal error has occurred;
amber and flashing when awaiting human attention.
8. The Up key moves to the previous item in a list, or increases a numerical value.
9. The Select key selects the item that is currently highlighted.
10. The Back key goes back to the previous menu. If you press it repeatedly, or hold
it down, you will soon return to the main menu.
11. The Down key moves to the next item in a list, or decreases a numerical value.
To highlight an item in the front panel, press the Up or Down key until the item is
highlighted.
To select an item in the front panel, first highlight it and then press the Select key.
Introduction
11
Page 14

Chapter 1
The four front-panel icons are all found in the main menu. If you need to select or
highlight an icon, and you don't see the icons in the front panel, press the Back key
until you can see them.
When this guide shows a series of front panel items like this: Item1 > Item2 > Item3,
it means that you should select Item1, then select Item2, then select Item3.
Introduction
Information about specific uses of the front panel can be found throughout this guide.
Printer software
The following software is provided with your printer:
● The Embedded Web Server, which runs in the printer and enables you to use a
● The HP-GL/2 and RTL driver for Windows
● The PostScript driver for Windows
● The PostScript driver for Mac OS 9 and Mac OS X
● The ADI driver for AutoCAD 14
Web browser on any computer to submit and manage print jobs, and check ink
levels and printer status
12
Page 15

2
How do I assemble the printer?
● “Getting started” on page 13
● “How do I unpack the printer?” on page 14
● “How do I assemble the stand?” on page 16
● “How do I attach the stand to the printer?” on page 22
● “How do I remove packaging materials from the printer?” on page 26
● “How do I assemble the bin?” on page 29
● “How do I switch on the printer for the first time?” on page 34
● “How do I install ink cartridges?” on page 36
● “How do I remove the setup printheads?” on page 40
● “How do I install the printheads?” on page 42
● “How do I install the printhead cleaners?” on page 45
● “How do I load a roll of paper onto the spindle?” on page 47
● “How do I load the paper into the printer?” on page 50
● “How do I connect the printer?” on page 56
● “How do I install accessories?” on page 58
Getting started
The following topics describe how to assemble your new printer (also described in the
Setup instructions).
Because some of the components of the printer are bulky, you may need up to four
people to lift them. You will also need at least 3 × 5 m (10 × 16 ft) of empty floor
space, and about two hours.
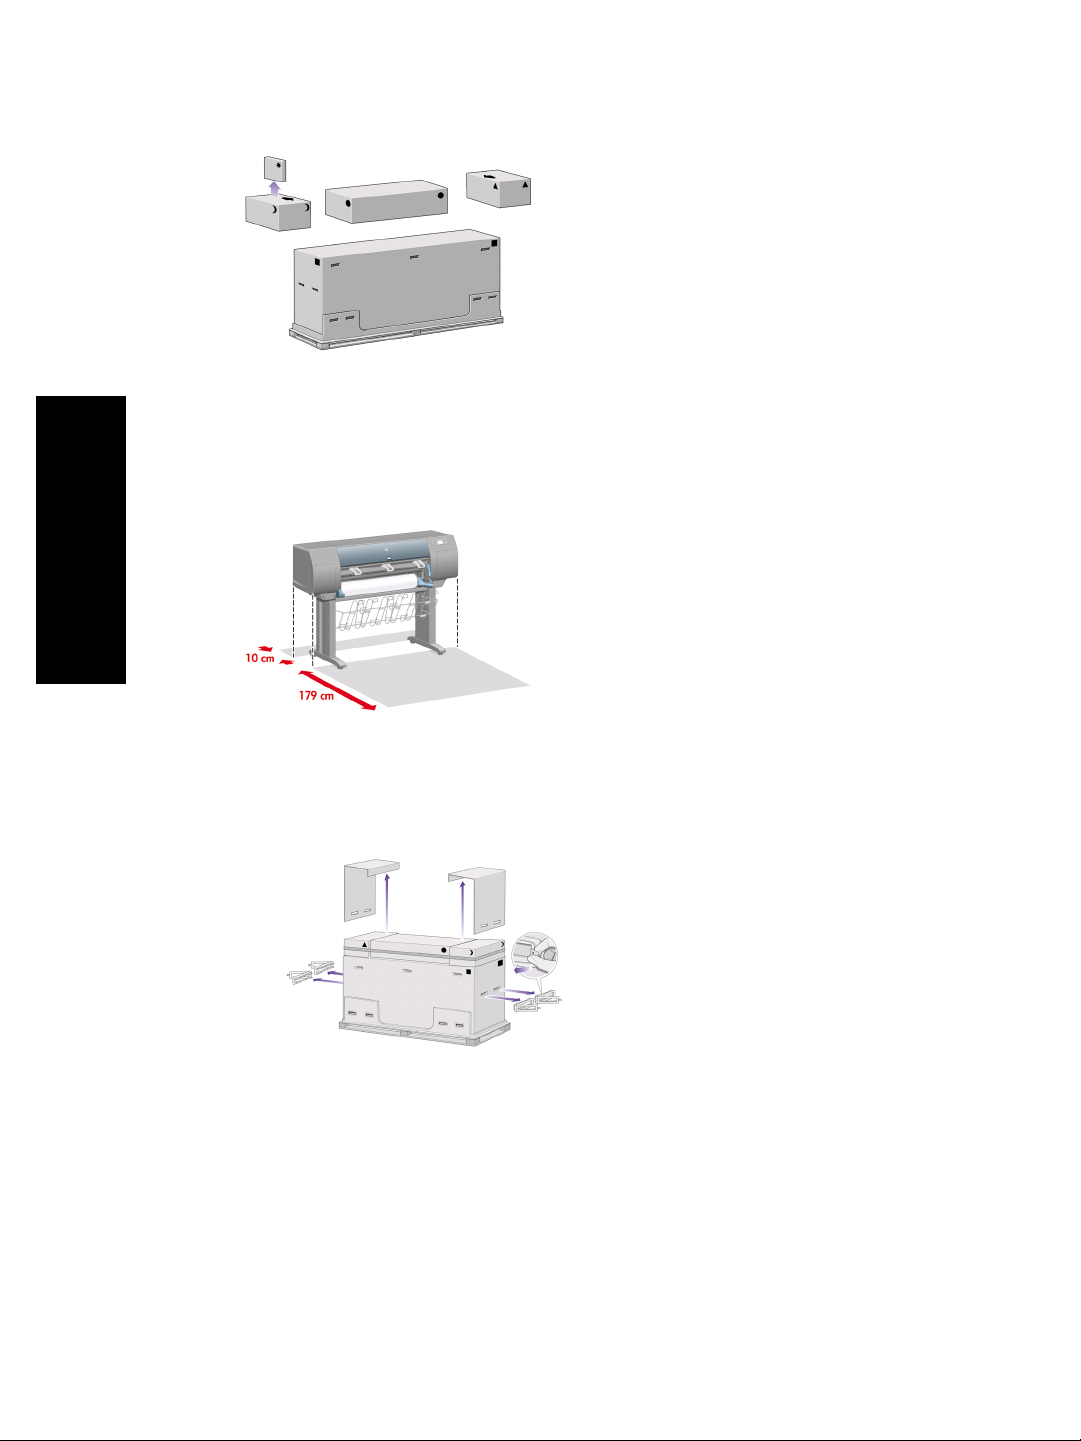
The symbols on the boxes identify the contents. Refer to the table below:
How do I assemble the printer?
Symbol on box
Contents of box
Printer body
Stand and bin assembly
Consumables box, including ...
Maintenance Kit (please keep this safe)
Spare box (used while attaching the stand to the
printer)
13
Page 16
Chapter 2
How do I unpack the printer?
Before you start unpacking, consider where you are going to put the assembled
printer. You should allow some clear space at the back and at the front of the printer.
The recommended clearances are shown in the illustration below.
How do I assemble the printer?
14
When you have identified a suitable location, you can begin unpacking.
1. Remove the two side lids. Then remove all the upper four plastic handles from
both sides of the box (two each side).
Page 17
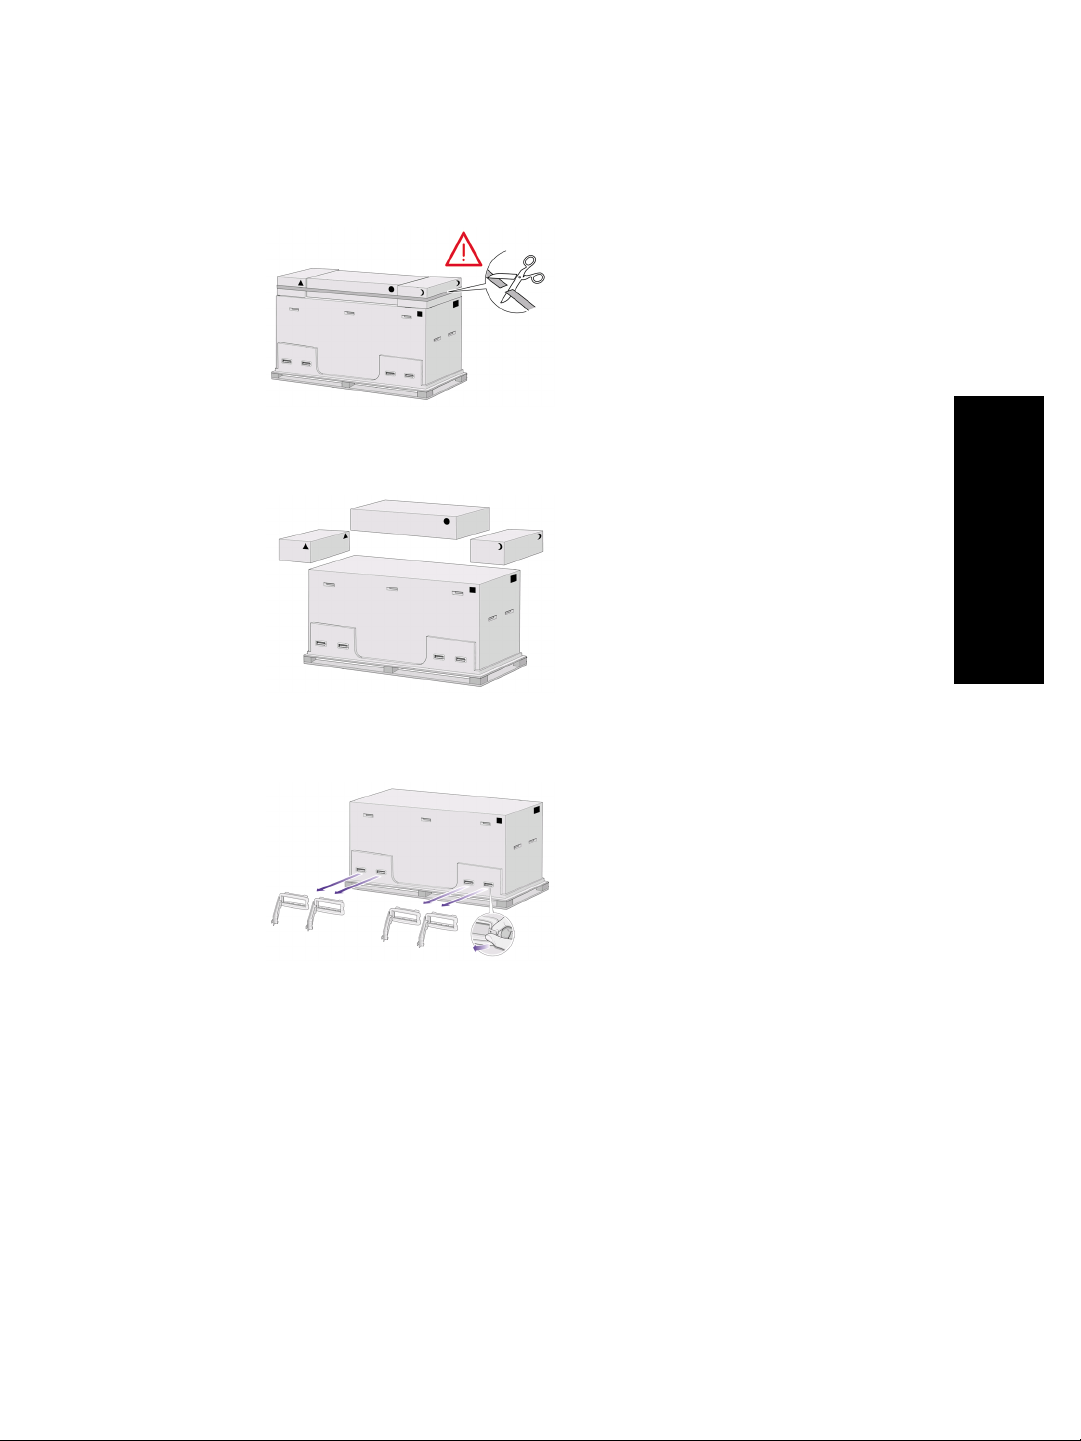
2. Cut the strap around the boxes carefully, as the boxes may fall as soon as the
strap is cut.
3. Remove the boxes from the top of the main printer box.
4. Remove all eight plastic handles from both sides of the box.
How do I assemble the printer?
15
Page 18
How do I assemble the printer?
Chapter 2
5. Remove the main printer box.
6. Remove the two packing pieces.
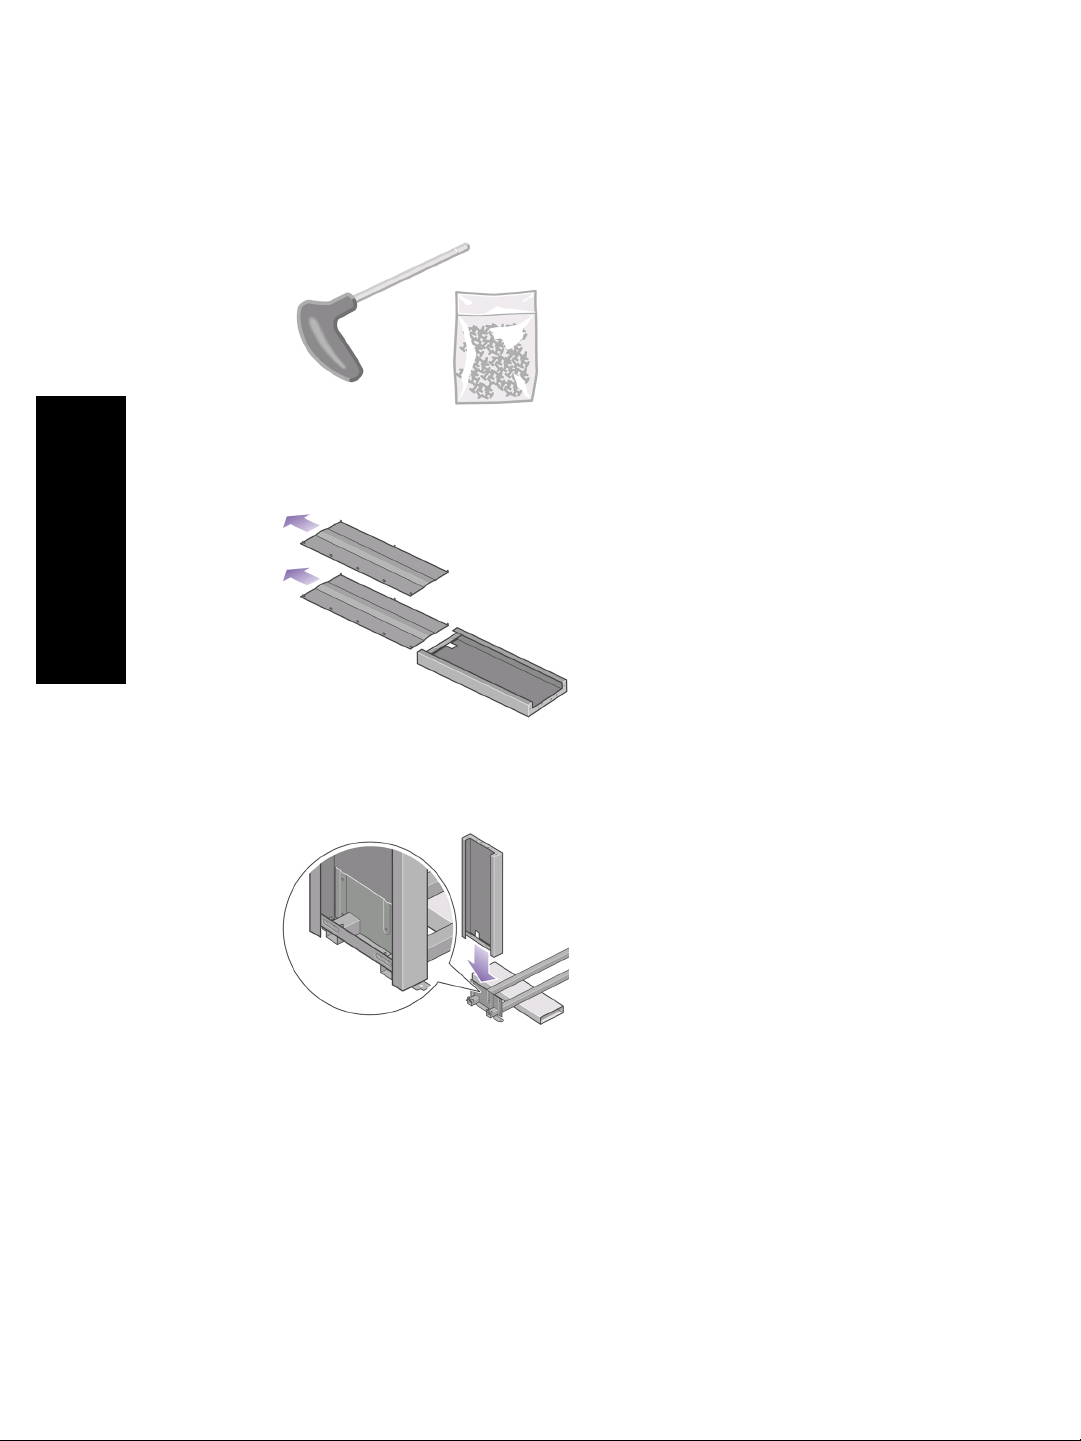
How do I assemble the stand?
Warning When you are unpacking the leg assembly, you will see that there is
anti-slip material around two of the wheels on the feet. Do not remove this
material yet.
1. Remove the first tray from the stand and bin assembly box.
16
Page 19
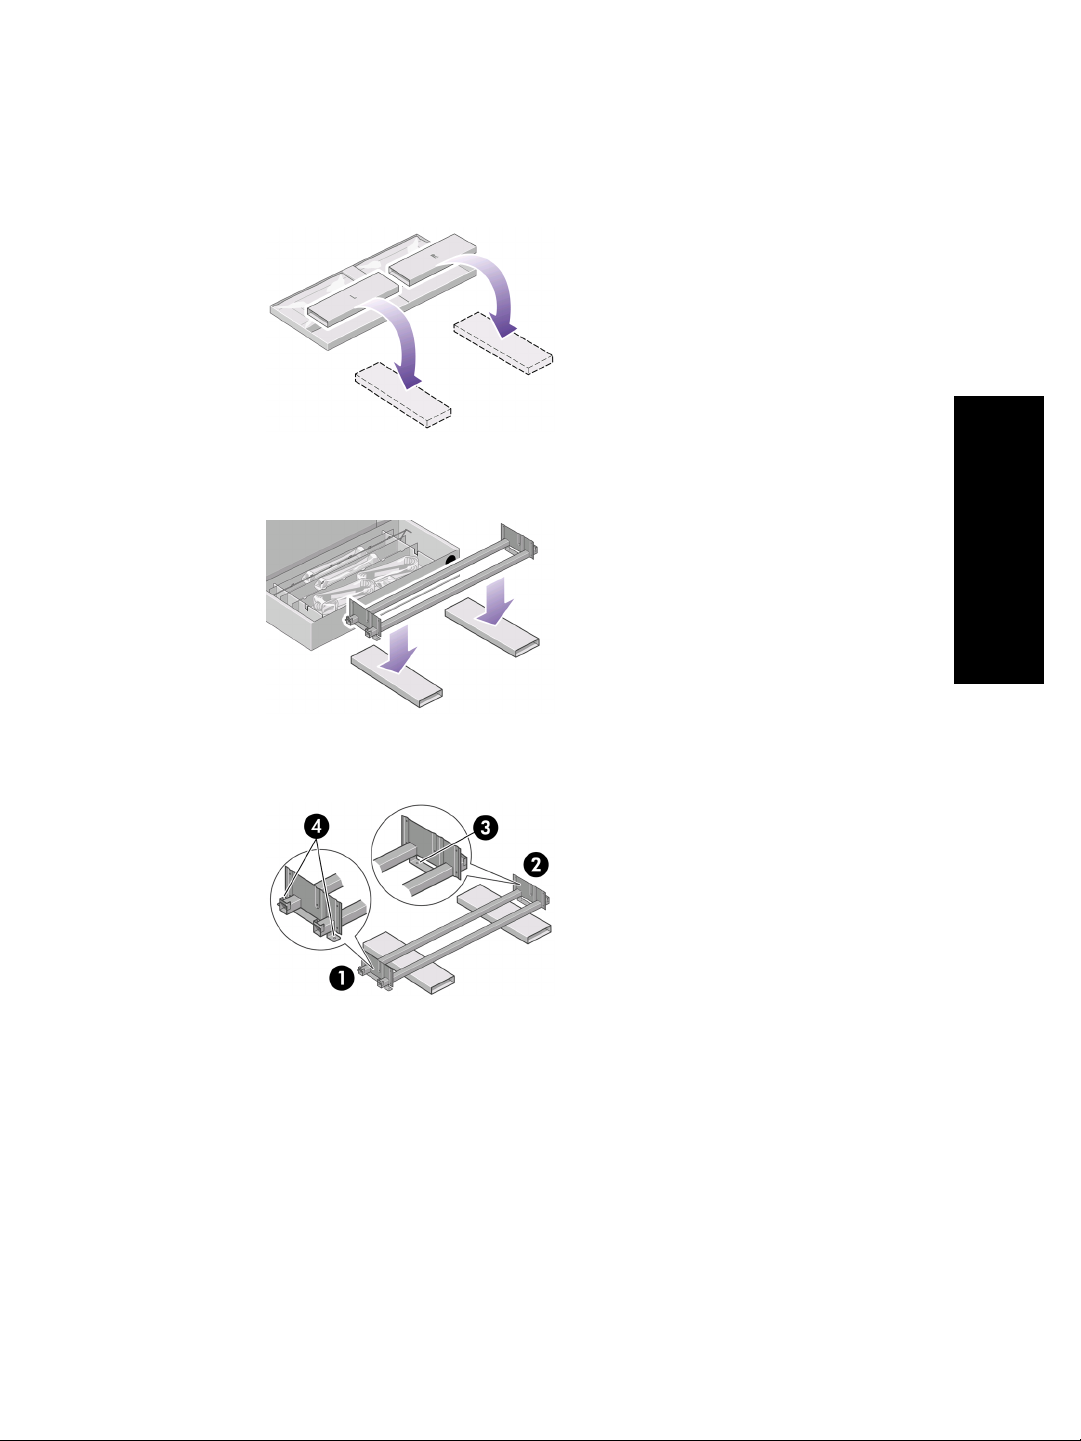
2. From the first tray, remove the two boxes marked with L and R. Place them on
the floor as shown.
3. Lower the cross-brace on to the L and R boxes.
How do I assemble the printer?
4. You now need to identify which is the left and the right side of the cross-brace.
(1) left (2) right (3) one hole (4) two holes
17
Page 20
How do I assemble the printer?
Chapter 2
5. Now you will need the bag of screws and the screwdriver provided. You may
notice that the screwdriver is slightly magnetic.
6. Remove the two leg covers from the left leg.
18
7. Lower the left leg onto the left side of the cross-brace. The left leg will fit only on
the left side of the cross-brace.
Page 21
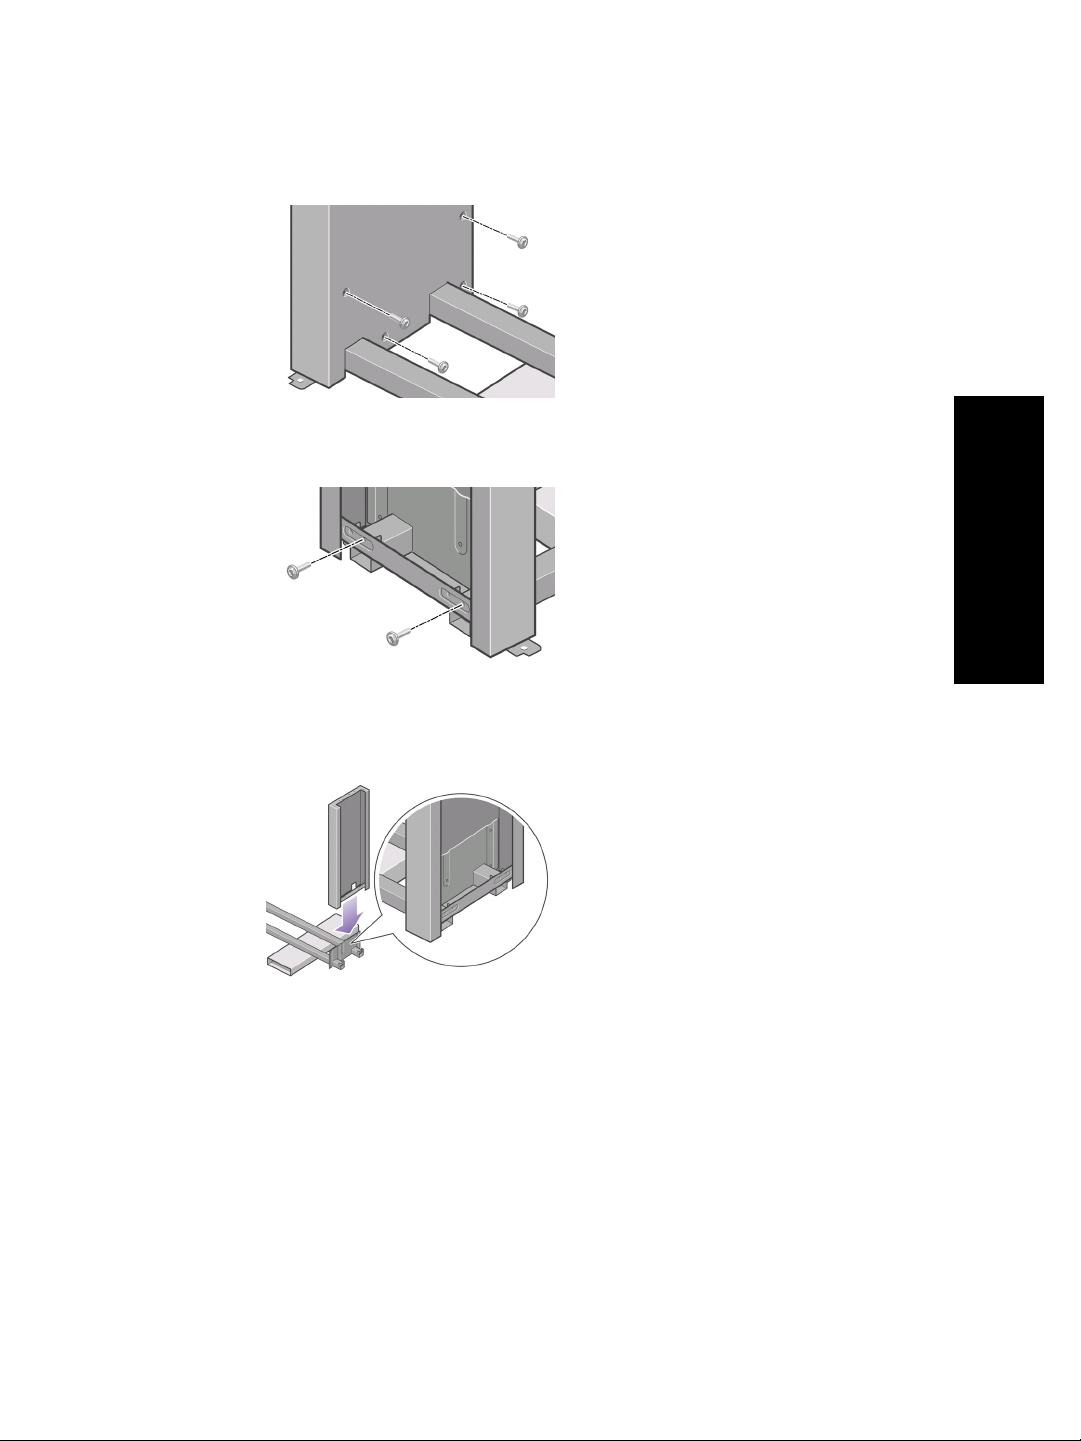
8. Fix the left leg to the cross-brace using four screws on the inner side of the leg.
9. Fix the left leg to the cross-brace using two screws on the outer side of the leg.
10. Lower the right leg onto the right side of the cross-brace. The right leg will fit only
on the right side of the cross-brace.
How do I assemble the printer?
19
Page 22

How do I assemble the printer?
Chapter 2
11. Fix the right leg to the cross-brace using four screws on the inner side of the leg.
12. Fix the right leg to the cross-brace using two screws on the outer side of the leg.
13. Position a foot on the left leg. There are pins to help you to position the foot
correctly.
Note Do not remove the anti-slip material from the wheel.
20
Page 23
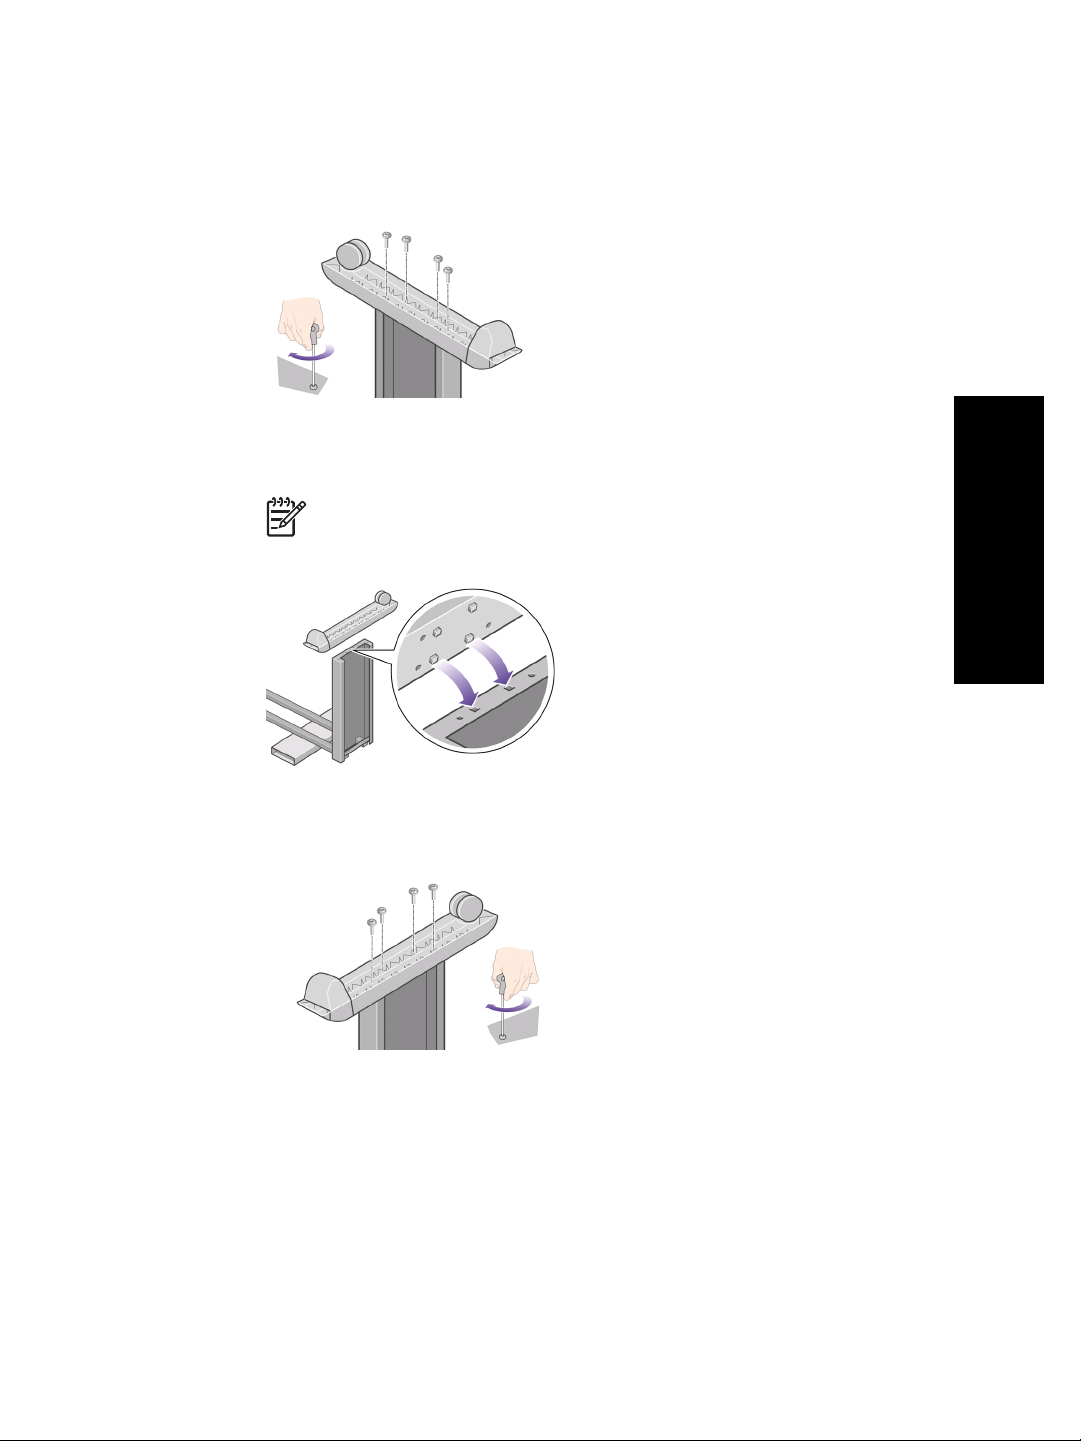
14. Fix the left foot using four screws.
15. Position a foot on the right leg. There are pins to help you to position the foot
correctly.
Note Do not remove the anti-slip material from the wheel.
How do I assemble the printer?
16. Fix the right foot using four screws.
21
Page 24
Chapter 2
How do I attach the stand to the printer?
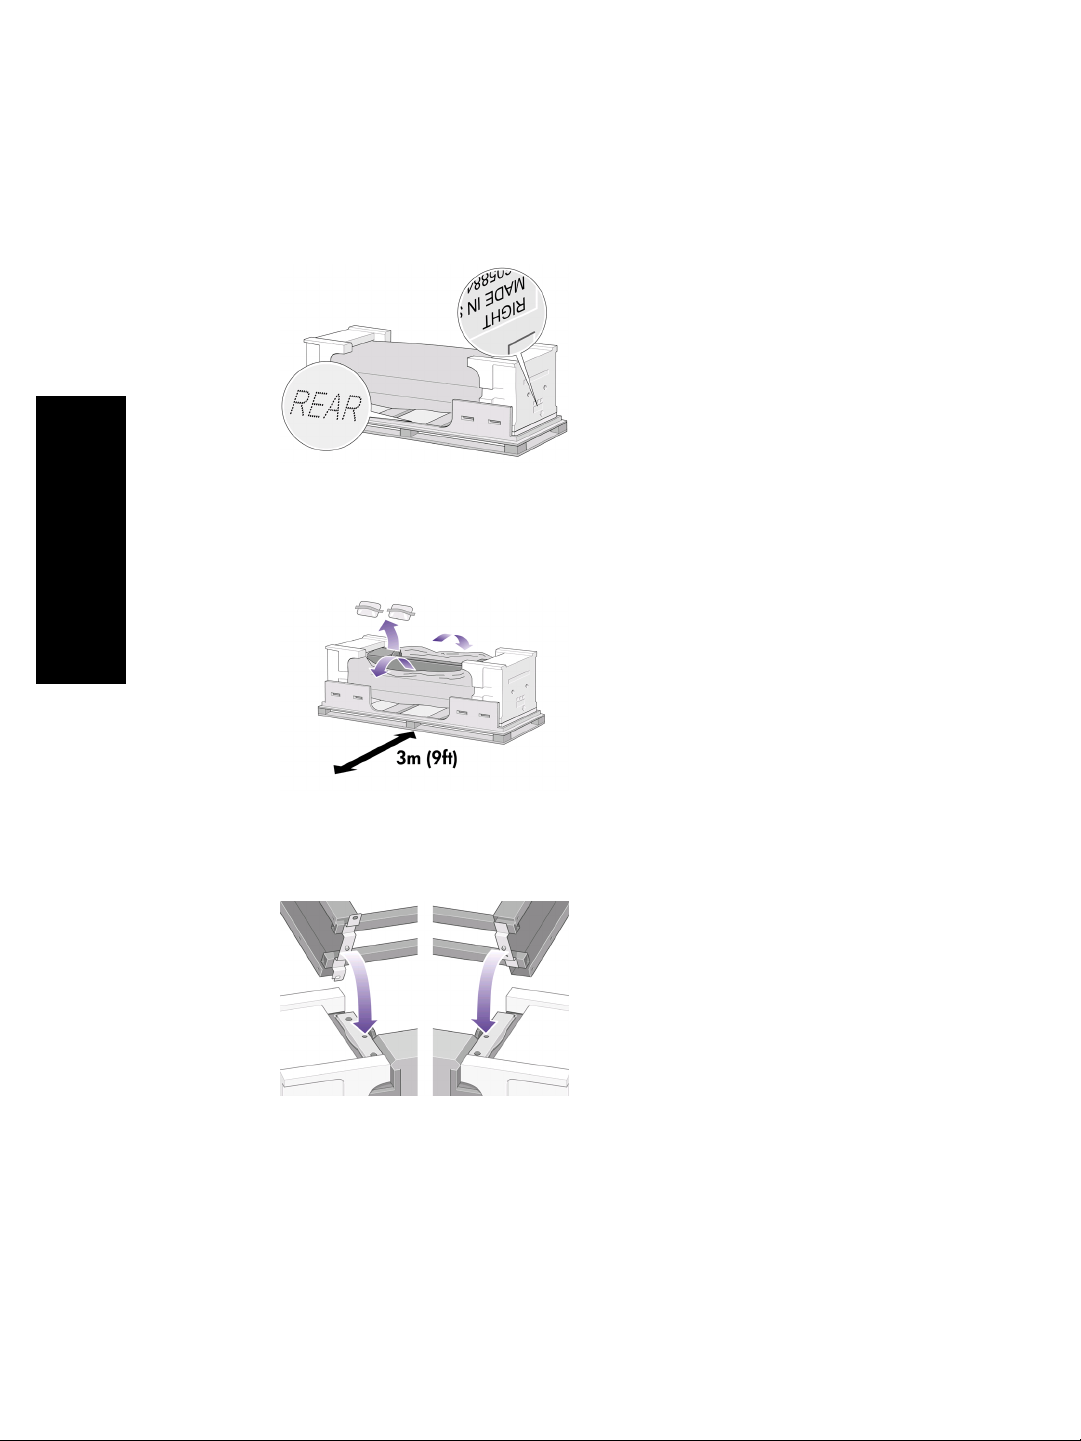
1. You now need to identify the left and right of the printer. This information is shown
on the foam end packs. Also identify the rear of the printer.
2. Pull open the protective plastic from the base of the printer. Please ensure that
there is a three-meter space clear of obstructions to the rear of the printer.
Remove the two desiccant bags from the printer.
How do I assemble the printer?
22
3. In this step, make sure you position the stand pins in the holes in the center of the
printer body brackets.
Page 25
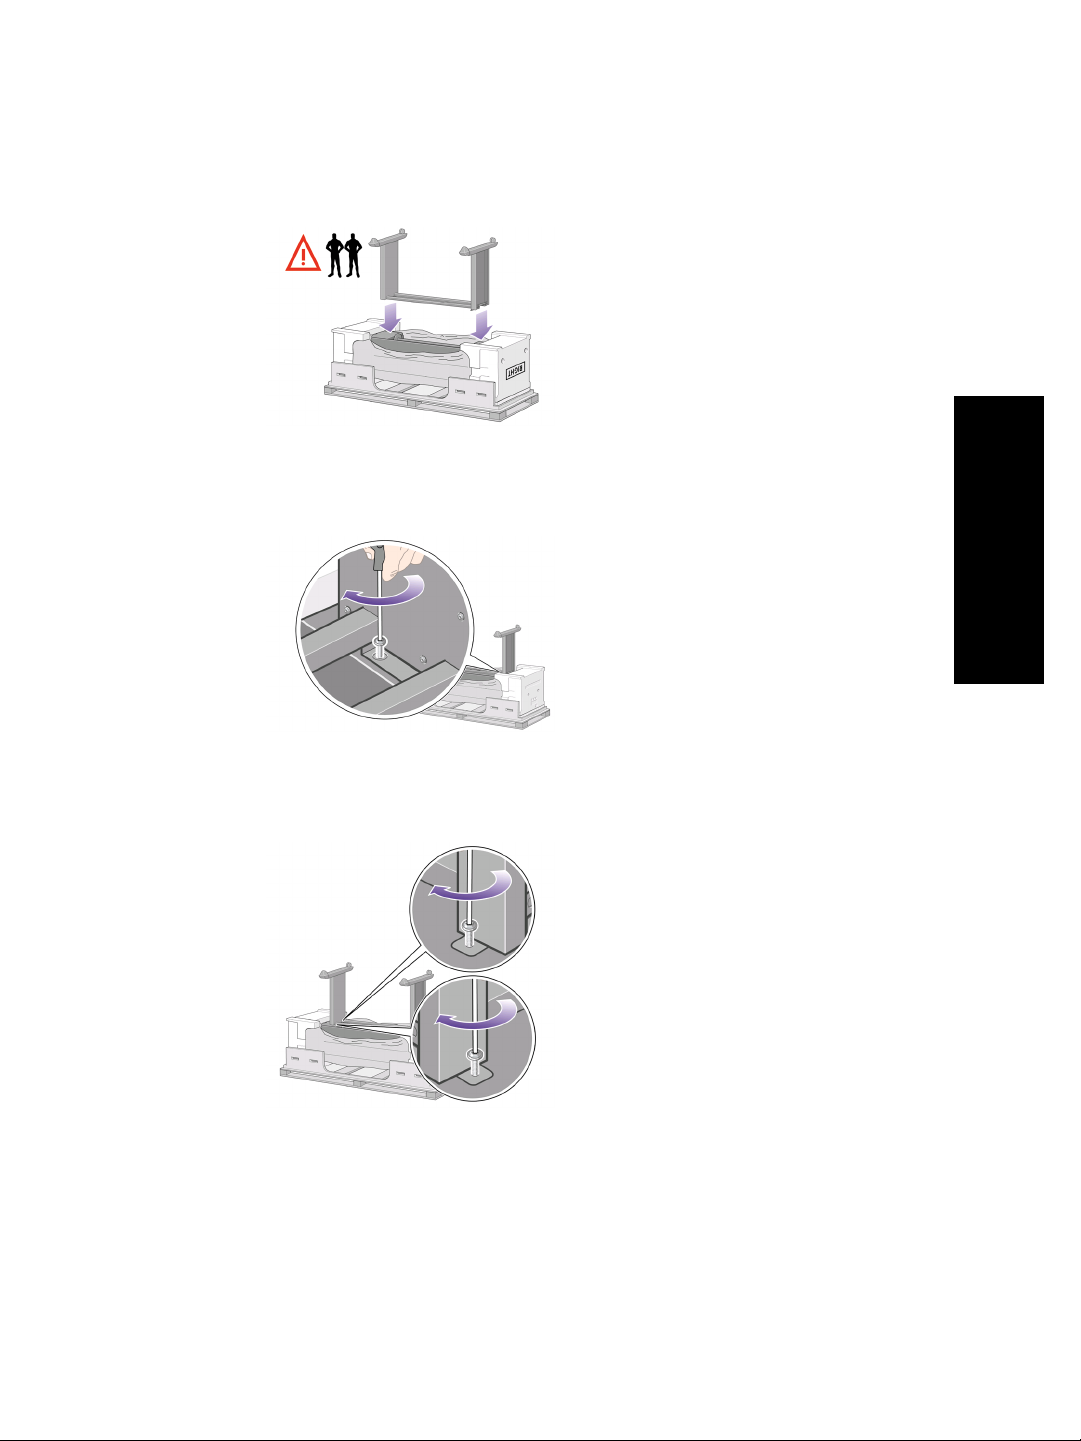
Lift the stand assembly onto the printer body. The anti-slip material should face to
the rear of the printer.
4. Fix the right side of the stand to the printer using one screw. Make sure that the
screw is fully tightened.
How do I assemble the printer?
5. Fix the left side of the stand to the printer using two screws. Make sure that the
screws are fully tightened.
23
Page 26
How do I assemble the printer?
Chapter 2
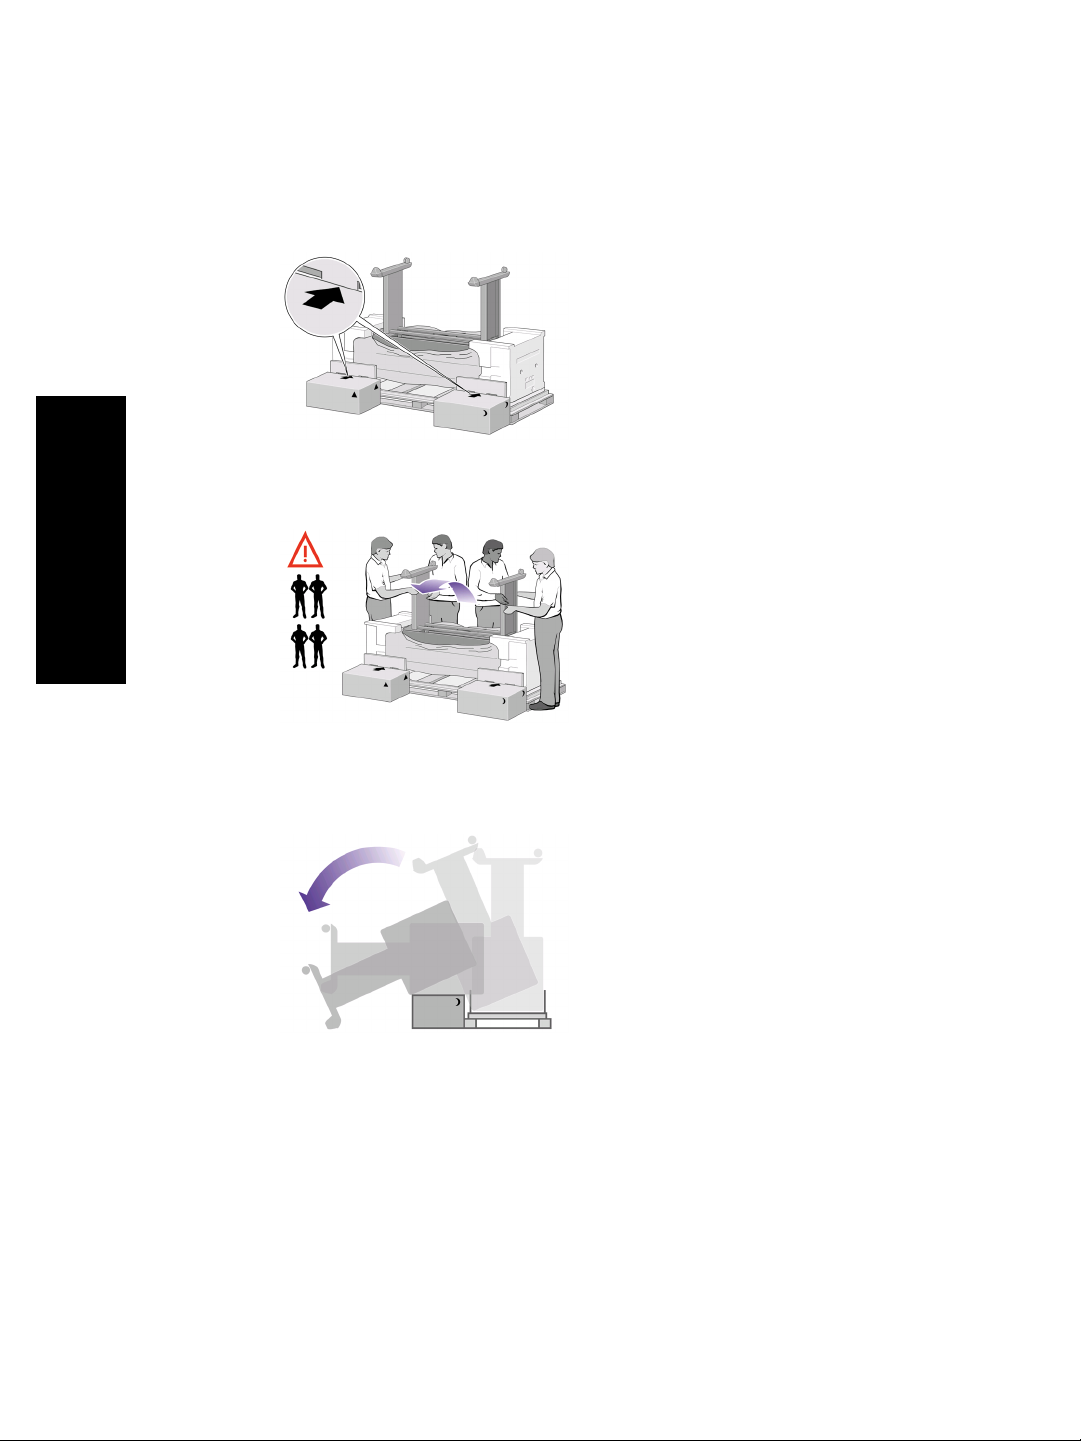
6. Place the spare and consumables boxes against the rear of the printer box. The
arrows on the boxes must point towards the printer box.
Check that the anti-slip material is still fixed to the two rear wheels.
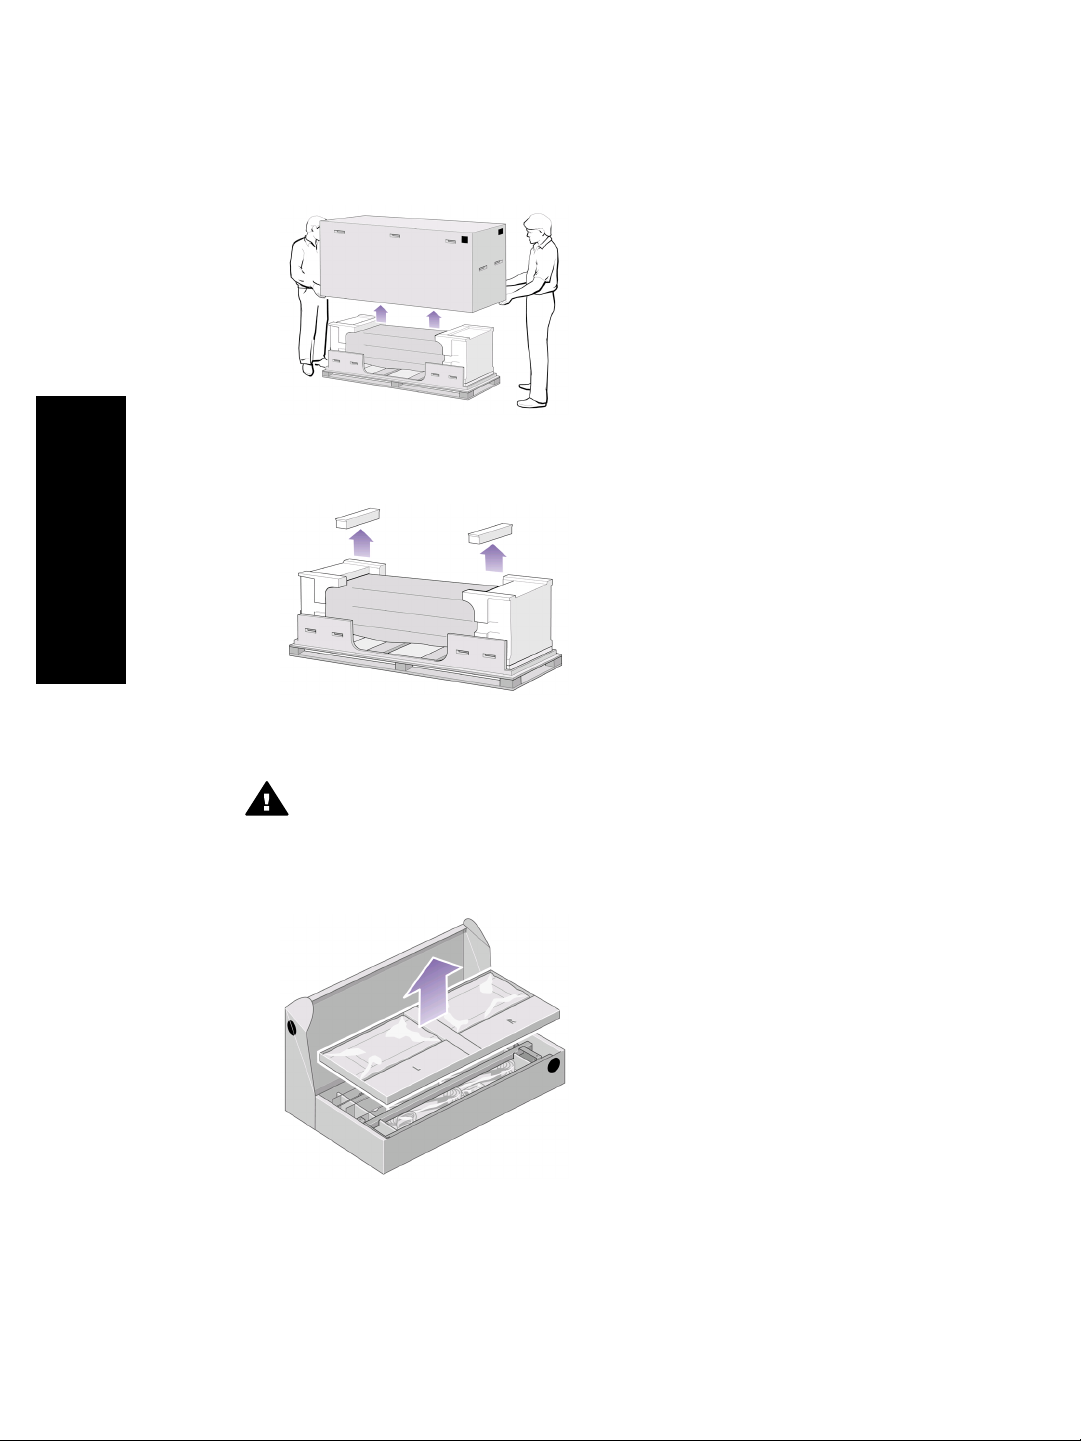
7. Using four people, rotate the printer on to the spare and consumables boxes.
24
Rotate the printer until its rear rests on the spare and consumables boxes and the
wheels with the anti-slip material touch the floor.
Page 27

8. Remove the pallet before trying to lift the printer into an upright position.
9. Using four people and the hand holds on the rear of the printer body, carefully lift
the printer into an upright position. The anti-slip material should stop the printer
from sliding forwards.
How do I assemble the printer?
25
Page 28
Chapter 2
How do I remove packaging materials from the printer?
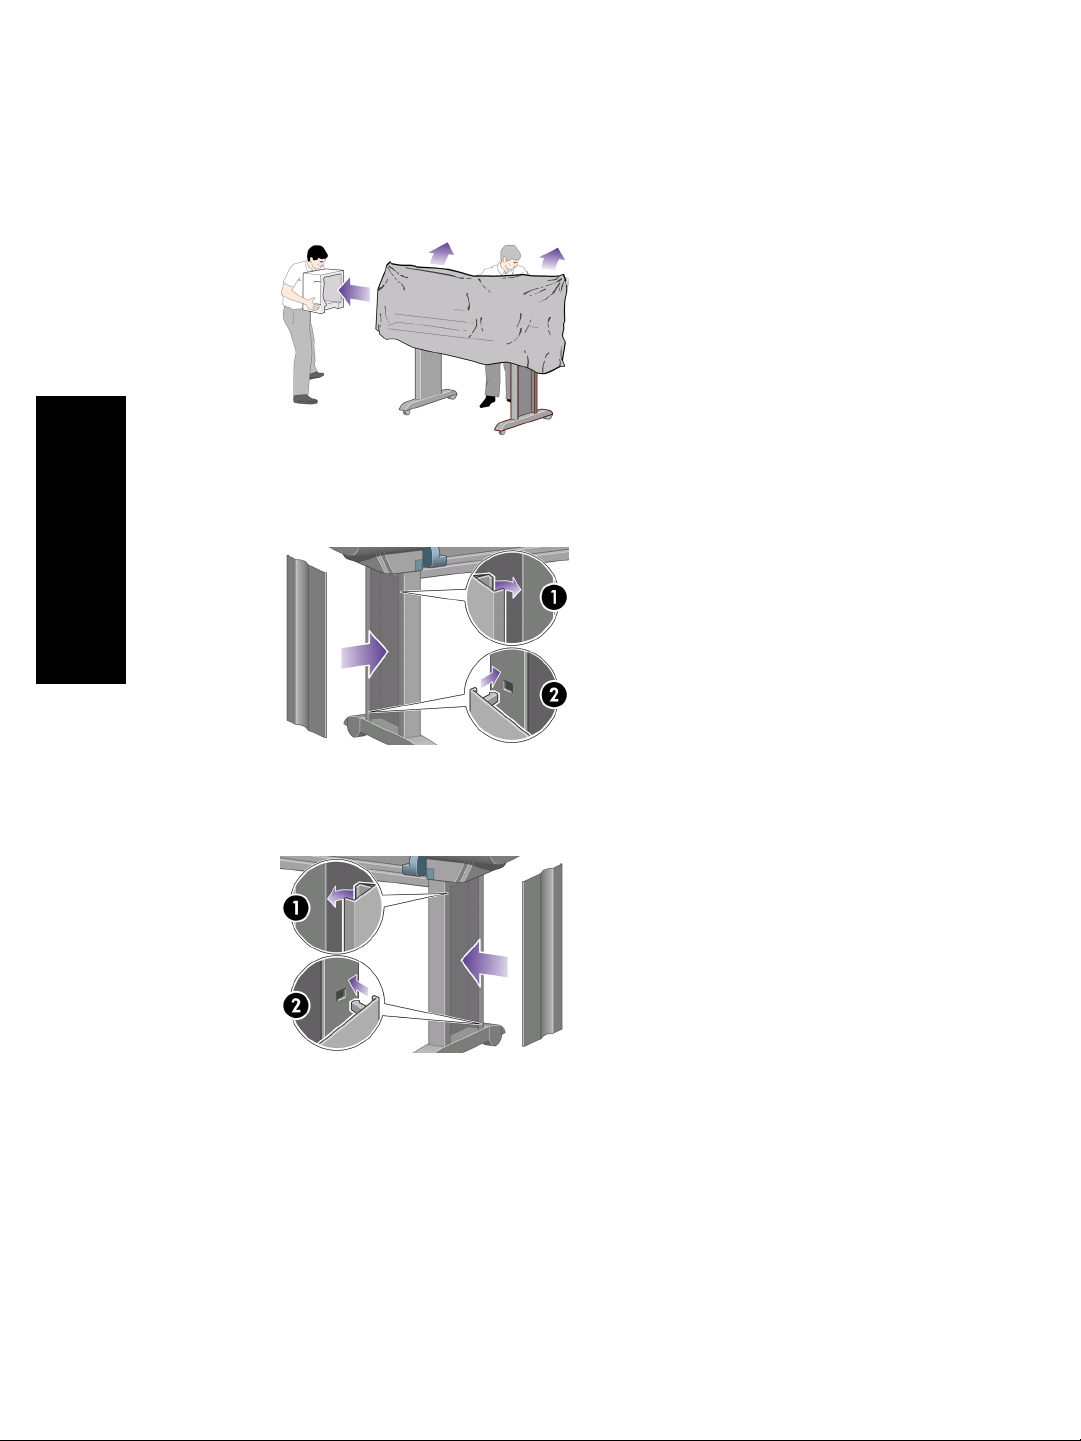
1. Remove the two foam end packs and the plastic covering the printer.
2. Position the left leg cover on the front of the left leg (1), then clip the rear edge (2)
into place.
How do I assemble the printer?
26
3. Position the right leg cover on the front of the right leg (1), then clip the rear edge
(2) into place.
Page 29
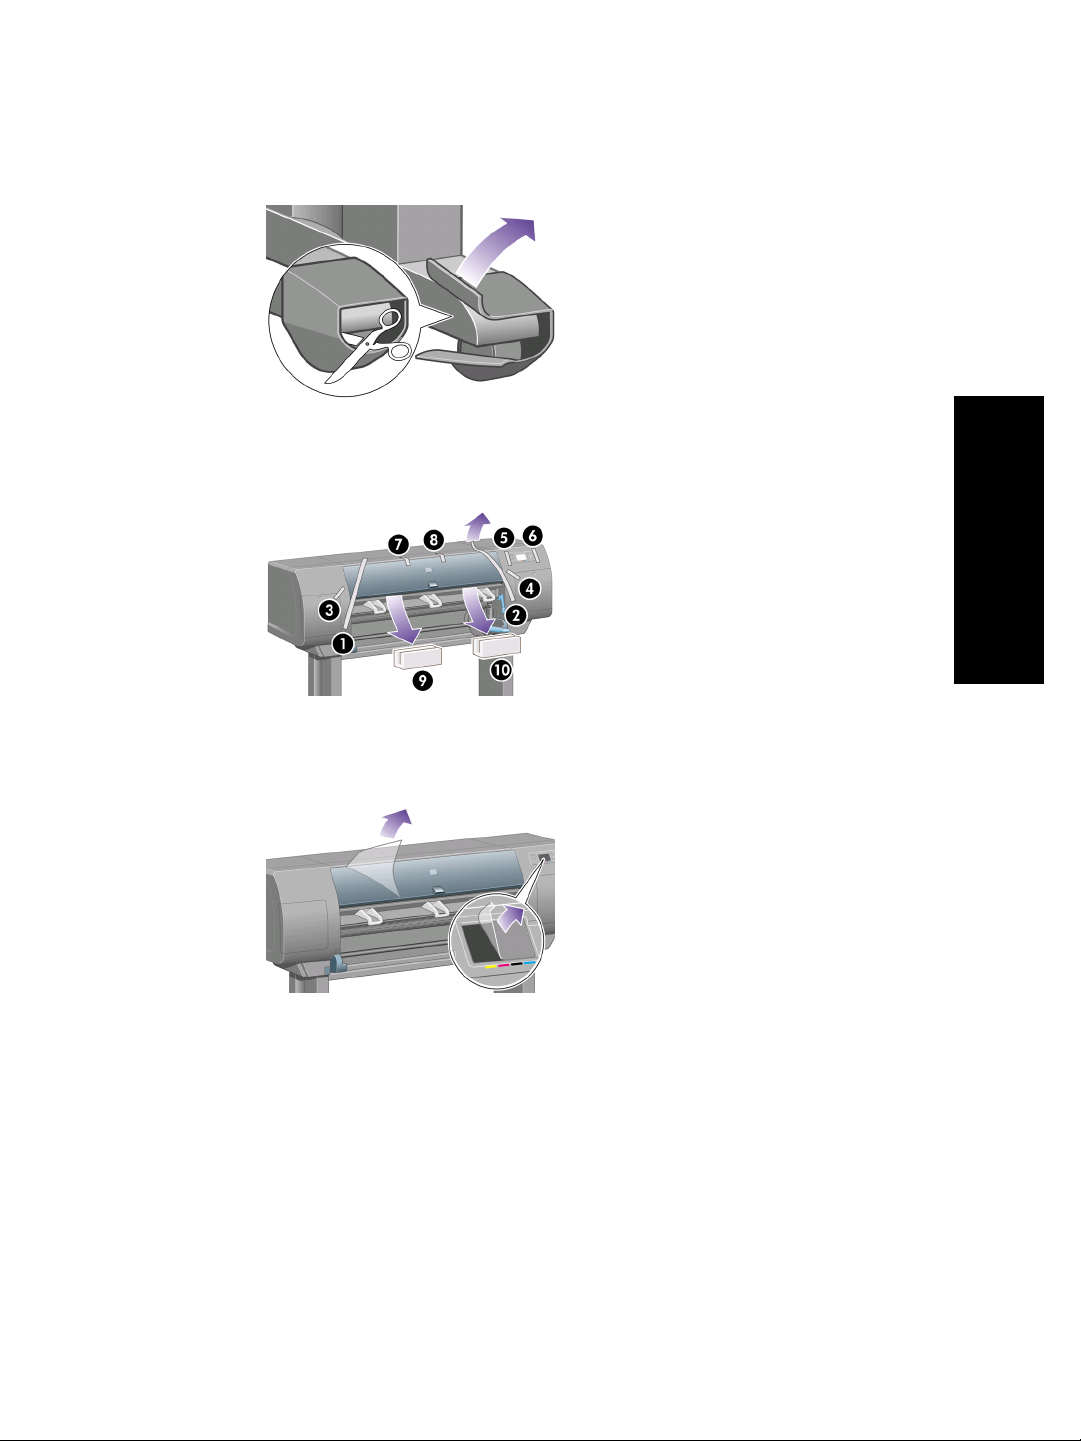
4. Remove the anti-slip material from the two rear wheels on the stand assembly.
5. Remove the packing tapes 1 to 8. Open the printer window and remove the two
window inserts 9 and 10.
6. Remove the protective covering from the printer window and the front panel
screen.
How do I assemble the printer?
27
Page 30
How do I assemble the printer?
Chapter 2
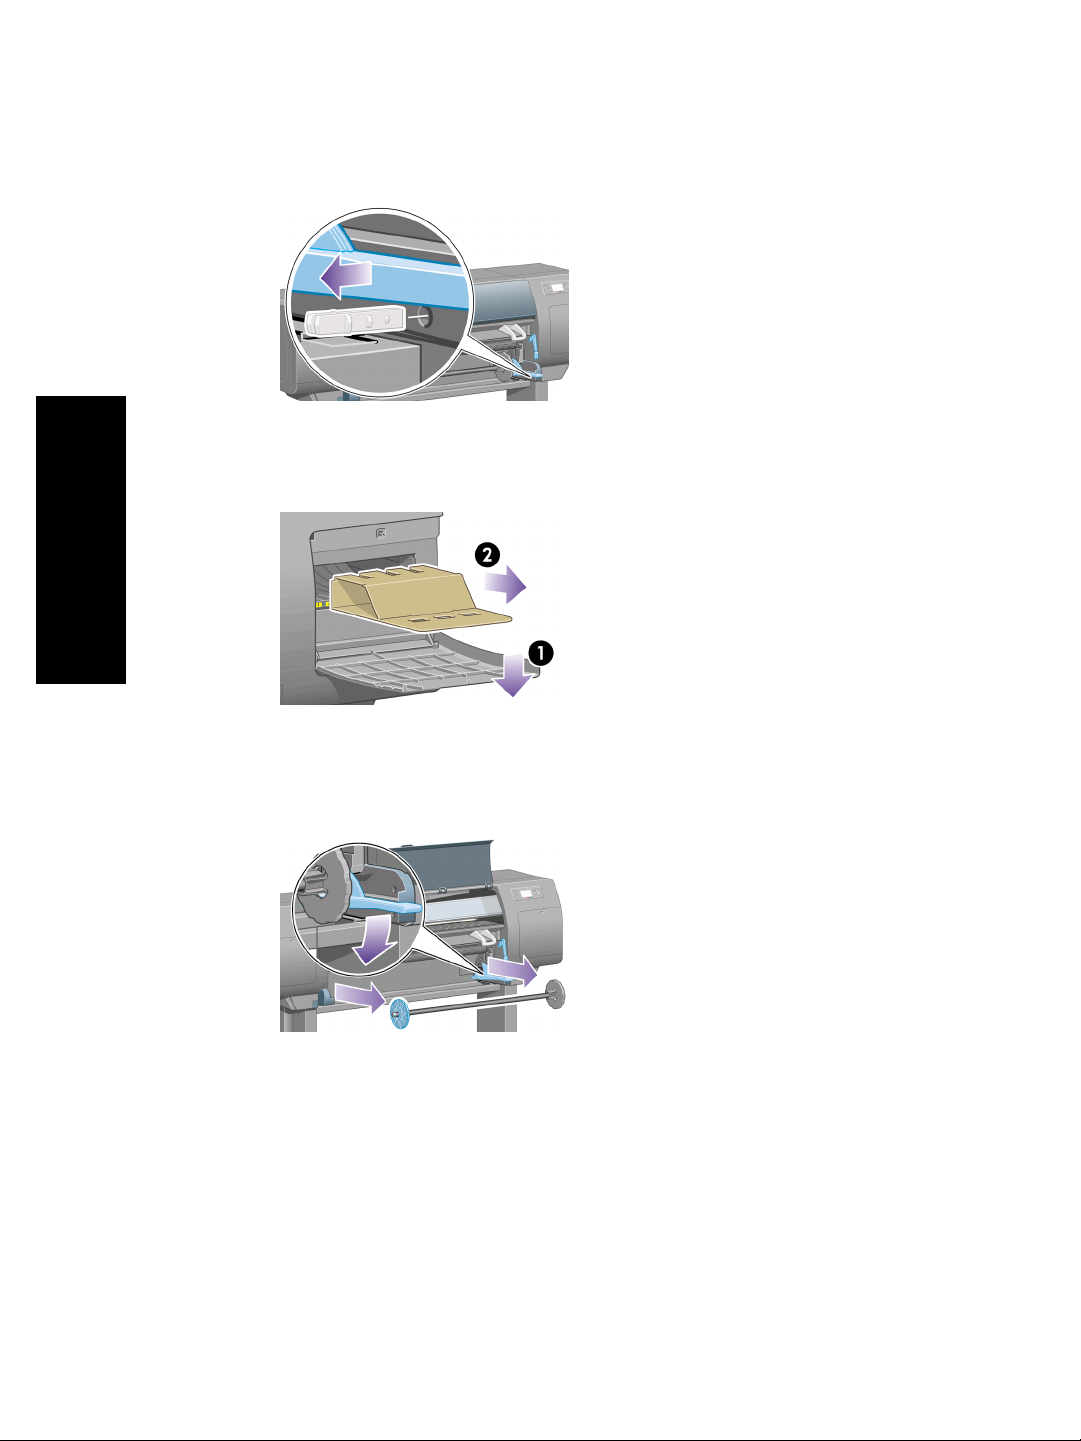
7. Remove the spindle lock.
8. Open the printhead cleaner door and remove the carriage packing material. Then
close the cleaner door.
28
9. Press the spindle lever down, which will unseat the right–hand end of the spindle.
Remove that end of the spindle first, and then the left. Do not insert your fingers
into the spindle supports during the removal process.
Page 31

10. Remove the spindle lock foam piece. Then replace the spindle.
11. Install the Quick Reference Guide holder. Angle the holder at the top (1), then
position the two hooks and clip the lower part (2) to the rear of the printer.
How do I assemble the printer?
How do I assemble the bin?
1. Locate the bin components.
29
Page 32

How do I assemble the printer?
Chapter 2
2. Fix one screw to the inside of the stand’s left leg.
3. Do not fully fit the screw.
4. Fix one screw to the inside of the stand’s right leg.
5. Do not fully fit the screw.
30
Page 33

6. Lift the supporting framework of the bin into position in front of the printer.
7. Fix the top arms of the bin to the two screws that you have just fitted.
8. Fix the lower arms of the bin to the stand using one screw for each leg.
How do I assemble the printer?
31
Page 34

How do I assemble the printer?
Chapter 2
9. Now tighten the two top screws.
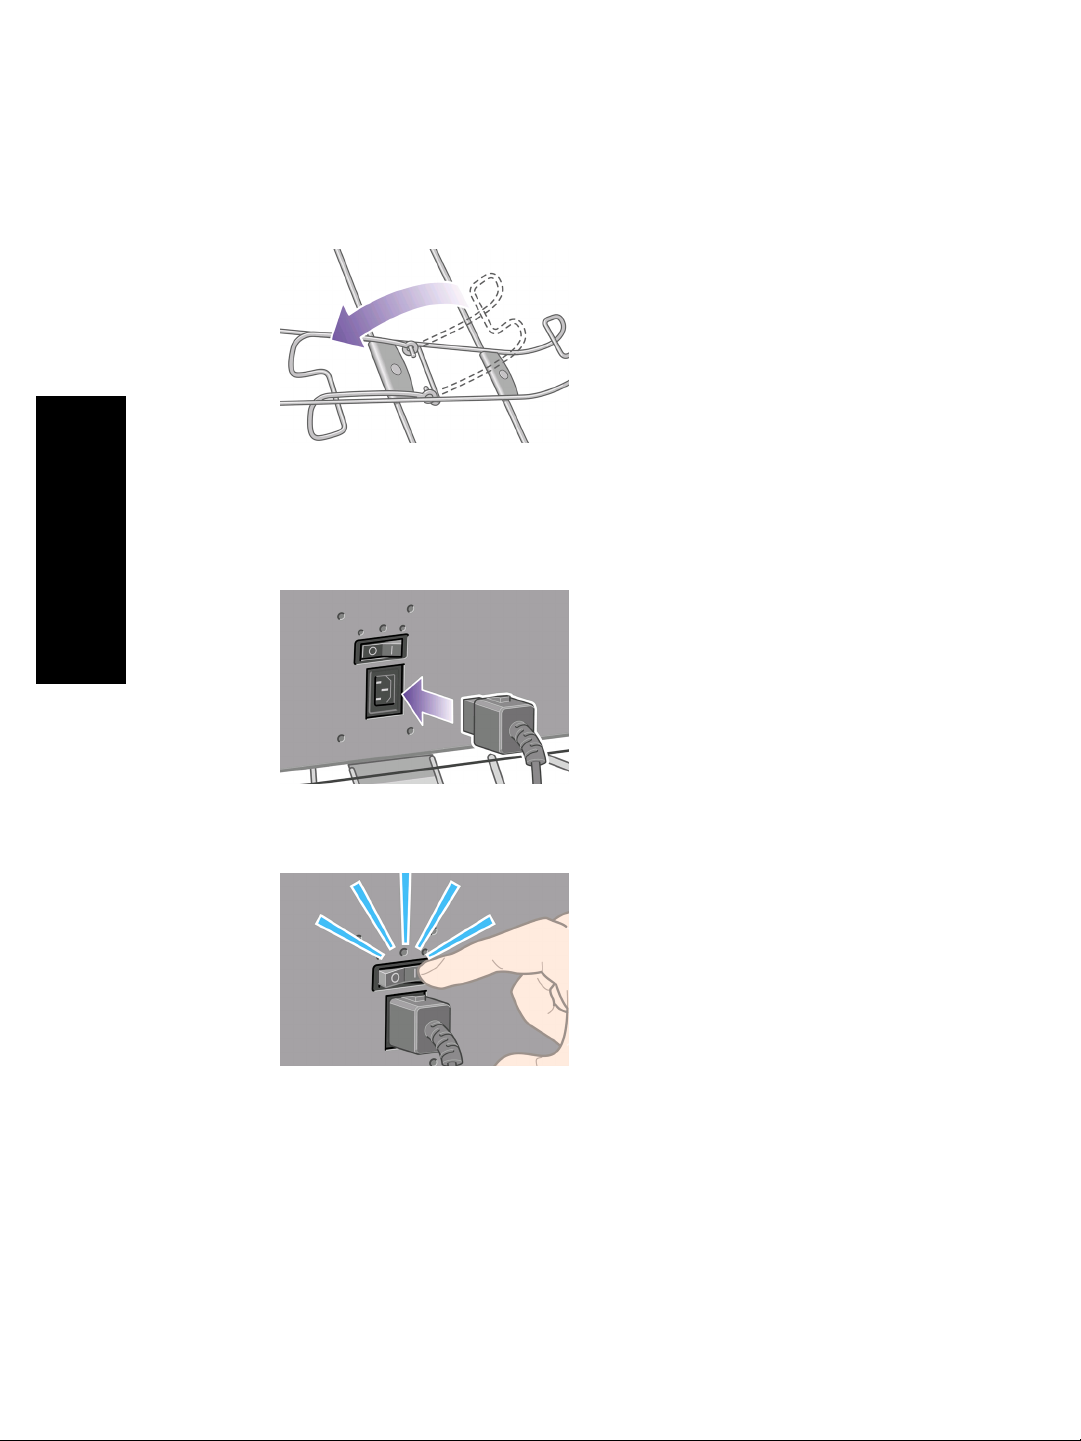
10. Clip all six loops to the frame of the bin. Locate the loops with rear extensions in
positions 2, 4, and 6.
32
11. Secure all six loops to the frame, using two clips on each loop.
Page 35

12. Fit all three mobile stoppers to the three loops as indicated.
13. Carefully squeeze the mobile stopper and then fit it onto the loop.
14. When the mobile stopper is engaged with the loop, release your grip.
How do I assemble the printer?
33
Page 36
Chapter 2
15. Move the three mobile stoppers into their parked position. These stoppers are
used only when printing on sheets of paper less than 900 mm in length (up to A1
size).
How do I switch on the printer for the first time?
1. Plug the power cable into the rear of the printer, then plug the other end into the
AC power outlet.
How do I assemble the printer?
34
2. Turn the power switch at the rear of the printer to the on position.
Page 37
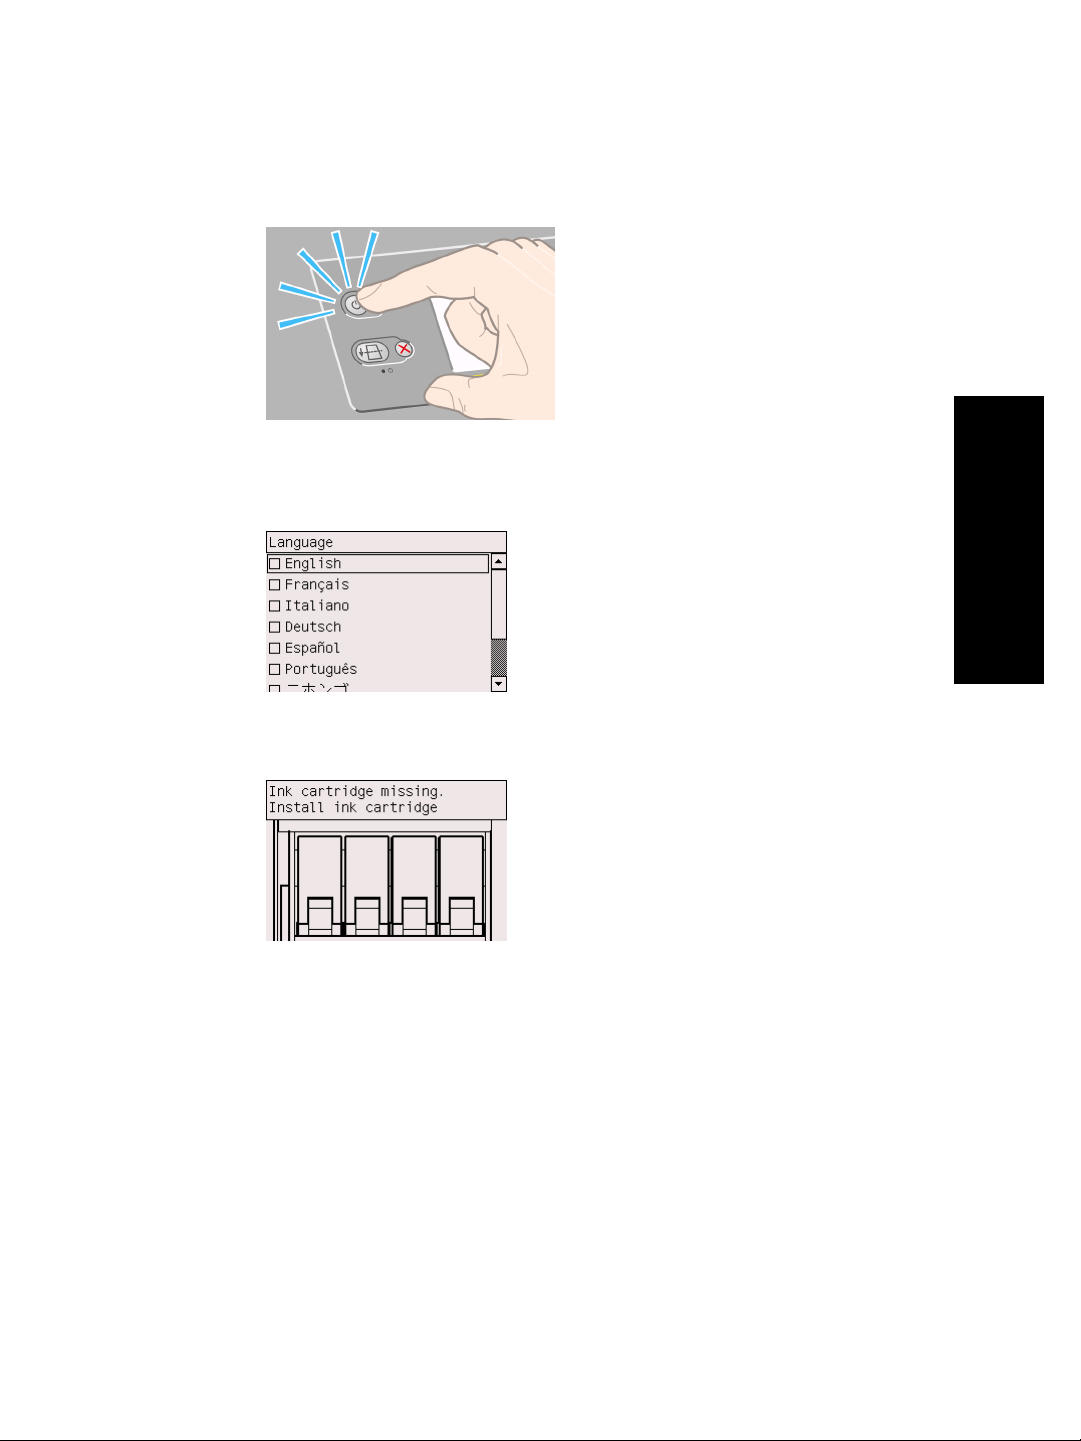
3. If the power light on the front panel remains off, press the Power key to switch on
the printer.
4. Wait until you see this front panel message. Highlight your language on the front
panel using the Up and Down keys. Press the Select key.
5. The front panel will now display how to install the ink supplies.
How do I assemble the printer?
35
Page 38
Chapter 2
How do I install ink cartridges?
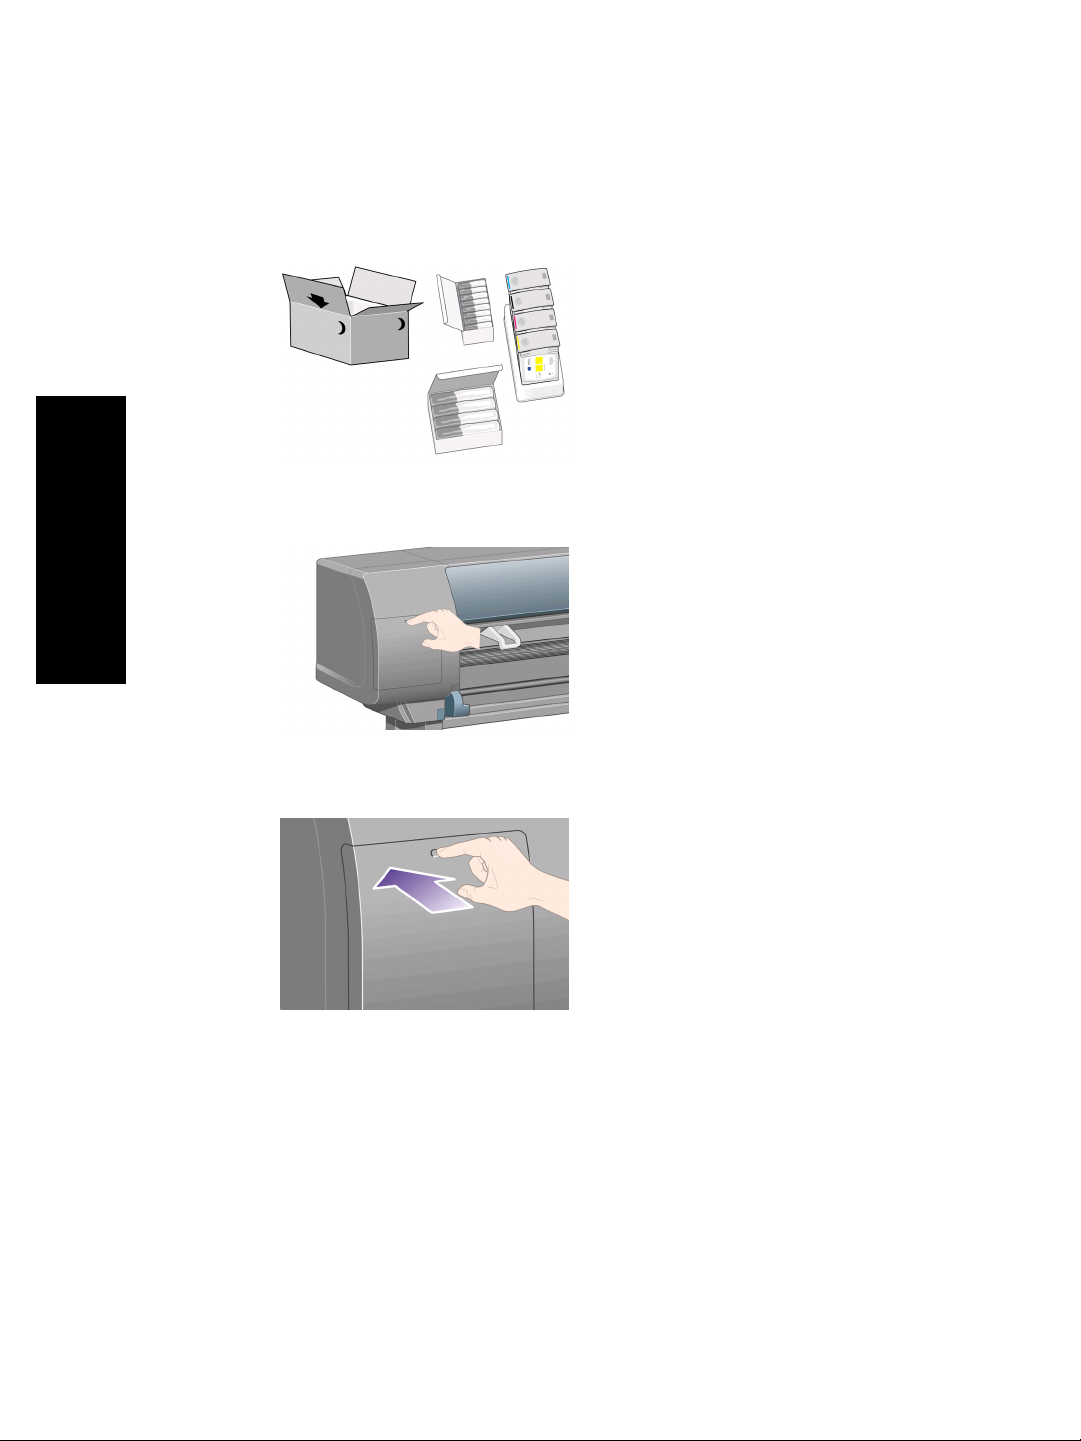
1. Remove the printheads, printhead cleaners, and ink cartridges from the
consumables box.
2. Find the ink cartridge door, which is on the left side of the printer.
How do I assemble the printer?
36
3. Press the ink cartridge door until it clicks.
Page 39

4. Open the ink cartridge door.
5. To release the ink cartridge drawer, pull the blue handle down.
6. Slide the ink cartridge drawer out.
How do I assemble the printer?
37
Page 40

How do I assemble the printer?
Chapter 2
7. Place the ink cartridge onto the ink cartridge drawer.
Note There are marks on the drawer showing the correct location.
8. Position the ink cartridge at the rear of the drawer as indicated.
38
9. Push the ink cartridge drawer back into the printer until it locks into position.
If you have difficulty, see “The problem is I cannot insert an ink
cartridge” on page 207.
Page 41

10. Install the other three ink cartridges in the same way.
11. Close the ink cartridge door (push it until it clicks shut).
12. Wait (about a minute) until you see this front panel message.
How do I assemble the printer?
39
Page 42
Chapter 2
How do I remove the setup printheads?
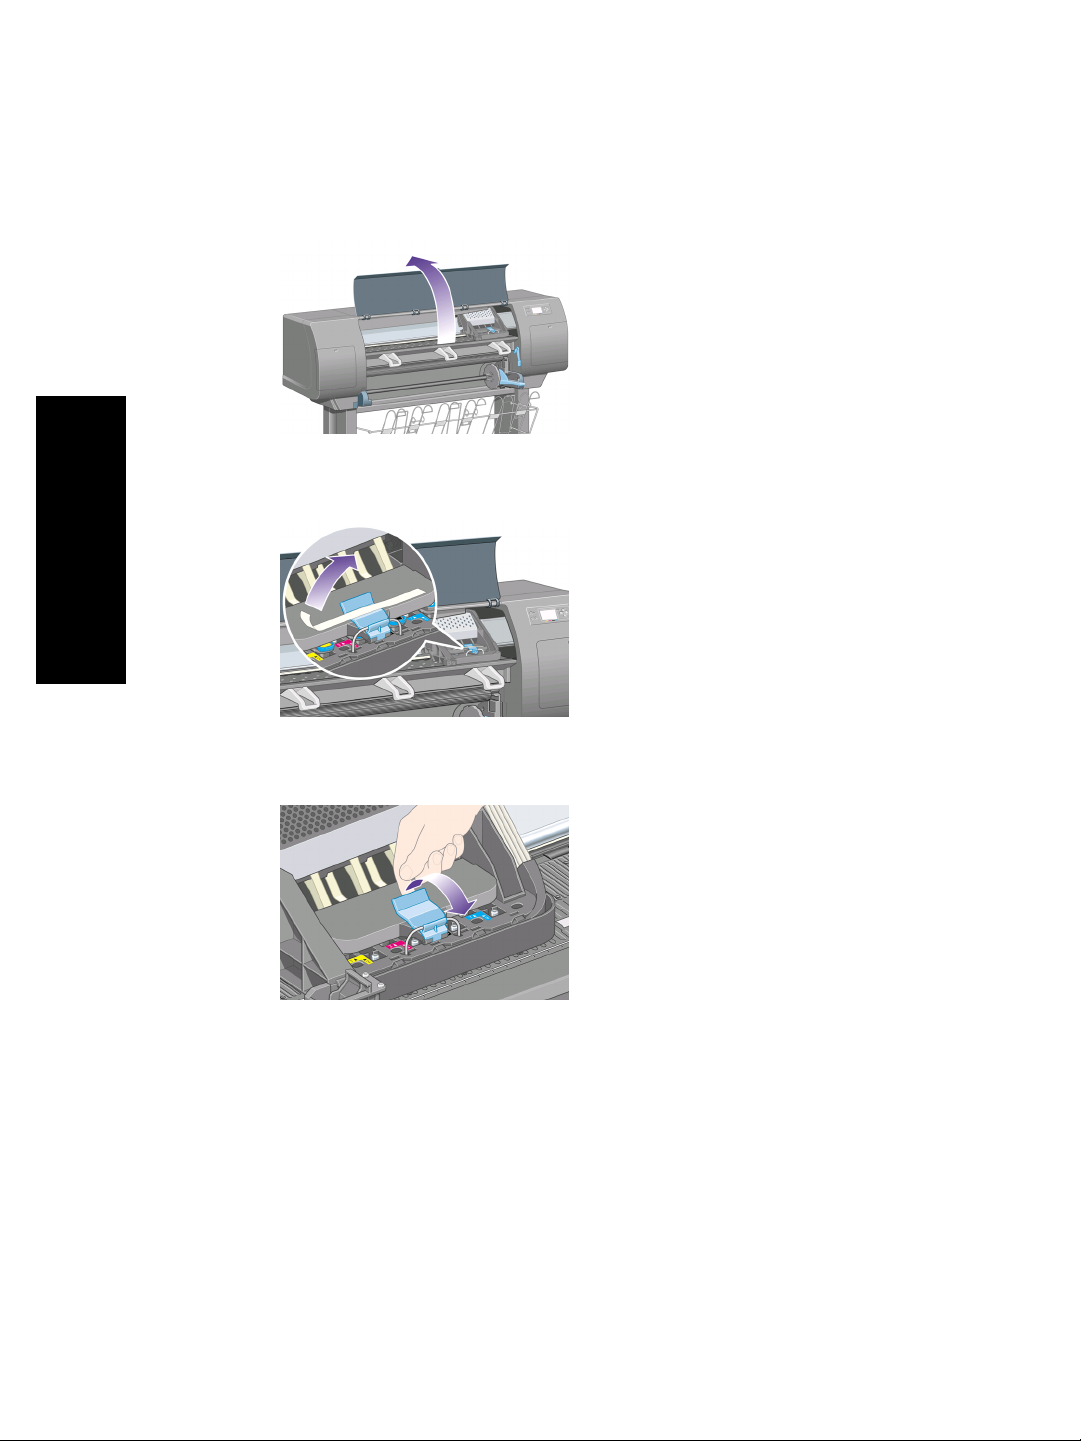
1. Open the printer window.
2. Remove the packing tape that is holding down the printhead carriage latch.
How do I assemble the printer?
40
3. Pull up and release the latch on top of the carriage.
Page 43

4. Lift up the cover. This will give you access to the setup printheads.
5. Before removing the setup printheads, look at the window on top of each one and
check that the printhead contains ink. If it does not, contact your customer service
representative.
How do I assemble the printer?
6. To remove a setup printhead, lift up the blue handle.
41
Page 44

How do I assemble the printer?
Chapter 2
7. Using the blue handle, gently disengage the setup printhead from the carriage.
8. Lift the setup printhead until it is released from the carriage. Then remove the
other setup printheads.
How do I install the printheads?
1. Remove the blue protective cap and the clear protective tape from the printhead.
42
Page 45
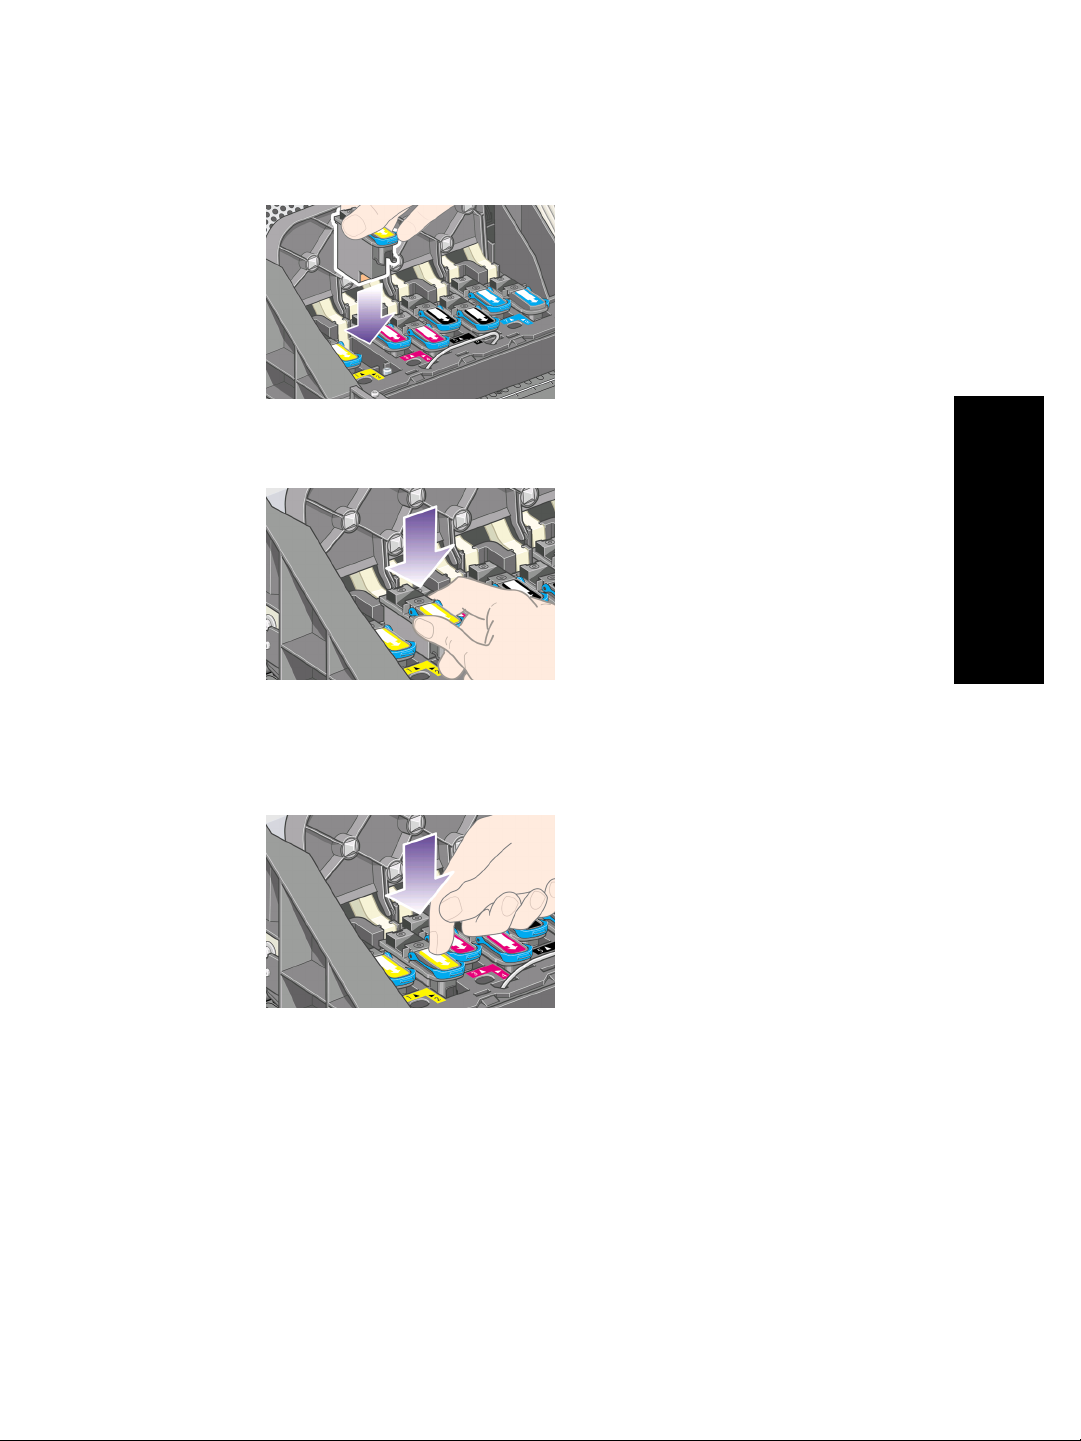
2. Lower all the printheads vertically into their correct positions.
3. Seat the printheads slowly and carefully.
If you have difficulty, see “The problem is I cannot insert a printhead” on page 207.
4. Make sure the printheads are correctly seated. When all the printheads are
installed, the front panel prompts, “Close printhead cover and window”.
How do I assemble the printer?
5. If Reseat is displayed on the front panel, see “The problem is the front panel
keeps telling me to reseat or replace a printhead” on page 207.
43
Page 46
How do I assemble the printer?
Chapter 2
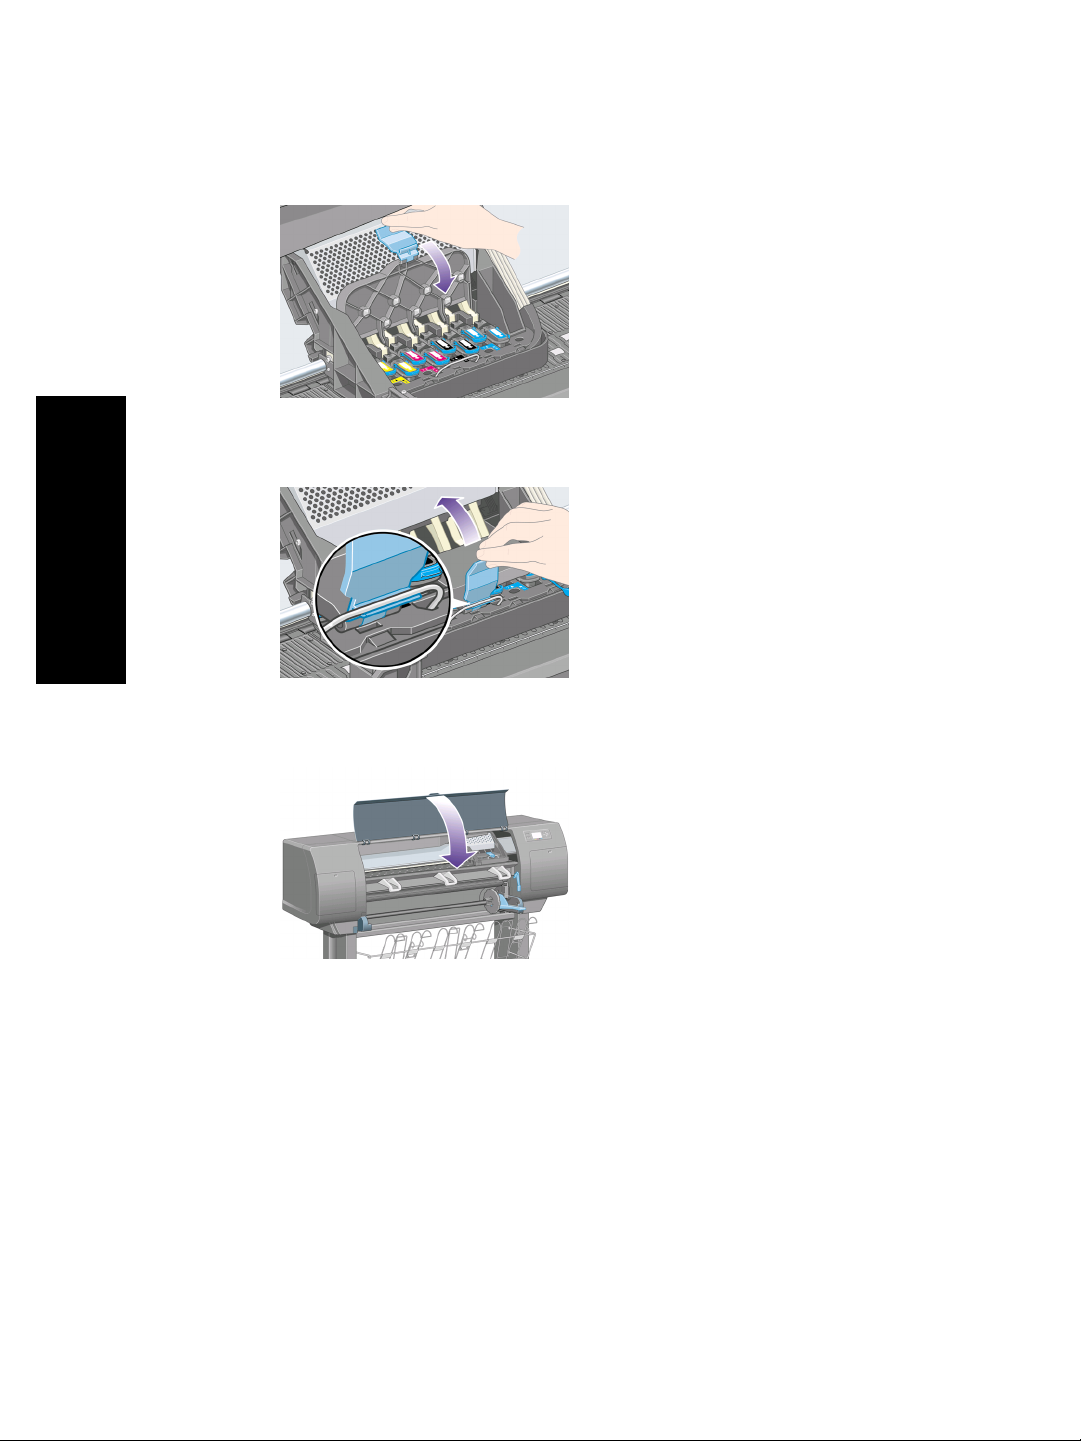
6. Close the carriage cover.
7. Make sure the latch engages correctly.
8. Close the printer window.
9. Please wait (about a minute) while the printer checks the printheads.
44
Page 47
How do I install the printhead cleaners?
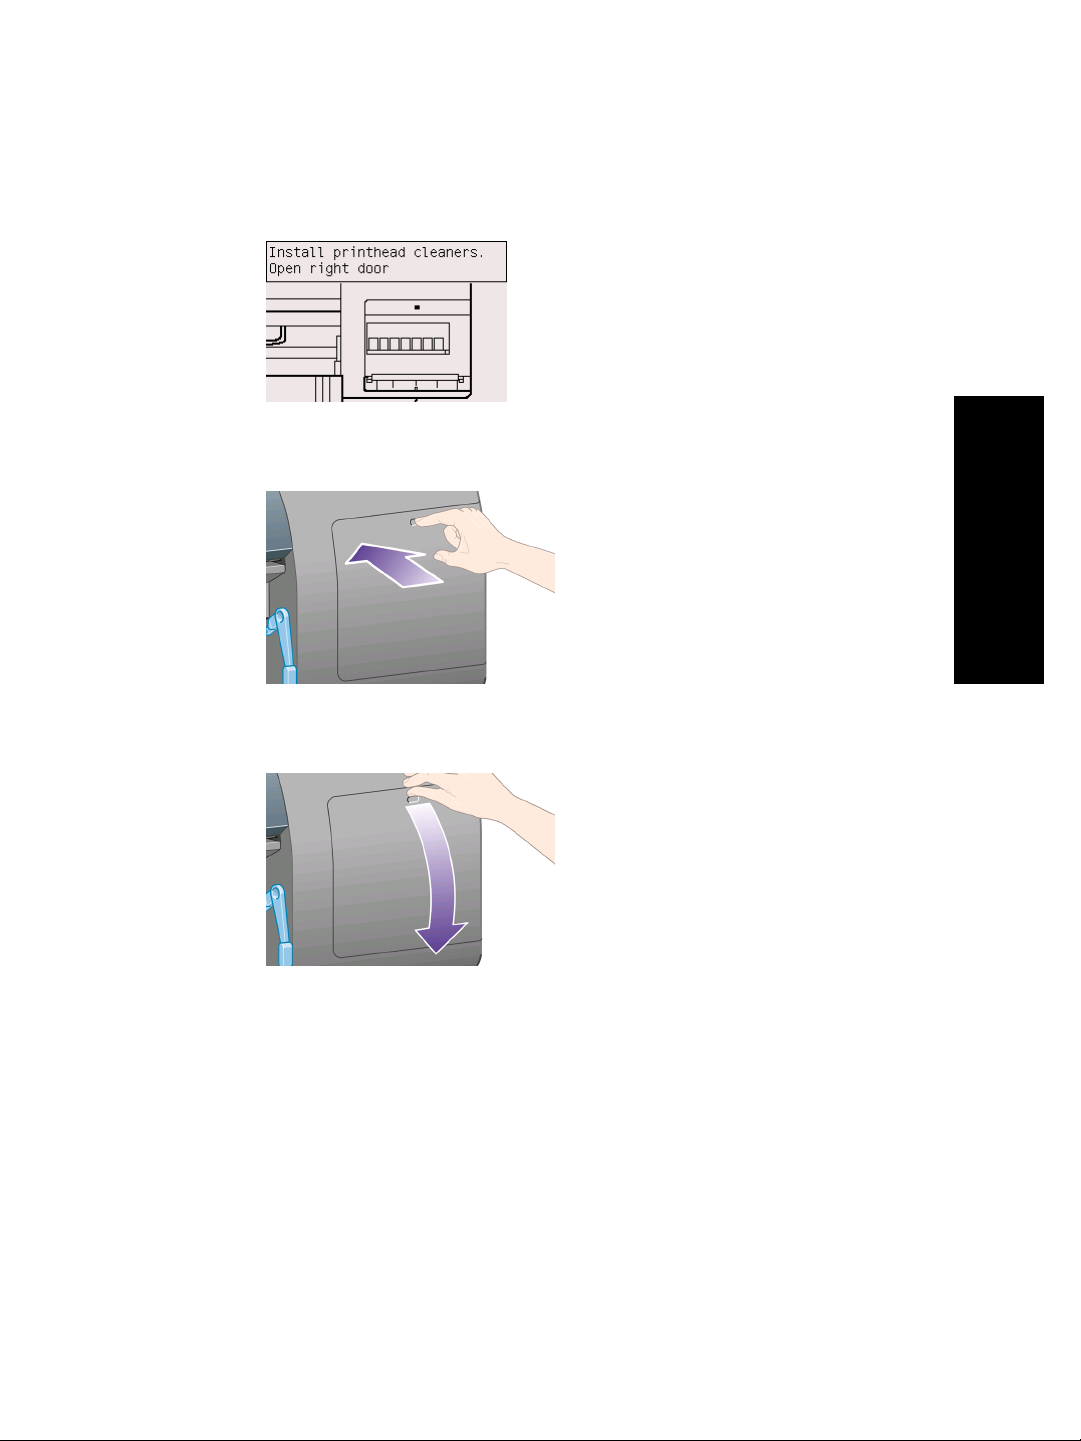
1. Wait until you see this front panel message.
2. Press the printhead cleaner door, which is on the right side of the printer.
3. Open the printhead cleaner door.
How do I assemble the printer?
45
Page 48

How do I assemble the printer?
Chapter 2
4. Insert the printhead cleaner into the slot of the correct color.
5. Push the printhead cleaner in and down until it clicks into place.
If you have difficulty, see “The problem is I cannot insert a printhead
cleaner” on page 207.
6. Insert the other seven printhead cleaners into the correct slots.
46
Page 49

7. Close the printhead cleaner door.
8. Wait until you see this front panel message, then press the Select key.
How do I load a roll of paper onto the spindle?
1. Lower the spindle lever.
How do I assemble the printer?
47
Page 50

How do I assemble the printer?
Chapter 2
2. Remove the right-hand end of the spindle (1) from the printer, then move it to the
right in order to extract the other end (2). Do not insert your fingers into the
spindle supports during the removal process.
3. Remove the blue paper stop (1) from the left-hand end of the spindle. Keep the
spindle horizontal.
4. Slide the roll of paper that came with your printer onto the spindle. Make sure the
paper is oriented exactly as shown.
Note There is also a label on the spindle showing the correct orientation.
48
Page 51
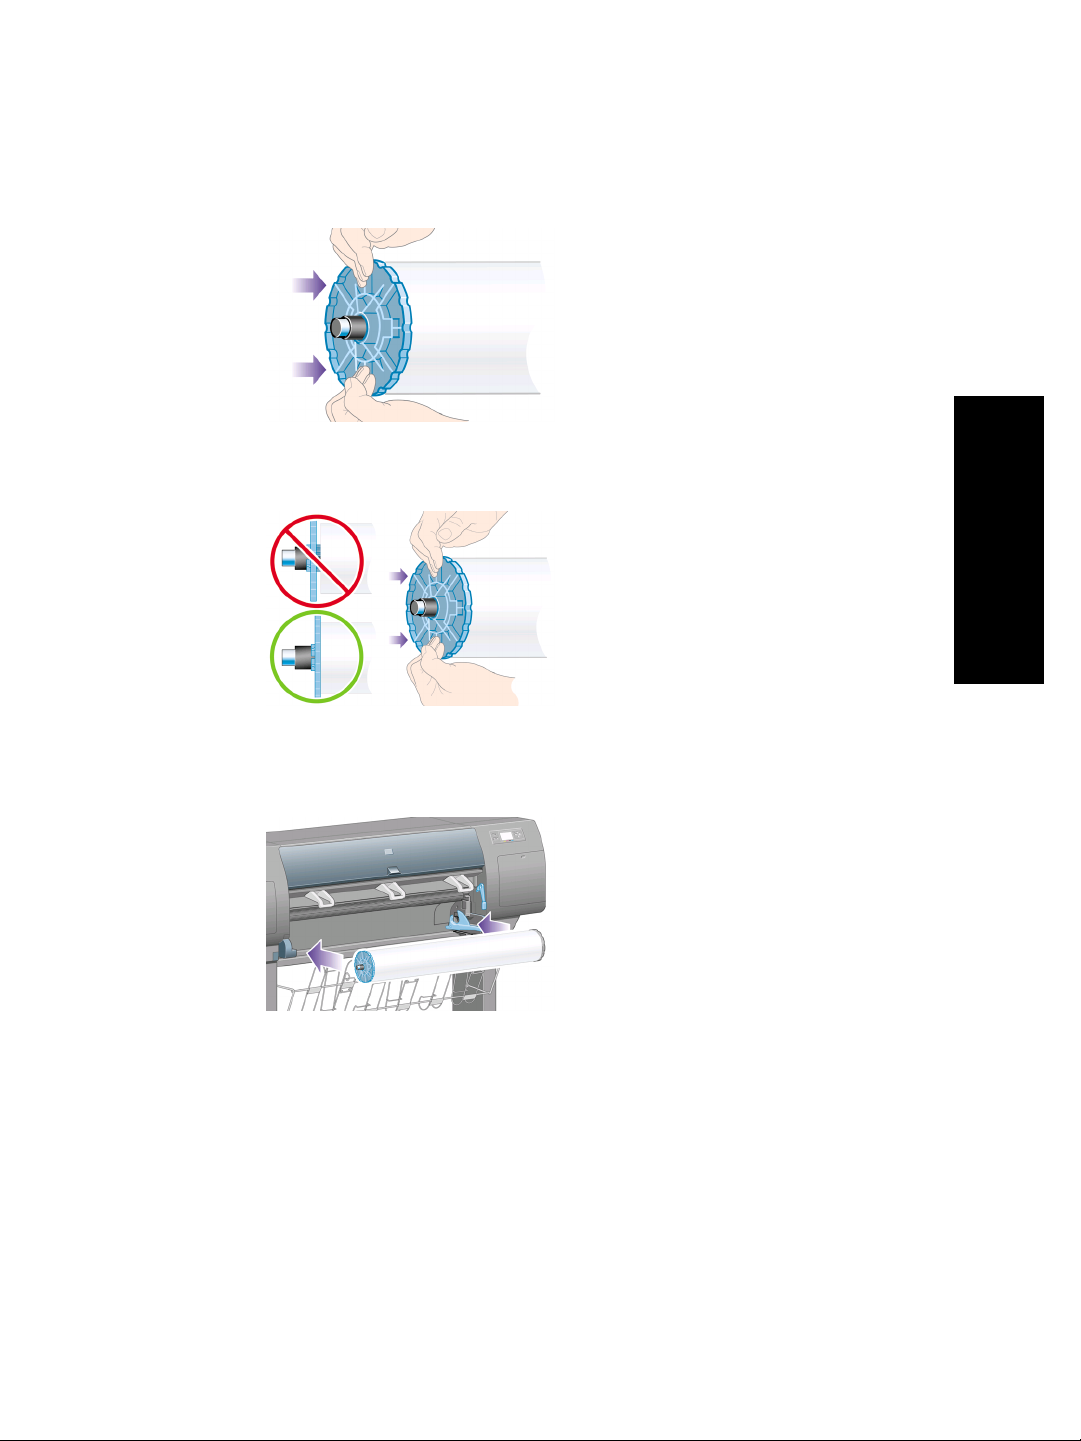
5. Put the blue paper stop onto the spindle and push it on as far as it will go without
using excessive force.
6. Make sure the stop is seated correctly.
How do I assemble the printer?
7. With the blue paper stop on the left, slide the spindle into the printer. The blue
spindle lever will drop down automatically as you insert the spindle.
49
Page 52

How do I assemble the printer?
Chapter 2
8. When you meet resistance, lift the blue lever to seat the spindle properly.
9. The spindle lever will be in the horizontal position when the spindle has been
correctly inserted.
How do I load the paper into the printer?
1.
At the front panel, highlight the
50
icon and press the Select key.
Page 53
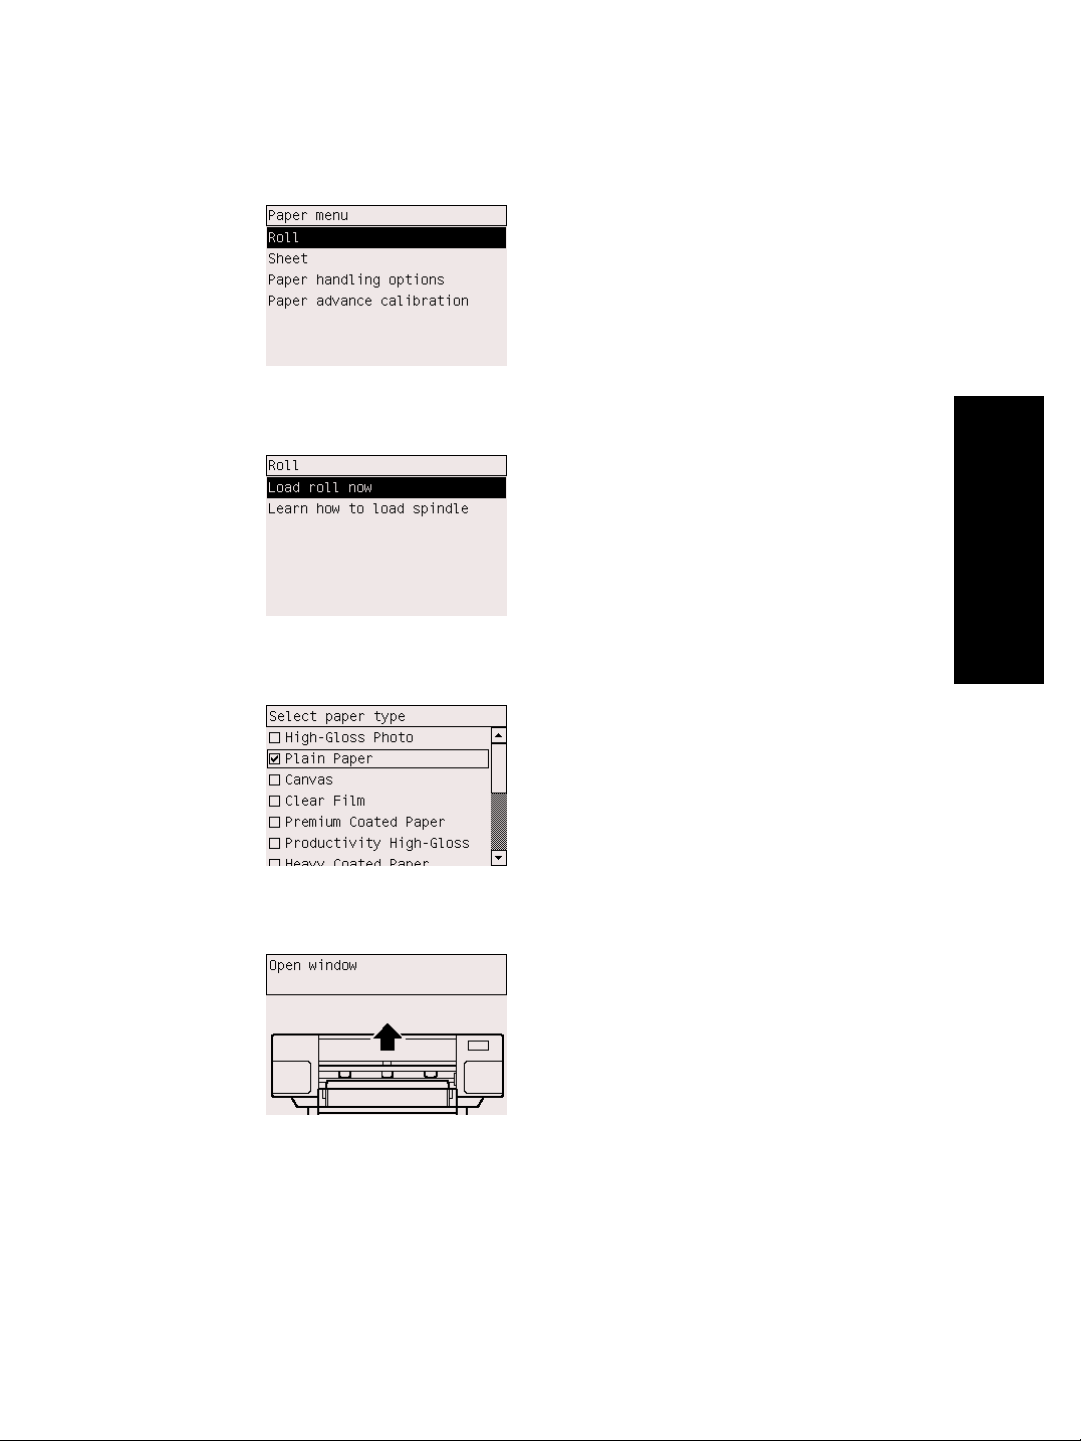
2. Highlight Roll and press the Select key.
3. Highlight Load roll now and press the Select key.
4. Highlight the paper type you have loaded and press the Select key.
5. Wait until you see the 'Open window' message.
How do I assemble the printer?
51
Page 54

How do I assemble the printer?
Chapter 2
6. Open the printer window.
7. Lift the paper load lever.
8. Pull out approximately 1 m (3 ft) of the roll.
52
Page 55

9. Insert the edge of the roll above the black roller.
Warning Take care not to touch the rubber wheels on the platen while
loading paper: they may rotate and trap skin, hair, or clothing.
10. Wait until the paper emerges from the printer as shown below.
How do I assemble the printer?
Note If you have an unexpected problem at any stage of the paper
loading process, see “The problem is the paper cannot be loaded
successfully” on page 209.
11. Make sure the paper is aligned with the blue line and half-circle on the platen.
53
Page 56

How do I assemble the printer?
Chapter 2
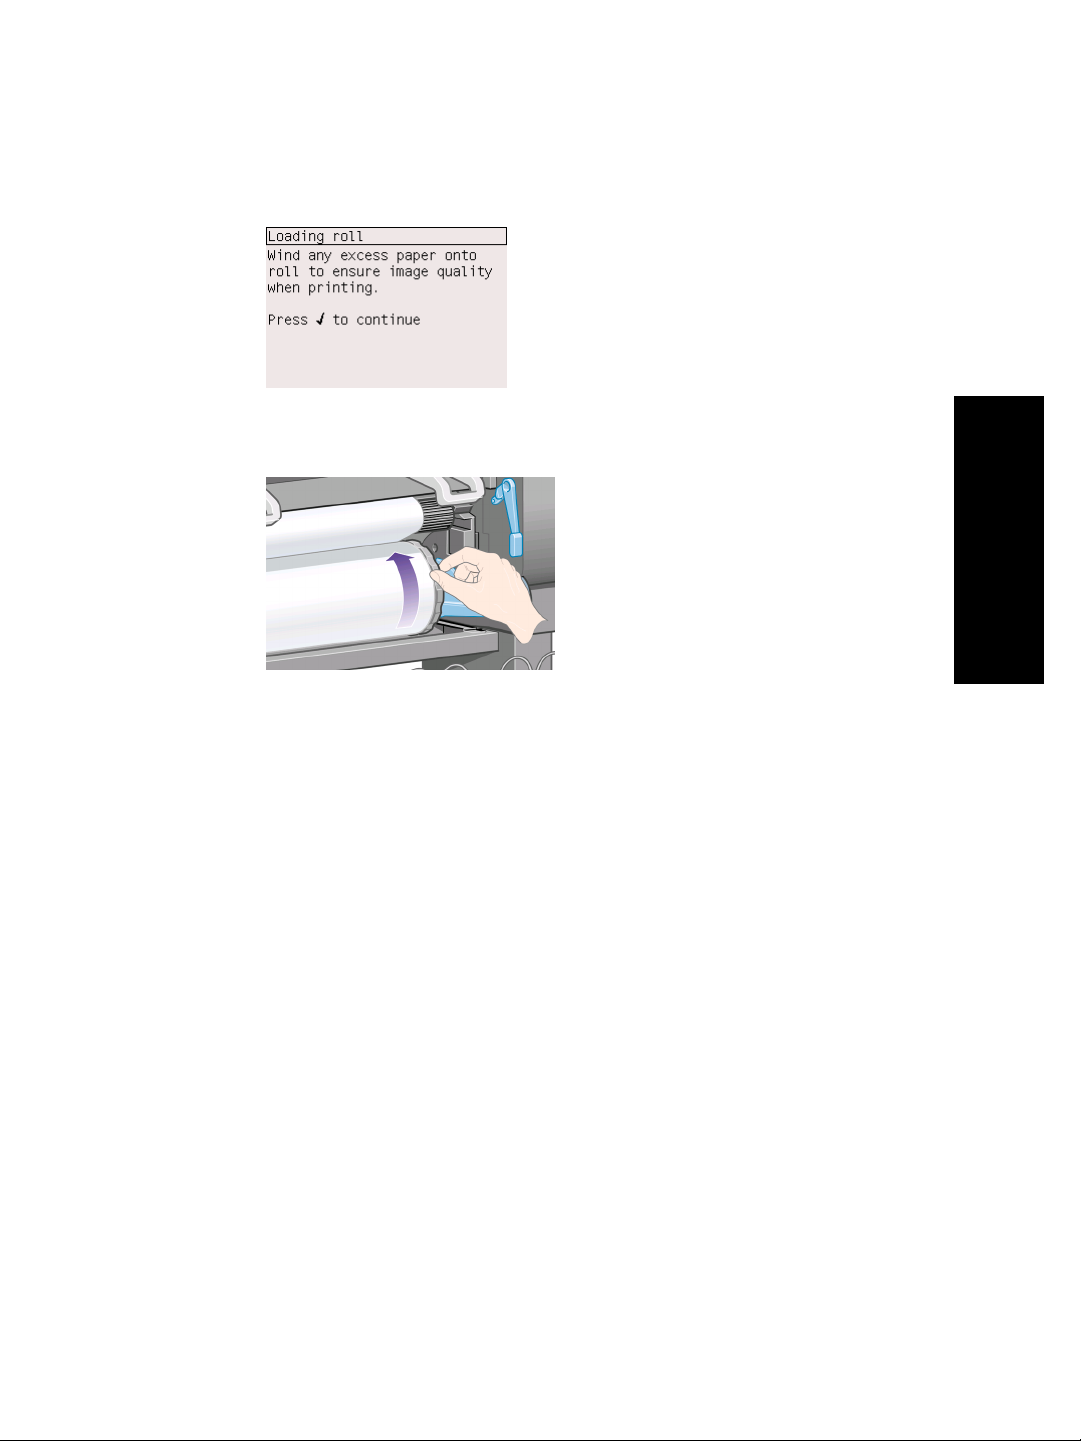
12. Lower the paper load lever.
13. You should see the front panel message below.
14. Using the stops, carefully wind the excess paper back onto the spindle.
54
15. Close the printer window.
Page 57
16. The printer will adjust the paper by winding it back and forth, after which you can
expect the front panel message below.
17. Using the stops, carefully wind the excess paper back onto the spindle.
18. The printer will automatically perform printhead alignment and a color calibration
for the paper type that you have loaded. During this process the printer will
advance the paper by up to 3 m (≈10 ft) before printing. Please do not try to stop
the paper advance; it is necessary to ensure a successful printhead alignment.
The whole alignment and calibration process will take about twenty minutes;
while it is going on, you can start connecting the printer. See “How do I connect
the printer?” on page 56.
How do I assemble the printer?
55
Page 58

Chapter 2
How do I connect the printer?
1. Your printer can be connected to a computer directly or to one or more computers
via a network.
(1) PC, Macintosh, or workstation
(2) Printer
(3) Server
(4) PC, Macintosh, or workstation
2. Locate the area at the back of the printer where you can connect the printer to
your computer or network, or install an optional accessory.
How do I assemble the printer?
56
3. A Fast Ethernet socket is provided for connection to a network.
Page 59

4. Two FireWire sockets are provided for direct connection to computers.
Note A FireWire cable is not provided with the printer. Any cable
recommended by the 1394 Trade Association may be used.
5. A larger socket is provided to connect an optional accessory.
Caution Do not attempt to use this socket for any other purpose.
How do I assemble the printer?
6. Pass the network cable through the hook at the rear of the printer.
57
Page 60
Chapter 2
How do I install accessories?
There are various optional accessories that you can buy and install at any time during
the life of your printer. The physical installation of each accessory is graphically
illustrated on the poster provided with the accessory (except in the case of the
Jetdirect print server; see below). Here are some further steps to follow after
completing the physical installation process.
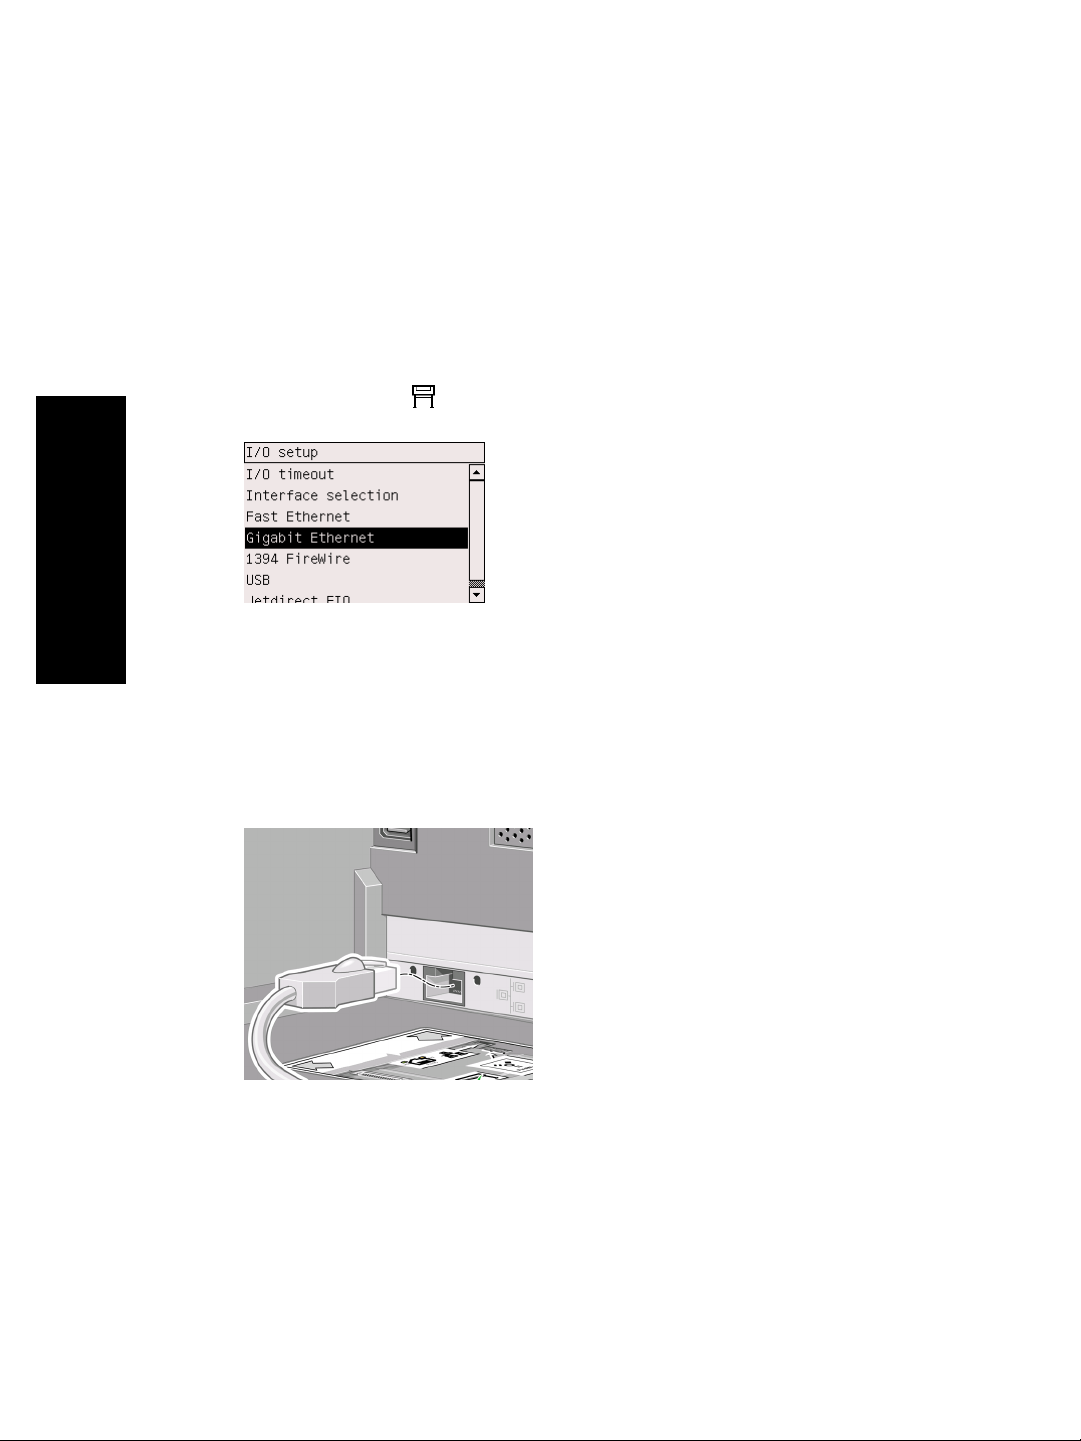
Gigabit Ethernet socket
To check that the Gigabit Ethernet socket has been correctly installed, go to the front
panel and select the
icon, then I/O setup > Gigabit Ethernet.
How do I assemble the printer?
The front panel will reveal whether the socket is Installed or Not installed.
Please follow the appropriate instructions to connect the printer to your network:
● “How do I connect my printer to a network (Windows)?” on page 64
● “How do I connect my printer to a network (Mac OS X)?” on page 66
● “How do I connect my printer to a network (Mac OS 9)?” on page 68
You can plug in your network cable as illustrated below.
58
Page 61
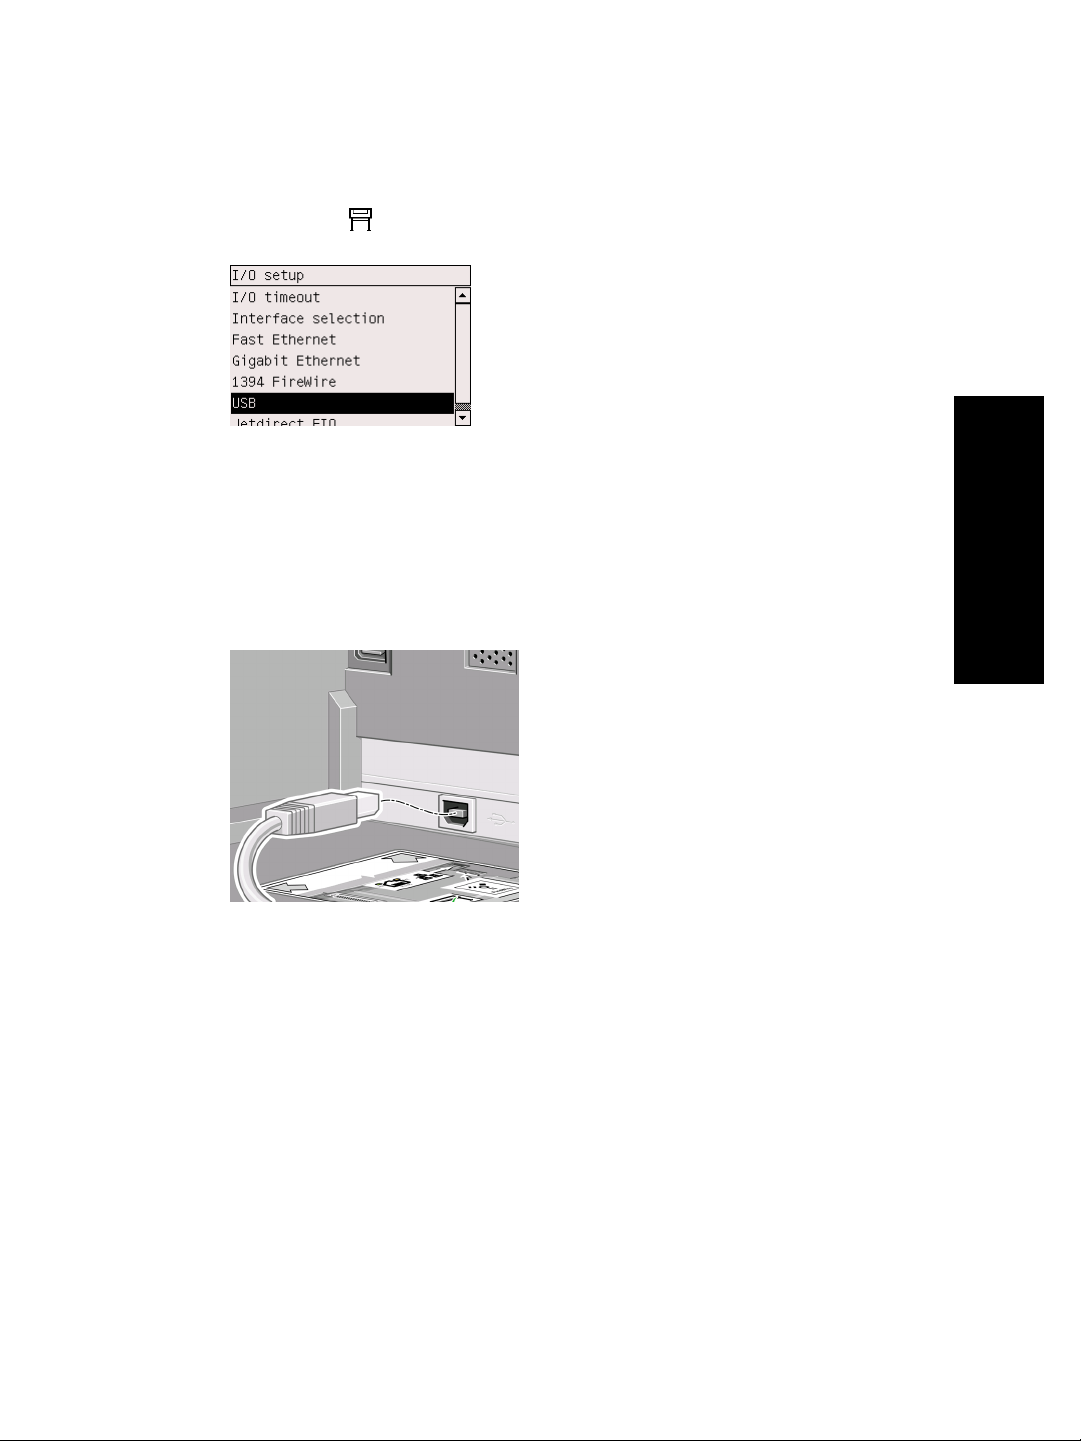
USB 2.0 socket
To check that the USB 2.0 socket has been correctly installed, go to the front panel
and select the
icon, then I/O setup > USB.
The front panel will reveal whether the socket is Installed or Not installed.
Please follow the appropriate instructions to connect the printer to your computer:
● “How do I connect my printer directly to a computer (Windows)?” on page 69
● “How do I connect my printer directly to a computer (Mac OS X)?” on page 70
● “How do I connect my printer directly to a computer (Mac OS 9)?” on page 71
You can plug in your USB cable as illustrated below.
How do I assemble the printer?
59
Page 62

How do I assemble the printer?
Chapter 2
Jetdirect print server
To install the Jetdirect card:
1. Go to the rear of the printer and remove a small cover plate secured by two
screws near the left-hand side.
60
Page 63

2. Insert the Jetdirect card and secure it with the screws that accompany the card.
How do I assemble the printer?
3. Save the cover plate and screws in case you decide to remove the Jetdirect card
later.
To check that the card has been correctly installed, go to the front panel and select
the
icon, then I/O setup > Jetdirect EIO.
The front panel will reveal whether the print server is Installed or Not installed.
Please follow the appropriate instructions to connect the printer to your network:
● “How do I connect my printer to a network (Windows)?” on page 64
● “How do I connect my printer to a network (Mac OS X)?” on page 66
● “How do I connect my printer to a network (Mac OS 9)?” on page 68
61
Page 64

How do I assemble the printer?
Chapter 2
You can plug in your network cable as illustrated below.
Memory expansion card
To check that the 256 MB memory expansion card has been correctly installed, go to
the front panel and select the
icon, then Information > Show printer
information. The front panel will display various items of information about the
printer, including Memory size (MB).
62
If the memory size is now shown as 512 MB, your memory expansion card has been
correctly installed.
Page 65

3
How do I set up my printer
software?
● “How do I choose which connection method to use?” on page 63
● “How do I connect my printer to a network (Windows)?” on page 64
● “How do I connect my printer to a network (Mac OS X)?” on page 66
● “How do I connect my printer to a network (Mac OS 9)?” on page 68
● “How do I connect my printer directly to a computer (Windows)?” on page 69
● “How do I connect my printer directly to a computer (Mac OS X)?” on page 70
● “How do I connect my printer directly to a computer (Mac OS 9)?” on page 71
● “How do I uninstall the printer driver (Windows)?” on page 72
● “How do I uninstall the printer driver (Mac OS 9)?” on page 72
How do I choose which connection method to use?
The following methods can be used to connect your printer.
Connection type
Fast Ethernet Fast; varies
Gigabit Ethernet
(optional
accessory)
Jetdirect print
server (optional
accessory)
FireWire Very fast Short (4.5 m=15 ft.)
USB 2.0 (optional
accessory)
Note 1 The speed of any network connection depends on all components
used in the network, which may include network interface cards, hubs, routers,
switches, and cables. If any one of these components is not capable of highspeed operation, you will find that you have a low-speed connection. The
speed of your network connection can also be affected by the total amount of
traffic from other devices on the network.
Speed Cable length Other factors
Long (100 m=328
according to
network traffic
Very fast; varies
according to
network traffic
Moderate; varies
according to
network traffic
Very fast Short (5 m=16 ft.)
ft.)
Long (100 m=328
ft.)
Long (100 m=328
ft.)
Requires extra
equipment
(switches).
Requires extra
equipment
(switches).
Requires extra
equipment
(switches).
Useful for wireless
or AppleTalk
connection, and
for Novell printing.
How do I set up my printer
software?
Note 2 The Gigabit Ethernet and USB 2.0 accessories are installed in the
same slot in the printer, so they cannot both be installed at the same time. This
63
Page 66

Chapter 3
does not affect the Jetdirect print server accessory, which is installed
elsewhere.
Note 3 There are various possible ways of connecting the printer to a
network, but only one of them can be active at a time; with the exception of the
Jetdirect print server, which can be active at the same time as one other
network connection.
How do I connect my printer to a network (Windows)?
In order to set up a network connection, you must configure the IP address of your
printer. There are two cases, depending on the kind of IP address configuration on
your network. You need only to follow the steps of the case that applies to your
network architecture:
● Automatic IP address configuration: the printer obtains an IP address automatically
● Manual IP address configuration: you need to enter an IP address manually
Automatic IP address configuration
In this case, once the network cable is connected and the printer is powered up, it
automatically takes an IP address. You need to get this value and perform the
following steps to configure the printer in the network:
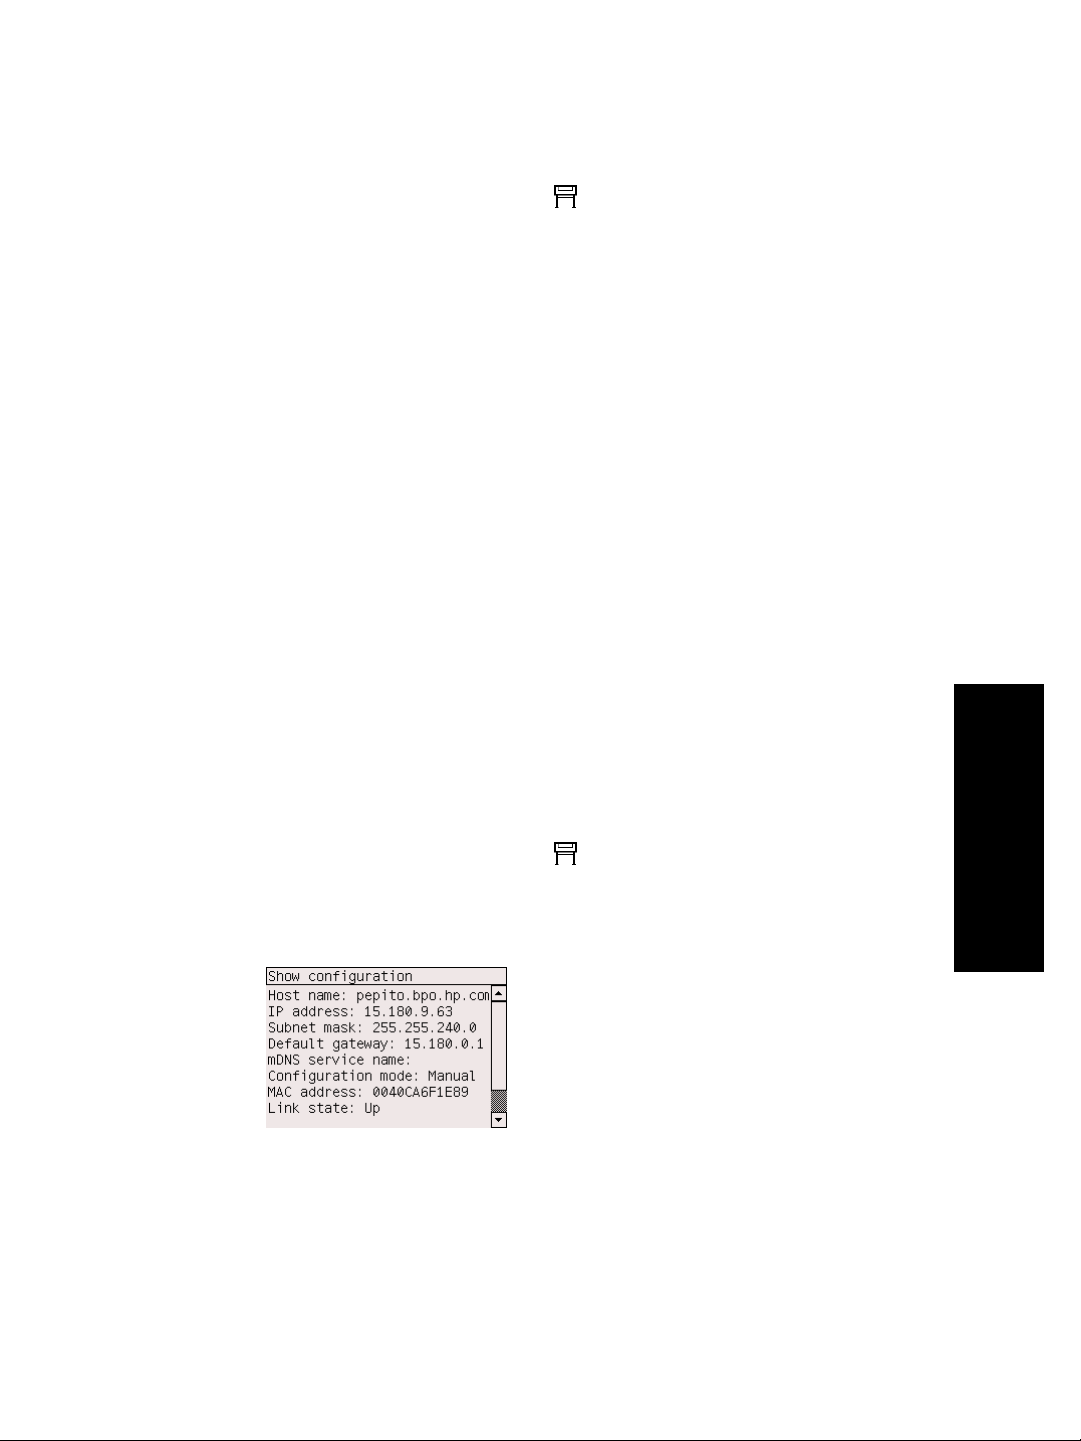
1.
Go to the front panel and select the
Gigabit Ethernet) > Show configuration.
2. The front panel will display some information, including the printer's IP address.
Make a note of the IP address.
icon, then I/O setup > Fast Ethernet (or
software?
How do I set up my printer
3. Insert the Printer Software Setup for Windows CD into your computer.
4. Choose the language.
5. Read the information in the Welcome dialog and click Next.
6. Read and accept the license agreement.
7. Choose Connected via the network.
8. Choose Basic network setup for a PC or server.
9. Wait while the configuration program looks for printers connected to your
network. When the search has finished, a list of printers will be displayed. Identify
your printer by its IP address, select it from the list, and click Next.
10. Wait while the configuration program analyzes the network and the printer. The
program will detect the network settings and will suggest the settings to be used
when configuring the printer. Normally, it is not necessary to change any of these
settings, so click Next.
64
Page 67

11. Choose your printer model and click Next.
12. Continue following instructions on the screen until the installation is complete.
Manual IP address configuration
In this case, there is no IP address at the moment of starting the installation. The
installation process will consist of detecting the printer, configuring its IP address, and
installing the driver with these settings. Perform the following steps:
1.
Go to the front panel and select the
icon, then I/O setup > Fast Ethernet (or
Gigabit Ethernet) > Show configuration.
2. The front panel will display some information, including the printer's MAC
address. Make a note of the MAC address.
3. Insert the Printer Software Setup for Windows CD into your computer.
4. Choose the language.
5. Read the information in the Welcome dialog and click Next.
6. Read and accept the license agreement.
7. Choose Connected via the network.
8. Choose Basic network setup for a PC or server.
9. Wait while the configuration program looks for printers connected to your
network. When the search has finished, a list of printers will be displayed. Identify
your printer by its MAC address, select it from the list, and click Next.
10. Wait while the configuration program analyzes the network and the printer. As
there are no TCP/IP parameters configured, the program will ask you to enter the
IP address, the subnet mask, and the gateway. Enter these values according to
your network configuration and take care, when choosing the IP address and the
subnet mask, that you select values that will not create conflicts with the current
network devices. It is recommended that you get these values from your network
administrator.
11. Choose your printer model and click Next.
12. At the end of the installation, you will have drivers configured to work with your
printer and your printer will have a valid IP address. You can see this IP address
on the front panel when you select the
icon, then I/O setup > Fast Ethernet
(or Gigabit Ethernet) > Show configuration.
How do I set up my printer
software?
65
Page 68

software?
How do I set up my printer
Chapter 3
How do I connect my printer to a network (Mac OS X)?
You can connect your printer to a network under Mac OS X using the following
methods:
● Rendezvous
● AppleTalk
● TCP/IP
Note The Printer Setup Utility was known as the Print Center in versions of
Mac OS X earlier than 10.3.
Using Rendezvous
Before you begin, make sure the following are true:
● The printer is set up and on.
● The Ethernet hub or router is on and functioning properly.
● All computers on the network are on and connected to the network.
● The printer is connected to the network.
● The printer drivers are installed. To install the drivers, insert the drivers CD and
follow the instructions on the screen.
To connect your printer using Rendezvous:
1.
Go to the front panel, select the
Gigabit Ethernet, if you are using that option) > Show configuration. Note the
mDNS service name of your printer, as shown on the front panel. You may need
it later on.
2. Open the Printer Setup Utility by selecting the Finder icon on your desktop. Click
the Applications icon in the top right corner of the Finder window, then select
Utilities from the list. Select Printer Setup Utility from the Utilities list.
3. Click the Add button. The Add Printer dialog is displayed.
4. Select Rendezvous from the popup menu.
5. Click on the name of the printer. If you cannot identify the printer by its name, use
the mDNS Service Name that you noted earlier.
6. The connection is configured automatically, and the printer is now available on
the network.
icon, and then I/O setup > Fast Ethernet (or
66
Using AppleTalk
Note AppleTalk is supported only with the optional Jetdirect print server.
Before you begin, make sure the following are true:
● The printer is set up and on.
● The Ethernet hub or router is on and functioning properly.
● All computers on the network are on and connected to the network.
● The printer is connected to the network.
● The printer drivers are installed. To install the drivers, insert the drivers CD and
follow the instructions on the screen.
Page 69
To connect your printer using AppleTalk:
1.
Go to the front panel and select the
icon, then I/O setup > Jetdirect EIO >
Show configuration.
2. The front panel will display some information, including the printer's Appletalk
name. Make a note of the Appletalk name.
3. Make sure that the AppleTalk protocol is active by double-clicking the System
preference icon on the Dock menu bar and selecting Network. Select Built-in
Ethernet as well as AppleTalk from the Show menu to confirm that AppleTalk is
active.
4. Open the Printer Setup Utility by selecting the Finder icon on your desktop. Click
the Applications icon in the top right corner of the Finder window, then select
Utilities from the list. Select Printer Setup Utility from the Utilities list.
5. In the Printer List, click the Add button to add a printer. The Add Printer List
dialog box is displayed.
6. Select AppleTalk from the pop-up menu. Select the Appletalk zone.
7. Click the Create button, and select the printer from the list. You may need the
AppleTalk name that you noted in step 2.
8. Click the Add button and close the Printer Setup Utility.
Using TCP/IP
Before you begin, make sure the following are true:
● The printer is set up and on.
● The Ethernet hub or router is on and functioning properly.
● All computers on the network are on and connected to the network.
● The printer is connected to the network.
● The printer drivers are installed. To install the drivers, insert the drivers CD and
follow the instructions on the screen.
To connect your printer using TCP/IP:
1.
Go to the front panel and select the
icon, then I/O setup > Fast Ethernet (or
Gigabit Ethernet) > Show configuration.
2. The front panel will display some information, including the printer's IP address.
Make a note of the IP address.
How do I set up my printer
software?
3. Open the Printer Setup Utility by selecting the Finder icon on your desktop. Click
the Applications icon in the top right corner of the Finder window, then select
Utilities from the list. Select Printer Setup Utility from the Utilities list.
4. Click the Add button. The Add Printer List dialog box is displayed.
67
Page 70

Chapter 3
5. Select IP Printing from the popup menu.
6. Type the printer's IP address (which you noted in step 2) into the Printer Address
field.
7. Select the HP Designjet 4000 PS3 PostScript Printer Description (PPD) file.
8. In the Printer Model field, select HP and then HP Designjet 4000ps.
9. Click the Add button. Close the Printer Setup Utility.
How do I connect my printer to a network (Mac OS 9)?
You can connect your printer to a network under Mac OS 9 using the following
methods:
● TCP/IP
● AppleTalk
Using TCP/IP
Before you begin, make sure that your printer is switched on and connected to the
network.
To connect your printer using TCP/IP:
1.
Go to the front panel and select the
Gigabit Ethernet) > Show configuration.
2. The front panel will display some information, including the printer's IP address.
Make a note of the IP address.
icon, then I/O setup > Fast Ethernet (or
software?
How do I set up my printer
3. Go to your computer and open the Desktop Printer Utility located in the HP
Designjet 4000ps folder on the hard disk.
4. Choose the AdobePS driver and the Printer (LPR) connection. Click OK.
5. Use the first Change button to select the HP Designjet 4000 PS3 PostScript
Printer Description (PPD) file.
6. Use the second Change button to enter the printer's IP address into the Printer
Address field. Click Verify and then OK.
7. Check that your changes appear correctly on the screen, then click Create.
8. Click Save to save your new printer setup on the Desktop.
Using AppleTalk
Note AppleTalk is supported only with the optional Jetdirect print server.
68
Page 71

Before you begin, make sure that your printer is switched on and connected to the
network.
To connect your printer using AppleTalk:
1.
Go to the front panel, select the
Show configuration. Note the AppleTalk name of your printer, as shown on the
front panel. You may need it later on.
2. Select Chooser from the Apple menu.
3. Click the Adobe PostScript driver icon.
4. In the AppleTalk Zones list, select the AppleTalk zone where your printer is
located (if it exists). Make sure that the AppleTalk protocol is Active.
5. The Chooser will check all the printers that are connected by AppleTalk in your
zone.
6. Select your printer. If you have several similar printers, you can identify the
correct one by its AppleTalk name.
7. Click the Create button in the Chooser to set up the printer.
8. The type of printer is selected automatically. A new printer icon will appear on
your desktop.
9. Close the Chooser. An icon will appear on your desktop.
icon, and then I/O setup > Jetdirect EIO >
How do I connect my printer directly to a computer
(Windows)?
You can connect your printer directly to a computer without going through a network,
by using the printer's built-in FireWire socket (supported under Windows 2000, XP,
and 2003 Server) or the optional USB 2.0 socket (supported under Windows 98 SE,
Me, 2000, XP, and 2003 Server).
1. Do not connect the computer to the printer yet. You must first install the
printer driver software on the computer, as follows.
2. Insert the Printer Software Setup for Windows CD into your CD drive. If the CD
does not autorun, run the SETUP.EXE program in the root folder of the CD.
3. Follow the instructions that appear on your screen.
4. When asked how the printer is connected, choose Connected directly to this
computer.
5. Choose your connection method and click Next.
6. Choose your printer model and click Next.
7. When prompted to do so, connect your computer to the printer, using a FireWire
or USB cable. Ensure that the printer is switched on. When the printer software
has detected the printer, the installation process will be completed automatically.
How do I set up my printer
software?
69
Page 72

Chapter 3
How do I connect my printer directly to a computer (Mac
OS X)?
You can connect your printer directly to a computer without going through a network,
by using the printer's built-in FireWire socket or the optional USB 2.0 socket.
1. Make sure the printer is powered off.
2. Insert the Software Setup CD into your CD drive.
3. In Finder, navigate to the CD.
4. Double-click on OS X HP DJ 4000ps Install to launch the installer.
5. The installer takes you through various steps until you reach the main install
dialog box.
6. Click the Install button.
7. The printer driver installs and a status bar is displayed. Follow any instructions
given by the installer, then quit the installer when the installation is complete.
Connecting with FireWire
1. Connect the FireWire cable between your printer and the computer.
2. Power on the printer.
3. Open the Printer Setup Utility by selecting the Finder icon on your desktop. Click
the Applications icon in the top right corner of the Finder window, then select
Utilities from the list. Select Printer Setup Utility from the Utilities list.
4. Click the Add button. The Add Printer dialog is displayed.
5. Select HP FireWire from the popup menu.
6. Click the name of the printer.
7. Click the Add button.
software?
How do I set up my printer
Connecting with USB
1. Connect the USB cable between your printer and the computer.
2. Power on the printer.
3. Open the Printer Setup Utility by selecting the Finder icon on your desktop. Click
the Applications icon in the top right corner of the Finder window, then select
Utilities from the list. Select Printer Setup Utility from the Utilities list.
4. The printer icon is automatically added to the list of available printers.
Note Under Mac OS X 10.2 only, the new printer appears as a Generic
printer. To correct this, first delete the Generic printer icon. Then click the Add
button, select USB from the popup menu in the Add Printer dialog, select the
name of your printer, and click the Add button.
Sharing the printer
Note Printer sharing between users is supported under Mac OS X 10.2.x and
10.3.
If your computer is connected to a network, you can make your directly-connected
printer available to other computers on the same network.
1. Double-click the System Preferences icon in the Dock menu bar on your desktop.
2. Enable printer sharing by going to Sharing > Services > Printer Sharing.
70
Page 73

3. From the client computer, the printer will now be displayed in the list of available
printers in the Printer Setup Utility.
How do I connect my printer directly to a computer (Mac
OS 9)?
You can connect your printer directly to a computer without going through a network,
by using the optional USB 2.0 socket.
1. Make sure the printer is powered off.
2. Insert the Software Setup CD into your CD drive.
3. In Finder, navigate to the CD.
4. Double-click on OS 9 HP DJ 4000ps Install to launch the installer.
5. The installer takes you through various steps until you reach the main install
dialog box. We recommend that you choose the Easy install option.
6. Click the Install button.
7. The printer driver installs and a status bar is displayed.
8. Click Restart to restart the computer.
9. Connect the USB cable between your printer and the computer.
10. Power on the printer.
11. Run the Desktop Printer Utility in the HP Designjet 4000ps folder.
12. Choose the AdobePS driver and the USB connection.
13. Click the Change button in the USB Printer Selection section to select the printer.
14. Click the Auto Setup button to set up the printer automatically. You can click the
Change button to select the PostScript Printer Description (PPD) file.
15. Once you have selected the correct PPD file, click the Create button to save the
desktop printer.
Sharing the printer
If you have Mac OS 9.1 or later, and your computer is connected to a network through
TCP/IP, you can make your directly-connected printer available to other computers on
the same network.
1. In the Apple menu, go to Control Panels > USB Printer Sharing.
2. Click the Start button.
3. Click the My Printers tab. The printer will be displayed. Check the box next to the
printer name to enable sharing.
4. To connect to the printer from another Macintosh, first install the printer driver
software: insert the drivers CD and follow the instructions on the screen.
5. In the Apple menu, go to Control Panels > USB Sharing.
6. Click the Network Printers tab. You will see a list of shared printers.
7. If your printer is in the list, click the Use checkbox next to the printer's name.
If your printer is not in the list, click the Add button, open the neighborhood where
the printer is shared, and choose the printer.
8. Run the Desktop Printer Utility in the HP Designjet 4000ps folder.
9. Choose the AdobePS driver and the USB connection.
10. Click the Change button in the USB Printer Selection section to select the printer.
How do I set up my printer
software?
71
Page 74

Chapter 3
11. Click the Auto Setup button to set up the printer automatically. You can click the
Change button to select the PostScript Printer Description (PPD) file.
12. Once you have selected the correct PPD file, click the Create button to save the
desktop printer.
How do I uninstall the printer driver (Windows)?
1. Insert the Printer Software Setup for Windows CD into your CD drive. If the CD
does not autorun, run the SETUP.EXE program in the root folder of the CD.
2. Follow the instructions on your screen to uninstall the printer driver.
How do I uninstall the printer driver (Mac OS 9)?
1. Insert the Software Setup CD into your CD drive.
2. In Finder, navigate to the CD.
3. Double-click on OS 9 HP DJ 4000ps Install to launch the installer.
4. The installer takes you through various steps until you reach the main install
dialog box. You have two options:
– Easy install
– Uninstall driver
Choose Uninstall driver.
5. The printer driver uninstalls and a status bar is displayed. Quit the installer when
the uninstallation is complete.
software?
How do I set up my printer
72
Page 75

4
How do I operate the printer?
● “How do I switch the printer on and off?” on page 73
● “How do I restart the printer?” on page 74
● “How do I change the language of the front panel?” on page 74
● “How do I access the Embedded Web Server?” on page 75
● “How do I change the language of the Embedded Web Server?” on page 76
● “How do I password–protect the Embedded Web Server?” on page 76
● “How do I request e-mail notification of specific error conditions?” on page 77
● “How do I change the sleep mode setting?” on page 77
● “How do I turn off the buzzer?” on page 77
● “How do I change the front panel contrast?” on page 77
● “How do I change the units of measurement?” on page 77
● “How do I adjust for altitude?” on page 78
How do I switch the printer on and off?
The normal and recommended way to switch the printer on and off is to use the
Power key on the front panel.
When you switch off the printer this way, the printheads are automatically stored with
the printhead cleaners, which prevents them from drying out.
If you are not planning to use the printer for a long time (for instance, a day or more),
you are recommended to switch it off using the Power key, and then also switch off
the power switch at the rear.
How do I operate the printer?
73
Page 76
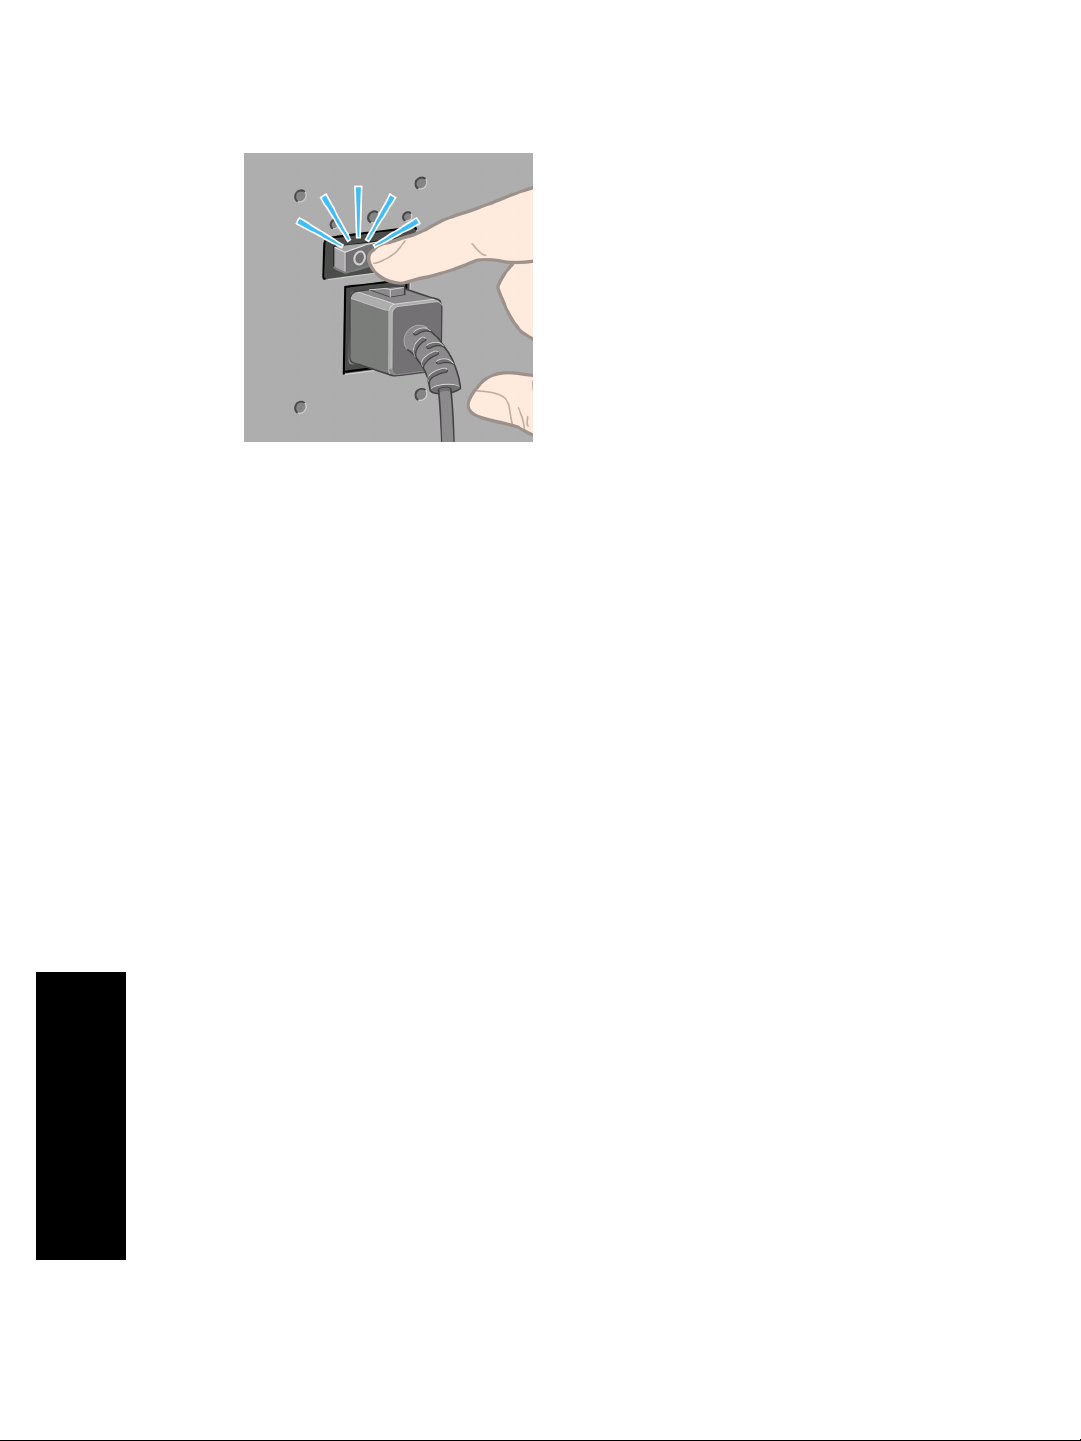
Chapter 4
To switch it back on later, use the power switch at the rear, and then the Power key.
When the printer has not been used for a certain period of time (30 minutes by
default), it will save power by going into sleep mode. However, any interaction with the
printer will return it to active mode, and it can resume printing immediately.
How do I restart the printer?
In some circumstances you may be advised to restart the printer. Please proceed as
follows:
1. Press the Power key on the front panel to switch the printer off, wait a few
moments, then press the Power key again. This should cause the printer to
restart; if not, continue with step 2.
2. Use the Reset key on the front panel. You will need an implement with a narrow
tip to operate the Reset key. This normally has the same effect as step 1 above,
but may work if step 1 does not.
3. If neither of the above steps seem to have any effect, you should switch off the
printer using the power switch at the rear of the printer.
4. Remove the power cord from the power socket.
5. Wait for 10 seconds.
6. Insert the power cord into the power socket and switch on the printer using the
power switch.
7. Check that the Power light on the front panel comes on. If it does not, use the
Power key to switch the printer on.
How do I change the language of the front panel?
To change the language of the front-panel menus and messages, start with the printer
powered off.
1. At the front panel, press the Select key and hold it down.
2. While holding the Select key down, press the Power key and hold it down.
3. Continue to hold down both keys until the green light on the left side of the front
How do I operate the printer?
74
panel starts flashing. You can expect a delay of about one second. If the green
light starts flashing without any delay, you may need to start again.
4. Release the Select and Power keys.
Page 77
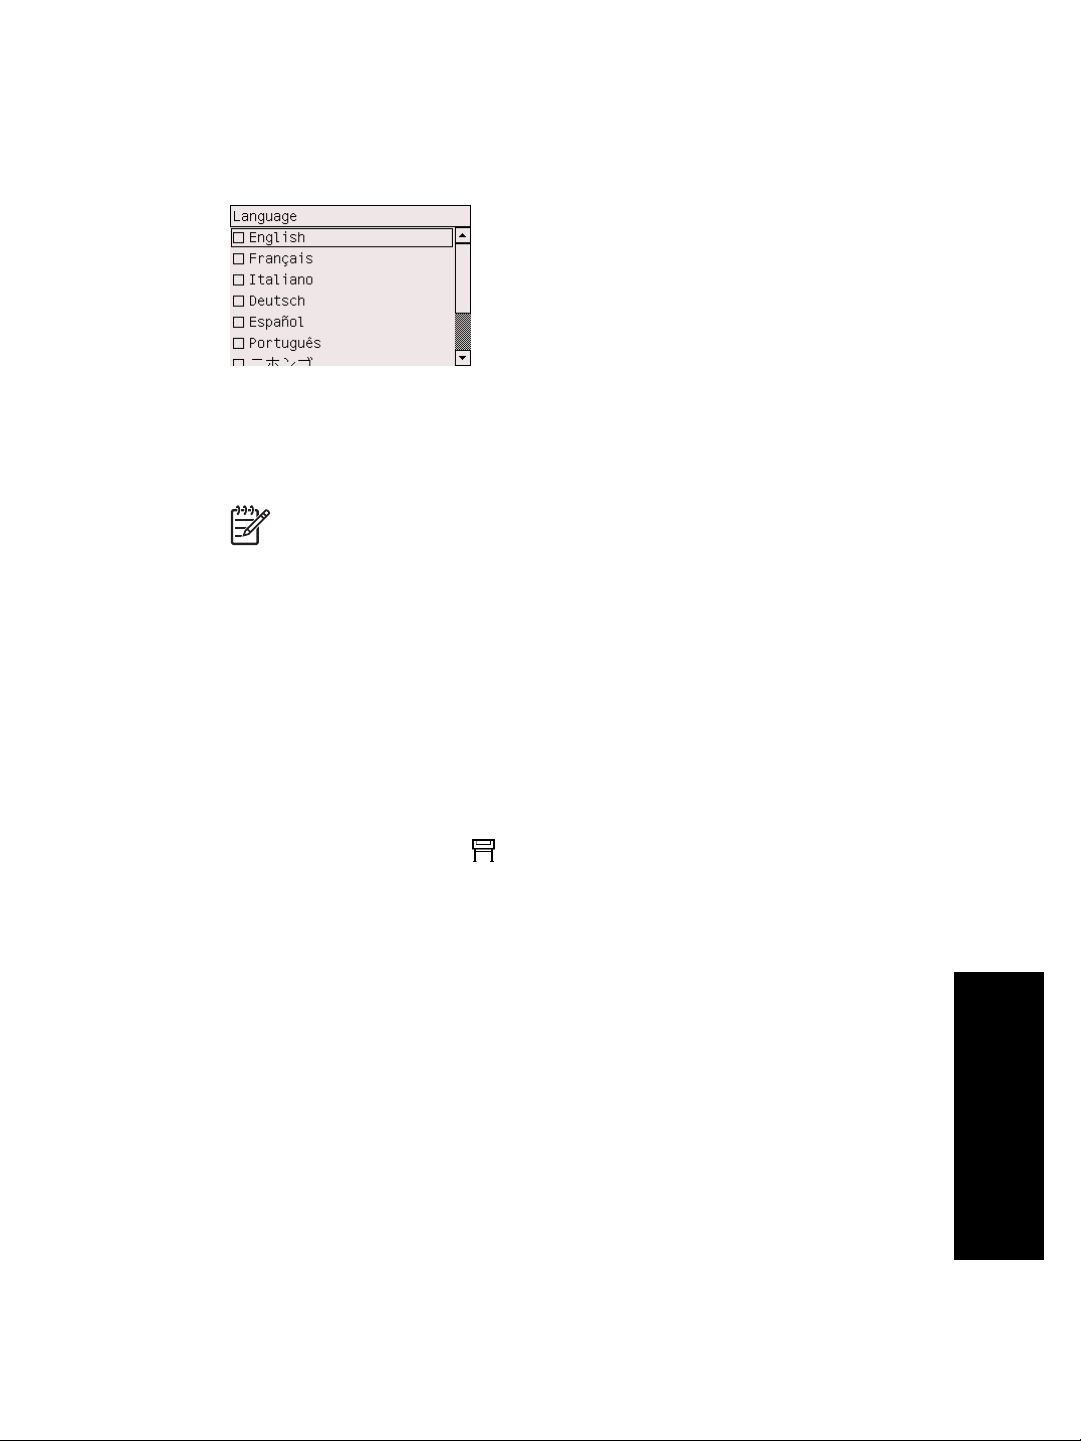
The language selection menu should now appear on the front panel.
How do I access the Embedded Web Server?
The Embedded Web Server enables you to manage your printer and your printing
jobs remotely using an ordinary Web browser running on any computer.
Note In order to use the Embedded Web Server, you must have a TCP/IP
connection to your printer. If you have an Appletalk, Novell, or USB connection
to your printer, you will not be able to use the Embedded Web Server.
The following browsers are known to be compatible with the Embedded Web Server:
● Internet Explorer 5.5 or later, for Windows.
● Internet Explorer 5.2.1 or later, for Mac OS 9.
● Internet Explorer 5.1 or later, for Mac OS X.
● Netscape Navigator 6.01 or later.
● Mozilla 1.5 or later.
● Safari.
There are several ways to access the Embedded Web Server:
● On any computer, open your Web browser and give the address of your printer.
You can find out the address of your printer (starting with http:) from the front
panel, by highlighting the
● Select Status of my printer, Check media available, or Manage my printer's
queue from the Services tab of your Windows printer driver, or from the Services
panel of your Mac OS printer driver.
● On a computer running Windows with your printer software installed, double–click
the Printer Access Utility icon on your desktop, then select your printer.
If you have followed these instructions but failed to get through to the Embedded Web
Server, see “The problem is I cannot access the Embedded Web Server from my
browser” on page 221.
icon.
How do I operate the printer?
Using IP over FireWire with Mac OS X 10.3
If you are using Mac OS X 10.3 and have a FireWire connection to your printer, it is
possible to set up an IP address for the printer in order to use the Embedded Web
Server. To do this:
1. Open System Preferences and click Network.
2. Choose Network Port Configurations from the Show pop-up menu.
75
Page 78

Chapter 4
3. Click New, and then choose FireWire from the Port pop-up menu. You can give
the new port configuration a name, FireWire.
4. Drag the port configuration to the top of the Port Configuration list. This ensures
that the port is assigned an IP address.
5. Click Apply Now.
If you don't drag the FireWire port configuration to the top of the Port Configuration
list, you need to choose Manually (or DHCP with manual address) from the
Configure IPv4 pop-up menu, and then enter an IP address. See
http://www.apple.com/ for more detail or updated information on activating IP over
FireWire.
When the printer is connected through FireWire, we recommend adding the printer
using the FireWire modules in order to take full advantage of FireWire printing, and to
use the IP over FireWire only to visit the printer’s Embedded Web Server.
If you connect your printer through FireWire and the printer is also connected to the
network through Fast Ethernet or Gigabit Ethernet, the printer’s IP over FireWire will
not be available and you will not be able to access the Embedded Web Server from
the Printer Dialog. However, you will be able to print through FireWire.
Also in the case of printer sharing over FireWire, remote users will not be able to
access the Embedded Web Server from the Printer Dialog, although they will be able
to print.
How do I change the language of the Embedded Web
Server?
The Embedded Web Server can work in the following languages: English,
Portuguese, Spanish, French, Italian, German, Simplified Chinese, Traditional
Chinese, Korean, and Japanese. It will choose whichever language you have
specified in your Web browser's options. If you have specified a language that it
cannot support, it will work in English.
To change the language, you must change your Web browser's language setting. For
example, in Internet Explorer version 6, go to the Tools menu and select Internet
Options, Languages. Then ensure that the language you want is at the top of the list
in the dialog box.
How do I password–protect the Embedded Web Server?
1. In the Embedded Web Server, go to the Security page, which you can find in the
Settings tab.
2. Enter a password of your own choice in the New password field.
3. Enter it again in the Confirm password field to guard against misspelling.
4. Click Set password.
Now no-one will be able to perform the following actions with the Embedded Web
Server without giving the password:
● Manage print jobs in the queue (cancel, delete)
How do I operate the printer?
76
● View previews of print jobs
● Delete stored jobs
Page 79

● Clear accounting information
● Update the printer's firmware
Note If you forget the password, see “The problem is I cannot access the
Embedded Web Server from my browser” on page 221.
How do I request e-mail notification of specific error
conditions?
1. In the Embedded Web Server, go to the E-mail server page, which you can find in
the Settings Tab, and ensure that the following fields are correctly filled in:
– SMTP server: the IP address of the outgoing mail server (SMTP) that will
process all e-mail messages from the printer. If the mail server requires
authentication, e-mail notifications will not work.
– Printer e-mail address: each e-mail message sent by the printer must
include a return address, which does not need to be a real, functional e-mail
address, but it should be unique, so that recipients of the message can
identify the printer that sent it.
2. Go to the Notification page, which is also in the Settings tab.
3. Click New to request new notifications (or Edit to edit notifications that have
already been set up). Then fill in the e-mail addresses to which notifications
should be sent, and select the incidents that should result in notification
messages. Initially the most commonly-specified incidents are shown; to see all
the possibilities, click Show all alerts.
How do I change the sleep mode setting?
If the printer is left switched on but unused for a certain period of time, it will go
automatically into sleep mode to save power. To change the time the printer waits
before it goes into sleep mode, go to the front panel and select the
Configuration menu > Sleep mode wait time.
How do I turn off the buzzer?
To turn the printer's buzzer on or off, go to the front panel and select the icon, then
Configuration menu > Buzzer.
How do I change the front panel contrast?
To change the contrast of the front panel display, select the icon, then
Configuration menu > Display contrast, and choose a value using the Up or Down
key. Press the Select key to set the value you have chosen.
How do I change the units of measurement?
To change the units of measurement displayed in the front panel, select the icon,
then Configuration menu > Unit selection, and select English or Metric.
icon, then
How do I operate the printer?
77
Page 80

Chapter 4
How do I adjust for altitude?
Your printer will work better if you tell it roughly at what altitude it is. To set the
altitude, go to the front panel and select the icon, then Configuration menu >
Altitude, and select a range.
How do I operate the printer?
78
Page 81

5
How do I handle paper?
● “How do I load a roll onto the spindle?” on page 79
● “How do I load a roll into the printer?” on page 83
● “How do I unload a roll from the printer?” on page 88
● “How do I load a single sheet?” on page 89
● “How do I unload a single sheet?” on page 93
● “How do I select supported paper types?” on page 94
● “How do I view information about the paper?” on page 95
● “How do I download media profiles?” on page 96
● “How do I use non-HP paper?” on page 96
● “How do I cancel the drying time?” on page 96
● “How do I change the drying time?” on page 97
How do I load a roll onto the spindle?
1. Make sure the printer wheels are locked (the brake lever is pressed down) to
prevent the printer from moving.
2. Lower the spindle lever.
How do I handle paper?
3. Remove the right-hand end of the spindle (1) from the printer, then move it to the
right in order to extract the other end (2). Do not insert your fingers into the
spindle supports during the removal process.
79
Page 82

How do I handle paper?
Chapter 5
The spindle has a stop at each end to keep the roll in position. The stop at the lefthand end can be removed to mount a new roll, it slides along the spindle to hold
rolls of different widths.
4. Remove the blue paper stop (1) from the left-hand end of the spindle.
5. If your roll has a three-inch cardboard core, ensure that the core adaptors
supplied with the printer have been installed. See below:
6. The roll may be very long; rest the spindle horizontally on a table and load the roll
on the table. Bear in mind that you may need two people to handle it.
7. Slide the new roll onto the spindle. Make sure the paper type is oriented as
shown. If it is not, remove the roll, turn it 180 degrees and slide it back on to the
spindle.
Note There is also a label on the spindle showing the correct orientation.
80
Page 83

8. Put the blue paper stop on to the upper end of the spindle, and push it towards
the end of the roll.
9. Ensure the blue paper stop is pushed in as far as it will go, without using
excessive force.
How do I handle paper?
81
Page 84

How do I handle paper?
Chapter 5
10. With the blue paper stop on the left, slide the spindle into the printer left and then
right as shown by the arrows 1 and 2.
11. To make sure that the right end of the spindle is in place, check that the spindle
lever is in its top position (horizontal). You can move the lever yourself if
necessary.
82
If you are a regular user of different paper types, you can change rolls more quickly if
you pre-load rolls of different paper types on different spindles. Extra spindles are
available for purchase.
Page 85
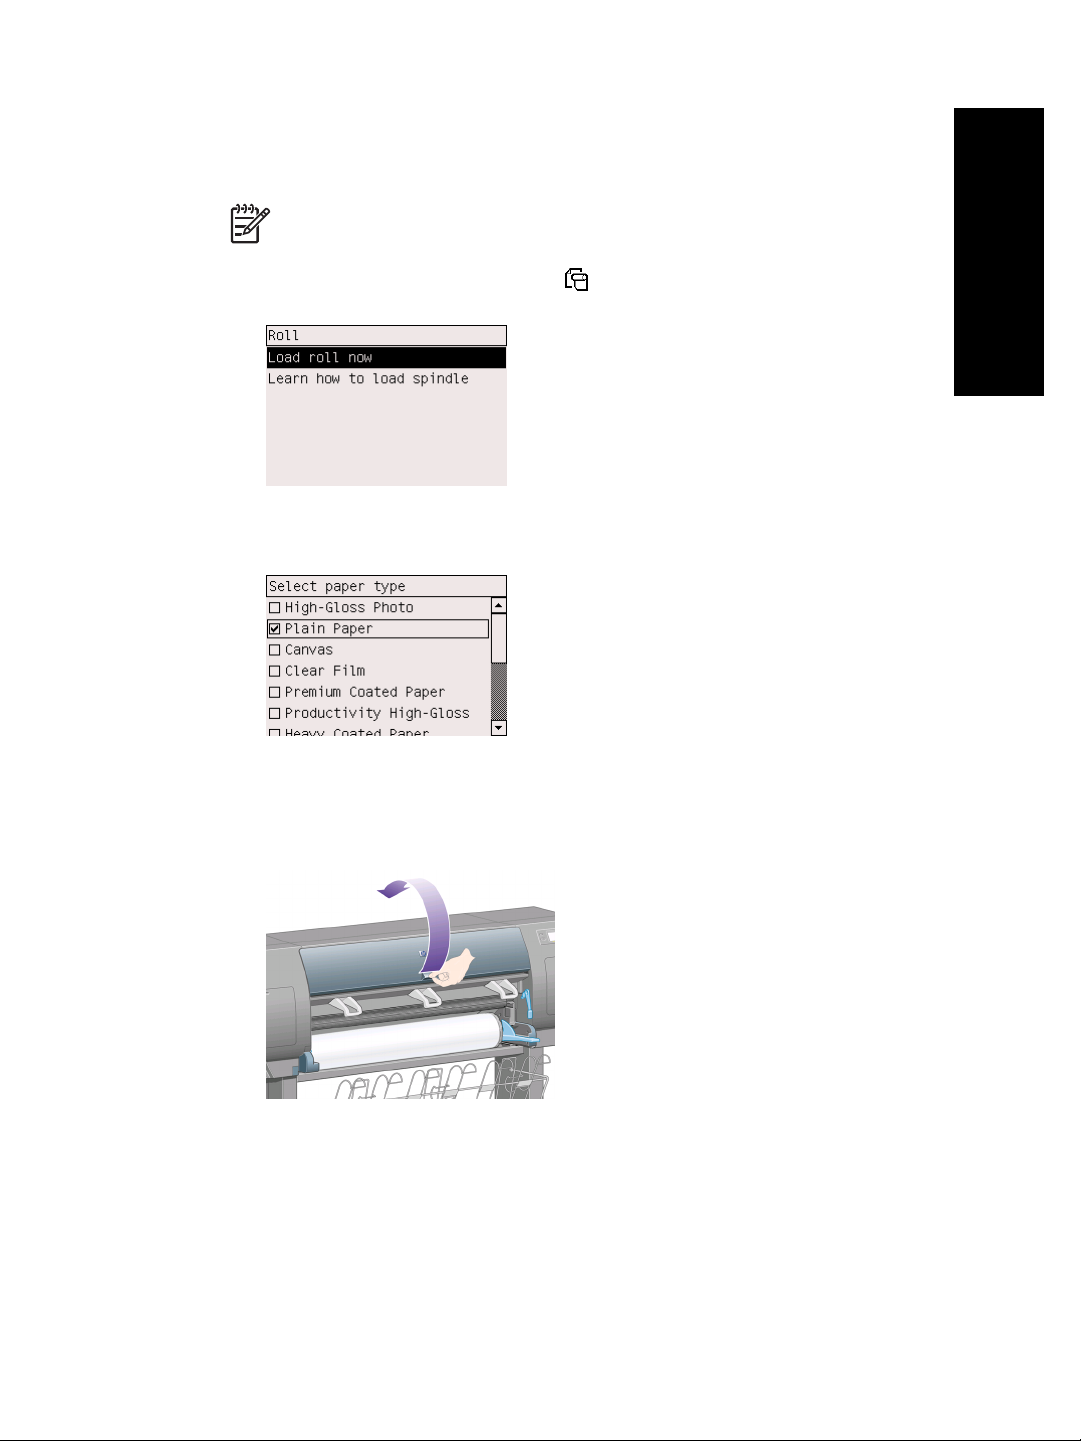
How do I load a roll into the printer?
Note To start this procedure you need to have a roll loaded on the spindle.
See “How do I load a roll onto the spindle?” on page 79.
1.
At the printer's front panel, select the
2. The front panel displays a list of paper types.
icon, then Roll > Load roll now.
How do I handle paper?
3. Select the paper type you are using. If it is not clear which you should select, see
“How do I select supported paper types?” on page 94.
4. Wait until the front panel prompts you to open the window.
83
Page 86

How do I handle paper?
Chapter 5
5. Lift the paper load lever.
6. Pull out approximately 1 m (3 ft.) of paper.
84
Page 87

7. Carefully insert the leading edge of the roll above the black roller.
Warning 1 Take care not to touch the rubber wheels on the platen while
loading paper: they may rotate and trap skin, hair, or clothing.
Warning 2 Take care not to push your fingers inside the printer's paper
path. It is not designed to accommodate fingers, and the results may be
painful.
8. Wait until the paper emerges from the printer as shown below.
How do I handle paper?
Note If you have an unexpected problem at any stage of the paper
loading process, see “The problem is the paper cannot be loaded
successfully” on page 209.
85
Page 88

How do I handle paper?
Chapter 5
9. Align the right-hand edge of the paper with the blue line and the left edge of the
half-circle on the right of the platen.
10. When the paper is correctly aligned with the blue line and half-circle, lower the
paper load lever.
86
11. The front panel prompts you to wind excess paper onto the roll.
Page 89

12. Wind the excess paper onto the roll. Use the paper stop to turn the roll in the
direction shown.
13. Lower the window.
14. The front panel again prompts you to wind excess paper onto the roll.
How do I handle paper?
15. The printer will perform a color calibration, if it has not already calibrated the
paper type you are using, and if color calibration is turned on. See “How do I
perform color calibration?” on page 139.
16. The front panel displays the Ready message and the printer is ready to print.
87
Page 90

Chapter 5
How do I unload a roll from the printer?
If there is more than 30 cm of paper remaining of the roll, use the following procedure.
1.
At the printer's front panel, select the
2. The paper will normally be removed from the printer.
If the paper is not automatically removed from the printer, the front panel will
prompt you to lift the paper load lever and turn the paper stop (1) by hand until
How do I handle paper?
the paper is removed from the printer. When you have finished, lower the paper
load lever.
3. Turn the paper stop (1) by hand, until the paper is fully wound onto the roll.
4. Press the Select key.
5. Press the spindle lever (2) down and remove the roll from the printer, pulling out
the right-hand end first. Do not insert your fingers into the spindle supports during
the removal process.
icon, then Unload paper now.
88
If there is less than 30 cm remaining of the roll, use the following procedure:
1. If you have already selected Unload paper now at the front panel, press the
Cancel key to cancel that procedure.
2. Ensure that the paper load lever is in the down position, and press the Form
Feed and Cut key twice (or until the paper advances).
3. Raise the paper load lever and pull the paper out manually.
4. Press the spindle lever (2) down and remove the empty spindle from the printer,
pulling out the right-hand end first. Do not insert your fingers into the spindle
supports during the removal process.
Page 91

How do I load a single sheet?
Any loaded roll must be unloaded before loading a sheet. See “How do I unload a roll
from the printer?” on page 88.
1.
At the printer's front panel, select the
Note As usual, you must press the Select key to select this option.
2. The front panel displays a list of paper types.
How do I handle paper?
icon, then Sheet > Load sheet now.
3. Select the paper type you are using. If it is not clear which you should select, see
“How do I select supported paper types?” on page 94.
89
Page 92
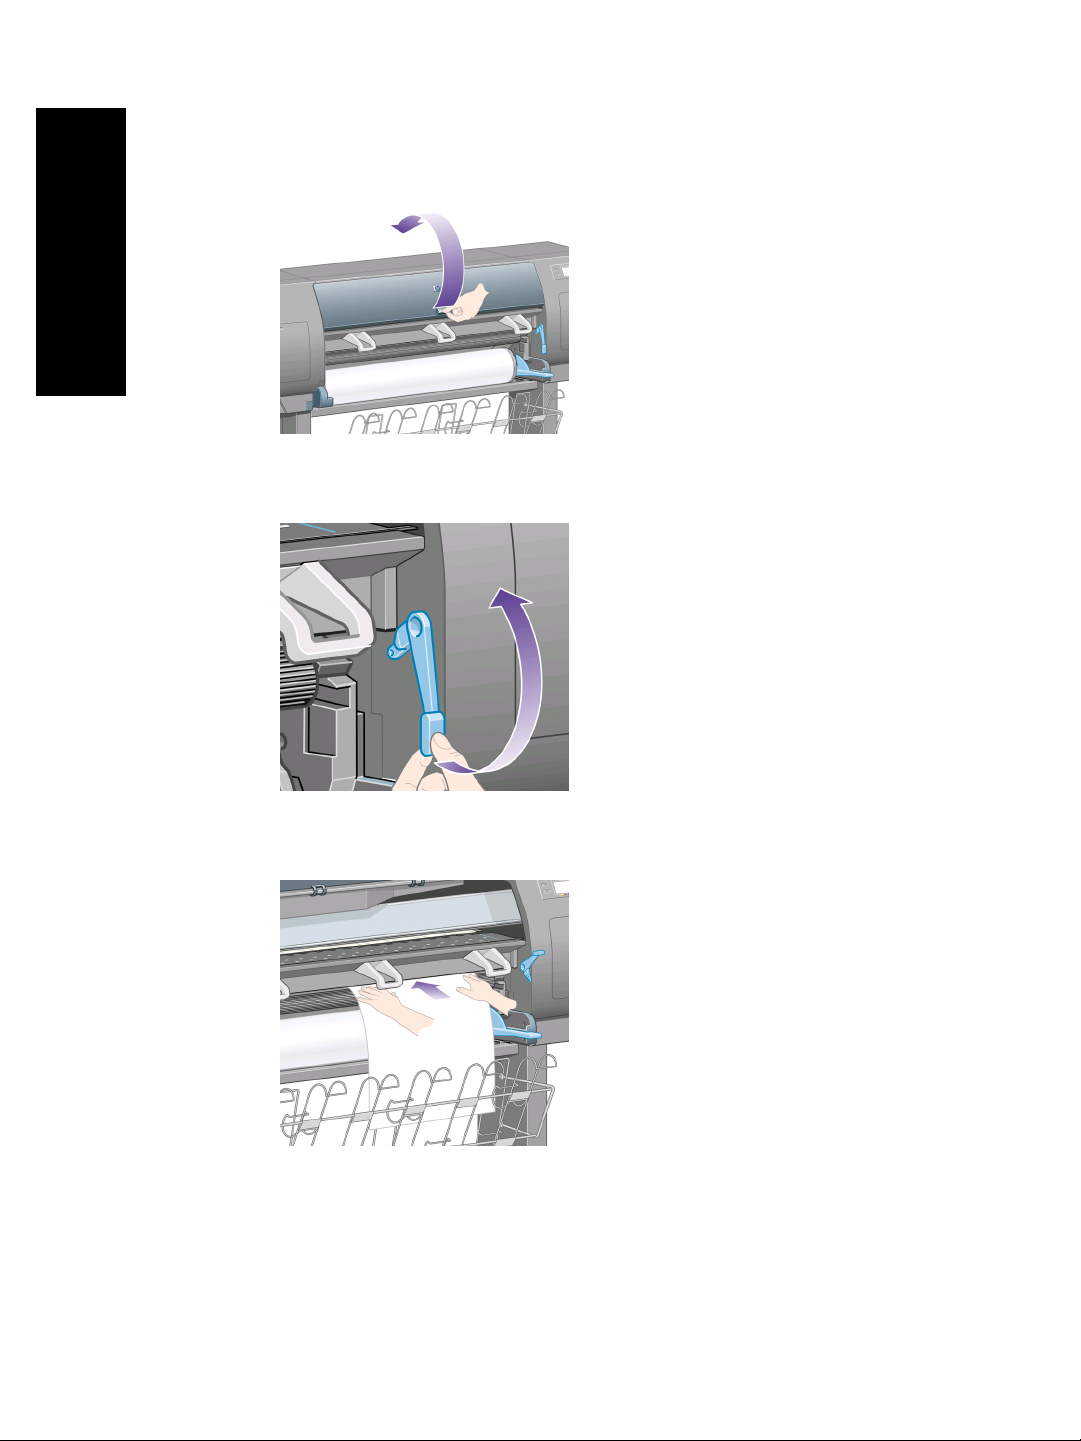
How do I handle paper?
Chapter 5
4. Wait until the front panel prompts you to open the window.
5. Lift the paper load lever.
90
6. Insert the sheet into the printer as shown below.
Page 93
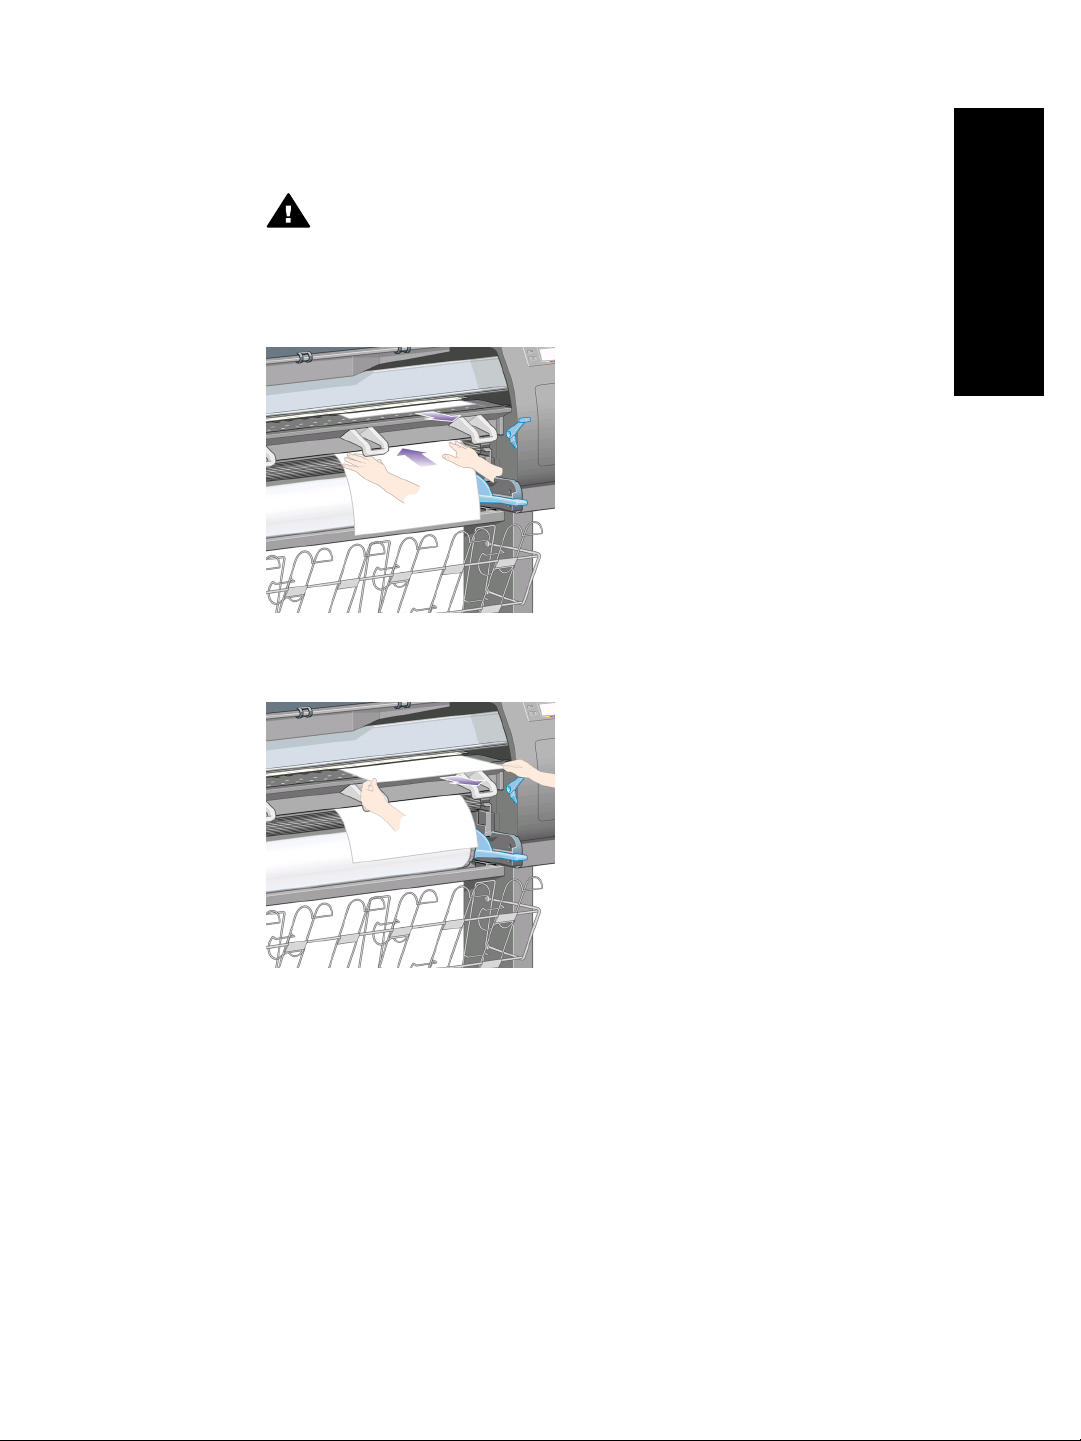
7. Insert the sheet until it reappears from the printer as shown below.
Warning 1 Take care not to touch the rubber wheels on the platen while
loading paper: they may rotate and trap skin, hair or clothing.
Warning 2 Take care not to push your fingers inside the printer's paper
path. It is not designed to accommodate fingers, and the results may be
painful.
8. Pull the sheet out from the top.
How do I handle paper?
91
Page 94

How do I handle paper?
Chapter 5
9. Align the leading edge of the sheet with the metal bar in the platen.
Align the right-hand edge of the sheet with the left edge of the half-circle on the
platen, as shown below.
10. Lower the window.
11. Lower the paper load lever.
92
12. If the paper has been loaded successfully, the front panel displays the Ready
message and the printer is ready to print. If something has gone wrong (paper
mispositioned or misaligned), follow the instructions on the front panel.
Page 95

13. If you are printing on a sheet of paper less than 900 mm in length (up to A1 size),
deploy the three mobile stoppers on the bin.
Note 1 When printing on sheet paper you are recommended to select
Normal or Best print quality, see “How do I change the print
quality?” on page 129.
Note 2 If you have an unexpected problem at any stage of the paper loading
process, see “The problem is the paper cannot be loaded
successfully” on page 209.
How do I unload a single sheet?
At the printer's front panel, select the icon, then Unload paper now.
To give the ink time to dry, the printer holds the sheet for some time (see “Tell me
about drying time” on page 238).
How do I handle paper?
93
Page 96
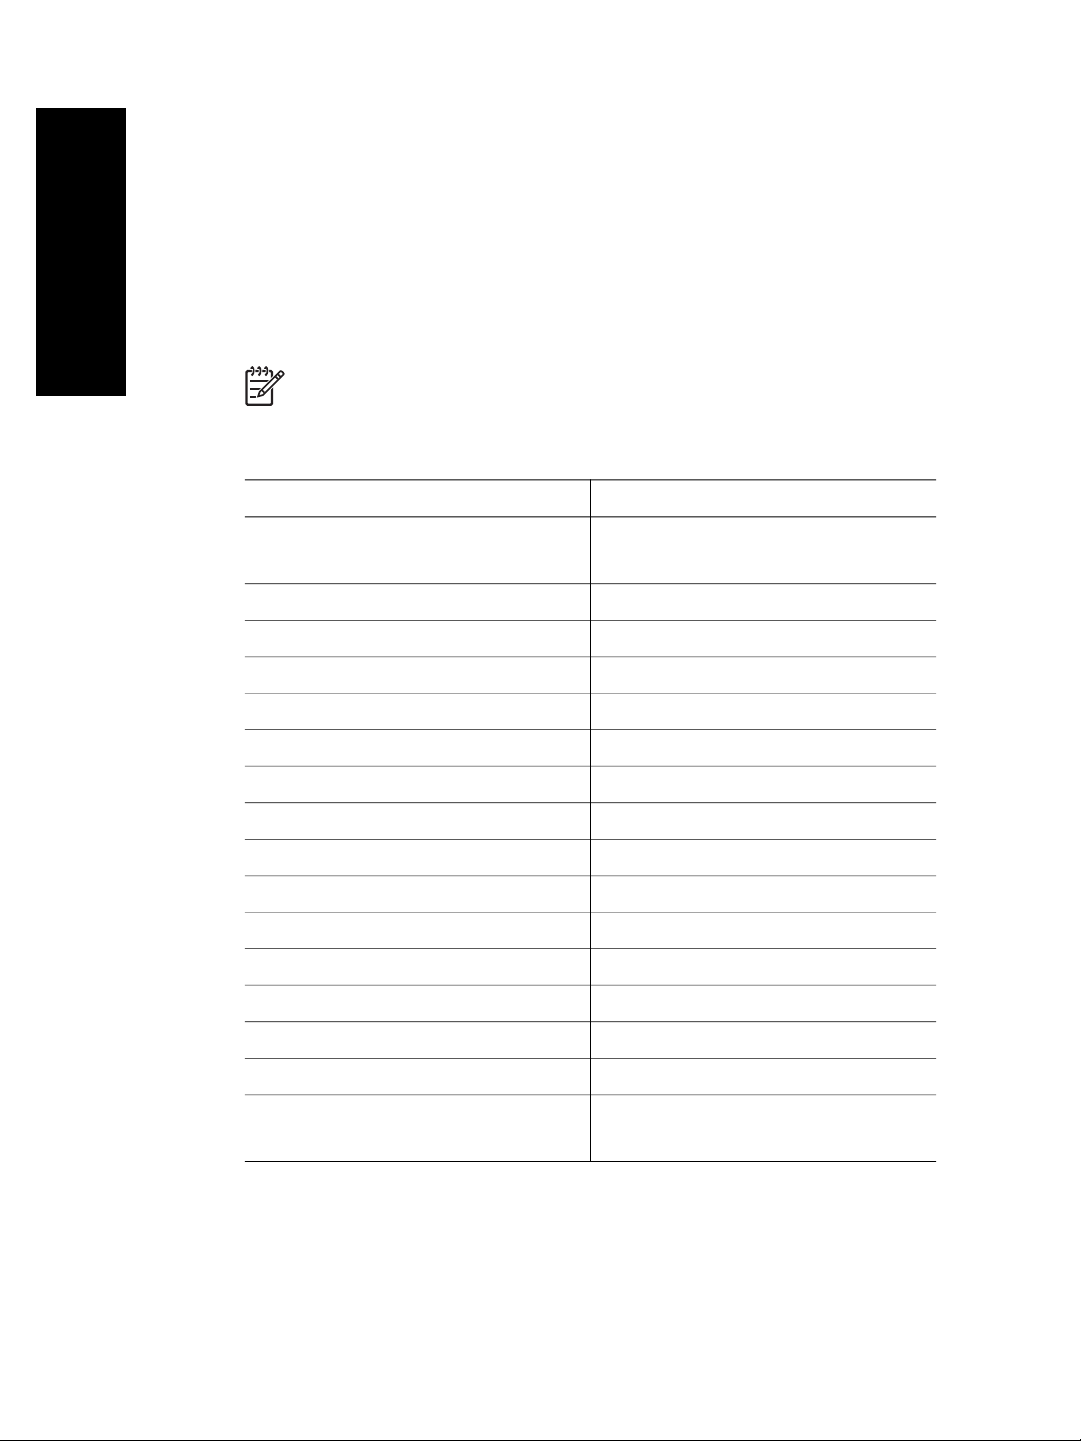
Chapter 5
How do I select supported paper types?
The following tables list the HP paper types that are suitable for use with your printer,
and show the name that you should select in the front panel when loading each paper
type. The “recommended” paper types, listed first, have been thoroughly tested and
are known to provide the best print quality when used with your printer. The “other
supported” paper types can be used with your printer but are not guaranteed to
provide the best print quality. For the part numbers, widths, and weights of these
How do I handle paper?
papers, see “Tell me about ordering paper” on page 245.
Note This list is likely to change over the course of time. For the latest
information, see http://www.hp.com/go/designjet.
Recommended paper types
Product name
HP Bright White Inkjet Bond Paper Bright White
HP Matte Film Matte Film
HP Clear Film Clear Film
HP Natural Tracing Paper Natural Tracing Paper
Front panel name
Max Speed Bright White
HP Translucent Bond Translucent Bond
HP Vellum Vellum
HP Coated Paper Coated Paper
HP Heavyweight Coated Paper Heavyweight Coated Paper
HP Heavyweight Coated Paper—long roll Heavyweight Coated Paper
HP Productivity Photo Gloss Productivity Photo Gloss
HP Productivity Photo Semi-Gloss Productivity Photo Gloss
HP Photo Paper RC Matte High-Gloss Photo Paper
HP Proofing Paper RC Satin High-Gloss Photo Paper
HP Universal High-Gloss Photo Paper High-Gloss Photo Paper
HP Universal Semi-Gloss Photo Paper High-Gloss Photo Paper
HP Universal Inkjet Bond Paper Bond Paper
Max Speed Bond Paper
94
Page 97
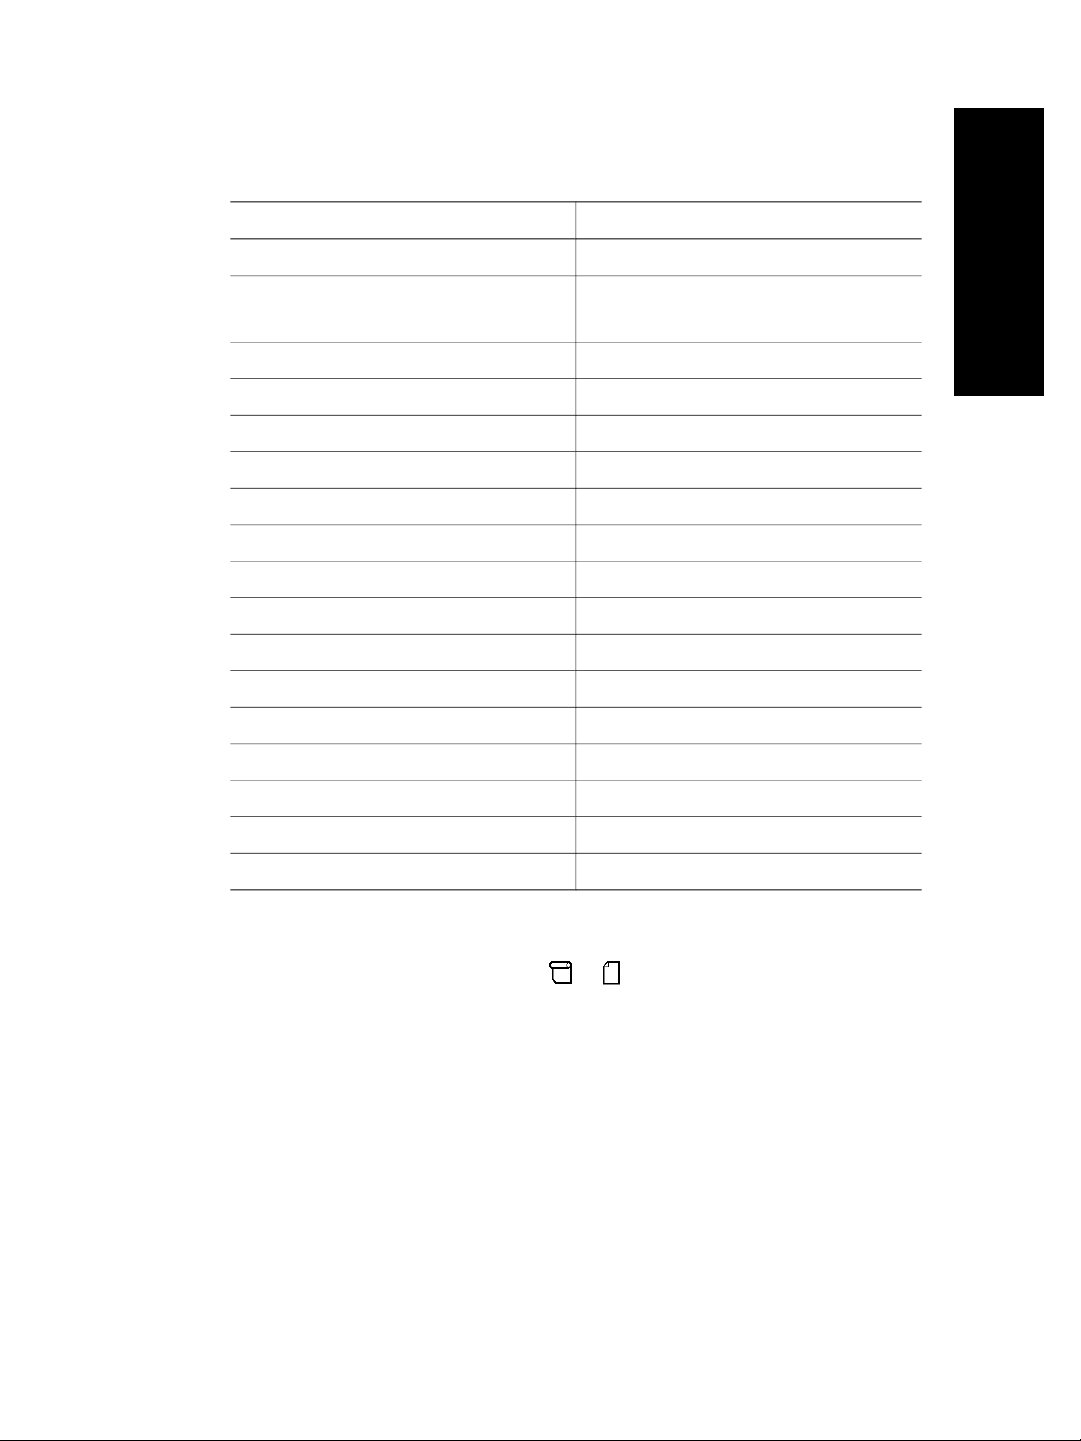
Other supported paper types
Product name
HP Polyester Film Opaque White Glossy High-Gloss Photo Paper
HP Universal Coated Paper Bright White
HP Universal Heavyweight Coated Paper Heavyweight Coated Paper
HP Super Heavyweight Coated Paper Super Heavy Coated Paper
HP Banners with Tyvek Super Heavy Coated Paper
HP Colorfast Adhesive Vinyl High-Gloss Photo Paper
HP Backlit Film Reverse Print Matte Matte Film
HP Studio Canvas Canvas
HP Outdoor Billboard Paper Blue Back Super Heavy Coated Paper
HP Canvas Matte Canvas
HP Outdoor Paper Super Heavy Coated Paper
HP Canvas Paper 140 gsm Canvas
HP Canvas Paper 180 gsm Canvas
Front panel name
Max Speed Bright White
How do I handle paper?
HP Fine Art Paper Aquarella Super Heavy Coated Paper
HP Fine Art Paper Cream Super Heavy Coated Paper
HP Fine Art Paper Sahara Super Heavy Coated Paper
HP Indoor Paper Self-Adhesive Super Heavy Coated Paper
How do I view information about the paper?
At the printer's front panel, highlight the or icon.
You will see the following information displayed on the front panel:
● The paper source (roll or sheet)
● The paper manufacturer's name
● The paper type you have selected
● The total width of the paper in millimeters (as measured by the printer)
If no paper is loaded, the message Out of paper is displayed.
The same information (apart from the manufacturer's name) is displayed on the
Embedded Web Server's Supplies page.
95
Page 98

Chapter 5
How do I download media profiles?
Each supported paper type has its own characteristics. For optimum print quality, the
printer changes the way it prints on each different paper type. For example, some may
need more ink and some may require a longer drying time. So the printer must be
given a description of the requirements of each paper type. This description is called
the “media profile”. The media profile contains the ICC profile, which describes the
color characteristics of the paper; it also contains information on other characteristics
How do I handle paper?
and requirements of the paper that are not directly related to color. Existing media
profiles for your printer are already installed in the printer's software.
However, you would find it inconvenient to scroll through a list of all paper types
available for your printer, so your printer contains media profiles for only the most
commonly used paper types. If you buy a paper type for which your printer has no
media profile, you will find that you cannot select that paper type in the front panel. To
download the correct media profile, go to http://www.hp.com/support/designjet-
downloads/, select the name of your printer, then select Media profiles.
If you do not find the media profile you want on the Web, you may find that it has been
added to the latest firmware for your printer. You can check the firmware release
notes for information. See “How do I update my printer's firmware?” on page 173.
How do I use non-HP paper?
HP's own paper types have been fully tested with the printer and can be expected to
give the best print quality.
However, you can print on paper from any manufacturer. In that case, you should
select (in the front panel) the HP paper type that is most similar to the paper you will
be using. If in doubt, try several different HP paper type settings, and choose the one
that provides you with the best print quality. If results are not entirely satisfactory with
any paper type setting, see “General advice” on page 189.
How do I cancel the drying time?
Press the Form Feed and Cut key (1) on the front panel.
Caution A print that has had insufficient time to dry can suffer from quality
problems.
96
Page 99

How do I change the drying time?
You may wish to change the drying time setting to suit special printing conditions.
How do I handle paper?
Select the
Extended, Optimal, Reduced, or None.
See “Tell me about drying time” on page 238.
icon, then Drying options > Drying time. You can then select
97
Page 100

How do I handle paper?
Chapter 5
98
 Loading...