

Page 1

C4699-90031 English
User’s Guide
HP DesignJet 330 and 350C
Plotters
Page 2
Finding information
This User’s Guide for the HP DesignJet 330 and 350C plotters contains the
following types of information:
setup
use
maintenance
troubleshooting
reference material.
T o help with finding specific information, a comprehensive table of contents is
provided at the front and an alphabetical index is provided at the back.
You will notice the use of symbols in the left margin and shaded backgrounds to
the text. These are used to identify different types of information as follows:
330
350C
Information specific only to the HP DesignJet 330 is shown like this.
Information specific only to the HP DesignJet 350C is shown like this.
All other information is applicable to both plotters.
The accompanying Quick Reference Guide contains:
selected information to help with everyday use of the plotter.
It is designed to be stored in the plastic pocket at the side of the plotter.
ii
Page 3
Where to find the most commonly needed information
To find how to ... Go to ...
Install the plotter.
Connect the plotter.
Configure the plotter using the Setup Sheet.
Load media.
Set the print quality.
Check cartridge alignment
Replace a cartridge.
Clean the cartridge nozzles by priming them.
Interpret the lights on the front panel.
Clear a media jam.
Solve print quality problems.
Order accessories.
T o find any other information ...
Chapter 1
Page 1–17
Page 1–19
Page 2–9
Page 3–15
Chapter 5
Page 7–2
Page 7–7
Chapter 8
Page 9–5
Page 9–12
Page 10–15
Go to the index
at the back
this manual.
of
iii
Page 4

iv
Page 5

Contents
Finding information ii
Welcome ix
1 Setting up your plotter
Fast track 1–2
Setup checklist 1–3
T ask 1: Check that you have all the items required 1–4
T ask 2: (Optional) Install a memory expansion module 1–6
T ask 3: Position the plotter 1–8
T ask 4: Switch on 1–9
T ask 5: Load the print cartridge(s) 1–10
T ask 6: (Optional) Change the language 1–14
T ask 7: Connect the plotter to your computer 1–17
T ask 8: (Optional) Configure the plotter 1–19
T ask 9: Set up the plotter in your application software 1–24
T ask 10: Send a sample or demo plot 1–26
2 Working with media
Caring for your media 2–2
Choosing media 2–2
Supported media types and relative costs 2–3
Physical characteristics of media types 2–4
HP DesignJet 350C: Recommended print quality settings and recommended
media for color plots 2–5
T ypical media-type choices by application 2–6
Before loading media 2–7
Before sending your file 2–7
Loading sheet media 2–9
T o load a sheet (without the roll-feed option installed) 2–9
T o realign the sheet manually (if necessary) 2–14
Loading roll media 2–17
T o change the roll 2–17
T o feed roll media into the plotter 2–21
T o load a sheet with the roll-feed option installed 2–26
Unloading media 2–27
Drying time 2–27
T o unload a sheet at the end of a plot 2–28
T o unload a sheet under any other circumstances 2–28
T o cut and unload a plot from a roll 2–29
CONTENTS
v
Page 6

Contents
3 Controlling your plot’s appearance
Ways to control the plots’ appearance 3–2
Page size 3–3
When do you need to adjust the page size in the plotter? 3–4
T o adjust the page size in the Setup Sheet 3–5
Page size and clipped plots 3–6
Rotating a plot 3–7
Can you rotate any drawing using the Setup Sheet? 3–7
T o rotate a plot using the plotter’s Setup Sheet 3–7
Exactly what is rotated? 3–8
The Rotate feature and clipped plots 3–9
How does Rotate interact with your software? 3–9
Plotting a mirror image 3–10
Changing the treatment of overlapping lines (Merge feature) 3–11
Changing the plotter’s logical pen characteristics 3–12
Printing color drawings in monochrome 3–13
T o switch from color to monochrome 3–13
Important points about monochrome printing 3–14
Choosing an appropriate print quality 3–15
T o change the print quality on the front panel 3–16
4 Managing your plots
T o cancel a plot 4–2
T o copy a plot 4–2
T o advance the media 4–3
5 Special internal plots
Their purpose and how to print them 5–2
Using the Black Cartridge Alignment Sheet 5–3
Using the Color Cartridge T est Sheet 5–7
vi
Page 7

6 Reconfiguring your plotter
T o see the current configuration of the plotter 6–2
T o change the serial interface settings 6–3
T o change the graphics language setting for less common applications 6–3
T o change the I/O timeout setting 6–4
T o upgrade your plotter with more memory 6–4
File size and memory usage 6–4
T o upgrade your plotter with a network interface 6–5
T o upgrade the HP DesignJet 330 plotter with color 6–5
7 Maintaining your plotter
Replacing cartridges 7–2
When to replace cartridges 7–2
Using genuine HP supplies 7–3
Before replacing cartridges 7–4
T o replace one or more cartridges 7–5
Cleaning the cartridge nozzles (priming) 7–7
Cleaning the plotter 7–9
Contents
CONTENTS
8 Front-panel lights
9 Troubleshooting
Using the documentation 9–2
Locating the source of your problem 9–3
Solving media-handling problems 9–4
If the plotter will not accept your media 9–4
If the plotter continually rejects your media, with the Error and Load Media
lights flashing 9–4
Clearing a media jam 9–5
Solving communication problems 9–8
Solving problems with plot position or content 9–9
If the plot is completely blank 9–9
If the output contains only a partial plot 9–9
If the plot is clipped 9–10
If the entire plot is in one quadrant of the correct plotting area 9–10
If one plot overlays another plot on the same sheet 9–10
If the output is distorted or unintelligible 9–11
If the plotter has drawn a different plot than the one you were
expecting 9–11
If pen settings seem to have no effect 9–11
vii
Page 8

Contents
Solving print-quality problems 9–12
If there are white streaks in solid areas or gaps in lines 9–12
If there are jagged vertical or horizontal lines 9–14
If there are slightly warped lines 9–14
If there are color “shadows” 9–14
If a cartridge is not printing at all 9–14
If there are blurred lines (ink “bleeds” from lines) 9–15
If there are blotchy areas (uneven fill density) 9–15
If there is other pronounced banding in area fills 9–15
If ink smears after you remove a plot 9–16
If the print quality appears to be poor just in one part of the plot 9–16
Solving miscellaneous problems 9–17
If the plotter does not plot 9–17
If the plotter seems too slow 9–17
Getting help 9–18
What to do before you call 9–18
If a repair is needed 9–19
10 Reference
Plotter specifications 10–2
Interface specifications 10–8
Parallel (Bi-Tronics/Centronics) Cable 10–9
Serial (RS-232-C) Cables 10–10
Interface cables 10–11
Regulatory notices 10–12
Ordering accessories 10–15
HP part numbers for HP DesignJet Papers and Films 10–18
HP-GL/2 and HP RTL programming information 10–19
How to order supplies and accessories 10–19
11 Glossary
Index
Documentation map
Please give us your feedback (removable)
viii
Page 9

Welcome
Welcome
An introduction to the HP DesignJet 330 and 350C plotters and their
accessories
WELCOME
330
350C
r0006
0006
The HP DesignJet 330 and HP DesignJet 350C are large-format inkjet plotters
employing HP
disposable print cartridge technology.
The HP DesignJet 330 prints in monochrome and uses a single cartridge,
containing black ink, one of which is supplied with your plotter.
The HP DesignJet 350C prints in color or monochrome, using
yellow , cyan, magenta and black cartridges, a set of which is
supplied with your plotter. All other supported colors are
generated using these four.
1749a
ix
Page 10
Welcome
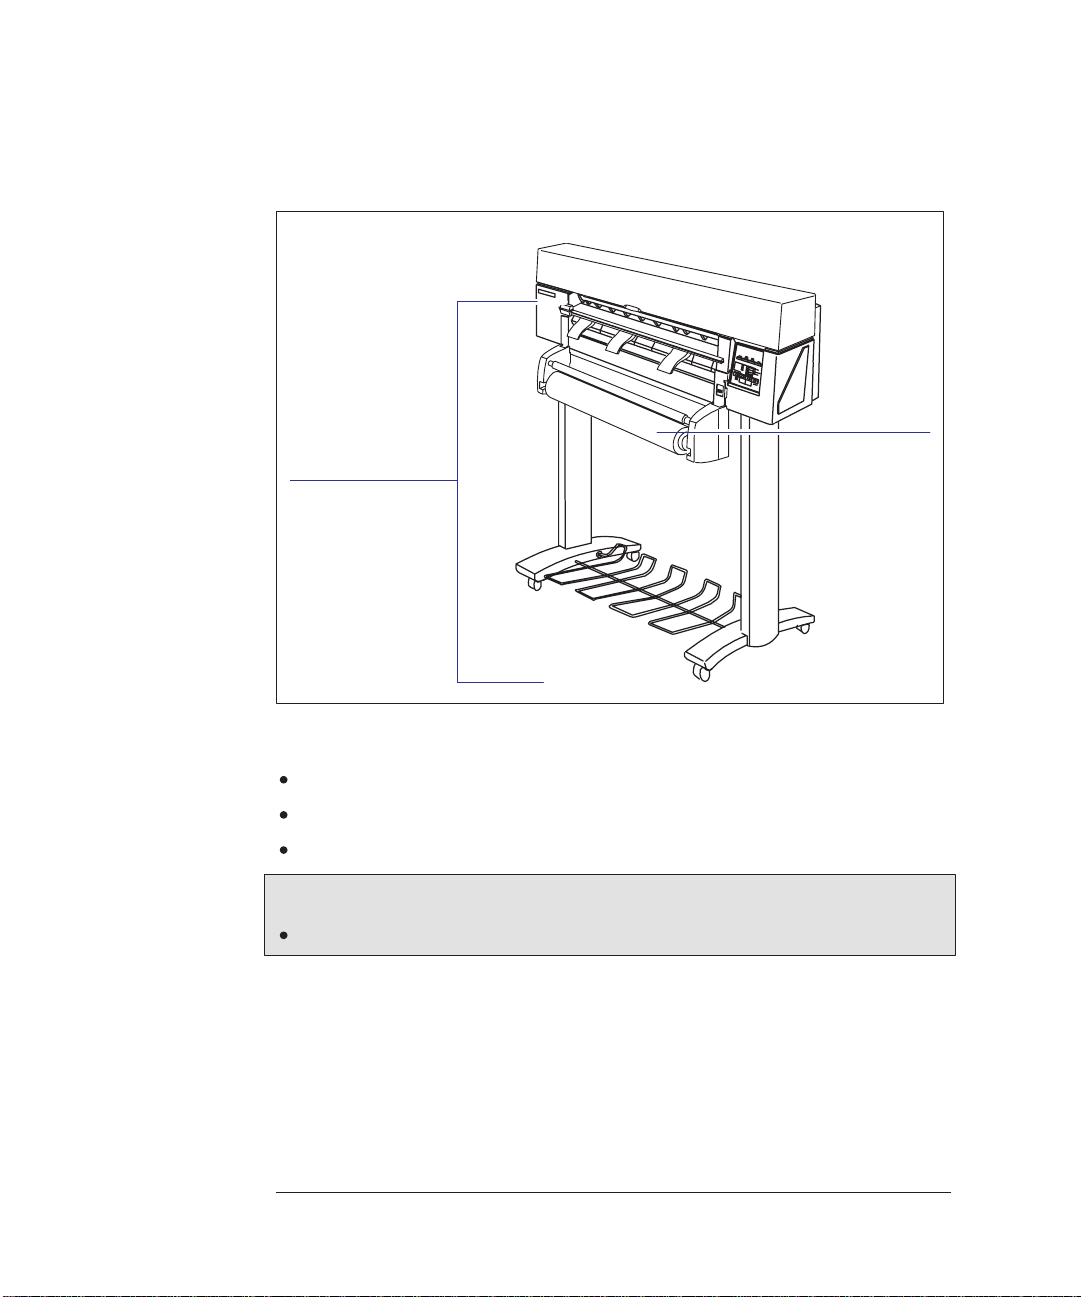
Accessories
Roll-feed and legs
assembly
Extra spindles
Media
deflector
with E/A0-size only
1916
330
You have a large series of accessories available for use with your plotter, including:
A roll-feed kit, including a legs assembly
Extra spindles for the roll-feed, for easy changing of rolls
Memory expansion modules
In addition, for the HP DesignJet 330:
A color upgrade kit, allowing the plotter to be upgraded to a HP DesignJet 350C
For the full range of available accessories, see page 10–15.
x
Page 11
Welcome
350C
Media
1
You can plot on sheet media up to E/A0 size or D/A1 size, depending on the plotter
model you have.
With the addition of the optional roll-feed kit, you can also plot on roll media up to
E/A0 or or D/A1 width.
2
A large range of media types is supported
:
Opaque bond
Translucent bond
Natural tracing paper
Vellum
Coated paper
Heavyweight coated paper
Matte and clear film
In addition, on the HP DesignJet 350C:
High-gloss film.
WELCOME
For the best-quality plots, use HP media, as your plotter’s configuration is
optimized for it and tested with it. For details of HP media, see page 10–18 and
any separate HP media literature supplied with the plotter.
T o indicate which media type you have loaded, use the plotter’s front panel.
1. It is possible that, since the publication of this document, more media types have been tested and
are now supported for your plotter. For the latest information, contact your HP dealer or local
HP Sales and Support office.
2. There may be differences between the ways some media types are used for color and for monochrome printing. Refer to the media advice later in this manual.
xi
Page 12
Welcome
Print quality
You can choose between three print quality options:
Best
Normal
Fast
In general, the better the print quality you choose, the slower the plotting routine.
The highest resolution in color, for the HP DesignJet 350C, is 300 dpi (dots per
inch) and the highest addressable* resolution in monochrome, for both the HP
DesignJet 330 and the HP DesignJet 350C, is 600 dpi. T o select a print quality
option, use either the keys on the plotter’s front panel or the printer driver in your
software.
Configuration settings
0.13
0.18
0.25
By pressing the Setup key on the front-panel of the plotter, you can print the
plotter’s current configuration in a Setup Sheet. If you want to change any of the
configuration settings (for example, line widths) you can do this by simply
marking your changes on the Setup Sheet and feeding it back into the plotter. The
plotter will read your request and re-configure itself automatically.
Each time you print one of these Setup Sheets it shows the plotter’s latest
configuration – and so please keep the latest one filed with your Quick Reference
Guide in the pocket at the side of the plotter, so that a service engineer would know
the current configuration even if the plotter is temporarily inoperable.
* For a definition of “addressable”, see page 10–3.
xii
Page 13
Welcome
Software applications and drivers
T o make sure that your plotter prints exactly what you were expecting – in terms of
size, position, orientation, color and quality – the key is to use the correct driver for
the combination of your application software and your plotter, and to be confident
that it is configured correctly.
T wo types of HP drivers are supplied with your plotter:
AutoCAD users,
for users of MicrosoftR Windows applications.
These drivers come with printed and online documentation to help you install and
configure them correctly.
Generally , software applications include their own drivers too. For some popular
applications, we have provided with this plotter a set of Software Application
Notes. If you find your own application in these notes, we recommend that you use
the information they contain as an overall guide to configuring the software for
your plotter.
Memory
Your plotter comes with a basic memory of 4MB. Note that there is not a
one-for-one relationship between the plotter’s memory and the maximum size of
file that it can plot. However, in case you need to print particularly large files, the
following memory expansion modules are available; 4MB, 8MB, 16MB, and
32MB. The maximum total memory is 36MB (4 + 32). With some drivers, there
are other means of printing large files – for advice, see page 9–17.
WELCOME
xiii
Page 14

xiv
Page 15

1
Fast track 1-2
Setup checklist 1-3
Task 1: Check that you have all the items required 1-4
Task 2: (Optional) Install a memory expansion module 1-6
Task 3: Position the plotter 1-8
Task 4: Switch on 1-9
Task 5: Load the print cartridge(s) 1-10
Task 6: (Optional) Change the language 1-14
Task 7: Connect the plotter to your computer 1-17
Task 8: Configure the plotter 1-19
Task 9: Set up the plotter in your application software 1-24
Task 10: Send a sample or demo plot 1-26
SETUP
1
Setting up your plotter
1–1
Page 16
Setting up your plotter
Fast track
Fast track
If you meet all the following requirements:
If you are happy with English as the language for the plotter’s internal plots.
If you are experienced at installing printers or plotters.
If you don’t want to add extra memory.
If you are going to connect the plotter directly to a PC.
If you are going to use a parallel connection.
... just follow the five steps on this page, and skip the rest of this chapter.
1 If the plotter is without legs, place it at the edge of a stable platform (see
page 1–10).
2 Connect the power cord and switch the plotter on.
3 Open the cover and load the supplied print cartridge(s) into the carriage on
the left of the plotter. For help, use the label on the plotter near the carriage
and the documentation in the cartridge box. Don’t forget to remove the tape
from the cartridge(s).
4 Switch off the plotter and your computer, connect the parallel cable, and then
switch them on again.
5 Choose your driver disk(s), read the instructions on the label and follow the
printed instructions that were shipped with the driver.
That’ s all!
1–2
Page 17
Setup checklist
Setting up your plotter
Setup checklist
Having unpacked and assembled the plotter, you can use the checklist below as
you complete each task explained in this chapter.
T ask
Check that you have all the items required.
1
(Optional) Install a memory expansion module.
2
Position the plotter.
3
Switch on.
4
Load the print cartridge(s).
5
(Optional) Change the language.
6
Connect the plotter to your computer.
7
(Optional) Configure the plotter.
8
Set up the plotter in your application software.
9
Done? (n)
SETUP
1
Send a sample or demo plot.
10
1–3
Page 18
Setting up your plotter
T ask 1: Check that you have all the items required
Task 1: Check that you have all the items required
Supplied
330
350C
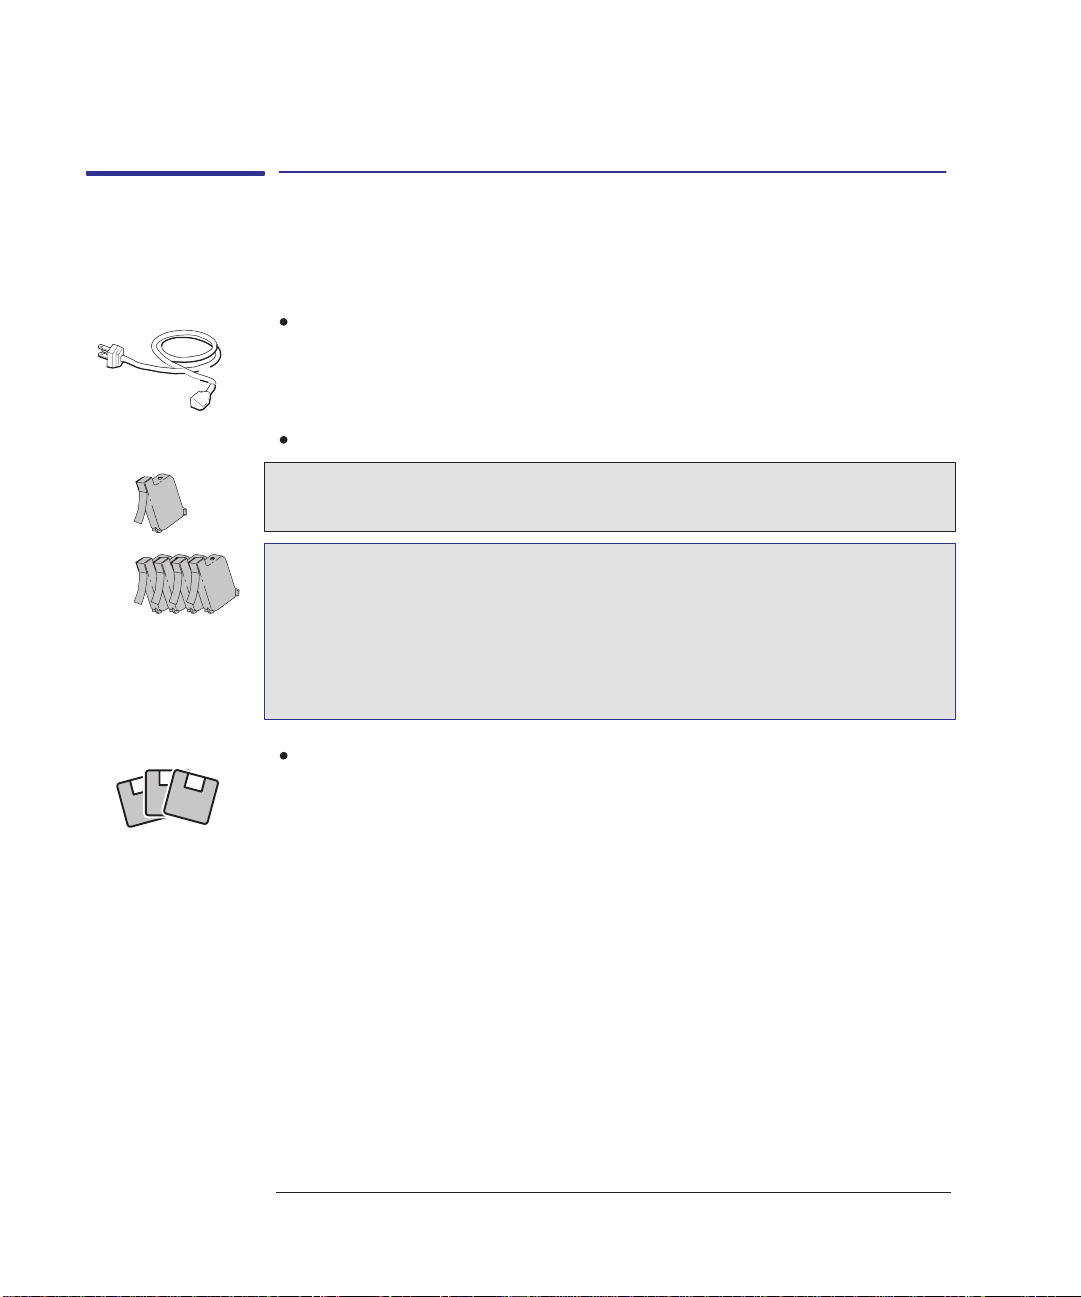
1 You will need the following items, which were supplied with the plotter.
Power cord
The power cord supplied with your plotter should meet the plug requirements for
your area. However, different power cords (international options) are available. If
necessary, contact your dealer or HP Sales and Support Office.
Print cartridge(s):
For the HP DesignJet 330:
– One black
For the HP DesignJet 350C:
– One yellow
– One cyan
– One magenta
– One black
Software
The following two software packs were supplied with the plotter. Whether you
need them depends on what application(s) you intend to use.
– Drivers for AutoCAD
– Drivers for Microsoft Windows applications
2 Inspect the plotter itself and the above accessories. If you received any item in a
damaged condition, notify the dealer or HP Sales and Support Office where you
purchased the plotter, and file a claim with the carrier.
1–4
Page 19
Setting up your plotter
T ask 1: Check that you have all the items required
Not supplied
Optional
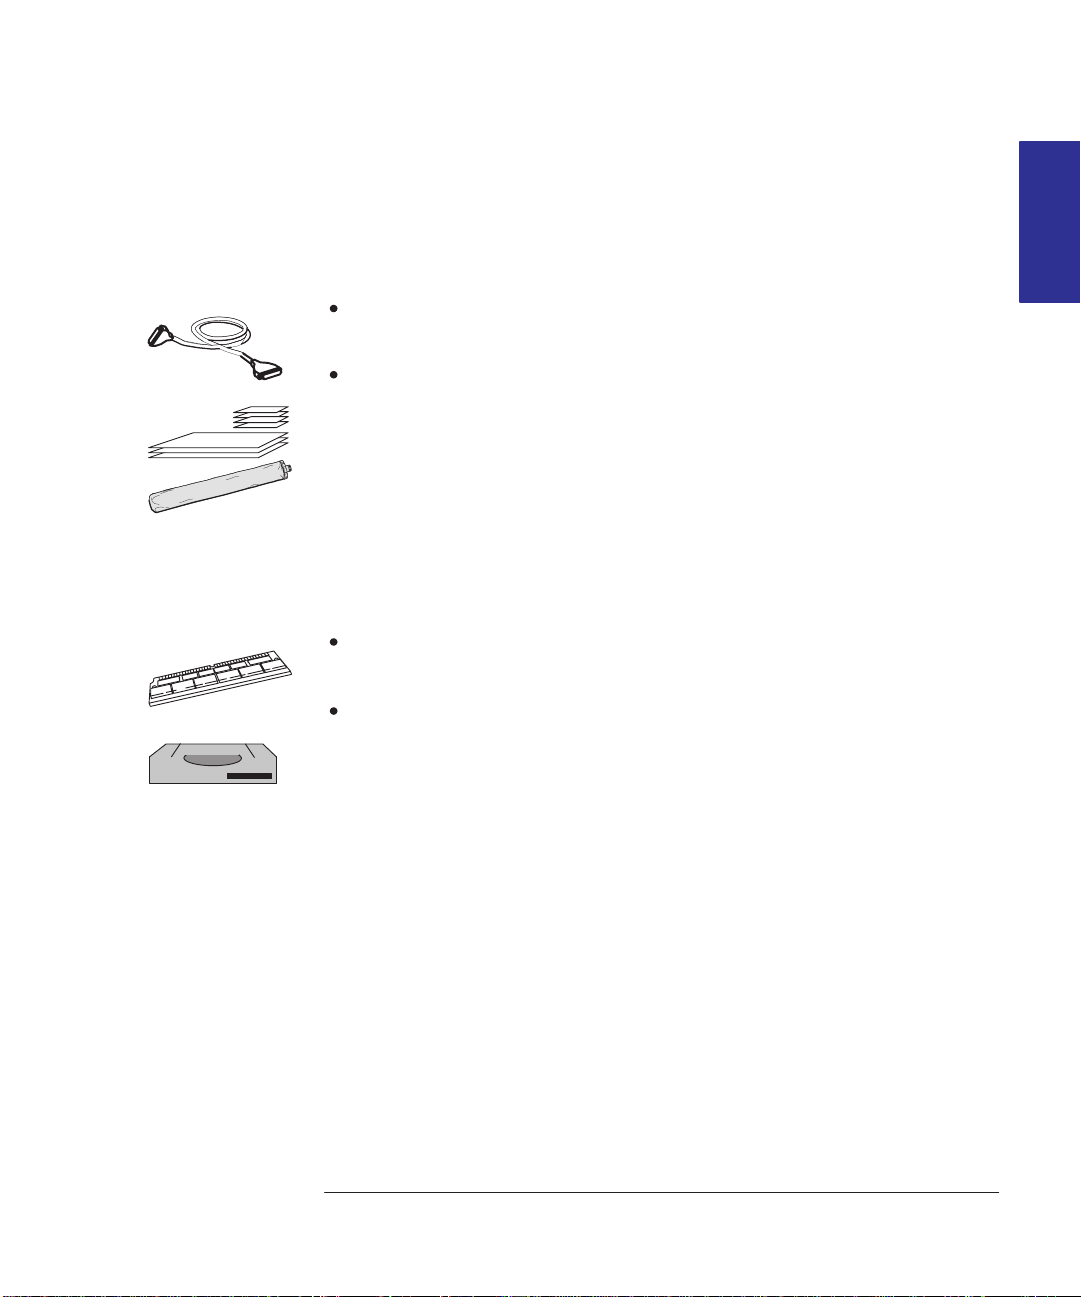
3 You will also need the following items, which were not supplied with the plotter.
Interface cable
For details of suitable cables, see page 10–11.
Media
For details of supported media types, see page 2–3. As part of the setup routine,
you may need up to three A-size or A4-size sheets, plus whatever size sheet you
prefer for a sample plot.
If you have fitted the optional roll-feed assembly, you can use either roll media
or cut sheets; if not, you can use only cut sheets.
4 If you have bought one, you will also need your:
Memory expansion module
For details of the memory expansion modules available, see page 10–16.
HP JetDirect EX print server
This is required if you intend to connect your plotter directly to a network. For
details of the latest HP JetDirect EX products, contact your local HP Sales and
Support Office. For configuration details, see page 1–18.
SETUP
1
1–5
Page 20
Setting up your plotter
T ask 2: (Optional) Install a memory expansion module
Task 2: (Optional) Install a memory expansion module
For details of the memory modules available, see page 10–16. You may install
only one.
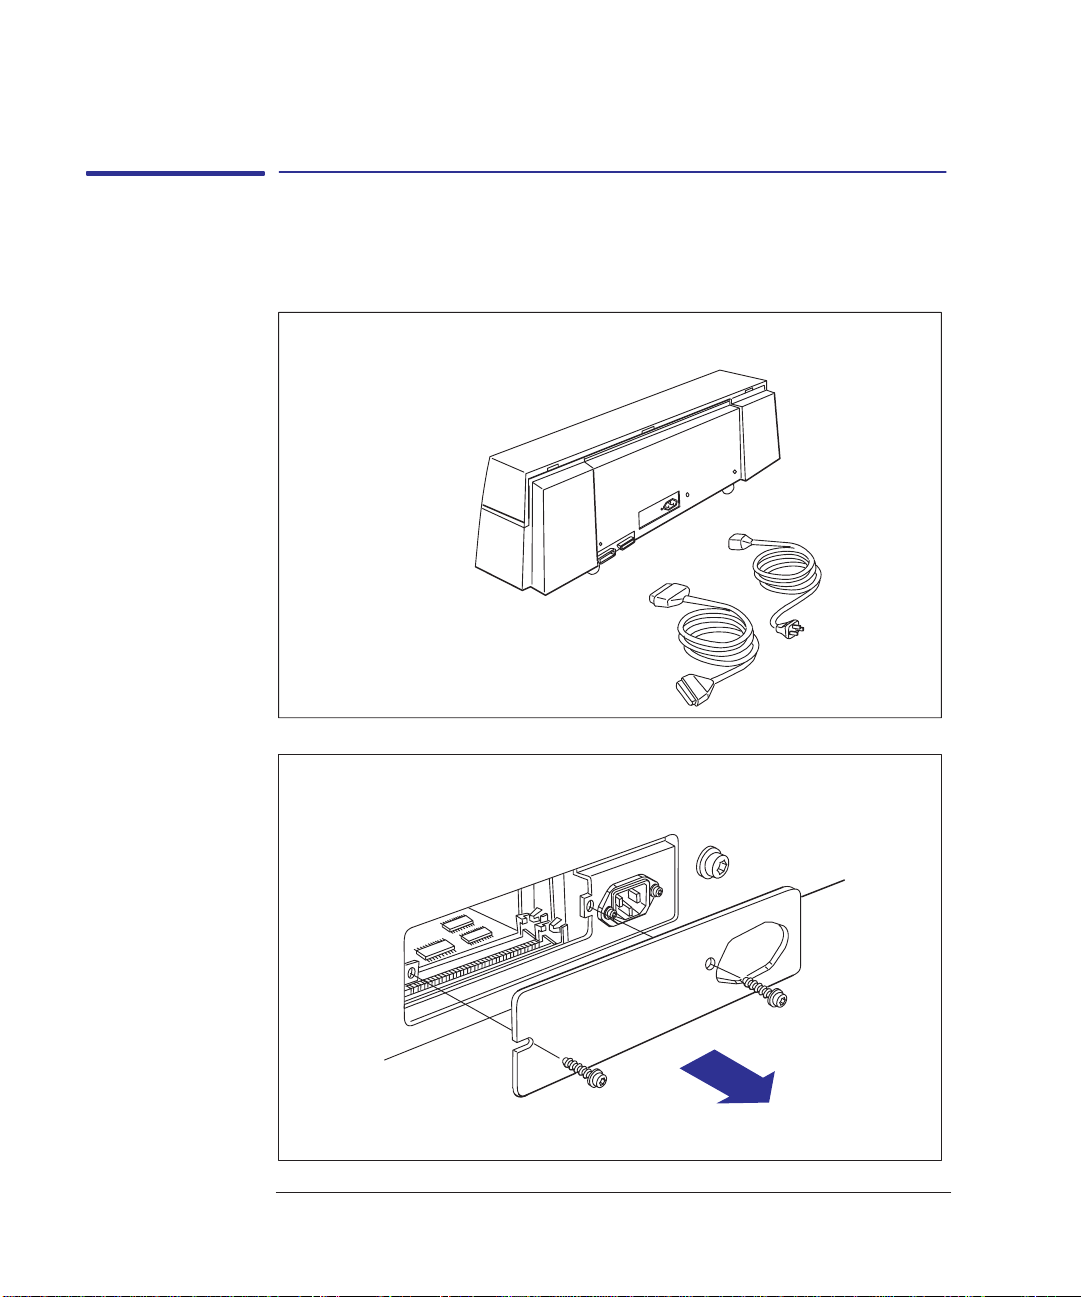
1
Make sure that the plotter is switched OFF and that neither the power cord
nor an interface cable is connected.
X
X
2
Unscrew the cover plate at the back of the plotter, and remove it.
1–6
1736a
1737
Page 21
Setting up your plotter
T ask 2: (Optional) Install a memory expansion module
CAUTION
Before handling a memory module, either put on a grounding wrist strap and
attach the end to the metal chassis of the plotter, or touch the outer metal
surface of the plotter with your hand. Otherwise, static electricity from your
body could damage the memory module.
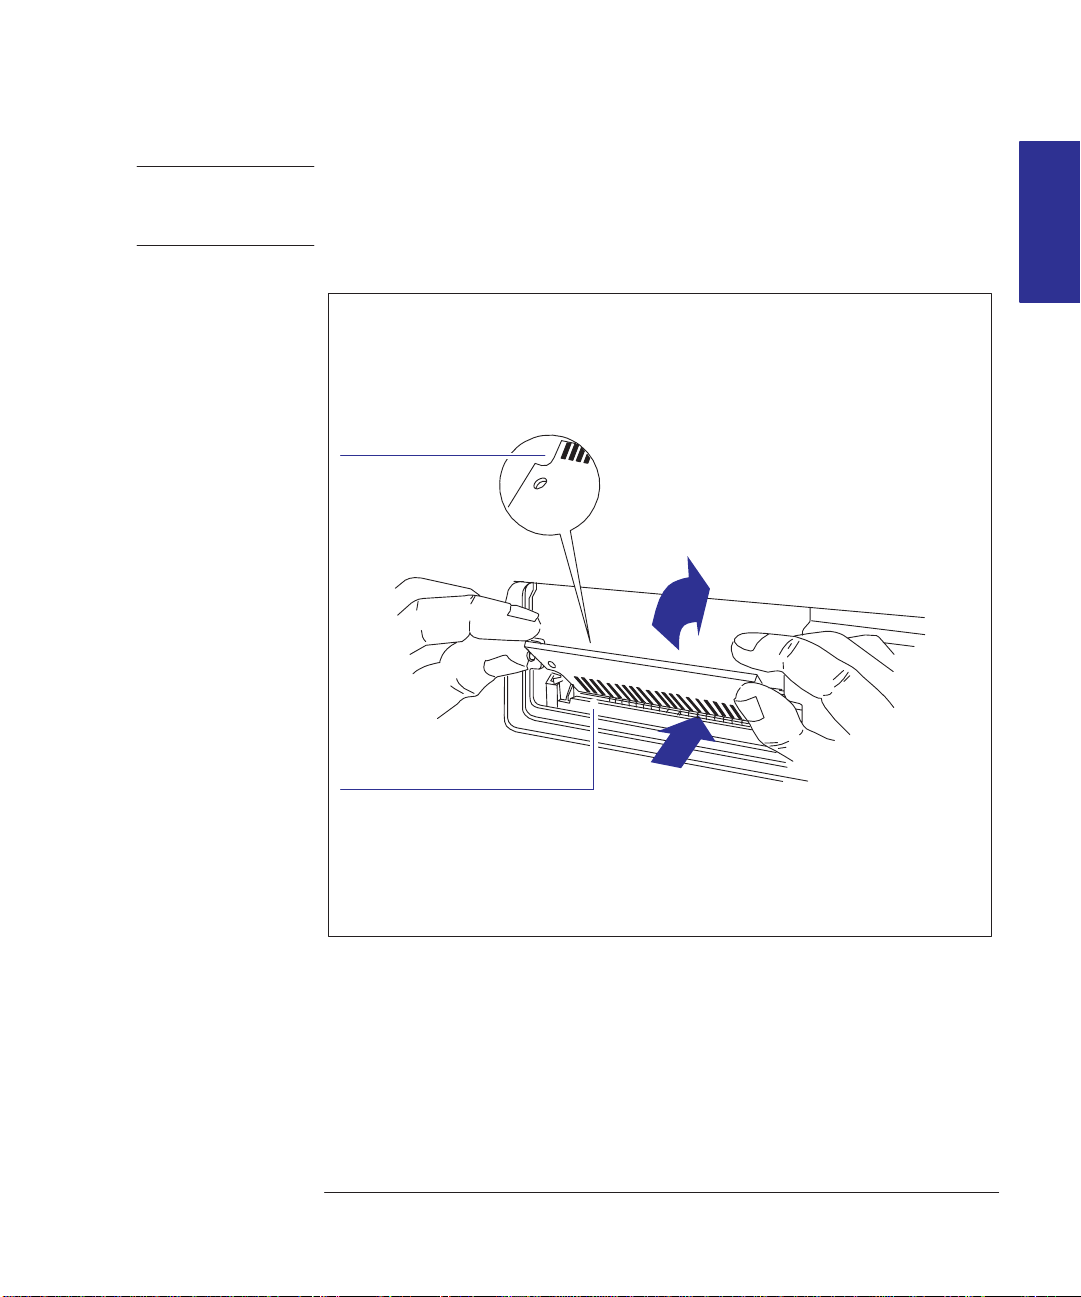
3 Take the memory module out of its bag, holding the module only by the edges.
4
With the module’s small notch on the left and the metallic edge away from
you, load the module into the slot nearest to you. (The other slot is not for
memory modules.) T o do this, first hold the module at an angle, and then
gradually push it back until it clicks into place vertically.
Notch
2
1
SETUP
1
Slot nearest to you
5 Replace the cover plat and screws.
Push until it clicks into place
1738a
1–7
Page 22
Setting up your plotter
T ask 3: Position the plotter
Task 3: Position the plotter
If you have fitted the optional roll-feed kit, you must also fit the legs assembly
for stability, so this task does not apply.
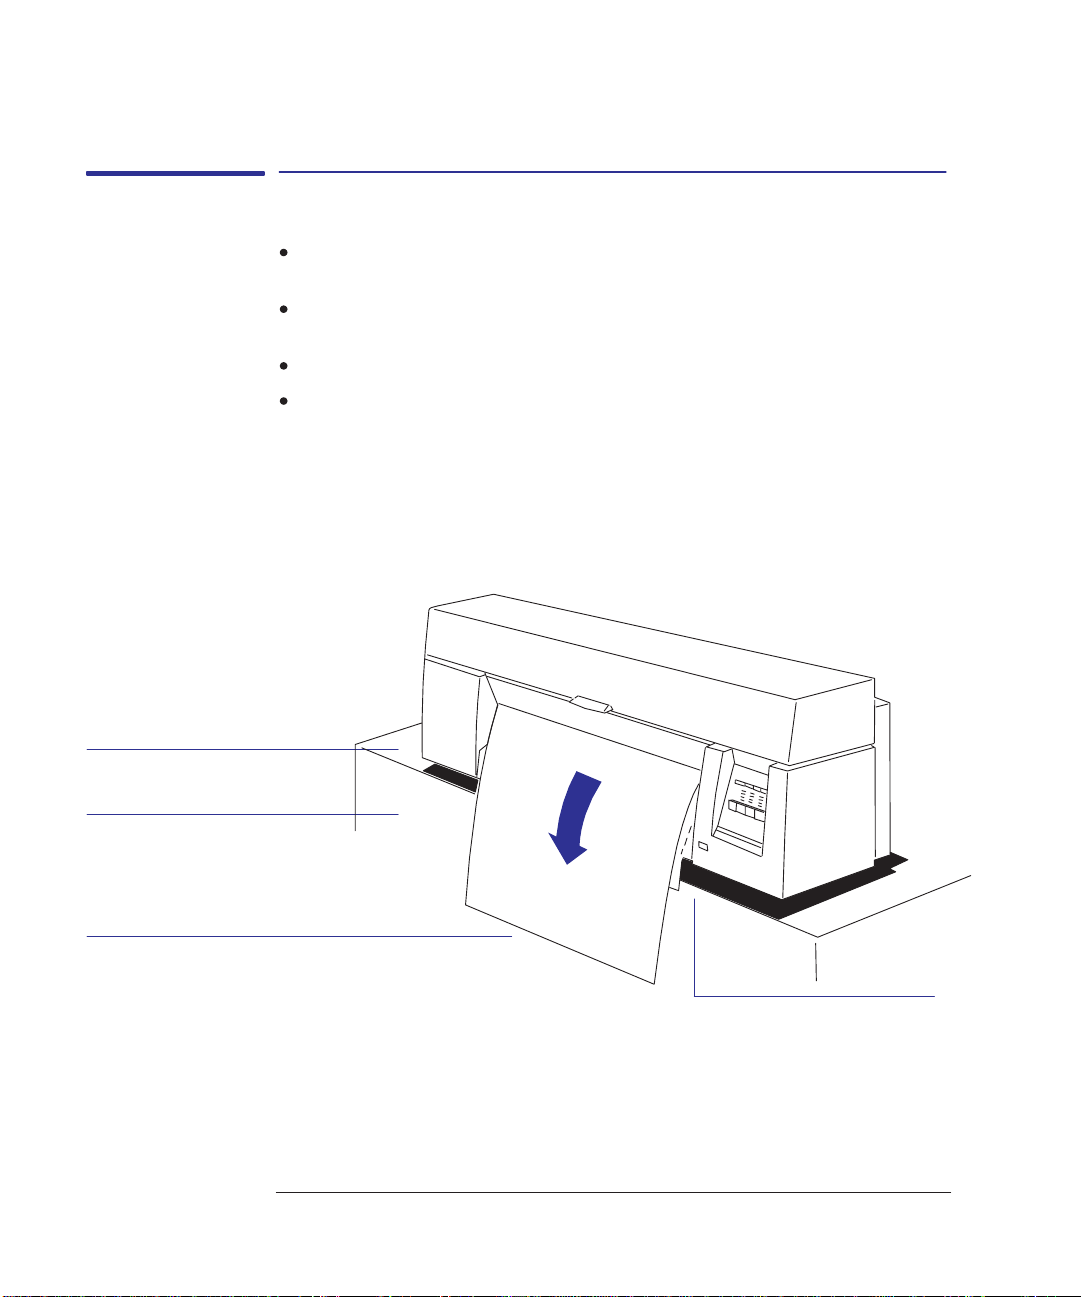
If you have not fitted the optional roll-feed and legs kit, position the plotter as
shown below.
For operating temperature and humidity, see page 10–5.
Allow enough space above the plotter to open the cover.
If the plotter is without legs ...
Level surface.
Sturdy support. For plotter
weights, see page 10–4.
Leave enough space for your largest sheet size
to hang freely from the media exit slot without
touching the ground.
1–8
1739
Place the plotter at the edge of
the support, so that sheets exit
without hitting the top of the
support.
Page 23
Task 4: Switch on
Setting up your plotter
T ask 4: Switch on
WARNING
Be sure that the power cord supplied with your plotter matches your ac power
connection requirements. Use only three-wire (earth-grounded) power cords
with this plotter.
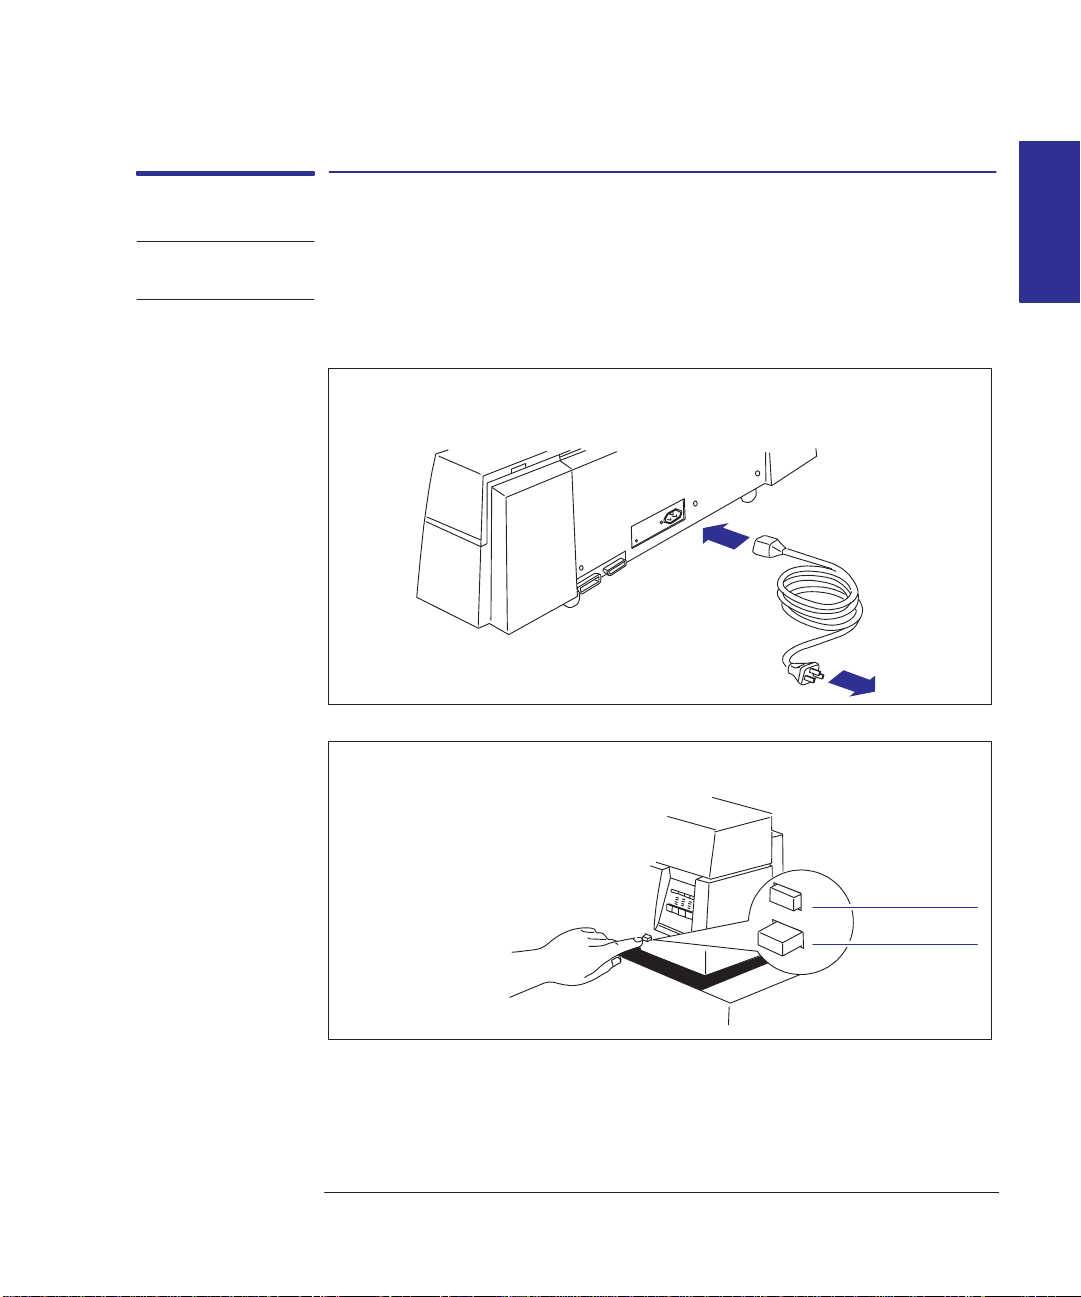
1 Make sure that the power switch on the front of the plotter is in the OFF position
(extended).
2
Plug the power cord into the socket at the back of the plotter, and then into
your power outlet.
1740a
3
Switch on the plotter, by pushing the power switch.
SETUP
1
4 If there is no sound, nor any light on the front panel, you may have a power
problem. For troubleshooting information, see chapter 9.
on
off
1741
1–9
Page 24
Setting up your plotter
T ask 5: Load the print cartridges
Task 5: Load the print cartridge(s)
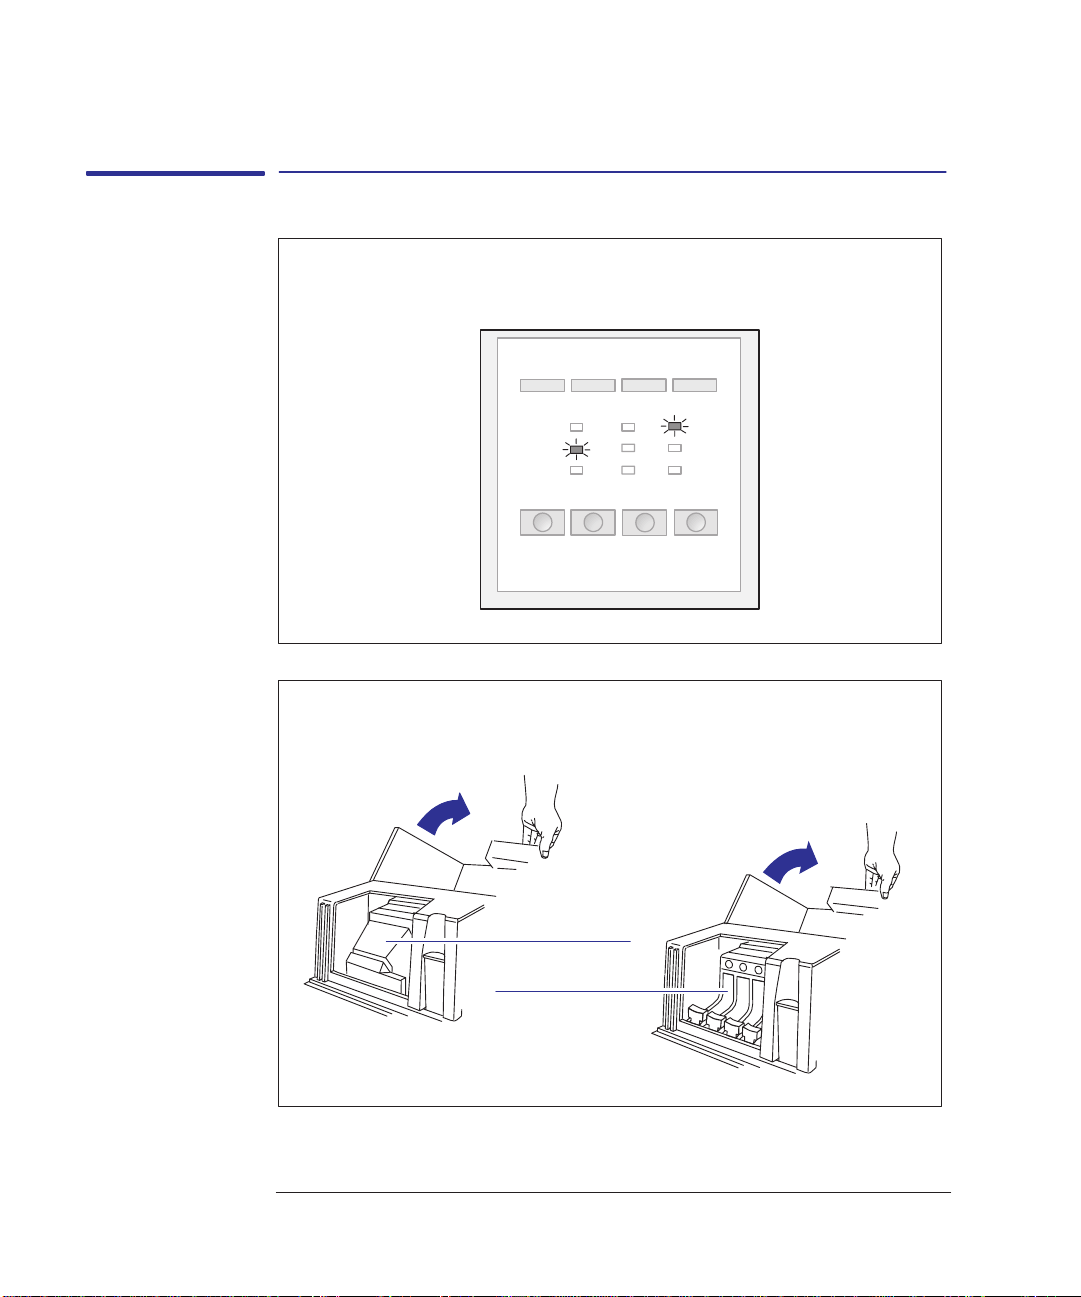
1
Make sure that, on the front panel, the Film and Error lights are flashing. If
other lights are on, look up their meaning in Chapter 8.
Error
Film
2
Open the cover. If necessary, wait for the cartridge carriage to move to the
service station (the area on the left of the plotter).
Cartridge carriage
in service station
330
r1752a
1752a
1–10
350C
Page 25
Setting up your plotter
T ask 5: Load the print cartridge(s)
WARNING
330
350C
Don’t touch the stainless steel strip that runs the length of the plotter behind
the cartridge carriage; its edge is very sharp. Keep hair, jewelry, clothing, and
foreign objects away from the plotter mechanisms.
A set of cartridges was supplied with the plotter:
The HP DesignJet 330 is supplied with one black cartridge.
The HP DesignJet 350C is supplied with four cartridges:
– yellow
– cyan
– magenta
– black
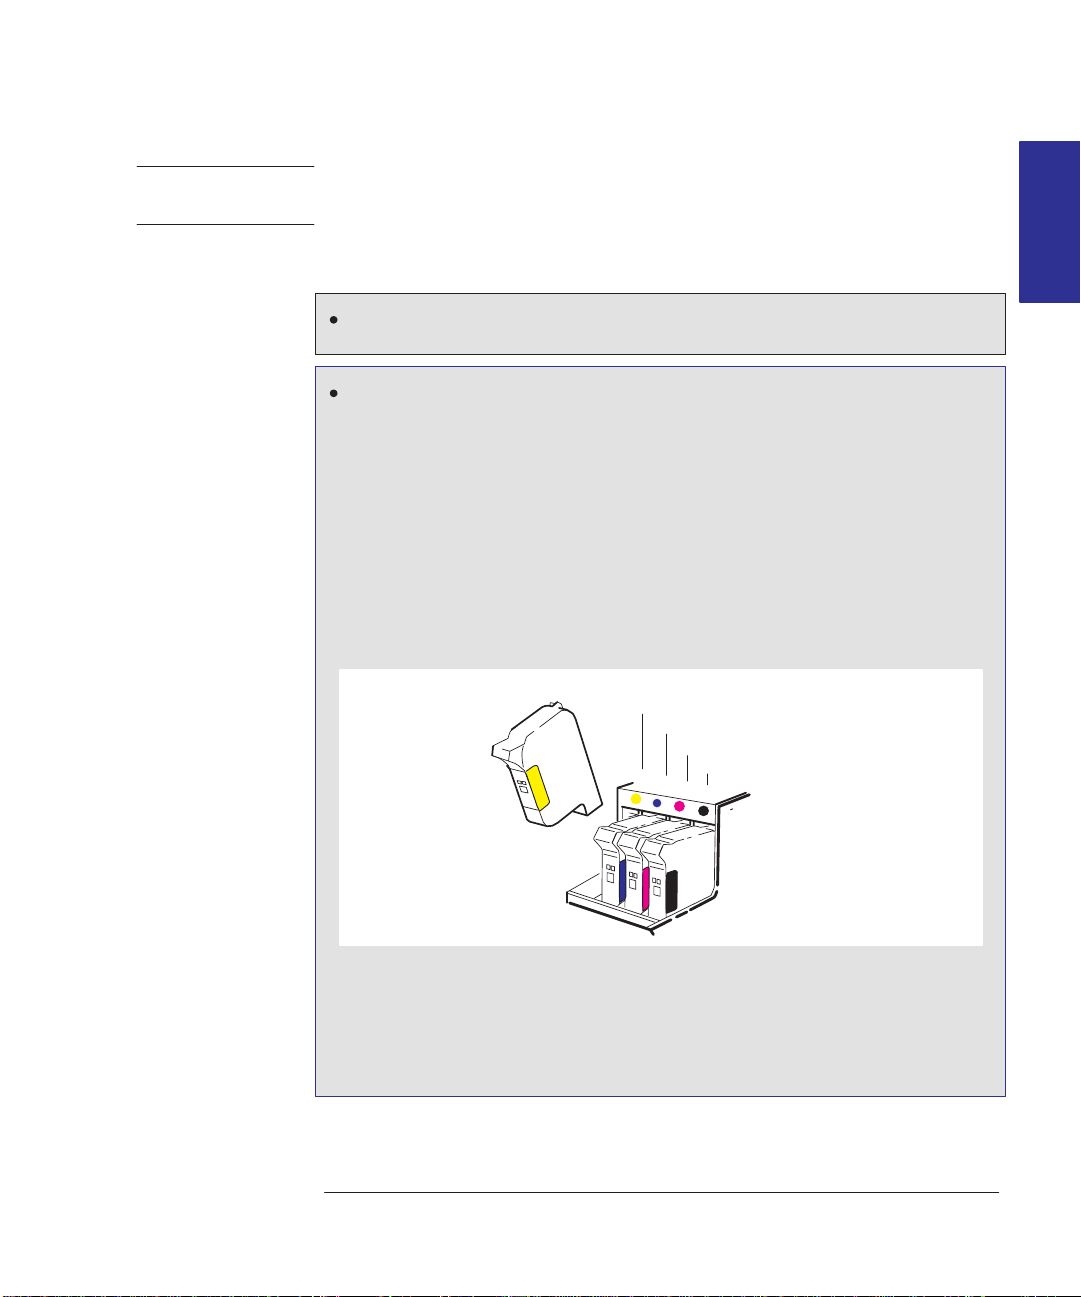
For the 350C, each stall in the carriage has a dot indicating the color of the
cartridge that should be installed: you must put the correct cartridge in the correct
stall. The sequence of the stall colors is, from left to right, yellow, cyan, magenta
and black.
Yellow
Cyan
Magenta
Black
SETUP
1
00019
For users with color-vision deficiencies. You can identify the colors of the
cartridges by the part numbers on the boxes – see page 10–17.
Note. It is not recommended to operate the 350C with only the black cartridge
loaded.
1–11
Page 26
Setting up your plotter
T ask 5: Load the print cartridges
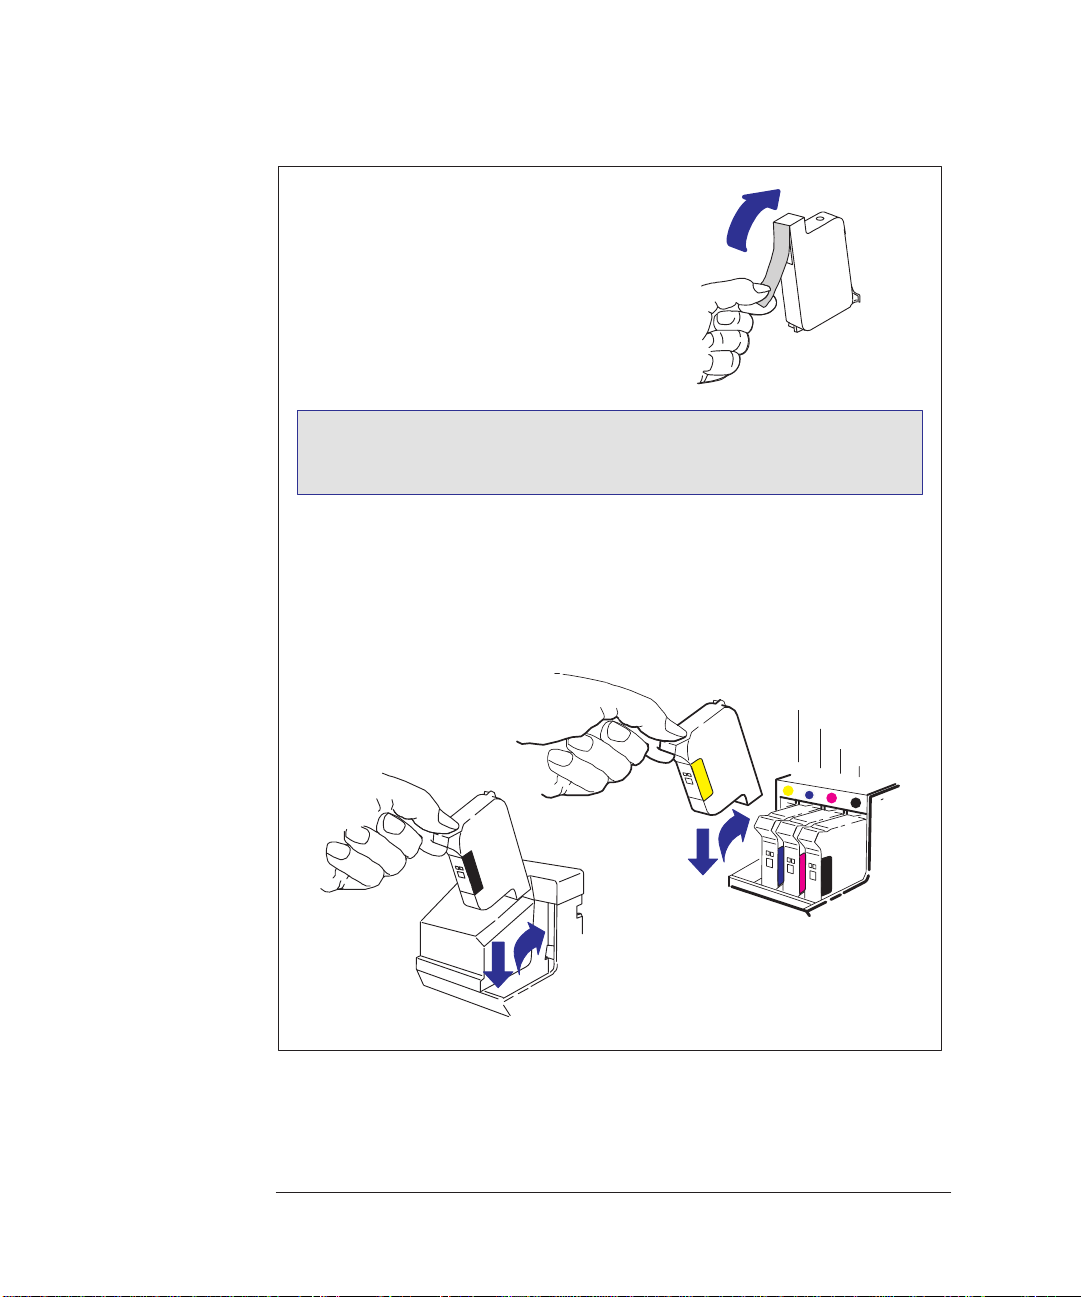
3
For each cartridge in the set:
1 Take the cartridge out of its box.
2 Remove the colored protective tape and tab
from the cartridge’s nozzles.
1754
For the 350C, match the color of the cartridge’s label with
350C
the color of the dot above the stall.
3 Make sure that the plotter is still switched ON. (Never install cartridges
with the plotter switched off.)
4 Insert the cartridge in the stall. Press down lightly and push the cartridge
away from you until it snaps into place. If it is installed correctly, the
Ready light flashes for a few seconds. Otherwise, re-seat it.
Yellow
Cyan
Magenta
Black
2
1
0019
350C
2
1
r004
330
1–12
Page 27

4
When all the cartridges are installed,
lower the cover.
Setting up your plotter
T ask 5: Load the print cartridges
On the front panel, the
should flash for up to about a minute
and then go off. The
should then be on (together with
T ype
and Print Quality lights).
If you wish, you can now check your cartridge alignment by running the Black
Cartridge Alignment Routine (See page 5–3). However, this is normally only
required for troubleshooting.
Ready light
Load Media light
Media
Load Media
SETUP
1
1–13
Page 28
Setting up your plotter
T ask 6: (Optional) Change the language
Task 6: (Optional) Change the language
All the plotter’s internal plots are available in the following languages: English,
French, Italian, German, Spanish, Portuguese and Japanese. By default, the
language is English. If English is what you want, then you can skip this task and
go to task 7.
T o change from English to any of the other languages, you must use the plotter’s
Setup Sheet, as explained below.
1
Load a sheet of A-size or A4-size plain paper, in portrait orientation. For
guidance on loading a sheet, see page 2–9.
When the
Plot will be on underside.
Ready light is on, you have loaded the sheet correctly.
1750
1–14
Page 29
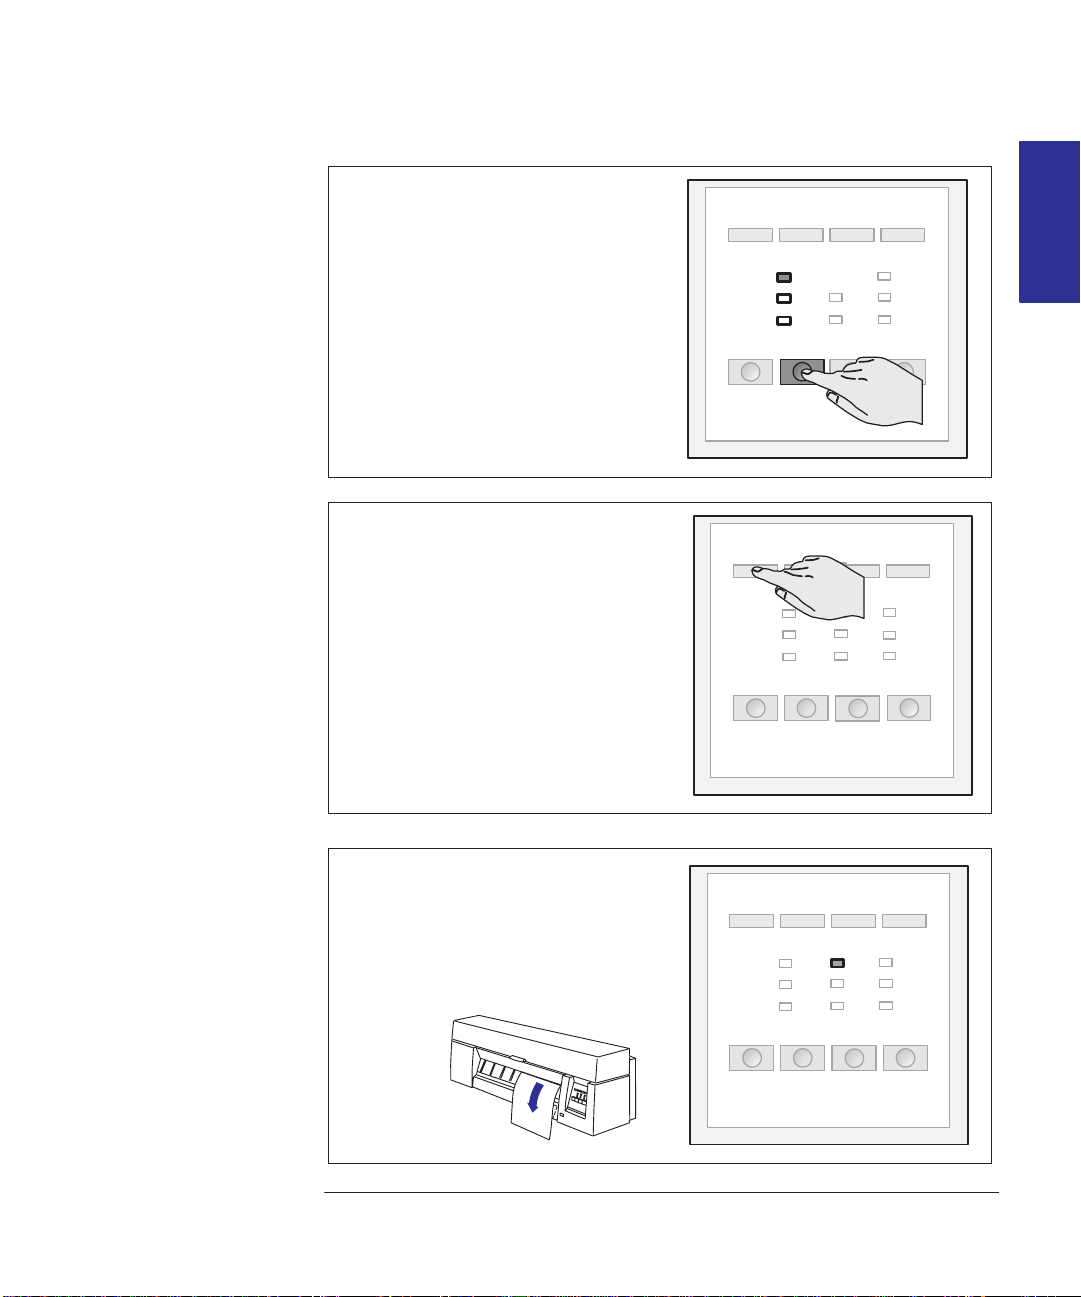
2
Make sure the front-panel Media T ype
is set to
Media T ype key until the Plain light is
on.
3
Press Setup.
Plain. If necessary, press the
Setting up your plotter
T ask 6: (Optional) Change the language
Plain
Media
T ype
Setup
SETUP
1
4
When the plot has finished, wait until
Load Media light comes on and
the
the plotter ejects the sheet. Remove
the sheet.
Load Media
1–15
Page 30
Setting up your plotter
T ask 6: (Optional) Change the language
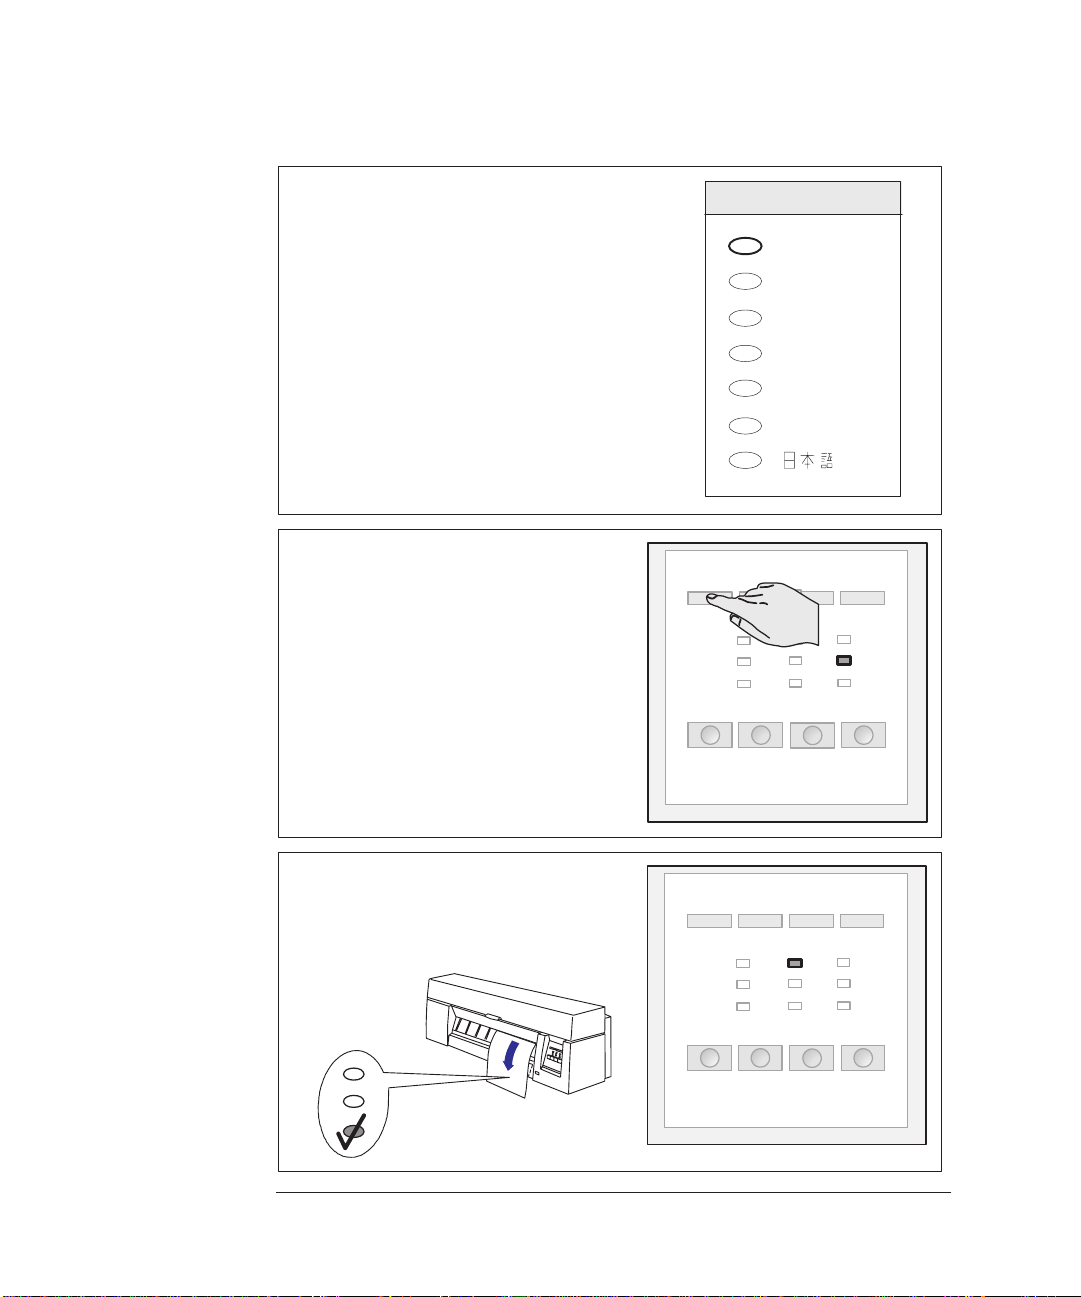
5
The plot is a Setup Sheet in English. You
can ignore all the information except the
box in the top left, headed “1. Language”.
1. Language
English
T ake a pencil or black pen and fill in the
oval next to the language you want.
6
Reload it in the plotter, printed side
down and with the large arrow pointing
into the plotter.
When the
Setup again.
Ready light comes on, press
The plotter will now read your marks
and reconfigure itself automatically.
Français
Deutsch
Español
Italiano
Português
Setup
Ready
When the Load Media light comes on
7
again, remove the sheet and make sure
that the plotter has marked your
selection with a check mark.
1–16
Load Media
1751b
Page 31

Setting up your plotter
T ask 7: Connect the plotter to your computer
Task 7: Connect the plotter to your computer
If you are connecting the plotter directly to your computer
1 Decide whether to use the parallel or serial interface.
If your computer and your application software support it, use the parallel
interface, as it is faster. You may connect both the parallel and the serial interface
simultaneously if you wish: the plotter uses the interface that first receives data.
2 Choose an interface cable.
For a list of HP cables for various computers, see the table on page 10–11. If you
are making up your own cable, refer to the interface specifications starting on
page 10–8. Use shielded interface cables only.
Note on the parallel interface. The parallel interface is an IEEE-1284-compliant
Bi-Tronics/Centronics interface. The same cable can be used for both Bi-T ronics
and Centronics communication.
3 Switch off the plotter and the computer .
4
Connect one end of the cable to the appropriate port on the back of the
plotter.
Port for serial-interface
cable (plotter end of cable:
Port for parallel-interface
cable (plotter end of cable:
36-pin male)
25-pin male)
SETUP
1
5 Connect the other end of the cable to your computer. For help on choosing the
correct port on the computer, refer to your computer documentation.
6 Switch on the computer and the plotter.
1744b
1–17
Page 32

Setting up your plotter
T ask 7: Connect the plotter to your computer
If you are connecting the plotter directly to a network
You can connect your plotter directly to a Local Area Network using an
HP JetDirect EX external network interface, connected to the plotter’s parallel
port. Various network operating systems are supported, in DOS, Unixr and
Macintosh environments. For the latest information on HP JetDirect EX products,
contact your local HP Sales and Support office.
PC Unix Macintosh
LAN
HP JetDirect EX Print Server
Parallel cable
HP DesignJet 330/350C
0001
For installation of the HP JetDirect EX interface, see the Installation Guide that
comes with that product.
1–18
Page 33

T ask 8 (optional): Configure the plotter
Task 8: (Optional) Configure the plotter
Setting up your plotter
In the majority of cases, there is no need to change any of the plotter’s default
settings. This may be because:
You prefer to change those settings that affect the appearance of your plots from
your application software.
The plotter’s factory defaults, listed on page 1–22, are acceptable.
However, if you do want to change the defaults, follow steps 1 through 8, which
explain how to print and use the Setup Sheet.
Note. If you changed the language from English (see task 6 above), you already
know how to use this sheet – but this time it will be in your chosen language.
1
Load a sheet of A-size or A4-size plain paper, in portrait orientation. For
guidance on loading a sheet, see page 2–9.
When the
Ready light is on, you have loaded the sheet correctly.
SETUP
1
Plot will be on underside.
1750
1–19
Page 34

Setting up your plotter
Task 8: (Optional) Configure the plotter
2
Make sure the front-panel Media T ype
is set to
Media T ype key until the Plain light is
Plain. If necessary, press the
on.
3
Press Setup.
Plain
Media
T ype
Setup
4
When the plot has finished, wait until
Load Media light comes on and
the
the plotter ejects the sheet. Remove
the sheet.
1–20
Load Media
Page 35

Setting up your plotter
T ask 8 (optional): Configure the plotter
HP DesignJet 330/350C Setup Sheet
Current setting =
1
1. Language 3. Graphics Language
English
Français
Deutsch
Español
Italiano
Português
2. Serial Interface 5. Plot Appearance
Baud Rate Parity
1200
2400
4800
9600
19200
38400
7. Page Size
Inked Area
Software
Over-
size
8. Pen Settings
If you want these pen settings to take effect, don’t forget to mark the oval above.
2
Width (mm)
0.13
0.18
0.25
0.35
0.50
0.70
1.00
Grayscale
100%
80%
60%
40%
20%
10%
5%
A1
A2
Desired setting =
None
Even
Odd
JIS
1
4. I/O Timeout
Best
B1
B2
B3
B4
23456781
2345678
Pencil or black pen
HP–GL(7586B)
HP–GL/2
0.5 min
1 min
5 min
30 min
Best
ANSI
Use settings from software
Use settings from tables below
Pen Number
SETUP
1
350C
6. Color/Mono
Auto rotate
Rotate off
Rotate 90_
Mirror off
Mirror on
Merge off
Merge on
Best
E
D
C
B
A
ISO
A0
A1
A2
A3
A4
350C
Color
Black
Red
Green
Yellow
Blue
Magenta
Cyan
ARCH
Print color
as color
Print color
as grayscale
Best
E1
E
D
C
B
A
Setup
3
Ready
1–21
Page 36

Setting up your plotter
Task 8: (Optional) Configure the plotter
An example of a Setup Sheet is shown on the previous page. That example is for
an E/A0-size plotter. The items in the Setup Sheet are listed in the table below.
Setup Sheet Items and Defaults
Factory
Item
Language English Task 6 explained how to change this.
Baud Rate 9600 (Serial interface only). You must set the baud
Parity None (Serial interface only). You must set the parity to
Graphics
Language
I/O Timeout 30 min See page 6–4.
Rotate off See page 3–7
Mirror of f See page 3–10
Merge off See page 3–1 1
Color/Mono Print color as
Page Size Inked Area See page 3–5.
Default Comments
rate to be the same as that of the computer
sending the data.
be the same as that of the computer sending the
data.
HP-GL (7586B) See page 6–3.
See page 3–13
color
350C
Pen Settings Use settings
from software
1–22
Note that not all the page size options shown in
the example are available on the D-size plotter.
See page 3–12.
Note that the color pen settings
are only available on the
HP DesignJet 350C.
350C
Page 37

5
Follow the instructions on the
Setup Sheet. Having marked the
ovals to change the settings, reload
the sheet in the plotter, printed side
down, with the large arrow pointing
into the plotter
When the Ready light comes on,
Setup again.
press
The plotter reads your marks and
reconfigures itself automatically.
When the Load Media light comes on
6
again, remove the sheet and make sure
that the plotter has marked your
selection with a check mark.
Setting up your plotter
T ask 8 (optional): Configure the plotter
Setup
Ready
Load Media
SETUP
1
1751b
7 Please store this latest copy of the Setup Sheet with the Quick Reference Guide in
the plastic pocket at the side of the plotter, so that a service engineer would know
the current configuration even if the plotter is inoperable.
1–23
Page 38

Setting up your plotter
T ask 9: Set up the plotter in your application software
Task 9: Set up the plotter in your application software
“Application software” is the software from which you intend to send plots to your
plotter – for example, a CAD system.
What is a driver? Your application software needs to know to which type of plotter it is sending
information. This knowledge, and other configuration information, is held in a
“driver.” A driver is a piece of software that handles communications between
your application software and a peripheral, for example a plotter. Drivers are
usually supplied as part of the application software, but they are also available
separately. If supplied separately, you need to install them separately.
AutoCAD Supplied with this plotter is a pack containing drivers for AutoCAD for DOS and
AutoCAD for Windows. Please refer to the documentation supplied with these
drivers.
Windows applications Supplied with this plotter is a pack containing a driver for applications that work
with Microsoft Windows. Please refer to the documentation supplied with this
driver.
Other applications Users of other applications should first check any Software Application Notes
supplied with the plotter, to see if their application is covered there.
For other applications, on the next page is a general recommendation as to which
device to choose when setting up this plotter. Device lists are not always up to date
with the latest plotters, and so with some software you may have to choose a
plotter other than the HP DesignJet 330 or the HP DesignJet 350C from the device
list.
1–24
Page 39

Setting up your plotter
T ask 9: Set up the plotter in your application software
When choosing from a device list, follow these preferences, which are listed here
in priority sequence.
Preference 1: HP DesignJet 330/350C
Preference 2: HP DesignJet 750C
Preference 3: HP DesignJet 650C
with a preference for C2858B/C2859B
rather than C2858A/C2859A
Preference 4: HP DesignJet 220
Preference 5: HP DesignJet 200
Preference 6: HP DesignJet 600
HP DesignJet
Preference 7: HP-GL/2 Device
or a similar option including a reference to HP-GL/2
Preference 8: Any of:
HP 7595B DraftMaster SX
HP 7596B DraftMaster RX
HP 7599A DraftMaster MX
HP 7595C DraftMaster SX Plus
HP 7596C DraftMaster RX Plus
HP 7599B DraftMaster MX Plus
SETUP
1
If any of the options quoted above appears, then your software supports HP-GL/2.
If it doesn’t support HP-GL/2, then go to Preference 8.
Preference 9: HP 7586B
This plotter supports HP-GL. However, if you choose this
device you may not be able to use you plotter’s parallel
connection – depending on the application software.
Getting help
If in doubt, or if you have problems with your driver, refer to the section at the end
of chapter 4 for advice on how to get help.
1–25
Page 40

Setting up your plotter
T ask 10: Send a sample or demo plot
Task 10: Send a sample or demo plot
T o verify a successful configuration, choose a sample plot in your application and
try to print it on the plotter.
In case of problems, refer to chapter 9 of this manual, “Troubleshooting”. To test
whether the source of any problem is in the plotter itself or in the link with your
application, it is useful to print the plotter’s internal demonstration plot.
To print the demonstration plot
1 If media is not already loaded, load roll media or a sheet, as explained in
Chapter 2, which also provides advice on the availability and use of different
media types.
2
Press simultaneously the two keys:
Setup
Continue
Plotting
The demonstration plot summarizes the plotter’s main features and includes a
sample CAD drawing, using a variety of line widths and colors. It is printed in the
language currently configured in the Setup Sheet. T o change it, see task 6.
1–26
Page 41

2
Caring for your media 2–2
Choosing media 2–2
Before loading media 2–7
Before sending your file 2–7
Loading sheet media 2–9
Loading roll media 2–17
Loading a sheet with the roll-feed option installed 2–26
Unloading media 2–27
MEDIA
2
Working with media
2–1
Page 42

Working with media
Caring for your media / Choosing media
Caring for your media
If your plotter includes the roll-feed and legs option, make sure the media
deflector is installed between the plotter’s legs, so that uncut media doesn’t drag
on the floor.
Handle film and glossy media by the edges or wear cotton gloves. Skin oils can
interact with ink and cause it to smear.
Choosing media
Your plotter supports many types of paper and other media types, and can operate
both with sheets and, if the roll-feed option is installed, with rolls. Choosing the
best media type for your requirements is the first – and most important – step in
ensuring good print quality.
350C
For color printing, although most supported media types are suitable, some not
recommended. For details, see the table on page 2–5.
When choosing between opaque paper types for monochrome printing, be
aware that you will use significantly less ink printing on coated paper types than
on normal opaque bond.
Whenever you load a roll or a sheet, you must check that the media type
specified on the plotter’s front-panel is correct for the media type you are
loading. It is essential for good print quality to specify this correctly. See the
table on page 2–3.
You should also be aware of which print quality setting (best, normal or fast)
you are using. You can set this either from your software or from the plotter’s
front panel. The combination of media type and print quality settings
automatically tells the plotter how to place the ink on the media – for example,
in terms of density and number of passes of the cartridges. For more details, see
the tables on pages 2–5 and 2–6.
For the best-quality plots, use HP media, as your plotter’s configuration is
optimized for it and tested with it. For details of HP media, see page 10–18 and
any separate HP media literature supplied with the plotter.
2–2
Page 43

(Plain light on)
2
350C
Working with media
Choosing media
Supported media types and relative costs
Media type
selection on
the front panel
Plain
Coated
(Coated light
on)
Film
(Film light on)
Glossy
(Film and
Coated lights
on)
1
your HP dealer or local HP Sales and Support Office.
2 HP Special InkJet paper and HP Heavyweight Special InkJet Paper are
DesignJet 330 and 350C plotters.
3
3
From time to time, new media types may become available. Up-to-date information is available from
Glossy media types are not supported on the HP DesignJet 330.
Supported HP media
HP Opaque Bond Plain paper
HP Translucent Bond Low
HP Natural Tracing Paper Tracing paper
HP Vellum Moderate
HP Coated Paper Color inkjet paper
HP Heavyweight Coated Paper Heavyweight color inkjet paper
HP Matte Film Poly matte film
HP Clear Film Translucent film
HP High-Gloss White Film High
1
Non–HP media also known
as ...
Plotter paper
Extra translucent bond
Matte paper
Presentation
Heavyweight matte paper
Matte polyester
Mylar
Clear polyester
not
supported on the HP
Relative
cost
Low
Moderate
Low/
moderate
Moderate
High
High
MEDIA
2
2–3
Page 44

Working with media
Choosing media
Physical characteristics of media types
Physical characteristics
Matte
or
HP media
HP Opaque Bond Wood-pulp Opaque Matte No
HP Translucent Bond Wood-pulp Semi-opaque Matte No
HP Natural Tracing
Paper
HP Vellum Cotton-fiber Semi-opaque Matte No
HP Coated Paper Wood-pulp Opaque Matte Yes
HP Heavyweight
Coated Paper
Base Opacity
Glossy
Special
coated
side for
plotting?*
350C
HP Matte Film Polyester Semi-opaque Matte Yes
HP Clear Film Polyester Clear — Yes
HP High-Gloss White
Film
* See page 2–10.
Polyester Opaque Glossy Yes
2–4
Page 45

d
1
Working with media
Choosing media
350C
Recommended print-quality settings and recommended media
for color plots
Print quality
(set either on the front panel
or in the software)
HP media Fast Normal Best
HP Opaque Bond OK for monochrome, but color for CAD
drawings only
HP Translucent Bond OK for monochrome, not recommended for
color
HP Natural Tracing Paper OK for monochrome, but color for CAD
HP Vellum
HP Coated Paper OK
HP Heavyweight Coated Paper
HP Matte Film
HP Clear Film
HP High-Gloss White Film Not
1
The limitation on the use of non-coated media for color really depends on:
D the amount of area fill in your drawing (the more there is, the less likely that
the print quality on opaque bond will be satisfactory),
D the quality of the media.
rawings only
recommended
1
OK for color;
not recommended for
monochrome
MEDIA
2
2–5
Page 46

*
*
Working with media
Choosing media
Typical media-type choices by application
Application Use T ypical choice of media Probable choice of
print quality
CAD
monochrome
CAD* and GIS
color
350C
Imaging and
graphics
packages
color
350C
Drafts Opaque bond
Translucent bond
Natural tracing paper
Vellum
Final versions Opaque bond
Matte or clear film
Archives Vellum
Matte or clear film
Diazo reproductions Translucent bond
Natural tracing paper
Vellum
Matte film
Drafts Opaque bond
Natural tracing paper
Vellum
Coated paper
Final versions Coated paper
Heavyweight coated paper
(for durability)
Matte film
Clear film
Archives Matte film
Clear film
Overlays Clear film Fast or Normal
Matte Opaque bond (for drafts)
Coated paper
Heavyweight coated paper
(for durability)
Gloss High-gloss white film Normal or Best
Clear film Clear film (colors not optimized for
this media type)
Fast or Normal
Fast or Normal
Fast or Normal
Fast or Normal
Normal or Best
Normal or Best
Best
Best
Normal or Best
Normal or Best
Normal or Best
Normal or Best
Fast or Normal
Fast or Normal
Normal or Best
Normal or Best
Normal or Best
Fast or Normal
Best
Normal
Fast, Normal or Best
Fast, Normal or Best
Normal or Best
Best
* CAD = Computer-Aided Design GIS = Geographical Information Systems
2–6
Page 47

Before loading media
Specify whether you are going to
load a sheet or a roll
Working with media
Before loading media / Before sending your file
MEDIA
On the front panel, if the
the plotter believes you are loading a
roll. If it is off, it believes you are
loading a sheet.
T o toggle between the two settings,
press the
Roll/Sheet key.
Roll light on,
Before sending your file
1
Specify the media type
Press the
light comes on against the name of the
media type you are going to load. For
an explanation of which media type
category on the front panel should be
used for each supported media type,
see the table on page 2–3.
Media T ype key until the
2
Roll
Roll/Sheet
Media
Type
350C
Note that, if your software printer driver allows you specify media type, you must
specify it correctly there as well.
T o select Glossy, press the Media Type key until both the
Film and Coated lights are on.
2–7
Page 48

Working with media
Before sending your file
2
Specify the print quality setting
Press the
Print Quality key until the
light comes on against the print
quality setting you require.
For details of each print quality
setting, see the table on page 3–15.
Print
Quality
Alternatively, you can specify the print quality setting from your software printer
driver. In this case, the driver’s setting is used for the next plot. During the plot,
the front-panel setting changes temporarily to that from the driver, and then
resumes its previous setting again.
2–8
Page 49

Working with media
Loading sheet media
Loading sheet media
To load a sheet (without the roll-feed option installed)
T o learn how to load a sheet correctly first time, follow steps 1 through 7.
When you load a sheet, the plotter checks that it is correctly aligned. If it is very
badly aligned, the plotter flashes an error on the front panel, as explained in step 8
below , and you must try again. If your alignment is almost correct, you have a
chance to re-align it, as explained in steps 8 and 9 below.
1 If your plotter has no legs, you’ll find it easier if it is positioned at the edge of the
table.
2
Which way round?
You can load a sheet in either portrait
or landscape orientation.
portrait landscape
or
MEDIA
2
Unless using the Rotate option (see page 3–7), load the sheet in the same
orientation as you have specified in your software. If you are loading an A- or
A4-size sheet, portrait orientation is recommended.
2–9
Page 50

350C
Working with media
Loading sheet media
3 Which side down? As you load the sheet, it is the underside on which the plotter
will print. With most media types, the two sides are different and so it is important
to load the sheet correctly.
Media T ype Which side down?
Opaque bond
Translucent bond
Natural tracing paper
Vellum
Coated paper
Heavyweight coated paper
Matte film Load with the matte side down.
Clear film Load with the rougher side down.
High-gloss white film Load with the rougher side down.
Both sides are the same. If the sheet is curled,
load with the curl up.
Load with the coated side down.
On HP Coated Paper and Heavyweight Coated
Paper, look for the small notch in the corner:
D When loading in a portrait orientation, make
sure the notch is on the right side of the leading
edge.
D When loading in a landscape orientation, make
sure the notch is on the left side of the leading
edge.
2–10
Page 51

4
Hold the sheet by its edges,
about 18 cm (7 in) from the
top.
Don’t hold the sheet
right at the top, as you
would have to adjust
your grip as you push the
sheet into the plotter, and
this would probably
make you misalign it.
Don’t place your hands
flat on the surface of the
sheet (as is normal when
loading a sheet into some
old pen plotters), as this
would make step 7 very
difficult for you.
Working with media
Loading sheet media
X
X
MEDIA
2
5
Align the right-hand side of the sheet with the
line of holes on the plotter.
6
Make sure the entire top edge of
the sheet – left and right – is
placed inside the entry slot,
especially if the sheet is wider than
A- or A4-size.
2–11
Page 52

Working with media
Loading sheet media
7
IMPORTANT. While keeping the right-hand side aligned with the line of
holes, push the sheet in one swift and decisive movement up into the entry slot.
Try to keep the angle of the sheet the same as the angle of the slot.
1750
Three things will happen in quick succession:
1 You will feel the sheet come up against the
media stops.
2 The sheet may buckle slightly, as you are still
pushing it. This is normal.
3 The plotter will start to take the sheet from
you.
Don’t touch the sheet
At this point, let go!
while the plotter feeds it
out again a short way, as
this would probably
misalign it.
2–12
X
Page 53

Working with media
Loading sheet media
8
The plotter takes about a minute to check the alignment. While it’s doing this,
Ready light on the front panel flashes.
the
MEDIA
either the
Ready light
stops flashing, but stays
on:
Ready
Alignment good –
ready to plot!
Wait until ...
or the Load Media
lights starts flashing:
Load Media
Alignment close.
Either realign the
sheet manually, as
explained in the next
section, or press
Cancel to start again
from step 4 on
page 2–11.
Ready
or the
Error and Load
Media
lights start
flashing:
Load Media Error
* Alignment bad. The
plotter has rejected the
sheet. Simply remove
it and start again from
step 4 on page 2–11.
(There’s no need to
press any key.)
2
* There is another reason why these two lights may flash: the sheet may be an invalid size. For supported media sizes, see page 10–3. With very small supported sizes (B/A3-loaded in landscape or
A/A4-size loaded in any orientation), there’s no middle option above: unless the alignment is good,
you have to remove the sheet and start again.
2–13
Page 54

Working with media
Loading sheet media
To realign the sheet manually (if necessary)
1
If the Load Media light is flashing without
Error light flashing, the plotter is
the
inviting you to realign the media manually.
2
1 Raise the cover. The
bail (the black metal
bar) is raised automatically .
2 Lower the green media
lever to release the
media.
1
Load Media
2
2–14
1801a
Page 55

Working with media
Loading sheet media
Align the edges of the media coming out of the plotter with the same edges
3
going into the plotter, by pulling them taut and aligning them by eye. For A3
sized media, if the roll-feed deflectors are fitted, you may find it easier if you
move them out of the way.
MEDIA
2
1918
4
1 Raise the green media
lever.
2 Lower the cover.
2
1
1801b
2–15
Page 56

Working with media
Loading sheet media
5
The plotter checks the alignment again. While it’s doing this, the Ready light
on the front panel flashes.
Ready
Wait until ...
either the
Ready light stops
flashing, but stays on:
Ready
Alignment good – ready to
plot!
or the Error and Load Media
lights start flashing:
Load Media Error
Alignment bad. The plotter has
rejected the sheet. Simply
remove it and start again from
step 4 on page 2–11.
Notice that you have only one
chance to realign the media
manually. If it’s still not right after
the realignment, you have to load
it again.
2–16
Page 57

Working with media
Loading roll media
Loading roll media
To change the roll
You can order spare spindles as accessories – see page 10–17. In this way, you can
keep different rolls on different spindles and make this task easier. However,
except where noted, this section assumes that you are using the same spindle for
both the old and the new roll.
1 Be sure the plotter wheels are locked (the brake lever pressed down) to prevent the
plotter from moving.
MEDIA
2
WARNING
In the next step (see next page):
Don’t touch the stainless steel strip that runs the length of the plotter behind
the cartridge carriage; its edge is very sharp.
Keep hair, jewelry, clothing, and foreign objects away from the plotter
mechanisms.
2–17
Page 58

Working with media
Loading roll media
2
If the old roll is not used up, then remove the media from the media path, as
explained here.
1 Raise the cover.
2 Lower the green media lever to release the media.
3 The bail (the black metal bar) should automatically rise when you raise the
cover.
4 Turn the roll on the spindle to wind the media out of the plotter and onto the
roll.
1
3
2
4
5 Raise the green media lever and then lower the cover.
1920
2–18
Page 59

Working with media
Loading roll media
3
Remove the old roll by pulling firmly first on the left end of the spindle and
then on the right. You may find that you have to push your thumbs against the
cover of the roll-feed assembly while pulling the roll with your fingers to be
able to release the spindle.
2
MEDIA
2
If the new roll is on a different spindle, then you can skip steps 4 and 5, and go
straight to step 6.
4
Remove the left media stop, and then remove the roll from the spindle, with
the right media stop still connected to the spindle.
1
2
1922a
2–19
Page 60

Working with media
Loading roll media
5
Remove the new roll from its wrapping, Place it on the spindle, so that, as the
media winds up from behind the roll, the media stop still on the spindle is on
the right. Push the right media stop so that it is flush against the end of the roll
(2 in the graphic below). Then insert the left media stop on the left end of the
spindle.
2
3
1
1922b
1930
WARNING
6
Put the loaded spindle back in the plotter, pushing first the right side into place
and then the left.
2
1
1921a
Make sure that each end of the spindle slots firmly into place with an audible
“click”.
It is important to make sure that the spindle is firmly in place, otherwise it
could fall off the plotter.
2–20
Page 61

Working with media
Loading roll media
To feed roll media into the plotter
1 If the leading edge of the roll is uneven, you may find it easier to load if you trim it
now , for example with scissors. However, once it is successfully loaded, you can
use the plotter’s built-in cutter to trim it, as explained in step 10 below.
2
Wind the media around the upper roller and hold it ready to load into the
plotter. Hold the media by its edges, about 18 cm (7 in) from the top.
1923a
Don’t hold the media right at the top, as you would have to adjust your grip
as you push it into the plotter, and this would probably make you misalign it.
Don’t place your hands flat on the surface of the media (as is normal when
loading media into some old pen plotters), as this would make step 5 very
difficult for you.
MEDIA
2
1928
Media path
(view from
right)
3
Align the right-hand side of the media with
the line of holes on the plotter.
2–21
Page 62

Working with media
Loading roll media
4 Make sure the entire leading edge of the roll – left and right – is placed inside the
entry slot.
5
IMPORTANT. While keeping the right-hand side aligned with the line of
holes, push the media in one swift and decisive movement up into the entry
slot. Try to keep the angle of the sheet the same as the angle of the slot.
1923
Three things will happen in quick succession:
1 You will feel the media come up against the media stops.
2 The media may buckle slightly, as you are still pushing it. This is normal.
3 The plotter will start to take the media from you.
At this point, let go!
Don’t touch the media while the plotter feeds it out again a short way, as this
would probably misalign it.
2–22
Page 63

6
Realigning the media is an essential, not
optional, part of the roll-loading procedure.
So, even if you align the media perfectly
when loading it, you must still go through
the motions of realigning it.
Working with media
Loading roll media
Load Media
MEDIA
When the
plotter is waiting for you to realign the
media, as explained below.
7
1 Raise the cover.
2 This automatically raises the bail (the black metal bar).
3 Lower the green media lever to release the media.
Load Media light is flashing, the
2
3
2
1
1924
2–23
Page 64

Working with media
Loading roll media
8
Align the edges of the media coming out of the plotter with the same edges
going into the plotter, by pulling them taut with both hands and aligning them
by eye. Make sure that the right-hand side of the media is aligned with the line
of holes on the plotter (
), the top roller () and the roll (). You may need to
manually unroll a small amount of the media from its roll, to align the sheet
satisfactorily.
9 Raise the green media lever.
2–24
Page 65

10
While the cover is open, the plotter will pause, waiting for you to trim the front
edge of the roll.
Trim the roll, as follows. Holding the front edge of the media taut, on the left
adjacent the cutter, slide the cutter from left to right and then back again.
MEDIA
2
11 Lower the cover.
2–25
Page 66

Working with media
T o load a sheet with the roll-feed option installed
To load a sheet with the roll-feed option installed
From time to time you may want to load a separate sheet even though you
normally use a roll – for example, to use the setup sheet.
1 If a roll is currently loaded in the plotter, unload it as explained on page 2–18,
remembering to raise the green media lever again when it’s done.
2
On the front panel, make sure the Roll
light OFF, to indicate that you are
going to load a sheet.
Roll
(OFF)
Roll/Sheet
3 Load the sheet as explained in the steps starting with step 2 on page 2–9.
2–26
Page 67

recom-
350C
Working with media
Unloading media
Unloading media
Drying time
On some media types, the ink needs to dry before the plot is unloaded. Since the
plotter knows which media type you are using, it allows the appropriate drying
time to elapse before the plotting process is complete – for example, before the
Load Media light comes on to let you know you can unload a plotted sheet.
T ypical Drying Times (minutes)
Print Quality
Fast Normal
HP Media T ype
HP Opaque Bond 0.5 1.5
HP Translucent Bond 0.5 1.0
HP Natural Tracing Paper 0.5 1.0
HP Vellum 1.0 3.0
HP Coated Paper 0 0.25
HP Heavyweight Coated Paper 0 0.25
HP Matte Film Not
HP Clear Film
HP High-Gloss White Film Not
-
mended
recom-
mended
or Best
4.0
4.0
4.0
MEDIA
2
Notice that you can unload some media types immediately.
2–27
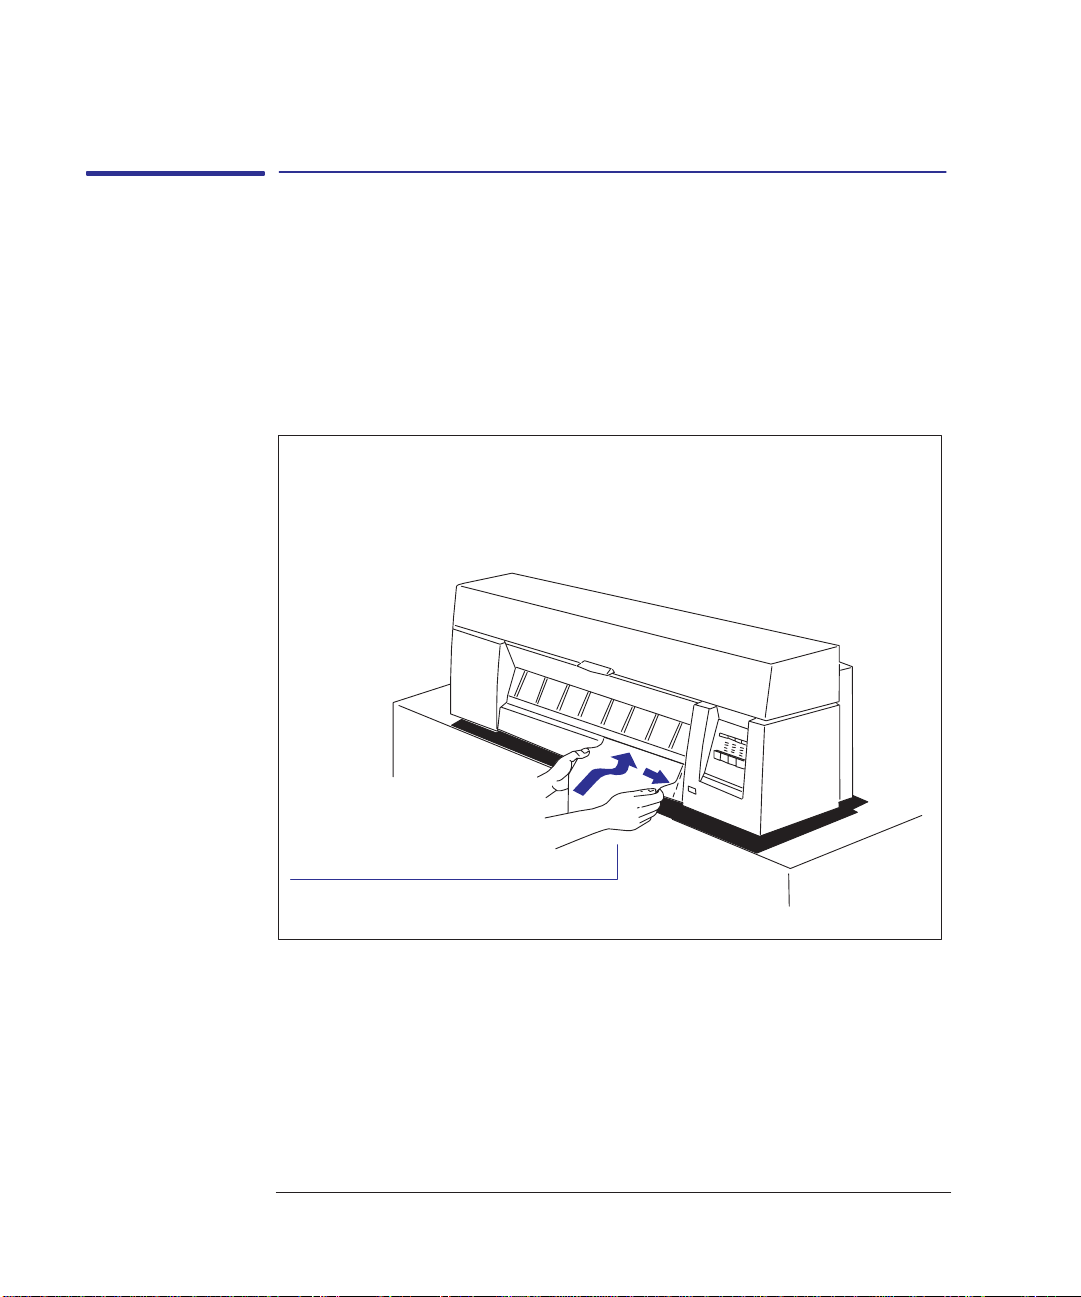
Page 68

To unload a sheet at the end of a plot
1
When the Load Media light comes on (not
flashing), the plot is finished.
2
Then simply pull the sheet downwards
to remove it from the plotter.
Working with media
Unloading media
Load Media
To unload a sheet under any other circumstances
Press Form Feed, wait for the sheet to
be ejected and them simply pull it
downwards to remove it from the
plotter.
2–28
Form Feed
1751
Page 69

Working with media
Unloading media
To cut and unload a plot from a roll
If the roll-feed option is installed, your plotter includes a built-in cutter. You may
choose to cut the roll between plots, or at the end of a series of plots, as explained
here.
There are two alternative plotting modes:
Pause mode. The plotter pauses between plots for you to cut the plot from the
roll (the default mode).
Continuous Plotting mode. The plotter does not pause between plots.
MEDIA
2
CAUTION
In Continuous Plotting mode, when you are cutting the roll after the last of a
series of plots, another plot sent to the plotter could start printing while you
are cutting. If this is likely, Pause mode, rather than Continuous Plotting
mode, is recommended.
T o switch between the two modes,
press the
time, except when it has paused and is
waiting for you to cut a plot from the
roll.
While the plotter is in Continuous
Plotting mode, the
Continue Plotting key at any
Roll light flashes.
Continue
Plotting
Roll
2–29
Page 70

To cut and unload a plot from a roll in Pause mode
Working with media
Unloading media
This mode is the default, and is indicated by the
1
When the plot is finished, the Ready
light stops flashing and goes off.
Holding the media taut on the left,
adjacent to the cutter, slide the cutter
from left to right and then back again,
to cut the plots from the roll.
Roll light not flashing.
Ready
Roll
2–30
Page 71

Working with media
Unloading media
2
Press Continue Plotting to confirm
that you’ve cut it.
Ready light comes on to confirm
The
that the plotter is ready for the next
plot.
To cut and unload a plot from a roll in Continuous Plotting mode
Continue
Plotting
Ready
Roll
MEDIA
2
This mode is indicated by the
1
When the plot is finished, the Ready
light stops flashing, but stays on to
confirm that the plotter is ready for the
next plot.
Roll light flashing.
Ready
Roll
2–31
Page 72

2
1 If the plotter has finished the series of
plots and you want to cut the roll after
the last one, press
Form Feed and wait
for the plotter to feed out more media.
Before cutting the roll (as explained next),
make sure that no other plot has been sent
to the plotter.
2 Holding the media taut on the left,
adjacent to the cutter, slide the cutter
from left to right and then back again, to
cut the plots from the roll.
Form Feed
3 There’s no need to press any other keys.
2–32
Page 73

3
Ways to control the plot’s appearance 3–2
Page size 3–3
Rotating a plot 3–7
Plotting a mirror image 3–10
Changing the treatment of overlapping lines (Merge feature) 3–11
Changing the plotter’s logical pen characteristics 3–12
Printing color drawings in monochrome 3–13
Choosing an appropriate print quality 3–15
PLOT
APPEARANCE
3
Controlling your plot’s appearance
3–1
Page 74

Controlling your plot’s appearance
Ways to control the plot’ s appearance
Ways to control the plot’s appearance
Note. Throughout this chapter there are references to “pens”. The pens referred to
are not the plotter’s physical print cartridges, but “logical” pens used in a software
palette.
This chapter discusses the ways in which you can control the appearance of your
plots, in terms of:
page size
plot orientation
the treatment of overlapping lines
pen characteristics (widths and color/grayscale levels)
rendering color drawings in monochrome
overall print quality and resolution
Apart from print quality, these controls are only available using the setup-sheet, an
example of which is shown on page 1–21. Print quality can be changed from the
front panel. This chapter explains the controls in the same order as in the list
above.
Changing the settings of these controls using the Setup Sheet is explained from
page 1–19.
It is also possible to change these settings within many applications and many
software drivers. In some cases, the plotter is in control, in some cases the
application or software driver is in control, and in other cases, the plotter interacts
with the application or software driver. Which is the case in which circumstances
is made clear in this chapter.
3–2
Page 75

Controlling your plot’s appearance
Page size
Page size
The Page size option applies only when using roll media, and is used to define the
way in which the plotter emulates a sheet of media when printing your plot. This
section explains how to make sure that the plotter prints your plot in the page size
you want.
MediaTerminology
Page size
Margin
Plotting area
Inked area
PLOT
APPEARANCE
3
0023
Page size This is what you can specify in your software, where it may be called “Page Size”,
“Media Size”, “Paper Size” etc., and where the options include, for example, ISO
A3, ANSI Letter, Architectural E, Custom, etc. Alternatively, it can be set by the
plotter. By default, the plotted page size is set to the inked area (plus the margins).
In AutoCAD for DOS, however, the “User Size” is the plotting area.
Margins These are fixed for the HP DesignJet 330 and 350C. The values are 17 mm on the
leading and trailing edges and 5 mm on the sides.
Plotting area This is the chosen page size minus the margins. For a table showing the plotting
areas for standard media sizes, see page 10–7.
This is the smallest rectangle that contains all the content of the drawing, while
maintaining its relative dimensions.
3–3
Page 76

Controlling your plot’s appearance
Page size
When do you need to adjust the page size in the plotter?
Normally you don’t need to. The default setting in the plotter is:
Inked Area. With this setting, the plotter interacts with your application, or
software driver, and saves wasted media by using a page size equal to the inked
area plus the margins (see page 3–3).
But, if you wish, you can specify the page size either from your software or by
using the plotter’s Setup Sheet, as explained here.
If you want a printed page of the exact size that you have specified in your
software, use the
With this setting, your application or your software driver is normally in
control, but see the comment regarding this setting in the table on page 3–5.
See also the section on Page size and clipped plots on page 3–6.
If you want your plots to be on a page meeting a specific standard (for example,
ISO or ANSI), but the actual size within that standard is not important, specify
the
Best option for that standard.
Software setting in the Setup Sheet.
For example you may want a page size that conforms to the ISO standard, but
not care whether the final page size is ISO A4 or ISO A3. In this case you
should specify
Best within the ISO options.
With this setting, the plotter interacts with your application, or software driver,
and uses the smallest standard page size into which the inked area, plus margins,
will fit.
If you want all your plots on the same size paper, regardless of your plot size
and software/driver settings, specify a discrete page size.
For example, you may want to print an ANSI A-size plot in the corner of an
ANSI D-size page, leaving the rest of the page blank. In this case, specify
within the ANSI options.
With this setting the plotter is in control of page size.
See also the section on Page size and clipped plots on page 3–6.
3–4
D
Page 77

()
if the inked area of the lot is between A3 and
Di
JS / / 3/
Oversize A1/A2
yy
Controlling your plot’s appearance
To adjust the page size in the Setup Sheet
Page size
Size
in Setup Sheet
Inked area The plotted page size is the inked area plus
Software The plotter looks to your software for a page
ISO Best “Best ...” options
A0/A1/A2/A3/A4
ANSI Best
E/D/C/B/A
JIS Best
B1/B2/B3/B4
ARCH Best
E1/E/D/C/B/A
Oversize (No “Best” option)
Over A1/A2
Comments
margins. For a definition of “inked area”, see
page 3–3.
size instruction in HP-GL/2 (the plotter’s
graphics language instruction set). If it is
there, the plotter uses that page size plus
margins. If not, the plotted page size is the
inked area plus margins.
The plotter chooses the smallest page size
(from the ISO-series: A4, A3 etc.) that will
hold the inked area of the plot. For example,
if the inked area of the plot is between A3 and
A4, the plotter chooses A3 as the page size.
screte options
ISO A0/A1/A2/A3/A4
ANSI E/D/C/B/A
JIS B1/B2/B3/B4
ARCH E1/E/D/C/B/A
The plotted page size is exactly the size you
specify. The largest discrete page size you
can specify depends whether your plotter is
an E-size or D-size model.
PLOT
APPEARANCE
3
3–5
Page 78

Controlling your plot’s appearance
Page size
Page size and clipped plots
When setting your page size, be aware that with some combinations of page size
and plot size, the plotter may print what it can, but may clip your plot:
If you specify in your software a page/plot size that is larger than the physical
size of the media loaded in the plotter.
A2 media in the plotter
Clipped area
A1 page size in software
If you specify in software a page size setting that is too small for the plot, the
plot will be clipped, even though the physical media size may be adequate.
If you specify a discrete page size in the Setup Sheet that is too small for the
plot, the plot may be clipped, even though the physical media size may be
adequate.
Page size specified in software
or in Setup Sheet
Clipped area
Physical roll media size
Full plot size
3–6
Page 79

Controlling your plot’s appearance
Rotating a plot
Rotating a plot
Can you rotate any drawing using the Setup Sheet?
No. The Rotate option available in the Setup Sheet is applicable only if:
the file contains no raster data.
The normal line drawings of most CAD software do not contain raster data, and
therefore you can use this
Microsoft Windows drivers supplied with this plotter, your files do contain raster
data and therefore you cannot use this
To rotate a plot using the plotter’s Setup Sheet
Providing your plot file does not contain raster data, you can rotate a plot using the
Setup Sheet, without changing the drawing in your software.
Rotate option, However, if you are using one of the
Rotate option.
PLOT
APPEARANCE
3
The available options are:
Auto rotate (roll media only). With this setting, the plotter will automatically
rotate a plot by 90_, providing it will fit on the available media, if this will save
media.
Rotate off. With this setting, the plotter will print your plot as requested by your
software, without adding any rotation. This is the default.
Rotate 90_. With this setting, the plotter will rotate all plots by 90_,
counterclockwise relative to the drawing’s orientation in your software:
Rotate off
Rotate 90_
3–7
Page 80

Controlling your plot’s appearance
Rotating a plot
Exactly what is rotated?
With roll media, both the drawing and the page orientation are rotated.
Rotate off
A
Notice that the narrow margins are always at the side, regardless of the
orientation.
With sheet media, the drawing is rotated, but the page orientation specified
in your software is retained. (You should always load sheet media in the same
orientation as you have specified in the software.)
Rotate off
A
Rotate 90_
A
0025
Rotate 90_
A
3–8
0026
Page 81

Controlling your plot’s appearance
Rotating a plot
The Rotate feature and clipped plots
With either roll or sheet media, if you rotate to landscape a plot whose original
orientation was portrait, the media may not be wide enough for the drawing, which
may be clipped. For example, rotating by 90_ a portrait D/A1-size plot on
D/A1-size media will probably result in a clipped plot. Clipping does not occur
Auto rotate, which checks whether the rotated plot will fit.
with
How does Rotate interact with your software?
The plotter adds the rotation setting to any rotation angle you specify in your
software.
For software applications which, like the plotter, rotate counterclockwise (for
example, CorelDRAW!) the result is the sum. For example, if your software
specifies 180 degrees rotation, and you set
your plot’s final rotation will be 270 degrees.
For software applications which rotate clockwise (for example, AutoCAD) the
result is the difference. For example, if your software specifies 90 degrees
rotation, and you set
Auto rotate behaves in the same way, if media could be saved.
Note that
best-fit page size in the Setup Sheet (see page 1–19). However the effects may not
be what you expect.
Auto rotate will rotate a plot to save media, even if you have chosen a
Rotate 90_ in the Setup Sheet, there will be no rotation.
Rotate 90_ in the Setup Sheet,
PLOT
APPEARANCE
3
3–9
Page 82

Controlling your plot’s appearance
Plotting a mirror image
Plotting a mirror image
You can plot a mirror image of a drawing, using the Setup Sheet, without changing
the drawing in your software,
The available options are:
Mirror off. With this setting, the plotter will print your plot as requested by your
software, without adding any mirroring. This is the default.
Mirror on. With this setting, the plotter will produce a mirror image of a
drawing, relative to the drawing’s orientation in your software:
Mirror off Mirror on
3–10
Page 83

Controlling your plot’s appearance
Changing the treatment of overlapping lines (Merge feature)
Changing the treatment of overlapping lines
(Merge feature)
The Merge feature provides two alternative settings for the treatment of
overlapping lines in the Setup Sheet:
350C
330
Merge off.
A subsequent line hides a
previous line where they
overlap.
Merge off.
A subsequent line hides a
previous line where they
overlap.
Merge on.
Overlapping lines and area
fills are merged.
Merge on.
Overlapping lines and area
fills are merged.
PLOT
APPEARANCE
3
You can set this feature from your software in some applications, for example in
AutoCAD.
3–11
Page 84

Controlling your plot’s appearance
Changing the plotter’s logical pen characteristics
Changing the plotter’s logical pen characteristics
The characteristics of the plotter’s logical pens, referenced by your software, can
be set either by software or by the settings for pens 1 through 8 in the Setup Sheet.
The default is to use settings from the software.
Sometimes you may, for example, want to produce a set of drawings all with the
same pen settings, but without having to change the software settings for the
individual drawings. In this case you can choose to provide the pen settings from
the plotter.
350C
330
If you want to provide your own settings in the plotter and use those, use the
Settings
Using this option, you can specify the
section in the Setup Sheet and select Use settings from tables below.
Width and Color/Grayscale of logical pens
Pen
1 through 8.
Item Available options
Pens 1 through 8.
Width (mm) 0.13, 0.18, 0.25, 0.35, 0.50, 0.70, 1.00
Note that 0.13 mm is a one-pixel line width and renders
some colors as a dot pattern.
Grayscale (%) 100, 80, 60, 40, 20, 10, 5
Color Black, Red, Green, Yellow, Blue, Magenta, Cyan
For the HP DesignJet 330, only pen Width and Grayscale are available.
Once you have chosen your pen settings, you can change back to
from software
and your settings will be saved for future use if you require.
Use settings
Note. If you want to produce black and white drawings instead of grayscale, then,
unless your driver has an option for this, choose
Use settings from tables below
and set all 8 pens to Black/100% Grayscale. If you are using one of the Windows
drivers supplied with the plotter, you must set this in the driver since the driver
overrides the
Pen Settings in the Setup Sheet.
3–12
Page 85

Controlling your plot’s appearance
Printing color drawings in monochrome
Printing color drawings in monochrome
AA
You can successfully print color drawings in monochrome with either the
HP DesignJet 330 or the HP DesignJet 350C.
330
350C
If you send a color file to the HP DesignJet 330 and your software settings are for
printing in color, the plotter will automatically convert the plot to grayscale.
However, if your plotter is set to
Setup Sheet
grayscale levels used. If you want to control these yourself, you must select
Use settings from tables below and set them in the Setup Sheet, as described on
page 3–12.
The default setting with the HP DesignJet 350C is to print color as color. However,
you may want to print a color drawing in monochrome, for example:
because you want a draft where color is not important, for example to check that
the plot is not going to be clipped,
because you want a version for photocopying in monochrome.
Pen Settings (see page 3–12), you will have no control over the
Use settings from software (the default) in the
To switch from color to monochrome
With the HP DesignJet 350C, if your application or software driver has a
color/mono setting, use this, since the Setup Sheet setting is normally overridden
by software. If not, you can set the plotter to print in monochrome by selecting
Print color as grayscale in the Color/Mono section of the Setup Sheet.
PLOT
APPEARANCE
3
You can force a color plot to monochrome, regardless of the application/driver
setting (except with the supplied Windows driver), by additionally setting the
Settings
The Setup Sheet setting also impacts the plotter’s internal demonstration plots.
Note that if there is no color information in your plot file, the plotter will print only
a black and white plot, not grayscale.
to Use settings from tables below (see page 3–12).
Pen
3–13
Page 86

Controlling your plot’s appearance
Printing color drawings in monochrome
Important points about monochrome printing
The monochrome plot will render colors as grayscales. If you want your plot
printed in only black and white, then you should set all your logical pens to
black, either in your software (easily achieved in CAD software by using a pen
number that is 100% black) or in the Setup Sheet (see page 3–12).
With monochrome plotting, you have the option to choose between 300 and 600
dpi resolution (see page 3–15).
350C
330
– With the HP DesignJet 350C, the resolution on glossy media is always 300
dpi. This is because, with the
performed using the cyan, yellow and magenta cartridges; the black cartridge is
not used.
– With the HP DesignJet 330, glossy media is not supported.
Glossy media type selected, all printing is
3–14
Page 87

Most
600
600 dpi
1
350C
330
Controlling a plot’s overall appearance
Choosing an appropriate print quality
Choosing an appropriate print quality
You can control the overall print quality of your plot from the plotter’s front panel.
Resolution
Print Quality Speed Ink Used Monochrome Color
Fast Highest Least 300 x 300 dpi.
Normal Normal
Best Lowest
1
Except for glossy media types, on which the resolution is
always 300 dpi.
Note that glossy media types are not supported on the HP DesignJet 330.
Note that glossy media types are not supported on the HP DesignJet 330.
x
Alternatively, you can specify the print quality setting from your software printer
driver. In this case, the driver’s setting is used for the next plot. During the plot,
the front-panel setting changes temporarily to that from the driver, and then
resumes its previous setting again.
300 x 300 dpi.
.
PLOT
APPEARANCE
3
The exact printing process used by the plotter varies not only with your print
quality setting, but also with your specification of the media type when loading the
media (see page 2–3). Recommended combinations of print quality and media type
are given in the table on page 2–5.
Recommended media types for various applications are given in the table on
page 2–6.
General tips By choosing Fast, you will get draft-quality output in the shortest time. By choos-
Normal, and a suitable media type, you will get high-quality output in a
ing
reasonable time. By choosing
Best, you will get the highest possible quality for
the media type, but the printing time will be longer.
3–15
Page 88

Controlling a plot’s overall appearance
Choosing an appropriate print quality
To change the print quality on the front panel
Use the front-panel
Print Quality key to
toggle between the three print quality
settings.
For details of each print quality level,
see the table on the previous page.
Both ON = Best
Fast
Normal
Print
Quality
The setting also impacts the plotter’s internal demonstration plots.
You cannot change the print quality setting for a plot already received by the
plotter.
3–16
Page 89

4
To cancel a plot 4-2
To copy a plot 4-2
To advance the media 4-3
PLOT4MANAGEMENT
Managing your plots
4–1
Page 90

X
Managing your plots
T o copy a plot / To copy a plot
To cancel a plot
T o cancel the current plot while it is
being received, or while it is printing,
Cancel.
press
The canceled plot stays in memory
until you send another, and so you can
subsequently use
again. Note that, for these purposes,
any internal plot (see chapter 5) counts
as another plot.
Replot to print it
Cancel
To copy a plot
T o print another copy of the last plot,
Replot.
press
It will be printed with the same
settings for
Quality
you’ve changed them on the front
panel.
Replot does not work if:
another file has already been sent to the plotter (including internal plots, for
example the Setup Sheet), or
you have switched the plotter off and on again since first sending the plot.
4–2
Media T ype and Print
as the original copy, even if
Replot
Page 91

To advance the media
Managing your plots
T o advance the media
Pressing the Form Feed key advances
the media out of the media exit slot.
Form Feed
You may want to do this:
when the plotter is in Continuous Plotting mode, you have reached the end of a
series of plots and want to cut the roll after the last one (see page 2–31), or
to eject damaged media after clearing a media jam (see page 9–5).
There is no need to use
Form Feed to unload a plotted sheet from the plotter – see
page 2–28.
Don’t press
Form Feed while a file is being received by the plotter, as this
terminates the data transmission (unless you are doing this as part of a
troubleshooting routine – see page 9–9).
PLOT4MANAGEMENT
4–3
Page 92

4–4
Page 93

5
Their purpose and how to print them 5-2
Using the Black Cartridge Alignment Sheet 5-3
Using the Color Cartridge Test Sheet 5-7
INTERNAL
PLOTS
5
Special internal plots
5–1
Page 94

Special internal plots
Their purpose and how to print them
Their purpose and how to print them
Various pre-defined plots are supplied with your plotter. You can print these by
pressing keys, or combinations of keys, on the plotter’s front panel.
See
Plot Purpose To print it, press ...
Setup Sheet To configure the
plotter
Setup
page ...
1–19 and
chapter 3
350C
Demonstration
Plot
Black Cartridge
Alignment Sheet
Color Cartridge
Test Sheet
Service
Configuration Plot
Print Quality Plot * *
To test the plotter 1–26
Setup
simultaneously
To test the
alignment
between the two
horizontal
cartridge
movements.
To test the
performance and
alignment of all
cartridges
* *
Setup Replot+
Cancel
simultaneously
Form
Feed
simultaneously
+
simultaneously
simultaneously
+
+
Media
Type
Print
Quality
Continue
Plotting
Continue
Plotting
Roll/
+
Sheet
5–3
5–7
* These plots are essentially for use by a qualified service engineer, if troubleshooting the plotter.
You may be asked to print one and read out some details over the phone.
5–2
Page 95

Special internal plots
Using the Black Cartridge Alignment Sheet
Using the Black Cartridge Alignment Sheet
Some of the circumstances in which it is useful to use the Black Cartridge
Alignment Sheet are explained in chapter 9,“Troubleshooting”. It tests the
alignment between the two horizontal cartridge movements – movement to the
right and movement to the left – and allows you to correct any misalignment.
1
Load a sheet of A-size or A4-size plain paper, in portrait orientation.
Make sure you have selected
(see page 2–3). For this plot, the plotter sets the print quality level
automatically.
Plain as the media type on the front panel
INTERNAL
PLOTS
5
Plot will be on underside.
For help on how to load a sheet, either refer to the pictures on the
right-hand side of the plotter’s media-entry slot, or see the section starting
on page 2–9. Note that you cannot print the Black Cartridge Alignment
Sheet on roll media. To load a sheet with the the roll-feed option installed,
see page 2–26.
1750
5–3
Page 96

Special internal plots
Using the Black Cartridge Alignment Sheet
2
When you have correctly loaded the sheet
(when the
press the
Ready light is on and steady),
Setup and Replot keys
Setup + Replot
simultaneously.
The Black Cartridge Alignment Sheet is
printed. An example is shown on
page 5–5.
3 When the Load Media light comes on (not flashing), the plot is finished. Simply
remove the sheet from the plotter.
4 Follow the instructions on the sheet itself. As you will see, this involves you
identifying the straightest set of vertical lines in each of the two boxes.
5 If the straightest sets are already the current selection, you need do nothing more.
If not, then mark the appropriate ovals, reverse the sheet as indicated, and reload it.
6
When the Ready light comes on, press
Setup.
The plotter now reads your marks and
adjusts itself automatically.
5–4
Setup
Ready
Page 97

Special internal plots
Using the Black Cartridge Alignment Sheet
HP DesignJet 330/350C
1
In each of the two large boxes,
mark the best set of lines by filling in the oval.
Jagged lines = bad Straight lines = good Current Best
2
Black Cartridge
Alignment Sheet
Pencil or
black pen
INTERNAL
PLOTS
5
3
Ready
Setup
R
7 When the Load Media light comes on again, remove the sheet and make sure that
the plotter has marked your selections with a check mark.
5–5
Page 98

Special internal plots
Using the Black Cartridge Alignment Sheet
Three important points concerning the Black Cartridge Alignment Procedure:
Always use the Black Cartridge Alignment Sheet immediately after printing it.
Never re-use a Black Cartridge Alignment Sheet.
Any plot that was in the plotter’s memory before you printed the Black
Cartridge Alignment Sheet has been lost and so, to print it, you must resend it.
5–6
Page 99

Special internal plots
Using the Color Cartridge Test Sheet
350C
Using the Color Cartridge Test Sheet
Some of the circumstances in which it is useful to use the Color Cartridge T est
Sheet are explained in chapter 9,“Troubleshooting”. It achieves two objectives:
It tells you which cartridge, if any, is not performing correctly.
It lets you check the alignment of the four cartridges to each other and, if
necessary, adjust it.
1
Load a sheet of A-size or A4-size plain paper, in portrait orientation.
Make sure you have selected
(see page 2–3). For this plot, the plotter sets the print quality level
automatically.
Plain as the media type on the front panel
INTERNAL
PLOTS
5
Plot will be on underside.
For help on how to load a sheet, either refer to the pictures on the
right-hand side of the plotter’s media-entry slot, or see the section starting
on page 2–9. Note that you cannot print the Color Cartridge Test Sheet on
roll media. To load a sheet with the the roll-feed option installed, see page
2–26.
1750
5–7
Page 100

Special internal plots
Using the Color Cartridge Test Sheet
2
When you have correctly loaded the sheet
(when the
press the
Ready light is on and steady),
Continue Plotting keys
Form
Feed
Continue
+
Plotting
simultaneously.
The Color Cartridge T est Sheet is printed.
An example is shown on page 5–9.
3 When the Load Media light comes on (not flashing), the plot is finished. Simply
remove the sheet from the plotter.
Notice that there are two parts, related to two quite distinct tasks:
The part headed
T o check the nozzles lets you see if any of the cartridges is
not printing correctly. It is to be used when cleaning the nozzles (priming) – see
page 7–7. Some examples of the patterns when a cartridge is not printing
correctly are shown here:
White streak
White gaps
5–8
1002
 Loading...