

Page 1
AX-M84
Micro HiFi System With Bluetooth ,USB SD/MMC&
Wireless Docking for iPod
* iPod not included
INSTRUCTION MANUAL
Page 2

SOME DOS AND DON'TS ON THE SAFE USE OF EQUIPMENT
This equipment has been designed and manufactured to meet international safety standards but, like any electrical
equipment, care must be taken if you are to obtain the best results and safety is to be assured.
DO read the operating instructions before you attempt to use the equipment.
DO ensure that all electrical connections (including the mains plug, extension leads and inter-connections between
the pieces of equipment) are properly made and in accordance with the manufacturer's instructions. Switch off and
withdraw the mains plug before making or changing connections.
DO consult your dealer if you are ever in doubt about the installation, operation or safety of your equipment.
DO be careful with glass panels or doors on equipment.
DO route the mains lead so that it is not likely to be walked on, crushed, chafed, or subjected to excessive wear and
tear or heat.
DON'T remove any fixed cover as this may expose dangerous voltages.
DON'T obstruct the ventilation openings of the equipment with items such as newspapers, tablecloths, curtains,
etc. Overheating will cause damage and shorten the life of the equipment.
DON'T allow electrical equipment to be exposed to dripping or splashing, or objects filled with liquids, such as
vases, to be placed on the equipment.
DON'T place hot objects or naked flame sources such as lighted candles or nightlights on, or close to equipment.
High temperatures can melt plastic and lead to fires.
DON'T use makeshift stands and NEVER fix legs with wood screws - to ensure
complete safety always fit the manufacturer's approved stand or legs with the fixings
provided according to the instructions.
DON'T use equipment such as personal stereos or radios so that you are distracted from
the requirements of traffic safety. It is illegal to watch television whilst driving.
DON'T listen to headphones at high volume, as such use can permanently damage your
hearing.
DON'T leave equipment switched on when it is unattended unless it is specifically stated
that it is designed for unattended operation or has a stand-by mode. Switch off using the
switch on the equipment and make sure that your family know how to do this. Special
arrangements may need to be made for infirm or handicapped people.
DON'T continue to operate the equipment if you are in any doubt about it working
normally, or if it is damaged in any way - switch off, withdraw the mains plug and consult
your dealer.
ABOVE ALL
--- NEVER let anyone especially children push anything into holes, slots or any other opening in the case - this could
result in a fatal electrical shock;
--- NEVER guess or take chances with electrical equipment of any kind
--- it is better to be safe than sorry!
*************
The mains lead on this equipment may be supplied with a moulded plug incorporating a fuse, the value of which is
indicated on the pin face of the plug. Should the fuse need to be replaced, an ASTA or BSI approved BS 1362 fuse
must be used of the same rating. If the fuse cover is detachable never use the plug with the cover omitted. If a
replacement fuse cover is required, ensure it is of the same colour as that visible on the pin face of the plug. Fuse
covers are available from your dealer.
DO NOT cut off the mains plug from this equipment. If the plug fitted is not suitable for the power points in your home
or the cable is too short to reach a power point, then obtain an appropriate safety approved extension lead or
consult your dealer.
Should it be necessary to change the mains plug, this must be carried out by a competent person, preferably a
qualified electrician.
If there is no alter native to cutting off the mains plug, ensure that you dispose of it immediately, having first removed
the fuse, to avoid a possible shock hazard by inadvertent connection to the mains supply.
IMPORTANT
The wires in this mains lead are coloured in accordance with the following code:
Blue
: NEUTRAL
Brown
: LIVE
As these colours may not correspond to the coloured markings identifying the terminals in your plug, proceed as
follows: The wire coloured BLUE must be connected to the terminal marked with the letter or coloured BLUE or
BLACK. The wire coloured BROWN must be connected to the terminal marked with the letter or coloured BROWN
or RED.
On no account connect either of these wires to the terminal marked E or by the ear th symbol E or coloured green or
green and yellow.
Alternatively, this equipment may be supplied with a rewireable plug already fitted, which may be removed if not
suitable and an alternative fitted in accordance with the preceding instructions.
**************
**************
IMPORTANT
N
L
UK-1
Page 3

This symbol on the product or in the instructions means that your electrical and
electronic equipment should be disposed at the end of its life separately from your
household waste. There are separate collection systems for recycling in the EU. For
more information, please contact the local authority or your retailer where you
purchased the product.
Please read this manual carefully before attempting to operate the unit in order to became familiar
with its features.
* Keep the safety and operating instructions for future reference.
* Avoid installing the unit in locations described below:
Places exposed to direct sunlight or close to heat radiating appliances such as electric heaters.
On top of other
Places lacking ventilation or dusty places.
Places subject to constant vibration.
Humid or moist places.
* Make sure not to obstruct the ventilation openings.
Operate turning controls and switches
* Before turning on the power for the first time, make certain the power cord is properly installed.
* Store your tapes or CD' s in a cool area to avoid damage from heat.
*
To disconnect the
* When the unit is disconnected from the mains supply the LED will not light up.
* Minimum distances around the apparatus for sufficient ventilation is 5cm.
Attention should be drawn to the environmental aspects of battery disposal.
*
* This apparatus has been designed for use in moderate climates.
For safety reasons, do not remove any covers or attempt to gain access to the inside of the product.
Do not attempt to remove any screws, or open the casing of the unit; there are no user serviceable
parts inside, refer all servicing to qualified service personnel.
stereo equipment that radiates heat.
product switch off and remove the plug from the mains supply.
Important Notes
as instructed in the manual.
CAUTION : TO
NO USER SERVICEABLE PAR TS INSIDE, REFER SERVICING TO QUALIFIED SERVICE
PERSONNEL.
The owners manual contains important operating and maintenance instructions, for
your safety, it is necessary to refe r to the manual.
WARNING : TO PREVENT FIRE OR SHOCK
DRIPPING OR SPLASHING. DISCONNECT FROM THE MAINS SUPPLY WHEN NOT
IN USE.
Note:
This unit will become warm when used for a long period of time. This is normal and does
a problem with the unit.
The CD player includes micro-processors which may malfunction as a result of external electrical
interference or noise. If the CD player is not working properly, disconnect the power source and
then reconnect it.
Before connecting the unit to the PC, make sure the power supply
otherwise, the unit may not work properly with the PC.
REDUCE THE RISK OF ELECTRIC SHOCK DO NOT REMOVE COVER ( OR BACK ) ,
ATTENTION
HAZARD, DO NOT EXPOSE THIS APPLIANCE TO
not indicate
from mains is disconnected,
UK-2
Page 4
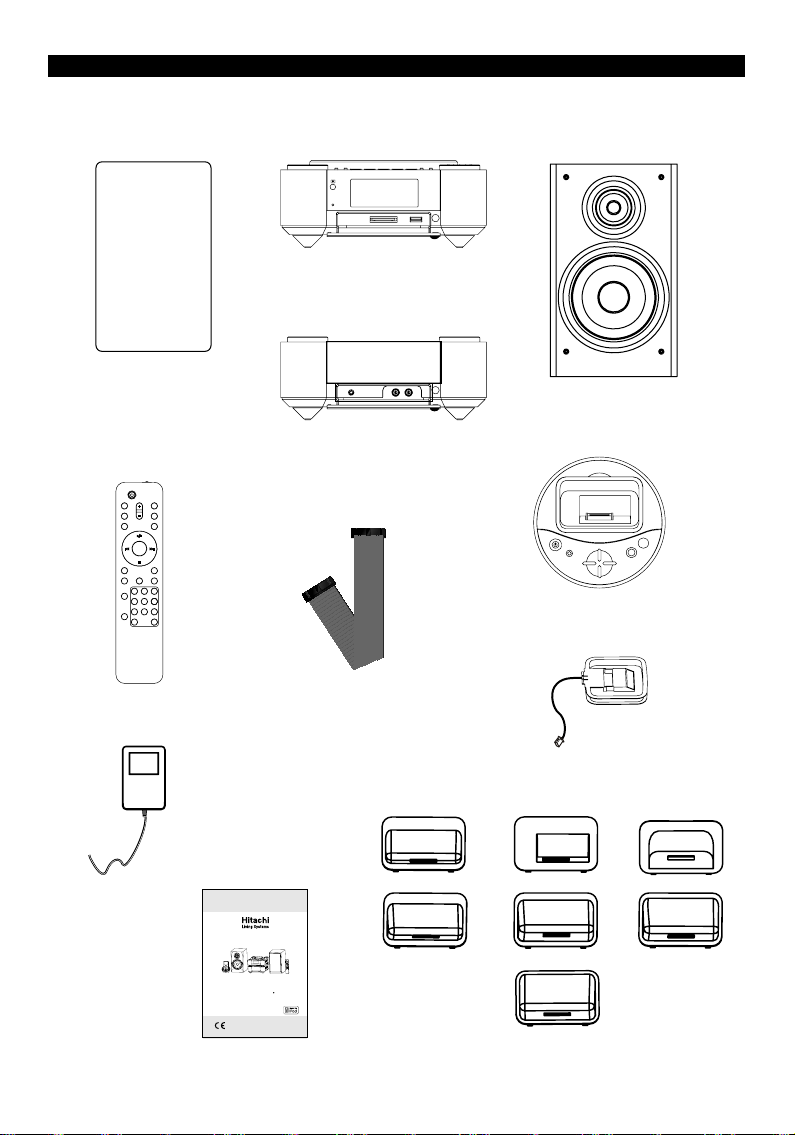
PACKAGE CONTENTS
Speakers cover(2 pcs) Speakers(2 pcs)
CD unit(1 pc)
Power Unit(1 pc )
iPod Docking(1 pc)
Remote(1pc)
Control cable cord(1 pc)
AM antenna(1 pc)
Transformer(1 pc)
Instruction manual(1 pc)
AX-M84
Micro Hi Fi System With Bluetooth ,USB SD/MMC &
Wireless Docking for iPod
*iPod not included
INSTRUCTION MANUAL
UK-3
Dock adapter(7 pcs)
No.5
No.4
No.6
No.3
No.1
No.7
No.2
Page 5
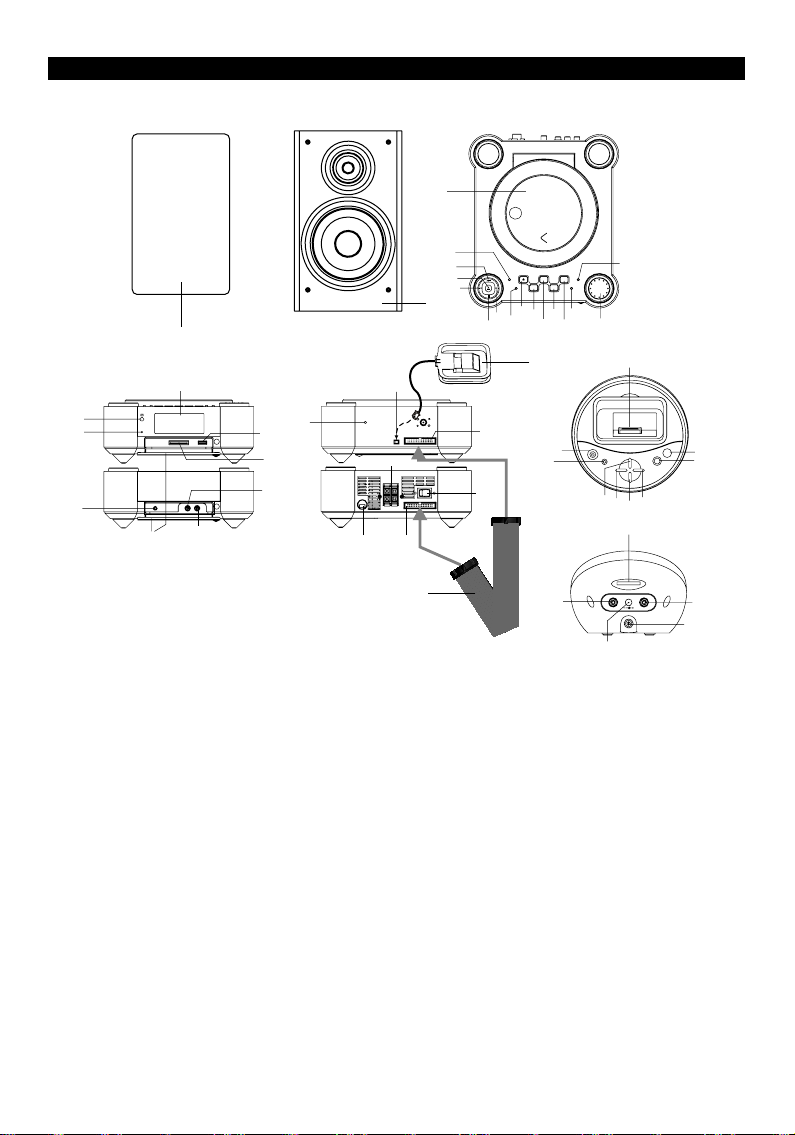
FEATURES AND CONTROLS
25
24
23
Speakers
26
Speakers cover
50
Front View Back View
19
20
21
1. SPEAKERS
2. CD DOOR
3. ERASE/MEMORY BUTTON
4. PLAY/PAUSE BUTTON
5. CD DOOR OPEN/CLOSE BUTTON
6. SKIP/TUNER/SEARCH DOWN BUTTON
7. STOP/BAND BUTTON
8. SKIP/TUNER/SEARCH UP BUTTON
9. CLOCK BUTTON
10. STANDBY/ON BUTTON
11. BLUETOOTH SEARCH BUTTON
12. MENU BUTTON
13. ENCODING BUTTON
14. FUNCTION BUTTON
15. RANDOM/MEM-DOWN BUTTON
16. VOLUME HIGH/LOW KNOB
17. REPEAT/MEM-UP BUTTON
18. VFD DISPLAY
19. IR SENSOR
20. STANDBY LED INDICATOR
21. EARPHONE OUTPUT JACK
22. AUX IN JACK “R”
23. AUX IN JACK “L”
24. SD/MMC CARD IN SLOT
25. USB DEVICE IN PORT
26. FM ANTENNA
18
22
45
Top View
2
3
4
5
6
1
27
47
28 29
48
27. MW ANTENNA JACK
28. AC POWER CORD
29. CONTROL CABLE
30. CONTROL CABLE IN SLOT
31. iPod CONNECTOR
32. STANDBY/SIGNAL LED INDICATOR BUTTON
33. SOURCE LED INDICATOR
34. PLAY/PAUSE BUTTON
35. SKIP/SEARCH DOWN BUTTON
36. SOURCE BUTTON
37. SKIP/SEARCH UP BUTTON
38. RANDOM BUTTON
39. REPEAT BUTTON
40. LINE IN JACK
41. 30-PIN PORT (Connect the Dock to your
computer)
42.
LINE OUT JACK
43. VIDEO OUT JACK
44. DC JACK
AUDIO DEVICE IN COVER
45.
10
13 15
11
8
9
12
7
30
46
14
49
32
33
40
OUT SLOT
17
16
31
34
35
36
41
44
46. AC POWER SWITCH
47. SPEAKER TERMINALS
48.
CONTROL CABLE CORD
49. AM ANTENNA
50. SPEAKERS COVER
38
39
37
42
43
UK-4
Page 6
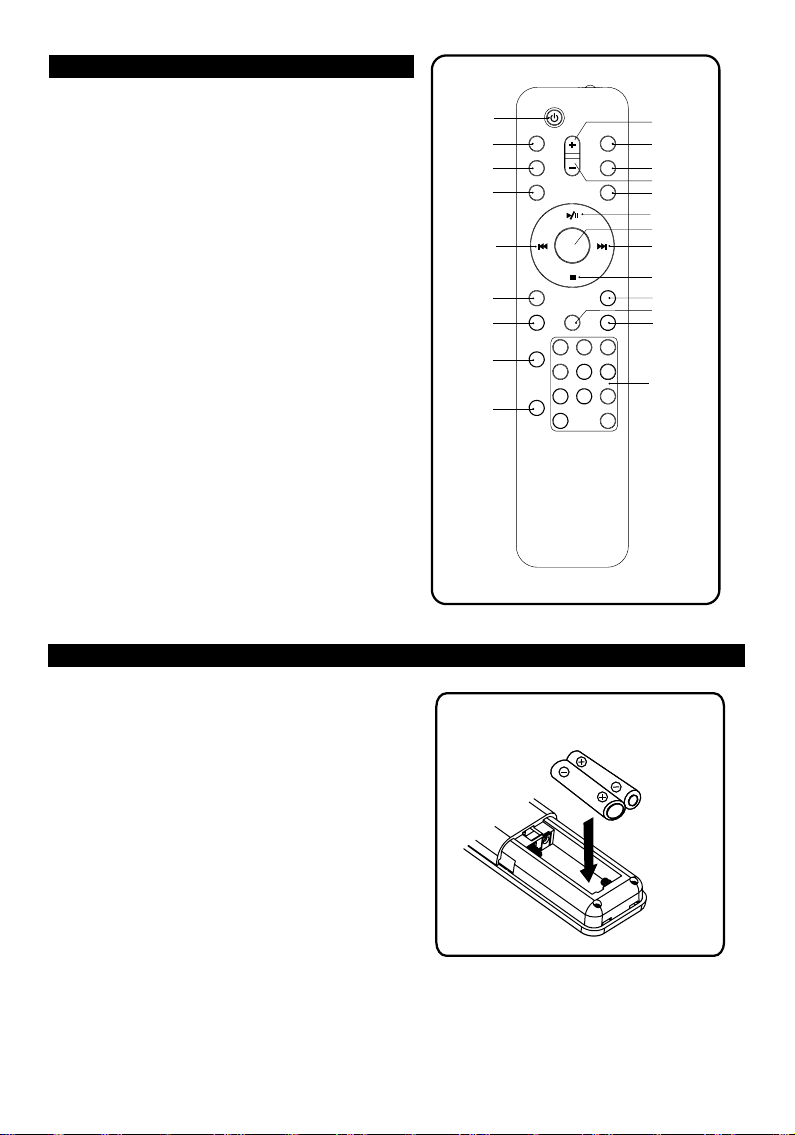
REMOTE CONTROL
1. STANDBY BUTTON
2. MUTE BUTTON
3. ID3 BUTTON
4. EQ BUTTON
5. SKIP/TUNING/SEARCH DOWN BUTTON
6. CLOCK BUTTON
7. INTRO/MONO/ST. BUTTON
8. REPEAT/MEM-UP BUTTON
9. RANDOM/MEM-DOWN BUTTON
10.VOLUME UP BUTTON
11.DOOR OPEN/CLOSE BUTTON
12.FUNCTION BUTTON
13.VOLUME DOWN BUTTON
14.MENU BUTTON
15.PLAY/PAUSE/ENTER BUTTON
16.ERASE/MEMORY BUTTON
1
2
3
4
5
6
7
8
9
10
11
12
13
14
15
16
17
18
19
20
21
22
17.SKIP/TUNING/SEARCH UP BUTTON
18.STOP/BAND BUTTON
19.TIMER BUTTON
20.ENCODING BUTTON
21.SLEEP BUTTON
22.NUMBER
SEARCH BUTTON
PUTTING THE BATTERIES INTO THE REMOTE CONTROL UNIT
Press down the compartment cover, and slide the
cover off to open the compartment. Place two
(UM4), (AAA), (R03) batteries in the remote
control according to the polarity markings ("+" and
" - ") inside the compartment and on the batteries.
Place the cover over the compartment, press down
lightly, and
push it upward until it snaps on.
NOTE : Remove the batteries from the remote
control if not in use for long period of time.
Do not mix normal batteries with rechargeable
batteries. When the batteries become weak,
remote control will not function. Replace them with
new batteries in this case.
UK-5
**BATTERIES NOT INCLUDED**
Page 7
iPod Dock and Adapters
No.4
Made for iPod
(4th generation)20GB only
Made for iPod with
colour display
(4th generation)20GB, 30GB only
U2 Special Edition
No.5
Made for iPod with video
(5th generation)30GB only
No.3
Made for iPod with video
(5th generation)60GB,80GB only
No.6
Made for iPod nano
(1st generation)1GB, 2GB, 4GB only
(2nd generation)2GB, 4GB,8GB only
Made for iPod with
colour display
(4th generation)40GB, 60GB only
No.1
Made for iPod
(4th generation)40GB only
Made for iPod mini
Dock adaptor
No.2
No.7
iPod Wireless Dock
Connector dock
UK-6
Page 8

VFD DISPLAY WINDOW
A
BCDEFG
H
A. ENCODING INDICATOR
B. BLUETOOTH INDICATOR
C. REPEAT 1 /ALL INDICATOR
D. TIMER INDICATOR
INSTALLING THE SPEAKER WIRE
E. STEREO INDICATOR
F. MUTE INDICATOR
G. VOLUME HIGH/LOW INDICATOR
H. TRACK/NUMBER/TIME INDICATOR
AC Main Power Switch
TO THE SPEAKER TERMINALS
1. Speakers Connection
Extend the speaker wires and connect them
to the SPEAKER TERMINALS.
2. Power Cord Connection
Before using , connect the AC Power Cord to
the AC outlet .Then turn on the main switch
on
the re ar of the unit. The STANDBY indicator
will light on.
AC Cord
OPERATING THE UNIT
When you first plug the unit into the AC outlet, then press the power switch on the rear of the unit, the
unit will be in standby mode, the power/standby LED indicator is red. You can press the STANDBY
button on the unit ( or on the remote control ) to
will be off. Pull the AC plug out of the wall socket if you want to switch off the unit completely.
switch the unit ON, and the standby LED indicator
STANDBY
1. Press the STANDBY button on the unit (or remote control) to switch the unit on.
2. Select the
FUNCTION button. The corresponding display will be shown.
Adjust the volume with the VOLUME
3.
4. Set the preset equalizer ( FLAT, ROCK, CLASSIC, JAZZ or POP) with the EQ button on the
remote control.
5. Press the STANDBY button
sound source () by pressing the
TUNER, CD, BLUETOOTH, USB, SD CARD or AUX IN
HIGH/LOW
again to turn off the unit.
knob.
UK-7
Page 9

MENU OPERATIONS
MENU
CLOCK
Press “ ”
To set hour
Press “ ”
To set min
Press“ ”
to confirm
USB
Press “ ”
ON TIMER OFF TIMER
Press “ ”Press “ ”
To set hour
Press “ ”Press “ ”
To set min
Press“ ”
to confirm
Press or button
TUNER
CARD
TIMER
To set hour
To set min
Press“ ”
to confirm
PRESET
Press or button
Press or button
SOURCE
Press “ ”
FLAT
DISC
EQ
VOLUME
Press “ ”
Press or button
POP
Press or button
ID3
Press or button
ID3 ON
Press or button
ID3 ON/ OFF
Press“ ”
to confirm
JAZZ
BROWSE
ON
ON/OFF
Press“ ”
to confirm
CLASSIC
ROCK
Note: “UP/DN” is “ or ”
"P" is “ ”.
RECORD
Press “ ”
REC CARD
Press or button
REC
CARD/USB
Press “P” to
confirm
PRE 01 PRE 02 PRE 20
CLOCK SETTING(on the Remote Control)
Note: 1. You can set the clock by following the 2 methods below when the main unit is under standby
mode or is turned on.
2. Each enable state as shown above will be cleared, if the button
CLOCK
A. Select the
1. Press and hold the
2. Press the
3. Press and hold the
4. Press the
5. Press the
B. Select the MENU button on the unit (or remote control) to set the current time.
1. Press the MENU button, until the CLOCK will show on the display.
2. Press the button once
3. Press the
4. Press the button again until the minute digit will flash on the display.(F2)
5. Press the
6. Press the button once to confirm the current time. (F3)
F1
button on the remote control to set the current time only.
CLOCK
or button
or
CLOCK
or
or
button once until the hour digit will flash on the display.(F1)
to adjust the correct hour digit.
CLOCK
button again until the minute digit will flash on the display.(F2)
button to adjust the correct minute digit.
button once more to confirm the current time. (F3)
until the hour digit will flash on the display.(F1)
button to adjust the correct hour digit.
button to adjust the correct minute digit.
F2
is not. press in 5 seconds.
F3
UK-8
Page 10

TIMER SETTING
Press the MENU button and then press the or button to select the TIMER. Press the button
to confir m the ON and OFF TIMER function.
ON TIME OFF TIME SOURCE VOLUM E
1. ON TIMER SETTING
A. Press the button once until the hour digit flashes on the display .Press the or button to
set hour digit.
B. Press the button again until the minute digit
minute digit.
C. Press the PLAY/PAUSE button to confirm.
2. OFF TIMER SETTING
A. Press the button once until the hour digit flashes on the display. Press the
set hour digit.
B. Press the button again until the minute digit flashes. Press the or button to set the
minute digit.
C. Press the
Note: If the display shows "SET ERR" while you set the “TIMER ON” it means both “TIMER ON” and
“TIMER OFF” is the same. In this case, please go to “TIMER OFF”
3. SOURCE SETTING
When the display shows "SOURCE":
A. Press the button once to enter the source setting.
B. Press the or
C. Press the button again to confirm your selection.
4. SETTING THE VOLUME
A. Press the button once to enter the volume setting. The default volume is 10.
B. Press the or
C. Press the button again to select the desired audio volume.
5. SETTING THE TIMER
A. Press the TIMER button on the remote control, and the “ ”appear on the display.
B. The unit will be played in
C. Press the TIMER button to cancel timer.
button to confirm the current OFF TIME.
button to set your desired source.
ON TIME OFF TIME SOURCE VOLUM E
button to set your desired volume.
ON TIME and will be switched off in OFF TIME automatically.
flashes. Press the or button to set the
or button to
to set the off time first.
PRESET DISCUSB TUNERCARD
RECORDING A PRESET STATION
First set the TIMER as above:
1. Press the button once to enter the preset station and adjust the setting for recording
the preset station.(F4)
2. Press the or button to set your desired station number.
3.
Press the button again to confirm recording of the preset station.
Note: For the means of encoding the preset station by USB or SD Card, please refer to the part
“ENCODING OPERATION” on Page 15.
PRESET DISCUSB TUNERCARD
PRE 01 PRE 02 PRE 20
F4
UK-9
Page 11

AUDIO SOURCE SELECT
Press the FUNCTION button to select the audio mode as below :
BLUETOOTH
CD
USB
CARD
AUX
TUNER
RADIO OPERATION
Press the FUNCTION button to select the TUNER mode on the unit (or remote control),you can
select the radio operation.
Extend the FM antenna for better FM reception.
Note:
1. Press the /BAND button to select wave band range (MW or FM) appearing on the display.
2. Select the desired frequency with the or button.
Manual Tuning
To tune for weak stations, use manual tuning by pressing the or button continuously until you
tune to the correct frequency or the reception is at its best.
Mono/ Stereo Select
You can use this function only in FM mode.
1. When you want to select FM stereo effect , press the INTRO/MONO/ST. button on remote
control. When you receive an FM stereo station the " " indicator will appear on the display,
which means FM stereo transmission is received.
2. When you press the INTRO/MONO/ST. button again, the FM STEREO indicator will turn
off & switch to MONO FM status.If your desired station is weak and noisy, switch to MONO to
reduce the noise.
Automatic Tuning
1. Press the or button for a few seconds, then release the button.
The tuner will automatically search the first station which has sufficient signal strength.
2. Repeat the above steps if you wish to select another station.
Programming preset stations
You can also preset stations of your choice and store up to 10 MW and 20 FM stations
in the unit’s memory. To store your selected broadcasting stations:
1. Press the /BAND button on the unit(or remote
make your selection.
2. Tun e to the desired station.
3. Press the ERASE/MEMORY button.
4. Press the RANDOM/MEM-DOWN or REPEAT/MEM-UP button to select your desired preset
number.
5. Press the ERASE/MEMORY again to confirm
6. To program more stations into memory, repeat the above 2 to 5 steps .
7. To change the stored preset stations, repeat the above 2 to 5 steps.
Note:
1. Storing a new station into a preset location will erase the previously stored station in that
location.
2. The stored stations will be saved even if you power off the unit.
3. When ress the button and ENCODING button to erase
all preset memory.
Selecting the Preset Stations
1. Press the /BAND button to select the desired band.
2. Press the RANDOM/MEM-DOWN or REPEAT/MEM-UP button to select the desired preset station
number.
3. The numeric location of that preset station is displayed along with the corresponding
frequency.
the unit is in STANDBY mode, p
control) to select between MW and FM to
your selection.
UK-10
Page 12

CD/MP3/WMA OPERATION
Listening To Compact Disc (CD/MP3/WMA)
1. To listen to CD/MP3/WMA disc, press the CD DOOR (OPEN/CLOSE) button, and the the CD door
will open automatically.
2. Insert the CD/MP3/WMA disc into the CD compartment, press the CD DOOR (OPEN/CLOSE) to
close the CD door.
the FUNCTION button on the unit (or remote control) repeatedly to select CD mode. The unit
3. Press
will read the CD/MP3/WMA disc automatically.
IMPORTANT : PLEASE DO NOT FORCE THE CD DOOR TO OPEN MANUALLY.
A) In CD mode
This unit can read CD, CD-R, CD-RW, MP3 and WMA DISCS.
B) In MP3 mode
This unit is also available to play :
1. It can read " 8 cm " and " Multi Section " of MP3 DISC.
2. It can "Playback Transfer Rate" in MP3 AND WMA".
a. In MP3 : Transfer bit rate : 32 - 320
b. In WMA : Transfer bit rate : 64 - 320 kbps.
3. The "Max Readable 99 folders and 999 tracks".
4. If no disc or can not read TCO, NO DISC will be displayed.
Playing the entire CD
1. Power ON the unit, press the FUNCTION button on the unit (or remote control) repeatedly to select
CD mode. The unit will read the CD/MP3/WMA disc automatically.(F.5) If there is no CD in the CD
compartment, the “NO DISC" will be indicated
2. Press the CD DOOR OPEN/CLOSE button once, and then place the CD into the CD compartment.
3. In the normal playback that CD or CD/MP3/WMA will be indicated on the display. (F.7) (F.8)
4. To start playback from the beginning, press
5. To interrupt playback, press the again, and the elapsed time in the display will flash.
6. To resume playback, press the button once more again.
7. To stop playback, press the /BAND button.
F5
kbps.
on the display. (F.6).
the button.
The display will show the total number of tracks.
F6
F7
F8
Selecting a different track during playback
1. Press the button until the desired track number appears in the display, playback will
begin from the desired track.
2. To play the next track, press the button once.
3. To play the previous
4. Press the once, the current playing track will be started again from the beginning.
5. You can also use the number search button on the remote control to go to the desired track .
or
track, press the button twice.
ID3 OPERATION (on the remote control)
1. Press the ID3 button once to open the ID3 function.
2. If the MP3 file contains “ID3” information it will
“TITLE NAME”
3.
Press the ID3 button on the remote again will switch off the ID3 display.
“ARTIST NAME”and “ALBUM NAME” to indicate on the display.
automatically to search the information of
UK-11
Page 13

BROWSE OPERATION
1. Press the MENU button, then press the or
2. Press the button once to set the menu
3. Press the button. "ON" will indicate on the display, and then press the button to
confirm the function.
4. A. In the STOP mode press the button to the first step menu and select the desired
folder.
B. Press the button to confirm and into the second step menu.(Max Depth of file is 8)
C. Press the button to select your desired track.
D. Press the
or
or
or
button, playback will begin from this track.
button to go to “BROWSE” mode.
operation.
USB&SD/MMC CARD MP3 PLAYBACK
1. Insert the USB device or SD/MMC CARD.
2. Press the FUNCTION button on the unit repeatedly to select the USB or SD/MMC CARD mode. The
unit will automatically read the total number of folders and tracks. (F9)
NOTE: 1. The unit can play both MP3 and WMA in this mode.
2. Most of the USB devices, SD or MMC cards are supported by this unit. In the unlikely event
of an
3. This unit support USB devices, SD or MMC cards of memory size up to 2GB. It cannot
access (or
4. It supports USB version 1.1 and 2.0.
5. If the WMA file is a protected “DRM file”, the display will indicate “unsupport WMA”.
unsupported device or card, try with a device or card of other brands.
take longer time to access) the memory devices over 2GB.
F9
Selecting a different track during playback
1.
Press the button until the desired track number appears in the display, then press
the button, playback will begin from the desired track.
2. To play the next track, press the button once.
3. To play the
4. Press the once, the current playing track will be started again from the beginning.
F10
or
previous track, press the button twice.
(F11)
F11
(F10)
REPEAT PLAYBACK
- CD/MP3/USB/CARD
1. Press the REPEAT/MEM-UP button once on the remote control/unit , “ ” is displayed. CD will
play the current track repeatedly.(F12)
2. Press the REPEAT/MEM-UP button twice, “ ALL” is displayed. CD will play all tracks
repeatedly.(F13)
3. Press the REPEAT/MEM-UP button the third time to cancel repeat play and the“ ALL” will
disappear from the display.
F12 F13
UK-12
Page 14

RANDOM PLAYBACK
1. Press the RANDOM/MEM-DN button on the remote control/unit, then RAND is displayed.(F14)
2. Press the RANDOM/MEM-DN button again, then the unit will resume normal playback.
INTRO PLAY(on the remote control)
1. Press the INTRO/MONO/ST. button on the remote control/unit, INTRO is displayed. INTRO will
play the first 10 seconds of
2. Press the INTRO/MONO/ST. button again, then the unit will resume to normal playback.
F14 F15
each track.(F15)
PROGRAM OPERATION
You can program up to 32 favorites songs. Program mode is activated while in stop mode.
1. How to program
- CD/MP3/WMA/USB/SD MMC
1) Press the ERASE/MEMORY button, shift to PROGRAM mode.(F16)
2) Press the
track.(F17)
3) Press the ERASE/MEMORY button to confirm the track number.
4) Repeat the above steps to program other tracks up to a maximum number of 32 tracks.
F16 F17
or button or number search buttons on rem ot e control to select the desired
2. PROGRAM PLAYBACK
After programming tracks, press the button and it will play the songs as you programmed.
3. CANCEL PROGRAM
1. Press the /BAND button twice, or open the CD tray door and close it, then the memory will be
erased.
2. Set a new program, the existing one will be cleared.
Note : When in program mode.
1. Press the
the unit will repeat the current track.
2. Press the “REPEAT/MEM-UP" button twice, the " ALL" will light on the display. Then the
unit
3. Press the “REPEAT/MEM-UP” button the third time, and the unit will return to play the program
normally.
“REPEAT/MEM-UP" button once, the " " indicator will light on the display. Then
will repeat all the total number of tracks.
UK-13
Page 15

BLUETOOTH FUNCTION OPERATION
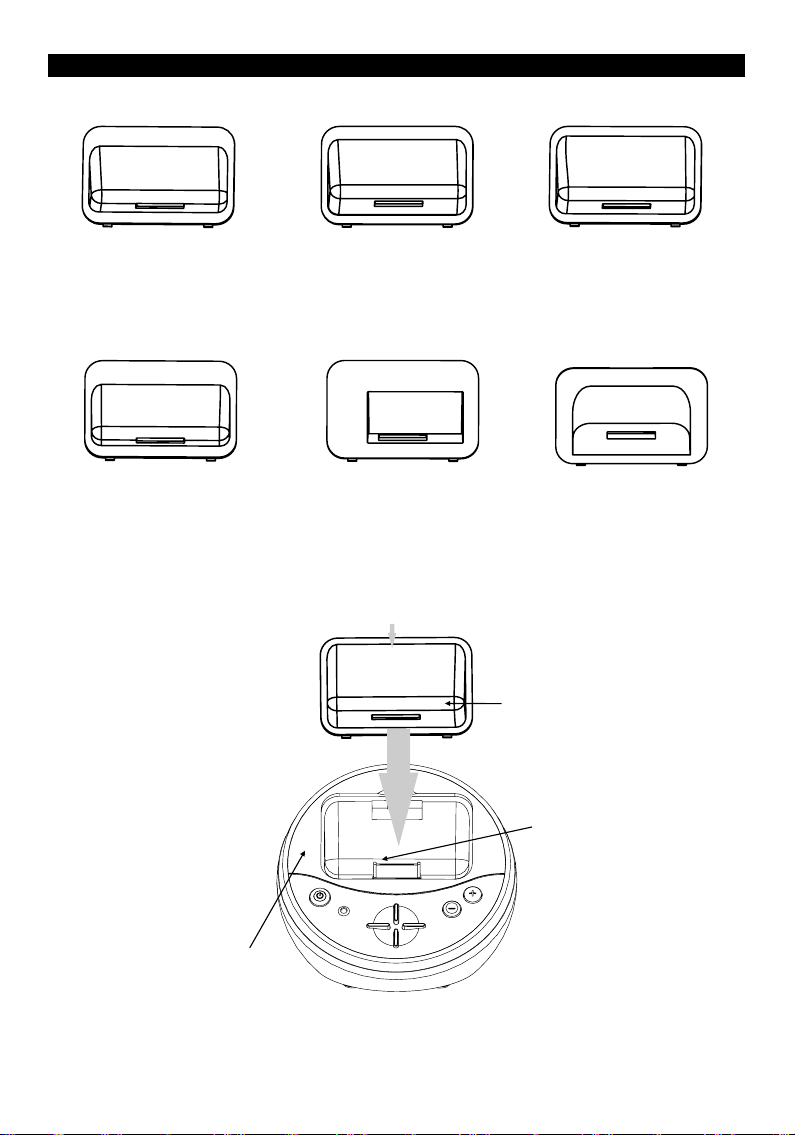
A. How to linking the unit and the Bluetooth on the docking
1. Press the FUNCTION button and select BLUETOOTH, when the main unit is turned on.
The display will show “NO LINK” before link.
2. Connect the iPod Wireless Dock with 9V DC power, the
around 3 seconds, and then remain in red.
3. Press the BLUETOOTH SEARCH button on the main unit once, the “PAIRING” mark ” ” will
flash on the display.
4. Then press the iPod
Wireless Dock STANDBY button, the STANDBY LED indicator will
flash in red for around 3 seconds, and then change into flashing blue (linking the Bluetooth
equipment).
5. The iPod Wireless Dock SOURCE light will remain in red under the LINE IN status.
6.
The STANDBY LED indicator will remain in blue when the main unit connected with the
docking, and the showing on the display will change from “PAIRING” into
“BT AVRCP”.(F18)
F18
Standby light will flash in red for
7. Finally, press the SOURCE button on the iPod Wireless Dock to play iPod or
LINE IN
source.
Note: iPod Wireless Dock SOURCE LED indicator: In red means LINE IN status, In yellow
means iPod status.
During the unit in iPod mode :
1. Press the button once to start the iPod playing. Adjust the volume level by
turn the VOLUME knob.
HIGH/LOW
2. Press the button once to pause the current track. To resume the playback,
press the
3. To skip forwards or backwards, press the button to
button once again.
or
select the desired track.
4. Press the
REPEAT or RANDOM button to on docking make the iPod plays repeatedly
or randomly.
Note: New iPod series' products (E.g. iPod Nano and iPod Classic) might not be compatible
with the REPEAT/RANDOM functions of this unit.
Charging the iPod Player battery through the main unit:
1. iPod has an internal non-removable battery, you may need to charge it if it has not been used for
awhile.
2. Yo u can charge the iPod through the main unit automatically under the STANDBY or POWER ON
mode.
Note : 1. The iPod's battery is 80-percent charged in about an hour, and fully charged in about
a few hours. If you charge it while playing music, it may take longer.
2. It is better not charge under in the TUNER mode. It may inter fere the reception.
Note : In any time, the iPod must be firmly inser ted to the docking with an appropriate dock
adapter(provided) to avoid any damages to the iPod and the unit.
UK-14
Page 16

B. The operation of Linking with mobile phone
(Note:A2DP Mode must be enabled by the phone Bluetooth)
1. Please activate the Bluetooth in the mobile phone(Refer to you mobile phone’s mannal for
the activation).
2. Please press the Function button and
set the unit function into the Bluetooth status.
3. Press “BLUETOOTH/SEARCH” button once on the main unit, and “PAIRING” will be shown
on the display.
4. Use the mobile phone to search the new Bluetooth equipment, the new Bluetooth
equipments, such as “BT MICRO”, “BT Dock”
etc. will show on your phone display after
searching several seconds.
5. Please choose “BT MICRO” and connect it, then input the pairing password “0000”, and
“PAIR OK” will then show then on the display of the main unit after linking, “BT AVRCP” will
show on the display during the playback.
Note: A. The names of Bluetooth on the main unit.
1. BT MICRO: the name of the main unit. The default Password: “0000”
2. BT DOCK:
the name of the docking, which supports the main unit. The mobile
phone can search the equipment; however, it cannot support such service item will
be informed.
B. using together with the mobile phone with Bluetooth
1. The Bluetooth in the mobile phone must support “A2DP”.
2. The Bluetooth device of the main unit cannot suppor t all the
mobile phone with
“A2DP” function, link, or playback.
C. The operation of exiting the Bluetooth link. (Mobile phone and the main unit)
1. Press the button on the main unit, and the “EXET BT” will show
on the display.
2. Press the button to confirm exiting the Bluetooth link, the docking will return to the
standby status automatically.
Note: 1. You can exit the Bluetooth link by pressing the STANDBY button on the docking
directly under the LINK status.
2. Many mobile phones are compatible with the Bluetooth linking function, please refer
to your mobile phone's manuals to see whether your phone supported such function.
VIDEO OUT SETTING (for i-Pod Video only)
1. During the unit in the STANDBY mode : Connect the TV set with a video cable (RAC-type cables)
to the VIDEO out jack on the rear of the iPod wireless dock.
2. During the unit in the iPod mode : Press the "MENU" button on the iPod
function.
3. To set iPod to display videos on a TV :
(a) Choose Videos > Video Settings, and then set TV Out to Ask or On.
(b) If you set TV Out to Ask, iPod gives you the option of showing
time you play a video.
Note : 1. For the audio-out, you can connect the TV SET with an audio cable to the AUDIO out jack on
the rear of the
2. If you have an iPod Vid eo in 30G, 60G and 80G, you can watch videos on a TV connected
that through the unit to your
3. The video out function of the new series of iPod (For example: iPod Nano and
iPod Classic) are not compatible with the unit.
®
docking. You can also gain the Audio out source through Bluetooth.
iPod Video.
®®
UK-15
Click Wheel to set the video
videos on TV or on iPod while every
Page 17

ENCODING OPERATION
1. Insert your USB devices to the USB port or insert your SD/MMC card to the memory card slot.
2. Press the MENU button, then press the
3. Press the button to enter into the Set up menu, the display will show the “REC CARD”.
4. Press the or button to select “REC USB” or “REC CARD”, and then press the
confirm the REC USB or REC CARD mode.
Note: The encode bit rates are: Tuner: 112 kbps.
AUX: 128 kbps.
ENCODING AND STORING
You can encode your favorite radio program into MP3 format and store it to your memory device
through the USB port or SD/MMC card slot.
1. Press the FUNCTION button repeatedly to select tuner function.
2. Press the
select the preset station to be encoded.(F19)
3. Press the ENCODING button to start encoding. The “REC” “CARD/USB” will be indicated and
flashed on the display. (A file named “001” will be set up and
second file named 002 will be set up automatically after 60 minutes' encoding, the same as
the later ones.)
4. Press the ENCODING button or /BAND button to stop encoding.
Note: Radio recorded files will be saved in
directory “RECORD”.
ENCODING AND STORING FROM A CD MODE
You can encode your
through the USB port or SD/MMC card slot.
1. Press the FUNCTION button repeatedly to select CD function.
2. Press the
be encoded.
3. Press and hold the ENCODING button around 2 seconds, the REC ONE or REC ALL will
display, and press the ENCODING button once again to alternate your
mode.(“REC ONE” means it will stop automatically after the encoding of a track. “REC ALL”
means it will record all the tracks of the current CD.)(F20)(F21)
F20
or button to search the stations or REPEAT/MEM-UP, RANDOM/MEM-DN to
favourite CD songs into MP3 format and store them to your memory device
or button or the number search buttons on remote control to select the track to
CD : 128 kbps.
BLUETOOTH: 128 kbps.
FROM RADIO MODE
F19
or button to select RECORD.
button to
displayed after 5 seconds , the
the “FMRECXXX” folder under the main
preferred encoding
F21
4. Press the ENCODING button to start sync encoding and the display will show “REC”
“CARD/USB” and flash. (A file named “001” will be set up and displayed after 5 seconds, the
second file named 002 will be set up automatically as soon as the copying of the second track,
the same as the later ones.) (F22)
F22
UK-16
Page 18

5. Press the ENCODING button or /BAND button to stop encoding.
Note: CD recorded files will be saved in the “CDRECXXX” folder under the main directory “RECORD”.
ENCODING AND STORING FROM BLUETOOTH MODE
You can encode your favorite tracks in the iPod into MP3 format and store those to your
device through the USB port or SD/MMC card slot.
1. Press the FUNCTION button to select BLUETOOTH function.
2. Start the iPod playing under the link mode between the Docking and the main unit.
3. Press the
4. Press the ENCODING button to start sync encoding and the display will show “REC”
“CARD/USB” and flash. (A file named “001” will be set up and displayed after 5 seconds, the
second file named 002
the later ones.(F23)
5. Press the ENCODING button or /BAND button to stop encoding.
Note: BLUETOOTH recorded files will be saved in the “BTRecXXX” folder under the main directory
“RECORD”,
ENCODING AND STORING FROM AUX MODE
You can encode your favorite tracks from AUX into MP3 format and store them to your memory
device through the USB port or SD/MMC card slot.
1. Press the FUNCTION button repeatedly to select AUX function.
2. Select
3. Press the ENCODING button to start sync encoding and the display will show “REC”
or button to select the track to be encoded.
will be set up automatically after 90 minutes' encoding, the same as
F23
where "XXX" may be "001", "002"...etc.
the tracks to be recorded.(on AUX equipment)
memory
“CARD/USB” and flash. (A file named “001” will be set up and displayed after 5 seconds, the
second file named 002 will be set up automatically after encoding for 60 minutes, the
same as
the later ones.)
4. Press the ENCODING button or /BAND button to stop encoding.
Note: AUX recorded files will be saved in the “AuxRecXXX” folder under the main directory
“RECORD”, where "XXX" may be "001", "002"...etc.
COPYING THE MP3/WMA DISC D ATA
TO THE USB DEVICE/SD CARD
You can copy the files from an MP3/WMA disc and store them into your memory device through the
USB por t or SD/MMC card slot.
1. Insert the MP3/WMA disc and press the Function button repeatedly to select the CD function.
2. Press the
or
button to select the track that you want to copy.
3. Press and hold the ENCODING button around 2 seconds, the REC ONE or REC ALL will be
displayed, press the ENCODING button once again to shift your preferred encoding
mode.(“REC ONE” means it will stop
automatically after the encoding of a track. “REC ALL”
means it will record all the tracks of the current CD.)
4. Press the ENCODING button to start copying the files and the display will show “REC”
“CARD/USB” and flash. (A file named “001” will be set up
and displayed after 5 seconds,
the second file named 002 will be set up as soon as the copying of the second track, the
same as the later ones. ) (F24)
F24
5. Press the ENCODING button or /BAND button to stop encoding.
Note: MP3/WMA recorded
files will be saved in the “CDRECXXX” folder, which is under the main
directory”RECORD".
UK-17
Page 19

COPYING THE USB/SD CARD DATA TO THE USB DEVICE/SD CARD
1. Press the FUNCTION button to select USB or CARD function.
2. Press and hold the ENCODING button around 2 seconds, the REC ONE or REC ALL will be
displayed, press the ENCODING button once again to shift your
preferred encoding
mode.
(“REC ONE” means it will stop automatically after the encoding of a track. “REC ALL” means it will
record all the tracks.)
3.
Press the ENCODING button again, ”REC CARD” or “REC USB” will be displayed and start
copying.(A
file named “001” will set up and display after 5 seconds, the second file named 002
will set up automatically as soon as the copying of the second track, the same as the later ones.)
4. Press the /BAND button to stop copying.
Note: Copied
files will be saved under the main directory "RECORD".
ERASING D ATA FROM THE SD/MMC CARD
You can use this function to erase the files.
1. Press the FUNCTION button to select USB/CARD function.
2. Press the
3. Press the
or button to select the file for you want to erase.
or button to play.
4. Press the ERASE/MEMORY button to delete the file. The display will show “DEL F ILE”.(F25)
Press the button again to confirm.
F25
Note: During encoding or copying, “MEMFULL” will be displayed if there is no space in the
memory
device.
UK-18
Page 20

AUX PLAYBACK
1. Press the FUNCTION button until the "AUX” indicator light up on the display. This unit can
input analog audio through these jacks.
2. Use a cable with RCA phone plays to connect audio equipment .
Note: AUX cable is not included.
EQ CONTROL(on the remote control)
Press the EQ button to select different preset EQ mode, the display will show in sequence during
every press:
FLAT
POP
JAZZ
CLASSIC
ROCK
TO SET SLEEP FUNCTION
1. If you want to fall asleep to music, press the SLEEP button on the remote control.
2. Yo u may adjust the Radio, CD, BLUETOOTH, USB, Card, AUX player's sleep function to play from
120, 90, 60, 45, 30,15, 5 minutes of music
120 90 60 45 30 15
before shutting itself off automatically.
5
SLEEPOFF
MUTE SETTING(on the remote control)
1. Press the MUTE button on the remo te control to mute the volume. The display will show MUTE.(F26)
2. Press the MUTE button again, to return to normal playback.
F26
LISTEN TO THE MUSIC BY USING HEADPHONE
A stereo headphone jack is provided for private listening. To listen to the unit with headphones
(not included ) insert the 3.5mm mini-stereo plug from the headphones into the PHONES jack on the
front panel. The external speakers are automatically muted when headphones are inserted.
UK-19
Page 21

COMPACT DISC
1. Always use a compact disc bearing the mark as shown.
2. Notes on handling discs
Removing the disc from its storage case and loading it.
* Do not touch the reflective reco rde d surface.
* Do not stick paper or write anything on the sur face.
* Do not bend the disc.
3. Storage
* Store the disc in its case.
*
Do not expose discs to direct sunlight or high temperature, high humidity or dusty
places.
4. Cleaning a disc
* Should the disc become soiled, wipe off dust, dirt and fingerprints with a soft
* The disc should be cleaned from the centre to the edge.
cloth.
FROM THE CENTRE TO THE EDGE
CORRECT
INCORRECT
* Never use benzene, thinners, record cleaner fluid or anti static spray.
* Be sure to close the CD door so
the lens is not contaminated by dust.
* Do not touch the lens.
UK-20
Page 22

SPECIFICATION
POWER SUPPLY : 230V~50Hz
OUTPUT POWER :
UNIT DIMENSION : CD Unit:222 (W) x 257
Power
SPEAKER BOX DIMENSION : 160 (W) x 234 (D) x 268 (H) mm
NET WEIGHT :
RADIO SECTION
FREQUENCY RANGE :
COMPACT DISC SECTION
OPTICAL PICKUP : 3 - BEAM LASER
FREQUENCY RESPONSE :
SPECIFICATION SUBJECT TO CHANGE WITHOUT FURTHER NOTICE.
Ventilation warning : " The nor mal ventilation of the product shall not be impeded for intended use."
9.4kg
30 Watts x 2
(D) x 93 (H) mm
Unit:222 (W) x 257 (D) x 88.5 (H) mm
FM 87.5 - 108 MHz
MW 522 - 1620 kHz
100Hz - 16kHz
This symbol on the product or
equipment should be disposed at the end of its life separately from your household waste. There
For more information, please contact the local authority or your retailer where you purchased the
Visit
Partmaster.co.uk today for the easiest way to buy electrical spares and accessories.
With over 1 million spares and accessories in stock we can deliver direct to your door the very
are separate collection systems for recycling in the EU.
in the instructions means that your electrical and electronic
product.
next day.
Visit www.partmaster.co.uk
or call
0870 6001 338
(UK customers only)
Calls charged at National Rate
UK-21
 Loading...