


 Loading...
User Guide |
|
907X – SPECIAL EDITION |
2020-02-25 v1 |

CONTENTS 2
1 |
INTRODUCTION |
7 |
|
|
1.1 |
907X Special Edition |
8 |
|
1.2 |
907X features |
9 |
|
1.3 |
Included items |
12 |
|
1.4 |
907X Technical specifications |
13 |
|
1.5 |
System requirements |
15 |
|
1.6 |
New in this version |
15 |
|
1.7 |
About this user guide |
15 |
|
1.8 |
Glossary |
16 |
|
1.9 |
Update camera firmware |
16 |
2 |
LENSES |
17 |
|
2.1 XCD Lens Range |
18 |
|
XCD 4/21 |
18 |
|
XCD 3.5/30 |
18 |
|
XCD 3.5/45 |
18 |
|
XCD 4/45P |
18 |
|
XCD 2.8/65 |
18 |
|
XCD 1.9/80 |
19 |
|
XCD 3.2/90 |
19 |
|
XCD 3.5/120 Macro |
19 |
|
XCD 2.8/135 and X Converter 1.7 |
19 |
|
XCD 3,5-4,5/35-75 |
20 |
|
Filters |
20 |
3 |
QUICK START |
21 |
|
|
3.1 |
Quick start |
22 |
|
|
Firmware |
22 |
|
|
Assembling the camera |
22 |
|
|
Battery |
23 |
|
|
SD card |
23 |
|
3.2 |
Charging the battery |
24 |
|
|
Battery charger |
24 |
|
|
Charge the battery |
24 |
|
|
Charging from the USB port |
24 |
|
|
Attach the lens |
25 |
|
|
Attach the shoulder strap |
26 |
|
|
Using the protective covers |
27 |
|
|
The First capture |
28 |
|
|
The First capture – continued |
29 |
|
|
Viewing the first capture on the computer |
30 |
907X Special Edition USER GUIDE |
www.hasselblad.com |

CONTENTS 3
4 SAFETY |
31 |
|
4.1 |
Safety and Warnings |
32 |
4.2 |
Cautions |
32 |
4.3 |
Disposal |
33 |
4.4 |
FCC |
34 |
4.5 |
ISED |
34 |
5 PARTS & CONTROLS |
35 |
|
5.1 |
Parts, components, buttons and controls |
36 |
5.2 |
Ports and connections |
42 |
5.3 |
Display and screens |
43 |
|
Tilt display |
43 |
6 |
USING THE 907X |
44 |
|
|
6.1 |
Touch display |
45 |
|
|
Touch display navigation |
45 |
|
|
Available screens |
46 |
|
6.2 |
Touch display main menu |
47 |
|
|
Main Menu |
47 |
|
|
Add shortcuts to main menu favourites |
47 |
|
|
How to add shortcuts to main menu |
48 |
|
|
How to remove shortcuts on the main menu |
48 |
|
|
How to move shortcuts on the main menu |
48 |
|
|
Control screen |
49 |
|
|
Locked exposure parameters on the control screen |
50 |
|
|
Settings on the control screen |
51 |
|
|
Self Timer settings |
55 |
|
|
Interval settings |
56 |
|
|
Interval operation |
57 |
|
|
Exposure bracketing settings |
58 |
|
|
Exposure bracketing operation |
59 |
|
|
Long exposure screen |
59 |
|
|
Fixed exposure compensation setting |
60 |
|
|
Light meter mode |
61 |
|
6.3 |
Memory cards |
62 |
|
|
Insert the SD memory card |
63 |
|
|
Remove the SD memory card |
63 |
|
|
Recommended memory cards |
63 |
|
|
Format SD cards |
64 |
|
6.4 |
Live view indications |
65 |
|
|
Live view overlays |
66 |
|
|
Zooming in live view |
66 |
907X Special Edition USER GUIDE |
www.hasselblad.com |

CONTENTS 4
|
6.5 |
Focusing |
67 |
|
|
Autofocus |
67 |
|
|
AF indications |
68 |
|
|
Manual focus |
69 |
|
|
Focus peaking |
70 |
|
6.6 |
Move autofocus point |
71 |
|
6.7 |
Resize autofocus point |
71 |
|
|
Menu screen navigation |
72 |
|
6.8 |
Browsing, preview and histogram |
74 |
|
|
Browsing images |
74 |
|
|
Zooming |
75 |
|
|
Browsing images – nine-view |
75 |
|
|
Select folder to browse |
76 |
|
|
Select card to browse |
76 |
|
|
Create new folder |
77 |
|
|
Delete images |
78 |
|
|
Browse overlays |
79 |
|
|
Histograms |
80 |
7 |
PHOCUS |
81 |
|
|
7.1 |
Phocus overview |
82 |
|
|
Phocus |
82 |
|
|
Features in Phocus |
83 |
|
|
Phocus Mobile 2 |
84 |
|
7.2 |
Connect to a computer |
85 |
|
7.3 |
Connect to an iPad pro |
85 |
|
|
Using cable |
85 |
|
|
Using Wi-Fi |
85 |
|
7.4 |
Connect the Camera to an Ipad Pro over Wi-Fi |
86 |
|
|
Bluetooth assisted Wi-Fi connection |
86 |
|
|
Manual Wi-Fi connection |
87 |
|
7.5 |
Phocus and Hasselblad capture files |
88 |
907X Special Edition USER GUIDE |
www.hasselblad.com |

CONTENTS 5
8 |
SETTINGS |
89 |
|
|
8.1 |
The camera settings menu |
90 |
|
|
Exposure |
90 |
|
|
Exposure settings |
91 |
|
|
Shutter function settings |
92 |
|
|
True Exposure explained |
93 |
|
|
AE-L (AE-Lock) / Quick Adjust |
94 |
|
|
Auto ISO / P / Full Auto |
95 |
|
|
Crop & Orientation |
96 |
|
|
Image orientation |
97 |
|
|
Image quality settings |
98 |
|
|
Focus settings |
99 |
|
|
Flash settings |
102 |
|
|
Camera configuration settings |
103 |
|
8.2 |
Video settings menu |
105 |
|
8.3 |
General settings menu |
106 |
|
|
Connectivity settings |
107 |
|
|
Display |
108 |
|
|
Live view |
109 |
|
|
Preview |
110 |
|
|
Touch |
111 |
|
|
Storage |
112 |
|
|
How to format a memory card |
113 |
|
|
Sound |
114 |
|
|
Date & Time |
115 |
|
|
Power |
116 |
|
|
Spirit Level |
117 |
|
|
Calibrate Spirit Level |
118 |
|
|
Language |
119 |
|
|
Service |
120 |
|
|
Firmware update |
121 |
|
|
Lens firmware update |
122 |
|
|
Log data |
123 |
|
|
Default settings |
124 |
|
|
Reset file counter |
125 |
|
|
About |
126 |
907X Special Edition USER GUIDE |
www.hasselblad.com |

CONTENTS 6
9 ACCESSORIES |
127 |
XH Lens adapter |
128 |
XV Lens adapter |
128 |
Tripod mount ring 75mm |
128 |
XPan Lens adapter |
129 |
Release cord X |
129 |
Battery charging hub |
129 |
10 APPENDIX |
130 |
|
10.1 |
Change from a foreign language |
131 |
10.2 |
Clean the sensor filter |
132 |
10.3 |
Clean the lens glass surface |
132 |
|
Remove dust |
132 |
|
Remove smear |
132 |
10.4 |
Error messages |
133 |
10.5 |
Information about the 907x user guide |
133 |
|
Updates |
133 |
|
3D product images |
133 |
|
Trademarks |
133 |
|
Copyright |
133 |
907X Special Edition USER GUIDE |
www.hasselblad.com |

1 INTRODUCTION
INTRODUCTION 8
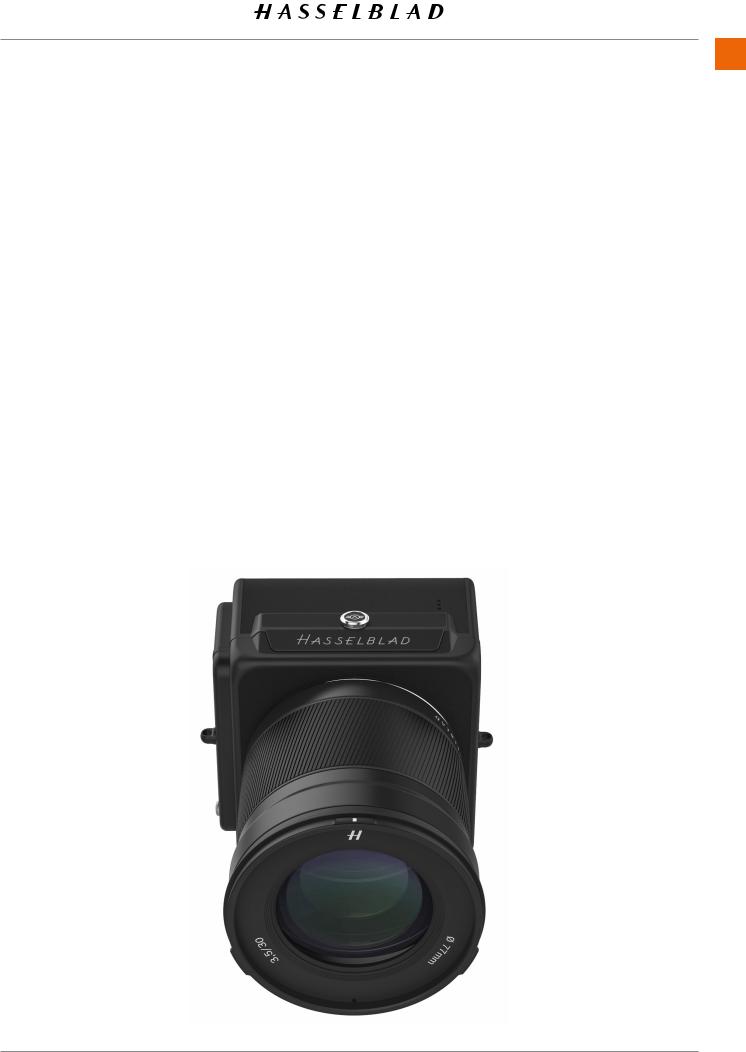
1.1 907X SPECIAL EDITION
On 20 July 1969, Astronauts Aldrin and Armstrong successfully landed on our lunar surface, becoming the first humans to step foot on the Moon. The 907X Special Edition celebrates the anniversary of this first Moon landing and the Hasselblad cameras that documented the historic event. Incorporating the 907X and CFV II 50C, it connects Hasselblad’s photographic history into one system, enabling full use of the high
performance lenses from the Hasselblad X System. Through additional lens adapters, the 907X Special Edition even supports V, H, and XPan system lenses.
This User Guide describes the functionality of the 907X Special Edition Camera. A separate User Guide is available that explains how to use the CFV II 50C on V System and Technical Cameras.
Reminiscent of the classic V System camera combined with Hasselblad’s high-end digital medium format technology, the 907X Special Edition camera offers a truly distinct photographic experience. Small and compact, it produces unparalleled medium format image quality. The CFV II 50C’s tilt screen enables the classic waist-level shooting style of the V System, hinting to Hasselblad’s history while letting photographers compose their images from a new point of view in the digital era.
907X Special Edition USER GUIDE |
CONTENTS |
www.hasselblad.com |
INTRODUCTION 9
1.2 907X FEATURES
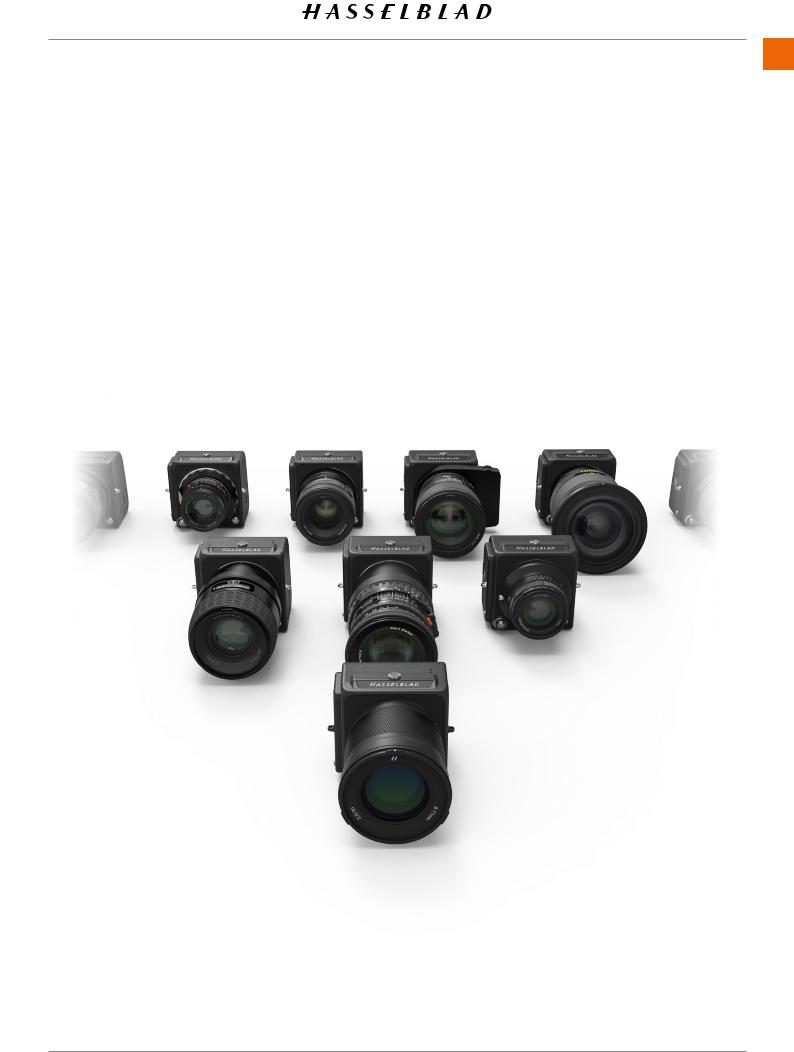
Full XCD Lens support
All XCD Lenses can be fully used with the same functionality as on an X System Camera, including Autofocus.
HC/HCD Lens support
All HC and HCD Lenses can be used with full functionality, including Autofocus using the optional XH Lens Adapter.
V System and XPan System lenses
All Lenses from the Hasselblad V and XPan Systems can be used in electronic shutter mode. Requires optional XV or XPan Lens adapters.
3rd Party Lens support
By using lens adapters from 3rd party manufacturers, almost all other lenses can be used in electronic shutter mode on the 907X camera.
907X Special Edition USER GUIDE |
CONTENTS |
www.hasselblad.com |
INTRODUCTION 10
V System Camera support
The CFV II 50C digital back can be removed from the 907X camera body and be used on most V System Cameras ever built. See the separate User Guide for the CFV II 50C for more information.
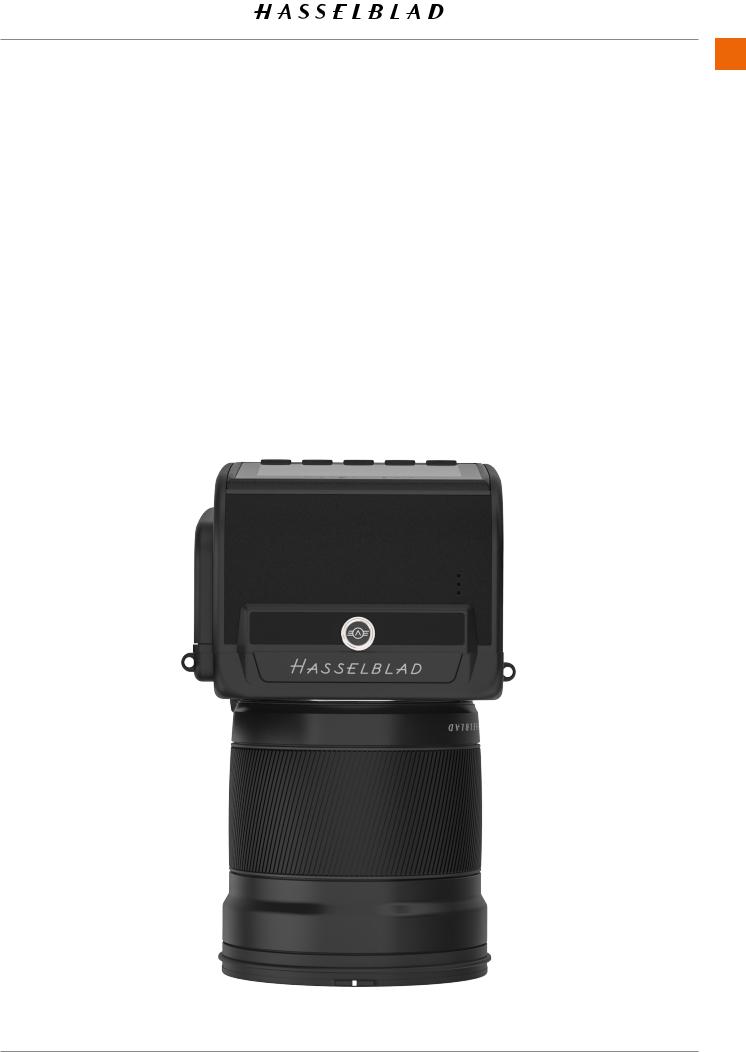
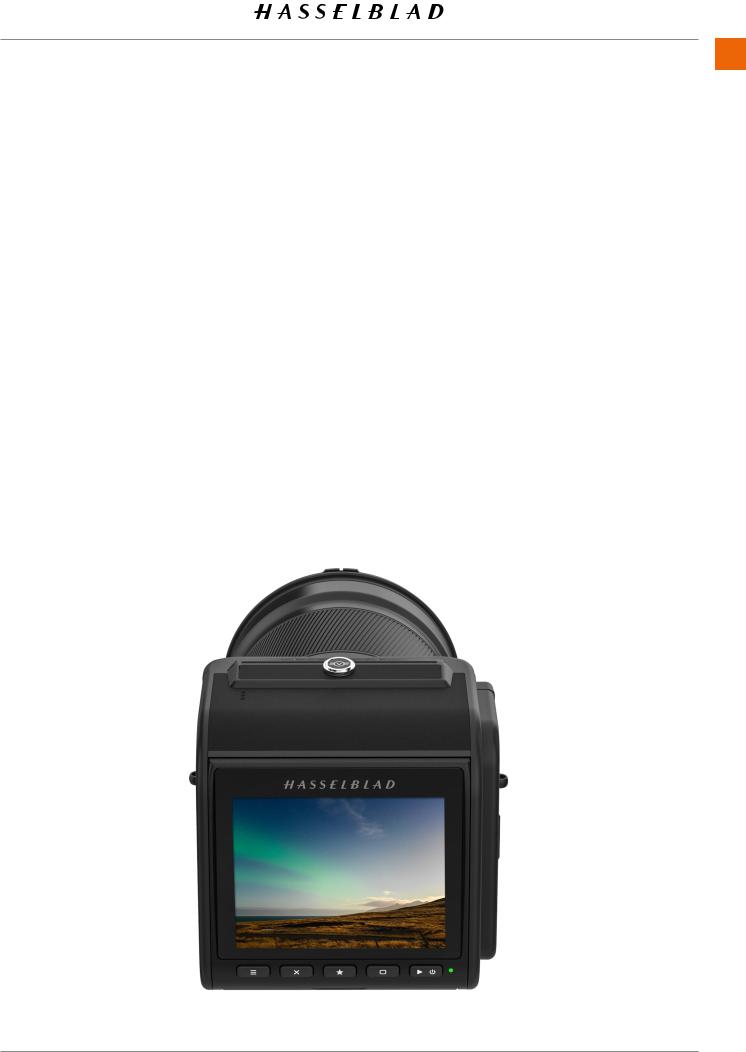
Touch screen interface
Equipped with a smartphone style user interface, the rear touch 3 inch display allows quick and simple access to the digital back shooting settings including WB and ISO. There is also the option of adding up to 8 favourite icons to the main menu display to allow fast access to your most frequently used functions and settings.
Tilt screen
The rear screen can be tilted upwards 90 degrees for convenient operation in many situations.
Live view
High frame rate live view is available to assist with critical focusing of the image.
Dual SD media card slots
Equipped with dual UHS-2 compatible media card slots, the digital back will automatically use them concurrently for storage.
Battery inside
Improving on previous CFV models, the interchangeable and rechargeable battery is now located inside the CFV, behind the SD card lid. This enables the streamlined shape and design to be maintained and makes it possible to adapt to basically all V System cameras ever made. Battery type is the same that is used for X System cameras.
907X Special Edition USER GUIDE |
CONTENTS |
www.hasselblad.com |
USB 3 Type C
Simplifying and enhancing tethered shooting to your Mac or PC, the USB 3 interface allows easy connectivity with today’s high speed ports.
Built-in Wi-Fi
The Wi-Fi function uses both 2.4 and 5 GHz and has the option of 802.11 b, g, n, a, ac (a and ac depending on region) connections. A separate App for iOS, Phocus Mobile 2 is available for download from the Apple App Store.
INTRODUCTION 11
JPEG & RAW files
The JPEG files are HNC profiled so you can print straight from a folder for amazing quality. RAW files are retained for your final masterpieces.
Digital lens corrections
The Digital lens correction, which is applied at the file editing stage, takes care of any colour aberration, distortion and light fall off however minor (which is inherent in any lens, anywhere) and resolves the situation automatically.
Huge 14 stop dynamic range
Makes it easier to keep details in both deep shadows and bright highlights. It will also allow fantastic HDR images to be assembled from less captures.
Large 43.8 x 32.9mm 50MP sensor
For amazing image resolution with low image noise, enabling enlargements in breathtaking quality.
Shallow depth of field
The larger size of the sensor delivers a shallower depth of field with a given focal length compared to a Full Frame 35mm camera enabling easier separation of your subject from the background and super smooth Bokeh with Hasselblad lenses delivering the classic “medium format look” to your images.
HNCS Hasselblad Natural Colour Solution
HNCS saves time and enables high colour accuracy. Especially important with skin tones and specific product tones that now are going to be perfectly rendered.
Hasselblad Phocus digital imaging software
The Hasselblad Phocus Digital imaging software is a capture, processing and file management application aimed primarily at Hasselblad RAW file handling. The desktop version is compatible with both Mac and PC and is a free download from www.hasselblad.com.
Hasselblad Phocus Mobile 2 app for iOS
Use the iPad Pro to edit images directly from the camera. Phocus Mobile 2 offers remote viewing and control when shooting tethered (Wi-Fi or USB cable). Phocus mobile 2 is free to download at Apple´s App Store for the iPad Pro.
The 907X camera is not compatible with the previous version of Phocus Mobile.
907X Special Edition USER GUIDE |
CONTENTS |
www.hasselblad.com |
1.3 INCLUDED ITEMS
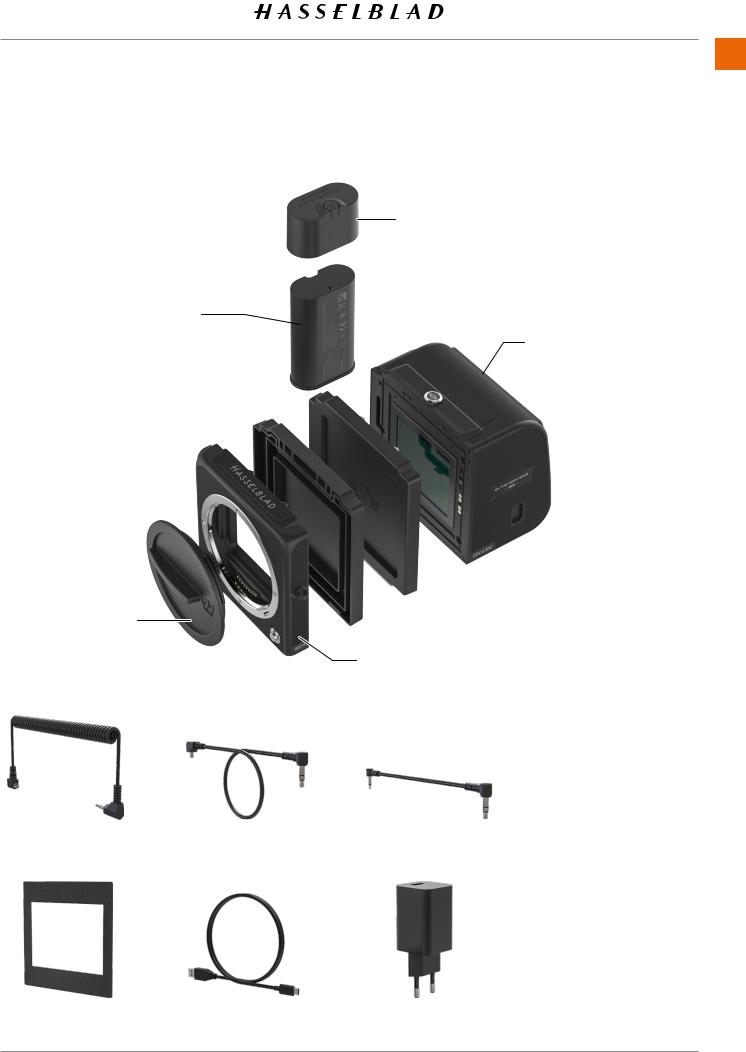
The 907X Special Edition camera is delivered with the following items.
Battery
Front protective cover
Flash sync input cable |
Flash sync output cable |
Focusing screen mask |
USB A to C cable, 80cm |
44x33mm |
|
INTRODUCTION 12
Battery protective cap
 CFV II 50C Special Edition
 CFV front protective cover
 907X rear protective cover 907X Special Edition camera body
Exposure cable CW
|
● |
Shoulder strap |
|
● |
Quick Start guide |
|
● |
In the box |
|
● |
Warranty leaflet |
|
● |
Disclaimer and |
USB charger |
|
safety guidelines |
● |
Registration card |
907X Special Edition USER GUIDE |
CONTENTS |
www.hasselblad.com |

INTRODUCTION 13
1.4 907X TECHNICAL SPECIFICATIONS
|
|
|
Camera Type |
Medium Format Mirrorless Digital camera with Autofocus, Auto exposure and interchangeable |
|
lenses. |
||
|
||
|
|
|
Construction |
Machined aluminium. Tripod socket 1/4”. |
|
|
|
|
Sensor Type |
CMOS, 50 megapixels (8272 × 6200 pixels, 5.3 × 5.3 µm). |
|
|
|
|
Sensor Dimensions |
43.8 × 32.9 mm |
|
|
|
|
Image Size |
Stills: 3FR RAW capture 106 MB on average. JPEG: Up to 22 MB, TIFF 8 bit: 154 MB. |
|
Video: To be enabled at a later date. |
||
|
||
File Format |
Hasselblad 3FR RAW, Full size JPEG. |
|
|
|
|
Shooting Mode |
Single shot, Continuous, Self Timer, Interval Timer and Exposure Bracketing. |
|
|
|
|
Colour Definition |
16-bit; Dynamic range up to 14 stops. |
|
|
|
|
ISO Speed Range |
ISO Auto, 100, 200, 400, 800, 1600, 3200, 6400, 12800, 25600. |
|
|
|
|
Storage Options |
Dual UHS-II SD cards or tethered to Mac or PC. Max 1 TB. SD Cards can be used in Overflow or |
|
Backup mode. Recommended cards are listed on page 63. |
||
|
||
|
|
|
Colour Management |
Hasselblad Natural Colour Solution (HNCS) |
|
|
|
|
Storage Capacity |
A 64 GB card holds approximately 600 RAW or 6000 JPEG High Quality images on average. |
|
|
|
|
User Interface |
Touch interface including swipe, scroll and pinch/spread to zoom. Camera grip with buttons and |
|
Scroll Wheels. Many camera functions and settings can be controlled from a tethered computer or |
||
|
iPad Pro/iPad Air (2019) over Wi-Fi or tethered. |
|
|
|
|
Display |
3 inch TFT type, 24 bit colour, 920 K dots (640 x 480). Can be tilted up to 90 degrees. |
|
|
|
|
Live View |
On camera and host computer with high frame rate. |
|
|
|
|
Histogram Feedback |
Yes, in Browse Mode on rear display. |
|
|
|
|
IR Filter |
Mounted in front of sensor. |
|
|
|
|
Acoustic Feedback |
Yes |
|
|
|
|
Software |
Phocus for Mac and Windows. Compatible with Adobe Photoshop Lightroom® and Adobe Camera |
|
Raw® |
||
|
Phocus Mobile 2 including support for tethered connection via USB-C |
|
|
|
|
Platform Support |
Macintosh: OS X version 10.12.2 or later. PC: XP/Vista/Windows 7 (32 and 64 bit)/ 8 / 10. |
|
|
|
|
iOS device Support |
iPad Pro or iPad Air (2019 or later) |
|
|
|
|
Host Connection Type |
USB 3.0 (5 Gbit/s) Type-C connector. |
|
|
|
|
Additional Connections |
Audio In/Out. |
|
|
|
|
Operating Temperature |
-10 to 45 ˚C. 14 to 113 ˚F. |
|
|
|
|
Wi-Fi |
802.11 b, g, n, a, ac (a and ac depending on region). |
|
|
|
Continued on the next page.
907X Special Edition USER GUIDE |
CONTENTS |
www.hasselblad.com |

INTRODUCTION 14
907X TECHNICAL SPECIFICATIONS – CONTINUED
|
|
|
|
Hasselblad XCD lenses with built in electronically controlled shutter and aperture. Automatic or |
|
|
manual focusing with instant manual focus override. Lens shades can be mounted in reverse for |
|
Lenses |
transport. |
|
Compatible with all H System lenses and some H System accessories using an XH Lens Adapter. |
||
|
Also compatible with V System and XPan Lenses using a XV or XPan Lens Adapter. Many other |
|
|
lenses via 3rd party lens adapters (E-shutter only). |
|
|
|
|
Shutter |
Electronically controlled lens shutter with speeds up to 1/2000 s. Flash sync at all speeds. Optional |
|
electronic shutter |
||
|
||
|
|
|
Shutter Speed Range |
68 minutes to 1/2000 s with XCD Lenses. 1/800 s or 1/2000 s with HC/HCD Lenses. Electronic |
|
shutter 68 min to 1/10000 s. |
||
|
||
|
|
|
Flash Sync Speed |
Flash can be used at all shutter speeds. Mechanical shutter only. |
|
|
|
|
Flash Compatibility |
Socket for connection of external flashes via included sync cable. |
|
|
|
|
Focusing |
Automatic and manual focusing. Instant manual focus override. Automatic focusing using contrast |
|
detection. 100% zoom or Focus Peaking available in manual focus. Up to 117 selectable autofocus |
||
|
points. |
|
|
|
|
Exposure Metering |
Spot, centre weighted and centre spot. |
|
|
|
|
Power Supply |
Rechargeable Li-ion battery (7.27 VDC/3400 mAh). Compatible with the 3200 mAh battery. |
|
Can be charged in camera via USB or with optional external charger. |
||
|
||
|
|
|
Dimensions |
907X + CFV II 50C: 102 × 93 × 84 mm, 907X only: 102 × 91 × 28 mm, CFV II 50C only: 91 × 93 × 61 |
|
mm |
||
|
||
|
|
|
Weight |
845 g (CFV II 50C: 650 g / 907X Camera Body: 195 g), including battery and SD card. |
|
|
|
907X Special Edition USER GUIDE |
CONTENTS |
www.hasselblad.com |
INTRODUCTION 15
1.5 SYSTEM REQUIREMENTS
Storage and editing of images requires certain minimum computer capabilities. Large images require a reasonably high performance computer with sufficient memory, advanced graphics capabilities and a recent operating system.
It is recommended that the computer has a USB 3 connector, which will allow you to load images more quickly from the camera. A USB SD card reader is also required for image transfer from the SD cards.
1.7 ABOUT THIS USER GUIDE
This User Guide is designed for on-screen PDF reading to take advantage of the interactivity functions and search tools.
Interactive PDF
You can navigate the user guide by selecting a chapter in the Table of Contents. This interactive feature is available on
nearly all PDF readers, computer platforms and web browsers. All pages contain a link back to the Table of Content and most page references also work as a click-able link.
1.6 NEW IN THIS VERSION
●New lens XCD 45P. “XCD 4/45P” on page 18.
Search Tools
On most PDF readers you can use the search tool to find a specific subject, function or setting.
Format and Printing the User Guide
Please note that the format is A4 to conform with the most common standard. Therefore if printing to US Letter format or similar please ensure you select “Fit to Printable Area” in the page scaling dialogue.
Photo Credits
Page 76, 91: Mattias Hammar
Page 16, 73, 74, 75, 76: Mads Selvig
Page 94: Philip Liljenberg
907X Special Edition USER GUIDE |
CONTENTS |
www.hasselblad.com |
1.8 GLOSSARY
In this user guide a few different terms are used:
Short-Press: Press and release a button within one second.
Long-Press: Press and hold a button for 1 second or more.
Tap: This means to touch a value or icon on the display with your finger briefly. This only works with a bare finger or when special touch-display gloves are used.
Double-Tap: Quickly tap the same location on the display within 1 second. This is mainly used to zoom in an image or Live View.
Swipe: A sliding movement is when you press and hold the finger and slide in one direction. This is typically used when selecting a value from a list or when panning in a zoomed-in image.
Spread: Place two fingers on the display and move them apart. Typically used for zoom in.
INTRODUCTION 16
Pinch: Place two fingers on the display with a distance between and move the fingers together. Typically used when zooming out.
Tethering: When the Camera is connected with a USB cable to a computer.
1.9 UPDATE CAMERA FIRMWARE
The Camera can be updated with improvements and new functions.
Before you start to use your new camera, please visit www. hasselblad.com and download the latest camera firmware and update the camera system to make sure you get the latest functionality. Also make sure to download the latest version of this user guide.
See page 121 for an in-depth description on how to download the camera firmware and update your camera.
907X Special Edition USER GUIDE |
CONTENTS |
www.hasselblad.com |

2 LENSES
Lenses 18
2.1 XCD LENS RANGE
XCD 4/21
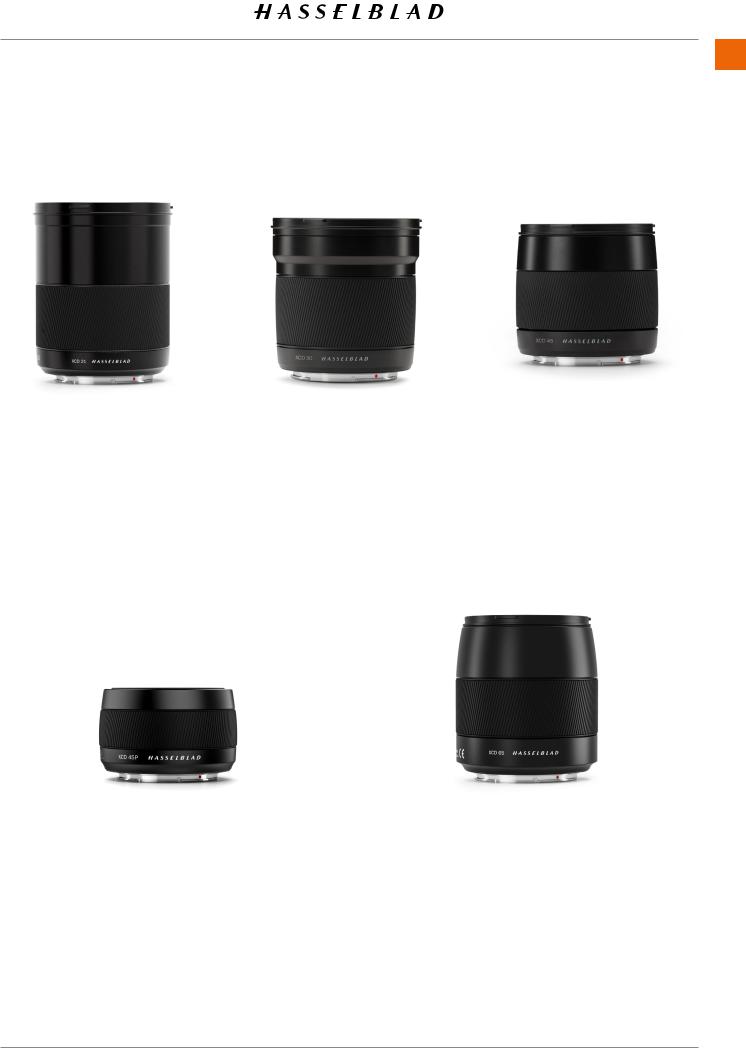
The XCD 21 is the ultra wide-angle lens. Its extremely short focal length provides a 17 mm full frame equivalent lens, making it perfect for landscape and architecture photography.
XCD 3.5/30
The XCD 30 is a wide-angle lens. Its focal length provides a 24 mm equivalent field of view, making it the perfect landscape, reportage and travel lens.
XCD 3.5/45
The XCD 45 is the ideal standard lens. Its moderate wide-angle focal length provides a 35 mm equivalent field of view, making it the perfect general purpose and travel lens.
XCD 4/45P
The XCD 45P is a highly compact lens. Its focal length provides a
35 mm equivalent field of view, making it a perfect general purpose and travel lens.
XCD 2.8/65
The XCD 65 mm is a normal lens. Its focal length provides a
50 mm equivalent field of view.
Its high aperture and excellent close-range performance makes it perfect for general type of photography as well as for reproduction.
907X Special Edition USER GUIDE |
CONTENTS |
www.hasselblad.com |
XCD 1.9/80
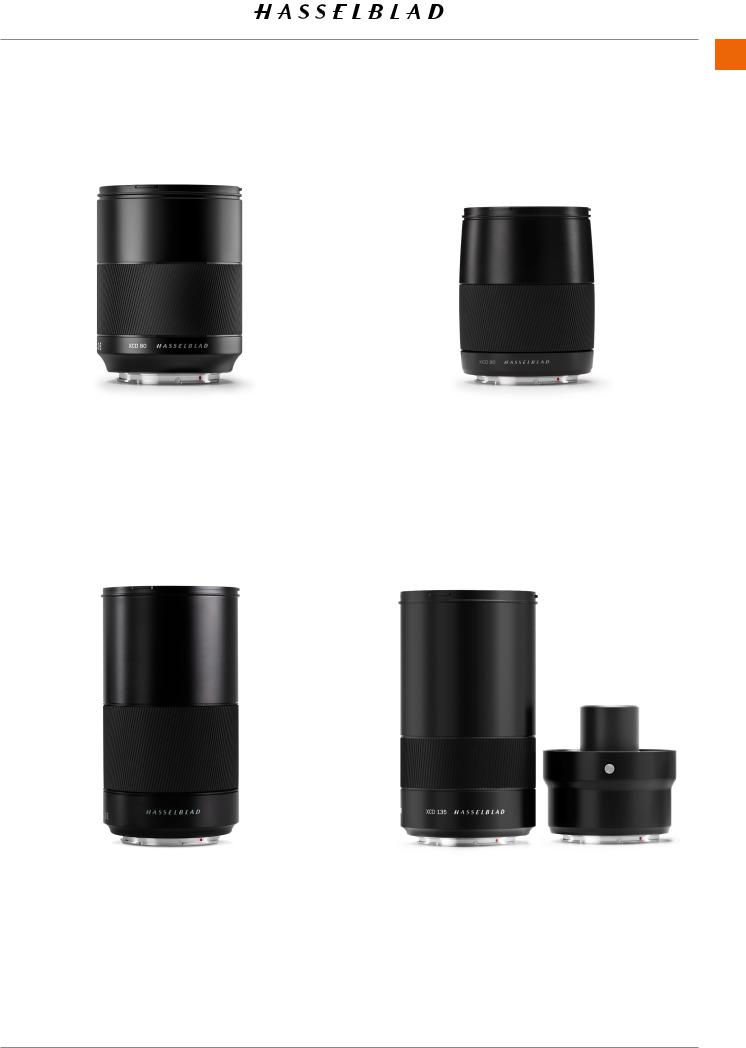
The XCD 80 is a high-aperture lens, providing very short depth- of-field with beautiful Bokeh, especially useful for available light portrait photography. It has a 63 mm equivalent field of view.
XCD 3.5/120 MACRO
The XCD 120 is the ideal macro lens. It is suitable for both closeup work and for portrait or other photography requiring a longer focal length. Focuses down to an image scale of 1:2. It has a 95 mm equivalent field of view.
Lenses 19
XCD 3.2/90
The XCD 90 is a light and compact short telephoto lens. Its moderate focal length provides a 71 mm equivalent field of view, making it a perfect all-round lens.
XCD 2.8/135 AND
X CONVERTER 1. 7
The XCD 135 is a moderate telephoto lens with a dedicated 1.7x converter, providing a 4.8/230mm lens. 35 mm equivalent focal lengths are 107 and 181 mm.
907X Special Edition USER GUIDE |
CONTENTS |
www.hasselblad.com |

XCD 3,5-4,5/35-75
This Zoom lens is ideal for photographers who are looking to keep the amount of equipment they carry when travelling to a minimum but don’t want to compromise on image quality.
Focuses down to 0.42m (W) / 0.6m (T). It has a 28-58 mm equivalent field of view.
FILTERS
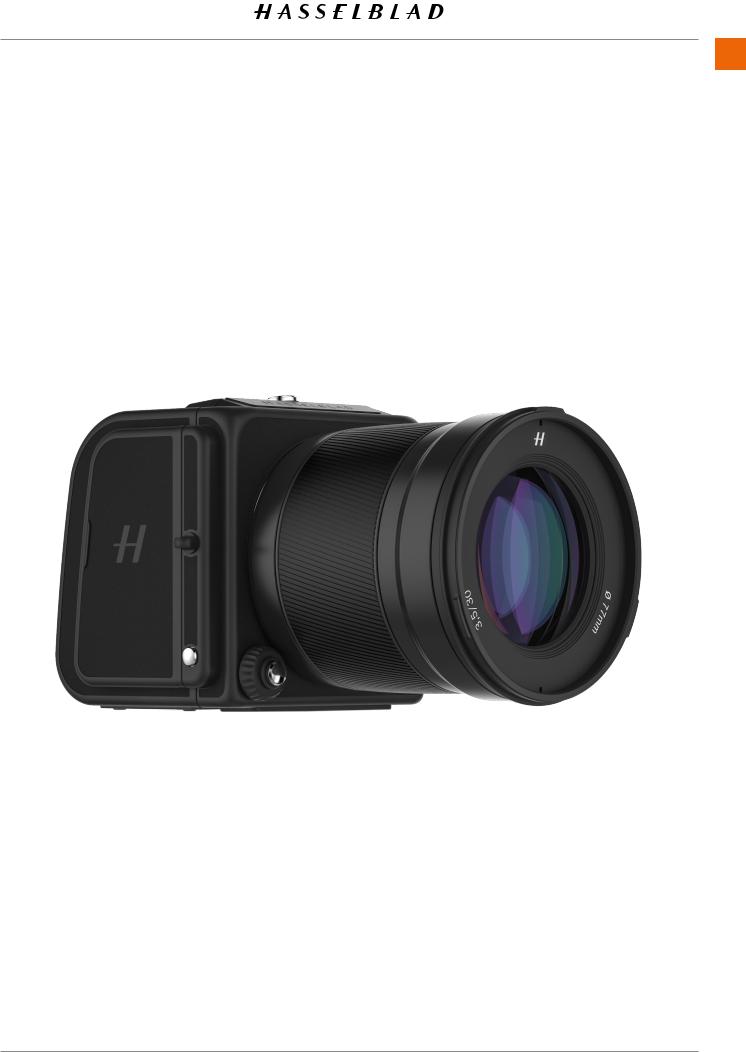
The XCD Lenses have a threaded filter mount with diameter as shown in the table to the right.
As there is no rotation of the front section of the lens when the focus is changed, the filter do not rotate either. This is particularly useful when using polarizing or graduated filters where the orientation is critical.
Lenses 20
LENS |
FILTER DIAMETER |
|
|
XCD 21 |
ø 77mm |
|
|
XCD 30 |
ø 77mm |
|
|
XCD 45 |
ø 67mm |
|
|
XCD 45P |
ø 62mm |
|
|
XCD 65 |
ø 67mm |
|
|
XCD 80 |
ø 77mm |
|
|
XCD 90 |
ø 67mm |
|
|
XCD 120 Macro |
ø 77mm |
|
|
XCD 135 |
ø 77mm |
|
|
XCD 35-75 |
ø 77mm |
|
|
907X Special Edition USER GUIDE |
CONTENTS |
www.hasselblad.com |
3 QUICK START
3.1 QUICK START
This chapter explains how to make the first capture using the default settings.
FIRMWARE
Make sure the camera has the latest firmware by checking the latest version that you can download at www.hasselblad. com. You can see the currently installed firmware by following the procedure on page 126. Instructions on how to update firmware can be found on page 121.
ASSEMBLING THE CAMERA
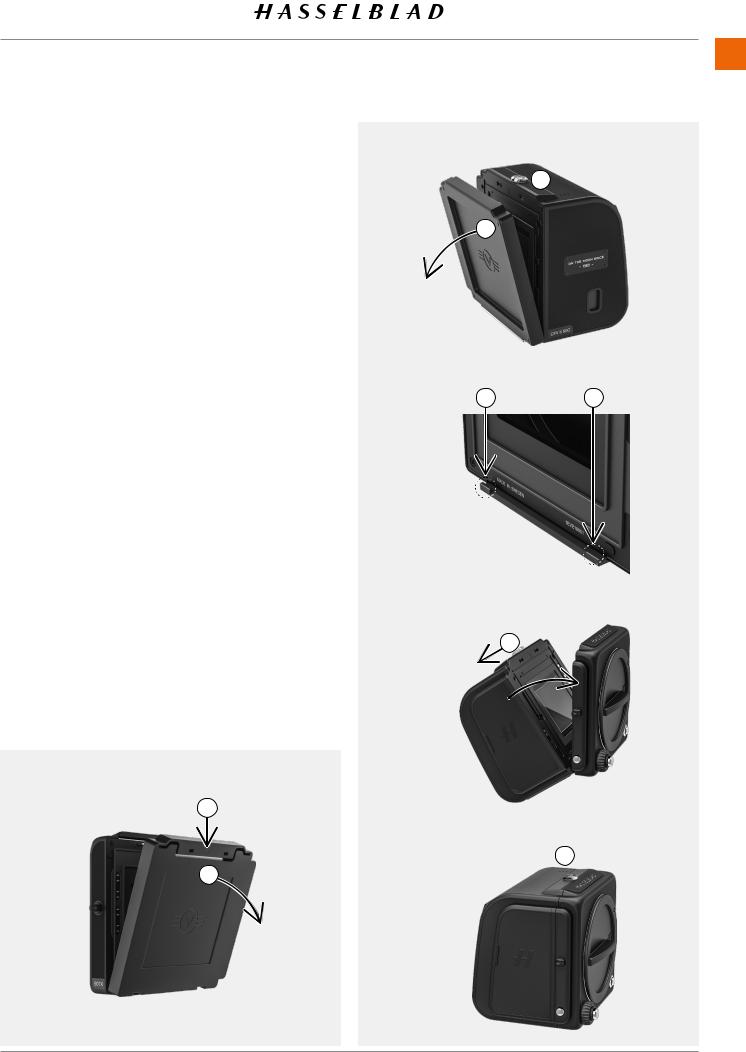
1Remove the rear protective cover of the 907X camera body by pressing on the top part (A) and then swinging the cover backwards (B).
2Remove the front protective cover of the CFV II 50C by sliding the lock button (C) in the direction of the arrow and then swinging the cover outwards (D).
3Attach the CFV II 50C to the 907X by placing the CFV II onto the lower supports on the 907X (E).
4Swing the CFV II towards the camera while holding the lock button on the open position (F).
5When the CFV II is attached to the camera, release the lock button (G) and make sure the CFV II is securely attached to the 907X.
A
B
Quick Start 22
 C
C
D
E E
F
G 
907X Special Edition USER GUIDE |
CONTENTS |
www.hasselblad.com |
BATTERY
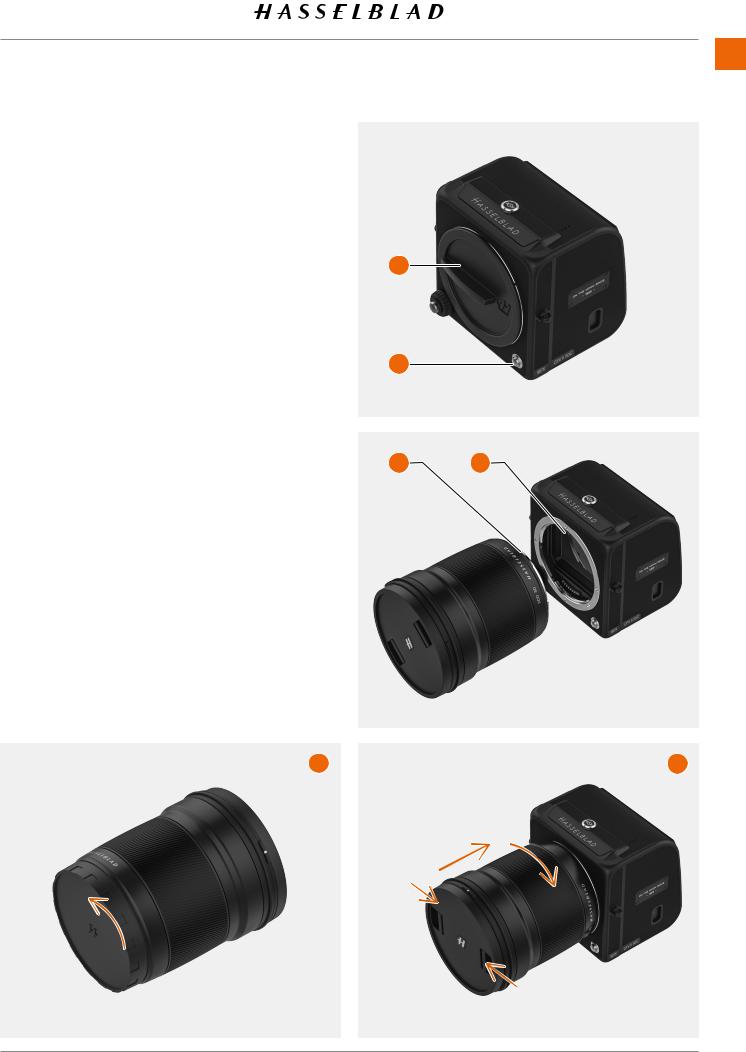
Make sure the battery is fully charged. See more on the next page. Open the right side lid by sliding it backwards (A) and insert the battery with the text facing backwards into the CFV until it clicks in place. (B)
Note!
When the battery is inserted, the rear status LED will show a blink sequence once to indicate the current battery charge level. See next page for details.
SD CARD
Insert the SD card into slot 1 or 2. The contact side of the card shall be facing towards the rear display (C).
Close the lid by swinging it back and sliding it forward.
For best results, the card should be formatted in the camera by using the procedure on page 64.
For recommended memory cards, see page 63.
Quick Start 23
A
B
C
907X Special Edition USER GUIDE |
CONTENTS |
www.hasselblad.com |
3.2 CHARGING THE BATTERY
BATTERY CHARGER
The camera is supplied with a USB power adapter for charging the camera battery through the USB port of the camera.
CHARGE THE BATTERY
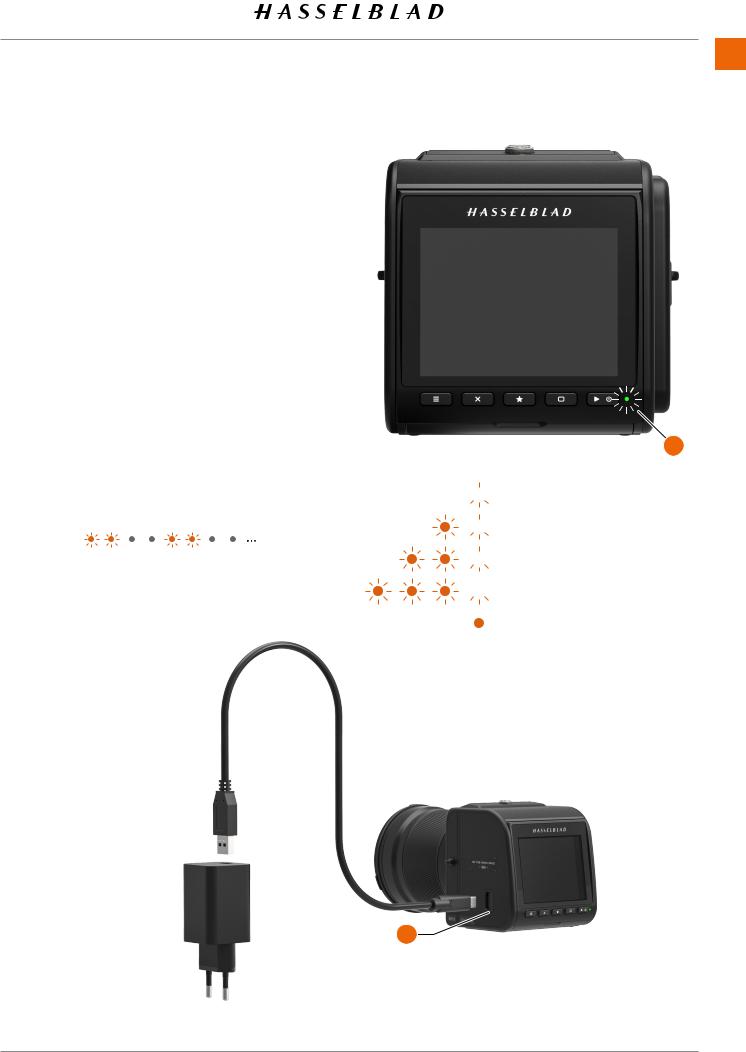
Turn off the camera and insert the USB-C plug from the battery charger into the USB socket on the camera (A). Insert the battery charger into a standard (100–240V~ /50–60 Hz) domestic socket.
CHARGING FROM THE USB PORT
When the battery is charging, the Status Led (B) indicates the current charge level by blinking with Orange color. See illustration to the right. E.g. if the battery has about 50% charge level, the LED will blink two times and then be turned off for a short period. The blinking sequence is repeated.
See also Battery Charging Hub accessory on page 129.
Quick Start 24
B


 One blink = 0% to 25%.


 Two blinks = 26% to 50%.


 Three blinks = 51% to 75%.


 Four blinks = 76% to 95%.
Steady light, 4 sec. = 95% to 100%
A |
907X Special Edition USER GUIDE |
CONTENTS |
www.hasselblad.com |
Quick Start 25
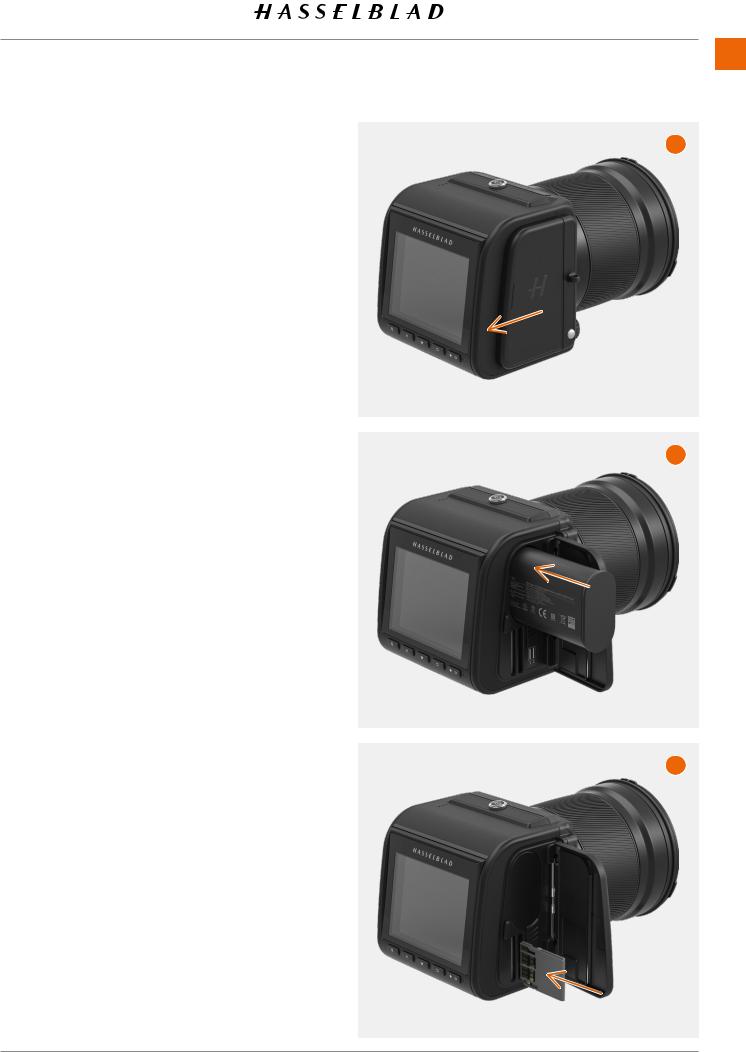
ATTACH THE LENS
●First remove the lens rear protective cap by rotating counter clock-wise (A). Then remove the front protective cover (B) of the camera by pressing the lens release button (C) and rotating the cover coun- ter-clockwise.
●Align the red index on the lens (D) with the index on
the camera (E) and insert the lens. Rotate the lens |
B |
clock-wise until it clicks into place (F). |
|
●Remove the front protective cap by pinching the two buttons together (F).
Note! |
C |
In order to collect as little dust as possible on the sensor, we |
|
recommend that you perform lens change in an as dust-free |
|
environment as possible. Try to make the lens change with the |
|
sensor facing down. |
|
You can use a soft dust brush or compressed air to remove |
D |
E |
dust. Also see page 132. |
|
|
A F
907X Special Edition USER GUIDE |
CONTENTS |
www.hasselblad.com |
Quick Start 26
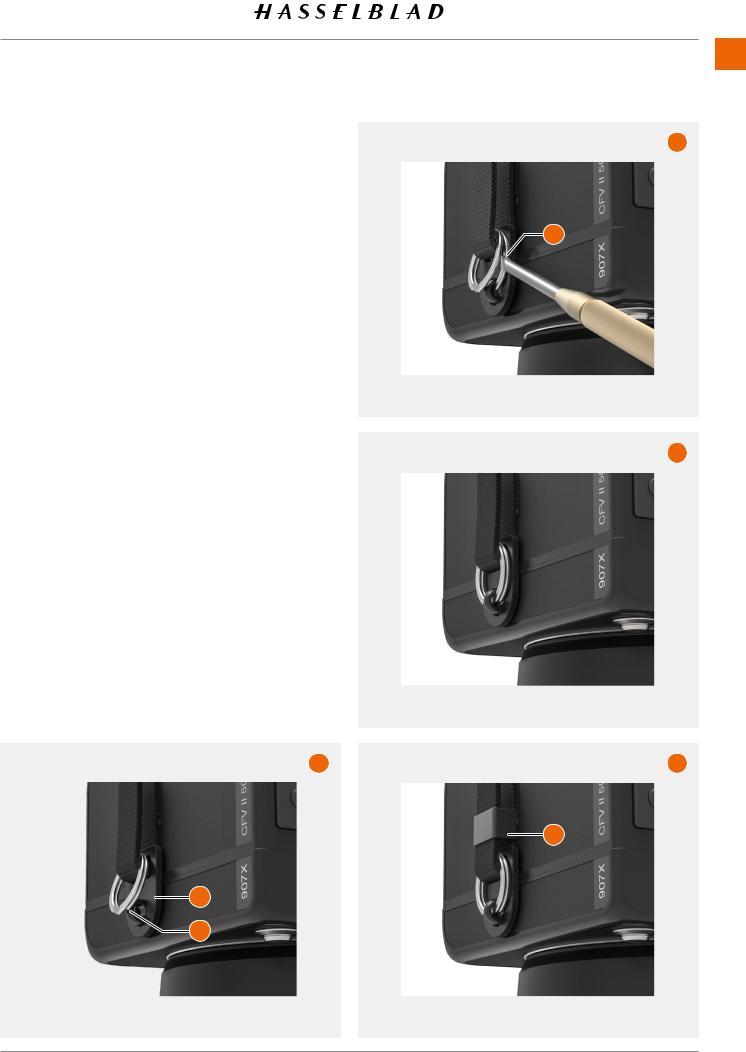
ATTACH THE SHOULDER STRAP
B
Attach the included shoulder strap to the camera by following these instructions:
A Hold or place the camera with the lens pointing down |
3 |
and one of the strap lugs facing you. Attach the leather |
|
end (1) of the strap to the metal strap lug (2). |
|
BOpen the metal ring (3) with a sharp tool. E.g. a screwdriver or a small knife. Be careful not to scratch the camera.
CInsert the open end of the metal ring into the hole of the strap lug. Rotate the ring one full turn and make sure it is fully attached to the strap lug.
DFinally, slide the plastic fastener (4) down.
Repeat the process for the other side of the camera.
Note!
If the strap is exposed to strong pulling force there is a risk that the metal rings or the strap itself can be damaged. Regularly check the condition and replace the rings or the entire strap if necessary.
A
4
1
2
C
D
907X Special Edition USER GUIDE |
CONTENTS |
www.hasselblad.com |

USING THE PROTECTIVE COVERS
Whenever the lens is removed from the camera or the 907X camera body is separated from the CFV II, protective covers should be used. The front protective cover is explained on page 25.
Camera rear protective cover
To remove:
Press the top part (A) down and tilt the cover backwards to release it.
To attach:
Place the cover on the lower supports (B) and press the top part (A) while tilting forward. Release pressure on the top part.
CFV protective cover
To remove:
Slide the locking button (C) in the direction of the arrow
(E) and tilt the cover forwards to release.
To attach:
Place the CFV on the lower supports (D) and slide the locking button in the direction of the arrow (E). Tilt the cover inwards until it locks.
A
Quick Start 27
B
E
 C
C
E
D |
907X Special Edition USER GUIDE |
CONTENTS |
www.hasselblad.com |

THE FIRST CAPTURE
Press and hold the power button (1) for one second to turn the camera on. When the status LED (2) has turned green it is ready to make the first capture.
Gently press the shutter release (half-press) to activate live view on the screen. With the default setting, the camera is in Aperture priority mode indicated by an “A” at the lower left part of the display. Use the control wheel to select another aperture if required. Aperture and shutter speed are indicated at the bottom of the live view screen (A)
Aim the camera at the subject. The rectangle in the center of the image is the active area for Autofocus (AF). Half-press
again to focus. Keep the button at half-press and re-compose if necessary and press the shutter release all the way to make the capture. The image will appear on the screen within a few seconds.
The default ISO is 100. Use the following steps and to set a different value:
●If the display is not already activate, press any of the rear buttons.
●Place your finger at the top of the screen and slide down to reveal the control screen (A). You can do this from any screen.
●Tap the ISO value in the top right area (B). Scroll through the list of ISO values by sliding up/down and tap the required value (C) to confirm the new ISO value
Note!
From the control screen you can also change white balance by tapping the white balance icon in the top left corner.
See more on page 51.
A
1 |
2 |
Quick Start 28
B
C
D
907X Special Edition USER GUIDE |
CONTENTS |
www.hasselblad.com |
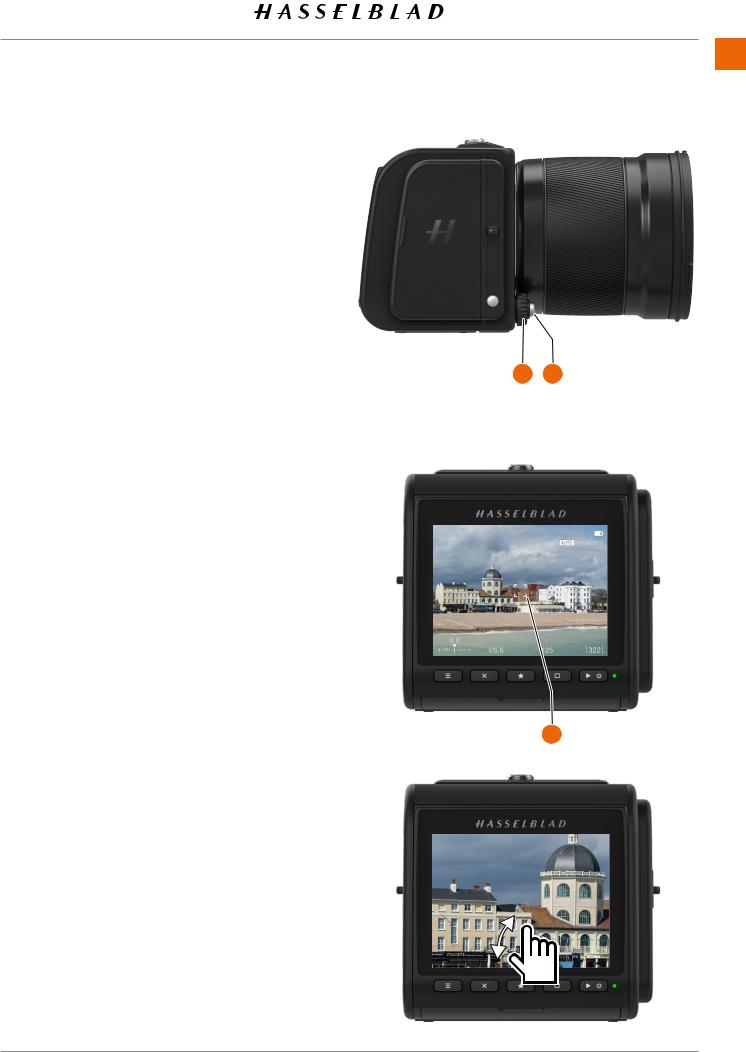
THE FIRST CAPTURE – CONTINUED
The camera is now fully ready to make captures. Half-press the shutter release (1) to activate live view.
To select a different aperture value, turn the control wheel (2). When the exposure mode is set to A, the camera will automatically adjust the shutter speed to match the new value.
Aim the camera and compose the subject. When you halfpress again, the camera will autofocus on the area inside the central rectangle (3).
Finally, press the shutter release fully to make the capture. The captured image is now shown on the display where you can zoom and pan by swiping to examine details.
See more on page 75.
Quick Start 29
2 |
1 |
3
907X Special Edition USER GUIDE |
CONTENTS |
www.hasselblad.com |
Quick Start 30
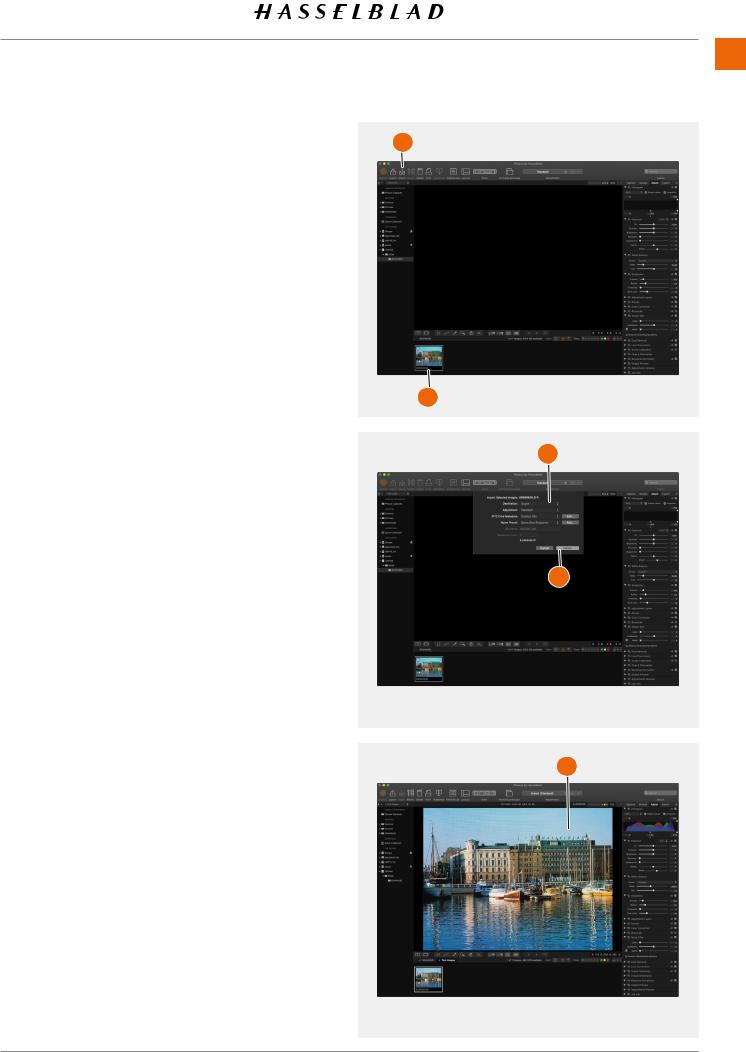
VIEWING THE FIRST CAPTURE ON THE |
B |
COMPUTER |
|
To view the image/images on the computer, you will first need |
|
to take the SD card from the camera and place it in an SD card |
|
reader. For best performance, you should use a USB-3 version |
|
of the card reader. |
|
Note! Do not remove the card from the camera while the |
|
status LED is blinking. |
|
The default setting of the camera is to store RAW images. It |
|
can be changed to store both RAW and Jpeg or Jpeg only. |
|
To use the RAW file, follow the procedure below. |
|
The next steps assume that you have installed Phocus on your |
A |
computer. Phocus is available as a free download from www. |
|
hasselblad.com. Here you can also find a dedicated user |
|
guide for Phocus. |
|
6Start Phocus.
7Connect the card reader to the computer and insert the card.
8After a few seconds, the image/images will appear in the lower program panel (A).
9To be able to view the image in the large viewer window,
it must first be imported. Click on the image to import and then click the “Import” icon  in the top panel (B).
10In the dialogue that appears, select a folder for the imported RAW file (C).
11Finally click on “Import” (D).
C
D
12 After a few seconds, the image will appear in the main |
|
Viewer Window (E) and you can use all the tools to change |
E |
the look as you like. Please study the separate Phocus user |
|
guide for more information. |
|
Note!
Alternatively, you can also use Adobe Photoshop Lightroom or Adobe Photoshop to directly open the images from the card.
907X Special Edition USER GUIDE |
CONTENTS |
www.hasselblad.com |
Loading...