


Installation and Operating Manual
Magnafire Series Coal Stoves - Mark I, II, and III
SAFETY NOTICE
PLEASE READ THIS ENTIRE MANUAL BEFORE YOU INSTALL OR USE YOUR NEW ROOM HEATER. FAILURE
TO FOLLOW THESE INSTRUCTIONS MAY RESULT IN PROPERTY DAMAGE, BODILY INJURY, OR EVEN DEATH.
APPROVED FOR USE IN THE U.S. AND CANADA
IF THIS HARMAN STOVE IS NOT INSTALLED CORRECTLY, A HOUSE FIRE MAY RESULT. FOR YOUR SAFETY, FOLLOW INSTALLATION DIRECTIONS PRECISELY.
CONTACT LOCAL BUILDING OR FIRE OFFICIALS ABOUT RESTRICTIONS AND INSPECTION REQUIREMENTS
FOR YOUR AREA.
CONTACTYOURLOCALAUTHORITY(SUCHASTHEMUNICIPALBUILDINGDEPARTMENT,FIREDEPARTMENT, FIRE PREVENTION BUREAU, ETC.) TO DETERMINE THE NEED FOR A PERMIT.
CETTE GUIDE D’UTILISATION EST DISPONIBLE EN FRANCAIS. CHEZ VOTRE CONCESSIONNAIRE DE HARMAN HOME HEATING.
Save These Instructions
3-90-70746R8_11/12
3-90-70746R8_11/12

Introduction
Thank you for purchasing a Harman Magnafire coal stove. The Magnafire series has been designed and built to last. Whether you’re heating a room or heating your whole house, you’ve made the right choice. Please read this entire instruction manual before attempting to install or operate your new stove. If you have further questions regarding your new stove, contact your Harman dealer. Follow these instructions and you will have many years of warmth and comfort enjoying your new coal stove.
If you are a first-time coal burner, keep in mind that you will not have instant success with maintaining a fire. No one does. Following these instructions should help you with the basic principals.
Please copy your serial number, from the label on the back of your stove, to the box below.
THis appliance is also approved for installation into a shop.
LIS
 T
T
 ED
ED
 SOLID FUEL
 (COAL) FIREPLACE
 ST
ST
 OVE OR ROOM HEA
 T
T
 ER
ER

POÊLE (DE CHARBON) DANS UN FOYER OU APPAREIL DE CHAUFFAGE
OMNI-Test Laboratories, Inc. |
MODEL/Modèle: MARK I |
Serial No. |
|
Tested to/Testé à: |
MARK II |
No de série: 008 |
BARCODE LABEL |
Report #/Rapport #135-S-07-4 |
|
|
|
UL 737, UL 1482, June 1985 |
MARK III |
|
|
Meets requirements of ULC S627/ |
|
|
|
Selon les exigences de ULC S627 |
CONTACT YOUR LOCAL BUILDING OFFICIALS ABOUT RESTRICTIONS AND INSTALLATION INSPECTION IN YOUR AREA/ |
||
Certifi ed for U.S.A. and Canada/Certifi é |
|||
pour les États-Unis et le Canada |
CONTACTEZ LE BUREAU DE LA CONSTRUCTION OU LE BUREAU DES INCENDIES AU DES RESTRICTIONS ET DE L’INSPECTION D’INSTALLATION DANS VOTRE VOISINAGE |
||
PREVENT
 HOUSE
HOUSE
 FIRES:

Install and use only in accordance with manufacturer’s installation and operation instructions and local building codes. In absence of any local codes, installation must meet minimum requirements of
NFPA 211 in USA. Refer to manufacturer’s instructions and local codes for precautions required for passing chimney through a combustible wall or ceiling. Inspect and clean chimney system frequently in accordance with manufacturer’s instructions.
FOR
 USE WI
 T
T
 H
H


 COAL ONLY.
Don’t connect this stove to a chimney serving another appliance.
Flue connector pipe must be 6” diameter, minimum 24 MSG black or 26 MSG blue steel.
Chimney must be factory built 103HT or masonry.
NOT
 E:
E:
 Replace glass only with 5mm ceramic glass available from your dealer.
Inspect and clean chimney frequently. Under certain condictions of use, creosote buildup may occur rapidly.
DO NOT
 OVERFIRE - IF
 HEA
HEA
 T
T
 ER
ER
 OR CHIMNEY CONNECT
 OR GLOWS, YOU ARE OVERFIRING.
PRÉVENT
 ION
ION
 DES FAUX
 DE MAISON:
Installez et utilisez en accord avec les instructions d’installation et d’opération du fabricant et des codes locaux. S’il n’y a pas de codes lacaux. l’installation doit suivre kes exigences minimum de NFPA 211 aux États-Unis. Référez vous aux instructions du fabricant et des codes locaux pour les précautions pour passer une cheminée à travers un mur ou unplafond combustibles. Inspectez et nettoyez le systèm de chiminée fréquemment en accord avec les instructions du fabricant.
UT
 ILISER
 SEULEMENT
 DU CHARBON
Ne pas connecter cet appareil à un tuyau de cheminée servant un autre appareil.
Le tuyau connector doit être de 6” de diamètre, d’acier noir de minimum de 24 MSG ou d’acier bleu de 26 MSG.
La cheminée doit être bâtit à l’usine de 103 HT
 ou faite en briques.
Note: Remplacez
  la vitre seulement avec une vitre céramique de 5mm disponible chez votre fournisseur.
Inspectez et nettoyez la cheminée fréquemment. Sous certaines conditions. il se peut que la créosote s’accumule rapidement.
NE PAS SURCHAUFFER. SI
 L’APPAREIL DE CHAUFFAGE OU LE TUYAU DE CHEMINÉE ROUGISSENT. VOUS SURCHAUFFEZ.
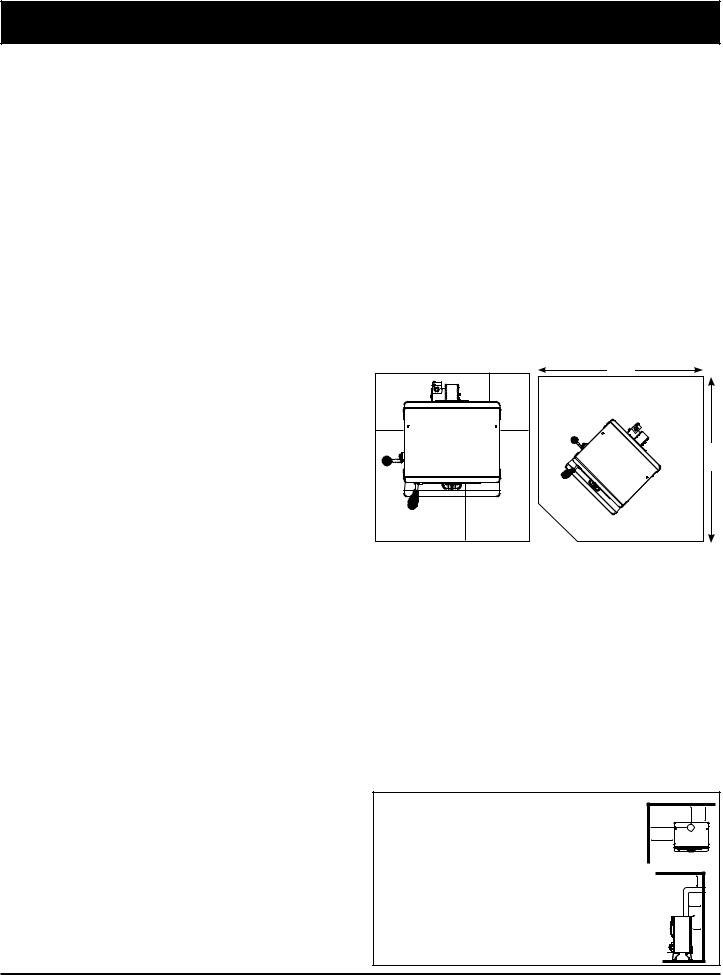
CLEARANCE TO COMBUSTIBLE SURFACE |
|
|
BACKWALL |
|
ESPACES LIBRES AUX COMBUSTIBLES |
|
Floor protection must be a 3/8” min. thickness, |
||
A - Unit to Sidewall |
33” |
SIDEWALL |
C |
D |
B |
A - Du mur de côté à l’appareil |
|
33” |
|
B - Unit to Backwall |
24” |
|
STOVE |
|
B - Du mur arrière àl’appareil |
|
24” |
non-combustible material or equivalent, extending |
|
C - Chimney Connector to Side Wall |
42” |
|
A |
|
|
C - Du tuyau de cheminée au mur de côté |
42” |
beneath heater and to front/sides/rear as indicated |
|
|
|
|
|
on the diagram |
|||||
D - Chimney Connector to Back Wall |
18” |
|
|
|
|
D - Du tuyau de cheminée au mur arrière |
18” |
||
|
|
|
|
|
|||||
E - Floor Protector, Side and Rear |
8” |
|
|
H |
|
E - Du plancher protecteur, Côté arrière |
8” |
Leprotecteur de plancher doit être de 3/8” |
|
F - Floor Protector, Front |
16” |
|
|
|
|
F - du plancher protecteur, Devant |
16” |
||
|
|
D |
|
d’épaisseur minimum, fait de matière non |
|||||
H - Pipe conector to Ceiling |
18”* |
|
|
|
|
H - Du tuyau connecteur au plafond |
18”* |
||
|
|
B |
|
combustible ou équivalent, s’étendant en dessous, |
|||||
*Not Tested - NFPA Guildlines |
|
|
|
|
|
*Pas testé - indications NFPA |
|
|
en avant, en arrière et sur les côtés de l’appareil de |
|
|
|
|
|
|
|
chauffage comme indiqué sur le diagramme. |
||
ELECTRICAL RATING: 115VAC, 60 HZ, 1.1 AMPS |
|
|
|
|
|
|
PUISSANCE ÉLECTRIQUE: 115VAC, 60 HZ, 1.1 AMPS |
||
DANGER: Risk of electrical shock. Disconnect power supply before servicing. Route power cord away from unit. |
|
DANGER: Il y a risque de choque électrique. Déconnectez le fi l électrique avant le service |
|||||||
Do not route power cord under or in front of appliance. |
|
|
|
|
|
|
Éloignez le fi l électrique de l’appareil. Ne placez pas le fi l électrique sous ou à l’avant de l’appareil. |
||
CAUTION: RISK OF EXCESSIVE TEMPERATURE AND DAMAGE TO UNIT. |
ATTENTION: IL Y A RISQUE DE TEMPÉRATURES EXCESSIVE ET DE DOMMAGE À |
||||||||
PROPER OPERATION REQUIRES THE USE OF ONLY PEA, NUT & COAL STOVE SIZE |
L’APPAREIL. UN BON FONCTIONNEMENT EXIGE L’USAGE D’ANTHRACITE DE CHARBON DE |
||||||||
ANTHRACITE COAL |
|
|
|
|
|
|
GROSSEUR D’UN POIS, D’UNE NOIX OU D’UN CHARBON. |
||
CAUTION:HOTWHILEINOPERATION.DONOTTOUCH. |
ATTENTION: CHAUD-NE PAS TOUCHER. TENIR LES |
||
KEEP CHILDREN AND CLOTHING AWAY. CONTACT MAY |
ENFANTS ET LES VENTEMENTS A L’ECART. RISQUE DE |
||
CAUSE SKIN BURNS. SEE NAMEPLATE AND INSTRUCTIONS. |
BRULURE. VOIR INSTRUCTIONS SUR LA PLAQUE. LAISSER |
||
KEEPFURNISHINGSAND OTHER COMBUSTIBLE MATERIALS |
UNE DISTANCE SUFFISANTE ENTRE L’APPAREIL ET LES |
||
A CONSIDERABLE DISTANCE AWAY FROM THIS APPLIANCE. |
MEUBLESOU AUTRES OBJECTA RISQUE. |
|
|
Exempt From EPA Certifi cation under 40 CFR 60.531 |
Manufactured by/Fabriqué par: |
Harman Home Heating |
|
Date of Manufacture / Date de fabrication |
|
352 Mountain House Road |
|
2012 2013 2014 JAN FEB MAR APR MAY JUN JUL AUG SEP OCT NOV DEC |
|
|
|
|
P.N. 3-90-90732 |
Halifax, Pa 17032 |
Rev B |
|
|
||
Listed by: OMNI-Test Laboratories, INC Report # 135-S-07-4
Safety Notice:
Stove is hot while in operation. Keep combustibles such as furniture, fuel, and draperies at least 36 inches away from the appliance.
Do not leave small children unattended while in the room with this heater.
Always wear gloves when attending to the stove.
This stove is not an incinerator. Do not burn garbage, painted or treated wood, or flammable liquids like gasoline kerosene, or engine oil.
3 |
Magnafire Series Coal Stoves |
3-90-70746R8_11/12 |

Index
1.Safety Considerations - Warnings to operator of possible dangers, fire hazards and cautions.
1.1Keep children away -- may cause serious burns
1.2Fuel/Firing Warnings
1.3Curing Paint
1.4Mobile Homes
2.Assembly & installation
2.1Unpacking and Inspection Of Parts
2.2 Locating The Stove
2.3Assembly
2.4General Information
3.Venting
3.1Types of Chimneys
3.2Common Chimney Problems
3.3What To Do If You Have A Problem
3.4Chimney Details
4.Grates
4.1Grate System and Controls
5.Operating Instructions
5.1Starting a Fire
5.2Loading Fuel
5.3Increasing Heat From a Low Fire
5.4Shaking Ashes
5.5Ashes and Ash Removal
5.6Safety
6.Preventive Maintenance Instructions
6.1Periodic and Everyday Maintenance
7.Optional Hot Water Coil
8.Warranty Information
9.Service Parts Diagrams
= Contains updated information
4 |
Magnafire Series Coal Stoves |
3-90-70746R8_11/12 |
Installation
1. Safety Considerations: |
2. Assembly & Installation: |
1.1KEEPCHILDRENAWAY-MAYCAUSESERIOUS |
2.1 UNPACKING AND INSPECTION OF PARTS. |
BURNS. |
Inspect the stove for any visible damage. The blower |
CAUTION: All surfaces of the stove are hot while in |
and the shaker handle are packaged inside the stove. |
operation. Do not touch. Keep Children Away. Wear |
2.2 Locating The stove. |
gloves while tending stove. Serious burns will result if |
Locate the stove as close to the chimney or flue |
special care is not taken. |
as possible while adhering to the recommended |
1.2 Fuel / Firing Information. |
clearances to combustible material. Safe stove |
clearance to combustible walls is 24” to the rear of the |
|
DANGER!FIREHAZARD!DONOTUSECHEMICALS |
stove, and 33” to the sides of the stove. In a corner |
OR FLUIDS TO START OR “FRESHEN UP” A FIRE. |
installation, you need 24” to the side walls. Clearance |
SEVERE BODILY INJURY AND/OR A FIRE IN THE |
to the front of the stove, for furniture, etc. is 36” |
HOME MAY RESULT. DO NOT BURN GARBAGE, |
|
Floor protection, for a combustible floor, must be a |
|
GASOLINE, THINNERS, KEROSENE, OR FUEL |
|
minimum of 3/8” thick non-combustible material. The |
|
OIL, ETC. AN EXPLOSION, A HOUSE FIRE OR |
|
floor protector should extend 8” to either side, and 16” |
|
PERSONAL INJURY COULD RESULT. KEEP ALL |
|
in front of the stove. Floor protection should also be |
|
SUCH LIQUIDS WELL AWAY FROM THE STOVE |
|
under any horizontal sections of flue pipe. |
|
WHILE IN USE. |
|
|
48" |
This heater is approved for burning coal only. Use of |
8” |
Floor |
|
any other fuel, except for the purpose of coal ignition, |
|
|
Protector |
is a violation of U.S. law. |
|
|
|
When and if the chimney pipe or connector reaches |
|
8” |
8” |
500˚ f. (maximum temperature), the stove is being |
|
|
48" |
|
|
|
|
over-fired. It is recommended that you use magnetic |
|
|
|
thermometers on the stove and flue connector, to |
|
|
|
ensure safe operation. |
|
16” from glass |
|
This stove consumes air when it is burning. If your |
|
|
|
|
Floor Protector |
||
|
|
||
house is especially tight, It is advisable that a nearby |
Alternatefloorprotectordimensionmaybeusedaslongastheysatisfy |
window be opened slightly while burning the stove. |
|
Information in this manual is manufacturer’s |
the measurement requirements shown below. |
Minumum size floor protection for a corner installation hearth pad is |
|
recommendations. If there is a discrepancy between |
48" x 48" (USA ONLY). |
these recommendations and your local code |
|
|
requirements, you must follow local codes. |
|
|
1.3 CURING PAINT. |
|
|
During the first few hours of burning, a blue smoke will |
|
|
be observed rising from the painted surfaces of the |
|
|
stove. This is the paint being cured, and will disappear |
|
|
over time. Increase the amount of fresh air in the |
|
|
room during this initial break-in period. This may be |
|
|
achieved by opening doors or windows. |
|
|
1.4 Mobile Homes. |
||
|
||
This stove is not approved for use in mobile/ |
|
|
manufactured homes. |
|
Floor Protection |
Inches |
Millimeters |
||
Requirements |
||||
|
|
|||
J |
SidesUSA /CANADA * |
8 |
203 |
|
K |
FrontUSA /CANADA * |
16 |
457 |
|
L |
RearUSA |
8 |
203 |
|
L |
RearCANADA |
Wall |
Wall |
|
|
|
|
|
|
clearance to combustible surfaces
A - Unit to Sidewall B - Unit to Backwall
C - Single Wall Chimney Connector to Sidewall D - Single Wall Chimney Connector to Sidewall E - Floor Protector, Side and Rear
F - Floor Protector, Front
H - Pipe Connector to Ceiling
* Not Tested - NFPA Guidelines
33”
24”
42”
18”
8”
16”
18”*
|
|
BACKWALL |
|
SIDEWALL |
|
D |
B |
C |
|
|
|
|
|
|
|
|
A |
STOVE |
|
|
|
|
|
|
|
H |
|
|
|
D |
|
|
|
B |
|
5 |
Magnafire Series Coal Stoves |
3-90-70746R8_11/12 |
Installation
2.3 Assembly.
Slide the blower into the slotted bracket on the rear of the stove. The blower will rest at the bottom of the slot.
The shaker handle bolts onto the shaker block using the bolts and lock washers provided.
The draft control is bolted through the hole in the center of the ash door as shown below. The knob should spin freely and open to a distance of about 1/4 inch from the door surface, while being able to close against the face of the door.
The viewing glass is installed between the door and the window frame. The glass gasket is installed only on the sides of the glass panel. The top and bottom of the glass are open to provide air-wash and secondary air to the firebox. The glass frame is secured to the door with four bolts.
The Mark II and Mark III also have a top trim piece which bolts onto the top of the door.
Be sure the frame bolts and trim bolts are secured.
2.4 GENERAL INFORMATION.
Installation Checklist:
A.Have your stove installed by a trained installer. Preferably one who is certified by the National Fireplace Institute or similar certification agency.
B.Before starting Installation, check for proper clearance to combustibles where the stove is going to be located.
C.Never vent a solid fuel burning appliance into a flue serving another appliance.
D.Have the chimney inspected and thoroughly cleaned. Inspect that it is a Class “A” chimney either masonryorfactorybuilt.Ifitisamanufacturedchimney, ensure that it is installed as per the manufacturers requirements. Be sure that the chimney is tall enough. Solid fuel chimneys fall under a general rule, 16 ft. minimum height, 2 ft. taller than anything within 10 ft., and 3 ft. above where it passes through the roof line. The chimney must be capable of a minimum .06 inches of water column of draft when the stove is burning.
E. Limit the amount of connector pipe. Position the stove as close to the flue as possible. (8 ft. or less)
No more than two 90° elbow fittings should be used.
Any horizontal connector pipe should have at least 1/4 in. of rise per foot in length. A barometric damper may be installed to prevent excessive or erratic draft.
MANUAL DAMPERS OR “HEAT SAVERS” MUST NEVER BE INSTALLED IN THE FLUE PIPE. IMPROPER OPERATION COULD RESULT IN
DEATH.
6 |
Magnafire Series Coal Stoves |
3-90-70746R8_11/12 |
Venting
Where an existing chimney is used, it must be large enough to provide a draft adequate for removing the gaseous products of combustion. The cross-sectional area of the chimney must be at least 25 percent greater than that of the connector. As a general rule, common 8” X 8” flue liner has an actual interior cross-sectional area of 42 to 49 inches. This is adequate for a 6 inch stove connector, which matches the appliance flue collar.
Important! Theconnectorpipemustbeconstructed of 24 gauge material or thicker.
3. Venting & Chimneys:
3.1 TYPES OF CHIMNEYS
The chimney is one of the most important, yet the most neglected and misunderstood portion of any solid fuel burning appliance installation. Do not connect your stove to a chimney flue that already serves another heating device.
The stove must be connected to its own flue. A minimum 8” X 8” is necessary for proper operation.
Under no circumstances should a manual flue damper be installed in the smoke pipe between the stove and the chimney.
Caution! the chimney must be a “class A” chimney in good working condition. the use of aluminum “type b” gas vent for solid fuels is not only un-safe but it is prohibited by the national fire protection agency (nfpa) code.
There are three types of “Class A” chimneys;
1)Masonry with a tile liner, including brick, block, stone, etc. It must be supported by a ground-level foundation.
2)Insulated “Class A” manufactured chimney, listed and certified by a national test agency.
3)Triple-walled metal “Class A” chimney, listed and certified by a national test agency.
If your masonry chimney has not been used for some time, have it inspected by a qualified person (building inspector, fire department personnel, etc.). If a listed and certified manufactured chimney is to be used, make certain it is installed in accordance with the manufacturers instructions and all local codes.
A coal stove can perform only as well as its venting system will allow it to.
3.2 common chimney problems
In order to have a properly operating heating system, the chimney needs to be capable of providing sufficient draft. The minimum required draft is .06 inches of water column (WC). To measure the draft, drill a hole in the connector pipe and attach a draft meter. First, check the draft above the barometric damper (if installed). Then check it below the barometric damper and make your damper adjustment to where it opens to prevent the draft from going higher than the .06 in WC. If the chimney is incapable of supplying the necessary draft, it will need to be improved. Whether it needs to be raised to a taller height, a flue liner installed, or a different style of cap placed on the top, the improvement method will need to be determined.
Reasons for insufficient draft;
A)Leaking chimneyAir leaking in around a loose fitting cleanout door, joints or seams in connector pipe are not secured properly, cracks or other defects in masonry.
B)Improperchimneyheight-Chimneydoesnotextend to a sufficient height above the roof line. (Remember the 3 ft.-2 ft.-10 ft. rule)
C)Obstructions in the chimney - Make sure the chimney has been cleaned. Different animals have been known to build nests in chimneys.
D)Treesorothertopographicalbarriers-Treesthatare taller than the house can cause the air currents to flow downward over the peak of the roof. This would lead to a down draft effect on the chimney. This can also be caused by adjacent buildings or fixtures. It could even be from a different peak on the same structure.
Wind direction
7 |
Magnafire Series Coal Stoves |
3-90-70746R8_11/12 |
Venting & Grates
E)Improperly sized flue - Too small of a chimney is incapable of moving the volume of air necessary. Too large of a flue could have trouble warming up to create the necessary upward flow.
F)Chimney offsets - Offset chimneys should be avoided if possible. Not only can the offset affect draft, it is also a place for debris to collect over time.
G)Too many elbows - The flue connector has more than two elbows in it. Sometimes, depending on overall chimney performance, one elbow could be too many.
H)Vent sharing - No more than one heating appliance shall vent into a single flue.
THE MOST IMPORTANT THING TO REMEMBER ABOUT CHIMNEYS IS THEIR NEED FOR MAINTENANCE AND CLEANING. IF A CHIMNEY IS NOT CLEANED ON A FREQUENT BASIS, IT WILL AFFECT DRAFT,AS WELLAS BEACONTRIBUTING FACTOR TO A POTENTIAL CHIMNEY FIRE.
3.3 what to do if you have a problem. If you have a chimney fire:
1.Be sure everyone is out of the house.
2.Call the fire department.
3.Close the draft control on the ash door and make sure both doors on the stove are closed and latched.
4.Do not put water on the fire, this will cause unnecessary damage to the stove and flue.
5.Have the chimney inspected and repaired prior to building another fire.
Smoke puffs out of stove;
A)Check previous suggestions for insufficient draft.
B)Check draft control for proper operation.
C)Chimney may be too low. Increase height.
D)Add more fresh air to the room. Your home may be so tight that there is not enough oxygen getting to the fire.
E)Remember, open the draft control and crack the door open slightly before reloading or checking the fire.
F)Check the ashes. The ash pan and firebox may be overloaded with ashes.
G)Check the chimney cleanout door to ensure it closes properly.
4. Grates
4.1 GRATE SYSTEM AND CONTROLS.
The Grates are made of heavy-duty cast iron. The function of the grate system is to support the coal while allowing air flow through the fire. The grate system also allows removal of the ashes by shaking them through the grates.
The grates are removable without the use of tools, once the fire bricks are removed, the grates simply lift out. Lift the right end higher to disengage from the shaking link. To re-install the grates, lower them, one at a time, left end first, be sure the grate hooks into the grate link as you drop it into place.
Your grates will last forever, as long as you keep your ashes cleaned out of the stove. When ashes are left pile-up against the grates, the air-flow is blocked. With no air flow through the grates, they will begin to sag from the intense heat.
The grates are designed to accommodate three different sizes of anthracite coal. Pea is defined as being able to fit through a round screen hole of 9/16” to 7/8”. Nut or Chestnut is defined as being able to fit through a round screen hole of 7/8” to 1½”. Finally, Stove coal which is 1½” to 2½” in size. Pea or Nut you’ll find work the best for starting a fire, while all three sizes burn just as well.
The external shaker handle allows for greater safety from burns, and the convenience of needing no extra tools.
Stove body

 Grates
Grate Link
Shaker Handle
Shaker Bar
8 |
Magnafire Series Coal Stoves |
3-90-70746R8_11/12 |
 Loading...