

Harman Stove Company Magnum Stoker Installation And Operating Manual

Installation & Operating Manual
The Harman Magnum Stoker
Tested by:
OMNI-TEST Laboratory
DO NOT BURN WET COAL.
R15
SAFETY NOTICE
PLEASE READ THIS ENTIRE MANUAL BEFORE YOU INSTALL AND USE YOUR NEW ROOM HEATER. FAILURE TO
FOLLOW INSTRUCTIONS MAY RESULT IN PROPERTY DAMAGE, BODILY INJURY, OR EVEN DEATH.
FOR USE IN THE U.S. AND CANADA.
IF THIS HARMAN STOVE IS NOT PROPERLY INSTALLED, A HOUSEFIRE MAY RESULT. FOR YOUR SAFETY, FOLLOW
INSTALLATION DIRECTIONS.
CONTACT LOCAL BUILDING OR FIRE OFFICIALS ABOUT RESTRICTIONSAND INSTALLATION INSPECTION
REQUIREMENTS IN YOUR AREA.
CONTACT YOUR LOCAL AUTHORITY (SUCH AS MUNICIPAL BUILDING DEPARTMENT, FIRE DEPARTMENT, FIRE
PREVENTION BUREAU, ETC.) TO DETERMINE THE NEED FOR A PERMIT.
CETTE GUIDE D'UTILISATION EST DISPONIBLE EN FRANCAIS. CHEZ VOTRE CONCESSIONNAIRE DE HARMAN STOVE
COMPANY.
MGMR13
SAVE THESE INSTRUCTIONS.

INDEX
Introduction 3
Warnings 3
Packing List 5
Assembly 6
Installation 9
2
Verti-Flow Stoker Control 10
Operation 14
Maintenance 15
Trouble-Shooting 17
Wiring Diagram 19
Feeder Parts 20
Domestic Hot Water Coil 21
Hot Air Option 22
Warranty 23
DO NOT BURN WET COAL
INTRODUCTION
3
THERMOSTAT
100 LBS.
COAL
WARNINGS
Never sleep in the same
room with any coal
burning stove.
This all new design by Harman features the Verti-Flow Stoker System.
This unique system provides a very wide range of heat output. The
Verti-Flow Stoker can operate from 5000 to over 85,000 btu's automatically.
This unit has a 100 pound coal capacity and can provide 85,000 btu's
for 17 hours or stretch out to over 100 hours when less heat is required.
A thermostat is used to regulate the heat output of the stove. When no
heat is needed, the stoker stops and only runs to maintain the fire. If heat is
needed, the thermostat can turn on the stoker at any time. After the thermostat
is satisfied, the stoker will turn off for twelve minutes and then run for four
minutes.
The four minutes "on" and twelve minutes "off" is a setting that will
perform well under most conditions. This "on" and "off" time can be changed
to provide more or less heat during the maintenance cycle.
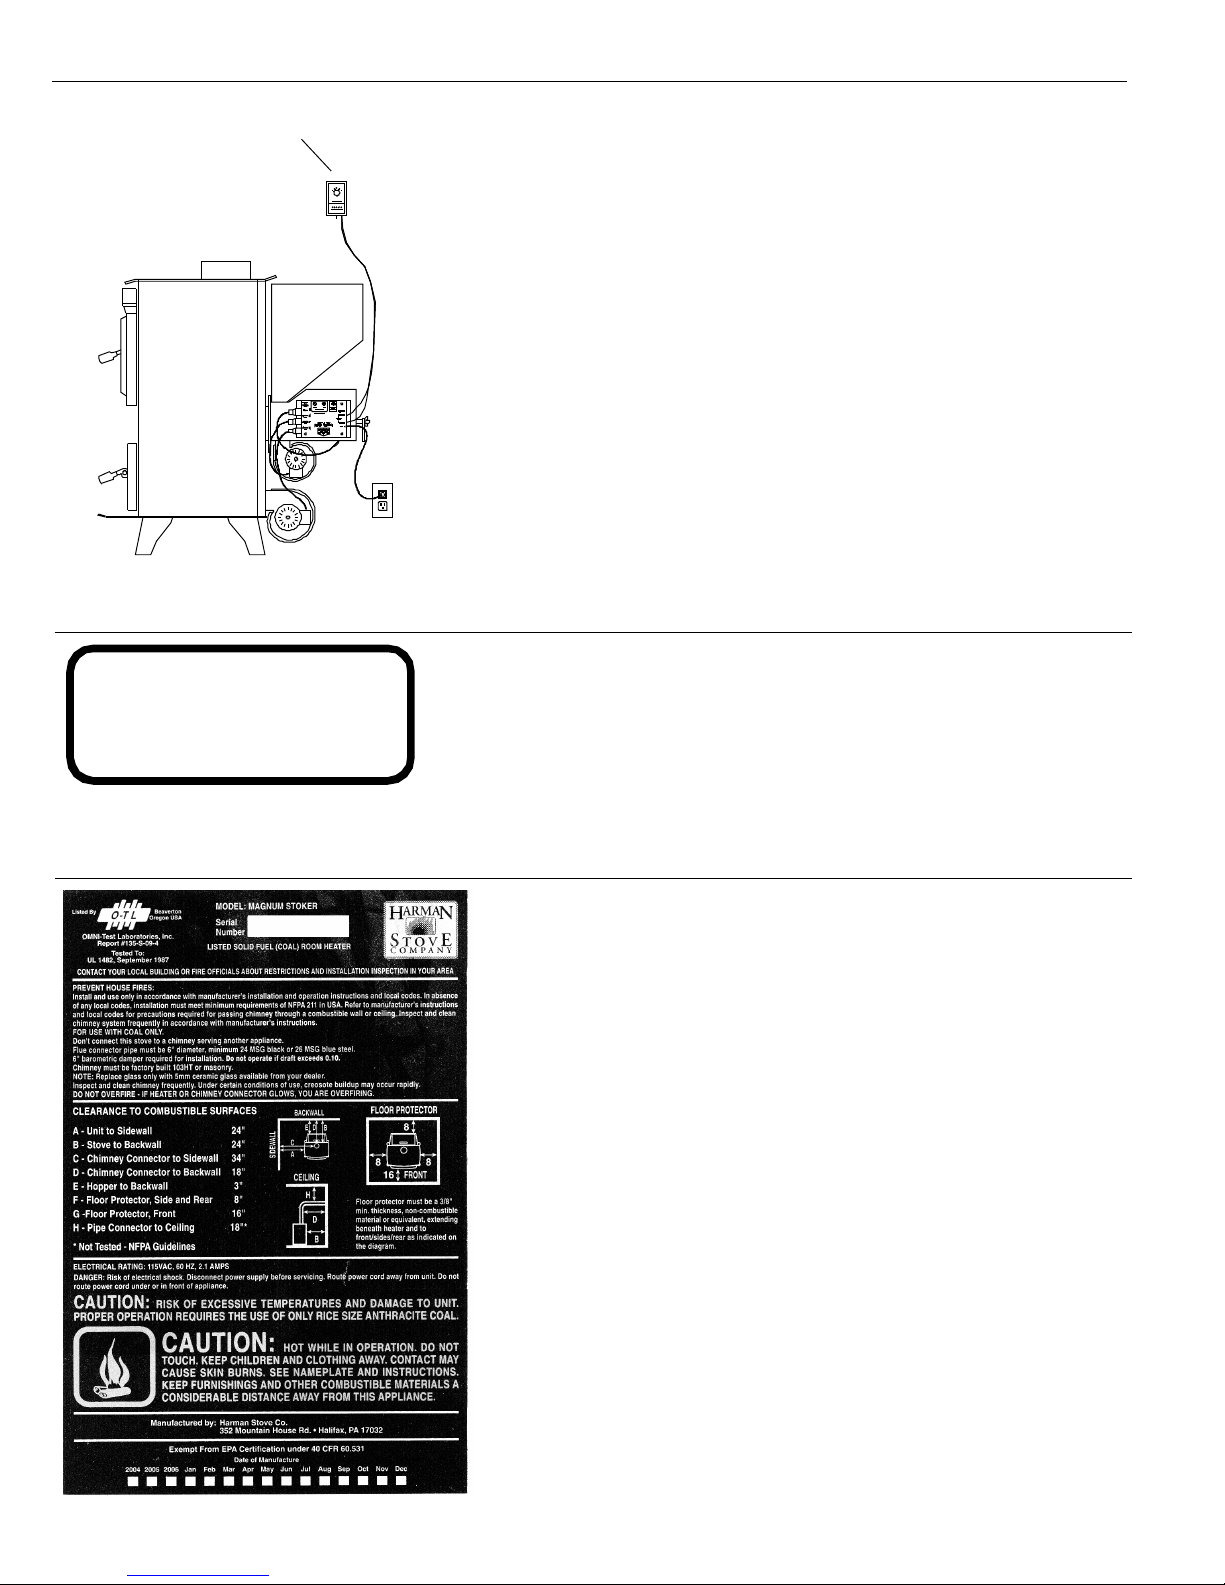
This unit must be connected to a chimney capable of providing a .04
minimum draft reading. WARNING!! If the chimney has no draft, coal gases
may escape from the unit and stovepipe. These gases are toxic and can be
fatal. It is recommended that a gas detector be installed to warn of this
condition. Check with your local stove dealer for purchasing a gas detector.
TESTING INFORMATION
This unit has been tested and approved by OMNI-TEST Labo-
ratories in accordance to the listed codes.
DO NOT BURN WET COAL

READ THIS
Always empty hopper when not burning for more than a
week. When left standing for long periods with wet coal,
the pusher block will rust and corrode, causing it to
seize. If the stoker is then turned "on", damage to the
pusher assembly and feed motor will result. This will be
considered neglect and will void the warranty on those
parts. Always check to see if moving parts are free
4
before using if the unit has not been burned for a period
of time. This can best be determined by shaking the
adjuster rod.
Wet Coal
Freshly delivered coal is watered down
to eliminate dust when loading and unloading.
Wet rice coal does not flow as well as damp or
dry coal. We do not recommend burning wet
coal, however, we realize if it's the only coal you
have it is better to burn it than freeze. If you
must burn wet coal, the feed rate must be increased in order to get the same size fire. As the
wet coal in the hopper dries out, the feed rate
must be decreased. If you don’t, the feeder will
over-fire the stove and waste coal. Doing this
once or twice a year will not damage your stove
as long as it is hot and burning. The damage is
caused when the hopper has wet coal in it when
the sto ve is co ld .
sion and it is totally the operator’s fault.
This will cause rust and corro-
Usually after the coal dries for three
or four days, depending on conditions, it will
flow very well and feed properly. Feed rate
will be the same as dry coal.
Damp coal also should not be left in
the hopper of a cold stove.
Damp Coal
DO NOT BURN WET COAL
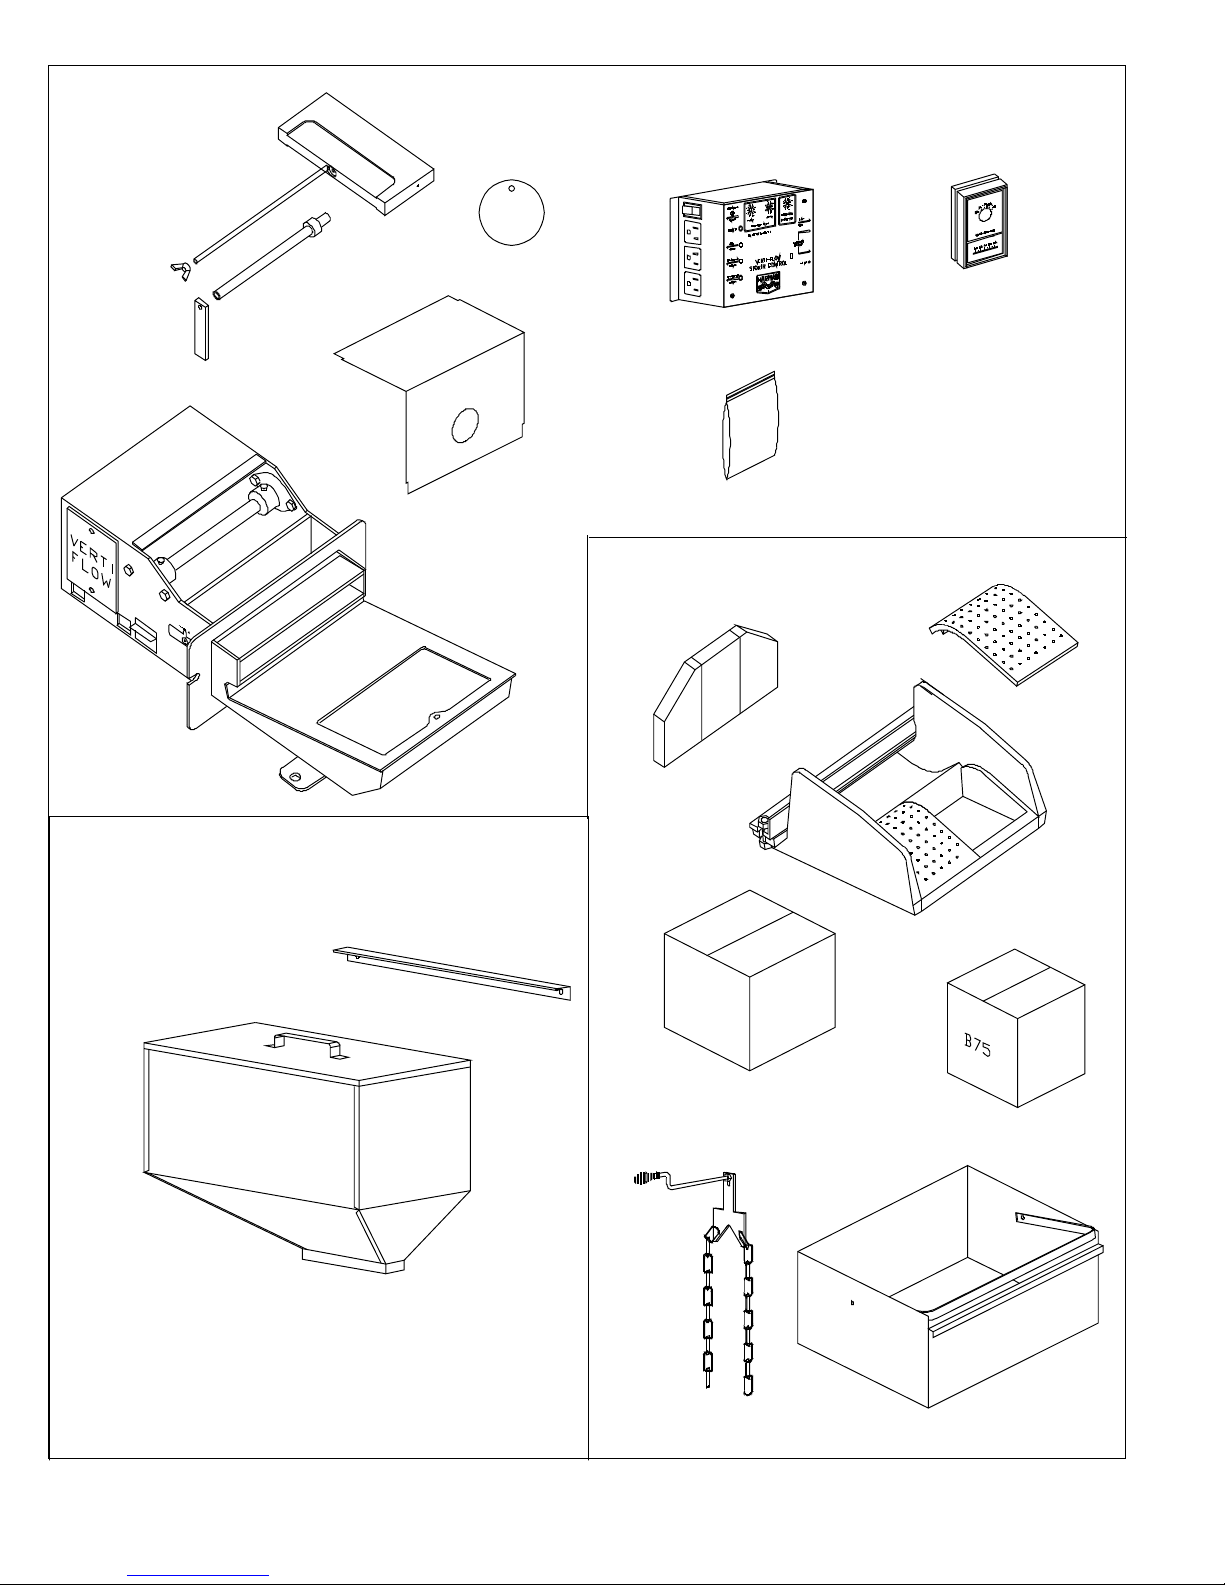
PACKING LIST
5
adjuster rod
wing nut
adjuster
Pusher block
adjuster tube
Parts inside feeder box
Restricter Plate
thermostat
control box
Inside bag
(2) terminals for thermostat wire
(4) 8-32 x 1/2 screws and nuts
motor cover
Parts inside stove
main feeder body
Parts inside hopper box
hopper lid
(2) grate inserts
firebricks
grate holder
hopper support
distribution blower
combustion blower
hopper
scraper
assembly
ash pan
DO NOT BURN WET COAL
ASSEMBLY
slot
6
adjuster rod
Pusher
block
First, a note to you, the customer.
This section on Assembly is in the manual for your information
should you ever need to move your unit and to help you understand how each part is installed.
dust tray
feed indicator
fig 1
It is not intended by Harman Stove Company that you
assemble this unit. This job is to be performed by your Harman
Dealer who has been taught how to assemble and explain the
operation of your new stoker to you.
Your dealer will also take a draft reading with the stoker
burning. This reading must be recorded on the warranty coupon in
order to activate your warranty.
The assembly and set-up are free. However, we do not
wish to imply that delivery and installation are free.
adjuster tube
fig 2
wing nut
adjuster
DO NOT BURN WET COAL
Feeder
adjuster rod from the front through the slot shown in fig.1.
Blowers
Be sure the pusher block is turned with the bolt hole to
feed indicator side.
7
Begin assembly by sliding the pusher block with the
fig 3
thermostat
gasket
Next, hold pusher block in the most rearward position and slide the adjuster tube over the adjuster rod until it
bottoms out on the pusher block. Thread the adjuster
over the adjuster rod. Thread wing nut on the end of the
adjuster rod.
Make sure the gasket is in place on the feeder
Control Box
opening on the rear of the unit, as shown in fig 3. Insert the
stoker into the opening in the rear of the unit. Bolt fast and
tighten with (2) 5/16 X 1 1/4 bolts.
Install the smaller of the two blowers on the bottom
of the feeder by sliding it into the bracket as far as it will
go. Install restricter plate on blower as shown below in
Fig. 4.
Slide the larger blower into place on the bottom rear
Cleanout Scraper
Large blower
fig 4
Install scraper as shown below with locking nut
on each side of the scraper. Tighten nuts when in the
rear most position to assure alignment. Cycle rod in
and out to clean unit.
lock nut
scraper
Restricter Plate
Control Box
Small blower
DO NOT BURN WET COAL
 Loading...