

Harman Stove Company Clarity 828i Installation And Operating Manual
INSTALLATION AND OPERATING MANUAL
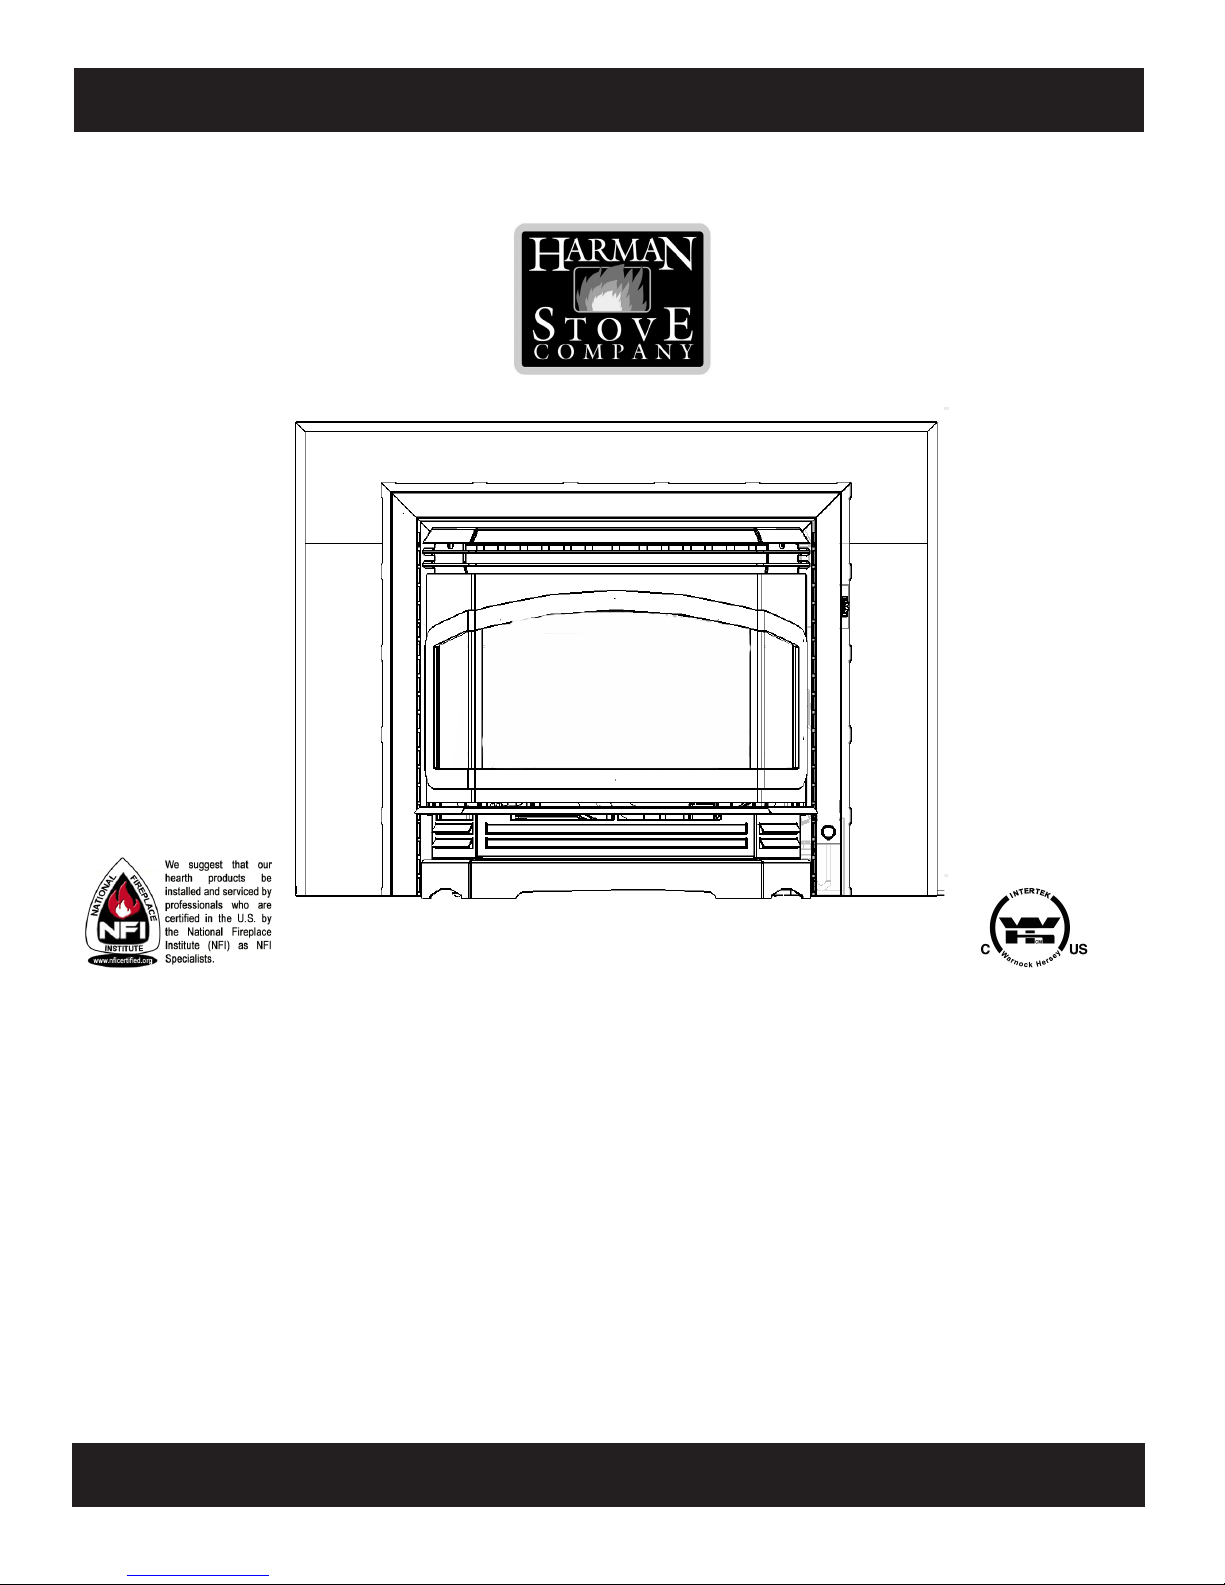
The Harman Clarity 828i Gas Fireplace Insert
“Ce manuel est disponible en Français sur demande”
SAFETY NOTICE
PLEASE READ THIS ENTIRE MANUAL BEFORE YOU INSTALL AND USE YOUR NEW ROOM HEATER. FAILURE
TO FOLLOW INSTRUCTIONS MAY RESULT IN PROPERTY
DAMAGE, BODILY INJURY, OR EVEN DEATH.
IF THIS HARMAN STOVE IS NOT PROPERLY
A HOUSE FIRE MAY RESULT. FOR YOUR SAFETY, FOLLOW
INSTALLATION DIRECTIONS.
CONTACT LOCAL BUILDING OR FIRE OFFICIALS ABOUT
RESTRICTIONS AND INSTALLATION INSPECTION
REQUIREMENTS IN YOUR AREA.
CONTACT YOUR LOCAL AUTHORITY (SUCH AS MUNICIPAL BUILDING DEPARTMENT, FIRE DEPARTMENT,
FIRE PREVENTION BUREAU, ETC.) TO DETERMINE THE
NEED FOR A PERMIT.
CETTE GUIDE D'UTILISATION EST DISPONIBLE EN
FRANCAIS. CHEZ VOTRE CONCESSIONNAIRE DE HARMAN STOVE COMPANY.
SAVE THESE INSTRUCTIONS.
INSTALLED,
R7
− FOR YOUR SAFETY: WHAT TO DO IF
YOU SMELL GAS
• Do not try to light any appliance.
• Open windows.
• Extinguish any open ame.
• Do not touch any electrical switch;
do not use any phone in your building.
Follow the gas supplier's instructions.
• If you can not reach your gas sup-
plier, call the re department.

TABLE OF CONTENTS
INTRODUCTION ...........................................................3
INSTALLATION .............................................................4
Clearances .................................................................4
Venting .......................................................................7
Test for Flue Spillage ................................................8
ASSEMBLY ..................................................................... 5
Connecting to a Gas Supply ...................................... 8
Connecting the Cordset and Thermostat ................... 9
Installing into a Fireplace ........................................10
Air Shutter Adjustment ............................................11
Monitoring the Gas Flame ....................................... 11
OPERATION .................................................................12
How to Light the Fire .............................................. 12
How to Turn Off the Fire ......................................... 12
MAINTENANCE .......................................................... 13
Removing the Glass .................................................13
Replacing the Gasket ............................................... 13
Inspecting the Venting ............................................. 13
Cleaning the Glass ................................................... 13
Convection Blower Service Access..........................14
Reference Pictures ...................................................15
APPENDIX A: FUEL CONVERSION .........................16
APPENDIX B: ALTITUDE DE-RATING ...................17
APPENDIX C: CHANGING ORIFICES ...................... 18
APPENDIX D: WIRING DIAGRAM ........................... 19
PARTS LIST & DRAWING................................ 20-21-22
SPECIFICATIONS .......................................................23
WARRANTY .................................................................24
Manufactured by:
Harman Stove Co.
352 Mountain House Road
Halifax, PA 17032
Tested by
Intertek Testing/Warncok Hersey
8431 Murphy Drive
Middleton, WI 53562
2

INTRODUCTION
The Harman Clarity 828I Vented Gas Fireplace
Insert is a listed, gas-red, vented room heater tested
by Intertek Testing Services/Warnock Hersey to ANSI
standard Z21.88-2002, CSA2.33-M02, and CAN/
CGA-2.17-M91.
The installation of the Clarity Fireplace Insert must
conform with local codes, or in the absence of local
codes, with National Fuel Gas Code, ANSI Z223.1
— latest edition (NFPA 54) and CAN 1 B1-149.1 and
.2 Gas Appliance Installation Code.
The Clarity Fireplace Insert is not for use in mobile
homes.
CAUTION: This appliance must be vented to the
outside.
Installation and repair of the Clarity Fireplace Insert
should be done by a qualied service person. The appliance should be inspected before use and at least
annually by a qualied service person. More frequent
cleaning may be required due to excessive lint from
carpeting, bedding material, etc. It is imperative that
control compartments, burners, and circulating air passageways of the appliance be kept clean. Any safety
screen or guard removed for servicing an appliance
must be replaced prior to operating the appliance.
When operating your Harman Clarity Fireplace In-
sert, respect basic safety standards.
Read these instructions carefully before you attempt
to operate the heater. Failure to do so may result in
damage to property or personal injury and may void
the product warranty.
Consult with your local building code agency and
insurance representative before you begin your installation to ensure compliance with local codes, including
the need for permits and follow-up inspections.
Observing required clearances to combustible materials, proper connection to an approved venting system,
and the accessibility of the gas and electrical supply
must all be considered when planning the installation
of the Clarity Fireplace Insert.
Adequate clearances around air openings to the combustion chamber and provisions for adequate combustion and ventilation air must be provided.
Install the Clarity Fireplace Insert only in a listed
solid-fuel burning factory-built replace or a masonry
solid-fuel burning replace. The Fireplace Insert and
vent should be enclosed when installed in, or when
passing through, a living area where children may
come in contact with it.
WARNING: If the information in this manual is not followed exactly, a re or explosion may
result causing property damage, personal injury or loss of life.
− FOR YOUR SAFETY
Do not store or use gasoline or other ammable vapors and liquids in the vicinity of this or
any other appliance.
Installation and service must be performed by a qualied installer, service agency, or the gas
supplier.
3
INSTALLATION
IMPORTANT NOTICE
Due to high temperatures, the Clarity 828I
Vented Gas Fireplace Insert should be located
out of trafc and away from furniture and
draperies.
Children and adults should be alerted to the
hazards of high surface temperatures and should
stay away to avoid burns or clothing ignition.
Young children should be carefully supervised
when they are in the same room as the Clarity
828I Fireplace Insert.
Clothing or other ammable materials should
not be placed on or near the Clarity 828I
Fireplace Insert.
Suveiller les enfants. Garder les vêtements, les
meubles, l'essence ou autres liquides à vapeur
inammables lin de l'appareil.
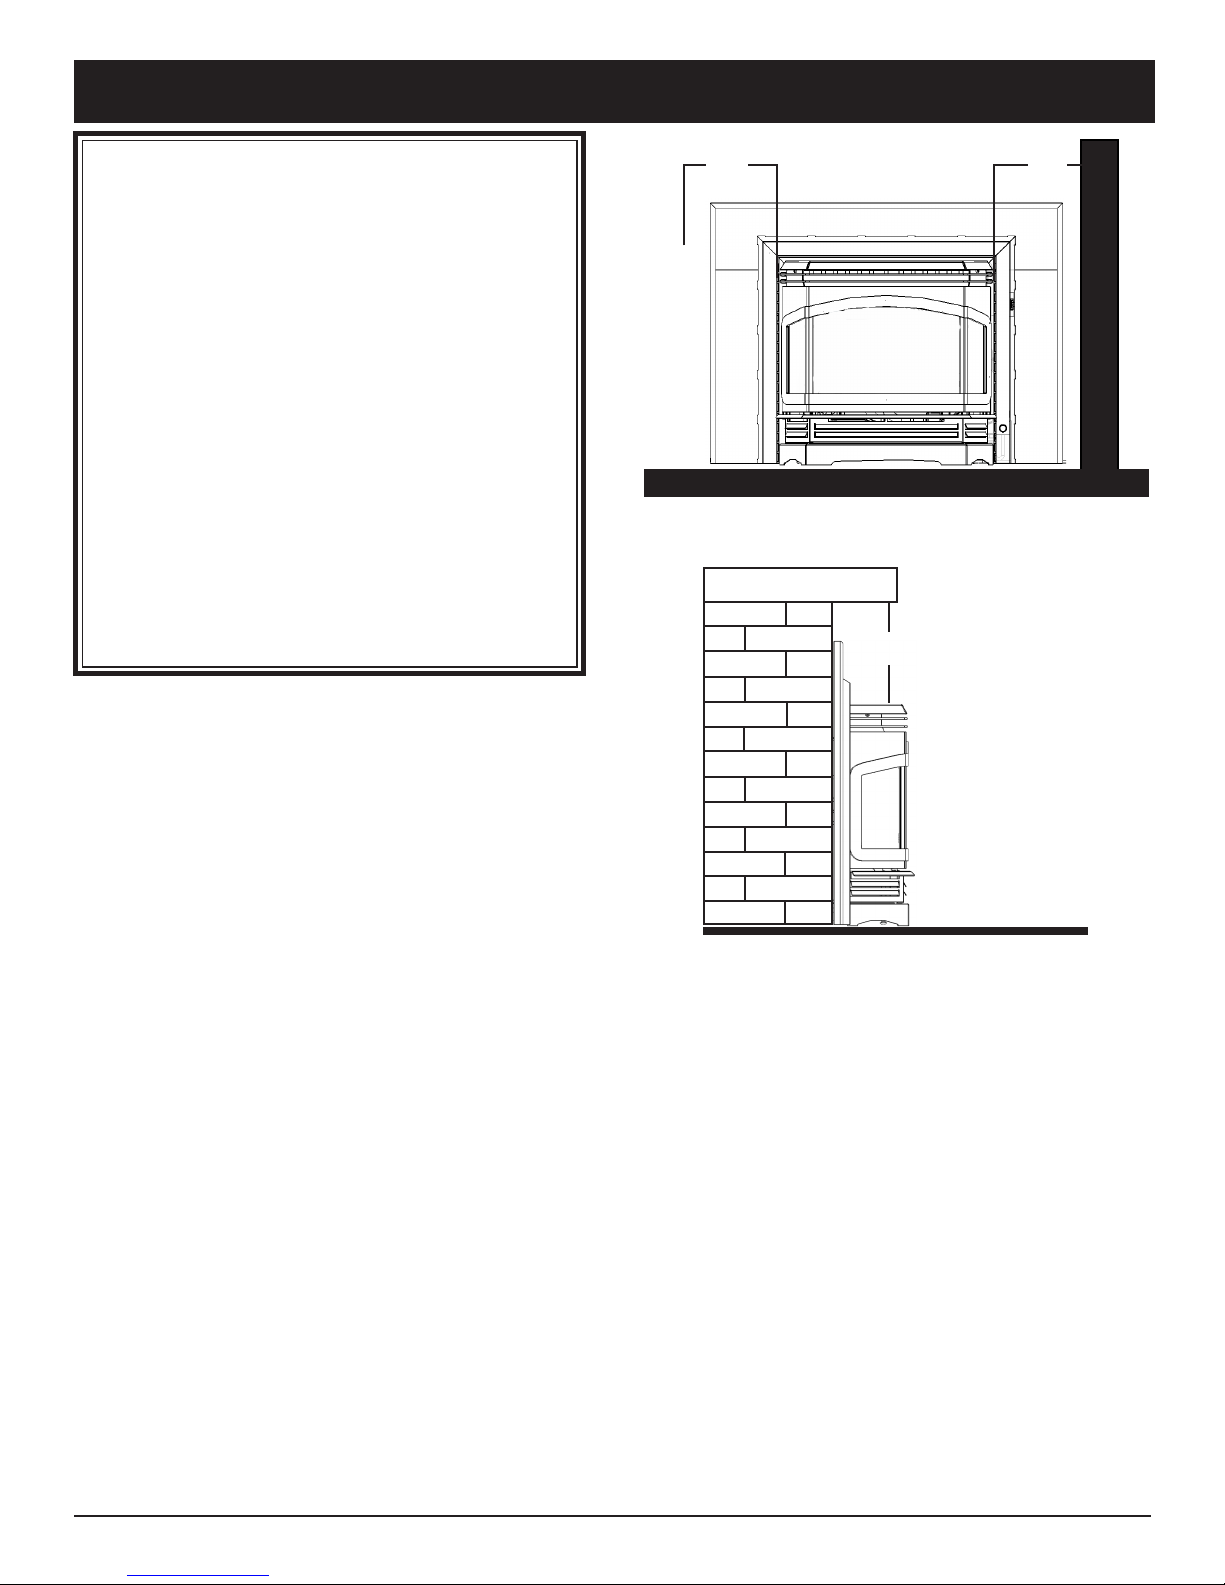
CLEARANCES
The following clearances to combustibles must be
observed:
10"
Clearance from unit to sidewall or combustible trim.
12"
10"
WALL
Unit to sidewall or
combustible trim ..........................10" (254 mm)
Unit to mantel and
combustible trim, unprotected ...12" (305 mm)
In addition to these clearances, adequate accessibility clearance for servicing and proper operation
must be maintained.
Do not, in any way, obstruct the combustion air
inlets that are located on the front of the heater.
Clearance from top of unit to mantel
and combustible trim, unprotected
4
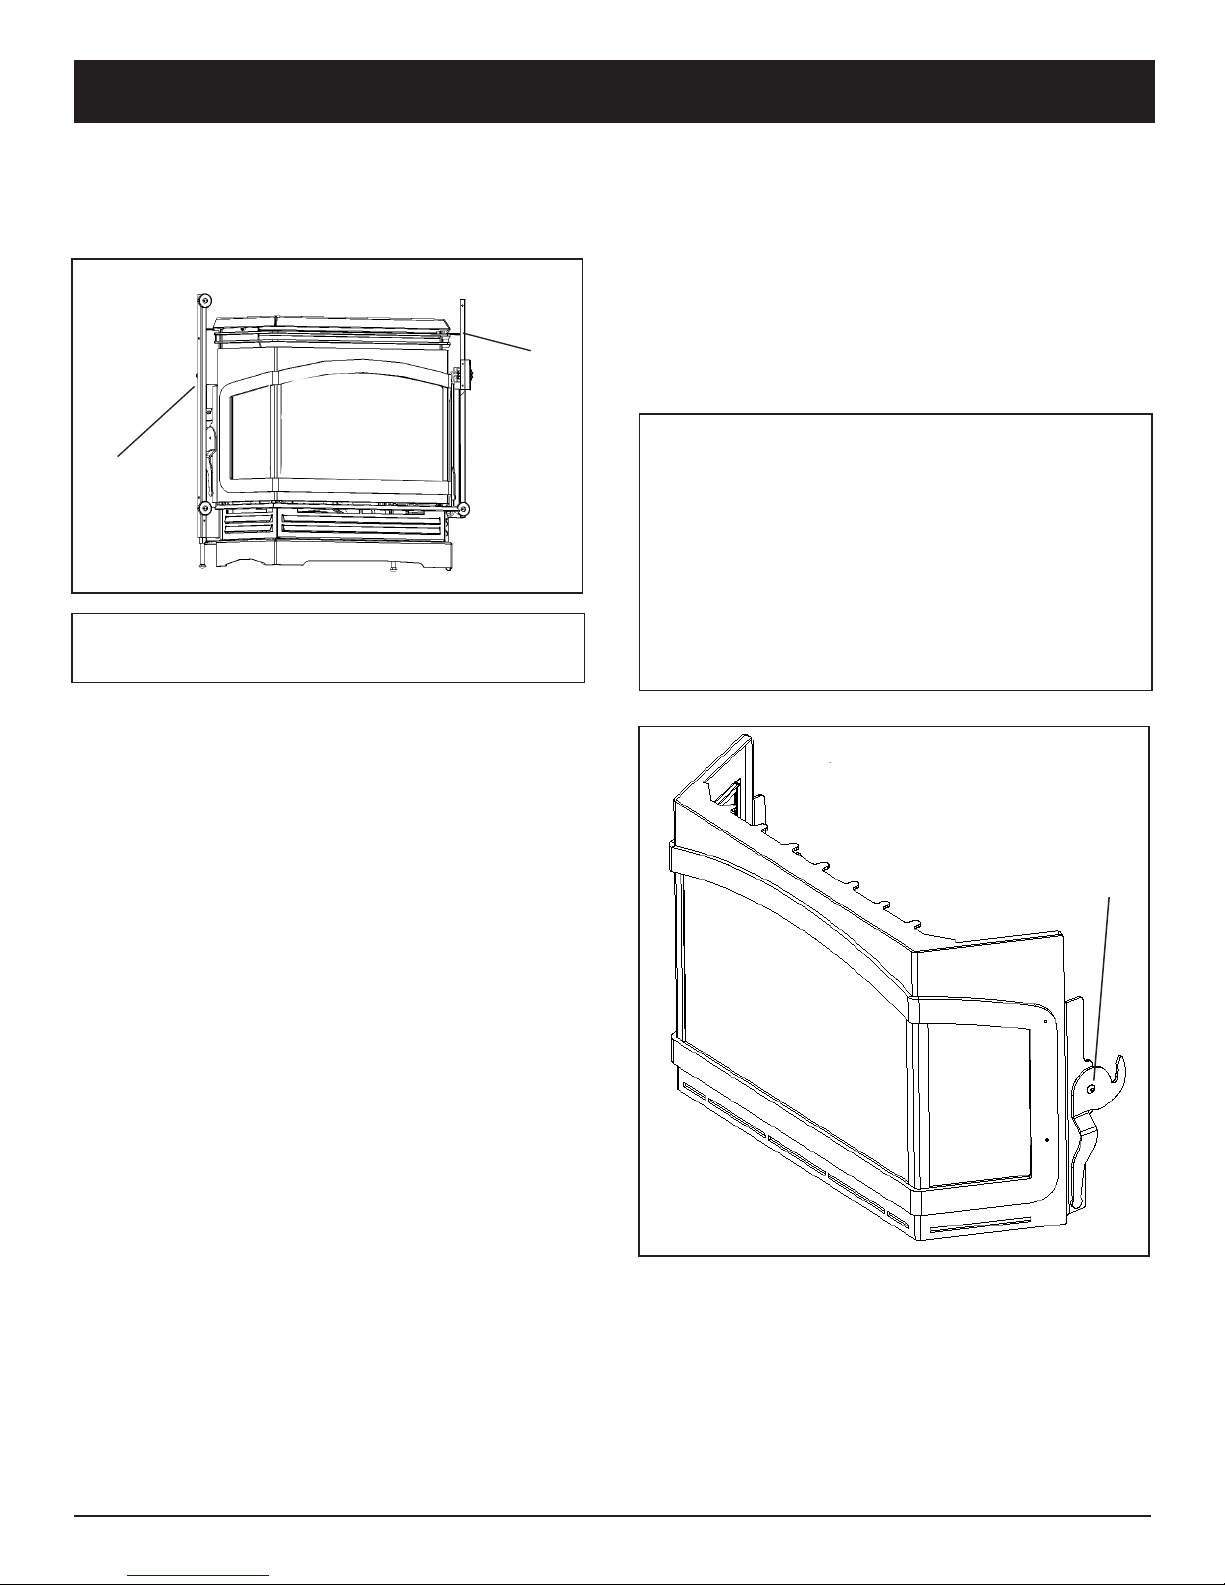
ASSEMBLY
The Clarity 828I Fireplace Insert comes with the
log set packed inside the rebox. The three trim
panels and two wing brackets are packed together in
a separate carton.
Right
Wing
Bracket
Left
Wing
Bracket
NOTE: The wing brackets must go on before
the door.
A second shipping carton contains the wing panels.
Two different size wing panel sets are available for
the Clarity Insert: large (32-1/2" X 44"), and small
(30" X 40"). The set that will work best with the
replace opening should be used. The wing panels
may be trimmed to t inside the replace opening if
a ush look is desired.
Before the unit is installed, all components should
be unpacked. The cross log must be removed, the
packing material taken out, and then re-installed.
The Clarity 828I is shipped from the factory
equipped to burn propane. If Natural Gas is to be
used, conversion kit # 1-00-09009 must be installed
at this time as well. See the fuel conversion instructions in Appendix A on page 16.
Removing the Glass door
NOTE: The glass door is heavy. Be prepared for
its weight when lifting it to avoid damage during
removal.
Locate latches on each side of the glass door. Then,
grasp each latch handle and pull forward until the
front is disengaged. Lift the glass door slightly and
remove it from the stove. Set the glass door aside in
a safe place where it will not be damaged.
WARNING: Do not abuse the glass on the
Clarity Fireplace Insert front by striking, slamming, or similar trauma. Do not operate this
Fireplace Insert with the glass panel removed,
cracked or broken. Use only glass supplied by
Harman and approved for use with this heater.
Do not use substitute materials. Replacement
of the panel should be done by a licensed or
qualied service person.
Latch
5
ASSEMBLY
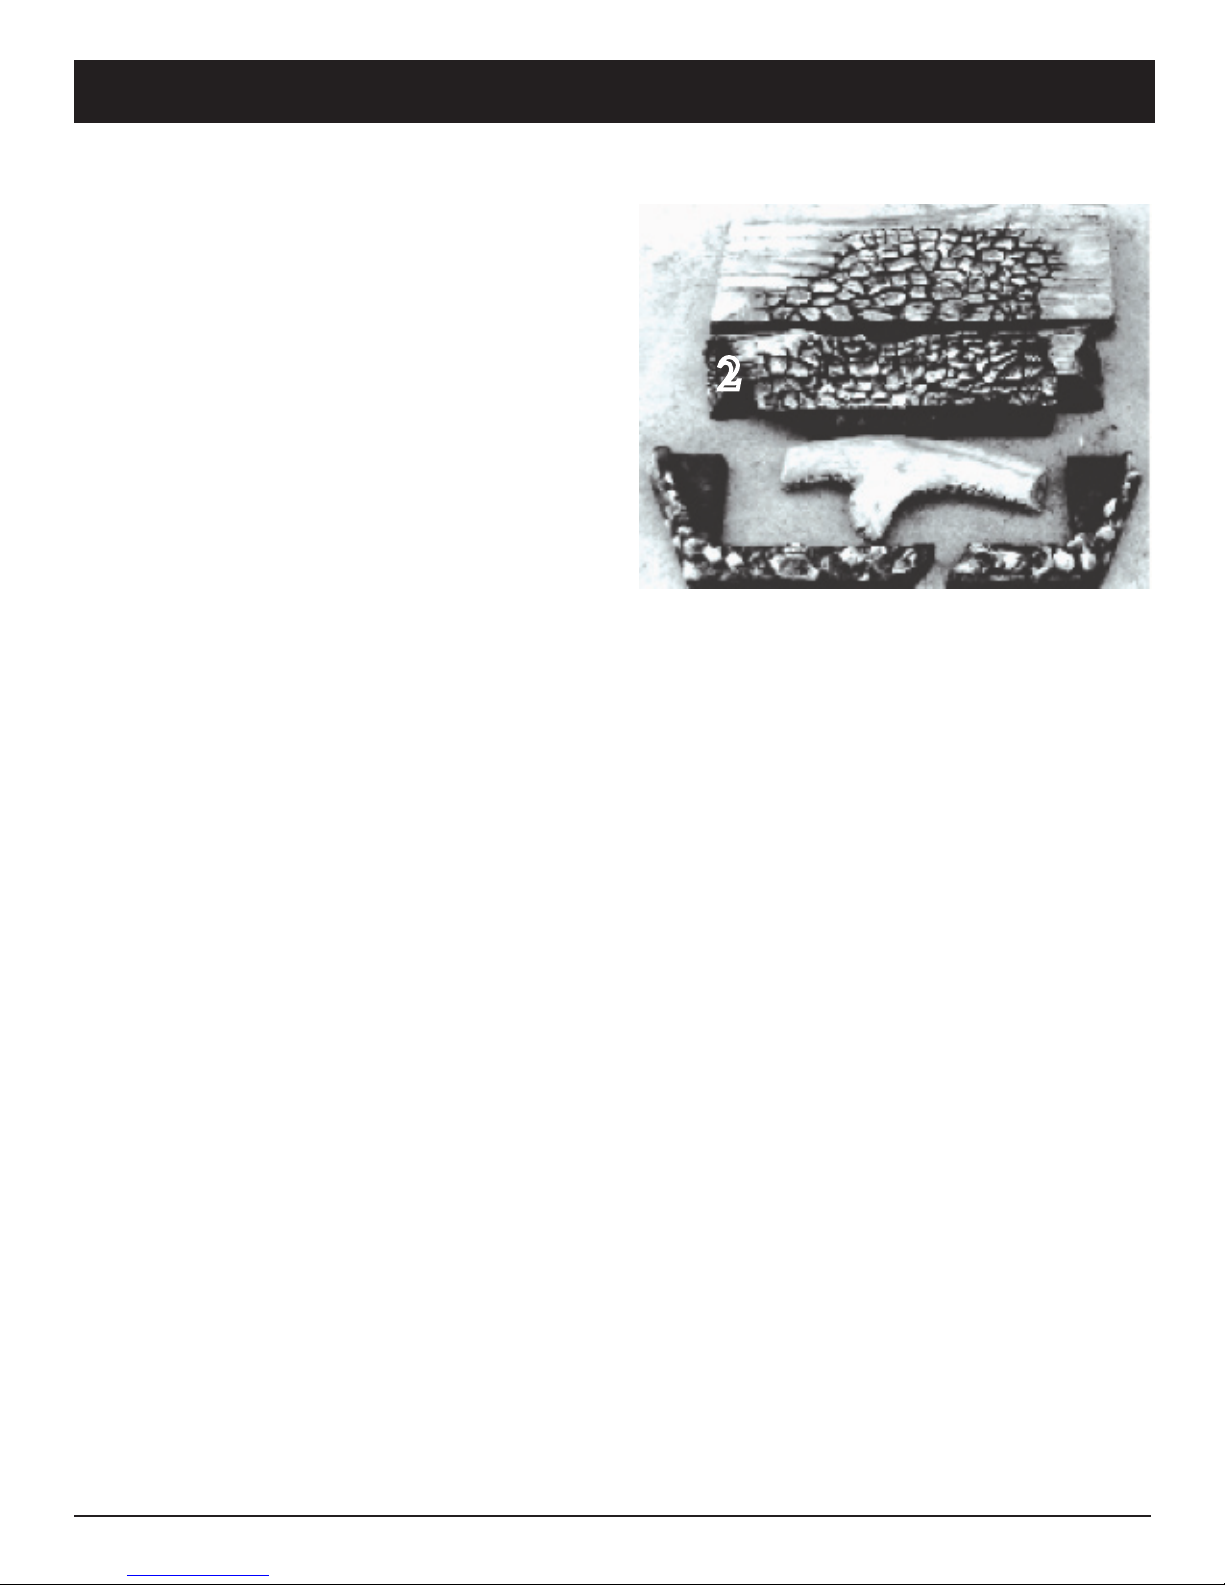
Removing and Replacing logs
The log set consists of a back log (1), a center
log that has a pilot-viewing port in the left end (2),
2-piece ember strip (3), and a cross log that rests on
top (4).
Remove the cross log, the center log, and the em-
ber strips, in that order. To remove the rear log, rst
pull the fuel system module forward about an inch,
to create clearance, then lift the log out.
Re-install the logs in the same order that they were
removed. Place the rear log in position rst, centered
and pushed snugly against the back wall, and slide
the fuel system module back into position.
Re-install the ember strips so that they rest against
the front of the rebox. Guide them toward you and
to the outside until they t snugly. Check the air slot
inside from the ember strips to conrm that they do
not obstruct it.
Install the center log so that it goes all the way to
the back and is centered. When properly positioned,
there should be an even gap along the front of the
center burner in the cavity in the log. A small portion
of the log support frame will be revealed. The center
log has a round viewing port in the left end through
which the pilot can be observed.
Install the cross log, making sure that it is oriented
with the forked end toward the left rear of the stove,
and slip it over the front locator pin.
3
2
1
4
3
Re-install and Secure the Glass door
NOTE: The glass door is heavy. Lift it carefully to prevent damage. Center the glass on the
opening and suspend it in place by placing the
tab hooks over the top edge of the opening. Press
the glass slightly against the stove to conrm
that it seats properly, then press it rmly against
the front while pushing the levers to the rear to
engage them.
6

Installation
INSTALLATION
PRELIMINARY STEPS TO PREPARE FOR
THE INSTALLATION OF THE CLARITY FIREPLACE INSERT
Remove the chimney cap if one exists so that the ue
may be cleaned and the venting installed.
Remove any existing hearth accessories such as glass
doors, spark screens, andirons, and grates.
Clean the chimney thoroughly to remove ash, soot,
and any obstructions, and then clean ash, soot, dust,
and debris from the replace.
The damper must be locked open to allow the 4"
venting to pass through. If it is necessary to modify
the damper area to allow passage of the venting, the
modications should be allowed under local codes.
Conrm any planned changes with local building ofcials.
Use Only Approved Venting
The Clarity 828I Vented Gas Fireplace Insert is
tested and listed for connection to a 4" (100 mm)
listed Class B venting system.
If the unit is installed to vent through an approved
masonry chimney or a factory-built chimney system,
a listed lining system approved for use with gas-red
appliances must be used.
Observe local codes when venting the Clarity. If
no local codes exist, follow the current edition of
ANSI Z223.1 and CAN1- B149 installation codes.
Do not connect the venting to the ue of a chimney
that serves a separate solid-fuel burning appliance.
The venting manufacturer's installation instructions must be followed exactly.
The Clarity Fireplace Insert is equipped with its
own integral draft hood so no additional draft hood
is required. The heater should be installed so that the
draft hood is in the same atmospheric pressure zone
as the air inlets to the heater.
The most efcient venting systems are those that
have a minimum number of bends and minimal horizontal runs.
The Clarity Fireplace Insert is equipped with a
thermally activated vent safety switch which will
shut down the main burner if the heater is not venting
properly. The safety switch will automatically reset
after the heater has cooled down.
The switch will continue to cycle off and on until
the venting problem is corrected. If you are unable to
correct the venting problem, seek expert advice from
your Harman dealer or installer.
DO NOT DISCONNECT OR BYPASS THE
VENT SAFETY SWITCH.
WARNING: Operation of this heater when
not connected to a properly installed and main-
tained venting system or tampering with the
vent safety shutoff system can result in carbon
monoxide (CO) poisoning and possible death.
IMPORTANT: Because of the high efciency
and low ue gas temperatures of this appliance, it
is important that it be connected to a well-sealed
and efcient venting system which is capable of
registering a negative pressure while the stove is
in operation.
7
INSTALLATION
Test for Flue Spillage
A spillage test should always be made at the
completion of the installation, and at least annually
thereafter.
1. Start all exhaust fans in the home and then close
all doors and windows in the room containing the
heater.
2. Light the heater and allow it to run for 5 minutes
on the high output setting. The convection air blower
should be turned off for the test.
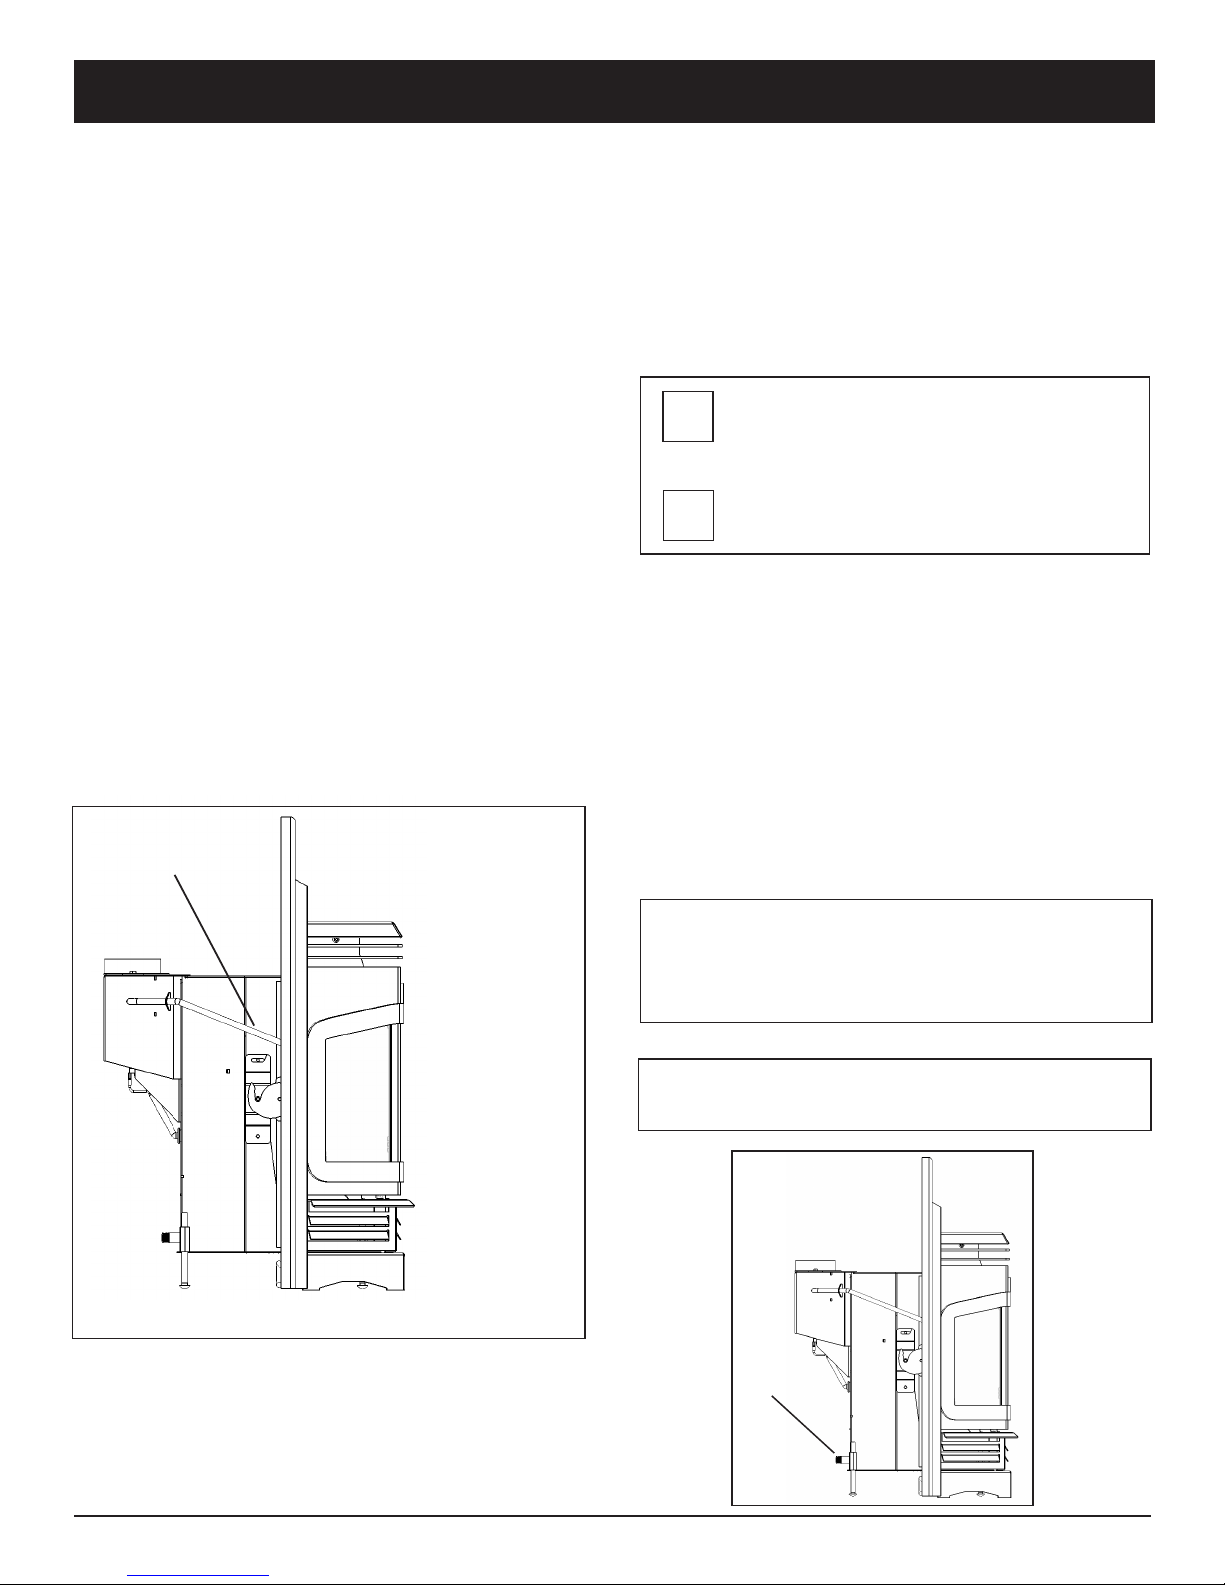
3. Remove the left trim panel, which is held in
place by a clip at the bottom and a magnet at the
top, and place a source of smoke (such as a match,
lighter, or a cigarette) in front of the ue spillage test
tube.
The smoke should be drawn into the tube. If it is
not, let the heater run for 5 more minutes and repeat
the test.
4. If the smoke is not drawn into the tube, turn off
the heater and determine why there is no draft. If
necessary, seek expert advice.
For sites with swirling or turbulent wind condi-
tions, a wind cap may solve the problem.
Draft Test Tube
Connecting the Clarity 828I Fireplace Insert to a Gas Supply.
Burn Only the Fuel for Which the Heater is Equipped.
The Clarity Fireplace Insert will burn either
natural gas or propane, but requires a conversion if
Natural Gas is to be burned. The label on the burner
system module indicates the fuel for which it is
equipped. The Prpoer box must be marked upon
installation or conversion.
NATURAL
PROPANE
Making The Connection
The gas inlet is located at the bottom right rear of the
Insert. The inlet tting is a 1/2" male pipe thread.
A separate gas shut-off valve and a 1/8" N.P.T. plugged
tapping should be installed immediately upstream of the
connection to the appliance.
The Clarity Fireplace Insert must be disconnected from
the gas supply piping during any pressure testing of that
system at pressures in excess of 1/2 psig (3.5 kPa).
The Clarity gas control valve must be in the OFF position during any pressure testing of the gas supply system
at pressures equal to or less than 1/2 psig (3.5 kPa).
Remove Left
Wing Cover to
Expose Draft
Test Tube.
WARNING: To avoid pipe compounds from
entering into the gas train, apply compounds
only to the male pipe threads and not to the
rst two threads.
CAUTION: TEST ALL PIPE JOINTS FOR
LEAKS BEFORE OPERATING
Inlet
8
 Loading...