


CONTENTS-----------------------------------------------------------------------------------------------------------------------------------
3SET-UP AND SAFETY
4GENERAL INFORMATION
4Special features of your television
4Receiving digital stations
4What is Common Interface?
25CONVENIENCE FUNCTIONS
26PARENTAL CONTROL
27TIMER FUNCTIONS
29 USB-MODE
5 |
CONNECTION/PREPARATION |
29 |
The file formats |
|
5 |
Connecting the antenna and the mains |
29 |
Connecting external data media |
|
|
cable |
30 |
The file browser |
|
6 |
Inserting batteries in the remote control |
30 |
Settings in the USB setup menu |
|
7 |
OVERVIEW |
30 |
Playback – Basic functions |
|
31 |
Additional playback functions |
|||
7 |
Connections and controls on the television |
32 |
USING EXTERNAL DEVICES |
|
|
set |
32 |
High definition – HD ready |
|
8 |
The remote control - main functions |
|||
9 |
The remote control - all functions |
32 |
Connection options |
|
10 |
SETTINGS |
33 |
Connecting an external device |
|
34 |
Headphones |
|||
10 |
Searching for television stations |
35 |
Connecting a PC |
|
11 |
Changing stored channels for digital sta- |
36 |
Inserting the CA module |
|
|
tions |
36 |
Access control for CA module and smart |
|
12 |
Picture settings |
|
card |
|
13 |
Audio settings |
37 |
SPECIAL SETTINGS |
|
15 |
TELEVISION OPERATION |
|||
37 |
Tuning digital television stations |
|||
15 |
Basic functions |
39 |
Tuning analogue television stations |
|
16 |
Zoom function |
40 |
Changing stored channels for analogue |
|
16 |
Zapping function |
|
stations |
|
16 |
Electronic TV guide |
42 |
INFORMATION |
|
17 |
Changing the picture format |
|||
42 |
Displaying signal information |
|||
18 |
USB RECORDING |
|||
42 |
Updating software |
|||
18 |
Connecting external data media |
42 |
Technical data |
|
18 |
Settings for PVR mode |
43 |
Service information for dealers |
|
20 |
Time shift – pausing programmes |
43 |
Environmental note |
|
20 |
Recording |
44 |
Troubleshooting |
|
21 |
Setting programmes for recording |
45 |
Additional Information for units sold in the |
|
22 |
Playback |
|
UK. |
23Sorting or deleting programmes in the recording list
24TELETEXT MODE
24 TOP text or FLOF text mode
24 Normal text mode
24 Additional functions
2 ENGLISH

SET-UP AND SAFETY------------------------------------------------------------------------------------------------
Please note the following information when setting up your television set.
7This television set is designed to receive and display video and audio signals.
Any other use is expressly prohibited.
7The ideal viewing distance is 5 times the screen diagonal.
7External light falling on the screen impairs picture quality.
7To assure sufficient ventilation make sure there is enough space around it in the wall unit.
7The television set is designed for use in dry rooms. If you do use it in the open, please ensure that it is protected from moisture, such as rain or splashing water.
7Do not expose the television set to any moisture. Do not place any vessels such as vases on the television, as they may spill liquid, thus presenting a safety risk.
7Place the television set on a solid, level surface. Do not place any objects such as newspapers on the television set or cloth or similar items beneath it.
7Heat build-up can be dangerous and shortens the operating life of the television set. For reasons of safety, have a specialist remove any dirt deposits in the set from time to time.
7Do not place the television set close to heating units or in direct sunlight, as this will impair cooling.
7Do not open the television set under any circumstances. Warranty claims are excluded for damage resulting from improper handling.
7Make sure the power cord or the power supply unit (if provided) are not damaged.
7The television set may only be operated with the mains cable/adapter supplied.
7Thunderstorms are a danger to all electrical devices. Even if the
television set is switched off, it can be damaged by a lightning strike to the mains or the antenna cable. Always disconnect the mains and antenna plugs during a storm.
7Clean the screen with a soft, damp cloth. Only use plain water.
7Clean the cabinet of your LCD television with the enclosed cloth. Only use plain water.
7Please note when deciding where to put the device that furniture surfaces are covered by various types of lacquer and plastic, most of which contain chemical additives. These may cause corrosion to the feet of the device, thus resulting in stains on the surface of the furniture which can be difficult or impossible to remove.
7The screen of your LCD television meets the highest quality standards and has been checked for pixel faults.
7Despite the great care taken in manufacturing, technological reasons make it impossible to completely discount the possibility that some pixels may be faulty.
7Provided they are within the thresholds specified by the DIN norm, pixel faults of this kind cannot be regarded as a defect as defined by the warranty.
7To prevent the spread of fire, keep candles or other open flames away from this product at all times.
7Do not connect any other equipment while the device is switched on. Switch off the other equipment as well before connecting it.
7Only plug the device into the mains socket after you have connected the external devices and the antenna.
7Make sure the power plug is freely accessible.
Caution:
7If you want to use a wall bracket for your television, make sure you read the assembly instructions for the wall bracket carefully or have your specialist dealer mount it for you.
7When buying the wall bracket, make sure that all the fastening points needed on the television are there on the wall bracket and that they are all used when it is mounted.
ENGLISH 3

GENERAL INFORMATION---------------------------------------------------------------------------
Special features of your television
Your television set enables you to receive and watch digital stations (via DVB-T and DVB-C), including in High Definition (HD).
At present, reception for these digital television stations in High Definition is only possible in some countries in Europe.
Although this television meets the current DVB-T and DVB-C standards as of August 2009, its compatibility with future DVB-T digital terrestrial broadcasts and DVB-C digital cable broadcasts is not guaranteed.
This television can receive and process all analogue and all unencrypted digital stations. This television set has an integrated digital and analogue receiver. The digital receiver unit converts the signals from digital stations to provide outstanding audio and picture quality.
The TV guide (only for digital stations) tells you of any schedule changes at short notice, and provides an overview of all the stations’ schedules for the next few days.
Detailed information on the individual stations
– if it is provided by the broadcaster – is also available in the electronic programme guide.
You can connect various data media, for example, an external hard drive, a USB memory stick or a digital camera to the USB socket. Using the file browser, you can then select and play the file formats you want (for example, MP4, MP3 or JPEG data).
You can record your personal choice of broadcasts.
The digital stations are converted by the television set and can be on the built-in USB external data media (for example, an external hard drive and USB memory stick).
Function Time Shift is a special technical feature. During playback from the USB external data media you can press a button on the remote control to simply pause the the broadcasts you are watching and resume it again at a later time.
During a recording in progress, you can selected a different broadcasts from the archive and watch that.
Receiving digital stations
To receive digital stations (DVB-T) you need a digital rooftop or indoor antenna (passive or active indoor antenna with its own power supply).
The antenna cable of the cable TV network that boardcast in DVB-C must be plugged into TV in order to receive the DVB-C boardcasts.
Unlike analogue broadcasting, not every station has its own transmission frequency. Instead, several stations are grouped into what are known as bouquets on a regional or national level.
You can find the current transmission information on teletext from various broadcasters, or look in a TV guide or on the Internet.
What is Common Interface?
Common Interface (CI) is an interface for DVB receivers.
Encoded stations can only be viewed with a CA module suitable for the encoding system and the corresponding smart card.
The television set is equipped with a Common Interface slot into which CA modules from various providers can be inserted.
You can insert the provider’s smart card into the CA module in order to enable the encrypted stations you want to see.
4 ENGLISH

CONNECTION/PREPARATION----------------------------------------------------------
Connecting the antenna and the mains cable
3 |
2 |
1 |
1For terrestrial digital stations (DVB-T) plug the cable of the rooftop, indoor antenna (passive or active indoor antenna with its own power supply) into the antenna socket »ANT IN« on the television set;
or
for digital stations of the cable TV network (DVB-C) plug the antenna cable into the antenna socket »ANT IN« on the television set; or
for analogue stations plug the antenna cable into the antenna socket »ANT IN« on the television set.
Note:
7When connecting an indoor antenna you may have to try it out at different positions until you get the best reception.
2Plug the mains cable supplied into the »AC IN« mains socket of the television.
3Plug the mains cable into the wall socket.
Note:
7Only plug the device into the mains socket after you have connected the external devices and the antenna.
7Only connect the television using the power cord supplied to a suitable earthed safety socket.
7Do not use an adapter plug or extension lead which does not meet the applicable safety standards. Do not tamper with the power cord.
ENGLISH 5

CONNECTION/PREPARATION----------------------------------------------------------
Inserting batteries in the remote control
1Open the battery compartment by removing the lid.
2Insert the batteries (2 x 1.5 V micro for example R03 or AAA). Observe the polarity (marked on the base of the battery compartment).
3Close the battery compartment.
Note:
7If the television no longer reacts properly to remotecontrolcommands,thebatteriesmay be flat. Be sure to remove used batteries.
7 The manufacturer accepts no liability for damage resulting from used batteries.
Environmental note
7Batteries, including those which contain no heavy metal, may not be disposed of with household waste. Please dispose of used batteries in an environmentally sound manner. Find out about the legal regulations which apply in your area.
6 ENGLISH
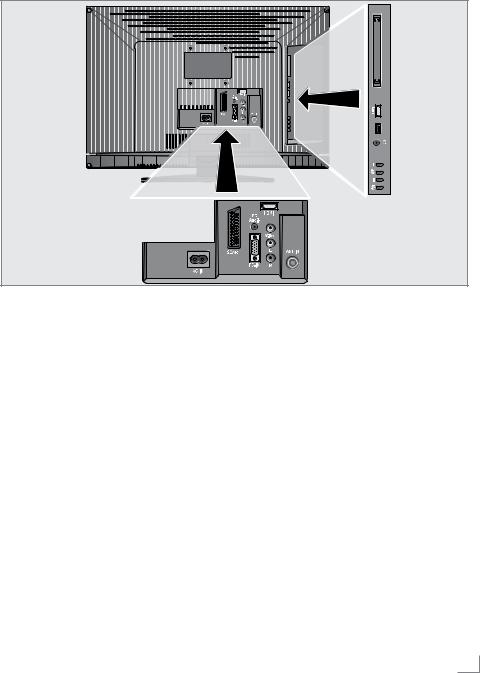
OVERVIEW----------------------------------------------------------------------------------------------------------------------------------
Connections and controls on the television set
AC IN Power cord socket.
SCART SCART socket (FBAS signal, RGB signal).
PC-IN VGA socket, video input for PC. PC Audio Audio input for PC.
L R |
Audio input for camcorder. |
Video |
Video input for camcorder. |
HDMI1 |
HDMI socket, audio/video input |
|
(HDMI). |
ANT IN |
Antenna socket. |
8Switches the television on from standby and back into standby mode.
-Increases the volume; station selection up.
V/P |
Pre-selection for volume or station. |
|
Switches the television on from |
|
standby. |
+Decreases the volume; station selection down.
UHeadphone connection (3.5 mm ø jack).
USB |
USB socket for external data |
|
media and PVR function. |
HDMI2 |
HDMI socket, audio/video input |
|
(HDMI). |
CI |
Common Interface slot. |
ENGLISH 7

OVERVIEW----------------------------------------------------------------------------------------------------------------------------------
The remote control - main functions
Sound on/off (mute). 

Switch the television on  from standby mode.
 Select stations directly.
Switches between picture formats.
Adjust the volume.
Switches the television on 

 from standby and back
into standby mode.

 Zapping function

 Opens the pre-selection
for AV channels and the
USB input. Then select
with »q« or »w« and confirm using »OK«.
Opens the menu.
Switches between teletext 
 mode, mixed mode and TV
mode.
|
Cursor control |
|
|
|
q w |
Move the cursor up and down |
|
|
|
|
in the menu. |
|
r e |
Move the cursor left/right in the |
|
|
|
|
menu. |
|
OK |
Opens the channel list; |
|
|
|
|
activates various functions. |
|
8 ENGLISH |
|
|
|
|
||
|
|
|
|
Switch the television on from standby mode; select channels in steps.

OVERVIEW----------------------------------------------------------------------------------------------------------------------------------
The remote control - all functions
16:9 |
Selects the split screen function |
|
in teletext mode. |
0 FAV |
Opens the channel list favou- |
|
rites. |
 REPEAT Selects subpages in teletext mode;
selects the repeat function in the file browser.
EPG/A-B Opens the electronic TV guide. Reveals answers in teletext mode.
repeats a selection of a recorded programme.
OK |
Opens the channel list; |
|
activates various functions. |
|
DOUBLE Enlarges the picture; |
|
switches to double character |
|
size in teletext mode. |
|
Switches back one menu level. |
iDisplays the number and name of a station as well as station information.
●(red) 8! Selects a page in teletext mode; starts playback in the file browser and switches to playback pause.
Start playback in the file browser;
●(green) EE Selects a page in teletext mode; starts the reverse picture search in the file browser.
●(yellow) 7 Freeze-frame;
selects a page in teletext mode; ends playback in the file browser.
ends recording or playback in the PVR mode.
time shift during live signal (in digital TV operation, only via external data media).
● (blue) W
TXT XY
Selects a page in teletext mode; starts the forward picture search in the file browser.
Opens the recorded list.
Selects the next track/the next picture in the file browser.
Page hold in teletext mode; selects the previous track/ the previous picture in the file browser.
Starts recording (in digital TV operation, recording only via external data media).
Selects different subtitles (in digital TV mode).
Selects different languages (in digital TV mode).
ENGLISH 9

SETTINGS----------------------------------------------------------------------------------------------------------------------------------------
Searching for television stations
The television has an automatic tuning function, which first searches for digital TV channels and then analogue ones.
You start the search and can then sort the television stations into your order of preference.
There are 550 presets for digital channels and 99 for analogue channels, to which you can assign TV stations from the antenna or from the cable connection (analogue channels).
1Press »POWER«, »1…0« or »P+« or »P–« to switch on the television from standby mode.
–The»Installation Guide« menu appears when the device is first switched on.
Installation Guide
Language Settings |
English |
Active Antenna Power |
Off |
Auto Tuning |
S |
Select |
Exit |
2Press »r« or »e« to select the language.
Help:
7If the »Installation Guide«menu does not appear on the screen, make the setting by following the instructions on returning the television to its factory condition on page 25.
Note
7 The antenna power supply may only be switched on if the antenna is actually an active indoor antenna with a signal amplifier and it is not already supplied with a voltage via a mains plug (or similar supply).
7Otherwiseyoumaycauseashortcircuitand irreparably damage your antenna.
3Select the »Active Antenna Power« with »q« or »w«.
Press »r« or »e« to switch on the antenna voltage »On« (Only DVBT Channels).
4Select »Auto Tuning« with »q« or »w« and confirm with »OK«.
– »Country Selection« is active.
5 Press »r« or »e« to select the country.
6Select the »Scan Type« with »q« or »w«. Press »r« or »e« to select whether you want to search for only digital television stations (DTV), only analogue television stations (ATV) or both (ATV & DTV).
7Select »Time zone« with »q« or »w«. Press »r« or »e« to select time zone.
8Select »TV Connection Type« with »q« or »w«. Press »r« or »e« to set the required connection type:
–»Antenna« to search for terrestrial TV channels (DVB-T);
Help:
7If you select »Cable« the screen for selecting the scan type appears. See Tuning all digital television stations with cable connection on page 37.
9Press »OK« to start the search for terrestrial TV channels.
–The »Searching...« menu appears, and the search for TV stations begins. This may take several minutes depending on the number of television stations received.
–The search is ended when the »Programme Table« appears.
Note:
7The search can be ended prematurely with »M«.
10 ENGLISH

SETTINGS----------------------------------------------------------------------------------------------------------------------------------------
Changing stored channels for digital stations
You can change the order of the channels found as required, delete channels you do not need and block access to certain presets (parental control).
Press »●« (blue) to switch between »Programme Table – ALL TYPE«, »Programme Table – DTV«, »Programme Table – RADIO« and »Programme Table – ATV«.
Press »●« (red) to display the channels assigned to a network.
Press »P+« to switch the channel list to the next page, press »P–« to switch it back to the previous page.
Opening the channel list
1Open the menu with »M«.
– The »PICTURE« menu is displayed.
2Select the »CHANNEL SETUP« menu with »r« or »e«.
3Select »Programme Table« with »q« or »w« and confirm with »OK«.
– The »Programme Table« menu is displayed.
Programme Table
Service Type |
ALL TYPE |
|
|
Network |
All Networks |
|
|
CHANNEL SETUP |
CA FAV1 FAV2 FAV3 FAV4 |
- D |
|
DTV |
1 Das Erste |
|
|
DTV |
2 ZDF |
|
|
DTV |
3 RTL Television |
|
|
DTV |
4 SAT.1 |
|
|
DTV |
5 ProSieben |
New position |
|
DTV |
6 VOX |
|
|
DTV |
7 RTL2 |
|
|
DTV |
8 kabel eins |
|
|
DTV |
9 Super RTL |
|
|
|
Select |
0 - 9 New position |
Back |
|
|
Exit |
|
|
|
|
|
Moving channels to different presets
1In the »Programme Table« menu, press »q« or »w« to select the channel to be moved.
2 Press »●« (green) to highlight the channel.
3Enter the new presets with one, two or three digits using »1…0«.
4Press »OK« to confirm the entry.
Notes:
7To sort the other television channels, repeat steps 1 to 4.
7 Stations that are assigned to fixed preset numbers (such as French stations with LCN coding) cannot be moved.
Creating a list of favourites
You can select your favourite channels and save them in up to four lists (FAV1 to FAV4).
1In the »Programme Table« menu, select the television channel with »q« or »w«.
2“Push” the television channel with »r« or »e« into the favourites list 1 to 4 and save it with »OK«.
–The position in the favourites list is marked with » «.
–You can enter the same channel in more than one favourites list.
Note:
7You can delete channels from the favourites list. Press »q« or »w« and »r« or »e« to select the channel and »OK« to delete it.
Deleting channels
1In the »Programme Table« menu, press »q« or »w« to select the channel to be deleted and press »●« (yellow) to confirm.
2Press »●« (green) to confirm the deletion.
Notes:
7 Press »●« (red) to delete all the channels.
7Presets whose channels have been deleted are no longer shown in the »Programme Table«.
ENGLISH 11
SETTINGS----------------------------------------------------------------------------------------------------------------------------------------
Skipping television stations
You can highlight television stations to be skipped when you select with »P+« or »P–«. It is still possible to select using the number buttons.
1In the »Programme Table« menu, select the television channel with »q« or »w«.
2Press »e« to switch to the »-« symbol and press »OK« to highlight the television channel.
– The channel is marked with »-«.
Note:
7Channels can be enabled again. Press »q« or »w« to select the channel, press »e« to switch to the symbol »-« and press »OK« to enable the channel again.
Ending the settings
1 Press »M« to finish the settings.
Picture settings
1Open the menu with »M«.
– The »PICTURE« menu is displayed.
PICTURE
Picture Mode |
|
Vivid |
|
Brightness |
●●●●●●●● |
45 |
|
Contrast |
●●●●●●●● |
88 |
|
Colour |
●●●●●●●●●● |
55 |
|
Sharpness |
●●●●●●●●● |
50 |
|
Colour Temperature |
Medium |
|
|
Back
Select
 Exit
Exit
2Select »Picture Mode«, »Brightness«, »Contrast«, »Colour«, »Sharpness« or »Colour Temperature« with »q« or »w«.
Select the value with »r« or »e« and confirm with »OK«.
Notes:
7Other settings can be found on the second page of the »PICTURE« menu.
3Switch to the second menu page with »q« and confirm »Advanced Picture Settings« with »OK«.
4Select »DNR«, »MPEG NR.«, »Vibrant colour«, »Perfect Clear«, »Dynamic Contrast«, »Dynamic Backlight« or »Backlight« with »q« or »w«.
Select the value with »r« or »e« and confirm with »OK«.
Notes:
7To switch to the first page of the »PICTURE« menu, press » «.
«.
7»Dynamic Contrast« (backlighting adjusts according to the picture content to ensure optimum contrast).
7You can only select the »MPEG NR.« function on digital and AV presets.
12 ENGLISH

SETTINGS----------------------------------------------------------------------------------------------------------------------------------------
7»MPEG NR.« reduces any interference from artefacts (pixel blocks) from digital stations with MPEG compression (such as from DVB- T receivers or DVD players).
7You can only change the backlighting if the »Dynamic Backlight« function is switched off.
5 Press »M« to end the setting.
Audio settings
1Open the menu with »M«.
– The »PICTURE« menu is displayed.
SOUND
Volume |
●●●● |
29 |
Balance |
●●●●●●●●●●● |
0 |
AVL |
Off |
|
Sound Type |
Stereo |
|
Sound Mode |
Normal |
|
Equalizer |
|
S |
Headphone |
●●● |
21 |
Back
Select
 Exit
Exit
2Select the »SOUND« menu with »r« or »e« and confirm with »OK«.
Note:
7Additional operations are explained in the following sections.
Volume
1Select »Volume« with »q« or »w« and adjust the setting with »r« or »e«.
Balance
1Select »Balance« with »q« or »w« and adjust the setting with »r« or »e«.
Automatic volume
The television channels broadcast at different volumes. The automatic volume limiting (AVL) function means the volume is kept the same when you switch between channels.
1Select »AVL« with »q« or »w« and then select »On« with »r« or »e«.
Stereo / two channel, mono
If the device receives two channel programmes, e.g. a film with the original sound on sound channel B (display: »Dual II«) and the dubbed version on sound channel A (display: »Dual I«), you can select the sound channel you desire. If the device receives stereo or Nicam programmes, it switches automatically to stereo sound (display: »Stereo«).
You can switch the sound to »Mono« if the stereo reception quality is poor.
1Select »Sound Type« with »q« or »w« and adjust the setting with »r« or »e«.
Stereo width
Widens the audio output for stereo programmes and improves the sound with mono reception.
1 Select »Sound Mode« with »q« or »w«.
2Press »r« or »e« to select the setting »Spatial«.
ENGLISH 13

SETTINGS----------------------------------------------------------------------------------------------------------------------------------------
Equaliser
The equaliser offers you four preset sound settings (Music, Sports, Movie and Speech) and one which you can create yourself (User).
1Select »Equalizer« with »q« or »w« and confirm with »OK«.
– The »Equalizer« menu appears.
2Select the audio setting »User« with »r« or »e« and confirm with »q«.
– The frequency band »120 Hz« is activated.
3Set the desired value with »q« or »w« and select the next frequency band with »r« or »e«.
4 Press » « to save the setting.
Audio description (audio subtitles)
Audio description is an additional audio channel for people who are visually impaired. The activities, surroundings, scene changes or the appearance, the gestures and facial expressions of the actors are described.
This sound is transmitted at the same time as the normal sound with digital television stations. This depends on the programme being broadcast.
1Switch to the second menu page with »q« and confirm »Audio Description« with »OK«.
2Select »Audio Description« with »q« or »w« and press »r« or »e« to select »On«.
3Select the »Volume« with »q« or »w« and adjust with »r« or »e«.
Concluding the settings
1 Press »M« to finish the settings.
14 ENGLISH

TELEVISION OPERATION------------------------------------------------------------------------------
Basic functions
Switching on and off
1Press »POWER«, »1…0« or »P+« or »P–« to switch on the device from standby mode.
2Press the »POWER« button to switch the television to standby mode.
Selecting channels
1 Use »1…0« to select channels directly.
2Press »P+« or »P–« to move up and down channels.
3Open the channel list by pressing »OK«, select the station with »q« or »w« and press »OK« to switch off the channel list.
4 Press »M« to switch off the channel list.
Selecting stations from lists
You can select stations from various lists, (e.g. All Channels, FAV1).
1Press »0 FAV« to call up the overview of channel lists.
– The overview is displayed.
2Press »q« or »w« to select the channel list and »OK« to confirm.
3Press »q« or »w« to select the channel and »OK« to confirm.
4 Press »M« to switch off the channel list.
Selecting AV channels
1Call up the »INPUT Source« menu with »
 «.
«.
2Select the desired AV channel position with »q« or »w« and press »OK« to confirm.
3Switch back to the television channel with »1…0«.
Switching between digital and analogue channels
1Open the »INPUT Source« menu by pressing » «.
«.
2Press »q« or »w« to select »DTV« (digital presets) or »ATV« (analogue presets) and press »OK« to confirm.
Adjusting the volume
1 Adjust the volume with »V+« or »V–«.
Muting
1Use »MUTE« to switch the sound off (mute) and to switch it on again.
Displaying information
1Press »i« to display the information.
– The display disappears automatically after a short while.
Freeze-frame
If you wish to view a particular scene for longer, you can freeze the frame of the current programme.
1 Press »3« (yellow).
2To quit this function, press »3« again.
Note:
7If a formatted external media is connected to the TV set, Freeze-frame option functions as Time shift option. Time shift option is described on page 20.
Audio language
You can select various languages when watching digital channels. This depends on the programme being broadcast.
1Press » « (blue) to open the selection menu.
2Select your language using »q« or »w« and press »OK« to confirm.
ENGLISH 15
 Loading...