

Graff G-8210, G-8577 Installation Instructions Manual
SHOWERHEADS
CABEZALES DE REGADERA
Installation Instructions Instrucciones de Instalación
Dear Customer Estimado Cliente
ENGLISH
~
ESPANOL
Thank you for selecting our product. We are confident we can fully satisfy Muchas gracias por elegir nuestro producto. Estamos seguros que podemos
your expectations by offering you a wide range of technologically advanced satisfacer completamente sus expectativas ofreciéndole una amplia variedad
products which directly result from our many years of experience in faucet de productos tecnológicamente avanzados que resultan directamente de
and fitting production. muchos años de experiencia en grifos y su producción apropiada.
ATTENTION!
For care, use soft towel with soap and water only! Under no
circumstances should you use any chemicals.
Model
Modelo
11-13/16"
300mm
13/16"
20mm
-
G 8210
2-3/4"
70mm
1/2-14NPT
ATENCIÓN!
Para el cuidado, utilice solamente una toalla suave con jabón
y aqua! Bajo ninguna circunstancia no use productos químicos.
Model
Modelo
7-1/2"
13/16"
20mm
190mm
2-3/8"
G 8577
60mm
-
K
1/2-14NPT
5/16"
8mm
8-11/16"
220mm
5-7/8"
150mm
9-7/16"
240mm
For easy installation of your Para la instalación fácil de su grifo
GRAFF faucet you will need: de la GRAFF usted necesitará:
l l
to READ ALL the instructions completely before beginning, LEER TODAS las instrucciones completamente antes de comenzar,
l l
to READ ALL the warnings, care and maintenance information. LEER TODA la información sobre las advertencias,
To complete the project, you should: cuidado y mantenimiento.
l
gather the tools and all the parts you will need, Para terminar el proyecto, usted debe:
l l
prepare the mounting area, recolectar las herramientas y todas las piezas que usted necesitará,
l l
mount the faucet, prepare el área para el montaje,
l l
connect the supply lines, monte el grifo,
l l
finally test and flush the faucet. conecte las líneas de fuente,
You should have the following tools: finalmente pruebe y limpie el grifo con un chorro de agua.
l
Philips screwdriver,
l
adjustable wrench,
l
channel pliers.
ENGLISH
l
Usted debe tener las herramientas siguientes:
l
destornillador Philips,
l
llave ajustable,
l
alicates acanalados.
13/16"
20mm
5-7/8"
150mm
~
ESPANOL
IOG 2837.60
1
Rev. 1 August 2014

G-8210
H
User's height
H=
Talla del usuario
Recommended installation height
H1=
Altura de montaje recomendada
H1
106-5/16"(2700mm)
SHOWERHEADS
CABEZALES DE REGADERA
Installation Instructions Instrucciones de Instalación
SET-UP DIAGRAM DIAGRAMA DE INSTALACIÓN
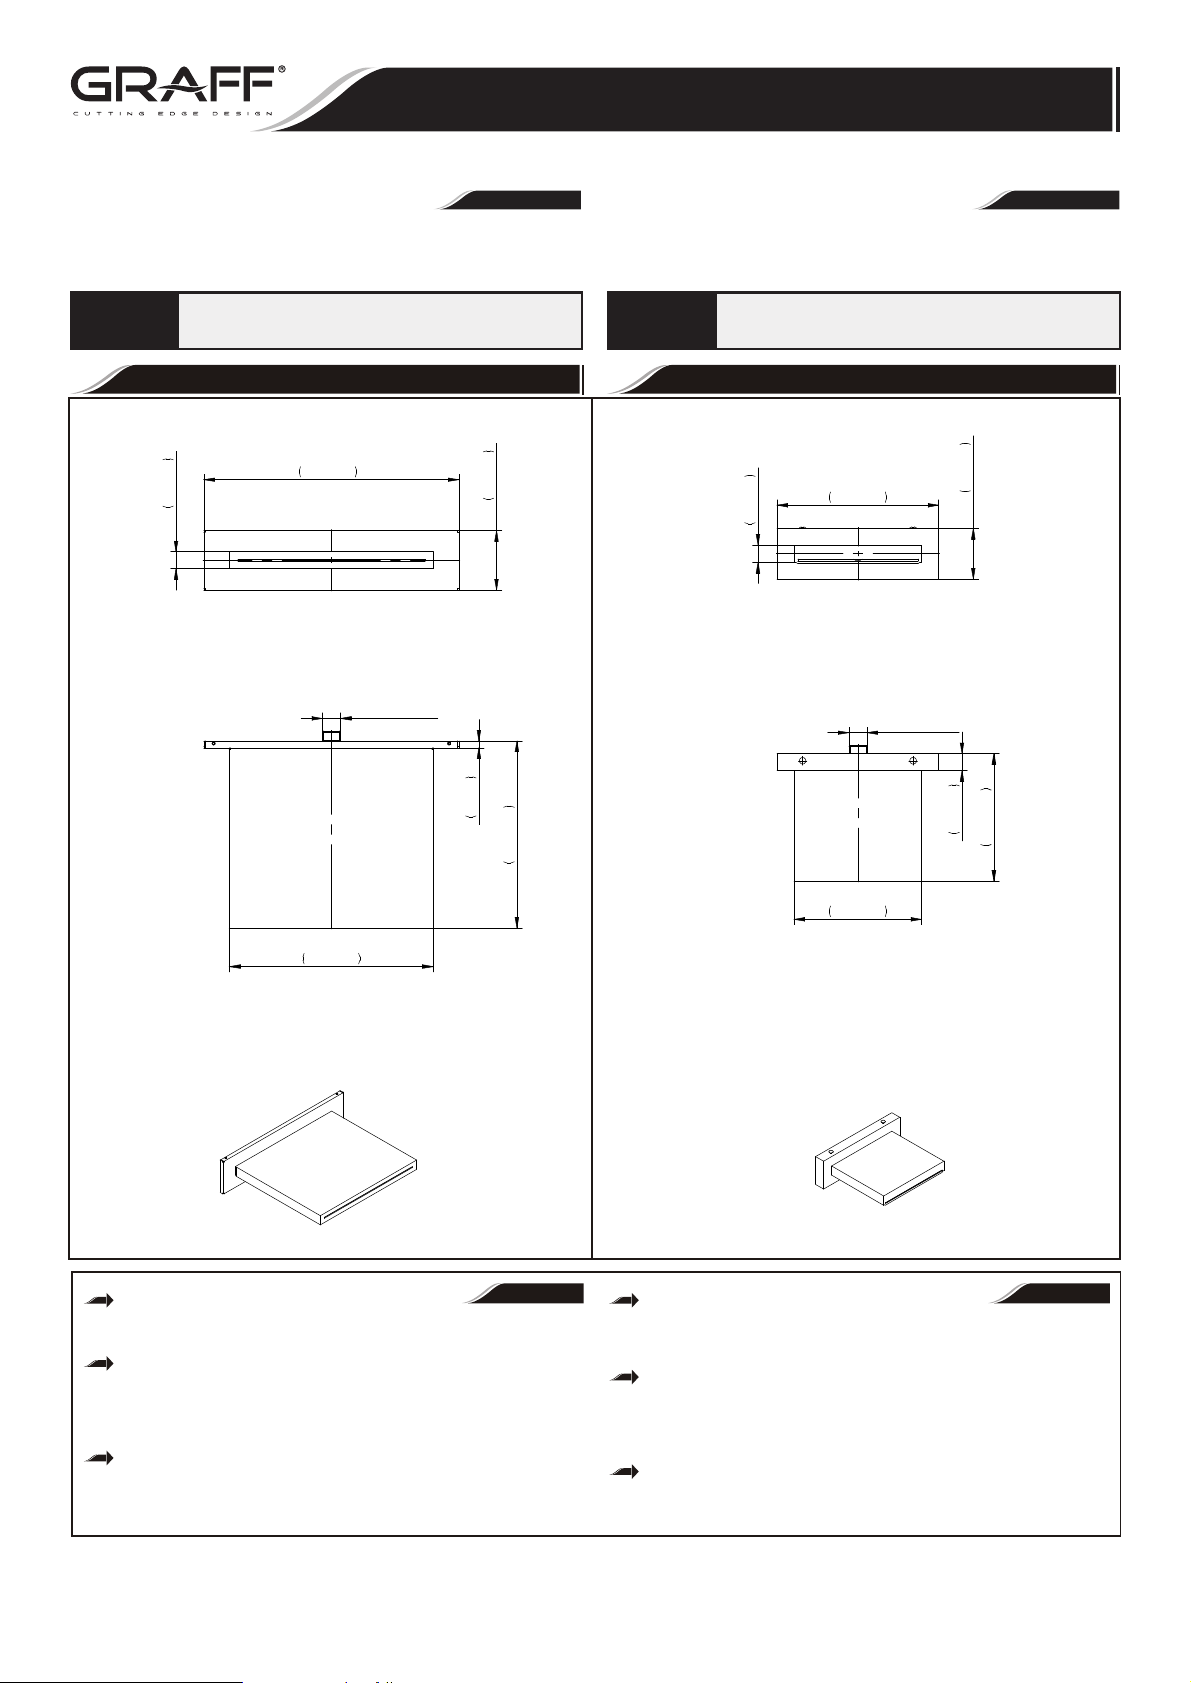
SIZE AND SPACING OF ASSEMBLY OPENINGS
TAMAÑOS Y DISTRIBUCIÓN DE LOS ORIFICIOS DE MONTAJE
G-8210
1-3/16"
30mm
2-3/8"
61mm
1/4"
6mm
9/16"
15mm
G-8577
1"
25mm
11-5/8"
295mm
10-1/16"
255mm
7-1/16"
180mm
6-5/16"
160mm
1/4"
6mm
3/8"
10mm
13/16"
20mm
9/16"
15mm
(mm)
63"(1600mm)
67"(1700mm)
70-7/8"(1800mm)
74-13/16"(1900mm)
8
H H1
(mm)
74-13/16"(1900mm)
78-3/4"(2000mm)
82-11/16"(2100mm)
86-5/8"(2200mm)
9
8
1/4"
6mm
1-15/16"
50mm
3/8"
1/4"
6mm
11/16"
17mm
10mm
DIAGRAMA DE INSTALACIÓN
6
9
5
6
7
3
10
10
4
5
IOG 2837.60
~
ENGLISH
1
1
2
Spout
2
Decorative cover
Mounting plate
3
4
Connector pipe
Screw
5
6
Dowel
7
Orifice /flow restrictor/
8
Screw
9
Hole plug
10
O-ring seal
11
Hex key
Caño
Caja
Chapa de montaje
Racor
Tornillo
Pasador
Orificio
Obturador
Junta tórica
Llave allen
Tornillo
2
ESPANOL
Rev. 1 August 2014
 Loading...